We can configure Sigma to use Single Sign-On (SSO) Authentication with any platform that supports SAML (e.g., Okta, OneLogin and Google SSO). We can also configure Sigma to use custom implementations that uses SAML.
For this QuickStart, we will focus on Okta.
When using Okta SSO, there are several user management options available. These include:
While Okta has many options available, we will focus on the foundational features.
### Target Audience Sigma administrators or security professionals who are interested in learning how to implement Sigma SSO with Okta.
Prerequisites
- A computer with a current browser. It does not matter which browser you want to use.
- Access to your Sigma environment. A Sigma trial environment is acceptable and preferred.
- An Okta account as Administrator. A development environment is acceptable.
For more information on Sigma's product release strategy, see Sigma product releases.
What You'll Learn
How to implement and customize Sigma Single-Sign-On using Okta as the identity provider.
What You'll Build
The results of this QuickStart will be a Sigma instance that only allows SSO, with user management provided by Okta. In the end, we will have a test user who can login to Sigma with SSO, have Sigma Creator rights but is not allowed to export any data.


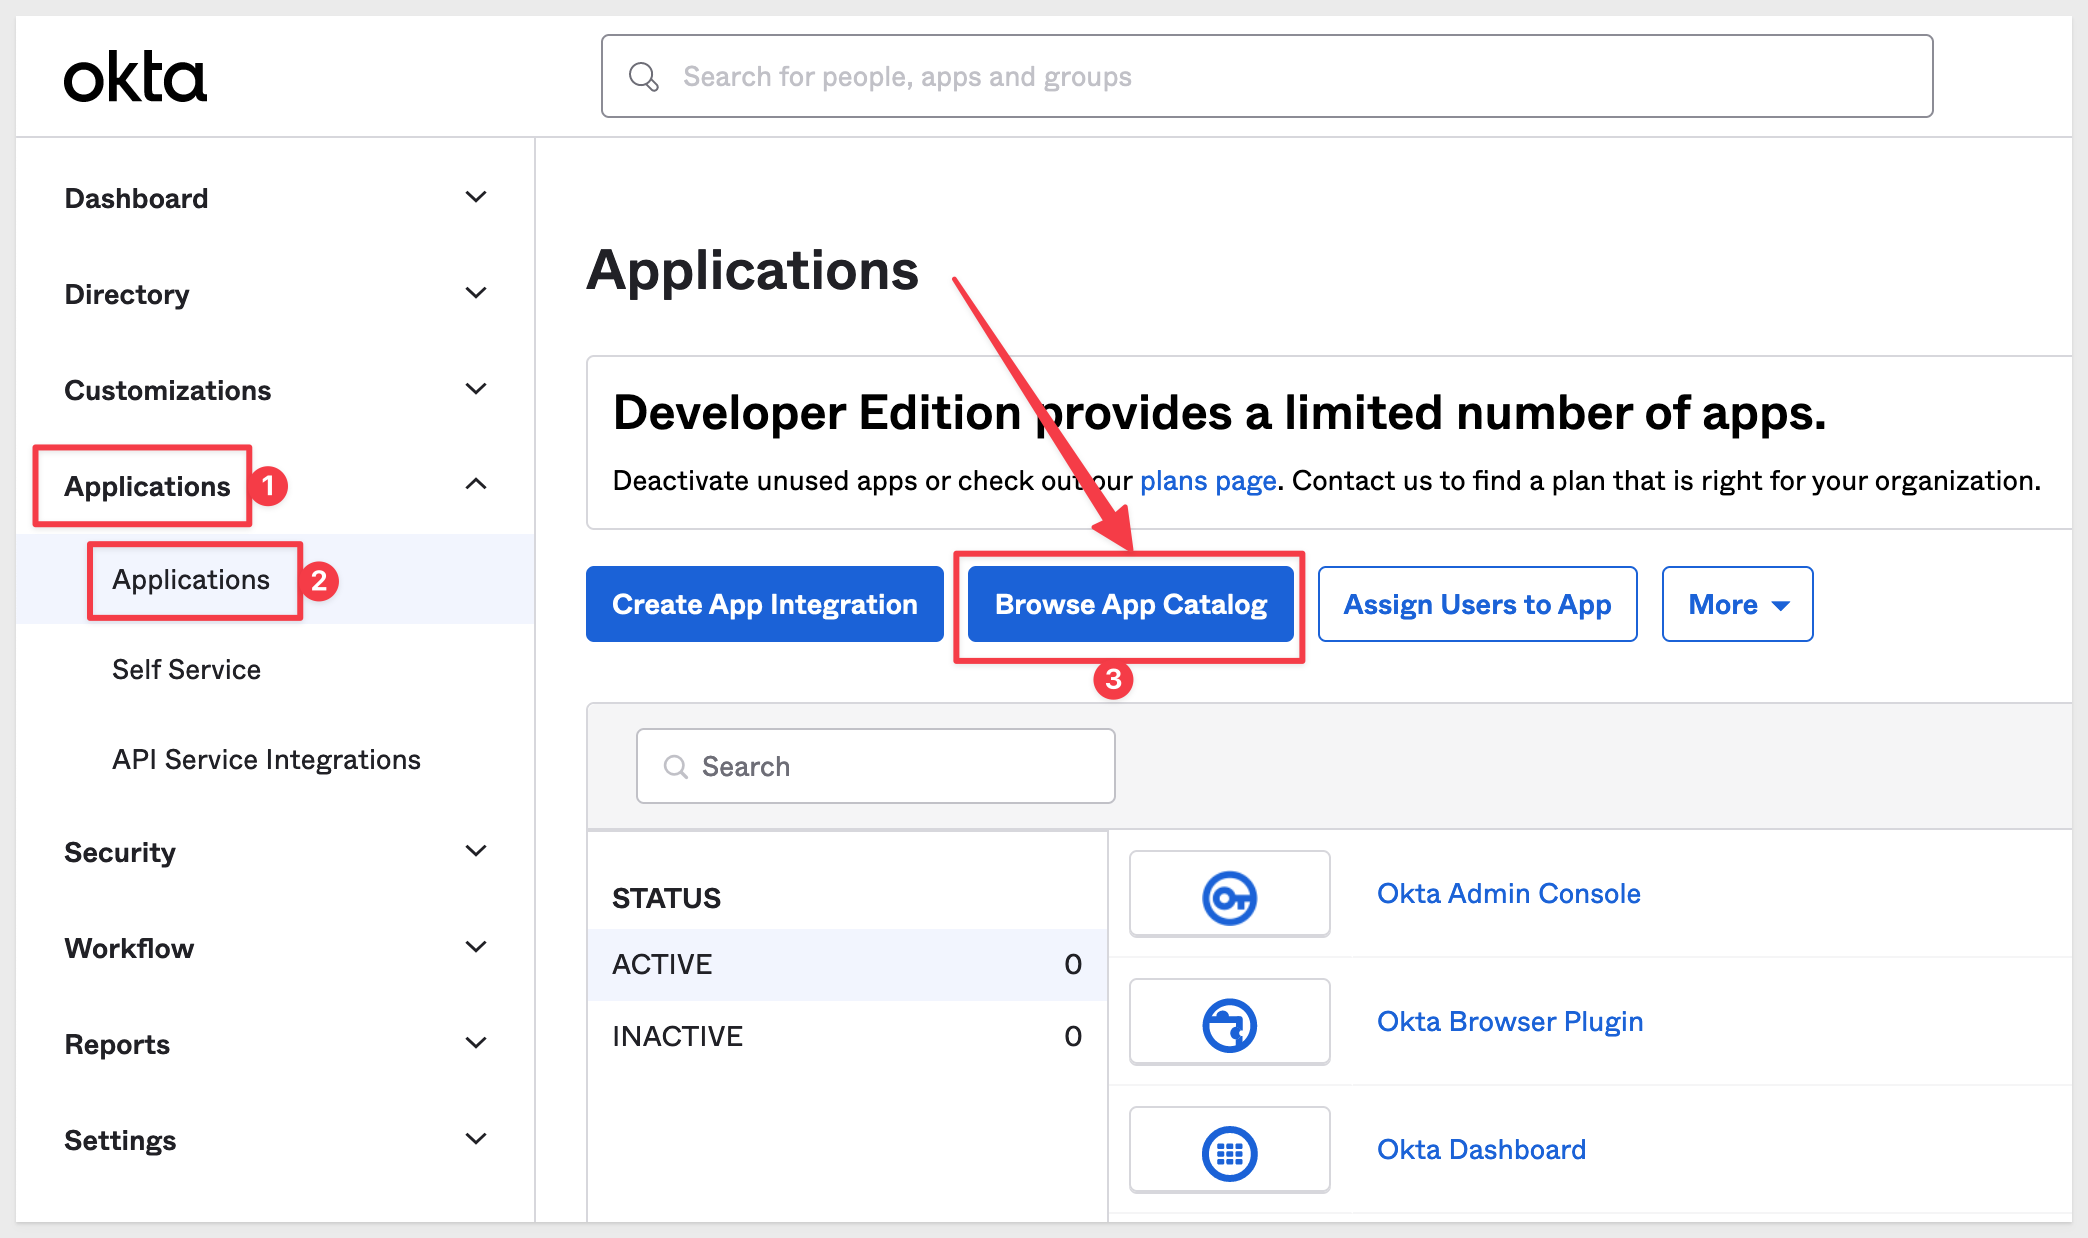
Login into Okta as Administrator and navigate to Applications > Applications and click Browse App Catalog:
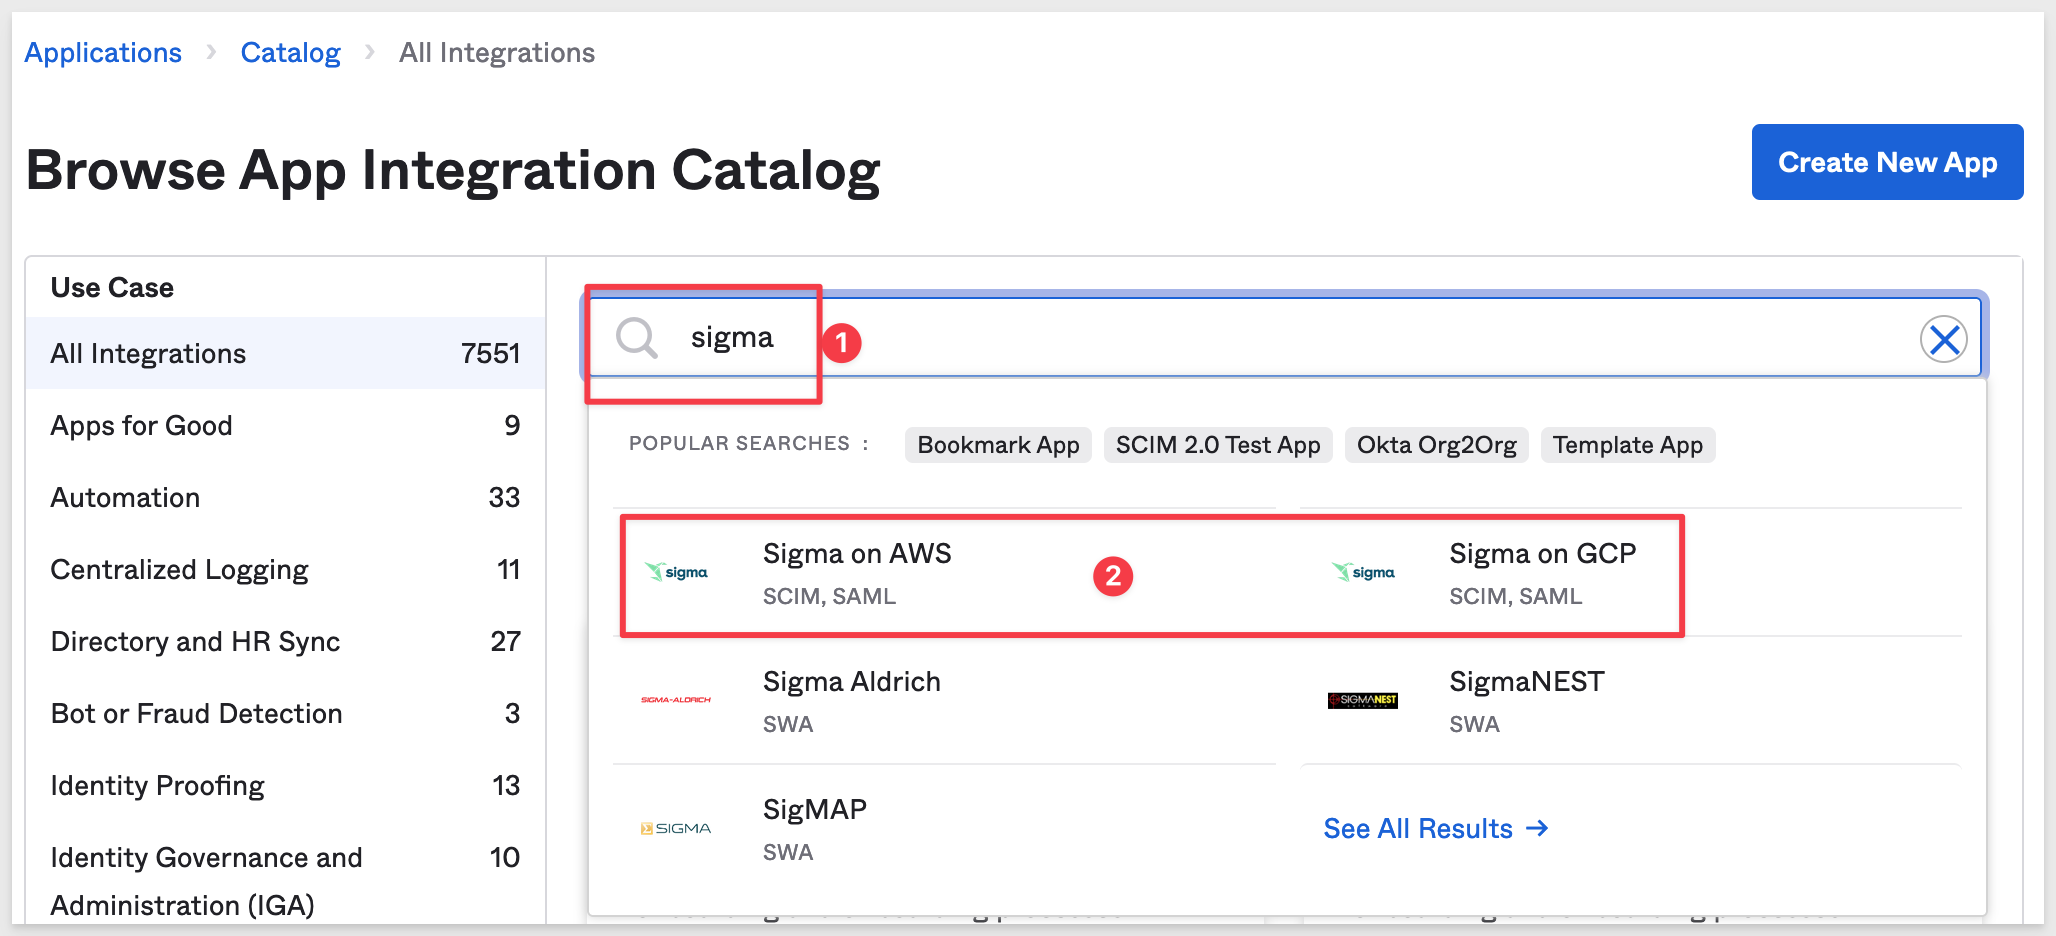
Depending on your cloud provider and region, type Sigma into the Okta search bar and select either Sigma on AWS or Sigma on GCP, based on where your Sigma instance is hosted.
Currently, the prebuilt Okta apps are only compatible with Sigma on AWS (US West 2) and Sigma on GCP.
For all other Sigma regions or clouds, follow the steps below to create a custom Okta app.
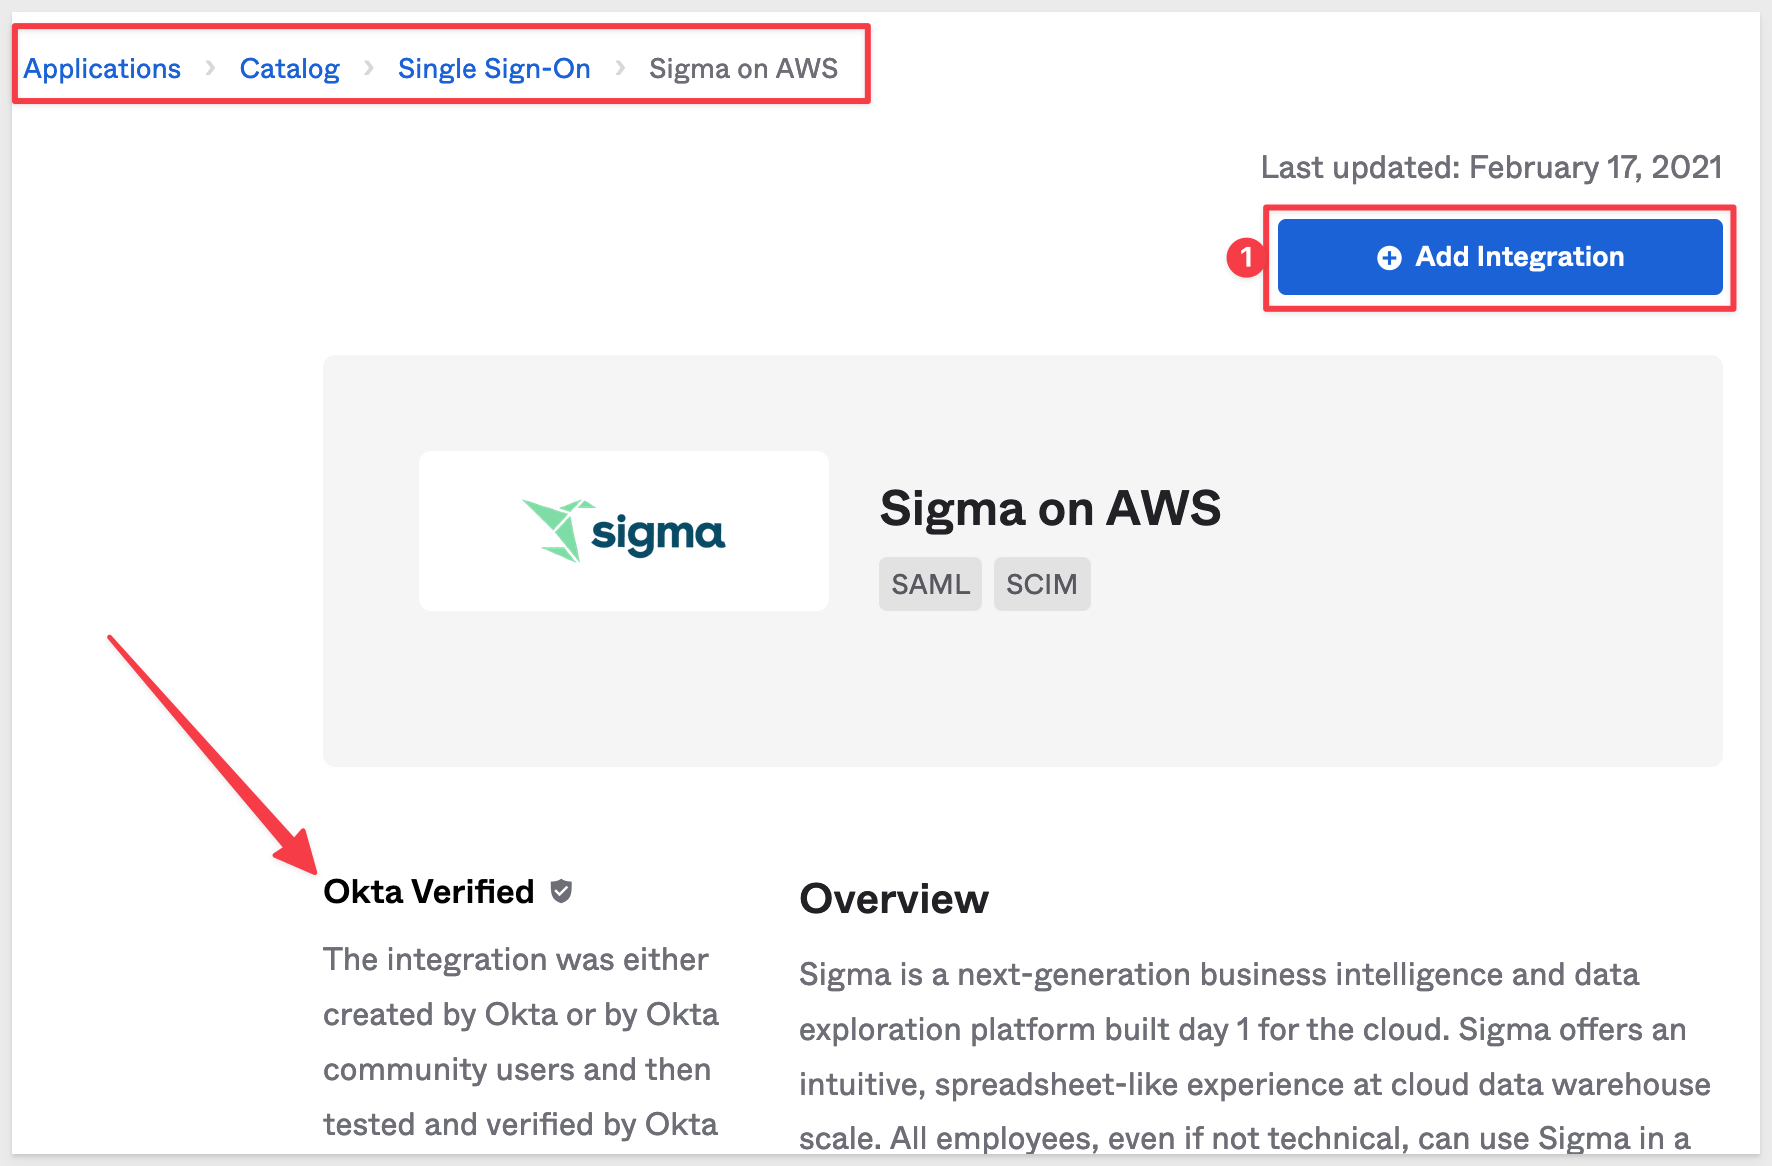
On the next page we see that Sigma is "Okta Verified". Click Add Integration:
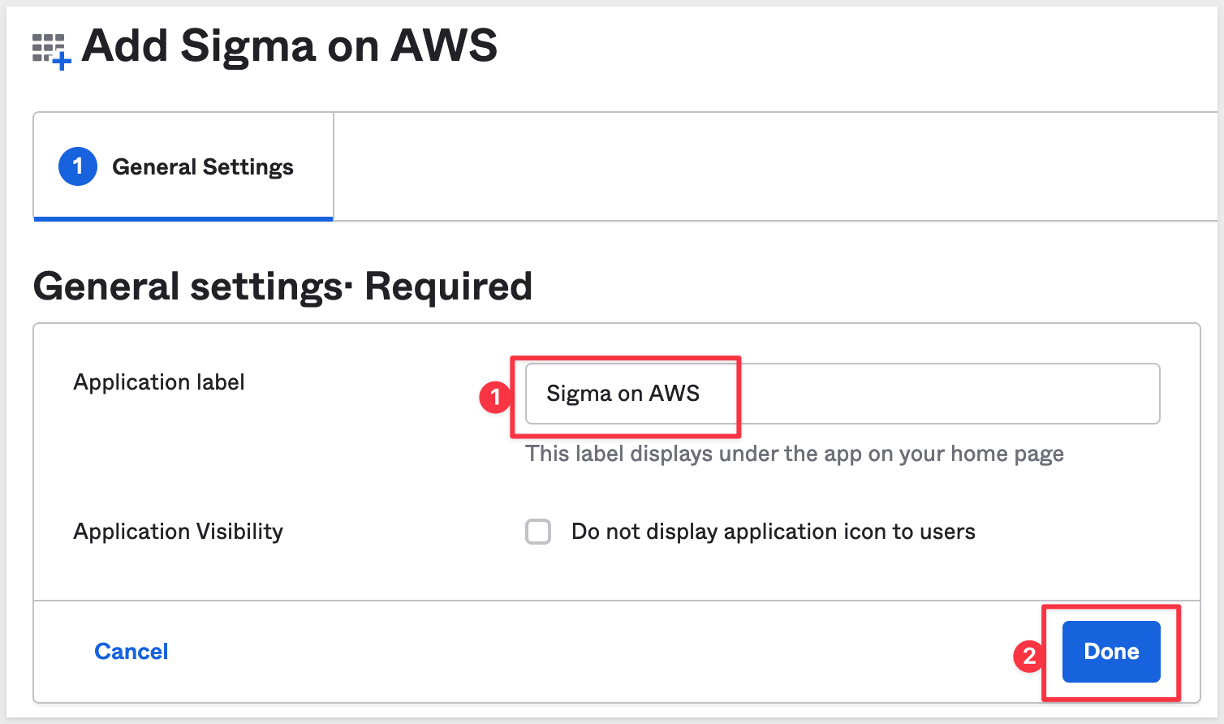
Give the integration a name and click Done:
We have to get some information and configure things in Sigma as we set this up.
In another browser tab, log into Sigma and navigate to Administration > Account and copy the URL as shown:
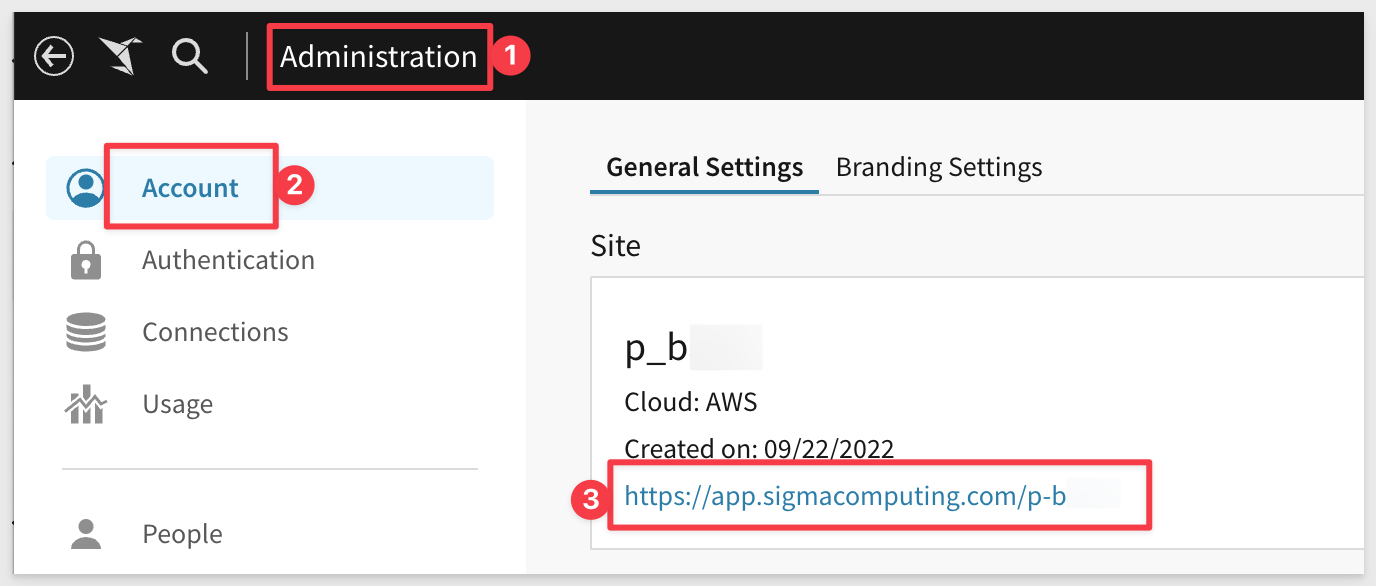
This is the URL Okta will use to reach Sigma. Save it off in a text file so we can use it later.
Navigate to Administration > Authentication and click Edit:
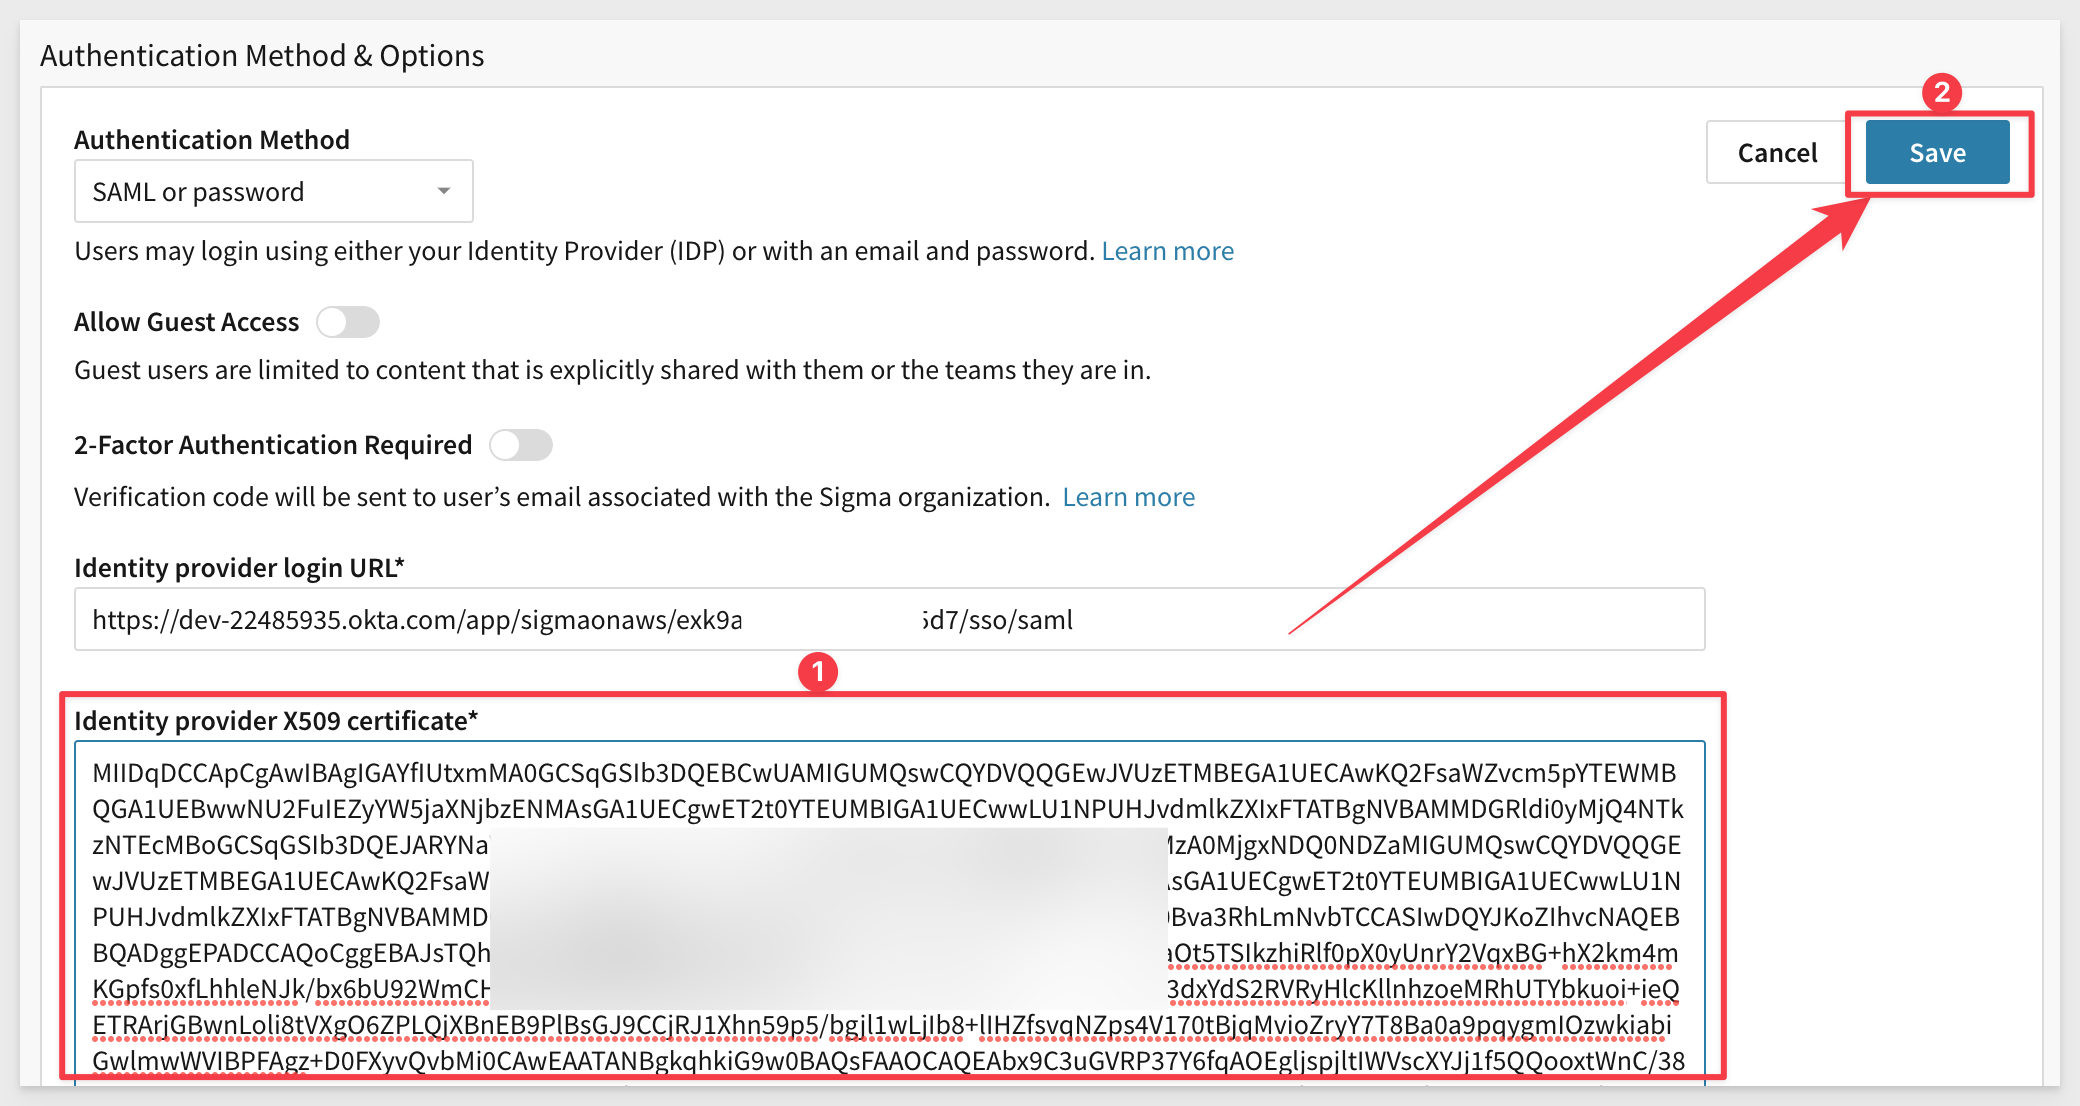
Select SAML or password so that we can login with Okta SSO or directly into Sigma with a our admin username and password.
There are other options on this page but we will leave them at the defaults. The links below provide more information on those options:

Sigma needs to have an Identity Provider (IDP) login URL and X509 certificate. We can gets these from Okta (our IDP).
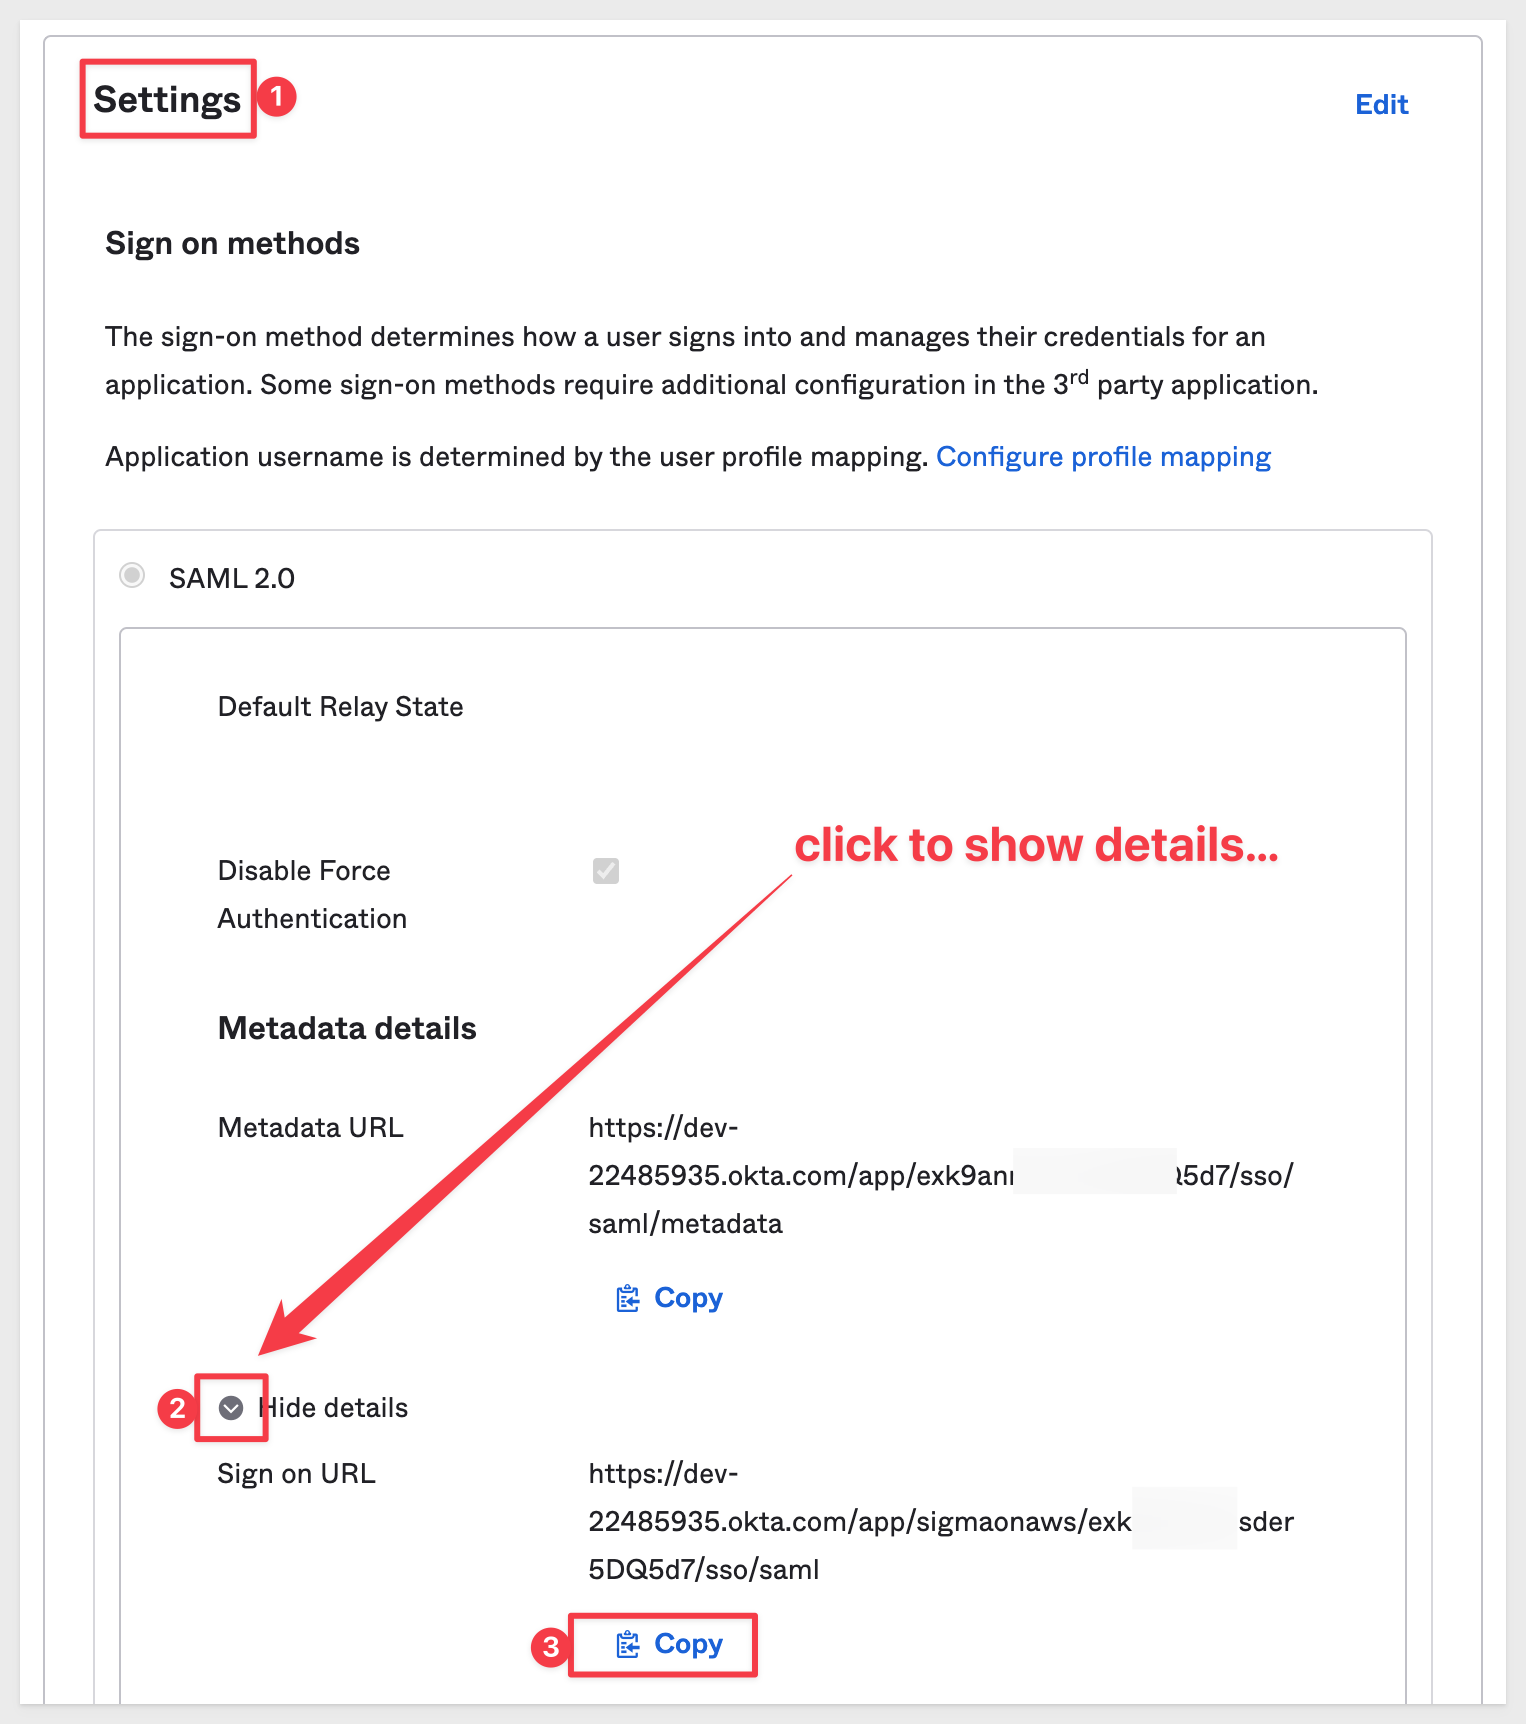
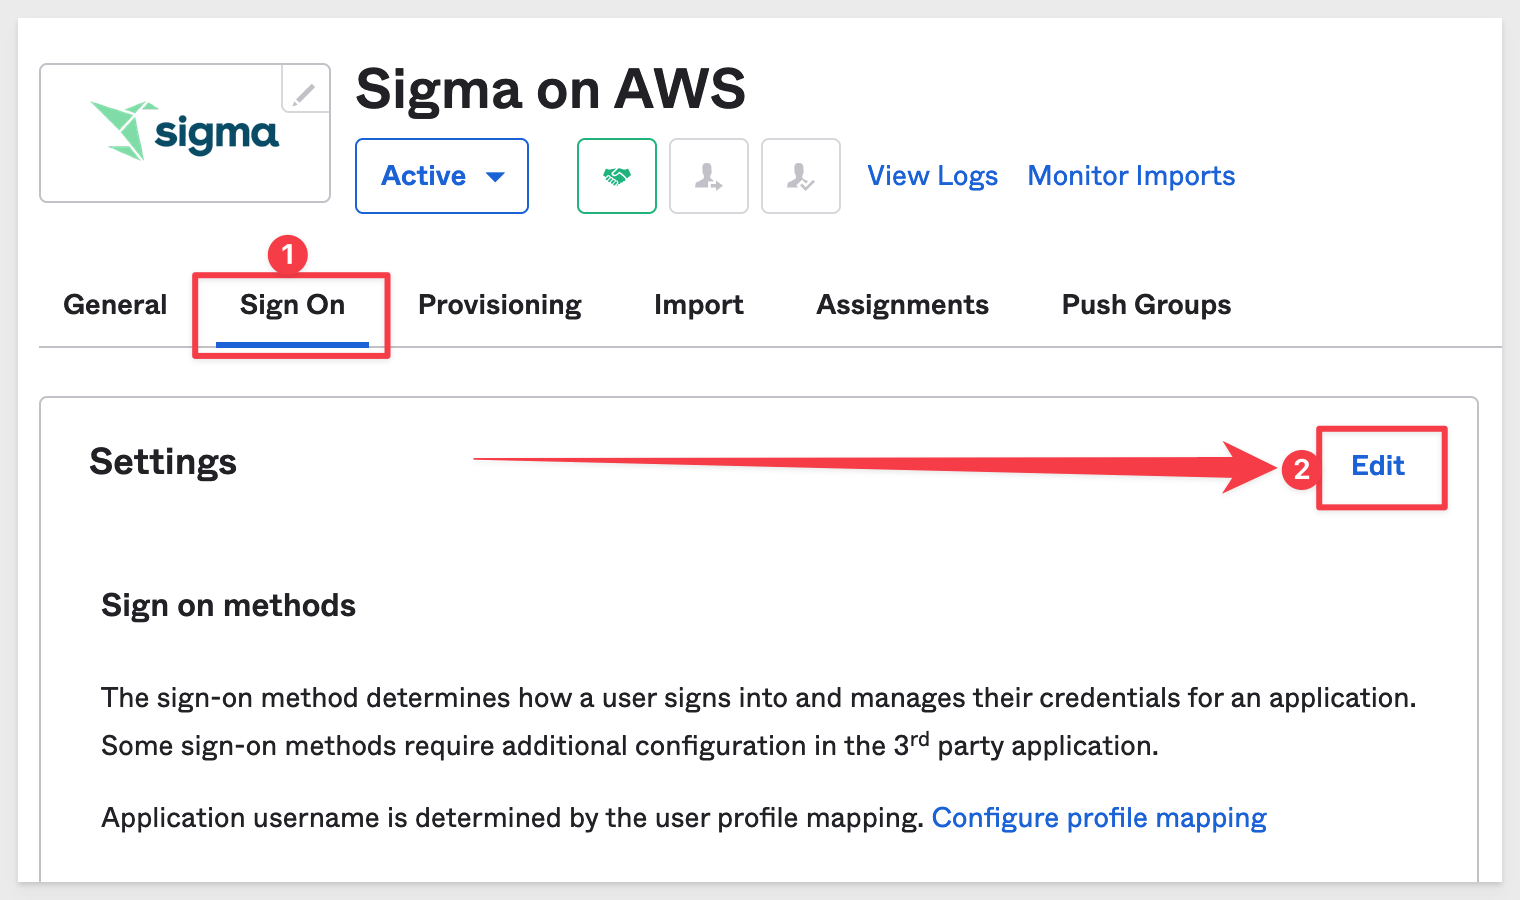
Return to Okta and navigate to the Sign On tab. Scroll down to find Settings group and the button to Show details after the "Metadata URL". We want to click to copy Sign on URL:
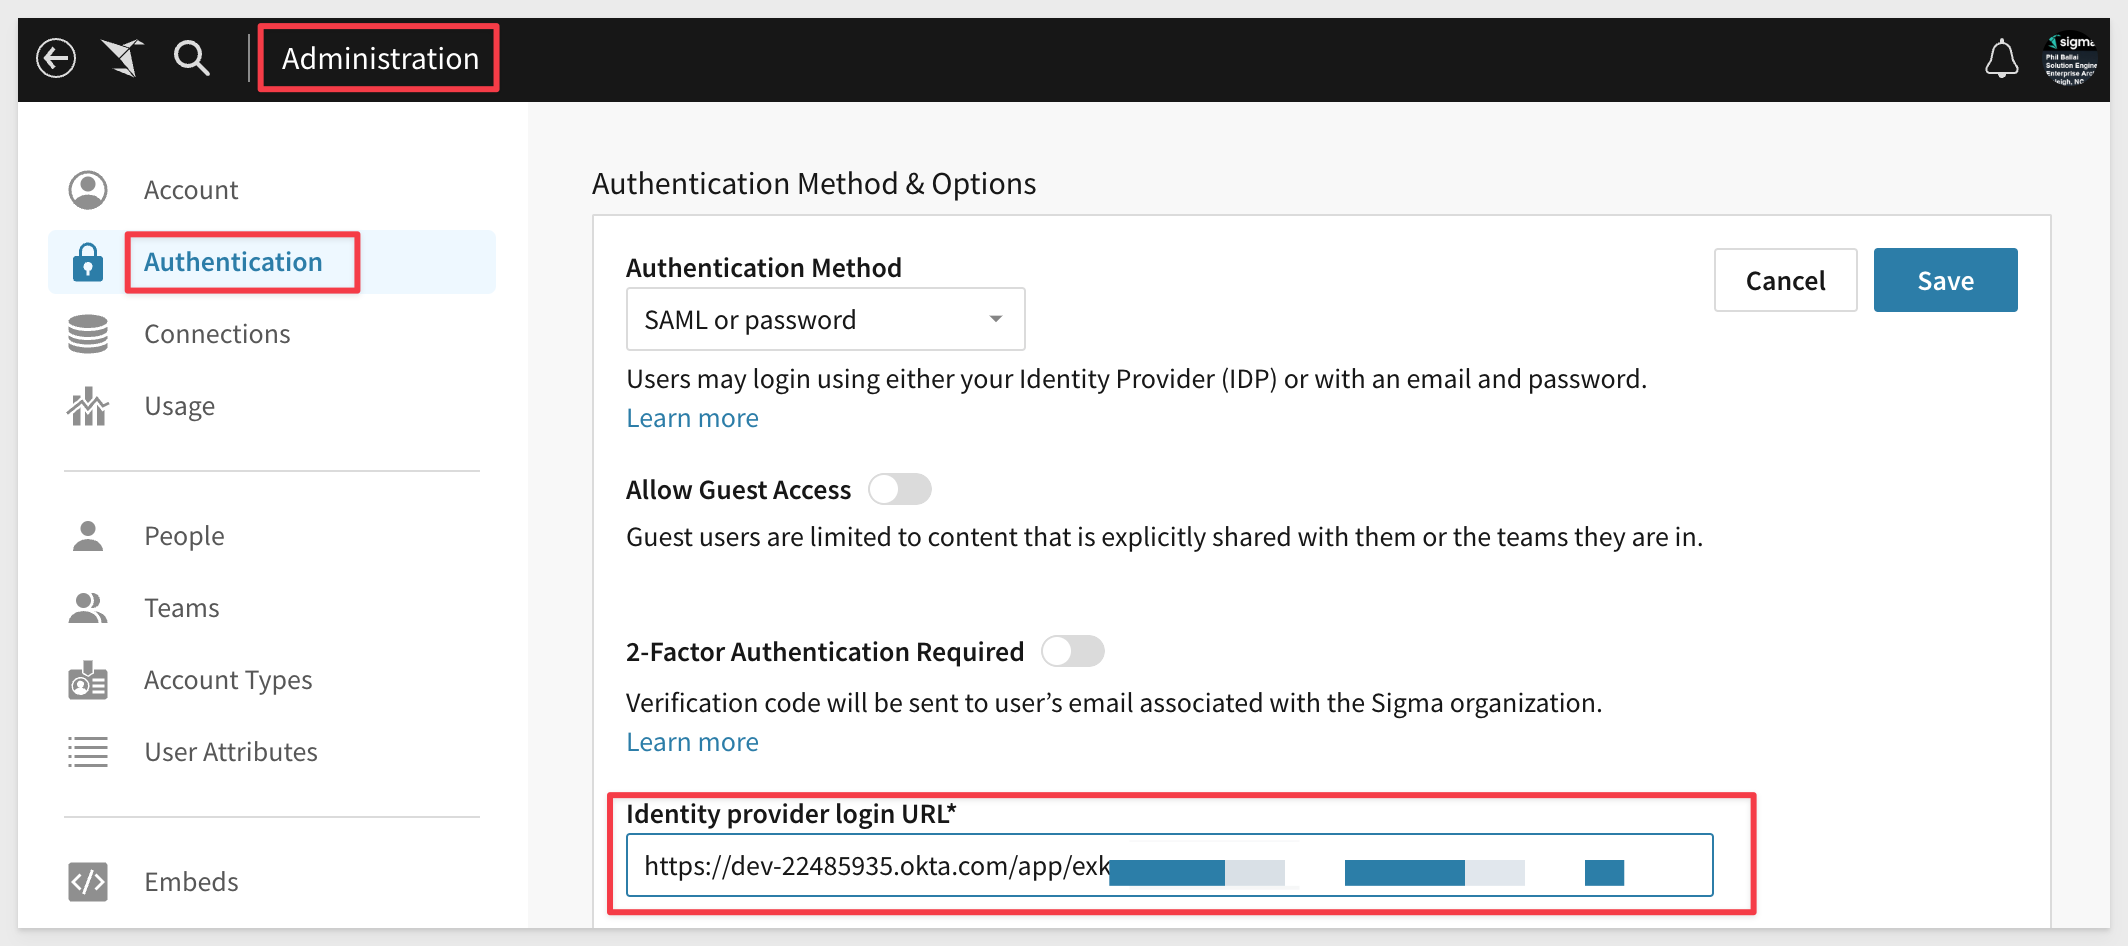
Paste this value into Sigma for the value of Identity provider login URL:
Now click to copy the x509 certificate, which little further down in the same group.
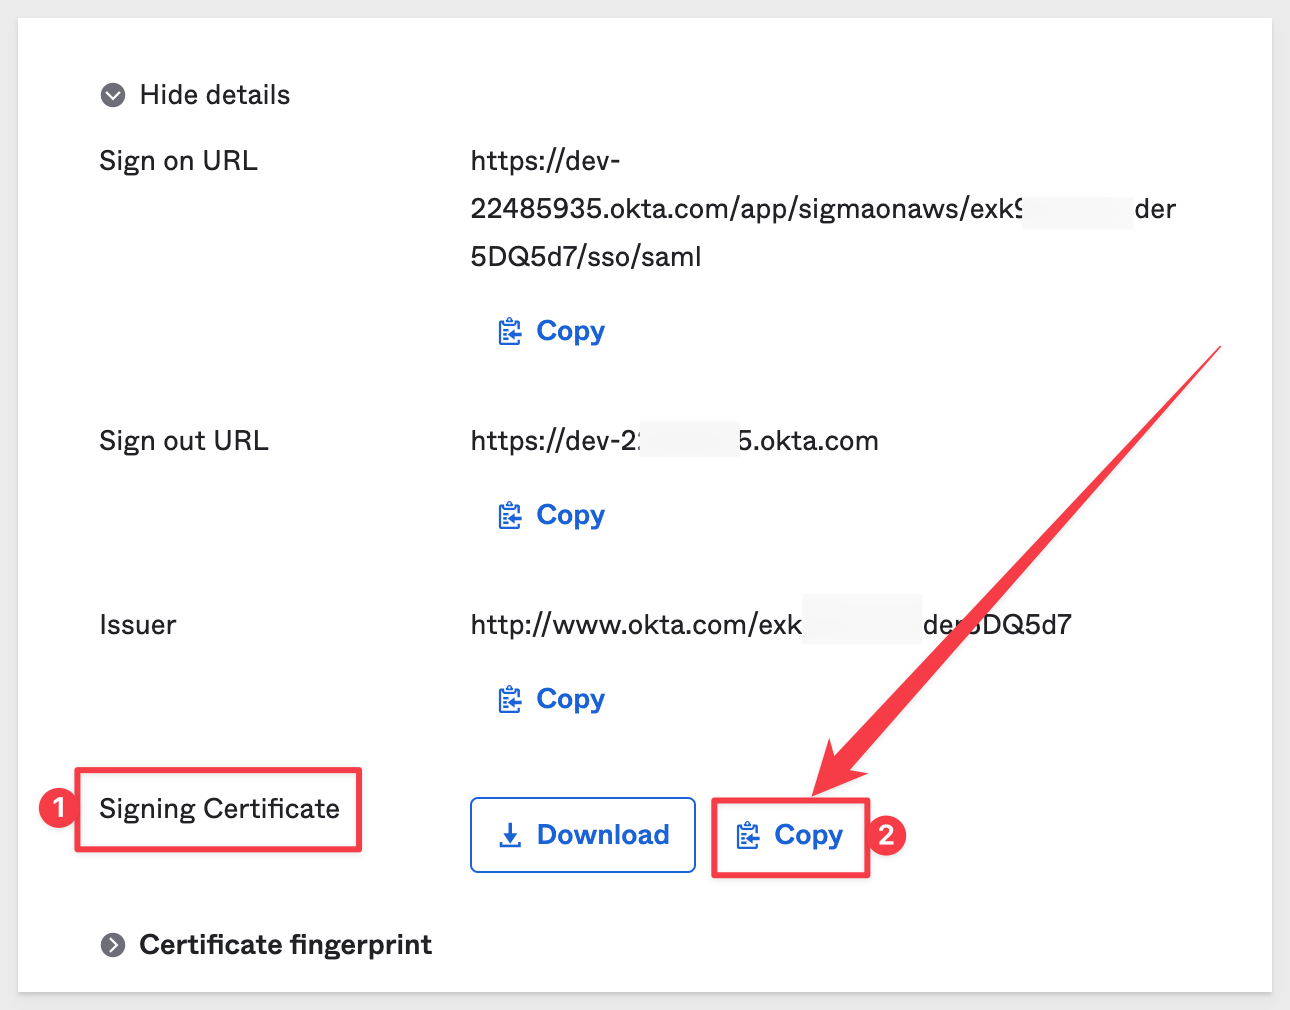
Paste this value into Sigma under the value for Identity provider X509 certificate and click Save:
Return to Okta and the Sign On page. This time, click Edit in the Settings group:
Copy the Sigma Account URL we saved off to a text file earlier and paste it into the Default Relay State box:
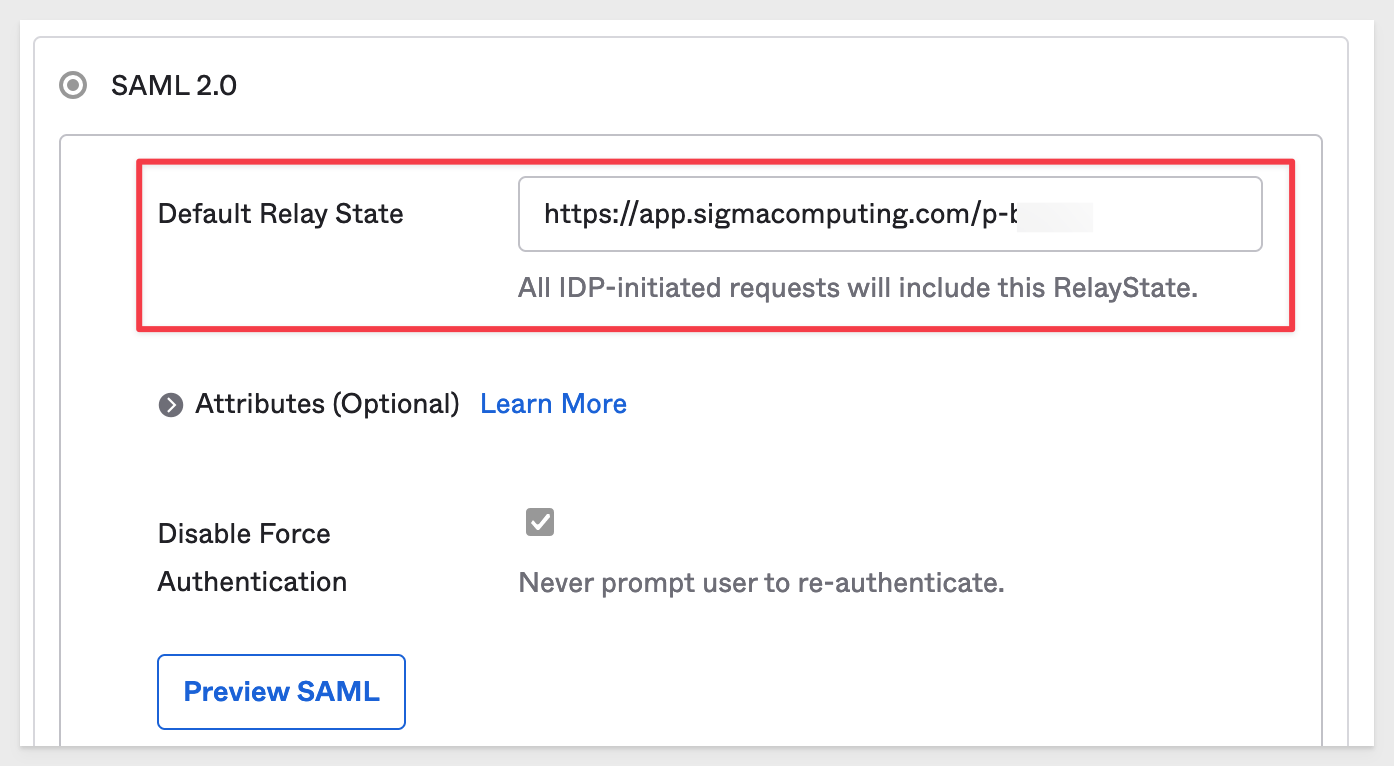
NOTE: The value for Default Relay State will vary depending on cloud provider. For AWS, append "/finish-login" to the URL. For example:
https://app.sigmacomputing.com/[yourCompanyId]/finish-login
Scroll all the way to the bottom and click Save.
Sigma will now allow users to login with SSO or username/password.
We have not yet completed the Okta/Sigma integration, but SSO is setup. Later we will complete the integration such that users/groups added in Okta, will be pushed to Sigma.
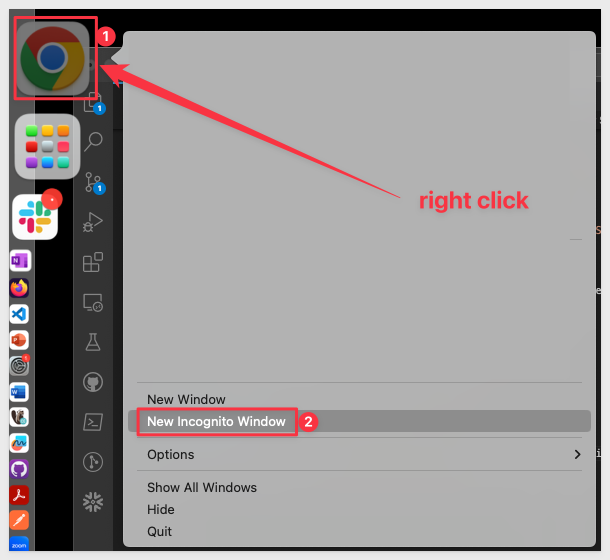
Open a new Chrome browser, in Incognito mode, so that we avoid issues with session cookies. You could also just use another browser like Firefox or Safari to create isolation.
Navigate to your Sigma portal using whatever URL you typically use.
For example: https://app.sigmacomputing.com/{YOUR ACCOUNT NAME}
Now that SSO is enabled, we are presented an additional login option. Recall that we left username/password authentication on. We will turn this off later.
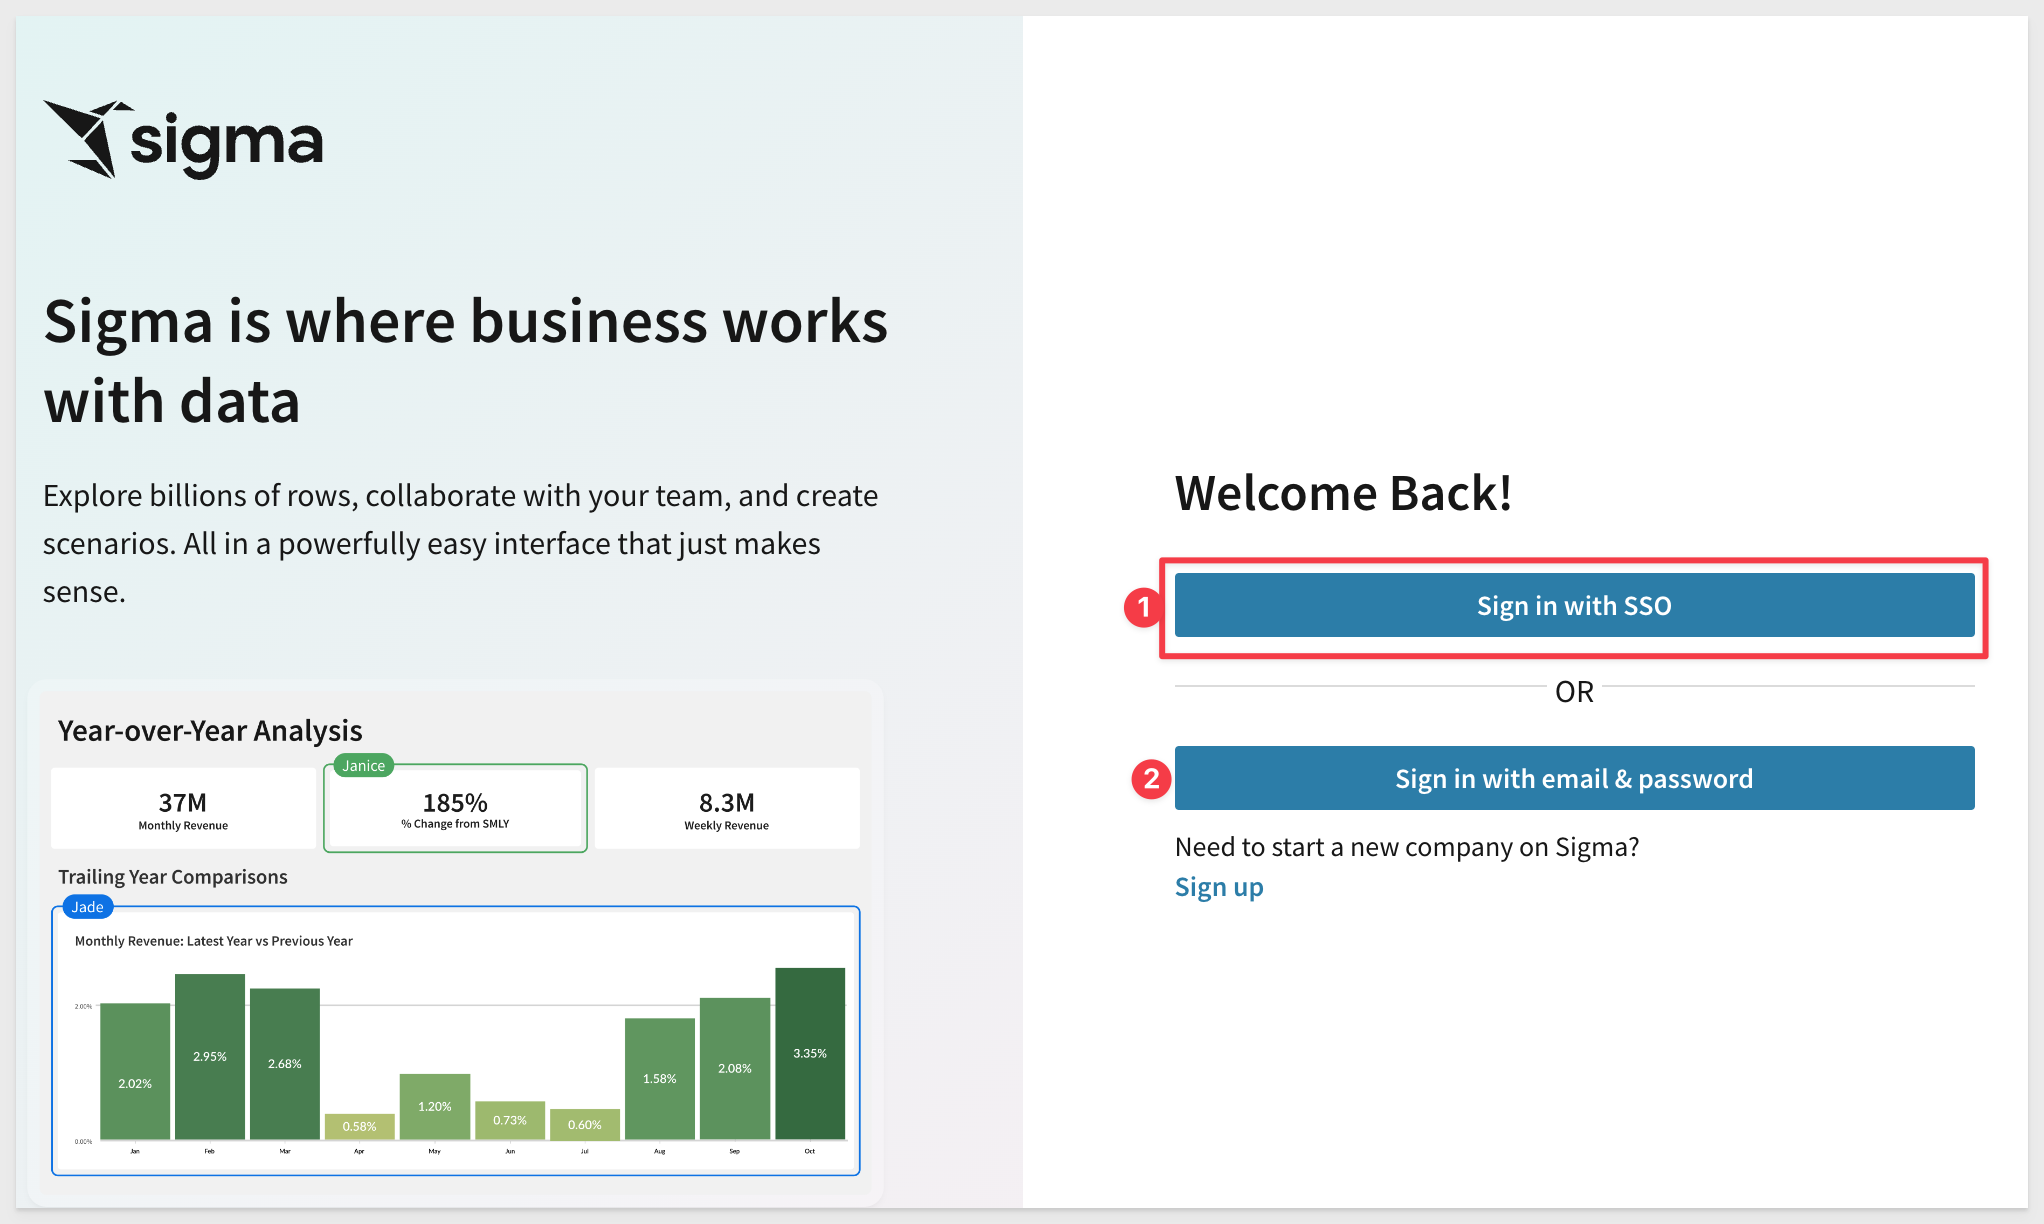
Click the Sign in with SSO button. We are talking to an Okta page for signing into Sigma now.
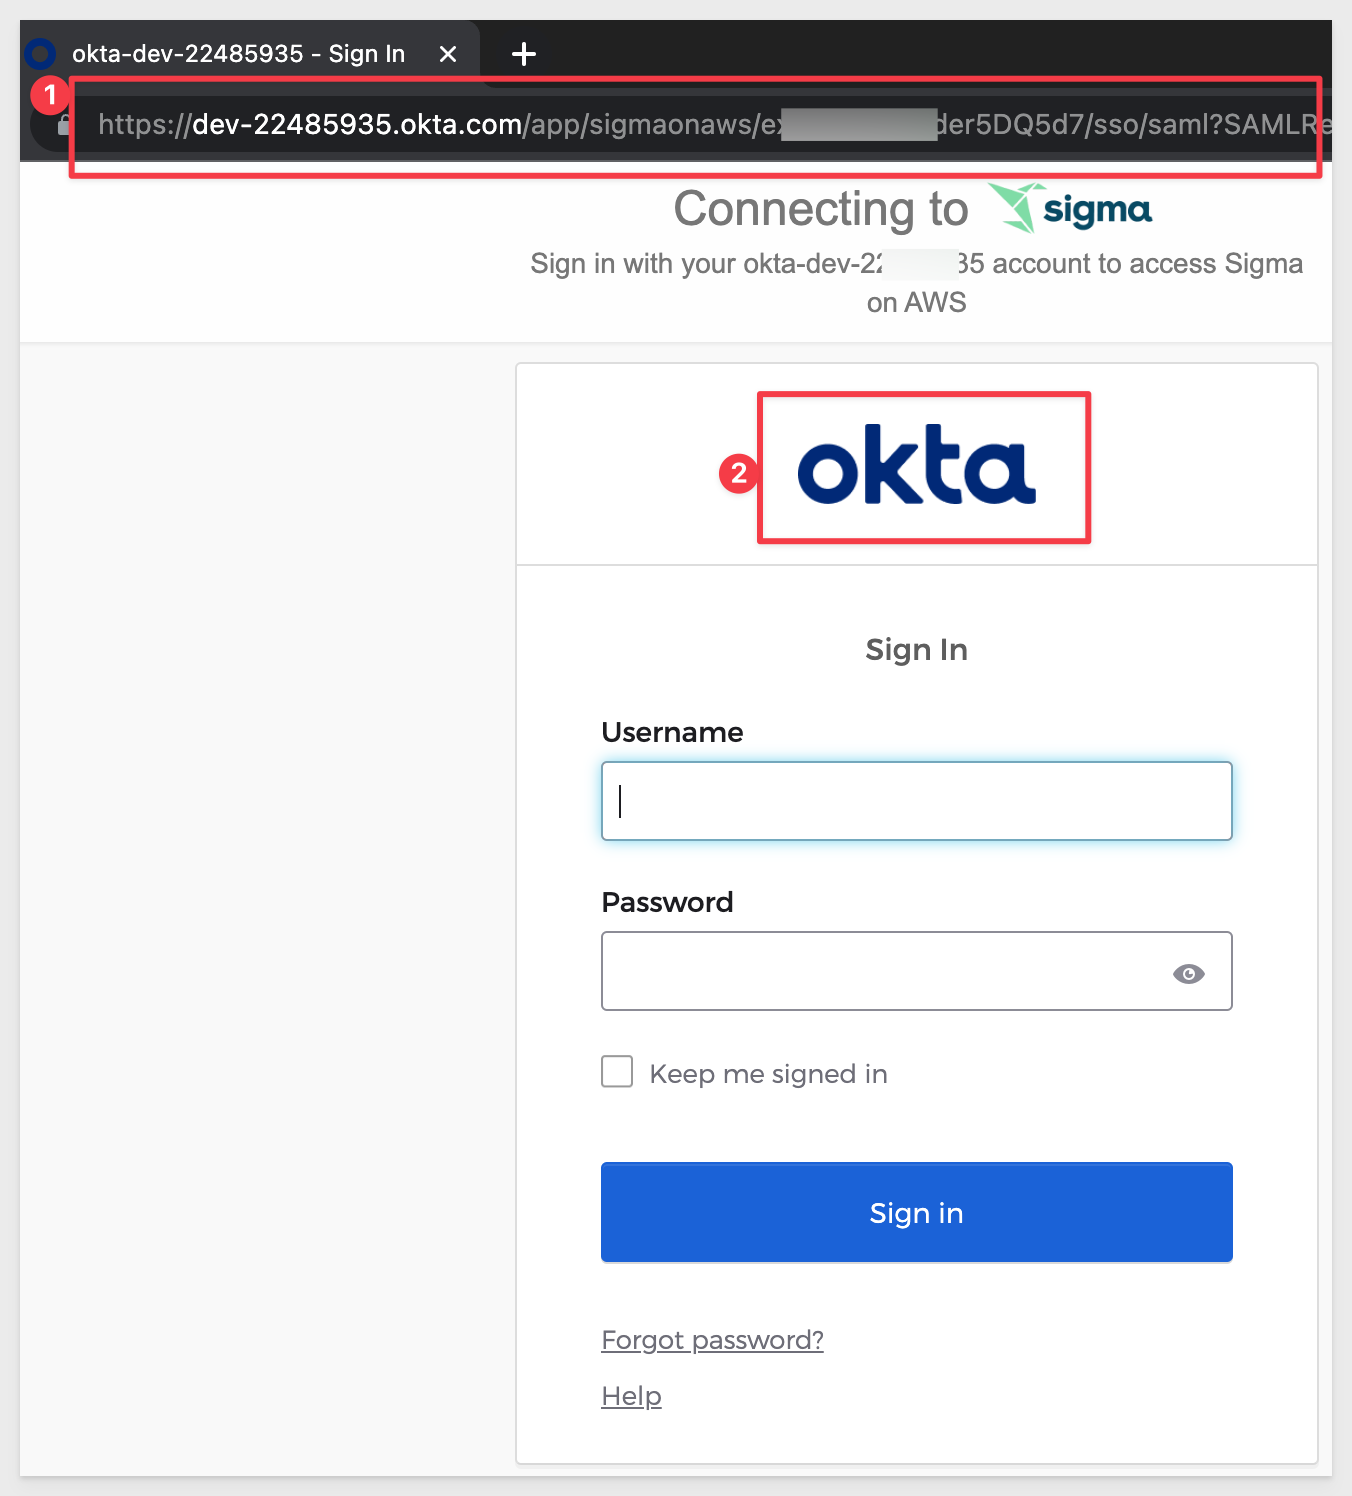
Try to login with your Sigma credentials. It will fail. This is because we have not created this user in Okta.
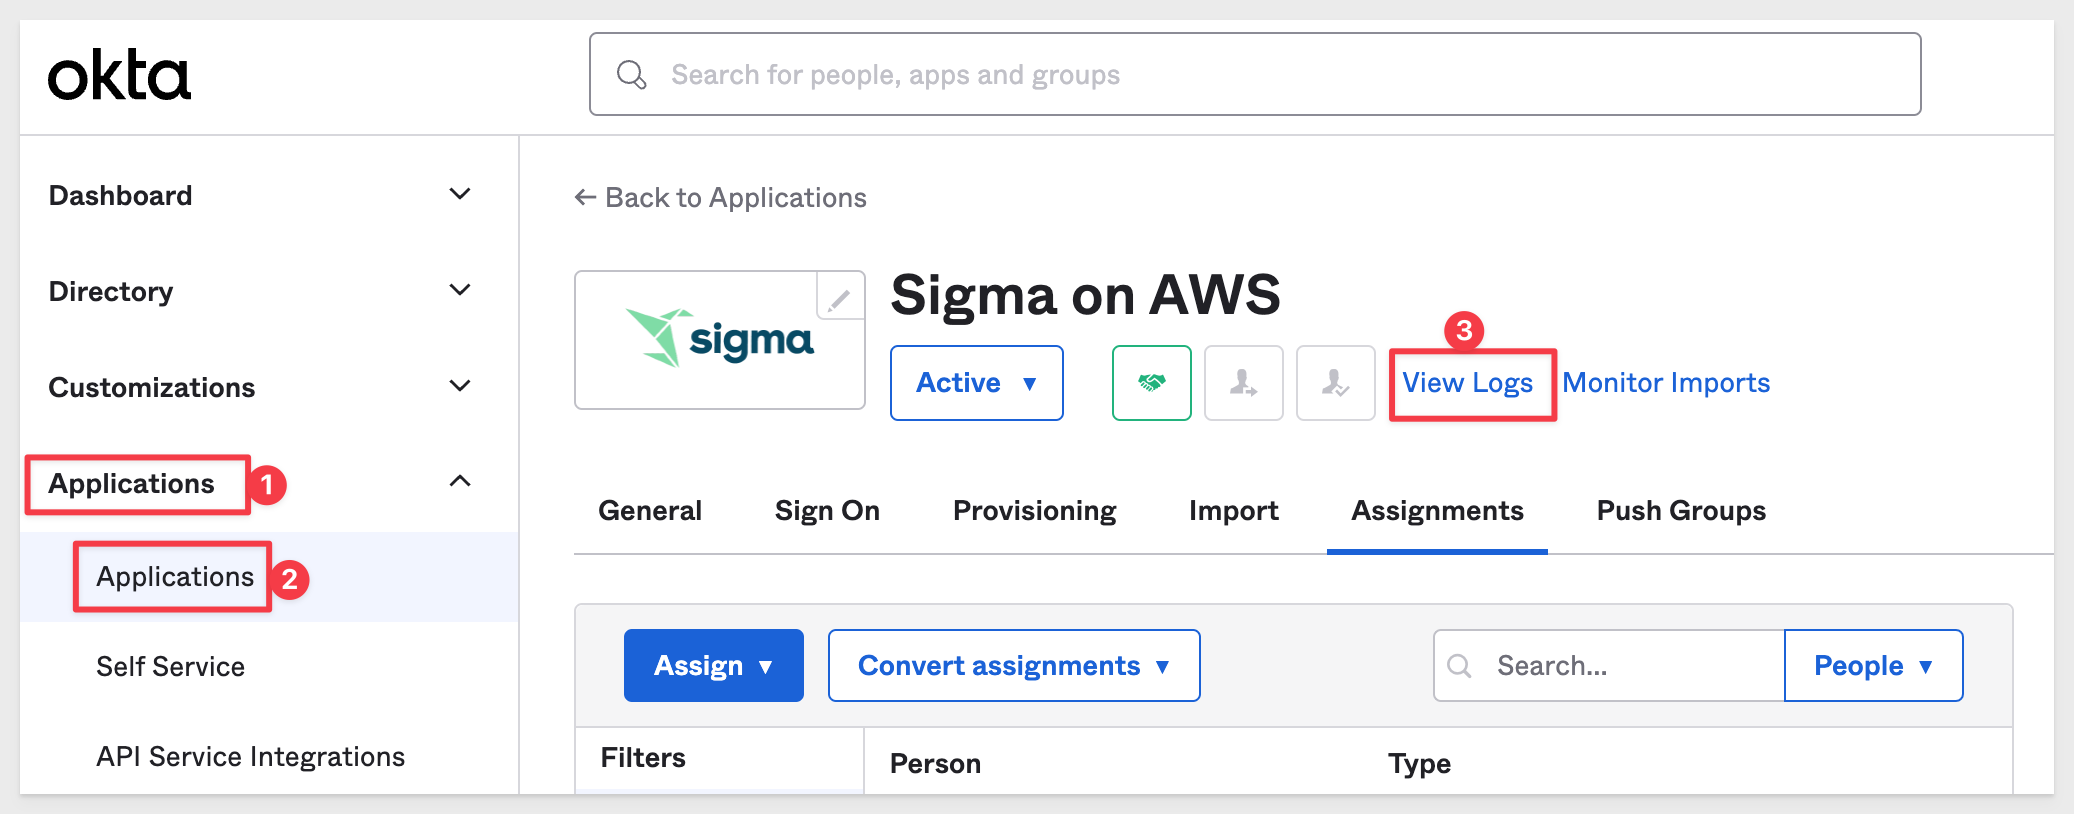
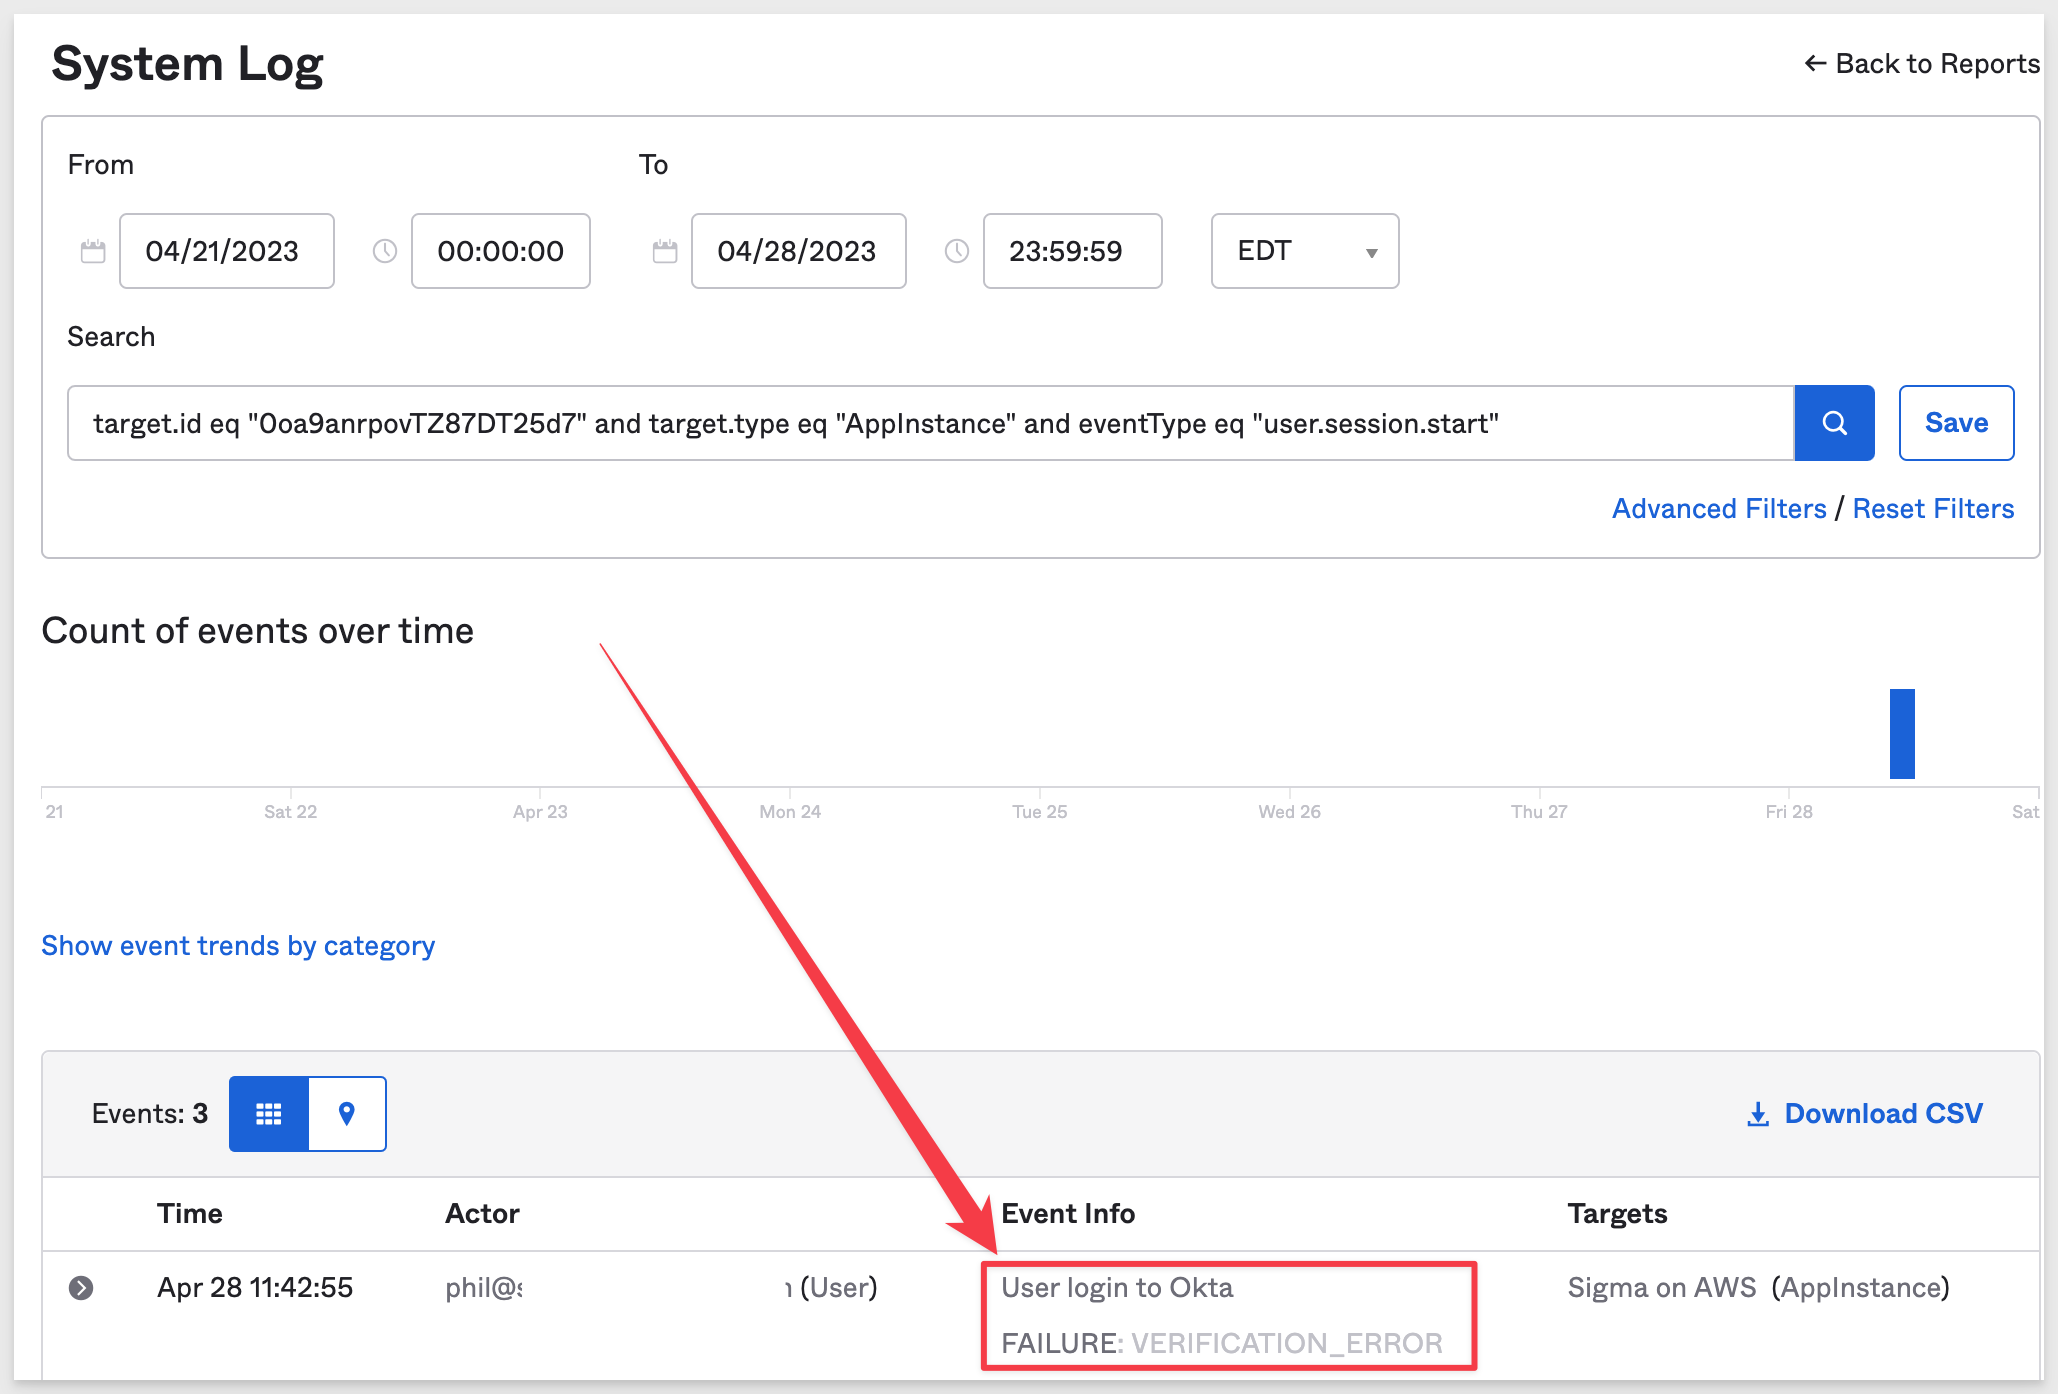
When errors occur in Okta (before reaching out to Sigma) it can be useful to review the Okta Application error log:
Here we see Verification error which indicates that Okta does not have a record for this user login attempt:
Add User in Okta
We need to add our Sigma Admin user in Okta so we can disable non-SSO logins to Sigma.
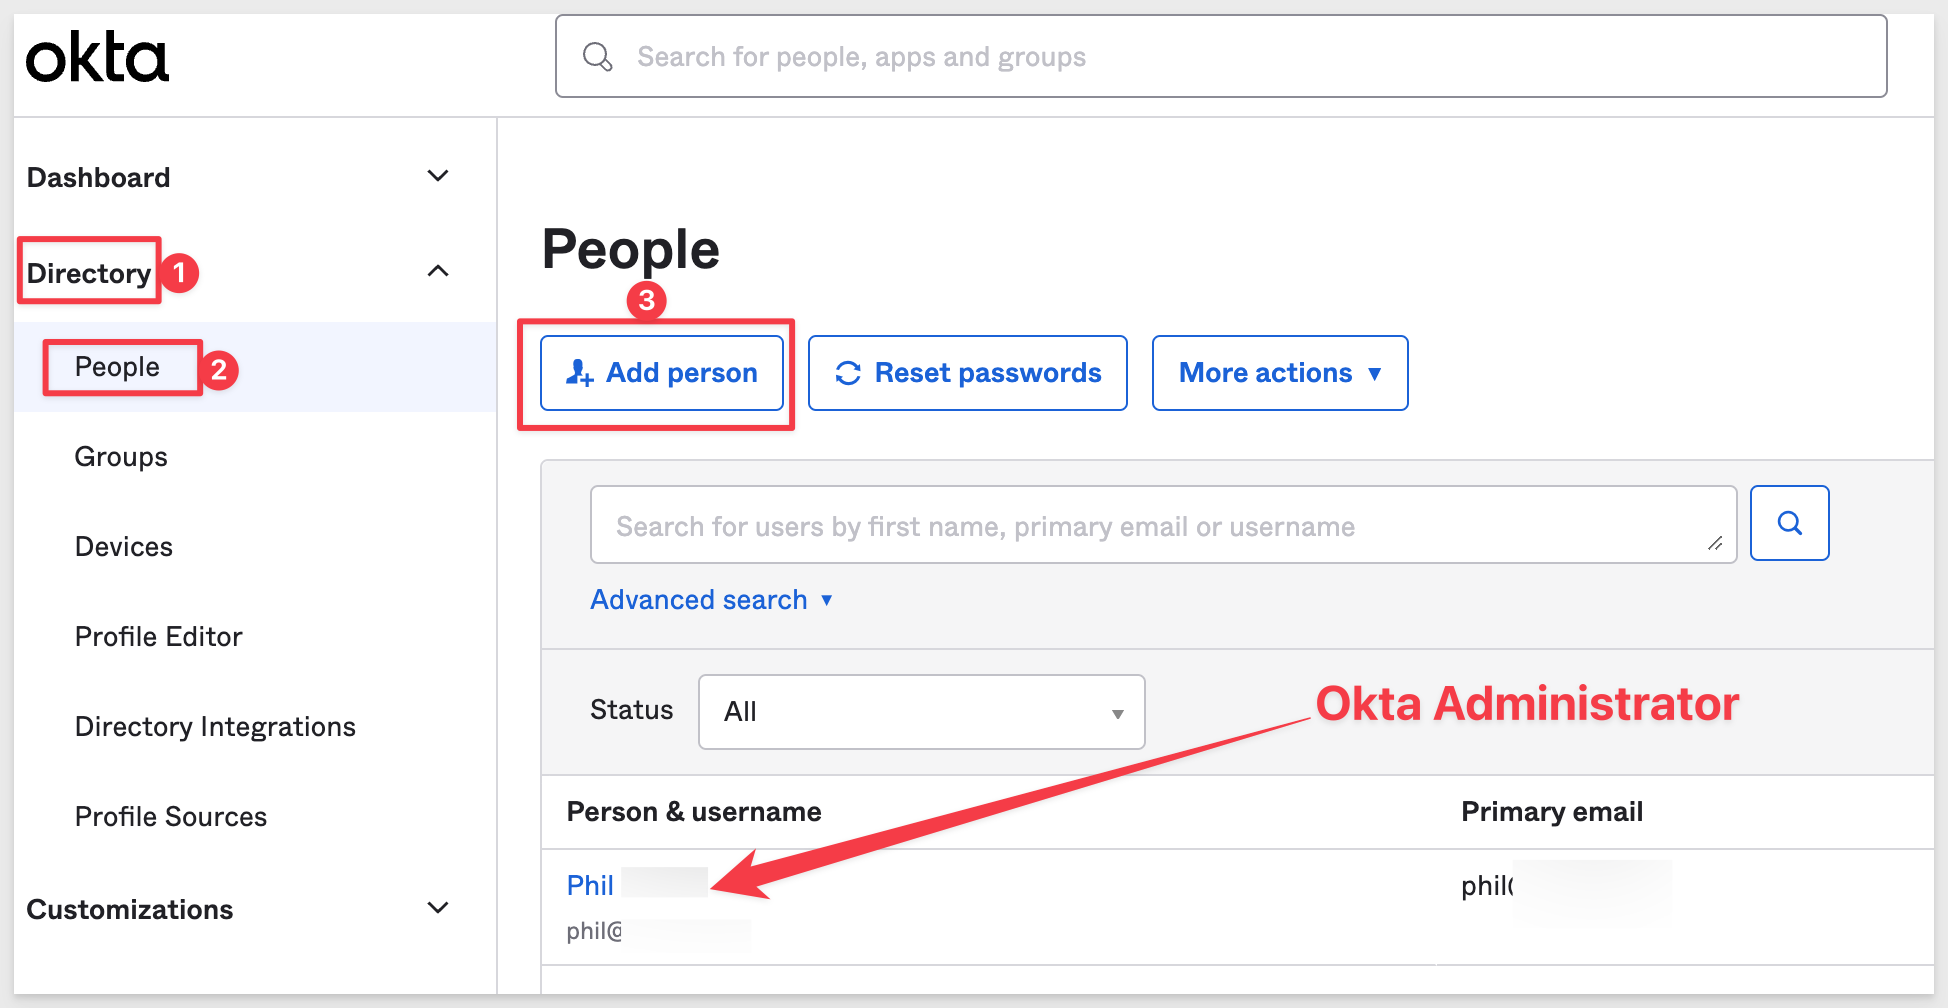
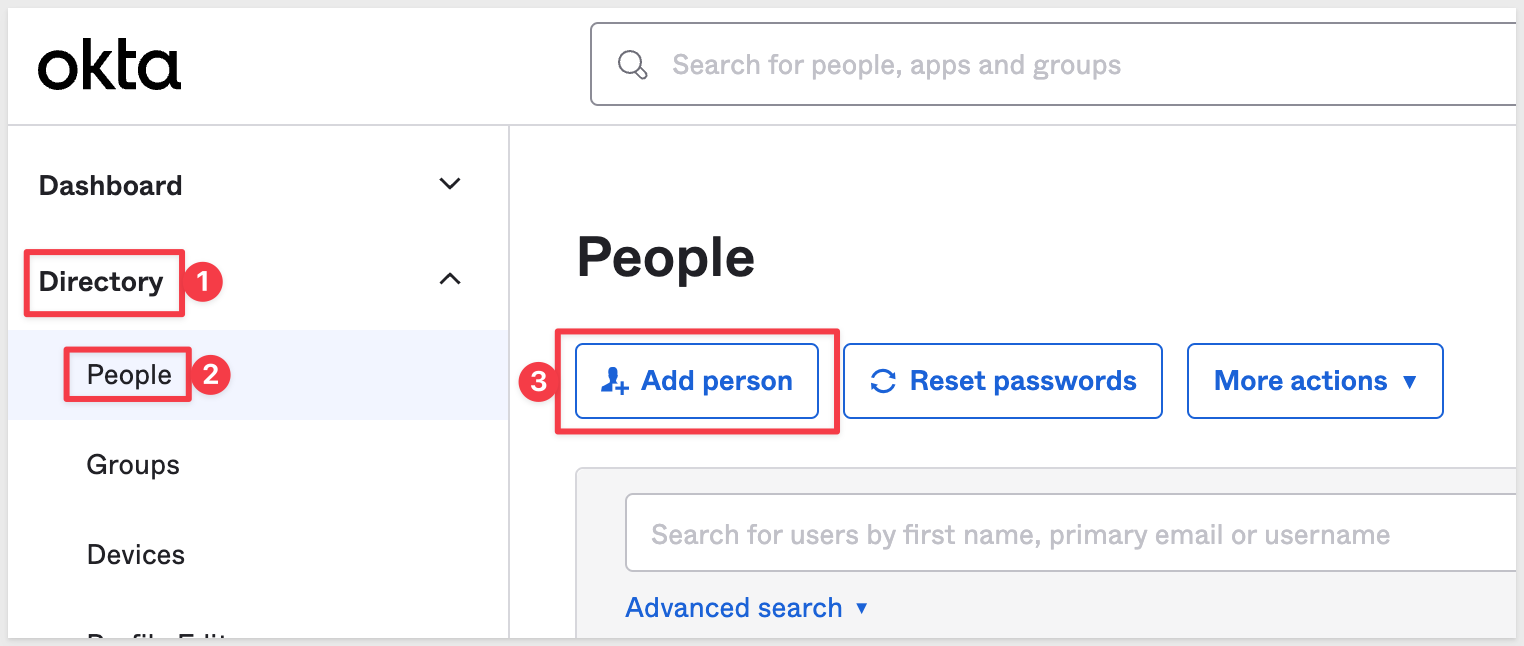
Navigate to Directory > People and click Add person:
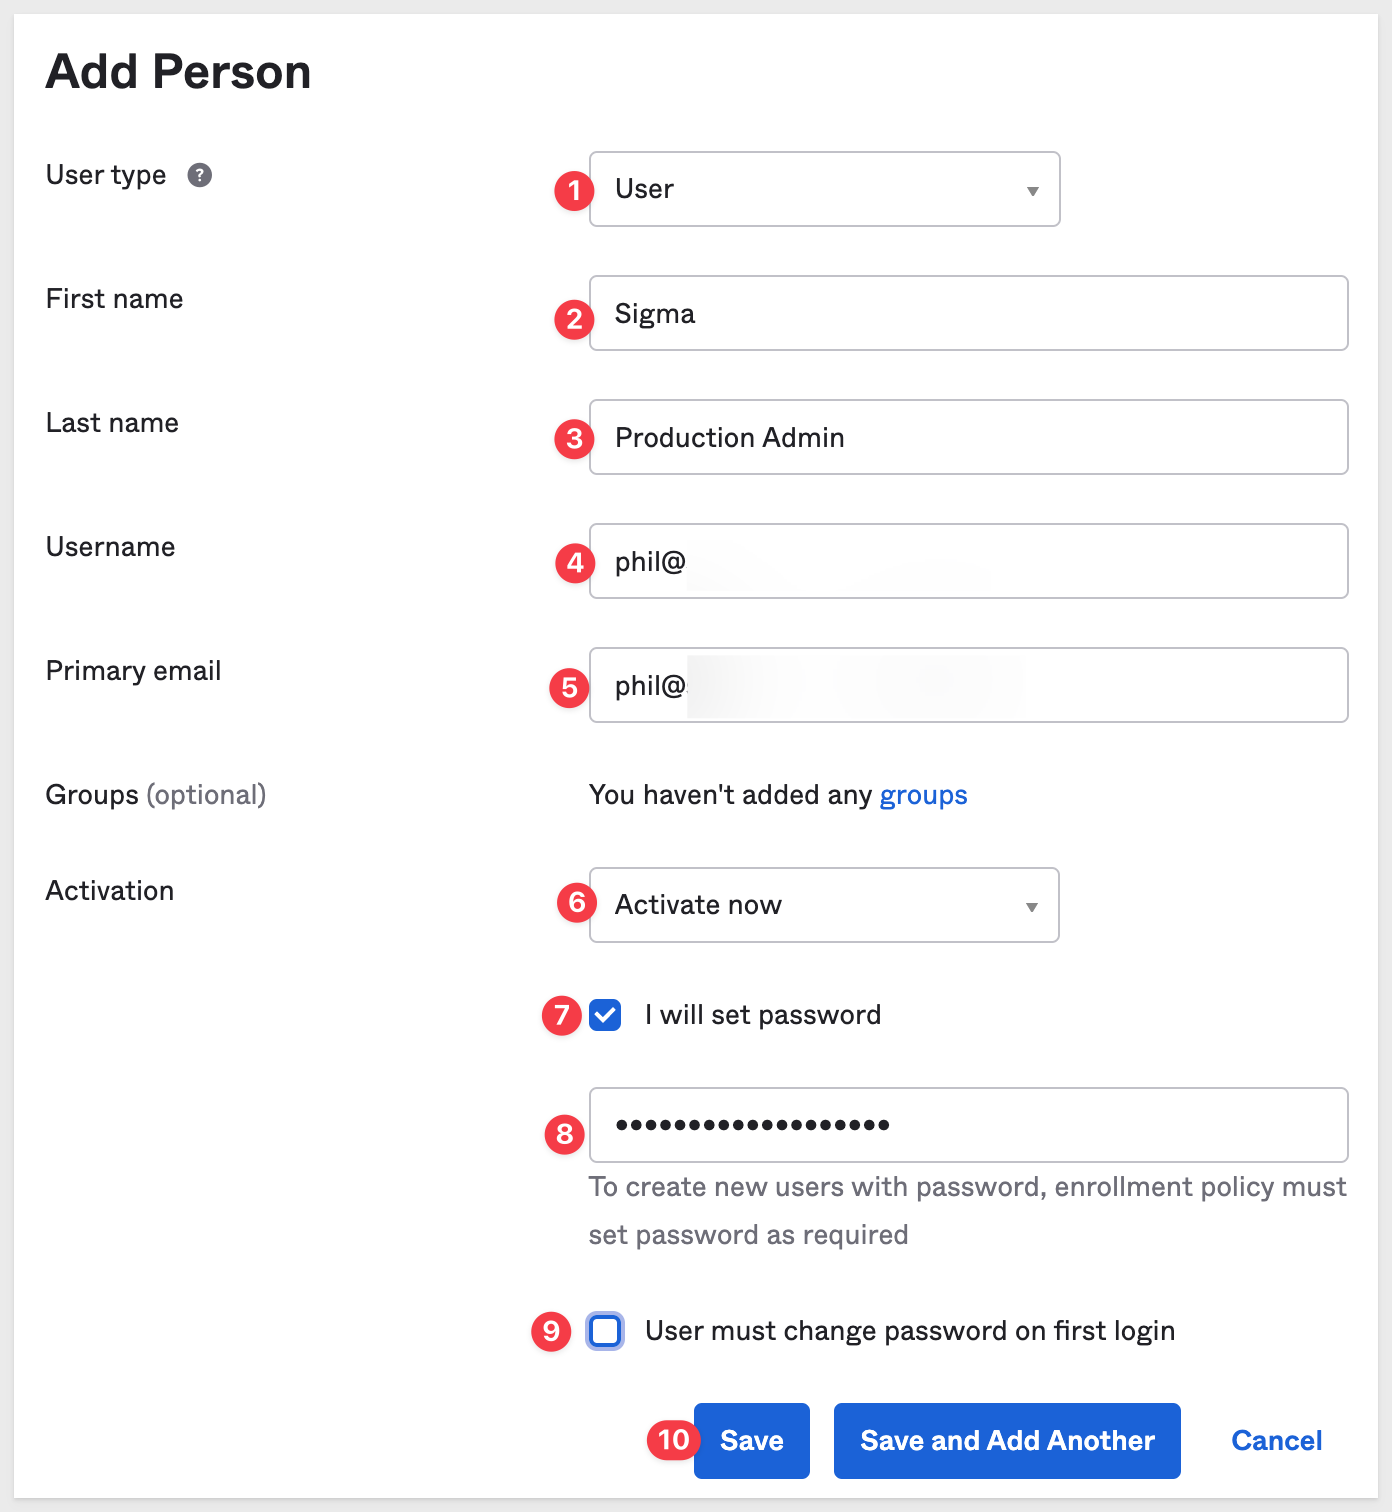
Configure the new user as follows and use the same password used for your Administrator user in Sigma:
Go back to the incognito Chrome window and try to login again. It will fail but this time, the errors is more instructive:
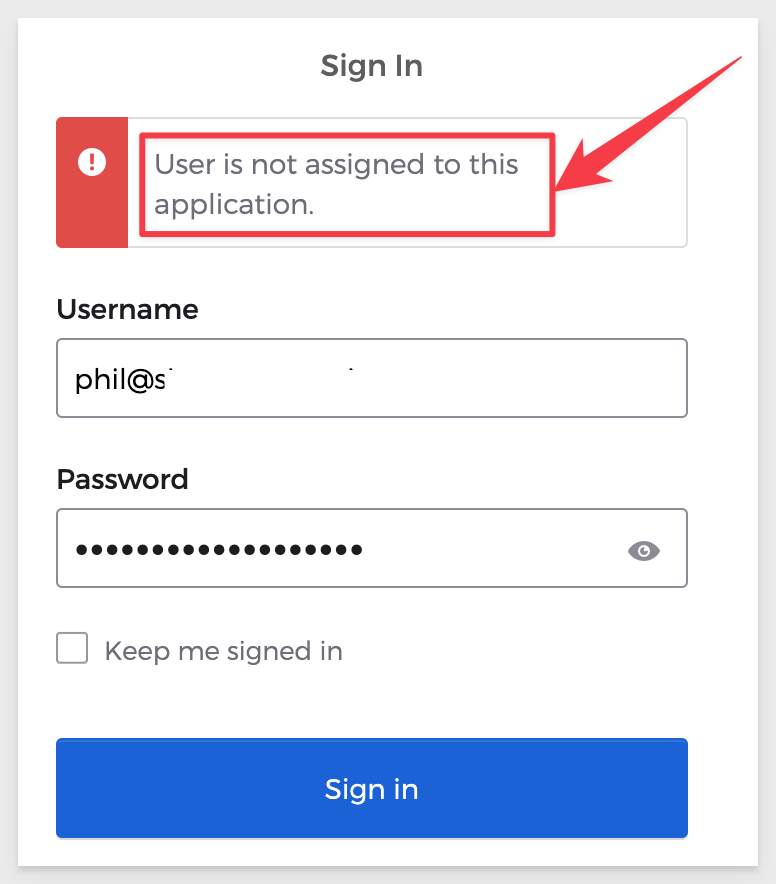
The user needs to be "assigned" to the Sigma application. Currently, this Okta user is not allowed to use anything.
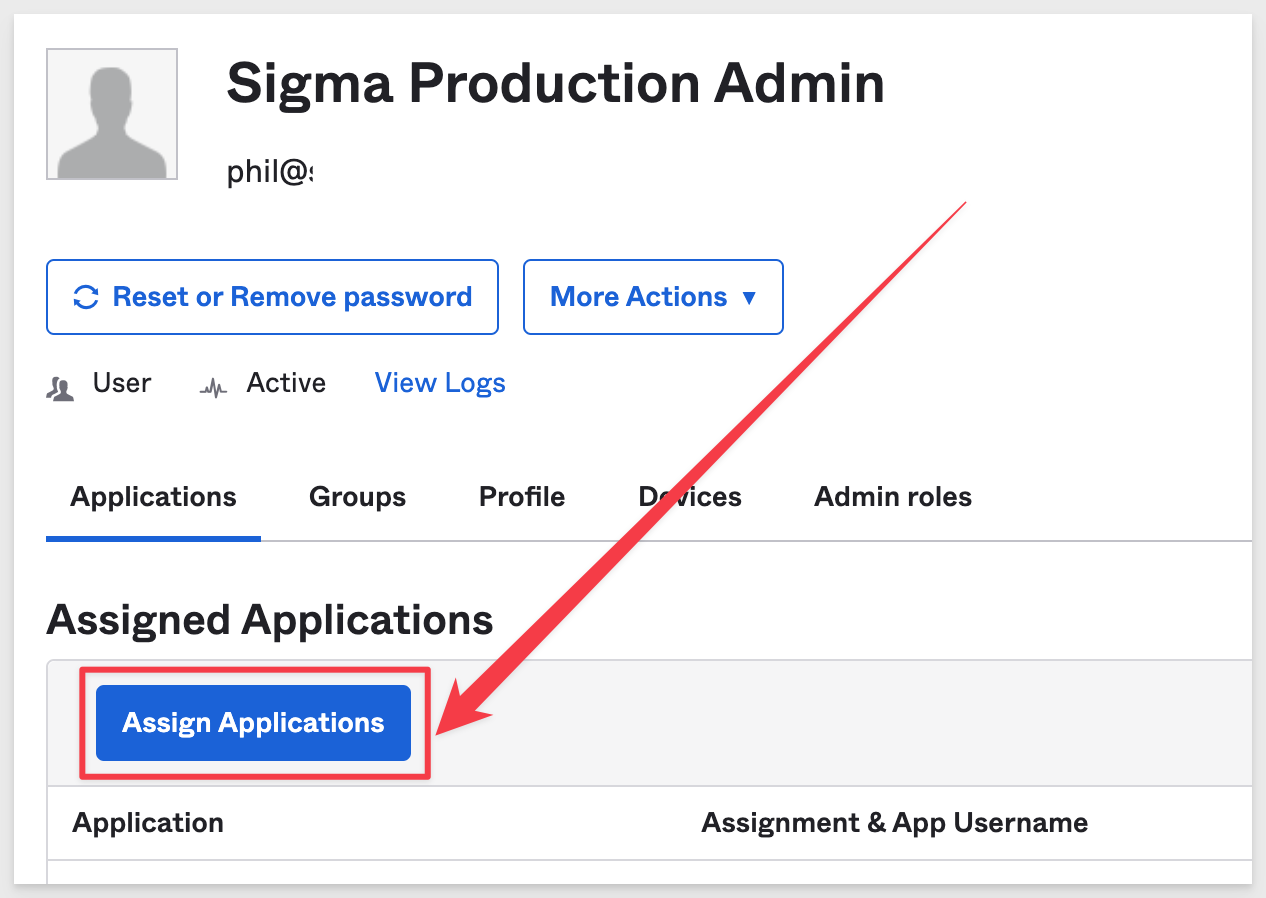
In Okta, navigate to the People list again and click on the user we created previously.

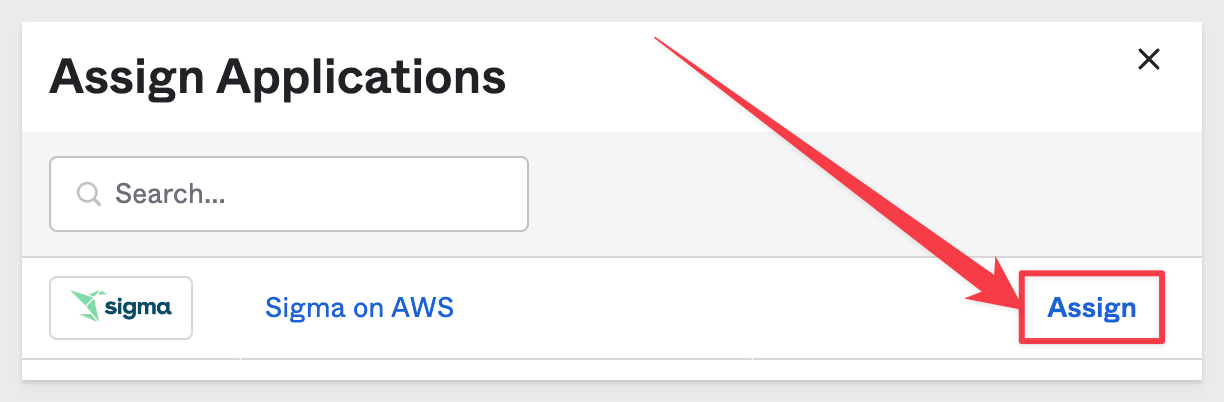
Click the Assign Application button.
Click to assign the Sigma on AWS application:
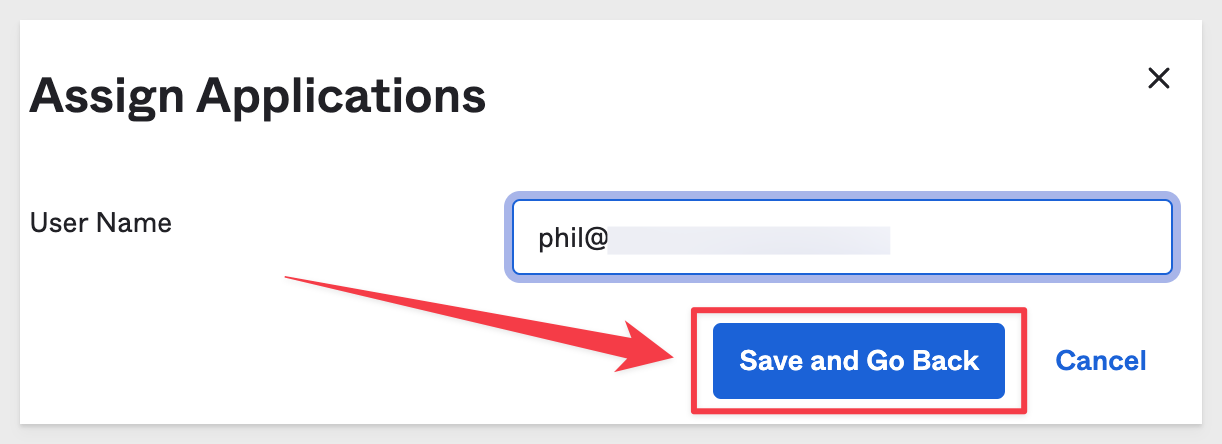
Next click Save and go back:
Click Done.
Now that the user is added in Okta, go back to incognito Chrome again and try to login again.
We are now able to login to Sigma with SSO.
Another inspection of the Okta log for the Sigma application reveals the two steps that occured:

We want to disable username/password logins to Sigma and enforce only SSO with Okta.
In Sigma, navigate to Administration > Authentication and click the Edit button.
Change the Authentication Method to only SAML.
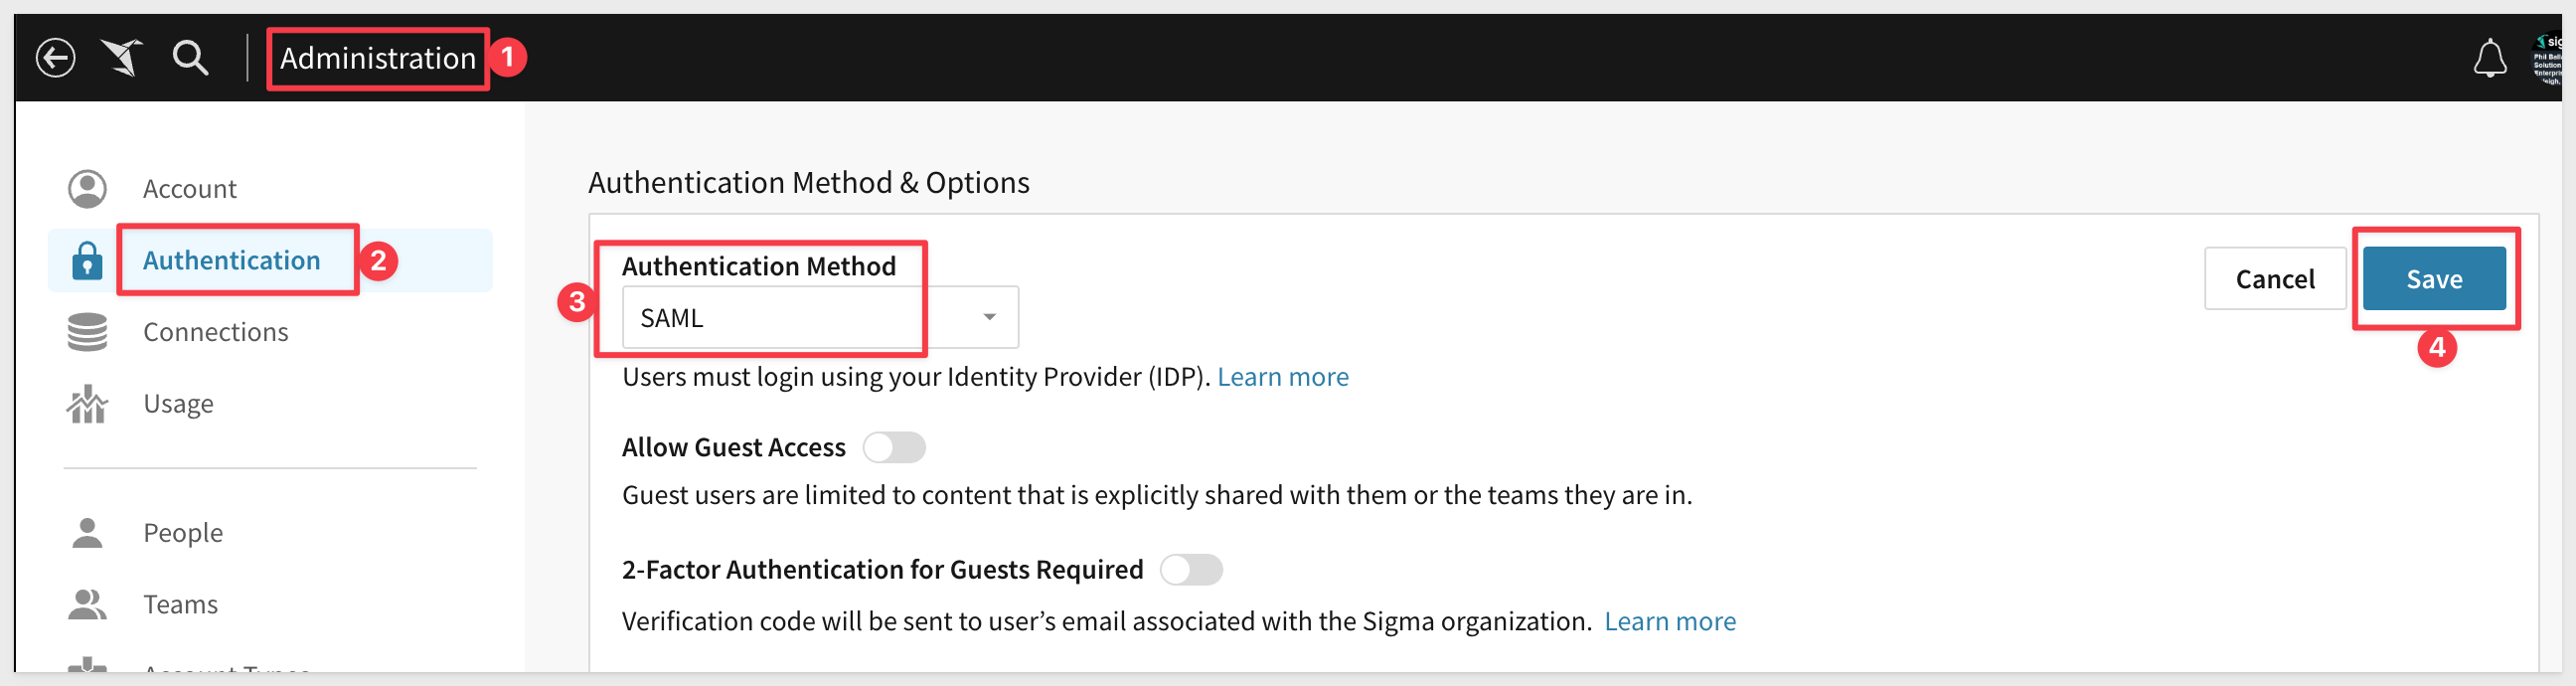
Sigma will now only support SSO login, in this case with Okta.
After logging out of Sigma, close the incognito browser and reopen a new one. Browse to Sigma like:
https://app.sigmacomputing.com/{ACCOUNT NAME}/login
We now only see the Sign in with SSO button:

The Sigma admin user is still able to login, but only with SSO.
So far, we have only used the admin user account in Sigma to setup and test Okta SSO with. Now we want to learn how to manage other users who may have different roles with SSO. There are many ways to do this, but we will focus on using "System for Cross-domain Identity Management", better known by its acronym SCIM, which is a standard for the automation of user and group provisioning between two services. In this case, the two services are Okta and Sigma.
Configuring SCIM for your Sigma organization will allow you to centralize management of users and teams through Okta.
This is preferred, as we want to manage users in one place (Okta) which likely is handing security operations for other applications besides Sigma.
Once SCIM provisioning is enabled for both services, all management of users and teams must be done through Okta. While not directly editable in Sigma, both will be displayed in your Sigma Admin Portal.
When you add SCIM to your Okta configuration, we will gain the ability to manage Sigma teams from Okta, and both user and group/team data in Okta will automatically be pushed to your Sigma organization (via REST API), regardless of user login.
The following functions are available with Okta / Sigma:
- Push New Users:
- New users created through Okta will also be created in Sigma.
- An Admin, Creator or Viewer user type (aka account type in Sigma) can be defined for each Sigma user in Okta. If no user type is defined, Sigma will limit the user to Viewer only permissions.
- Push User Profile Updates:
- Updates made to the user's name (‘given name' and ‘family name') in their Okta profile will automatically be pushed to Sigma.
- Updates made to a user's ‘user type' (via that application Assignment page) will automatically be pushed to Sigma.
- Deactivate Users:
- Deactivating a user through Okta will deactivate the user in Sigma.
- The user's profile information will be maintained as an inactive user.
- Ownership of any documents created by the user will be transferred to the Admin performing the deactivation. Any documents located in the user's My Documents folder will automatically be transferred to a folder in the Admin's My Documents.
- Reactivate Users:
- Sigma user accounts can be reactivated by reactivating the corresponding account in Okta.
- The user's profile information will be maintained as an inactive user.
- Ownership of any documents created by the user will be transferred to the Admin performing the deactivation. Any documents located in the user's My Documents folder will automatically be transferred to a folder in the Admin's My Documents.
- Push Groups / Teams:
- Groups created in Okta will be created as Teams in Sigma.
- Deactivate Groups / Teams:
- Deactivating a group in Okta will deactivate the corresponding team in Sigma.
- Any documents located in the team's workspace folder will automatically be transferred to the My Documents folder of the Admin performing the deletion.
Learn more about SCIM with Sigma
Before we add anymore users in Okta, we want to configure the automated exchange of data between Okta and Sigma.
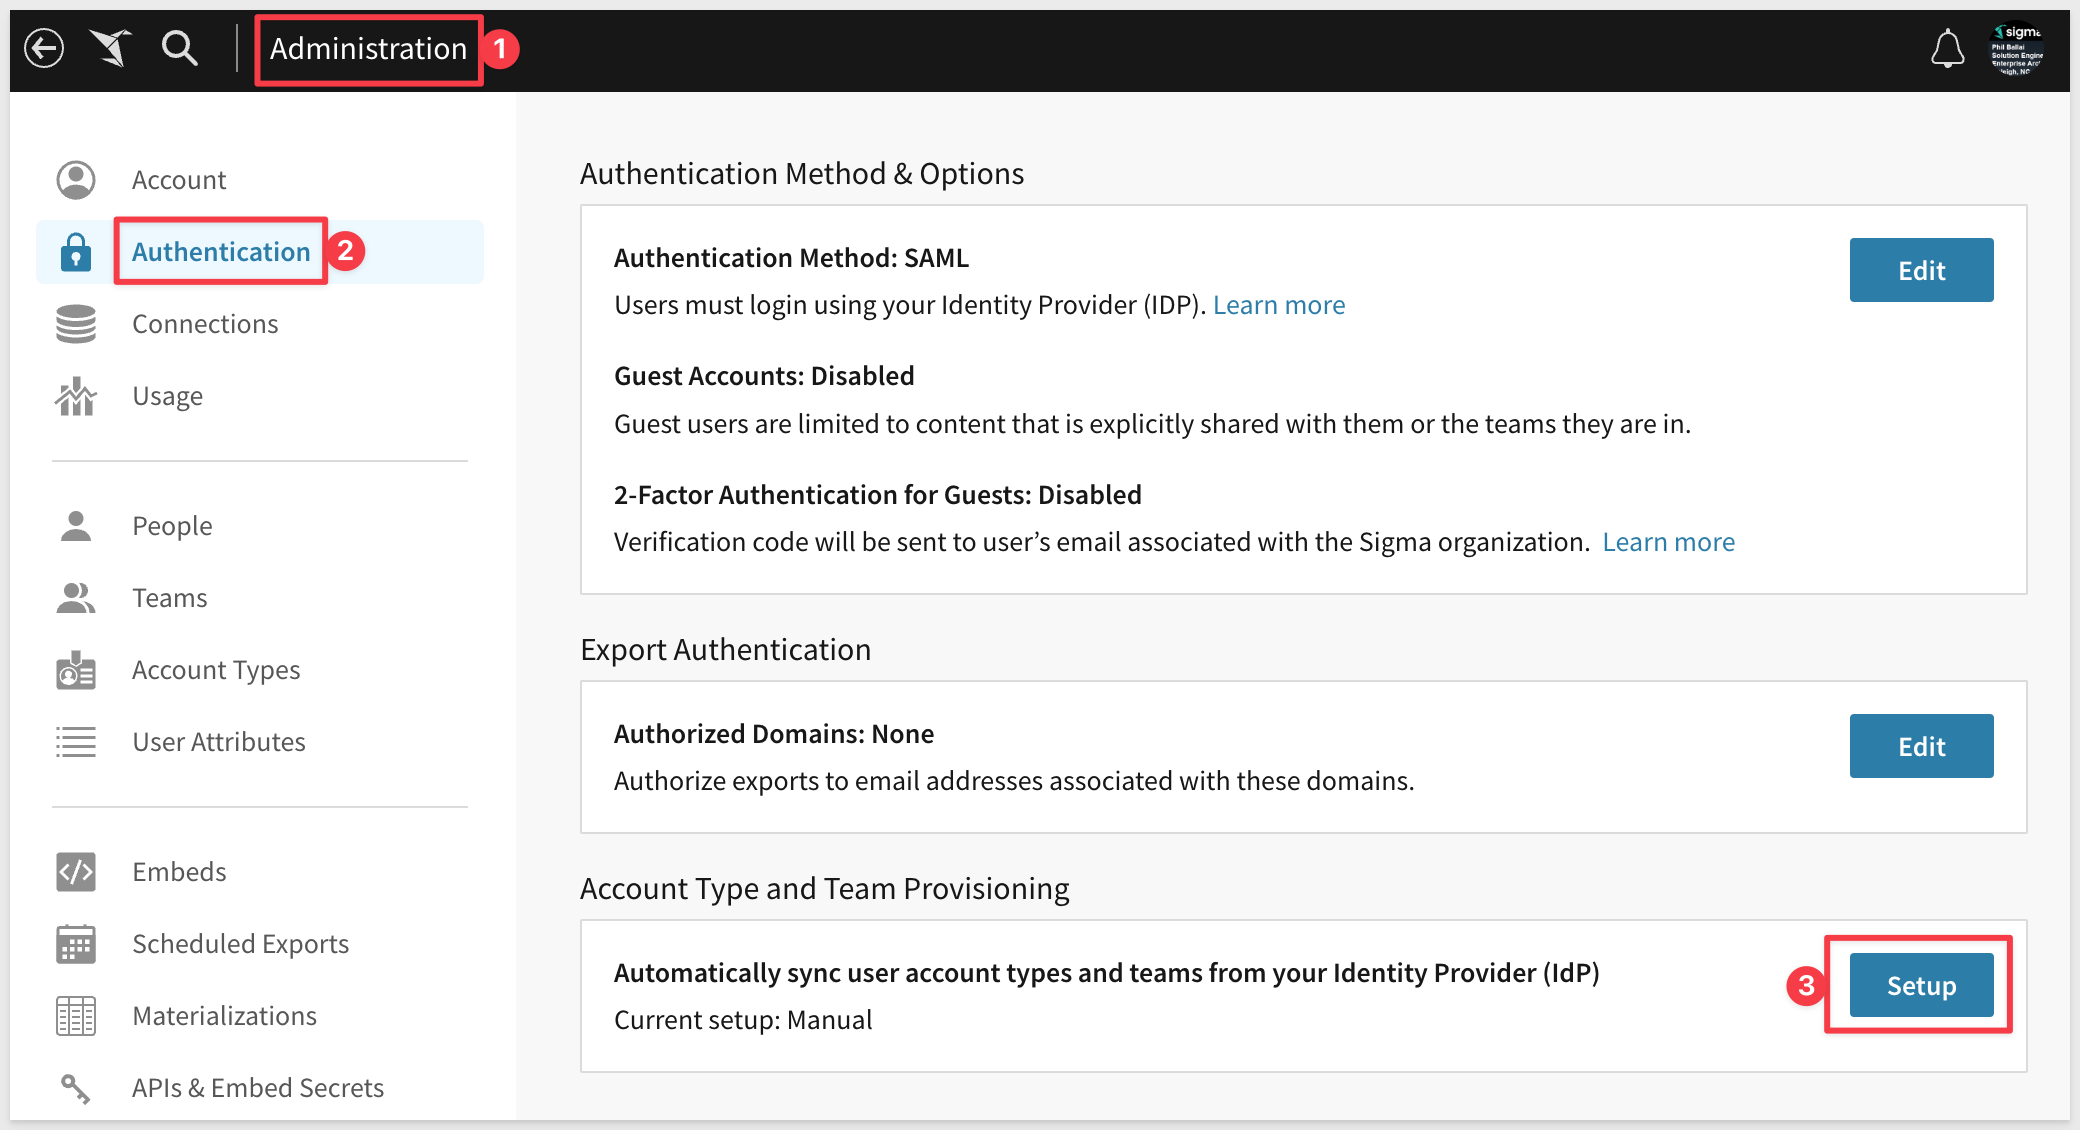
In Sigma, navigate to Administration > Authentication and click the Setup button for "Account Type and Team Provisioning":
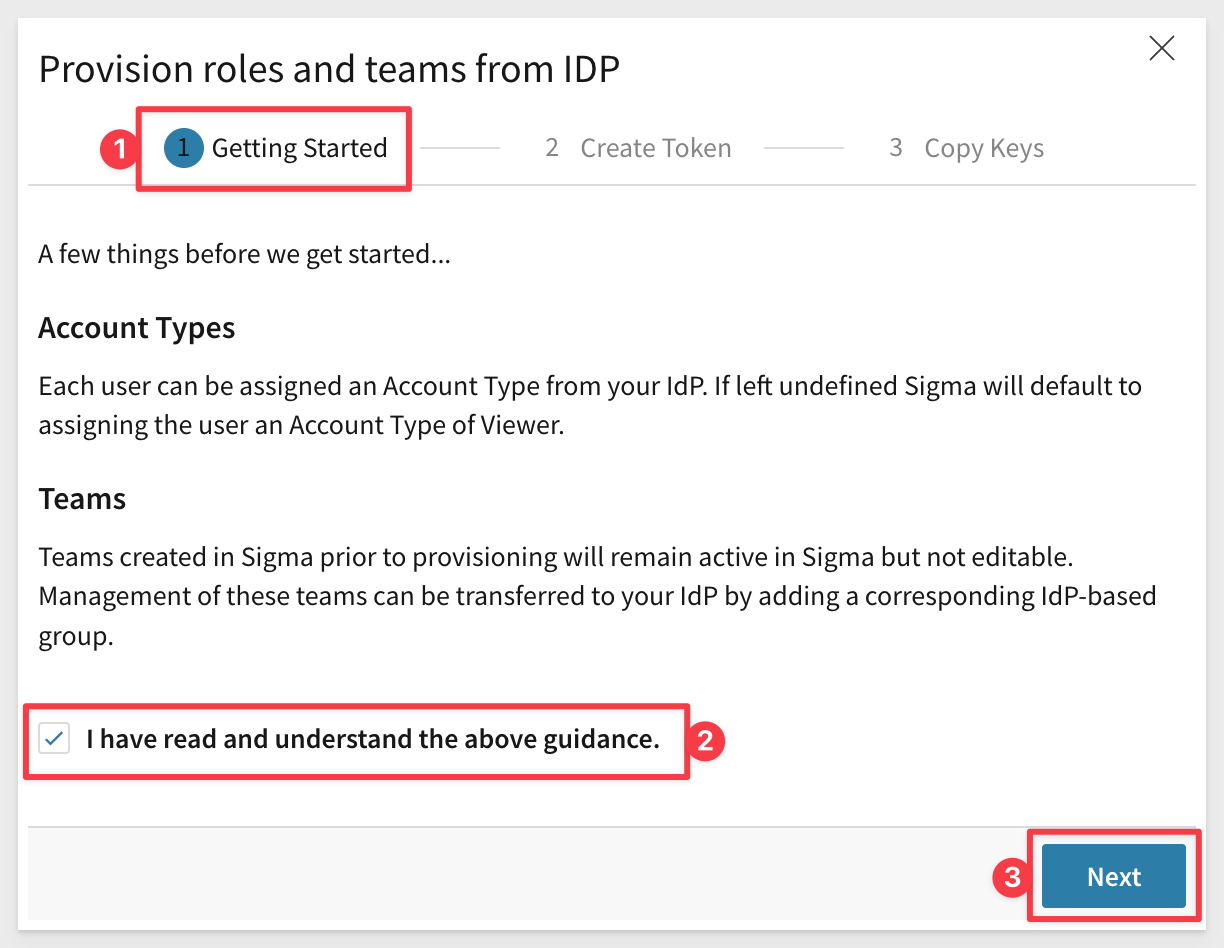
In the popup, check the box on for I have read and understand the above guidance. and click Next:
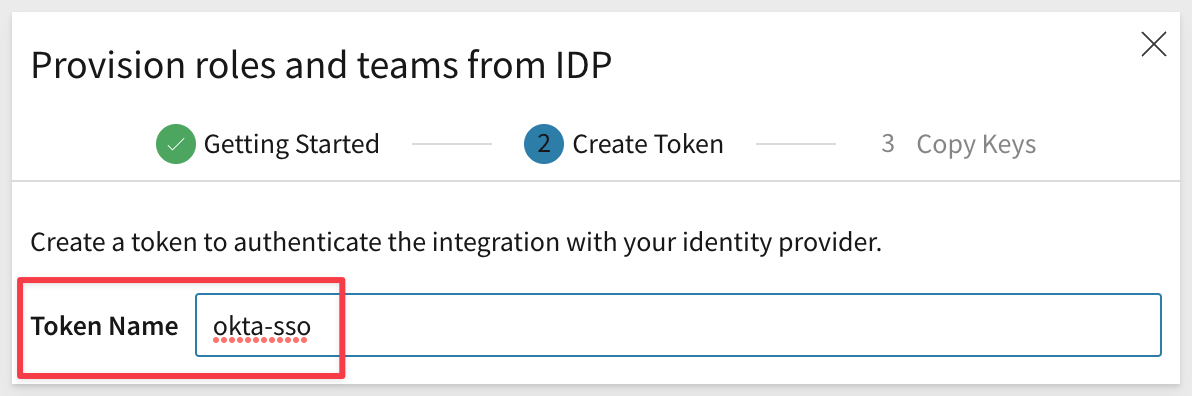
Give the token a friendly name and click Next:
Click Copy for the Directory Base URL and Bearer Token and save these values to a text file for now. We will use them later.
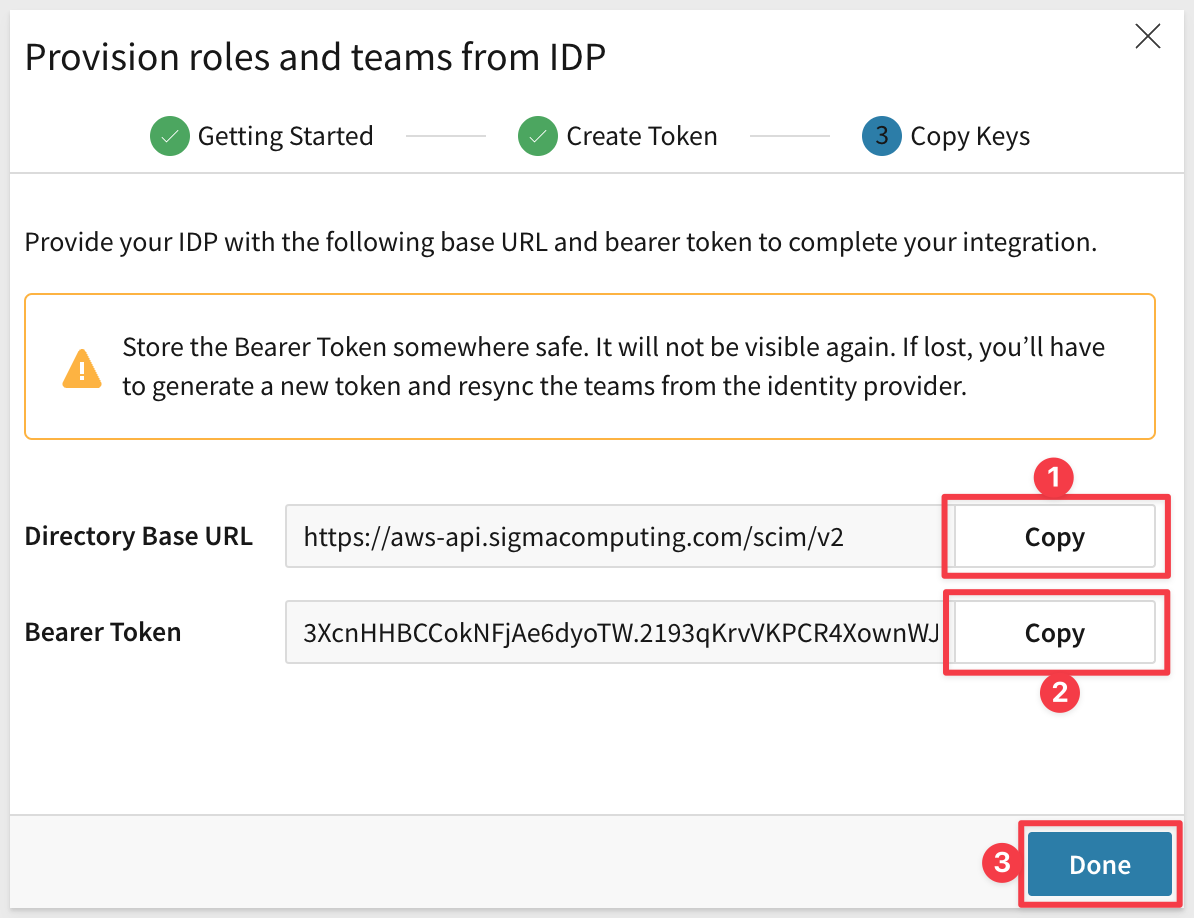
Click Done.
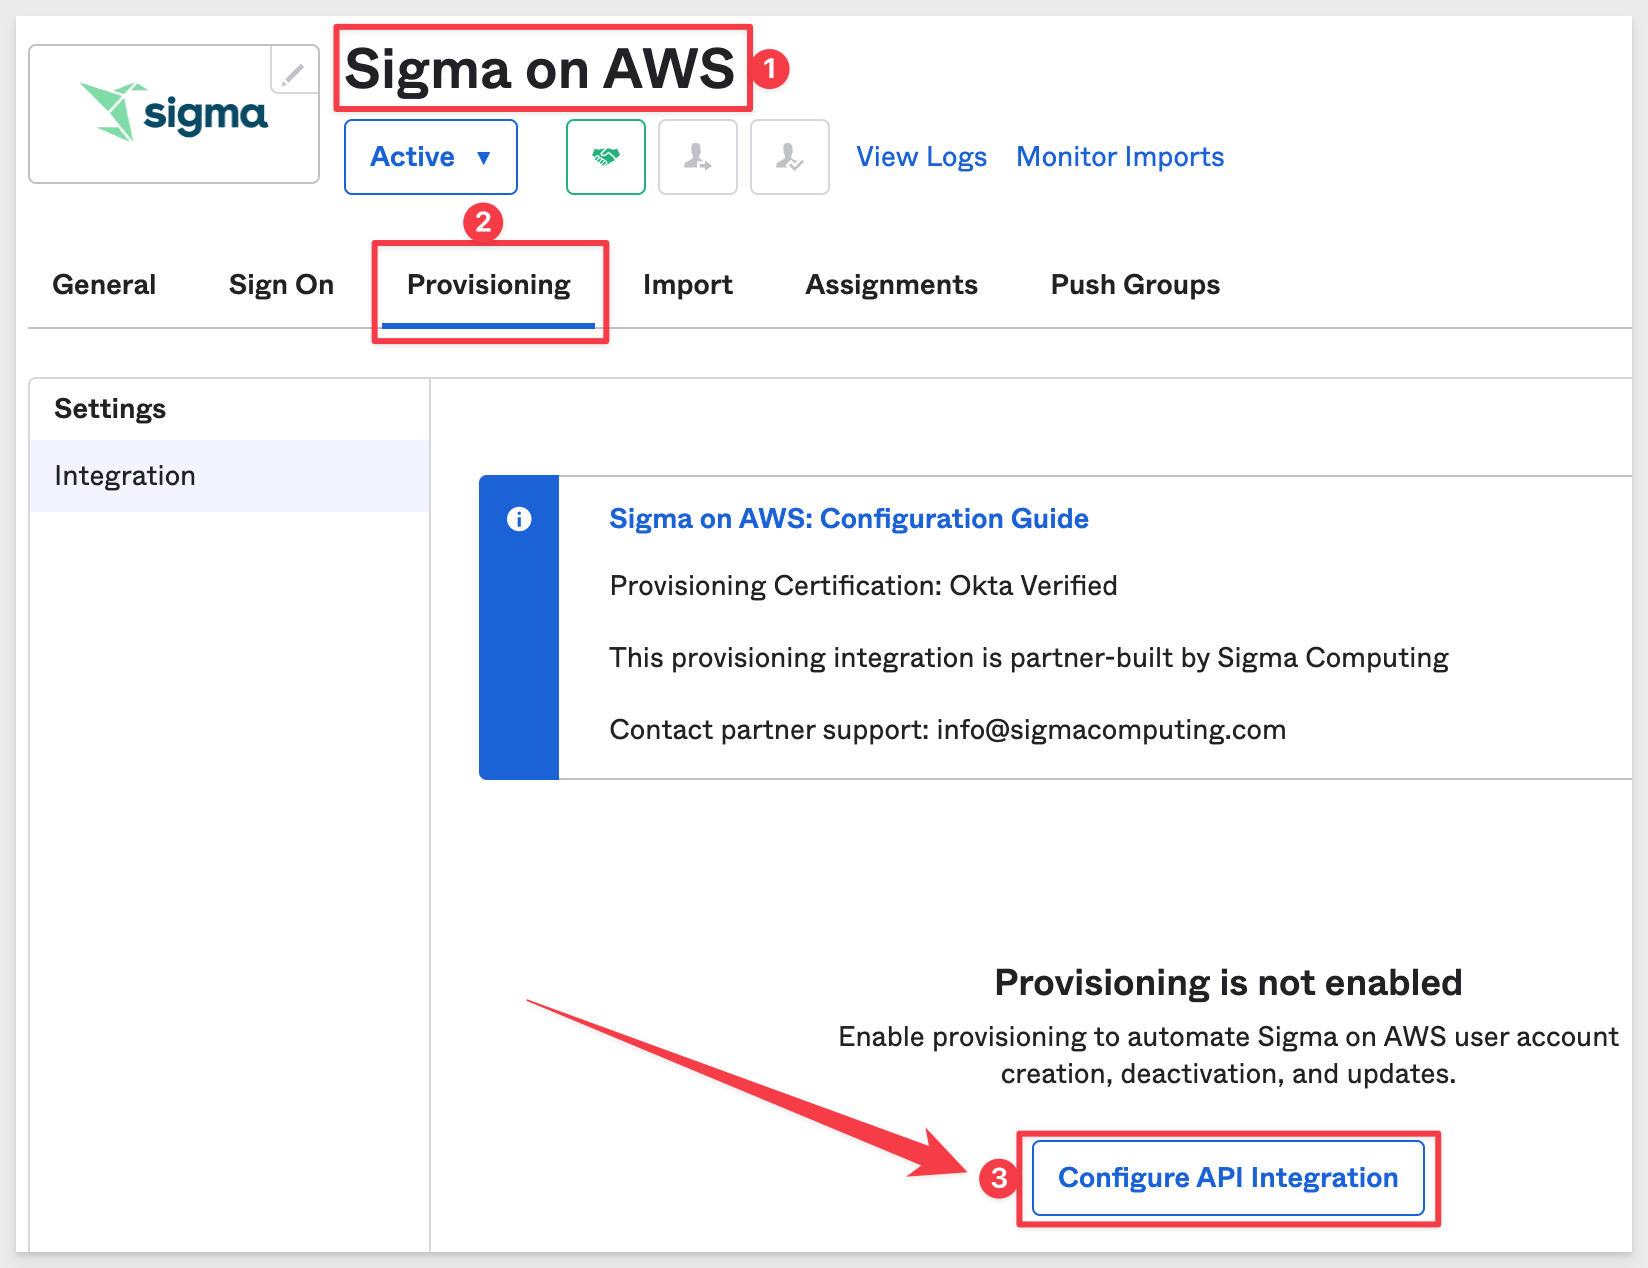
Back in Okta, navigate to Applications > Applications and click into Sigma on AWS.
Click on the Provisioning tab. Click the Configure API Integration button:
Click on the checkbox for Enable API Integration, paste the API Token (Bearer Token) we saved earlier and click the Test API Credentials button:
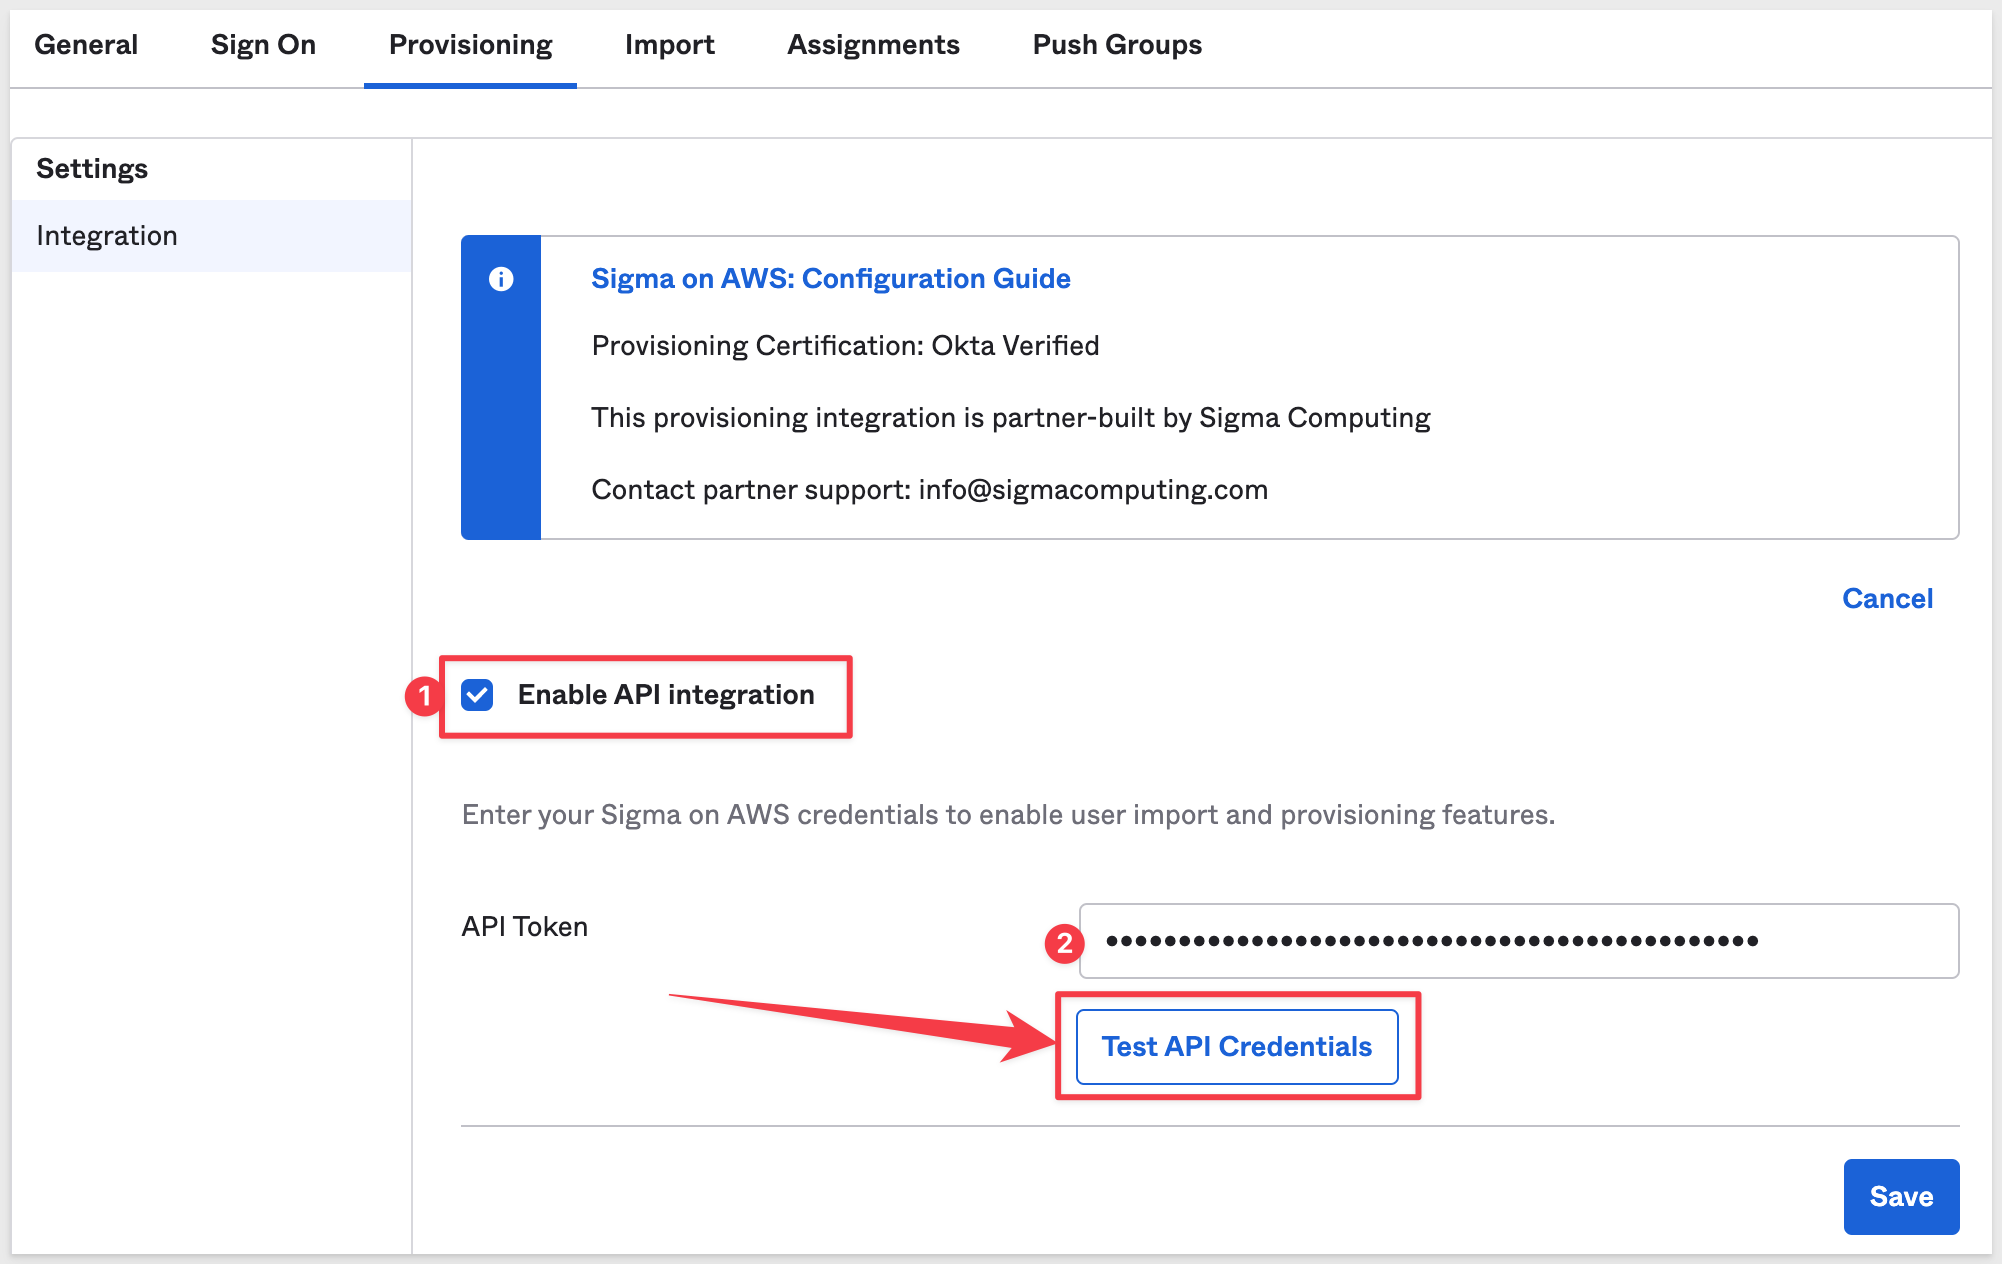
We should receive a message Sigma on AWS was verified successfully! if all is good.
Click Save.
Now Okta is able to communicate with Sigma's REST endpoint for this account only.
We now have more configuration options available to us in Okta to control SSO.
We want to control what happens when a user who exists in Okta (and is allowed to access Sigma) but does not exist in Sigma, is handled.
We want Okta to creates a user in Sigma on AWS when assigning the app to a user in Okta.
Click Edit at the top right corner across fromProvisioning to App.
Then click the Enable checkbox on adjacent to Create.
Also enable the checkboxes for Update User Attributes and Deactivate Users. Okta provides information that describes what these do.
Click Save.
Okta supports Sigma "out-of-the-box" account types. It manages this in its Profile Editor.
Navigate to Directory > Profile Editor and click on Sigma on AWS User:
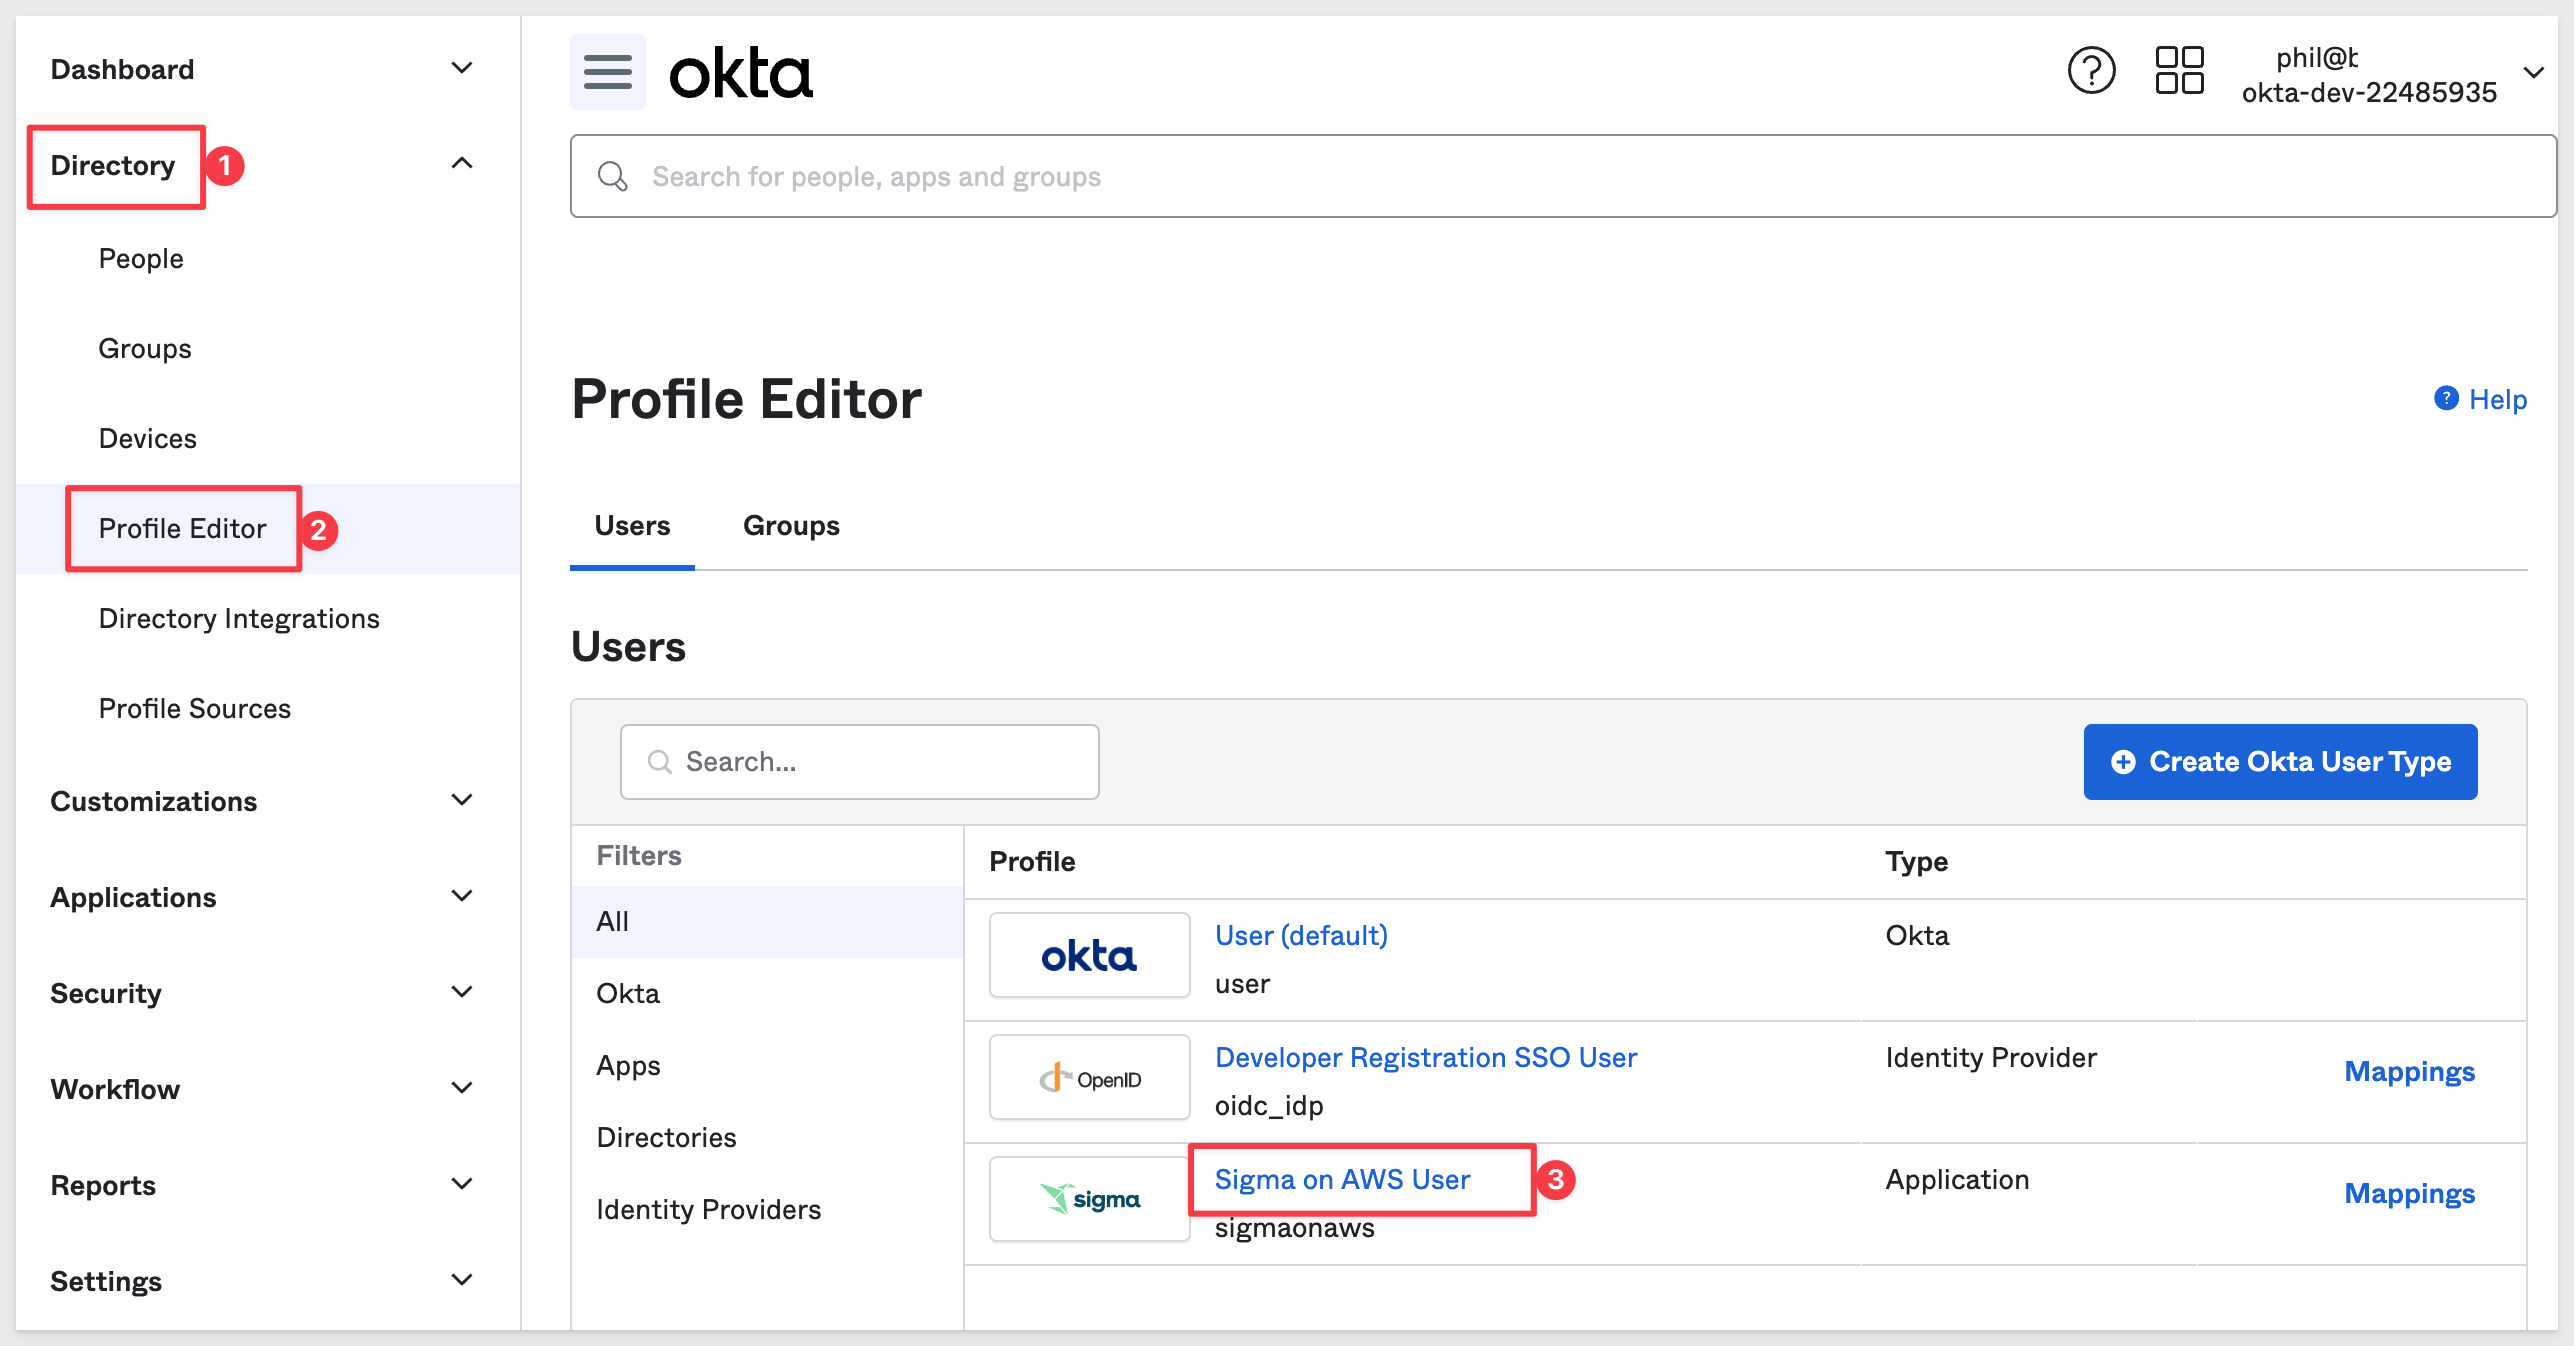
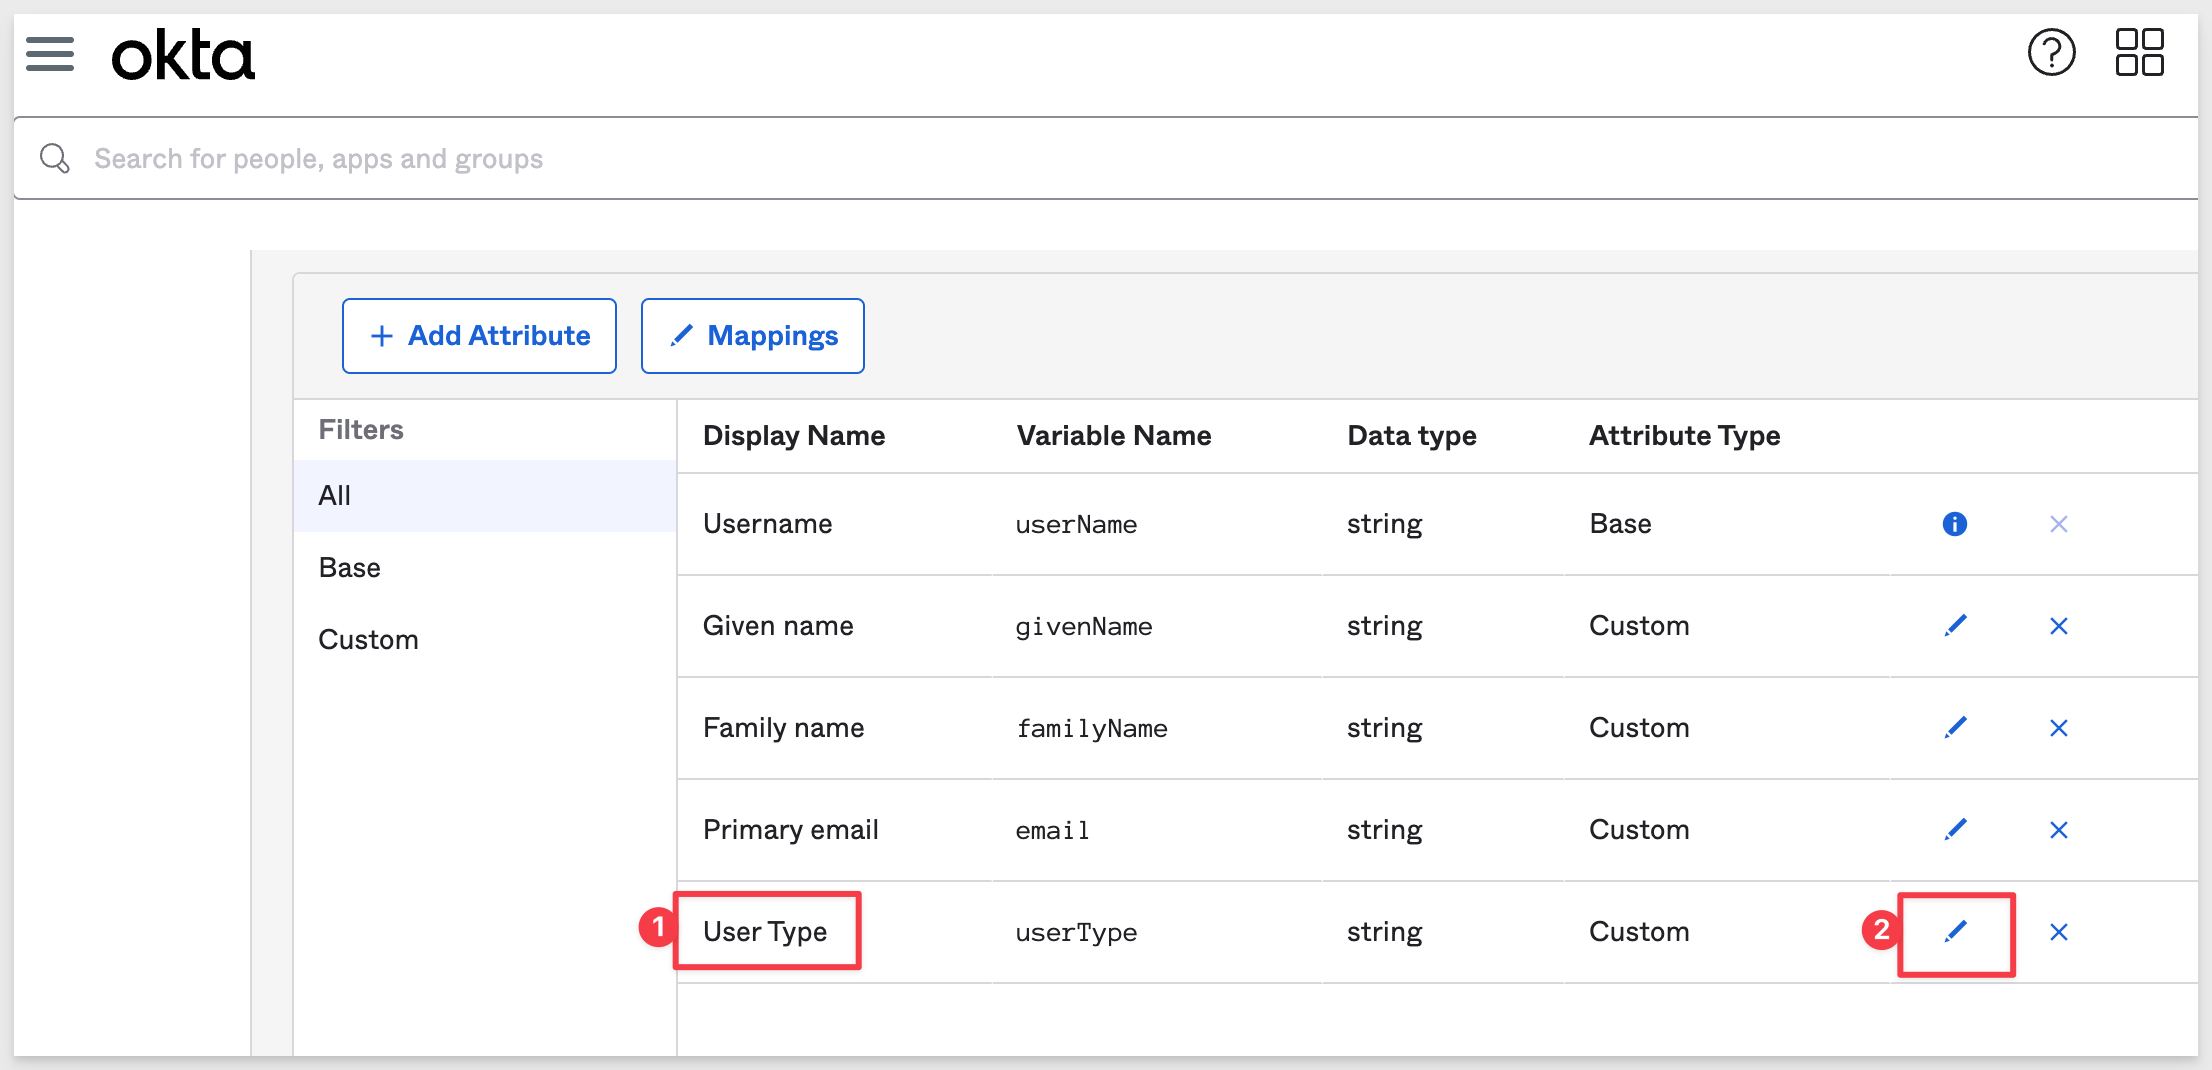
Click on the "pencil" icon for User Type:
We are presented with the pre-configured settings for User Type. We see that the "base" Sigma Account Types that are included in all Sigma accounts are pre-configured for us:
Pro
Essential
Lite
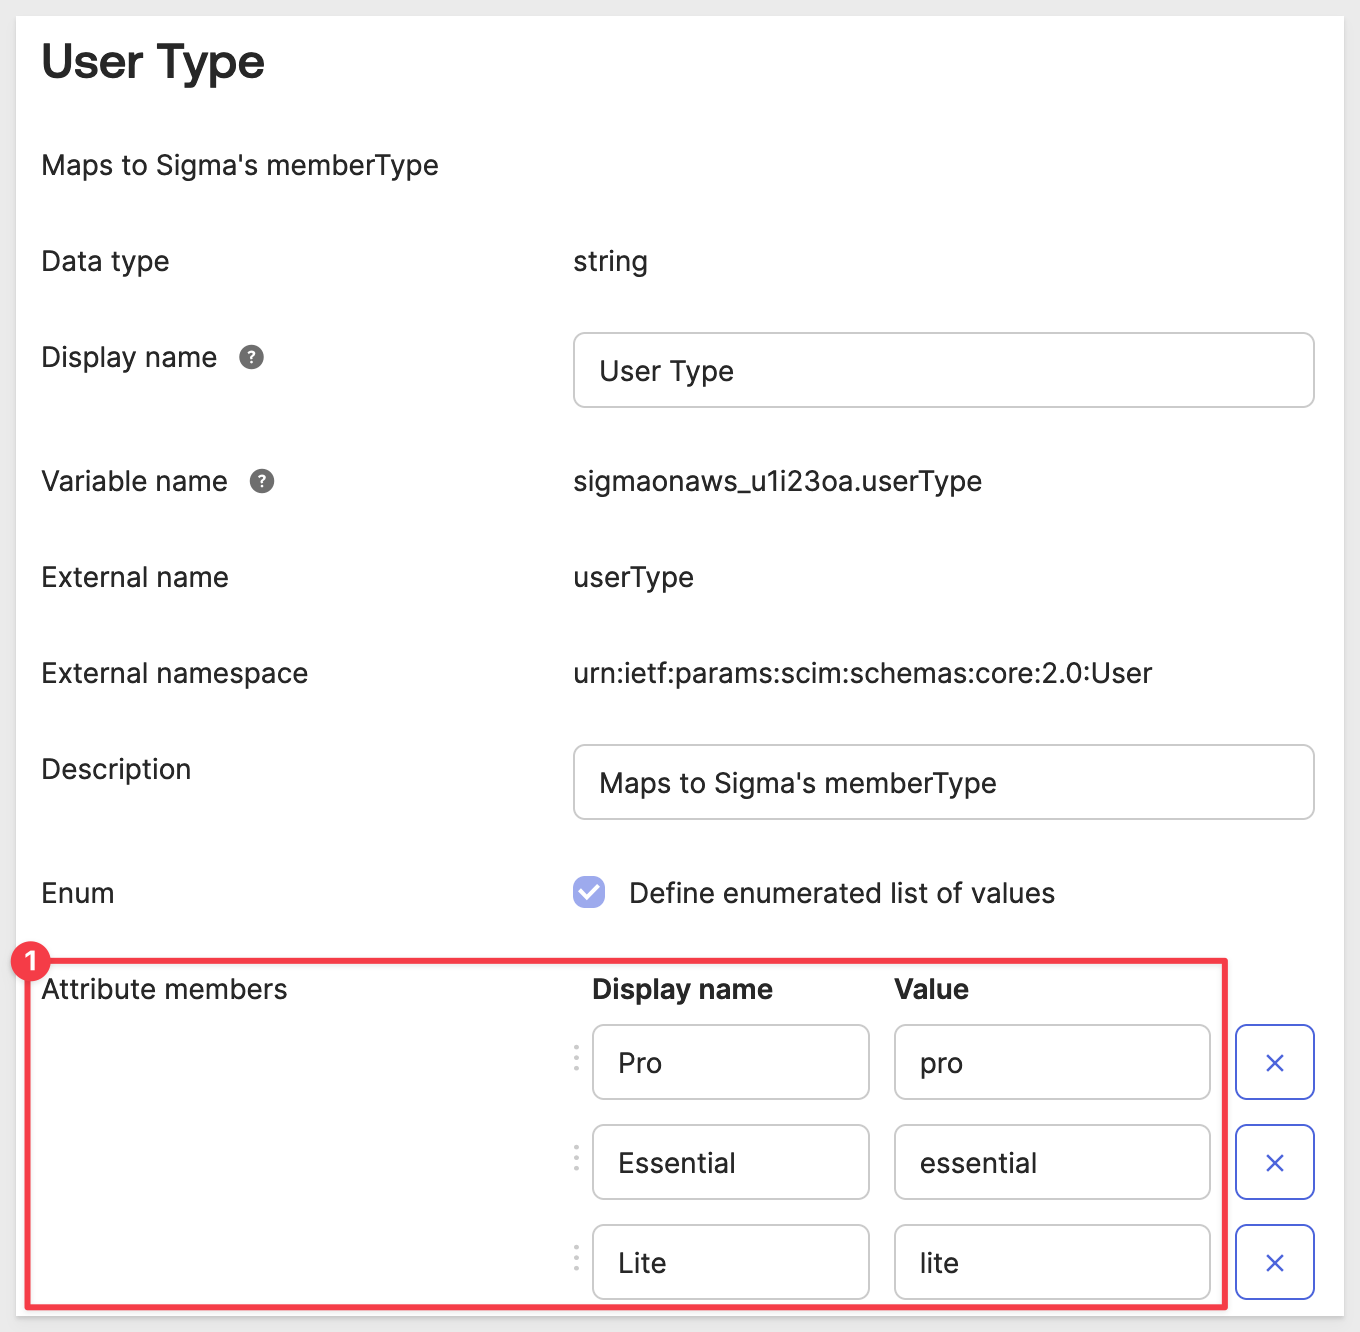
This is where we can also + Add Another to support Sigma custom Account Types later.
A user's Account Type can be managed in Okta directly and this is fine when there are only a few users. It is a best practice to use Okta Groups to manage what Sigma operations are permitted to all group members.
Groups created in Okta will be pushed to Sigma now that we have the integration all set up. There is no need to create them first in Sigma.
Let's add a Group for Viewers.
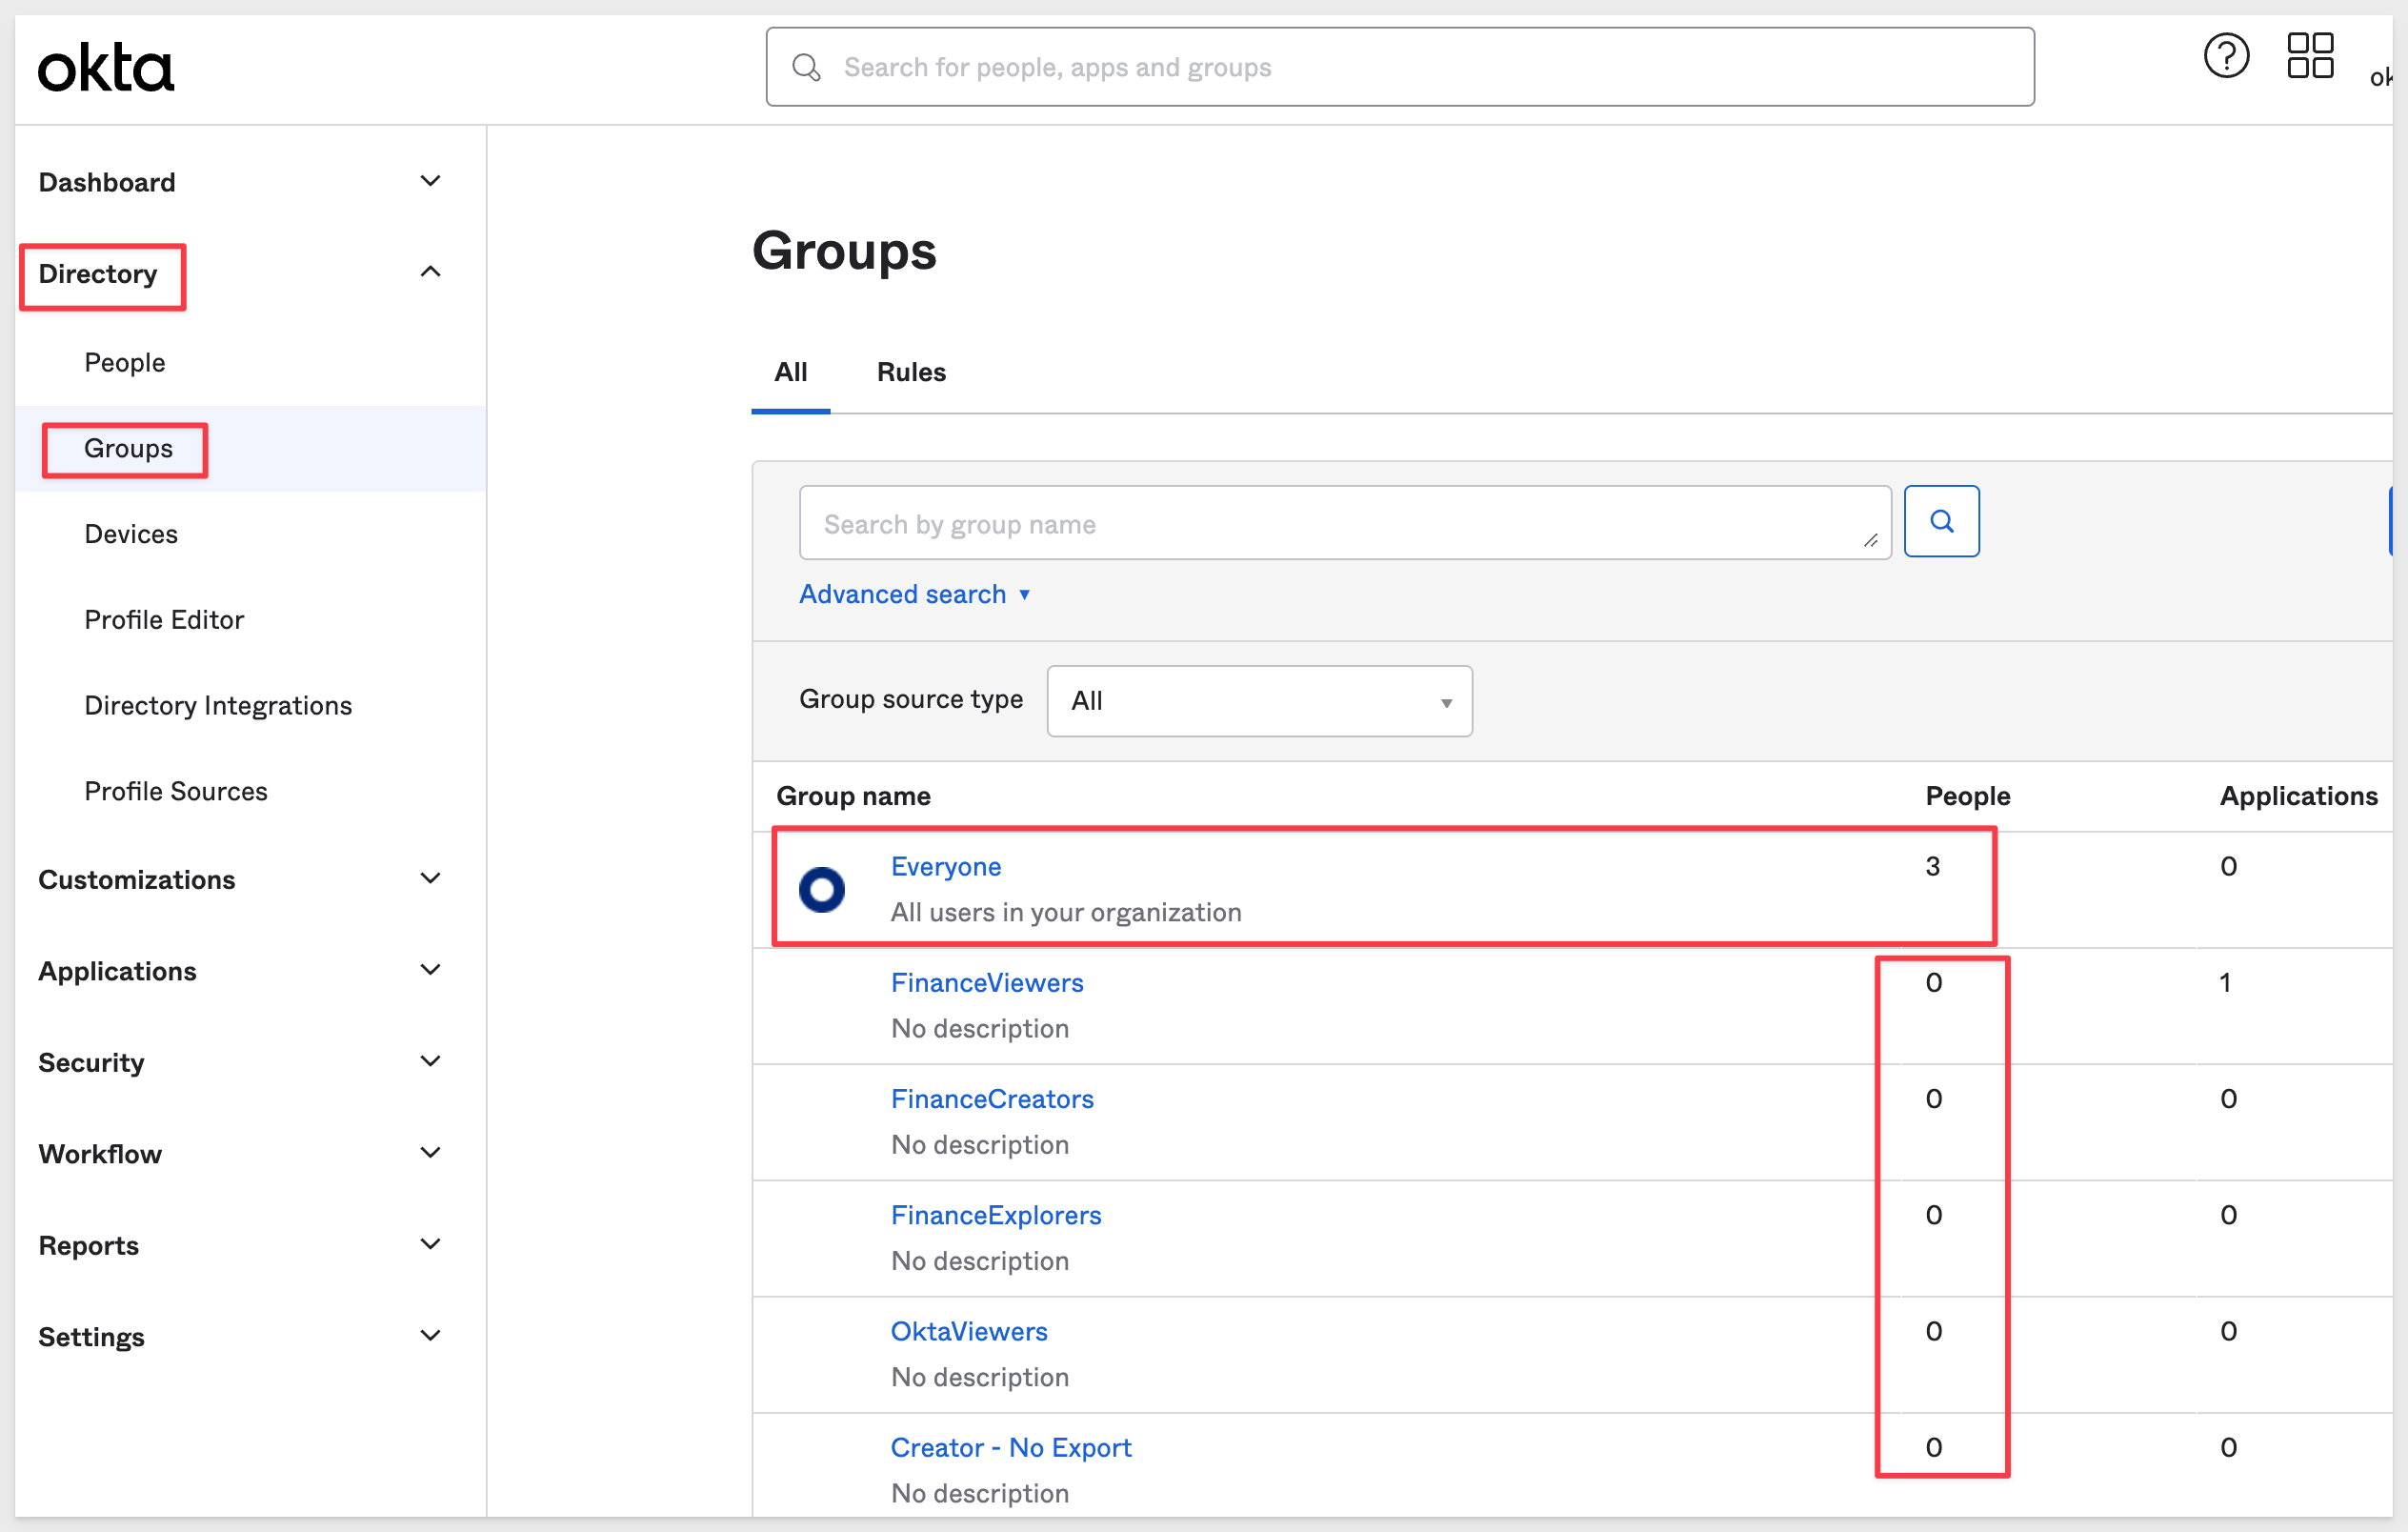
In Okta, navigate to Directory > Groups and click the Add Group button.
You may notice some groups already exist, having been imported from Sigma (in this example, some existed but can be ignored as we will not use them).
The Everyone group is created automatically by Okta. There are three Okta users, but since no application is assigned, these users have no right to login to Sigma. They can however, log into Okta, which is expected since in practice, there would be other business applications being secured by Okta.
There is one application assigned to an existing Sigma Team called FinanceViewers, but no users, so that is also protected from logging in via SSO.
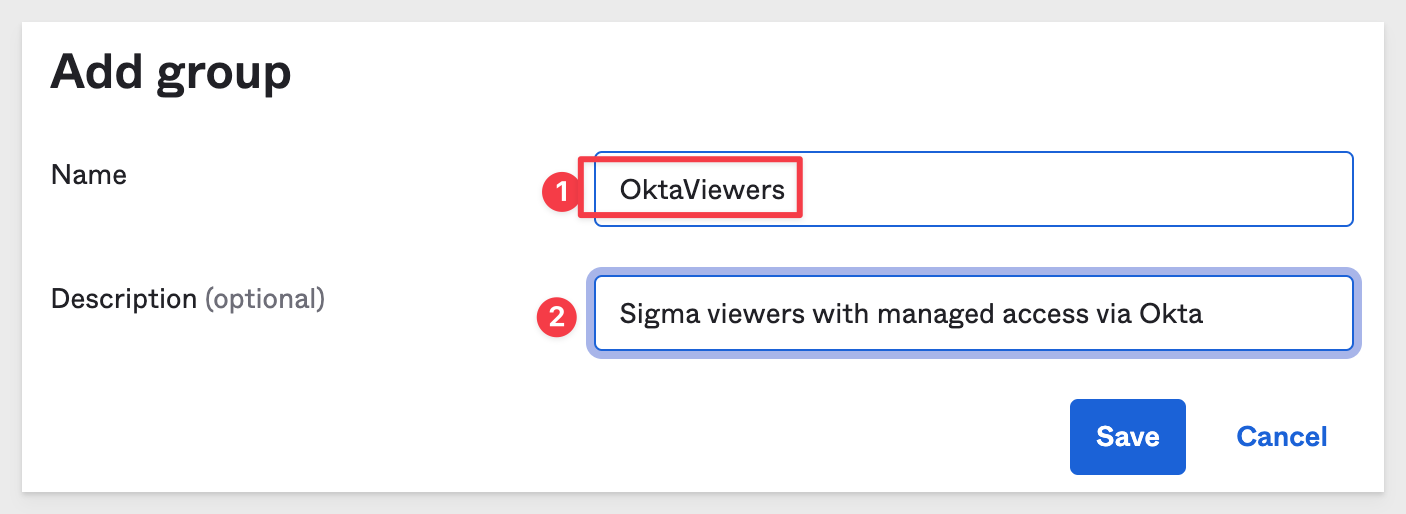
Click Add Group and give it a name OktaViewers and click Save:
We need to assign the Sigma on AWS application to this group. Click onto the new OktaViewers group and click Assign applications.
Click the Assign button in the Sigma on AWS row.
We now need to set the Sigma Account Type this new group will use. We have the three standard Sigma Account Types to choose from.
Select Lite and click Save and Done.
Anyone who is a member of this group will get view access as defined in Sigma > Administration > Account Types > Lite.
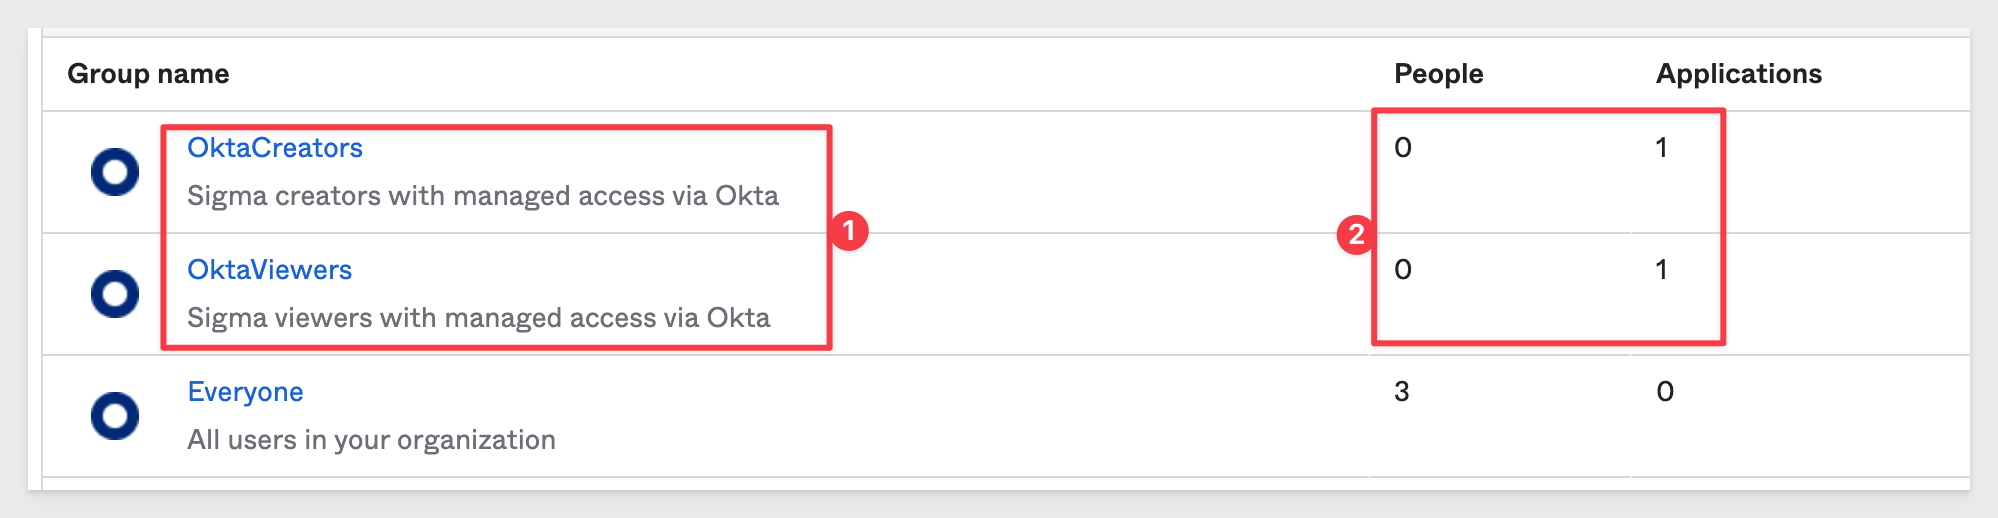
While we are here, let's create another Group for Sigma Essentials Account Type. The workflow is the same, but in the last step, assign the new group the Account Type of Essentials (which maps to Sigma Essentials).
We can call this group OktaCreators.
When done, our Groups list should look this this, with the two new groups each having one application and no users assigned yet:
The last step (and whenever new groups are created) is to push the new group(s) to Sigma.
Navigate to Applications > Applications. We can see that our Sigma Viewer user has an error. This is because we did not push the new groups to Sigma yet (and they are a member of one).
Click the Push Groups tab.
Select Push Groups and Find groups by name.
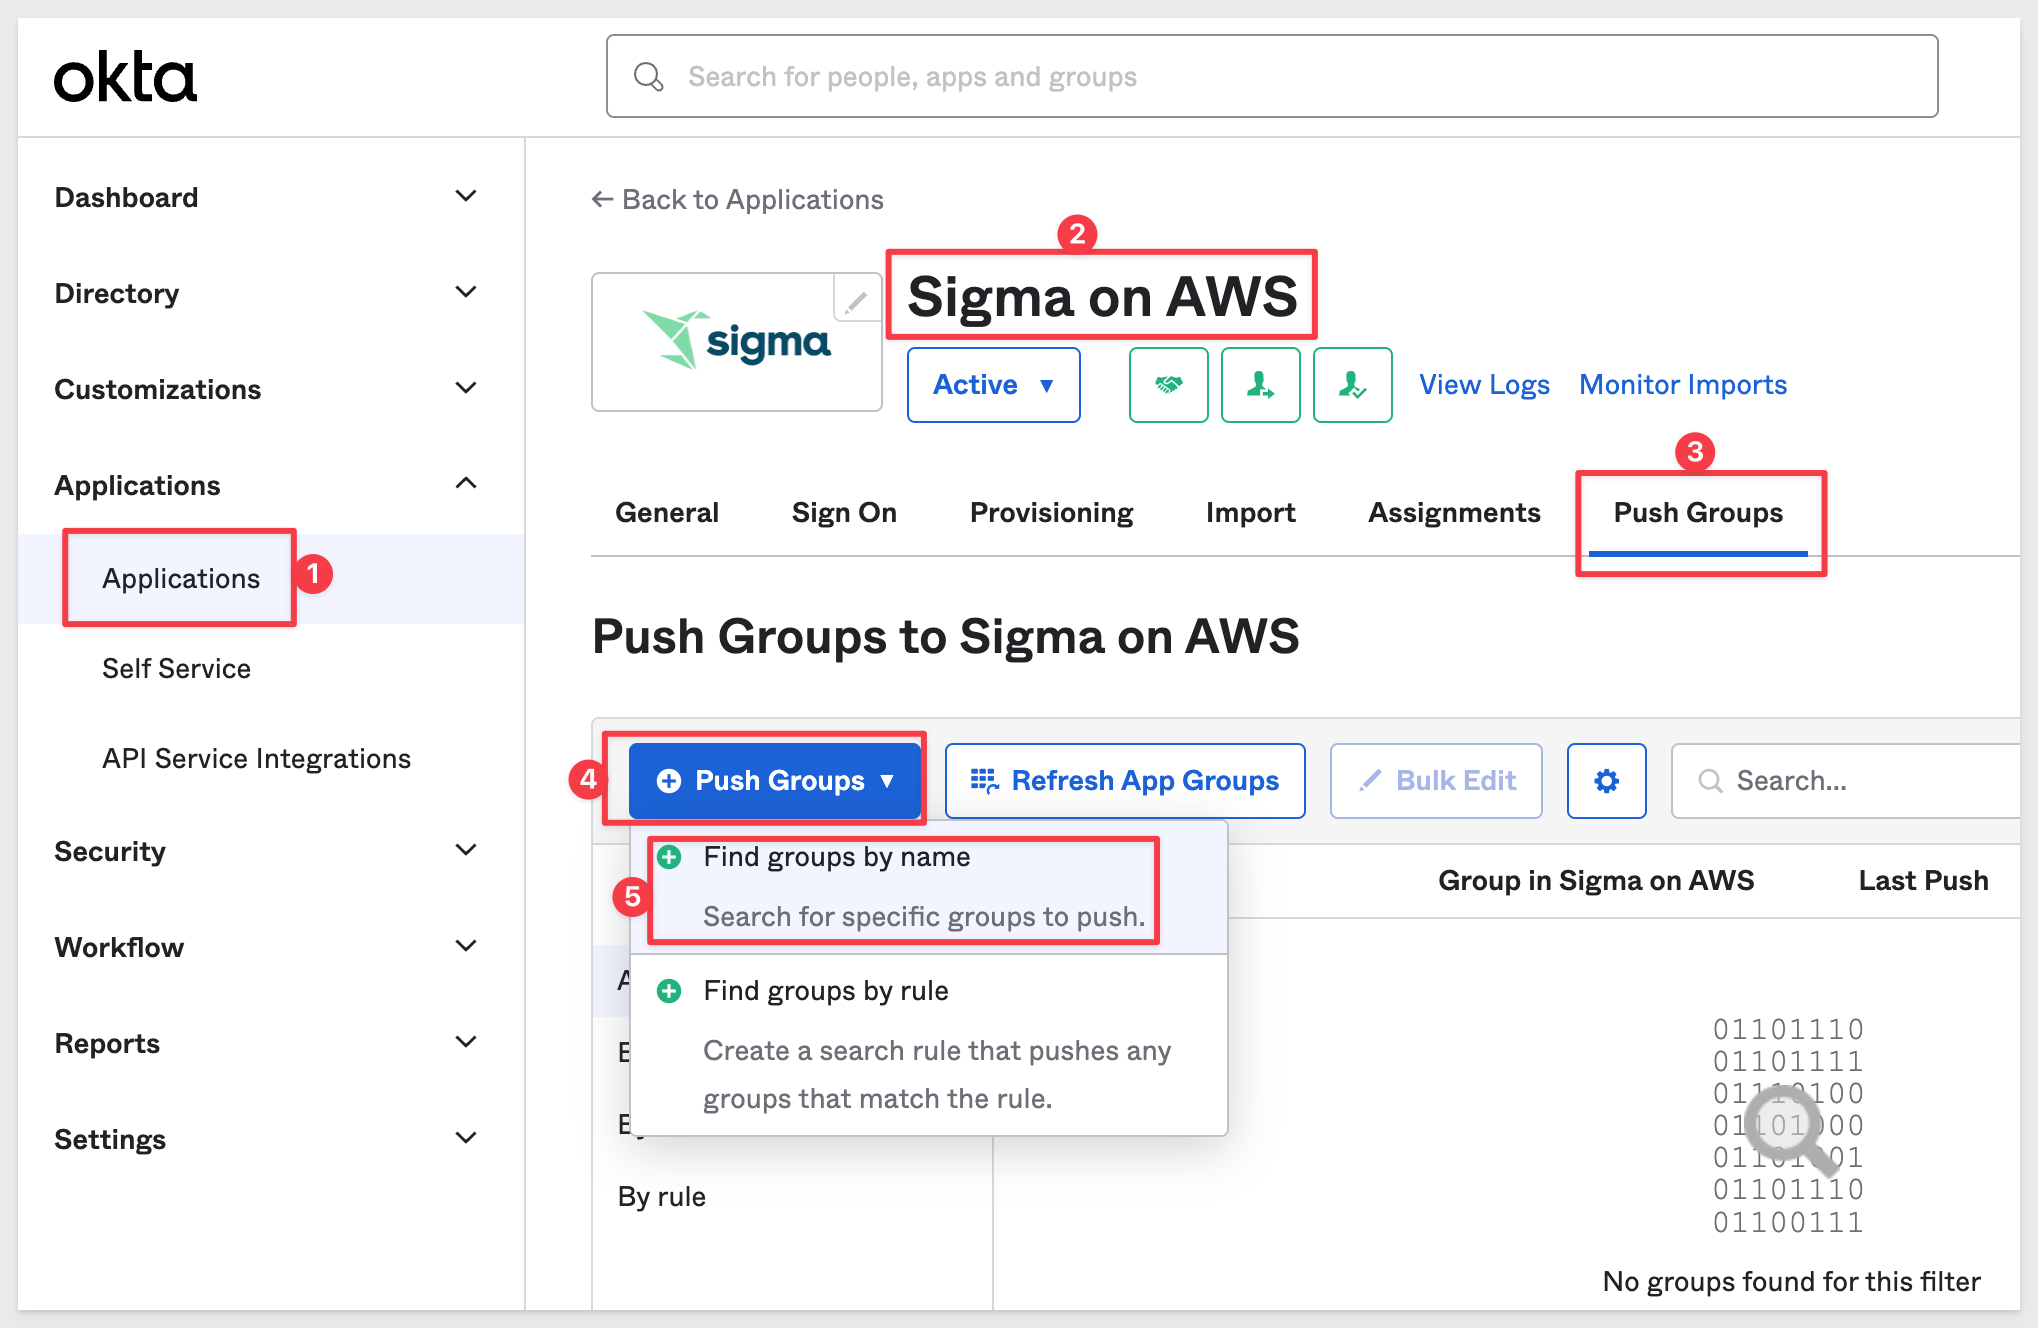
Start typing Ok and click to add the OktaViewers group:
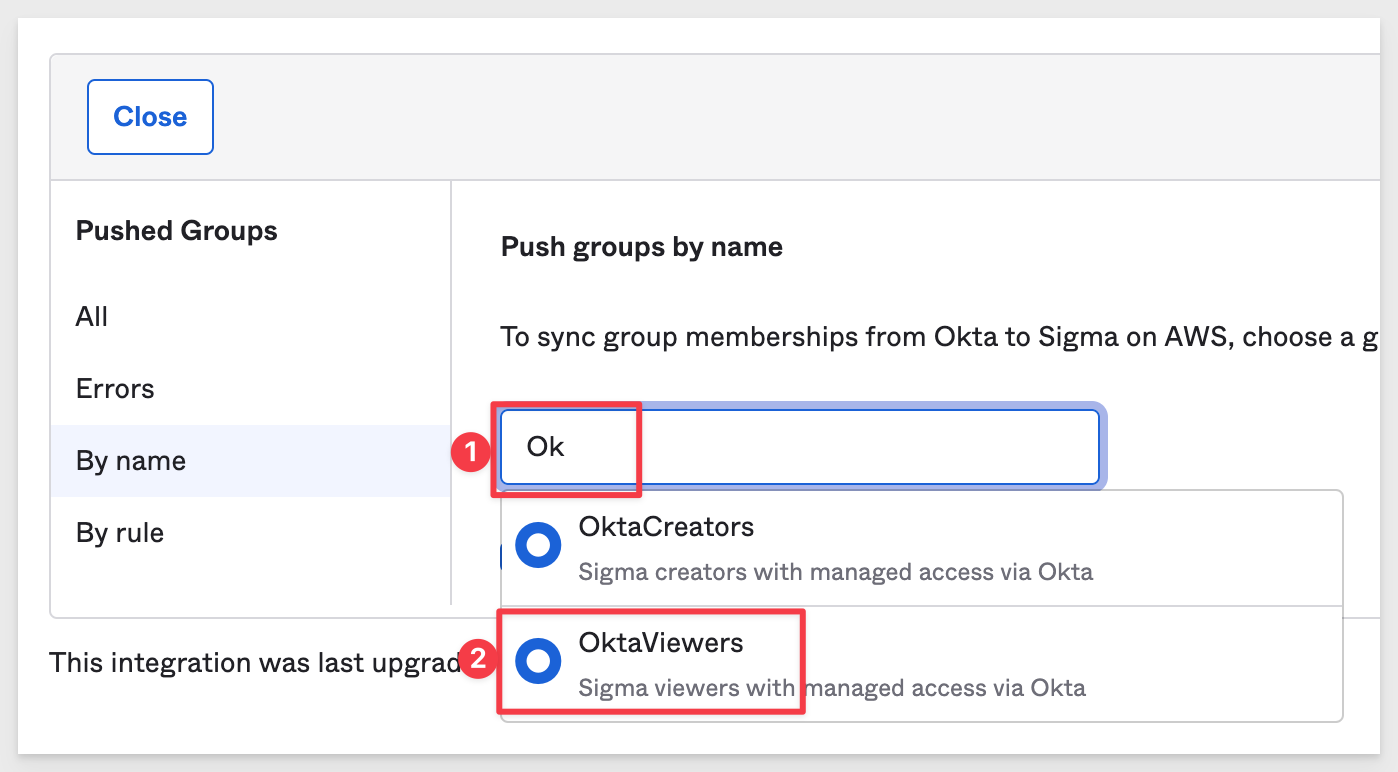
Click Save & Add Another and add the OktaCreators group as well.
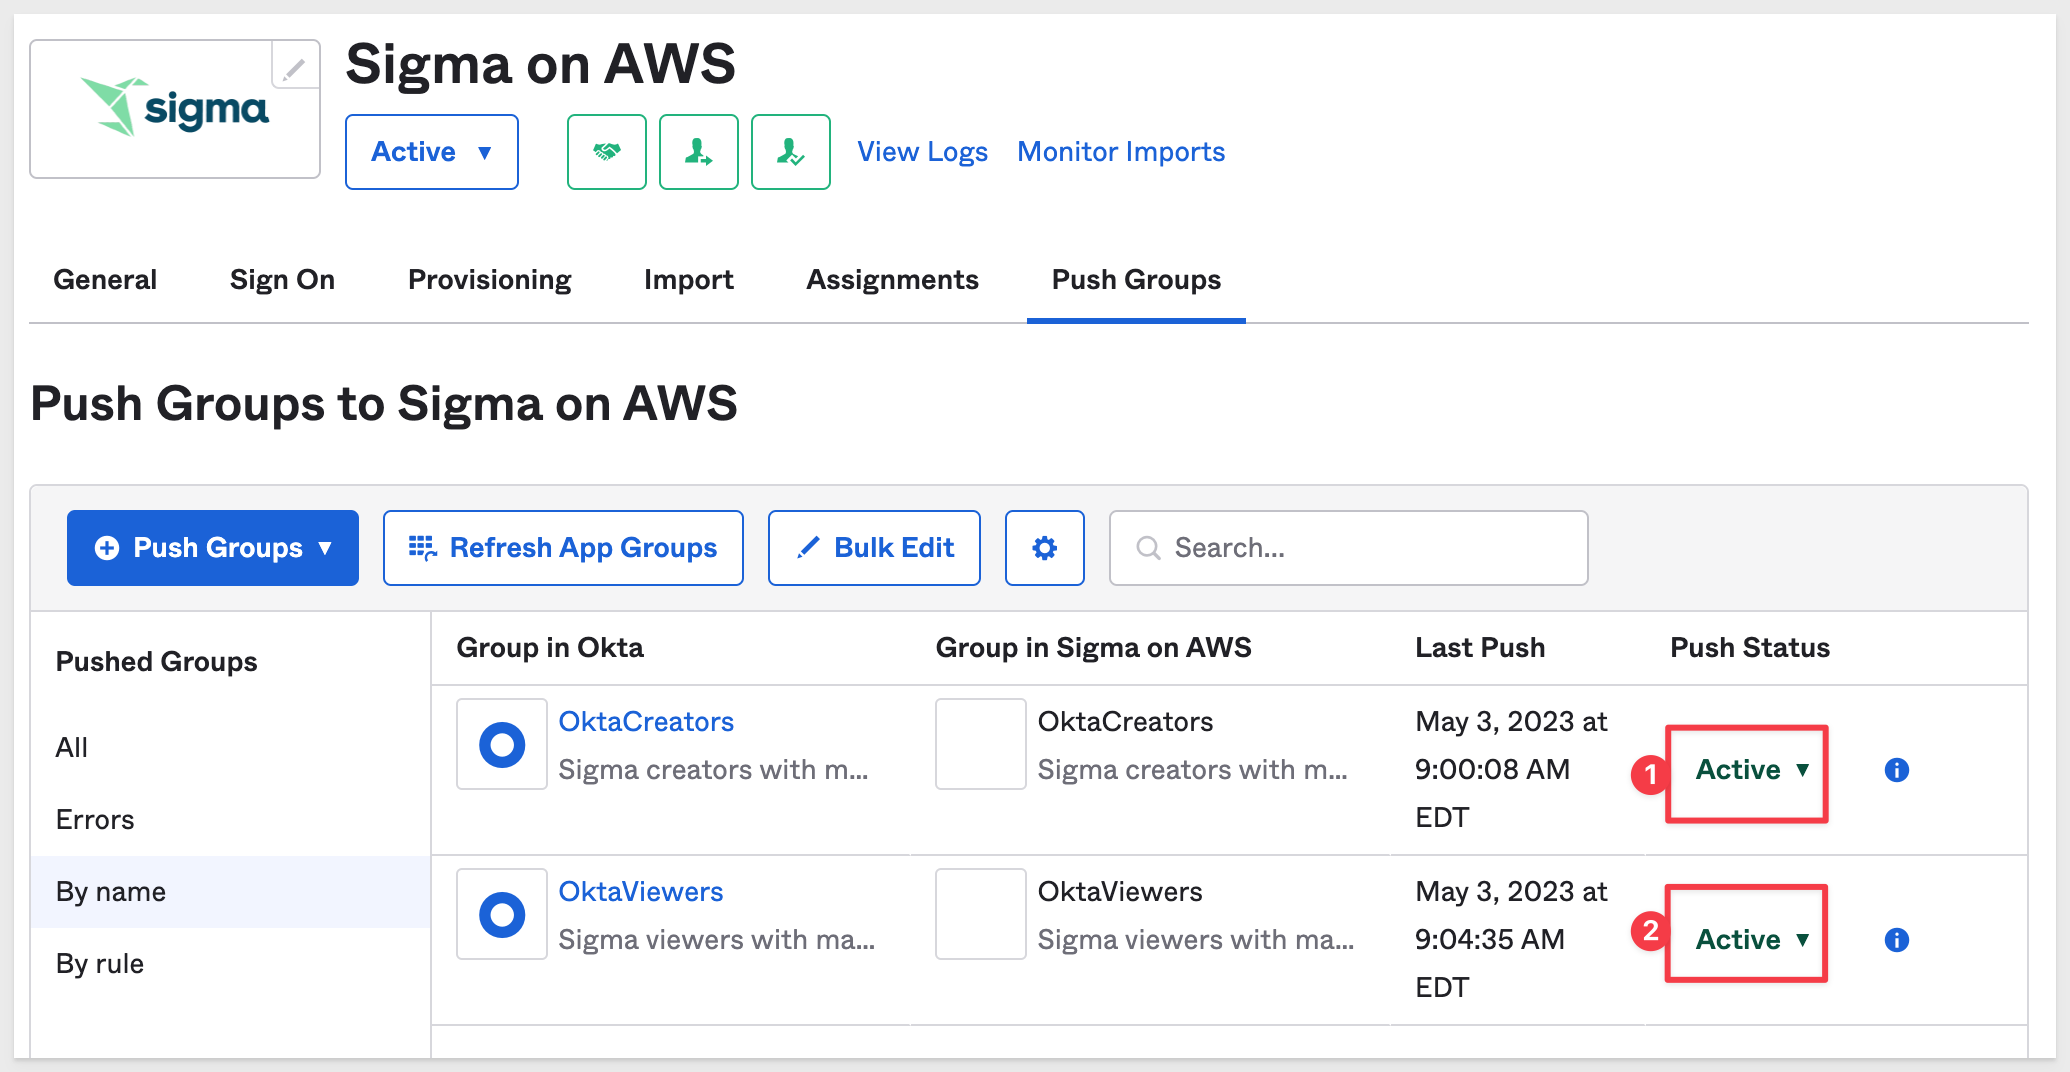
Then click Save. The new groups should show a status as Pushing to Active fairly quickly:
Now we can assign new users to groups in Okta as we create them. These new users can then use SSO to gain access to Sigma and will have the group rights that are afforded to them by Sigma Account Type.
We will make our first new user a Lite user in Sigma.
In Okta, navigate to Directory > People and click the Add Person button:
Configure the new user as shown, tailoring the details to suit the user. Check the box (#2) to set User must change password... on:
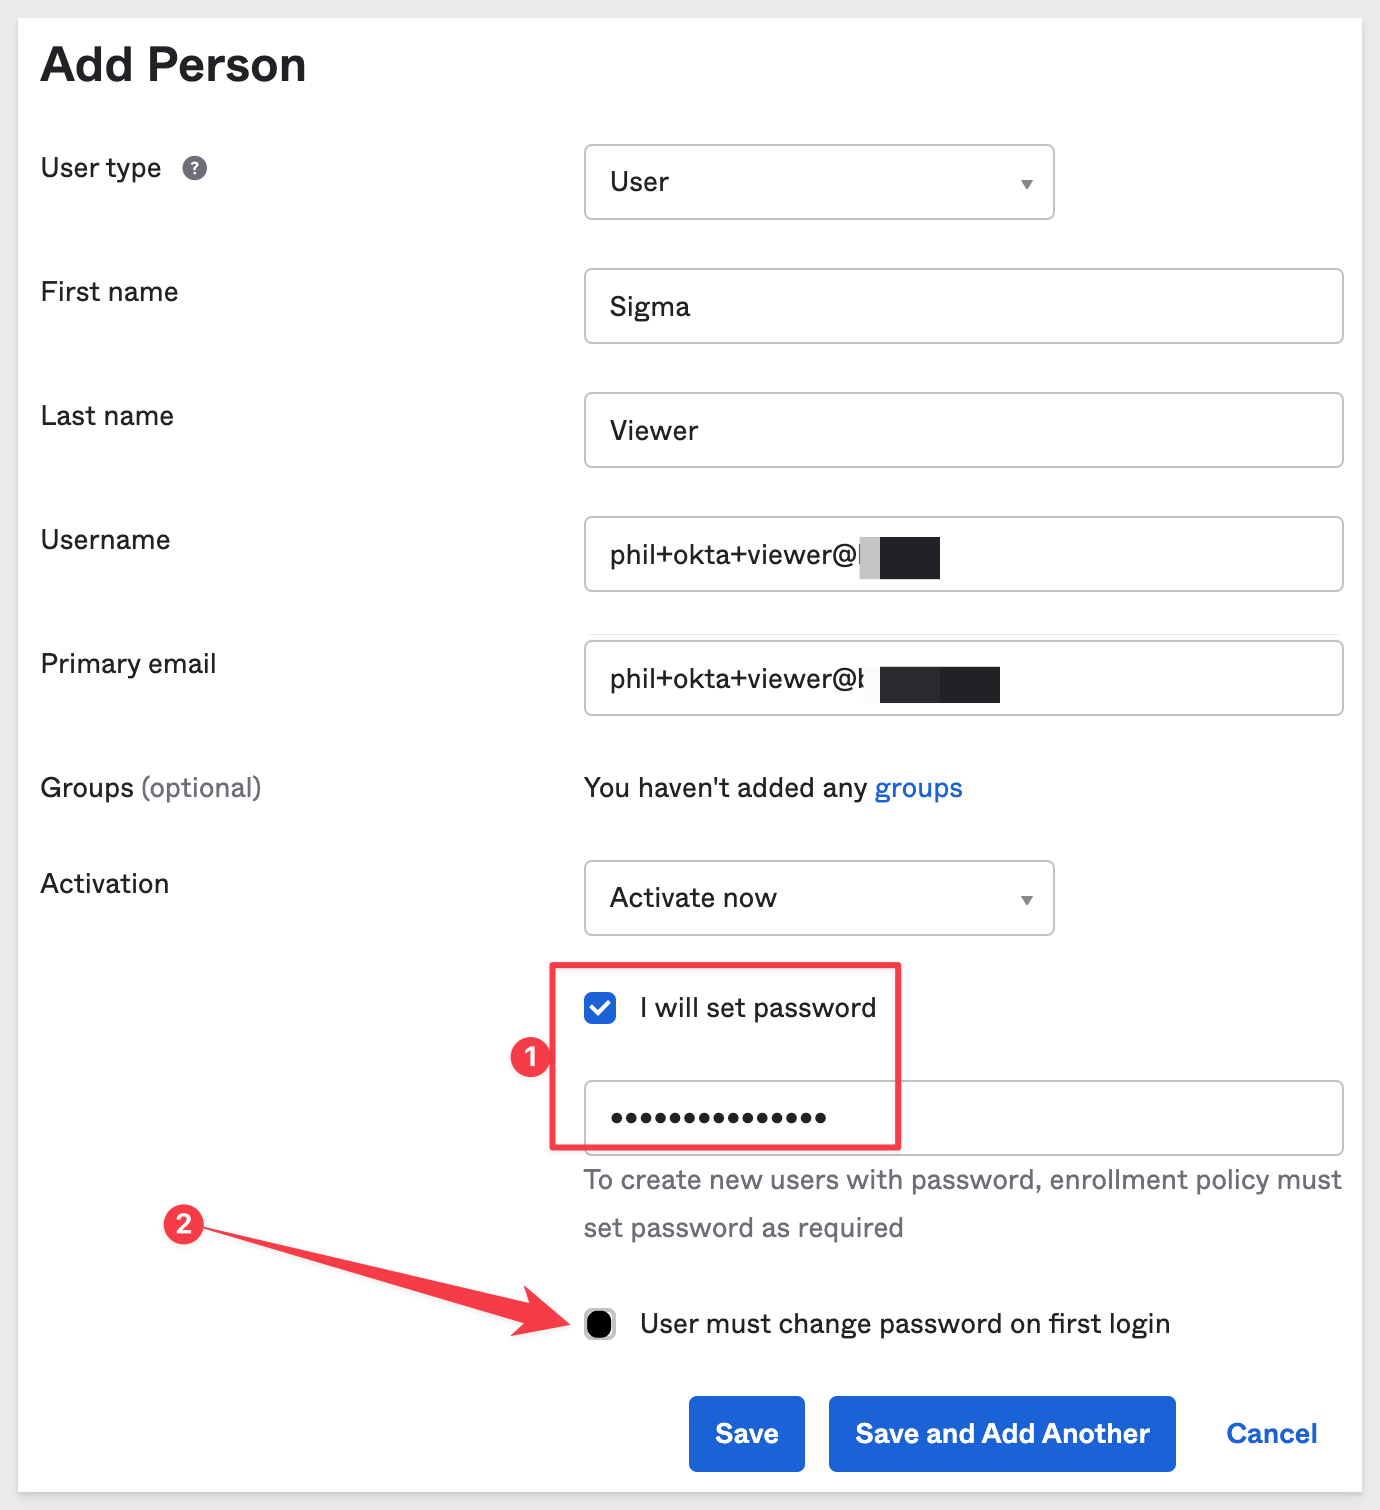
Click Save when done.
Test New User
Open a new incognito Chrome browser and navigate to your Sigma account.
Click Sign in with SSO.
For Username use the email address assigned to the new user created in Okta. Enter the password as well.
Okta will respond with a page asking for a new password. Provide one.
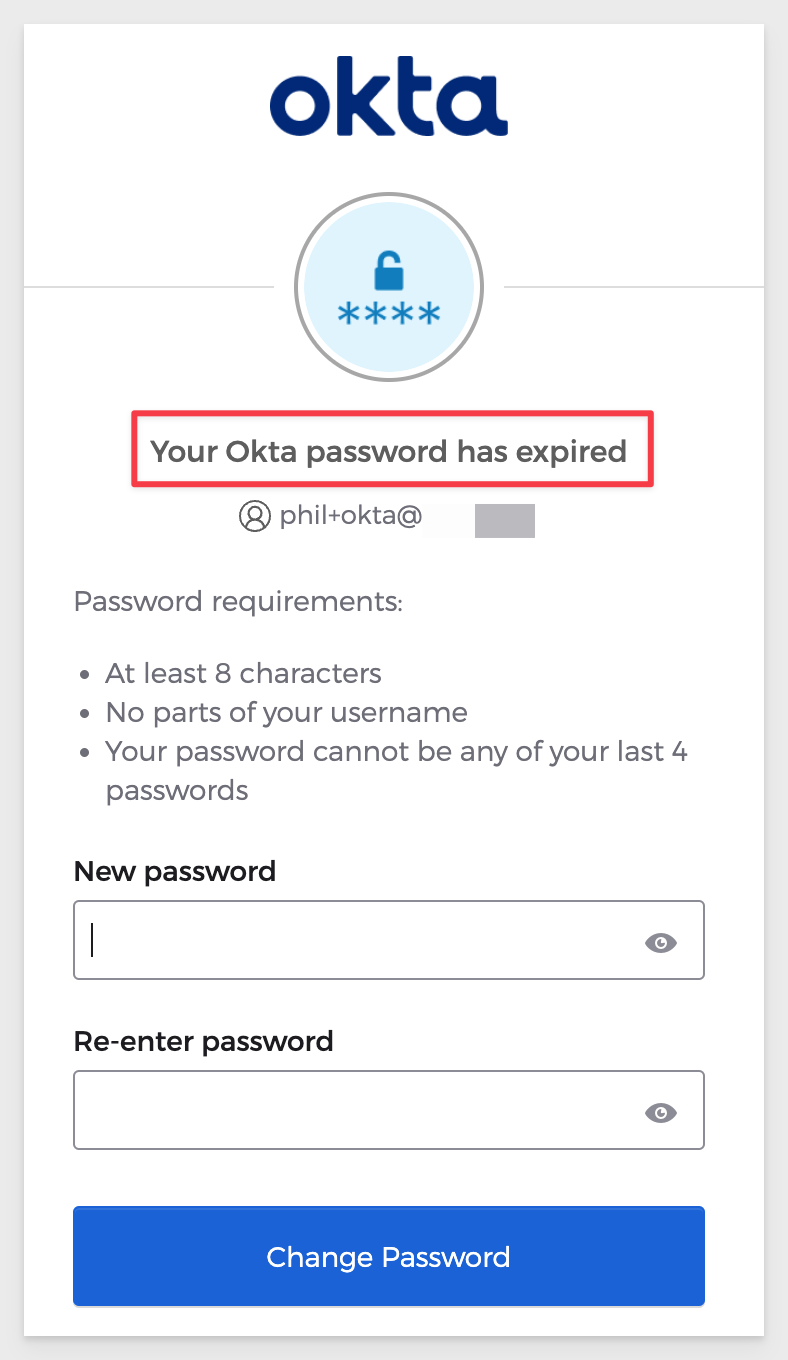
Read more about Okta Sign-on policies
After resetting the password and trying to login again we face another problem:
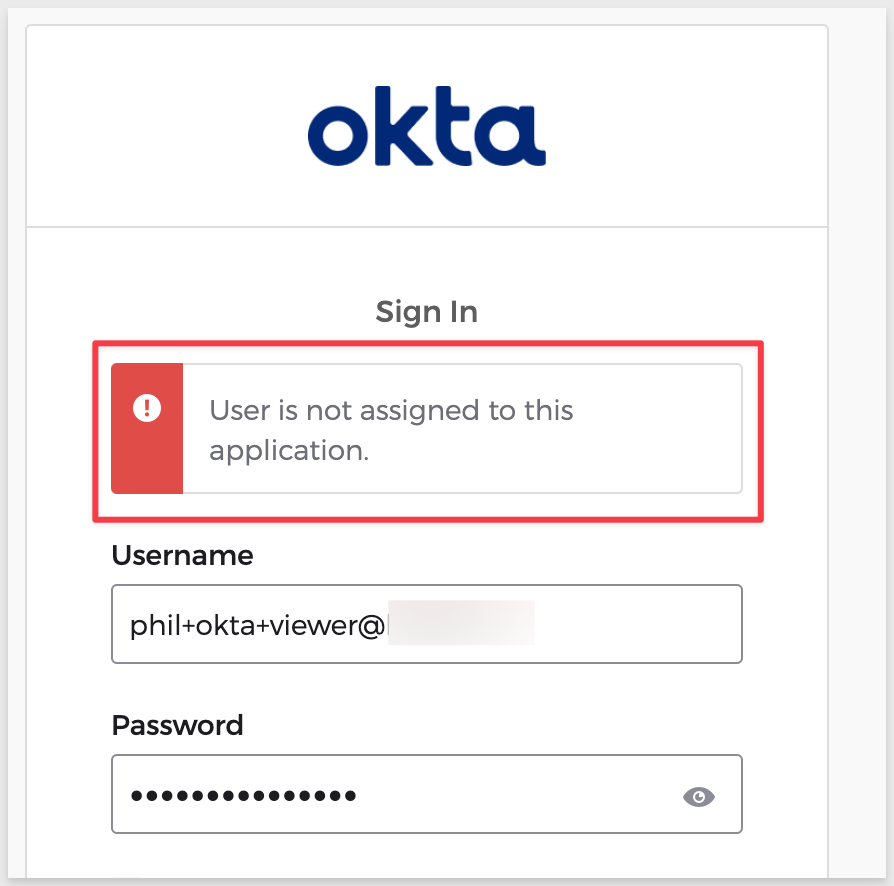
What happened?
In Okta, we created a Group and assigned the Sigma on AWS application to the group but we did not assign this user to the group. Let's do that now.
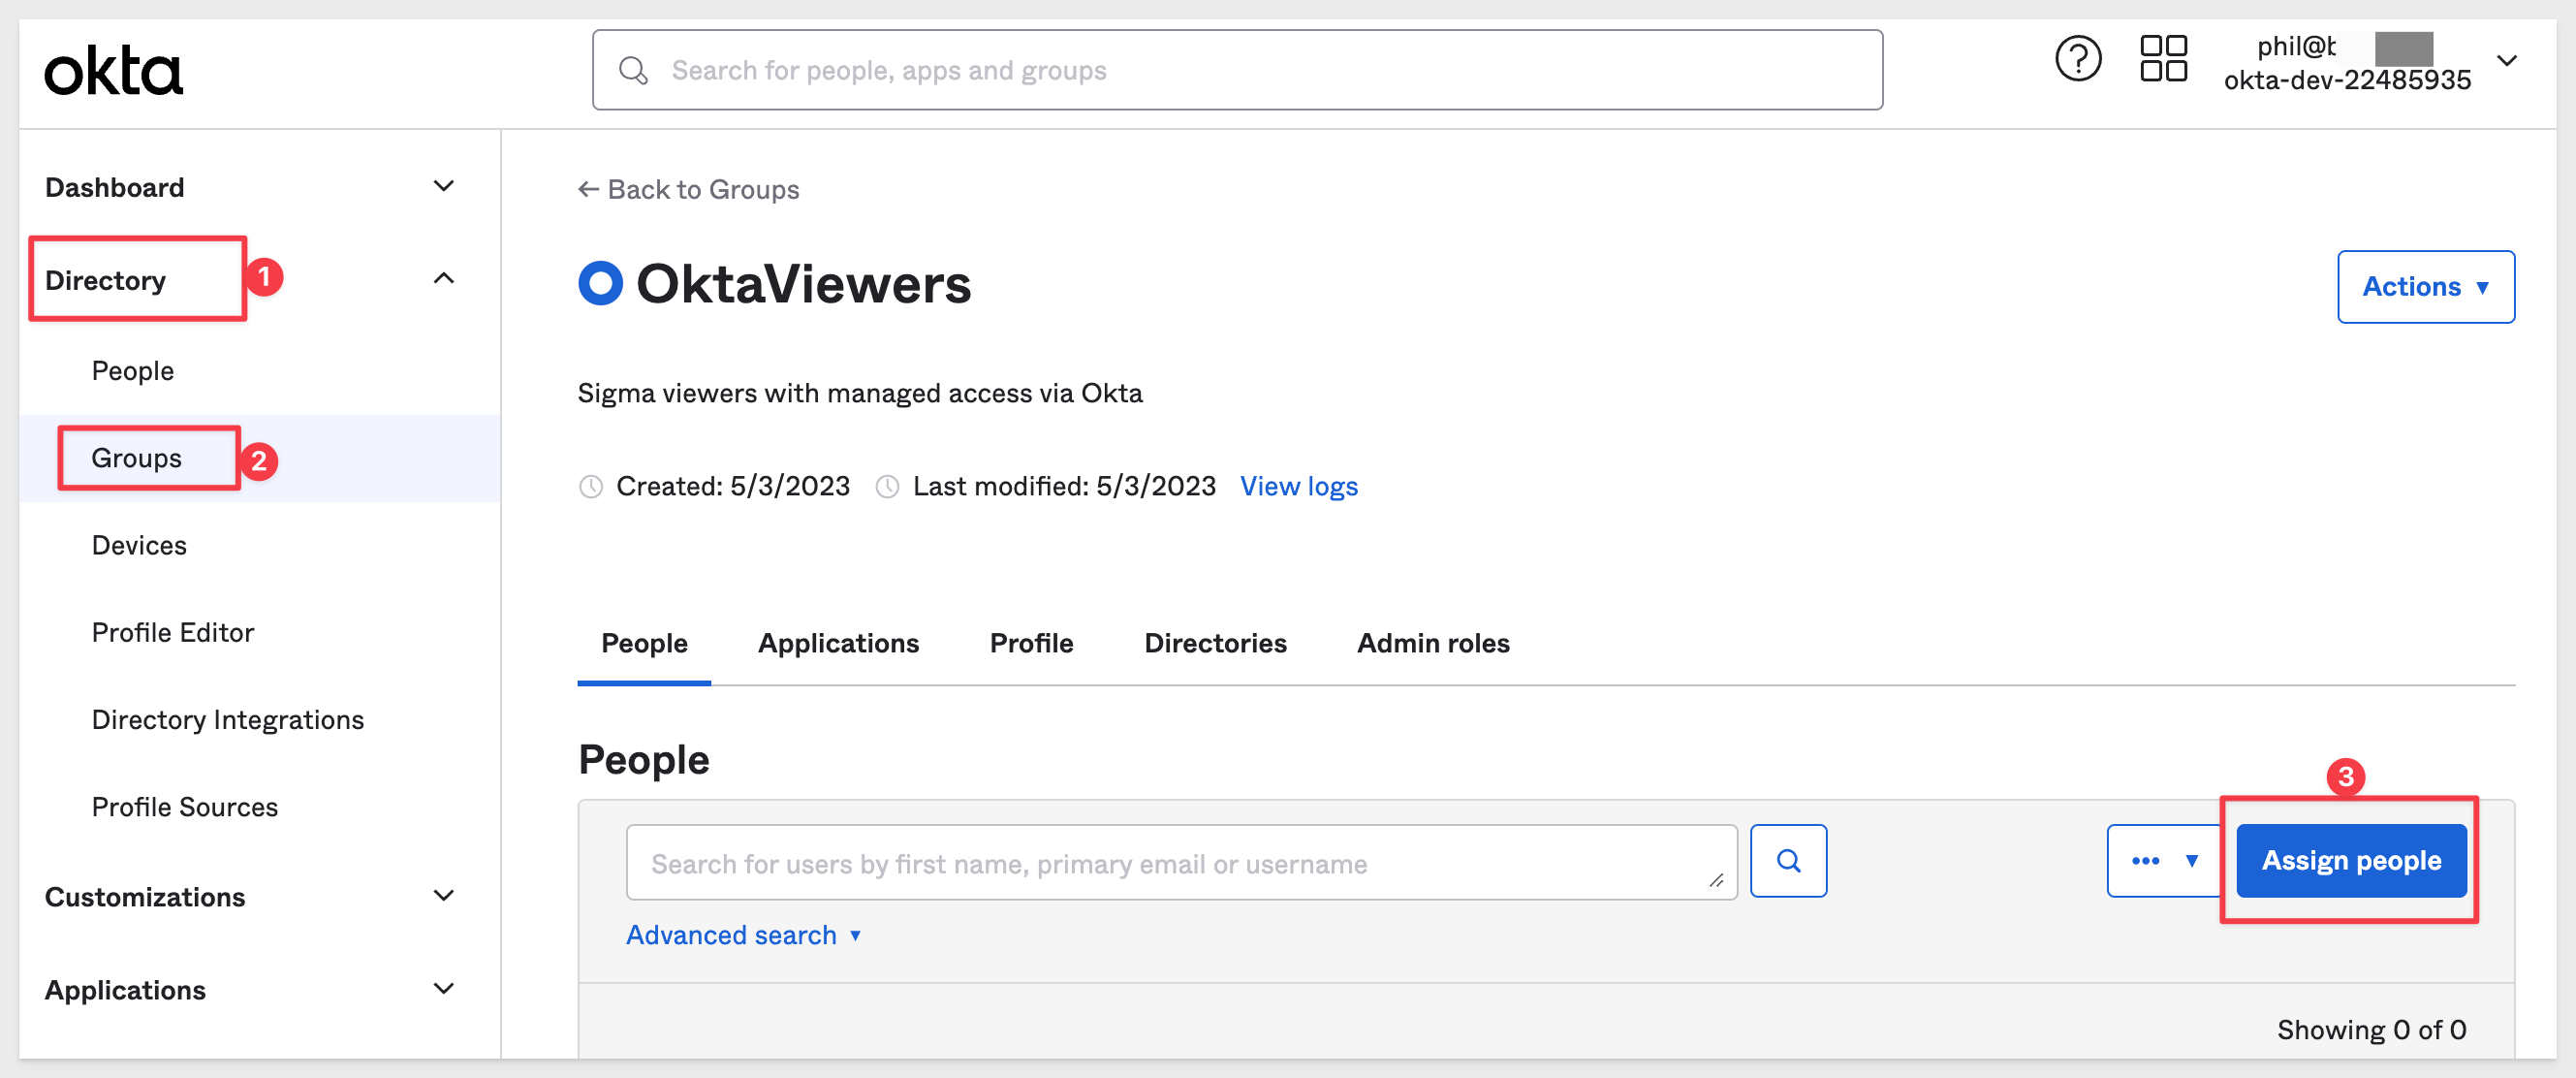
Navigate to Directory > Groups and click into the OktaViewers group we created. Click Assign people:
Select the Sigma Viewer user we created earlier by clicking on the +:
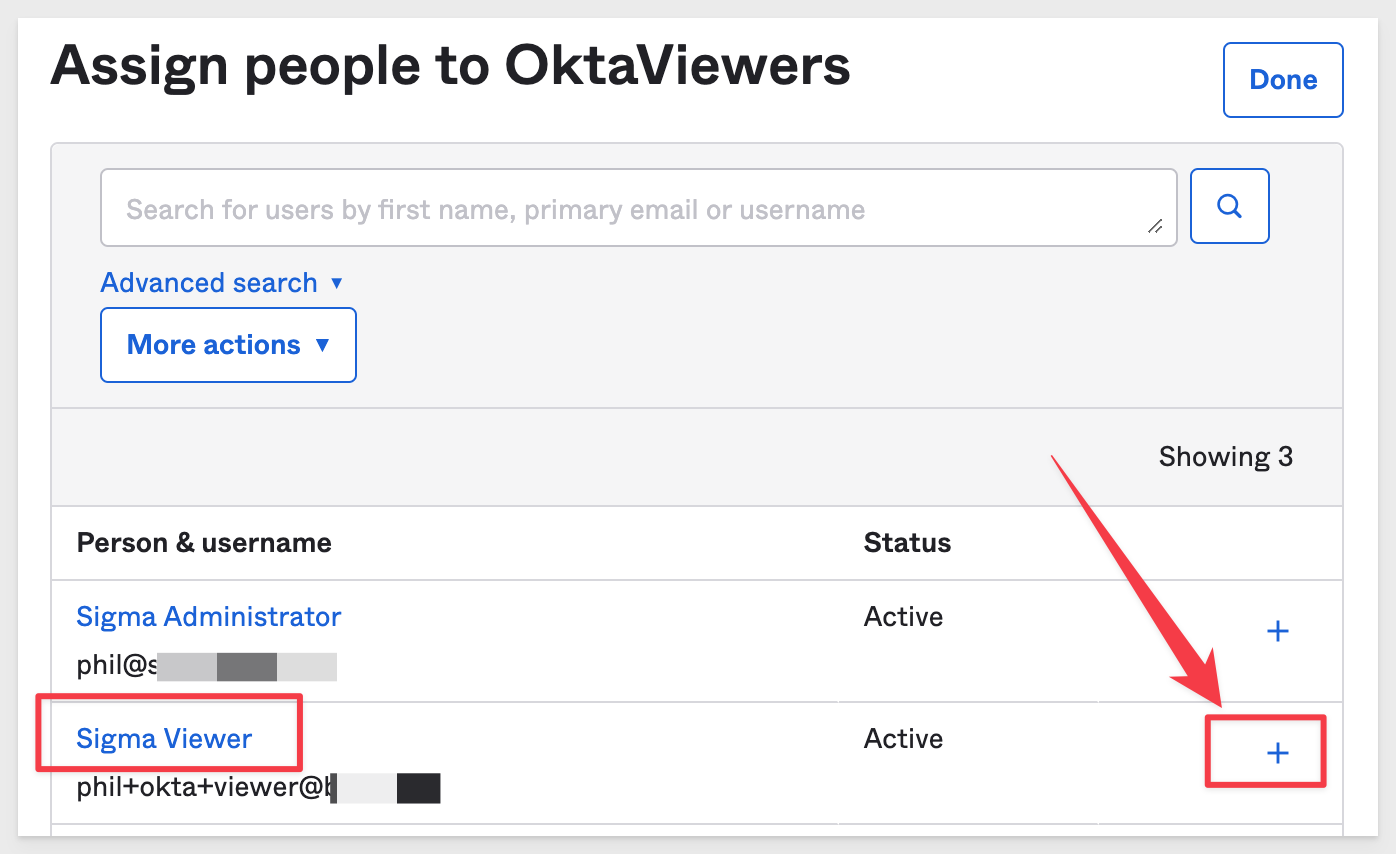
That user is now Assigned with a green checkmark in the list.
We don't need to give the new user permission to use the Sigma on AWS application in Okta. That is implied when we granted the Group access.
After changing password, we can successfully log into the Sigma portal. In the users Profile we have Viewer access and a team membership of OktaViewers:
It is also possible to see the Sigma App in the Okta portal for this user.
The address to login to an Okta developers account is:
https://dev-22485XXX-admin.okta.com/
Replace the "dev-[number]" with your dev account value.
Login to Okta (in another incognito browser window). Use the new user's email and password to login.
The Okta portal should show the Sigma App tile:

Clicking on the tile will take you directly into Sigma, as your user is Okta authenticated already.
It is common for companies to give users access to Sigma, but disallow them the ability to export (download) data for various reasons. This is done by creating an Account Type in Sigma, with exporting restricted, and map an Okta group to it.
Any users who are assigned to this "download restricted" group/team, will not be able to export content.
Let's see how to adjust the user we just created in Okta to grant more rights, but also not allow exports.
Since Okta has no record for a new Account Type we need to add it so we can then assign it to group(s).
Navigate to Directory > Profile Editor. Locate the Attributes section and then User Type. Click the pencil icon:
Click Add another and enter the values as shown:
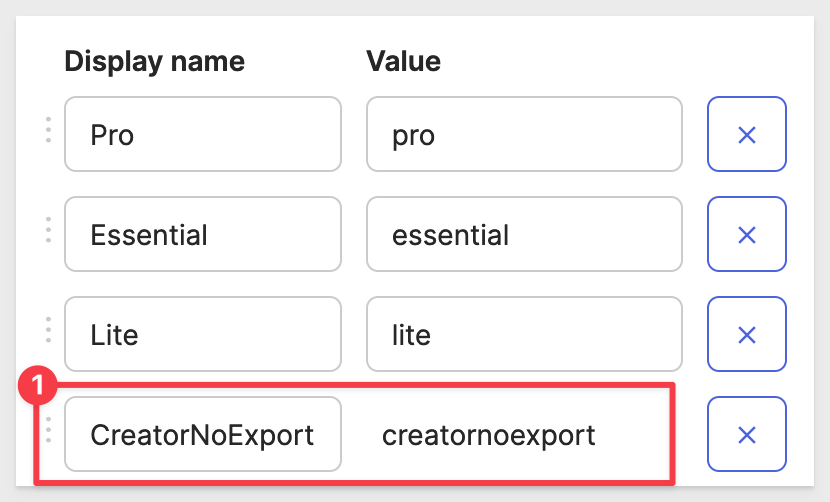
Scroll to the bottom and click Save Attribute.
We will need to create a new Group in Okta (which we will push to Sigma as a Team) so that we can manage the level of access we want users to have.
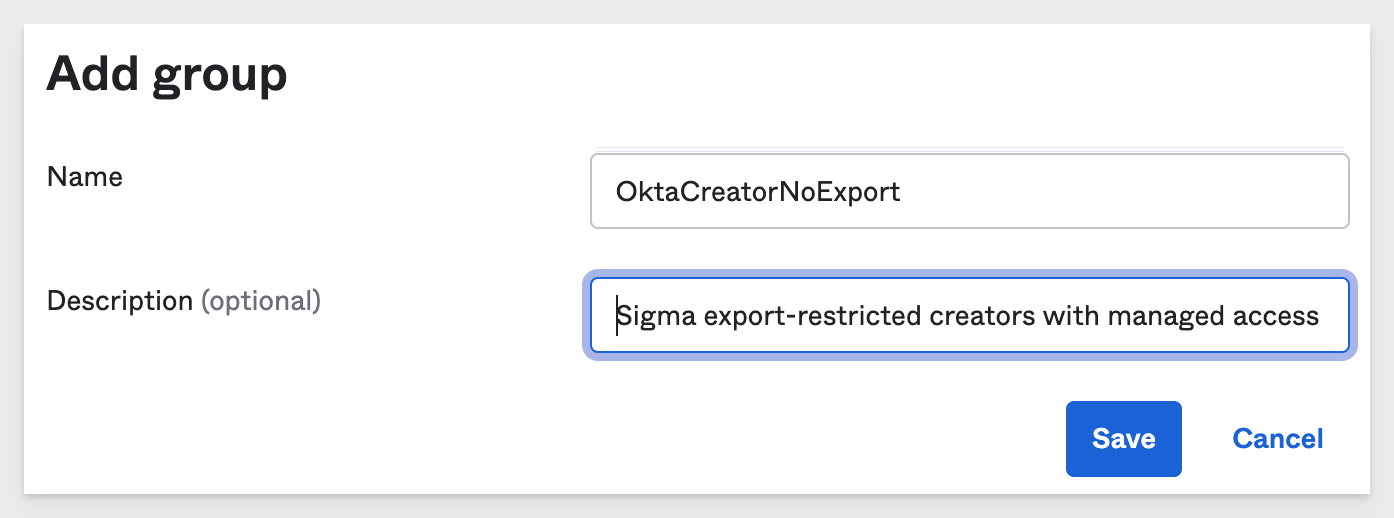
In Okta, Directory > Groups, click Add group:
Give the Group a name and description as shown and click Ok.
We need to assign this new group to the Sigma on AWS application:
Click Save and Go Back and then Done.
The Sigma Viewer user already has Viewer rights in Sigma via Okta group membership in the Okta Viewer group.
Add our test user to the new OktaCreatorNoExport group (using the same workflow we have done previously.)
Since this user is a member of more than one group, we need to make sure that the correct group is used when they log in.
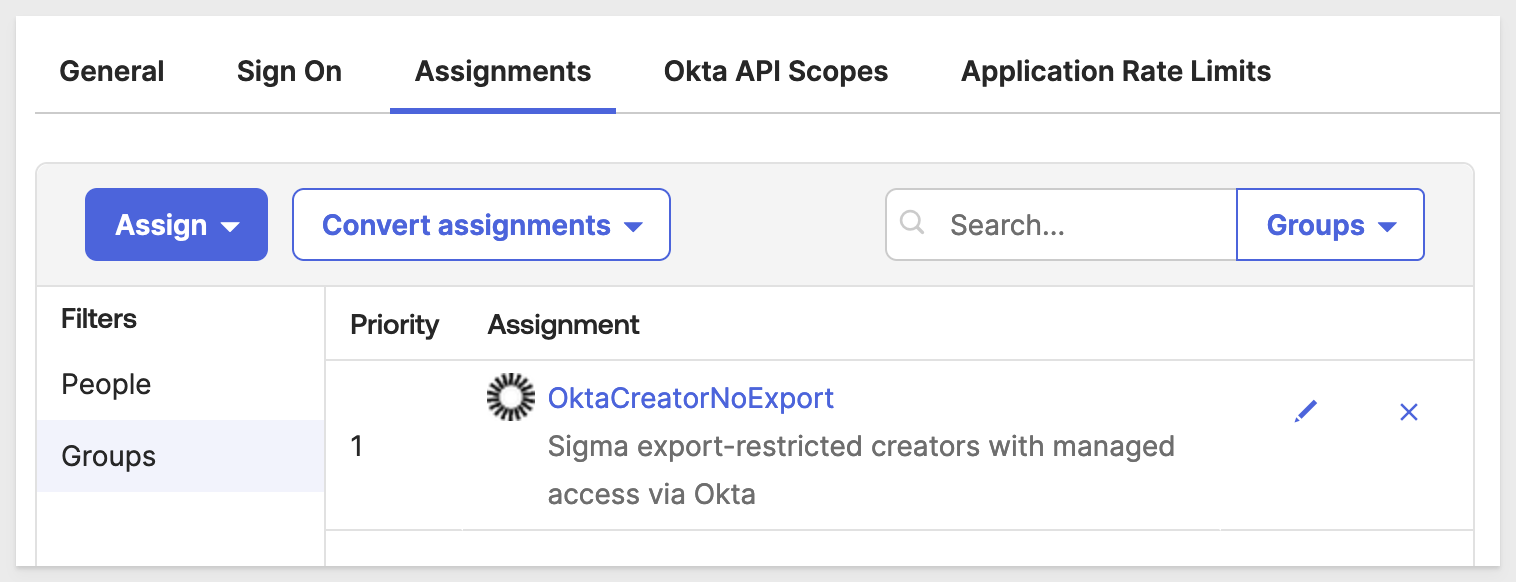
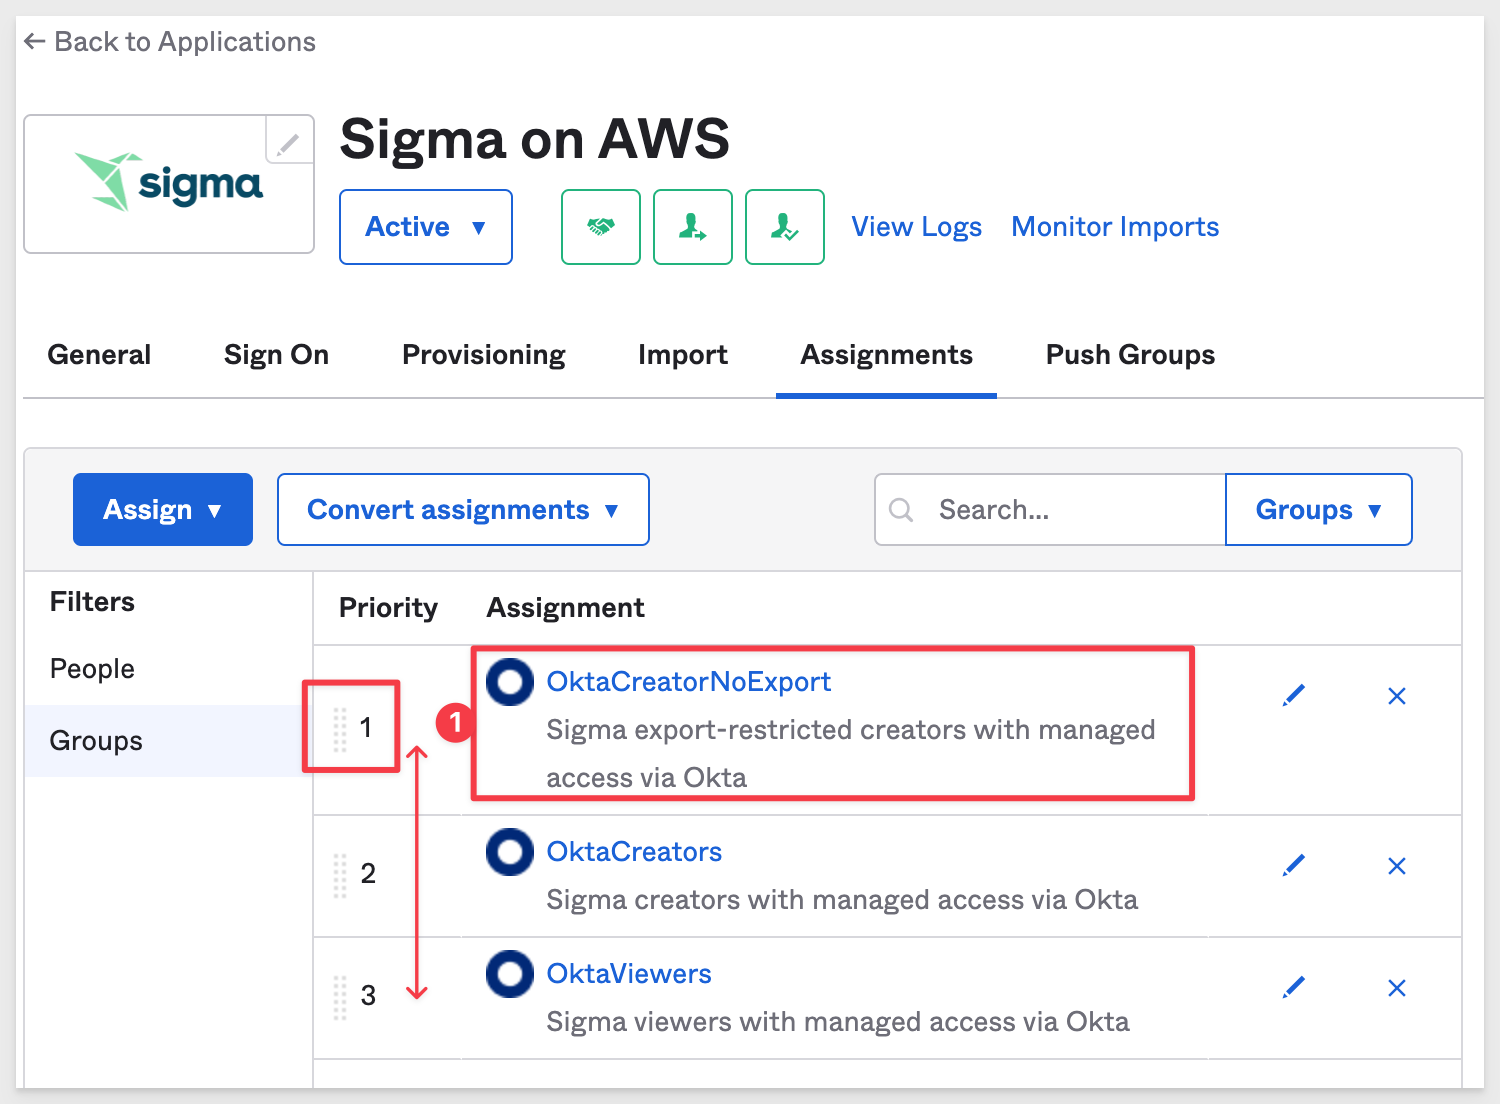
Navigate to the Assignments tab on the Sigma on AWS > Applications page.
Click Groups. Our three custom groups are listed. The first column is the Priority in which they are assigned to a user (if the user is a member) when a user logs in. We want our user to have OktaCreatorNoExport, so click and hold on the drag bar and drag it to the top (#1) position as shown:
Navigate to the Sigma on AWS application, Push Groups tab.
Click + Push Groups and Find groups by name and select the OktaCreatorNoExport group.
Wait for the group to become Active.

Return to Sigma (as Administrator)
Navigate to Administration > Teams. Our Okta Group is listed here.
Let's add a new Account Type. Click on Account Types > and Create New Account Type button:
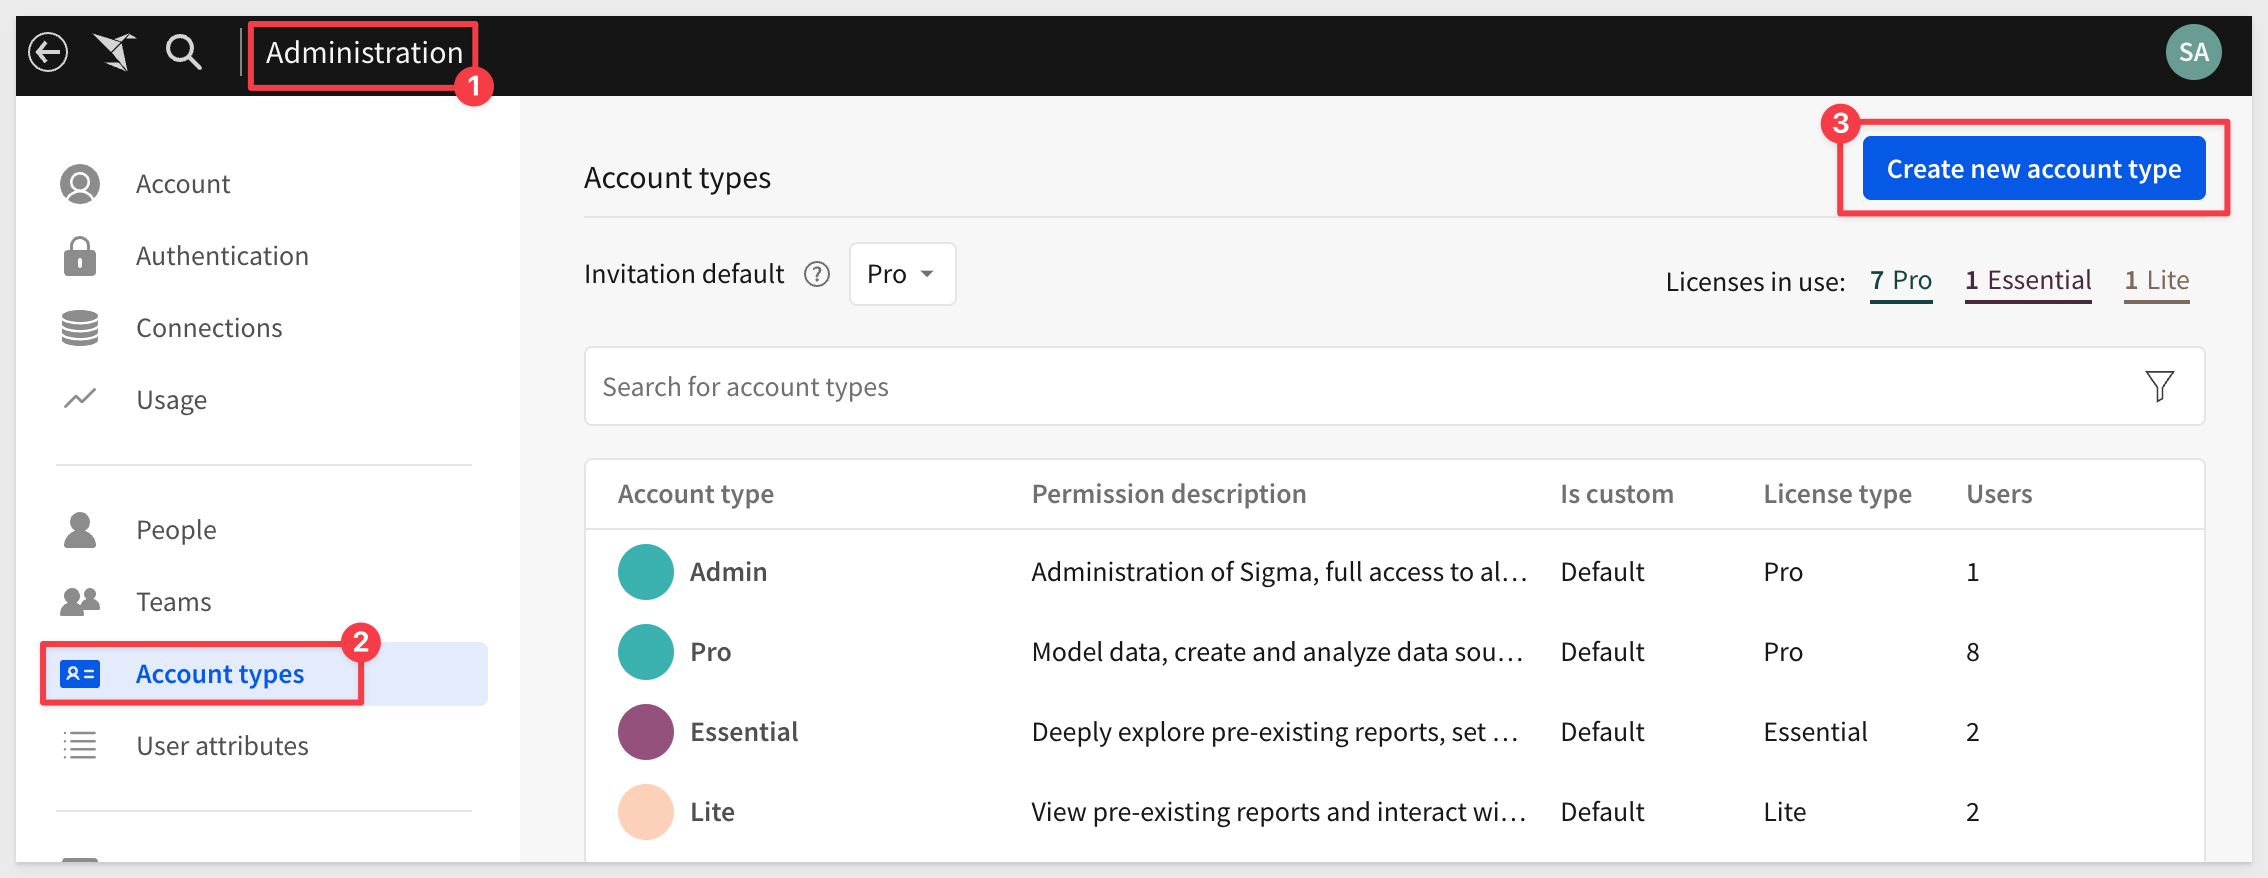
Configure the Account Type as shown. Notice that we are not allowing any Export functionality:
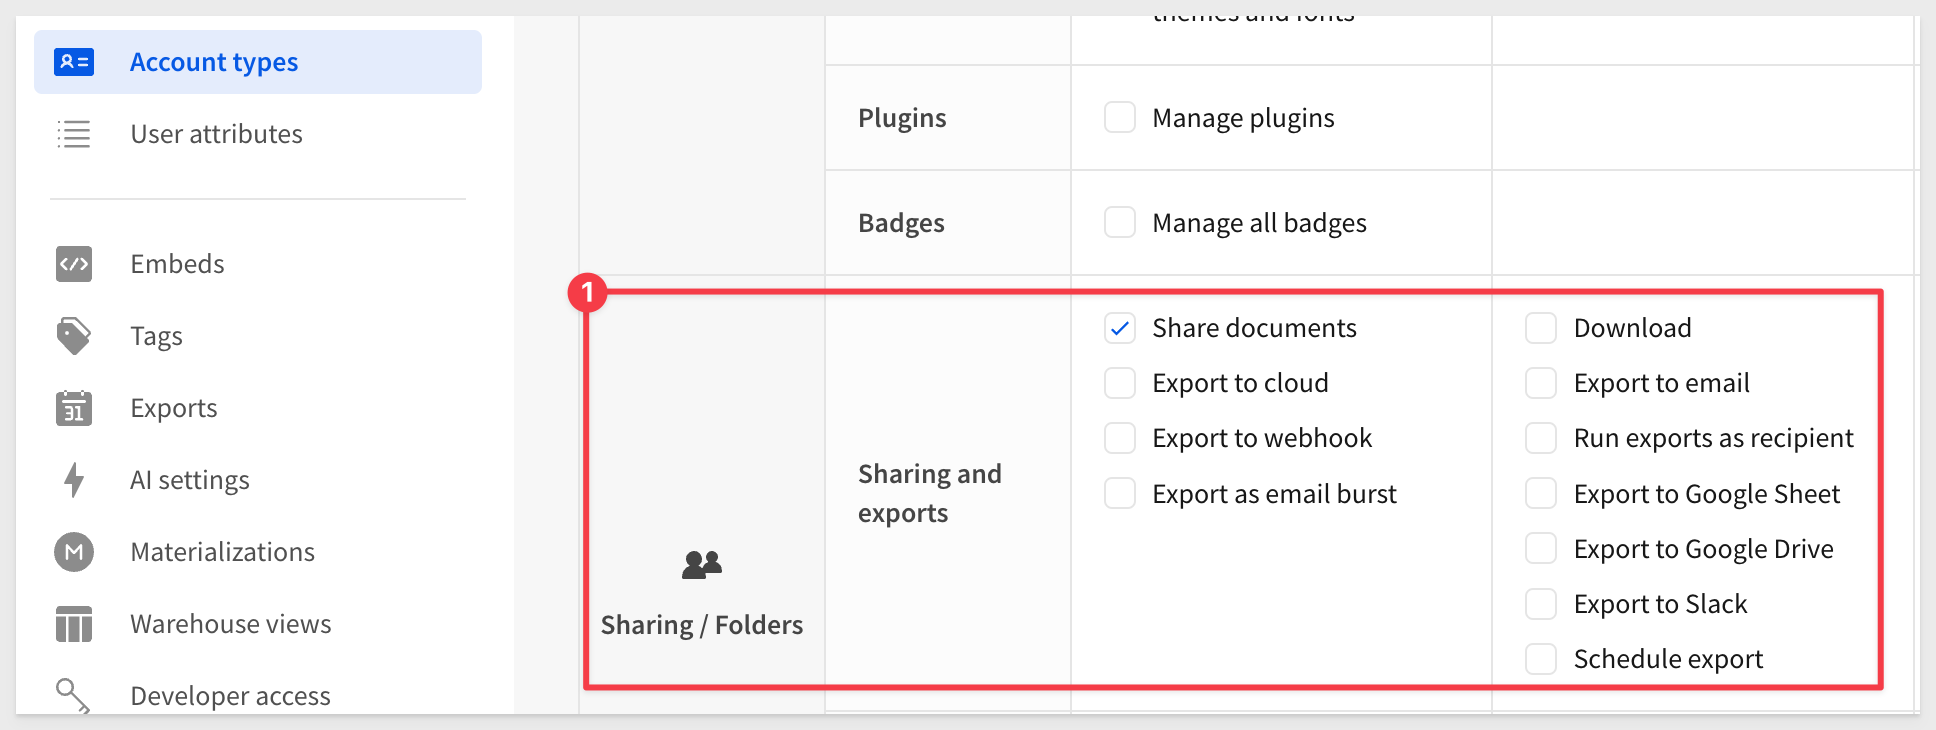
Click Create.
Test New Role in Sigma
Using a new incognito browser, login to Sigma as our test user.
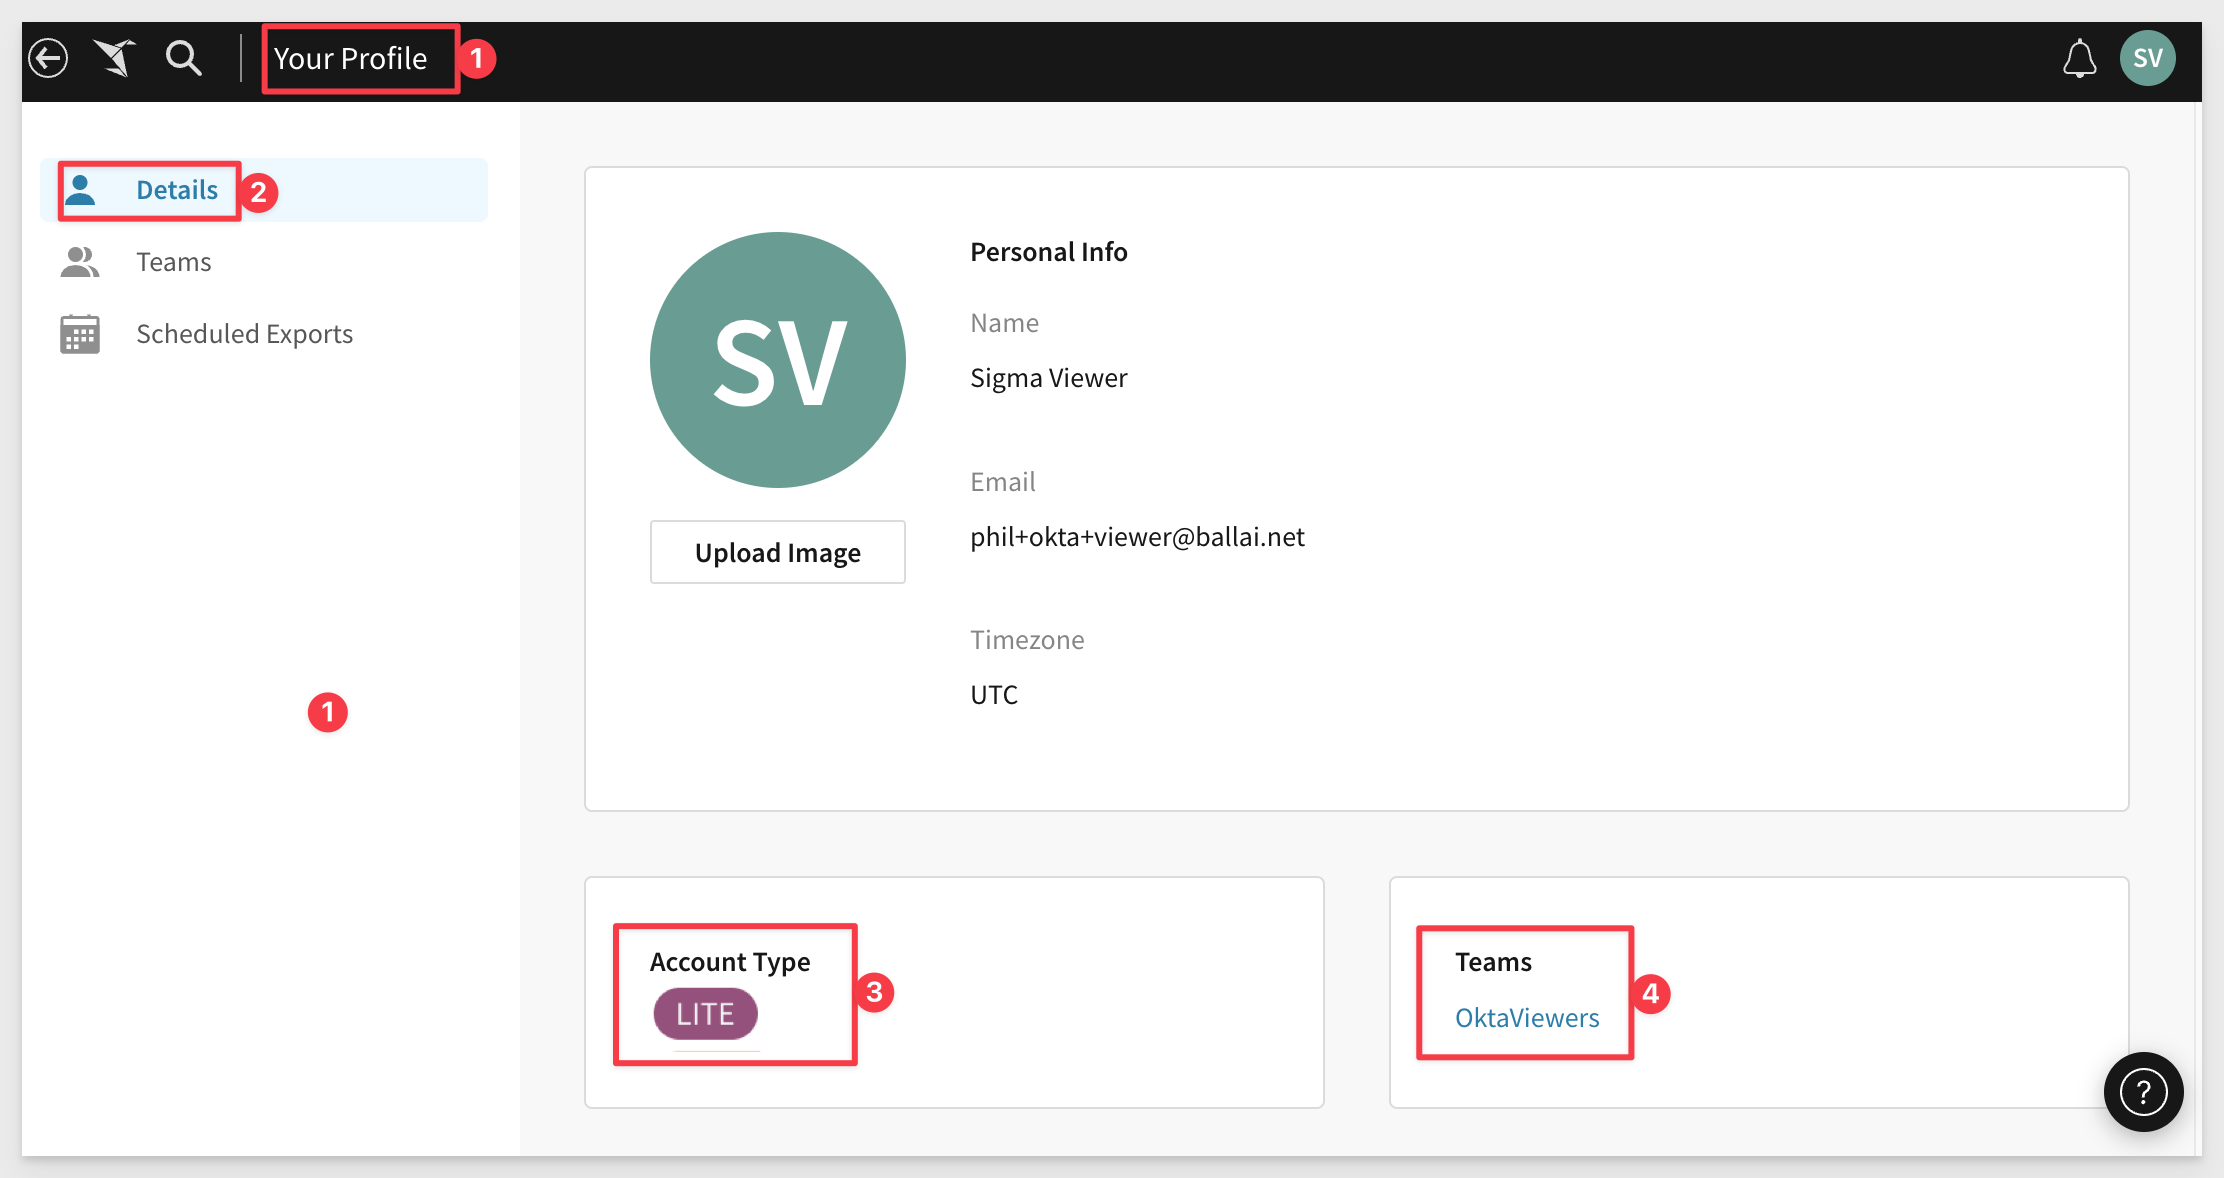
Navigate to User Profile > Details (the icon in the upper-most right corner) and see that this user is a member of both teams now, and has CreateorNoExport. We cannot change this in Sigma as Okta is handling user management operations now.
The Sigma / Okta integration enables many additional capabilities than covered here. We encourage you to explore based on use case needs and curiosity.
A few of them are:
<ol type="n">
  <li><strong>User Roles:</strong> The concept of User Attribute in Sigma is implemented by using Okta userRoles to pass user-specific role information upon login. </li>
  <li><strong>Sigma Audit Logging:</strong> Captures user login events (in addition to Okta logs) for customers who want the extra layer of information.</li>
  <li><strong>Zonal Restrictions:</strong> Prevent users from logging on based on physical location.</li>
  <li><strong>Device Restriction:</strong> Prevent users from logging on based on device operating system.</li>
  <li><strong>Behavior Detection:</strong> Behavior Detection analyzes patterns of user behavior and create profiles of typical patterns based on previous activity.</li>
</ol>
More reading on the extensive features Okta provides is available here
In this lab we learned how to implement and customize Sigma Single-Sign-On using Okta as the identity provider.
Additional Resource Links
Be sure to check out all the latest developments at Sigma's First Friday Feature page!
Help Center Home
Sigma Community
Sigma Blog