Sigma agents can already act on a workbook — setting a control, inserting a row — through the same mechanisms a person uses. Some tasks need more than that: a real calculation or transformation Sigma's native formula language can't express in one step. This QuickStart demonstrates how to give an agent exactly that, by wiring a Python element in as a callable tool.
We'll build a small parsing tool that turns messy, inconsistently formatted text into structured fields — first as a plain workbook feature anyone can click, then as something an agent can call itself, across several notes in one request.
Along the way you'll learn how to:
- Build a Python element that parses free text with multiple fallback patterns, not just one
- Wire that element to a button, so it works as a standalone tool before any agent touches it
- Attach the same element to an agent as a callable action
- Test a capability the button alone can't demonstrate: checking several notes in a single request and reporting on all of them
For more information on Sigma's product release strategy, see Sigma product releases
If something doesn't work as expected, here's how to contact Sigma support
Target Audience
Sigma workbook authors and admins who want an agent to run a calculation or transformation Sigma's native formulas can't express — not just answer questions or act through a control or table.
For the fundamentals of building and configuring a Sigma agent, see Agents 01: Building Your First Sigma Agent — but this QuickStart includes everything you need to follow along on its own.
Prerequisites
- Any modern browser is acceptable.
- Access to your Sigma environment with permission to create and manage agents, and to create input tables.
- Admin access to a Snowflake connection with Python enabled, and Snowflake privileges to grant
CREATE PROCEDUREon a write-back schema. See Set up a Snowflake connection for Python for the full setup — this QuickStart assumes it's already done. - Some familiarity with Sigma is assumed. Not all steps will be shown, as the basics are assumed to be understood.
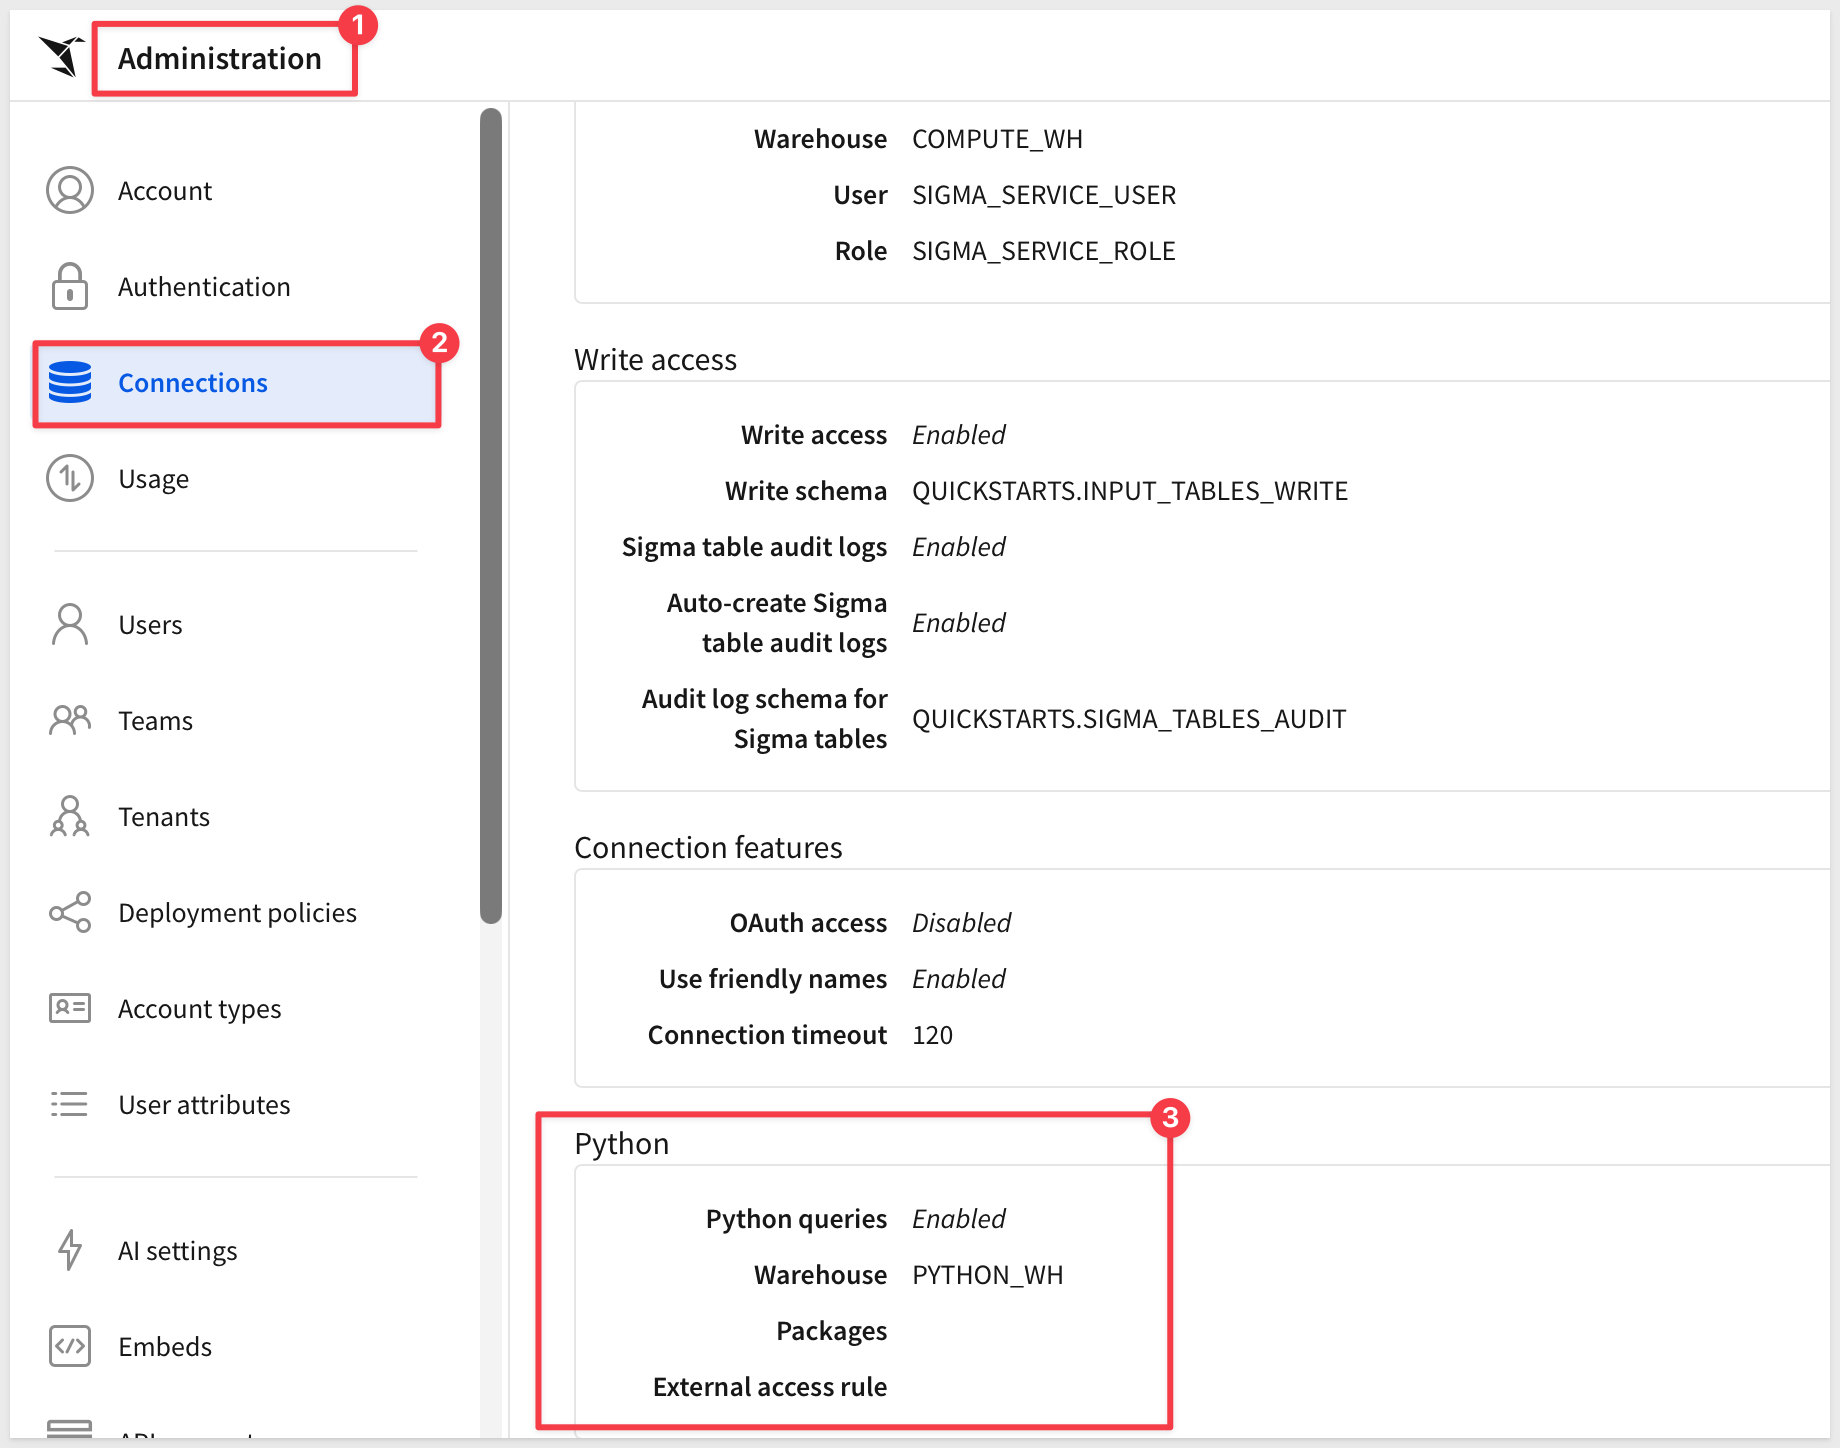
See Write and run Python code in Sigma for the general Python-element reference used throughout this QuickStart.

Before an agent can reach for this, the tool has to exist and work on its own — a person clicking a button, nothing agent-specific about it yet. This section builds that: a table of messy notes, a control to pick one, a Python element that does the actual parsing, and a button that runs it.
Create a new workbook
From Sigma Home, click Create New and select Workbook. Save and name it:
Python Parsing Tool - QuickStart
Rename the page from Page 1 to:
Parser
Add the order exception notes
Add Input > Empty. Select the Python-enabled Snowflake connection from Prerequisites — not Sigma Sample Database.
Rename the initial Text column:
Note Text
Delete the pre-populated seed rows so the table starts empty.
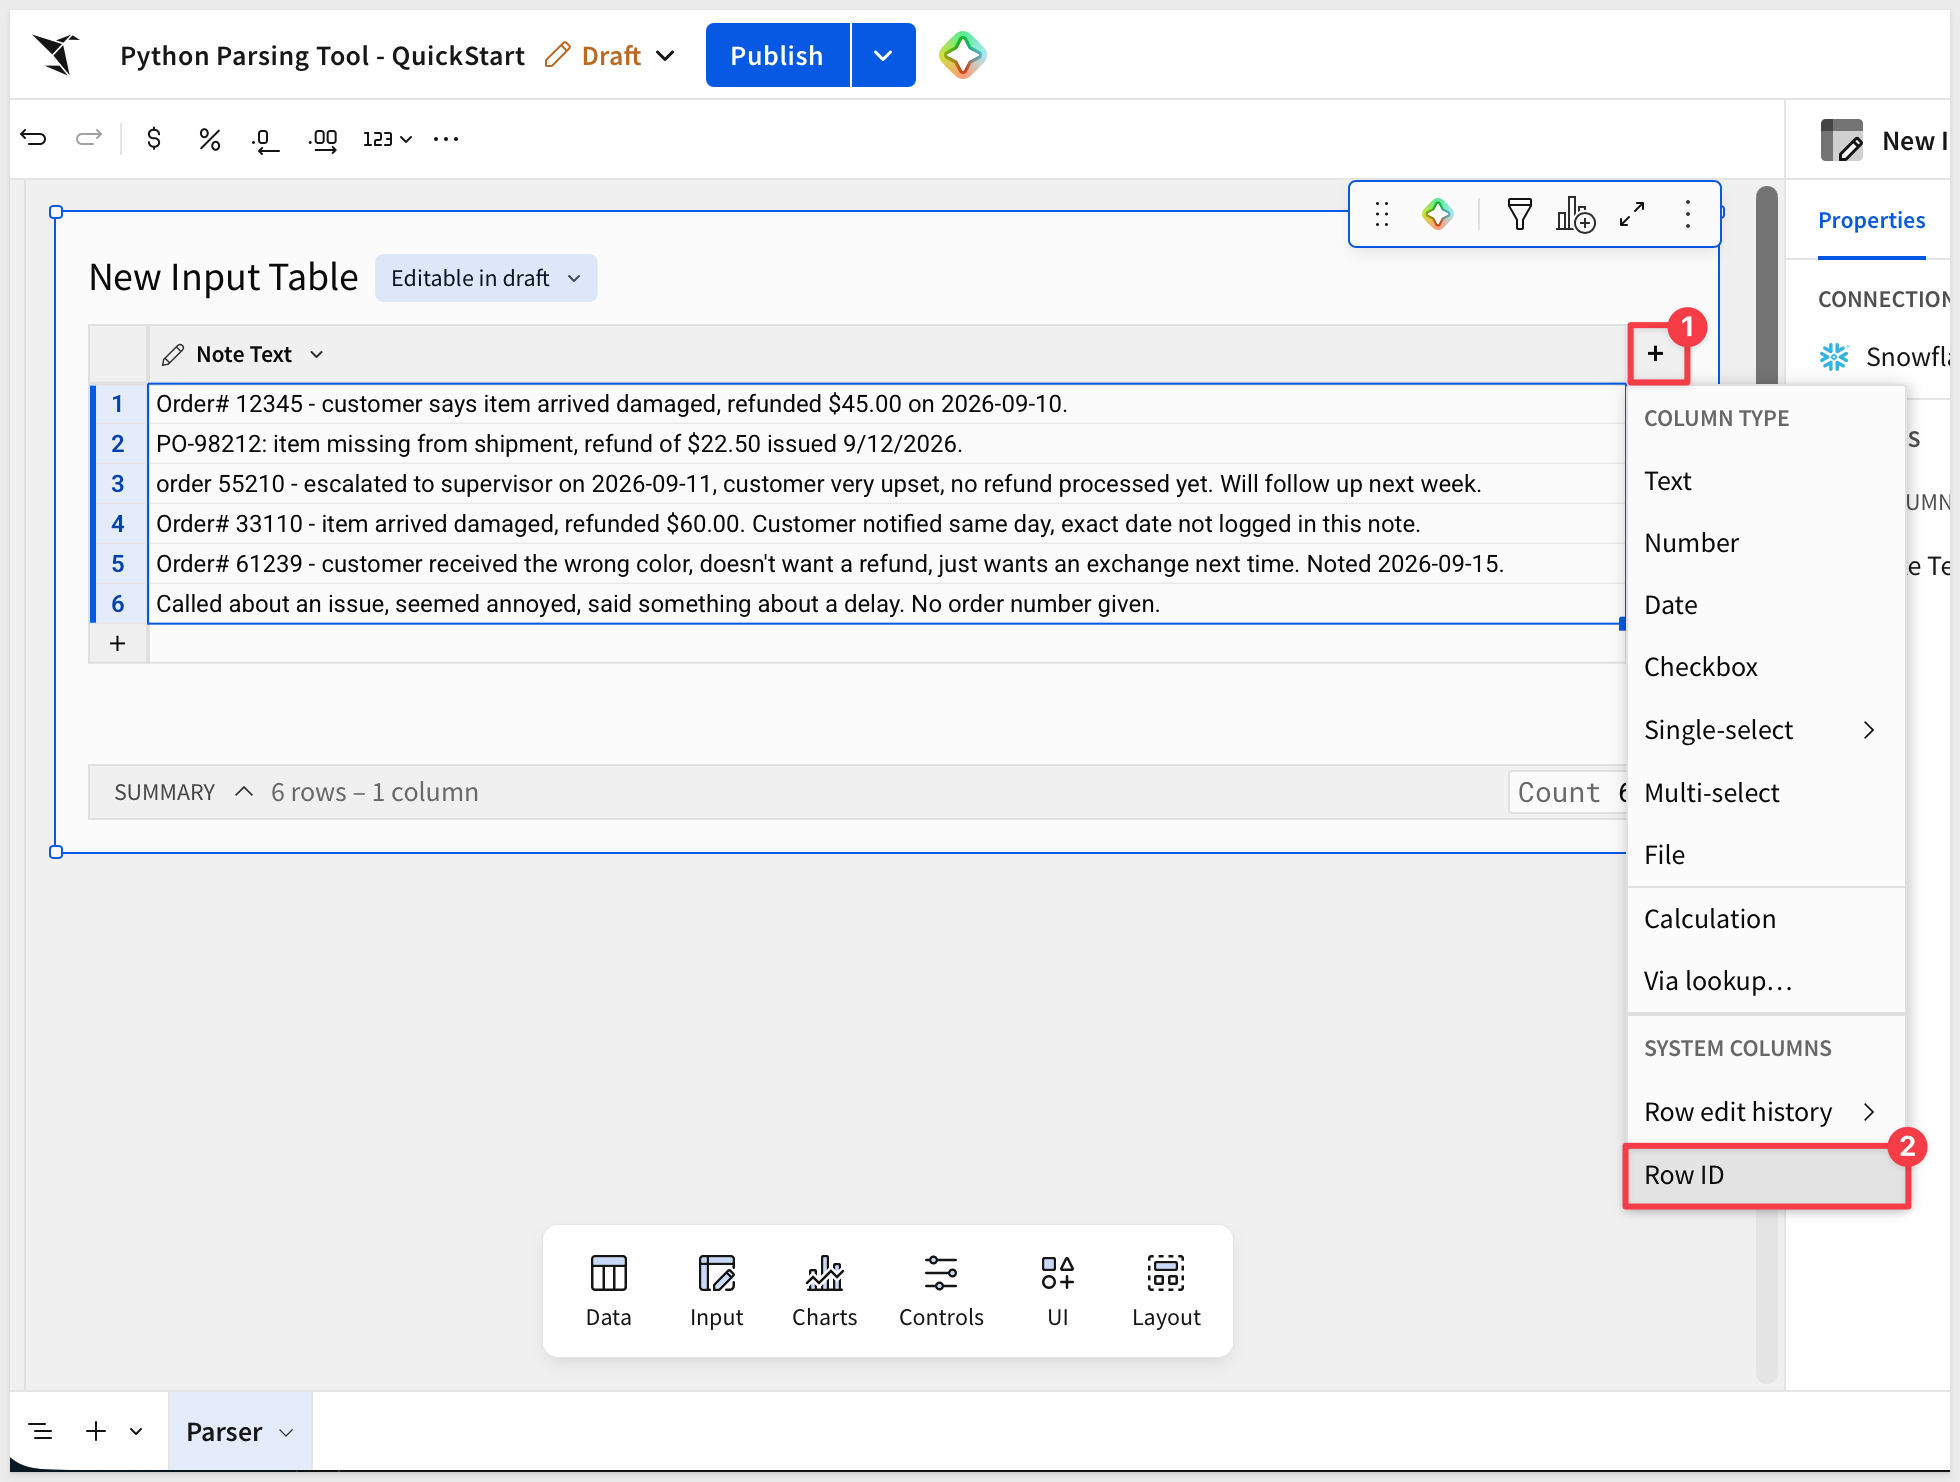
Select a cell in the Note Text column and paste:
Order# 12345 - customer says item arrived damaged, refunded $45.00 on 2026-09-10.
PO-98212: item missing from shipment, refund of $22.50 issued 9/12/2026.
order 55210 - escalated to supervisor on 2026-09-11, customer very upset, no refund processed yet. Will follow up next week.
Order# 33110 - item arrived damaged, refunded $60.00. Customer notified same day, exact date not logged in this note.
Order# 61239 - customer received the wrong color, doesn't want a refund, just wants an exchange next time. Noted 2026-09-15.
Called about an issue, seemed annoyed, said something about a delay. No order number given.
Use the column caret's + menu to add one more column. Under SYSTEM COLUMNS, select Row ID — Sigma fills a unique ID into every row automatically, so there's nothing to type or paste for this column.
Rename the table:
Order Exception Notes
Add the note picker control
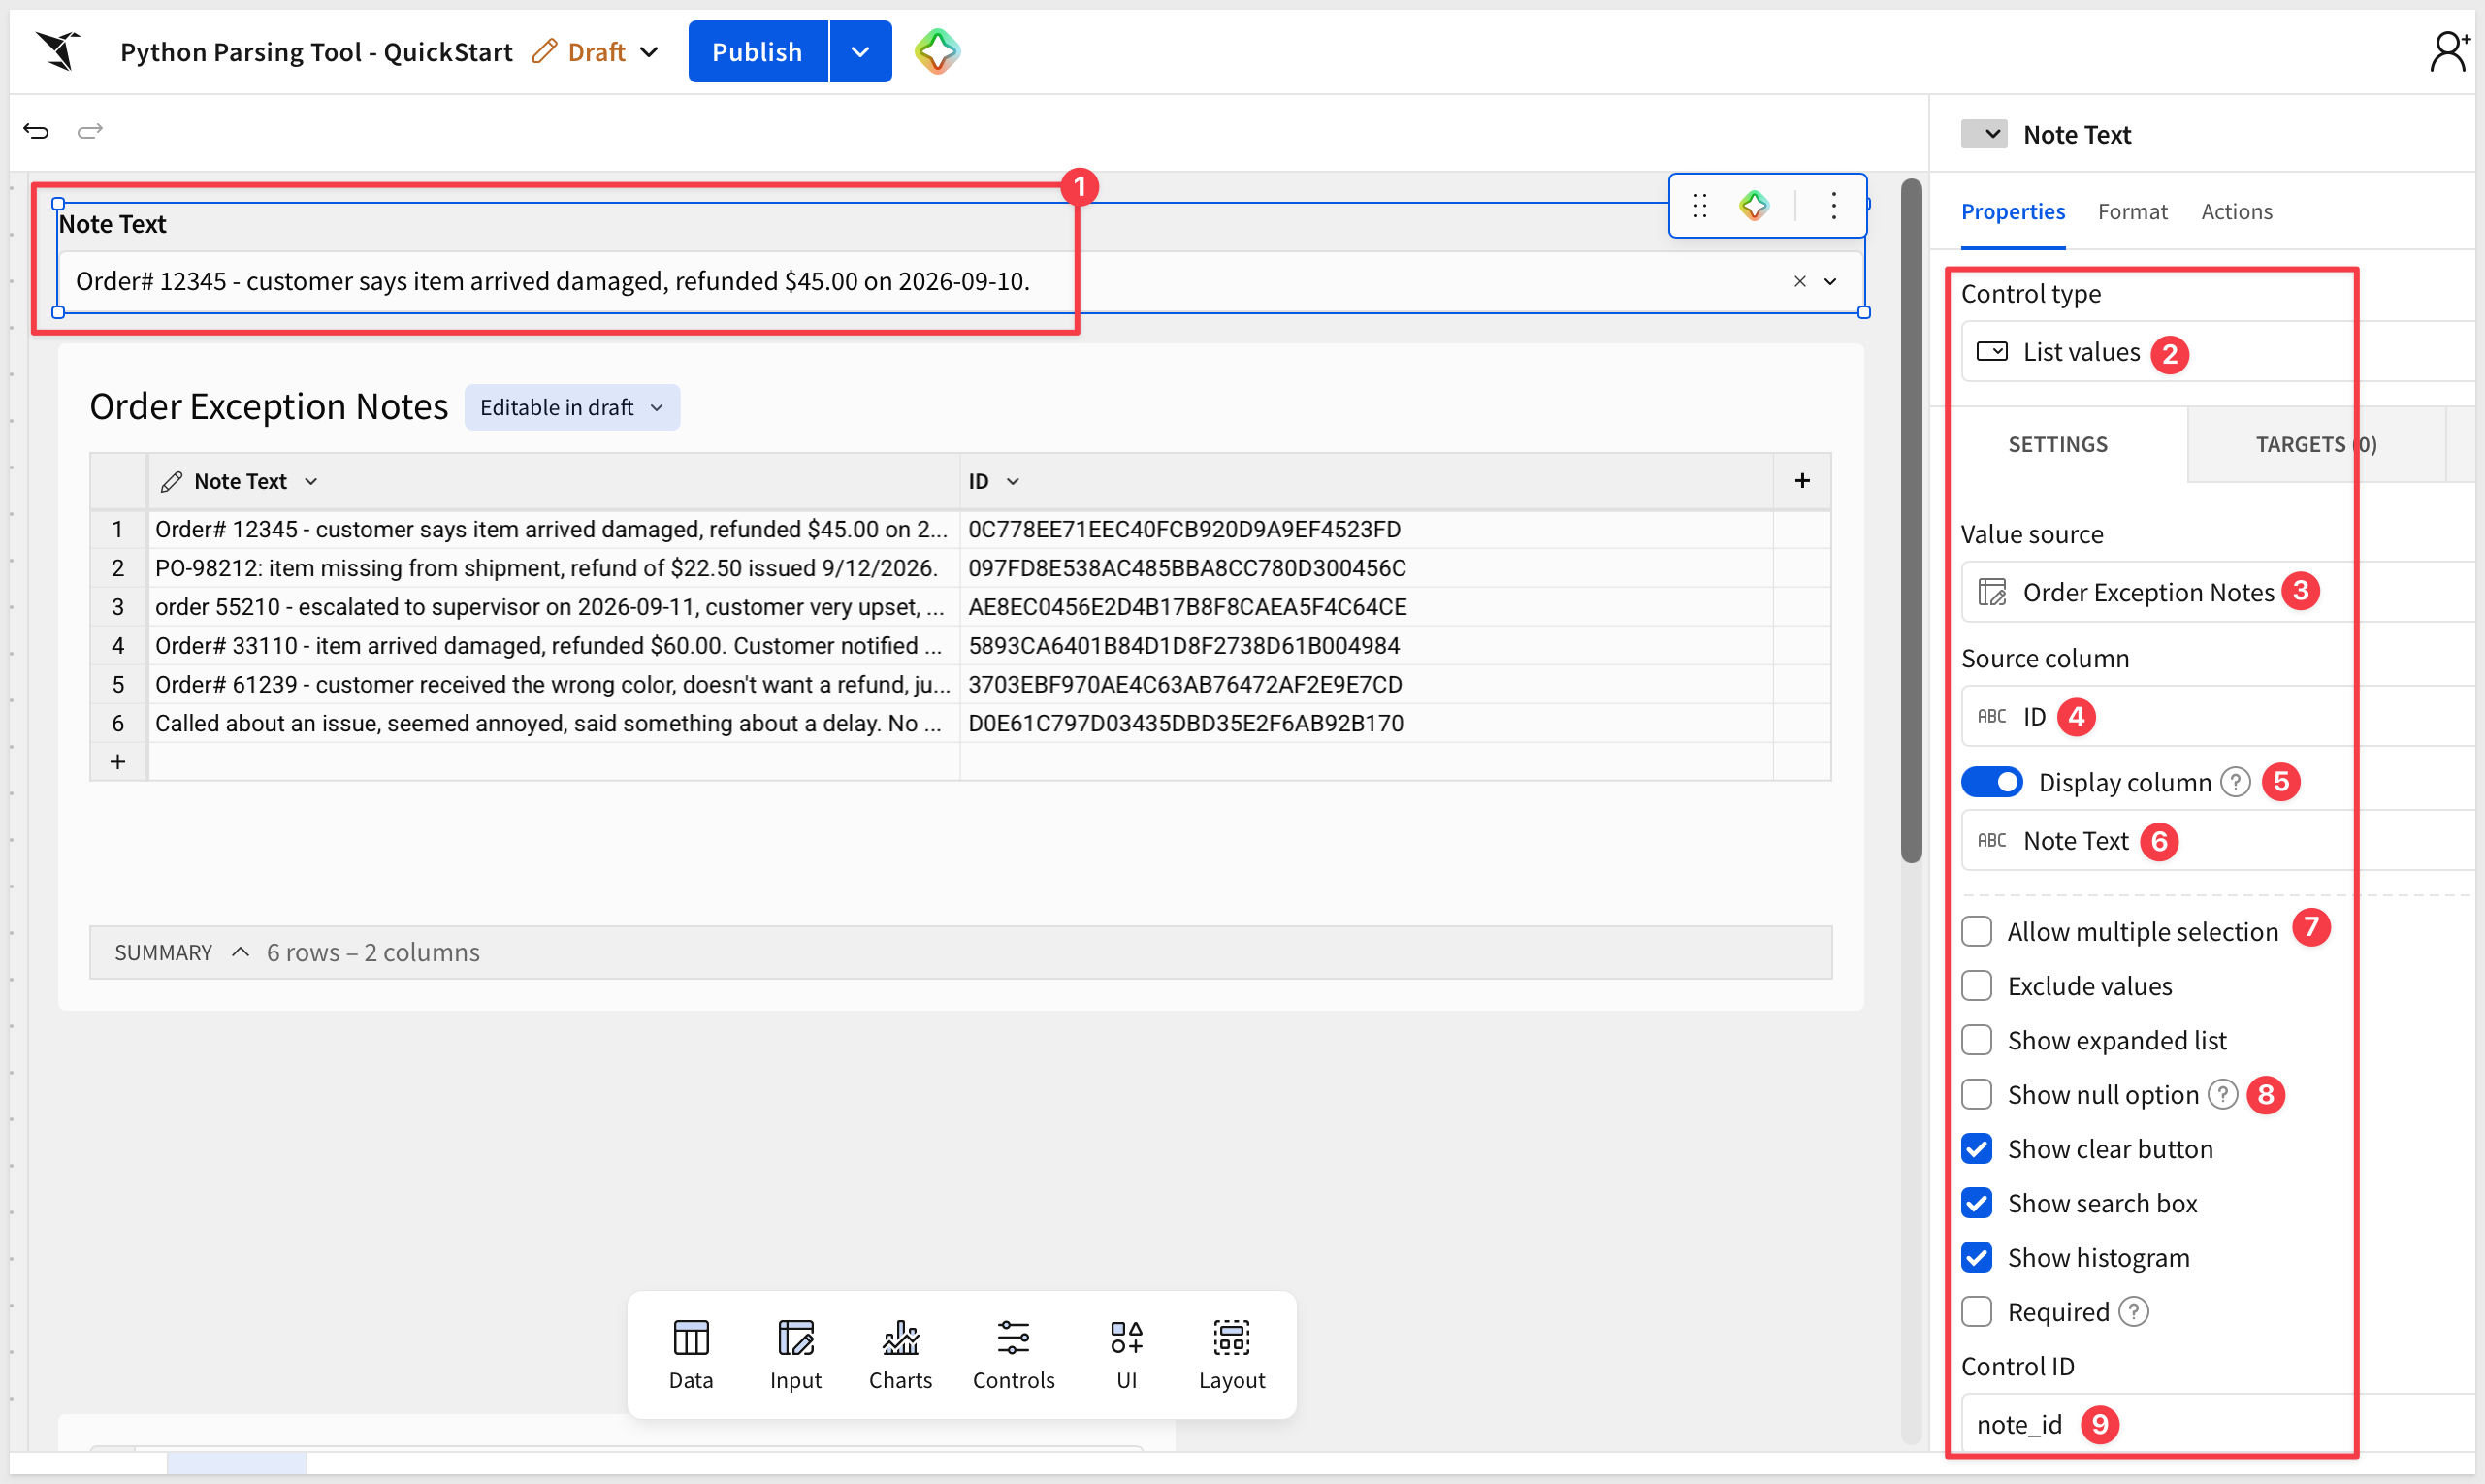
From the element bar, add Controls > List Values. Set its label to:
Note
Under Value source, select Order Exception Notes.
Set Source column to ID — that's the actual value the control will hold.
Turn on Display column and set it to Note Text, so the dropdown shows the readable note instead of a raw ID.
Set the Control ID:
note_id
Turn off Allow multiple selection — exactly one note has to be selected at a time for the Python element to parse.
Leave Targets empty — this control feeds the Python element directly, not a table filter.
Add the Python element
Add Data > Python.
There's no separate panel for wiring up sources — a Python element pulls in a workbook element by calling sigma.get_element() directly in the code, and a control value the same way you already used it in the earlier smoke test, with sigma.get_control_value().
Paste the code (overwriting the sample code):
import re
import pandas as pd

notes = sigma.get_element("Order Exception Notes").to_pandas()
selected_id = sigma.get_control_value("note_id")
note = notes.loc[notes["ID"] == selected_id, "Note Text"].iloc[0]

def extract_order_id(text):
    for pattern in [r"Order#\s*(\d+)", r"PO-(\d+)", r"[Oo]rder\s+(\d+)"]:
        match = re.search(pattern, text)
        if match:
            return match.group(1)
    return None

def extract_issue_type(text):
    text_lower = text.lower()
    for keyword in ["damaged", "missing", "escalated"]:
        if keyword in text_lower:
            return keyword
    return None

def extract_refund_amount(text):
    match = re.search(r"\$([0-9]+(?:\.[0-9]{2})?)", text)
    return float(match.group(1)) if match else None

def extract_resolved_date(text):
    for pattern in [r"(\d{4}-\d{2}-\d{2})", r"(\d{1,2}/\d{1,2}/\d{2,4})"]:
        match = re.search(pattern, text)
        if match:
            return match.group(1)
    return None

order_id = extract_order_id(note)
issue_type = extract_issue_type(note)
refund_amount = extract_refund_amount(note)
resolved_date = extract_resolved_date(note)

missing = [name for name, value in [
    ("order_id", order_id), ("issue_type", issue_type),
    ("refund_amount", refund_amount), ("resolved_date", resolved_date),
] if value is None]
flags = "OK" if not missing else "missing " + ", ".join(missing)

result = pd.DataFrame([{
    "note_id": selected_id,
    "order_id": order_id,
    "issue_type": issue_type,
    "refund_amount": refund_amount,
    "resolved_date": resolved_date,
    "flags": flags,
    "raw_note": note,
}])

sigma.output("parsed_note", result)
Before running this, select Order# 12345 in the Note Text control — the code above filters by whatever note_id currently holds, and there's nothing to match against if the control is still blank.
Click Run once.
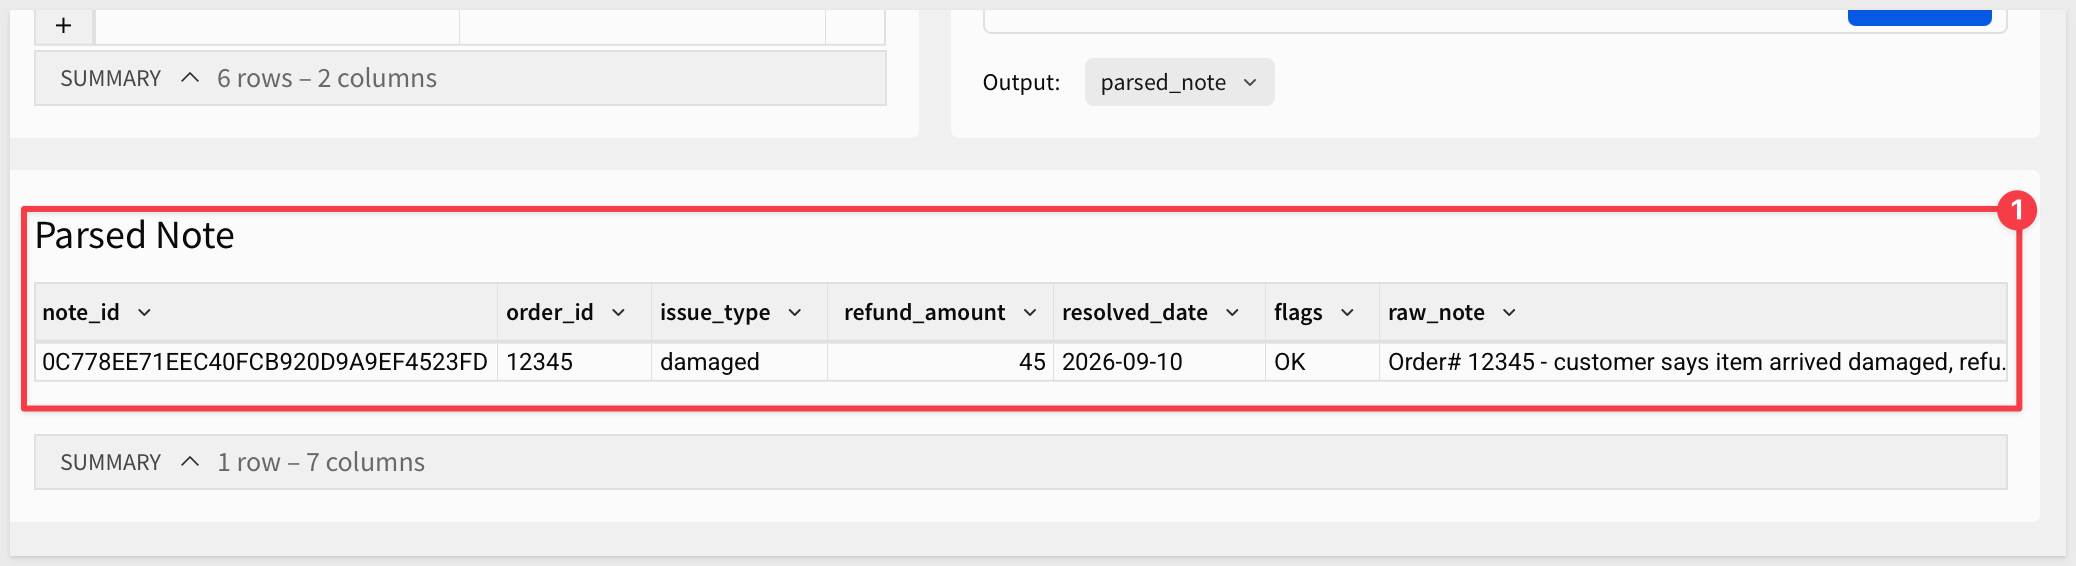
Under Output, select parsed_note, choose Table.
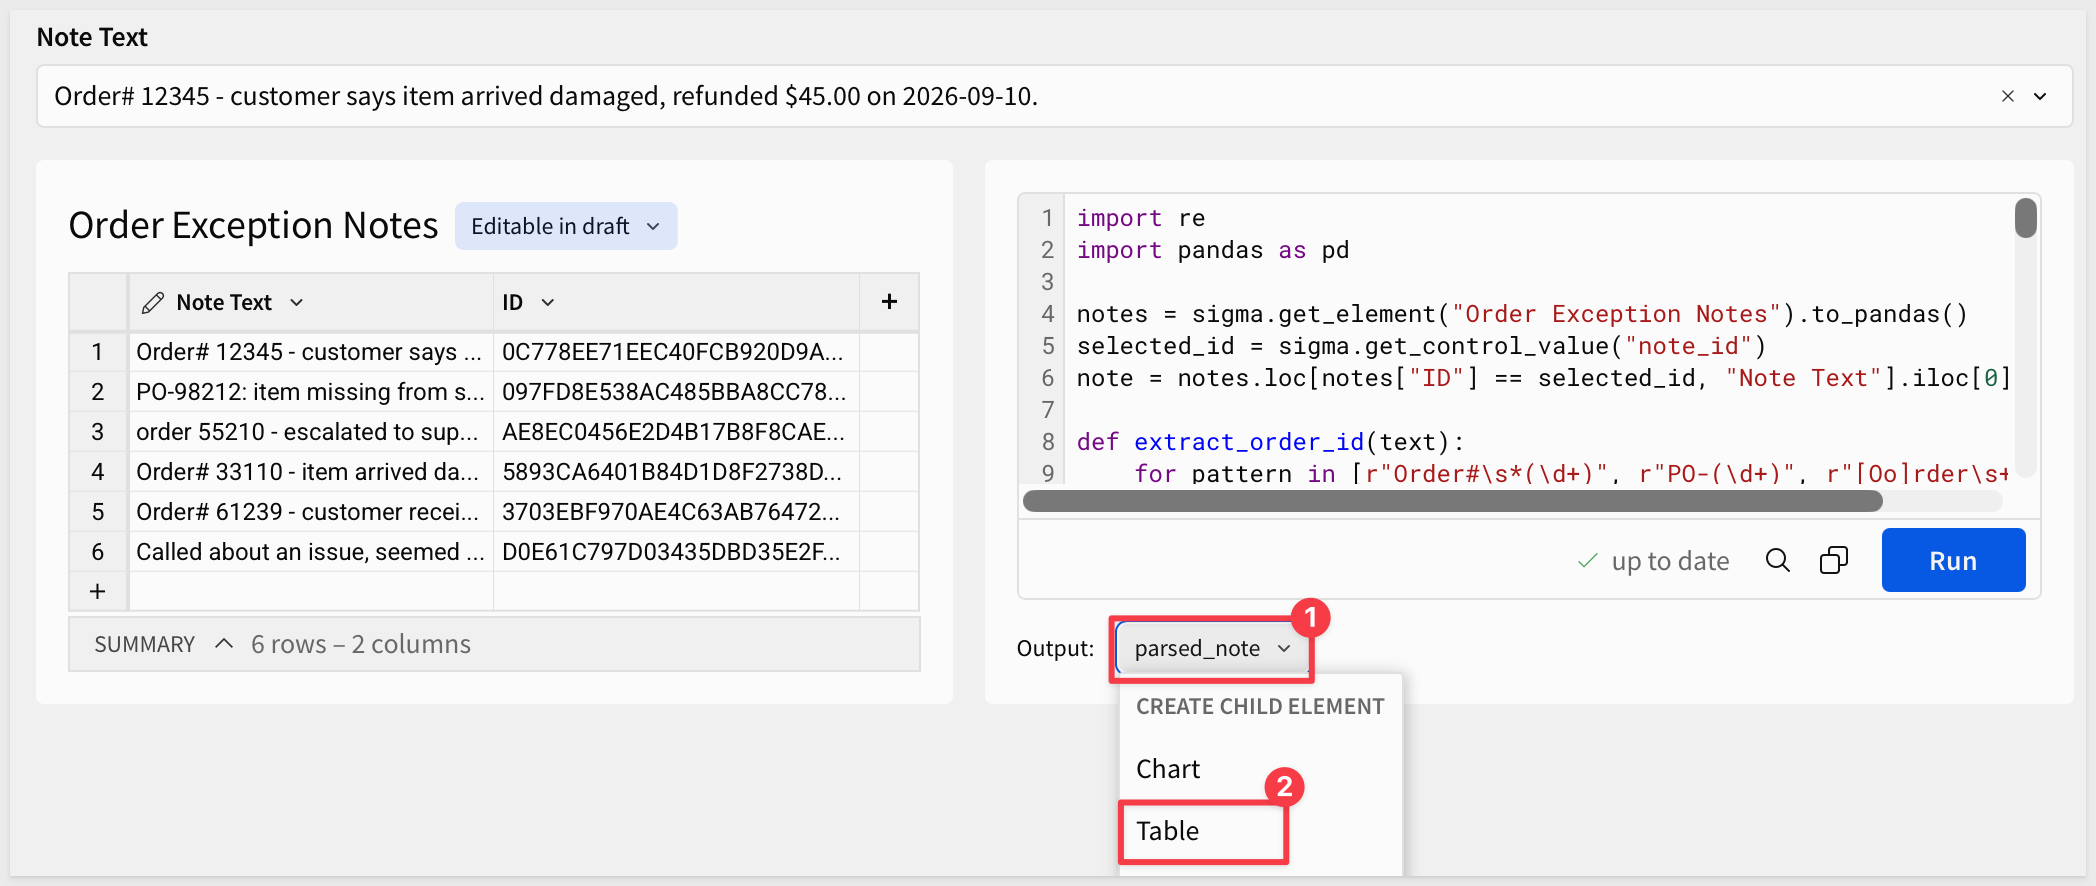
The new table shows the selected row parsed into columns.
Rename the child table:
Parsed Note
Add a log for every parse
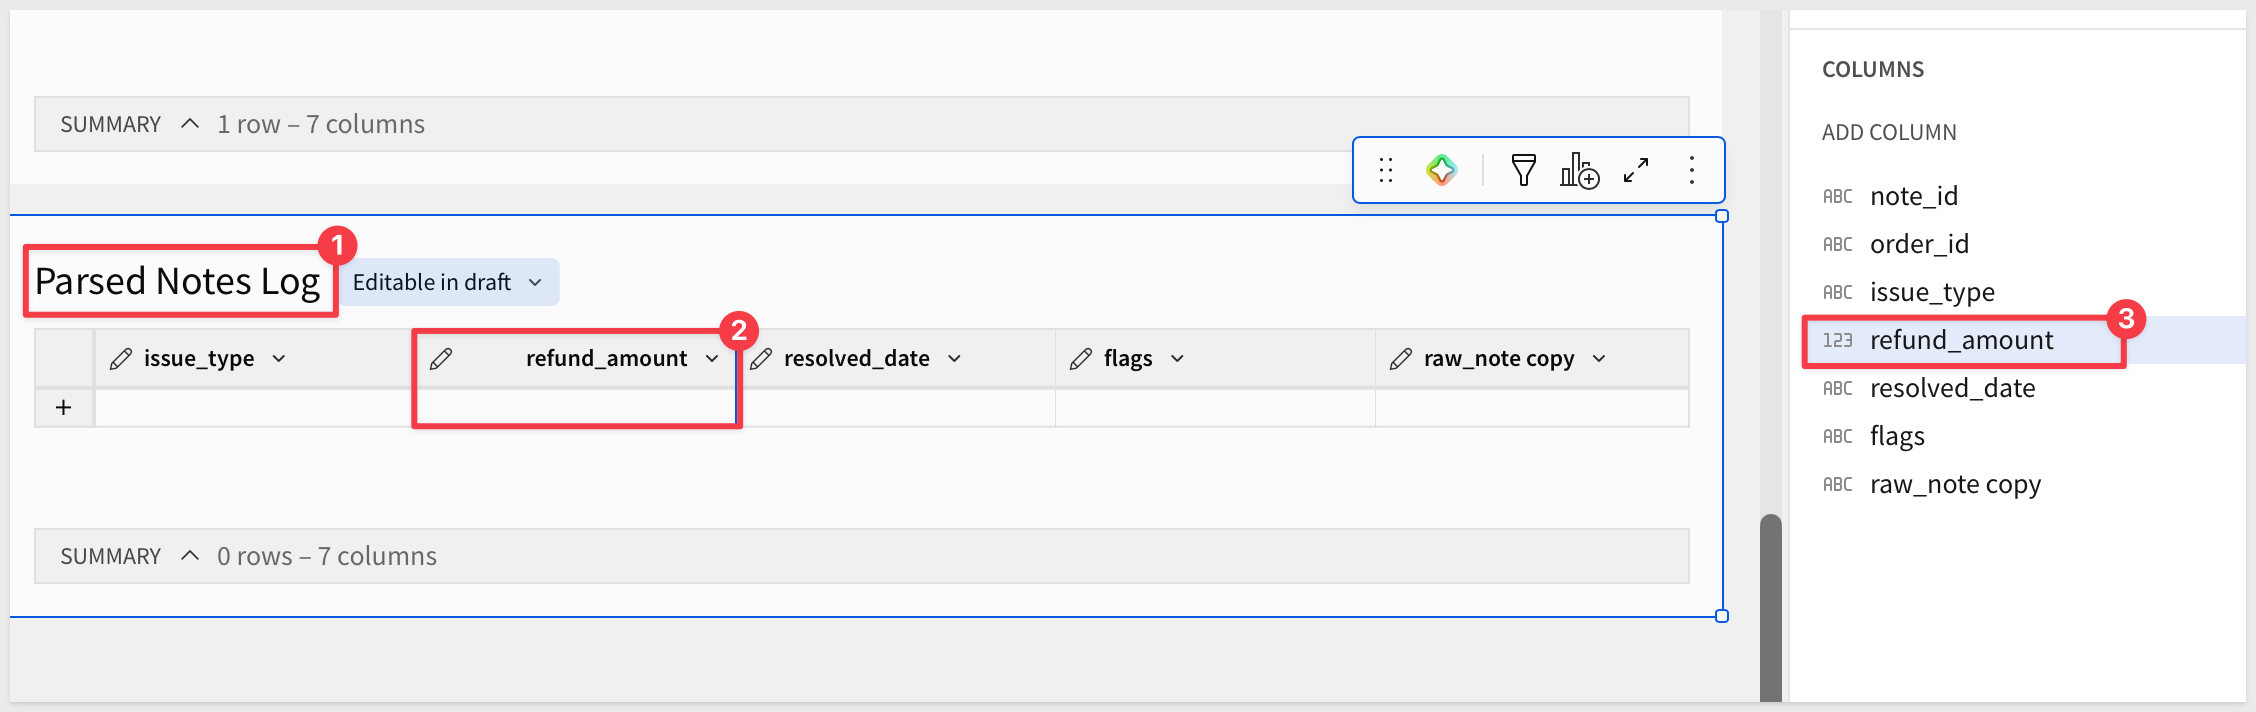
Parsed Note only ever holds the single most recent result — a Python element can't read its own prior output back in, Sigma blocks that as a circular dependency. To keep a running history instead, add a second, plain input table.
Add Input > Empty on the same Python-enabled connection.
Add columns to match Parsed Note's fields:
Column name:        Type
note_id             Text
order_id            Text
issue_type          Text
refund_amount       Number
resolved_date       Text
flags               Text
raw_note            Text
Be sure to set refund_amount to Number — the Insert row action rejects a numeric formula value going into a Text column, so this one has to match Parsed Note's type. Every other column can stay Text.
Delete the pre-populated seed rows so it starts empty. Rename the table:
Parsed Notes Log
Add the run button
Add UI > Button. Change its text to:
Parse Selected Note
Select the button and click + next to Action sequence.
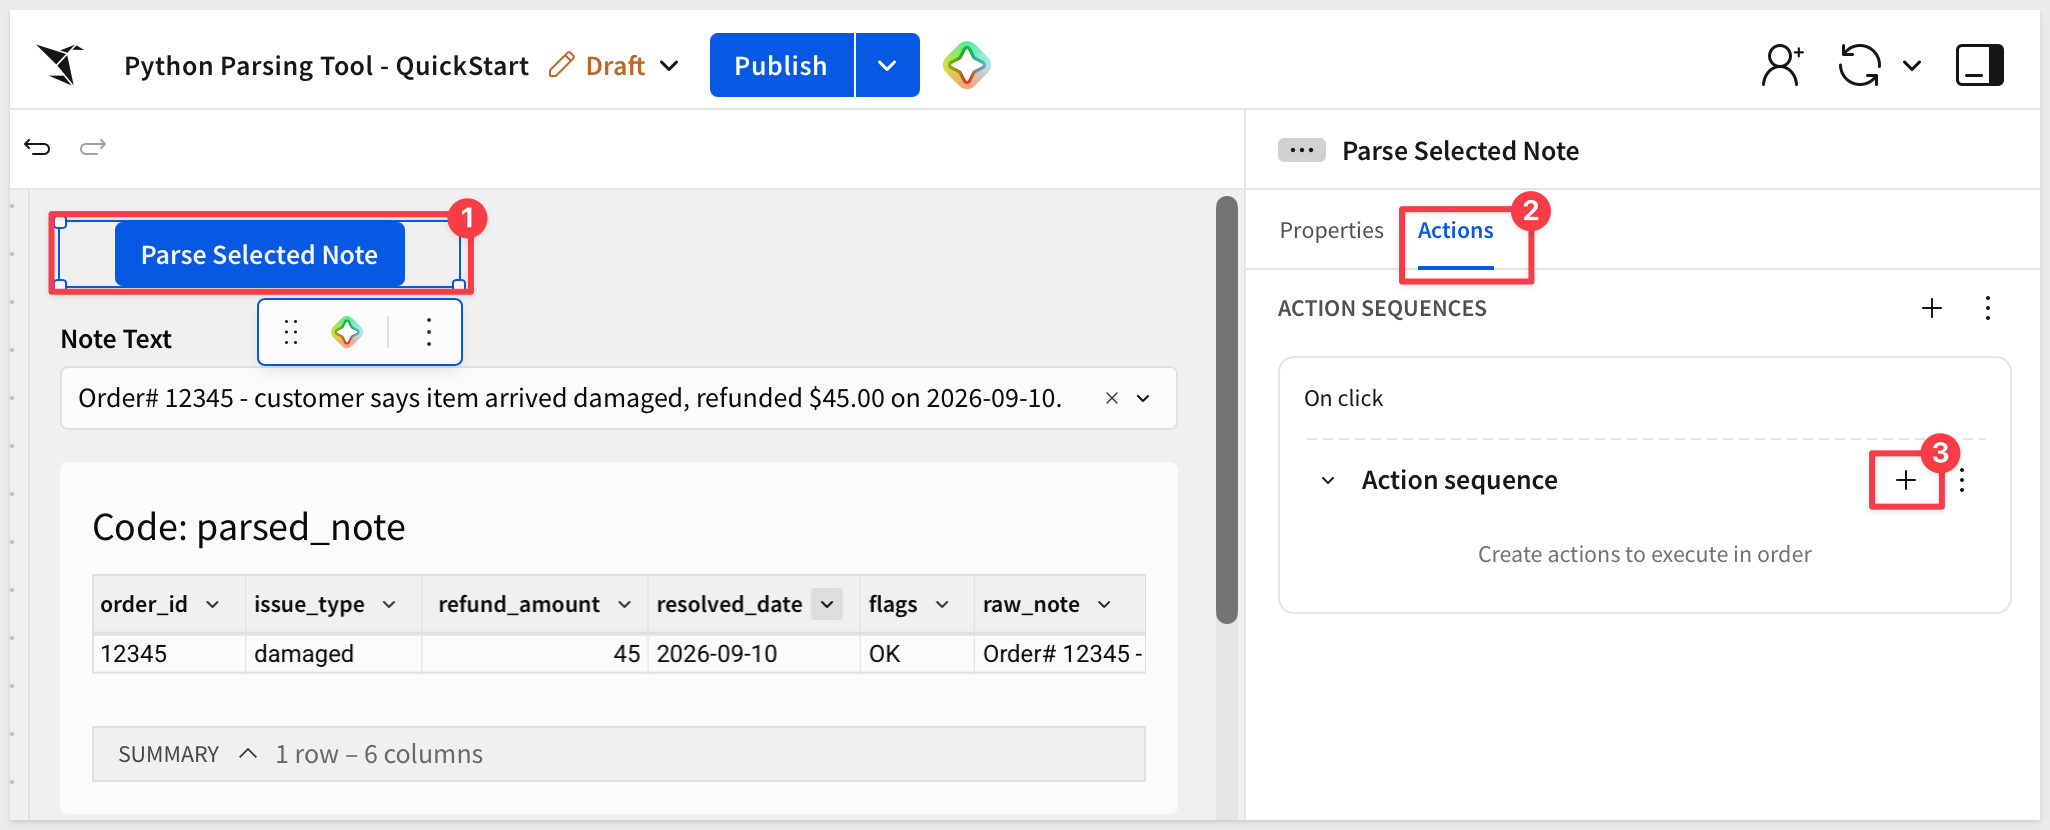
Configure the first step:
Action type: Run Python element
Element: Code (Parser)
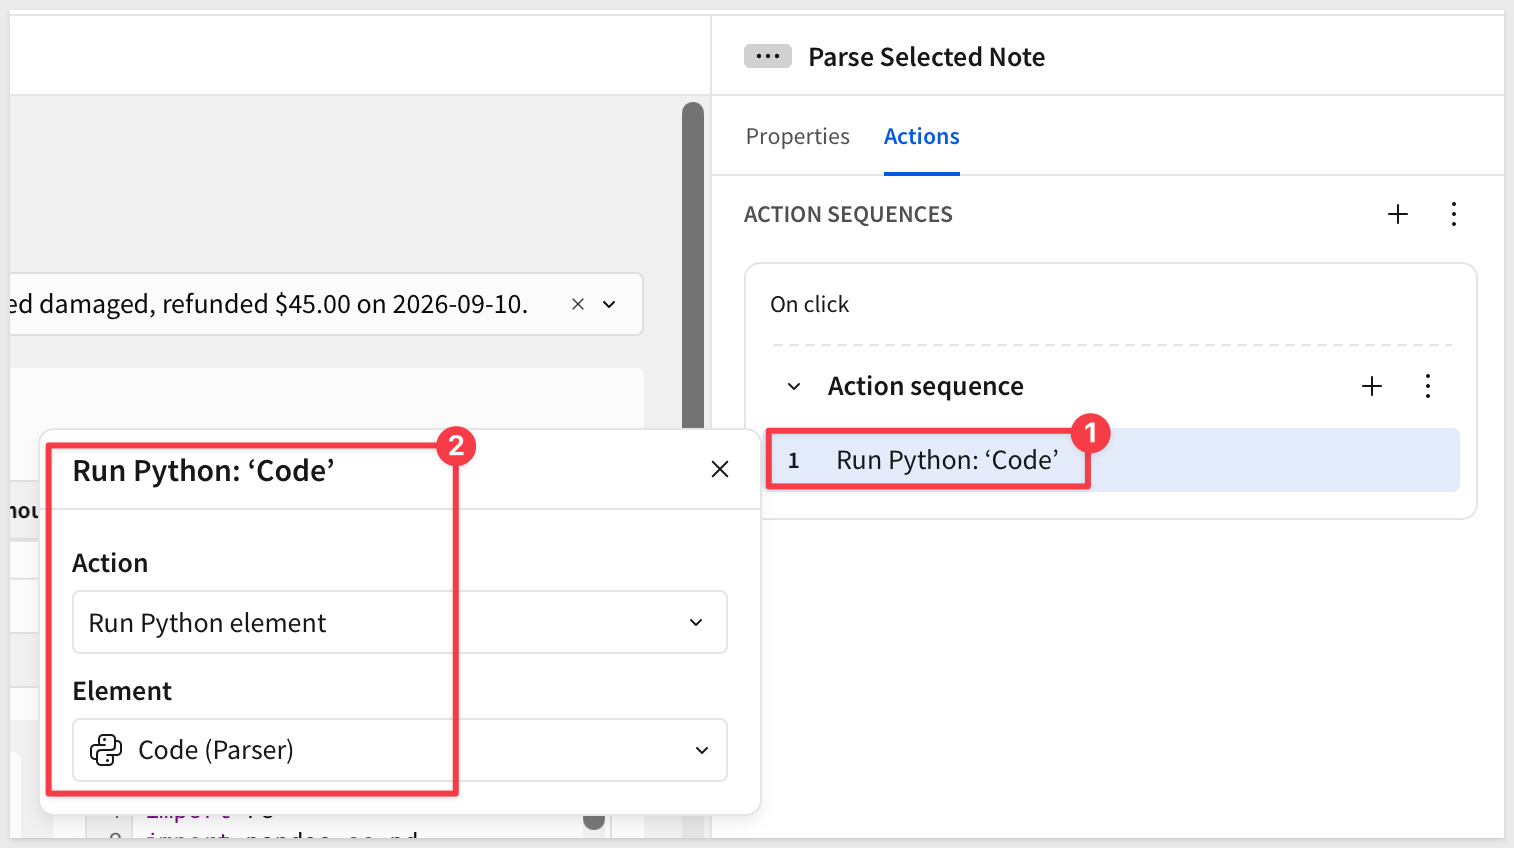
Add a second step:
Action type: Insert row (under Input Tables and Forms)
Into: Parsed Notes Log
Set column values: for each column, use Formula and reference Parsed Note's matching column:
[Parsed Note/note_id]
[Parsed Note/order_id]
[Parsed Note/issue_type]
[Parsed Note/refund_amount]
[Parsed Note/resolved_date]
[Parsed Note/flags]
[Parsed Note/raw_note]
Click Publish.
Test it manually
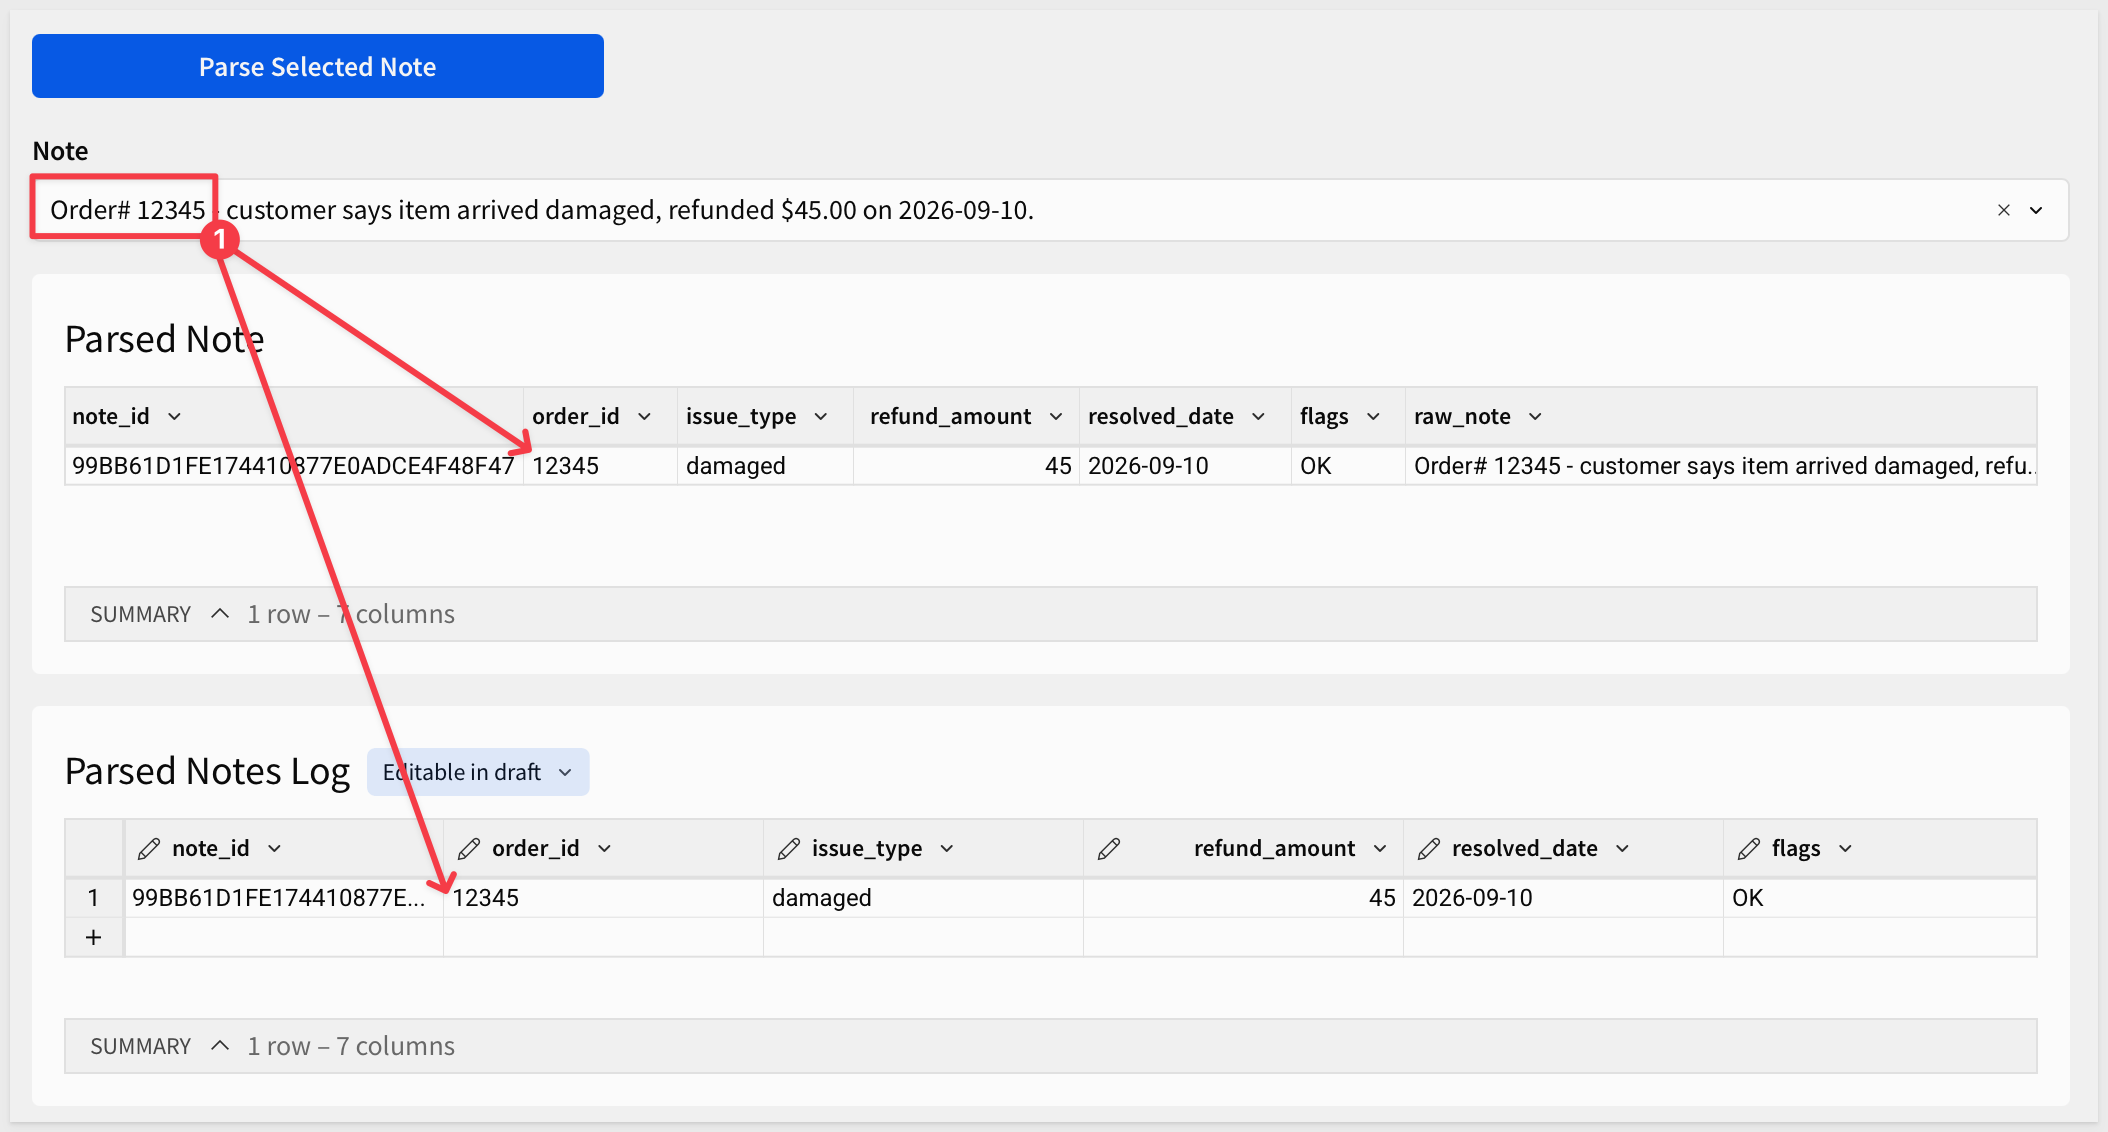
Select the note beginning Order# 12345 and click Parse Selected Note.
Check Parsed Note — since we had previously tested this, the table still shows Order 12345.
Check Parsed Notes Log too — it should now have that same row logged.
This time change the list control to select Order 55210 and click the Parse Selected Note button again.
Parsed Note shows just this new result — that table always holds only the latest run.
Parsed Notes Log is the one that keeps growing: it should now have two rows, this one added to the last.
refund_amount comes back empty on this one and flags says so — the note never mentioned a dollar figure, so there's nothing to guess at.
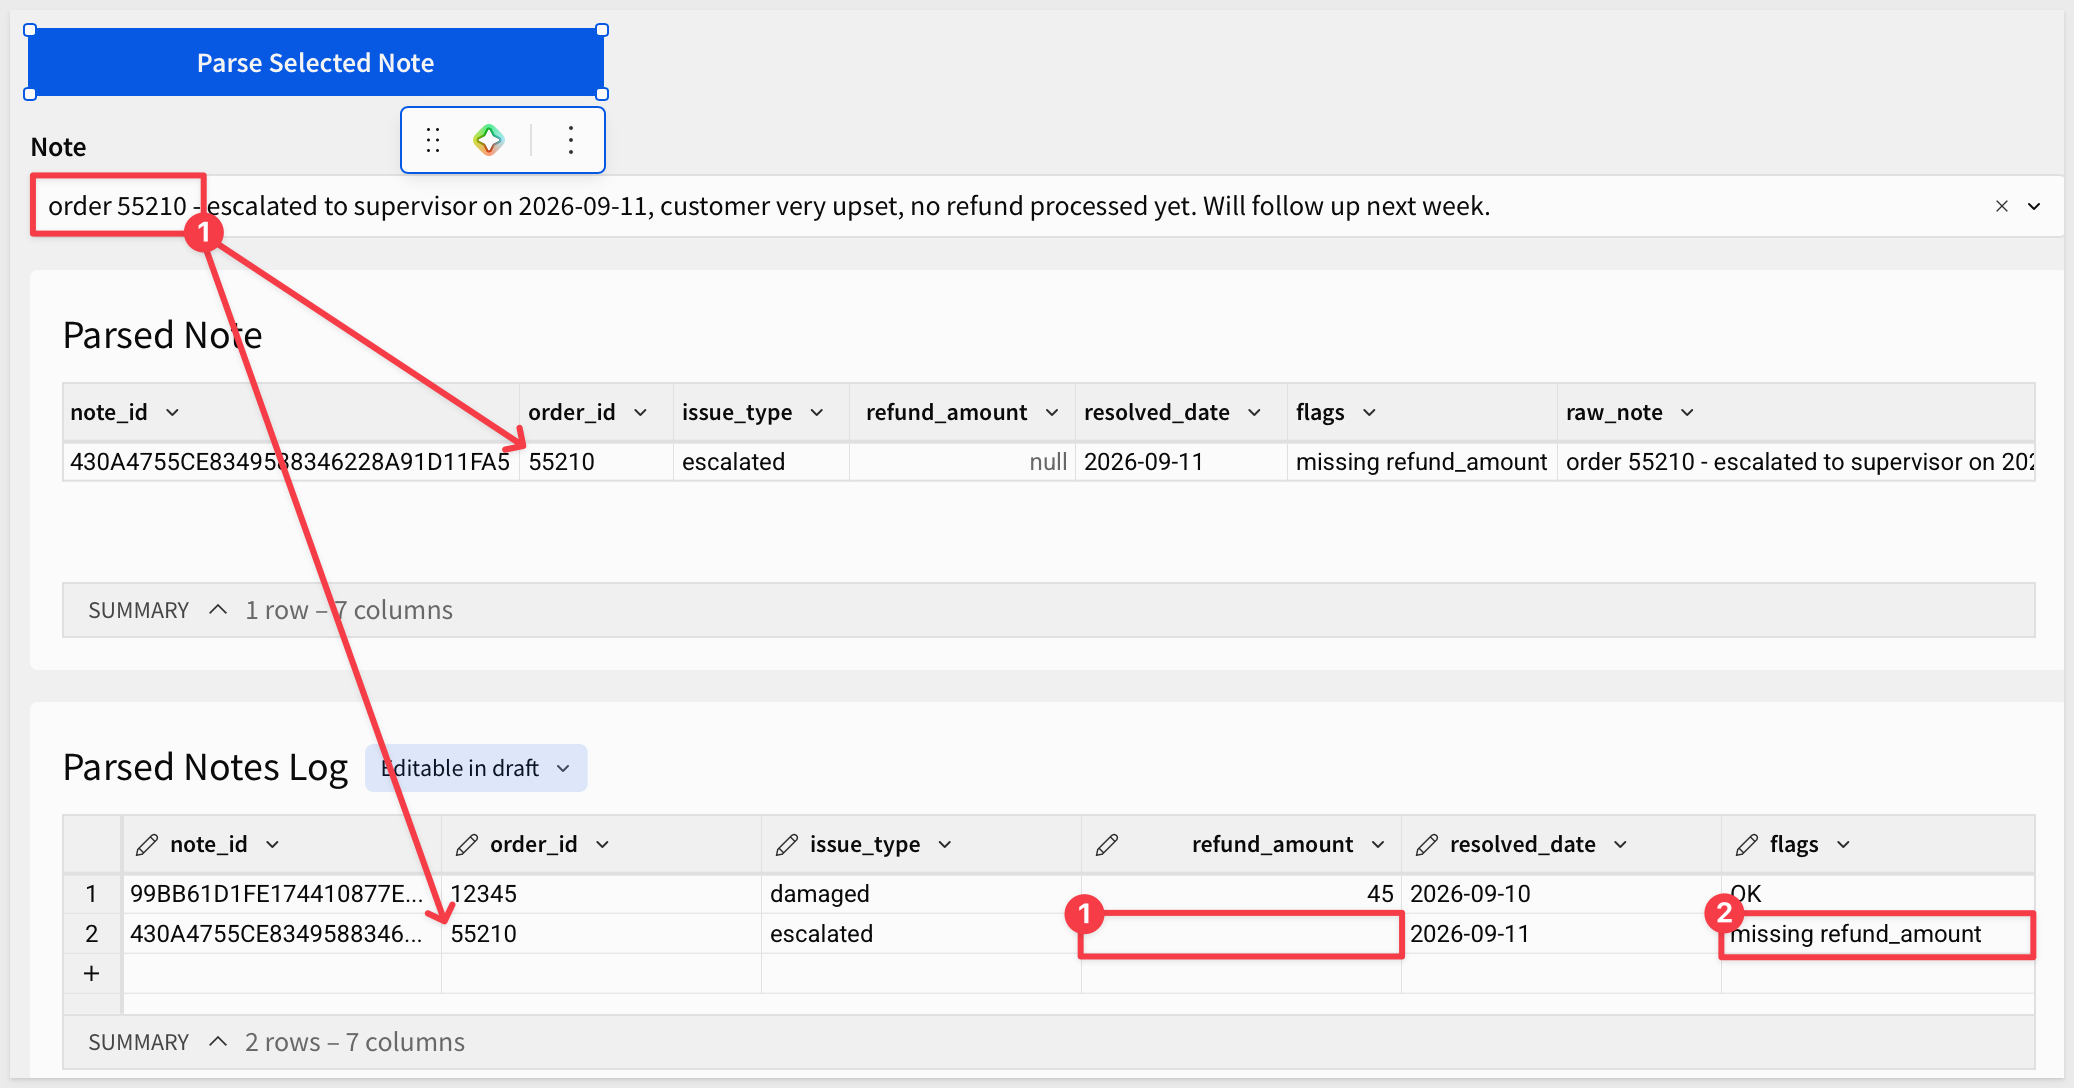
The tool works, end to end, without anything agent-specific about it — a control, a Python element, and a button a person clicks.
The next section gives an agent this exact same tool, with one difference: it can't click a dropdown, so its version of this action needs one more step than the button's did.
The button proved the parsing tool works. This section attaches the exact same tool to an agent — same Python element, same underlying action, with one difference: a person picks a note from a dropdown, but an agent can't click one, so its version of this action needs to look up the note's ID itself before it can run anything.
Add a chat page and an agent
Click + next to the page tabs to add a new page, then rename it from Page 1 to:
Chat
Add a UI > Chat element and select + Create new agent.
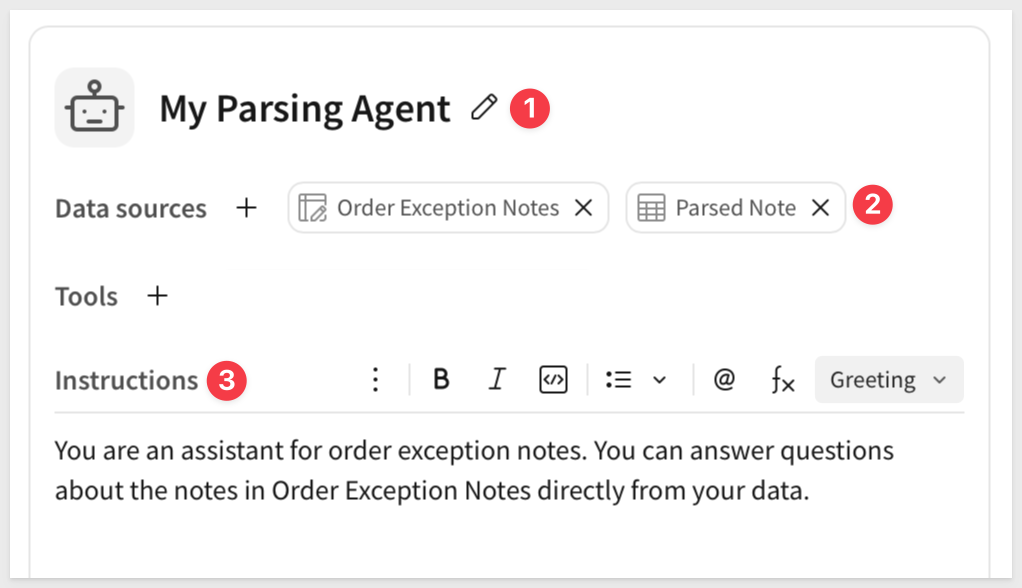
Using the pencil icon, rename the new agent:
My Parsing Agent
Under Data sources, add Parser > Order Exception Notes — the agent needs to see the notes and their IDs to pick the right one, not just trigger the parser blindly.
Also add Parser > Parsed Note. Running the action changes what that table holds, but running it doesn't hand the agent the result directly — without this as a data source, the agent has no way to actually read what the parser just produced.
Click the Instructions tab and enter:
You are an assistant for order exception notes. You can answer questions about the notes in Order Exception Notes directly from your data.
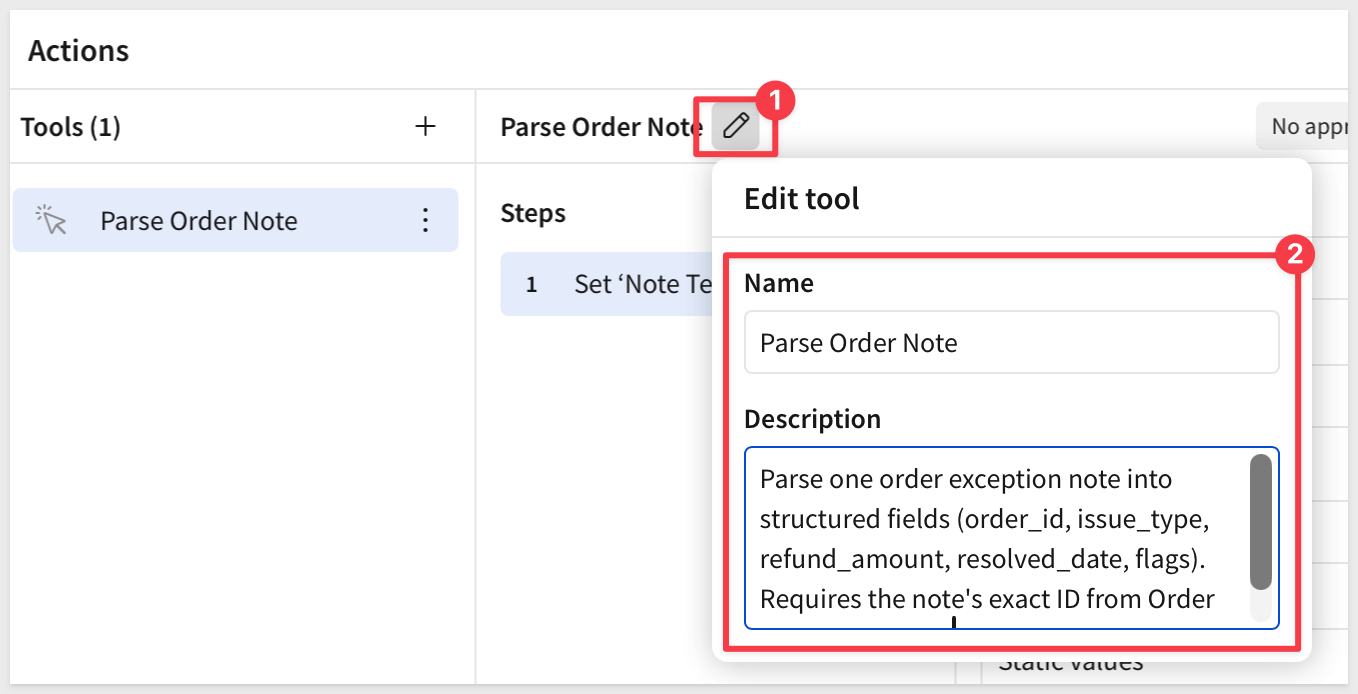
Under Tools, click + and select Action. Name it:
Parse Order Note
Set the description:
Parse one order exception note into structured fields (order_id, issue_type, refund_amount, resolved_date, flags). Requires the note's exact ID from Order Exception Notes.
Leave Requires approval off — this action doesn't write a business record, it recomputes a scratch result that gets overwritten on the next run, the same thing the button already does.
Configure the first step: Run an action > Set control value.
Under Update control, select Note (Parser).
Set Set value as to Agent input, and set Agent input name to:
note_id
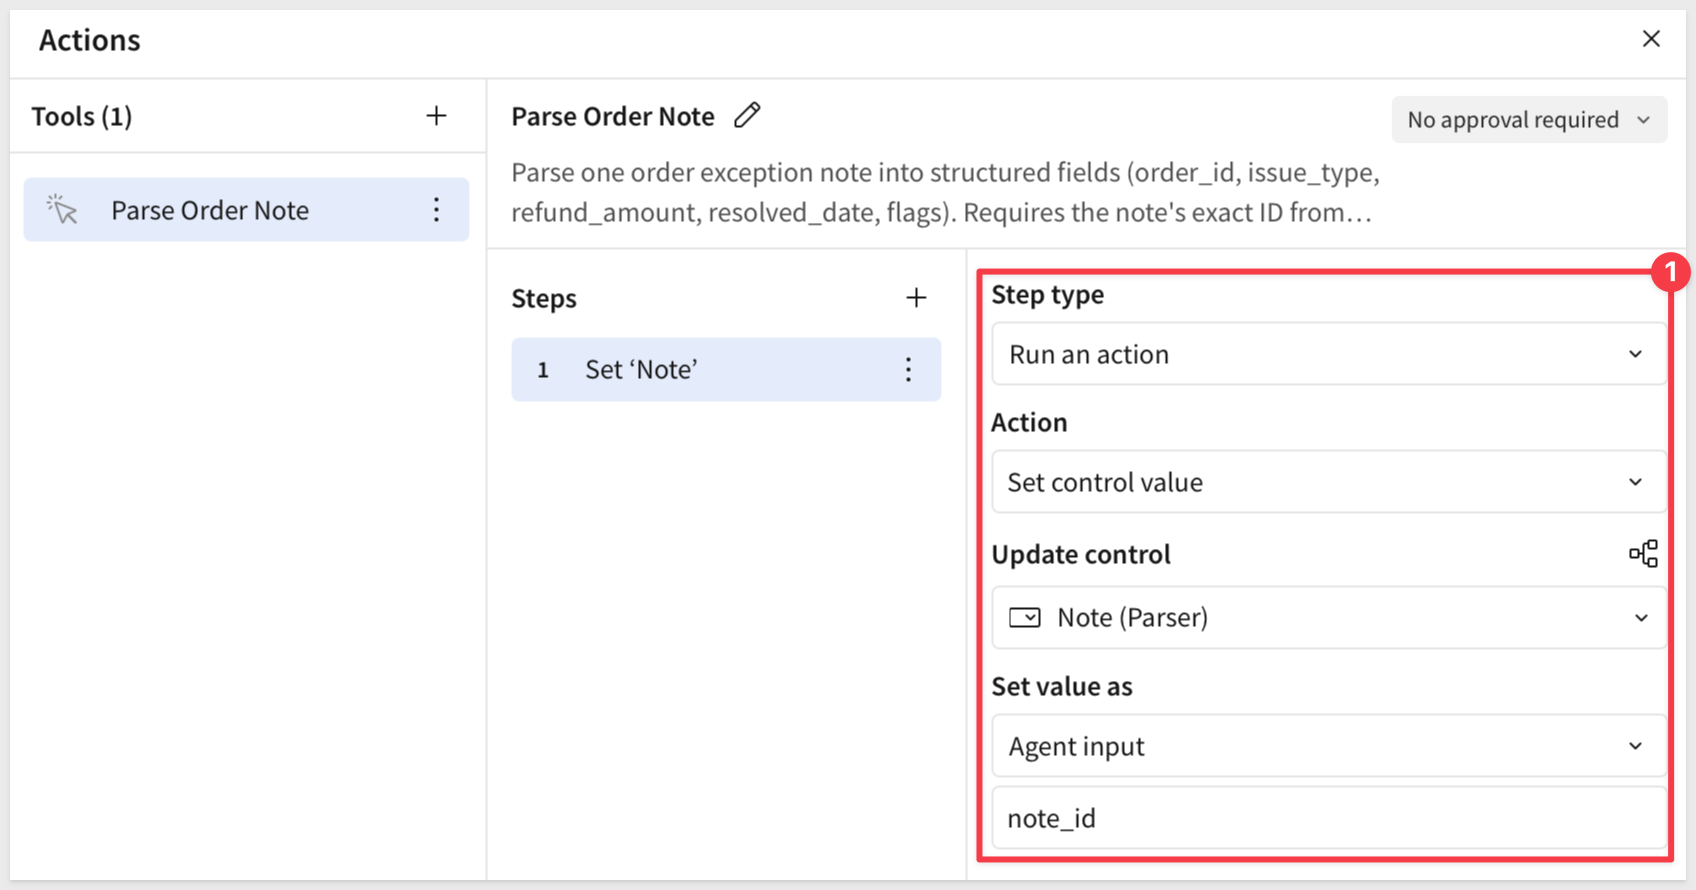
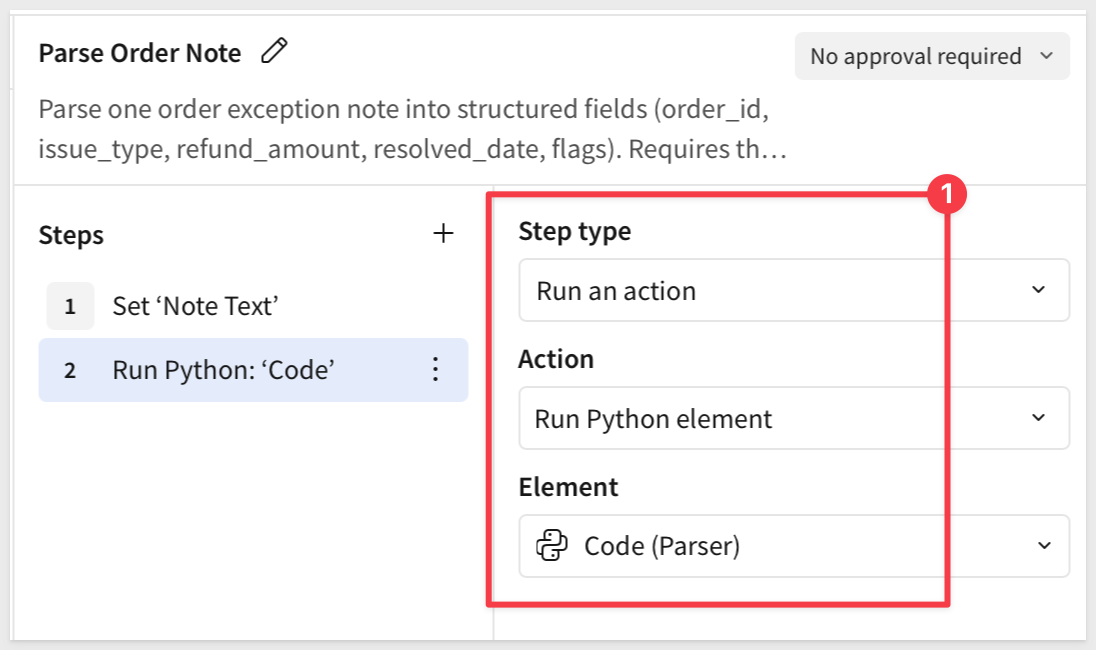
Add a second step: Run an action > Run Python element > Code (Parser).
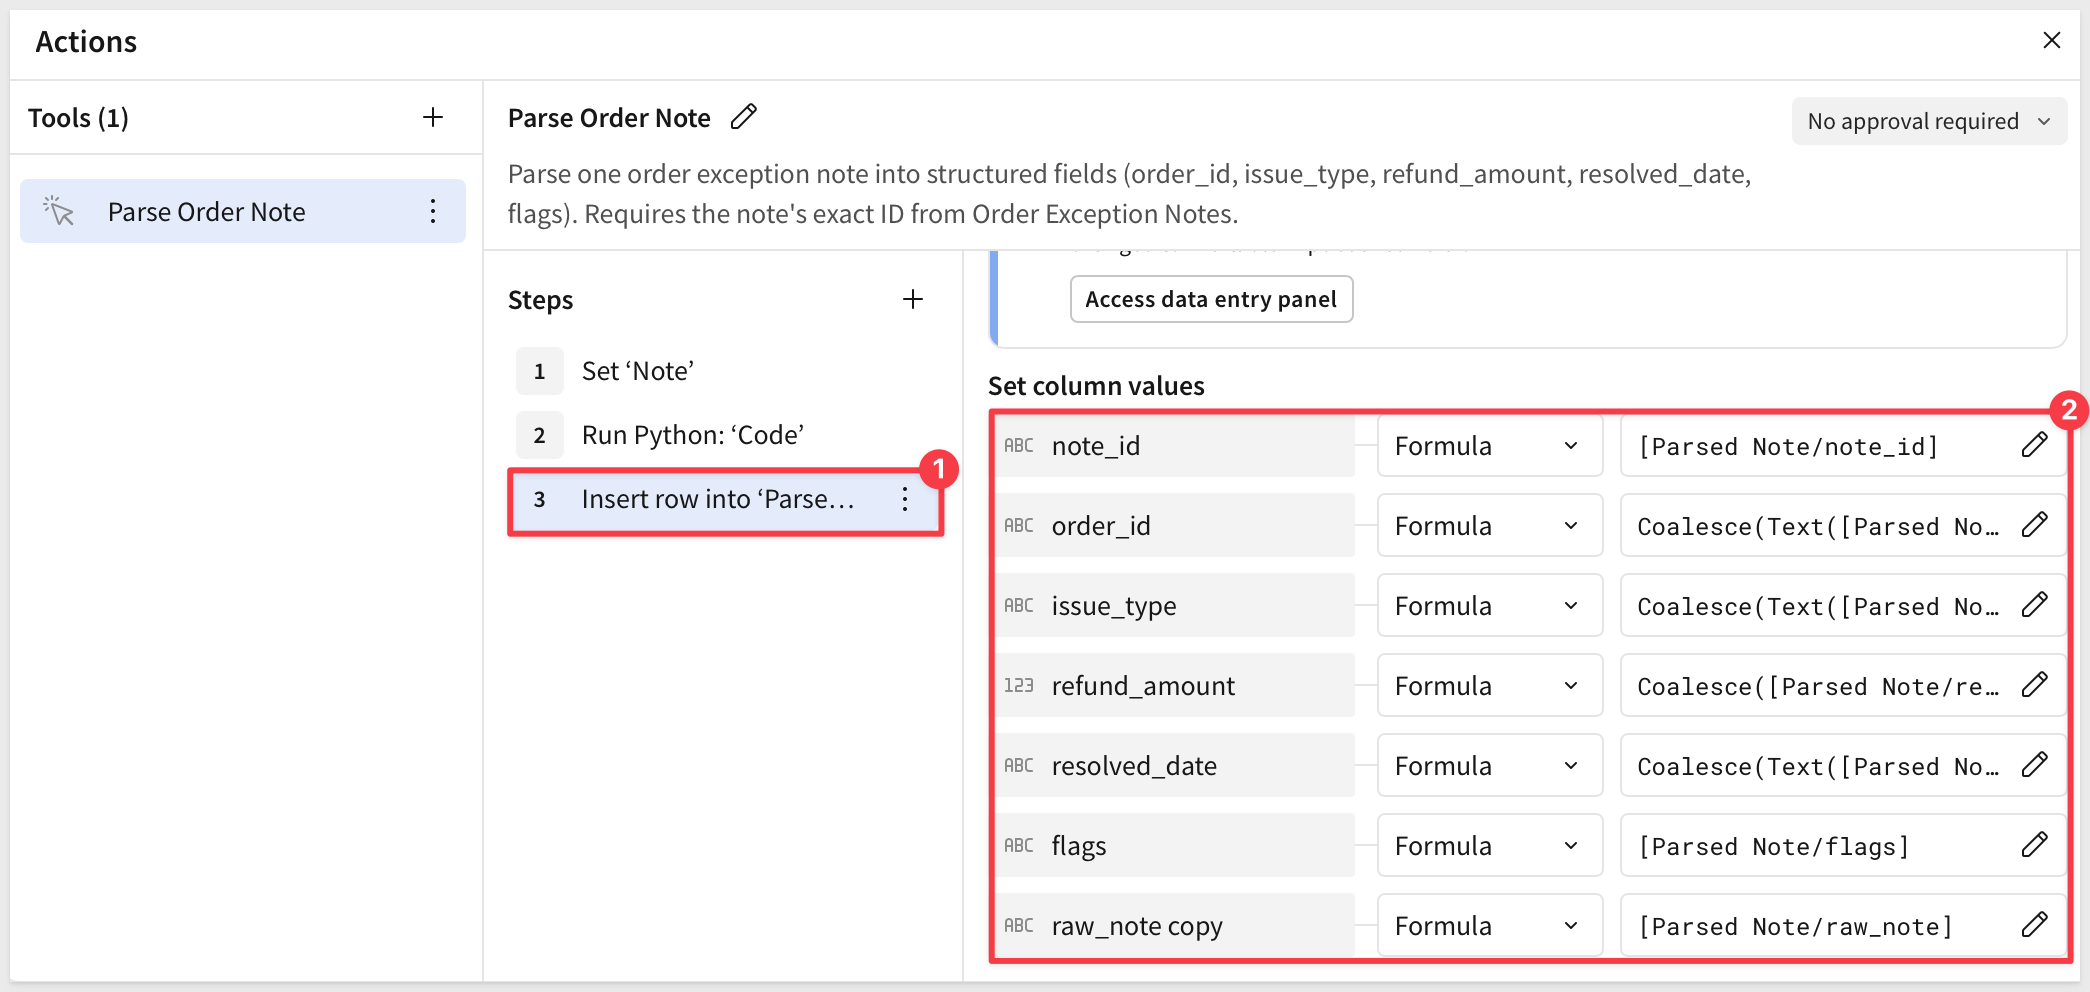
Add a third step: Run an action > Insert row > Into: Parsed Notes Log.
Map each column the same way the button's version does — Formula, referencing Parsed Note's matching column — with one addition: wrap any column that can come back null (issue_type, refund_amount, resolved_date) in Coalesce, so a missing value inserts as blank instead of failing the row.
The text columns also need a Text() wrapper around the reference itself — Parsed Note's order_id/issue_type/resolved_date mix strings and blanks, so Coalesce needs them read explicitly as text before it can compare them against a plain "":
Value:              Formula:
note_id:            [Parsed Note/note_id]
order_id:           Coalesce(Text([Parsed Note/order_id]), "")
issue_type:         Coalesce(Text([Parsed Note/issue_type]), "")
refund_amount:      Coalesce([Parsed Note/refund_amount], 0)
resolved_date:      Coalesce(Text([Parsed Note/resolved_date]), "")
flags:              [Parsed Note/flags]
raw_note            [Parsed Note/raw_note]
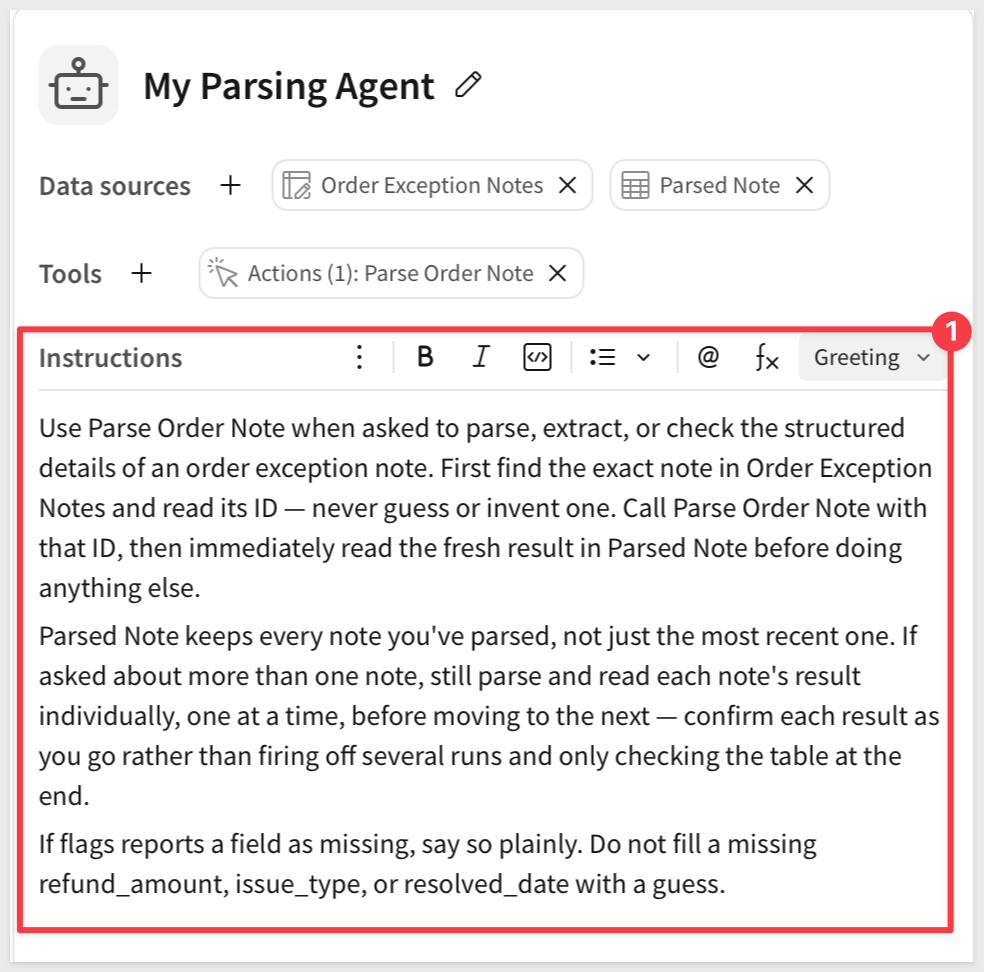
Revise the Instructions tab, adding:
Use Parse Order Note when asked to parse, extract, or check the structured details of an order exception note. First find the exact note in Order Exception Notes and read its ID — never guess or invent one. Call Parse Order Note with that ID, then immediately read the fresh result in Parsed Note before doing anything else.

Parsed Note keeps every note you've parsed, not just the most recent one. If asked about more than one note, still parse and read each note's result individually, one at a time, before moving to the next — confirm each result as you go rather than firing off several runs and only checking the table at the end.

If flags reports a field as missing, say so plainly. Do not fill a missing refund_amount, issue_type, or resolved_date with a guess.
Click Save and then Publish.
The tool now has two callers: a button a person clicks, and an agent that has to look up its own input first. The next section tests the one thing only the second caller can do.
The previous section already proved the button works. This section proves something the button structurally can't easily do: an agent checking several notes in one request and reporting on all of them, not just running the same single lookup a person could do by hand.
Move the result into view
We want to watch the result build as the agent works, not switch pages to check it after every answer.
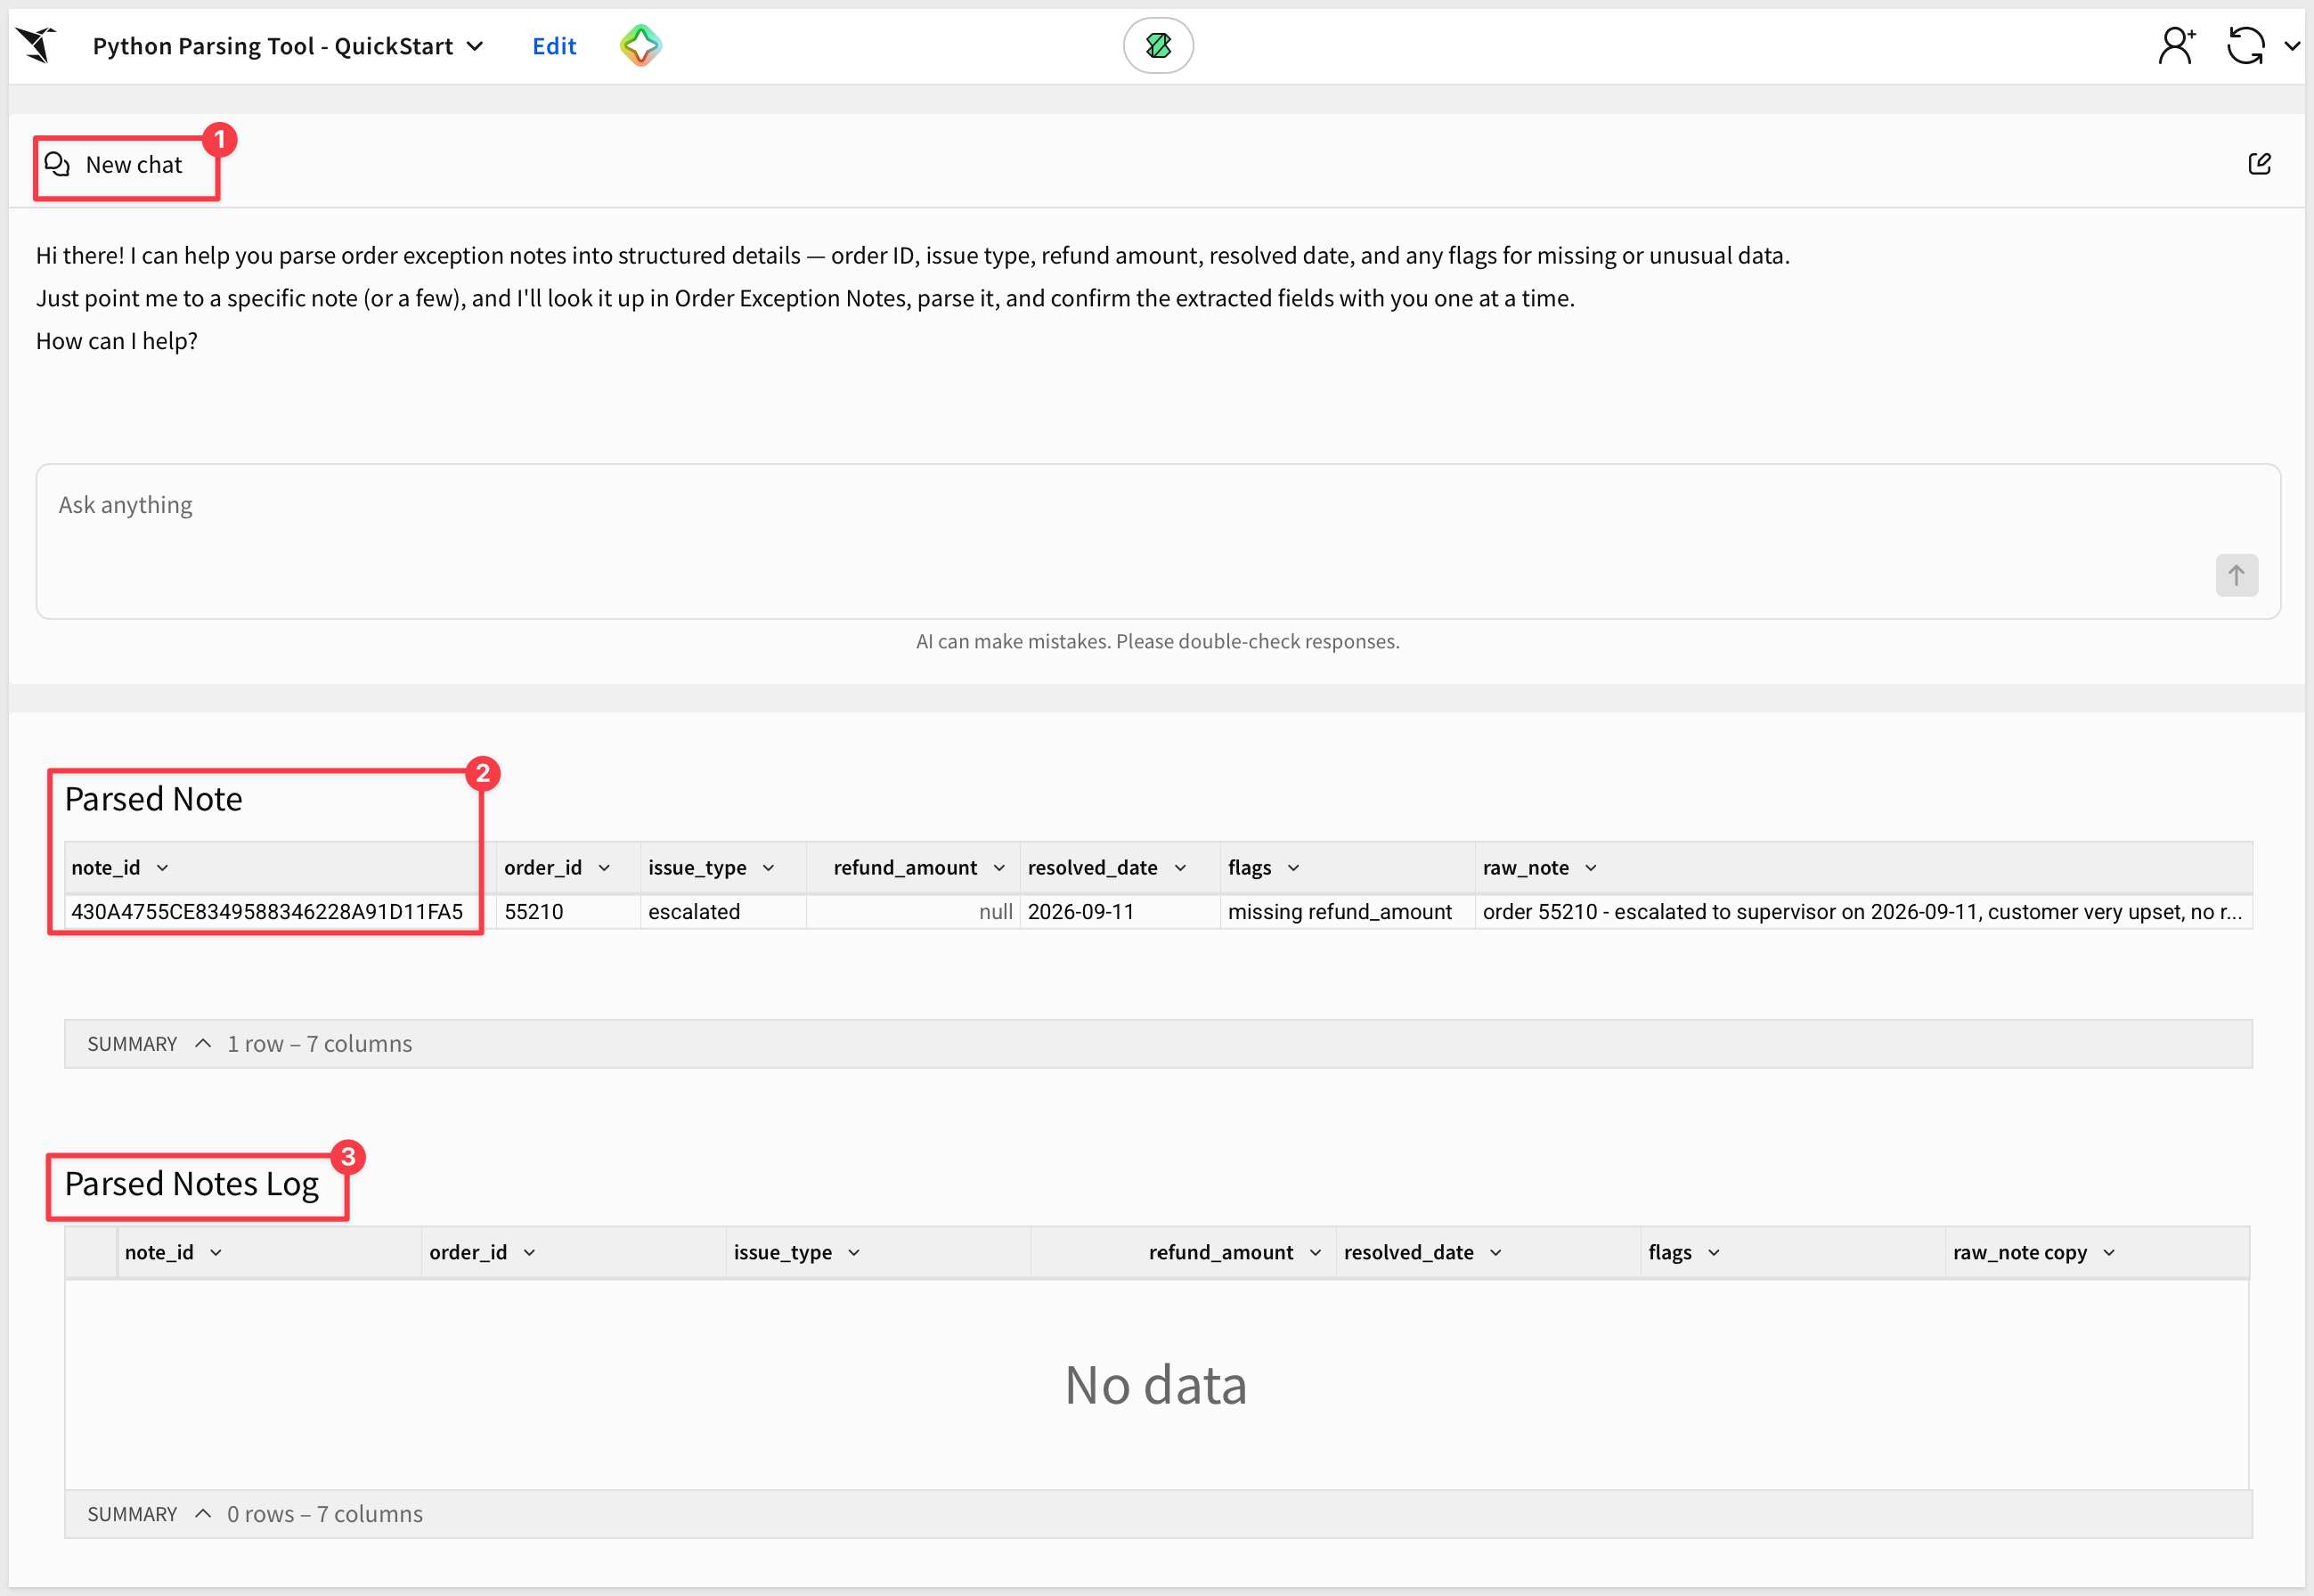
Move both Parsed Note and Parsed Notes Log tables from the Parser page to the Chat page, below the chat element.
Parsed Note shows the latest single result; Parsed Notes Log is the one that should visibly grow, row by row, as the agent works through several notes.
Order Exception Notes stays on Parser — it's static, the agent only reads from it, so there's nothing to watch happen there in real time.
Let's also delete the two rows in Parsed Notes Log before the next test. It's a plain, non-deduplicated log, so whatever's already in it from earlier testing would otherwise mix in with the next result.
Click Publish.
Confirm the agent's version works
On the Chat page, ask:
Parse each of the order exception notes, one at a time, and tell me what you found for each.
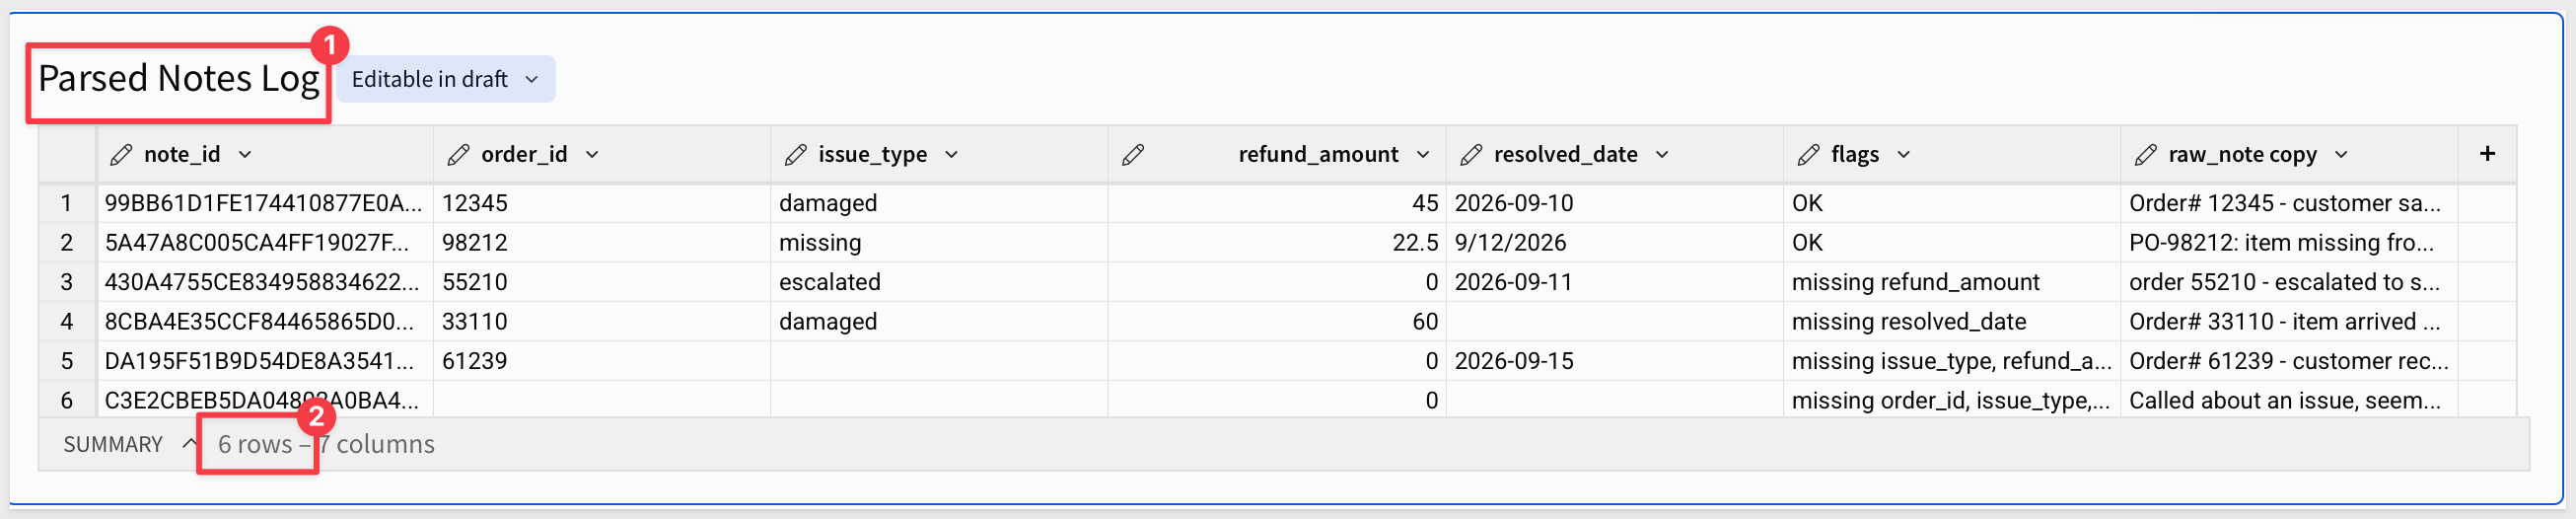
Confirm the agent works through all six notes individually — reading each result before moving to the next, exactly as its Instructions say — and reports back on every one, not just the first it finds. Parsed Notes Log should end up with all six rows, each with its own flags.
We gave an agent a Python tool — first proving it works as a plain workbook feature a person can click, then handing the exact same tool to an agent and proving something the click alone can't: looping it across every note in one request and building a running log as it goes.
Core concepts
- A Python element is a callable tool, not a special kind of calculation — it sits on the same
Toolssurface as an action or a warehouse specialist; the agent doesn't get a back door into it, it just supplies the same control value a person would set by hand - The button and the agent are the same tool with one real difference — a person already picked a note from the dropdown before clicking; the agent can't click a dropdown, so its version needs an extra step first: reading the note's ID off its own data, then setting the control itself
- Multiple fallback patterns tried in sequence is the actual reason this is a script and not a formula — a single formula commits to one pattern; parsing free text that doesn't follow one consistent format needs several patterns and a way to fall back cleanly when the first one doesn't match
Key takeaways
An agent's Instructions can say "read the result" — that's meaningless without a Data source:
- Running an action that changes a table doesn't hand the agent that table's contents
- That's why
Parsed Noteis attached as a second data source alongsideOrder Exception Notes— without it, the agent has no way to see what its own action just produced
A single overwritten result isn't a history:
- Sigma blocks a Python element from reading its own output back in — that's a circular dependency, not something to work around inside the element
- Building a real running log needed a genuinely separate table and the same
Insert rowmechanic from earlier in this series, not a Python-side trick
Looping is the actual reason to give an agent a Python tool instead of a button:
- Asked to parse every note individually, the agent worked through all six, reading each result before moving to the next, exactly the way its Instructions said to
- A button proves the calculation works once; only the agent proves it works across everything you ask about, in a single request
Extending an agent into Python doesn't loosen control over what runs:
- The connection Python runs on still needs Admin-level Snowflake grants, the same governance any other write-capable connection needs
- Nothing about calling Python from an agent skips that — it's the same script, running under the same access, whichever caller triggered it
Next steps
Explore the rest of the Agents series.
Additional Resource Links
Blog
Community
Help Center
QuickStarts
Be sure to check out all the latest developments at Sigma's First Friday Feature page!