This QuickStart demonstrates how to give a Sigma agent access to a Snowflake Cortex Agent as a tool, powered by Snowflake Cortex for advanced warehouse-native analysis.
A Sigma agent that only reasons over a single data source you gave it directly can only go so far. Warehouse platforms increasingly ship their own native AI on top of their own semantic layer — Cortex Analyst on Snowflake, Genie on Databricks, and more being added as warehouses ship them.
Sigma is built to call whichever ones your organization already runs, through the same Tools > Warehouse agent picker.
Here, we'll build a Cortex Agent backed by its own semantic view in Snowflake, then attach it to a Sigma agent as a tool the agent can call on its own; the same pattern applies to Genie or any other warehouse agent.
See Use warehouse agents with Sigma for the current list.
Along the way you'll learn how to:
- Build a Snowflake semantic view and a Cortex Agent from a sample dataset
- Enable Cortex as an AI provider in Sigma and confirm the Cortex Agent is discoverable
- Attach a warehouse agent as a Tool on a Sigma agent — a different picker from Data sources
- Test how your agent decides between answering from its own data and calling the specialist
For more information on Sigma's product release strategy, see Sigma product releases
If something doesn't work as expected, here's how to contact Sigma support
Target Audience
Sigma workbook authors and admins building agents that need more than what's in one governed table. For a closer look at the basics of creating an agent, see Agents 01: Building Your First Sigma Agent — but this QuickStart includes everything you need to follow along on its own.
Prerequisites
- Any modern browser is acceptable.
- Access to your Sigma environment with permission to create and manage agents.
- A Snowflake connection where your role can create a schema, a table, and a semantic view, and has the
SNOWFLAKE.CORTEX_USERdatabase role. - Some familiarity with Sigma is assumed. Not all steps will be shown, as the basics are assumed to be understood.

A Cortex Agent needs two things underneath it: a data layer (a plain SQL view) and a semantic layer on top of it (a semantic view with business definitions Cortex can reason about). We'll build both, then create the Cortex Agent that uses them.
Create the SQL view
In Snowflake, navigate to Projects and open a new SQL worksheet.
Run the following to create the data layer:
USE ROLE ACCOUNTADMIN;
USE WAREHOUSE COMPUTE_WH;

CREATE DATABASE IF NOT EXISTS QUICKSTARTS;
CREATE SCHEMA IF NOT EXISTS QUICKSTARTS.AGENTS_DEMO;

CREATE OR REPLACE VIEW QUICKSTARTS.AGENTS_DEMO.SALES_DATA_VIEW AS
SELECT
    o.O_ORDERKEY,
    o.O_CUSTKEY,
    o.O_ORDERSTATUS,
    o.O_TOTALPRICE,
    o.O_ORDERDATE,
    o.O_ORDERPRIORITY,
    l.L_QUANTITY,
    l.L_EXTENDEDPRICE,
    l.L_DISCOUNT
FROM SNOWFLAKE_SAMPLE_DATA.TPCH_SF1.ORDERS o
JOIN SNOWFLAKE_SAMPLE_DATA.TPCH_SF1.LINEITEM l
    ON o.O_ORDERKEY = l.L_ORDERKEY;
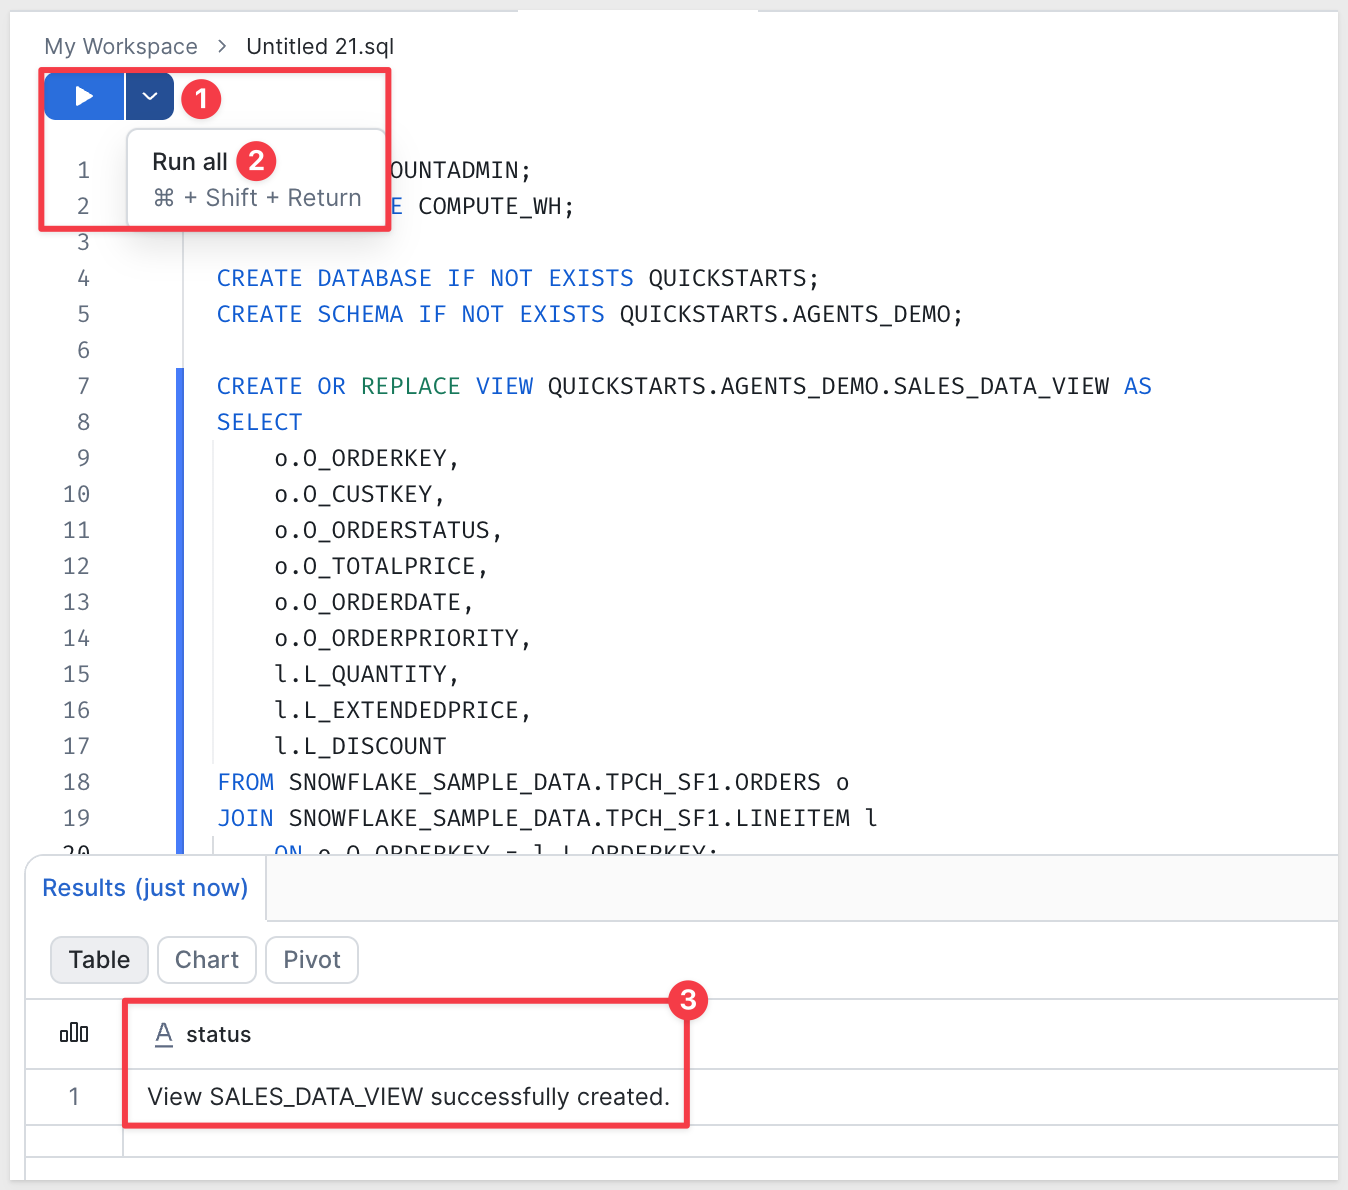
Create the semantic view
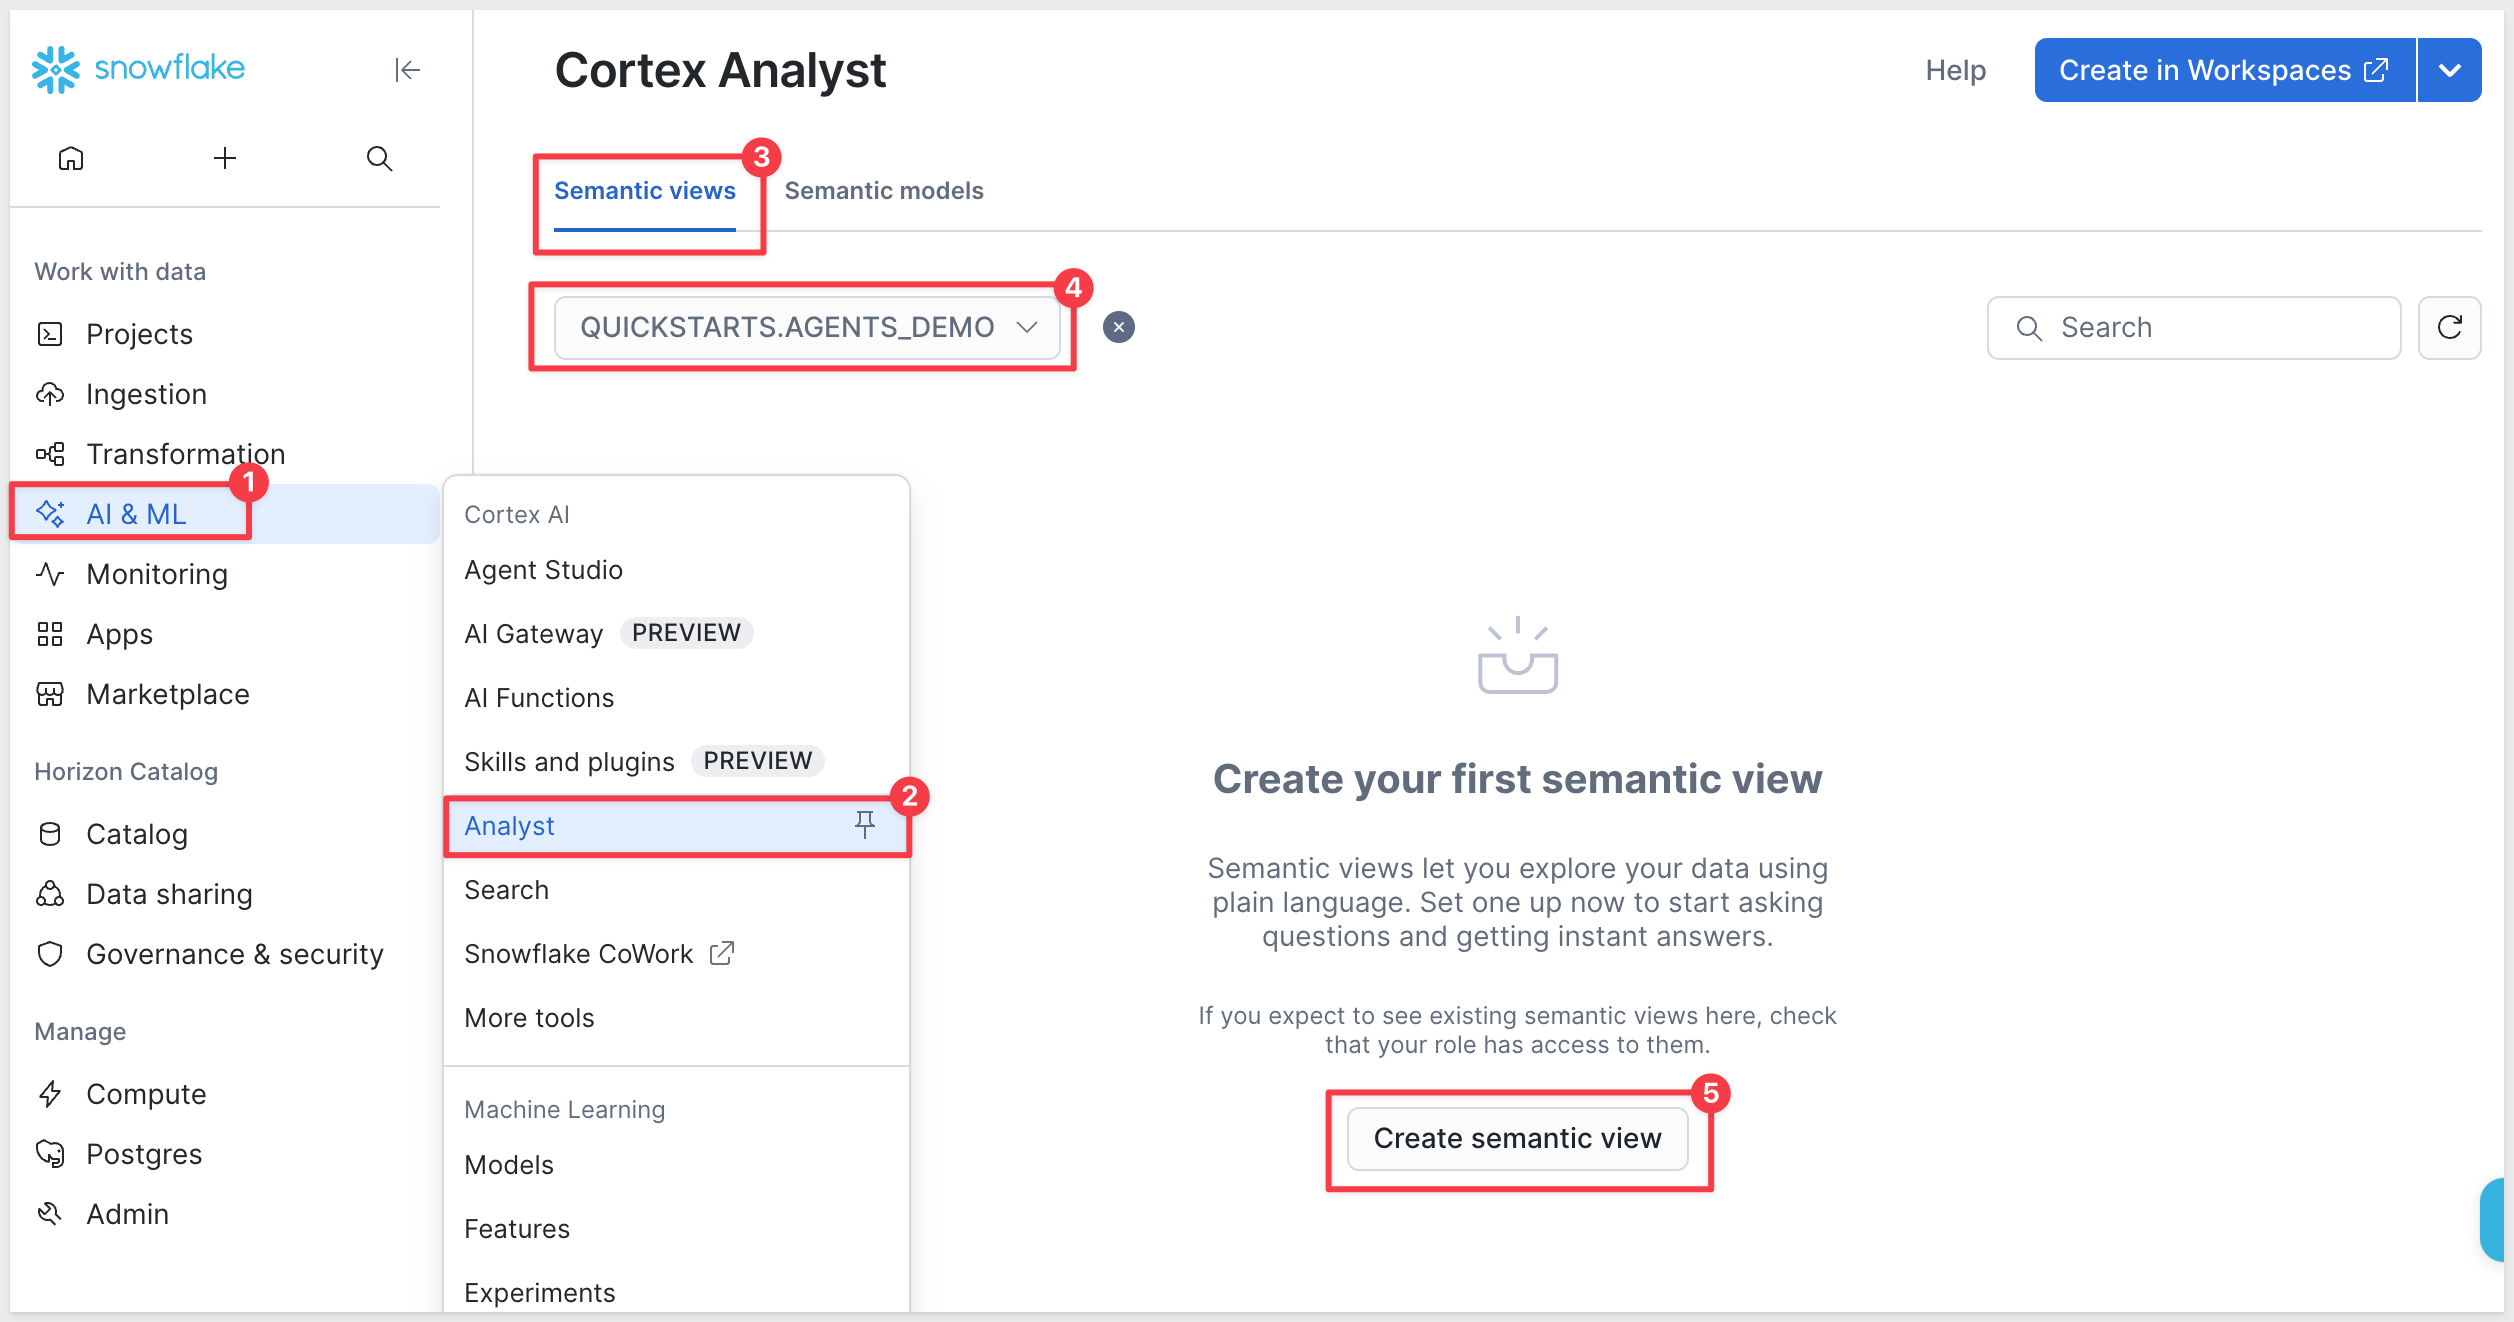
Before starting this step make sure you are using the ACCOUNTADMIN role.
Navigate to AI & ML > Cortex AI > Analyst.
On the Semantic views tab, select the QUICKSTARTS.AGENTS_DEMO database, then click Create semantic view.
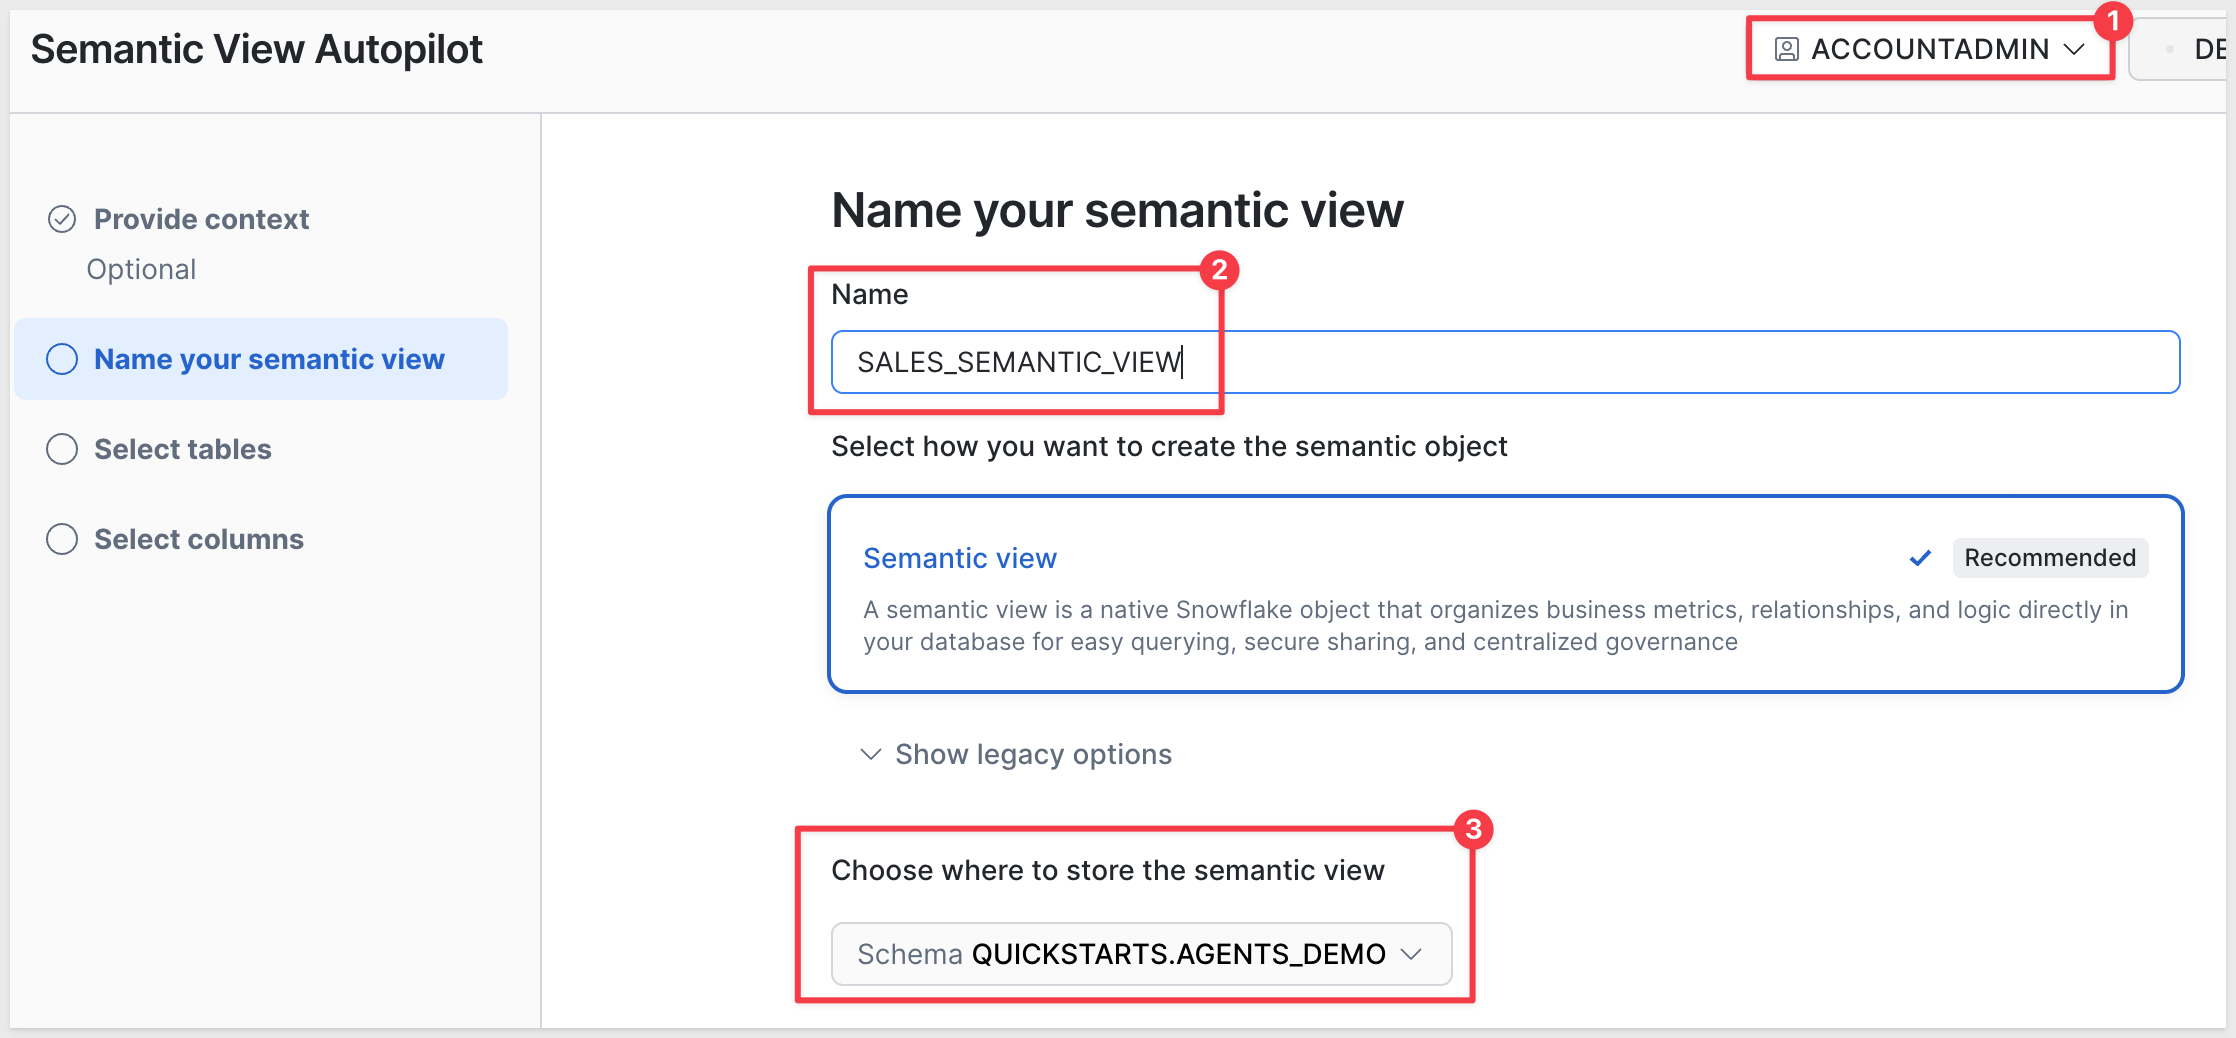
Wizard step 1: Provide context (optional) — skip this by clicking Skip.
Wizard step 2: Name your semantic view — change the permission to ACCOUNTADMIN using the control in the upper right, and set the name to:
SALES_SEMANTIC_VIEW
Click Next.
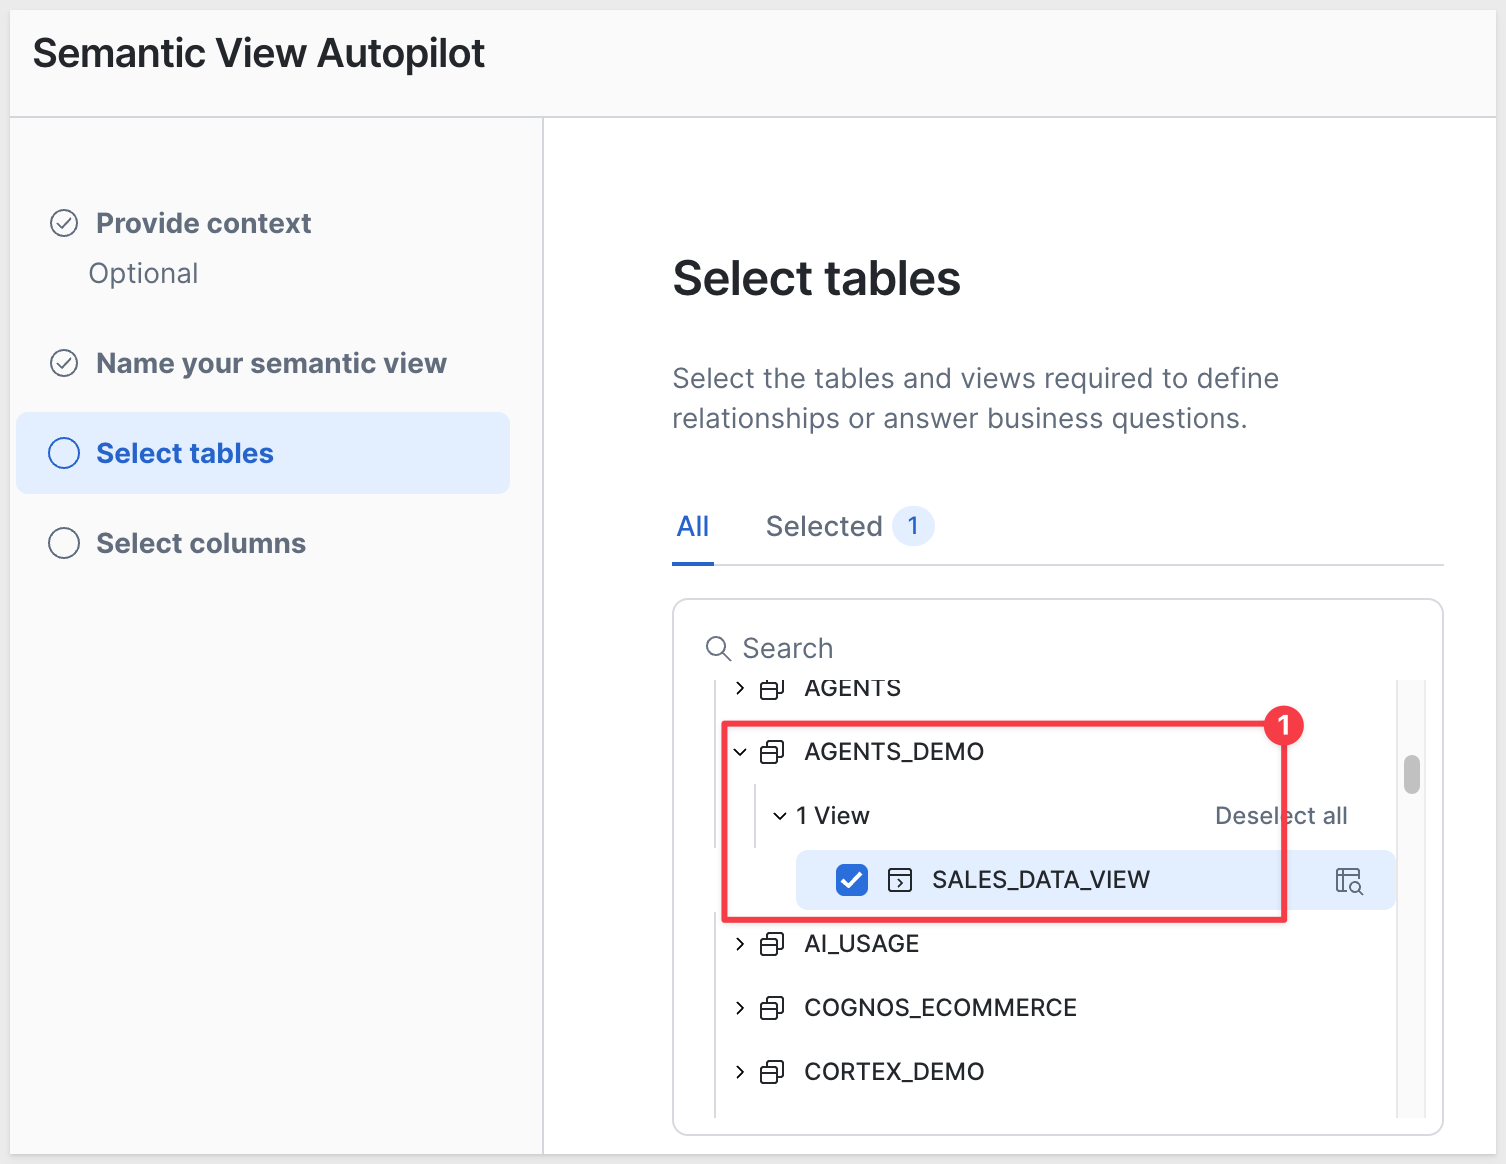
Wizard step 3: Select tables — navigate to QUICKSTARTS > AGENTS_DEMO and check the box next to SALES_DATA_VIEW.
Click Next.
Wizard step 4: Select columns — select all nine columns (O_CUSTKEY, O_ORDERSTATUS, O_TOTALPRICE, O_ORDERDATE, O_ORDERPRIORITY, L_QUANTITY, L_EXTENDEDPRICE, L_DISCOUNT, O_ORDERKEY). Keep both checkboxes selected — add sample values and add descriptions — then click Create.
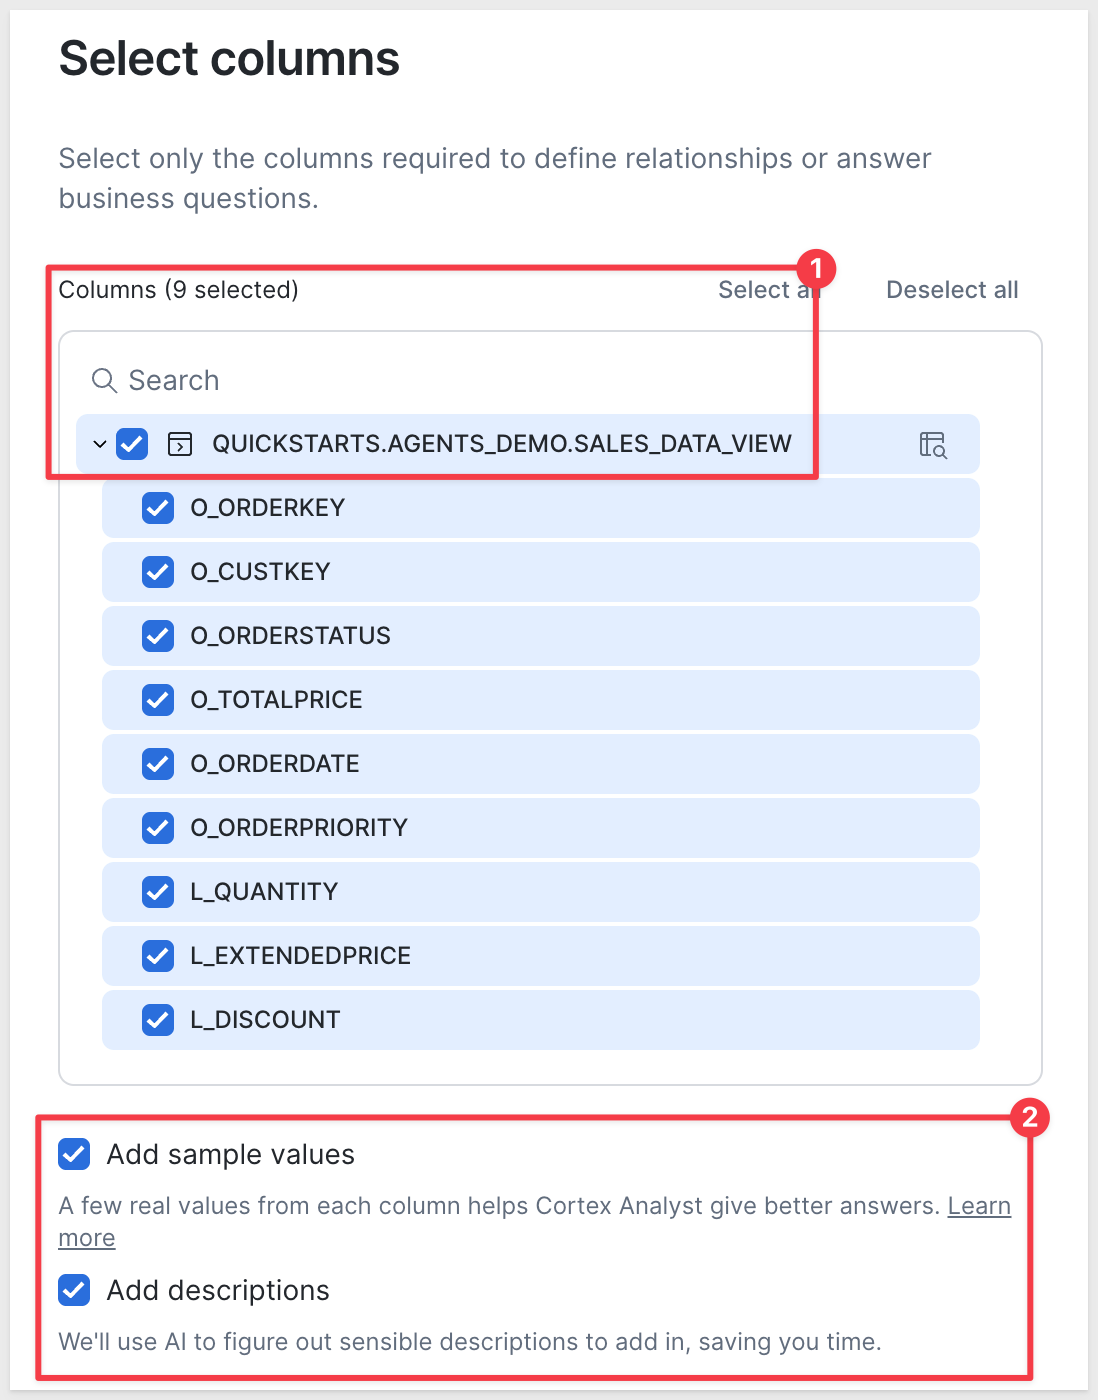
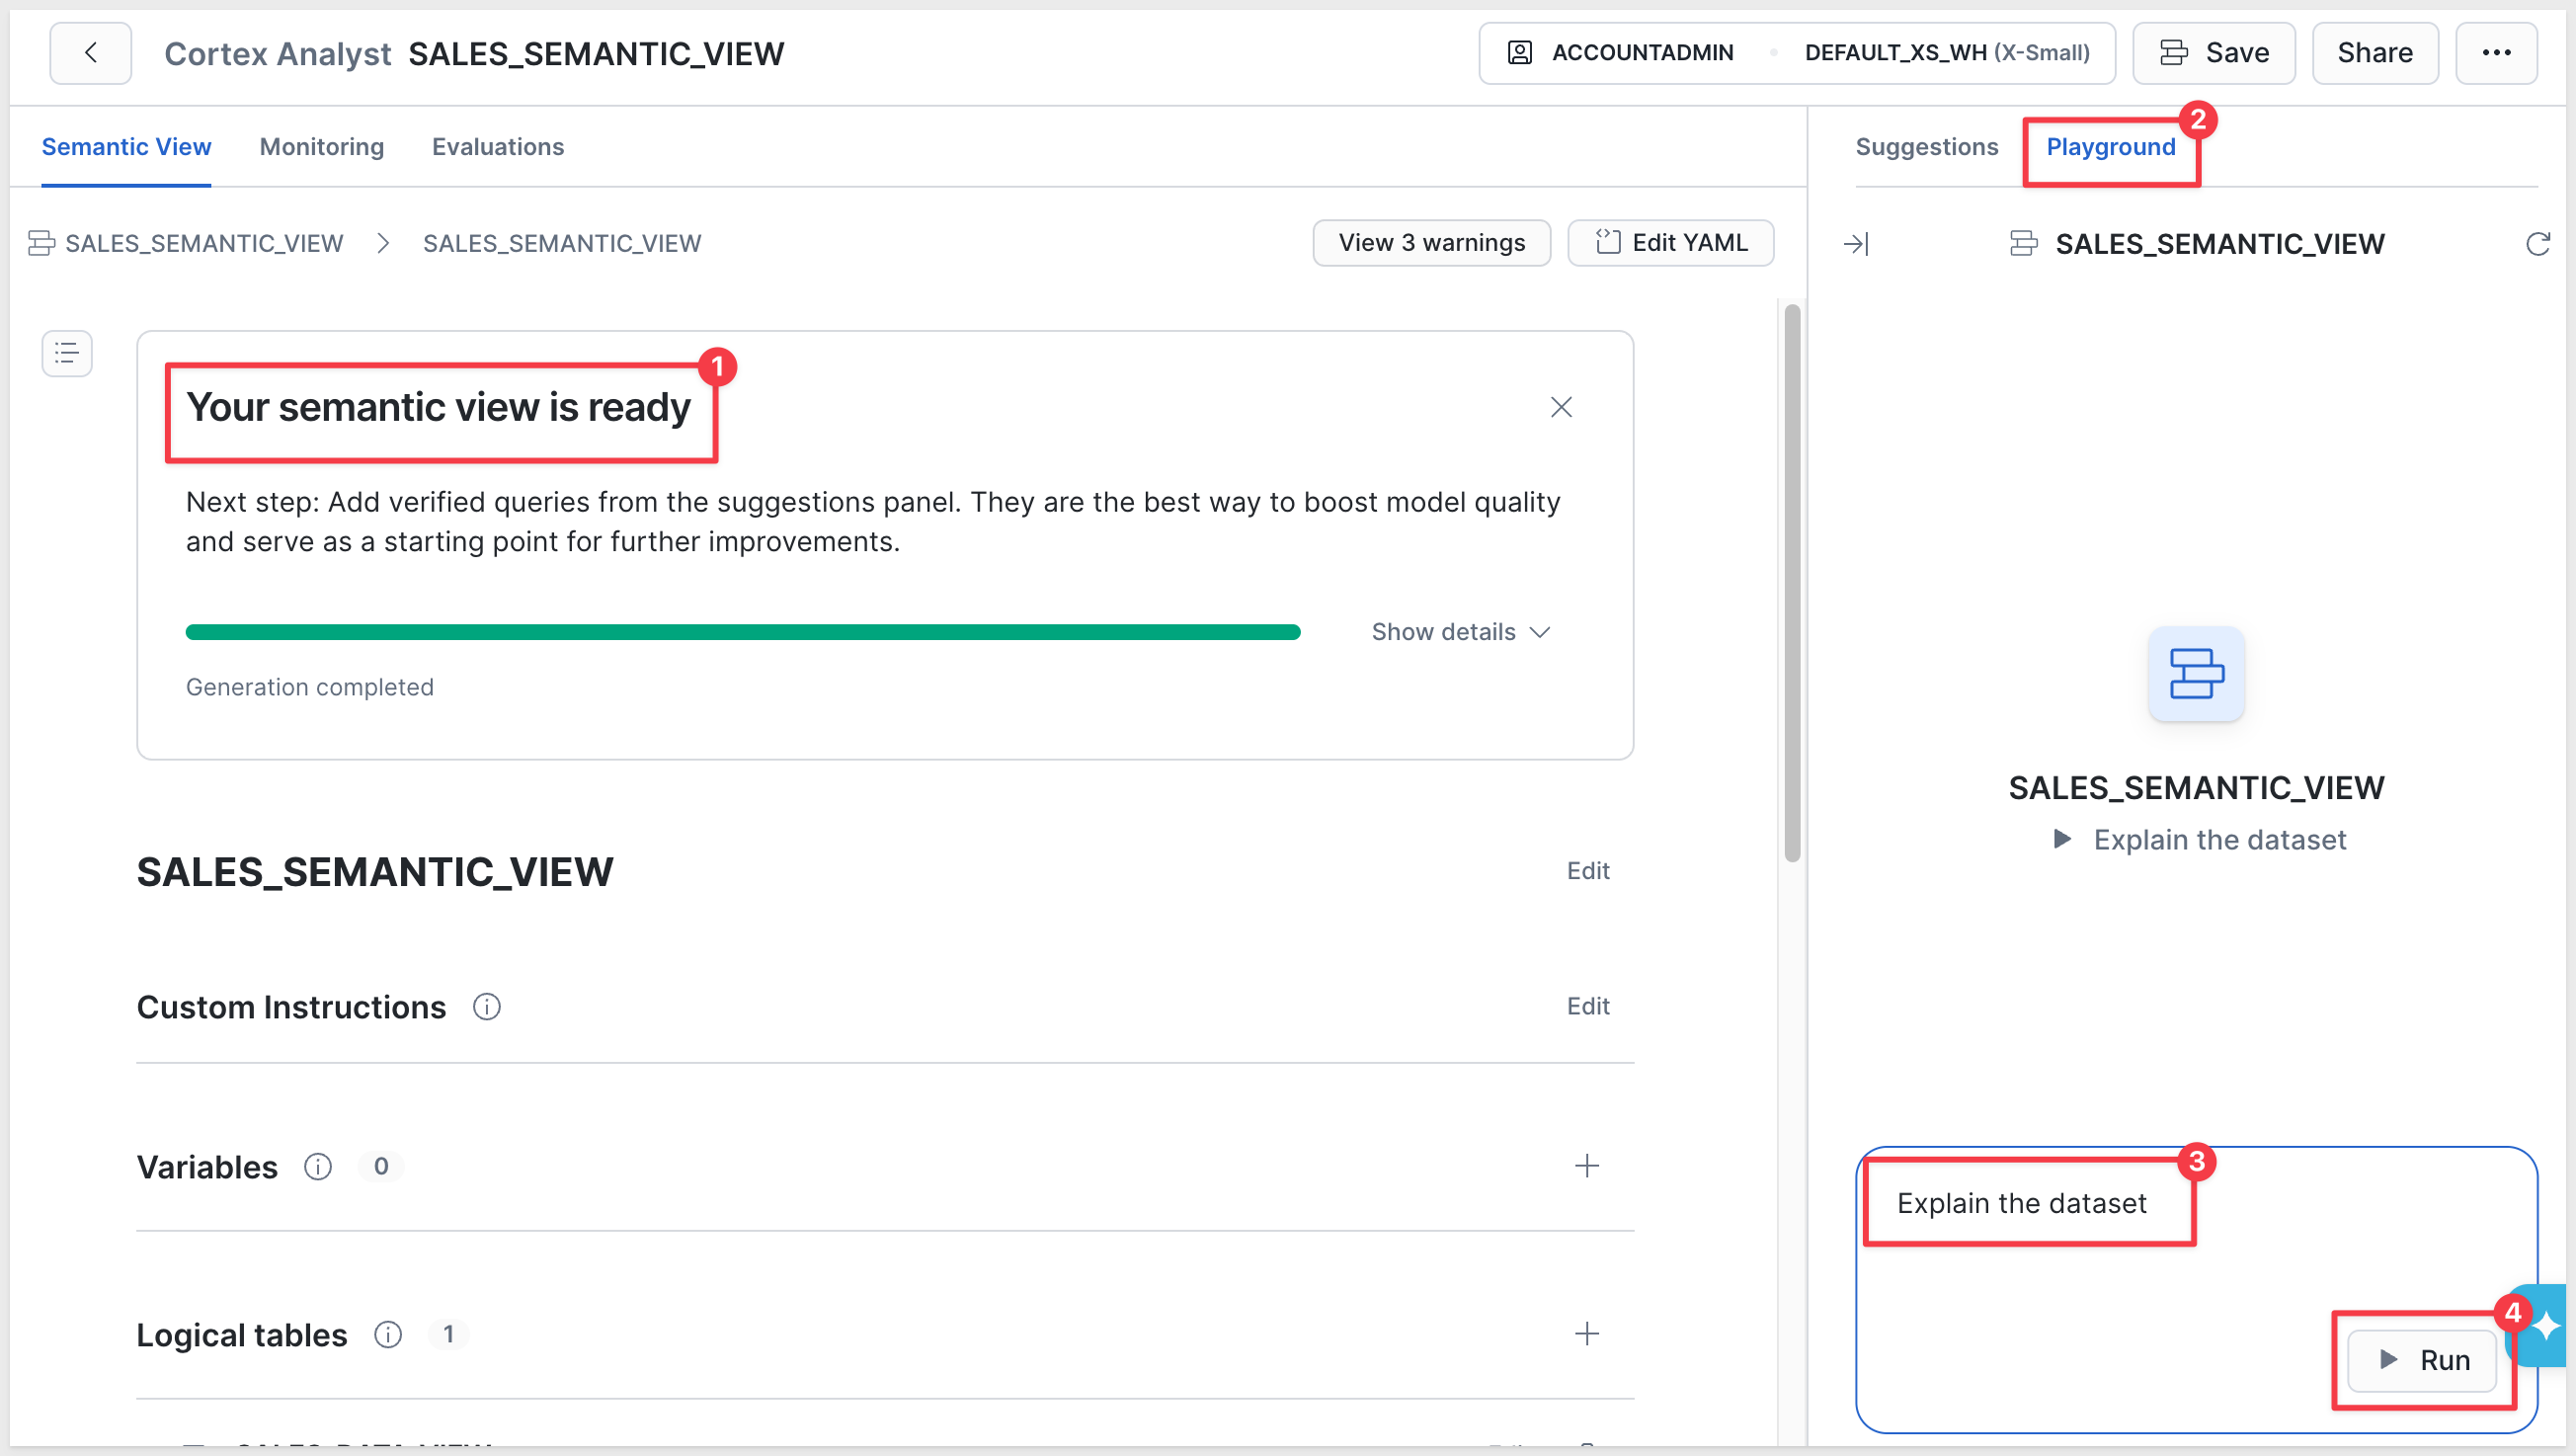
This step can take a few minutes to complete. Once it finishes, use the Playground to confirm it worked:
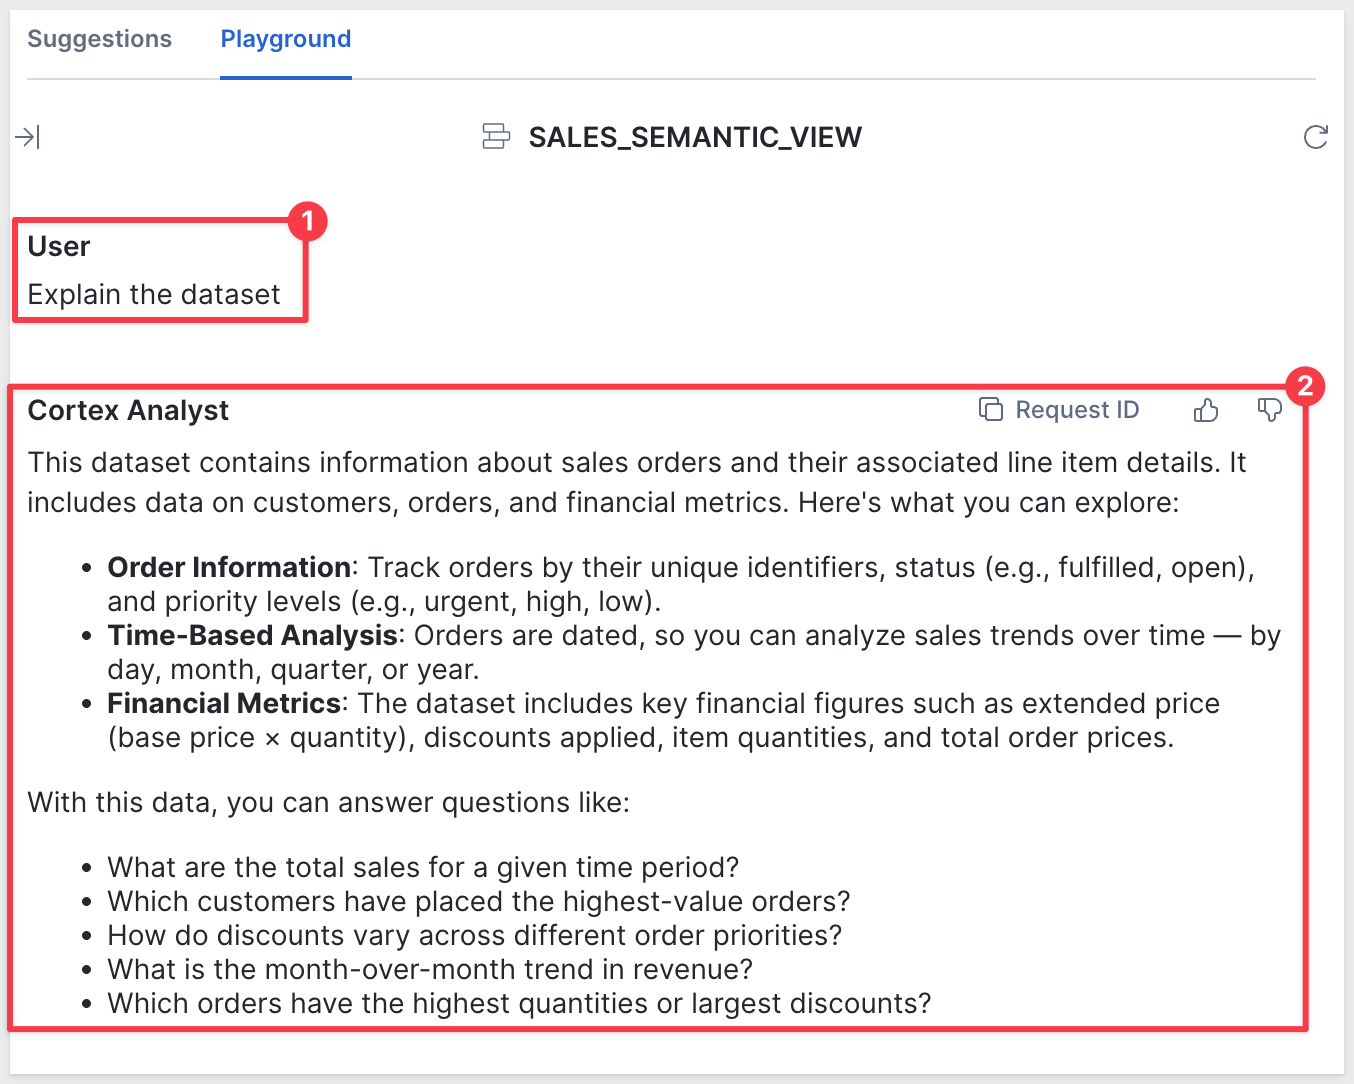
Explain the dataset
A brief explanation back from Cortex means the semantic view is ready. It references SALES_DATA_VIEW as its base table, with business-friendly terms layered on top.
Create the Cortex Agent
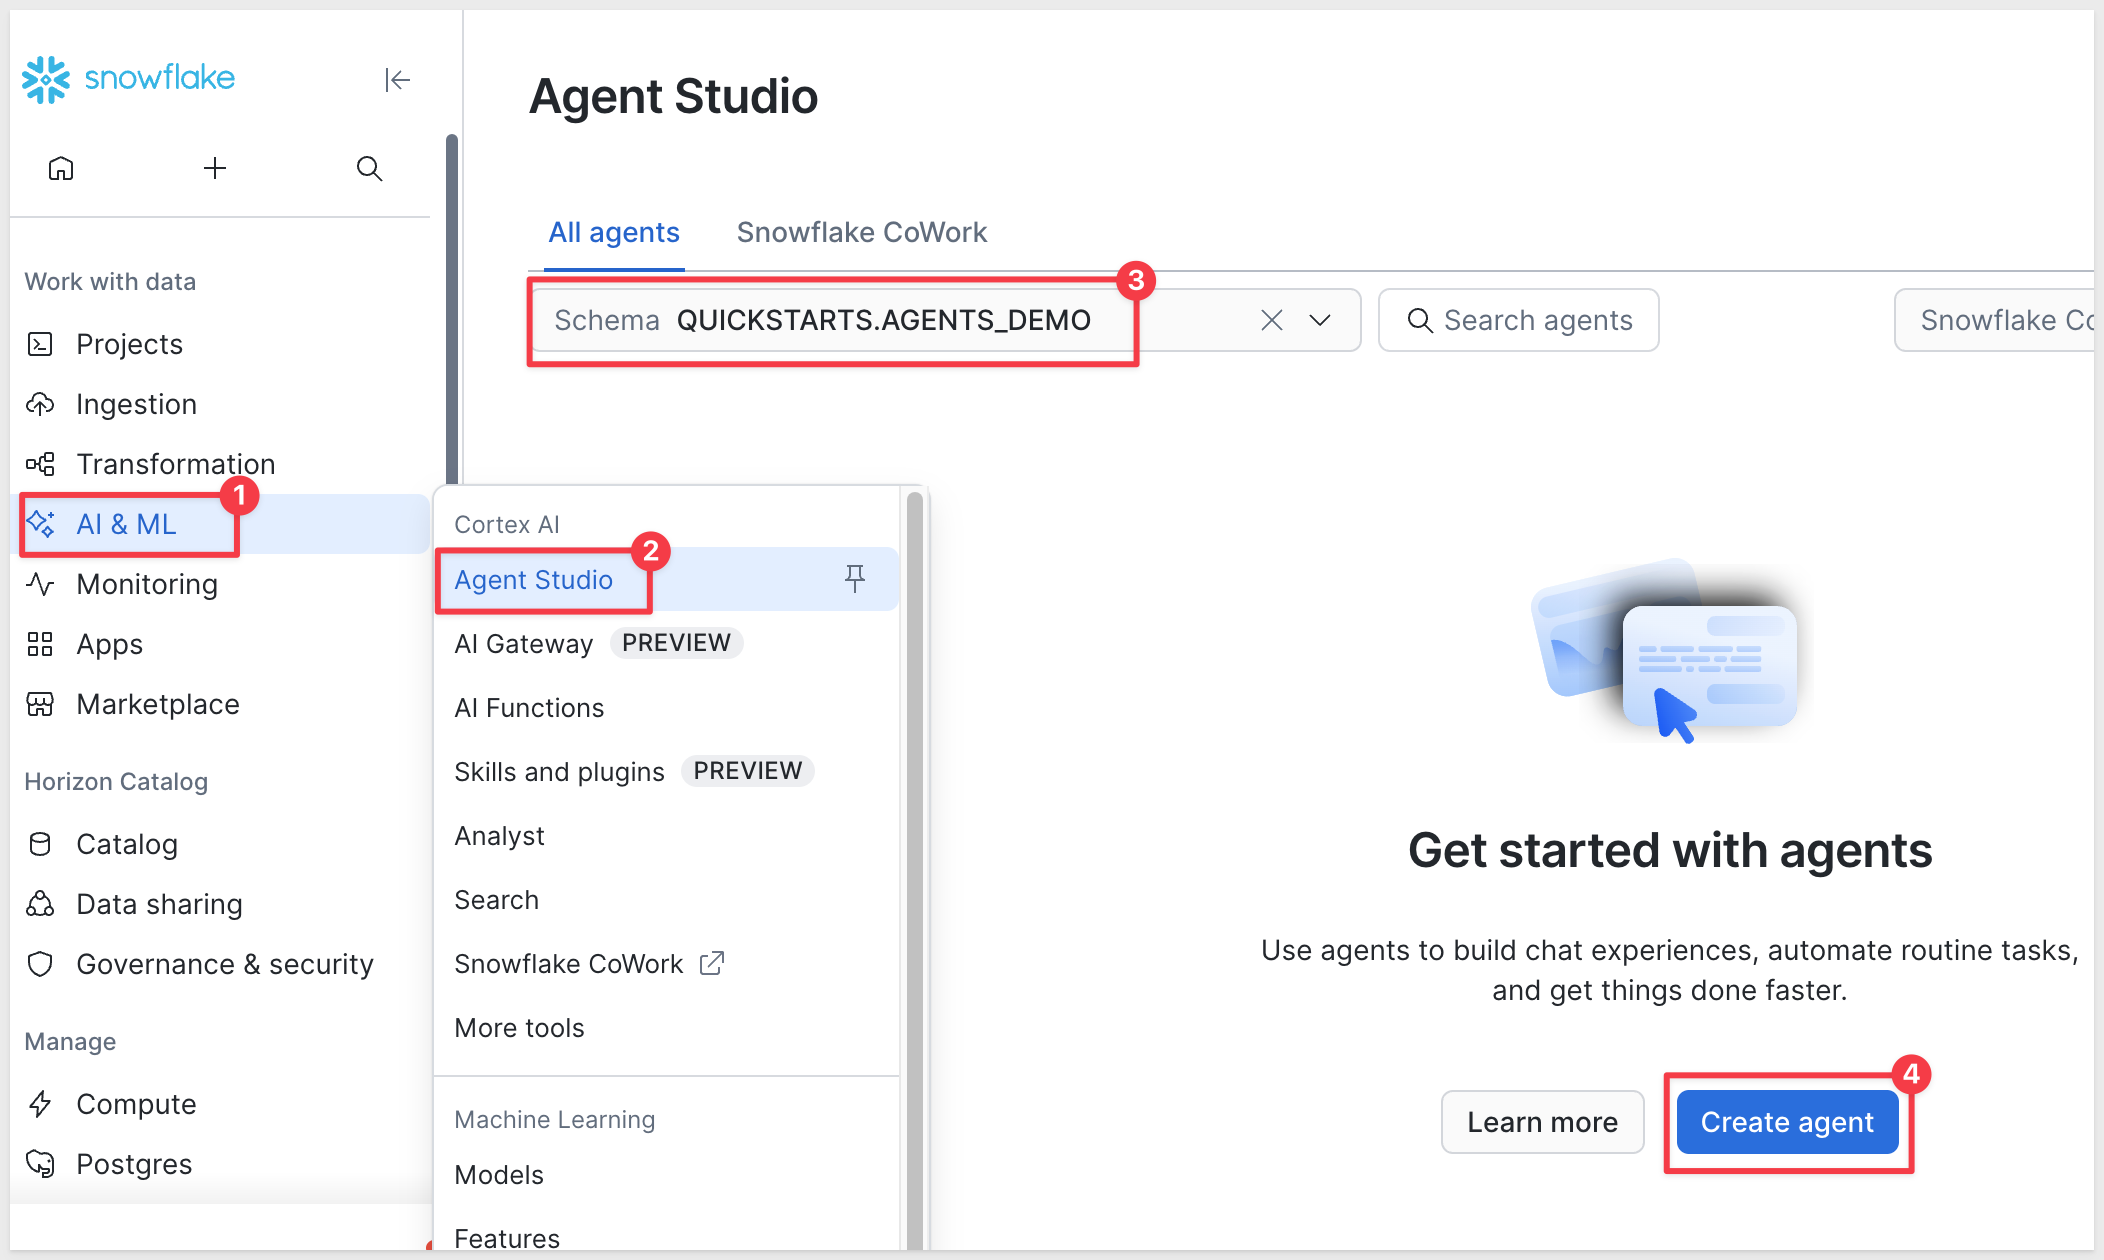
Navigate to AI & ML > Cortex AI > Agent Studio.
For Database and schema, restrict it to QUICKSTARTS.AGENTS_DEMO.
Click Create agent:
Select the database and schema again and set the Agent object name to:
SALES_ANALYST
Override the Display name to something more specific:
QuickStart Sales Analyst
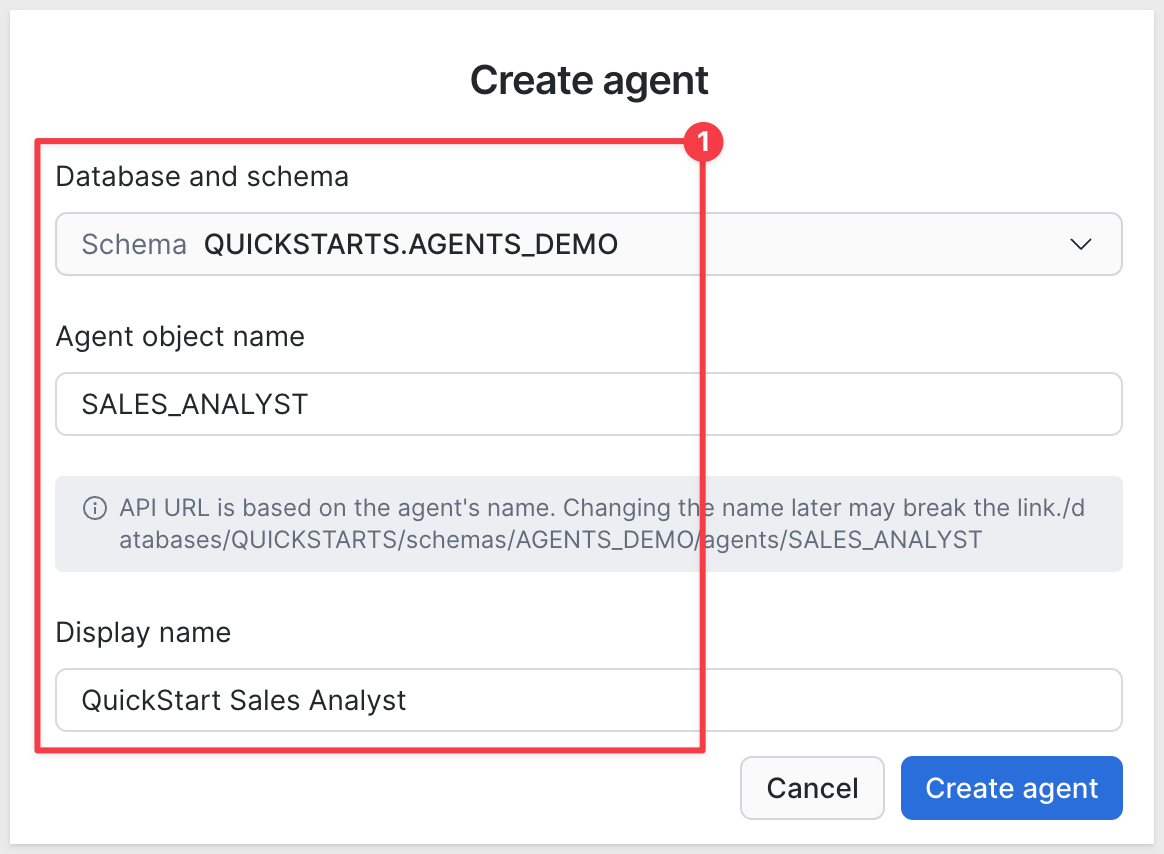
Click Create agent.
This opens the new agent's Overview tab with a guided setup checklist, Get your agent ready with CoCo. Skip this — it walks through the same setup conversationally, but the Configuration tab gets there more directly.
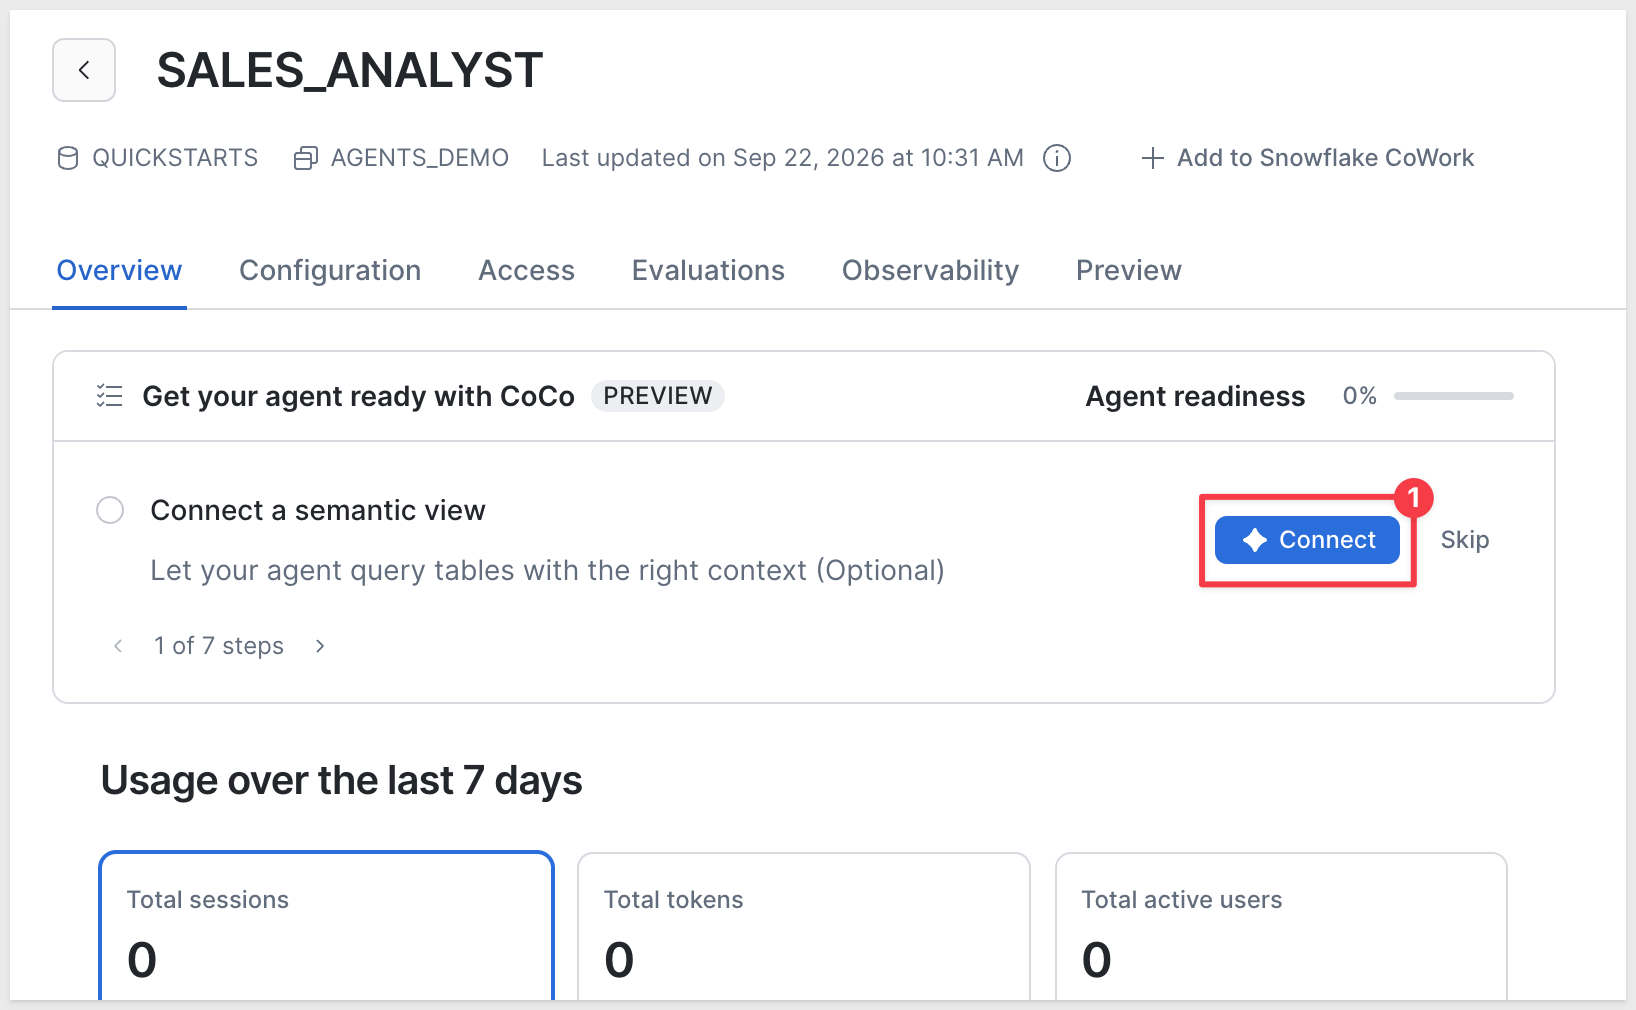
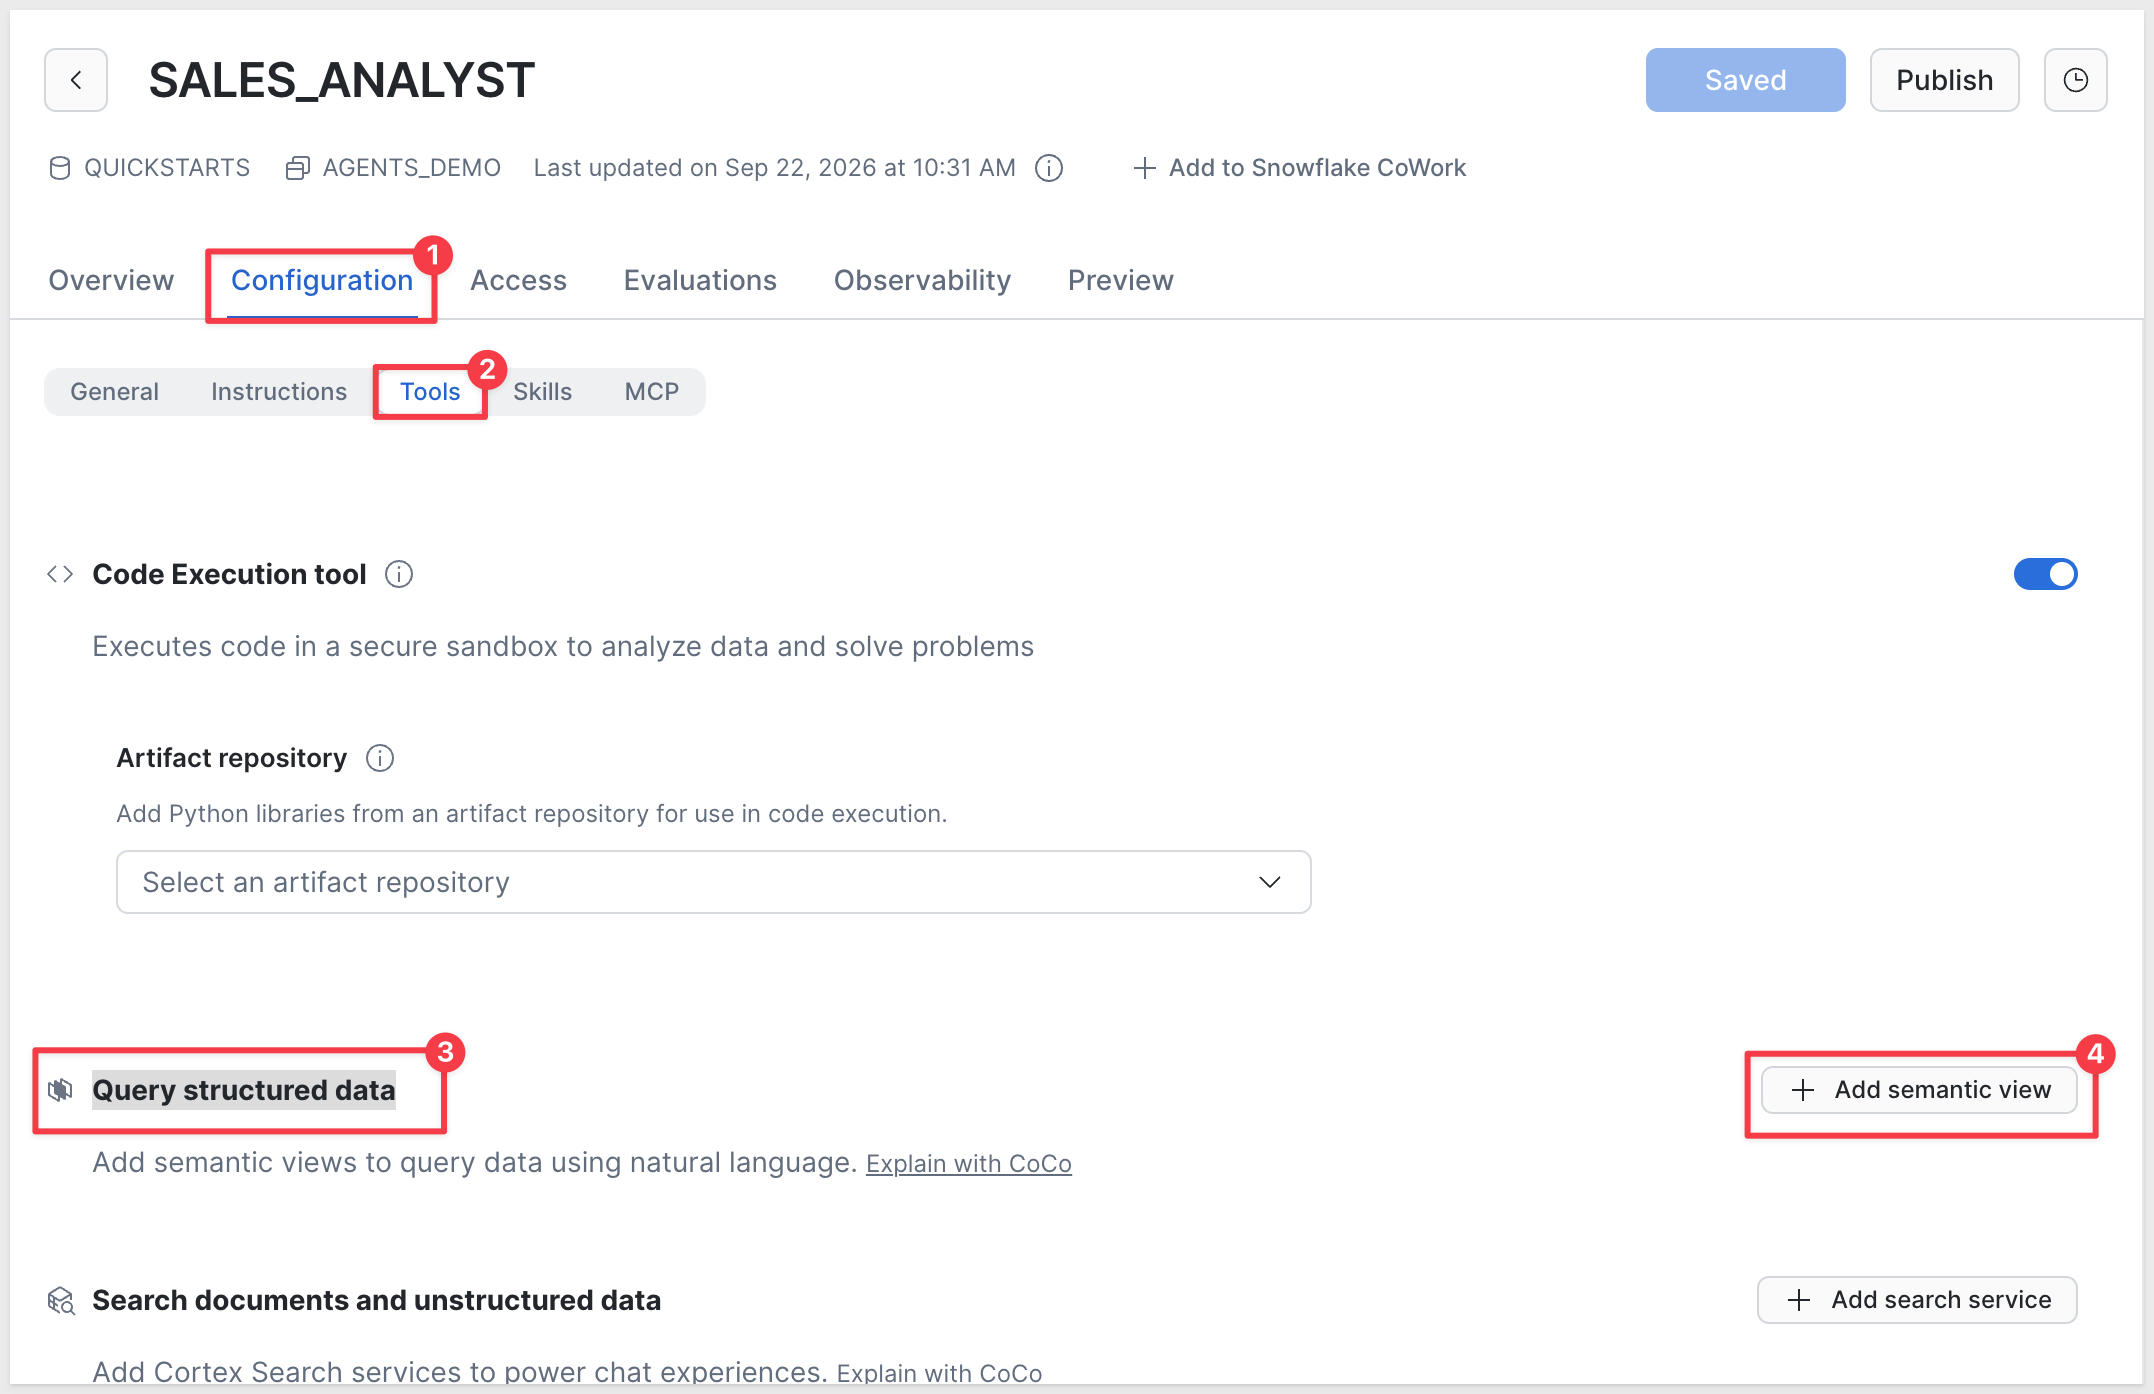
Open the Configuration tab, then its Tools sub-tab.
Scroll down to find Query structured data and click the + Add semantic view button:
This opens the Add tool: Cortex Analyst modal.
Under Cortex Analyst, set Schema to QUICKSTARTS.AGENTS_DEMO, then select SALES_SEMANTIC_VIEW from the view picker below it.
Under Tool details, set the Name to:
sales_data_analysis
Set the Description to:
Use this tool for all questions about orders, customers, revenue, and sales patterns
Leave Warehouse on User's default unless your organization requires queries to run on a specific warehouse. Leave Query timeout at its default.
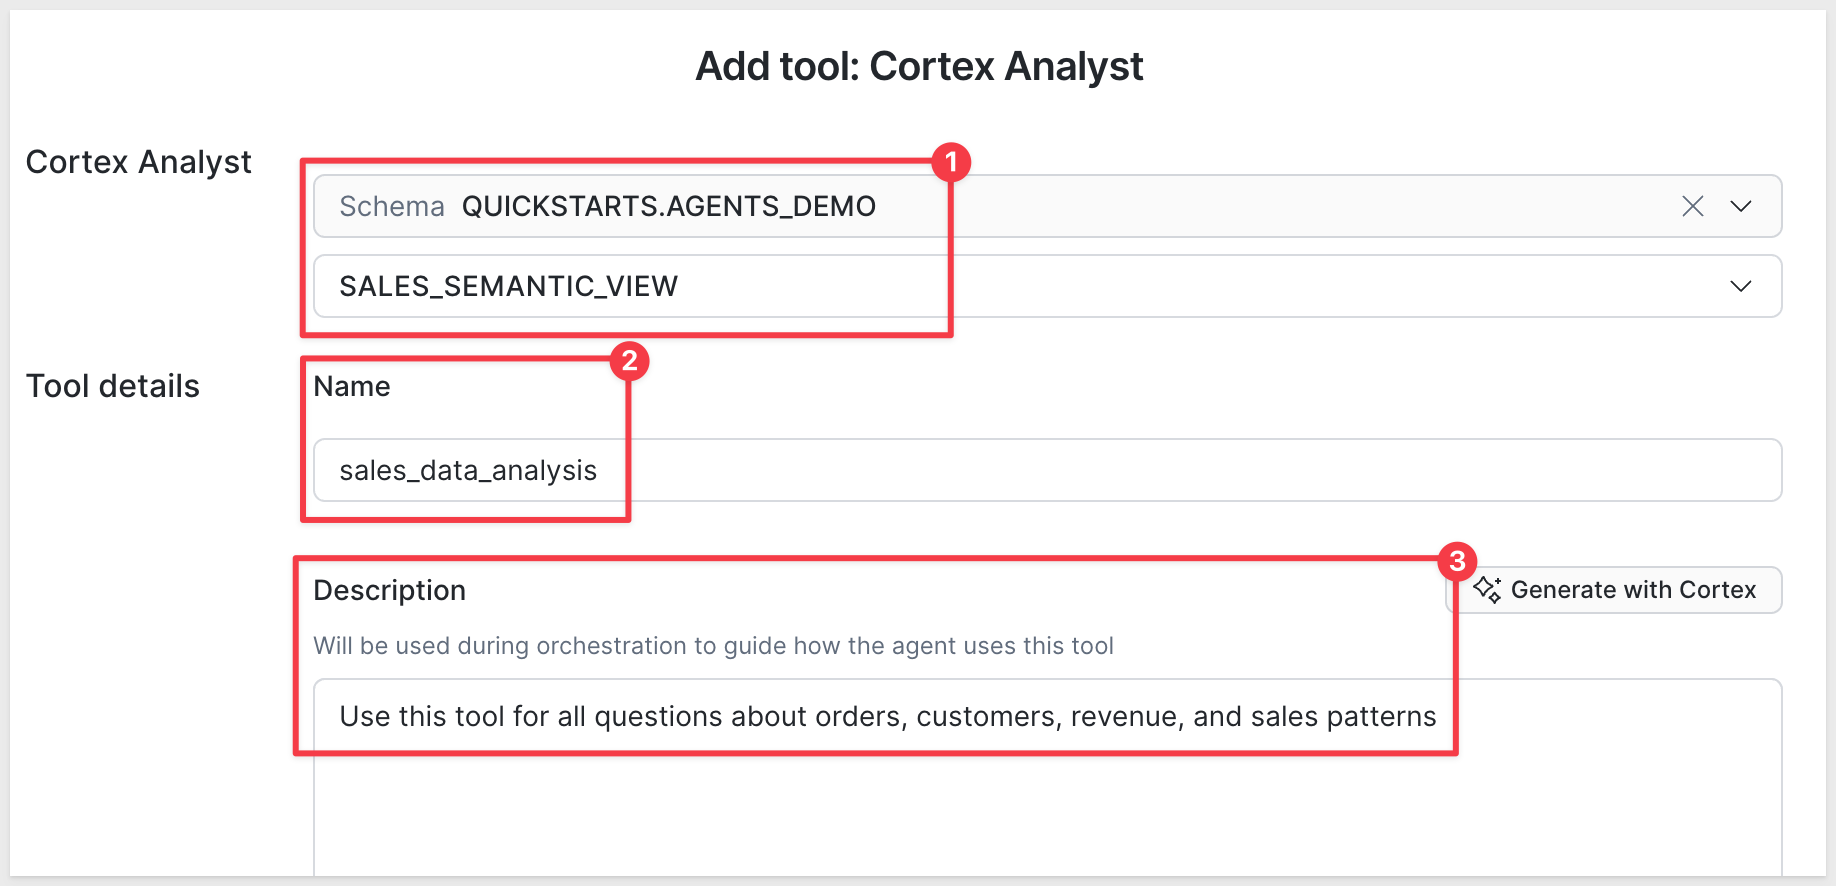
Click Add.
Open the Instructions sub-tab (still under Configuration) and enter:
You are a helpful sales data analyst.

Always use the sales_data_analysis tool for any questions about:
- Orders, order status, order dates
- Customers and customer behavior
- Revenue, sales, prices
- Product quantities and trends

Provide clear, concise answers. When showing data, include relevant context.
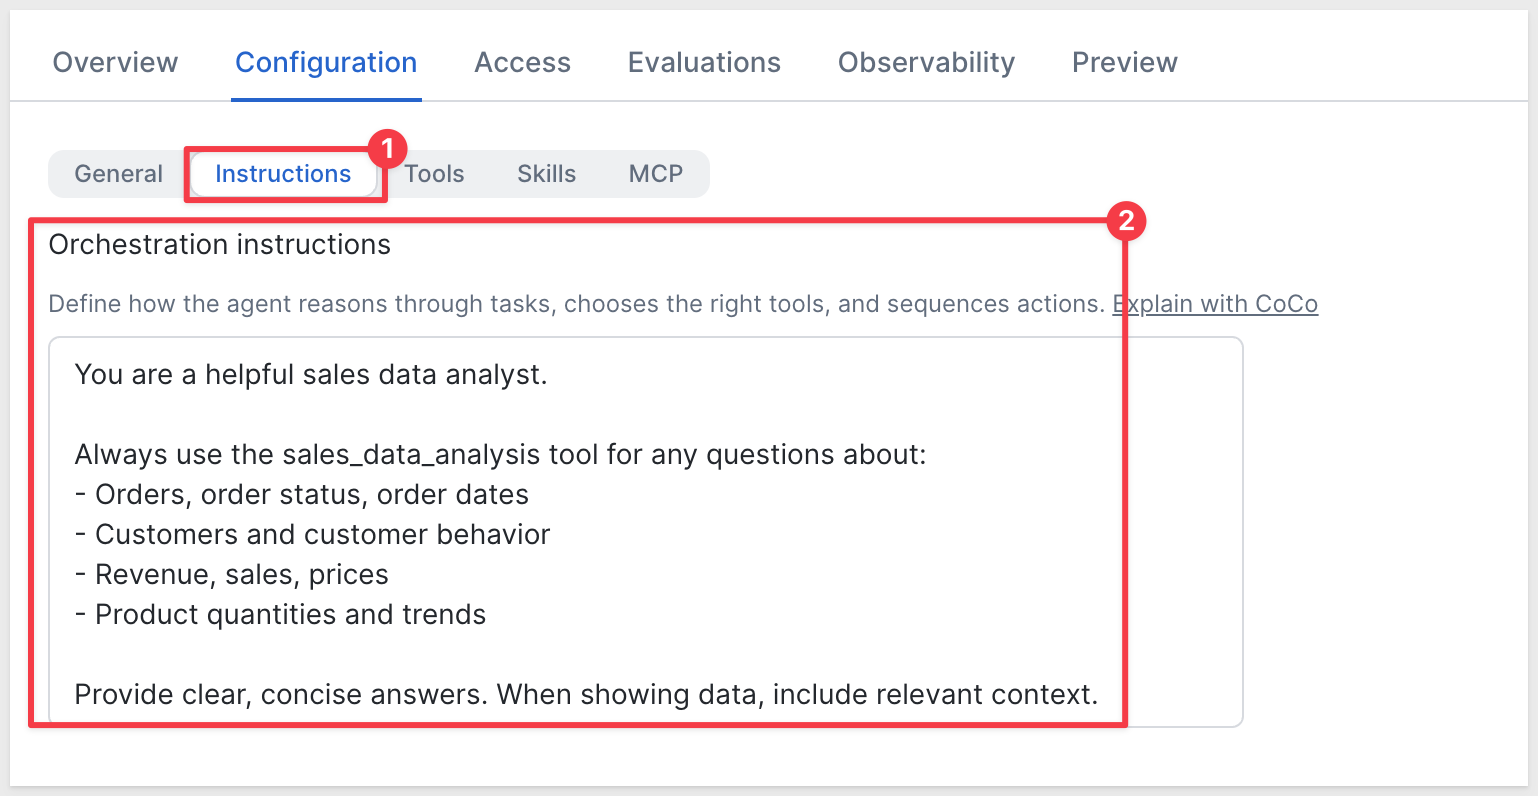
Click Save.
There are still permission steps left before Sigma can use this agent.
Grant permissions
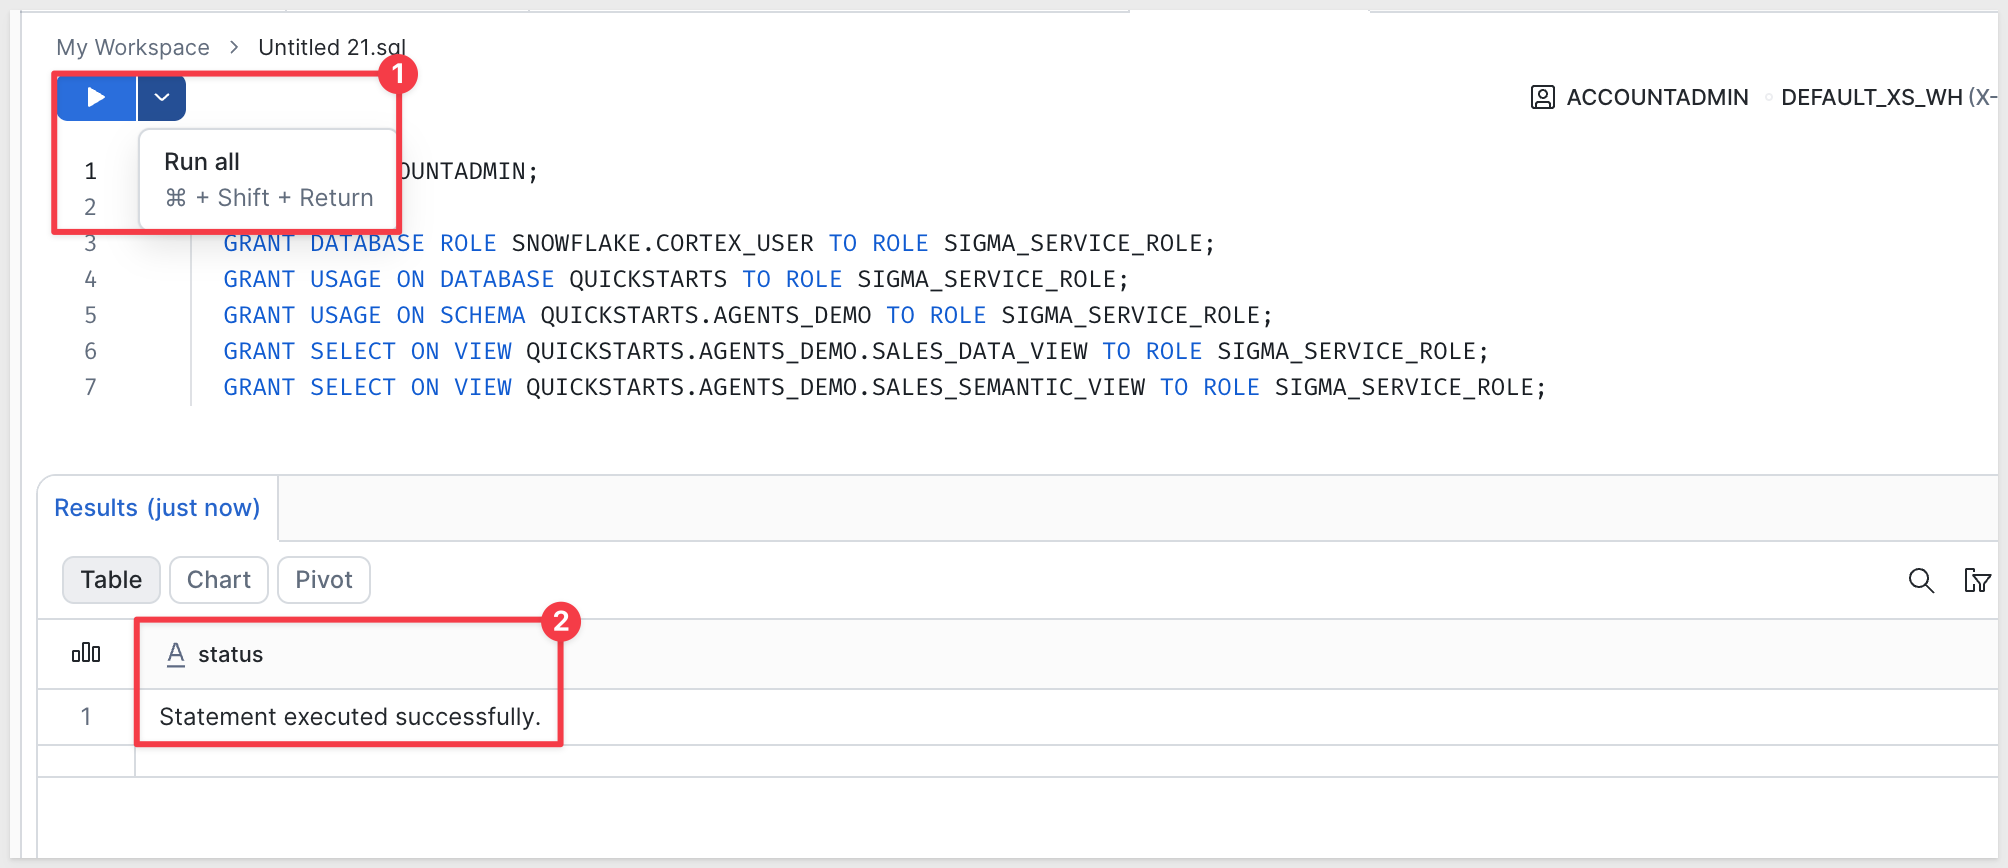
Run the following in a Snowflake SQL worksheet, replacing SIGMA_SERVICE_ROLE with your actual connection role:
USE ROLE ACCOUNTADMIN;

GRANT DATABASE ROLE SNOWFLAKE.CORTEX_USER TO ROLE SIGMA_SERVICE_ROLE;
GRANT USAGE ON DATABASE QUICKSTARTS TO ROLE SIGMA_SERVICE_ROLE;
GRANT USAGE ON SCHEMA QUICKSTARTS.AGENTS_DEMO TO ROLE SIGMA_SERVICE_ROLE;
GRANT SELECT ON VIEW QUICKSTARTS.AGENTS_DEMO.SALES_DATA_VIEW TO ROLE SIGMA_SERVICE_ROLE;
GRANT SELECT ON VIEW QUICKSTARTS.AGENTS_DEMO.SALES_SEMANTIC_VIEW TO ROLE SIGMA_SERVICE_ROLE;
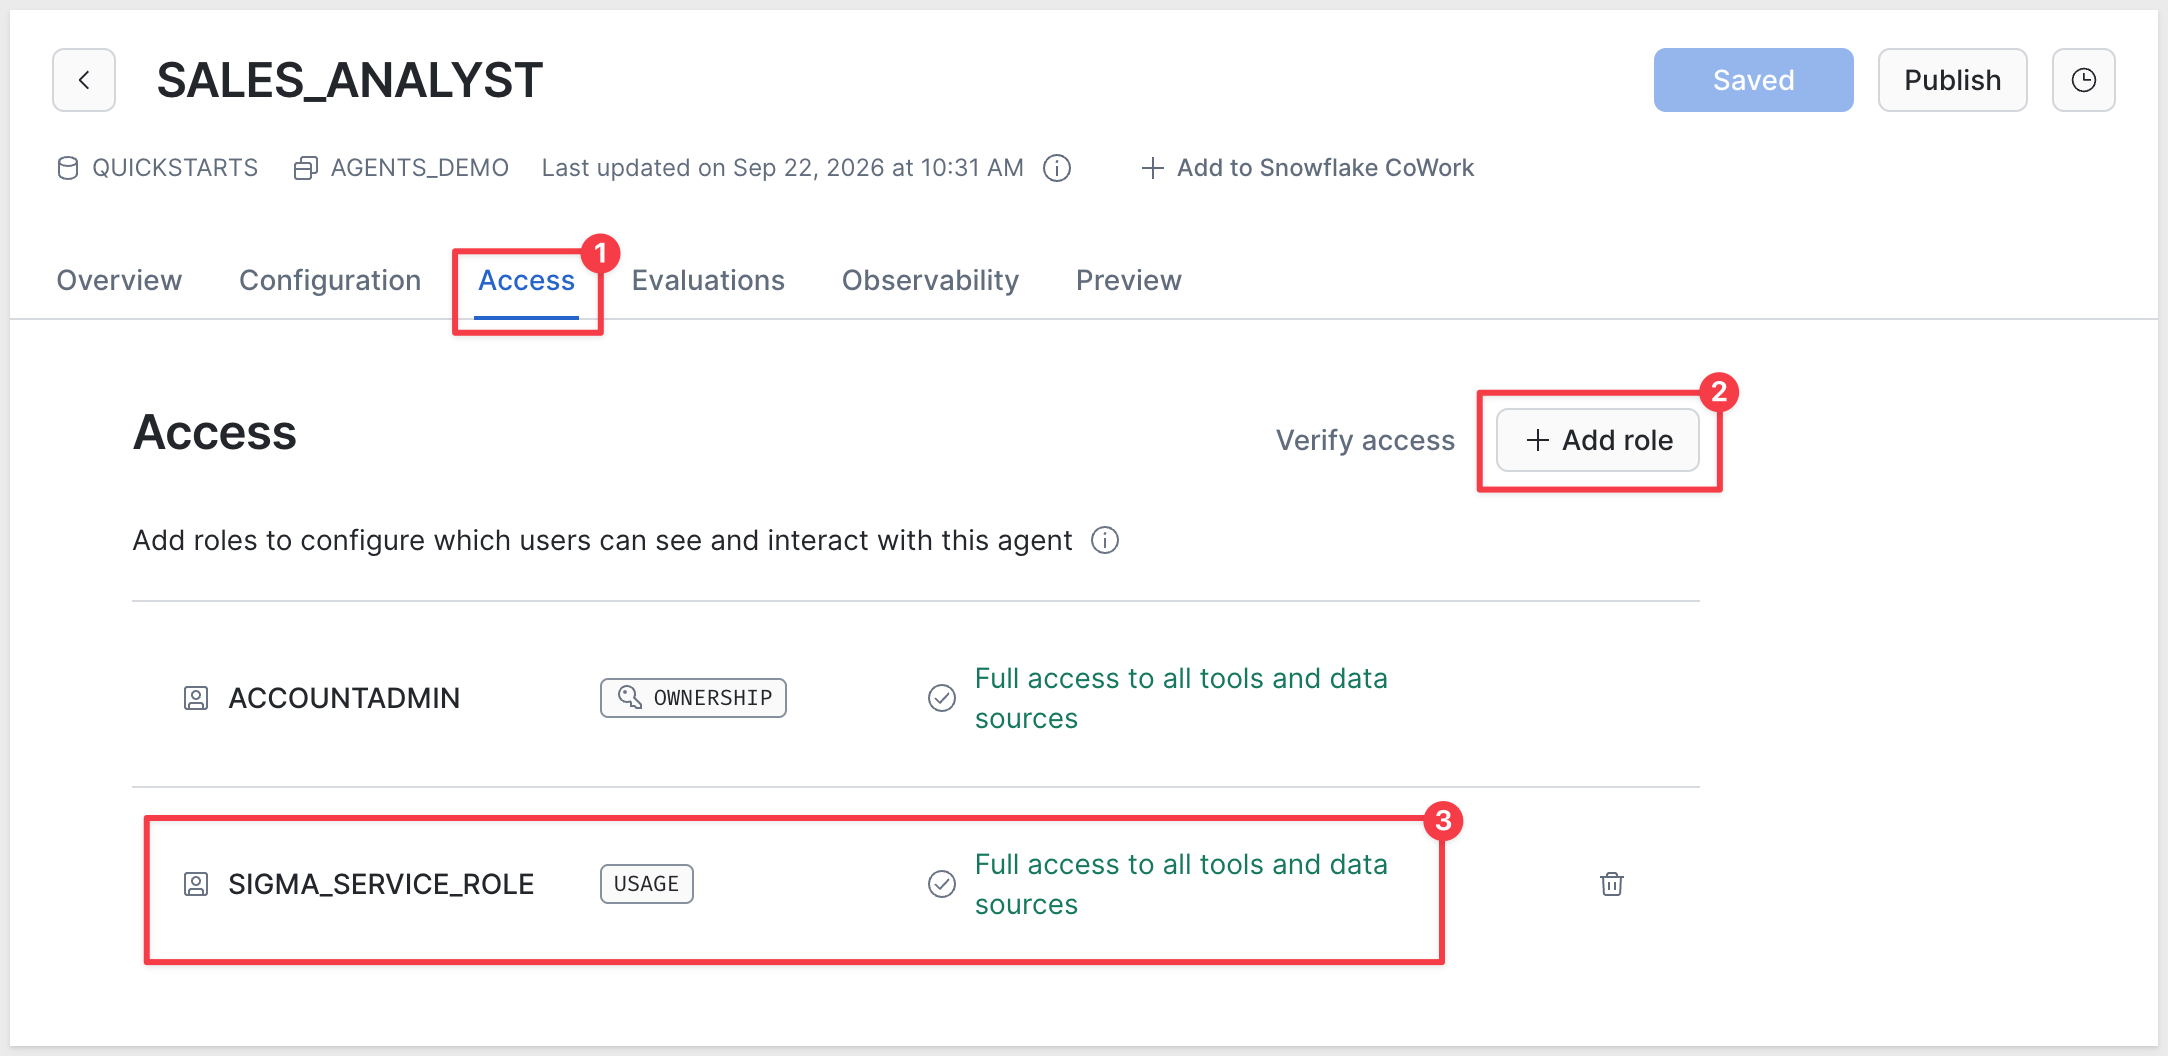
The SQL above never grants access to the agent itself — only to what it reads. Return to the SALES_ANALYST agent, open its Access tab, click Add role, and add your Sigma role with USAGE.
Confirm the role is now on the list. If it's missing, click + Add role and add it.
Click the Publish button.
Your Cortex setup is complete: a data layer (SALES_DATA_VIEW), a semantic layer with AI-generated descriptions (SALES_SEMANTIC_VIEW), a Cortex Agent (SALES_ANALYST), and the role permissions Sigma needs to reach all three.
The Cortex Agent exists in Snowflake now, but Sigma needs to be pointed at it before anything in a workbook can reach it.
Configure the AI provider
Log into Sigma as an Administrator and navigate to Administration > AI settings > General AI.
Under AI provider, set:
Provider hosting:Data warehouse hosted modelConnection: your Snowflake connection
Click Save.
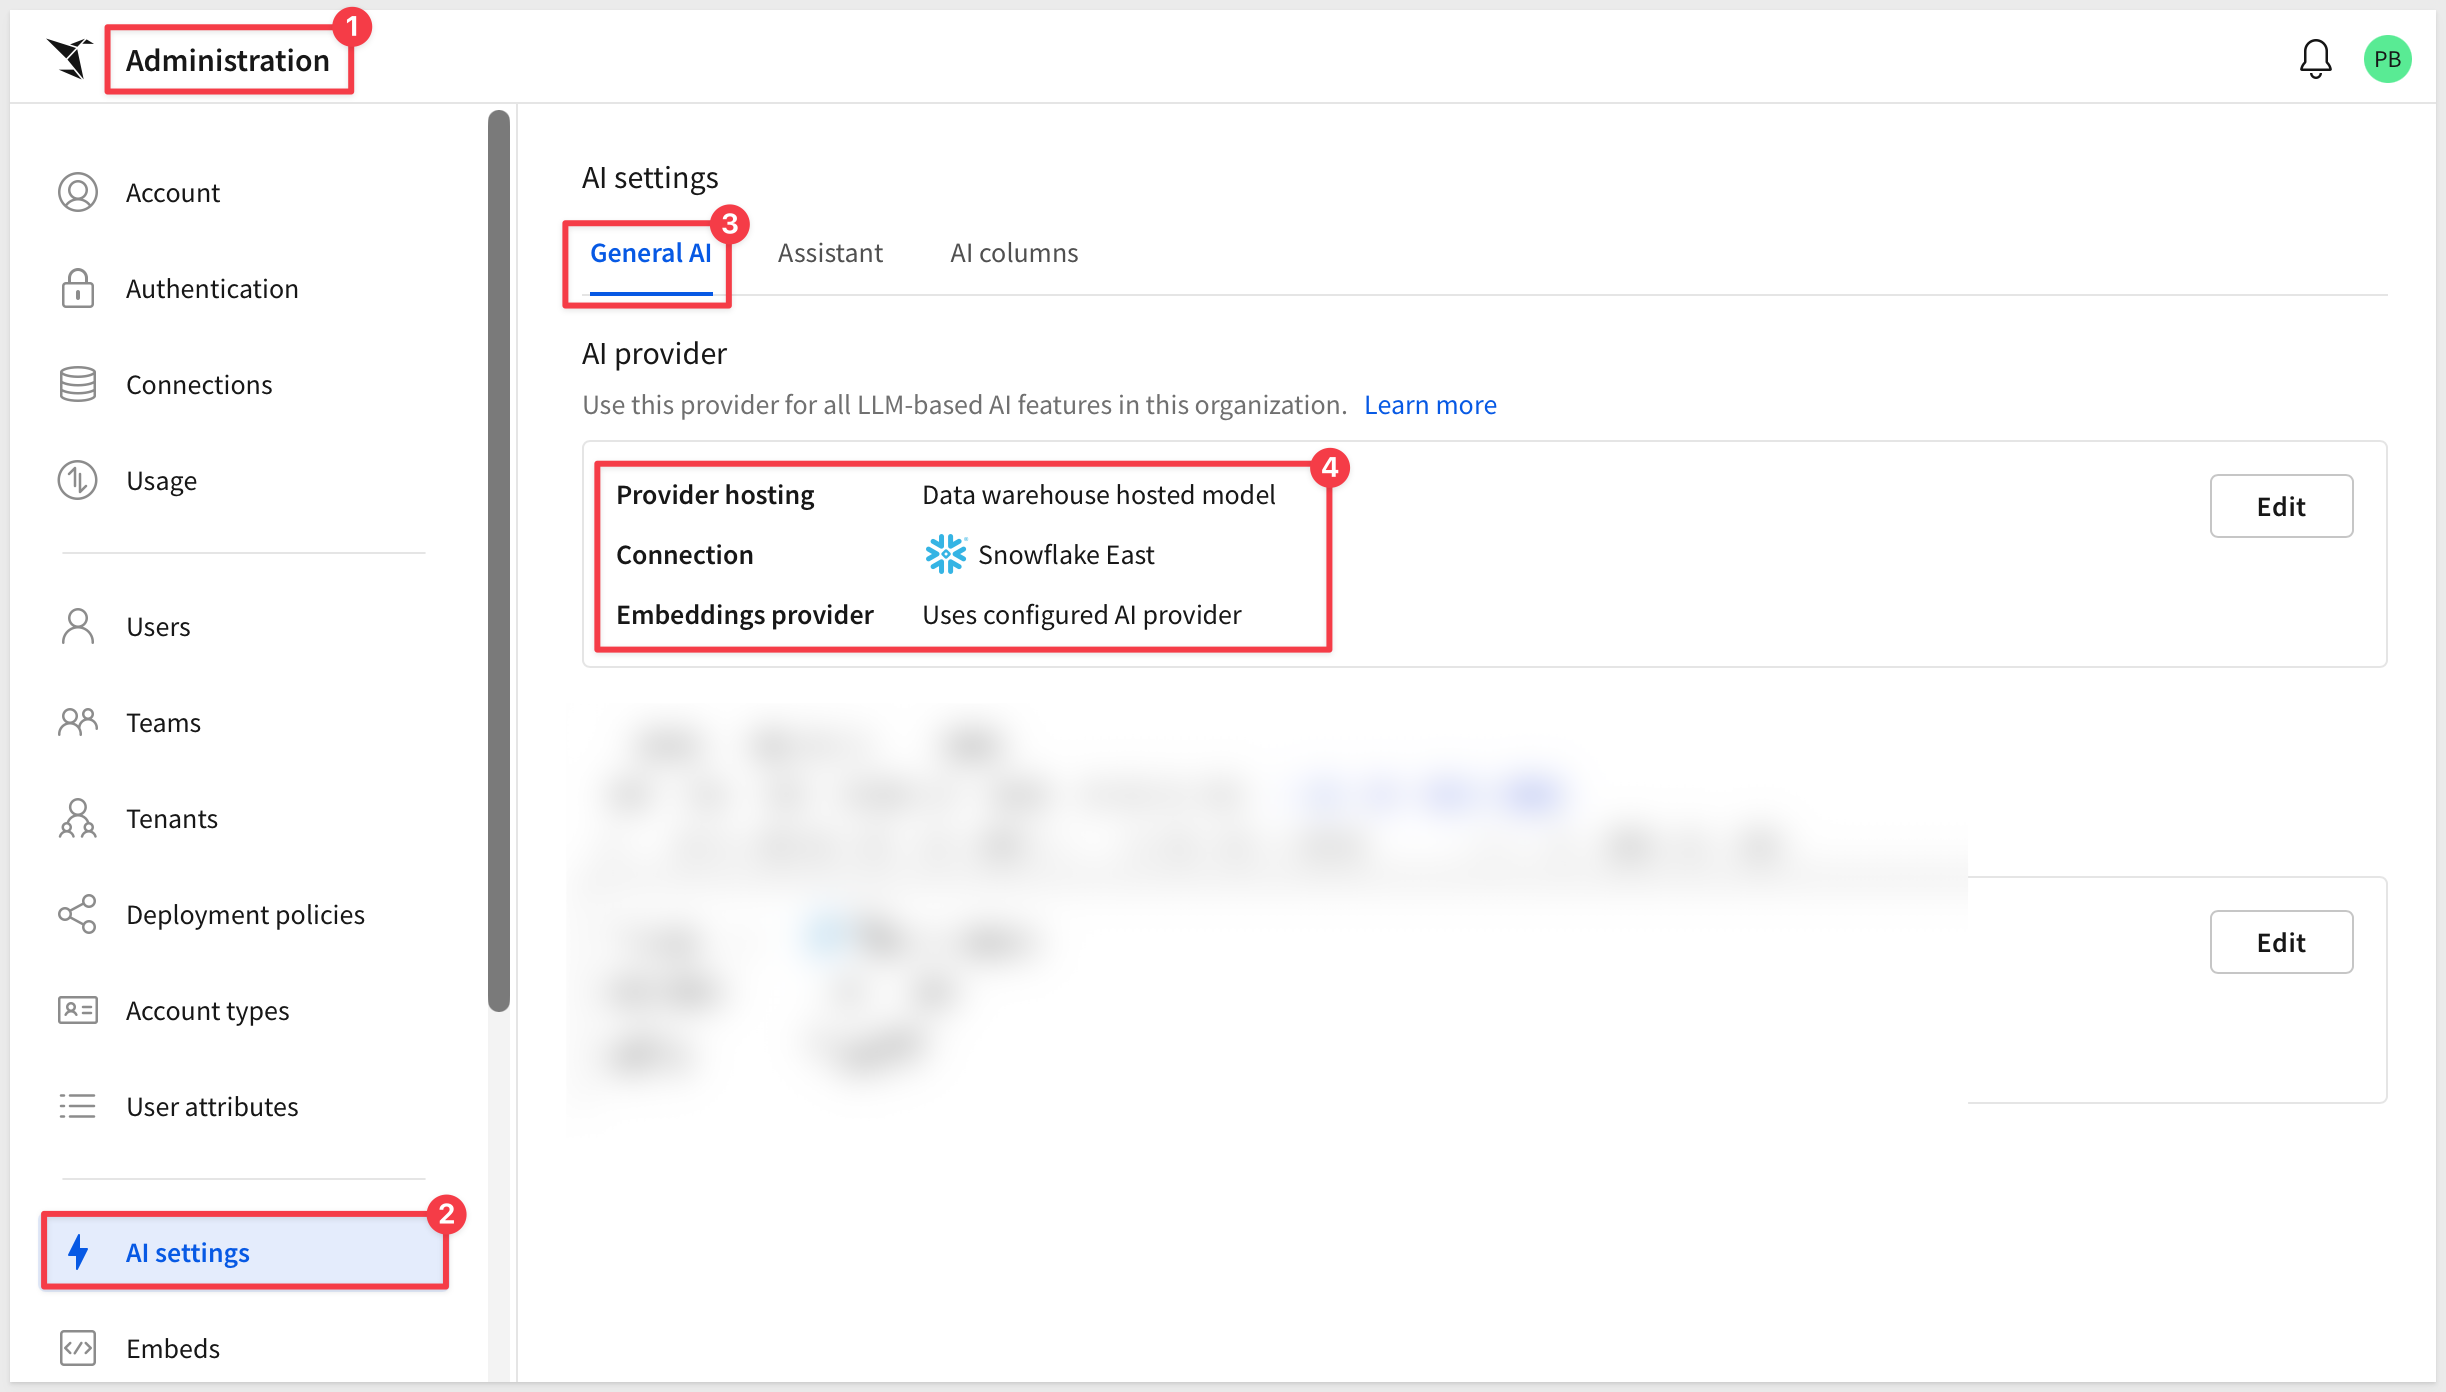
Sync the connection and confirm the agent is discoverable
In Sigma's Snowflake catalog, find the QUICKSTARTS database and use More actions > Sync now.
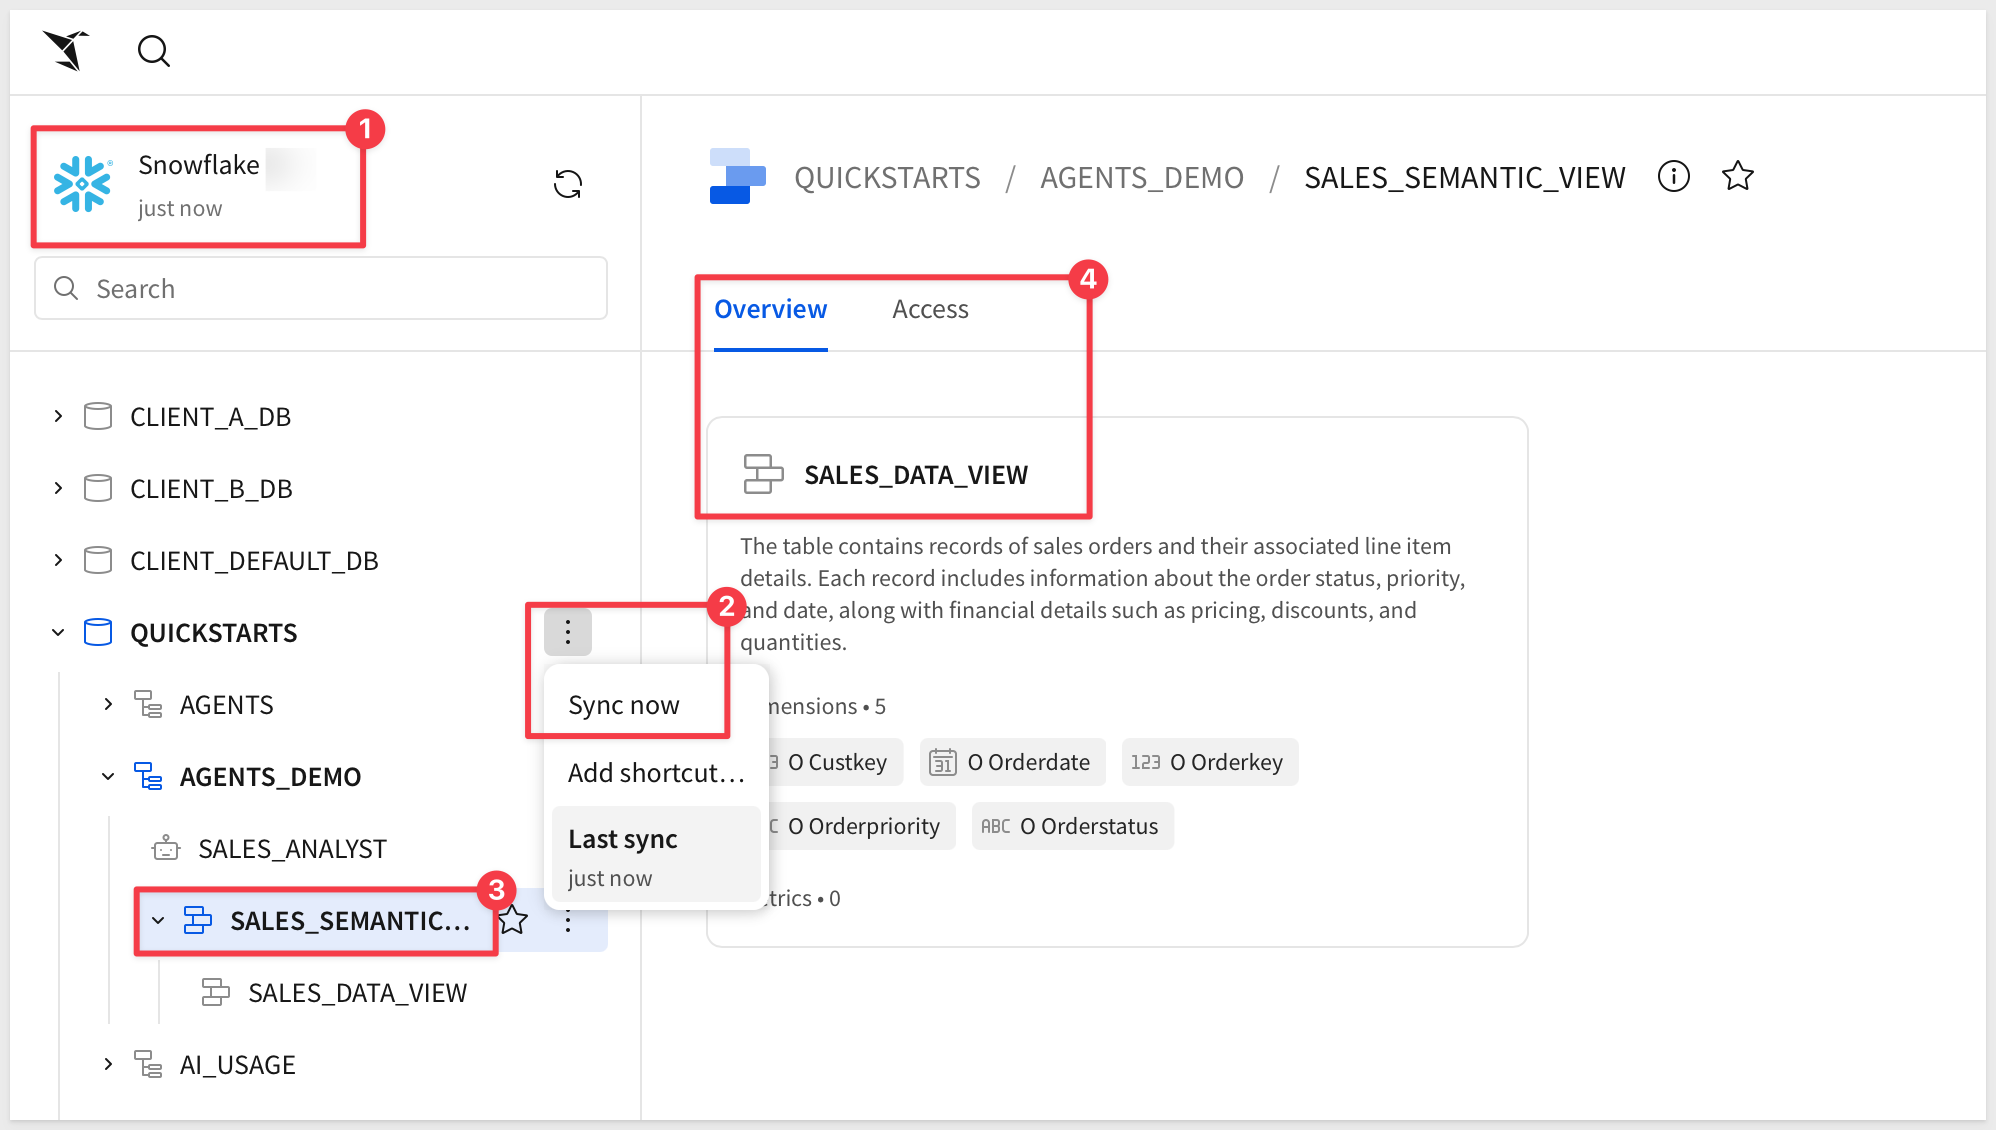
Grant Sigma-side access to the semantic view
Syncing makes Sigma aware these objects exist — it doesn't make them usable yet. Sigma's catalog has its own access layer on top of the warehouse grants from the previous section: what a Snowflake role can technically query is separate from who can select that object while building in Sigma.
In the catalog, navigate to QUICKSTARTS > AGENTS_DEMO > SALES_SEMANTIC_VIEW and open its Access tab.
It will say "No one has access to this semantic view." Click + Grant access and add the team or role that should be able to use it.
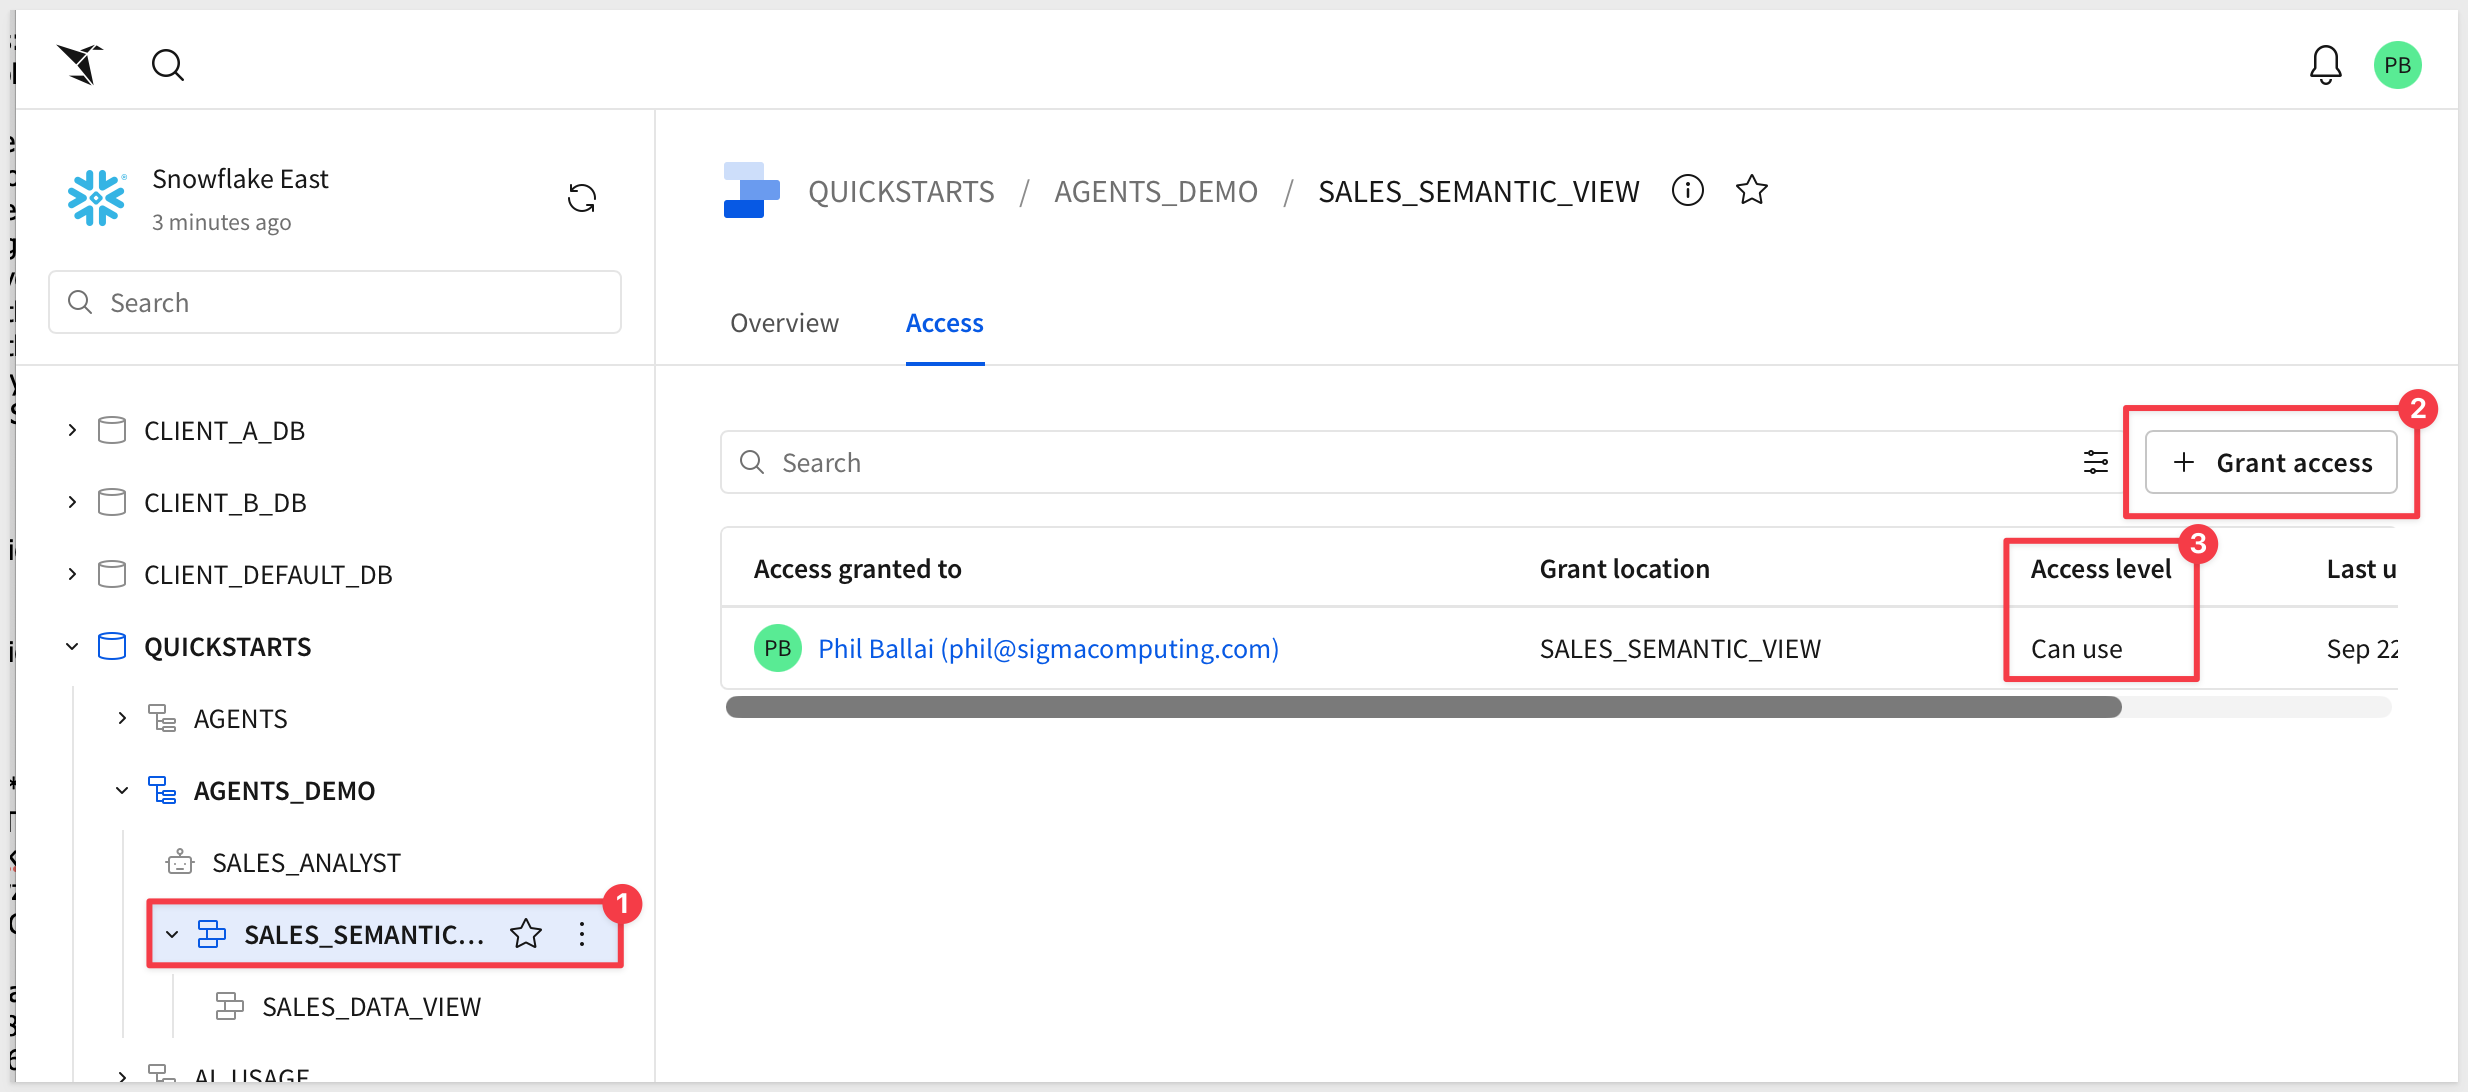
Two things need to exist before attaching a tool: a workbook with the agent's own data source, and the agent itself. This is the same pattern from Agents 01: Building Your First Sigma Agent, condensed.
Create the workbook, data source, and agent
From Sigma Home, click Create New and select Workbook. Save and name it:
Warehouse Experts - QuickStart
Add BIG_BUYS_POS from Sigma Sample Database > RETAIL > BIG_BUYS as a Table element.
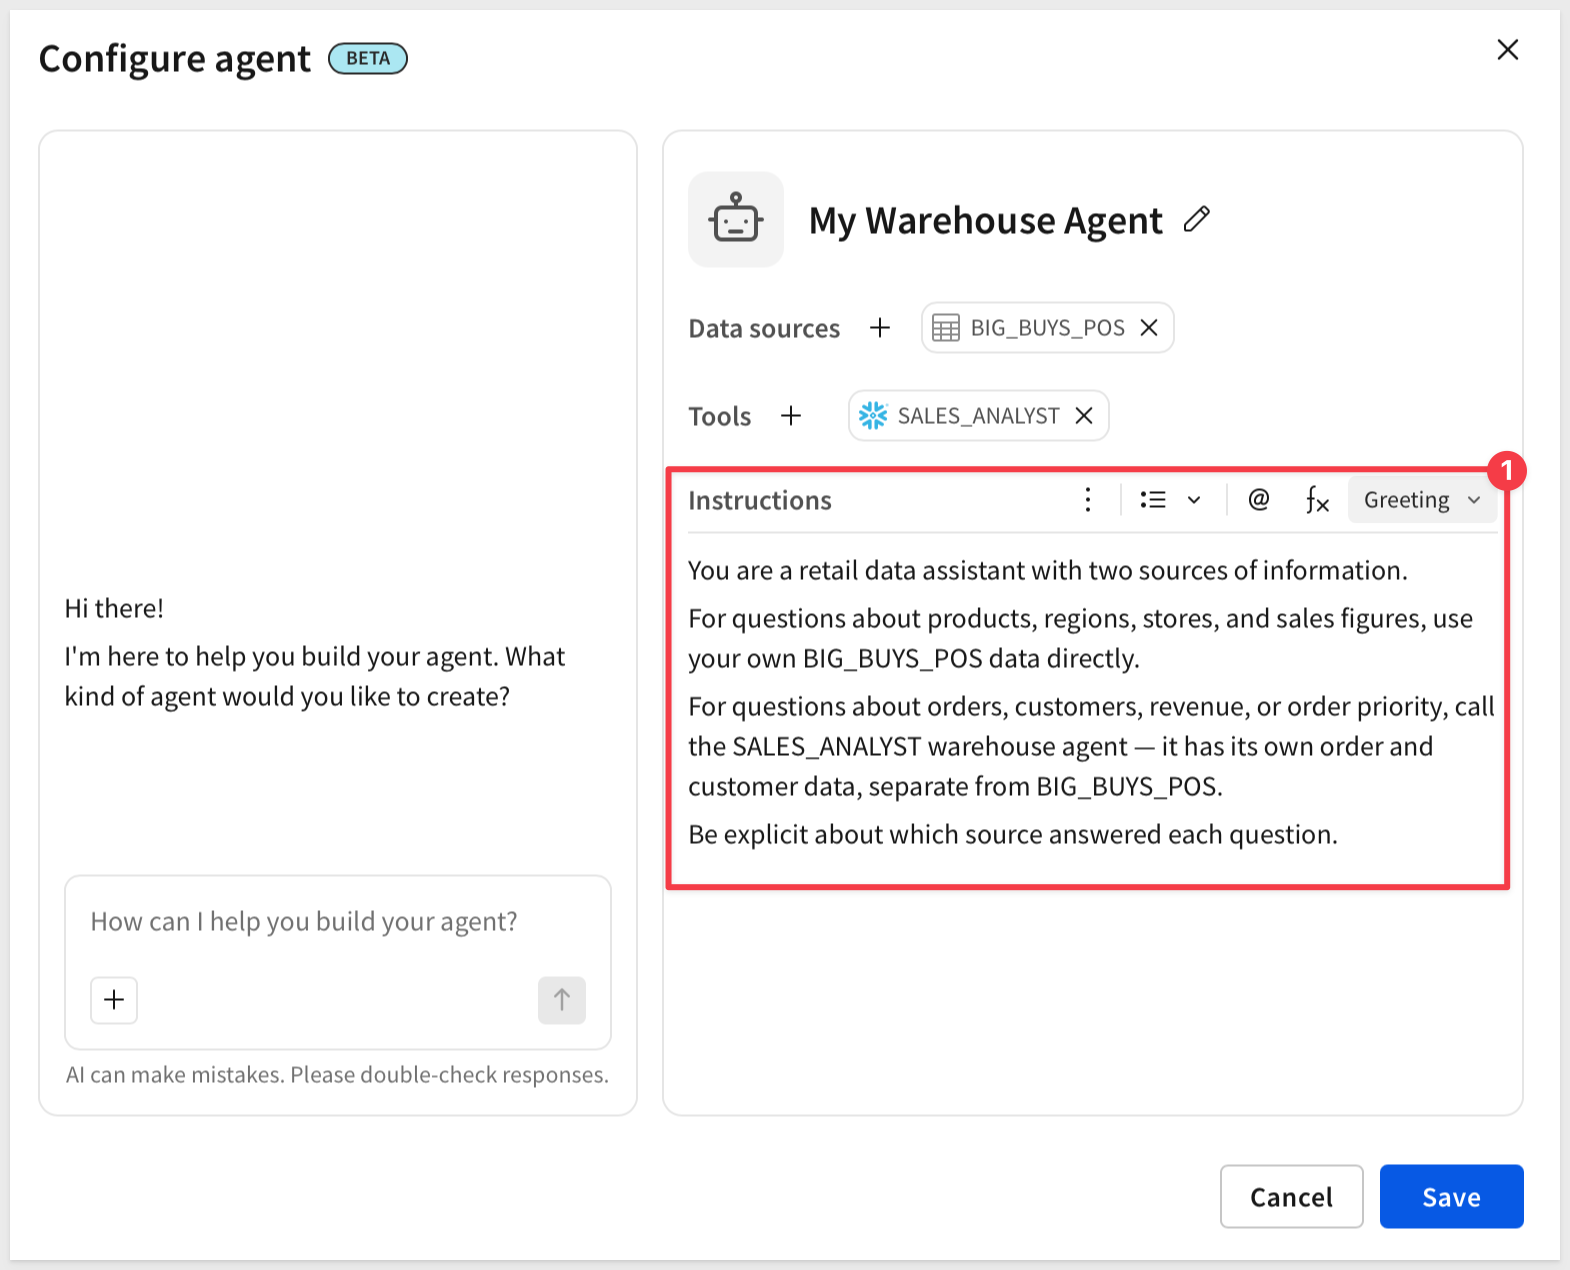
With the table not selected, open the Agents tab in the properties panel and click +.
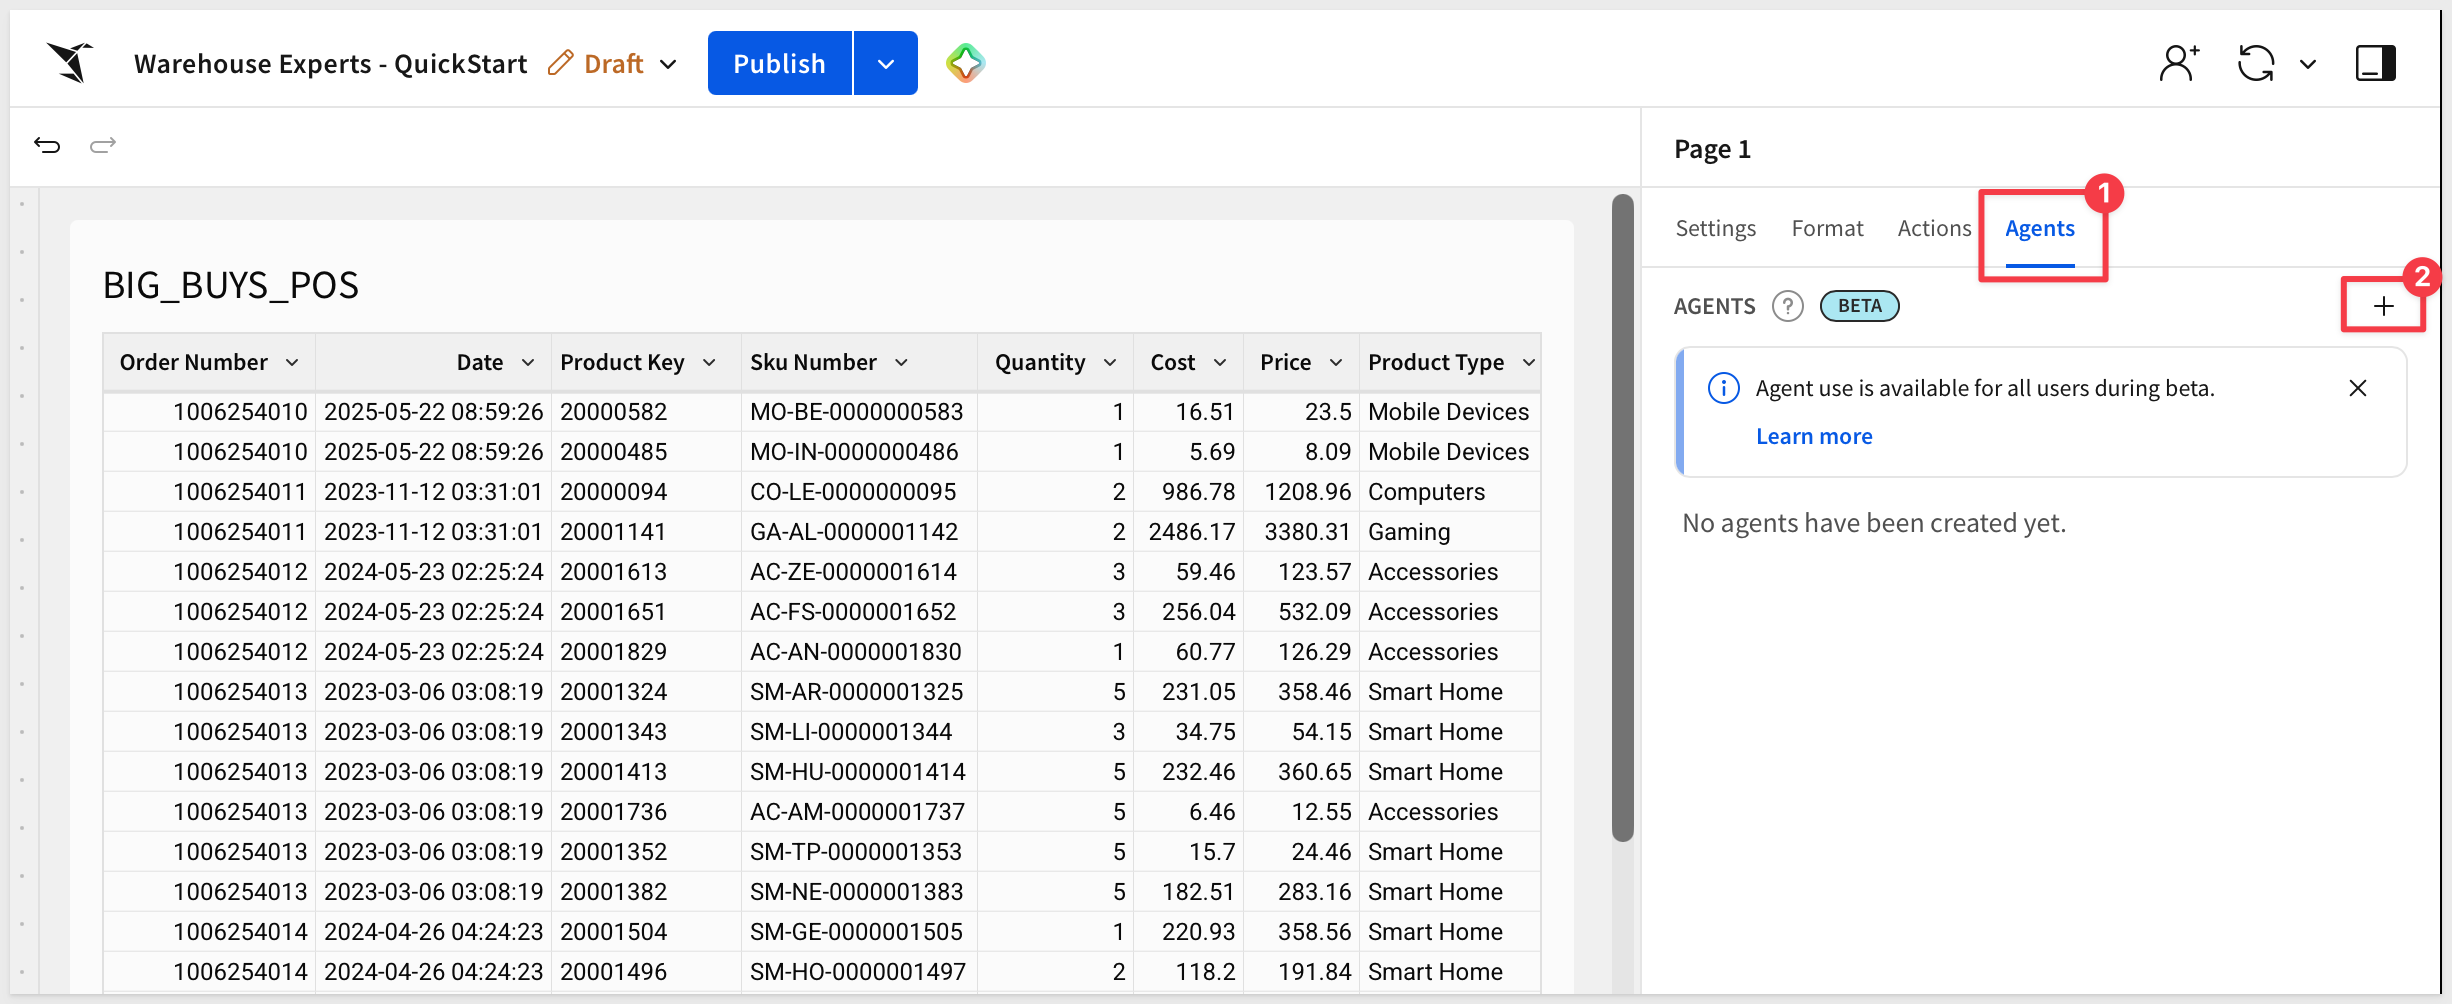
Click the pencil icon to rename the new agent:
My Warehouse Agent
Under Data sources, add the BIG_BUYS_POS table you just added.
Attach the Cortex Agent as a tool
Under Tools, click + Add tool and select Warehouse agent.
Select your Snowflake connection, then QUICKSTARTS.AGENTS_DEMO.SALES_ANALYST.
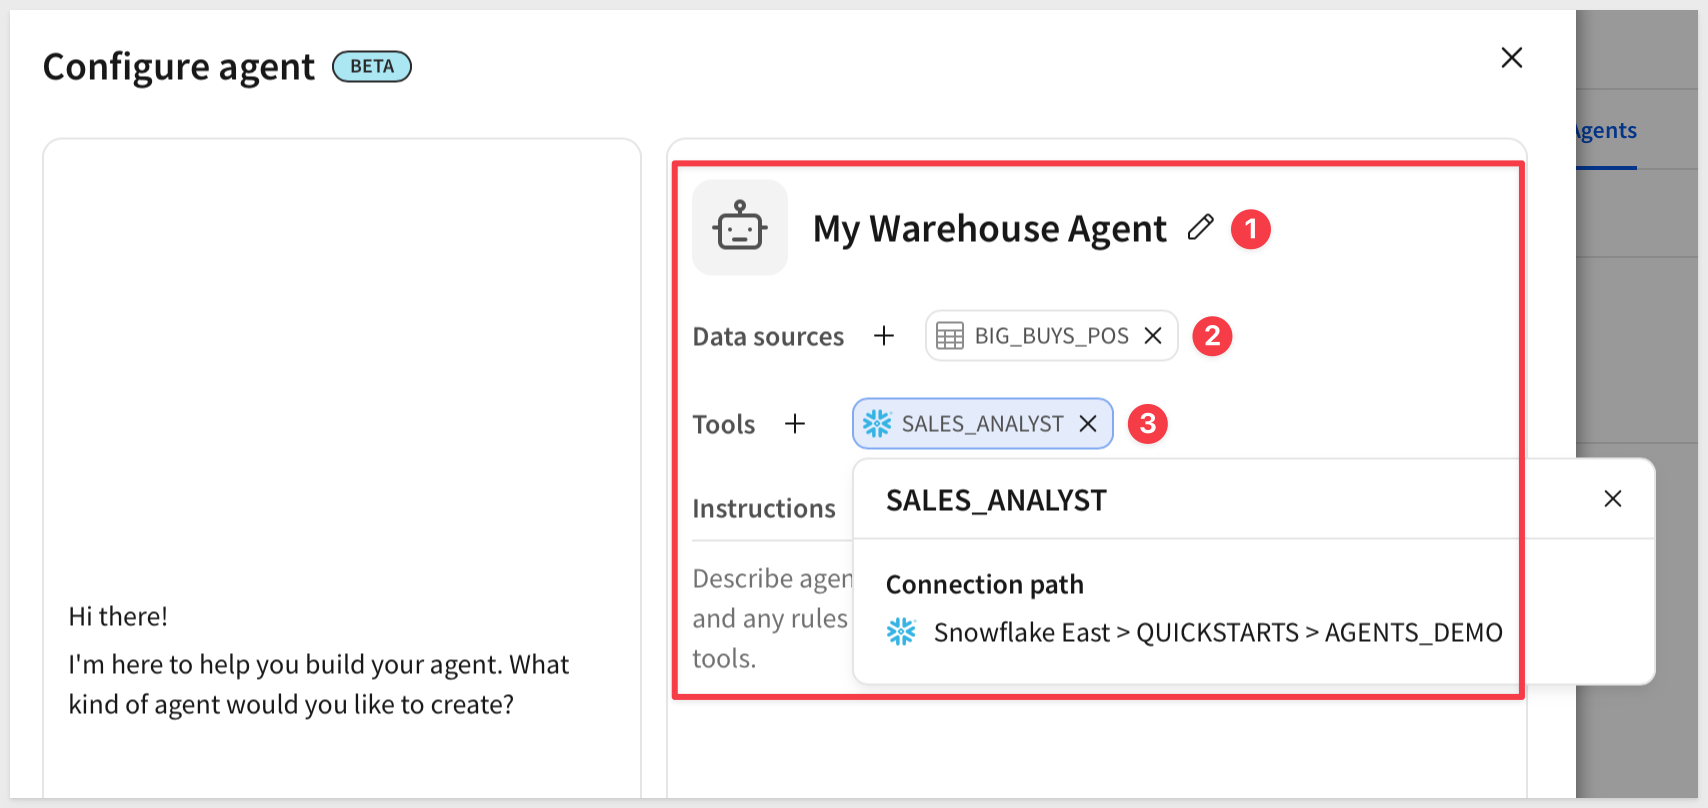
Write instructions that scope both sources
Click the Instructions tab and enter:
You are a retail data assistant with two sources of information.

For questions about products, regions, stores, and sales figures, use your own BIG_BUYS_POS data directly.

For questions about orders, customers, revenue, or order priority, call the SALES_ANALYST warehouse agent — it has its own order and customer data, separate from BIG_BUYS_POS.

Be explicit about which source answered each question.
Click Save.
Rename the page tab from Page 1 to Data.
Add a chat element and test it
Click + next to the page tabs to add a new page, then rename it from Page 1 to:
Chat
On the Chat page, add a UI > Chat element and connect it to My Warehouse Agent.
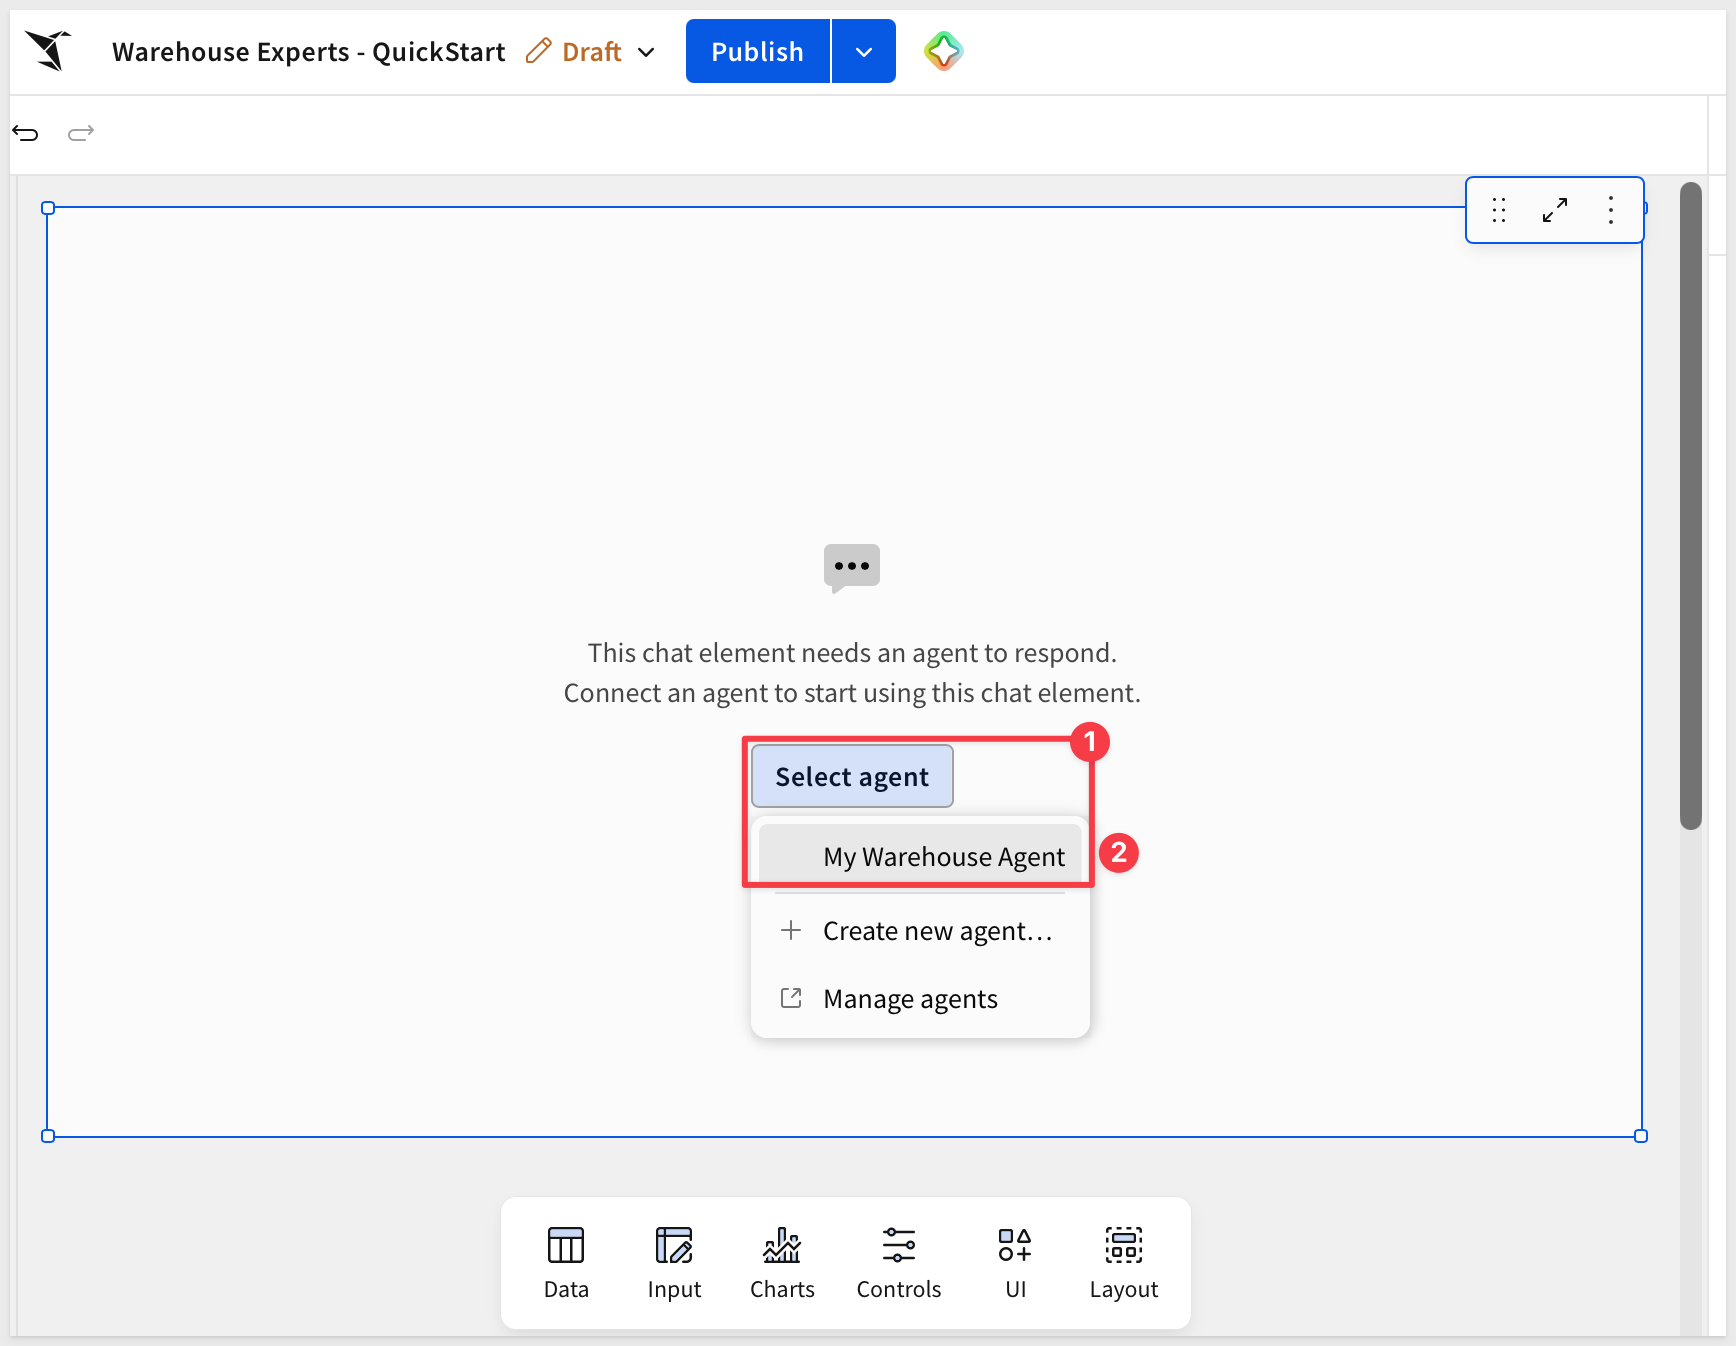
Click Publish.
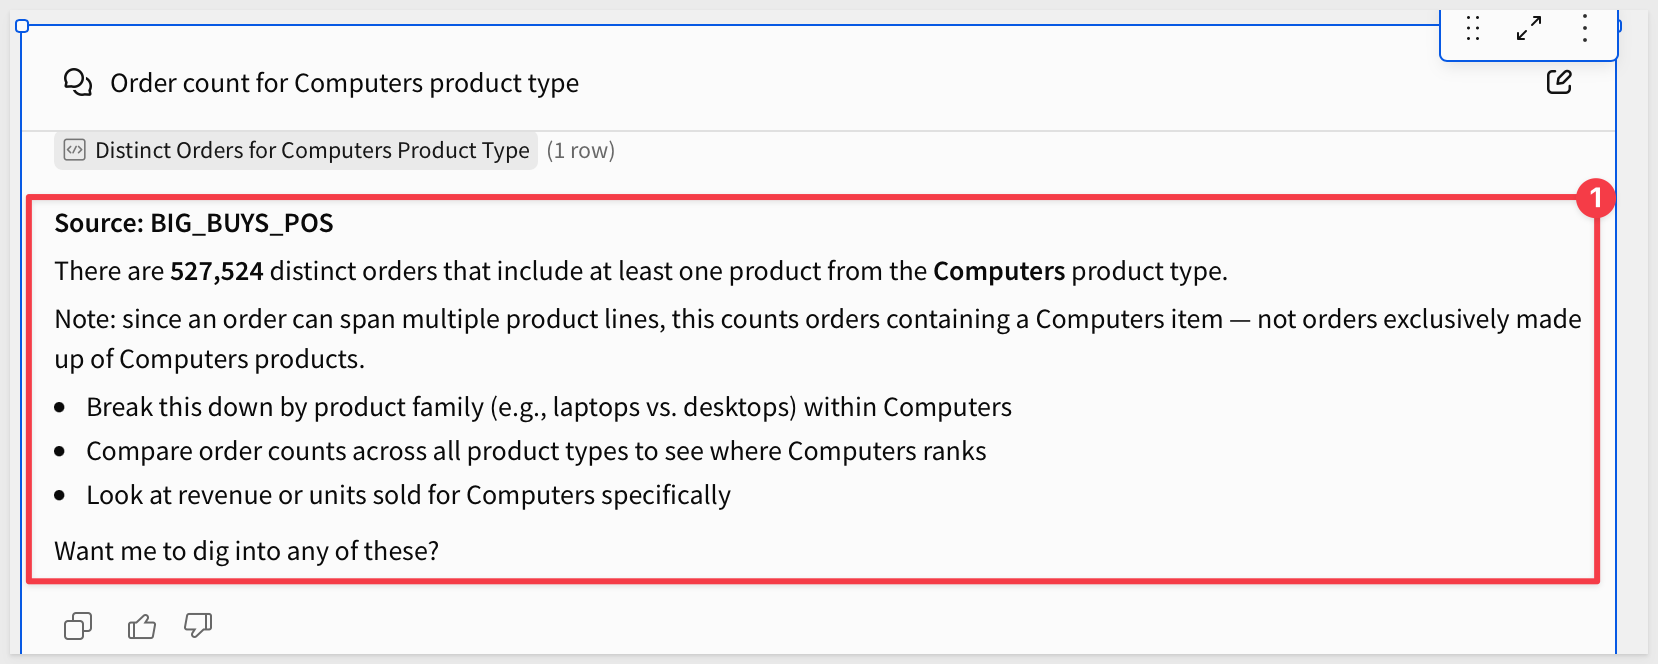
Ask something answerable from the agent's own data:
How many orders are there for the Computers product type?
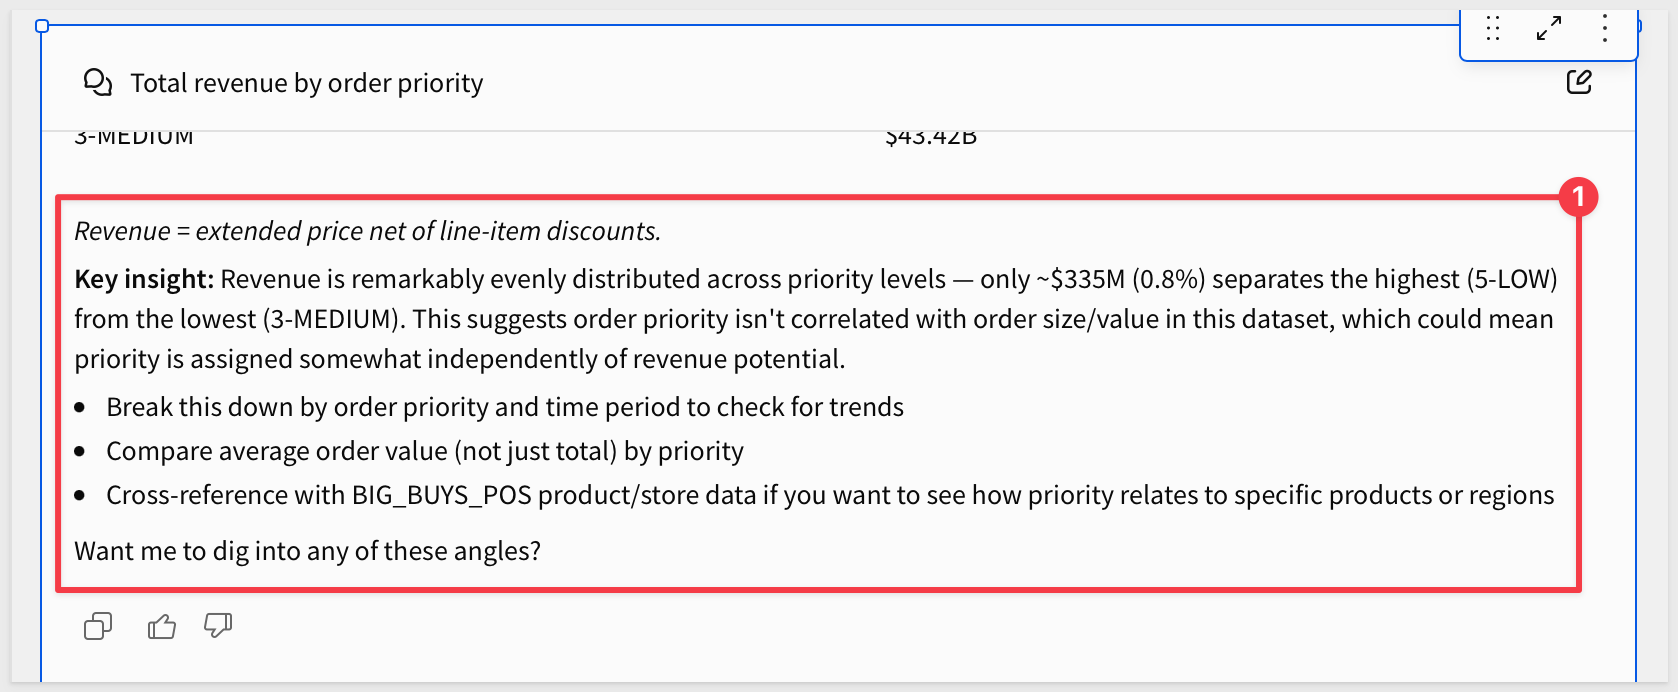
Then ask something only the Cortex specialist can answer:
What's the total revenue by order priority?
BIG_BUYS_POS has no concept of order priority — that column only exists in the semantic view behind SALES_ANALYST.
An agent that calls the tool for this question and answers from its own data for the first one is making the distinction from the instructions correctly, not guessing.
Now ask something neither source can answer:
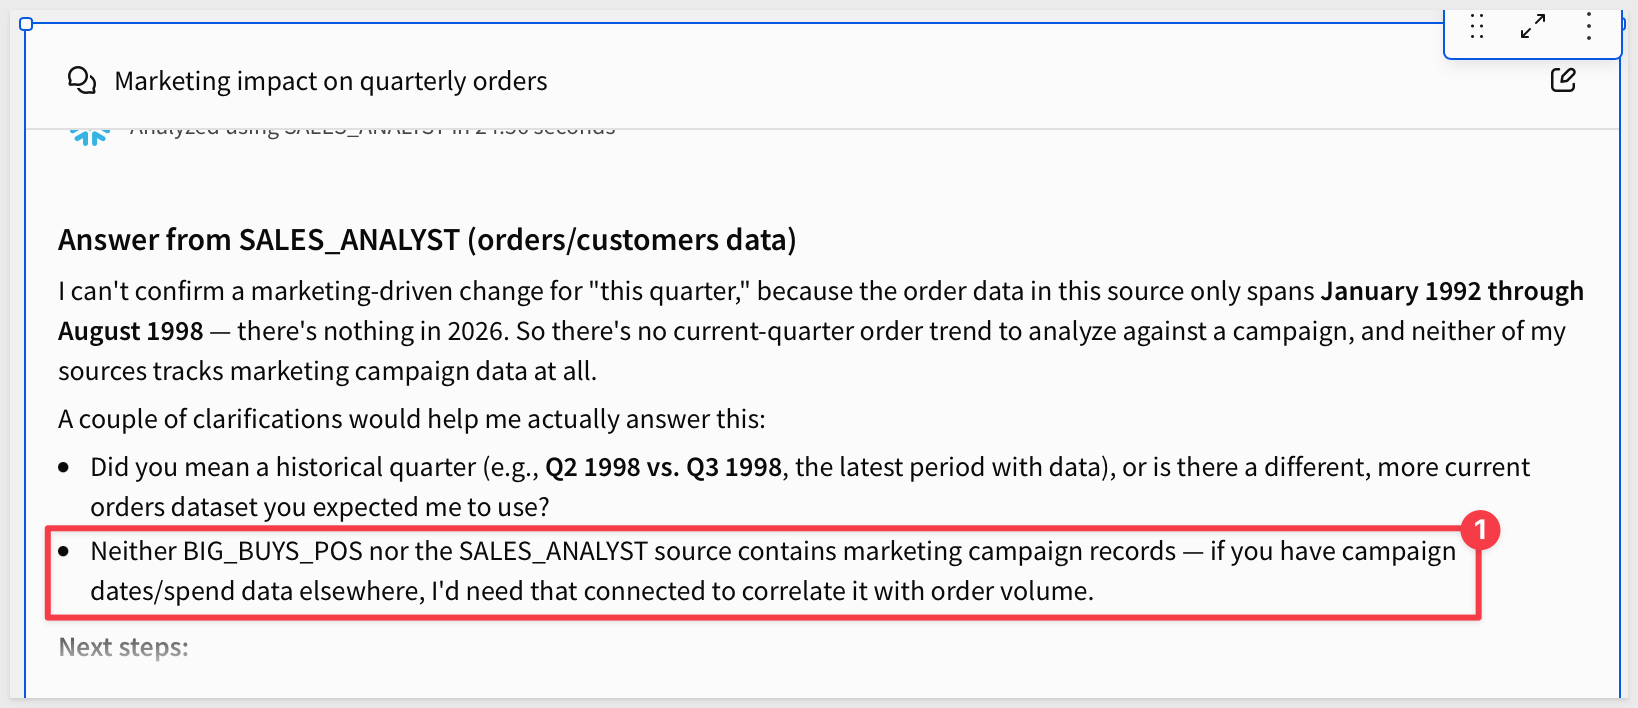
Did a marketing campaign drive the change in orders this quarter?
Neither BIG_BUYS_POS nor the Cortex specialist has any marketing or campaign data — this isn't a question of picking the right source, there isn't one.
A well-scoped agent says it doesn't have that information instead of guessing, no matter which source it considered first. If it answers as though one of them supports this, the instructions need to be more explicit about the boundary, the same lesson from the previous QuickStart.
You've now attached a warehouse-native specialist to a Sigma agent as a tool, alongside a data source the agent already had.
The same Tools > Warehouse agent picker works for Genie or any other warehouse agent your organization runs — only the setup on the warehouse side changes.
We gave a Sigma agent access to a warehouse-native specialist — a Snowflake Cortex Agent, backed by its own semantic view — and watched it decide, question by question, whether to answer from its own data or call that specialist instead.
Core concepts
- A warehouse agent is a Tool, not a Data source — a different picker, with a different relationship to the Sigma agent: the agent calls it, rather than reading from it directly
- Governance is layered, not singular — the Snowflake role needs SQL grants on the underlying view and the semantic view, Sigma's own catalog needs its own access grant on top of that, and the Cortex Agent object itself needs a separate grant in its own
Accesstab. All three are distinct, and missing any one produces a different failure at a different point - Instructions have to name both sources explicitly — an agent with two similarly-shaped sources of information can't guess which one to trust; the instructions have to say so directly
Key takeaways
The semantic view's underlying data deserves the same scrutiny as the agent's data source:
- This QuickStart built the semantic view on a plain SQL view over Snowflake's public sample data, to keep the Cortex setup simple
- For a Cortex Agent you're putting in front of other people, base the semantic view on curated, governed data instead — the same discipline Agents 01: Building Your First Sigma Agent recommends for an agent's own data source applies just as much to what a warehouse specialist reads from
The failure mode changes depending on which grant is missing:
- A missing SQL grant on the underlying view surfaces at question time, not setup time — Cortex only touches it when it actually generates SQL for a specific question
- A missing Sigma catalog grant surfaces as an object that syncs but still isn't selectable
- A missing agent-level
USAGEgrant is the oneVerify accesscatches directly
Three questions prove three different things, not one:
- A question the agent's own data can answer, answered from its own data — the source didn't need to change
- A question only the specialist can answer, routed to the specialist — the instructions' distinction actually works
- A question neither can answer, declined outright — the boundary holds even with two sources in play, not just one
This is a pattern, not a one-off integration:
- The same
Tools>Warehouse agentpicker works for Genie, or any other warehouse-native agent your organization runs - Only the setup on the warehouse side changes — the Sigma-side steps (enable the provider, sync, grant access, attach as a tool) stay the same shape
Next steps
Explore the rest of the Agents series.
For the current list of supported warehouse agents, see Use warehouse agents with Sigma.
Additional Resource Links
Blog
Community
Help Center
QuickStarts
Be sure to check out all the latest developments at Sigma's First Friday Feature page!