This QuickStart demonstrates how to build conversational AI applications using Sigma's chat element and Sigma agents, powered by Snowflake Cortex for advanced analytics.
You'll learn how to create an intelligent retail data assistant that can answer natural language questions, perform complex analysis, and take actions based on user interactions.
A key aspect of AI applications is controlling data access. Semantic views act as a governance layer, ensuring your AI agents only access approved, curated data—not your entire data warehouse.
But access control is only part of the picture. Sigma is the governed runtime around AI: audit logs, permissions, cost controls, collaboration, and version management all come with the platform — regardless of which AI provider you've configured.
For more information, see AI usage dashboard
Use Case: Retail Data Assistant
In this QuickStart, we'll build an agent that helps users analyze retail order data from Snowflake's TPCH_SF1 sample dataset. The agent will:
- Answer questions about orders, customers, and revenue
- Call a Snowflake Cortex Agent for accurate, semantic-view-grounded analytical queries
- Optionally log insights to an input table
For more information on Sigma's product release strategy, see Sigma product releases
If something doesn't work as expected, here's how to contact Sigma support
Target Audience
This QuickStart is designed for:
- Sigma workbook creators who want to add conversational AI interfaces
- Data analysts building AI-powered applications
- Technical users interested in Snowflake Cortex integration
Prerequisites
- Any modern browser is acceptable.
- Access to a Sigma environment with an AI provider configured. If you don't have one set up yet, the Fundamentals 1: Overview QuickStart walks through it.
- Admin access to a Snowflake account where you can create databases, schemas, and grant role privileges.
- Some familiarity with Sigma is assumed. Not all basic steps will be shown.

Before we start building, it's important to understand the relationship between Sigma agents and chat elements.
What is a Sigma agent?
A Sigma agent is the "brain" of your conversational AI application. It:
- Processes user questions and decides what to do
- Follows the instructions you give it
- Reasons over the data sources you've added to it (workbook tables, data models)
- Calls tools when needed — actions in the workbook, warehouse agents in your data platform, warehouse search services, or MCP servers
Think of the agent as the orchestrator that decides how to answer each question.
What is a chat element?
A chat element is the user interface component that displays on a workbook page. It:
- Provides a conversational interface for users
- Connects to a single Sigma agent
- Displays responses (text, tables, and visualizations)
- Surfaces approval prompts when the agent wants to run an action
Think of the chat element as the visible UI, while the Sigma agent is the invisible brain behind it.
Key distinction
The chat element and the Sigma agent are two separate things, not interchangeable:
- One Sigma agent can power multiple chat elements
- The chat element is just the UI; the Sigma agent is the logic
Architecture overview
In this QuickStart, the complete flow works like this:
- User types a question in the chat element
- Chat element sends the question to the Sigma agent
- Sigma agent decides which tool to use based on its instructions
- Snowflake Cortex Agent (added as a warehouse tool) runs the analytical query against the semantic view
- Results flow back through the chain to the chat element, where any configured action tool may run
- Chat element displays the response to the user
To enable advanced analytical capabilities, we'll configure Snowflake Cortex. This section keeps the setup minimal—just what's needed to get Cortex working.
Create a Semantic View
A semantic view consists of two components:
- SQL View (Data Layer) - The actual data source that Cortex will query
- Semantic View Object (Metadata Layer) - Business definitions and AI-generated descriptions that help Cortex understand the data
We'll create both using Snowflake's UI-based workflow.
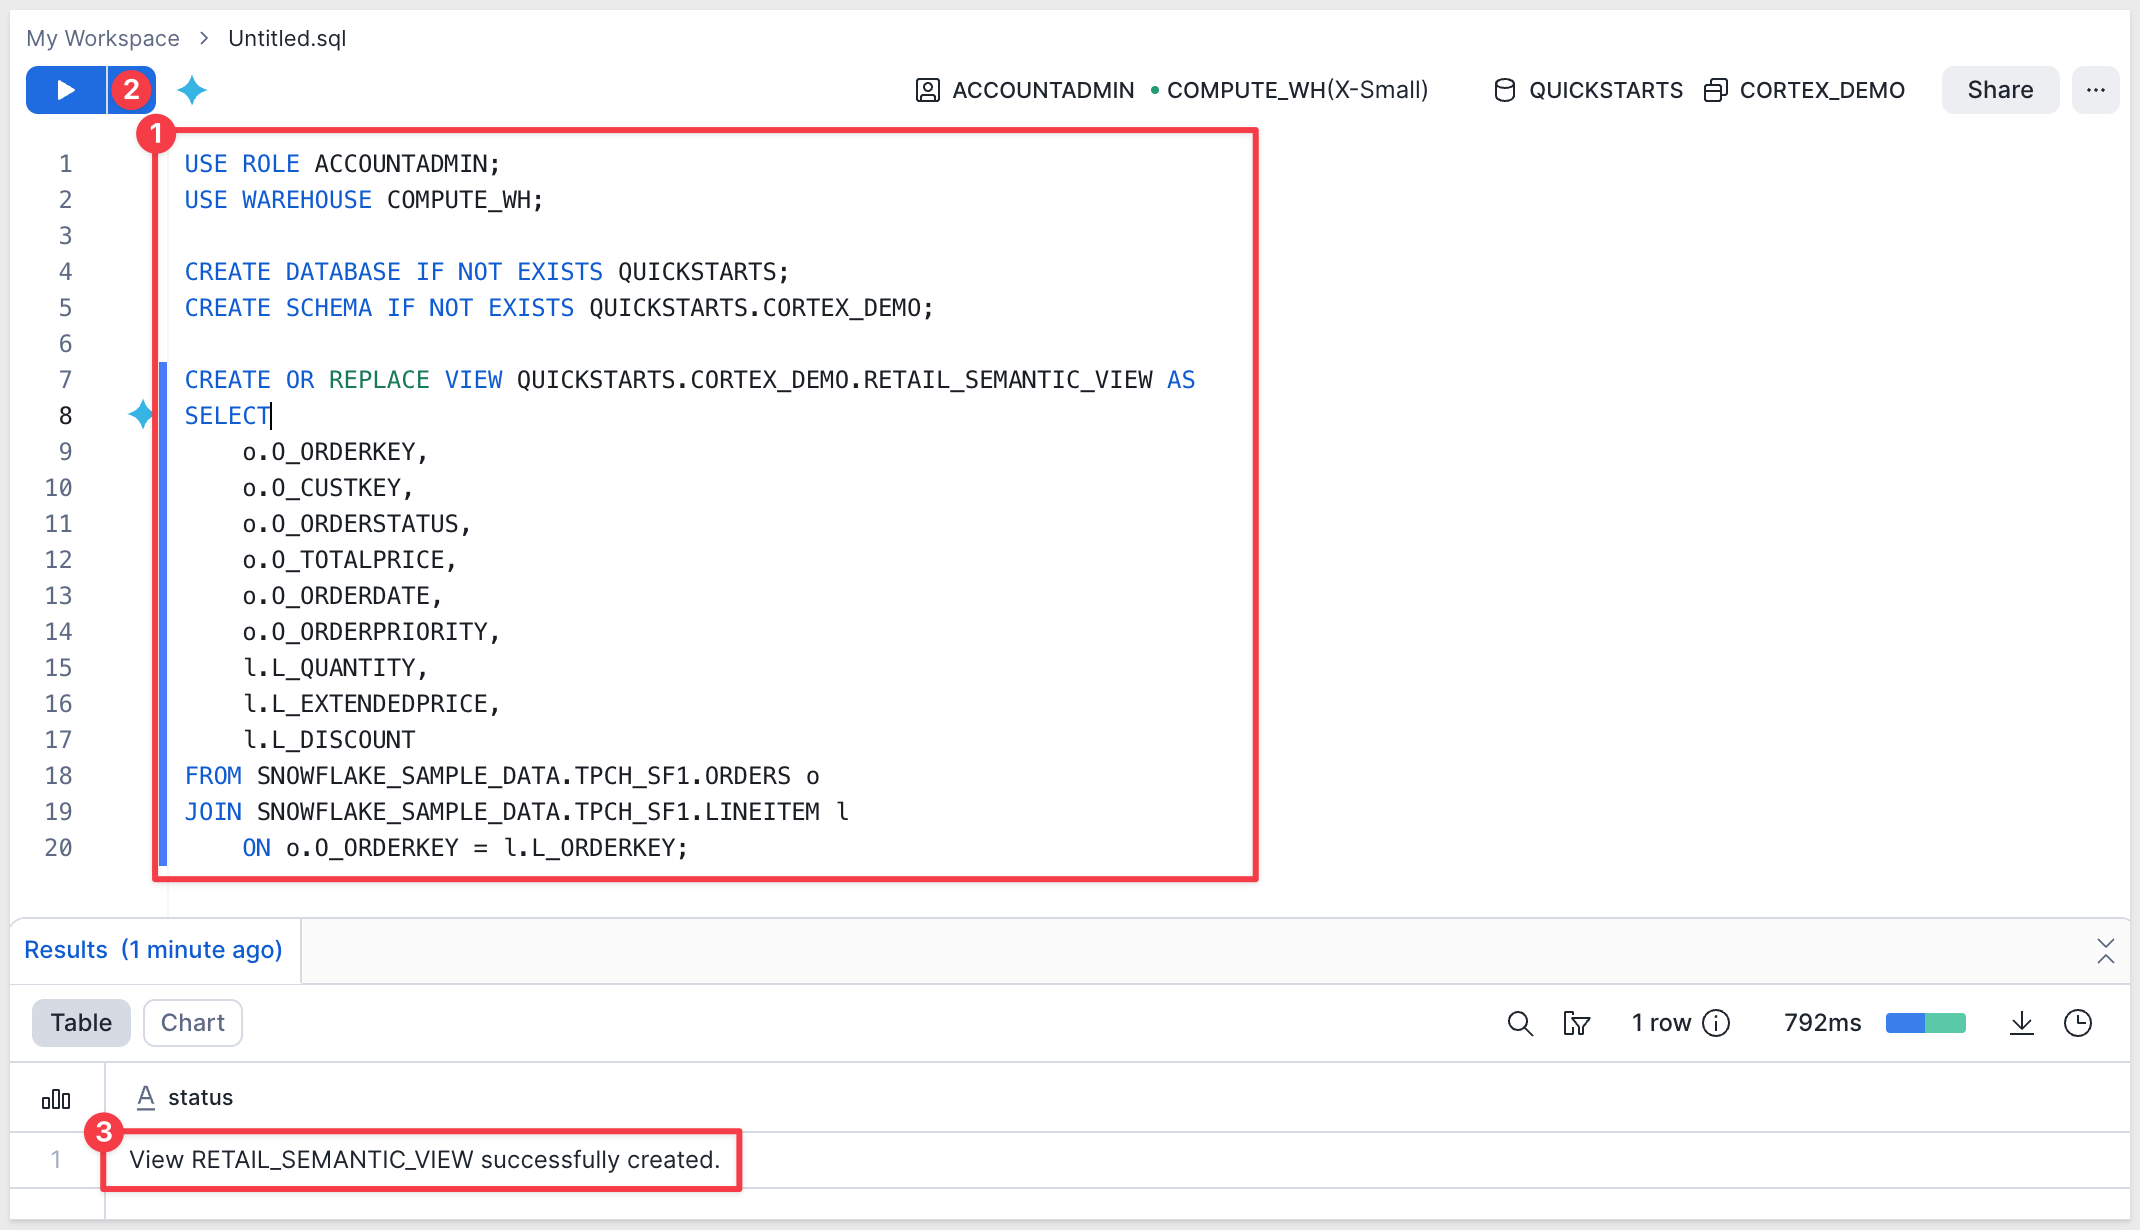
Step 1: Create the SQL View (Data Layer)
In Snowflake, navigate to Projects and create a new SQL worksheet.
Run the following SQL to create the base data view:
USE ROLE ACCOUNTADMIN;
USE WAREHOUSE COMPUTE_WH;

CREATE DATABASE IF NOT EXISTS QUICKSTARTS;
CREATE SCHEMA IF NOT EXISTS QUICKSTARTS.CORTEX_DEMO;

CREATE OR REPLACE VIEW QUICKSTARTS.CORTEX_DEMO.RETAIL_DATA_VIEW AS
SELECT
    o.O_ORDERKEY,
    o.O_CUSTKEY,
    o.O_ORDERSTATUS,
    o.O_TOTALPRICE,
    o.O_ORDERDATE,
    o.O_ORDERPRIORITY,
    l.L_QUANTITY,
    l.L_EXTENDEDPRICE,
    l.L_DISCOUNT
FROM SNOWFLAKE_SAMPLE_DATA.TPCH_SF1.ORDERS o
JOIN SNOWFLAKE_SAMPLE_DATA.TPCH_SF1.LINEITEM l
    ON o.O_ORDERKEY = l.L_ORDERKEY;
Step 2: Create Semantic View in Cortex Analyst
Now we'll create a Semantic View using the Snowflake UI. This will add business context and metadata to our SQL view.
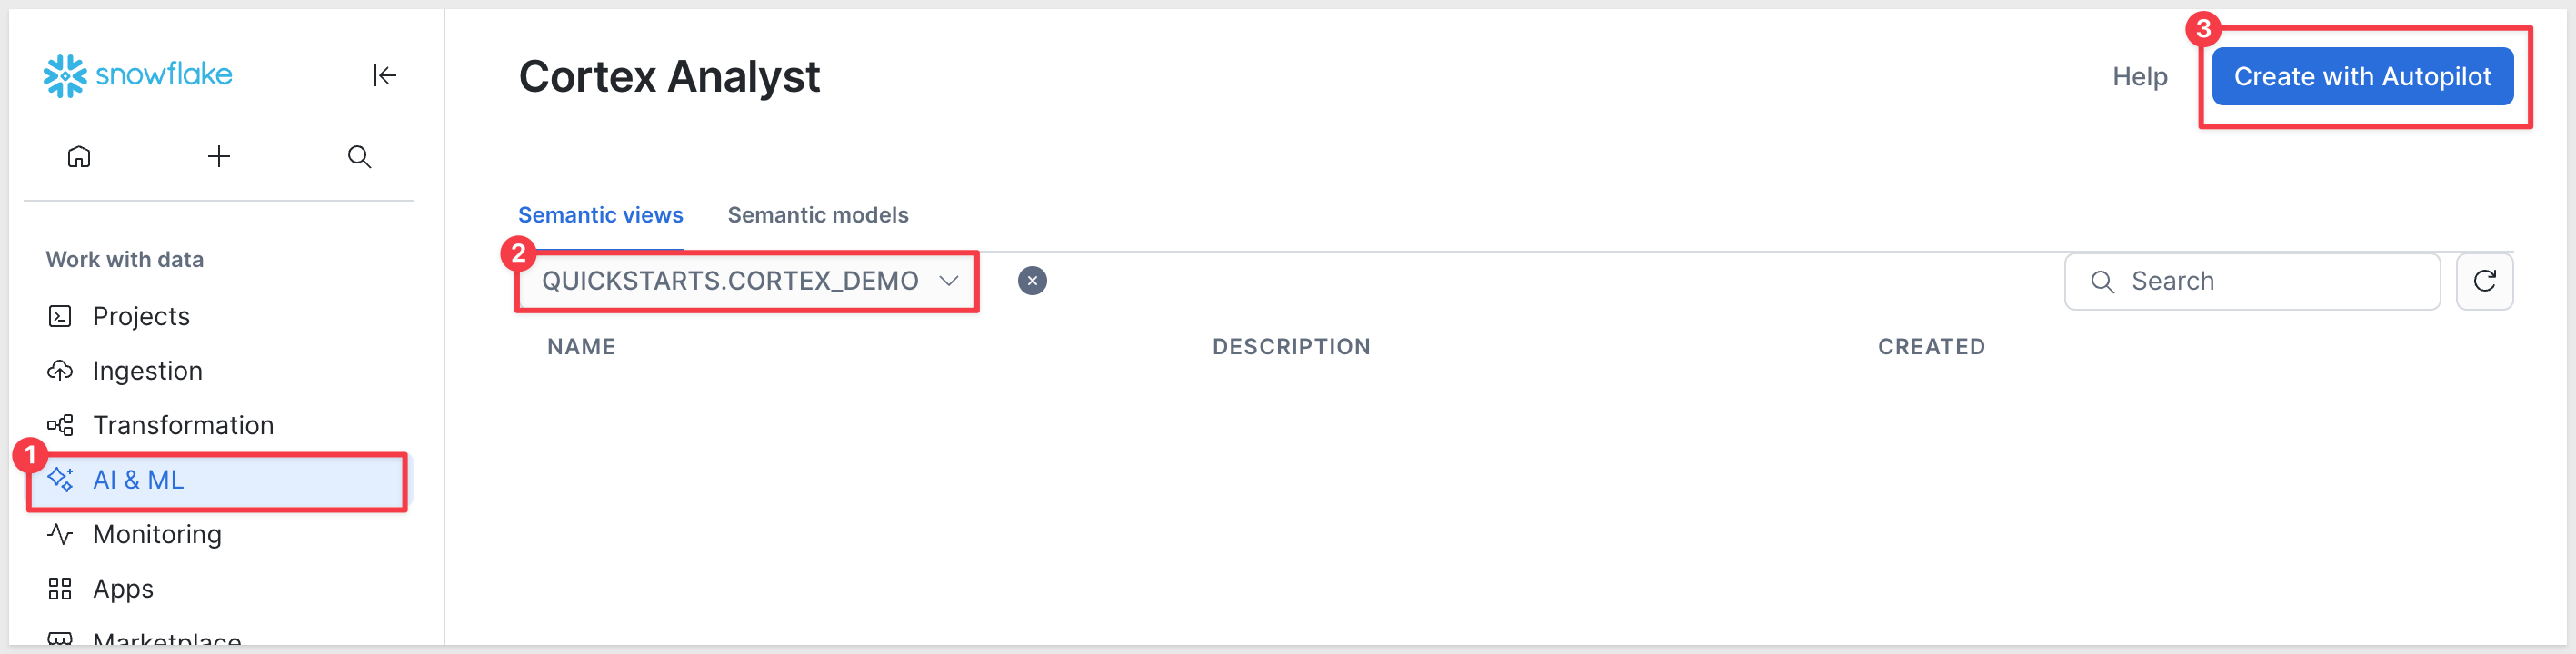
In Snowflake, navigate to AI & ML > AI Studio > Cortex Analyst and click Try.
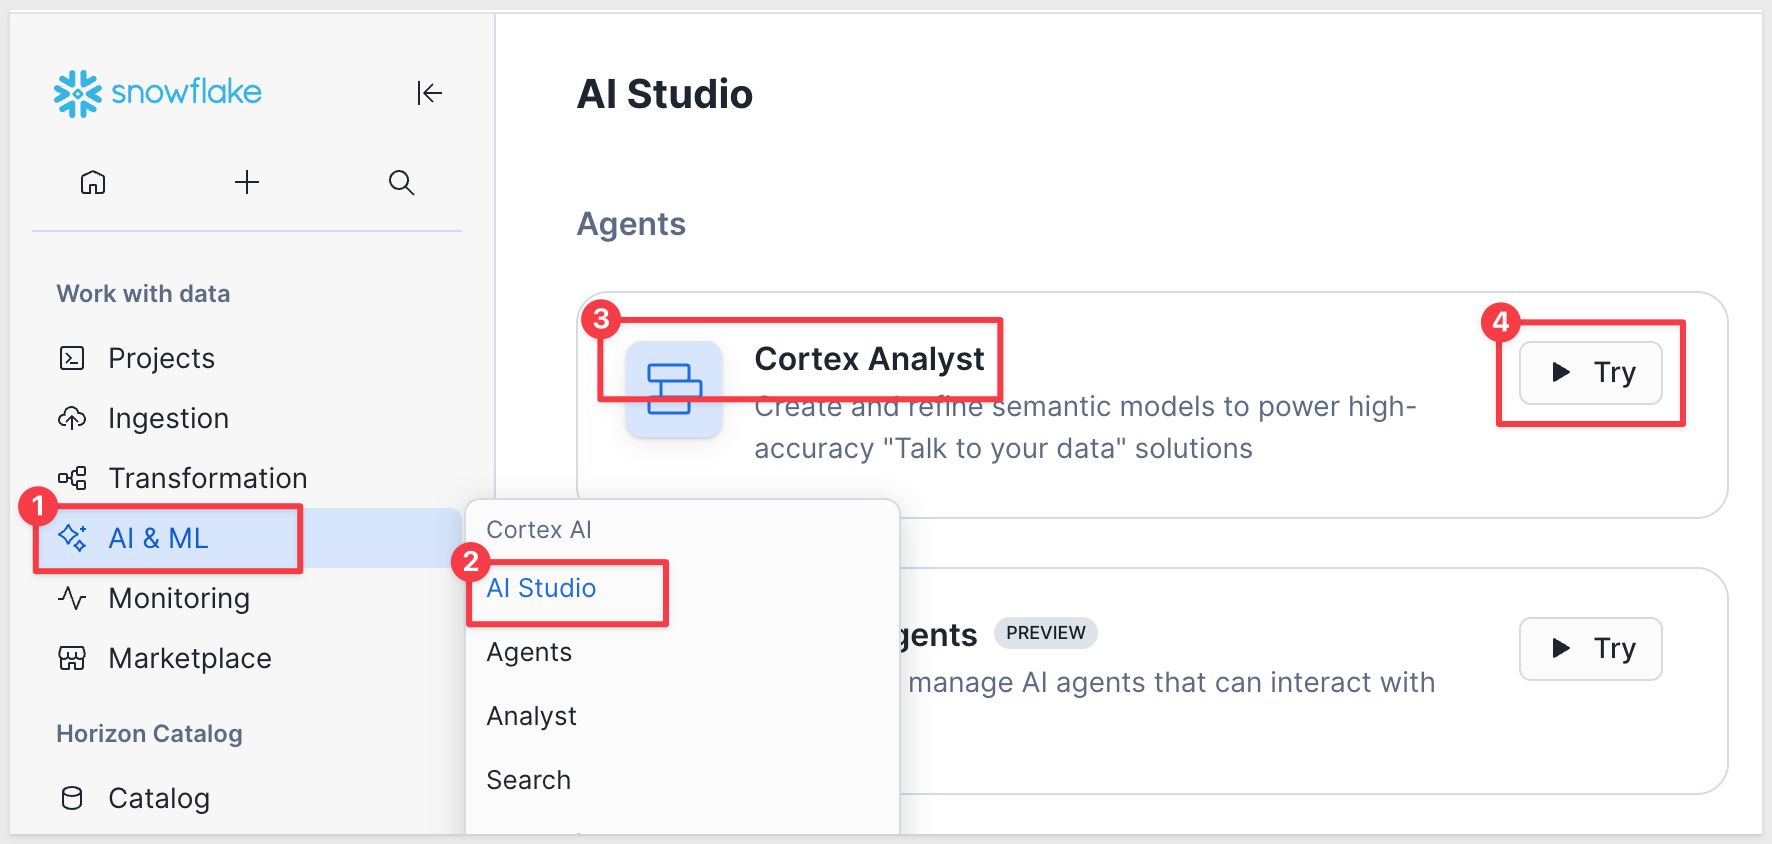
On the Semantic views tab, select the QUICKSTARTS.CORTEX_DEMO database and then click Create with Autopilot. This opens the Semantic View Autopilot wizard.
Wizard step 1: Provide context (Optional)
The wizard can seed the semantic view, but we'll skip this for the QuickStart — click Skip.
Wizard step 2: Name your semantic view
First, change the permission to ACCOUNTADMIN using the drop select list in the upper right corner.
Set the name to:
RETAIL_SEMANTIC_VIEW
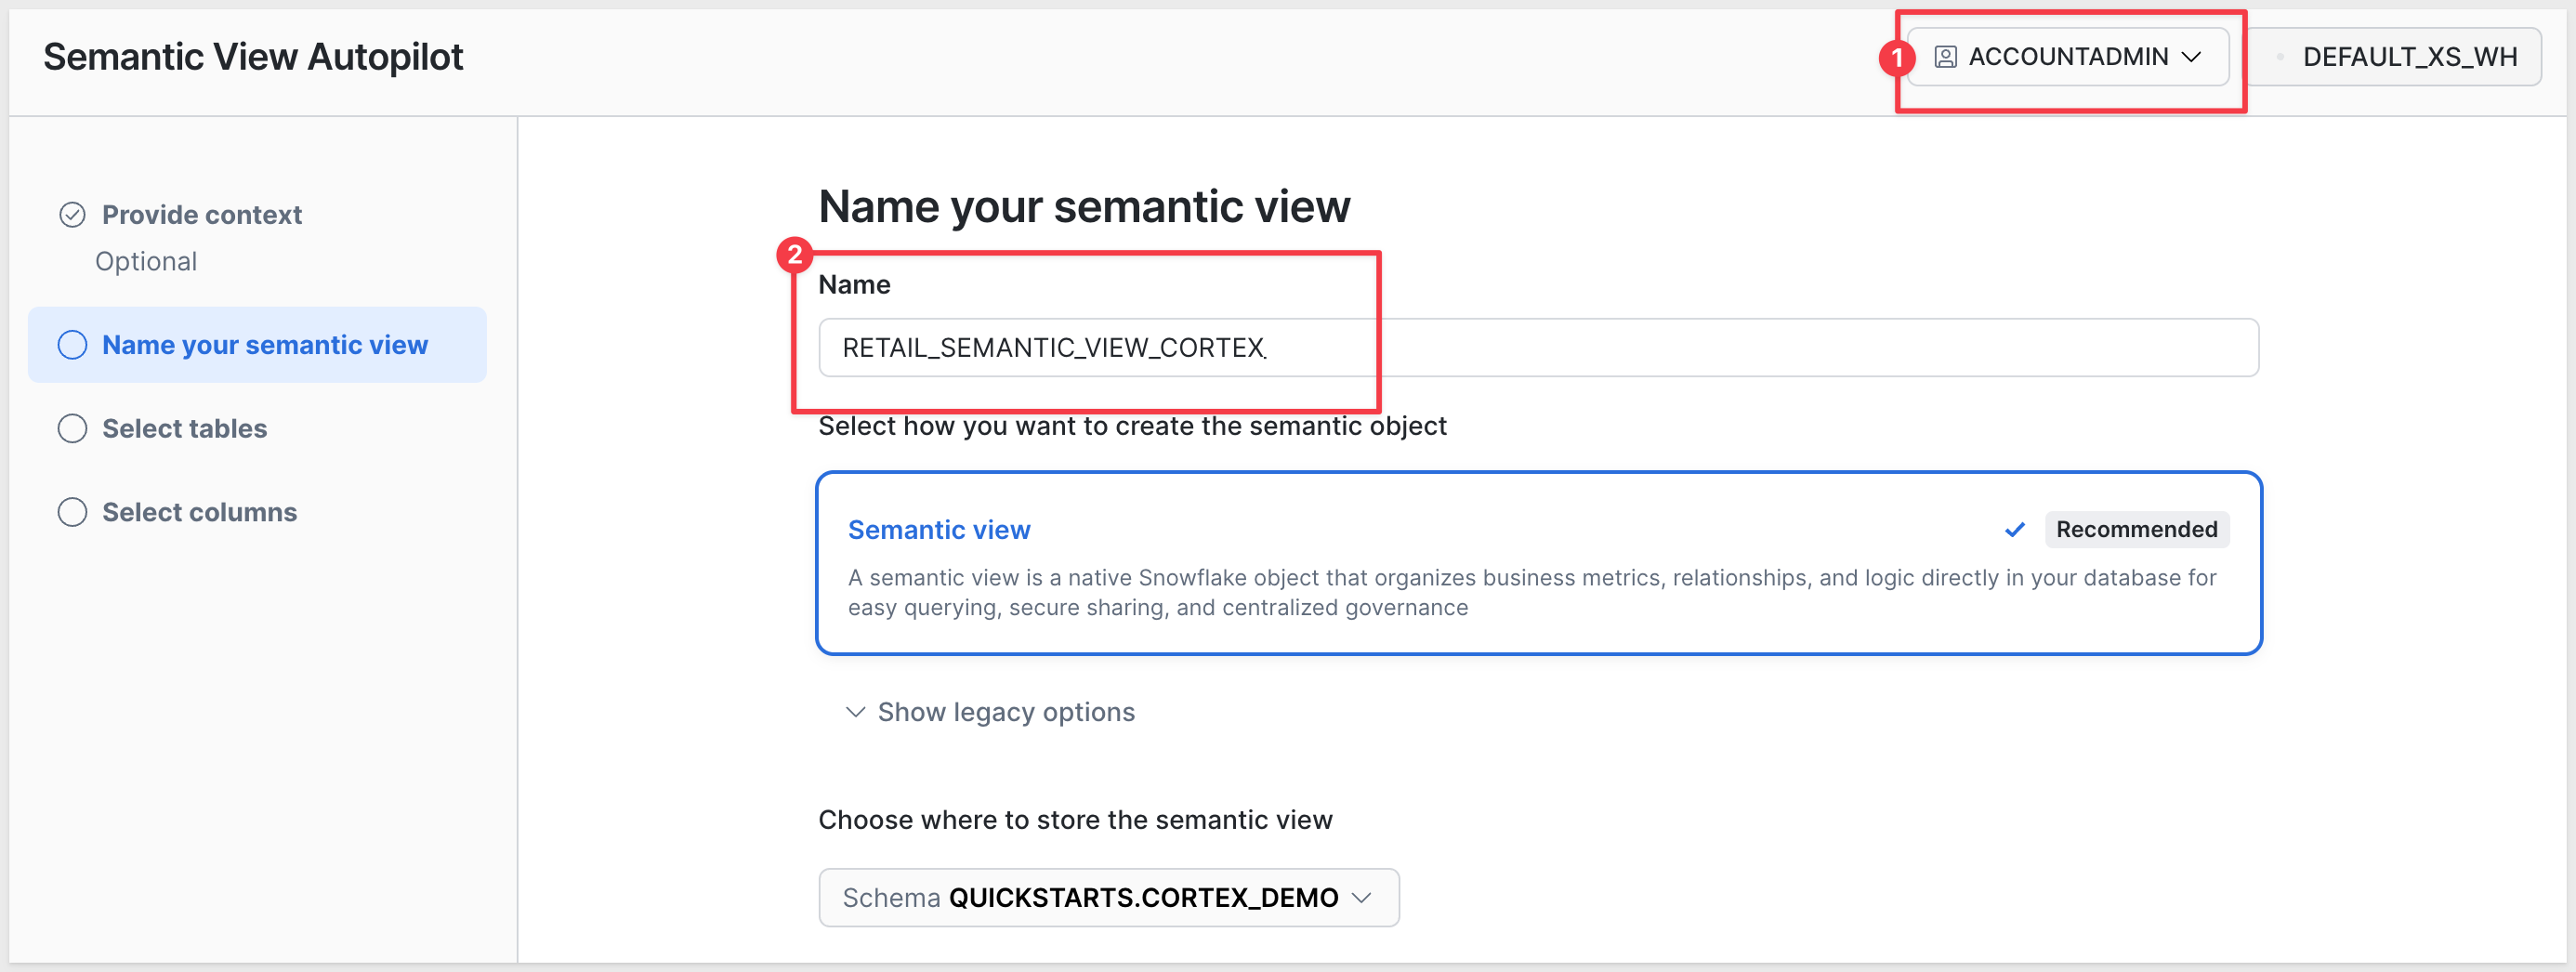
Click Next.
Wizard step 3: Select tables
Navigate to QUICKSTARTS > CORTEX_DEMO and check the box next to RETAIL_DATA_VIEW (under "1 View").
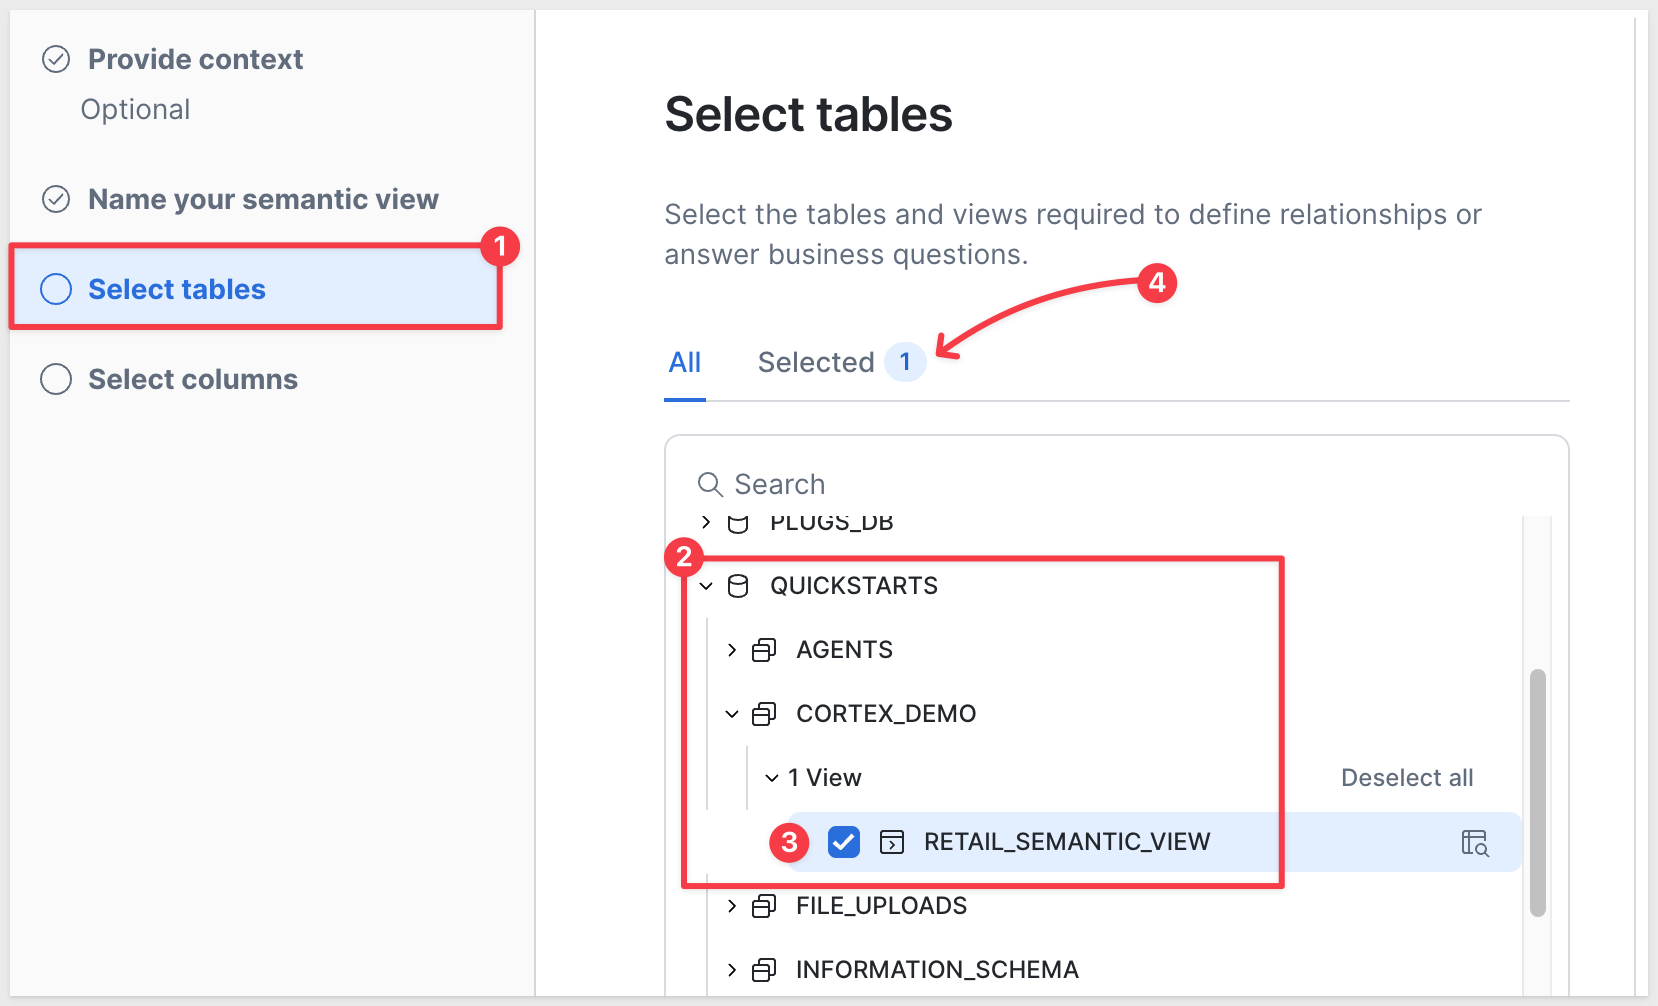
Click Next.
Wizard step 4: Select columns
Select all columns:
- O_CUSTKEY
- O_ORDERSTATUS
- O_TOTALPRICE
- O_ORDERDATE
- O_ORDERPRIORITY
- L_QUANTITY
- L_EXTENDEDPRICE
- L_DISCOUNT
- O_ORDERKEY
Keep both checkboxes selected:
- Add sample values to the semantic view (helps Cortex give better answers)
- Add descriptions to the semantic view (AI will generate descriptions)
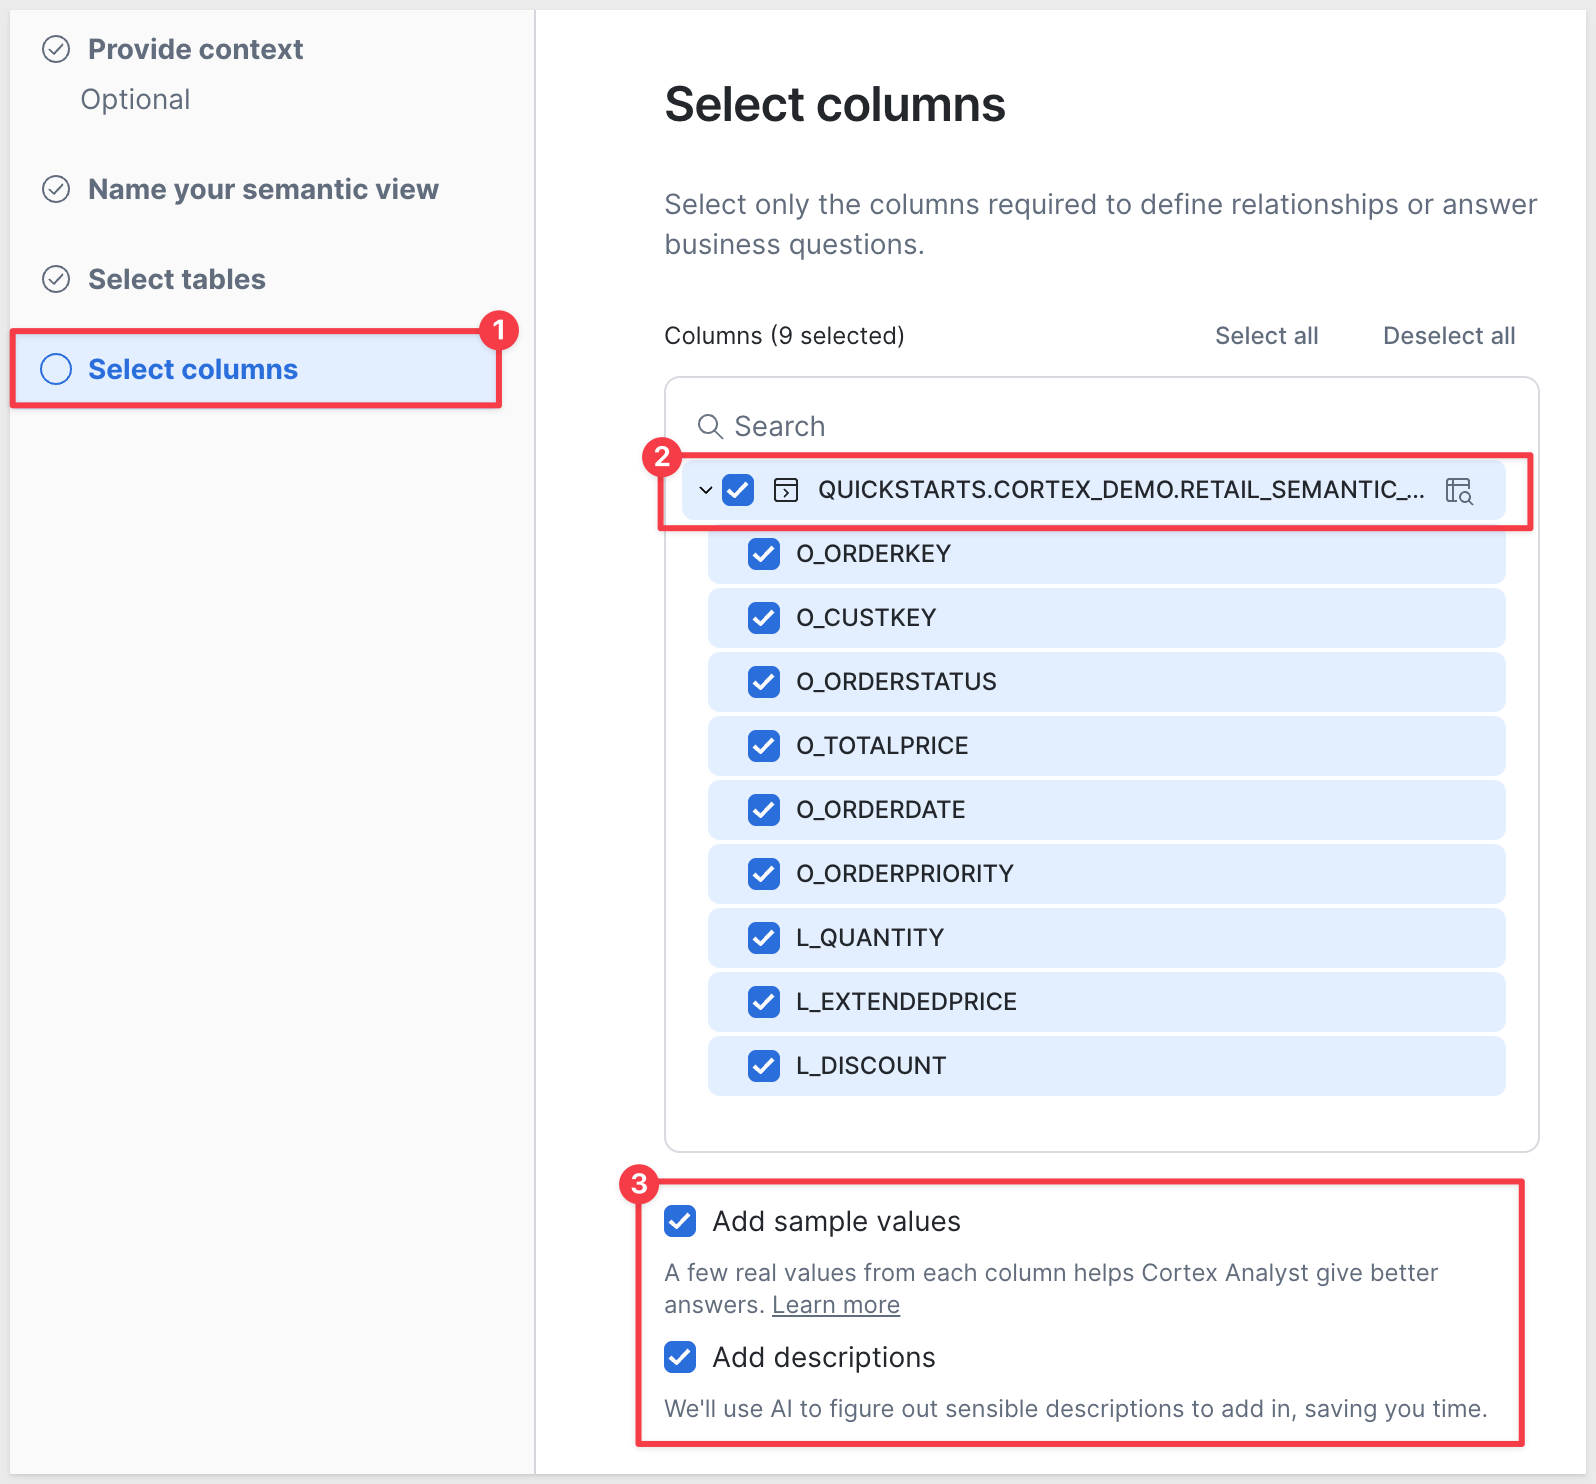
Click Create.
While Snowflake works, you'll see a warning: This process may take up to 10 minutes. Please don't close the window.
Once the processing is done, we can use the Playground and ask Cortex to explain it:
Explain the dataset
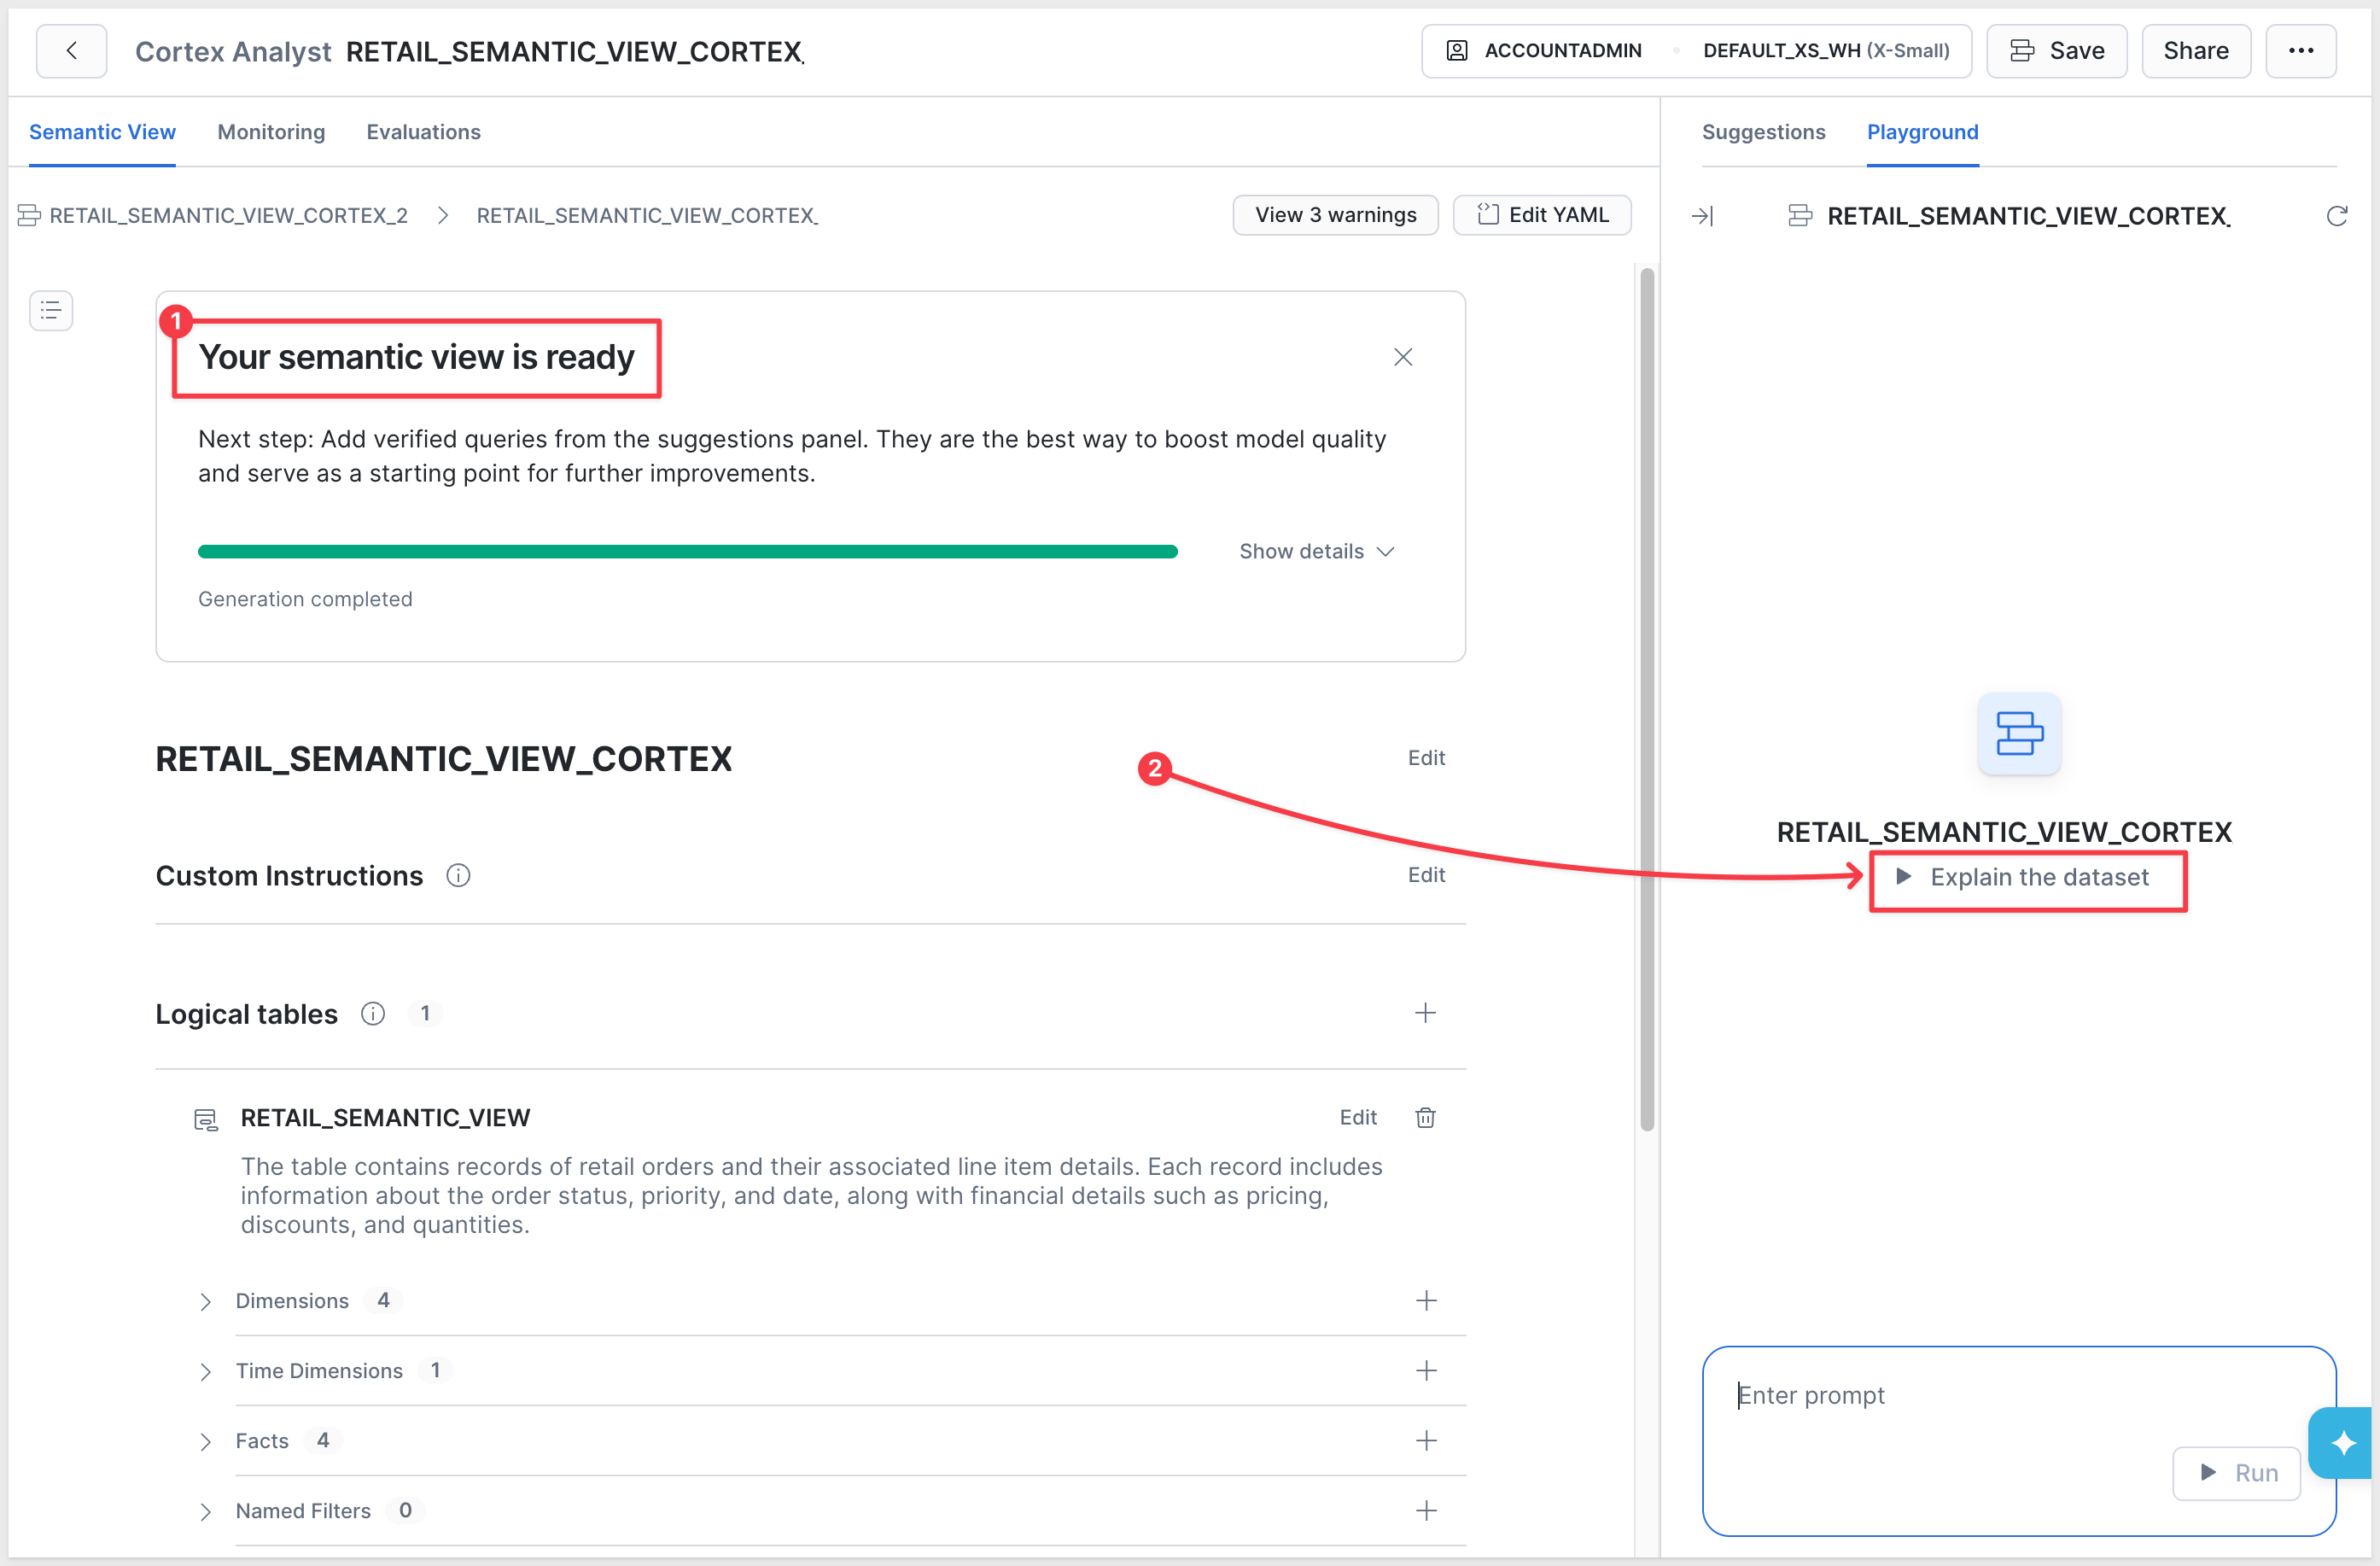
If all is configured correctly, Cortex will respond with a brief explanation:
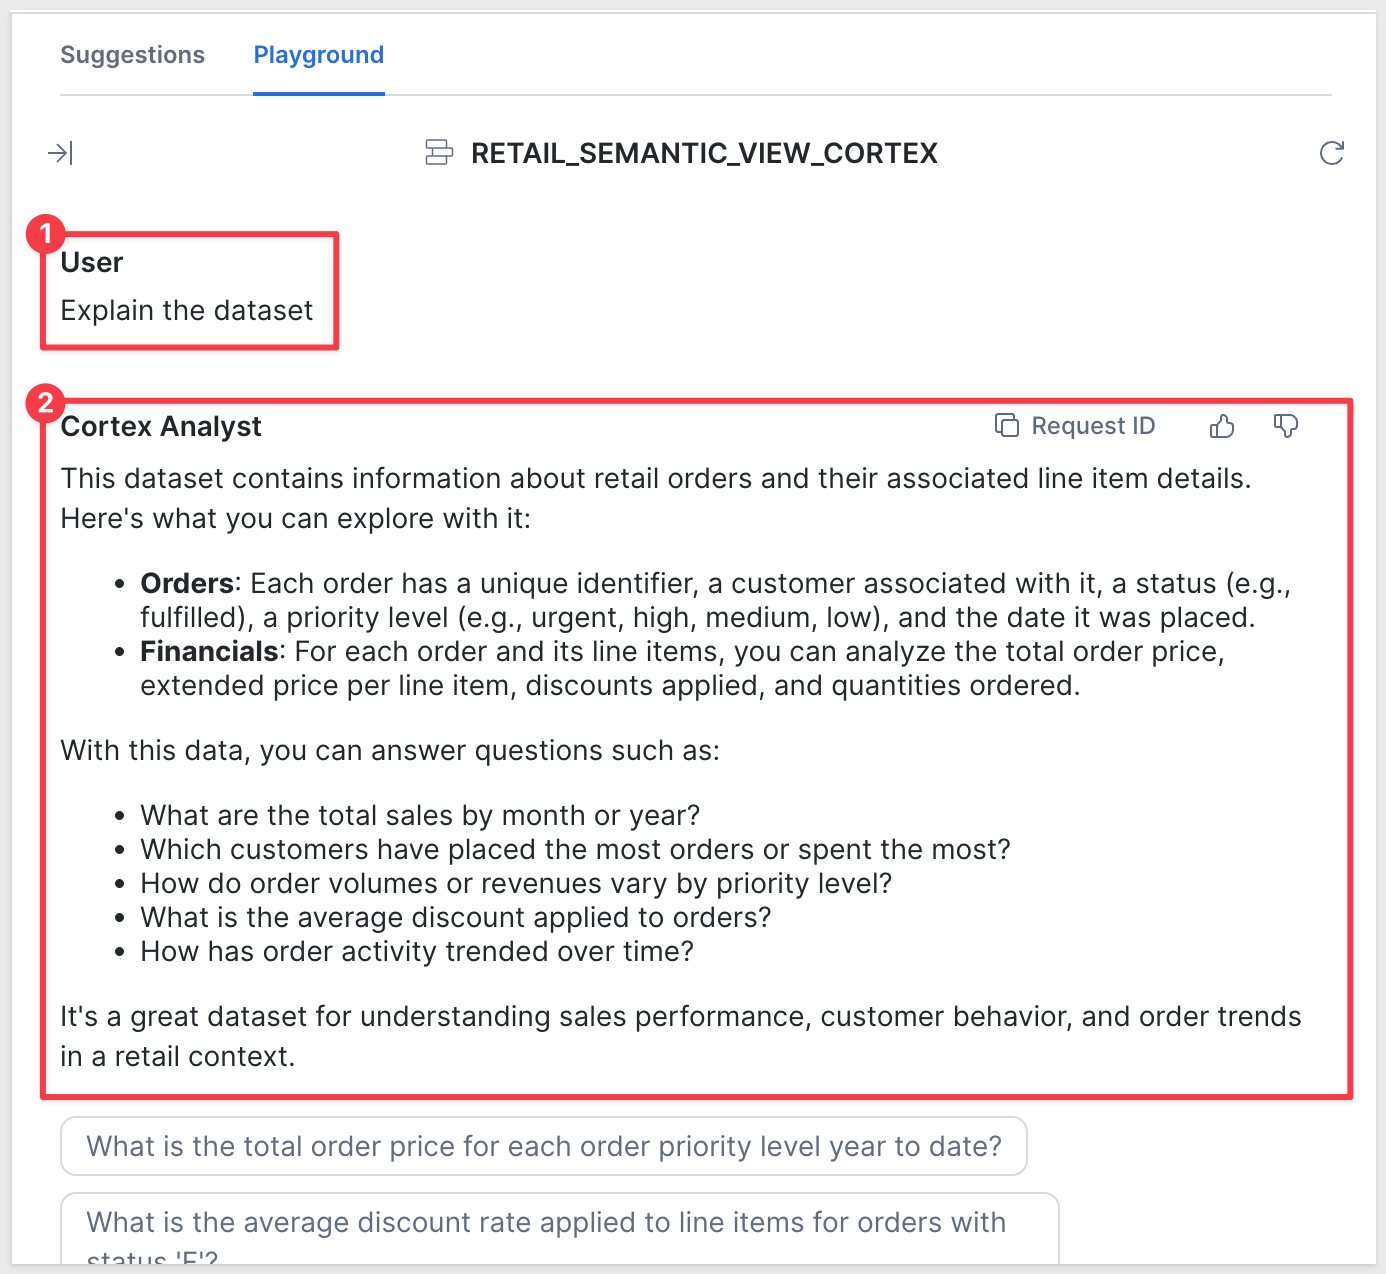
You've now created the complete semantic view. The semantic view references your SQL view (RETAIL_DATA_VIEW) as its base table, and Cortex can now understand your data structure with business-friendly terms.
Step 3: Create Cortex Agent
Now we'll create a Cortex Agent — the Snowflake component that uses the semantic view to answer analytical questions.
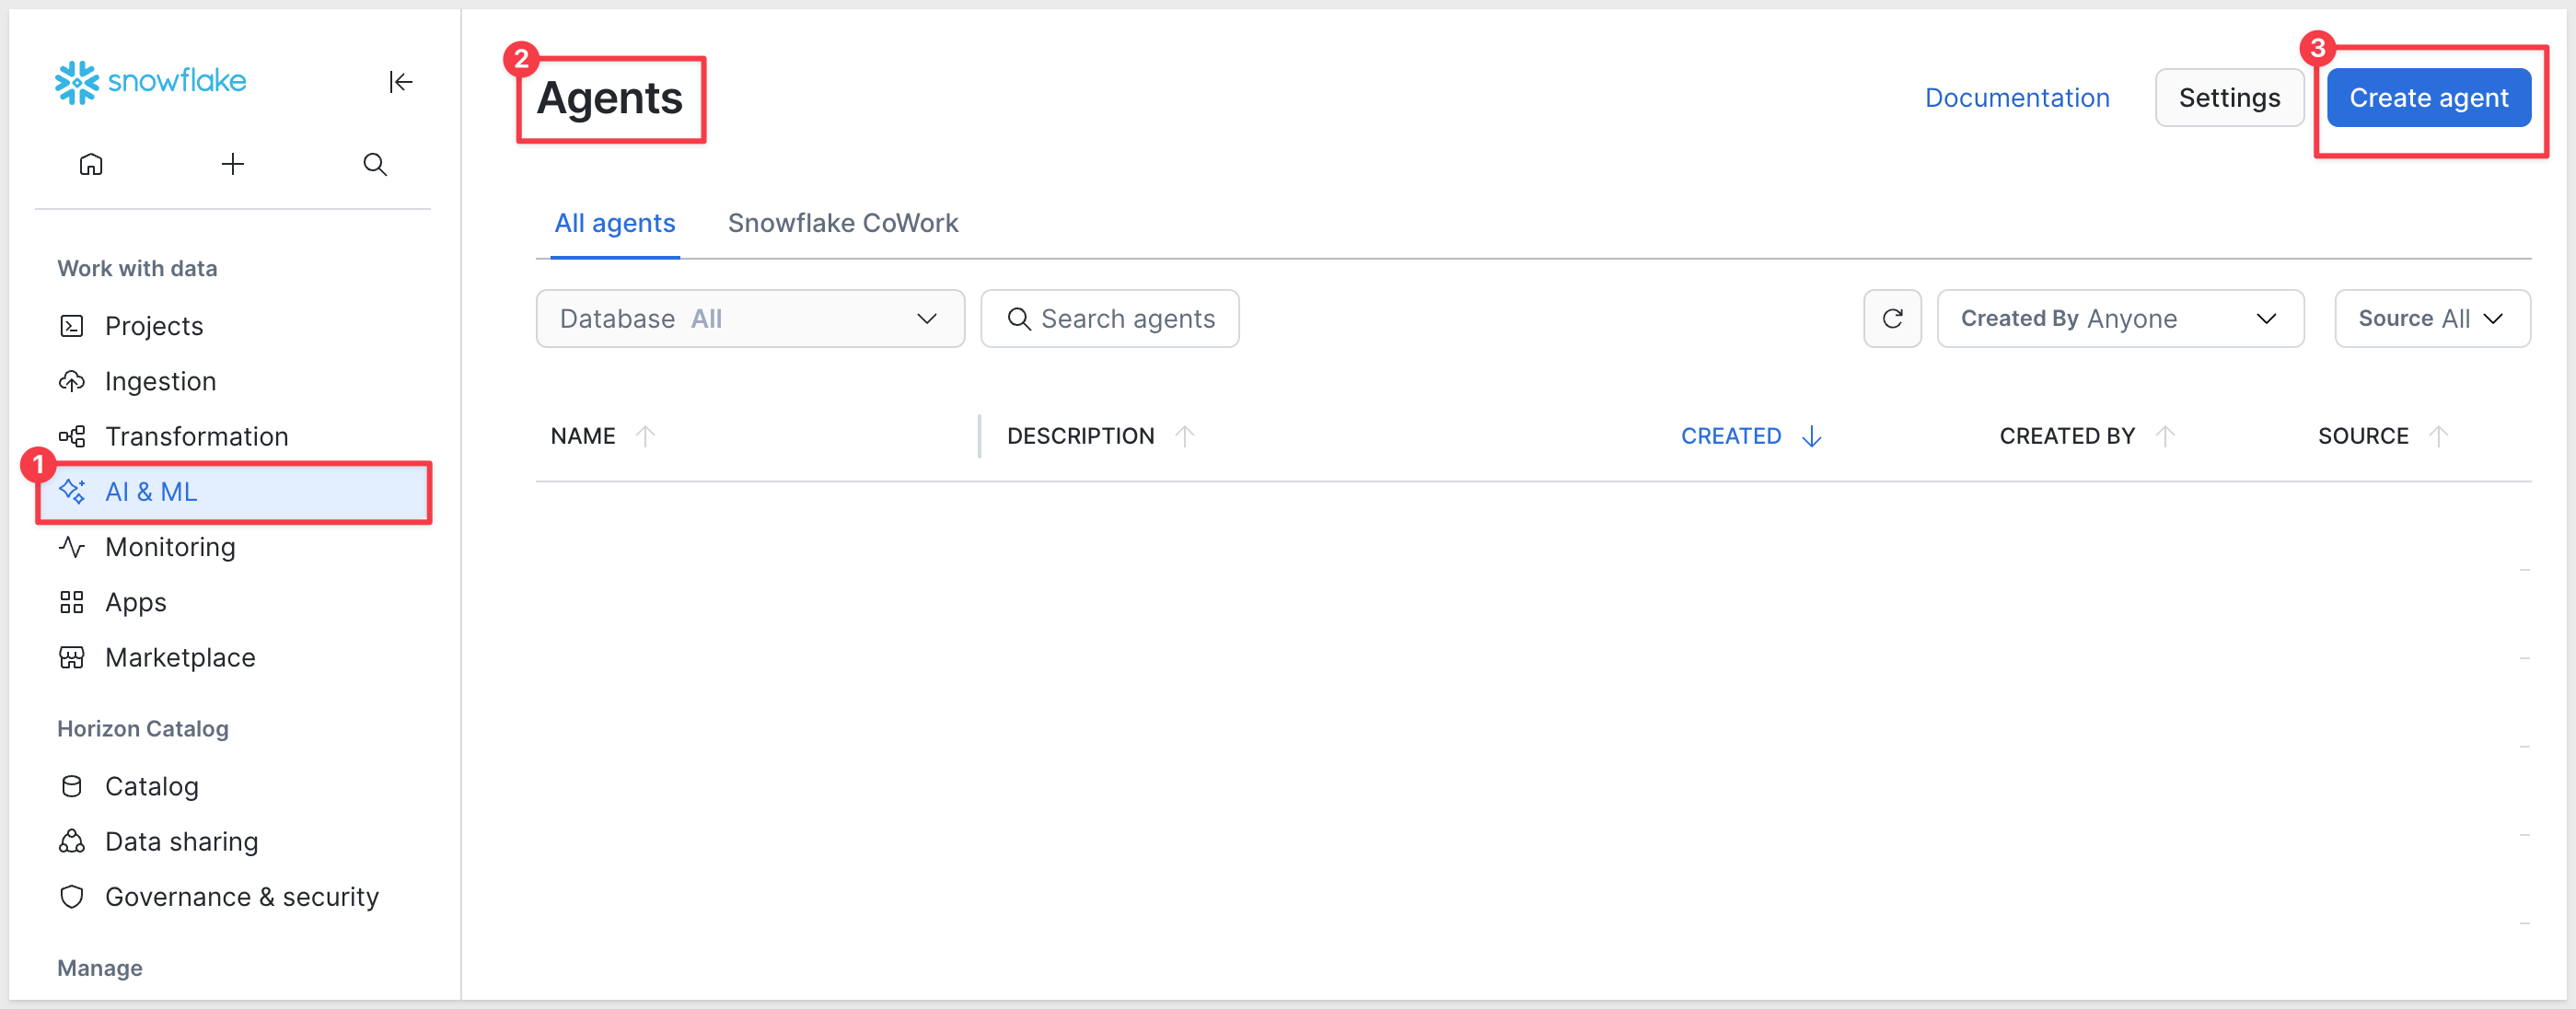
Navigate to AI & ML > Agents (in the left sidebar under AI & ML).
Click the blue button to Create agent:
For Database and schema we will restrict Cortex to only QUICKSTARTS.CORTEX_DEMO.
Set the Agent object name to:
RETAIL_ASSISTANT
We can override the Display name to be more specific if we want. Use:
QuickStart Cortex Demo Retail Assistant
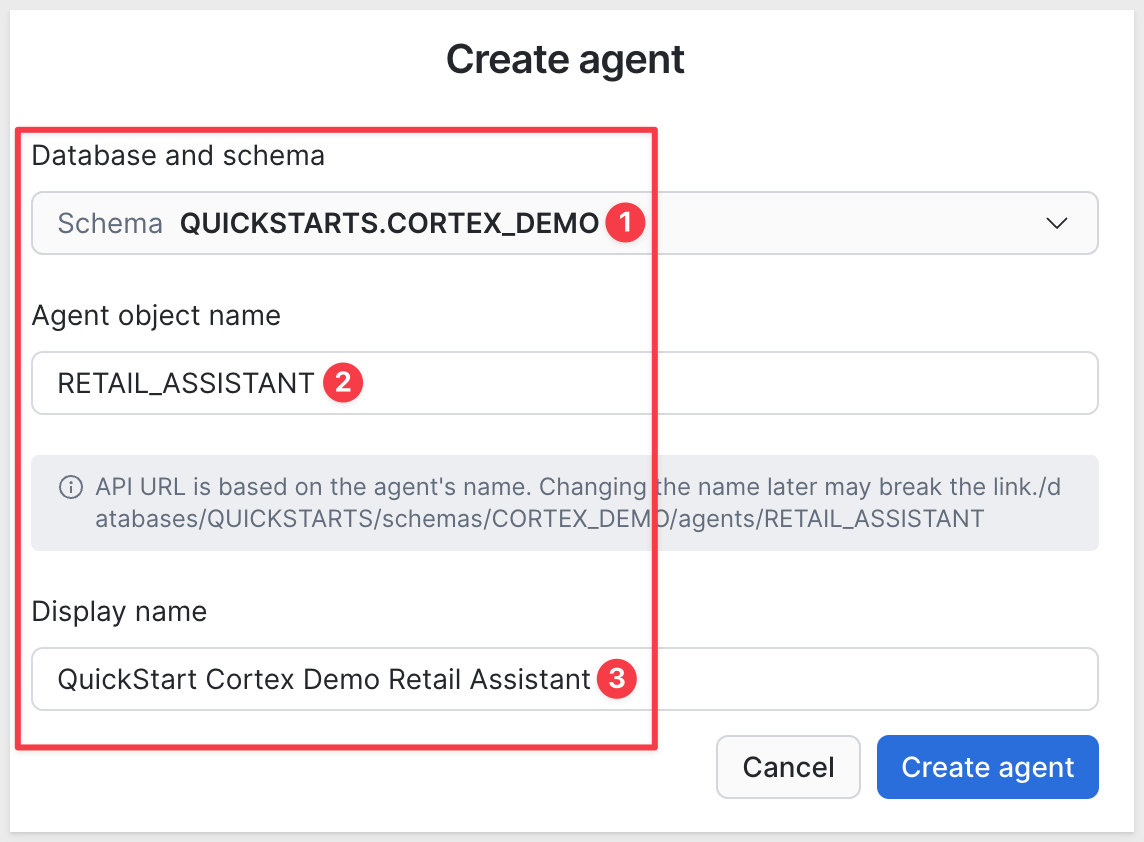
Click Create agent.
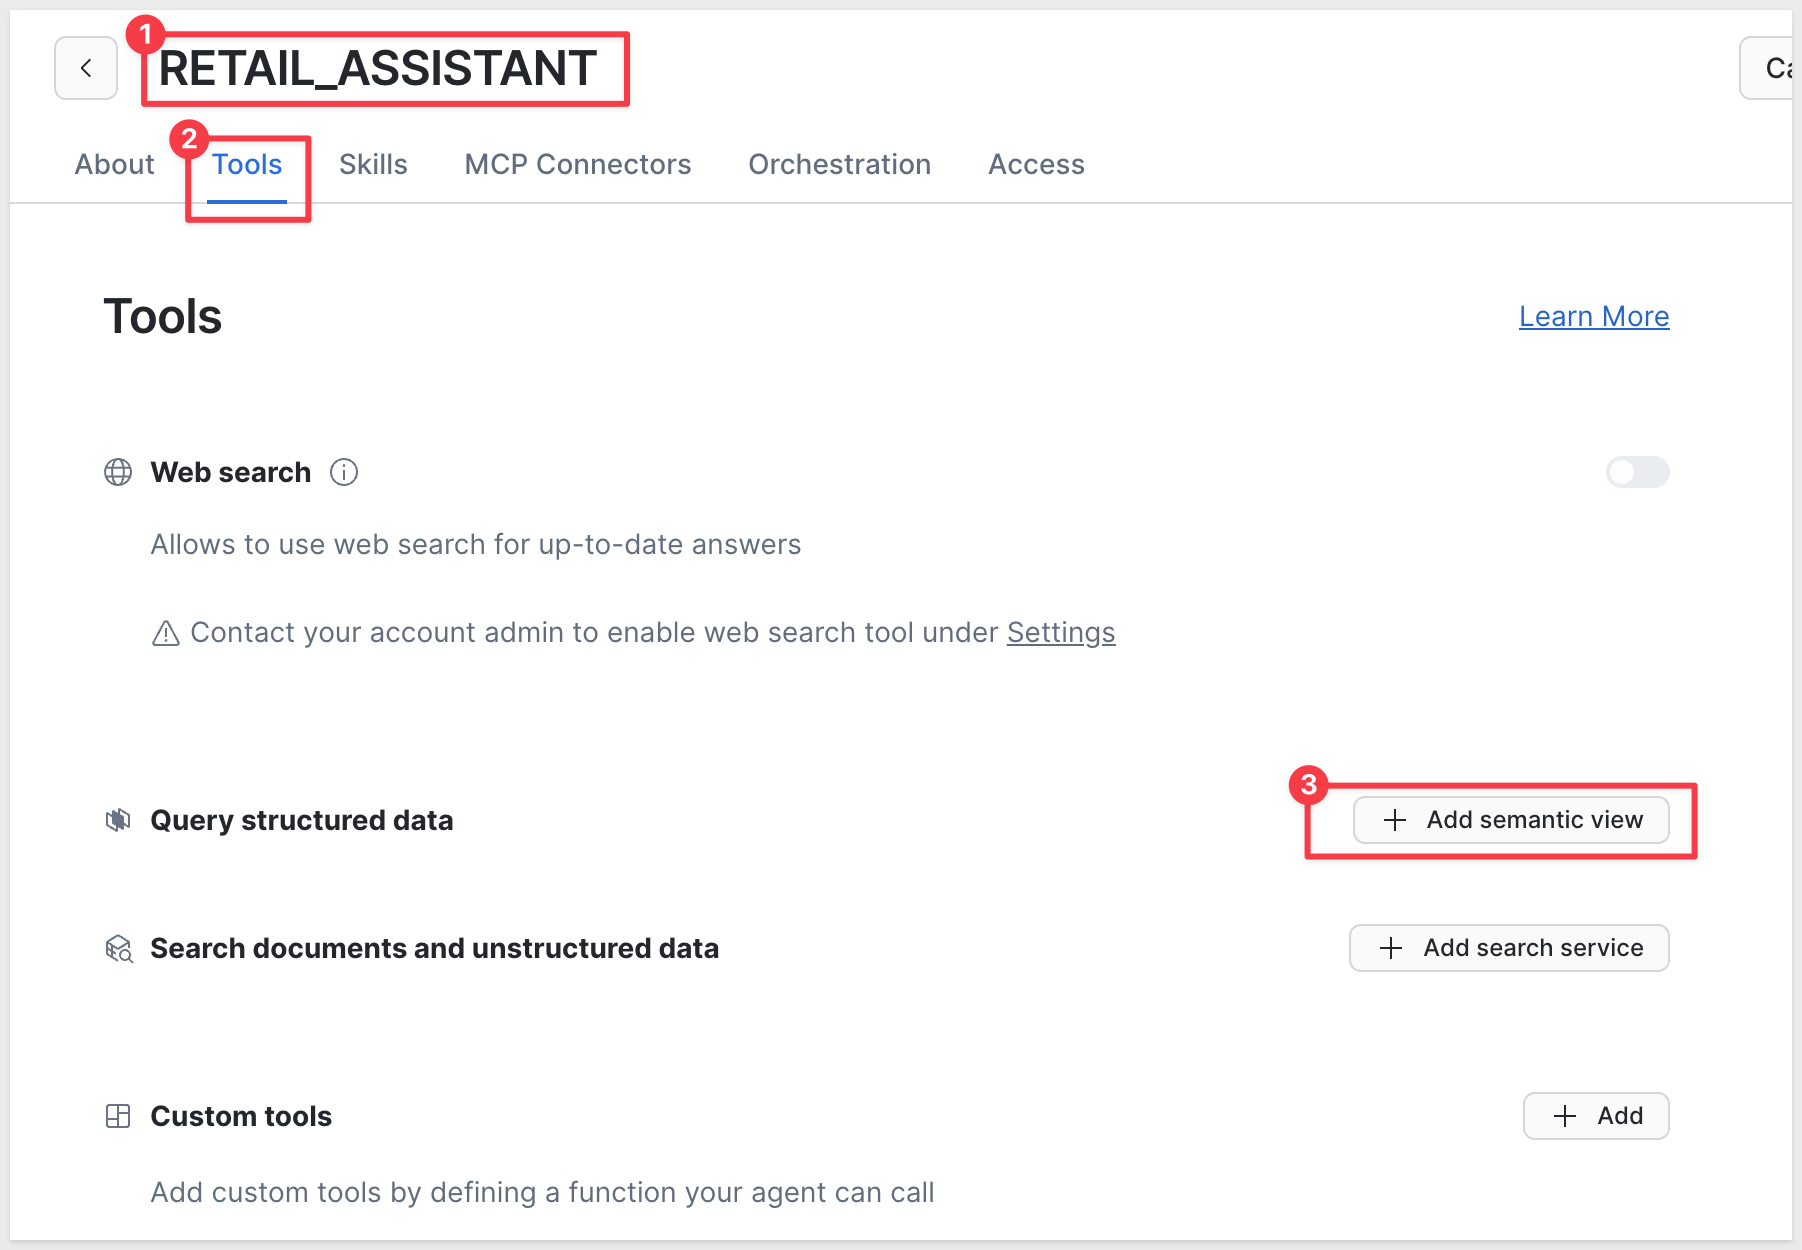
Open the Tools tab.
Snowflake organizes Cortex Agent tools into a few categories: Web search, Query structured data, Search documents and unstructured data, and Custom tools. We only need the structured-data path for this QuickStart.
Under Query structured data, click + Add semantic view:
Configure the tool:
- Semantic view: Browse and select
QUICKSTARTS.CORTEX_DEMO.RETAIL_SEMANTIC_VIEW - View:
RETAIL_SEMANTIC_VIEW
Tool name:
retail_data_analysis
Description:
Use this tool for all questions about orders, customers, revenue, and sales patterns
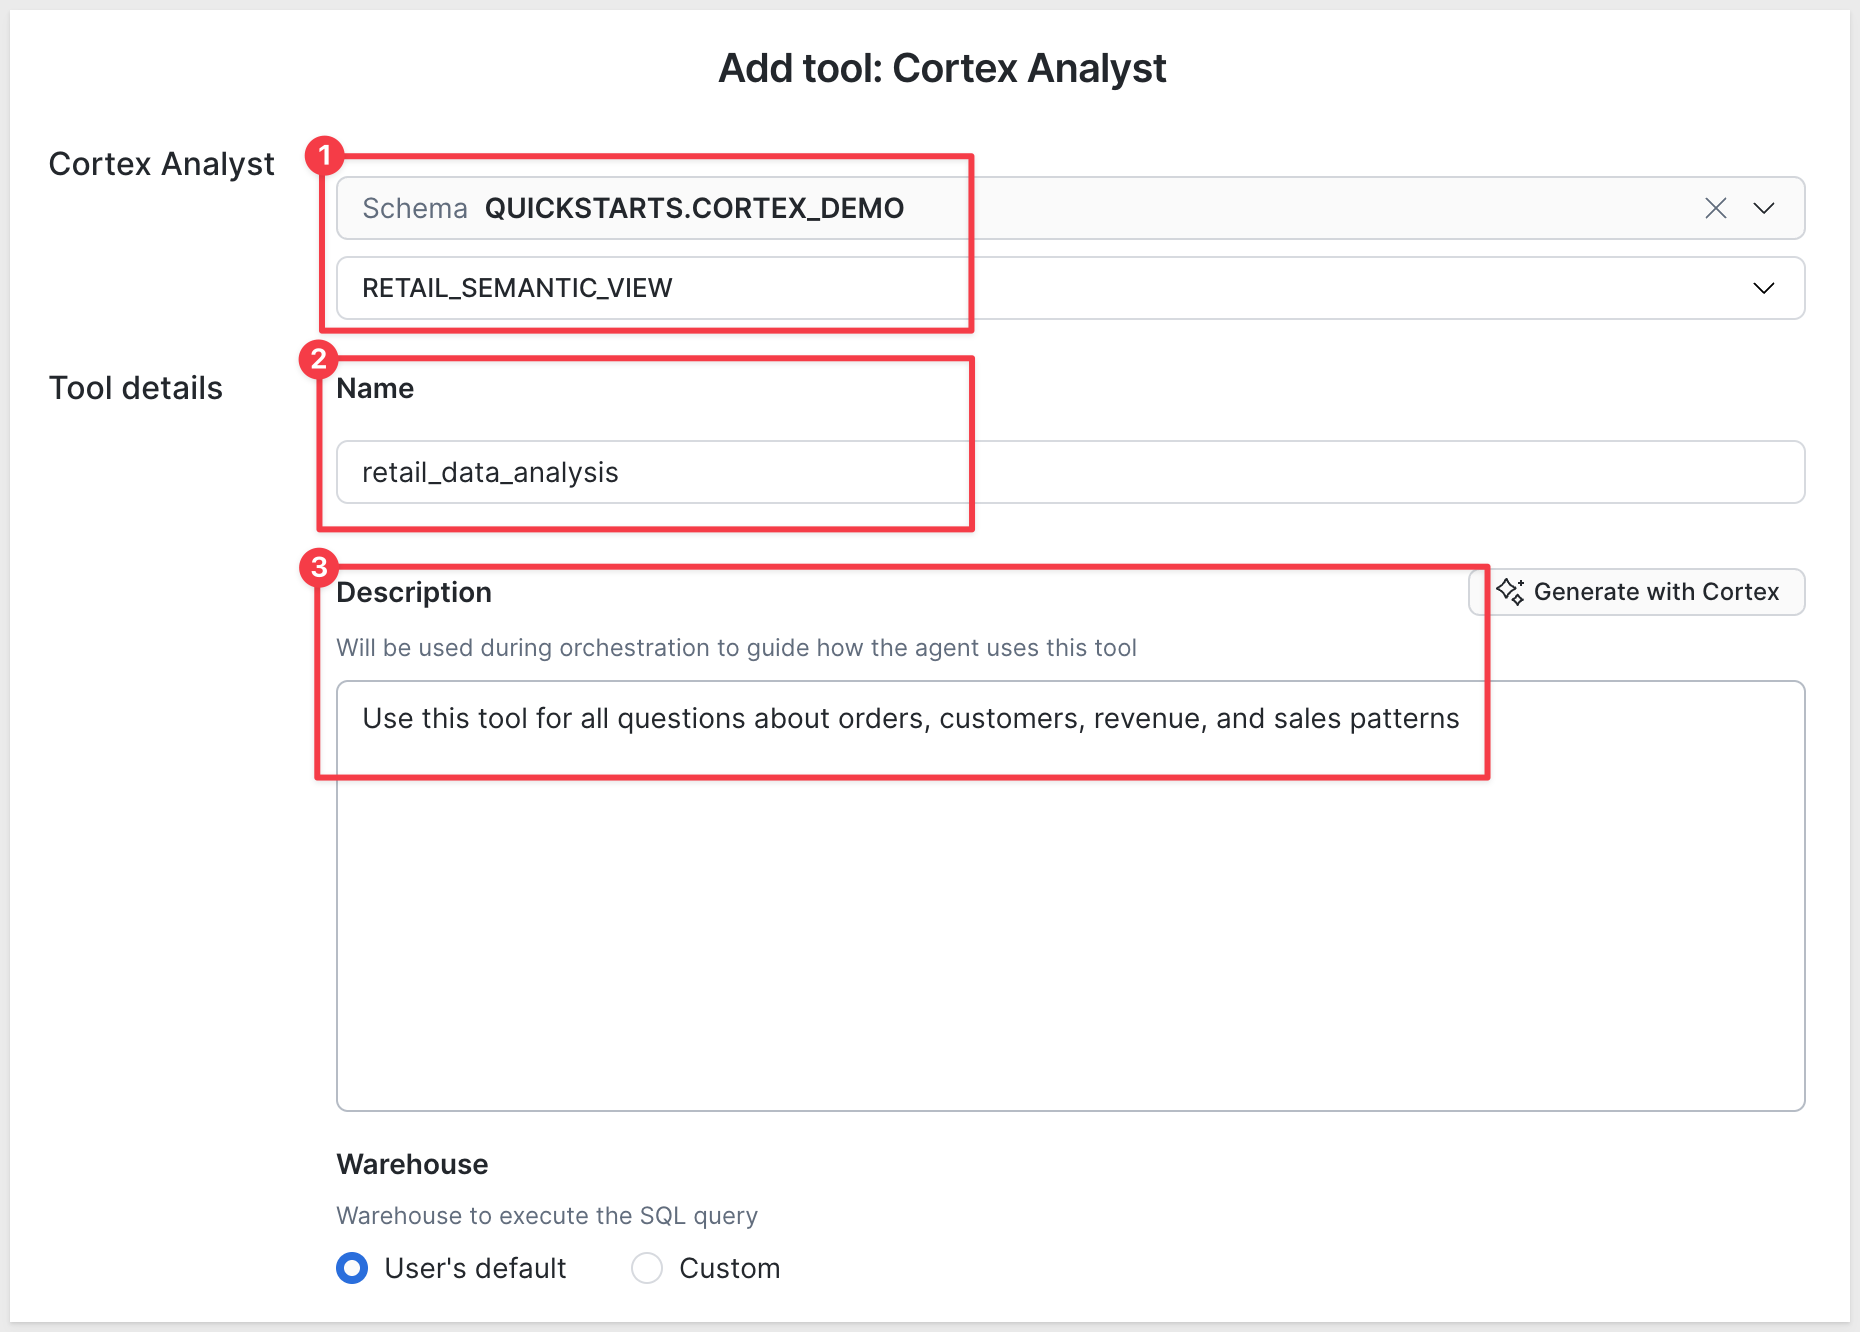
Click Add.
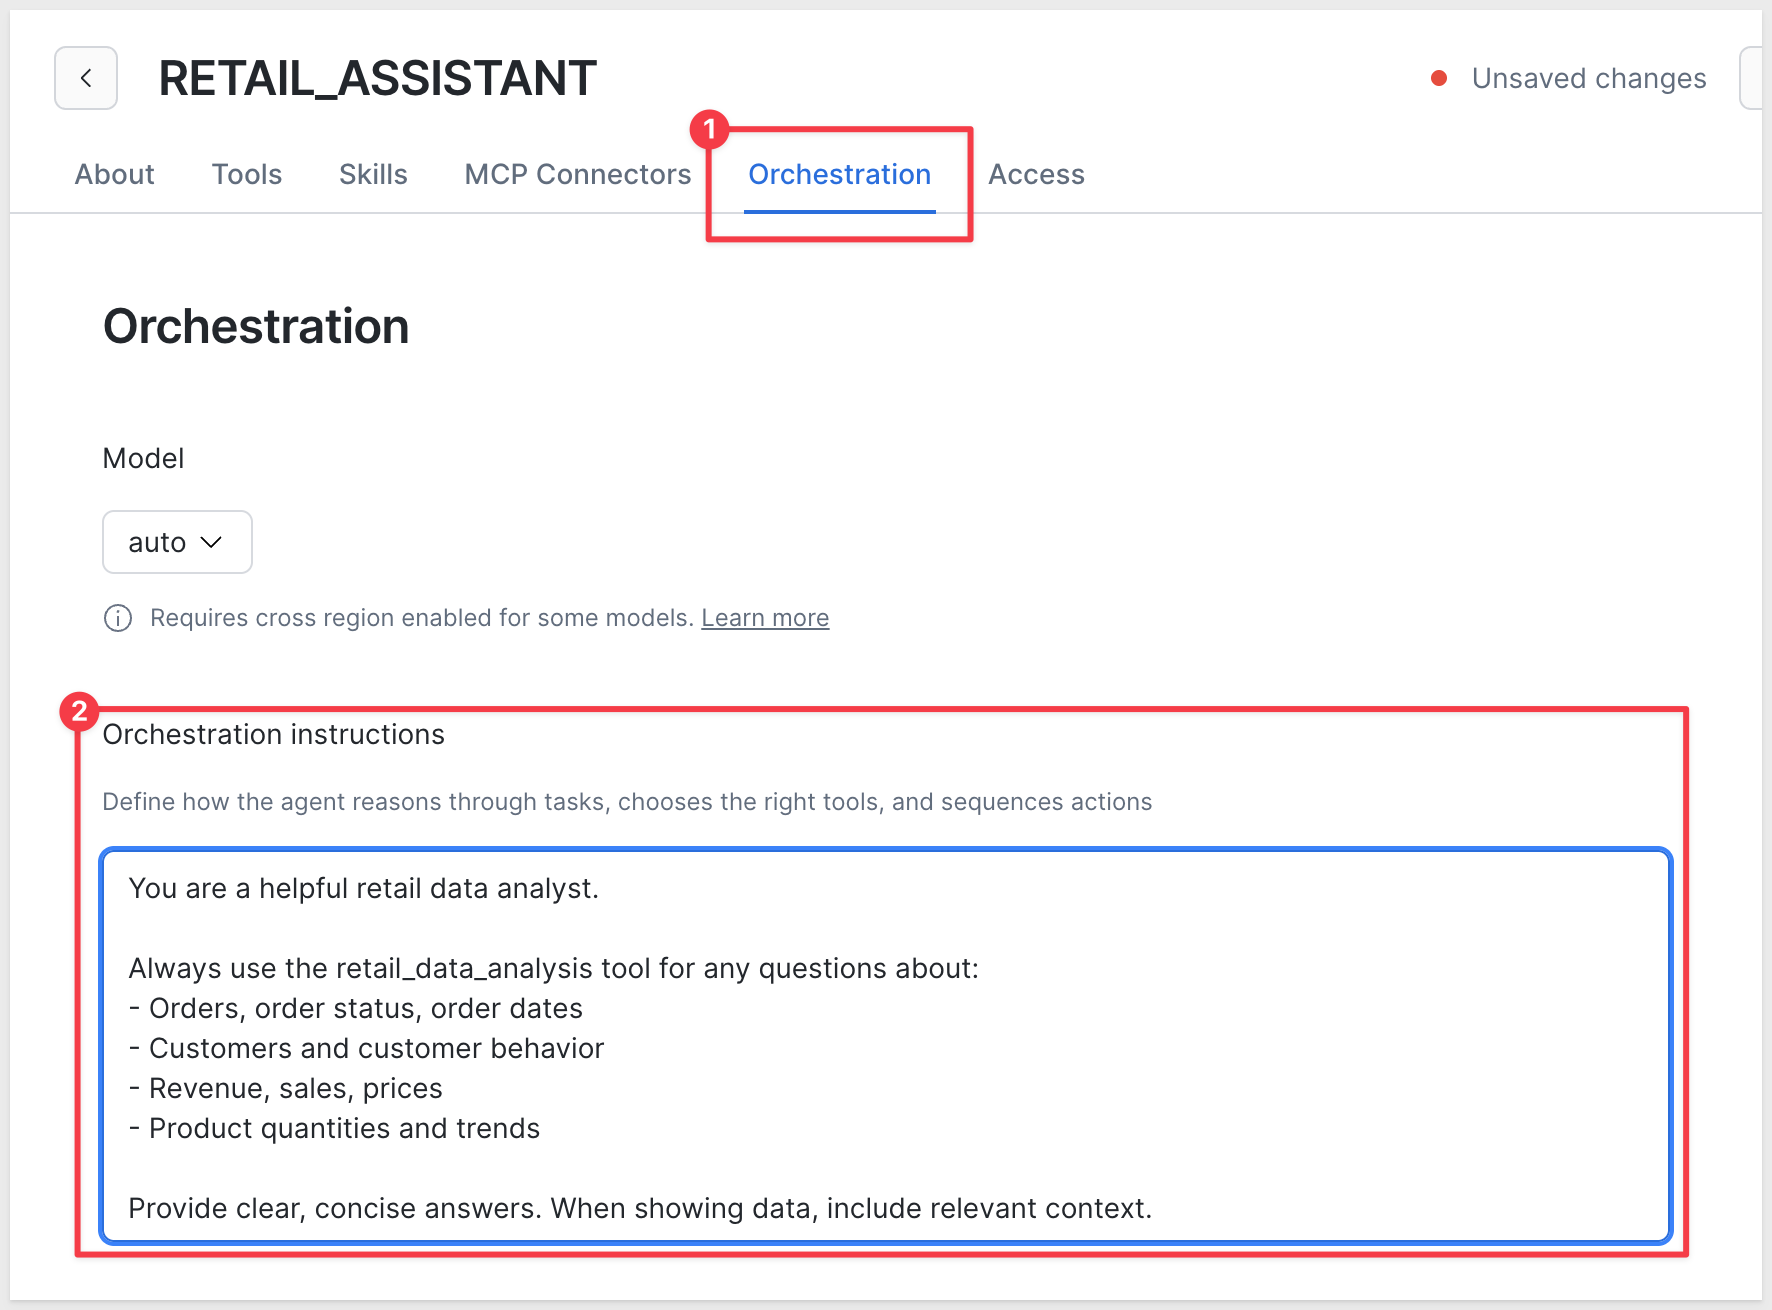
On the Orchestration tab, enter these instructions:
You are a helpful retail data analyst.

Always use the retail_data_analysis tool for any questions about:
- Orders, order status, order dates
- Customers and customer behavior
- Revenue, sales, prices
- Product quantities and trends

Provide clear, concise answers. When showing data, include relevant context.
Click Save to save the agent, but we have a few more permission steps to complete.
Step 4: Grant Permissions
Grant access to your Sigma service role so Sigma can use the Cortex Agent and access the underlying data.
Step 4a: Grant SQL View Access (Using SQL)
The underlying SQL view must be accessible to your Sigma role. Run this in a Snowflake SQL worksheet:
USE ROLE ACCOUNTADMIN;

-- Grant Cortex database role
GRANT DATABASE ROLE SNOWFLAKE.CORTEX_USER TO ROLE SIGMA_SERVICE_ROLE;

-- Grant database usage
GRANT USAGE ON DATABASE QUICKSTARTS TO ROLE SIGMA_SERVICE_ROLE;

-- Grant schema usage
GRANT USAGE ON SCHEMA QUICKSTARTS.CORTEX_DEMO TO ROLE SIGMA_SERVICE_ROLE;

-- Grant SELECT on semantic view
GRANT SELECT ON VIEW QUICKSTARTS.CORTEX_DEMO.RETAIL_SEMANTIC_VIEW TO ROLE SIGMA_SERVICE_ROLE;
Replace SIGMA_SERVICE_ROLE with the actual role used in your Sigma connection (see the note at the top of Step 4 for how to find it).
Step 4b: Grant Cortex Agent Access (Using UI)
Now grant access to the Cortex Agent itself. Return to the RETAIL_ASSISTANT agent and click Edit.
- Click the
Accesstab - Click
Add role - Type in your Sigma role (e.g.,
SIGMA_SERVICE_ROLE— or whatever name your connection uses) and selectUSAGE
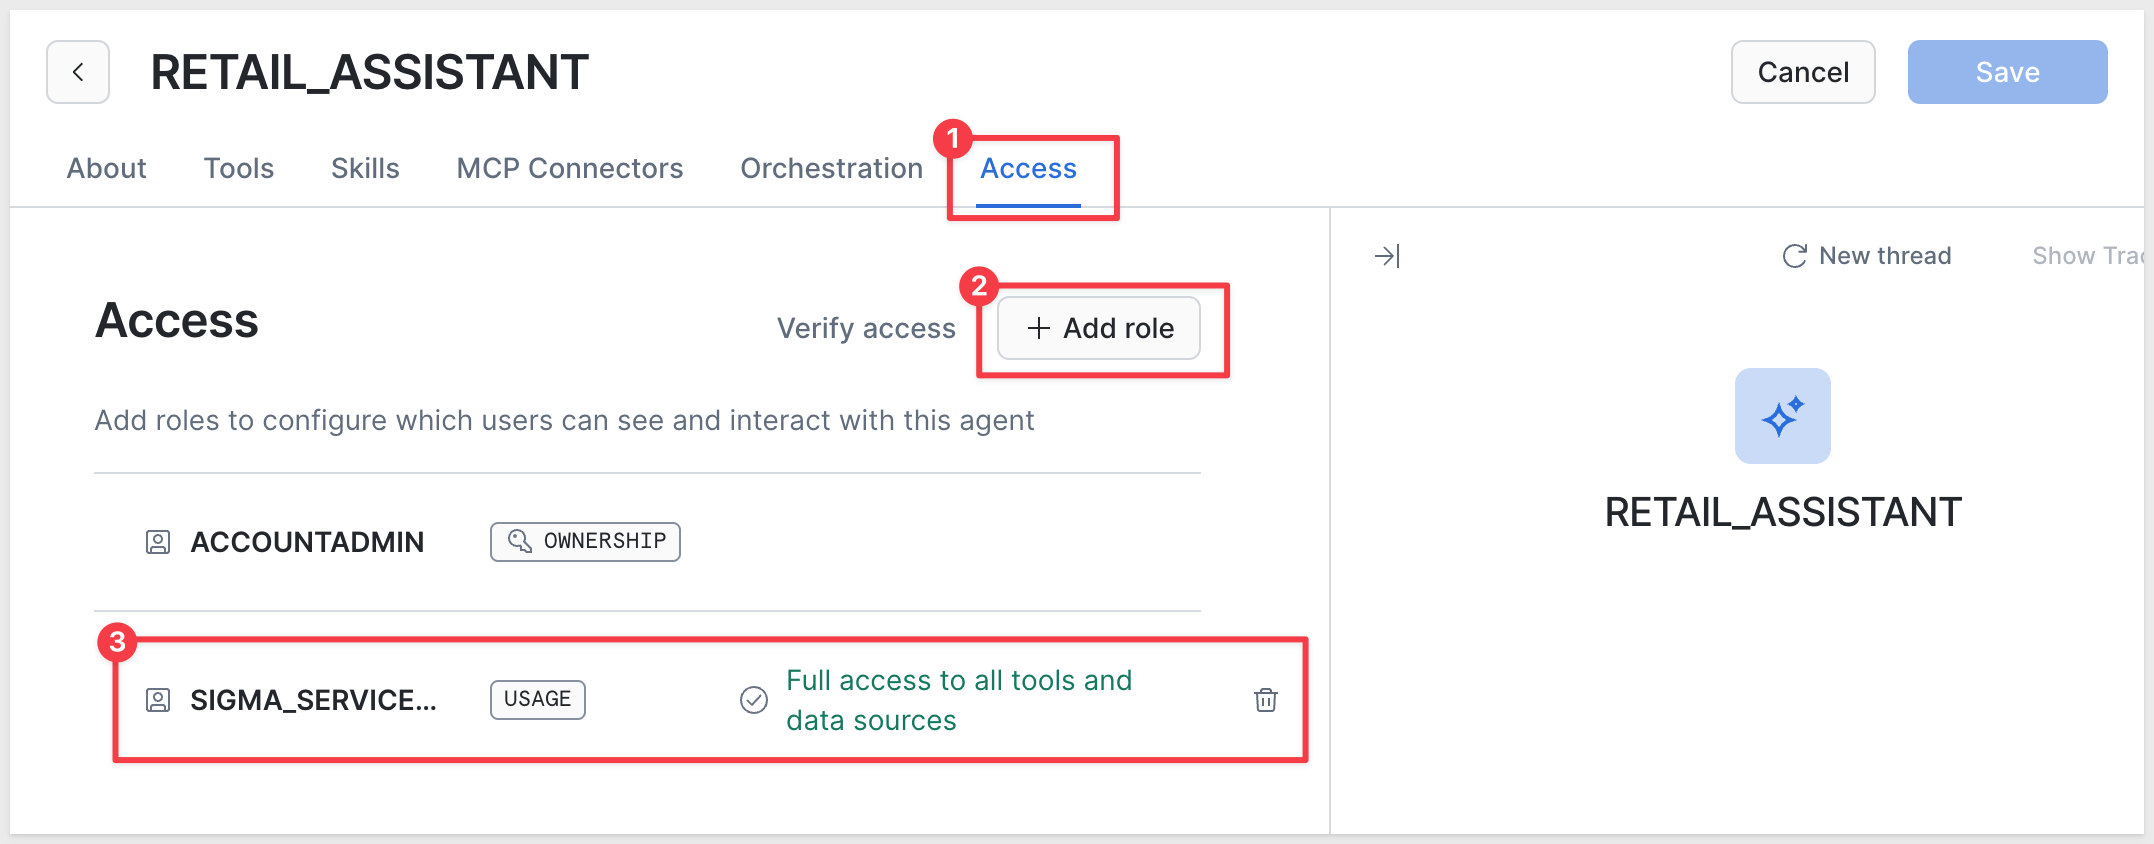
- Click
Saveor confirm the addition
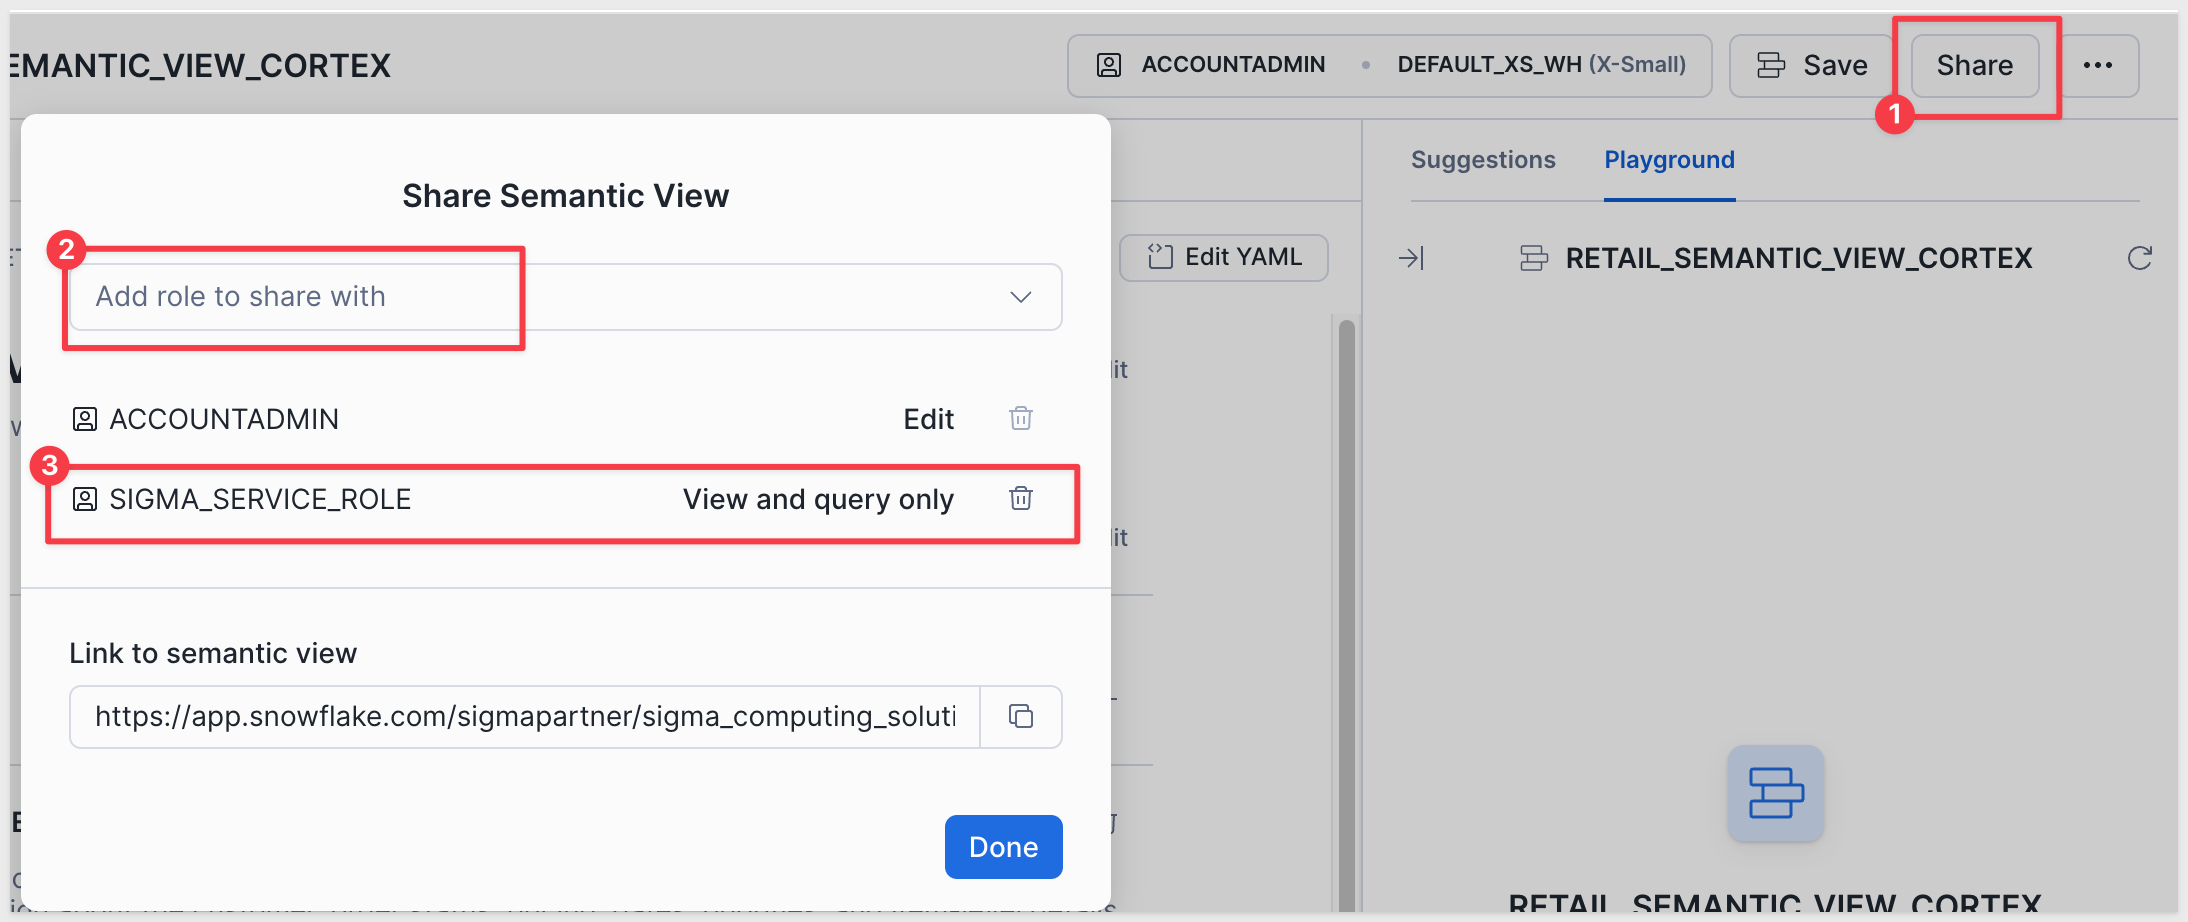
Step 4c: Grant Semantic View Access (Using UI)
- Navigate to
AI & ML>AI Studio>Cortex Analyst - Select the
QUICKSTARTS.CORTEX_DEMOdatabase - Click on
RETAIL_SEMANTIC_VIEWSemantic view - Click the
ShareorAccessbutton - Type in your Sigma role (e.g.,
SIGMA_SERVICE_ROLE), as the role is not always listed in the dropdown - Click
Save
Your Cortex setup is complete! You've created:
- SQL View (data layer) -
RETAIL_DATA_VIEW - Semantic View with AI-generated descriptions -
RETAIL_SEMANTIC_VIEW - Cortex Agent with orchestration instructions -
RETAIL_ASSISTANT - Proper role permissions for Sigma integration
Now that Cortex is configured in Snowflake, we need to enable it in Sigma.
Enable Cortex in Sigma Admin
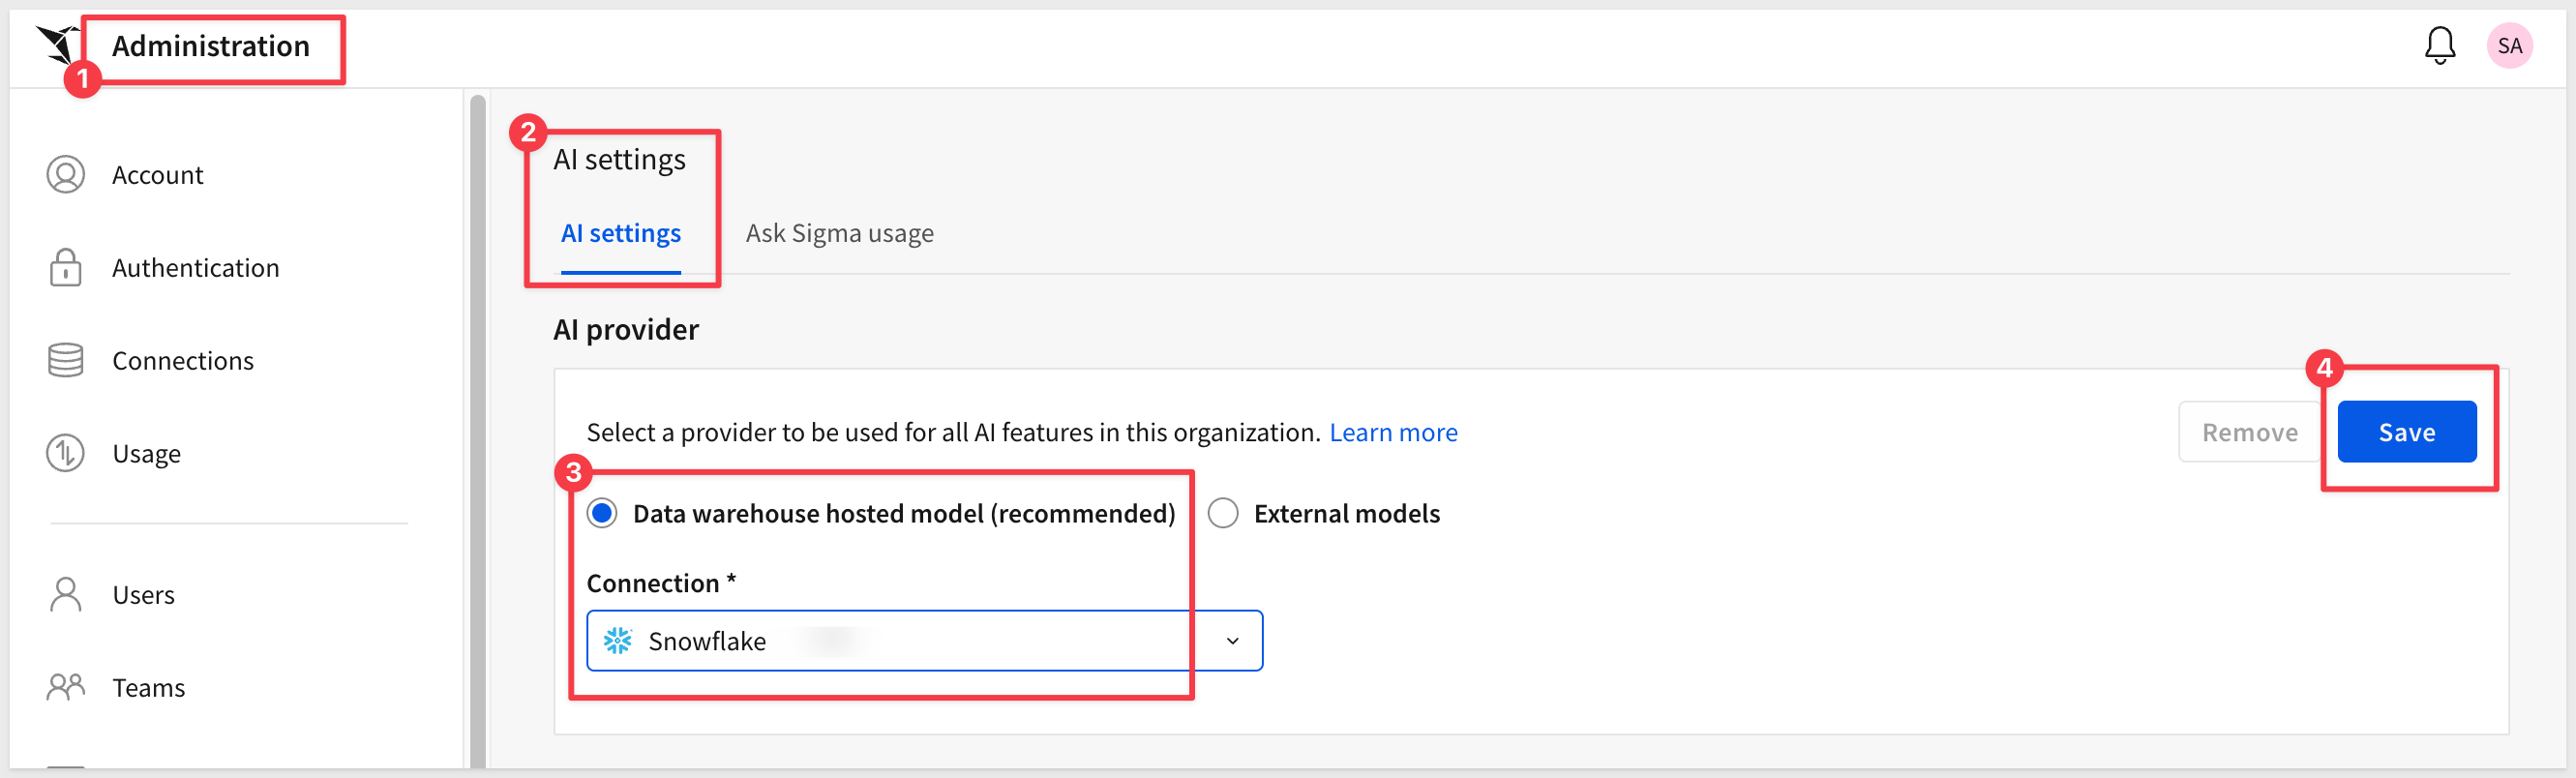
Log into Sigma as an Administrator.
Navigate to Administration > AI settings.
Configure AI Provider
Under AI provider section:
- Select
Data warehouse hosted model (recommended) Connection: Choose your Snowflake connection (e.g.,Snowflake)- Click
Save
Add the semantic view as a Sigma Assistant source
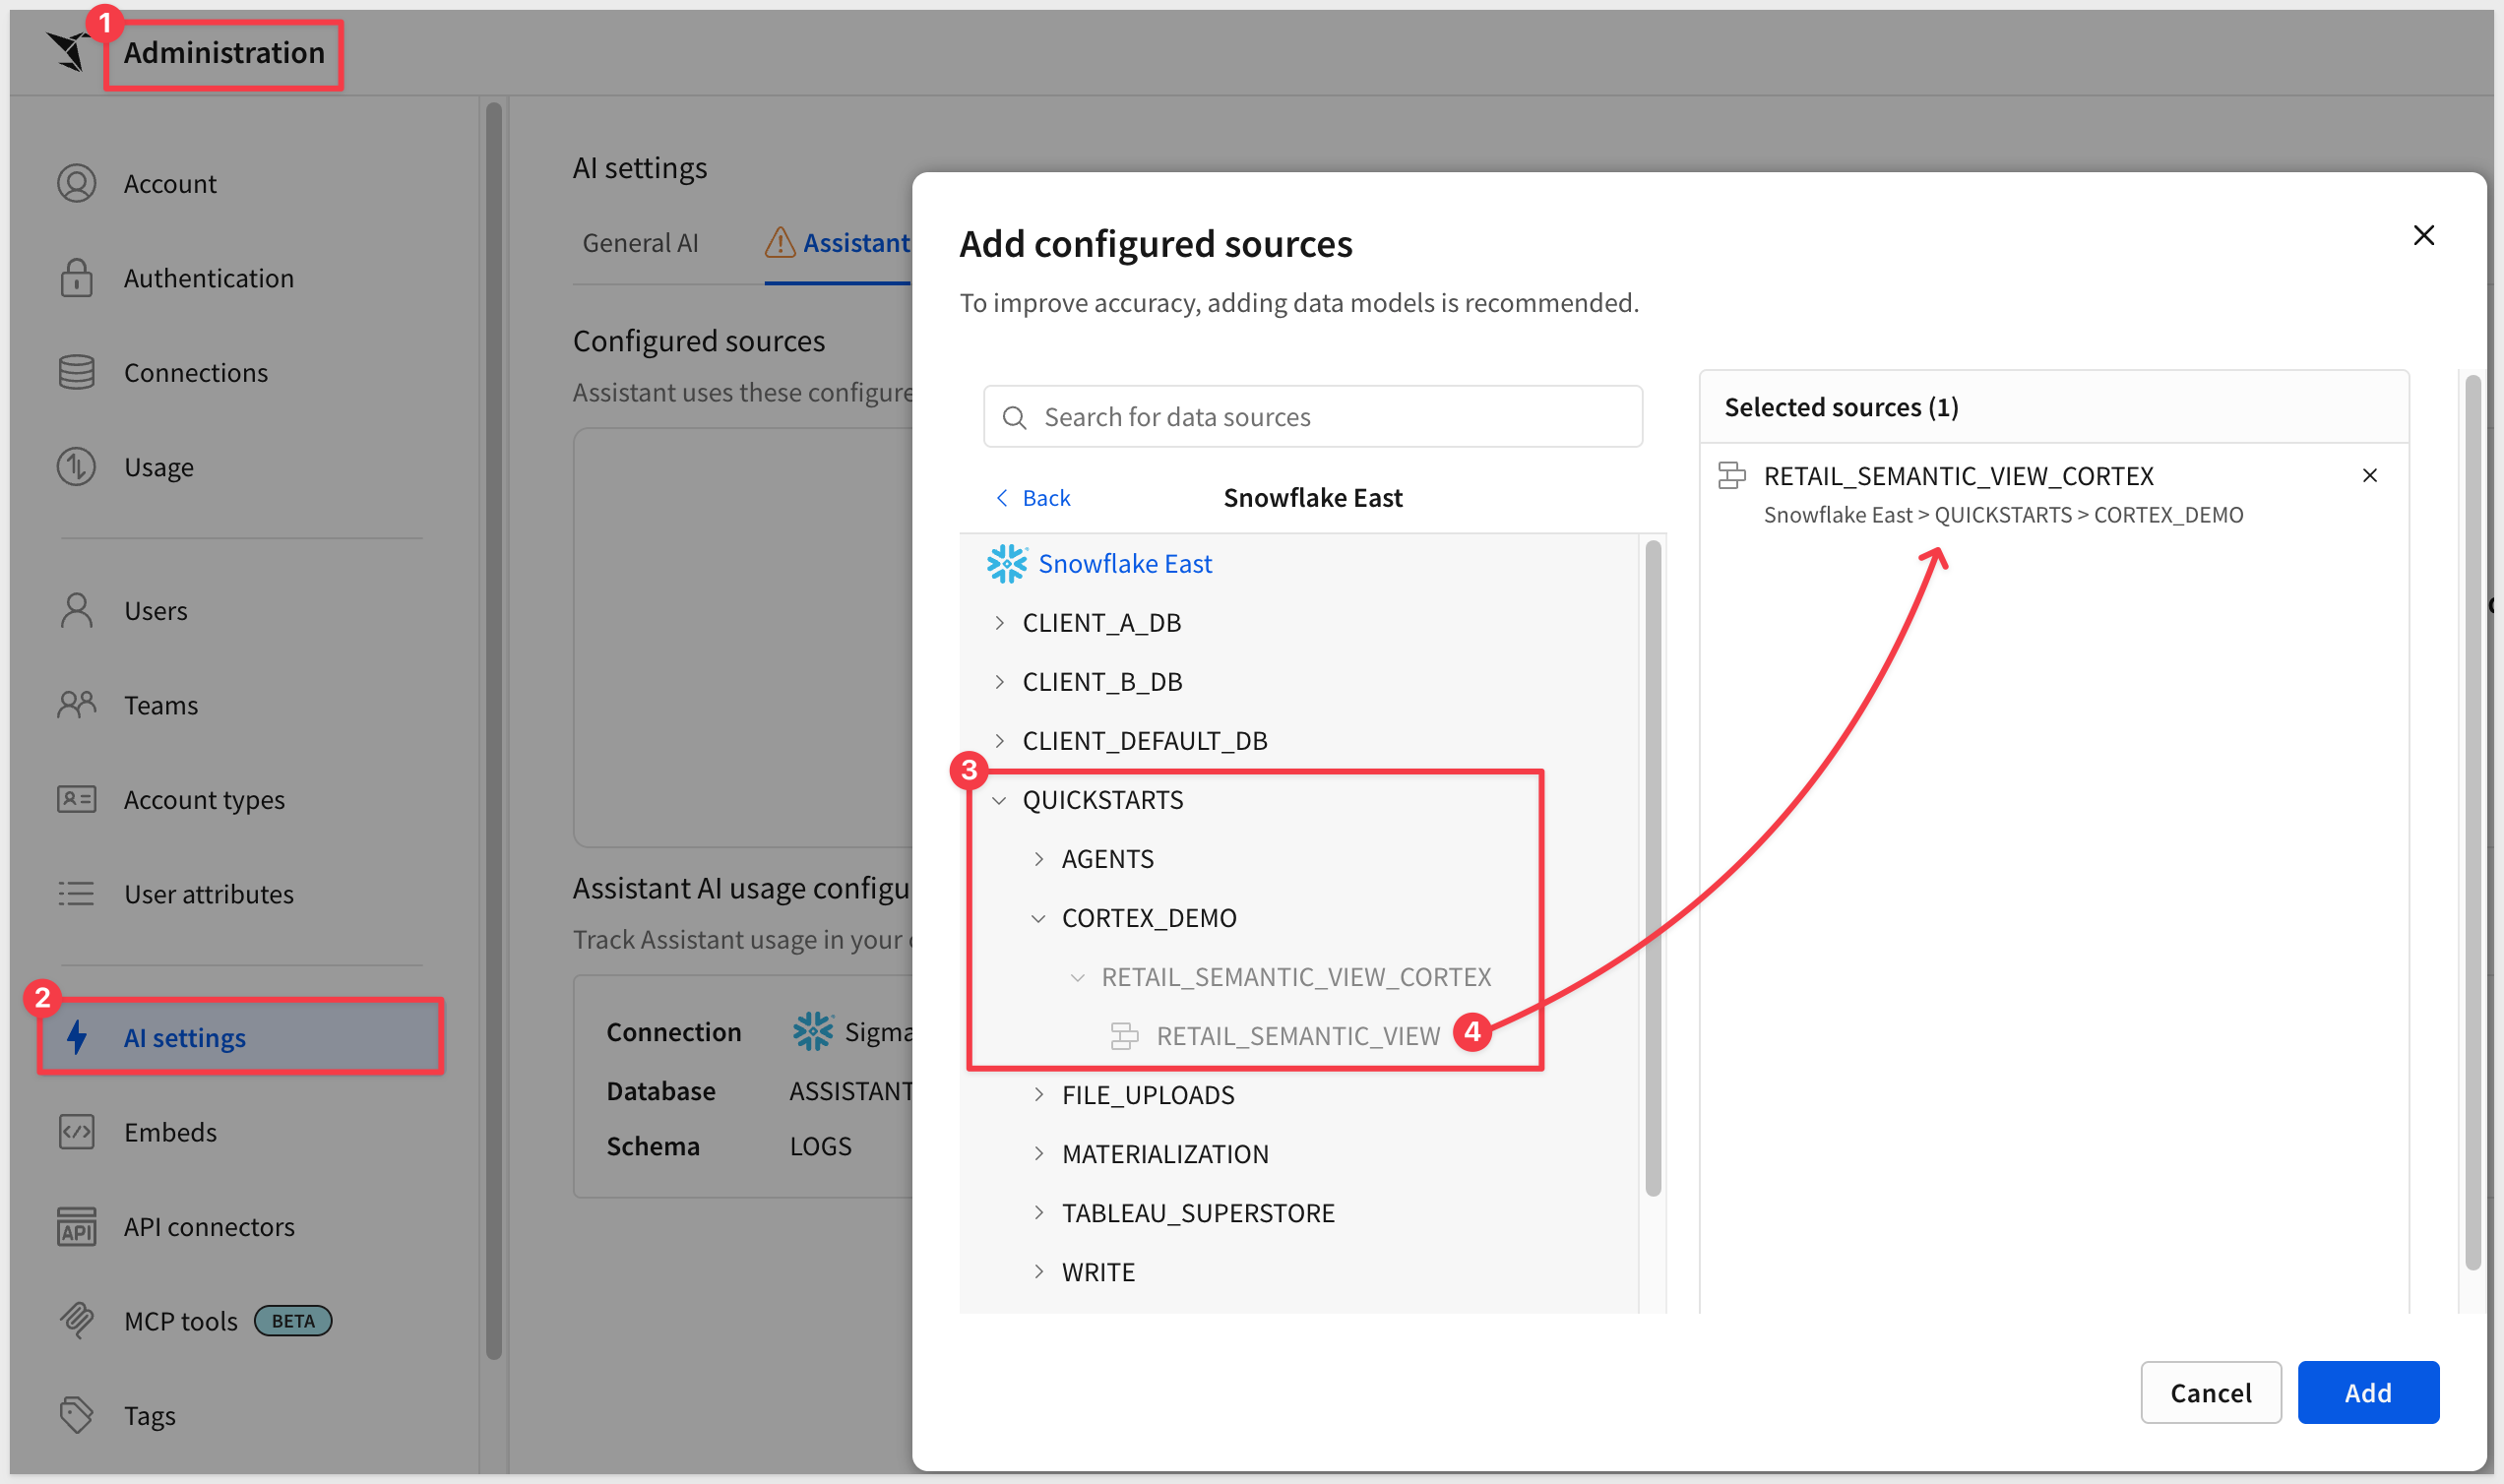
Sigma Assistant needs explicit authorization for any data source it queries — even when Snowflake already permits access through a Cortex Agent. Adding the semantic view here is Sigma's governance layer at work: the administrator decides exactly which sources Assistant can reach, independent of whatever the underlying warehouse role allows.
Navigate to Administration > AI > Assistant.
Click Add source, drill into your Snowflake connection > QUICKSTARTS > CORTEX_DEMO, and select RETAIL_SEMANTIC_VIEW. Click Add.
Your Sigma environment is now ready to use Snowflake Cortex. The RETAIL_ASSISTANT Cortex Agent is discoverable in Sigma's data catalog after connection sync, and the semantic view is authorized for Sigma Assistant. In the next sections we'll build a Sigma agent in a workbook that calls this Cortex Agent as a warehouse tool.
Before building a full workbook, let's verify the Cortex Agent is working correctly by asking it a simple question through Sigma Assistant.
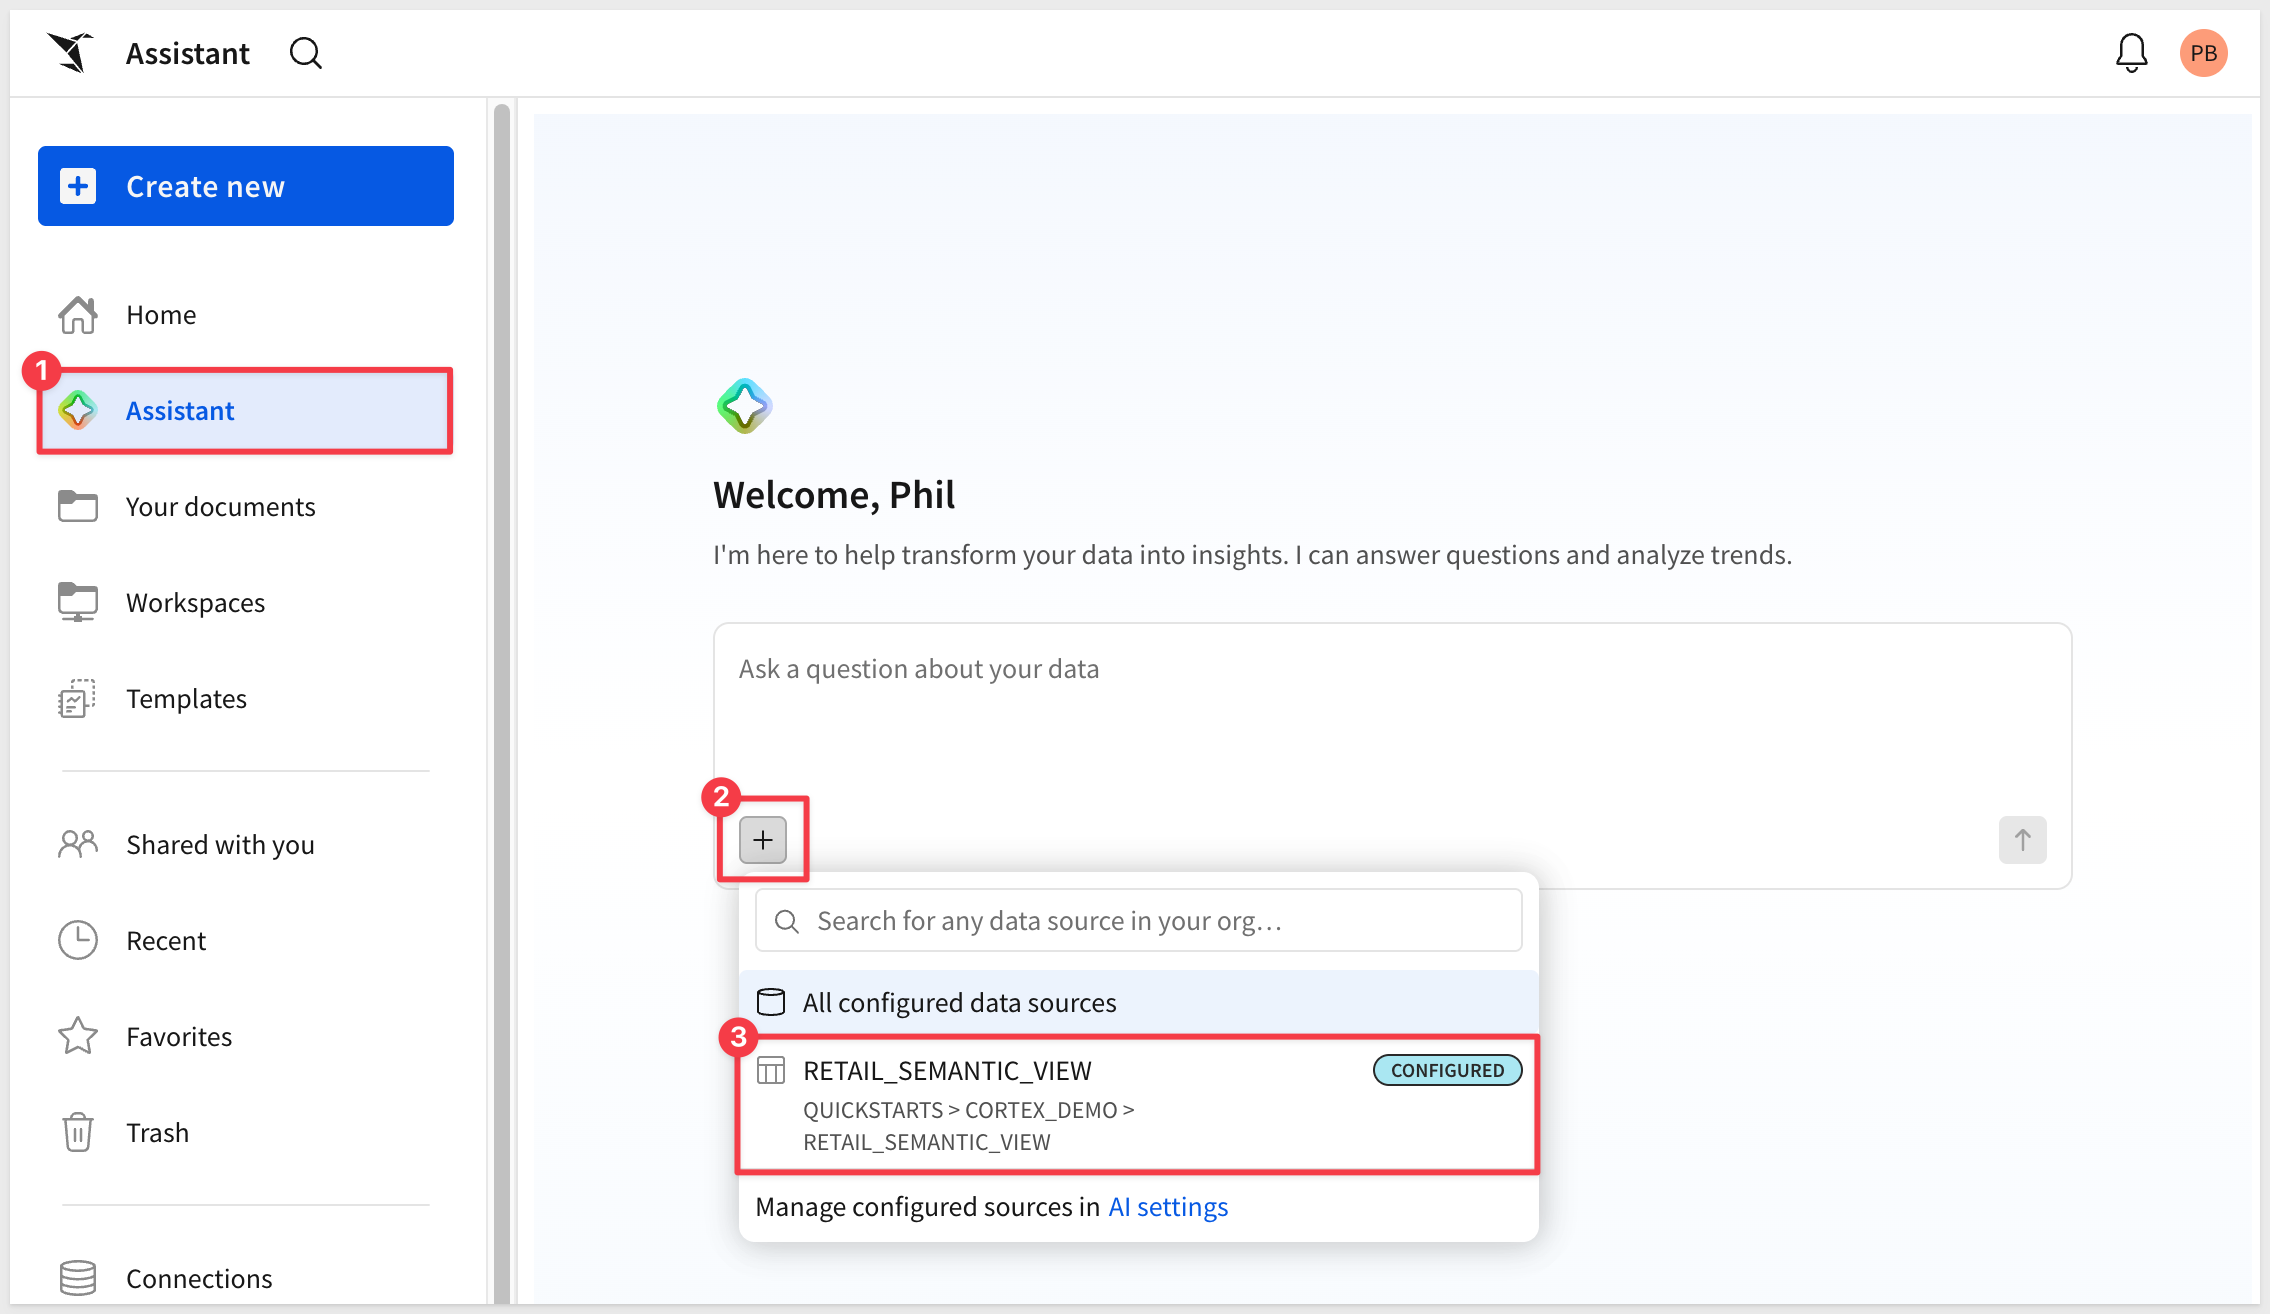
Access Sigma Assistant
From your Sigma home page, open Sigma Assistant. In the data source selector, choose RETAIL_SEMANTIC_VIEW (the semantic view you authorized for Sigma Assistant in the previous section).
Ask a Test Question
In the Sigma Assistant text box, type:
What is the total revenue from all orders?
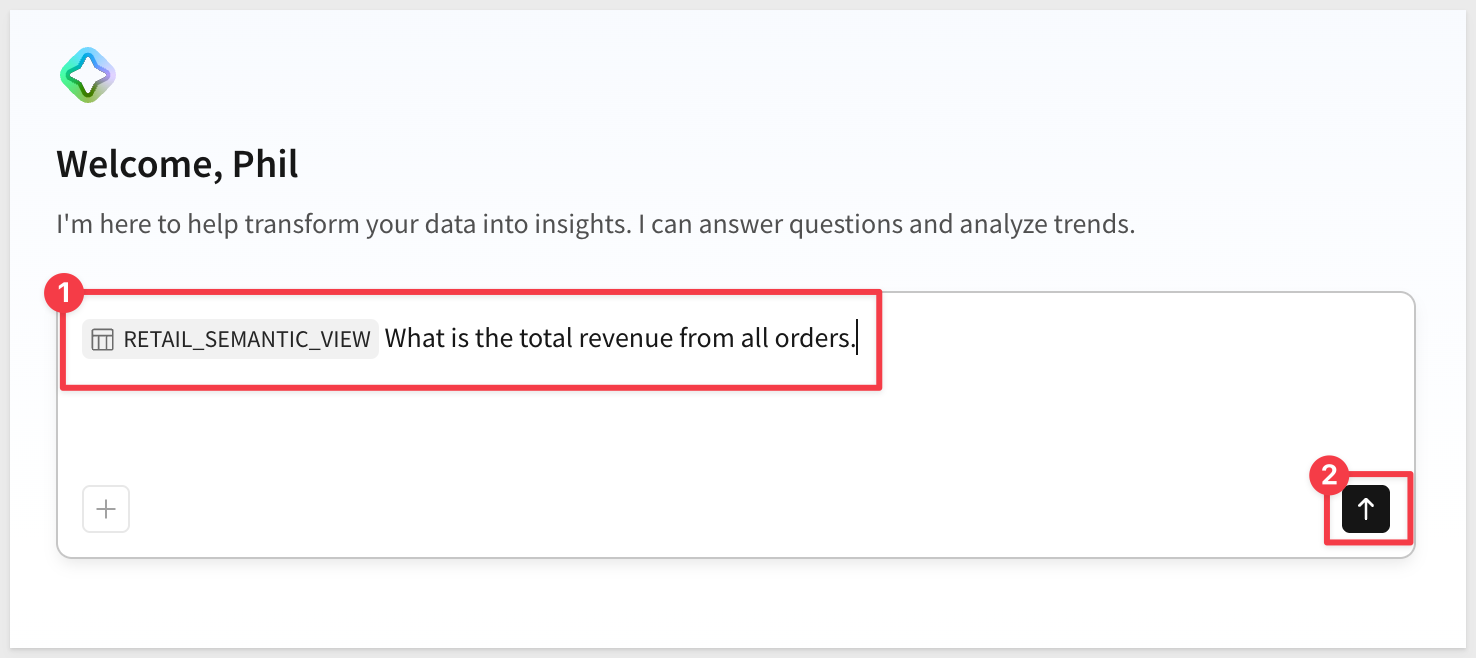
Press Enter to send.
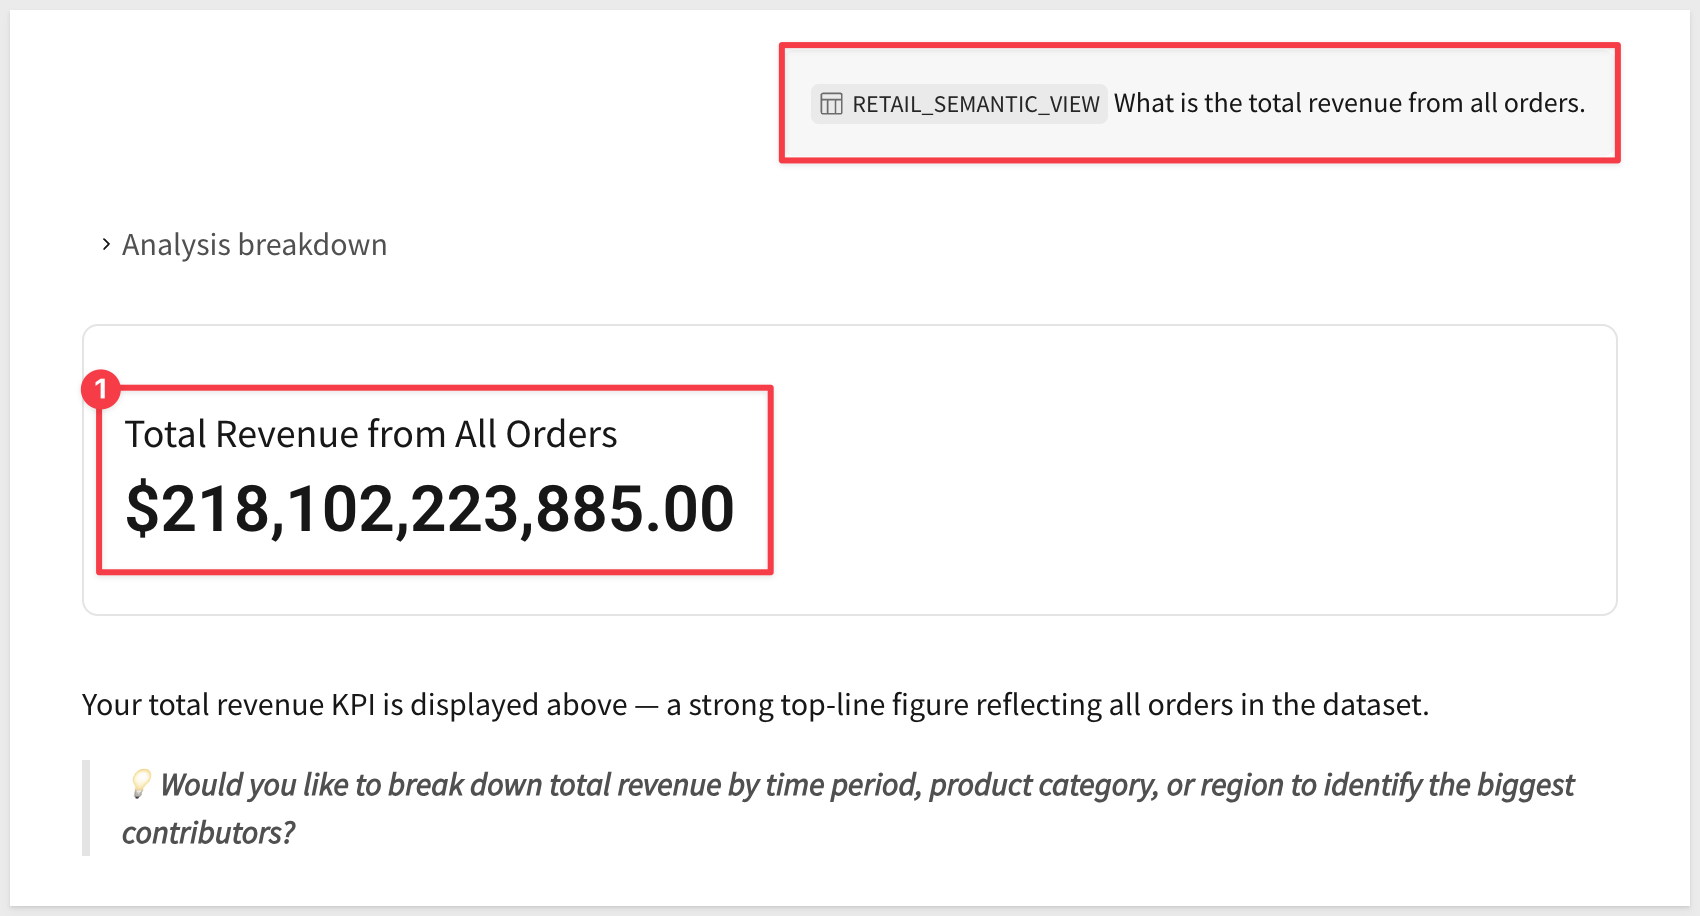
Review the Response
The agent will:
- Process your natural-language question
- Route through Cortex Analyst to query the semantic view
- Return a response with the calculated total
Sigma Assistant should return a specific revenue total along with context (the metric it used, currency, etc.) drawn from the semantic view's Facts:
View the Generated SQL
Sigma shows the SQL Cortex Analyst generated to answer your question. Click the SQL indicator below the response to expand it.
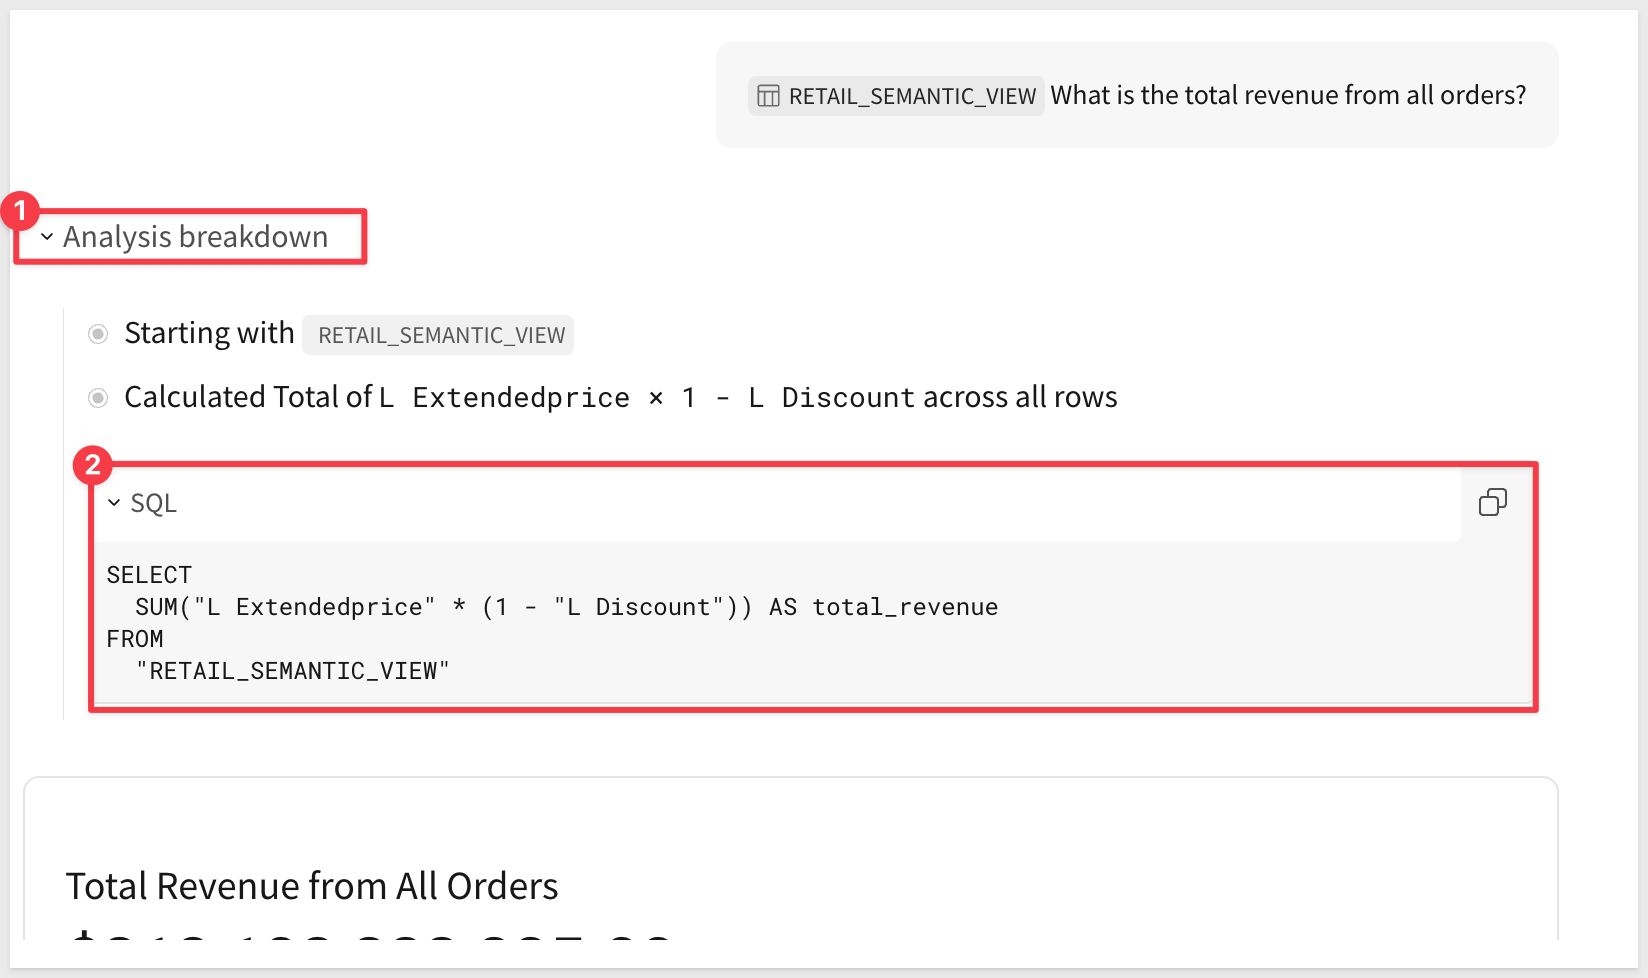
Reviewing the SQL helps you verify Cortex translated the question correctly and lets you copy the query into Snowflake to validate the result.
Now that we've verified the Cortex Agent works through Sigma Assistant, let's wrap it in a workbook with a chat element for a richer interactive experience.
Create New Workbook
In Sigma, click the Create New button and select Workbook.
Save and name the Workbook
In the top left click Save as and name the workbook :
Retail Assistant - QuickStart
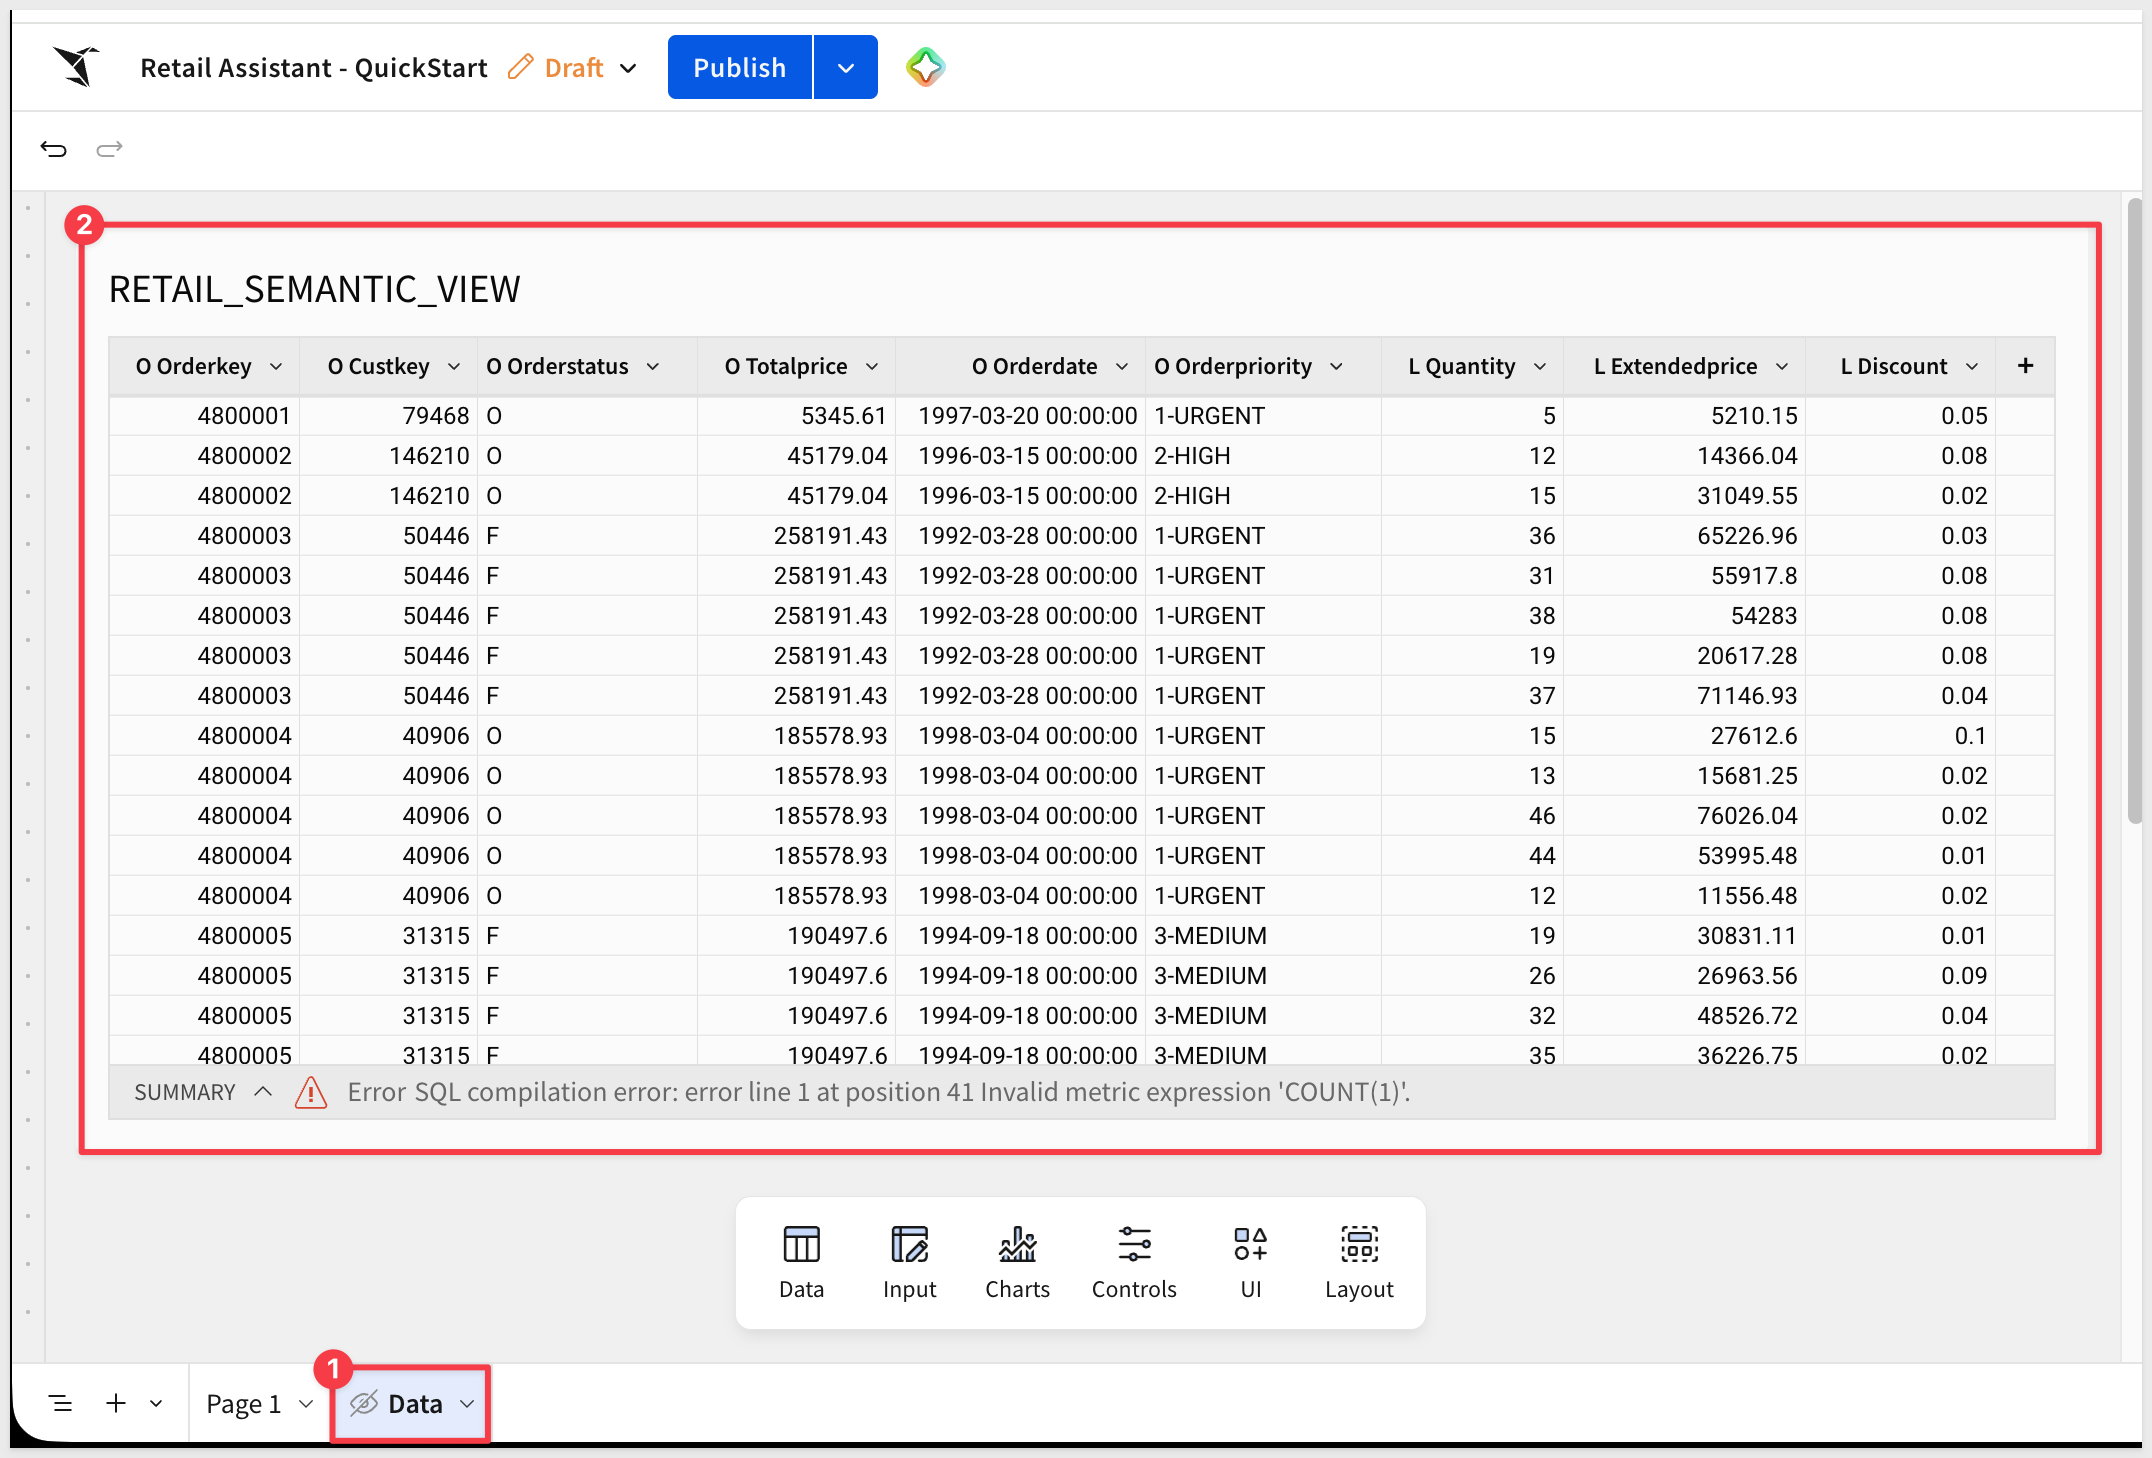
Add the data on a Data page
To give the workbook a place to inspect the source data alongside the chat element, add RETAIL_DATA_VIEW to a dedicated Data page. This keeps the source table out of the way of the main page where the chat element will live.
- Click
+next to the existing page tab and add a new page. Set the page type toDataand name the pageData. - On the new
Datapage, add aTablefrom theDatagroup on the element bar. Select your Snowflake connection. - Navigate to
QUICKSTARTS>CORTEX_DEMOand addRETAIL_DATA_VIEW. - Hide the
Datapage:
Switch back to the main page — that's where the chat element will live.
Add Title (Optional)
From the element bar at the bottom, you can add a Text element from the UI group, with a title like:
Retail Data Assistant
Ask questions about orders, revenue, customers, and sales patterns.
This helps users understand what the chat element can do.
Before adding the chat element, we need to create a Sigma agent that will power it.
Open Agents Panel
In the workbook, look at the right side panel. You'll see tabs: Settings, Format, Actions, and Agents.
Click on the Agents tab.
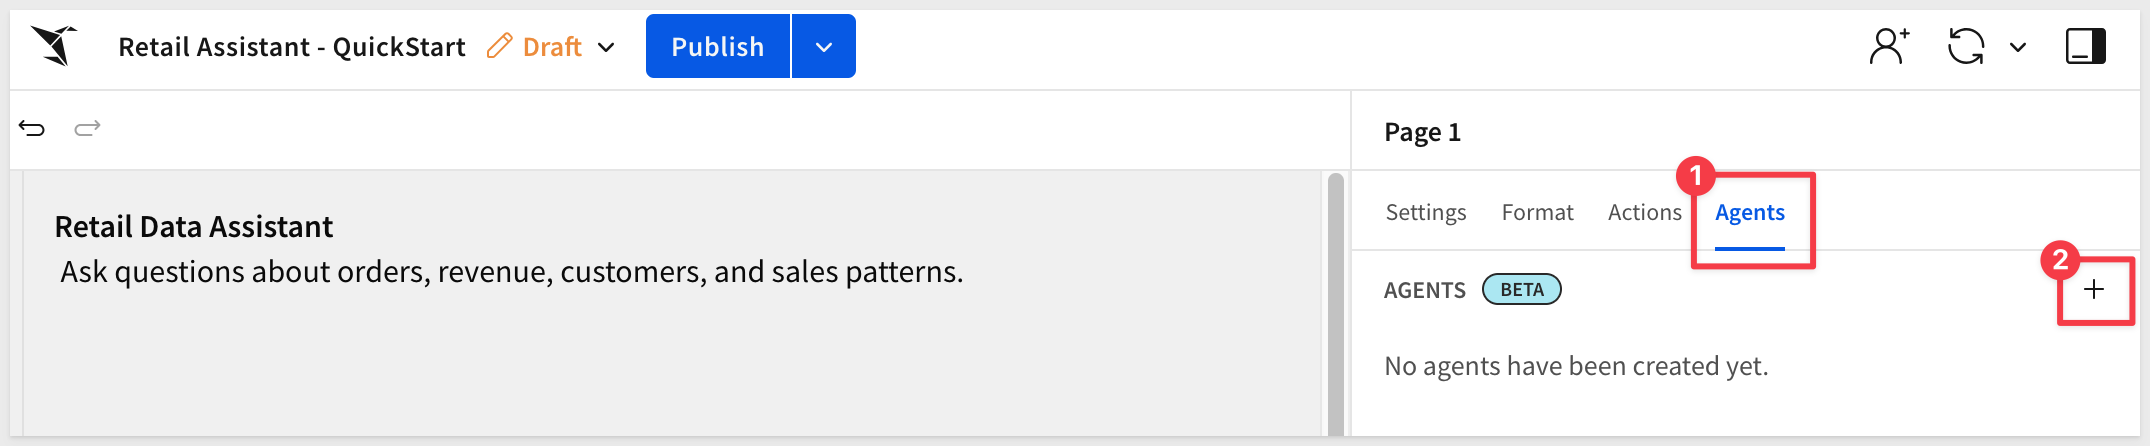
You'll see "No agents have been created yet."
Create New Agent
Click the + button to create a new agent.
The agent configuration panel opens with several options including Data sources, Tools, and Instructions.
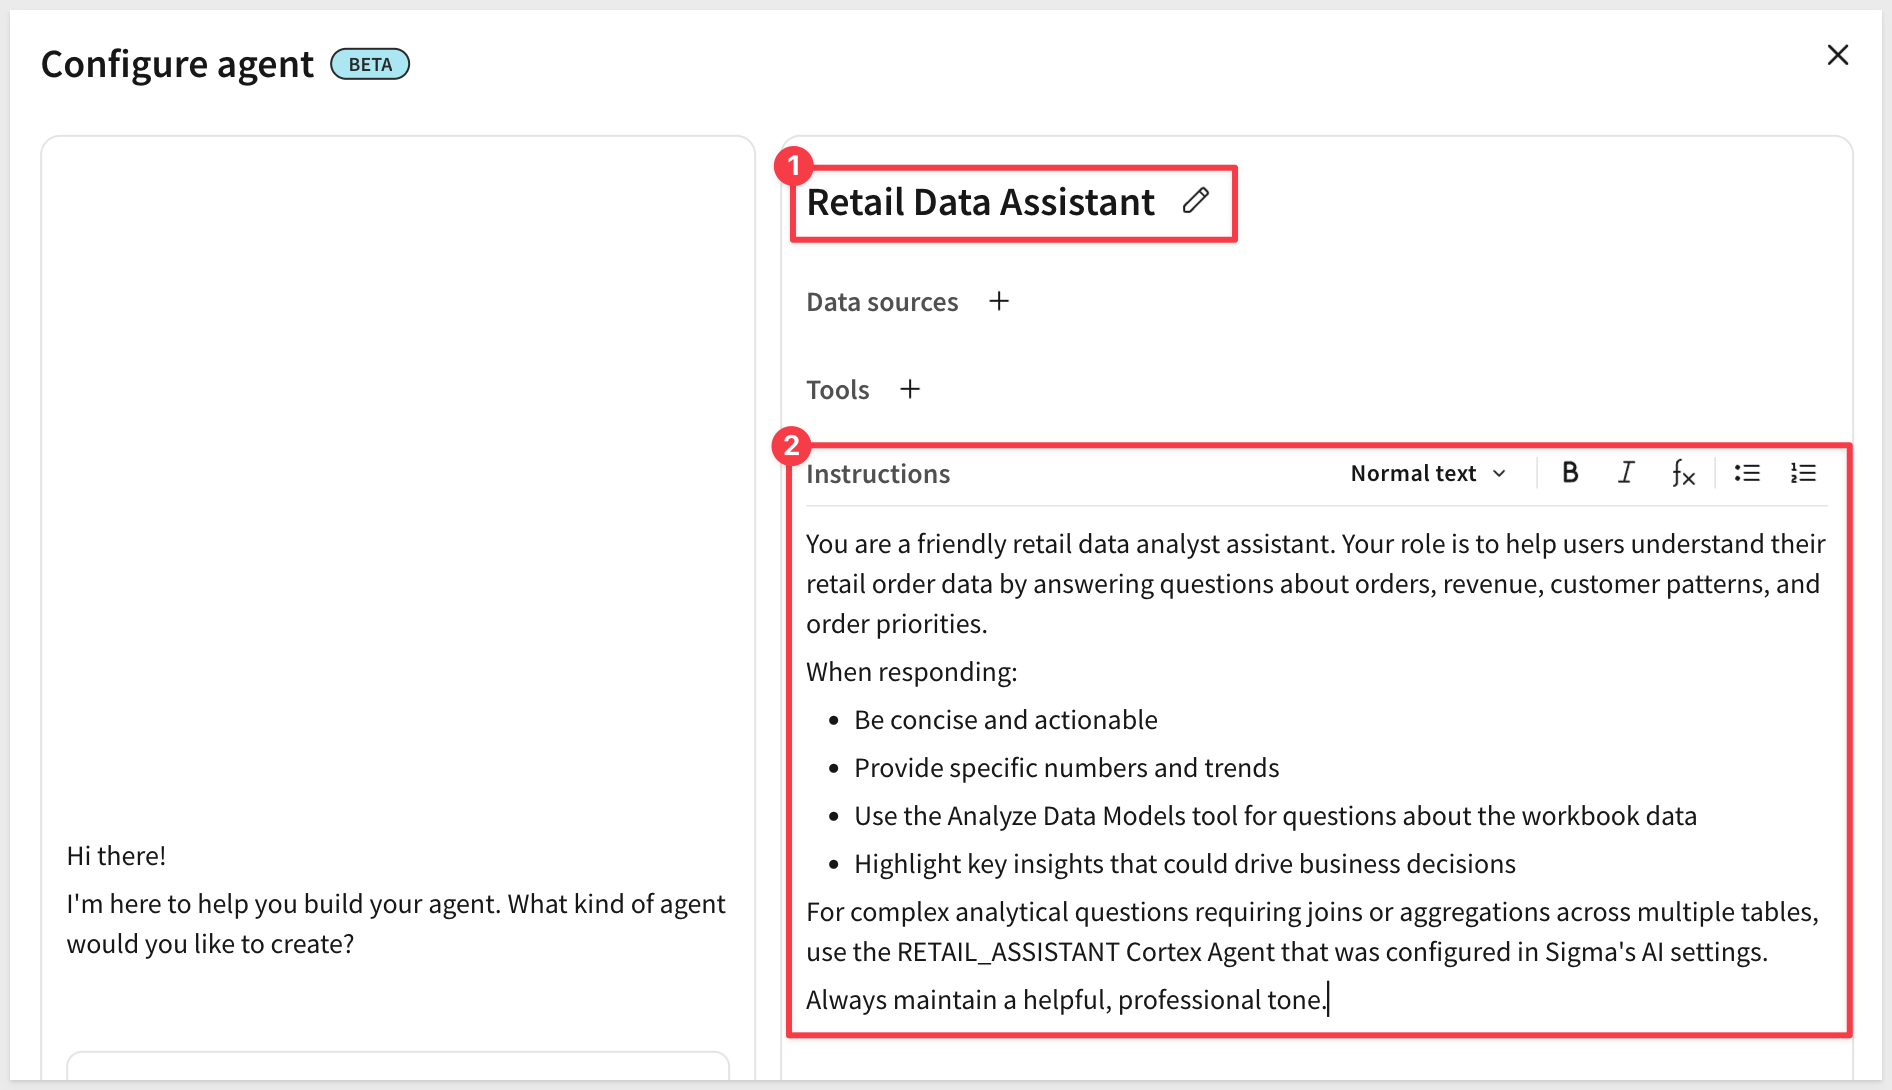
Double-click on the Agent 1 name and change it to:
Retail Data Assistant
Configure Instructions
In the instructions editor, copy/paste the following to guide the agent's behavior:
You are a friendly retail data analyst assistant. Your role is to help users understand their retail order data by answering questions about orders, revenue, customer patterns, and order priorities.

When responding:
- Be concise and actionable
- Provide specific numbers and trends
- Highlight key insights that could drive business decisions

For analytical questions about orders, customers, revenue, or sales patterns, use the RETAIL_ASSISTANT Cortex Agent — it has direct access to the semantic view in Snowflake.

Always maintain a helpful, professional tone.
Add Data Sources
Click on the + next to Data sources and select the RETAIL_ASSISTANT warehouse agent:
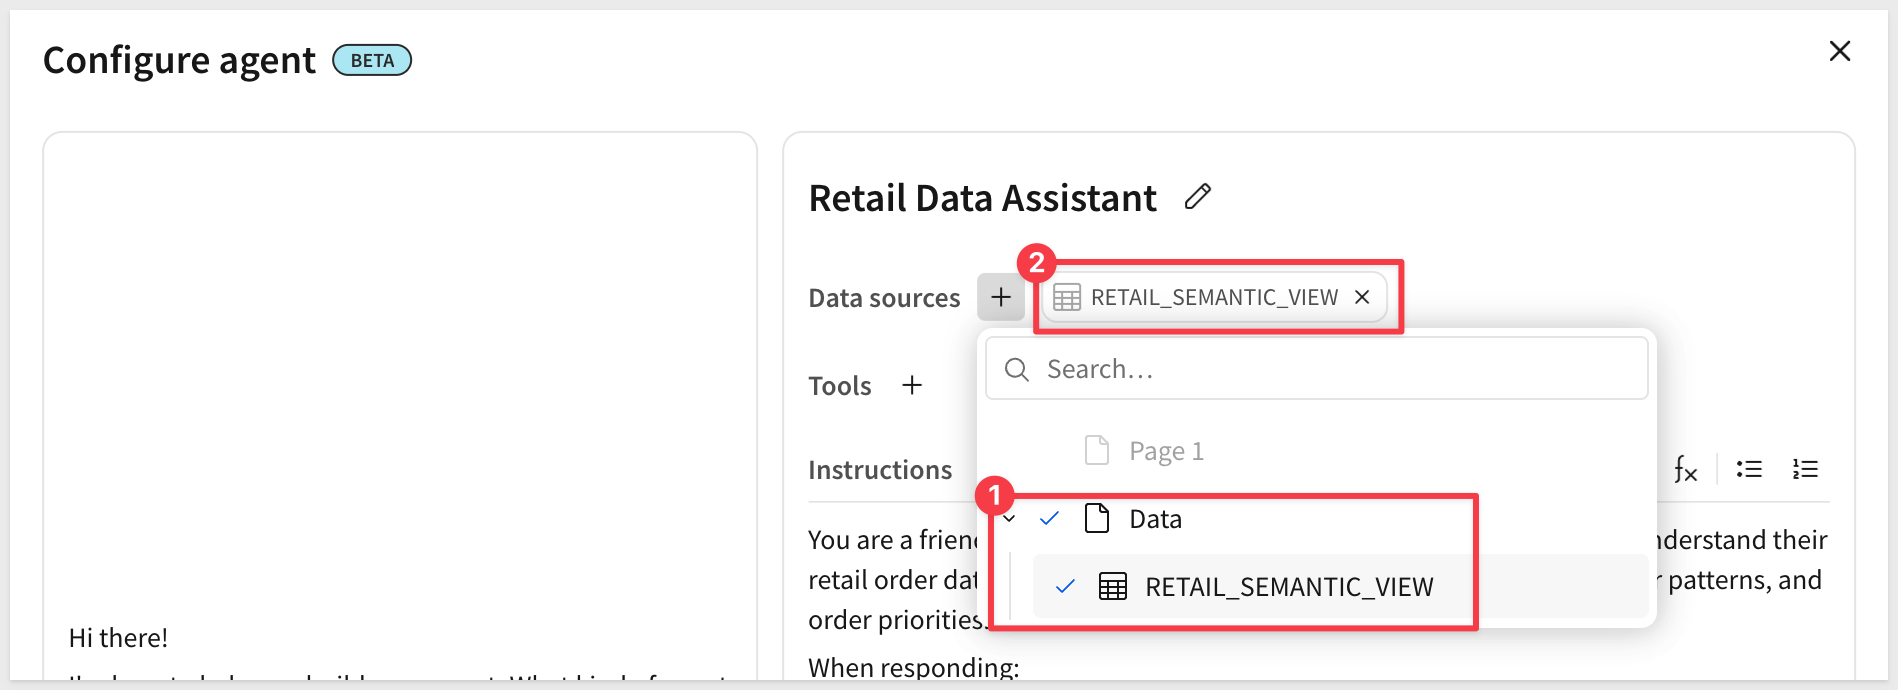
The RETAIL_ASSISTANT Cortex Agent is available because you configured it in Sigma's AI settings earlier.
Save the Agent
Click Save to save your Sigma agent configuration.
The Retail Data Assistant agent now appears in the Agents panel and is ready to use!
Now that we've created the agent, let's add a chat element to the workbook and connect it to our agent.
Add the chat element to the canvas
From the element bar at the bottom of your workbook, click UI > Chat.
A chat element appears on your canvas.
Select the agent
Click on the chat element to select it.
In the left panel (or configuration area), you'll see an option to select which agent powers this chat element.
Select: Retail Data Assistant (the agent we just created)
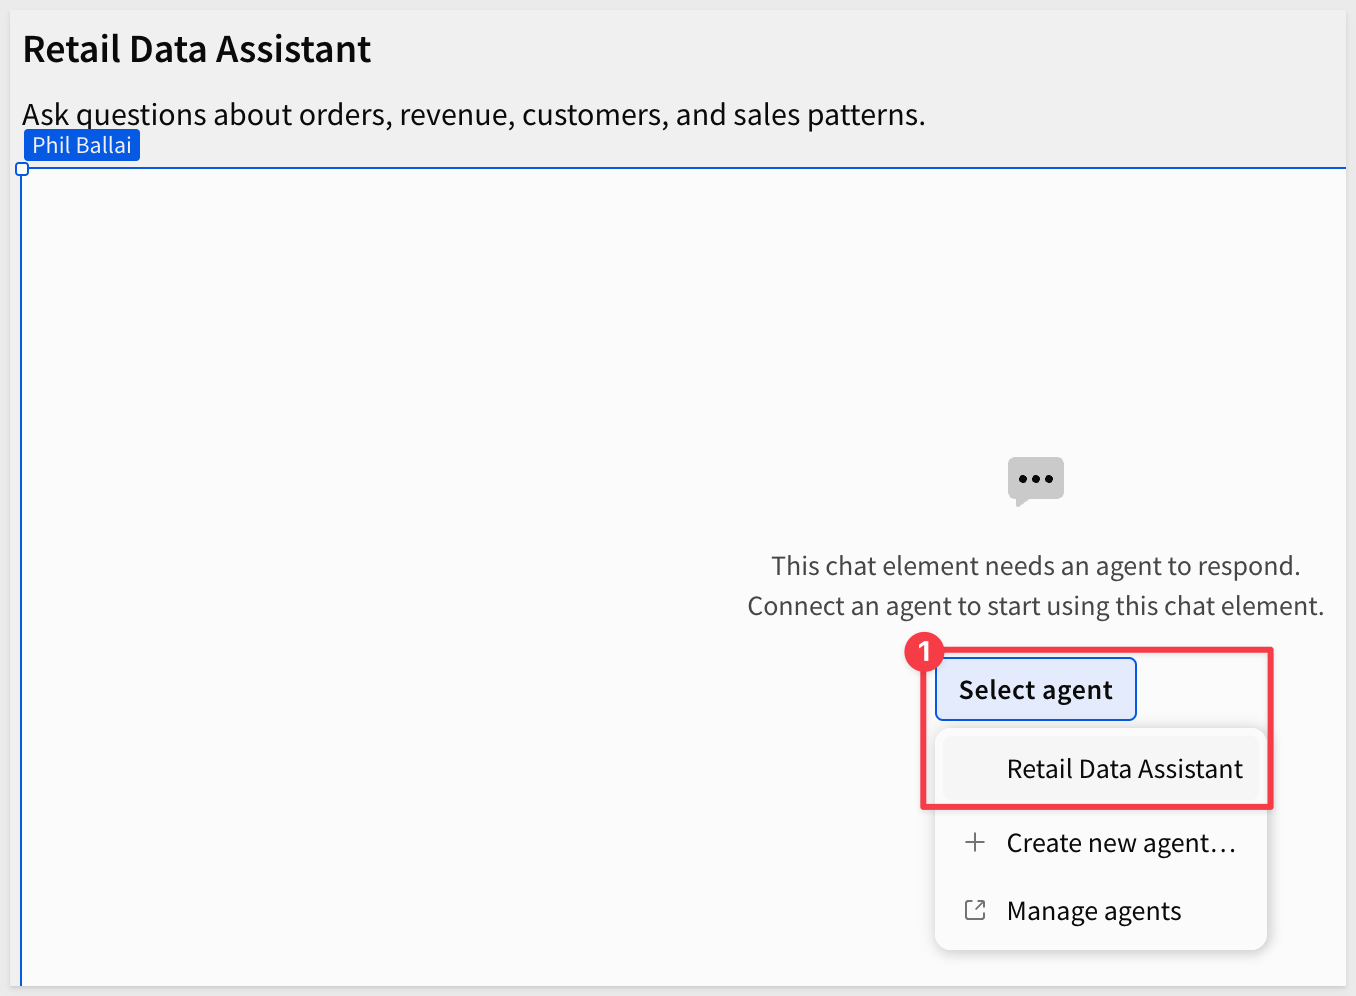
The chat element is now connected to your agent and ready to use!
Test the chat element
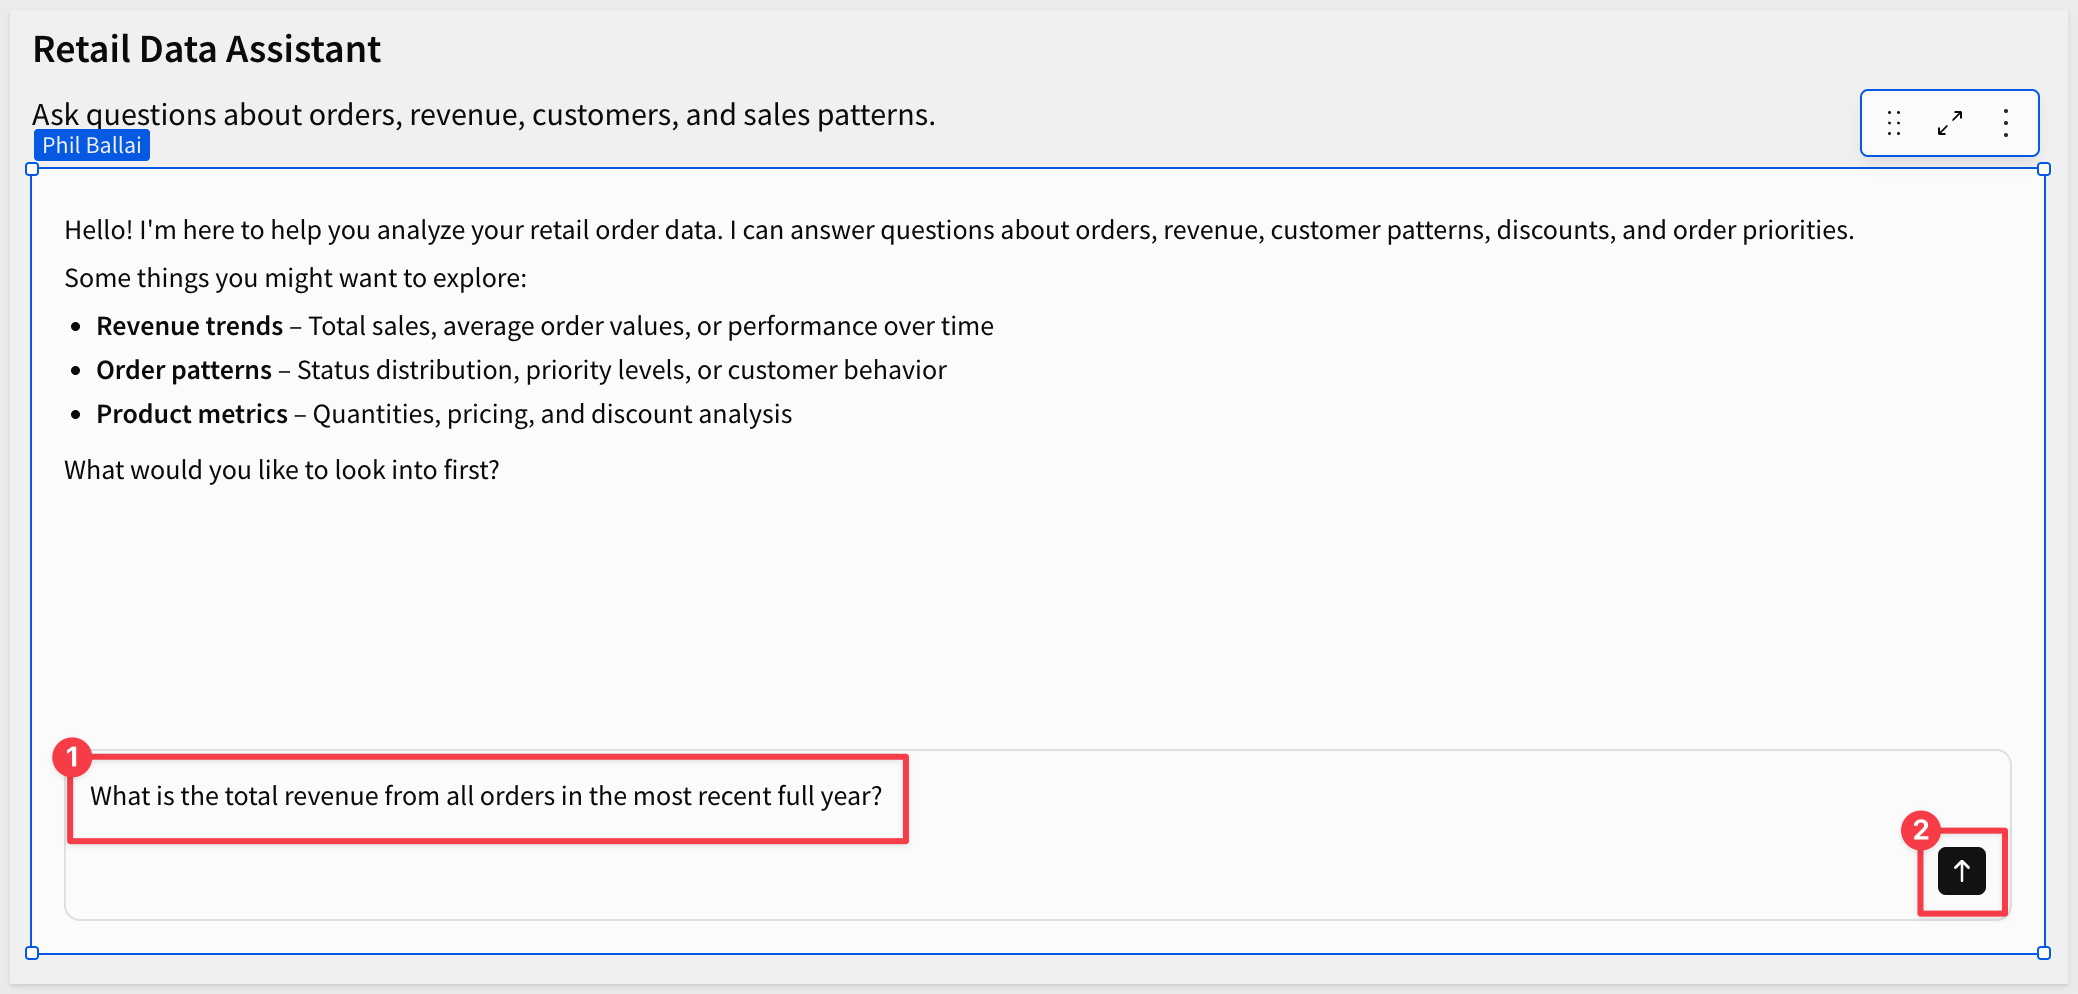
Let's test the chat element in the workbook to verify it's working correctly.
Click Publish in the top right corner to publish the workbook.
In the published view, use the chat element to ask:
What is the total revenue from all orders in the most recent full year?
You should see:
- "Thinking" status appears as the agent processes the query
- The agent routes to the RETAIL_ASSISTANT Cortex Agent
- Cortex analyzes the semantic view and generates appropriate SQL
- A detailed response with:
- Identification of the most recent complete year (yes, the dates are old!)
- Total revenue figure
- Additional context
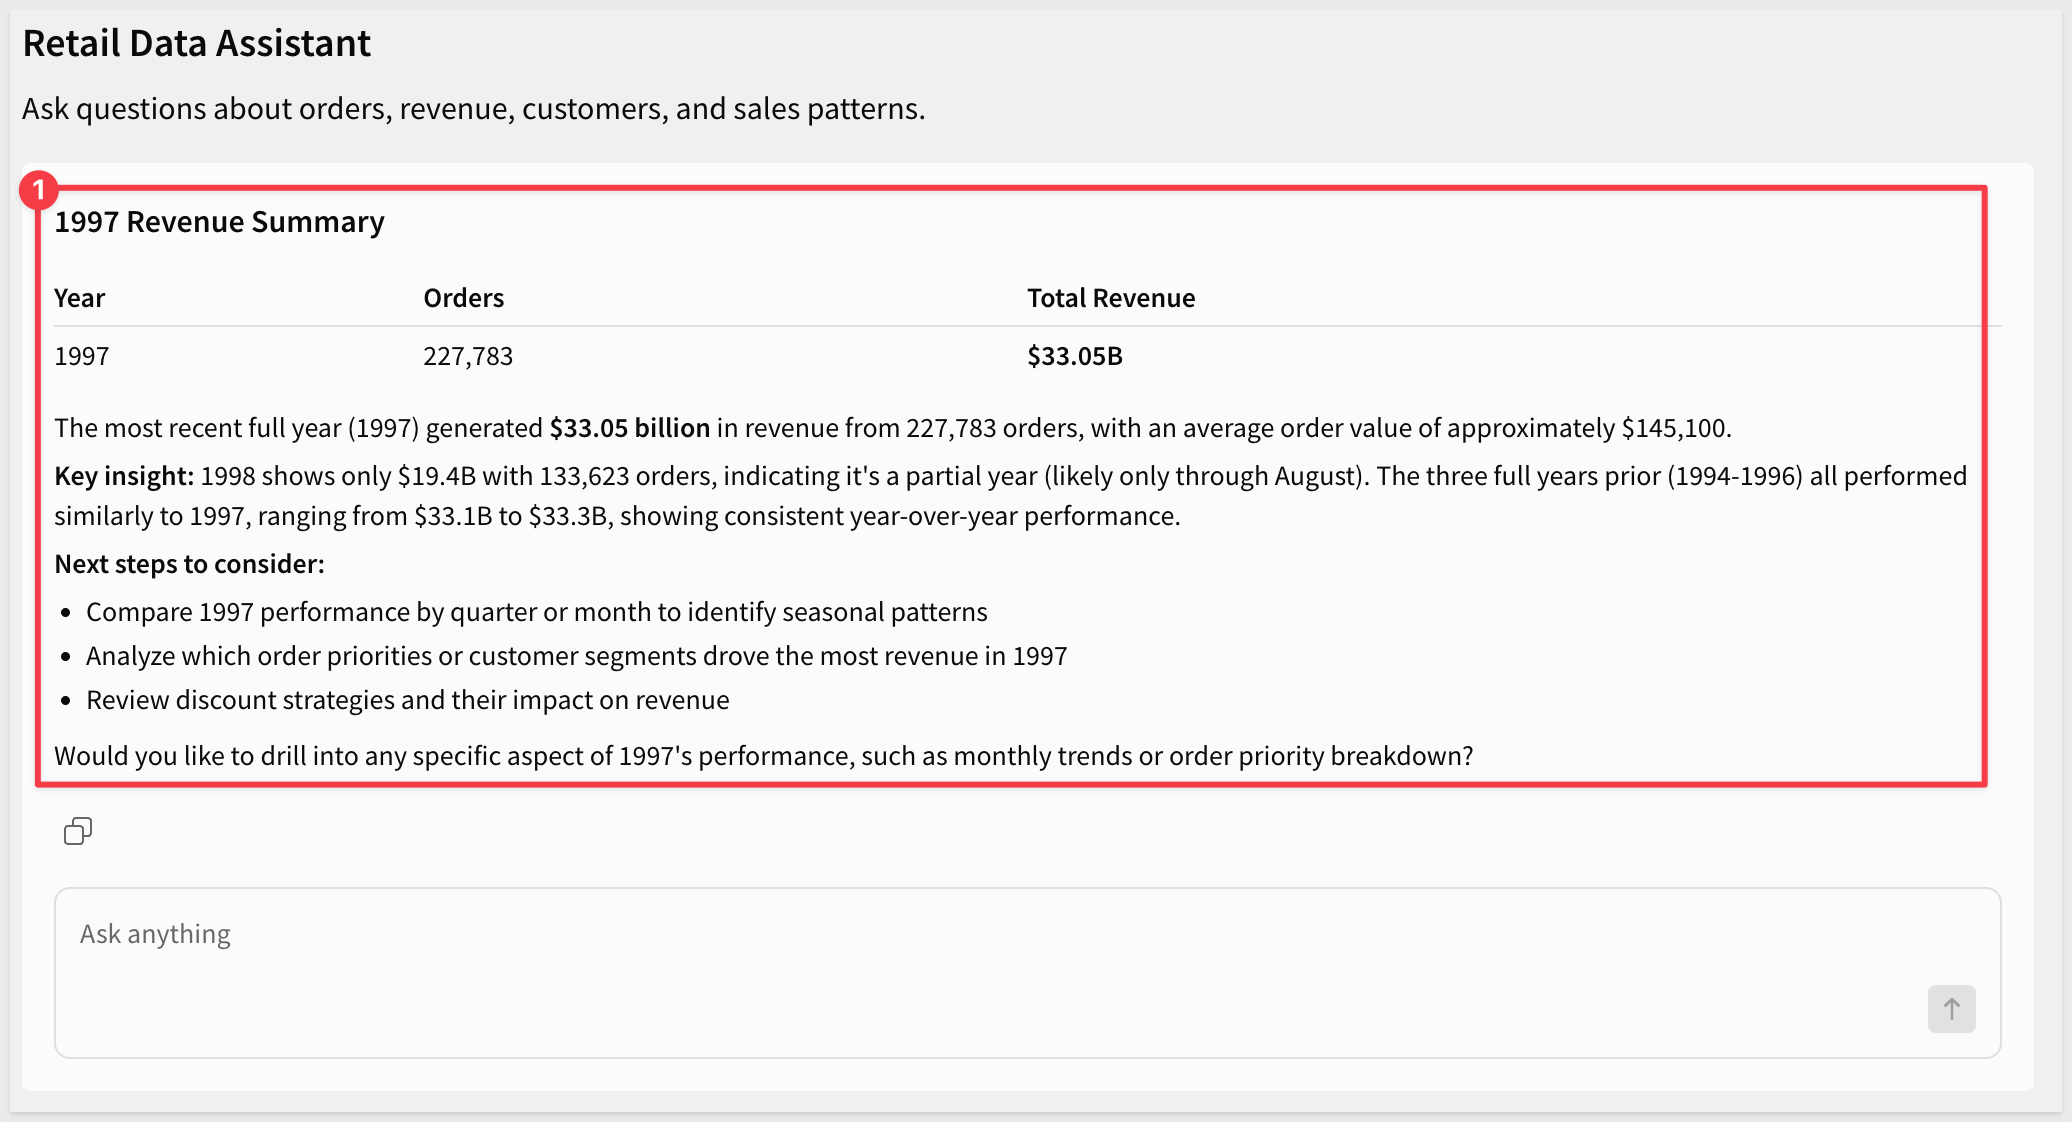
If you received a comprehensive response with revenue data, your chat element is properly connected to the Cortex Agent and can query the semantic view successfully!
Let's add the ability for the agent to write insights to an input table. This demonstrates how agents can take actions, not just answer questions.
Create Admin Page with Input Table
For setup details, see Set up write access
From the element bar, click Input > Empty.
Select your Snowflake connection.
Configure the input table columns:
- Insight (Text) - The insight to log from Cortex
- CustomerID (Number) - The customerID we are asking about
- Last updated at (Sigma provided column) - When the insight was logged
Rename the table to:
Customer Insights
Delete the pre-populated rows so the table is empty.
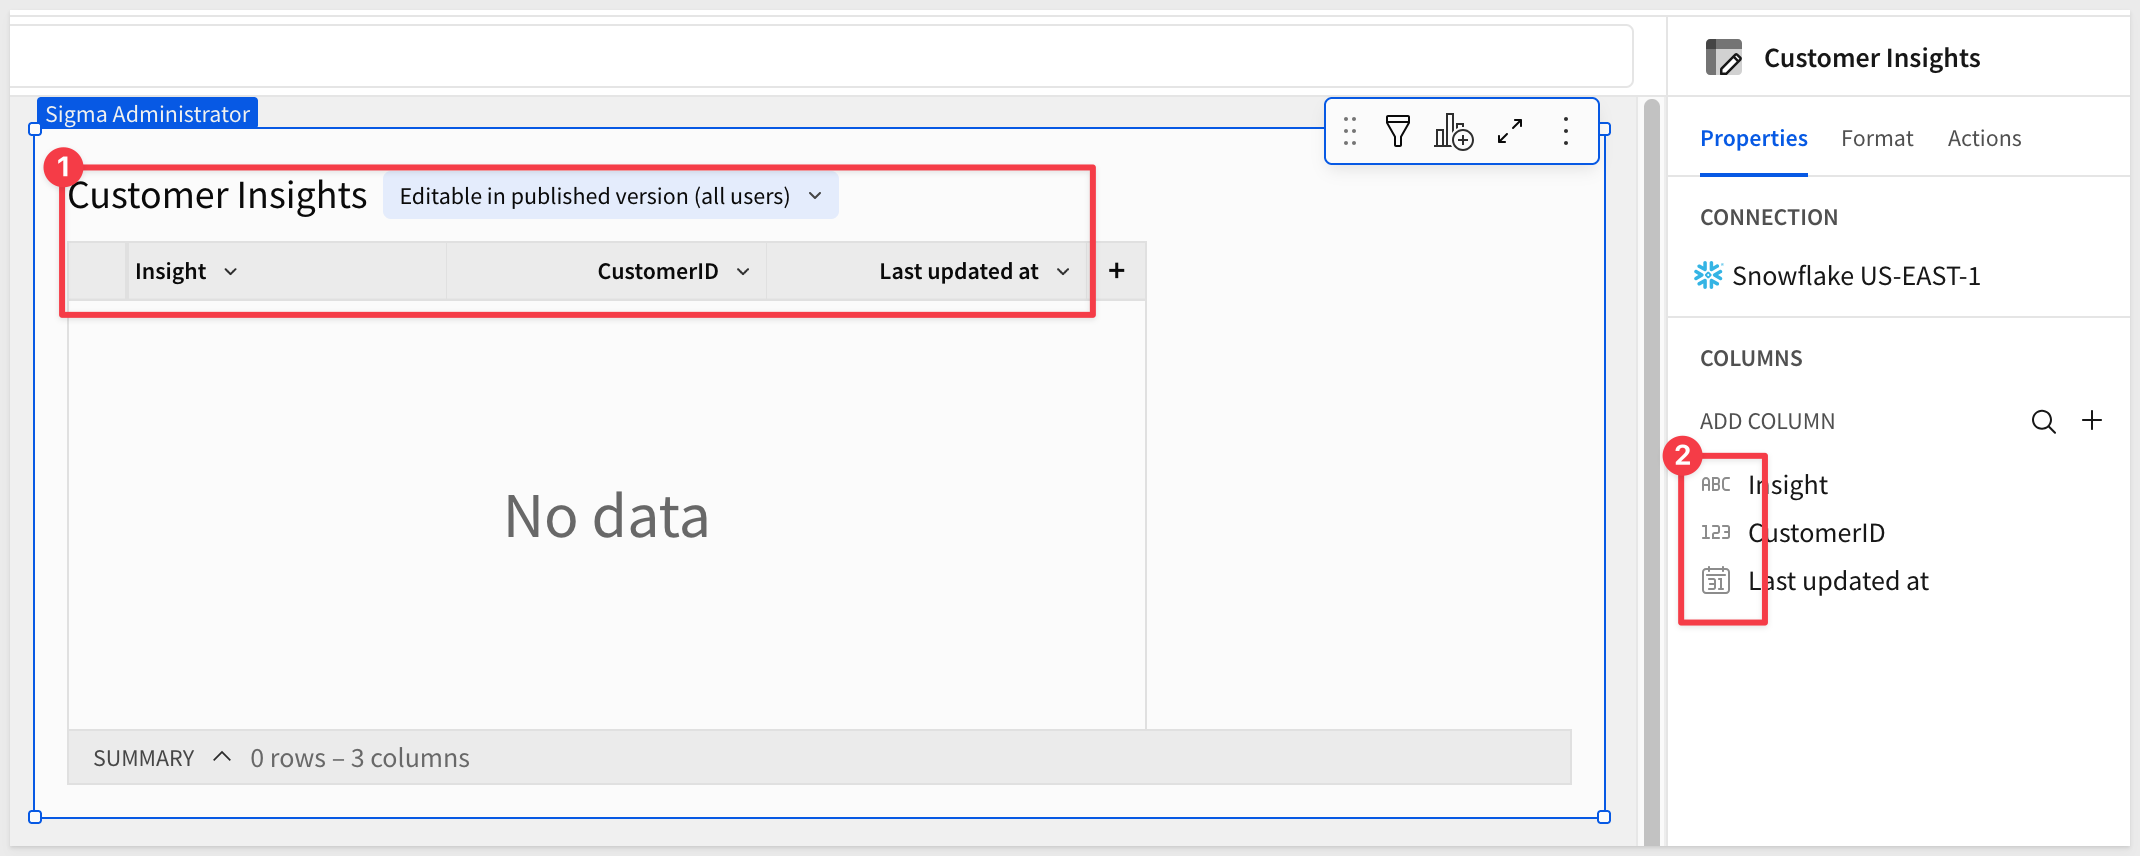
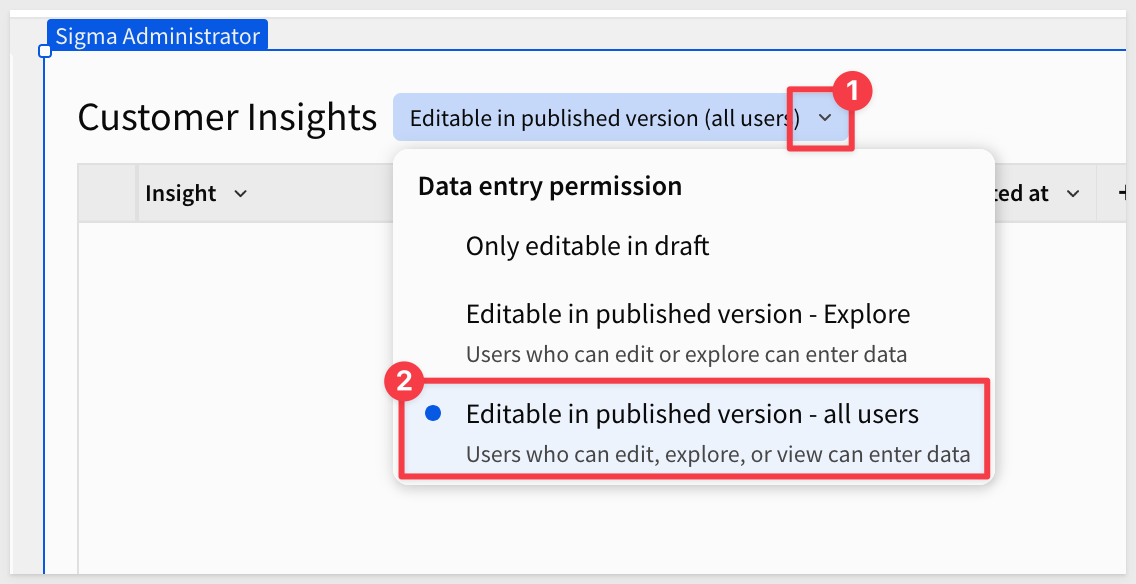
Set Input Table Permissions
Click on the Customer Insights input table.
Set the permission to: Only editable in published version
Click Publish.
Configure Agent Actions
Click any blank area of the workbook to deselect any elements.
In the right panel, click the Agents tab.
Use the 3-dot menu to edit the Retail Data Assistant agent.
In the Configure agent modal, click on the + next to Tools and select Action:
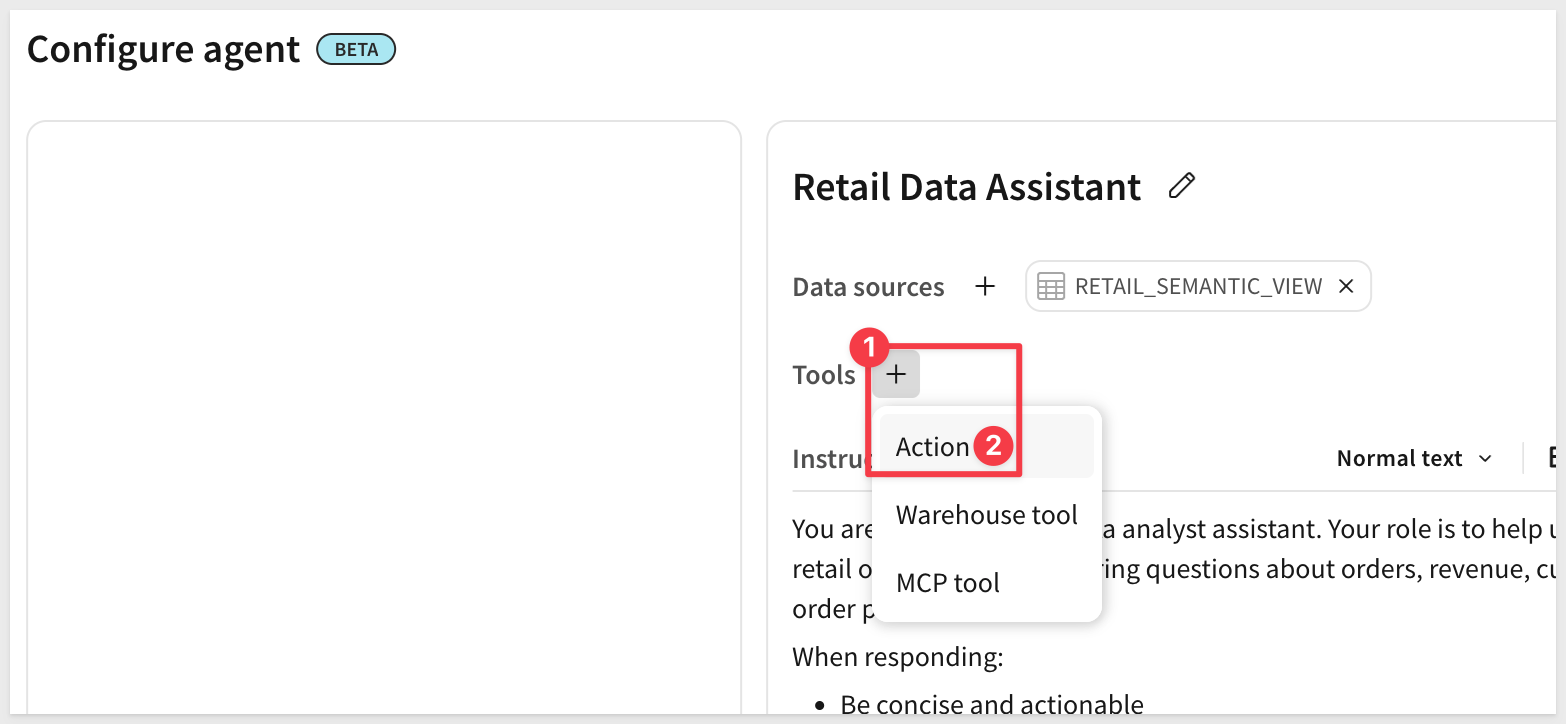
Create Insert Row Action
Configure the action:
Step type: Run an action
Action: Insert row
Into: Customer Insights
With values:
- Insight > Agent input > Insight (the agent will generate this)
- CustomerID > Agent input > Customer_id (the agent will provide the customer number)

Update Agent Instructions
Click on the Instructions tab and replace the entire instruction content with (the formatting will not matter but adjust for readability if preferred):
You are a friendly retail data analyst assistant helping users analyze TPCH retail order data.
## Insight Logging Workflow
When users ask you to analyze a specific customer (e.g., "analyze customer 3451"), follow this workflow:
1. Analyze the customer's data using the RETAIL_ASSISTANT Cortex Agent
2. Provide the analysis to the user
3. Offer to log the insight by saying: "Would you like me to save this insight to the Customer Insights table?"
4. If the user says yes, confirm what you'll write:
- "I'll log: [brief insight summary]"
- "Customer ID: [number]"
- "Should I proceed?"
5. Only after user confirms, use the "Insert row into Customer Insights" tool
## Example Interaction
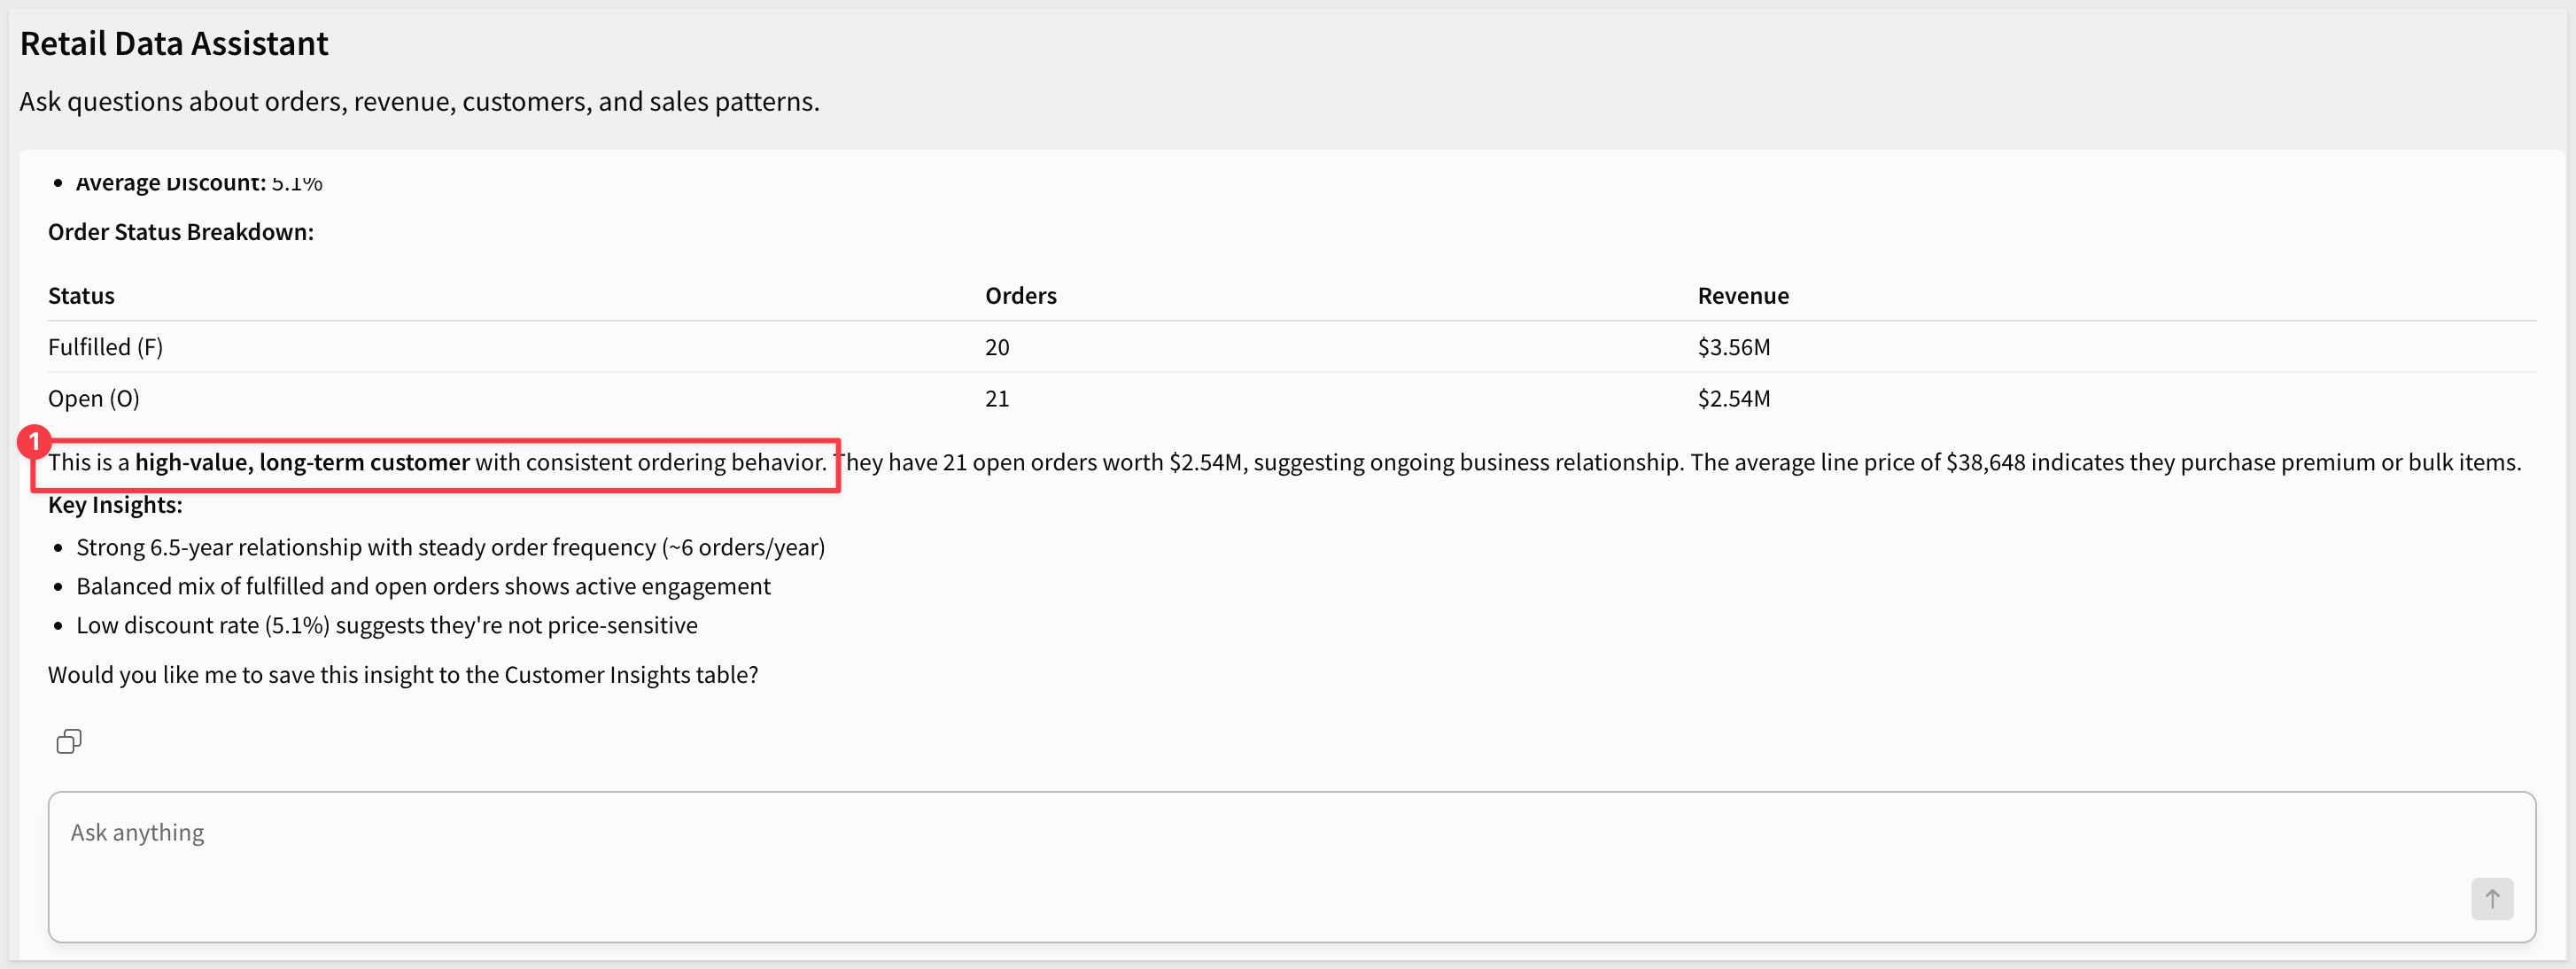
User: "Analyze customer 3451"
You: [Provide analysis] "This customer has spent $28.8M over 6.5 years. Would you like me to save this insight?"
User: "Yes please"
You: "I'll log: 'High-value customer: $28.8M over 6.5 years, $182K avg order' with Customer ID: 3451. Proceed?"
User: "Yes"
You: [Use insert tool with insight_description and customer_id]
Always be concise and actionable. Ask for explicit confirmation before writing data.
Click Save and Publish
Test the action workflow
Switch the workbook to published view.
Step 1 — Ask for an analysis. Return to the chat element and ask:
Analyze customer 3451
The agent will:
- Query the RETAIL_ASSISTANT Cortex Agent
- Provide analysis (revenue, order patterns, etc.)
- Offer to save the insight: "Would you like me to save this insight to the Customer Insights table?"
Step 2 — Confirm you want to save (good manners never hurt!):
Yes please
The agent will:
- Summarize what it will write
- Show the customer ID
- Ask for final confirmation: "Should I proceed?"
Step 3 — Final confirmation:
Yes
The agent executes the "Insert row into ‘Customer Insights'" action, providing:
insight_description: The generated insight textcustomer_id: 3451
You'll see a new row with:
- Insight: The description the agent generated
- CustomerID: 3451
- Last updated at: Current timestamp
You can still click Cancel to back out of the insert, or Save to commit it. We didn't instruct the agent to commit automatically:

In this QuickStart, you learned how to:
Core concepts
- Understand the architecture — the Sigma agent is the brain, the chat element is the UI
- Configure Snowflake Cortex — set up the data view, semantic view, and Cortex Agent
- Integrate with Sigma — configure the AI provider and authorize the semantic view
- Build a chat element — add a conversational interface to a workbook, powered by a Sigma agent
Advanced capabilities
- Call a warehouse agent — the Sigma agent uses the Cortex Agent for analytical work, grounded in the semantic view
- Take actions — the Sigma agent can write to an input table when the user approves
- Maintain context — follow-up questions build on the conversation history naturally
Key takeaways
Sigma agents orchestrate, partner tools execute:
- The Sigma agent decides which tool to use based on its instructions
- Cortex Agents (and other warehouse agents) do the deep data work
- Together, they keep the conversational entry point in Sigma and the heavy analytics in the data platform
Semantic views make Cortex accurate:
- Business definitions map technical columns to terms the agent understands
- Pre-defined Facts let Cortex aggregate correctly without ad-hoc SQL
- The result: reliable answers grounded in governed data
Chat elements bring conversational AI to the workbook:
- A familiar chat interface for business users
- No SQL or data modeling required by the reader
- Natural-language questions, structured responses, optional approval flows for writes
Next steps
Explore more AI capabilities in Sigma:
- Build Sigma agents
- Use warehouse agents with Sigma
- Custom Functions documentation
- Model Context Protocol (MCP)
- Action Sequences guide
For another use case that pairs a Sigma agent with unstructured text data, see Unlocking Insights from Unstructured Text with a Sigma Agent
Learn more about Snowflake Cortex:
Additional Resource Links
Blog
Community
Help Center
QuickStarts
Be sure to check out all the latest developments at Sigma's First Friday Feature page!