Sigma's file uploads feature allows users to attach files to row-level data, preview them, and pass file references through input tables and forms. By configuring external storage integration with Snowflake, you can extend this capability to perform advanced AI-powered processing on uploaded files.
In this QuickStart, you'll learn how to build a multi-modal AI application that can:
- Analyze images using AI vision capabilities
- Transcribe and analyze audio/video files
- Extract structured information from documents (PDFs, invoices, receipts)
- Ask questions across multiple files simultaneously using natural language
This approach enables unstructured data analysis directly within Sigma, combining file attachments with Snowflake's AI functions for intelligent document processing, content classification, and information extraction.
For more information on Sigma's product release strategy, see Sigma product releases
If something doesn't work as expected, here's how to contact Sigma support
Target Audience
This QuickStart is designed for data analysts, developers, and technical users who want to build AI-powered applications that process unstructured data like images, documents, and audio files.
Prerequisites
- A computer with a modern web browser (any browser will work).
- Access to your Sigma environment with file upload capabilities enabled.
- Administrative access to a Snowflake environment.
- Snowflake Cortex AI enabled in your Snowflake account.
- AWS S3 bucket for external file storage.
- Familiarity with Snowflake SQL and Sigma workbook development.

Before configuring Sigma's storage integration, you need to set up the AWS infrastructure that will store your uploaded files. This involves creating an S3 bucket, IAM policies, and roles with proper permissions.
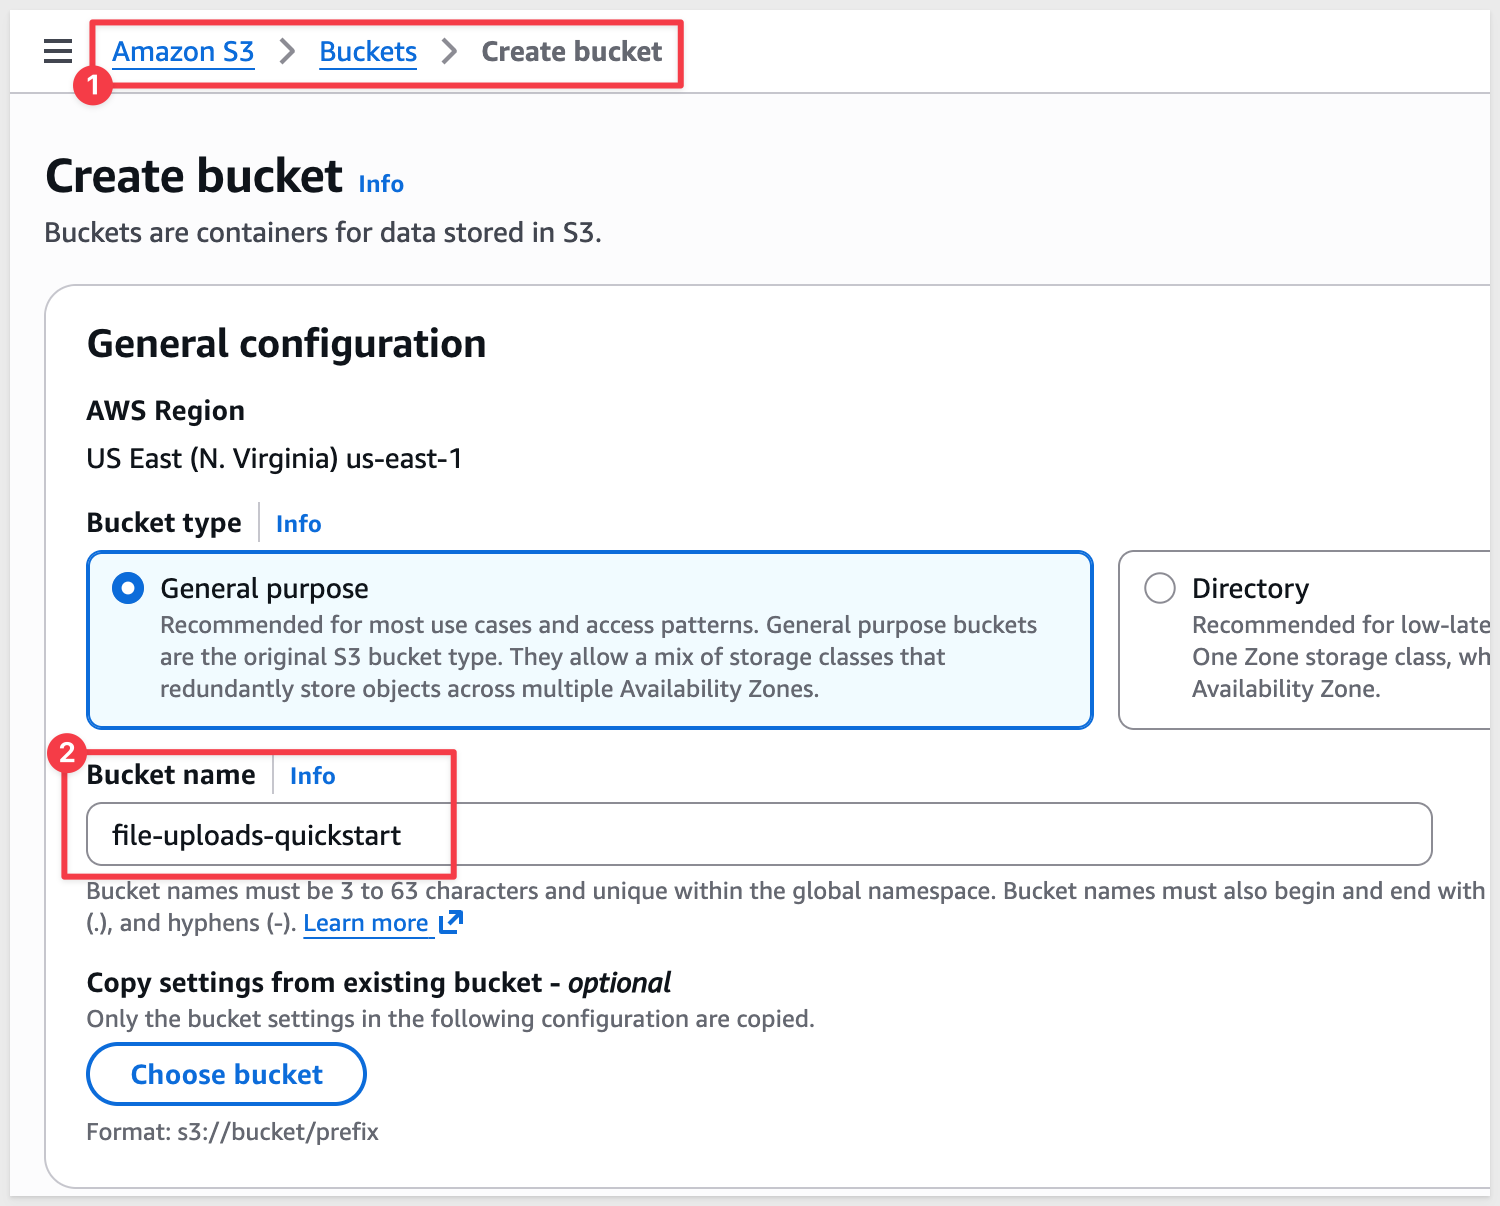
Create S3 Bucket
Log into your AWS Console and navigate to S3.
Click Create bucket and configure:
- Bucket name: Choose a unique name (e.g.,
file-uploads-quickstart) - AWS Region: Select your preferred region
- Block Public Access settings: Keep all public access blocked (recommended)
- Leave other settings as default
Scroll all the way down the page and click Create bucket.
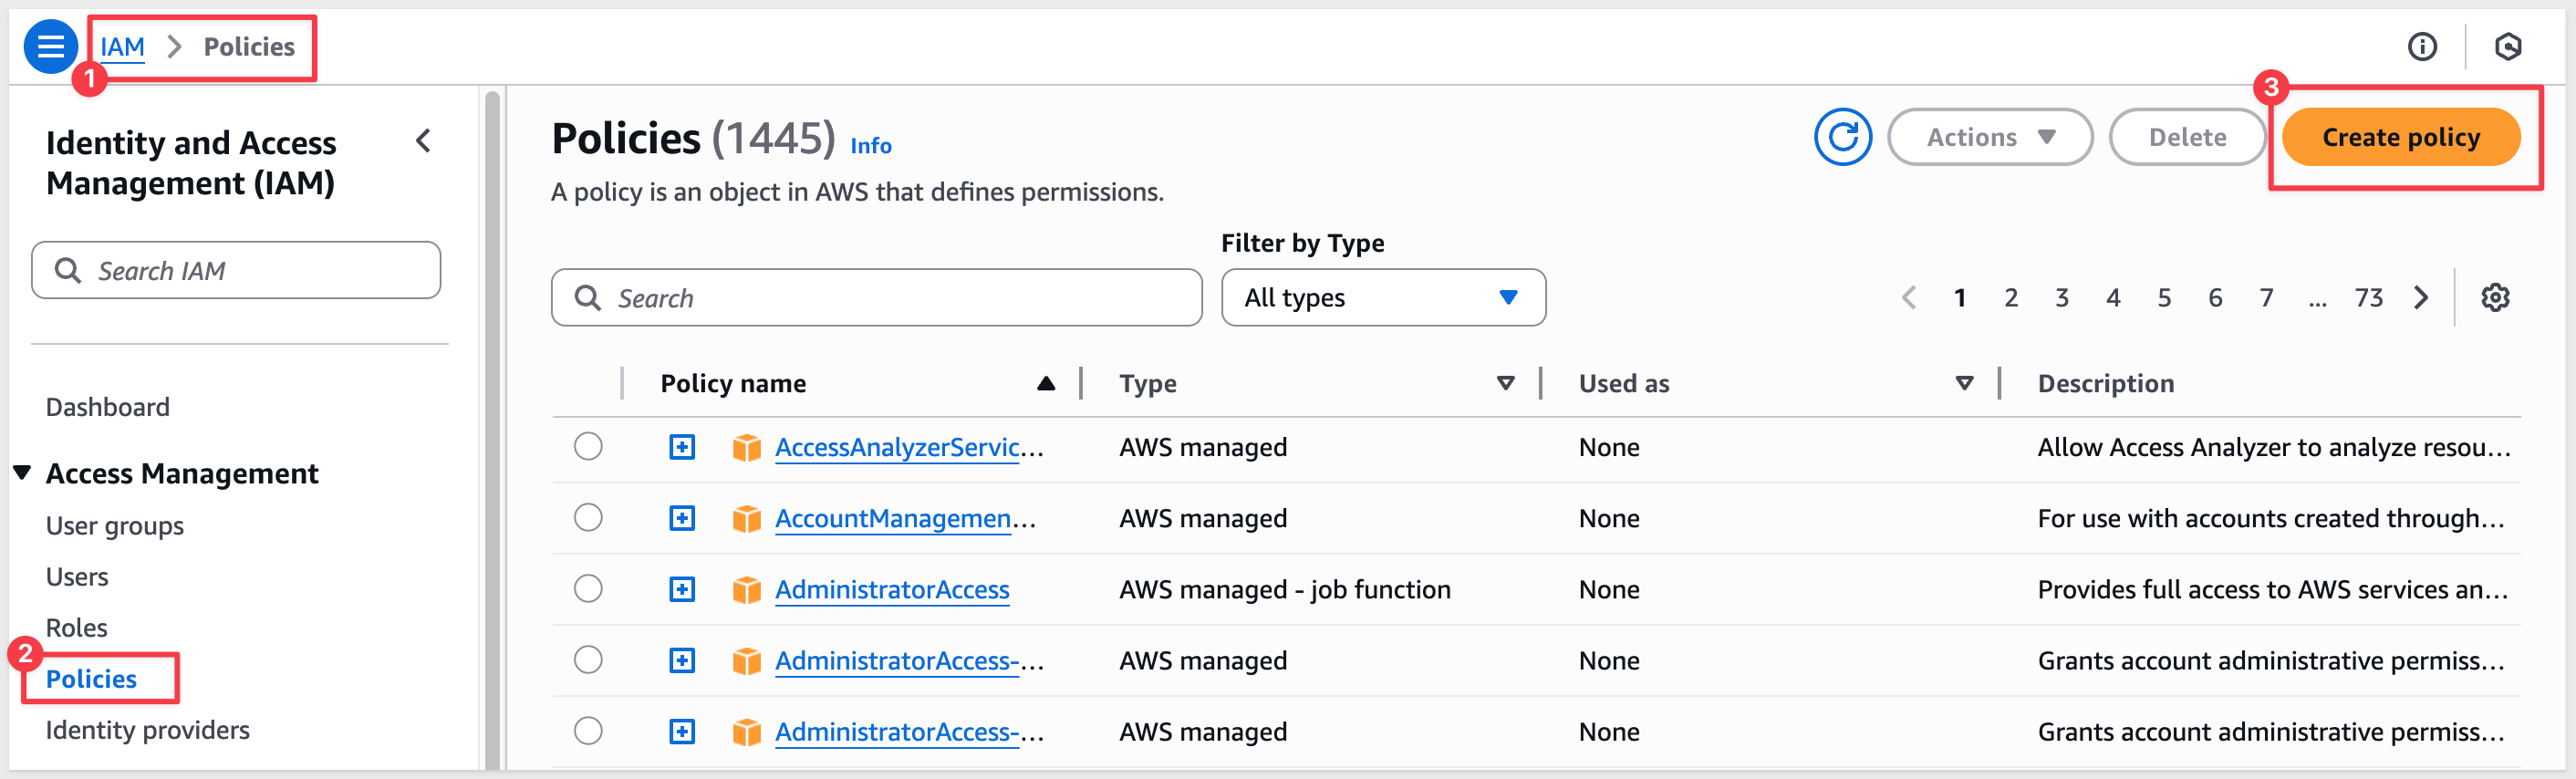
Create IAM Policy
Navigate to IAM > Policies and click Create policy:
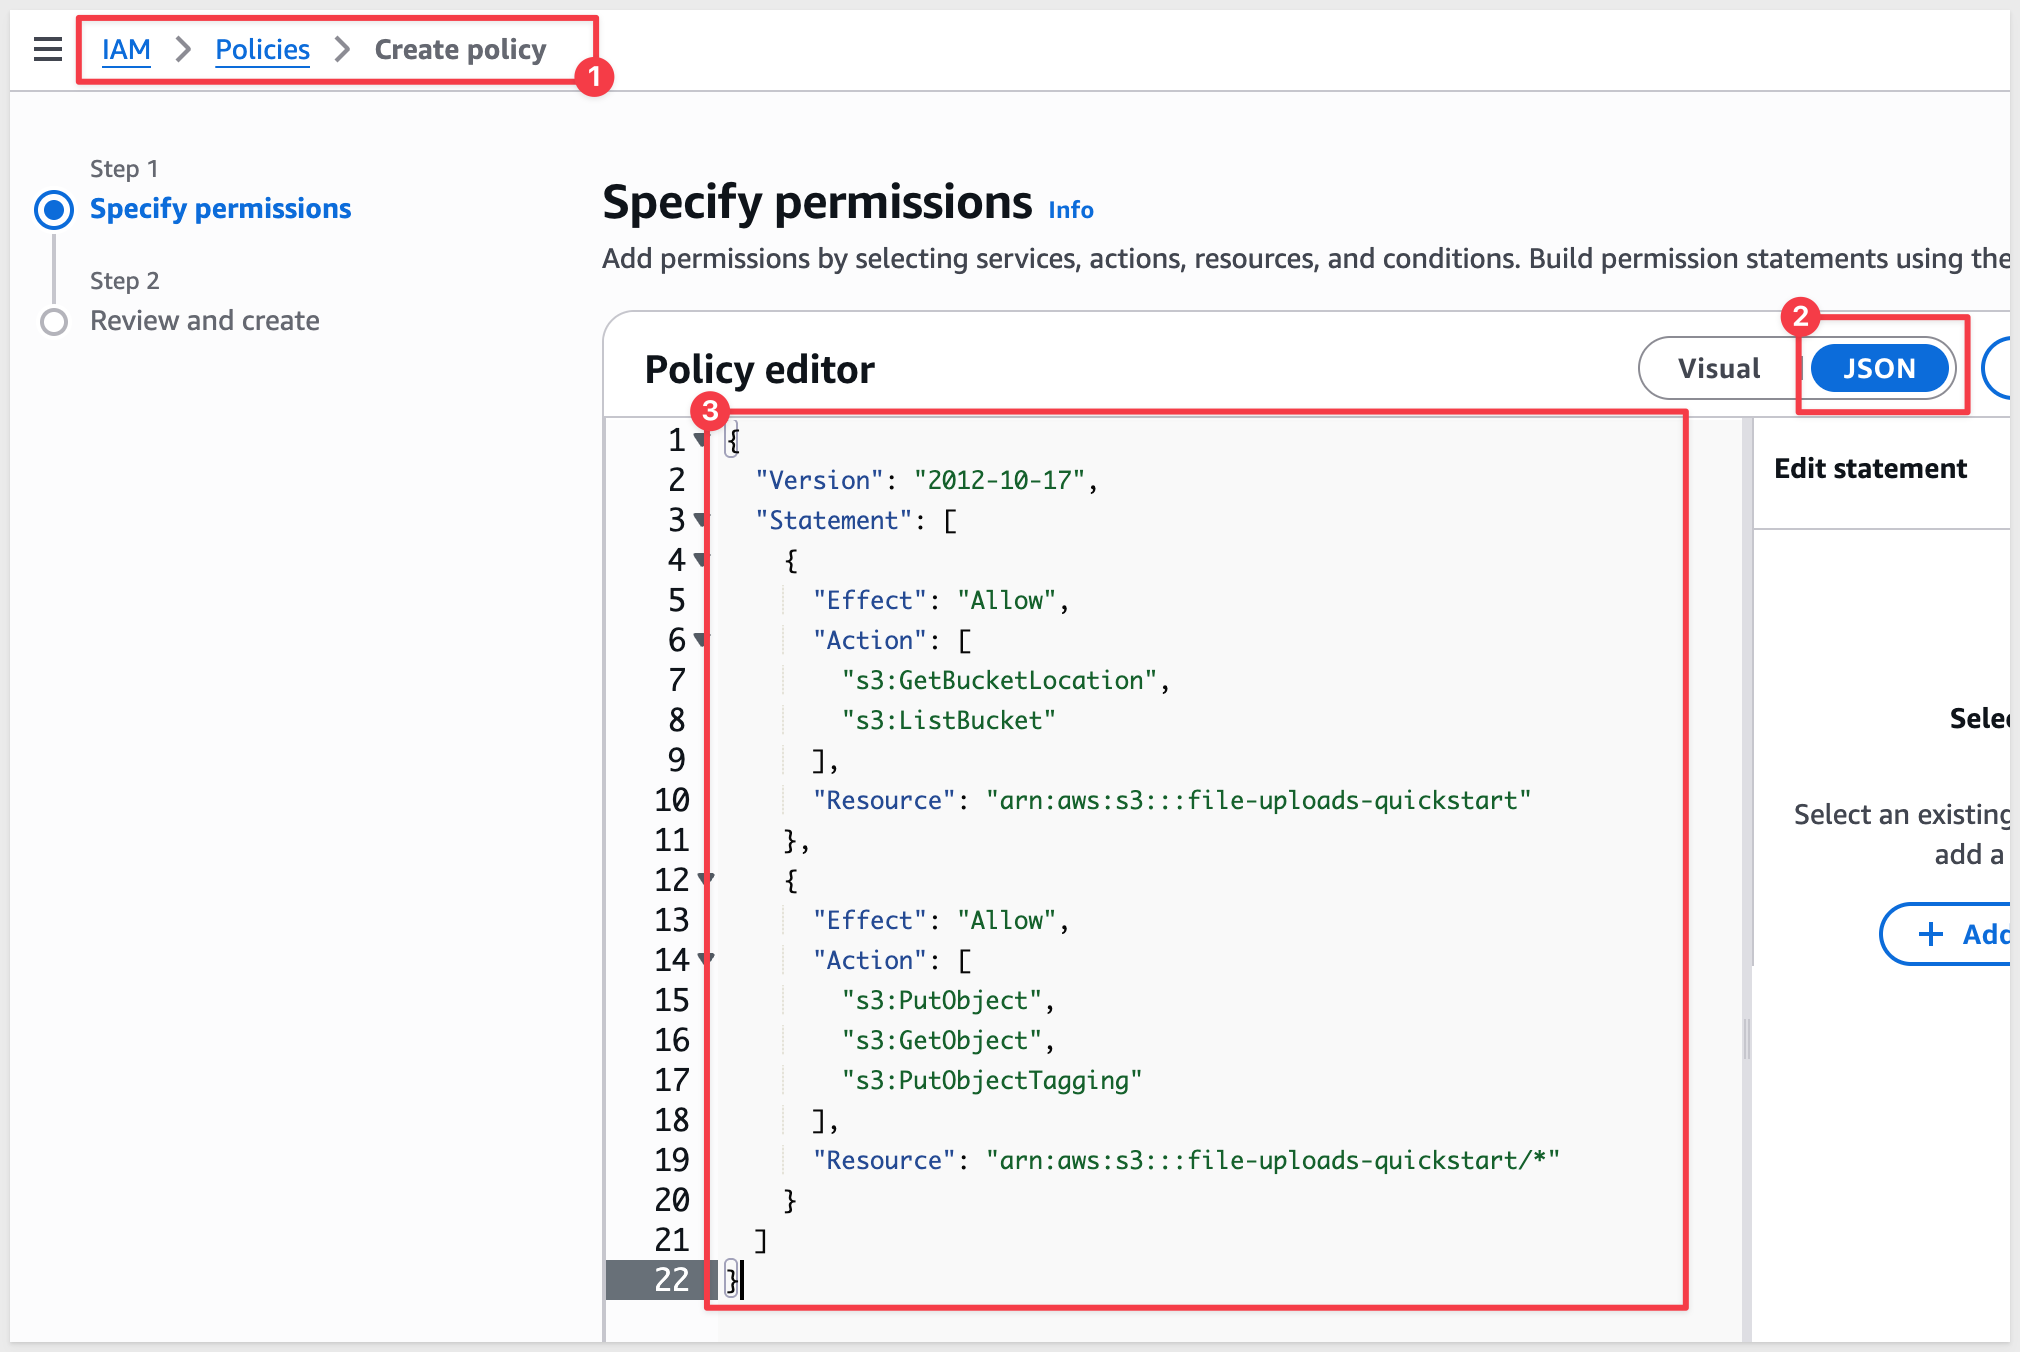
Switch to the JSON tab and replace the existing code with the following policy document:
{
  "Version": "2012-10-17",
  "Statement": [
    {
      "Effect": "Allow",
      "Action": [
        "s3:GetBucketLocation",
        "s3:ListBucket"
      ],
      "Resource": "arn:aws:s3:::file-uploads-quickstart"
    },
    {
      "Effect": "Allow",
      "Action": [
        "s3:PutObject",
        "s3:GetObject",
        "s3:PutObjectTagging"
      ],
      "Resource": "arn:aws:s3:::file-uploads-quickstart/*"
    }
  ]
}
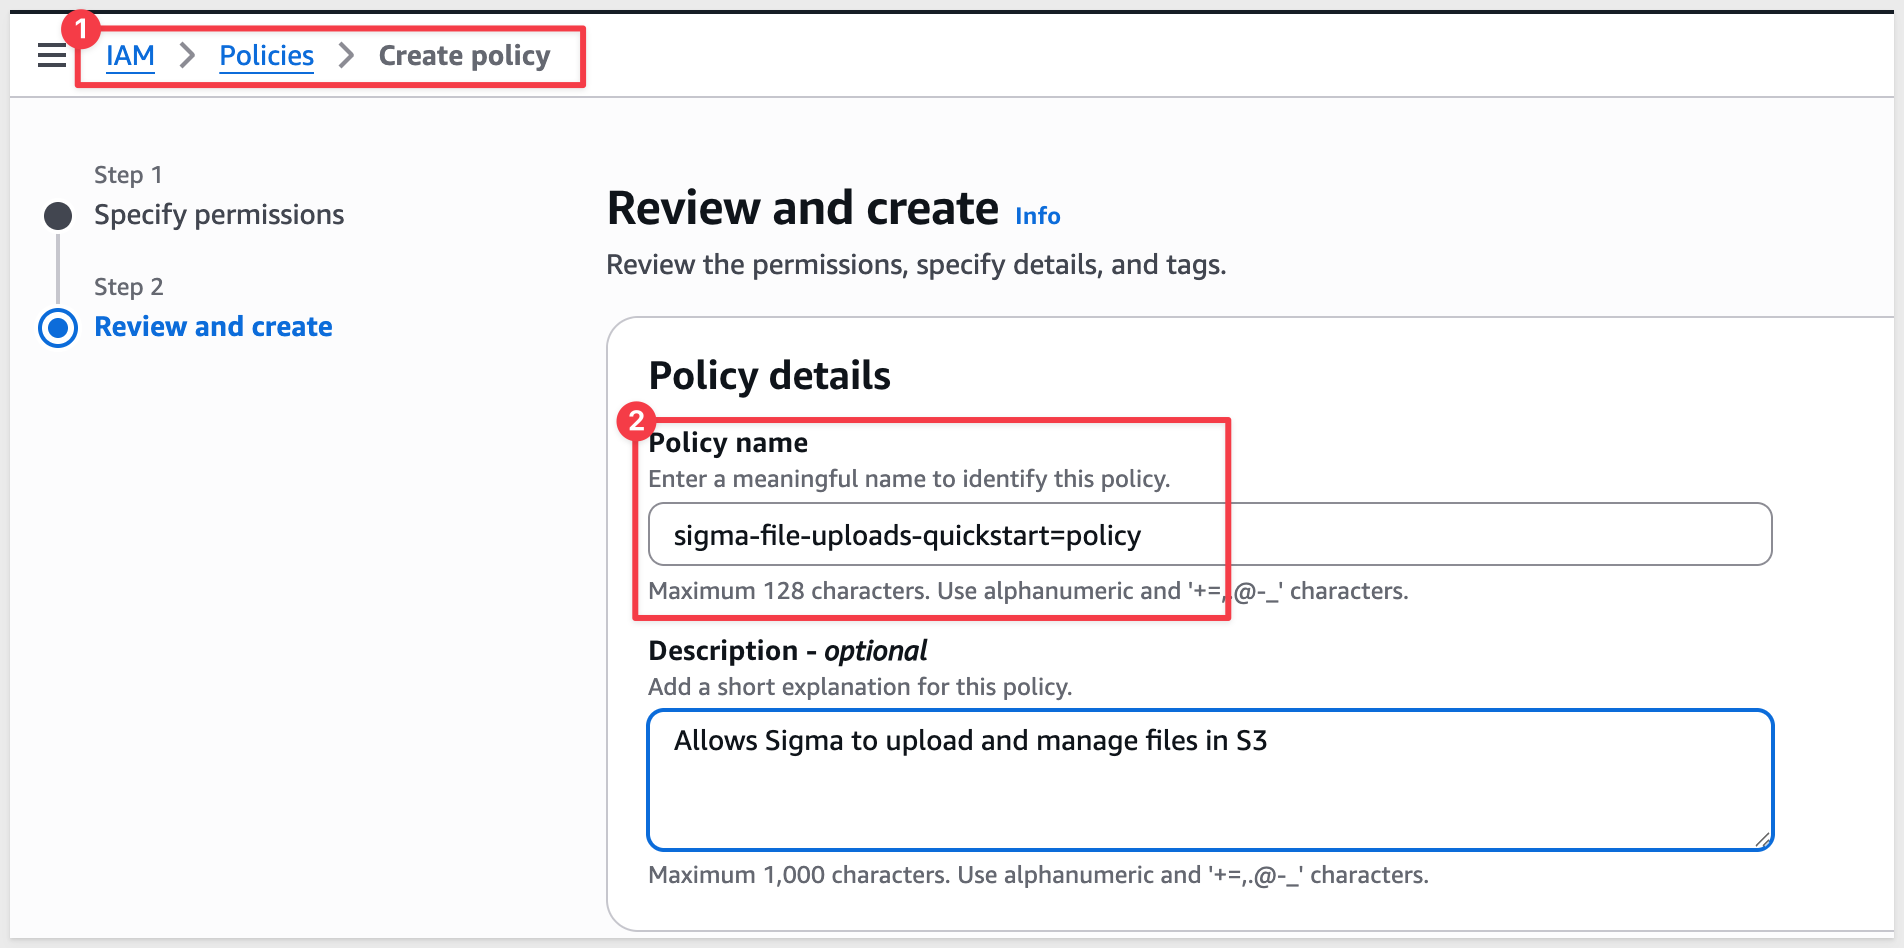
Click Next, then:
- Policy name:
sigma-file-uploads-quickstart-policy - Description:
Allows Sigma to upload and manage files in S3
Click Create policy.
Create IAM Role
Navigate to IAM > Roles and click Create role.
Configure the role:
- Trusted entity type: Select
AWS account - An AWS account: Select
This accountand enter your AWS account ID - Require external ID: Check this box and enter a temporary value:
0000
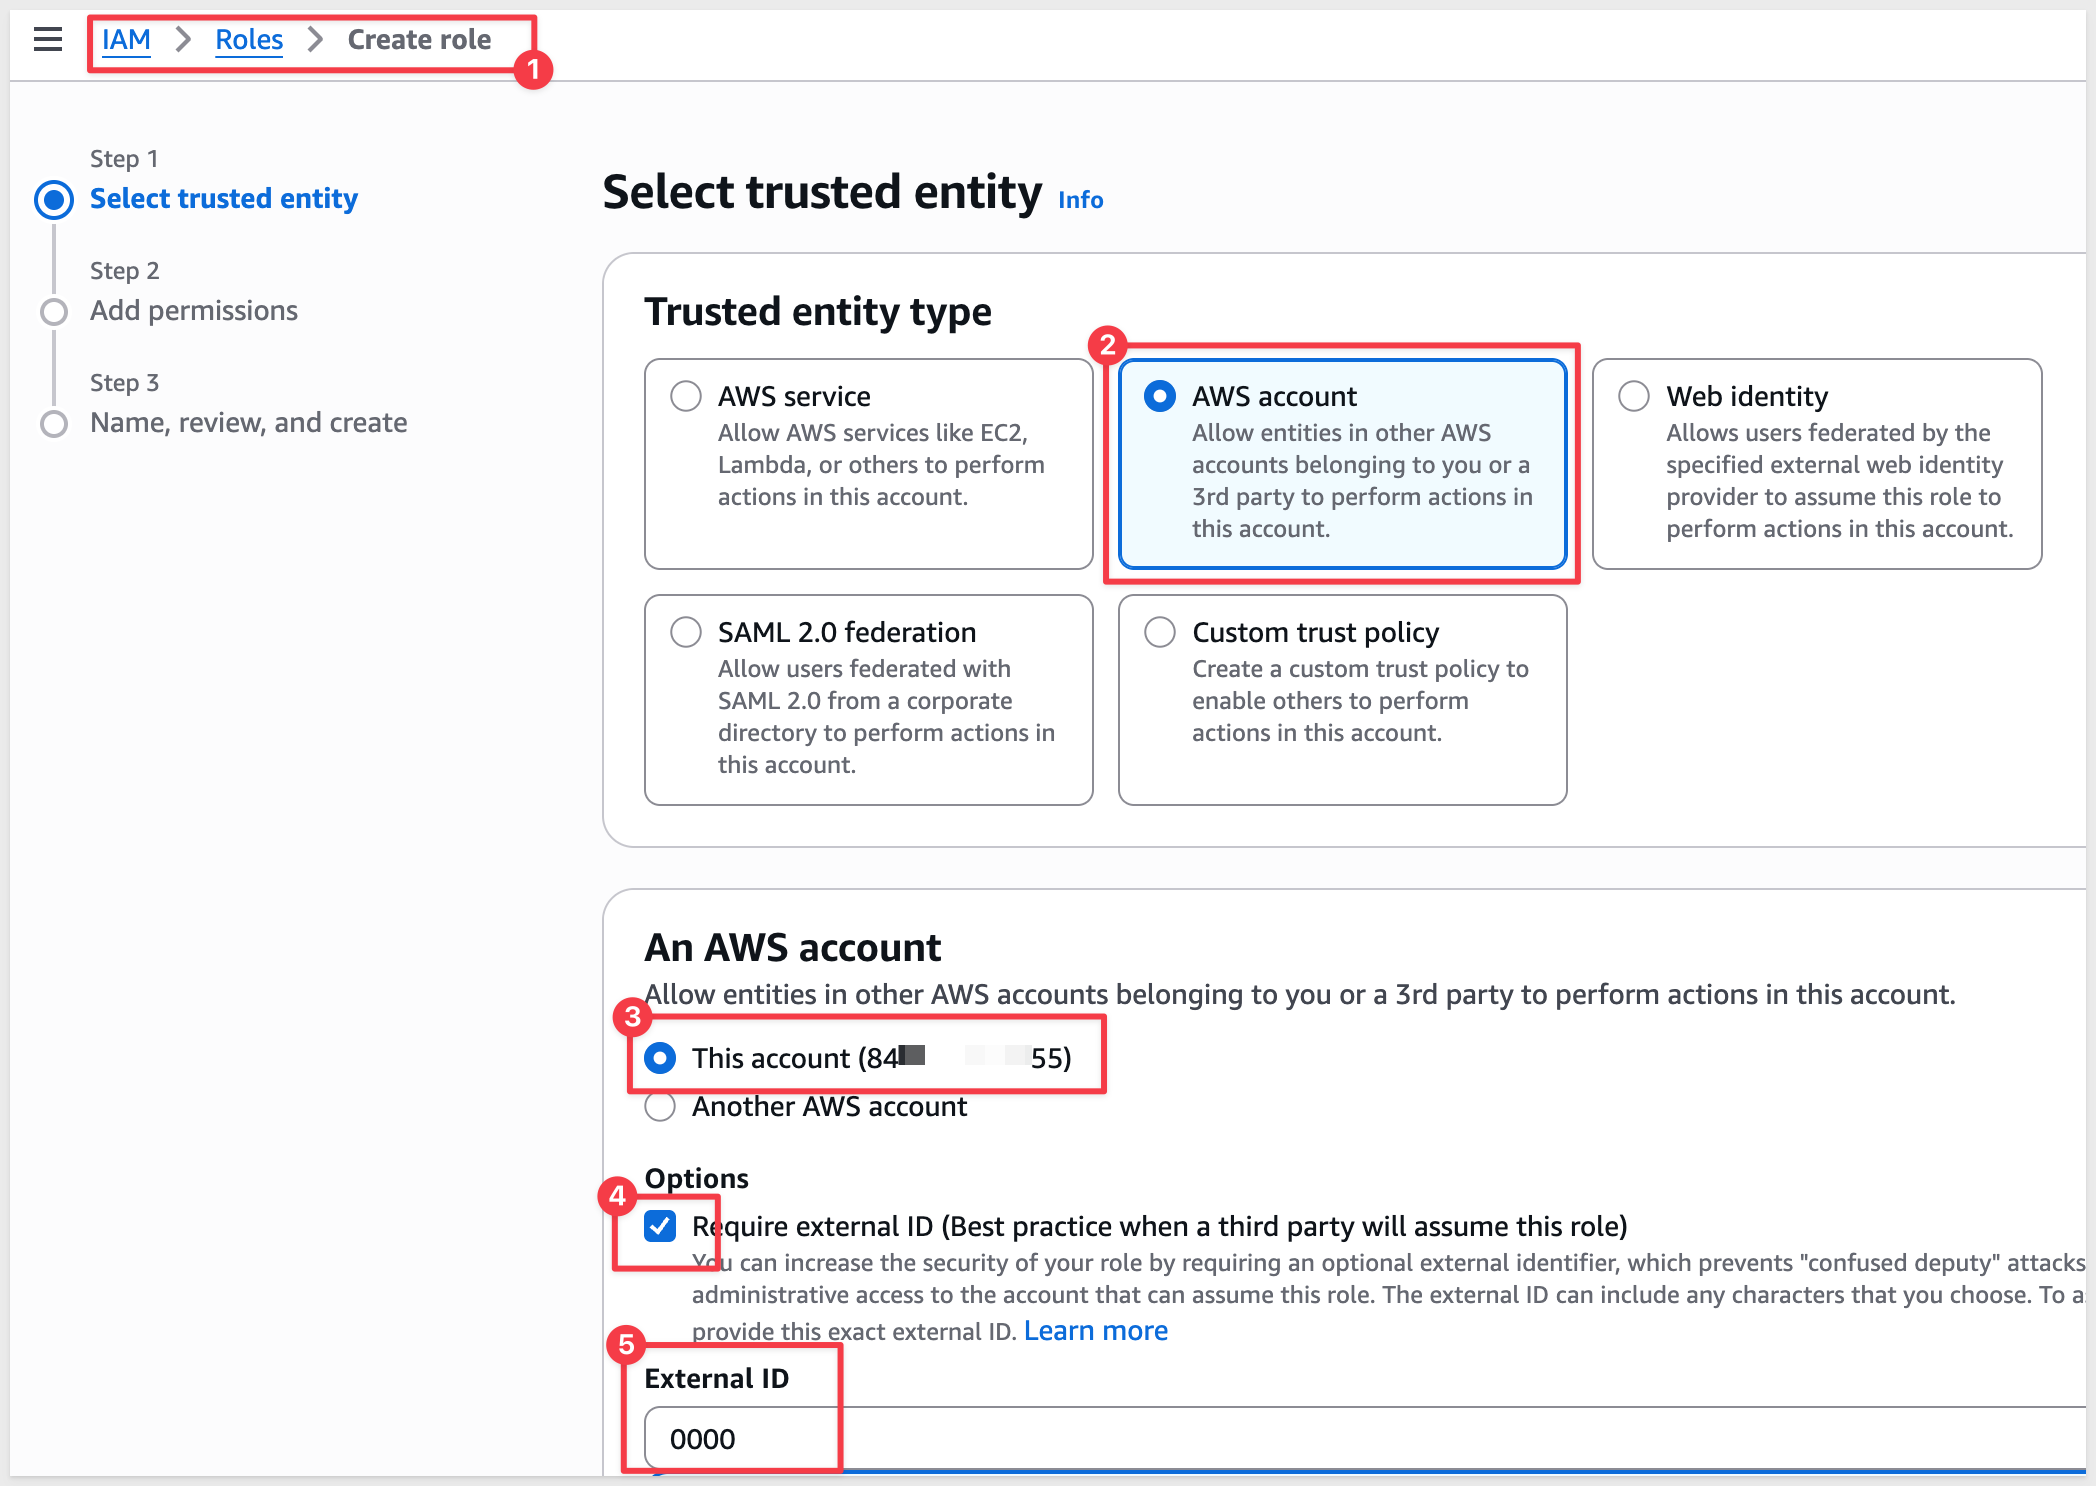
Click Next.
On the permissions page:
- Search for and select
sigma-file-uploads-quickstart-policy(the policy you just created)
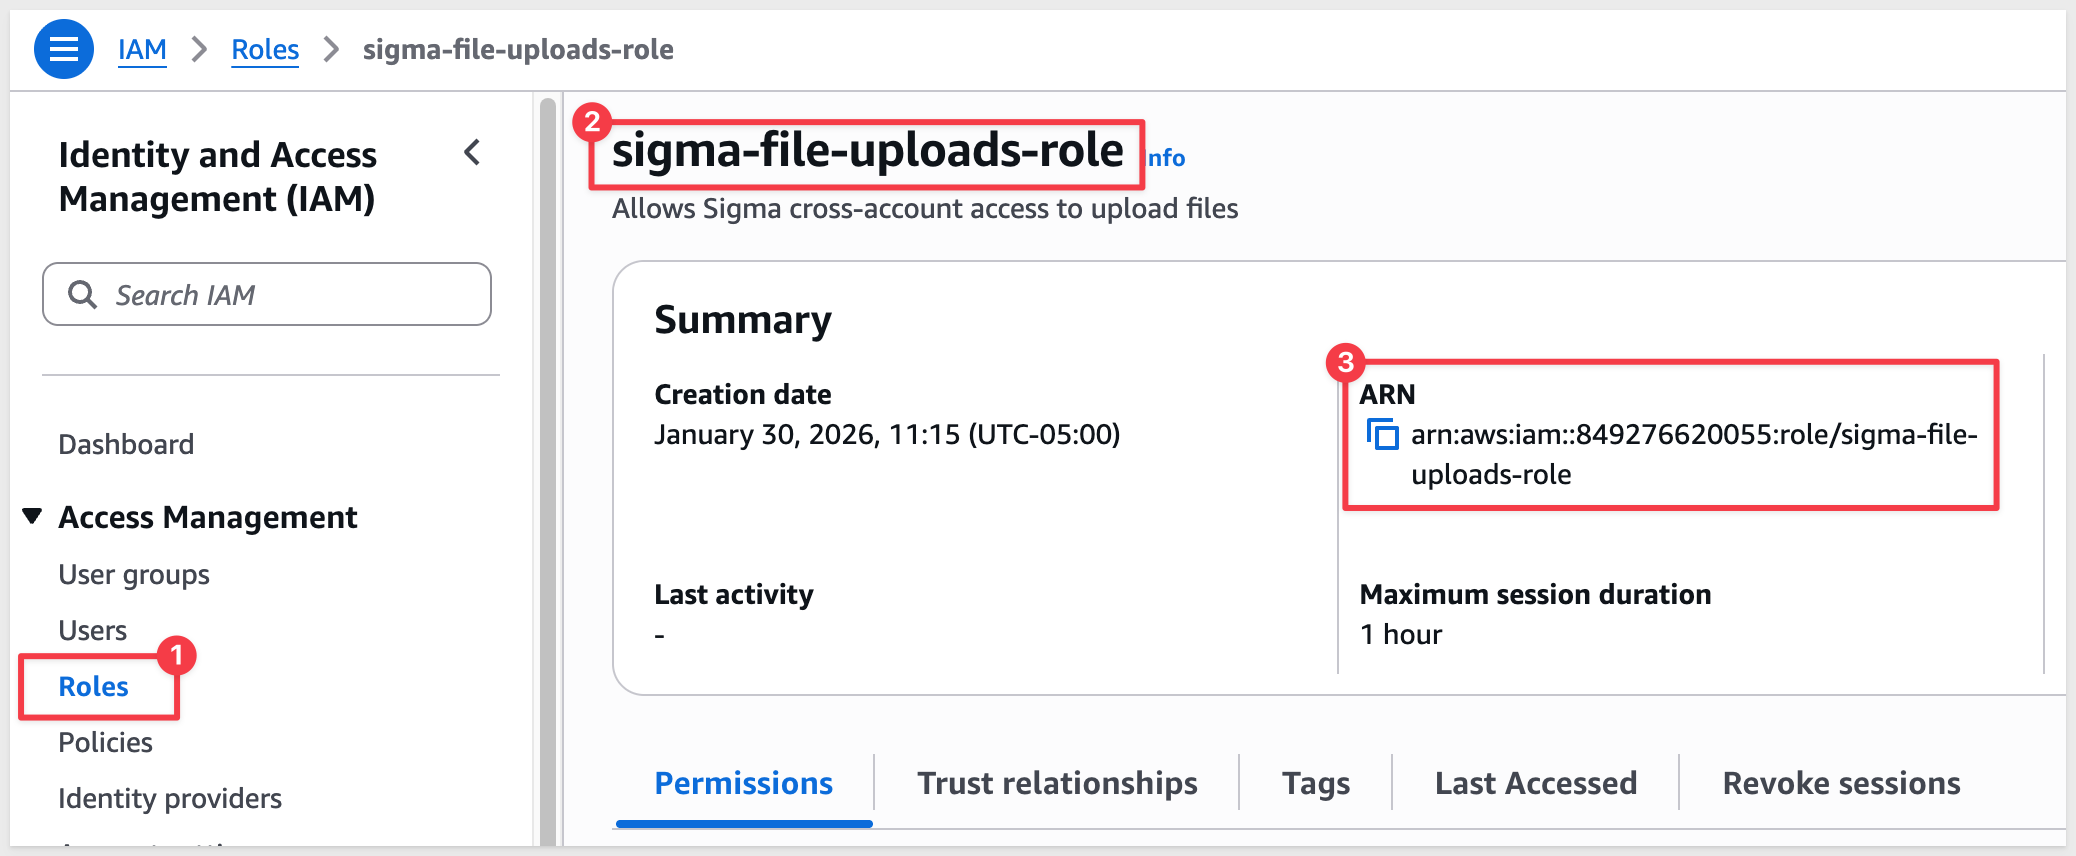
Click Next, then:
- Role name:
sigma-file-uploads-role - Description:
Allows Sigma cross-account access to upload files
Click Create role.
After creating the role, search for it by name (sigma-file-uploads-role), click on it and copy the Role ARN - you'll need this when configuring Sigma.
The ARN format is: arn:aws:iam::123456789012:role/sigma-file-uploads-role
Configure S3 Bucket CORS
Return to S3 and click to select your file uploads bucket.
Click the Permissions tab, then scroll to Cross-origin resource sharing (CORS).
Click Edit and enter the following CORS configuration:
[
  {
    "AllowedHeaders": ["*"],
    "AllowedMethods": ["GET", "PUT", "POST"],
    "AllowedOrigins": ["https://app.sigmacomputing.com"],
    "ExposeHeaders": []
  }
]
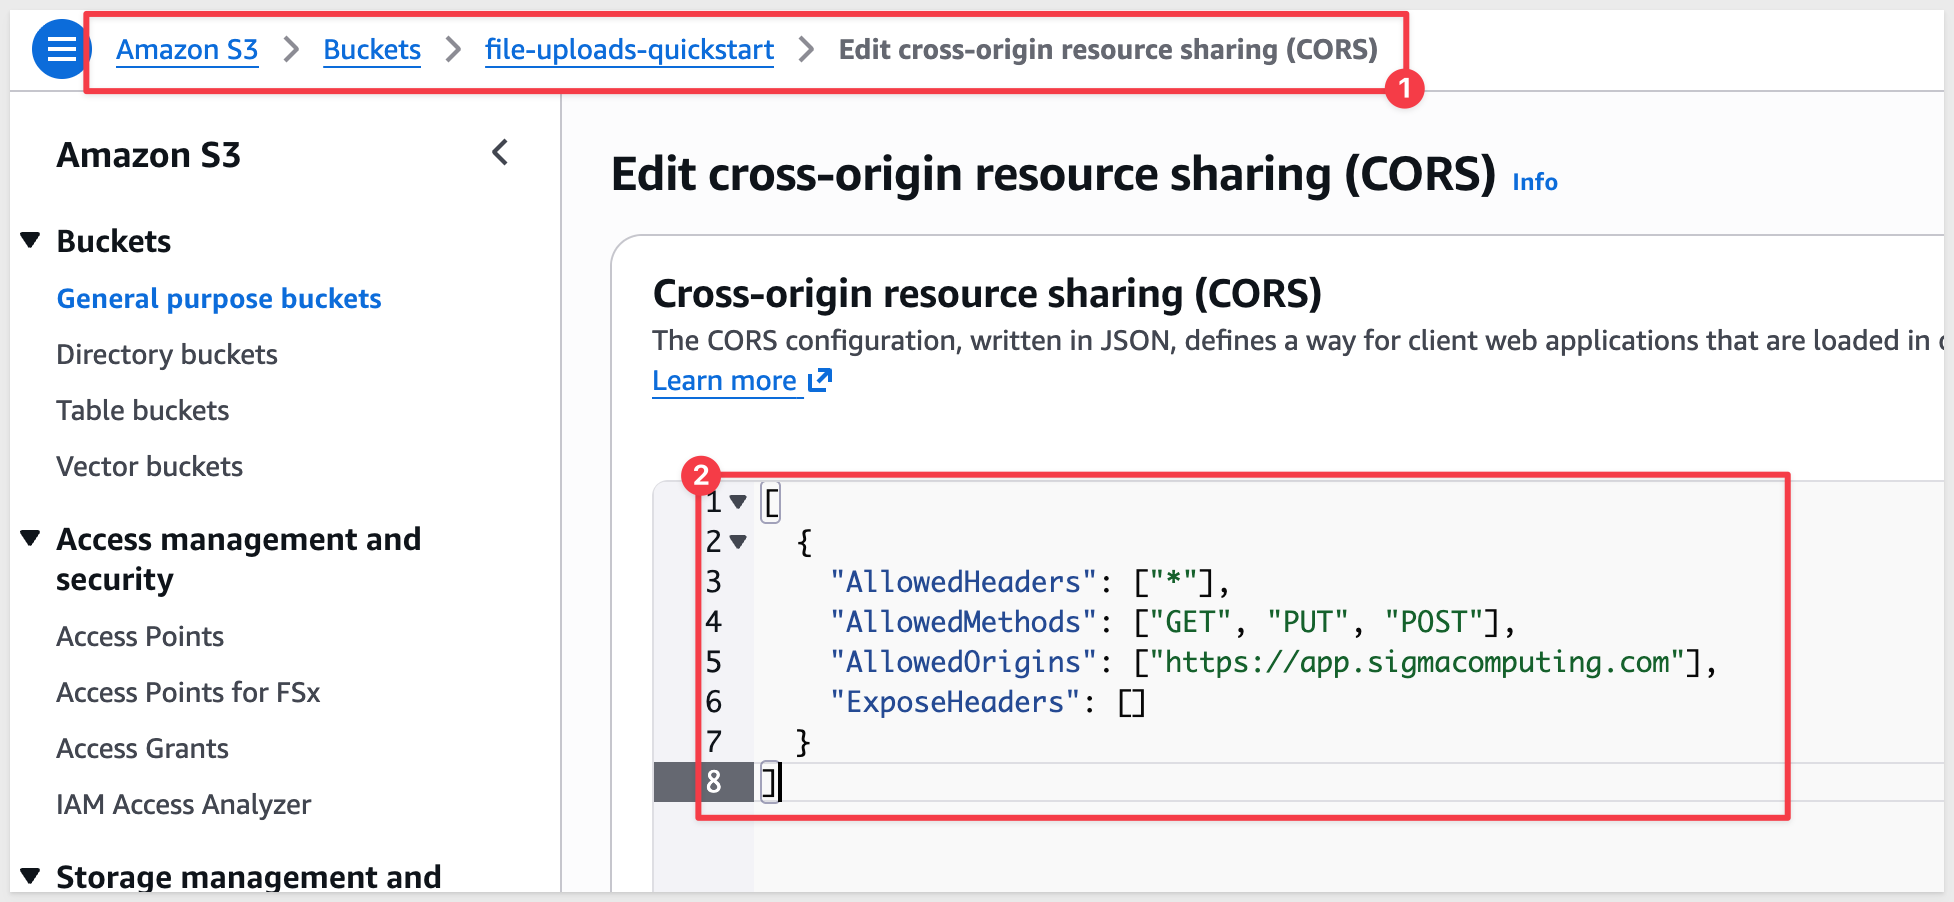
Click Save changes.
Now that your AWS infrastructure is ready, you'll configure Sigma to use your S3 bucket for file storage.
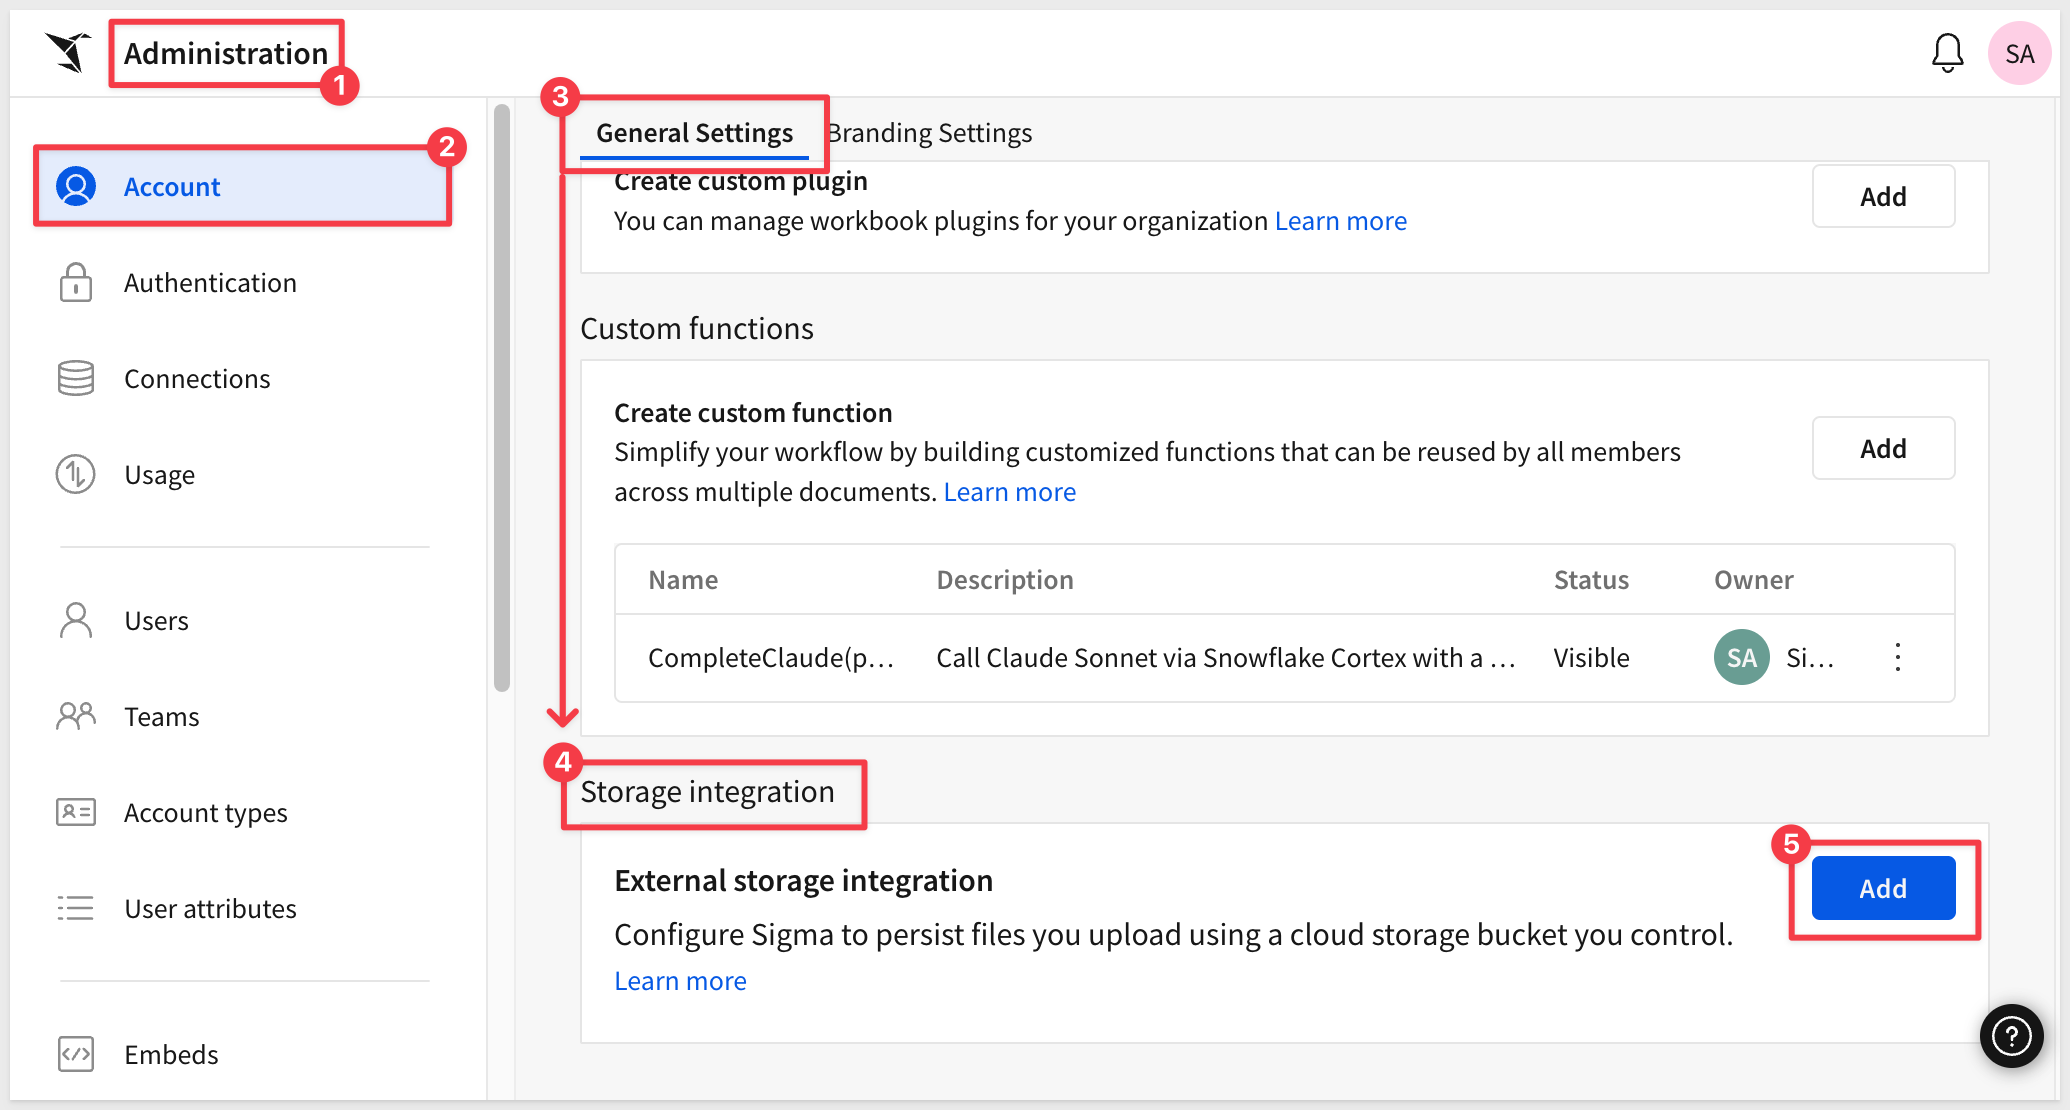
Add Storage Integration in Sigma
Log into Sigma as Administrator and navigate to Administration > Account > Storage Integration and click Add:
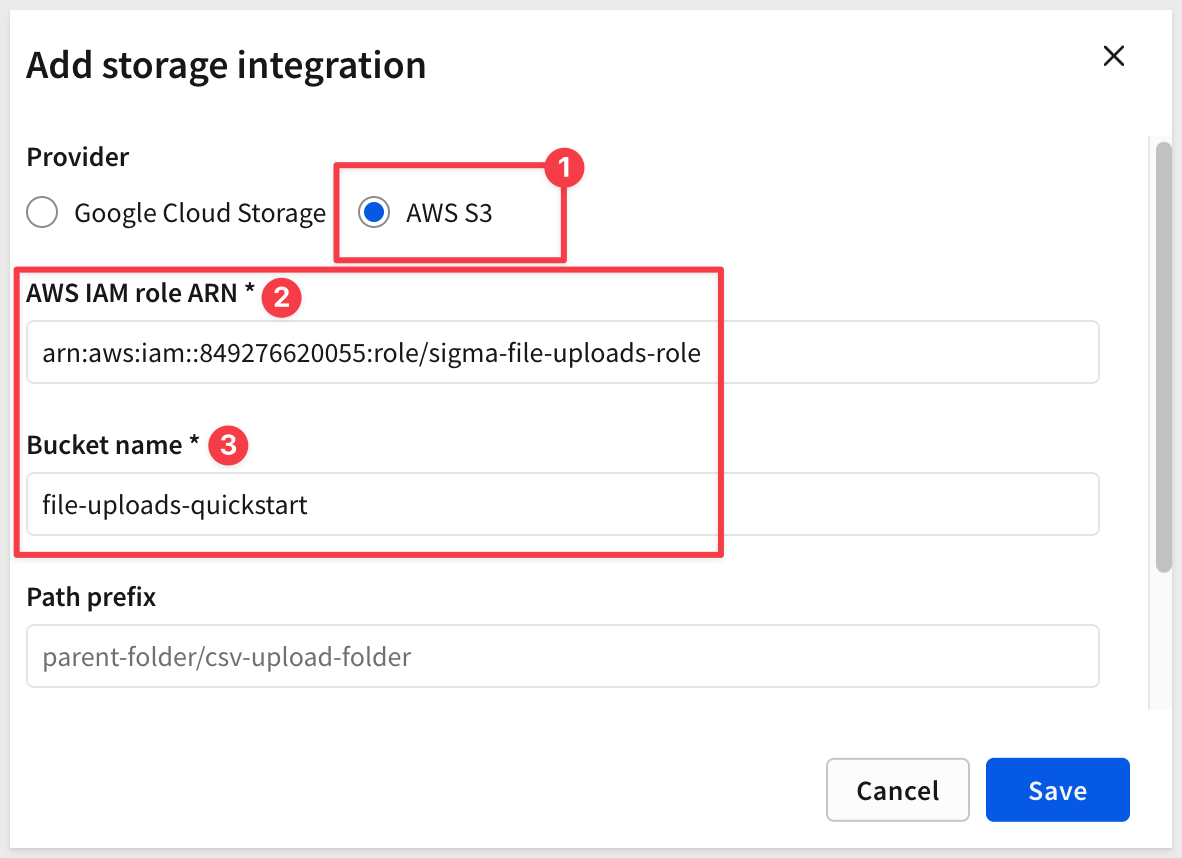
Configure the external storage integration:
- Provider: Select
AWS S3 - AWS customer IAM role ARN: Enter the Role ARN from your IAM role (e.g.,
arn:aws:iam::123456789012:role/sigma-file-uploads-role) - Bucket name: Enter your S3 bucket name (e.g.,
file-uploads-quickstart) - Prefix: (Optional) Enter a folder path if you want to isolate Sigma uploads (e.g.,
sigma-uploads/)
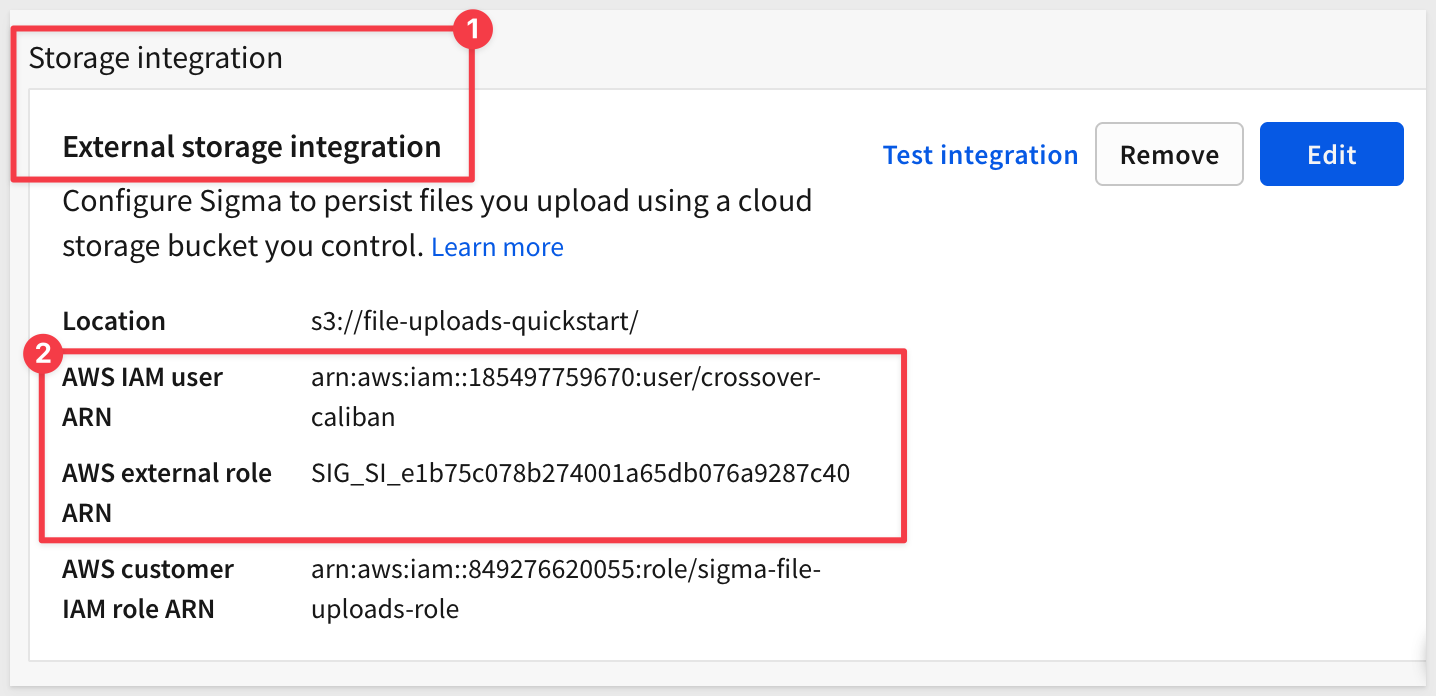
After entering these details, Sigma will display three values:
- AWS IAM user ARN: Sigma's IAM user identity (copy this)
- AWS external role ARN: Sigma's external ID for cross-account access (copy this)
- AWS customer IAM role ARN: Your role ARN echoed back (already have this)
Update IAM Role Trust Policy
Return to AWS Console and navigate to IAM > Roles.
Select your sigma-file-uploads-role.
Click the Trust relationships tab, then click Edit trust policy:
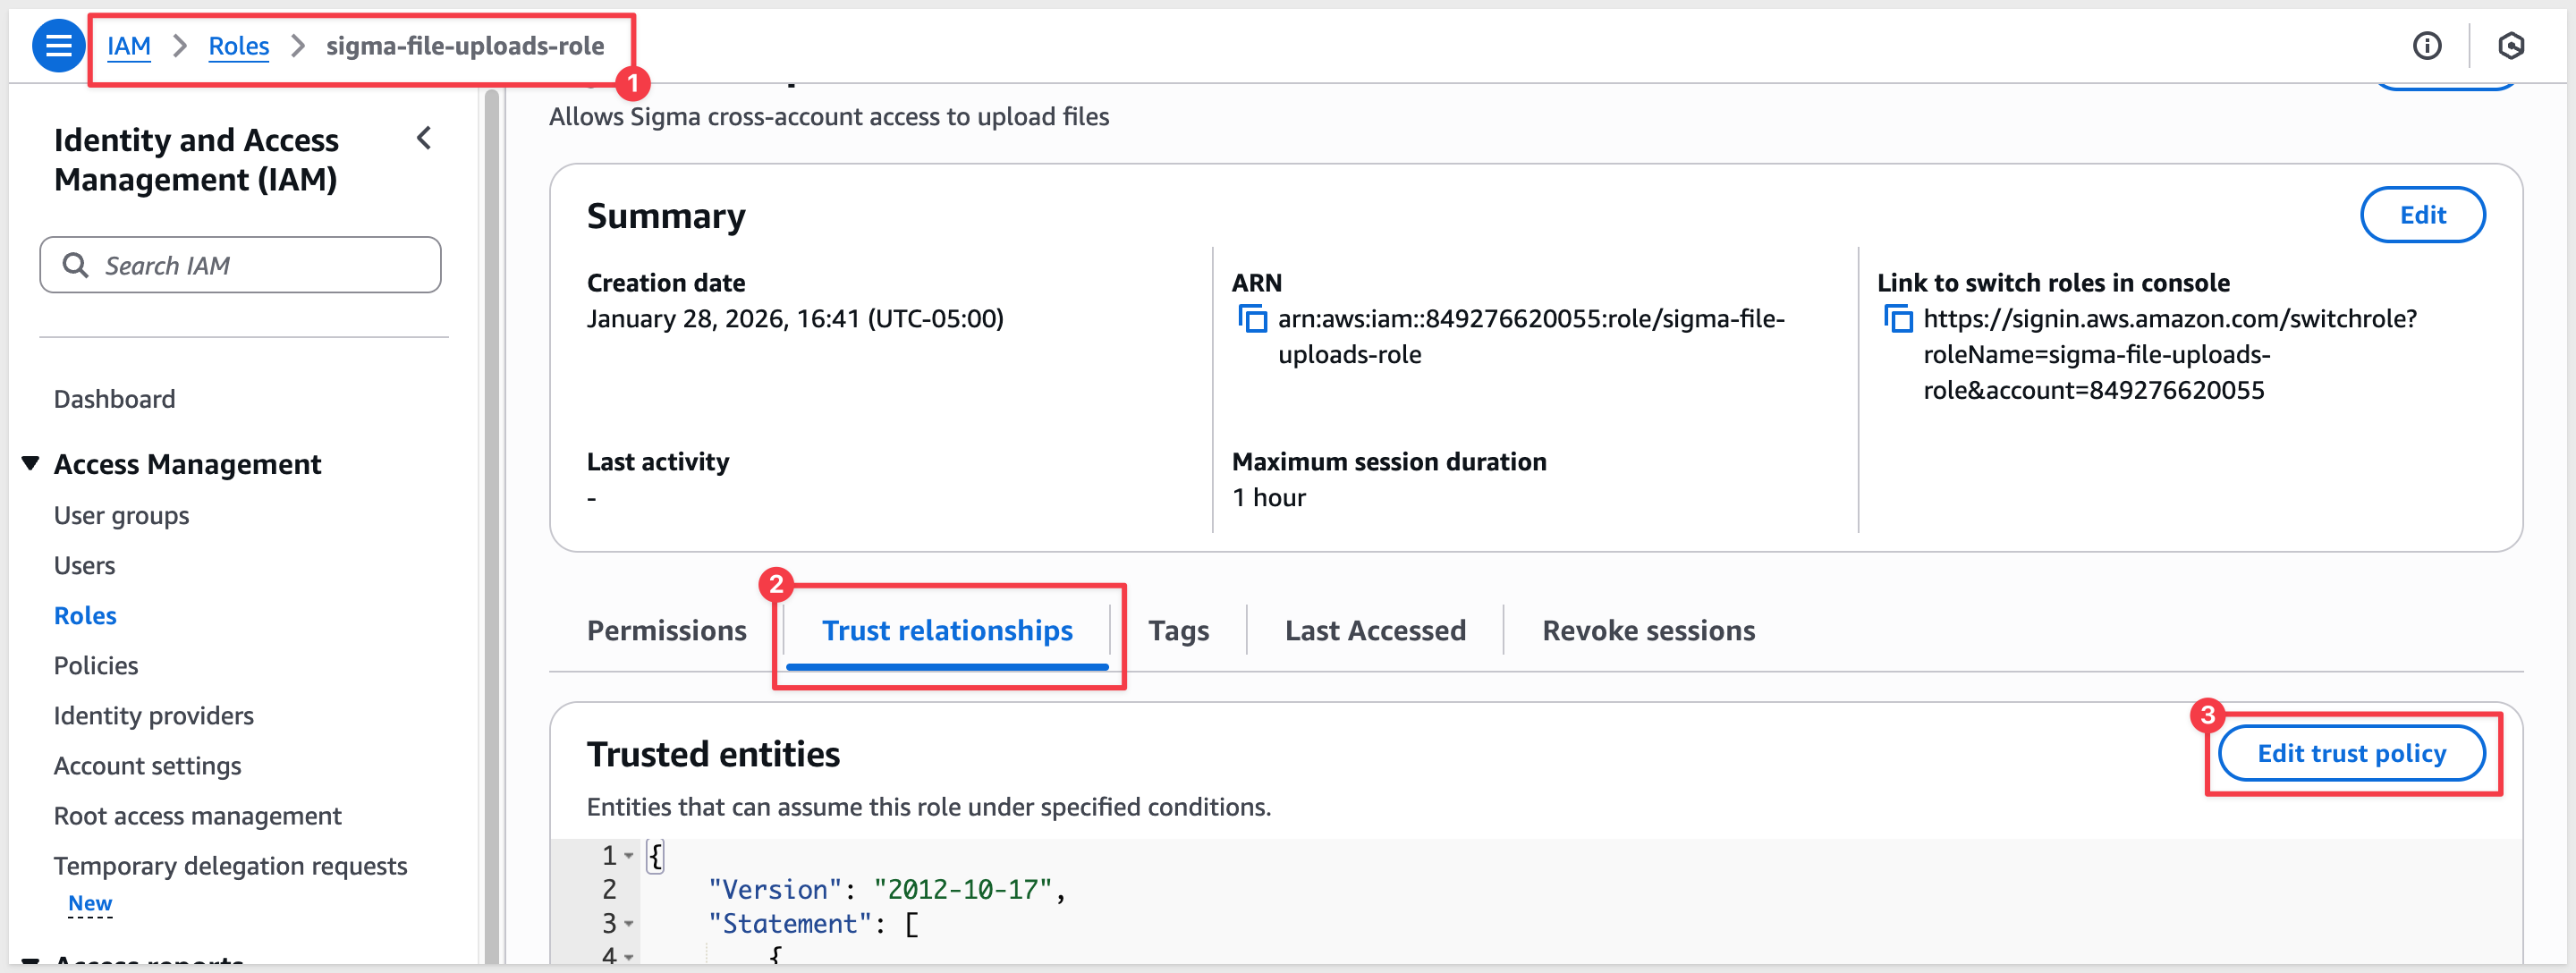
Replace the entire trust policy document with:
{
  "Version": "2012-10-17",
  "Statement": [
    {
      "Effect": "Allow",
      "Principal": {
        "AWS": "arn:aws:iam::123456789012:user/sigma-upload-user"
      },
      "Action": "sts:AssumeRole",
      "Condition": {
        "StringEquals": {
          "sts:ExternalId": "abc123def456ghi789"
        }
      }
    }
  ]
}

Click Update policy.
Verify Configuration
Return to Sigma and click Test connection on the Storage Integration page:
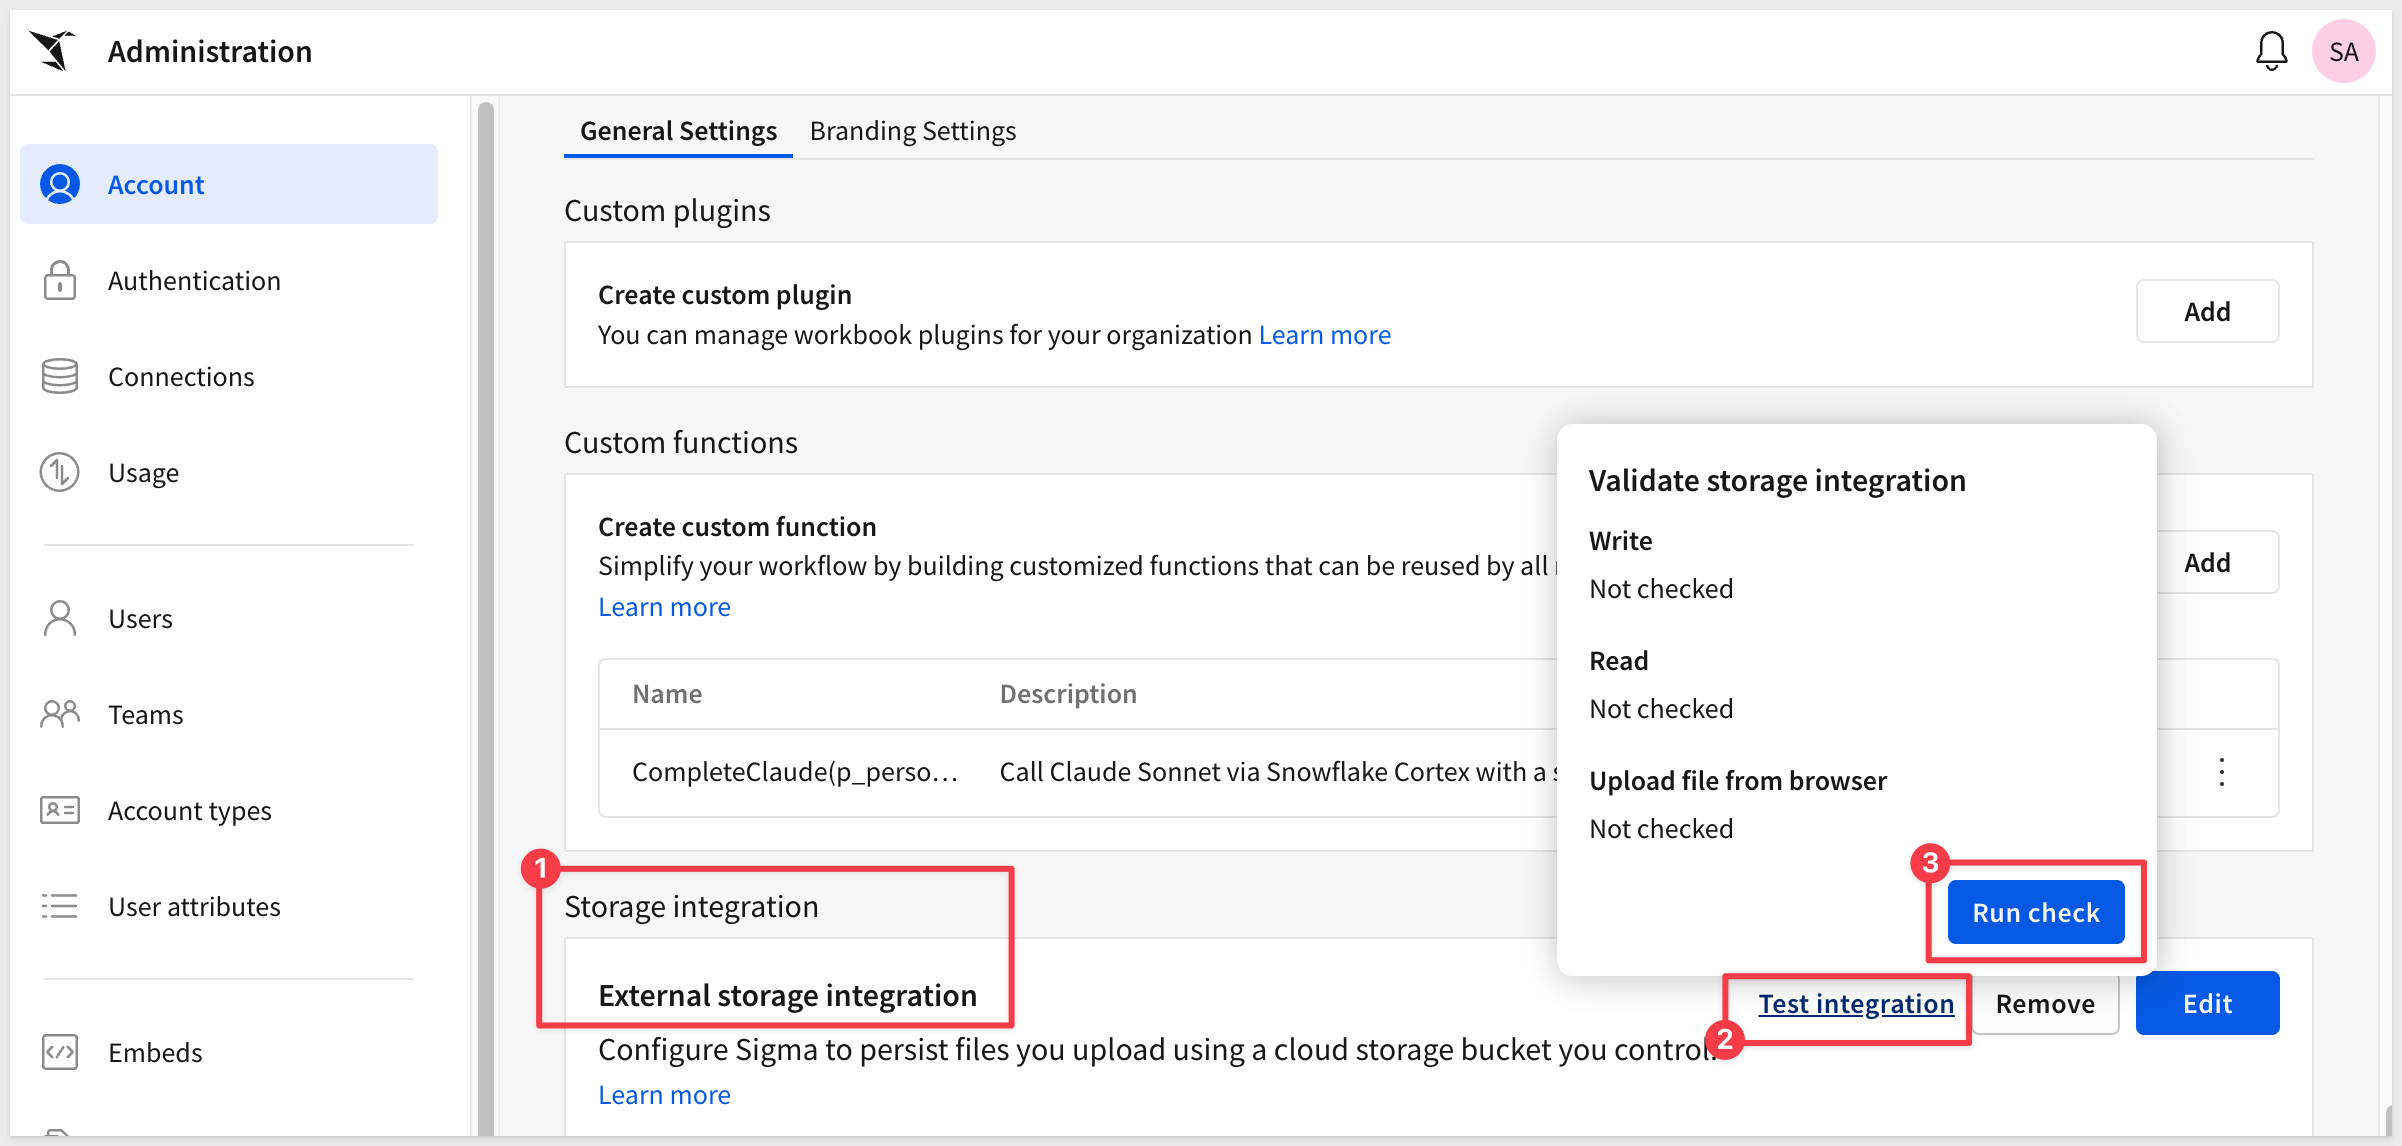
If configured correctly, you'll see a success message confirming Sigma can access your S3 bucket:
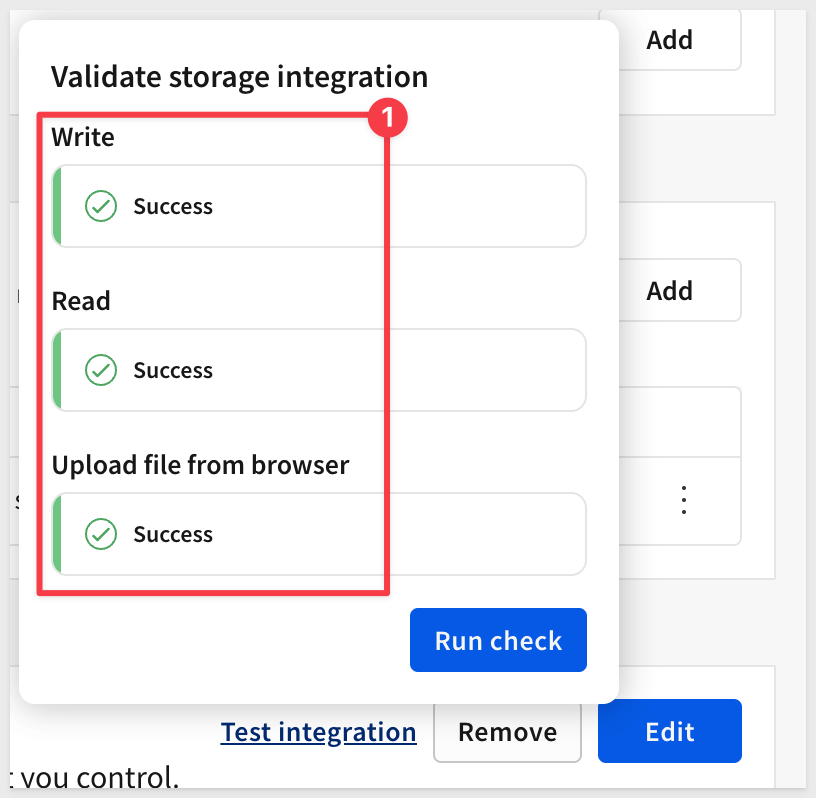
Sigma will now persist all uploaded files to your S3 bucket, making them accessible for downstream processing in Snowflake.
For additional details, see Configure storage integration for file upload columns
Before setting up storage integration, you need to ensure Snowflake Cortex AI is properly configured with a vision-capable model.
Enable Cross-Region Inference
Multi-modal AI models (like Claude) that can analyze images may not be available in all Snowflake regions by default. Enable cross-region inference to access these models.
In Snowflake, run as ACCOUNTADMIN:
USE ROLE ACCOUNTADMIN;
ALTER ACCOUNT SET CORTEX_ENABLED_CROSS_REGION = 'AWS_US';
Test Which Models Are Available
Different Snowflake regions have different models available. Test which models work in your region:
-- Test Claude models (vision-capable, best for multi-modal)
SELECT SNOWFLAKE.CORTEX.COMPLETE('claude-sonnet-4-5', 'Say hello') AS response;

-- Test Reka (vision-capable)
SELECT SNOWFLAKE.CORTEX.COMPLETE('reka-flash', 'Say hello') AS response;

-- Test text-only models (these will NOT work for image processing)
SELECT SNOWFLAKE.CORTEX.COMPLETE('mistral-7b', 'Say hello') AS response;
SELECT SNOWFLAKE.CORTEX.COMPLETE('mixtral-8x7b', 'Say hello') AS response;
SELECT SNOWFLAKE.CORTEX.COMPLETE('llama3-70b', 'Say hello') AS response;
Run each query to see which models are available in your region.
Choose a vision-capable model that works:
claude-sonnet-4-5(recommended for best quality)reka-flash(alternative vision model)
You'll use this model name in the application's LLM control later.
To make files uploaded via Sigma accessible for AI processing in Snowflake, you need to create a database, schema, storage integration, and external stage.
Create or Use Database and Schema
First, create a database and schema to store your file upload stage, or use existing ones if you prefer.
In Snowflake, run the following SQL:
USE ROLE ACCOUNTADMIN;
CREATE DATABASE IF NOT EXISTS QUICKSTARTS;
USE DATABASE QUICKSTARTS;

CREATE SCHEMA IF NOT EXISTS FILE_UPLOADS;
USE SCHEMA FILE_UPLOADS;
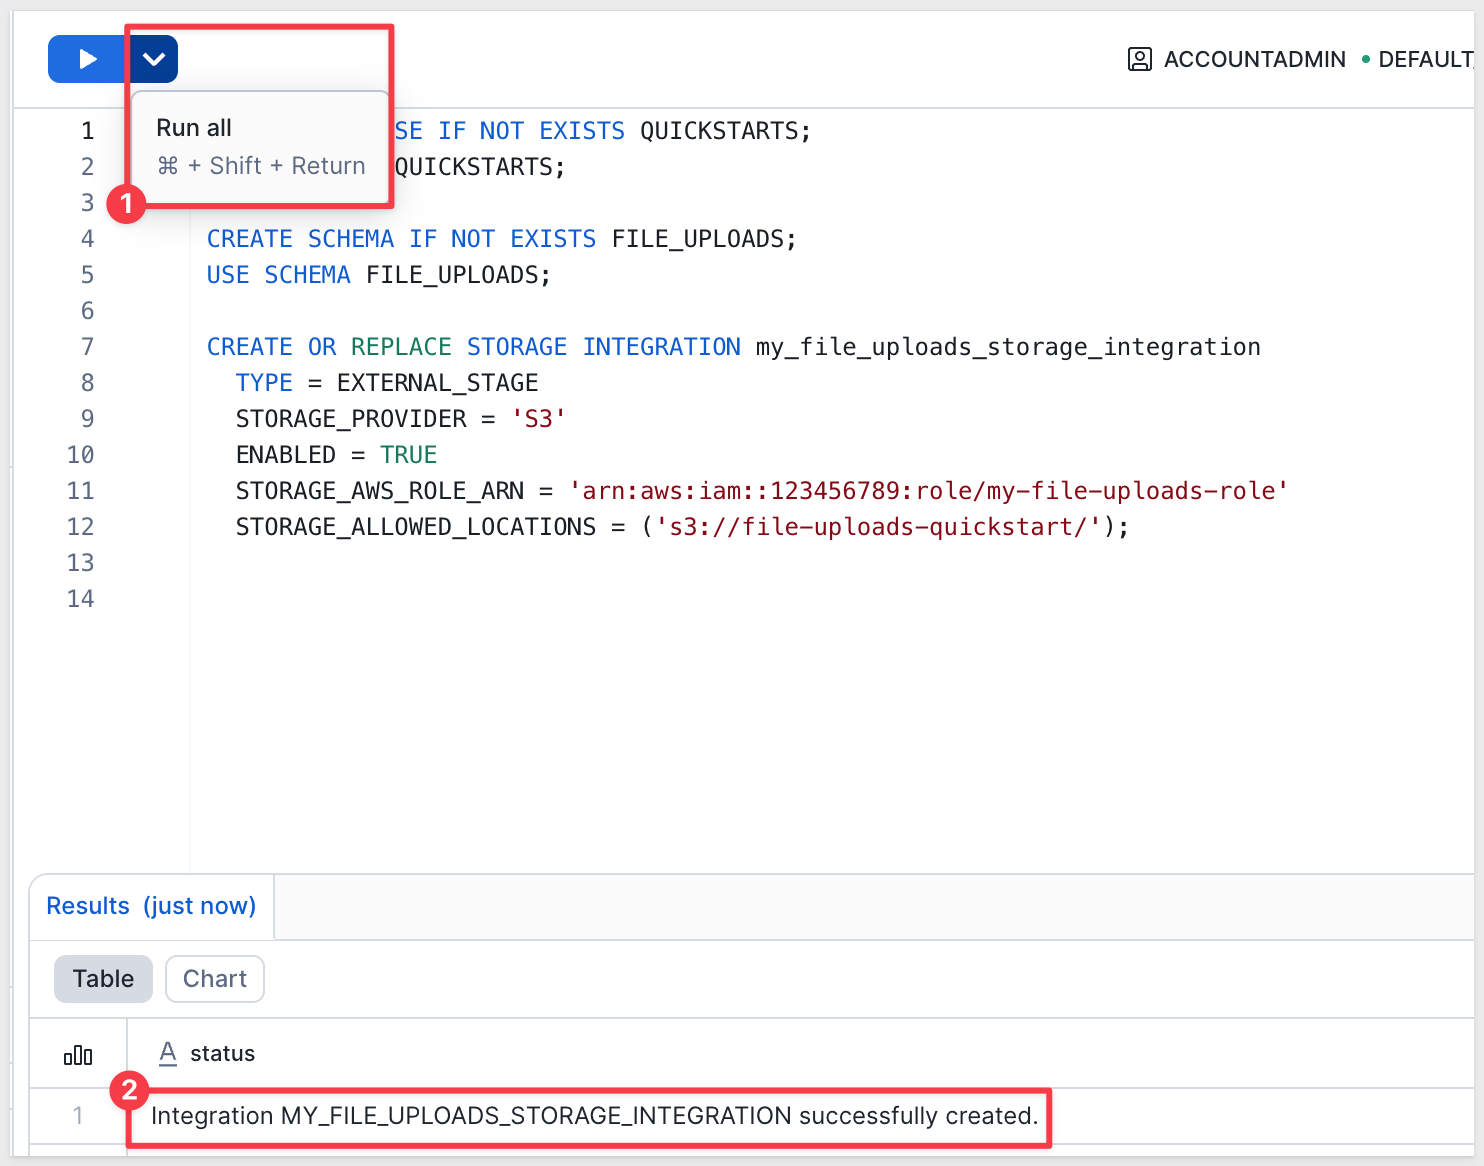
Create Storage Integration
Run the following SQL to create a storage integration mapped to your AWS S3 bucket:
CREATE OR REPLACE STORAGE INTEGRATION my_file_uploads_storage_integration
  TYPE = EXTERNAL_STAGE
  STORAGE_PROVIDER = 'S3'
  ENABLED = TRUE
  STORAGE_AWS_ROLE_ARN = 'arn:aws:iam::YOUR_AWS_ACCOUNT_ID:role/sigma-file-uploads-role'
  STORAGE_ALLOWED_LOCATIONS = ('s3://file-uploads-quickstart/');
Update IAM Trust Policy for Snowflake
Now you need to update your AWS IAM role to trust both Sigma AND Snowflake.
First, get Snowflake's IAM credentials:
DESC STORAGE INTEGRATION my_file_uploads_storage_integration;
From the output, copy these two values:
- STORAGE_AWS_IAM_USER_ARN (e.g.,
arn:aws:iam::644982758253:user/yq810000-s) - STORAGE_AWS_EXTERNAL_ID (e.g.,
AJB44127_SFCRole=2_PRSQLGRBPzzYcOuK1pSOUmr5beI=)
In AWS Console, navigate to IAM > Roles > sigma-file-uploads-role > Trust relationships > Edit trust policy.
Replace the trust policy with the following, adding BOTH Sigma and Snowflake credentials:
{
  "Version": "2012-10-17",
  "Statement": [
    {
      "Effect": "Allow",
      "Principal": {
        "AWS": [
          "PASTE_SIGMA_AWS_IAM_USER_ARN_HERE",
          "PASTE_SNOWFLAKE_STORAGE_AWS_IAM_USER_ARN_HERE"
        ]
      },
      "Action": "sts:AssumeRole",
      "Condition": {
        "StringEquals": {
          "sts:ExternalId": [
            "PASTE_SIGMA_AWS_EXTERNAL_ROLE_ARN_HERE",
            "PASTE_SNOWFLAKE_STORAGE_AWS_EXTERNAL_ID_HERE"
          ]
        }
      }
    }
  ]
}
Click Update policy in AWS.
Grant usage on the storage integration to the role that Sigma uses to connect to Snowflake:
GRANT USAGE ON INTEGRATION my_file_uploads_storage_integration TO ROLE sigma_user;
Create External Stage
Create an external stage in Snowflake that maps to your storage integration:
CREATE OR REPLACE STAGE QUICKSTARTS.FILE_UPLOADS.FILE_UPLOADS
  STORAGE_INTEGRATION = my_file_uploads_storage_integration
  URL = 's3://file-uploads-quickstart/';
Enable directory listing on the stage:
ALTER STAGE QUICKSTARTS.FILE_UPLOADS.FILE_UPLOADS SET DIRECTORY = (ENABLE = TRUE);
Grant permissions to your Sigma user role:
-- Grant access to database and schema
GRANT USAGE ON DATABASE QUICKSTARTS TO ROLE sigma_user;
GRANT USAGE ON SCHEMA QUICKSTARTS.FILE_UPLOADS TO ROLE sigma_user;

-- Grant access to the stage
GRANT USAGE, READ, WRITE ON STAGE QUICKSTARTS.FILE_UPLOADS.FILE_UPLOADS TO ROLE sigma_user;

-- Grant access to Snowflake Cortex AI functions
GRANT DATABASE ROLE SNOWFLAKE.CORTEX_USER TO ROLE sigma_user;

-- Grant access to Sigma's input table schema
-- Note: Database and schema names may vary based on your Sigma configuration
-- Check Administration > Connections > [Your Connection] > Write access settings
GRANT INSERT, UPDATE, DELETE ON FUTURE TABLES IN SCHEMA SIGMA_INTERNAL.INPUT_TABLES_WRITE TO ROLE sigma_user;
Now you'll build the application interface that allows users to upload files and interact with AI processing.
Create Initial Workbook Structure
Create a new workbook in Sigma.
Rename the default page to Main.
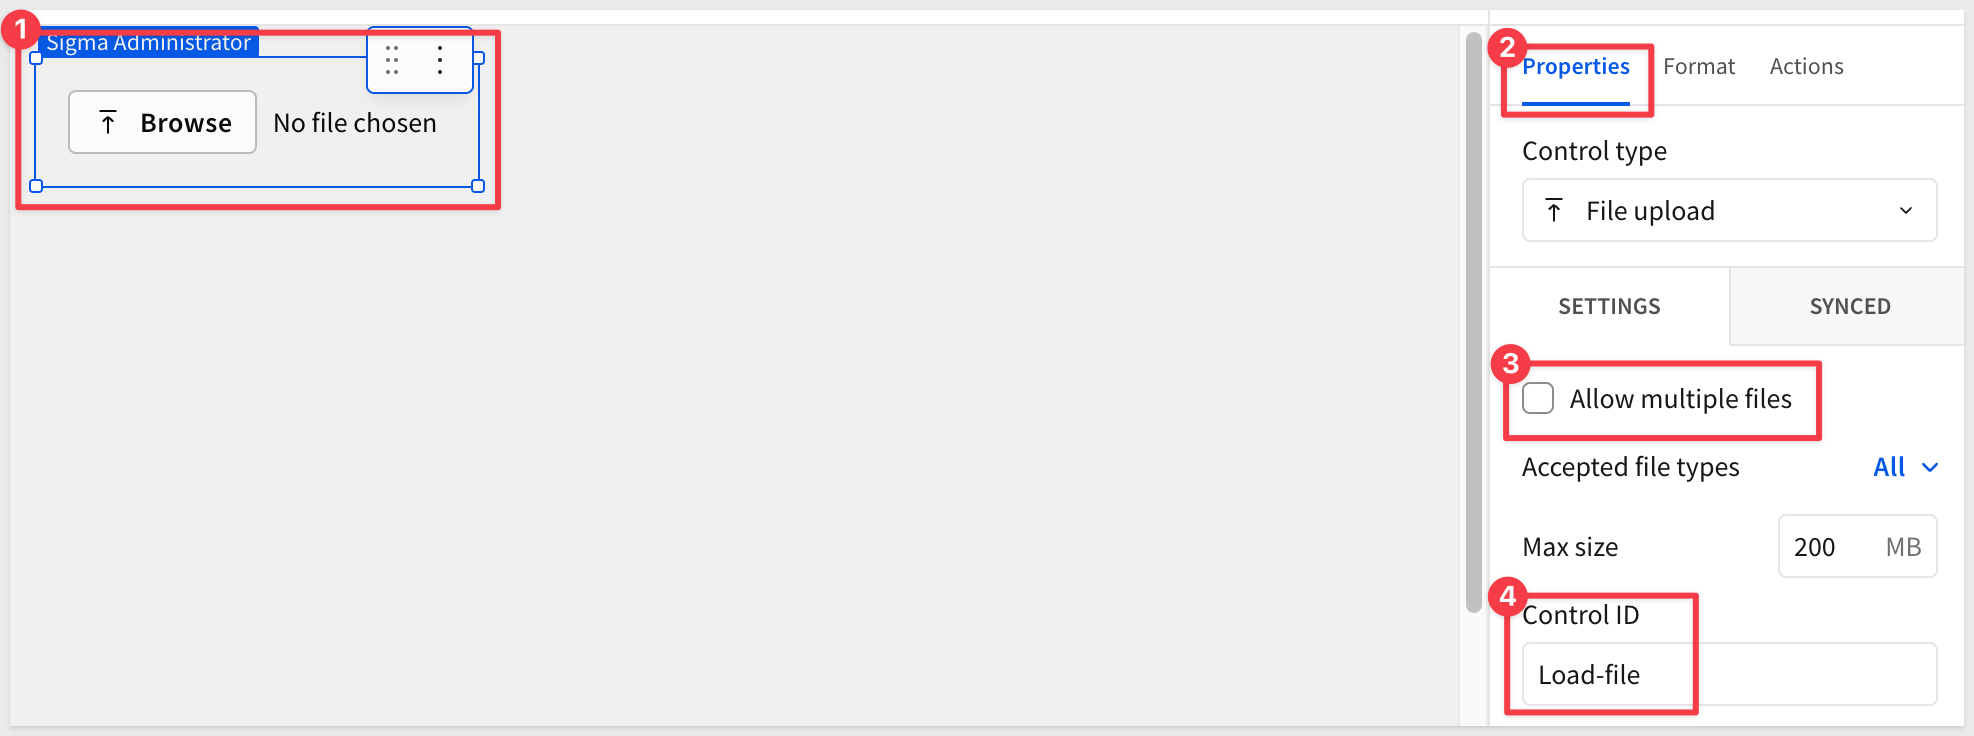
From the element bar at the bottom of the page, click Controls and select File upload.
Configure the file upload control:
- Change
Control IDin the properties panel toLoad-file - Deselect
Allow multiple files - Click the
Formattab and disableShow label
Add Input Table for Files
Add a new workbook page and rename it Admin.
From the element bar, click Input > Empty and select your Snowflake connection.
Configure the input table columns:
- Double-click the existing
Textcolumn header and rename it toName - Click the
+next to this column and add columns with these names and types:FileID(Text)Type(Text)AI Summary(Text)AI Detailed Description(Text)
- Click the
+next to the last column and selectFileas the column type (leave the column name asFile) - Drag the
Filecolumn to the first position (before all other columns)
Your column order should be: File, Name, FileID, Type, AI Summary, AI Detailed Description
Rename the table to My files by double-clicking the table name.
Delete the pre-populated rows:
- Highlight rows 1-3, right-click and select
Delete 3 rows:
Add Row ID Column
Add a Row ID column to uniquely identify each row in the My files table.
Click the + next to the last column, choose the Sigma provided Row ID column type.
Rename the column to RowID
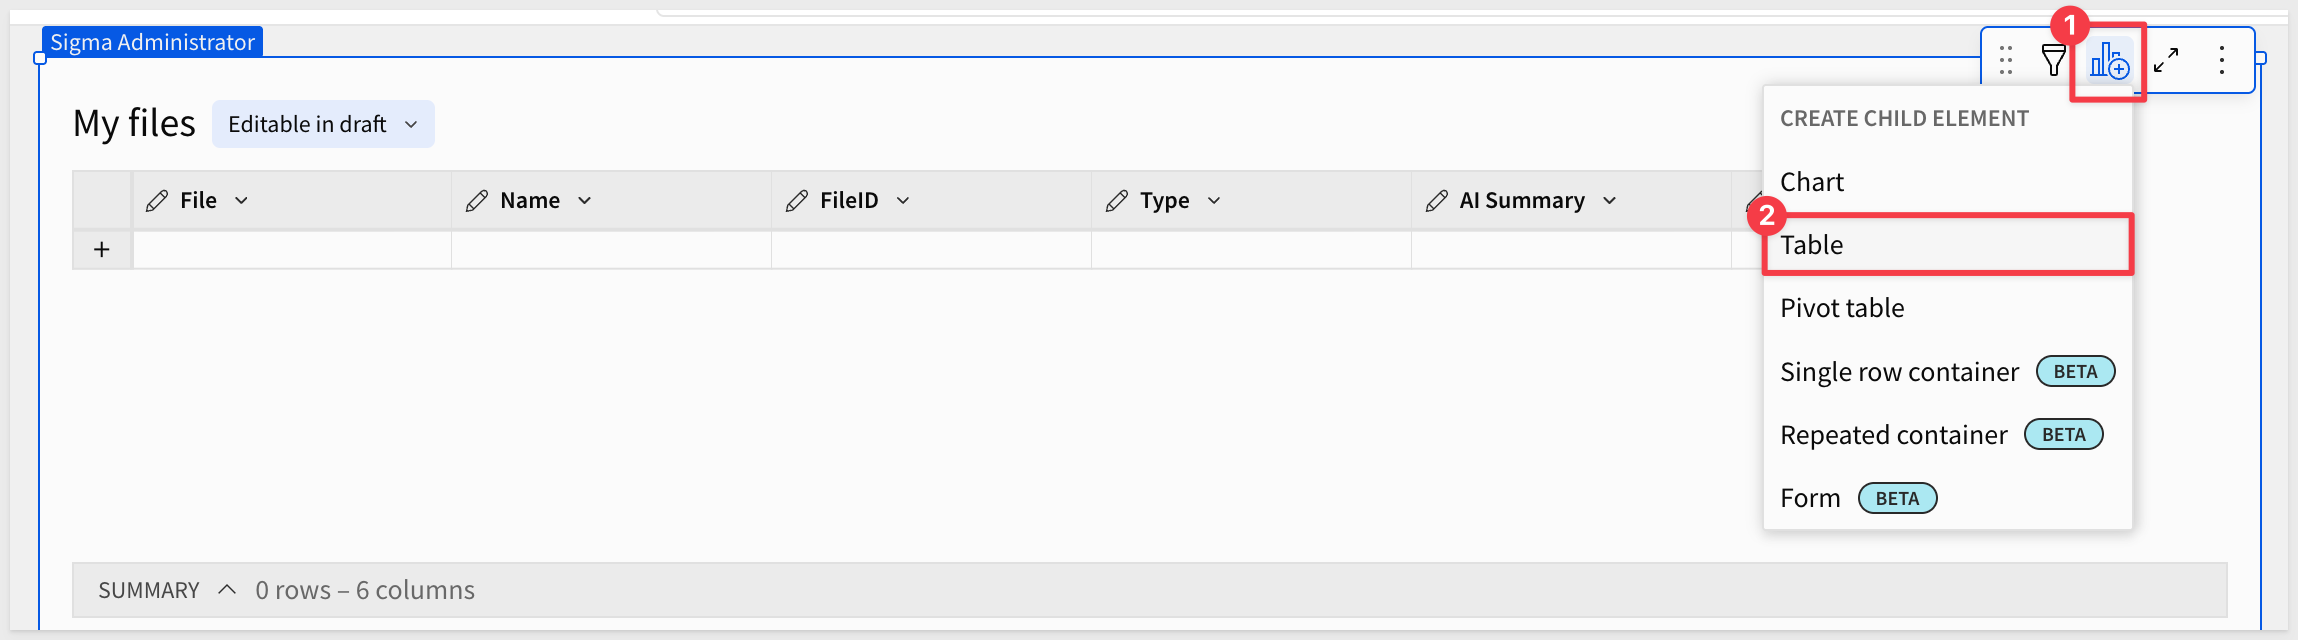
Create Child Table on Main Page
Now create a child table that will be displayed to users on the Main page.
In the upper right corner of the My files table, click Create Child Element > Table.
Click the 3-dot menu on this new child table and select Move to > Main.
Rename the child table to Your files with insight.
This child table will display all the same data as the parent table on the Admin page, but users will interact with it on the Main page.
Create Admin Page Controls
Now add the control variables that will be used in formulas throughout the application.
Navigate to the Admin page.
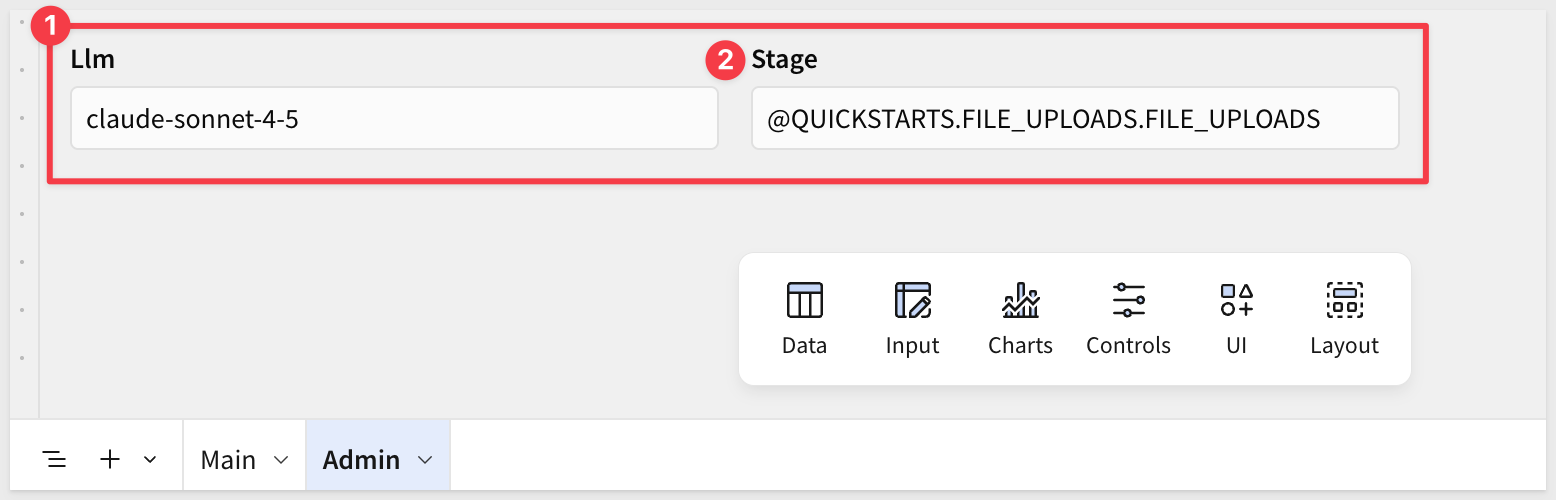
Add two text input controls and configure them:
From the element bar, click Controls > Text input.
Configure the first control:
- Change
Control IDtoLlm - Enter value:
claude-sonnet-4-5
Add one more text input control to the Admin page:
- Add another text input control
- Change
Control IDtoStage - Enter value:
@QUICKSTARTS.FILE_UPLOADS.FILE_UPLOADS
- Change
Add Delete Button Column
On the Main page, in the Your files with insight child table, click the + next to the last column to add a new column.
Configure the delete column:
- Rename the column to
Deleteby double-clicking the column header - In the formula bar, enter:
copy-code
"https://cdn-icons-png.flaticon.com/128/6861/6861362.png"
3. Transform the column type toset image: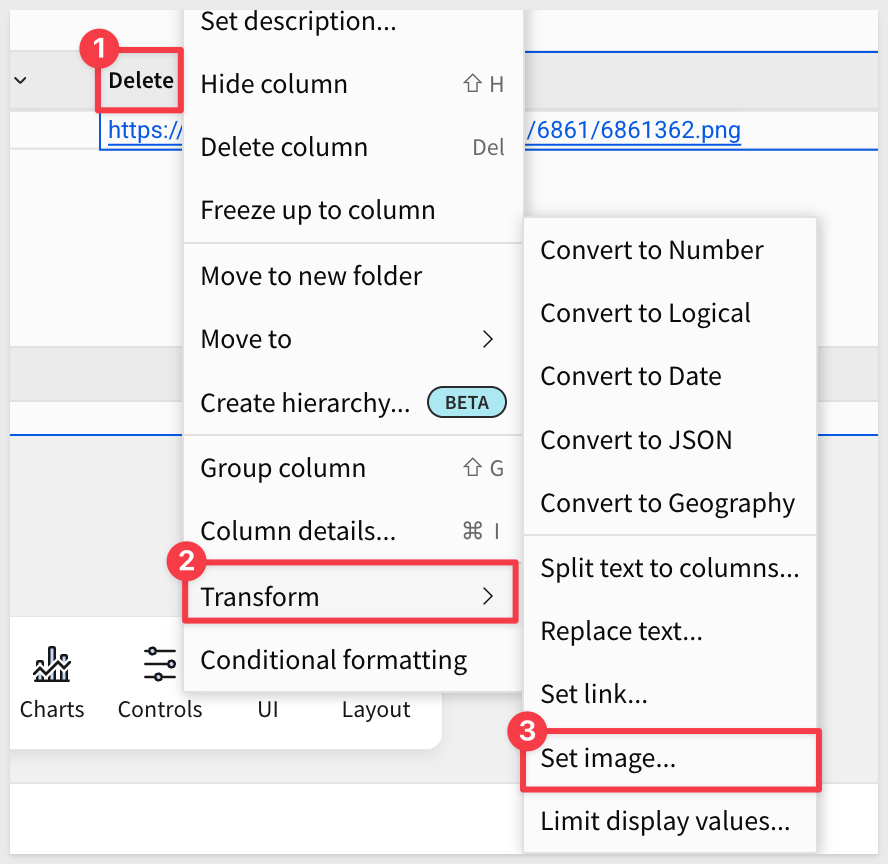 Set the image size to
 25 x 48and enablePreserve aspect ratio: We can test that the trash icon appears by hitting
 Enteron theAdmin>My filesinput table. 4. With theDeletecolumn selected. click the Actions tab in the properties panel 5. ClickAdd actionand selectDelete row(s)6. Configure the action: - In:Your files with insight (Main)- Delete row(s) by:Single row- Column: SelectRowID- ID: SelectRowID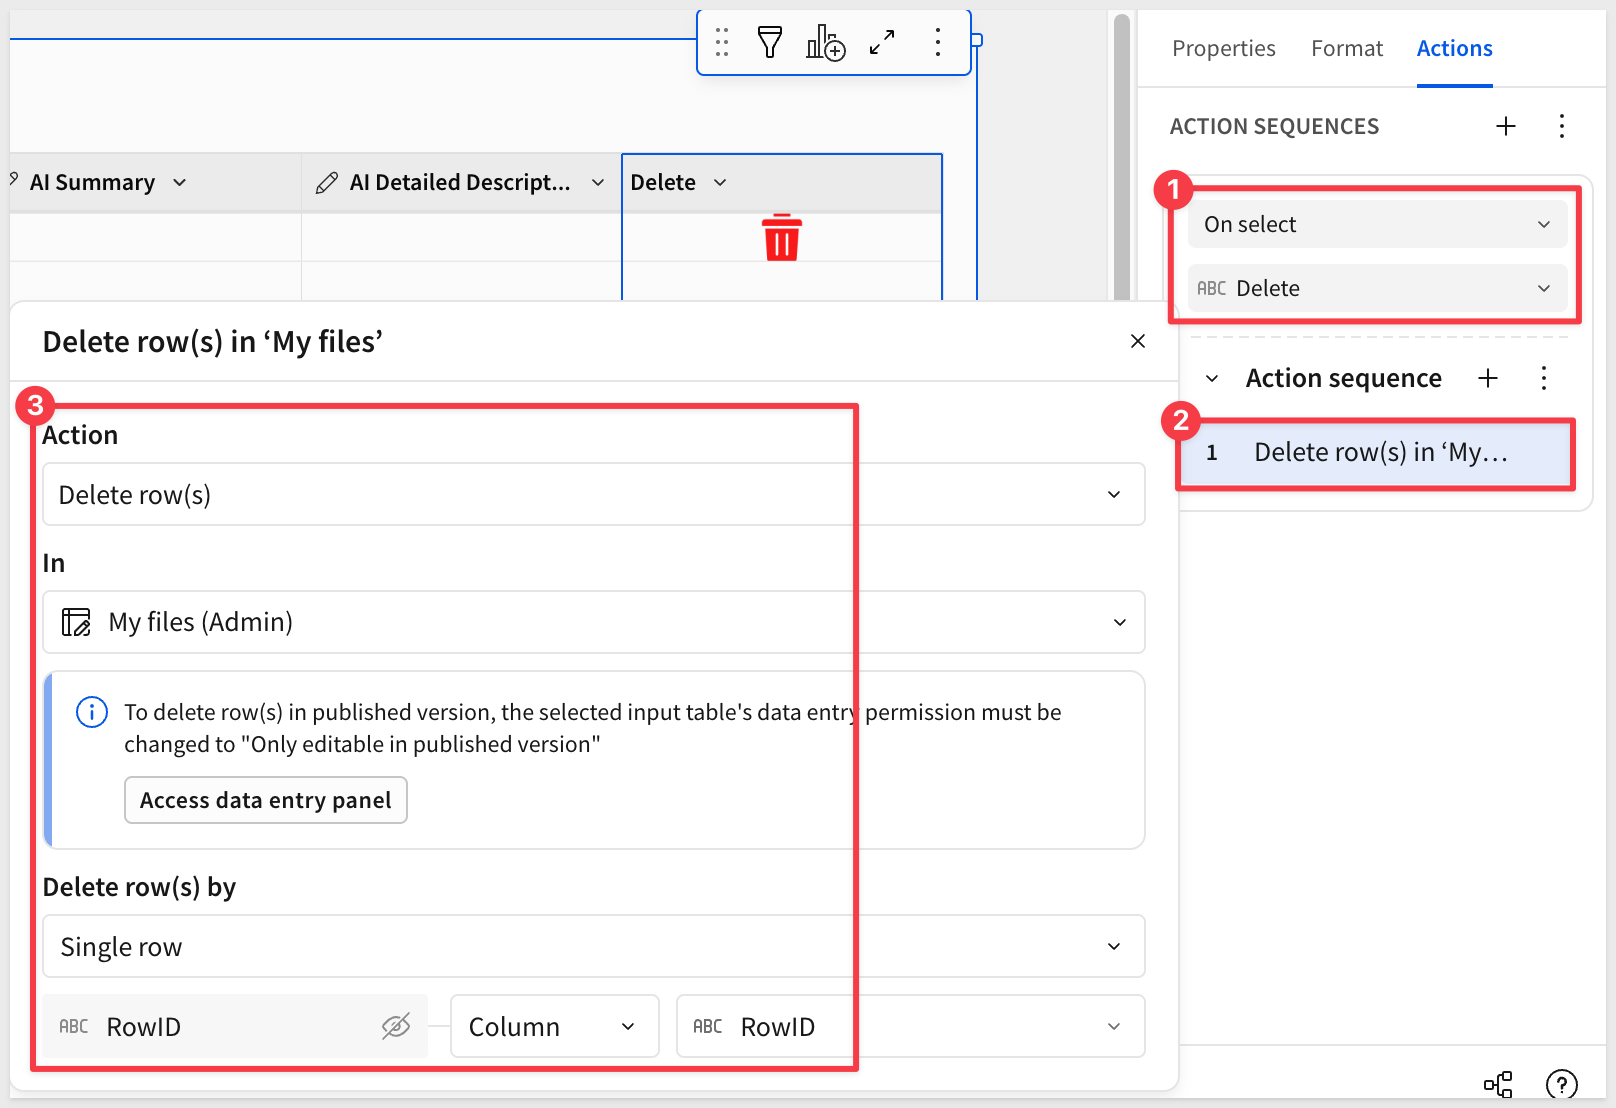 Add one more action to
 RefreshtheYour files with insight (Main)table after the row is deleted. The trash icon will now act as a clickable delete button for each row. Hide theRowIDcolumn. ### Add Calculated Columns for Preview and Results 1. Add Preview Column In theYour files with insighttable click the+button after theFilecolumn and selectAdd a new column. Rename the column toPreview. Enter this formula:copy-code
If(IsNull([FileID]), "https://cdn.pixabay.com/photo/2017/03/08/21/19/file-2127825_640.png", SplitPart([Type], "/", 1) = "image", CallText("get_presigned_url", [Stage], [FileID]), SplitPart([Type], "/", 2) = "plain", "https://cdn.pixabay.com/photo/2017/03/08/21/19/file-2127825_640.png", SplitPart([Type], ".", -1) = "document", "https://cdn.pixabay.com/photo/2017/03/08/21/19/file-2127825_640.png", SplitPart([Type], "/", 2) = "pdf", "https://static.vecteezy.com/system/resources/thumbnails/023/234/824/small/pdf-icon-red-and-white-color-for-free-png.png", SplitPart([Type], ".", -1) = "presentation", "https://cdn-icons-png.flaticon.com/512/9034/9034417.png", SplitPart([Type], "/", 1) = "audio", "https://image.similarpng.com/file/similarpng/original-picture/2021/07/Sound-wave-pattern.-Equalizer-graf-design.png", SplitPart([Type], "/", 1) = "video", "https://image.similarpng.com/file/similarpng/original-picture/2021/07/Sound-wave-pattern.-Equalizer-graf-design.png", "https://cdn.pixabay.com/photo/2017/03/08/21/19/file-2127825_640.png")
Transform the column to set image.
2. Add AI Results Column
Click the + button after the Type column and select Add a new column > Calculation.
Rename the column to AI Results.
Enter this formula:
[AI Detailed Description]
Add Visual Separation
From the element bar, click UI > Divider.
Drag this divider between your file uploader and table.
Select all three objects (file uploader, divider, and table) by dragging a selection box around them.
Click Create container to group them together.
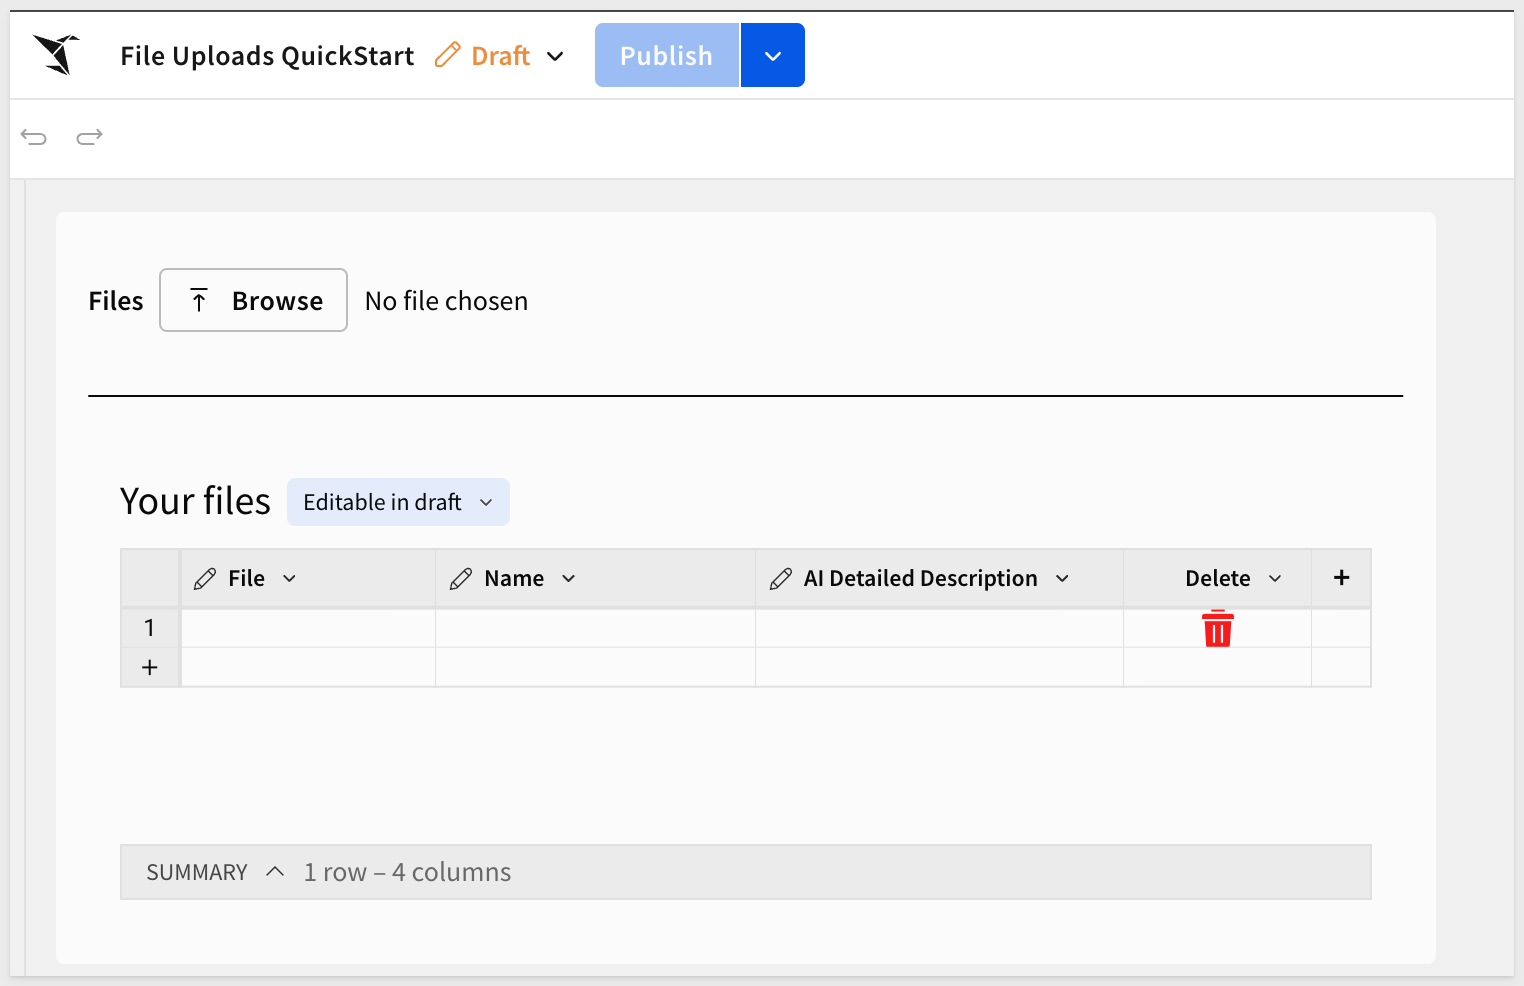
Your workbook should now show a clean file upload interface with a table to display results.
Click Save as and name the workbook File Uploads QuickStart:
Next we will configure actions that automatically process files when they're uploaded, using different AI functions based on file type.
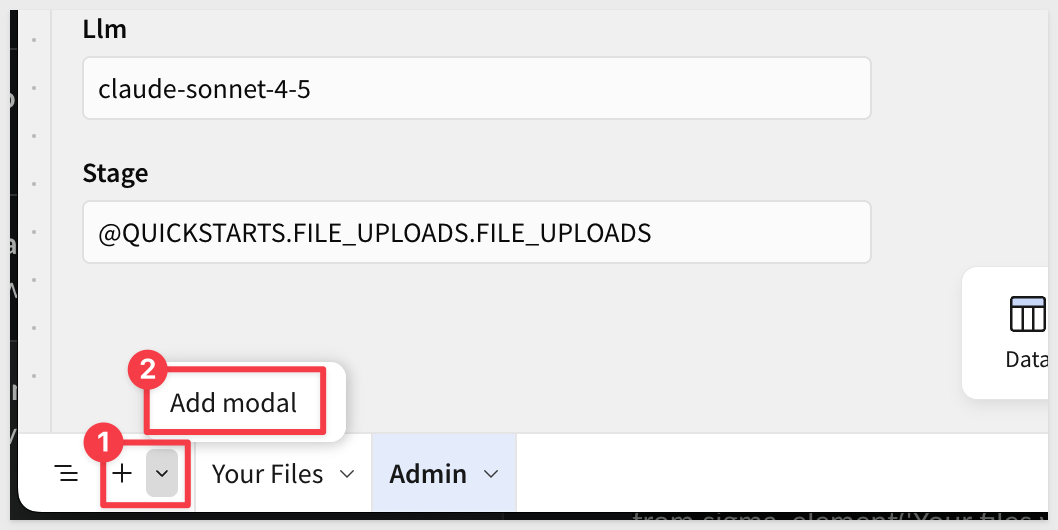
Create Processing Modal
Click + in the lower left corner and select Add modal:
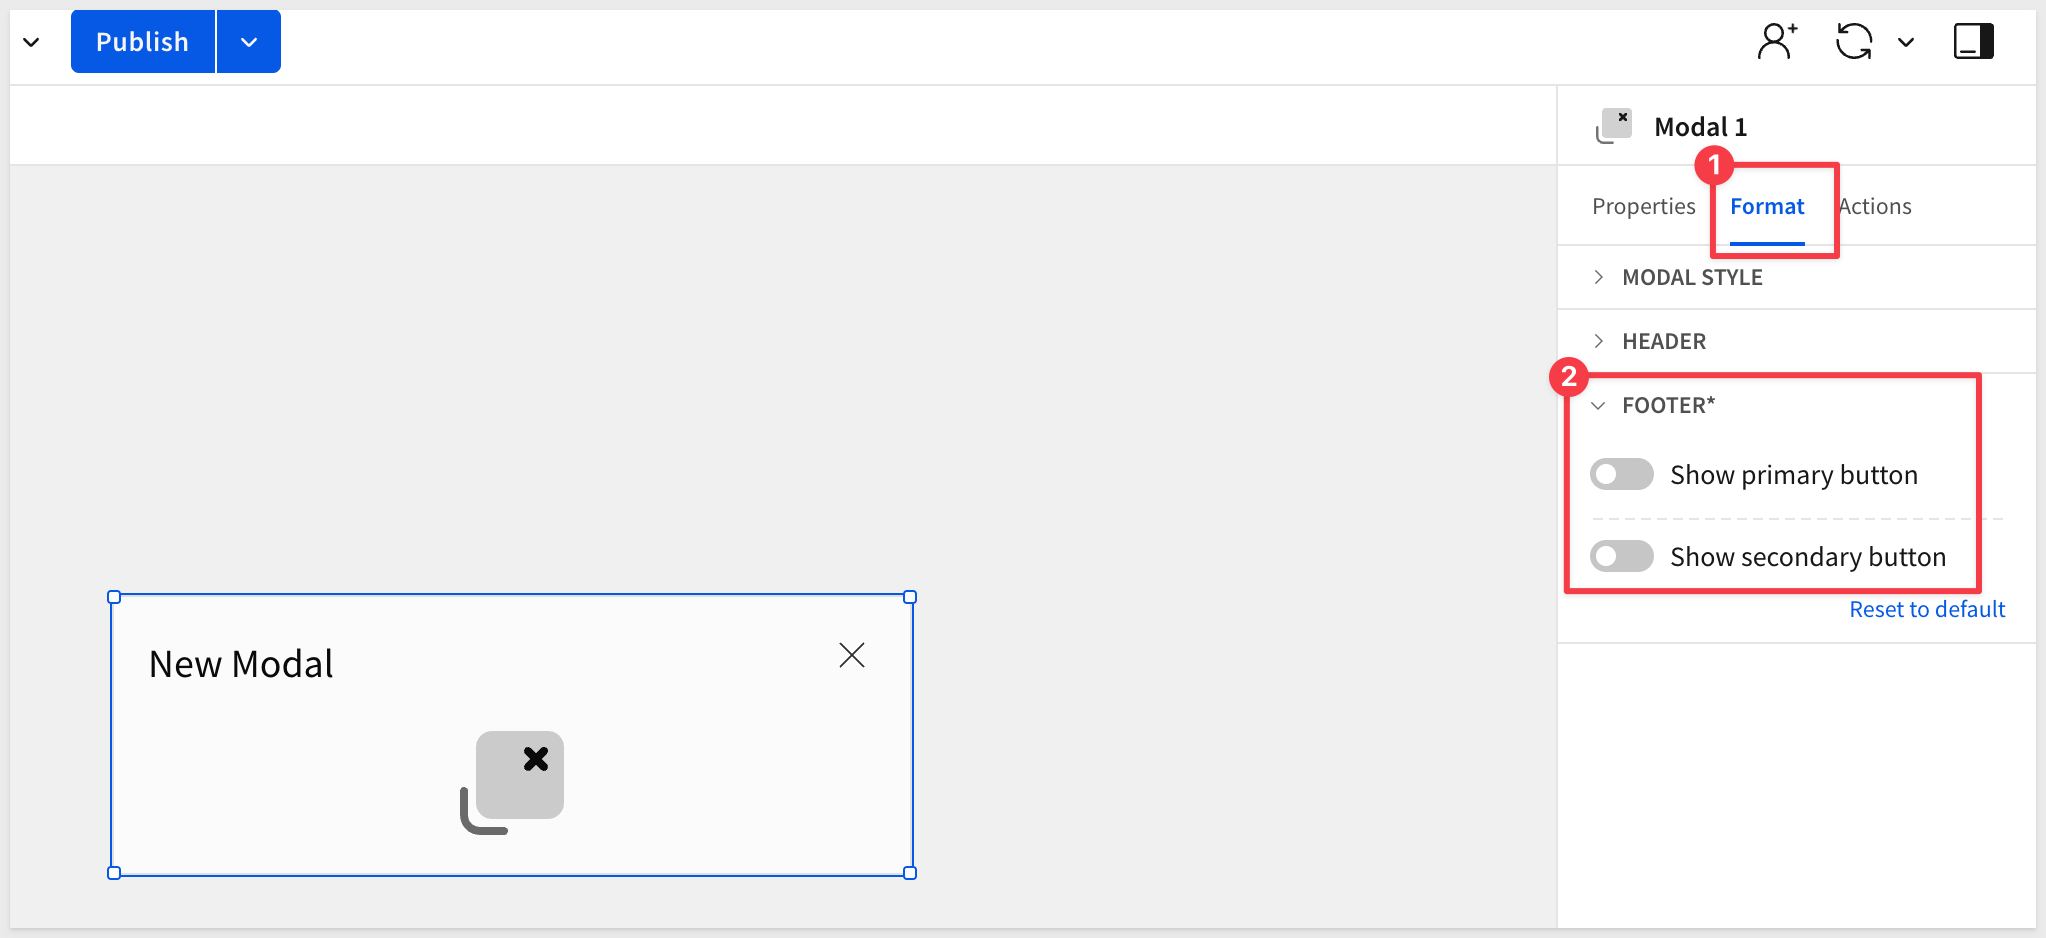
Click the Format tab in the properties panel:
- In the
Footersection, deselect both button options
Minimize the modal height:
Change the header text to Please wait...
Select UI from the bottom toolbar and click Image object.
Any image will do, but we used an animated gif:
Add Action Sequence 1: Process Images
Return to the Main page and select the Load file upload control (with the Browse button).
Click Actions in the right-hand properties panel.
Click the 3-dot menu next to Action sequence and select Add condition.
In the box under Custom formula, enter:
SplitPart(Text(Json(Text([Load-file])).type), "/", 1) = "image"
This condition checks if the uploaded file is an image.
Now add the 5-step action sequence by clicking the + button repeatedly:
Action 1: Select Open modal and choose the Modal Wait modal you created.
Action 2: Select Insert row
- Into:
My files (Admin) - Configure the column mappings for all columns:
- File: Control →
Load file (Main) - Name: Formula →
Text(Json(Text([Load-file])).name) - FileID: Formula →
Text(Json(Text([Load-file])).id) - Type: Formula →
Text(Json(Text([Load-file])).type) - AI Summary: Formula →
Text(CallVariant("ai_complete", [Llm], "give a brief 2-3 sentence summary of the following: ", CallText("to_file", [Stage], Text(Json(Text([Load-file])).id)))) - AI Detailed Description: Formula →
Text(CallVariant("ai_complete", [Llm], "give a detailed description of the following: ", CallText("to_file", [Stage], Text(Json(Text([Load-file])).id))))
- File: Control →
Action 3: Select Clear control
- Apply to:
Specific control - Control:
Load file (Main)
Action 4: Select Refresh element
- Element:
Your files with insight (Main)
Action 5: Select Close modal
Add Action Sequence 2: Process Audio/Video (Optional)
Click the 3-dot menu next to the first action sequence you just created and select Duplicate.
Change the condition formula to:
In(SplitPart(Text(Json(Text([Load-file])).type), "/", 1), "audio", "video")
In Action 2 (Insert row), update the AI formulas to use transcription:
- AI Summary: Formula →
Text(CallVariant("ai_complete", [Llm], Concat("give a brief 2-3 sentence summary of the following: ", CallText("to_varchar", CallText("ai_transcribe", CallText("to_file", [Stage], Text(Json(Text([Load-file])).id))))))) - AI Detailed Description: Formula →
Text(CallVariant("ai_complete", [Llm], Concat("give a detailed description of the following: ", CallText("to_varchar", CallText("ai_transcribe", CallText("to_file", [Stage], Text(Json(Text([Load-file])).id)))))))
This uses AI_TRANSCRIBE to convert audio/video to text before analyzing.
Leave all other column mappings and actions in the sequence unchanged.
Add Action Sequence 3: Process Documents (Optional)
Click the 3-dot menu next to the action sequence and select Duplicate again.
Change the condition formula to:
Not(In(SplitPart(Text(Json(Text([Load-file])).type), "/", 1), "image", "audio", "video"))
This catches all other file types (PDFs, Office docs, etc.).
In Action 2 (Insert row), update the AI formulas to use document parsing:
- AI Summary: Formula →
Text(CallVariant("ai_complete", [Llm], Concat("give a brief 2-3 sentence summary of the following: ", CallText("get", CallText("ai_parse_document", CallText("to_file", [Stage], Text(Json(Text([Load-file])).id))), "content")))) - AI Detailed Description: Formula →
Text(CallVariant("ai_complete", [Llm], Concat("give a detailed description of the following: ", CallText("get", CallText("ai_parse_document", CallText("to_file", [Stage], Text(Json(Text([Load-file])).id))), "content"))))
This uses AI_PARSE_DOCUMENT to extract text from documents before analyzing.
Leave all other column mappings and actions in the sequence unchanged.
Now you'll add the ability to ask questions across all uploaded files simultaneously.
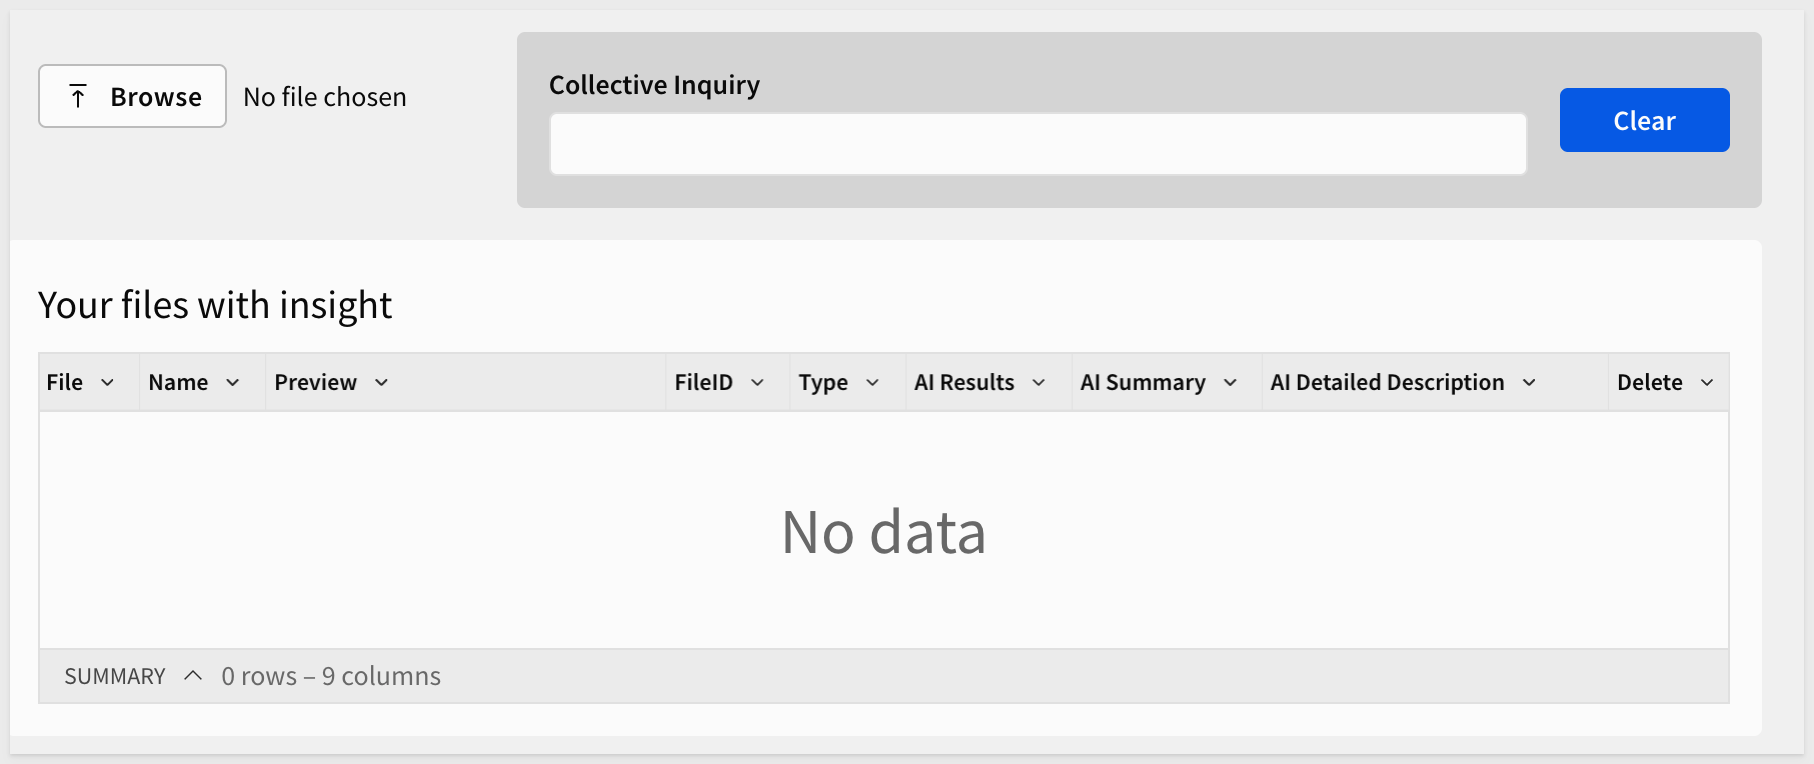
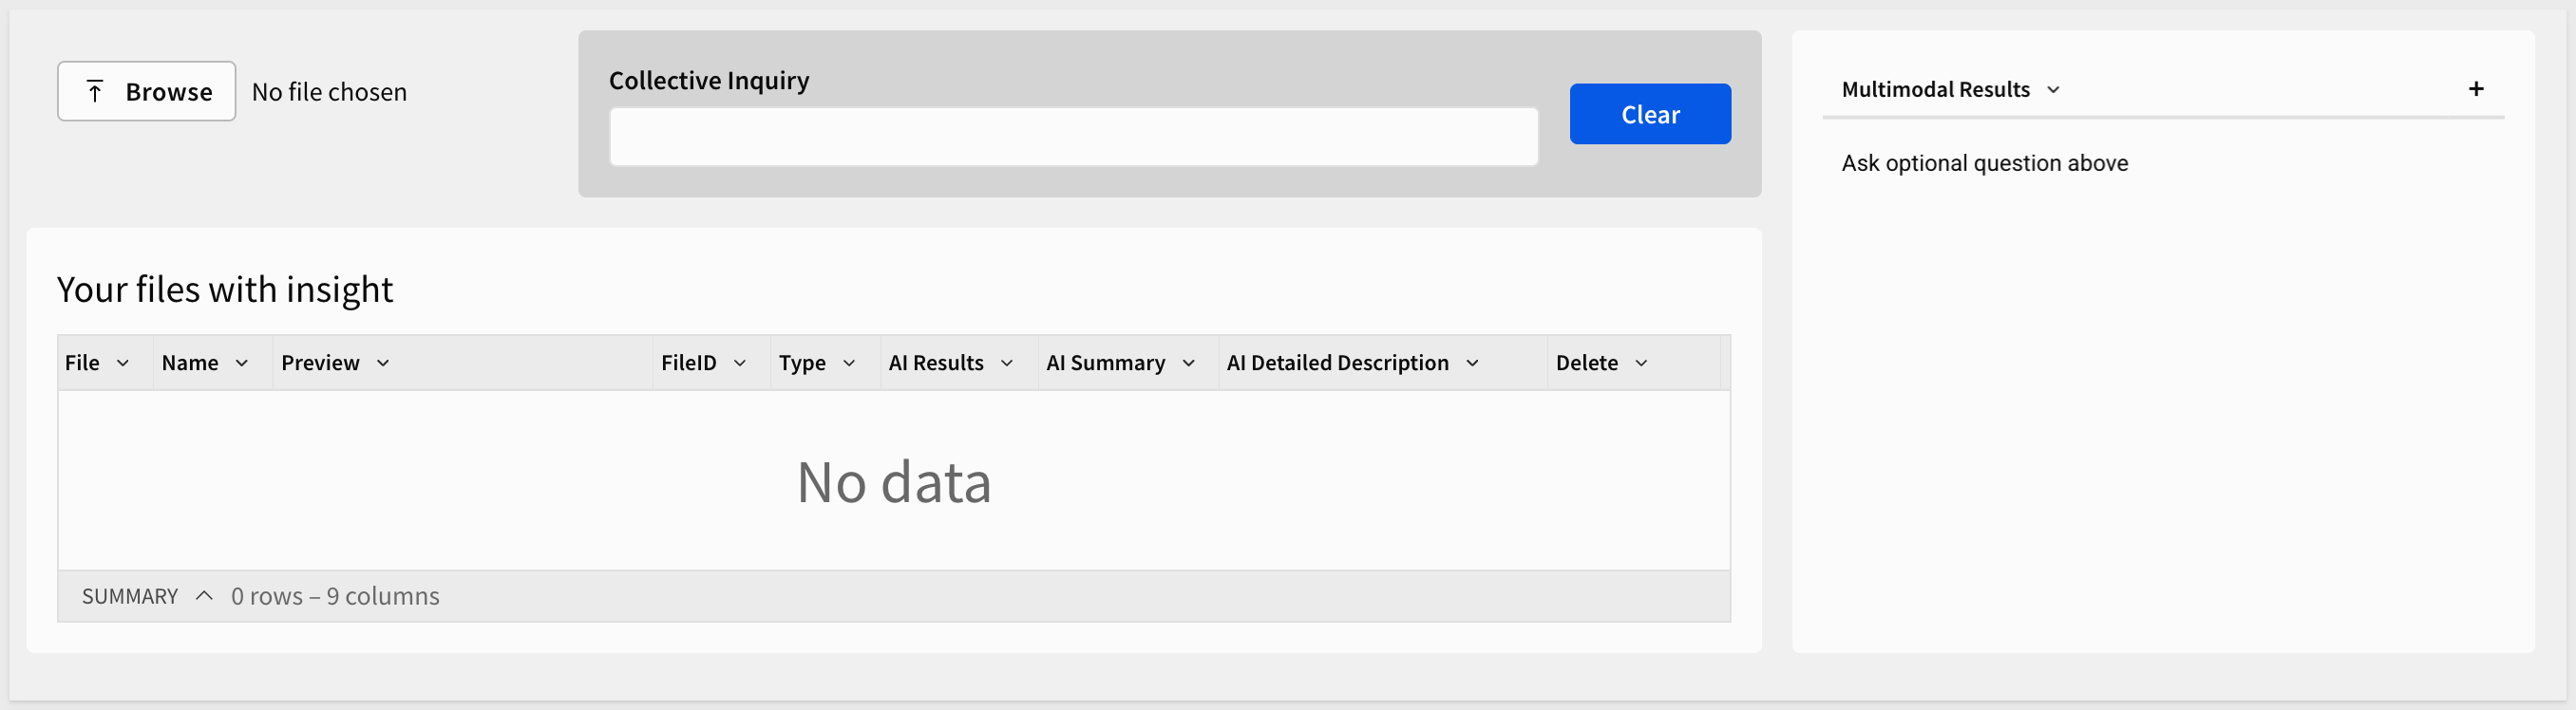
Create Inquiry Interface
From the element bar, click Controls > Text input.
Change Control ID to CollectiveInquiry.
Drag it to the right side of your existing container.
From the element bar, click UI > Button.
Change the button Text to Clear.
Drag it to the right of the CollectiveInquiry text input.
Select both new objects (text input and button) and click Create container:
Create Multi-Modal Custom SQL
Now you'll create a SQL table that allows users to ask questions across ALL uploaded files simultaneously. This is the "multi-modal inquiry" feature.
How it works:
- Aggregates all file data: Uses
listagg()to combine all file names and AI descriptions into a single text string - Checks for user question: Uses the
{{CollectiveInquiry}}control parameter - if the user typed a question, it proceeds; if empty, shows "Ask optional question above" - Passes to AI: Sends the user's question + all aggregated file data to
ai_complete()for analysis - Returns comprehensive answer: AI analyzes all files together and answers the question based on the combined context
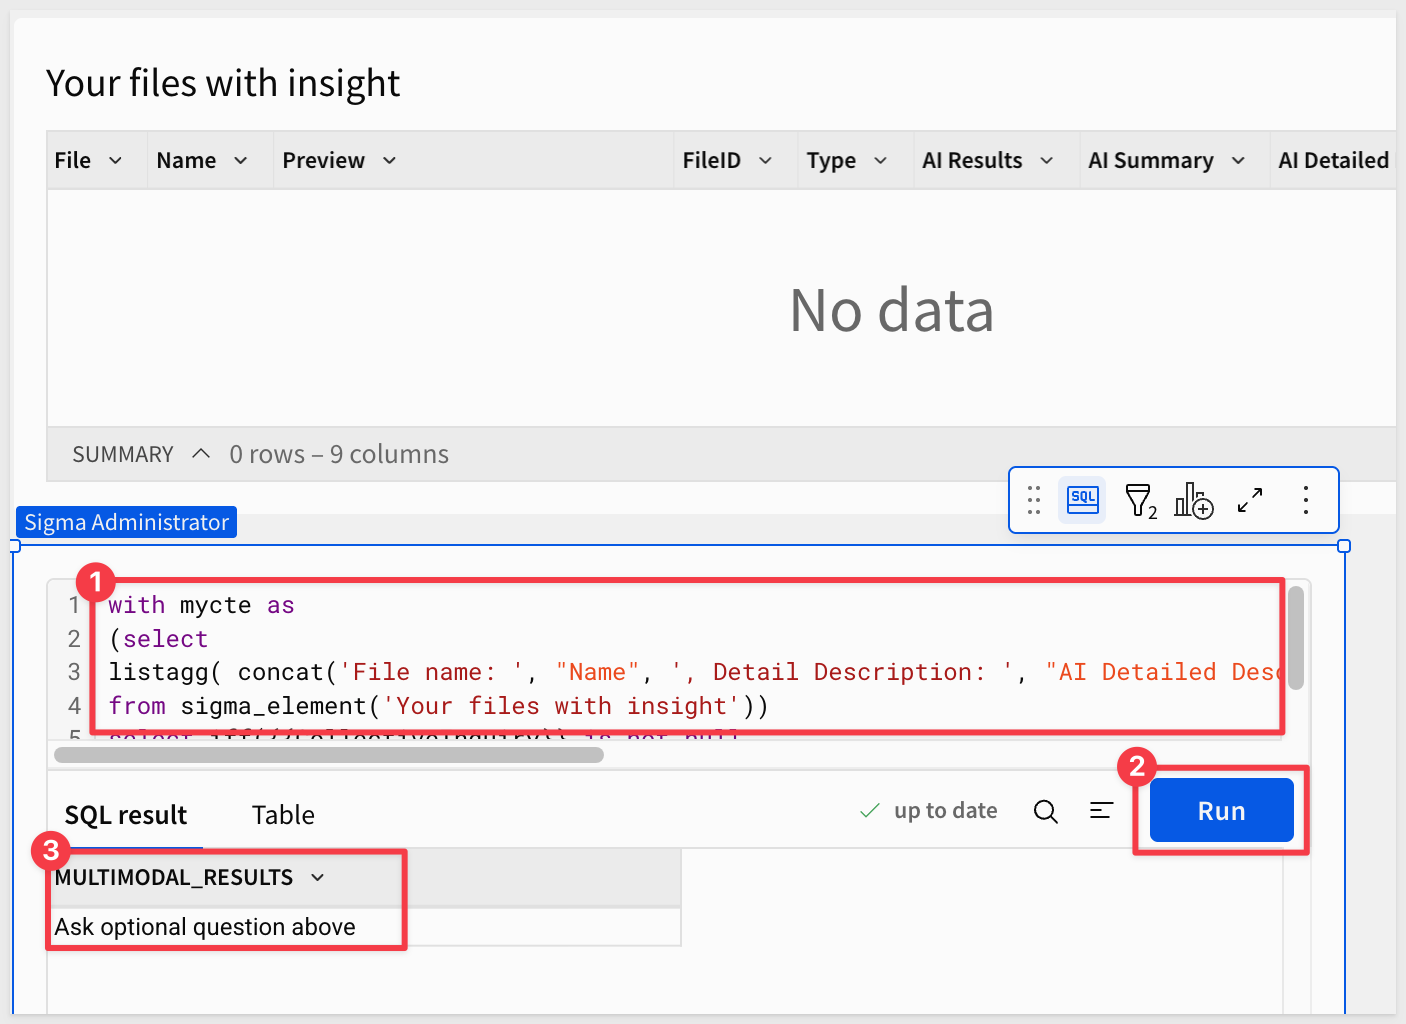
Click Data from the element bar, then select Table > SQL.
Select your Snowflake connection.
Click SQL and paste in the following:
with mycte as
(select
listagg( concat('File name: ', "Name", ', Detail Description: ', "AI Detailed Description", ' ; \n' )) all_results
from sigma_element('Your files with insight'))
select iff({{CollectiveInquiry}} is not null,
ai_complete({{LLM}}, concat('Answer the following inquiry', {{CollectiveInquiry}}, ' from the following: ', all_results)), 'Ask optional question above') multimodal_results from mycte
Click Run to execute the query.
In the element panel, click the Format tab and turn off both the Title and Show summary bar.
Change the table to Presentation mode.
Drag the table to position it next to the Your files table:
Configure Clear Button Action
Select the Clear button.
Click Actions in the properties panel.
Click the + button to add an action:
Action: Select Clear control and choose CollectiveInquiry.
Now you're ready to test your multi-modal file processing application.
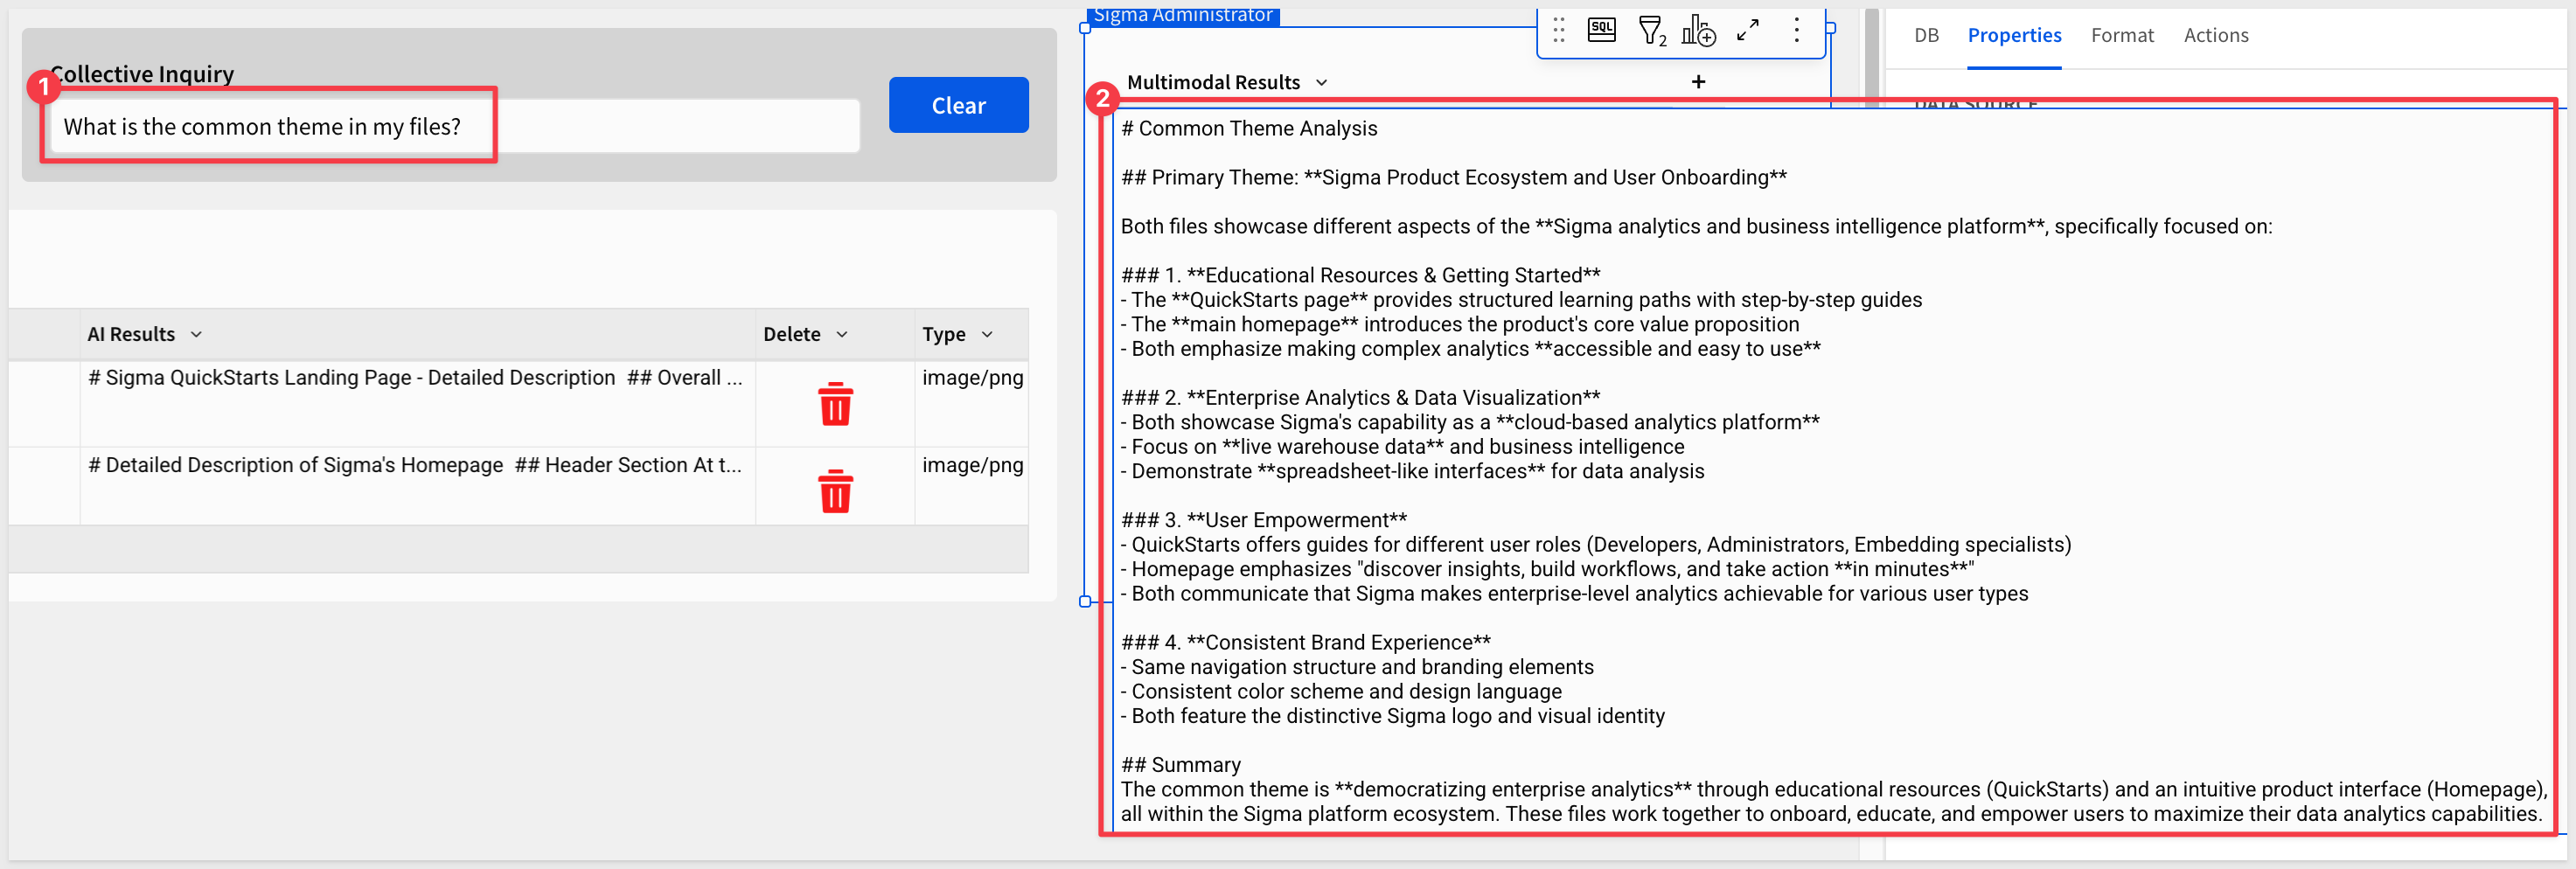
Test Basic File Upload
To make the example really simple, we created two screenshots, one of Sigma's homepage and another of the QuickStarts homepage. We will upload them both and then ask the AI to compare them, just to see what happens.
Upload any test image by clicking the Browse button in the Load file control.
The application will:
- Show the "Processing..." modal while the files are uploaded and the AI evaluates the content
- Automatically generate an AI Detailed Description and AI Summary
- Display the file and descriptions in the
Your files with insighttable
Test Multi-Modal Inquiry
After uploading multiple files:
- Type a question in the
CollectiveInquiryfield and pressEnter.
Examples questions:
- "What is the common theme in my files?"
- "Compare and contrast my files"
- "Summarize the key information across all documents"
- The multimodal results table will automatically update with the AI-generated response
The AI will analyze all uploaded files collectively and provide an integrated answer based on their combined content. Use the Clear button to reset the inquiry field when needed:
Expected Results
You should now have a working multi-modal AI application that:
- Processes images (and documents, and audio/video files if you configured those) automatically
- Generates intelligent descriptions of file content
- Answers natural language questions across multiple files
- Provides a clean, user-friendly interface for unstructured data analysis
- Ready for final clean-up and other usability enhancements to suit
This section covers common issues you may encounter and how to resolve them.
Error: "Edits can only be made in draft mode"
Symptom: When uploading a file, you see: Error in Insert row into 'My files' - Edits can only be made in draft mode
Solution: Click the Edit button in the top-right of the workbook to enter draft/edit mode. Input table actions only work in draft mode during development. Once you publish the workbook with the table set to "Editable in published version", end users will be able to insert rows.
Error: "Warehouse error: query failed" during file upload
Symptom: Files upload to S3 but the Insert row action fails with a vague warehouse error.
Root Cause: Usually an AWS permissions or Snowflake grants issue.
Solution: Check these in order:
1. Verify Snowflake can access the stage
USE ROLE your_sigma_role;
LIST @QUICKSTARTS.FILE_UPLOADS.FILE_UPLOADS;
If this fails with an AWS assume role error, the IAM trust policy is incorrect.
2. Check IAM trust policy includes both Sigma AND Snowflake
In AWS Console > IAM > Roles > sigma-file-uploads-role > Trust relationships, verify BOTH:
- Sigma's IAM user ARN and External ID (from Sigma Admin page)
- Snowflake's IAM user ARN and External ID (from
DESC STORAGE INTEGRATION)
The trust policy should have arrays with both values:
"AWS": [
  "arn:aws:iam::XXXX:user/sigma-user",
  "arn:aws:iam::XXXX:user/snowflake-user"
],
"sts:ExternalId": [
  "sigma-external-id",
  "snowflake-external-id"
]
3. Verify Cortex permissions
SHOW GRANTS TO ROLE your_sigma_role;
Look for DATABASE ROLE SNOWFLAKE.CORTEX_USER. If missing:
USE ROLE ACCOUNTADMIN;
GRANT DATABASE ROLE SNOWFLAKE.CORTEX_USER TO ROLE your_sigma_role;
4. Verify stage permissions
SHOW GRANTS TO ROLE your_sigma_role;
Look for USAGE, READ, WRITE ON STAGE. If missing:
USE ROLE ACCOUNTADMIN;
GRANT USAGE, READ, WRITE ON STAGE QUICKSTARTS.FILE_UPLOADS.FILE_UPLOADS TO ROLE your_sigma_role;
5. Test the AI function directly in Snowflake
USE ROLE your_sigma_role;
SELECT SNOWFLAKE.CORTEX.AI_COMPLETE(
  'claude-3-7-sonnet',
  'Say hello'
) AS result;
If this fails, check cross-region inference is enabled:
USE ROLE ACCOUNTADMIN;
ALTER ACCOUNT SET CORTEX_ENABLED_CROSS_REGION = 'AWS_US';
Error: "Error assuming AWS_ROLE: User is not authorized to perform sts:AssumeRole"
Symptom: Snowflake cannot access the S3 stage.
Solution: The AWS IAM role trust policy doesn't trust Snowflake's IAM user. Follow the "Update IAM Trust Policy for Snowflake" section to add Snowflake's credentials to the trust policy.
Files upload to S3 but don't appear in the table
Symptom: You can see files in the S3 bucket, but the Insert row action doesn't add them to the Sigma table.
Solution:
- Make sure you're in Edit mode (not published/view mode)
- Check the browser console for JavaScript errors
- Verify all column mappings in the Insert row action (Action 2) are configured correctly
- Simplify the AI Detailed Description formula to a static value to isolate if the issue is with the AI processing
Admin page controls (Llm, Stage) are empty
Symptom: The Llm or Stage controls on the Admin page don't have values.
Solution: Navigate to the Admin page and manually enter:
- Llm:
claude-sonnet-4-5(or your preferred vision-capable model) - Stage:
@QUICKSTARTS.FILE_UPLOADS.FILE_UPLOADS(or your actual stage path)
Save the workbook after setting these values.
Understanding File Deletion Behavior
The Action column's delete button removes rows from the Sigma input table, but does not delete the actual files from S3.
Managing S3 Files
You have several options for managing files in your S3 bucket:
Option 1: Manual Cleanup
- Periodically review and delete old files through the AWS S3 Console
- Simple and gives you full control over what gets deleted
Option 2: S3 Lifecycle Policies (Recommended)
- Configure automatic deletion of files older than a certain age
- Example: Delete files older than 90 days automatically
- Set up in AWS S3 Console under
Management>Lifecycle rules
Option 3: Monitor and Alert
- Set up AWS CloudWatch alerts for bucket size
- Manually clean up when storage costs exceed thresholds
Example: S3 Lifecycle Policy
To automatically delete files older than 90 days:
- In AWS S3 Console, select your bucket
- Navigate to
Management>Lifecycle rules - Click
Create lifecycle rule - Configure:
- Rule name:
Delete old uploads - Prefix: (leave empty to apply to all files, or specify your Sigma prefix)
- Lifecycle rule actions: Select
Expire current versions of objects - Days after object creation:
90
- Rule name:
- Click
Create rule
Files will now be automatically deleted 90 days after upload, keeping your storage costs manageable.
In this QuickStart, you learned how to extend Sigma's file uploads feature with AI-powered processing capabilities:
- Configured external storage integration to persist files in your cloud storage
- Created Snowflake storage integration and stage to access uploaded files
- Built action sequences for automatic AI processing based on file type
- Developed a multi-modal AI application that handles images, documents, and audio/video
- Implemented conditional processing based on file type
- Enabled multi-modal inquiry to ask questions across multiple files using custom SQL
Advanced Use Cases
The techniques in this QuickStart enable many business applications:
Intelligent Document Processing
- Extract structured data from invoices and receipts
- Classify documents by type and content
- Automate form data extraction
Visual Content Analysis
- Analyze product images for quality control
- Classify visual content for organization
- Generate metadata for image libraries
Audio/Video Intelligence
- Transcribe meeting recordings and generate summaries
- Analyze customer service calls
- Extract action items from video conferences
Next Steps
Explore additional AI capabilities:
- Structured Extraction: Use AI_EXTRACT to pull specific fields from documents (vendor name, date, amount, etc.)
- Classification: Add automatic content classification using AI_COMPLETE
- Translation: Implement multi-language support using AI_TRANSLATE
- Batch Processing: Process multiple files in bulk with input tables
For more information, see:
Additional Resource Links
Blog
Community
Help Center
QuickStarts
Be sure to check out all the latest developments at Sigma's First Friday Feature page!