This workflow demonstrates how to streamline retail revenue adjustments by enabling collaboration between Adjusters and Approvers.
The example highlights a common use case: providing a price reduction on a line item to address a customer satisfaction issue.
Adjusters can propose changes to the revenue column, while Approvers review, reject or adjust them before finally approving an adjustment.
This interactive example showcases Sigma's ability to build workflows that are both flexible and intuitive, allowing users to efficiently manage and track revenue adjustments in real time.
Target Audience
Developers interested in using Sigma to build interactive data applications.
Prerequisites
- A computer with a current browser. It does not matter which browser you want to use.
- Access to your Sigma environment.
- Some familiarity with Sigma is assumed. Not all steps will be shown as the basics are assumed to be understood.
For more information on Sigma's product release strategy, see Sigma product releases.

Log into Sigma as Administrator and create a new workbook.
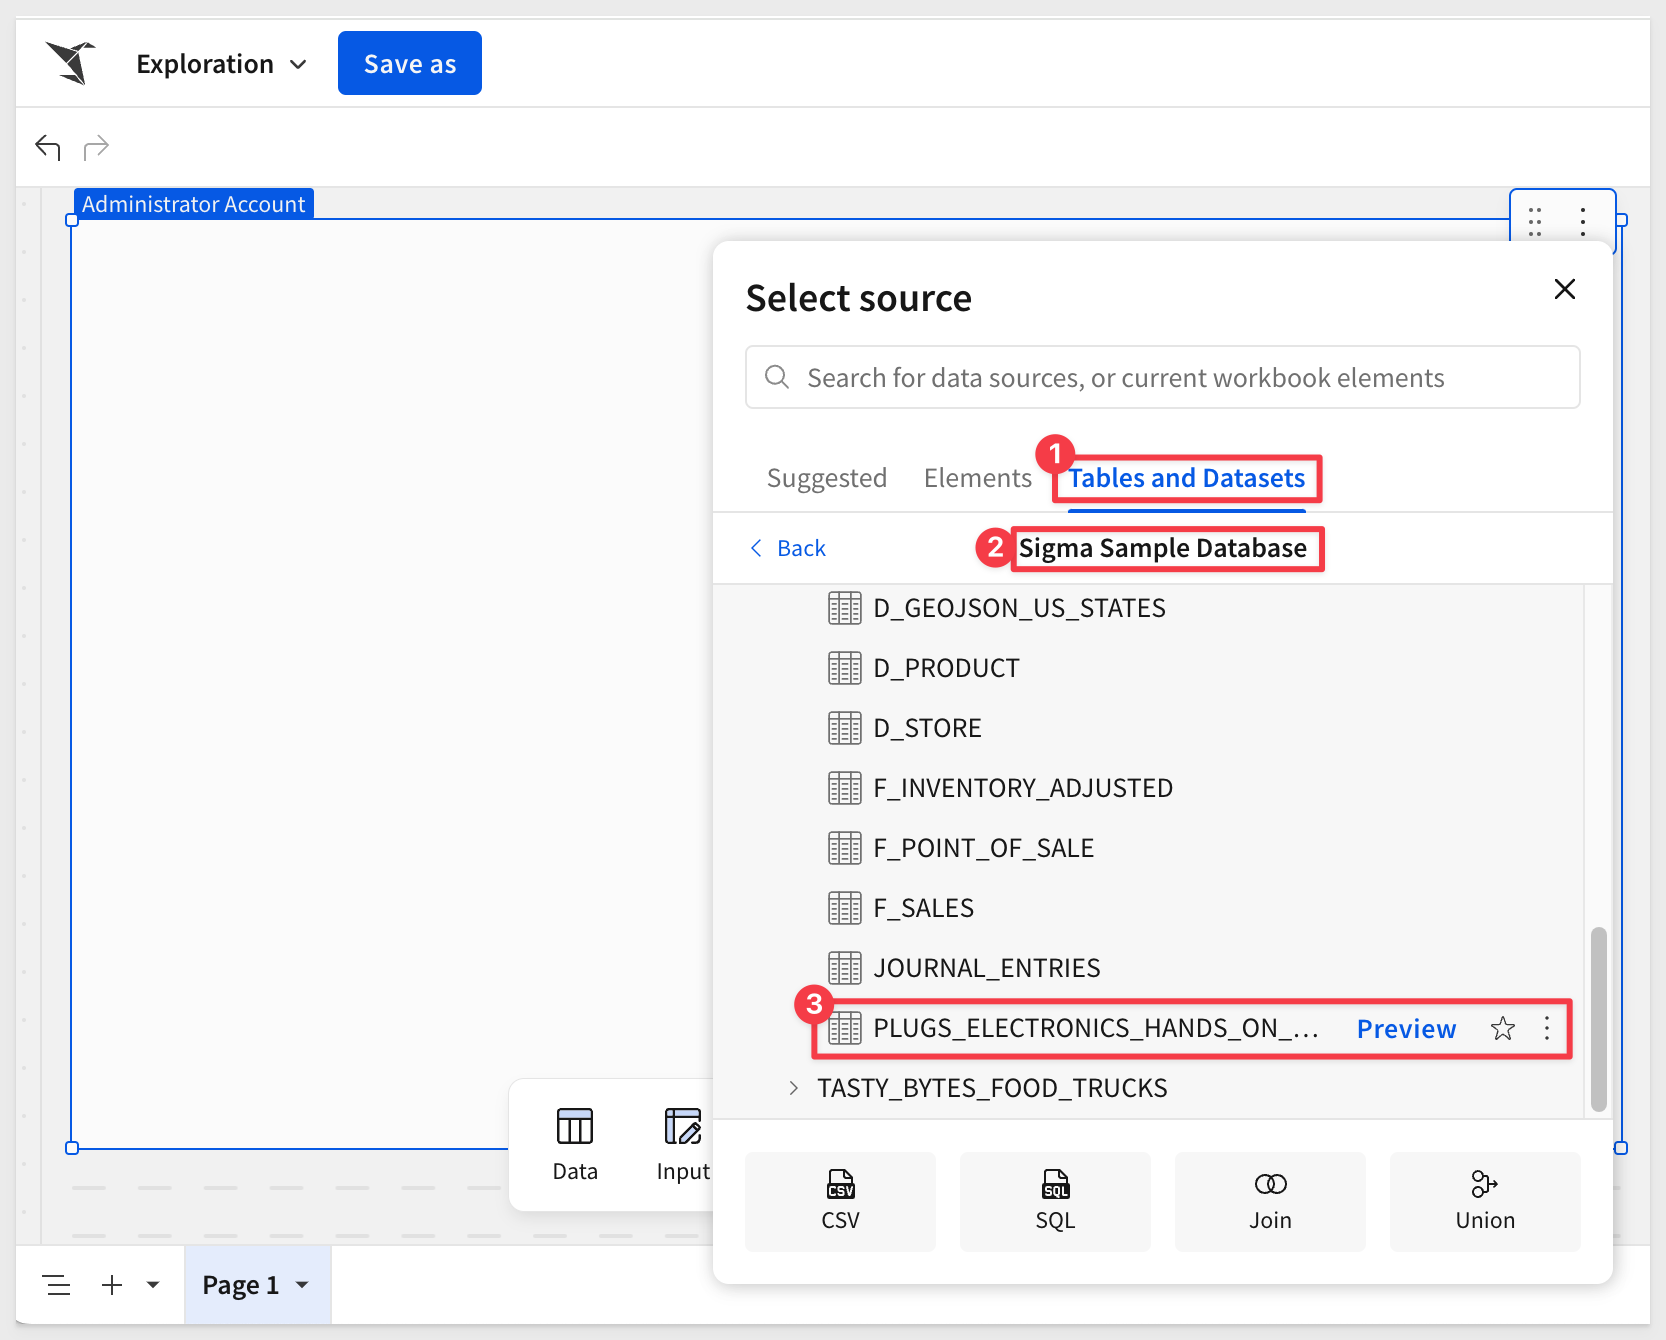
Add a new Data > Table to the page and set the source to Sigma Sample Database > RETAIL > PLUGS_ELECTRONICS > PLUGS_ELECTRONICS_HANDS_ON_LAB_DATA:
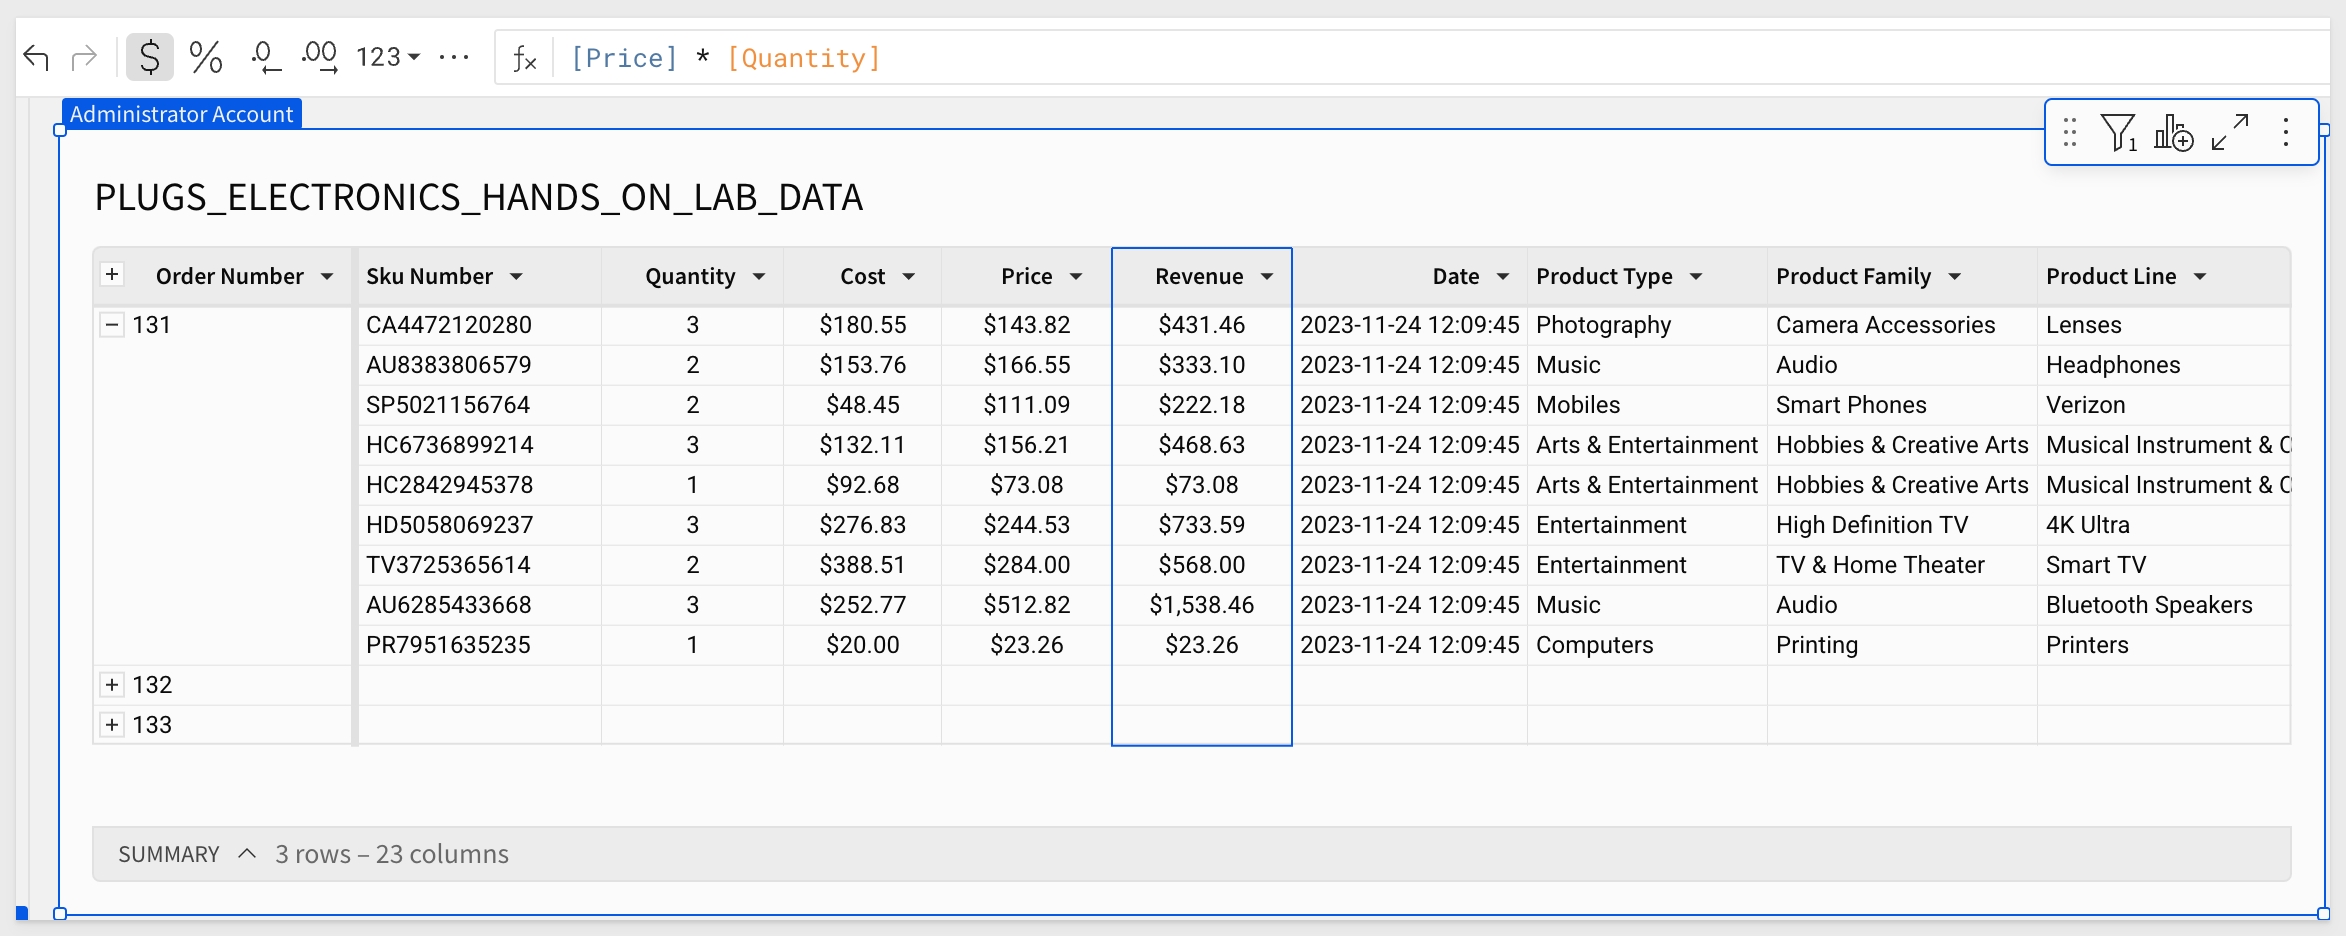
Add a new column, rename it to Revenue and set the formula to:
[Price] * [Quantity]
Let's cull the data down for this demonstration. We don't need 4.5 million rows to build our AI App, although Sigma handles it fine anyway. There is no reason to use more data than is required and efficiency matters.
Filter the table down to just Order Number and set the range to 131-133.
Group the data on Order Number:
Let's just assume these are the orders in the cloud data warehouse ("warehouse") that require review, modification and approval.
Since it is possible that each order can have multiple items (SKUs), we need to add a column to ensure that we can easily identify any row uniquely.
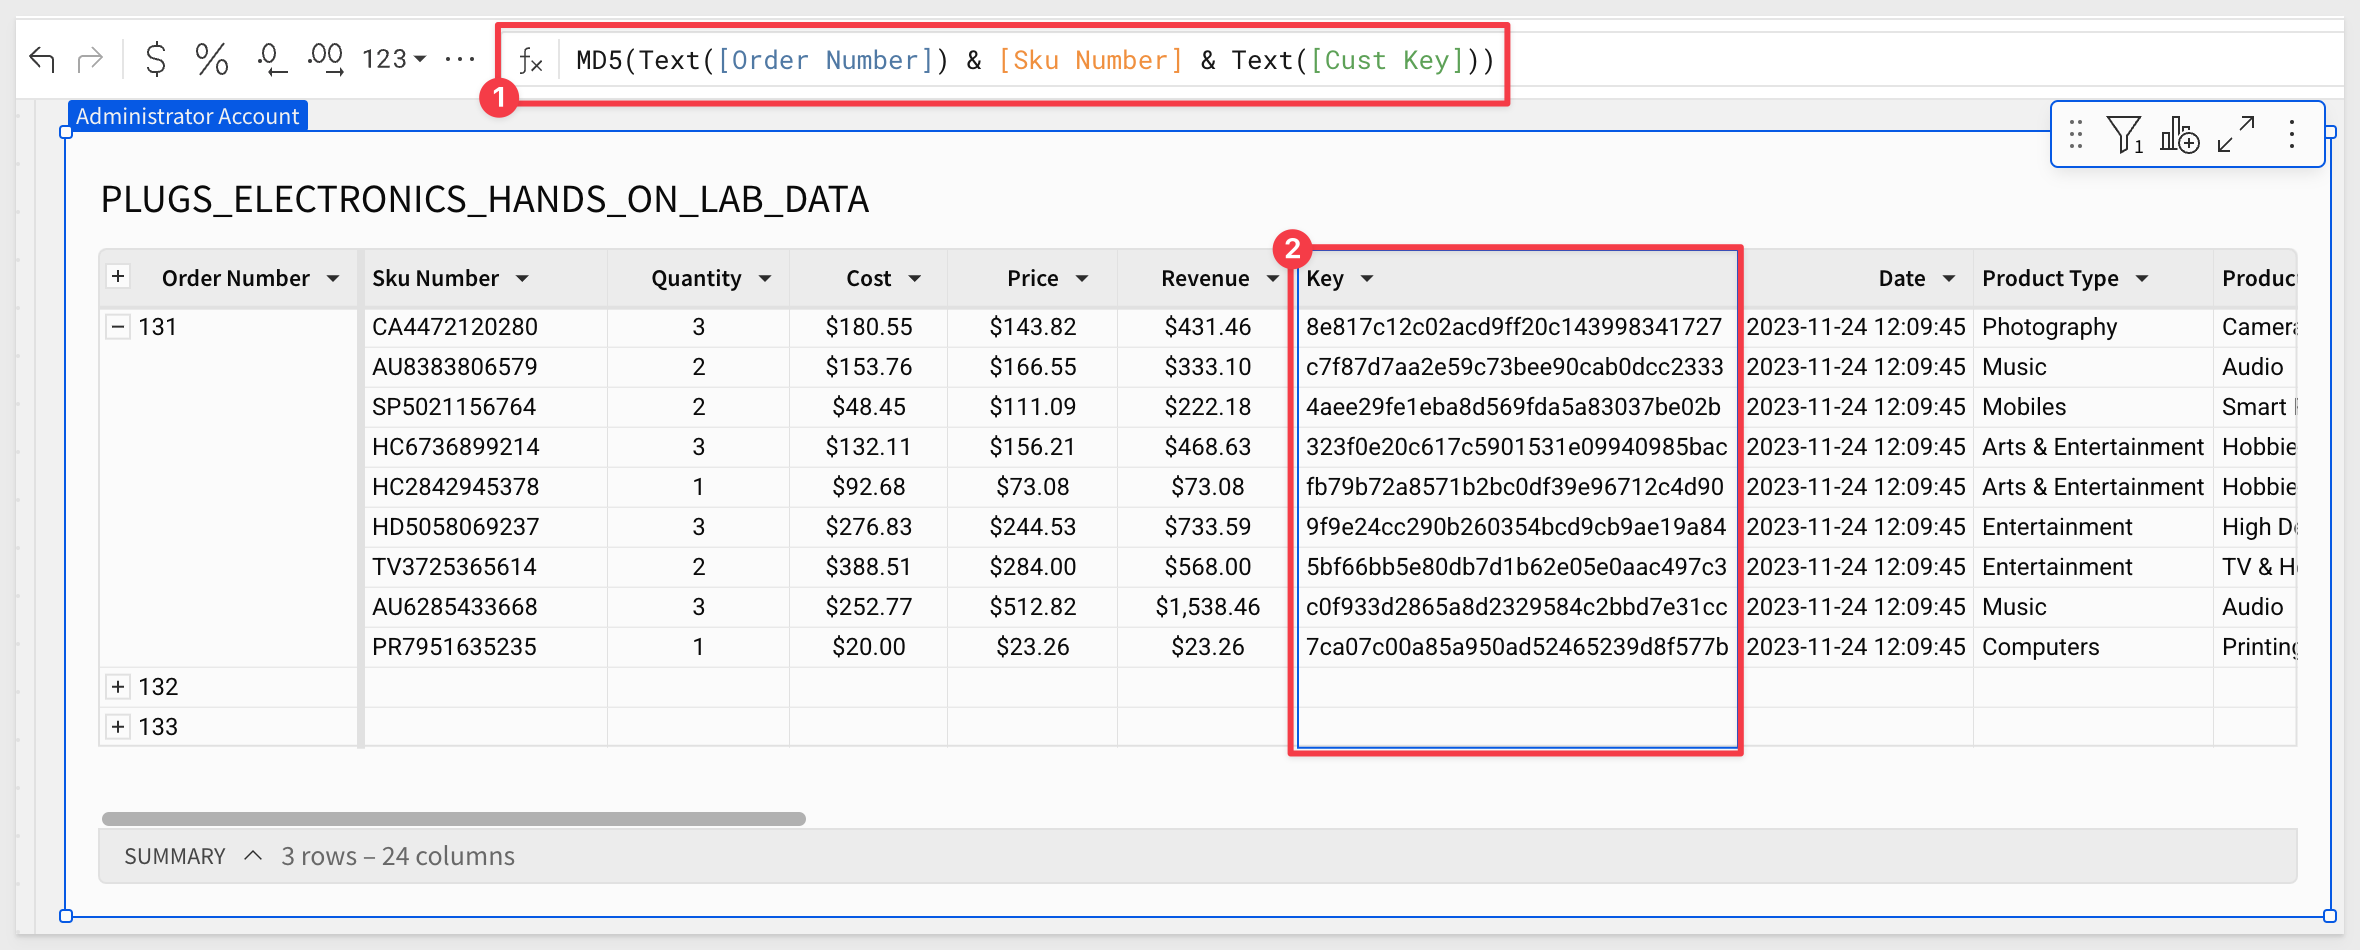
Add a new column, rename it to Key and set the formula to:
MD5(Text([Order Number]) & [Sku Number] & Text([Cust Key]))
The MD5 function is a nice way to create unique identifiers, in this case by combining the Order Number, SKU and Cust Key. For the purposes of this QuickStart, that should be sufficient.
Before creating the linked input table, make sure the Order Number group is fully expanded so that all child rows are visible. Click the + to the left of the column header text Order Number to fully expand all rows.
Create a Linked Input Table from the PLUGS_ELECTRONICS_HANDS_ON_LAB_DATA table.
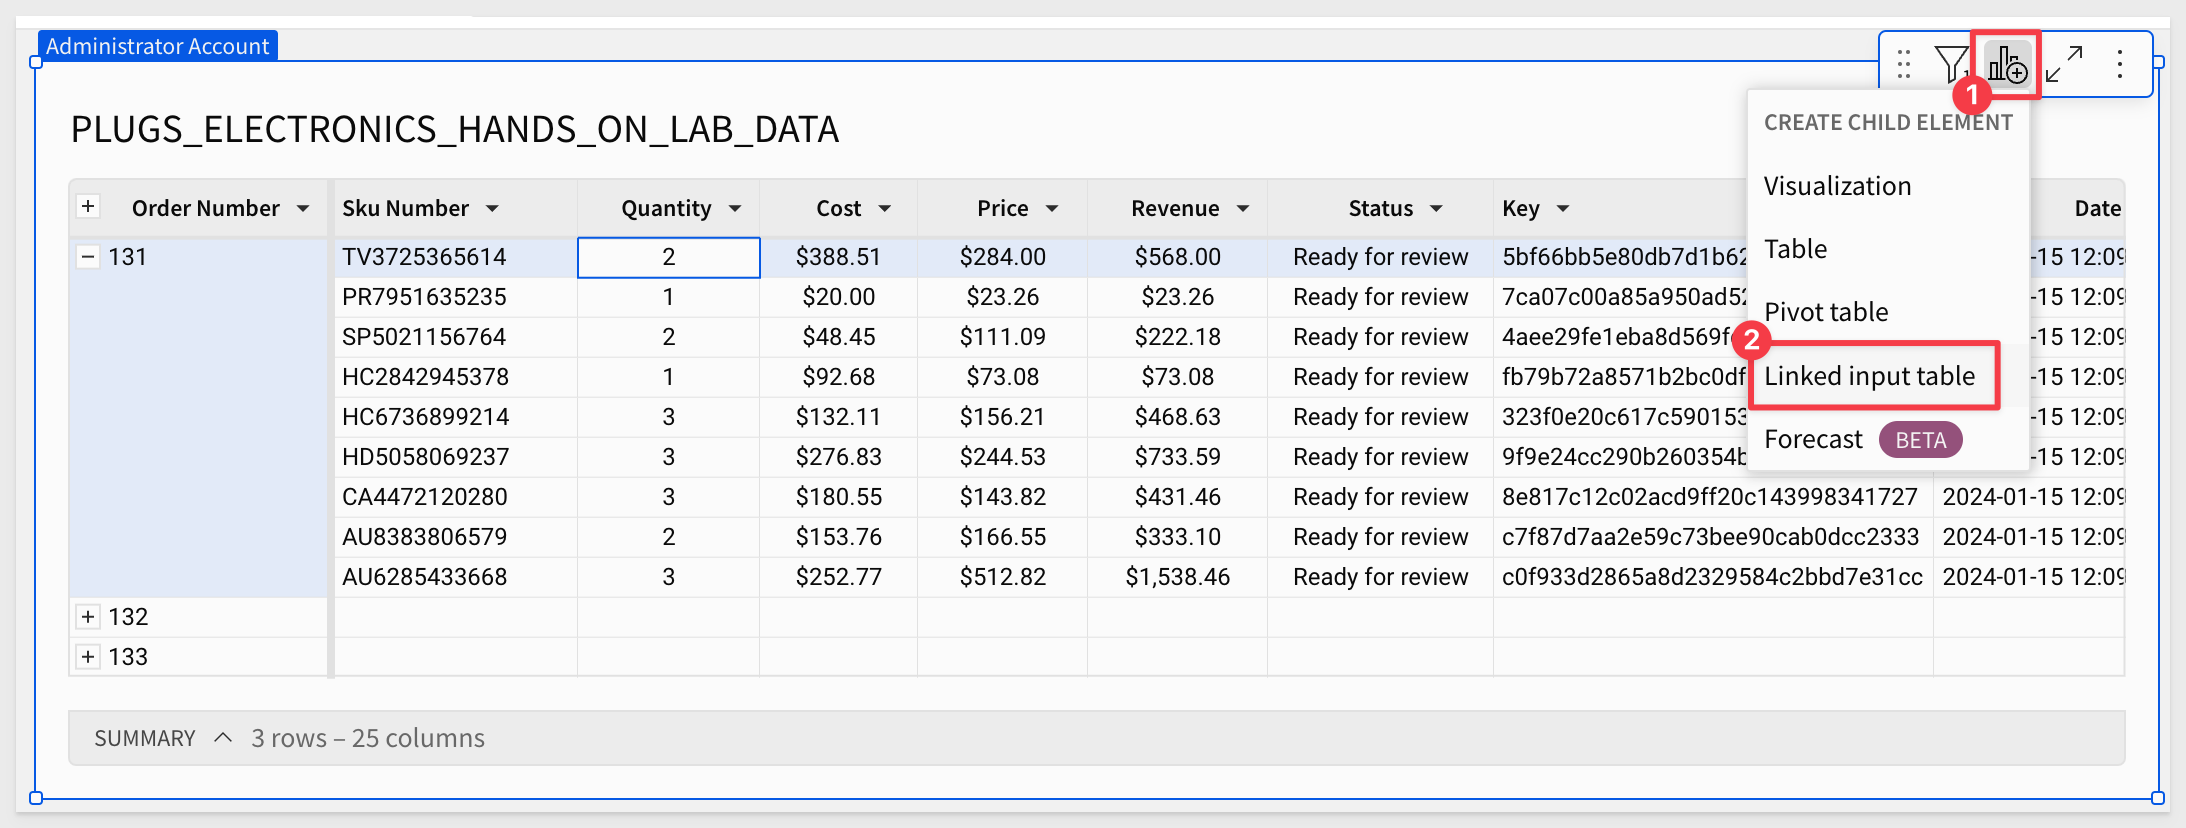
Select the Key column as the unique row identifier.
To make things cleaner, let's deselect the columns that are not really needed for this demonstration and leave only the ones shown in the screenshot below.
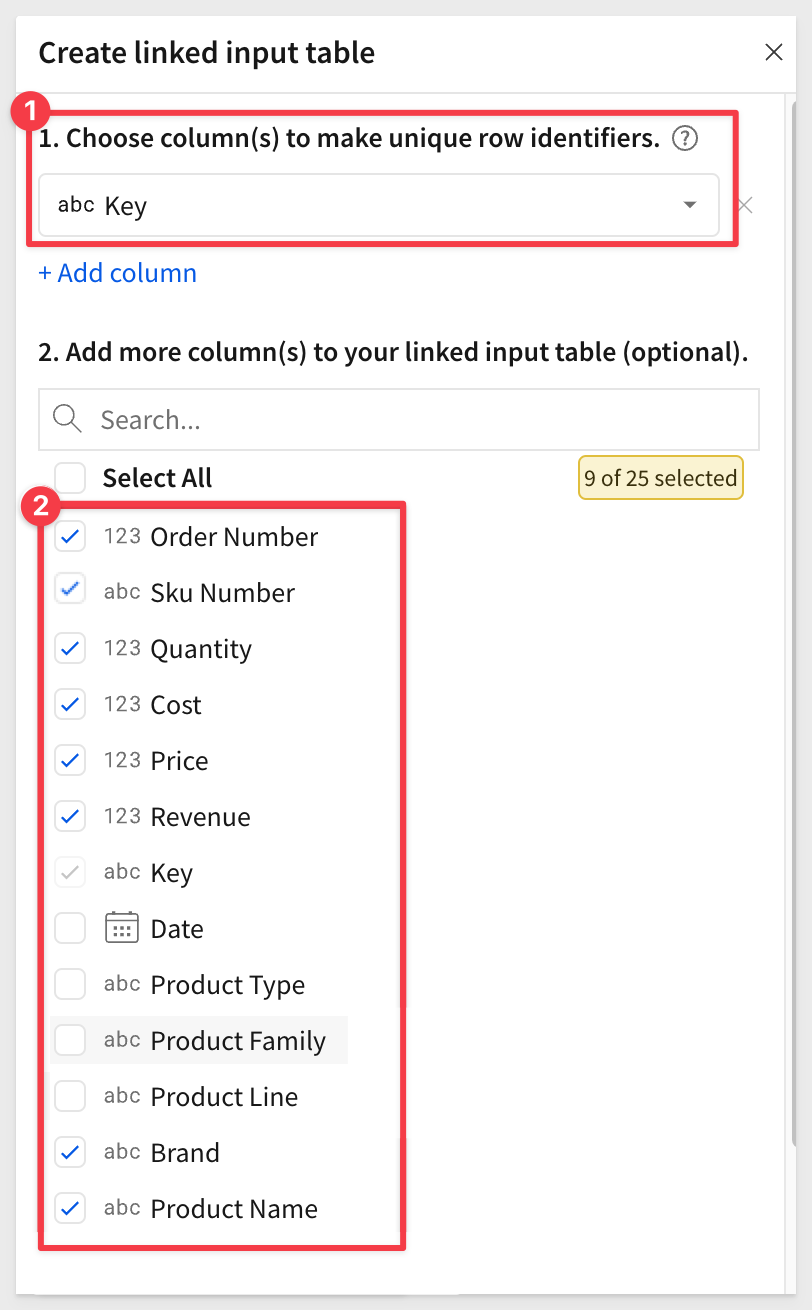
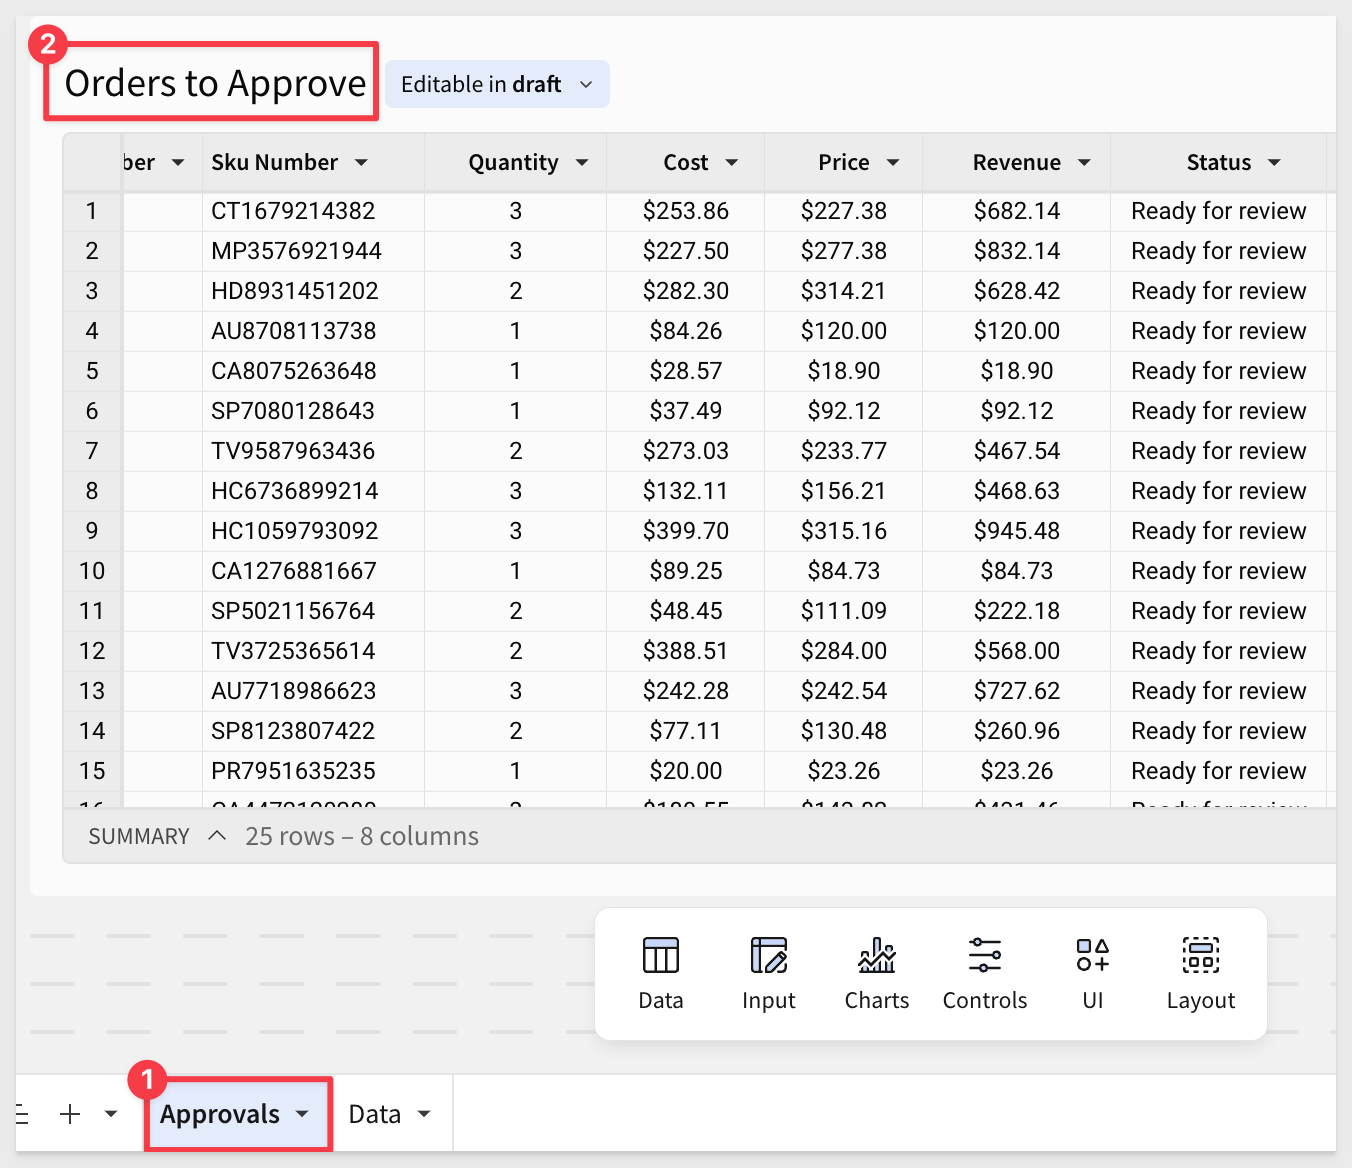
Rename the input table to Orders to Approve.
Rename this page to Data.
Add a new workbook page and rename it to Approvals.
Move the new input table to the Approvals page.
Save the workbook as QuickStart - Approval Flow.
With our sample data in place, we want to give the user a way to target a specific order number.
Hide the Key column. We will be able to reference it, but no need for users to see it.
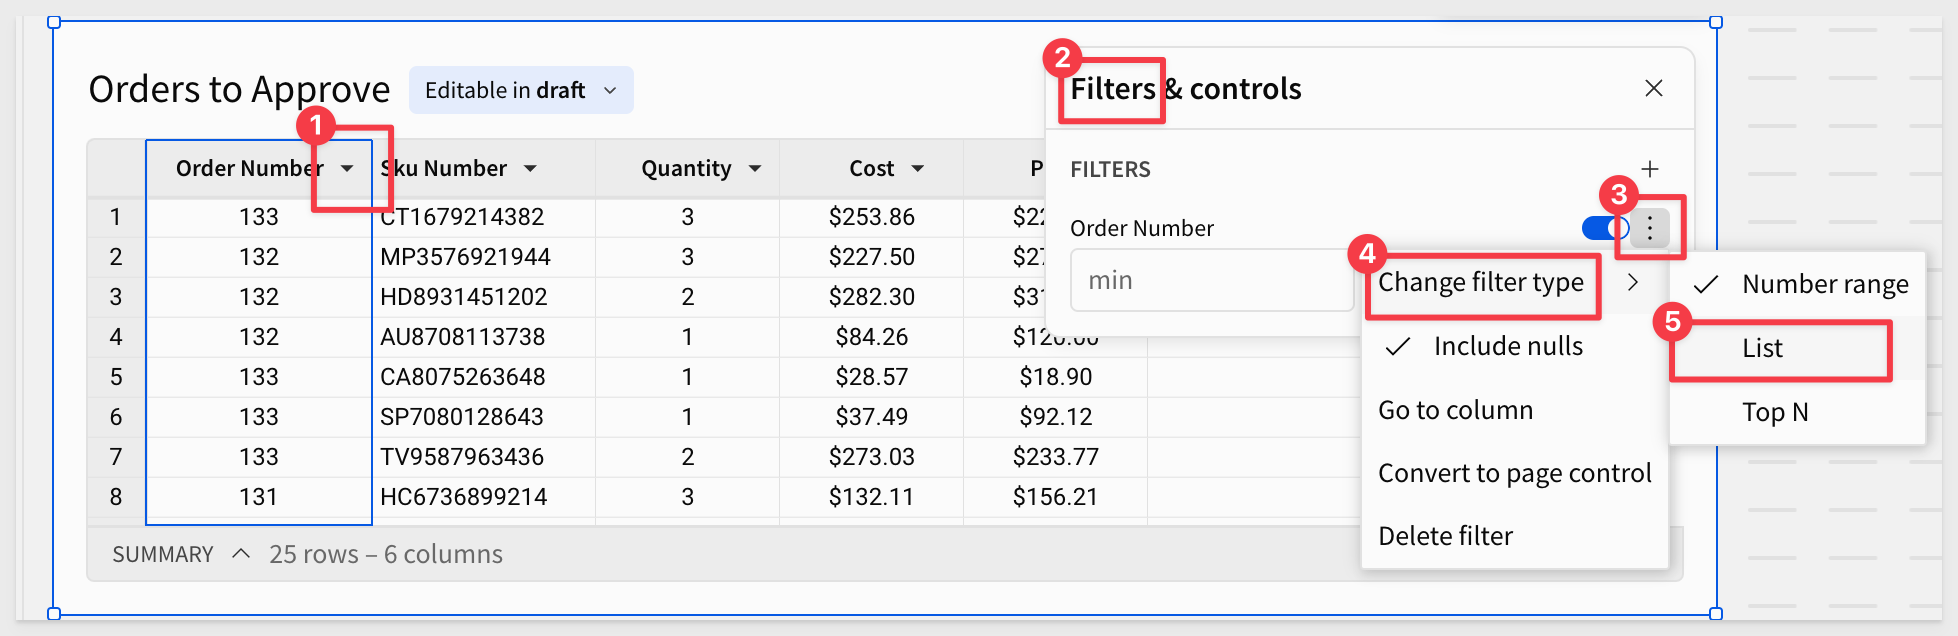
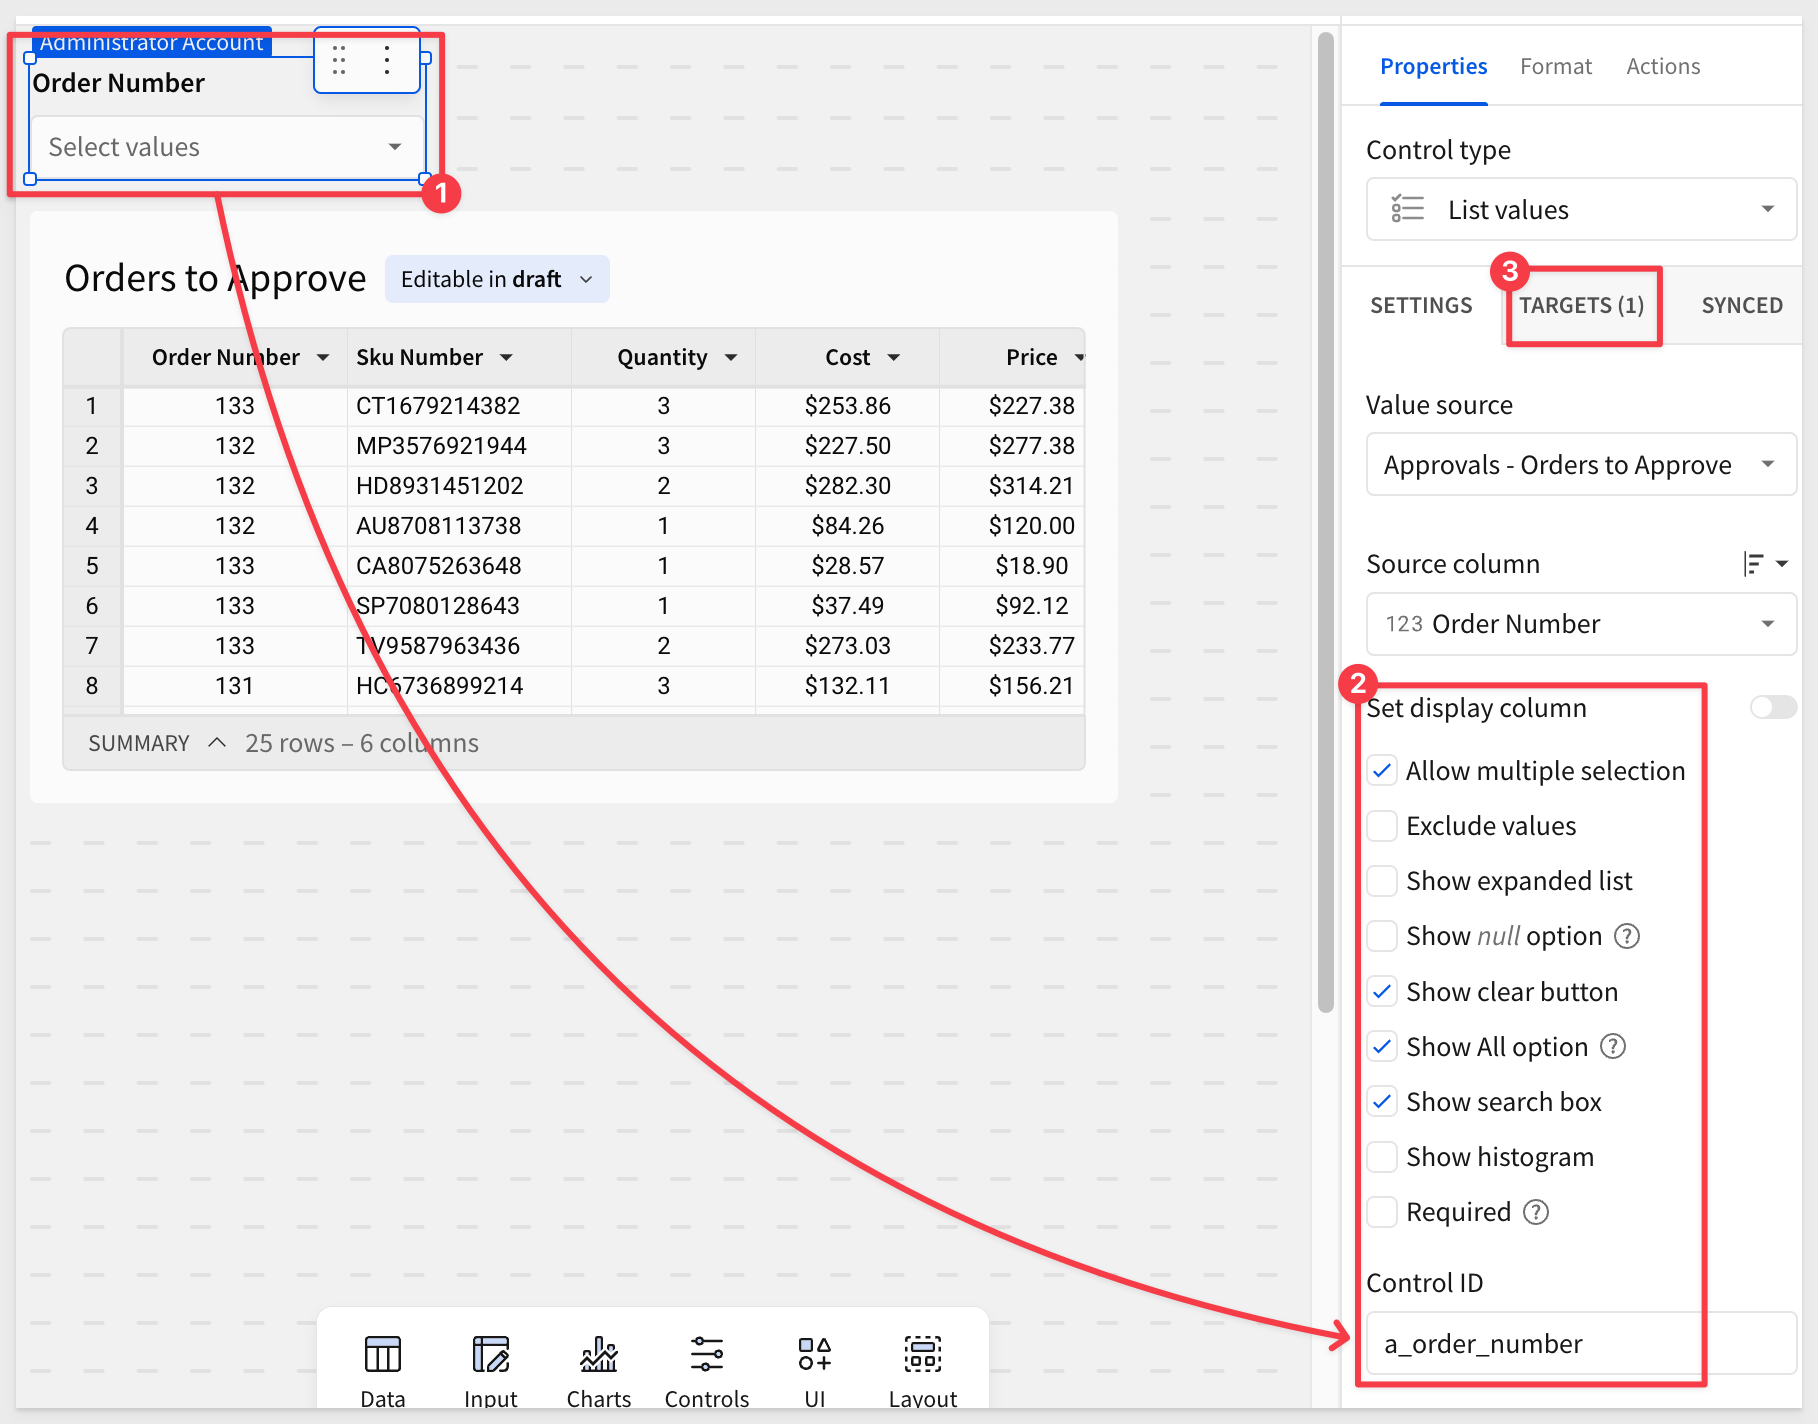
Using the Order Number column, create a filter and Change filter type to List:
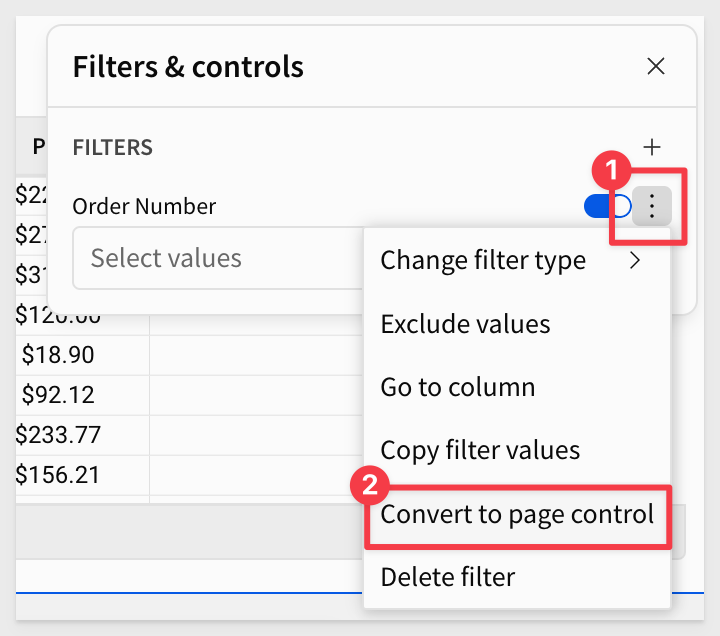
Then change it to a Page control:
We can adjust the Order Number control as shown to clean things up to our preferences:
We want the AI App to open a modal window when the user clicks on a single cell in a specific row.
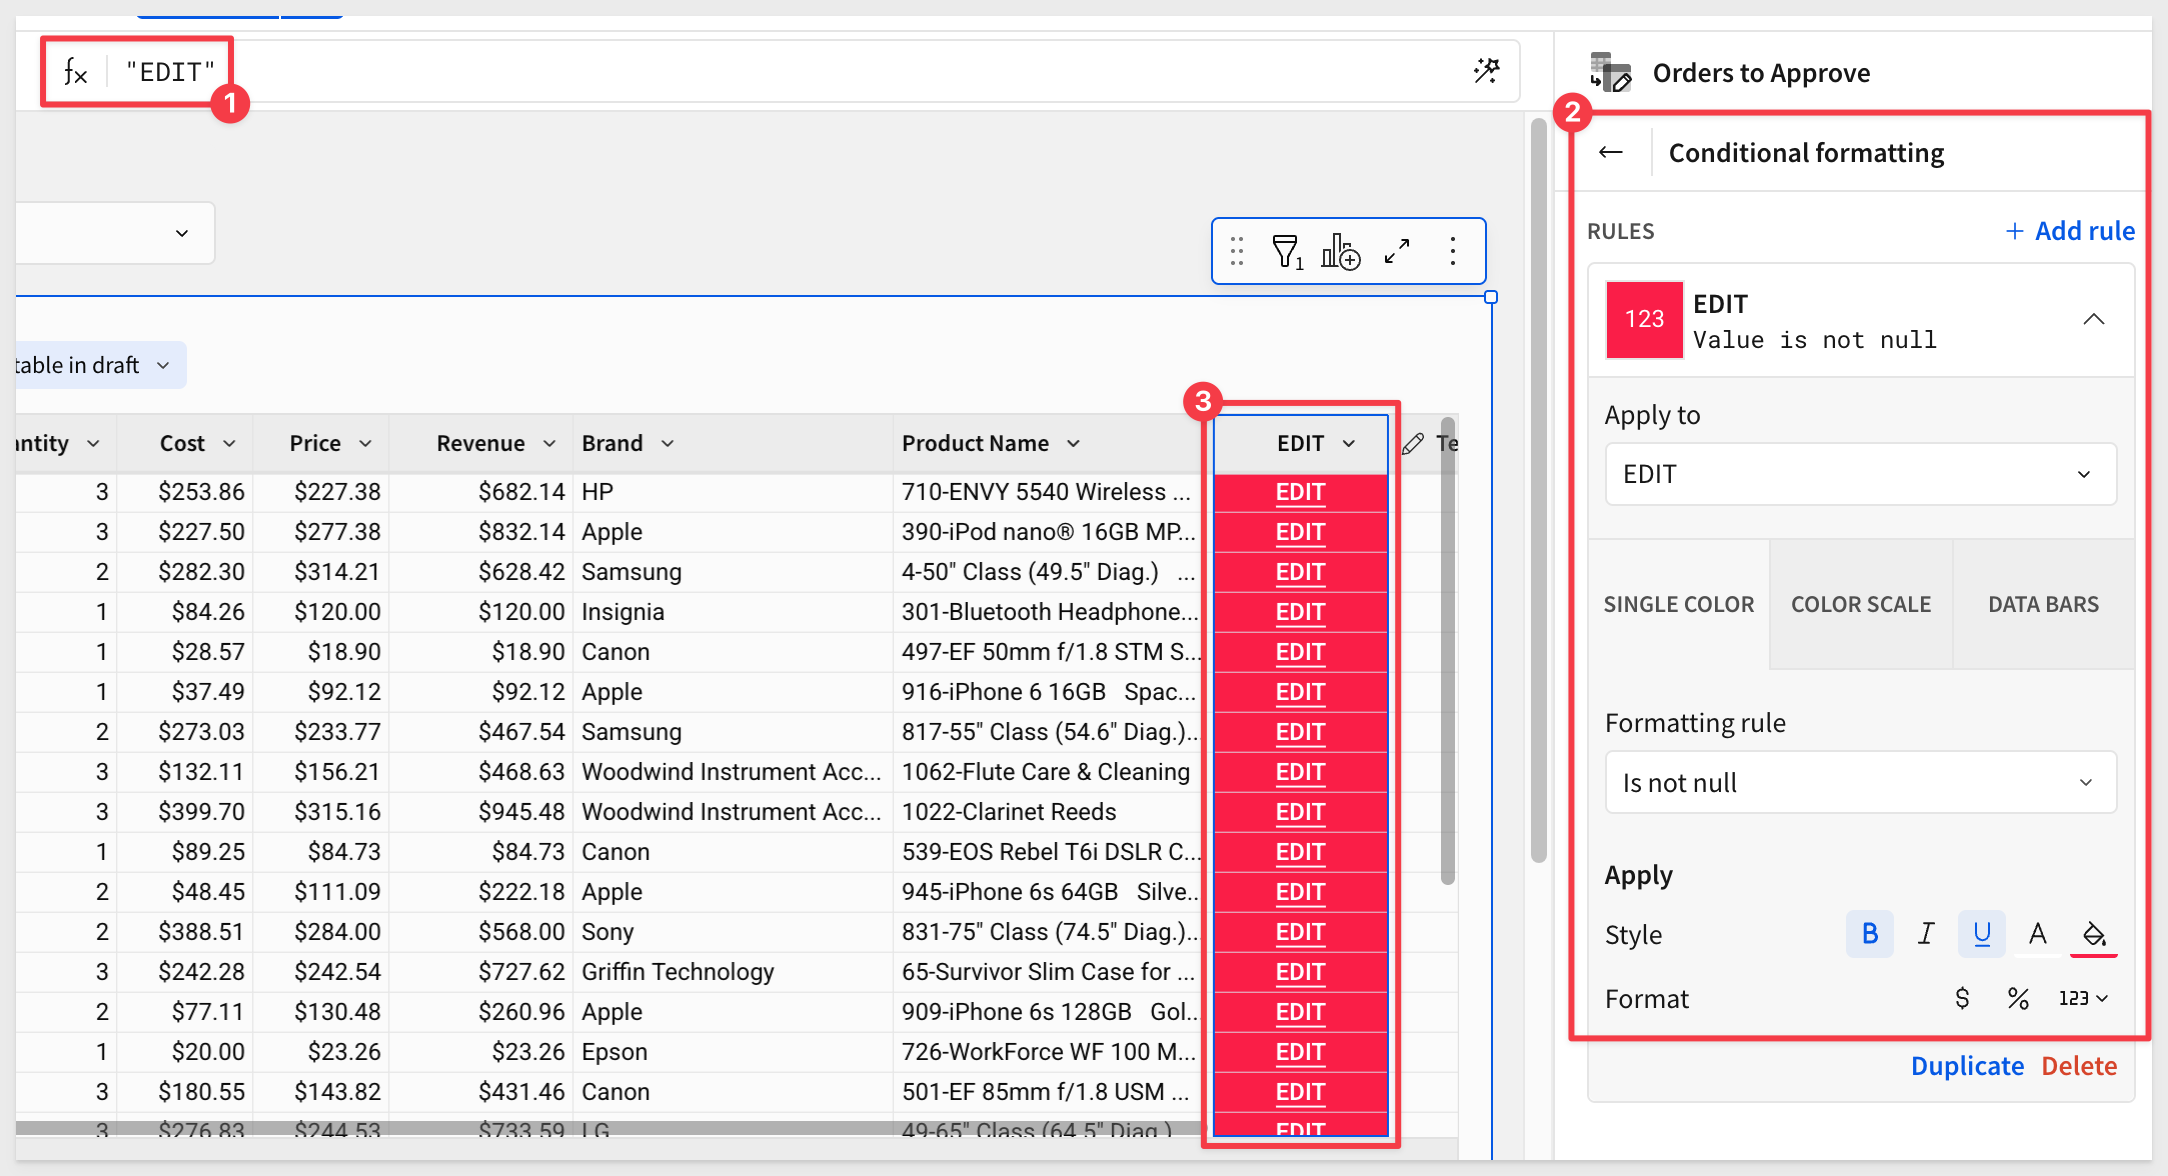
Let's make it really obvious for the user and add a new Calculation column to Orders to Approve and rename it to Edit. Set the formula to:
"EDIT"
Make it even more clear to the user with conditional formatting:
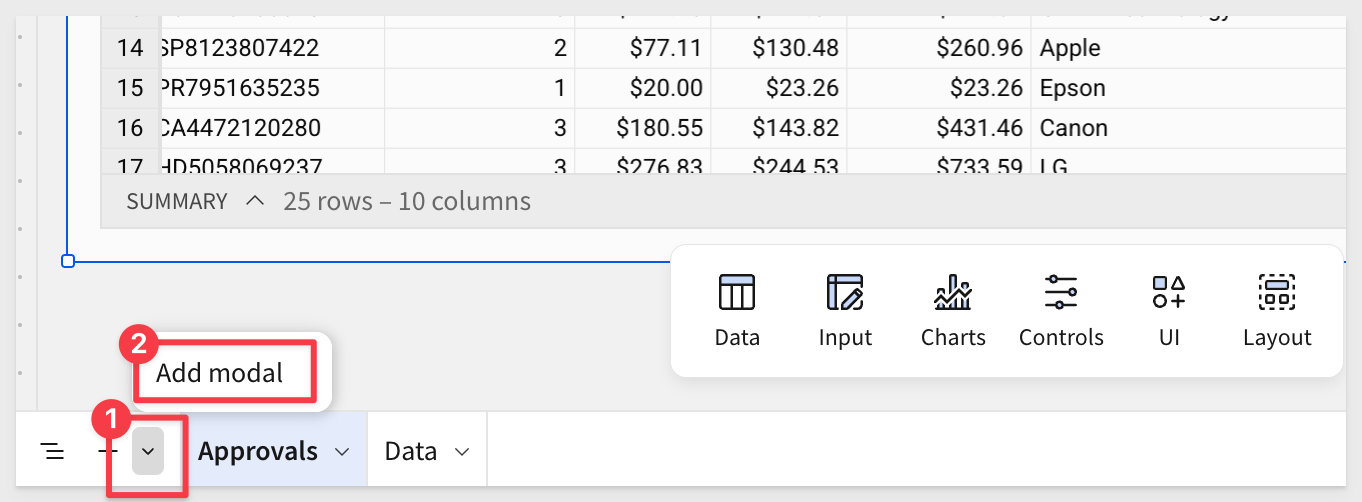
Add a modal
Add a modal from the lower left corner of the page:
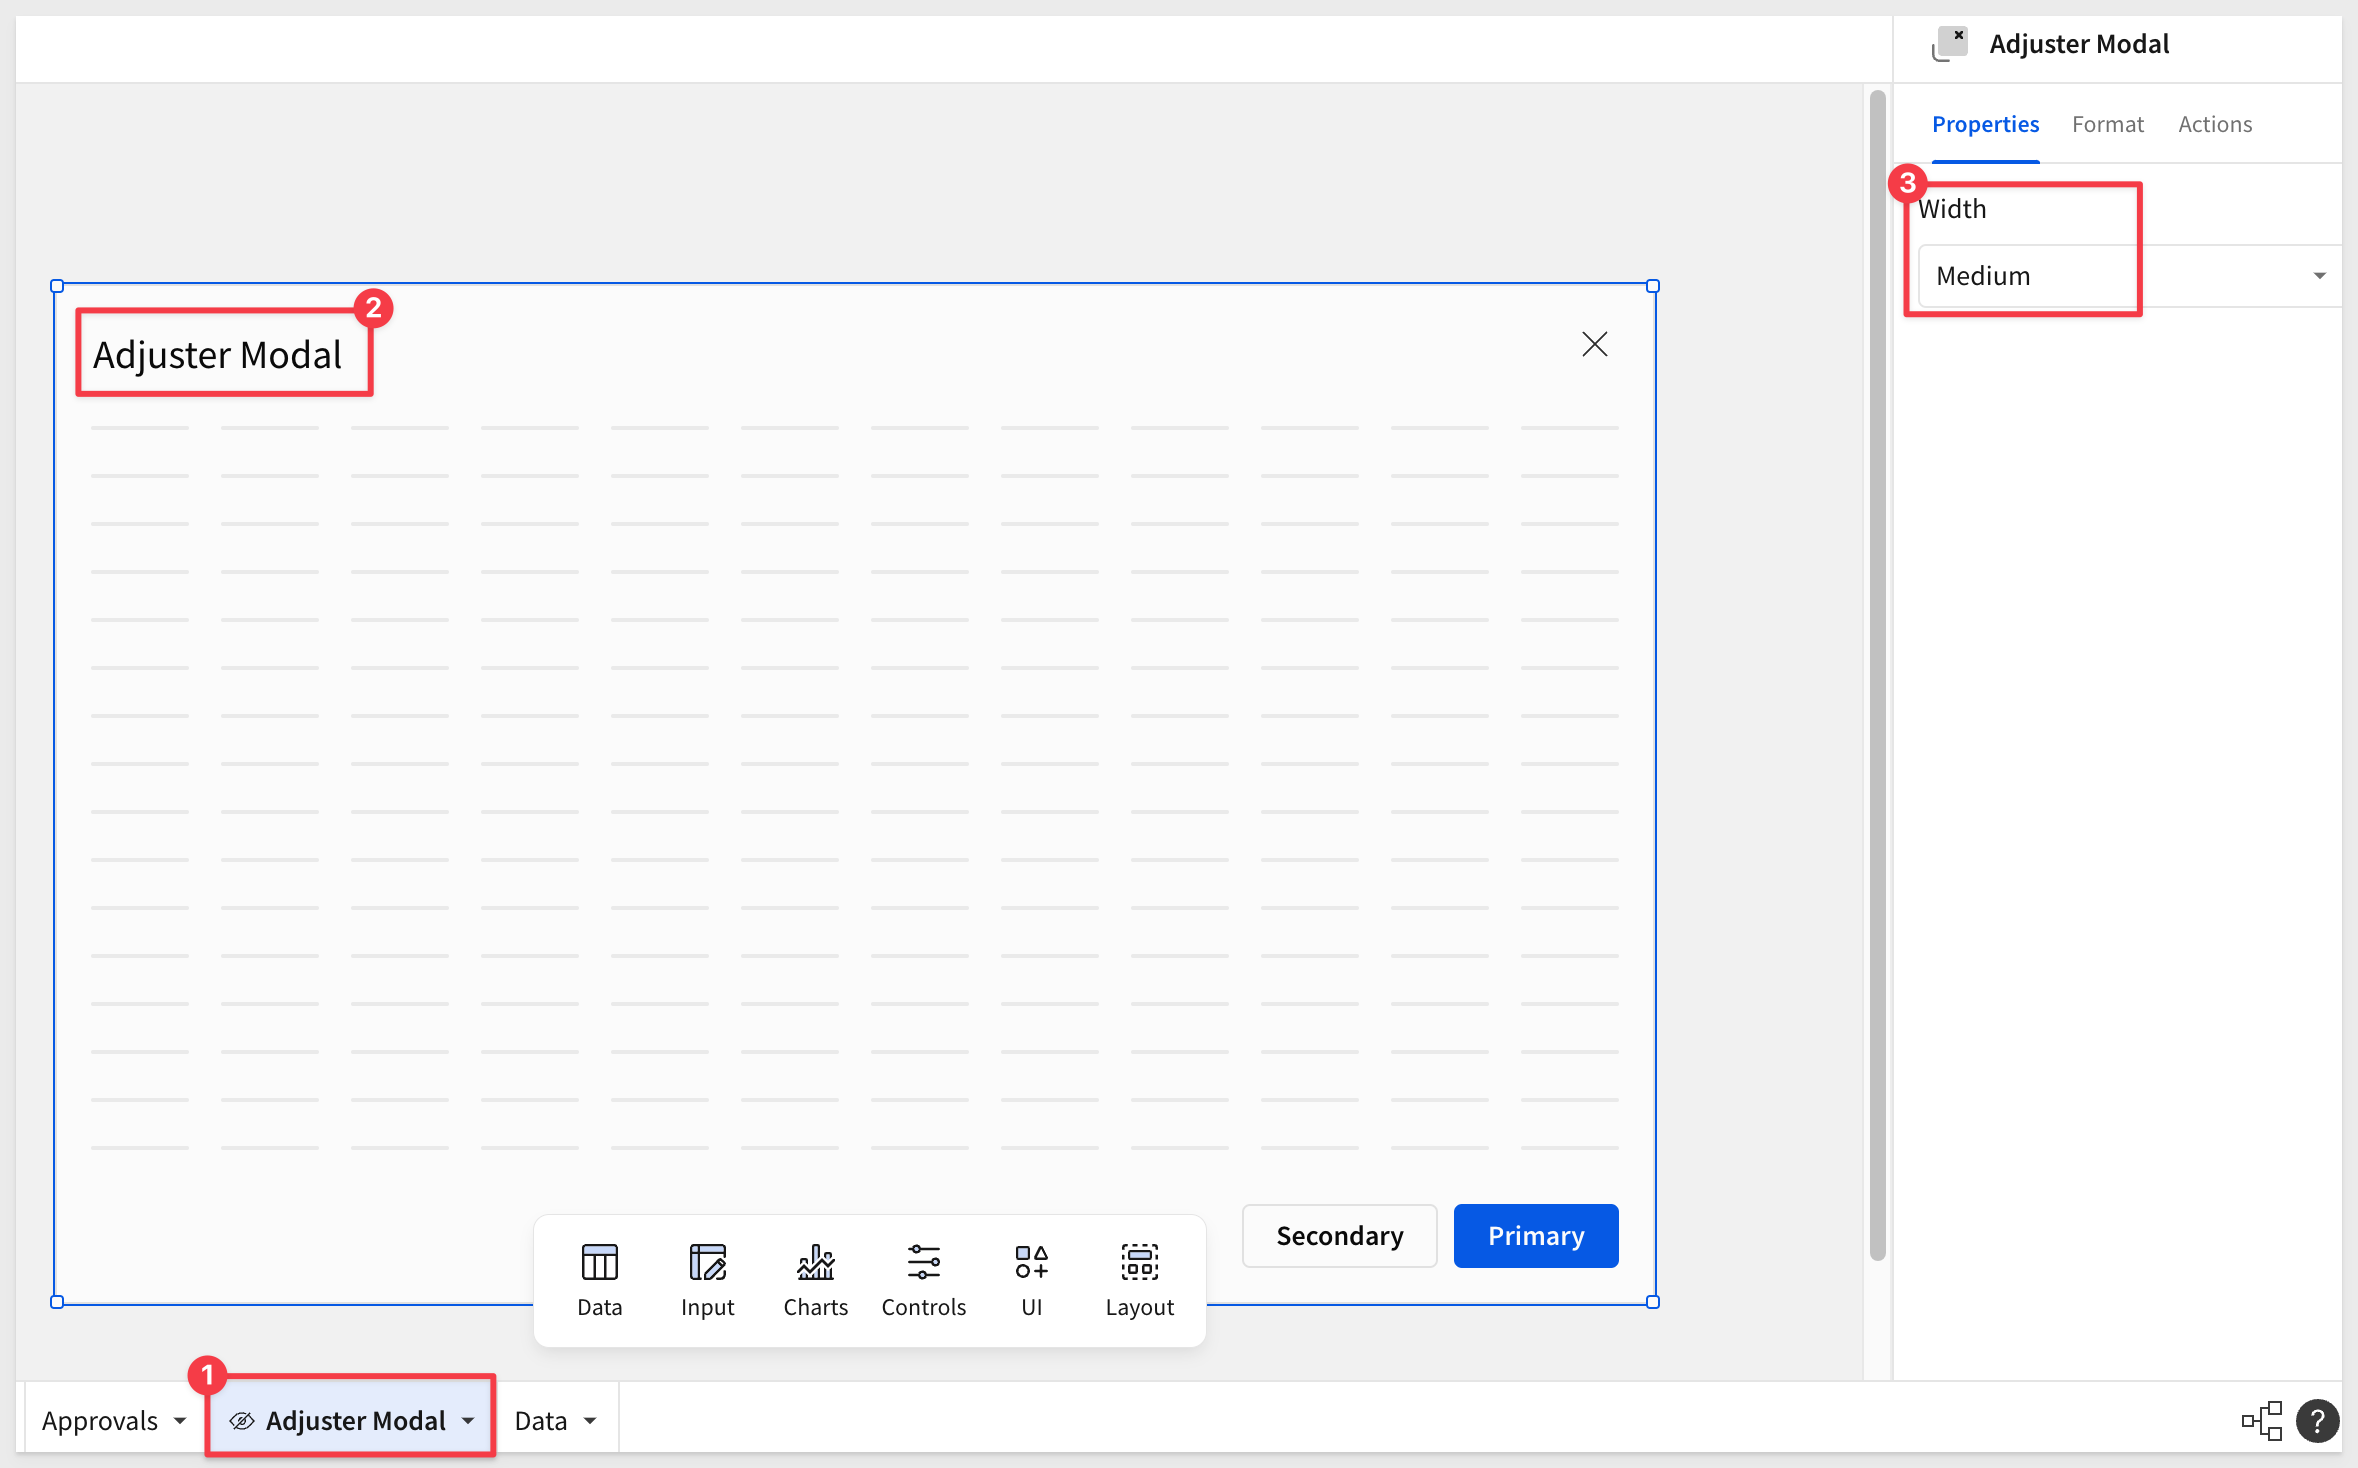
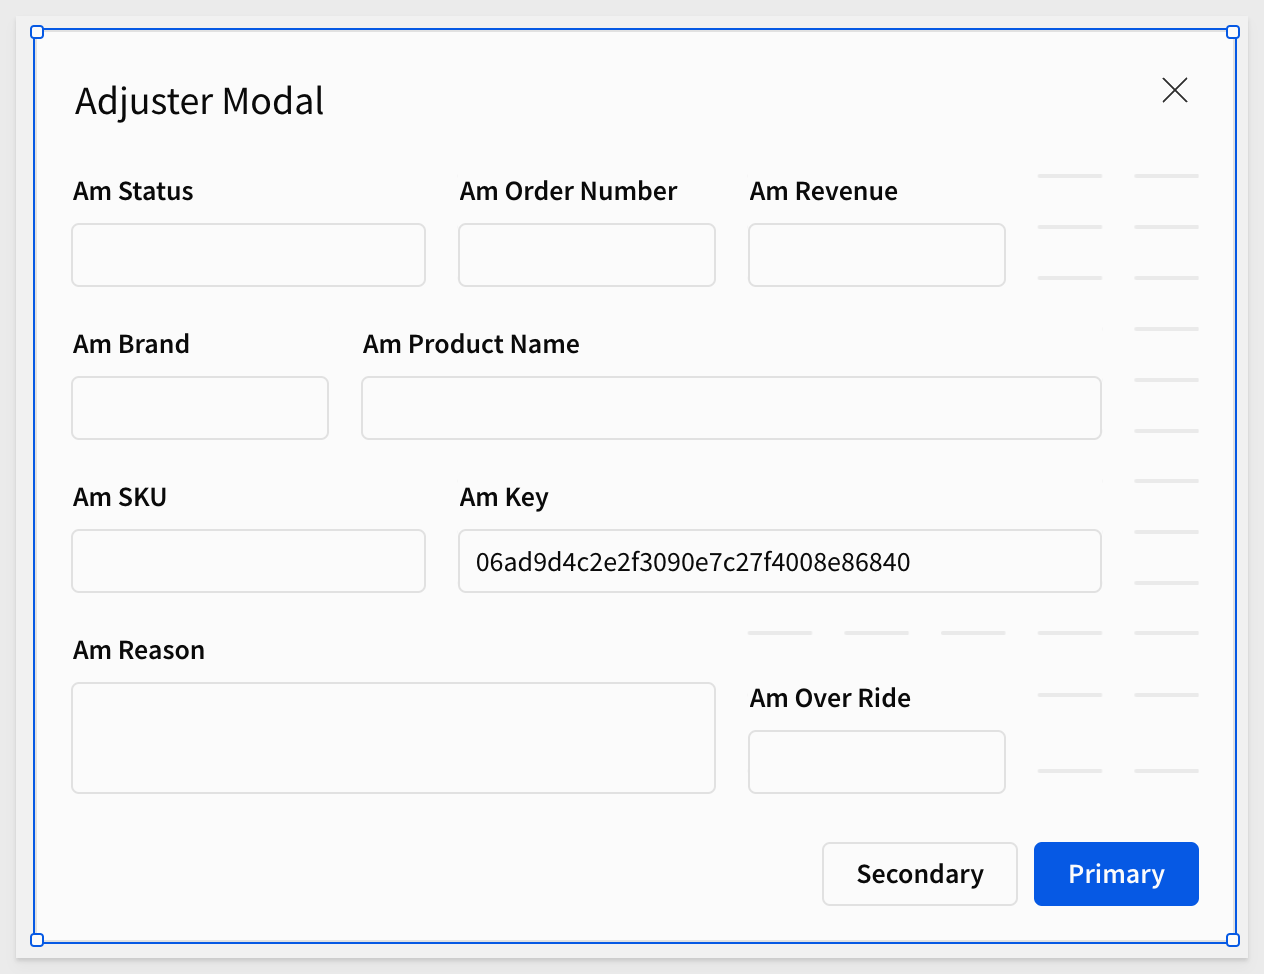
Rename the new modal Adjuster Modal and change its title to Adjuster Modal too.
Our first action
With the Orders to Approve table selected, open the Actions menu.
Configure the action as shown, to open a New modal:
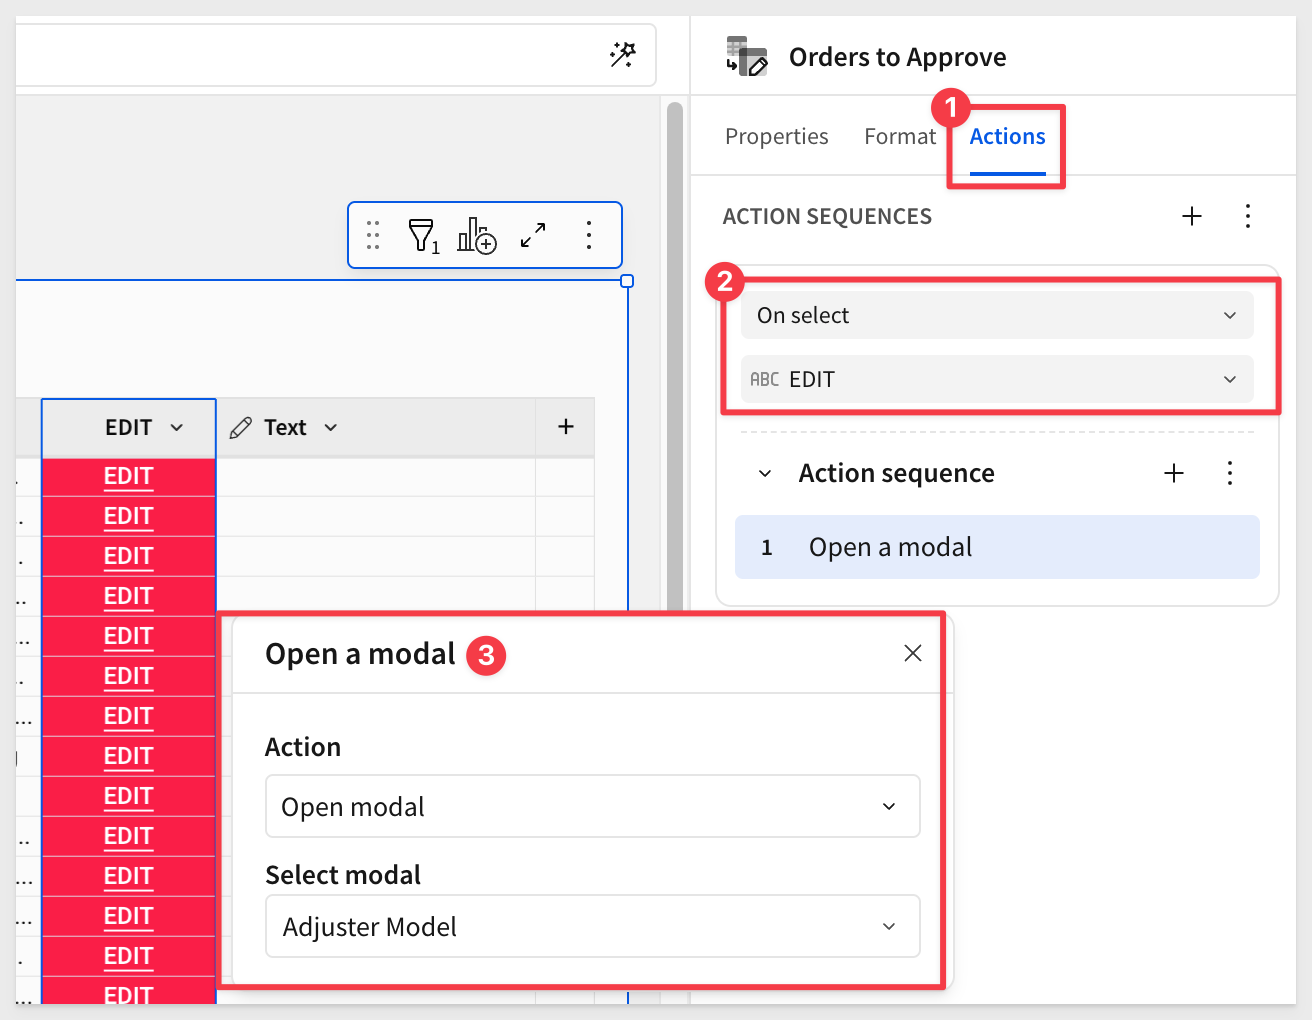
Now if a cell is clicked in the EDIT column, the modal will appear.
This is all very slick, but let's get back to what we need to do here; allow an authorized person to apply an OverRide (i.e., order discount for example) to a specific order (perhaps as a customer service issue) and submit it for final approval.
To accomplish this, we will need to pass a few other values from the selected row to the Adjuster Modal where the user will then modify as desired.
Adding Controls to the Modal
To support the required passing of user selected values, we will use a few Sigma controls on the modal.
Once the controls are in place, we will return to creating some actions to control the passing of values from Orders to Approve to the Adjuster Modal.
We will start by adding a Controls > Text input control to the modal and setting its Control ID to am-Key:
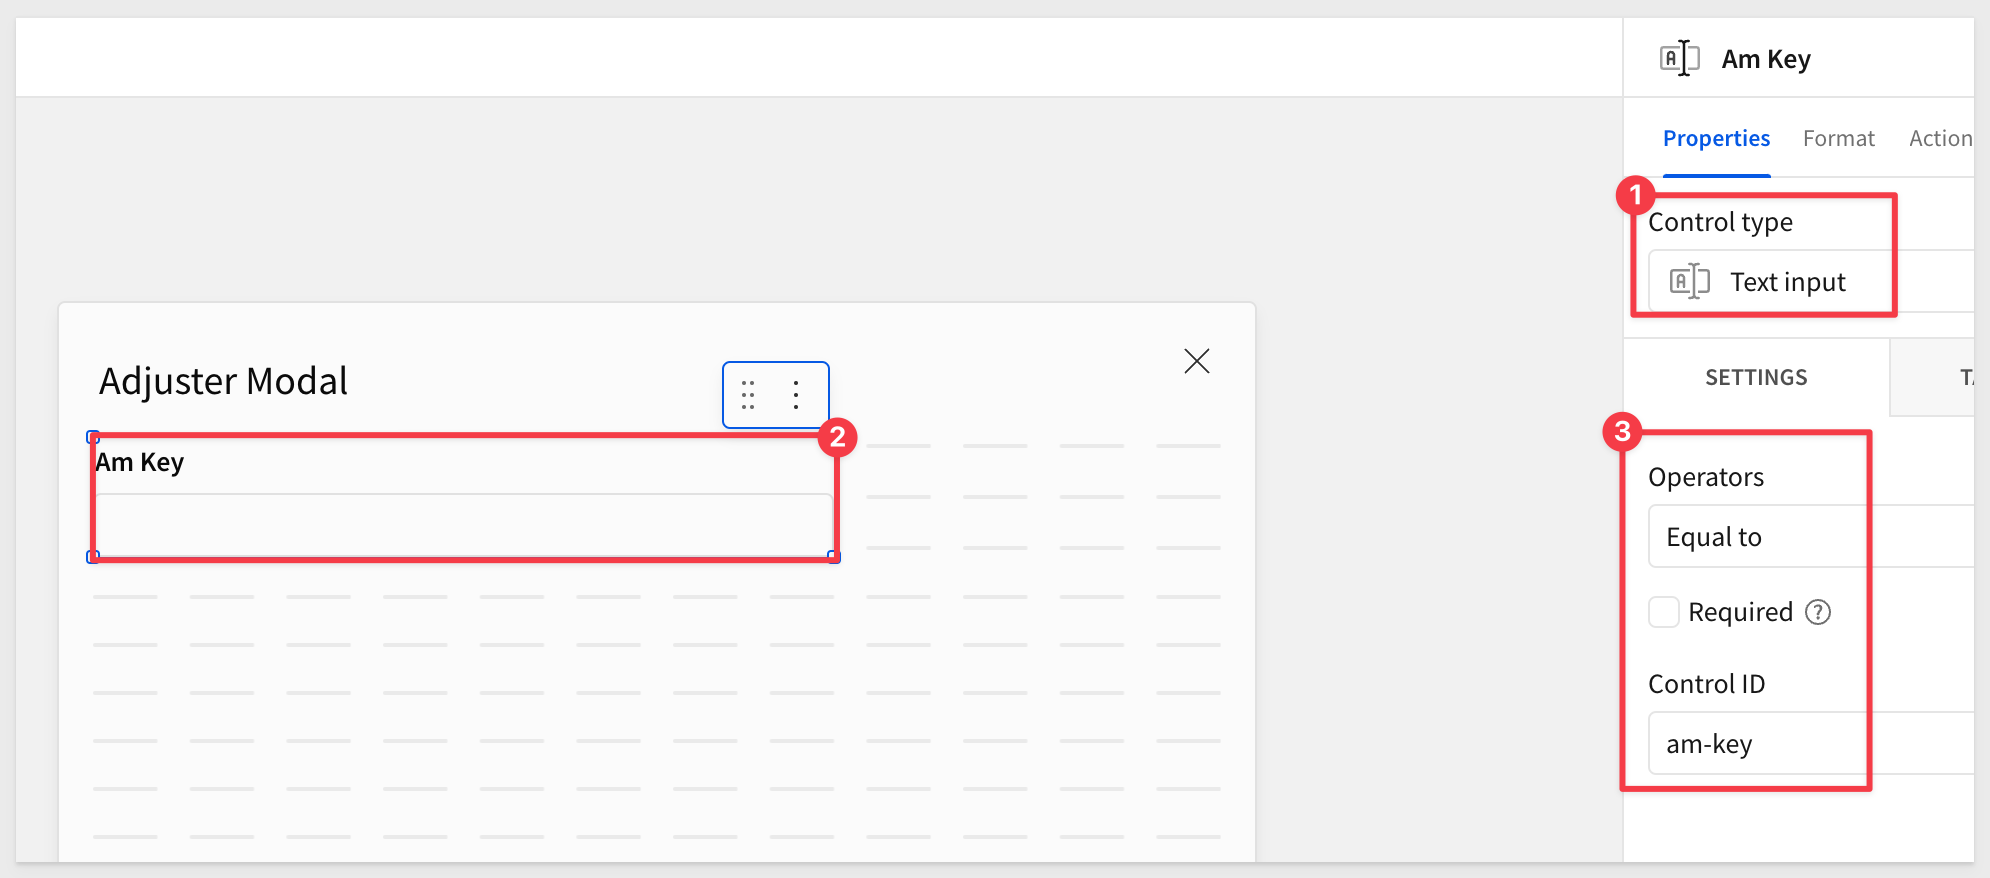
This will hold the key value that allows us to identify the exact row we are targeting.
Since this process will be somewhat repetitive, let's make this first one work first before we add the rest.
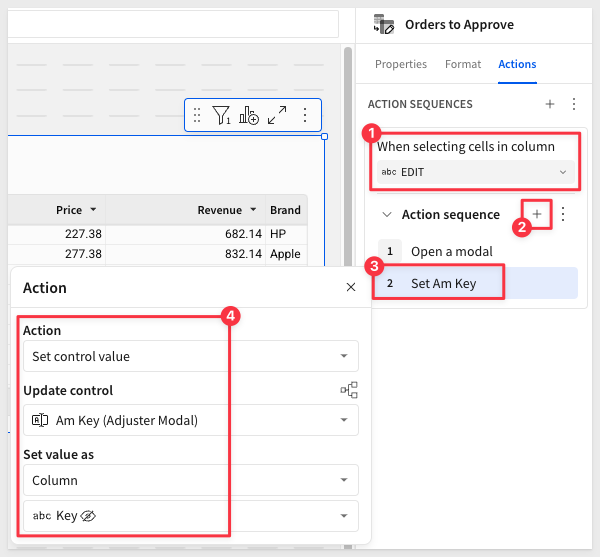
Back on the Approvals page > Orders to Approve table > Actions, we add another action to Set control value as shown:
Test it out
Click any cell in the Edit column on the Orders to Approve table and make sure the Key value is passed as expected:
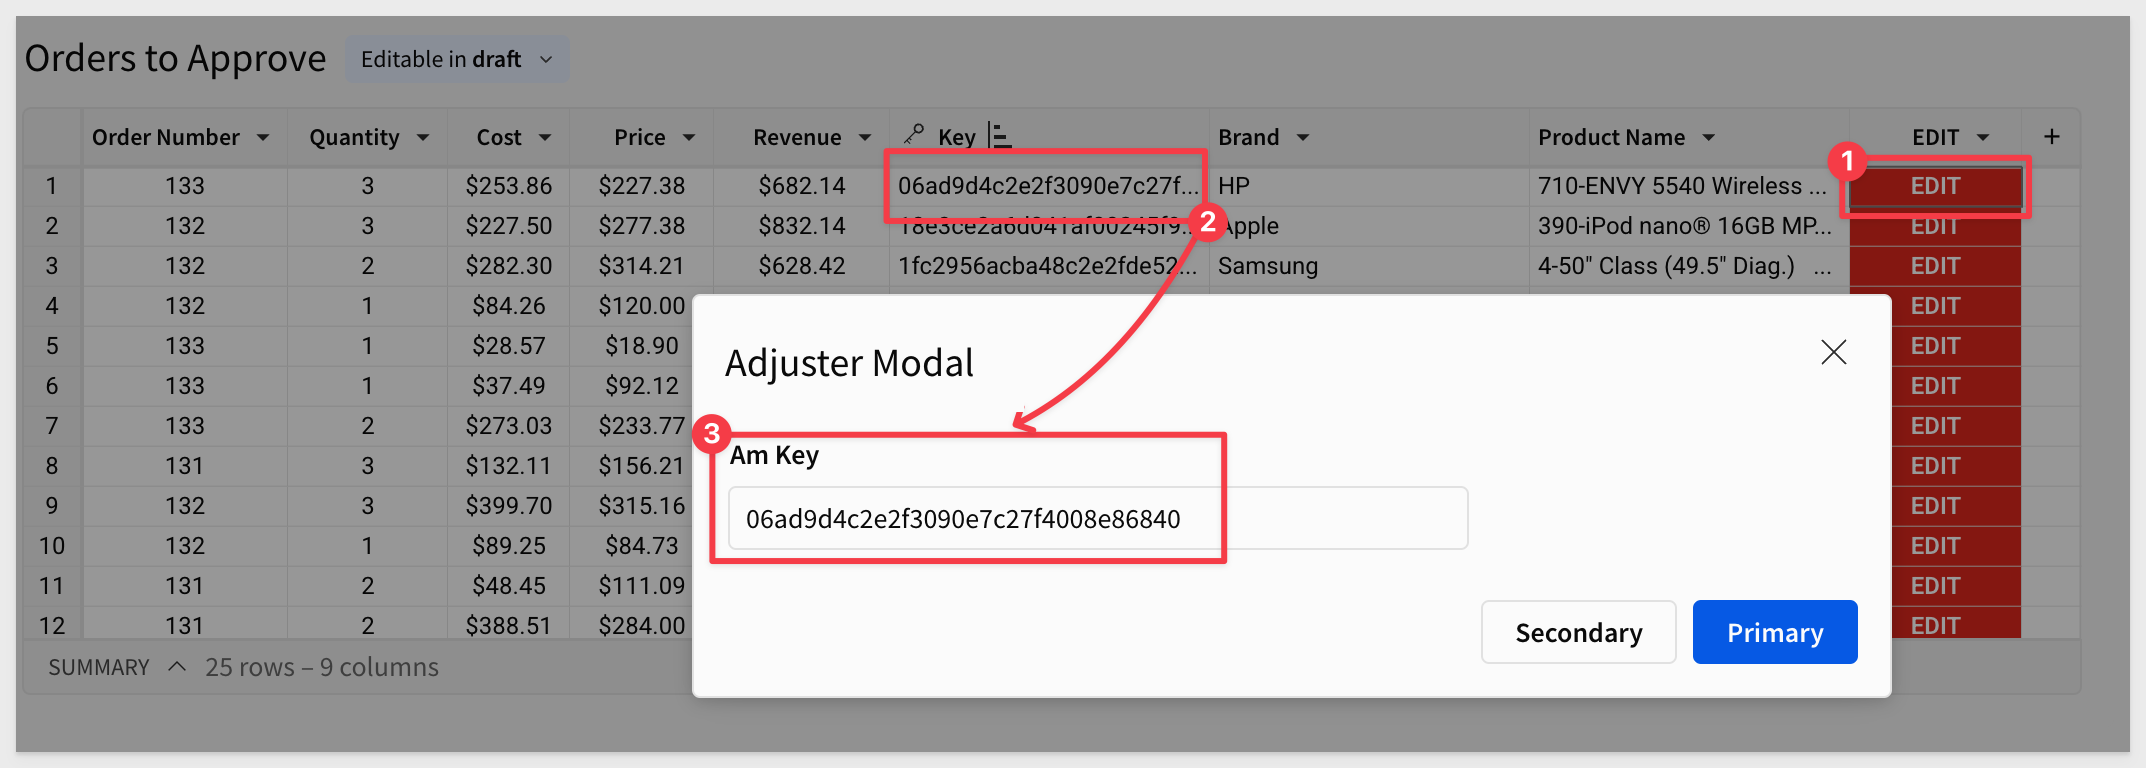
If all is good, let's move on.
Add remaining controls
Now that we have done it once, adding the rest of the controls and corresponding actions is very similar. Remember to select the correct control for the data type and also set the Control ID for each using our design pattern.
Here are the controls required:
Current Status - am_Status
Add a Controls > Text input control and set the Control ID to am_status.
Current Status - am_Order_Number
Add a Controls > Number input control and set the Control ID to am_Order_Number.
Current Revenue - am_Revenue
Add a Controls > Number input control and set the Control ID to am_Revenue. Also set the Data format to Currency.
Current Status - am_Brand
Add a Controls > Text input control and set the Control ID to am_Brand.
Current Status - am_Product_Name
Add a Controls > Text input control and set the Control ID to am_Product_Name.
Current Status - am_SKU
Add a Controls > Text input control and set the Control ID to am_SKU.
Current Status - am_Reason
Add a Controls > Text area control and set the Control ID to am_Reason.
OverRide Revenue - am_Over_Ride
Add a Controls > Number input control and set the Control ID to am_Over_Ride. Also set the Data format to Currency.
The OverRide value represents whatever value the user decides is an appropriate adjustment. When we store this value, we will not alter the source data value for revenue in any way.
Instead, we will store it in a log table, and later we will also show it in a reporting table along with the original value for Revenue for easy comparison.
At this point we have all our controls and need to map actions to populate them with values. We have not worried about UI appearance; that is easy and we will do that later.
Map actions to new controls
Return to the Approvals page and add the corresponding actions for each of these controls.
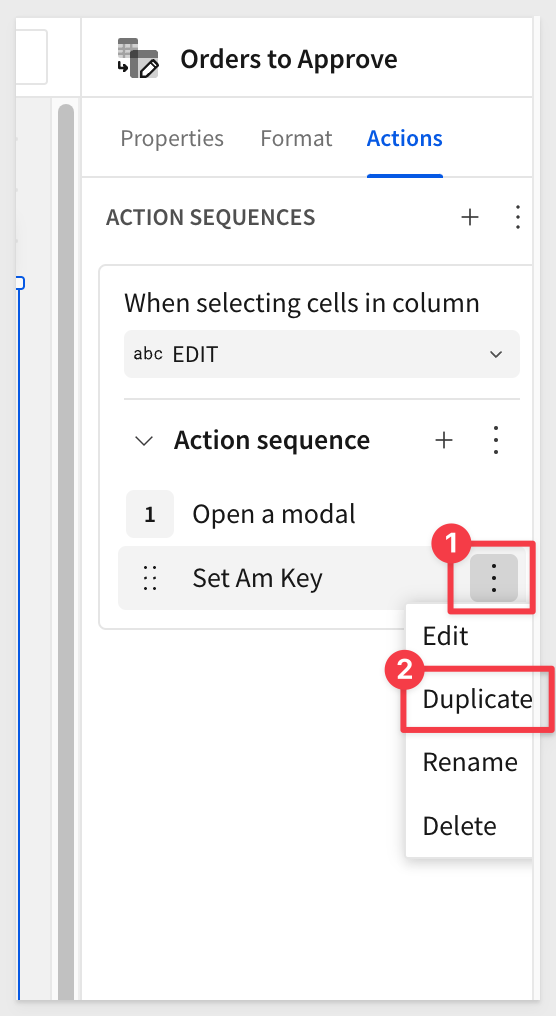
We could use the + to add another action but we can save a few clicks by duplicating the existing one, Set Am Key and then just adjust the configuration of the duplicate:
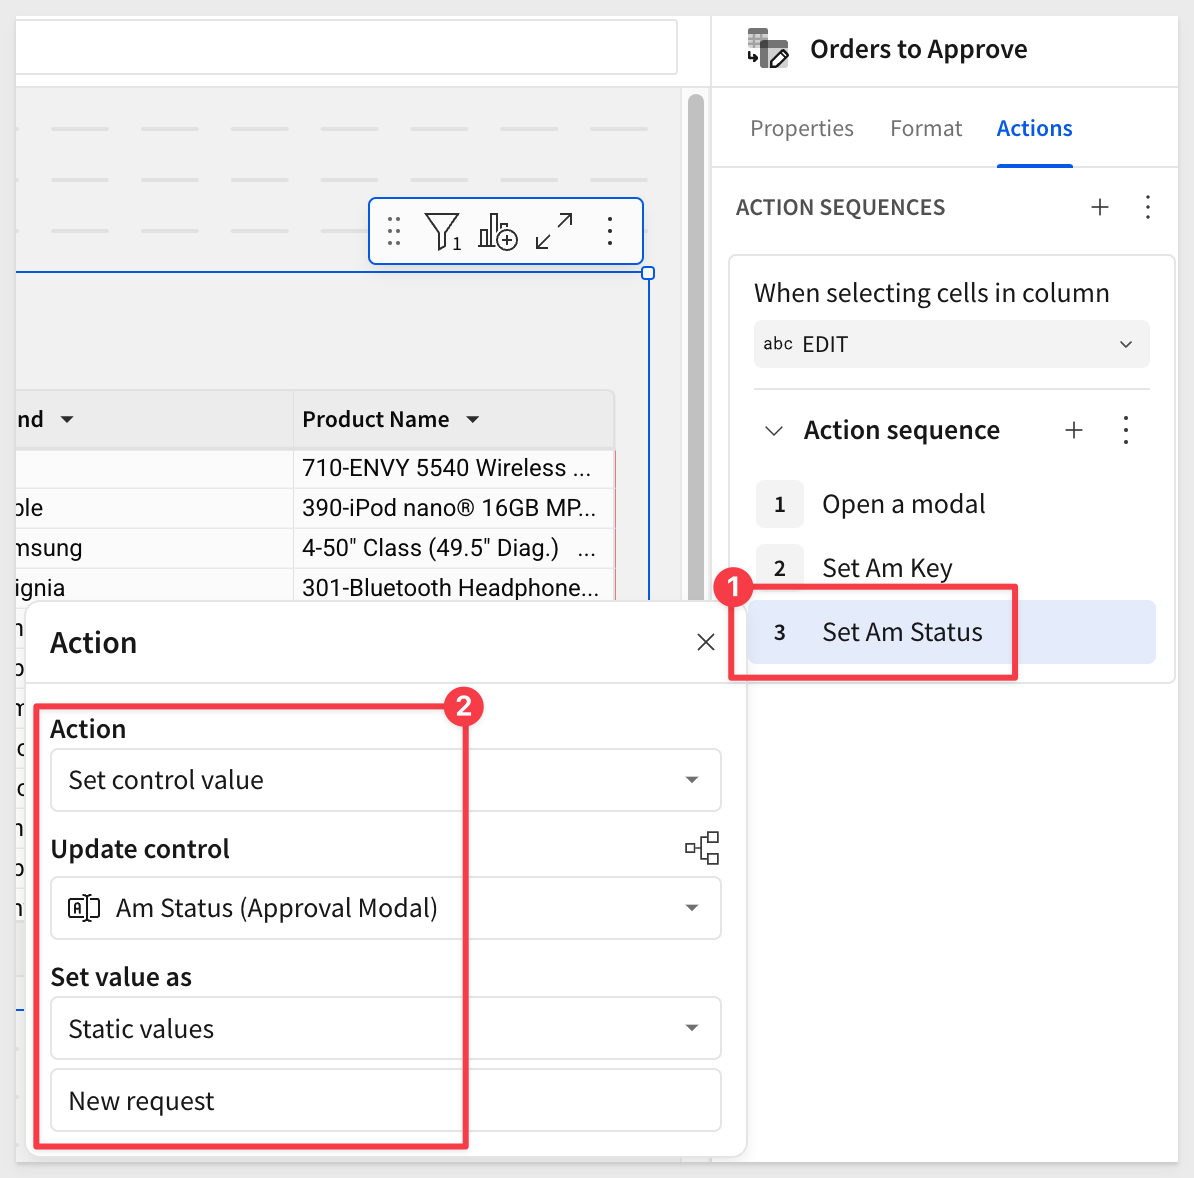
Since we don't have a Status column yet, we can set the action to send a Static value of New request:
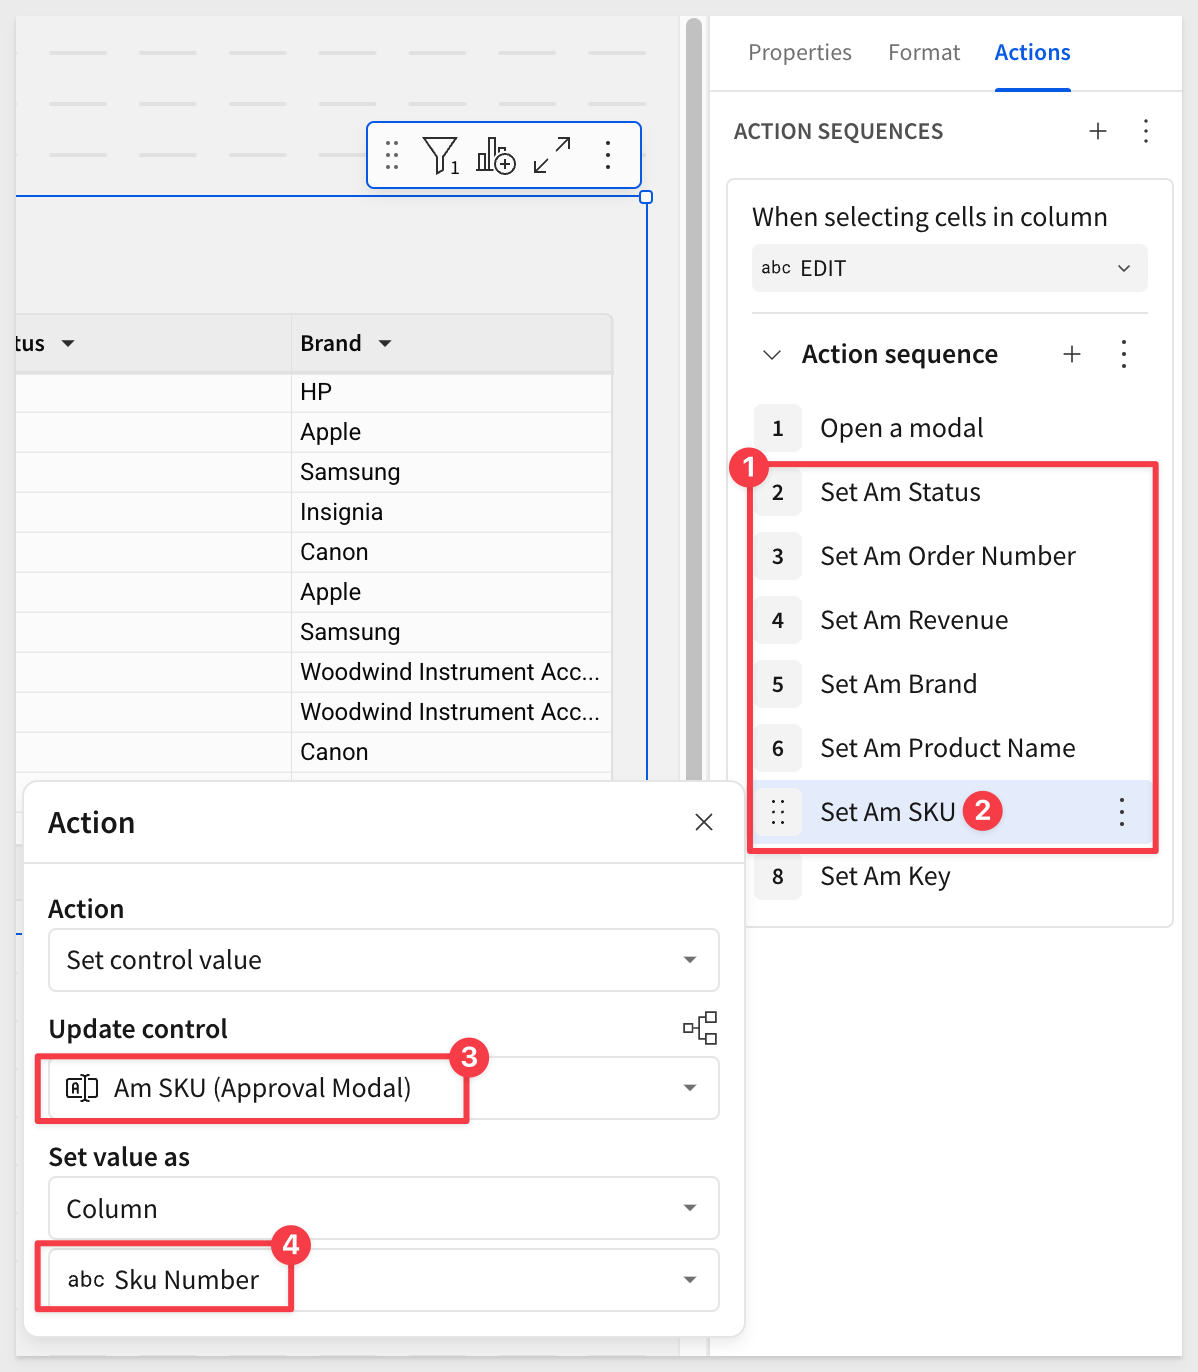
The rest of the actions follow the same pattern, adjusting for the Update control value and Set value as value:
We don't need actions (yet) for this set of actions ("sequence") for Am Over Ride and Am Reason as this sequence will later represent the user making the initial adjustment request.
Retest the workflow to see the expected value pass:
Style the modal
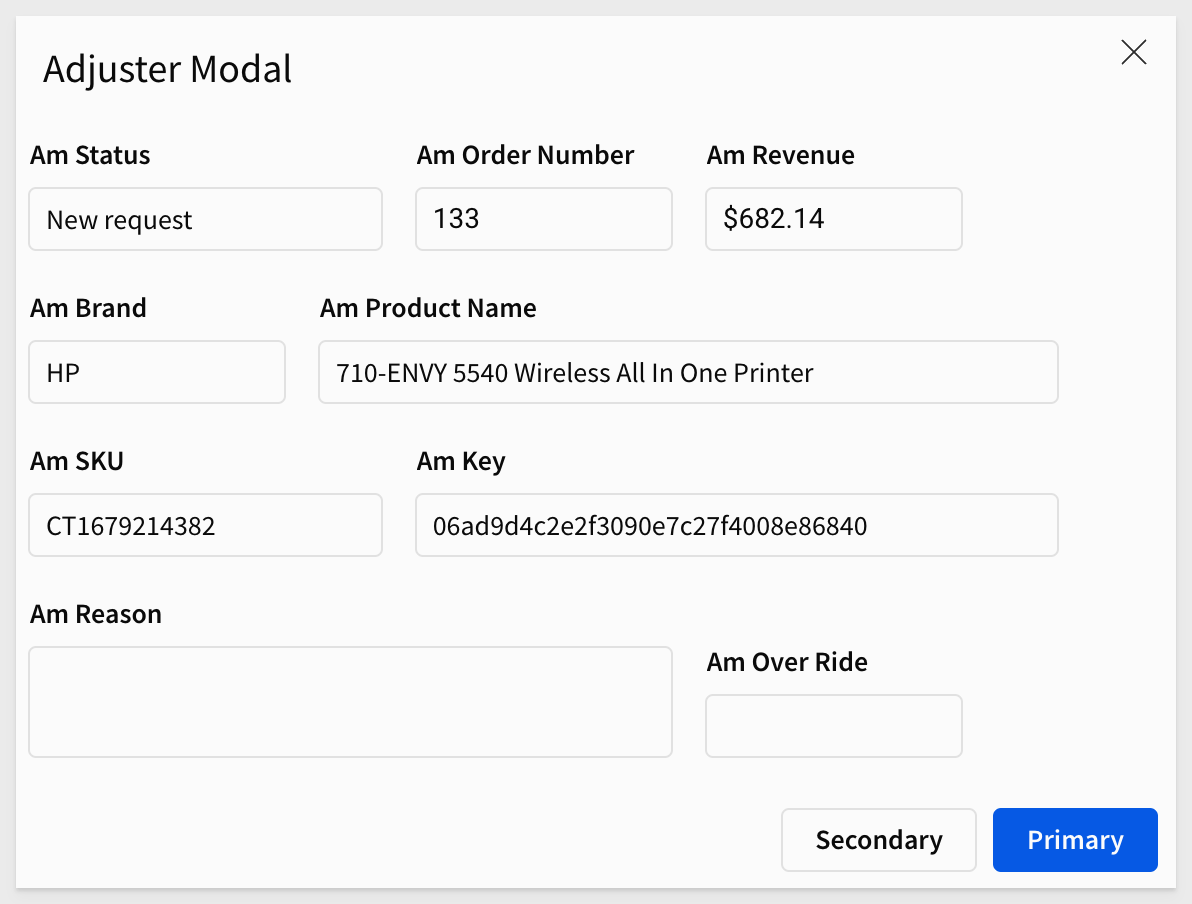
We organized the controls a bit and added a UI > Text to each "block" of controls, just to make it clear what they are. When we are done, the modal should look like this:
We also want to place the two groups of controls into their own Containers. This will allow us to target everything in a container by its name. A big time saver.
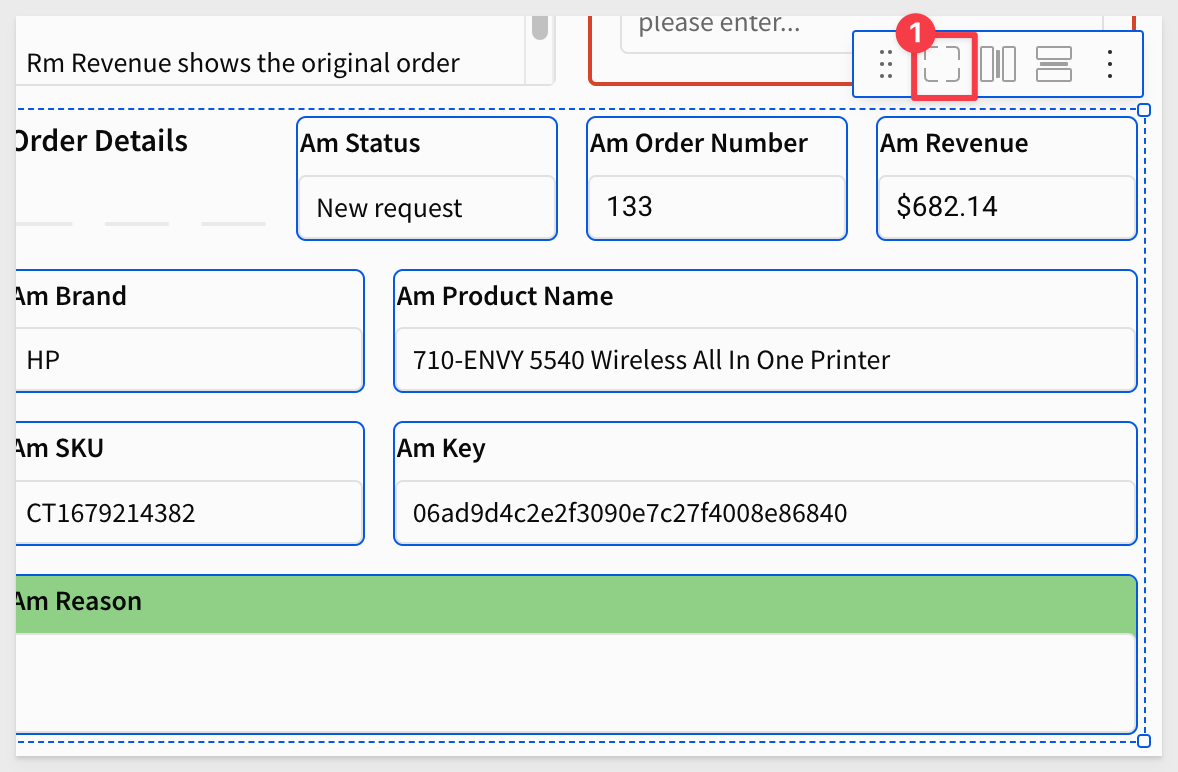
Just click-hold and drag around the controls and select the container icon as shown below:

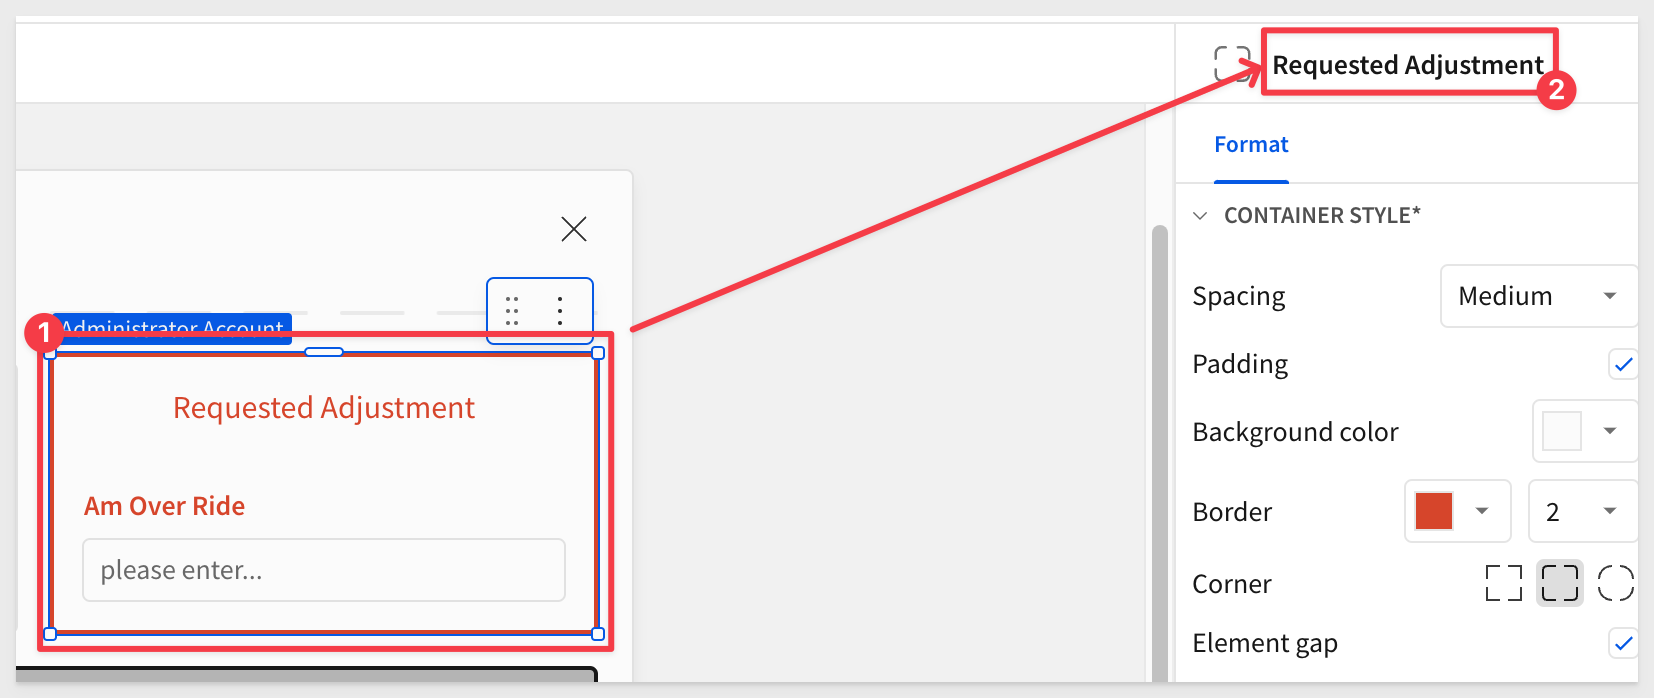
The container's name can be set as shown, by clicking on the name (numbered item 2 below):
Repeat to create a second container for the Order Details controls:
Here is the text for Instructions:
An adjustment is requested on this order and line item.

Make sure to include some information with your update.
Before we create actions to save an "adjustment", we need to create a place for them to be stored.
We will use another Sigma input table for this.
On the Approvals page, create a new Input > Empty input table below the existing table.
Set the connection to the Sigma sample database.
We will need to add and configure a few columns. These columns will be populated by data sent by the Approvals Modal when the user saves an override.
Add and configure the following columns:
Column Name:      Type:
Order Number      Number
Previous Revenue  Number
Latest OverRide   Number
Latest Status     Text
Reason            Text
Key               Text
The Key column can be hidden once testing is done.
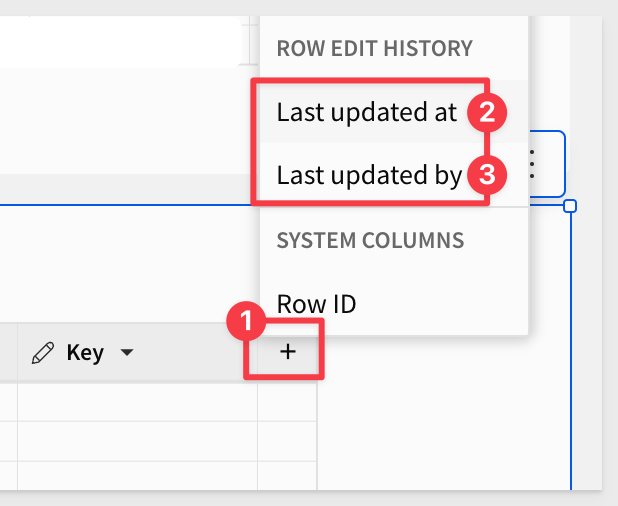
Also add the Sigma supplied columns for Last updated at and Last updated by:
If any rows got created accidentally, just select them and delete them.
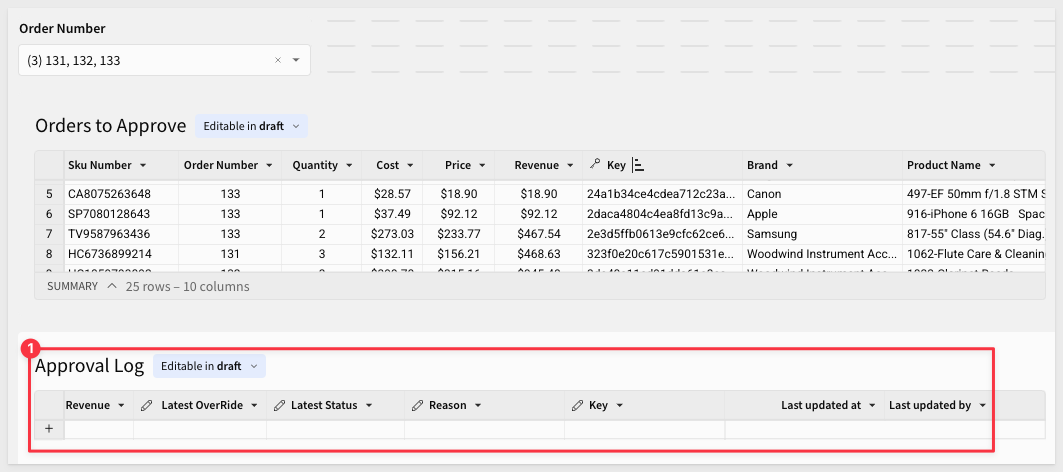
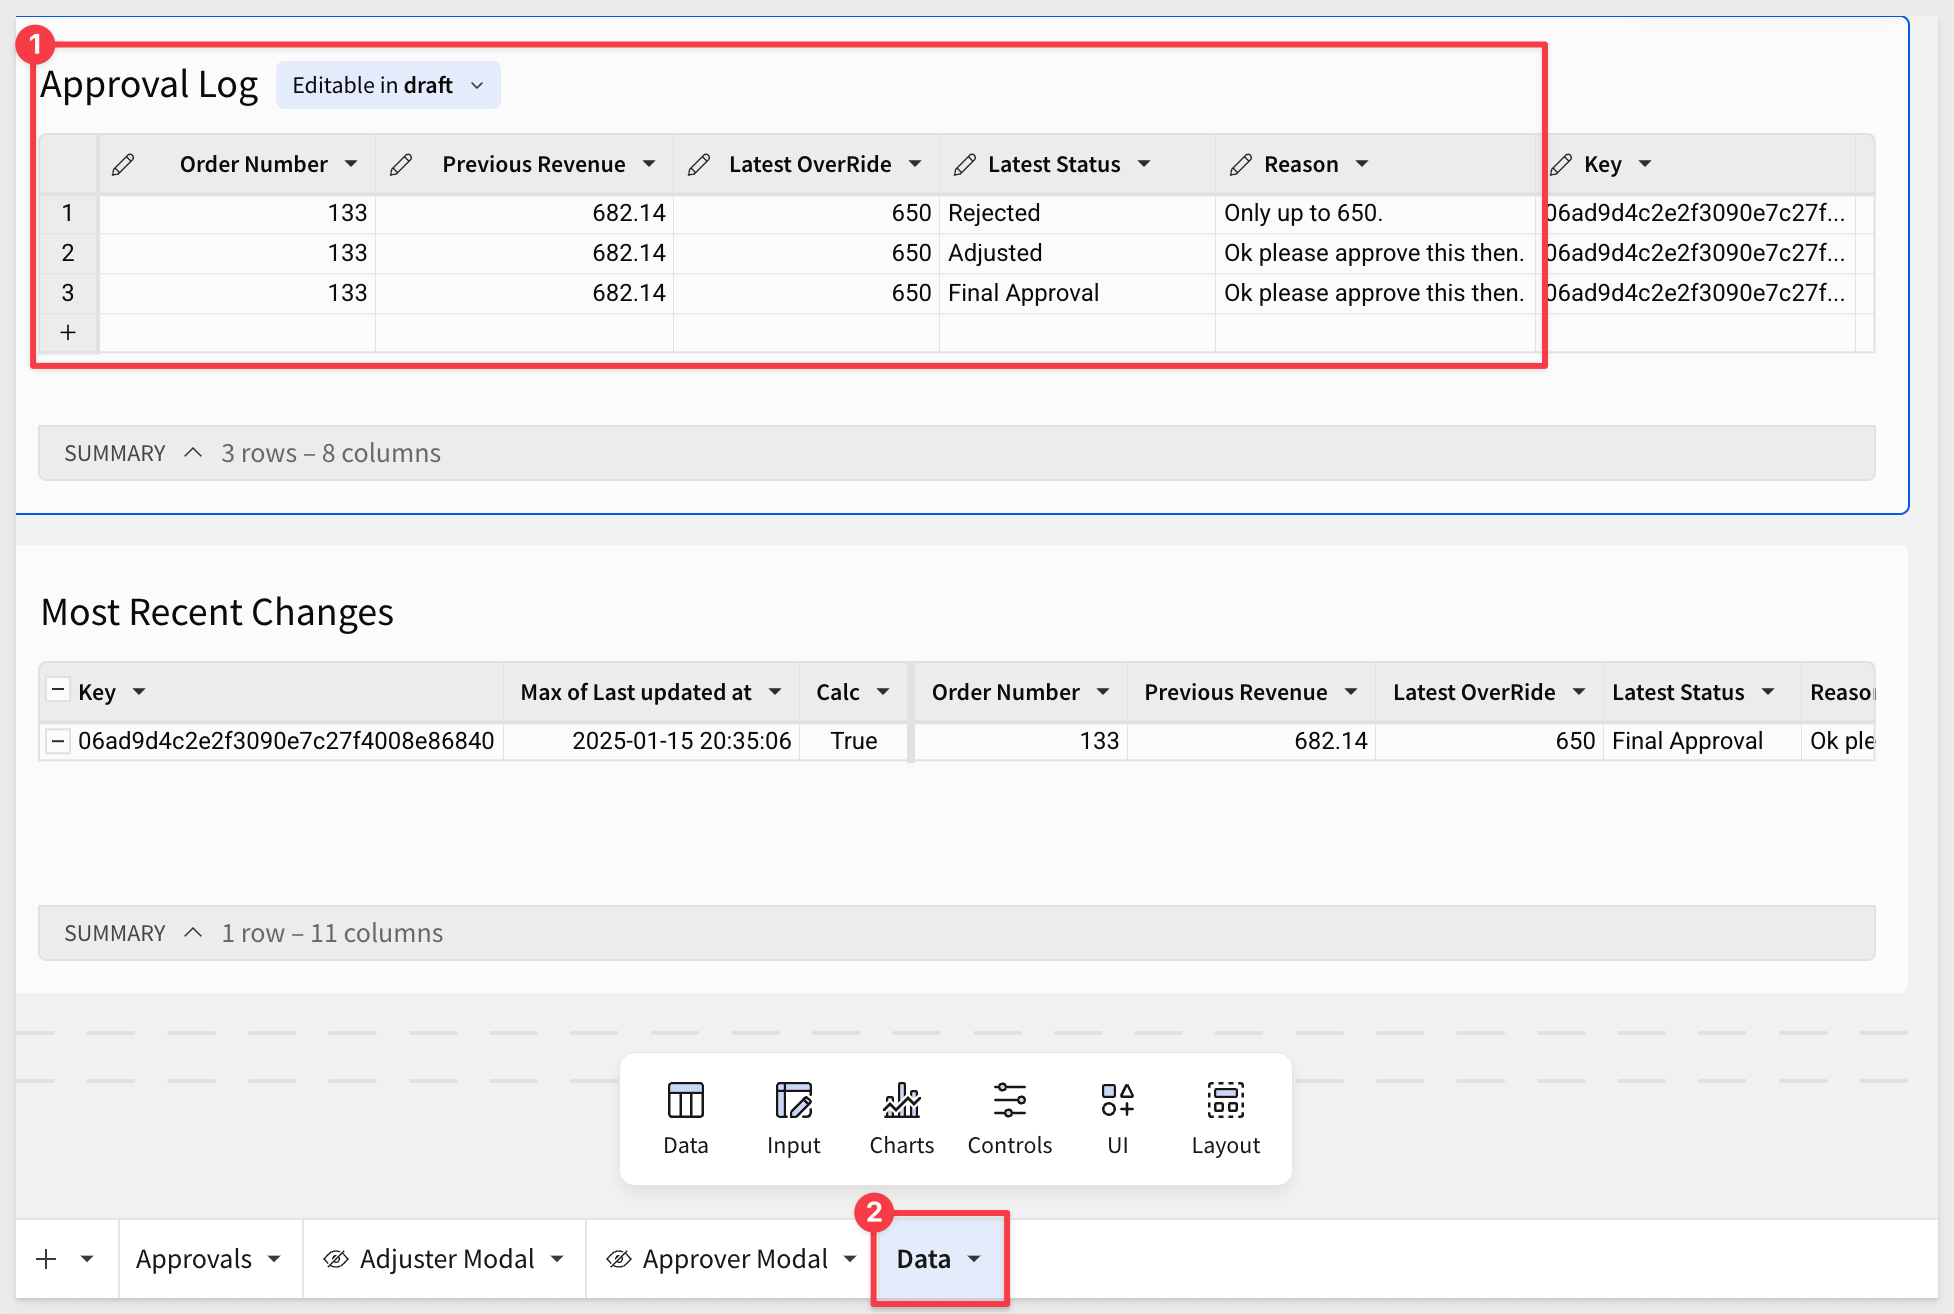
Rename the new input table to Approval Log:
Most recent records
Now that our Approval Log is capturing all the changes, we can use that to provide more functionality to the user.
To make this useful, we need to implement a method to list the most recent status for each unique item in any order. Remember, each order can include multiple items, and we need to be able to adjust the revenue at the line-item level.
Move the Approval Log to the Data page.
Once it is on the Data page, use it to create a Child table. We do this because:
- 1: We want to leave the
Approval Logtable "unedited", so that we can leverage it anytime to drive any future analytic needs. - 2: We need to filter the data in a child (see point 1) to list only the most recent override for each unique item.
It can be handy to name child elements that are not shown to the user in a way to easily identify them. This is just a preference, and not required.
Rename the child table to Most Recent Adjustments.
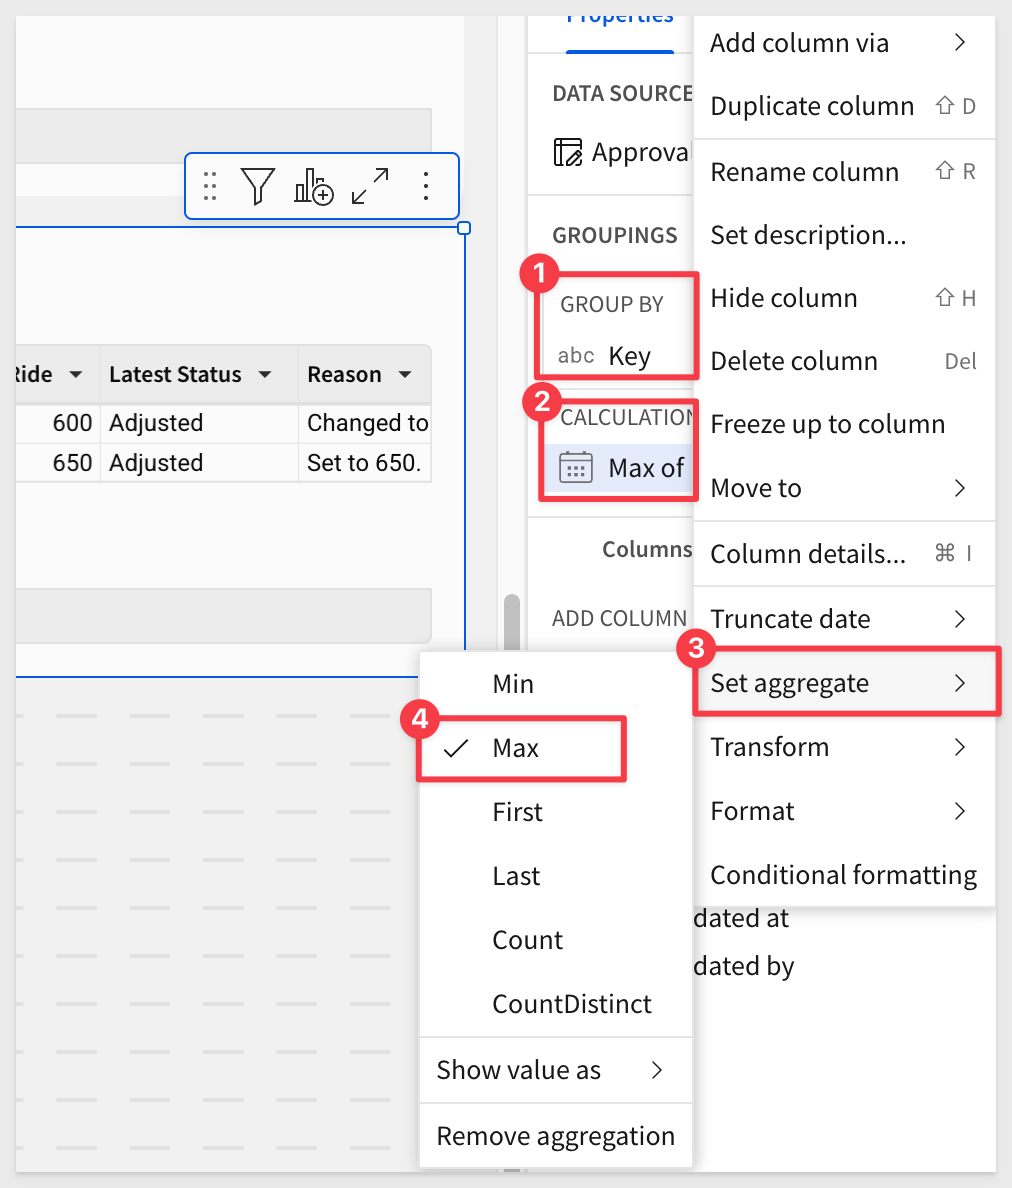
Group the table on Key and drag Last Updated at to CALCULATIONS, changing the aggregation to MAX:
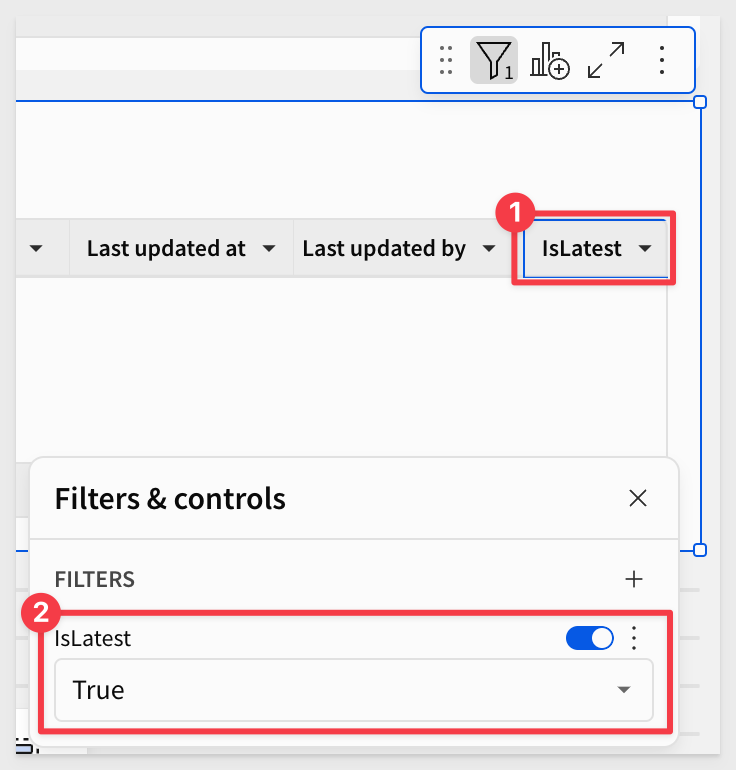
Add a new column and rename it to IsLatest. Set the formula to:
If([Last updated at] = [Max of Last updated at], True)
Set a filter on IsLatest to only show the most recent record:
We have some more work to do related to this and we will come back to it later.
Now that we have a place to store them, let's create the actions required to insert rows into the new Approval Log.
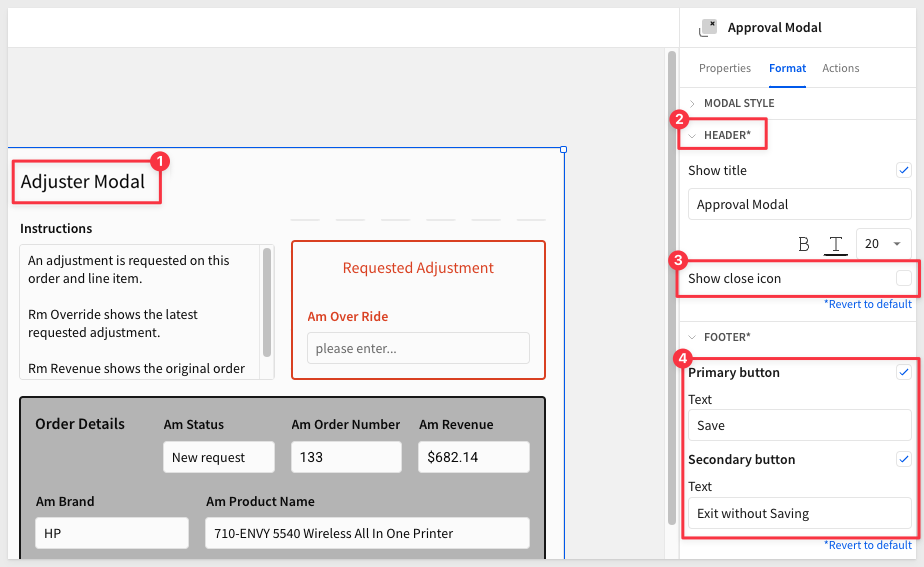
Return to the Adjuster Modal and open its format menu.
We will uncheck the Show close icon since we will provide our own save button.
In the Footer we will set the Primary button text to Save.
Set the Secondary button text to Exit without Saving:
Approval modal actions
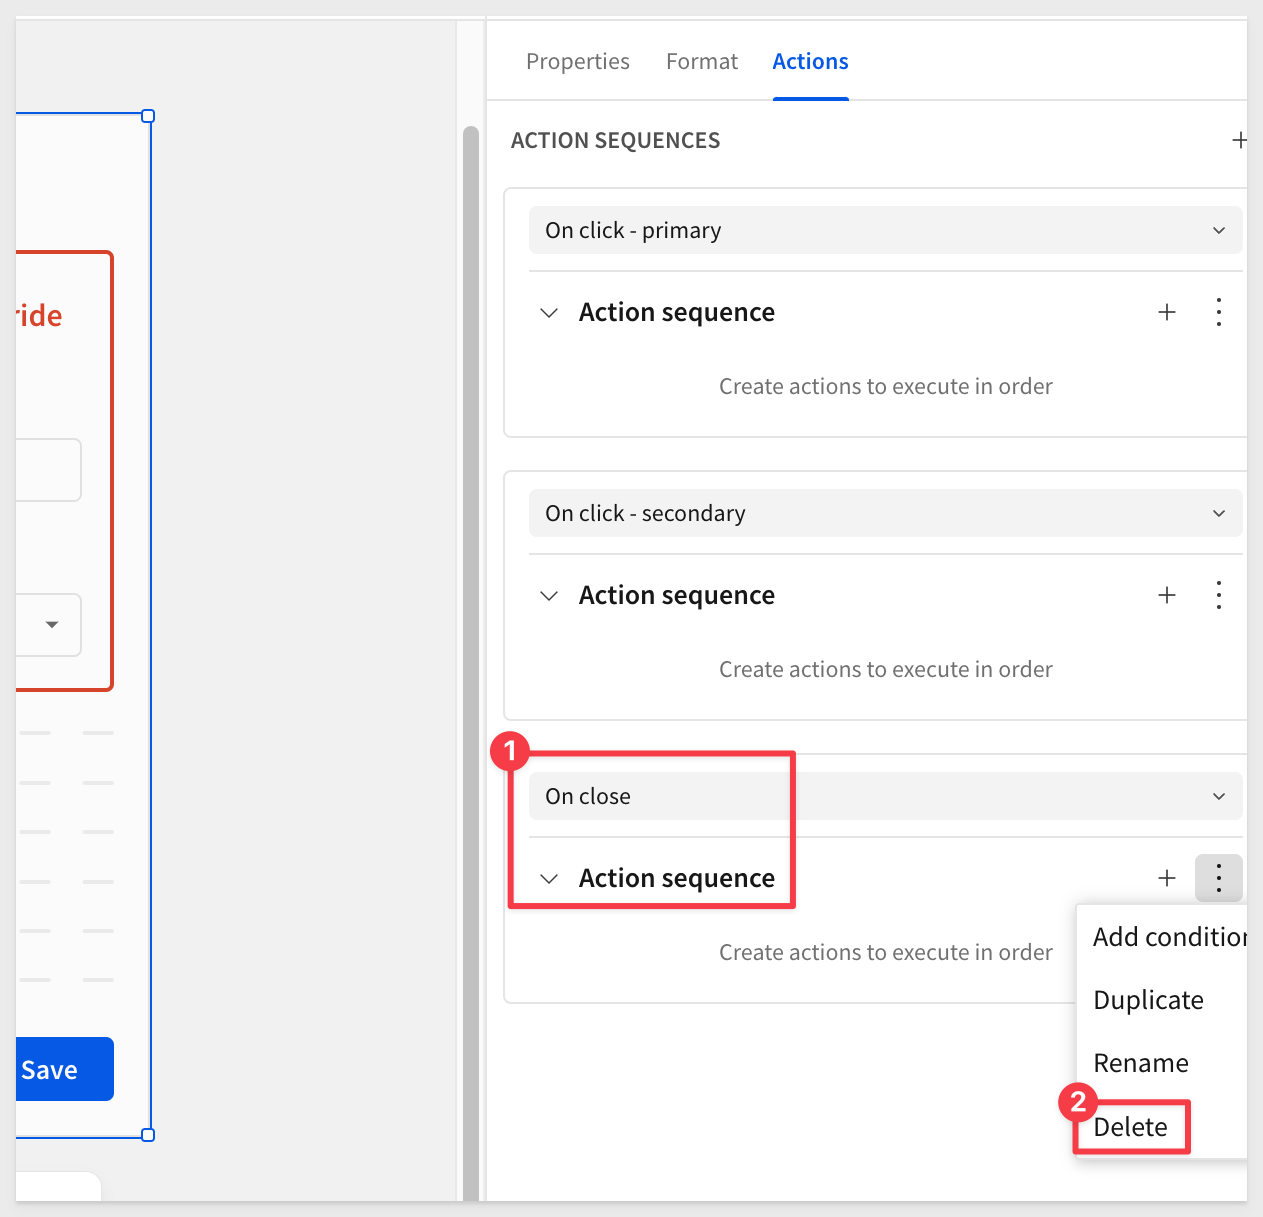
With the Adjuster Modal selected, open the Actions menu. When using the footer buttons there are existing Action Sequences there for us to just configure.
Since we will not be using the On close sequence, we can just delete that:
Secondary button
Let's configure the actions for the Secondary button first.
We don't want any values entered by the previous user to be retained, and just to be safe, we will clear all values as well when the user clicks Exit without Saving button.
This is easy to do with actions, since we have our controls in containers.
To clear both containers, use two actions. Here is the second one configured and targeting the Order Details container.
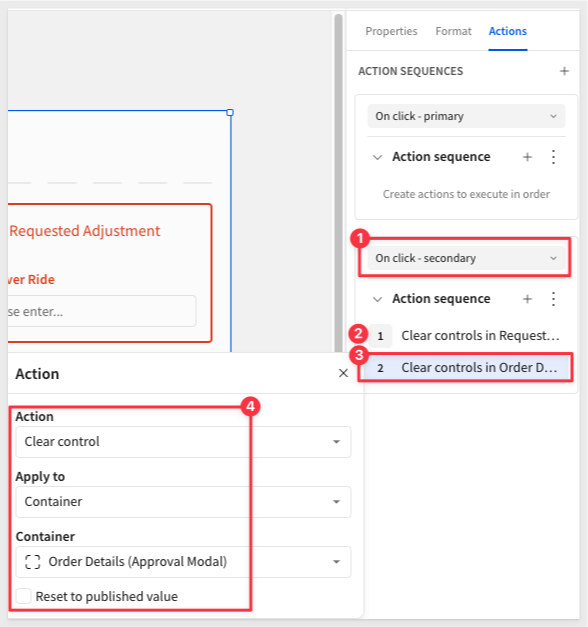
The first action is the same; it just targets the Requested Adjustment container.
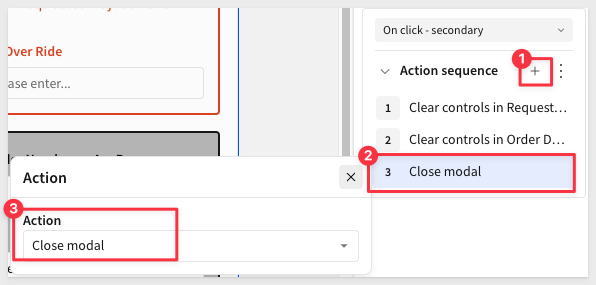
The last action is simply to close the modal, which will return the user to the calling workbook page:
Give that workflow a quick test to make sure it works as expected.

Primary button
Now let's configure the actions for when the user does make a change.
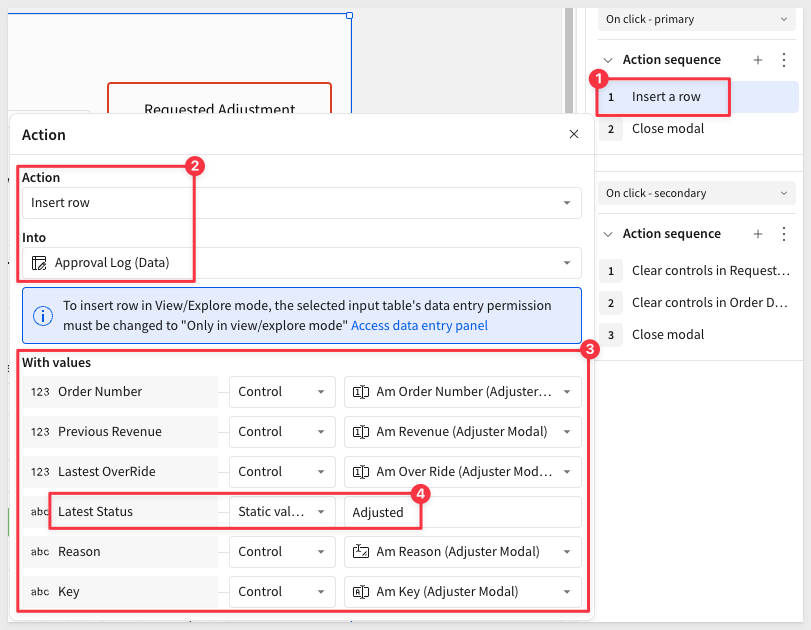
Using On click - primary configure an Insert a row action as shown below:
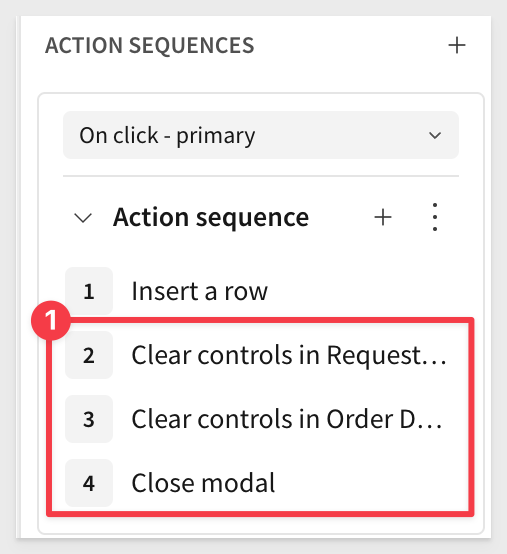
Also configure the actions to clear the containers and close the modal after the insert action:
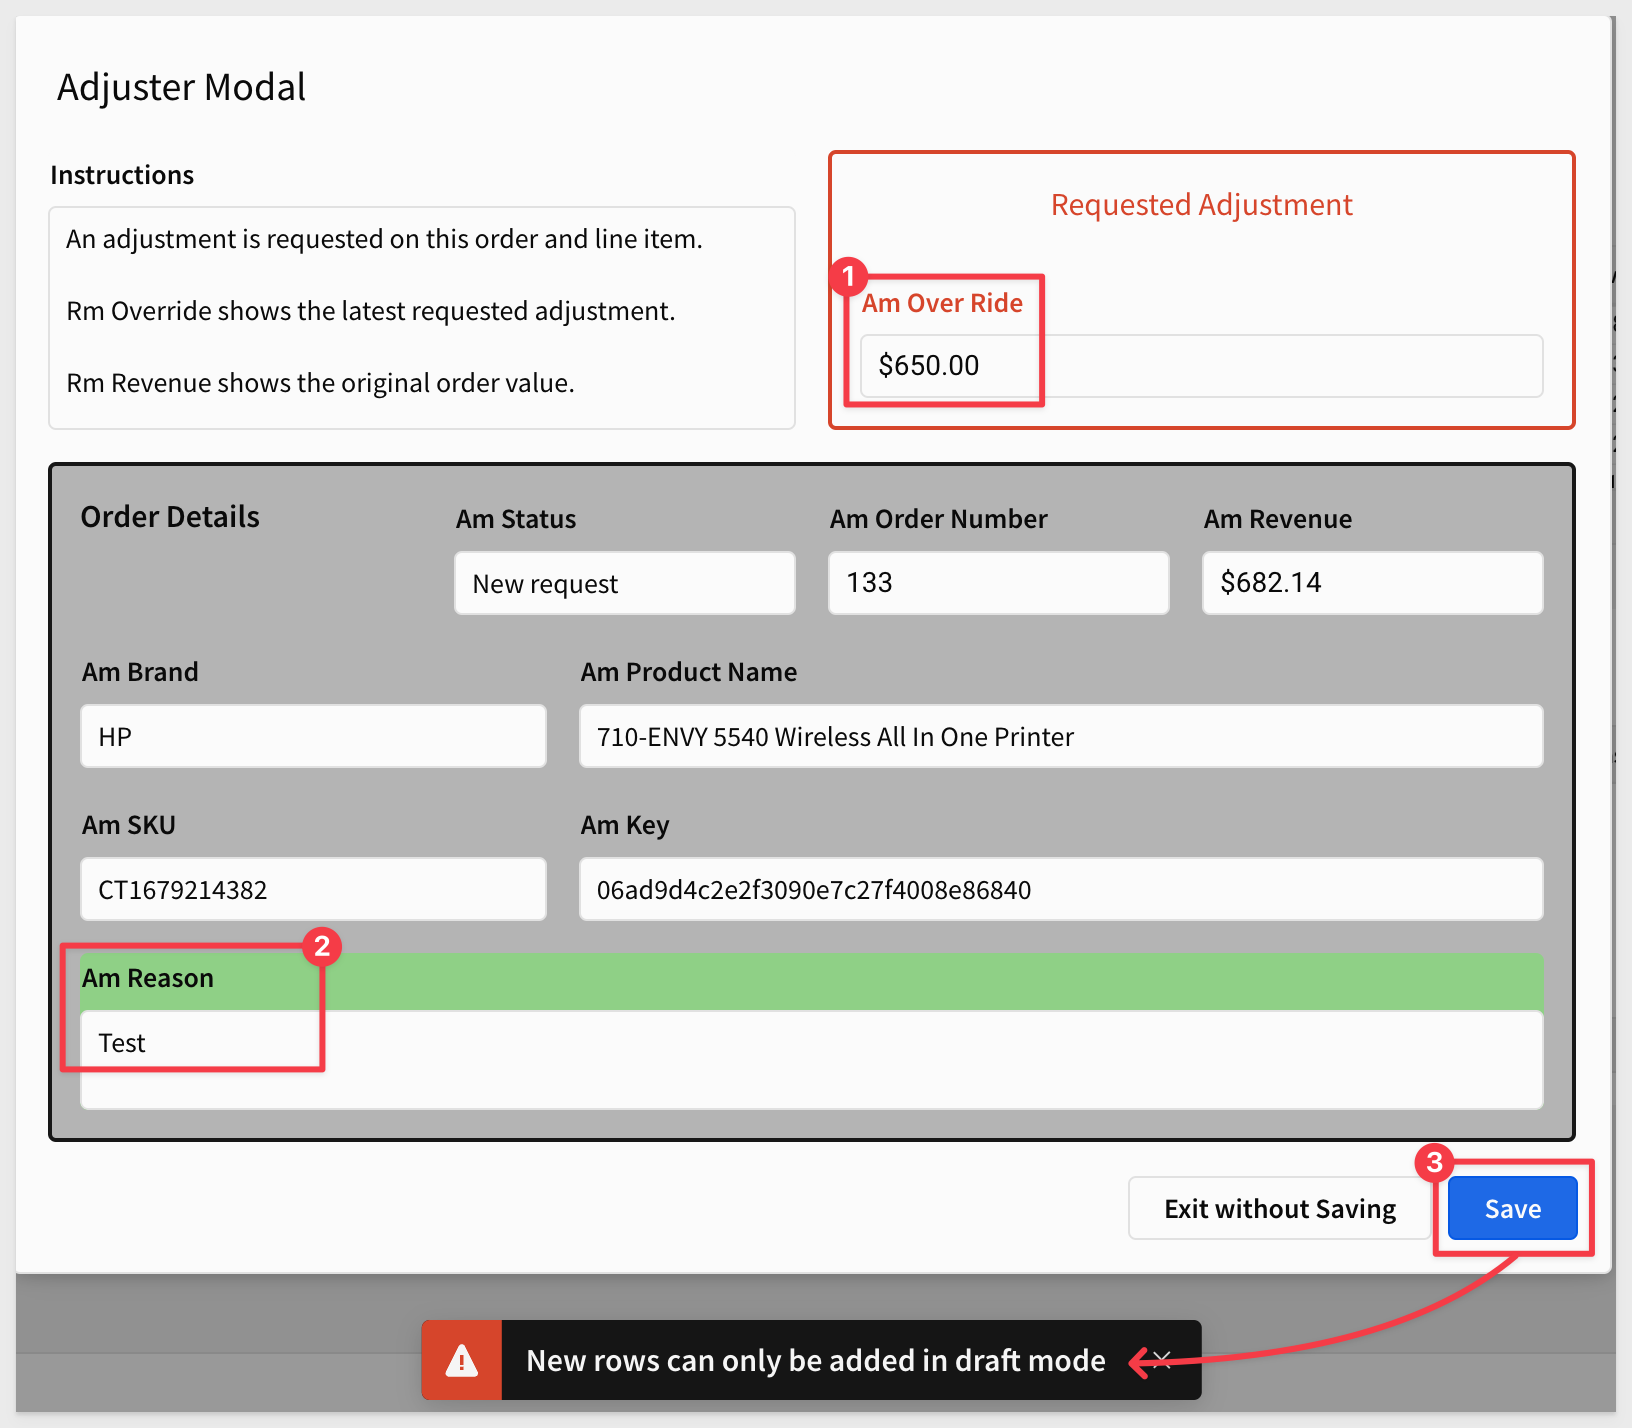
Click Publish, go to the Published version of the workbook and give it a test.
Sigma notifies us that something is wrong:
Set the workbook back to Edit mode.
This error is the result of us trying to test against the Published version when our Approval Log input table we are trying to write to is set to Editable in draft.

Input table governance
Sigma allows you to preserve data integrity and enhance security in input tables through data validation, column protection, and customizable data entry permissions.
During our configuration and testing work our input table was set to Only editable in draft mode. This is fine for building and testing. However, if we want to test in Published mode, we need to first set the input table to Editable in view/explore mode and also click Publish.
It is fine to switch between modes when we are building. We just want to make sure the functionality is understood.
With the workbook still in Edit mode, retest the workflow again. It should work as expected now.
The Approval Log was moved back to the Approvals page for this video only:

Our use case calls for two user personas. We will use Adjuster to represent the person interacting with a customer, making adjustments and dealing with rejections after the fact.
The second persona will be the person who has the final say on any adjustment request. We will call them the Approver.
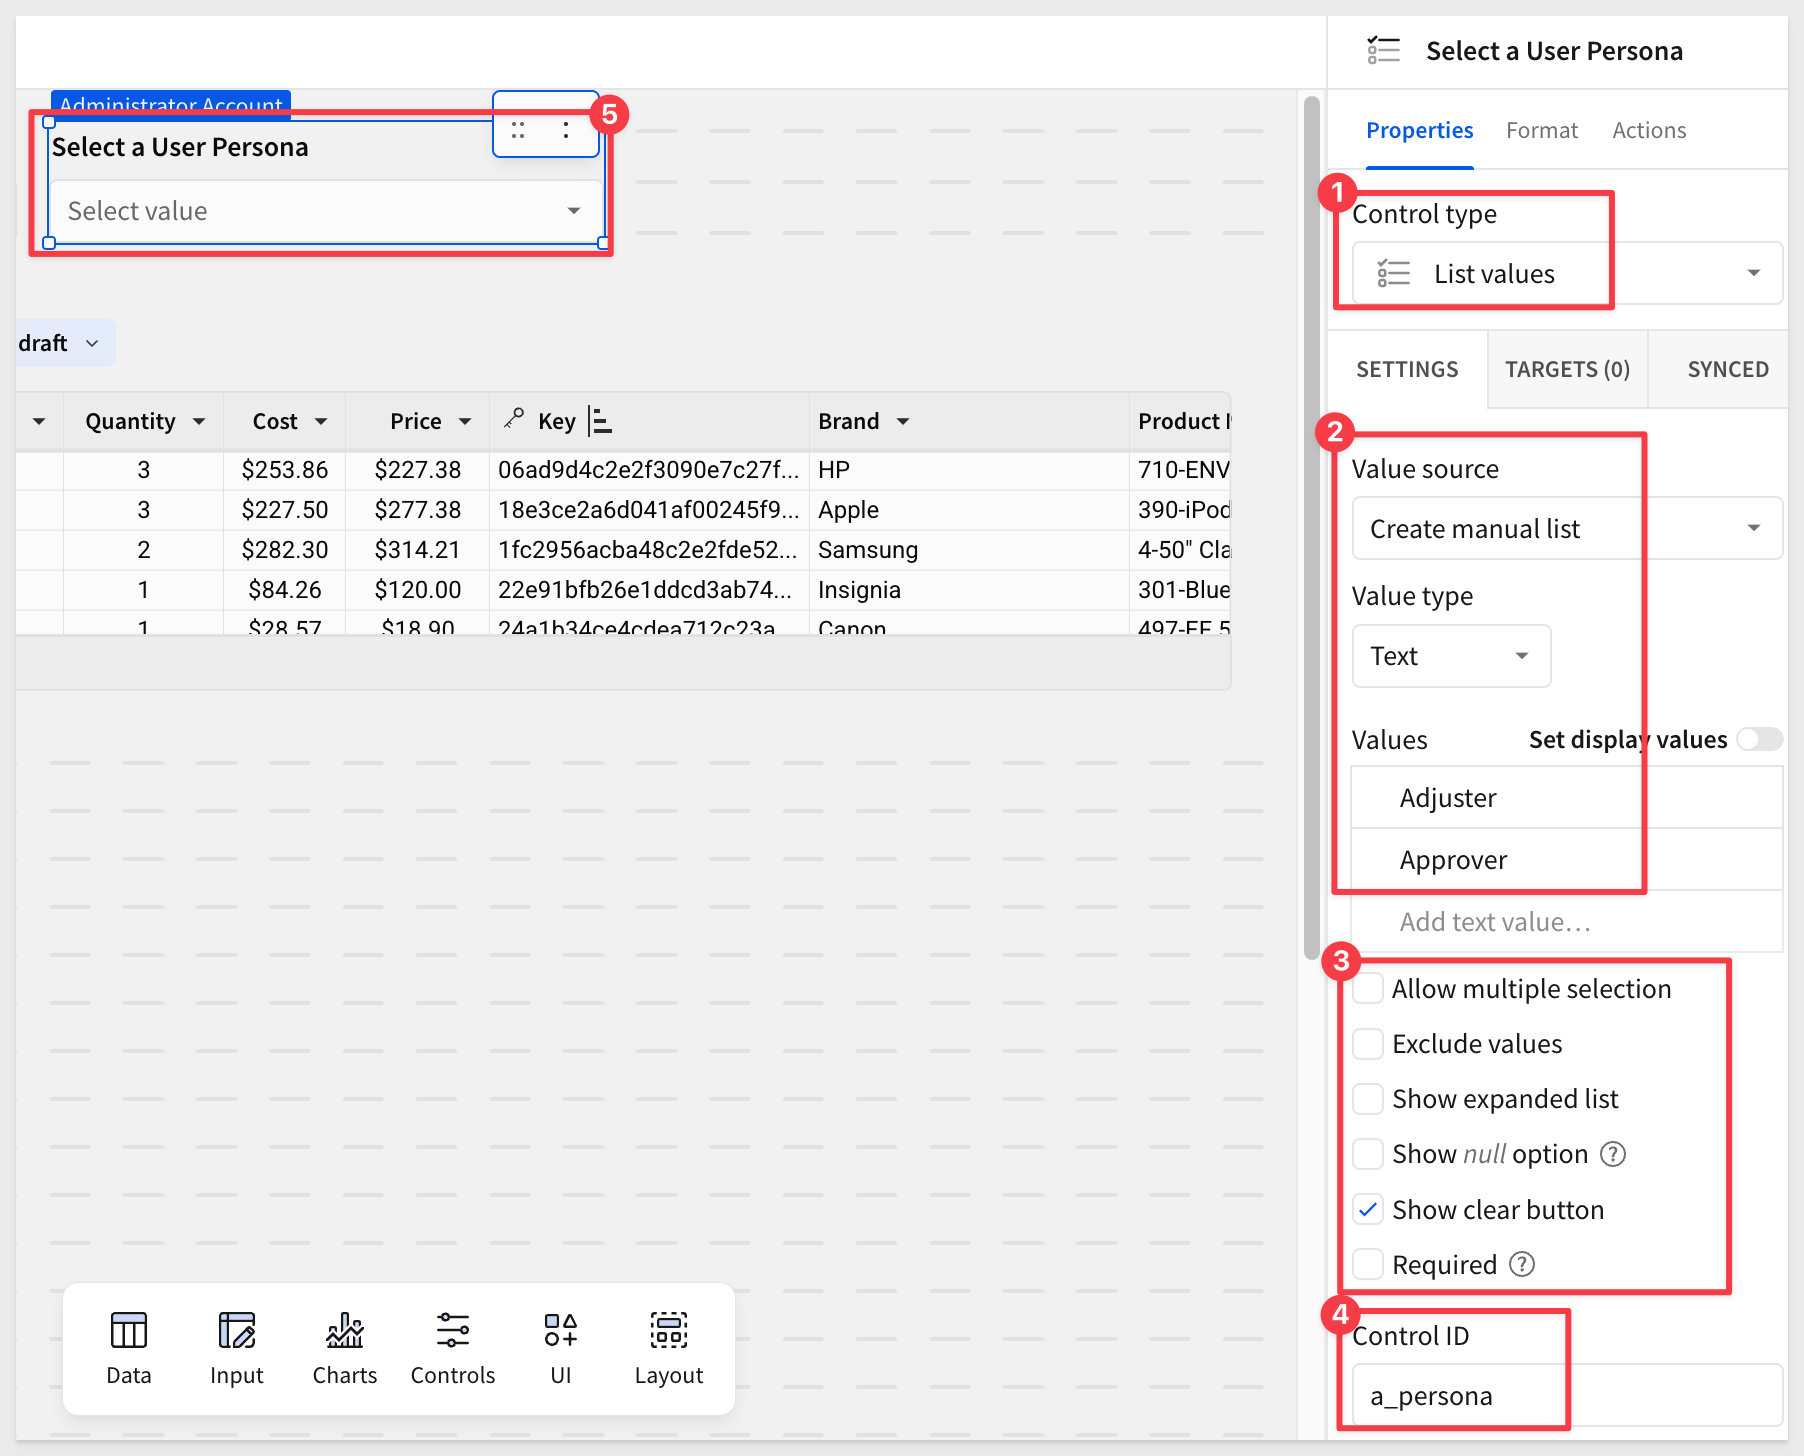
On the Approvals page, add a new List control and configure it as shown:
Delete all test rows from the Approval Log table on the Data page.
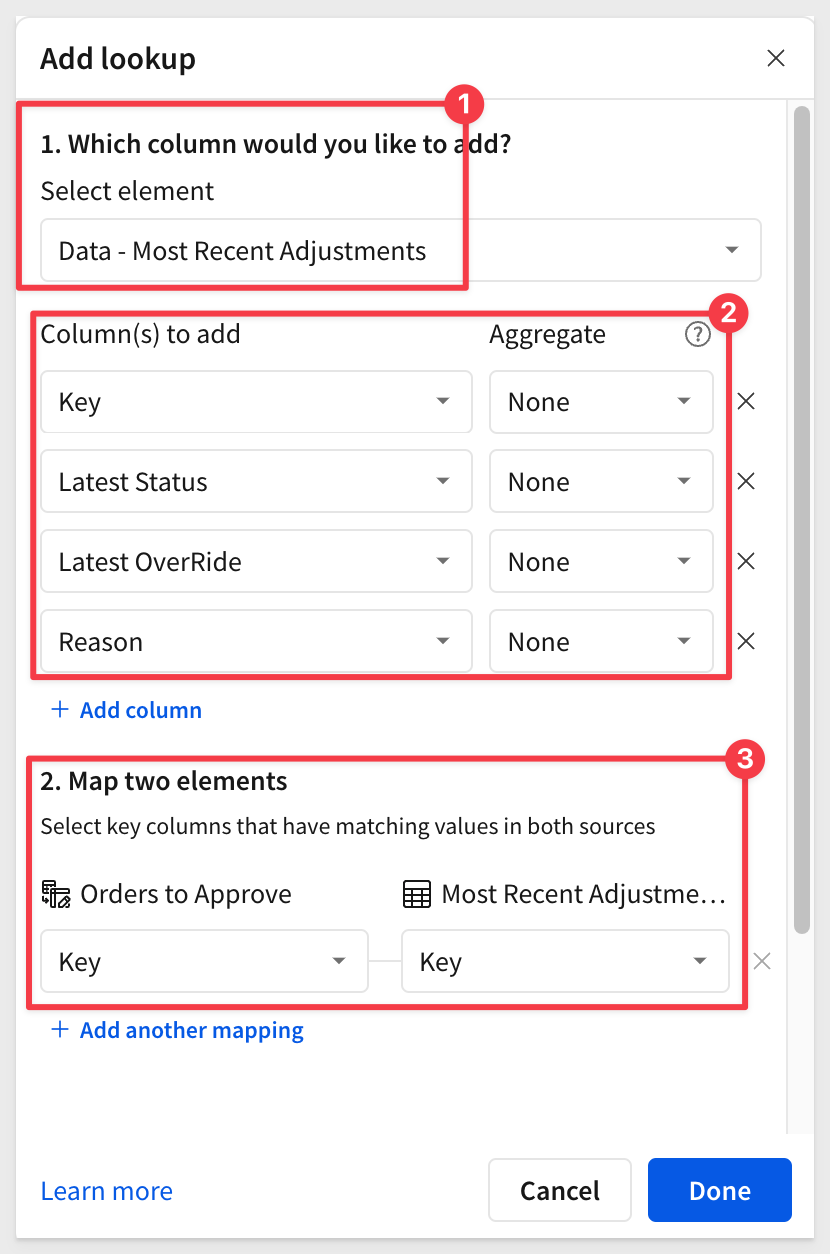
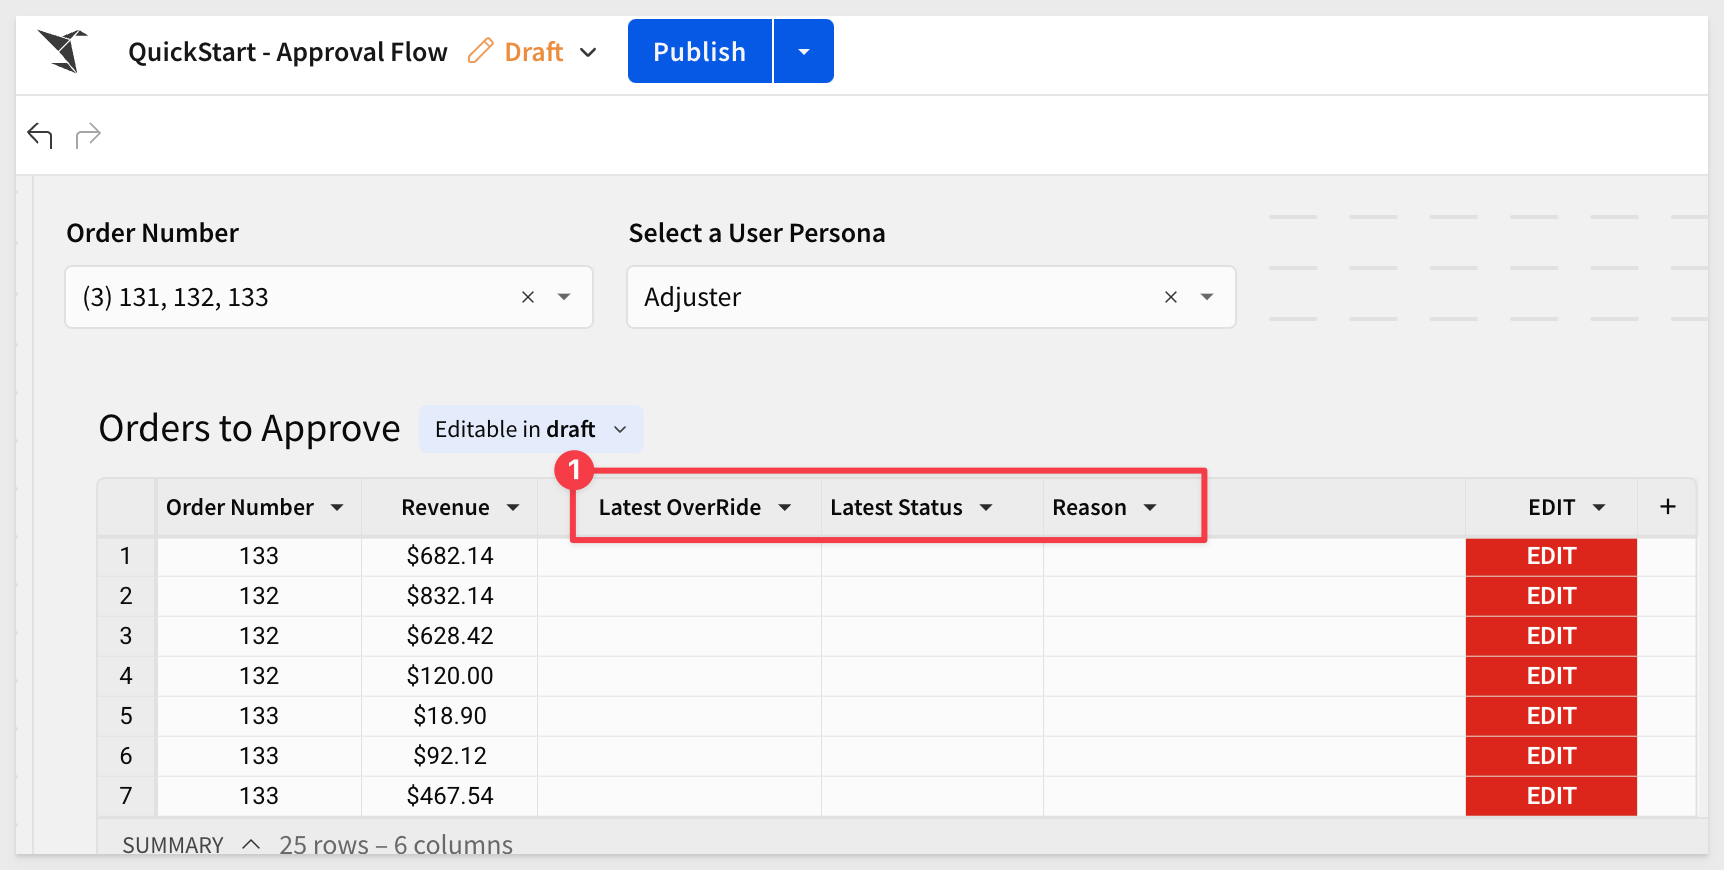
Back on the Approvals page, add some columns to the Orders to Approve table via Lookup:
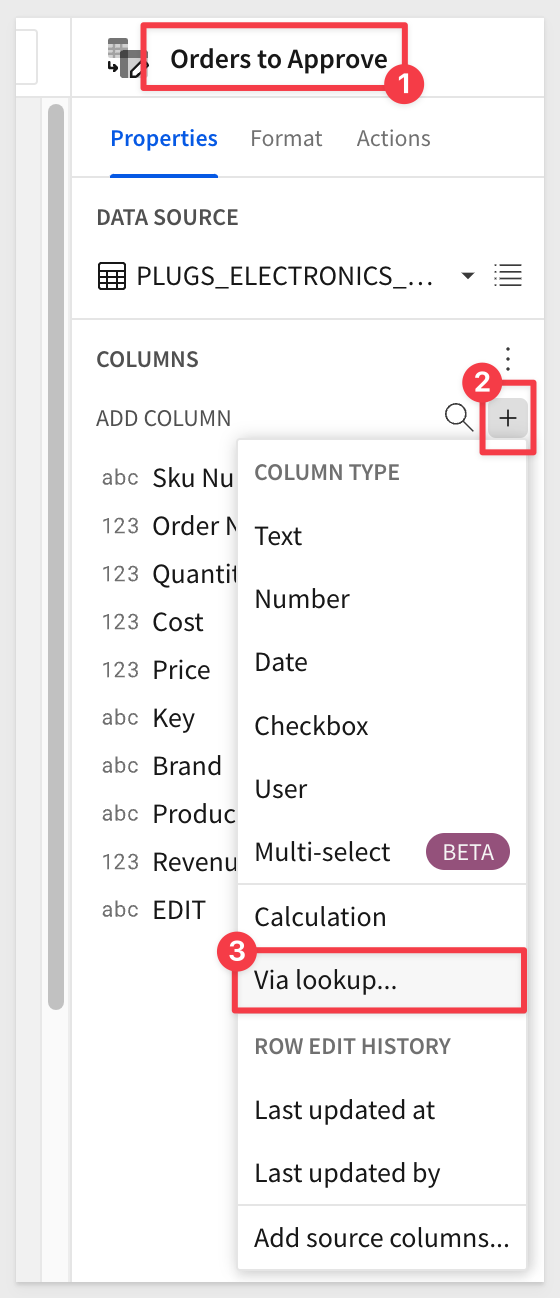
Configure these columns, matching on the Key column in the two elements:
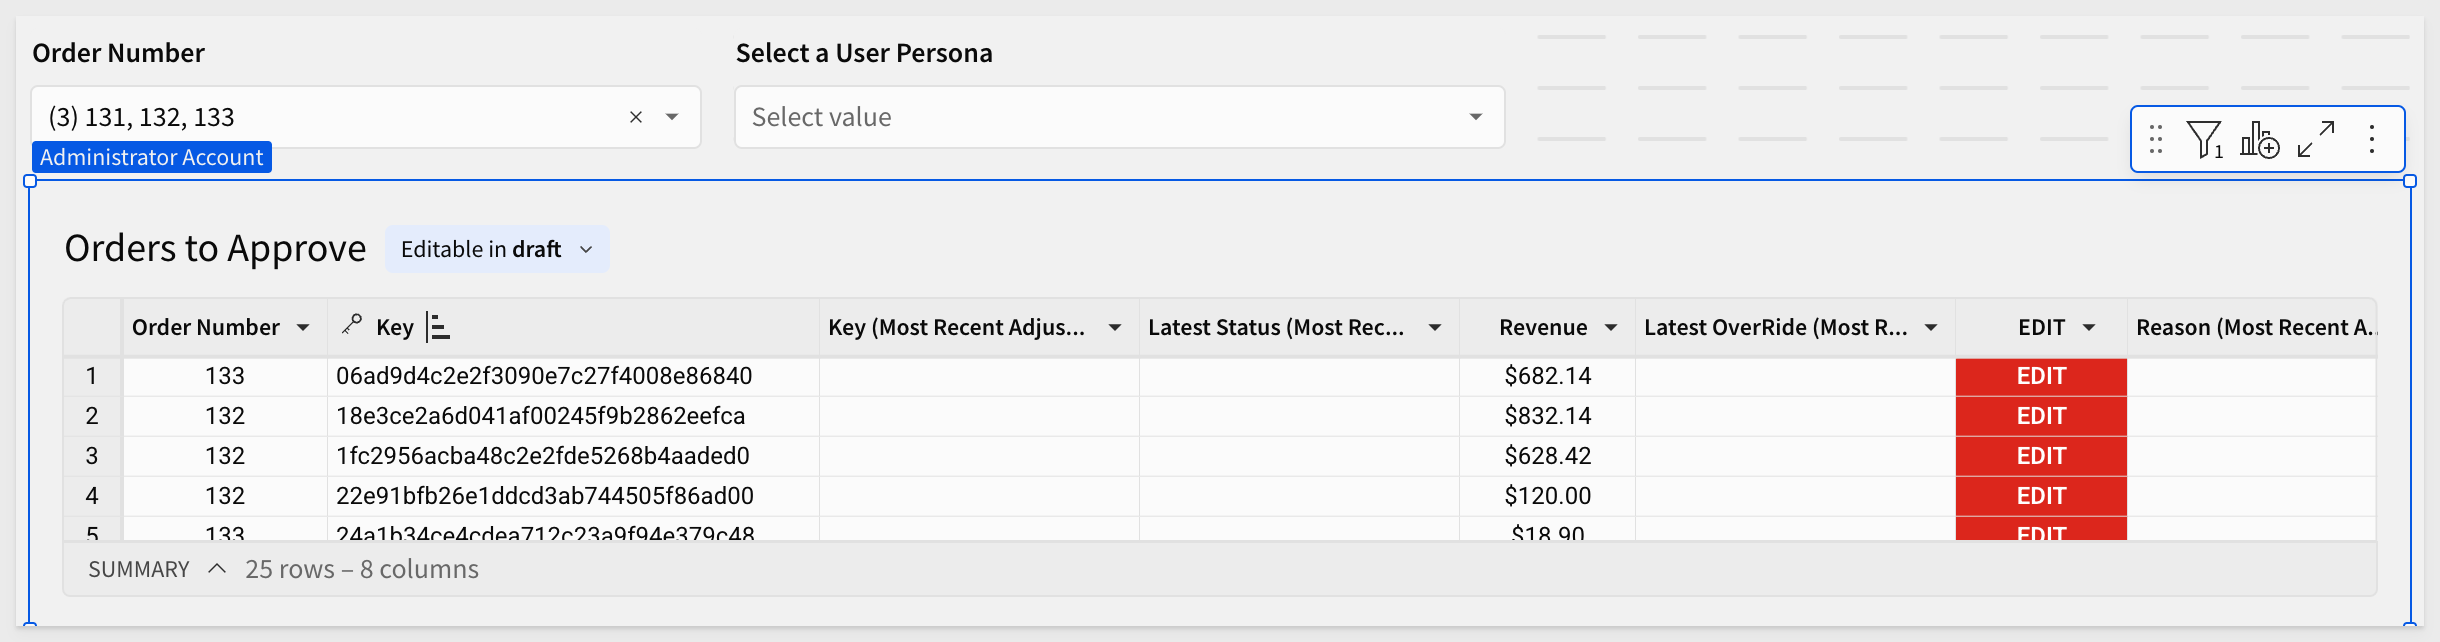
While testing it can be useful to hide some columns in the Orders to Approve table, which should look something like this after adding the lookup:
Let's pause for a moment to add the Approver modal so that we have all the UI elements we need to make this data app work.
Now that we have personas, we can start to expand the functionality to make the data app respond to actions, based on the selected persona.
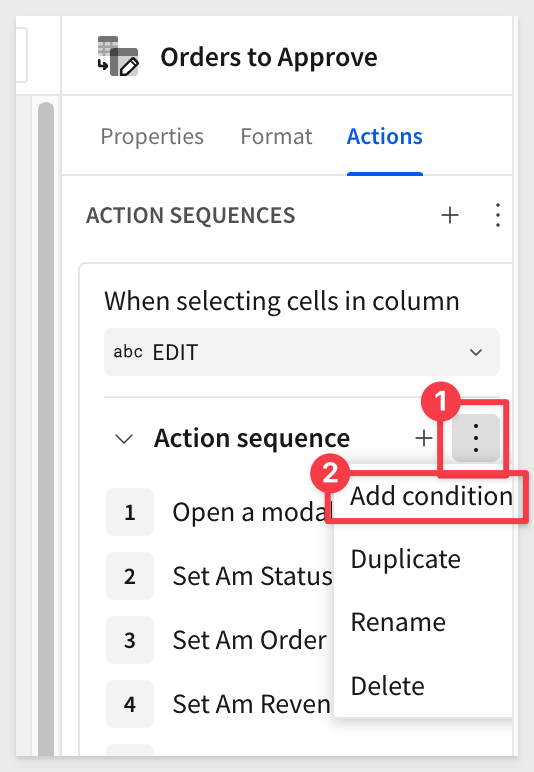
In the Actions panel on the Orders to Approve table, we have our existing action sequence that reacts when the user clicks the EDIT cell.
We will make this sequence conditional, so that it will only run when the condition is met. In this case, the condition will be that the Latest Status cell in the selected row is blank.
First, add the condition:
Configure it as shown:

Since there are no rows with any status, the Adjuster Modal should still appear when EDIT is clicked. That is expected.
Now we can create the Approver Modal. This is very much a repeat of how we created the Adjuster Modal, tweaked for rejections and so forth.
In fact, we can just duplicate the Adjuster Modal to save some time:
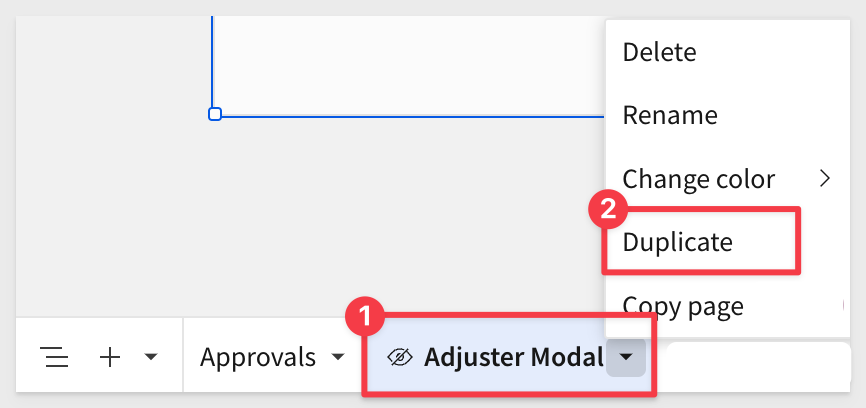
Rename the copy to Approver Modal and change its title to match.
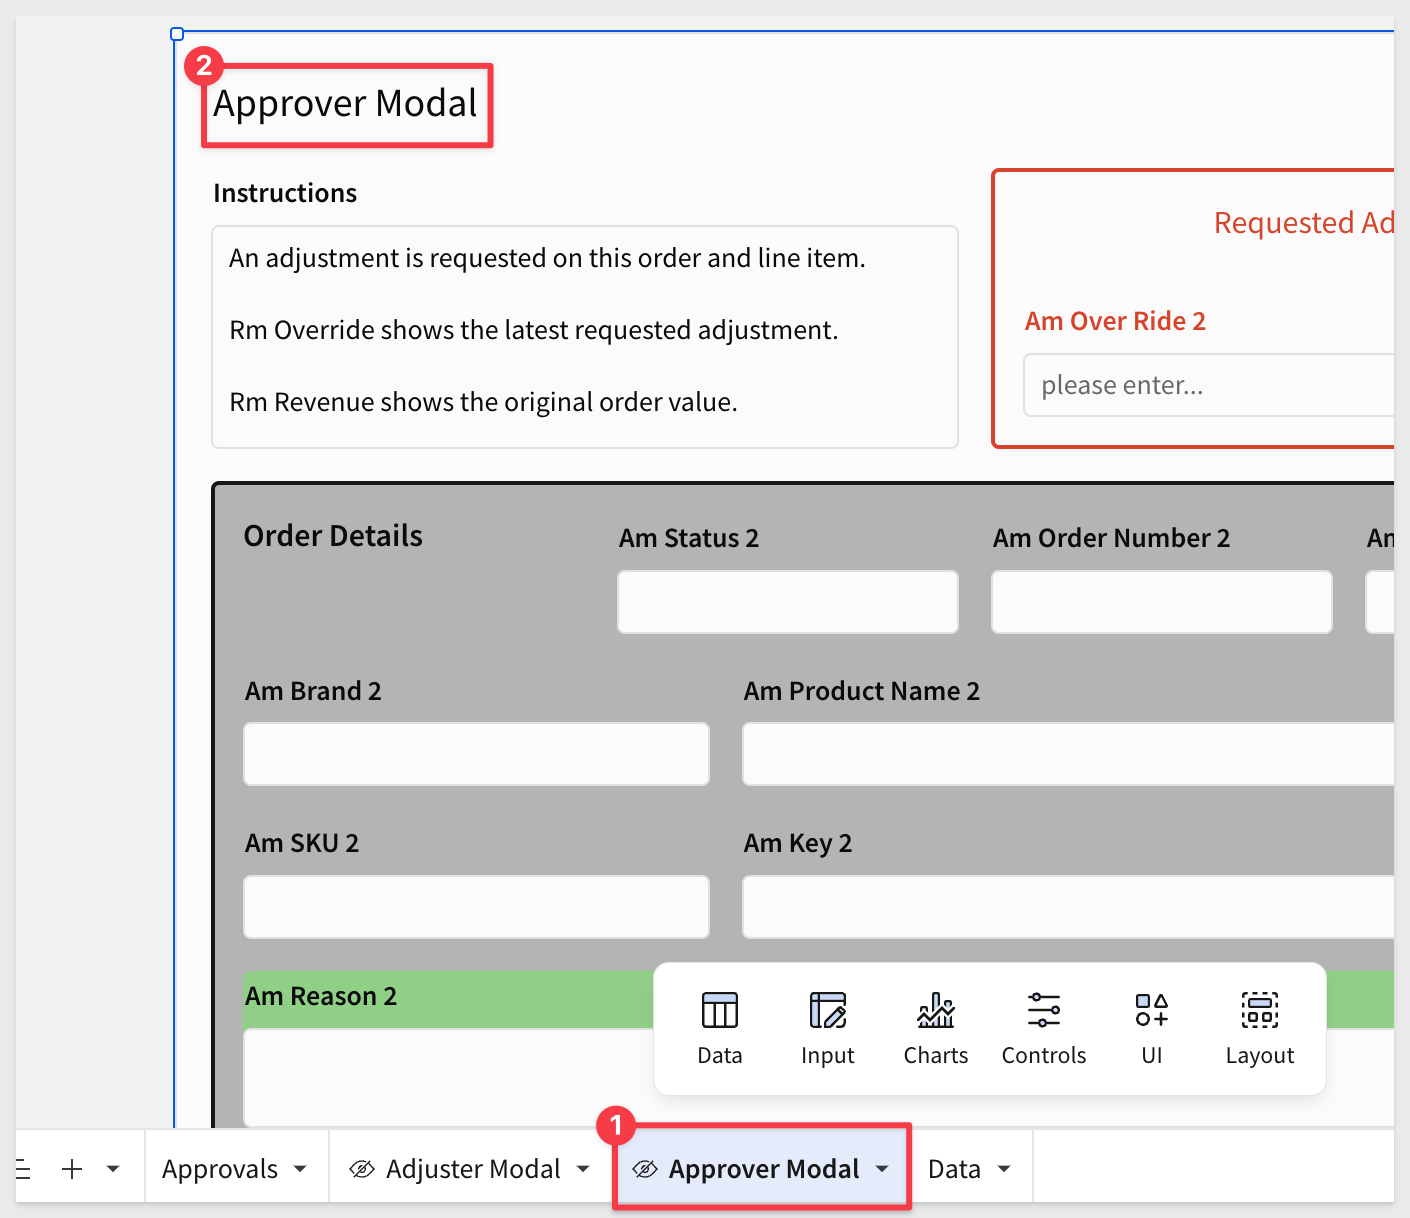
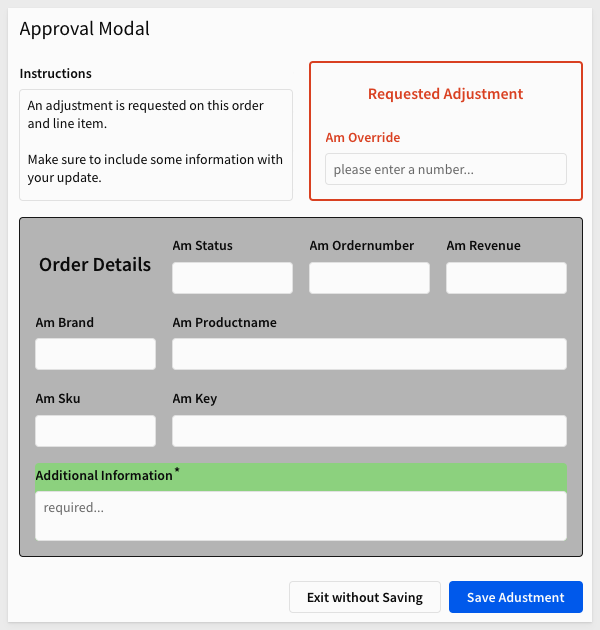
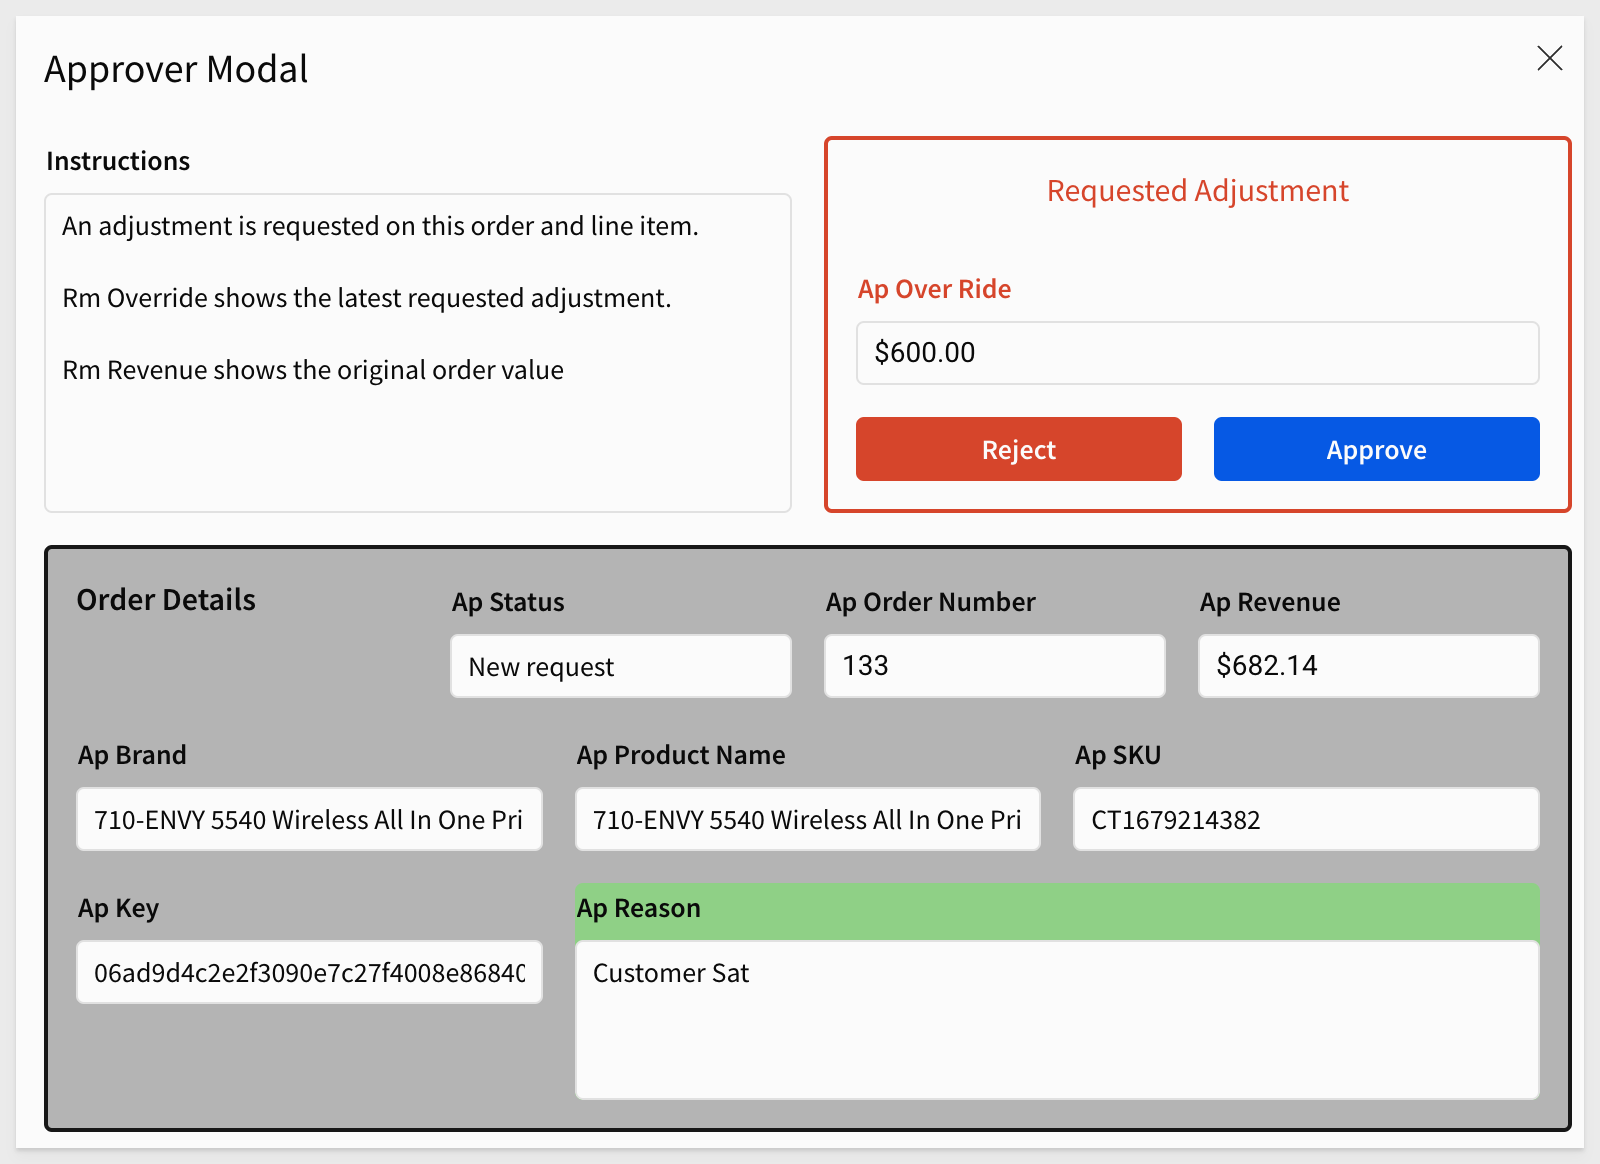
Next we will update the Instructions to:
An adjustment is requested on this order and line item.

Rm Override shows the latest requested adjustment.

Rm Revenue shows the original order value.
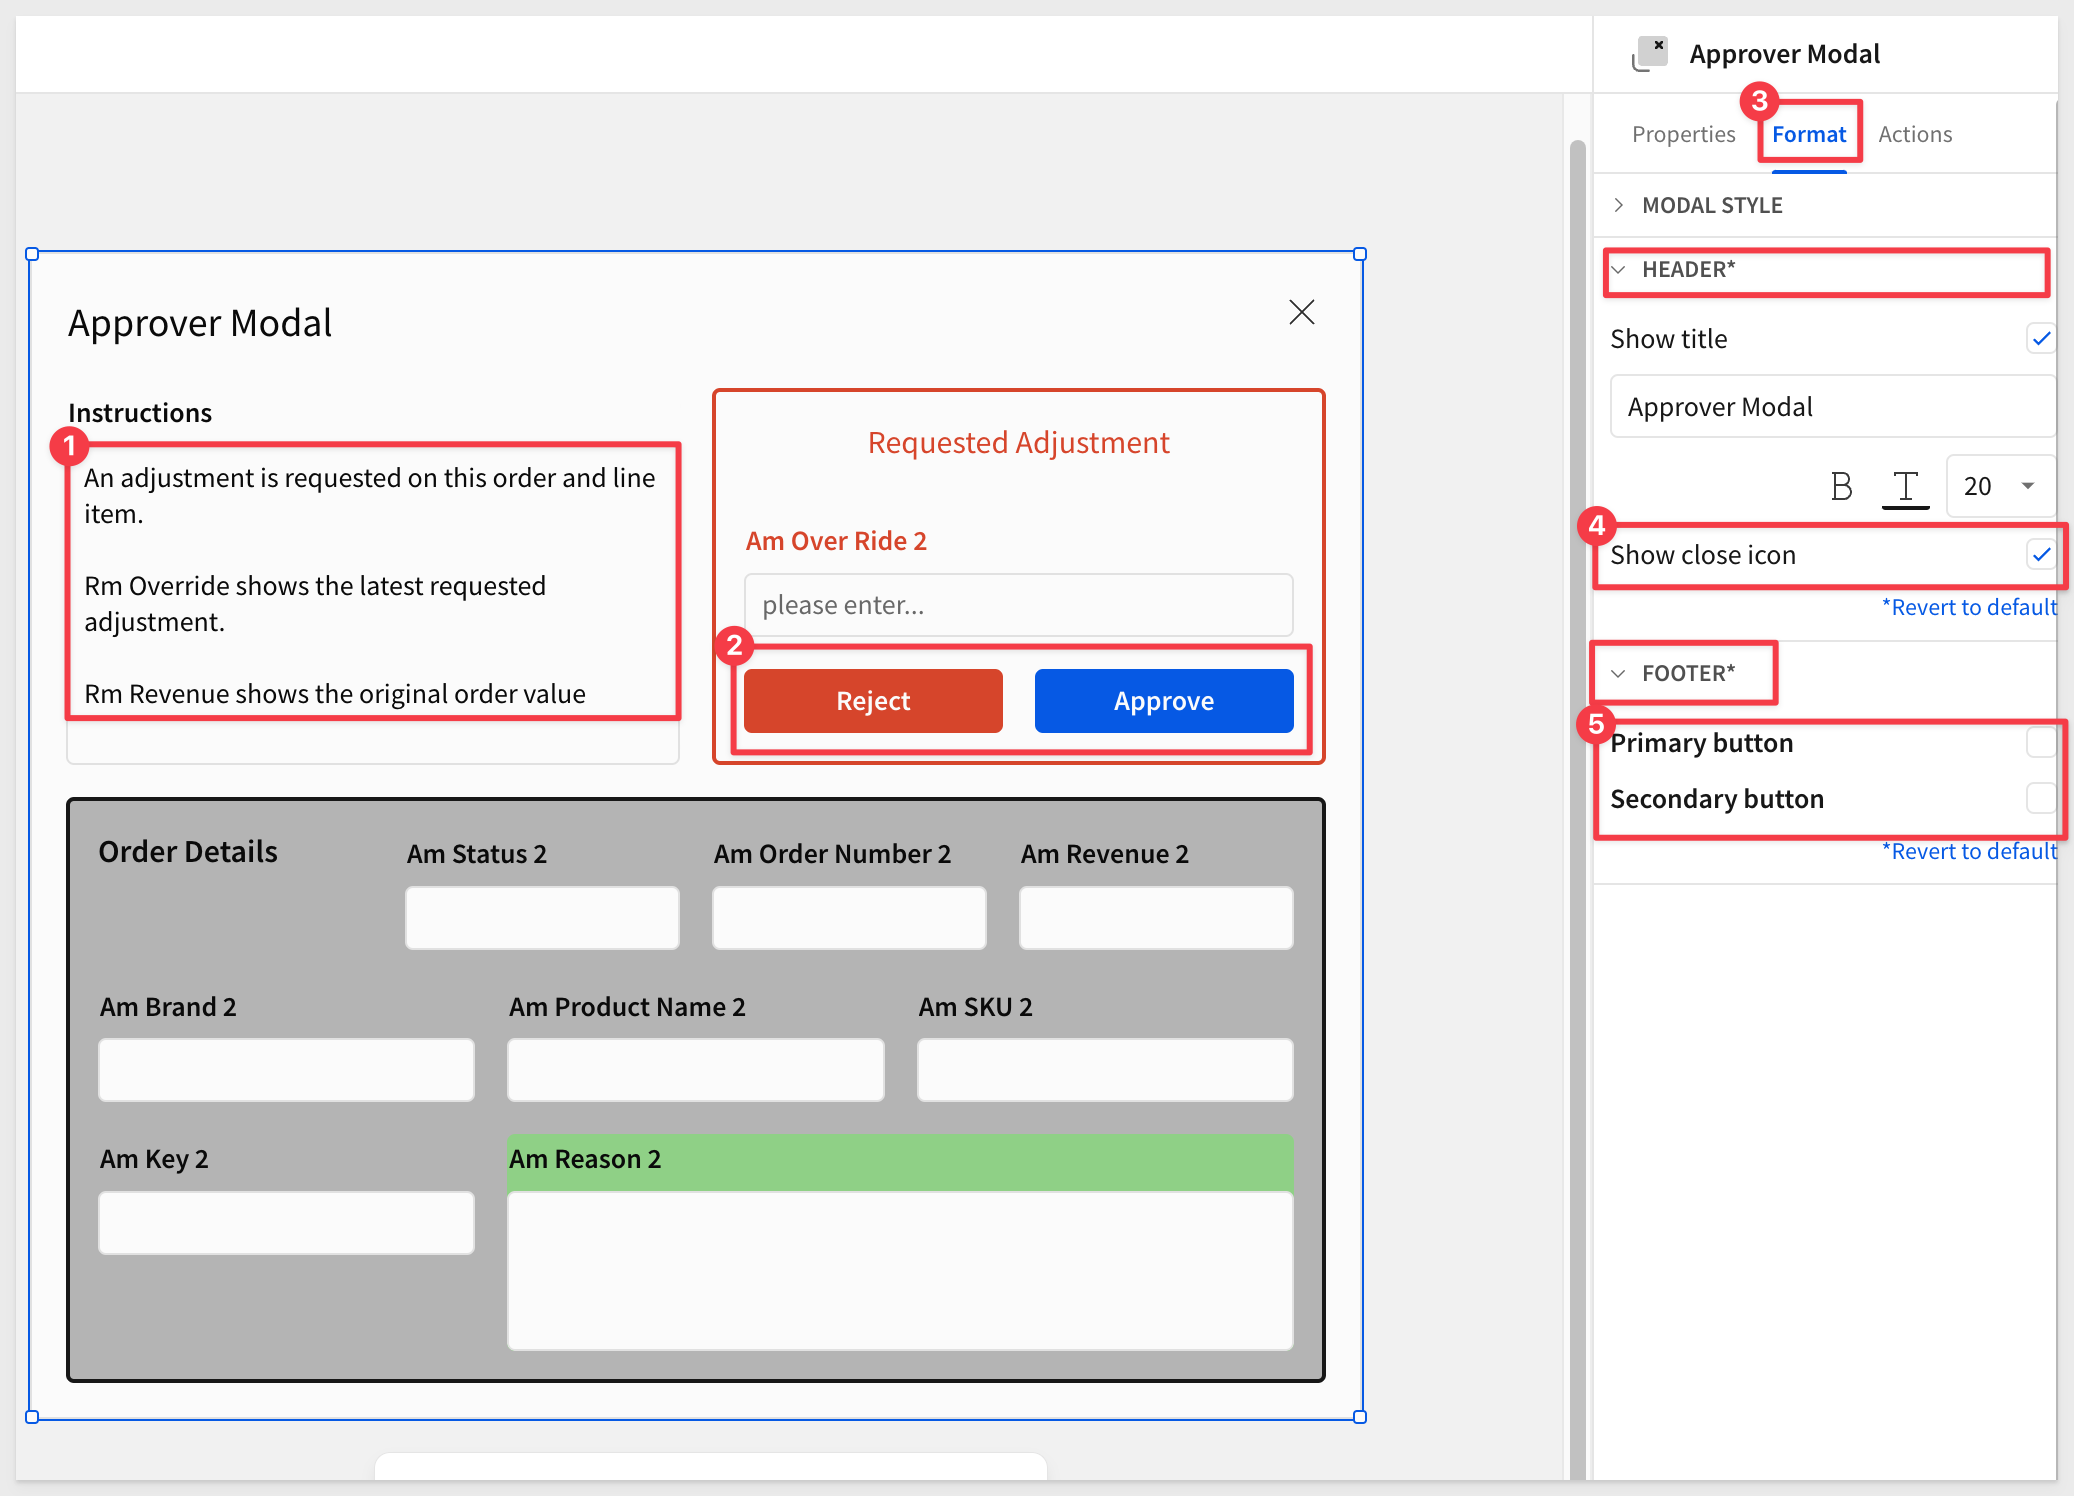
Then add two UI > Buttons to the page, labeling one Reject and the other to Approve.
Enable showing of the Show close icon.
Disable the standard two footer buttons:
The actual arrangement and styling you decide on is up to you. Spend time if you prefer, but it will work as expected without it too.
When we duplicated the Adjuster Modal the controls came over too but their Control IDs will just have 2 appended to each of their names; not ideal.
Adjust each controls ID to follow our arbitrary pattern rule mentioned earlier. For example, for the Over Ride control we set the ID to ap_Over_Ride, the ap_ indicating the control is on the Approval Modal modal.
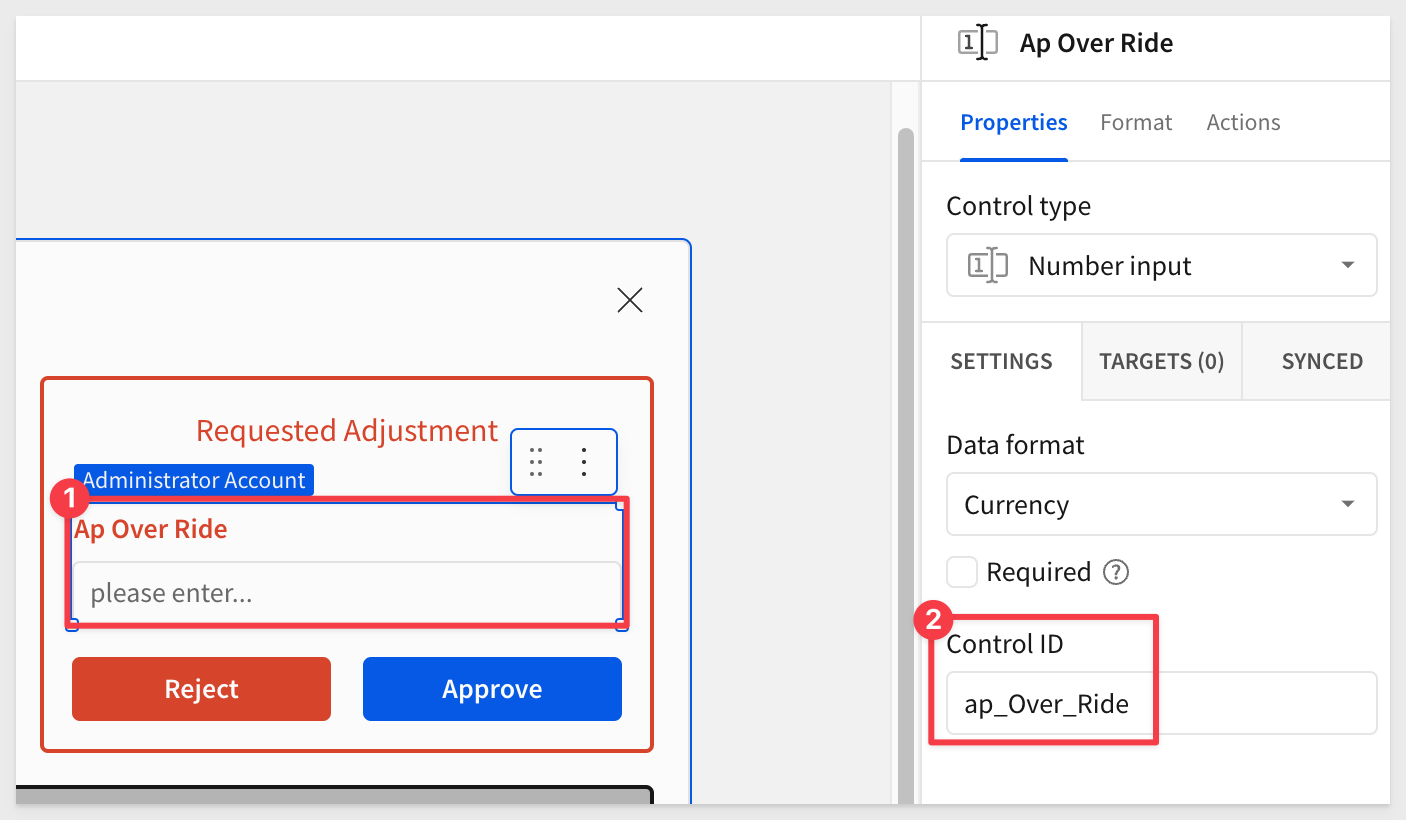
Make sure to update every control on the page to the pattern.
Lastly, rename the two containers to Requested Adjustment Approver and Order Details Approver so that we can reference them by name easily.
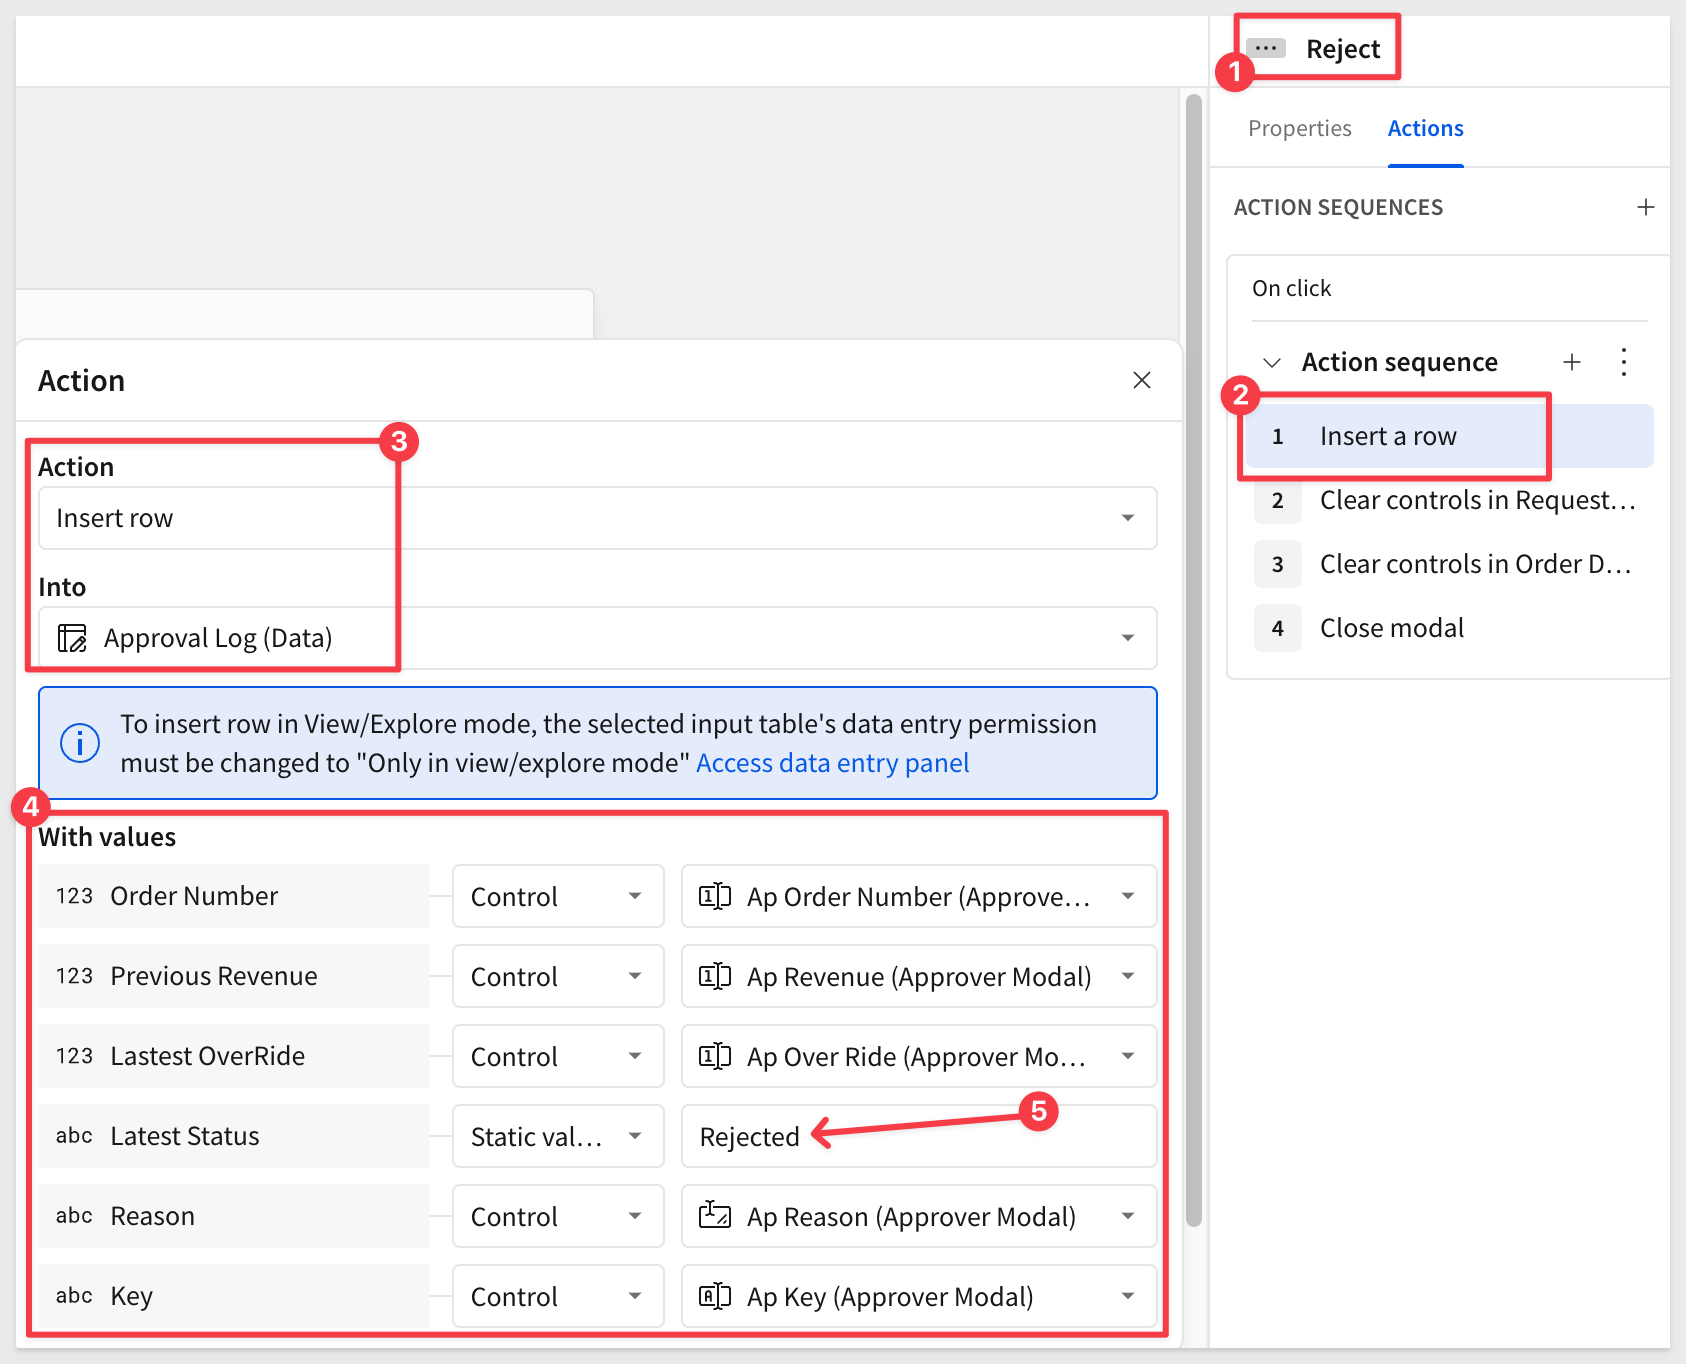
Reject button actions
We want the reject button to insert a row in the Approval Log table.
For the Latest Status column we will use a Static value of Rejected.
Also add two more actions to clear the two containers on the Approver Modal and one to Close modal.
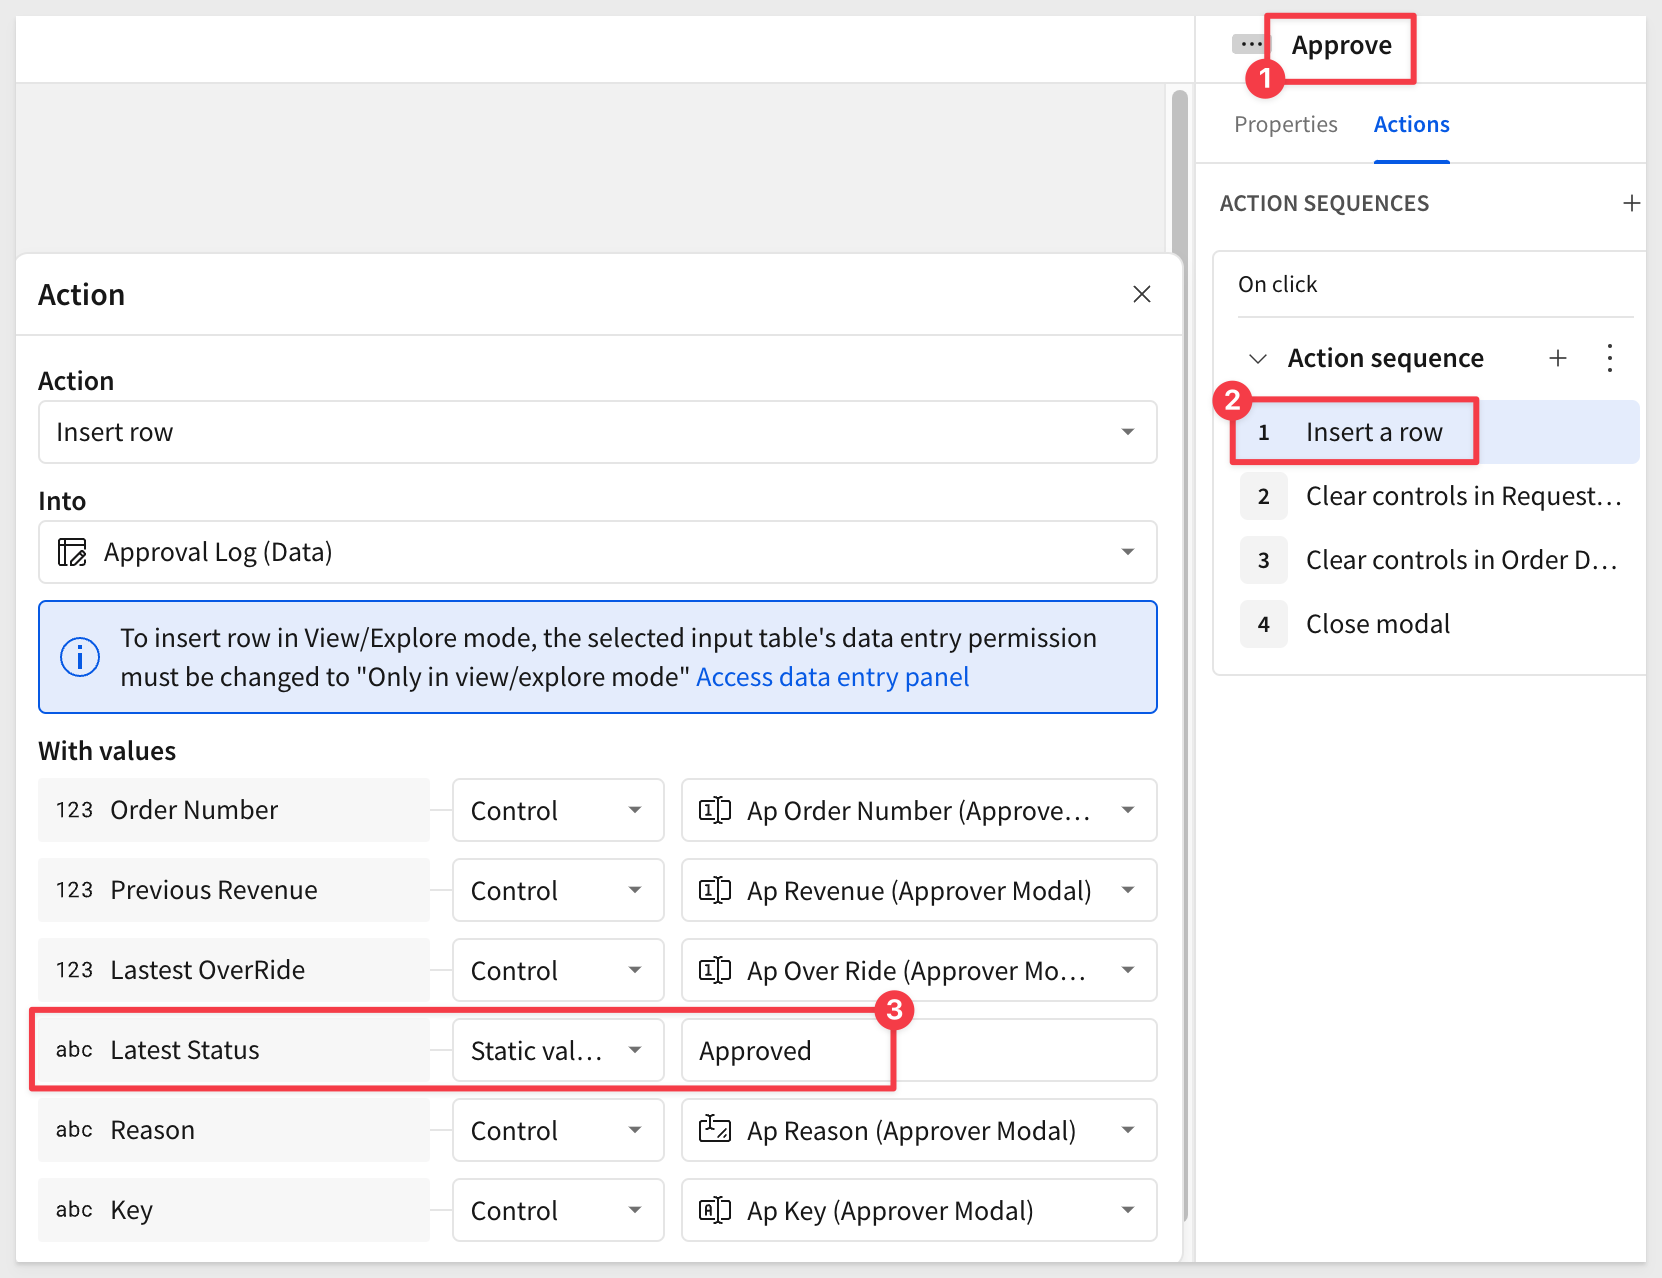
Approve button actions
Repeat the same process for the Approve button, changing the static value for Latest Status to Approved.
Drag the Open a modal action to the last position.
Add reject condition
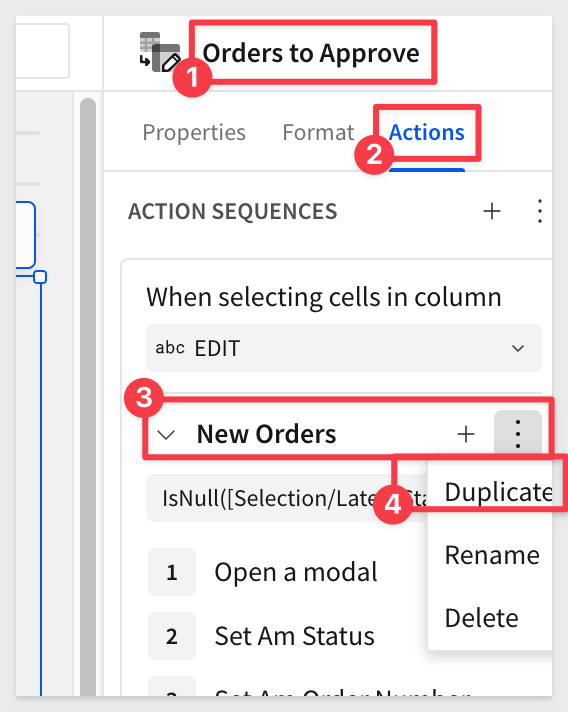
Back on the Orders to Approve table, double-click the first action sequence text to change its name. Name it New Orders.
Then Duplicate it, and rename the new duplicate to Adjusted:
Change the condition on the Adjusted sequence to only trigger when the Latest Status column is Adjusted for the selected row:
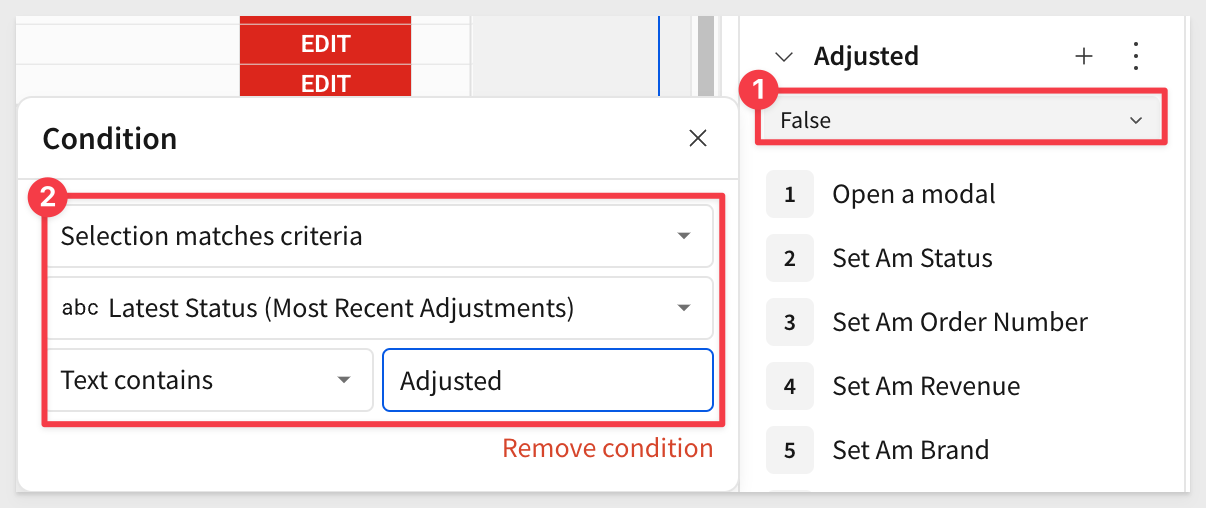
Adjust the Open a modal to target the Approver Modal for each Set control value action. For example:
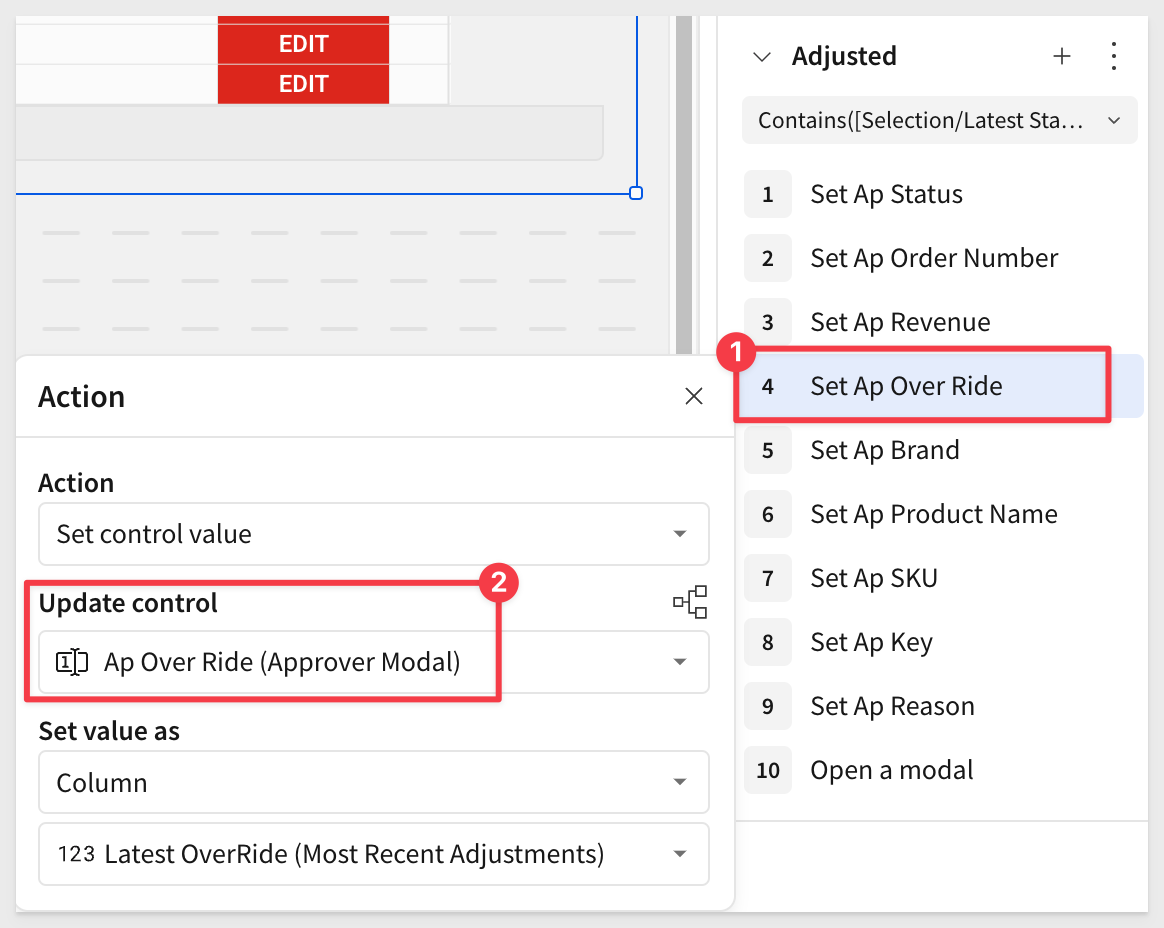
Drag the Open a modal action to the last position.
A quick test with an order that has been Adjusted already should then be routed to the Approver Modal with all controls showing the correct values:
Reject handling
We added a way for the approver to reject records, but we also need a way for the adjuster to resubmit rejects for approval again too. This is just a repeat of what we just did.
From the Orders to Approve table, Actions, we want to duplicate the New Orders sequence (since this one opens the adjuster modal).
Rename the new duplicate to Rejected.
In the Condition, revise the Text contains to check to Rejected, using Latest Status.
In the Set Am Status action, revise the Static value to send Resubmission.
Now when the adjuster clicks on a Rejected row, they use the same Adjuster Modal to work as before, with only a few minor differences.
On the Orders to Approve table, add a new Calculation column to the Orders to Approve table, setting the formula to:
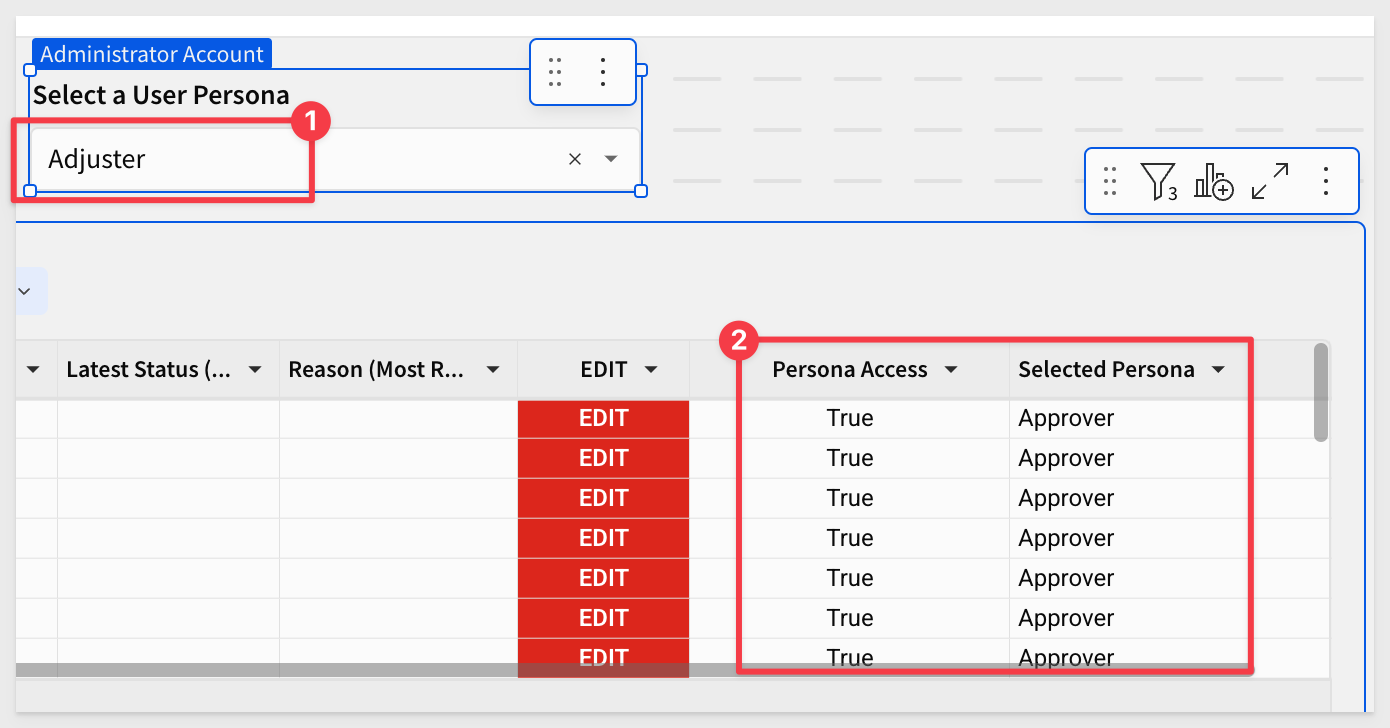
Switch([a_persona], "Adjuster", [Latest Status (Most Recent Adjustments)] = "Rejected" or IsNull([Latest Status (Most Recent Adjustments)]), "Approver", [Latest Status (Most Recent Adjustments)] = "Adjusted" or [Latest Status (Most Recent Adjustments)] = "Approved", False)
Rename it to Persona Access.
Create another Calculation column, renamed to Persona with this formula:
If(Lookup([Latest Status (Most Recent Adjustments)], [Key], [Latest Status (Most Recent Adjustments)]) = "Adjusted", "Adjuster", "Approver")
Now set a Filter on the Persona Access column to only show the True rows.
When Adjuster is selected, all rows are shown (assuming there are none from any testing cycle). When Approver is selected, no rows should appear:
After shortening a few column names and hiding others, we are ready for some testing:
Click Publish.
Testing
Pick an order and take it through an entire cycle from request, rejection and approval. After working through all the details, it is pretty easy to troubleshoot if something unexpected happens.
Here is what is expected:

Now that the data app is working, we can easily use the power of Sigma to build analytics on top of the data as every record is present for us on the Data page:
In this QuickStart, we built a fully functioning Approval AI App using Sigma only. Data is automatically stored in the cloud data warehouse of your choice and under your control only. This is the power of Sigma!
Additional Resource Links
Blog
Community
Help Center
QuickStarts
Be sure to check out all the latest developments at Sigma's First Friday Feature page!