In this QuickStart, you'll build a fully functional crowdsourcing app in Sigma that lets users submit, view, and upvote ideas—all without writing any code or using external tools.
You'll learn how to capture user input with input tables, personalize the experience using user-aware controls, and create a clean, interactive workflow with modals and actions.
We'll also show you how to track submissions, prevent duplicate upvotes, and apply basic styling to polish the final experience.
This is a great introduction to Sigma AI Apps—and a simple yet powerful example of how to go beyond dashboards and build collaborative, warehouse-native applications.
For more information on Sigma's product release strategy, see Sigma product releases
If something doesn't work as expected, here's how to contact Sigma support
Target Audience
The typical audience for this QuickStart includes users of Excel, common Business Intelligence or Reporting tools, and semi-technical users who want to try out or learn Sigma.
Prerequisites
- Any modern browser is acceptable.
- Access to your Sigma environment.
- Some familiarity with Sigma is assumed. Not all steps will be shown, as the basics are assumed to be understood.

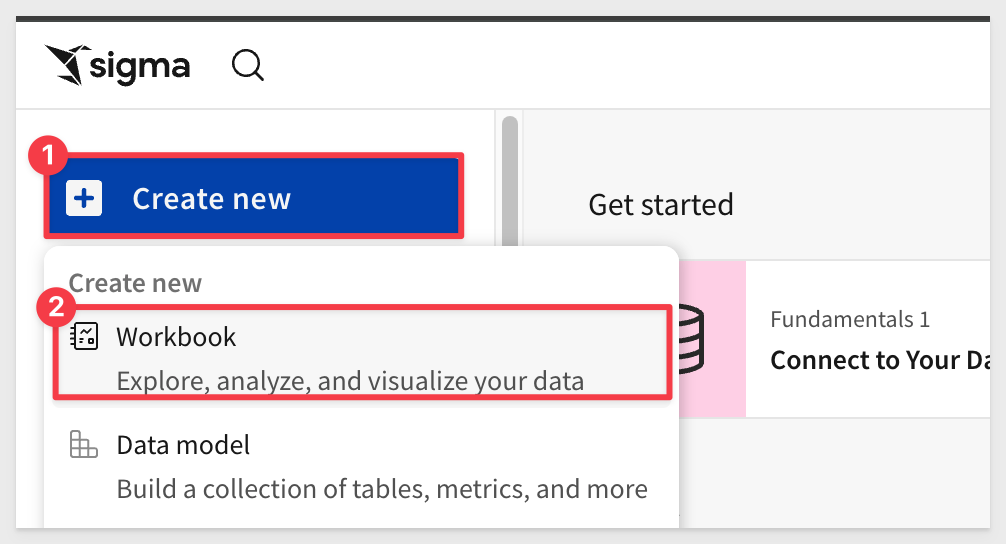
Log into Sigma and create a new workbook:
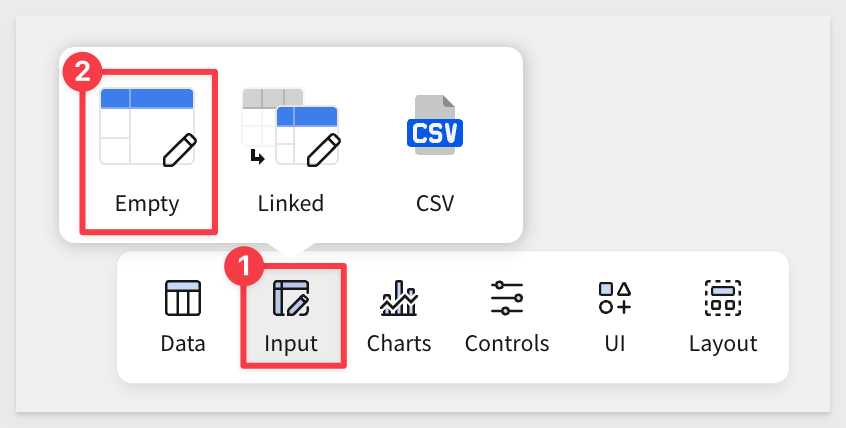
We need a place where people can submit suggestions that are automatically stored in the warehouse. An input table is perfect for this.
Using the Element bar, click Input and Empty to place a blank input table on the page:
When prompted, select the Sigma Sample Database and click Create.
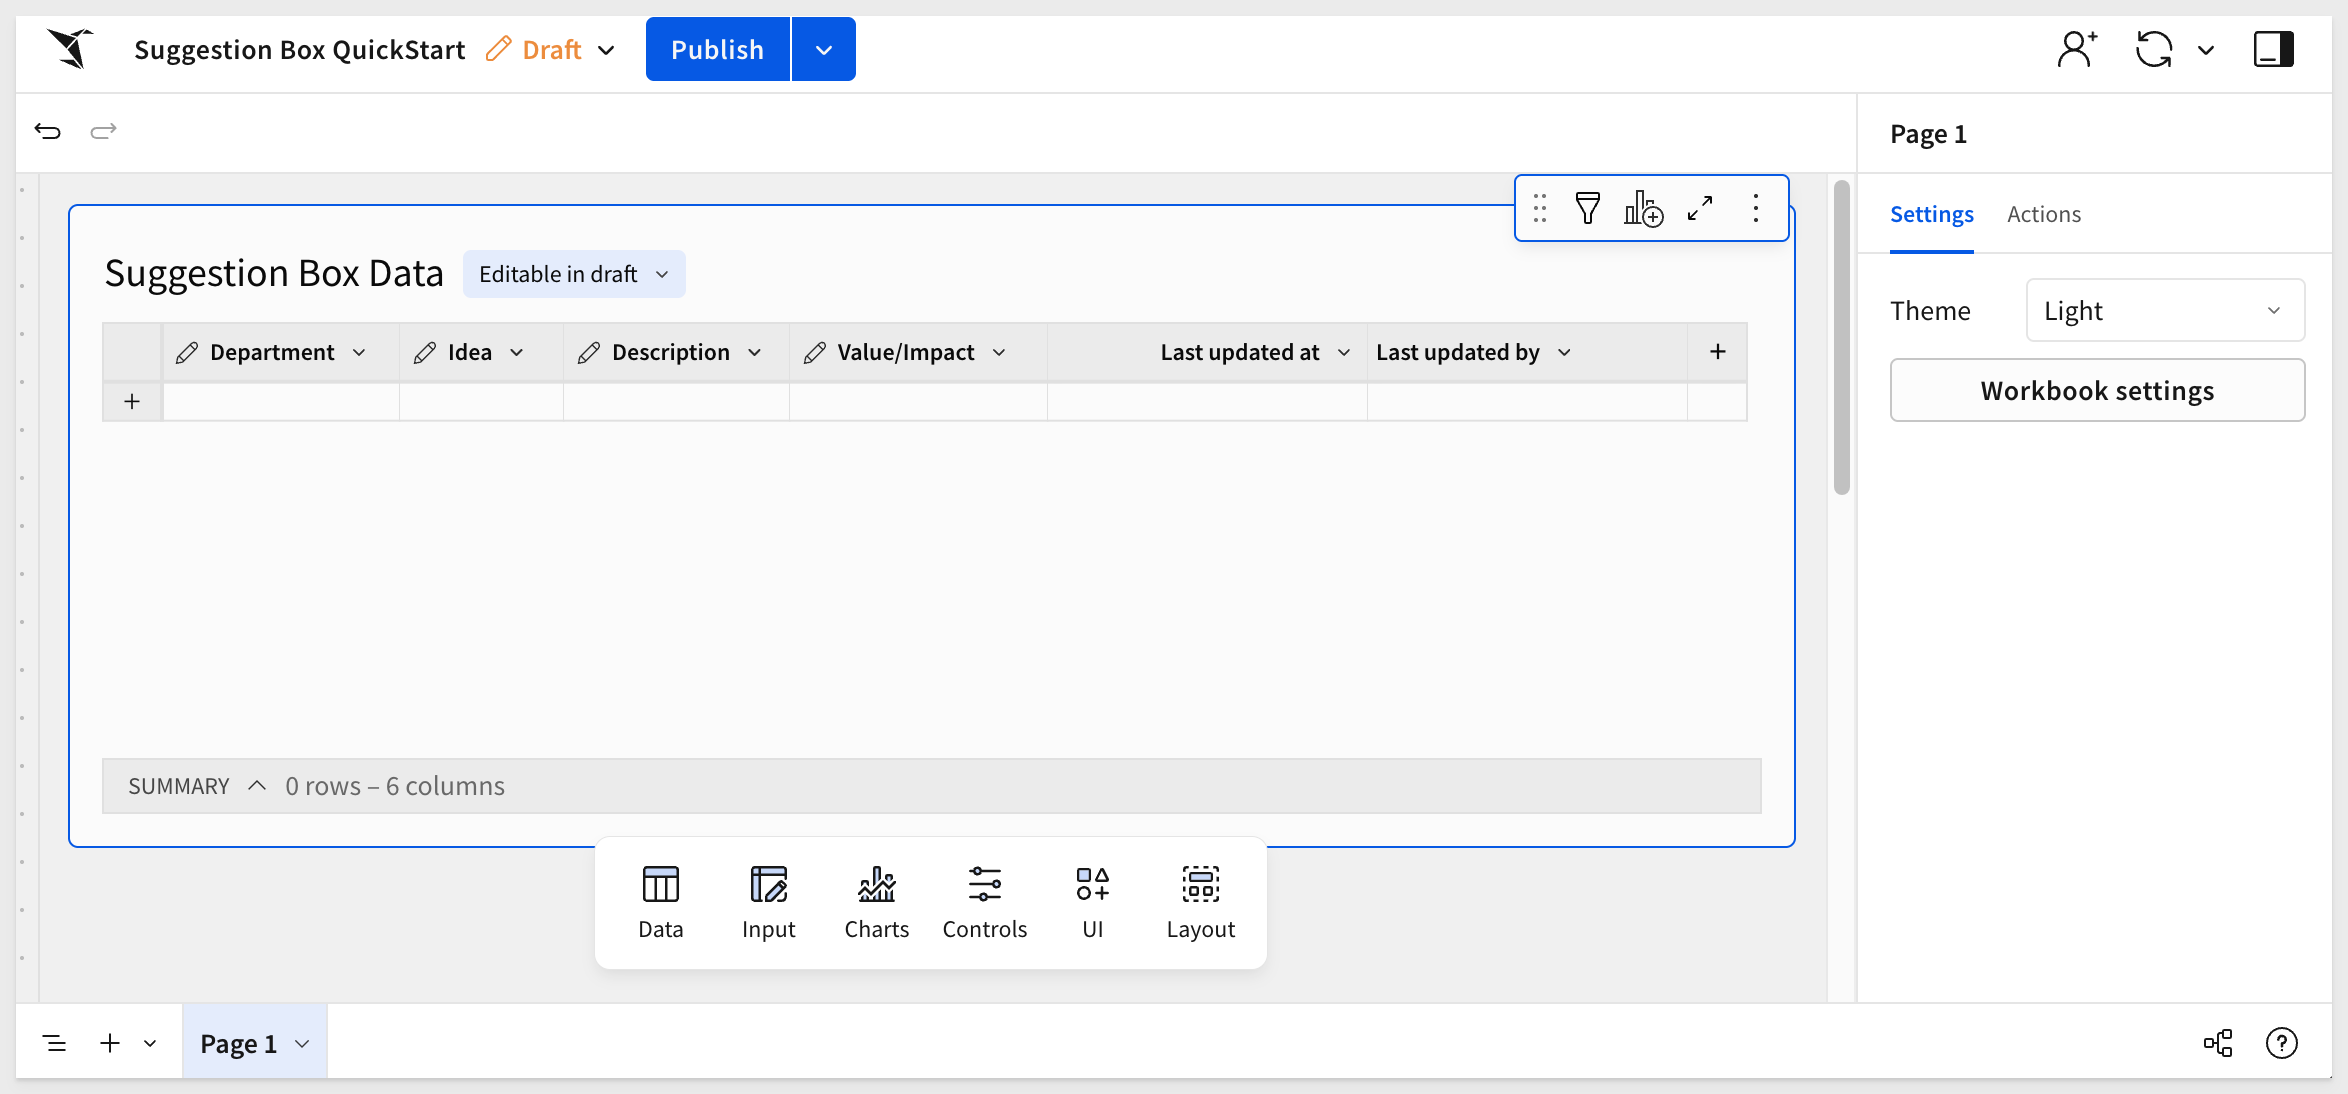
The table will be created with one column named Text. Rename it to Department.
Click + to add three more text columns and name them Idea, Description, and Value/Impact:
Sigma offers a few optional native columns to help track input table activity.
Click + and select Add new column > Row edit history > Last updated at:
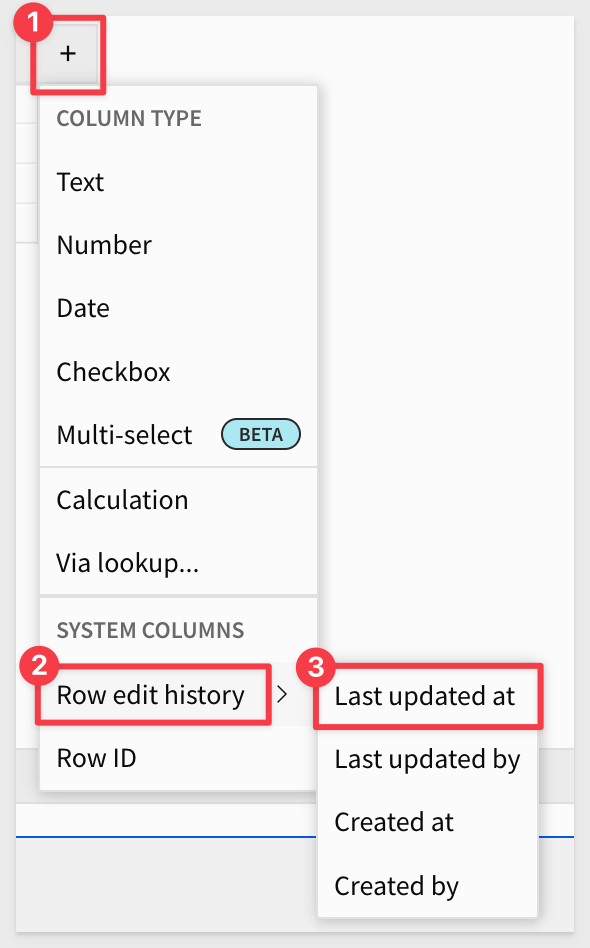
Repeat the process, this time adding Last updated by.
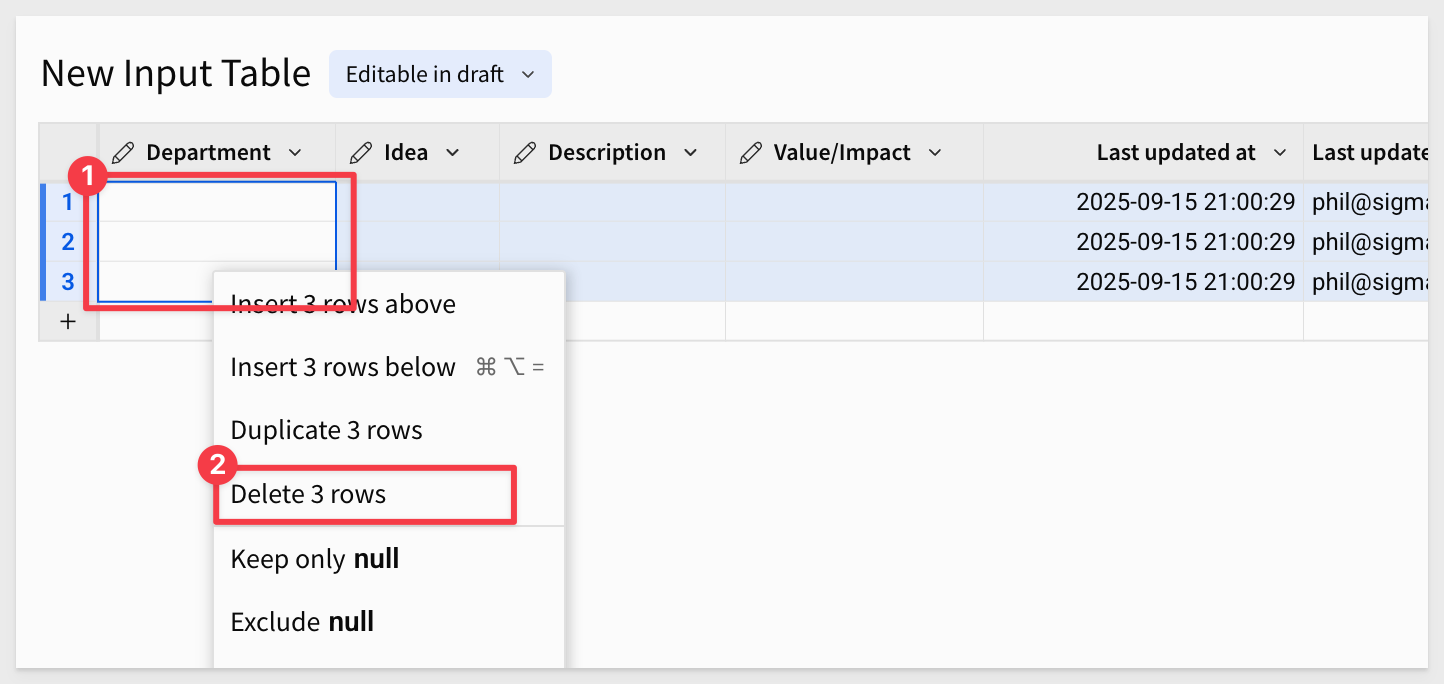
Extra clicks may create empty rows, which you can delete by selecting them all, right-clicking, and choosing Delete x rows:
Rename the New Input Table to Suggestion Box Data.
Click Save As and name the workbook Suggestion Box QuickStart:
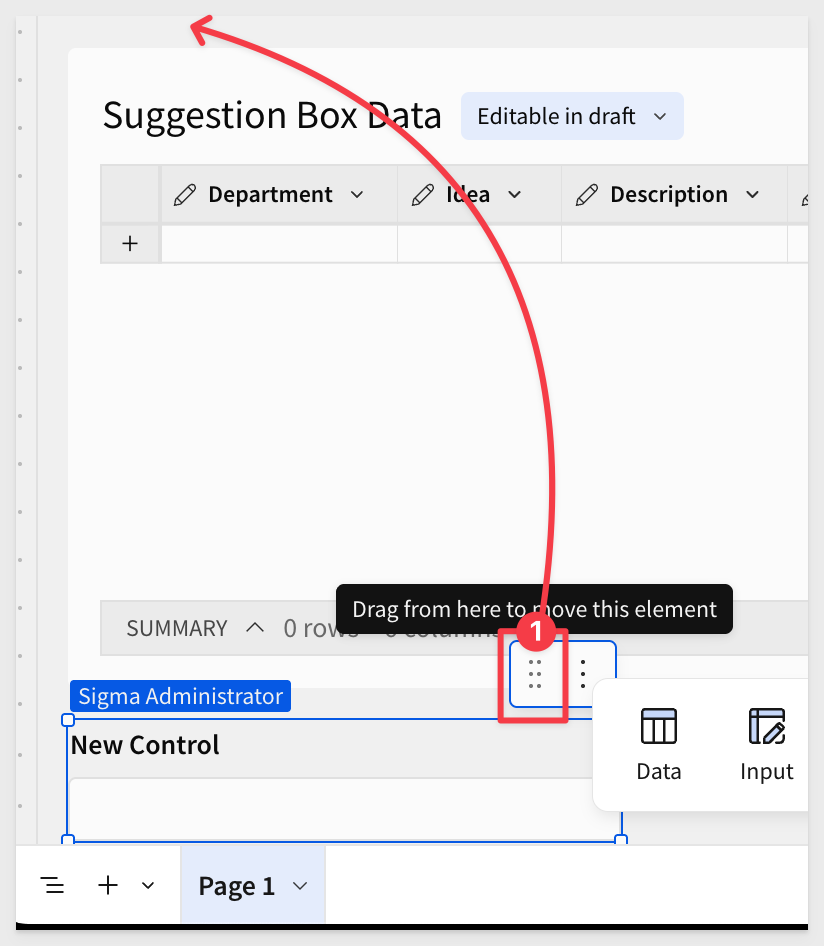
Using the Element bar, click Controls and Text input to add the control to the page.
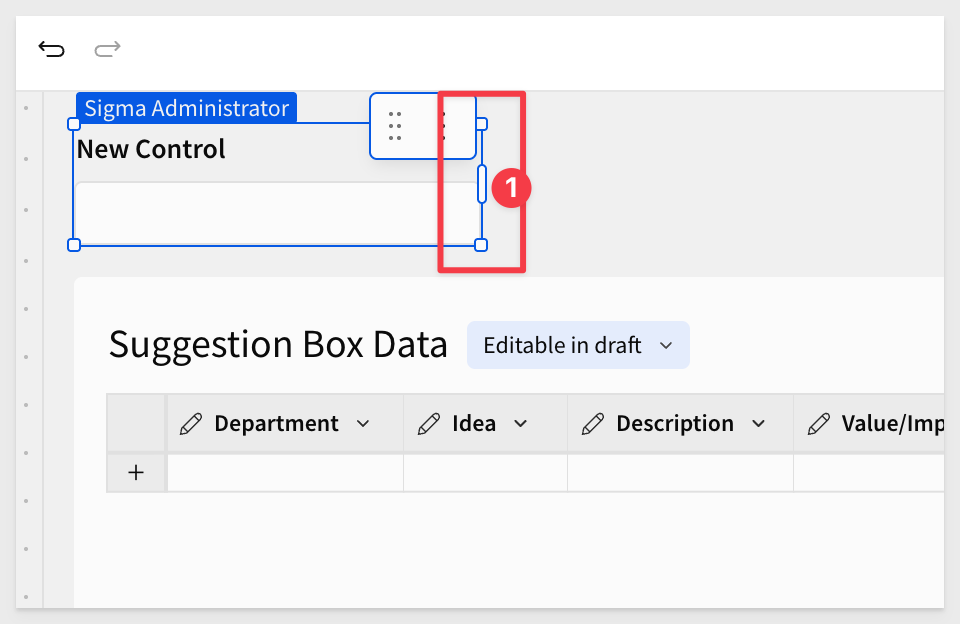
Drag it above the input table:
Reduce it to an appropriate size:
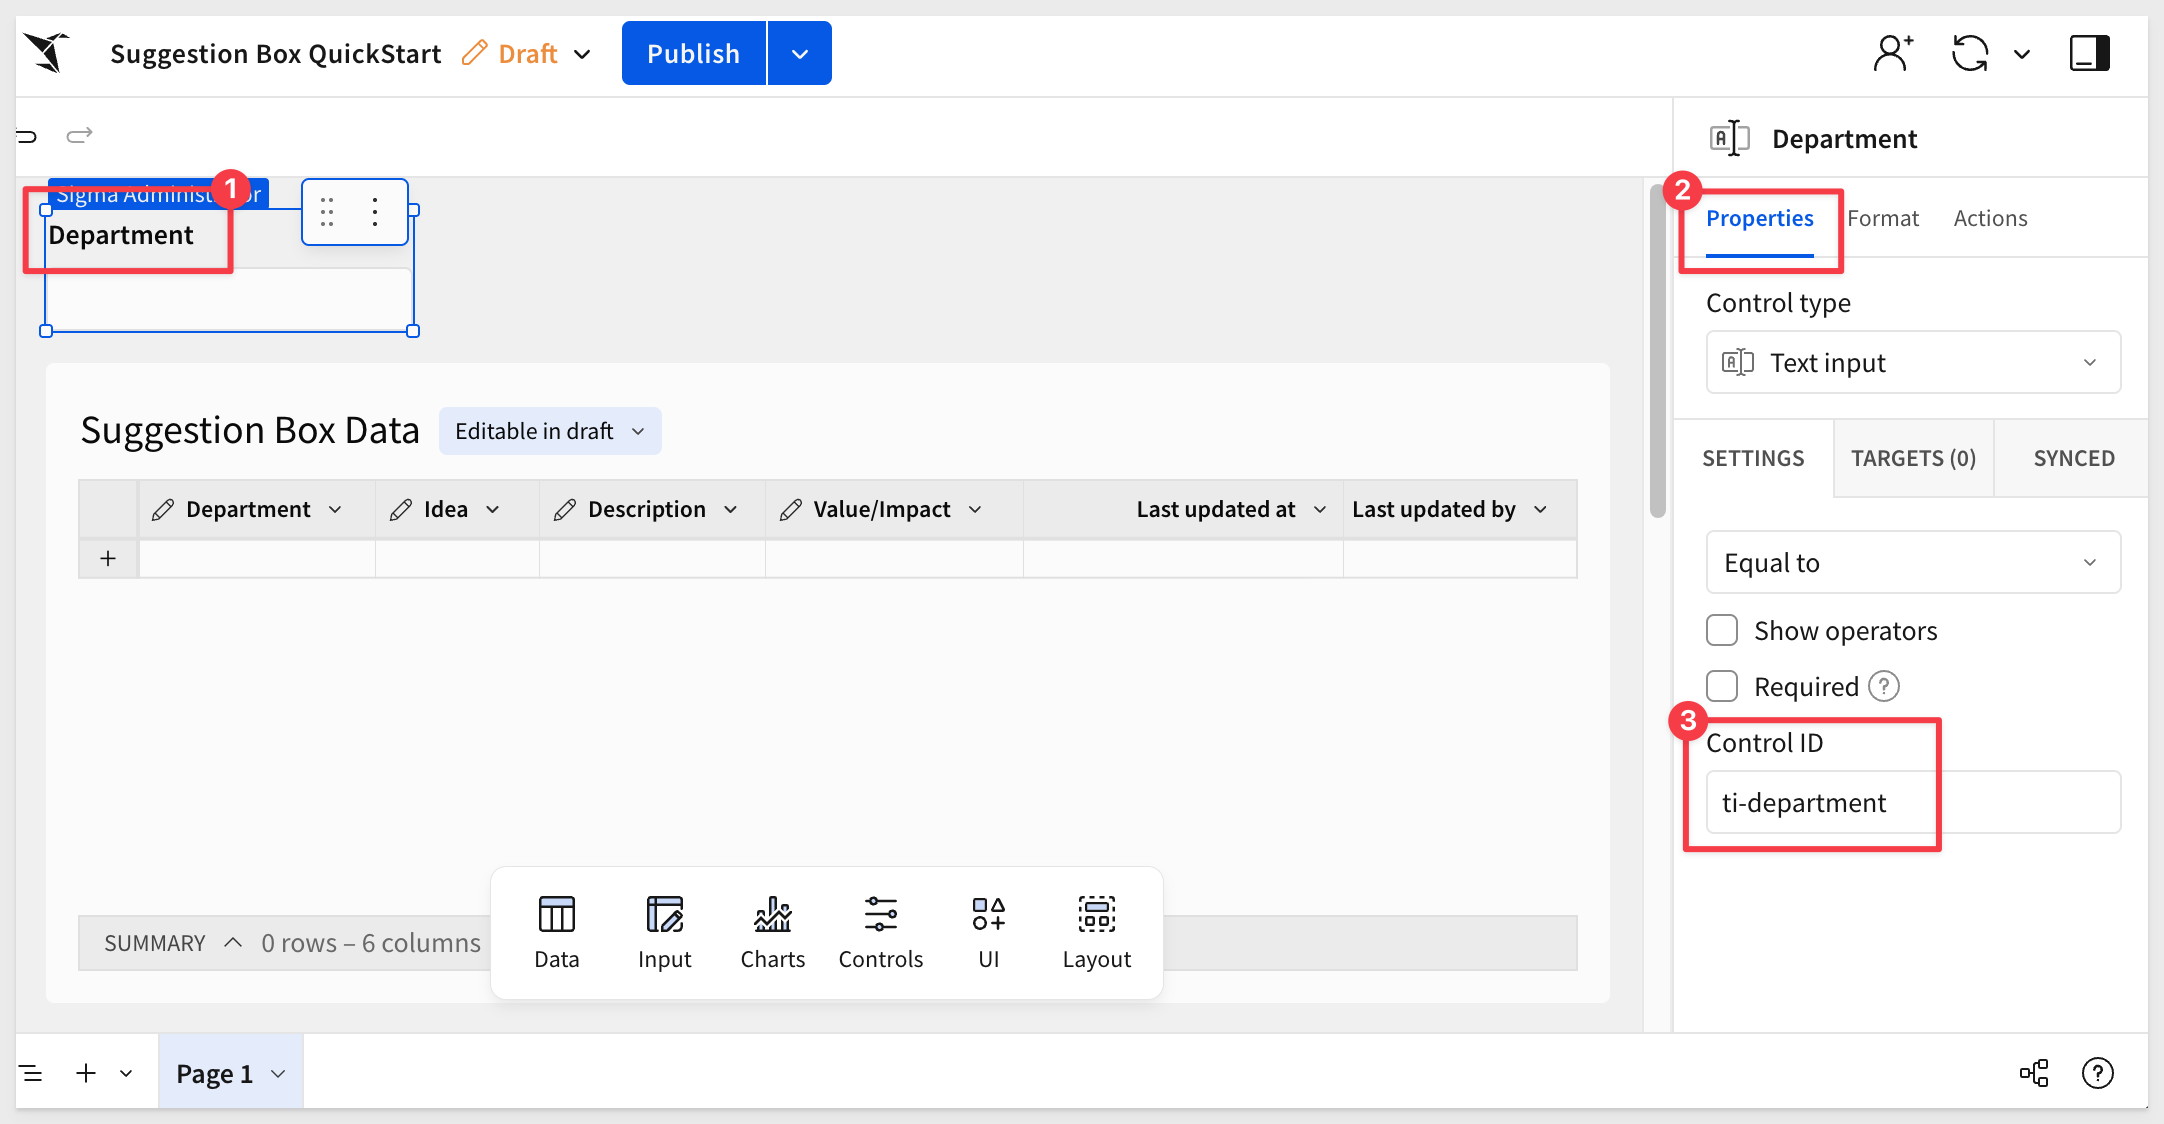
Rename it Department, and set its Control ID in Properties to ti-department:
Now, simply duplicate the Department control three times and adjust the name and Control ID for the three duplicates.
Use the following values for the duplicates:
Name            Control ID
Idea            it-idea
Description     ta-description
Value/Impact    ta-value-impact
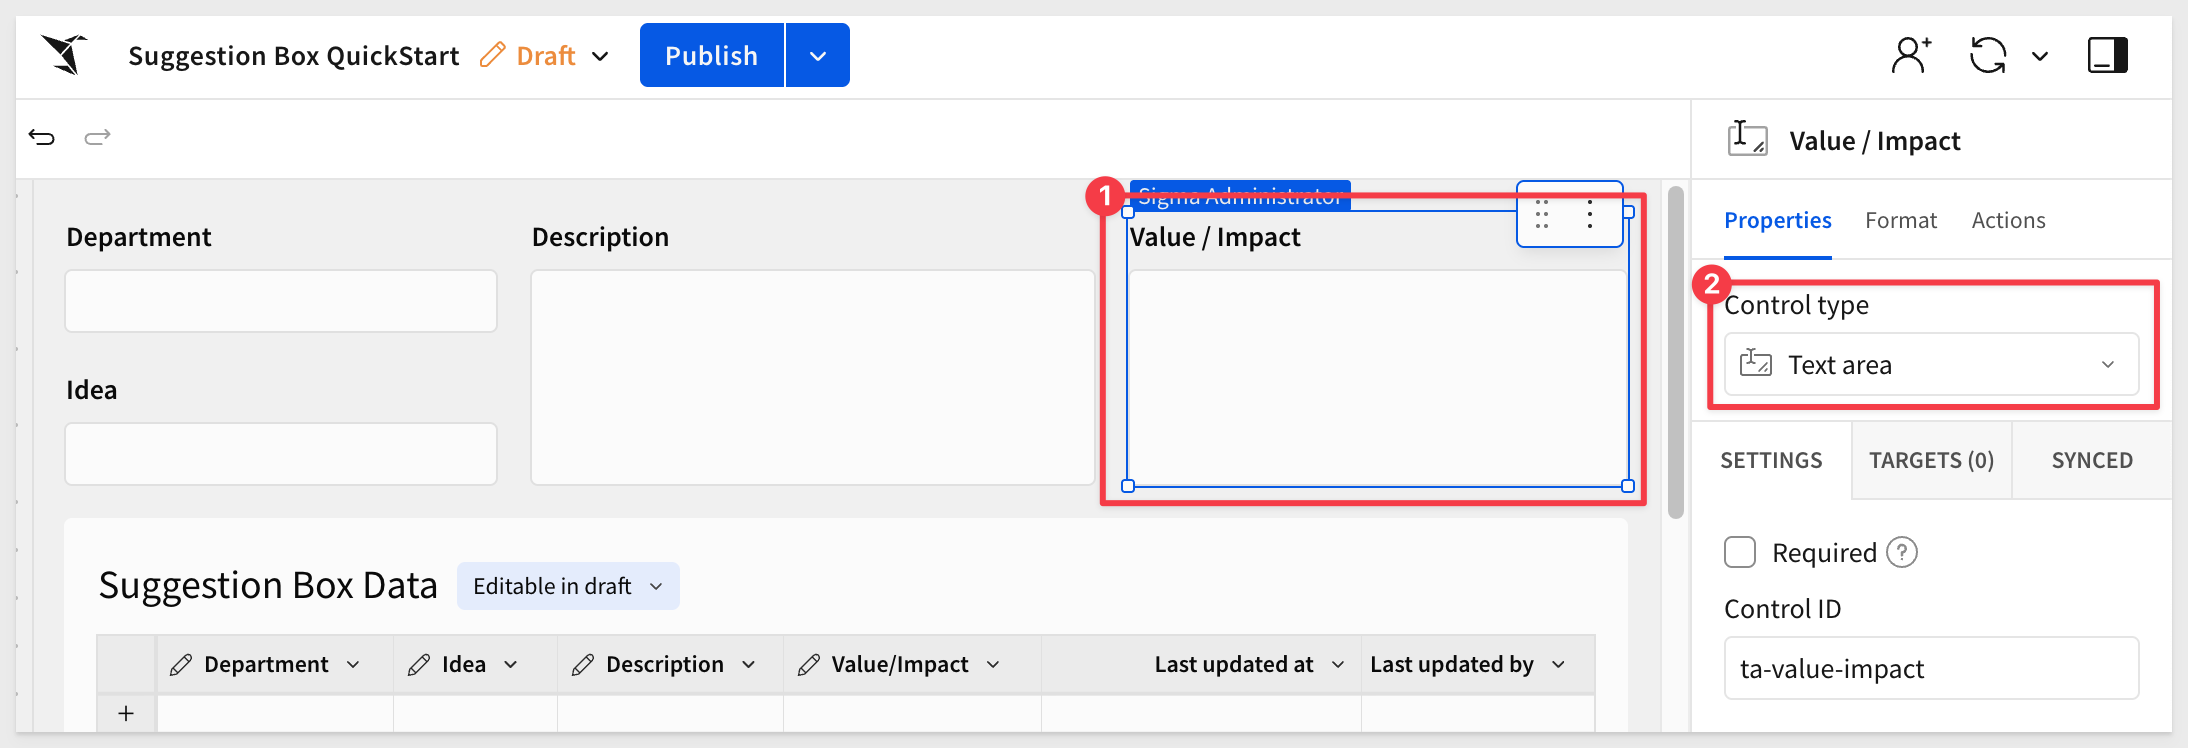
After the controls are created, change the Control type for Description and Value/Impact to Text area:
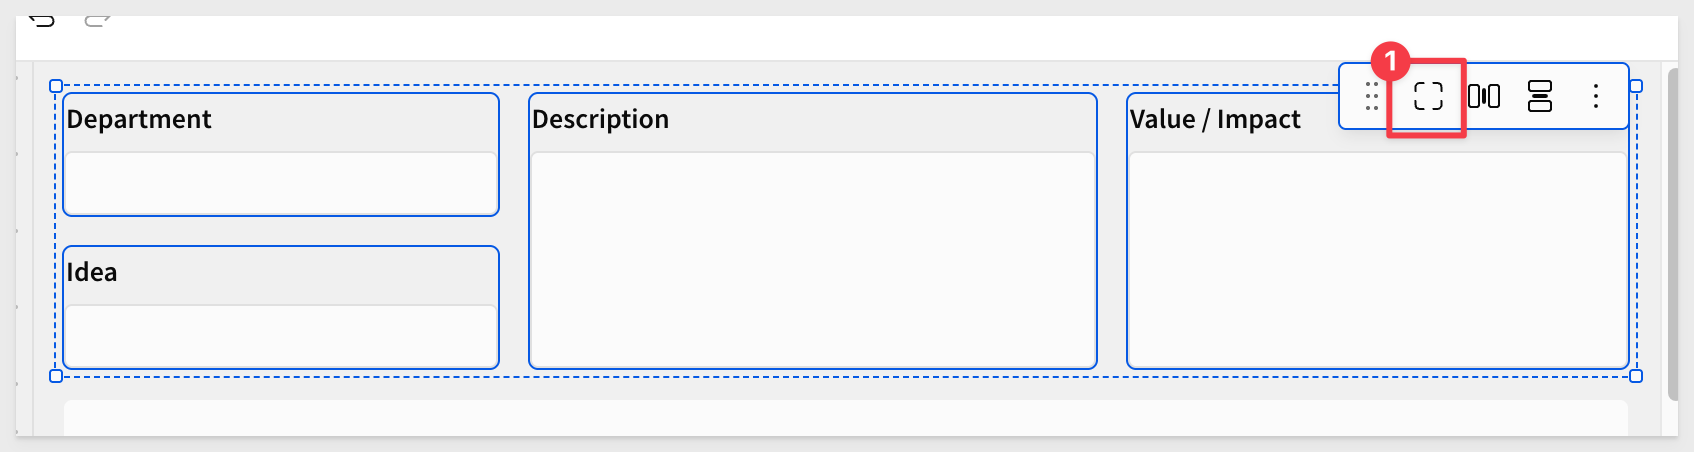
Use your mouse to select all four controls and place them inside a container:
Containers are a great way to group elements and apply shared styling options.
For more information, see Use containers to organize workbook layouts
Add buttons
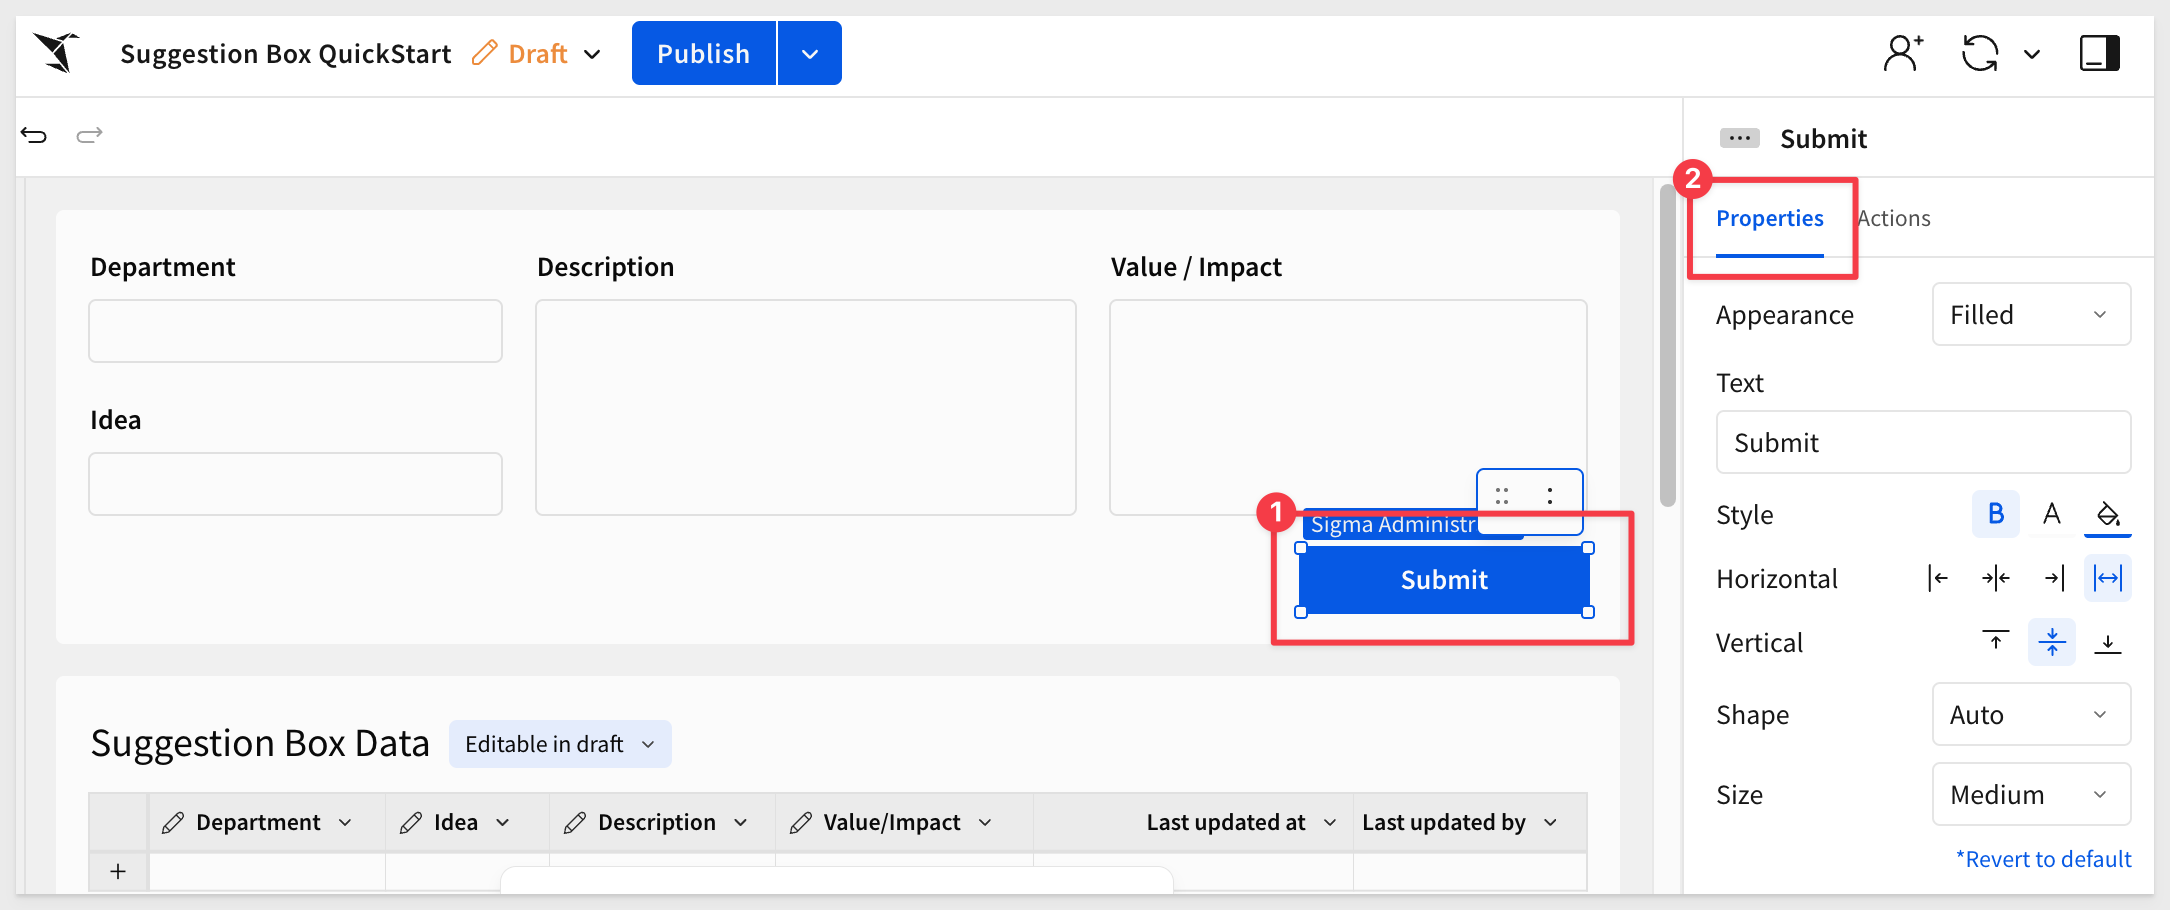
Using the Element bar > UI add a Button to the container and change its Text to Submit. Adjust other properties to customize the appearance as desired:
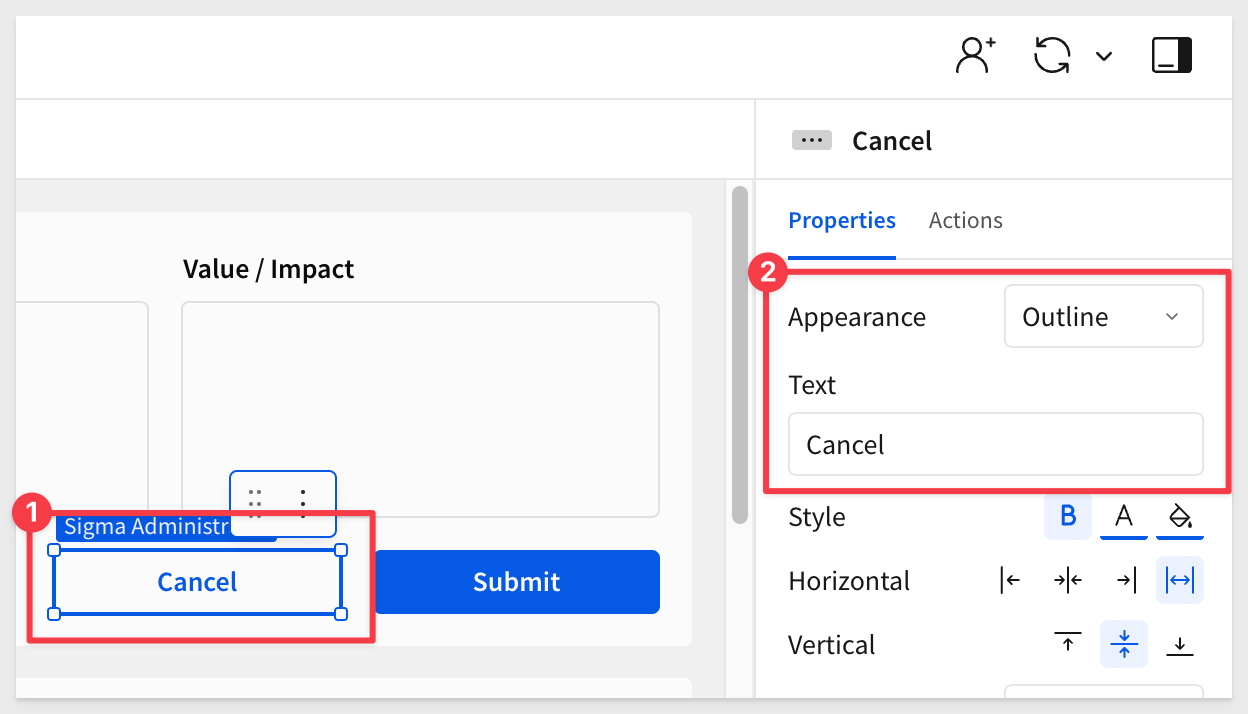
Duplicate the Submit button, and name the new one Cancel, change the appearance of this button to Outline:
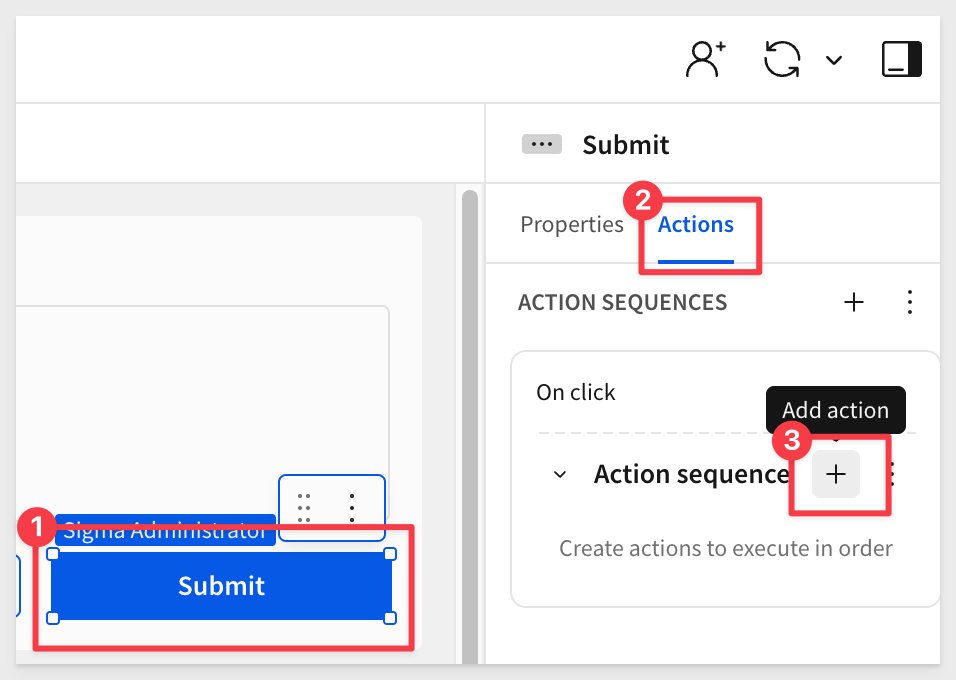
Add actions
Select the Submit button, then open the Actions tab in the Element panel.
Click the + next to Action sequence to add an action that will trigger On click of the Submit button:
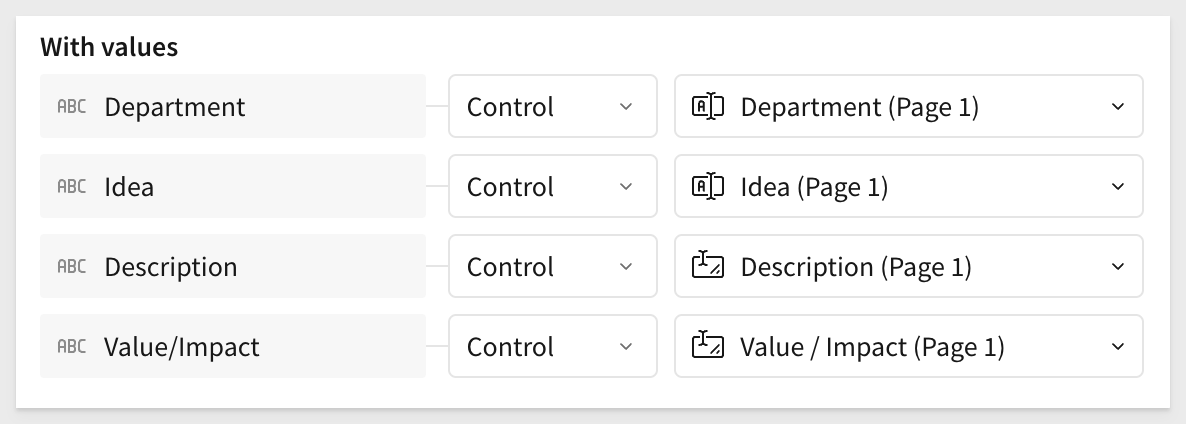
We want the new action to add a new row of data to the input table with the values from our four input controls. This is really simple to do.
Select the Insert row action. Since we only have one input table, that is selected for us and Sigma also discovered and configured the four controls for us in the With values section:

A closer inspection reveals that three of the fields are not mapped correctly so we need to fix that:
Once you confirm the configuration is correct, click the x to close the action modal.
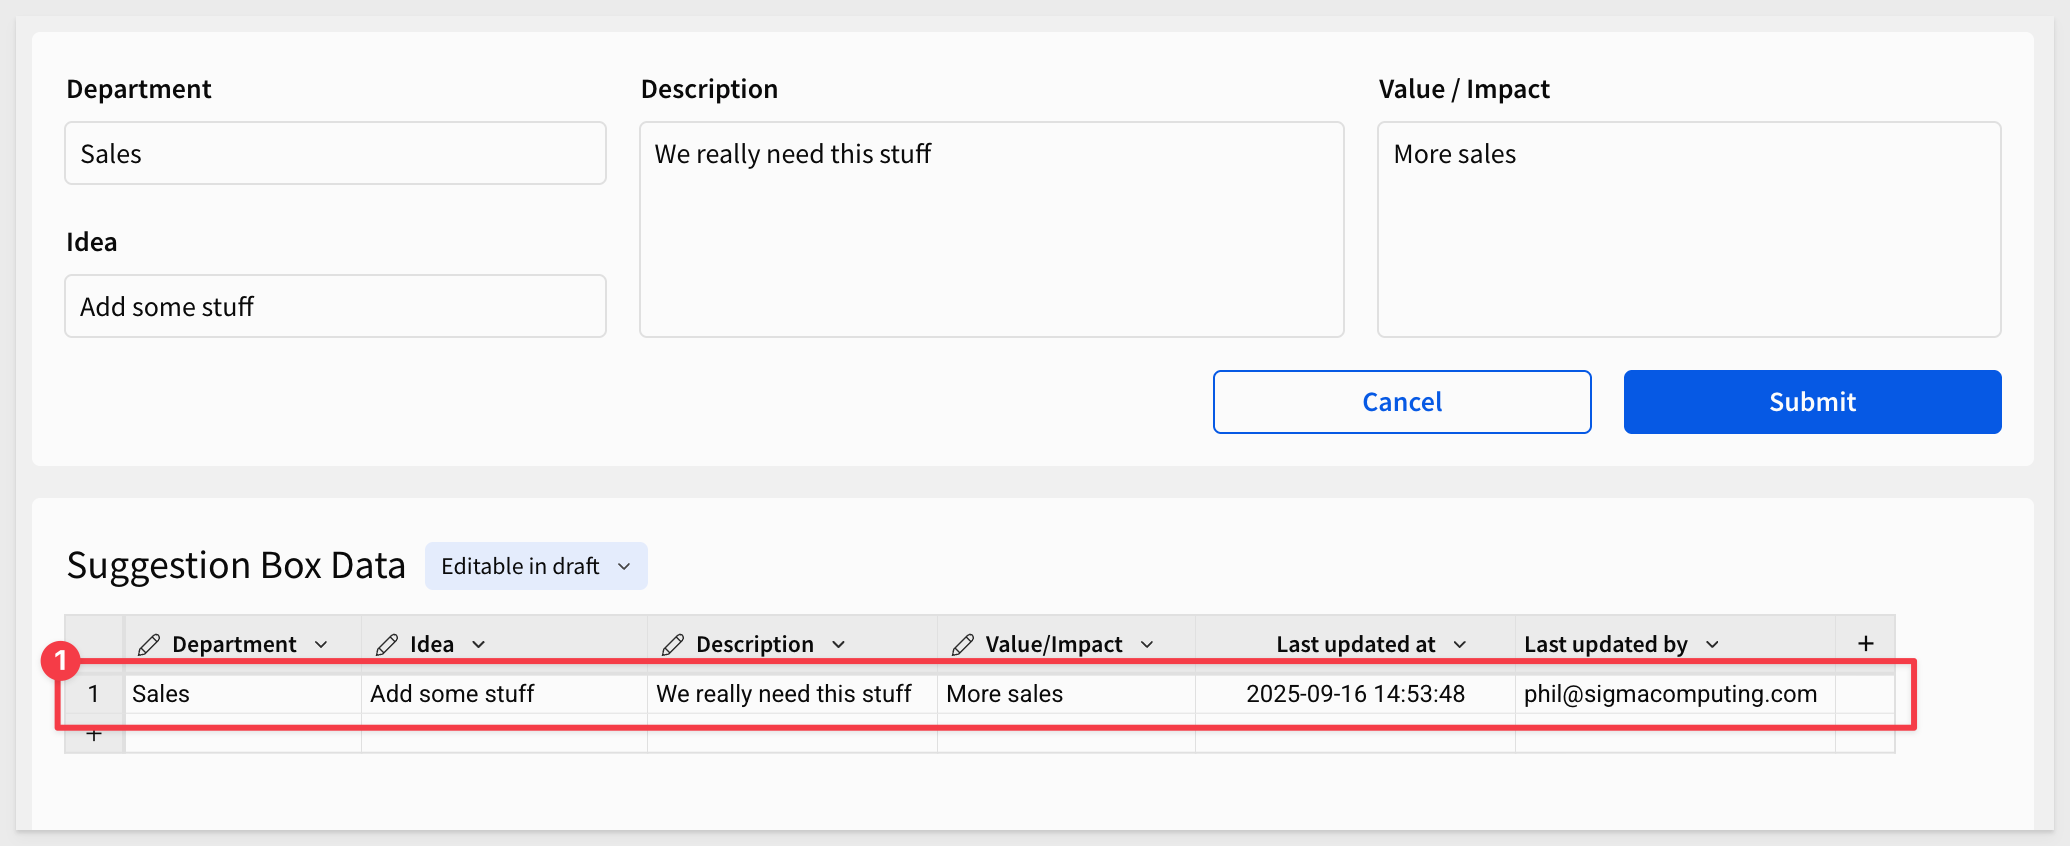
Now, let's do a quick smoke test to watch the new row get added to the input table.
Add some information to the four controls and click Submit.
A row of data should be added with data in the correct columns:
Let's improve the AI App by adding a pop-up (modal) to capture suggestions, instead of having a flat page.
Select the container, the click Move > New modal:
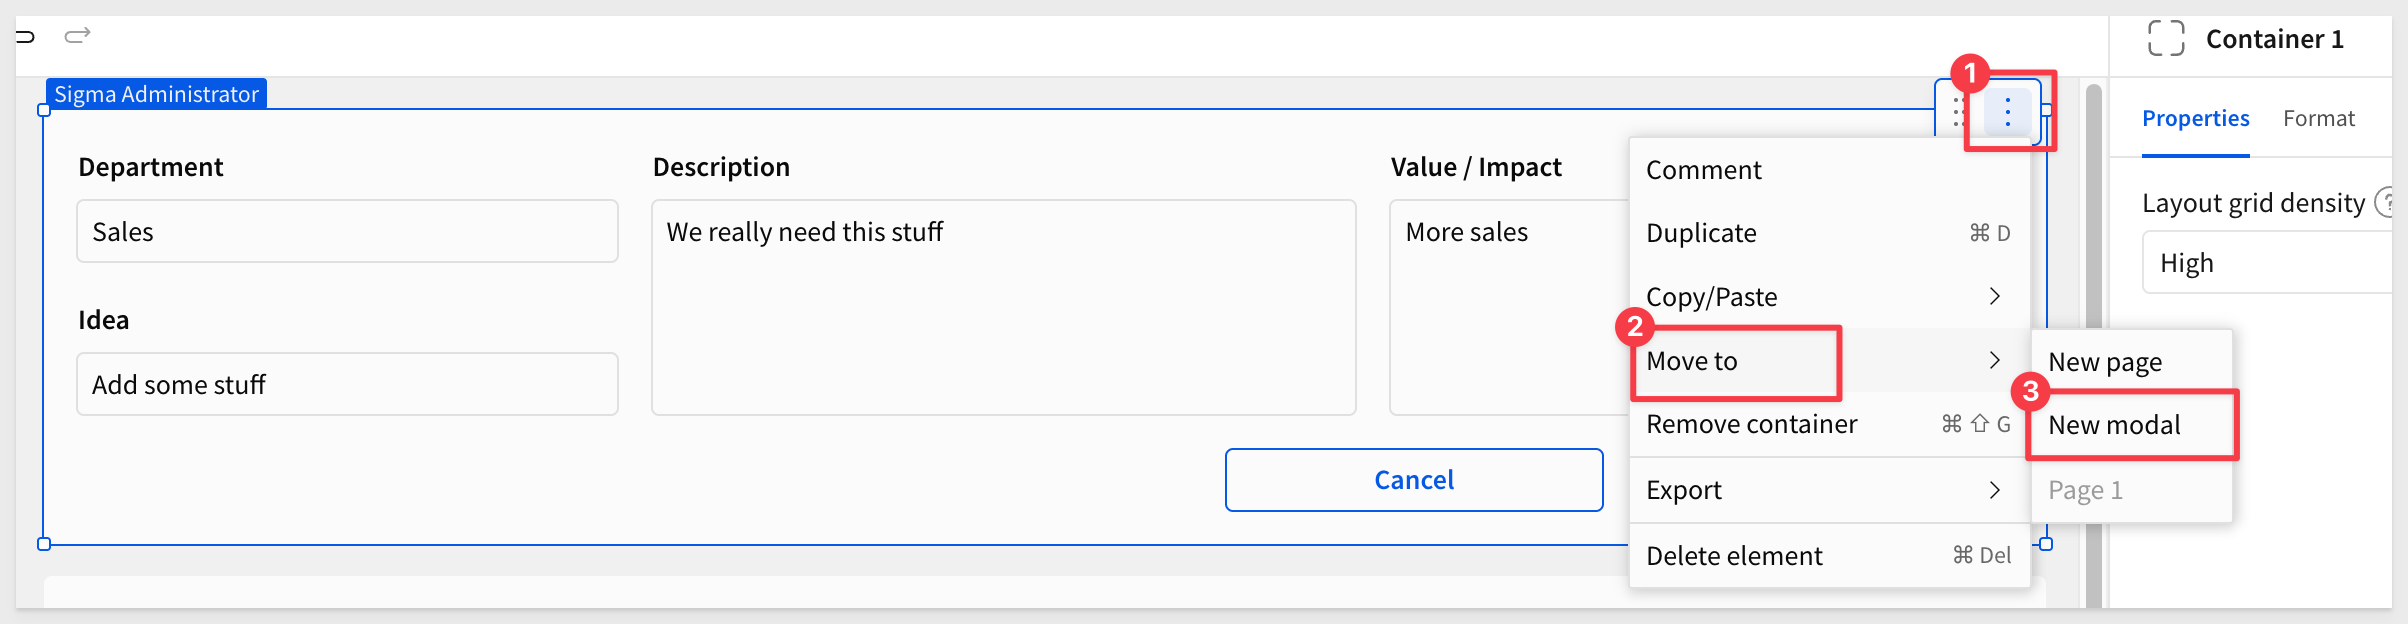
Sigma will create a new modal page with everything from the container included automatically.
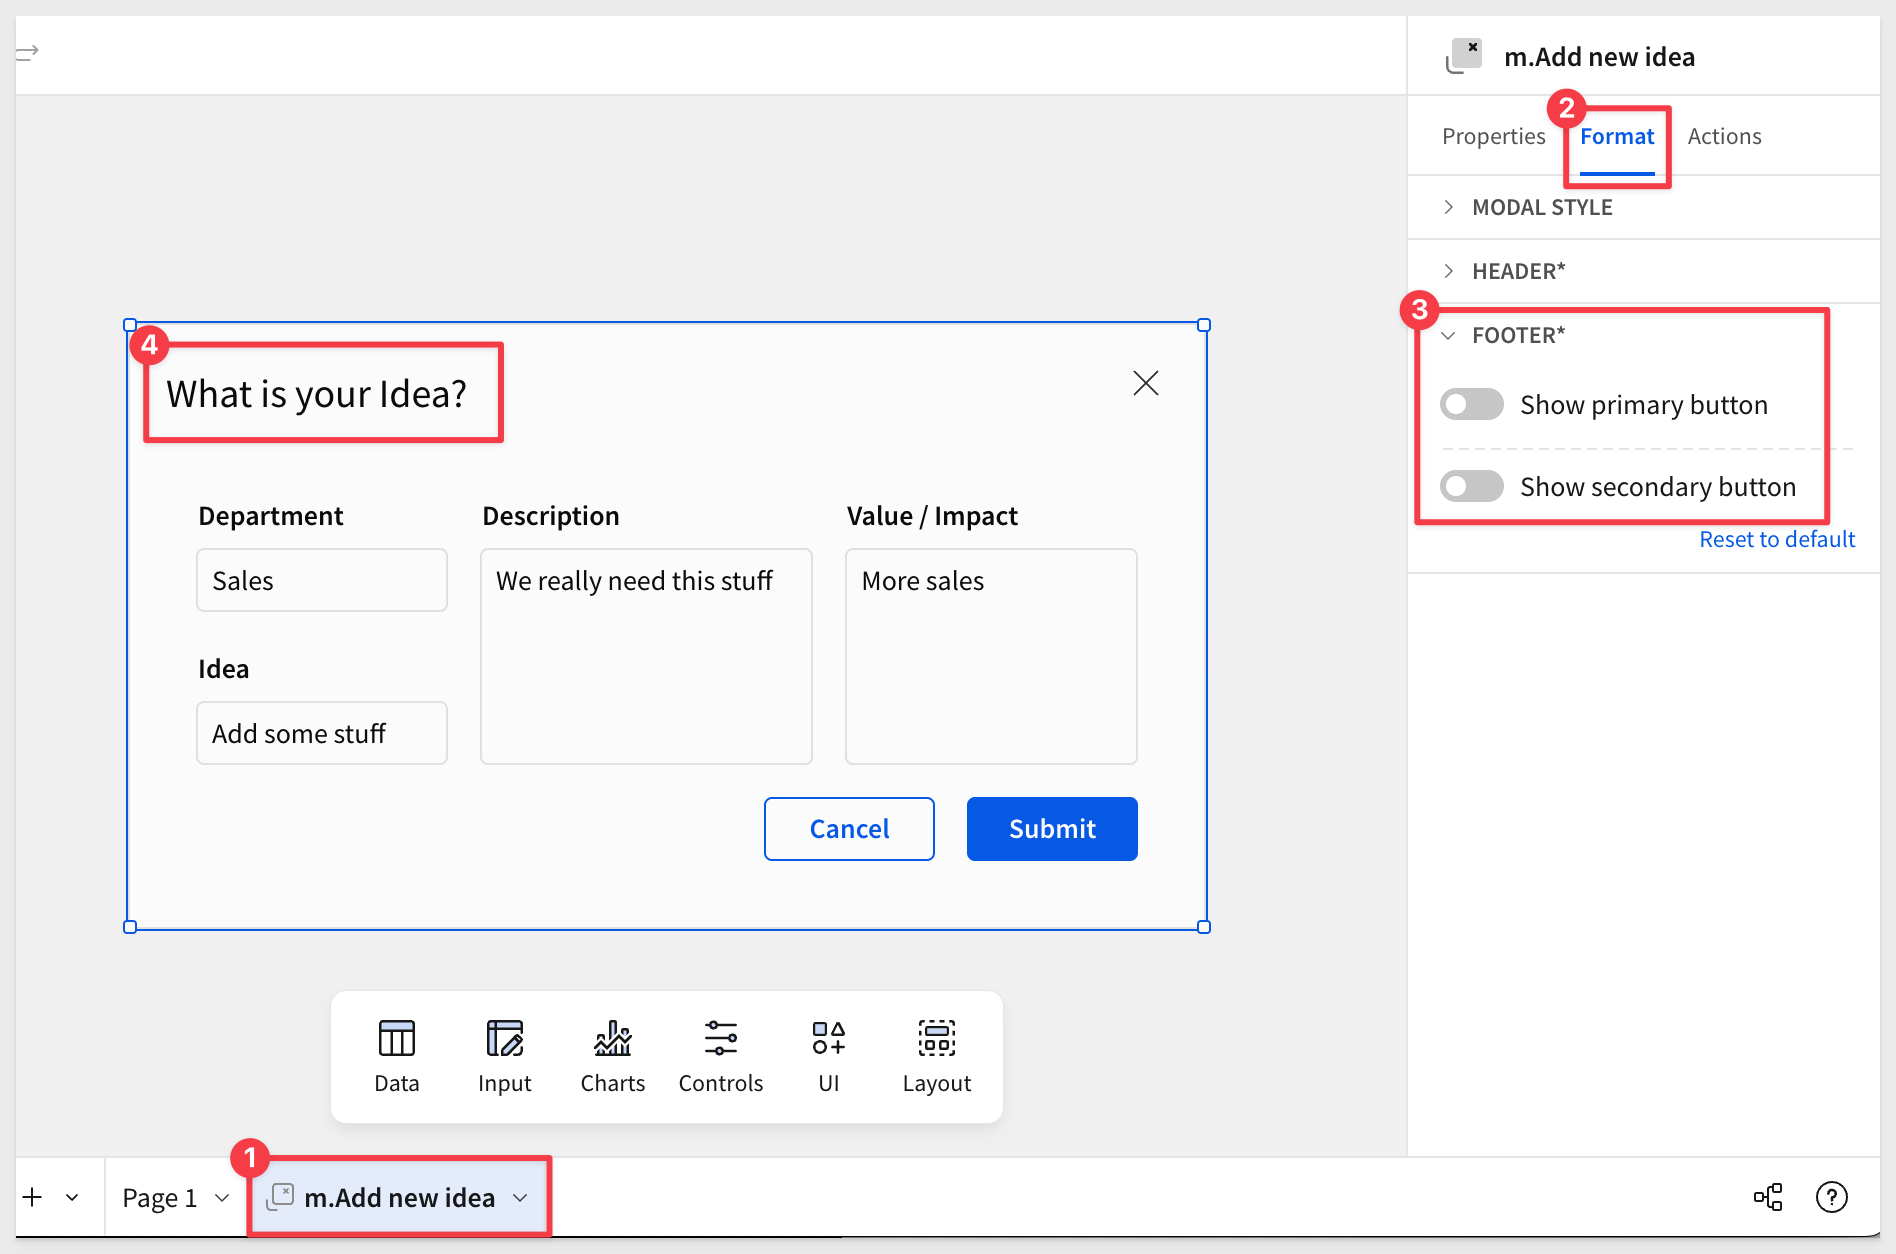
Rename the modal tab to m.Add new idea.
Modals include default cancel and submit buttons, but since we've already created our own, we can disable the defaults.
You can also change the modal title to something more user-friendly:
Rename the page with your input table Submitted ideas.
Click Publish.
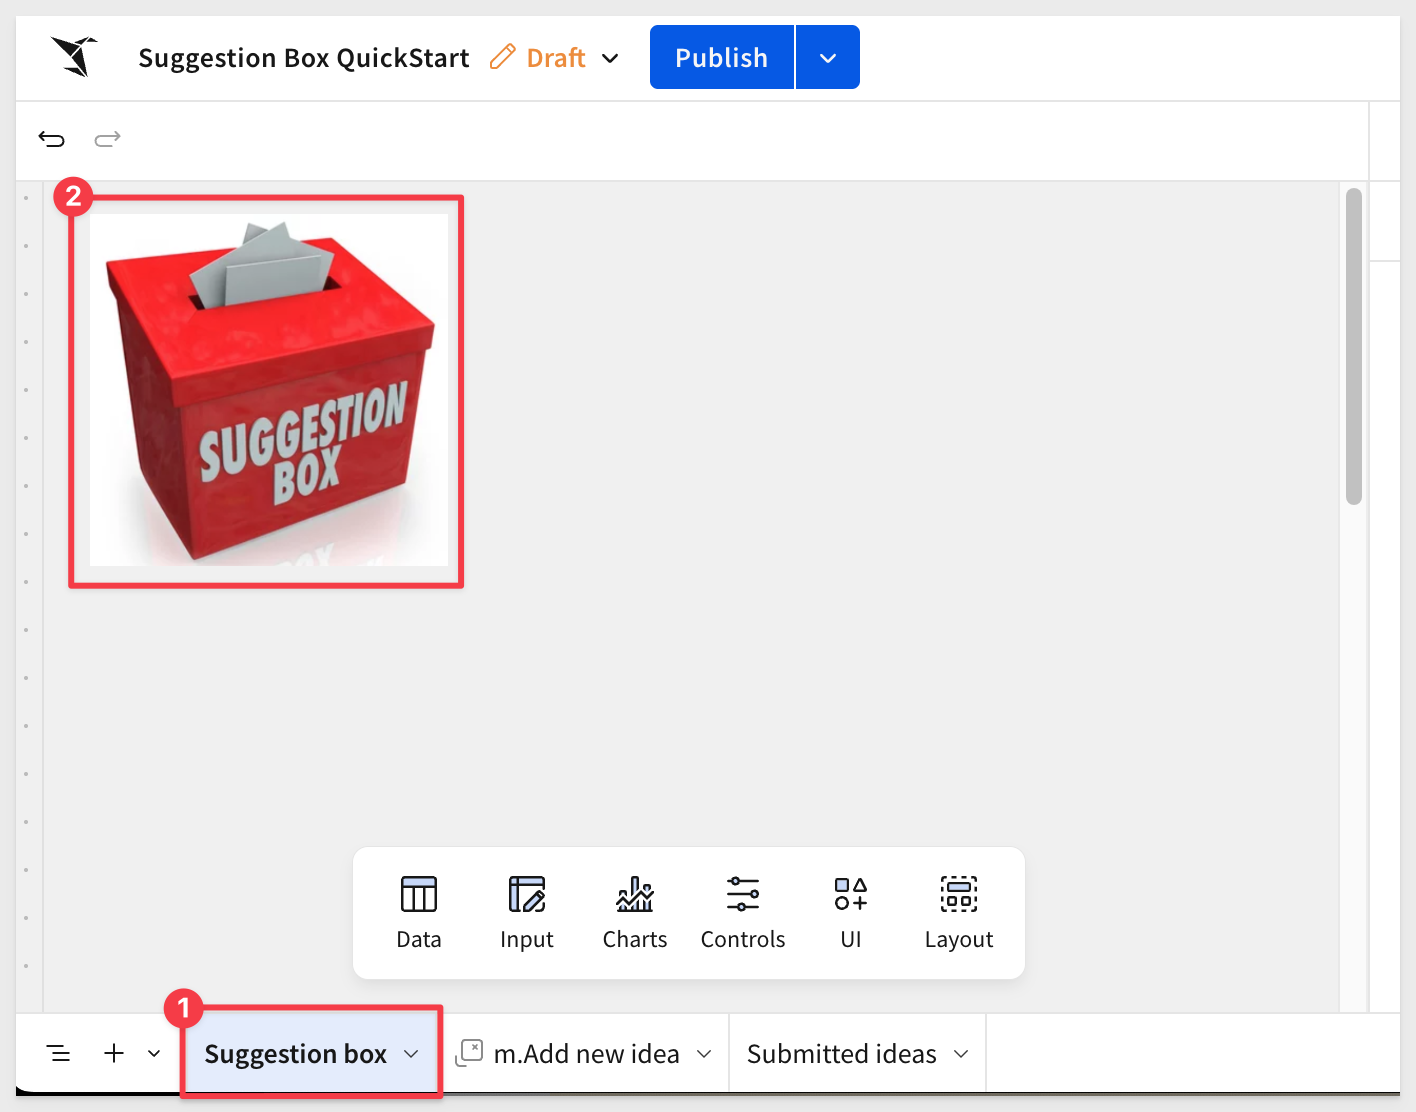
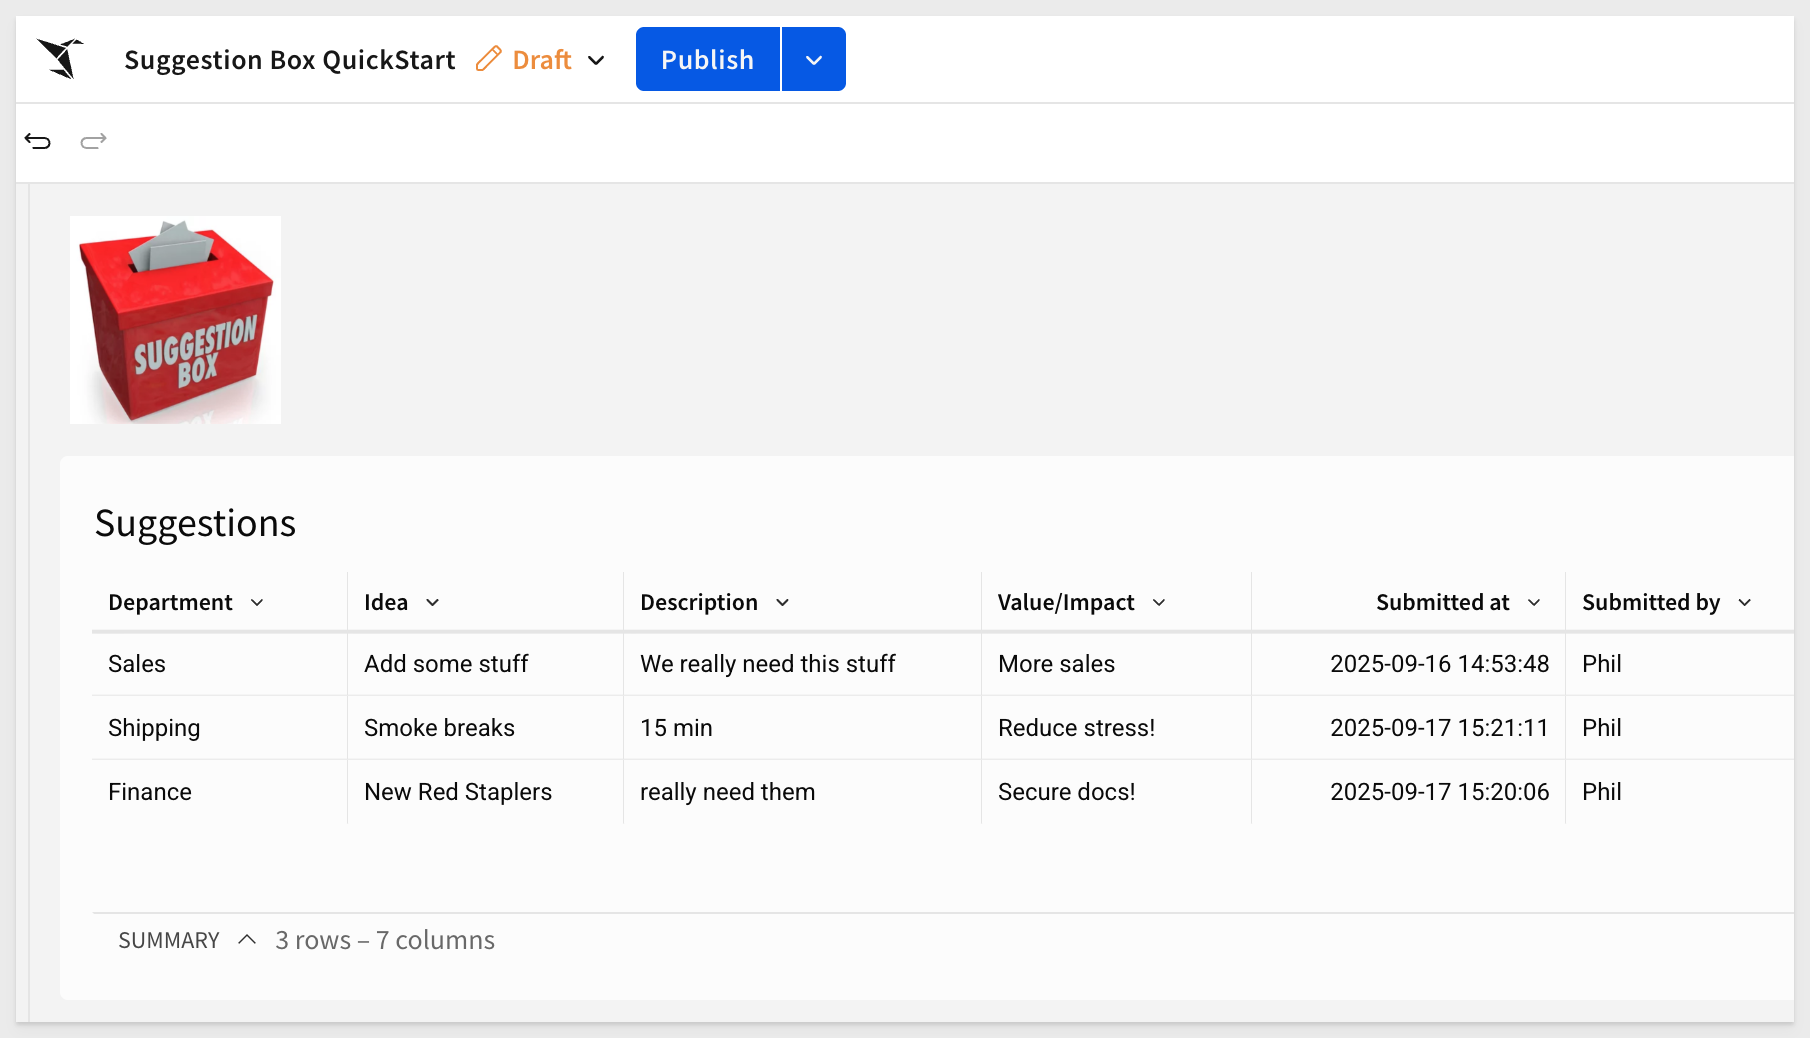
Add a new page to the workbook. This will serve as the main page where users submit ideas.
Rename the new page Suggestion box.
Find an image from the internet to represent your suggestion box. This image will act as the button users click to submit a new idea.
Save this image to your computer.
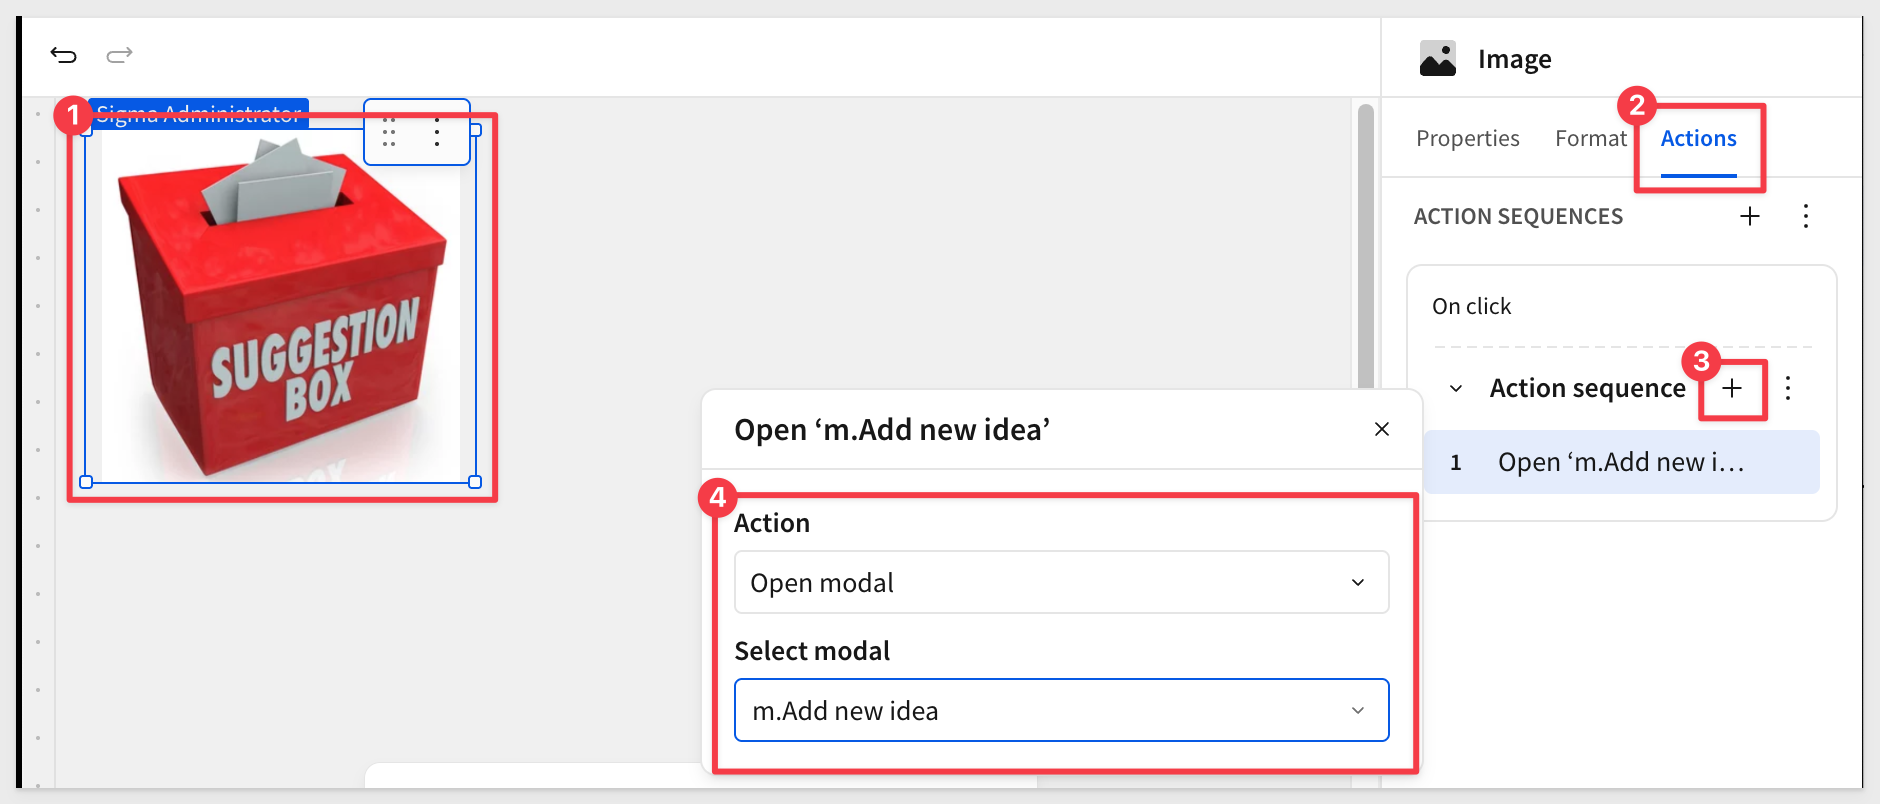
On your Suggestion box page, use the Element bar > UI > Image control to add the image you just saved to the page:
Add an action to the image that opens the "m.Add new idea" modal:
Click the image, and the modal should appear. Enter some information and click Submit.
You can check that the new row gets added to the Suggestion Box Data input table, but the form does not clear when you hit Submit and the modal stays open.
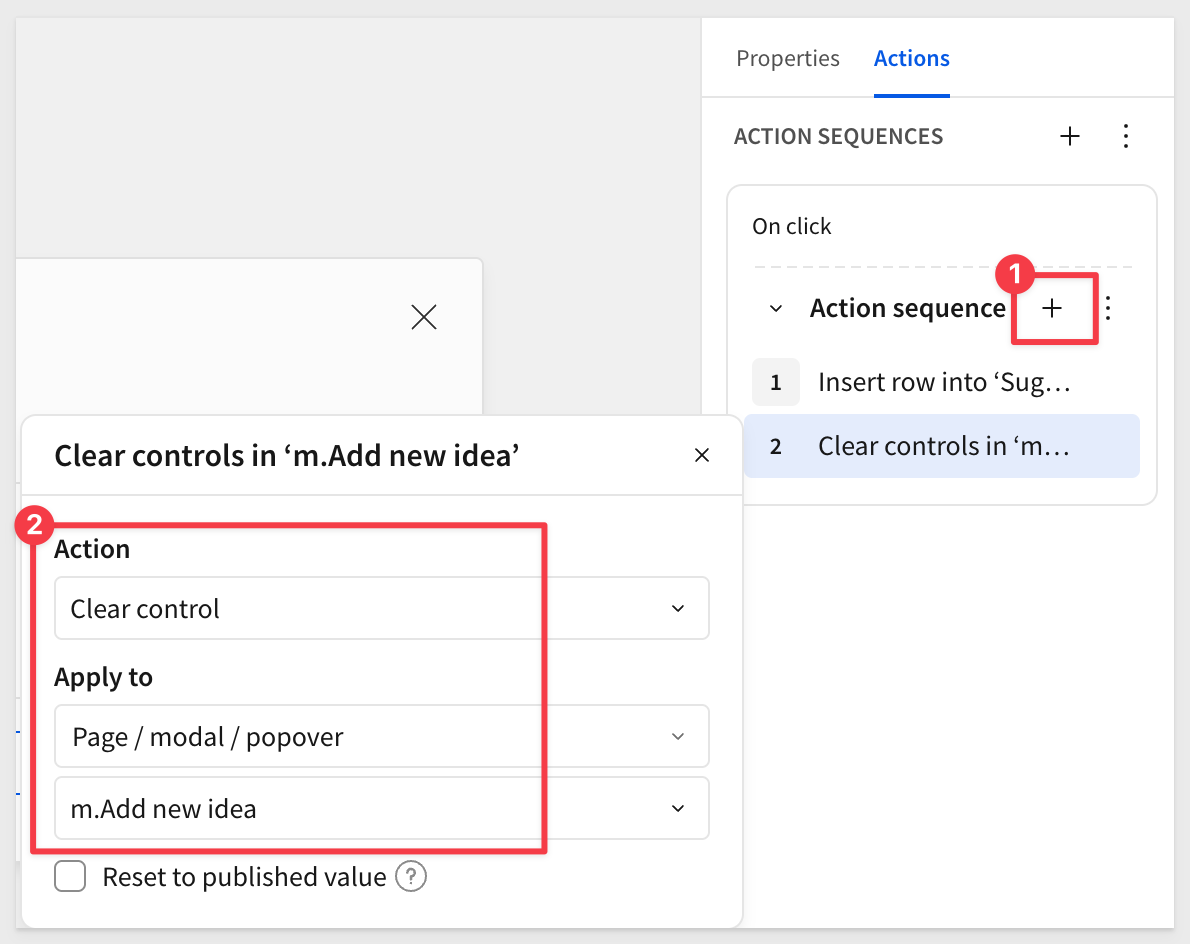
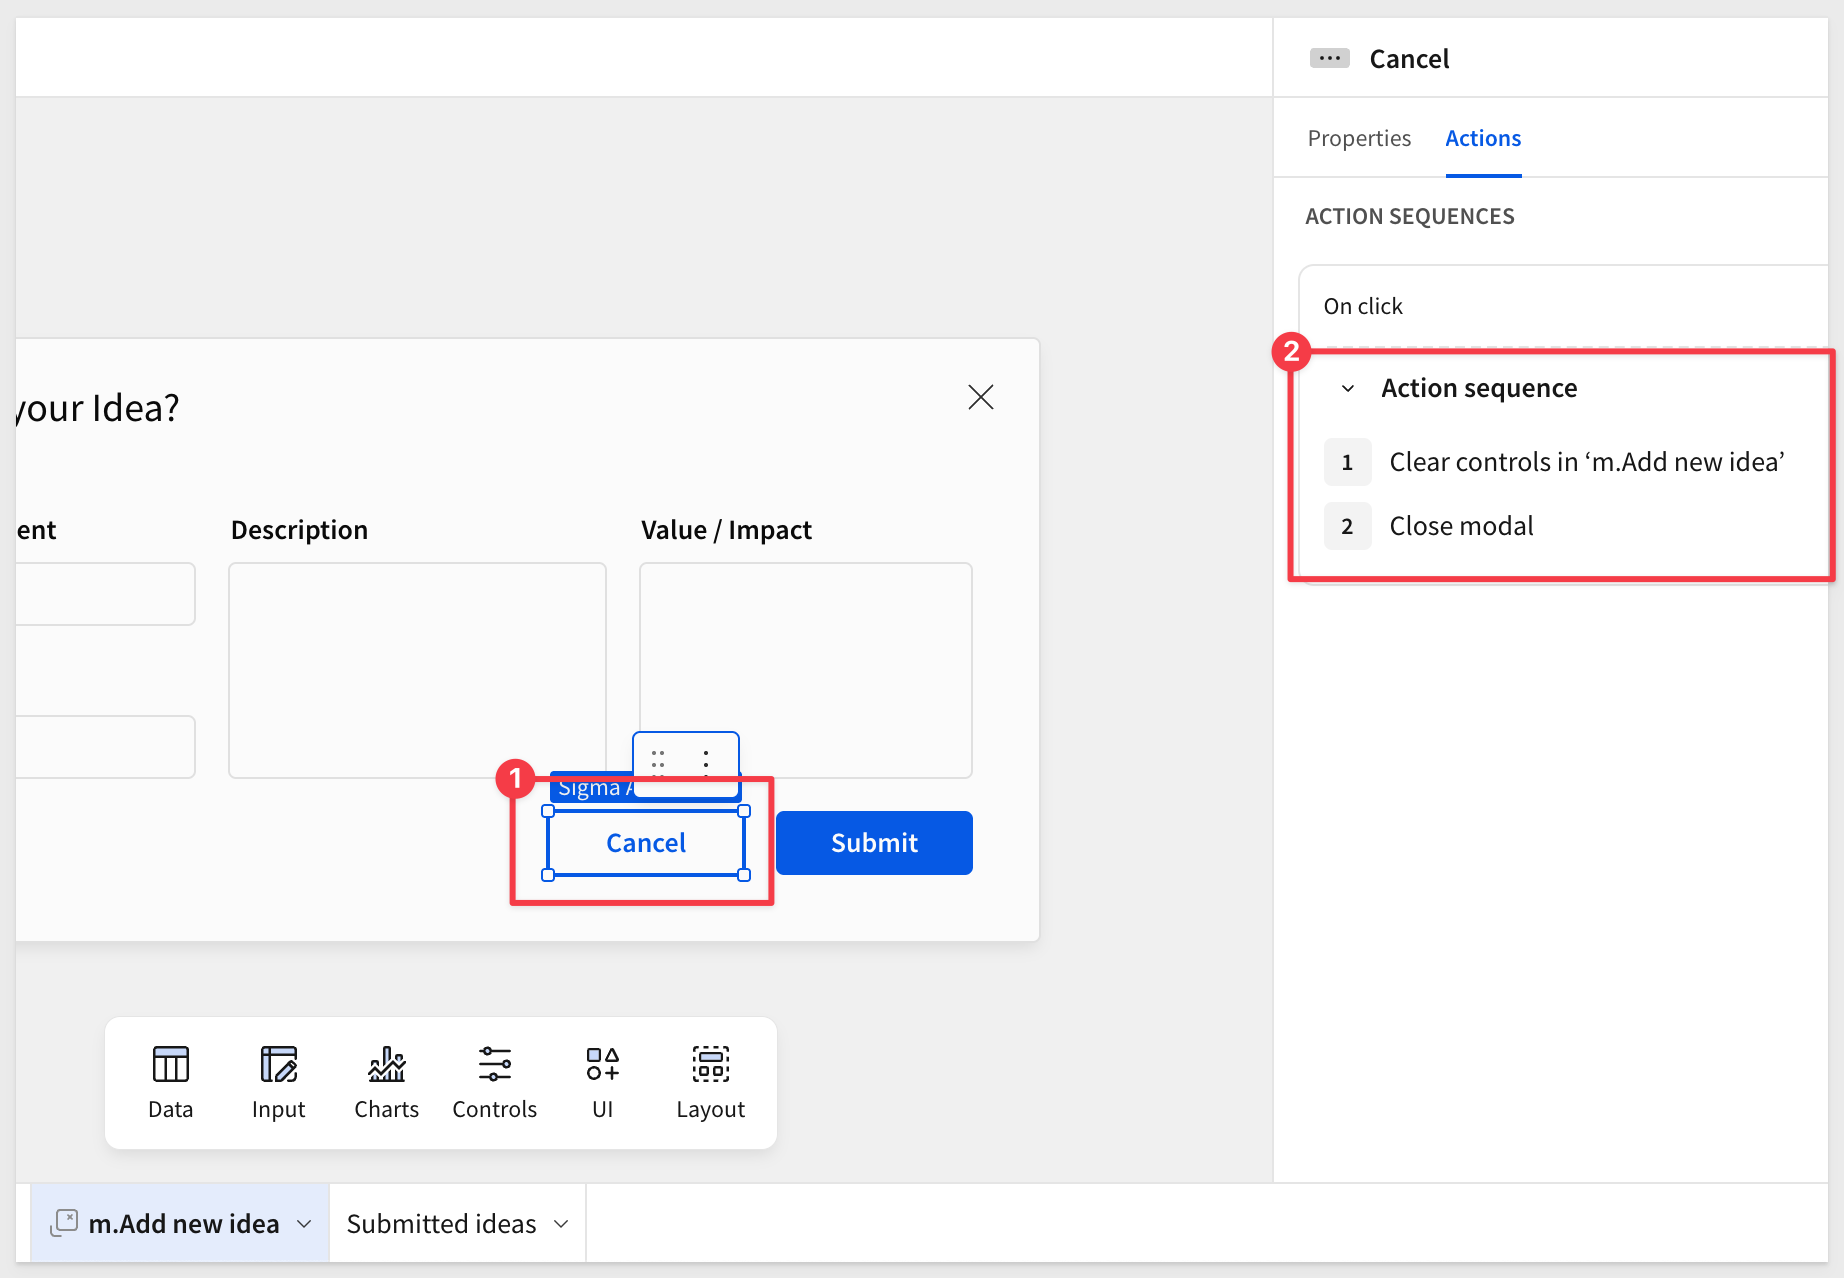
To solve this, we need to add an action to the Submit button.
Click on the Submit button on the m.Add new idea modal.
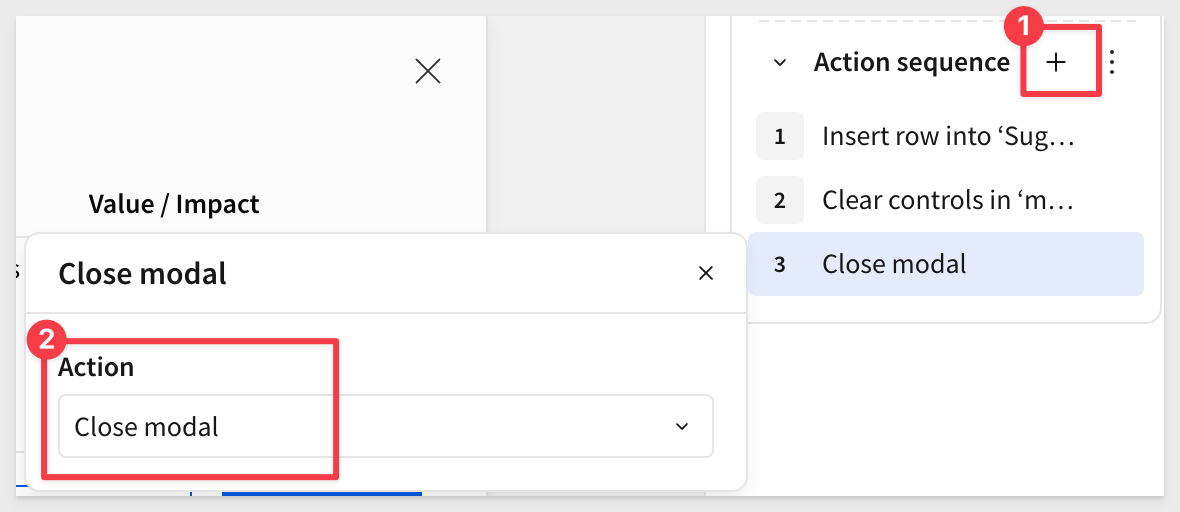
Add an action to clear the all controls on the m.Add new idea modal:
Add one more action to close the modal:
Return to the Suggestion box page and click the image to test another idea submission.
This time, the new row is added to the input table, the form clears, and the modal closes as expected.
Cancel button actions
Now that you have an understanding of how to configure actions, setting up the cancel workflow is straightforward.
Add actions to the Cancel button to clear the controls and close the modal:
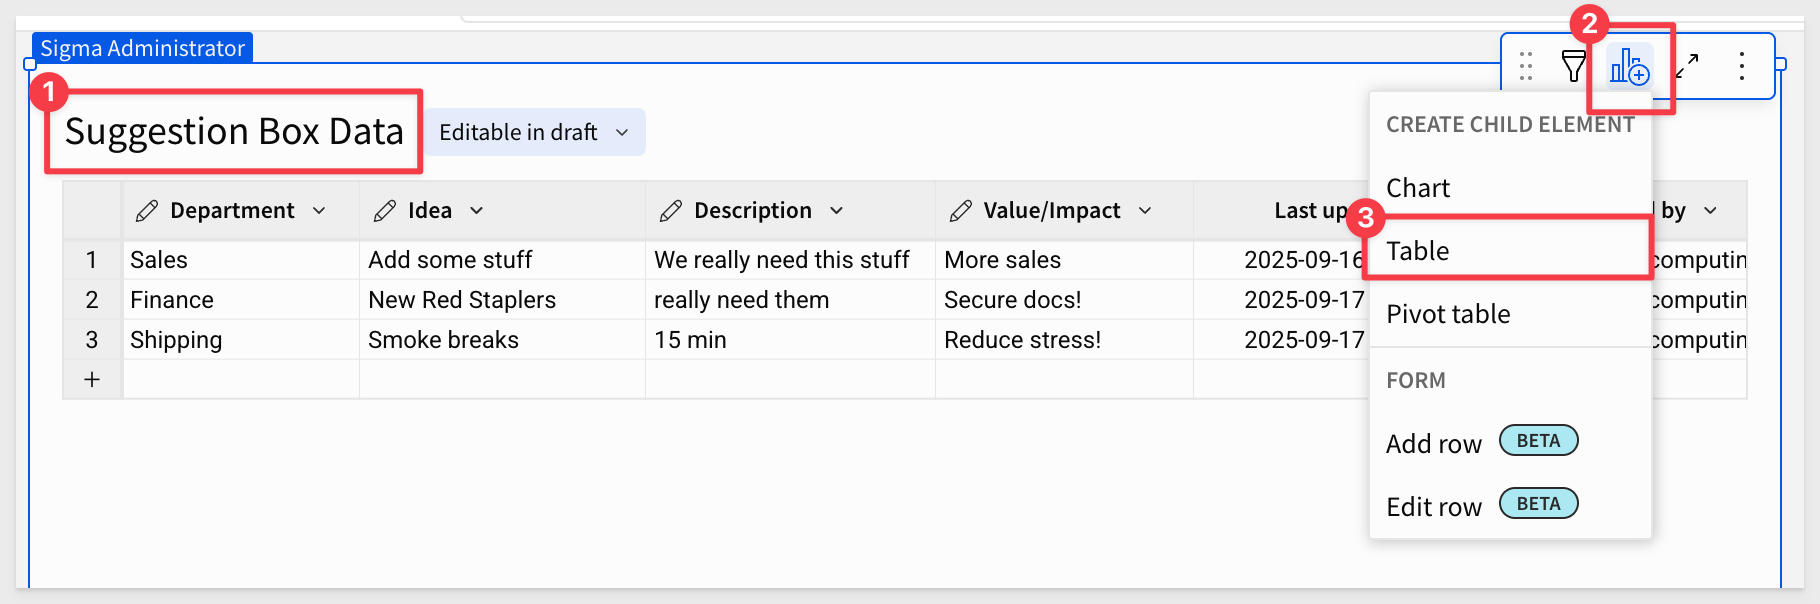
Next, we'll display the submitted ideas on the Suggestion Box page.
To create visibility into the previously submitted ideas, go to your Submitted ideas tab and create a child table from the input table:
Let's format the child table in a presentation-friendly way by adjusting settings on the Format tab of the Element panel.
Notice there are a lot of formatting options in the Table style group:
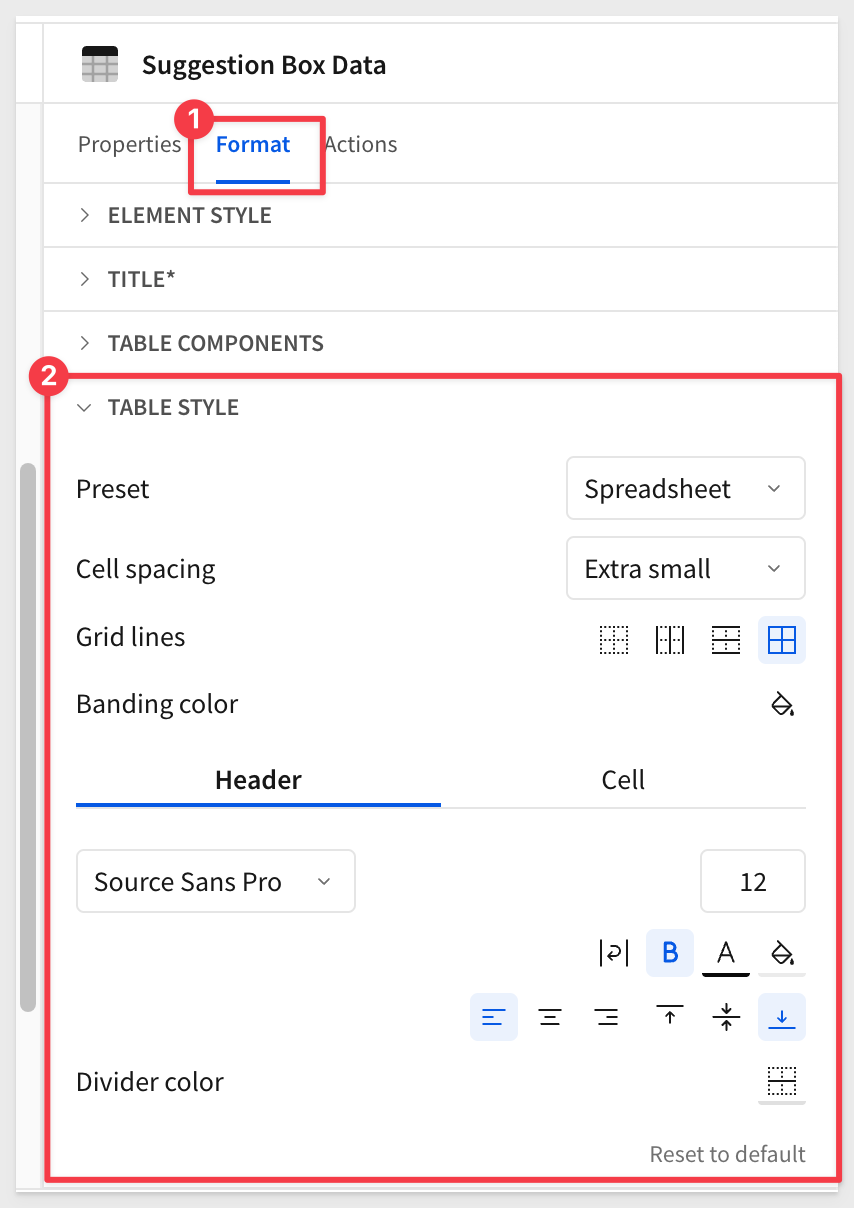
Set the Preset to Presentation and Cell spacing to Medium. Adjust any other to your preference.
Rename the child table Suggestions.
In the table itself, rename Last updated at to Submitted at.
Create a new column named Submitted by and set its formula to just show the person's name and not the email address:
Proper(SplitPart([Suggestion Box Data/Last updated by], "@", 1))
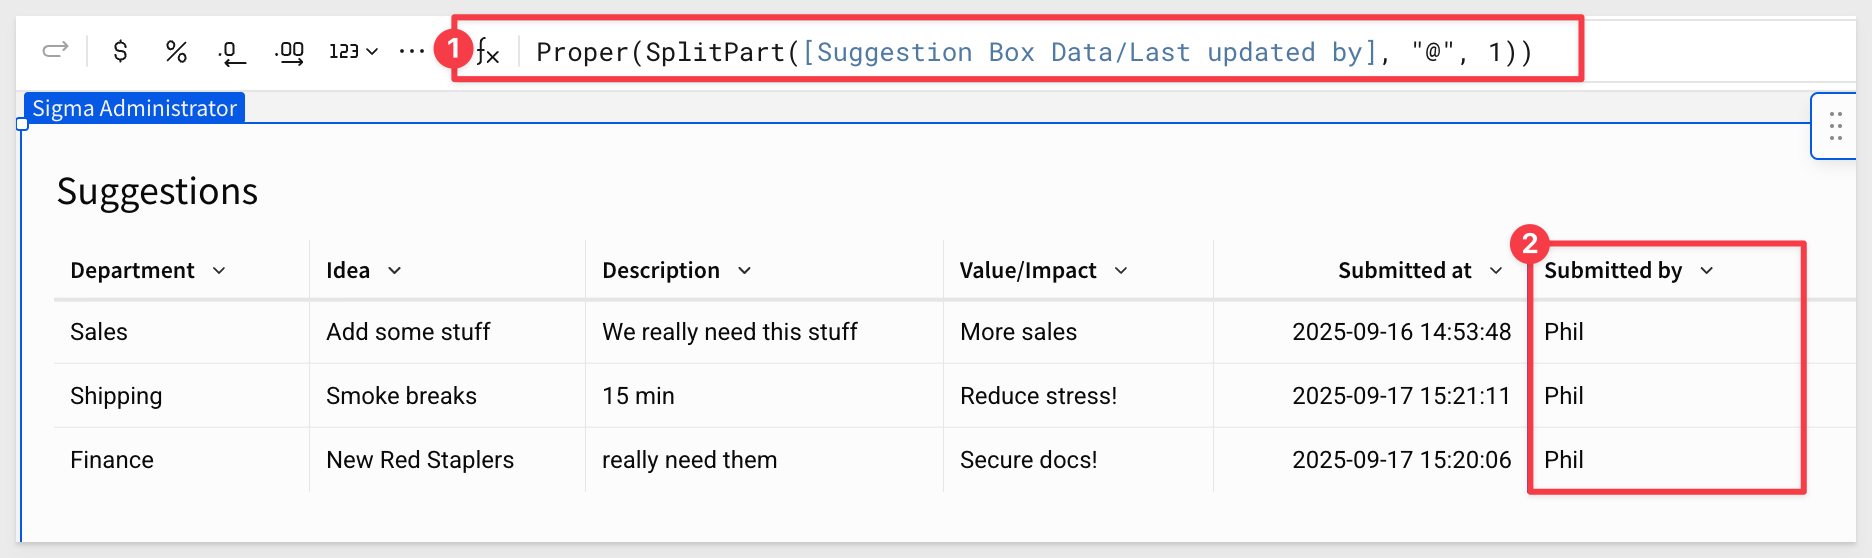
For more information, see Proper Function
Hide the original Last updated by column.
We'll use that column in a formula shortly, so it needs to remain in the table—but doesn't need to be displayed to end users.
Move the formatted Suggestions table to the Suggestion box tab and place it below the image:
Next, let's add a toggle to filter the table to only show your own suggestions.
Create a new column named Current user idea? and set the formula to:
[Last updated by]=CurrentUserEmail()
This will return true or false based on the currently logged-in Sigma user.
Filter on this column:
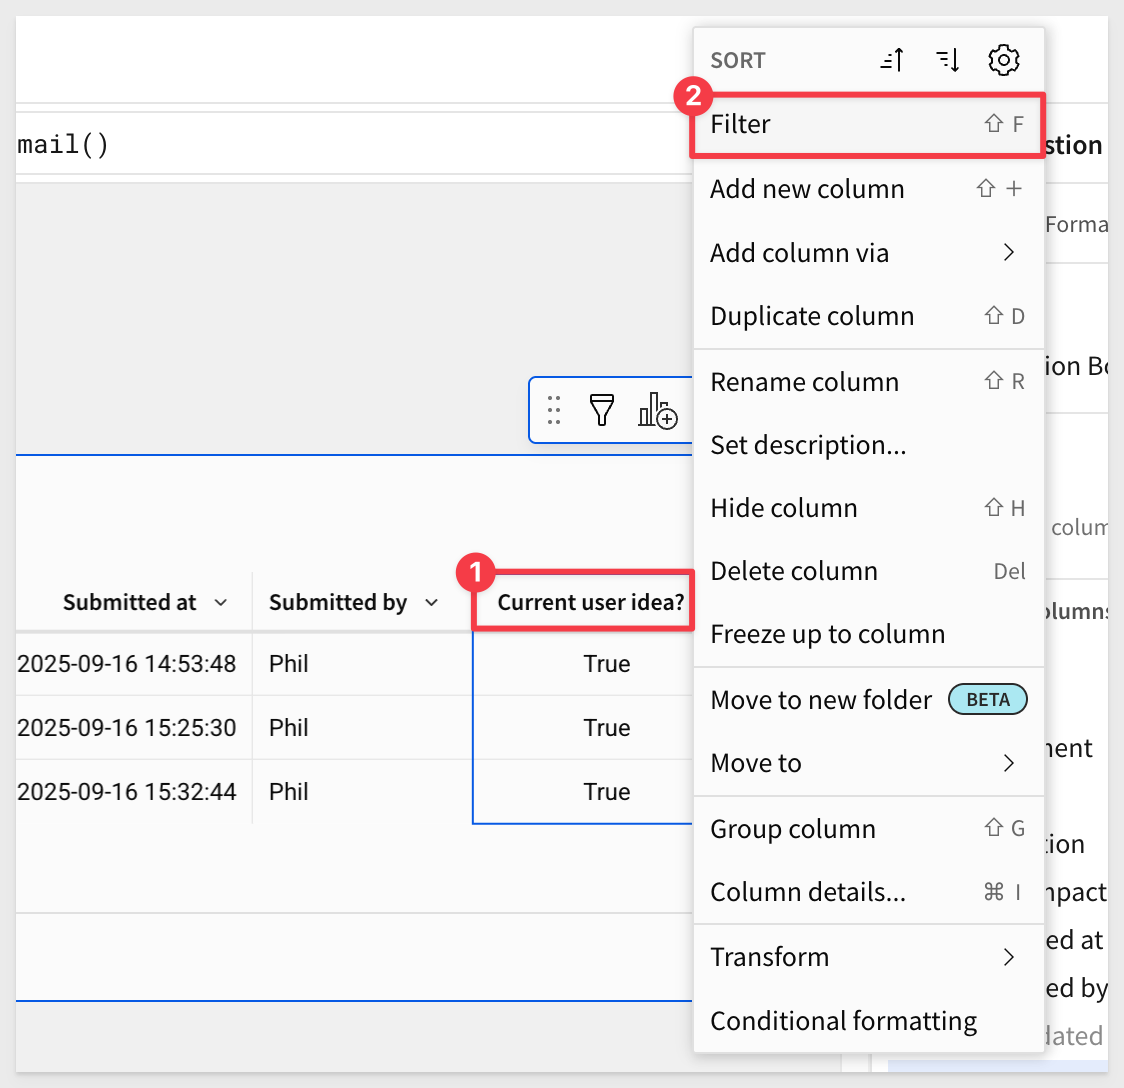
Convert it to a page control:
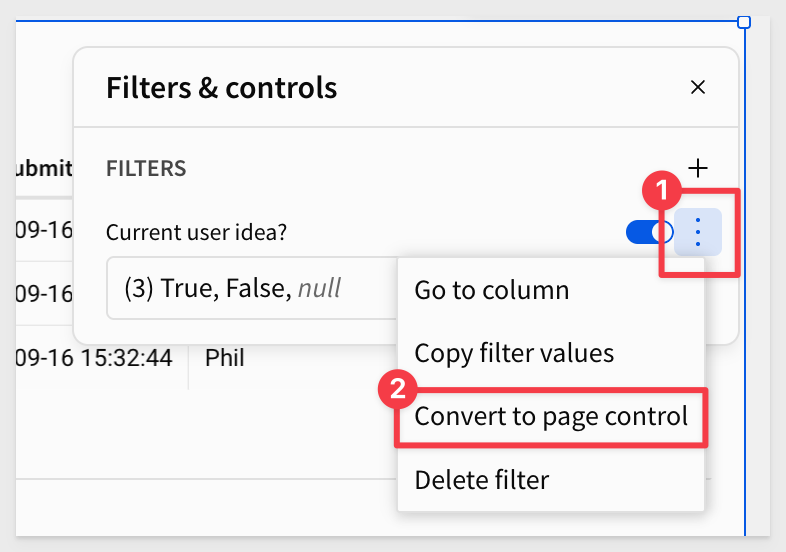
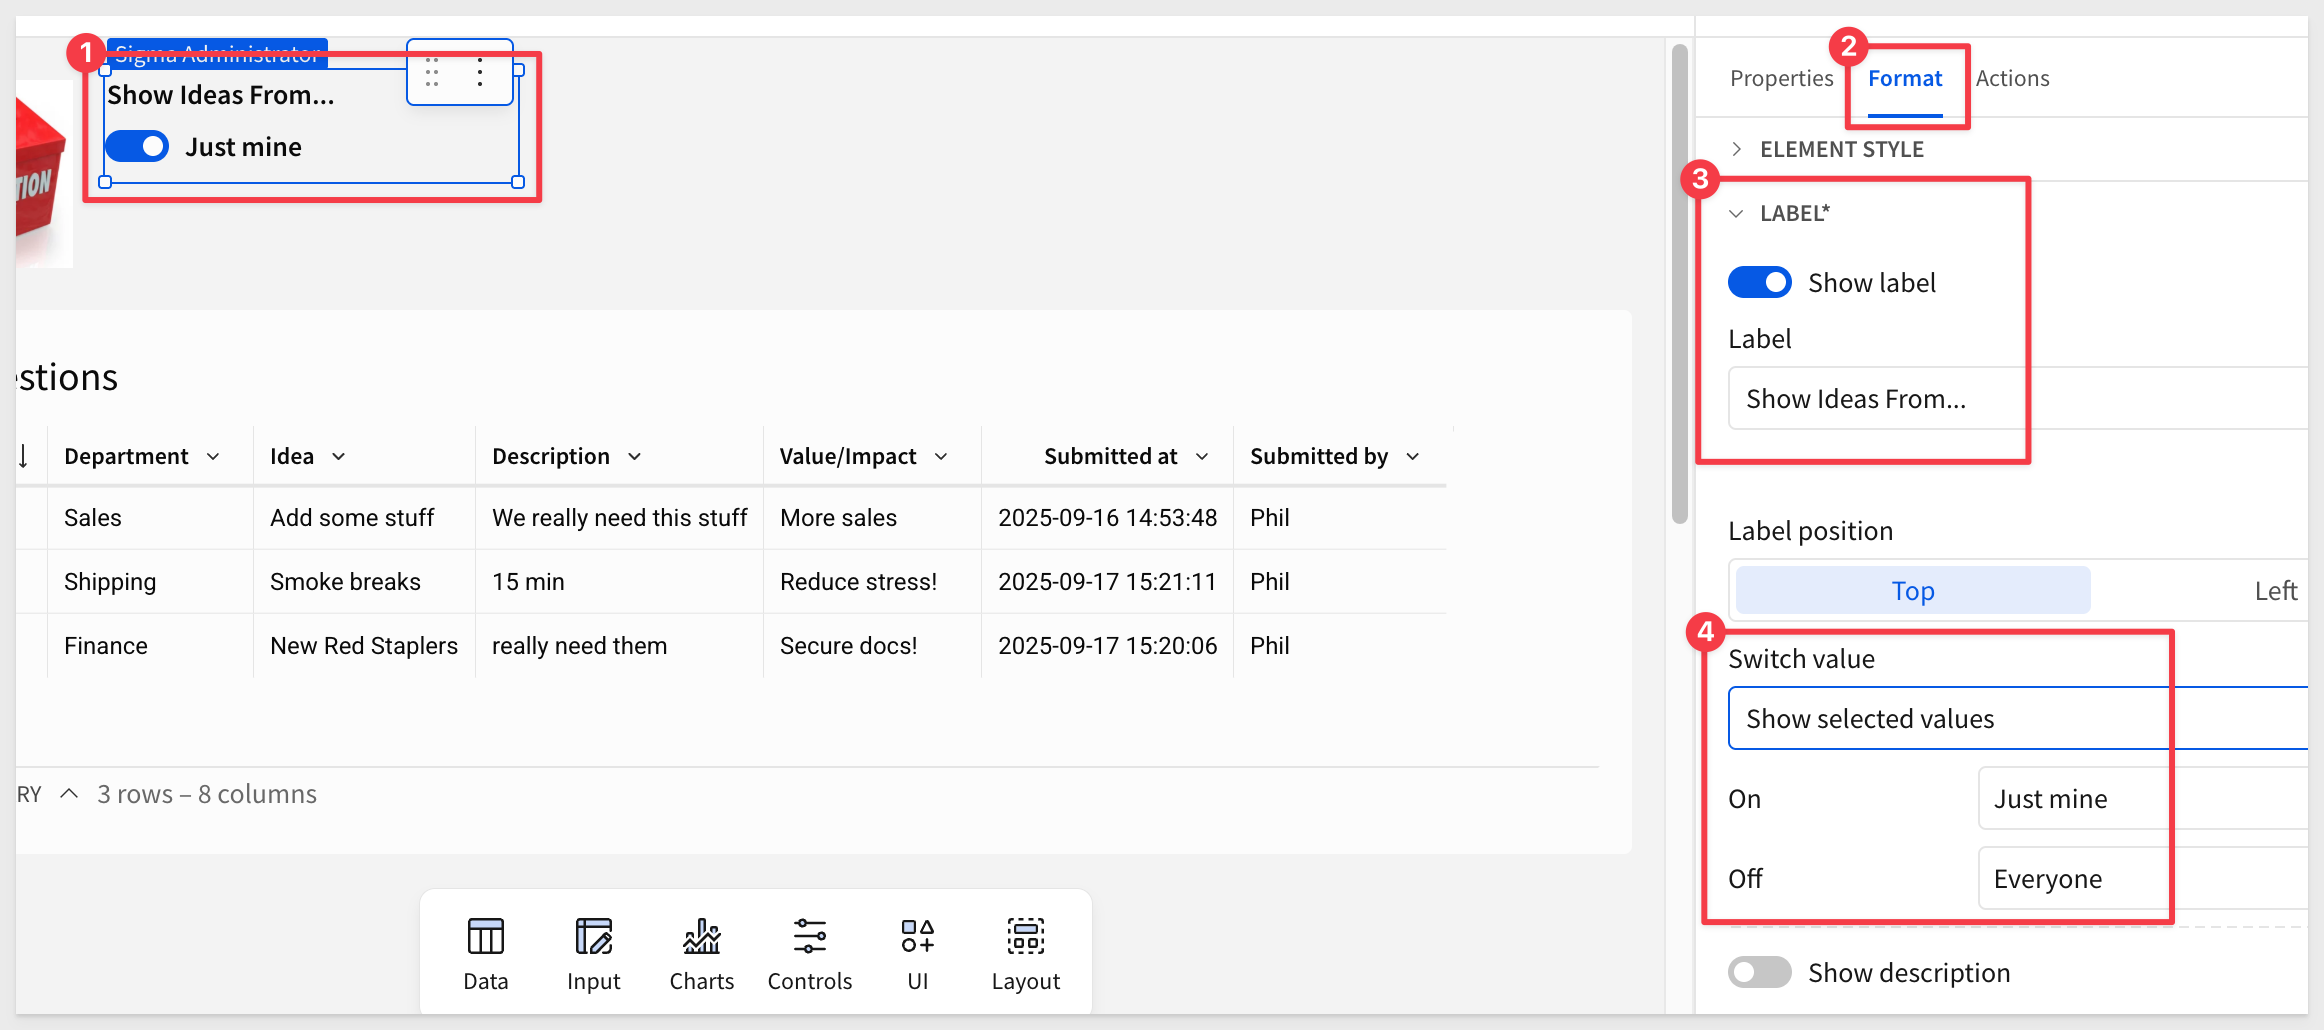
Change this filter to a Switch control type and set the Filter type to True/All:
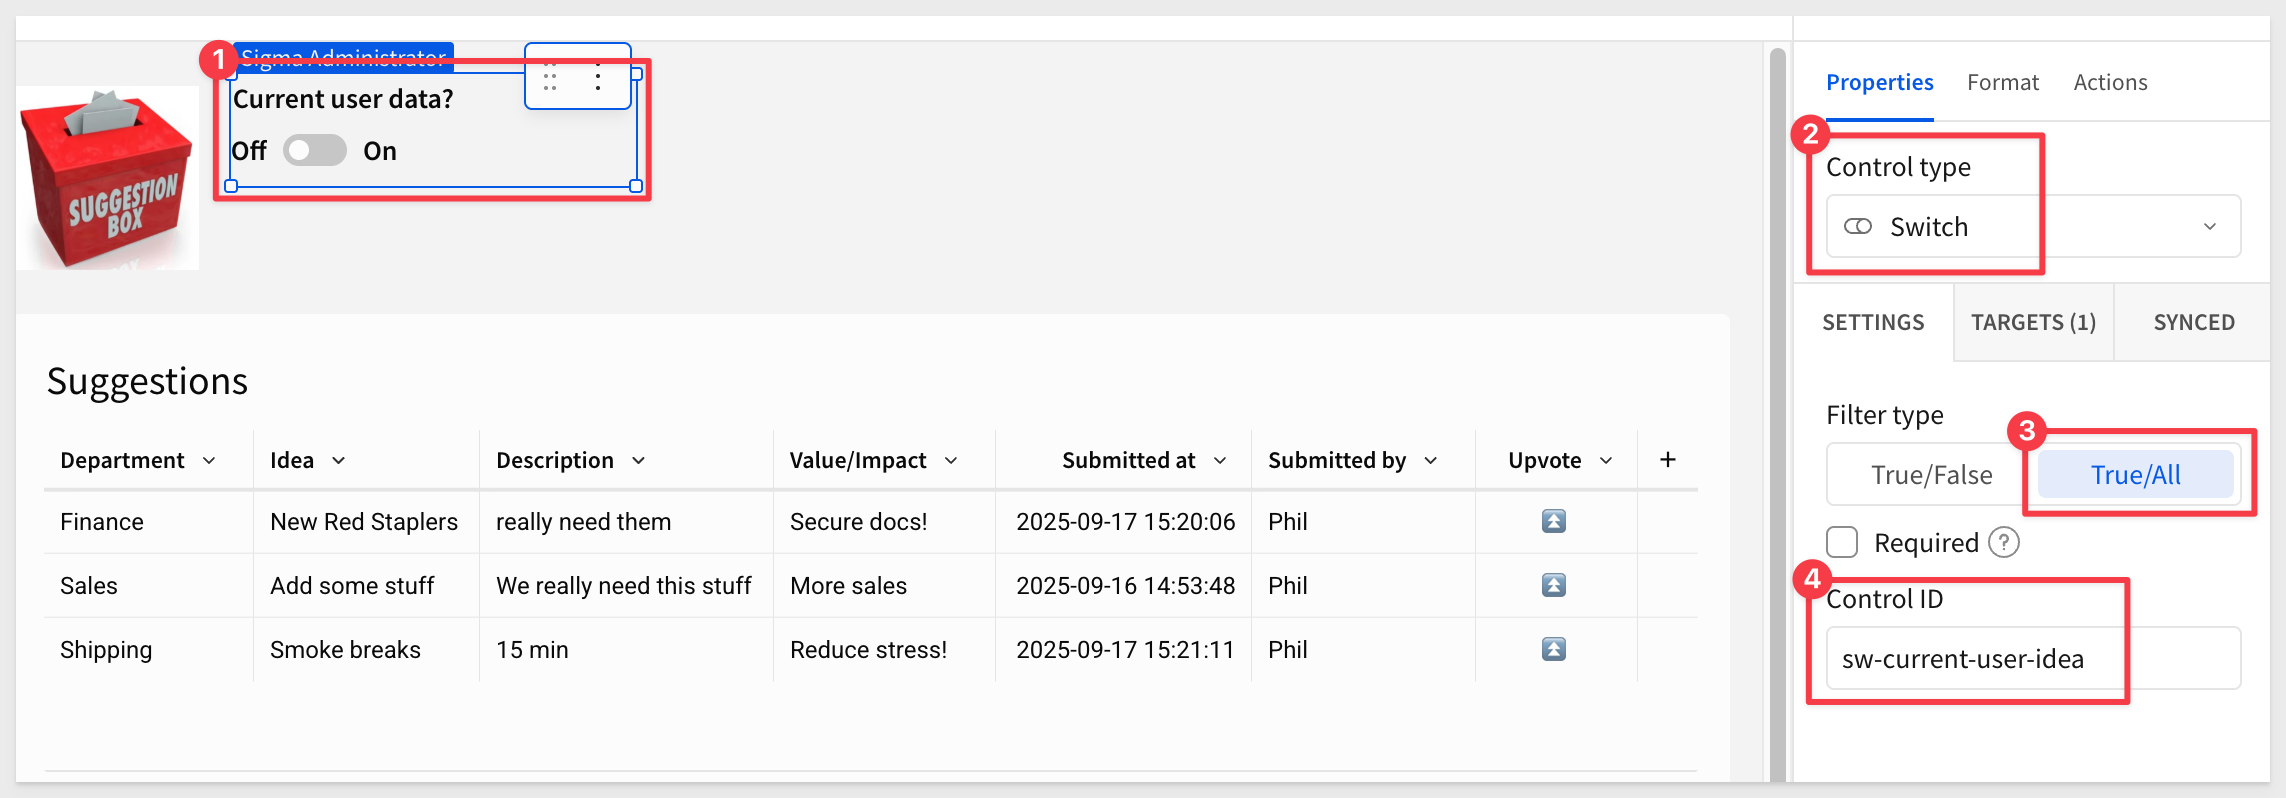
You can improve the UI of the switch control for a cleaner look:
Hide the Current user idea? column.
You can test the switch control, but it won't do anything yet since you've submitted all the ideas. It will work once other users have submitted ideas.
Now that we can collect ideas, it would be great if people could upvote ideas so we can see which ideas are the most popular.
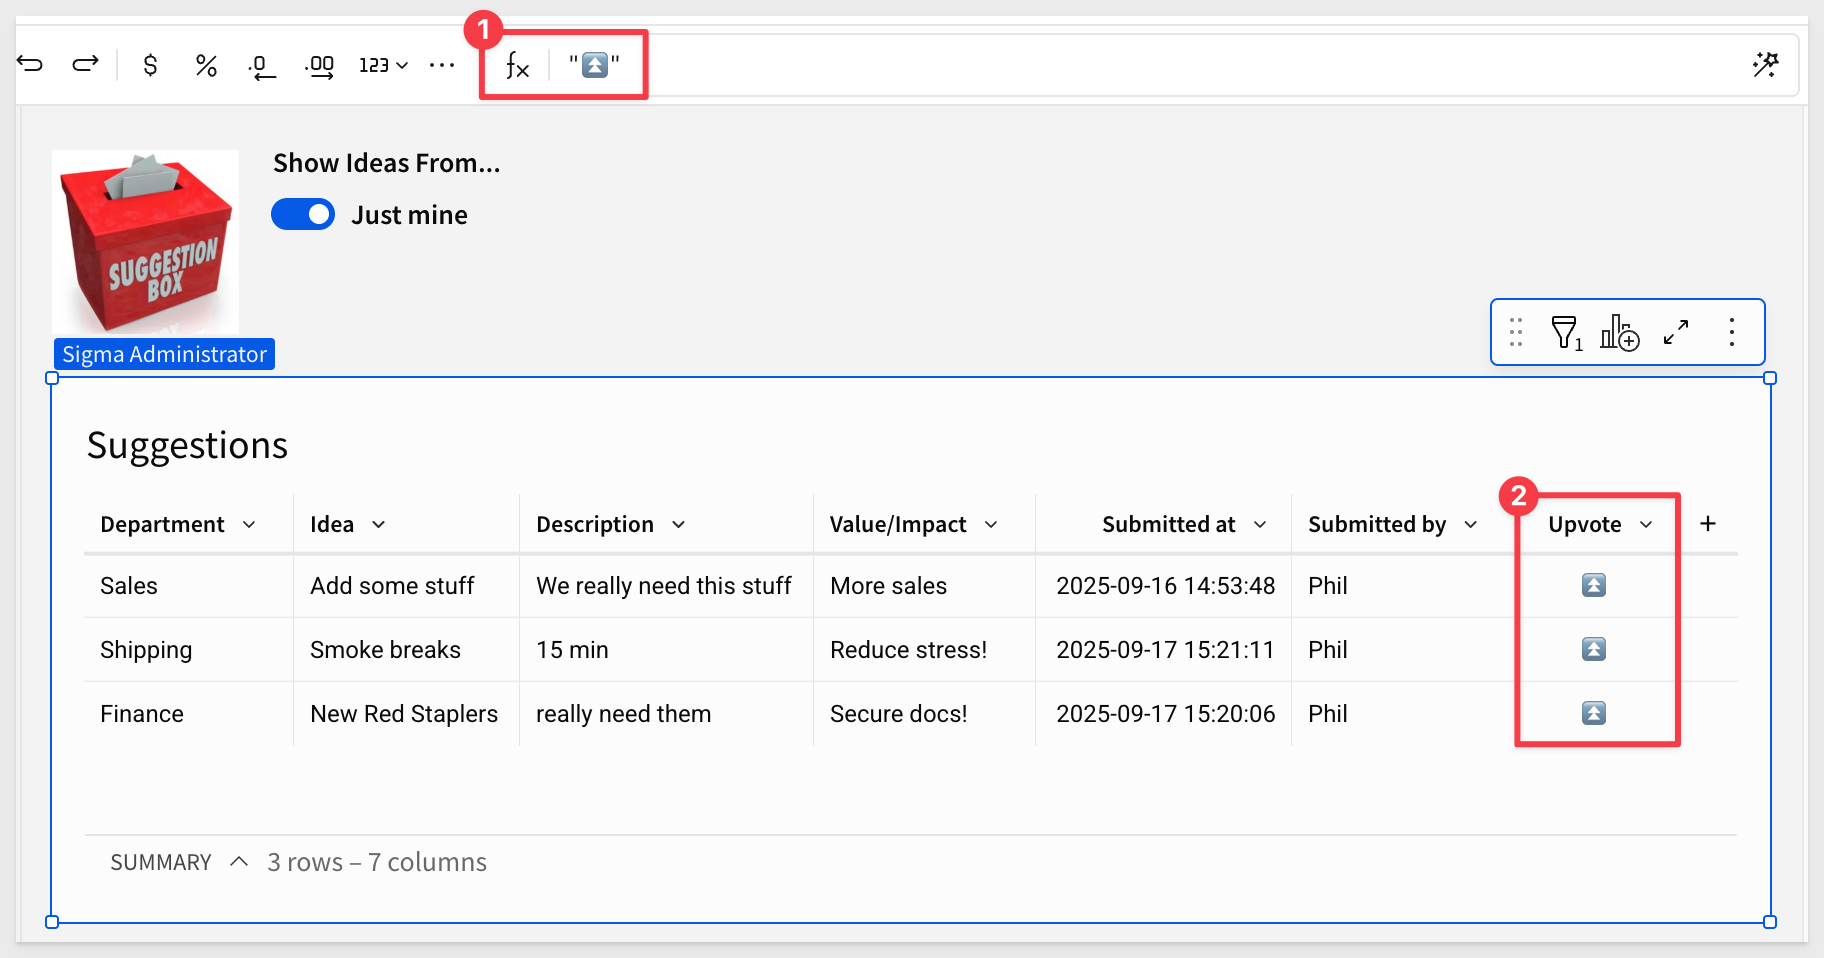
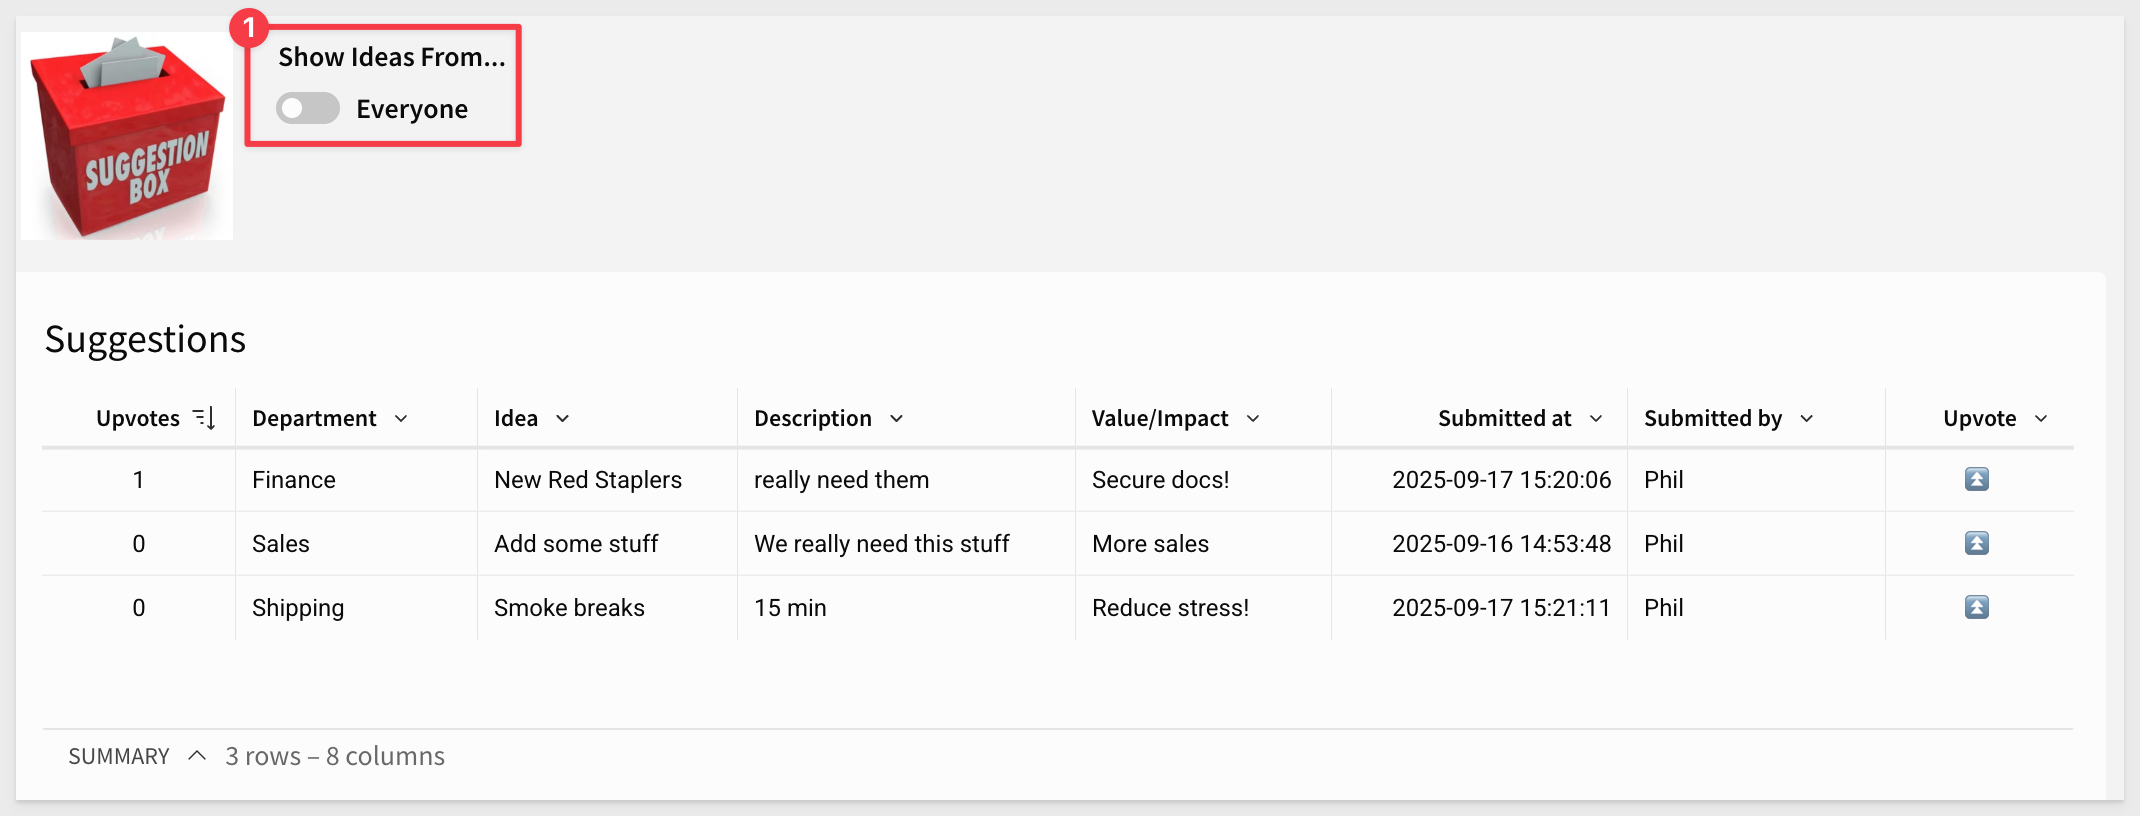
Navigate to your Suggestion Box page and add a new column to the Submitted Ideas table using the formula "⏫️" and rename it Upvote (quotes required):
Upvoting input table
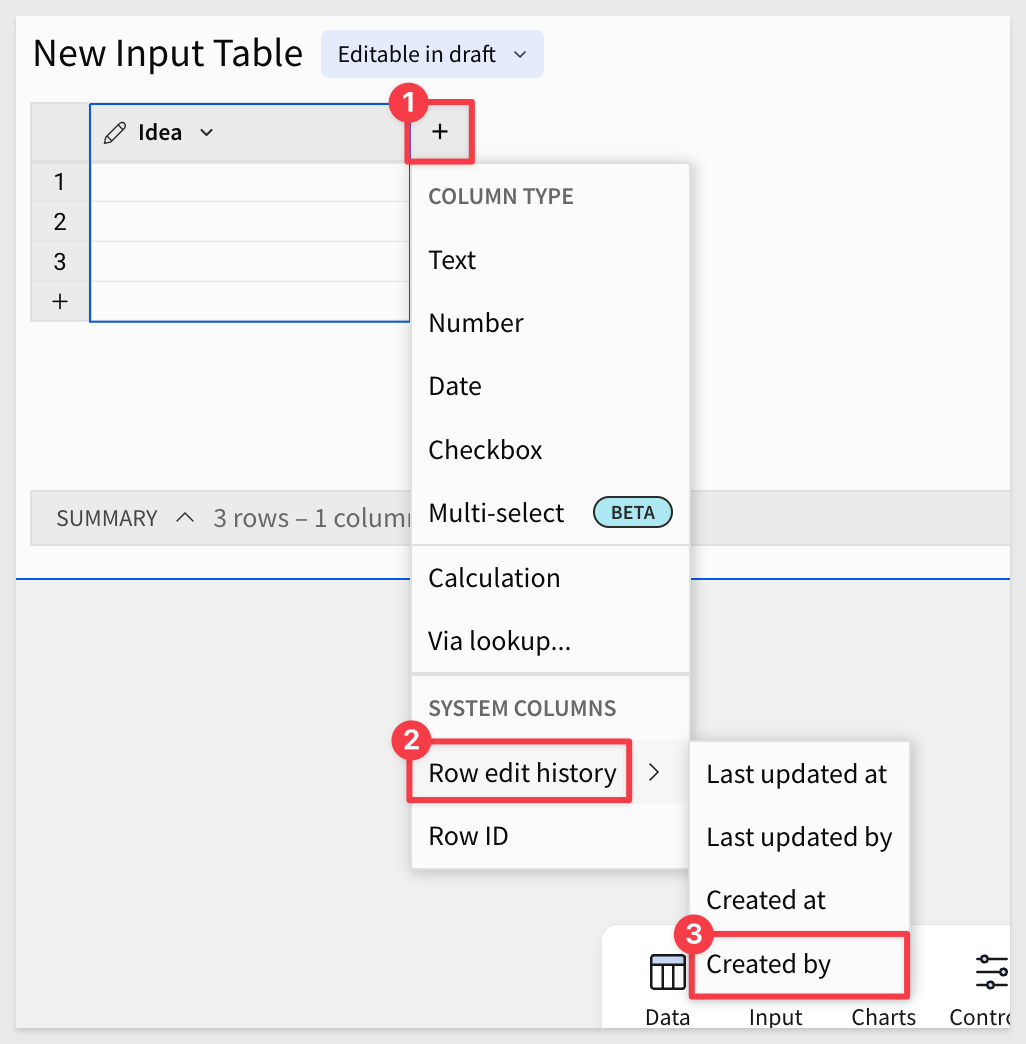
When users upvote a suggestion, we need to store that information somewhere. We will do that with another empty input table that has two columns.
Add a new Empty input table under the Suggestions table on the Suggestion box page and use the Sigma Sample Database connection.
Configure two text columns: Idea and Upvoted by. Use the Created by option to capture who made the upvote:
Rename the input table Upvoted Ideas and move it to the Submitted ideas page to avoid influencing users.
Add upvote action
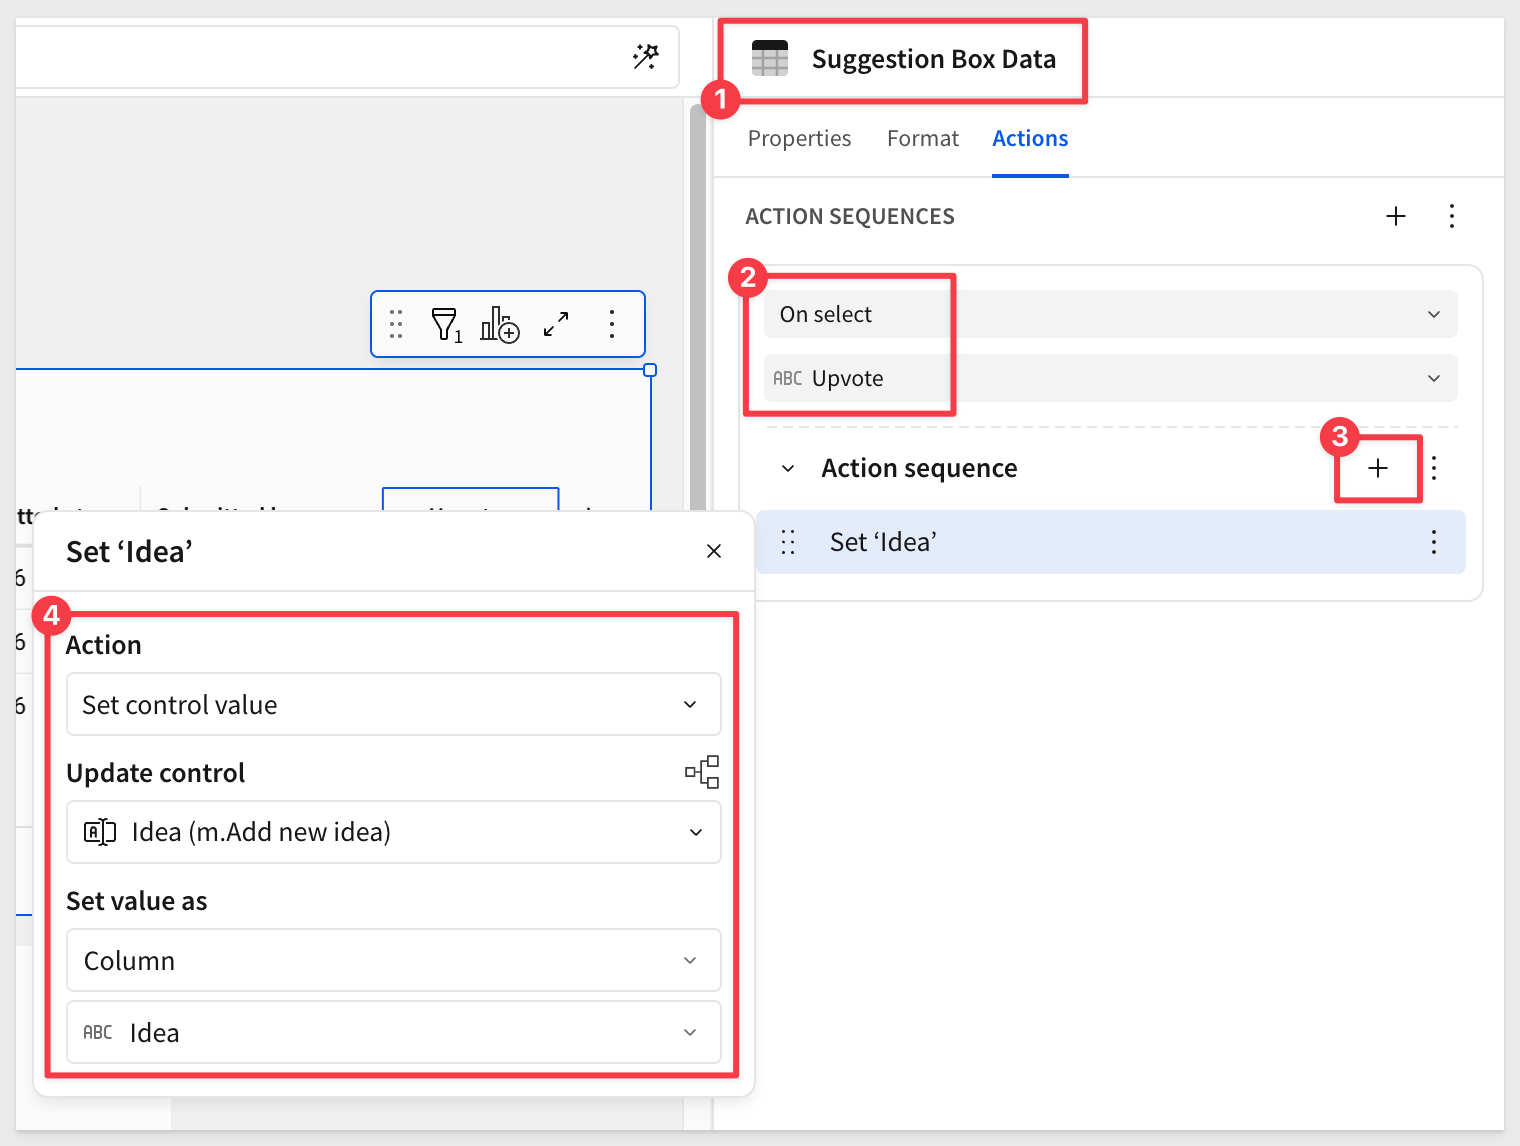
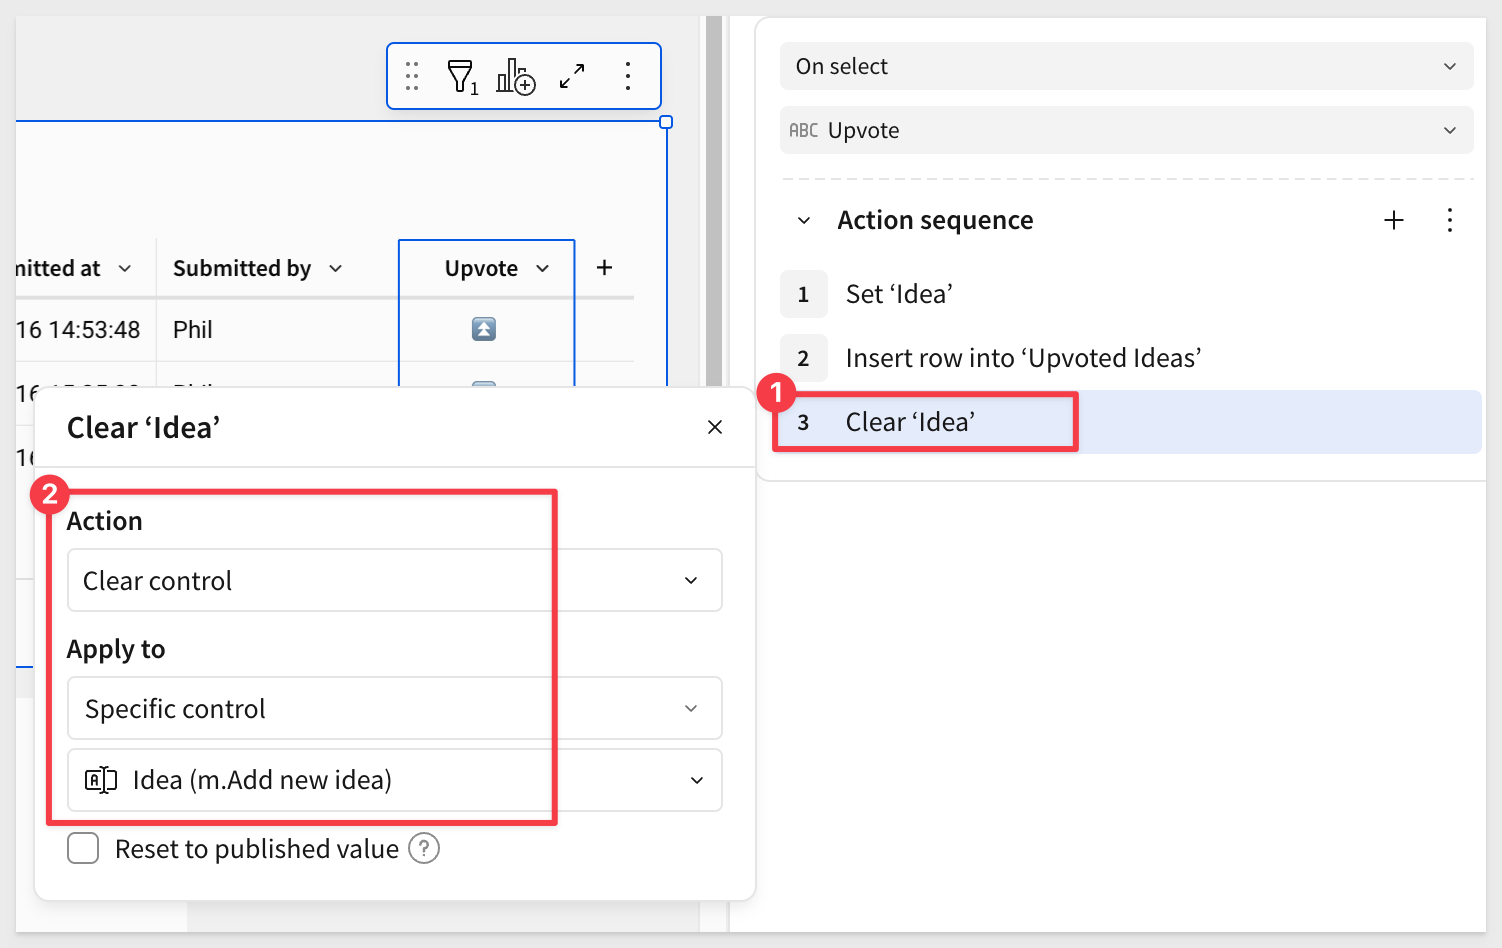
Select the Upvote column in the Suggestion Box table that has the ⏫️. We need to add three actions for when a user clicks to upvote an idea that:
1: Updates the Ideas control to match the idea that was clicked:
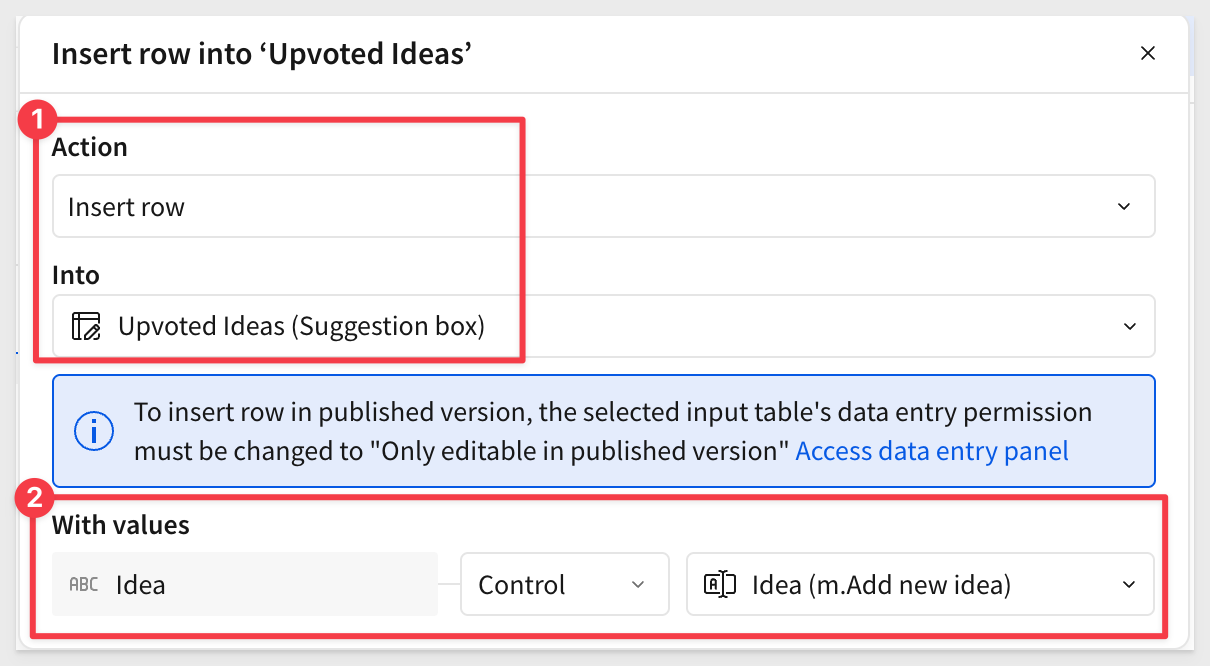
2: Inserts a new row into the Upvotes input table with the selected idea:
3: Clears the Ideas control after submission:
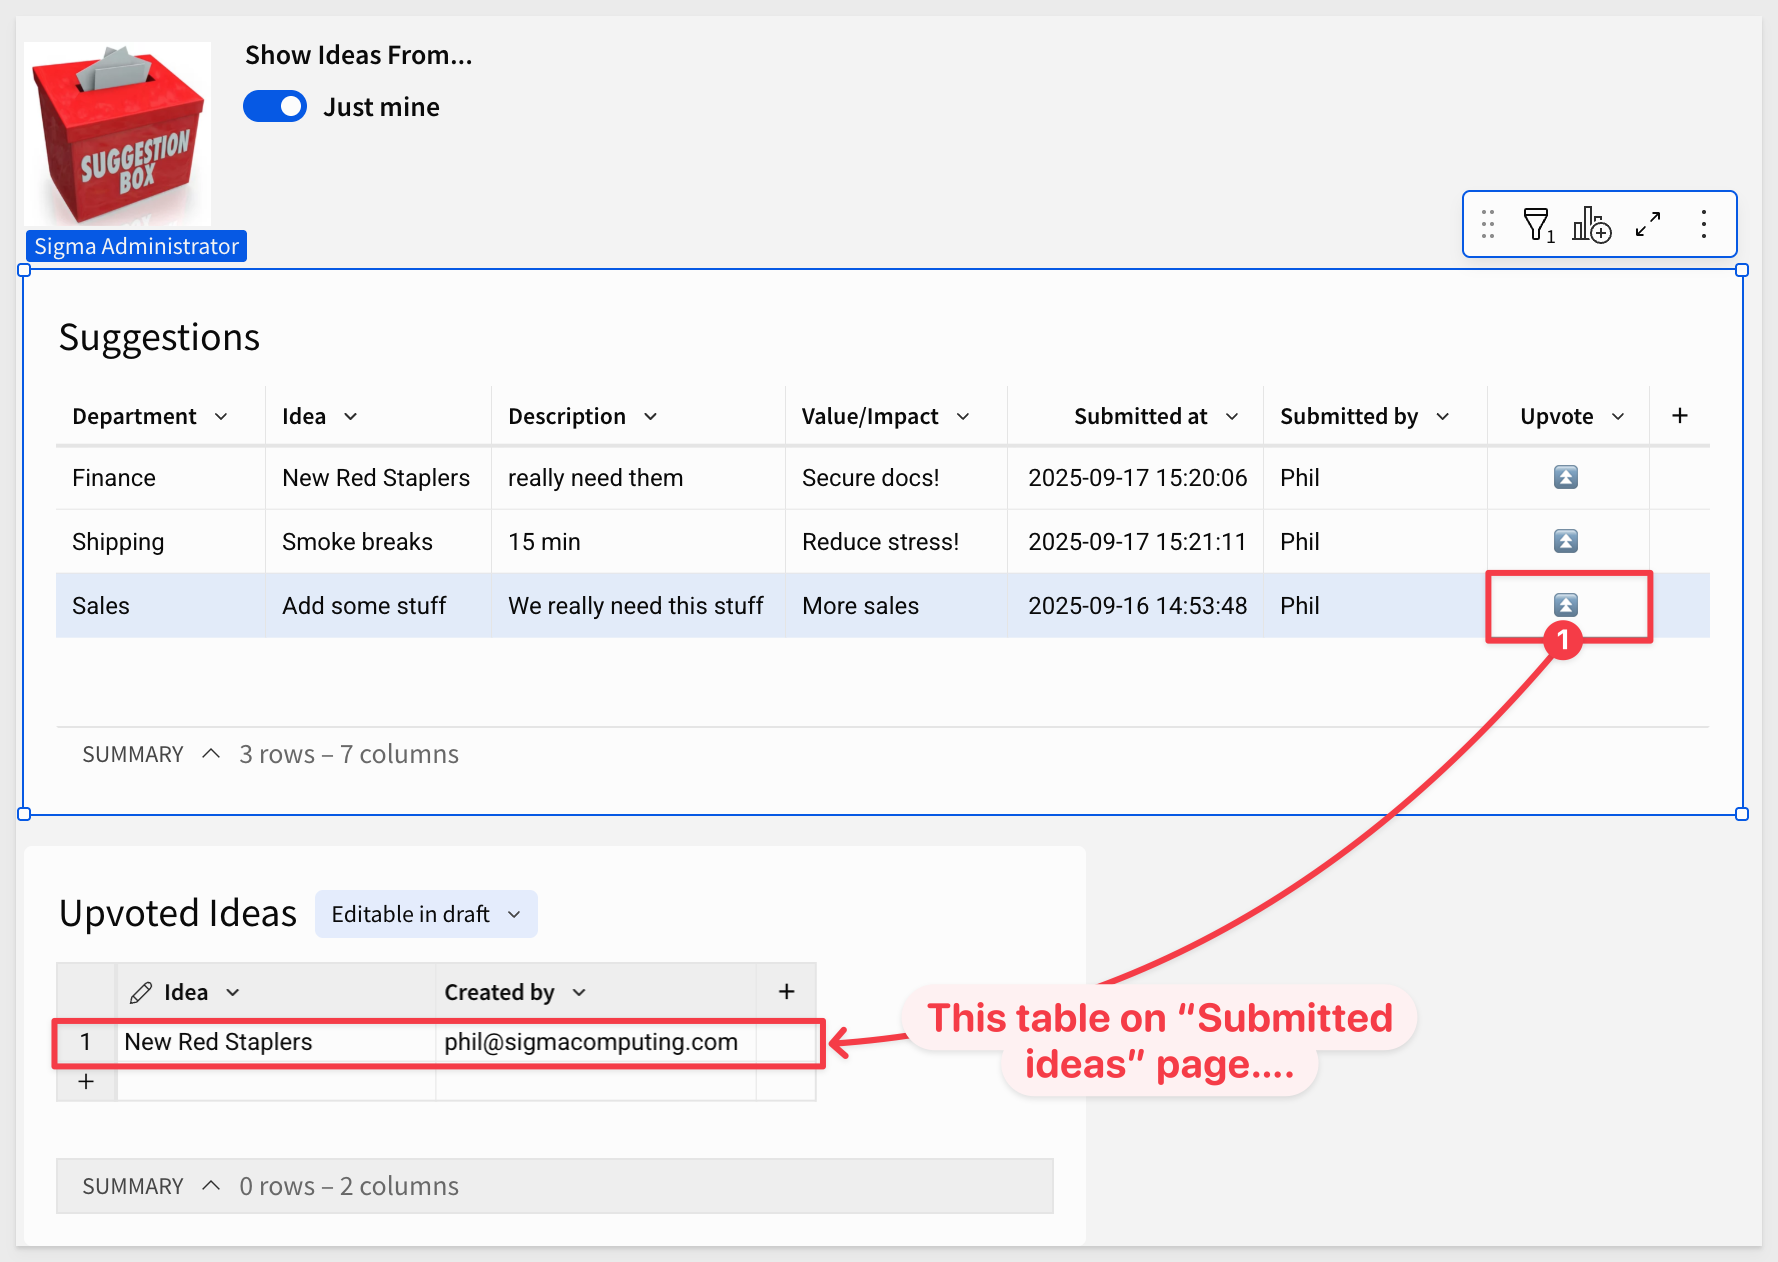
Go ahead and test the upvote action by clicking on any cell with the ⏫️ icon. A new row should appear in the Upvoted Ideas table with the idea name and your email address:
Prevent duplicate upvotes
Now let's display the number of upvotes in the Submitted ideas table and handle repeat votes from the same user.
Add a new column via lookup to the Upvoted Ideas table:
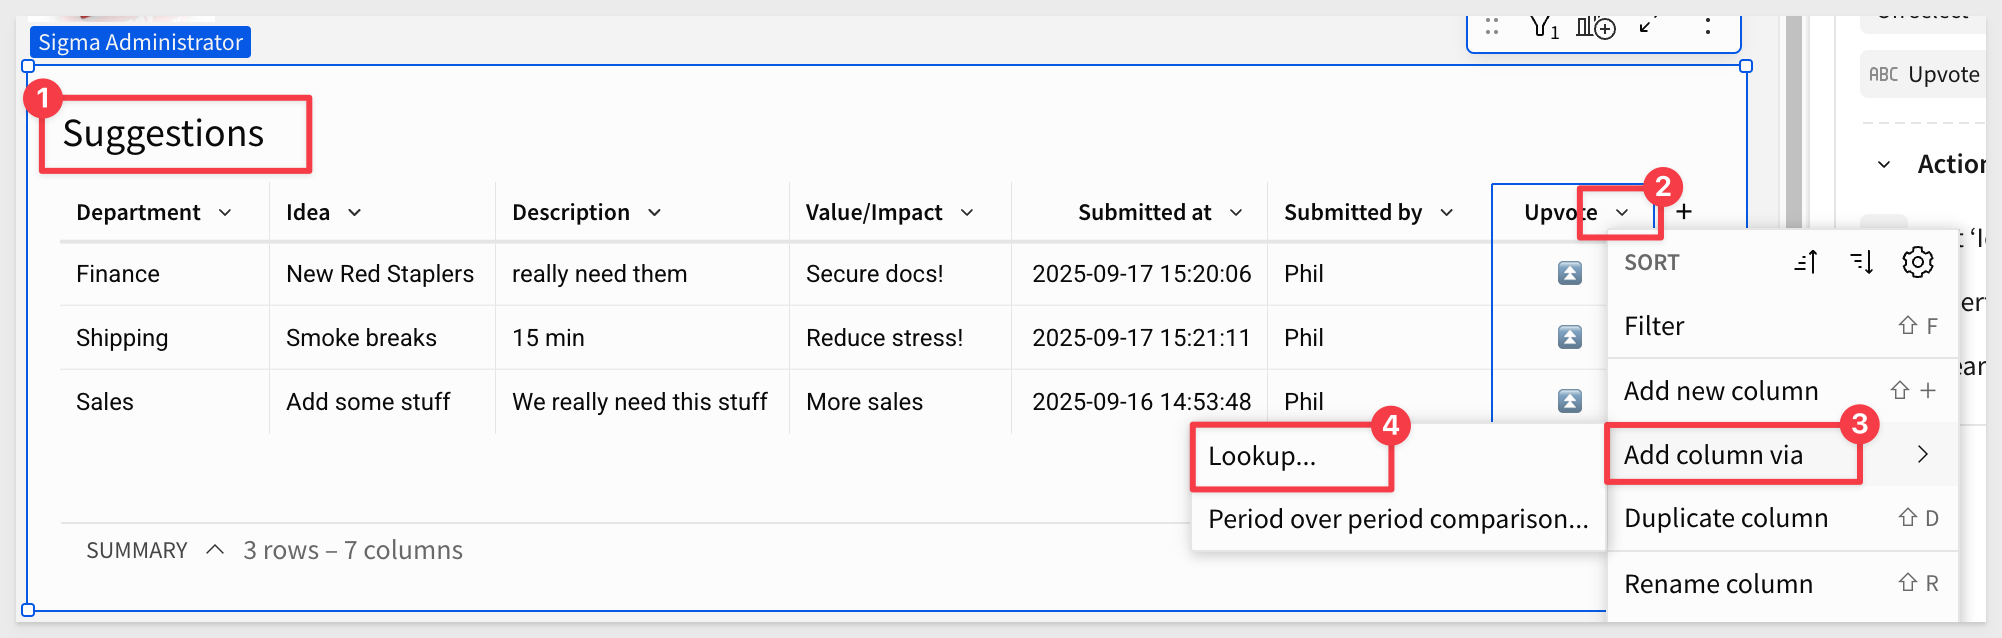
Configure the lookup to return a distinct count of the Create by column, matched on idea:
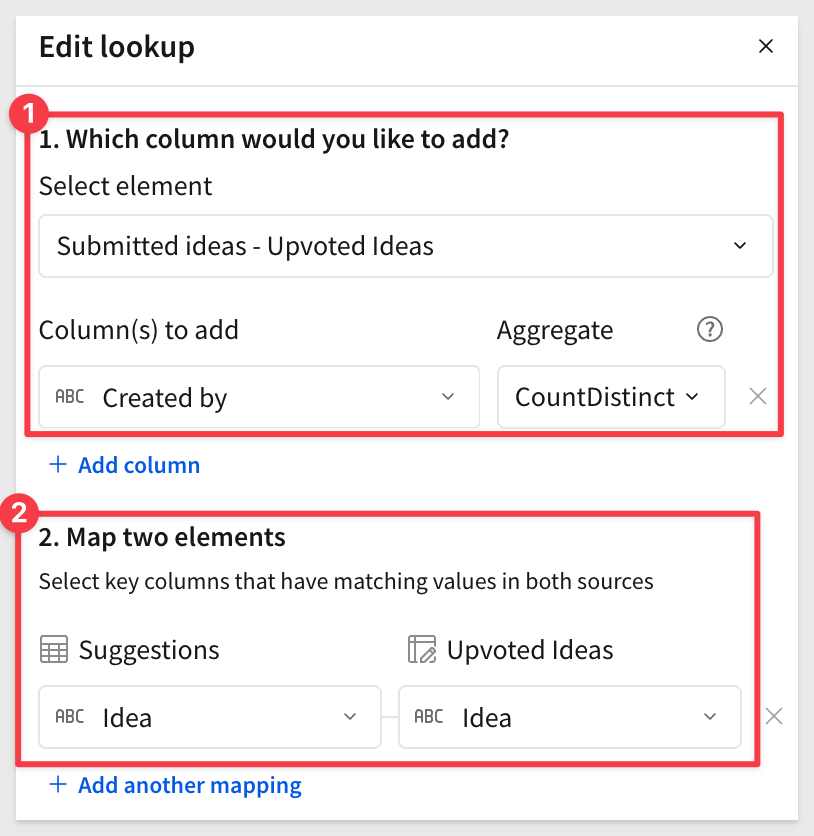
Rename the new column Upvotes, and drag it to the first position in the table.
In this setup, users can see which idea ranks highest, but not how many votes were cast or who voted. Of course, that is possible along with many other things like adding charts or other visualizations that Sigma provides.
Now that you know the basics, adding more functionality follows the same workflow we've already used.
Go to the Submitted ideas page and set the data entry permission to Editable in published version:
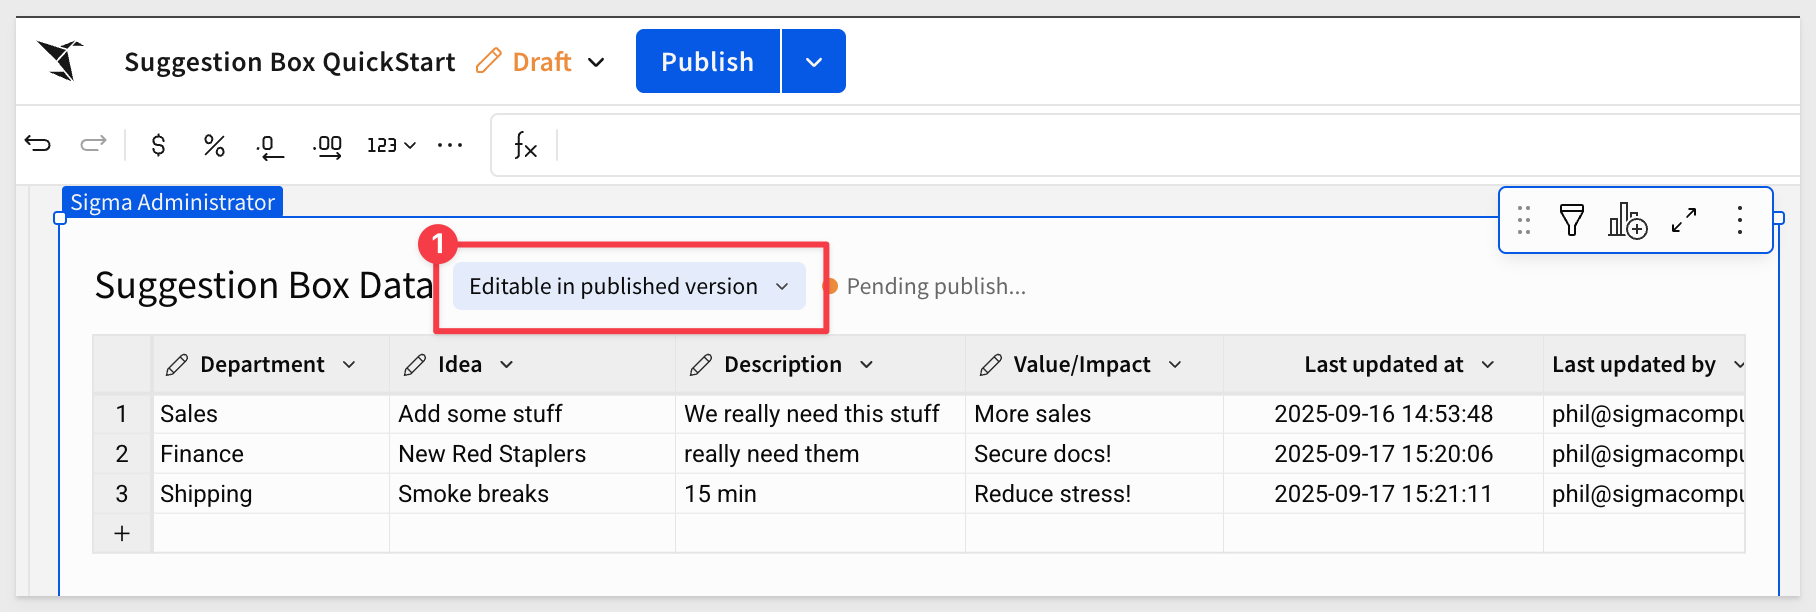
Do the same for the Upvoted Ideas table.
Hide the Submitted ideas tab.
Click Publish to publish the workbook.
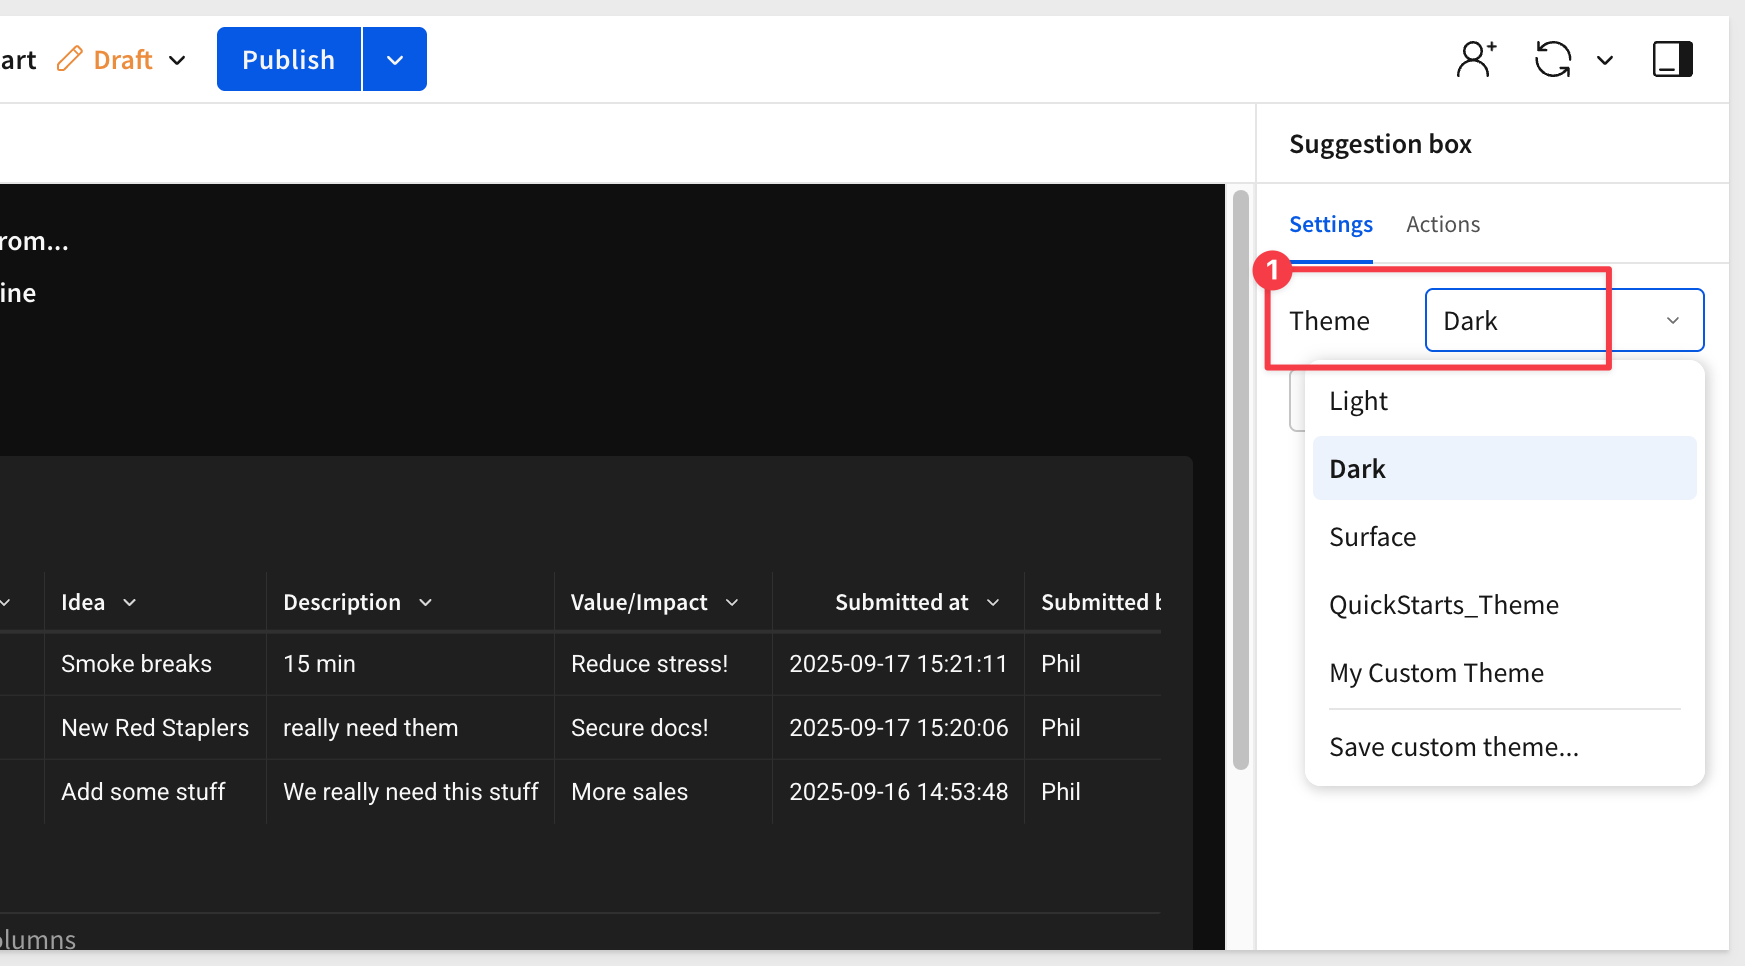
Apply a theme (optional)
Sigma provides pre-defined themes to allow you to quickly style a workbook. You can also create your own themes.
Click away from any element on the workbook page to open the theme selector and preview available themes (e.g.,Dark):
The Workbook settings button exposes many additional options you can customize.
For more information, see Create and manage workbook themes
Changing the theme revealed a display issue with null values in the Rank column. We did not see this earlier but we can fix it easily now. The issue is that the lookup used to create the Rank column made a distinct count based on two text columns and the resulting new column (Rank) is numeric. Since two of the rows have no value, their rank is null:
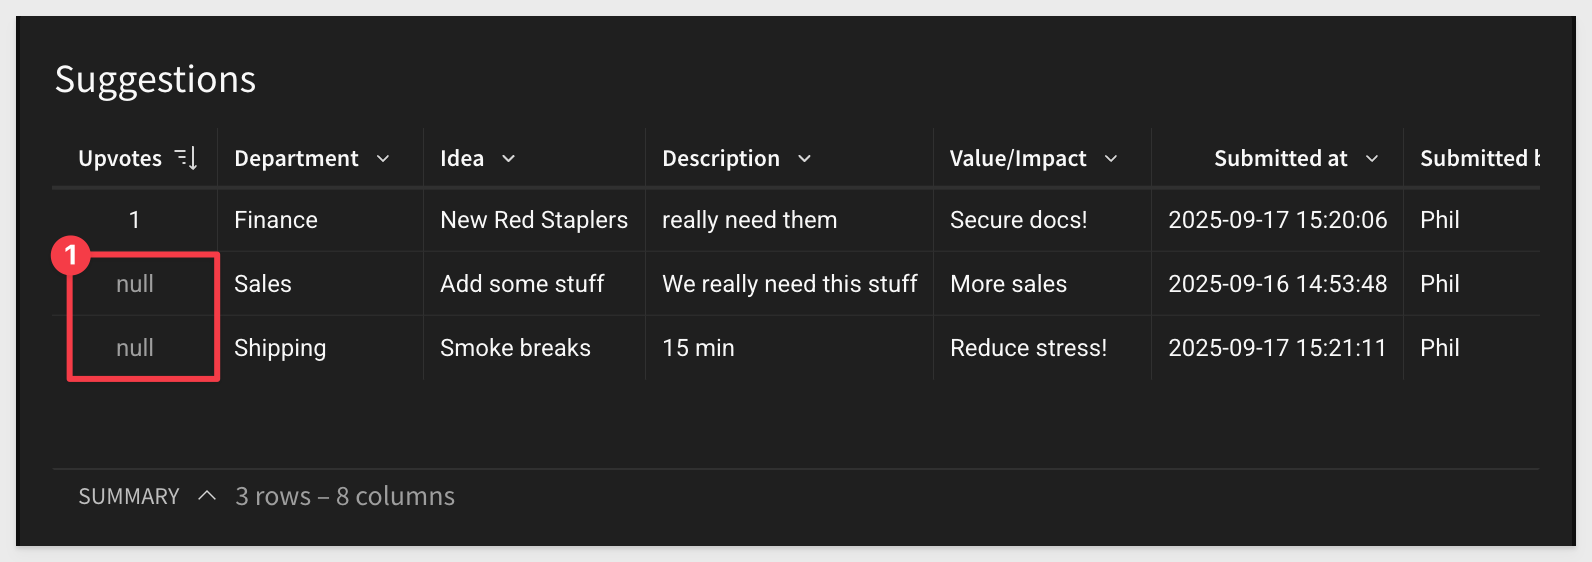
You can fix this easily by adjusting the formula in the rank column to avoid this.
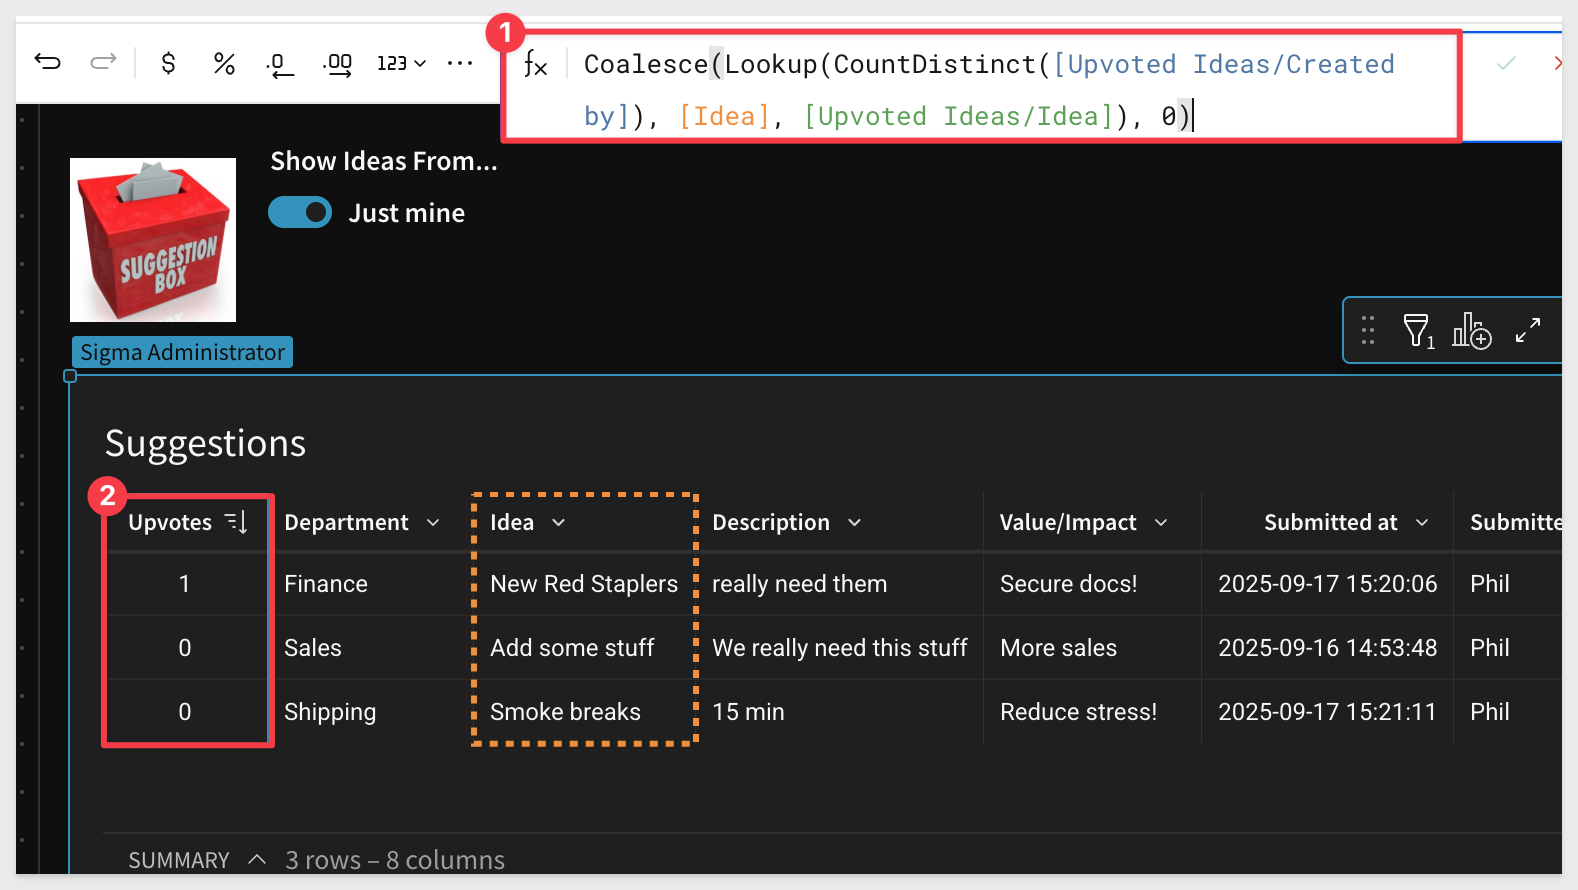
Select the Rank column and adjust the formula to handle nulls:
Coalesce(Lookup(CountDistinct([Upvoted Ideas/Created by]), [Idea], [Upvoted Ideas/Idea]), 0)
For more information, see Coalesce
The Upvotes column displays correctly, as the formula uses coalesce to replace nulls with 0.
Final test (optional)
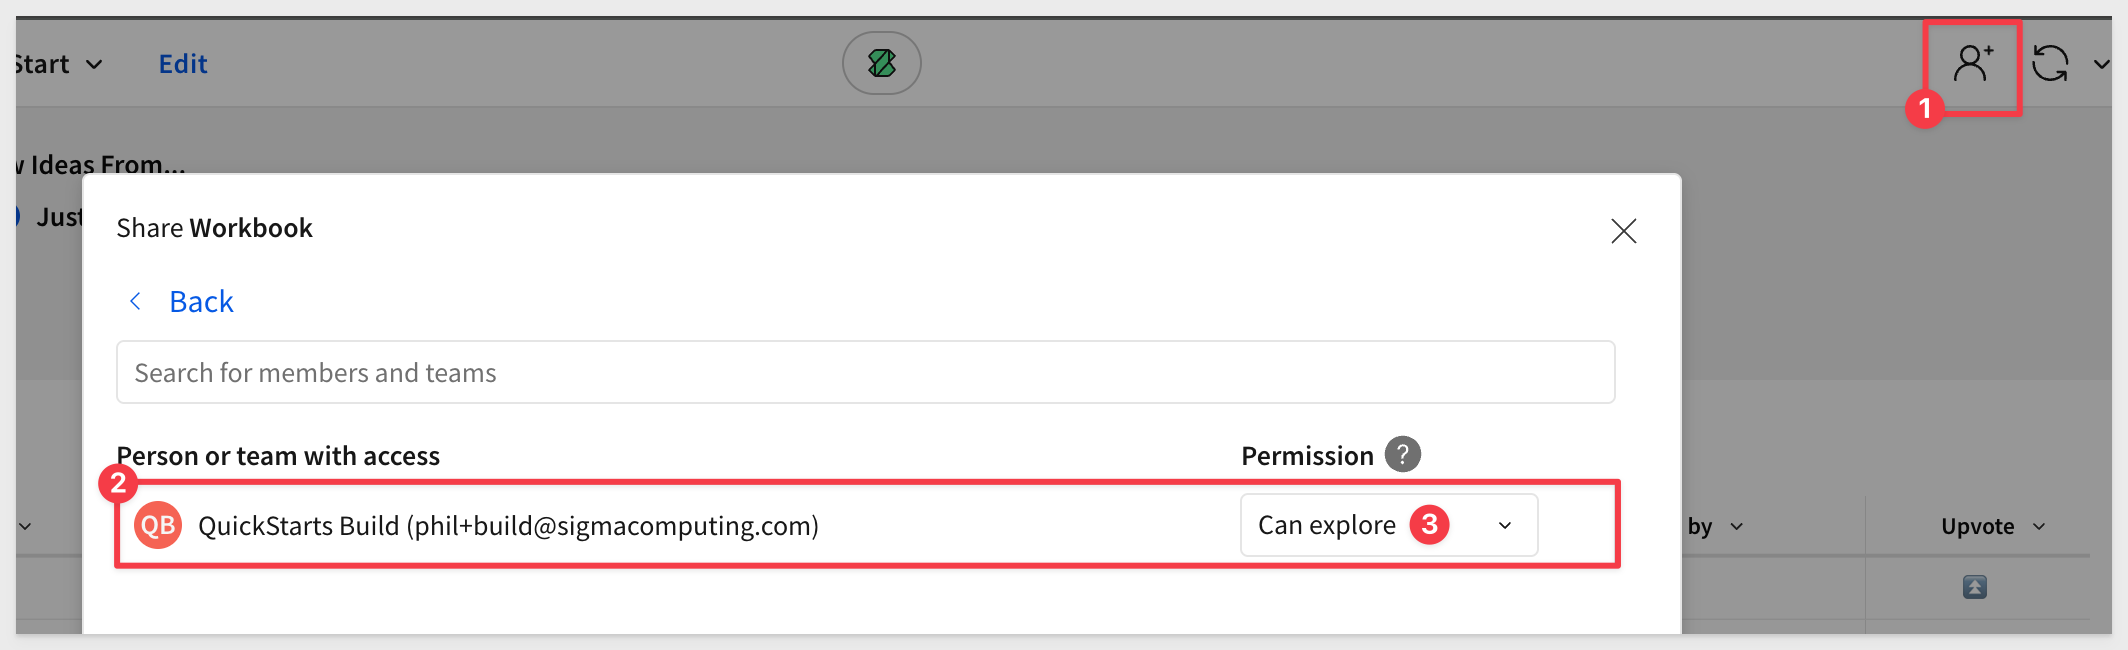
Let's validate how the application behaves when accessed by another user. We can use Sigma's [User Impersonation]() feature to do this. This allows an administrator to use Sigma as if they were another user which is useful for debugging issues reported by specific users.
Before we can impersonate, we need to share the workbook with another user:
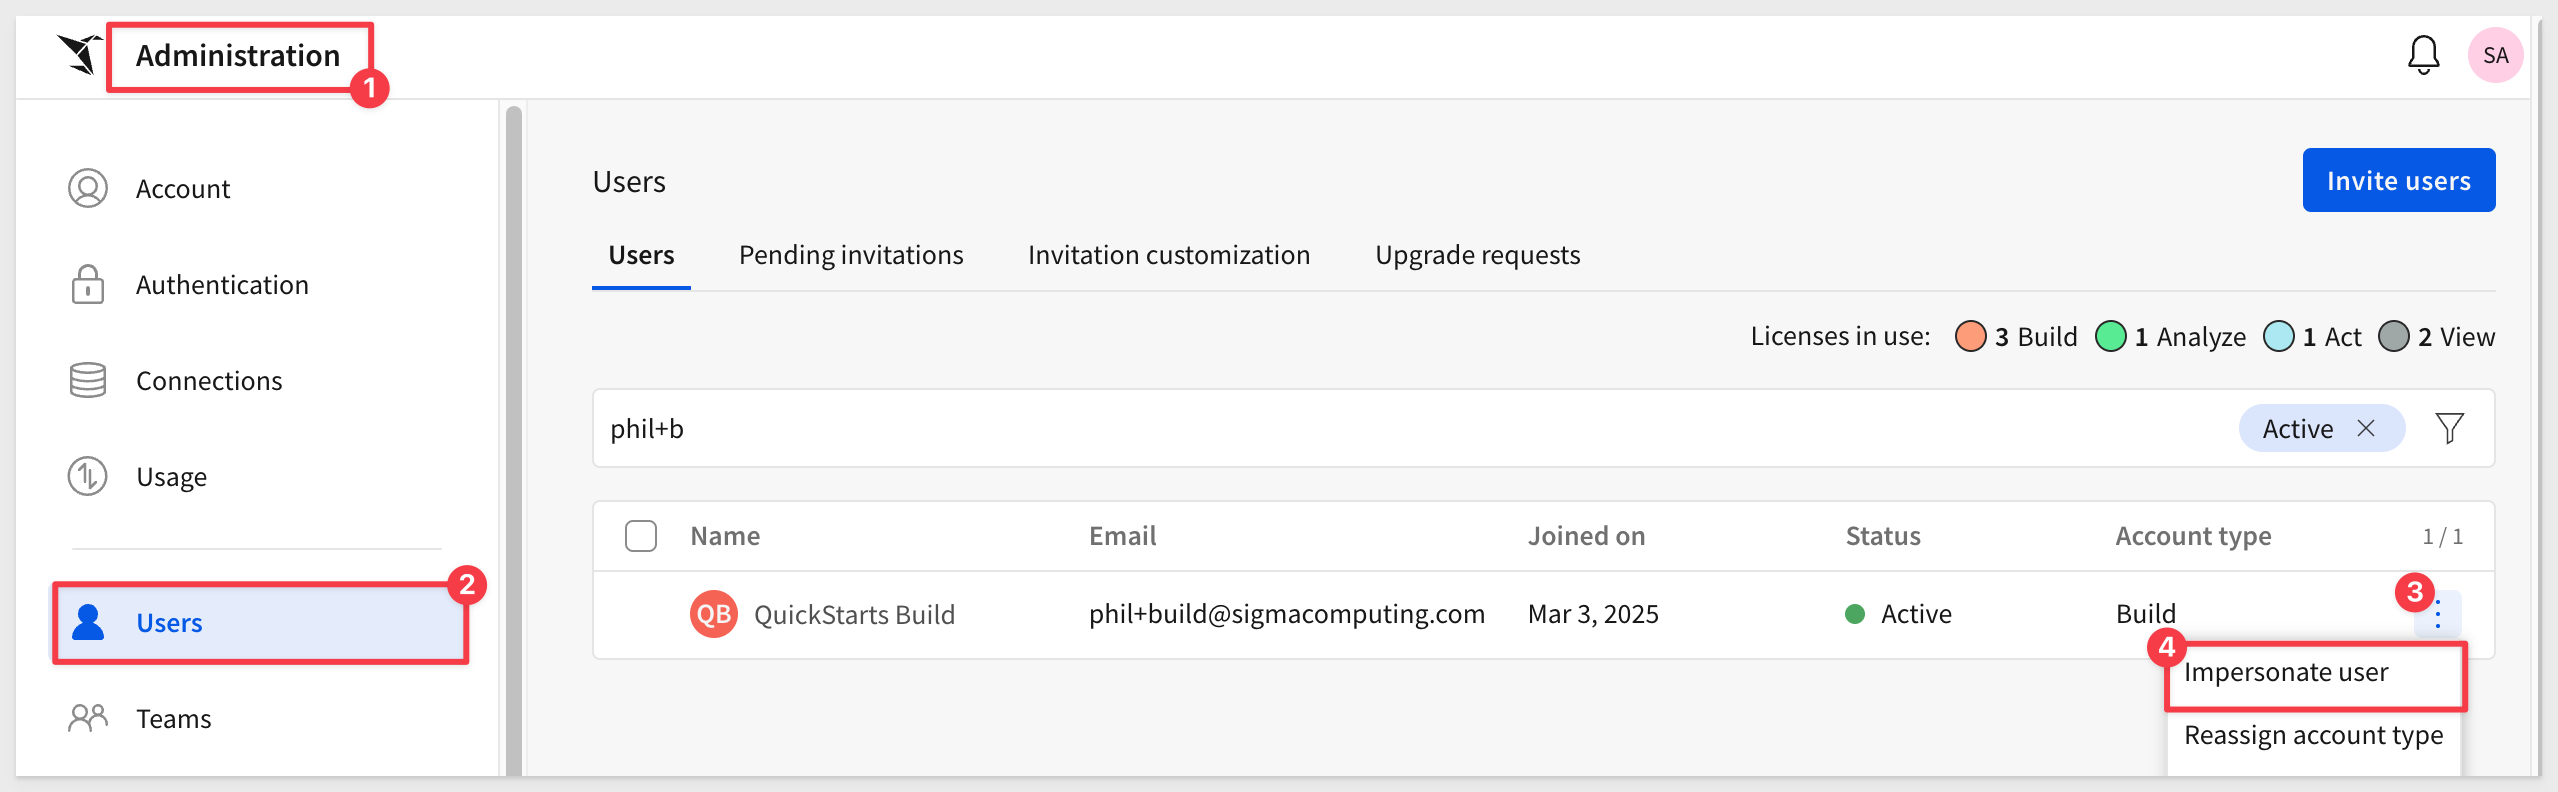
Once shared, go to Administration > Users, select a user, and click Impersonate user:
In Shared with me, the user can open the Suggestion Box QuickStart workbook:
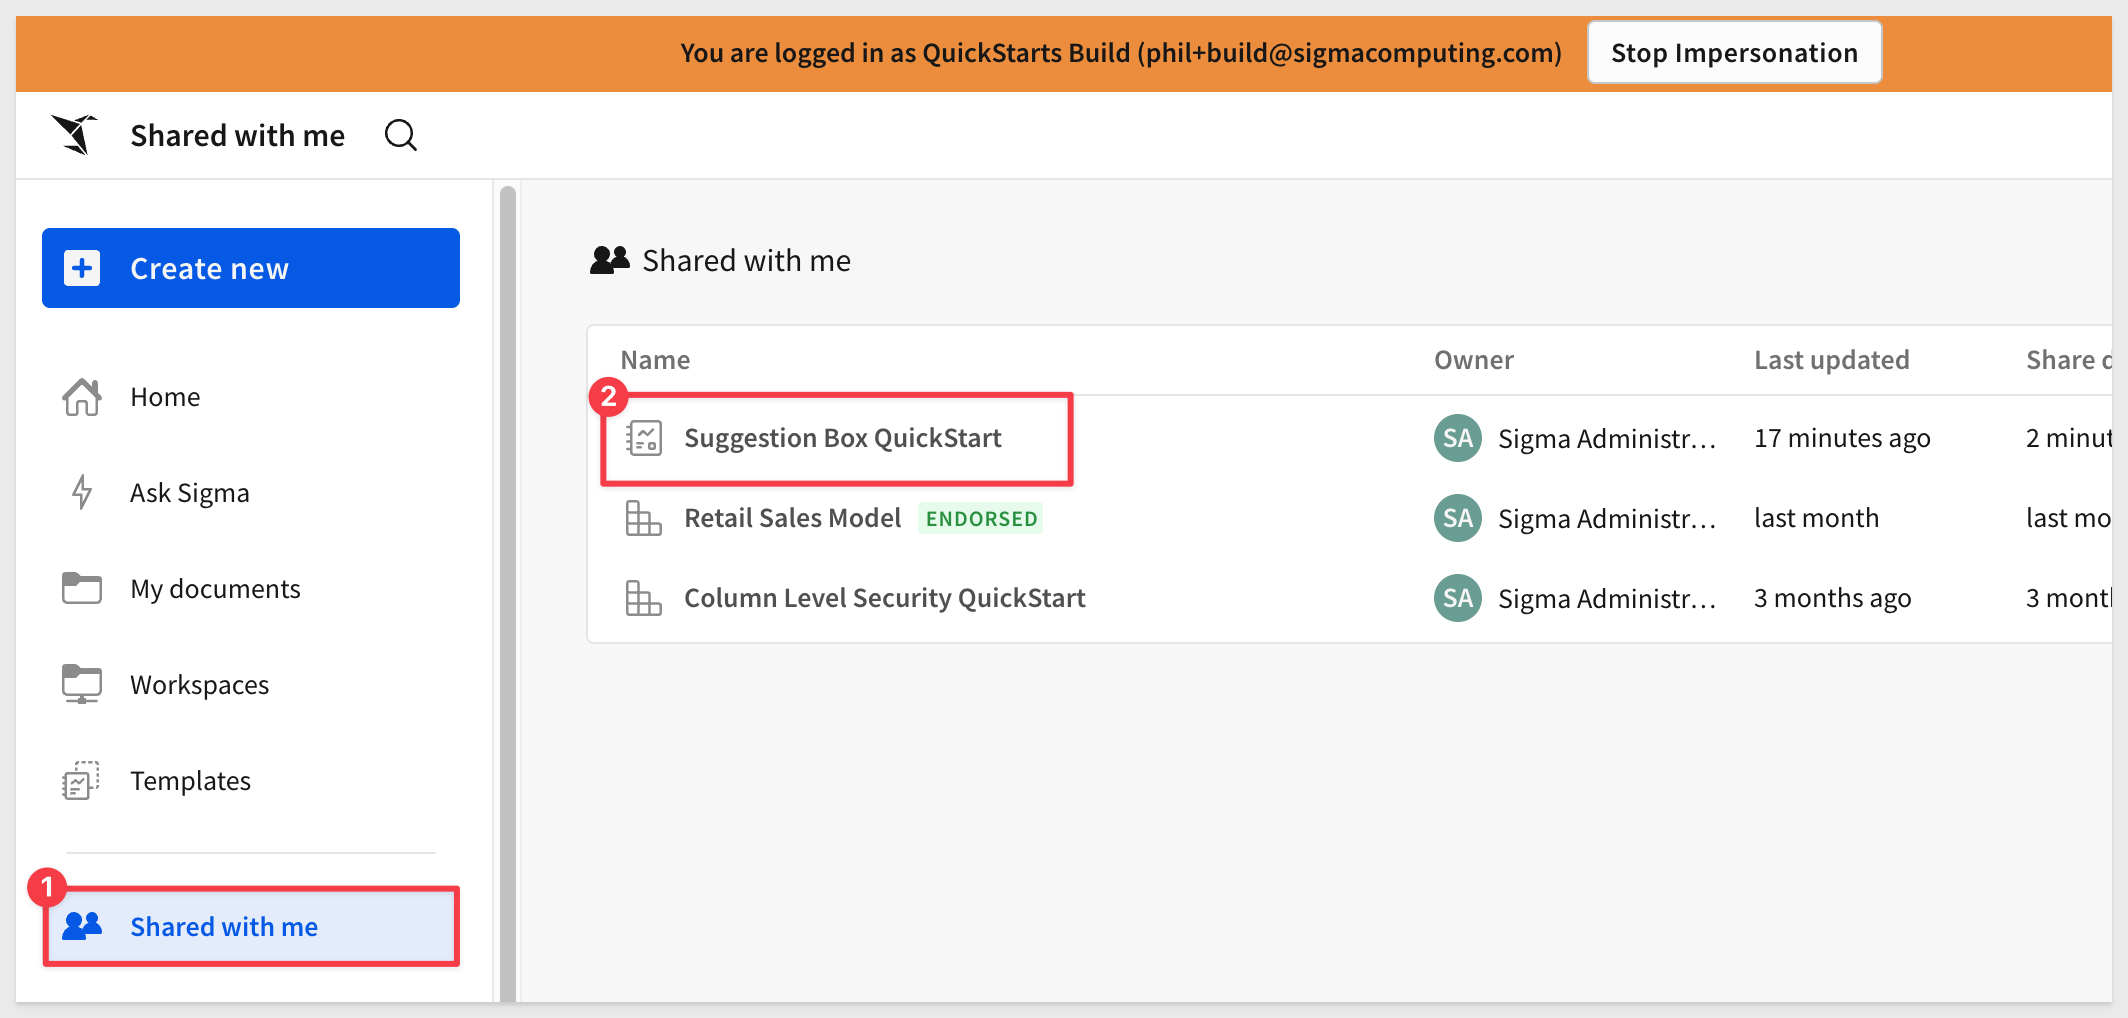
Since the impersonated user has not submitted a suggestion and the switch selector is set to Just mine, there is no data.
Change it to Everyone, and you'll see all ideas and can upvote them too:
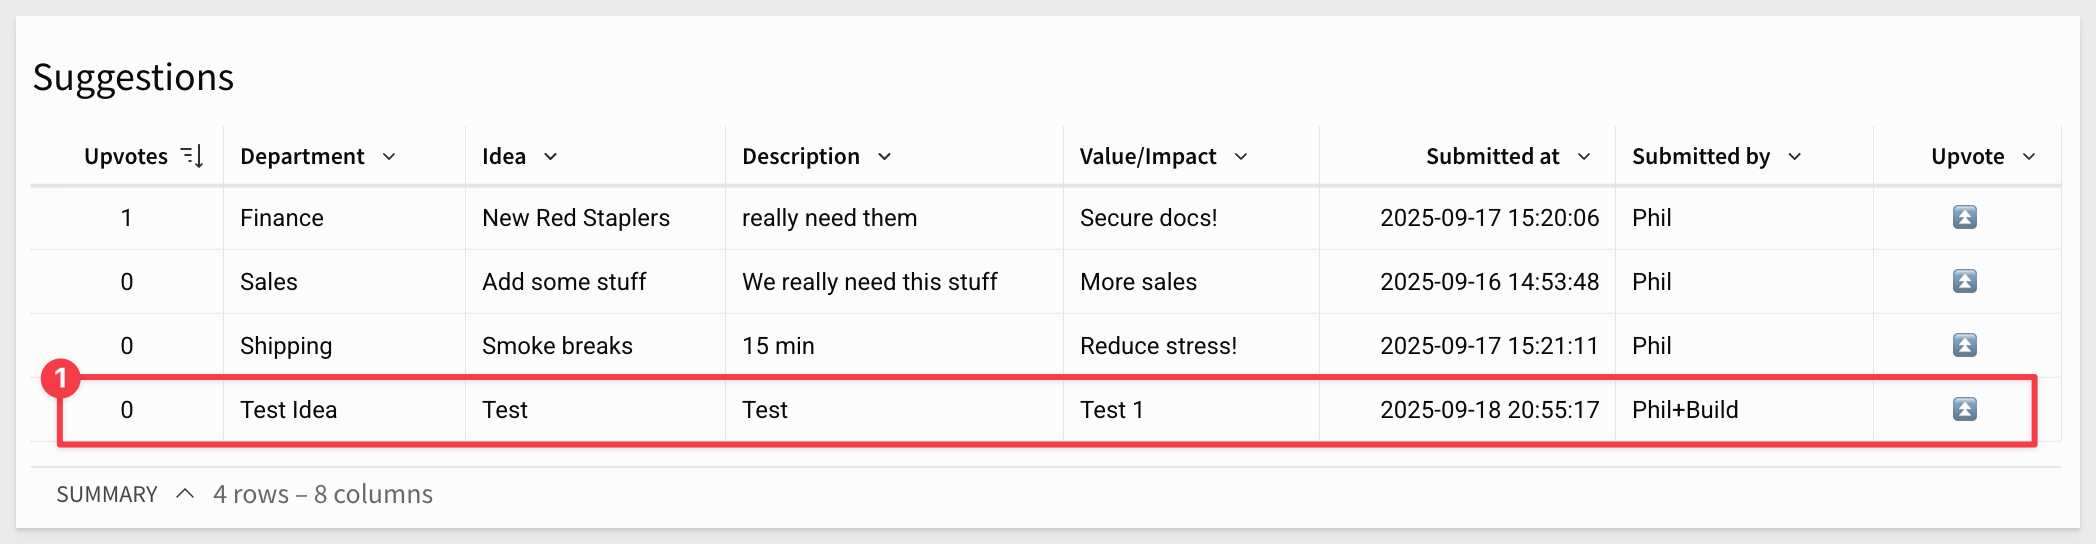
If a new suggestion is submitted, it will appear in the table with the impersonated user listed under Submitted by:
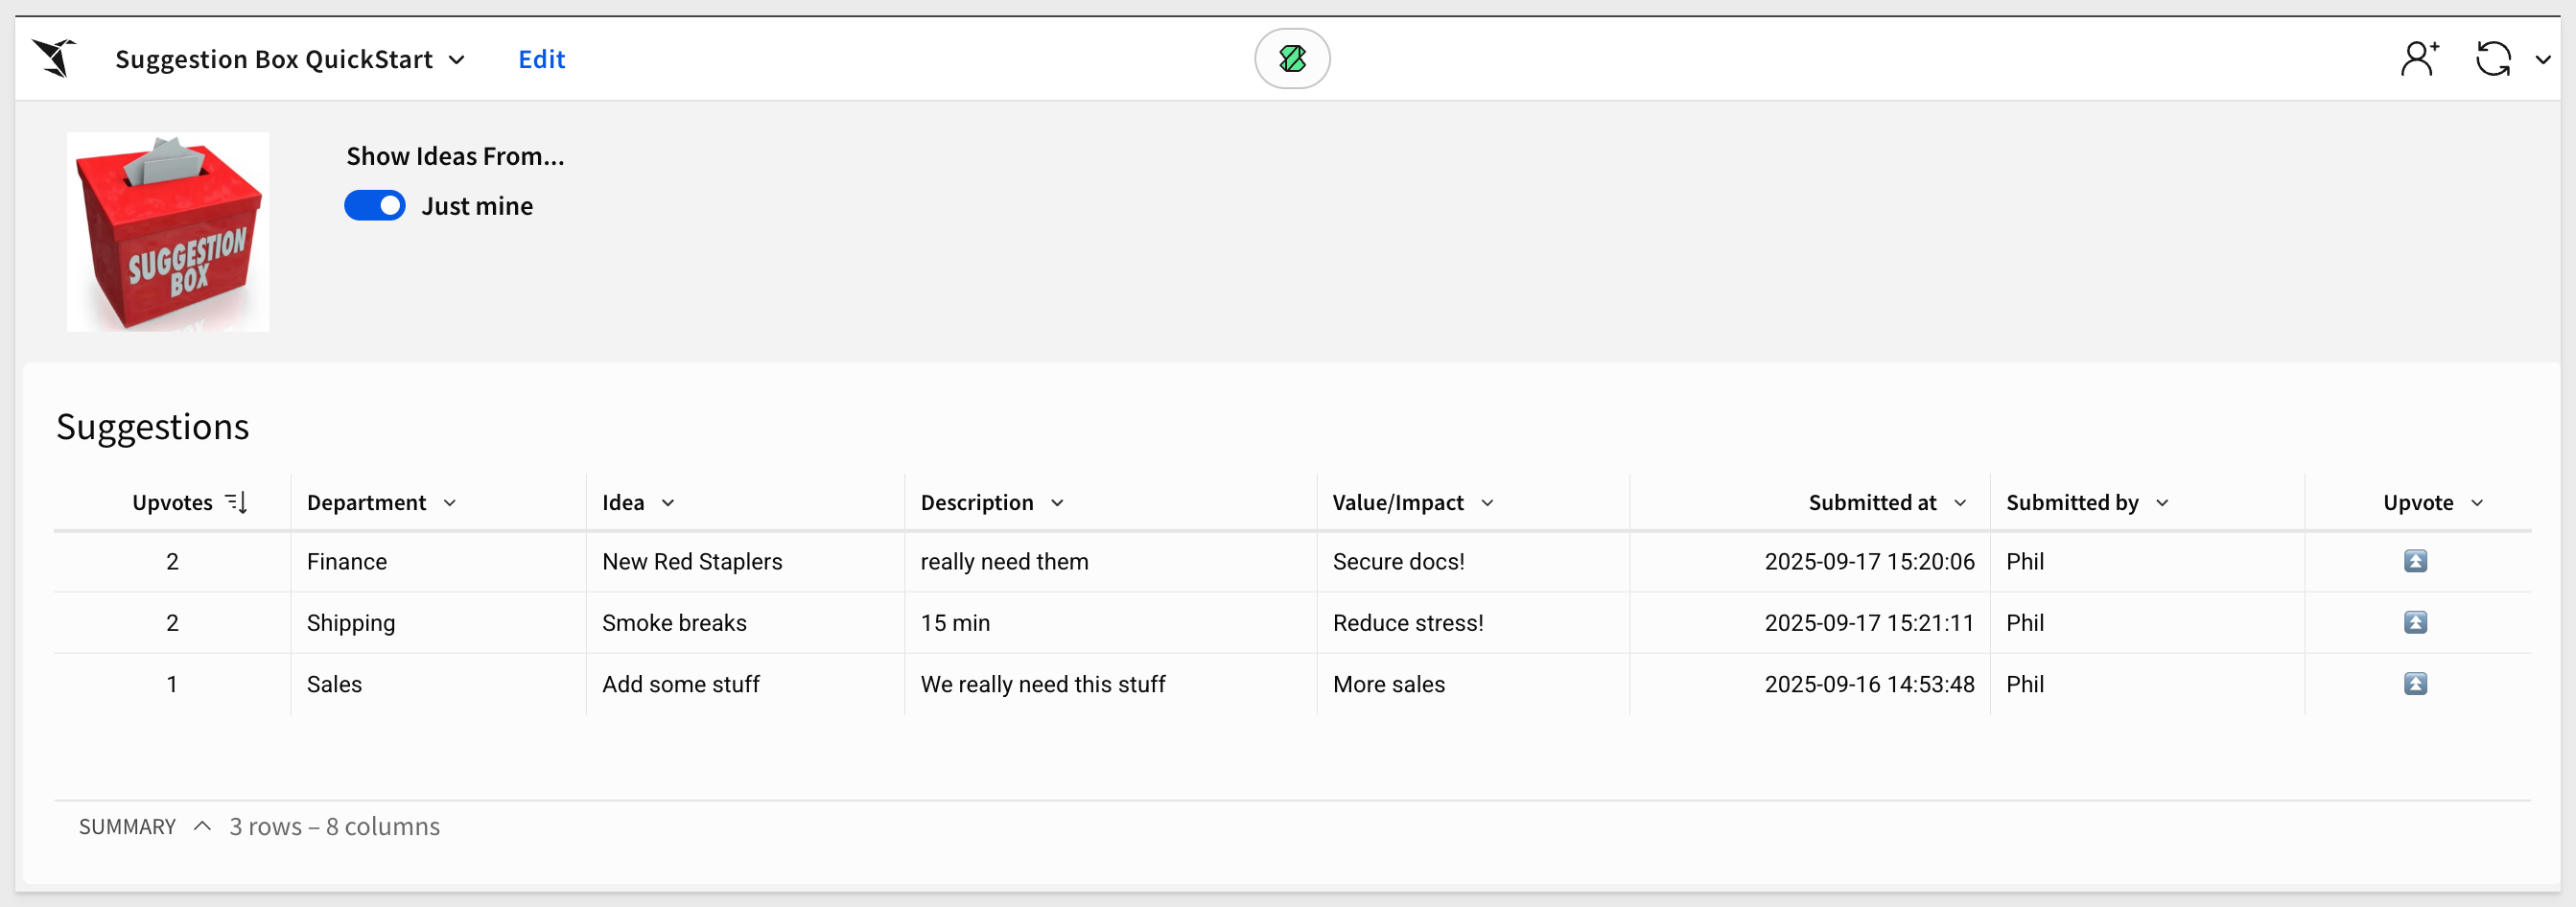
After making a few upvotes, let's also sort the table by this column so that the most upvoted ideas appear first:
Congratulations! You just built a feature-rich Suggestion Box application in record time.
In this QuickStart, we created a complete Suggestion Box app in Sigma—from capturing and storing ideas to enabling upvotes and personalized views.
Along the way, we used input tables, controls, modals, and actions to build a polished user experience.
We also explored ways to manage data visibility, prevent duplicate votes, and simulate user interactions using impersonation. With just a few Sigma features, we delivered a lightweight yet powerful solution—ready to extend and deploy.
Additional Resource Links
Blog
Community
Help Center
QuickStarts
Be sure to check out all the latest developments at Sigma's First Friday Feature page!