This QuickStart demonstrates how to use Sigma's native capabilities to build a Budget Variance Analysis (BVA) workflow.
The focus is on enabling snapshotting functionality entirely within Sigma, contrasting with previous approaches that relied on cloud data warehouse procedures.
The workflow includes three core components:
- Editable Budget Table: Users can modify budget data interactively through a pivot table, with changes captured via an input table.
- Snapshot Creation: A dedicated button allows users to save the current state of the budget as a snapshot, enabling historical comparisons and version control.
- Snapshot Retrieval: Users can retrieve and update existing snapshots to explore budget adjustments over time.
Use Case Highlights
- Streamlined Workflows: This approach leverages Sigma's input tables, modals, and overlays, eliminating the need for external database procedures.
- Finance-Focused: Tailored for finance use cases, such as budget tracking, variance analysis, and historical comparisons.
- Scalable and Flexible: By maintaining a ledger of changes and snapshots, this solution scales to support iterative budgeting processes.
- Adaptable Framework: While focused on a finance use case, the underpinnings can be easily adapted to any other use case too.
Key Features and Implementation Steps
Interactive Budget Editing:
- The editable budget table is implemented as a pivot table connected to an input table.
- Changes are triggered using modals and onSelect actions, which insert new rows into the input table to track updates.
- This ledger-style data approach ensures an audit trail for all budget adjustments.
Snapshot Management:
- Snapshots are stored as batches, with each snapshot assigned a unique identifier.
- The batch ID increments with each new snapshot, maintaining a clear edit history.
- Users can revert to previous snapshots or explore edits using a dropdown to queue specific snapshots.
Pre-Pivot and Pivot Table Setup:
- A pre-pivot table aggregates budget adjustments by hierarchy (function, department, expense) and date.
- Boolean (true/false) columns help determine whether a value is part of the original data, the current batch, or other categories, simplifying the inclusion logic for the final pivot table.
- The pivot table uses Sigma's grouping and aggregation features to display the latest data.
Snapshot Retrieval and Inclusion:
- Using Sigma's array and lookup functions, snapshots are dynamically retrieved and applied based on user selection.
- The inCurrentSnapshot column determines if a value belongs to the selected snapshot, ensuring accurate visualization of budget states.
Target Audience
Sigma builders interested in leveraging the advanced capabilities to create fully functioning AI Apps.
Prerequisites
- A computer with a current browser. It does not matter which browser you want to use.
- Access to your Sigma environment.
- Some familiarity with Sigma is assumed. Not all steps will be shown as the basics are assumed to be understood.
For more information on Sigma's product release strategy, see Sigma product releases.

We will use two CSV files as a basis for this QuickStart. Click the button below to download the zip file and extract it to a convenient location.
Once extracted, there will be two files:
- Annual Budget Upload - One Time.csv
- Batched Edits Storage.csv
Batched Edits Storage.csv will have only one row of data, and that is expected.
Log into Sigma as Administrator and create a new workbook.
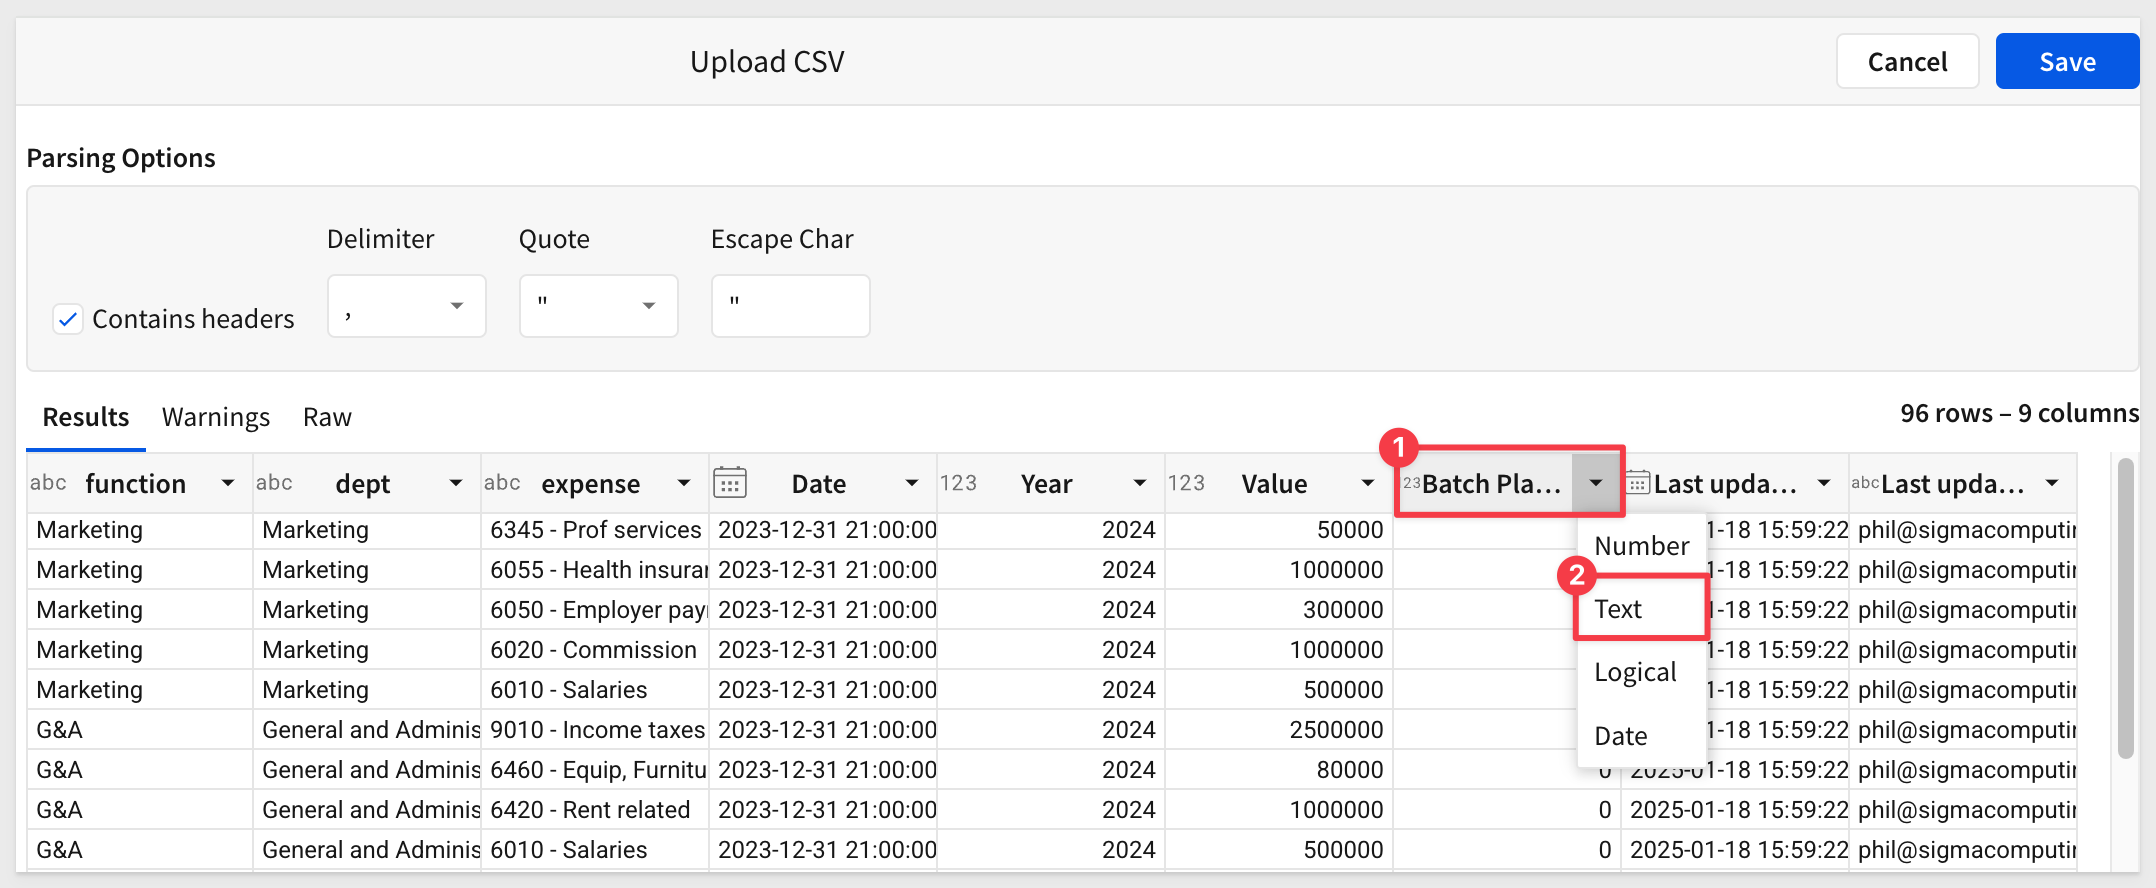
Add a new CSV Input Table to the page, select the Sigma Sample Database and drag the Annual Budget Upload - One Time.csv file onto the page:

In the Parsing Options, change the column Batch Placeholder to a type of Text and click Save:
Add a new Calculation column to the table and set the formula to:
DateTrunc("year", [Date])
Rename the new column to Year.
Rename the new input table to Annual Budget.
Once that is uploaded, repeat the process for the second CSV file.
Since the CSV had no data, Sigma could not derive the column type for the Date column.
Change the Date column to Type = Date using the Date columns menu.
Also update the Value column to Type = Number and the Last updated at to Type = Date.
Click Save.
Add a new Calculation column to the table, rename it to Year and set the formula to:
DateTrunc("year", [Date])
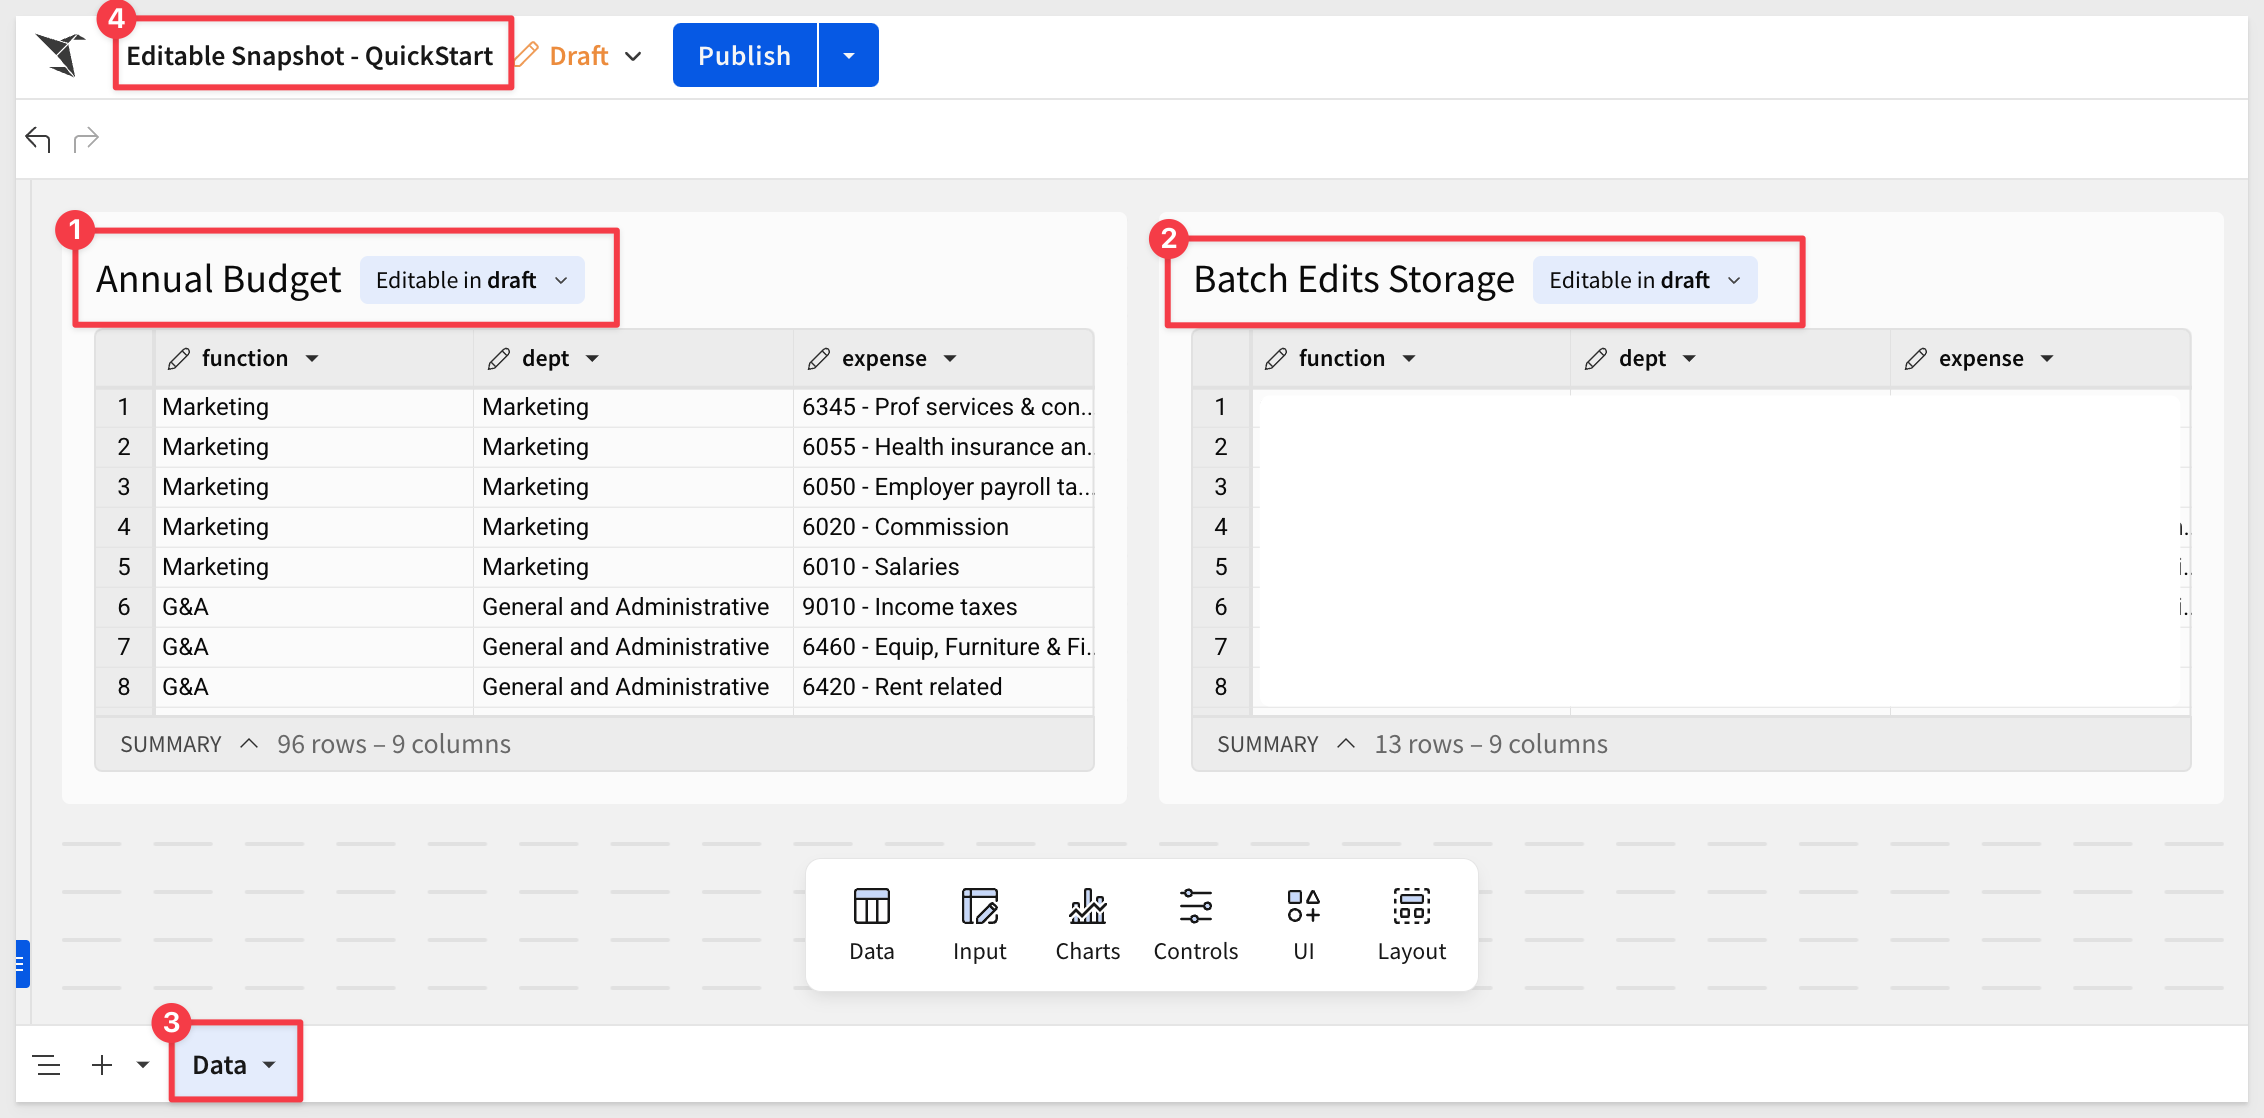
Rename the second input table to Batch Edits Storage.
Rename the workbook page Data and save the workbook as Editable Snapshot - QuickStart
Union sample tables
The result of a union, this next table combines data from the original datasets (e.g., the initial Annual Budget upload) and the Batch Edits Storage table, which tracks edits and snapshots.
It serves as the foundational dataset that includes both the starting point (original budget) and all subsequent changes.
Unlike the pre-pivot table (which we will create later), this union table captures the entire history of edits, snapshots, and original records.
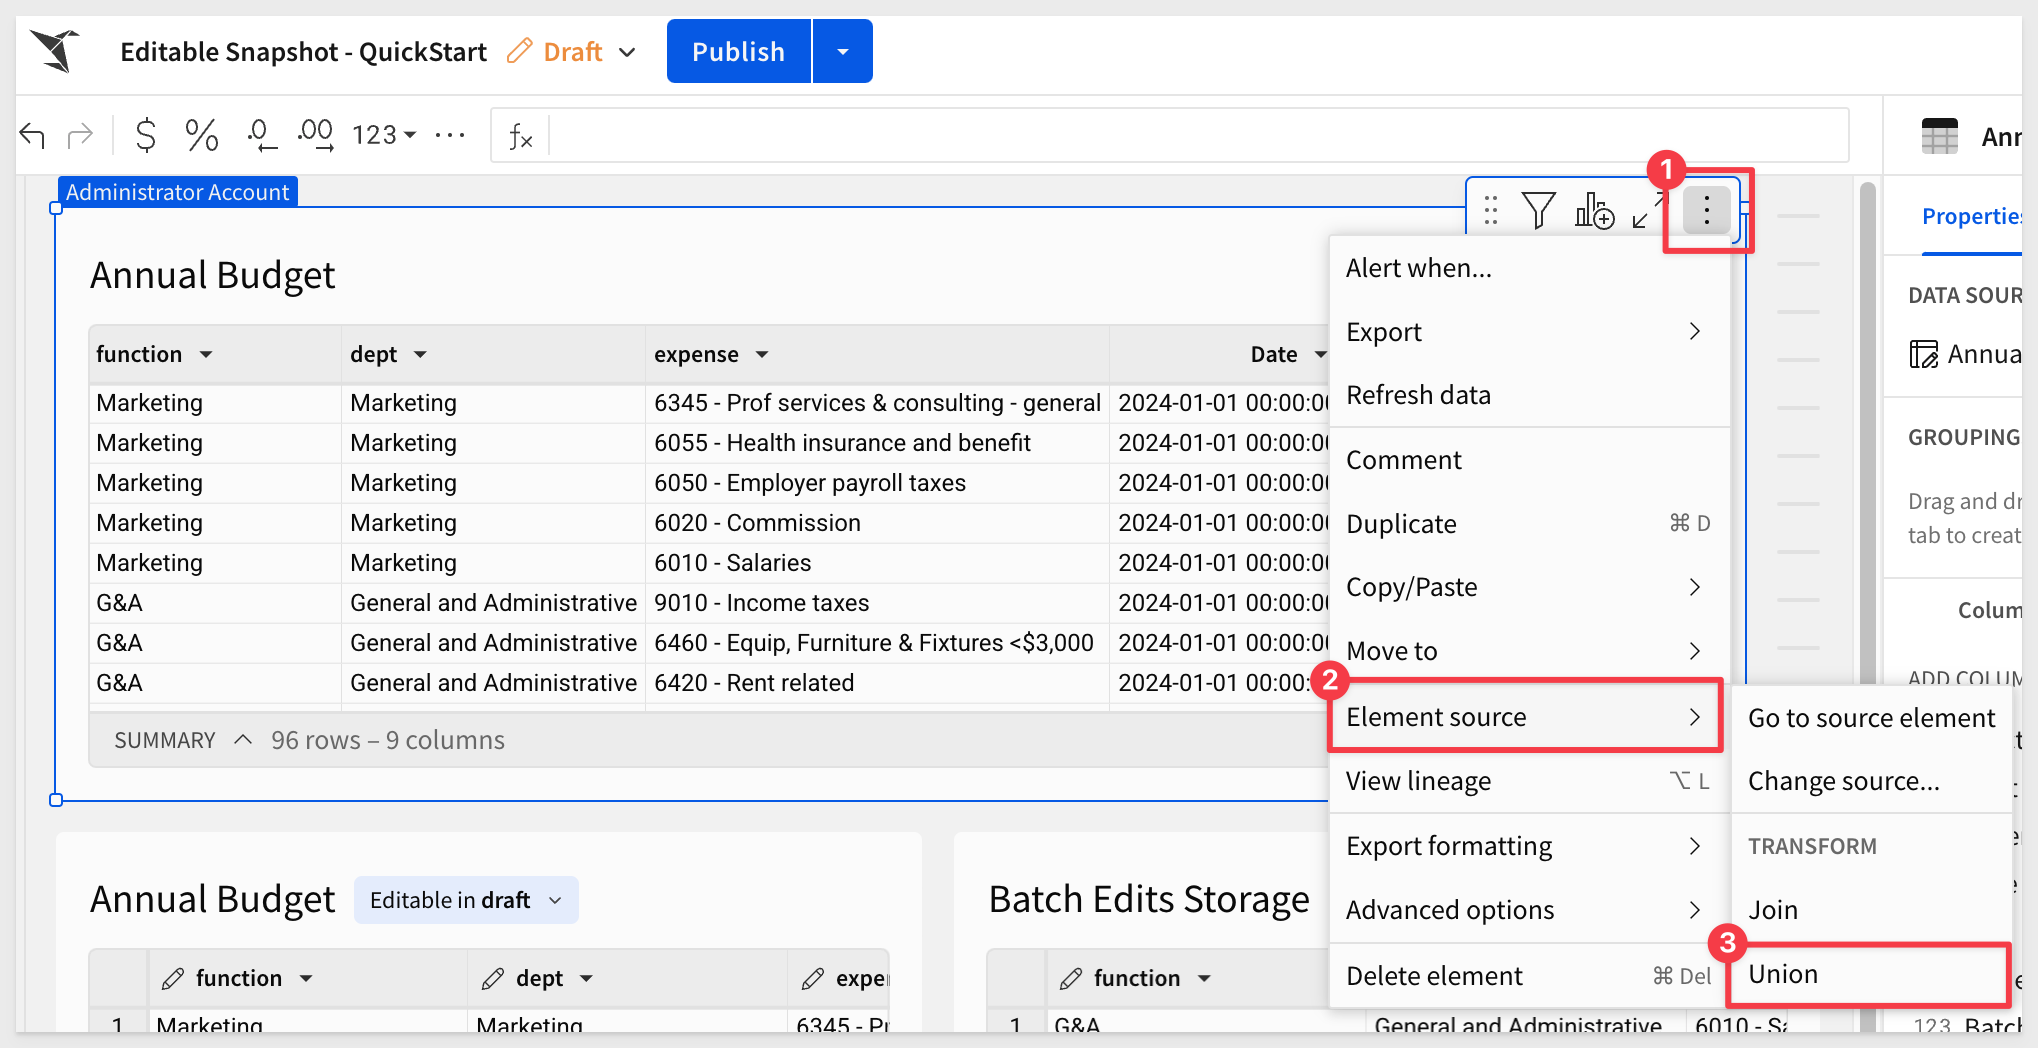
From the Element bar > Data group, drag a new Table onto the page.
Set the source to user the Annual Budget input table.
From the new table, open the 3-dot menu and select Element source > Union:
Select the Batch Edits Storage input table as the source.
Accept all available columns and check the column mapping to be sure it is correct:
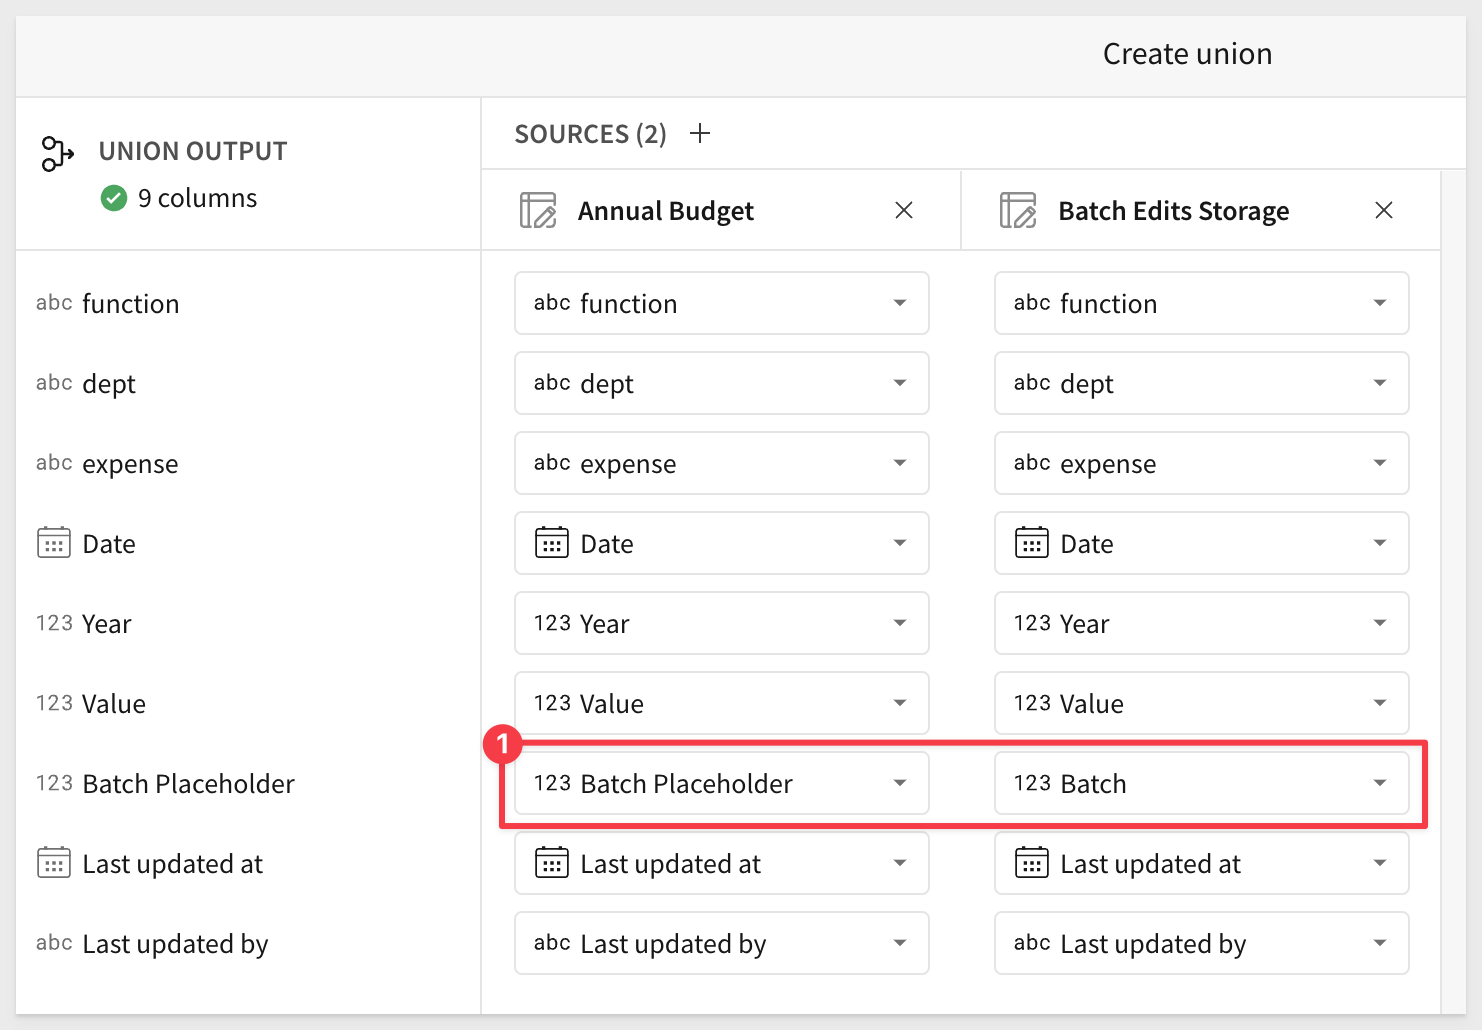
Rename the union table Annual Budget + Batch Edits Storage.
We now have three elements on the Data page:
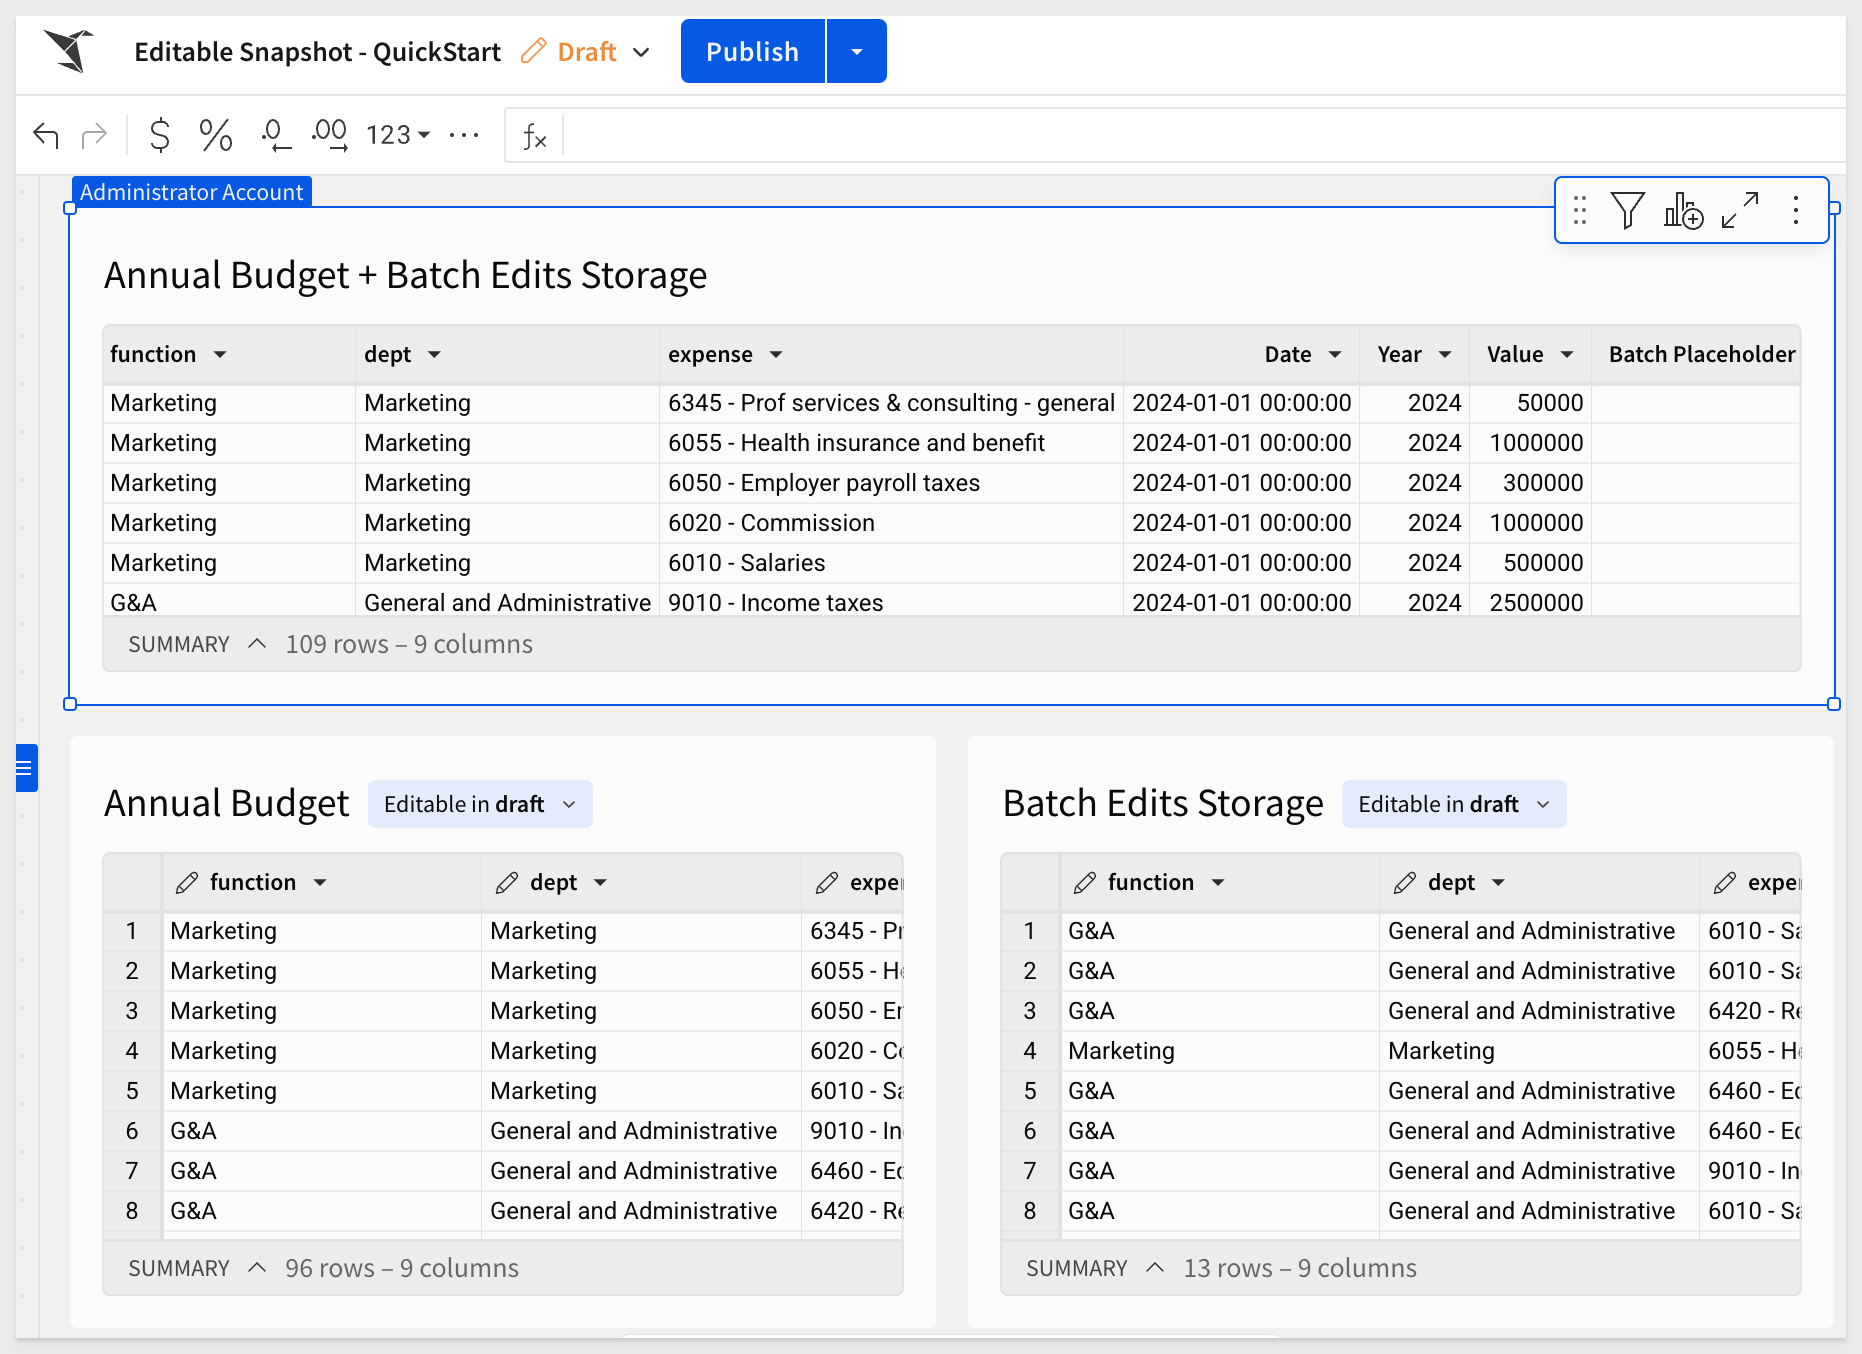
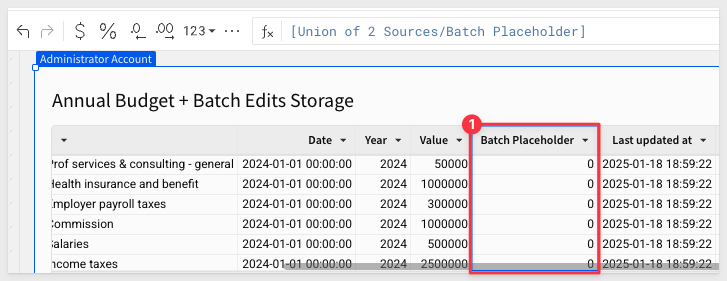
There one column called Batch Placeholder and all values are zero. The value of zero means the "original batch" or value.
We need a few controls, columns, and an input table to determine whether a row belongs to the original dataset, the current snapshot, another category, and so on.
These are crucial for deciding which rows to include in the final pivot table. However, we can't add them all now because they depend on objects that have not yet been created.
Let's create them step by step.
Batch ID Control
Before we can add the other columns mentioned earlier, we need to add a few controls that the columns will reference. We will start with the Batch ID control.
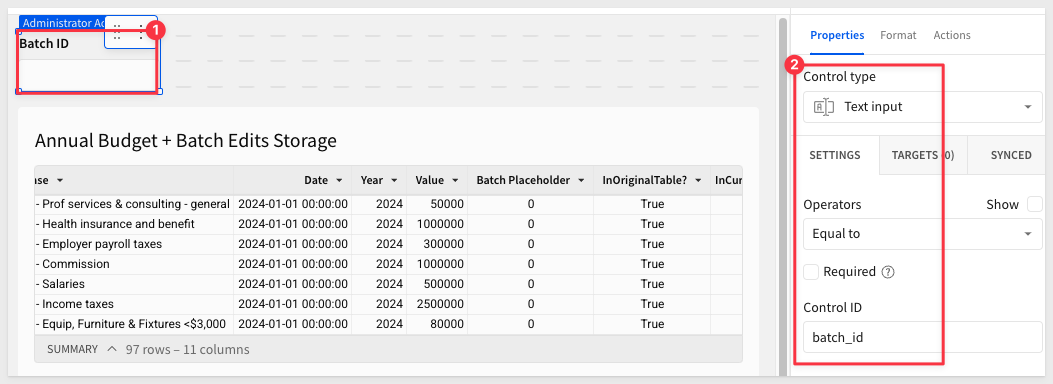
Add a new Text input control, rename it to Batch ID and set the Control ID to batch_id:
InOriginalTable and InCurrentBatch columns
Now we can add a new column to the Annual Budget + Batch Edits Storage table.
Add a new column and rename it to InOriginalTable?. Set the formula to:
[Batch Placeholder] = "0"
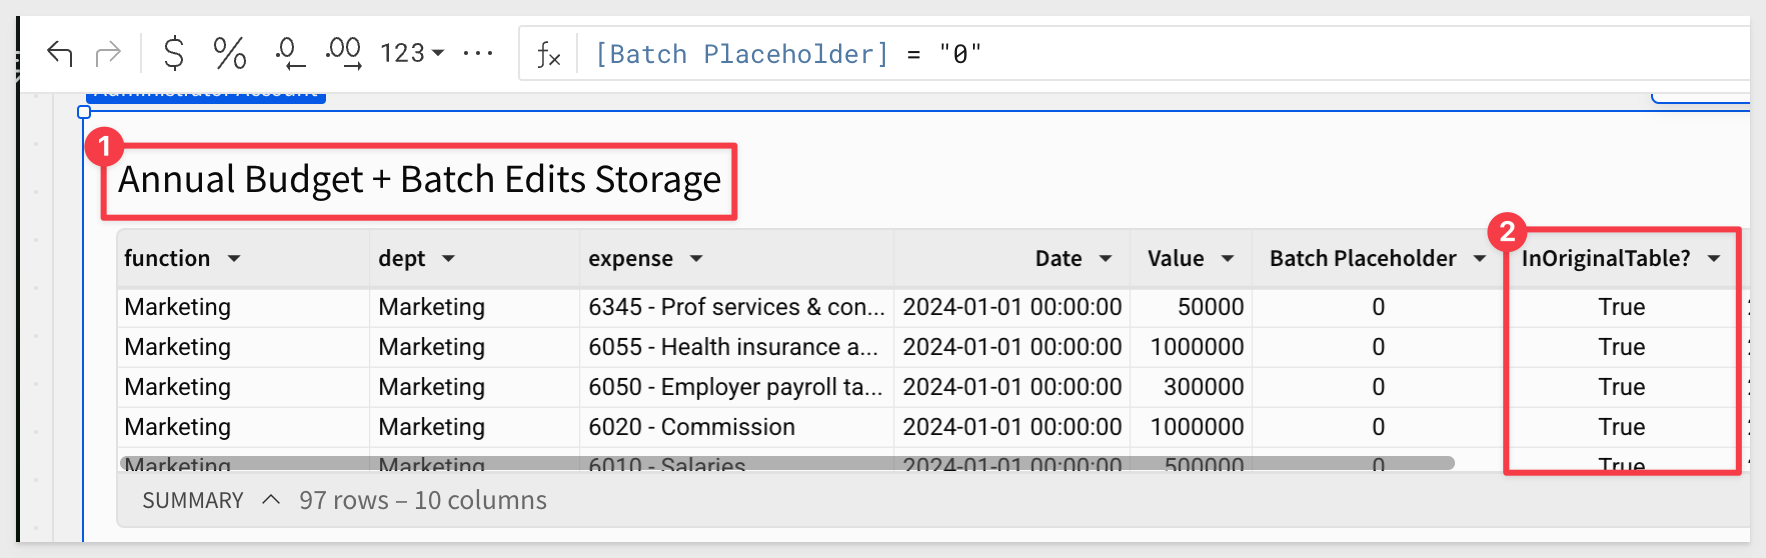
This formula checks if a row belongs to the original dataset by comparing the value in the Batch Placeholder column to 0. Rows where this condition is TRUE represent the initial state of the data before any edits or snapshots were made. It ensures the original data can be identified and displayed when needed. Later, we will show another way to capture the original state of the data.
Add another new column and rename it to InCurrentBatch?. Set the formula to:
[Batch Placeholder] = [batch_id]
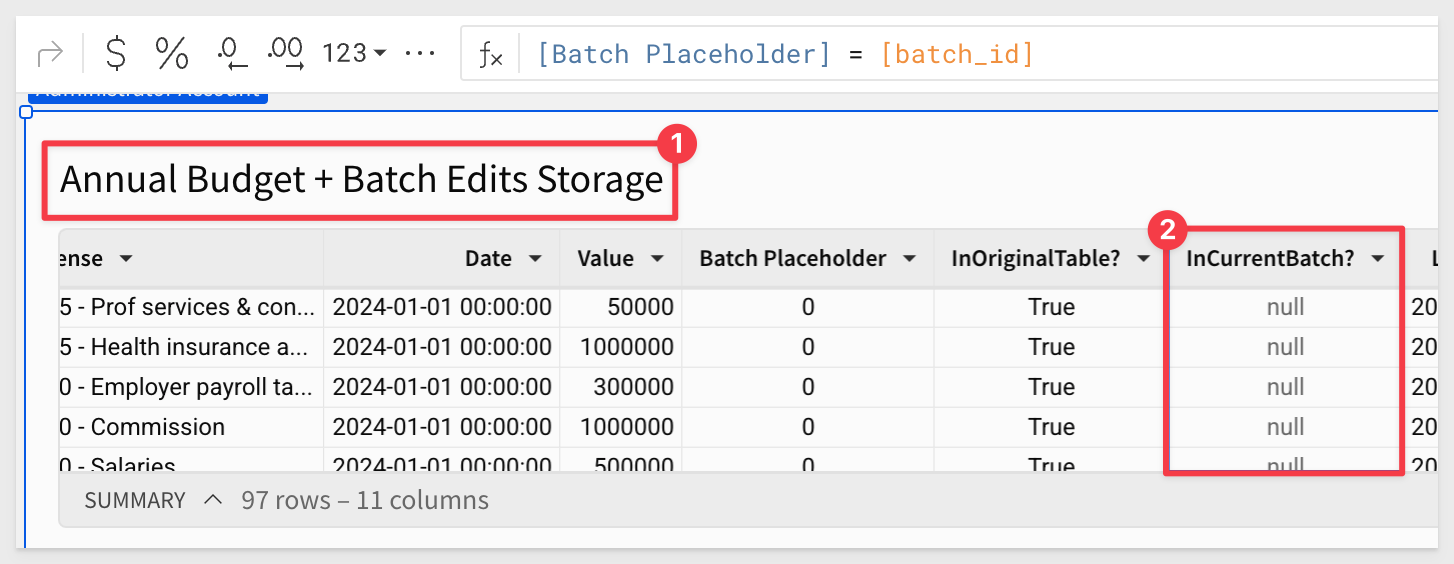
This formula checks if a row belongs to the current snapshot by comparing the value in the Batch Placeholder column to the current batch_id. Rows where this condition is TRUE are part of the snapshot currently selected by the user, allowing the display to reflect the corresponding snapshot data.
Snapshot input table
Add a new Empty Input Table, use the Sigma Sample Database and rename it to Snapshots.
Rename the first column to Snapshot Name.
Add a new Multi-select column and save with the default settings:
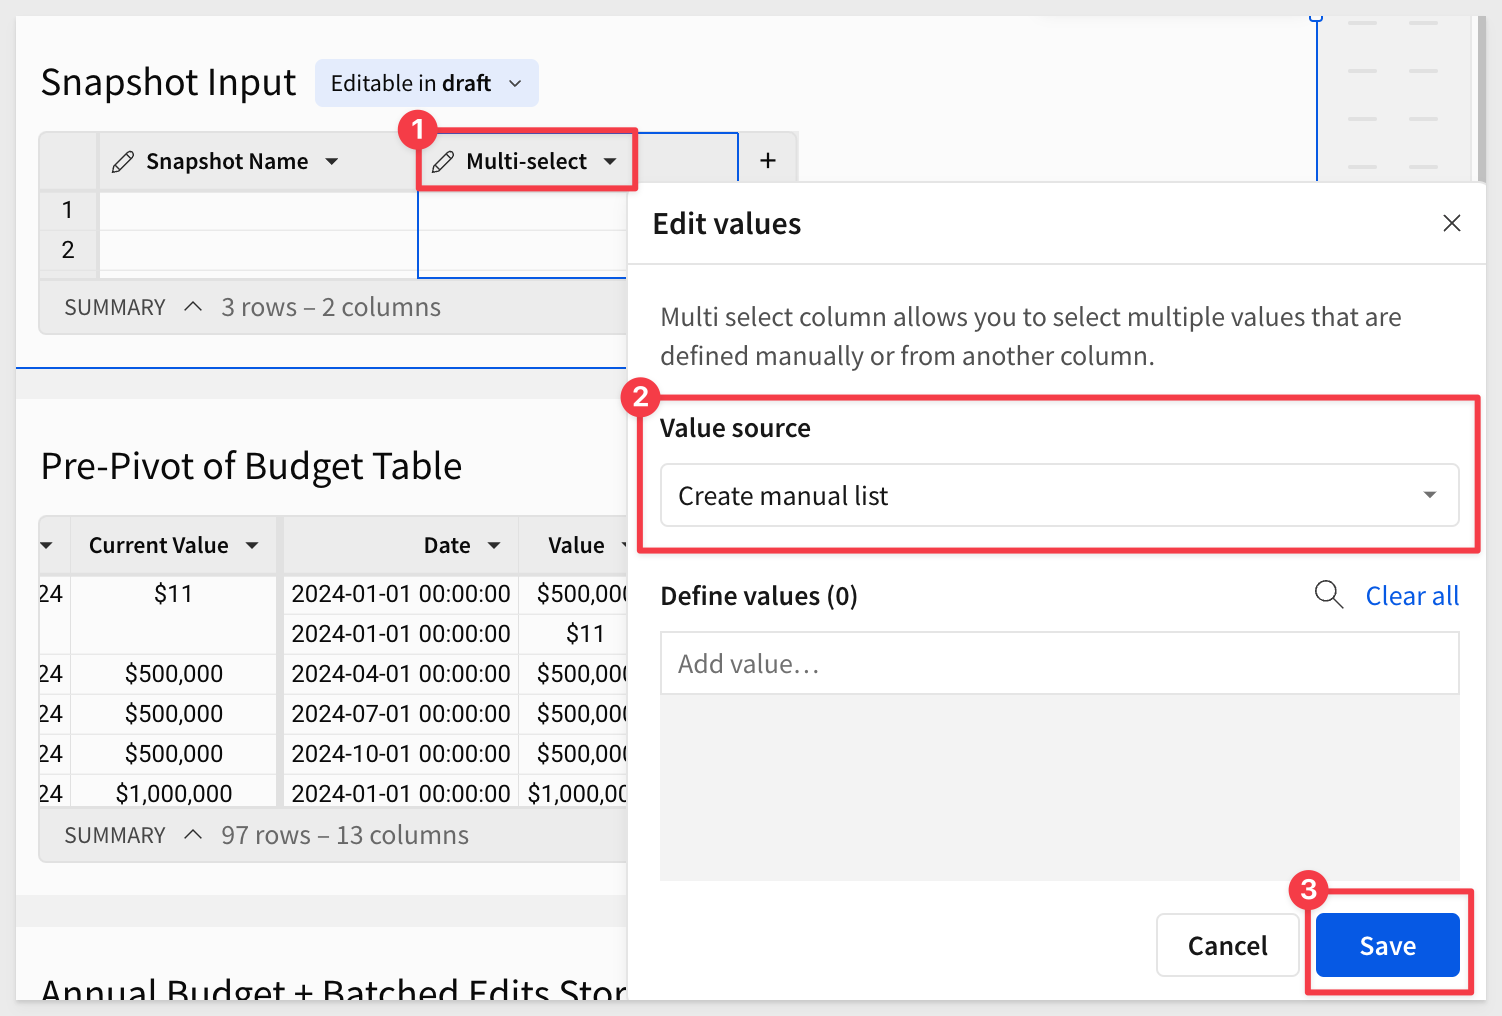
Rename the column to Batches.
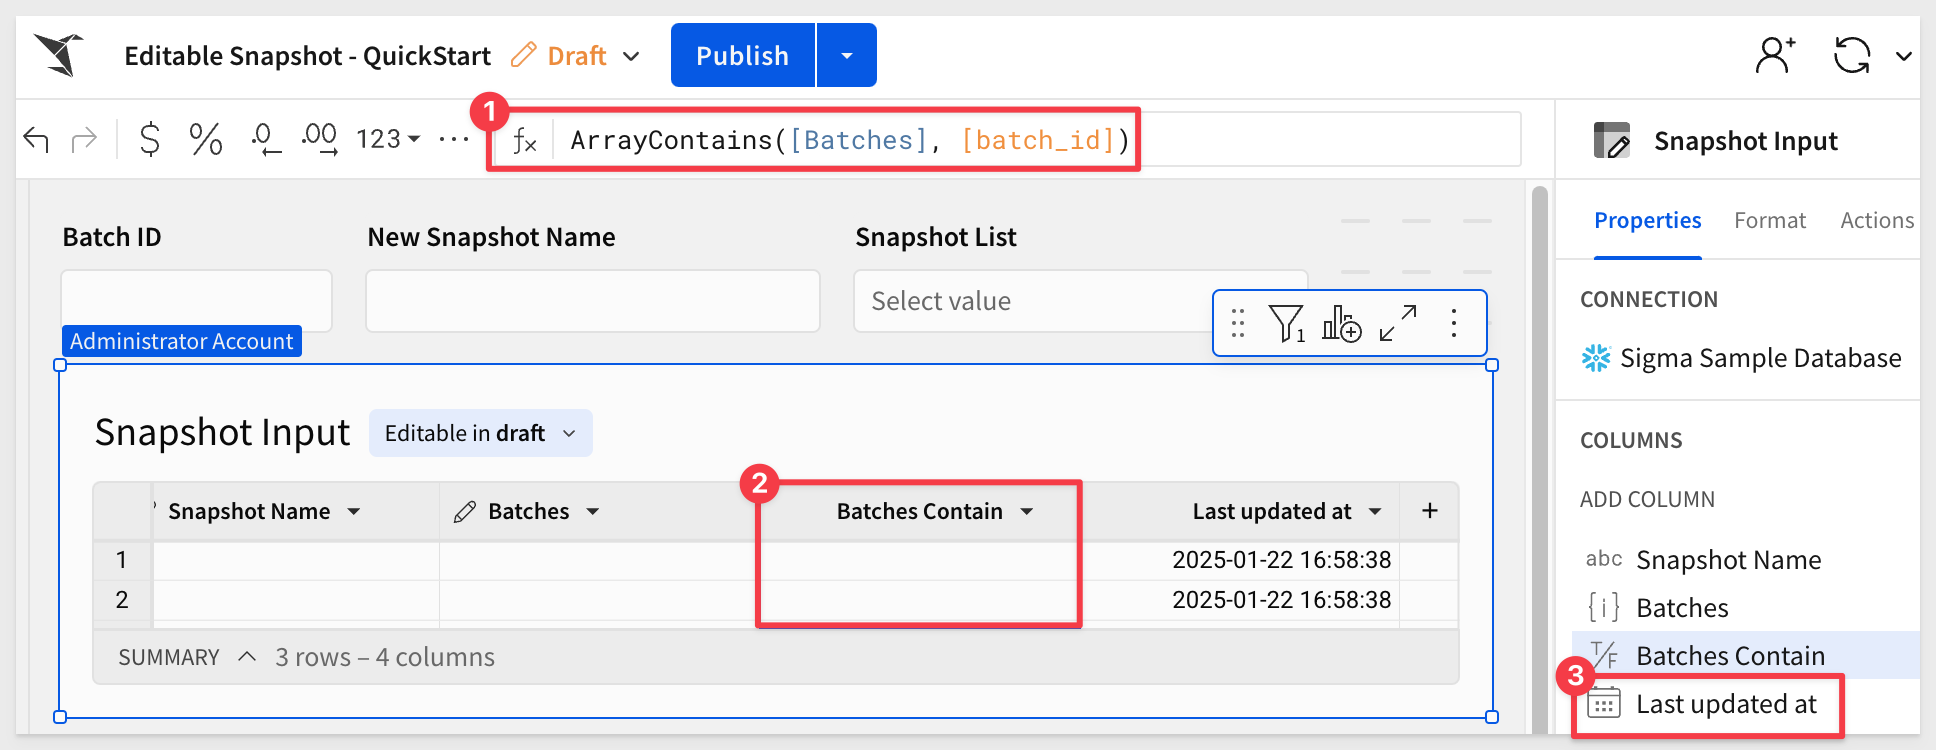
Add a new Calculation column, rename it to Batches Contain and set the formula to:
ArrayContains([Batches], [batch_id])
This formula checks if the current batch_id exists in the Batches list for a row. If TRUE, it means the row is associated with the current snapshot or batch. This allows for dynamic inclusion of rows that belong to the selected snapshot, ensuring accurate data display based on the user's selection.
Add the standard column for Last updated at:
Delete any empty rows, if any exist.
Snapshotting controls
We need two more columns to determine if the row is in the "current snapshot".
This requires two new controls and a new input table to be created so we can reference them in a column formula.
Add a new Text input control, rename it to New Snapshot Name and set the Control ID to new_snapshot_name.
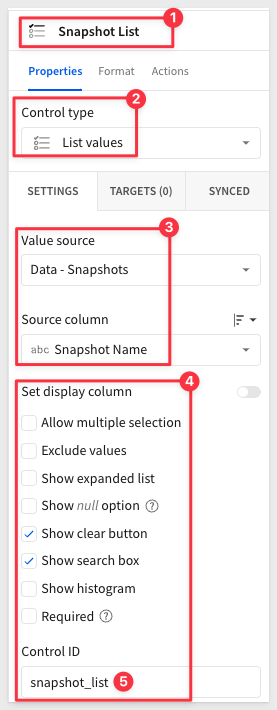
Add a new List values control, rename it to Snapshot List and set the Control ID to snapshot_list.
Set the Value source to Data - Snapshots and Source column to Snapshot Name.
Two more columns
Now we can add the last two columns to the Annual Budget + Batch Edits Storage table.
Add a new column, rename it to InCurrentSnapshot? and set the formula to:
ArrayContains(Lookup([Snapshots/Batches], [snapshot_list], [Snapshots/Snapshot Name]), [Batch Placeholder])
This formula checks whether the current Batch Placeholder value exists in the list of batches associated with a selected snapshot.
It works by first using Lookup to retrieve the Batches list from the Snapshots table based on the snapshot_list control and the Snapshot Name column.
Then, ArrayContains determines if the Batch Placeholder is part of that batch list. This ensures the display reflects rows that belong to the snapshot selected by the user.
For the last new column, and and rename it to IncludeMe? and set the formula to:
[InOriginalTable?] or [InCurrentBatch?] or [InCurrentSnapshot?]
This formula combines logical checks to determine if a row should be included in the final display. It evaluates whether the row belongs to one of three key categories:
- InOriginalTable?: Checks if the row is part of the original dataset (e.g., Batch Placeholder = "0").
- InCurrentBatch?: Checks if the row belongs to the currently active batch (e.g., Batch Placeholder = [batch_id]).
- InCurrentSnapshot?: Checks if the row is included in the currently selected snapshot (using logic like ArrayContains with snapshots).
If any of these conditions are TRUE, the row is included in the final display, ensuring the pivot table reflects the appropriate dataset.
We are done adding columns to this table, but we need one more control.
Add a List values control, rename it to All Batches and set the Control ID to all_batches.
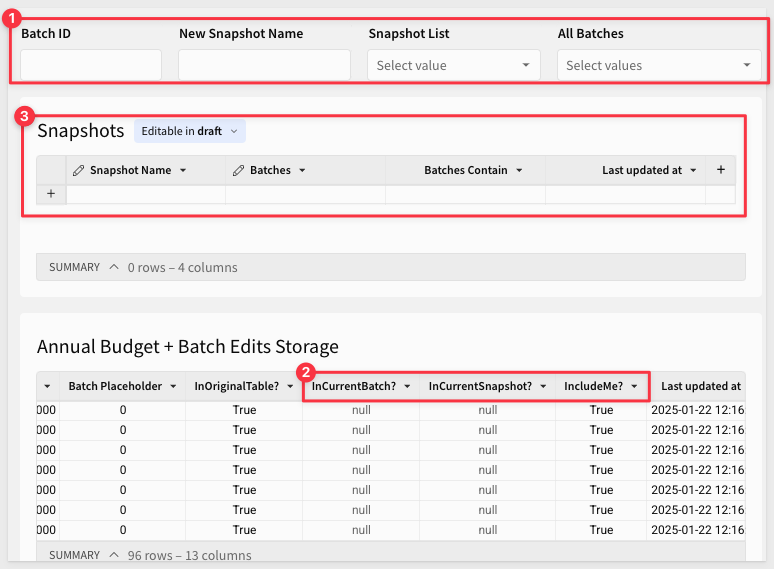
We now have the four required columns and all the required controls and input table:
We will want to create another table that aggregates data from the original data sources to ensure that all adjustments and snapshots are organized for easy access and visualization.
To accomplish this, we will simply make a duplicate of the Annual Budget + Batch Edits Storage table:
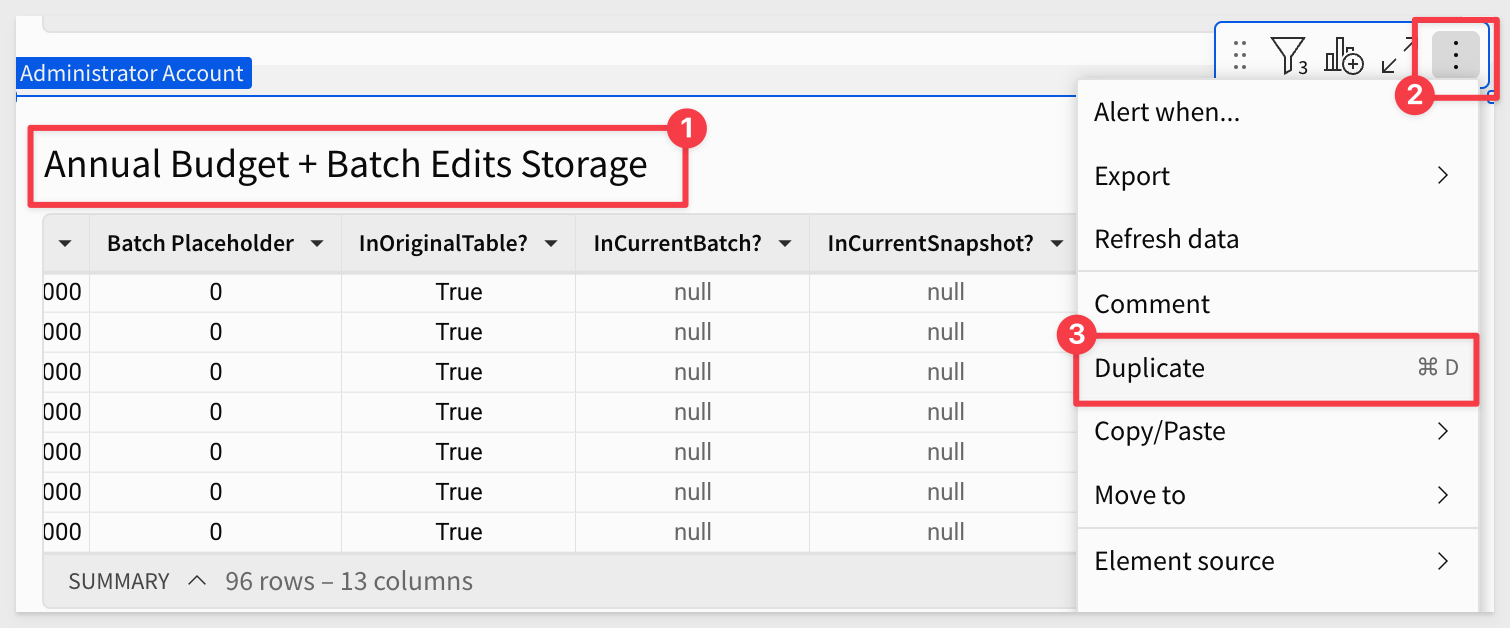
Rename this duplicate table to Pre Pivot of Budget Table.
Group the table as shown below, truncating Date to Quarter:
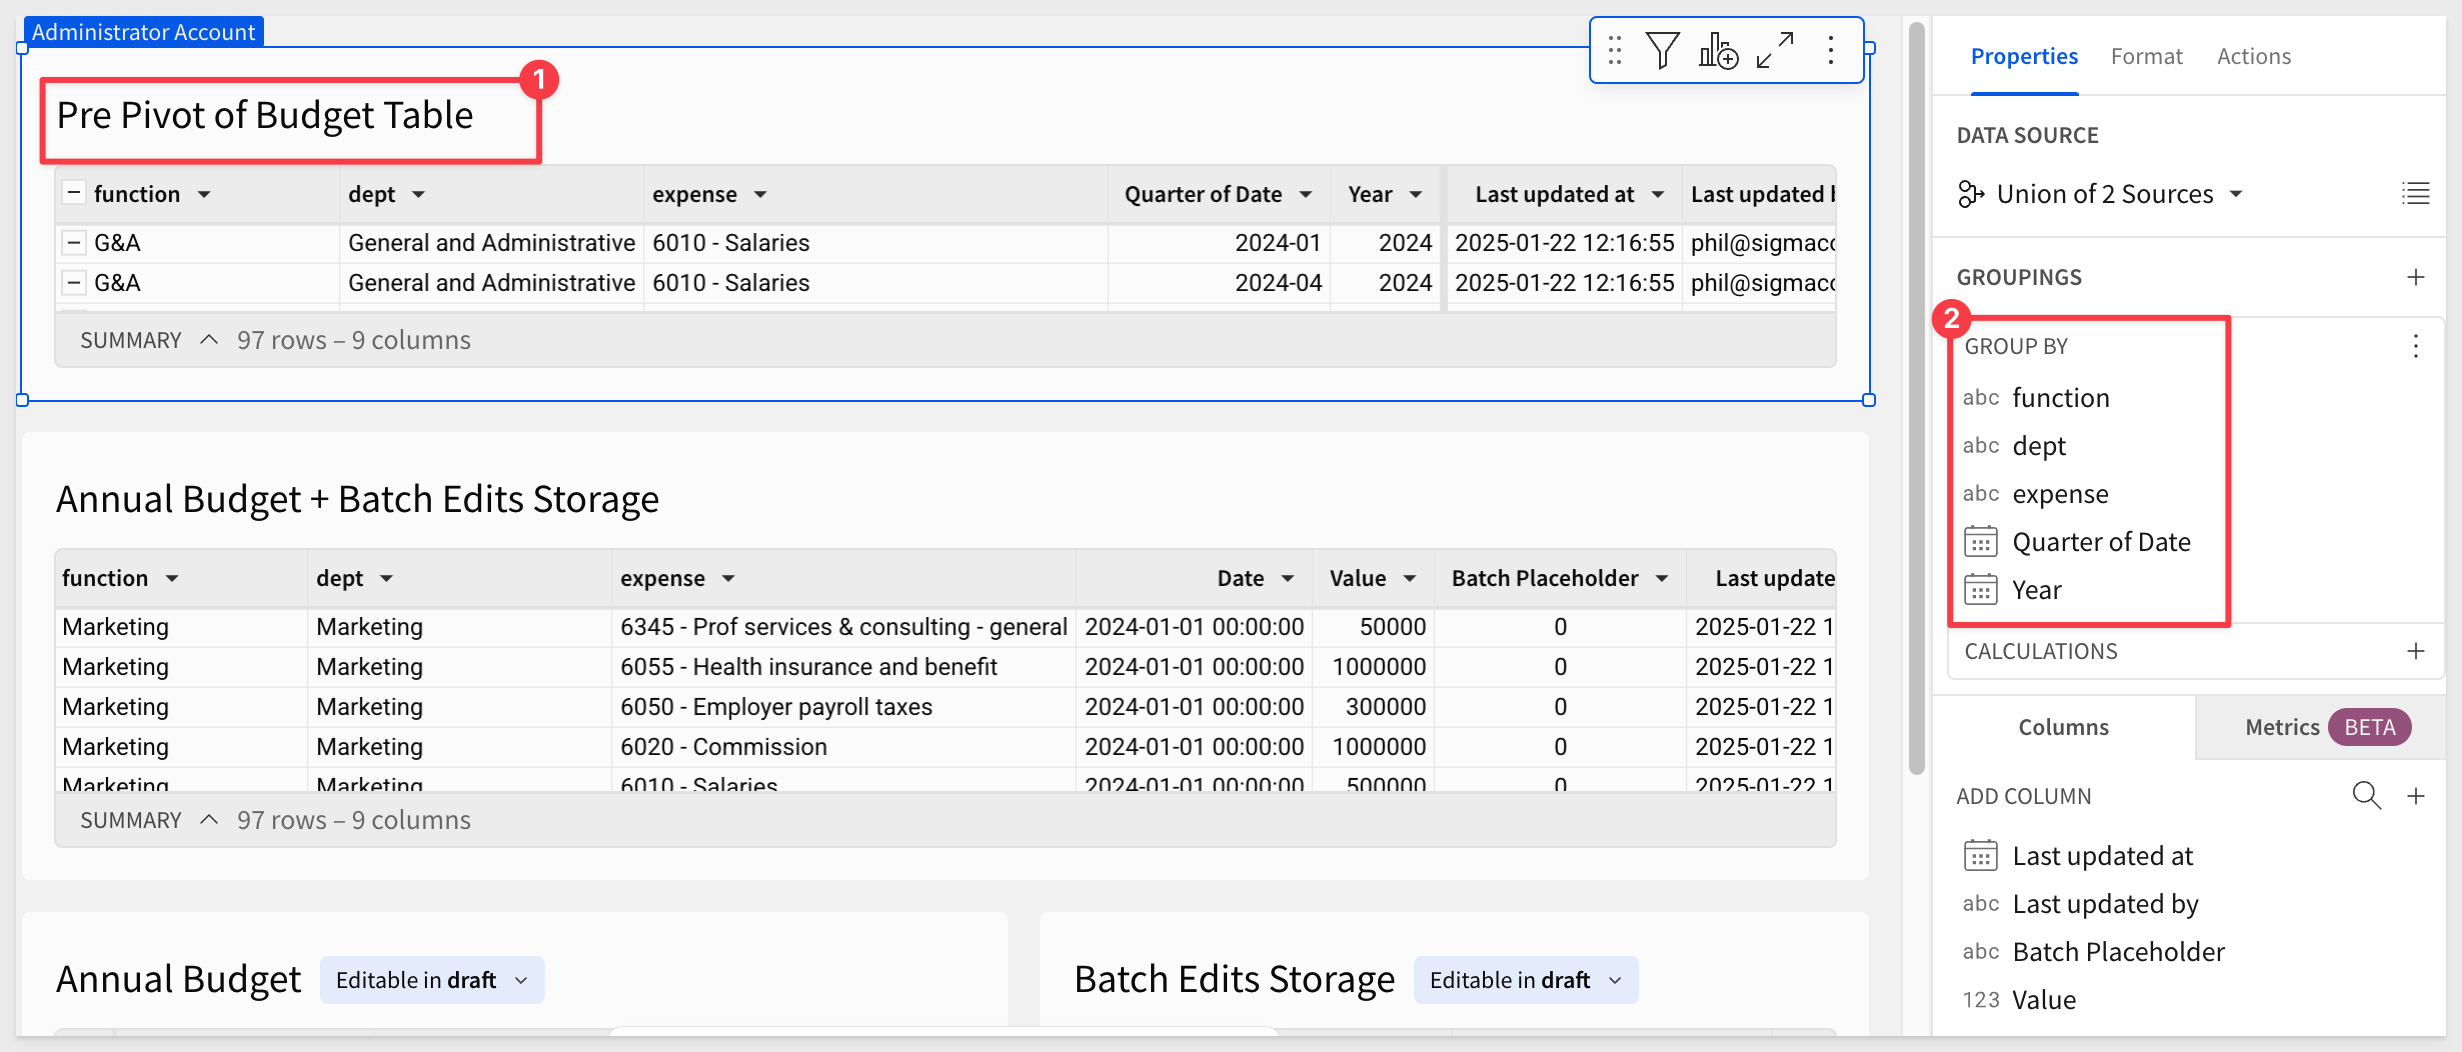
Duplicate the Value column and drag Value(1) up to the same group as the other columns.
Once grouped, the Value(1) name changes to Value. Rename that to Current Value and set the formula to:
First([Value])
The First function returns the first result in a column in every row of the first column.

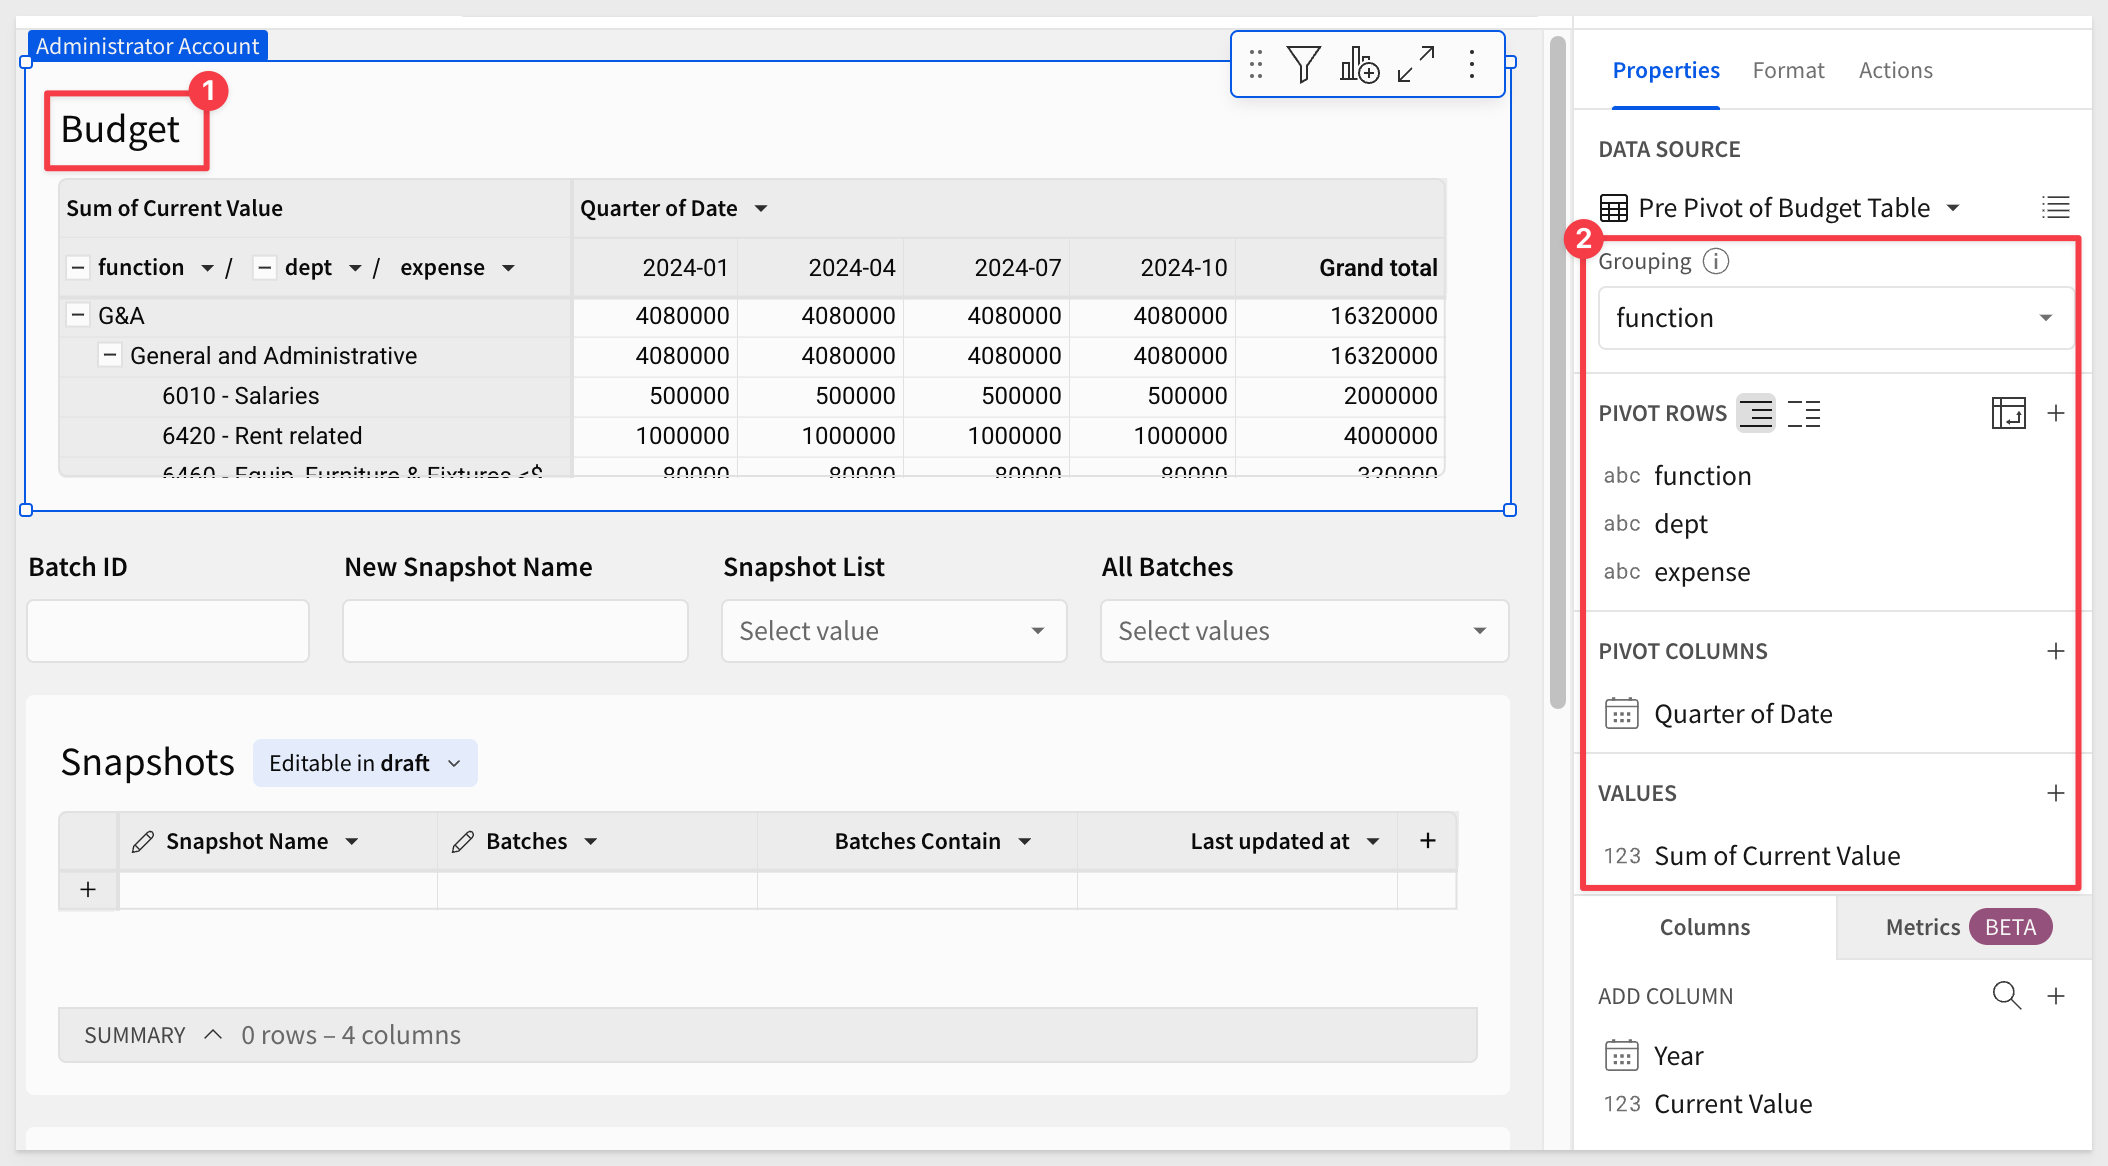
Add a new Pivot table to the top of the page and set the source to the Pre Pivot: Edit Budget - Main Table.
Rename it to Budget.
Configure the pivot as shown below:
Using your mouse, select everything shown below and move them to a new page:
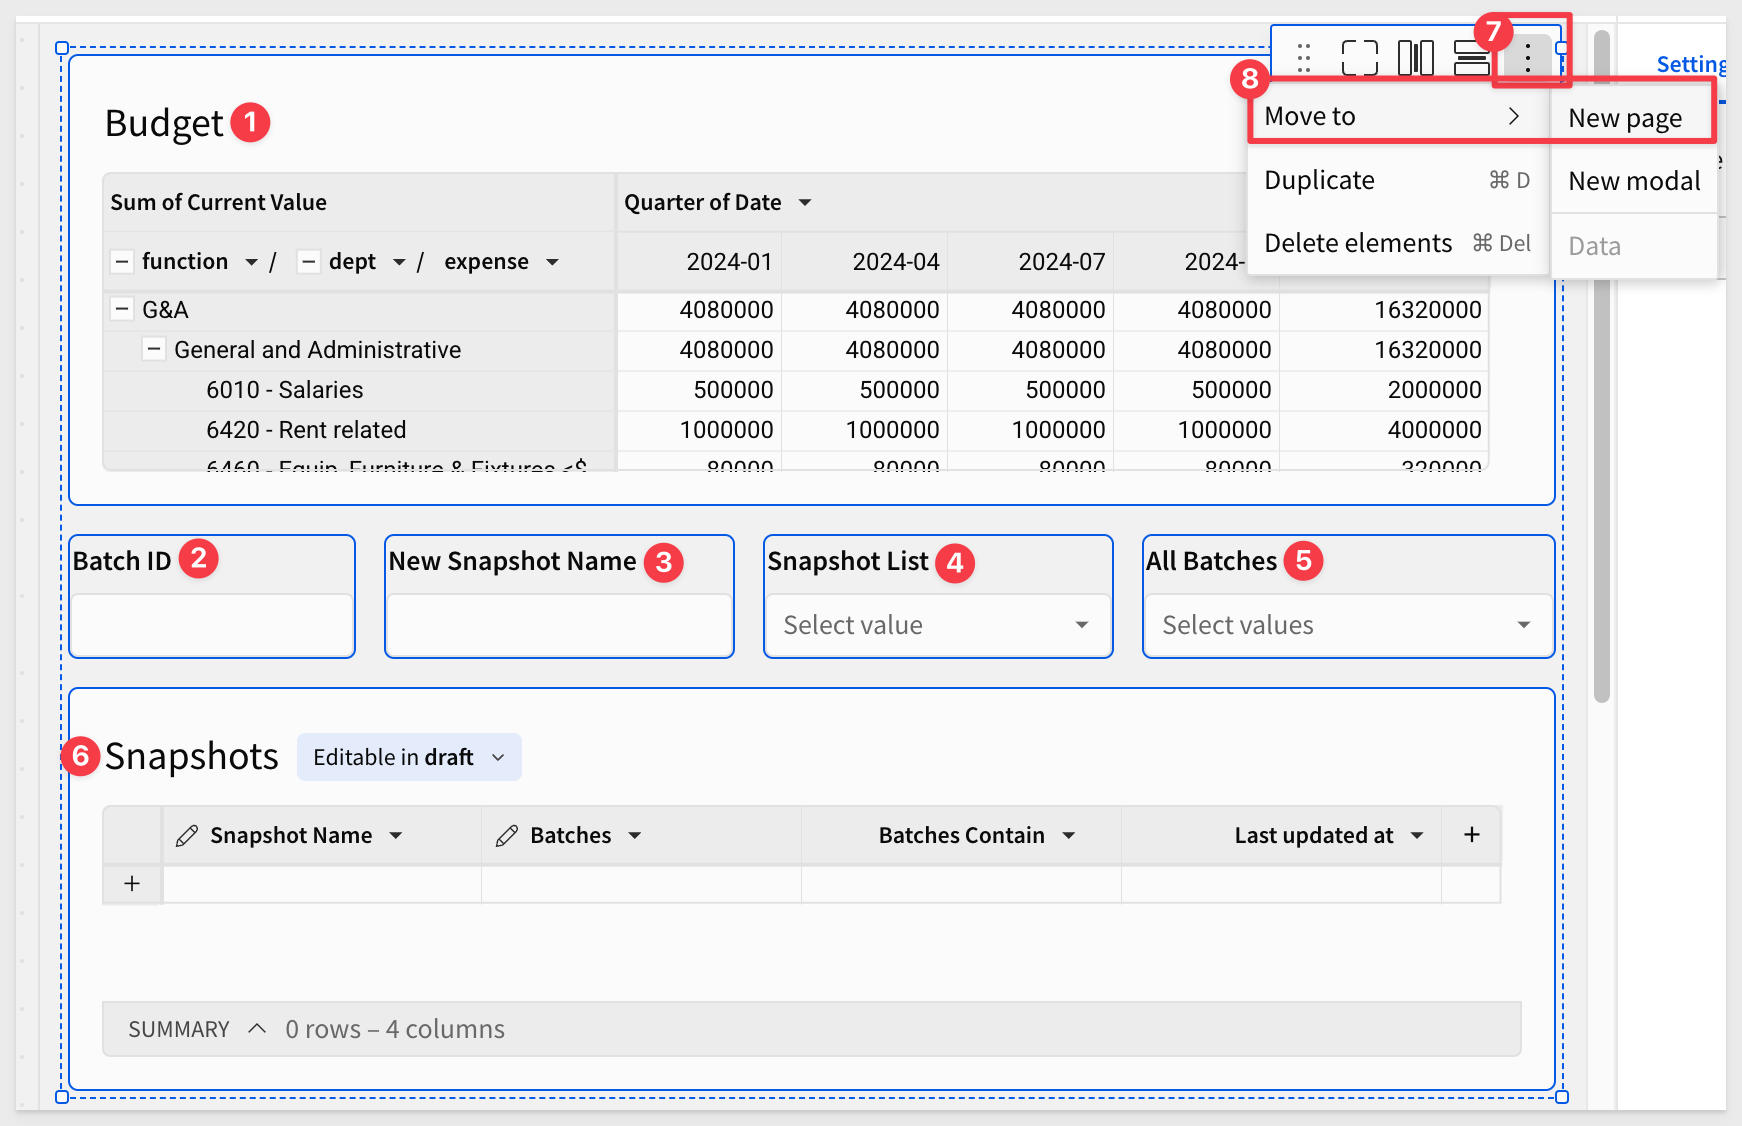
Also move over the Batch Edits Storage table from the Data page to the New Page. It will help us see what is happening later when we create snapshots.
Rename the new page Budget.
Delete any empty rows in the two input tables that may have been created while clicking around.
After some rearranging (optional), the Budget page looks like this:
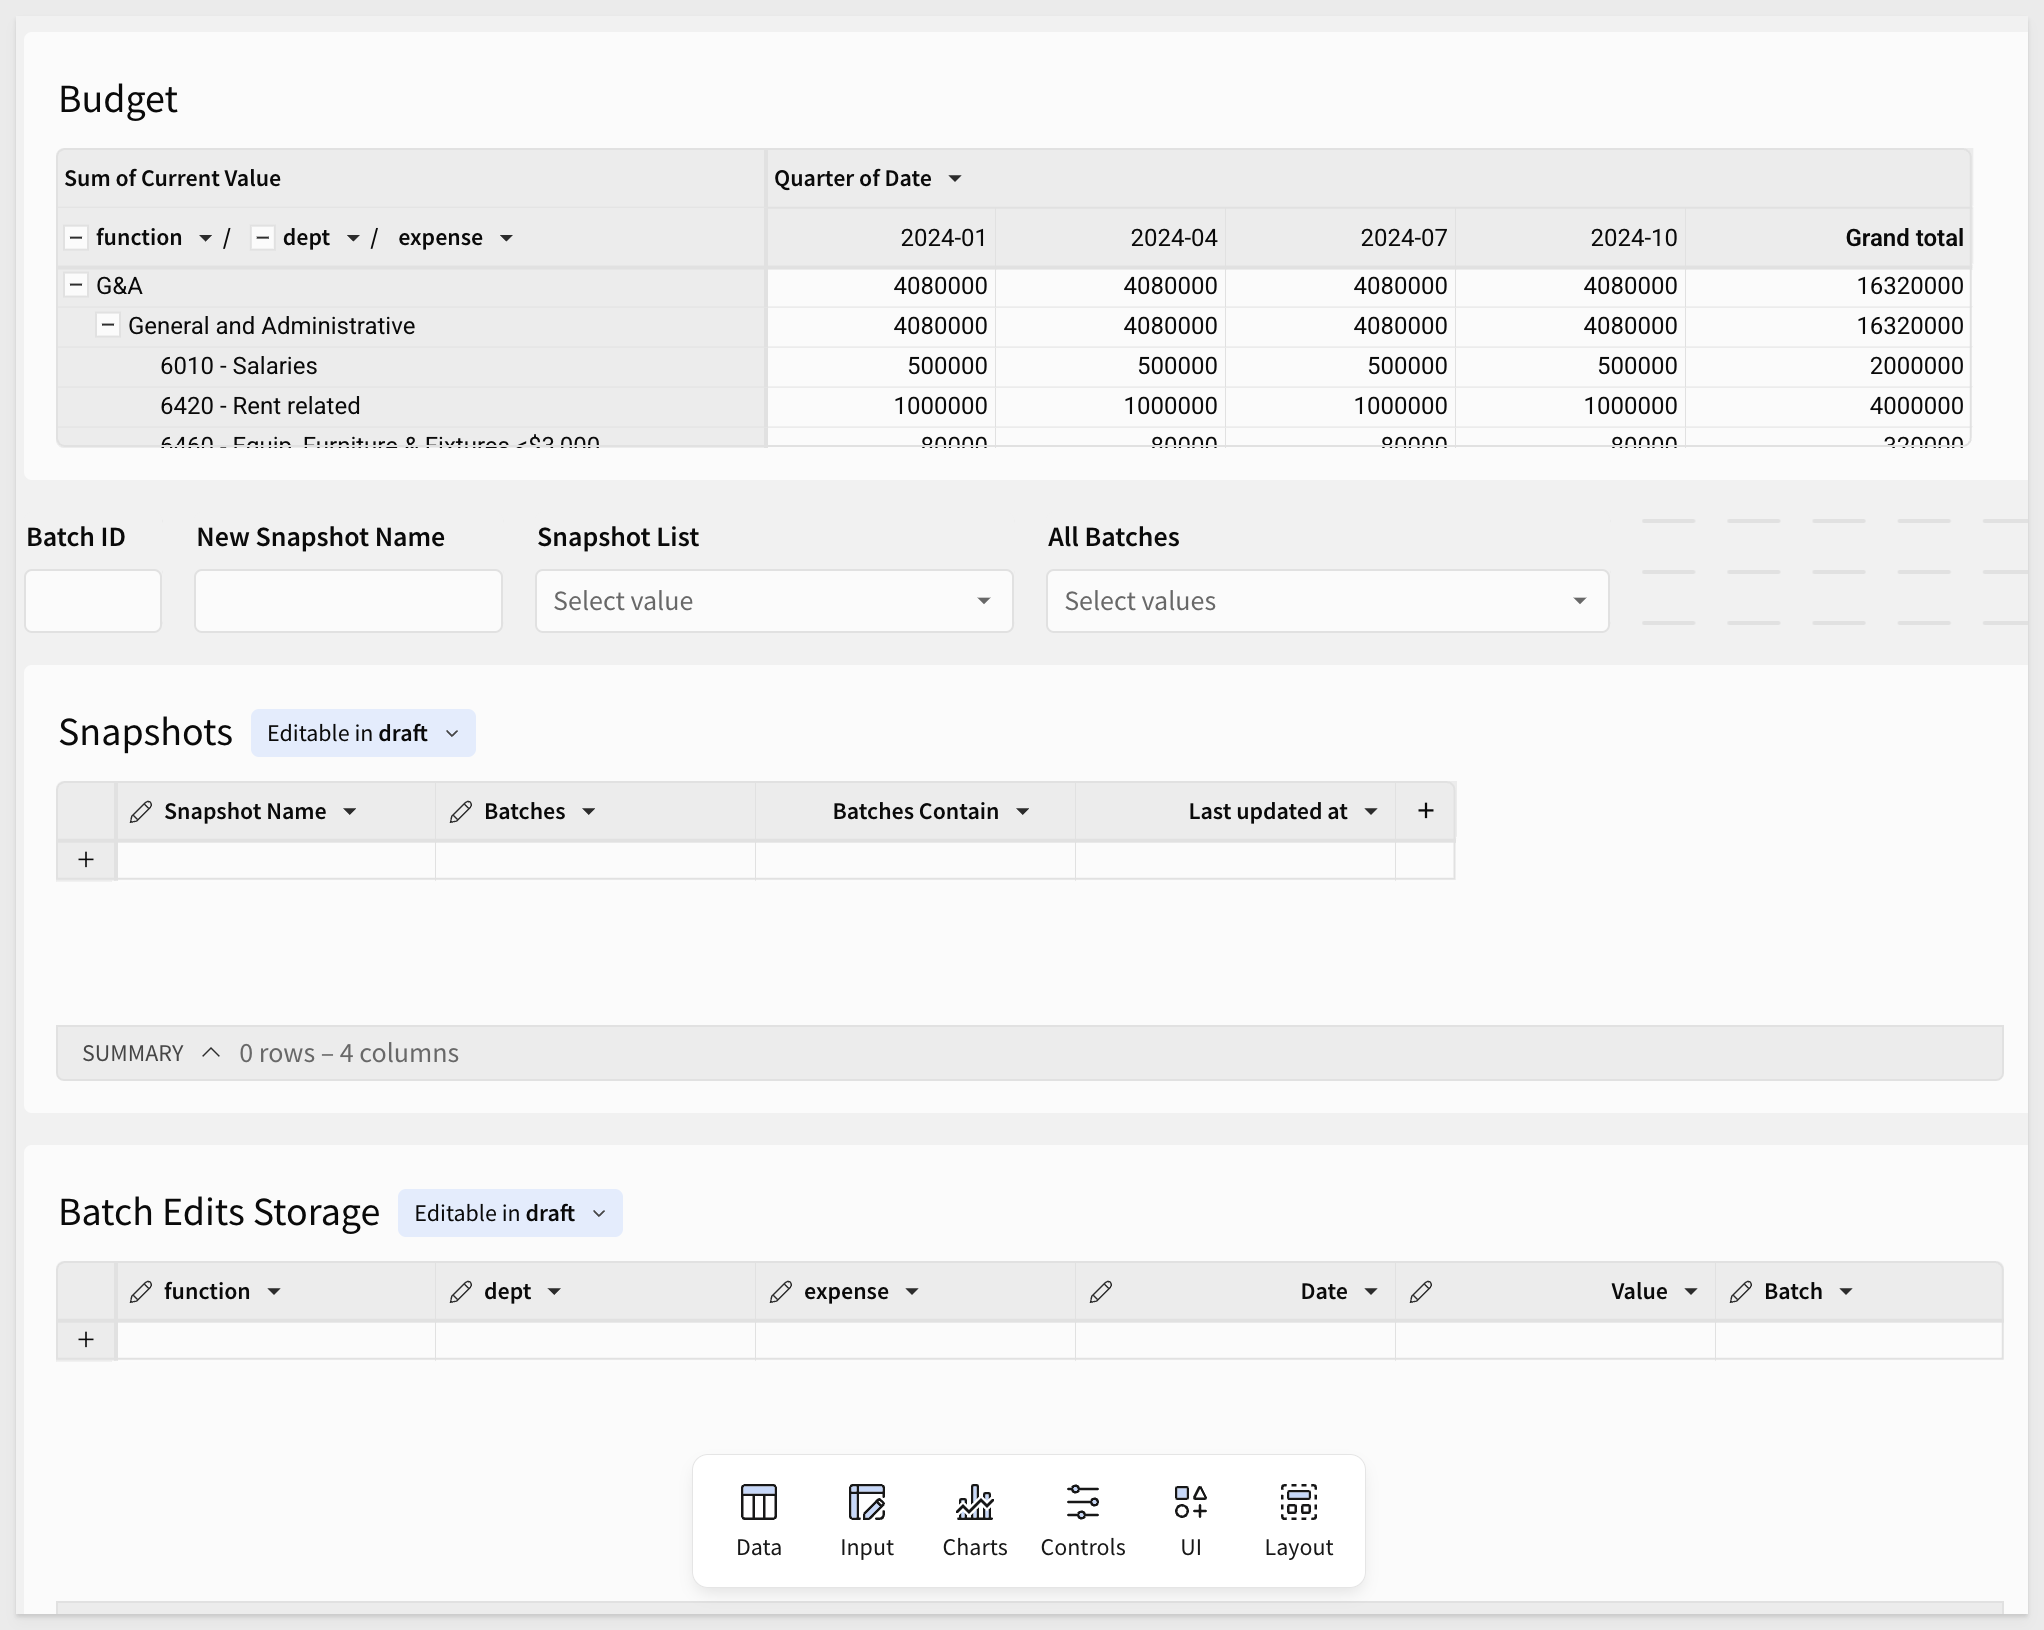
Click Publish.
Now that we have the data organized the way we want, we can start to build the interactivity we are really after.
With the Budget pivot selected, open the Actions menu on the Element panel.
Change the On select value to Sum of Current Value and click the + to add an action to the existing Action sequence that opens a new modal:
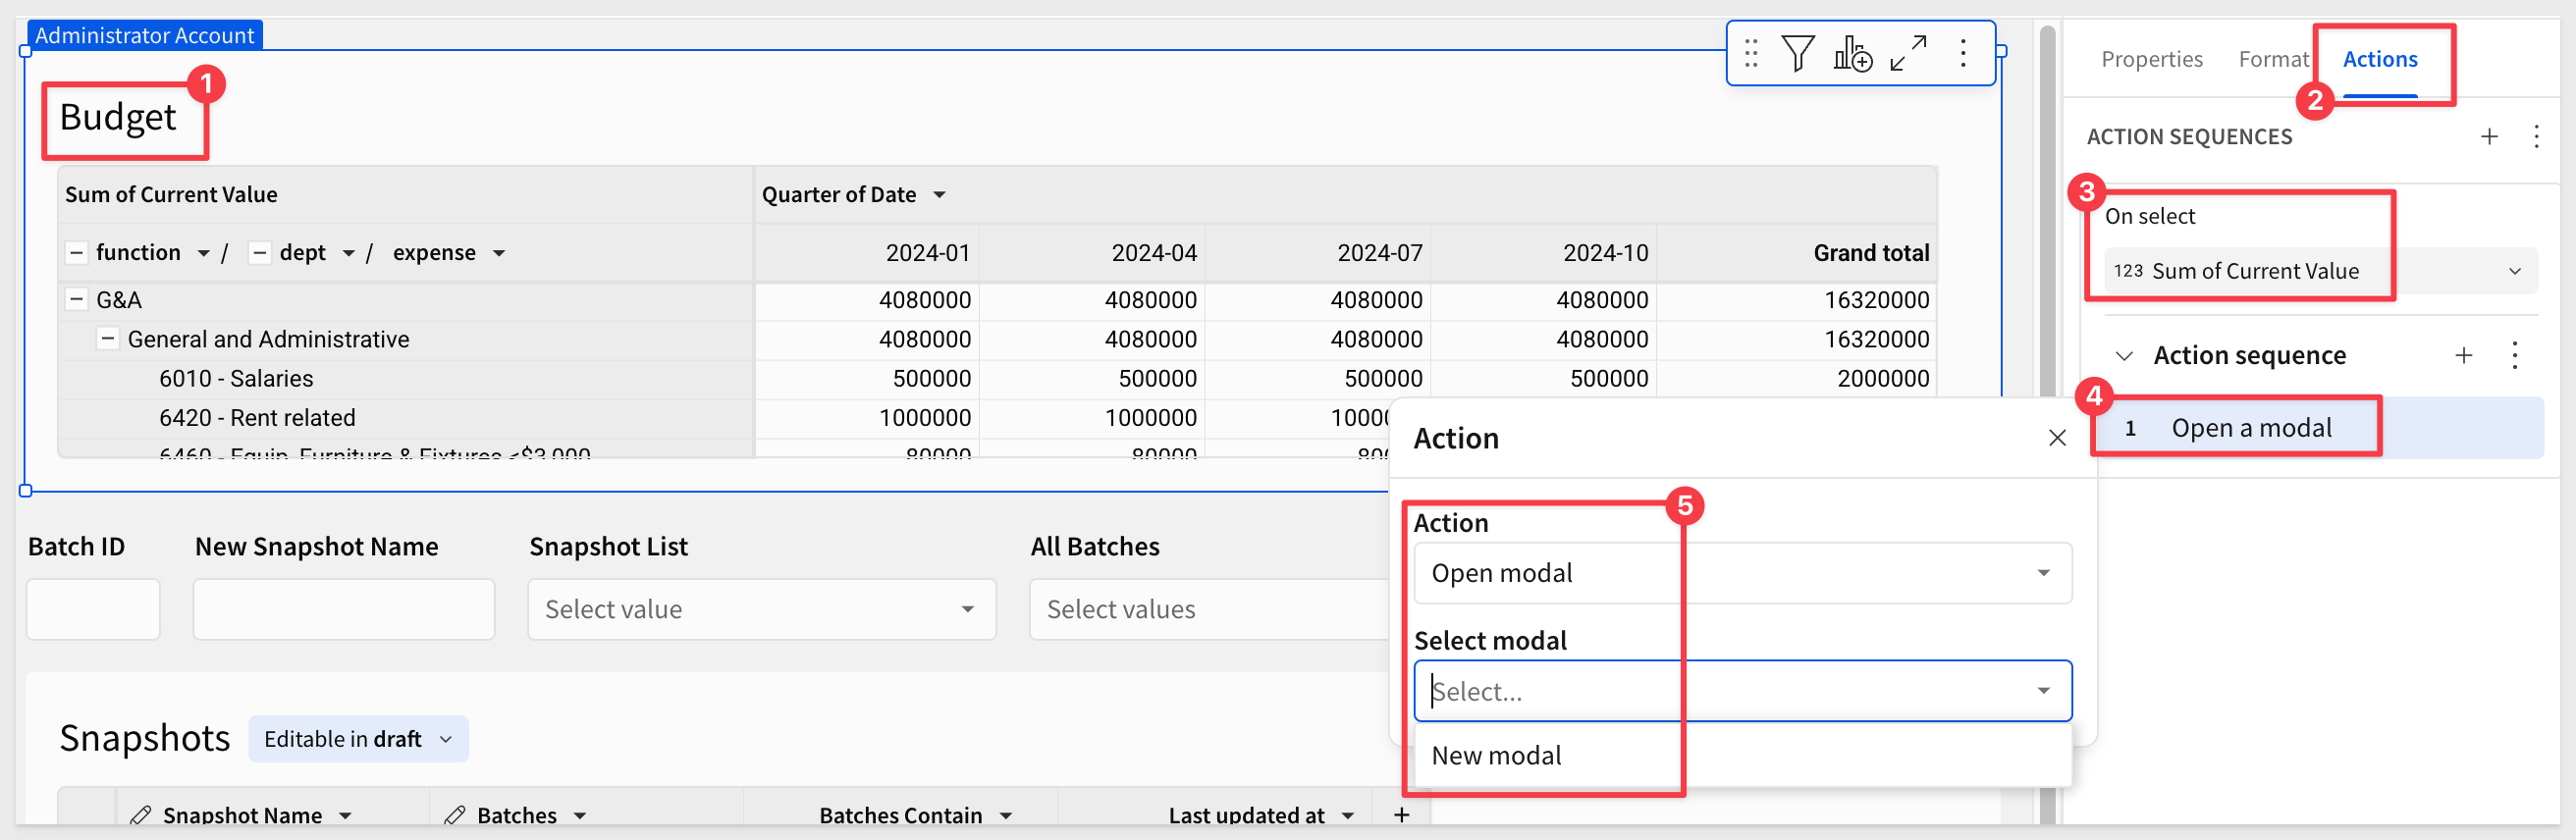
Rename the page tab to Edit Budget Modal.
Modal content
On the Edit Budget Modal page, we want to add some controls to both inform the user and provide a control to allow them to edit a budget value.
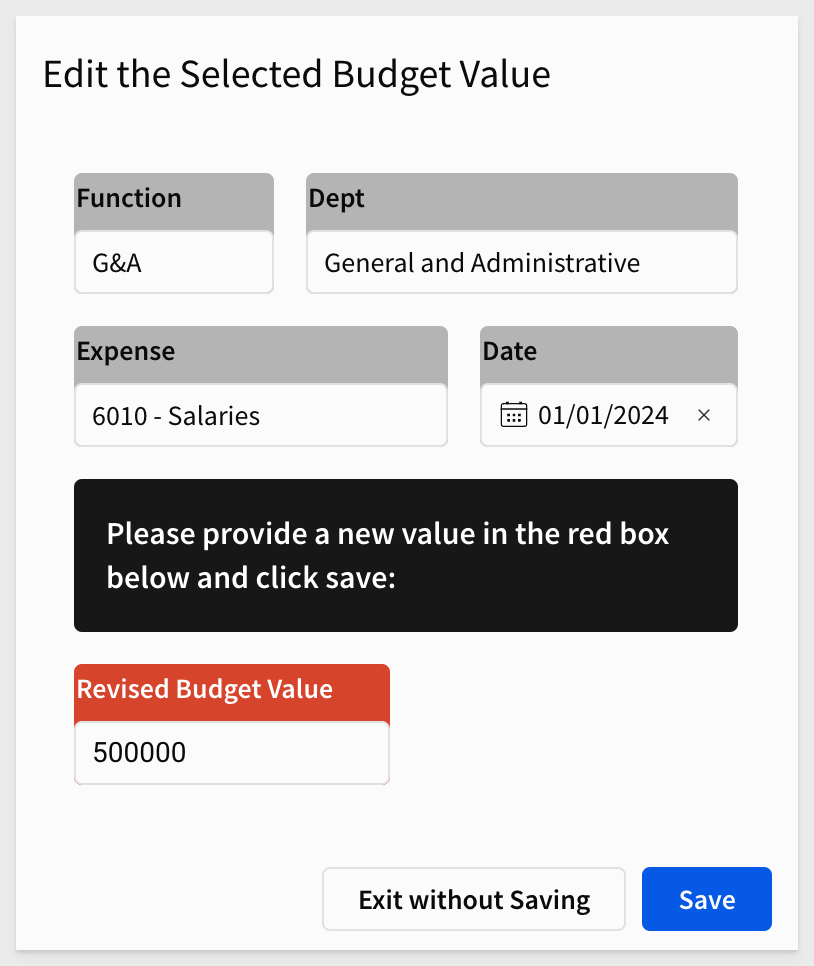
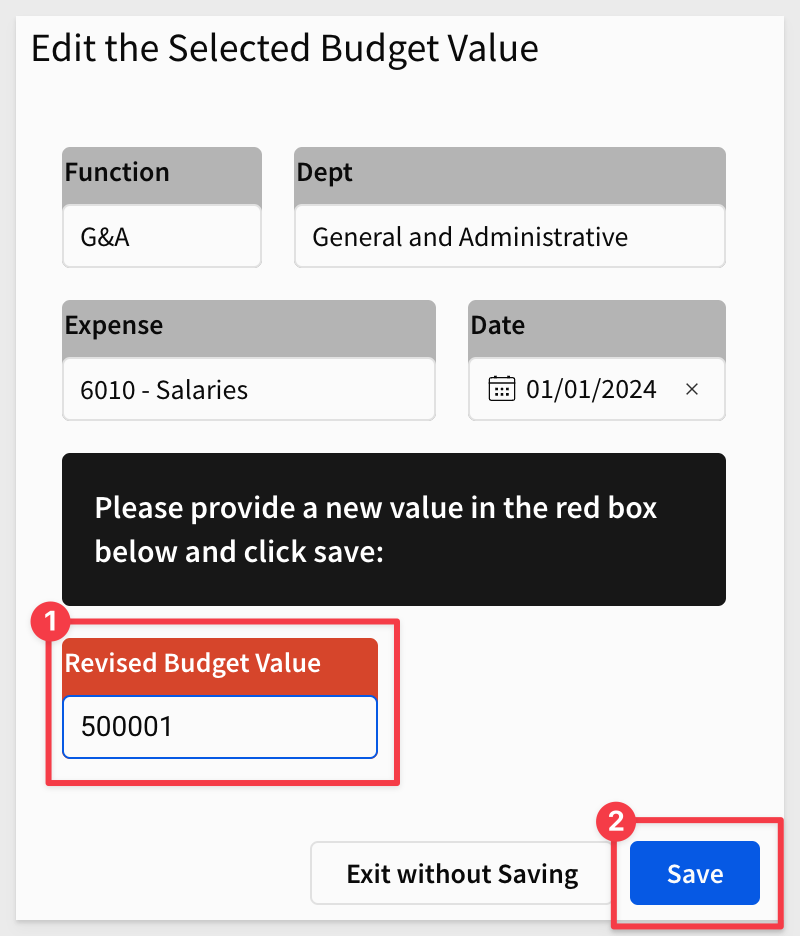
Rename the modal's title to Edit the Selected Budget Value.
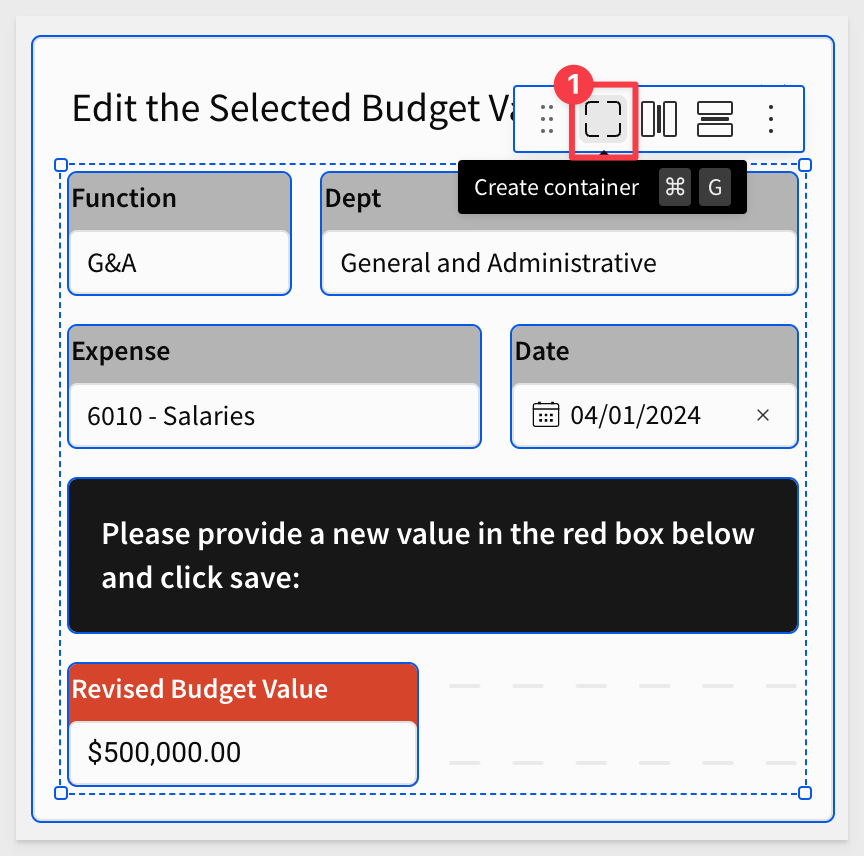
We are going to add just a few elements to the modal, and when done, it will look something like this:
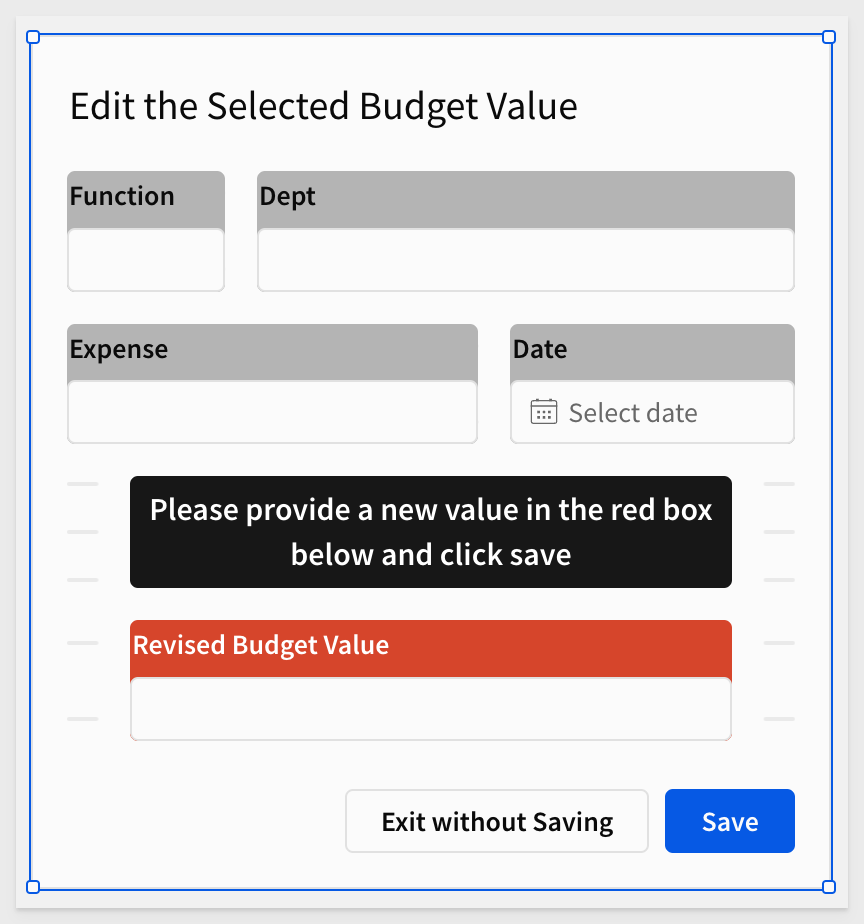
With just a little experience, building and configuring a modal can be done extremely quickly.
First, we need to place some controls on the page and configure them.
This modal has five controls, three are text input, one is date, and the other is a number input.
Each of these controls can be found in the Element bar under the Controls group.
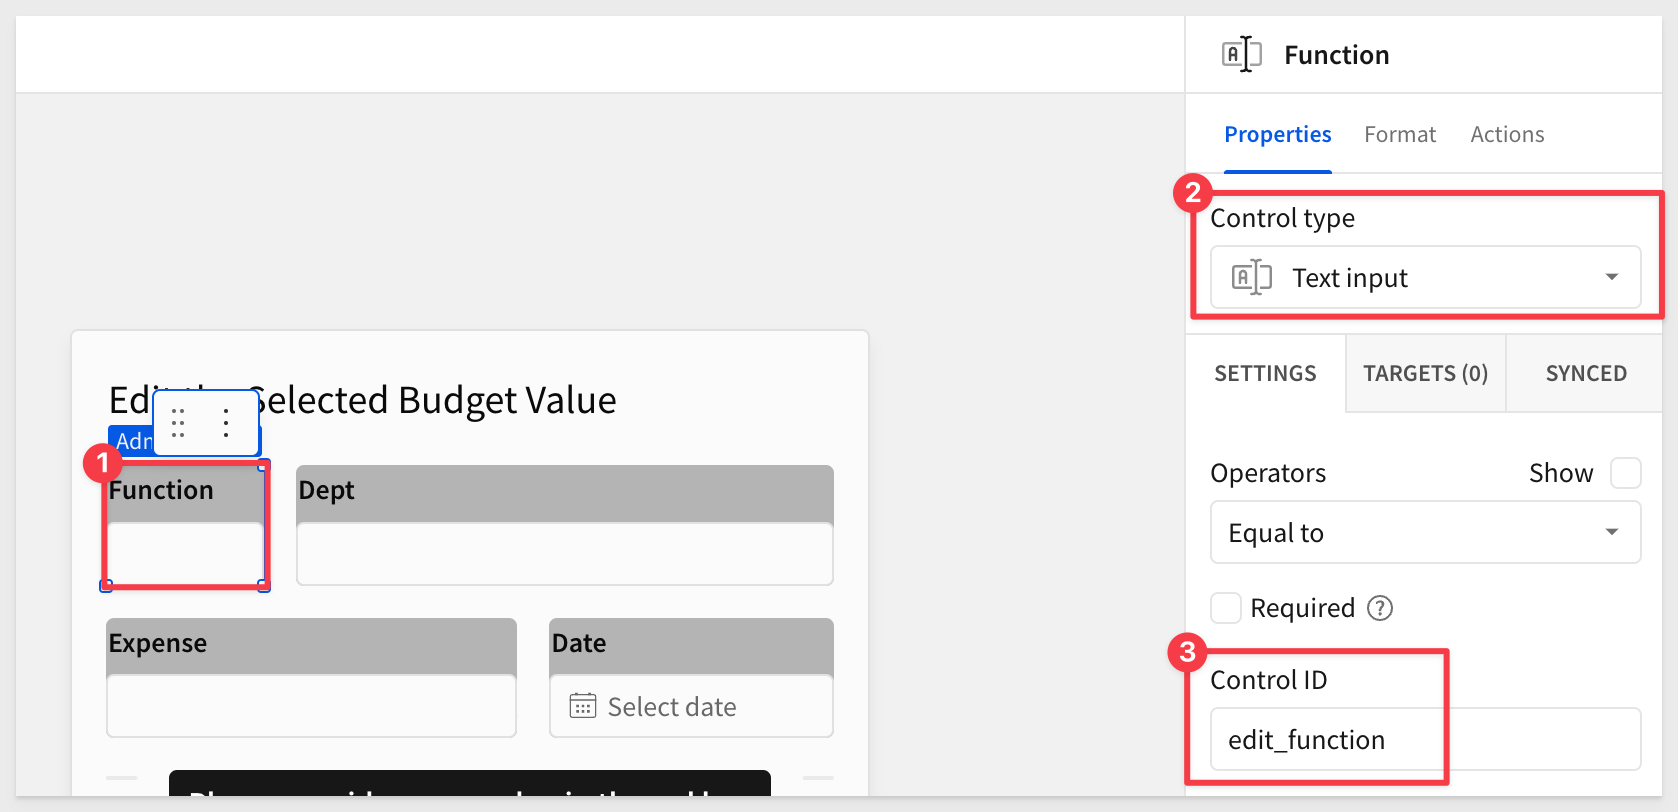
For each one, drag the control type needed onto the modal and configure it as follows:
1: Function (edit_function):
Add text input control and set the Control ID to edit_function.
For example, the Function control configuration looks like this (after renaming each control to remove the "_edit" from the label):
Configuring the other controls is the same or similar, based on the control type.
2: Dept (edit_dept):
Add text input control and set the Control ID to edit_dept.
3: Expense (edit_expense):
Add text input control and set the Control ID to edit_expense.
4: Date (edit_date):
Add Date control and set the Control ID to edit_date.
5: Revised Budget Value (edit_revised_budget_value):
Add number input control and set the Control ID to edit_revised_budget_value. Also set the format to Currency.
Add the UI > Text element to the page (as shown in the sample rendering earlier) with the following text:
Please provide a new value in the red box below and click save:
To save some actions later, place all these controls in a container. Simply left-click/hold and drag a mouse window around them and click the container icon:
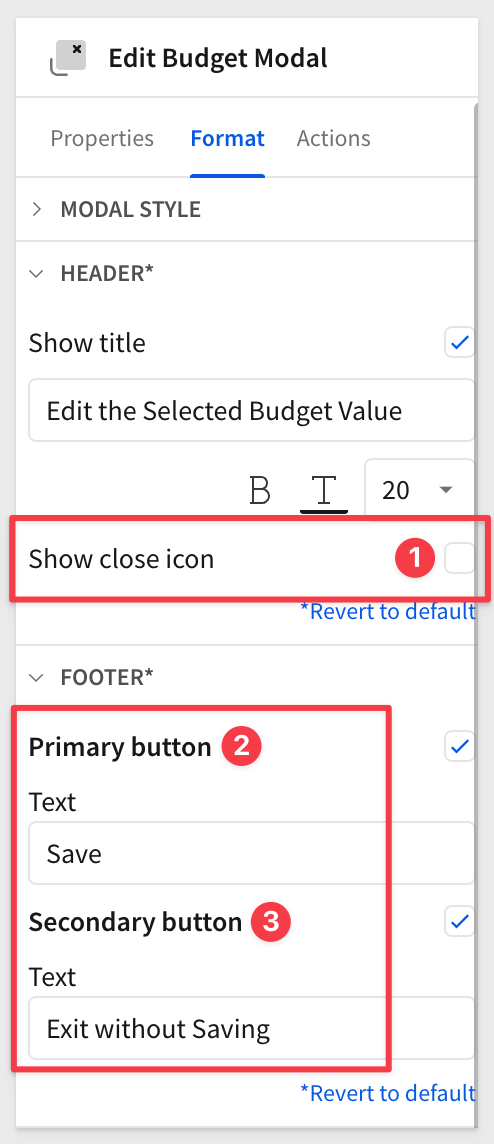
Still on the Edit Budget Modal, we need to configure what happens when the user clicks either of the modal buttons.
In the Format menu, we want to disable Show close icon and show the Primary and Secondary buttons as shown:
In the Actions menu, we can delete the On close action sequence, since we removed the Show close icon from the modal.
For both buttons, set a Close modal action.
Before we add the action to Insert a row to the Primary button, we need to add a few elements to the Data page.
Modal actions
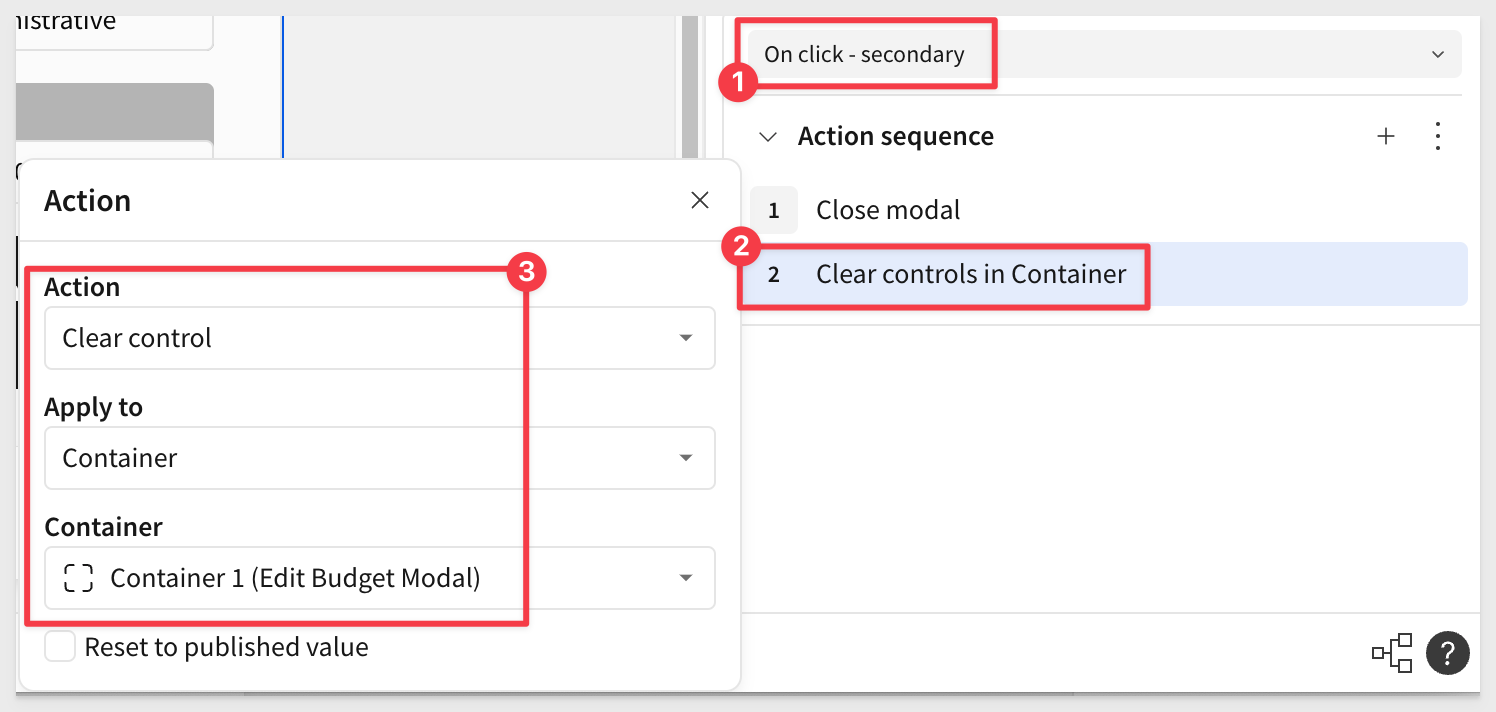
We already configured the Exit without Saving button to Close the modal. However, it is a good idea to also clear all the values for all the controls on the modal too.
Since all the controls are also in a container, we can just target the container by name to clear:
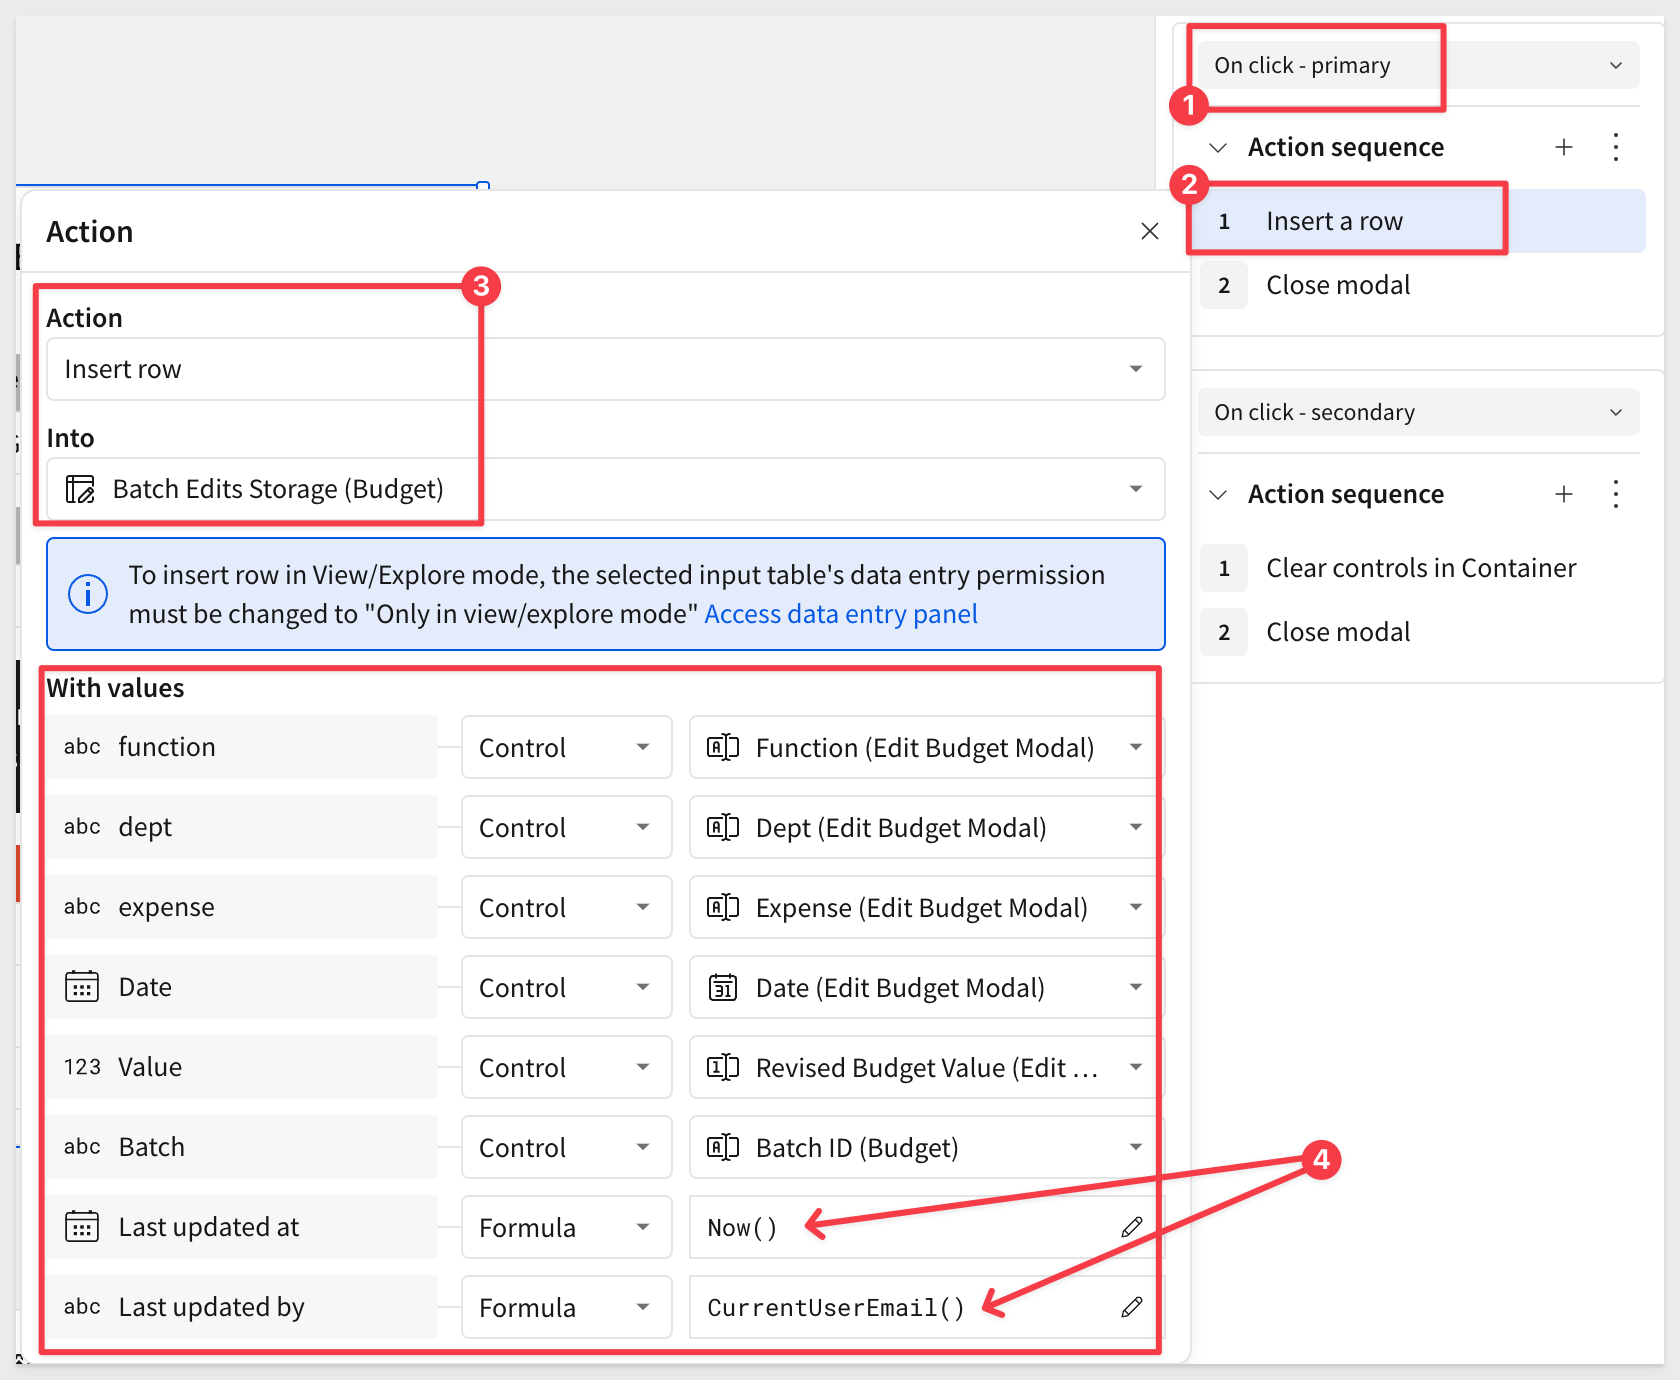
For the Save button, we want to use an action that will insert a row in the specified input table, with the columns configured to suit our needs.
Add that action so that it looks like this:
Before we can test, we need to also configure the actions on the Budget table to pass the values to the modal too.
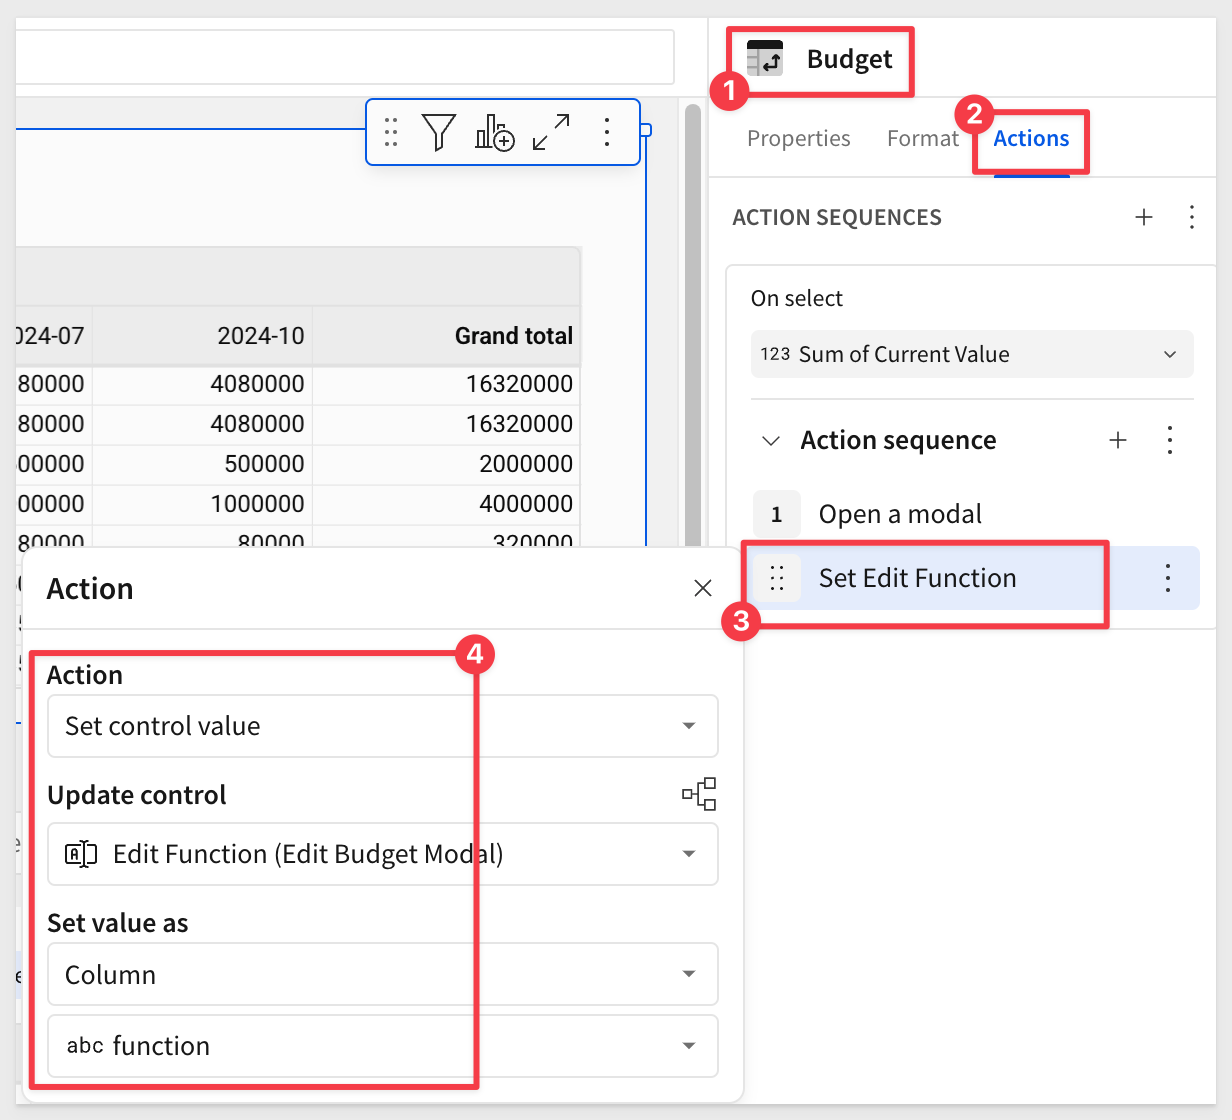
Return to the Budget page and select the Budget table.
For example, to pass the value for Function for the selected row, we configure a Set control value action like this:
Dept and Expense are pretty obvious.
For Set Revised Budget Value use the Sum of current value column.
For Set Date use the Quarter of Date column
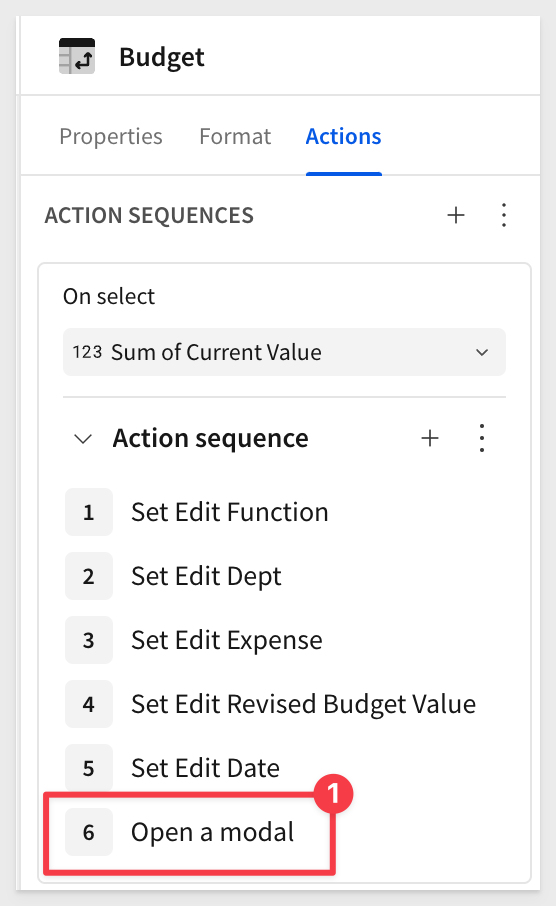
We now have six actions, with Open a modal in the last position.
Quick test
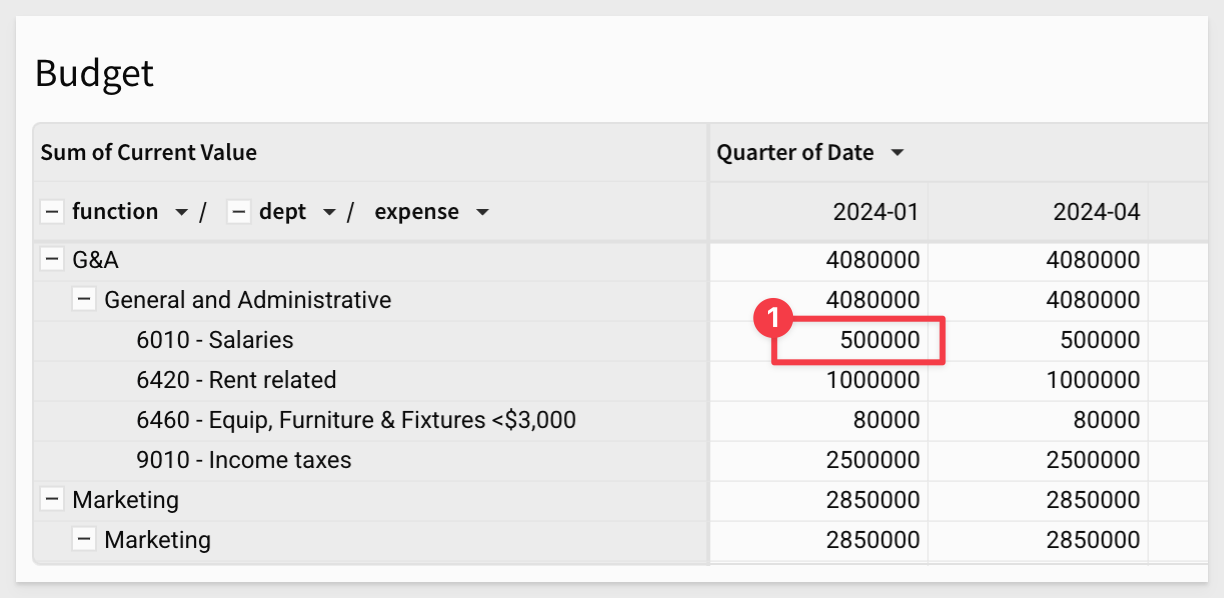
If we click the value of 500000 (as shown below) in the Budget table, our modal should have all the corresponding values populated:
If we alter the value of Revised Budget Value in the modal to 100 (for example), and click Save, the new value will appear in the Budget table along with a new row in the Batch Edits Storage table.

The value for Batch is blank; this is expected as that will be handled when we setup snapshots next.
We can delete the new row(s) from the Batched Edits Storage table and the Budget table will revert to the old value (500000).
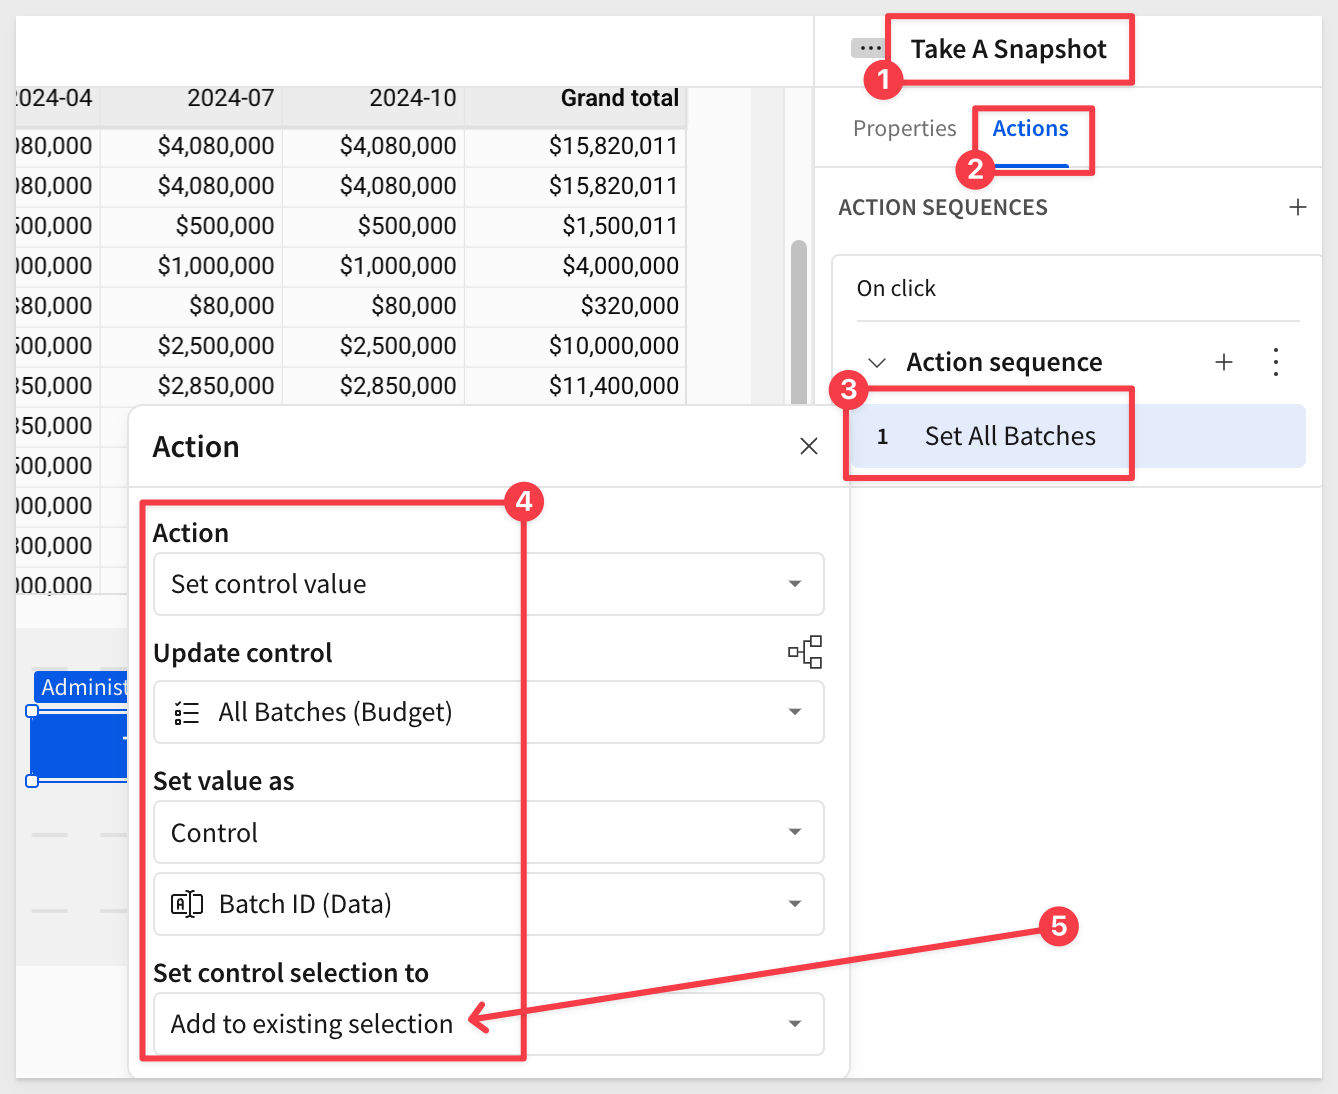
Add a new button to the Budget page and set the label to Take a Snapshot.
Open it's action menu and add a Set control value action configured as shown.
Make sure to set the Set control selection to properly:
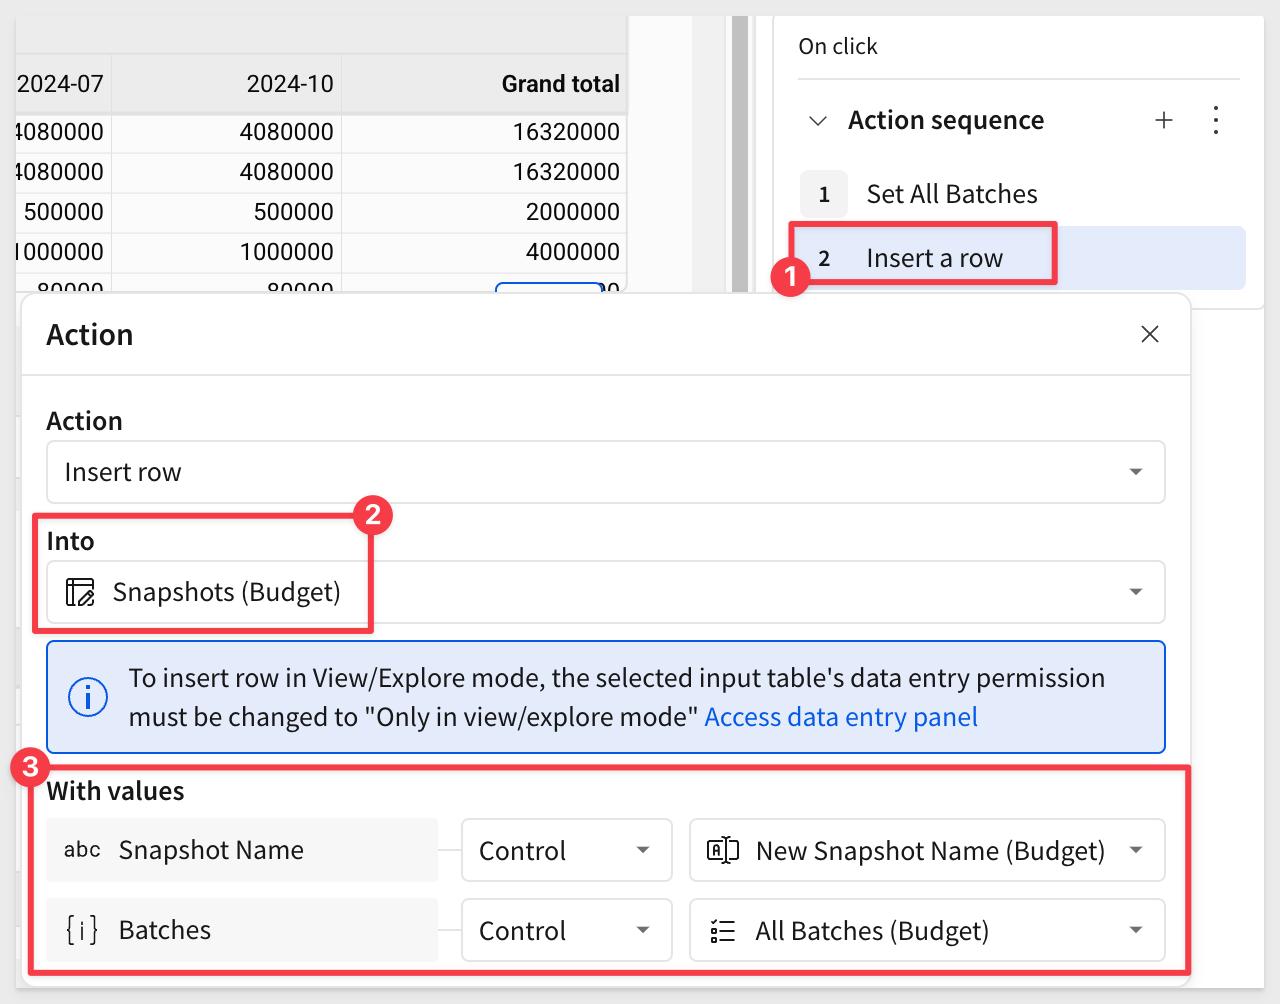
The next action inserts a row into the Snapshot Input table with the control values as shown:
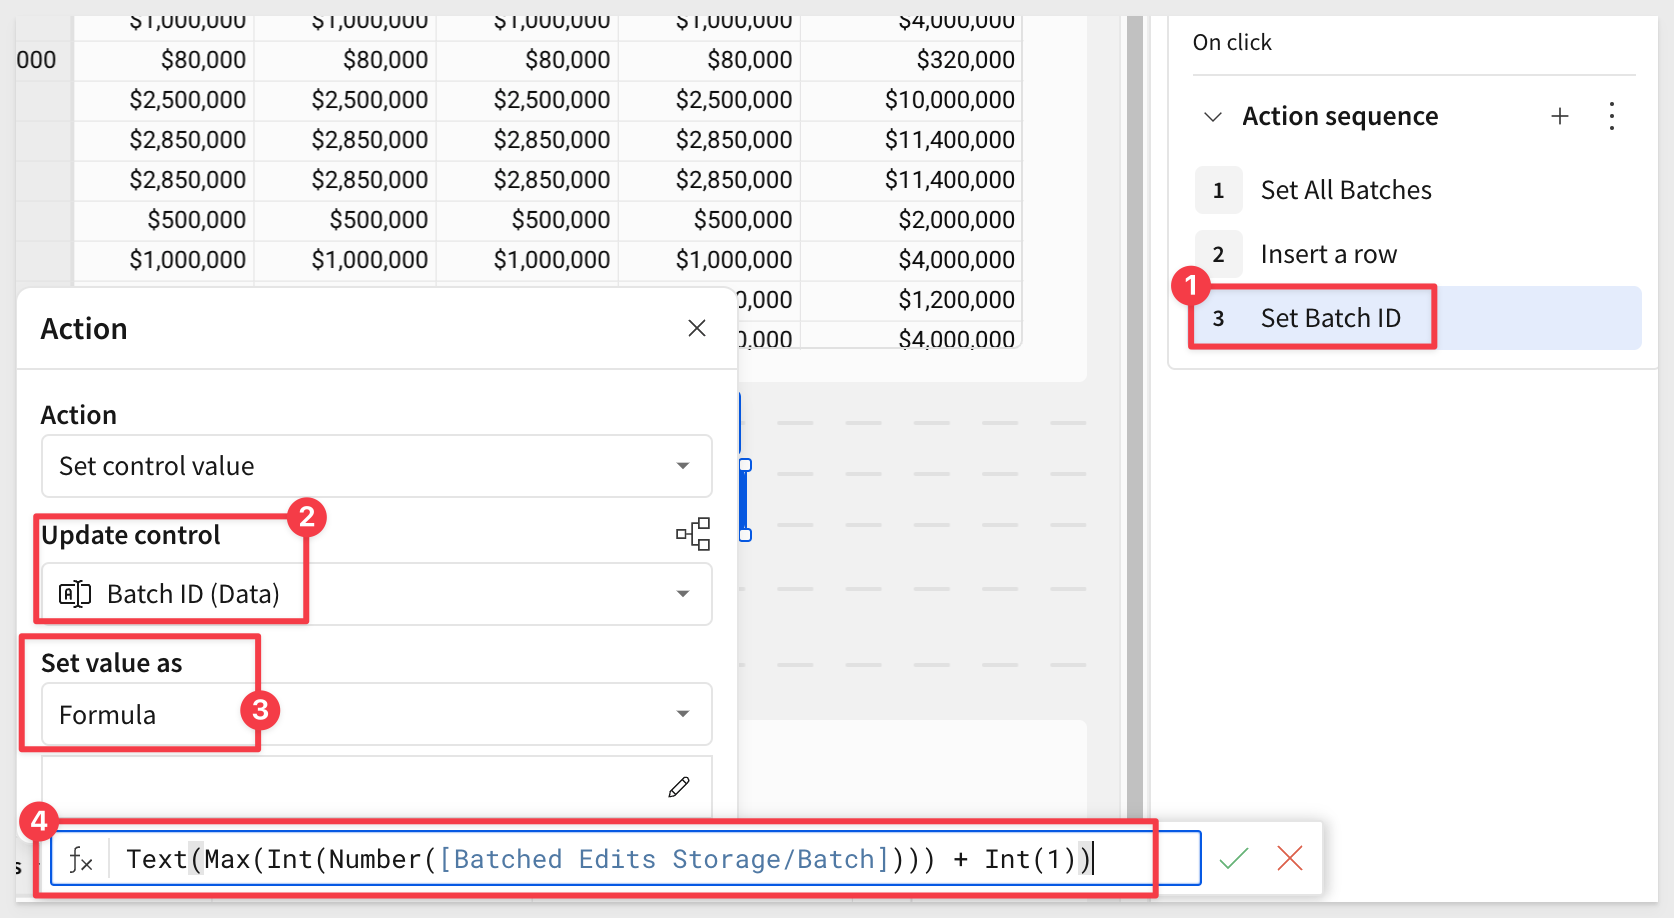
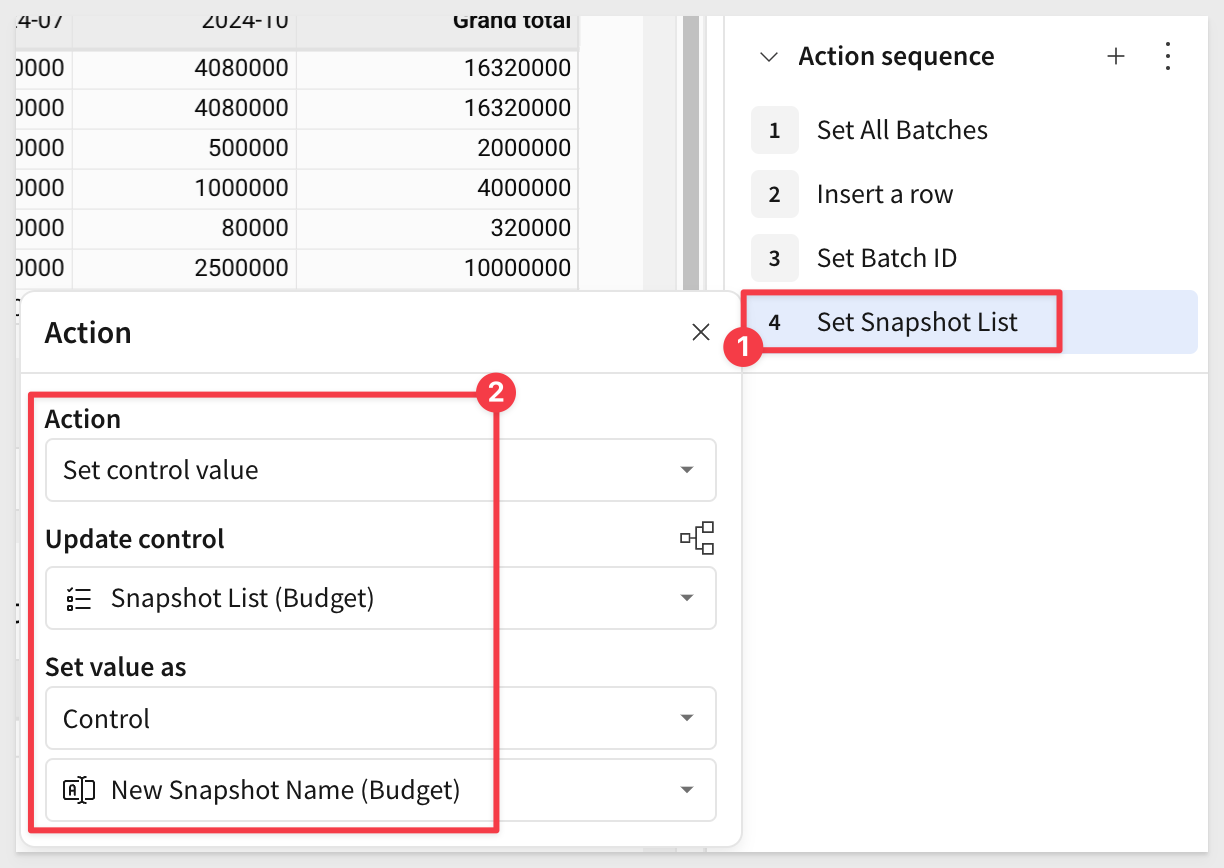
After that, we add another action to update the Batch ID control on the Data page, using this formula to derive the correct value:
Text(Max(Int(Number([Batch Edits Storage/Batch]))) + Int(1))
The last action is to update the New Snapshot Name control:
Click Publish.
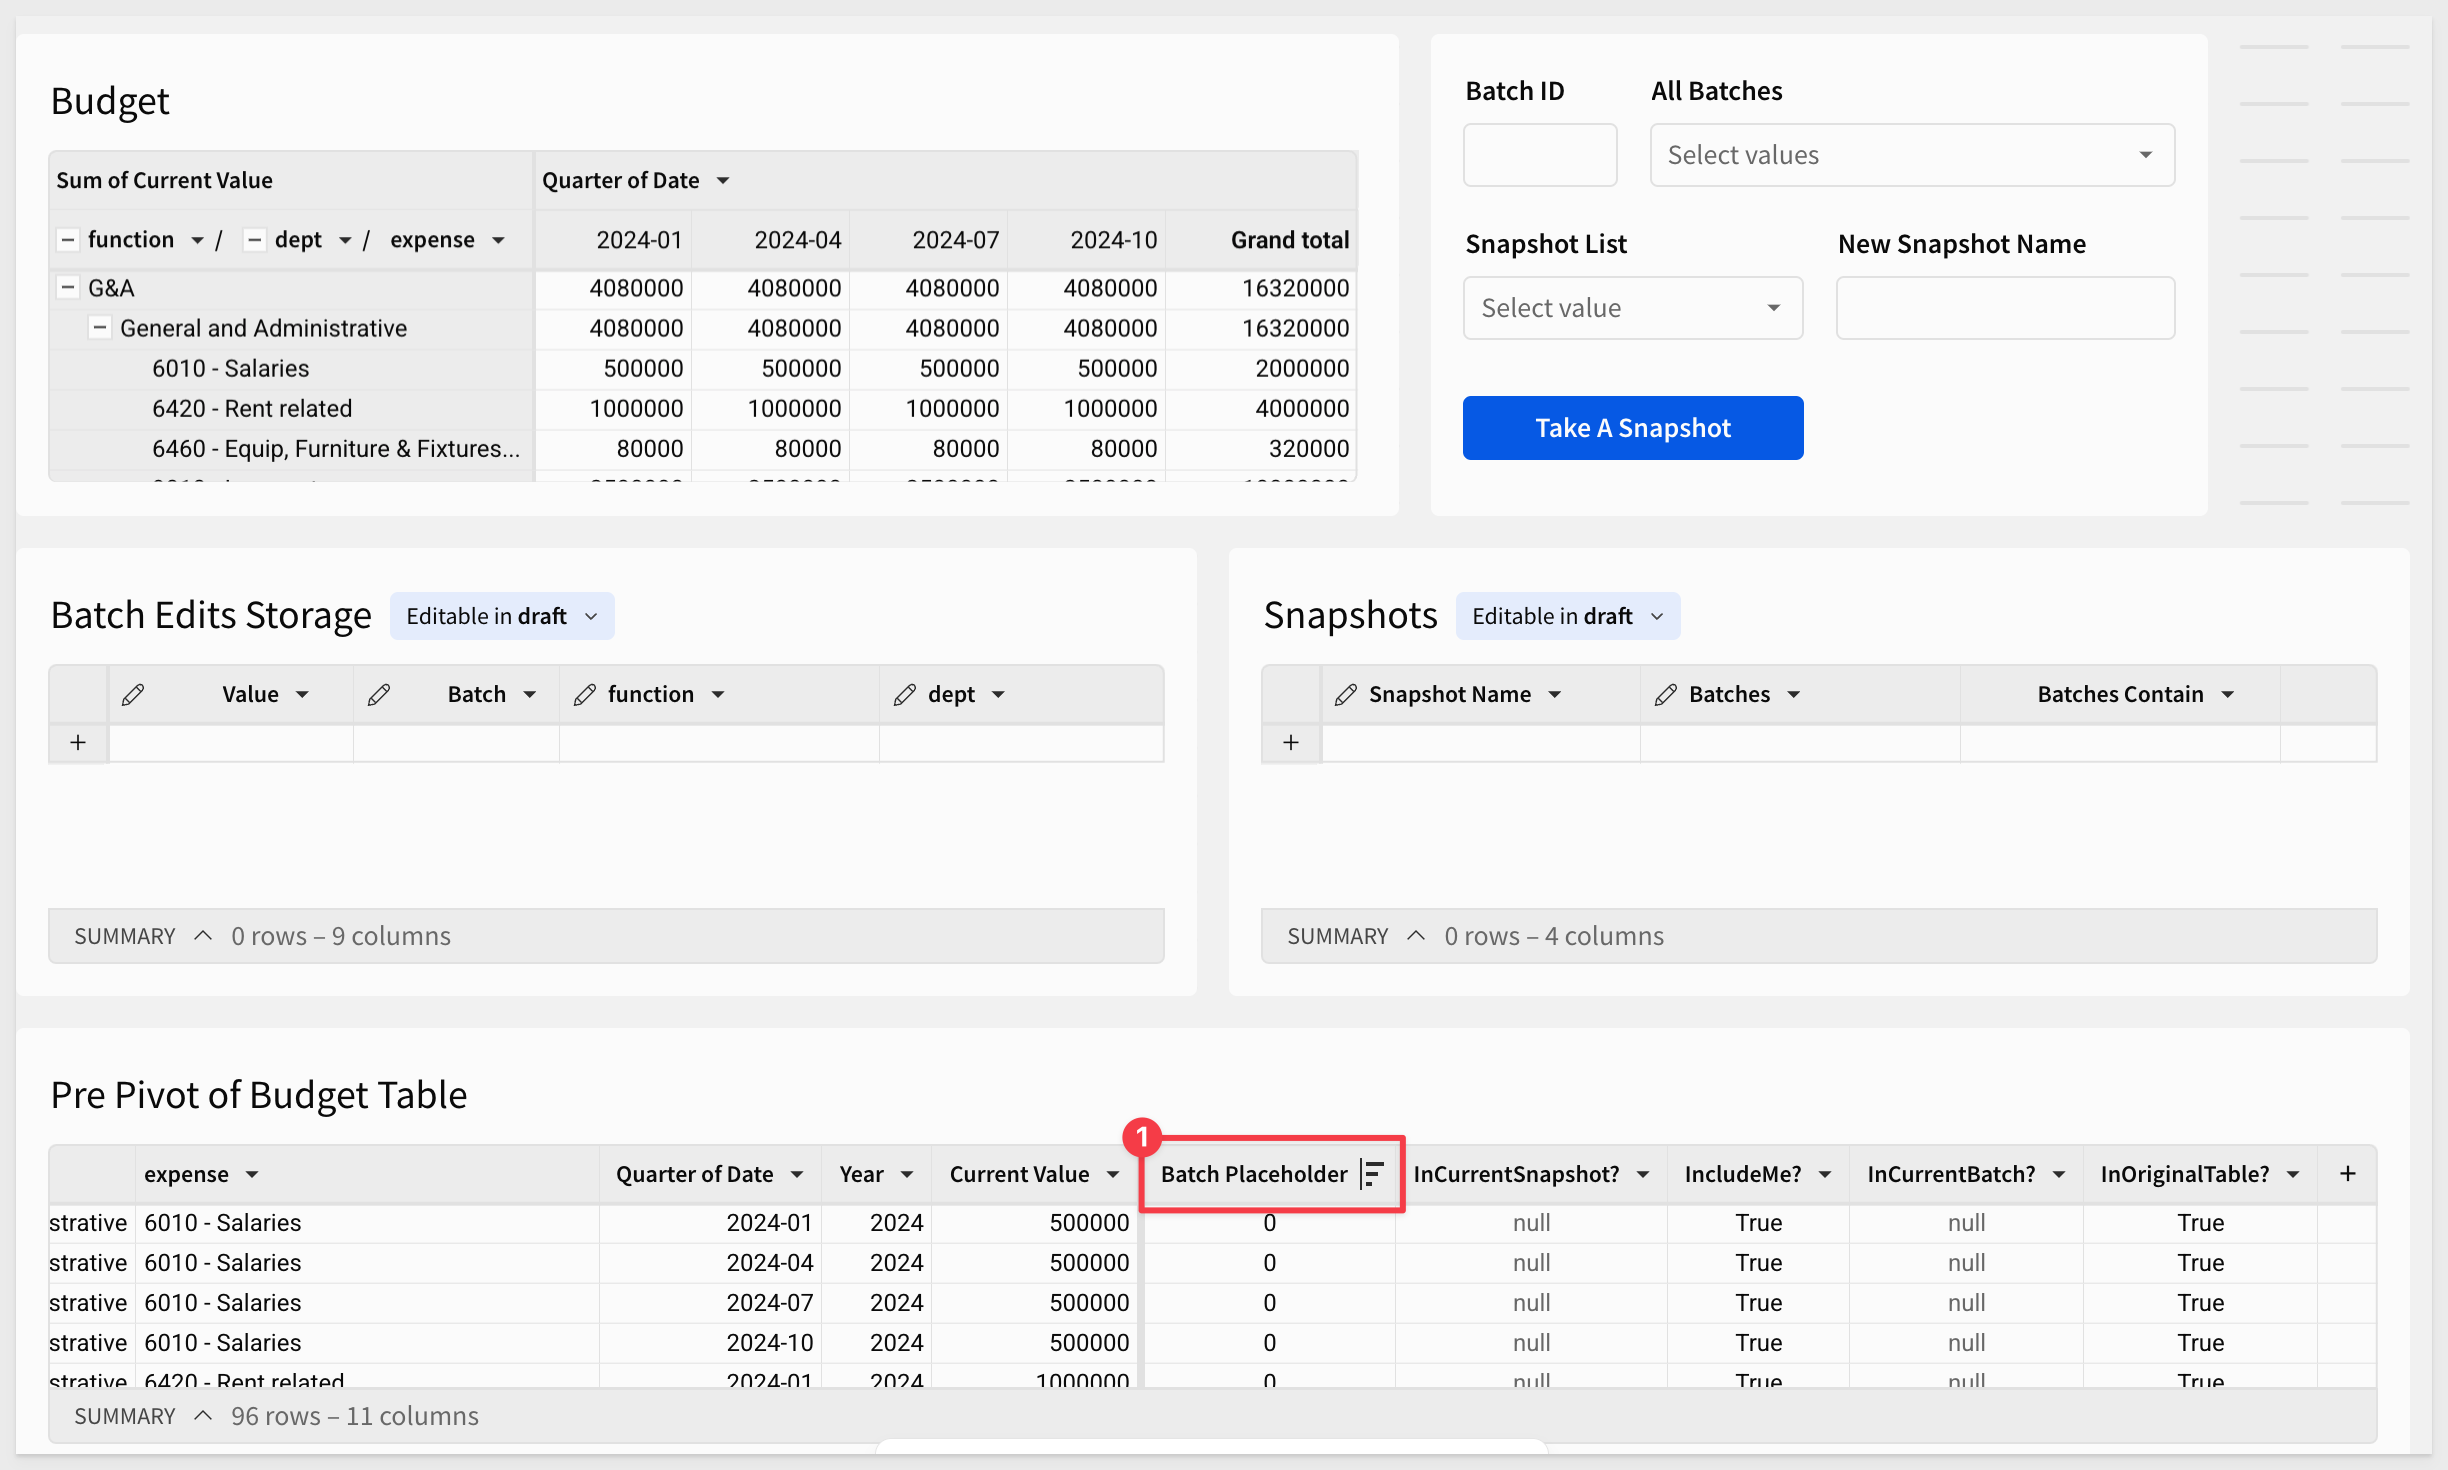
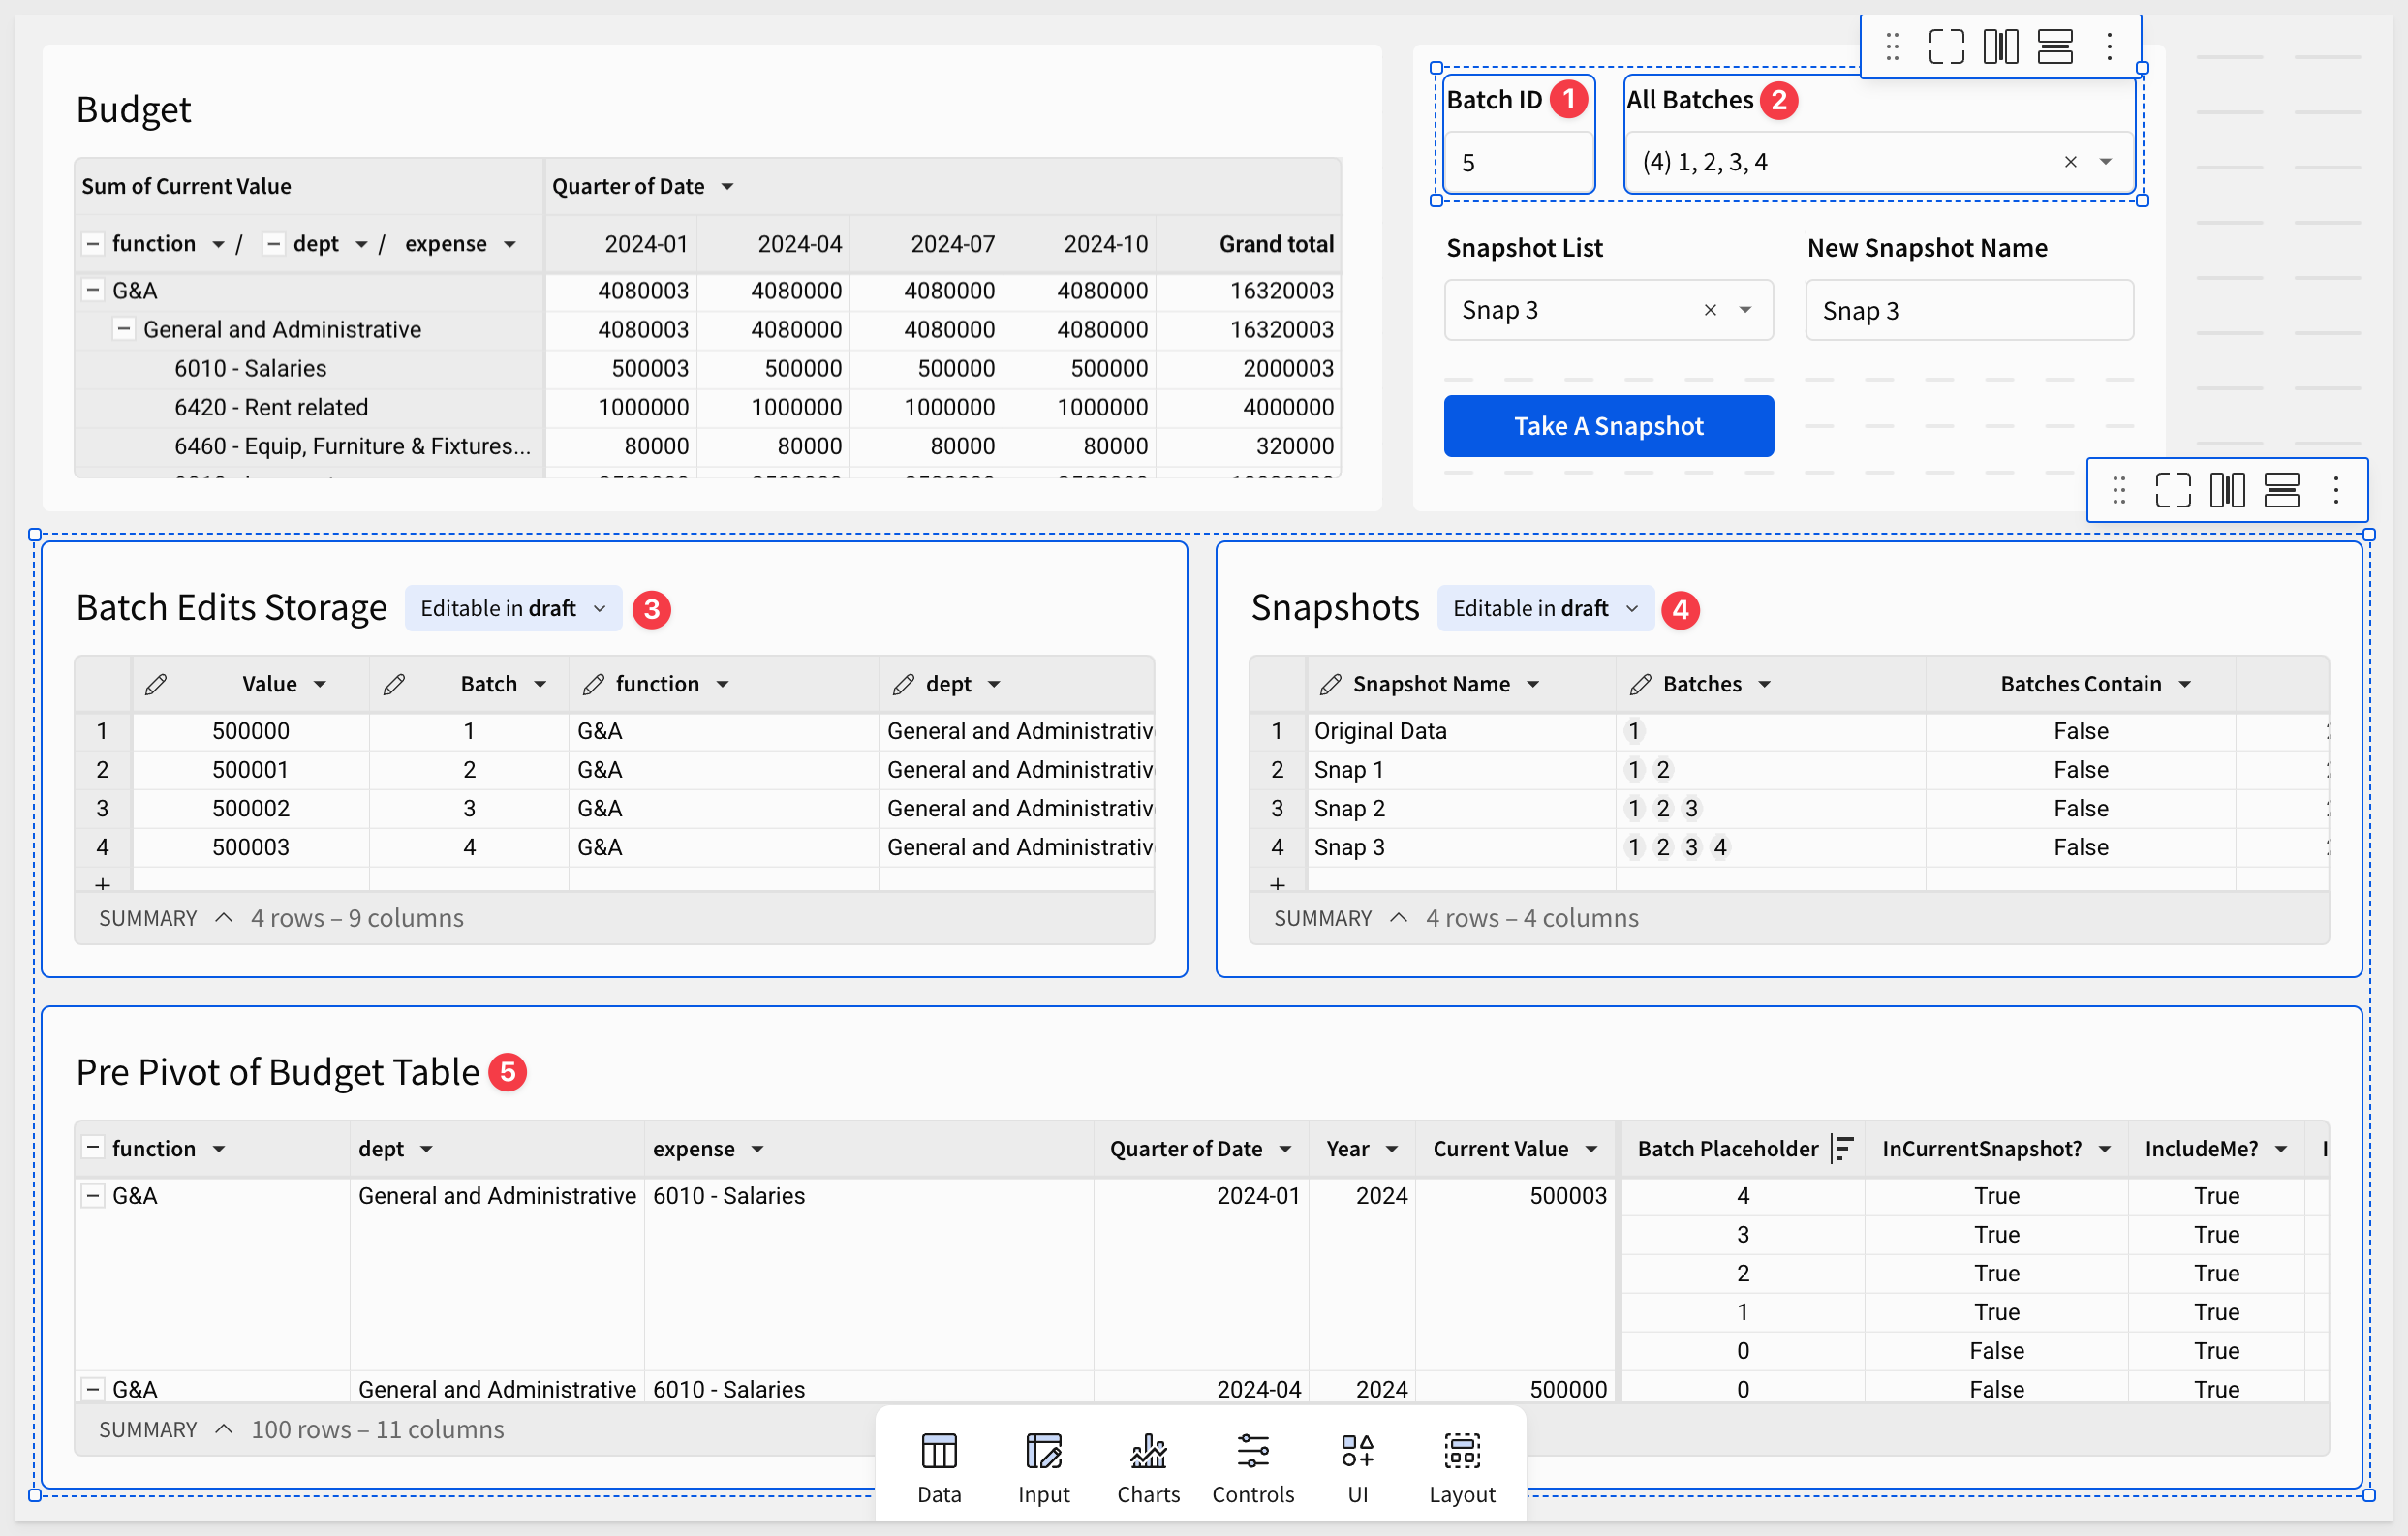
Before we do some testing, let's rearrange the elements on the Budget page so we can observe the changes as the occur.
Here is what our Budget pages is arranged:
Since there is no data in the Batch Edits Storage or Snapshots input table, it might be a good idea to snapshot the original data so that we can revert to it if needed.
We can do this in two steps:
Enter the value 1 in the Batch ID control and press Enter.
Click the value 500000 in the Budget table. We will arbitrarily use this cell for this test:

Make no changes on the Edit the Selected Budget Value and click Save.
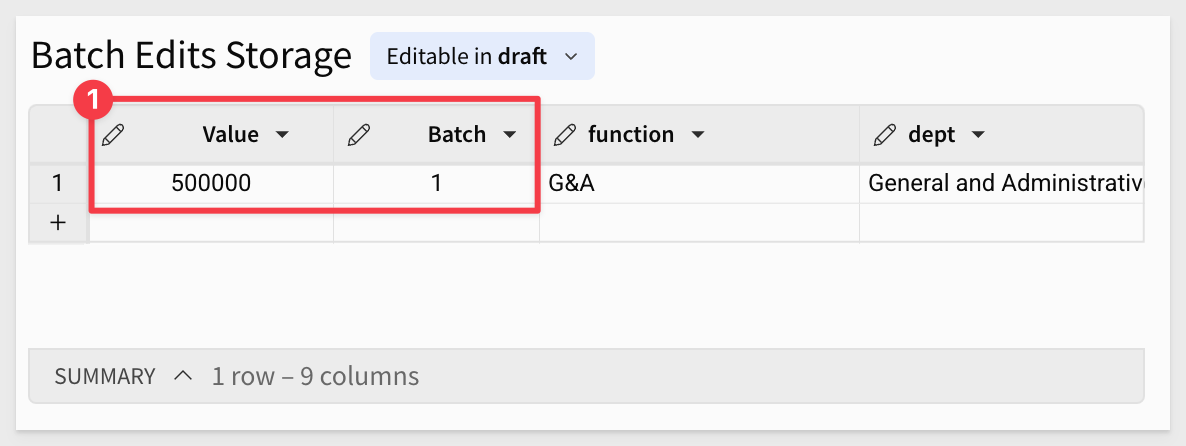
This will place one row in the Batch Edits Storage table, but the data has not changed apart from now having a batch value of 1:
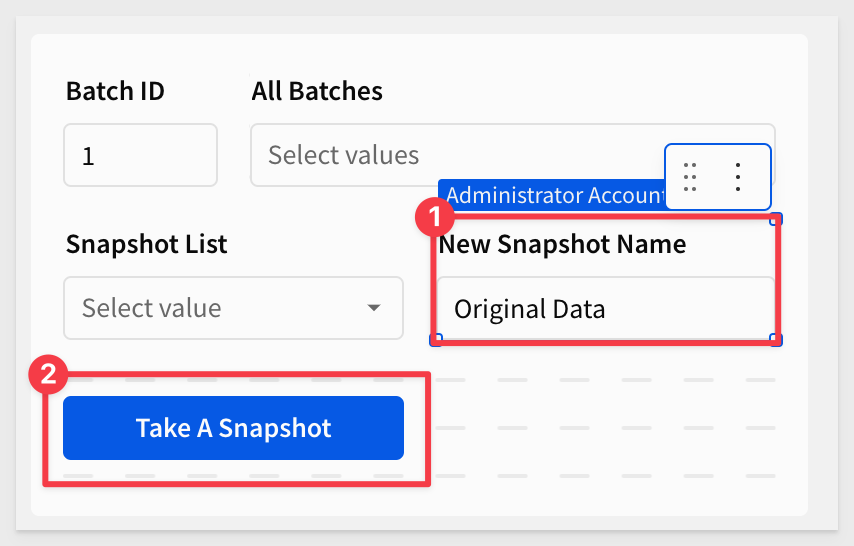
Now enter the text "Original Data" in the New Snapshot Name control and click Take A Snapshot:
A new row is added to the Snapshots table with a Batches value of 1.
The Pre Pivot of Budget Table shows a new row in the grouping with the value of 500000 and a Batch Placeholder of 1.
The Budget table shows the value is still 500000 which is expected as we did not change that value but rather made a snapshot of it as the original value.
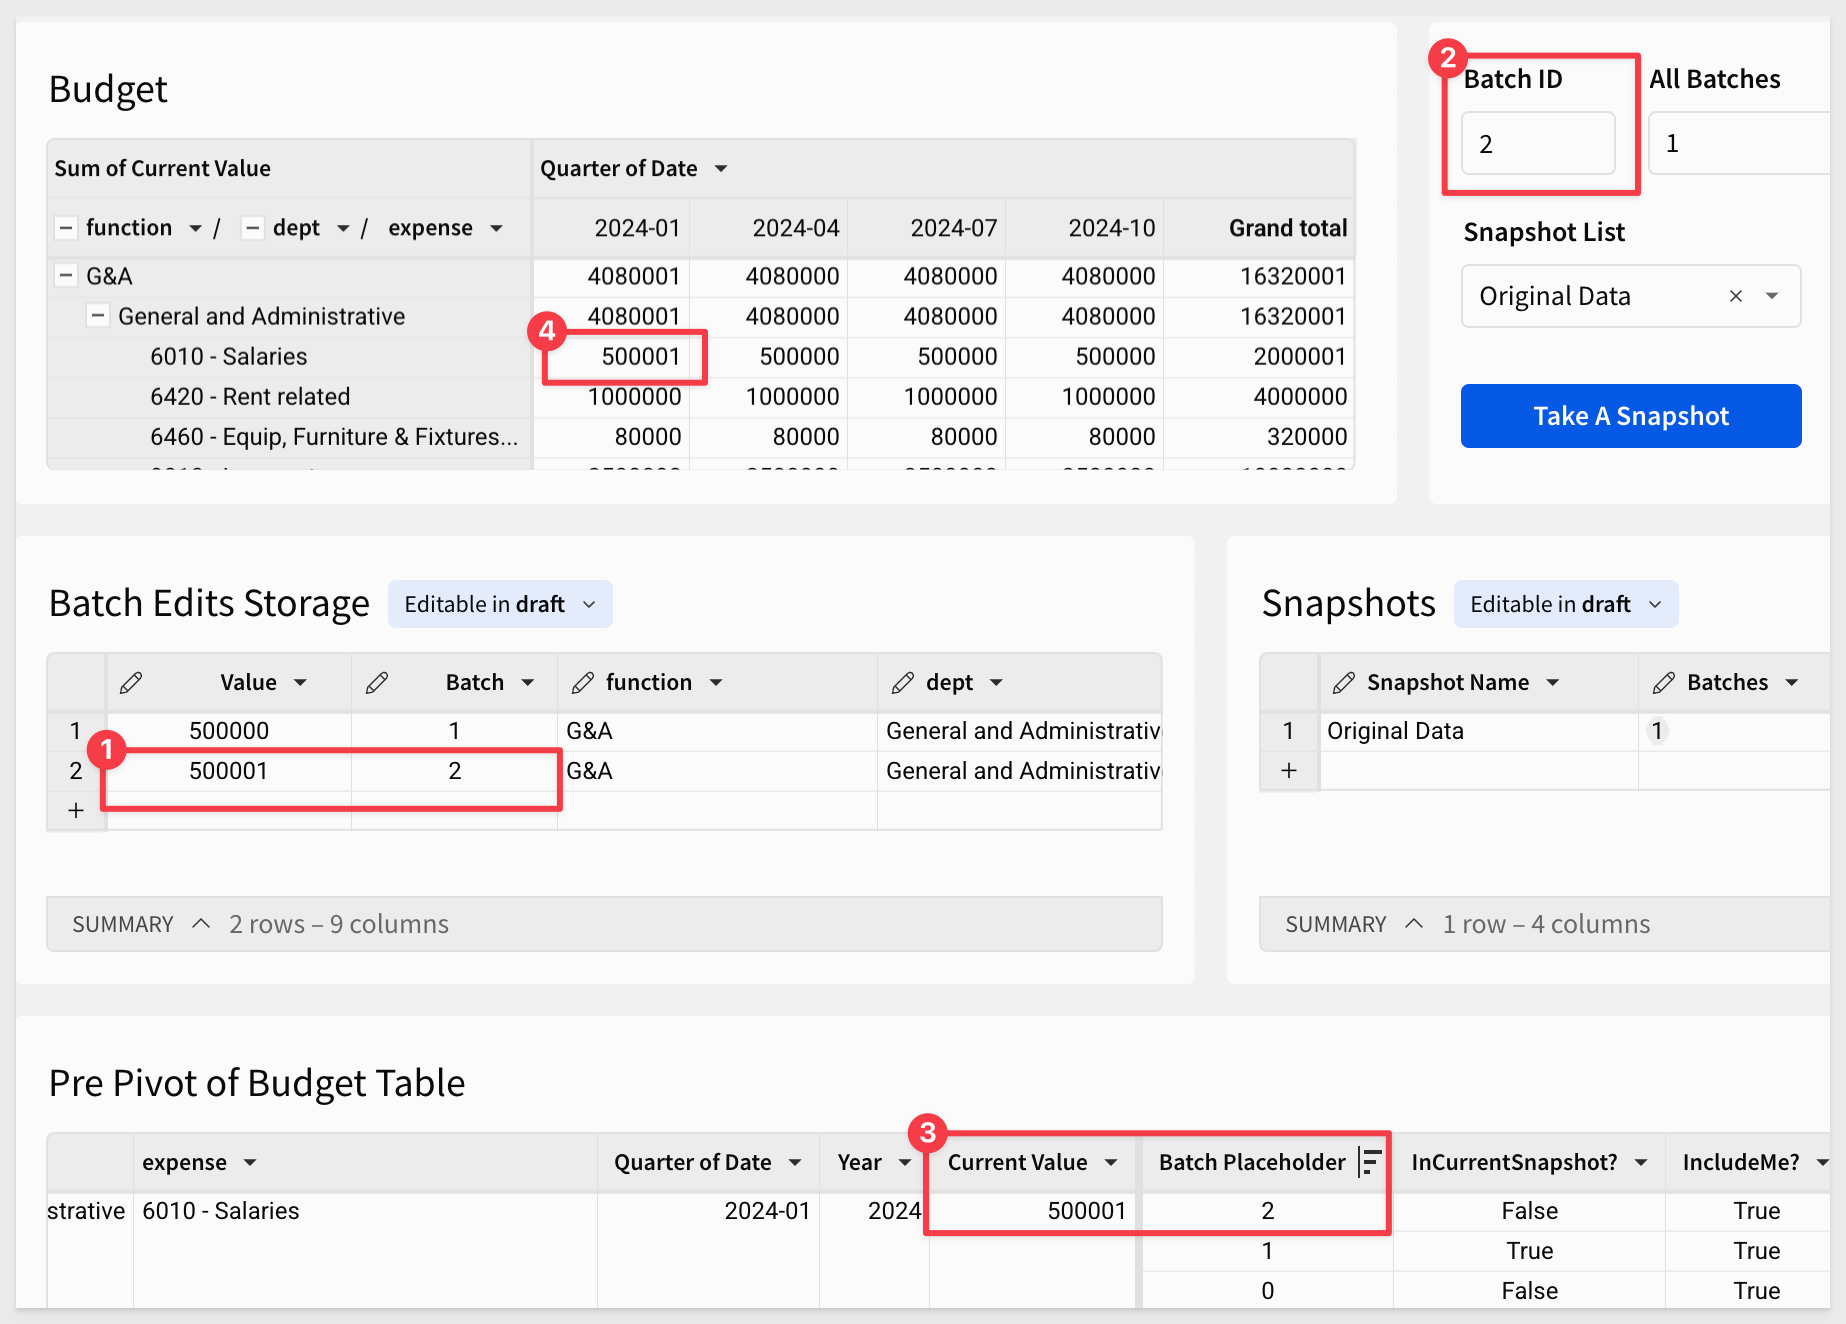
Now click on the Buget table and the same 500000 as before. This time, change the value using the modal to 500001 and click Save:
A few things have happened now.
- A new row was created in
Batch Edits Storagewith revisedValueand incrementedBatch. - The
Batch IDcontrol was incremented to2. - The
Pre Pivot of Budget Tableshows a new row for the grouping, with the newValueand `Batch Placeholder, sorted in the correct order. - The
Budgettable shows the revised value of500001:
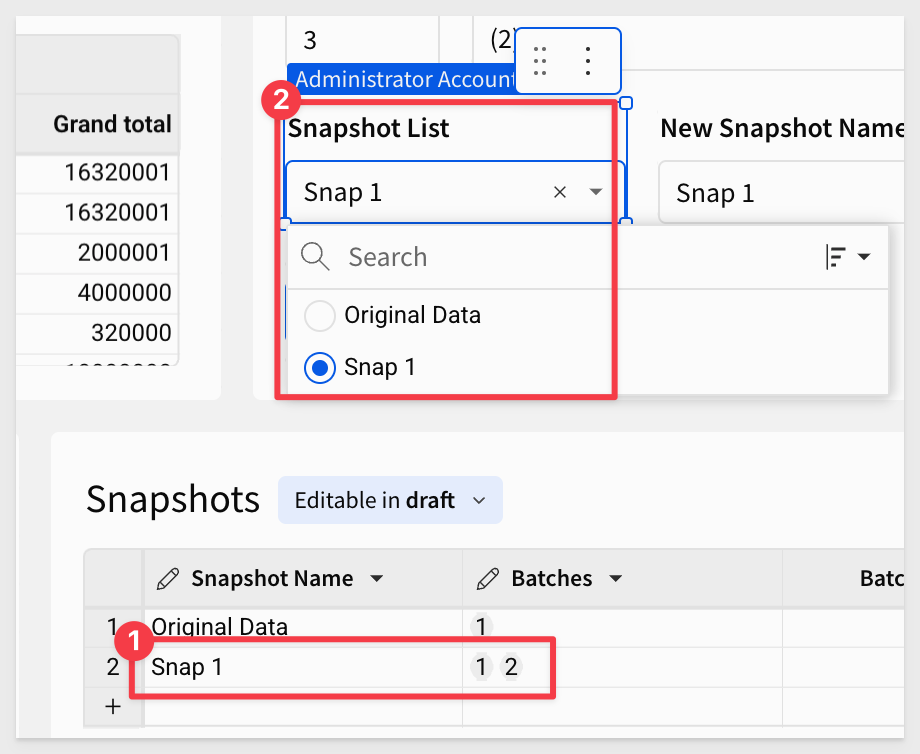
Now change the New Snapshot Name control value to the text Snap 1 and click Take a Snapshot.
The result is a new row in the Snapshots table with the new name and Batches value of batch numbers 1 and 2:
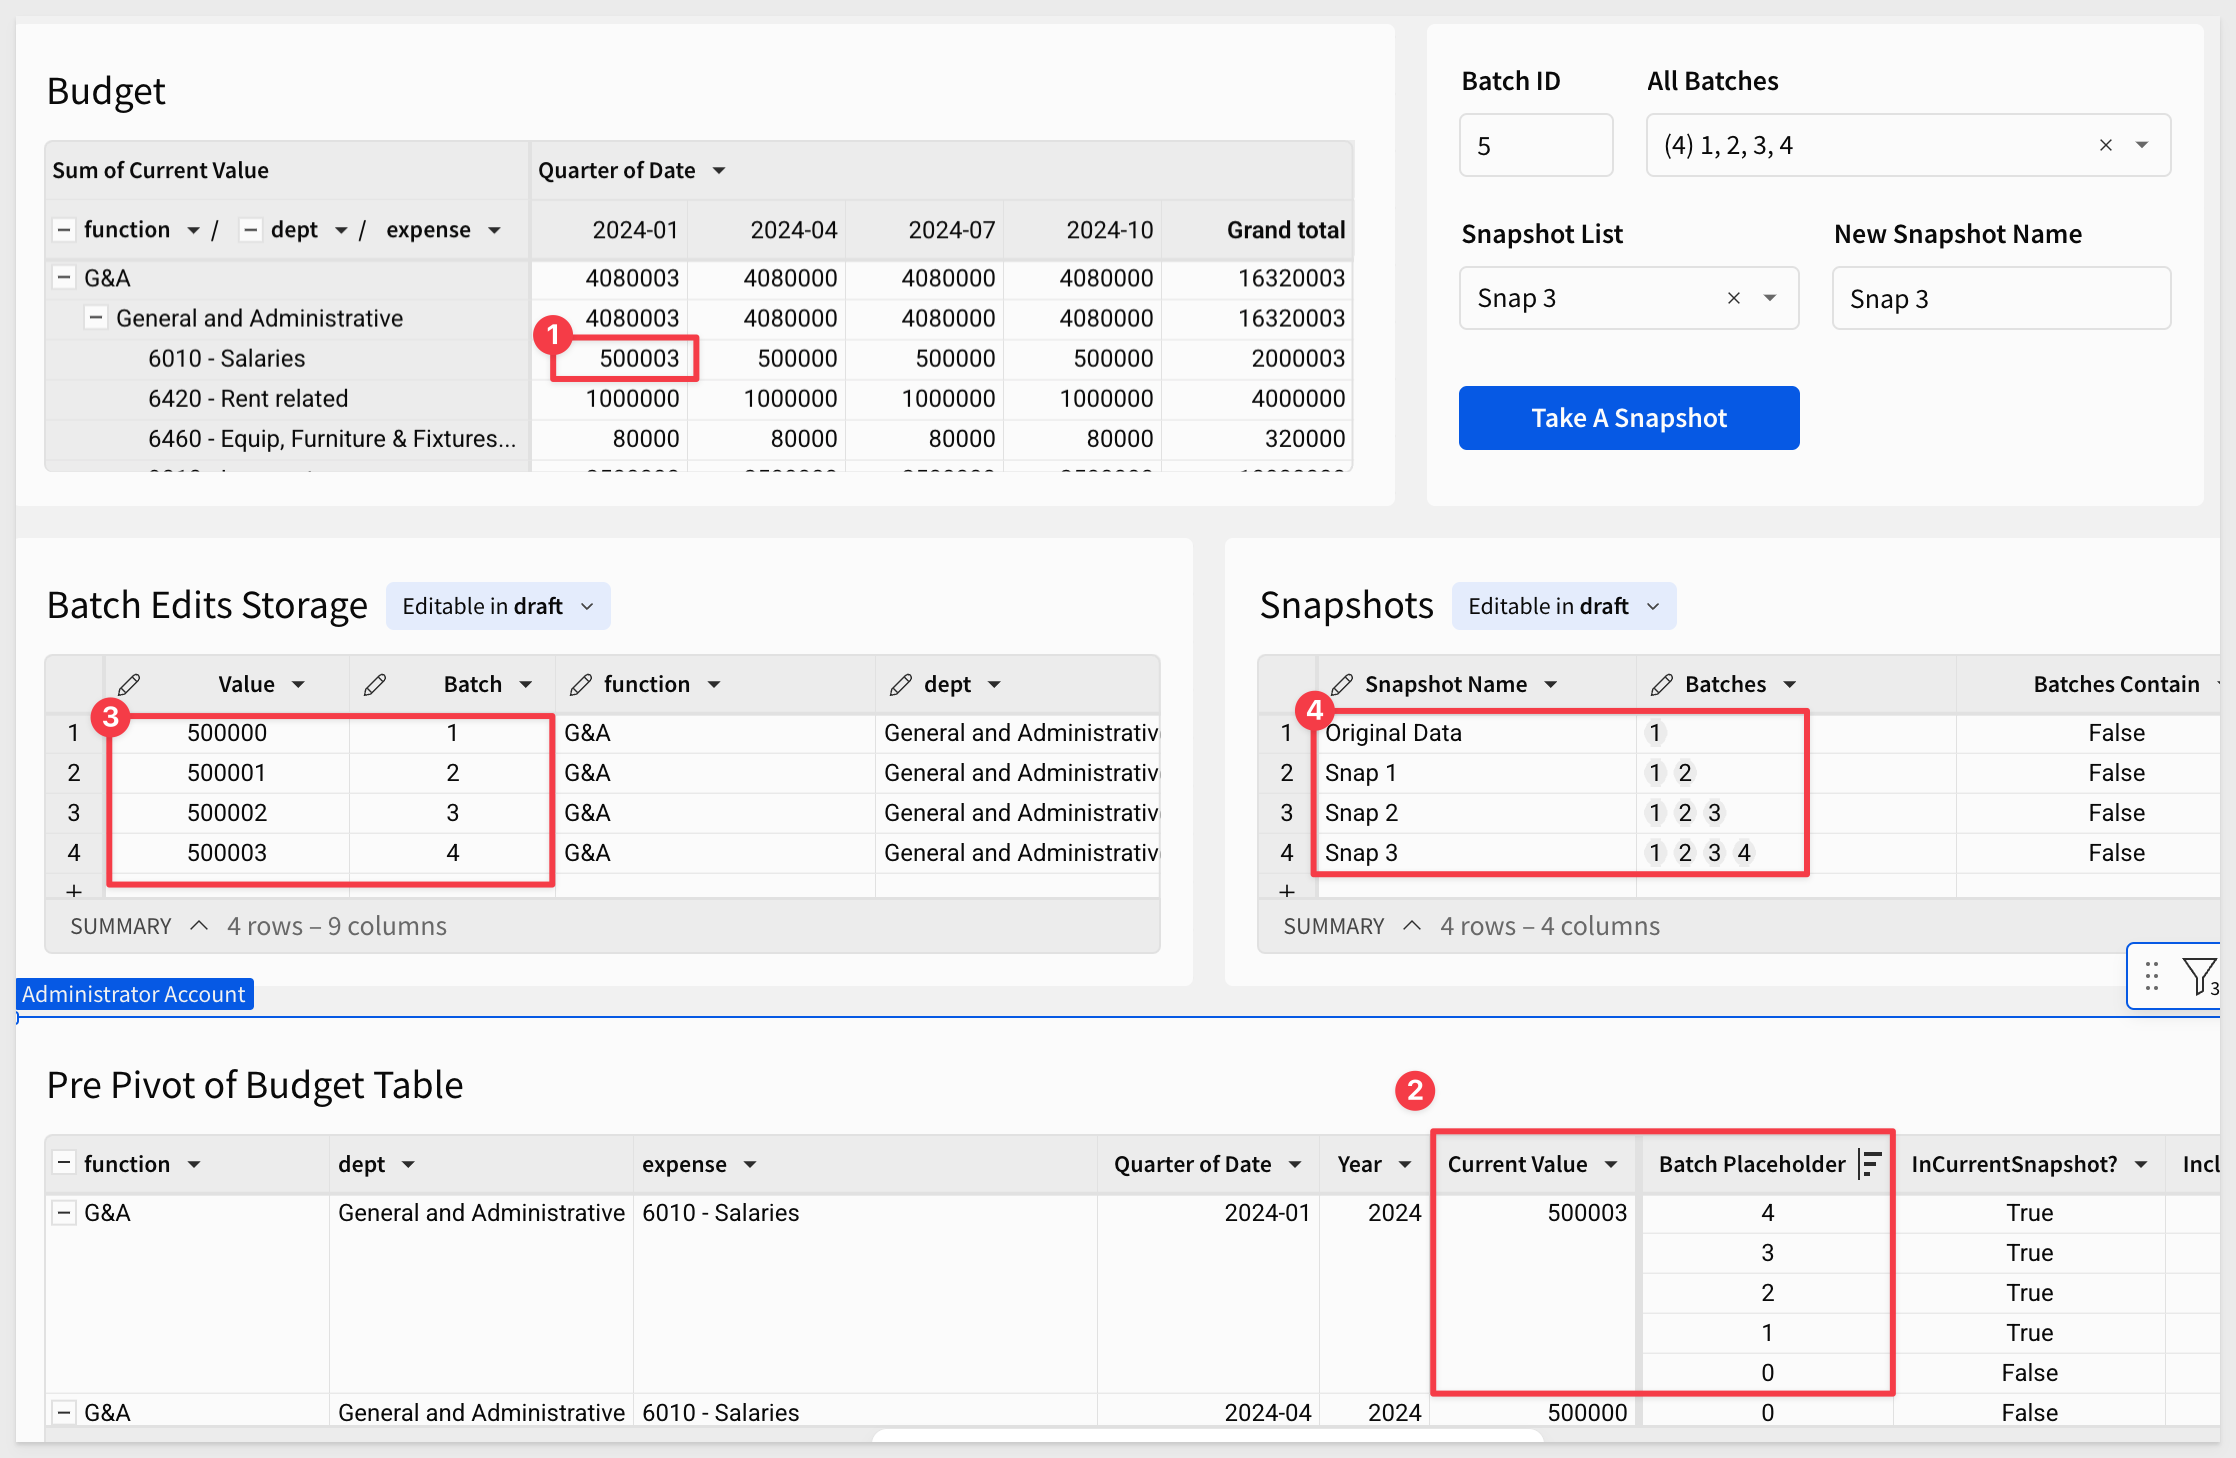
Repeat this process and add two more revisions to the same value, each time incrementing the value by one.
The final result will look like this.
Make a mistake? Just delete all the rows from the Batch Edits Storage and Snapshots input tables and try again.
Looking at old snapshots
There are many elements that are not required for the end user to see, now that we have some snapshots.
Let's move these elements back to the Data page and hide that page too.
Now our Budget page looks like an easy-to-use data app!.
Since we already created some snapshots, just choose the one of interest from the Snapshot List control:

Original data - Alternate method
Another way to get to the original data, that does not require snapshotting, is to simply clear the Snapshot List control using the Show clear button:
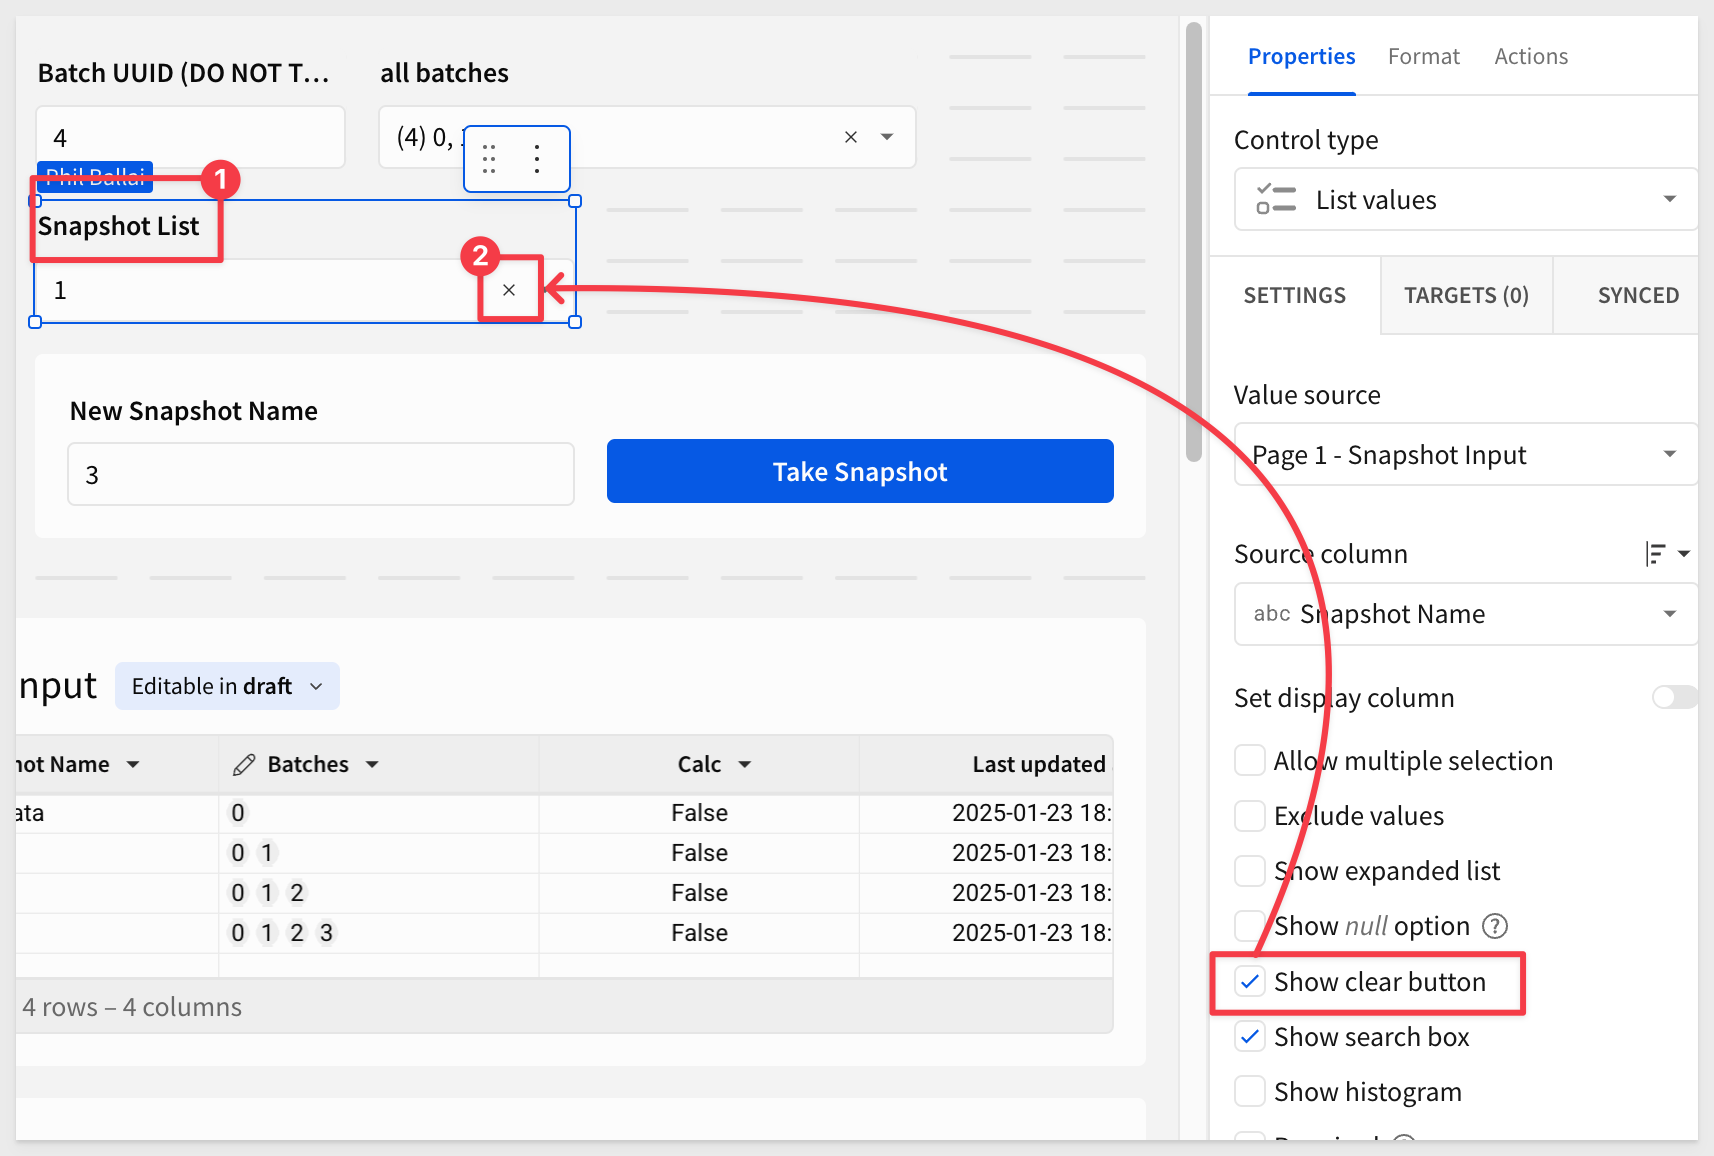
Clicking the x to clear the control will revert the Budget table to its original state.
This is possible because we have a column in the source data called Batch Placeholder, with the value 0 assigned to all rows.
Given how flexible Sigma AI Apps are, there are likely many other ways to accomplish what your specific use case requires.
Snapshotting to the cloud data warehouse, built entirely with Sigma—how awesome is that!
In this QuickStart, we demonstrate how to use Sigma to create, manage, and retrieve snapshots entirely within Sigma's interface. Snapshots are automatically stored in the cloud data warehouse, enabling dynamic tracking and reverting of data states with no external dependencies.
Additional Resource Links
Blog
Community
Help Center
QuickStarts
Be sure to check out all the latest developments at Sigma's First Friday Feature page!