Pivot table spreading refers to the ability to adjust aggregate values in a pivot table and redistribute those changes dynamically across the underlying dataset. This enables users to make targeted adjustments directly in the pivot table interface and have those changes reflected in the source data.
Use Cases in Business Applications
Pivot table spreading has versatile applications across industries, such as:
- Financial Planning & Budgeting:
Adjusting department budgets or quarterly forecasts while redistributing the impact across expense categories or time periods. - Sales & Revenue Management:
Revising monthly sales targets for a region and allocating changes to individual products or sales teams. - Inventory Management:
Correcting total inventory counts for a warehouse and spreading adjustments across SKUs or suppliers. - Marketing Campaign Allocation:
Adjusting the total budget for a campaign and redistributing funds across channels or geographic regions. - Resource Allocation:
Balancing labor hours, machine usage, or other resources within operational constraints.
Potential Advantages
- Granular Control:
Enables detailed adjustments while preserving the integrity of aggregated data. - Actionable Analytics:
Transforms static reports into interactive tools for operational decision-making. - Time Savings:
Eliminates manual recalculations by automating data redistribution. - Transparency:
Logs and tracks changes for auditing or collaboration.
Challenges to Consider
As with all technology implementations, there are a few considerations, some of which are listed below:
- Complex Data Models:
Spreading requires a clear definition of the relationships between aggregate values and underlying rows. - Performance:
Redistributing adjustments across large datasets in real-time can be computationally intensive. - User Training:
Business users may need guidance to understand the methods and implications of their adjustments.
In this QuickStart
Here is a short summary of the workflow that we will create in this QuickStart.
1: User Interaction:
A user selects a cell in a pivot table representing a specific aggregate (e.g., total revenue for a product line in January 2020).
The user selects a specific value to adjust, using one of three methods:
- Adjust: Increment or decrement the total by a specific value.
- Change: Replace the total with a new value.
- Scale: Apply a percentage increase or decrease.
2: Data Redistribution:
- The system identifies the underlying rows contributing to the selected cell's total.
- The adjustment is distributed proportionally or uniformly across those rows, based on the spreading method.
3: Stored Procedure Execution: A Snowflake stored procedure applies the adjustments to the relevant rows in a staging table, ensuring consistency.
4: Real-time Updates: The changes are reflected in the pivot table, along with the previous values, allowing users to see the impact of their adjustments immediately.
4: Logging of Adjustments: As each user records an adjustment, a record of that transaction is written to a log table.
Target Audience
Developers interested in using Sigma to build interactive data applications.
Prerequisites
- A computer with a current browser. It does not matter which browser you want to use.
- Access to your Sigma environment.
- Administrative access to a Snowflake account.
- Some familiarity with Sigma is assumed. Not all steps will be shown as the basics are assumed to be understood.
For more information on Sigma's product release strategy, see Sigma product releases.

In most QuickStarts we are able to use sample data provided to all Sigma customers directly.
However, in this demonstration, it is important that the data we use to drive our work (henceforth known as the BASE_DATA) exists in the Snowflake account you are working in. This ensures that we can execute table operations using a stored procedure, which we will discuss later.
We have provided this data in AWS S3 so that loading it into Snowflake is straightforward.
Loading Base_Table in Snowflake
Log into Snowflake as ACCOUNTADMIN and run the following script. There are inline comments so to explain the operations.
-- Creates the database `SIGMA_QUICKSTARTS` if it does not already exist.
CREATE DATABASE IF NOT EXISTS SIGMA_QUICKSTARTS;

-- Creates the schema `PIVOT_SPREADING` under the `SIGMA_QUICKSTARTS` database if it does not already exist.
CREATE SCHEMA IF NOT EXISTS SIGMA_QUICKSTARTS.PIVOT_SPREADING;

CREATE OR REPLACE TABLE base_table (
    "brand" STRING,              -- Brand of the product.
    "product_family" STRING,     -- Family of the product.
    "product_type" STRING,       -- Type of product (e.g., category).
    "product_line" STRING,       -- Specific product line.
    "product_name" STRING,       -- Name of the product.
    "order_number" STRING,       -- Unique identifier for each order.
    "sku_number" STRING,         -- Identifier for the product or item in the transaction.
    "quantity" INT,              -- Quantity sold or ordered.
    "price" FLOAT,               -- Price of the product.
    "revenue" FLOAT,             -- Revenue generated for the transaction.
    "date" DATE,                  -- Date of the transaction (specific day).
    "row_count" INT
);

-- Creates the table `BASE_TABLE` within the `PIVOT_SPREADING` schema if it does not already exist.
COPY INTO BASE_TABLE
FROM 's3://sigma-quickstarts-main/csv/Base_Table.csv'
FILE_FORMAT = (TYPE = 'CSV' FIELD_OPTIONALLY_ENCLOSED_BY = '"' SKIP_HEADER = 1);

-- Creates the table `SPREAD_UPDATE` within the `PIVOT_SPREADING` schema if it does not already exist.
-- This table will store data such as order information, hierarchical keys, and revenue for adjustments.
CREATE OR REPLACE TABLE SIGMA_QUICKSTARTS.PIVOT_SPREADING.SPREAD_UPDATE (
    "order_number" STRING,
    "date" DATE,
    "sku_number" STRING,
    "revenue" FLOAT,
    "l1_key" STRING,
    "l2_key" STRING,
    "l3_key" STRING
);

-- Populate SPREAD_UPDATE table with deduplicated data
INSERT INTO SIGMA_QUICKSTARTS.PIVOT_SPREADING.SPREAD_UPDATE (
    "order_number",
    "date",
    "sku_number",
    "l1_key",
    "l2_key",
    "l3_key",
    "revenue"
)
SELECT
    "order_number",
    "date",
    "sku_number",
    MD5("product_type" || TO_CHAR("date", 'YYYY-MM-DD HH24:MI:SS')) AS "l1_key",
    MD5("product_type" || "product_family" || TO_CHAR("date", 'YYYY-MM-DD HH24:MI:SS')) AS "l2_key",
    MD5("product_type" || "product_family" || "product_line" || TO_CHAR("date", 'YYYY-MM-DD HH24:MI:SS')) AS "l3_key",
    "revenue"
FROM
    SIGMA_QUICKSTARTS.PIVOT_SPREADING.base_table;

-- Creates the table `SQL_LOG` within the `PIVOT_SPREADING` schema if it does not already exist.
-- This table will hold a record of changes and can aid troubleshooting.
create or replace TABLE SIGMA_QUICKSTARTS.PIVOT_SPREADING.SQL_LOG (
	UUID VARCHAR(16777216),
	SQL_TEXT VARCHAR(16777216),
	SQL_TS TIMESTAMP_NTZ(9),
	LOG_DATA VARCHAR
);

-- Retrieves and displays all rows from the `SPREAD_UPDATE` table for verification.
Select * From BASE_TABLE;
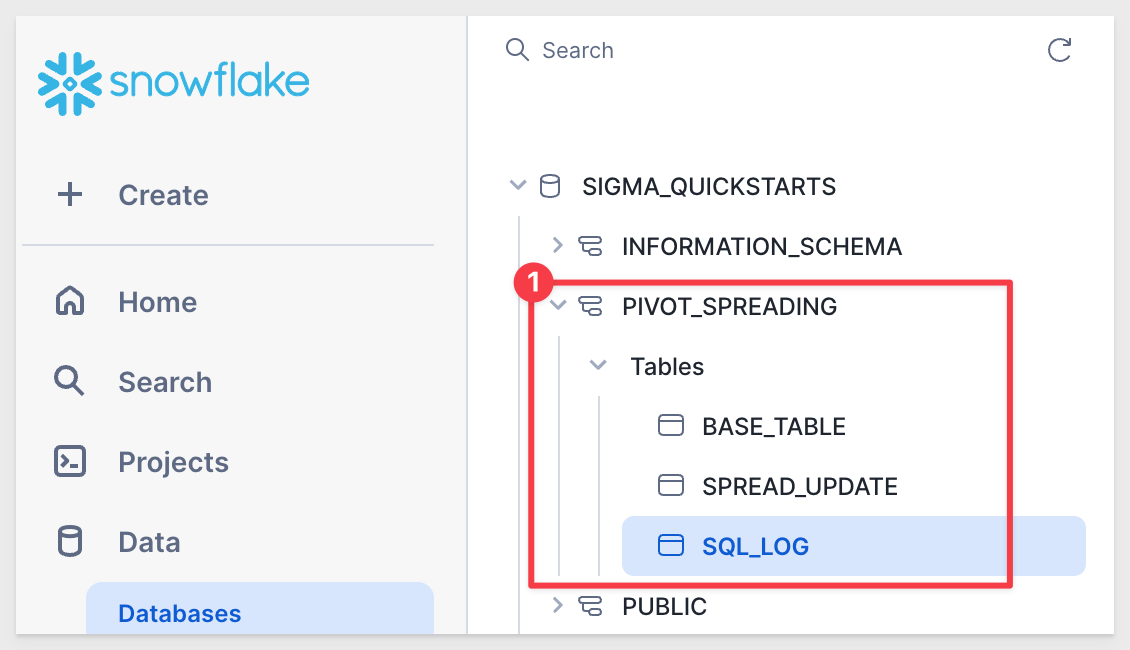
Upon successful completion, three new tables are created. The Base_Table and Spread_Update have data, but SQL_LOG is empty.
Base_Table in Sigma
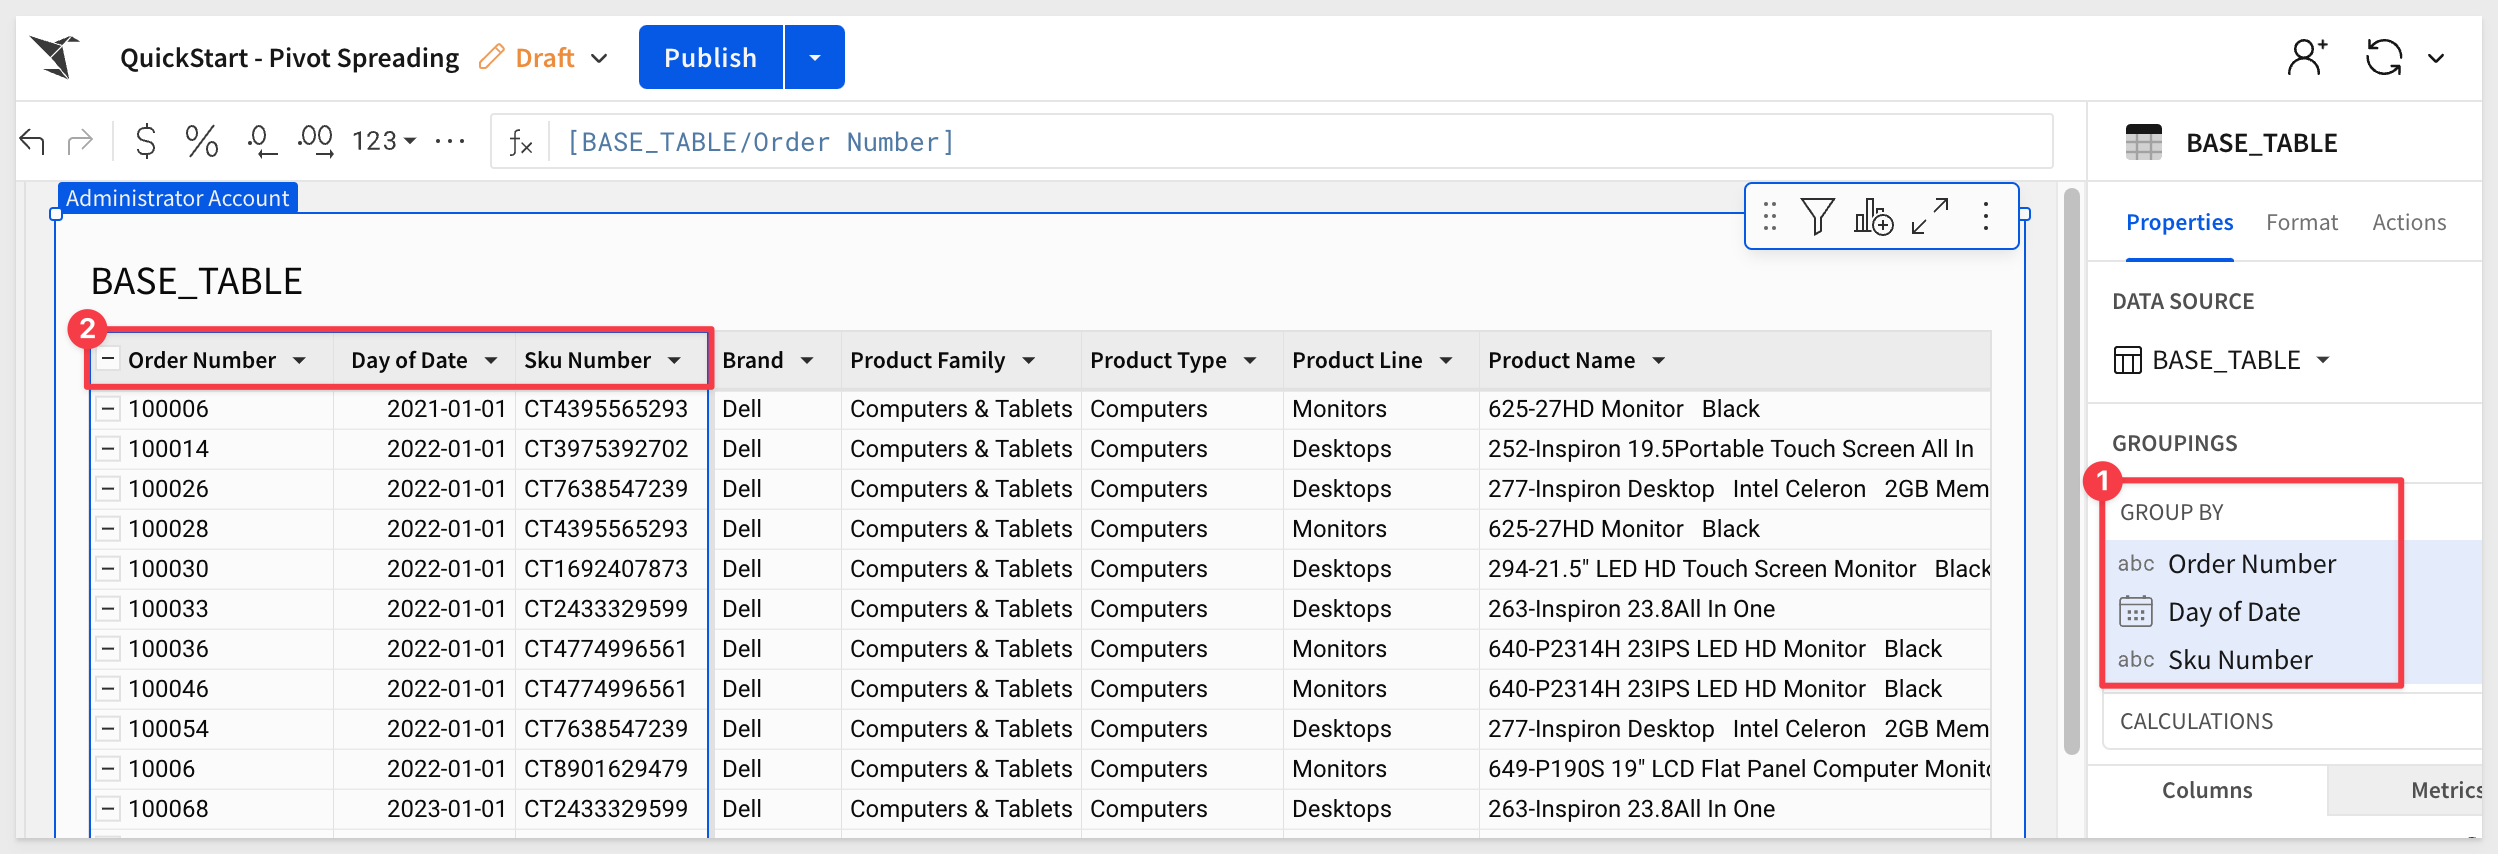
In Sigma, create a new workbook and add a new table to a page, using the Base_Table from the SIGMA_QUICKSTARTS database and the PIVOT_SPREADING schema.
Rename the page to Data:

Group the table as shown in the screenshot below:
Set the Price and Revenue columns to currency
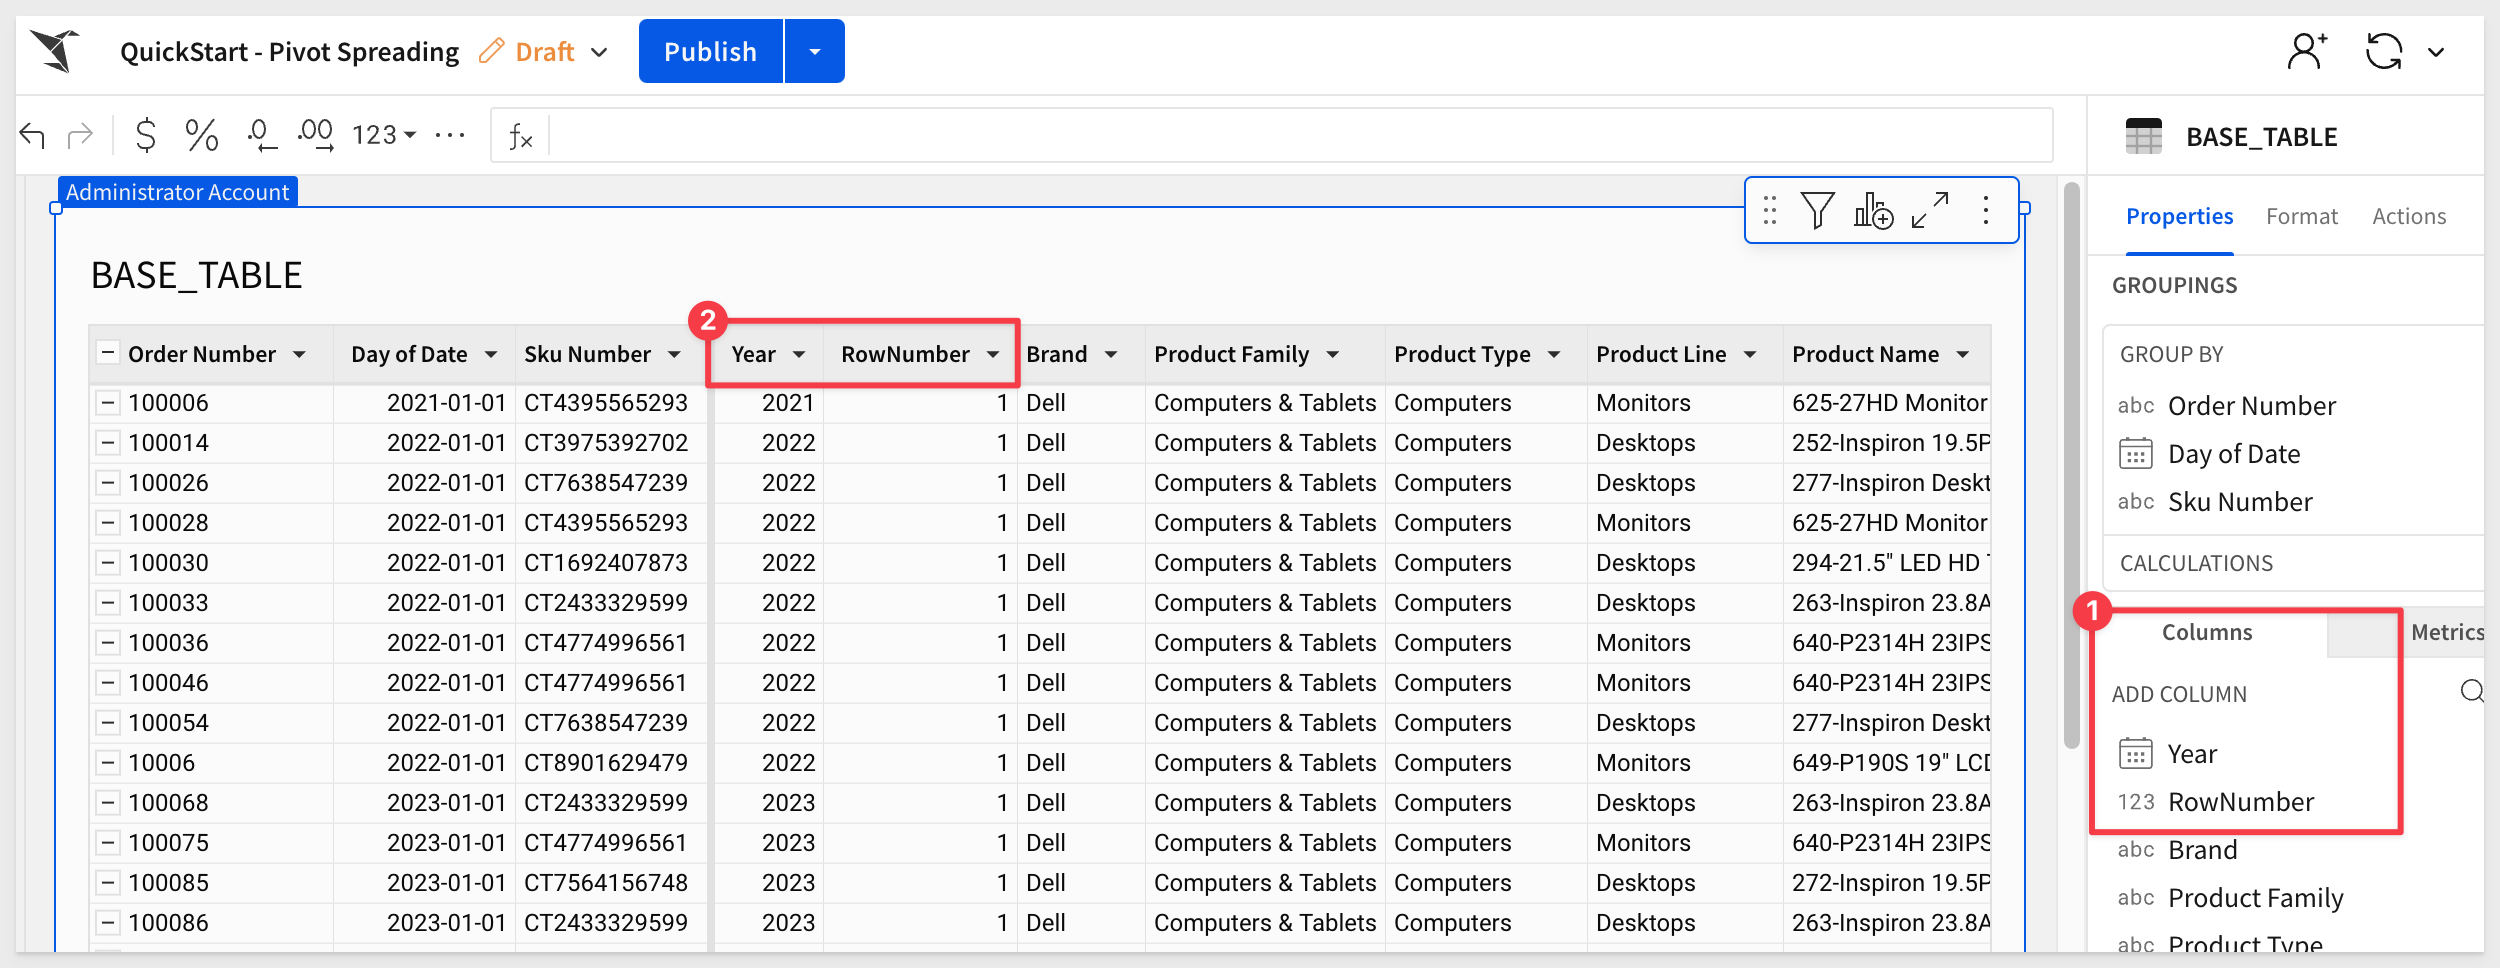
Add a new column and set it's formula to:
DateTrunc("year", [Date])
Rename the column to Year.
Add a new column and set it's formula to:
RowNumber()
Add three more columns after the RowNumber column, rename and apply the following formula to each one:
Column Name:    Formula:
l1_key	        MD5([Product Type] & Text([Year]))
l2_key	        MD5([Product Type] & [Product Family] & Text([Year]))
l3_key	        MD5([Product Type] & [Product Family] & [Product Line] & Text([Year]))

These three columns each is a hashed representation of a combination of product attributes and the year. Hashing (MD5) ensures that the keys are compact, unique, and suitable for efficient lookups.
These keys represent different levels of granularity in the data:
- l1_key: Represents the highest level, combining Product Type and Year.
- l2_key: Adds Product Family to provide more specificity within the same Product Type and Year.
- l3_key: Adds Product Line for the most detailed level, capturing Product Type, Product Family, Product Line, and Year.
This allows the stored procedure to apply changes only to rows associated with the selected grouping.
We will use these later in a store procedure to determine how we make spreading adjustments.
Click Publish.
Add a new page and rename it to Pivot.
Add a new pivot table to the page and set it's source to the BASE_TABLE table on the Data page.
Configure the pivot as shown in the screenshot below:
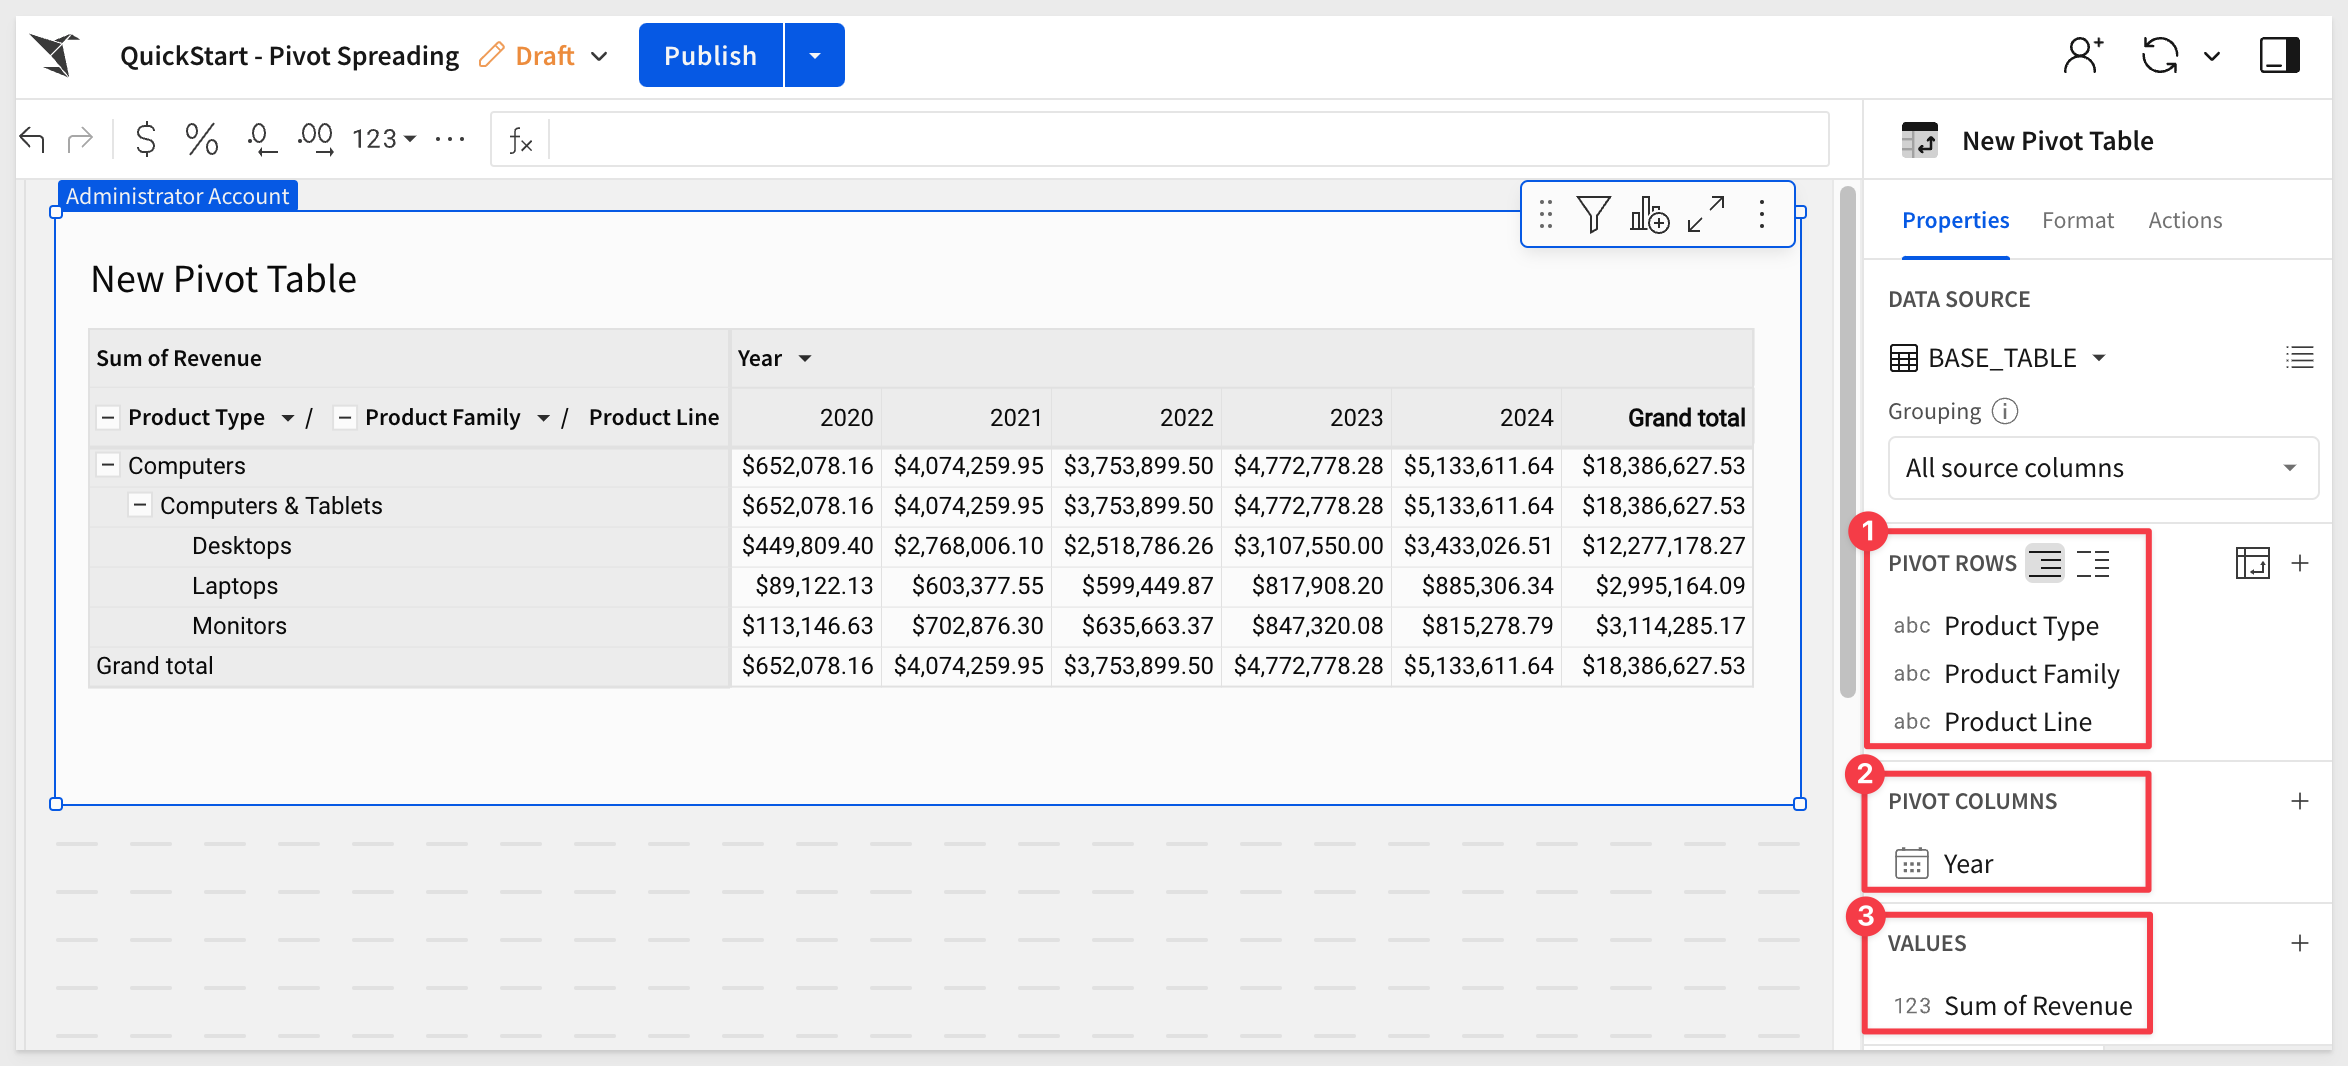
Rename the pivot table to Revenue Planning.
Our pivot is done for the moment. We need to prepare additional data in Snowflake to support spreading operations.
In order to make this work, we will use another table that we have arbitrarily named Spread_Update. You may have noticed this table was created when we ran the Snowflake script to load the BASE_TABLE data from S3.
Add to Sigma page
Add it to the Pivot page under the Revenue Planning table:
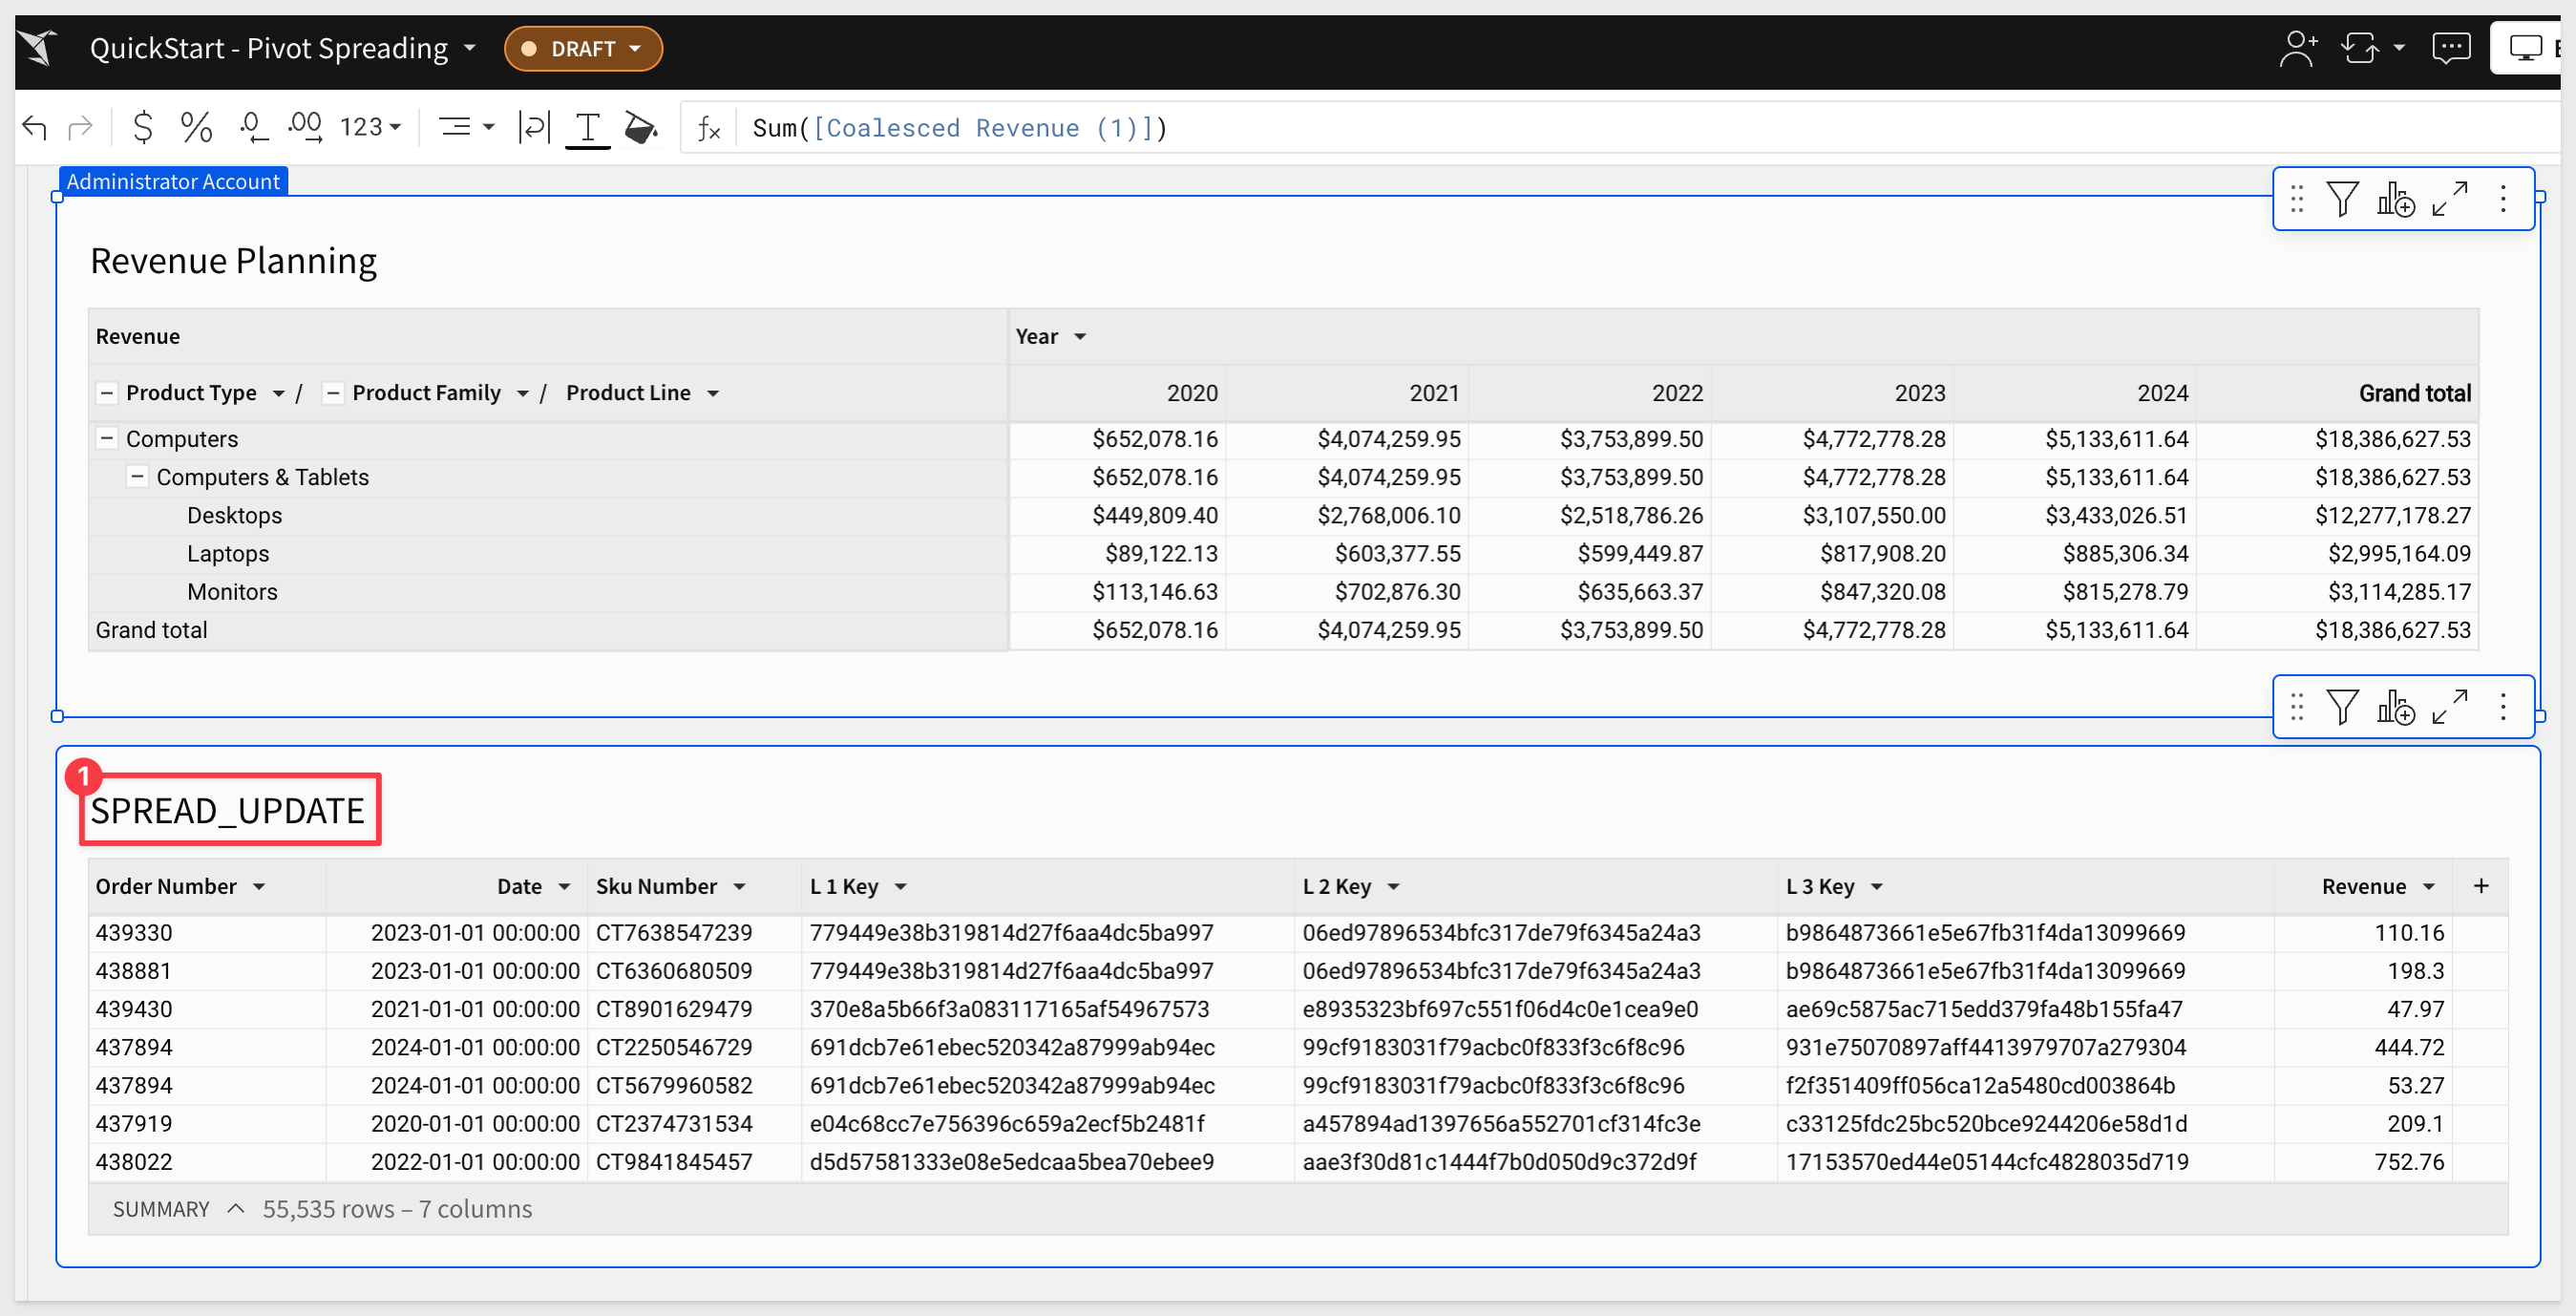
With this table added to the workbook, we can now reference it's columns in the Revenue Planning table.
Add more columns to Revenue Planning
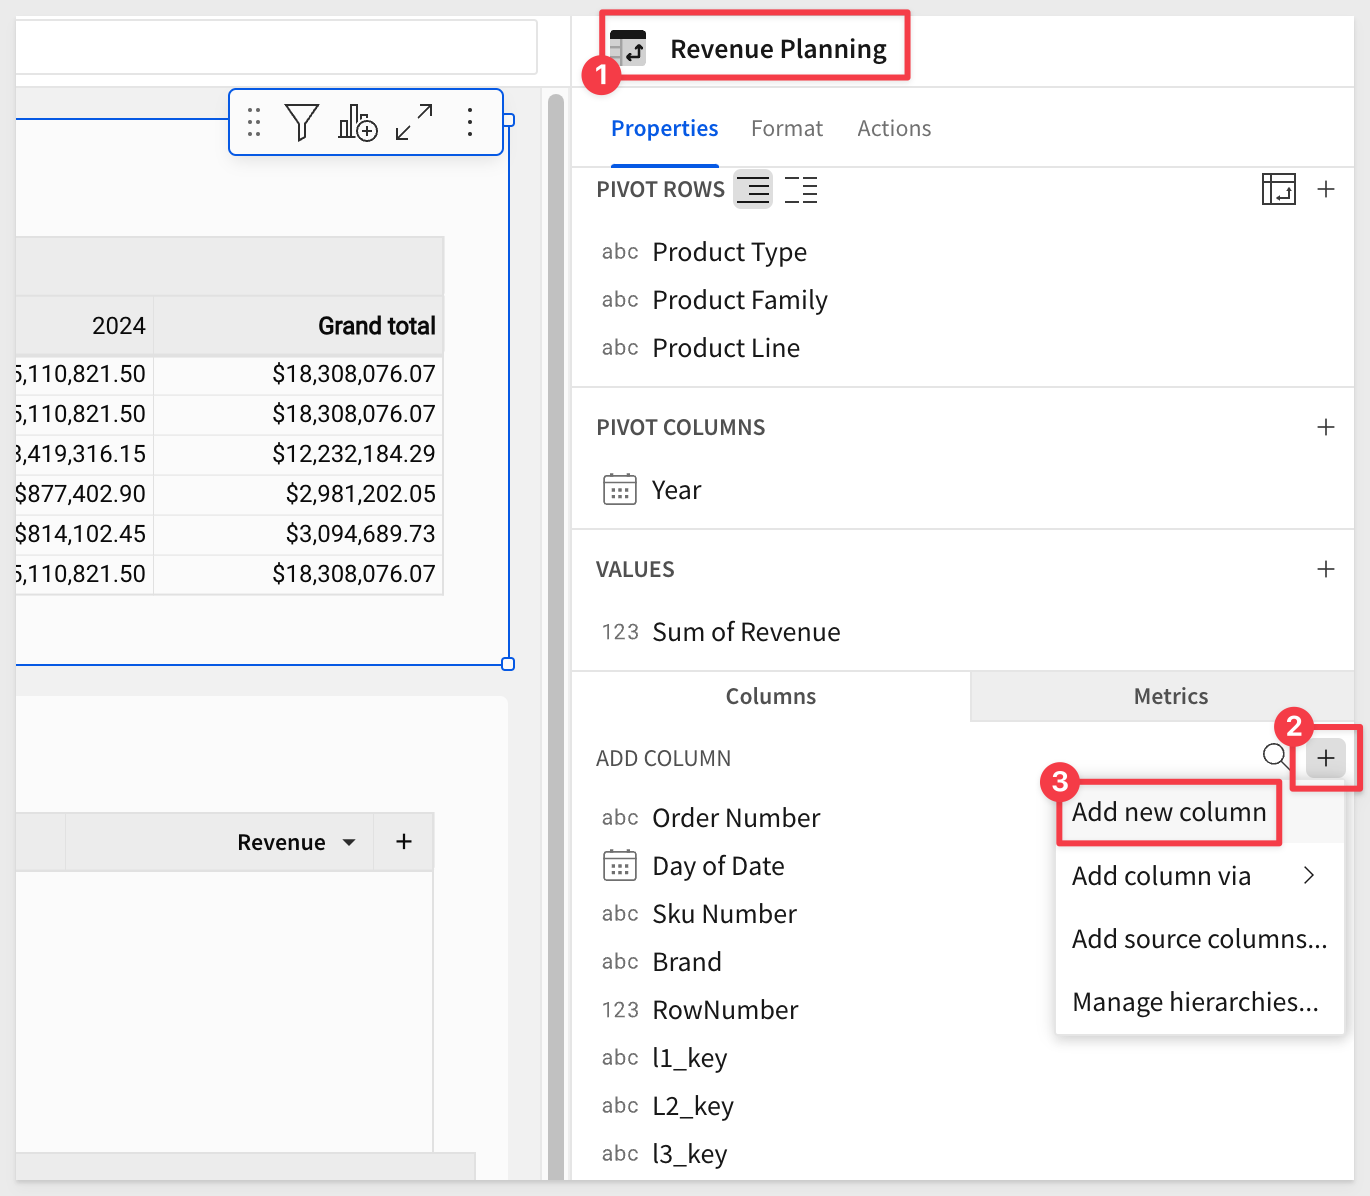
Add a new column set the formula to:
Lookup([SPREAD_UPDATE/Revenue], [Order Number], [SPREAD_UPDATE/Order Number], [Date], [SPREAD_UPDATE/Date], [Sku Number], [SPREAD_UPDATE/Sku Number])
This formula performs a lookup operation, retrieving the value of SPREAD_UPDATE > Revenue from the SPREAD_UPDATE table based on a match between the specified columns in the current table and the corresponding columns in the SPREAD_UPDATE table.
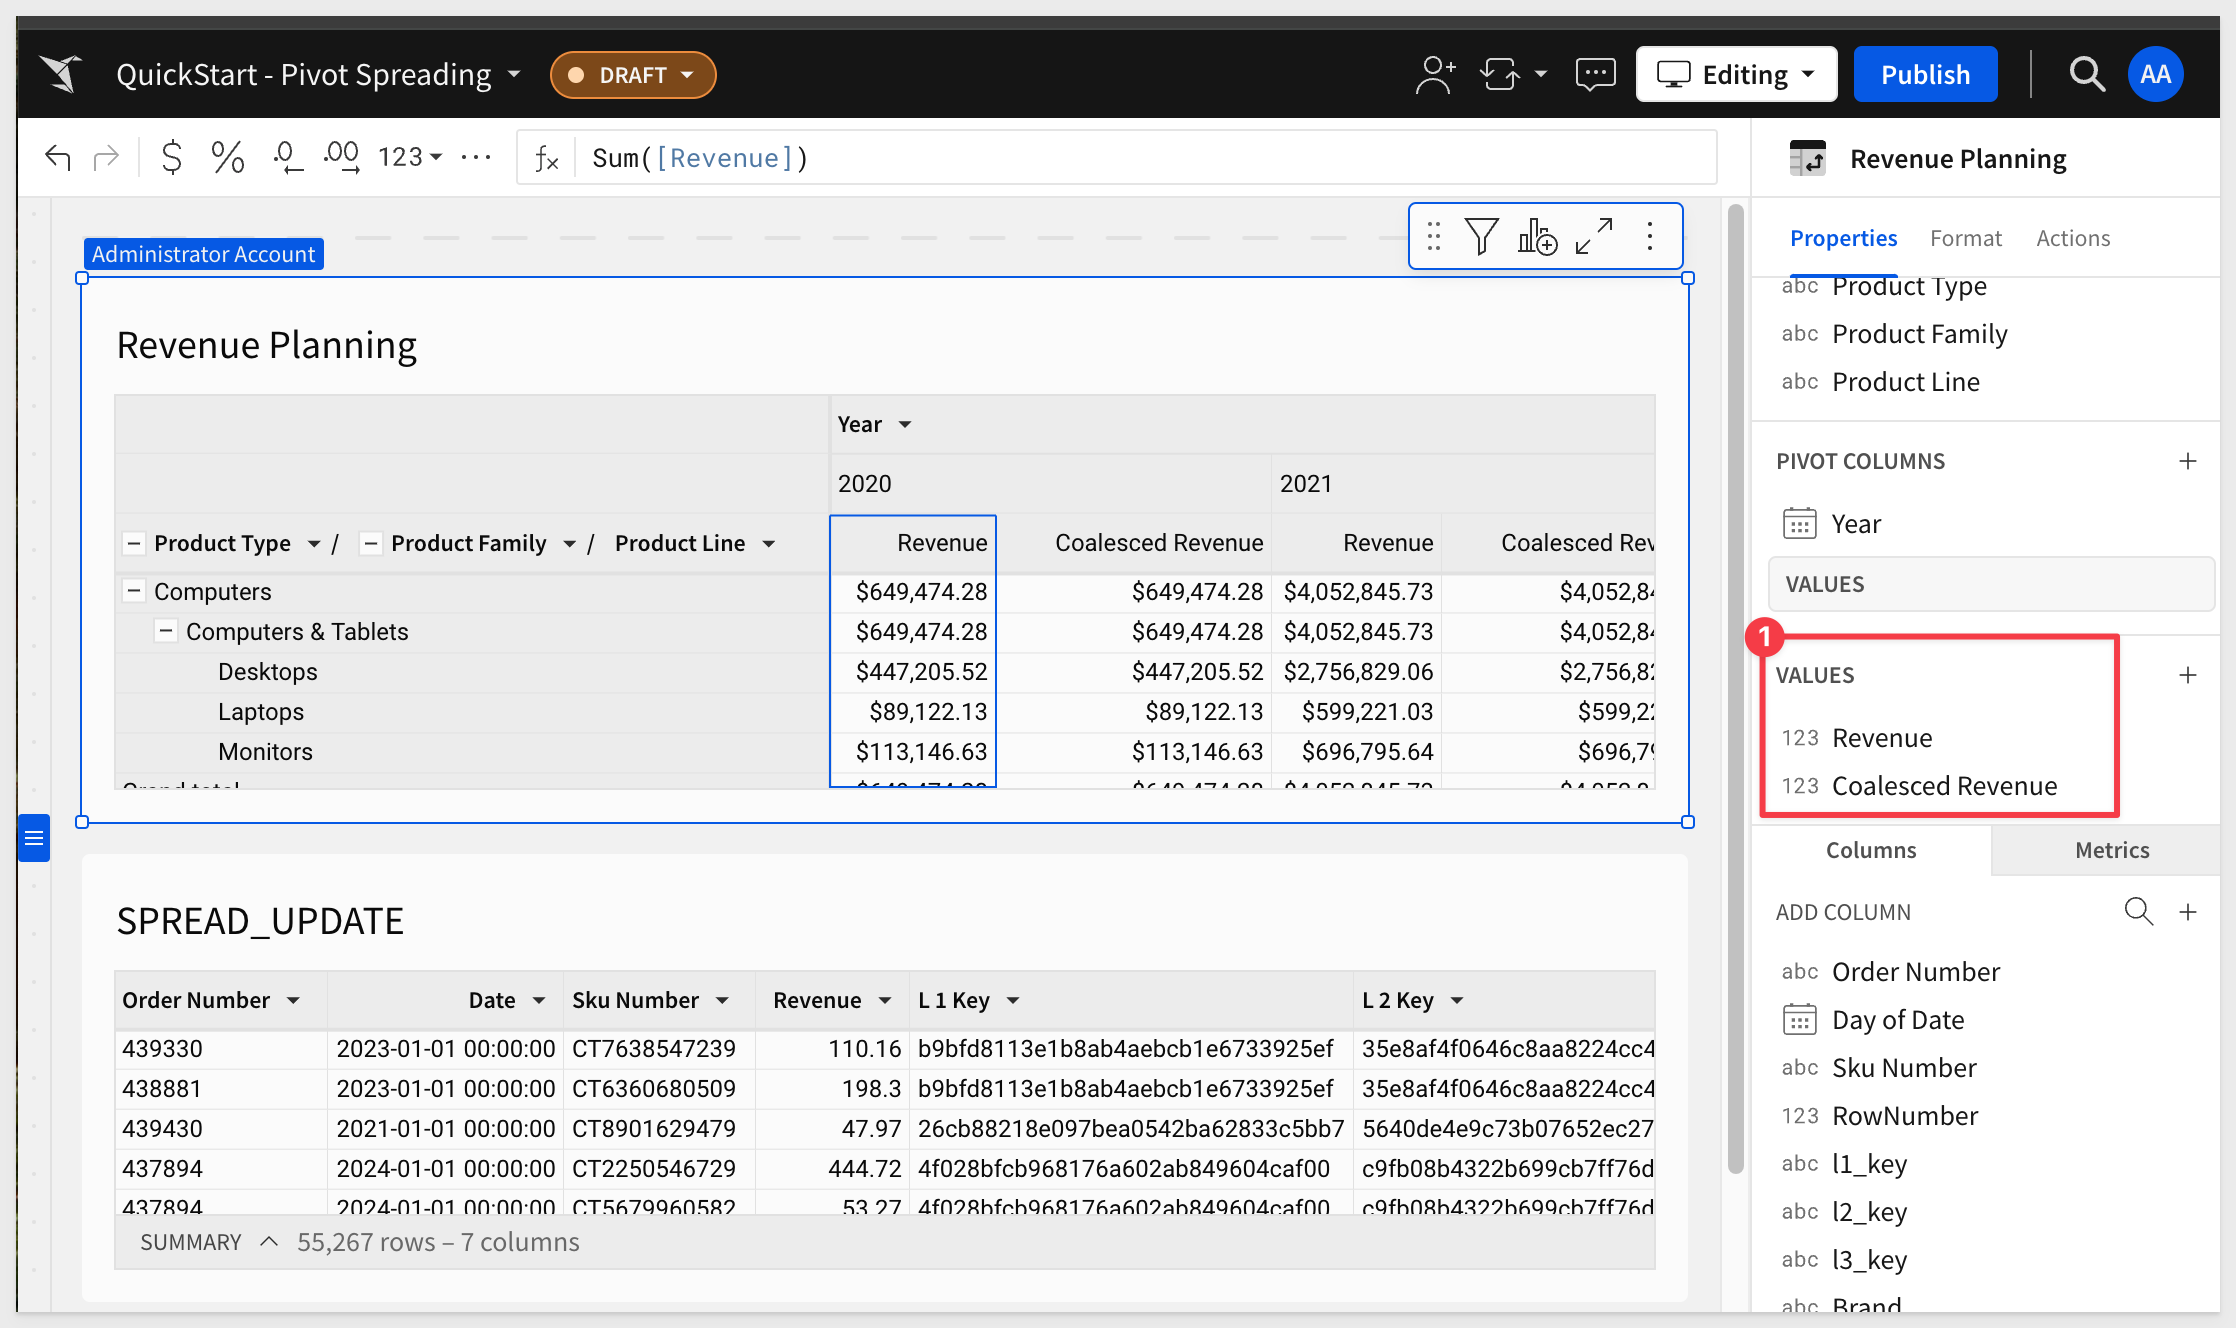
Add another new column and rename it to Coalesced Revenue. Set the formula to:
Coalesce([Revenue (SPREAD_UPDATE)], [Revenue])
This formula will display the SPREAD_UPDATE value where it exists, and fallback to the base Revenue value otherwise. Since we don't yet have any data in SPREAD_UPDATE, the existing Revenue value will be used.
Drag the Coalesced Revenue column to the VALUES grouping and rename it back to Coalesced Revenue.
The page now looks like this, including a little bit of text and currency format adjustments:
Click Publish.
About Spread_Update
The Spread_Update table plays a central role in the pivot table spreading functionality, as it is the target for all updates made by the soon to be created stored procedure. It's primary role is to:
Act as a Data Adjustment Target:
- This table holds the rows that will be updated during the spread process.
- Adjustments made in the pivot table are applied to this table, modifying the relevant rows based on the selected
KEYandLEVELvalues passed.
Act as an Intermediate Layer:
- It acts as a bridge between the source data (BASE_TABLE) and the final output.
- Rows from the
BASE_TABLEare merged into theSPREAD_UPDATEtable if they don't already exist, ensuring that all necessary data is available for spreading.
Efficiency:
- By focusing updates on a single table, the stored procedure ensures that adjustments are localized outside of the orginal source data.
The SPREAD_UPDATE table includes the following columns (based on the stored procedure):
Column | Description |
date | The date associated with the transaction or data row. |
l_1_key | Hierarchical key representing the highest level of aggregation. |
l_2_key | Hierarchical key for a more specific grouping. |
l_3_key | Hierarchical key for the most granular level. |
order_number | Unique identifier for each order. |
revenue | The revenue value for the specific row, which will be adjusted. |
sku_number | Identifier for the product or item in the transaction. |
We want to add some actions in Sigma to allow users to perform adjustments. However, we need to configure a page (modal window) that will both display the selected values and allow a user to configure their desired adjustment.
In Sigma, click on the Revenue Planning pivot table and select Actions from the menu. Choose the Coalesced Revenue column, Open model and New modal:

This creates a new hidden page called Modal 1. The page is hidden as we only want it to show up when a user clicks something that requests it.
Rename the page to Adjustments and the title from New Modal to Adjustments.
For the purposes of this demonstration, this modal will allow the user to adjust the selected Coalesced Revenue from the pivot table, choosing from three different methods. It will also display information about which selections have been made.
Adding the Controls
Selected values display
We will use a Sigma input controls to capture user selected values and to refer to these values when we call the stored procedure.
Add the following controls to the Adjustments modal:
1: Current revenue value selected (p_current):
Add Number input control and set the Control ID to p_current. Also set the Data format to Currency.
2: Level selected (p_level):
Add number input control and set the Control ID to p_level. Also set the Data format to Automatic.
3: Key corresponding to the level selected (p_key):
Add text input control and set the Control ID to p_key. Also set the Operator to Equal to.
4: Selected product type (p_type):
Add text input control and set the Control ID to p_type. Also set the Operator to Equal to.
5: Selected product family (p_family):
Add text input control and set the Control ID to p_family. Also set the Operator to Equal to.
6: Selected product line (p_line):
Add text input control and set the Control ID to p_line. Also set the Operator to Equal to.
7: Selected year (p_year):
Add Date input control and set the Control ID to p_year.
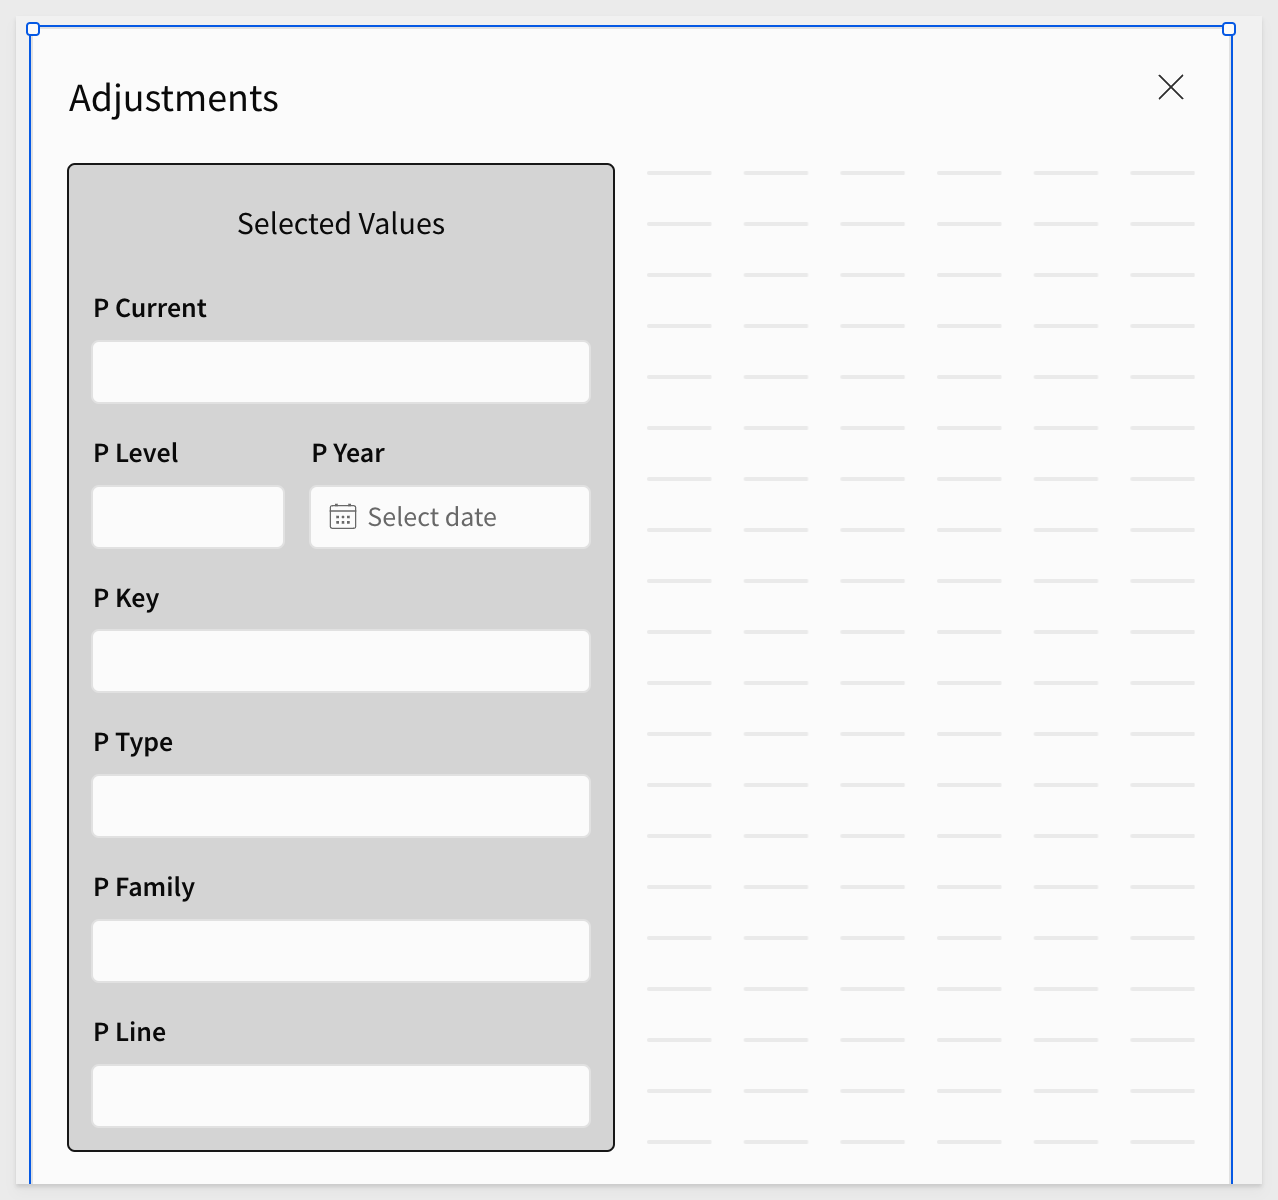
To save some actions later, place all these controls in a container. Simply left-click/hold and drag a mouse window around them and click the container icon.
While not required, we applied a little styling to the container and renamed it to Selected_Values. We also added a UI > Text label to it:
Adjustment values selection
Now let's add a few more controls (outside the Selected Values container) to allow the user to enter a value for the adjustment and select a method from three options.
1: Adjustment value desired (p_adjustment):
Add Number input control and set the Control ID to p_adjustment. Also set the Data format to Number.
2: Adjustment method desired (Method):
Add Segmented control and set the Control ID to Method. Configure the Create manual list as shown in the screenshot below:
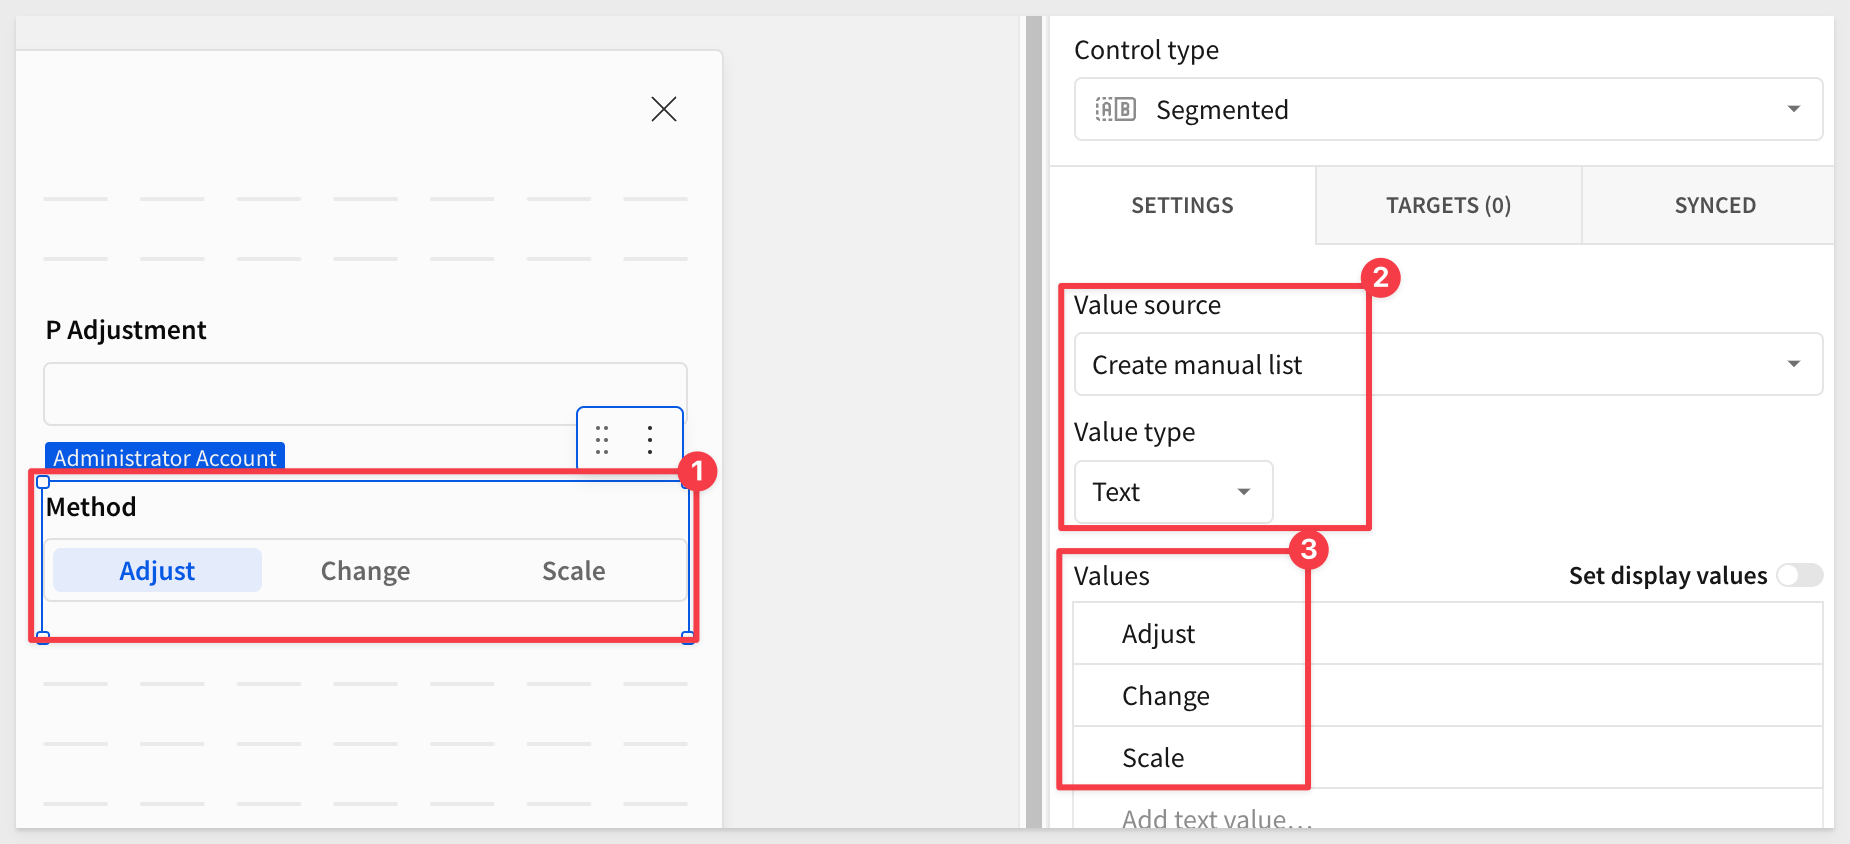
3: Value of the adjustment:
Add UI > Text element and set its formula to:
If(IsNull([Method]) OR IsNull([p_current]) OR IsNull([p_adjustment]),
   0,
   Switch([Method],
          "Adjust", [p_current] + [p_adjustment],
          "Change", [p_adjustment],
          "Scale", [p_current] * (1 + [p_adjustment] / 100),
          0))
This formula dynamically calculates a new value based on the selected adjustment method:
- Adjust: Adds or subtracts P Adjustment directly from P Current.
- Scale: Adjusts by percentage the value supplied in P Adjustment.
- Change: Replaces the value with the value for P Adjustment.
- If the required values are not set, it will return zero.
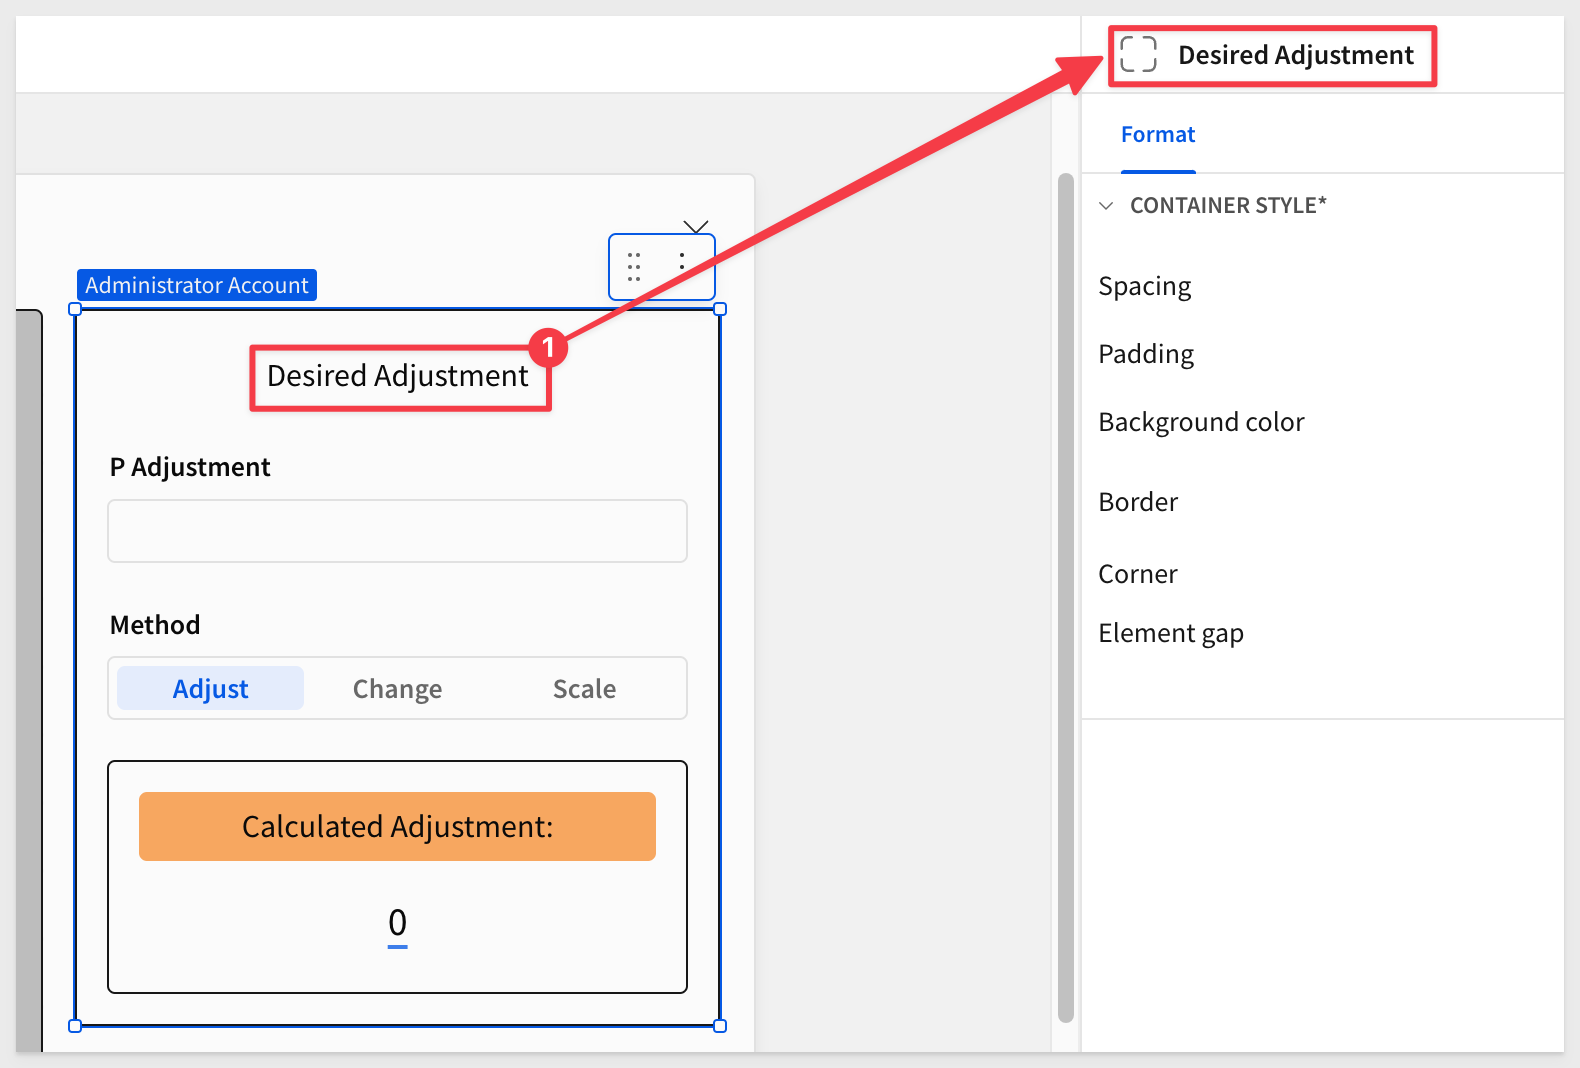
After some fiddling with the UI, and placing the adjustment items in a container called Desired Adjustment, the section now looks like this:
With our modal configured we can now setup actions to leverage the controls on that page.
Return to the Pivot page, select the Revenue Planning pivot table and click on it's Actions.
We have one action configured so far that opens the modal when a user clicks on a Coalesced Revenue cell. You can test that now to see it work.
We can now add more actions to clear the modal's controls and pass values to it, based on the user click.
Clear the containers (2) of previous values
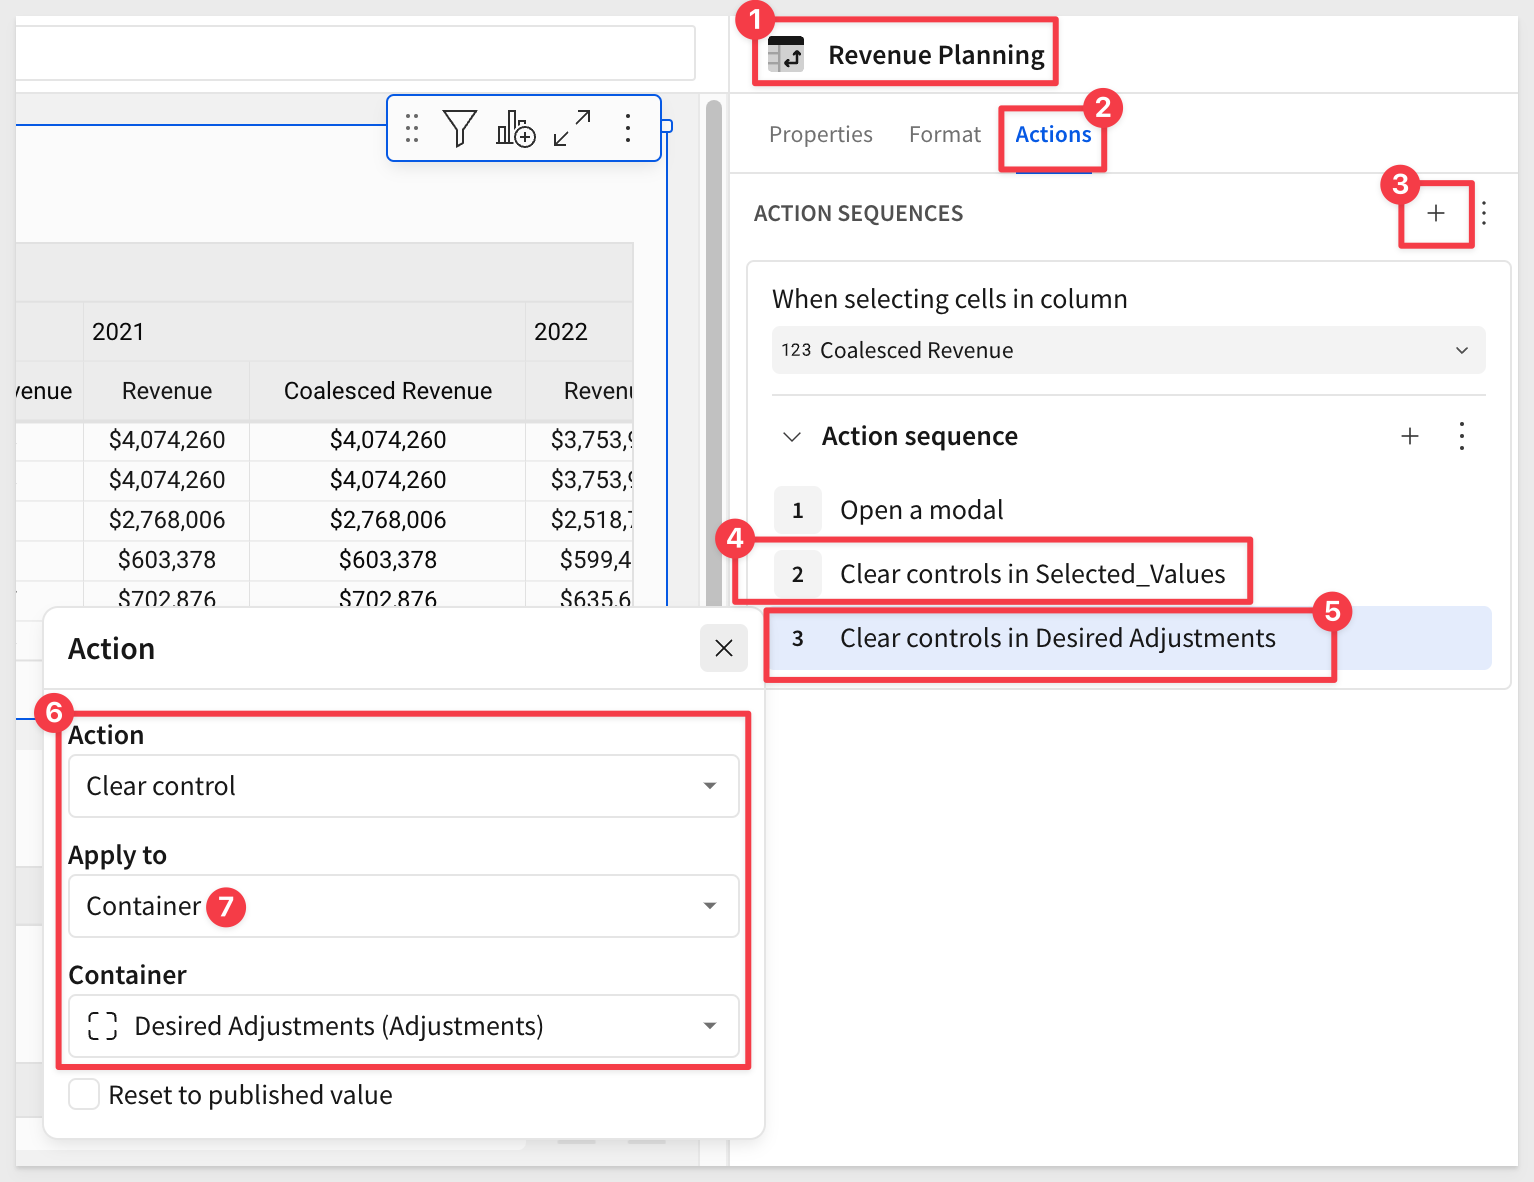
For our second action, click the + and configure a Clear control action, targeting a Container and the Selected_Values container.
Repeat the process (this time using the lower + icon) and create the same action for the Desired Adjustments container:
Set actions for three product levels
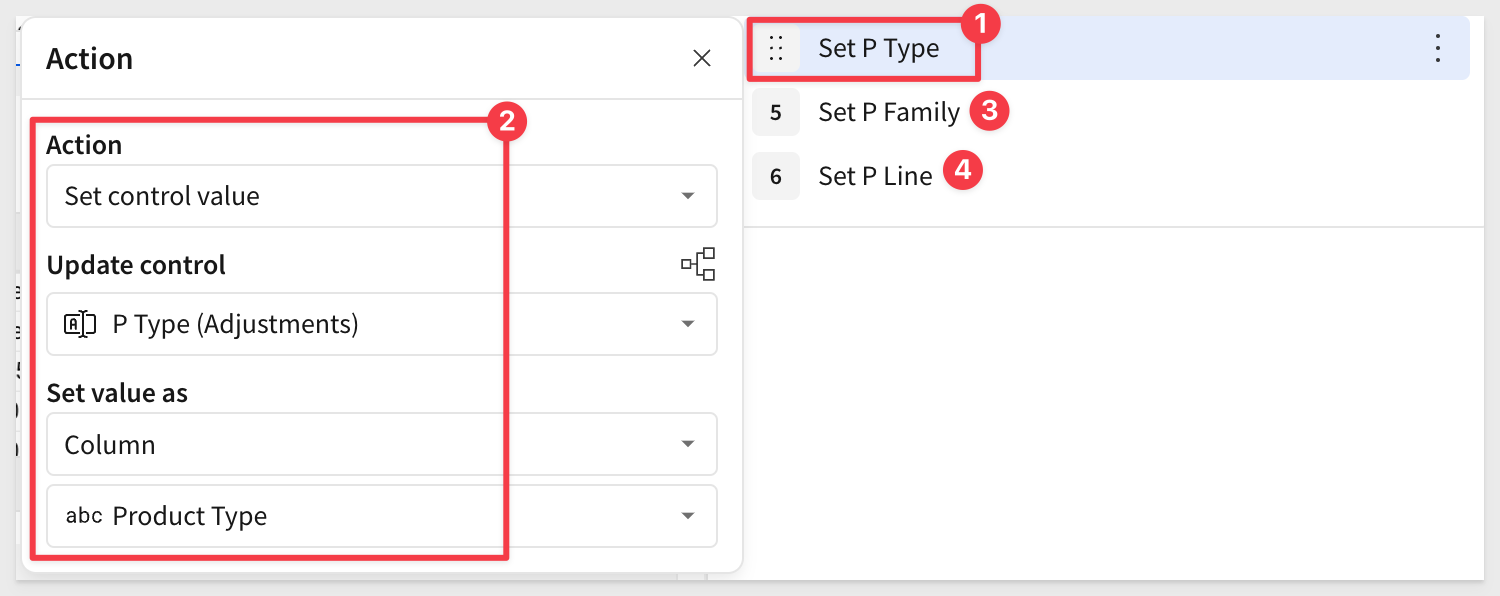
Configure three Set control value actions for product type, family and line:
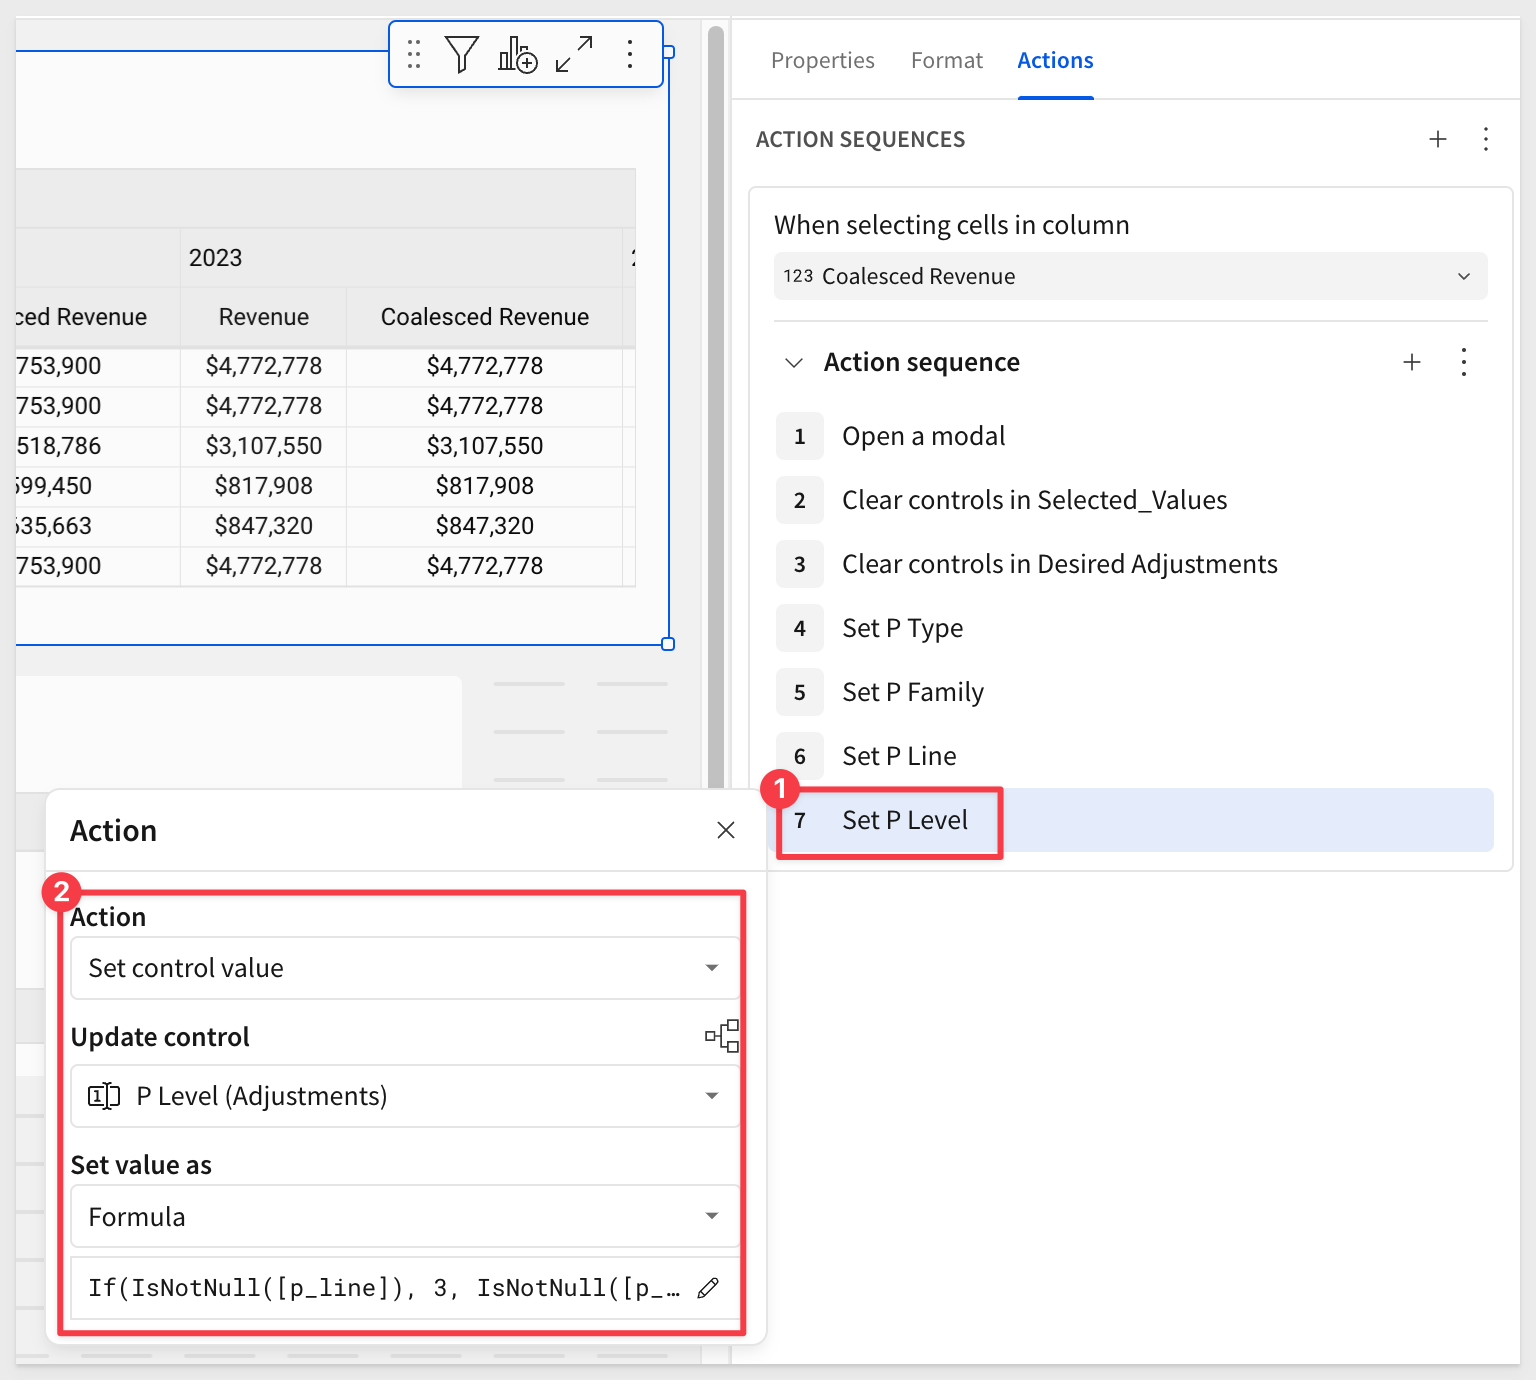
Configure action for selected level
In this next Set control value action, we will use a formula to determine the value of the product level selected:
Here is the formula to be used, as shown in the screenshot below:
If(IsNotNull([p_line]), 3, IsNotNull([p_family]), 2, IsNotNull([p_type]), 1)
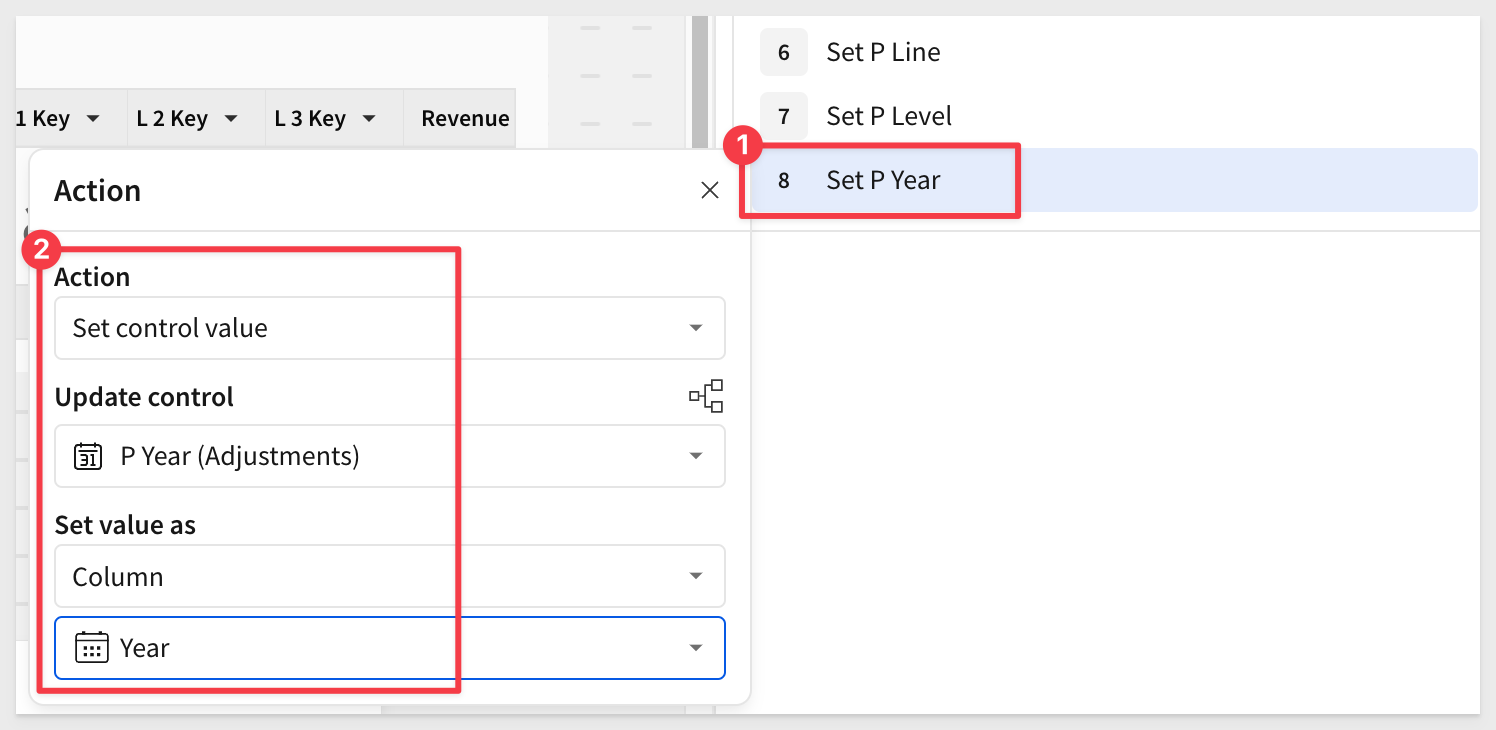
Set selected year
You know what to do now...
Set the key value selected
Configure another Set control value action to update the P Key control, using this formula:
Switch([p_level], 3, MD5([p_type] & [p_family] & [p_line] & Text([p_year])), 2, MD5([p_type] & [p_family] & Text([p_year])), 1, MD5([p_type] & Text([p_year])))

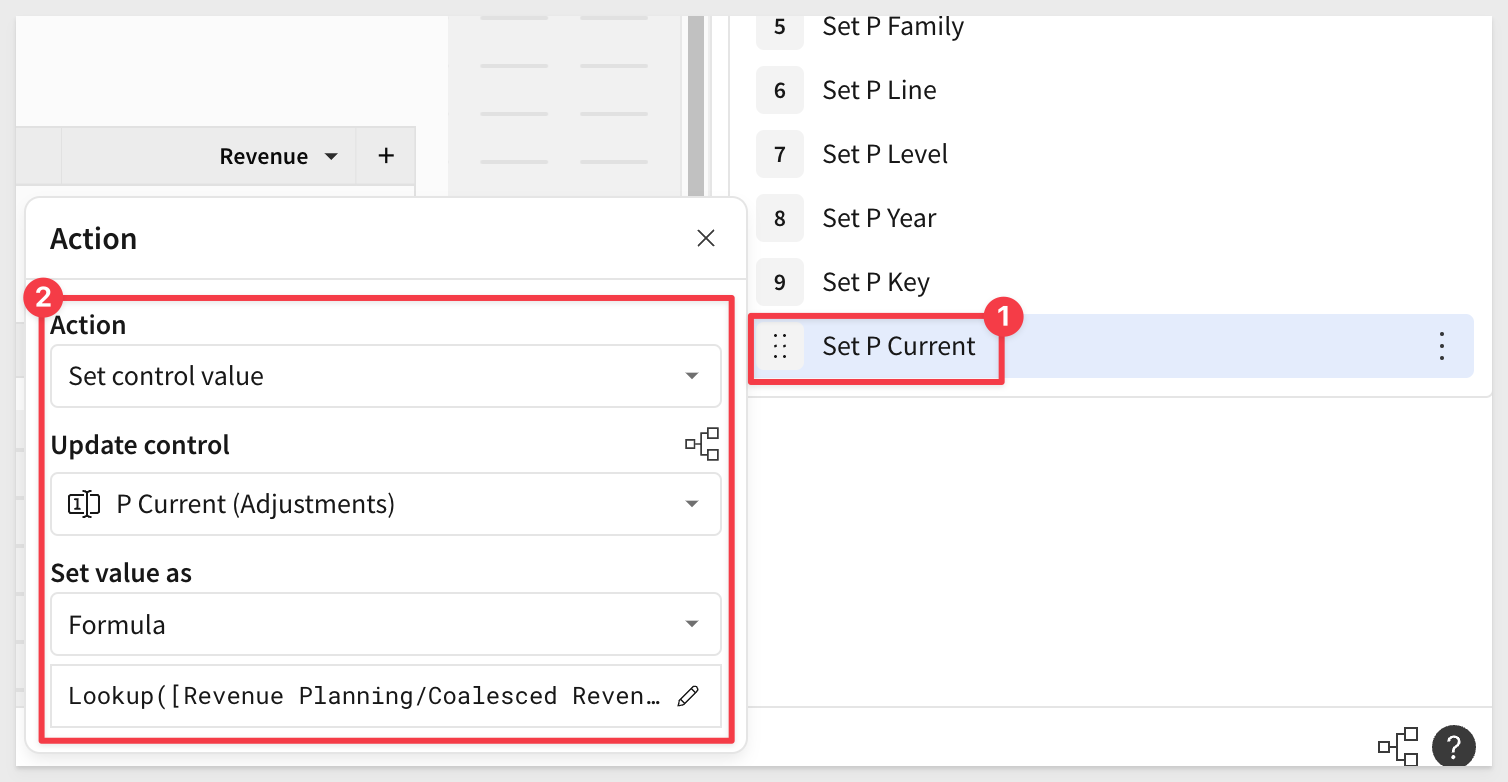
Set the current value selected
Configure another Set control value action to update the P Current control, using this formula:
Lookup(Sum([Revenue Planning/Coalesced Revenue (1)]), [p_key], Switch([p_level], 3, [Revenue Planning/l3_key], 2, [Revenue Planning/l2_key], 1, [Revenue Planning/l1_key]))
Now drag the Open a modal action to the last position:
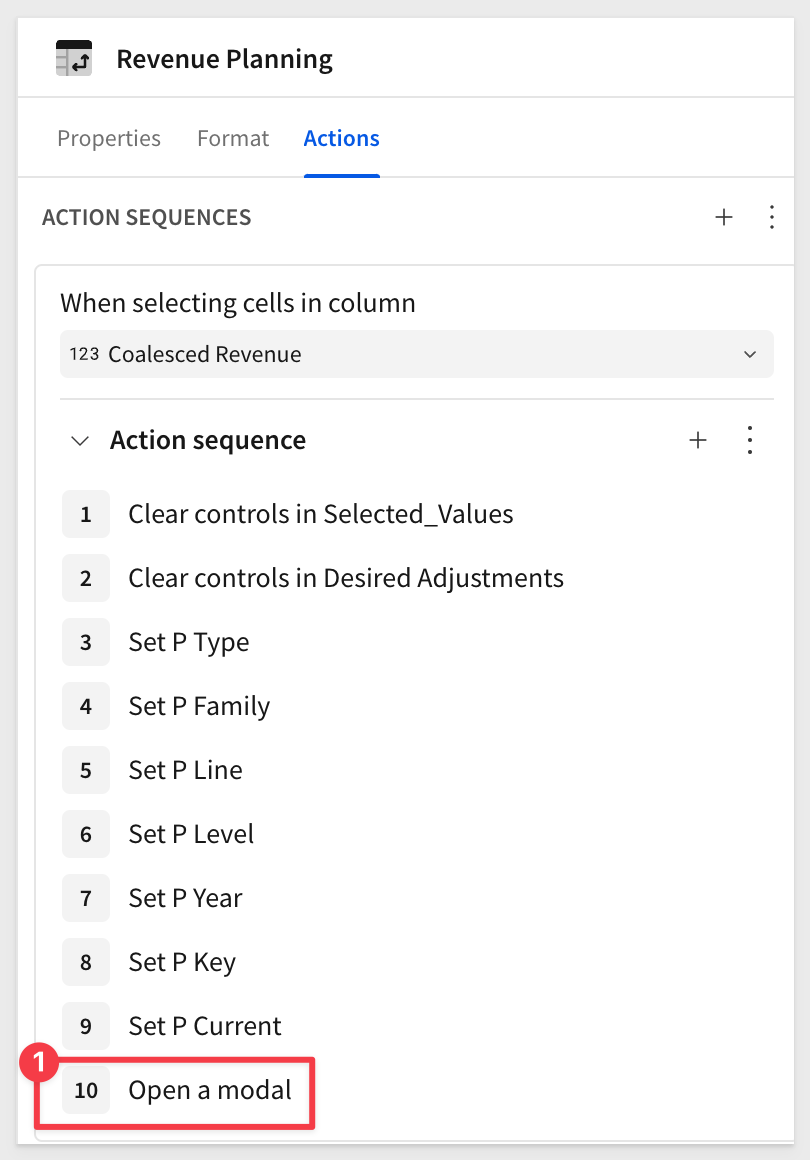
Click Publish.
Give it a quick test
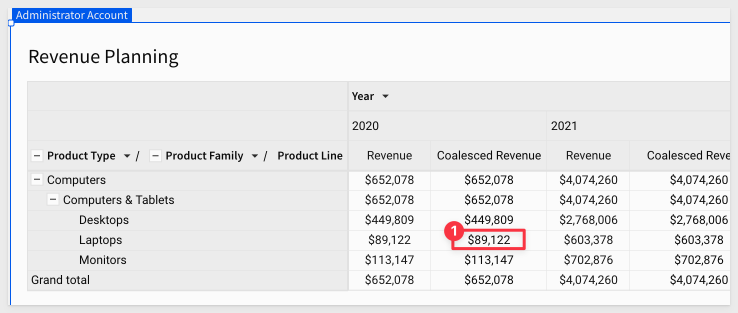
Click on any Coalesced Revenue value, noting the product details, value and year. These values should appear in the modal as expected. For example, if the value selected below is clicked:
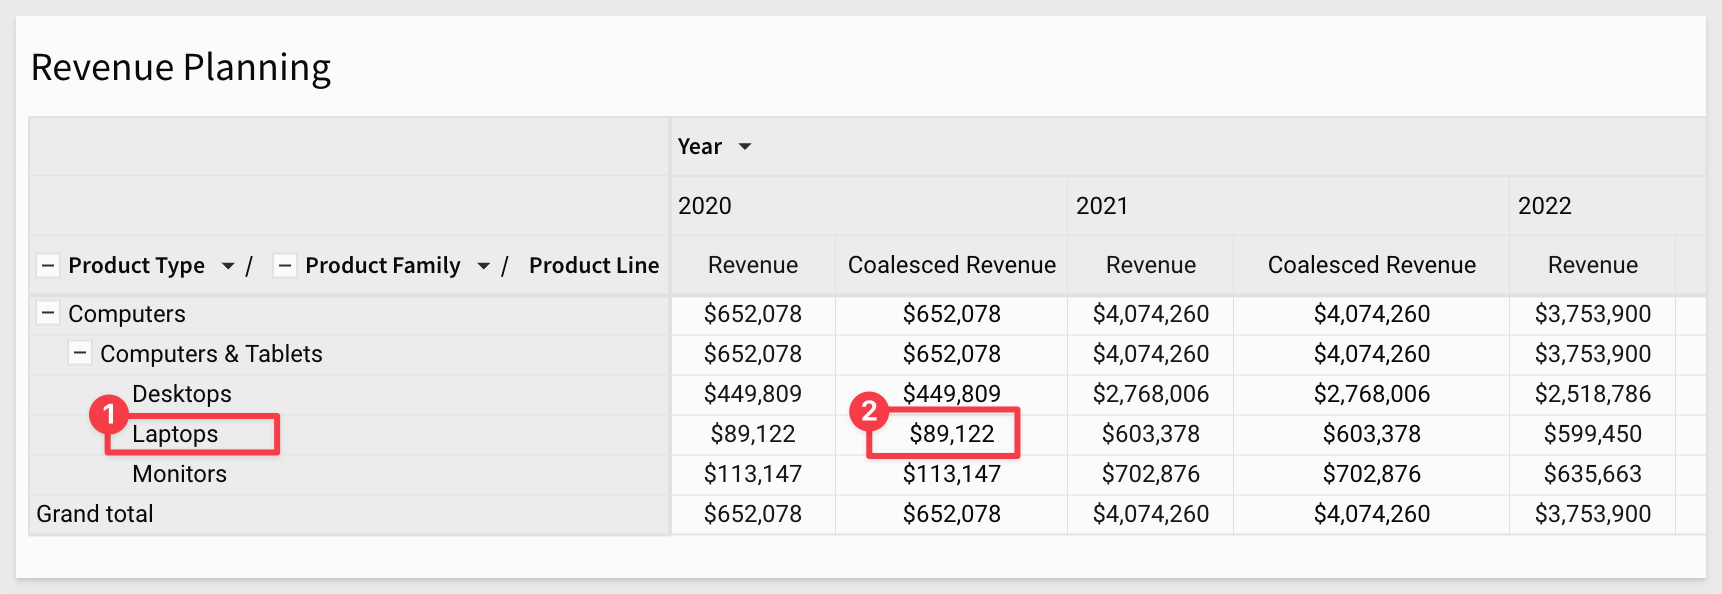
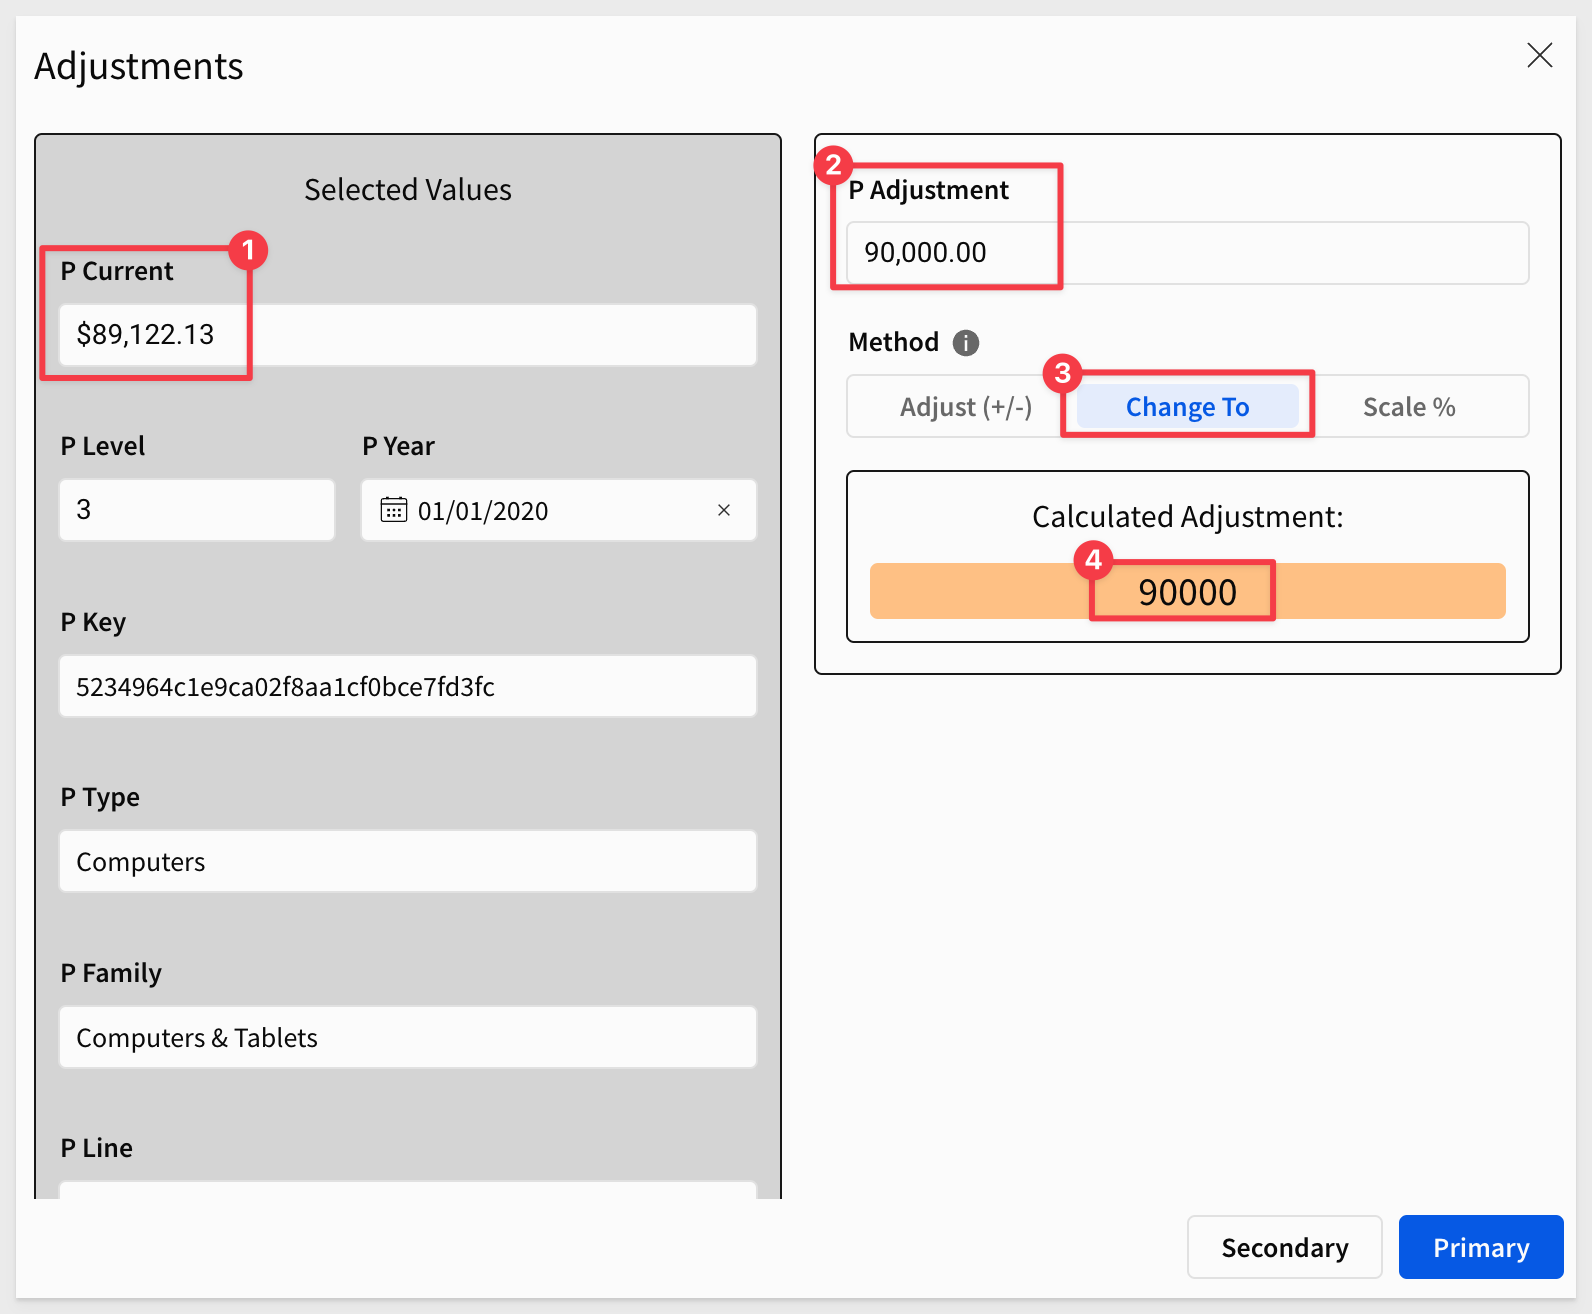
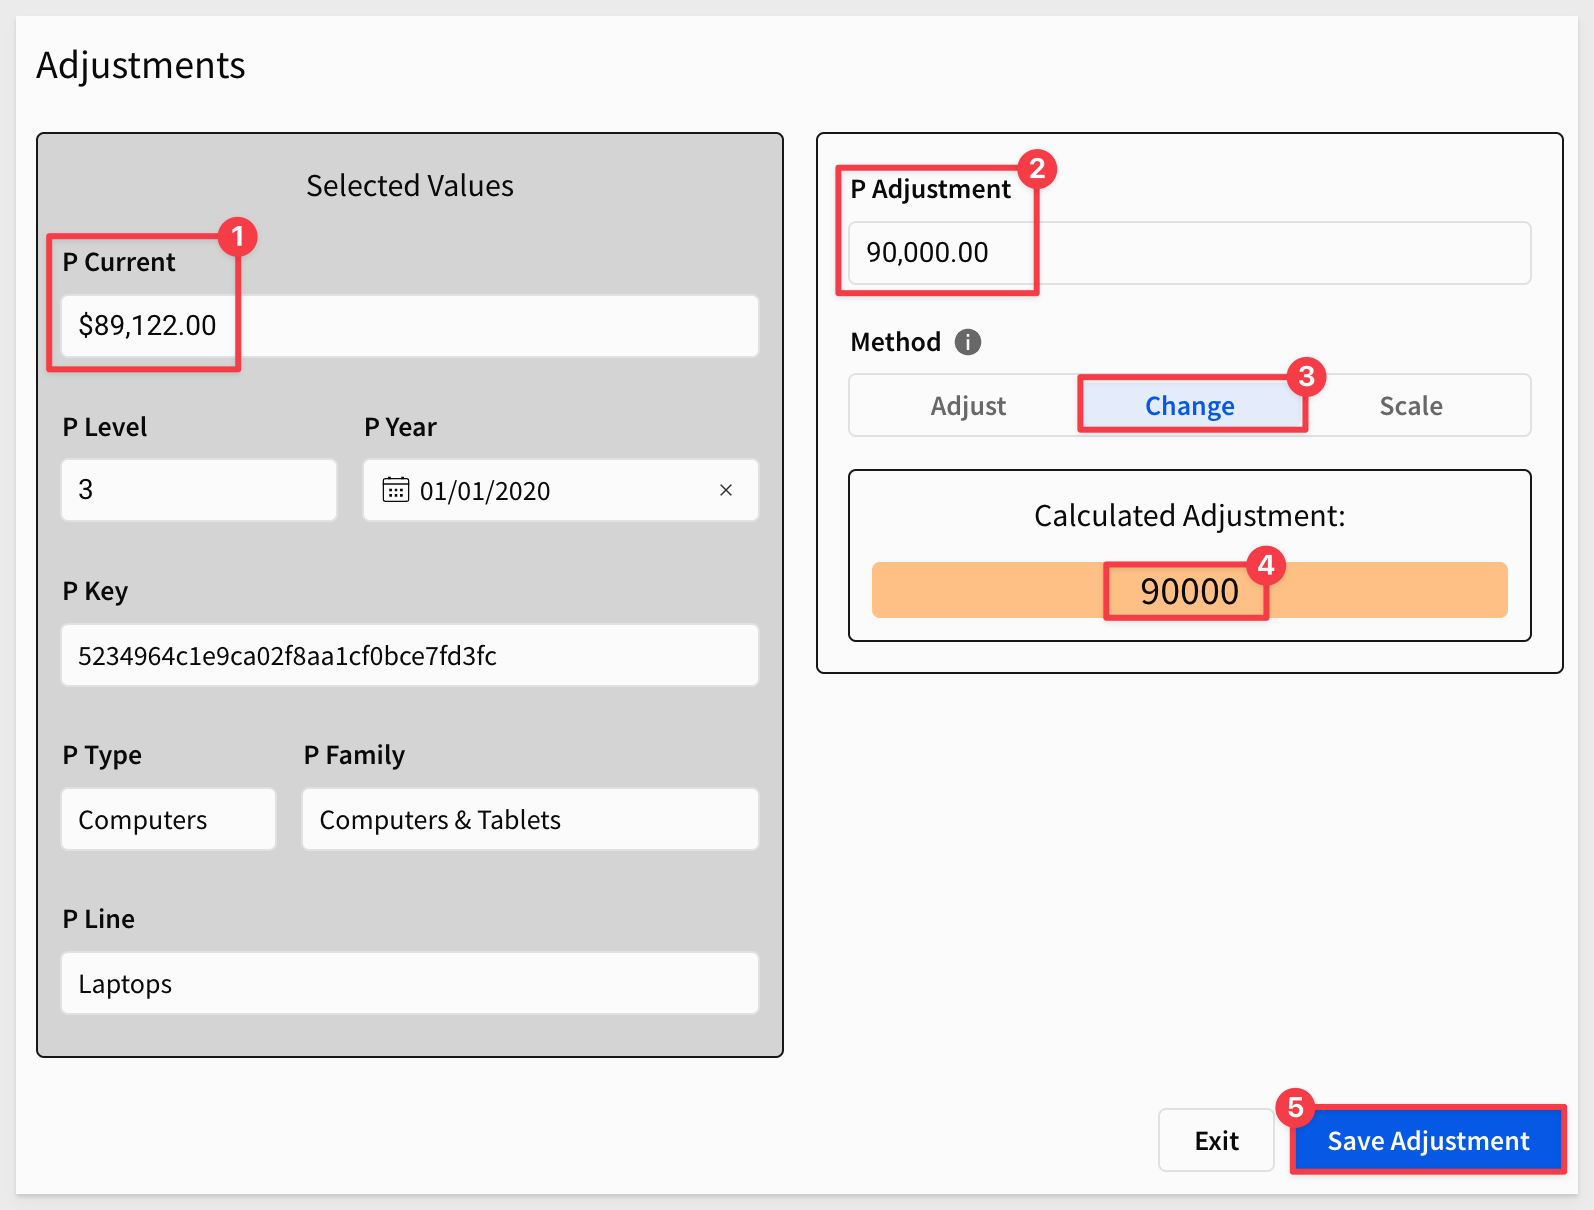
We can see those values appear in the modal as expected. We also can enter a value in P Adjustment and click the Change method to see the desired value appear too:
Now we will wire up the stored procedure to take some of this information and update our Revenue Planning and Spread_Update table.
Sigma users will click a button to execute a stored procedure, named SPREAD, that is designed to handle pivot table spreading by adjusting values in a designated Snowflake table called SPREAD_UPDATE, based on user input.
The procedure interacts with the BASE_TABLE to prepare data, applies adjustments (e.g., scaling, direct changes, or percentage changes), and ensures data integrity while not altering the source data.
It also logs SQL operations for troubleshooting purposes.
This procedure can dynamically handle adjustments at different hierarchical levels (e.g., l1, l2, l3 keys) and updates only the rows relevant to the selected pivot table cell.
Summary of operation
Here are the basic steps taken by the procedure:
- Prepare the data:
Syncs the SPREAD_UPDATE table with rows from the BASE_TABLE for the selected key. - Calculate adjusted (coalesced) revenue:
Retrieve the coalesced revenue value for the selected key and level. - Adjust the values:
Apply the user-specified adjustment method to update the SPREAD_UPDATE table. - Log the operations:
Track all SQL executions for troubleshooting and transparency.
Spreading calculations used:
The spreading method selected by the user in Sigma (Adjust, Change or Scale) determines the type of adjustment.
For those interested, here are the formula applied for each method:
Adjust:
Adds or subtracts a fixed amount, distributed proportionally across rows
set revenue = revenue + {ADJUSTMENT} * revenue / {sum_revenue}
Change:
Sets a new total value, redistributing it proportionally across rows.
set revenue = {ADJUSTMENT} * revenue / {sum_revenue}
Scale:
Adjusts revenue by a percentage.
set revenue = revenue + {ADJUSTMENT}/100 * revenue
Updates are applied to rows in SPREAD_UPDATE matching the KEY at the specified LEVEL.
Creating the procedure in Snowflake
Run the following code in Snowflake to both create the stored procedure in our database/schema.
CREATE OR REPLACE PROCEDURE SIGMA_QUICKSTARTS.PIVOT_SPREADING.SPREAD(
    "LEVEL" FLOAT,
    "KEY" VARCHAR(16777216),
    "ADJUSTMENT" FLOAT,
    "METHOD" VARCHAR(16777216)
)
RETURNS VARCHAR(16777216)
LANGUAGE JAVASCRIPT
EXECUTE AS OWNER
AS '
    var SPREAD_TABLE = "SIGMA_QUICKSTARTS.PIVOT_SPREADING.SPREAD_UPDATE";
    var BASE_TABLE = "SIGMA_QUICKSTARTS.PIVOT_SPREADING.BASE_TABLE";
    var LOG_TABLE = "SIGMA_QUICKSTARTS.PIVOT_SPREADING.SQL_LOG";
    var UUID = generateUUID();

    // Helper function to generate a UUID
    function generateUUID() {
        var sql = "SELECT UUID_STRING()";
        var statement = snowflake.createStatement({ sqlText: sql });
        var resultSet = statement.execute();
        resultSet.next();
        return resultSet.getColumnValue(1);
    }

    // Helper function to log and execute SQL statements
    function executeSQL(sql, binds = []) {
        try {
            var log_data = JSON.stringify({ LEVEL, KEY, ADJUSTMENT, METHOD });
            var log_sql = "INSERT INTO " + LOG_TABLE + " (UUID, SQL_TEXT, SQL_TS, LOG_DATA) VALUES (?, ?, CURRENT_TIMESTAMP, ?)";
            var log_statement = snowflake.createStatement({
                sqlText: log_sql,
                binds: [UUID, sql, log_data]
            });
            log_statement.execute();
        } catch (err) {
            throw new Error("Logging Error: " + err.message + "\\nSQL text: " + sql);
        }

        try {
            var statement = snowflake.createStatement({ sqlText: sql, binds: binds });
            return statement.execute();
        } catch (err) {
            throw new Error("Error executing the procedure: " + err.message + "\\nSQL text: " + sql);
        }
    }

    // Prepare the SPREAD table, ensuring it has all the rows to be spread
    var sql_prepare = `
MERGE INTO ${SPREAD_TABLE} AS spread_update
USING (
    SELECT
        "order_number",
        "date",
        "sku_number",
        MD5("product_type" || "product_family" || "product_line" || TO_CHAR("date", ''YYYY-MM-DD HH24:MI:SS'')) AS "l1_key",
        MD5("product_type" || "product_family" || TO_CHAR("date", ''YYYY-MM-DD HH24:MI:SS'')) AS "l2_key",
        MD5("product_type" || "product_family" || "product_line" || TO_CHAR("date", ''YYYY-MM-DD HH24:MI:SS'')) AS "l3_key",
        "revenue"
    FROM ${BASE_TABLE}
    WHERE MD5("product_type" || "product_family" || "product_line" || TO_CHAR("date", ''YYYY-MM-DD HH24:MI:SS'')) = ''${KEY}''
) AS base
ON
    spread_update."order_number" = base."order_number" AND
    spread_update."date" = base."date" AND
    spread_update."sku_number" = base."sku_number"
WHEN MATCHED THEN
    UPDATE SET
        spread_update."revenue" = base."revenue"
WHEN NOT MATCHED THEN
    INSERT ("order_number", "date", "sku_number", "l1_key", "l2_key", "l3_key", "revenue")
    VALUES (base."order_number", base."date", base."sku_number", base."l1_key", base."l2_key", base."l3_key", base."revenue");
`;
    executeSQL(sql_prepare);

    // Get sum(revenue) for the key being spread
    var sql_sum = `SELECT SUM("revenue") FROM ${SPREAD_TABLE} WHERE "l${LEVEL}_key" = ''${KEY}''`;
    var result = executeSQL(sql_sum);
    var sum_revenue = null;

    if (result.next()) {
        sum_revenue = result.getColumnValue(1);
    } else {
        throw new Error("No rows found for the provided key.");
    }

    // Perform the actual spread by updating revenue for the matching rows
    var sql_spread = `UPDATE ${SPREAD_TABLE} SET `;

    if (METHOD === "Adjust") {
        sql_spread += `"revenue" = "revenue" + (${ADJUSTMENT} * "revenue" / ${sum_revenue})`;
    } else if (METHOD === "Scale") {
        sql_spread += `"revenue" = "revenue" + (${ADJUSTMENT} / 100 * "revenue")`;
    } else if (METHOD === "Change") {
        sql_spread += `"revenue" = (${ADJUSTMENT} * "revenue" / ${sum_revenue})`;
    }

    sql_spread += ` WHERE "l${LEVEL}_key" = ''${KEY}''`;
    executeSQL(sql_spread);
';
Execute the procedure and confirm a success response from Snowflake.
We will use the existing Primary button on the Adjustments modal page (for convenience).
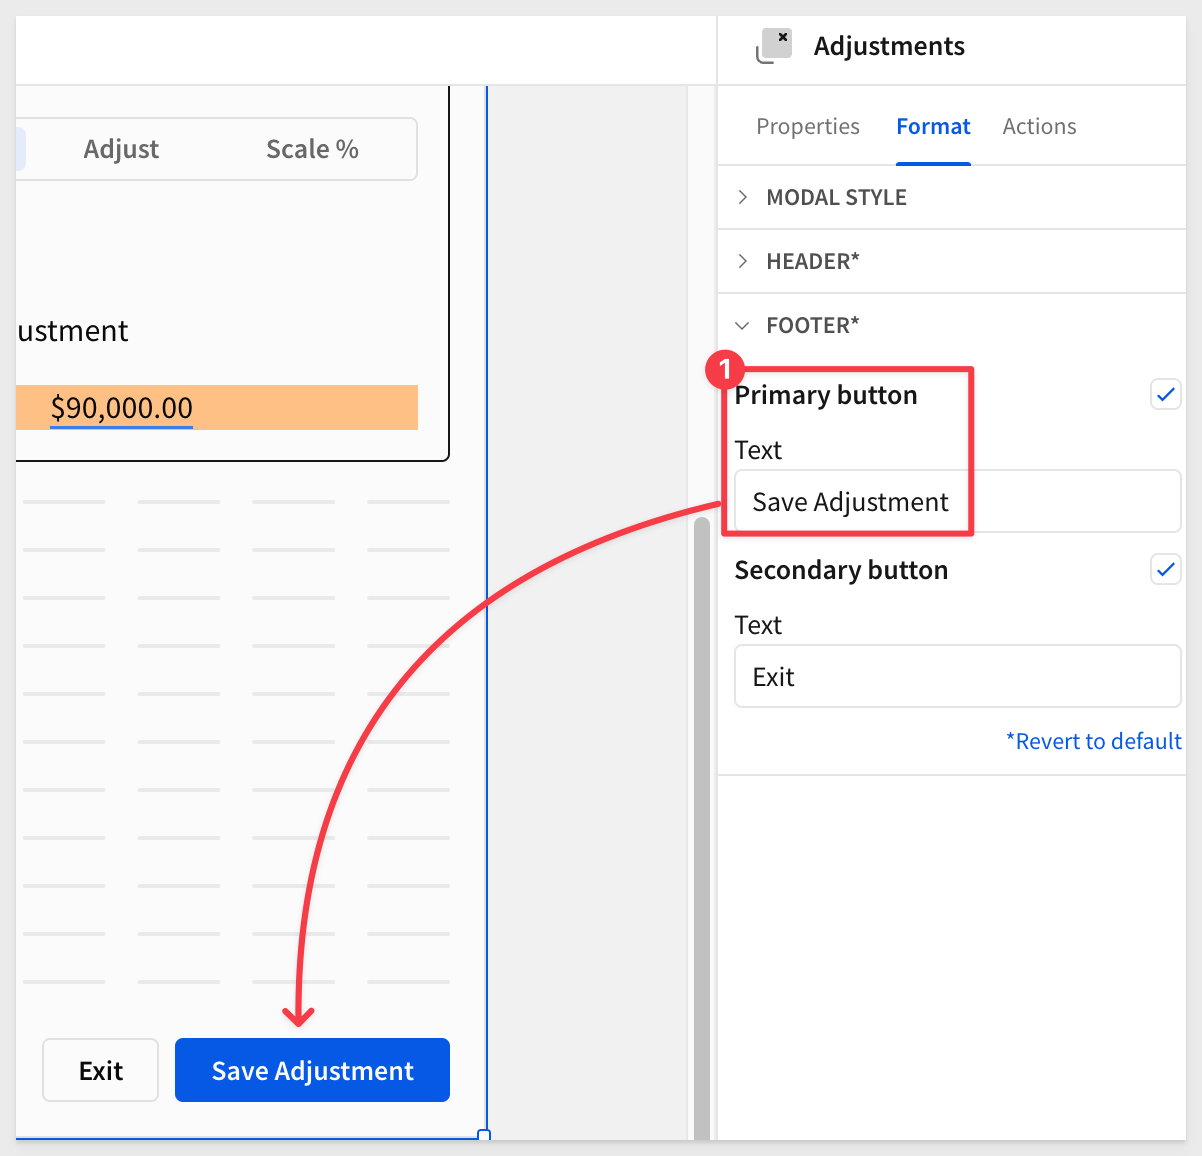
The Secondary button will be used to clear and exit the modal:
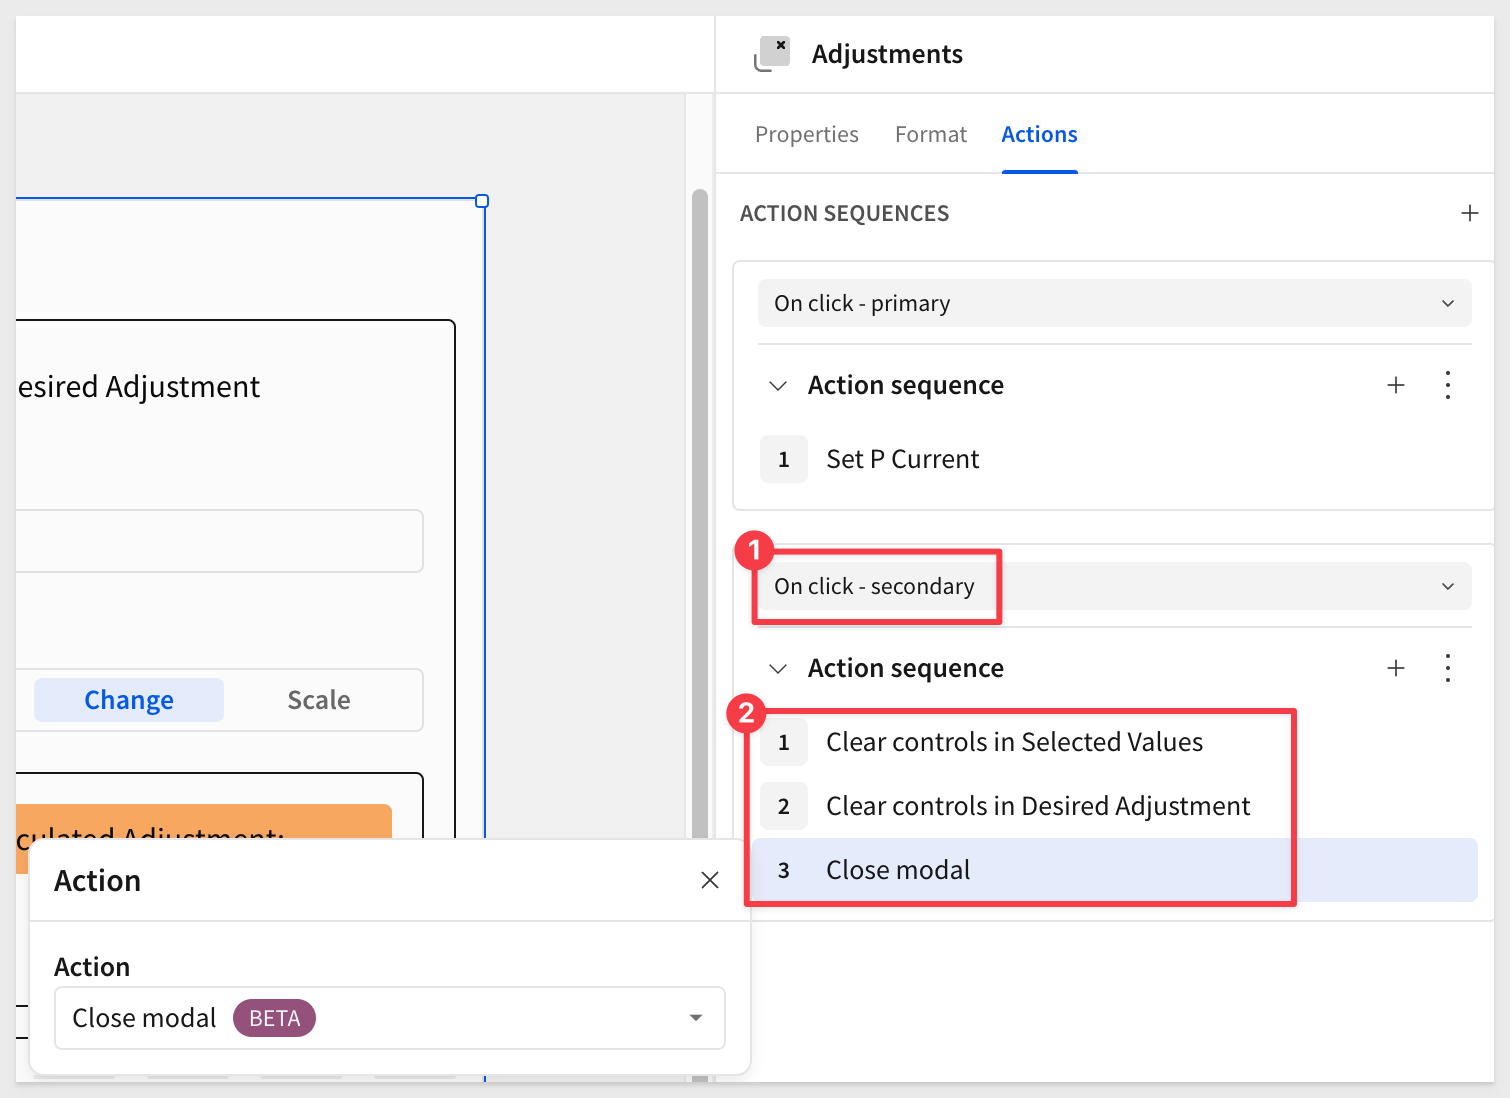
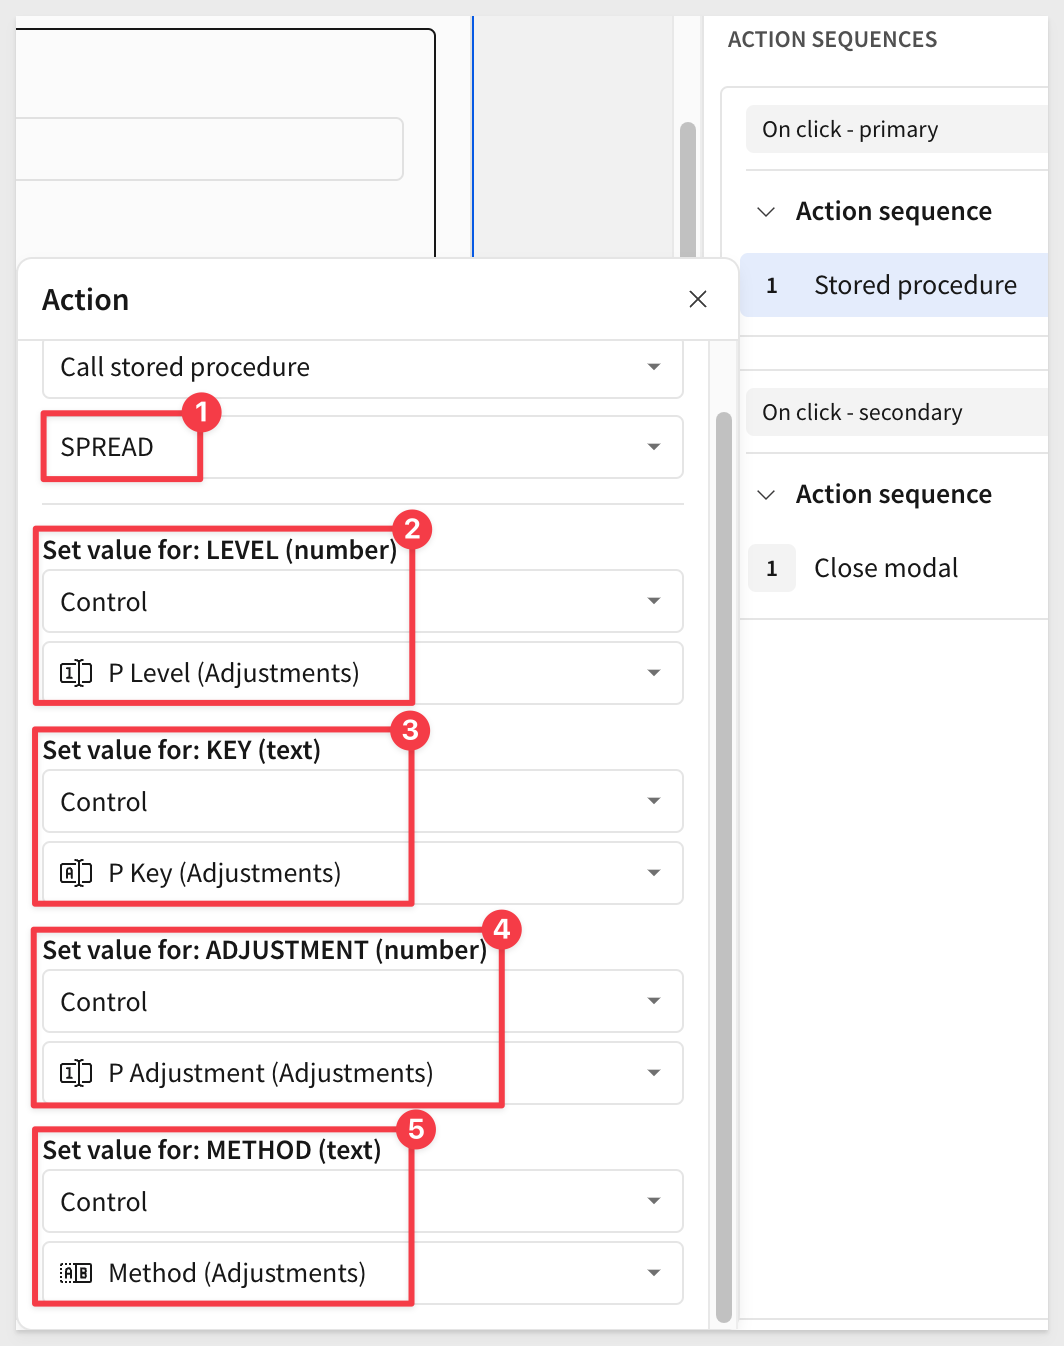
From the Actions menu of the Primary button, configure the action to call the stored procedure:
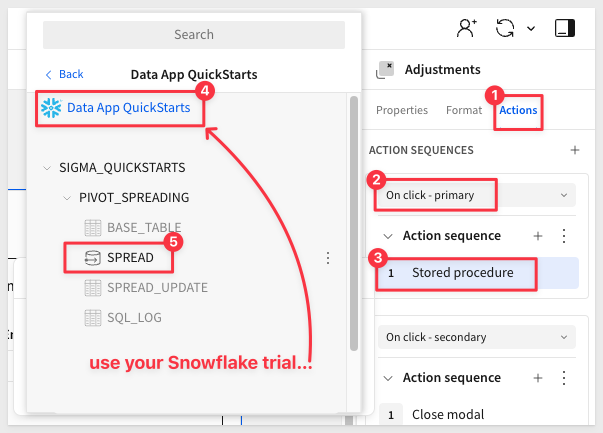

Once Sigma evaluate the selected procedure, we are prompted to choose how required variables should be passed:
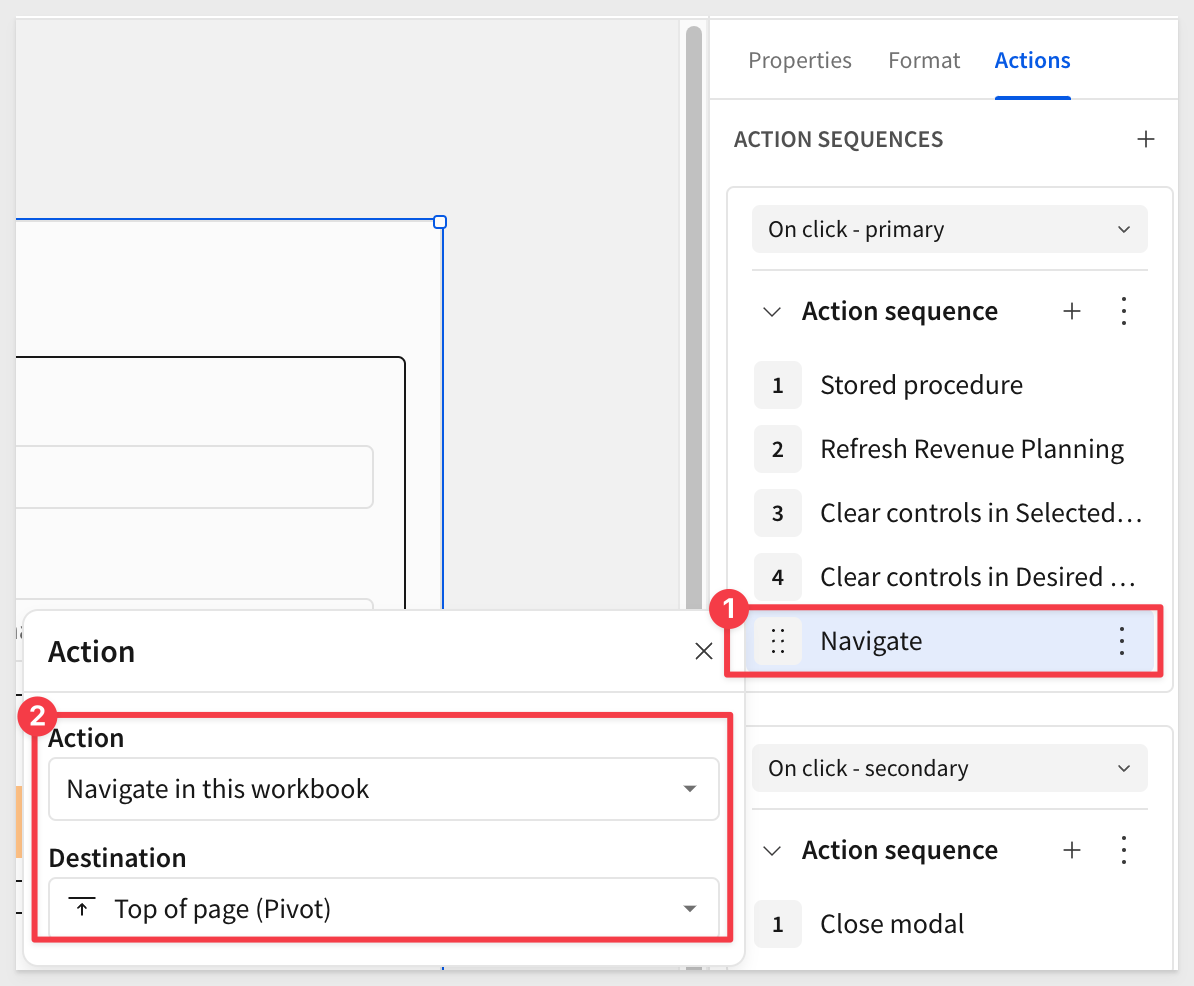
Add another action to refresh the Revenue Planning pivot with the new data.
Add another action to clear the Selected Adjustments and Desired Adjustment containers, just so we are always sure that the current values are removed prior to using the modal.
Add one more action to Navigate in this workbook to the Pivot pages, Top of page.
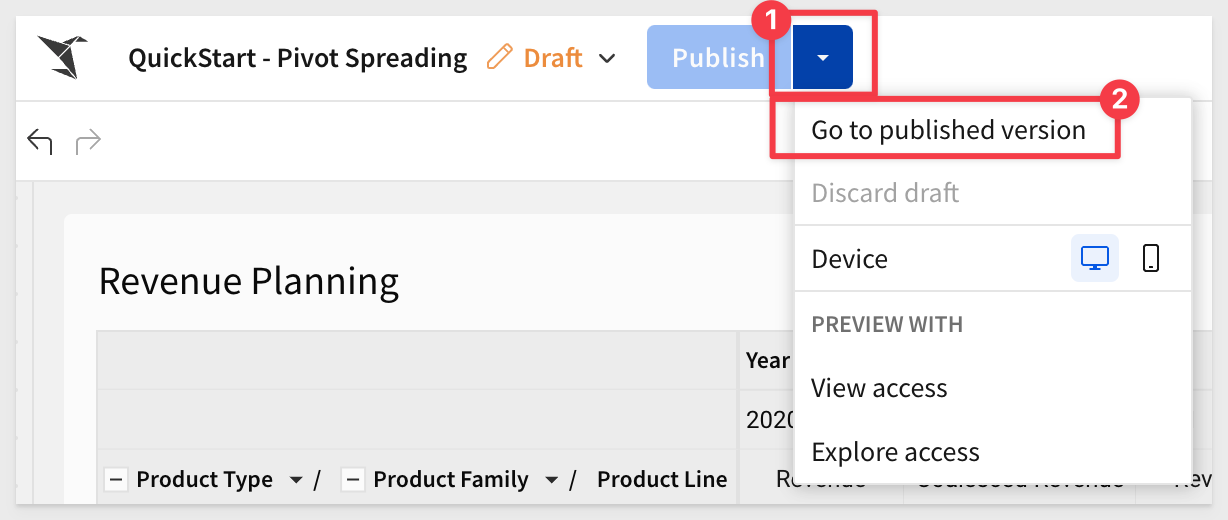
Click Publish and switch to the published version:
Give it a test
Clicking on a value in a Coalesced Revenue column:
We set P Adjustment to 90000 and clicked Change.
Since we are directly changing values, the Calculated Adjustment is also 90000.
After saving, we are returned to the Pivot page and can see the value we selected for Coalesced Revenue has been updated to 90000.
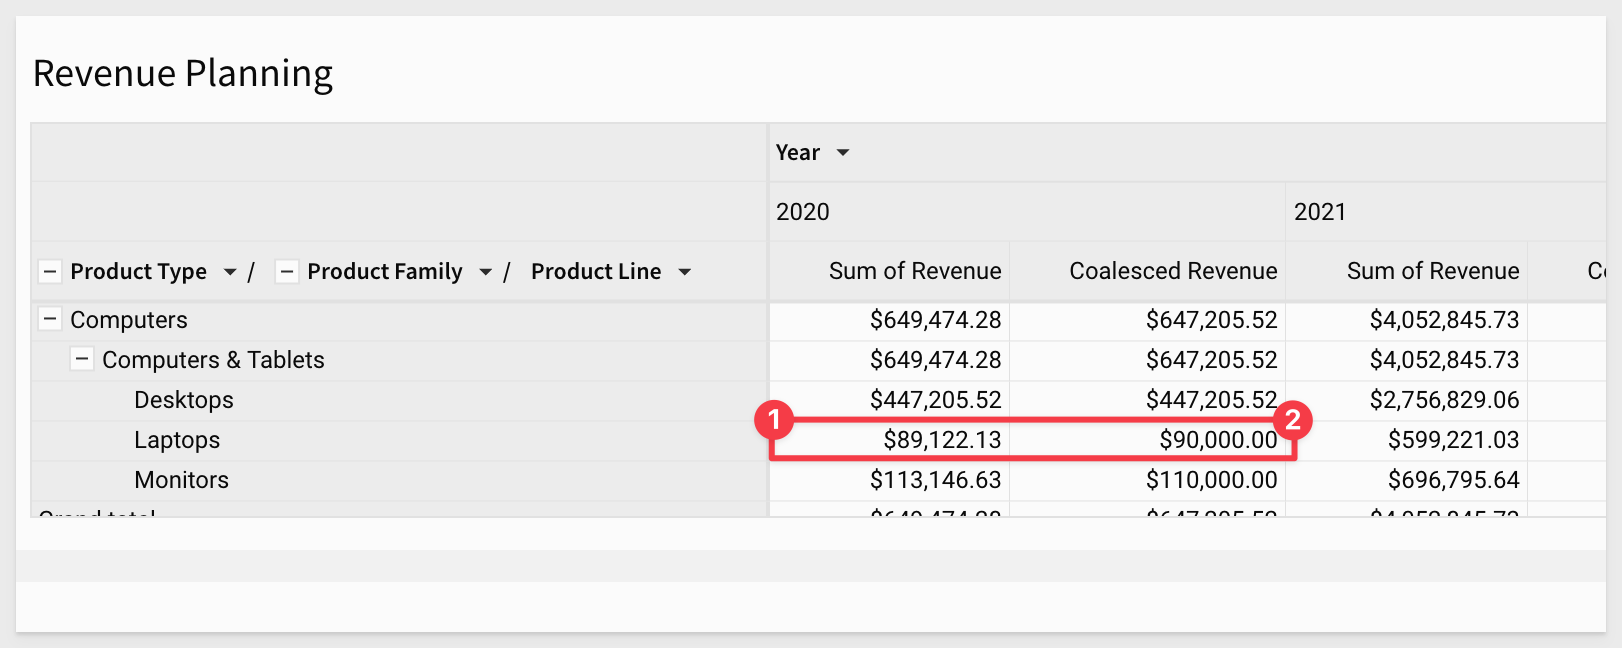
Notice that the original value for Sum of Revenue in 2020 has not changed as we did not want to alter the source data.
Feel free to try more adjustments using the Adjust or Scale methods. They will work as expected and the actual calculations that were called out earlier can easily be adjusted to suit different business requirements.
Add a new page to the workbook and rename it to Log.
Add a new table and connect it to the SQL_LOG table:

For clarity, we cleared the SQL_LOG table and did one adjustment so we could show the expected results from each adjustment saved.
SQL Text contains the actual query that was built and executed by the procedure:

This can be really useful in debugging and tracking. Of course, there are other options like using Sigma's Audit Logging or Snowflake's Query History reporting as well.
In this QuickStart, we built a data application to enable end users to make adjustments in a pivot table, without altering the underlying data.
This functionality allows businesses to transition from static reporting to dynamic, interactive workflows.
Additional Resource Links
Blog
Community
Help Center
QuickStarts
Be sure to check out all the latest developments at Sigma's First Friday Feature page!