This QuickStart demonstrates integrating JIRA's REST API with Sigma using Basic Authentication and API Actions. You'll connect to JIRA Cloud, query issues using JQL (JIRA Query Language), and optionally update issue statuses directly from Sigma workbooks.
Unlike simple no-authentication examples, this QuickStart shows enterprise-grade patterns using authenticated API requests with dynamic parameters.
What you'll build:
A Sigma workbook that:
- Queries JIRA issues using JQL filters
- Displays issue details (summary, status, priority, assignee)
- Allows users to filter issues by project, type, and status
- Optionally updates issue statuses via API write-back
Along the way you'll learn how to:
- Configure JIRA API tokens for Basic Authentication
- Create API credentials in Sigma with Basic Auth
- Build API connectors with dynamic JQL parameters
- Parse JSON responses using Python elements on Snowflake
- Create interactive workflows with API Actions
For more information on Sigma's product release strategy, see Sigma product releases
If something doesn't work as expected, here's how to contact Sigma support
Target Audience
This QuickStart is ideal for:
- Sigma developers integrating external APIs with authenticated endpoints
- Technical users managing JIRA projects who want to create custom dashboards
- Teams building operational workflows that span Sigma and JIRA
Prerequisites
- A Sigma account with workbook creation and API Action permissions
- A JIRA Cloud account (free trial available at Atlassian)
- Intermediate familiarity with Sigma workbooks, controls, and elements
- Access to Snowflake for Python element execution (included with Sigma Sample Database)
- Basic understanding of REST APIs and JSON (helpful but not required)

Assuming you have already created a JIRA trial account, perform the following steps:
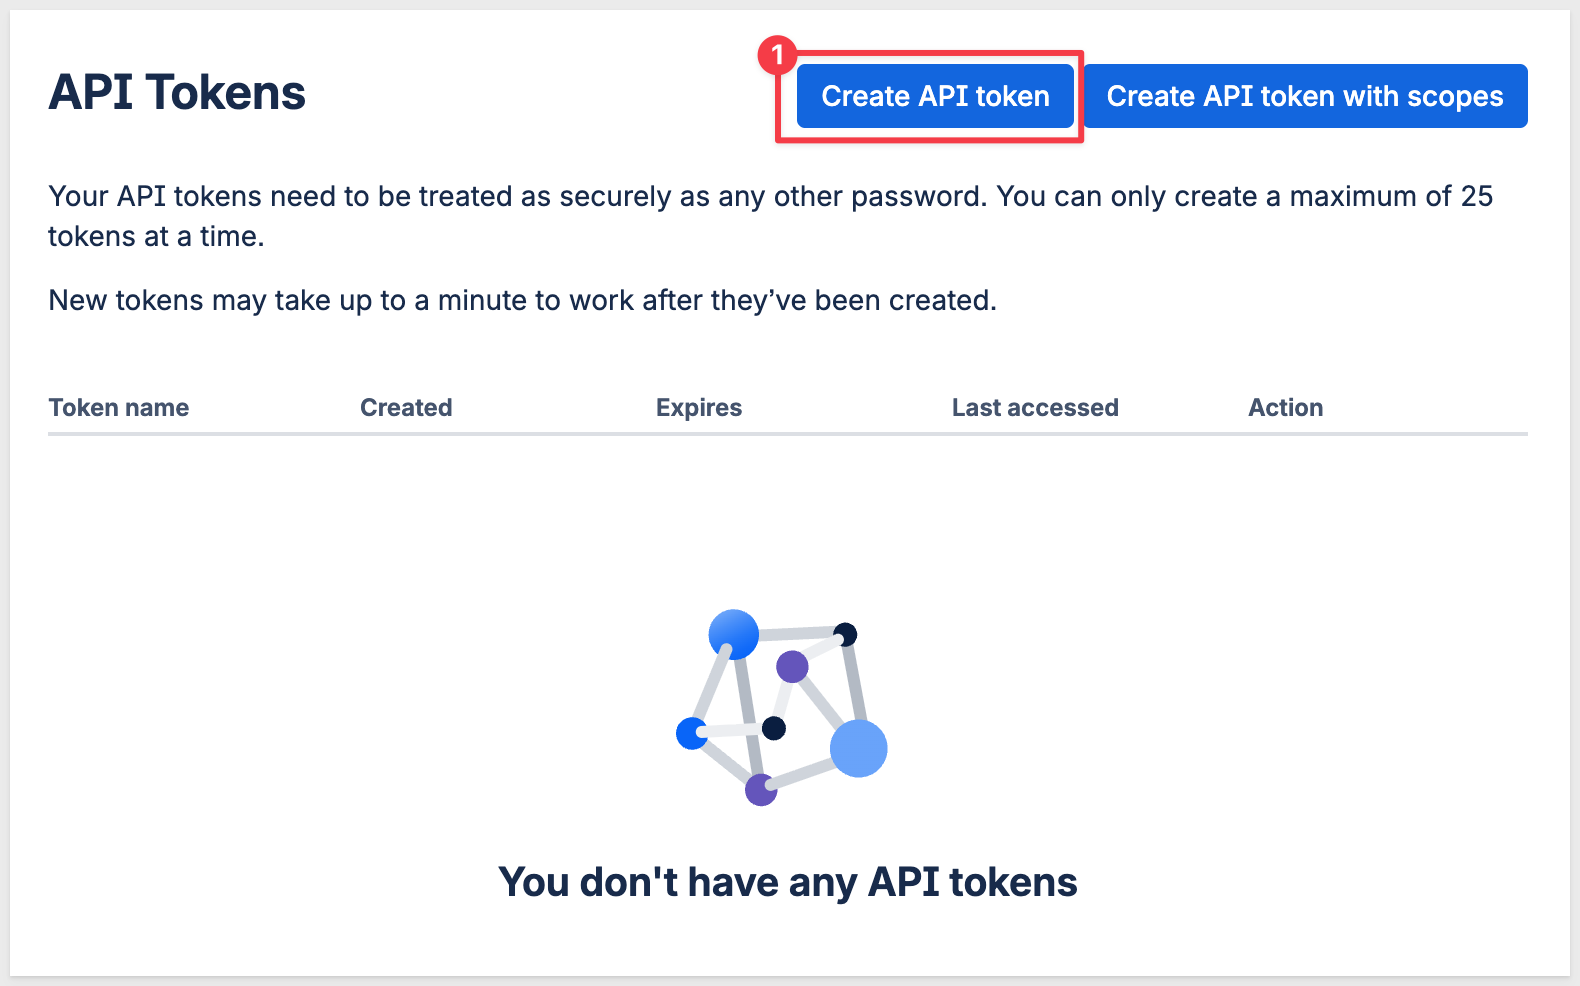
- Browse to: JIRA API Tokens creation page
- Click
Create API token:
- Name it:
QuickStarts Tokenand give it a date in the future that allows enough time to complete testing:
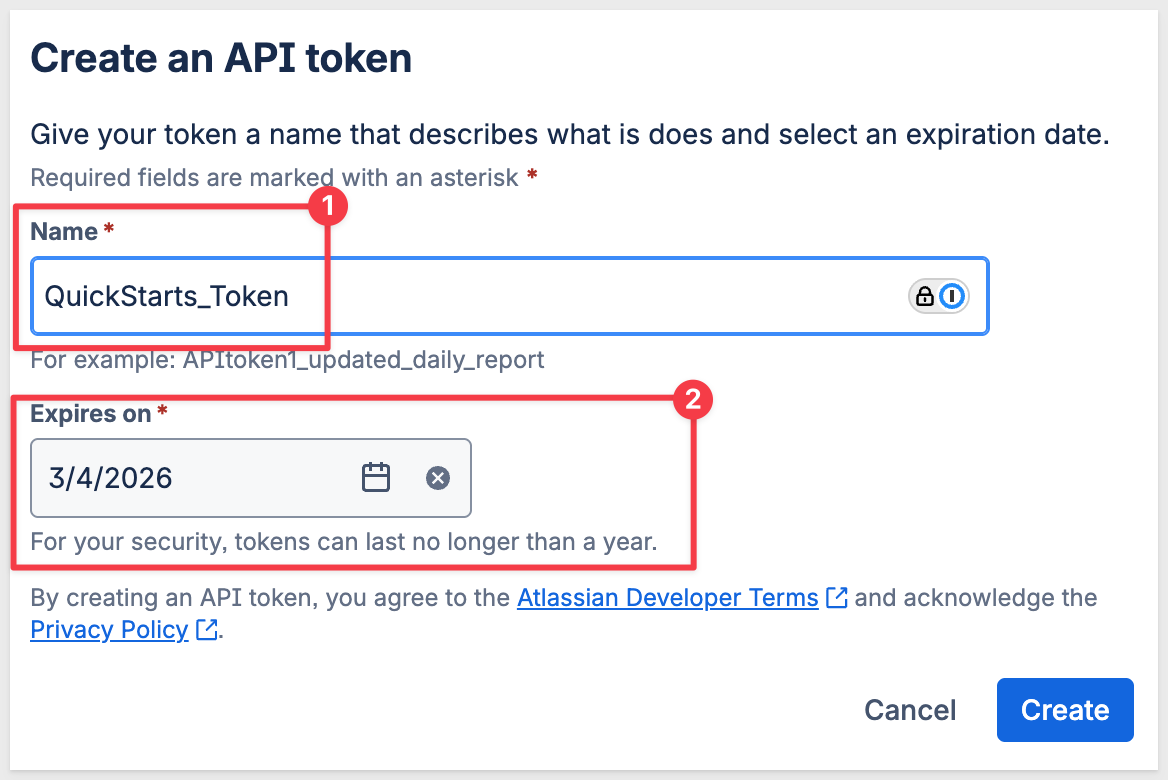
- Click
Create - Copy the token immediately - you won't see it again! (place it in a safe location):
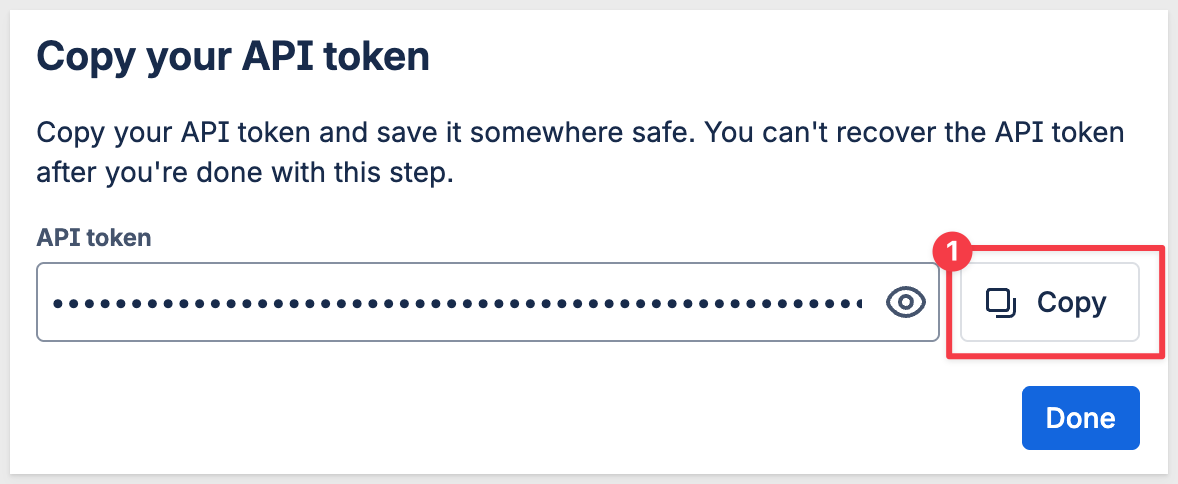
- Click
Done.
JIRA Cloud uses Basic Authentication with API tokens. This is simpler than OAuth 2.0 and works well for server-to-server integrations like Sigma.
How Basic Auth works:
- Your email address serves as the username
- The API token you created serves as the password
- Sigma encodes these credentials and includes them in the
Authorizationheader of each API request
Why this approach:
- No OAuth redirect flows or token refresh logic required
- API tokens can be scoped and revoked independently from your JIRA password
- Suitable for automated integrations where user interaction isn't needed
Sigma API Actions support many common authentication methods including (at the time of this QuickStart):
- Bearer token
- Basic Auth
- OAuth (client credentials)
- OAuth (authorization code)
- OAuth (password credentials)
For more information, see Add a new API credential to Sigma
Now we'll create a credential in Sigma that securely stores your JIRA authentication details.
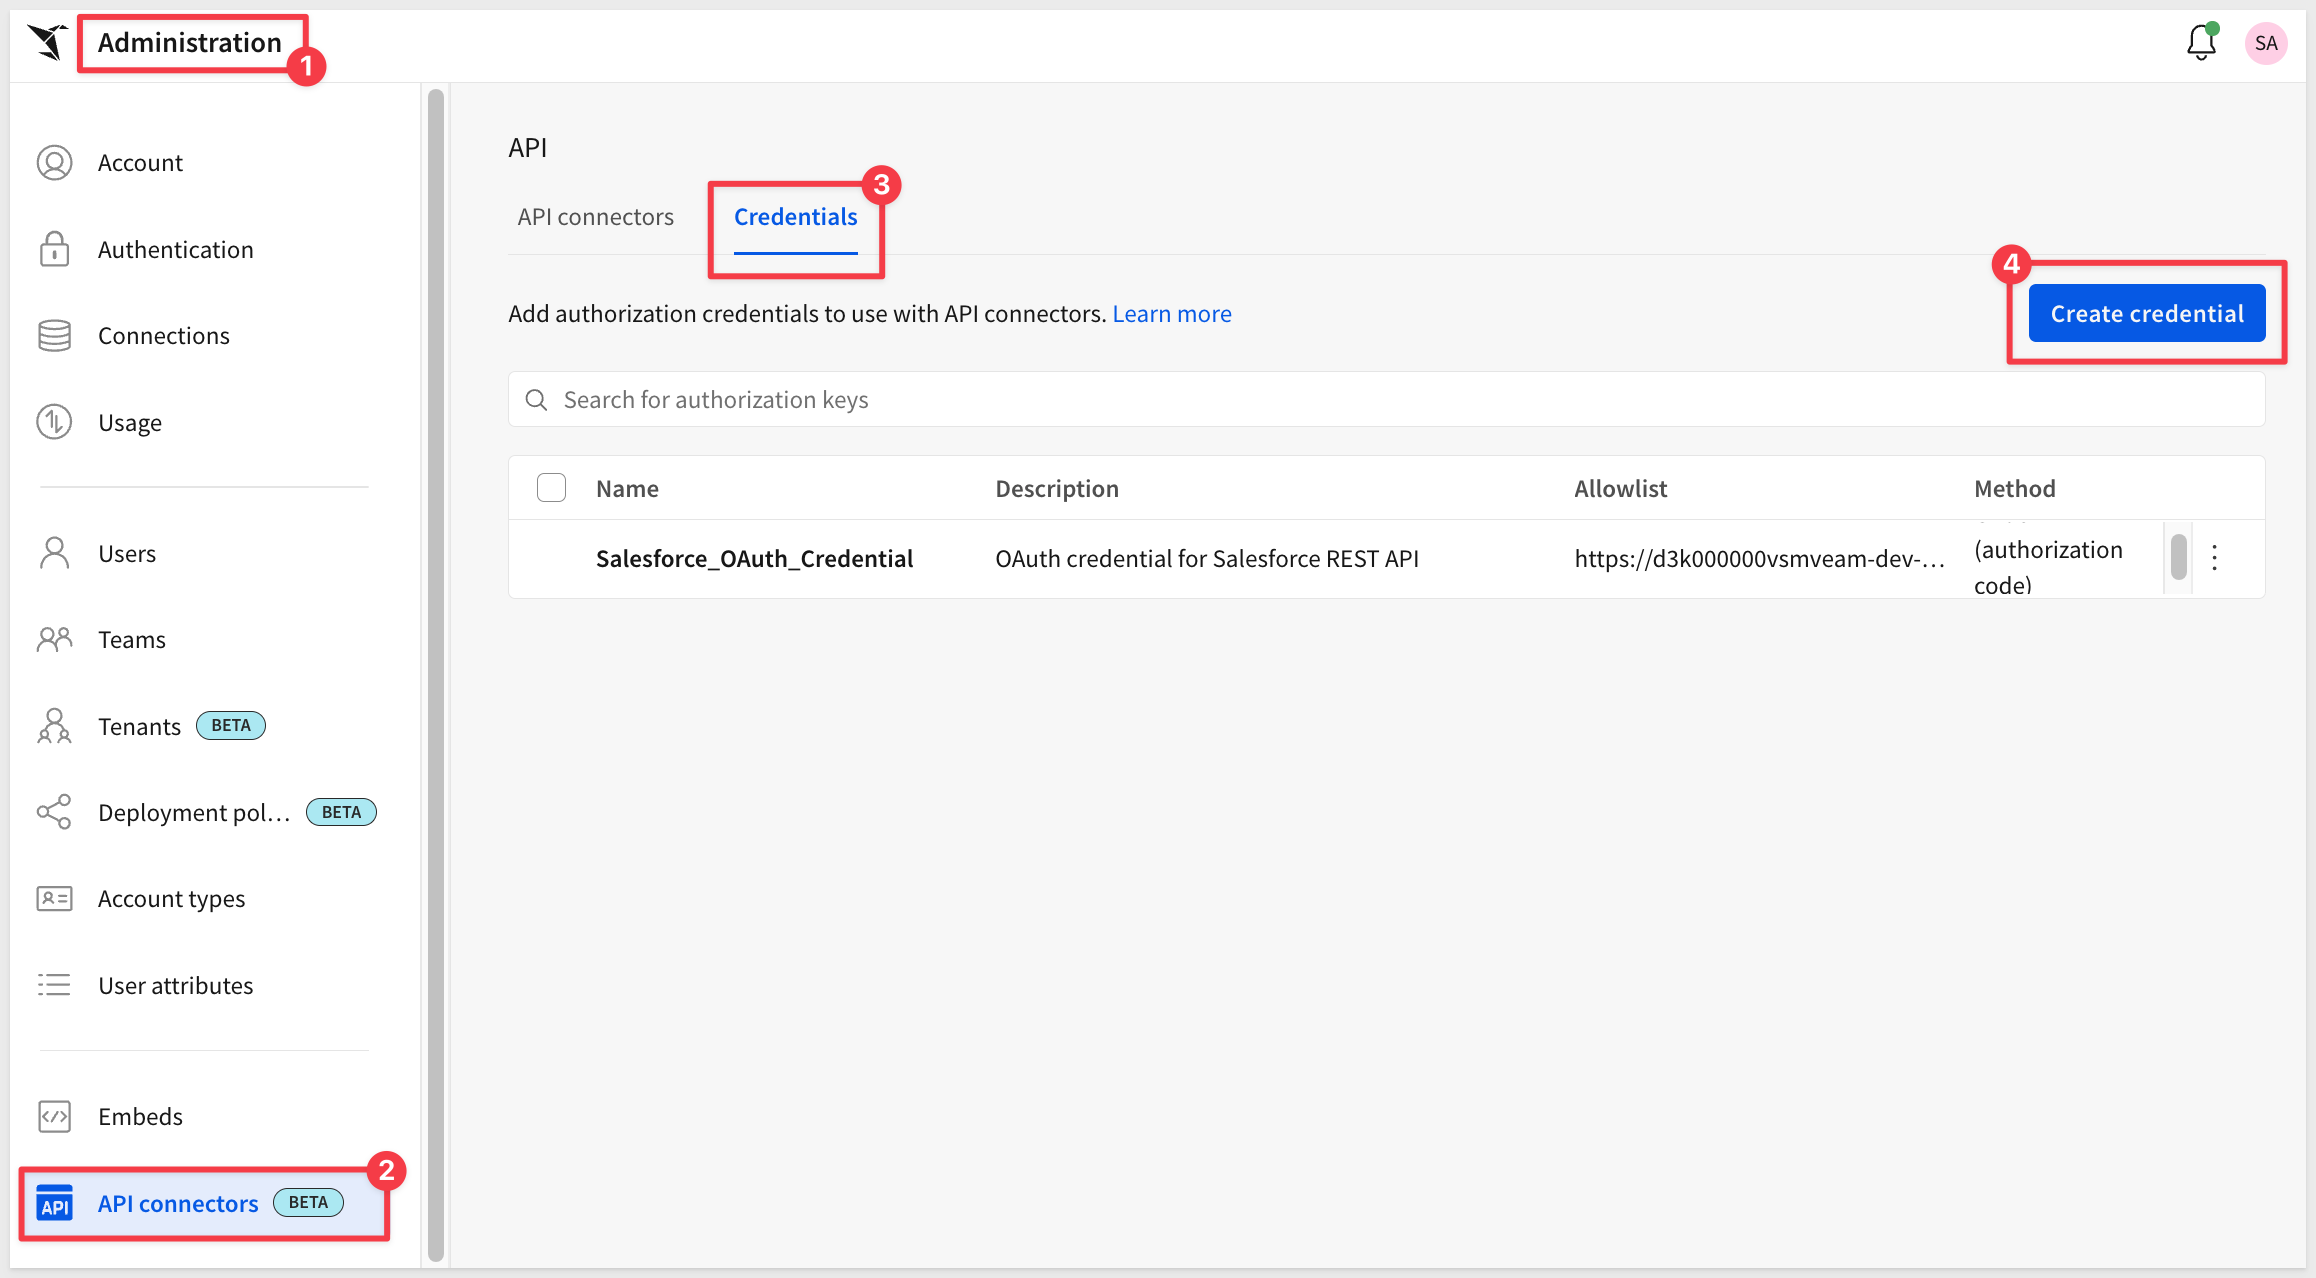
- In Sigma, navigate to
Administration>API connectors>Credentials - Click
Create Credential:
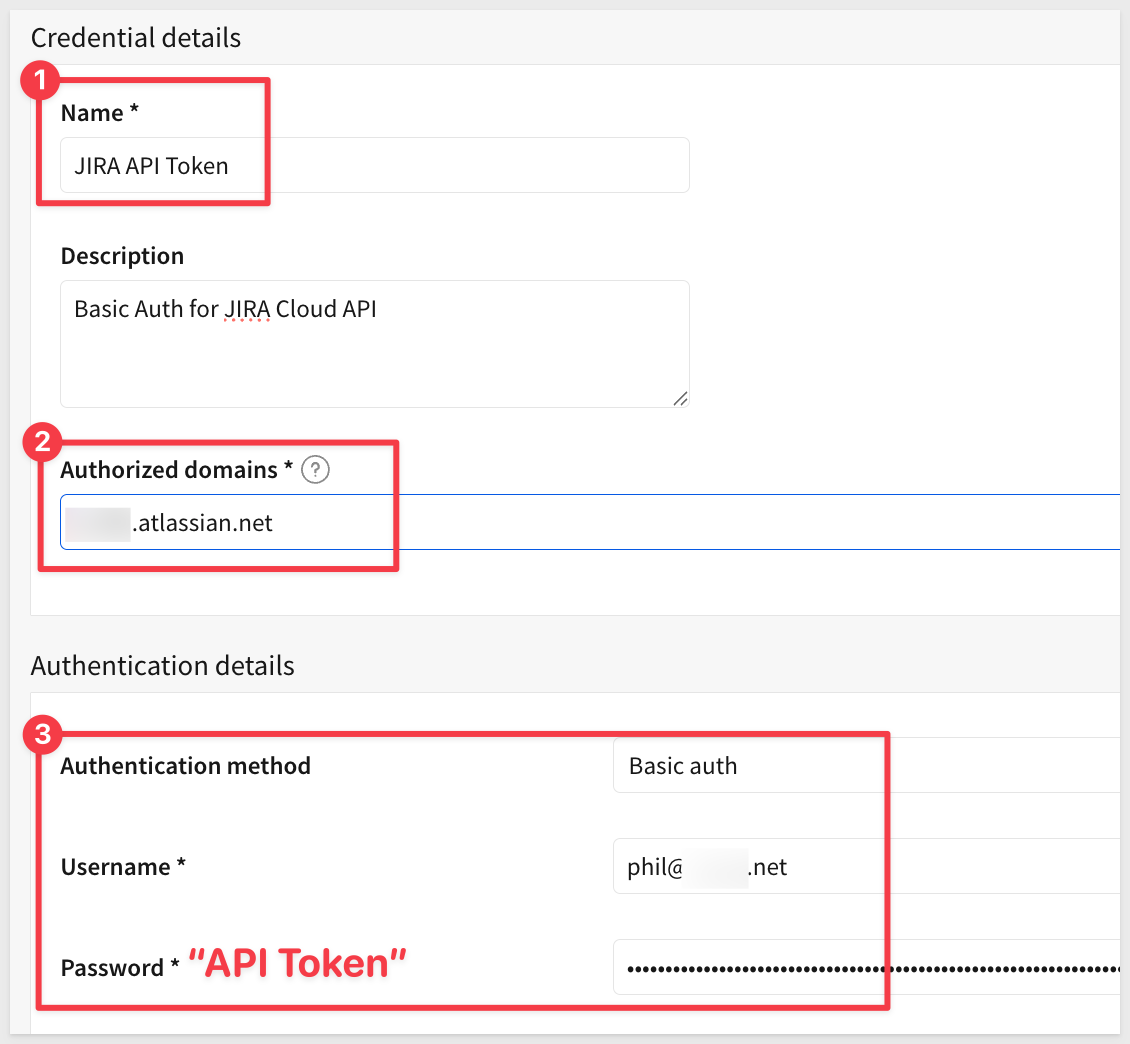
- Configure the credential:
- Name:
JIRA API Token - Description:
Basic Auth for JIRA Cloud API - Authorized domains: Your specific JIRA domain (e.g., yourcompany.atlassian.net)
- Authentication method:
Basic auth - Username: Your JIRA email address (e.g.,
yourname@domain.com) - Password: Paste the API token you created in the previous section (the API token serves as the password for Basic auth)
- Name:
- Click
Save.
The credential is now available for use in API connectors throughout your Sigma organization.
API connectors define the endpoints we'll call from Sigma. First, let's create a connector that searches for JIRA issues using JQL.
Create the Connector
- Still on the
Administration>API Connectorspage, select theAPI connectorstab. - Click
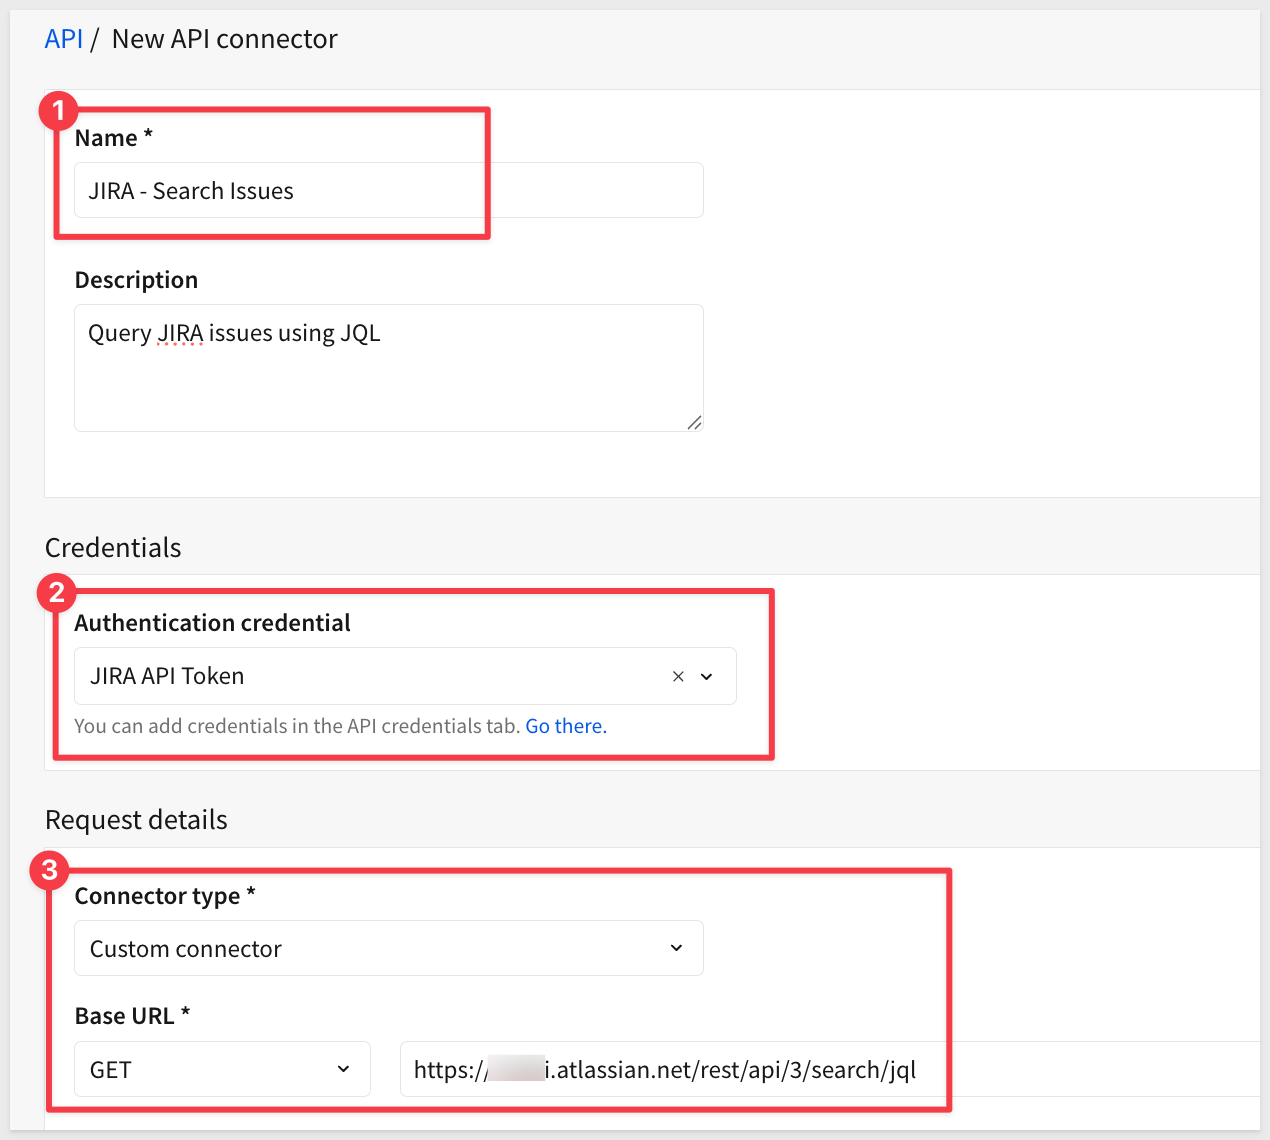
Create connector - Configure the connector details:
- Name:
JIRA - Search Issues - Description:
Query JIRA issues using JQL - Credential: Select
JIRA API Token(the credential we created)
- Name:
- In the
Request detailssection, configure:- Connector type:
Custom connector - Base URL: Set the method to
GETand enterhttps://YOUR-DOMAIN.atlassian.net/rest/api/3/search/jql(replaceYOUR-DOMAINwith your actual JIRA domain)
- Connector type:
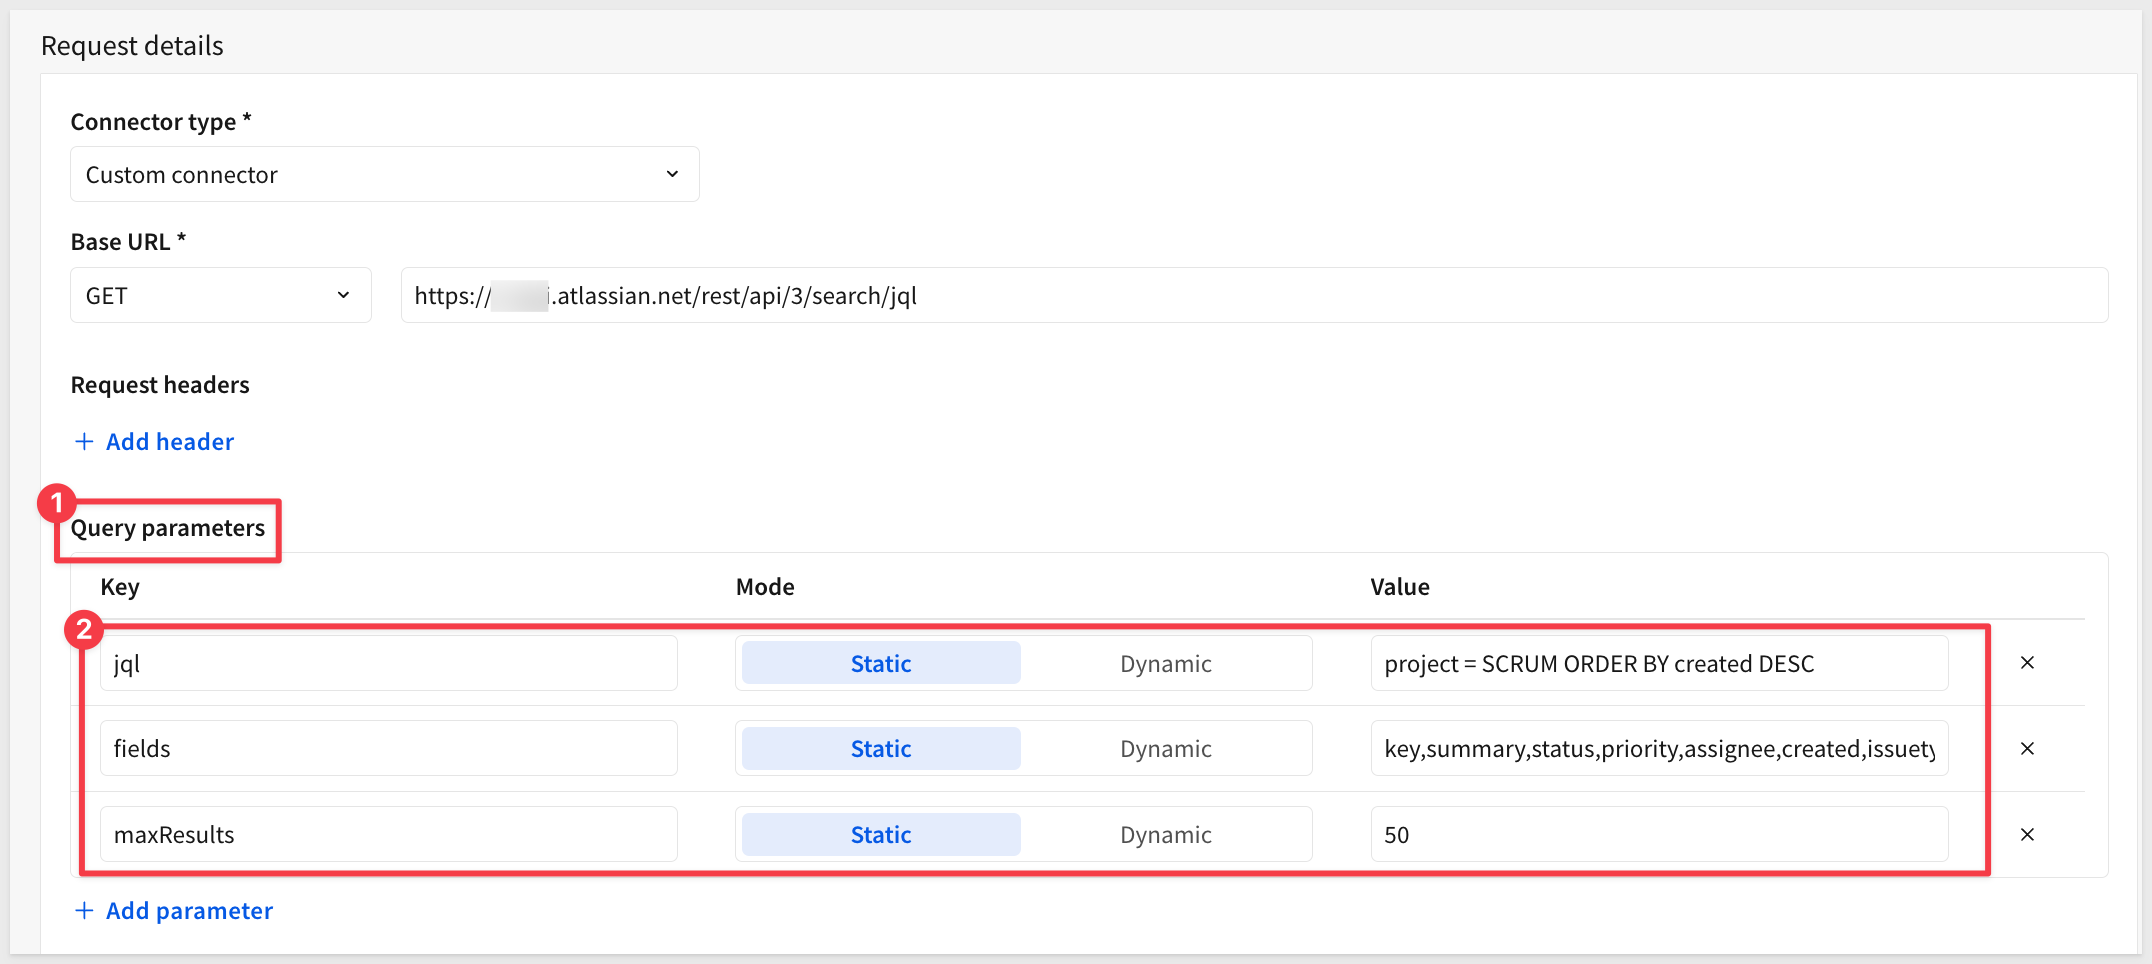
Add Query Parameters
- In the
Query parameterssection, clickAdd parameter:- Key:
jql - Mode:
Static - Value:
project = SCRUM ORDER BY created DESC
- Key:
This default JQL query retrieves all issues from the SCRUM project, ordered by creation date.
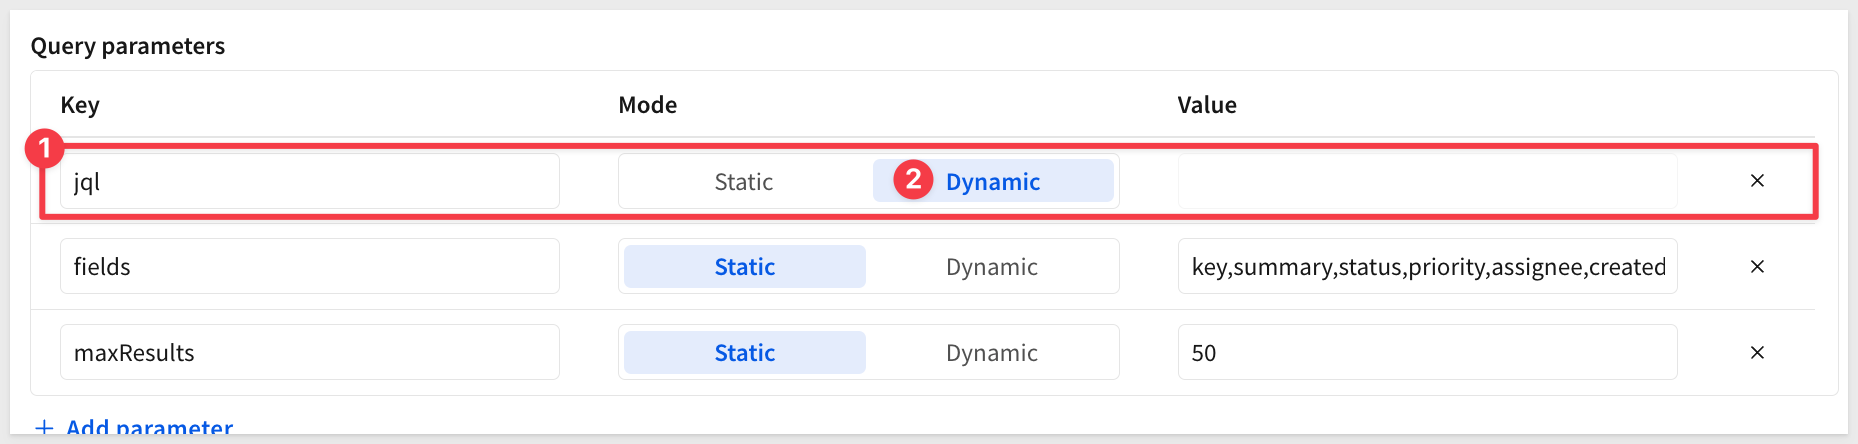
- Add a second query parameter for the fields we want to retrieve:
- Key:
fields - Mode:
Static - Value:
key,summary,status,priority,assignee,created,issuetype
- Key:
This tells JIRA which fields to return in the response. Without this parameter, the API returns minimal data (only IDs).
- Optionally add a third query parameter to limit results:
- Key:
maxResults - Mode:
Static - Value:
50
- Key:
This limits the number of results returned (JIRA's default is 50, maximum is 100).
- Click
Test connectorto verify the connector works.
You should see a successful response with JIRA issue data in JSON format, now including all the fields (key, summary, status, etc.):

- Click
Saveto save the API connector
Before we build the Sigma workbook, let's create some sample issues in JIRA to work with. A JIRA trial starts with empty projects, so we need to add test data.
Navigate to Your Project
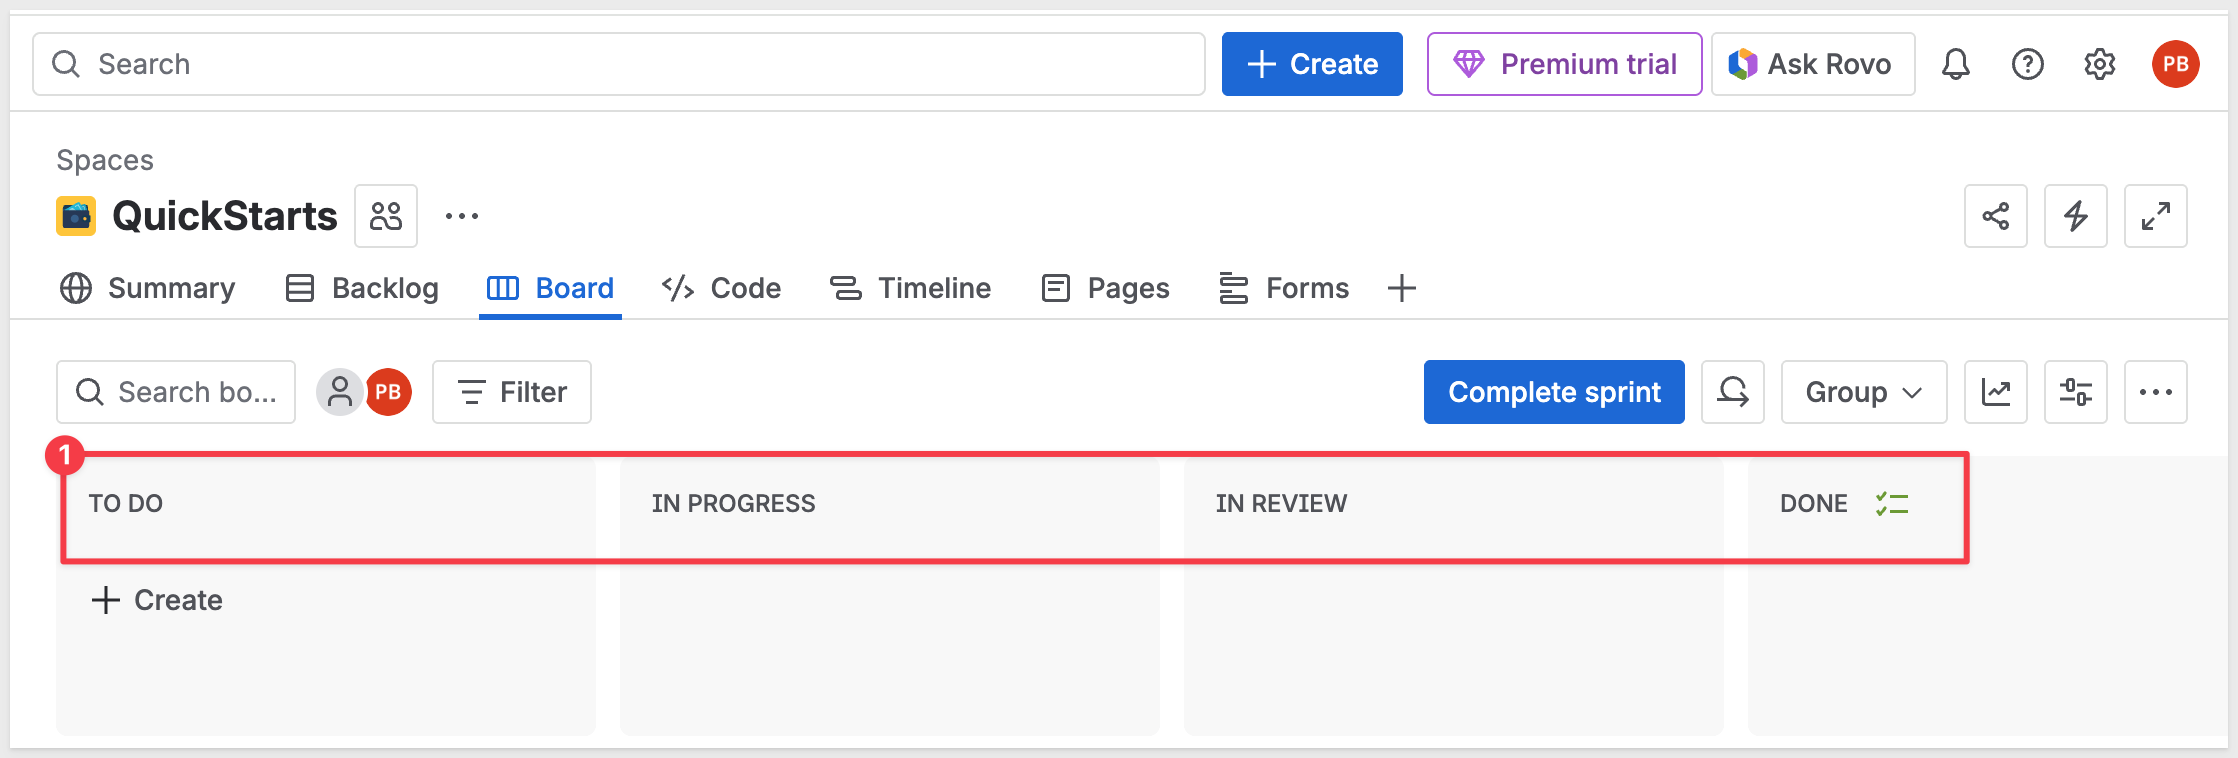
- Go to your JIRA board:
https://YOUR-DOMAIN.atlassian.net/jira/software/projects/SCRUM/boards/1 - You should see a Scrum board with columns:
To Do, In Progress, In Review, Done.
JIRA may have created a couple of default tasks (Task 1, Task 2) to get you started. You can keep these or delete them to make the UI cleaner.
Create Issues
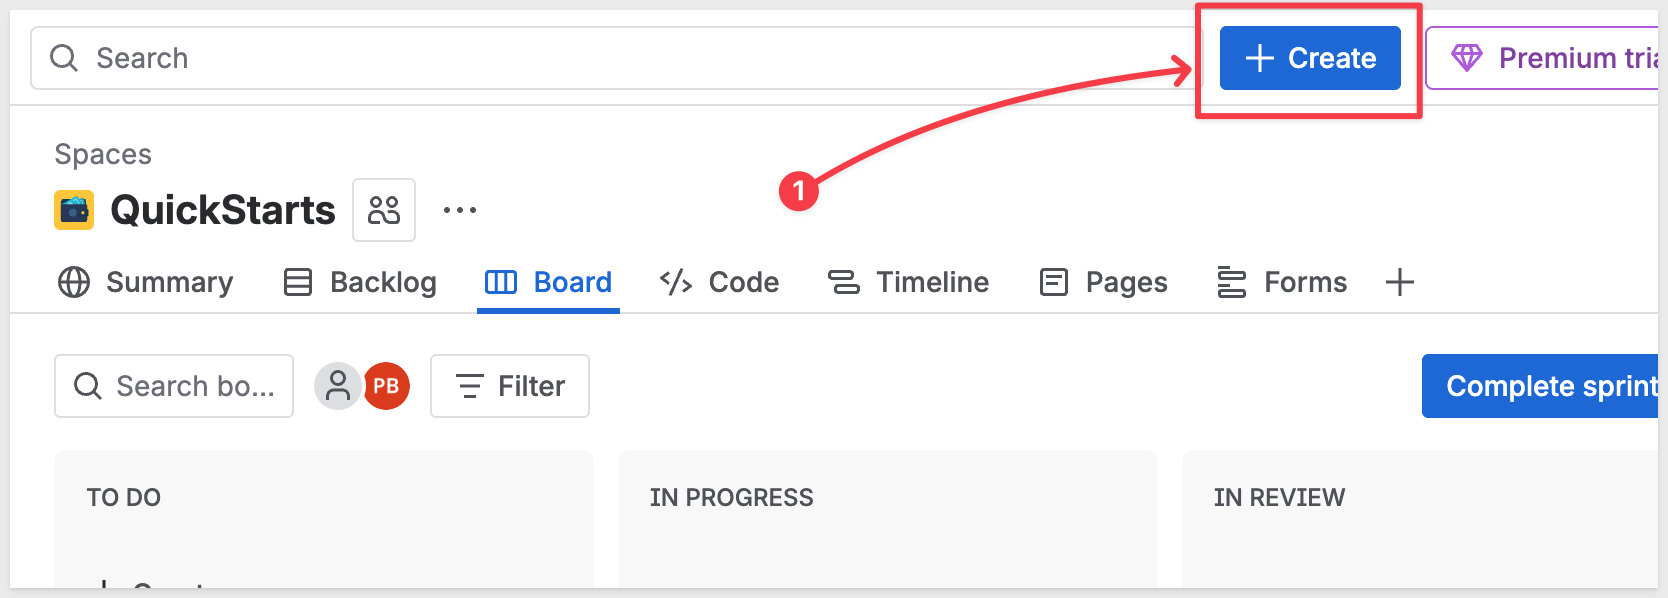
- Click the
+ Createbutton at the top of the page:
- Select
TaskforWork type. - For the
Summaryfield, useSet up development environment - Click
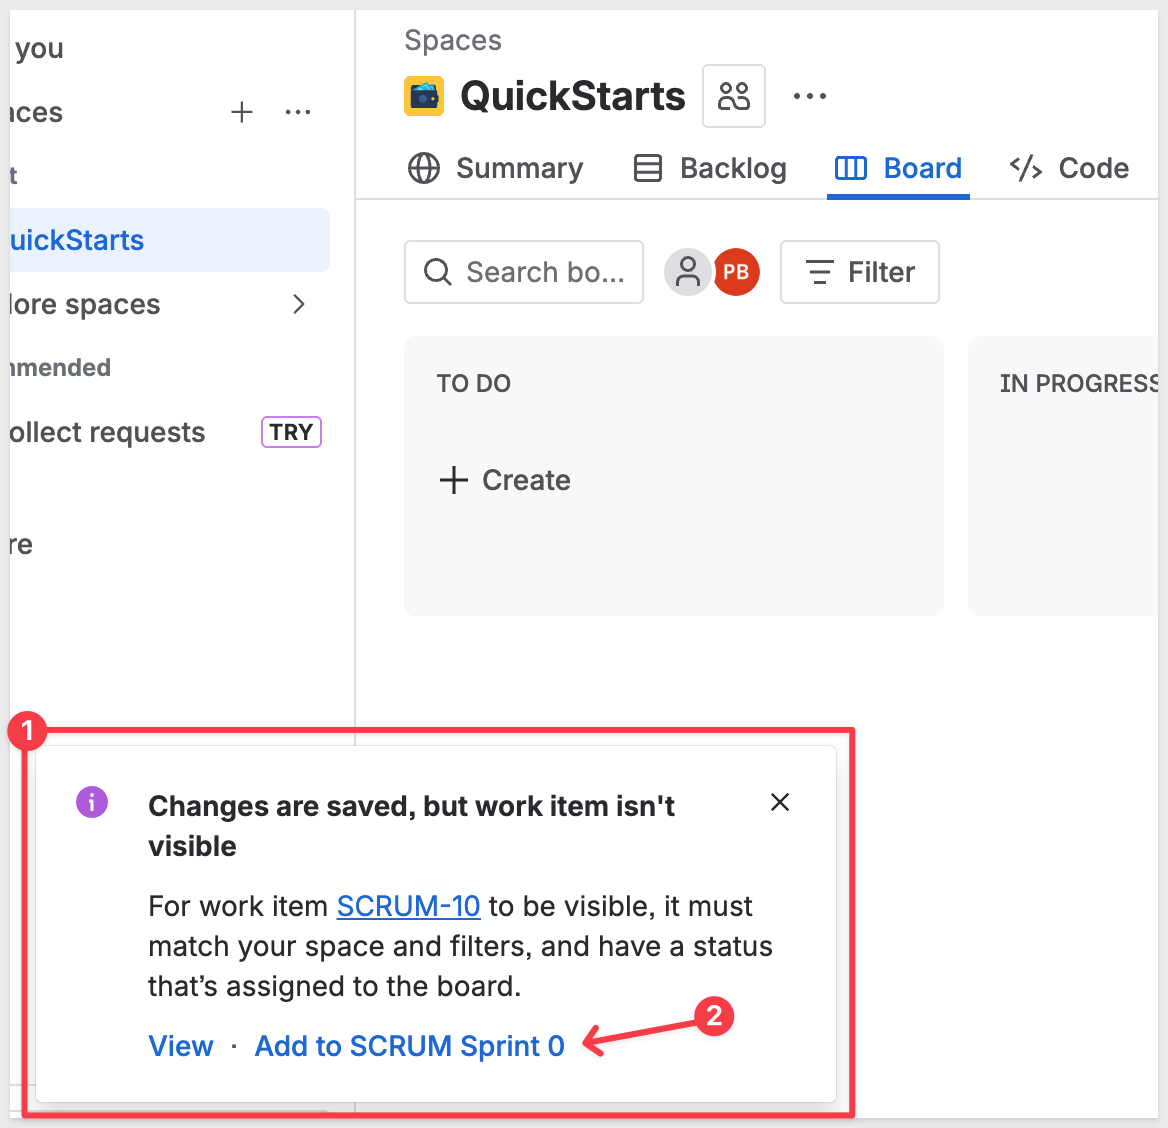
Create.
A popup will appear that allows us to assign the new task to our default scrum and sprint. Click the Add to SCRUM Sprint 0 link:
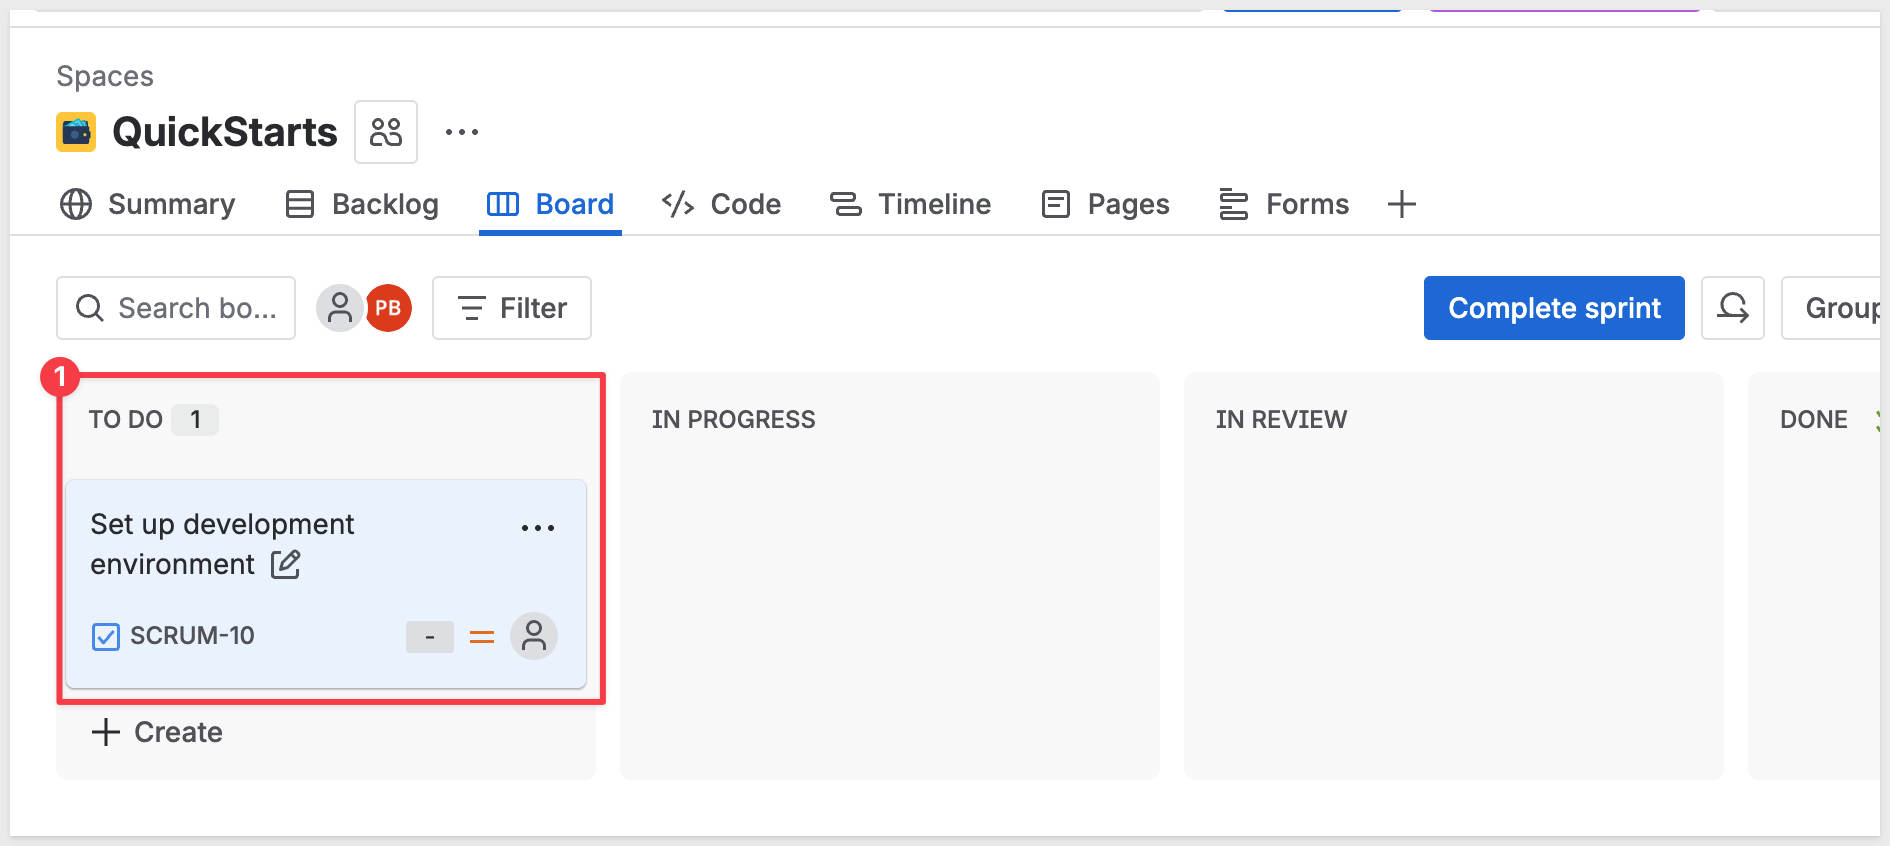
The issue will appear in the TO DO column:
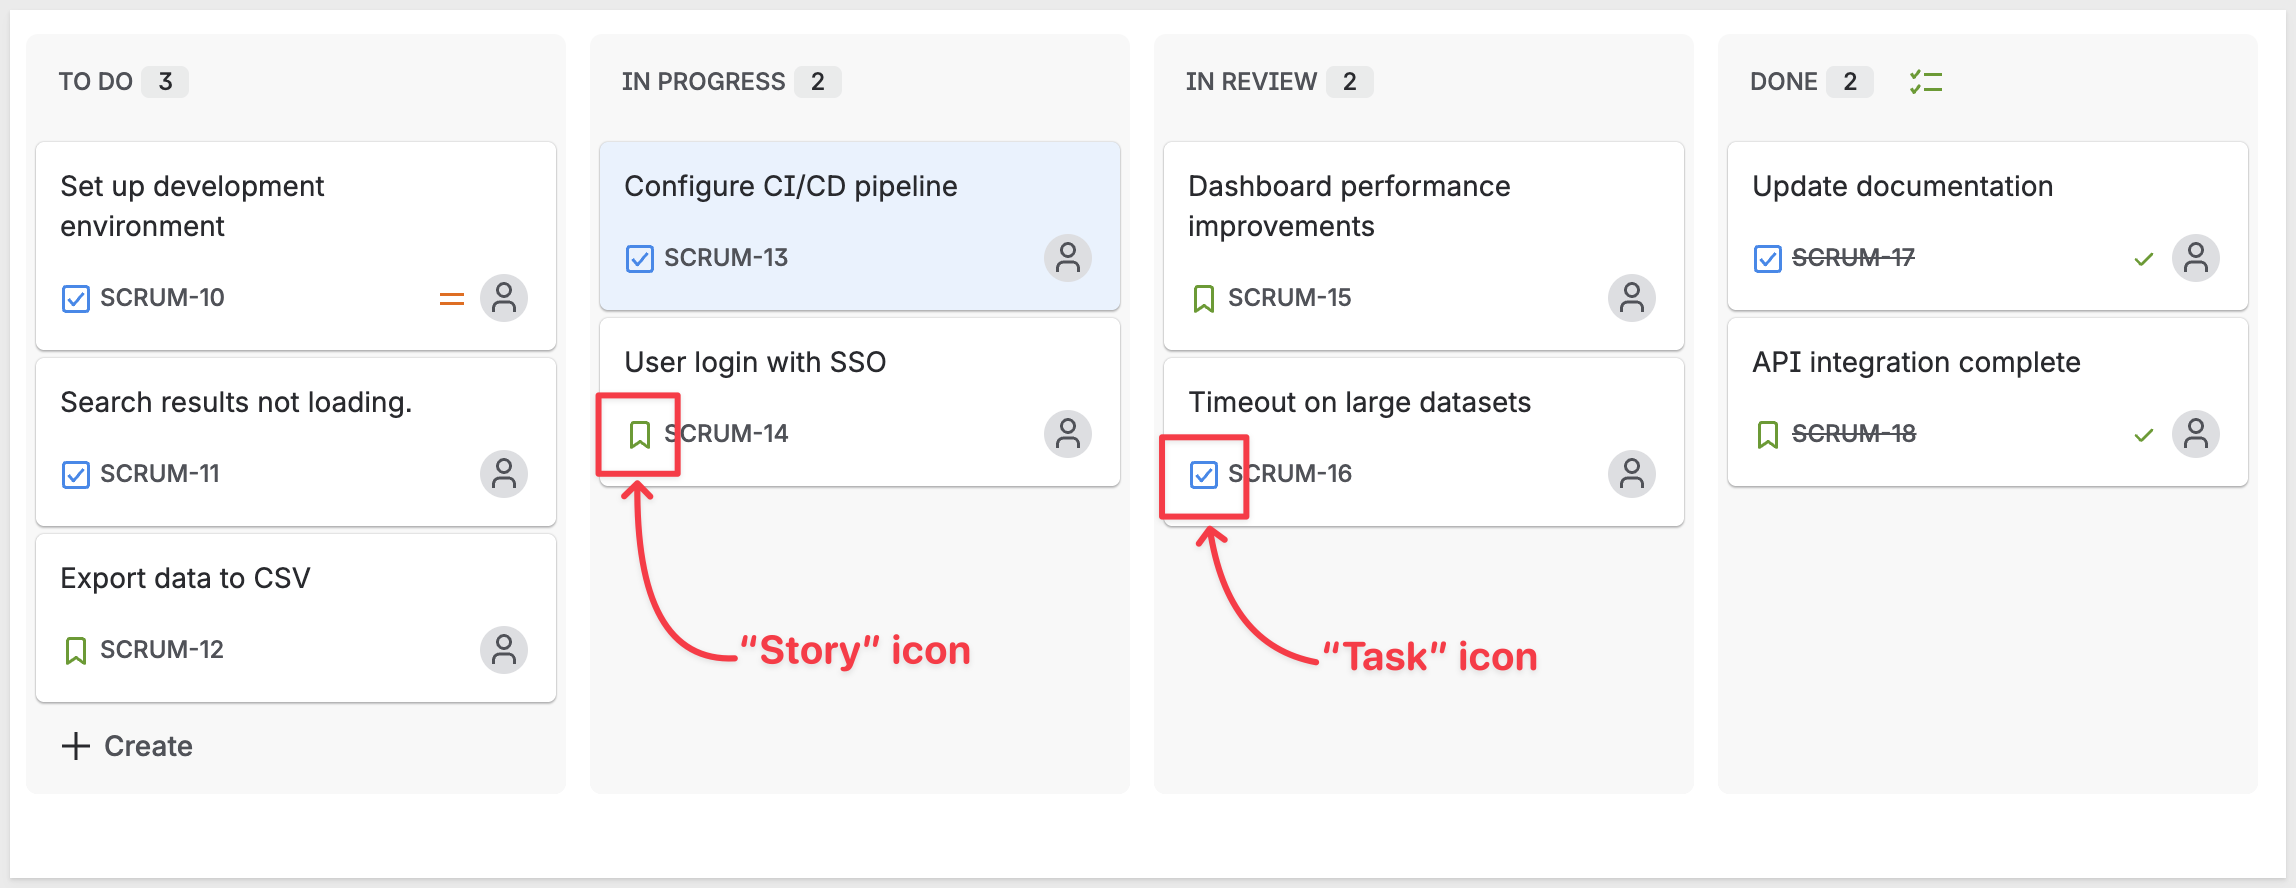
- Create additional issues with variety using different work types (Task, Story, Epic). Here's a suggested set organized by status:
TO DO:
Search results not loading(Task)Export data to CSV(Story)
IN PROGRESS:
Configure CI/CD pipeline(Task)User login with SSO(Story)
IN REVIEW:
Dashboard performance improvements(Story)Timeout on large datasets(Task)
DONE:
Update documentation(Task)API integration complete(Story)
The following optional sections are provided to orient readers less familiar with JIRA and are not required.
Set Different Statuses (optional)
- To change an issue's status, drag and drop it between columns on the board:
- Drag some issues to
In Progress - Drag some to
In Review - Drag some to
Done
- Drag some issues to
Add Details (Optional)
- For more realistic data, click on individual issues and add:
- Priority: High, Medium, or Low
- Assignee: Assign some to yourself, leave others unassigned
- Labels: Add tags like "backend", "frontend", "urgent"
- Due dates: Add dates to a few issues
Verify Your Data (Optional)
- Once you've created several issues, test the JQL query in JIRA:
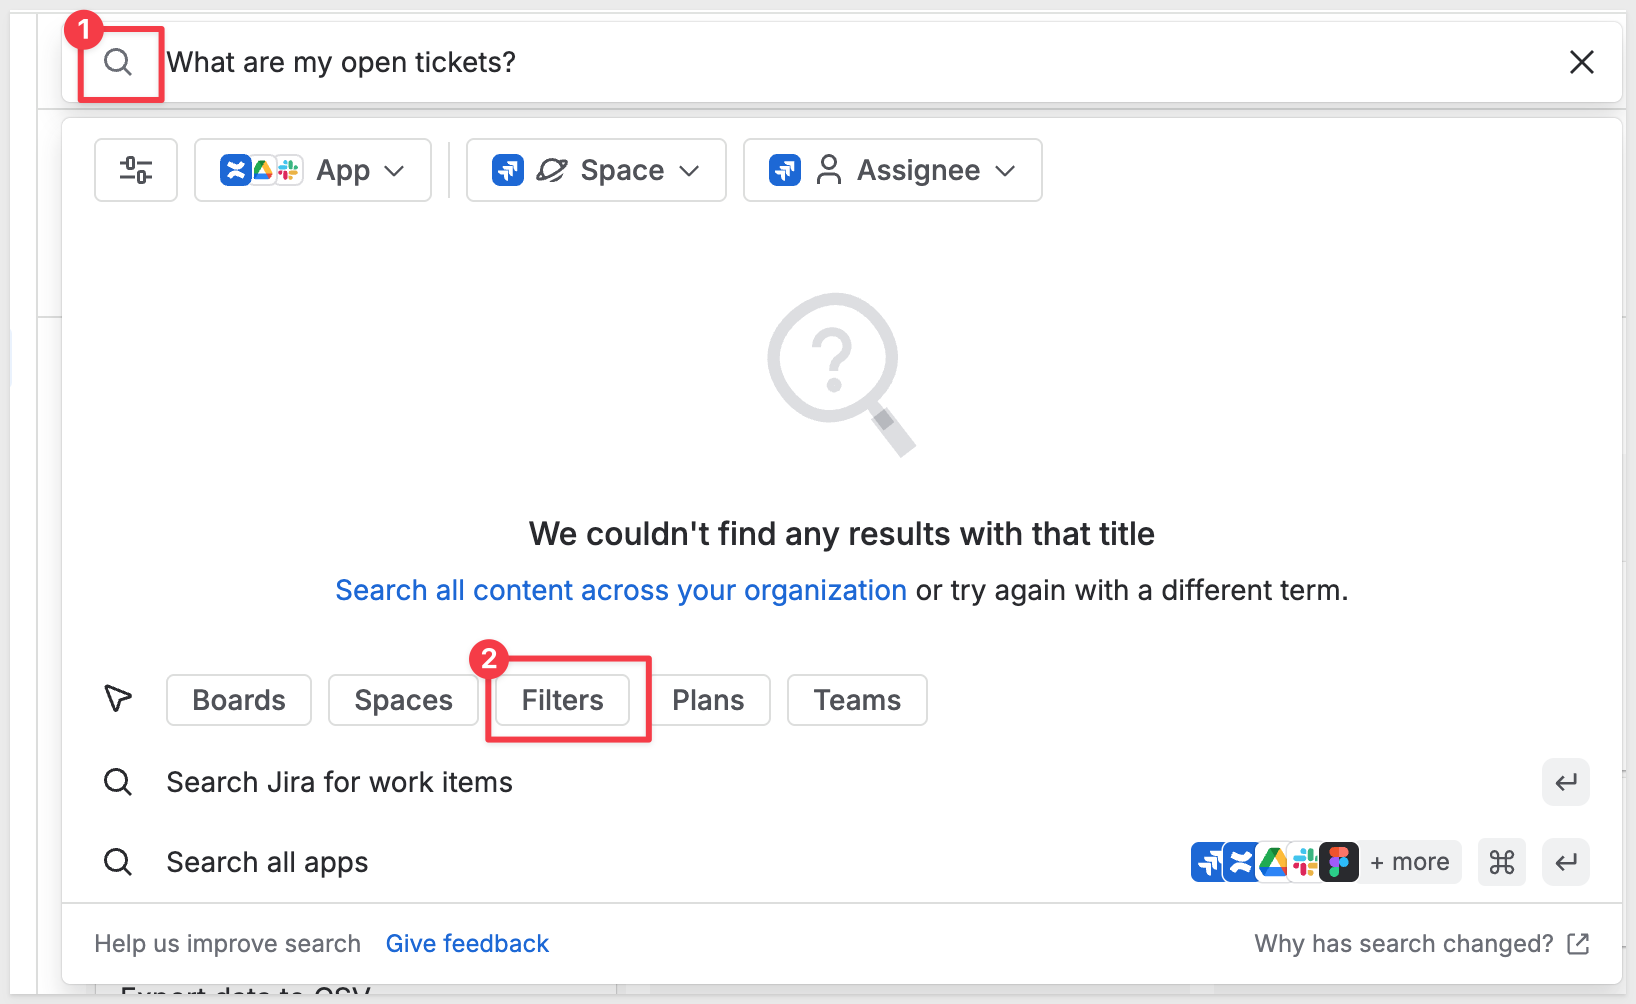
- Click the search icon in the top navigation
- Click on
Filterstab at the bottom:
- Click
Create filter:
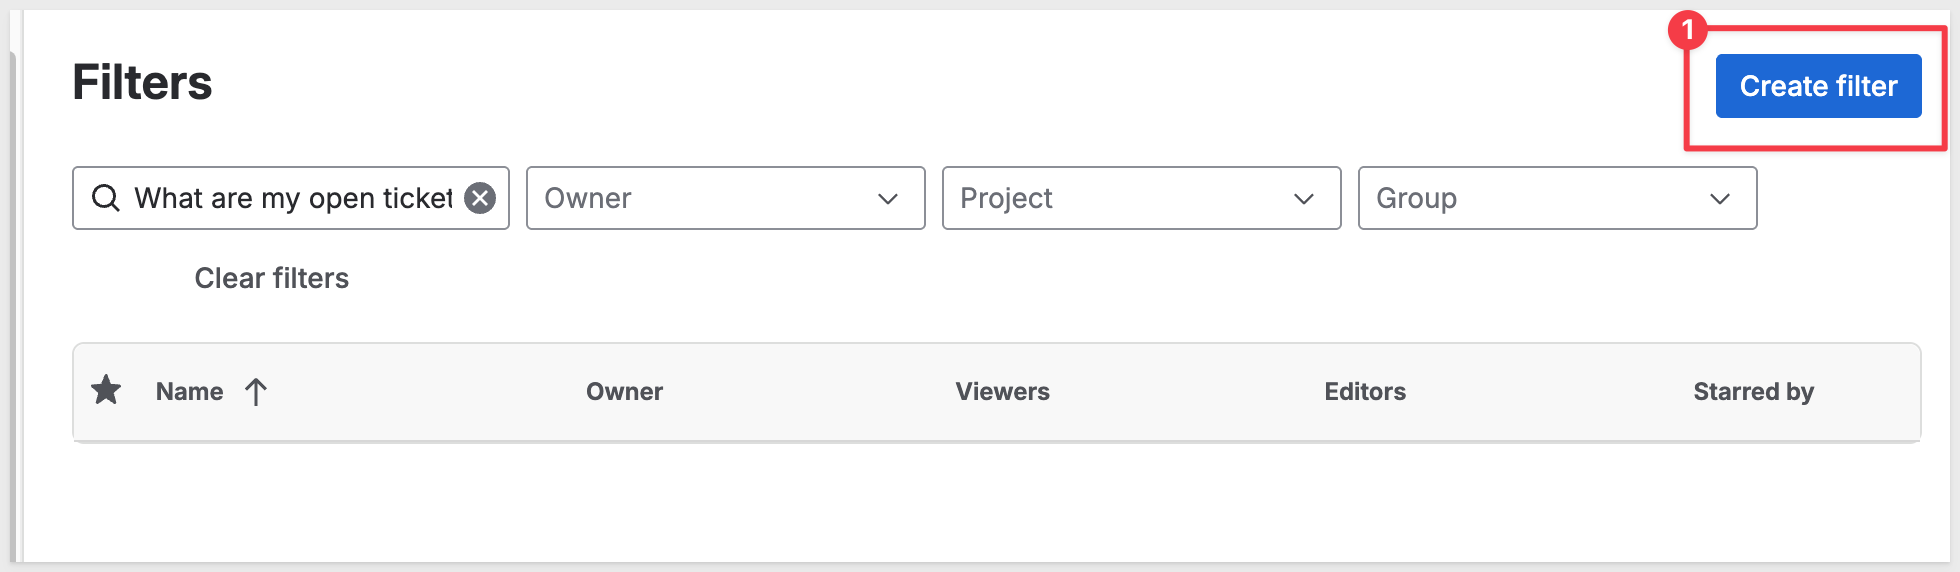
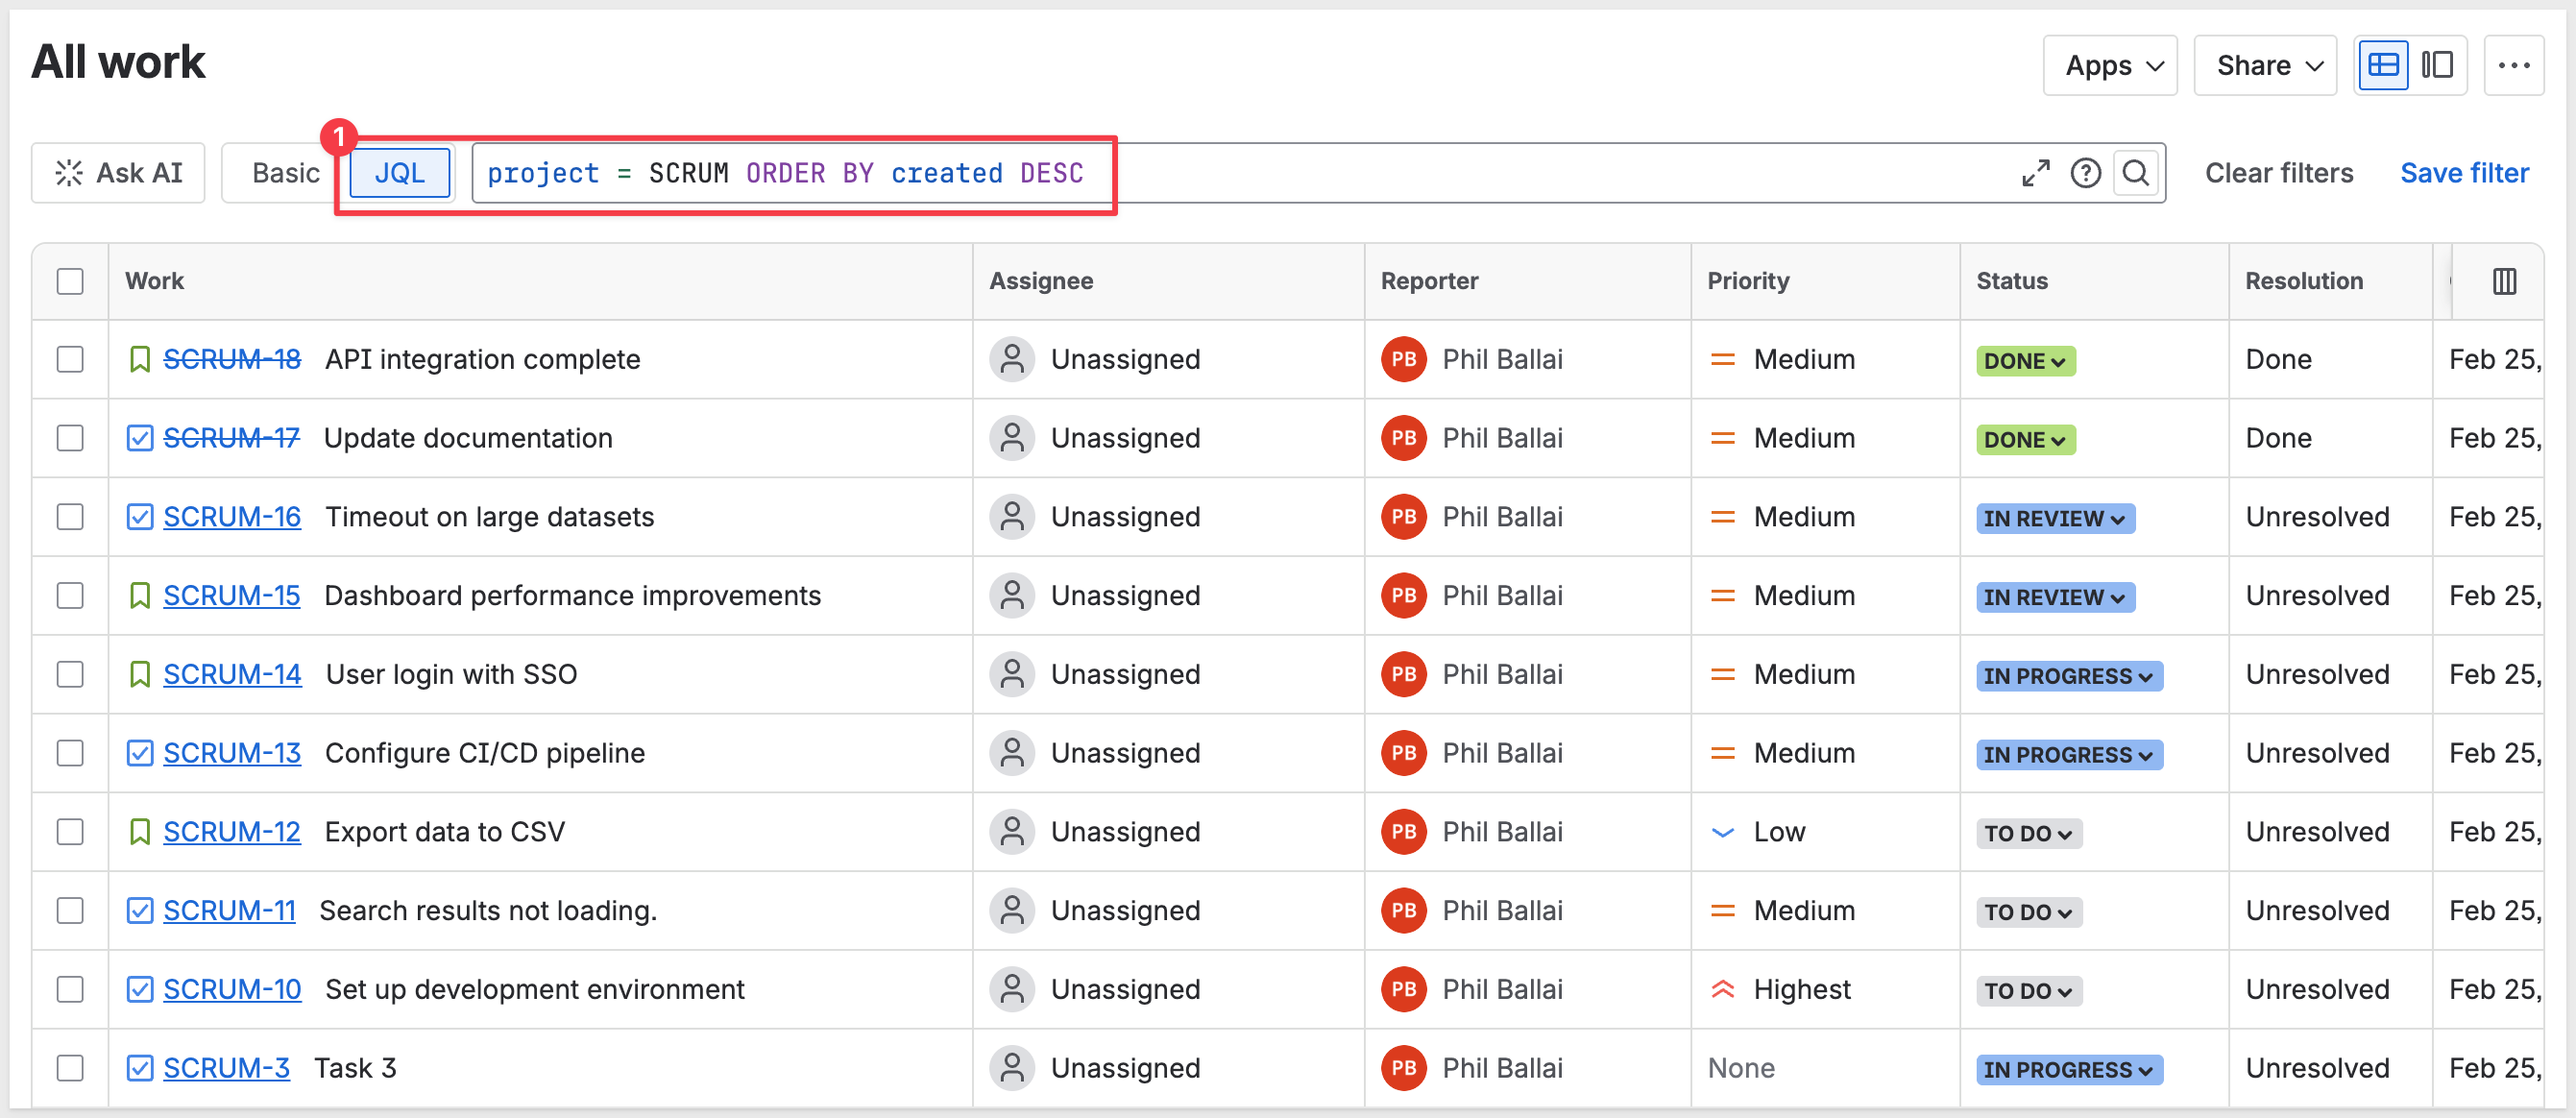
- In the search bar, enter:
project = SCRUM ORDER BY created DESC - You should see all your issues listed
Alternatively, you can verify by simply viewing your board - all the issues you created should be visible in their respective columns.
Now you're ready to query this data from Sigma!
Before building the workbook, let's understand how we'll parse JIRA's JSON responses using Python. We're covering this now so you understand the overall data flow before implementing it in the next section. This preview will make the workbook setup clearer and help you understand why each element is needed.
Why Python elements:
JIRA's API returns nested JSON with arrays of issues, each containing multiple fields. Python elements (which run on Snowflake) let us transform this JSON into tabular data that Sigma can display and analyze.
How the workflow works:
- Button action calls API → stores JSON response in a text area control
- Python element reads from text area → using
sigma.get_control_value() - Python parses and flattens JSON → extracts fields from nested structure
- Python outputs DataFrame → using
sigma.output()to make it available to child elements - Child table element displays data → shows the parsed issues in table format
What the Python code does:
import pandas as pd
import json

# Read the API response from the text area control
raw = sigma.get_control_value("raw-response")

# Parse the JSON response
response_data = json.loads(raw)

# Extract issues array
issues = response_data.get('issues', [])

# Flatten nested JSON into tabular format
flattened_issues = []

for issue in issues:
    flattened_issues.append({
        'Issue Key': issue['key'],
        'Summary': issue['fields']['summary'],
        'Status': issue['fields']['status']['name'],
        'Priority': issue['fields']['priority']['name'] if issue['fields'].get('priority') else 'None',
        'Assignee': issue['fields']['assignee']['displayName'] if issue['fields'].get('assignee') else 'Unassigned',
        'Created': issue['fields']['created'],
        'Work Type': issue['fields']['issuetype']['name']
    })

# Convert to DataFrame
df = pd.DataFrame(flattened_issues)

# Output the DataFrame so child elements can use it
sigma.output("jira_issues", df)
This code extracts key fields from each nested issue object and creates a DataFrame with one row per issue.
For more information, see Write and run Python code in Sigma
Now let's create a workbook that calls the JIRA API and displays the results.
Create a New Workbook
- In Sigma, click
Create New>Workbook - Click
Save asand name the workbookJIRA Issues QuickStartin your preferred location - Rename the first page from
Page 1toIssues
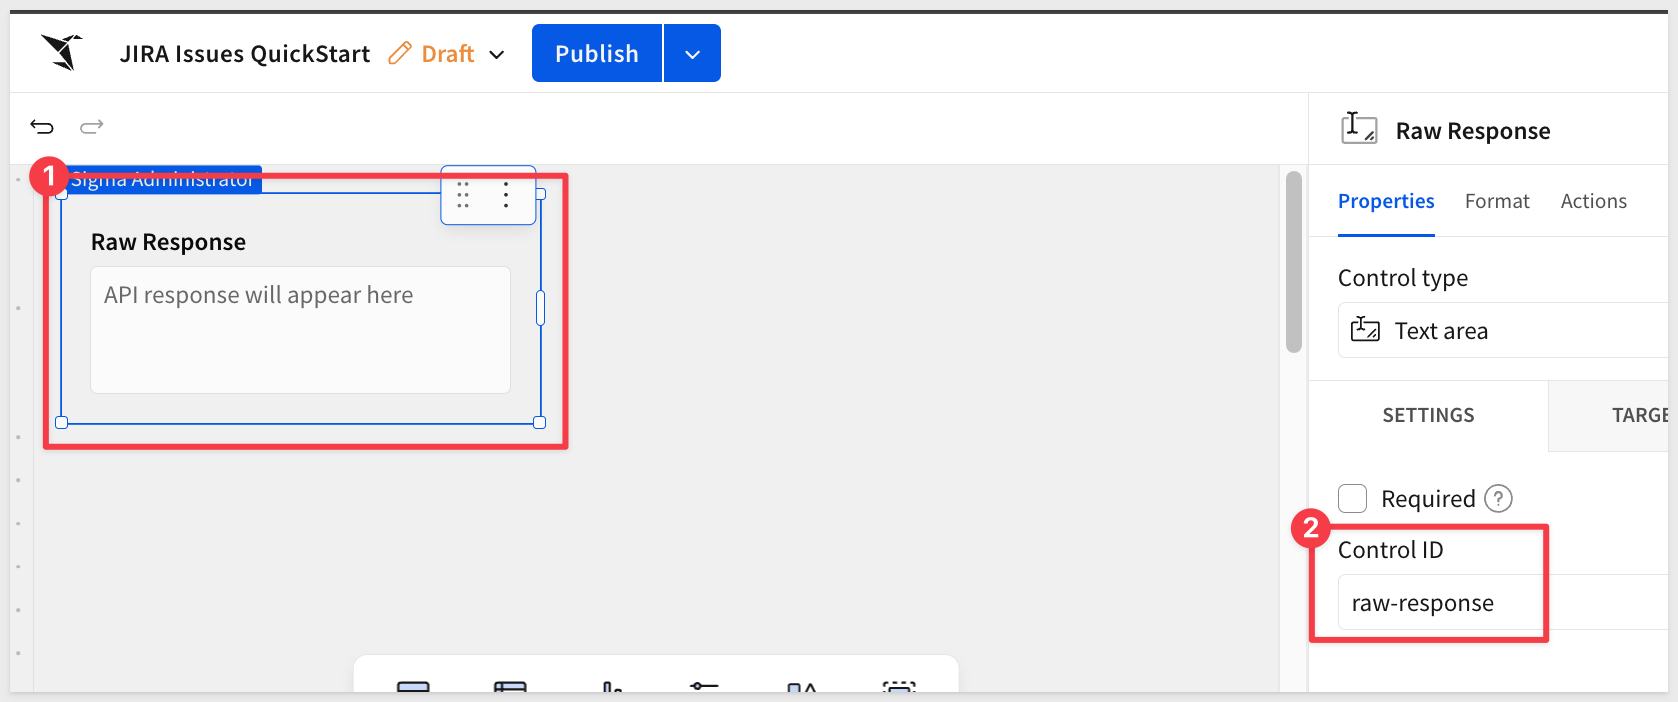
Add a Text Area for Raw Response
- From the
Element bar, add aText areacontrol from theControlsgroup - Configure the text area:
- Control ID:
raw-response - Placeholder (found in the
Format>ELEMENT STYLEtab):API response will appear here
- Control ID:
This control will display the raw JSON response for debugging purposes.
Add a Button to Trigger the API Call
- Add a
Buttonelement from theUIgroup - Change the button text to
Load JIRA Issues
Configure Button Actions
- Click on the button and select
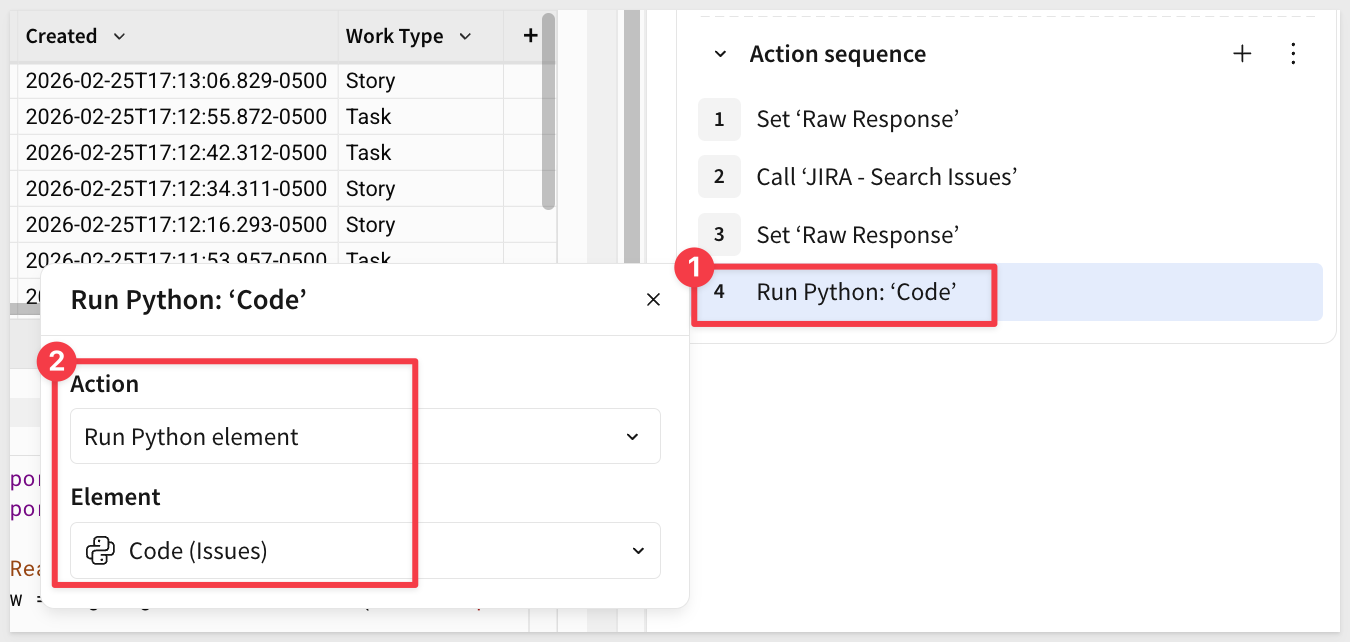
Action sequencefrom theElement propertiespanel
We'll create a sequence of three actions for now:
Action 1: Clear the Raw Response
- Action type:
Set control value - Control:
Raw API Response - Value: Leave blank (this clears the control)

Action 2: Call the JIRA API
- Action type:
Call API - API Connector:
JIRA - Search Issues - Endpoint:
Search with JQL
The Outputs section shows the action variables:
Call 'JIRA - Search Issues' - Data(the response body)Call 'JIRA - Search Issues' - Status(HTTP status code)Call 'JIRA - Search Issues' - Headers(response headers)

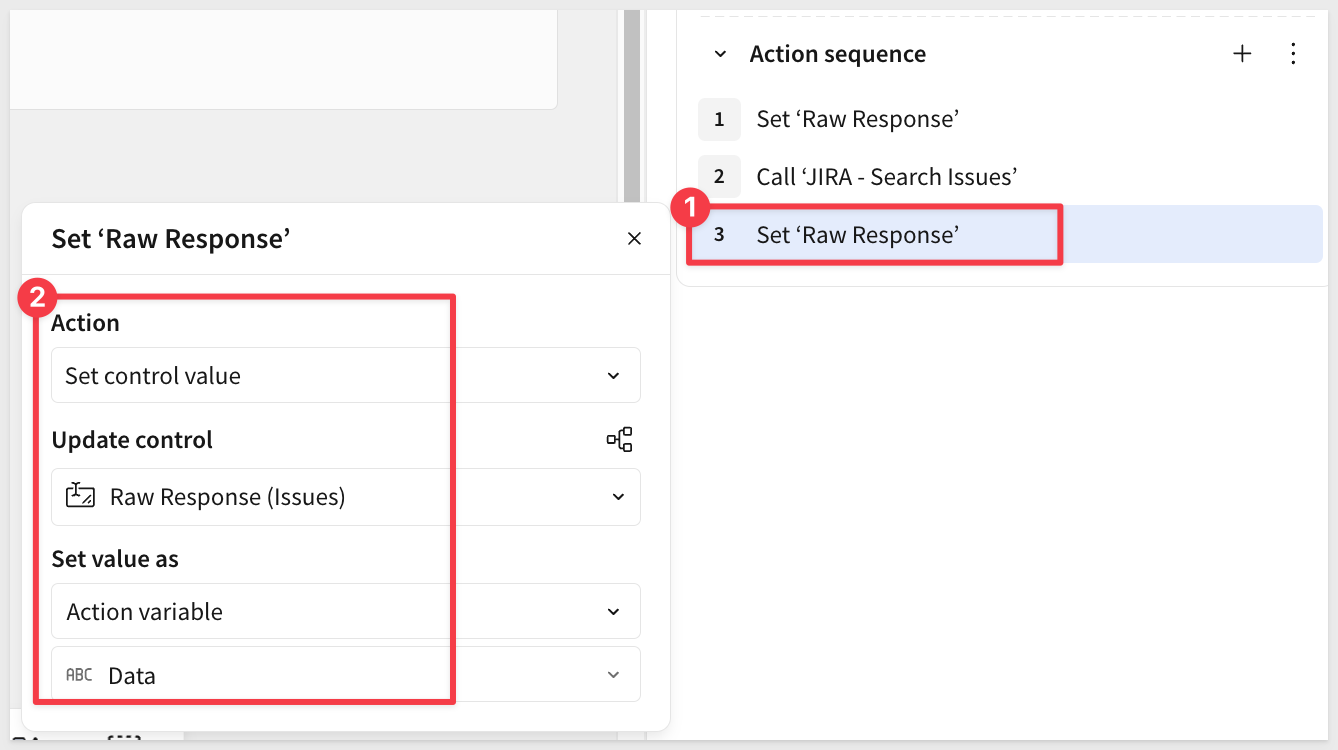
Action 3: Display the Raw Response
- Action type:
Set control value - Control:
Raw API Response - Set value as:
Action variable - Select:
Call 'JIRA - Search Issues' - Data
Test the API Call
- Click the
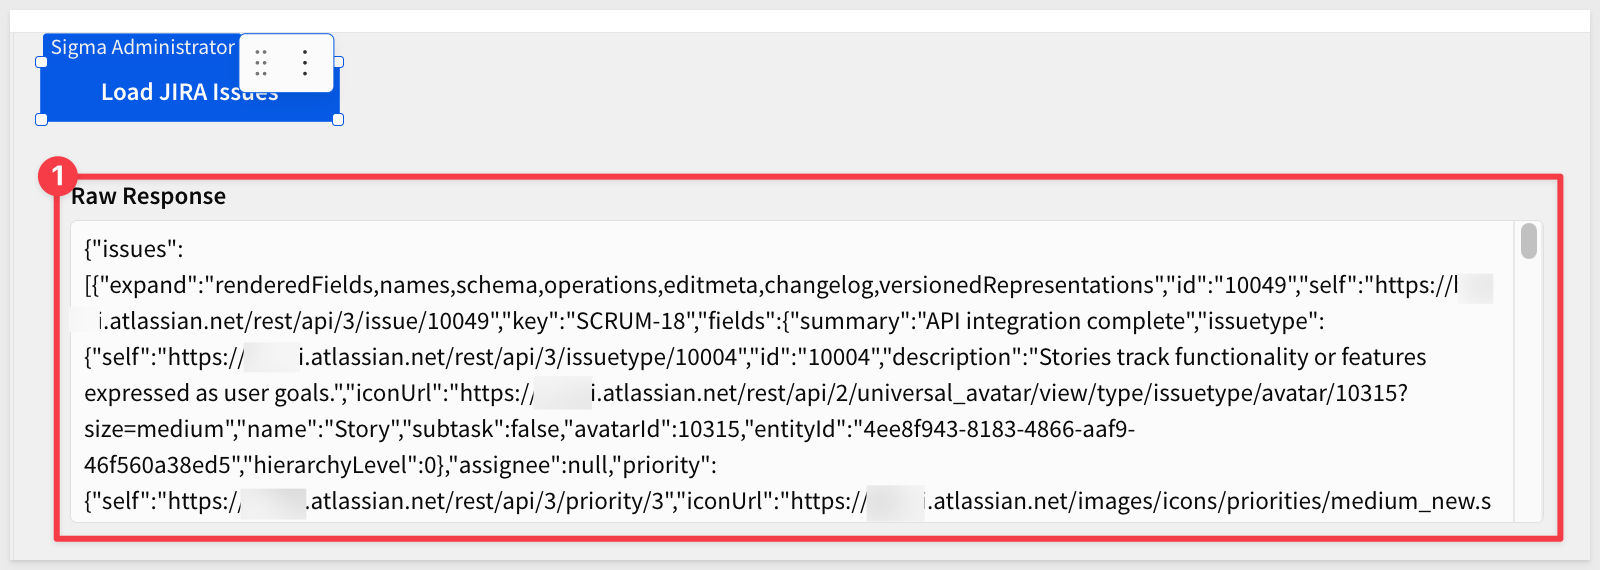
Load JIRA Issuesbutton
You should see the raw JSON response appear in the text area control, showing your JIRA issues.
Now we'll use a Python element to transform the JSON response into a table.
Add a Python Element
- From the
Element bar, add aPythonelement from theDatagroup - Select the Snowflake connection that has Python enabled.
For more information, see Write and run Python code in Sigma
Write the Python Code
- In the Python editor, replace all the sample code in the element with:
import pandas as pd
import json

# Read the API response from the text area control
raw = sigma.get_control_value("raw-response")

# Handle empty response - create empty DataFrame with proper schema
if not raw:
    df = pd.DataFrame({
        "Issue Key": pd.Series(dtype="str"),
        "Summary": pd.Series(dtype="str"),
        "Status": pd.Series(dtype="str"),
        "Priority": pd.Series(dtype="str"),
        "Assignee": pd.Series(dtype="str"),
        "Created": pd.Series(dtype="str"),
        "Work Type": pd.Series(dtype="str")
    })
else:
    # Parse the JSON response
    response_data = json.loads(raw)

    # Extract issues array
    issues = response_data.get('issues', [])

    # Flatten nested JSON into tabular format
    flattened_issues = []

    for issue in issues:
        flattened_issues.append({
            'Issue Key': issue['key'],
            'Summary': issue['fields']['summary'],
            'Status': issue['fields']['status']['name'],
            'Priority': issue['fields']['priority']['name'] if issue['fields'].get('priority') else 'None',
            'Assignee': issue['fields']['assignee']['displayName'] if issue['fields'].get('assignee') else 'Unassigned',
            'Created': issue['fields']['created'],
            'Work Type': issue['fields']['issuetype']['name']
        })

    # Convert to DataFrame
    df = pd.DataFrame(flattened_issues)

# Output the DataFrame as 'jira_issues' for child elements
sigma.output("jira_issues", df)
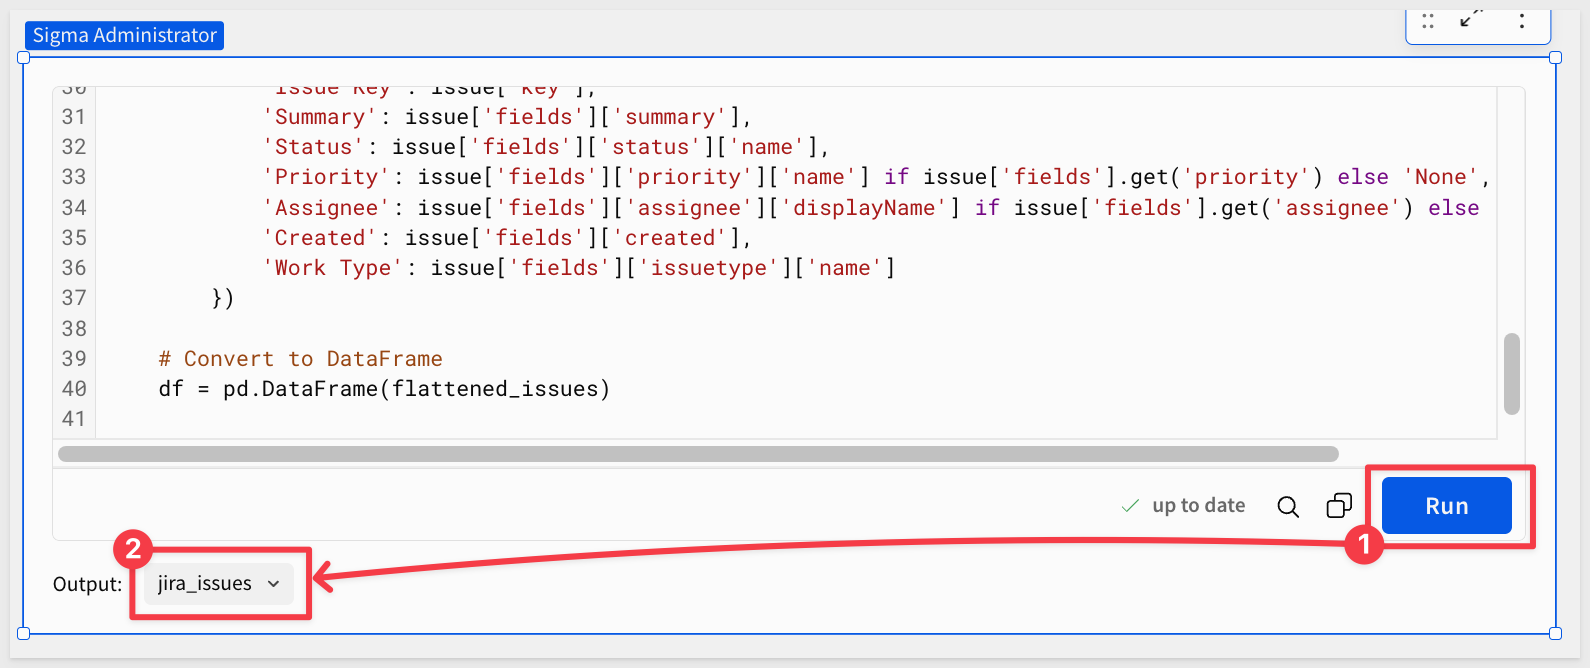
- Click
Runto execute the Python code
You should see an output option appear:
Add Child Table Element
- Select the
jira_issuescontrol and clickTablefrom the menu:
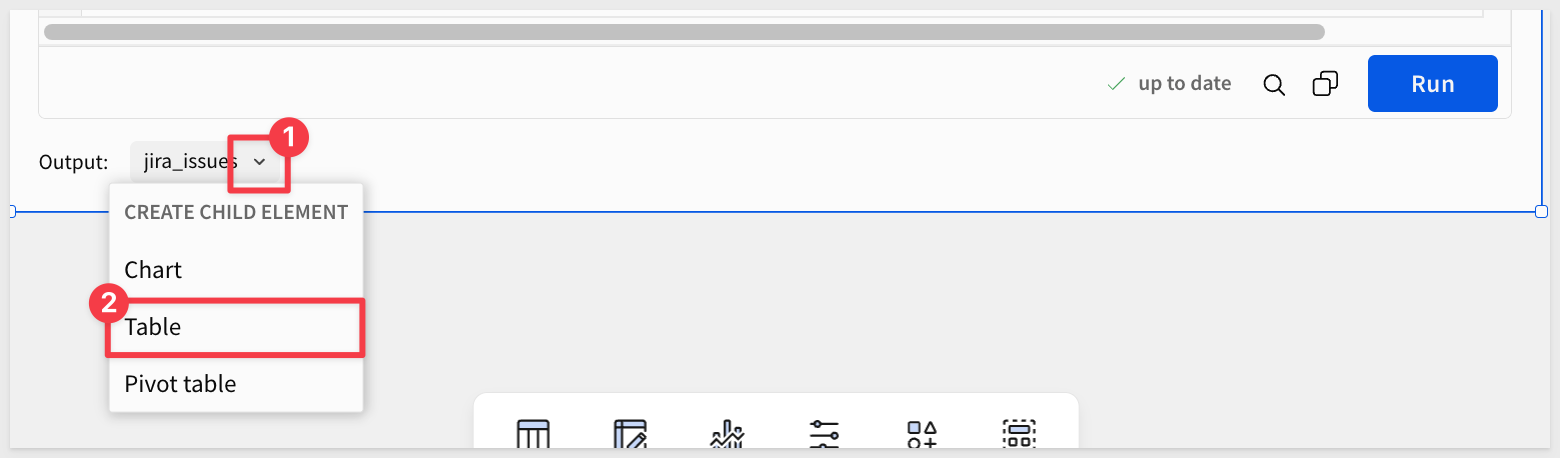
A table will appear showing all the parsed JIRA issues with properly formatted columns. We moved the elements around in the screenshot below...
- Rename the table to
JIRA Issues Table

Update Button to Refresh Python Element
- Now that the Python element exists, go back to the
Load JIRA Issuesbutton and add a fourth action:
Click on the button and select Edit actions
Action 4: Run the Python Element
- Action type:
Run Python element - Element:
Code (Issues)(your Python element)
This triggers the Python element to re-execute and parse the updated API response.
Test the Complete Workflow
- Click the
Load JIRA Issuesbutton
You should now see:
- The raw JSON response in the text area clear and reload
- The Python element will run
- The parsed table update with all your JIRA issues
The complete workflow now refreshes both the raw response and the parsed table automatically!
Let's add a control that lets users filter issues by status.
Add a Status Filter Control
- Add a
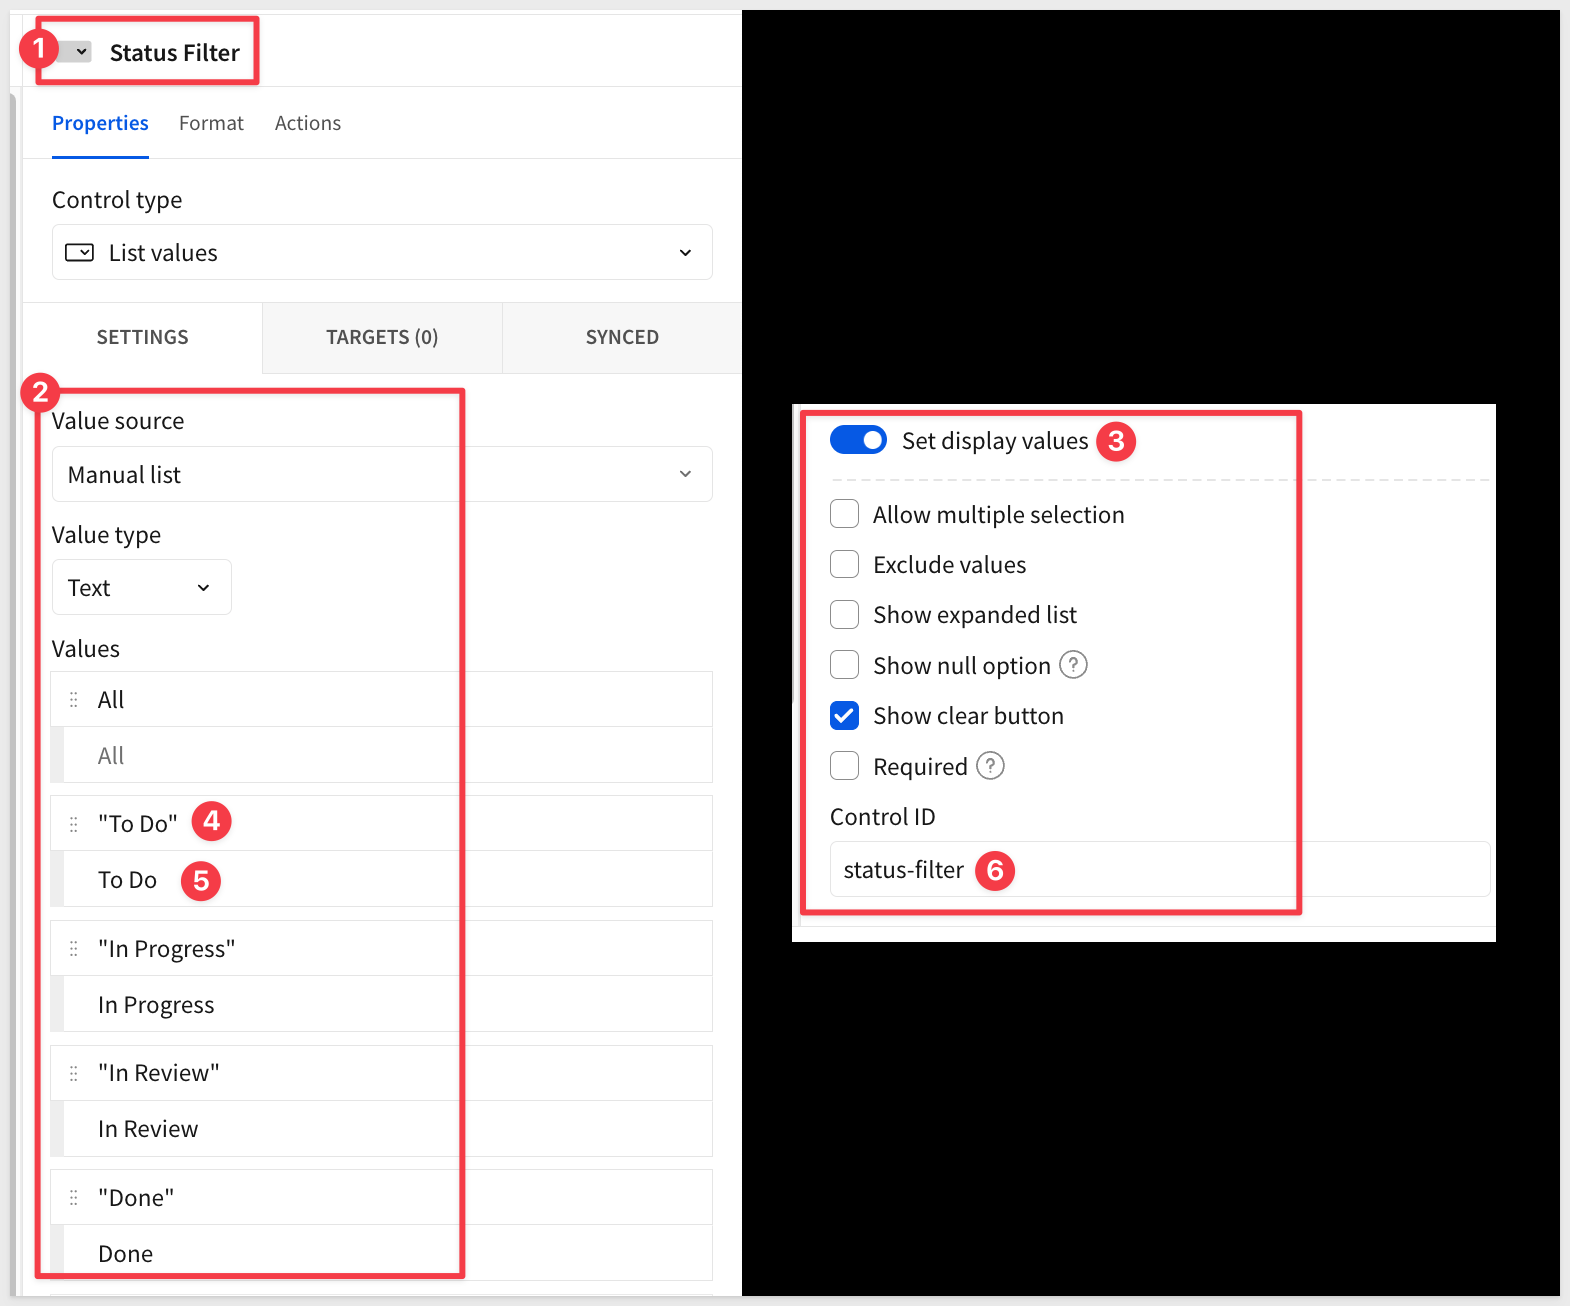
List valuescontrol from theControlsgroup - Configure it:
- Control ID:
status-filter - Allow multiple selection: Disabled (unchecked)
- Control ID:
- Toggle on
Set display values - Options: Add these values exactly as shown. For each option, enter the Display value first, then the Value:
- Display:
All→ Value:All - Display:
To Do→ Value:"To Do" - Display:
In Progress→ Value:"In Progress" - Display:
In Review→ Value:"In Review" - Display:
Done→ Value:"Done"
- Display:
This separates what users see (clean text without quotes) from what gets used in formulas (values with quotes for JQL).
Create a Second API Connector for Filtered Queries
Following the pattern from the Salesforce QuickStart, we'll create a second API connector specifically for filtered queries. This keeps the button working unchanged.
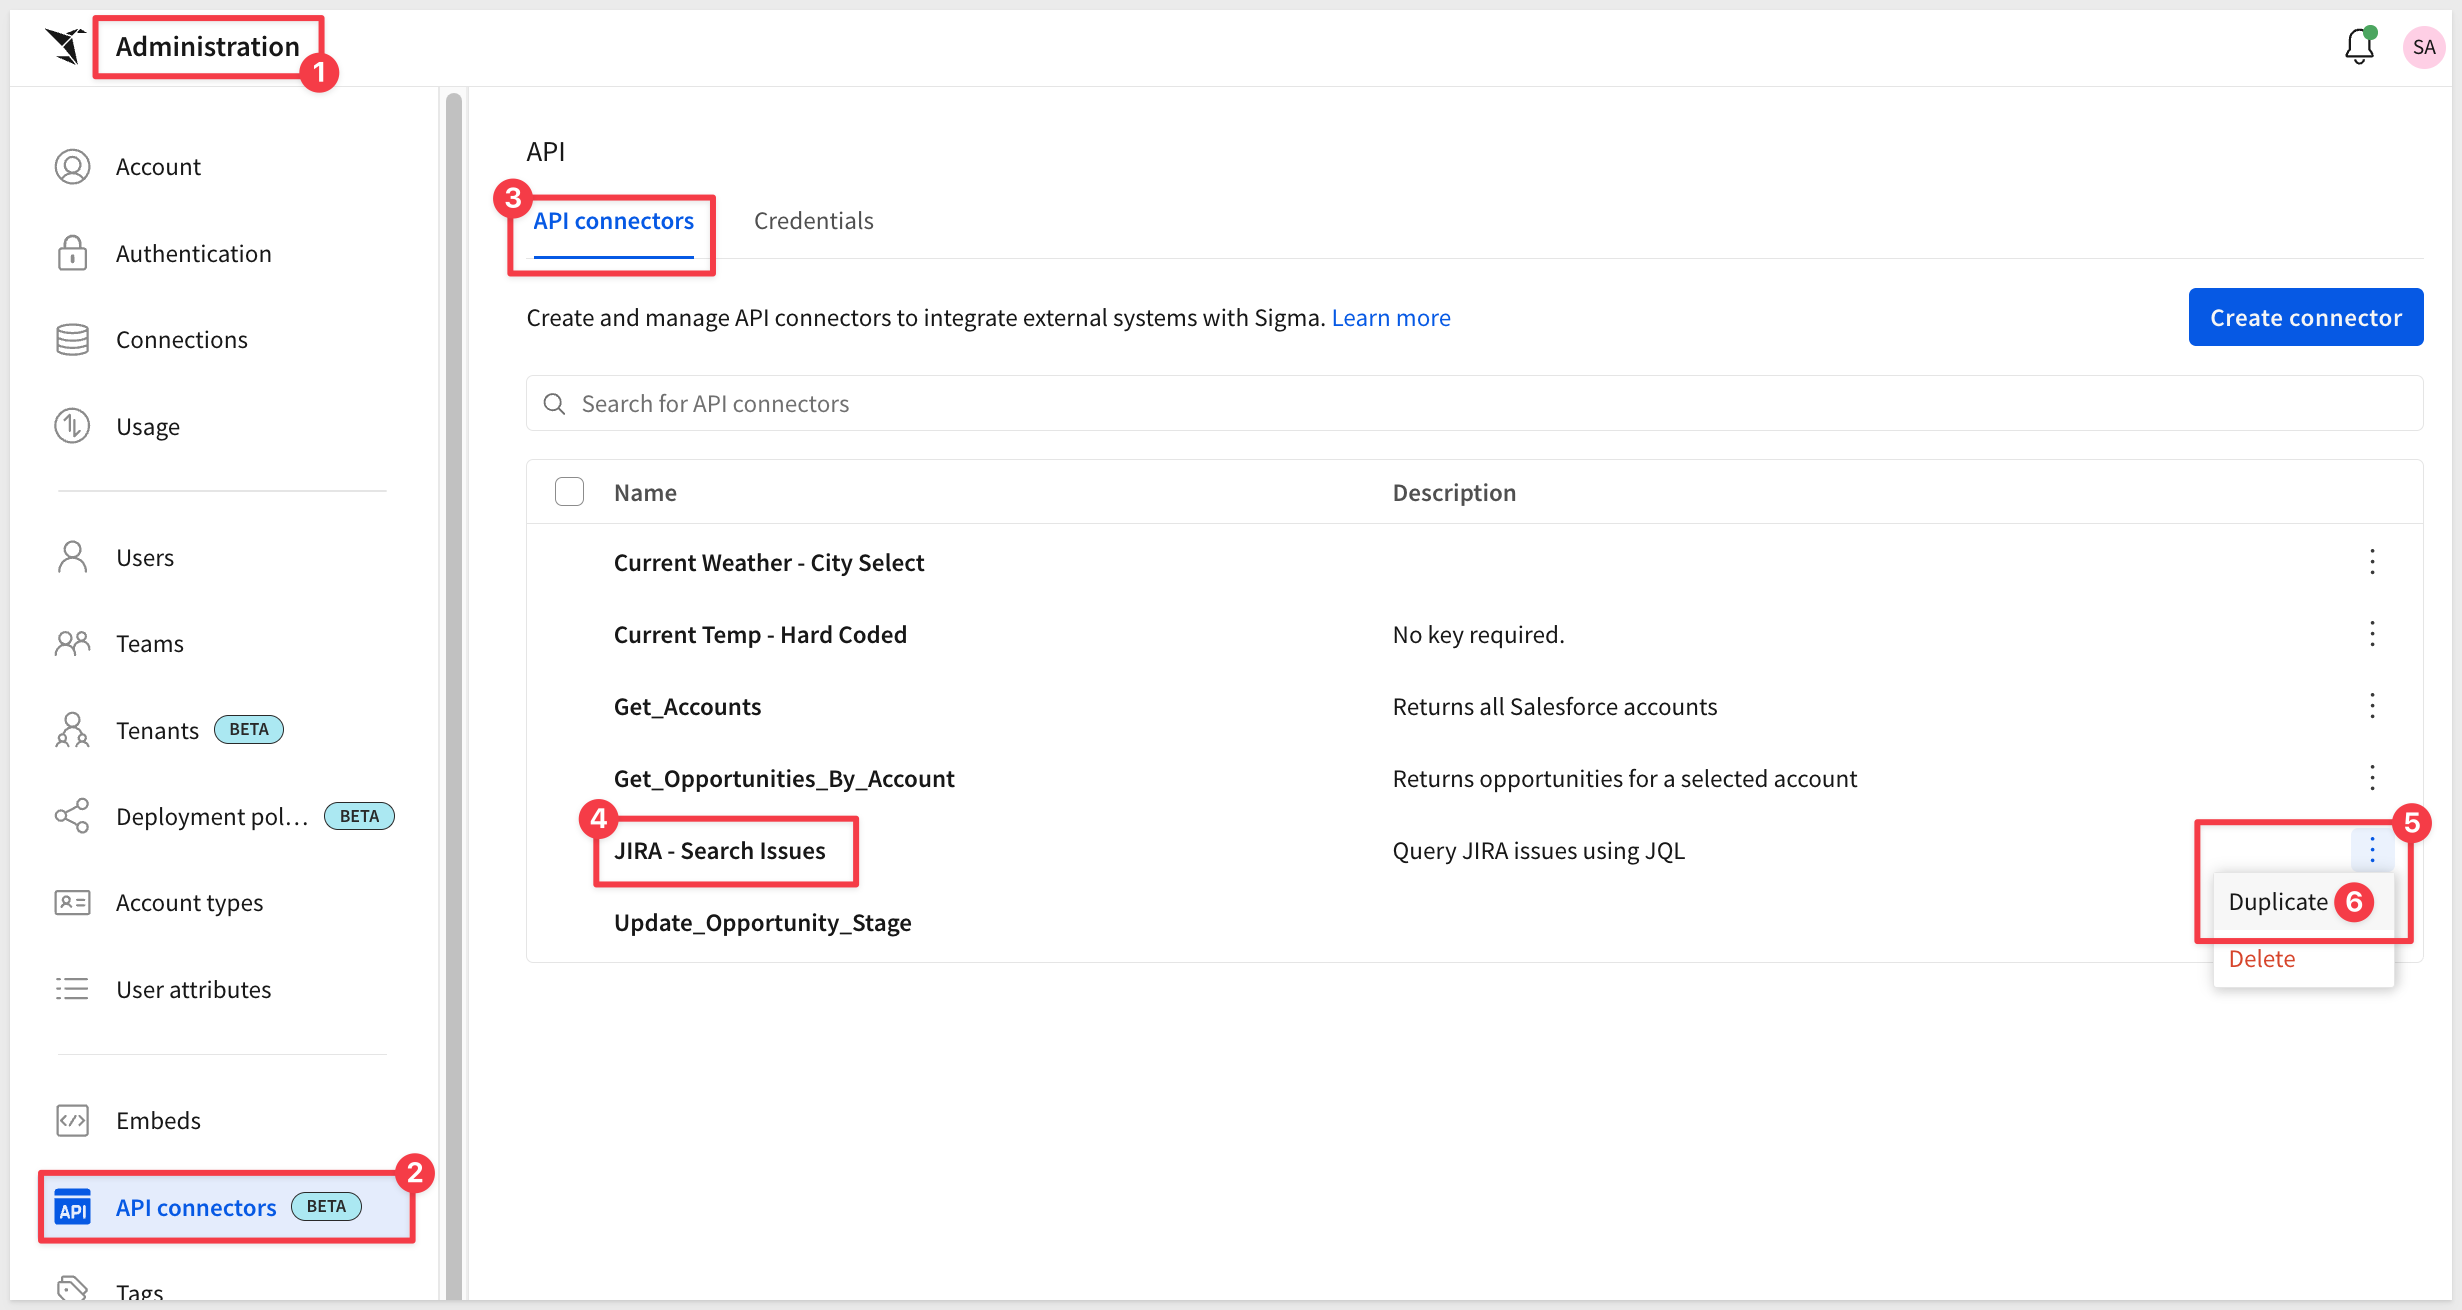
- Navigate to
Administration>API Connectors - Find the
JIRA - Search Issuesconnector and click the three-dot menu - Select
Duplicate:
- Open the copied connector and rename it
JIRA - Search Issues by Status - Set the
Authentication credentialtoJIRA API Token. - In the
Query parameterssection, find thejqlparameter - Change Mode from
StatictoDynamic
Dynamic parameters don't have default values:
- Click
Save
Now we have two connectors:
- JIRA - Search Issues (Static, used by the button) - returns all issues
- JIRA - Search Issues by Status (Dynamic, used by the filter) - returns filtered issues
Add Action to the Status Filter Control
Now we'll configure the status filter control to automatically refresh the data when a user selects a different status.
- Go back to your workbook
- Click on the
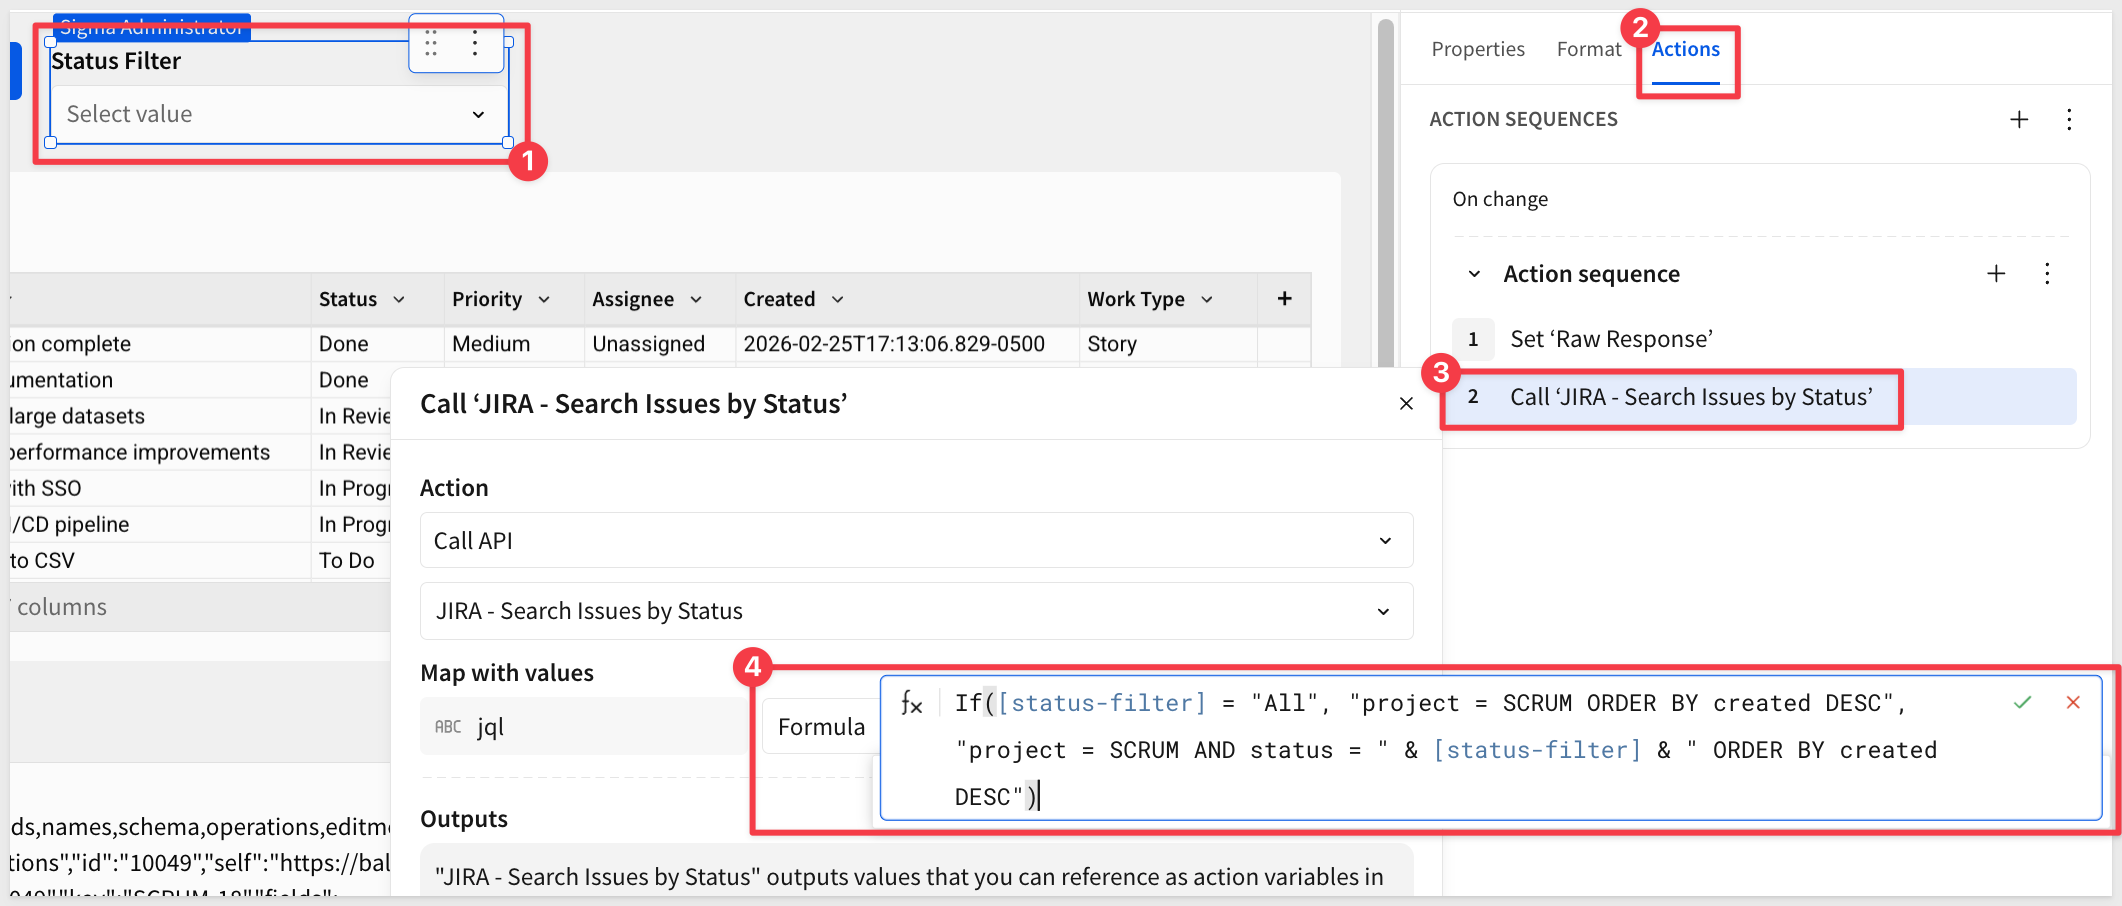
Status Filtercontrol - In the
Element propertiespanel, go to theActionstab
We'll create a sequence similar to the button, but using the new dynamic connector:
Action 1: Clear the Raw Response
- Action type:
Set control value - Control:
Raw Response - Value: Leave blank or remove anything held over from testing
Action 2: Call the JIRA API with Dynamic JQL
- Action type:
Call API - API Connector:
JIRA - Search Issues by Status
In the parameter mapping section:
- Map with values:
jql - Formula:
If([status-filter] = "All", "project = SCRUM ORDER BY created DESC", "project = SCRUM AND status = " & [status-filter] & " ORDER BY created DESC")
This formula:
- If "All" is selected, returns:
project = SCRUM ORDER BY created DESC - Otherwise, returns:
project = SCRUM AND status = "In Progress" ORDER BY created DESC
The quotes are already part of the control value, so they're automatically included in the JQL query.
Action 3: Set the Raw Response
- Action type:
Set control value - Control:
Raw Response - Set value as:
Action variable - Select:
Call 'JIRA - Search Issues by Status' - Data
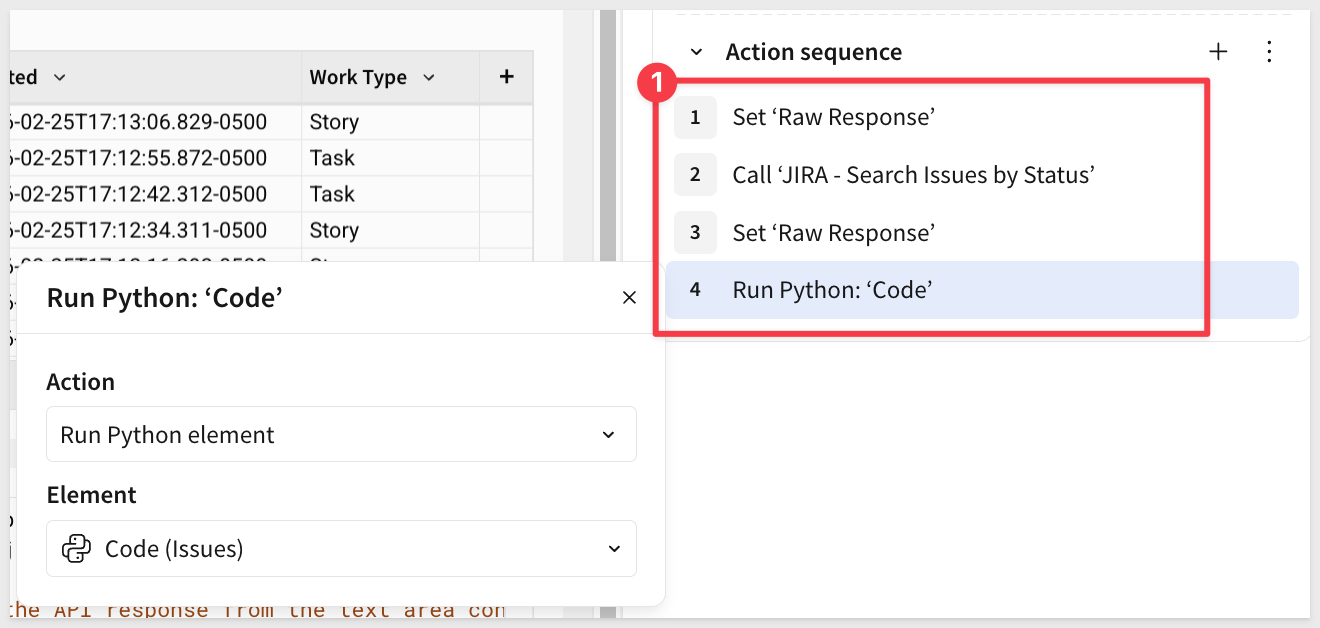
Action 4: Run the Python Element
- Action type:
Run Python element - Element:
Code (Issues)(your Python element)
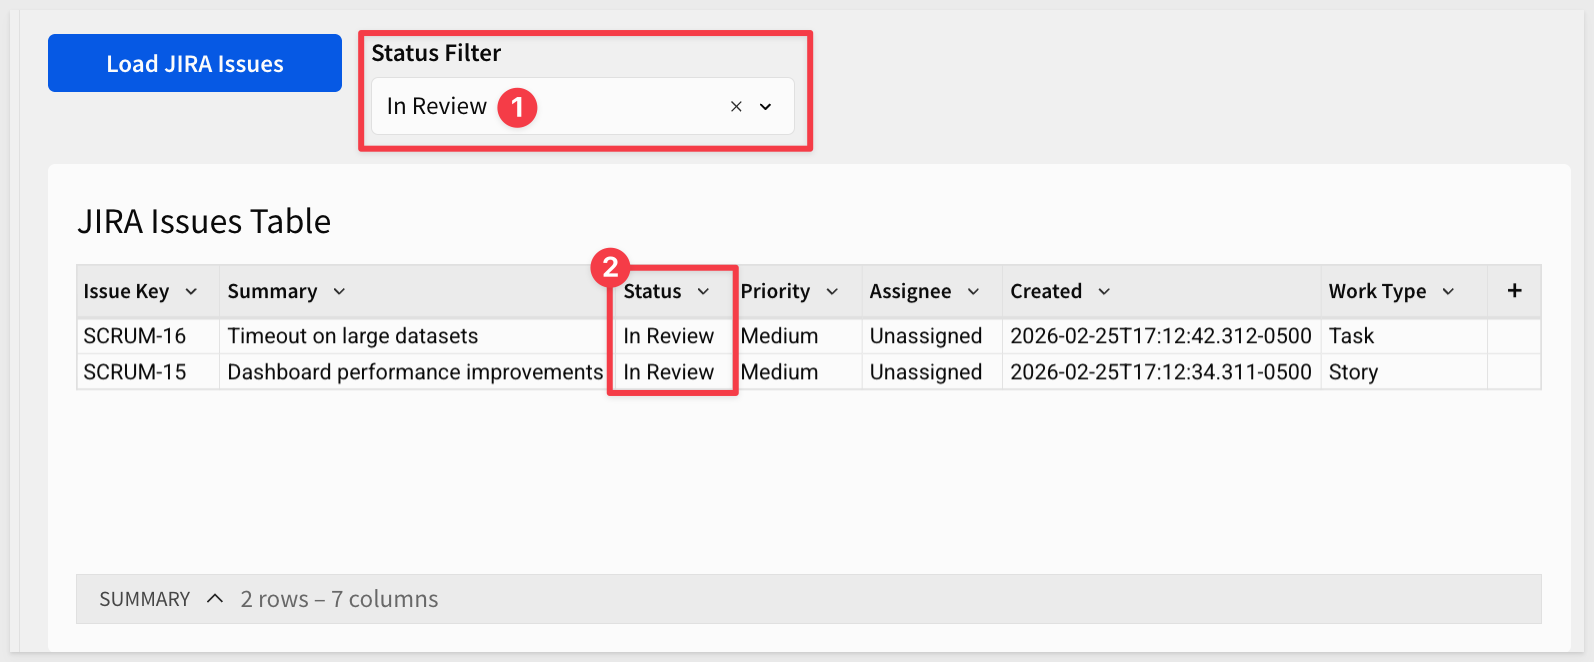
Test the Filter
Try selecting different statuses from the Status Filter control.
The Python will run, raw-response will update and the table will update to show only issues matching the selected status - no need to click the button.
Want to update JIRA issues directly from Sigma? Let's add a write-back workflow using JIRA's transitions API.
Find Available Transitions
Before creating the transition connector, we need to discover the transition IDs for your workflow. Let's create a connector in Sigma to find them.
- Navigate to
Administration>API Connectors - Click
Create connector - Configure the connector:
- Name:
JIRA - Get Transitions - Description:
Get available transitions for an issue - Credential:
JIRA API Token
- Name:
- Configure the request details:
- Connector type:
Custom connector - Base URL: Set method to
GETand enterhttps://YOUR-DOMAIN.atlassian.net/rest/api/3/issue/:issueKey/transitions
- Connector type:
Replace YOUR-DOMAIN with your actual JIRA domain. The /:issueKey syntax tells Sigma this is a path parameter.
- Scroll down to the
Path parameterssection and configure:- Key:
issueKey(matches the parameter name in the base URL) - Mode:
Static - Value: Enter one of your test issue keys (e.g.,
SCRUM-1)
- Key:
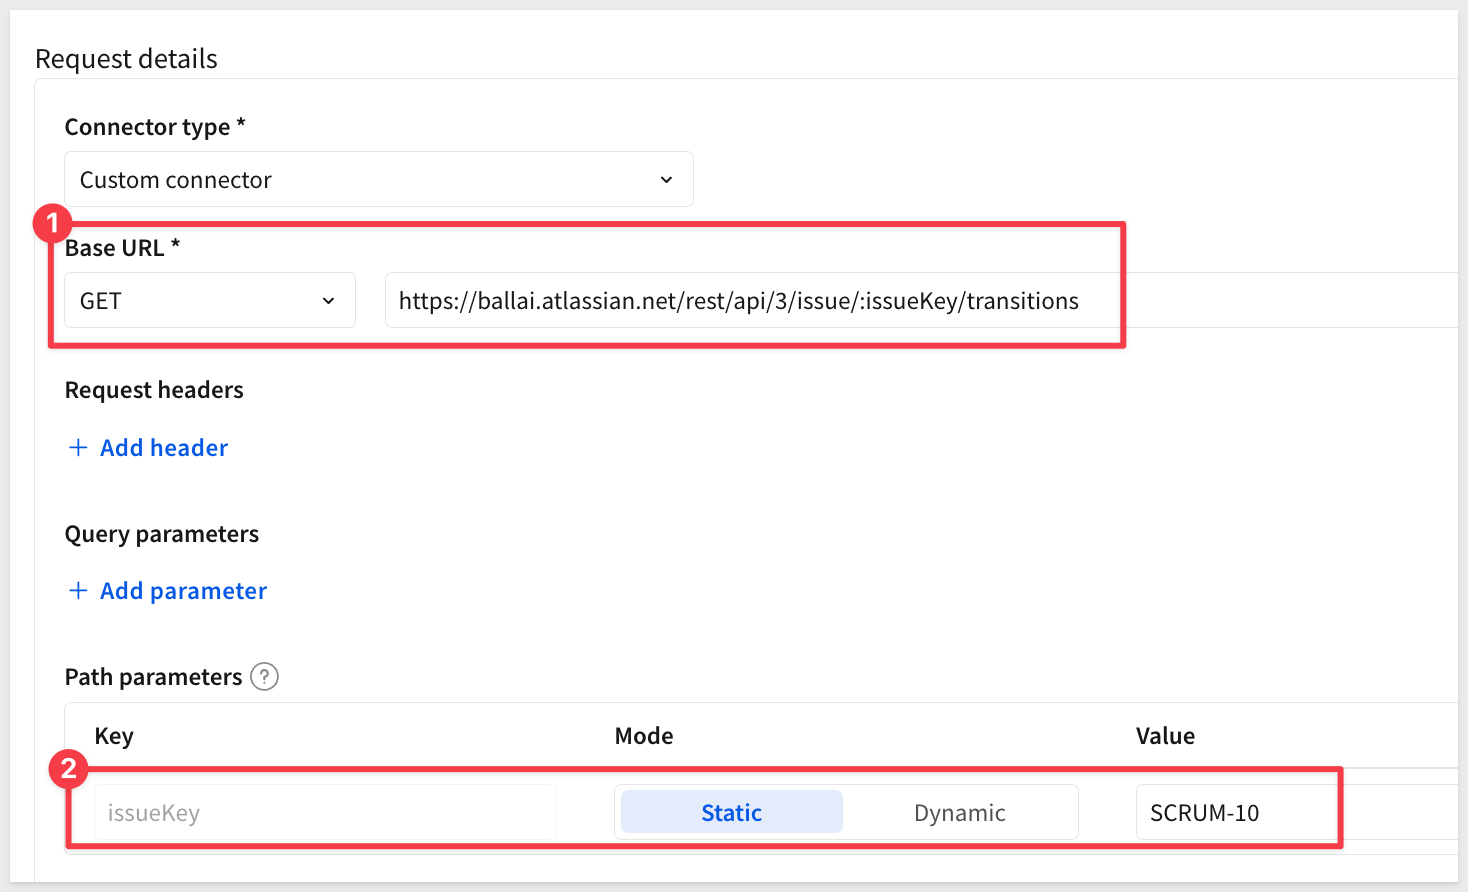
The /:issueKey in the base URL will be replaced with this value when the connector is called.
- Click
Test connector
The response shows available transitions for that issue:
{
  "transitions": [
    {
      "id": "11",
      "name": "To Do",
      "to": { "id": "10000", "name": "To Do" }
    },
    {
      "id": "21",
      "name": "In Progress",
      "to": { "id": "10001", "name": "In Progress" }
    },
    {
      "id": "31",
      "name": "In Review",
      "to": { "id": "10002", "name": "In Review" }
    },
    {
      "id": "41",
      "name": "Done",
      "to": { "id": "10003", "name": "Done" }
    }
  ]
}
- Note the transition IDs from the response:
- "11" = To Do
- "21" = In Progress
- "31" = In Review
- "41" = Done
These are the IDs you'll use in the next connector. Yours will likely be different.
- You can save or discard this connector—it was just for discovery
Create a Dynamic Transition Connector
- Navigate to
Administration>API Connectors. - Create a new API connector:
- Name:
JIRA - Transition Issue - Description:
Transition JIRA issue to a new status - Credential:
JIRA API Token
- Name:
- Configure the connector details:
- Connector type:
Custom connector - Base URL:
- Important: Change the method dropdown from
GETtoPOST - Enter:
https://YOUR-DOMAIN.atlassian.net/rest/api/3/issue/:issueKey/transitions
- Important: Change the method dropdown from
- Connector type:
Replace YOUR-DOMAIN with your actual JIRA domain. The /:issueKey syntax tells Sigma this is a path parameter.
- In the
Path parameterssection, configure:- Key:
issueKey(matches the parameter name in the base URL) - Mode:
Dynamic
- Key:
The /:issueKey in the base URL will be dynamically replaced with values from your workbook, so set it to be Dynamic under Path parameters.
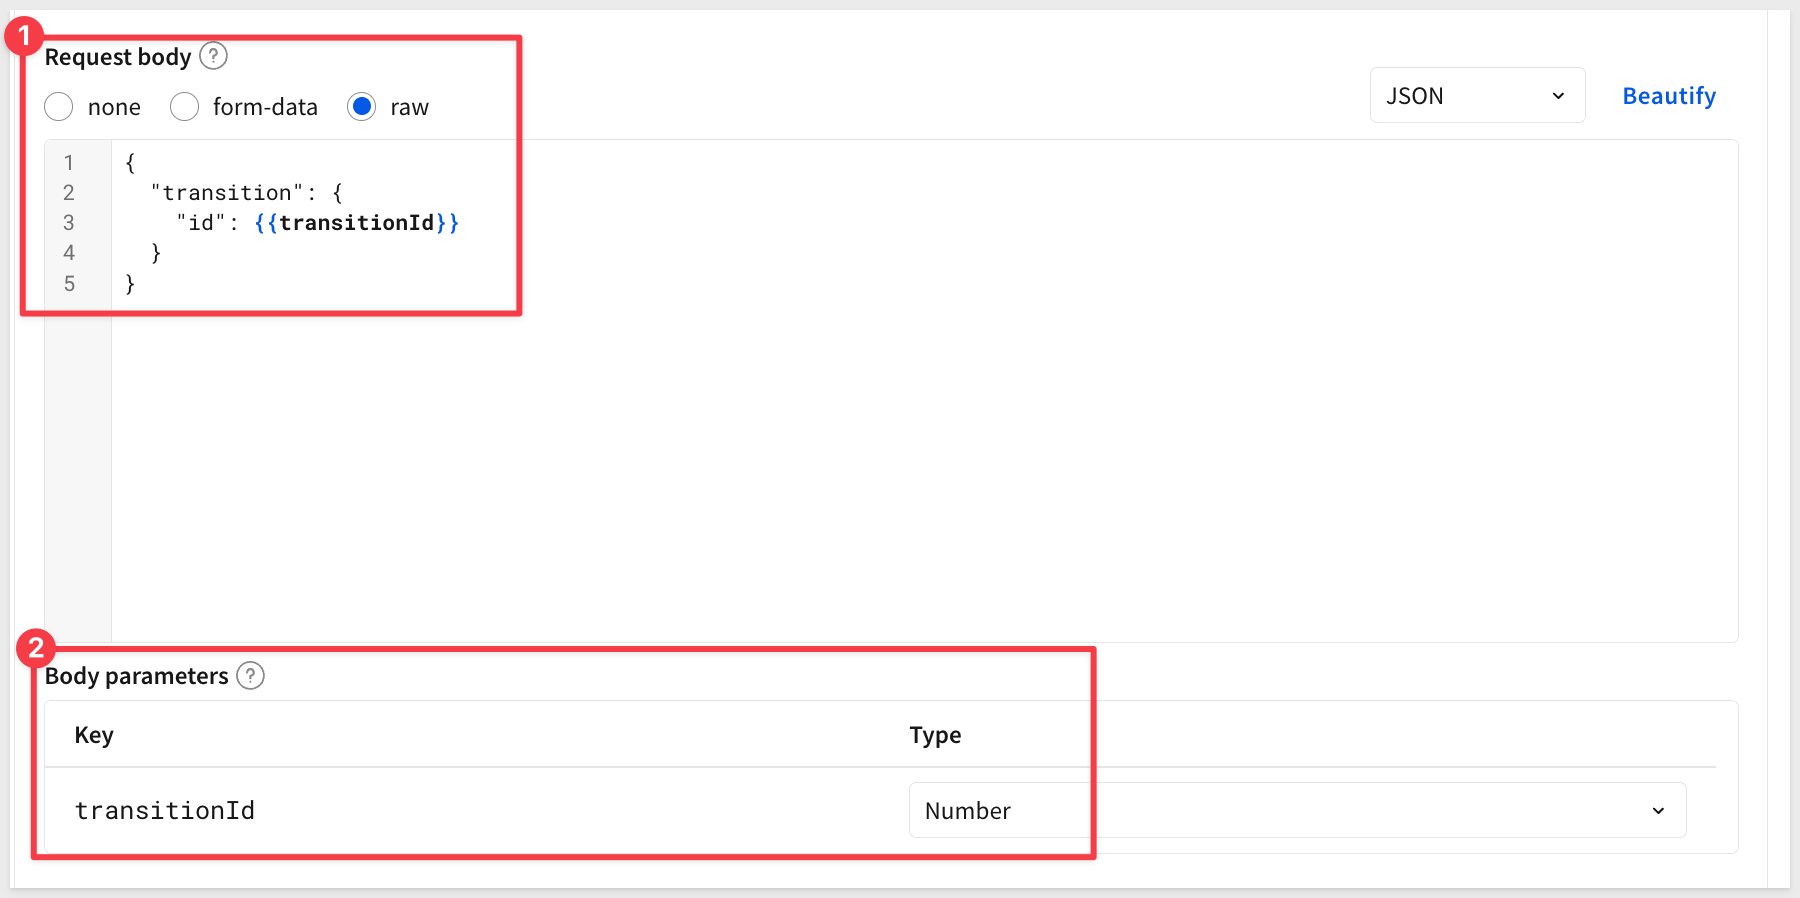
- Scroll down to the
Request bodysection:- Select the
rawradio button (not "none" or "form-data") - In the text area that appears, enter this JSON template:
- Select the
{
  "transition": {
    "id": {{transitionId}}
  }
}
The {{transitionId}} is a placeholder that will be replaced by the parameter value.
- Scroll down to the
Body parameterssection. Sigma automatically detects thetransitionIdparameter from your JSON template. Configure it:- Key:
transitionId(automatically added) - Type:
Number(transition IDs are numeric)
- Key:
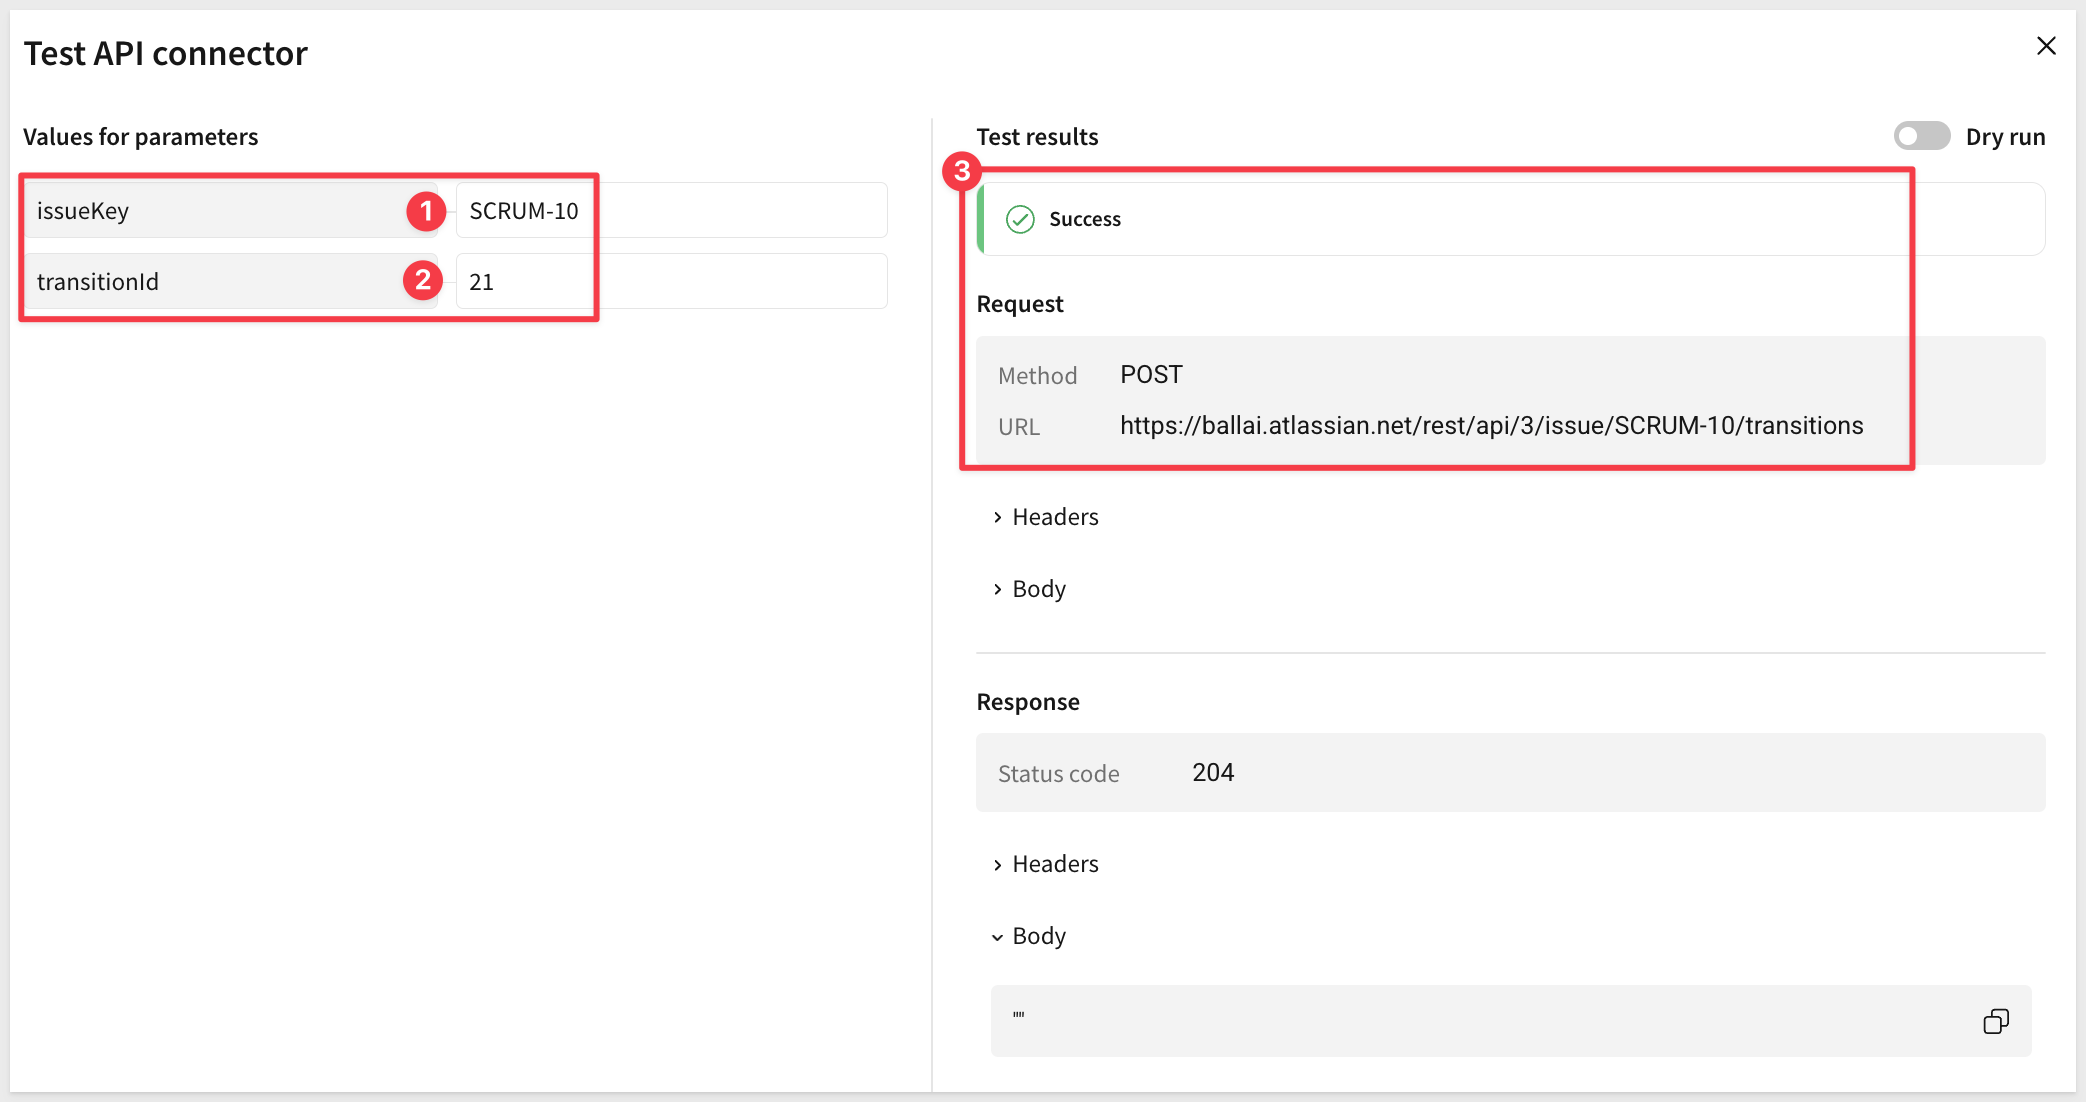
- Test the connector:
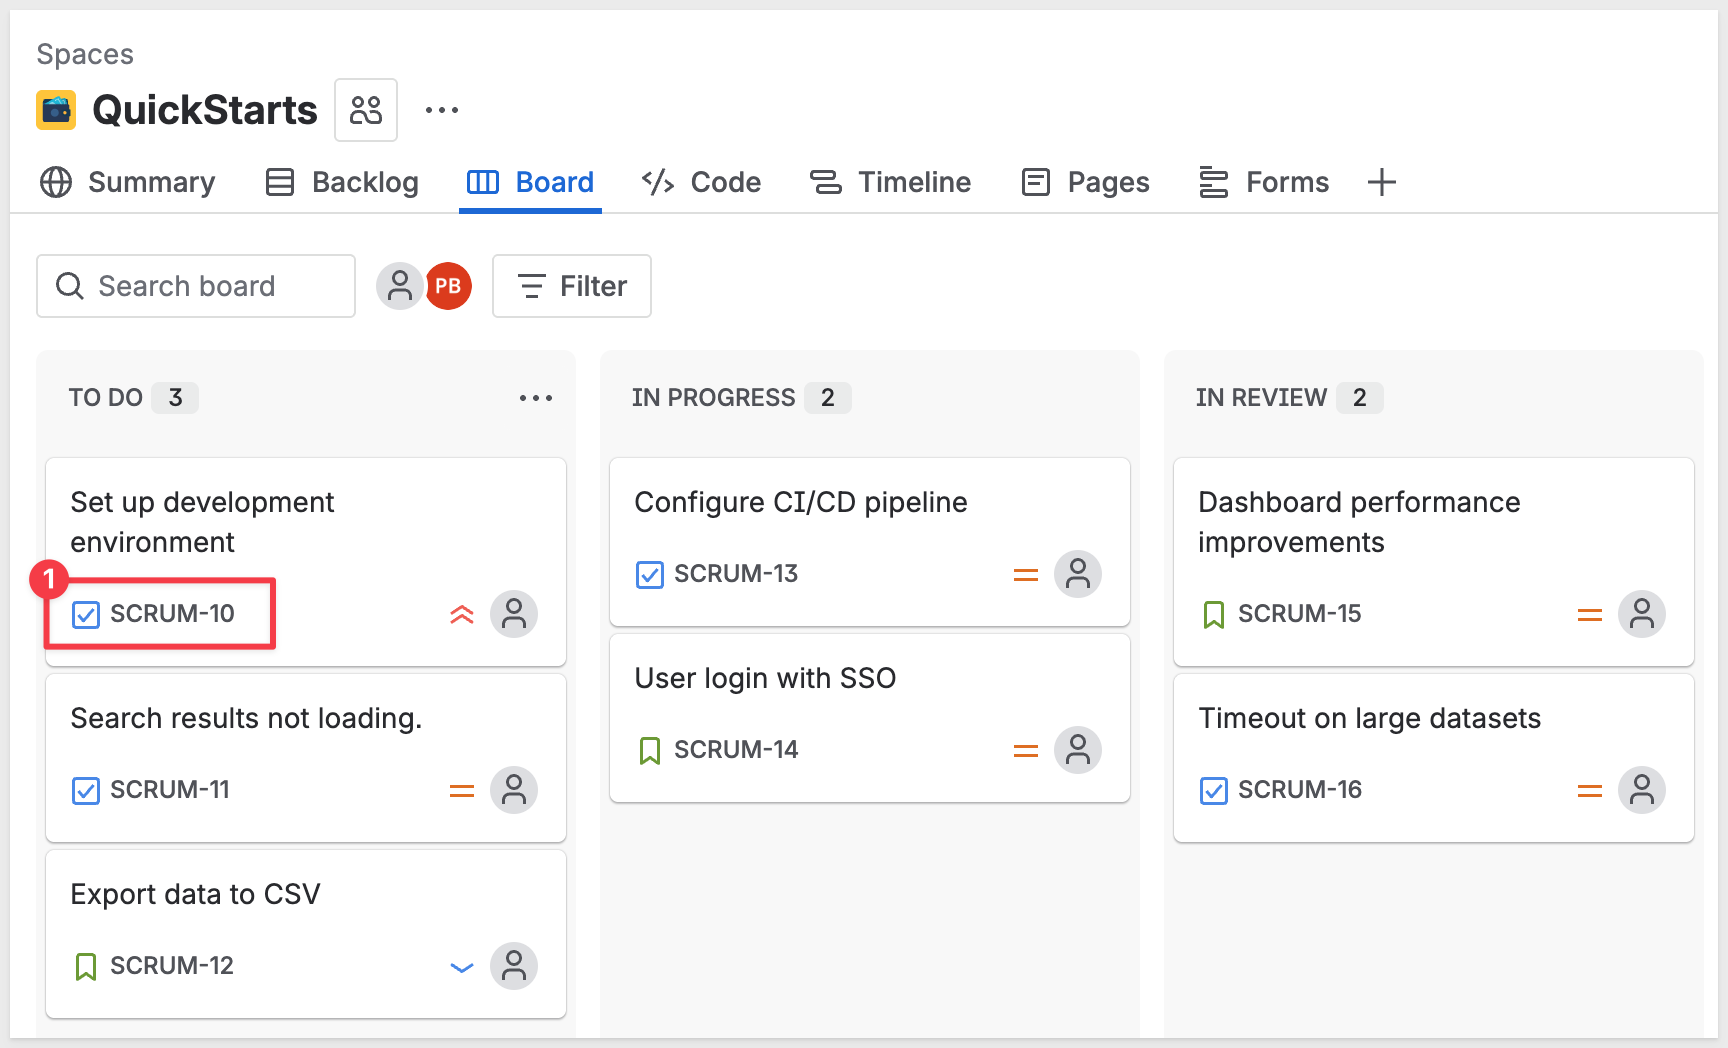
- issueKey: Enter a test issue key (e.g.,
SCRUM-10) - transitionId: Enter a valid transition ID from step 7 (e.g.,
21for "In Progress")
- issueKey: Enter a test issue key (e.g.,
- Click
Test connectorto verify it works:
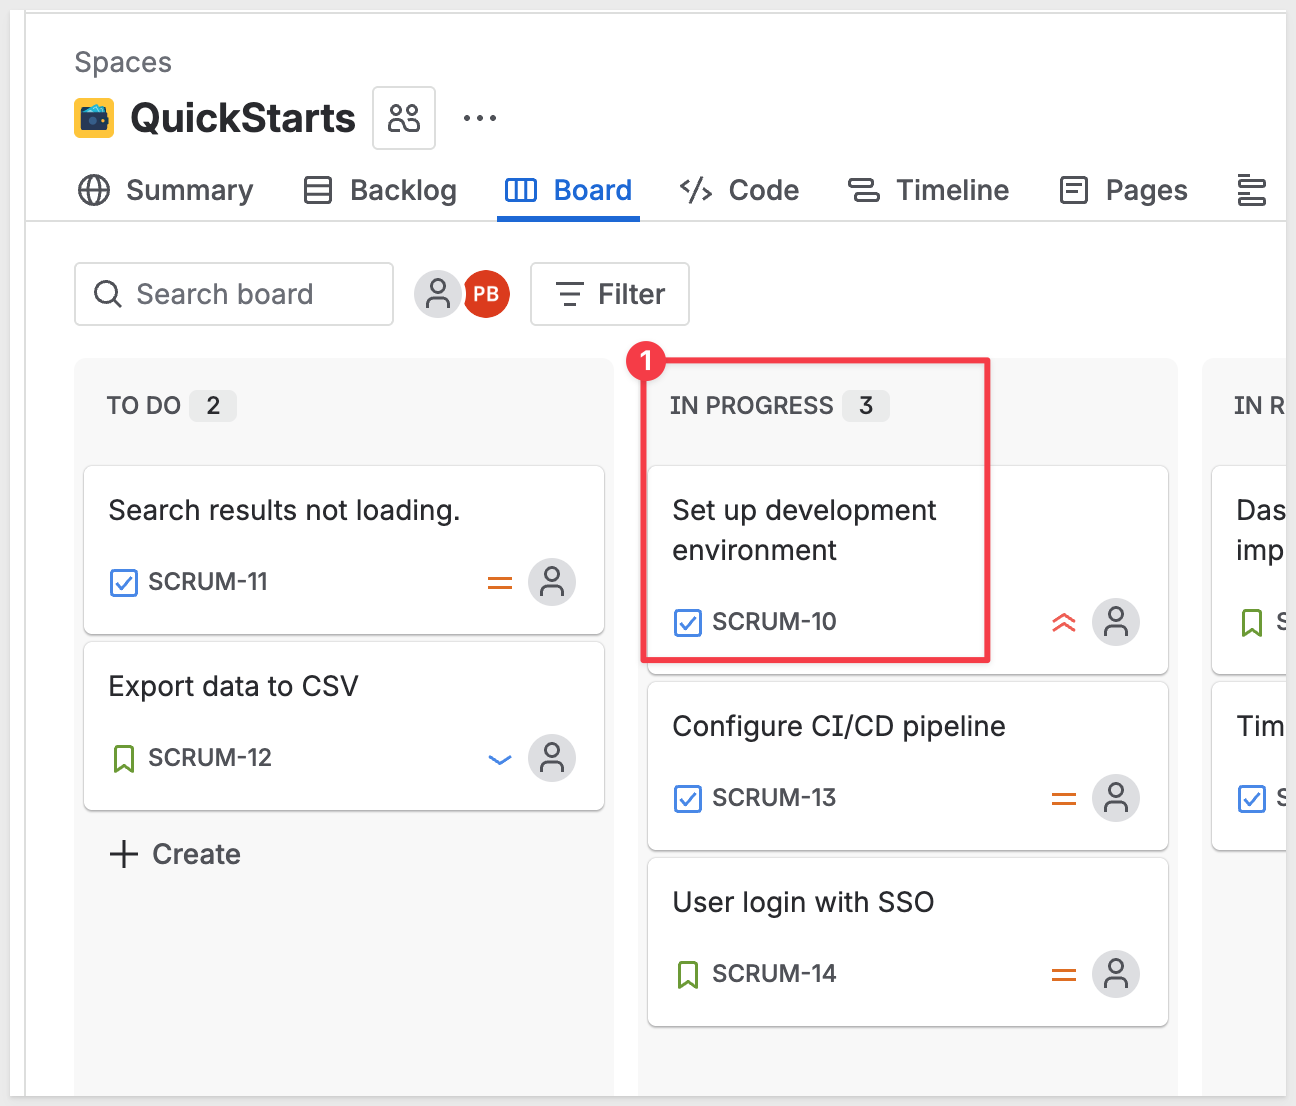
You can also check to make sure JIRA shows the change (moved SCRUM-10 from TO DO to IN-PROGRESS)
Add Status Update Modal to Workbook
Now let's create an interactive modal that allows users to update issue statuses.
Create the Modal and Controls
- In your workbook, add a
UI>Modalelement - Rename the modal to
Update Status Modal - Add a
Text inputcontrol:- Control ID:
modal-issue-key
- Control ID:
This control will display which issue is being updated.
- Add a
List valuescontrol.
Toggle on Set display values.
- Control ID:
modal-new-status - Allow multiple selection: Disabled
- List Values: Add the same values with display names as before:
- Value:
11→ Display:To Do - Value:
21→ Display:In Progress - Value:
31→ Display:In Review - Value:
41→ Display:Done
- Value:
We will use the Primary button to initiate actions when clicked but first we need to configure actions on the table.
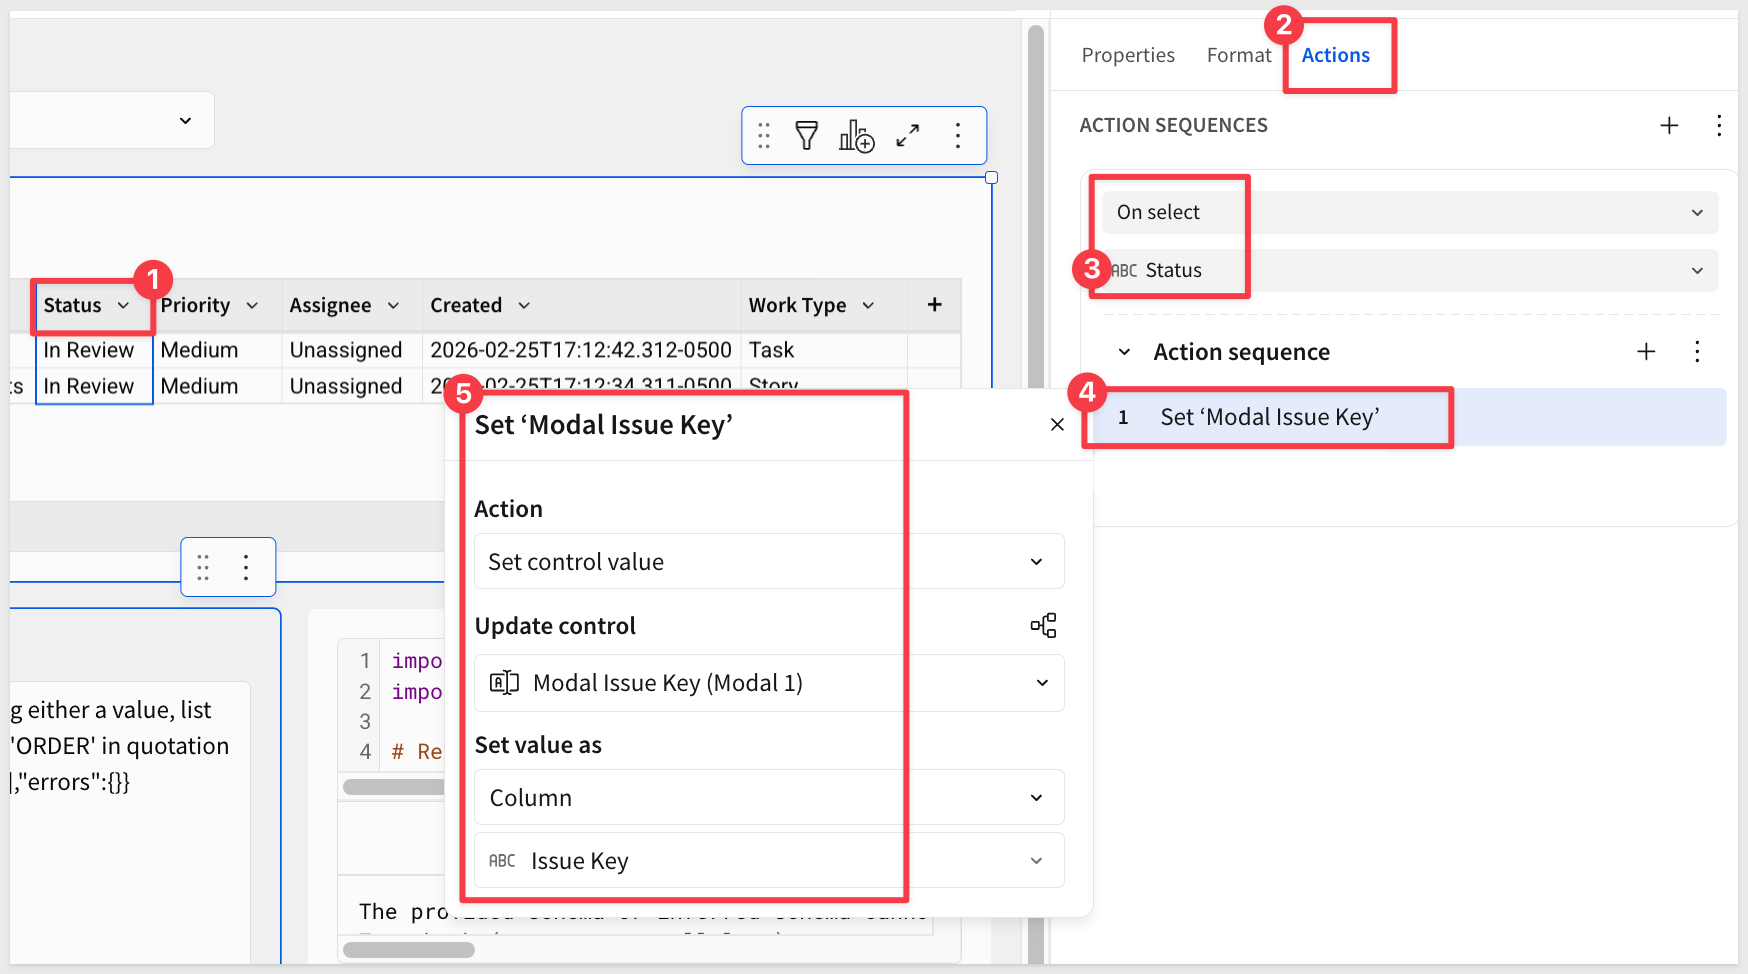
Add Action to Status Column
- Back on the
JIRA Issues Table, click on theStatuscolumn header - In the
Element propertiespanel, go to theActionstab - Add an action with trigger
On click>Status.
Action 1: Set Issue Key
- Action type:
Set control value - Control:
modal-issue-key - Set value as:
Column value - Select column:
Issue Key
Action 2: Open Modal
- Action type:
Open modal - Select modal:
Modal 1
Now when users click a Status cell, the modal opens with the Modal Issue Key pre-filled:

Configure Save Button Actions
- Back on
Modal 1, add the following action sequence to theOn click - primaryaction sequence.
Action 1: Call Transition API
- Action type:
Call API - API Connector:
JIRA - Transition Issue - Map with values:
- issueKey:
- Select
Controlfrom the dropdown - Choose
modal-issue-key - transitionId:
- Select
Formulafrom the dropdown (not Control, since we need to convert to Number) - Enter the formula:
copy-code
Number([modal-new-status])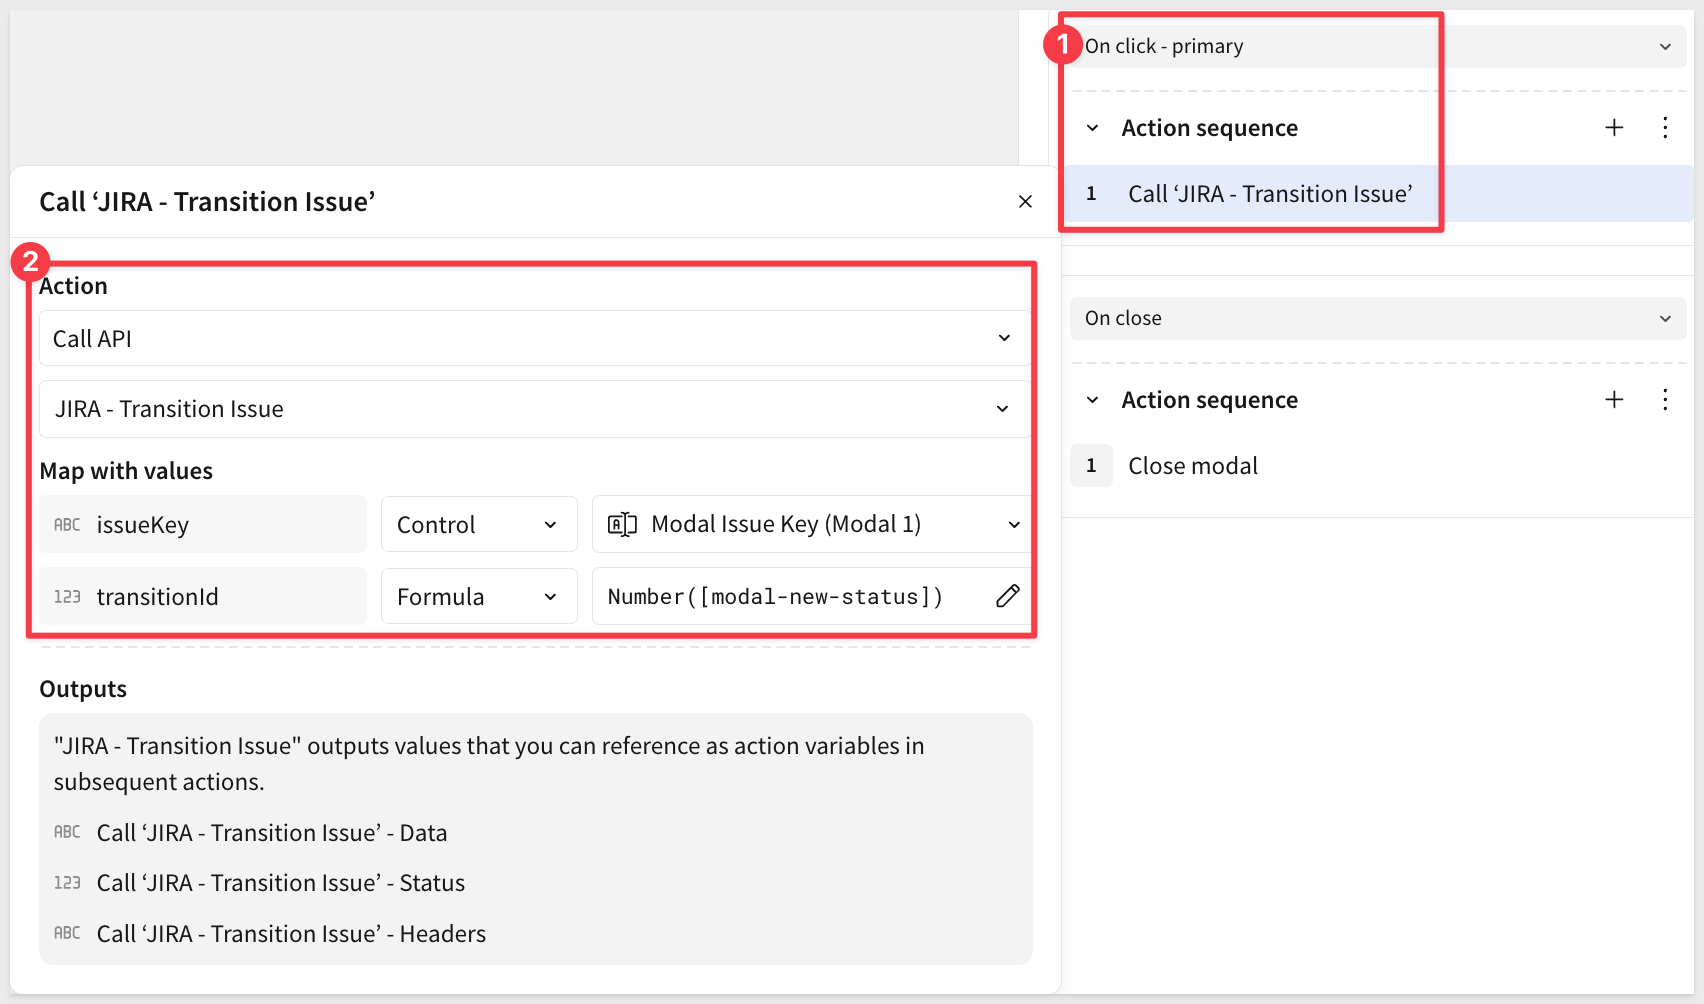 #### Action 2: Reload JIRA Data - Action type:
 Call API- API Connector:JIRA - Search Issues(use the Static connector to fetch all issues) This re-fetches all issues from JIRA after the transition, ensuring you see the updated status regardless of what filter is currently selected: #### Action 3: Set Raw Response - Action type:Set control value- Control:raw-response- Set value as:Action variable- Select:Call 'JIRA - Search Issues' - Data#### Action 4: Run Python Element - Action type:Run Python element- Element:Code (Issues)This parses the fresh data and updates the table. #### Action 5: Clear Status Selection - Action type:Clear control- Apply to:Specific control- Control:Modal New Status (Modal 1)This resets the dropdown so the next time the modal opens, no status is pre-selected. #### Action 6: Close Modal - Action type:Close modalClickSaveto save the complete action sequence. #### Test the Workflow Let's move theSet up development environmenttask that we moved intoIN PROGRESSmanually a few steps back toTO DO: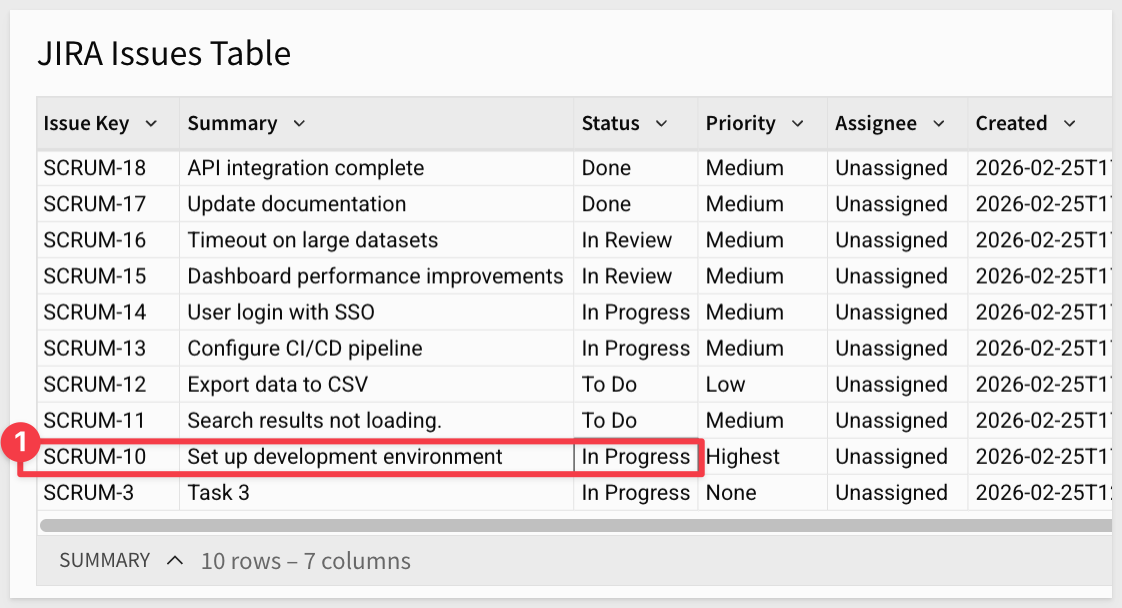 20. Click on the
 Statuscell for the issue 21. The modal should open with the Issue Key displayed 22. Select a new status from the dropdown (e.g., "To Do")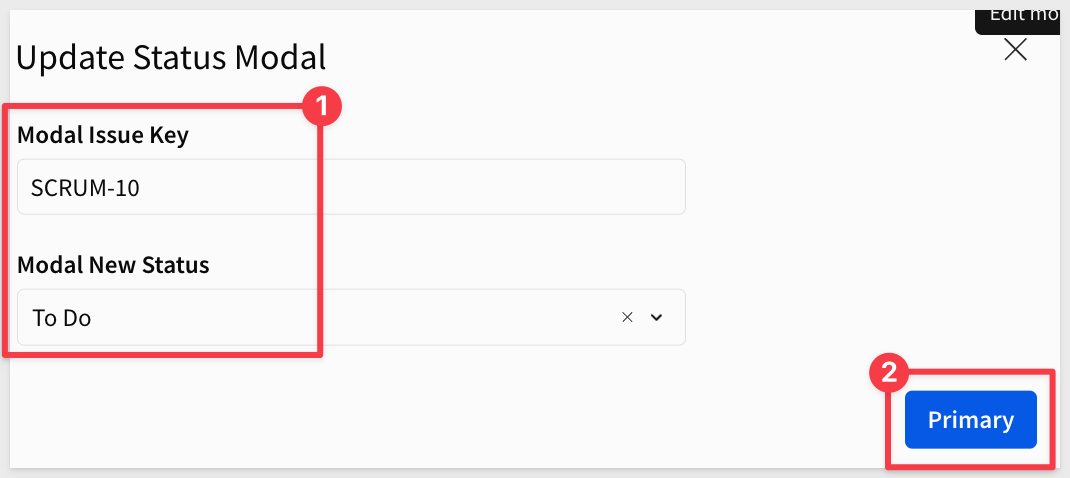 23. Click
 Save. The API call will execute, the modal will close, and the table should refresh to show the updated status: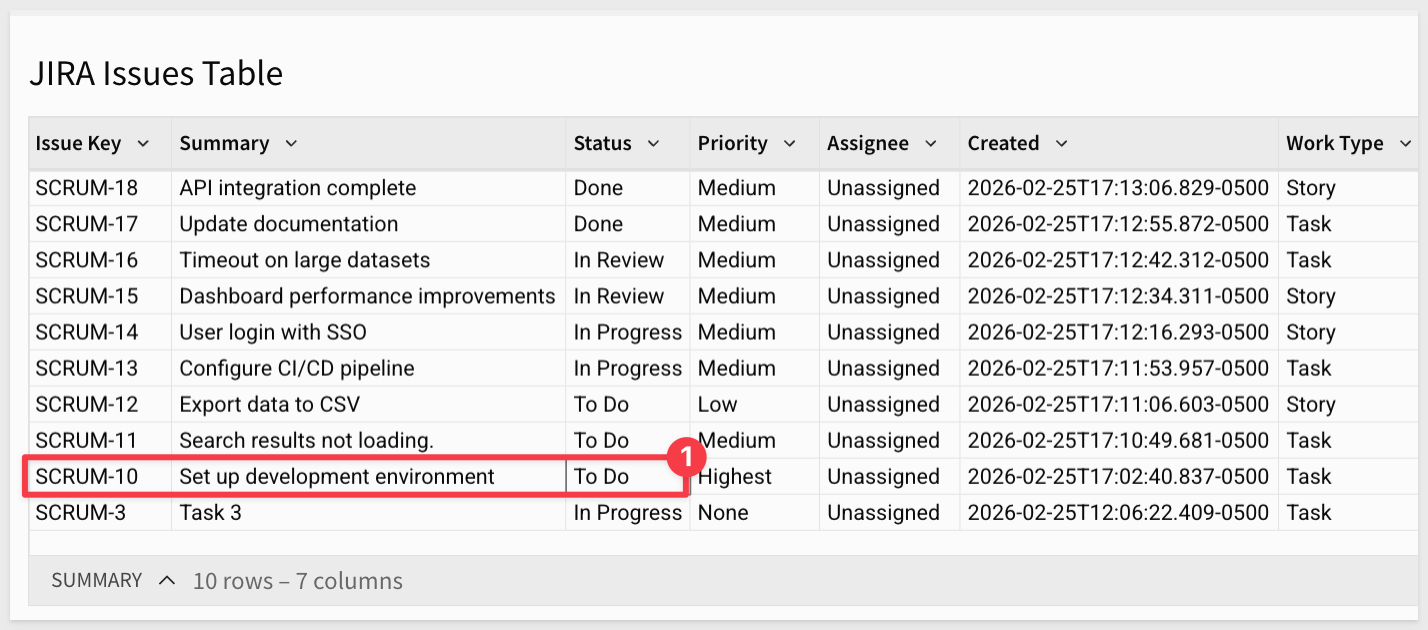 Now users can transition issue statuses directly from Sigma, and the table will automatically refresh to show the changes!
## What we've covered Duration: 5 In about an hour, you built a complete bidirectional JIRA integration—querying issues with dynamic filters, parsing nested JSON responses, and updating issue statuses through an interactive modal—all without writing backend code or managing servers. Sigma API Actions turned what would typically require dedicated API infrastructure, authentication handling, and custom middleware into a straightforward workflow: configure credentials, define connectors, build actions. This same pattern works for any REST API using Basic Authentication (ServiceNow, Zendesk, GitHub, GitLab, Confluence, Bitbucket). Create credentials, define endpoints, call APIs, parse responses, display results. The value isn't just speed—it's accessibility. Business analysts and data teams can now build operational integrations that previously required engineering resources, turning Sigma into a true operational analytics platform where data doesn't just flow in for reporting, but flows back out to drive action. Additional Resource LinksBlog
Now users can transition issue statuses directly from Sigma, and the table will automatically refresh to show the changes!
## What we've covered Duration: 5 In about an hour, you built a complete bidirectional JIRA integration—querying issues with dynamic filters, parsing nested JSON responses, and updating issue statuses through an interactive modal—all without writing backend code or managing servers. Sigma API Actions turned what would typically require dedicated API infrastructure, authentication handling, and custom middleware into a straightforward workflow: configure credentials, define connectors, build actions. This same pattern works for any REST API using Basic Authentication (ServiceNow, Zendesk, GitHub, GitLab, Confluence, Bitbucket). Create credentials, define endpoints, call APIs, parse responses, display results. The value isn't just speed—it's accessibility. Business analysts and data teams can now build operational integrations that previously required engineering resources, turning Sigma into a true operational analytics platform where data doesn't just flow in for reporting, but flows back out to drive action. Additional Resource LinksBlog
Community
Help Center
QuickStarts
Be sure to check out all the latest developments at Sigma's First Friday Feature page!