This QuickStart walks you through using Sigma API Actions to connect to Salesforce's REST API, retrieve live Salesforce data, and surface it directly inside a Sigma workbook. Unlike the API Actions - Getting Started QuickStart, this workflow uses authenticated requests, dynamic parameters, and a more realistic enterprise-grade API pattern.
You'll build a Sigma workbook from scratch that lets you select a Salesforce object (such as Account, Contact, or Opportunity), execute a SOQL query, and view the returned results in real time.
Along the way you'll learn how to:
- configure Salesforce API connectors using OAuth or token-based credentials
- pass dynamic query parameters from workbook controls
- call Salesforce's REST API using Sigma workbook actions
We will use a Salesforce developer's account for this demonstration.
For more information on Sigma's product release strategy, see Sigma product releases
If something doesn't work as expected, here's how to contact Sigma support
Target Audience
This QuickStart is ideal for:
- Sigma developers integrating external APIs with authenticated endpoints
- Technical users managing JIRA projects who want to create custom dashboards
- Teams building operational workflows that span Sigma and Salesforce
Prerequisites
- A Sigma account with workbook creation and API Action permissions.
- Intermediate familiarity with Sigma workbooks, controls, and elements
- Access to Snowflake for Python element execution (included with Sigma Sample Database).
- Admin access to a Salesforce environment
- Basic understanding of REST APIs and JSON (helpful but not required)

Salesforce Authentication Overview
Before calling Salesforce APIs from Sigma, you must configure a secure OAuth 2.0 connection. Salesforce requires an access token for every request, and these tokens expire on a schedule determined by your Salesforce org. API Actions can store and refresh tokens automatically, but the initial setup requires a one-time authorization.
This QuickStart uses Sigma and a connected app in Salesforce configured for OAuth 2.0.
Step 1: Create (or Verify) a Salesforce Connected App
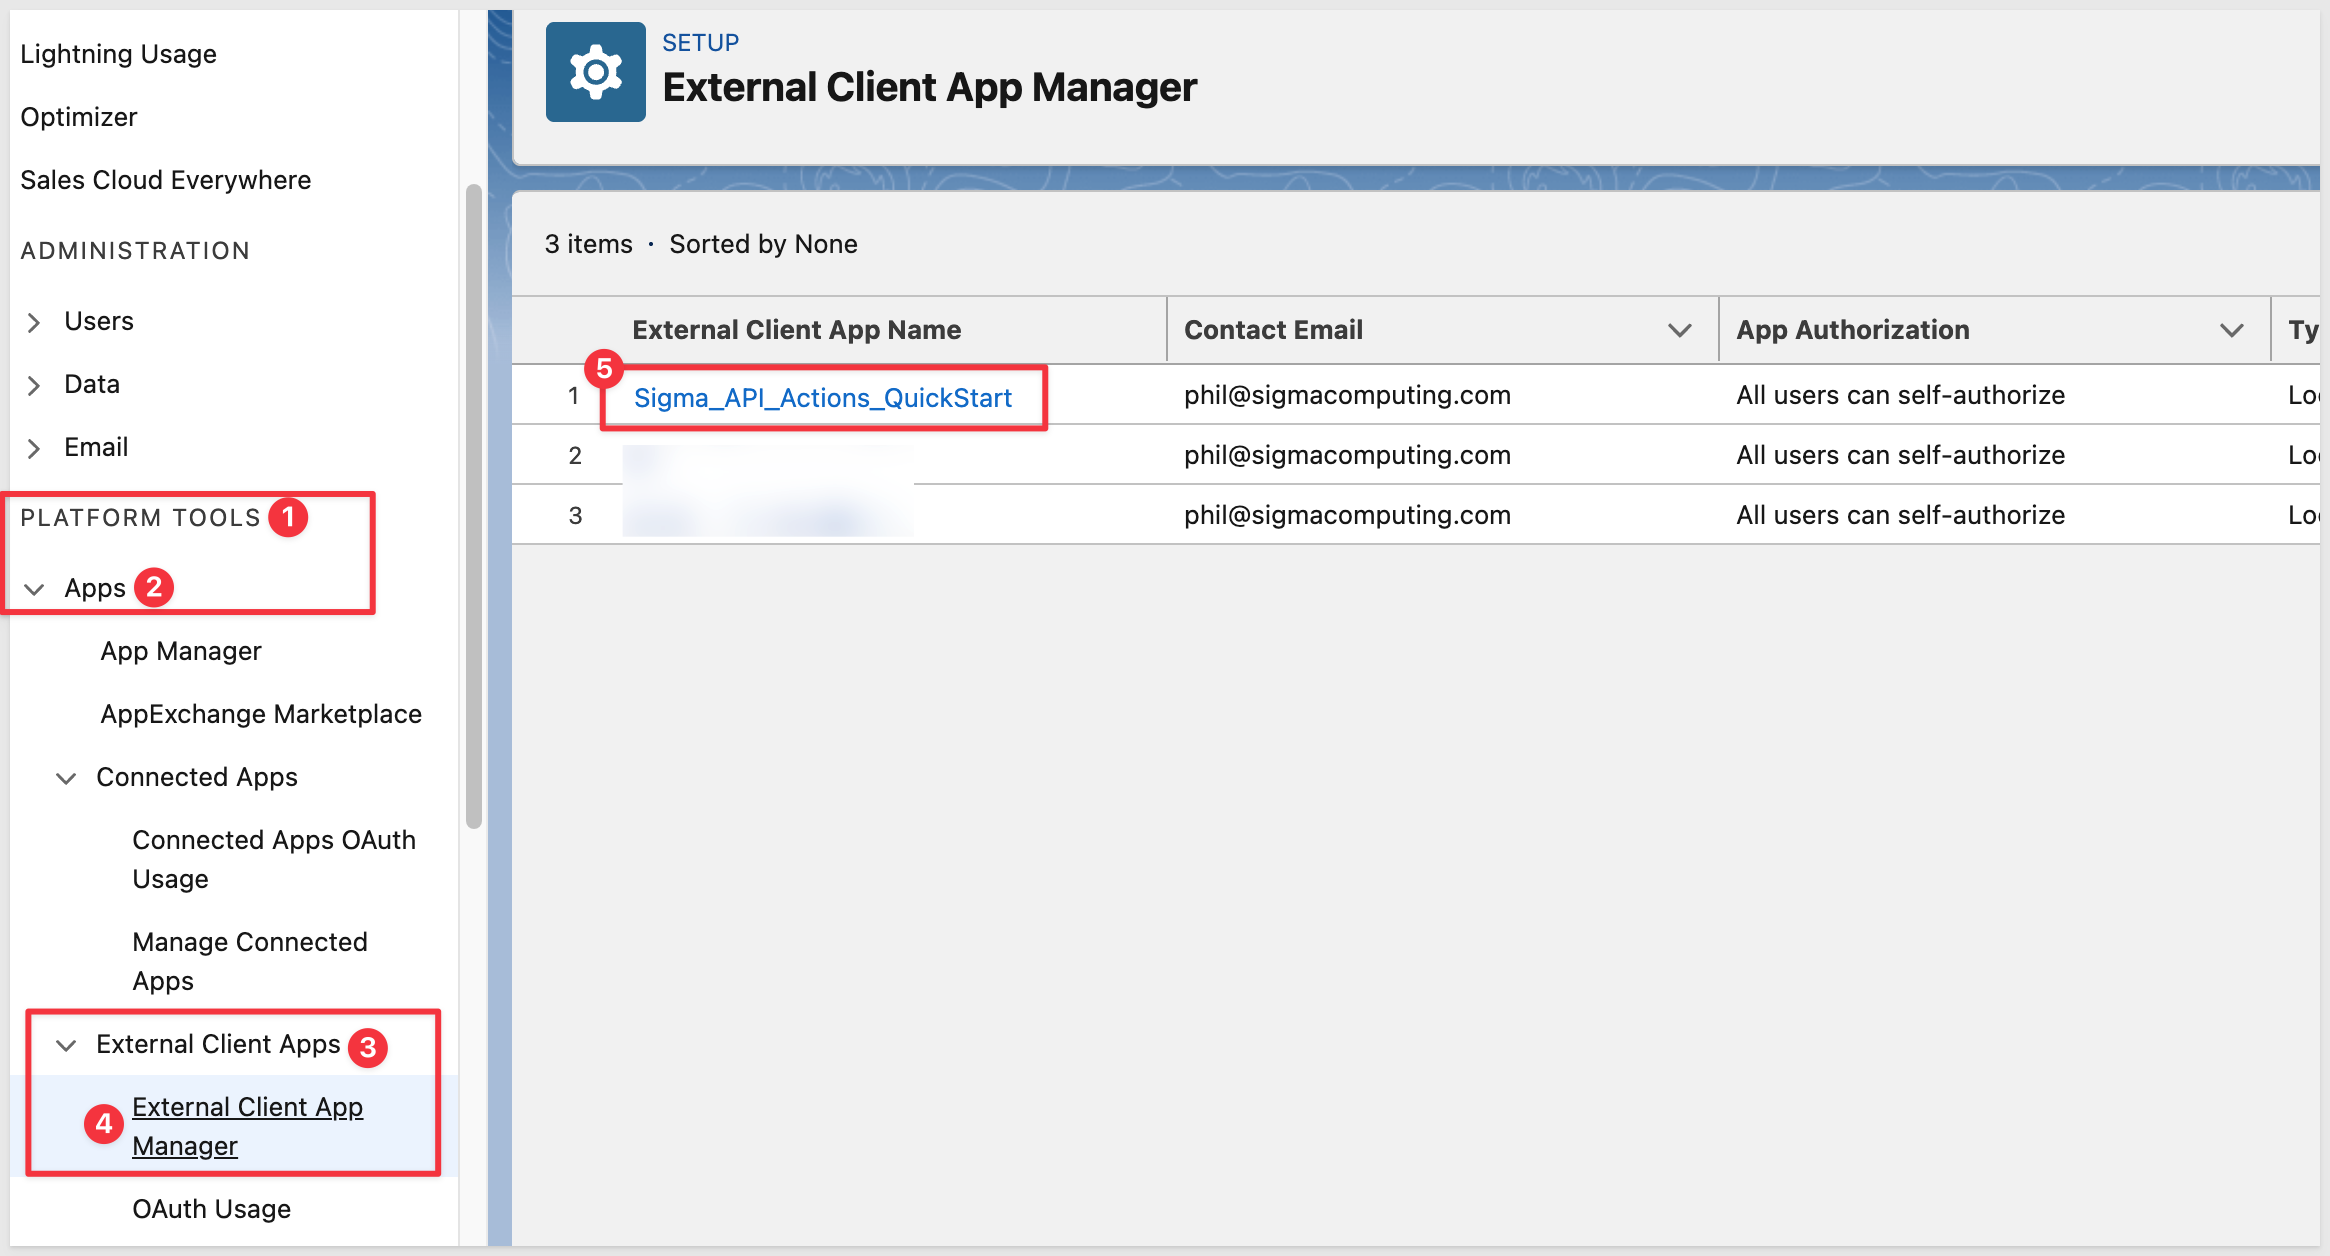
In Salesforce, navigate to Setup > Apps > App Manager:
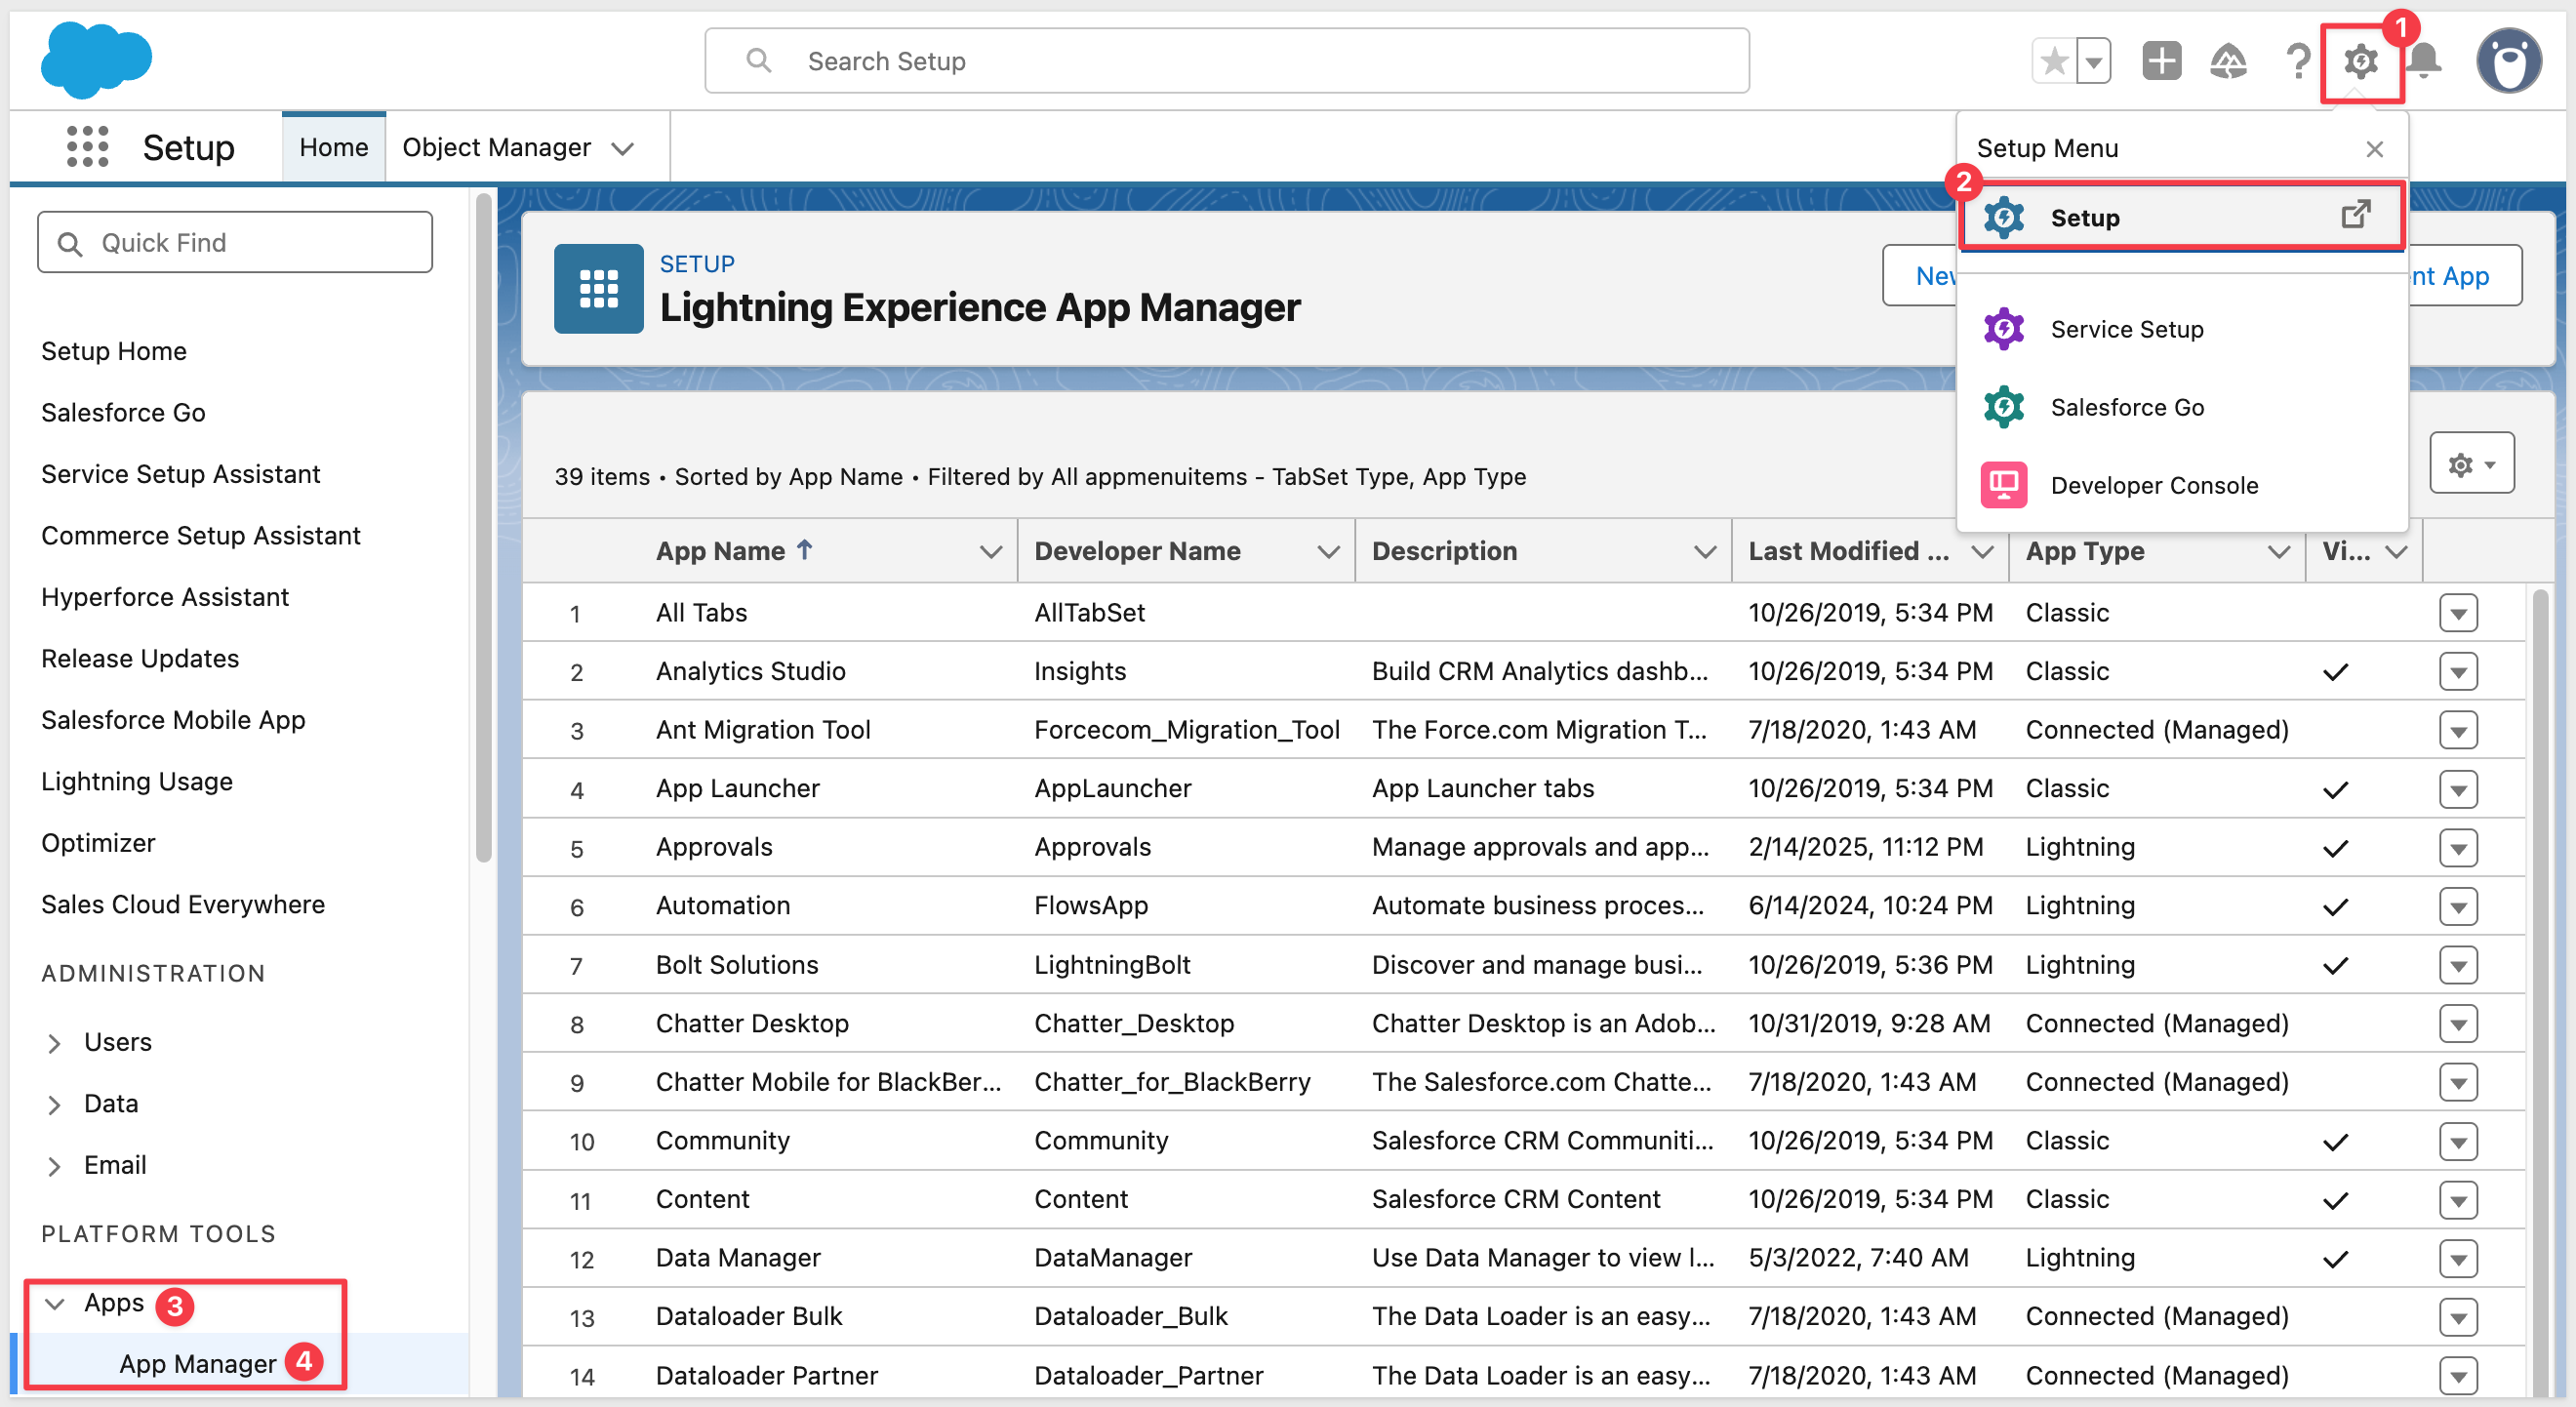
Click New External Client App
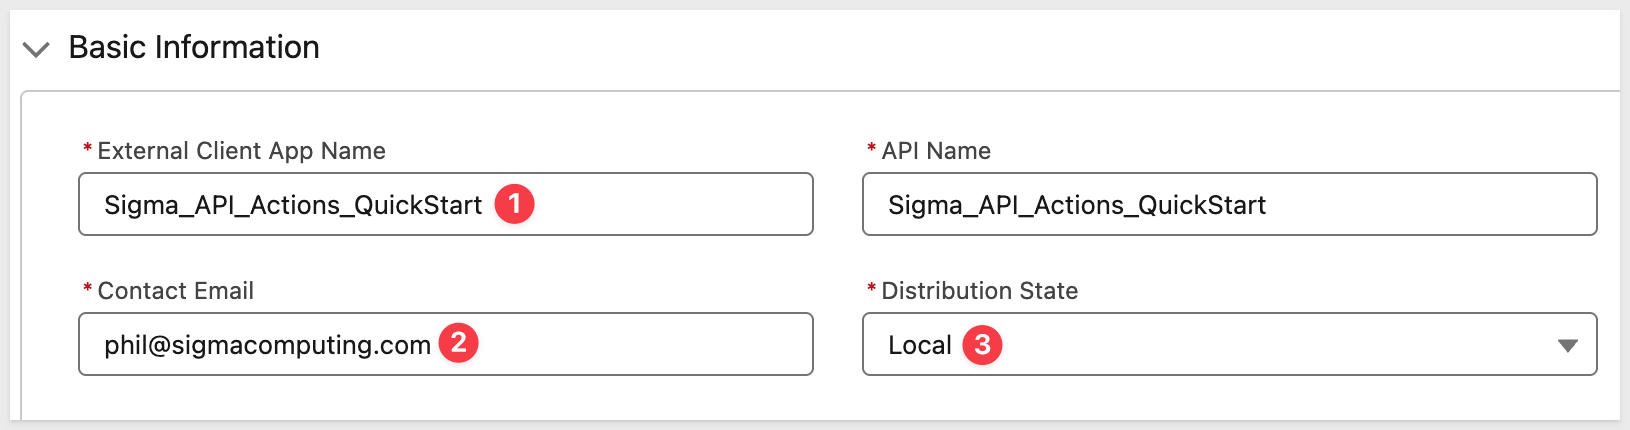
Provide a name such as Sigma_API_Actions_QuickStart, Contact Email and Distribution State as Local.
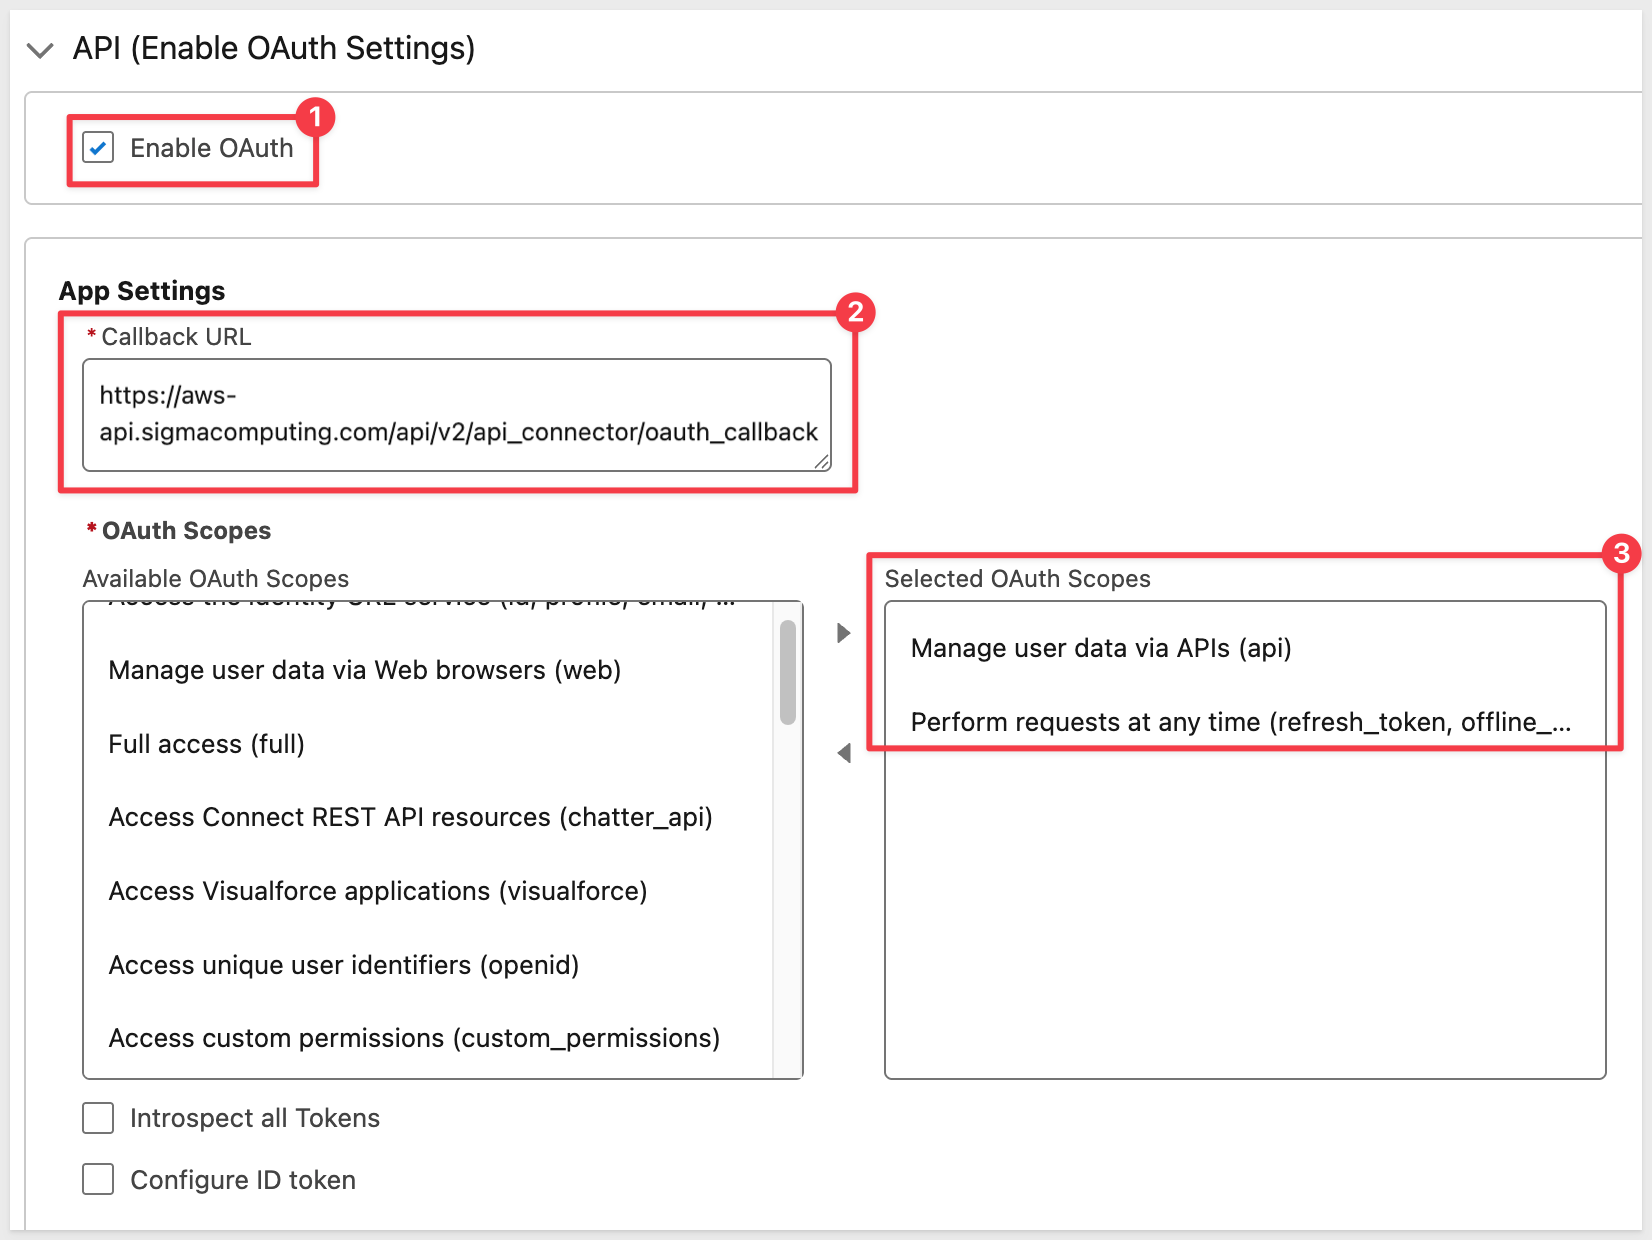
Scroll down the page to API (Enable OAuth Settings
Check the box to Enable OAuth.
Set the Callback URL to Sigma's API connector OAuth callback. The URL varies by cloud provider:
Cloud | Callback URL |
AWS |
|
Azure |
|
GCP |
|
Scopes
For this QuickStart, we only need the minimal scopes that allow:
- Running SOQL queries
- Reading/writing standard Salesforce objects
- Refreshing tokens without user interaction
Add the following OAuth scopes:
- Manage user data via APIs (api) This is the core scope that allows CRUD + querying via REST and SOAP.
- Perform requests at any time (refresh_token, offline_access) This allows Sigma to refresh the access token automatically.
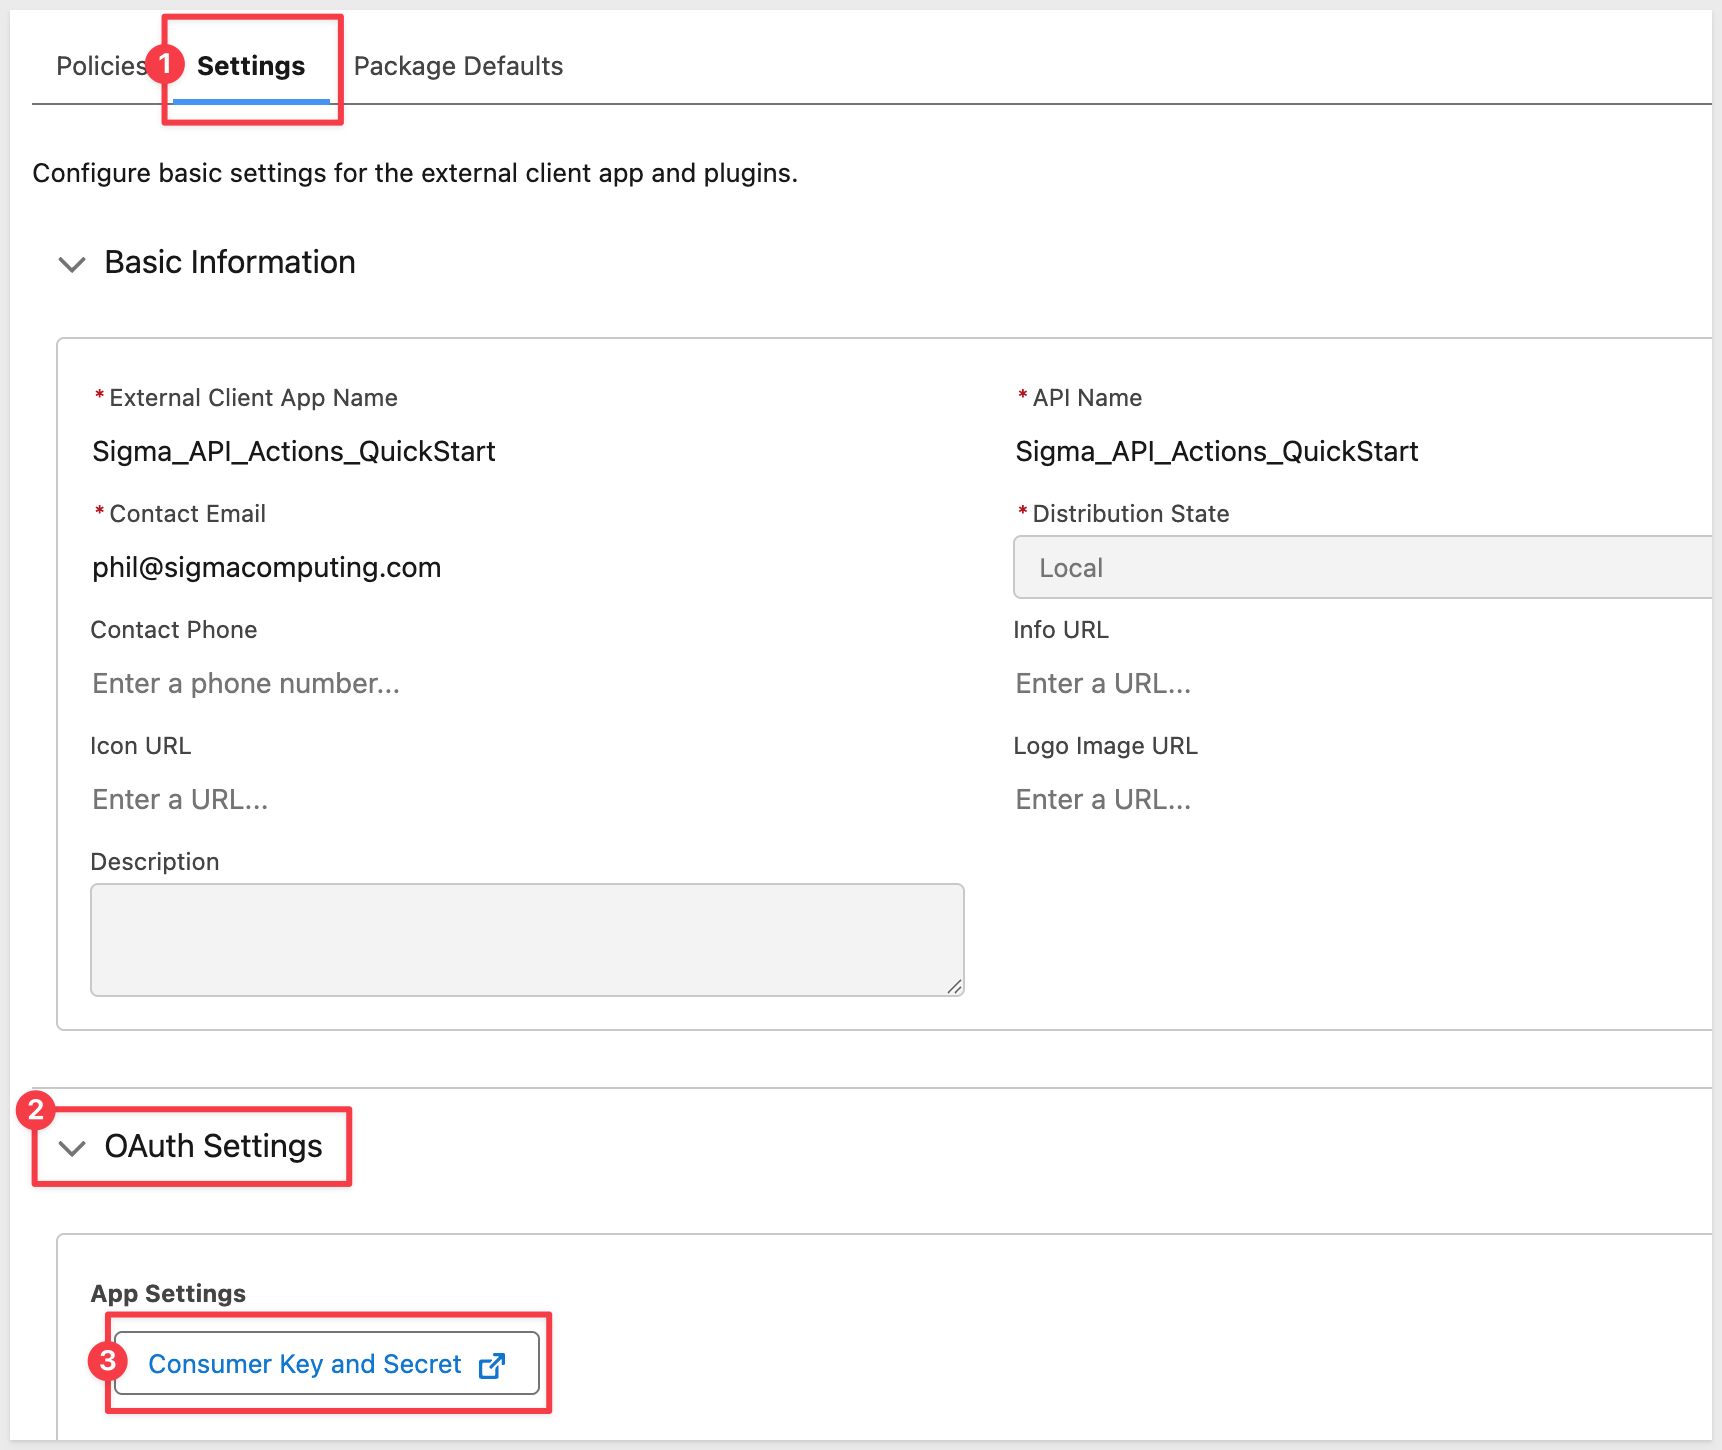
Click Create.
Once created, we can access and copy the Client ID and Client Secret values off to a text file for now. You'll need these in Sigma when performing the initial authorization.
These can be found on the connected app Settings tab, under OAuth Settings > Consumer Key and Secret button:
If for some reason you need to locate the Sigma_API_Actions_QuickStart Client App again, if can be found here:
With the Salesforce Connected App in place, we can now configure the matching credential in Sigma.
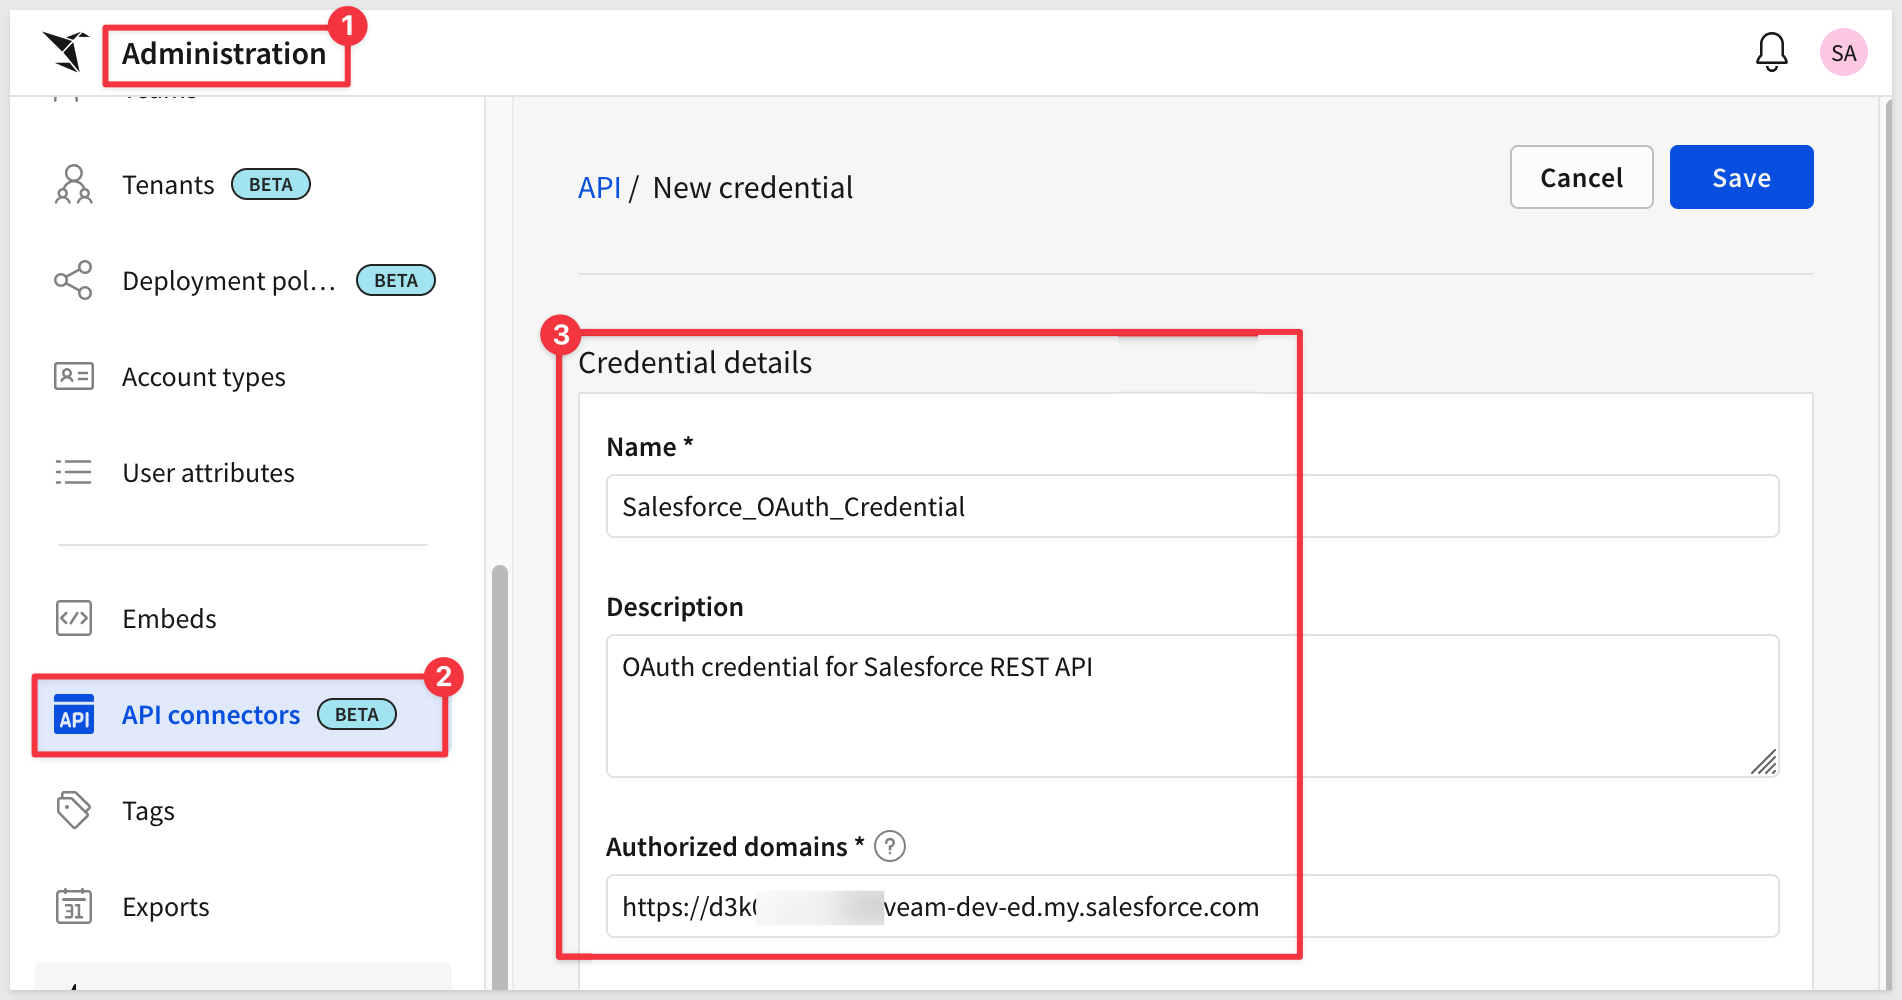
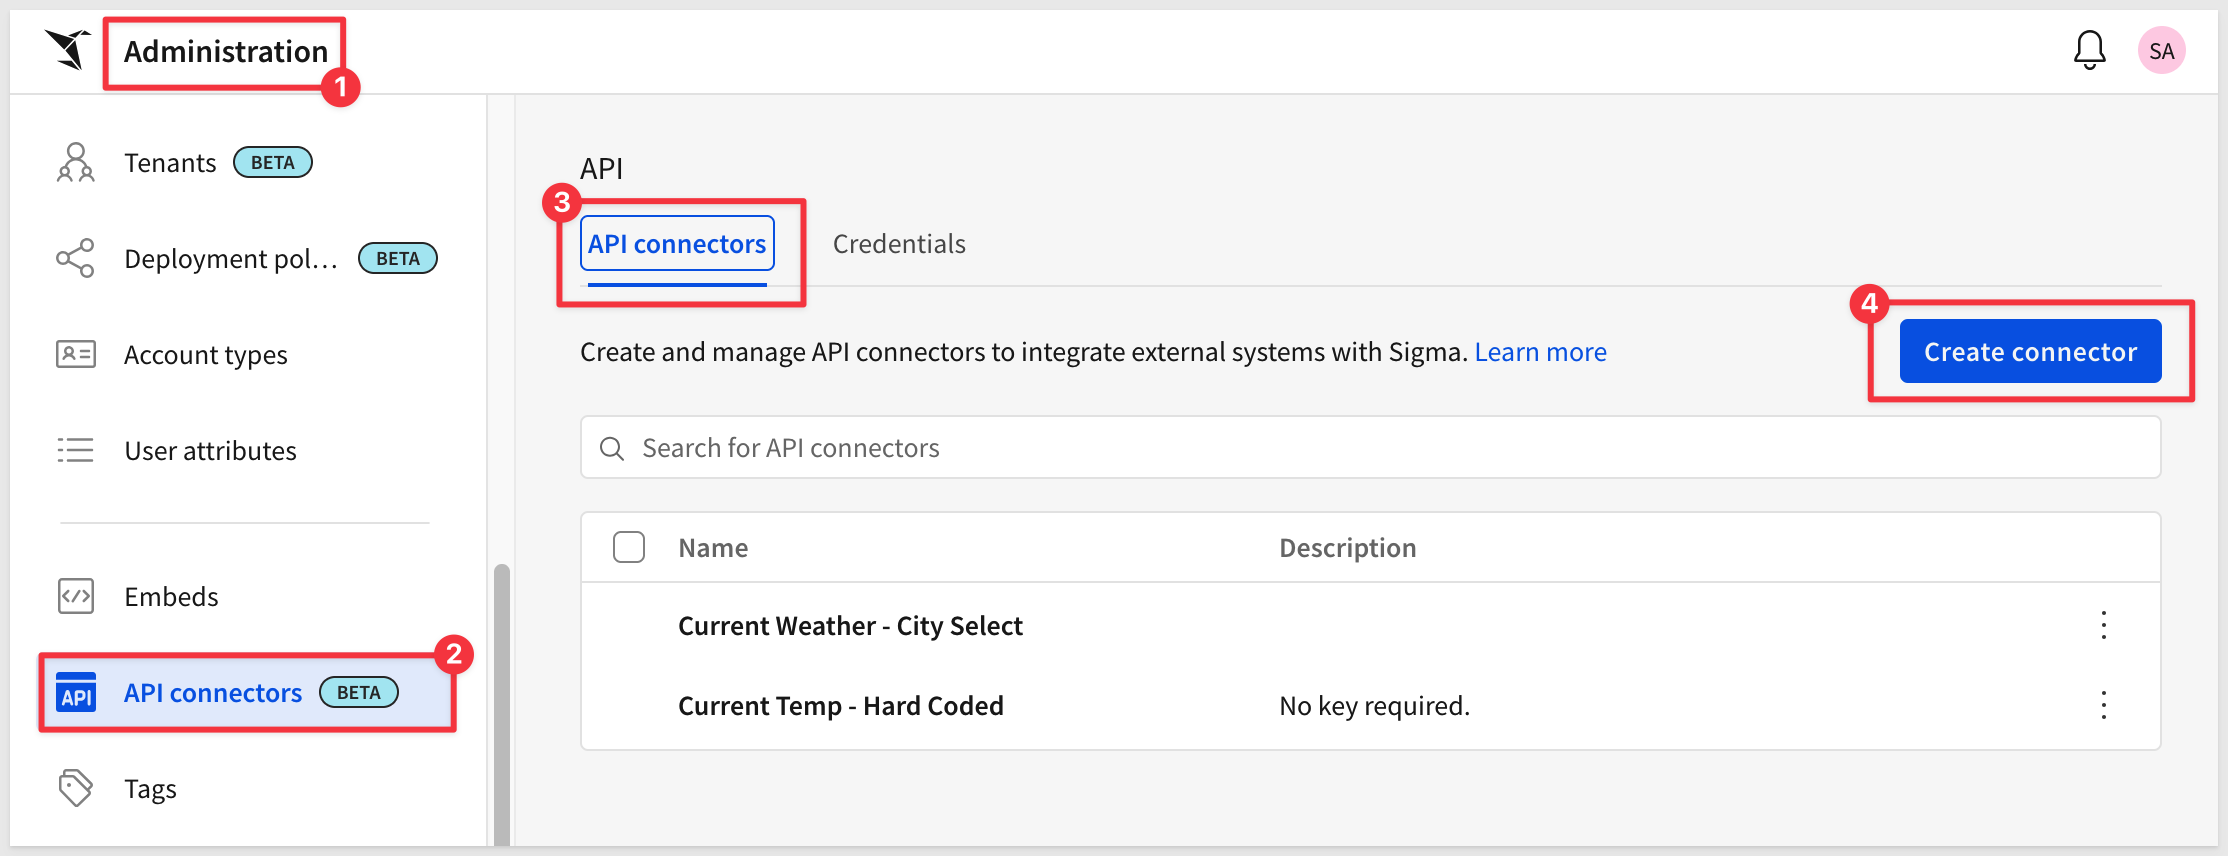
In Sigma, navigate to Administration > API connectors and select the Credentials tab.
Click Create credential.
Fill in the Credential details section:
Field | Value |
Name |
|
Description | Optional — e.g., |
Authorized domains | Your Salesforce instance domain (e.g., |
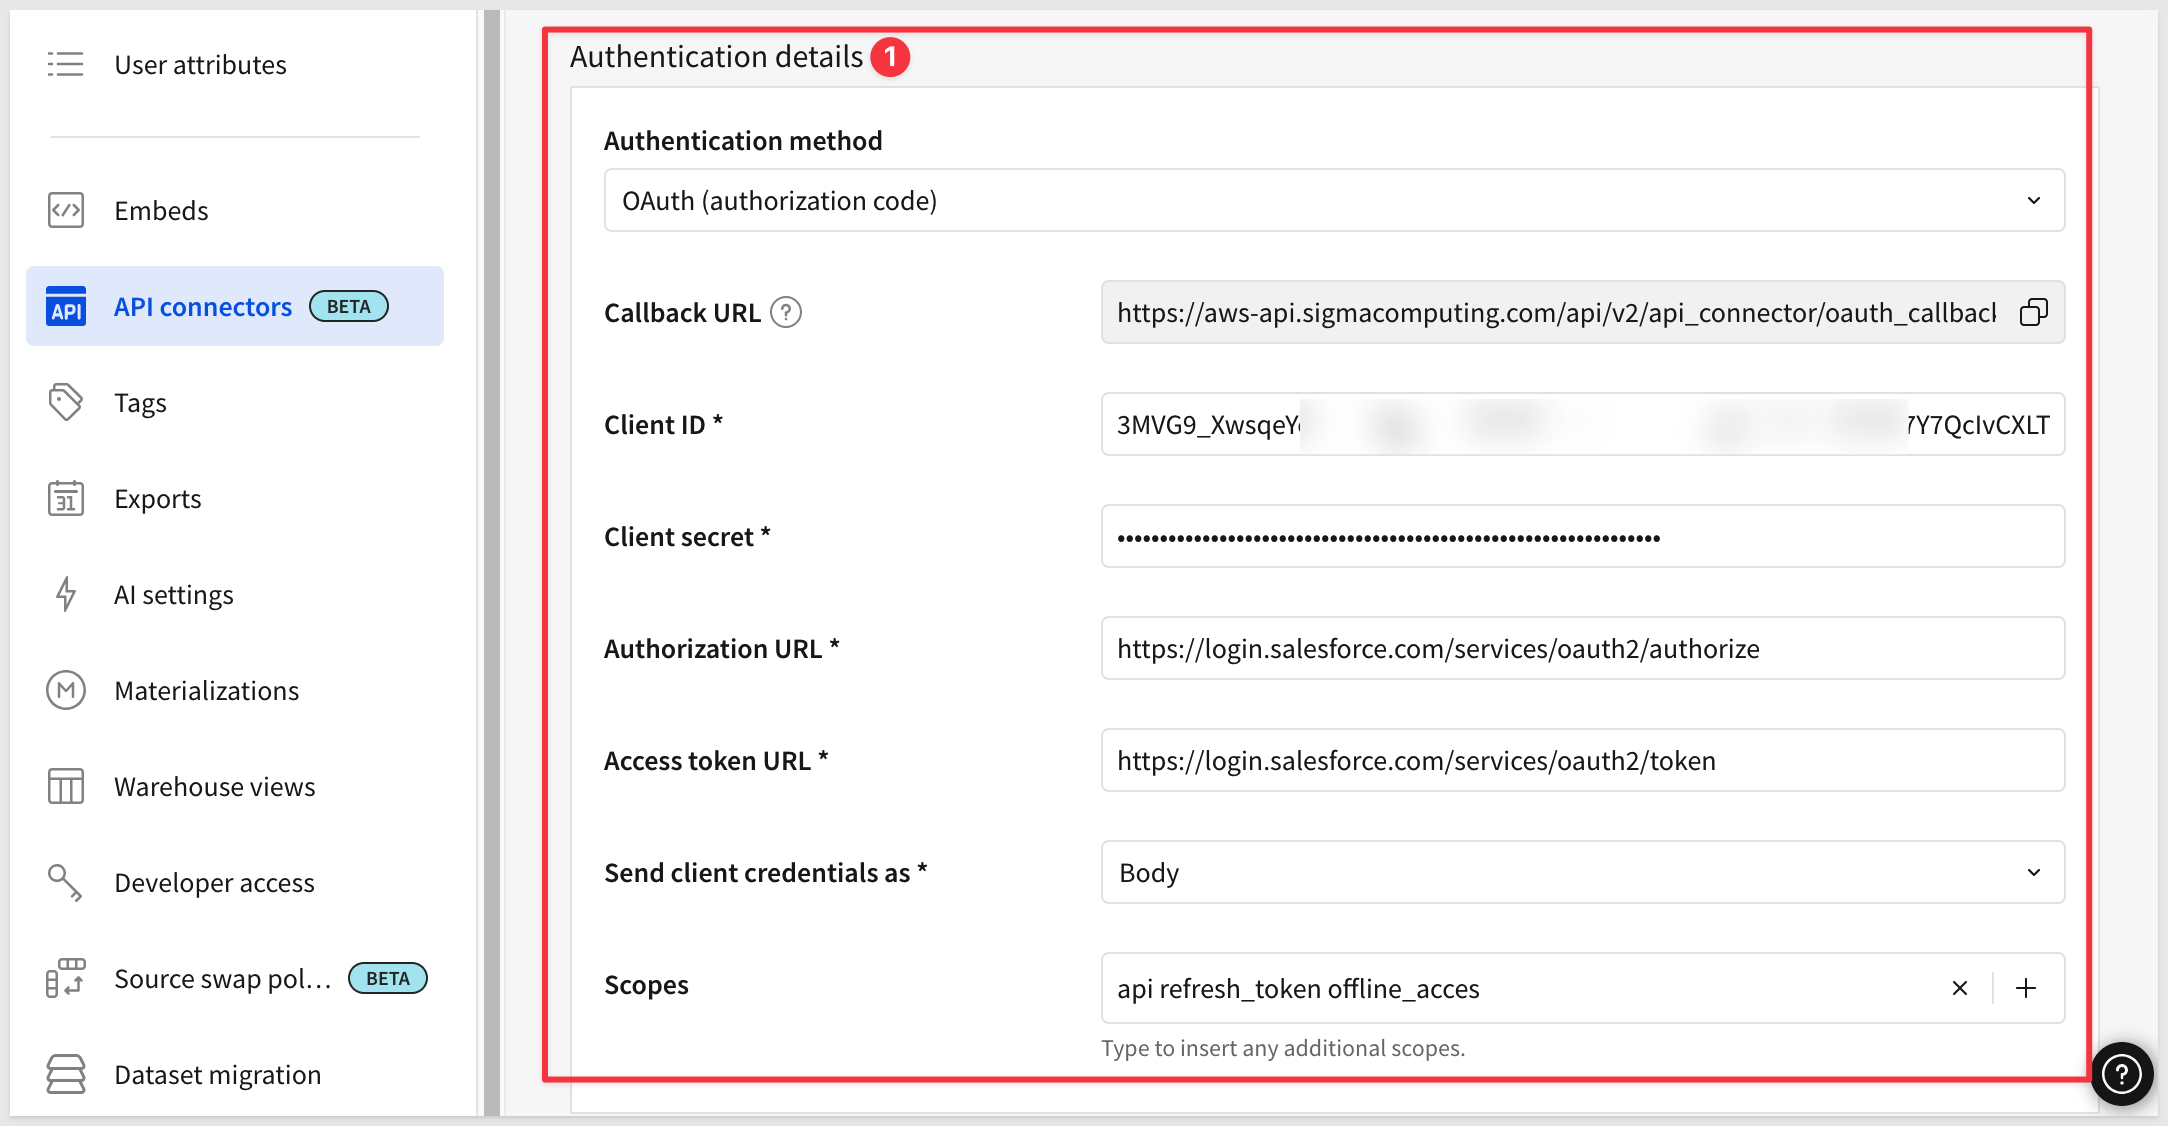
Under Authentication details, set Authentication method to OAuth (authorization code).
Sigma automatically provides a read-only Callback URL. This is the value you entered in the Salesforce Connected App in the previous section.
Fill in the remaining fields using the values from your Salesforce Connected App:
Field | Value |
Client ID | Consumer Key from Salesforce |
Client secret | Consumer Secret from Salesforce |
Authorization URL |
|
Access token URL |
|
Send client credentials as |
|
Scopes | (leave empty — scopes are already defined in the Salesforce Connected App) |
Click Save.
The credential is saved but not yet authorized:
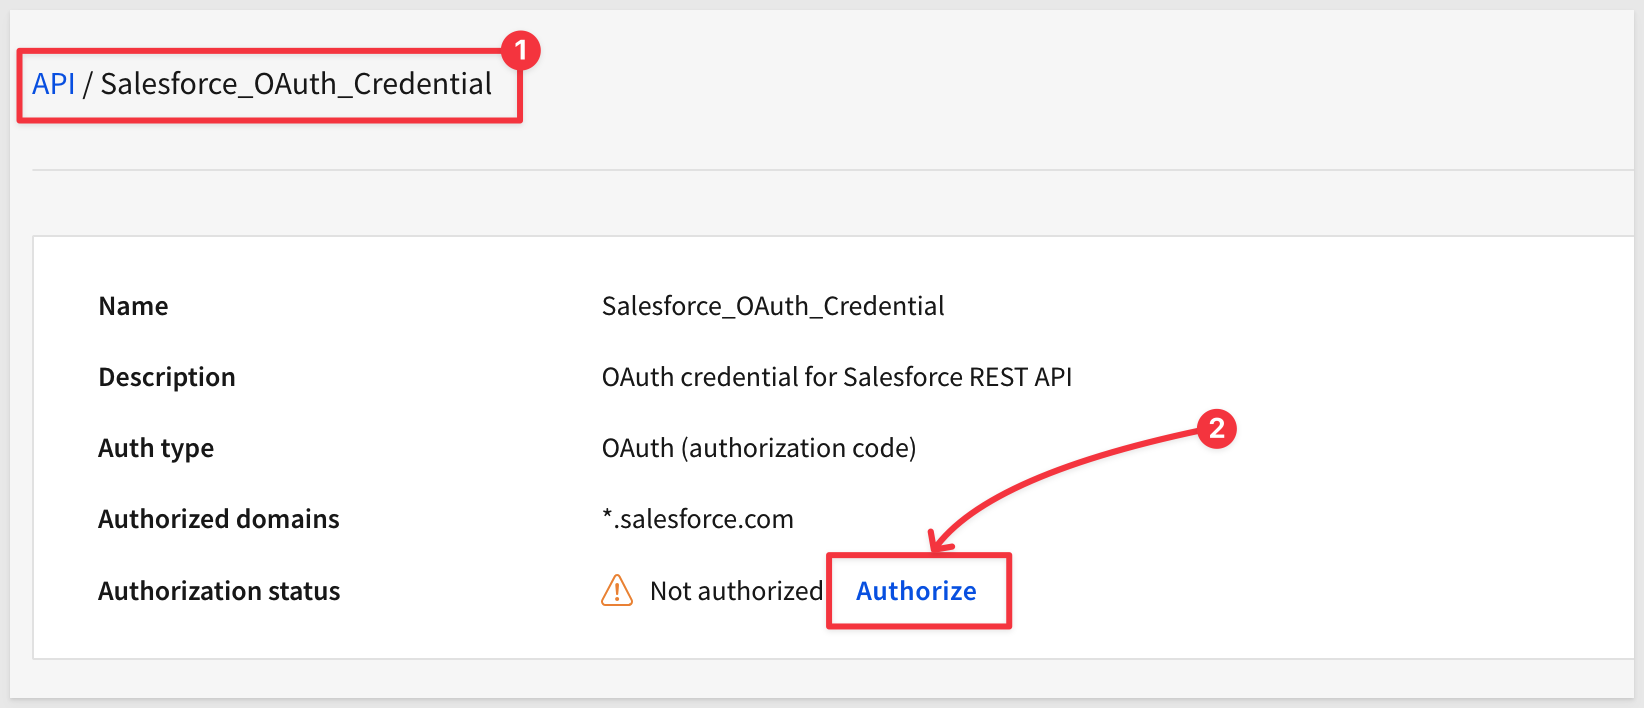
Click the Salesforce_OAuth_Credential name to open it.
Click the Authorize link.
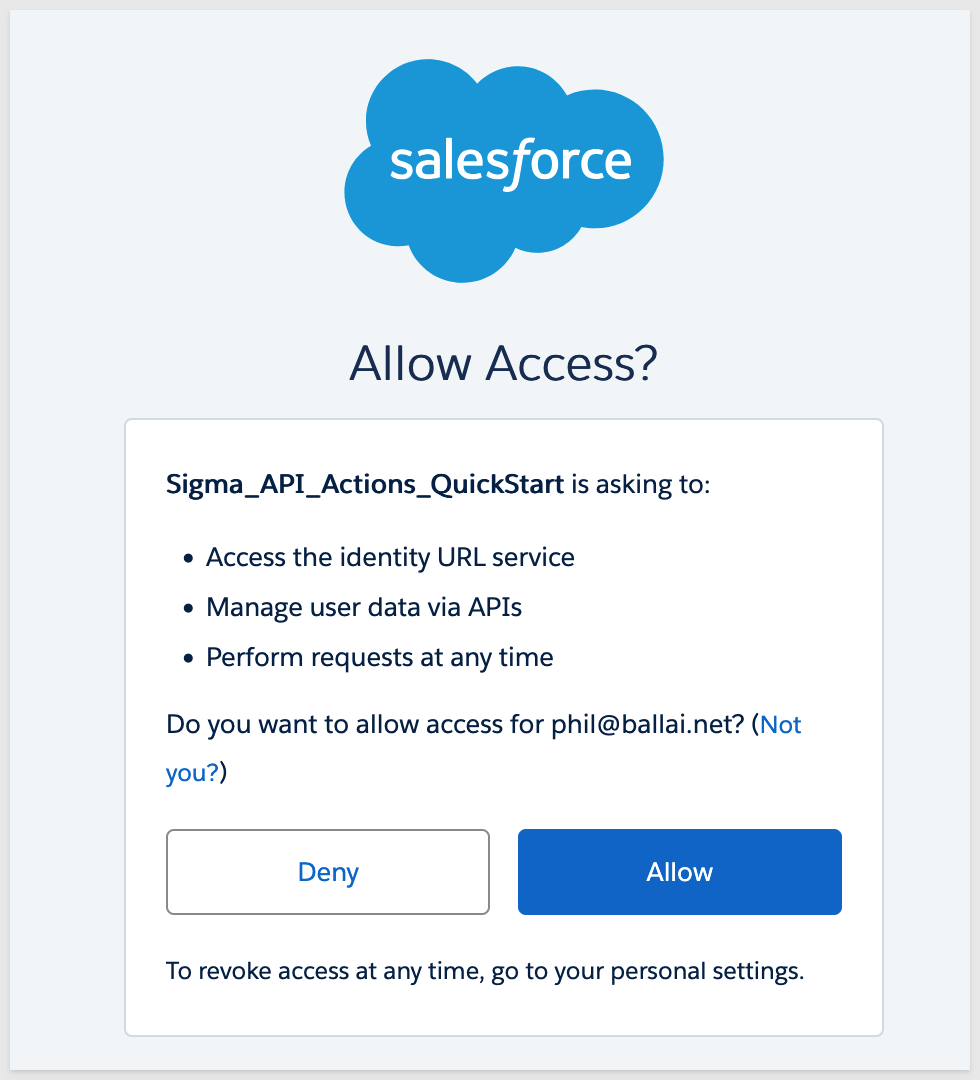
A Salesforce login window opens in your browser.
Log in and approve the access request.
Once complete, Sigma stores the refresh token and handles all future token renewals automatically — no manual re-authorization required.
With the credential authorized, we can now define the Salesforce API requests that Sigma is allowed to call. Each connector in Sigma represents one API request — we need two: one to fetch accounts and one to fetch opportunities for a selected account.
Connector 1: Get Accounts
In Sigma, navigate to Administration > API connectors and click Create connector:
Fill in the form as follows:
Field | Value |
Name |
|
Description | Optional — e.g., |
Authentication credential |
|
Base URL (GET) |
|
Under Query parameters, click Add parameter and set the following:
- Key:
q - Mode:
Static - Value:
copy-codeBefore saving, click
SELECT Id, Name, BillingCity, BillingState, Phone, Type, Industry FROM Account ORDER BY Name LIMIT 50Test connectorto verify the connector reaches Salesforce and returns data: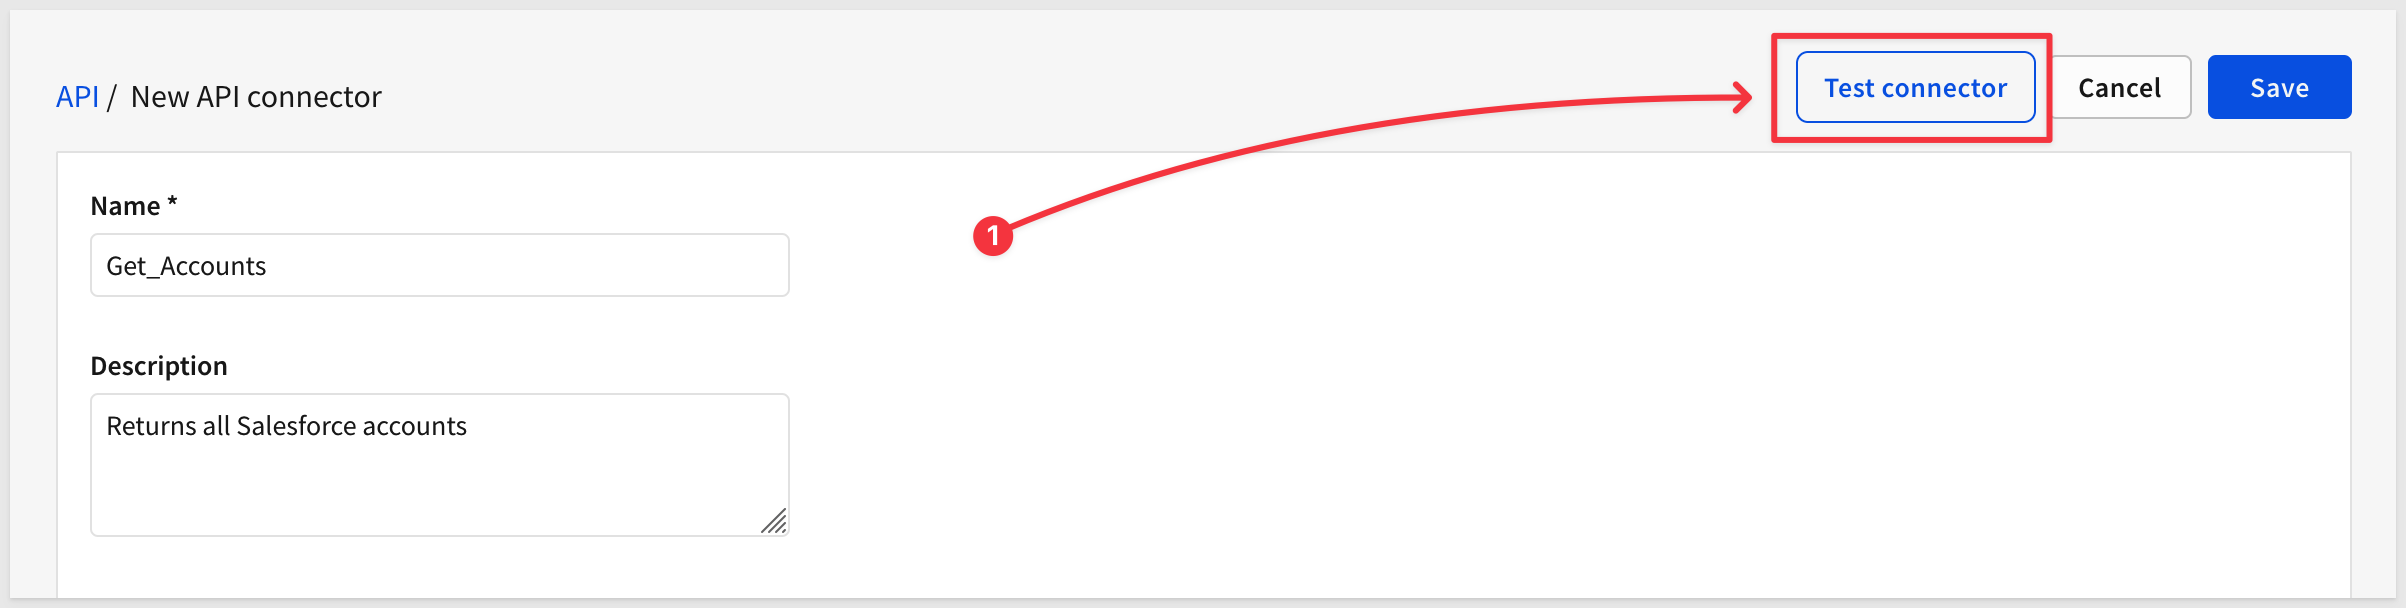 A
A Test API connectorpanel opens showing the full request URL and response. ASuccessresult with status code200confirms the connector is working correctly: The response body shows the Salesforce JSON structure — a
 recordsarray containing the account data. This is the structure Sigma will parse when the action fires from the workbook. ClickCancelto close the test panel, then clickSave. ### Connector 2: Get Opportunities by Account ClickCreate connectoragain to define the second request. | Field | Value | |——-|——-| | Name |Get_Opportunities_By_Account| | Description | Optional — e.g.,Returns opportunities for a selected account| | Authentication credential |Salesforce_OAuth_Credential| | Base URL (GET) |https://| Under.my.salesforce.com/services/data/v65.0/query Query parameters, clickAdd parameterand set the following: - Key:q- Mode:Dynamic- Value: (leave empty — the SOQL will be constructed and passed at runtime from the workbook)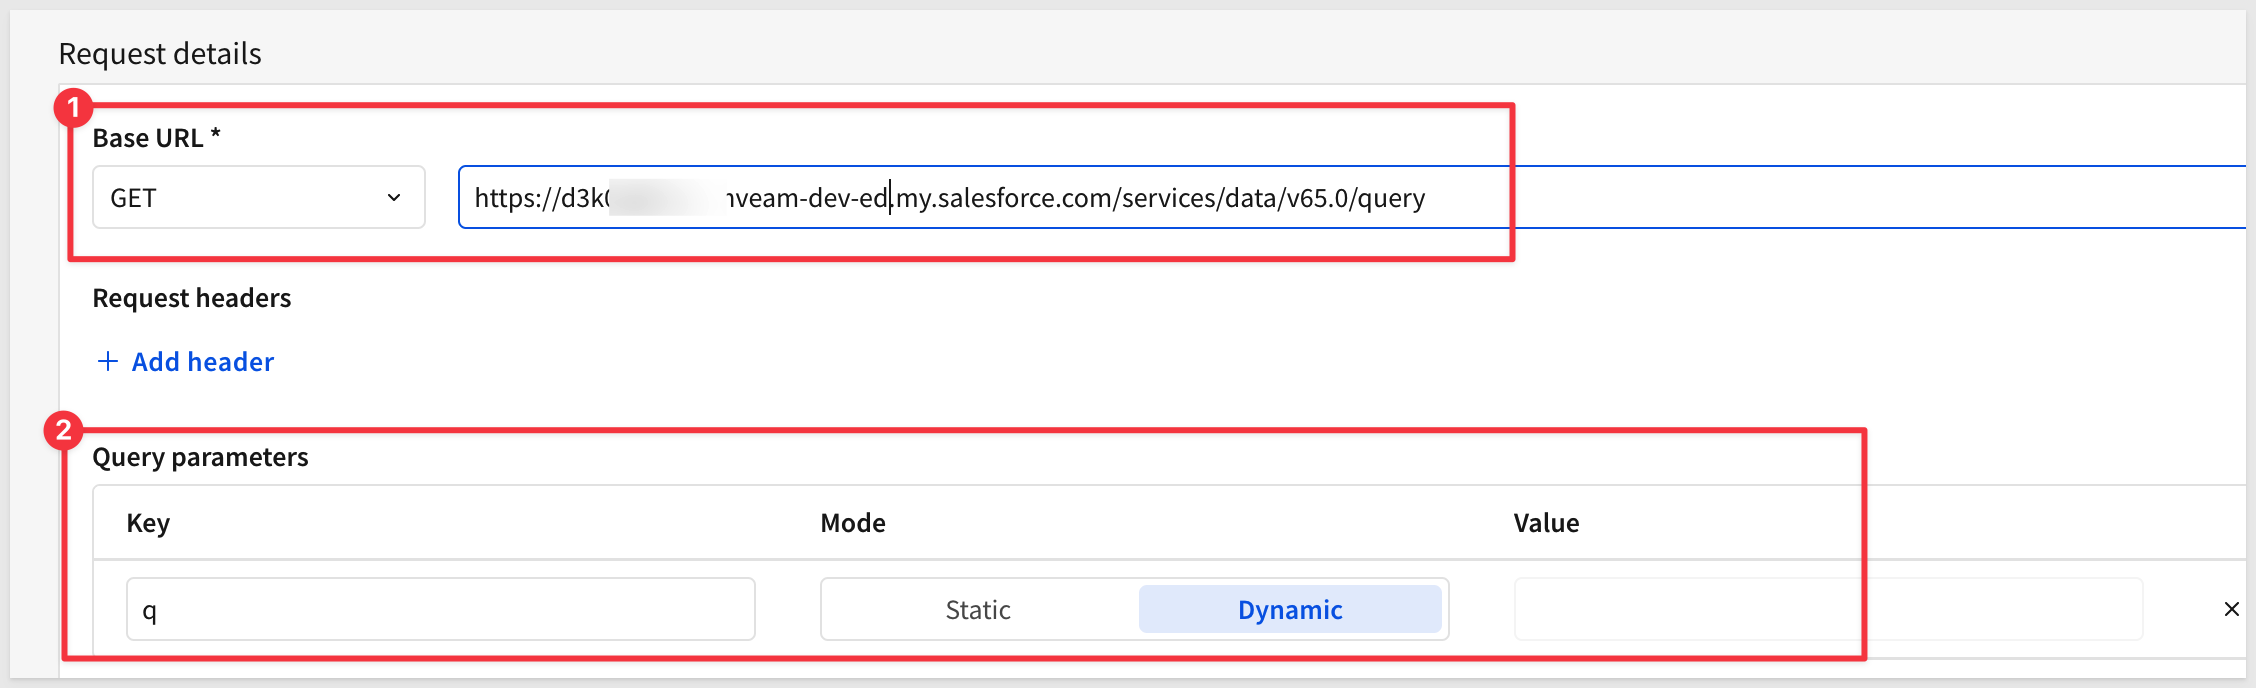 Click
Click Save. Both connectors are now configured and ready to be called from a Sigma workbook. ## Enable Python on the Snowflake Connection Duration: 5 Sigma's API Actions return raw JSON responses. To parse a bulk response (like a list of Salesforce accounts) into an interactive table, we use a Sigma Python element. Python elements in Sigma run on Snowflake compute and require a dedicated warehouse. ### Part 1: Snowflake Setup Log in to Snowflake as ACCOUNTADMINand run the following:copy-code
USE ROLE ACCOUNTADMIN;
-- CREATE DEDICATED PYTHON WAREHOUSE
CREATE WAREHOUSE IF NOT EXISTS PYTHON_WH
WAREHOUSE_TYPE = STANDARD
WAREHOUSE_SIZE = XSMALL
AUTO_SUSPEND = 60
AUTO_RESUME = TRUE
COMMENT = 'Dedicated warehouse for Sigma Python queries';
-- START THE WAREHOUSE IMMEDIATELY
ALTER WAREHOUSE PYTHON_WH RESUME;
-- GRANT ACCESS TO SIGMA SERVICE ROLE
GRANT USAGE ON WAREHOUSE PYTHON_WH TO ROLE SIGMA_SERVICE_ROLE;
GRANT CREATE PROCEDURE ON SCHEMA QUICKSTARTS.INPUT_TABLES_WRITE TO ROLE SIGMA_SERVICE_ROLE;
Part 2: Enable Python in Sigma
In Sigma, navigate to Administration > Connections and edit your Snowflake connection.
Scroll to the Python section and configure:
Field | Value |
Enable Python queries | Toggle ON |
Warehouse |
|
Packages | (leave empty) |
External access rule | (leave empty) |
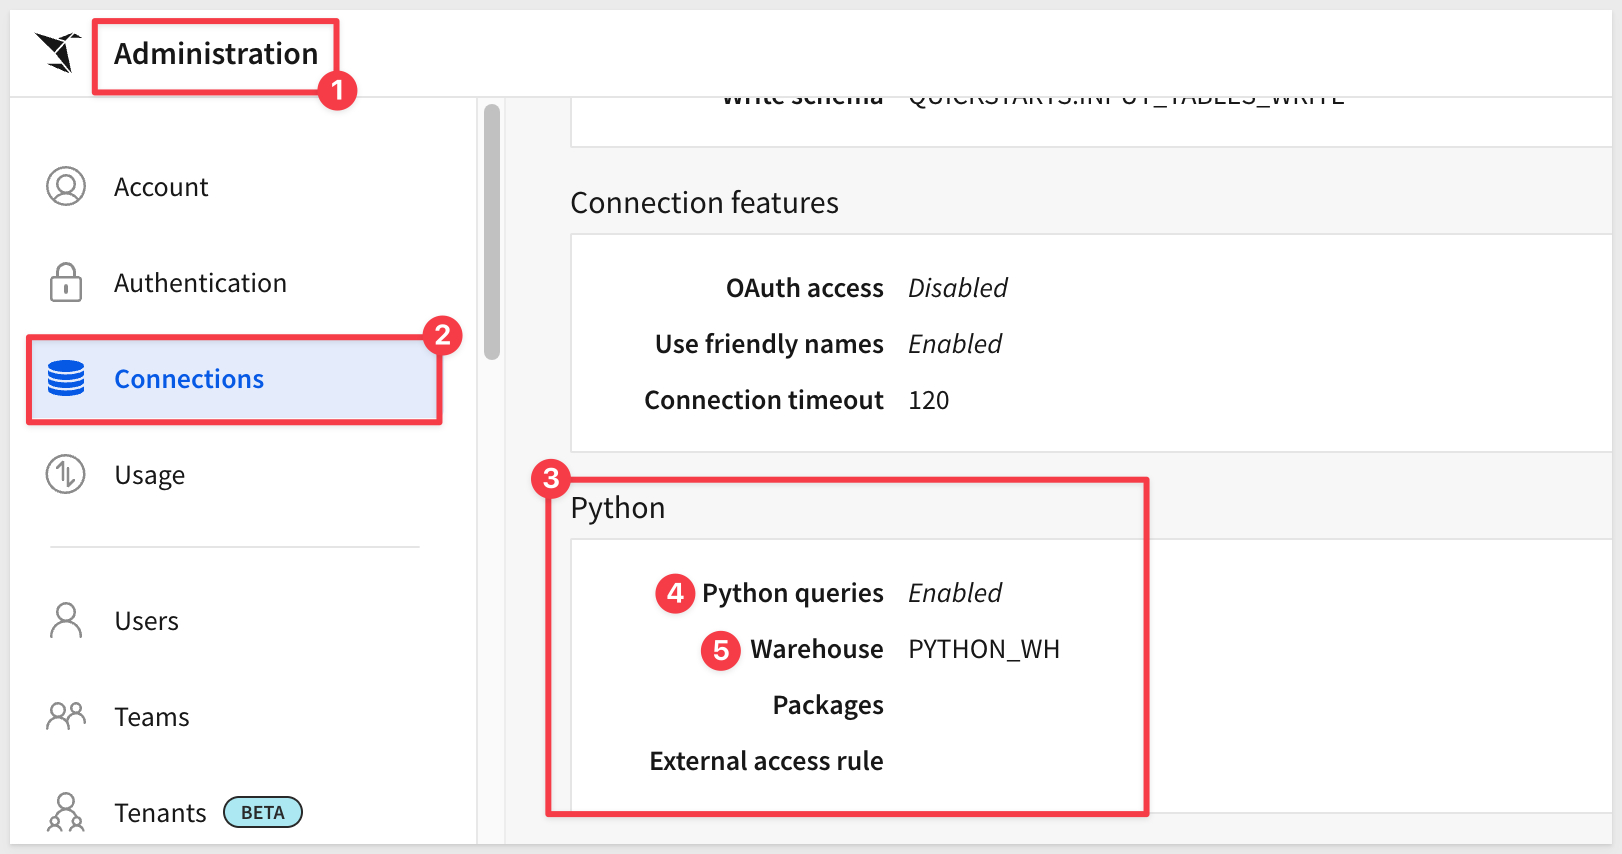
Click Save.
Part 3: Initialize the Python Procedure
Sigma creates the required stored procedure the first time a Python element executes. To trigger this, (from the Sigma home page), click Create new > Workbook.
Click Save as and name the workbook Salesforce Account Explorer QuickStart.
Add a Python element from the Data group on the Element bar.
Enter the following, and click Run:
import pandas as pd
sigma.output("test", pd.DataFrame({"status": ["initialized"]}))
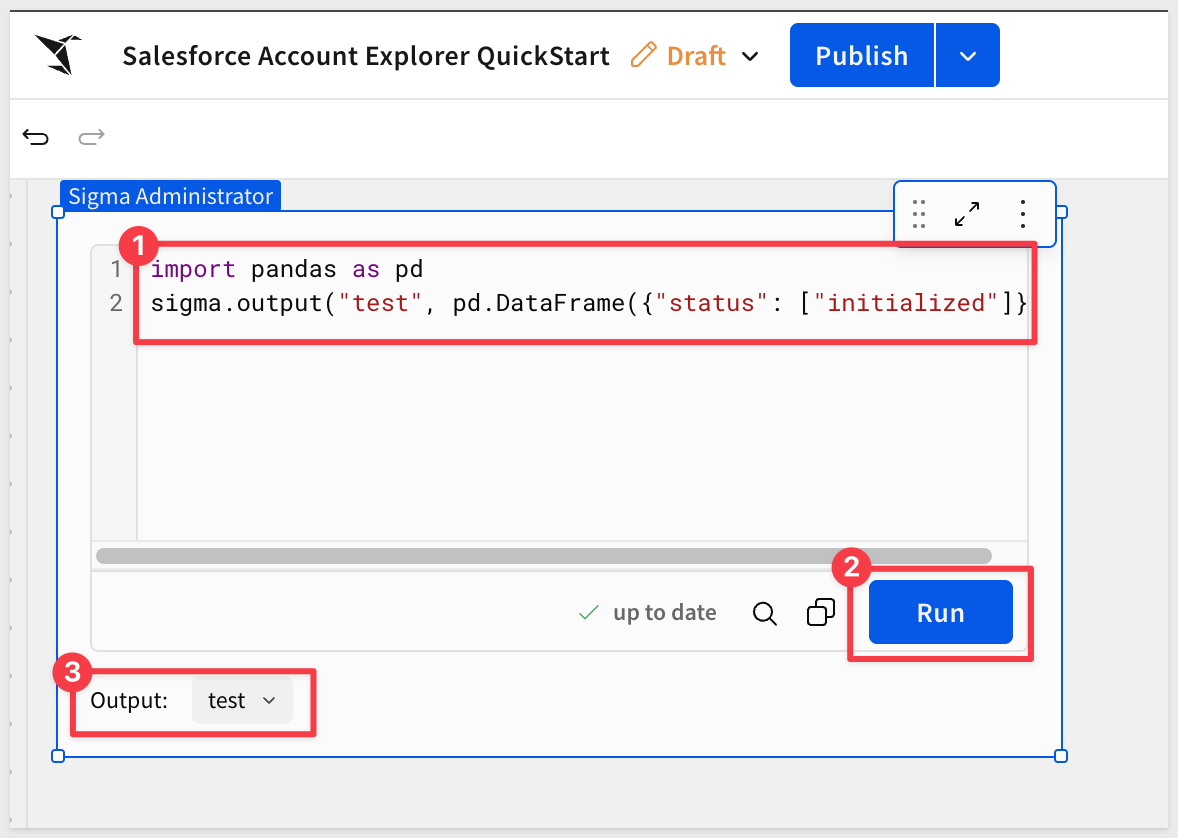
Once the element executes successfully, return to Snowflake and run the following to grant access to the procedure:
USE ROLE ACCOUNTADMIN;

GRANT USAGE ON PROCEDURE QUICKSTARTS.INPUT_TABLES_WRITE.RUN_PYTHON_CODE(VARCHAR, VARCHAR) TO ROLE SIGMA_SERVICE_ROLE;
Python is now ready to use in Sigma workbooks.
With the API connectors configured, we can now build the workbook to surface Salesforce data.
Create New Workbook
In Sigma, click the + Create New button and select Workbook.
Click Save As and name the workbook Salesforce Account Explore QuickStart.
Add Initial Elements
The first part of the architecture uses four elements working together to get the current account list into a list control:
- A button that calls the Salesforce API
- A text area that holds the raw JSON response
- Python element that parses that response into a table
- A list control that gets the account names from the table
Rename the current page from Page 1 to Controls.
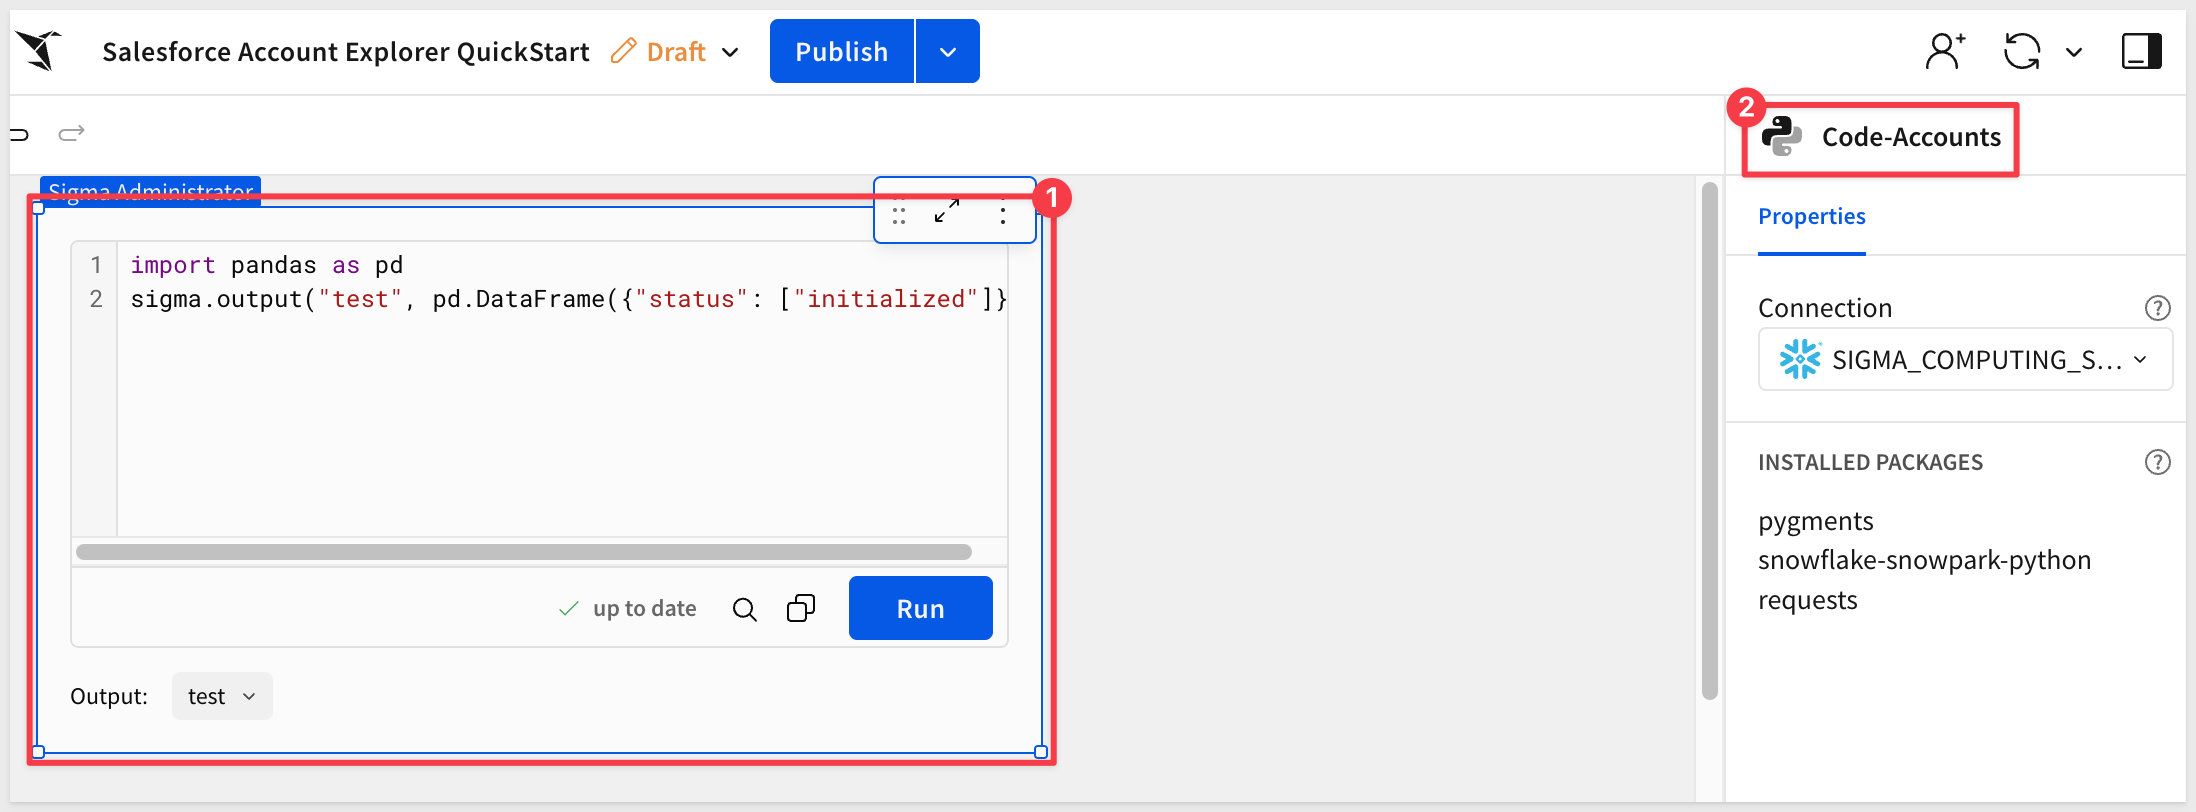
Rename the existing Python element to Code-Accounts:
Add the Response Control
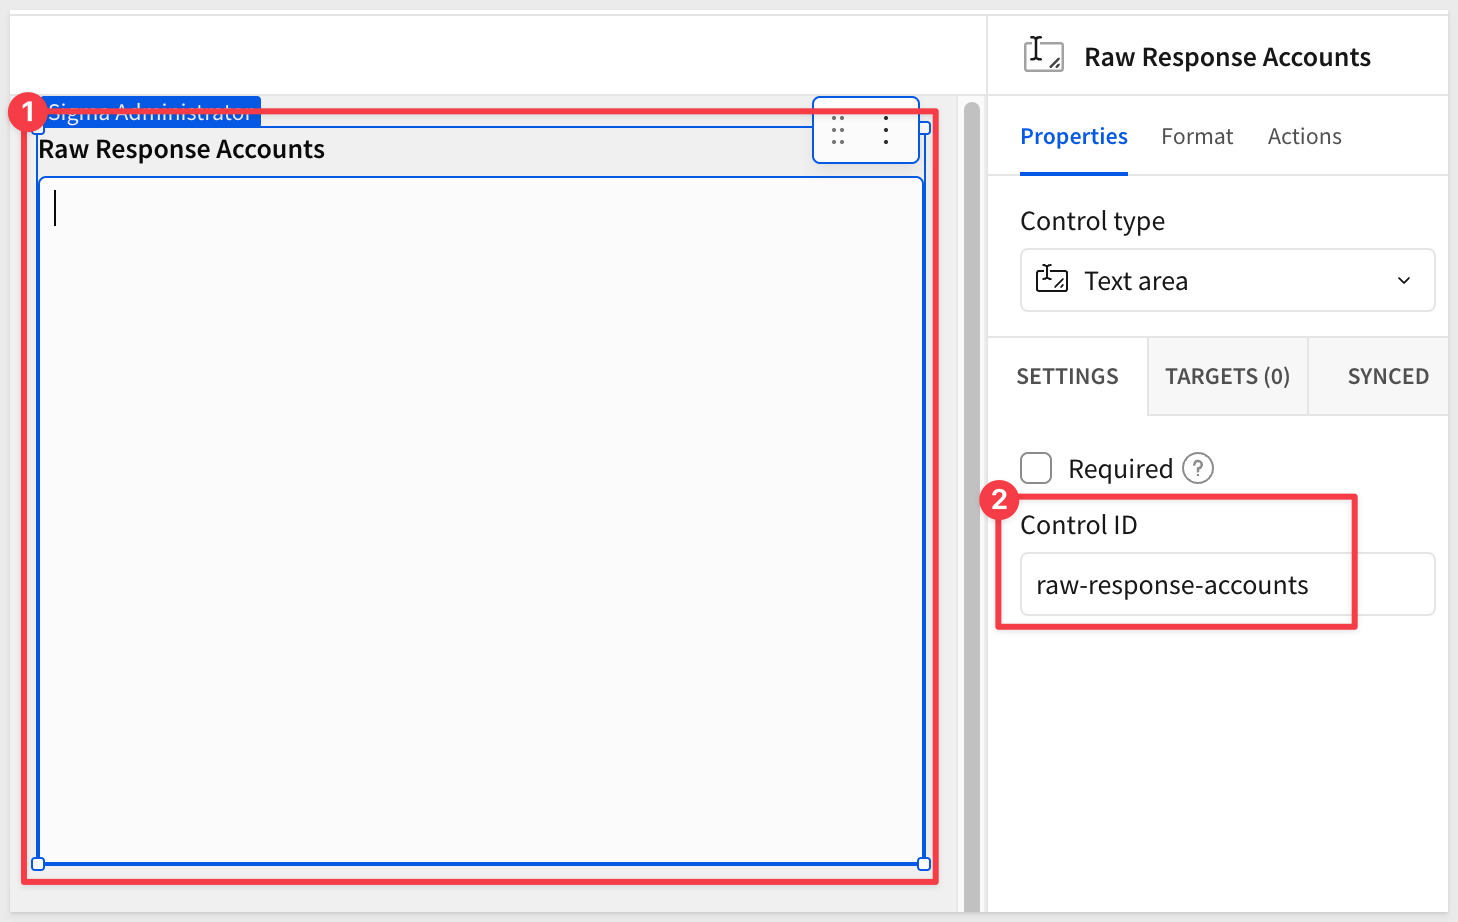
The Salesforce API returns a raw JSON payload. We store it in a text area control so a Python element can read and parse it.
Using the Element bar, add a Text area element from the Controls group.
In the right panel, set the control label to raw-response-accounts:
Add the Refresh Account List Button
Add a Button from the UI group to the page.
Label the button Refresh Account List.
Add the first action — Call the API:
With the button selected, open the Actions panel on the right and click + to add an action sequence.
Click + inside the sequence and select Call API. Configure it as follows:
Field | Value |
Connector |
|
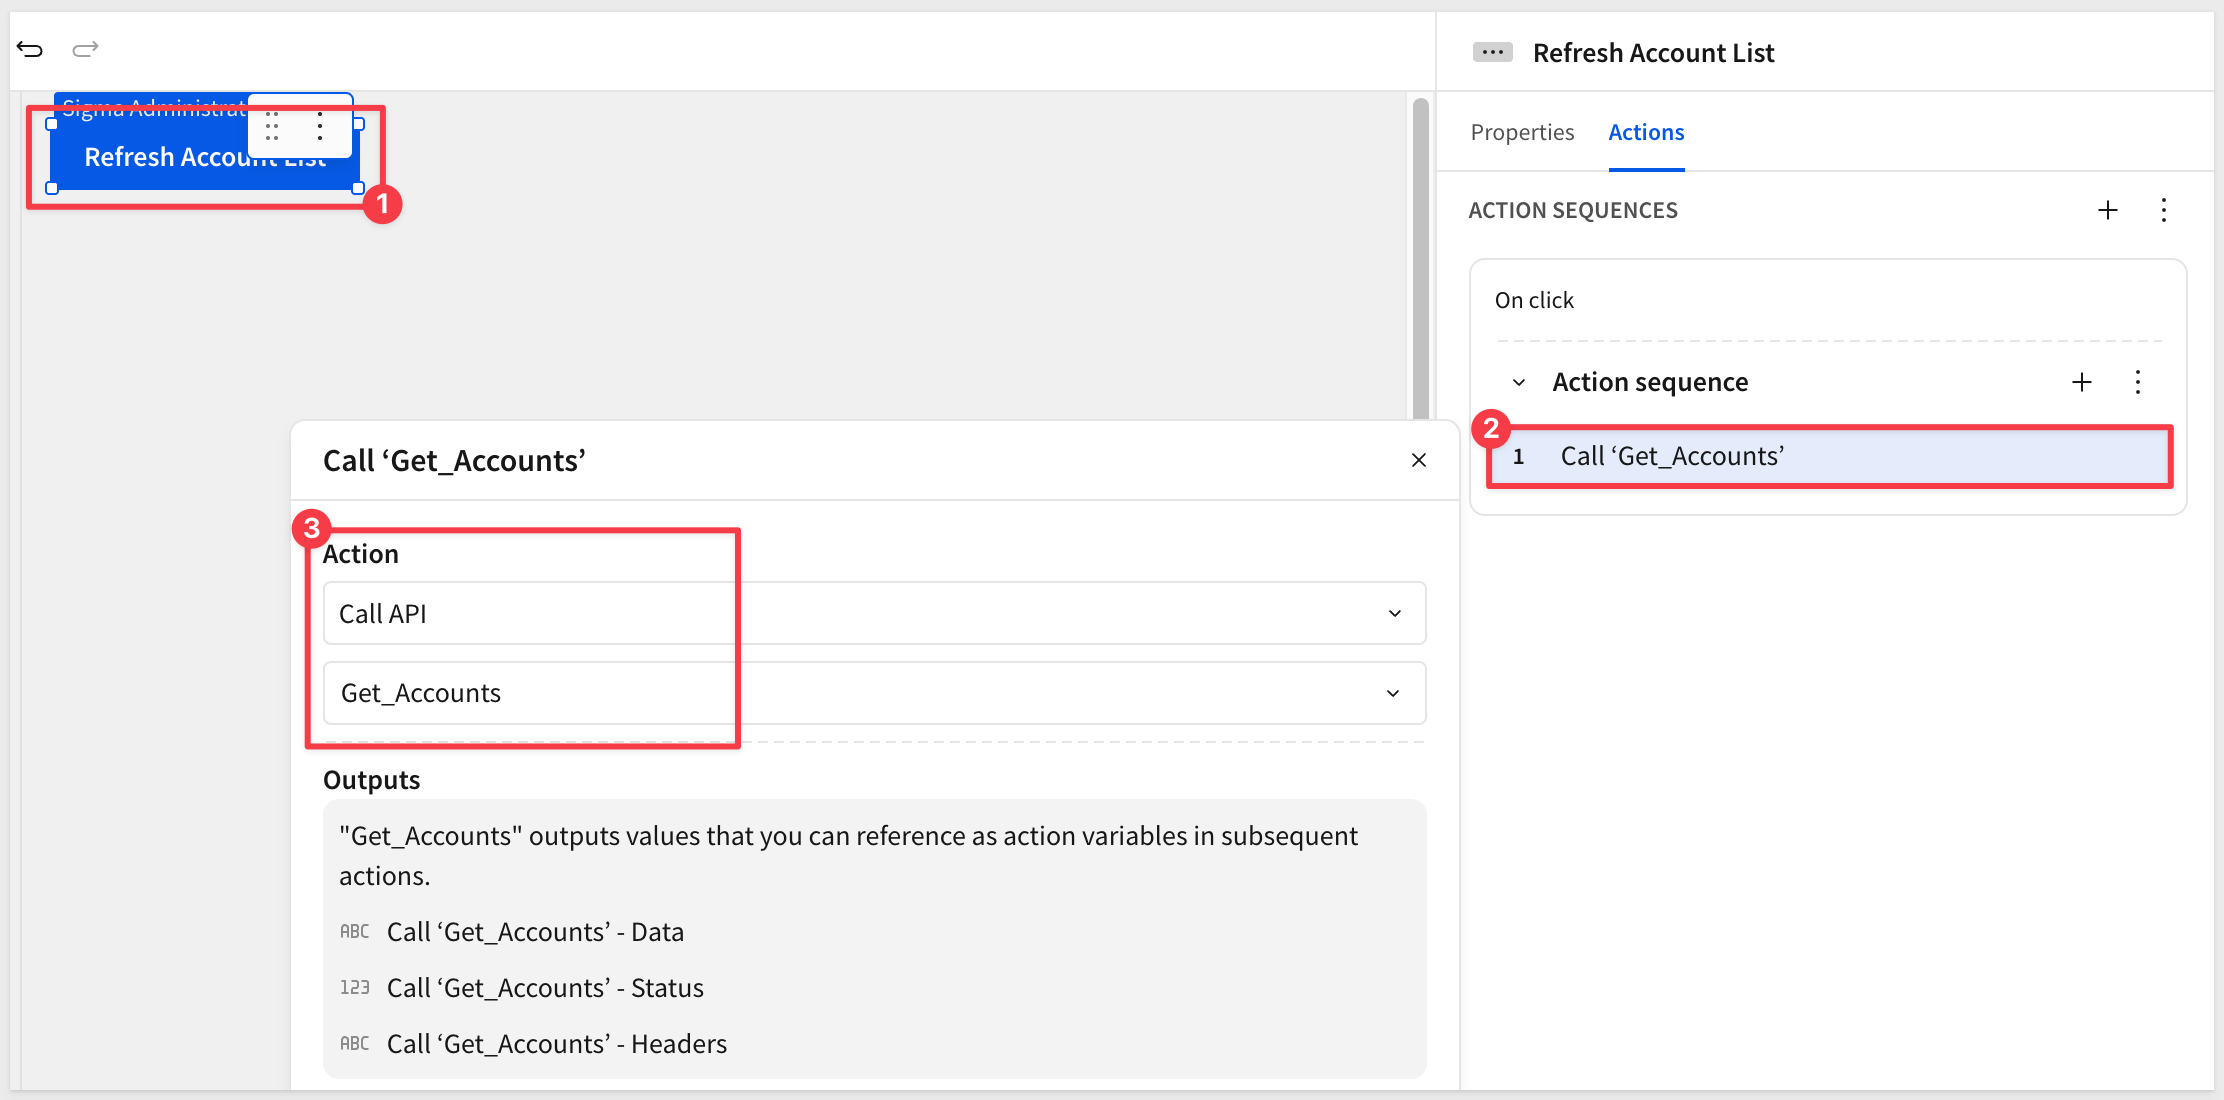
Add the second action to store the response:
Click + again inside the same sequence and select Set control value. Configure it as follows:
Field | Value |
Action |
|
Update control |
|
Set value as |
|
Variable |
|
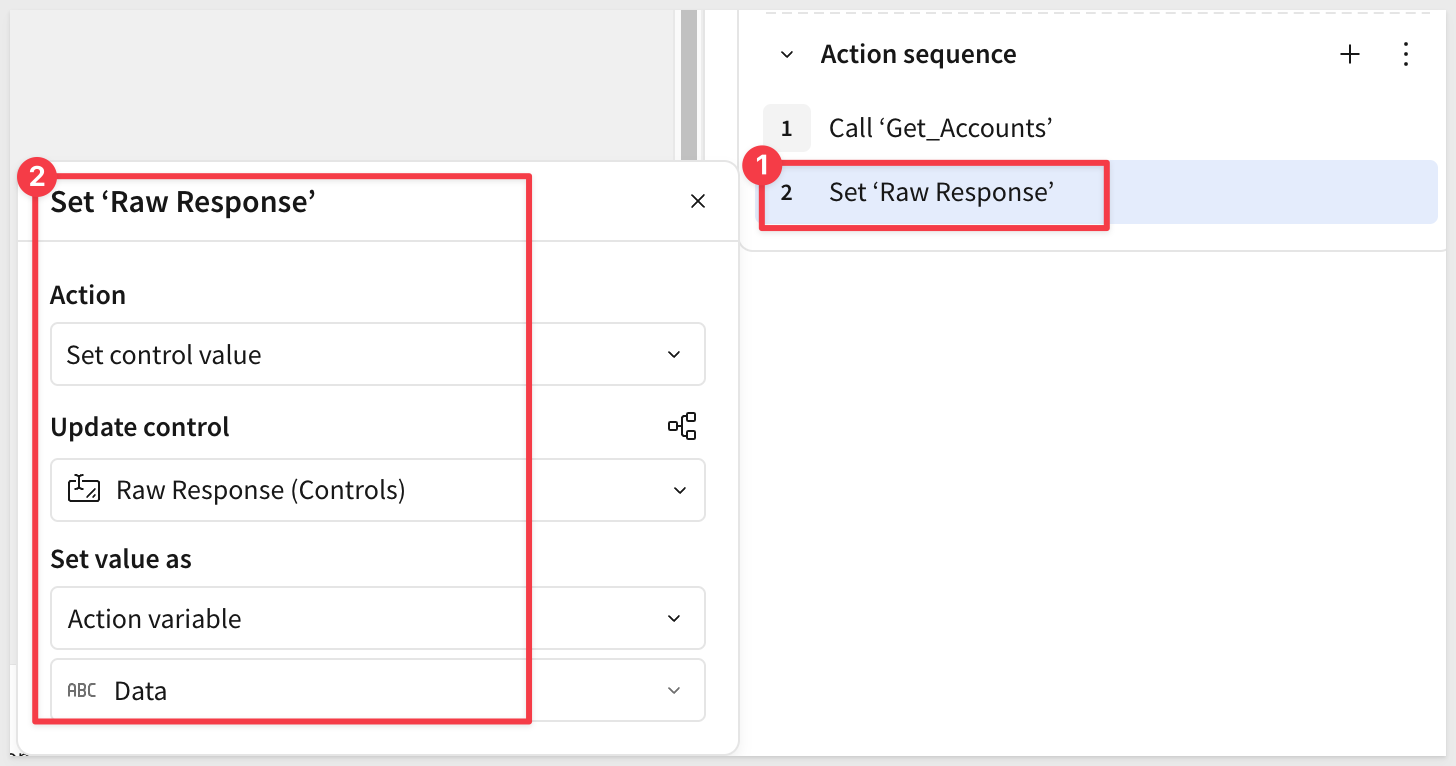
Click Save.
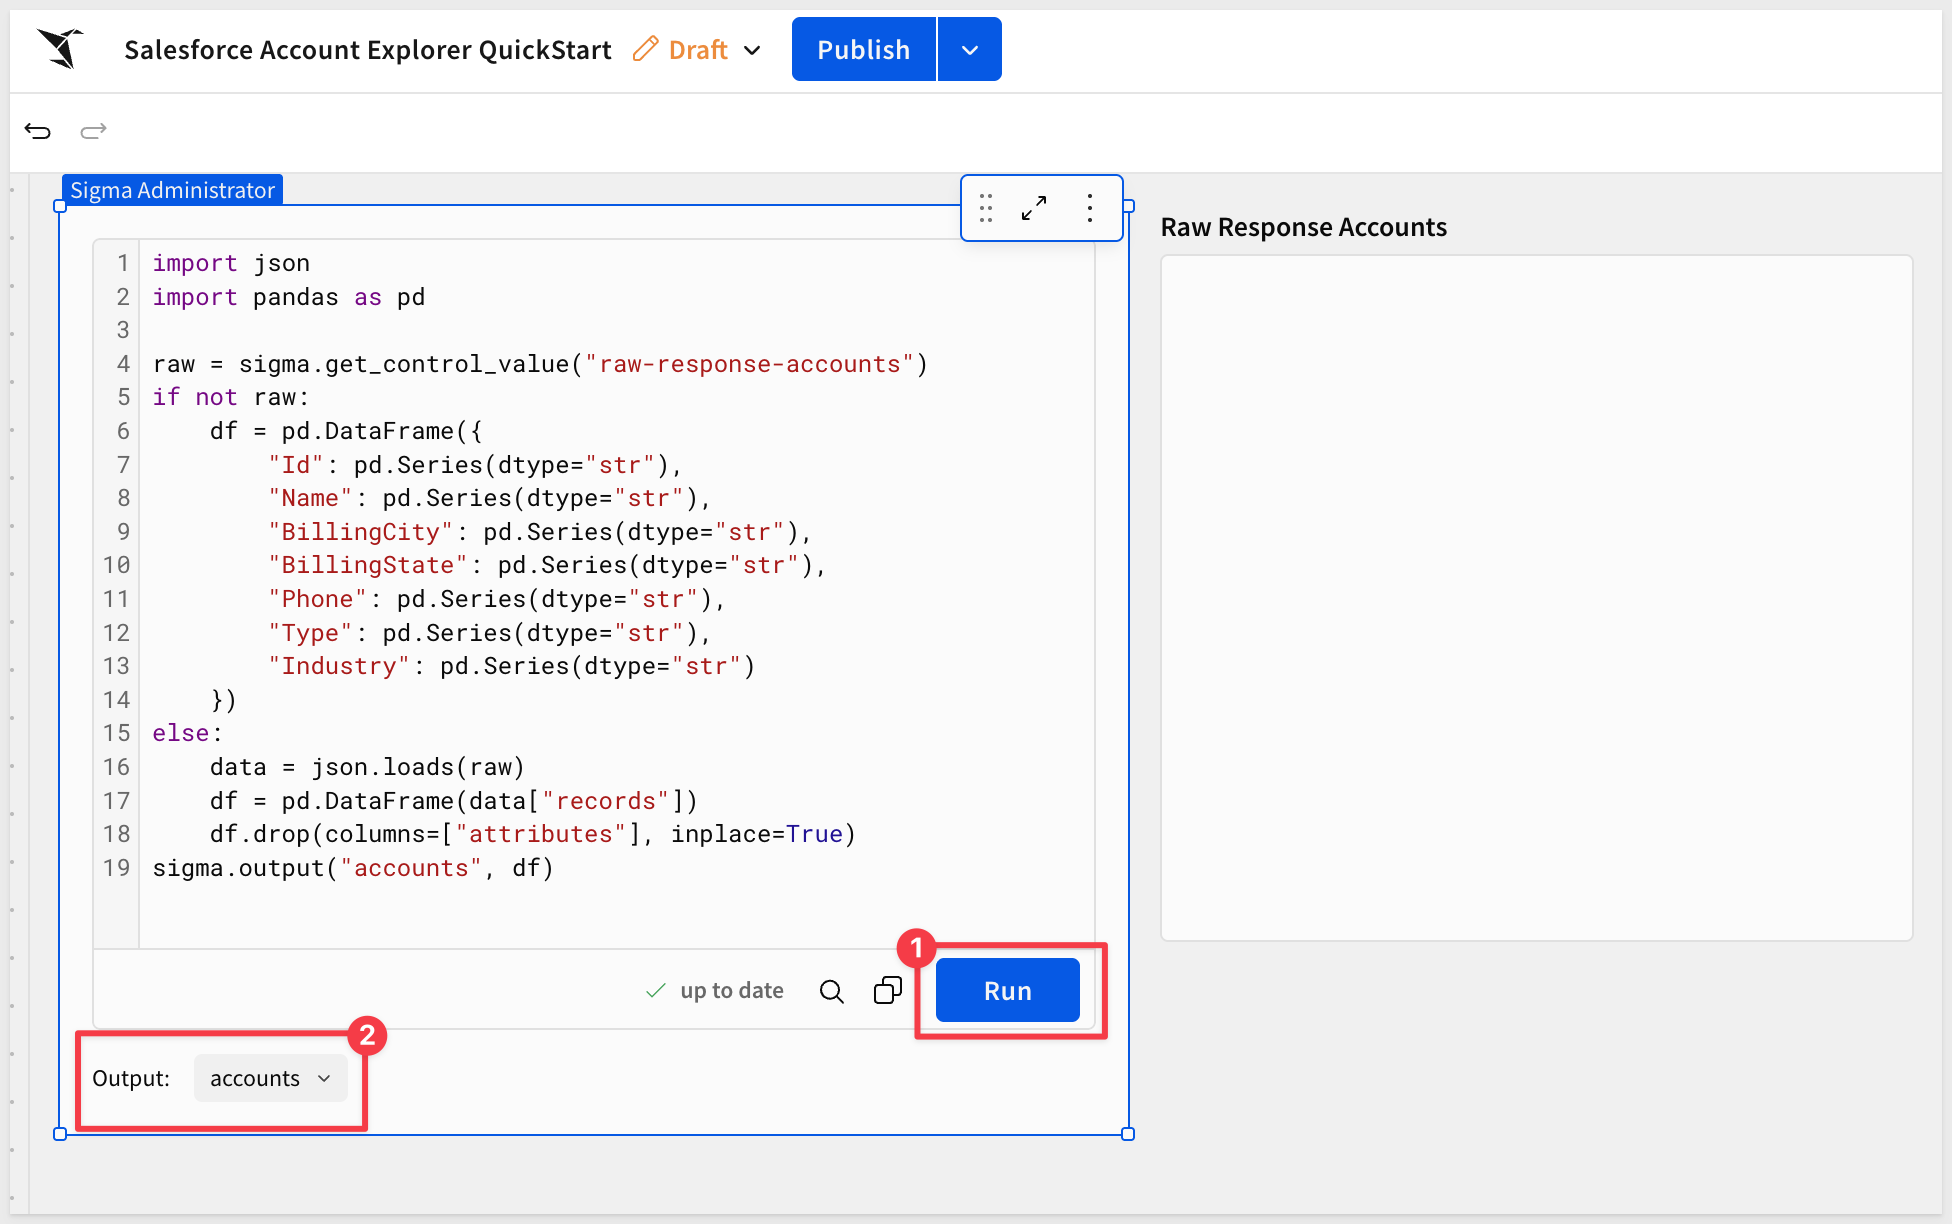
Revise the Python Element
Back on the Controls page, enter the following code:
import json
import pandas as pd

raw = sigma.get_control_value("raw-response-accounts")
if not raw:
    df = pd.DataFrame({
        "Id": pd.Series(dtype="str"),
        "Name": pd.Series(dtype="str"),
        "BillingCity": pd.Series(dtype="str"),
        "BillingState": pd.Series(dtype="str"),
        "Phone": pd.Series(dtype="str"),
        "Type": pd.Series(dtype="str"),
        "Industry": pd.Series(dtype="str")
    })
else:
    data = json.loads(raw)
    df = pd.DataFrame(data["records"])
    df.drop(columns=["attributes"], inplace=True)
sigma.output("accounts", df)
Click Run. Once execution completes, you will see Output: accounts appear at the bottom of the element.
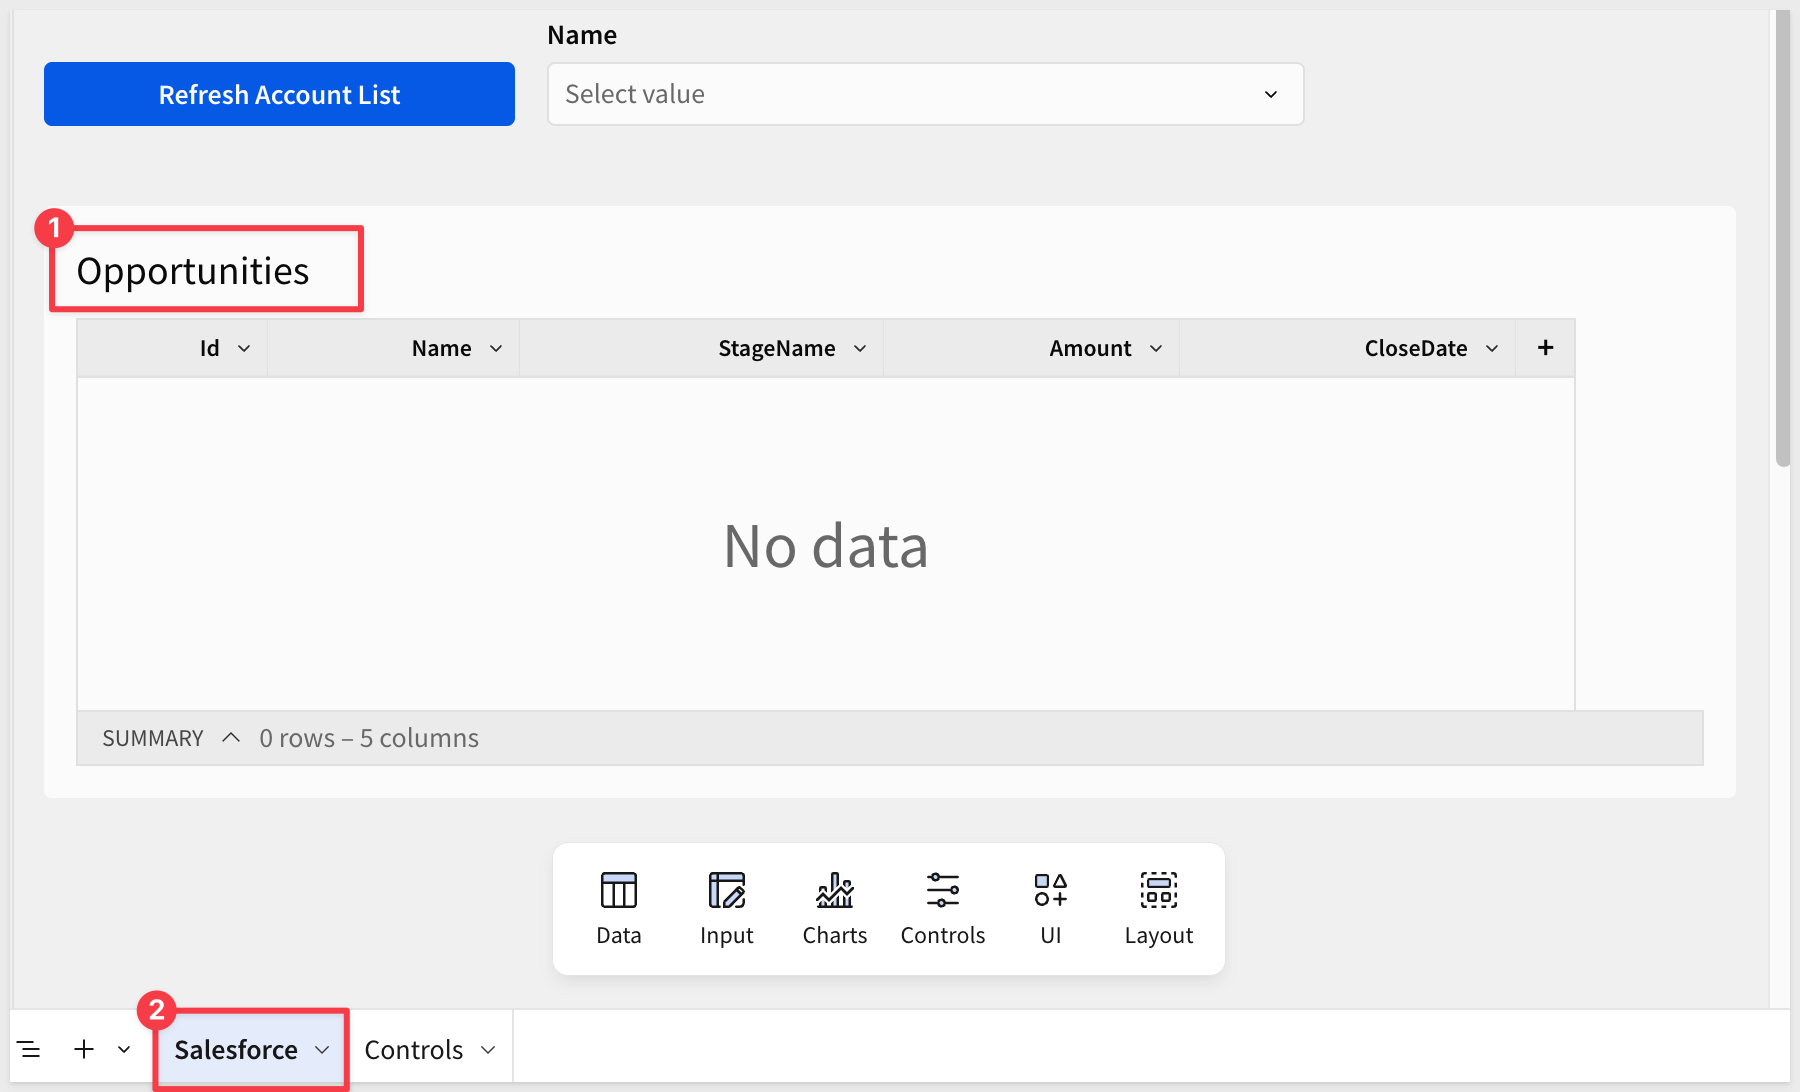
Add the Accounts Table
With the Python element selected, click Add child element and select Table.
Sigma automatically uses the accounts output as the data source. The table renders with the columns from the SOQL query: Id, Name, BillingCity, BillingState, Phone, Type, and Industry.

Rename the table Accounts.
Click the Refresh Account List button. Everything is on the same page, so you can immediately see the Accounts table populate with live data from Salesforce.
Reorganize the Workbook
With the accounts flow validated, create a clean user-facing page and move the button there.
Create a Salesforce page:
Click the + icon next to the page tab to add a new page. Name it Salesforce.
Move the Refresh Account List button to the Salesforce page by selecting it, clicking the three-dot menu, and choosing Move to page > Salesforce.
Add an account selector:
On the Salesforce page, click Add element and select Controls > List values.
In the right panel configure the following:
Field | Value |
Value source |
|
Source column |
|
Set display column | Toggle ON, select |
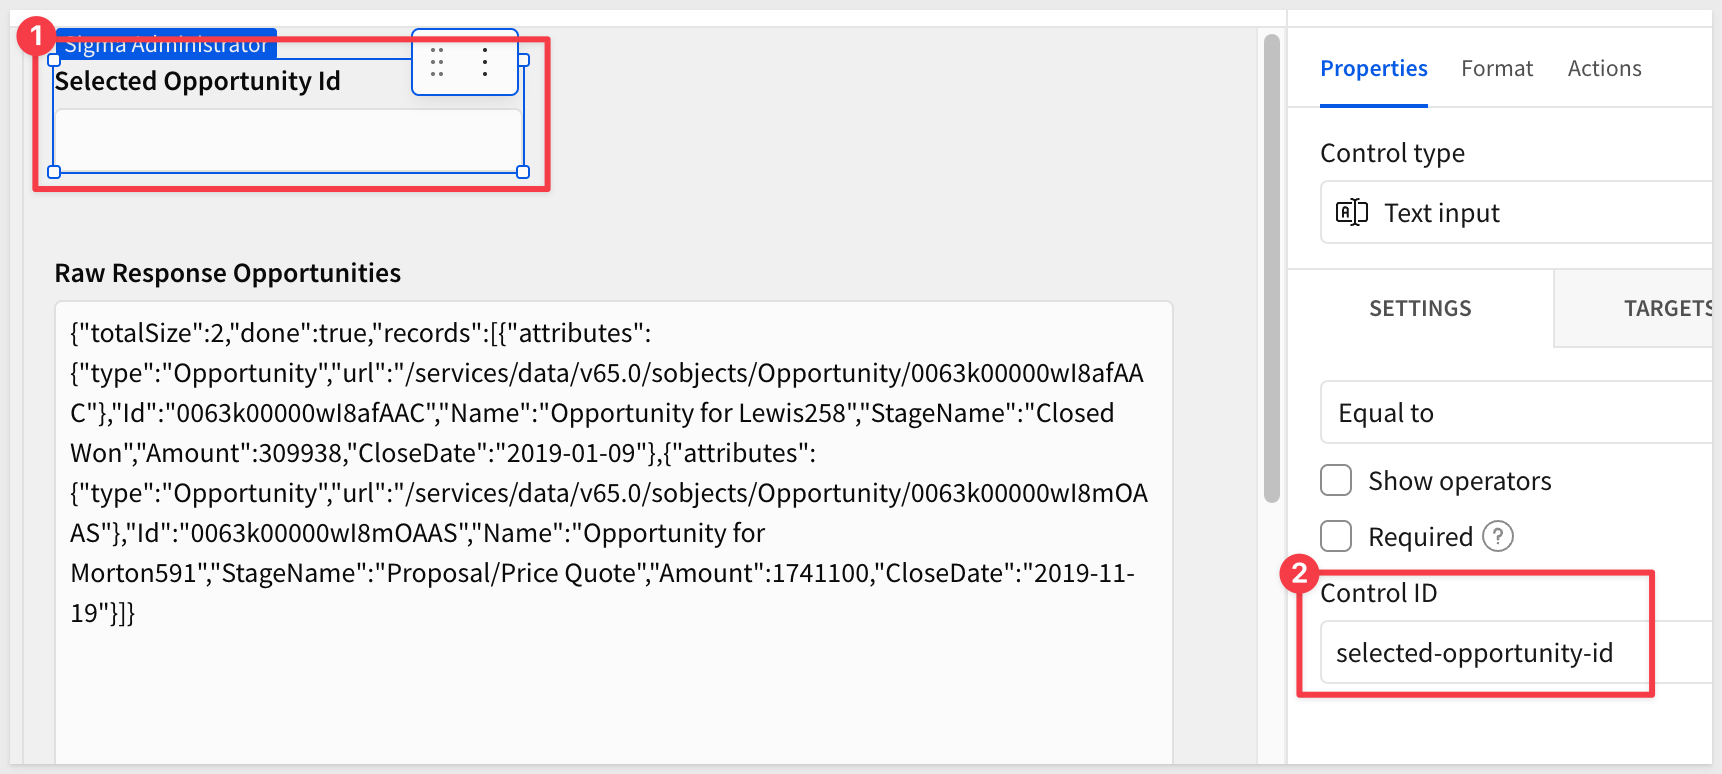
Control ID |
|
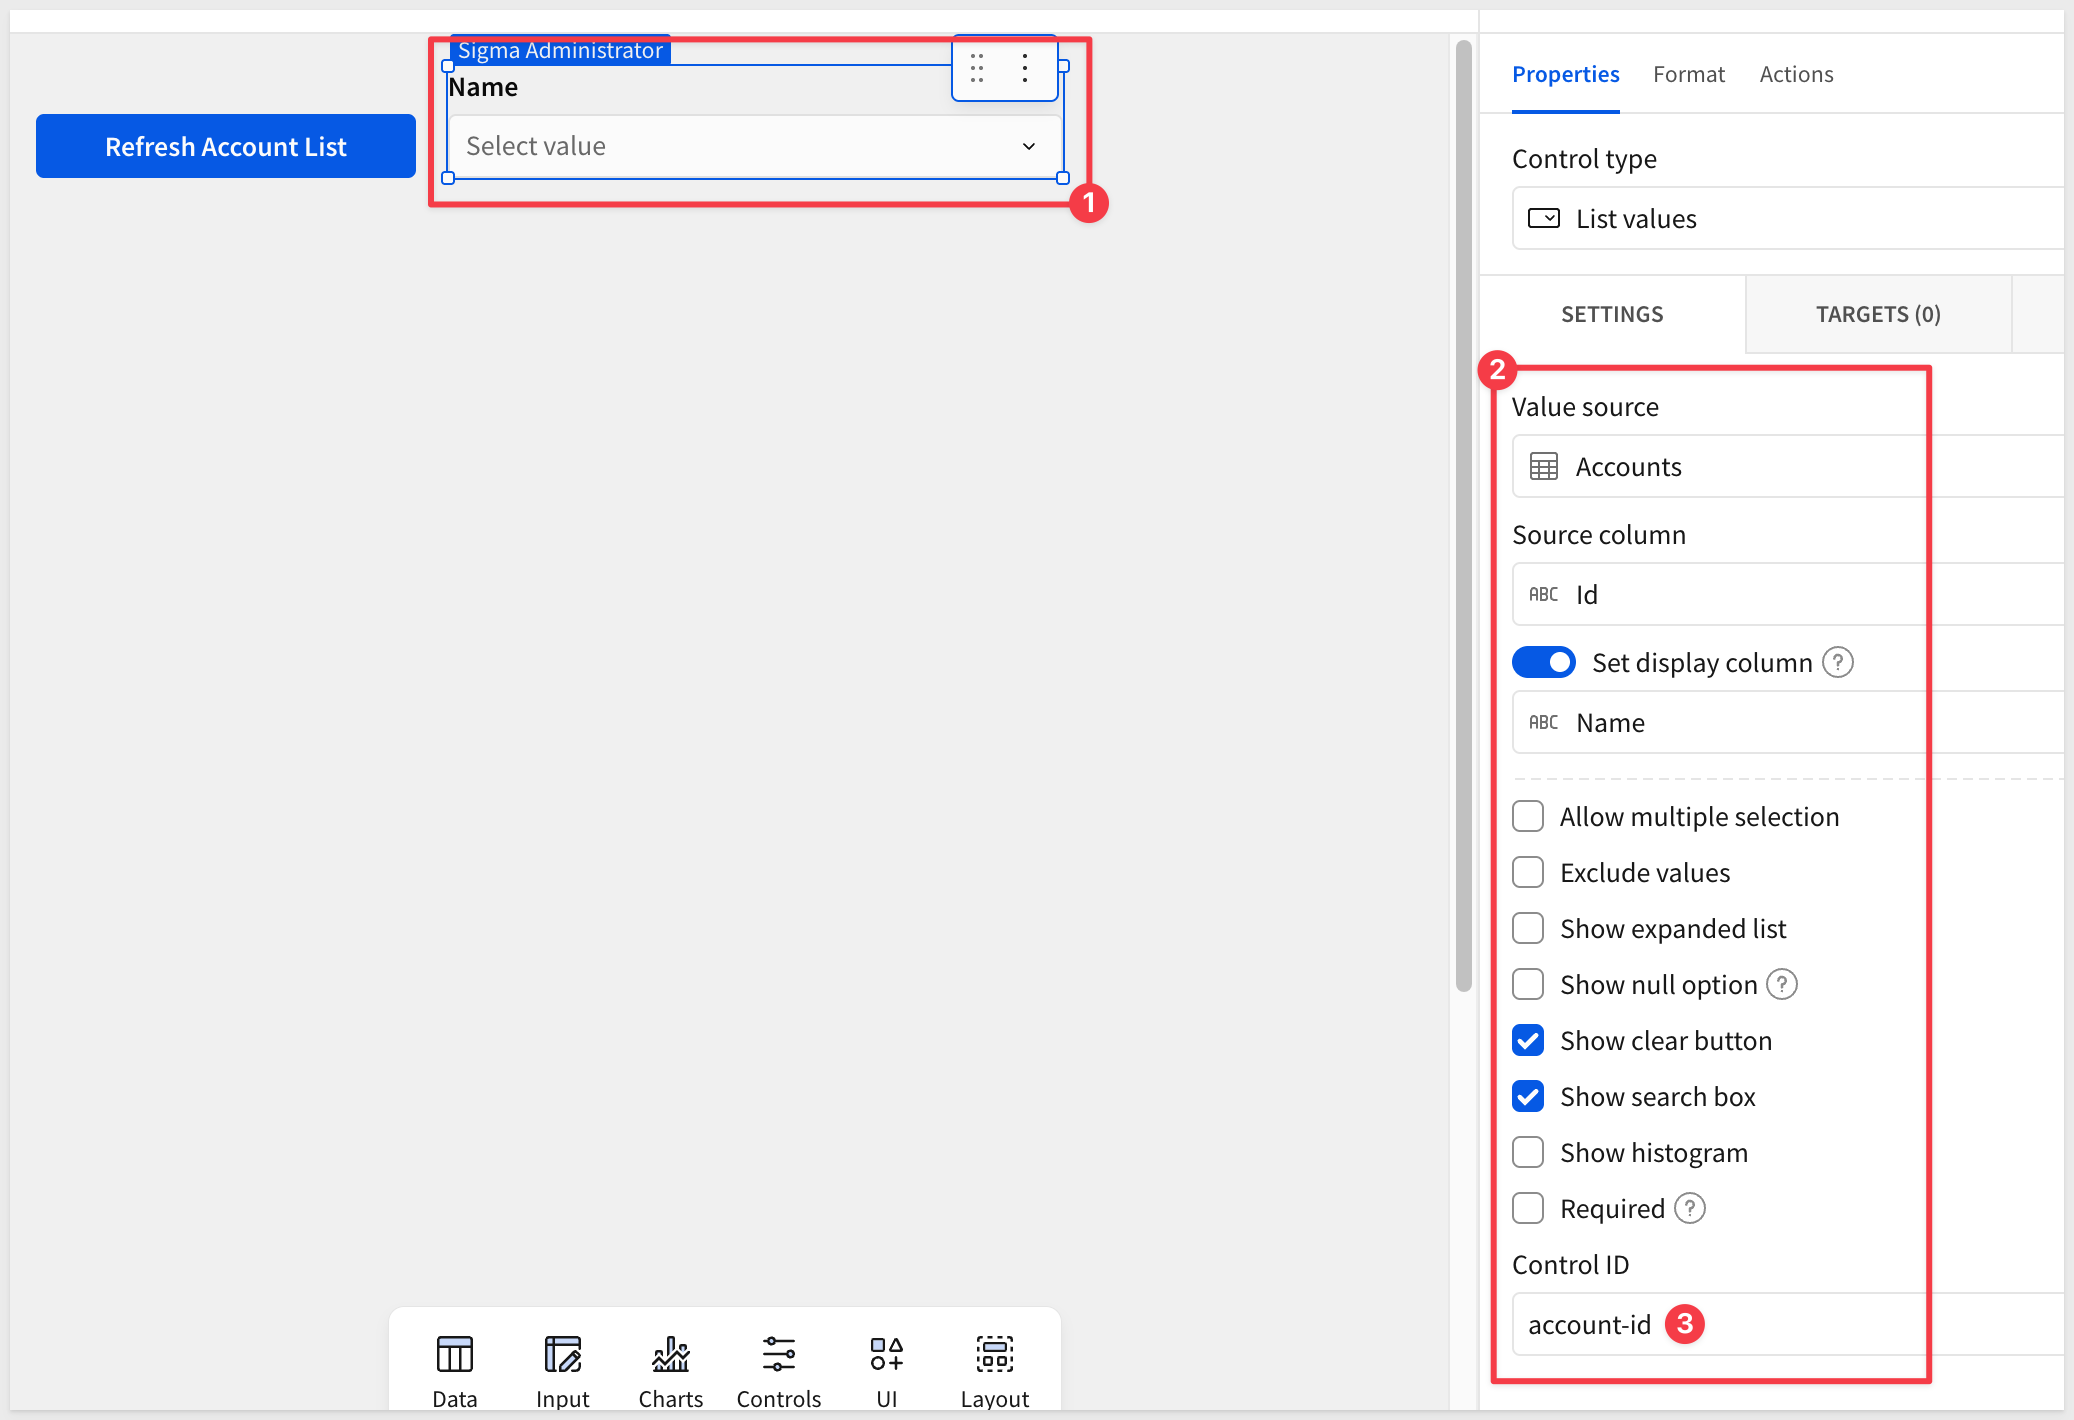
The Salesforce page now has the Refresh Account List button and account name selector. The Controls page holds all the plumbing — text area, Python element, and accounts table.
With the accounts list in place, we can now wire up the account-id selector to call the Salesforce opportunities endpoint and display results for the selected account. The pattern mirrors the accounts flow: an action writes the raw API response to a text area control, and a Python element parses it into a table.
Add the Opportunities Plumbing
Navigate to the Controls page.
Click Add element and select Controls > Text area. Label it Raw Opp Response.
Set the Control ID to raw-response-opportunities.
Add another Python from the Data group and change the name to Code-Opportunities.
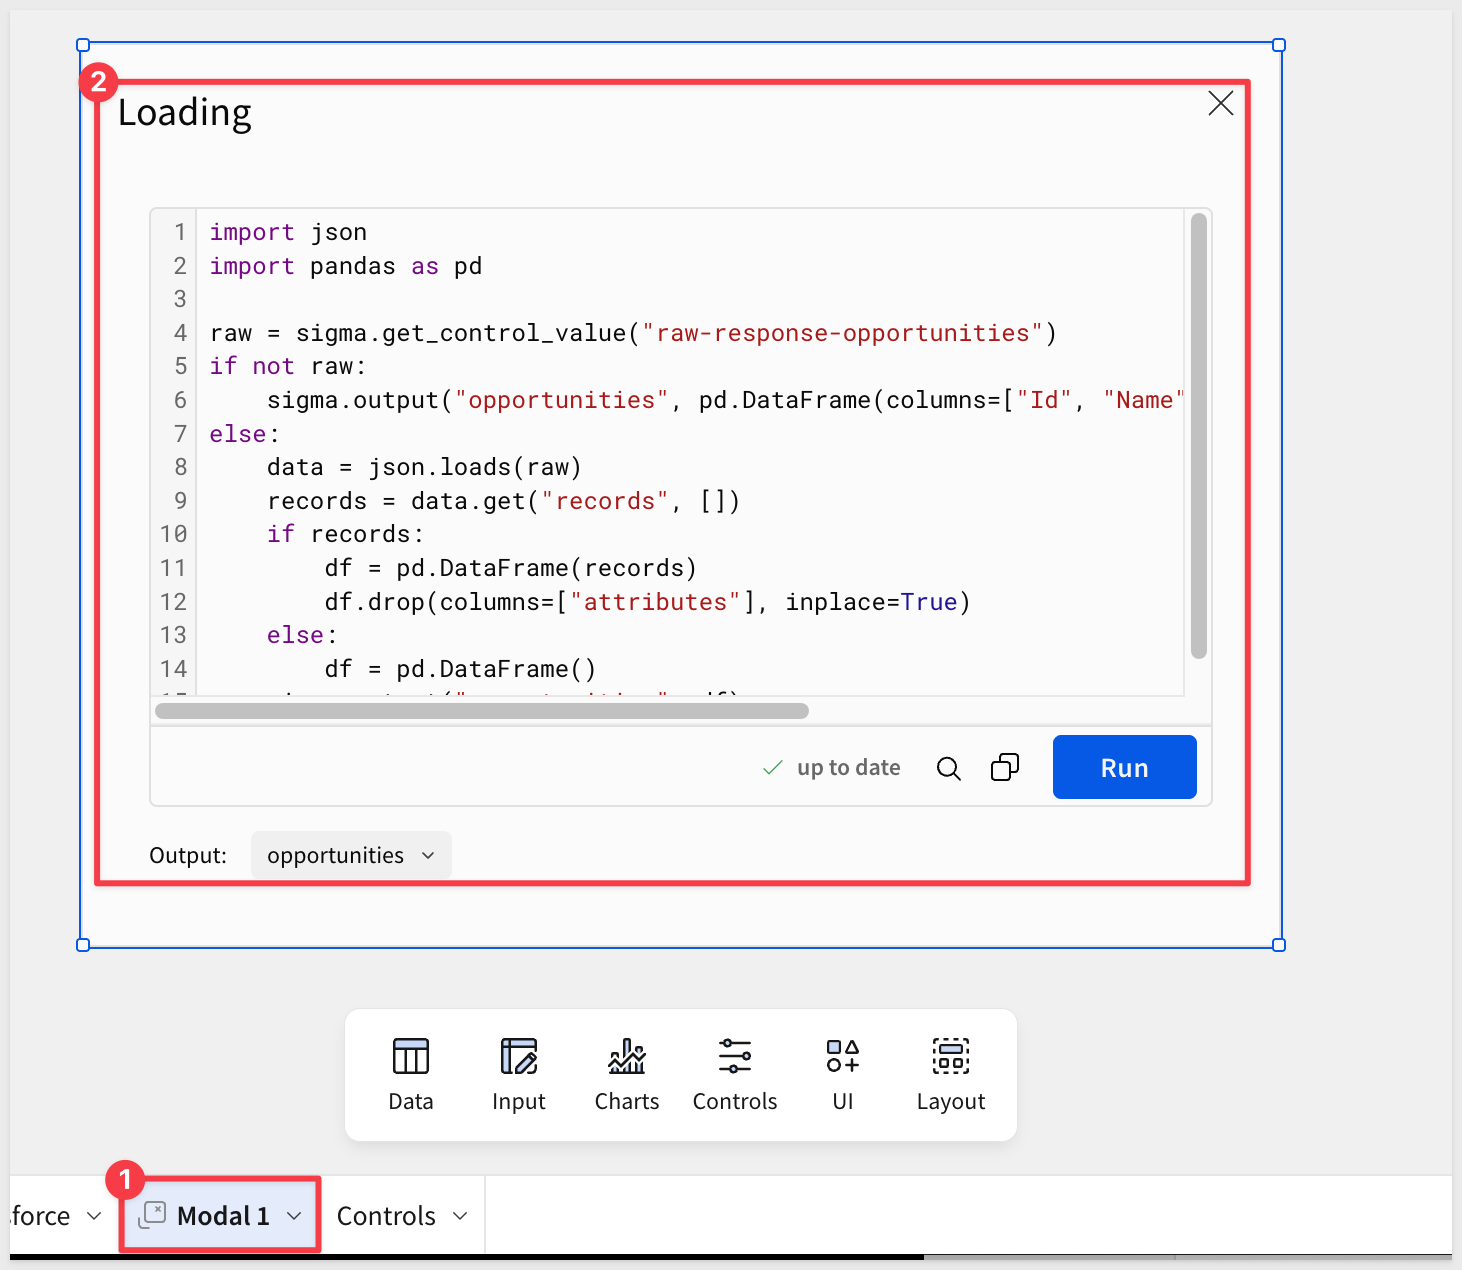
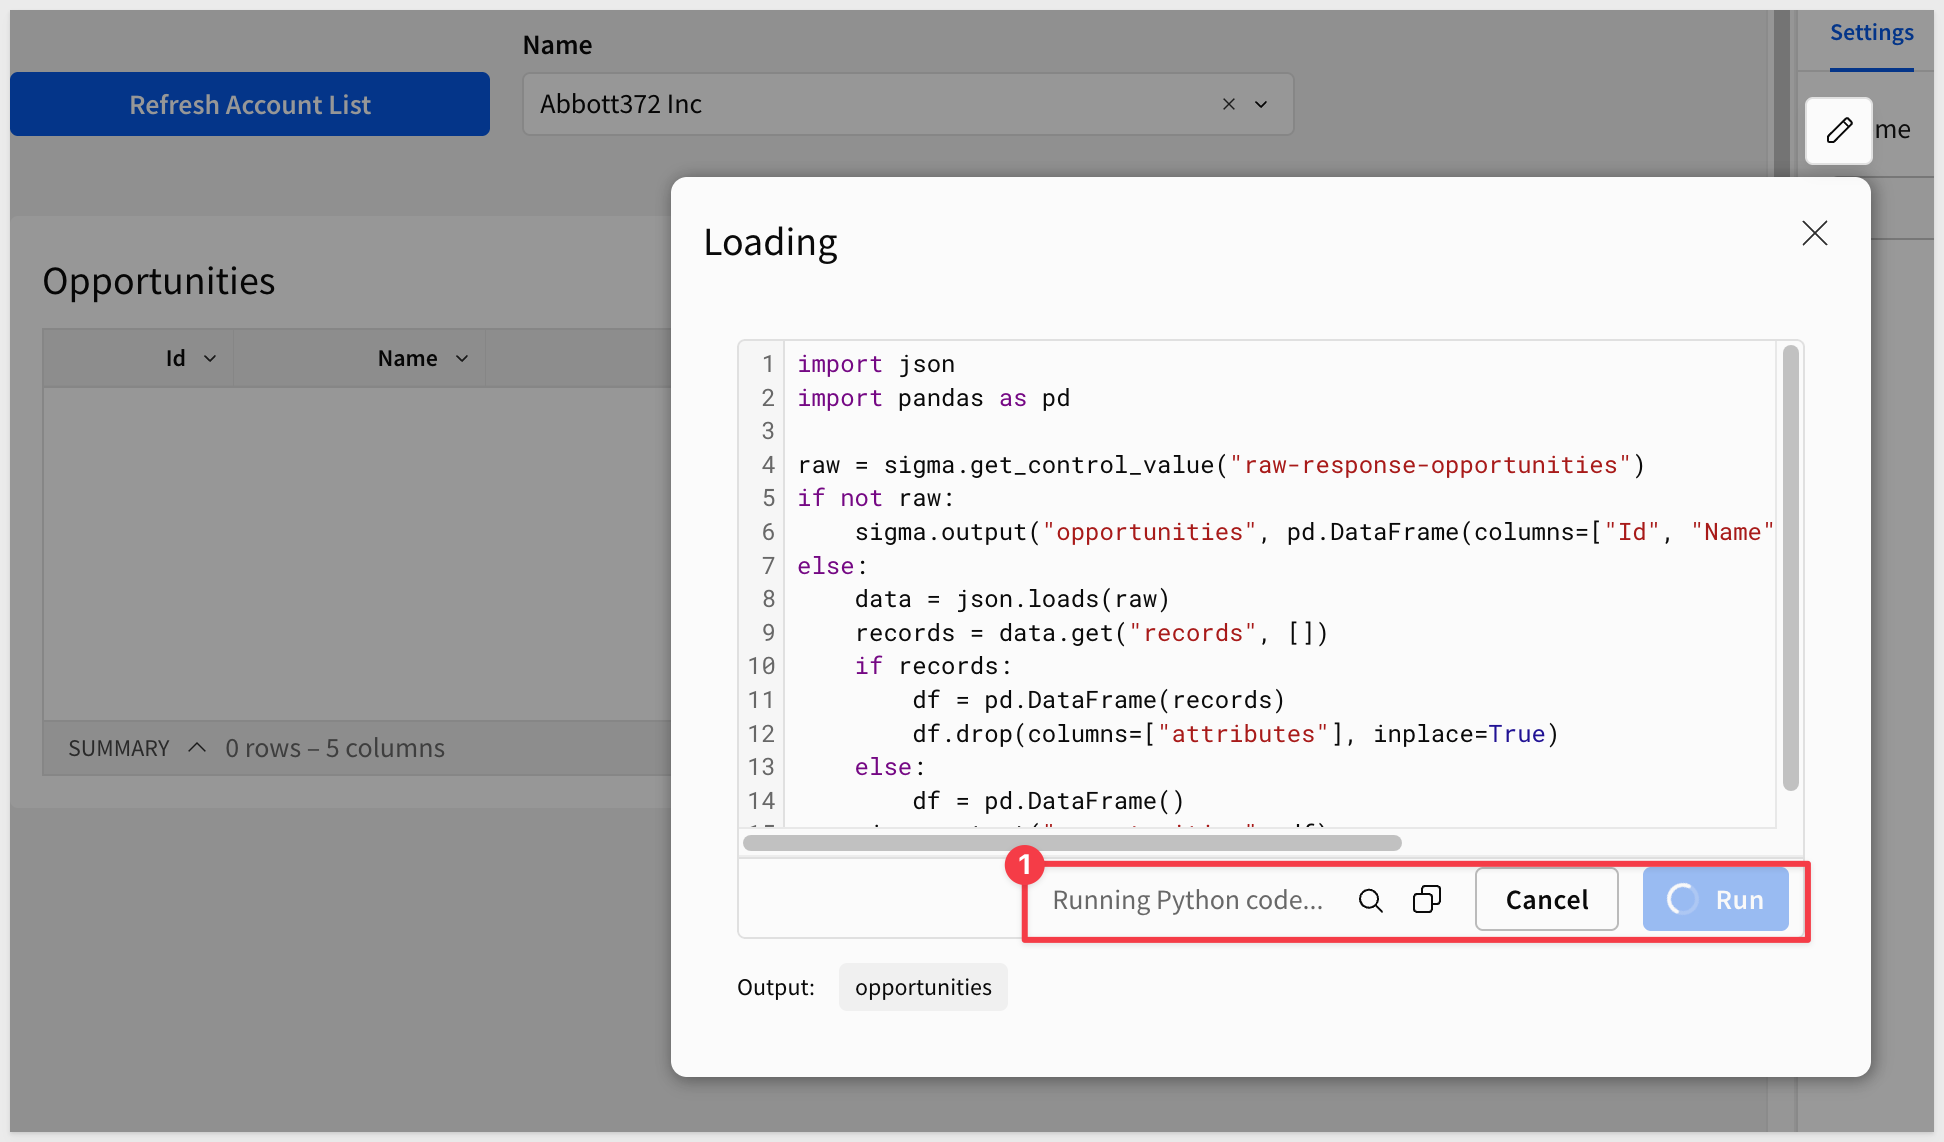
Replace the sample code with:
import json
import pandas as pd

raw = sigma.get_control_value("raw-response-opportunities")
if not raw:
    sigma.output("opportunities", pd.DataFrame(columns=["Id", "Name", "StageName", "Amount", "CloseDate"]))
else:
    data = json.loads(raw)
    records = data.get("records", [])
    if records:
        df = pd.DataFrame(records)
        df.drop(columns=["attributes"], inplace=True)
    else:
        df = pd.DataFrame()
    sigma.output("opportunities", df)
Click Run. Once execution completes, Output: opportunities appears at the bottom of the element.

Add the Opportunities Table
With the Code-Opportunities element selected, click Add child element and select Table.
Rename the table Opportunities.
Move the Opportunities table to the Salesforce page by selecting it, clicking the three-dot menu, and choosing Move to > Salesforce.
Add a Loading Modal
Because the Python element takes a moment to execute, we can show the user a visual indicator that the workflow is running.
Add a new Modal to the workbook:
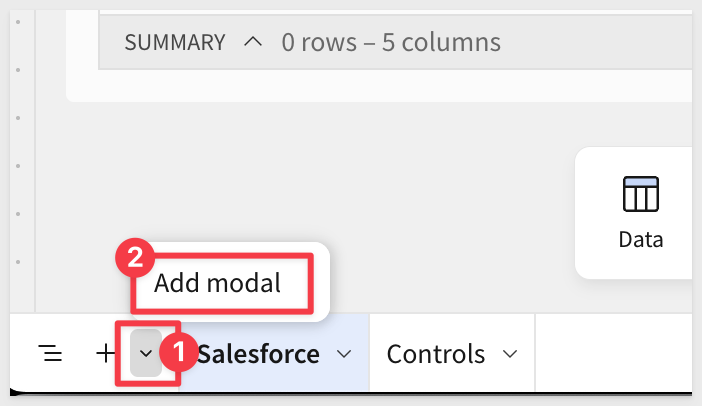
Name the modal Loading (or any name you prefer — you will reference it in the action sequence).
Move the Code-Opportunities Python element from the Controls page into the modal by selecting it, clicking the three-dot menu, and choosing Move to > Modal 1 (or whatever you named your modal).
Wire Up the Account Selector
Click the account list control to select it. Open the Actions panel and click + to add an action sequence.
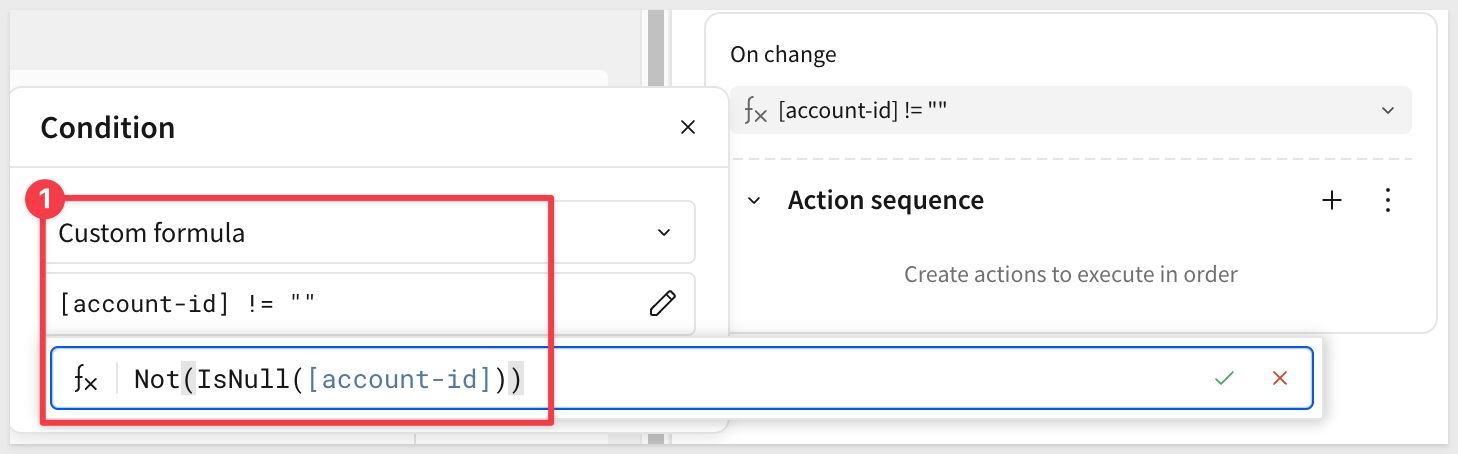
Add a condition to the sequence so the API is only called when an account is actually selected:
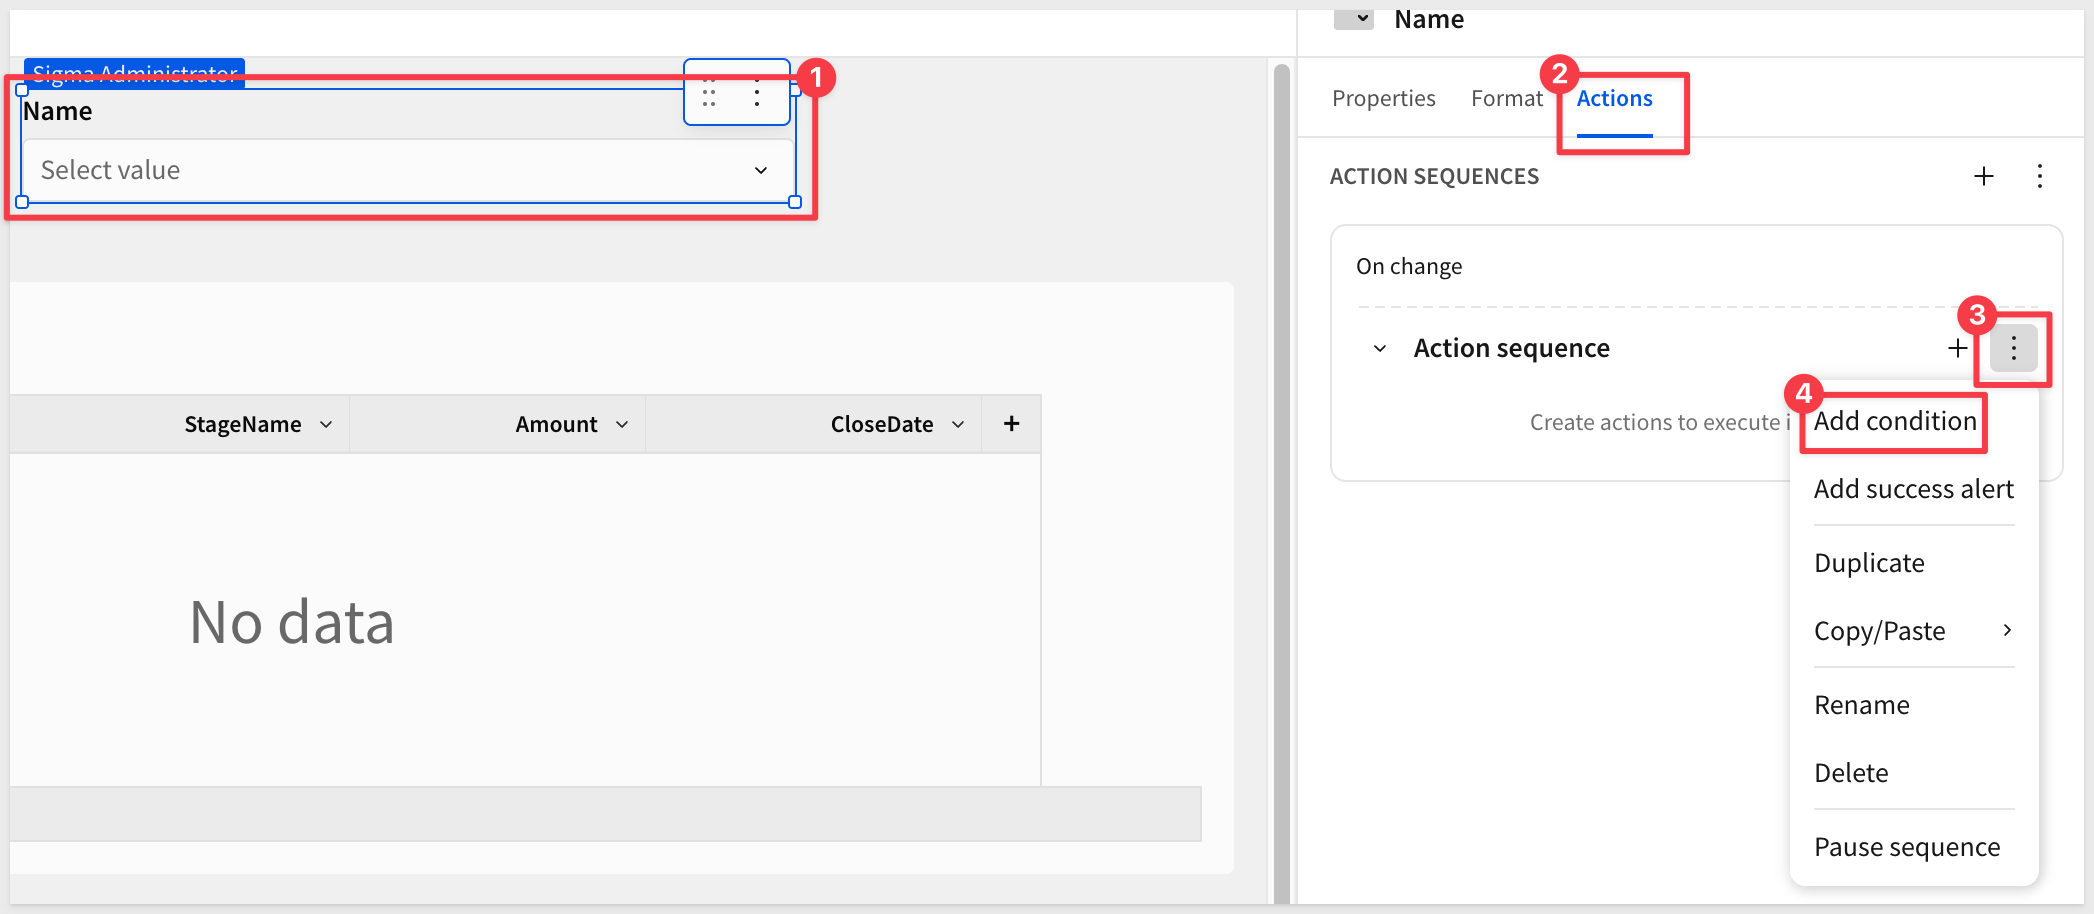
Change the condition to use a Formula and set the formula to:
Not(IsNull([account-id]))
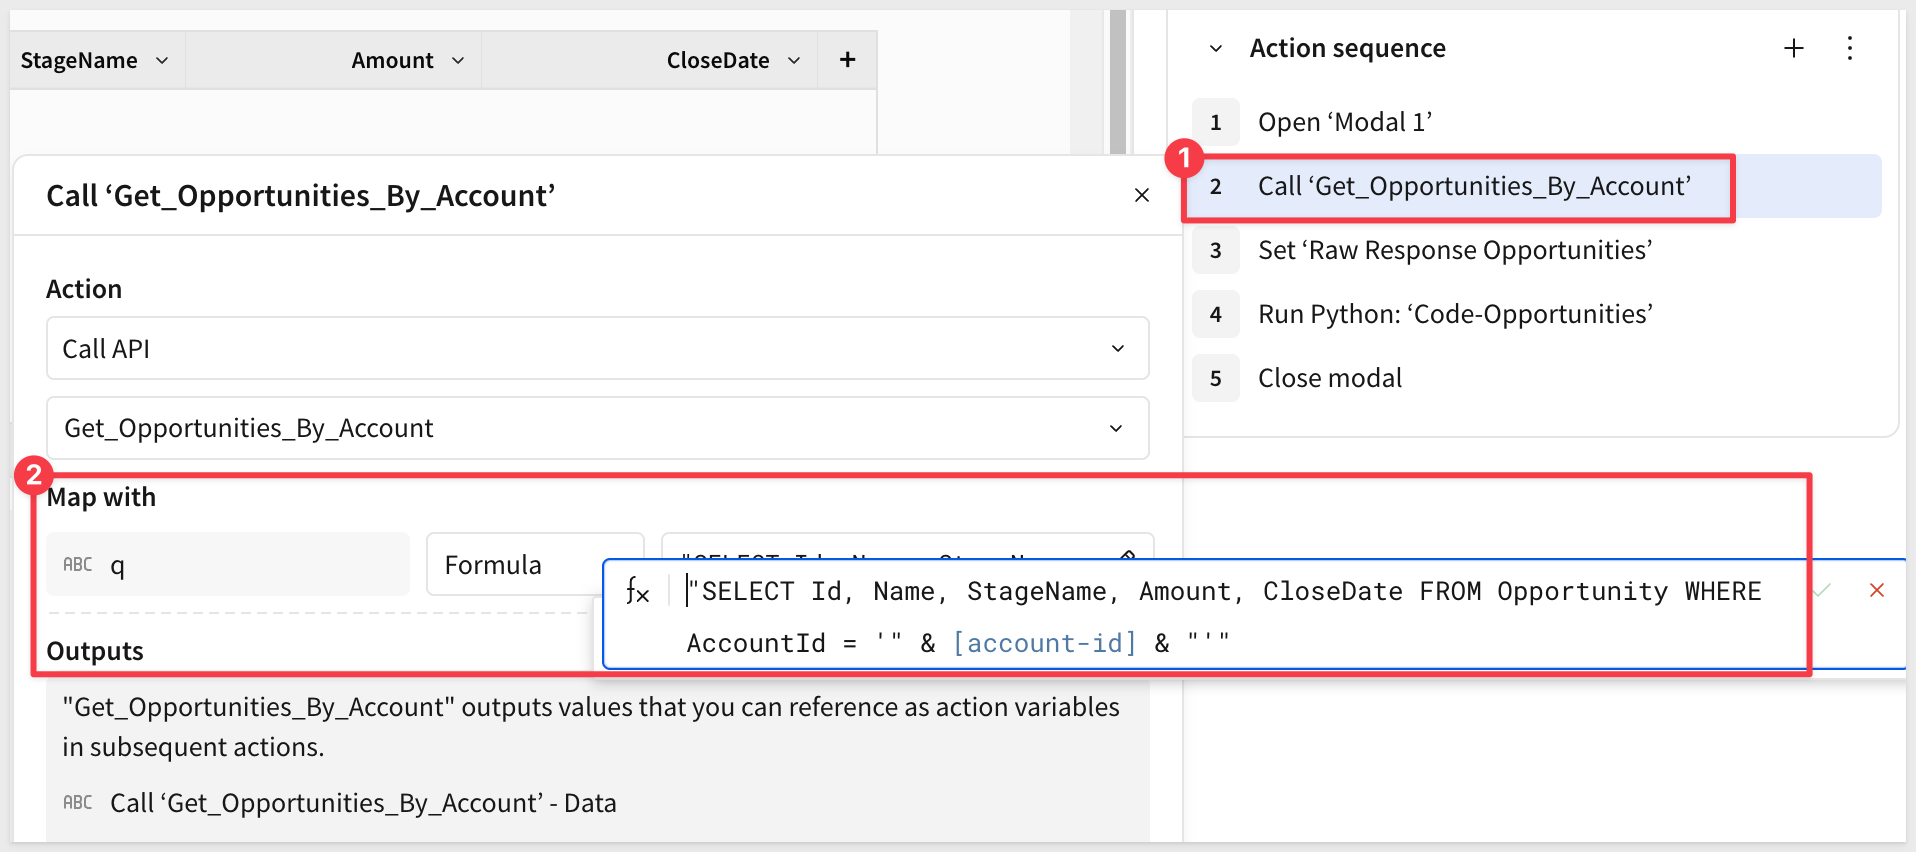
Build the action sequence with 5 steps:
Step | Action | Configuration |
1 |
| Select your |
2 |
| Connector: |
3 |
| Control: |
4 |
| Element: |
5 |
| (no configuration required) |
For step 2 (the Call API action), set the dynamic q parameter type to Formula and enter:
"SELECT Id, Name, StageName, Amount, CloseDate FROM Opportunity WHERE AccountId = '" & [account-id] & "'"
Click Publish.
Test the Flow
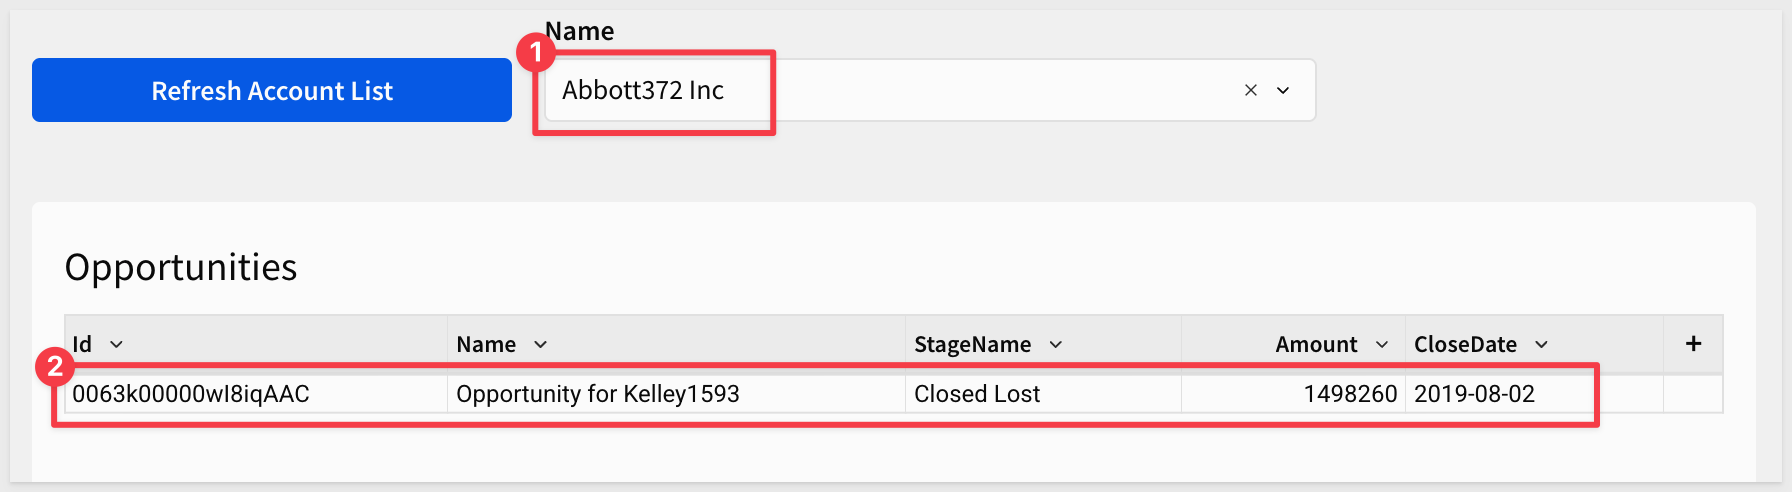
Click Refresh Account List to populate the accounts list.
Select any account from the Name list. Sigma fires the action sequence, calls Get_Opportunities_By_Account with that account's Salesforce ID, stores the response, re-runs the Python element, and the Opportunities table updates with live data.
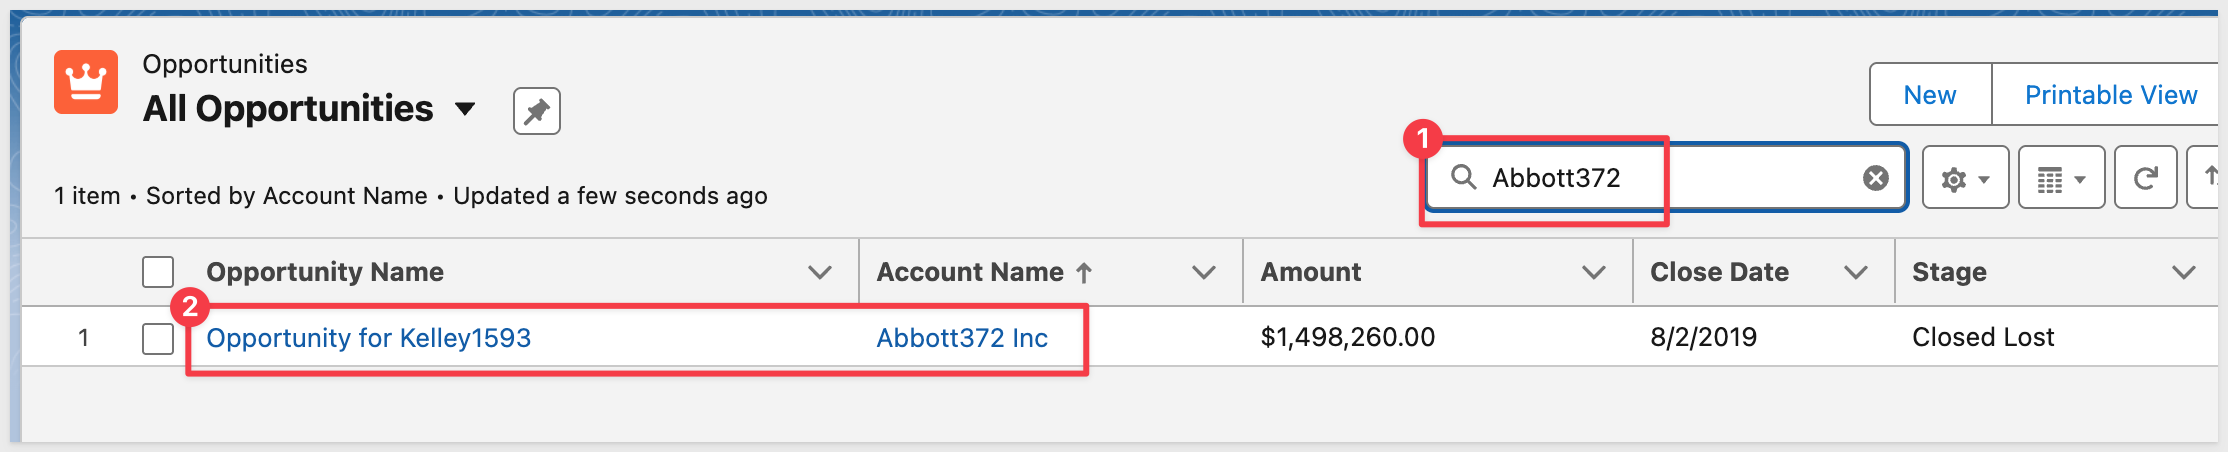
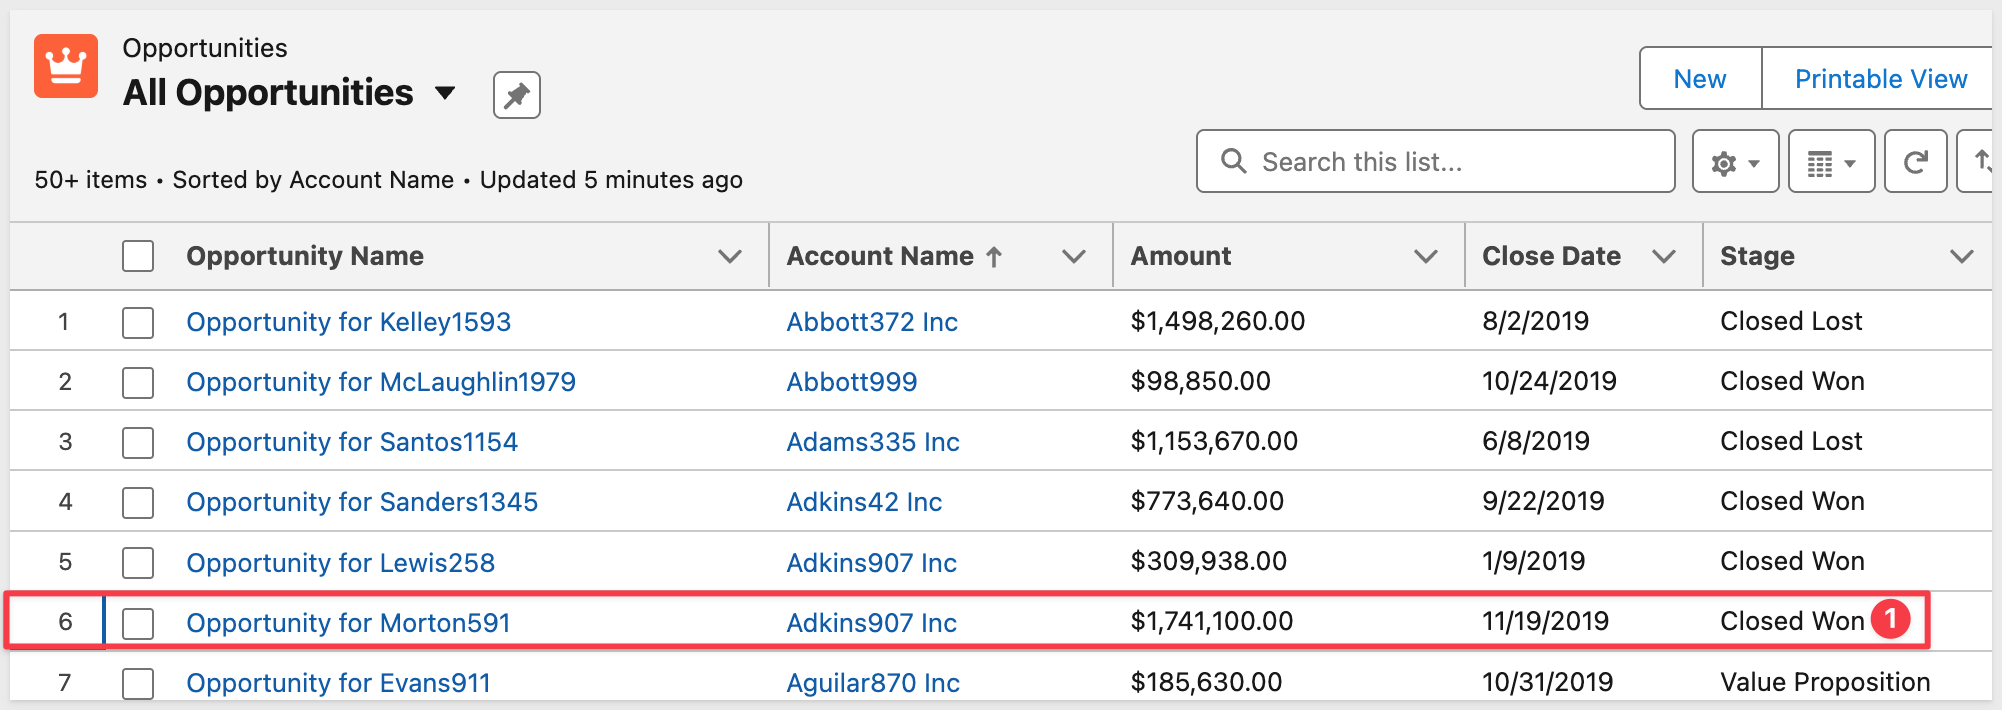
Of course you need to select an account that has an opportunity. Developers accounts use standard data so we used Abbot372 Inc:
We can confirm the returned opportunity matches in Salesforce as a validation step:
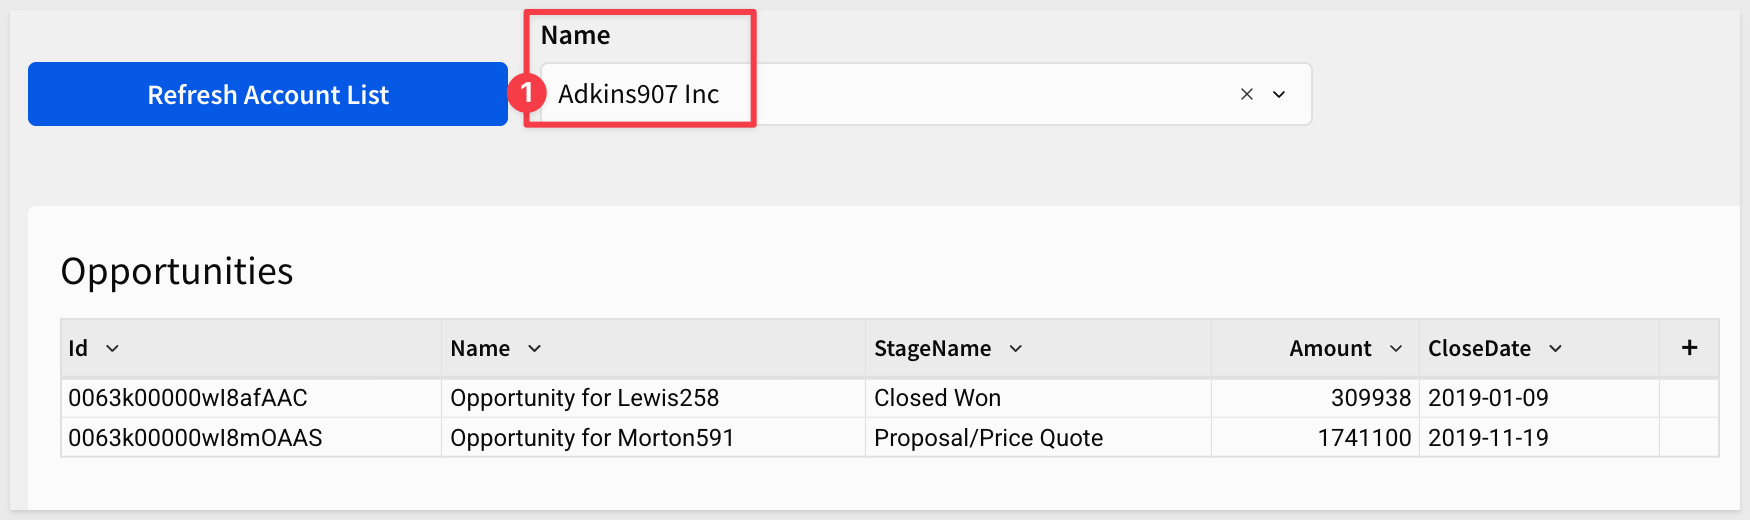
Adkins907 Inc has two opportunities:
With read-only access validated, we can now add a write-back workflow that allows users to update an opportunity's stage directly from Sigma — demonstrating the full bidirectional integration between Sigma and Salesforce.
Create the Update Stage API Connector
In Sigma, navigate to Administration > API connectors and click Create connector.
Configure the connector:
Field | Value |
Name |
|
Authentication credential |
|
Base URL |
|
Verify that under Path parameters, Sigma auto-created:
- Key:
Id - Mode:
Dynamic
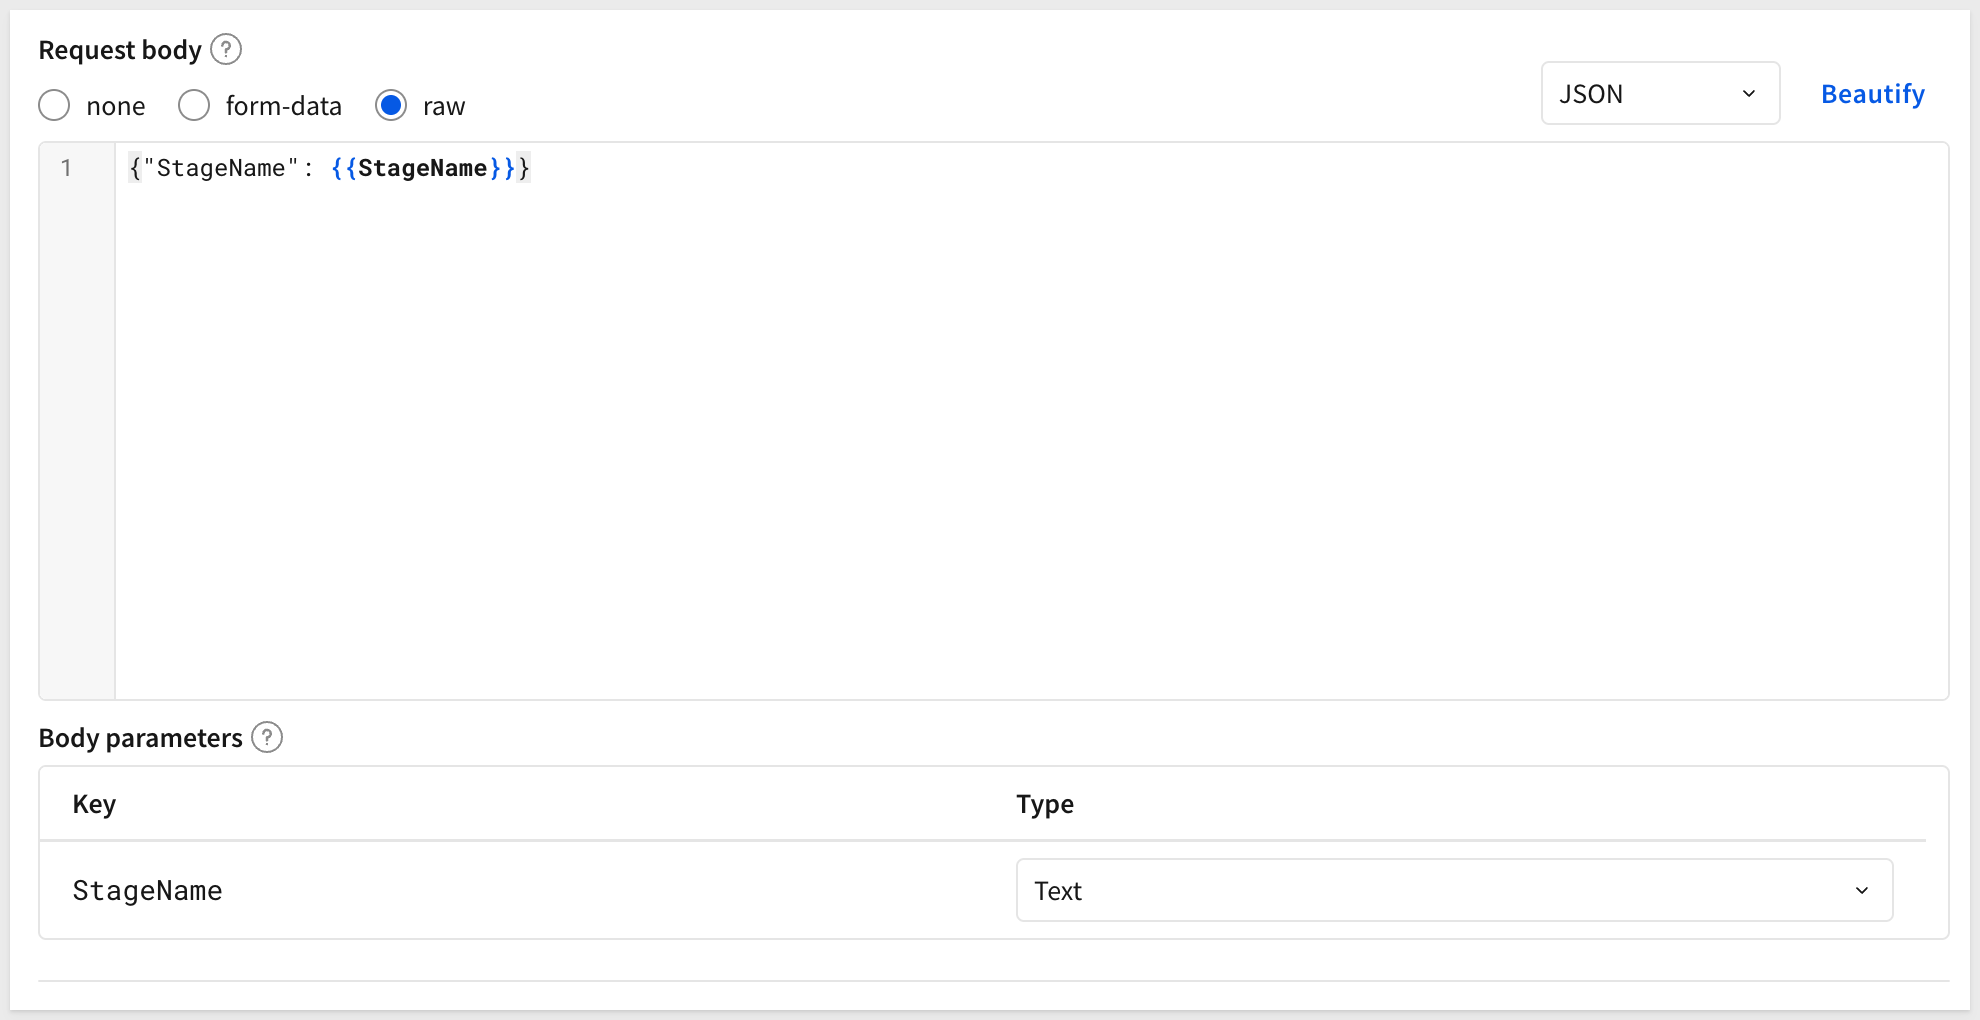
Under Request body, select raw and set the content type to JSON and enter:
{"StageName": {{StageName}}}
Under Body parameters, configure StageName as:
- Key:
StageName - Type:
JSON
Click Save.
Add the Edit Column and Stage Update Modal
We need a way to set a new value for the stage of a selected opportunity. There are many ways to design a UI to support this, but we will use a simple one: adding an "Edit" column to the Opportunities table and setting an action against it.
When a row is selected for edit, a modal will appear and allow the user to set a different stage for the opportunity from a pick list, then return to the Salesforce page to show the new value. We can then validate in Salesforce that the change made its way back there too.
Add a hidden control to store the selected opportunity ID:
Navigate to the Controls page and add a Text input element.
Set the Control ID to selected-opportunity-id.
This control will store the ID of the opportunity the user clicks to edit, making it available to the API action inside the modal.
Create the Edit Stage Modal:
Add a new Modal to the workbook and set its title to:
Select a new stage for this opportunity
Add a List values control to the modal and configure it:
Field | Value |
Label |
|
Control ID |
|
Values | Static list |
Add the following stage values manually:
- Needs Analysis
- Value Proposition
- Proposal/Price Quote
- Closed Won
- Closed Lost
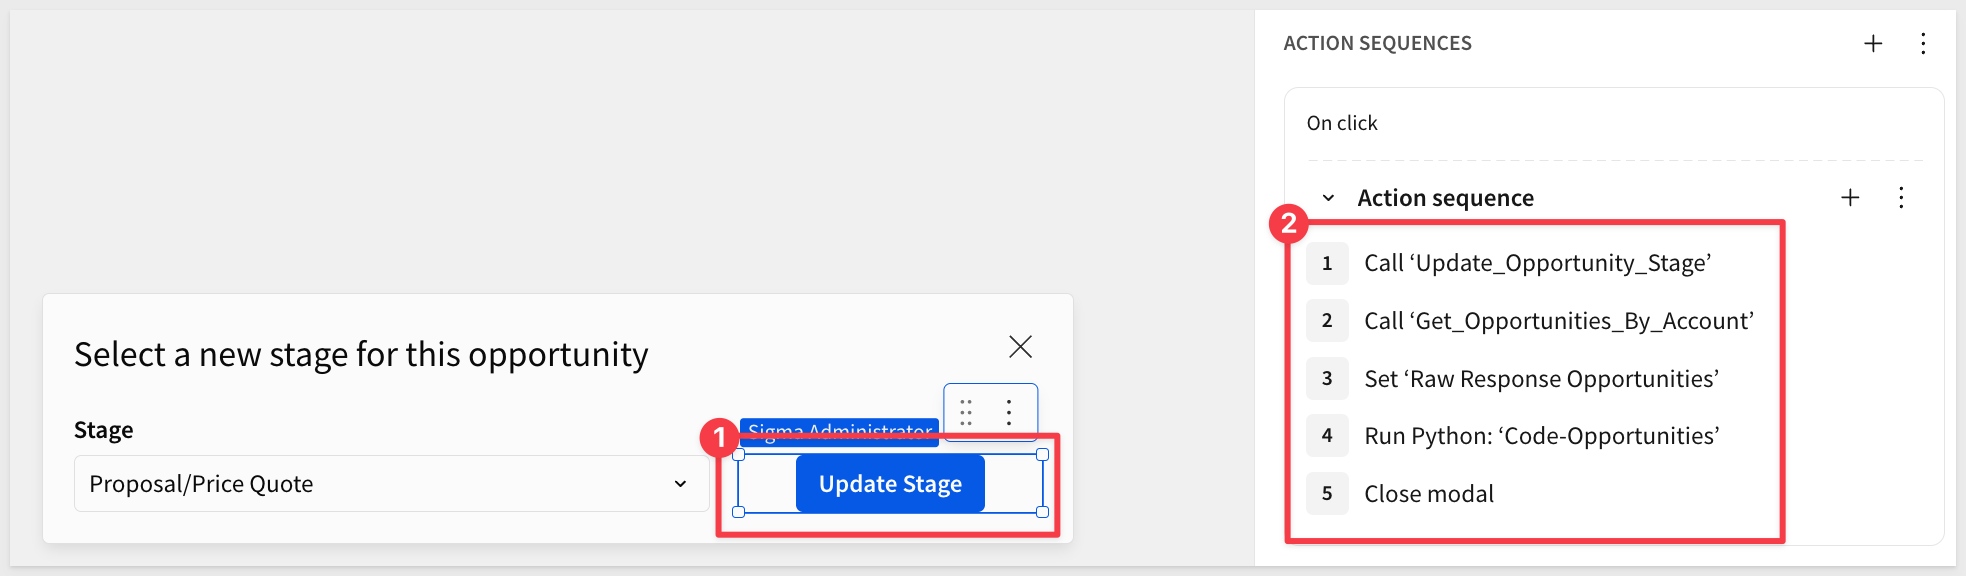
Add a Button to the modal and label it Update Stage.
With the button selected, add an action sequence with 5 steps:
Step | Action | Configuration |
1 |
| Connector: |
2 |
| Connector: |
3 |
| Control: |
4 |
| Element: |
5 |
| (no configuration required) |
For step 1, configure the dynamic parameters:
Idparameter: Map to theselected-opportunity-idcontrol (on the Controls page)StageNameparameter: Map to thenew-stagecontrol (in the modal)
For step 2, configure the dynamic q parameter using a formula:
"SELECT Id, Name, StageName, Amount, CloseDate FROM Opportunity WHERE AccountId = '" & [account-id] & "'"
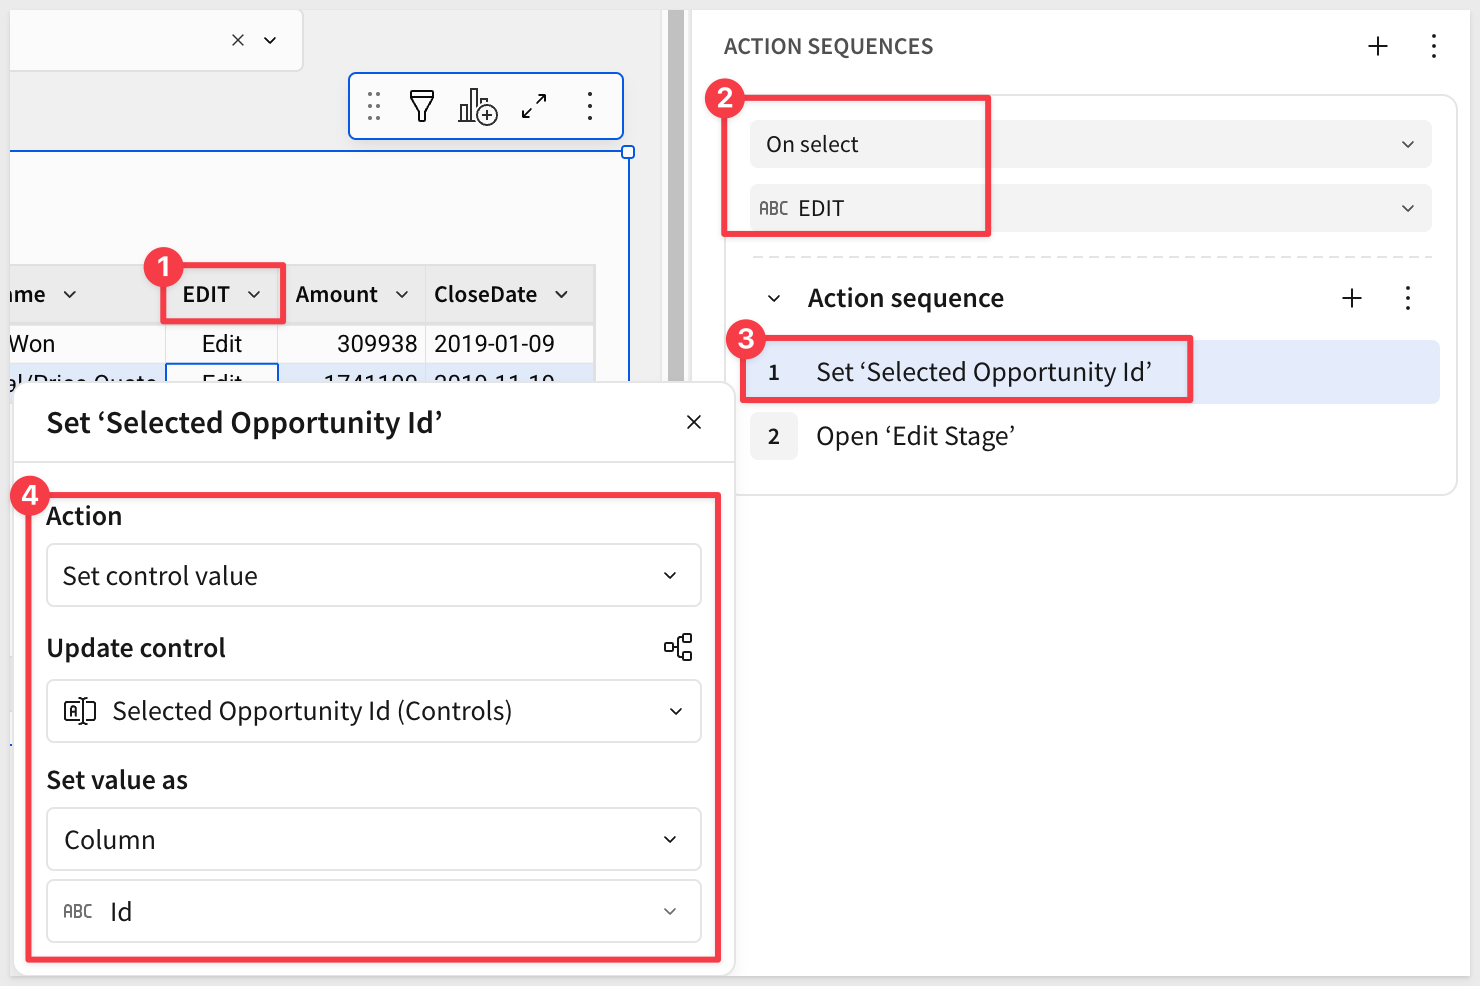
Add the Edit Column to the Opportunities Table:
Navigate to the Salesforce page and click the Opportunities table to select it.
In the table toolbar, click the + icon to add a new column. Rename the column Edit.
Enter the value "Edit" in the formula bar.
With the Edit column selected, open the Actions panel and click + to add a row-level action sequence.
Set the trigger to On select targeting the Edit column.
Add 2 steps to the action sequence:
Step | Action | Configuration |
1 |
| Control: |
2 |
| Modal: |
Test the Write-Back Flow
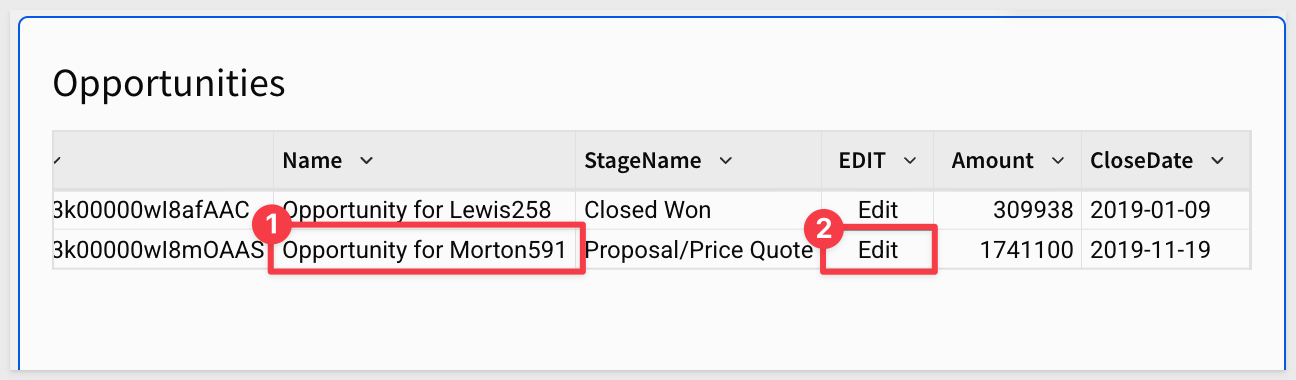
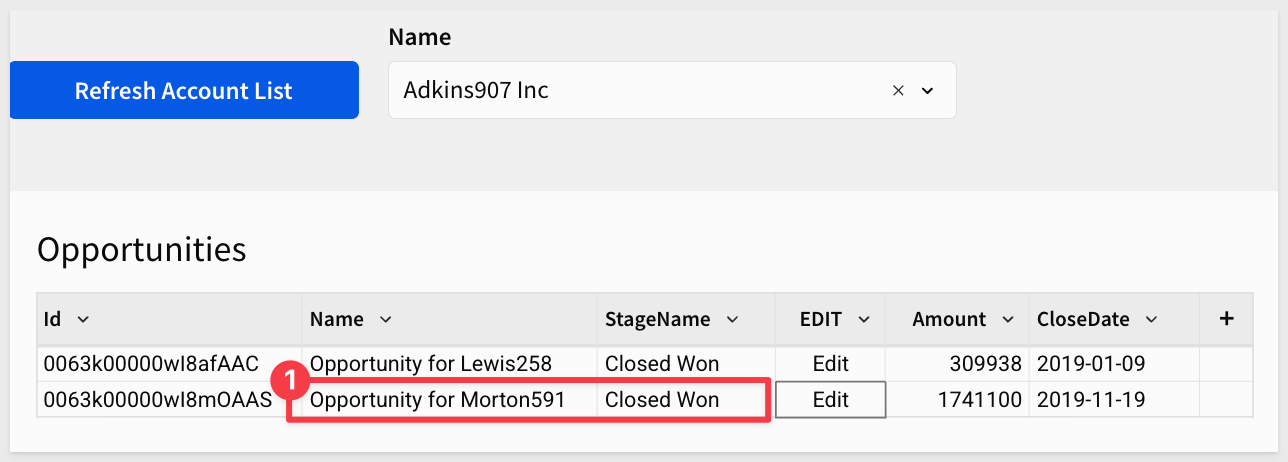
Click Refresh Account List and select Adkins907 Inc from the account list.
The Opportunities table shows two opportunities. Focus on Opportunity for Morton591, currently at Proposal/Price Quote stage.
Click the Edit cell for Opportunity for Morton591.
The Edit Stage modal opens. From the Stage control, select Closed Won.
Click the Update Stage button.
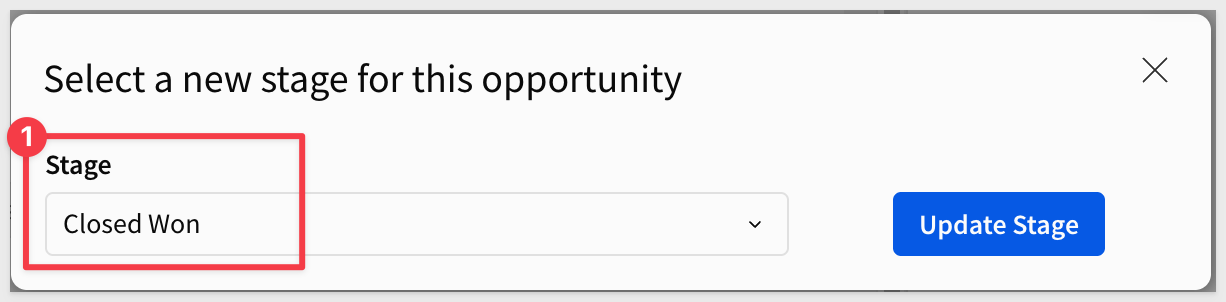
Sigma fires the PATCH request to Salesforce, re-fetches the updated opportunities, re-runs the Python element, closes the modal, and refreshes the table. The StageName column for that opportunity now shows Closed Won.
You can verify the update in Salesforce by navigating to the opportunity record — the Stage field will reflect the change made from Sigma.
In this QuickStart, we connected Sigma directly to a live Salesforce org using OAuth 2.0 and Sigma API Actions — with no ETL pipeline, no warehouse load, and no manual token management.
We covered:
- Salesforce Connected App setup — creating an OAuth 2.0 Connected App, setting the correct callback URL, and granting minimal API scopes
- Sigma API credentials — configuring an OAuth (authorization code) credential in Sigma so tokens are stored and refreshed automatically
- Sigma API connectors — defining three connectors: one GET with a static SOQL query to return all accounts, one GET with a dynamic parameter to fetch opportunities for a selected account, and one PATCH to update opportunity stage values
- Python on Snowflake — creating a dedicated warehouse, enabling Python in the Sigma connection settings, and initializing the stored procedure Sigma uses to execute Python elements
- Workbook construction — adding a Refresh Account List button, an account selector list, and wiring
Run Python elementactions to drive live data through text area controls and Python elements into interactive tables - Write-back workflow — implementing a PATCH-based update flow that allows users to change opportunity stage values directly from Sigma, with automatic table refresh to reflect the changes
The result is a bidirectional Salesforce integration: a full account list loaded on demand, a live opportunities view that updates whenever a different account is selected, and the ability to update opportunity stages directly in Sigma with changes persisting back to Salesforce — all powered by Salesforce's REST API from directly within Sigma.
Additional Resource Links
Blog
Community
Help Center
QuickStarts
Be sure to check out all the latest developments at Sigma's First Friday Feature page!