This QuickStart demonstrates integrating ServiceNow's REST API with Sigma using Basic Authentication and API Actions—showing you how to build a complete bidirectional integration for incident management without ETL pipelines.
What you'll build:
A Sigma workbook that:
- Queries ServiceNow incidents using the Table API
- Displays incident details (number, description, state, priority, urgency)
- Allows users to filter incidents by state (New, In Progress, Resolved, etc.)
- Updates incident states directly in ServiceNow via API write-back
Along the way you'll learn how to:
- Configure ServiceNow API credentials for Basic Authentication
- Create API credentials in Sigma with Basic Auth
- Build API connectors with dynamic query parameters
- Parse nested JSON responses using Python elements on Snowflake
- Create interactive modals for data updates
- Implement write-back workflows with PATCH requests
- Orchestrate multi-step action sequences
For more information on Sigma's product release strategy, see Sigma product releases
If something doesn't work as expected, here's how to contact Sigma support
Target Audience
This QuickStart is designed for Sigma developers integrating external APIs, technical ServiceNow users building custom dashboards, and IT service management teams working across Sigma and ServiceNow workflows.
Prerequisites
- A Sigma account with workbook creation permissions
- A ServiceNow Personal Developer Instance (PDI) - We'll show you how to get one
- Access to a Snowflake connection in Sigma with Python enabled
- Intermediate familiarity with Sigma workbooks, elements, and controls
- Basic understanding of REST APIs and JSON (helpful but not required)

Before building the integration, you need a ServiceNow developer instance with sample incident data. ServiceNow provides free Personal Developer Instances (PDIs) for learning and testing.
We will demonstrate using the sample data provided in ServiceNow developer accounts.
Request a ServiceNow Developer Instance
If you don't already have a ServiceNow developer account:
Step 1: Navigate to the ServiceNow Developer Portal
Click Sign up (or Log in if you already have an account).
Step 2: Create an Account
Complete the registration form with your details. You'll receive a confirmation email.
Step 3: Request a Personal Developer Instance
Once logged in:
- Click
Request Instance(green button in the top right) - Select
Zurich(Latest release) - Click
Request
The instance takes ~5-10 minutes to provision. You'll see a confirmation page with your instance details.
Access Your Instance
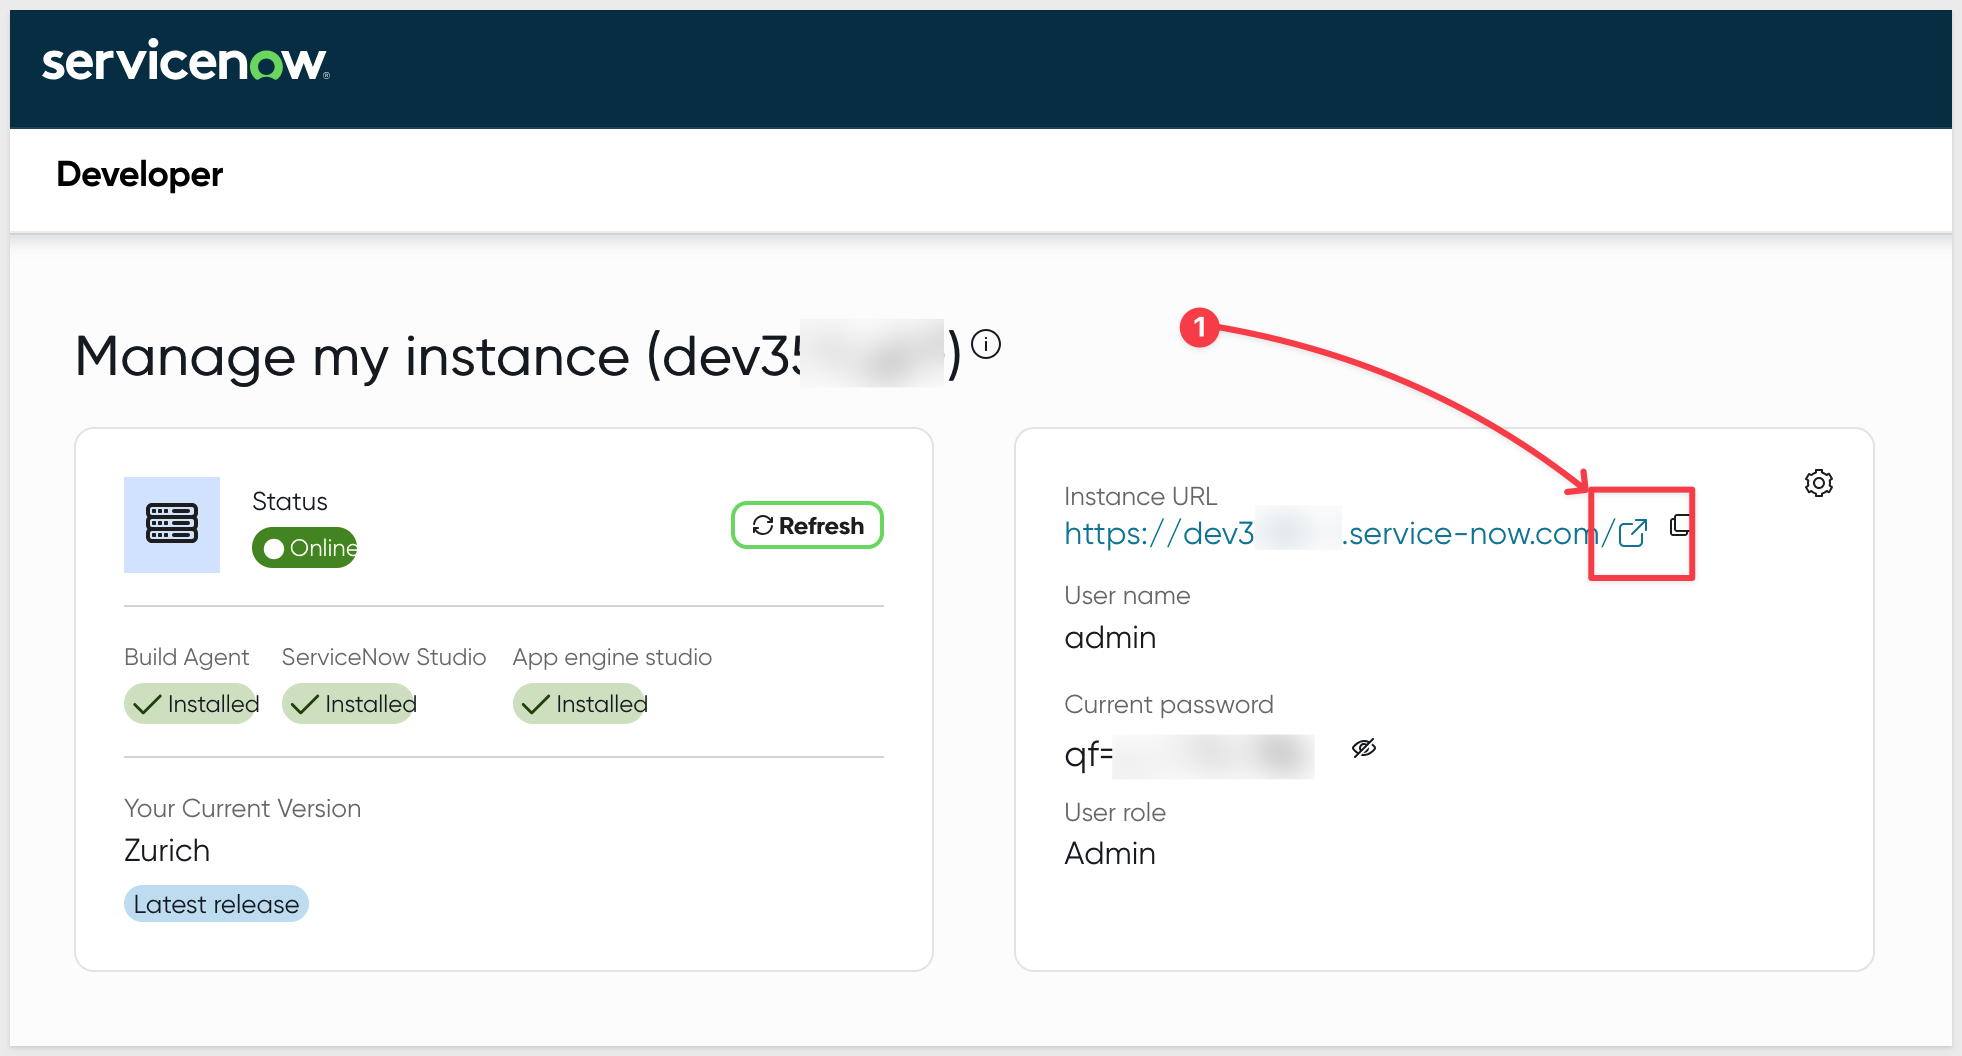
Step 4: View Instance Details
Once your instance is ready, you'll see:
- Instance URL:
https://devXXXXXX.service-now.com/(where XXXXXX is your unique instance number) - Username:
admin - Password: Click the eye icon to reveal
- Status: Online
Step 5: Open Your Instance
Click on the Instance URL to open your ServiceNow instance in a new tab:
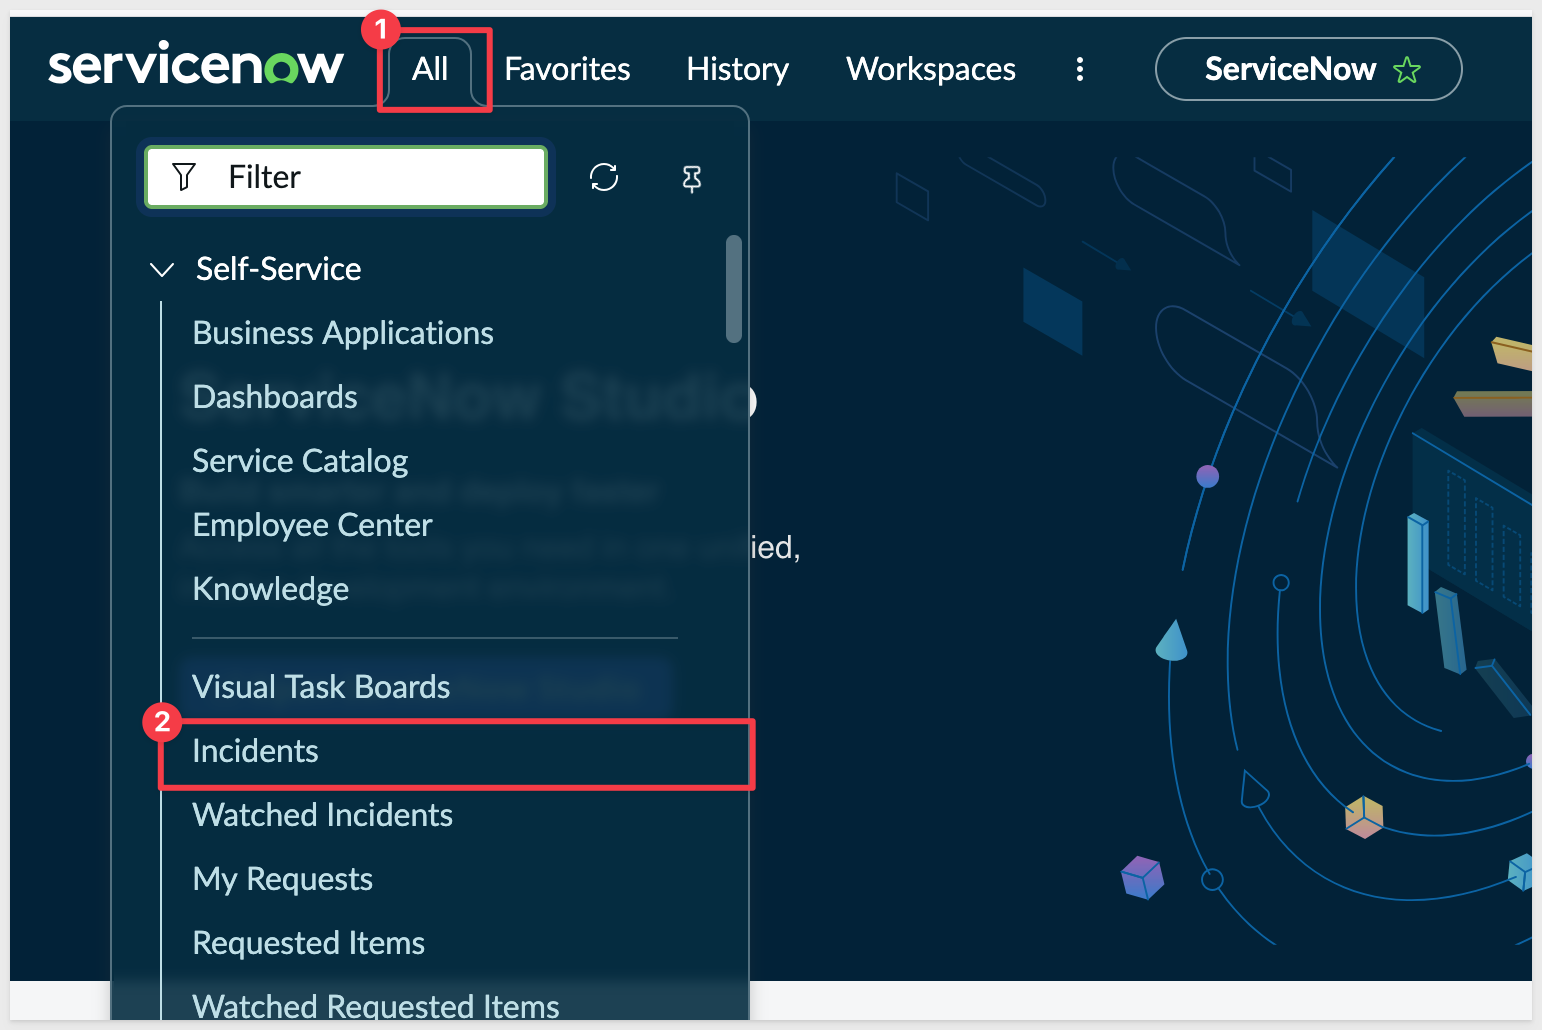
You'll be taken to the ServiceNow home page where you can open the All menu and select Incidents:
Verify Sample Incident Data
Step 6: Navigate to Incidents
Click on All to set the filters to show every incident:
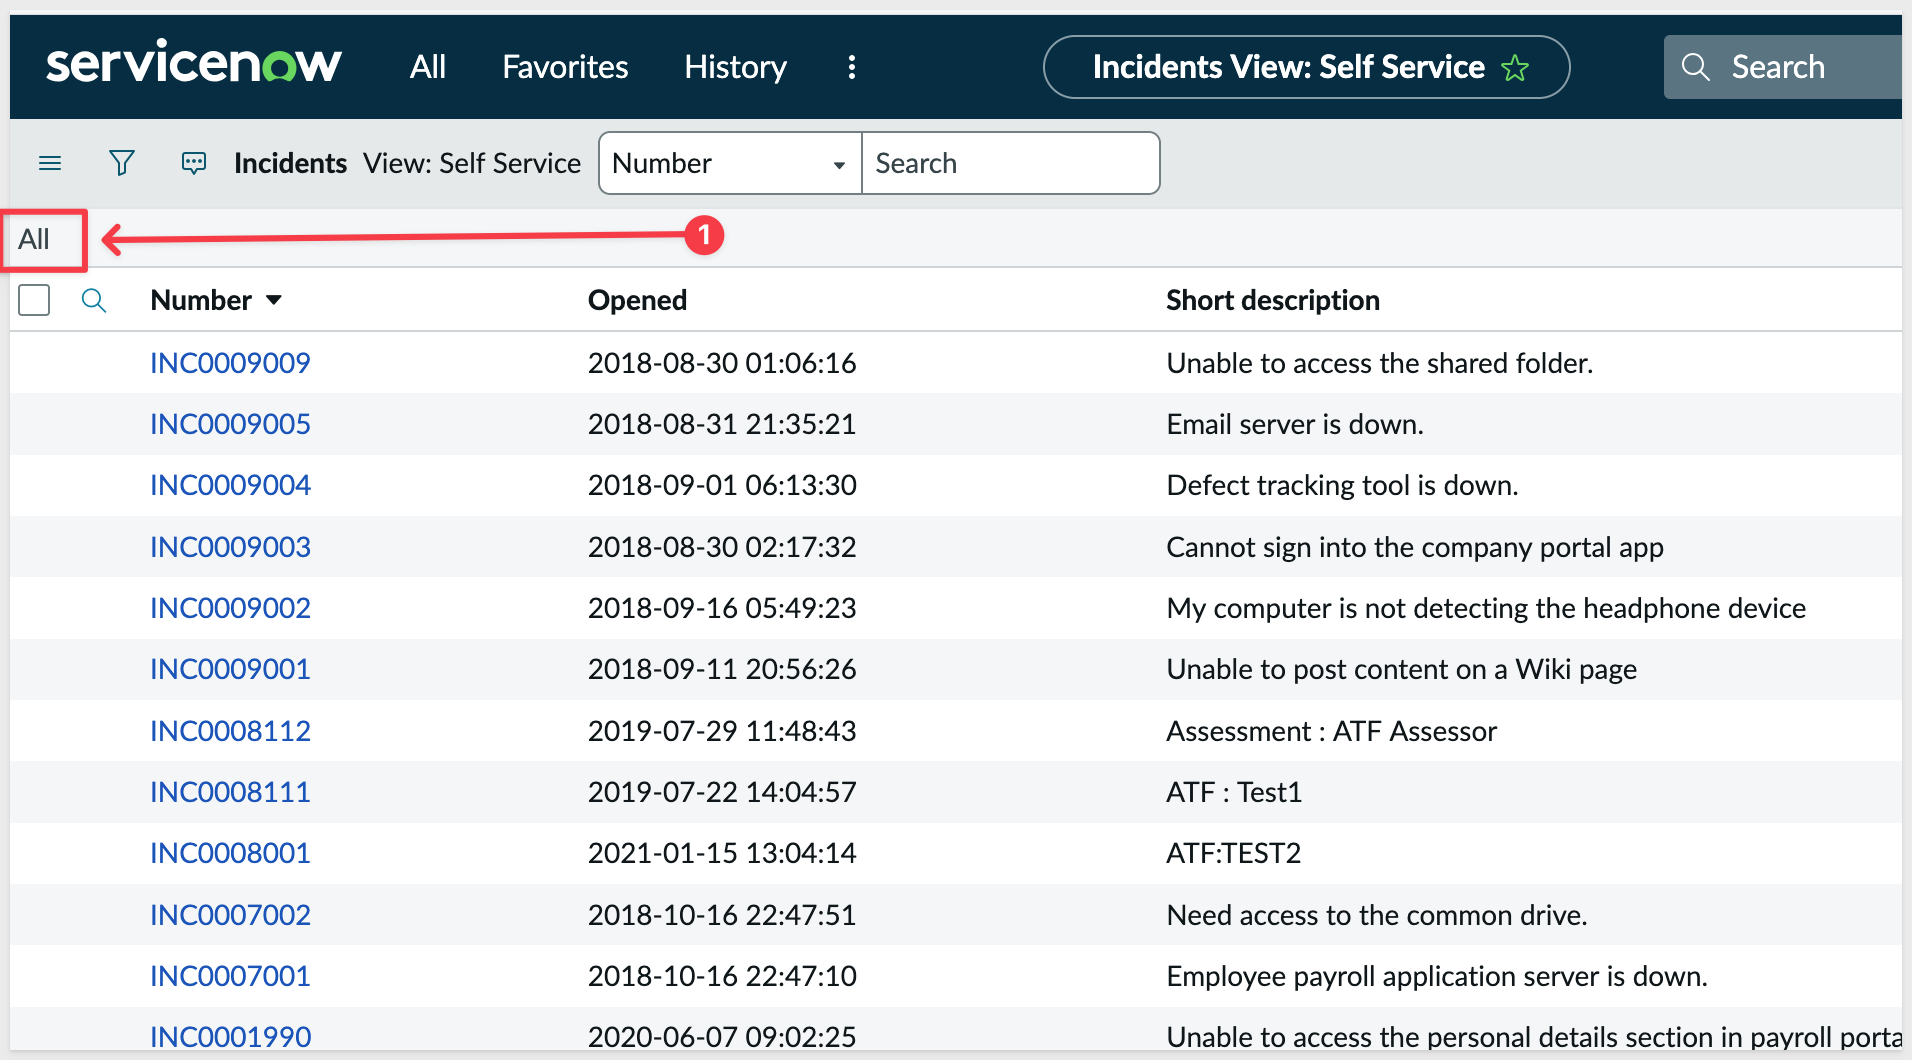
Step 7: Inspect an Incident
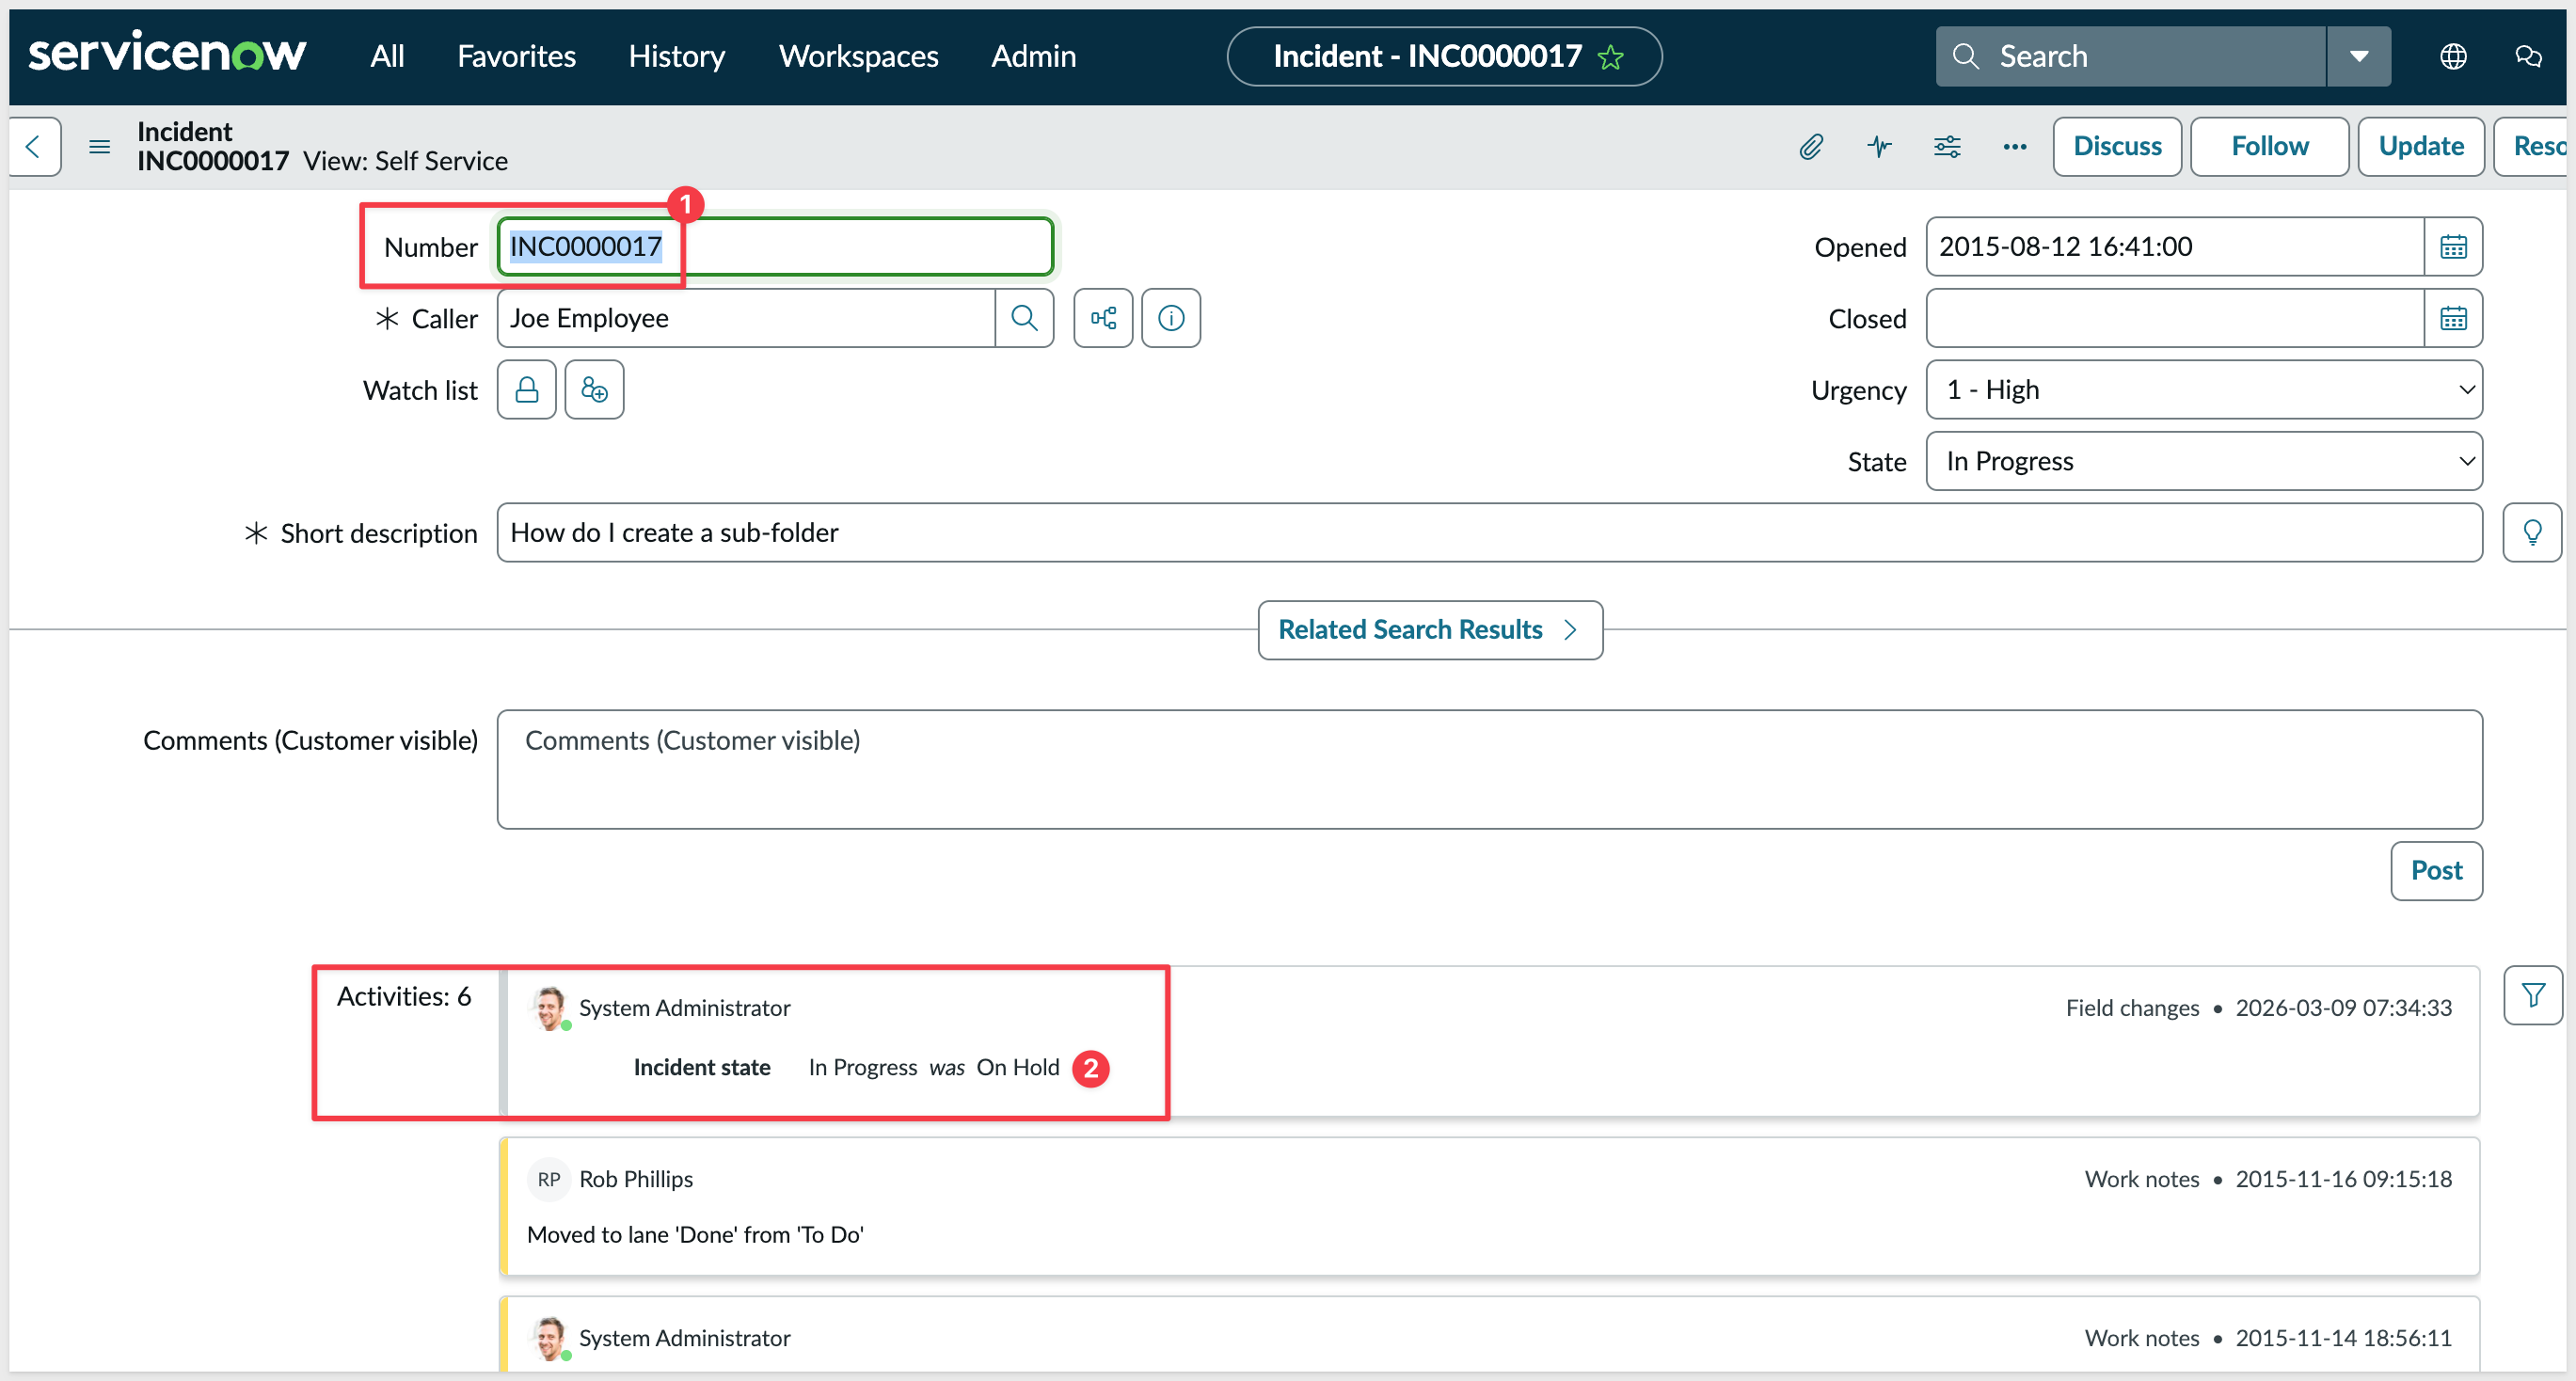
Click on any incident number (like INC0009005) to open the incident form.
Verify you can see fields like:
- Number
- Caller
- State (dropdown with: New, In Progress, On Hold, Resolved, Closed, Canceled)
- Urgency
- Short description

What You've Verified
We now have:
- A working ServiceNow developer instance
- Sample incident data (20+ incidents)
- Admin credentials (username:
admin) - Instance URL (
https://devXXXXXX.service-now.com/) - Basic understanding of available incident states and fields
Now that your ServiceNow instance is verified, let's configure authentication in Sigma. ServiceNow supports Basic Authentication using username and password, which is perfect for developer instances.
Create API Credentials in Sigma
In Sigma, open the left navigation menu and select Administration > Credentials and click the Create credential button:
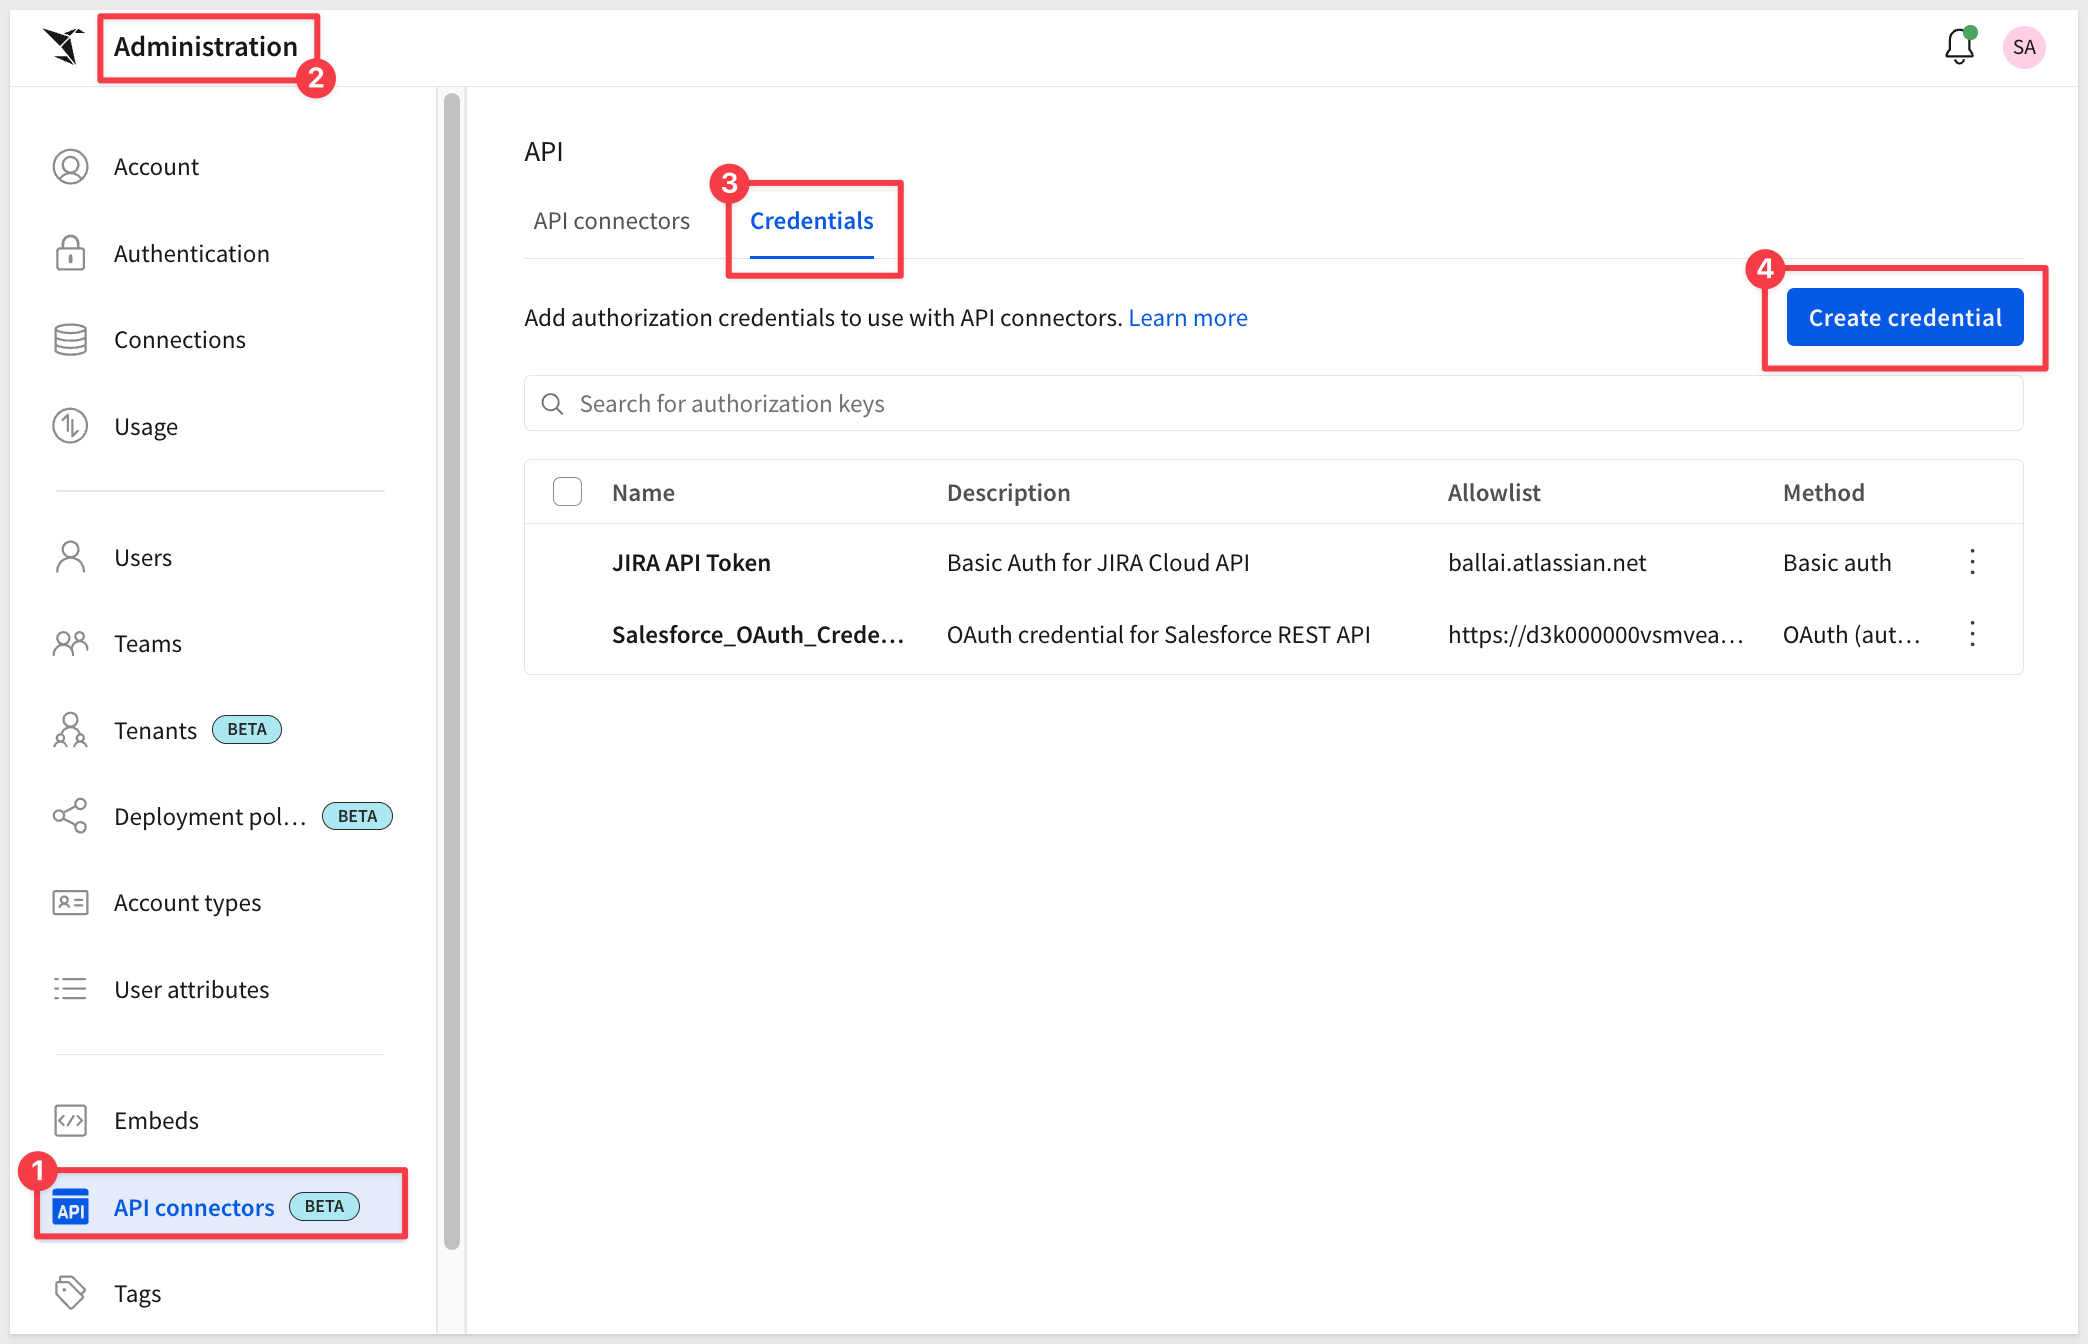
In the Create Credential dialog:
- Name:
ServiceNow Basic Auth - Authentication Type: Select
Basic Authentication - Username:
admin(your ServiceNow admin username) - Password: Enter your ServiceNow instance password (the one you revealed in the previous section)
- Authorized domains:
devXXXXXX.service-now.com(replace with your actual instance domain)

Click Create to save the credential.
You'll see ServiceNow Basic Auth in your API Credentials list.
We now have:
- A Basic Auth credential stored in Sigma
- Secure storage of your ServiceNow admin credentials
- Ready to create API connectors that use this authentication
For more information, see Add a new API credential to Sigma
Now we'll create an API connector that queries incidents from ServiceNow's Table API. This connector will use the Basic Auth credential we just created.
Understanding ServiceNow's Table API
ServiceNow provides a REST API for accessing table data:
Endpoint: GET /api/now/table/{table_name}
For incidents: GET /api/now/table/incident
Query Parameters:
sysparm_limit: Number of records to returnsysparm_fields: Comma-separated list of fields to returnsysparm_query: Encoded query string for filtering
Documentation: ServiceNow Table API
Create the API Connector
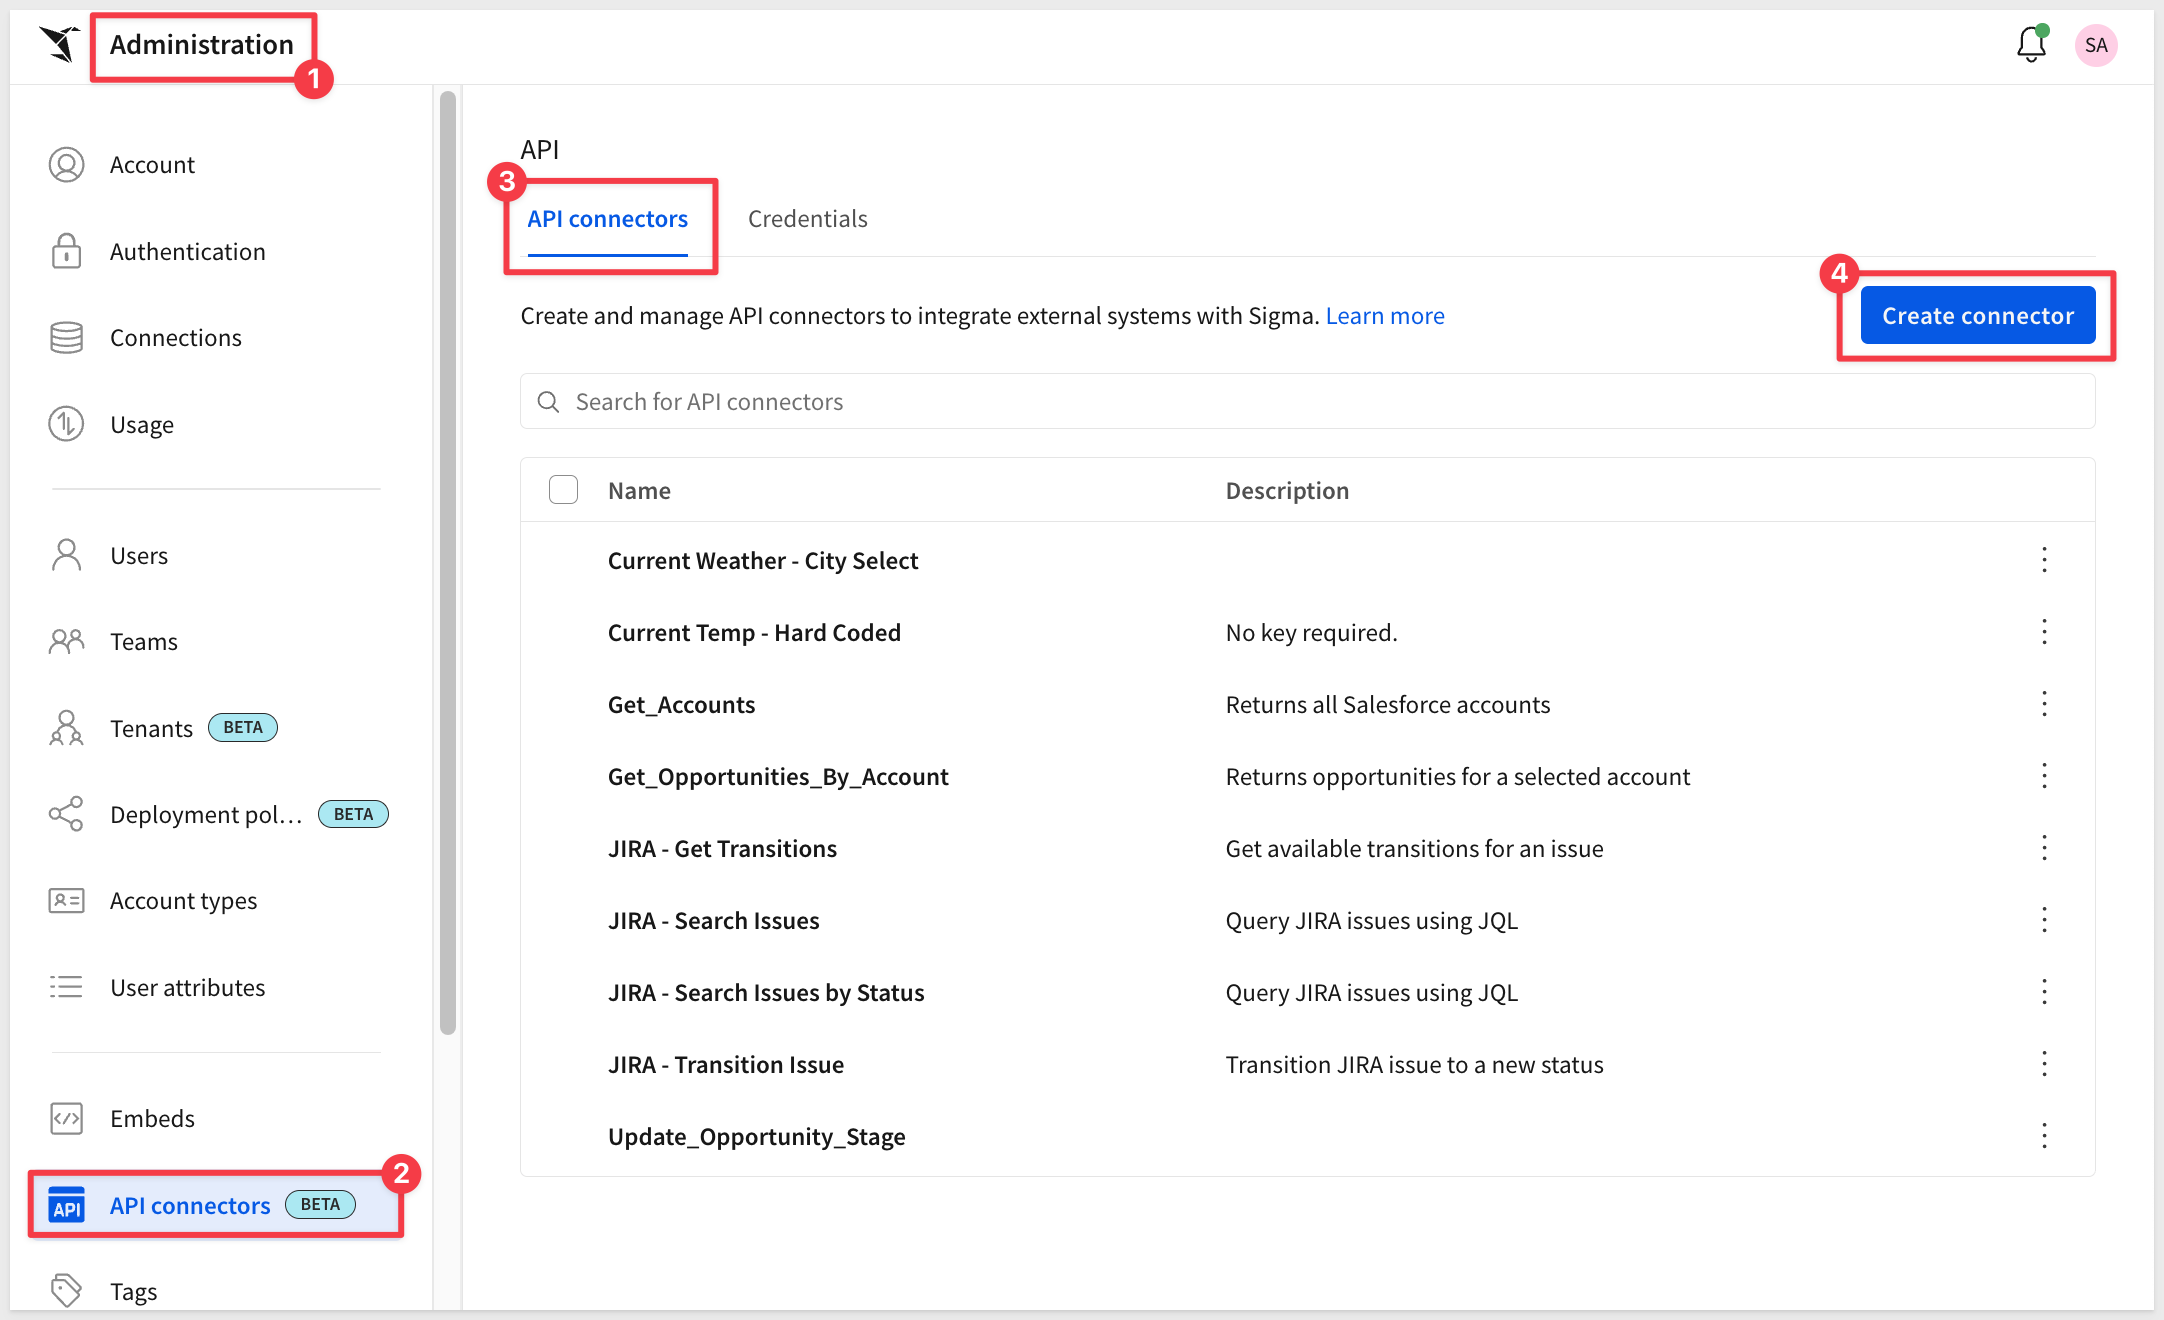
Step 1: Navigate to API Connectors
In Sigma, navigate to Administration > API Connectors and click Create connector:
Step 2: Configure Base URL
Configure the new connector using:
- Name:
ServiceNow - Get Incidents - Credential: Select
ServiceNow Basic Auth(the credential we created earlier) - Base URL:
- GET
https://devXXXXXX.service-now.com/api/now/table/incident- Replace
devXXXXXXwith your actual instance number - Example:
https://dev555471.service-now.com/api/now/table/incident
- Replace
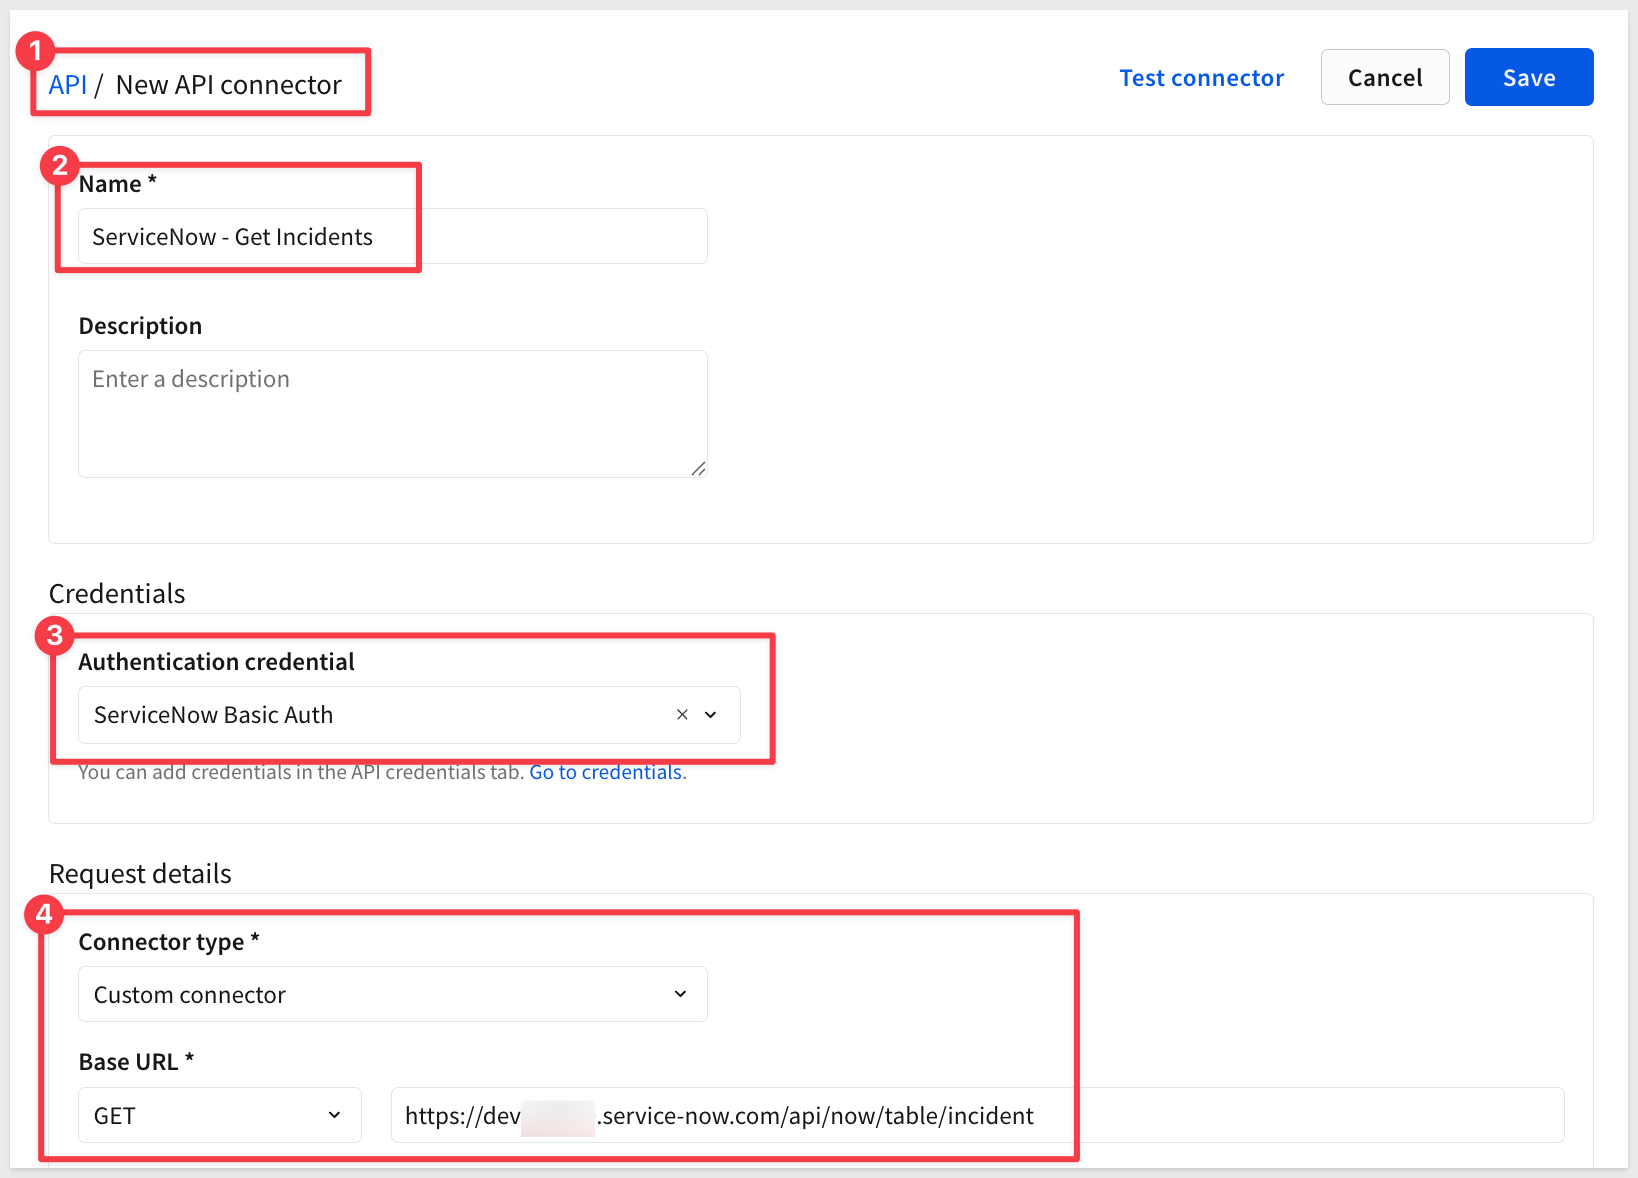
Step 3: Add Query Parameters
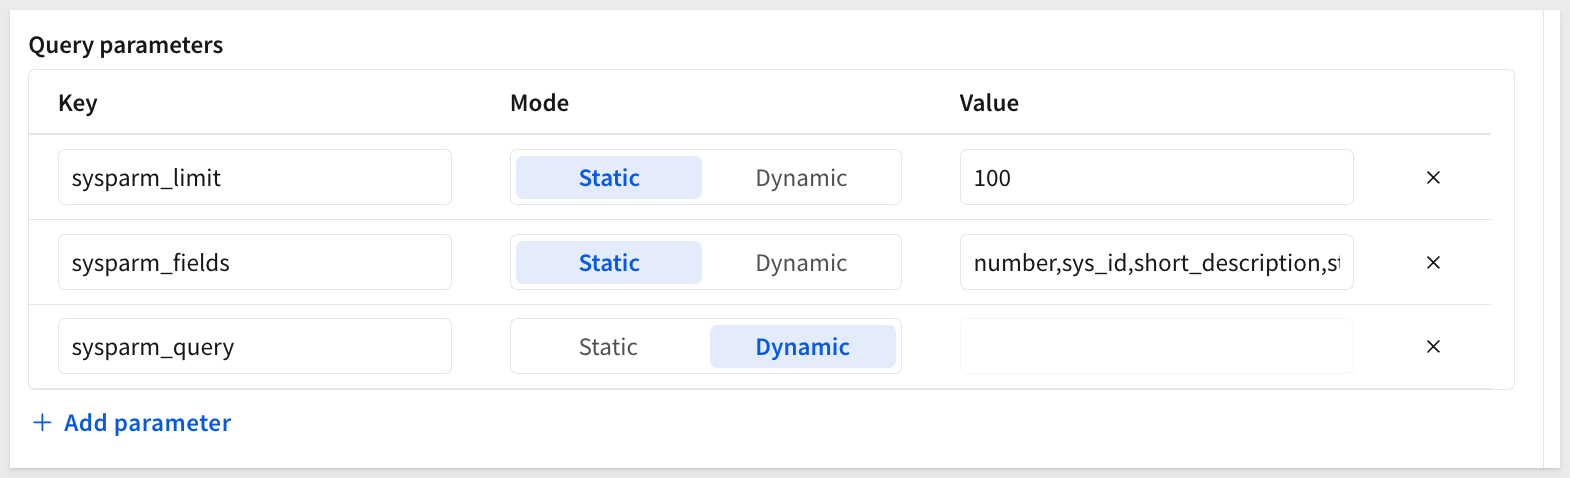
In the Query Parameters section, click the + Add:
Parameter 1:
- Key:
sysparm_limit - Mode
Static - Value:
100
This limits results to 100 incidents.
Parameter 2:
- Key:
sysparm_fields - Mode
Static - Value:
number,sys_id,short_description,state,priority,urgency,caller_id,
            opened_at,closed_at,assigned_to
The field list to return to Sigma in the response.
Parameter 3 (Dynamic):
- Key:
sysparm_query - Mode
Dynamic - Value: (leave empty)
This is a Dynamic filter for incident state, sent from Sigma at runtime:
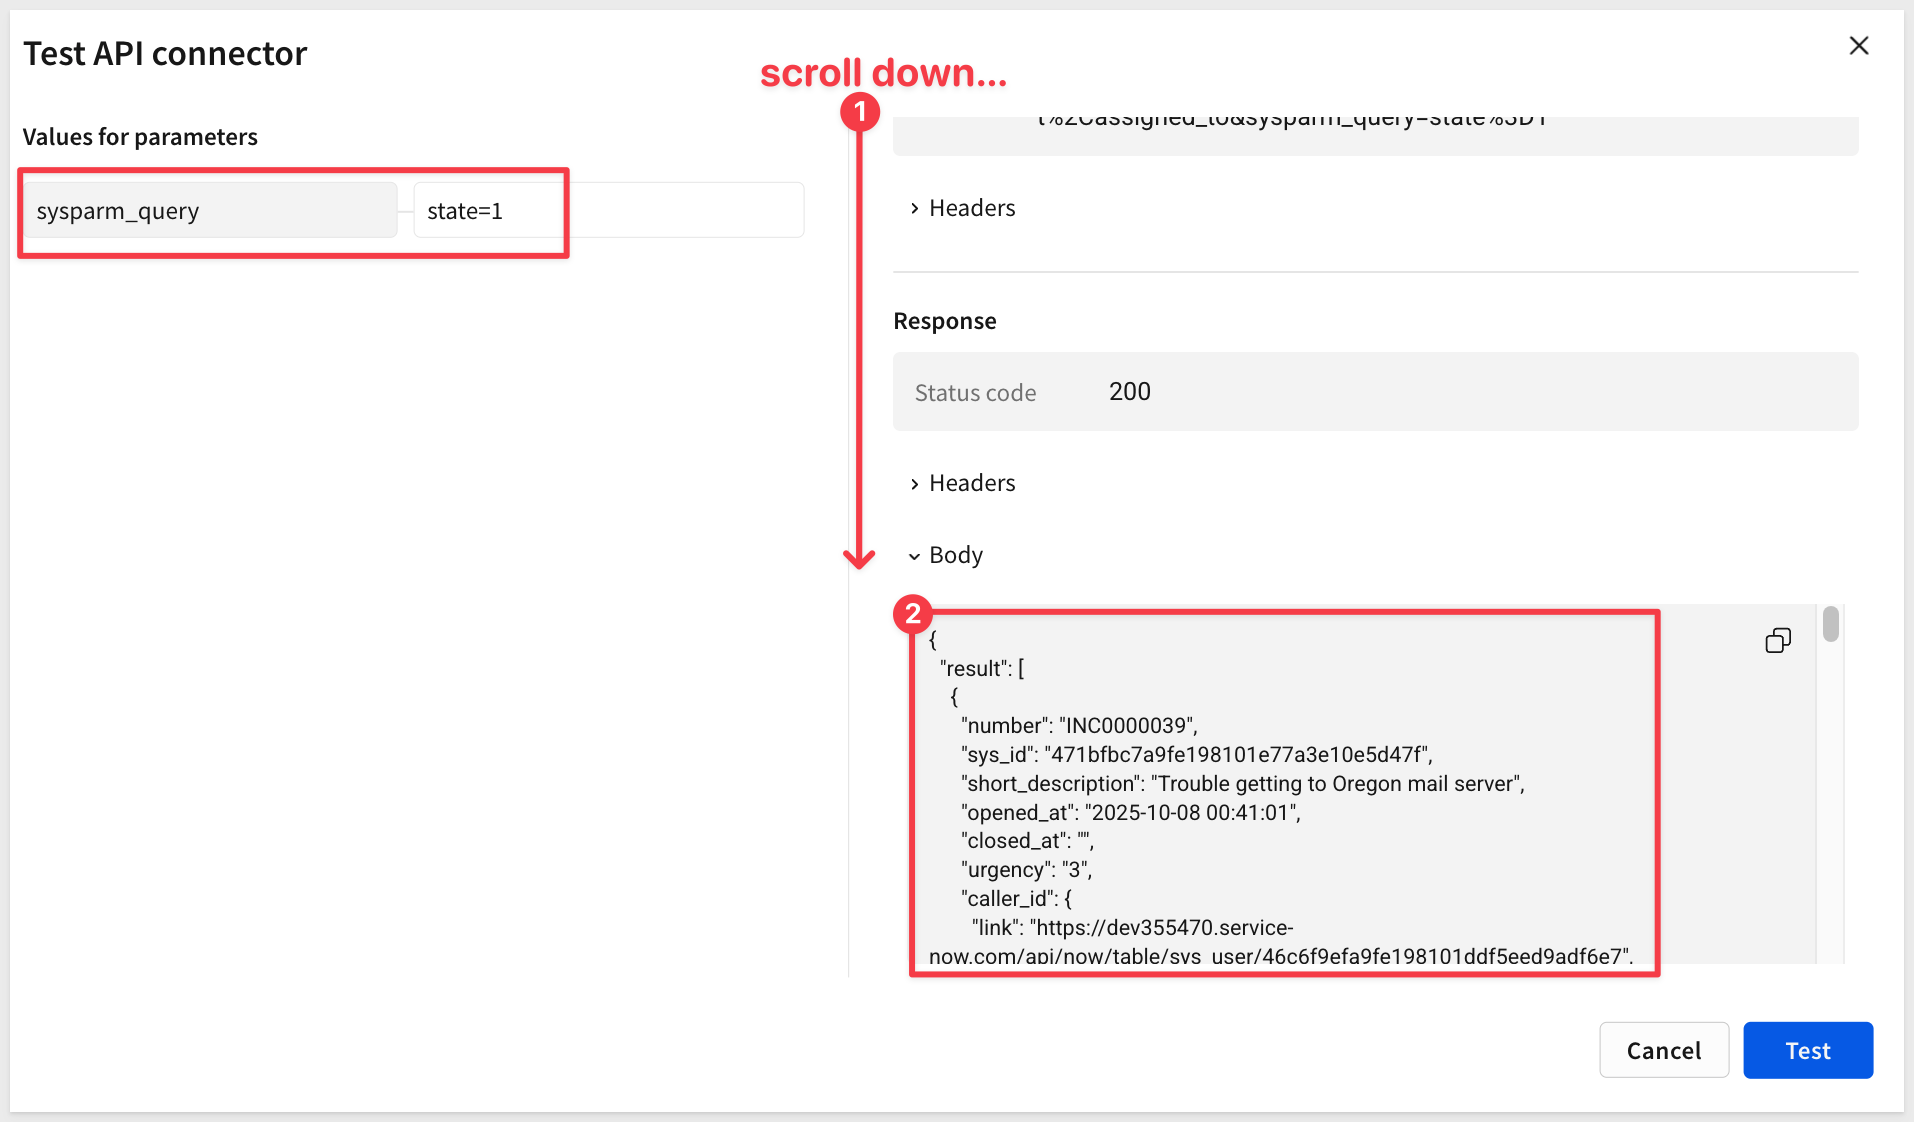
Step 4: Test the Connector
Before saving, let's test the connector:
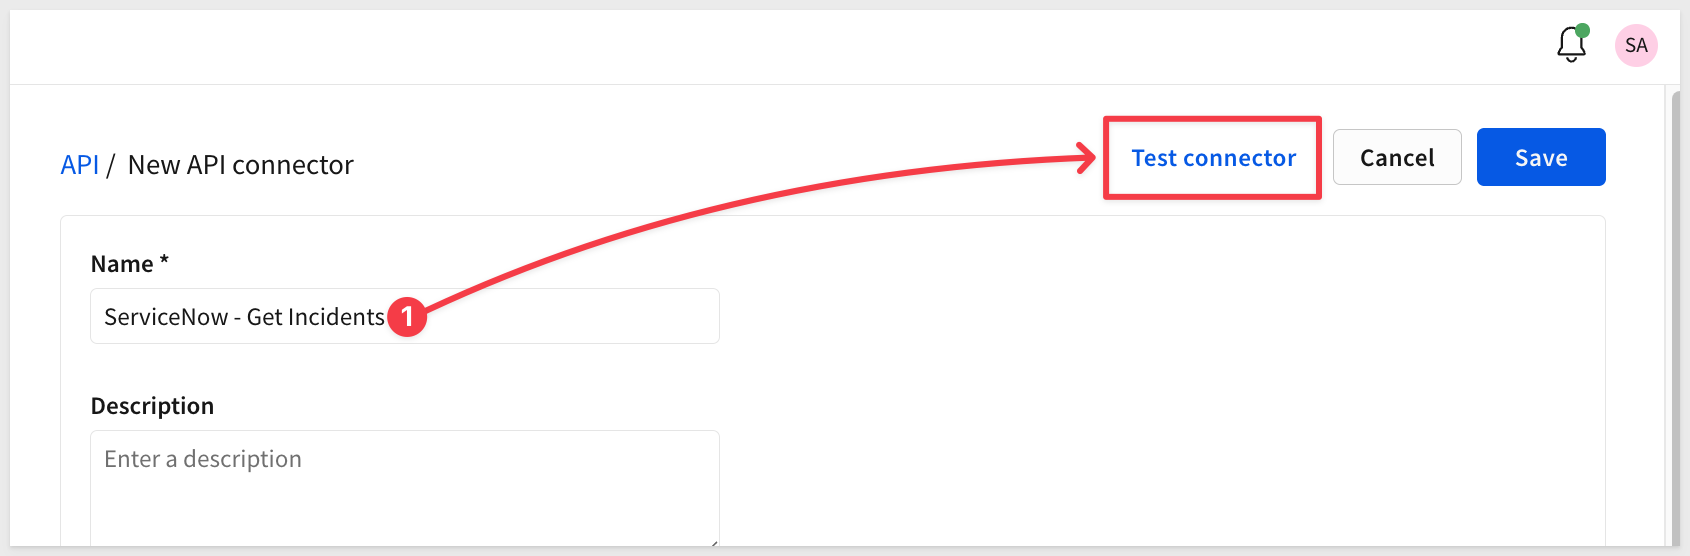
- In the Test section, set
sysparm_queryto:state=1- In ServiceNow, state values are numeric: 1=New, 2=In Progress, 3=On Hold, 6=Resolved, 7=Closed, 8=Canceled
- Click
Send Test Request
You should see a JSON response with incident data in the Body section:
Step 5: Save the Connector
Click Create to save the connector.
You'll see ServiceNow - Get Incidents in your API Connectors list.
Understanding ServiceNow State Values
ServiceNow uses numeric codes for incident states:
State Code | State Name |
1 | New |
2 | In Progress |
3 | On Hold |
6 | Resolved |
7 | Closed |
8 | Canceled |
We'll use these codes when building filters in our workbook.
We now have:
- An API connector that queries ServiceNow incidents
- Dynamic filtering capability via the
sysparm_queryparameter - Tested API connection returning live incident data
Sigma's API Actions return raw JSON responses. To parse ServiceNow's response (a list of incidents) into an interactive table, we use a Sigma Python element.
Python elements execute on Snowflake, so we need to prepare your Snowflake environment.
Step 1: Create a Dedicated Warehouse
In Snowflake, execute these commands as ACCOUNTADMIN:
USE ROLE ACCOUNTADMIN;

CREATE WAREHOUSE IF NOT EXISTS PYTHON_WH
  WAREHOUSE_TYPE = STANDARD
  WAREHOUSE_SIZE = XSMALL
  AUTO_SUSPEND = 60
  AUTO_RESUME = TRUE
  COMMENT = 'Dedicated warehouse for Sigma Python queries';

ALTER WAREHOUSE PYTHON_WH RESUME;

GRANT USAGE ON WAREHOUSE PYTHON_WH TO ROLE SIGMA_SERVICE_ROLE;
GRANT CREATE PROCEDURE ON SCHEMA QUICKSTARTS.INPUT_TABLES_WRITE TO ROLE SIGMA_SERVICE_ROLE;
Step 2: Enable Python in Sigma Connection
In Sigma, navigate to Administration > Connections.
Find your Snowflake connection and click to edit it:
- Enable Python queries: Turn ON
- Warehouse: Select
PYTHON_WH - Packages: Leave empty
- External access rule: Leave empty
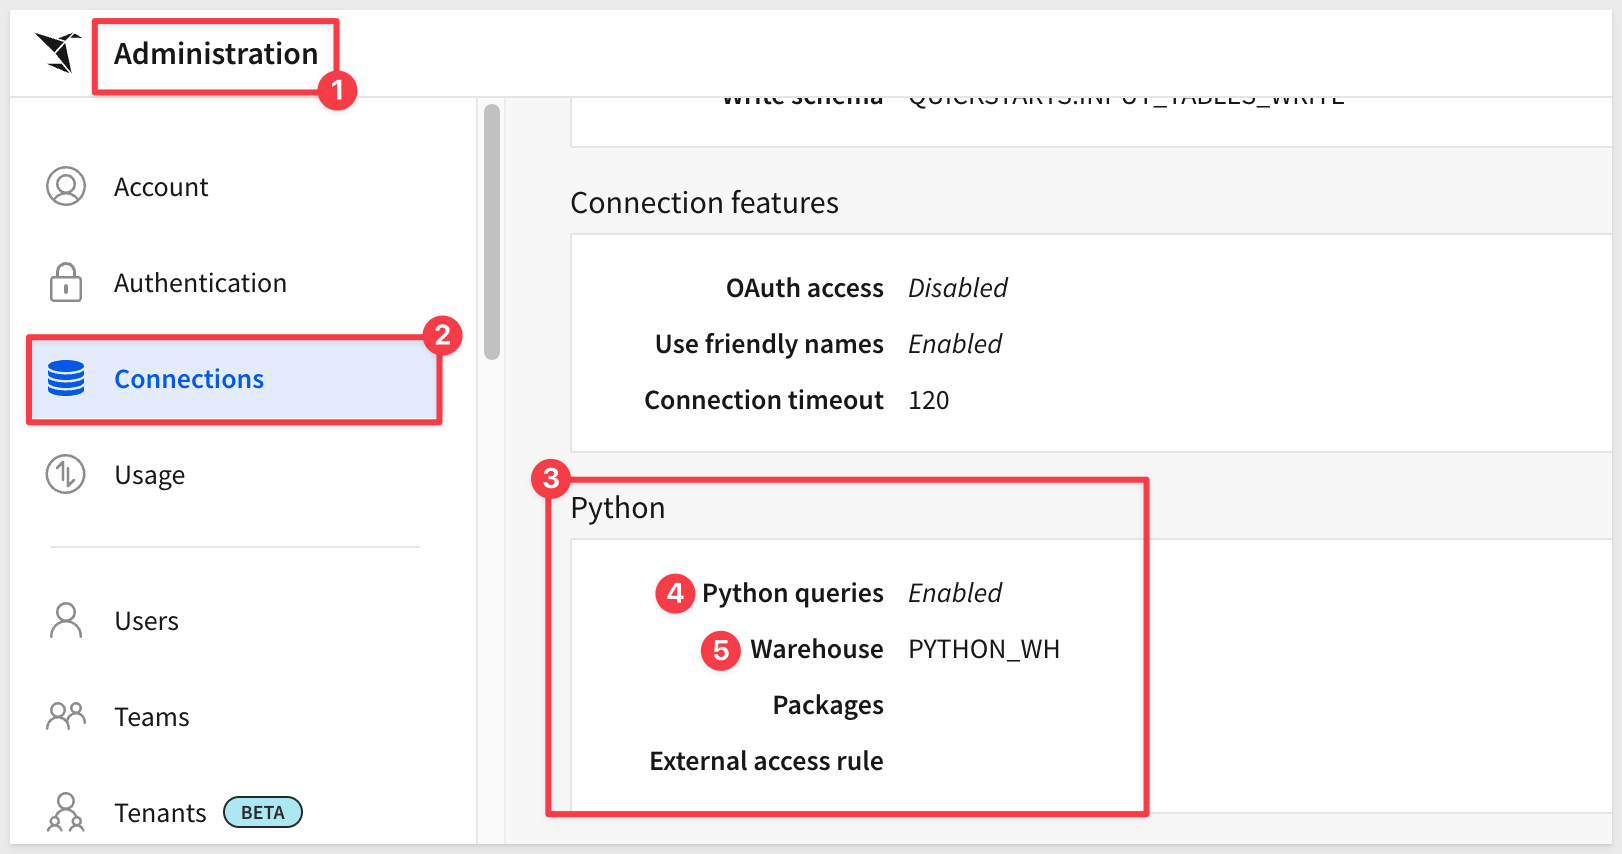
Click Save.
Step 3: Initialize the Python Procedure
Now we need to initialize Snowflake's Python procedure. This is a one-time setup.
Create a test workbook:
- In Sigma, create a new workbook
- Add a
Pythonelement using theElement bar>Data>Python. - Replace the default code with:
import pandas as pd
sigma.output("test", pd.DataFrame({"status": ["initialized"]}))
- Click
Run
You'll see output indicating Python executed successfully:
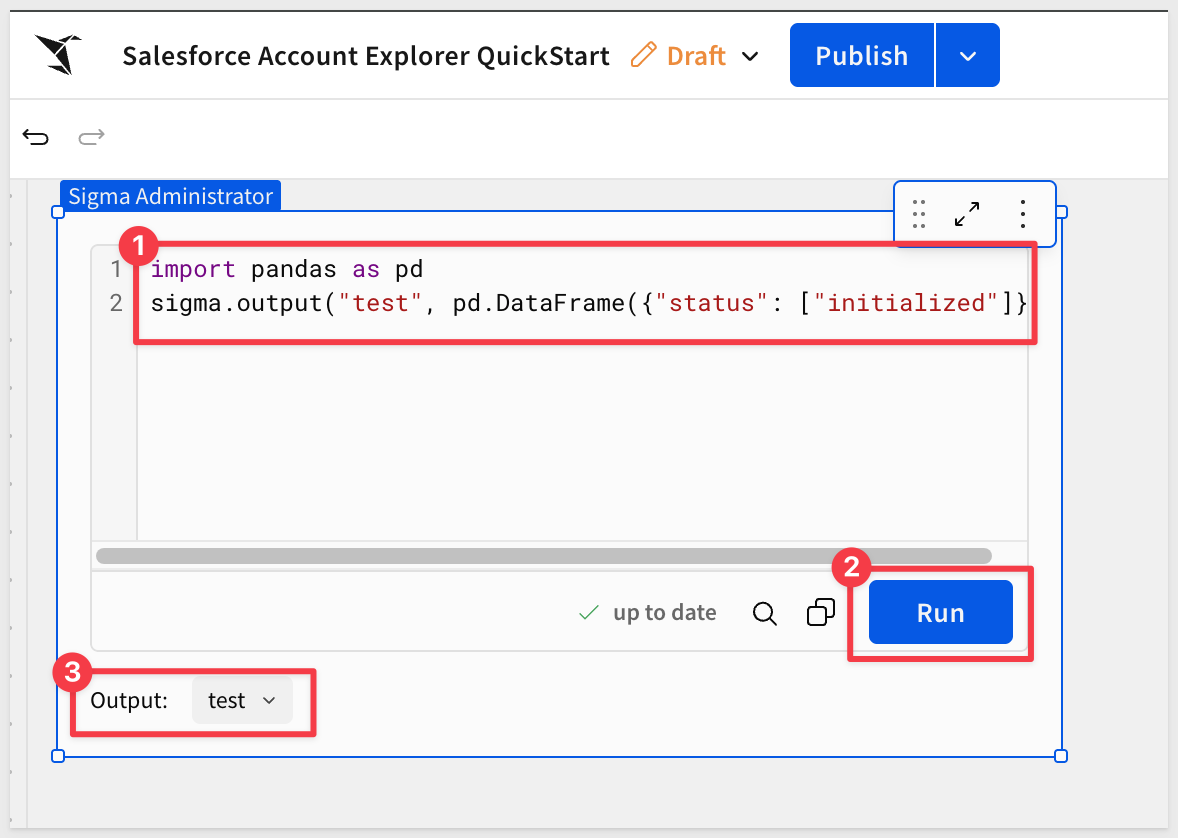
There is no need to save this workbook.
Step 4: Grant Procedure Access
Once the element executes successfully, return to Snowflake and run the following to grant access to the procedure:
USE ROLE ACCOUNTADMIN;
GRANT USAGE ON PROCEDURE QUICKSTARTS.INPUT_TABLES_WRITE.RUN_PYTHON_CODE(VARCHAR, VARCHAR) TO ROLE SIGMA_SERVICE_ROLE;
We now have:
- A dedicated warehouse for Python execution
- Python enabled in your Sigma connection
- Initialized Python procedure in Snowflake
- Proper permissions for Sigma to execute Python
Now we'll build a Sigma workbook that calls the ServiceNow API, parses the JSON response, and displays incidents in a table with dynamic filtering.
Create the Workbook
Step 1: Create a New Workbook
In Sigma, click Create New > Workbook.
Click Save as and name the workbook: ServiceNow API Actions QuickStart
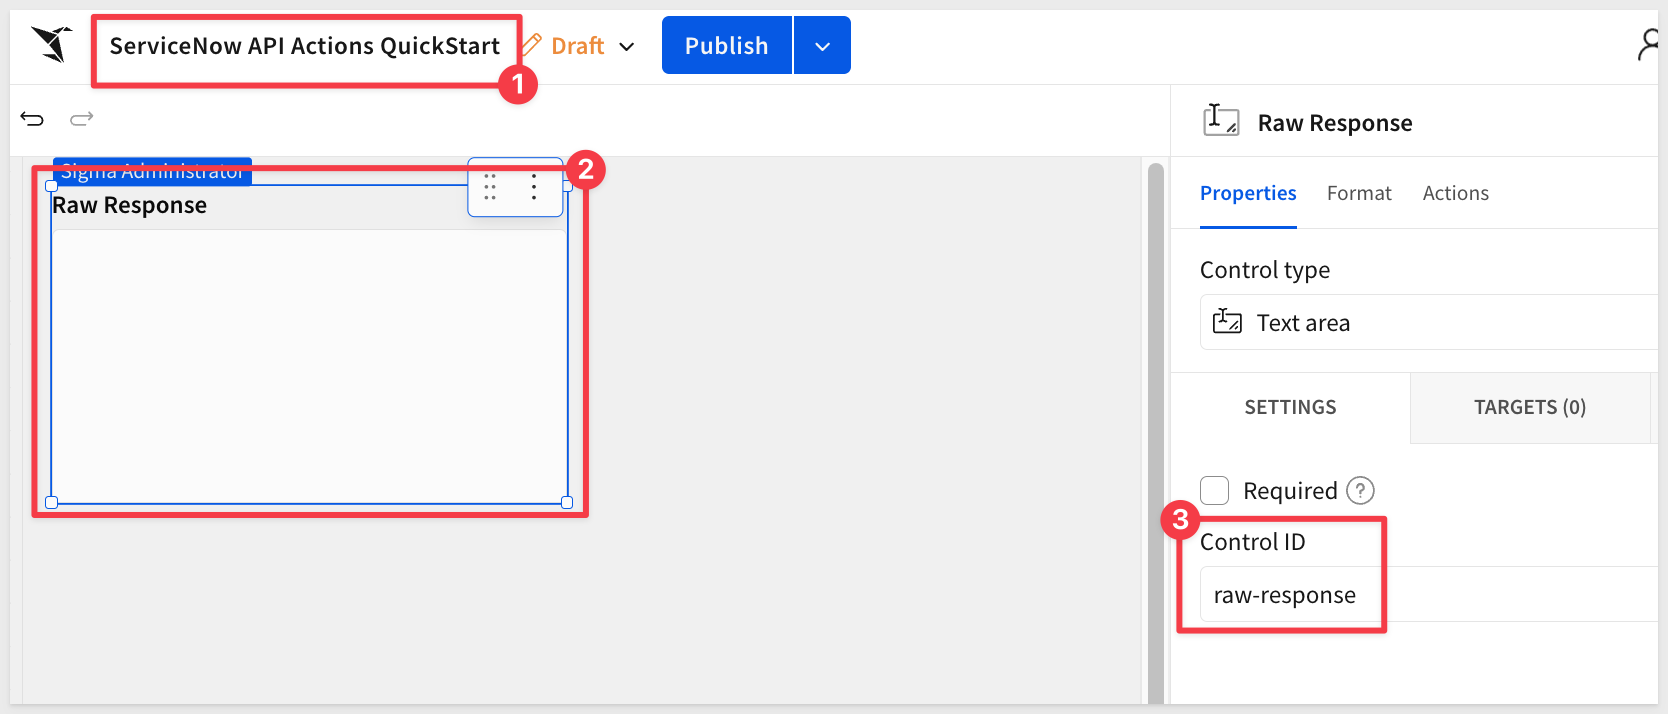
Step 2: Add a Text Area Control for Raw Response
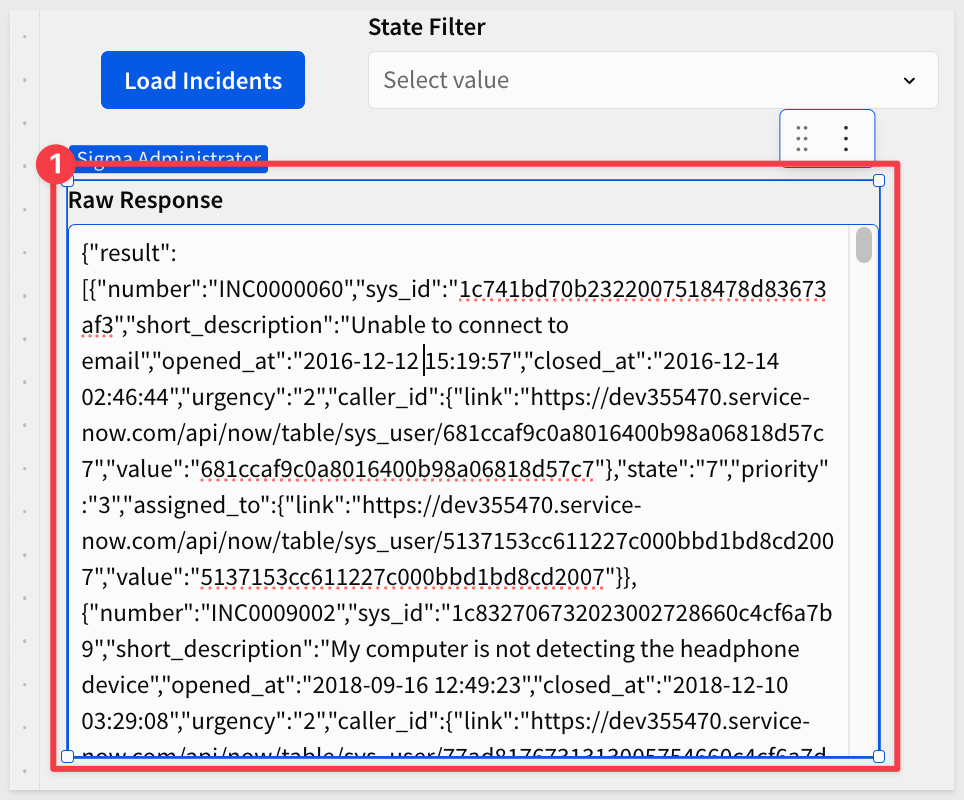
We'll use a text area control to store the raw JSON response from ServiceNow.
- Use the
Element barto add aControls>Text Area - Set the
Control IDto:raw-response
Leave it blank (the API action will populate it):
Step 3: Add a List Control for State Filter
Create a control that lets users filter the loaded incidents by state:
- Use the
Element barto add aControls>List values - Set the
Control IDto:state-filter - Configure the list values — use the same value for both display and actual:
Value |
New |
In Progress |
On Hold |
Resolved |
Closed |
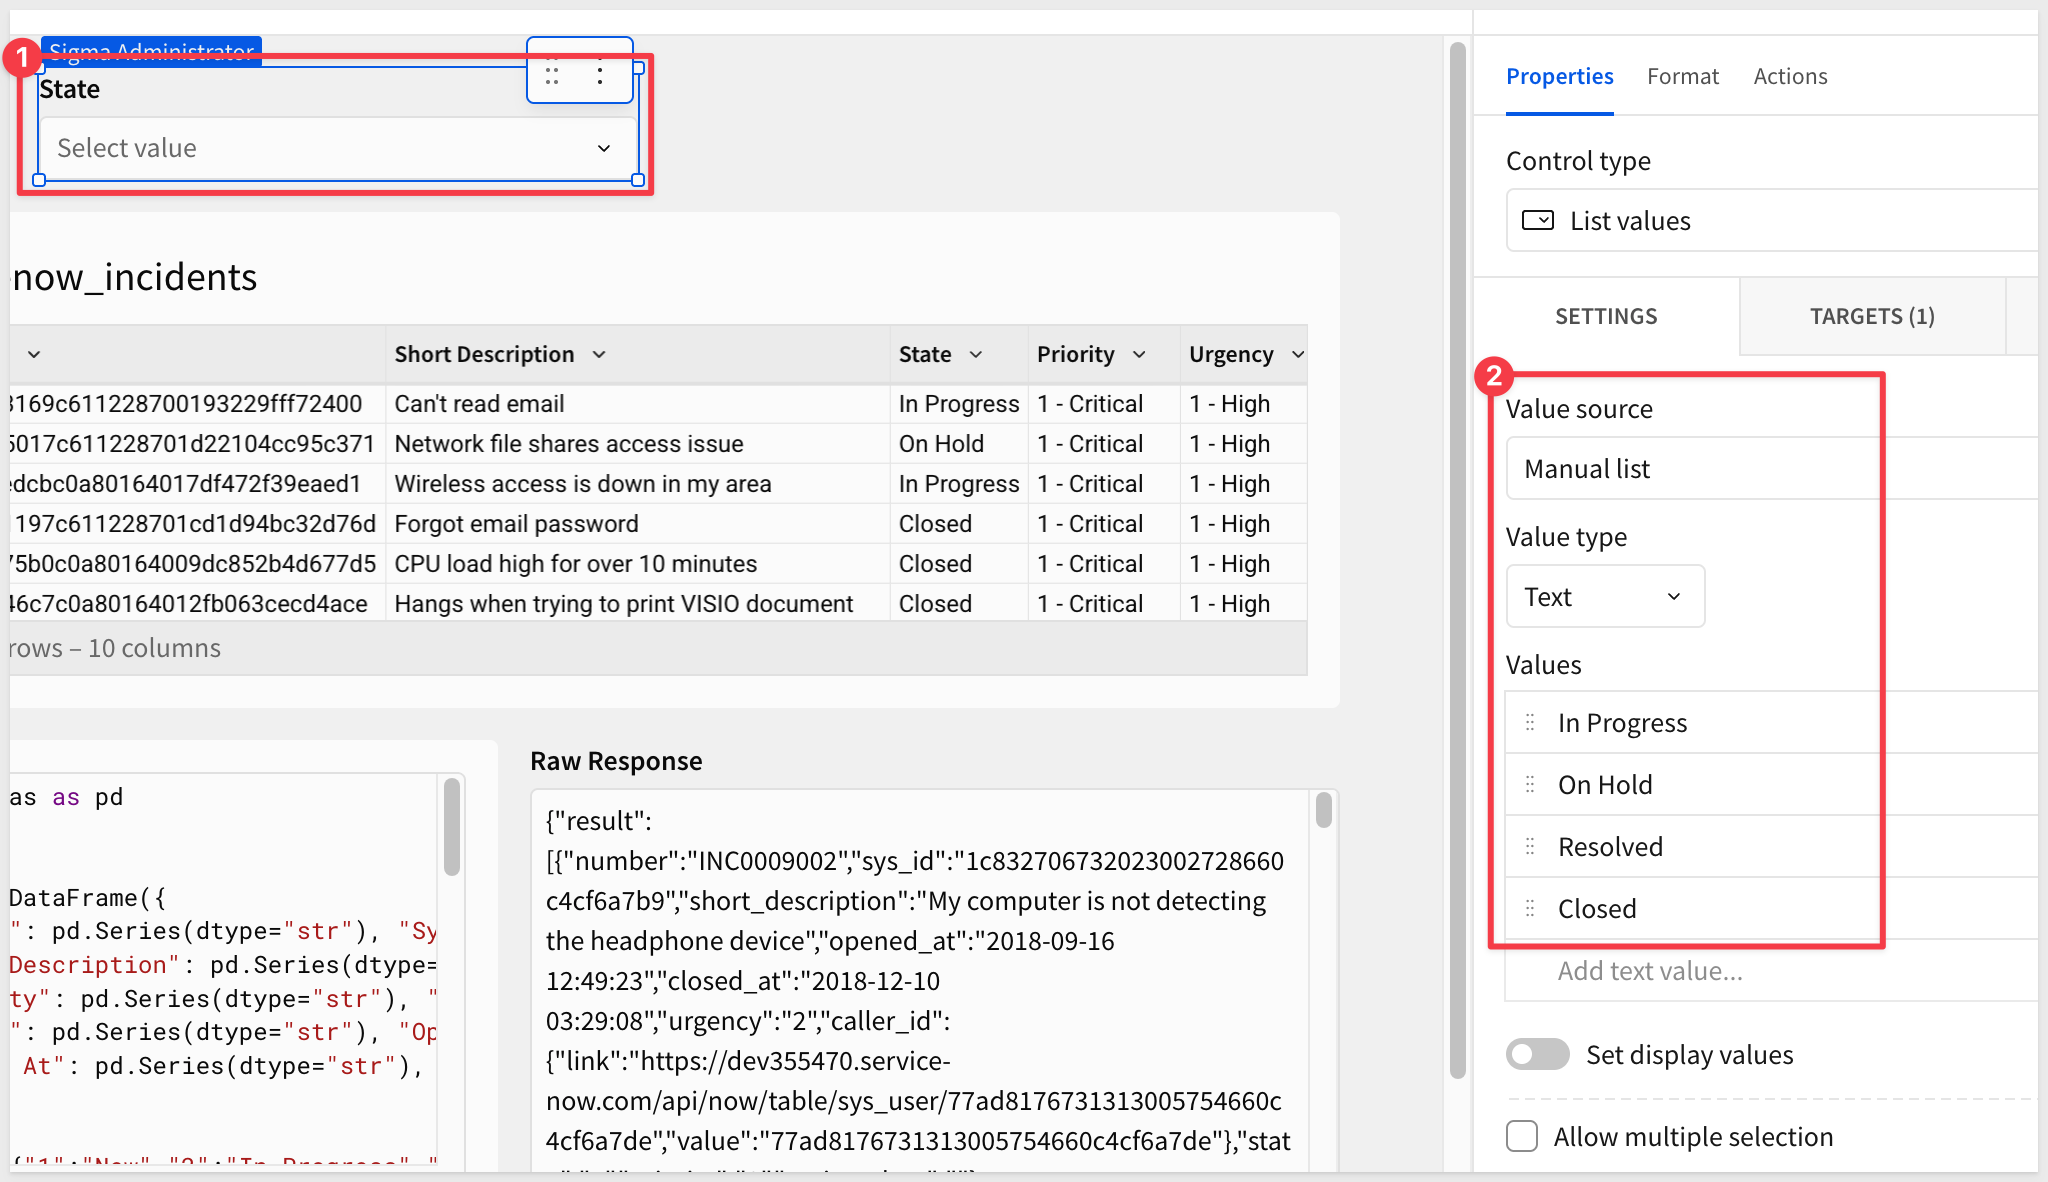
Be sure to disable Allow multiple selection as the value must contain one selection only:
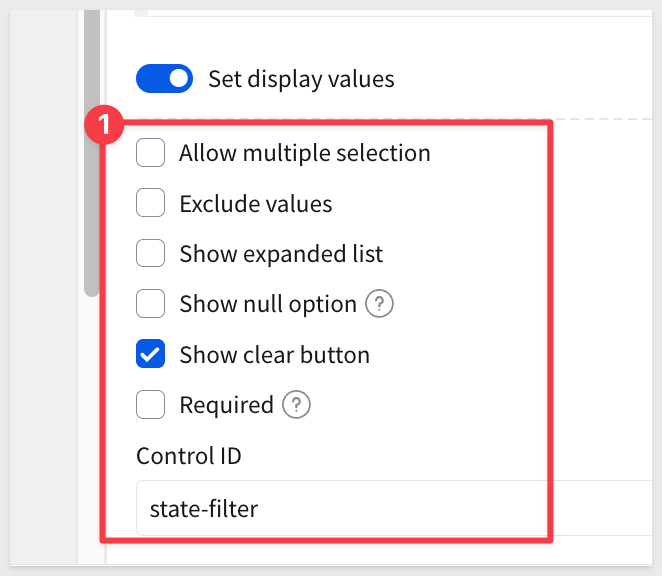
- Set the
TARGETSto theServiceNow Incidentstable and theStatecolumn

Step 4: Add a Button to Call the API
Create a button that triggers the API call:
- Click
Add>UI>Button - Set button text:
Load ServiceNow Incidents
Step 5: Configure the Button Action
Now we'll configure the button to call the ServiceNow API:
- Click the button's
Actionsmenu - Click the
+to add anAction sequence - Choose
Call API
Configure the first action:
Field | Value |
Action |
|
API Connector |
|
sysparm_query |
|
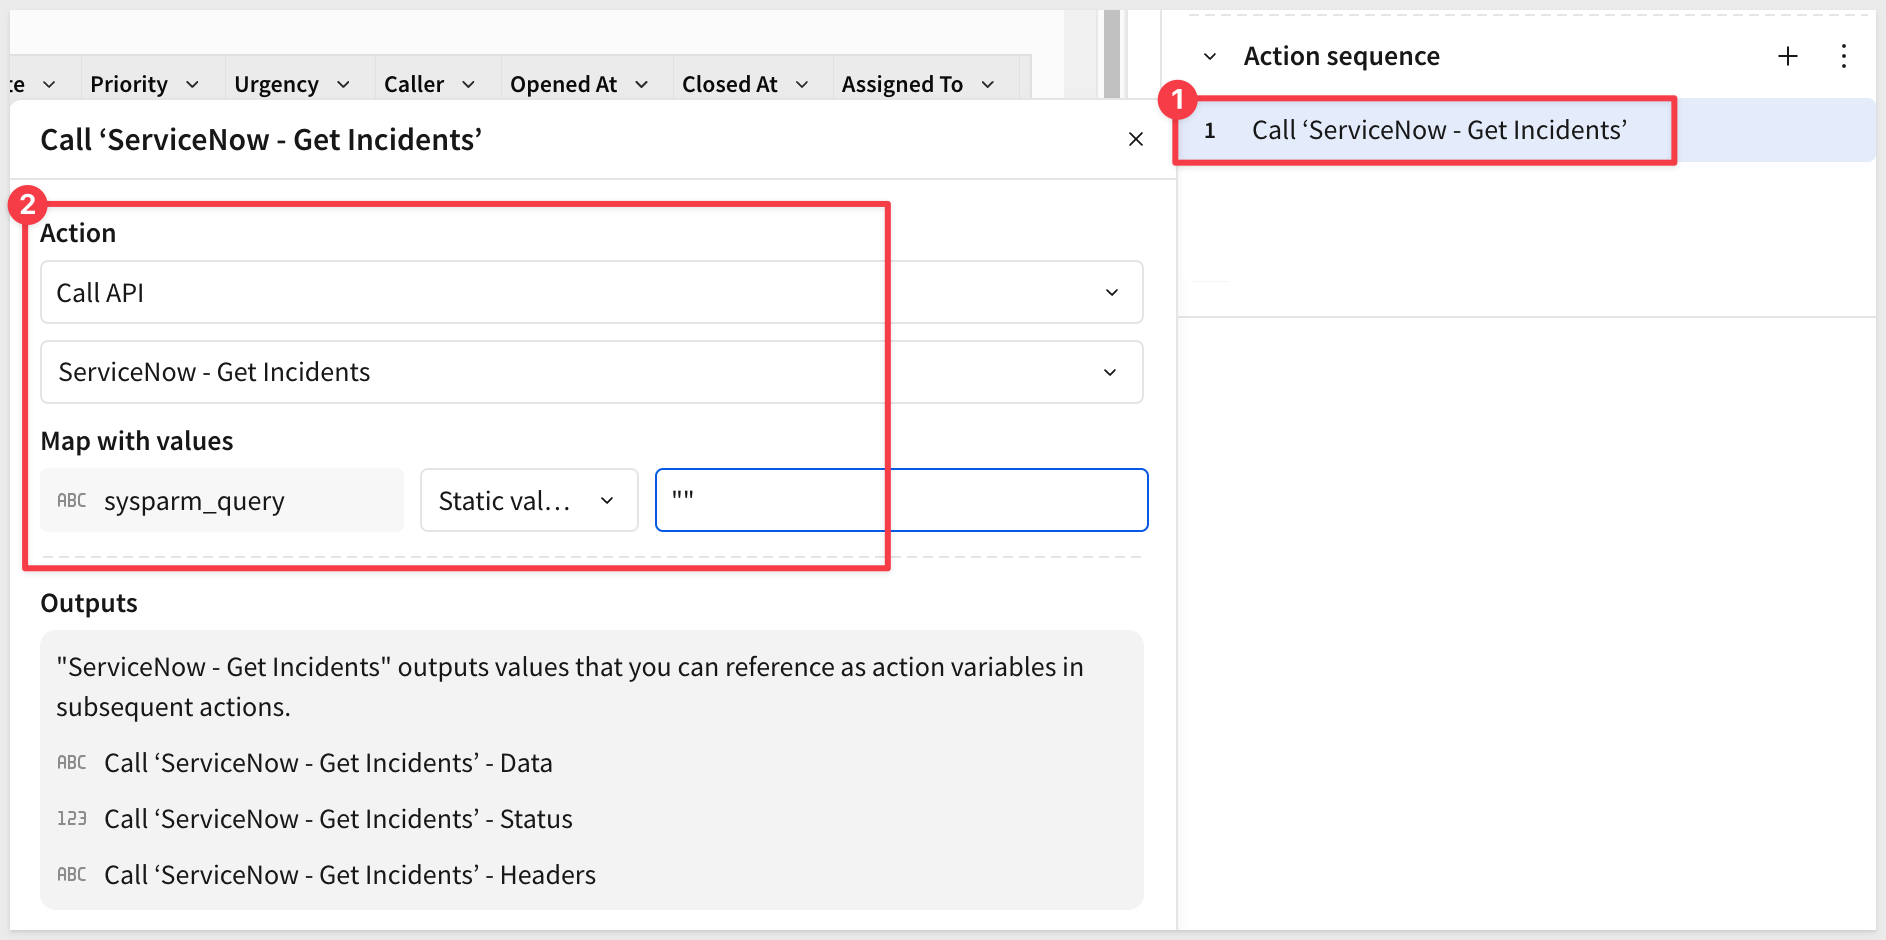
- Click the
+to add a second action to the sequence - Choose
Set control value
Configure the second action:
Field | Value |
Action |
|
Update control |
|
Set value as |
|
Variable |
|
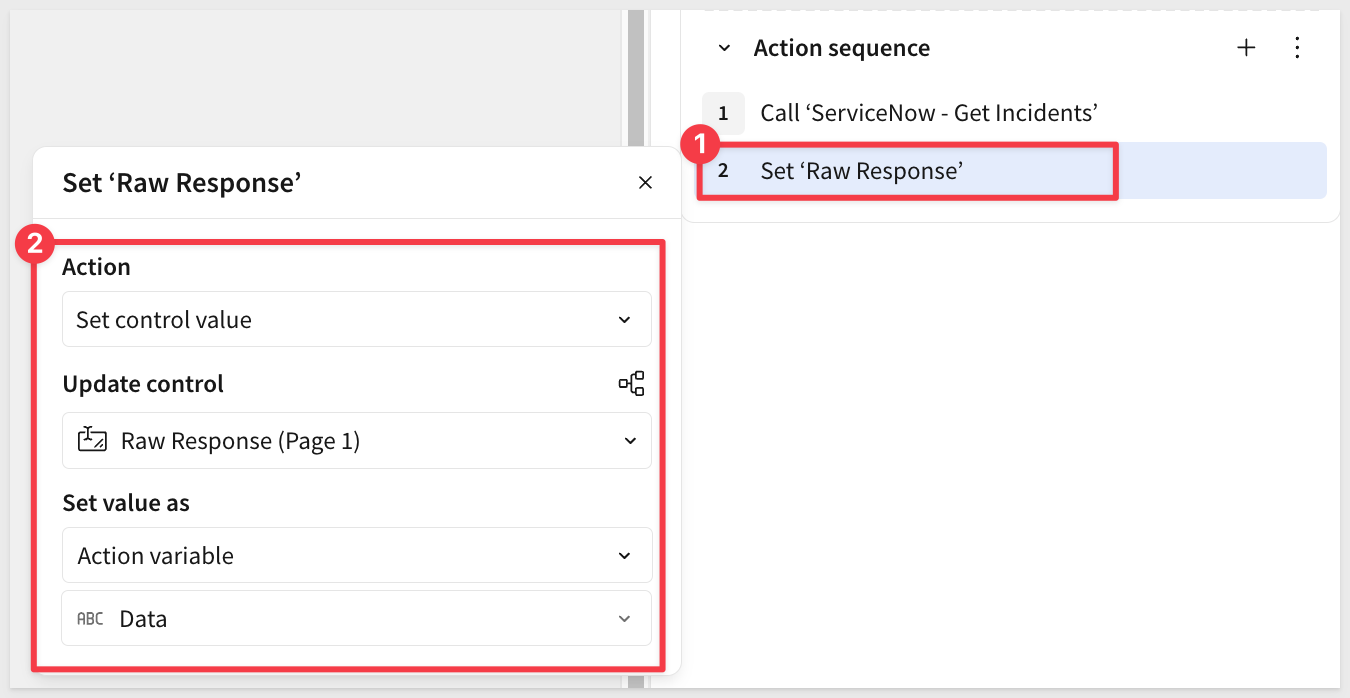
This stores the API response JSON in the text area control for parsing.
Step 6: Test the API Call
Click the Load ServiceNow Incidents button.
You should see the raw-response text area populate with JSON data from ServiceNow.
Parse JSON with Python
Now we'll use a Python element to transform the JSON response into a Sigma table.
Step 7: Add a Python Element
- Add a
Pythonelement using theElement bar>Data>Python. - Replace the default Python code with:
import pandas as pd
import json

# Fallback empty DataFrame with typed columns.
# Snowflake requires a defined schema even when there are no rows to display.
EMPTY = pd.DataFrame({
    "Number": pd.Series(dtype="str"), "Sys ID": pd.Series(dtype="str"),
    "Short Description": pd.Series(dtype="str"), "State": pd.Series(dtype="str"),
    "Priority": pd.Series(dtype="str"), "Urgency": pd.Series(dtype="str"),
    "Caller": pd.Series(dtype="str"), "Opened At": pd.Series(dtype="str"),
    "Closed At": pd.Series(dtype="str"), "Assigned To": pd.Series(dtype="str")
})

# ServiceNow returns numeric codes for State, Priority, and Urgency.
# These maps convert them to readable labels for display in the table.
STATE    = {"1":"New","2":"In Progress","3":"On Hold","6":"Resolved","7":"Closed","8":"Canceled"}
PRIORITY = {"1":"1 - Critical","2":"2 - High","3":"3 - Moderate","4":"4 - Low","5":"5 - Planning"}
URGENCY  = {"1":"1 - High","2":"2 - Medium","3":"3 - Low"}

# Read the raw JSON response stored in the workbook text area control.
raw = sigma.get_control_value("raw-response")

try:
    # Parse the JSON and extract the result array.
    # If the response is an error or not a list (e.g. a PATCH response), default to empty.
    incidents = json.loads(raw).get('result', [])
    if not isinstance(incidents, list):
        incidents = []

    rows = []
    for i in incidents:
        # ServiceNow returns reference fields (caller, assigned_to) as nested objects.
        # Extract the display_value when present, otherwise use the raw value.
        caller   = i.get('caller_id',   '')
        assigned = i.get('assigned_to', '')
        if isinstance(caller,   dict): caller   = caller.get('display_value',   '')
        if isinstance(assigned, dict): assigned = assigned.get('display_value', '')

        rows.append({
            'Number': i.get('number',''), 'Sys ID': i.get('sys_id',''),
            'Short Description': i.get('short_description',''),
            'State':    STATE.get(i.get('state',''),    i.get('state','')),
            'Priority': PRIORITY.get(i.get('priority',''), i.get('priority','')),
            'Urgency':  URGENCY.get(i.get('urgency',''),  i.get('urgency','')),
            'Caller': caller, 'Opened At': i.get('opened_at',''),
            'Closed At': i.get('closed_at',''), 'Assigned To': assigned
        })

    # Build the DataFrame, or return the typed empty schema if no incidents matched.
    df = pd.DataFrame(rows) if rows else EMPTY
except Exception:
    # Return empty on any parse error (missing raw value, API error response, etc.)
    df = EMPTY

# Output the DataFrame to Sigma as a named result set.
sigma.output("servicenow_incidents", df)
Step 8: Run the Python Element
Click Run (bottom right of the Python element).
You should see output indicating the Python executed successfully.
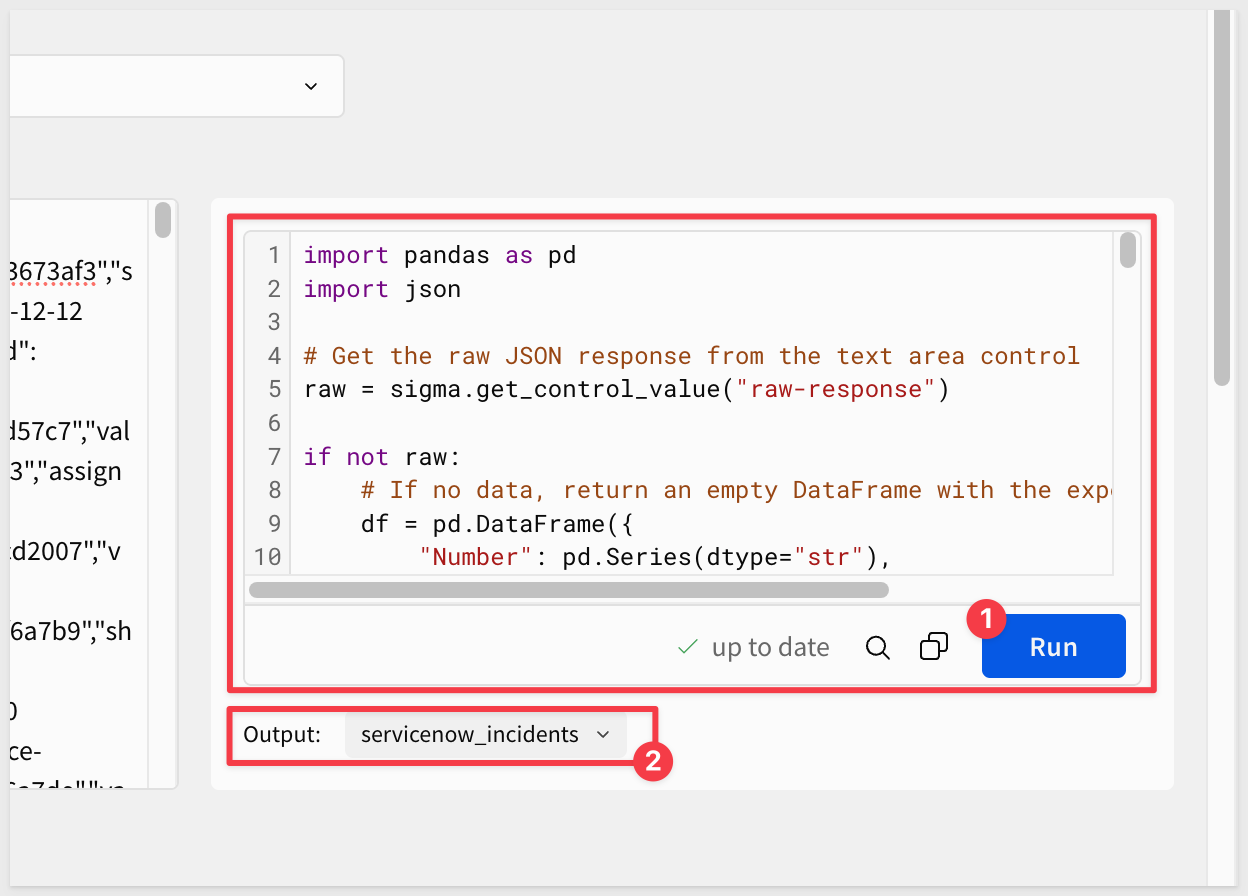
Step 10: Create a Table from Python Output
- Click on the Python element's output result
- Select
Create>Child Element>Table
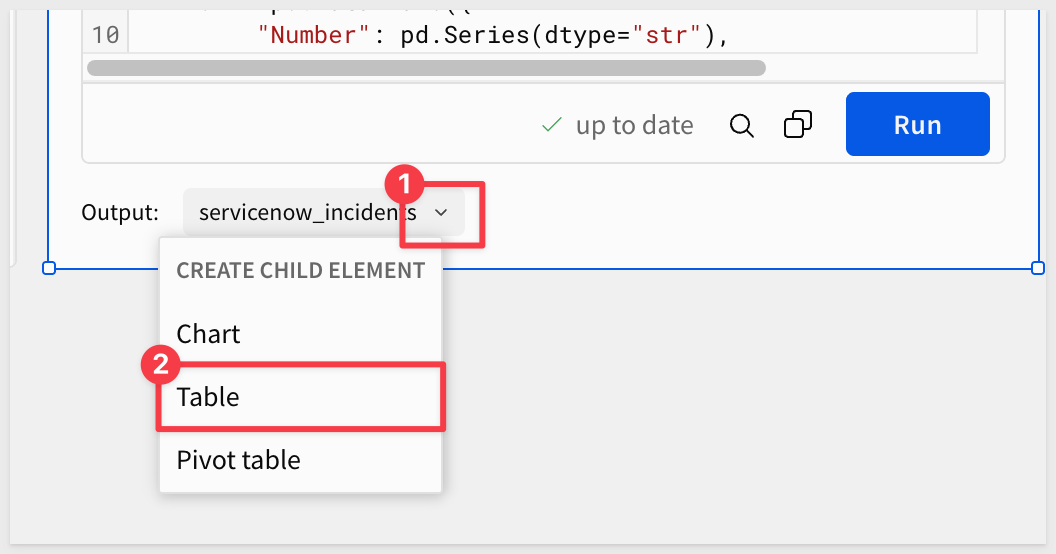
You should now see a table populated with ServiceNow incident data:
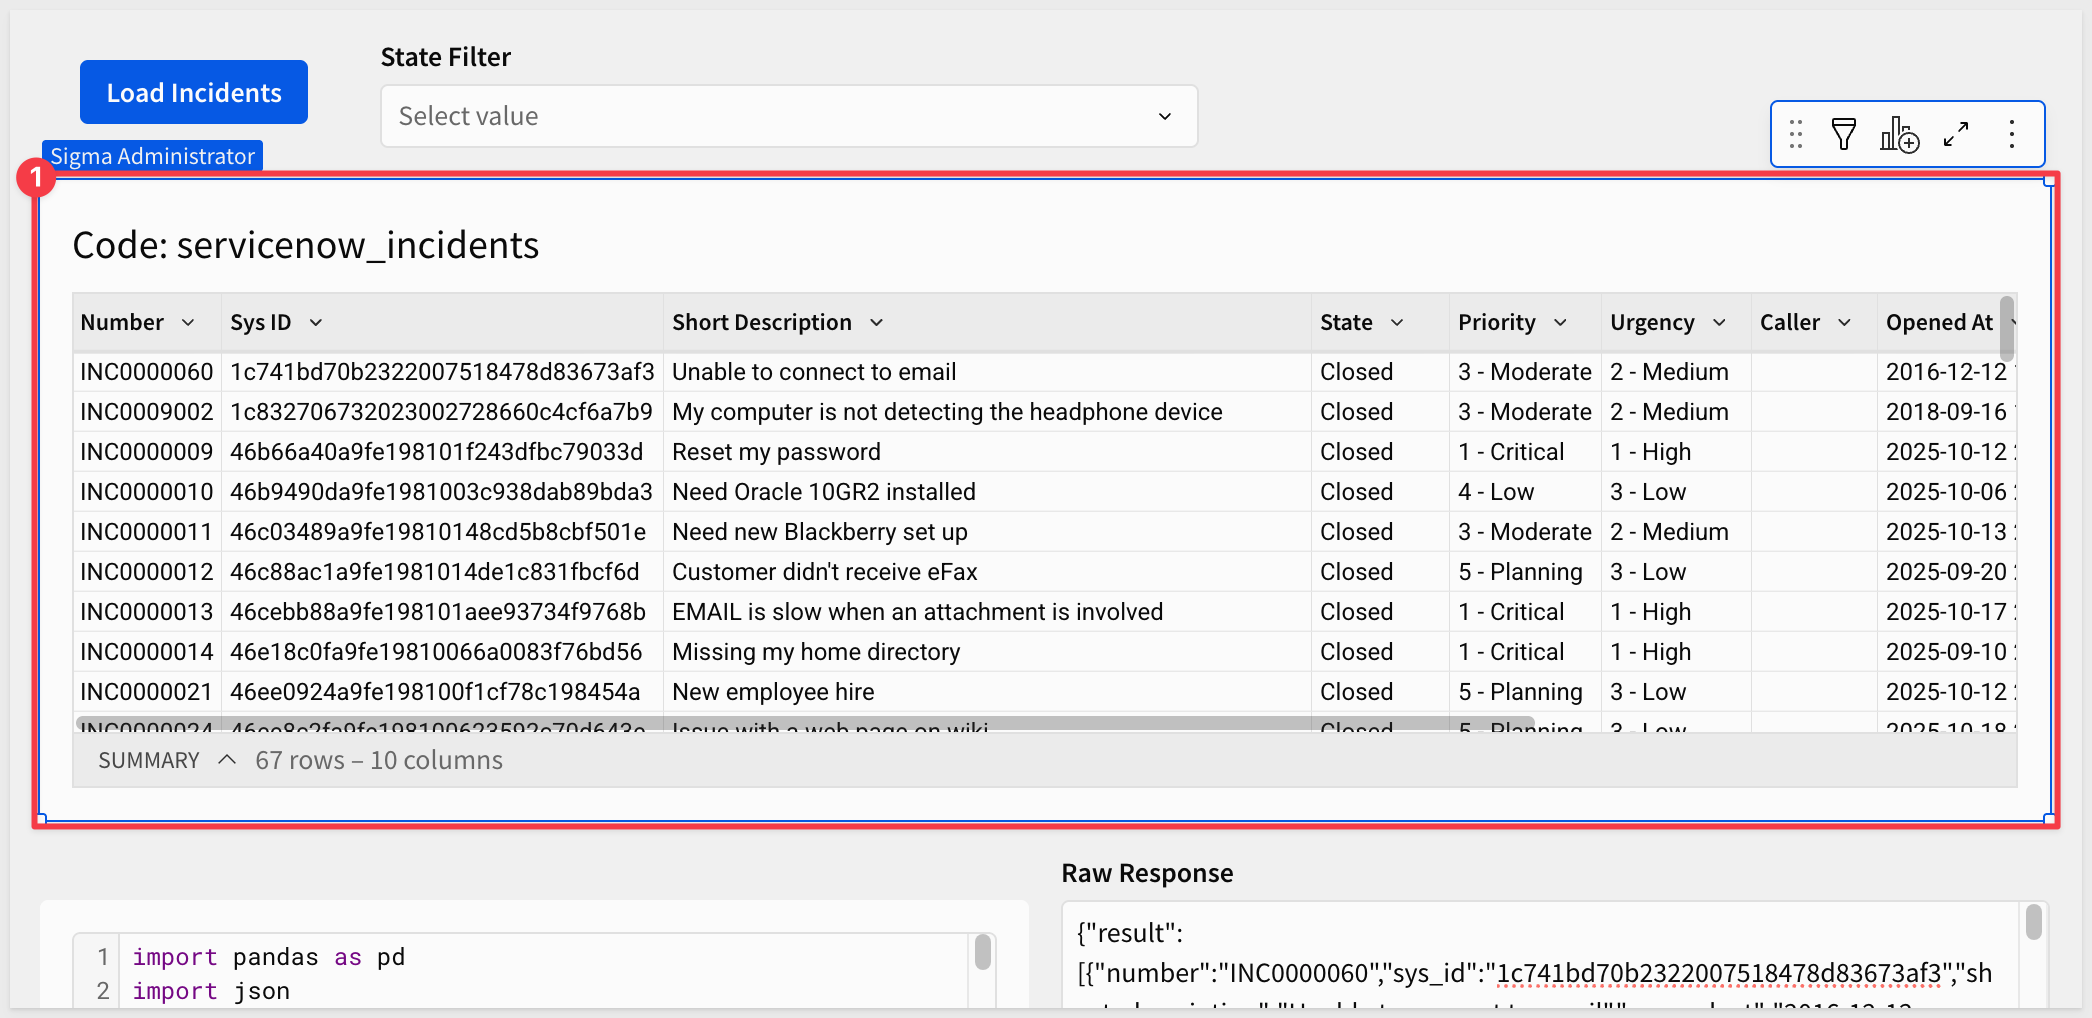
Rename the table: ServiceNow Incidents.
Now return to the state-filter control and complete step 4 from earlier — set the TARGETS to the ServiceNow Incidents table and the State column.
Step 11: Add Python Action to the Load Button
Now that the Python element exists, we need to go back to the Load ServiceNow Incidents button and add a third action to run it after the raw response is stored:
- Click the
Load ServiceNow Incidentsbutton to select it - In the
Actionspanel, click+to add a third action to the existing sequence - Choose
Run Python element>Code (ServiceNow Incidents)
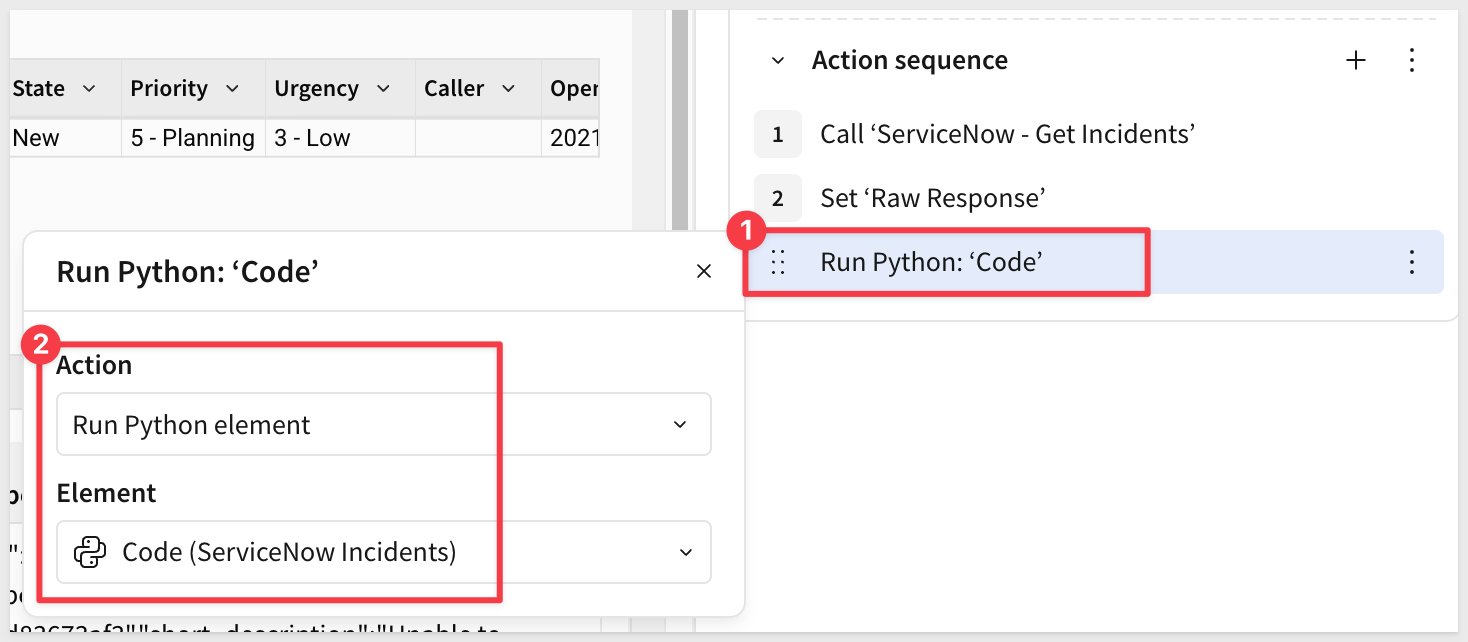
The button now has three actions in sequence: (1) Call the ServiceNow API, (2) Store the response in raw-response, (3) Run the Python element to parse and display the data.
Step 12: Test the State Filter
Click Load ServiceNow Incidents to load all incidents, then select a value from the State filter (e.g., In Progress).
The table should immediately filter to show only incidents matching the selected state. Use the x on the control to clear the filter and return to all incidents.
We now have:
- A working read workflow that queries ServiceNow incidents
- Dynamic state filtering driven by a workbook control
- JSON parsing that handles ServiceNow's nested response structure
- A table displaying incident data with readable field values
- Real-time data refresh on button click
Now we'll add the ability to update incident states in ServiceNow directly from Sigma. This demonstrates bidirectional integration—not just reading data, but writing changes back to the source system.
Create the Update Incident API Connector
Step 1: Create a New API Connector
Navigate to Administration > API Connectors and click Create Connector.
Step 2: Configure the Update Connector
- Name:
ServiceNow - Update Incident - Description:
Update Incident State - Authentication credential: Select
ServiceNow Basic Auth - HTTP Method and Base URL:
PATCHhttps://devXXXXXX.service-now.com/api/now/table/incident/:sys_id- Replace
devXXXXXXwith your instance number - The
:sys_idis a path parameter that will be replaced at runtime
Step 3: Configure Path Parameter
Because the Base URL includes :sys_id, Sigma automatically creates the sys_id path parameter. You just need to change its mode:
In the Path Parameters section, find the auto-generated sys_id row and set the Mode to Dynamic:
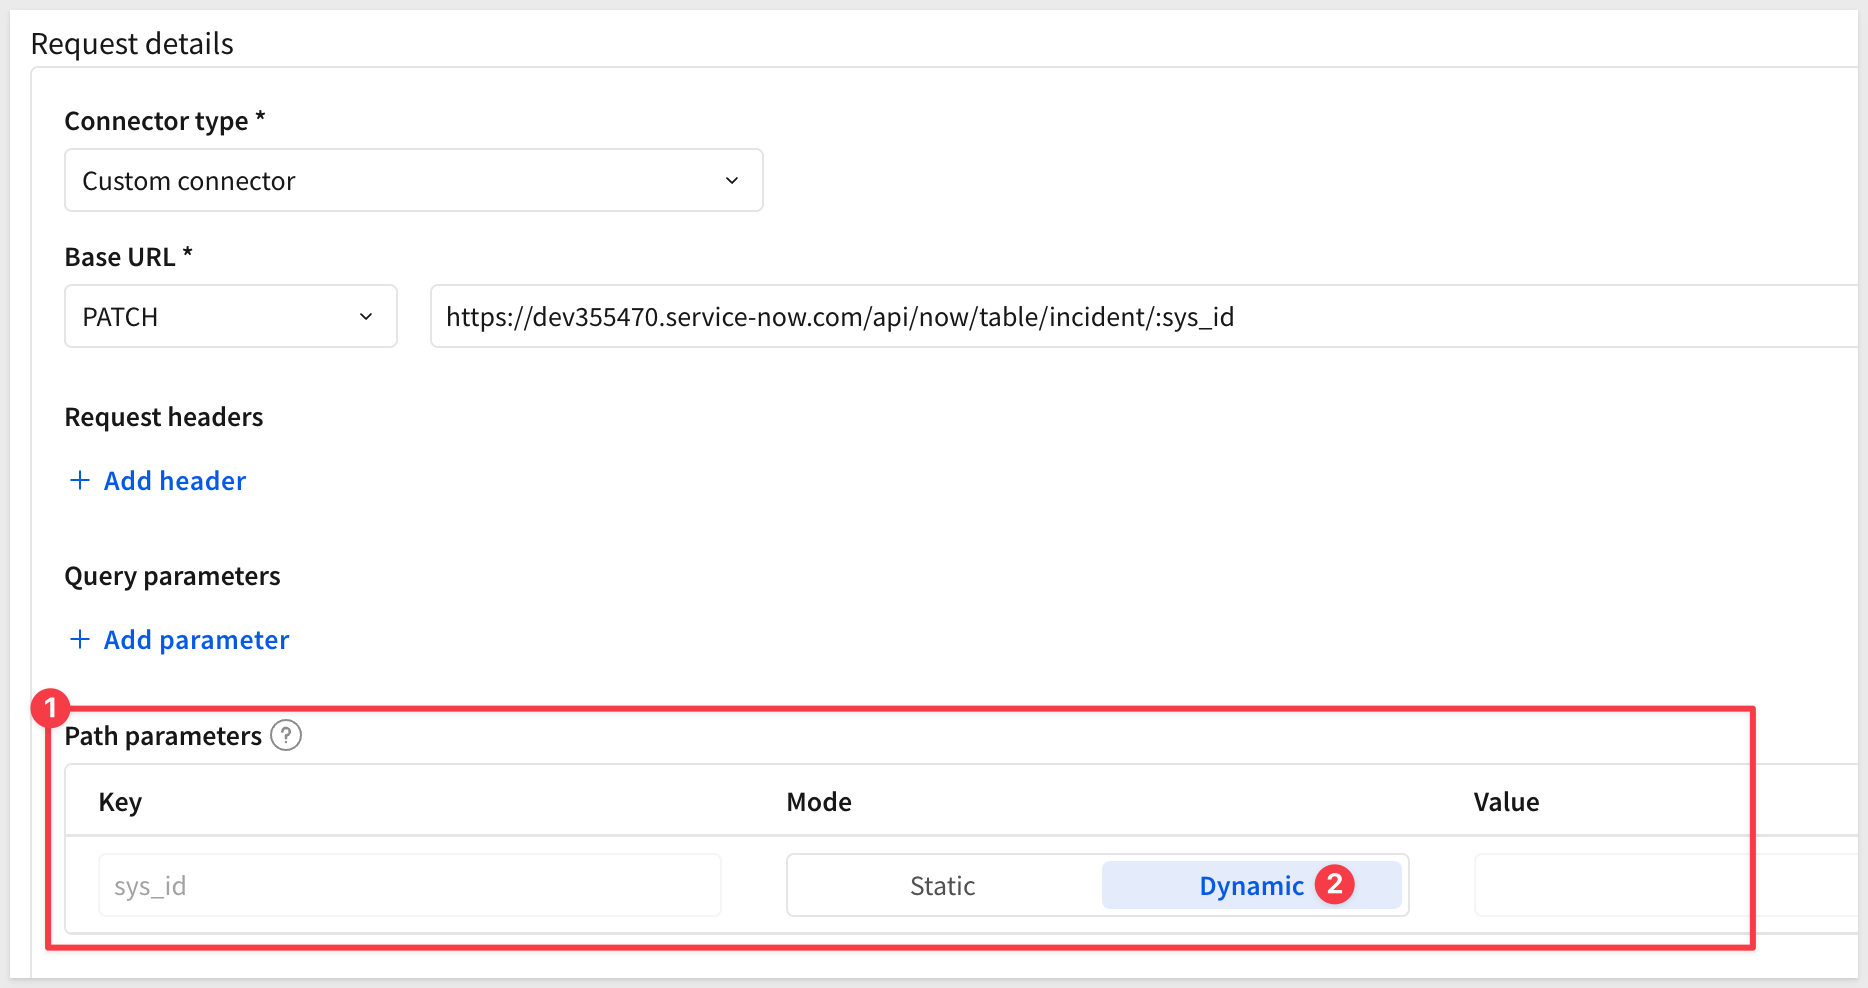
The sys_id value will be passed at runtime from the workbook action.
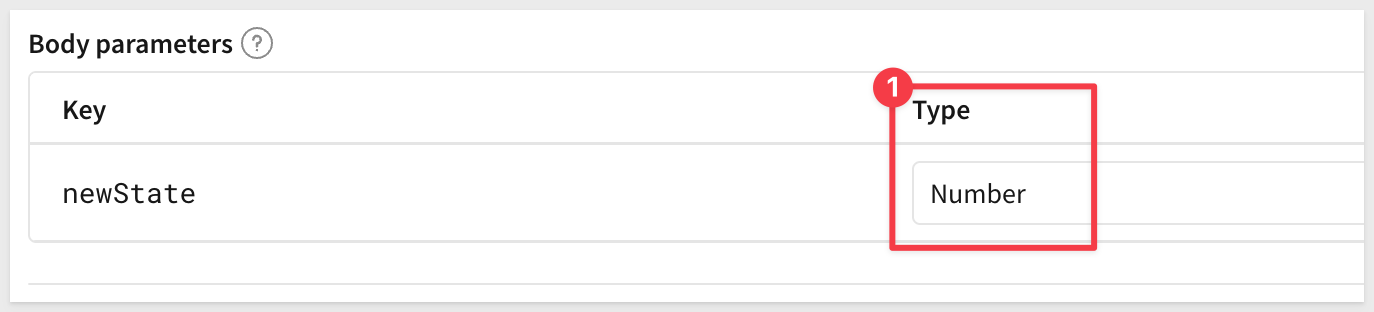
Step 4: Configure Request Body
In the Body parameters section:
- Content Type:
JSON - Body Template:
{
  "state": {{newState}}
}

Step 5: Define Body Variables
In the Body Variables section set the variable newState to use Number type.
Save the new connector.
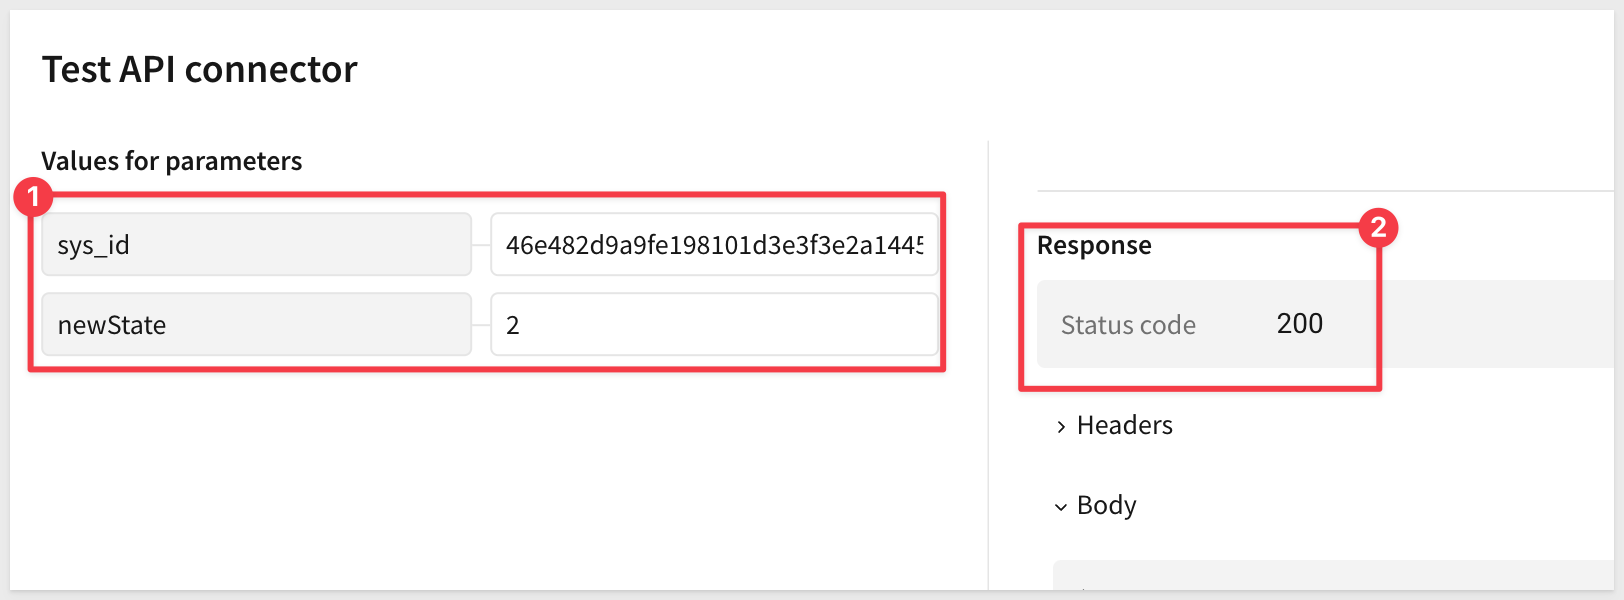
Step 6: Test the Update Connector
Return to the ServiceNow Incidents table and copy a Sys ID value from one of the records that has a State of On Hold. We will use this as a test record, taking the incident from On Hold to In Progress.
With the Sys ID copied return to the ServiceNow - Update Incident API connector.
In the Test section:
- Click the
Editbutton - Click the
Test connectorlink - Set
sysIdto a real sys_id from your table (copy one from the Sys ID column) - Set
newStateto:2(In Progress) - Click
Test
You should see a successful response with the updated incident data.
Save the connector.
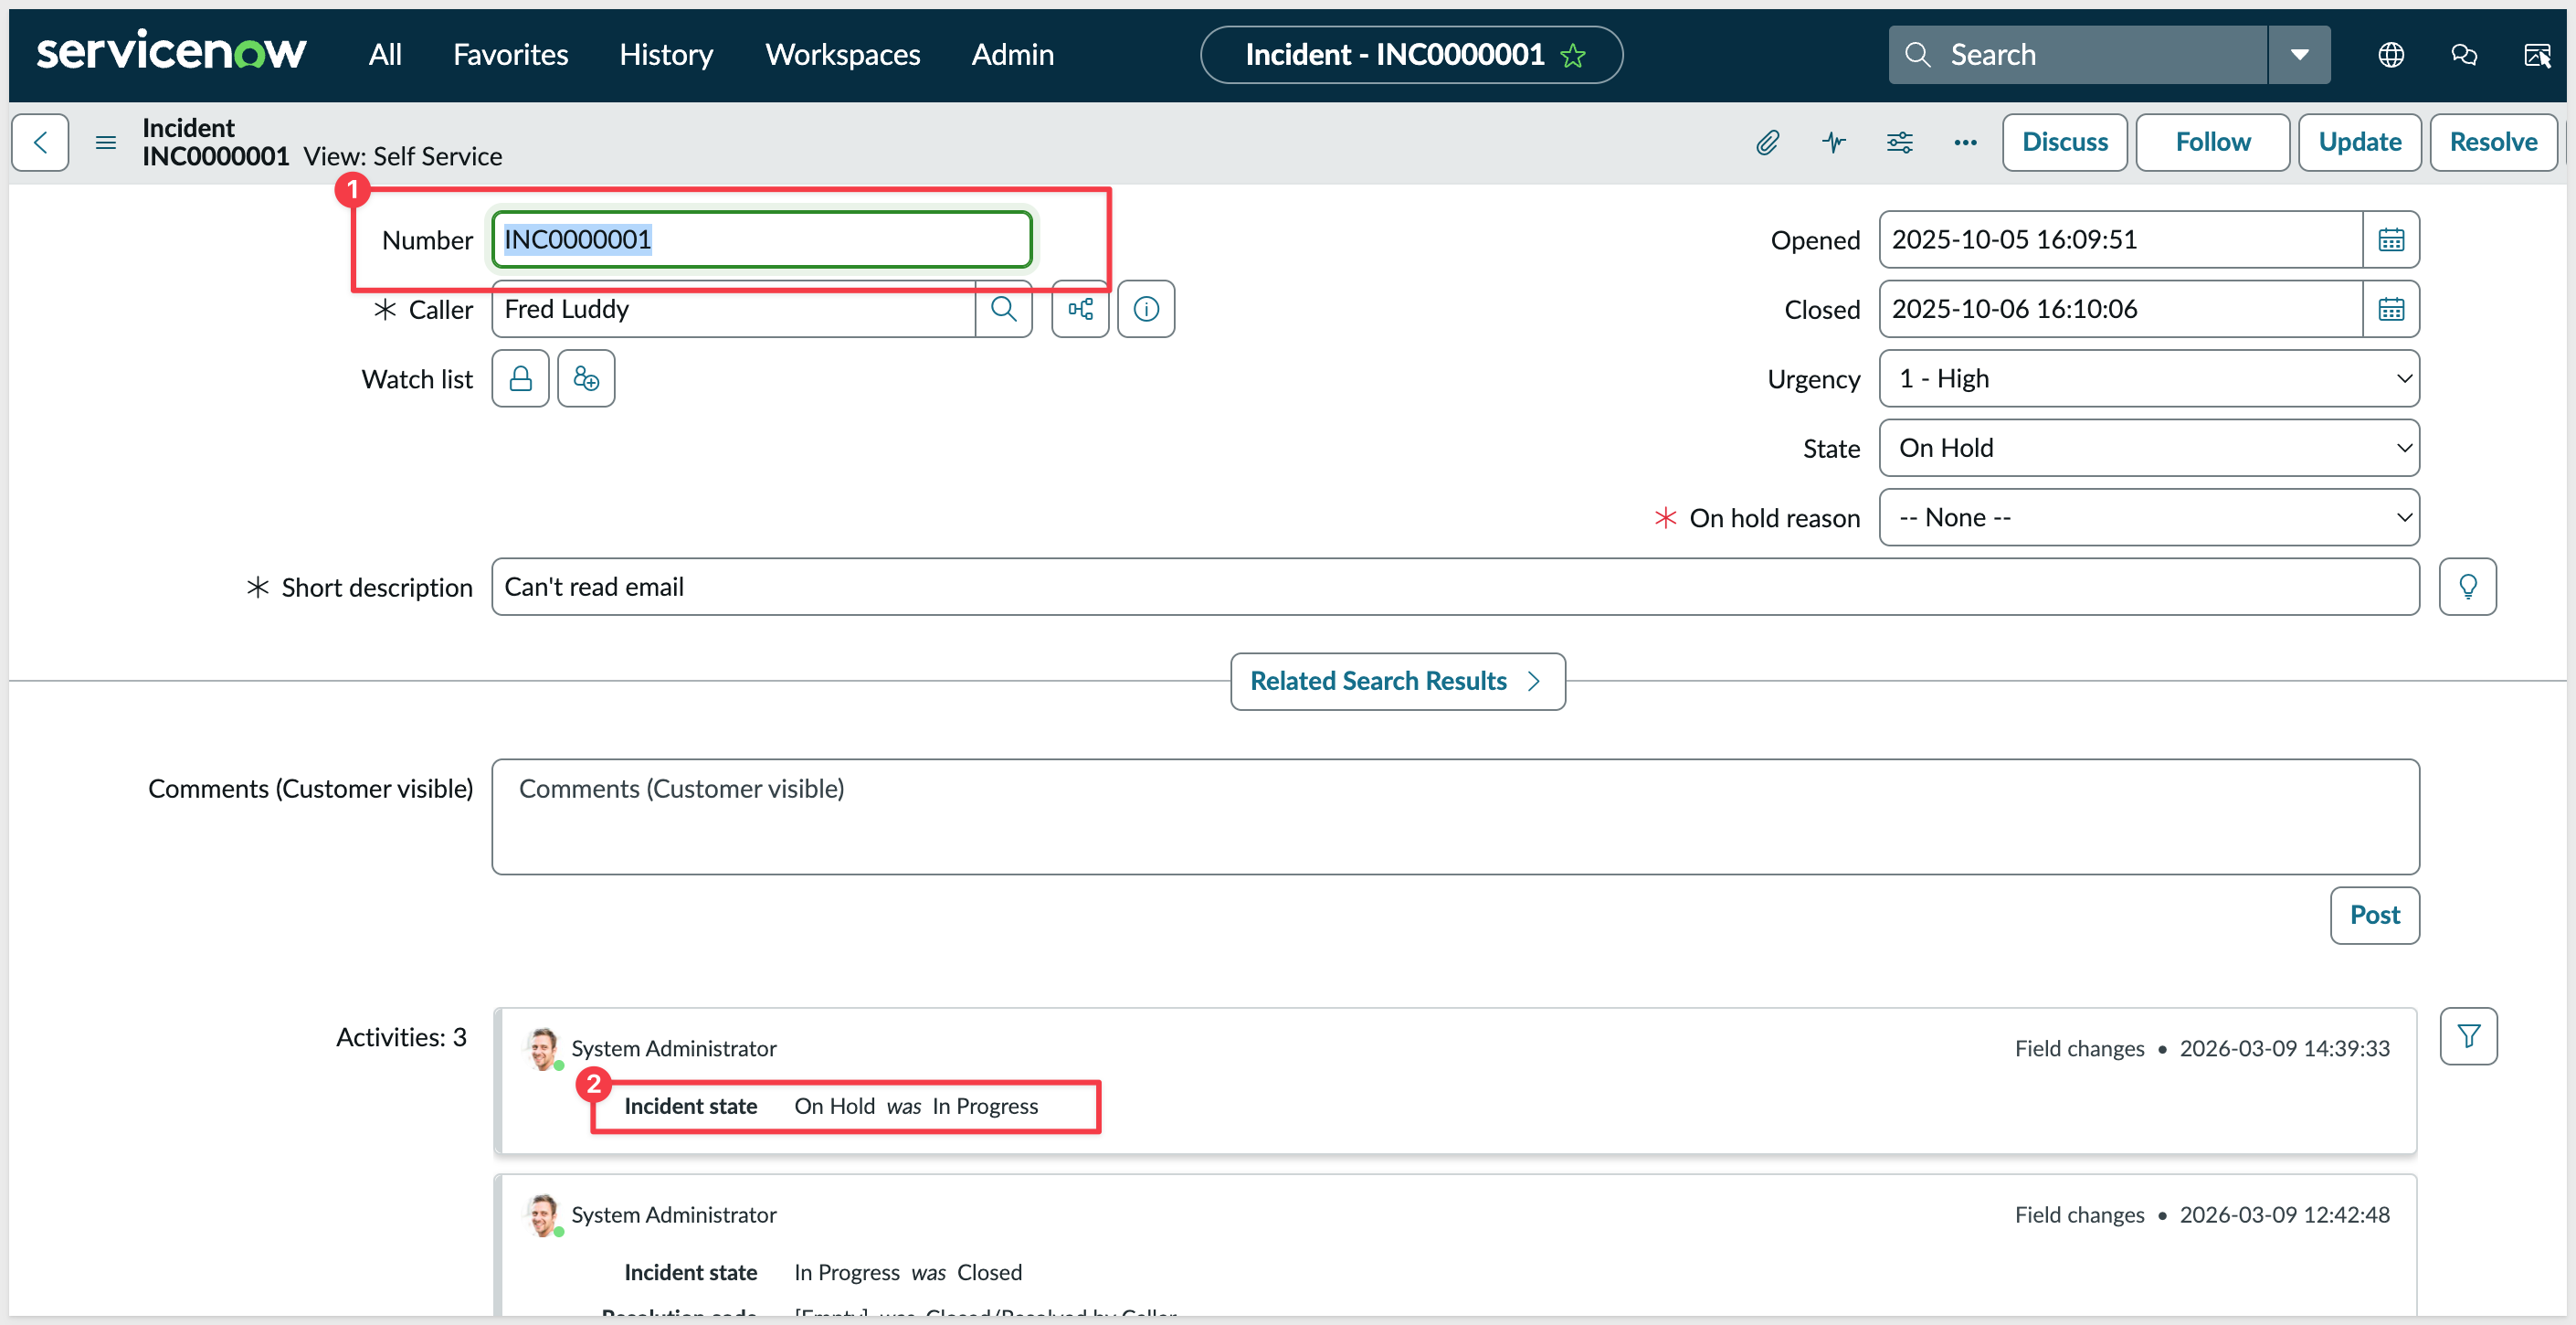
We can verify that the state change was successful in ServiceNow as well by looking at the Activities section for the Incident Number tested:
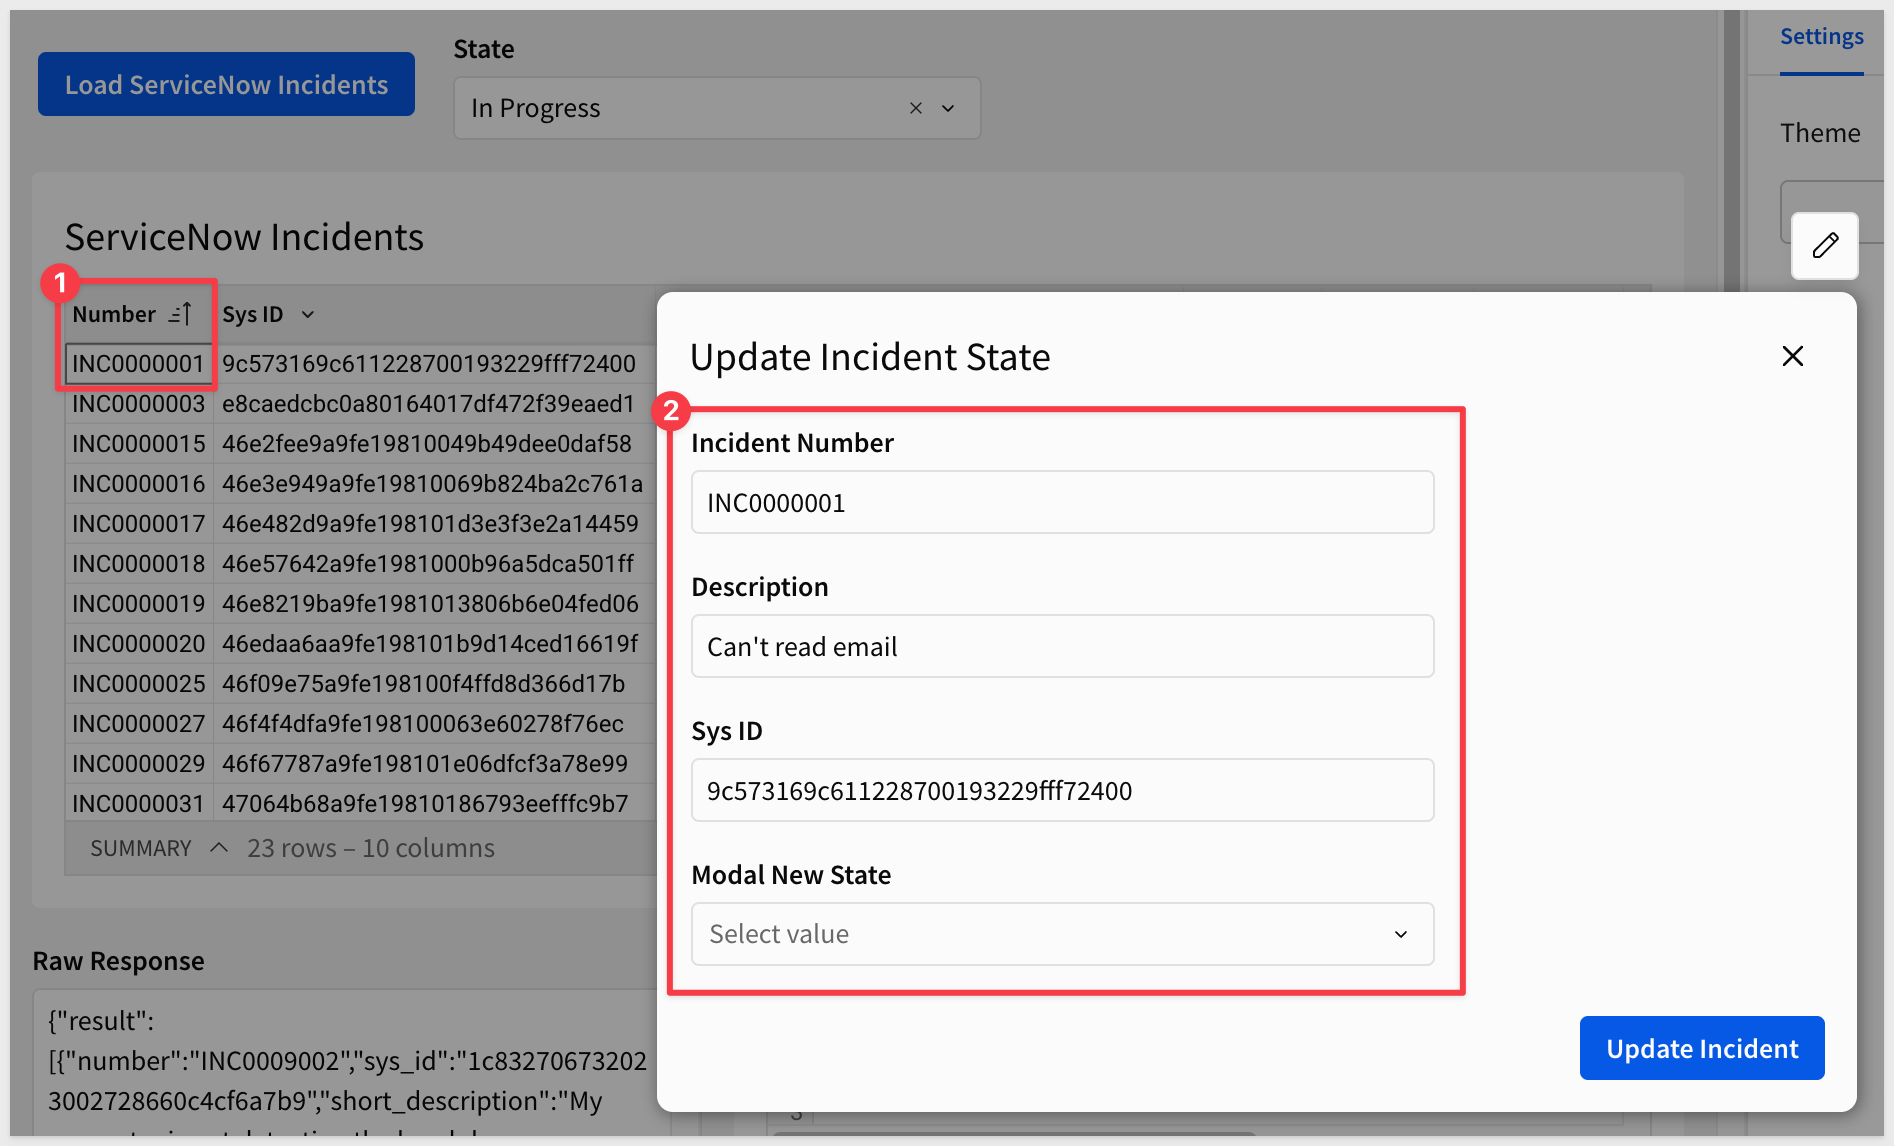
Now we'll add UI elements to allow users to select an incident and update its state.
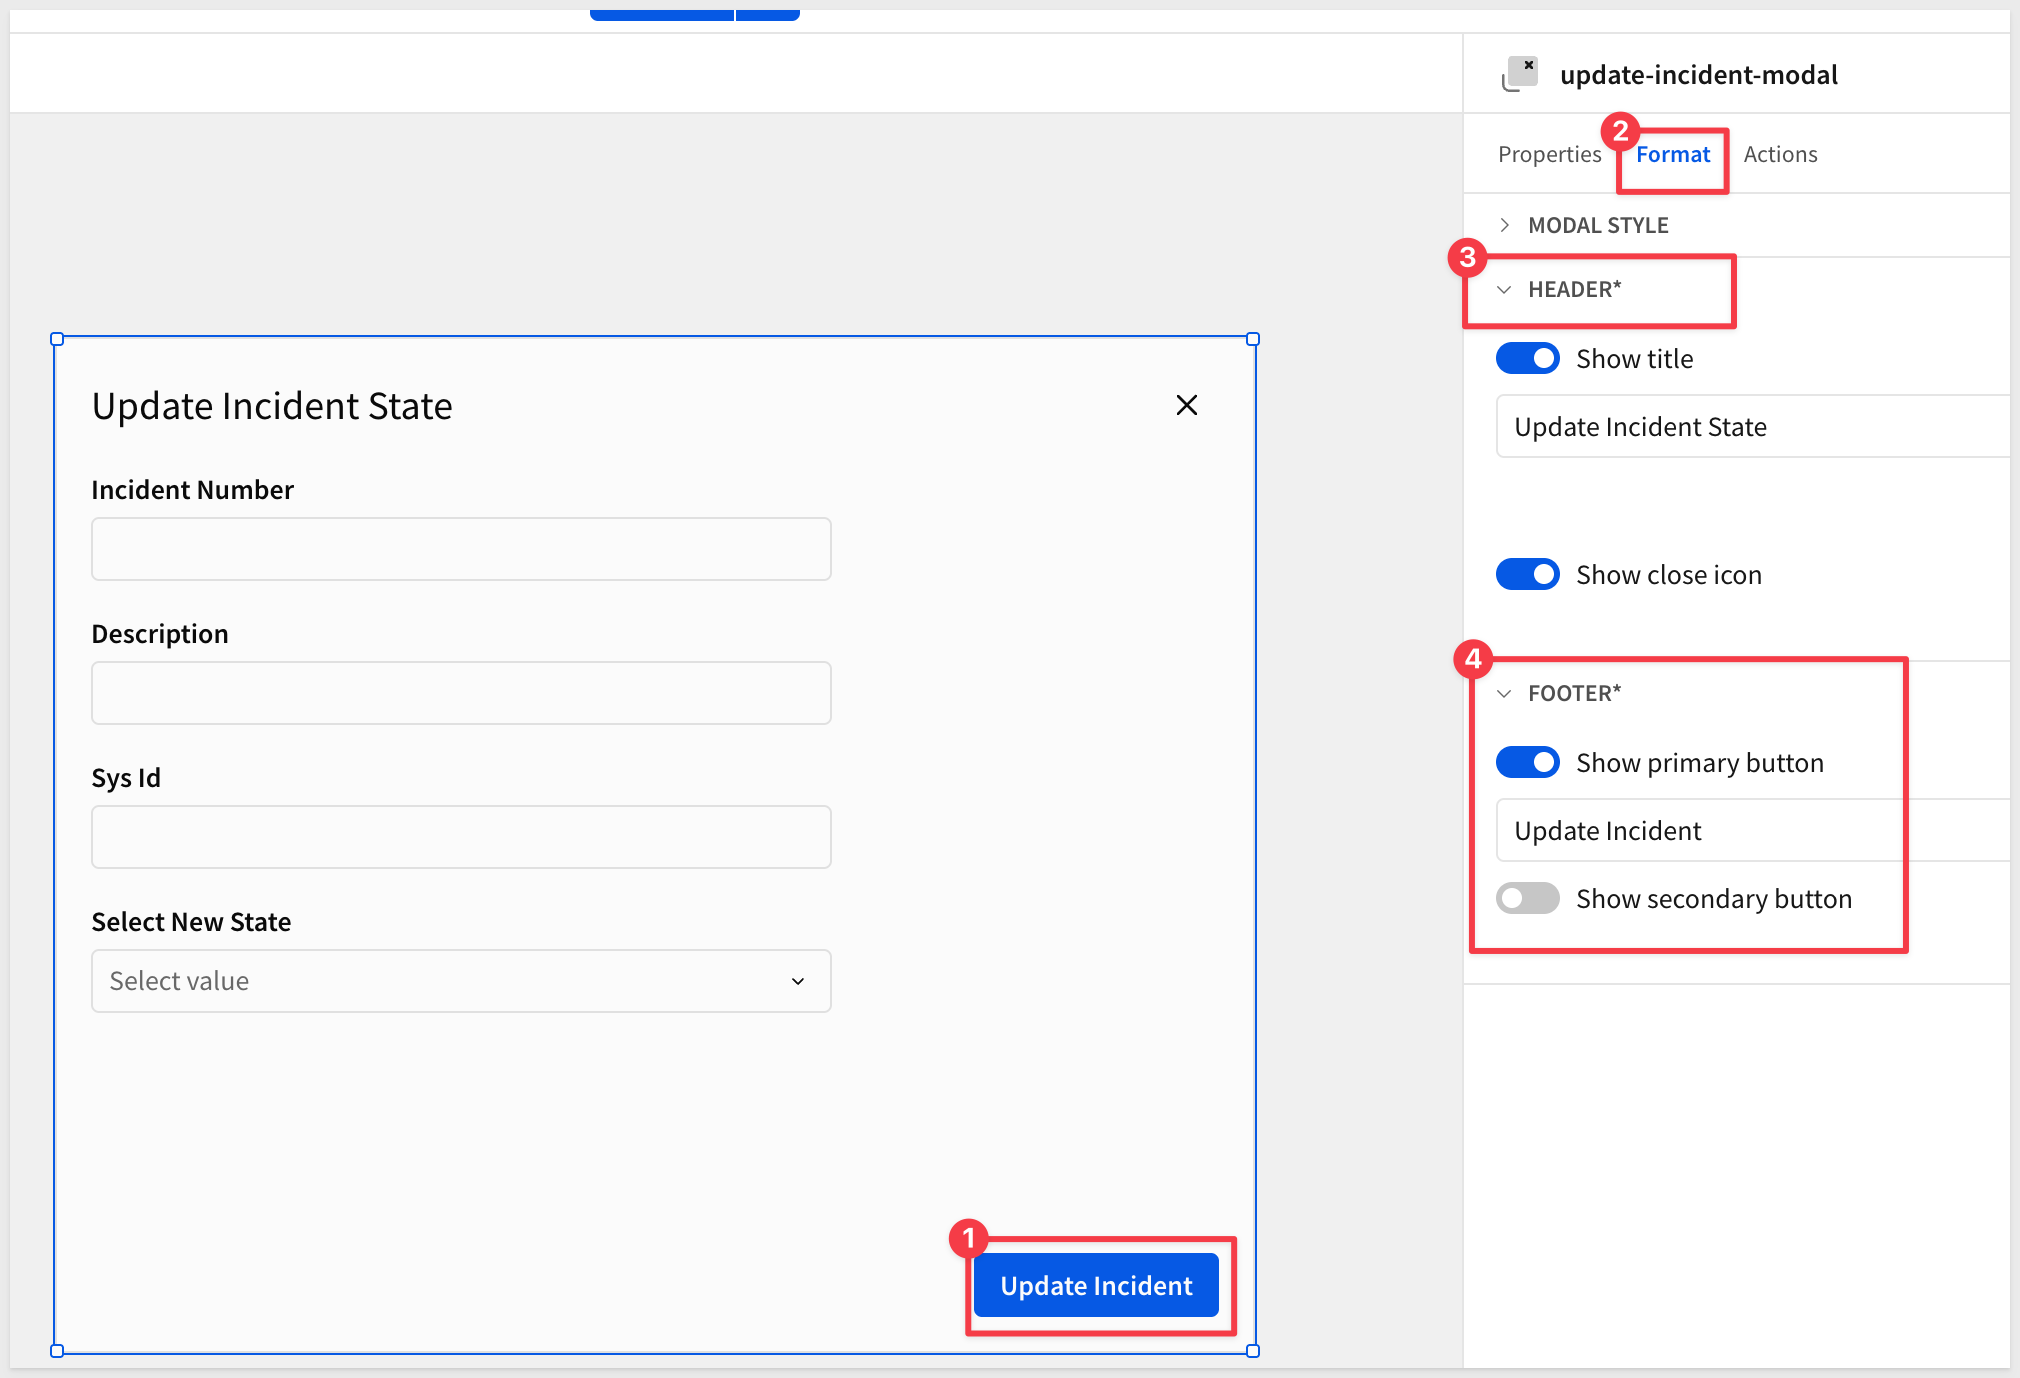
We'll use a modal to show a popup when users click an incident:
- In the lower left corner of the workbook, click the
+and selectAdd modal:
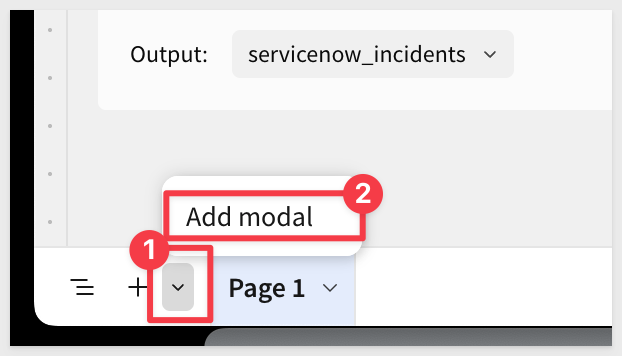
- Rename the modal:
update-incident-modal - Set the modal title:
Update Incident State
Might as well rename Page 1 to ServiceNow Incidents.
Inside the modal, add these controls:
Control 1: Incident Number
- Type:
Controls>Text input - Control ID:
modal-incident-number - Label:
Incident Number
Control 2: Current Description
- Type:
Controls>Text input - Control ID:
modal-description - Label:
Description
Control 3: Sys ID
- Type:
Controls>Text input - Control ID:
modal-sys-id - Label:
Sys ID
Control 4: New State
- Type:
Controls>List values - Control ID:
modal-new-state - Label:
Select New State
Display Value | Actual Value |
In Progress | 2 |
On Hold | 3 |
Resolved | 6 |
Closed | 7 |
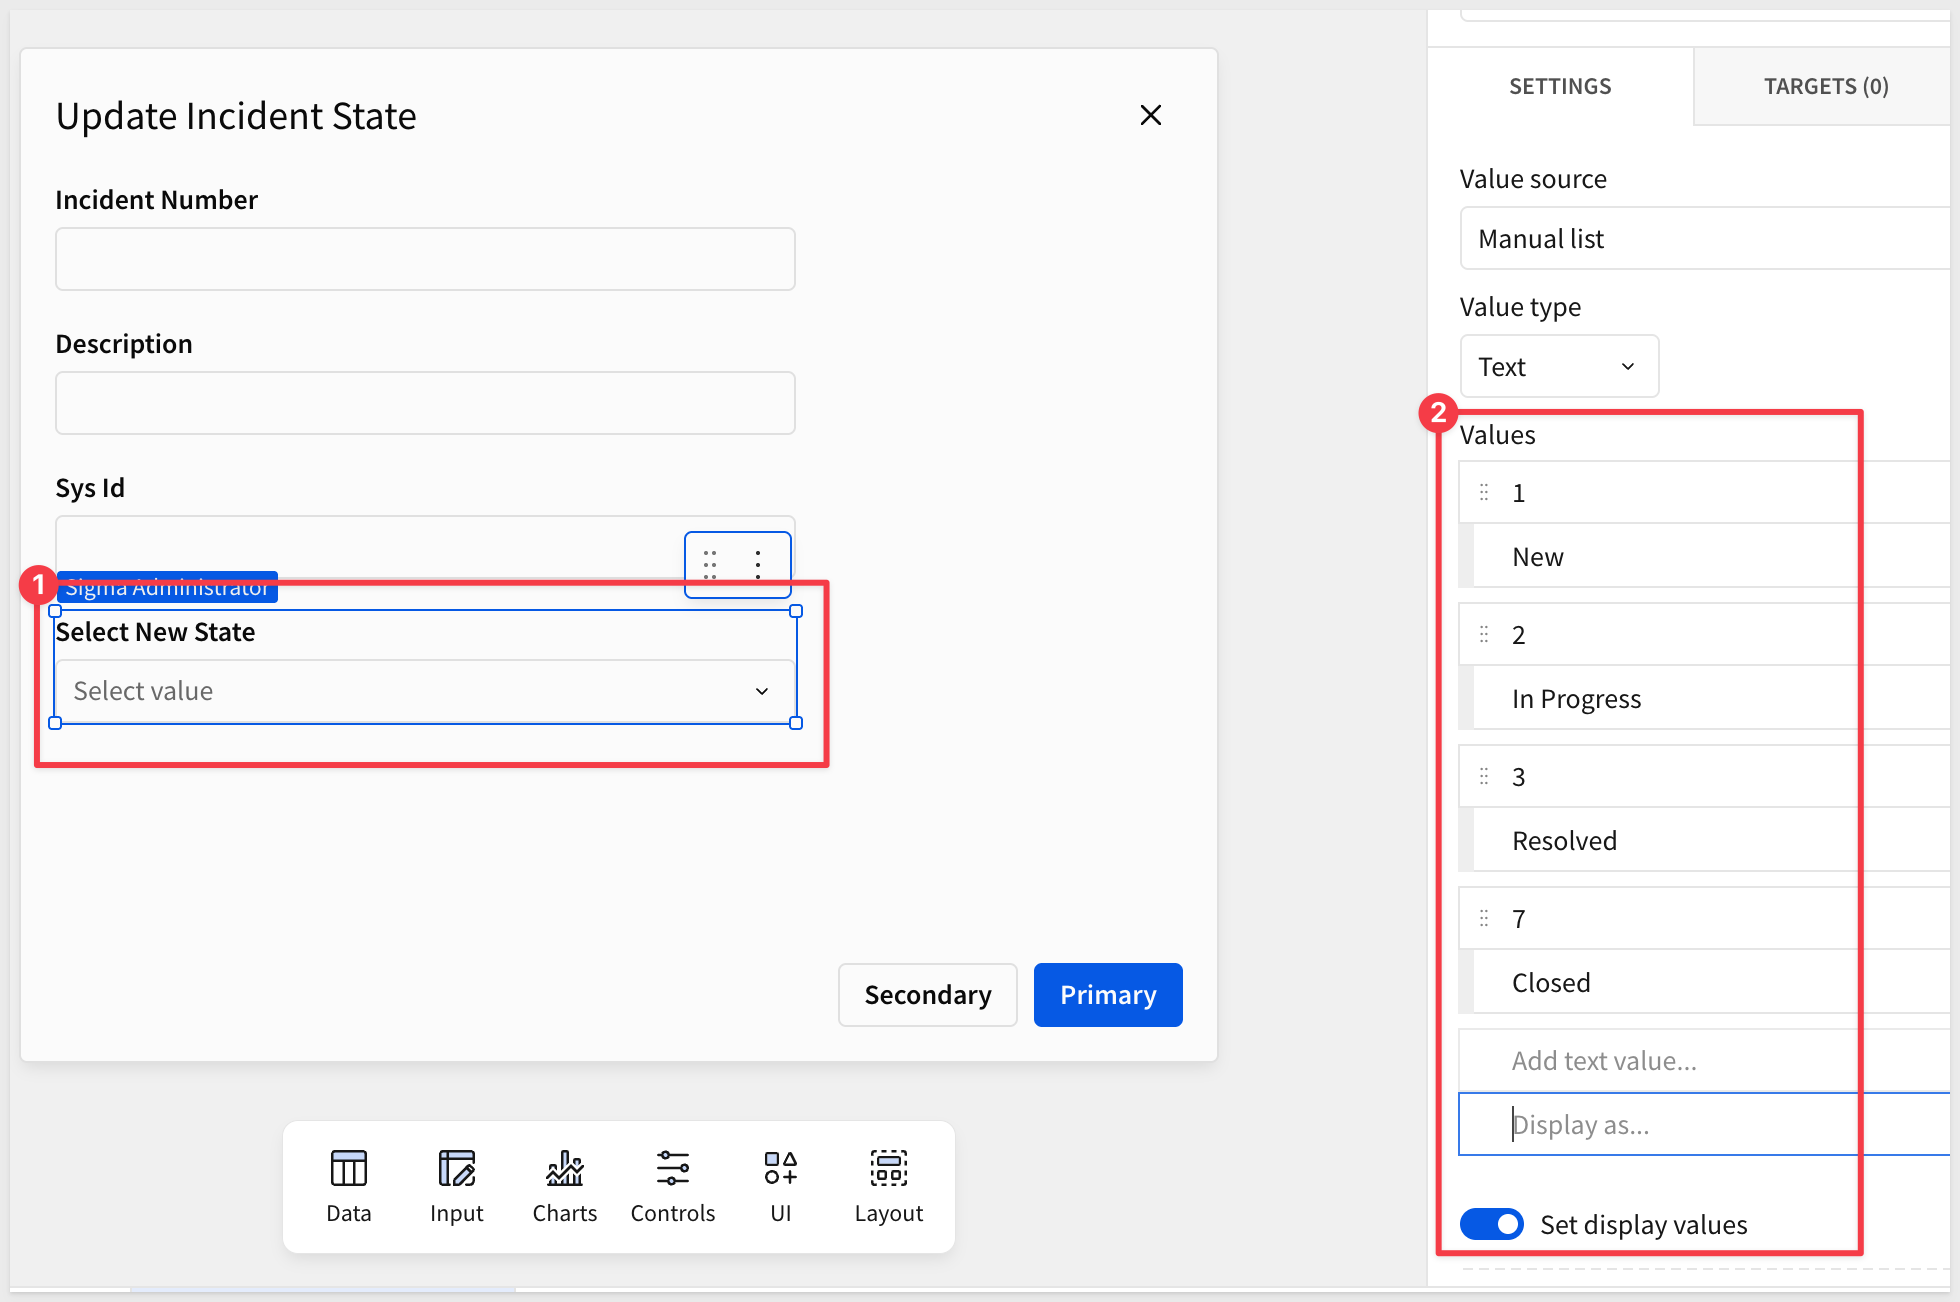
Be sure to disable the Allow multiple selection checkbox under the list select control. The API expects a single value for State:
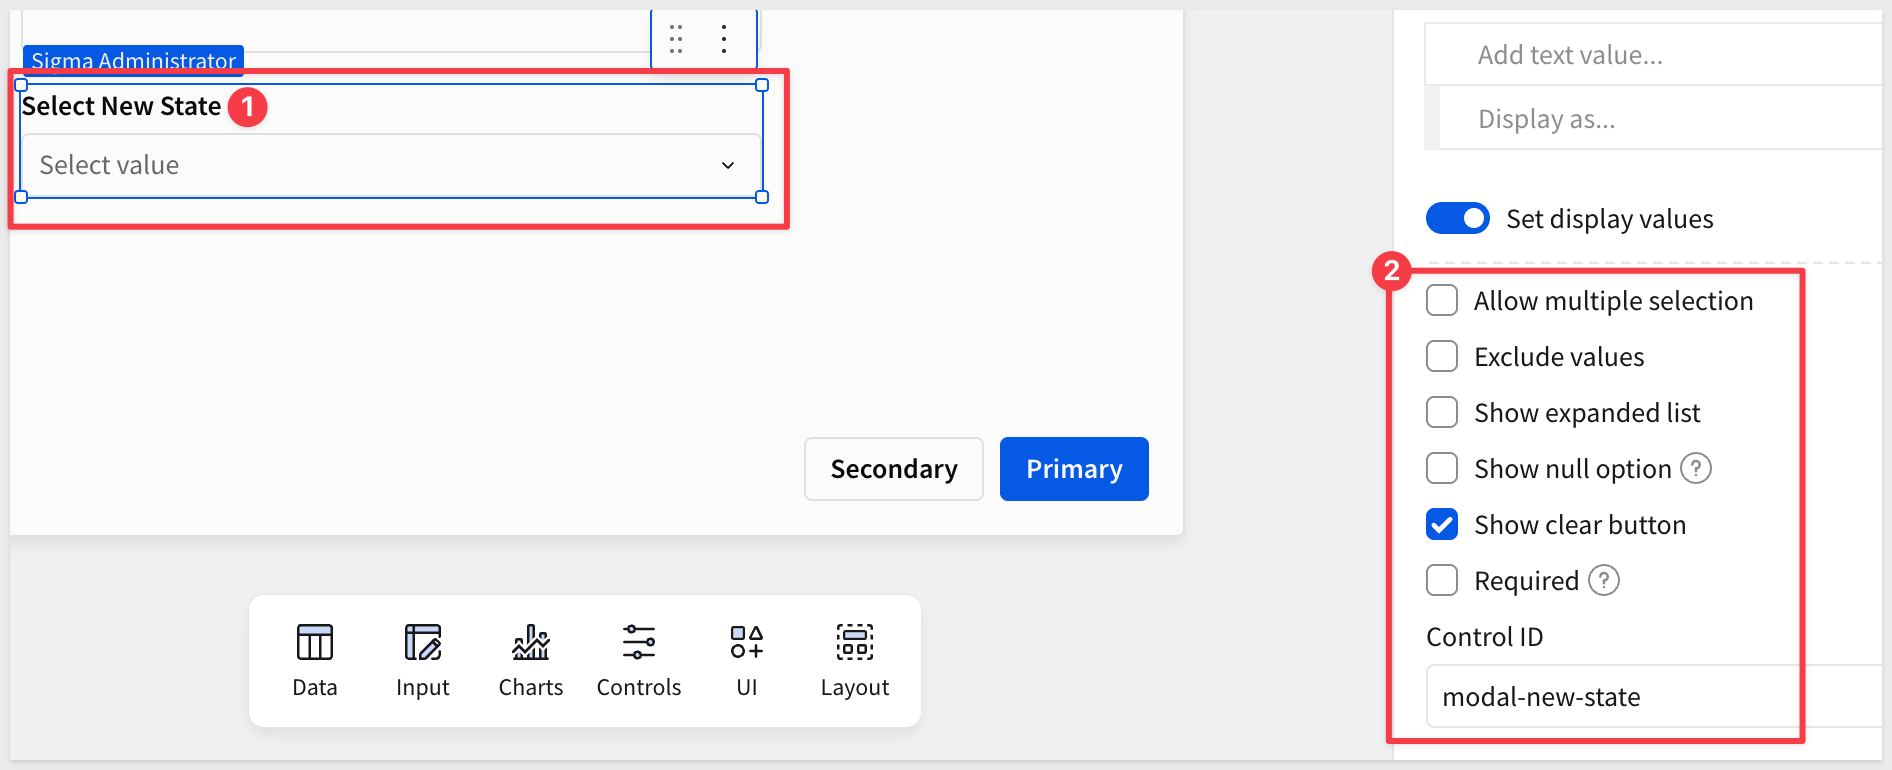
Control 5: Button - Submit Update
We can just configure one of the default buttons instead of adding a new one. Let's configure Primary for this; click that button and set the label to Update Incident.
Also disable the Secondary button since we won't need that:
Now we can configure the ServiceNow Incidents table to open the modal when a row is clicked.
Return to the ServiceNow Incidents page.
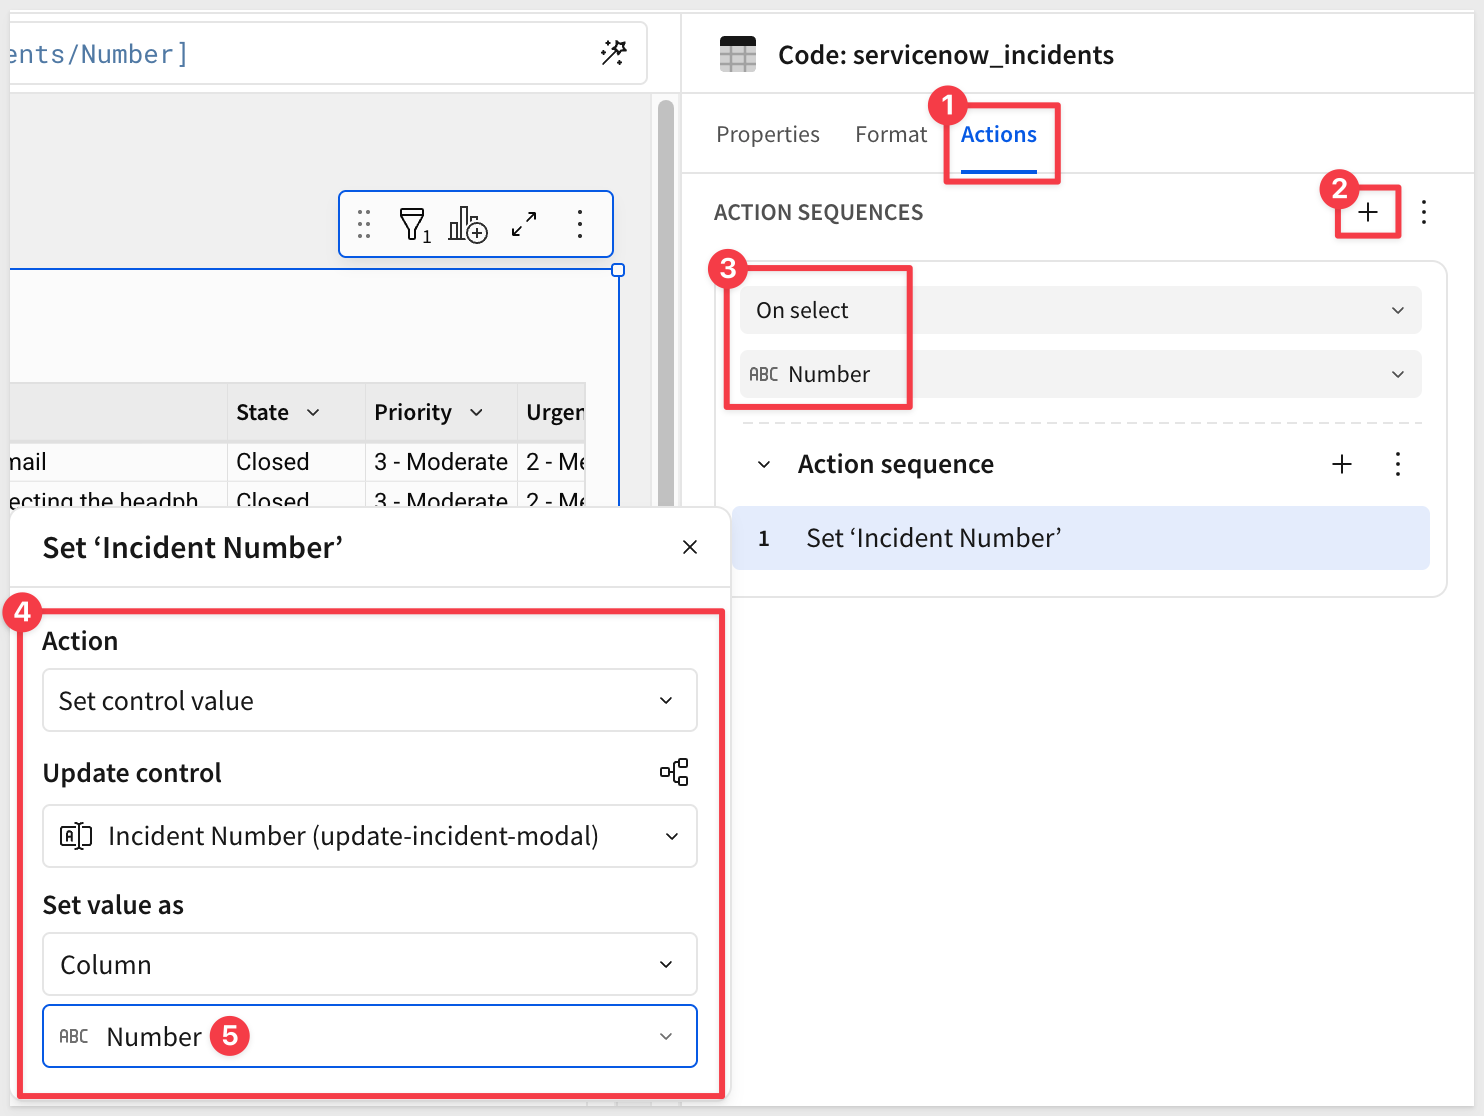
We will configure an action on the Number column so that when a user clicks a specific incident number, the modal will open and allow them to set a new State.
- Click the header of the
Numbercolumn to select it - Click
Actions>Add sequence>+ - Choose
Set Control Value
Set these control values:
Update control=Incident Number (update-incident-modal)Set value as=Column/Number
This sends the selected Number to the modal and is shown on the modal-incident-number text input control.
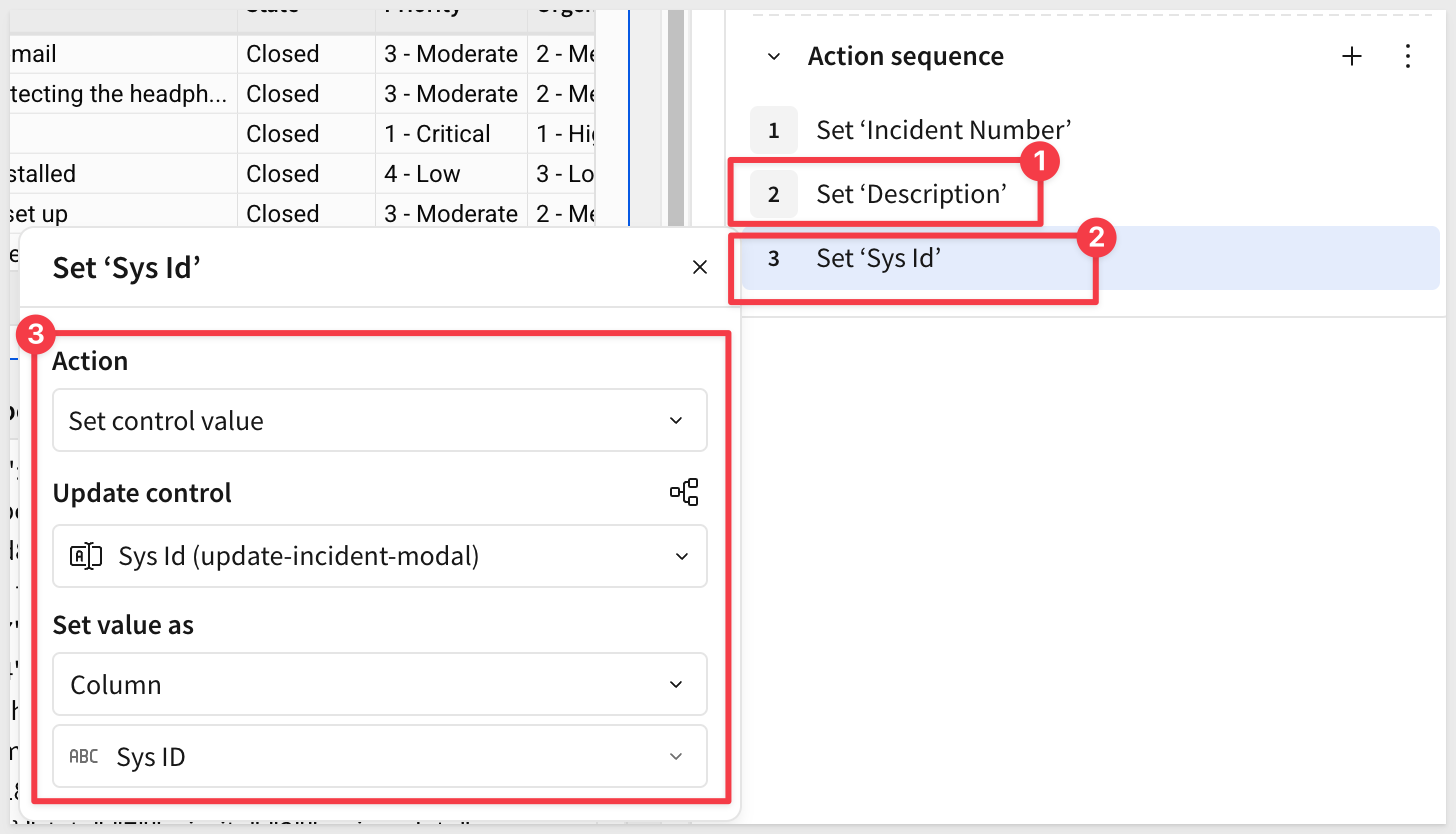
Repeat the process for the other values we want to pass to the modal.
For example, the action configurations needed are for Description and Sys ID:
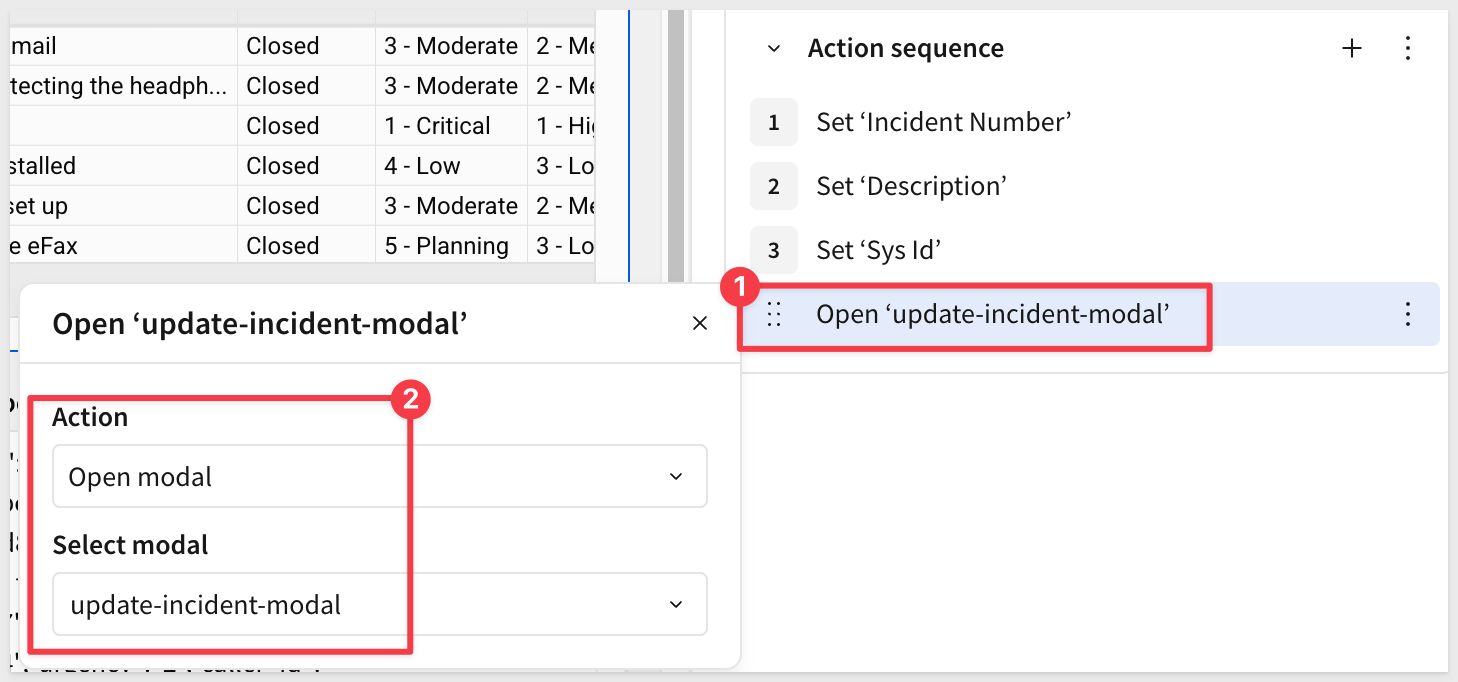
Add a fourth action to open the update-incident-modal:
Configure modal to apply the change in incident state
Open the update-incident-modal page.
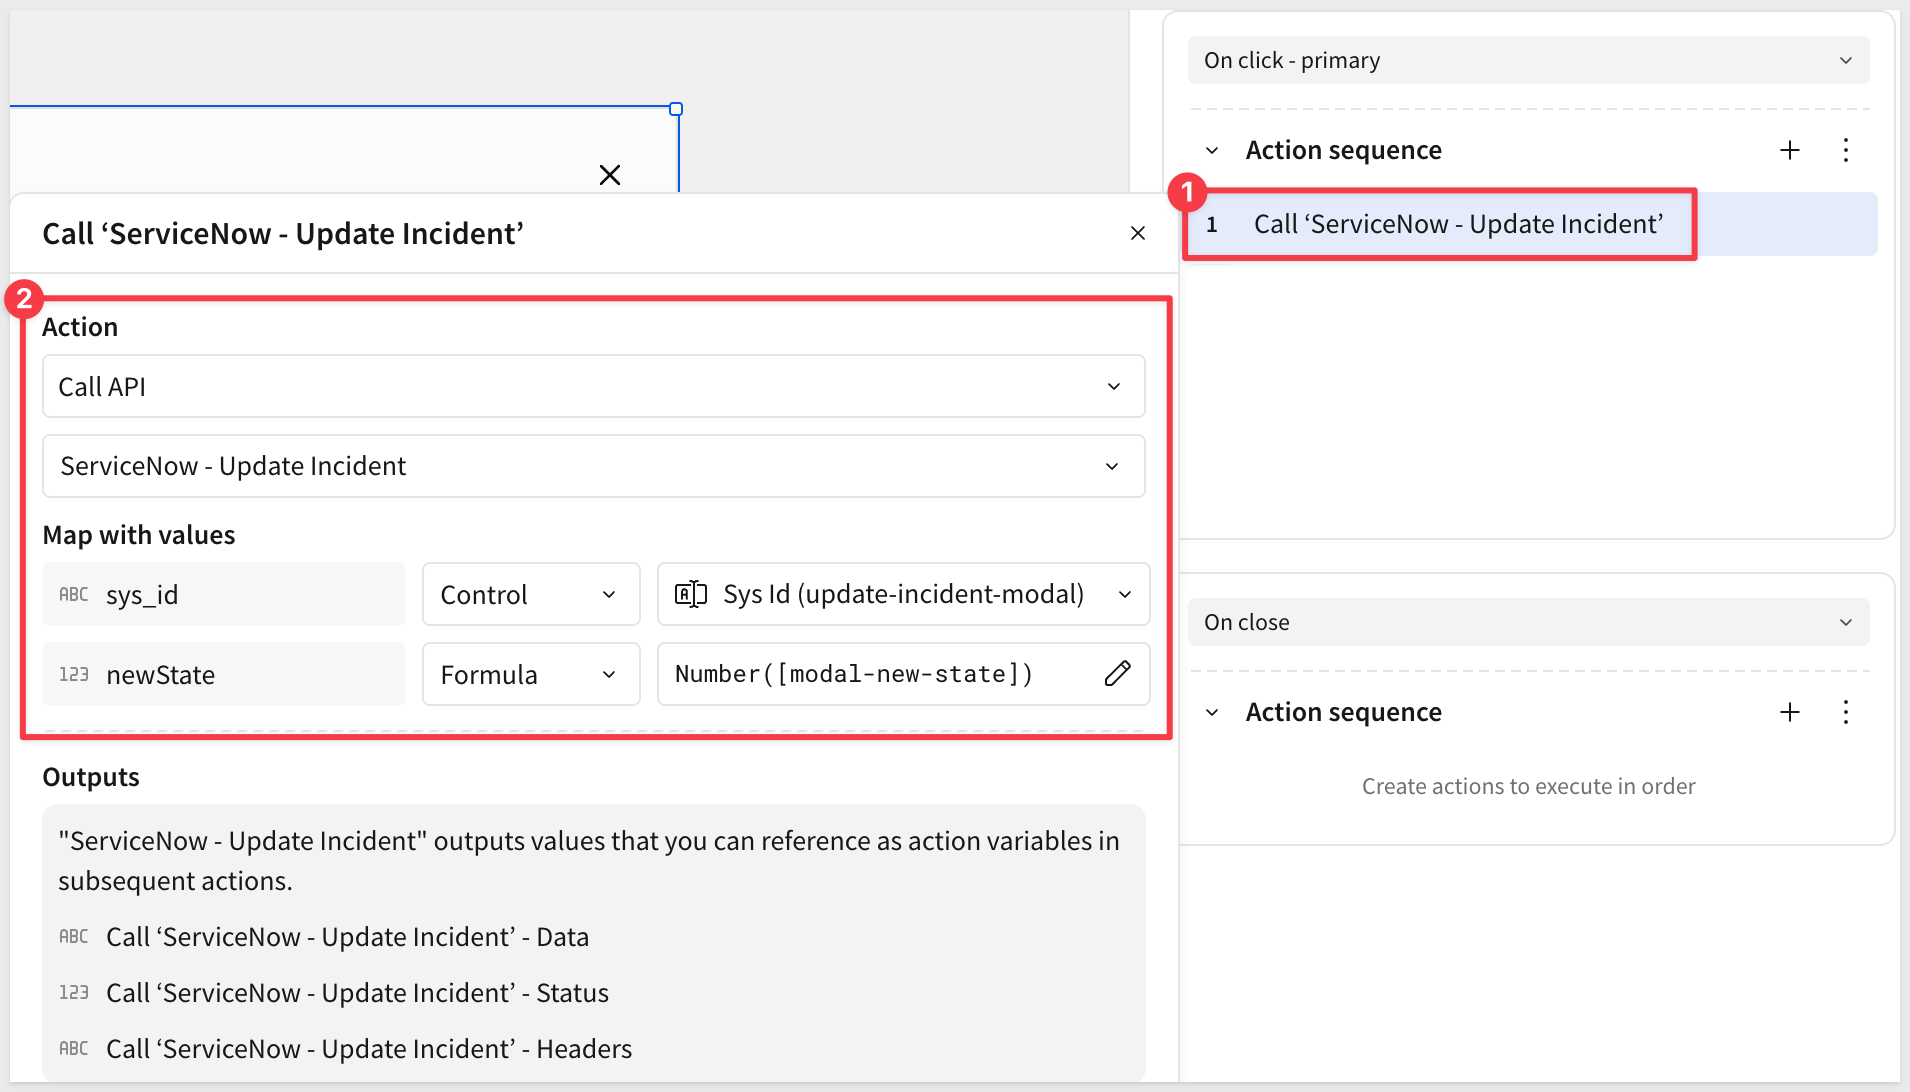
Configure the Update Incident button actions to call the ServiceNow - Update Incident API connector:
- Click the button's
Actionsmenu - Select
Add Action - Choose
Call API
Configure the API action:
- API Connector:
ServiceNow - Update Incident - Parameters:
sys_id: type =Control, value =Sys Id (update-incident-modal)newState: type =Formula, value =Number([modal-new-state])
- Click
Add Action(add a second action) - Choose
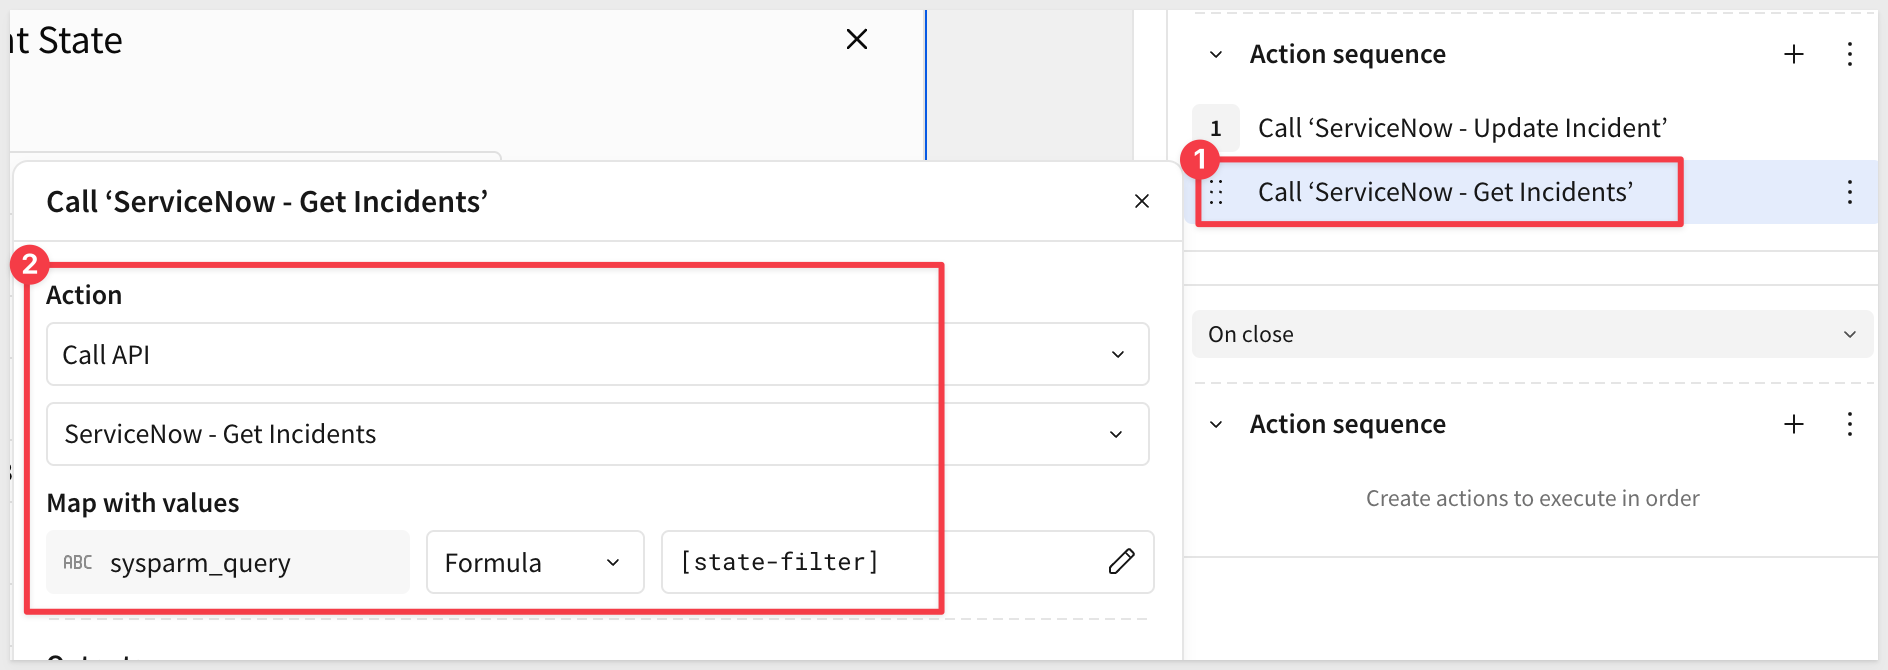
Call API
Configure the second action to re-fetch the updated incident list:
- API Connector:
ServiceNow - Get Incidents - sysparm_query: type =
Static value, value =""(empty string — returns all incidents)
- Click
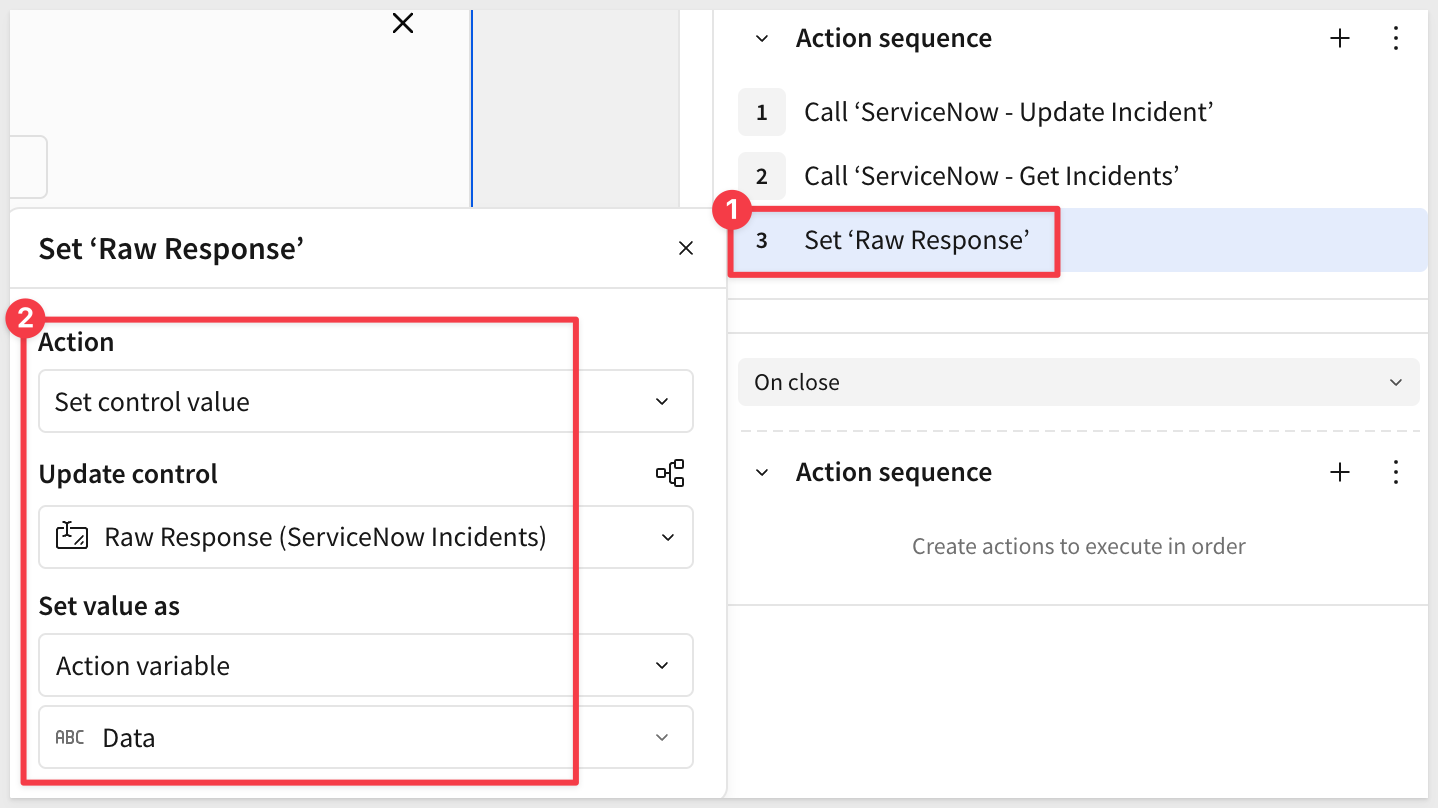
Add Action(add a third action) - Choose
Set control value
Configure the third action to store the fresh response:
- Update control:
raw-response (Controls) - Set value as:
Action variable - Variable:
Data(from Call ServiceNow - Get Incidents)
- Click
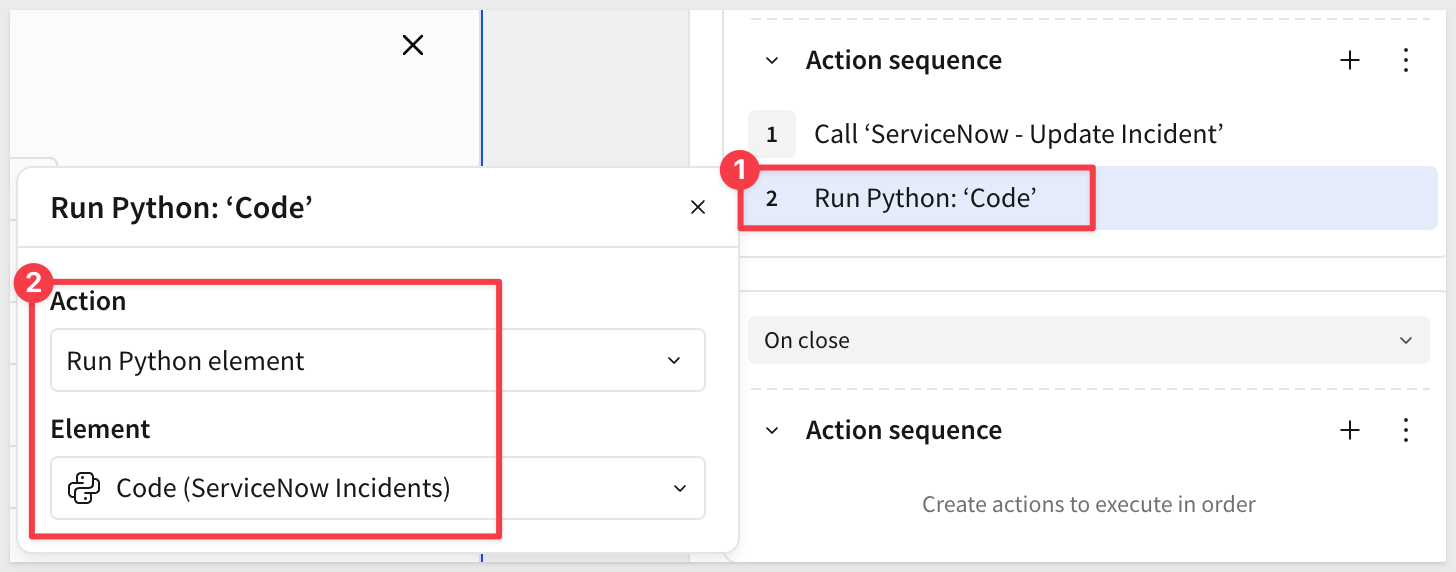
Add Action(add a fourth action) - Choose
Run Python element>Code (ServiceNow Incidents):- This parses the fresh JSON response into the table
- Click
Add Action(add a fifth action) - Choose
Close Modal
Step 12: Test the Update Workflow
Return to the ServiceNow Incidents page.
- Click the
Load ServiceNow Incidentsbutton to load fresh data - Click on any incident row in the table (perhaps sort the table on the
Numbercolumn and work with the first record...) - The modal should open showing the incident details:
- Select
On HoldorIn Progressas the new state — note the current state first so you can verify the change - Click
Update Incident
The modal should close, and the table should refresh showing the updated state.
For example, if we change INC0000001 from In Progress to On Hold in Sigma, we can see the result in Servicenow:
We now have:
- A complete write-back workflow using PATCH requests
- Interactive modal for updating incident states
- Action sequences that update ServiceNow and refresh Sigma data
- Bidirectional sync between Sigma and ServiceNow
- Real-time verification of changes in both systems
In about an hour, you built a complete bidirectional ServiceNow integration—querying live incidents with dynamic state filters, parsing nested JSON responses with Python, and updating incident states directly in ServiceNow through an interactive modal—all without writing backend code or managing a single server.
What used to require a dedicated integration layer, ETL pipelines, and ongoing infrastructure maintenance is now a Sigma workbook. Sigma's API Actions handle the authentication, parameter passing, and response handling, so you can focus on the workflow rather than the plumbing.
The pattern you built here isn't limited to ServiceNow. Any SaaS platform with a REST API and Basic Authentication support—Zendesk, JIRA, GitHub, Freshservice, PagerDuty—can be integrated the same way. Query live data, surface it in Sigma, let users act on it, and write changes back. No middleware, no replication, no custom UI.
For IT and operations teams, this changes what's possible. Analysts who previously needed engineering support to build operational tooling can now do it themselves. Instead of exporting data to spreadsheets and manually updating systems, the workflow lives in Sigma—where the data already is.
Sigma isn't just a place to report on what happened. With API Actions, it becomes the place where your team takes action on what's happening right now.
Additional Resource Links
Blog
Community
Help Center
QuickStarts
Be sure to check out all the latest developments at Sigma's First Friday Feature page!