Sigma's API enables you to create and manage data models programmatically using JSON specifications. This approach unlocks powerful workflows that go beyond the UI, including:
- Version control: Store data model definitions in Git for change tracking and collaboration
- Code review: Review data model changes through pull requests before deployment
- CI/CD integration: Automate data model deployments across environments
- Programmatic management: Create, update, and retrieve data models via API calls
In this QuickStart, you'll learn how to:
- Authenticate to Sigma's REST API using client credentials
- Create a new data model from a JSON specification
- Update an existing data model programmatically
This workflow allows data teams to treat their analytics infrastructure as code, applying software engineering best practices to data modeling.
For more information on Sigma's product release strategy, see Sigma product releases
If something doesn't work as expected, here's how to contact Sigma support
Target Audience
This QuickStart is designed for developers, data engineers, and technical users who want to manage Sigma data models programmatically through the API.
Prerequisites
- Sigma account with API access enabled
- API credentials (Client ID and Secret) - see Generate API client credentials
- Permission to create, edit, and publish data models
- Command-line familiarity and access to curl or similar tool
- Basic understanding of JSON format
- Access to Sigma Sample Database (available in all Sigma instances)

A data model's JSON specification defines its complete structure in a standardized format. Let's examine the key components:
Basic Structure
When creating a data model, the minimal spec requires:
{
  "name": "My Data Model",
  "schemaVersion": 1,
  "folderId": "abc123...",
  "pages": [...]
}
Required fields for creation:
name: Display name of the data modelschemaVersion: Specification version (currently 1)folderId: ID of the folder where the data model will be storedpages: Array of pages containing elements
When the API returns a data model spec (via GET or after POST/PUT), it includes additional metadata:
{
  "dataModelId": "0983d911-16f1-481e-901e-0e7d86016754",
  "name": "Bike Stations Data Model",
  "url": "https://app.sigmacomputing.com/...",
  "documentVersion": 2,
  "latestDocumentVersion": 2,
  "schemaVersion": 1,
  "ownerId": "yRn1UFV8ngVWBM1Hgrl51h7MS8uow",
  "folderId": "72a56f98-6c10-4a07-8795-b7661ffc5226",
  "createdBy": "yRn1UFV8ngVWBM1Hgrl51h7MS8uow",
  "updatedBy": "yRn1UFV8ngVWBM1Hgrl51h7MS8uow",
  "createdAt": "2026-01-27T16:40:17.830Z",
  "updatedAt": "2026-01-27T16:41:15.807Z",
  "pages": [...]
}
Read-only metadata fields:
dataModelId: Unique identifier for the data modelurl: Direct link to open the data model in SigmadocumentVersion/latestDocumentVersion: Version trackingownerId,createdBy,updatedBy: User identifierscreatedAt,updatedAt: Timestamps
Pages and Elements
Each page contains elements (tables, charts, etc.):
"pages": [
  {
    "id": "page1",
    "name": "Page 1",
    "elements": [...]
  }
]
Table Elements
A table element defines the data source and columns:
{
  "id": "mytable",
  "kind": "table",
  "source": {
    "connectionId": "xyz789...",
    "kind": "warehouse-table",
    "path": ["DATABASE", "SCHEMA", "TABLE"]
  },
  "columns": [
    {
      "id": "col1",
      "formula": "[TABLE/Column_Name]"
    },
    {
      "id": "col2",
      "formula": "[TABLE/Another_Column]"
    }
  ],
  "order": ["col1", "col2"]
}
Element structure:
id: Unique identifier for the elementkind: Type of element (table, pivot, chart, etc.)source: Data source configurationcolumns: Array of column definitionsorder: Optional array defining column display order
Source types:
warehouse-table: Direct table referencecustomSQL: Custom SQL queryjoin: Join multiple tablesunion: Combine multiple sourcesdata-model: Reference to another data model
Column Formulas
Columns use Sigma's formula syntax:
[TABLE/Column_Name]: Reference a source columnConcatenate([col1], " ", [col2]): Calculated column- Any valid Sigma formula expression
For a complete example, view the sample spec we'll use: bikes-stations-basic.json
Client credentials (a unique client ID and client secret) are required to authenticate to Sigma's REST API.
Sigma uses the client ID to identify your application and the client secret to verify your identity. Together, these credentials enable secure, programmatic access to Sigma's API endpoints using OAuth 2.0 authentication.
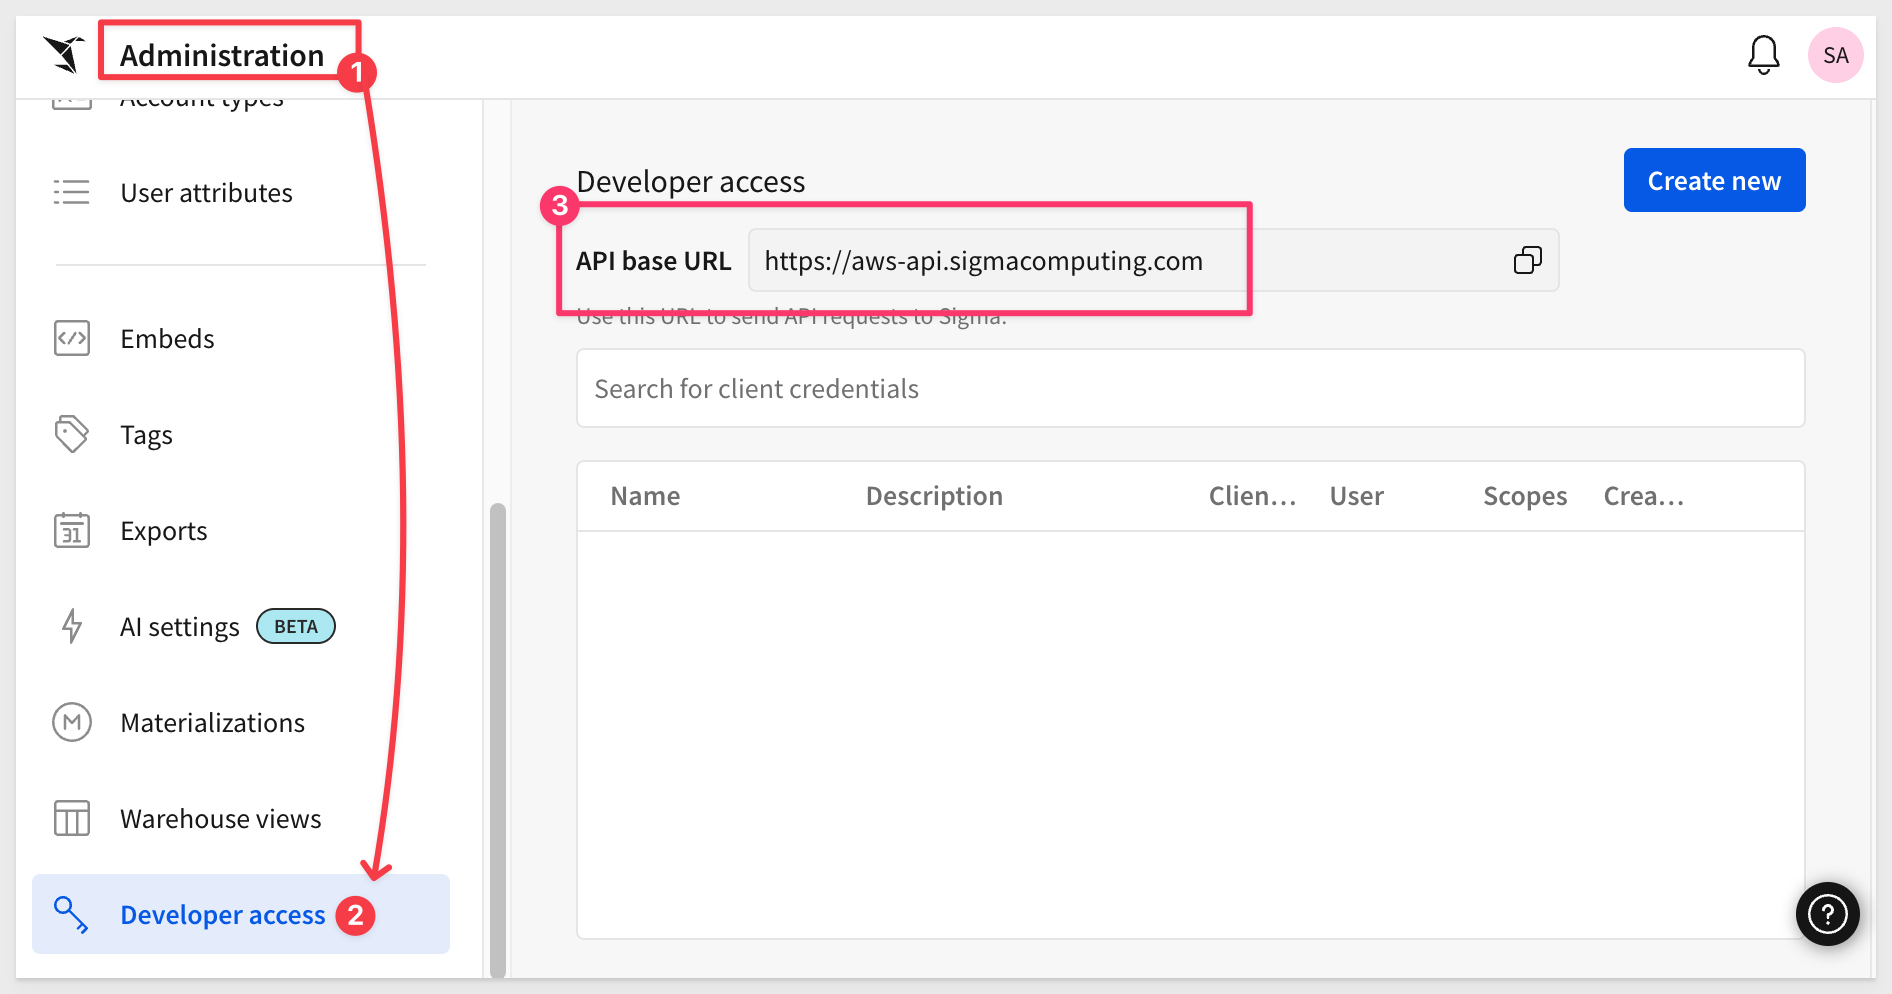
Navigate to Administration and scroll down to Developer Access.
Click Create New:
In the Create client credentials modal, select REST API, give it a name, and assign an administrative user as the owner.
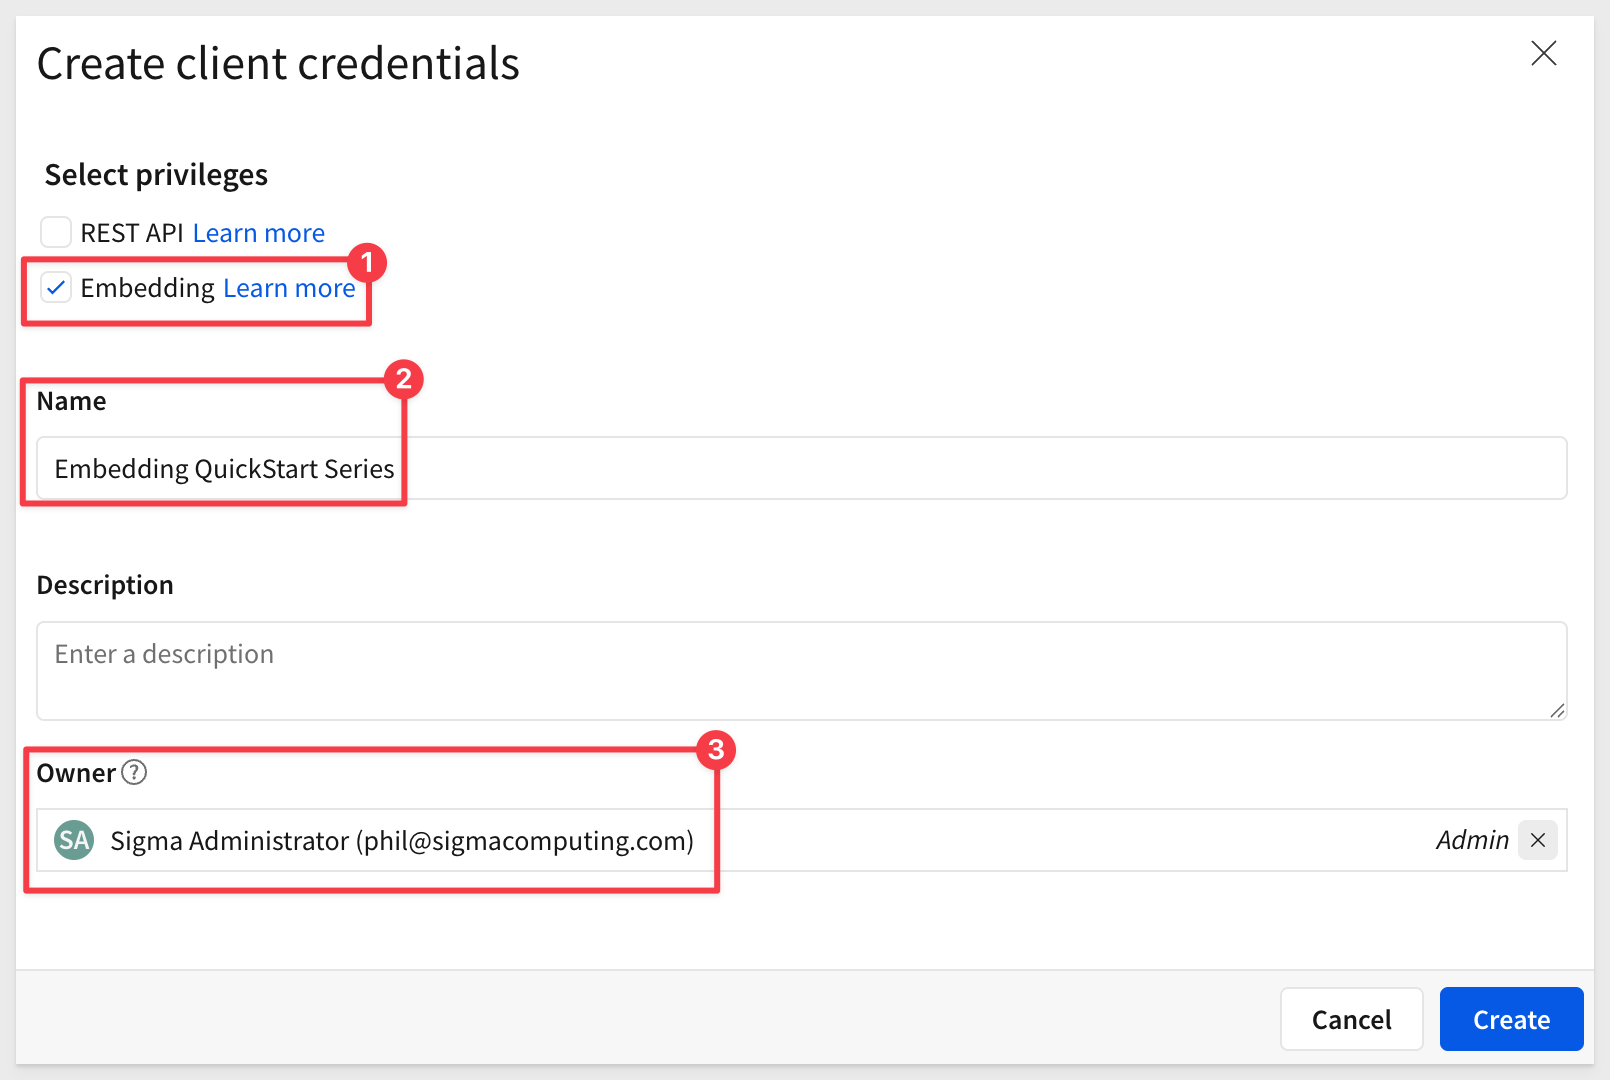
Click Create.
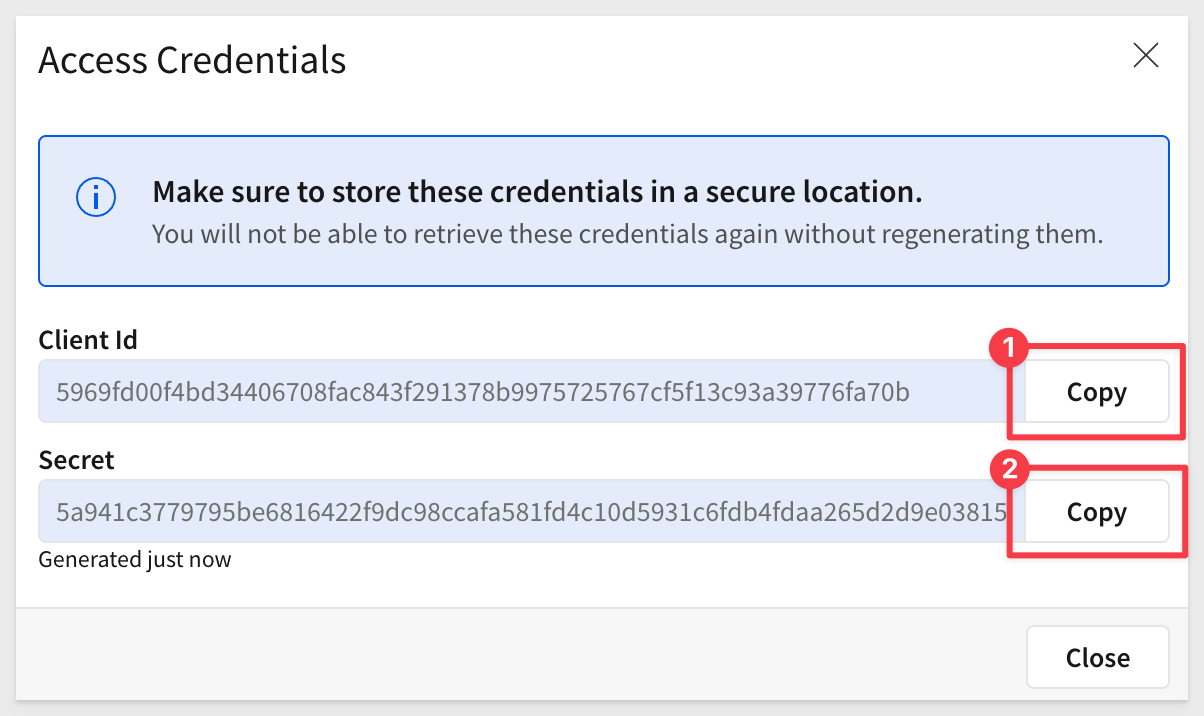
Copy and paste the Client ID and Secret - you'll add them to your .env file in the next section.
Clone the Project Folder
We have made sample JSON specifications and templates available in a public GitHub repository to save time.
While you could clone the entire repository, we'll use sparse-checkout to clone only the specific folder we need, keeping your local project cleaner.
Open a Terminal session.
Create a new directory in a location of your choice:
mkdir sigma_quickstarts
Change to the new directory:
cd sigma_quickstarts
Initialize a new git repository:
git init
Add the remote repository as the origin:
git remote add -f origin https://github.com/sigmacomputing/quickstarts-public.git
Enable sparse checkout:
git config core.sparseCheckout true
Specify the folder you want to clone by adding it to the sparse-checkout configuration:
echo "data-models-as-code" >> .git/info/sparse-checkout
Pull the specified folder from the repository:
git pull origin main
Change directory to the new folder:
cd data-models-as-code
You should now see the project structure:
data-models-as-code/
├── README.md
├── .env.example
├── .gitignore
└── specs/
    ├── bikes-stations-basic.json
    └── bikes-stations-updated.json
The folder contains:
- README.md: Documentation about the example specs
- .env.example: Template for your environment variables
- specs/: Sample JSON specifications for creating and updating data models
To make working with the API easier, we'll use environment variables to store your access token and IDs. This eliminates the need to copy/paste values in every command.
Create Your .env File
In your terminal session, make sure you're in the data-models-as-code directory:
cd sigma_quickstarts/data-models-as-code
The repository you cloned includes a .env.example template file. Copy it to create your own .env file:
cp .env.example .env
Open .env in your text editor. The file contains placeholders for all values we'll gather:
# Your Sigma API credentials (from previous section)
CLIENT_ID=your_client_id_here
CLIENT_SECRET=your_client_secret_here

# Access token (we'll get this next)
ACCESS_TOKEN=your_access_token_here

# API base URL (update based on your region)
API_BASE_URL=https://aws-api.sigmacomputing.com

# IDs (we'll gather these after authentication)
FOLDER_ID=your_folder_id_here
CONNECTION_ID=your_connection_id_here
For now, update only these two values:
- Add your Client ID and Secret from the previous section (replace
your_client_id_hereandyour_client_secret_here) - Update
API_BASE_URLto match your Sigma region (shown in the Developer Access screen from the previous section)
To create a data model via the API, you need an access token, a folder ID, and a connection ID.
Load Environment Variables
First, load the CLIENT_ID, CLIENT_SECRET, and API_BASE_URL you configured into your shell session:
export $(grep -v '^#' .env | xargs)
This loads the credentials you configured earlier so we can use them in the API calls below. The grep -v '^#' filters out comment lines.
Authenticate with the API
Now use the OAuth token endpoint to get your access token:
curl --request POST \
  --url ${API_BASE_URL}/v2/auth/token \
  --header 'accept: application/json' \
  --header 'content-type: application/x-www-form-urlencoded' \
  --user "${CLIENT_ID}:${CLIENT_SECRET}" \
  --data 'grant_type=client_credentials'
The --user flag sends your credentials as Basic Authentication in the Authorization header.
The response contains your access token:
{
  "access_token": "eyJhbGciOiJIUzI1NiIsInR5cCI6IkpXVCJ9...",
  "token_type": "bearer",
  "expires_in": 3600,
  "refresh_token": "c231dcb48752496d93cf9c6728be82f4..."
}
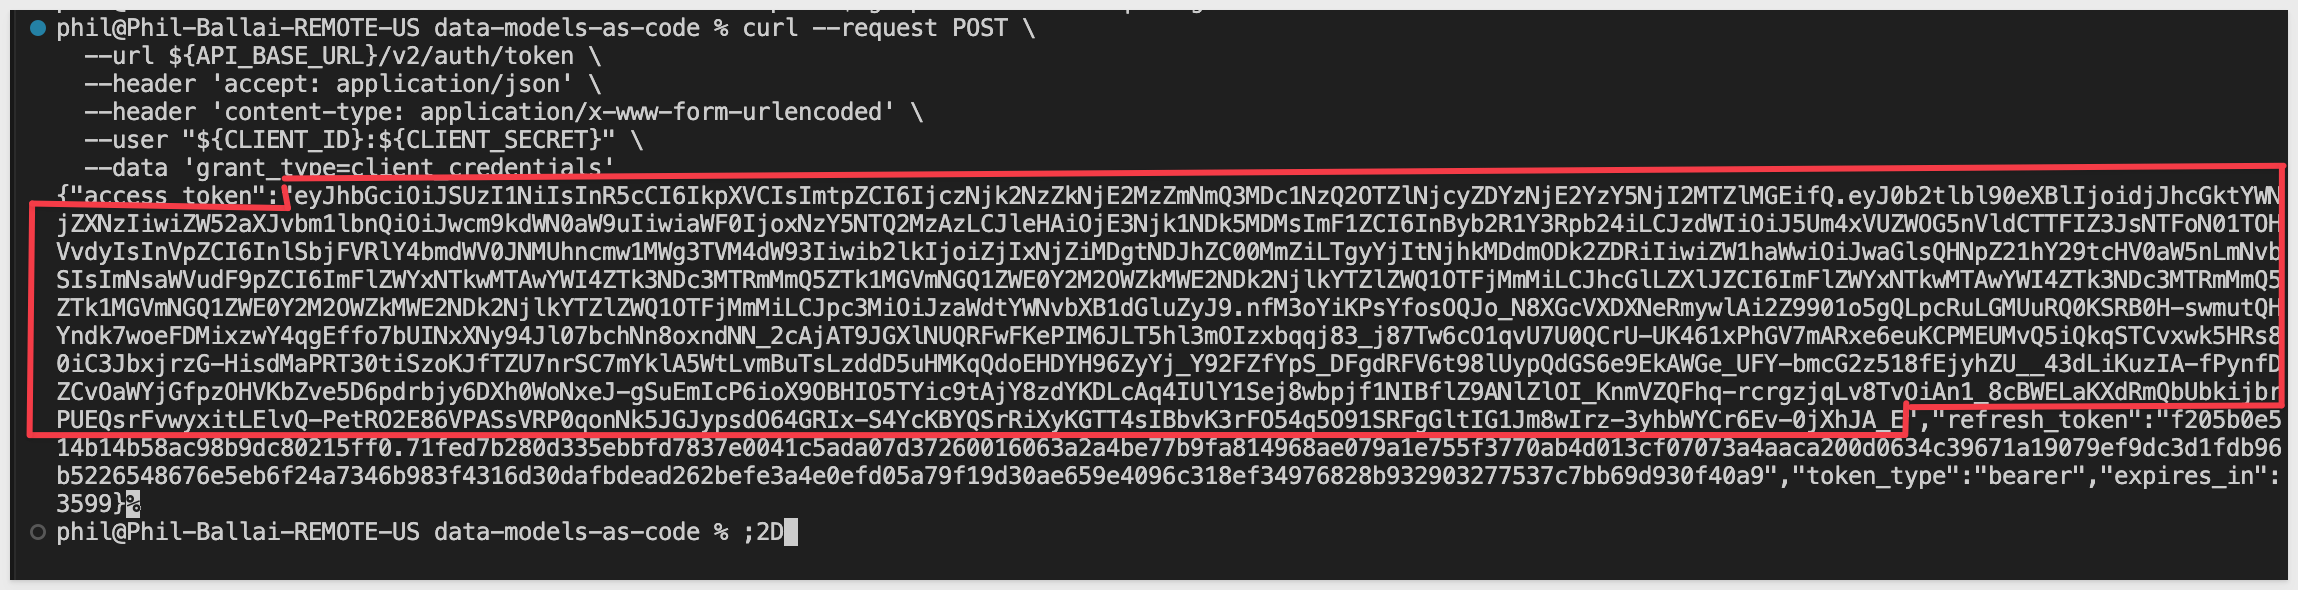
Copy ONLY the access_token value (the JWT token, not the refresh_token portion of the value) and add it to your .env file:
ACCESS_TOKEN=eyJhbGciOiJIUzI1NiIsInR5cCI6IkpXVCJ9...
Then reload your environment variables:
export $(grep -v '^#' .env | xargs)
For more information, see Generate API client credentials
Create a folder
Create a new folder where your data models will be stored called Data Models as Code:
curl --request POST \
  --url ${API_BASE_URL}/v2/files \
  --header 'Accept: application/json' \
  --header "Authorization: Bearer ${ACCESS_TOKEN}" \
  --header 'Content-Type: application/json' \
  --data '{
    "type": "folder",
    "name": "Data Models as Code"
  }'
The response contains the new folder's details:
{
  "id": "fe99c419-6855-4860-9437-5e507a021ac3",
  "urlId": "7KqjYZB8yOjpItmbP4wojF",
  "name": "Data Models as Code",
  "type": "folder",
  "path": "My Documents/Data Models as Code",
  "createdAt": "2026-01-26T18:30:00.000Z",
  ...
}
Copy the id value and add it to your .env file:

FOLDER_ID=fe99c419-6855-4860-9437-5e507a021ac3
Then reload your environment variables:
export $(grep -v '^#' .env | xargs)
You can verify the folder was created by logging into Sigma and checking My Documents.
Get Your Connection ID
Search for the Sigma Sample Database connection:
curl --request GET \
  --url "${API_BASE_URL}/v2/connections?search=Sigma%20Sample%20Database" \
  --header 'Accept: application/json' \
  --header "Authorization: Bearer ${ACCESS_TOKEN}"
The response returns the Sigma Sample Database connection (it will have "isSample": true):
{
  "organizationId": "6b306b21-8b0c-4dc0-9d59-1facd04621ac",
  "connectionId": "6036a5a7-3fc2-4e50-9122-1ffb132ac24c",
  "name": "Sigma Sample Database",
  "isSample": true,
  ...
}
Copy the connectionId value and add it to your .env file:
CONNECTION_ID=6036a5a7-3fc2-4e50-9122-1ffb132ac24c

You now have all the required values (ACCESS_TOKEN, FOLDER_ID, and CONNECTION_ID) in your .env file. You'll reload these environment variables in the next section when you're ready to create the data model.
For more information, see List files and List connections
Now you're ready to create a data model programmatically using the sample JSON spec from the repository you cloned earlier.
Load All Environment Variables
First, reload your environment variables to ensure all IDs are available:
export $(grep -v '^#' .env | xargs)
This loads your ACCESS_TOKEN, FOLDER_ID, and CONNECTION_ID for use in the following commands.
Update the Spec with Your IDs
The specs/bikes-stations-basic.json file from your cloned repository contains placeholder values. Replace them with your actual IDs using environment variables:
sed -e "s/YOUR_FOLDER_ID_HERE/${FOLDER_ID}/g" \
    -e "s/YOUR_CONNECTION_ID_HERE/${CONNECTION_ID}/g" \
    specs/bikes-stations-basic.json > bikes-stations-configured.json
This reads from specs/bikes-stations-basic.json and creates a new file bikes-stations-configured.json in your current directory with your actual values:

Create the Data Model
Use the POST /v2/dataModels/spec endpoint to create your data model:
curl --request POST \
  --url ${API_BASE_URL}/v2/dataModels/spec \
  --header 'Accept: application/json' \
  --header "Authorization: Bearer ${ACCESS_TOKEN}" \
  --header 'Content-Type: application/json' \
  --data @bikes-stations-configured.json
The API returns the newly created data model with its dataModelId:
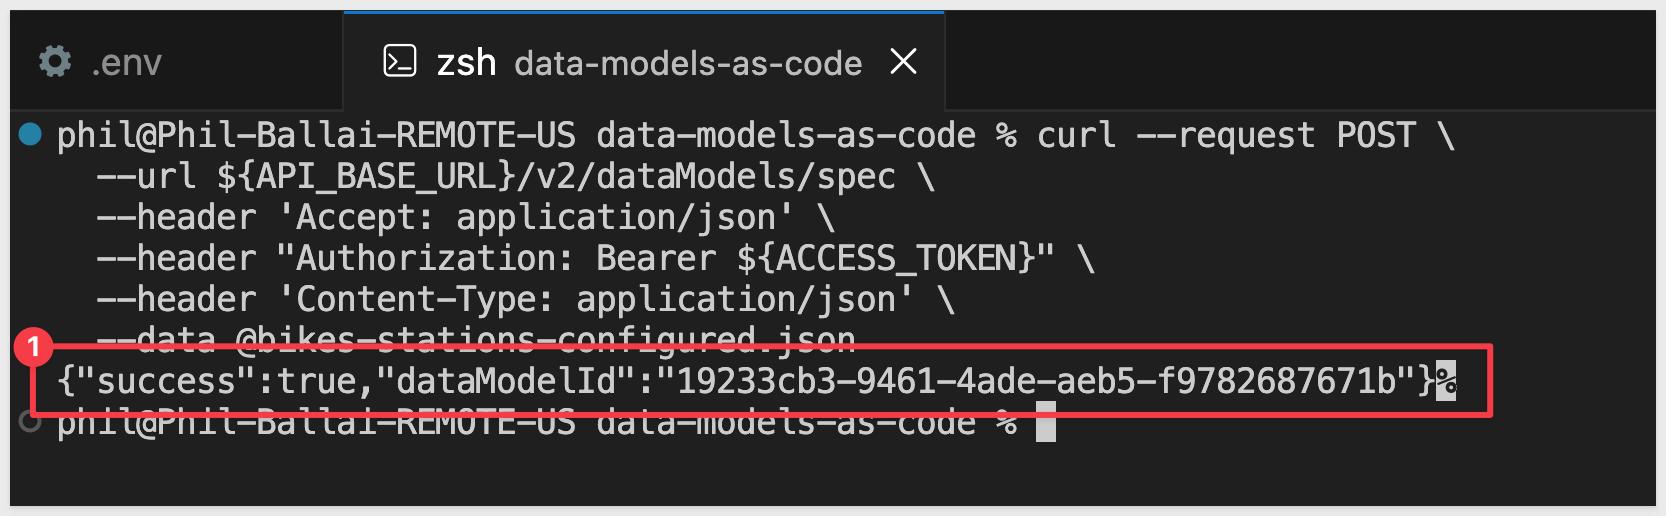
Copy this dataModelId and add it to your .env file:
DATA_MODEL_ID=abc123-def456-ghi789
Then reload your environment variables:
export $(grep -v '^#' .env | xargs)
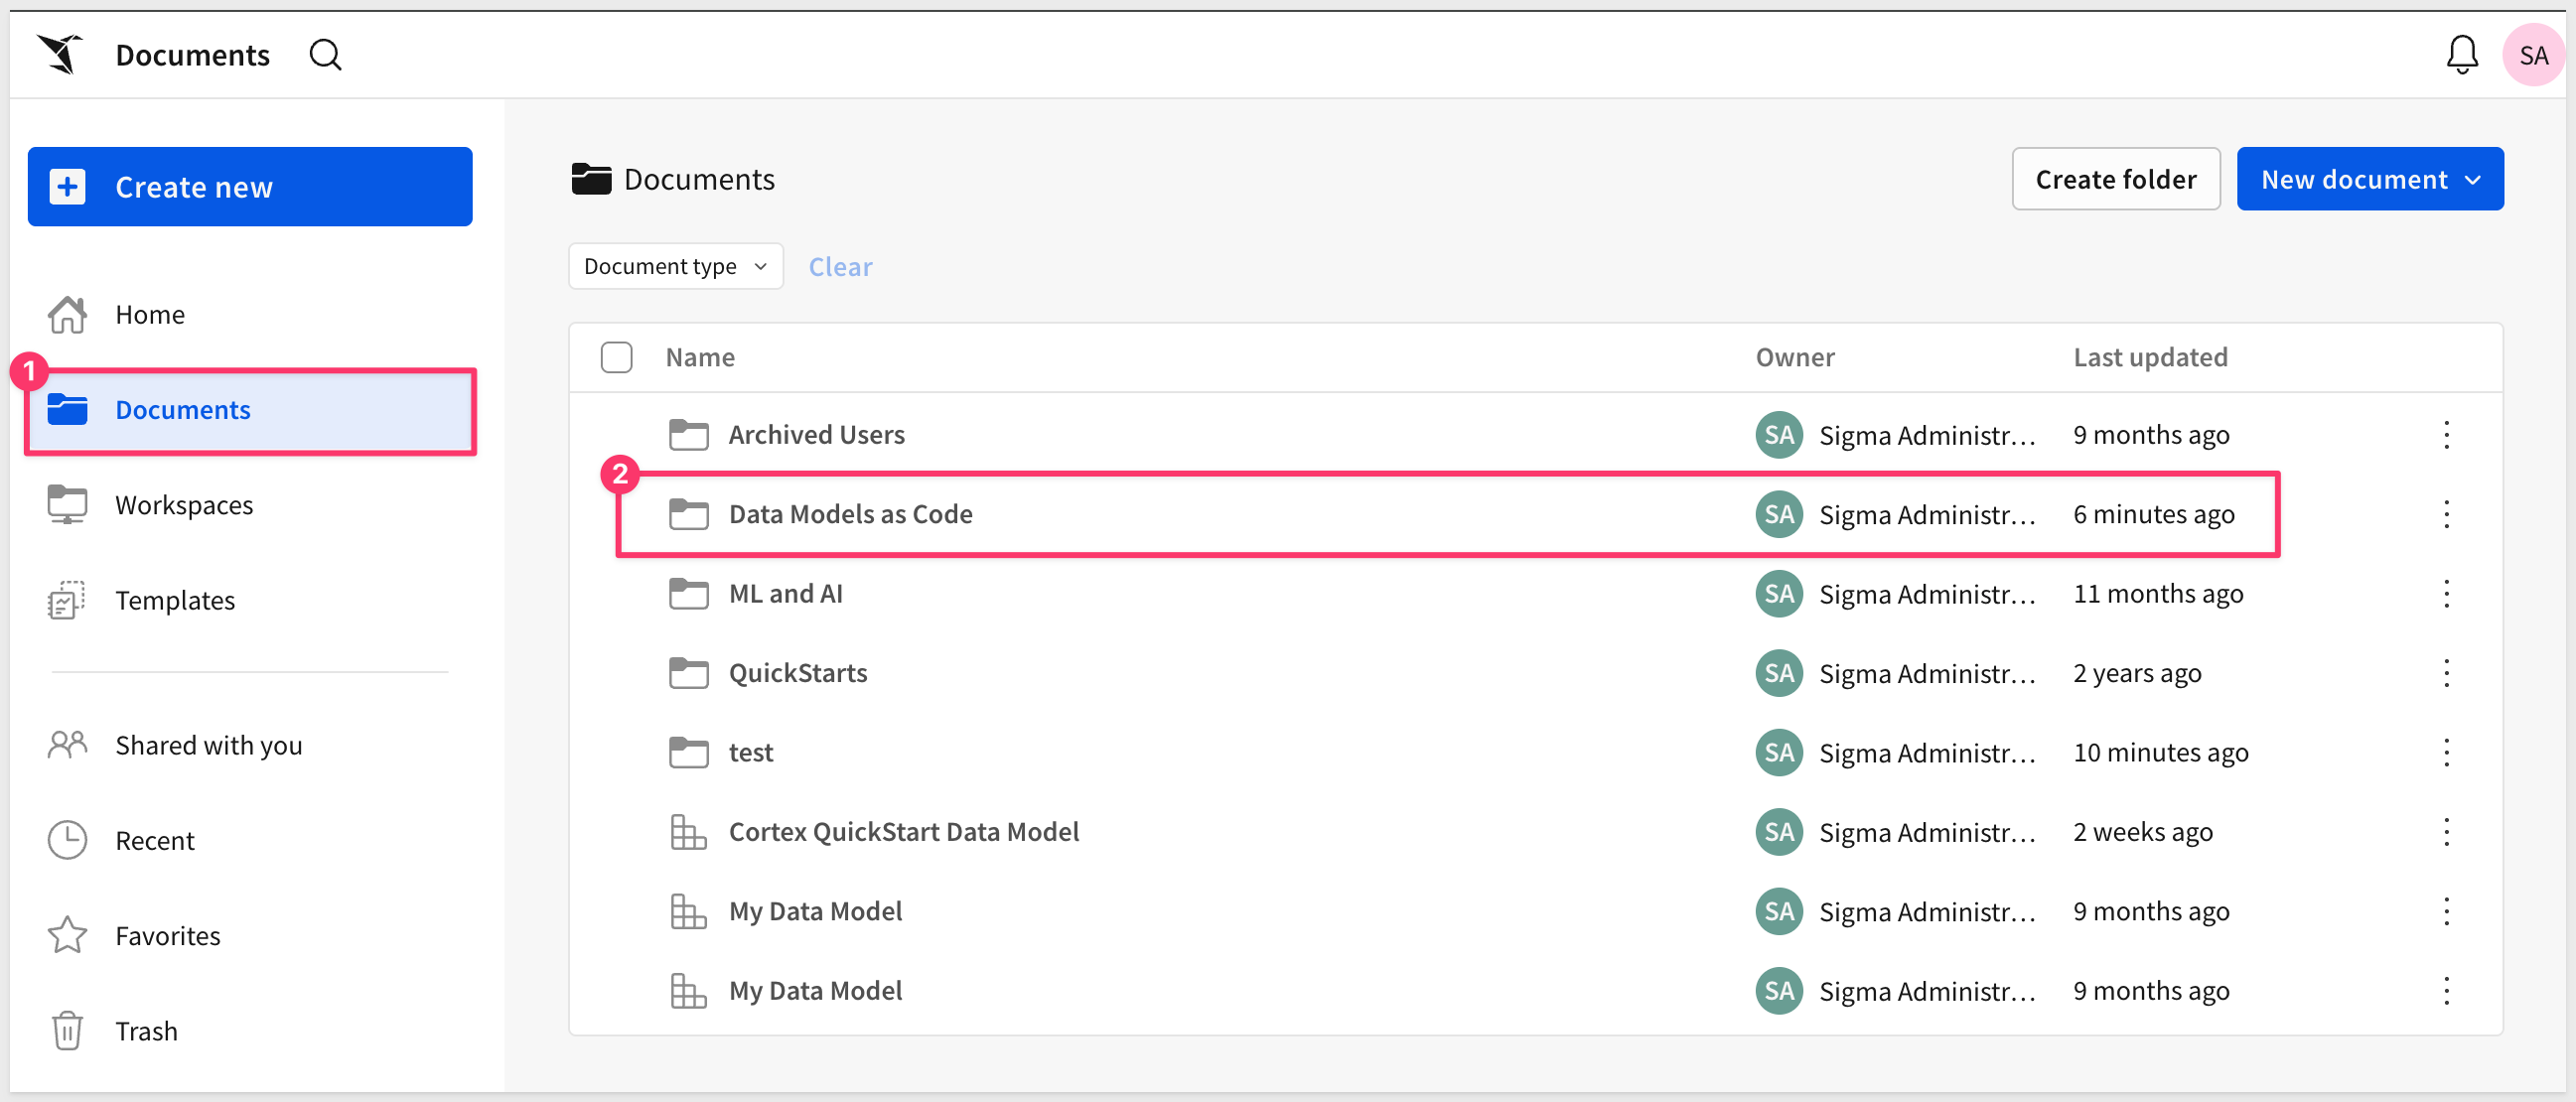
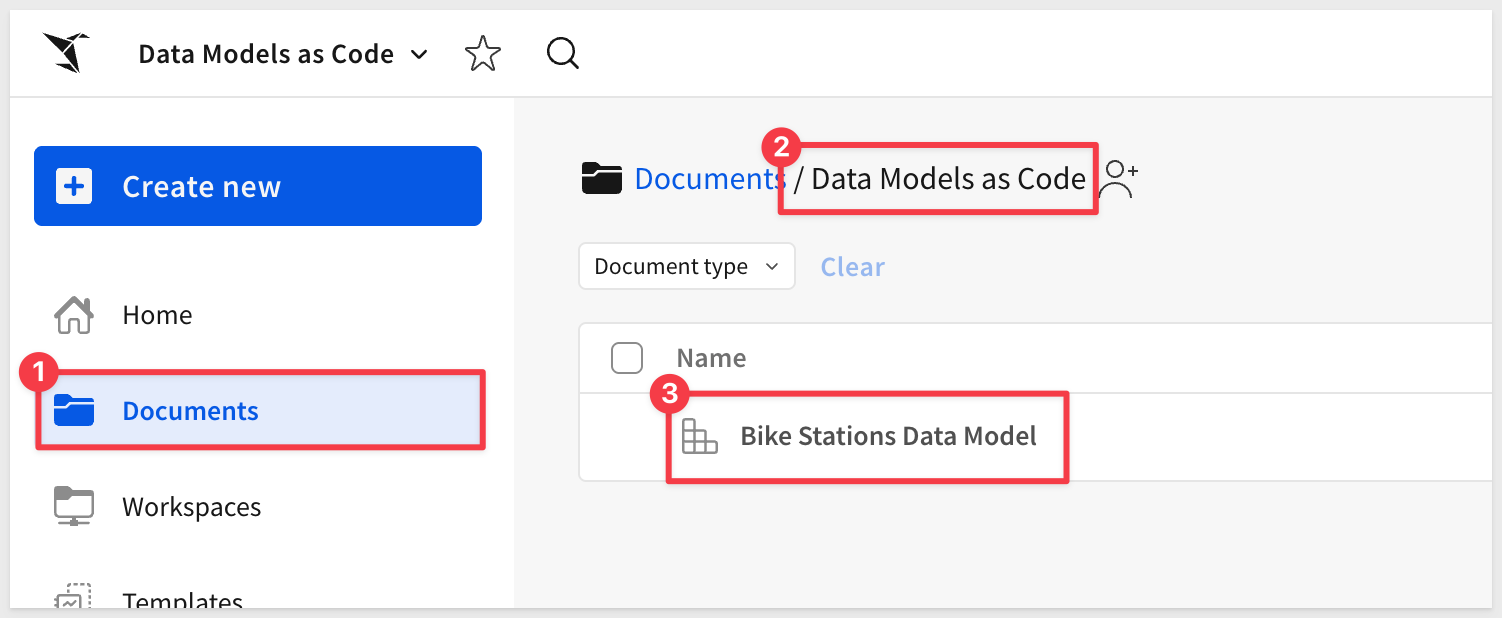
You can now open the data model in Sigma by navigating to the folder you specified and viewing the newly created Bike Stations Data Model.
Click into the data model to see the STATIONS table:
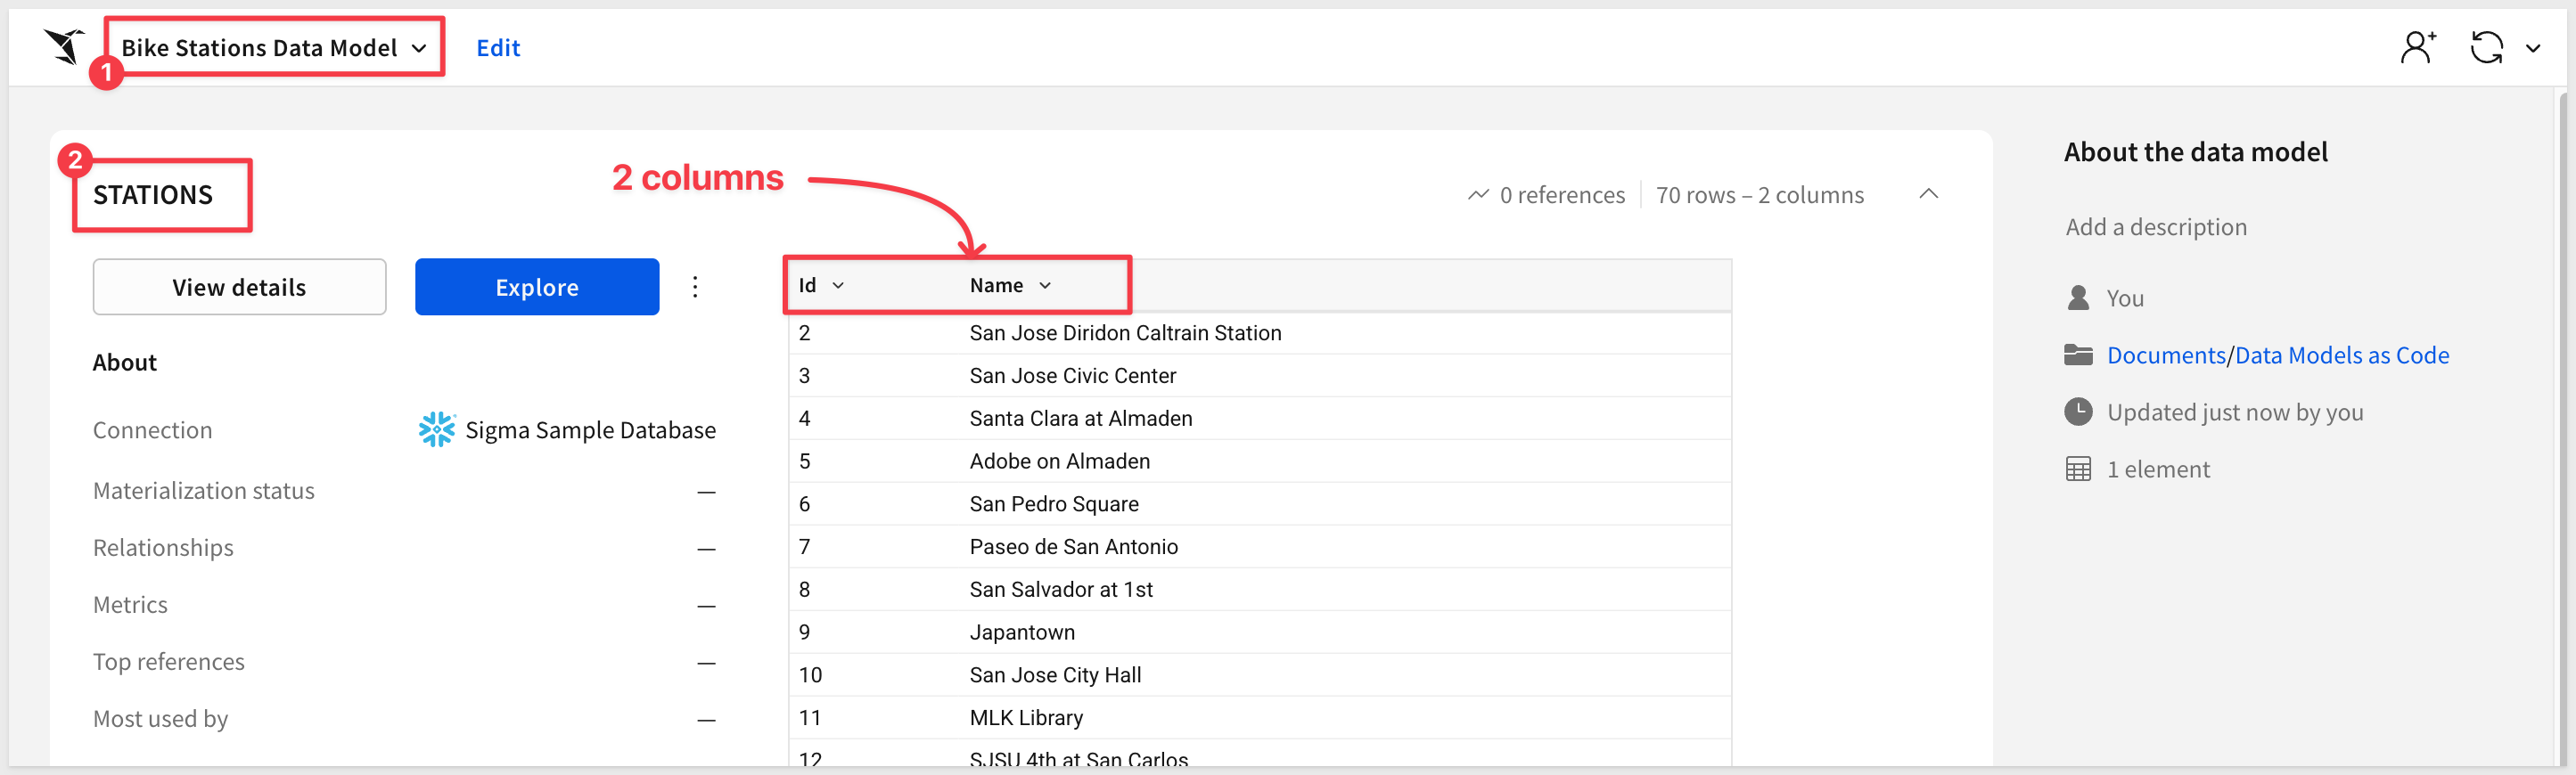
While this is not a complex model, you've successfully created a data model entirely through code without touching the Sigma UI. This same approach scales to much more complex data models with joins, metrics, custom SQL, calculated columns, and controls.
The key benefit is that your data model definition is now stored as code, making it version-controllable, reviewable, and deployable through automated pipelines.
For more information, see Create a data model from a JSON specification
Let's modify the data model by adding new columns. This demonstrates how to iterate on data models using code.
Review the Changes
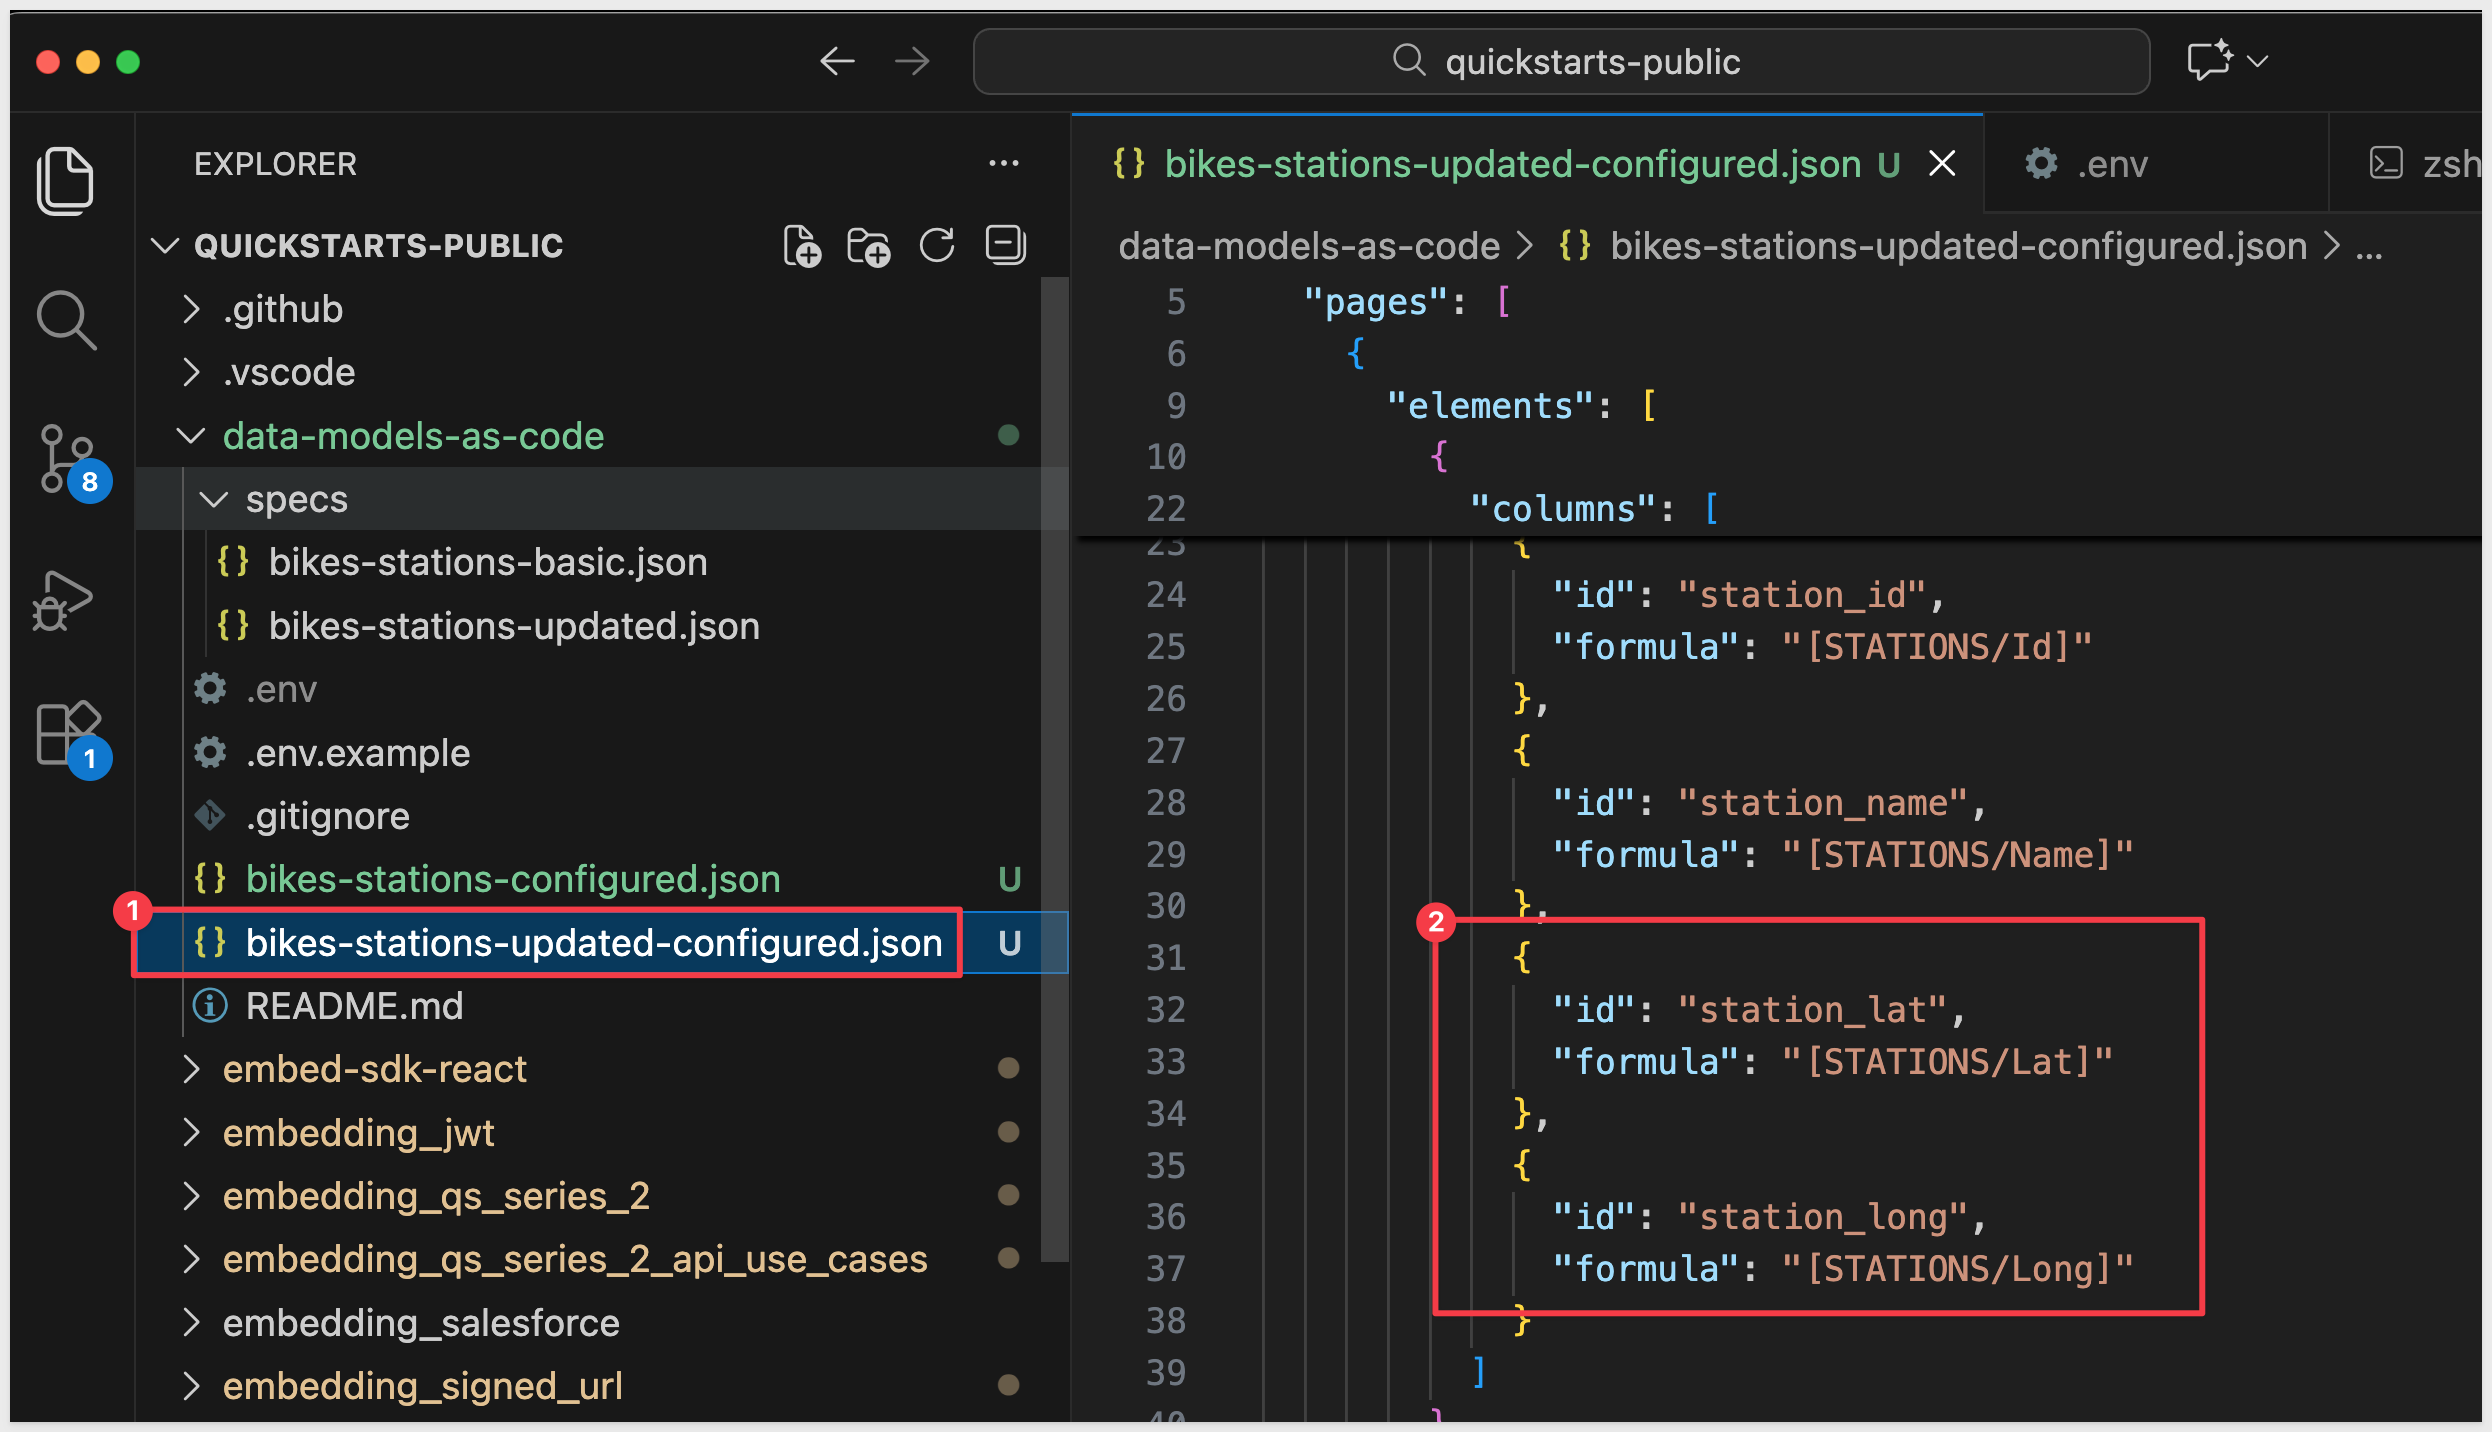
The repository includes an updated spec at specs/bikes-stations-updated.json that enhances the data model by adding two additional columns:
- Station Latitude (
[STATIONS/Lat]) - Station Longitude (
[STATIONS/Long])
This expands the model from 2 columns to 4 columns, adding geographic coordinates that could be used for mapping visualizations. The updated spec maintains the same simple table structure while adding more data from the STATIONS table:
"columns": [
  {
    "id": "station_id",
    "formula": "[STATIONS/Id]"
  },
  {
    "id": "station_name",
    "formula": "[STATIONS/Name]"
  },
  {
    "id": "station_lat",
    "formula": "[STATIONS/Lat]"
  },
  {
    "id": "station_long",
    "formula": "[STATIONS/Long]"
  }
]
Update the IDs
Replace the placeholder values in the updated JSON file with your actual IDs:
sed -e "s/YOUR_FOLDER_ID_HERE/${FOLDER_ID}/g" \
    -e "s/YOUR_CONNECTION_ID_HERE/${CONNECTION_ID}/g" \
    specs/bikes-stations-updated.json > bikes-stations-updated-configured.json
This reads from specs/bikes-stations-updated.json and creates bikes-stations-updated-configured.json with your actual values.
Apply the Update
Use the PUT /v2/dataModels/{dataModelId}/spec endpoint:
curl --request PUT \
  --url ${API_BASE_URL}/v2/dataModels/${DATA_MODEL_ID}/spec \
  --header 'Accept: application/json' \
  --header "Authorization: Bearer ${ACCESS_TOKEN}" \
  --header 'Content-Type: application/json' \
  --data @bikes-stations-updated-configured.json
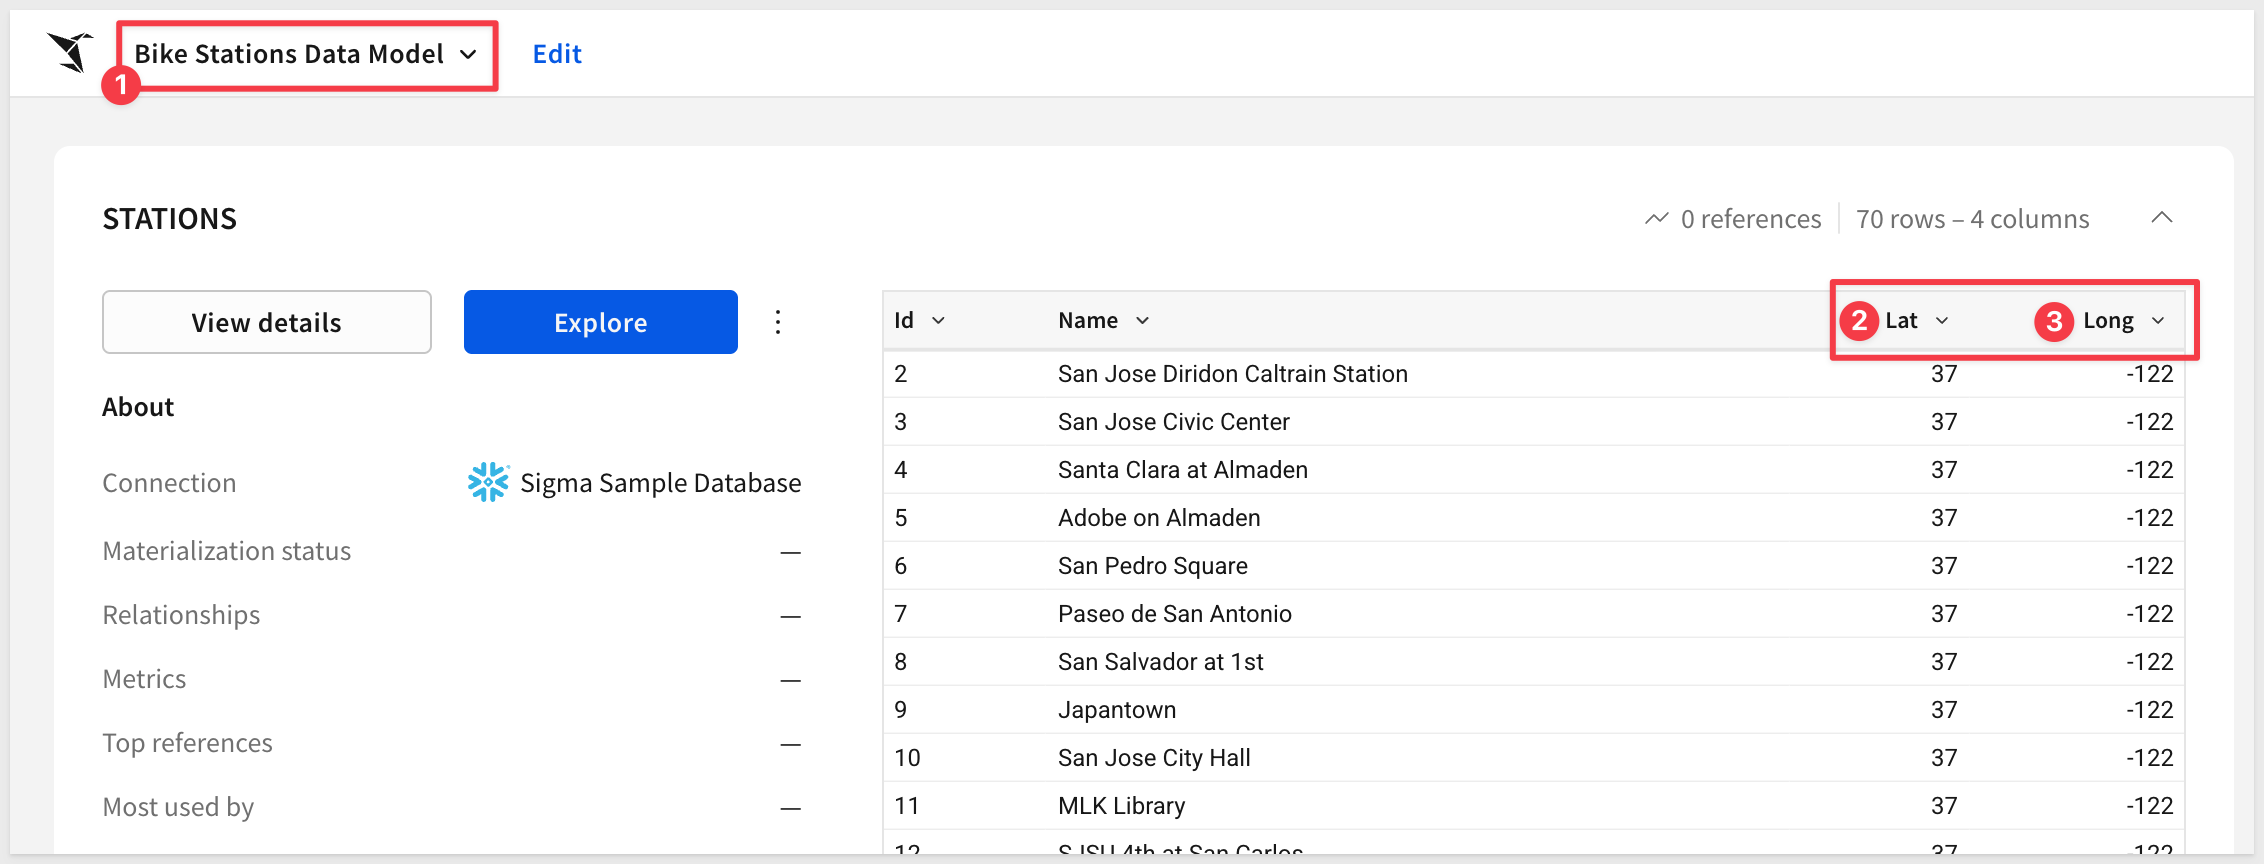
Verify the Changes
The API returns the updated data model. You can verify the changes by opening the data model in Sigma and seeing the two new columns:
- Station Lat (latitude coordinates)
- Station Long (longitude coordinates)
These geographic columns can be used to create map visualizations in Sigma workbooks.
For more information, see Update a data model from a JSON specification
Now that you understand the basics of creating and updating data models via API, let's explore what's possible with more complex structures and how to scale this approach.
Explore Advanced Examples
While this QuickStart used a simple table structure, the JSON specification supports much more complex data models.
The Data Model Representation Example Library provides comprehensive examples for:
Advanced Data Structures:
- Joins: Combine data from multiple tables with various join types
- Custom SQL: Incorporate raw SQL queries as data sources
- Unions: Merge rows from multiple sources vertically
- Calculated Columns: Create computed fields derived from existing data
- Metrics: Define aggregated measures and KPIs
Interactive Controls:
- Date pickers, range sliders, and number inputs
- List values, text areas, and checkboxes
- Segmented controls and switches
- Top N controls for limiting results
Each example in the library includes the complete JSON structure you can adapt for your use cases.
Next Steps and Best Practices
Version Control:
Store your data model specs in Git to enable change tracking, code reviews through pull requests, and the ability to roll back to previous versions.
CI/CD Integration:
Automate data model deployments across development, staging, and production environments using GitHub Actions or similar tools.
Multi-Environment Management:
Maintain separate specs for each environment, using environment variables to swap folder IDs and connection IDs as needed.
Template Library:
Build a collection of reusable data model templates for common patterns your team frequently needs.
In this QuickStart, you learned how to manage Sigma data models as code using the API:
- Authenticate to the API: Generate access tokens using client credentials with OAuth 2.0
- Gather required IDs: Retrieve folder and connection IDs needed for data model creation
- Understand JSON specifications: Explore the structure of data model specs including pages, elements, sources, and columns
- Create data models programmatically: Build a new data model from a JSON specification using the POST endpoint
- Update data models via API: Modify existing data models by adding columns using the PUT endpoint
Additional Resource Links
Blog
Community
Help Center
QuickStarts
Sigma API Reference
Be sure to check out all the latest developments at Sigma's First Friday Feature page!