A common ask from teams evaluating Sigma is migrating their Tableau footprint — usually to take advantage of all the amazing things Sigma offers. The conversion itself can be a blocker — and the part this QuickStart automates.
The usual Tableau-to-Sigma migration loop is rebuild-each-dashboard-by-hand, eyeball the numbers against the source, hope nothing drifted in the translation. Done on a single dashboard it's tedious. Across an entire catalog can be the reason migration projects slip.
This QuickStart walks through a Claude Code skill called tableau-to-sigma that automates the loop.
Provide it a Tableau dashboard URL; it discovers the workbook structure, builds (or reuses) a Sigma data model from the warehouse tables behind the dashboard, mirrors the layout, and verifies every chart's numbers against the Tableau source before exiting. If any check fails, the conversion is flagged for review instead of quietly passing.
For the demonstration, we'll run the skill end-to-end against the built-in Superstore sample dashboard on a Tableau Cloud dev site. You'll see the artifacts each phase produces, the gap report Claude hands back, the parity comparison against the source CSVs, and the final Sigma workbook side-by-side with its Tableau original.
What else this enables
A pure lift-and-shift is the floor, not the ceiling. The same skill family supports three follow-on moves that turn a migration into an upgrade:
- Dedup before you migrate. Most BI estates carry years of dashboard sprawl — multiple near-identical dashboards built by different teams over time. The assessment skill flags dashboards that are roughly 90% the same and recommends merging them before conversion. You move 200 dashboards instead of 800, and every downstream conversation is simpler. Pair this with the usage data the assessment pulls (who views what, how often) and you can confidently retire cold content rather than carry it forward.
- Enhance, don't just translate. Many "dashboards" in legacy tools are really input-driven workflows in disguise — a dashboard whose data is refreshed by uploading a CSV each morning is actually a forecasting app waiting to happen. After the lift-and-shift, the skill can suggest replacing those patterns with native Sigma constructs: input tables for write-back, Sigma Assistant for natural-language analysis, scheduled agents for routine summaries. The result isn't "the old dashboard, in a new tool" — it's "the workflow, finally done right."
- Audit your source as a side effect. The parity check that closes the run isn't just a confidence test on the migration — it's a fresh pair of eyes on the source platform's math. Sigma customers have caught multi-year calculation errors during their first migration run because the parity gate flagged a Sigma vs source mismatch and the source turned out to be wrong. Plan the migration as your final audit of the legacy system.
Target Audience
Sigma SEs, technical CSMs, and migration partners running Tableau-to-Sigma conversions — or scoping a batch migration with the companion tableau-assessment skill.
Prerequisites
Claude Codeinstalled (CLI or desktop).- Sigma API credentials.
- Tableau Cloud / Server access
- A Tableau dashboard you're authorized to convert, hosted on Tableau Cloud or Server. Tableau Desktop alone won't work — the skill reads through Tableau's REST and VDS APIs, which only Cloud/Server expose.
- The warehouse tables behind the dashboard must be reachable from a Sigma connection (Snowflake, BigQuery, Databricks, Redshift, Postgres and others).
Node.js(any recent LTS) for building the converter MCP. The conversion uses a separate MCP server,sigma-data-model-mcp, cloned + built (npm install && npm run build) into~/Desktop/sigma-data-model-mcp. The skill prompts you to install it mid-conversion — no upfront work needed — but pre-build it if you'd rather skip the gate.

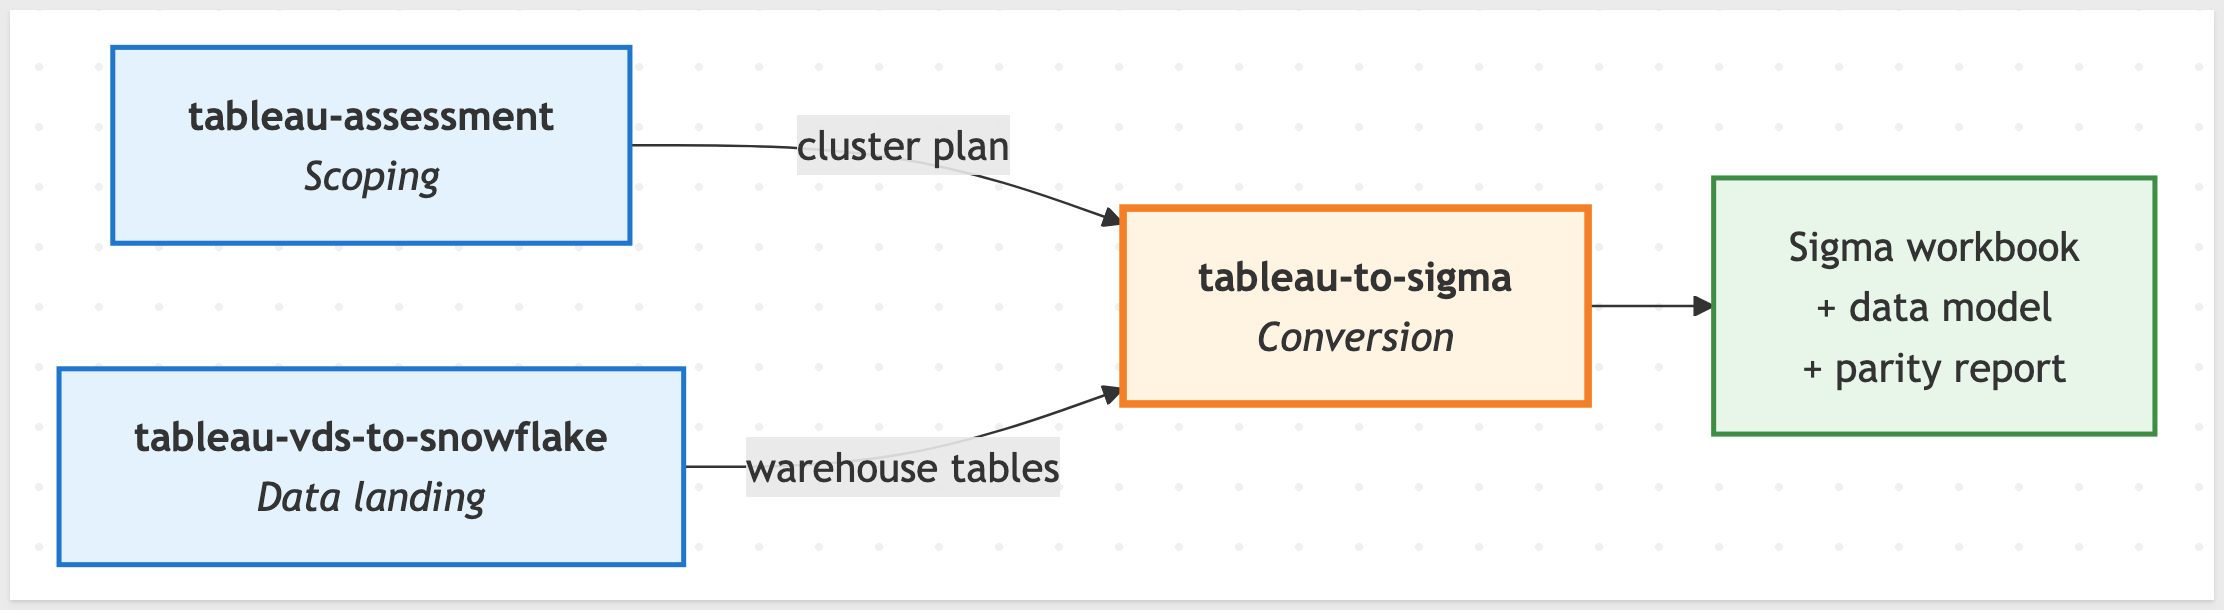
tableau-to-sigma is one of three skills that ship together as a single repo (cloned in the next section). Most of this QuickStart focuses on the converter — but knowing where the other two fit saves dead ends later.
Skill | Role | When to reach for it |
| Scoping | Auditing a Tableau Cloud site before committing to a conversion plan. Emits a ranked workbook shortlist and a cluster plan that |
| Conversion | The subject of this QuickStart. Converts a single workbook (or a batch via cluster plan) to a Sigma workbook with verified data parity. |
| Data landing | When the source data lives inside a Tableau extract and isn't already in the warehouse Sigma reads. Pulls the data via the VizQL Data Service and lands it in Snowflake. |
Here's how the three skills connect in a full migration — tableau-assessment hands the converter a cluster plan, tableau-vds-to-snowflake lands data into the warehouse when the source isn't already there, and tableau-to-sigma produces the Sigma workbook with a verified parity report:
Which skill for your situation
Not every migration needs all three skills. Use the table below to map your scenario to the smallest set that fits.
In this QuickStart we're in the first row (one workbook, data already in Snowflake), so only tableau-to-sigma runs.
Your situation | Skill(s) to use |
1 workbook, data already in your warehouse |
|
1 workbook, data only in a Tableau extract |
|
10+ workbooks (any data source) |
|
Auditing BI sprawl without converting yet |
|
Converting a TDS/TDSX (Tableau data source file) to a Sigma data model, no workbook |
|
For batch migrations the typical sequence is tableau-assessment → tableau-vds-to-snowflake (where needed) → tableau-to-sigma per workbook. The Scaling Up section later walks through that in more detail.
First we need to clone the skill's GitHub repository, then run the setup scripts that capture your Sigma and Tableau credentials.
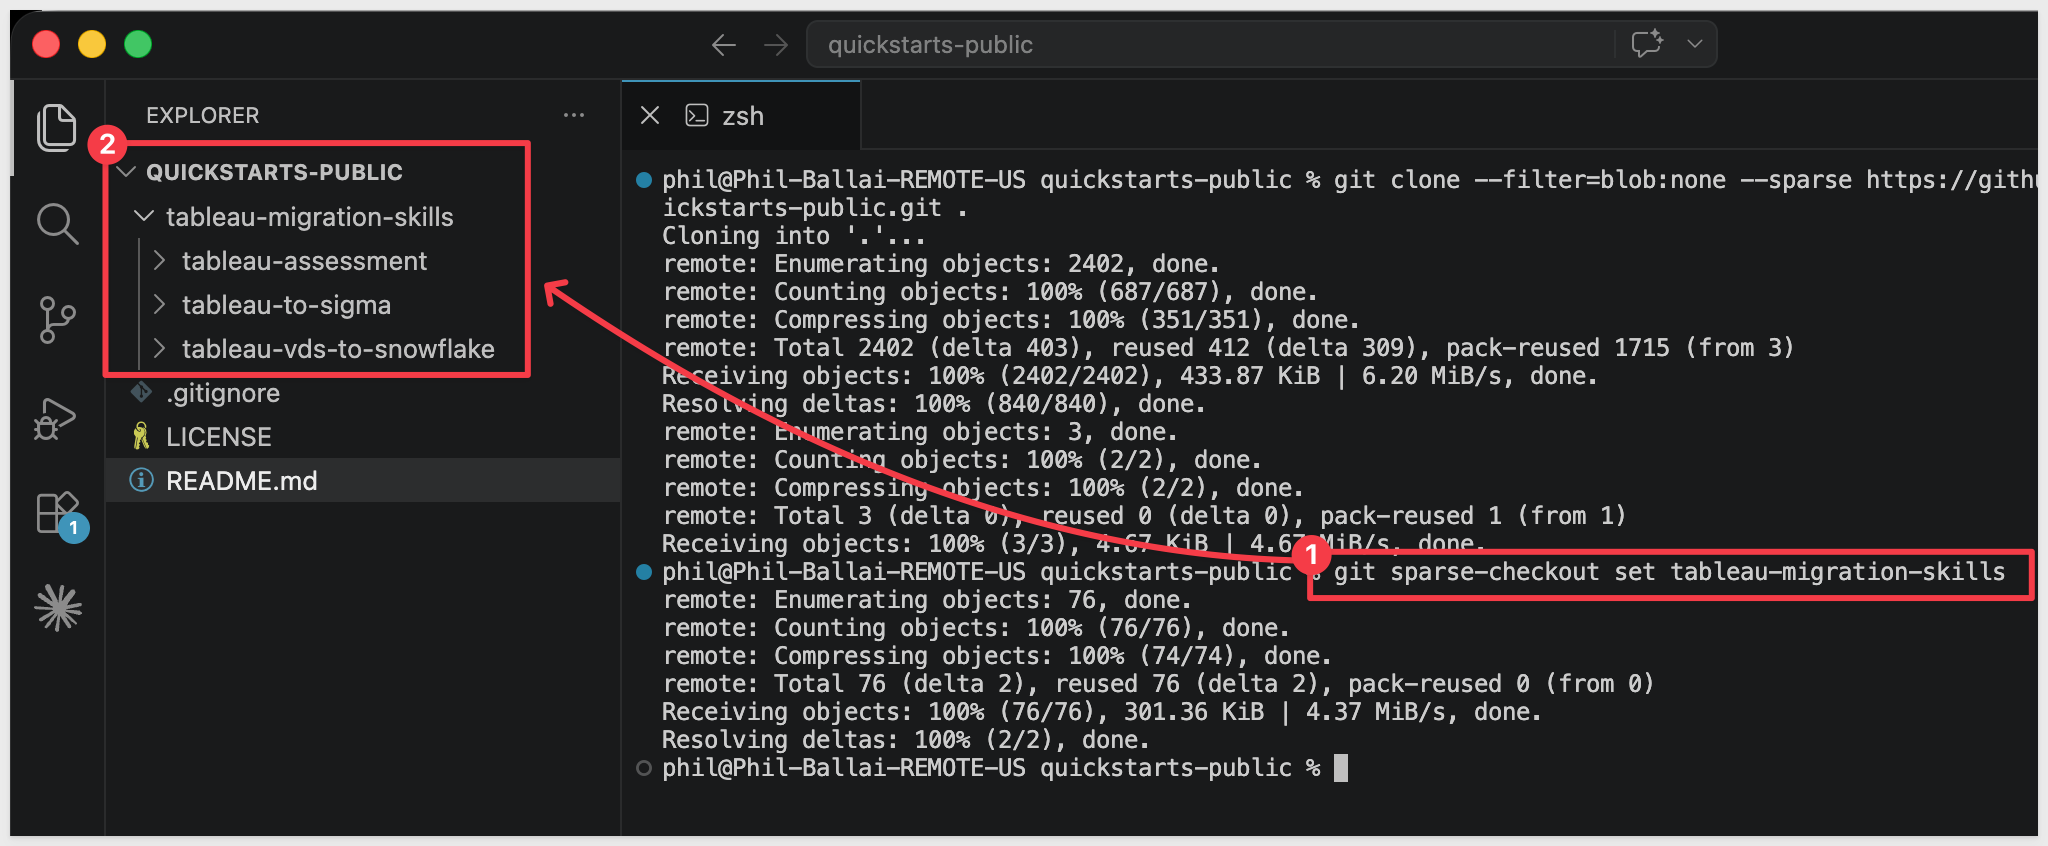
The three skills live in sigmacomputing/quickstarts-public under tableau-migration-skills/.
From a terminal, run each command below one at a time so you can confirm each step before moving on.
Step 1: Create a local folder for the clone
We'll clone into this folder in the next step.
mkdir -p ~/quickstarts-public
Step 2: Move into the new folder so the next command runs in the right working directory.
cd ~/quickstarts-public
Step 3: Clone the repo without pulling any files yet
The --sparse flag tells Git you'll choose which folders to fill in next. The trailing . clones into the current folder.
git clone --filter=blob:none --sparse https://github.com/sigmacomputing/quickstarts-public.git .
Step 4: Fill in only the tableau-migration-skills folder
Every other QuickStart asset in the repo stays empty on disk.
git sparse-checkout set tableau-migration-skills
Step 5: Symlink tableau-to-sigma into the Claude skills folder
This lets Claude Code invoke tableau-to-sigma as a skill.
ln -s ~/quickstarts-public/tableau-migration-skills/tableau-to-sigma ~/.claude/skills/tableau-to-sigma
Step 6: Symlink tableau-assessment
Used to scope a Tableau site before conversion.
ln -s ~/quickstarts-public/tableau-migration-skills/tableau-assessment ~/.claude/skills/tableau-assessment
Step 7: Symlink tableau-vds-to-snowflake
Used to land Tableau extracts into Snowflake when the source data isn't already in your warehouse.
ln -s ~/quickstarts-public/tableau-migration-skills/tableau-vds-to-snowflake ~/.claude/skills/tableau-vds-to-snowflake
Steps 5-7 should return with no error.

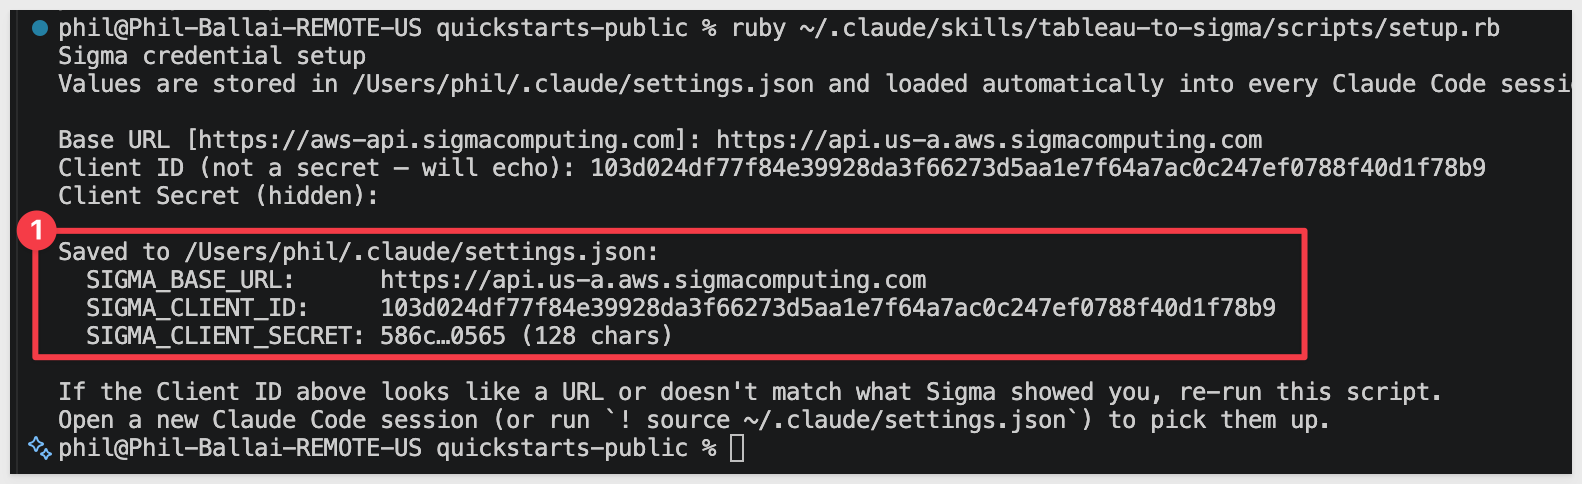
Step 8: Capture your Sigma API credentials.
This script prompts for SIGMA_BASE_URL, SIGMA_CLIENT_ID, and SIGMA_CLIENT_SECRET and writes them into Claude's settings.
Run once per machine.
If you don't already have credentials, see Configure API credentials in Sigma — the skill needs API access credentials, not embed.
ruby ~/.claude/skills/tableau-to-sigma/scripts/setup.rb
Step 9: Capture your Tableau credentials.
The next script prompts for four values, in order:
Prompt | What to paste | Example |
Server URL | Your Tableau host, base URL only — no |
|
Site contentUrl | The path segment between |
|
PAT name | The label you typed when you created the Personal Access Token in Tableau |
|
PAT secret | The token value Tableau showed once at creation time (input is hidden) |
If your full Tableau URL looks like https://us-east-1.online.tableau.com/#/site/examplesite-29eb398209, the server URL is the part before /#/, and the site contentUrl is examplesite-29eb398209.
Also run once per machine.
ruby ~/.claude/skills/tableau-to-sigma/scripts/setup-tableau.rb
The response will be: 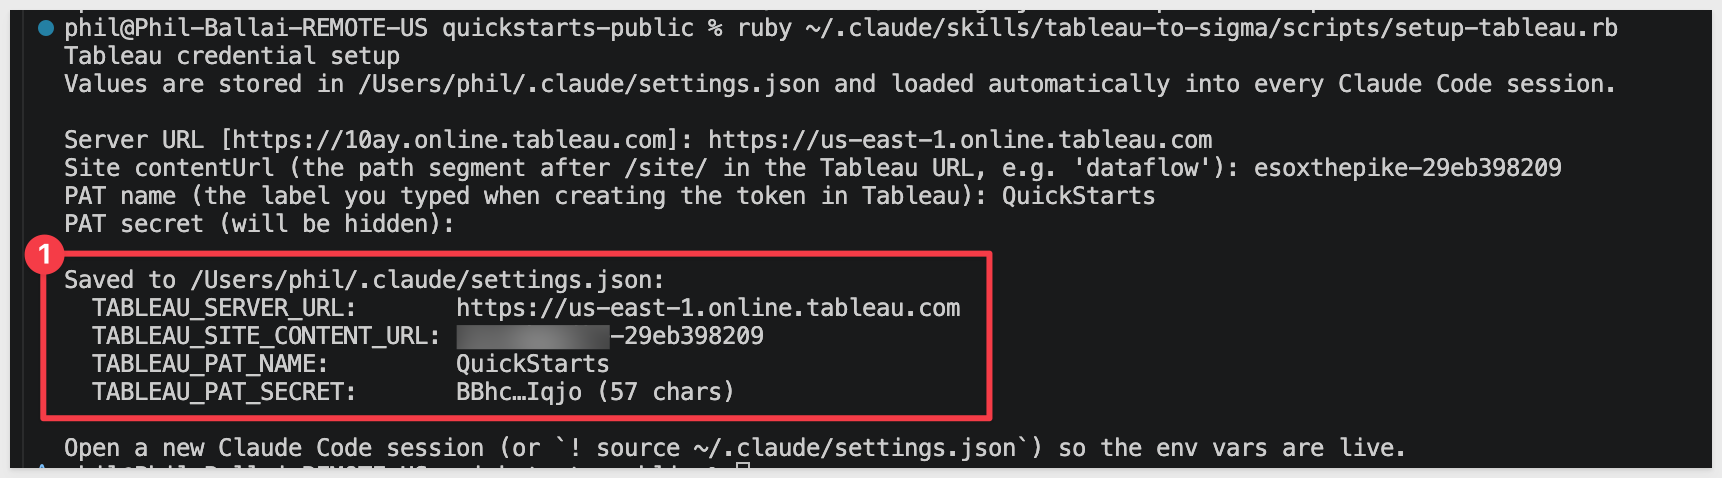
Ignore the Open a new Claude Code session note.
Verify the install by typing claude in your terminal to start Claude Code, then run:
claude
/tableau-to-sigma
Claude should start reading the reference files and ask what workbook we want to convert:
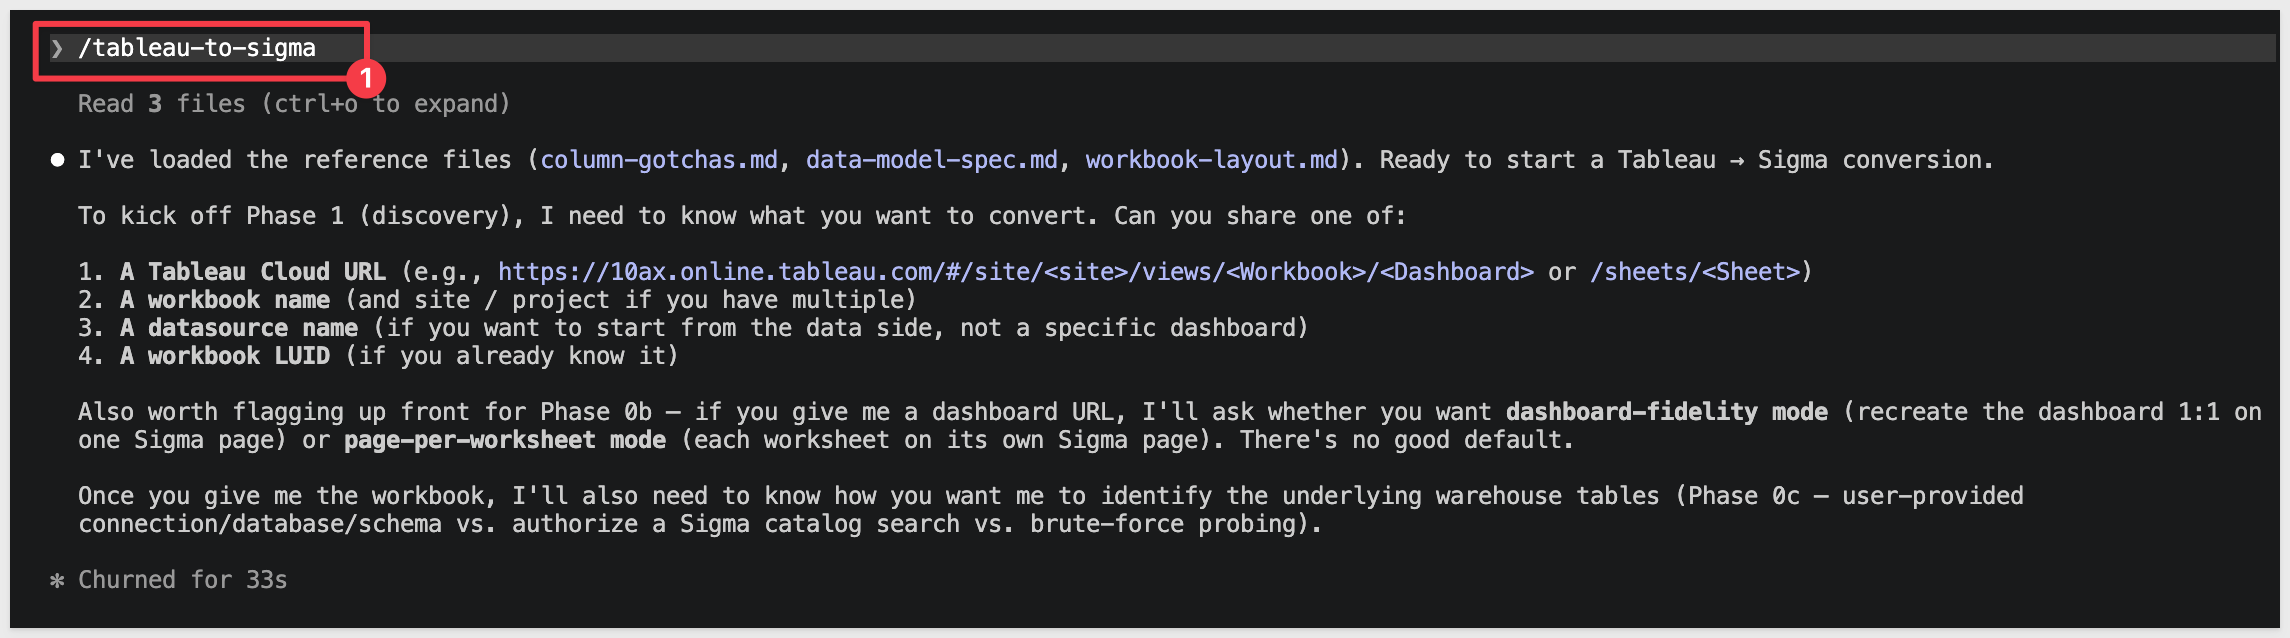
Before going any further, we need to prepare the data the dashboard uses.
For the converter to produce a working Sigma workbook, the data the Tableau dashboard reads needs to be reachable from a warehouse Sigma can also read. Sigma queries the warehouse live — it doesn't read Tableau's internal .hyper extracts — so we need to land the same data on the Sigma side before any conversion happens.
In this section we'll load the three Superstore tables (Orders, Returns, People) into a fresh Snowflake schema.
The Tableau dashboard itself stays on Tableau Cloud unchanged — we're only preparing the target-side warehouse so Sigma has tables to model against.
Step 1: Open a Snowsight worksheet and run the load script
Make sure the active role in the top-right has CREATE DATABASE privileges (ACCOUNTADMIN works on most demo accounts) and a warehouse is selected (COMPUTE_WH is fine). Then paste and run the script below.
USE ROLE ACCOUNTADMIN;
USE WAREHOUSE COMPUTE_WH;
CREATE DATABASE IF NOT EXISTS QUICKSTARTS;
CREATE SCHEMA IF NOT EXISTS QUICKSTARTS.TABLEAU_SUPERSTORE;
USE SCHEMA QUICKSTARTS.TABLEAU_SUPERSTORE;
-- CSV format and external stage pointing at the public S3 bucket.
CREATE OR REPLACE FILE FORMAT csv_format
TYPE = CSV
FIELD_DELIMITER = ','
SKIP_HEADER = 1
FIELD_OPTIONALLY_ENCLOSED_BY = '"'
NULL_IF = ('NULL', 'null', '');
CREATE OR REPLACE STAGE superstore_stage
URL = 's3://sigma-quickstarts-main/sample-superstore/'
FILE_FORMAT = csv_format;
-- Tables with explicit, Snowflake-friendly column names (underscores in place of spaces).
CREATE OR REPLACE TABLE ORDERS (
ROW_ID INT,
ORDER_ID VARCHAR,
ORDER_DATE DATE,
SHIP_DATE DATE,
SHIP_MODE VARCHAR,
CUSTOMER_ID VARCHAR,
CUSTOMER_NAME VARCHAR,
SEGMENT VARCHAR,
COUNTRY_REGION VARCHAR,
CITY VARCHAR,
STATE_PROVINCE VARCHAR,
POSTAL_CODE VARCHAR,
REGION VARCHAR,
PRODUCT_ID VARCHAR,
CATEGORY VARCHAR,
SUB_CATEGORY VARCHAR,
PRODUCT_NAME VARCHAR,
SALES NUMBER(18,4),
QUANTITY INT,
DISCOUNT NUMBER(5,4),
PROFIT NUMBER(18,4)
);
CREATE OR REPLACE TABLE RETURNS (
RETURNED VARCHAR,
ORDER_ID VARCHAR
);
CREATE OR REPLACE TABLE PEOPLE (
REGIONAL_MANAGER VARCHAR,
REGION VARCHAR
);
-- Load each CSV from S3.
COPY INTO ORDERS FROM @superstore_stage/Sample-Superstore-Orders.csv.csv;
COPY INTO RETURNS FROM @superstore_stage/Sample-Superstore-Returns.csv.csv;
COPY INTO PEOPLE FROM @superstore_stage/Sample-Superstore-People.csv.csv;
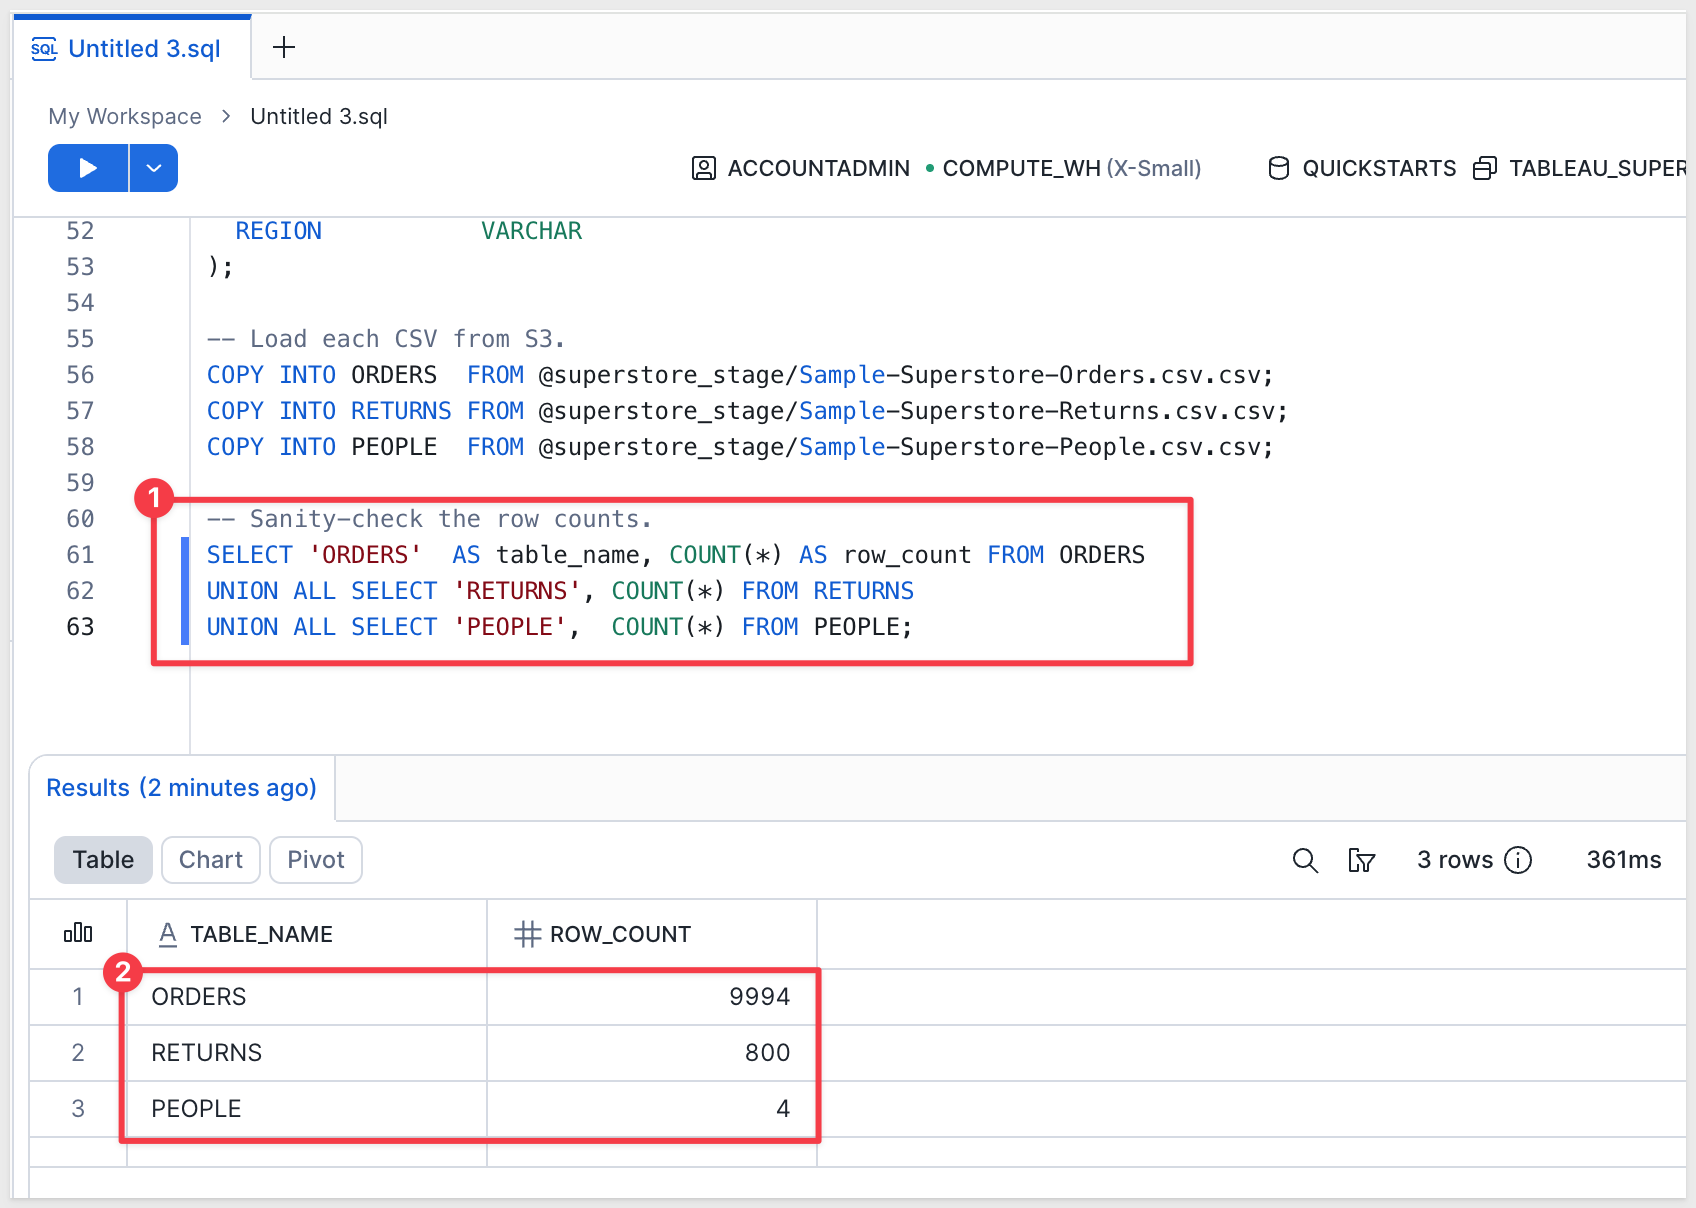
-- Sanity-check the row counts.
SELECT 'ORDERS' AS table_name, COUNT(*) AS row_count FROM ORDERS
UNION ALL SELECT 'RETURNS', COUNT(*) FROM RETURNS
UNION ALL SELECT 'PEOPLE', COUNT(*) FROM PEOPLE;
The script is safe to re-run if anything goes sideways — it drops and re-creates the three tables each time, so you won't end up with stale rows or half-loaded data.
Step 2: Confirm the row counts
The final SELECT returns three rows. The expected counts for the standard Sample-Superstore dataset are:
Step 3: Grant the Sigma connection role read access to the new database and schema
Sigma queries Snowflake under the role you selected when you created the connection. That role needs USAGE on the database and schema and SELECT on the tables — otherwise Sigma will see the account but not the data we just loaded.
The example below uses SIGMA_SERVICE_ROLE. If your connection uses a different role, swap the role name. You can confirm the role under Administration > Connections > [your connection] > Connection credentials.
USE ROLE ACCOUNTADMIN;
GRANT USAGE  ON DATABASE QUICKSTARTS                                   TO ROLE SIGMA_SERVICE_ROLE;
GRANT USAGE  ON SCHEMA   QUICKSTARTS.TABLEAU_SUPERSTORE                TO ROLE SIGMA_SERVICE_ROLE;
GRANT SELECT ON ALL TABLES    IN SCHEMA QUICKSTARTS.TABLEAU_SUPERSTORE TO ROLE SIGMA_SERVICE_ROLE;
GRANT SELECT ON FUTURE TABLES IN SCHEMA QUICKSTARTS.TABLEAU_SUPERSTORE TO ROLE SIGMA_SERVICE_ROLE;
The two GRANT USAGE statements give the role visibility into the database and schema. The two GRANT SELECT statements cover the three tables we just loaded plus any tables you add to the schema later.
With the install, demo data, and Sigma's connection access all in place, we're ready to run the conversion against the Tableau dashboard.
The skill runs the whole conversion in a single command — you only invoke /tableau-to-sigma once and answer a few prompts. From there it works autonomously through these stages:
- Fetch source artifacts from Tableau — workbook metadata,
.twbXML, view CSVs, calc-field definitions, dashboard PNG - Drop artifacts into
/tmp/— the local working folder every later stage reads from/ - Build (or reuse) the Sigma data model — sourced from the warehouse tables behind the dashboard
- Build the Sigma workbook — every chart and control positioned to mirror the Tableau dashboard
- Verify chart-level data parity — Sigma's query results compared row-for-row against the Tableau view CSVs
- Surface the gap report + final summary in Claude Code — what was auto-translated, what needs review
For this demo we'll run the conversion against the Superstore dashboard on your Tableau Cloud dev site.
Since we left off at Claude's prompt, we can just select the 1. A Tableau Cloud URL option:

The URL looks similar to this:
https://us-east-1.online.tableau.com/#/site/testsite-29eb398209/views/Superstore/Overview
Select Type something and paste your URL:
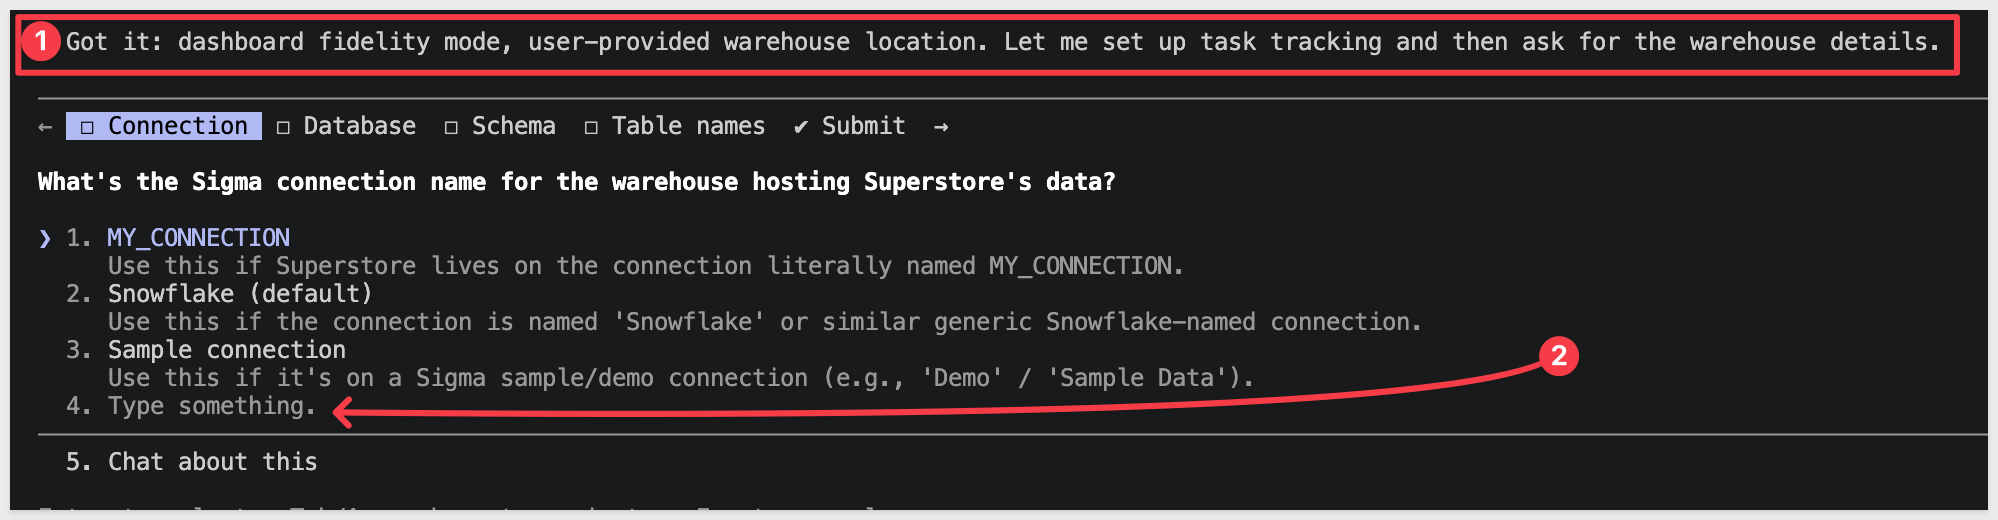
Claude will then ask what Conversion mode we want to use — select Dashboard fidelity (1:1):

Claude also needs to know where our dashboard data lives. Choose option 1:

Claude prompts for the connection, database, and schema. In our case, we need to select 4. Type something because we don't want Claude to waste time scanning several connections:
Use the values from the Prepare the Demo Data section:
Connection Name: {your Snowflake connection name in Sigma}
Database: QUICKSTARTS
Schema: TABLEAU_SUPERSTORE
The prompt is driven by prompt-data-location.rb in the skill repo — answering this once up front saves the skill from brute-force probing every Sigma connection looking for the source tables later (which gets slow on orgs with many connections).
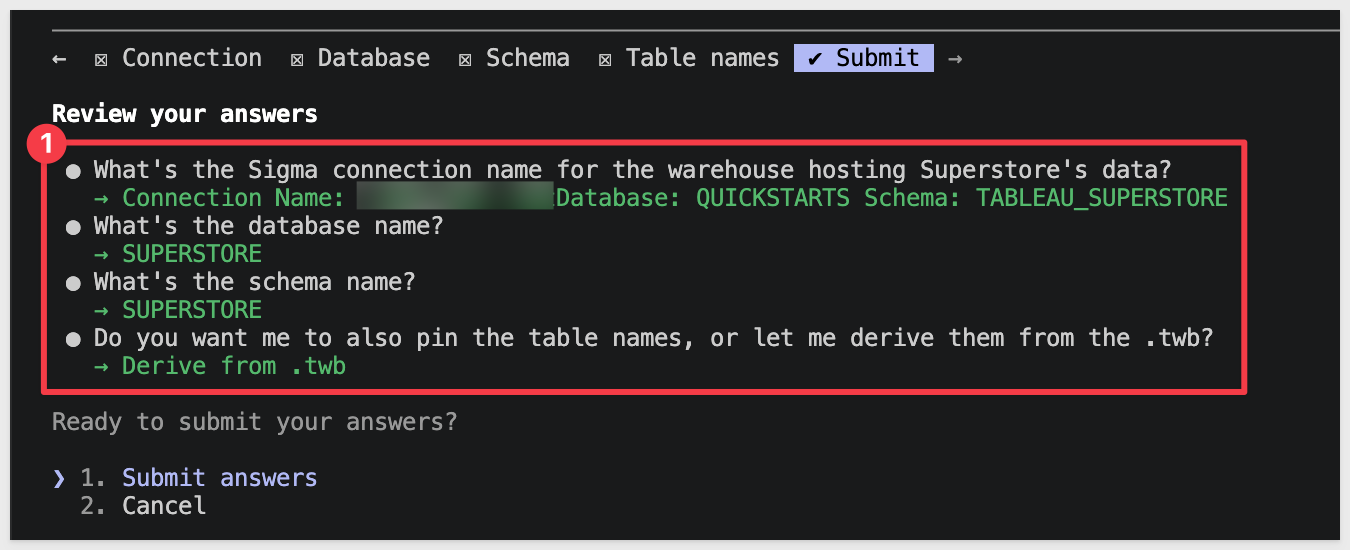
We are asked to approve our choices:
Claude will start going through its task list and may prompt for approvals along the way:
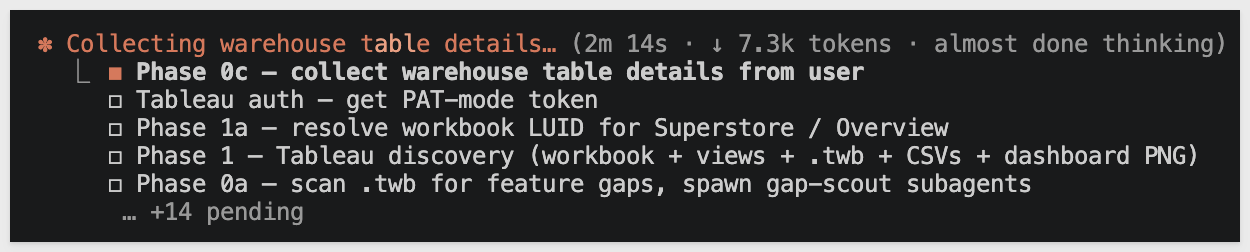
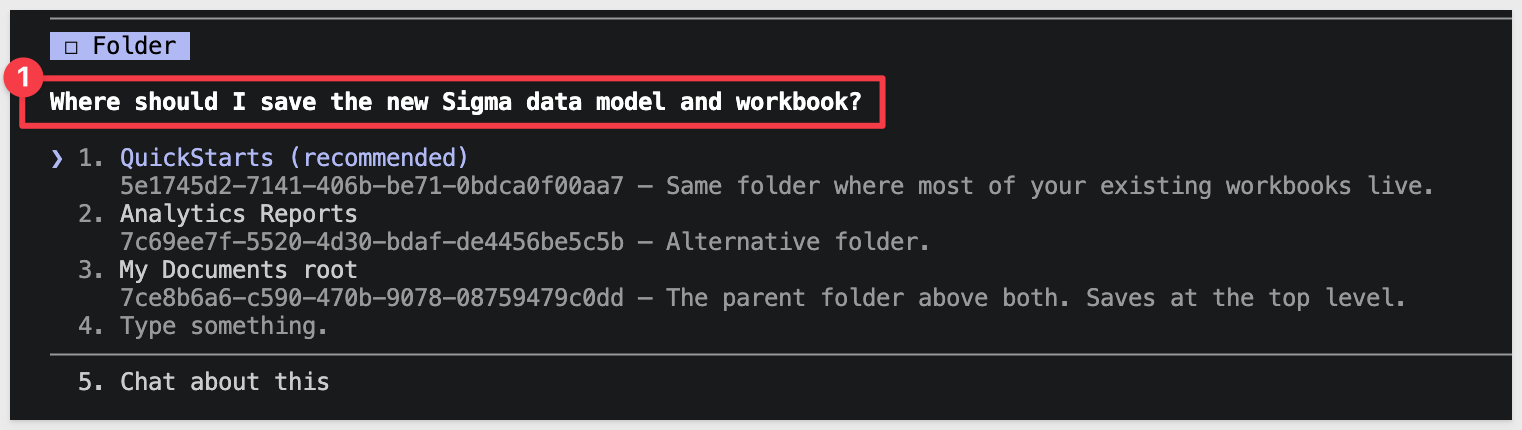
Claude will ask where to save the new data model and workbook in Sigma. Select a choice that makes sense in your Sigma instance:
Once fully complete, Claude lets us know:

It also tells us if there are any gaps:

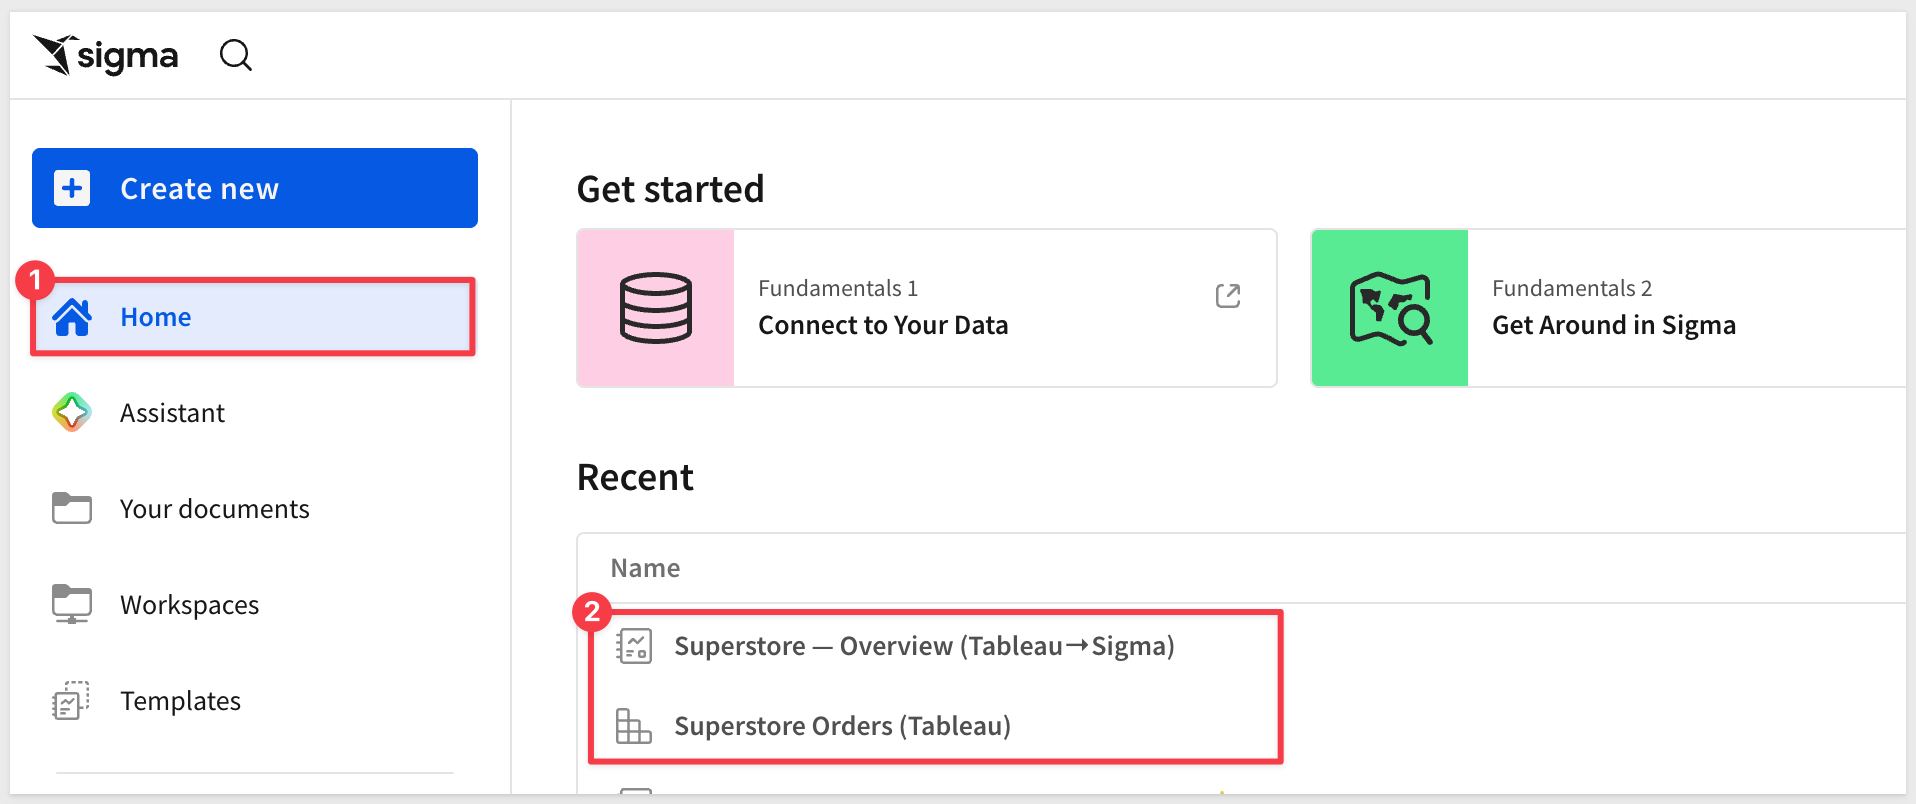
You'll have a Sigma data model and workbook in your org:
A gap report is created in /tmp/, along with a parity check confirming the numbers match the Tableau source.
From here the work is review — open the Sigma workbook, scan the gap report for any items flagged for follow-up, and tweak the look-and-feel to taste. Enrich and extend the new workbook using Sigma's AI Assistant and Actions
Workbook landed in Sigma: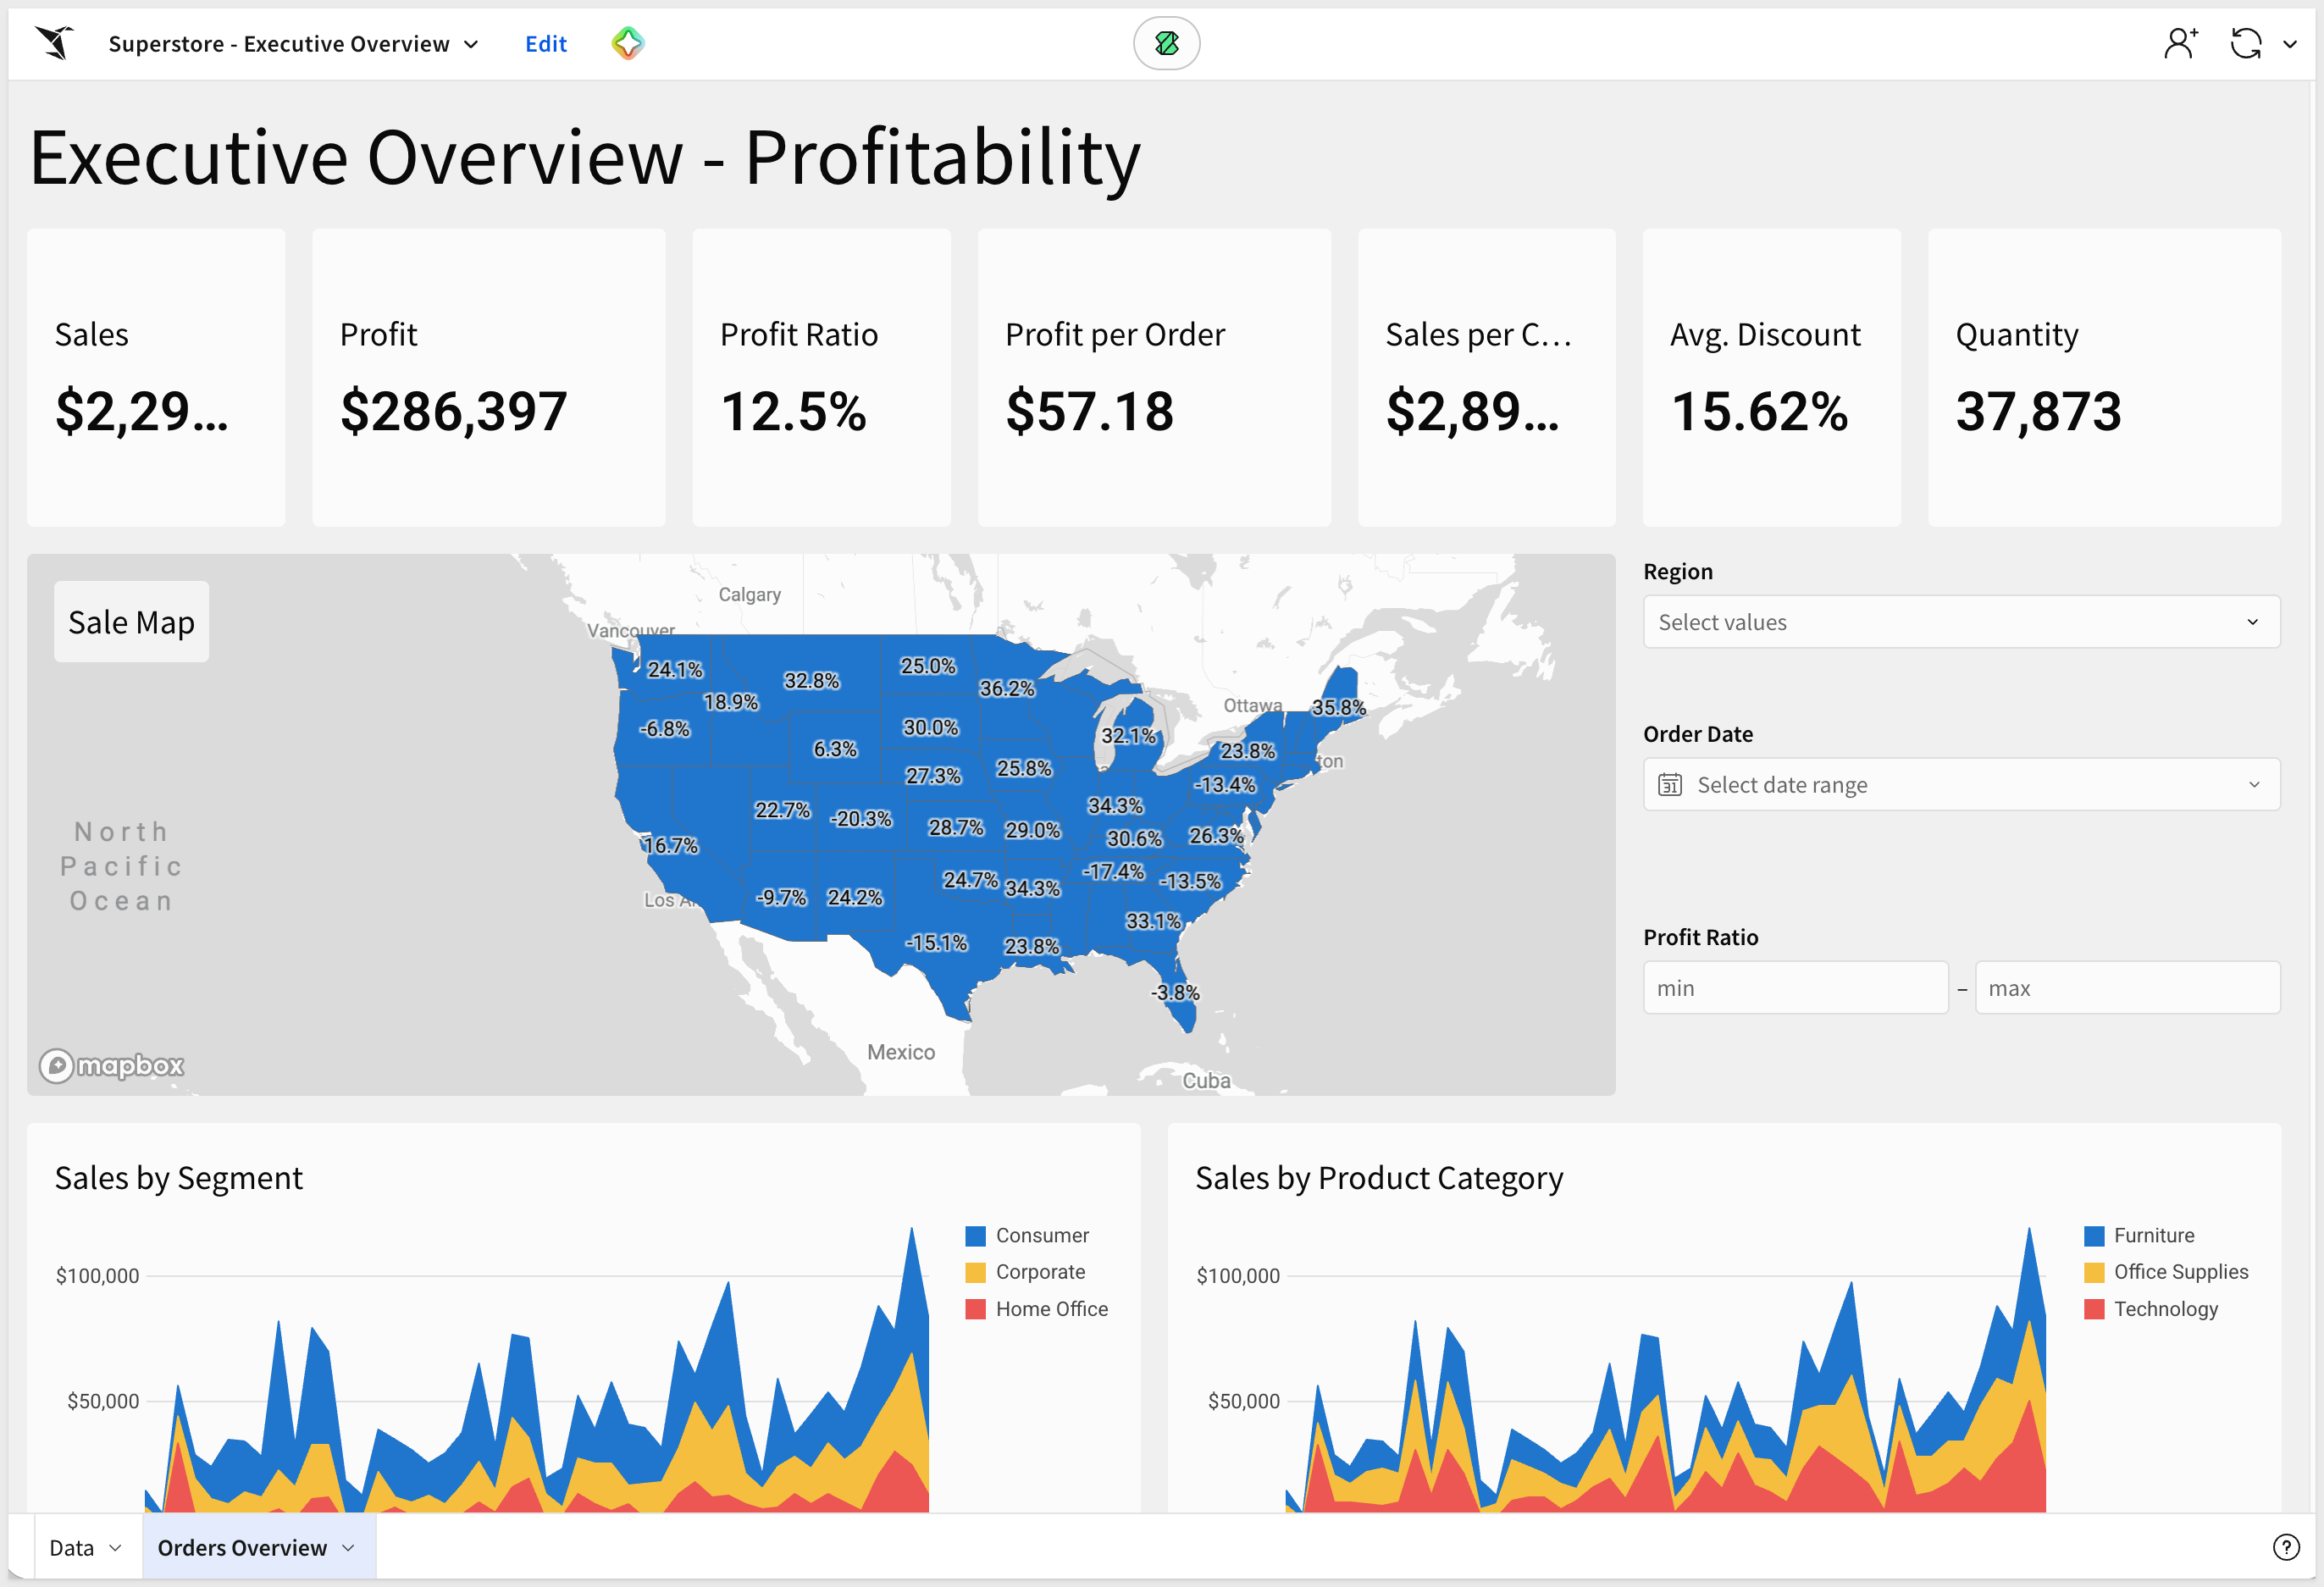
Data Model: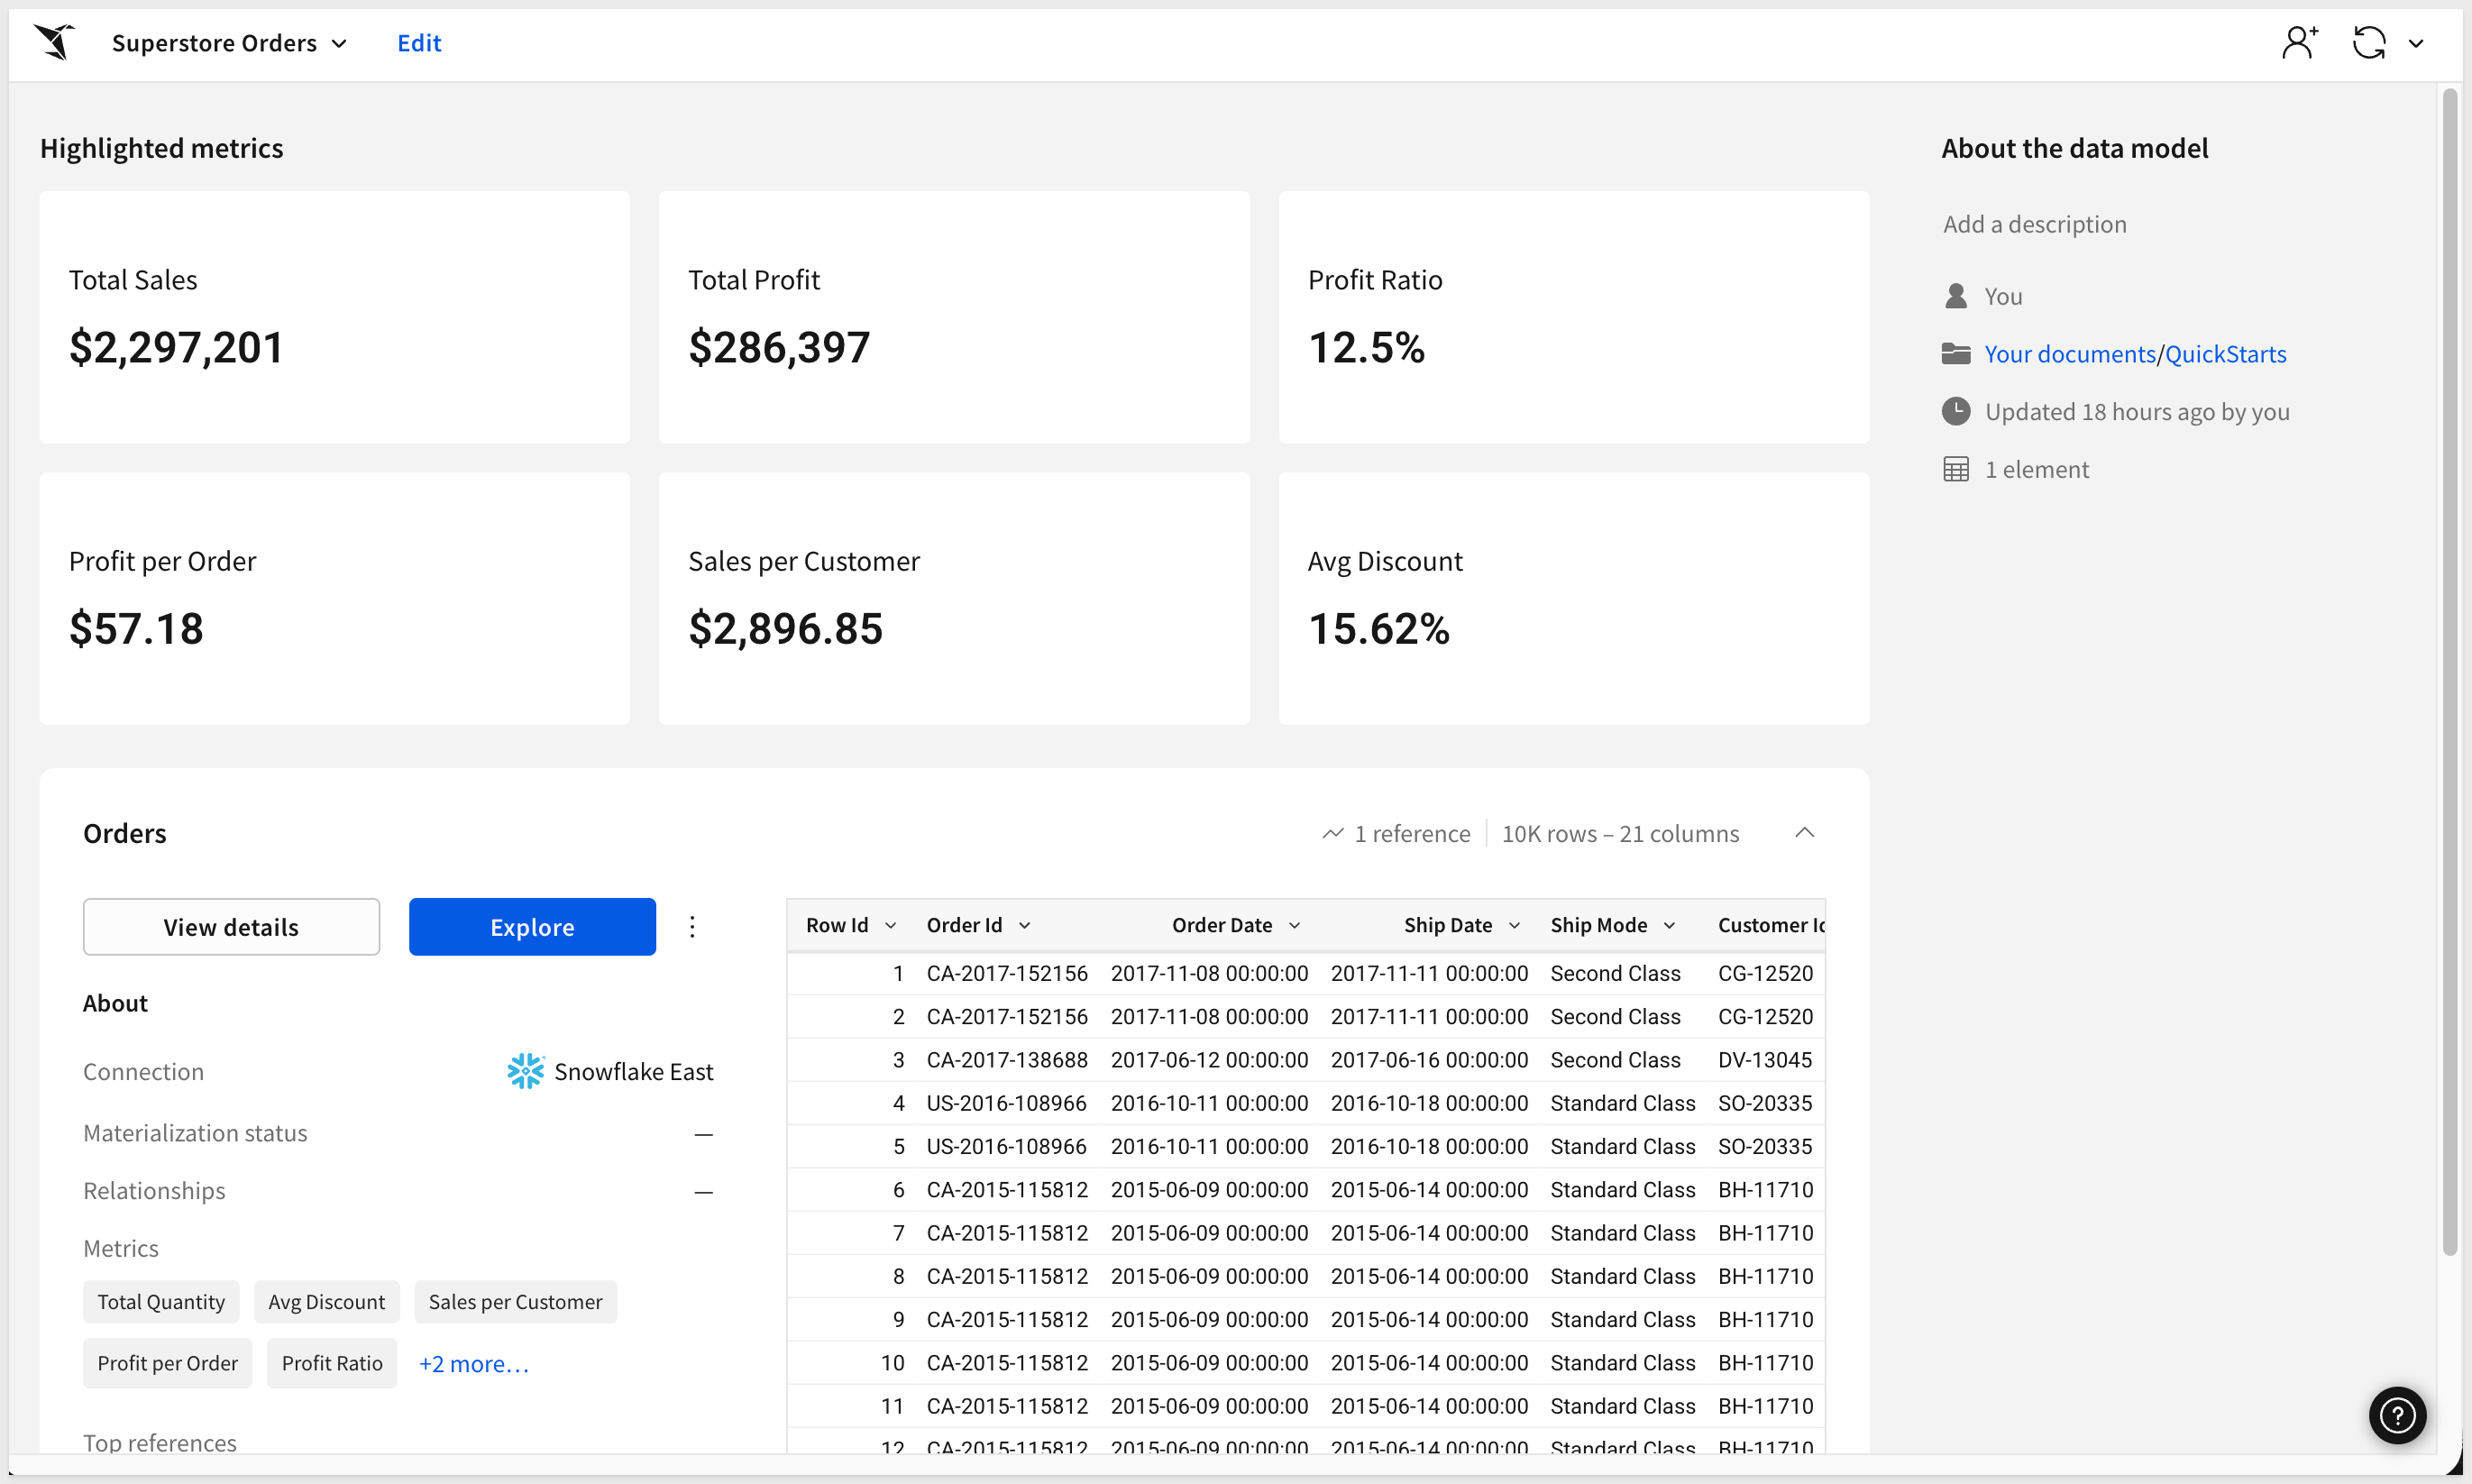
The sections that follow are reference material covering the workbook spec, what the skill does under the hood at each stage, scaling up for larger conversions, and common issues.
Skim if you're curious about a specific stage; skip if the working result is enough.
The conversion leans on two Sigma APIs — Workbook as Code and Data Models as Code — to build the data model and workbook from JSON specs. The same endpoints are available to you for inspecting what the skill produced, or for round-tripping a spec through your own tooling.
Endpoint | What it does |
| Create a workbook from a JSON spec (what the skill calls during |
| Fetch the spec of an existing workbook |
| Update a workbook in-place from a modified spec |
| Create a data model from a JSON spec (what the skill calls during |
| Fetch the spec of an existing data model |
| Update a data model in-place |
Try it in Postman:
Grab the workbook ID Sigma assigned during the conversion (visible in the Sigma UI URL after /workbook/, or in /tmp/), then:
GET https://api.<region>.aws.sigmacomputing.com/v2/workbooks/<workbookId>/spec
Authorization: Bearer <access_token>
The response is a single JSON document describing every page, element, control, and layout block in the workbook.
For example, the spec for the Superstore workbook we just migrated looks like this:
{
"workbookId": "68abe7c1-3ae2-4437-b9a8-d78a8f095c6d",
"name": "Superstore — Overview (Tableau→Sigma)",
"url": "https://app.sigmacomputing.com/quick-start-fundamentals-2026/workbook/Superstore-Overview-Tableau-Sigma-3bvLiL5BDx9MNn5z3v9vuB",
"documentVersion": 2,
"latestDocumentVersion": 2,
"ownerId": "zEoTFxOxZNR5mYKufCXN8yPtDaPDJ",
"folderId": "5e1745d2-7141-406b-be71-0bdca0f00aa7",
"createdBy": "zEoTFxOxZNR5mYKufCXN8yPtDaPDJ",
"updatedBy": "zEoTFxOxZNR5mYKufCXN8yPtDaPDJ",
"createdAt": "2026-06-03T15:14:15.470Z",
"updatedAt": "2026-06-03T15:15:07.658Z",
"schemaVersion": 1,
"pages": [
{
"id": "page-data",
"name": "Data",
"elements": [
{
"id": "master",
"kind": "table",
"source": {
"dataModelId": "fd8ab351-4f31-4f60-9801-937bd9d42884",
"elementId": "by8CF63nB0",
"kind": "data-model"
},
"columns": [
{
"id": "m-row-id",
"formula": "[Orders/Row Id]",
"name": "Row Id"
},
{
"id": "m-order-id",
"formula": "[Orders/Order Id]",
"name": "Order Id"
},
{
"id": "m-order-date",
"formula": "[Orders/Order Date]",
"name": "Order Date"
},
{
"id": "m-ship-date",
"formula": "[Orders/Ship Date]",
"name": "Ship Date"
},
{
"id": "m-ship-mode",
"formula": "[Orders/Ship Mode]",
"name": "Ship Mode"
},
{
"id": "m-customer-id",
"formula": "[Orders/Customer Id]",
"name": "Customer Id"
},
{
"id": "m-customer-name",
"formula": "[Orders/Customer Name]",
"name": "Customer Name"
},
{
"id": "m-segment",
"formula": "[Orders/Segment]",
"name": "Segment"
},
{
"id": "m-country",
"formula": "[Orders/Country]",
"name": "Country"
},
{
"id": "m-city",
"formula": "[Orders/City]",
"name": "City"
},
{
"id": "m-state",
"formula": "[Orders/State]",
"name": "State"
},
{
"id": "m-postal-code",
"formula": "[Orders/Postal Code]",
"name": "Postal Code"
},
{
"id": "m-region",
"formula": "[Orders/Region]",
"name": "Region"
},
{
"id": "m-product-id",
"formula": "[Orders/Product Id]",
"name": "Product Id"
},
{
"id": "m-category",
"formula": "[Orders/Category]",
"name": "Category"
},
{
"id": "m-sub-category",
"formula": "[Orders/Sub-Category]",
"name": "Sub-Category"
},
{
"id": "m-product-name",
"formula": "[Orders/Product Name]",
"name": "Product Name"
},
{
"id": "m-sales",
"formula": "[Orders/Sales]",
"name": "Sales"
},
{
"id": "m-quantity",
"formula": "[Orders/Quantity]",
"name": "Quantity"
},
{
"id": "m-discount",
"formula": "[Orders/Discount]",
"name": "Discount"
},
{
"id": "m-profit",
"formula": "[Orders/Profit]",
"name": "Profit"
}
],
"name": "Master",
"order": [
"m-row-id",
"m-order-id",
"m-order-date",
"m-ship-date",
"m-ship-mode",
"m-customer-id",
"m-customer-name",
"m-segment",
"m-country",
"m-city",
"m-state",
"m-postal-code",
"m-region",
"m-product-id",
"m-category",
"m-sub-category",
"m-product-name",
"m-sales",
"m-quantity",
"m-discount",
"m-profit"
],
"visibleAsSource": false
}
]
},
{
"id": "page-overview",
"name": "Overview",
"elements": [
{
"id": "txt-title",
"kind": "text",
"body": "# Executive Overview — Profitability"
},
{
"id": "kpi-row",
"kind": "container"
},
{
"id": "kpi-sales",
"kind": "kpi-chart",
"source": {
"elementId": "master",
"kind": "table"
},
"columns": [
{
"id": "k-sales-v",
"formula": "Sum([Master/Sales])",
"name": "Sales",
"format": {
"kind": "number",
"formatString": "$,.0f",
"currencySymbol": "$"
}
}
],
"value": {
"id": "k-sales-v"
},
"name": "Sales"
},
{
"id": "kpi-profit",
"kind": "kpi-chart",
"source": {
"elementId": "master",
"kind": "table"
},
"columns": [
{
"id": "k-profit-v",
"formula": "Sum([Master/Profit])",
"name": "Profit",
"format": {
"kind": "number",
"formatString": "$,.0f",
"currencySymbol": "$"
}
}
],
"value": {
"id": "k-profit-v"
},
"name": "Profit"
},
{
"id": "kpi-profit-ratio",
"kind": "kpi-chart",
"source": {
"elementId": "master",
"kind": "table"
},
"columns": [
{
"id": "k-pr-v",
"formula": "Sum([Master/Profit]) / NullIf(Sum([Master/Sales]), 0)",
"name": "Profit Ratio",
"format": {
"kind": "number",
"formatString": ",.1%"
}
}
],
"value": {
"id": "k-pr-v"
},
"name": "Profit Ratio"
},
{
"id": "kpi-profit-per-order",
"kind": "kpi-chart",
"source": {
"elementId": "master",
"kind": "table"
},
"columns": [
{
"id": "k-ppo-v",
"formula": "Sum([Master/Profit]) / NullIf(CountDistinct([Master/Order Id]), 0)",
"name": "Profit per Order",
"format": {
"kind": "number",
"formatString": "$,.2f",
"currencySymbol": "$"
}
}
],
"value": {
"id": "k-ppo-v"
},
"name": "Profit per Order"
},
{
"id": "kpi-sales-per-customer",
"kind": "kpi-chart",
"source": {
"elementId": "master",
"kind": "table"
},
"columns": [
{
"id": "k-spc-v",
"formula": "Sum([Master/Sales]) / NullIf(CountDistinct([Master/Customer Name]), 0)",
"name": "Sales per Customer",
"format": {
"kind": "number",
"formatString": "$,.2f",
"currencySymbol": "$"
}
}
],
"value": {
"id": "k-spc-v"
},
"name": "Sales per Customer"
},
{
"id": "kpi-avg-discount",
"kind": "kpi-chart",
"source": {
"elementId": "master",
"kind": "table"
},
"columns": [
{
"id": "k-ad-v",
"formula": "Avg([Master/Discount])",
"name": "Avg. Discount",
"format": {
"kind": "number",
"formatString": ",.2%"
}
}
],
"value": {
"id": "k-ad-v"
},
"name": "Avg. Discount"
},
{
"id": "kpi-quantity",
"kind": "kpi-chart",
"source": {
"elementId": "master",
"kind": "table"
},
"columns": [
{
"id": "k-qty-v",
"formula": "Sum([Master/Quantity])",
"name": "Quantity",
"format": {
"kind": "number",
"formatString": ",.0f"
}
}
],
"value": {
"id": "k-qty-v"
},
"name": "Quantity"
},
{
"id": "el-map",
"kind": "region-map",
"source": {
"elementId": "master",
"kind": "table"
},
"columns": [
{
"id": "rm-state",
"formula": "[Master/State]",
"name": "State"
},
{
"id": "rm-pr",
"formula": "Sum([Master/Profit]) / NullIf(Sum([Master/Sales]), 0)",
"name": "Profit Ratio",
"format": {
"kind": "number",
"formatString": ",.1%"
}
}
],
"region": {
"id": "rm-state",
"regionType": "us-state"
},
"label": [
{
"id": "rm-pr"
}
],
"name": "Sale Map"
},
{
"kind": "control",
"controlId": "ctl-region",
"id": "el-ctl-region",
"name": "Region",
"filters": [
{
"source": {
"kind": "table",
"elementId": "master"
},
"columnId": "m-region"
}
],
"controlType": "list",
"mode": "include",
"selectionMode": "multiple",
"values": [],
"source": {
"kind": "source",
"source": {
"kind": "table",
"elementId": "master"
},
"columnId": "m-region"
}
},
{
"kind": "control",
"controlId": "ctl-date",
"id": "el-ctl-date",
"name": "Order Date",
"filters": [
{
"source": {
"kind": "table",
"elementId": "master"
},
"columnId": "m-order-date"
}
],
"controlType": "date-range",
"mode": "between",
"includeNulls": "when-no-value-is-selected"
},
{
"kind": "control",
"controlId": "ctl-profit-ratio",
"id": "el-ctl-profit-ratio",
"name": "Profit Ratio",
"controlType": "number-range",
"includeNulls": "when-no-value-is-selected"
},
{
"id": "el-seg",
"kind": "area-chart",
"source": {
"elementId": "master",
"kind": "table"
},
"columns": [
{
"id": "seg-segment",
"formula": "[Master/Segment]",
"name": "Segment"
},
{
"id": "seg-month",
"formula": "DateTrunc(\"month\", [Master/Order Date])",
"name": "Month",
"format": {
"kind": "datetime",
"formatString": "%Y"
}
},
{
"id": "seg-sales",
"formula": "Sum([Master/Sales])",
"name": "Sales",
"format": {
"kind": "number",
"formatString": "$,.0f",
"currencySymbol": "$"
}
}
],
"yAxis": {
"columnIds": [
"seg-sales"
]
},
"xAxis": {
"columnId": "seg-month"
},
"color": {
"by": "category",
"column": "seg-segment"
},
"name": "Monthly Sales by Segment"
},
{
"id": "el-cat",
"kind": "area-chart",
"source": {
"elementId": "master",
"kind": "table"
},
"columns": [
{
"id": "cat-category",
"formula": "[Master/Category]",
"name": "Category"
},
{
"id": "cat-month",
"formula": "DateTrunc(\"month\", [Master/Order Date])",
"name": "Month",
"format": {
"kind": "datetime",
"formatString": "%Y"
}
},
{
"id": "cat-sales",
"formula": "Sum([Master/Sales])",
"name": "Sales",
"format": {
"kind": "number",
"formatString": "$,.0f",
"currencySymbol": "$"
}
}
],
"yAxis": {
"columnIds": [
"cat-sales"
]
},
"xAxis": {
"columnId": "cat-month"
},
"color": {
"by": "category",
"column": "cat-category"
},
"name": "Monthly Sales by Product Category"
}
]
}
],
"layout": "<?xml version=\"1.0\" encoding=\"utf-8\"?>\n<Page type=\"grid\" gridTemplateColumns=\"repeat(24, 1fr)\" gridTemplateRows=\"auto\" id=\"page-data\">\n <LayoutElement elementId=\"master\" gridColumn=\"1 / 25\" gridRow=\"1 / 21\"/>\n</Page>\n<Page type=\"grid\" gridTemplateColumns=\"repeat(24, 1fr)\" gridTemplateRows=\"auto\" id=\"page-overview\">\n <LayoutElement elementId=\"txt-title\" gridColumn=\"1 / 25\" gridRow=\"1 / 3\"/>\n <GridContainer elementId=\"kpi-row\" type=\"grid\" gridColumn=\"1 / 25\" gridRow=\"3 / 11\" gridTemplateColumns=\"repeat(24, 1fr)\" gridTemplateRows=\"auto\">\n <LayoutElement elementId=\"kpi-sales\" gridColumn=\"1 / 5\" gridRow=\"1 / 9\"/>\n <LayoutElement elementId=\"kpi-profit\" gridColumn=\"5 / 8\" gridRow=\"1 / 9\"/>\n <LayoutElement elementId=\"kpi-profit-ratio\" gridColumn=\"8 / 11\" gridRow=\"1 / 9\"/>\n <LayoutElement elementId=\"kpi-profit-per-order\" gridColumn=\"11 / 15\" gridRow=\"1 / 9\"/>\n <LayoutElement elementId=\"kpi-sales-per-customer\" gridColumn=\"15 / 19\" gridRow=\"1 / 9\"/>\n <LayoutElement elementId=\"kpi-avg-discount\" gridColumn=\"19 / 22\" gridRow=\"1 / 9\"/>\n <LayoutElement elementId=\"kpi-quantity\" gridColumn=\"22 / 25\" gridRow=\"1 / 9\"/>\n </GridContainer>\n <LayoutElement elementId=\"el-map\" gridColumn=\"1 / 21\" gridRow=\"11 / 30\"/>\n <LayoutElement elementId=\"el-ctl-region\" gridColumn=\"21 / 25\" gridRow=\"11 / 16\"/>\n <LayoutElement elementId=\"el-ctl-date\" gridColumn=\"21 / 25\" gridRow=\"16 / 21\"/>\n <LayoutElement elementId=\"el-ctl-profit-ratio\" gridColumn=\"21 / 25\" gridRow=\"21 / 26\"/>\n <LayoutElement elementId=\"el-seg\" gridColumn=\"1 / 13\" gridRow=\"30 / 45\"/>\n <LayoutElement elementId=\"el-cat\" gridColumn=\"13 / 25\" gridRow=\"30 / 45\"/>\n</Page>\n"
}
Every chart element references the master table on the Data page — that's the "two pages, master is the single source" rule from Building the Sigma Workbook showing up in practice.
Once you've got the spec, you can hand-edit and PUT it back to update the workbook, version-control it in Git alongside other infrastructure-as-code, or use it as a template to script bulk workbook creation.
After you answer the interactive prompts, the skill kicks off discovery — the first autonomous phase. It pulls everything it needs from Tableau into a structured local snapshot in /tmp/ before any conversion logic runs. Every later phase reads from these artifacts, so the quality of the discovery output sets the ceiling for the whole conversion.
This phase also produces the first thing worth reviewing: a gap report that classifies every Tableau feature in the workbook as auto-convertible, needs-a-hint, manual-fix, or unhandled. Reading it before authoring a Sigma spec avoids the time you'd otherwise burn discovering mid-build that a calc field uses a function Sigma doesn't have.
Claude resolves the dashboard URL to a workbook ID and starts pulling every artifact it needs into /tmp/ — workbook metadata, the .twb XML, every dashboard view as a CSV, the datasource's calculated-field definitions, and a rendered PNG of the dashboard. The fetches run in parallel against Tableau's REST and VDS APIs.
In parallel with the artifact fetches, Claude runs scripts/scan-workbook-gaps.rb against the .twb to inventory every Tableau feature the workbook uses and classify each as:
- Auto: the skill translates end-to-end with no intervention
- Hint: the skill emits a
WARNwith a copy-paste Sigma formula; agent reviews - Manual: post-publish setup required (typically cross-chart action filters)
- Unhandled: feature not yet covered — the gap-scout subagent attempts an autonomous translation against the Sigma org, persists the rule on success, escalates on failure
Claude then reads the dashboard PNG via the multimodal tool before writing any spec — this is mandatory per the skill's Phase 1d checklist. CSV headers don't tell you bar-vs-pie, dual-axis-vs-single, or what controls live on the dashboard's filter shelf.
The gap report lands at /tmp/ alongside a workbook-content-gaps-report.json companion (machine-readable, useful when batch-orchestrating multiple conversions). Reviewing the markdown report sets honest expectations on what the conversion will and won't handle cleanly.
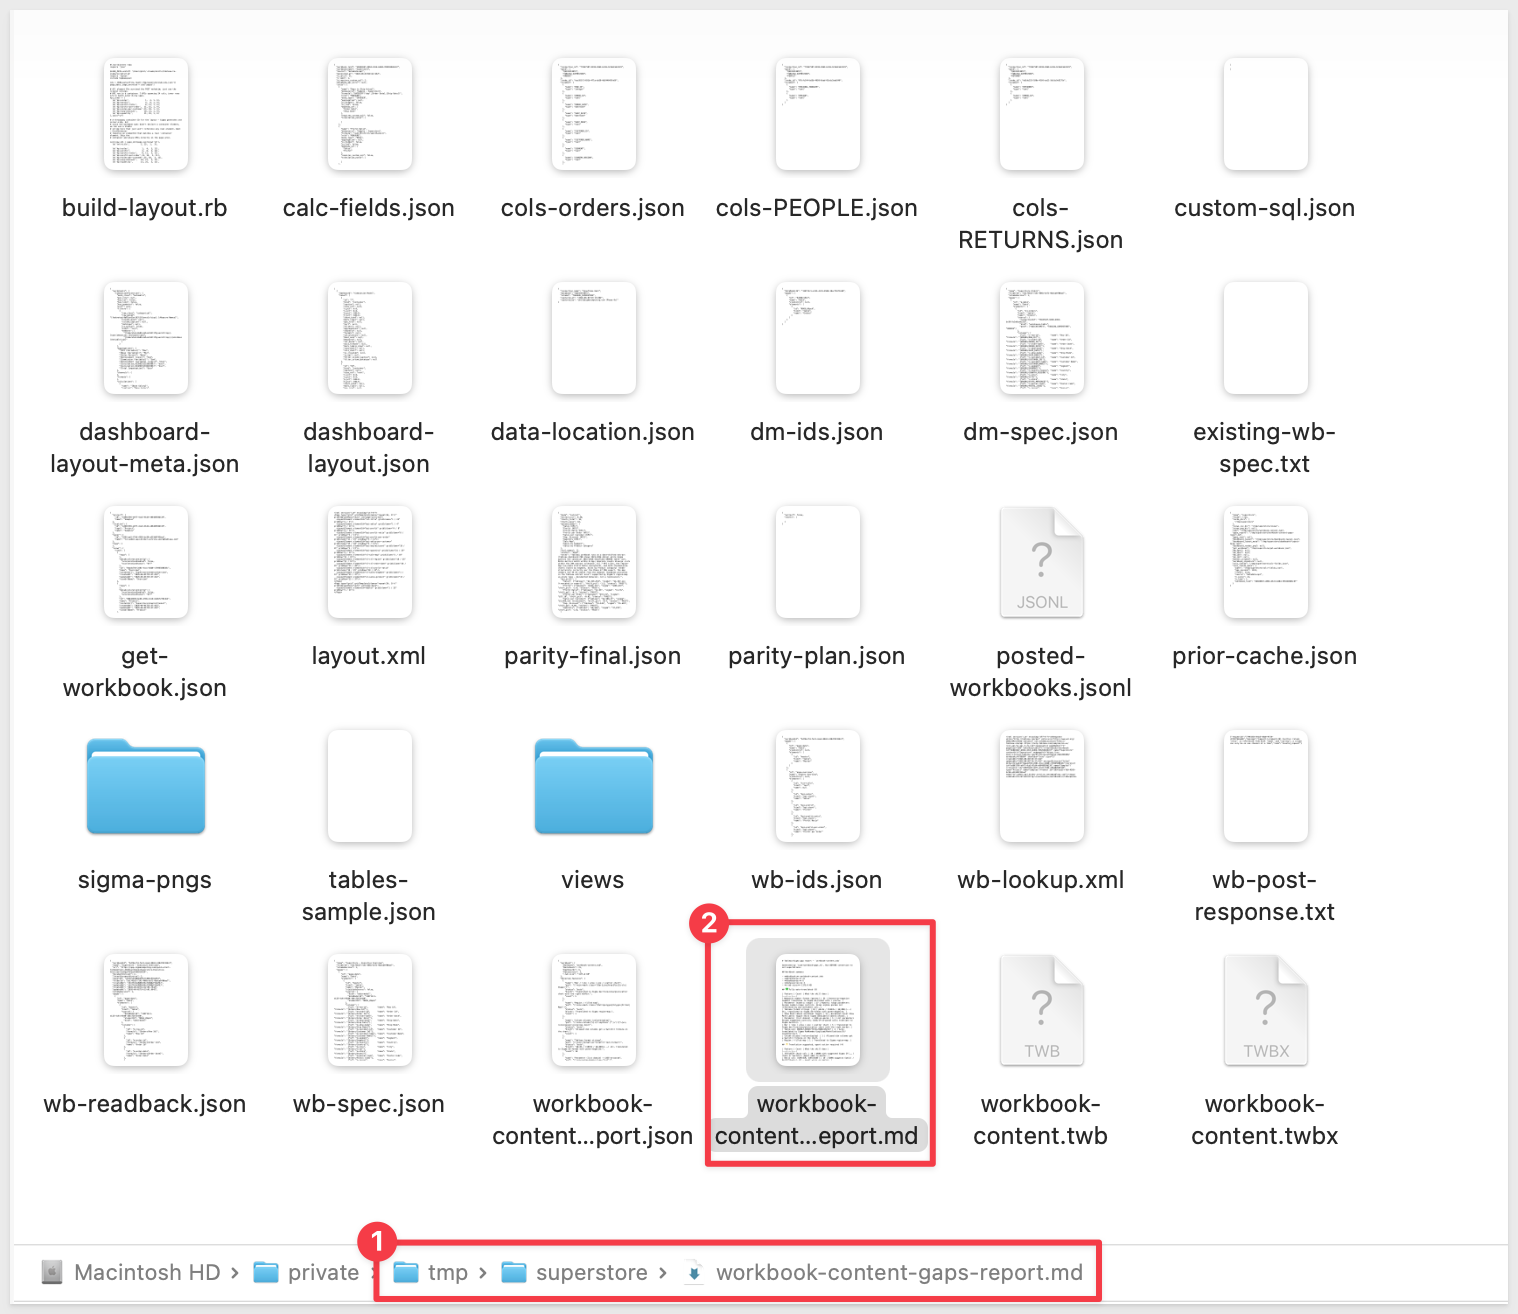
For example, this gap report tells us what was fully translated and suggestions for a few items that remain:
# Tableau→Sigma gap report — `workbook-content.twb`

Generated by `scan-workbook-gaps.rb`. Run BEFORE conversion to set expectations.

## Workbook summary

- **Workbook:** workbook-content.twb
- **Worksheets:** 21
- **Dashboards:** 6
- **Datasources:** 3
- **.twb size:** 1175.8 KB

## ✅ Fully auto-translated (9)

| Feature | Count | What the skill does |
|---|---|---|
| Negative number format (parens) | 53 | Parens-on-negative segment translates to Sigma d3-format with ( prefix. |
| Parameter (numeric range) | 27 | Numeric range parameters become number-range controls. Skips orphan params not referenced by any worksheet calc. |
| Tableau format strings | 18 | p0.0% / C1033% / $#,##0;(...) etc. translated to Sigma d3-format with paren-negative. |
| Show Mark Labels worksheet toggle | 11 | Worksheet-level Show Mark Labels toggle emits Sigma dataLabel:{labels:shown}. |
| Parameter (list domain) + CASE-on-param | 5 | List parameters become segmented controls; CASE/IF-on-param calcs translate to Sigma Switch(). |
| Bar / line / area / pie / scatter chart | 5 | Translated to Sigma bar/line/area/pie/scatter chart with the right marker. |
| Table-calc INDEX/LOOKUP/TOTAL/RANK/ZN/IIF | 4 | Auto-translated to Sigma RowNumber/Lag/Lead/Rank/Coalesce/If/CountDistinct. |
| Column aliases (value→display) | 1 | Aliased dim columns get a Switch() formula on the chart. |
| Region / filled map | 1 | Translated to Sigma region-map. |

## ⚠️ Translation suggested, agent action required (4)

| Feature | Count | What the skill does |
|---|---|---|
| IF/ELSEIF chain calc | 10 | WARN with suggested Sigma If(...) chain or Switch(). Agent adds to master. |
| Ratio calc (SUM/SUM, SUM/COUNT) | 10 | WARN suggests Sum(x) / NullIf(Sum(y), 0) — agent wires on master. |
| Reference lines / bands / trendlines | 10 | WARN per chart; agent adds Sigma referenceMarks manually post-publish (see beads-sigma-7ak). |
| FIXED LOD calc | 6 | WARN with suggested Sigma window aggregate or Custom SQL element. |

## 🛠 Post-publish manual setup required (3)

| Feature | Count | What the skill does |
|---|---|---|
| Dashboard filter / highlight / nav actions | 5 | Skill writes actions.md listing each action; customer wires Sigma cross-element filtering after publish. |
| Drill hierarchies | 3 | Hierarchies map to pivot rowsBy OR a segmented drill-level control (beads-sigma-jbw). |
| Forecast / trendline model | 1 | No Sigma forecast primitive; agent emits a note + Custom SQL option (beads-sigma-yi0). |

## ❌ Not yet handled — escalation path (0)

_None detected._

## Suggested next steps

2. The **Manual** features need post-publish work. See `<workbook>-actions.md` after conversion for action-filter mappings.
3. The **Hint** features will show as `WARN` lines during conversion with copy-paste-ready Sigma formulas — review each before publishing.

_Generated by tableau-to-sigma skill. Issues: https://github.com/sigmacomputing/quickstarts-public/issues_
Before building a new data model, the skill scans your Sigma org for an existing DM that already covers the workbook's columns. scripts/find-or-pick-dm.rb parallel-fetches up to 25 DM specs and scores each against the workbook's signature:
- Column overlap (0.7 weight) — how many of the workbook's referenced columns exist on the candidate DM
- Source-table FQN overlap (0.2 weight) — does the DM source from the same warehouse tables
- Metric overlap (0.1 weight)
A score ≥ 0.85 auto-reuses the DM (skips the DM-build work — typically the heaviest 2-3 minutes of the conversion). A score between 0.6 and 0.85 prompts the operator. Below 0.6, the skill builds new.
When reusing a DM, the mandatory next step is scripts/inspect-dm-shape.rb. This inspects the DM's element graph and emits a per-column resolution plan classifying each workbook-referenced column as either:
location: "fact"— direct reference, formula[Master/Column Name]location: "dim"— Lookup required, with the exact formula shown verbatim
This eliminates the 2-3 minute spec-rework loop that previously hit when a reused DM had separate dim elements and the agent assumed a flat fact.
With the DM resolved (reused or freshly built), Claude composes the workbook spec. For a single-dashboard URL the default is dashboard-fidelity mode — every Tableau tile maps to a Sigma element, positioned in the same grid.
The spec follows three mandatory rules — surfaced loudly in the skill's SKILL.md and the spec validator:
- Two pages, always. A
Datapage holds the master table (sourced from the DM); a content page holds the charts, controls, and text. Co-locating master + charts puts a giant table on the dashboard the user has to delete. - Master is the single source. Every chart element sets
source: {kind: "table", elementId: "master"}, regardless of which page it lives on. Cross-page references are fully supported. - POST once, PUT for every update.
POST /v2/workbooks/specis create-only. Re-POSTing during error recovery creates a duplicate workbook inMy Documents— exactly the regression that motivated the orphan-cleanup tooling.
After the workbook POST + readback, Claude builds and applies the layout. The skill runs these two scripts under the hood (shown for reference — you don't run them yourself):
ruby scripts/build-dashboard-layout.rb \
  --layout /tmp/<name>/dashboard-layout.json \
  --wb-ids /tmp/<name>/wb-ids.json \
  --out /tmp/<name>/layout.xml

ruby scripts/put-layout.rb \
  --workbook <workbook-id> \
  --layout /tmp/<name>/layout.xml
build-dashboard-layout.rb walks each Tableau zone, converts its x_pct / y_pct / w_pct / h_pct into Sigma 24-column grid spans, and stretches adjacent tiles to close gaps where Tableau had legend or filter zones Sigma doesn't render. Skipping this step makes Sigma render every tile in a single-column auto-stack — the regression the hard gate catches.
The conversion is not complete until every chart's Sigma values match Tableau's view CSV. scripts/phase6-parity.rb runs in two passes:
- Pass 1 — auto-builds a parity plan by matching Sigma chart-element names to Tableau view CSVs; emits per-chart SQL queries.
- Pass 2 — finalize: Claude fires the listed Sigma queries in a single parallel MCP batch, the script verifies row-level equality (or structural-only with measure-drift tolerance when
--extract-modeis set), and writesparity-final.json.
ruby scripts/phase6-parity.rb --tableau /tmp/<name> --workbook-id <id>
# ... agent collects actuals via mcp__sigma-mcp-v2__query ...
ruby scripts/phase6-parity.rb --tableau /tmp/<name> --finalize \
  --actuals /tmp/<name>/parity-actuals.json
The conversion is gated by scripts/assert-phase6-ran.rb, which checks four independent things:
- Phase 6 ran —
parity-final.jsonexists withstatus=PASSat the required pass-rate - No orphan workbooks —
posted-workbooks.jsonlhas ≤ 1 entry, orcleanup-marker.jsonshows a successful non-dry-run cleanup - No
type=errorcolumns on the live workbook — catches circular references and runtime errors introduced after the initial POST - Real layout applied — the workbook spec's top-level
layoutfield is non-empty and isn't Sigma's auto-stack signature
ruby scripts/assert-phase6-ran.rb --tableau /tmp/<name>
Exit 0 means the conversion may declare GREEN. Any non-zero exit means downgrade to YELLOW or RED with a documented reason.
For multi-workbook migrations (10+ workbooks at once), tableau-to-sigma is one of three skills you'll use together. The batch flow specifically pairs the converter with the tableau-assessment skill:
tableau-assessmentinventories the Tableau Cloud site (workbooks, datasources, refresh history, license posture, per-workbook complexity from a.twbgap-scan) and emits two artifacts: a shareable readout HTML, and abatch-plan.jsonwith wave-by-wave subagent briefs. Workbooks are clustered by shared warehouse tables so workbooks that should share a DM build a leader DM first and followers reuse it.- For any cluster whose data isn't already in the warehouse, run
tableau-vds-to-snowflakeper datasource before kicking off the cluster's conversion wave. Sigma needs warehouse-native data; the converter can't operate on a Tableau-extract-only datasource. - The conversation-layer agent fires each conversion wave as a parallel batch of
Agent()calls, each carrying a self-contained brief generated bytableau-to-sigma'sscripts/orchestrate-batch.rbcompanion intableau-assessment. Cluster leaders build the DM; followers reuse it viafind-or-pick-dm.rb+inspect-dm-shape.rb. Continue-on-failure semantics mean a single broken workbook doesn't block the rest of the batch.
Per-follower real time is typically 6-8 min — saves the 2-3 minutes of DM-build work plus most of discovery by reusing the leader's artifacts.
- The data-location prompt didn't fire, OR you want a clean state between runs:
Three places hold state from prior conversions:- Local working dir —
/tmp/holds discovery artifacts, the data-model spec, the workbook spec, and the parity report. Safe to/ rm -rfbetween runs. - Project memory —
~/.claude/projects/holds anything Claude auto-saved across sessions (warehouse paths, parity-mode hints, error-handling shortcuts). Inspect each file (/memory/ ls+cat) and delete only the ones with aHow to apply:block that bypasses a prompt you want to see.
- Local working dir —
The most common culprit for the Phase 0c bypass is superstore_location.md. Don't blindly nuke the whole directory — some memories (your role, API base, extract-drift parity-mode) are useful operational guidance.
The directory name is your launch path with / swapped for -, so ~/quickstarts-public becomes -Users-.
- Sigma's
Trash— the data model and workbook from a prior run land here on delete. Sigma's UI can't permanently purge them today, butfind-or-pick-dm.rbfilters outisArchived: trueitems so they don't bias the picker. Safe to leave in Trash. - Three workbooks in My Documents:
POST is create-only; each retry creates a new workbook. Runruby scripts/cleanup-orphan-workbooks.rb --workdir /tmp/to delete all-but-the-most-recent ID viaDELETE /v2/files/{id}. - Single-column auto-stack layout:
Sigma's server auto-generates a left-half stacked layout when a workbook is POSTed without one.assert-phase6-ran.rbgate 4 catches this; fix by runningbuild-dashboard-layout.rb+put-layout.rb. - Chart renders blank in Sigma but spec compiled:
A column resolved totype=error— typo'd ref,IsIn(), a window function in a calc column. Runverify-workbook.rbfor the diagnostic;mcp__sigma-mcp-v2__describeon the element shows which column is broken. - Pivot table appears as a flat table:
Verifyparse-twb-layout.rbemittedchart_kind: pivot-table. If it emittedtableinstead, the source worksheet had dims on only one shelf — that's a flat detail list, not a crosstab. - KPI tile missing from Sigma:
If a Tableau scorecard parsed as something other thanchart_kind: kpi, the worksheet probably had a hidden dim on a shelf (color encoding, detail). Inspectrows_shelf/cols_shelfon the zone JSON. - Sigma MCP query 401s mid-Phase 6:
The MCP session has staled. Re-callmcp__sigma-mcp-v2__begin_sessionand retry the query. Do not abandon Phase 6 over a recoverable auth error. - "Table not found" or "Connection has no access" during data-model build:
The warehouse table the Tableau workbook reads isn't in any Sigma connection your user can reach. Either (a) ask to grant Sigma access to the existing warehouse table, or (b) land the Tableau datasource into a fresh warehouse table using the siblingtableau-vds-to-snowflakeskill, then re-runtableau-to-sigma. The skill explicitly bails before authoring a broken spec. POST /v2/workbooks/specreturns 404:
TheWorkbook as Codefeature isn't enabled on your Sigma org. File a request with your internal Sigma support / CSM team to enable it on your org, then re-run. Validate by tryingGET /v2/workbooks/in Postman — a/spec 200with a JSON body confirms the flag is on; a404means it's still off.- Snowsight: "This role cannot create a table in QUICKSTARTS.TABLEAU_SUPERSTORE":
The role active in the Snowsight UI (top-right role badge) isn't the same as the role you set in your worksheet withUSE ROLE. The load wizard uses the UI's active role, not the worksheet's. Click the role badge in the top-right and switch toACCOUNTADMIN(or the role that owns the schema) before re-running the load. - Setup script ran but
ruby ~/.claude/skills/tableau-to-sigma/scripts/setup.rbreports "No such file or directory":
The symlinks in~/.claude/skills/point at~/quickstarts-public/..., but~/quickstarts-public/doesn't actually exist on disk. You skipped (or didn't complete) Steps 1–4 of the install. Runls ~/quickstarts-public/tableau-migration-skills/tableau-to-sigma/to confirm — if it errors, re-run the clone steps from the install section.
What you built is less a single migration and more a repeatable conversion path. The Sigma workbook the skill produced isn't a hand-rebuilt one-off — it's the output of a process you can point at any Tableau dashboard whose data already lives somewhere Sigma can read. The data model came from the warehouse tables, the layout mirrored the source dashboard, and the parity check confirmed the numbers without you having to spot-check each chart.
The techniques worth carrying into your next migration:
- Land the data first, convert second. Sigma queries the warehouse live, so the conversion can only ever be as good as the warehouse-side data. The skill bails before authoring a broken spec when it can't find the tables — that fail-fast posture saves rework.
- Read the gap report before opening the workbook. It sets honest expectations on what was auto-translated, what needs review, and what isn't covered yet. A
WARNline is easier to handle before you've opened the Sigma workbook than after. - Treat the data-location answer as part of the spec. Answering it once up front skips the skill probing every Sigma connection on your org, and the answer is part of the recoverable state if you need to re-run.
- Use the four-gate hard check as the "done" signal, not a visual look-over. A parity check that passes four gates is a much stronger guarantee than "the dashboard looks right."
When you're ready to scale past a single workbook, tableau-assessment produces the cluster plan and tableau-vds-to-snowflake lands Tableau-only datasources into the warehouse — the same converter then runs in batch mode against the result. The narrow conversion you just walked through is the building block for migrations of dozens or hundreds of workbooks.
Additional Resource Links
Blog
Community
Help Center
QuickStarts
Be sure to check out all the latest developments at Sigma's First Friday Feature page!