A common ask from teams evaluating Sigma is migrating their Power BI footprint — usually to take advantage of all the amazing things Sigma offers. The conversion itself can be a blocker — and the part this QuickStart automates.
The usual Power BI-to-Sigma migration loop is rebuild-the-semantic-model-by-hand, rewrite every DAX measure, relay each page, eyeball the numbers against the source, hope nothing drifted in the translation. Done on a single report it's tedious. Across an entire workspace can be the reason migration projects slip.
This QuickStart walks through a Claude Code skill called powerbi-to-sigma that automates the loop.
Point it at a Power BI report; it extracts the semantic model and report layout from Fabric (PBIR or the older single-file format), translates the DAX measures into Sigma formulas, builds (or reuses) a Sigma data model from the warehouse tables behind the model, and lays the workbook out to mirror the source. It then runs a verification pass to confirm every column reference in the Sigma model resolves cleanly against the live warehouse, and surfaces a punch list of anything it couldn't auto-translate — instead of silently producing a broken workbook.
For the demonstration, we'll run the skill end-to-end against a sample Power BI report on a Fabric workspace. You'll see the artifacts each phase produces, the DAX-translation breakdown the converter hands back, the verification report against the live warehouse, and the resulting Sigma data model and workbook landed in your org — along with the gap list of items to hand-polish.
What else this enables
A pure lift-and-shift is the floor, not the ceiling. The same skill family supports three follow-on moves that turn a migration into an upgrade:
- Dedup before you migrate. Most BI estates carry years of dashboard sprawl — multiple near-identical dashboards built by different teams over time. The assessment skill flags dashboards that are roughly 90% the same and recommends merging them before conversion. You move 200 dashboards instead of 800, and every downstream conversation is simpler. Pair this with the usage data the assessment pulls (who views what, how often) and you can confidently retire cold content rather than carry it forward.
- Enhance, don't just translate. Many "dashboards" in legacy tools are really input-driven workflows in disguise — a dashboard whose data is refreshed by uploading a CSV each morning is actually a forecasting app waiting to happen. After the lift-and-shift, the skill can suggest replacing those patterns with native Sigma constructs: input tables for write-back, Sigma Assistant for natural-language analysis, scheduled agents for routine summaries. The result isn't "the old dashboard, in a new tool" — it's "the workflow, finally done right."
- Audit your source as a side effect. The parity check that closes the run isn't just a confidence test on the migration — it's a fresh pair of eyes on the source platform's math. Sigma customers have caught multi-year calculation errors during their first migration run because the parity gate flagged a Sigma vs source mismatch and the source turned out to be wrong. Plan the migration as your final audit of the legacy system.
Target Audience
Sigma SEs, technical CSMs, and migration partners running Power BI-to-Sigma conversions — or scoping a batch migration with the companion powerbi-assessment skill.
Prerequisites
Claude Codeinstalled (CLI or desktop).- Sigma API credentials.
- Power BI / Fabric access with permission to read the target workspace. You do not need to register an Entra app — the skill authenticates via device-code flow using the well-known Power BI Desktop public client.
Python 3.10or newer with themsalandtruststorepackages (the skill installs them viarequirements.txt). macOS's stock system Python is typically 3.9 — older than the skill needs. Ifpython3 --versionreports anything below 3.10, install a newer interpreter via Homebrew (brew install python@3.12) or python.org.Node.js(any recent LTS) for building the converter MCP. The conversion uses a separate MCP server,sigma-data-model-mcp, cloned + built (npm install && npm run build) into~/Desktop/sigma-data-model-mcp. The skill prompts you to install it mid-conversion — no upfront work needed — but pre-build it if you'd rather skip the gate.- A Power BI report you're authorized to convert. Power BI Desktop alone won't work — the skill reads through Fabric's REST APIs, which require a published report in a Fabric workspace (including
My workspace). - The warehouse tables behind the Power BI model must be reachable from a Sigma connection (Snowflake, BigQuery, Databricks, Redshift, Postgres and others).

powerbi-to-sigma is one of two skills that ship together as a single repo (cloned in the next section). Most of this QuickStart focuses on the converter — but knowing where the assessment skill fits saves dead ends later when scoping a batch migration.
Skill | Role | When to reach for it |
| Scoping | Auditing a Fabric tenant before committing to a conversion plan. Emits a per-report DAX complexity readout, a ranked migration shortlist, and a cluster plan that |
| Conversion | The subject of this QuickStart. Converts a single report (or a batch via cluster plan) to a Sigma workbook with verified data parity. |
Here's how the two skills connect in a full migration — powerbi-assessment hands the converter a ranked shortlist and cluster plan, and powerbi-to-sigma produces the Sigma workbook with a verified parity report:

Which skill for your situation
Not every migration needs both skills. Use the table below to map your scenario to the smallest set that fits.
In this QuickStart we're in the first row (one report, data already in Snowflake), so only powerbi-to-sigma runs.
Your situation | Skill(s) to use |
1 report, data already in your warehouse |
|
1 report, Import-mode model with no warehouse copy of the data | Land the data in your warehouse first (separate from these skills), then |
10+ reports (any data source) |
|
Auditing Power BI sprawl without converting yet |
|
First we need to clone the skill's GitHub repository, then run the setup scripts that capture your Sigma and Power BI credentials.
The two skills live in sigmacomputing/quickstarts-public under powerbi-migration-skills/.
From a terminal, run each command below one at a time so you can confirm each step before moving on.
Step 1: Create a local folder for the clone
We'll clone into this folder in the next step.
mkdir -p ~/quickstarts-public
Step 2: Move into the new folder so the next command runs in the right working directory.
cd ~/quickstarts-public
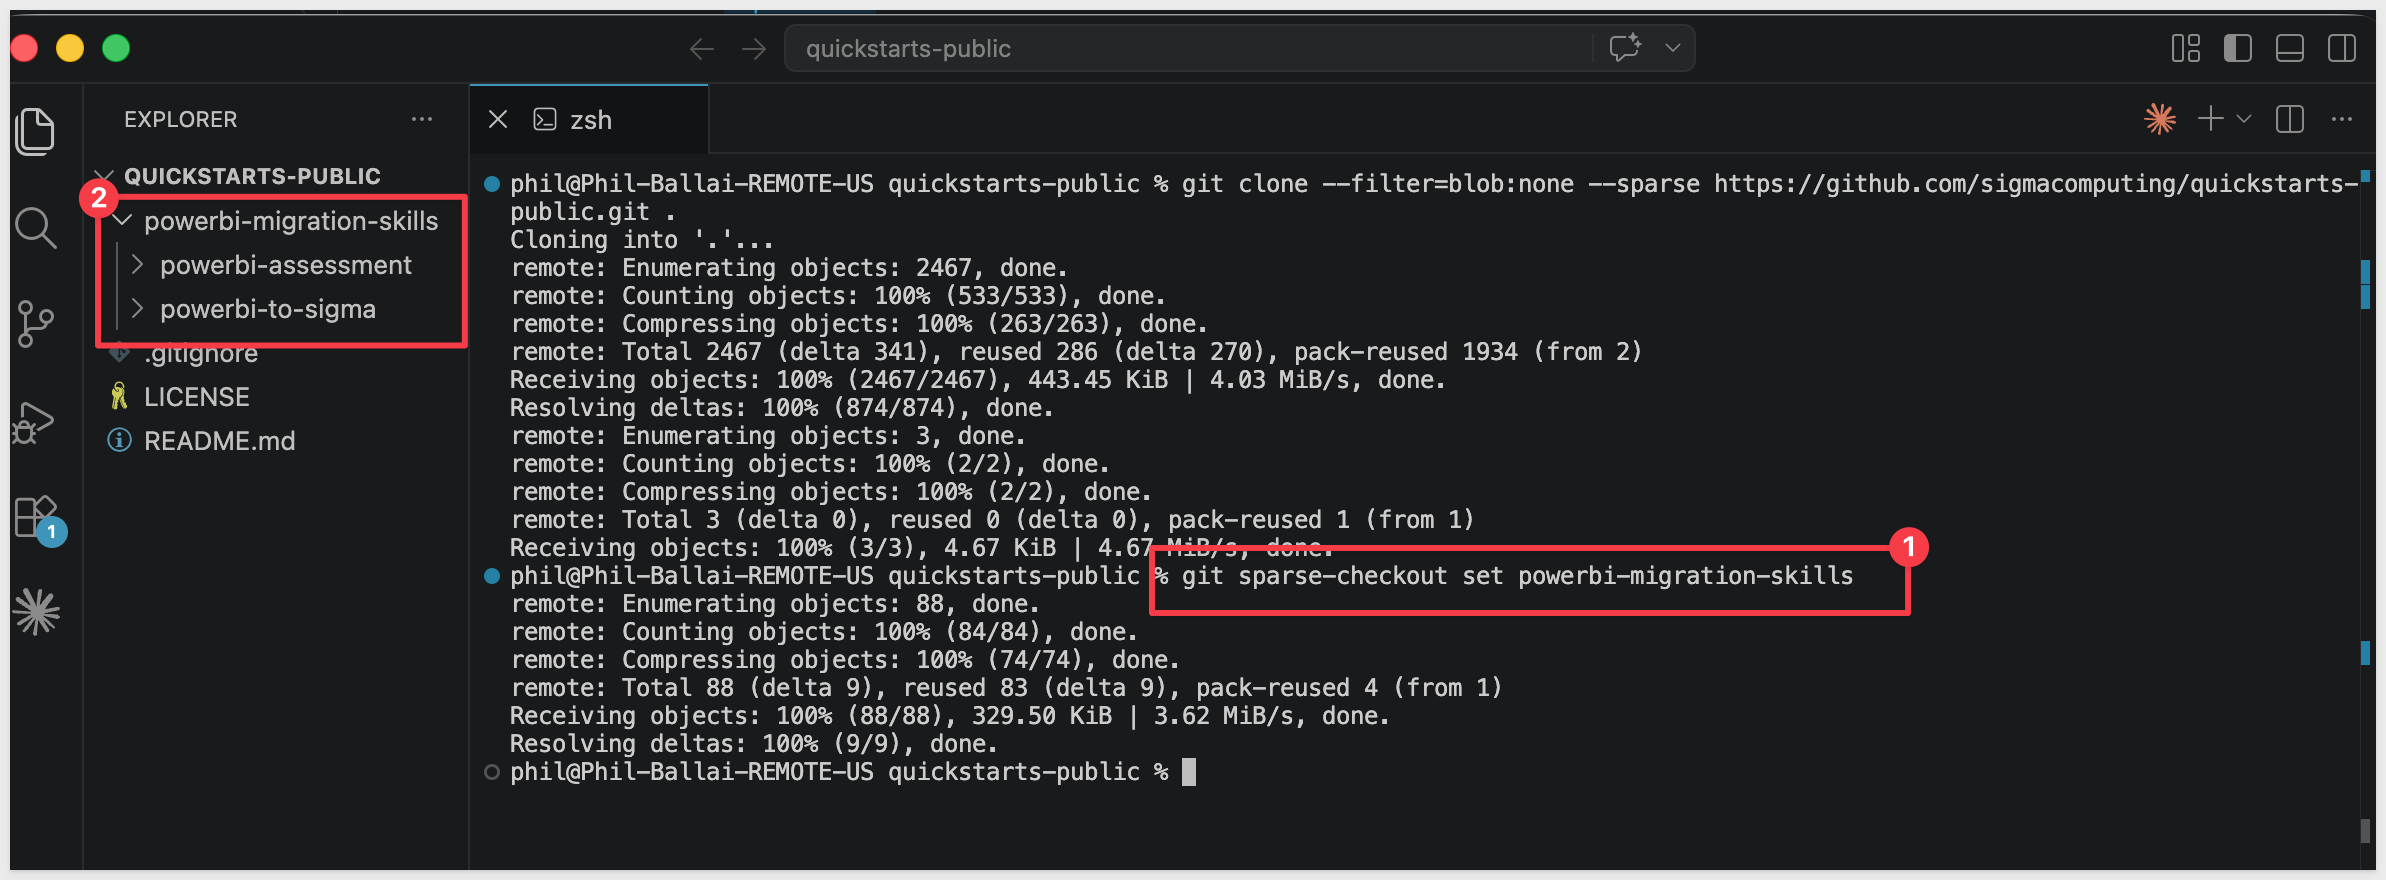
Step 3: Clone the repo without pulling any files yet
The --sparse flag tells Git you'll choose which folders to fill in next. The trailing . clones into the current folder.
git clone --filter=blob:none --sparse https://github.com/sigmacomputing/quickstarts-public.git .
Step 4: Fill in only the powerbi-migration-skills folder
Every other QuickStart asset in the repo stays empty on disk.
git sparse-checkout set powerbi-migration-skills
Step 5: Symlink powerbi-to-sigma into the Claude skills folder
This lets Claude Code invoke powerbi-to-sigma as a skill.
ln -s ~/quickstarts-public/powerbi-migration-skills/powerbi-to-sigma ~/.claude/skills/powerbi-to-sigma
Step 6: Symlink powerbi-assessment
Used to scope a Power BI tenant before conversion.
ln -s ~/quickstarts-public/powerbi-migration-skills/powerbi-assessment ~/.claude/skills/powerbi-assessment
Steps 5 and 6 should return with no error.

Step 7: Install the Python dependencies the skill uses.
The skill calls Fabric and Power BI REST APIs from Python, including corporate-TLS handling for restricted networks.
python3 -m pip install -r ~/.claude/skills/powerbi-to-sigma/scripts/requirements.txt
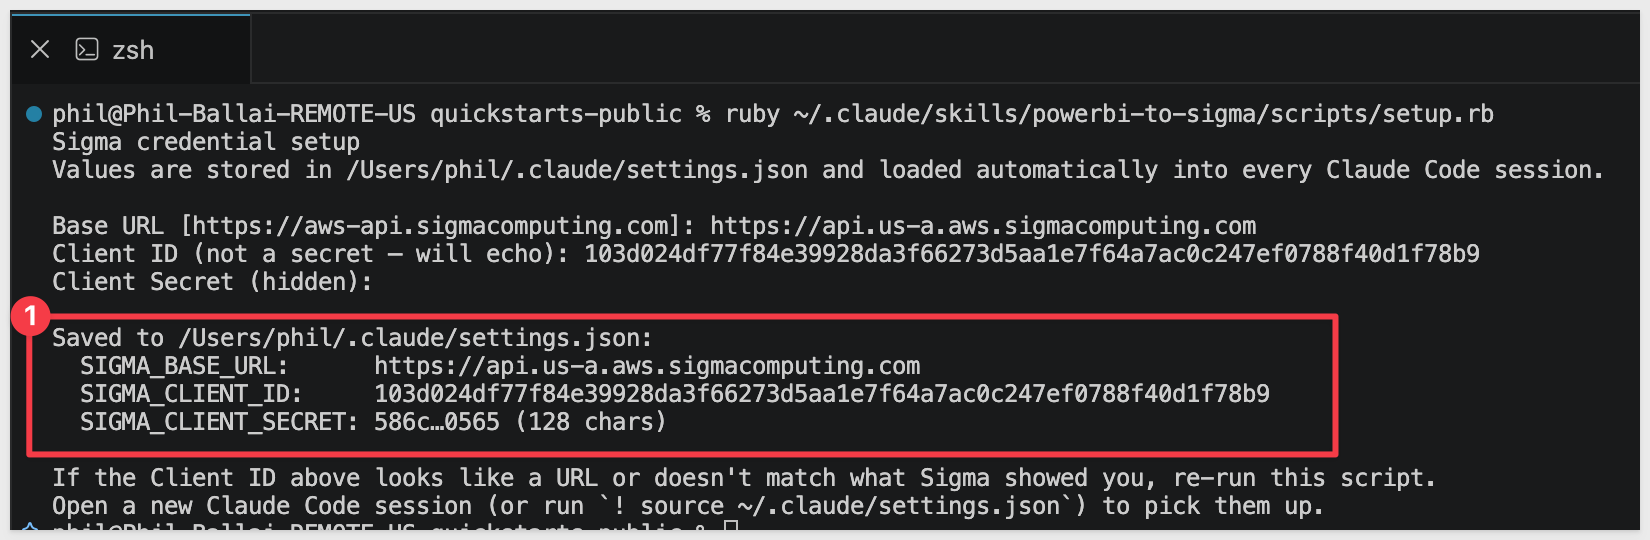
Step 8: Capture your Sigma API credentials.
This script prompts for SIGMA_BASE_URL, SIGMA_CLIENT_ID, and SIGMA_CLIENT_SECRET and writes them into Claude's settings.
Run once per machine.
If you don't already have credentials, see Configure API credentials in Sigma — the skill needs API access credentials, not embed.
ruby ~/.claude/skills/powerbi-to-sigma/scripts/setup.rb
Step 9: Authenticate with Power BI.
This script runs the device-code flow — it prints a Microsoft sign-in URL and a short code.
python3 ~/.claude/skills/powerbi-to-sigma/scripts/fabric-auth-check.py
Open the URL in any browser, paste the code, and sign in with the account that owns the Power BI workspace you'll convert reports from.

Once authenticated, terminal will show:

Step 10: Verify the install.
This lists every workspace and item visible to your signed-in account — confirms both Power BI authentication and the assessment skill's installation worked. The script writes its inventory to the path you pass in --out.
python3 ~/.claude/skills/powerbi-assessment/scripts/fabric-inventory.py --out /tmp/pbi-inventory.json
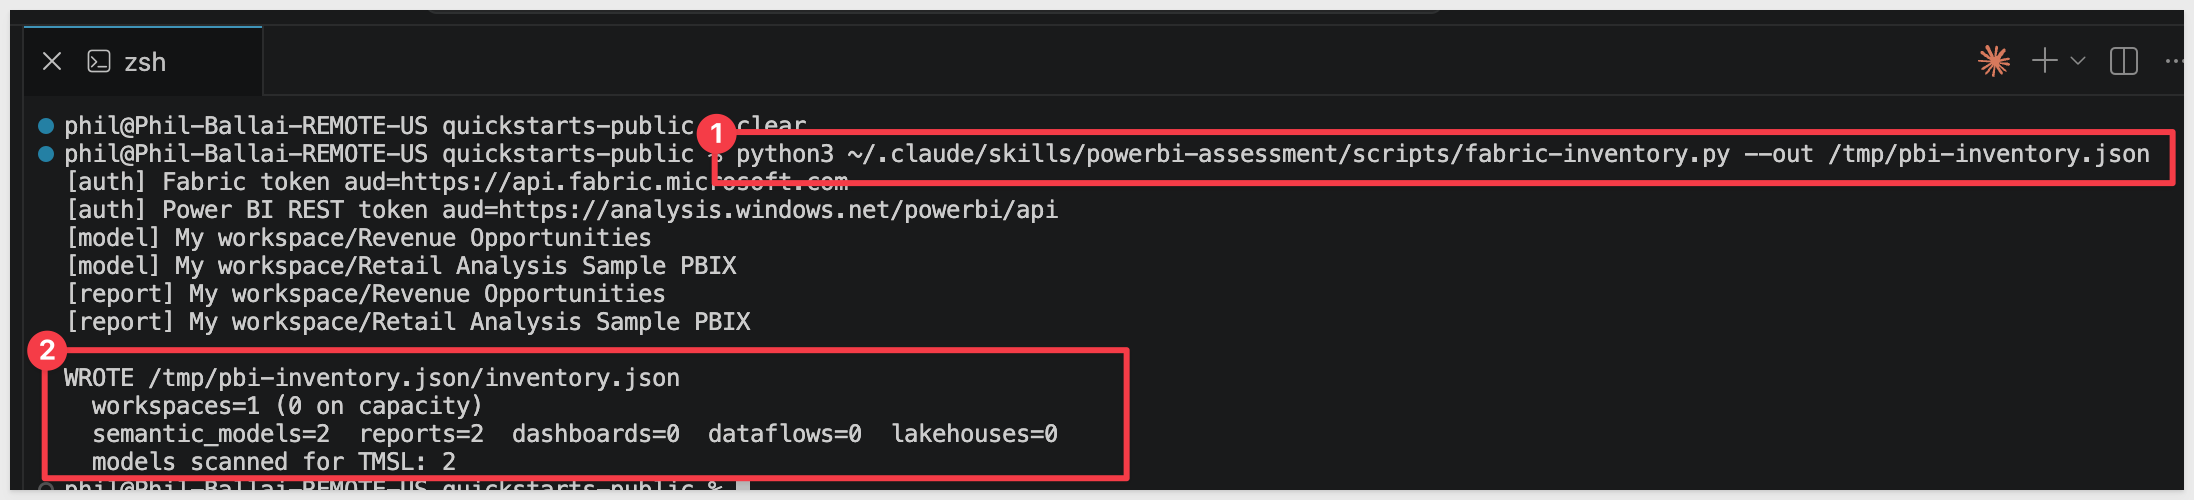
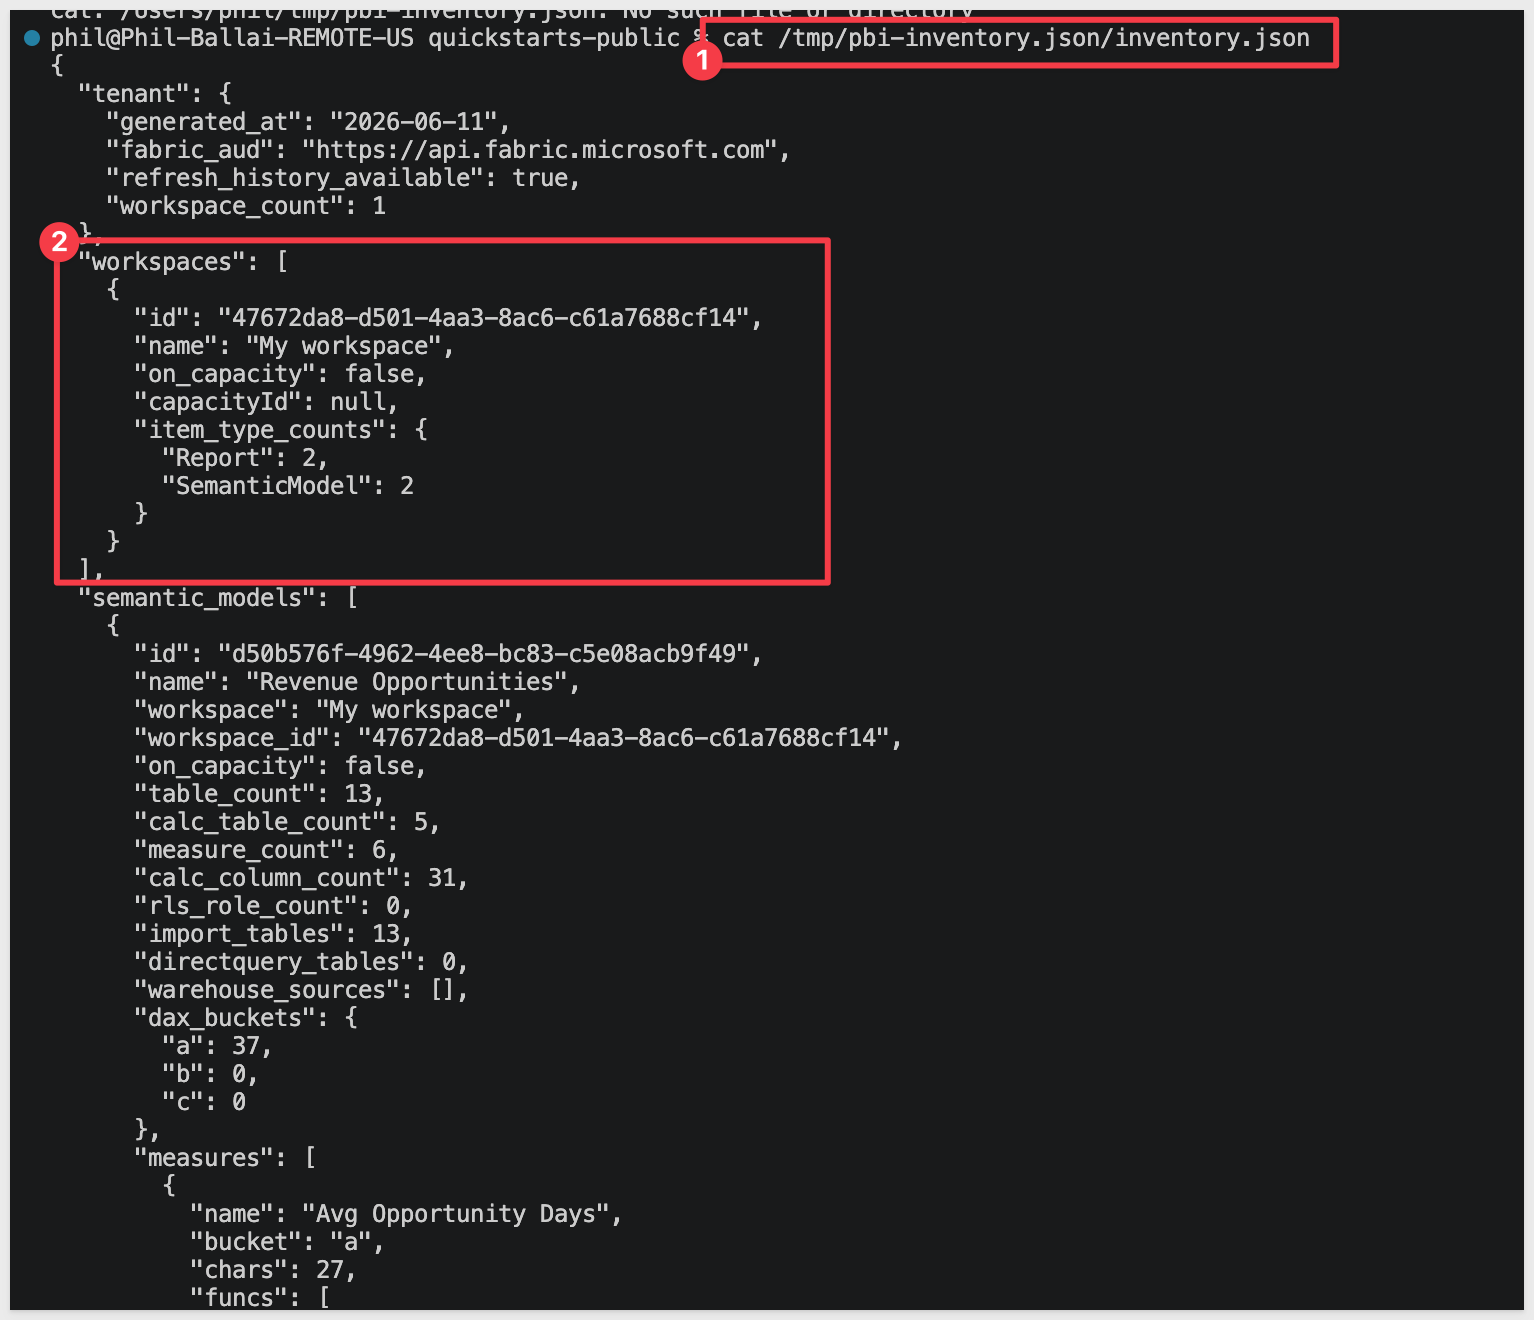
Then open the file to confirm:
cat /tmp/pbi-inventory.json/inventory.json
You should see at least your My Workspace listed. If you've already published reports there (such as the Retail Analysis Sample PBIX we'll set up in the next section), they'll show too:
Verify Claude Code can invoke the skill by typing claude in your terminal to start Claude Code, then running:
claude
/powerbi-to-sigma
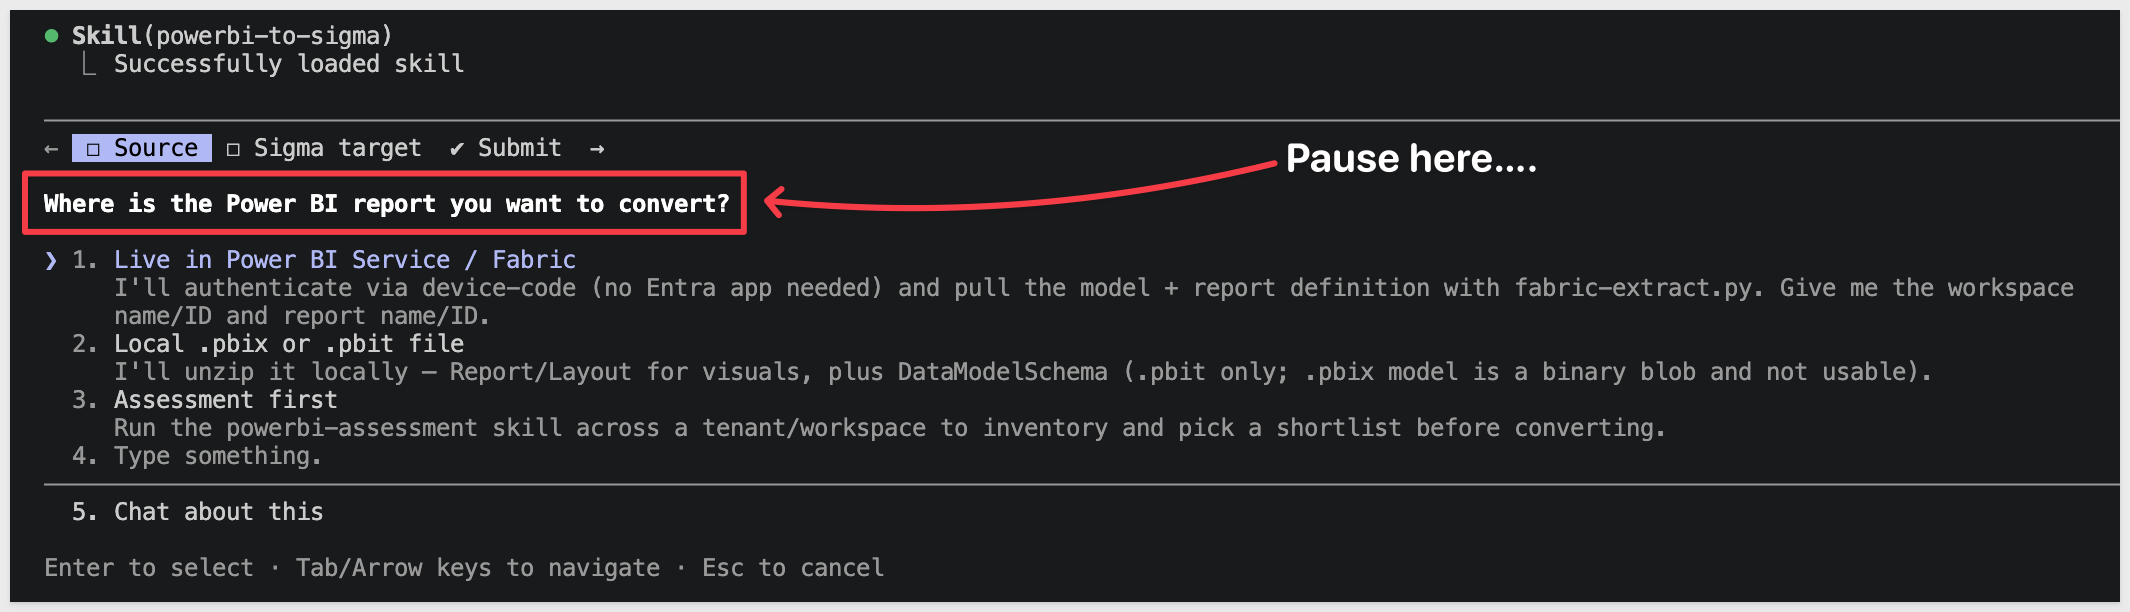
Claude should start reading the reference files and ask what report you want to convert.
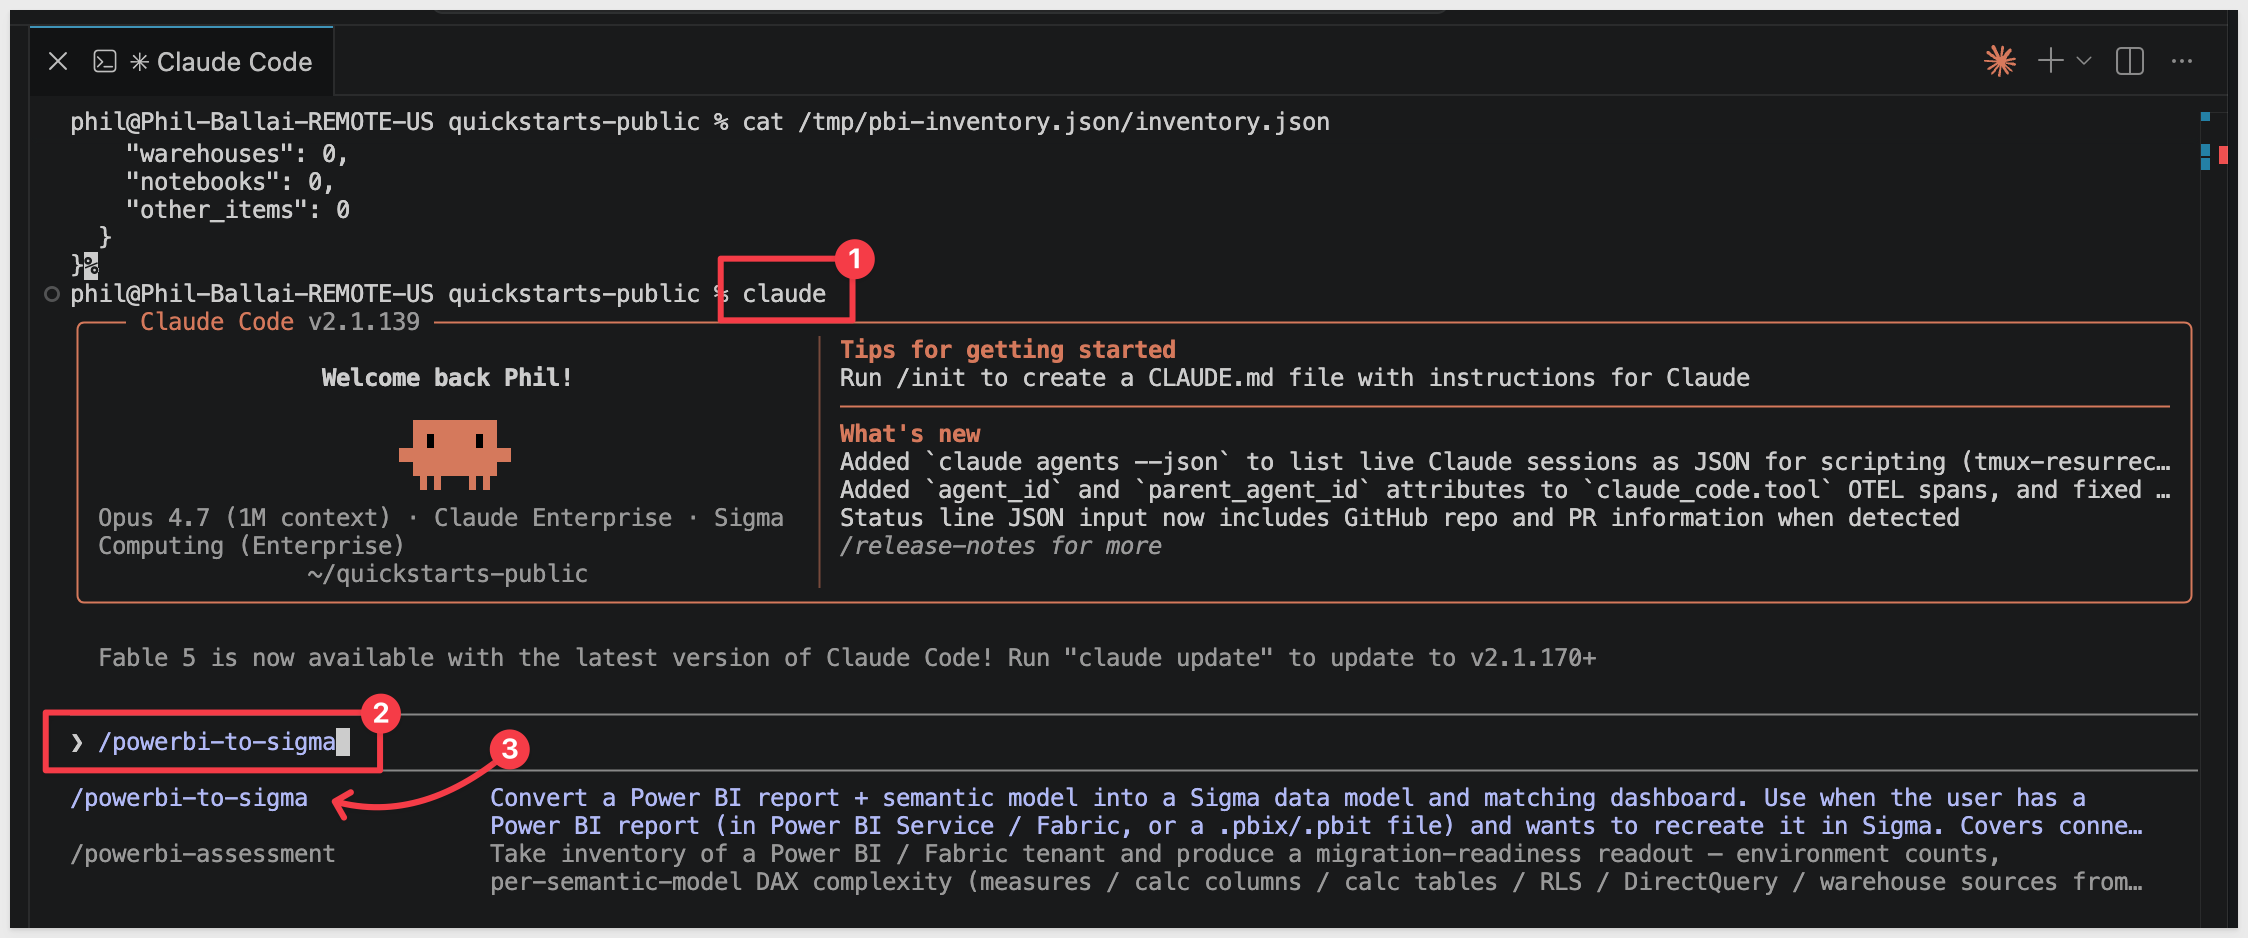
Pause at this response:
Before going any further, we need to prepare the data the report uses.
Data prep has two halves:
- Power BI side — download the Retail Analysis
.pbix(a copy of Microsoft's obviEnce-licensed sample, mirrored to a stable Sigma URL) and upload it to your own Fabric / Power BI workspace. The skill reads TMSL + PBIR from that published model during the conversion run.
- Sigma side (this section) — the same data needs to live in a warehouse Sigma can read. We'll land it in Snowflake.
The Snowflake schema below mirrors the Power BI model's five user-facing tables — District, Item, Sales, Store, and Time — plus the relationships the model declares between them. The Power BI auto-date plumbing tables (DateTableTemplate_*, LocalDateTable_*) are omitted: Sigma derives date hierarchies natively, so they translate without a backing warehouse table.
USE ROLE ACCOUNTADMIN;
USE WAREHOUSE COMPUTE_WH;
CREATE DATABASE IF NOT EXISTS QUICKSTARTS;
CREATE SCHEMA IF NOT EXISTS QUICKSTARTS.POWERBI_RETAIL_ANALYSIS;
USE SCHEMA QUICKSTARTS.POWERBI_RETAIL_ANALYSIS;
-- CSV format and external stage pointing at the public S3 bucket.
CREATE OR REPLACE FILE FORMAT csv_format
TYPE = CSV
FIELD_DELIMITER = ','
SKIP_HEADER = 1
FIELD_OPTIONALLY_ENCLOSED_BY = '"'
NULL_IF = ('NULL', 'null', '');
CREATE OR REPLACE STAGE retail_analysis_stage
URL = 's3://sigma-quickstarts-main/powerbi/'
FILE_FORMAT = csv_format;
-- Snake_case_UPPER is the converter's canonical warehouse naming convention,
-- so we use it here. The Power BI model uses CamelCase / spaces in its
-- column names — when the skill asks how the warehouse maps to the PBI model,
-- we'll provide an explicit rename block that bridges the two cleanly (see the
-- "Run the Conversion" section). This avoids the converter's unhappy path
-- with camelCase-no-underscore warehouse columns.
-- Dimension: District (9 rows)
CREATE OR REPLACE TABLE DISTRICT (
DISTRICT_ID NUMBER(38,0),
DISTRICT VARCHAR,
DM VARCHAR,
DM_PIC_FL VARCHAR,
DM_PIC VARCHAR,
BUSINESS_UNIT_ID NUMBER(38,0)
);
-- Dimension: Item (364,184 rows). FAMILY_NANE preserves the typo in the
-- source model — the rename list in "Run the Conversion" maps it through.
CREATE OR REPLACE TABLE ITEM (
ITEM_ID NUMBER(38,0),
SEGMENT NUMBER(38,0),
CATEGORY VARCHAR,
BUYER VARCHAR,
FAMILY_NANE NUMBER(38,0)
);
-- Fact: Sales (923,371 rows). REPORTING_PERIOD_ID is a Power BI calculated
-- column ([MonthID]&"01") materialized in the CSV export, stored here as a
-- regular column rather than recomputed in Sigma.
CREATE OR REPLACE TABLE SALES (
MONTH_ID NUMBER(38,0),
ITEM_ID NUMBER(38,0),
LOCATION_ID NUMBER(38,0),
SUM_GROSS_MARGIN_AMOUNT NUMBER(19,4),
SUM_REGULAR_SALES_DOLLARS NUMBER(19,4),
SUM_MARKDOWN_SALES_DOLLARS NUMBER(19,4),
SCENARIO_ID NUMBER(38,0),
REPORTING_PERIOD_ID NUMBER(38,0),
SUM_REGULAR_SALES_UNITS NUMBER(19,4),
SUM_MARKDOWN_SALES_UNITS NUMBER(19,4)
);
-- Dimension: Store (104 rows). The last five columns (CITY, OPEN_YEAR,
-- STORE_TYPE, OPEN_MONTH_NO, OPEN_MONTH) are Power BI calculated columns
-- materialized in the CSV export.
CREATE OR REPLACE TABLE STORE (
LOCATION_ID NUMBER(38,0),
CITY_NAME VARCHAR,
TERRITORY VARCHAR,
POSTAL_CODE VARCHAR,
OPEN_DATE DATE,
SELLING_AREA_SIZE NUMBER(38,0),
DISTRICT_NAME VARCHAR,
NAME VARCHAR,
STORE_NUMBER_NAME VARCHAR,
STORE_NUMBER NUMBER(38,0),
CITY VARCHAR,
CHAIN VARCHAR,
DM VARCHAR,
DM_PIC VARCHAR,
DISTRICT_ID NUMBER(38,0),
OPEN_YEAR NUMBER(38,0),
STORE_TYPE VARCHAR,
OPEN_MONTH_NO NUMBER(38,0),
OPEN_MONTH VARCHAR
);
-- Dimension: Time (734 rows). MONTH parses from "YYYY-MM-DD" date strings.
CREATE OR REPLACE TABLE TIME (
REPORTING_PERIOD_ID NUMBER(38,0),
PERIOD NUMBER(38,0),
FISCAL_YEAR NUMBER(38,0),
FISCAL_MONTH VARCHAR,
MONTH DATE
);
-- Load each CSV from S3.
COPY INTO DISTRICT FROM @retail_analysis_stage/District.csv;
COPY INTO ITEM FROM @retail_analysis_stage/Item.csv;
COPY INTO SALES FROM @retail_analysis_stage/Sales.csv;
COPY INTO STORE FROM @retail_analysis_stage/Store.csv;
COPY INTO TIME FROM @retail_analysis_stage/Time.csv;
-- Grant Sigma's service role visibility on the new schema and its tables.
-- Substitute SIGMA_SERVICE_ROLE with the role your Sigma connection actually
-- uses if it differs — you can confirm it in Sigma under Administration >
-- Connections by clicking your Snowflake connection.
GRANT USAGE ON DATABASE QUICKSTARTS TO ROLE SIGMA_SERVICE_ROLE;
GRANT USAGE ON SCHEMA QUICKSTARTS.POWERBI_RETAIL_ANALYSIS TO ROLE SIGMA_SERVICE_ROLE;
GRANT SELECT ON ALL TABLES IN SCHEMA QUICKSTARTS.POWERBI_RETAIL_ANALYSIS TO ROLE SIGMA_SERVICE_ROLE;
GRANT SELECT ON FUTURE TABLES IN SCHEMA QUICKSTARTS.POWERBI_RETAIL_ANALYSIS TO ROLE SIGMA_SERVICE_ROLE;
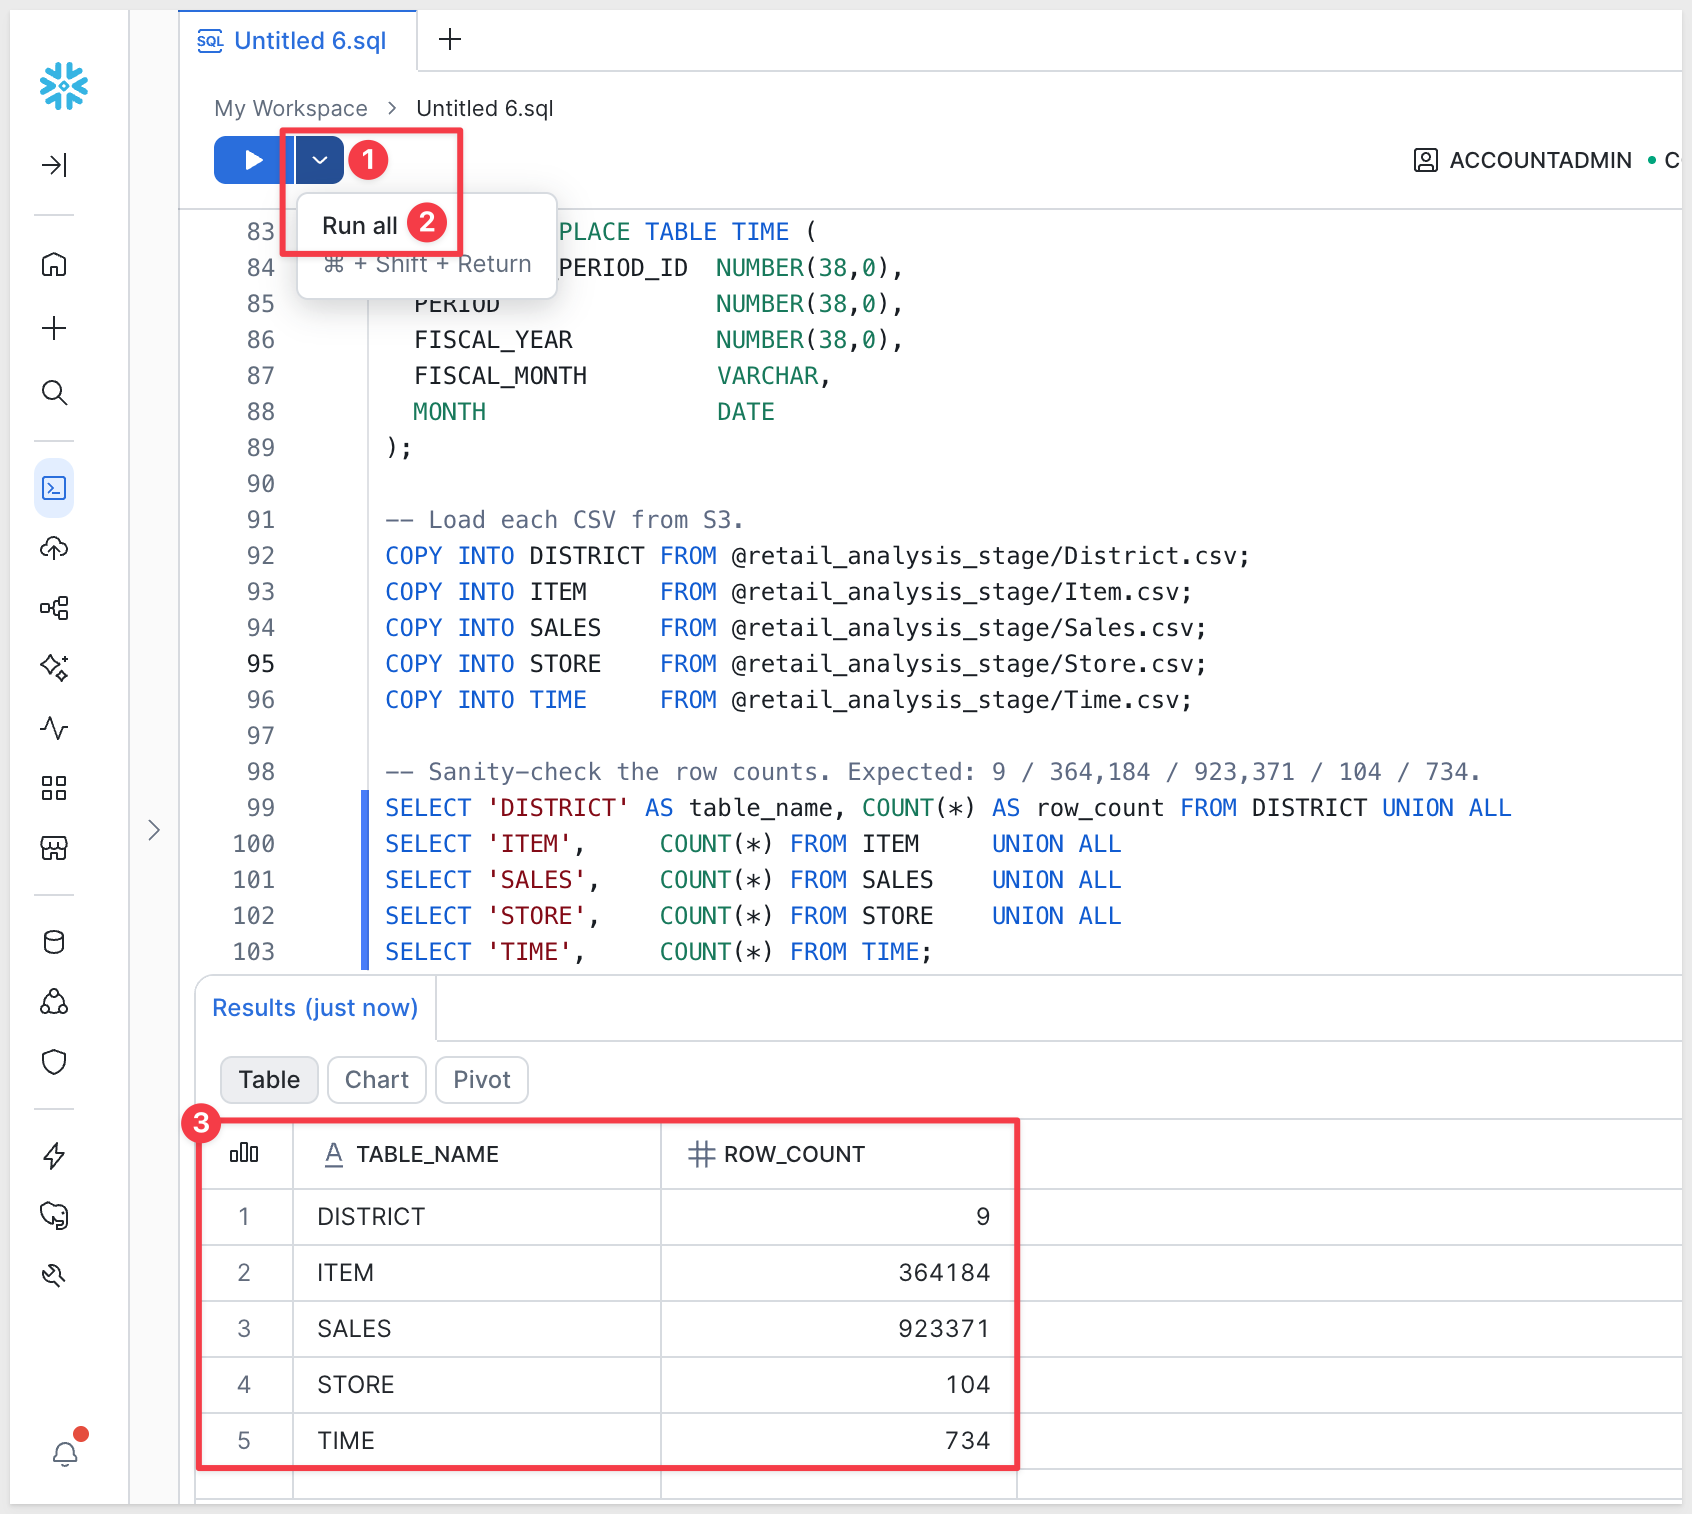
-- Sanity-check the row counts. Expected: 9 / 364,184 / 923,371 / 104 / 734.
SELECT 'DISTRICT' AS table_name, COUNT(*) AS row_count FROM DISTRICT UNION ALL
SELECT 'ITEM', COUNT(*) FROM ITEM UNION ALL
SELECT 'SALES', COUNT(*) FROM SALES UNION ALL
SELECT 'STORE', COUNT(*) FROM STORE UNION ALL
SELECT 'TIME', COUNT(*) FROM TIME;
If the load completes cleanly, the sanity-check query at the bottom should return the five rows shown in its comment. Mismatched row counts mean either a COPY partial-load error (check Snowflake's load history) or a different S3 file than expected:
The converter needs a Sigma folder to land the new data model and workbook in. The skill will ask for the folder's UUID during the next section — it will be easier to have it ready.
To keep this simple, we will use a plain folder and not a workspace.
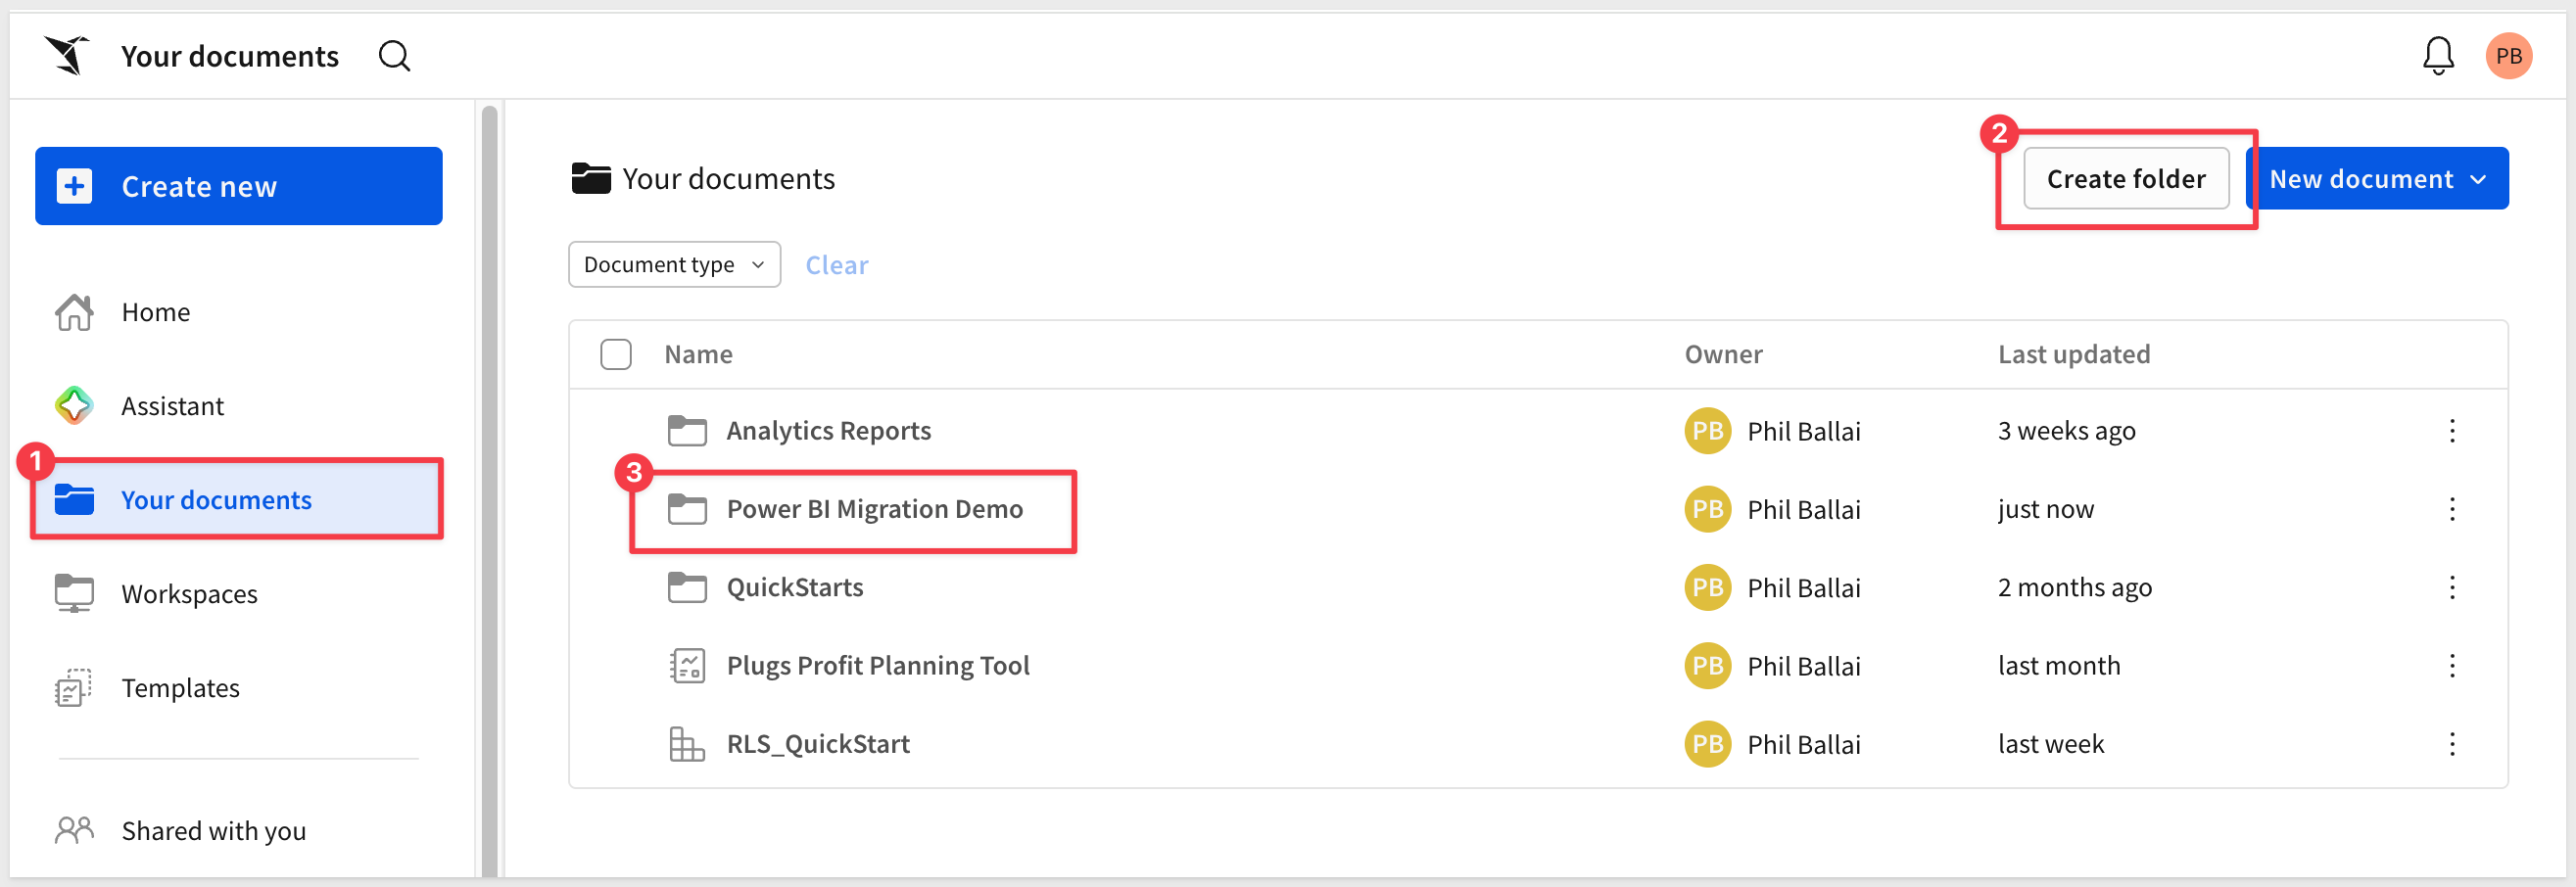
Step 1: Create (or pick) a folder in Sigma.
Open your Sigma org, navigate to where you want the migrated workbook to live, and create a folder for it. Something like:
Power BI Migration Demo
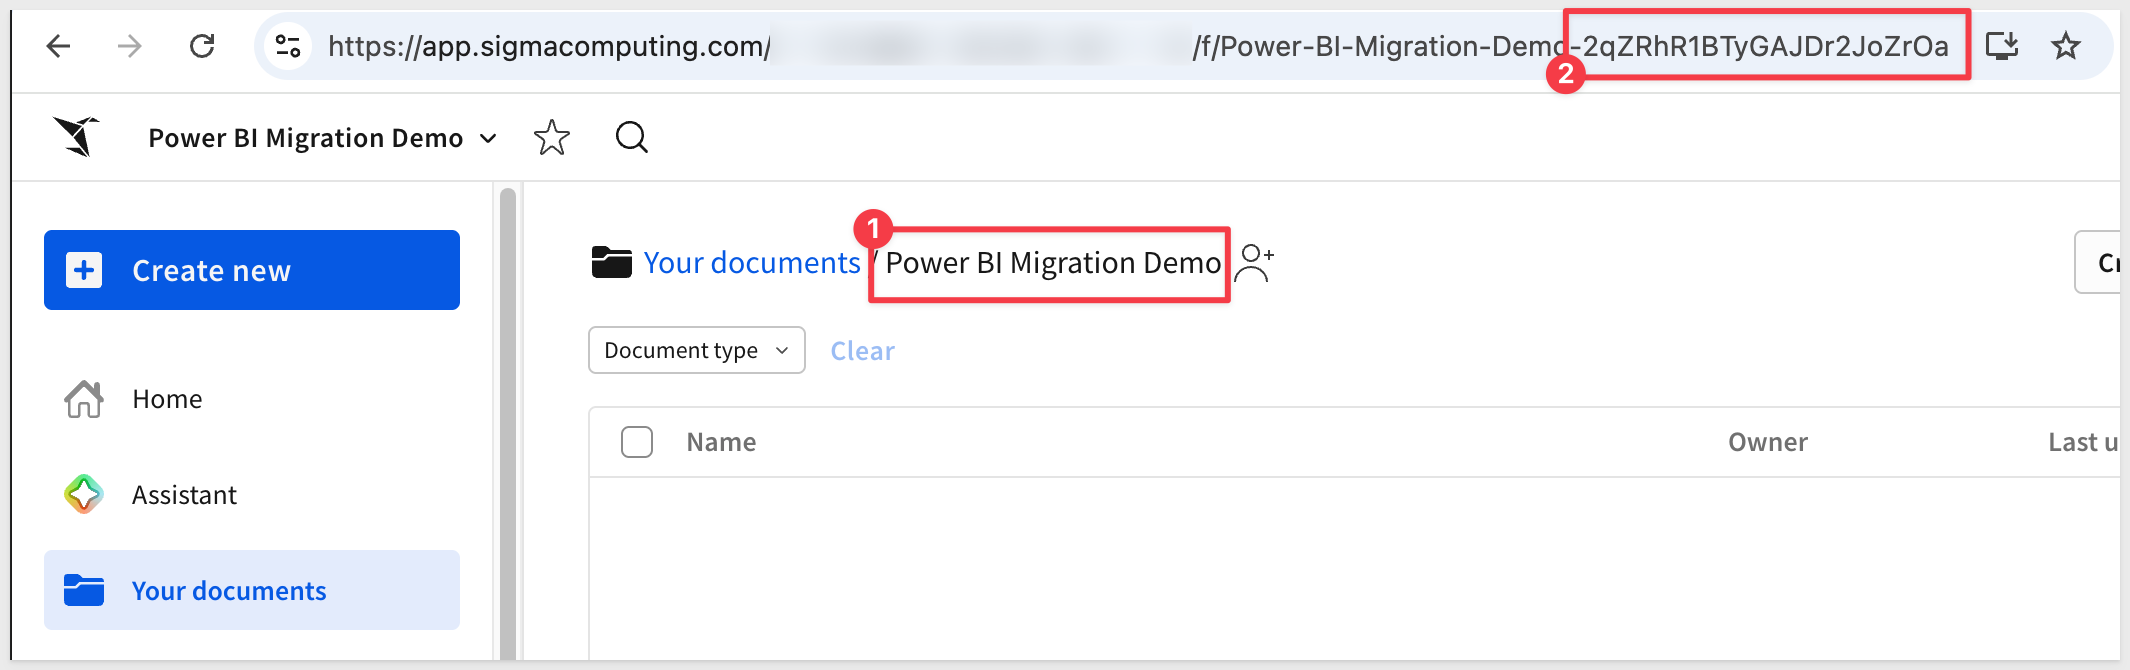
Step 2: Grab the folder ID.
Open the folder. The ID is the last segment of the URL — a short alphanumeric string, roughly 22 characters, that looks like 2qZRhR1BTyGsdDr2JoZrOa. Copy it from the address bar and keep it on the clipboard for the next section.
At the end of the previous section we left Claude asking Where is the Power BI report we want to convert:
Choose option 1. Live in Power BI Service / Fabric.
Claude then asks What workspace + report should I extract?:
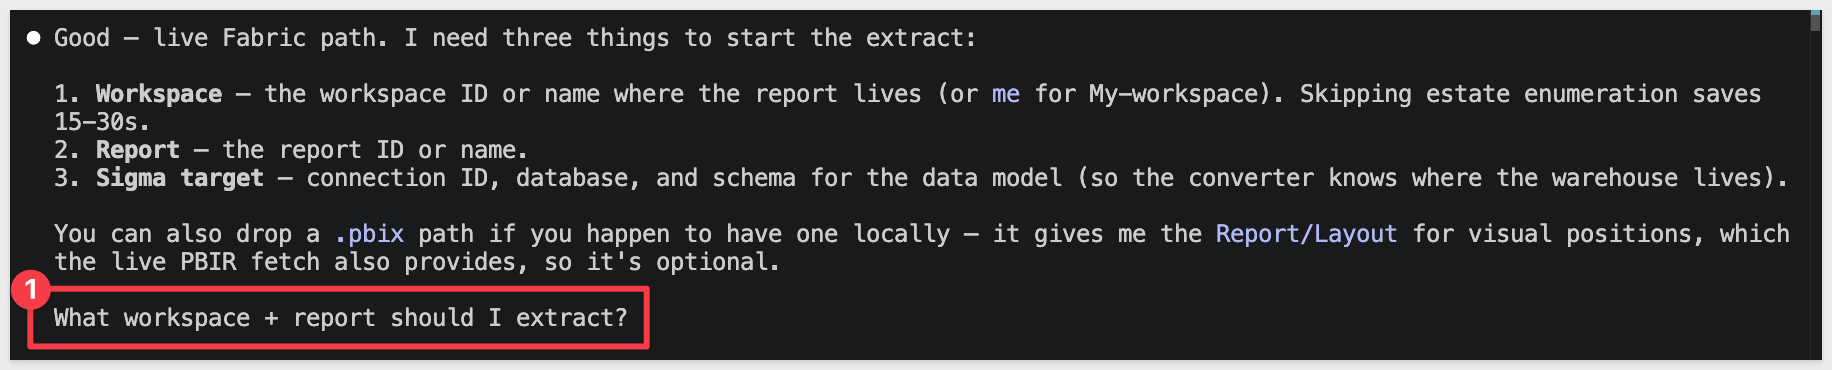
For this demo:
Power BI workspace: My workspace
Power BI report: Retail Analysis Sample PBIX
Sigma folder ID: <paste the ID you copied earlier>
Once submitted, Claude kicks off the conversion.
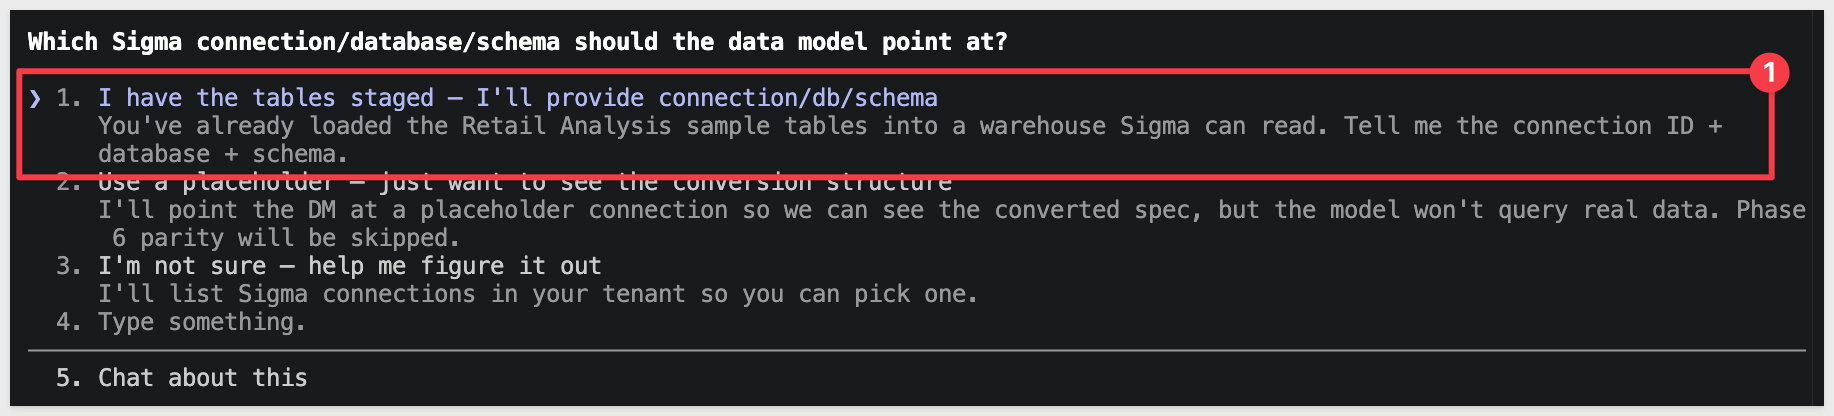
Before any extraction runs, the skill examines the source to confirm Sigma will have something it can actually read.
Choose option 1. I have the tables staged — I'll provide connection/db/schema:
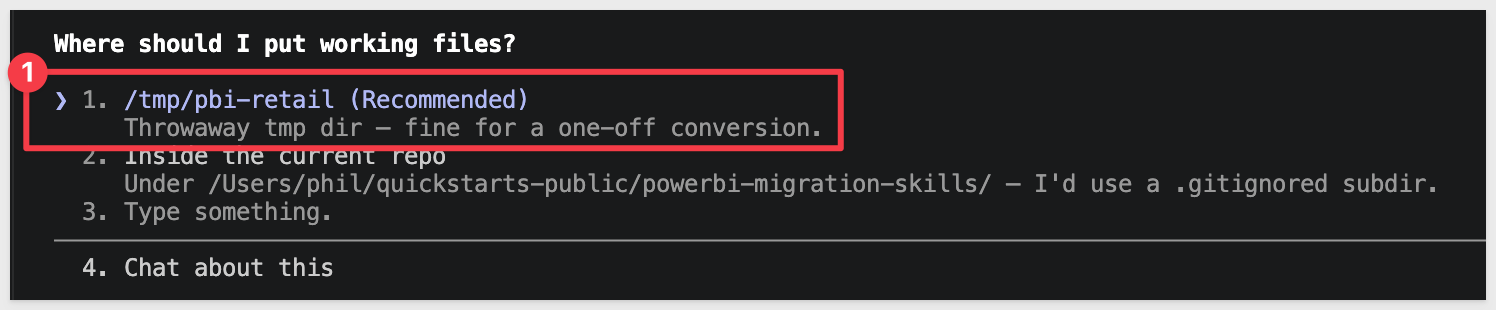
Claude wants to know Where should I put working files?
Choose option 1. /tmp/pbi-retail (Recommended):
Select 1. Submit answers if everything looks good when prompted.
Claude now asks Drop the connection ID, database, and schema and I'll start the extract.
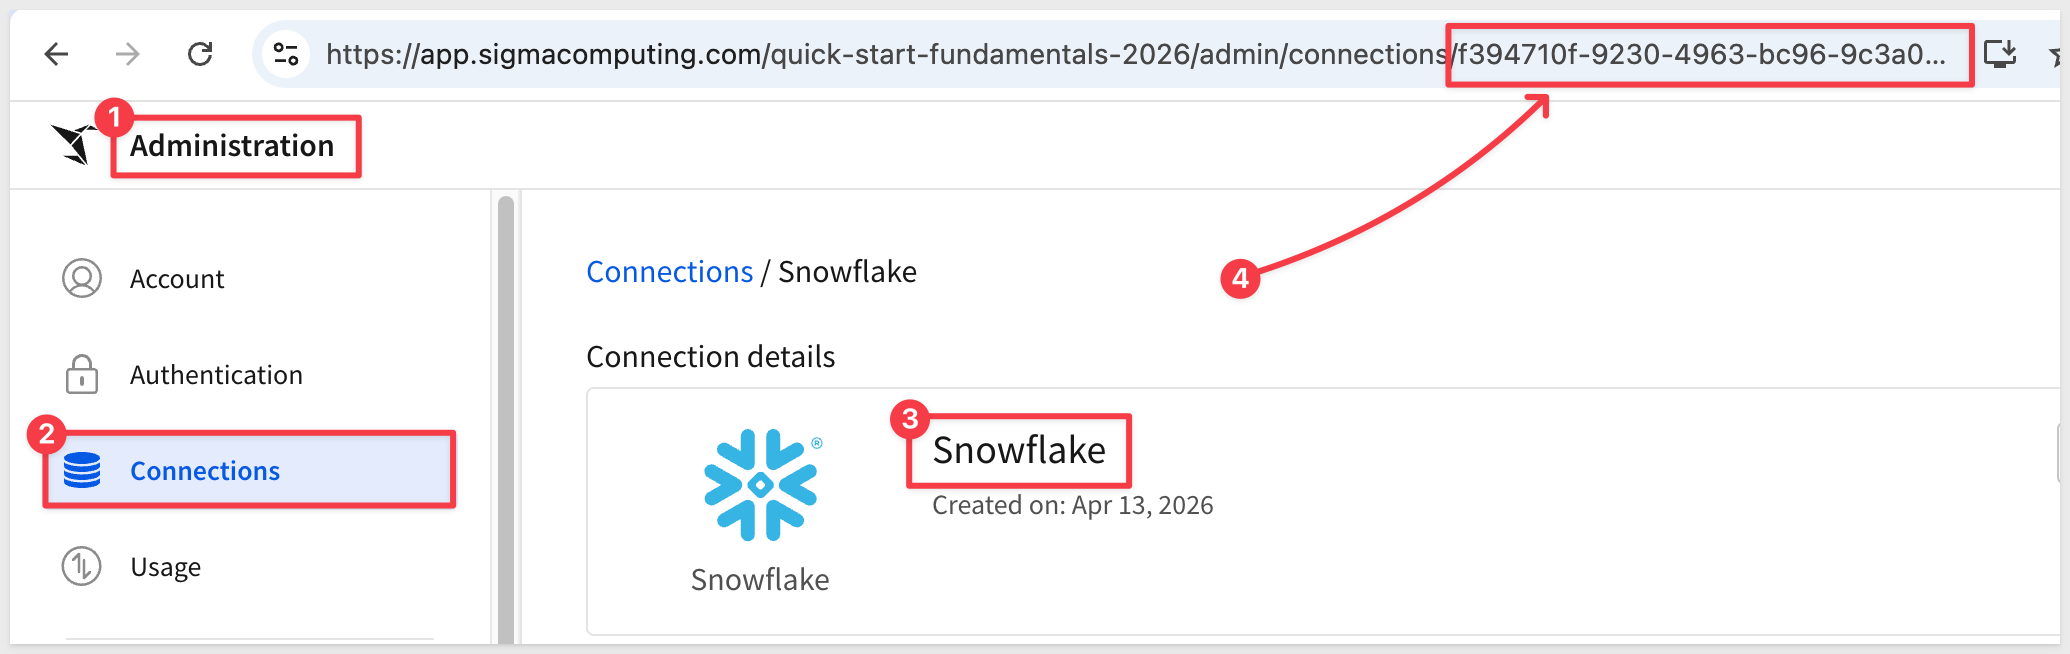
To find the connection ID in Sigma, navigtate to Administration > Connections (or from the homepage), click your Snowflake connection, and replace in the code below.
Copy and paste the values shown, adjusting for your connection ID:
Sigma connection: <YOUR CONNECTION ID>
Database: QUICKSTARTS
Schema: POWERBI_RETAIL_ANALYSIS
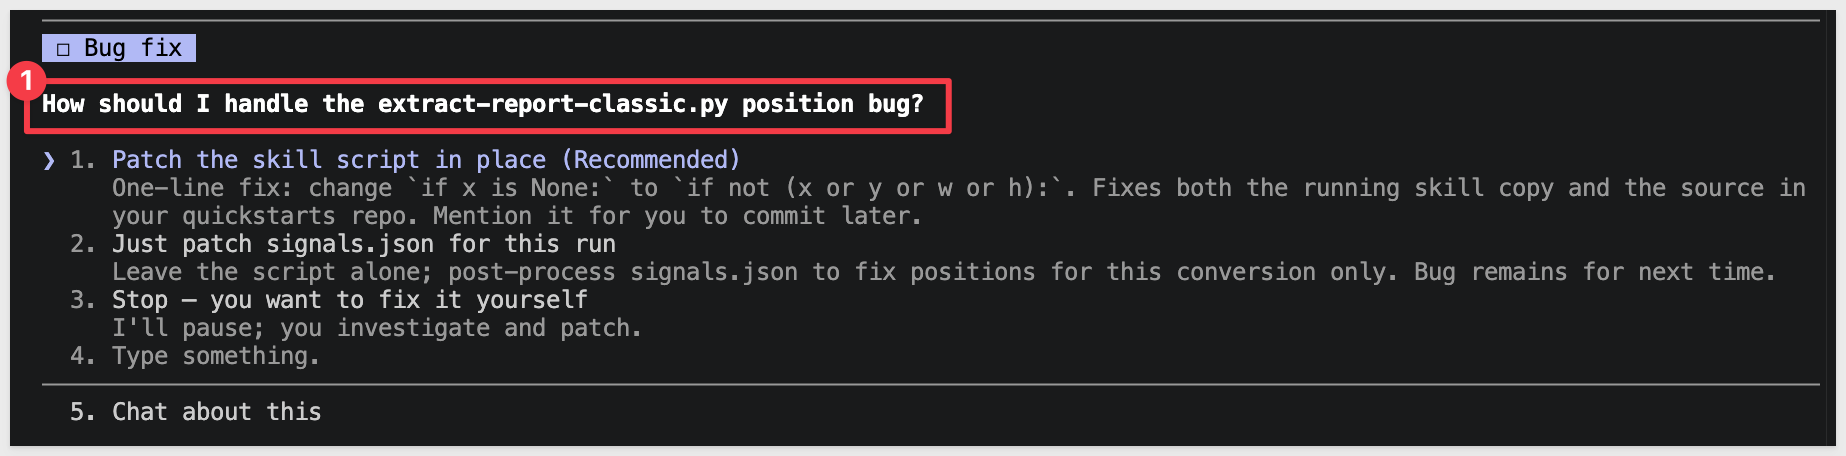
For the Retail Analysis sample, the data is embedded inside a classic .pbix file, so the skill may ask how to proceed if it finds issues along the way:
Shortly after, the skill pauses again at the Converter gate — the convert_powerbi_to_sigma tool runs from a separate repo (sigma-data-model-mcp) that the skill expects on disk:
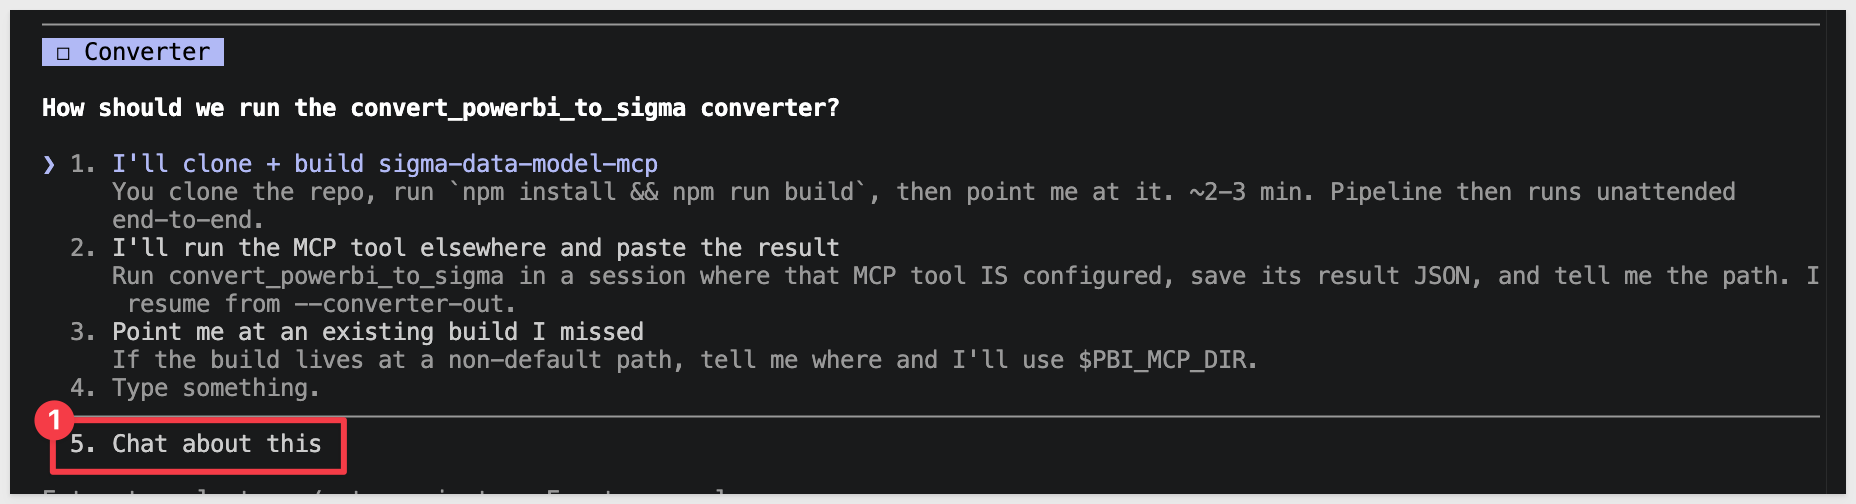
Pick option to Chat about this and tell Claude to handle the clone and build for you:
Clone twells89/sigma-data-model-mcp into ~/Desktop/sigma-data-model-mcp (or if it already exists, cd in and git pull). Then run `npm install && npm run build` in that directory. Once the build is done, come back to the converter gate and pick option 1, pointing it at ~/Desktop/sigma-data-model-mcp.
Claude runs the clone, the npm install, and the build (~2–3 minutes), then returns to the gate and resumes the conversion. You may see one or two approval prompts during the npm install step — accept them.
With most of the questions out of the way, the skill works autonomously through these phases, asking for permission from time to time. Of course, depending on your AI model the questions and request can vary from what has been shown here.
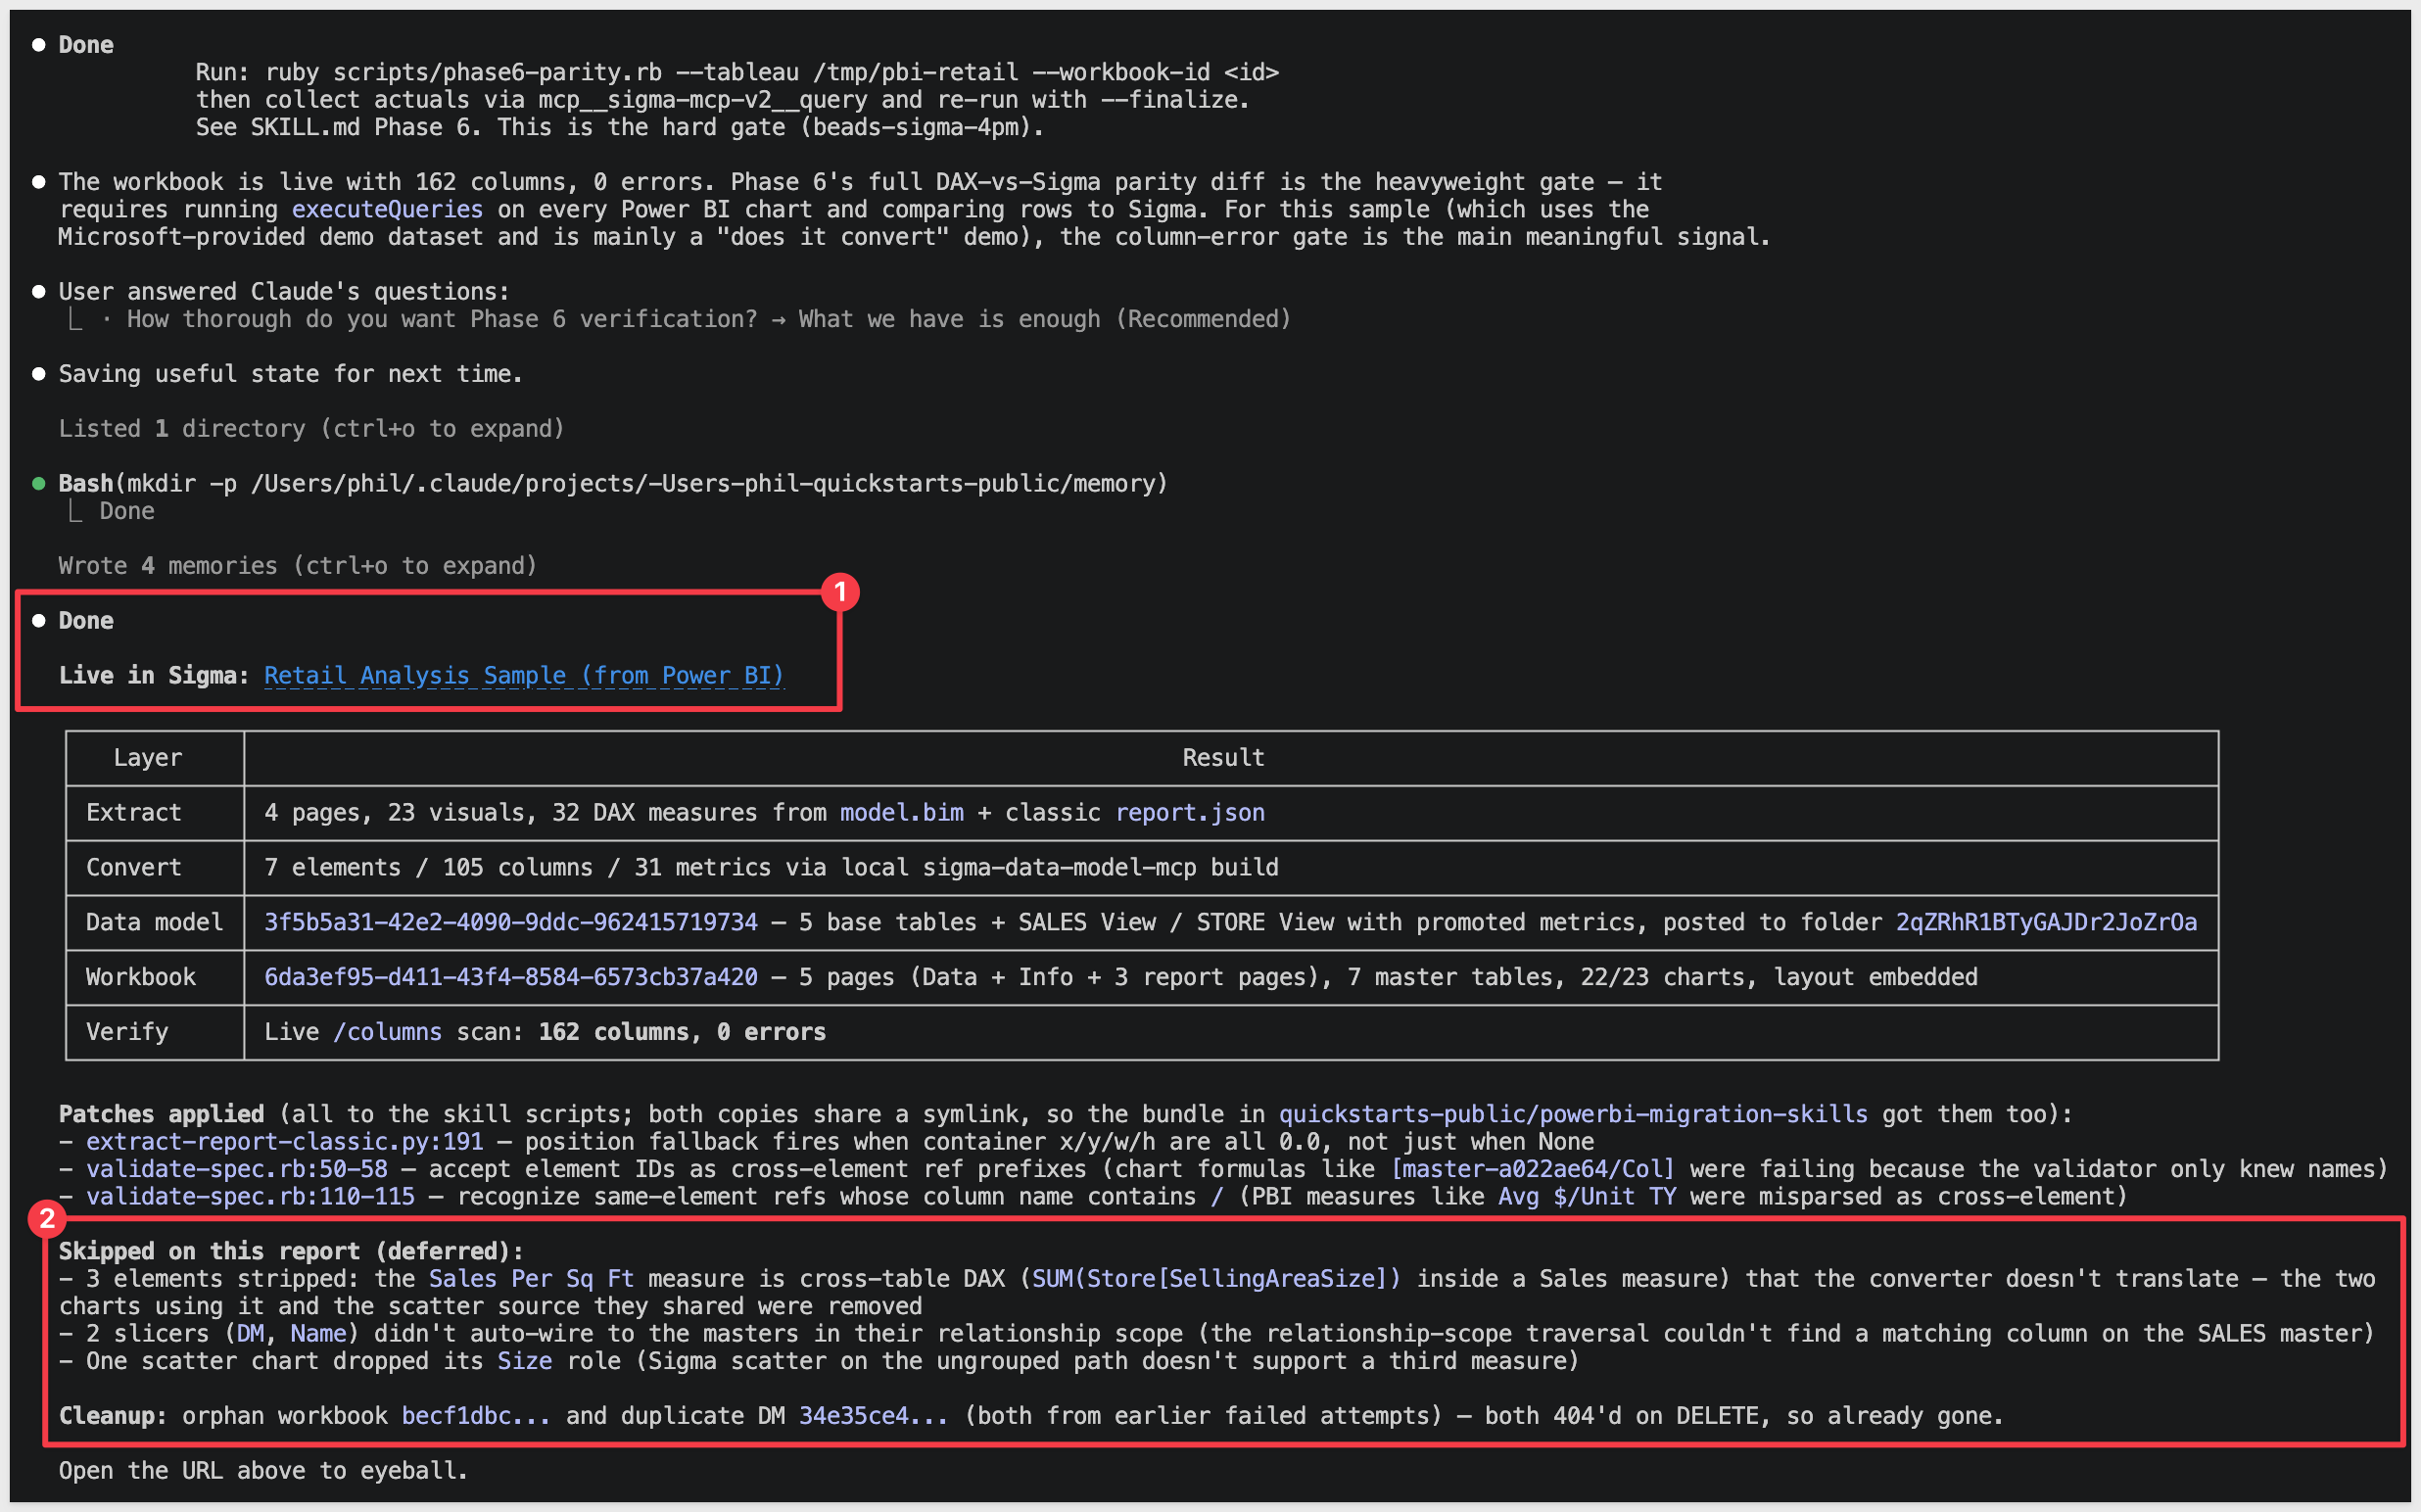
Once the build is done, we see lot of information and a few deferred tasks too:
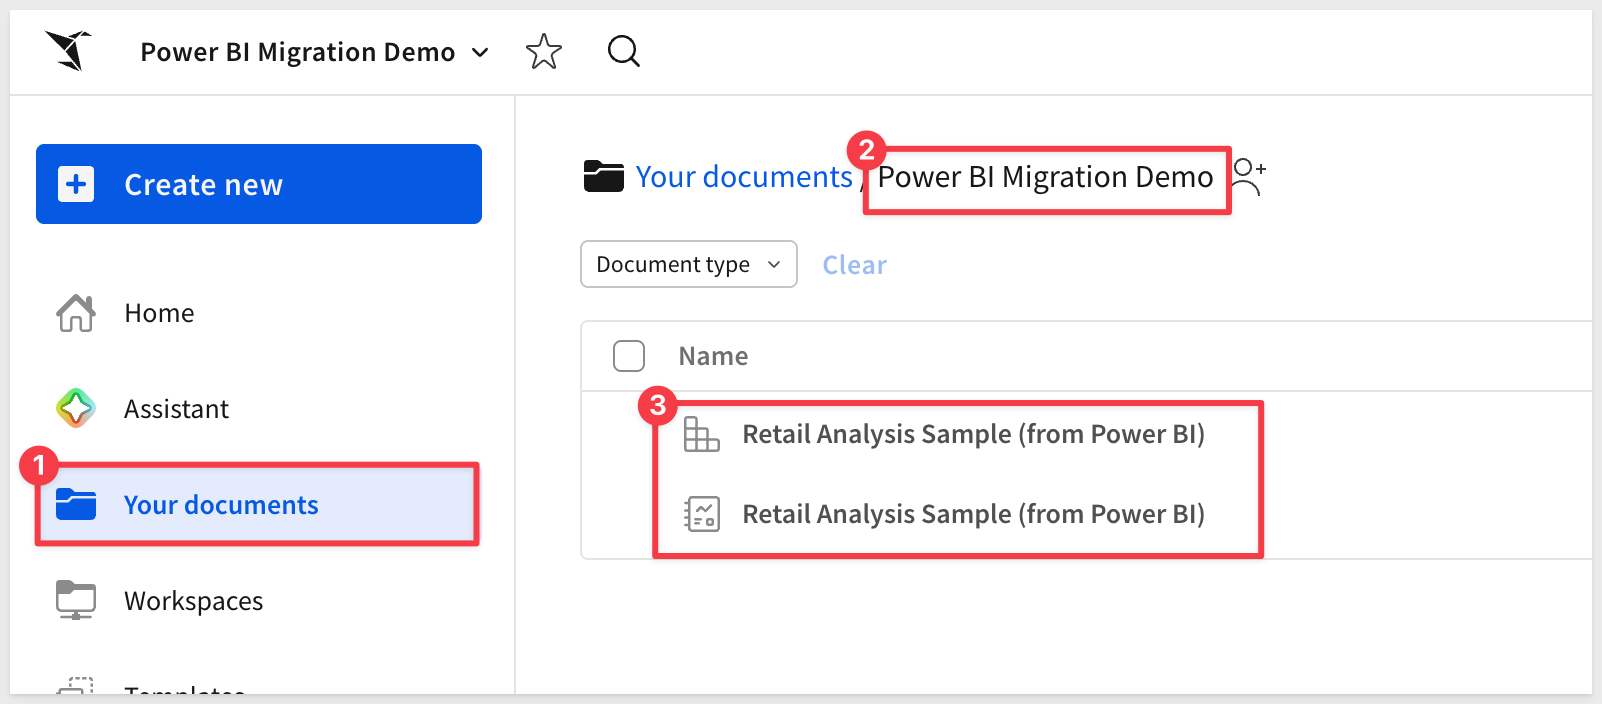
In Sigma, we can see the new workbook, which is stored in the Your documents > Power BI Migration Demo folder we requested:
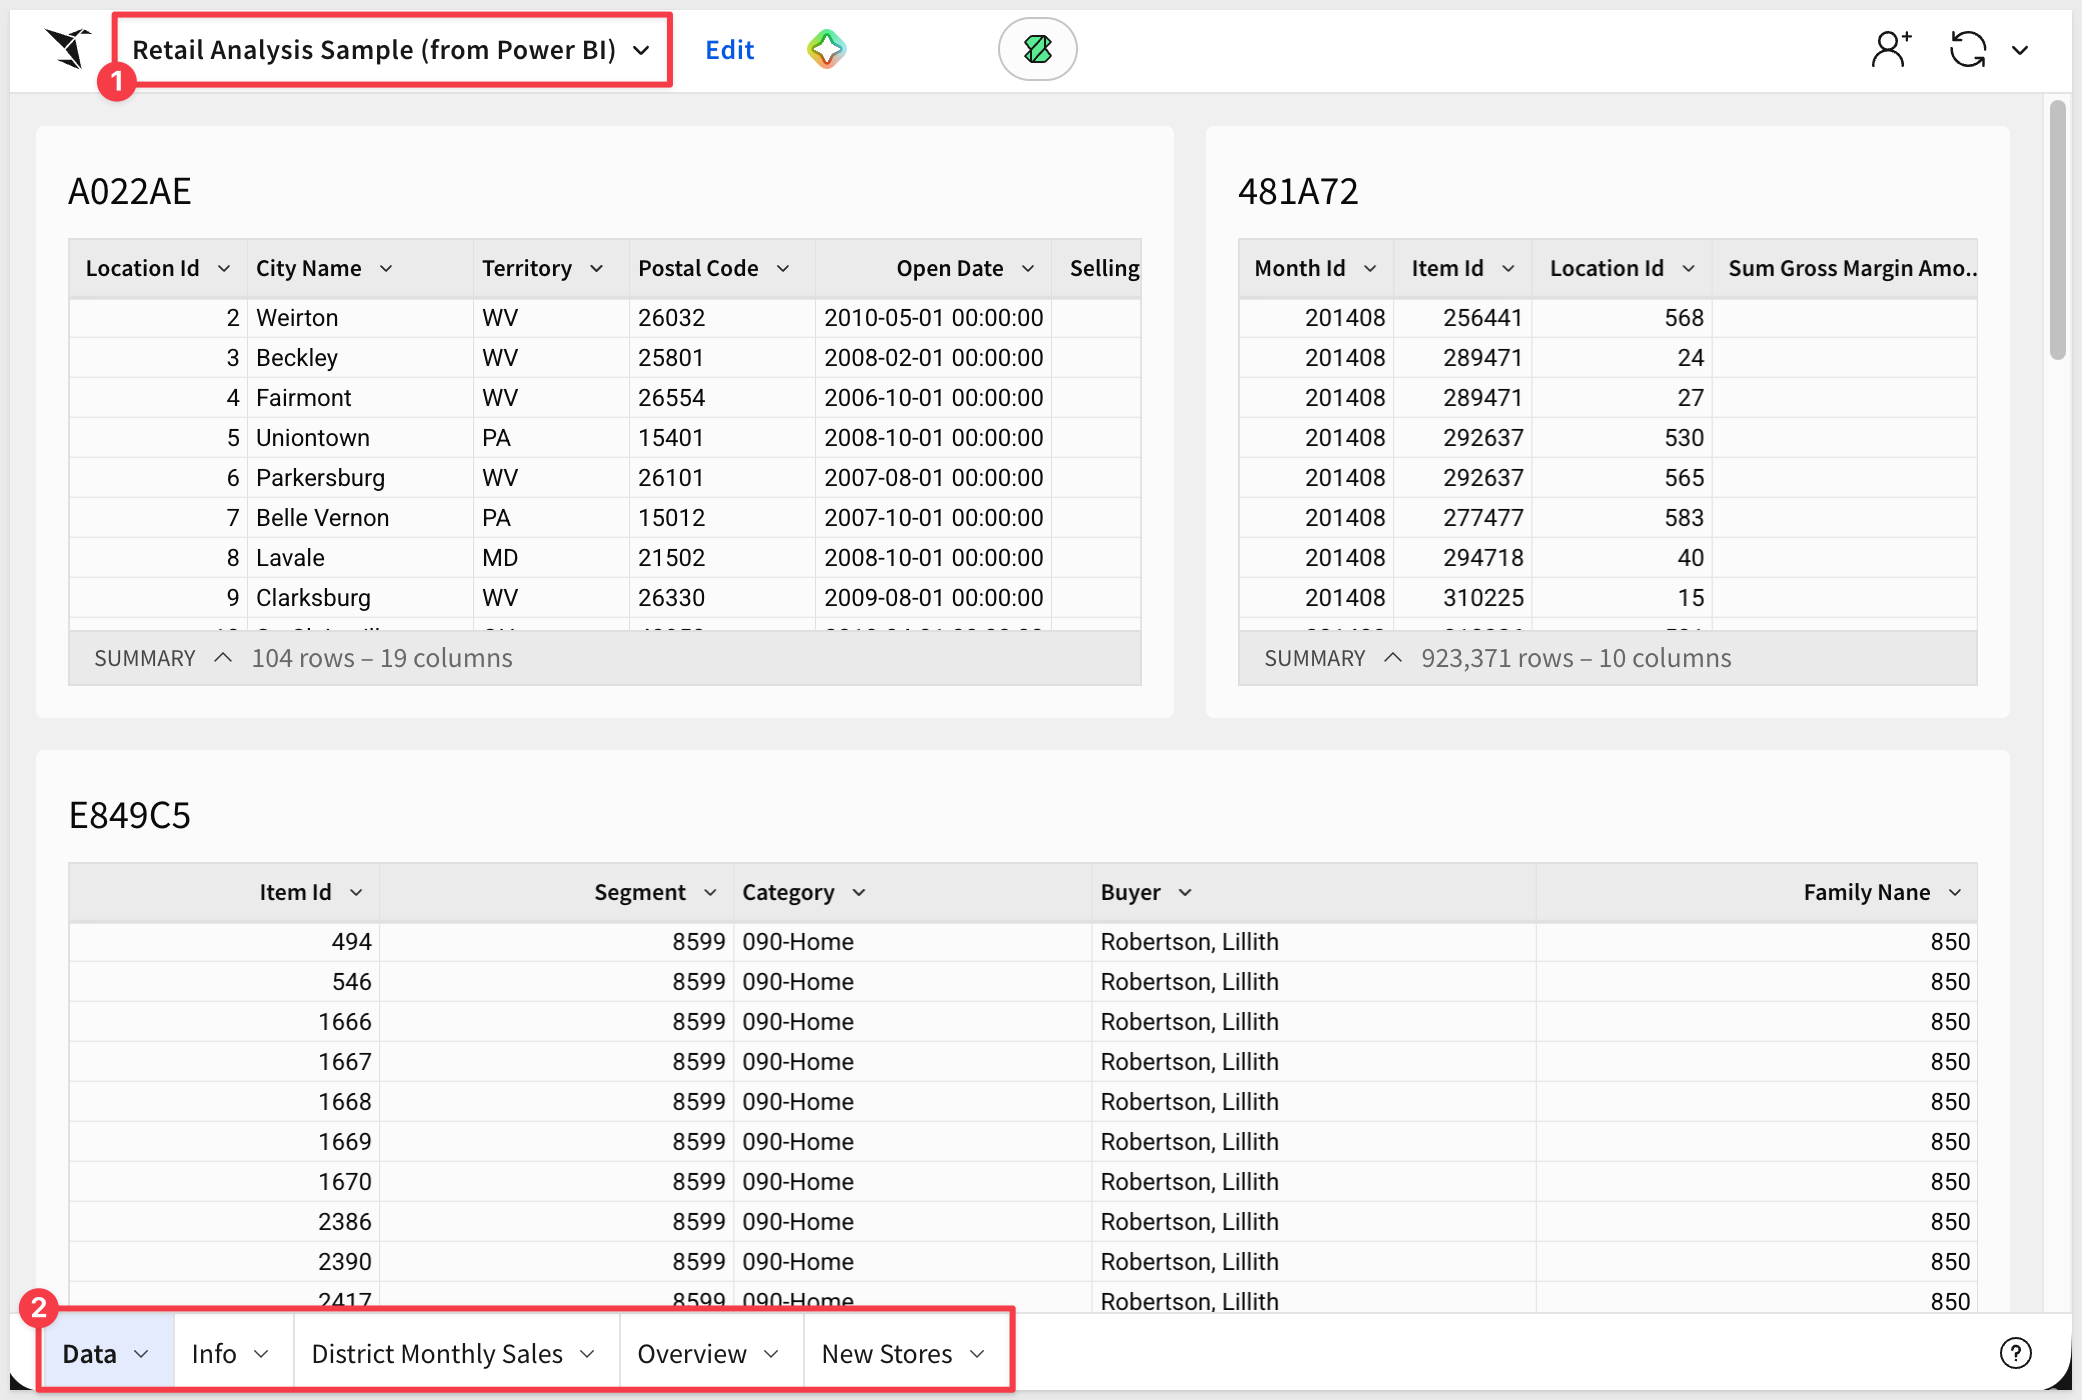
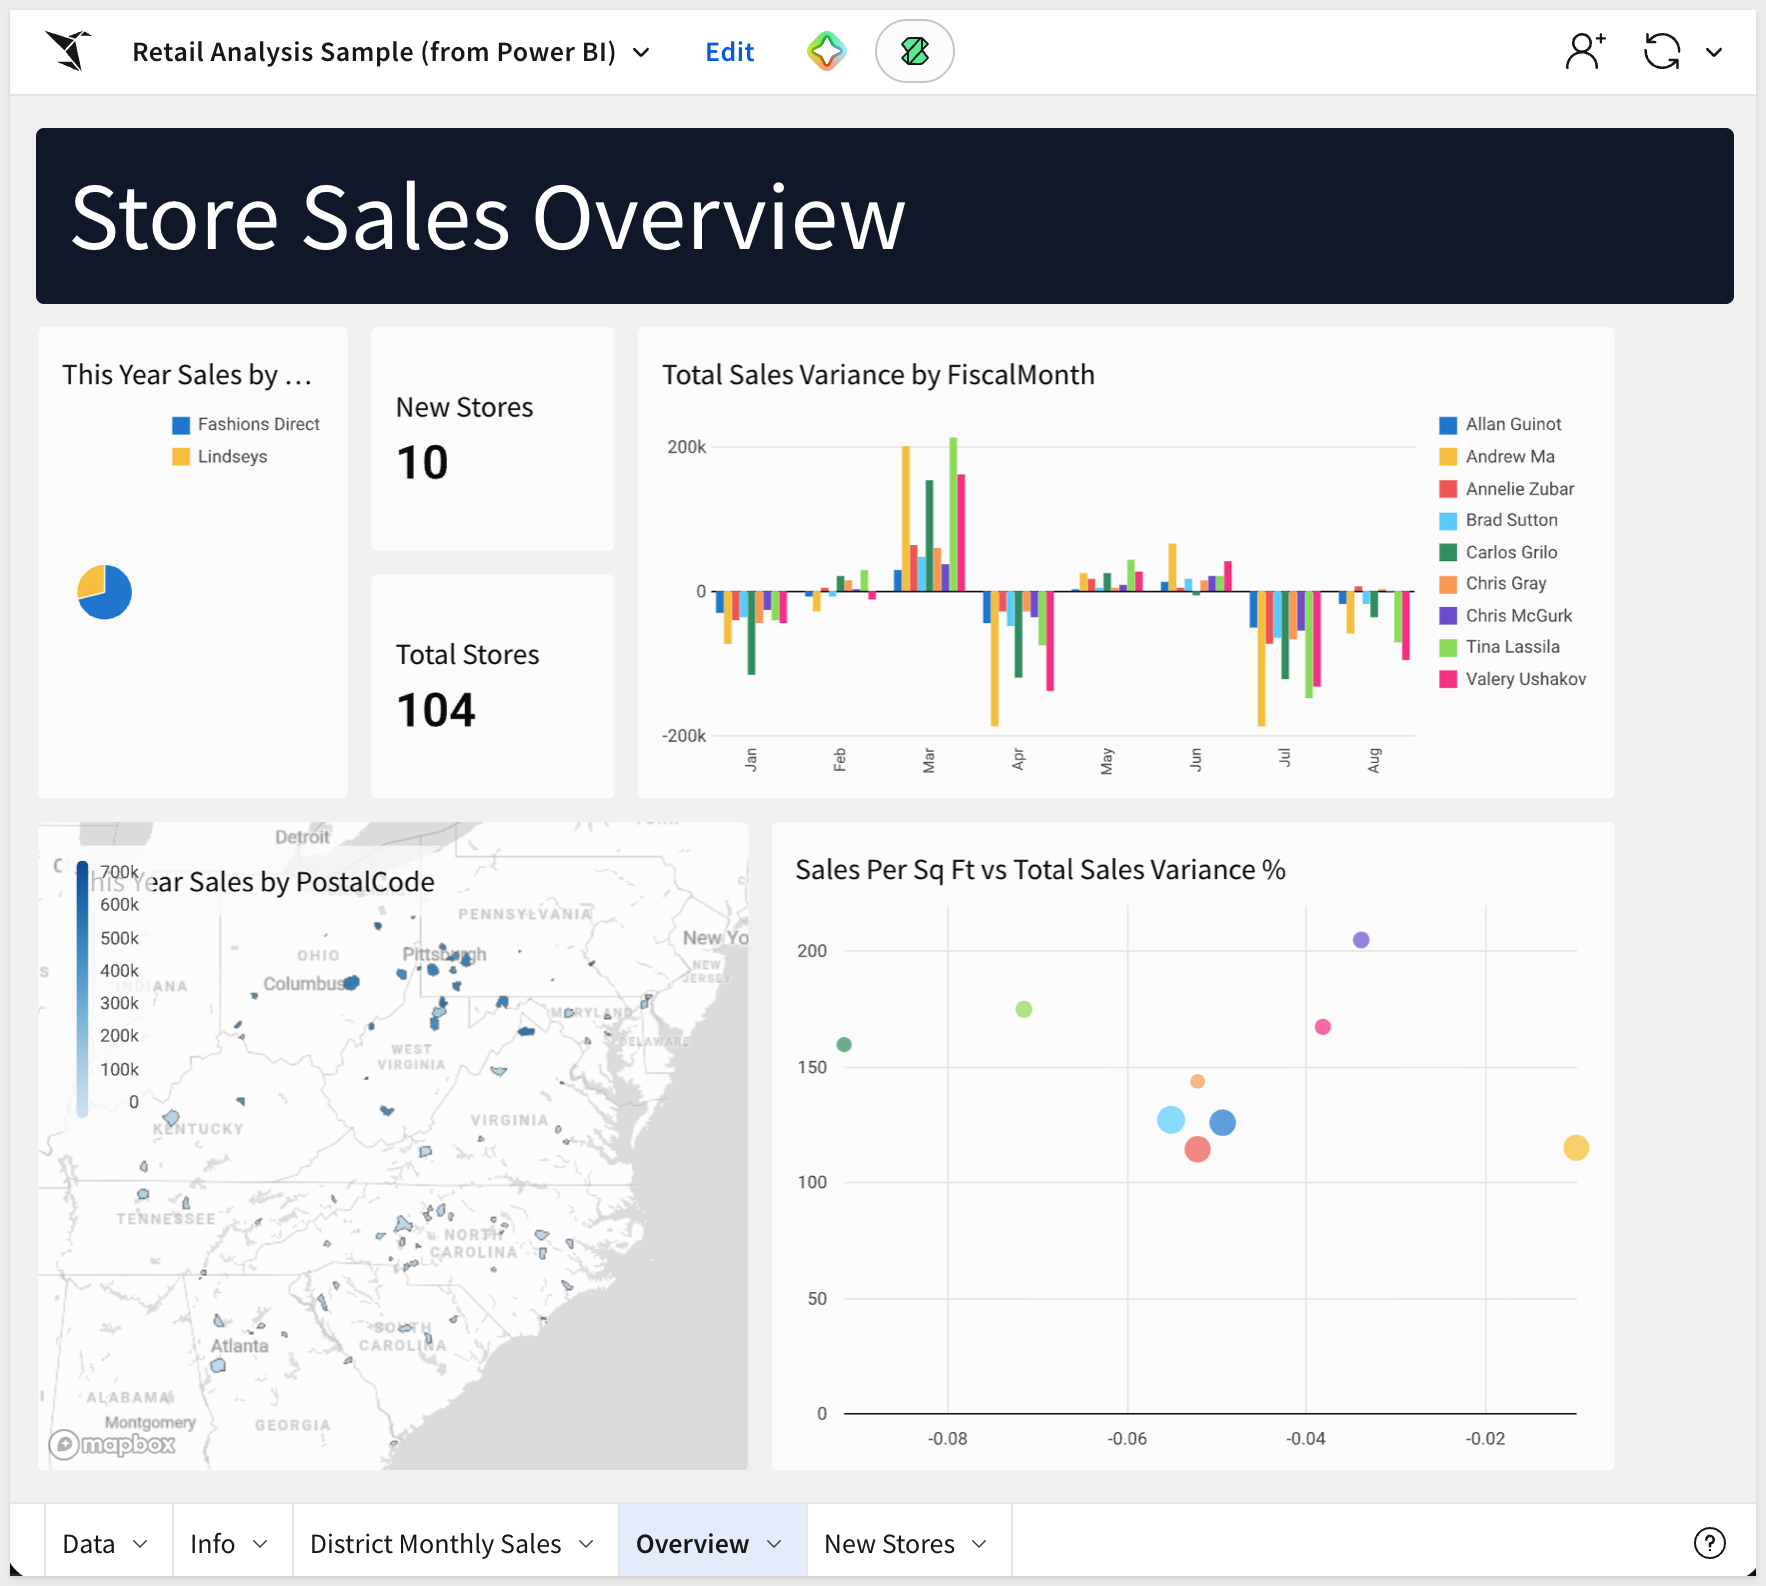
We can click into the new workbook to see the data and other visuals that have been converted onto pages in Sigma:
With a working Sigma data model and a near-complete workbook in place, the remaining work is review and polish. Three categories to triage:
Visuals the skill auto-translated cleanly — open the workbook, scan each page, and confirm the numbers look right against the Power BI source. These are the bulk of what landed; they ship as-is.
Visuals the skill flagged as deferred — the Workbook Summary surfaced specific items it couldn't translate (cross-table DAX measures, slicers without auto-wireable scope, scatter charts with a third measure). Open each, decide whether to hand-author a Sigma equivalent or drop the visual entirely.
Layout fidelity — the skill embeds layout from the source PBIR, but complex absolute positioning sometimes lands rough. If charts stack vertically instead of mirroring the Power BI grid, run put-layout.rb against the workbook to restore positions.
ruby ~/.claude/skills/powerbi-to-sigma/scripts/put-layout.rb \
  --workbook-id <your-workbook-id> \
  --layout /tmp/pbi-retail-analysis/layout.json
From here, the workbook is yours to enrich — use Sigma's AI Assistant to extend the analysis with natural-language queries, and Actions to wire interactive behavior the source report didn't have.
A converted workbook isn't useful if the numbers drifted in translation. Phase 5 closes the loop — for every measure that made it into the Sigma data model, the skill issues two queries:
- The original DAX against the published Power BI semantic model via the
executeQueriesREST API - The Sigma equivalent against the new data model
...and compares the results row-for-row.
The verification report summarizes each layer of the conversion. For the Retail Analysis sample run, the output looks like this:
Layer | Result |
Extract | 4 pages, 23 visuals, 32 DAX measures from |
Convert | 7 elements / 105 columns / 31 metrics via the local |
Data model | 5 base tables + |
Workbook | 5 pages, 7 master tables, 22 of 23 charts, layout embedded |
Verify | Live |
The Verify row is the headline. A clean 0 errors here means every column reference in the Sigma data model resolves against the live warehouse — the skill has handed you a workbook where no element is silently pointing at a column that doesn't exist.
A single report is the easy case. Real migrations involve workspaces with dozens or hundreds of reports — and migrating them one-by-one through the converter loses the leverage of doing the planning work once. That's where the companion powerbi-assessment skill comes in.
Point powerbi-assessment at a Fabric tenant and it inventories every workspace and report, scoring each on:
- DAX complexity buckets — how many measures are mechanical (a), filter-context restructure (b), or escalation-only
- Visual coverage — which Power BI visual kinds appear, and which Sigma equivalents exist
- Source plumbing — RLS roles, DirectQuery vs Import, warehouse sources parsed from M scripts
- Effort estimate — token + dollar cost to run the conversion (Opus and Sonnet) per report
The output is a readout.md and a Sigma-branded readout.html you can share with stakeholders, plus a ranked migration shortlist sorted by value / (1 + cost) — the cheapest, highest-value reports to convert first.
The shortlist becomes input to a cluster plan — powerbi-assessment groups reports that share the same semantic model, so one Sigma data model can serve a whole family of reports instead of producing N near-duplicate DMs. powerbi-to-sigma consumes that cluster plan in batch mode and runs the conversions concurrently.
Typical flow for a real migration engagement:
- Run
powerbi-assessmentagainst the target tenant; review the shortlist with stakeholders. - Pick the top N reports to convert first.
- Hand the cluster plan to
powerbi-to-sigma --batchand let it work through them. - Spot-check each output; file the inevitable gap items upstream.
Ths following a just a "grab bag" of things that might come up during real conversions, with the fix for each.
python3 --versionreports 3.9.x andpip installrejectstruststore:
macOS's stock Python is too old for the skill's dependencies. Install Python 3.10+ via Homebrew (brew install python@3.12) or python.org, then usepython3.12 -m pip install ...explicitly. Avoidpip3as a shorthand — it can quietly resolve back to the old interpreter.- Skill pauses at a "converter MCP gate" mid-run:
The conversion delegates the actual model translation to a separate MCP server (sigma-data-model-mcp). If it isn't installed locally, the skill stops at the gate. Pick option6. Chat about thisand tell Claude:Clone twells89/sigma-data-model-mcp into ~/Desktop/sigma-data-model-mcp for me, then run
npm install && npm run build in that directory. Once the build is done, come back to the gate and pick option 1.
Claude runs the clone, install, and build, then returns to the gate. After that the skill may also prompt for a "build commit" — choose the(Recommended)option, which honors a 3-day-stability rule on the converter's commit age. - Schema not visible in Sigma after
COPY INTO:
Sigma's service role doesn't have access to the new schema. The DDL block inPrepare the Demo Dataincludes theGRANT USAGEandGRANT SELECTstatements — if you skipped or modified them, run them now with the role name your Sigma connection actually uses (find it in Sigma underAdministration>Connections). - Cross-table DAX measures dropped from the workbook:
Measures that aggregate one table's column inside another table's context (e.g.,SUM(Store[SellingAreaSize])inside aSalesmeasure) are a converter gap today — they get listed as "deferred" in the Workbook Summary and the dependent visuals are stripped from the build. Hand-author the Sigma equivalent (typically aLookup+ aggregation) on the affected visual. - Slicers don't auto-wire to charts:
Power BI slicers translate to Sigma controls, but the converter's relationship-scope traversal sometimes can't find the matching target column on the chart's master element. The Workbook Summary lists the un-wired slicers; open each control in Sigma and add the target manually. - Scatter chart missing its third measure (Size role):
Sigma scatter on the ungrouped path doesn't support a third measure for point size. The converter drops the Size role and continues. If the third dimension is essential, switch to a grouped scatter or split into two adjacent scatters. - Device-code login expired between runs:
Tokens last about an hour. Rerunpython3 ~/.claude/skills/powerbi-to-sigma/scripts/fabric-auth-check.pyto refresh. - Corporate TLS interception breaks Microsoft auth:
Thetruststorepackage the skill uses honors the system trust store, which usually covers corporate CAs automatically. If it still fails, your proxy CA bundle isn't in the system store — install it viaKeychain Access(macOS) or your OS's certificate manager. - Many
Bash command — Contains shell syntax that cannot be statically analyzed — Do you want to proceed?prompts during DAX translation:
The skill fireseval "$(...)"patterns to inject tokens dynamically. Claude Code's safety analyzer can't pattern-match these for blanket approval even in accept-edits mode. Click1. Yeson each — it's expected behavior, not a misconfiguration. After the run, you can use the/fewer-permission-promptsskill to scan the transcript and add those patterns to your.claude/settings.local.jsonso subsequent runs are silent. - "Data model has error columns" after POST:
A column the model declares can't be resolved against the warehouse. Usually a column name mismatch (snake_case_UPPER warehouse vs CamelCase Power BI) or a missing rename in the renames block. Re-check theMap the Warehousesection's rename list against the actual warehouse columns; the skill will surface the specific column in the error.
What you built is less a single conversion and more a repeatable migration path. The skill took a Power BI report — semantic model, DAX measures, layout — and produced a Sigma data model, a workbook, and a parity report against the live source, without anyone hand-rebuilding visuals or eyeballing numbers.
The patterns worth carrying into your next migration:
- Two skills, one workflow —
powerbi-assessmentscopes and prioritizes;powerbi-to-sigmaconverts and verifies. The same shape applies whether you're migrating one report or a hundred. - Warehouse-first — Sigma reads the live warehouse, so the conversion's value comes from getting the data where Sigma can see it. The DDL + S3 + GRANTs scaffolding in
Prepare the Demo Datatransfers to any warehouse Sigma can reach. - Honest decision surfacing — every gate the skill paused at was a real choice. Treating those as features, not friction, is how the migration produces a trustworthy result instead of a confident-but-wrong one.
- Parity as proof — the
executeQueries-vs-Sigma comparison is what makes the result shippable. Without it you're spot-checking; with it you have evidence every measure lines up.
A first-pass conversion produces a working starting point and a documented punch list, not a hand-polished workbook. The polish loop is short, and you know exactly what to look at. That's the migration approach you can scale.
Additional Resource Links
Blog
Community
Help Center
QuickStarts
Be sure to check out all the latest developments at Sigma's First Friday Feature page!