Some administrative work in Sigma is easy to do once and tedious to do repeatedly. Reviewing who has access, taking stock of your connections, provisioning new members, or capturing an inventory of content all mean clicking through the same screens by hand — work that's slow to repeat, easy to get slightly wrong each time, and hard to hand off to a schedule or a teammate.
The Sigma CLI (sigma) is built for exactly this. It's a typed command-line wrapper over Sigma's REST API that handles authentication, gives you discoverable commands, and returns clean JSON you can pipe into scripts, pipelines, and scheduled jobs — so the tasks you used to do by hand become repeatable and auditable. Because every command runs through the same REST API, permissions, and audit logging as the rest of Sigma, that automation stays governed — the CLI is a new front door to Sigma, not a way around its controls.
In this QuickStart you'll install and configure sigma, learn how its commands map to the REST API, and then build something practical: a governance inventory that exports your members, connections, and workbooks to CSV. You'll finish by wrapping that inventory in a script you can run on a schedule.
Along the way you'll learn how to:
- Install
sigmaand add it to your PATH - Authenticate using a named profile (OAuth or API key)
- Discover resources and actions with the CLI's built-in help
- Read JSON output and reshape it with
jq - Export a governance snapshot of your organization to CSV
- Automate the whole thing as a repeatable, scheduled job
For more information on Sigma's product release strategy, see Sigma product releases
If something doesn't work as expected, here's how to contact Sigma support
Target Audience
This QuickStart is written for developers, technical admins, and automation engineers who are comfortable working in a terminal and want to manage Sigma programmatically rather than through the UI.
Prerequisites
- A macOS, Linux, or Windows machine with terminal access and internet connectivity.
- Access to a Sigma environment where you can generate API credentials or sign in with OAuth.
- An Admin account type is required to generate API credentials, or an account type with the "Use Sigma API with OAuth" permission for OAuth authentication.
- Basic familiarity with the command line and, ideally, jq for working with JSON.

You can install sigma with the shell installer or with Homebrew. Pick one.
Option 1: Shell installer
This works on macOS and Linux and installs the latest release:
curl --proto '=https' --tlsv1.2 -LsSf https://assets.sigmacomputing.com/sigma-cli/releases/latest/sigma-cli-installer.sh | sh
The installer places the binary at ~/.sigma-cli/bin/sigma. For most setups, that directory won't be on your PATH yet, so add it by appending this line to your shell profile (~/.zshrc or ~/.bashrc):
export PATH="$HOME/.sigma-cli/bin:$PATH"
There is no response, just an empty command line.
Reload the shell to apply the change:
source ~/.zshrc
Confirm the shell can now find the binary. This should return the path to sigma:
which sigma
Option 2: Homebrew
If you use Homebrew, this installs sigma and adds it to your PATH automatically:
brew install sigmacomputing/tap/sigma-computing-cli
Verify the installation
Confirm sigma is on your PATH and see which version you're running:
sigma --version
The response will be similar to:
sigma 0.2.1
Install jq
The examples in this QuickStart use jq to reshape the JSON that sigma returns, so install it now.
On macOS with Homebrew:
brew install jq
On macOS without Homebrew, download the prebuilt binary directly:
curl -Lo jq https://github.com/jqlang/jq/releases/latest/download/jq-macos-arm64 && chmod +x jq && sudo mv jq /usr/local/bin/
The sudo mv step will prompt for your macOS login password. Nothing is displayed as you type — press Enter when done.
On Linux, use your package manager of choice (for example, apt install jq or yum install jq).
sigma stores credentials in named profiles, so you can keep separate configurations for different Sigma organizations or environments (for example, staging and prod) and switch between them per command.
Start the interactive login:
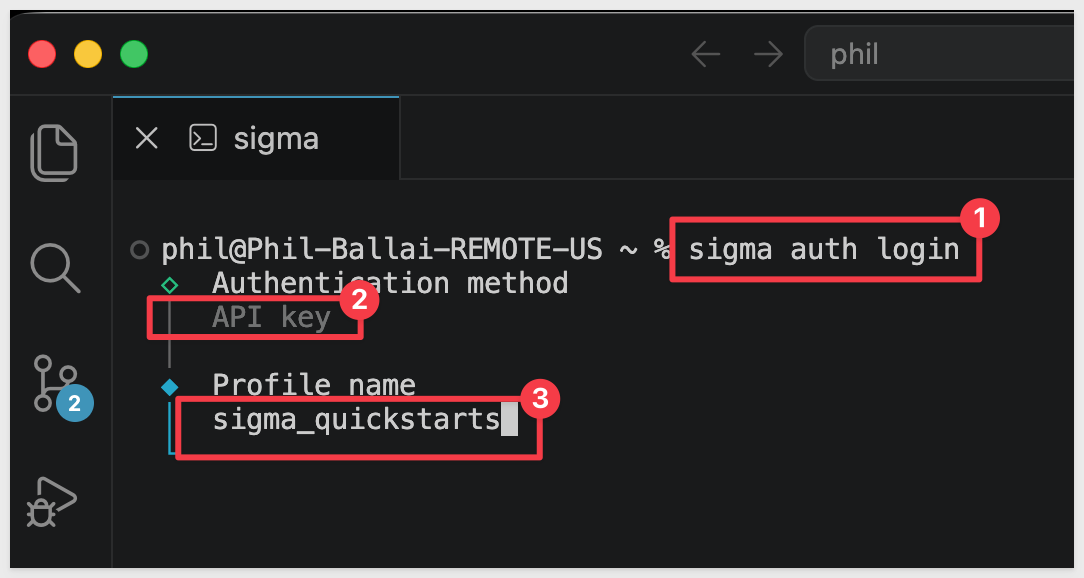
sigma auth login
Choose Create new profile, then pick one of the two authentication methods below. We will demonstrate with an API key.
Information on how to Generate Sigma API client credentials
Option 1: OAuth
Select OAuth, enter your Sigma organization URL, and give the profile a name (for example, staging). A browser window opens for you to sign in. This method requires an account type with the "Use Sigma API with OAuth" permission.
Option 2: API key
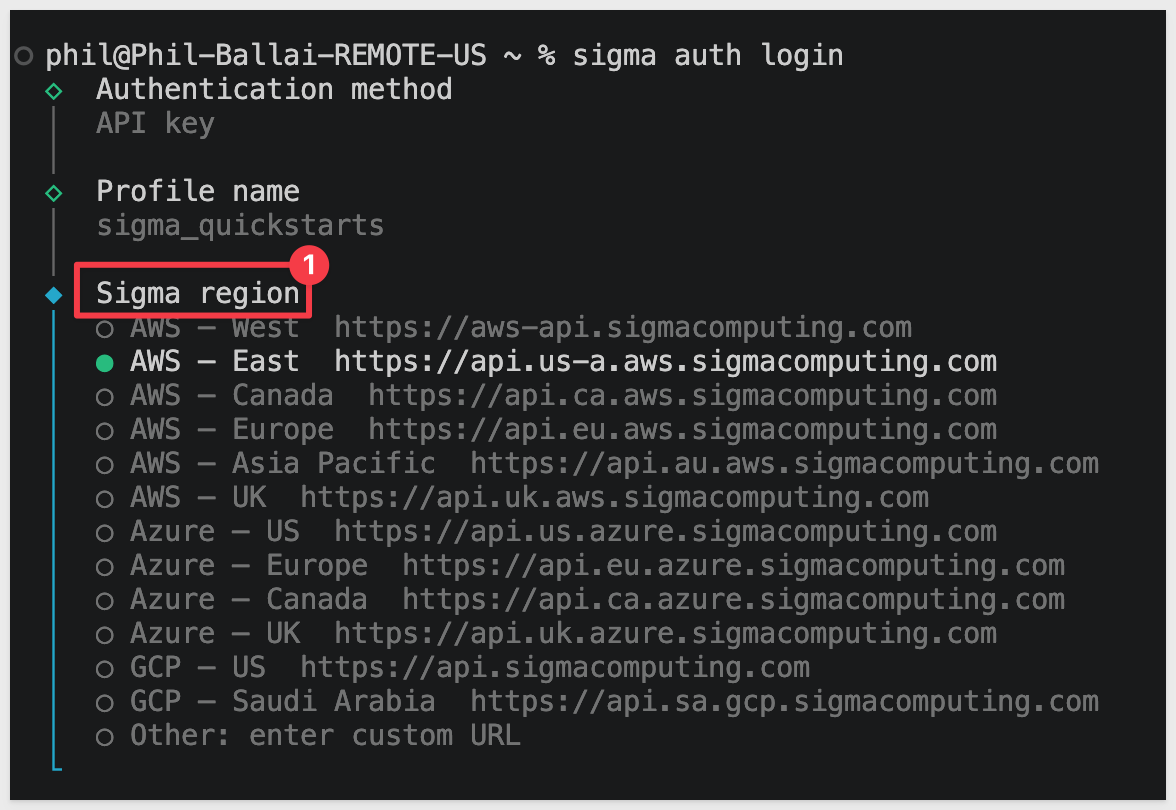
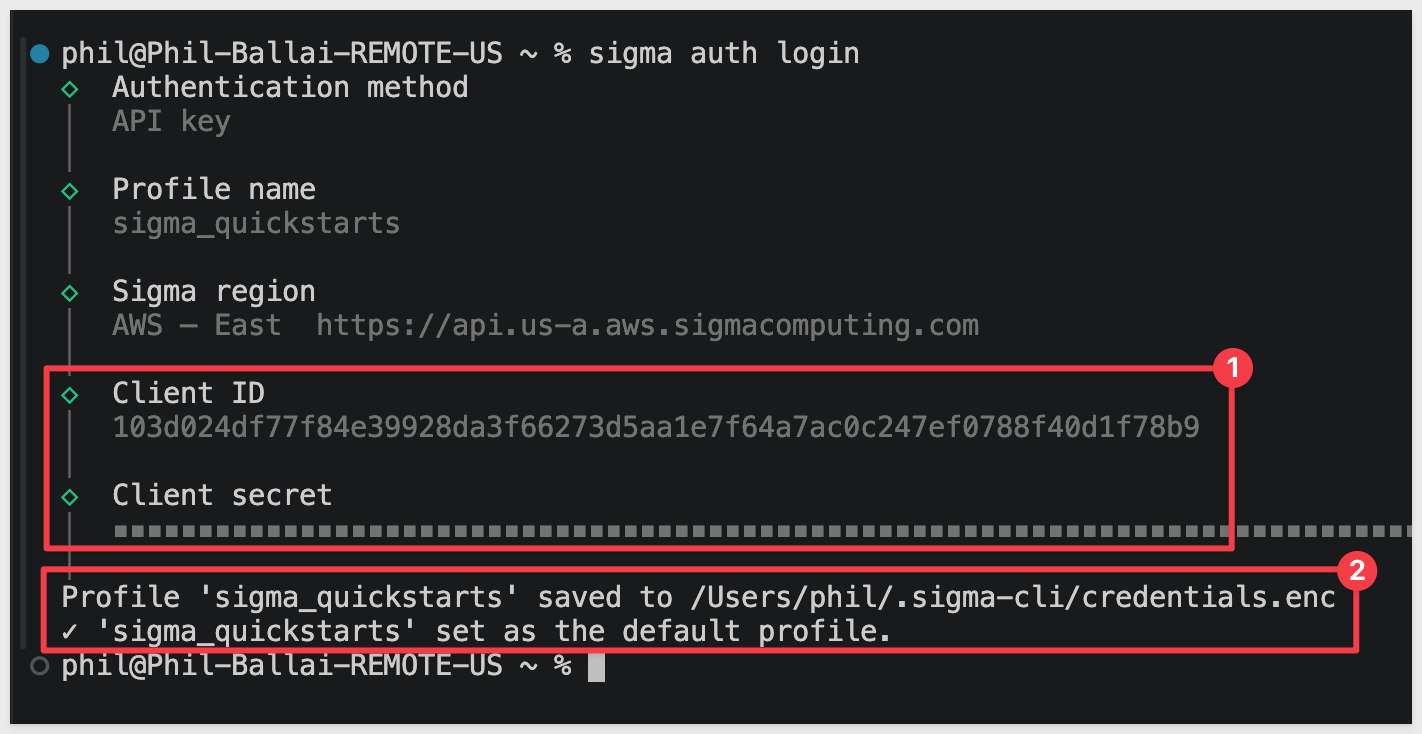
First generate API credentials in Sigma from Administration > Developer Access (an Admin account type is required). Then run sigma auth login, select Create new profile, choose API key, name the profile, select the API base URL for your organization, and paste in your client ID and secret.
After selecting API key, press Enter.
Enter a Profile name:
sigma_quickstarts
Select the region where your Sigma instance is hosted:
Enter your Client ID and Secret and press Enter. The profile location will be returned:
Select a profile per command
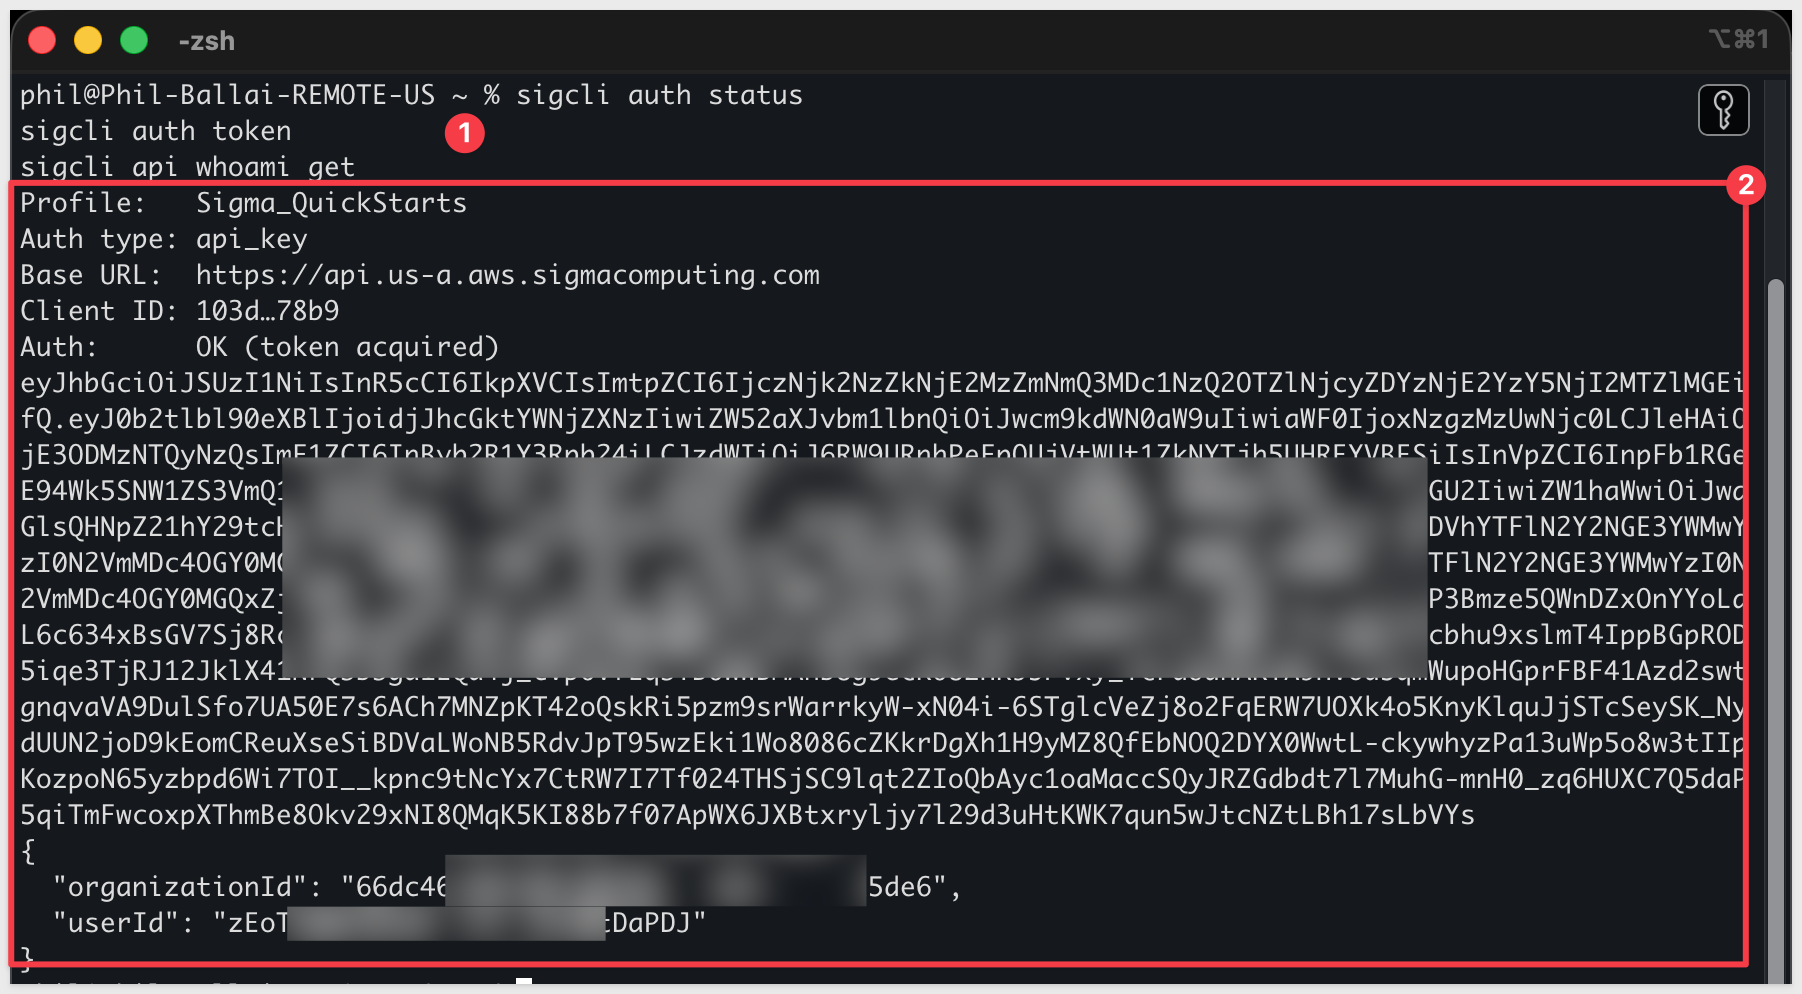
Once you have a valid profile, check the auth status:
sigma -p sigma_quickstarts auth status
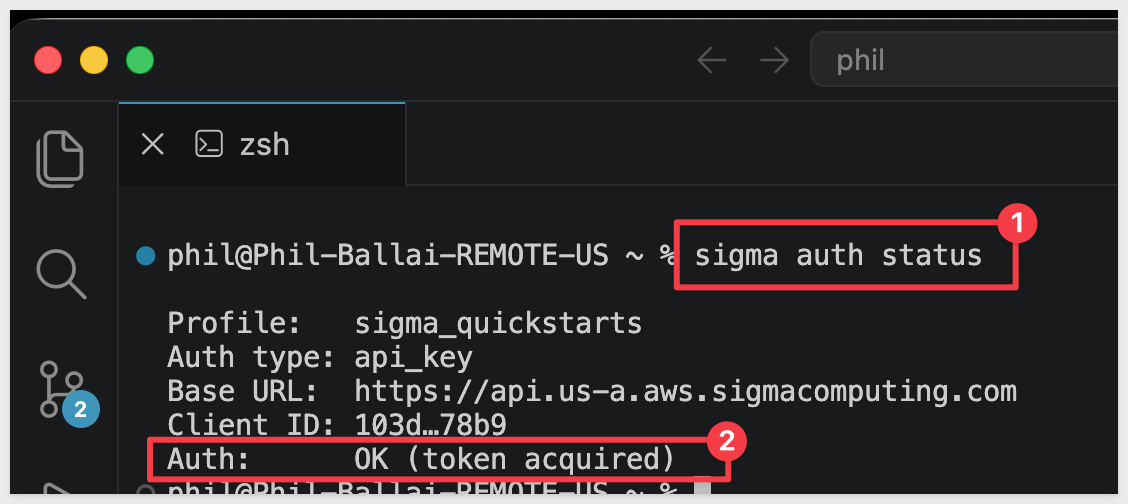
Verify your authentication
These three commands confirm that your profile works and tell you who you're authenticated as:
sigma auth status
sigma auth token
sigma api whoami get
auth statusreports whether your profile is authenticatedauth tokenprints the current bearer tokenwhoamireturns the member record for the signed-in user
Nearly every sigma command follows the same shape, which mirrors the REST API:
sigma api {resource} {action} [--flags]
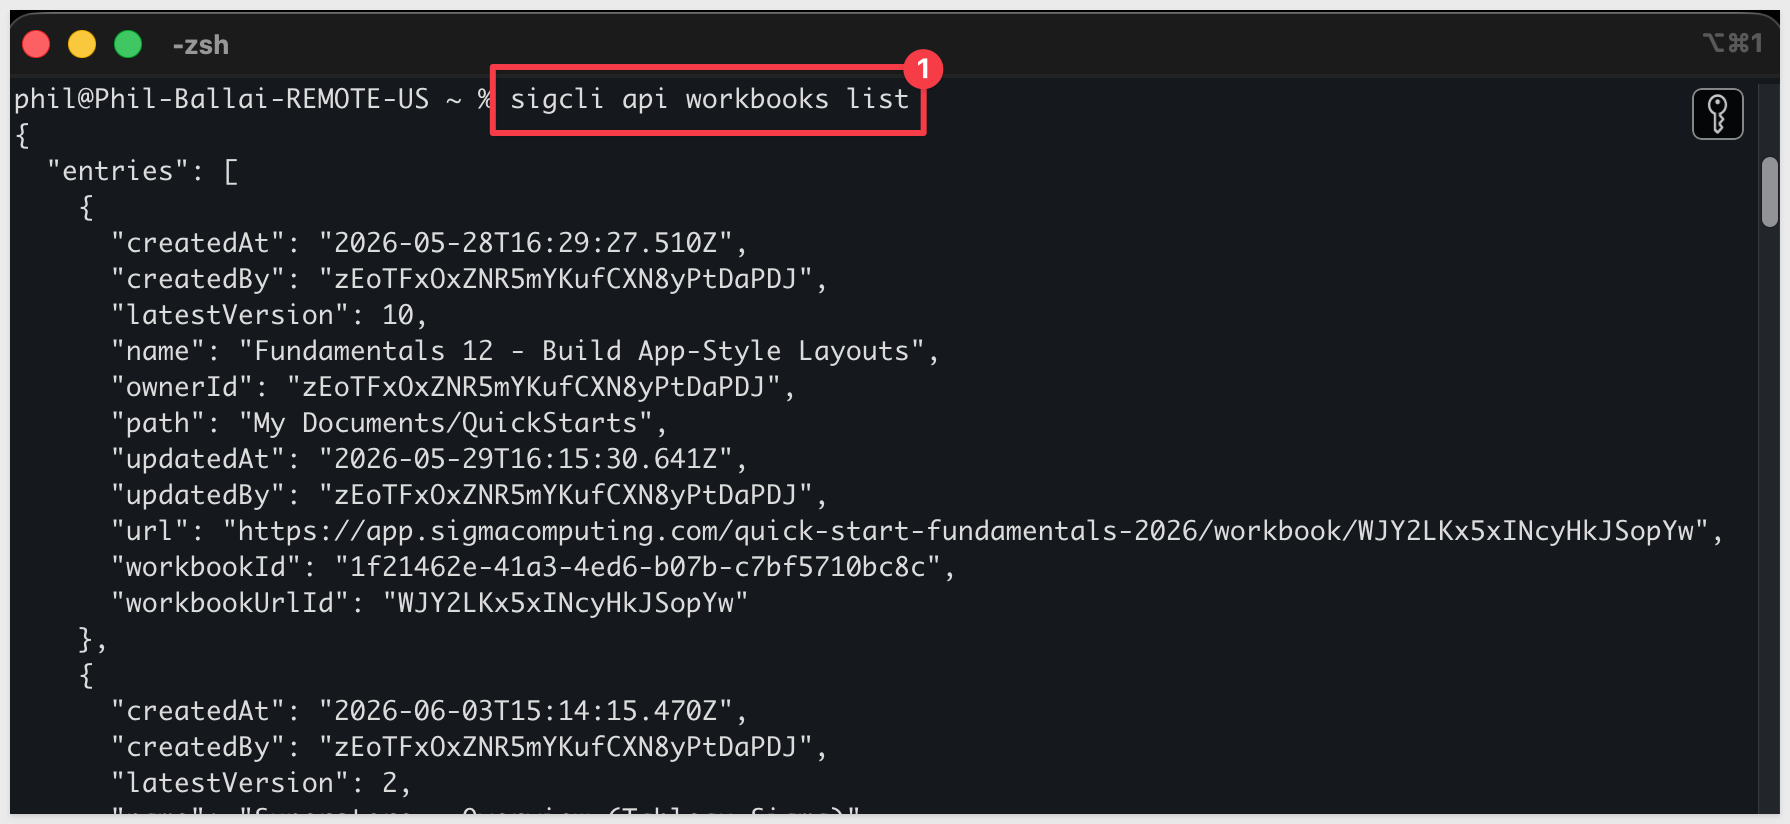
For example, sigma api workbooks list lists the workbooks in your organization:
sigma api workbooks list
Discover what's available
You don't need to memorize resources and actions — the CLI tells you what it supports:
sigma --help
sigma api workbooks --help
sigma api schema workbooks get
--helpat the top level lists the available resources.- Adding
--helpafter a resource shows its actions and flags. sigma api schema {resource} {action}describes the parameters an action expects, so you know exactly what to pass.
Pass parameters
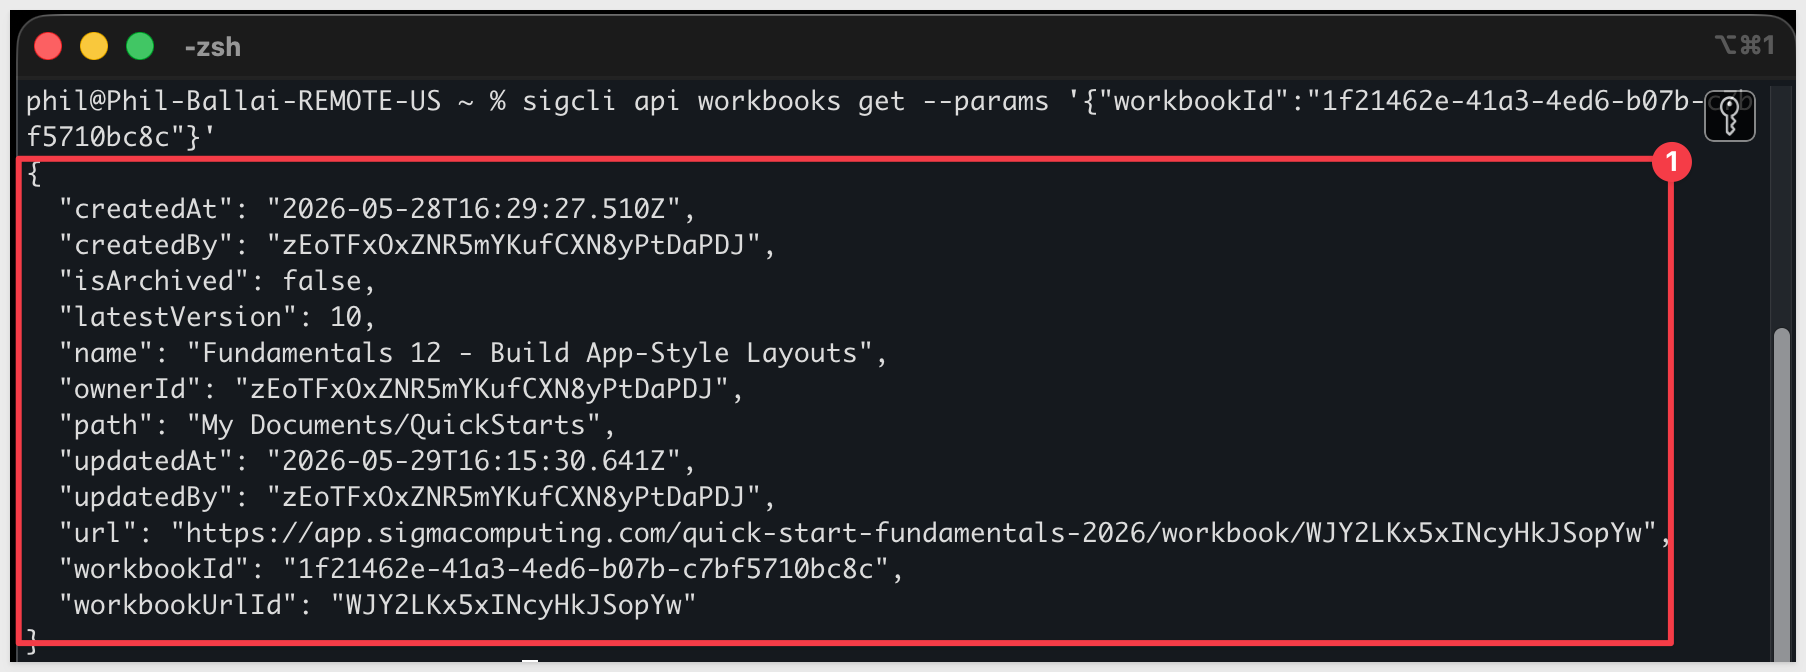
Actions that need input take a JSON object via --params. For example, to fetch a single workbook, pass its workbookId (you'll find this in the workbooks list output above):
sigma api workbooks get --params '{"workbookId":"YOUR-WORKBOOK-ID"}'
This returns the details for that workbook:
Read and reshape the output
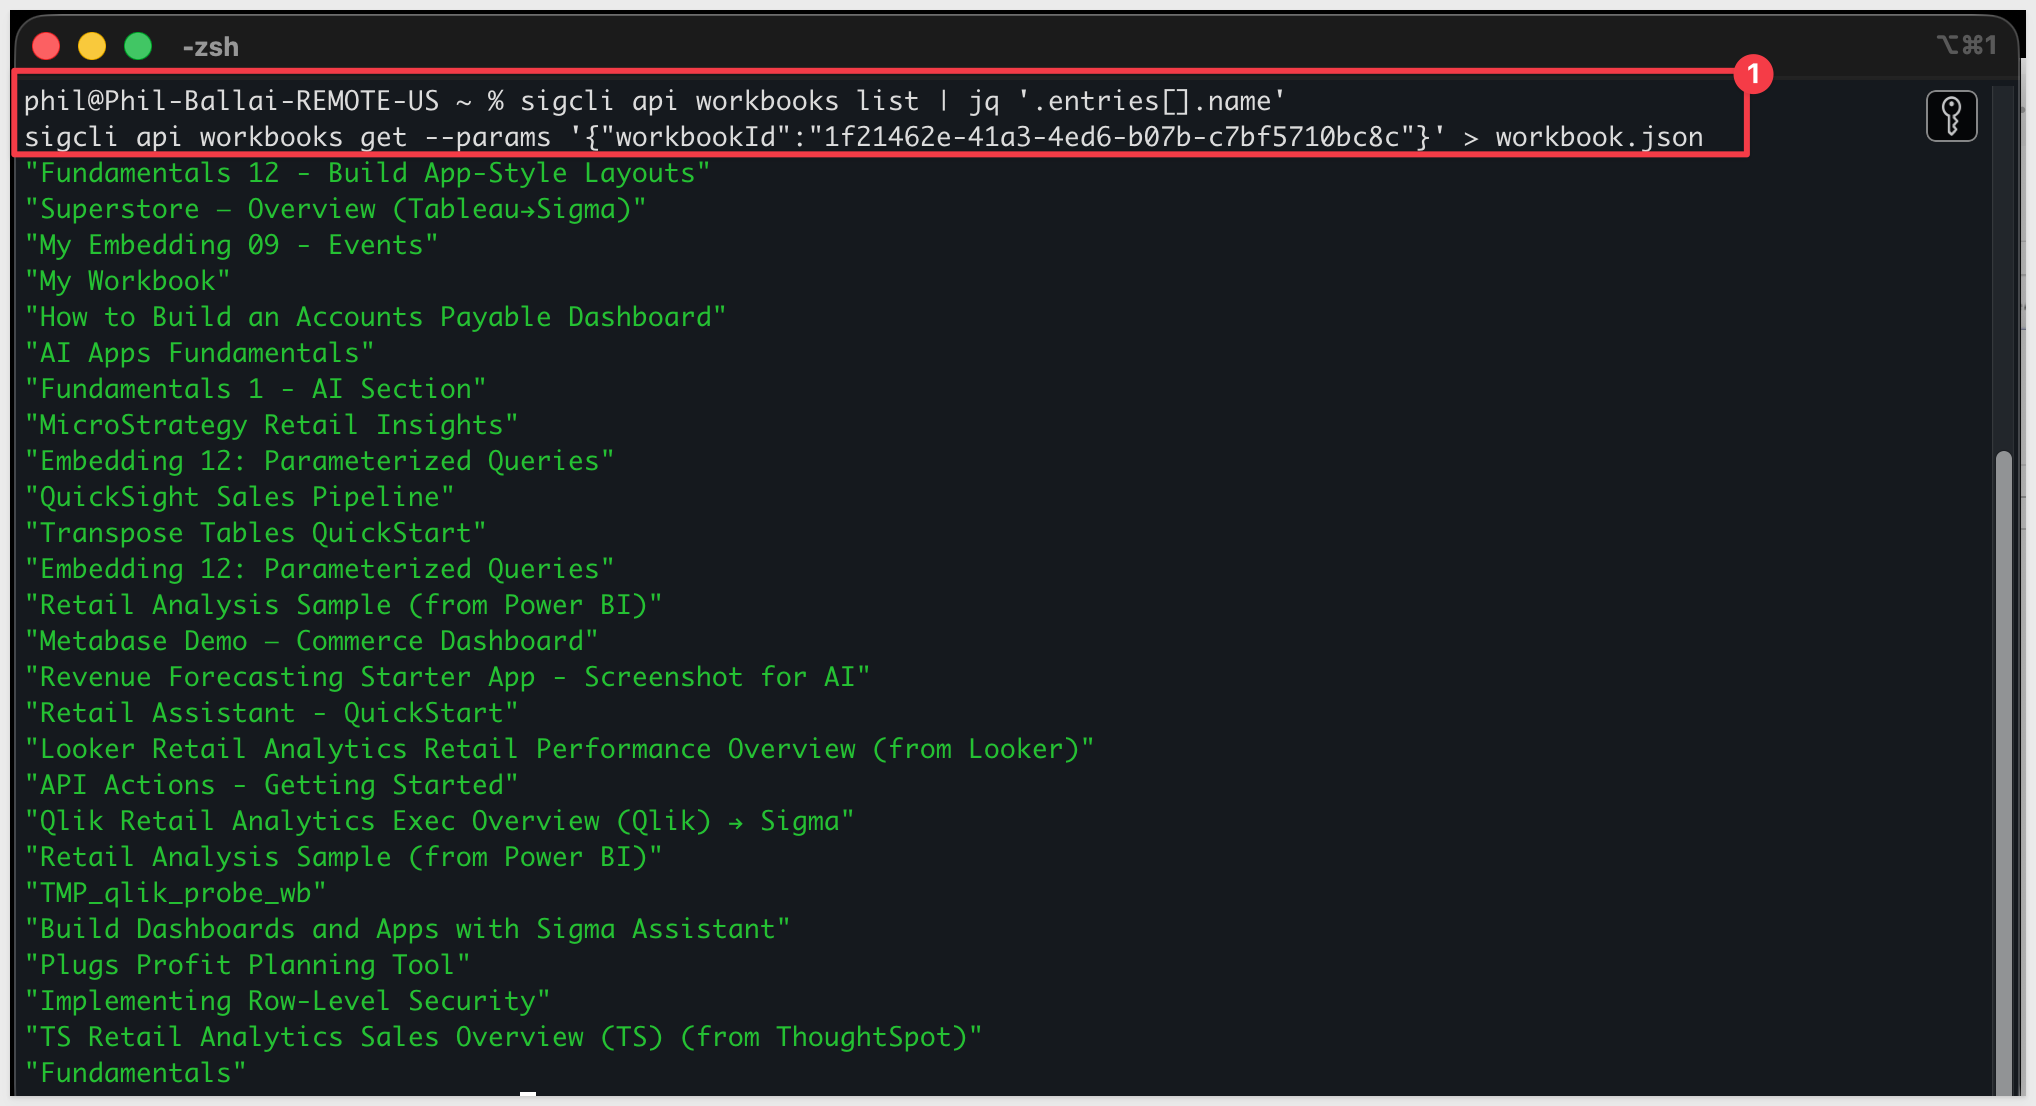
Commands return JSON to standard output, which makes them easy to combine with tools like jq or to save to a file:
sigma api workbooks list | jq '.entries[].name'
sigma api workbooks get --params '{"workbookId":"YOUR-WORKBOOK-ID"}' > workbook.json
Check exit codes
sigma returns a distinct exit code for each outcome, which is what lets scripts branch on success or failure:
0— success1— API error2— authentication error3— validation error4— network error
If something isn't behaving, turn on debug logging to see the underlying requests:
SIGMA_CLI_LOG=debug sigma api connections list
Setting SIGMA_CLI_LOG this way only applies to the single command it prefixes, so there's nothing to turn off — the next command you run without it returns to normal output.
Now put the pieces together. A common, high-value task for any Sigma admin is answering "who has access, what connections exist, and what content do we have?" With sigma you can pull all three and export them to CSV in a few commands.
List your members
Start by looking at the raw output so you can see the available fields:
sigma -p sigma_quickstarts api members list | jq '.entries[0]'
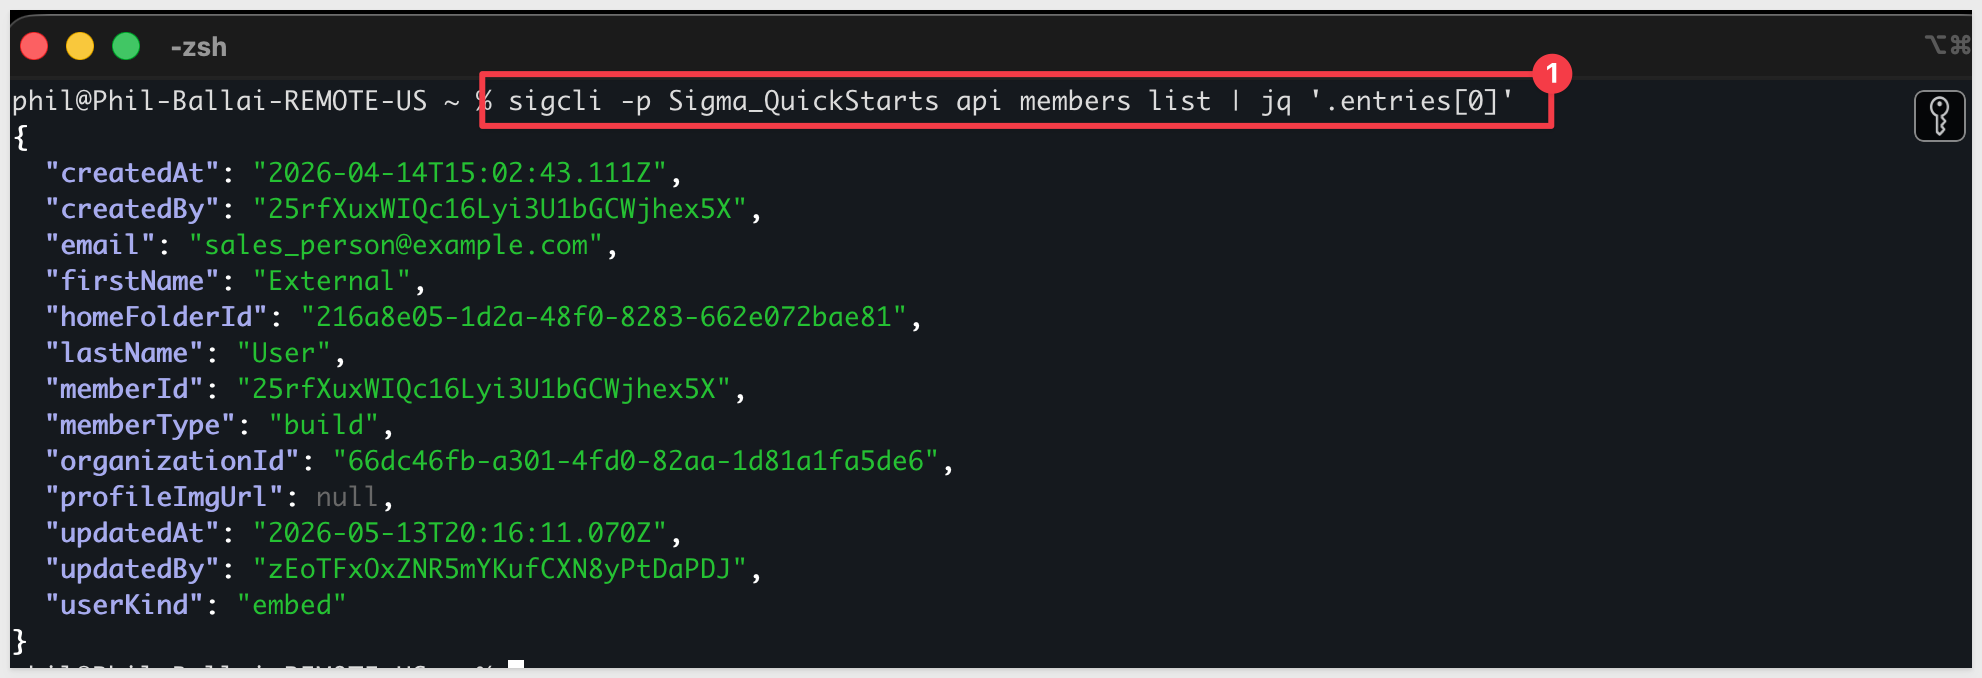
Then reshape the fields you care about into CSV rows. jq -r outputs raw strings, and @csv quotes and comma-separates them safely:
sigma -p sigma_quickstarts api members list \
  | jq -r '.entries[] | [.email, .firstName, .lastName, .memberType] | @csv' \
  > members.csv
The > redirect writes each file to your current working directory, so the three CSVs land wherever your terminal is pointed. Run pwd if you're not sure where that is, or ls *.csv to confirm they were created.
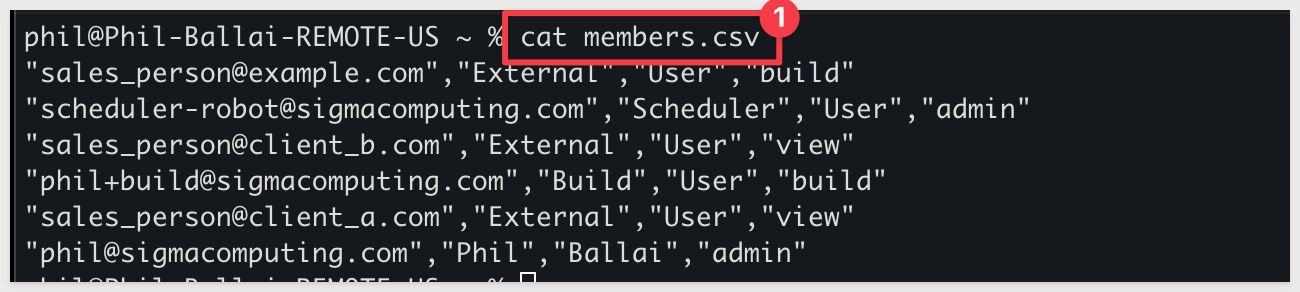
You can view the contents of members.csv using cat:
cat members.csv
List your connections
sigma -p sigma_quickstarts api connections list \
  | jq -r '.entries[] | [.connectionId, .name, .type] | @csv' \
  > connections.csv
List your workbooks
sigma -p sigma_quickstarts api workbooks list \
  | jq -r '.entries[] | [.workbookId, .name, .ownerId] | @csv' \
  > workbooks.csv
You now have three CSV files describing your organization's people, data connections, and content — a snapshot you can open in a spreadsheet, load into Sigma itself, or diff against last week's run to see what changed.
Because each step is a single command with a predictable exit code, you can collect them into one script and run it unattended.
We did this in VS Code, but it can also be done in a plain terminal.
Create a new file named:
sigma_inventory.sh
#!/usr/bin/env bash
set -euo pipefail

# Ensure sigma and jq are found when run by cron, which uses a minimal PATH
export PATH="/opt/homebrew/bin:/usr/local/bin:$HOME/.sigma-cli/bin:$PATH"

# Read credentials from the file store so the script works without a logged-in session
export SIGMA_CLI_KEYRING_BACKEND=file

PROFILE="sigma_inventory"
OUTDIR="sigma_inventory_test"
mkdir -p "$OUTDIR"

# Fail early if the profile isn't authenticated
sigma -p "$PROFILE" auth status

sigma -p "$PROFILE" api members list \
  | jq -r '.entries[] | [.email, .firstName, .lastName, .memberType] | @csv' \
  > "$OUTDIR/members.csv"

sigma -p "$PROFILE" api connections list \
  | jq -r '.entries[] | [.connectionId, .name, .type] | @csv' \
  > "$OUTDIR/connections.csv"

sigma -p "$PROFILE" api workbooks list \
  | jq -r '.entries[] | [.workbookId, .name, .ownerId] | @csv' \
  > "$OUTDIR/workbooks.csv"

echo "Inventory written to $OUTDIR"
Save the new file.
A few things worth pointing out about this script:
set -euo pipefailstops the script on the first error.- The
export PATH=...line ensuressigmaandjqare found when the script runs unattended. A scheduler likecronuses a minimal environment that doesn't include Homebrew's directory or your shell profile, so without this the script would fail withcommand not found. The line covers Homebrew on Apple Silicon (/opt/homebrew/bin), Homebrew on Intel (/usr/local/bin), and the shell-installer location (~/.sigma-cli/bin). - The
export SIGMA_CLI_KEYRING_BACKEND=fileline tellssigmato read credentials from a file rather than the OS keyring. By defaultsigmastores credentials in your operating system's keyring (the macOS Keychain, for example), which only unlocks for an interactive, logged-in session. A scheduler likecronhas no such session, so a keyring lookup fails withUser interaction is not allowed. File-based storage sidesteps that. - The
auth statuscheck up front means it fails clearly if the profile's credentials have expired, rather than producing empty files. OUTDIRcreates a folder namedsigma_inventory_test, and the three CSVs are written inside that folder, not next to the script. Keeping the output together makes it easy to find and easy to clean up.
Create a profile for unattended runs
The OS keyring (macOS Keychain) only unlocks during an interactive session, so any profile stored there fails when cron calls it. File-based storage keeps the credentials in a plain file that unattended runs can read without a session.
Create a dedicated profile for the script now:
export SIGMA_CLI_KEYRING_BACKEND=file
sigma auth login
Name it to signal its purpose:
sigma_inventory
Use the same API credentials as before. A separate profile is intentional — it keeps your interactive profile (sigma_quickstarts) isolated from automation, and makes it easy to rotate or revoke one without touching the other.
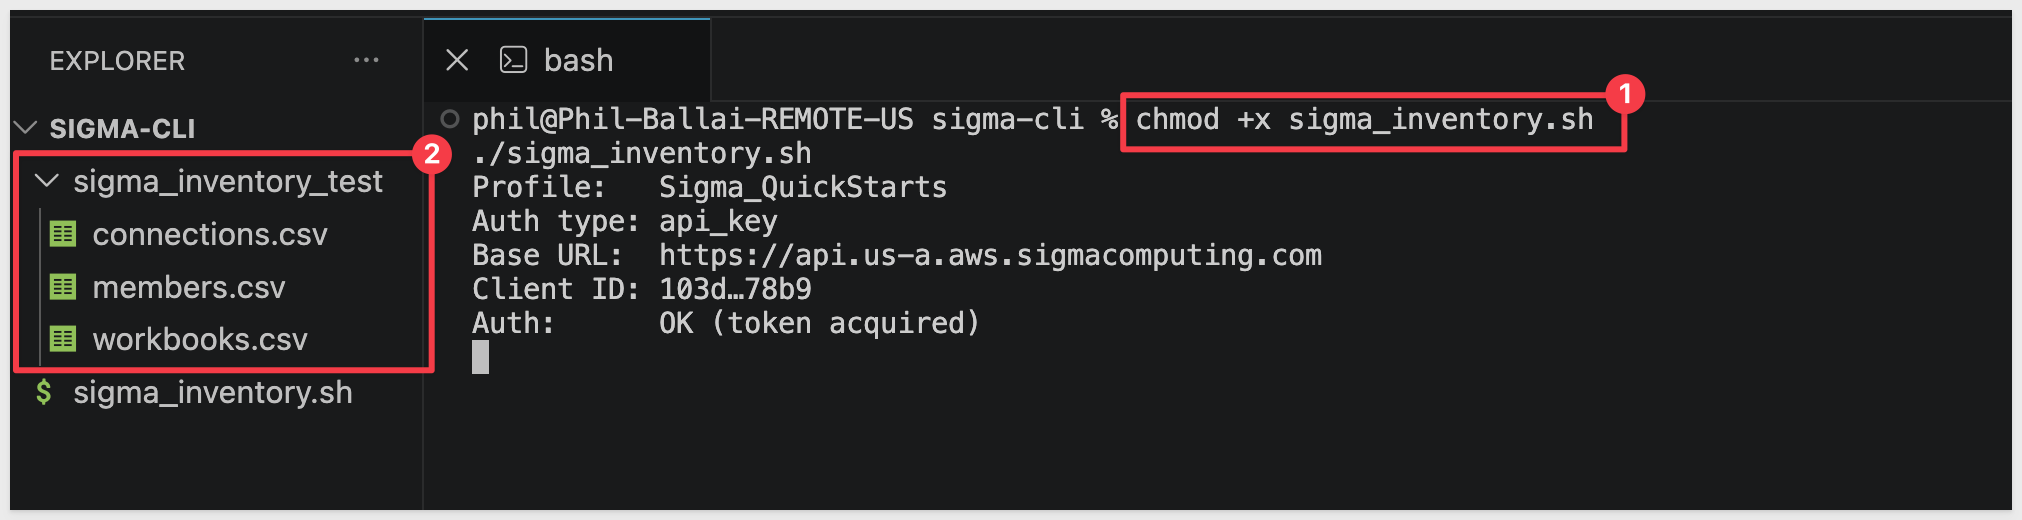
Make it executable and run it:
chmod +x sigma_inventory.sh
./sigma_inventory.sh
It finishes almost instantly, but a lot just happened: the script made three separate calls to Sigma's REST API — one each for members, connections, and workbooks — and jq reshaped every response into a CSV as it came back.
You'll have a folder named sigma_inventory_test containing the three resulting files:
Run it on a schedule
To capture a weekly snapshot automatically, schedule the script with cron, your machine's built-in job scheduler.
The schedule lives on your machine, in your user's crontab — it is not stored in Sigma. Sigma has no knowledge of the schedule; it simply receives normal API calls whenever the script runs. Anything that can run sigma on a timer (cron, a CI/CD scheduler, a cloud function) works the same way.
Since you already have a sigma_inventory_test folder from the manual run, delete it first so there's no doubt the scheduled run is what recreates it:
rm -rf sigma_inventory_test
cron runs with a minimal environment and does not start in the folder where you created the script, so it needs to know exactly where the script lives. In the folder where you saved sigma_inventory.sh, run pwd to print its full path:
pwd
Open your crontab for editing:
crontab -e
Add the following entry, changing into the script's folder first with cd so it runs from its own directory and writes its output — the log and the sigma_inventory_test folder — right alongside itself. Replace {your-script-folder} with the path pwd returned.
So you can watch it run instead of waiting for a distant day, set the time to a minute or two from now. Cron fields are minute then hour on a 24-hour clock, so if it's currently 4:03 PM, 05 16 * * * runs at 4:05 PM:
05 16 * * * cd {your-script-folder} && ./sigma_inventory.sh >> sigma_inventory.log 2>&1
For more information on cron formatting, see Set up a custom delivery schedule
Now save and exit so cron installs the schedule — the change only takes effect once the editor closes. crontab -e opens your default terminal editor:
- in
viorvim, type:wq - in
nano, pressCtrl+OthenCtrl+X
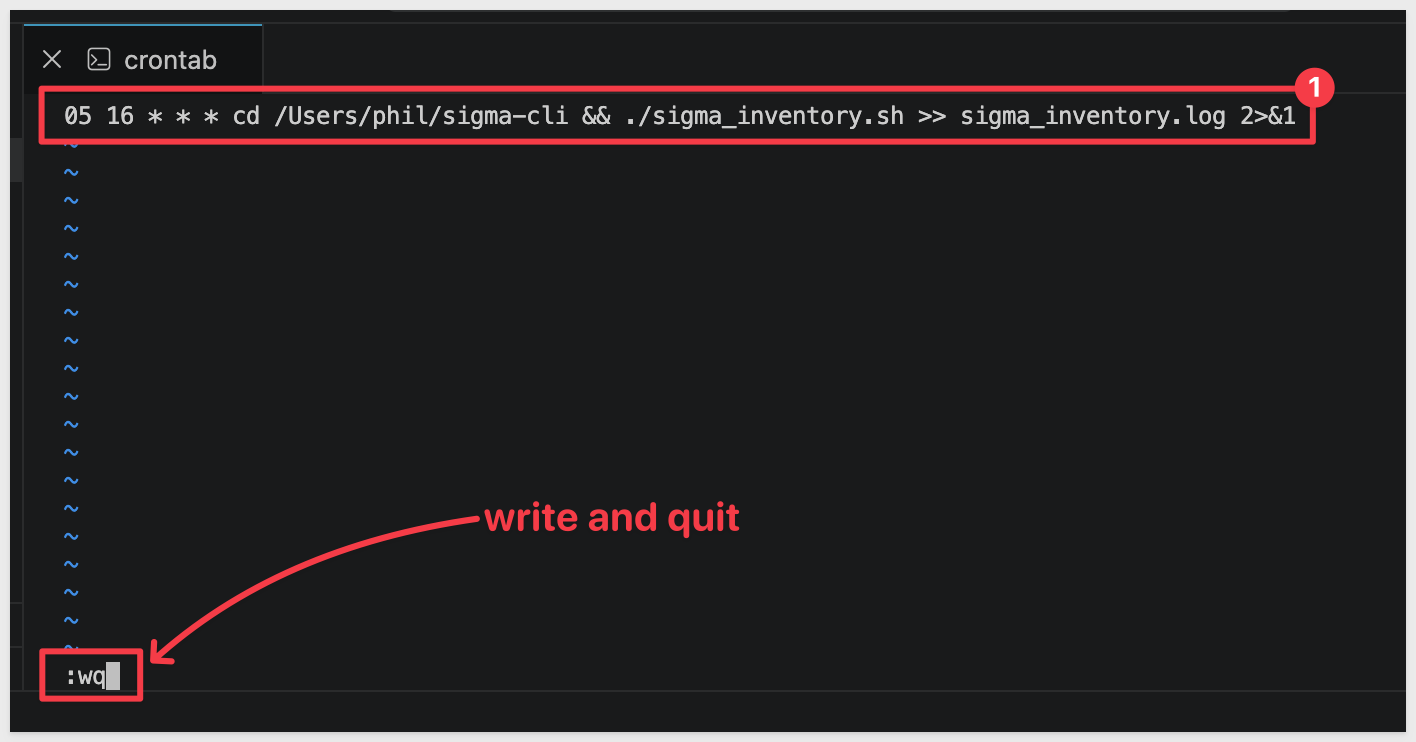
Saving the crontab returns you to the prompt with no output — that's expected, cron is silent. Confirm the entry is registered:
crontab -l

When the scheduled minute passes, confirm cron recreated the sigma_inventory_test folder and check that the log recorded a clean run. From inside your script folder:
ls sigma_inventory_test
cat sigma_inventory.log
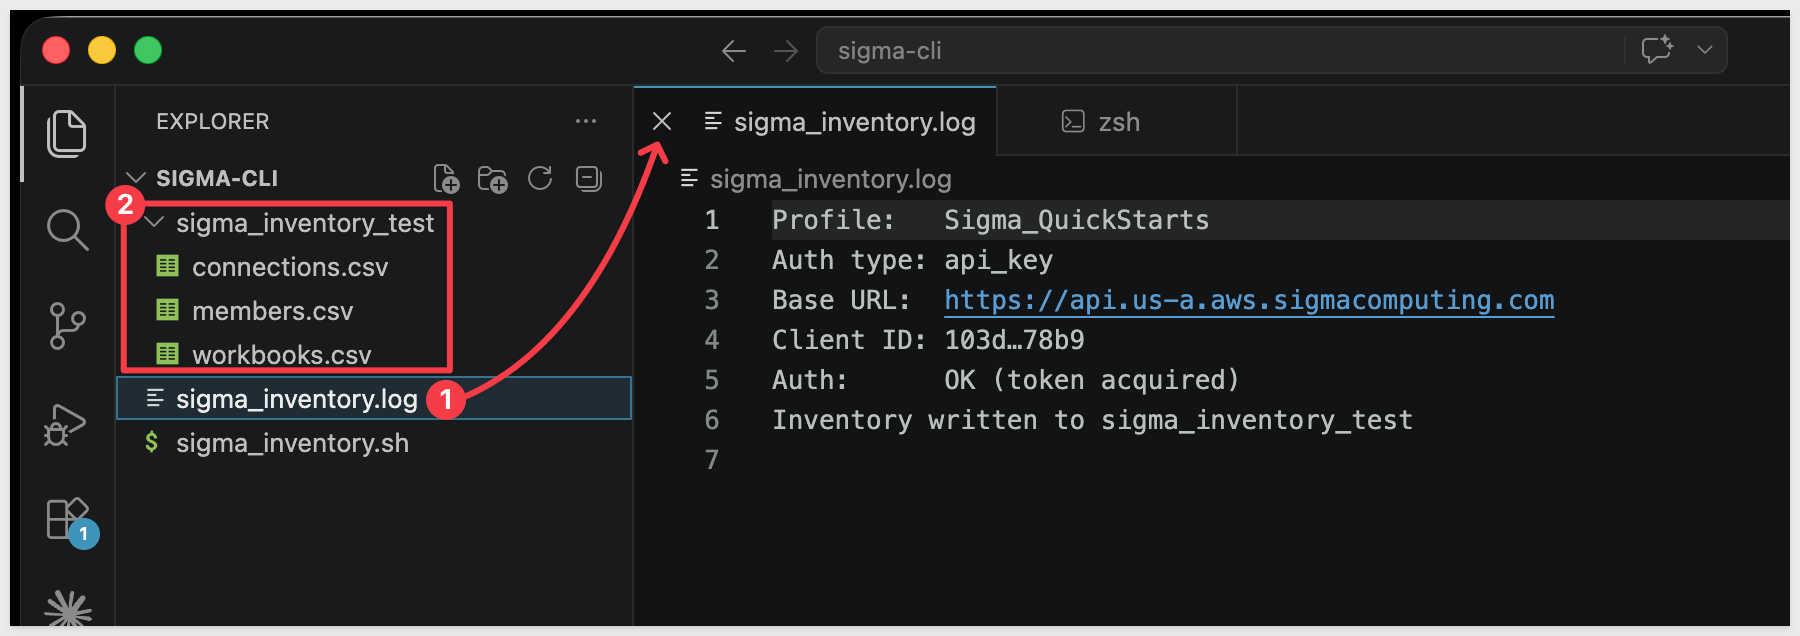
If the log shows an error like No such file or directory, cron couldn't find the script — double-check the path in your cron entry against what pwd returned.
Once it runs cleanly, edit the crontab again with crontab -e and set the time to whatever cadence you actually want — for example, 0 8 * * 1 runs the inventory every Monday at 8 AM.
Or, to remove the test schedule, edit the crontab again and delete the line:
crontab -e
The same script works unchanged inside a CI/CD pipeline. Store your API credentials as pipeline secrets, configure the profile non-interactively, and let the exit codes gate the rest of your workflow — for example, halting a deployment if auth status returns a non-zero code.
If you want to remove the Sigma CLI and everything installed during this QuickStart, follow these steps in order.
Remove the CLI binary and credentials
If you installed with the shell installer:
rm -rf ~/.sigma-cli
If you installed with Homebrew:
brew uninstall sigma-computing-cli
Either way, remove the credentials and profile data:
rm -rf ~/.sigcli
Remove the PATH line from your shell profile (if you added it)
If you followed the shell installer path and added the PATH line to your shell profile, open it and delete that line:
nano ~/.zshrc
Delete the line:
export PATH="$HOME/.sigma-cli/bin:$PATH"
Save and exit (Ctrl+O, then Ctrl+X).
Open a new terminal window
A new terminal window clears any PATH or environment variables set only in the current session — including the PATH export if you ran it directly rather than saving it to your shell profile.
Confirm the binary is gone
which sigma
This should return nothing.
Remove test output files (if you created them)
rm -f sigma_inventory.sh sigma_inventory.log
rm -rf sigma_inventory_test
Remove the cron entry (if you added one)
crontab -e
Delete the sigma line, save and exit.
You installed the Sigma CLI, authenticated it with a named profile, and learned how its sigma api {resource} {action} structure maps directly onto Sigma's REST API. From there you built a governance inventory — exporting your members, connections, and workbooks to CSV — and wrapped it into a script you can schedule or drop into a pipeline.
The bigger takeaway is the pattern, not just the report. Once Sigma operations are commands that return structured output and meaningful exit codes, they become building blocks: you can compose them, version them, put them under review, and run them the same way every time.
The inventory here is a starting point — the same approach applies to provisioning members, promoting content between environments, and any other administrative task you'd rather not do by hand. And because every command runs through Sigma's existing REST API, permissions, and audit logging, that automation stays governed no matter who — or what — invokes it.
Additional Resource Links
Sigma CLI overview
Install and configure the Sigma CLI
Use the Sigma CLI
Sigma REST API documentation
Blog
Community
Help Center
QuickStarts
Be sure to check out all the latest developments at Sigma's First Friday Feature page!