Sigma's embedded solution is highly flexible and can accommodate a myriad of use cases. These include:
- Providing all your customers with a common dashboard.
- Offering only certain customers a more specialized dashboard.
- Supporting users at varying levels of functionality (e.g., view-only vs. build)
- Any combination of the above scenarios or other possibilities.
Sigma employs federated user access to cater to all these needs and beyond. This is often realized through single sign-on (SSO) technologies and the establishment of trust relationships between the systems involved.
With Sigma embedding, users log in to your application (the "host application"), get authenticated (with an optional role assignment), and this information is conveyed to Sigma when a part of your app requires embedding.
It's crucial to note that Sigma has its own proprietary role-based access control (RBAC) system. While some customers exclusively use this system, many others with an existing identity management provider (IDP) prefer to integrate that with Sigma.
For more information, see using SSO with Sigma
Additional information is also available: managing user and teams with SCIM
In this QuickStart, we will use the local host application framework we created in Embedding 01: Getting Started
For more information on Sigma's product release strategy, see Sigma product releases
If something is not working as you expect, here's how to contact Sigma support
Target Audience
Semi-technical users who will be aiding in the planning or implementation of Sigma with embedding. No SQL or technical data skills are needed to complete this QuickStart. It does assume some common computer skills like installing software, using Terminal, navigating folders and copy/paste operations.
Prerequisites
- A computer with a current browser. It does not matter which browser you want to use.
- Access to your Sigma environment.
- Embedding 01: Getting Started is required to complete this QuickStart.

Federated user access refers to a mechanism that allows users to use a single set of credentials (such as username and password or other authentication methods) to access multiple software systems without requiring separate accounts for each system. This is typically achieved through single sign-on (SSO) technologies and trust relationships established between the participating systems.
Advantages of Federated Access:
- User Convenience: Users don't have to remember multiple passwords. They can log in once and access multiple systems seamlessly.
- Improved Security: Centralized authentication reduces the risk of password fatigue—where users reuse or choose weak passwords due to having too many to remember. With federation, strong authentication mechanisms can be uniformly enforced across all connected systems.
- Efficient User Management: IT departments can manage user accounts centrally. When a user leaves the organization or changes roles, access can be modified or revoked from a single point, ensuring timely and consistent updates across all systems.
- Reduced Administrative Overhead: With fewer accounts to manage, there's a reduction in the time and resources required for account maintenance, password resets, and other administrative tasks.
- Interoperability: Federated user access often relies on standards such as SAML (Security Assertion Markup Language), which ensures different systems, even from different vendors, can work together seamlessly.
Challenges of Federated Access:
- Complex Setup: Establishing trust relationships and integrating systems can be technically challenging, especially when dealing with legacy systems or those without native federation support. Sigma makes this easy by adopting the parent applications security at runtime, through our server-side API.
- Potential Single Point of Failure: If the central identity provider suffers downtime or issues, it might affect user access to all connected systems.
- Security Concerns: While federation can enhance security in many ways, it's crucial to secure the central identity provider. If compromised, attackers could gain access to all linked system
- Interoperability Issues: While standards exist, not all systems interpret or implement these standards consistently, leading to potential integration challenges.
Common Use Cases:
- Business Partnerships: Companies that collaborate frequently might use federated access to provide their employees access to shared tools and platforms without creating multiple accounts.
- Cloud Services: As organizations adopt more cloud services, federated user access ensures employees can seamlessly access all cloud platforms without multiple logins.
- Academic Institutions: Universities and colleges often federate access to libraries, learning systems, and other resources—allowing students and faculty to use everything they need with a single set of credentials.
- Enterprise Intranets and Applications: Large organizations might have many internal tools, dashboards, and systems. Federated access ensures employees can navigate these resources smoothly.
Now that you have a high-level understanding of federated access, let's explore how you can leverage it with Sigma.
In the QuickStart Embedding 01: Getting Started, we discussed and created some teams and workspaces.
To recap:
- Teams let you create user groups in Sigma. When you grant access and permissions to a team, the grants apply to all members assigned to the team.
- Workspaces allow folders and documents to be compartmentalized, categorized, and easily shared with the correct users. They can be shared among users and teams via permission grants.
Next, we will create three more teams, each with their own workspace.
- Client_A Team: A
Privateteam for our customer Client_A. - Client_B Team: A
Privateteam for our customer Client_B. - All_Clients_Team: A
Publicteam for any customer to see. Many customers have generic content they want to make available to all their external clients.
For more information about teams, see Create and manage teams
For more information about workspaces, see Manage workspaces
Create teams and workspaces
Log in to Sigma and navigate to Administration > Teams and click Create Team.
Name the team All_Clients_Team, set it to Public, check the box to Create a Workspace and click Create:
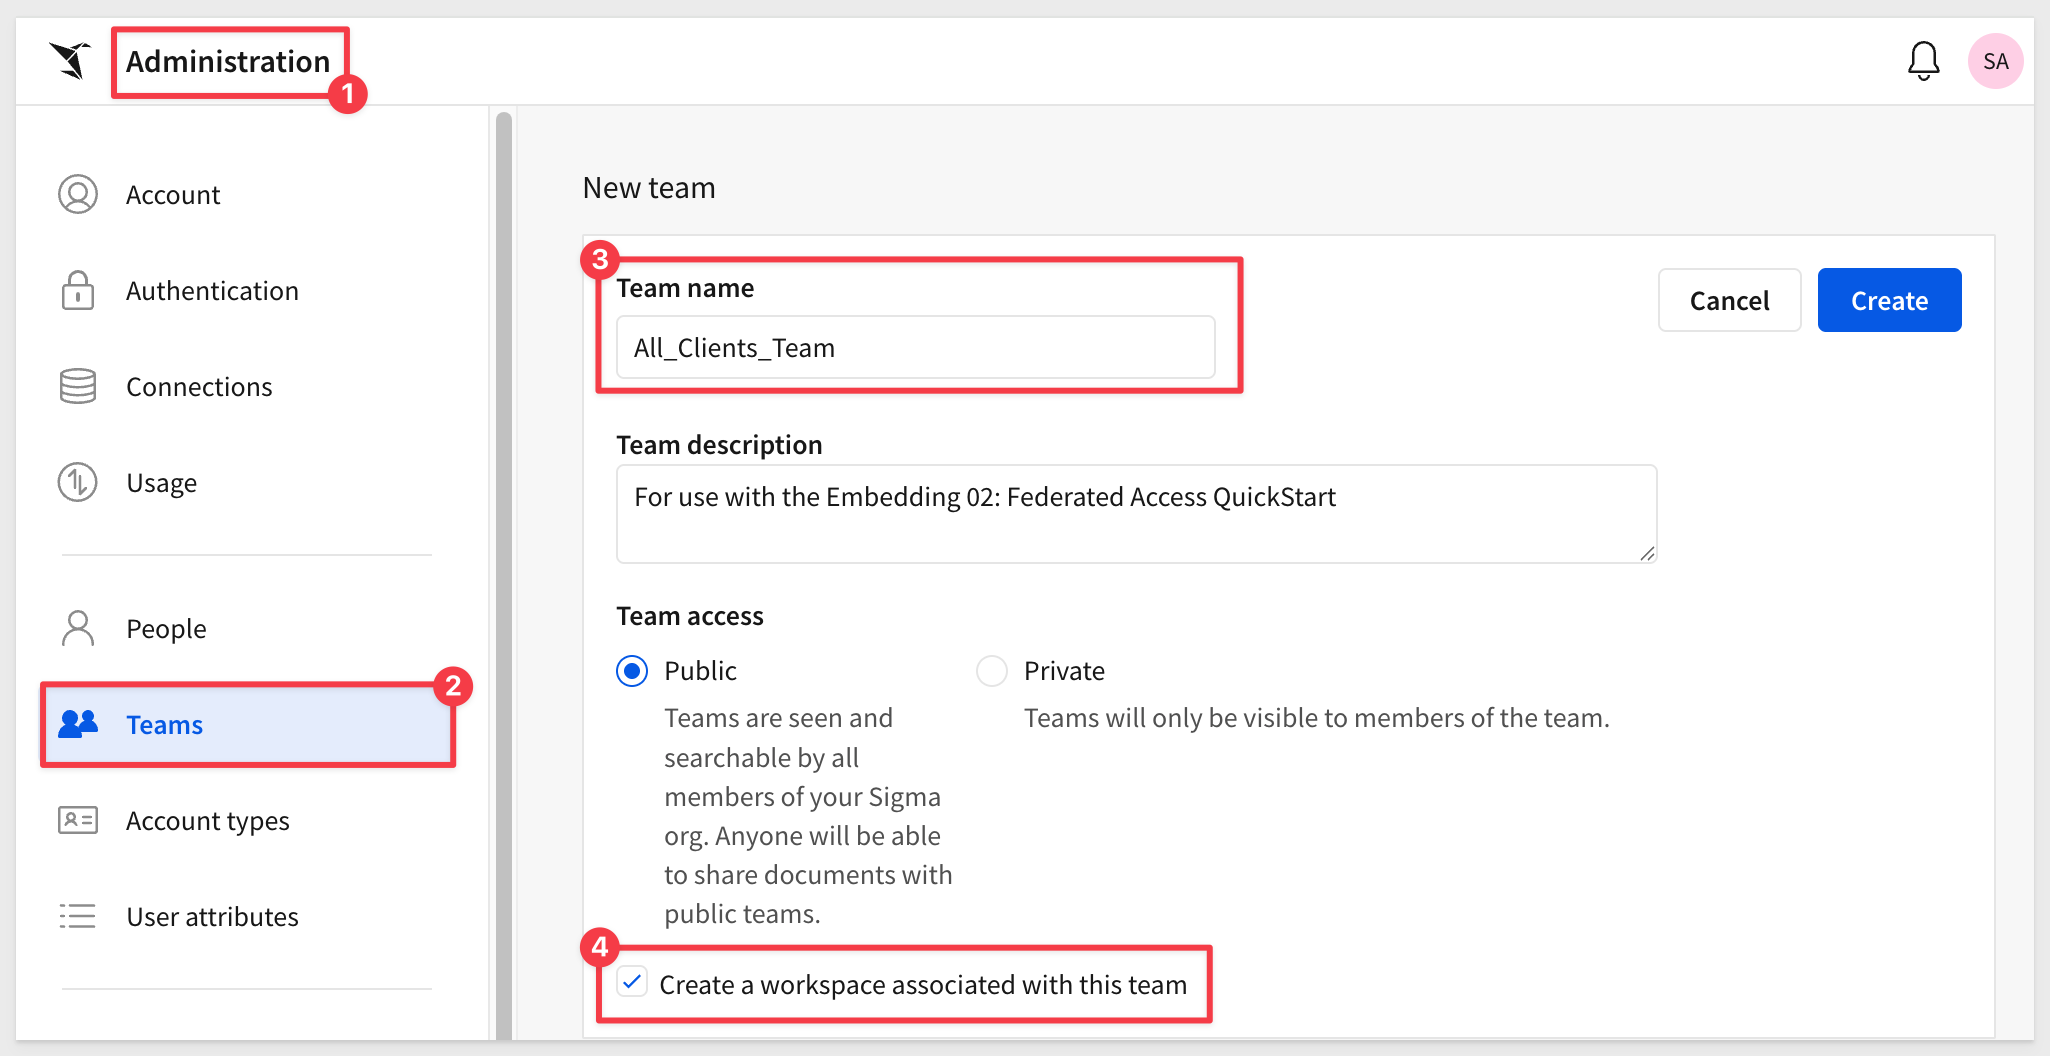
A new workspace is created for you automatically with the name All_clients_team.
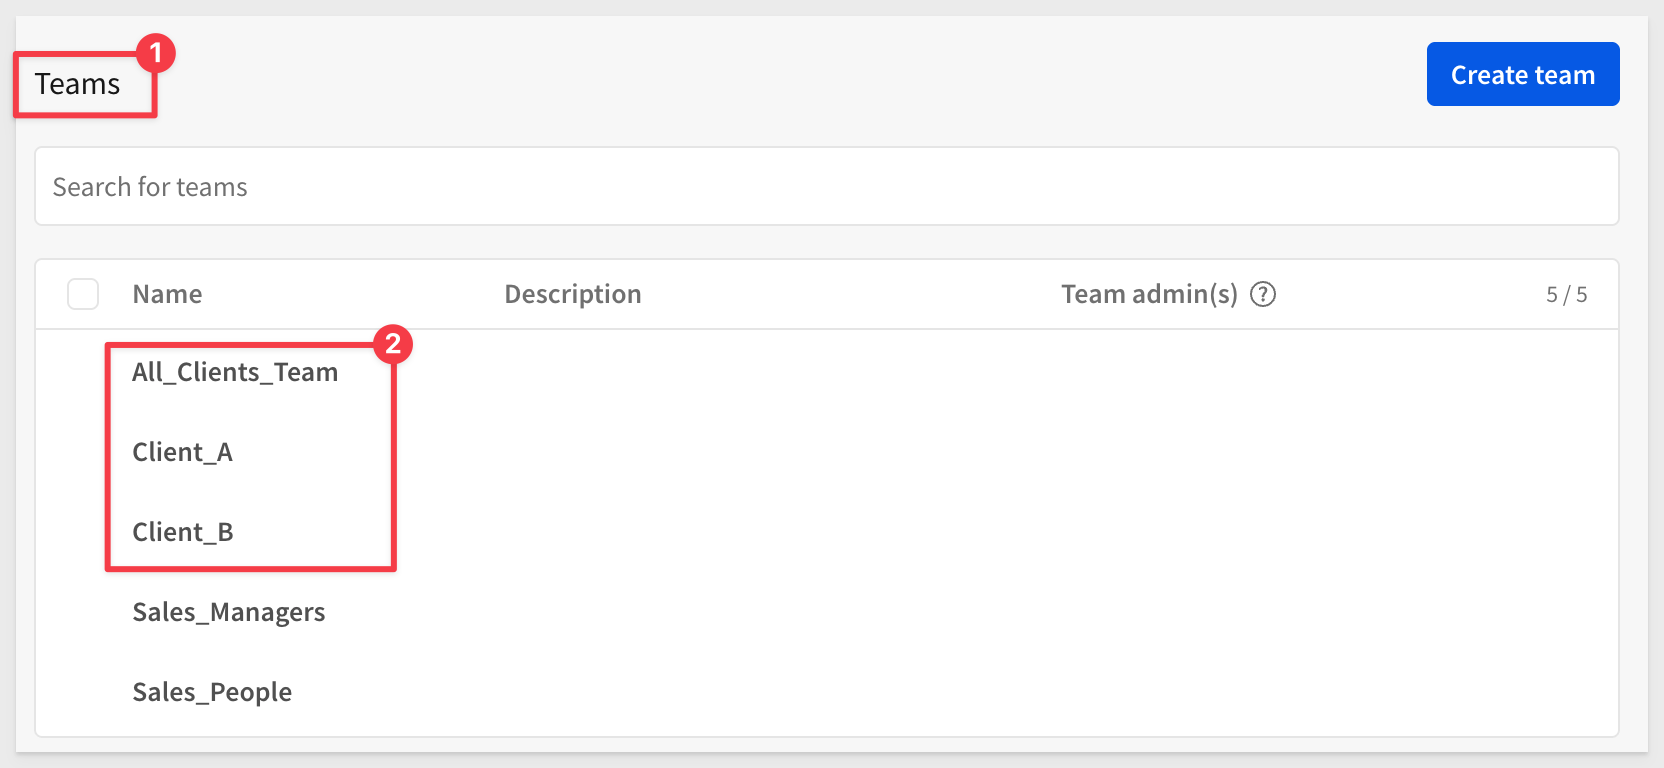
Create two more teams, one for Client_A and one for Client_B. Each time, check the box to also create a workspace and set both teams to Private.
We should now have our three teams:
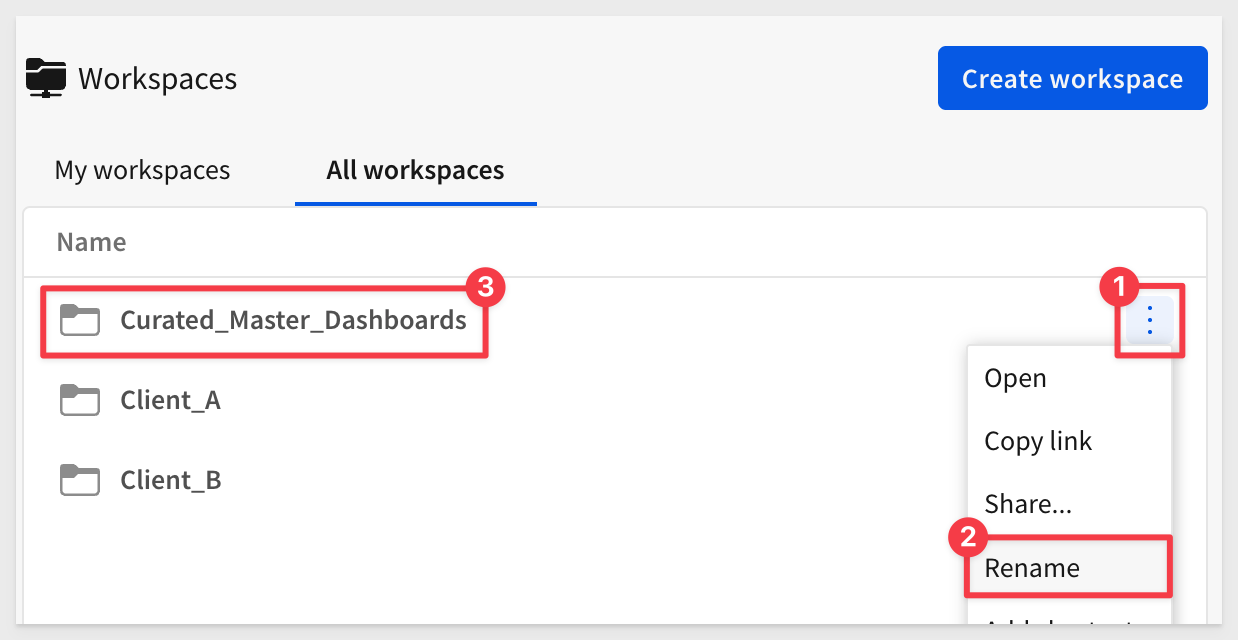
Workspaces are shown by returning to the  page and clicking
 Workspaces > All workspaces:
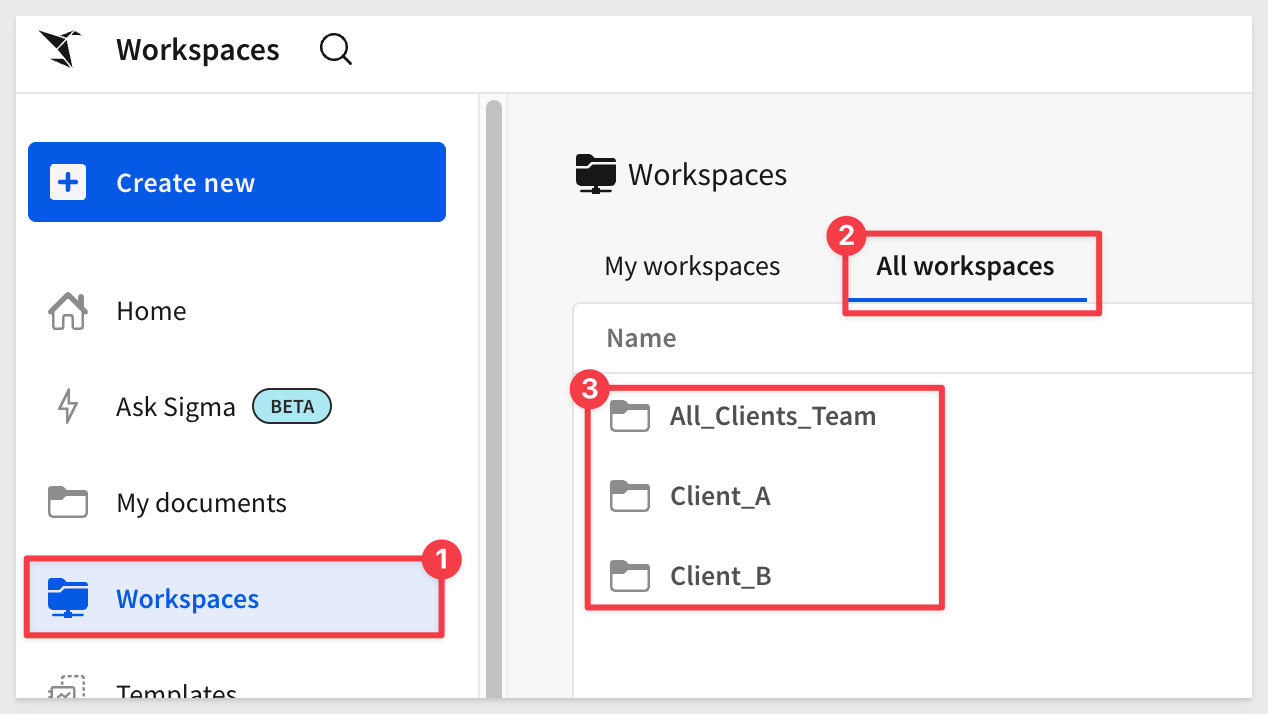
Since we're logged in as an admin, we can see all workspaces.
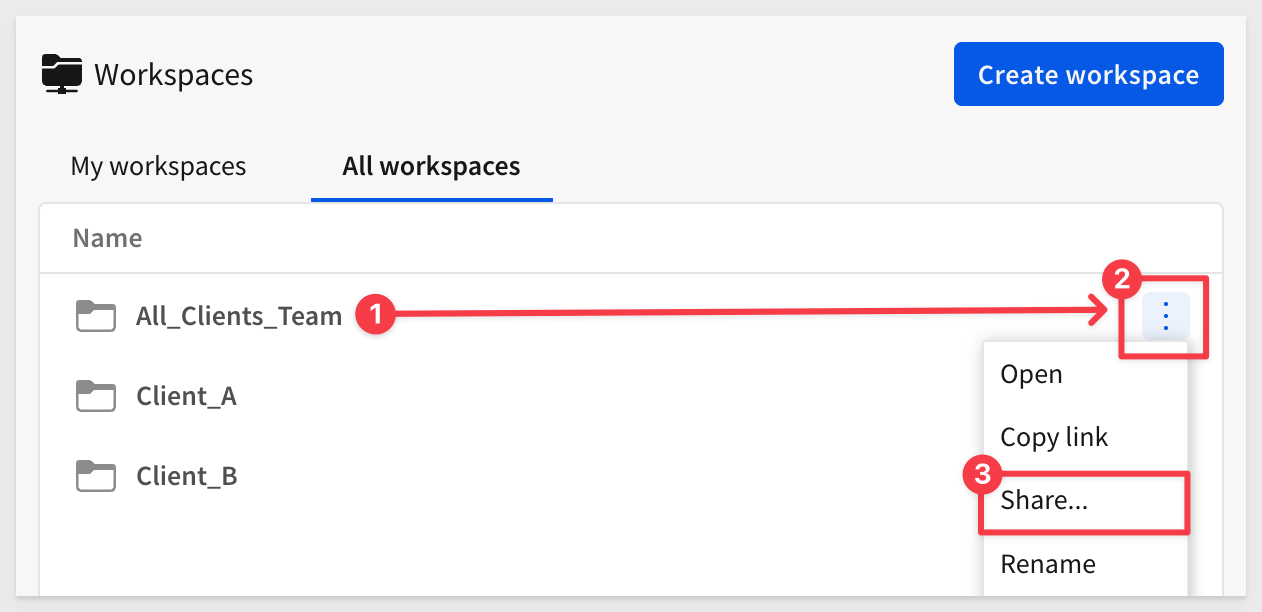
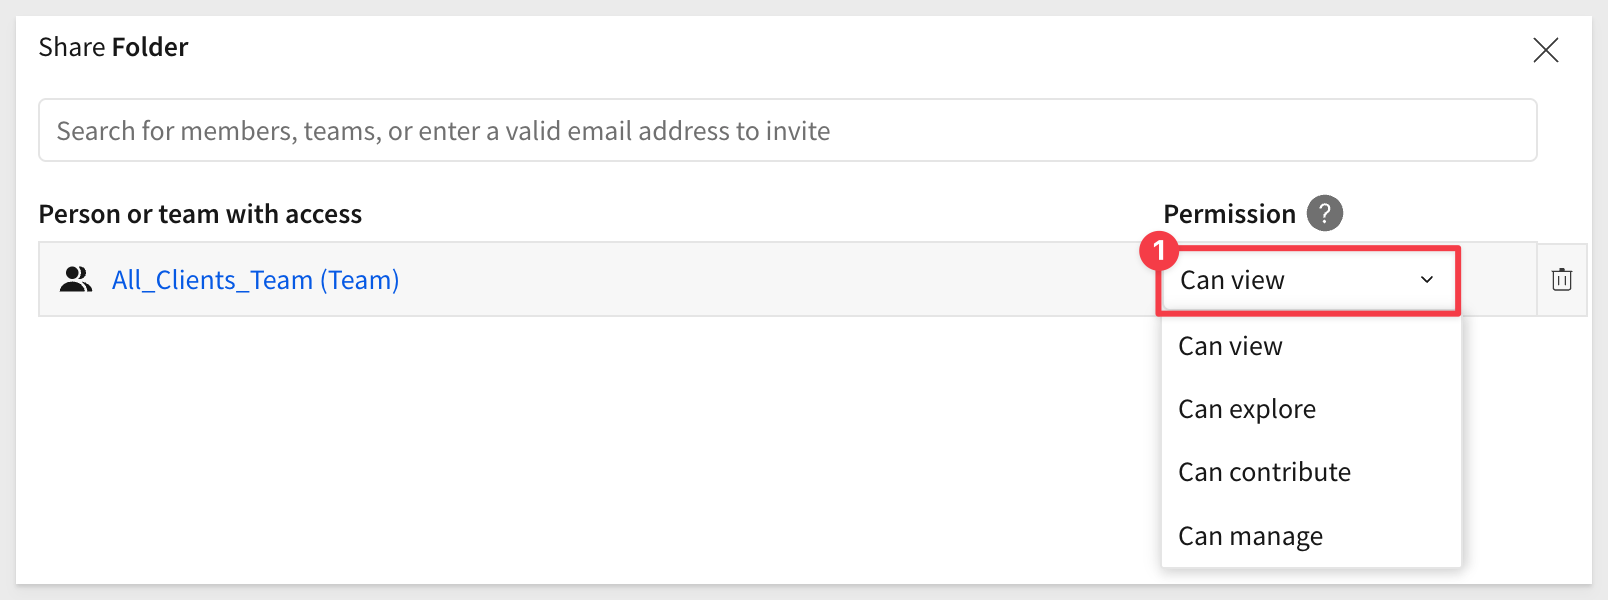
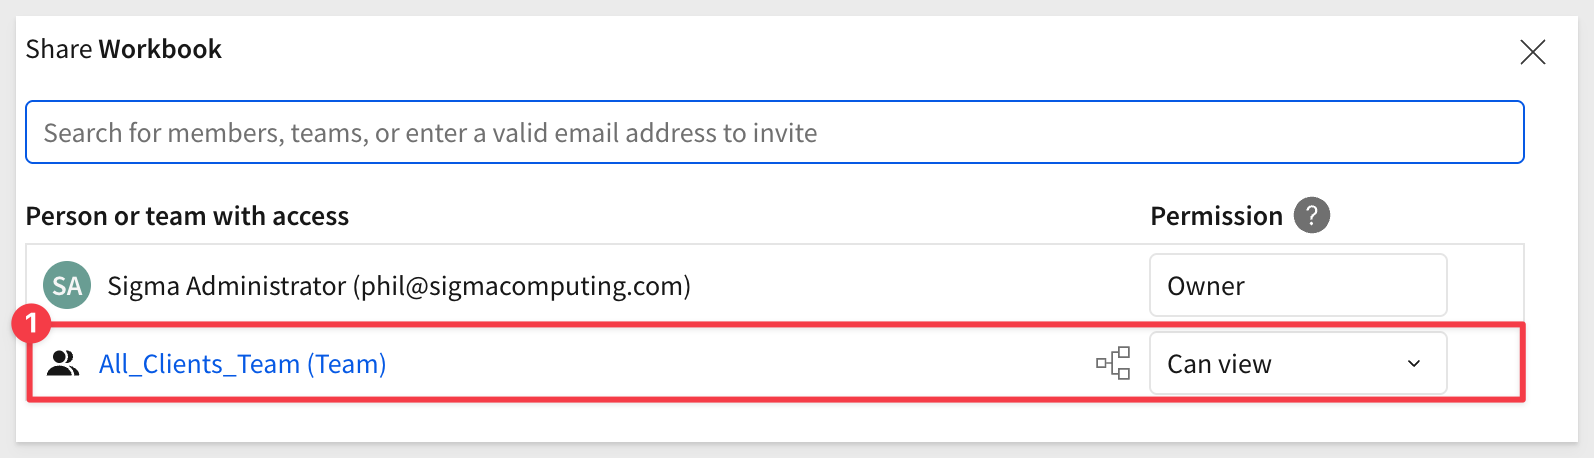
Creating a workspace this way grants the team Can contribute permission by default.
Since the content is intended for all clients, we should probably change that permission to Can view:
Let's rename the new workspace to something more descriptive. We will use Curated_Master_Dashboards:
Lastly, change the sharing settings for both Client_A and Client_B teams to Explore. This will let them drill down into the data further.
Next, we need some content in the new workspace.
Let's make a copy of the workbook created in the previous QuickStart, Getting_Started_QuickStart.
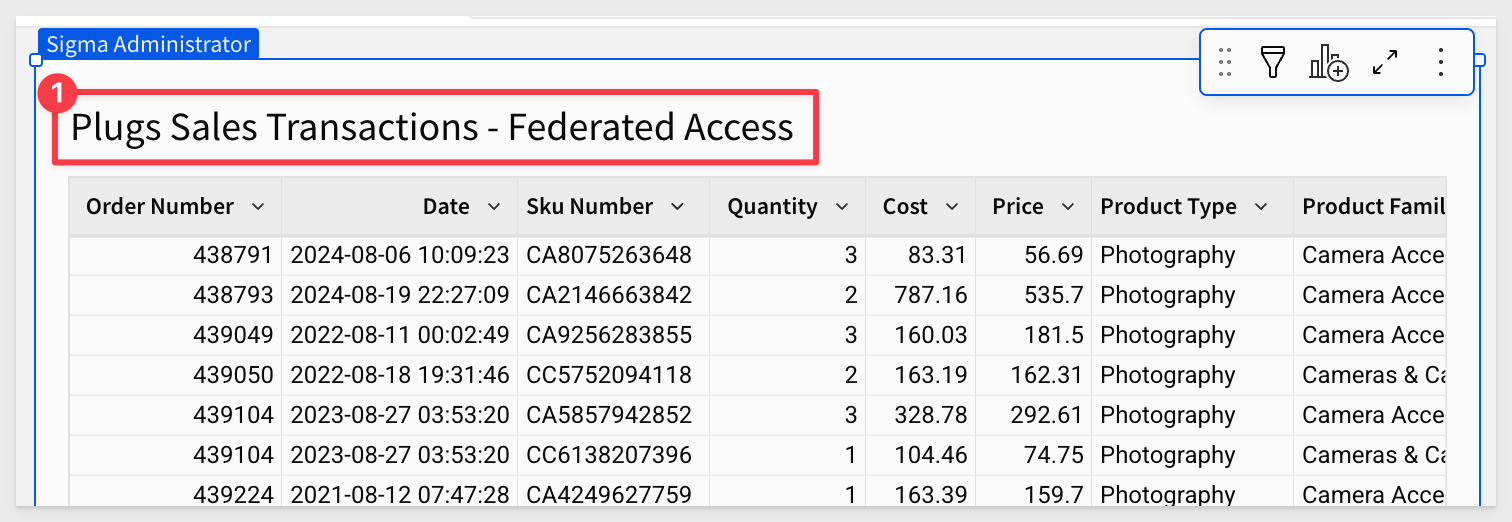
It is a simple workbook, having one table on it:
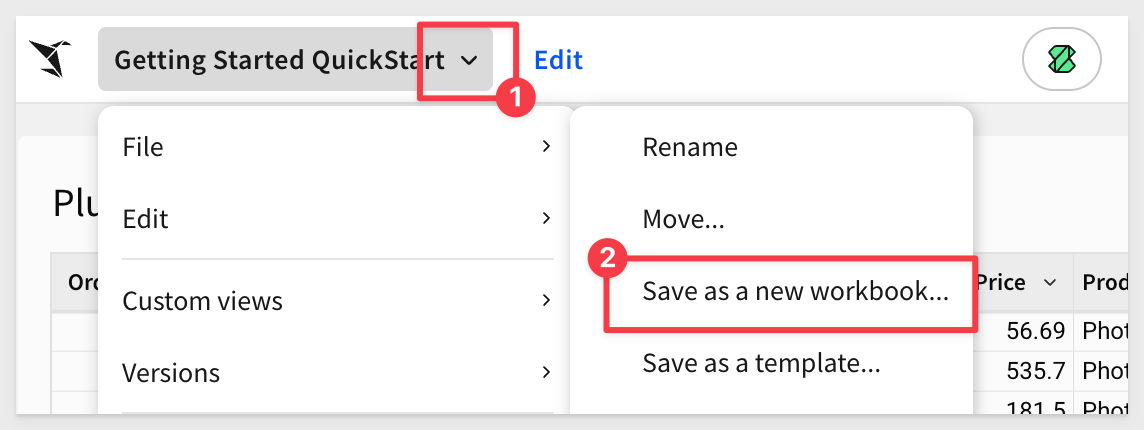
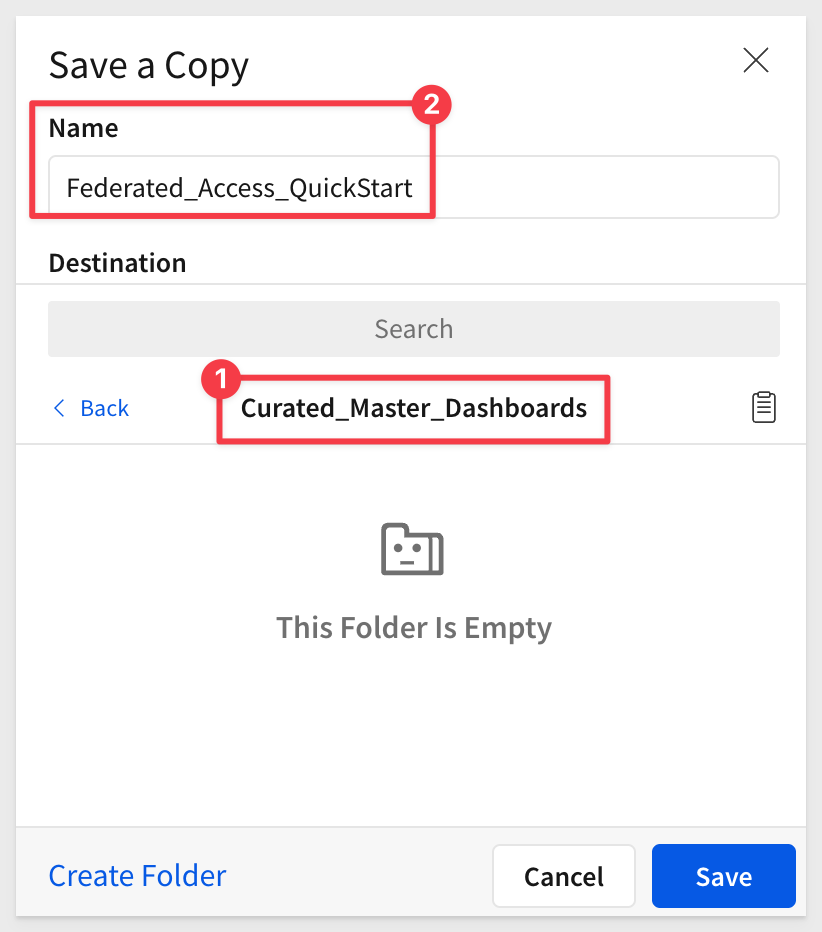
Save it as a new workbook in the Curated_Master_Dashboards workspace, and name it Federated_Access_QuickStart:
Rename the table from Plugs Sales Transactions to Plugs Sales Transactions – Federated Access:
Click Publish.
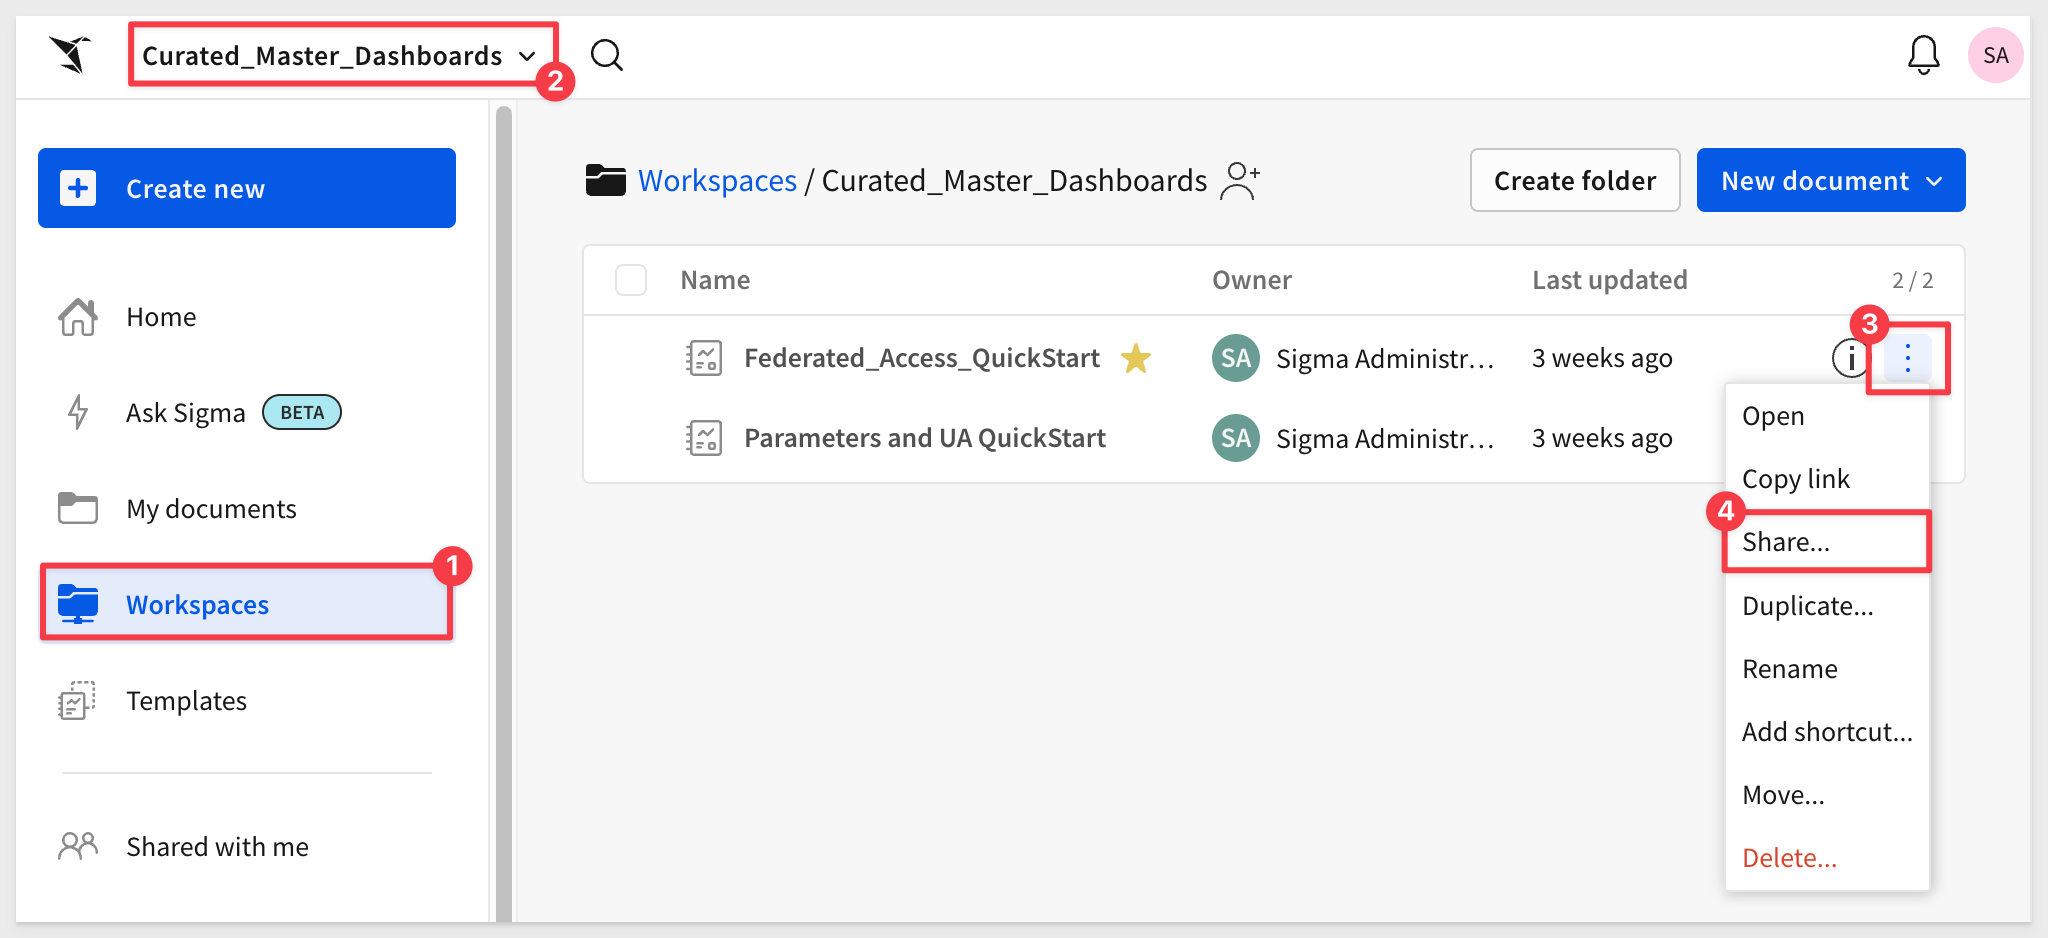
Navigate to Home > Workspaces. You'll find the Federated_Access_QuickStart workbook, and if you check its sharing settings, you'll see that all members can View it:
Now that we have something we can embed, let's work through a few test scenarios. While these tests are basic, it provides a good understanding of how we can isolate content and permissions based on teams and workspaces.
Test 1: Allow the All_Clients_Team access to the entire workbook.
In VSCode, open the embedding_qs_series_2 folder created in the QuickStart: Embedding 01: Getting Started.
Open the .env file. The Client_ID and Secret should already be configured from the last QuickStart.
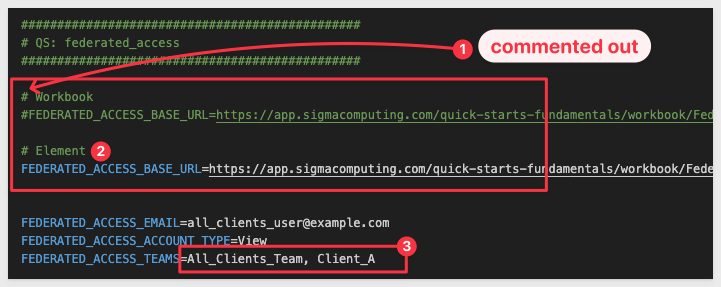
Scroll down to the # QS: federated_access section
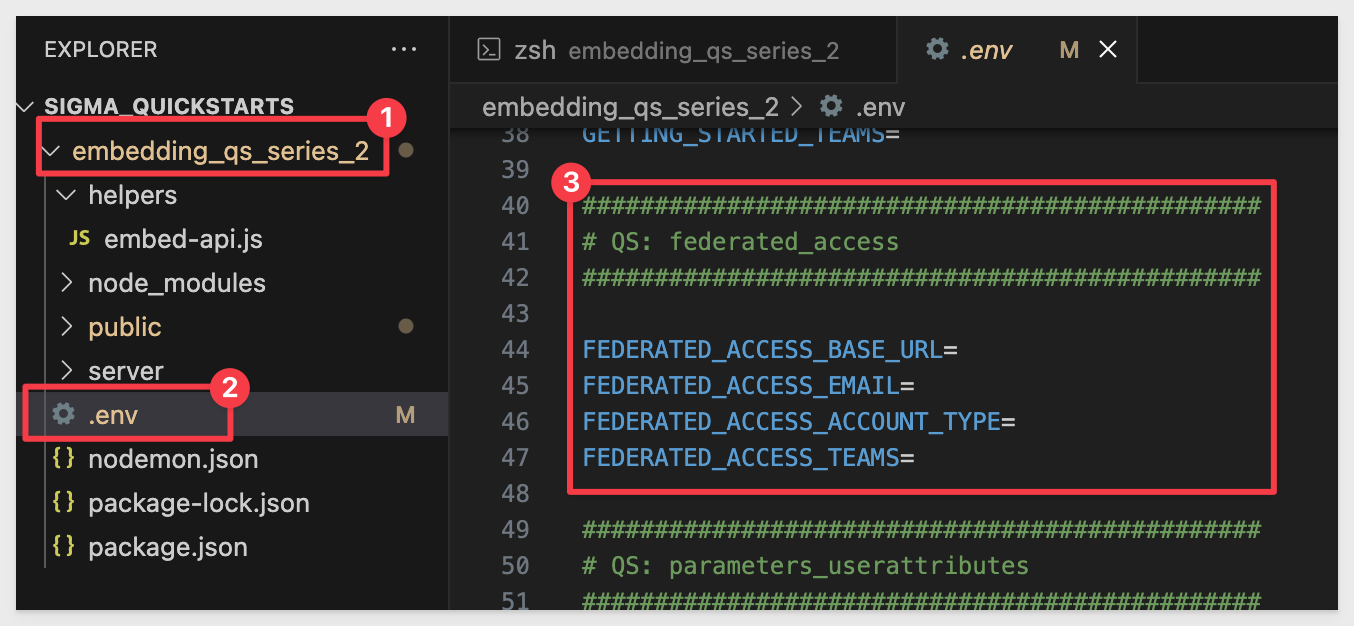
Here we need to configure the four items. For this test case we used:
FEDERATED_ACCESS_EMAIL=all_clients_user@example.com
FEDERATED_ACCESS_ACCOUNT_TYPE=View
FEDERATED_ACCESS_TEAMS=All_Clients_Team
For FEDERATED_ACCESS_BASE_URL= we opened the Federated_Access_QuickStart workbook in Published mode:
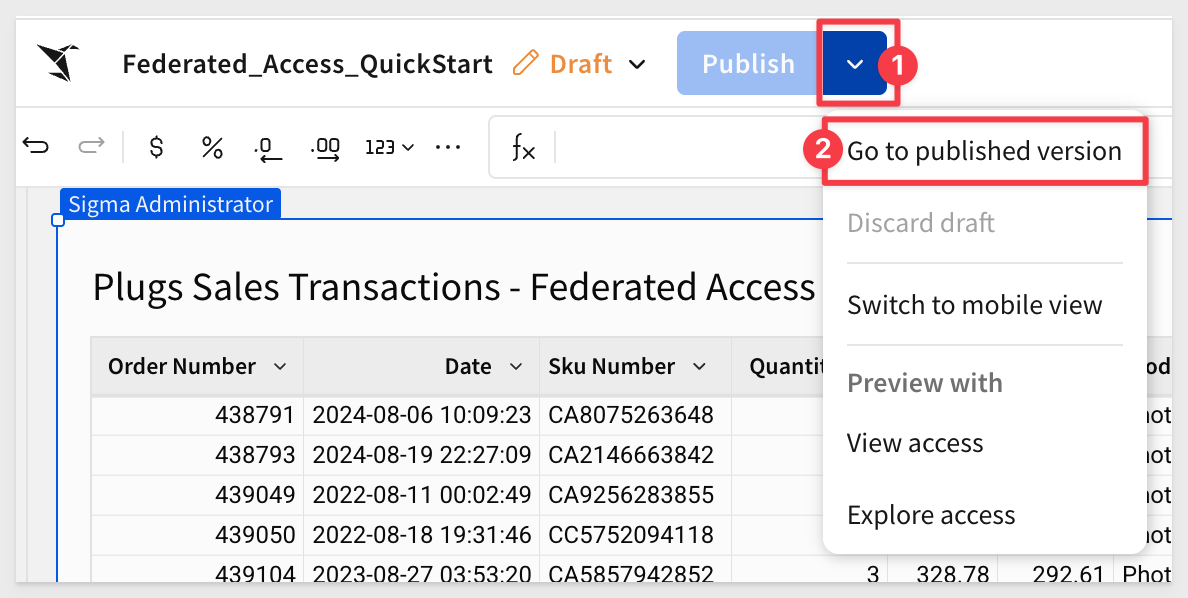
Then we copied the URL directly from the browser to use as the value for FEDERATED_ACCESS_BASE_URL.
Save the .env file changes.
Open a new Terminal in VSCode, navigate to the embedding_qs_series_2 directory, and start the Express web server by running:
npm start
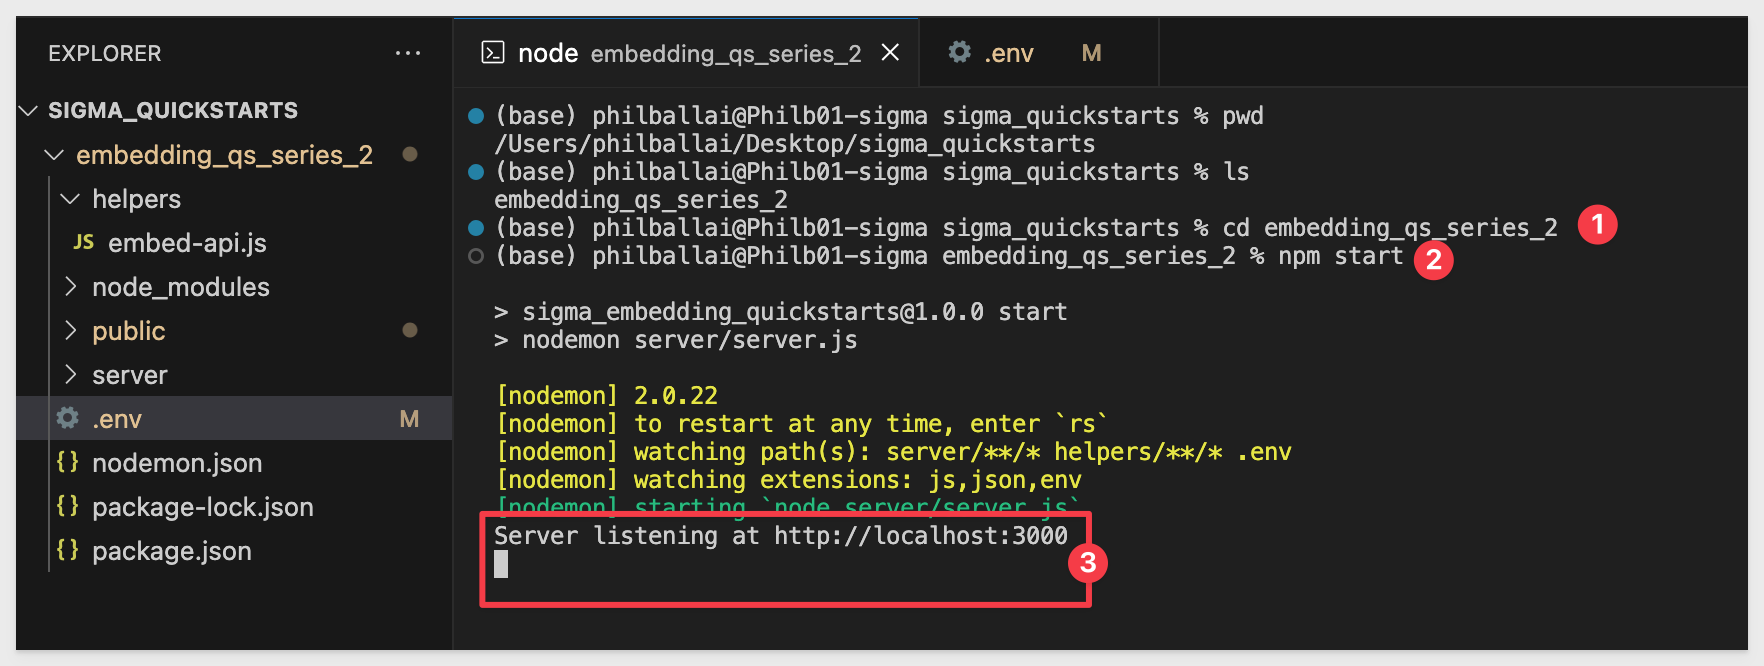
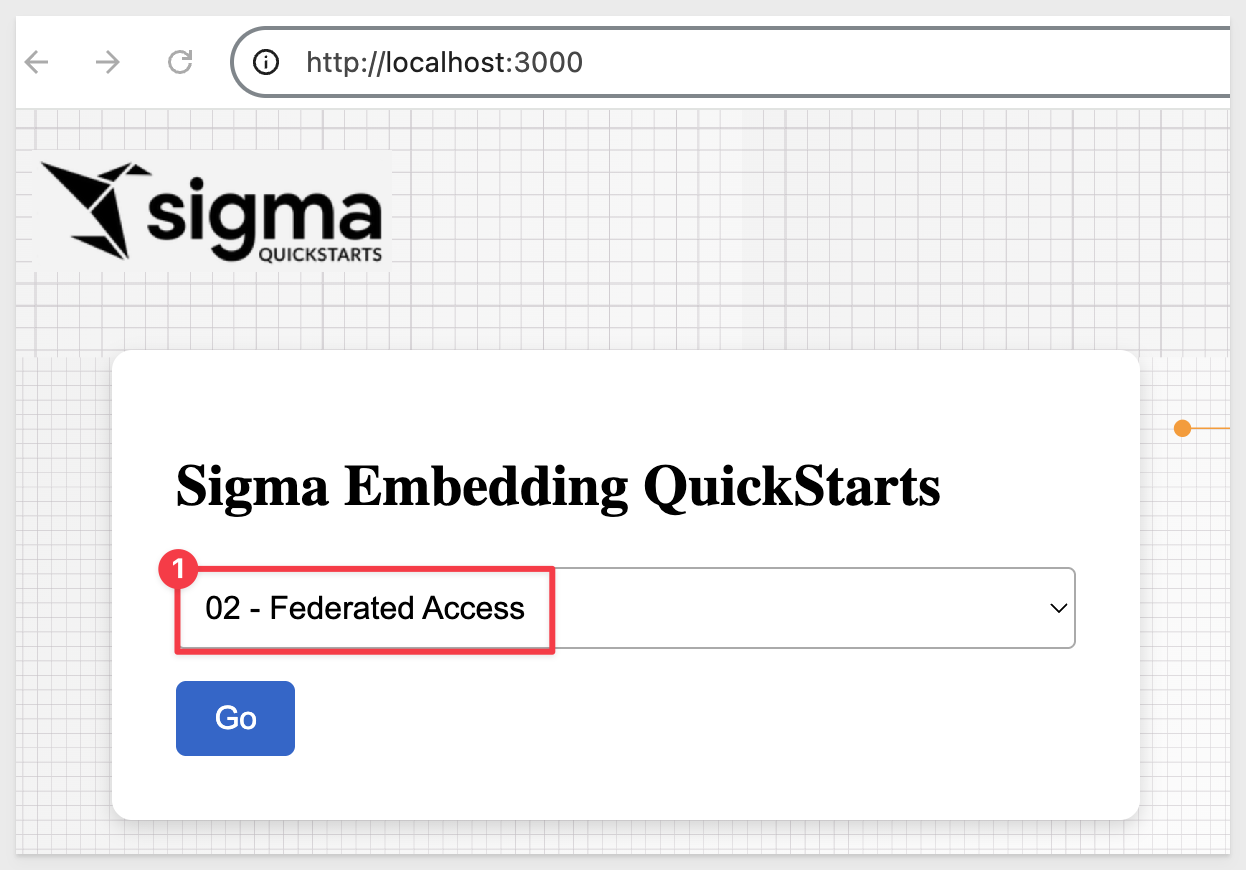
Open http://localhost:3000 in a browser:
Select Federated Access from the list and click Go:
The page will load the embedded content along with the .env parameters that are being used:
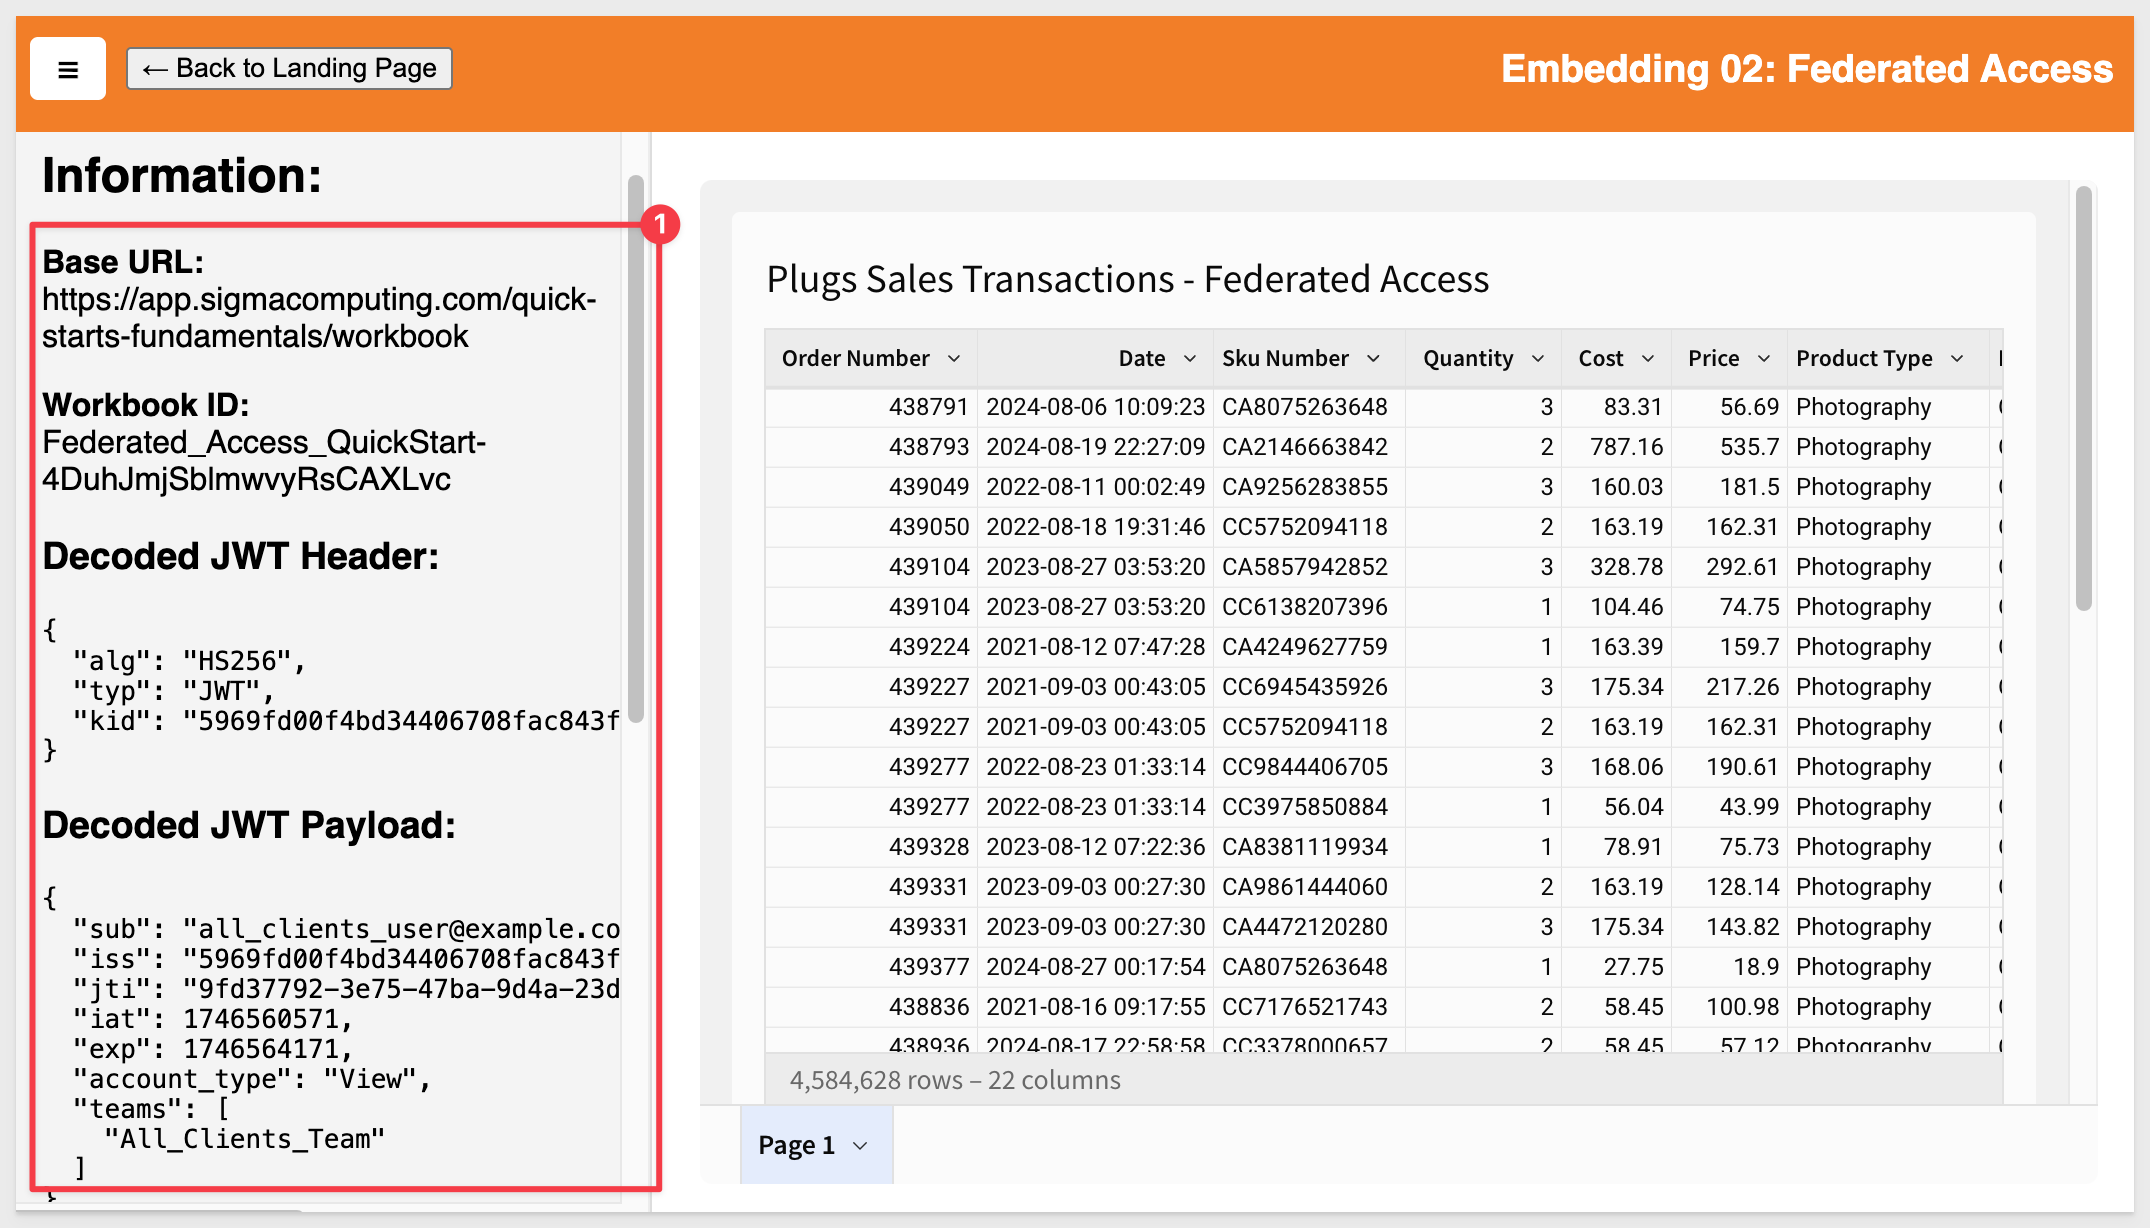
To make this use case work, we only need to pass different .env parameters. This simulates the host application passing parameters to Sigma at runtime.
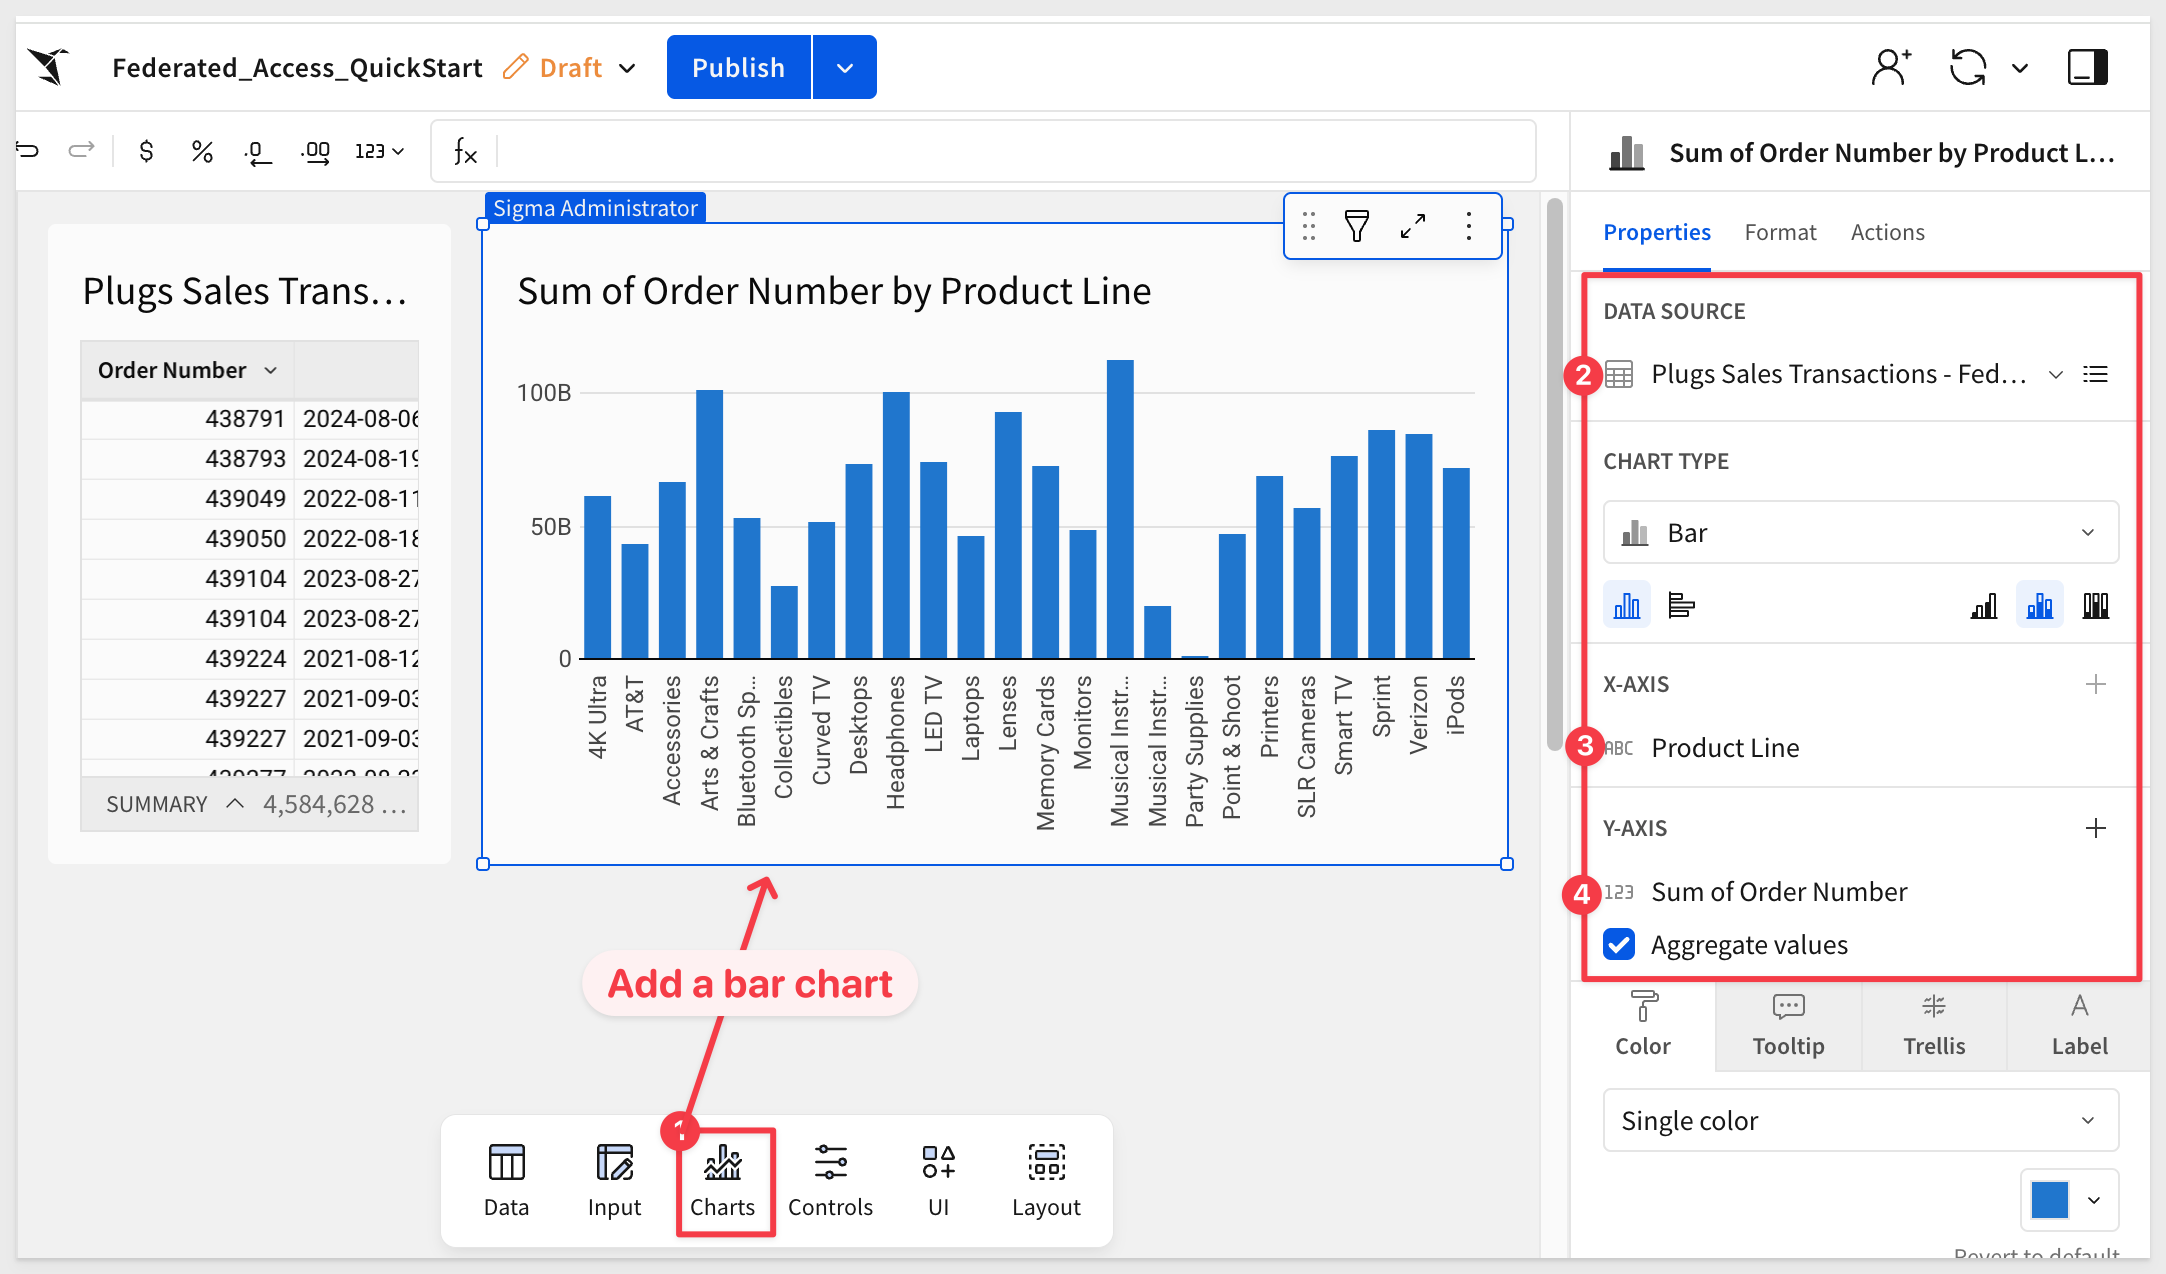
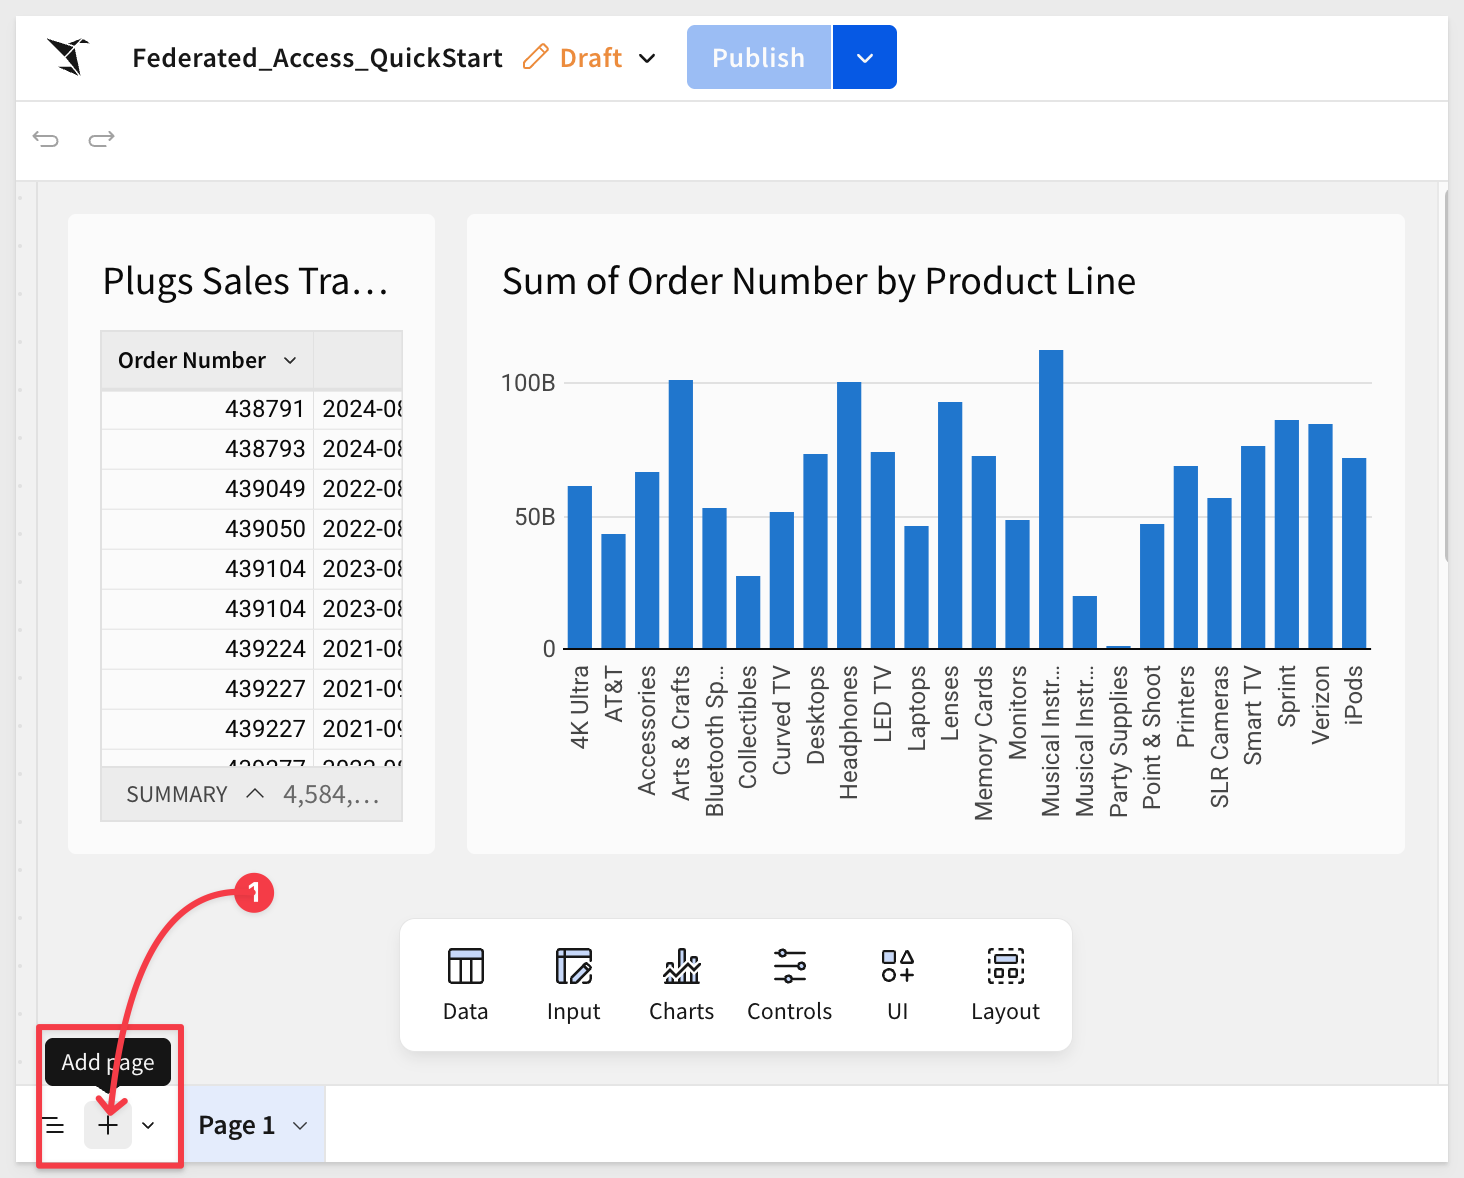
Put the workbook in Edit mode and add a new Bar Chart from the Element Bar.
Configure the chart as shown:
Click Publish and place the workbook in Publish version mode as before.
Then click to select the bar chart and copy the URL from the browser.
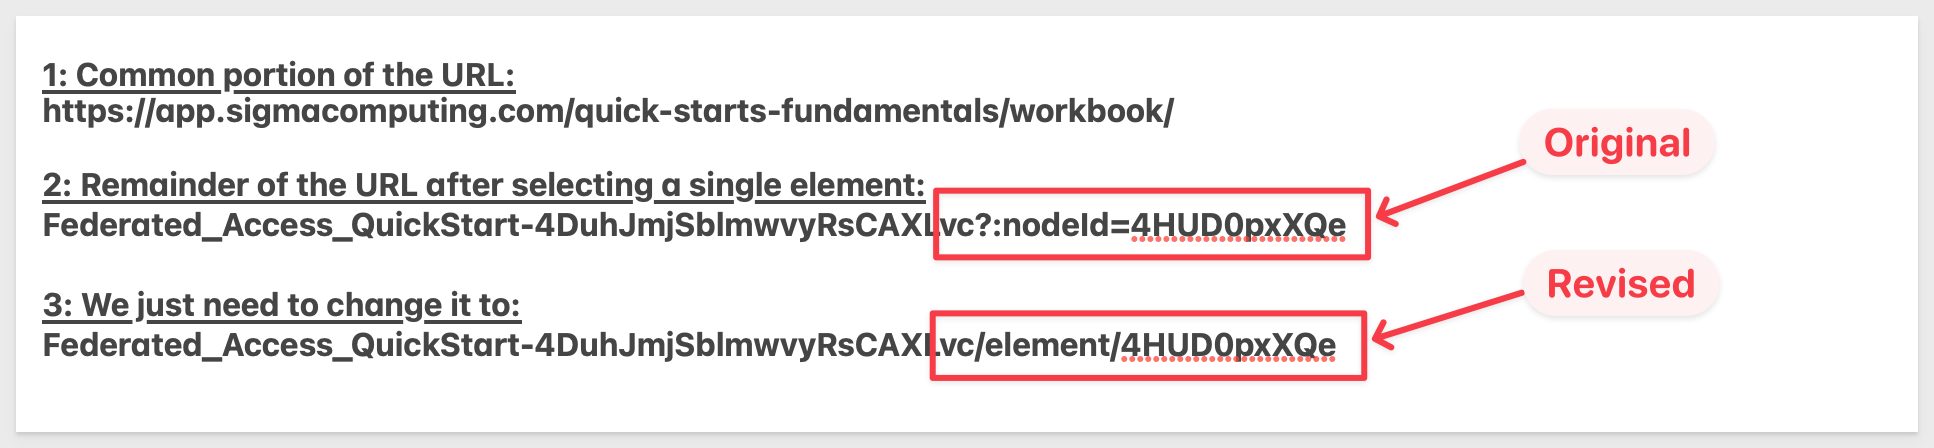
For single elements and workbook pages, we need to adjust the URL as described in p. Scroll down to the section What URL to use.
The URL syntax for a single element is as follows:
https://app.sigmacomputing.com/{organization-name}/workbook/{workbookname}-{workbookUrlId}/element/{elementId}
Key changes in our example URL were as follows:
Once we have the edited URL, we can update our .env parameter to use it.
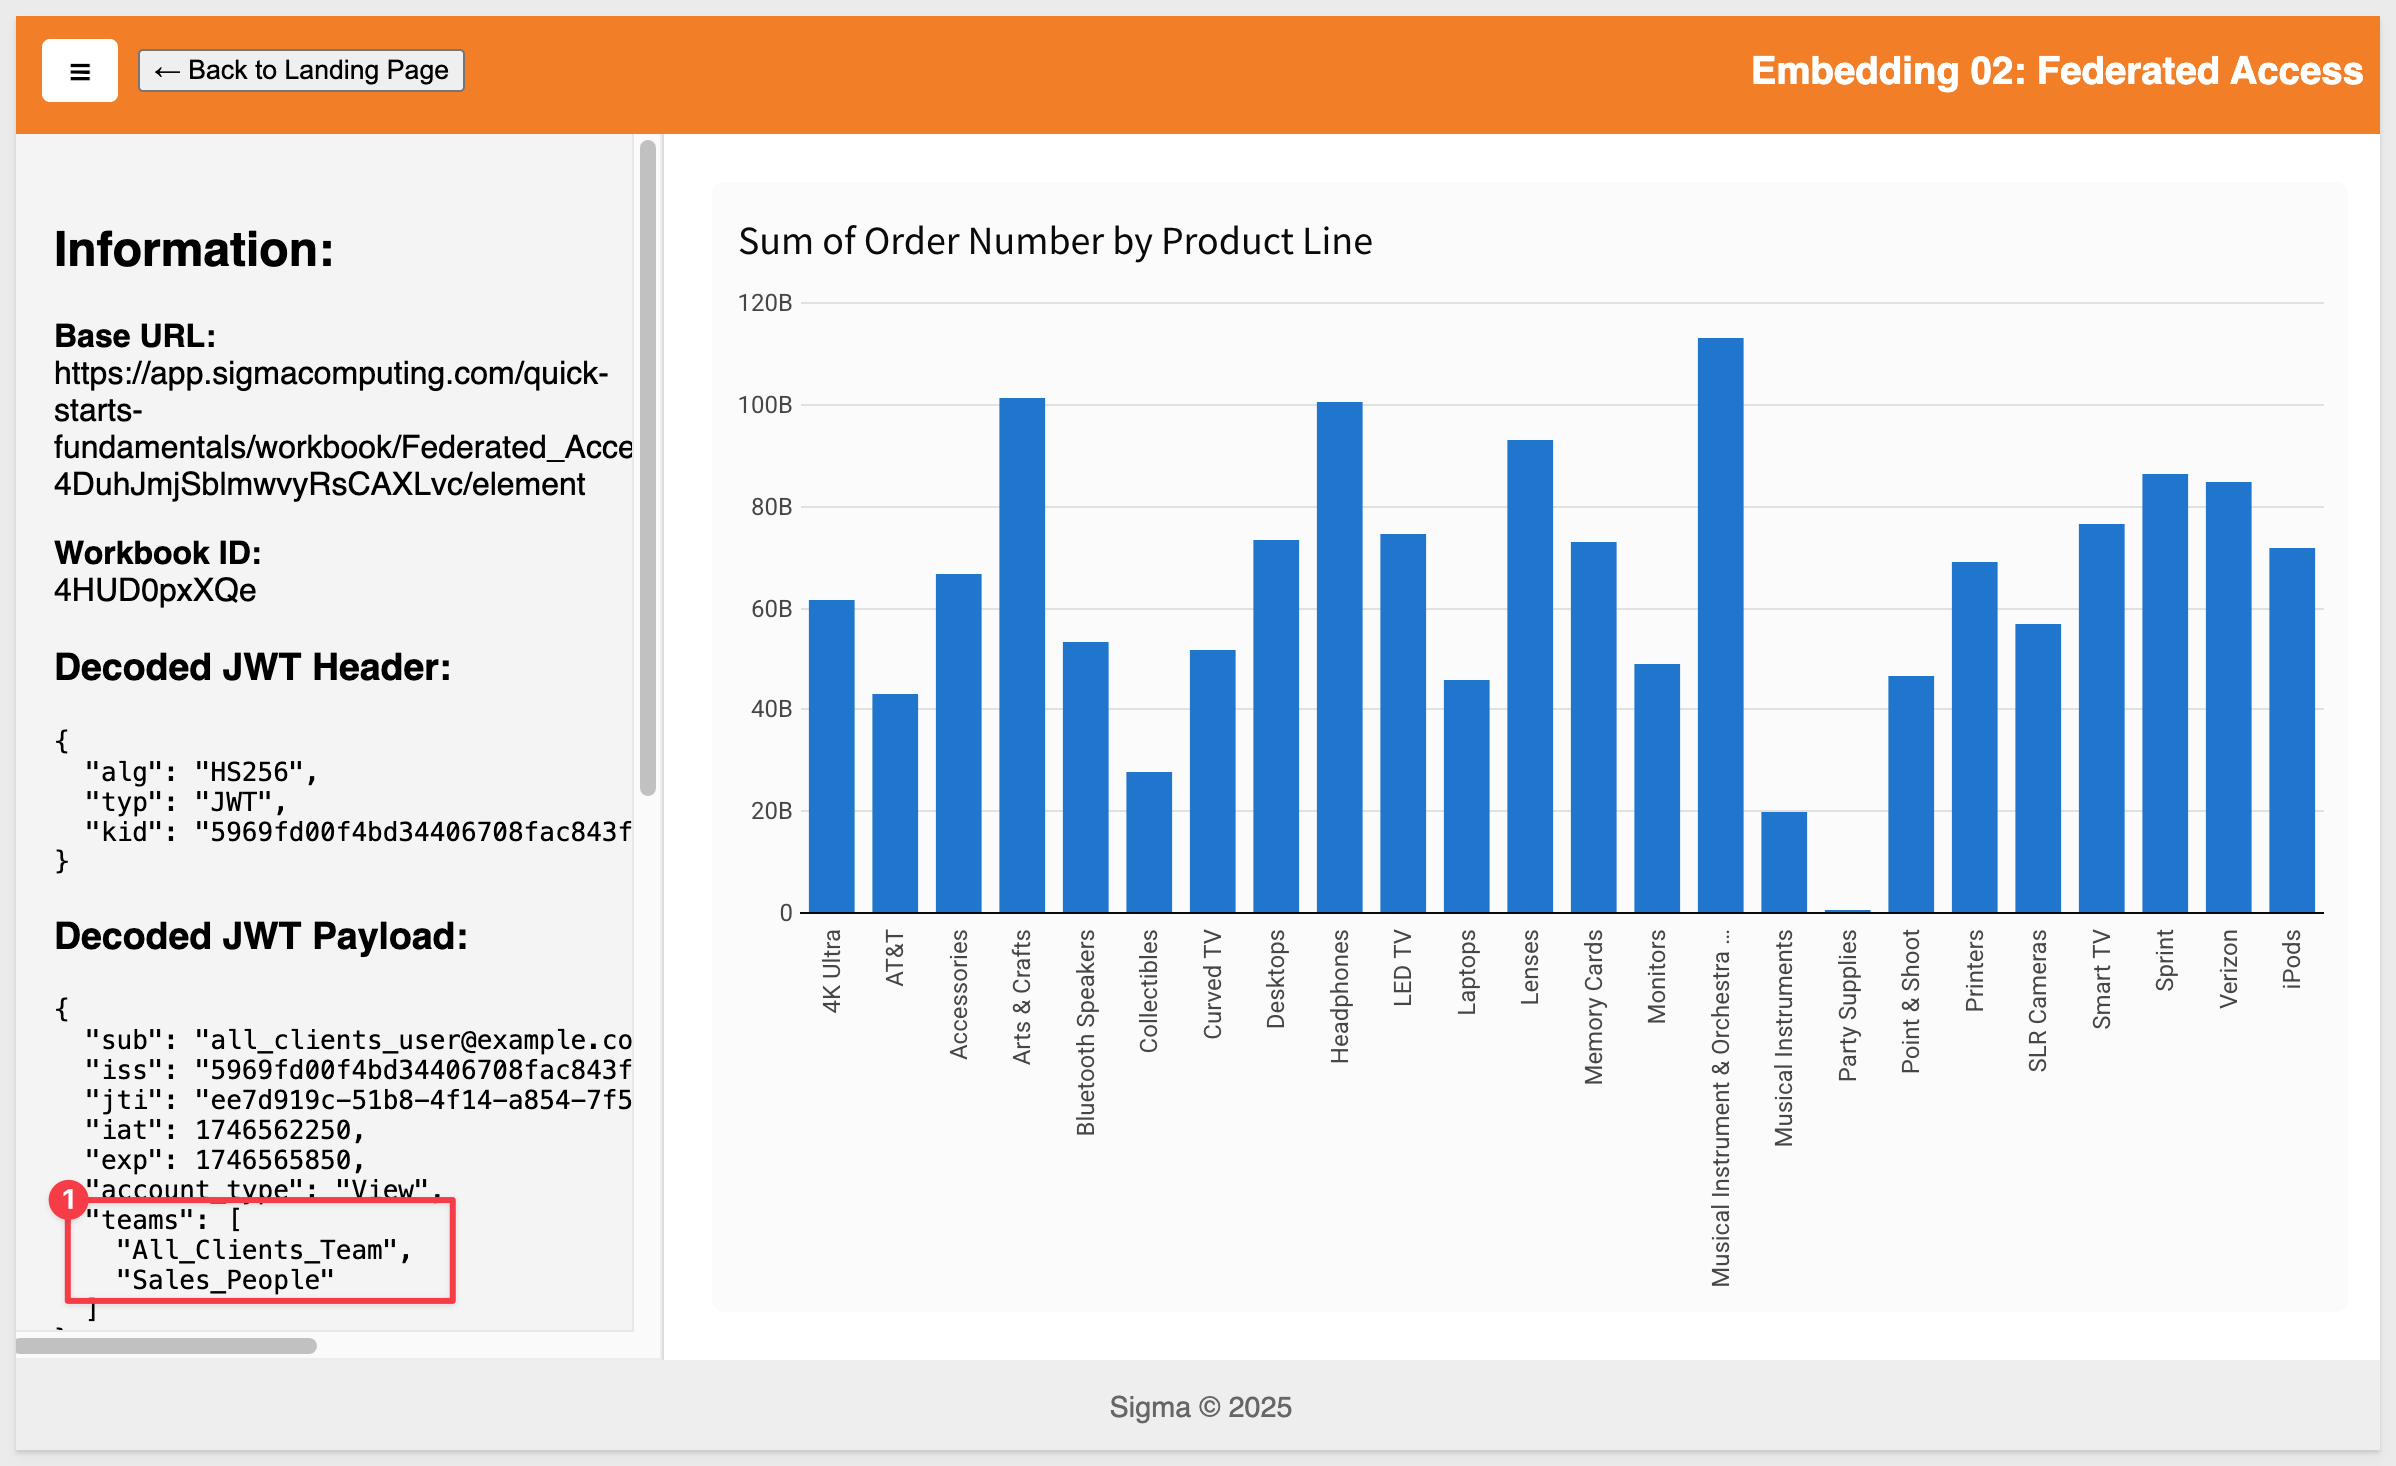
We also can use this moment to show that a user in Sigma can be a member of more than one team.
Simply pass the extra team as shown:
PROGRAMMING NOTE: Multiple teams must be passed as an array. In our sample application, this is handled in the embed-api.js code so that .env can just use a comma-delimited string. This logic appears on lines 43–44 of that file:
// Convert comma-separated teams string into array
   const teamsArray = rawTeams ? rawTeams.split(",").map((t) => t.trim()) : [];
Now, when we refresh the host application in the browser, we see the single-element embed:
Restricting a team to a workbook page follows the same process as element restriction.
Return to the Federated_Access_QuickStart, place it in Edit mode and add a new page:
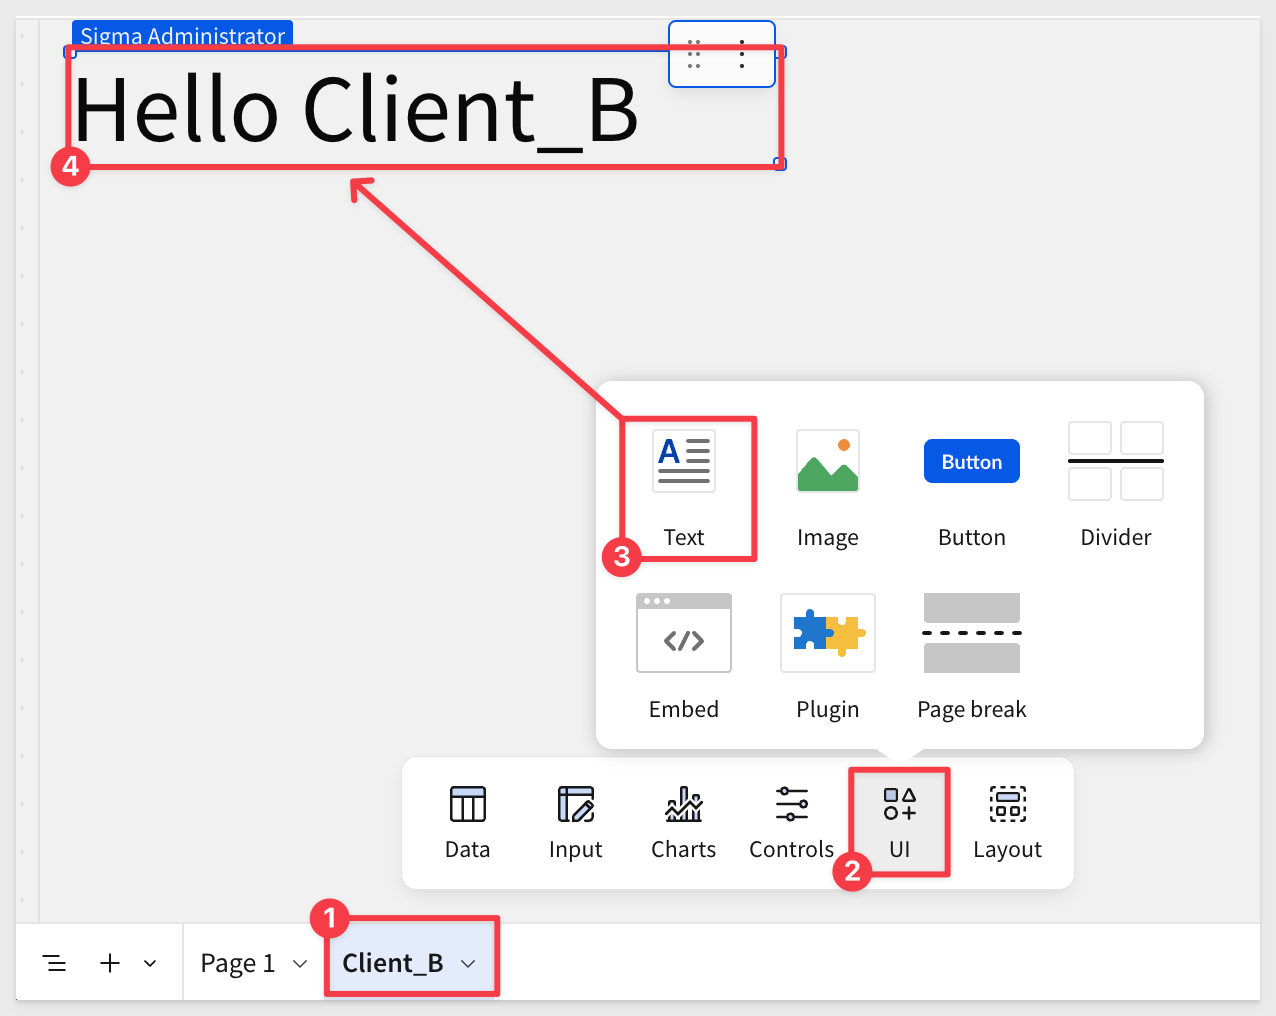
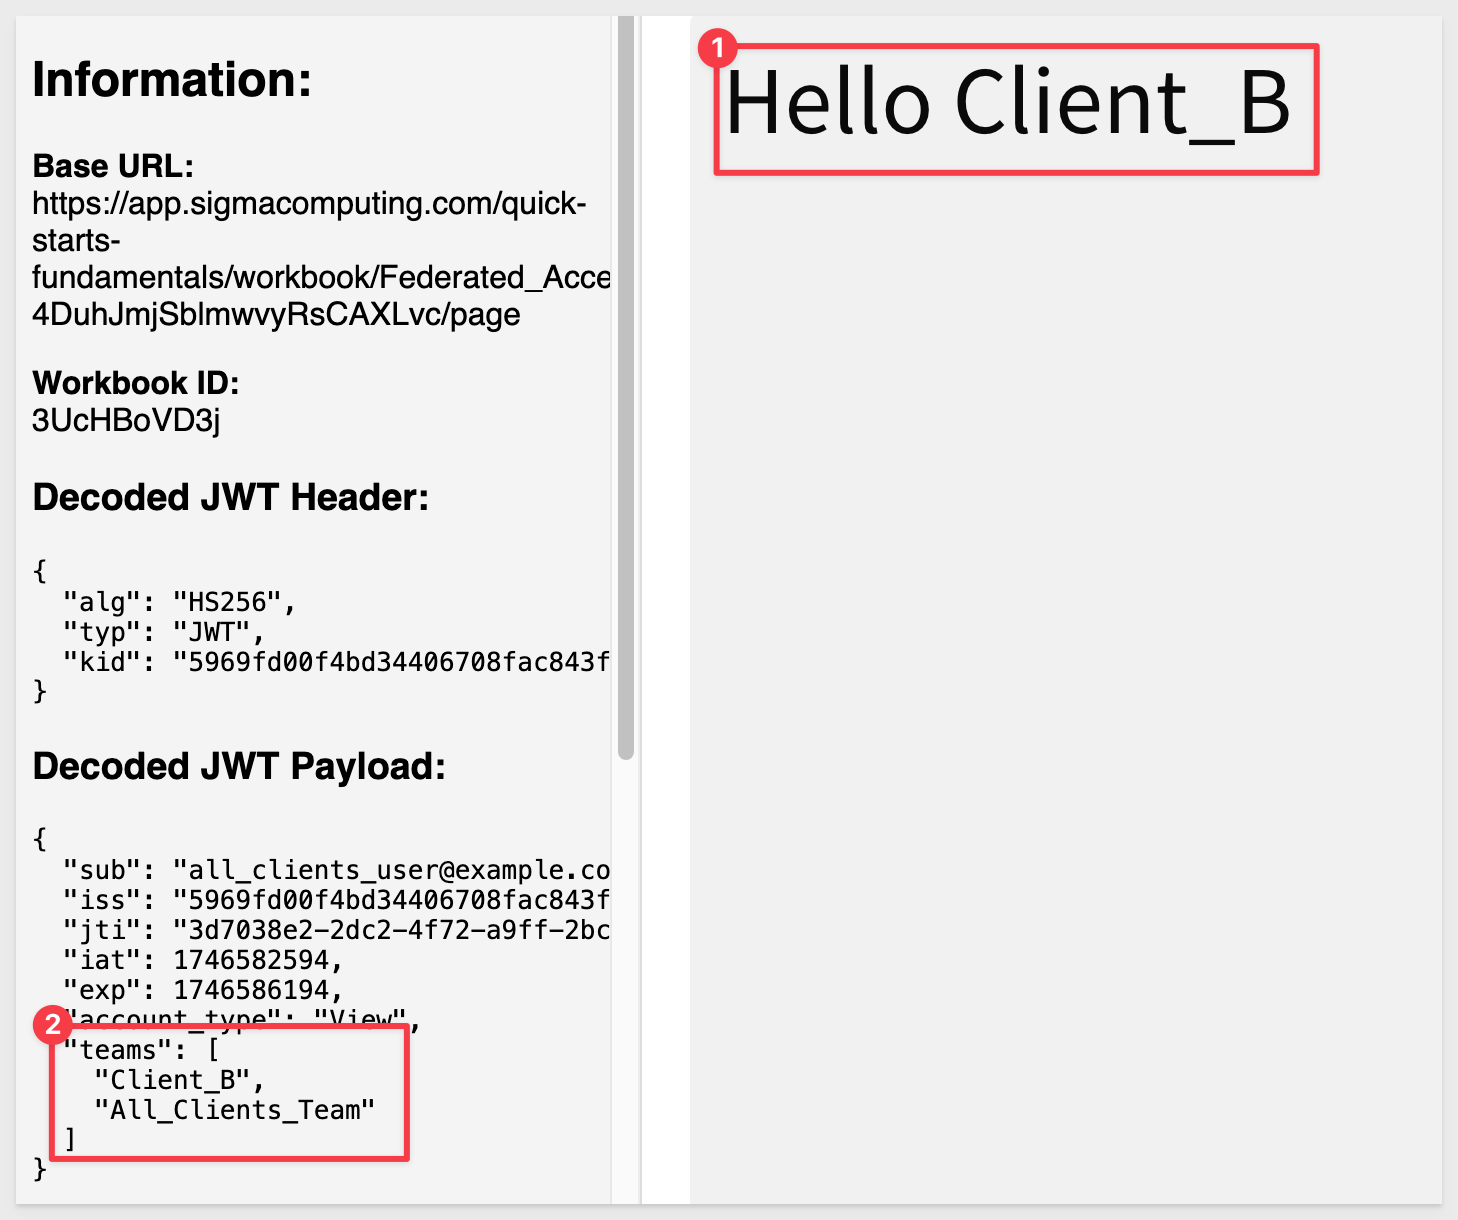
Double-click on the new Page 2 tab and rename it to Client_B.
Add a UI > Text control to the page and type Hello Client_B:
Click Publishand reopen the workbook in Published version mode.
With nothing selected on the Client_B page, copy the URL from the browser.
As with the single element, we need to adjust the URL to follow the page-specific syntax.
The URL syntax for a workbook page is as follows:
https://app.sigmacomputing.com/{organization-name}/workbook/{workbookname}-{workbookUrlId}/page/{pageId}
For example, we adjusted the URL to this:
https://app.sigmacomputing.com/quick-starts-fundamentals/workbook/Federated_Access_QuickStart-4DuhJmjSblmwvyRsCAXLvc/page/3UcHBoVD3j
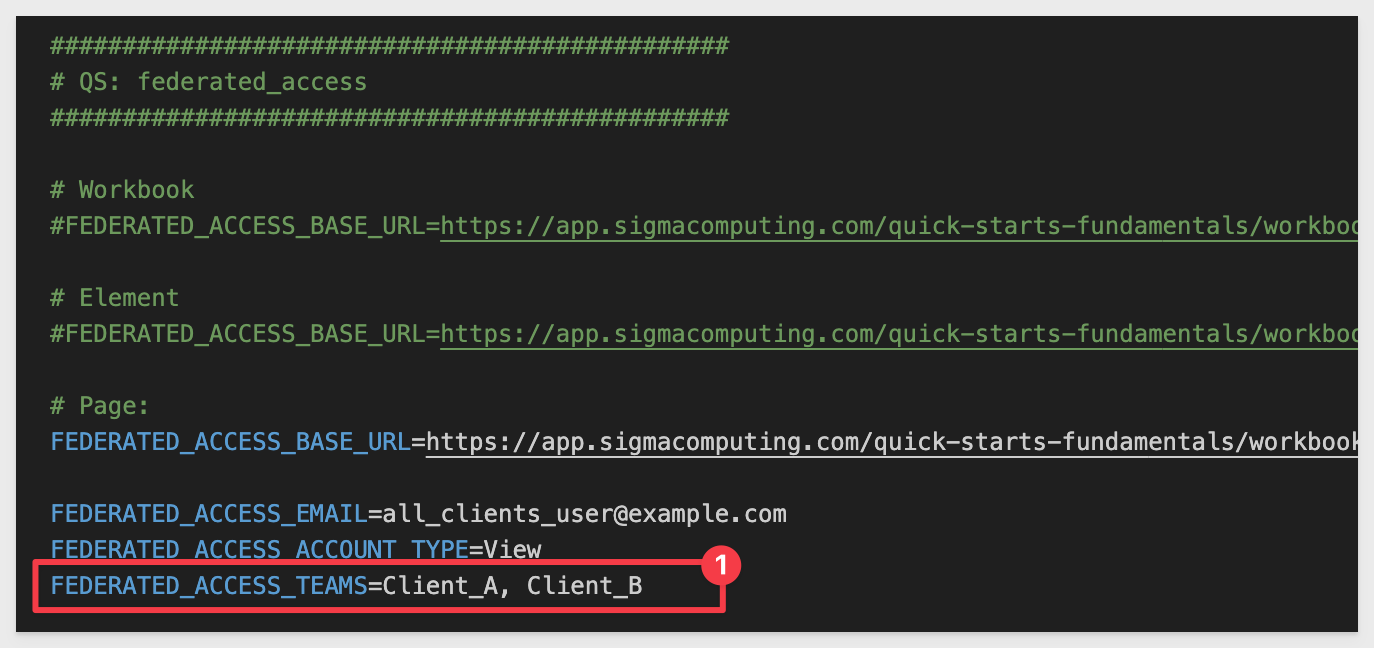
Update the .env parameters with the new URL and change the team to Client_A, Client_B. We expect this configuration will not work, but let's test that assumption.
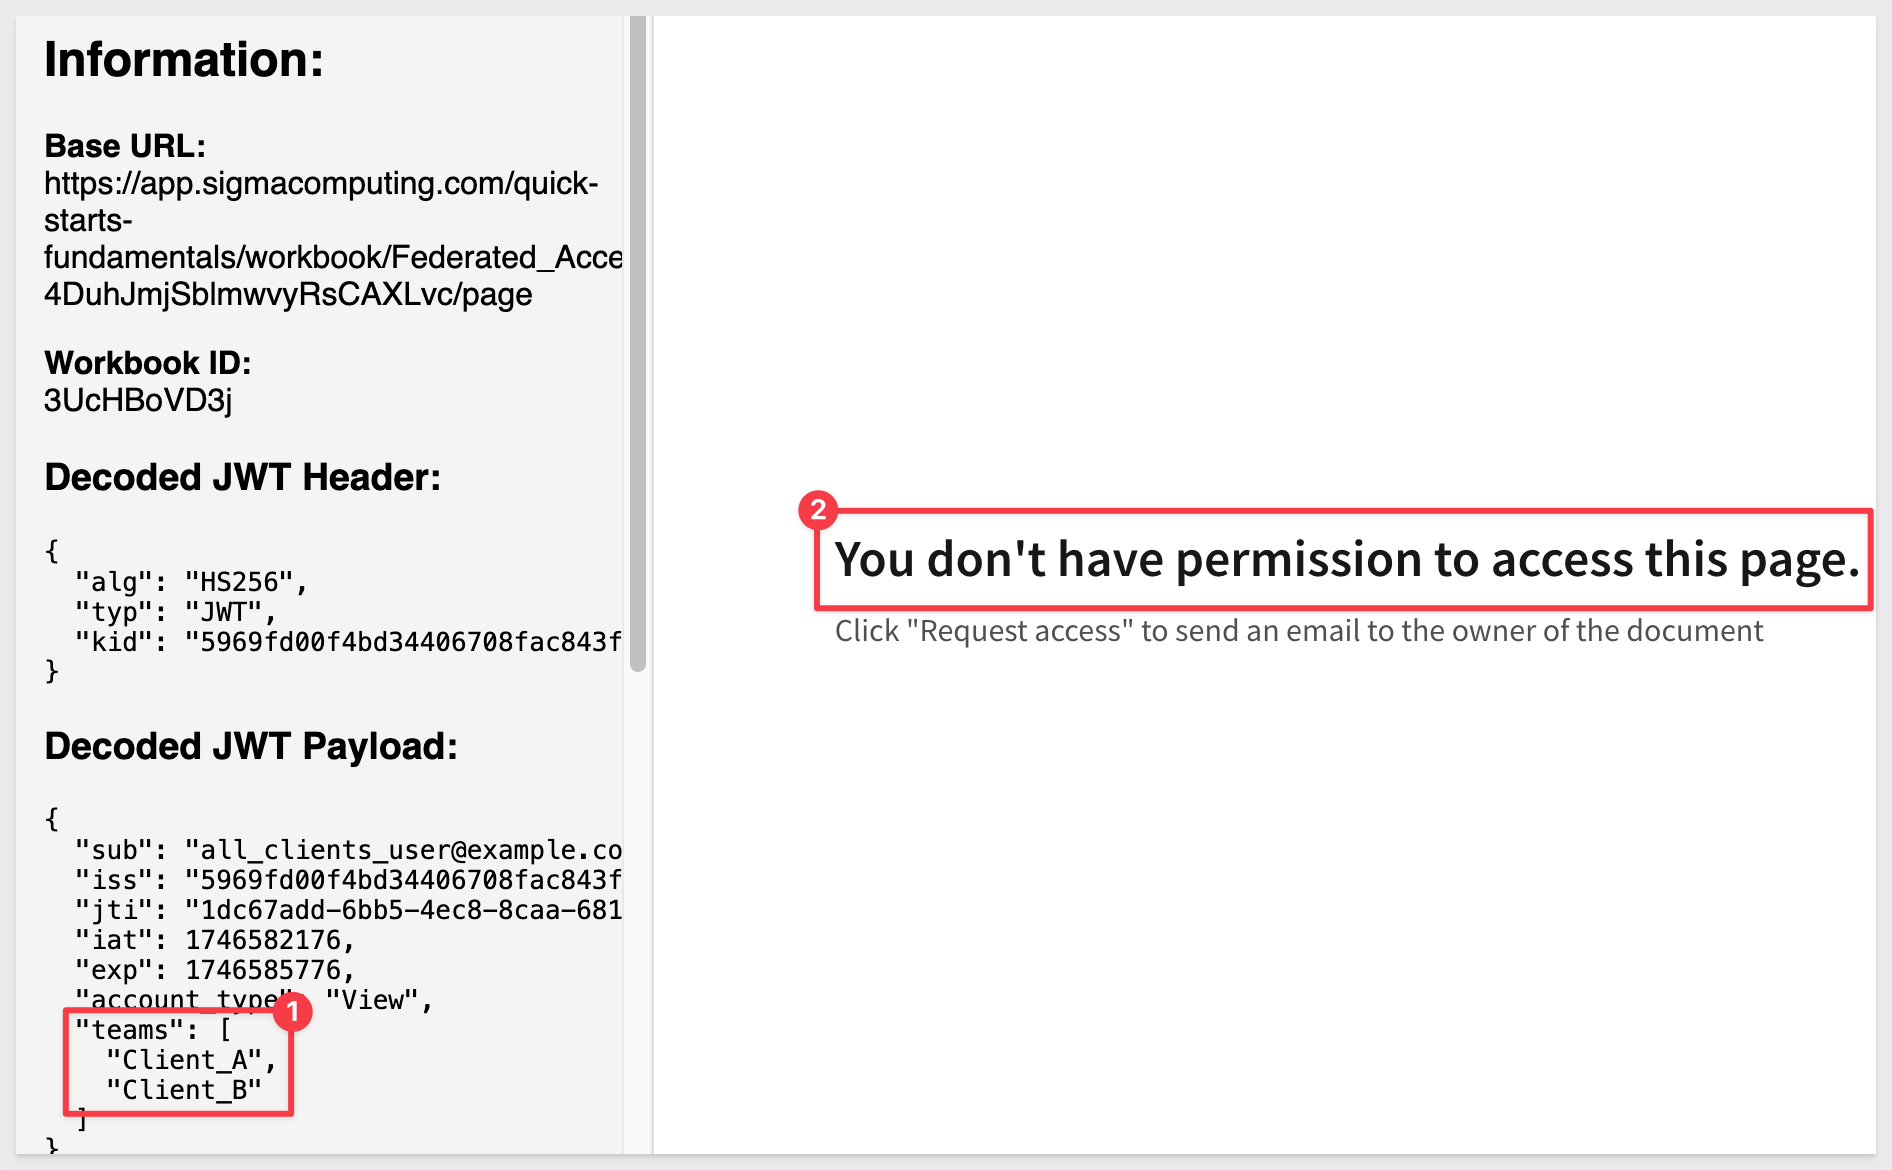
Save the .env file and refresh the browser.
With only the Client_A and Client_B teams, we do not have permission to access the embedded content:
Adding All_Clients_Team (and removing Client_A) from the team list allows the embed to render:
The team-workspace functionality is clearly flexible, and this was a quick example to get you thinking.
In this QuickStart, we explored how to leverage Sigma's team and workspace permissions to deliver secure, federated access to embedded content. We demonstrated how different teams can be granted varying levels of access—ranging from full workbooks to individual elements or pages—based solely on the parameters passed at runtime.
Embedding with Sigma is both flexible and straightforward, giving customers the ability to mix and match approaches to meet their security and user experience goals.
This is just the beginning — other QuickStarts in the embedding series will introduce even more advanced techniques for securing and customizing embedded experiences.
Additional Resource Links
Blog
Community
Help Center
QuickStarts
Be sure to check out all the latest developments at Sigma's First Friday Feature page!