This QuickStart assumes you have already taken the QuickStart Embedding 1: Prerequisites so that you have a sample environment to complete the tasks in this QuickStart.
We also recommend you table the the QuickStart Embedding 3: Application Embedding as we will build on that content
Some steps may not be shown in detail as we assume you have taken these other two QuickStarts or are familiar with Sigma workflows.
A list of all the available events is available here.
For more information on Sigma's product release strategy, see Sigma product releases.
Target Audience
Semi-technical users who will be aiding in the planning or implementation of Sigma. Limited SQL and technical data skills are needed to do this QuickStart. It does assume some common computer skills like installing software, using Terminal, navigating folders and edit/copy/paste operations.
Prerequisites
- A computer with a current browser. It does not matter which browser you want to use.
- Access to your Sigma environment. A Sigma trial environment is acceptable and preferred.
- A working web server based on Node.js as demonstrated in the QuickStart: Embedding 01: Prerequisites.
The downloaded zip file is the embedding code and simple webpage we will use during this QuickStart.
There are three folders; two for Actions and one for Events.
his will minimize the effort as you go through the QuickStart adjusting the files for the different exercises. They are named to be clear which section they are to be used.
- Node.js and required Packages (all free):
- Express
- Node-supervisor
- crypto (included with Node.js installation)
What You'll Learn
The exercises in this QuickStart will discuss and walk you through the steps to send messages from a Parent application to Sigma (Inbound Events) and also receive messages from Sigma in a Parent application (Outbound Events) using HTML and JavaScript.
What You'll Build
Functioning examples of Sigma Events, embedded inside a Parent application.

In this QuickStart we will be demonstrating passing variables between the Parent application and Sigma. Sigma is embedded in the Parent application using HTML iframe(s).
Inbound Events:
Are variables sent from the Parent application to Sigma. There is no "listener" to code into the iframe; Sigma handles that out-of-the-box. Sigma can use these messages to update control values. For example, passing a new value to a Sigma control that is used to filter table data.
Inbound events can be passed using either JavaScript or URL.
In general:
- JavaScript is used when you want to pass values from the Parent to the embed without causing the embed to refresh.
- The URL method is used at runtime and the variable values are appended to the embed url.
Out-bound Events:
Are variables sent from Sigma to the Parent application which must have a "listener" coded into the Parent application to receive and react to the message as desired.

Let's first make sure that you have an embed that we can work with. We will be using Node.js and the setup, configuration and use of this was covered in the QuickStart: Embedding 01: Prerequisites. and the QuickStart: Embedding 03: Secure Access.. Go back and review those QuickStarts if you need a refresher.
Workbook setup
We will use the Sigma sample database to create a Workbook Page that has one control and one table as shown below.
Create a new Workbook, add the D_STORE table from the Sigma Sample Database / Retail / Plugs Electronics schema.
Add a new Control to the workbook and configure it as shown below, also setting it to target the table:
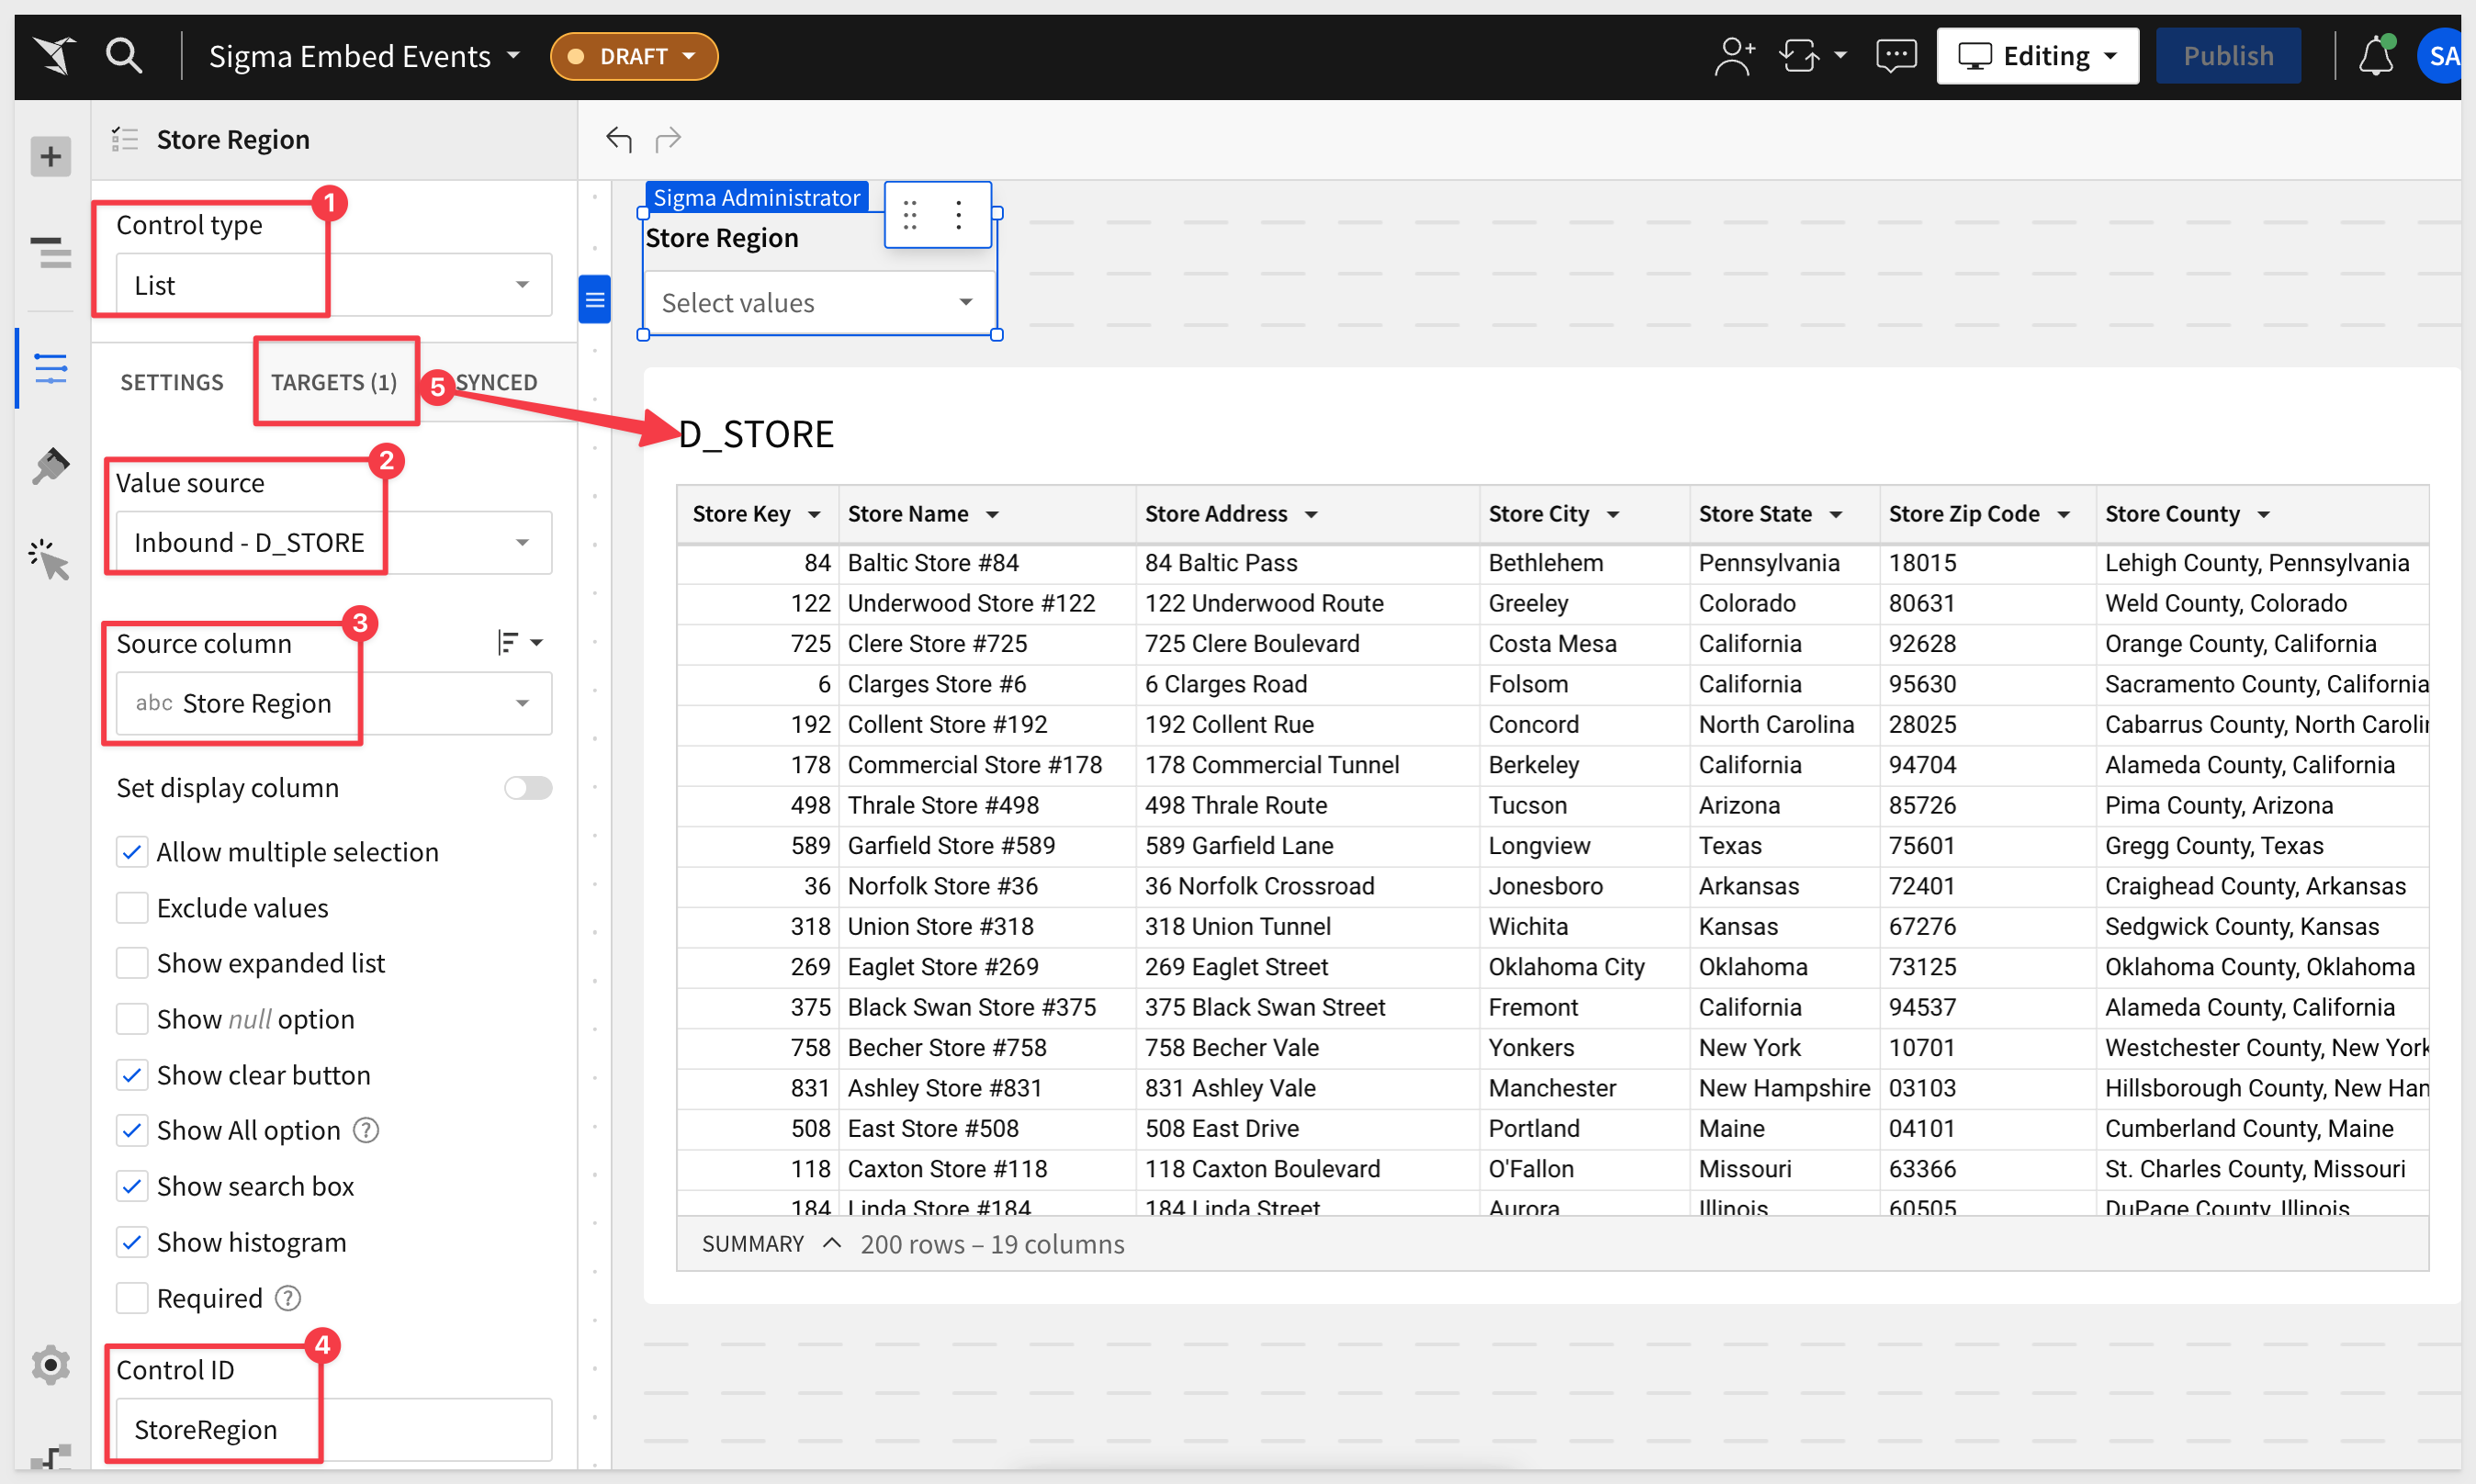
Rename the workbook Page 1 to Inbound.
Save the workbook as Sigma Embed Events.
Using Sigma. create the Embed URL for the workbook page called inbound and save it off to a text file for now. This is your Embed Path.
Embed API setup
Using the folder extracted from the project files downloaded earlier, open the embed-api.js file subfolder called sigma_embed_events in a text editor and change the values for:
- Embed Path
- Embed Secret
- ClientID
- External_user_team (this is the Team that you shared this embed with)
- Account_type (this type must exist in your Sigma environment)
Use Terminal to launch the Node web server by right-clicking on the unzipped subfolder called sigma_embed_events_inbound and selecting the option for New Terminal at folder.
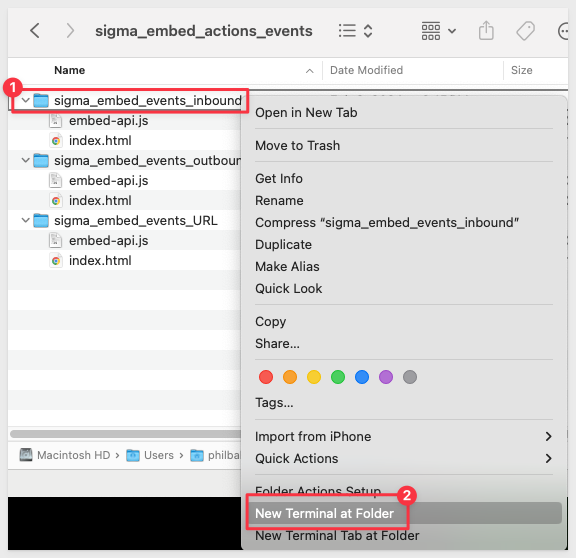
Start the webserver:
supervisor embed-api.js
Use Chrome to browse to:
http://localhost:3000
Assuming you got something like the screenshot below, we are ready to send some events:
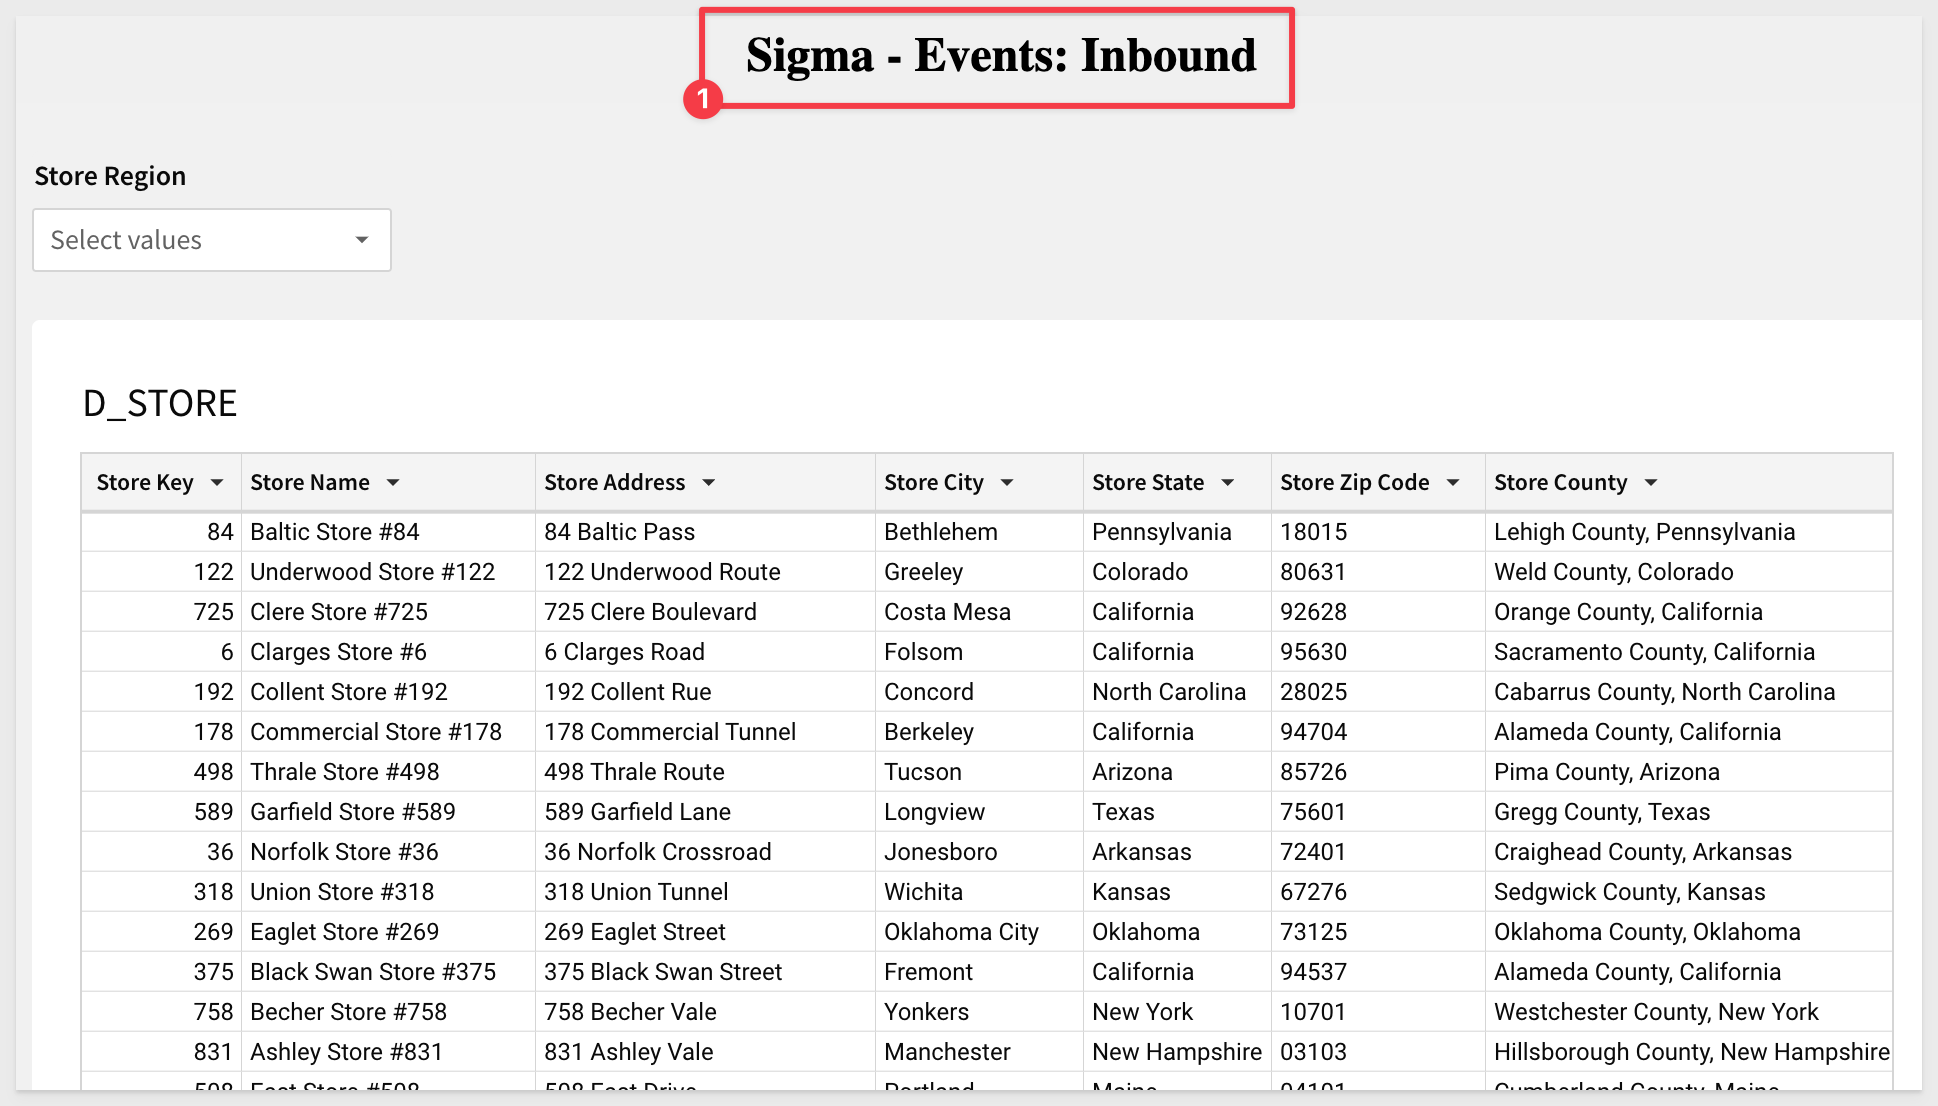

In our configuration, the file Index.html is analogous to the Parent application Sigma is embedded into.
We will first send a message to the embedded iframe and see the table data change.
For this demonstration, we will use Chrome Inspector (Inspector) to execute JavaScript commands and see the results. This is the easiest way to see Events working without even changing the Index.html code.
Back in Chrome, and on the embed page (localhost:3000), press your F12 key to open Inspector. Click the Console tab in Inspector. Your browser should look like this:
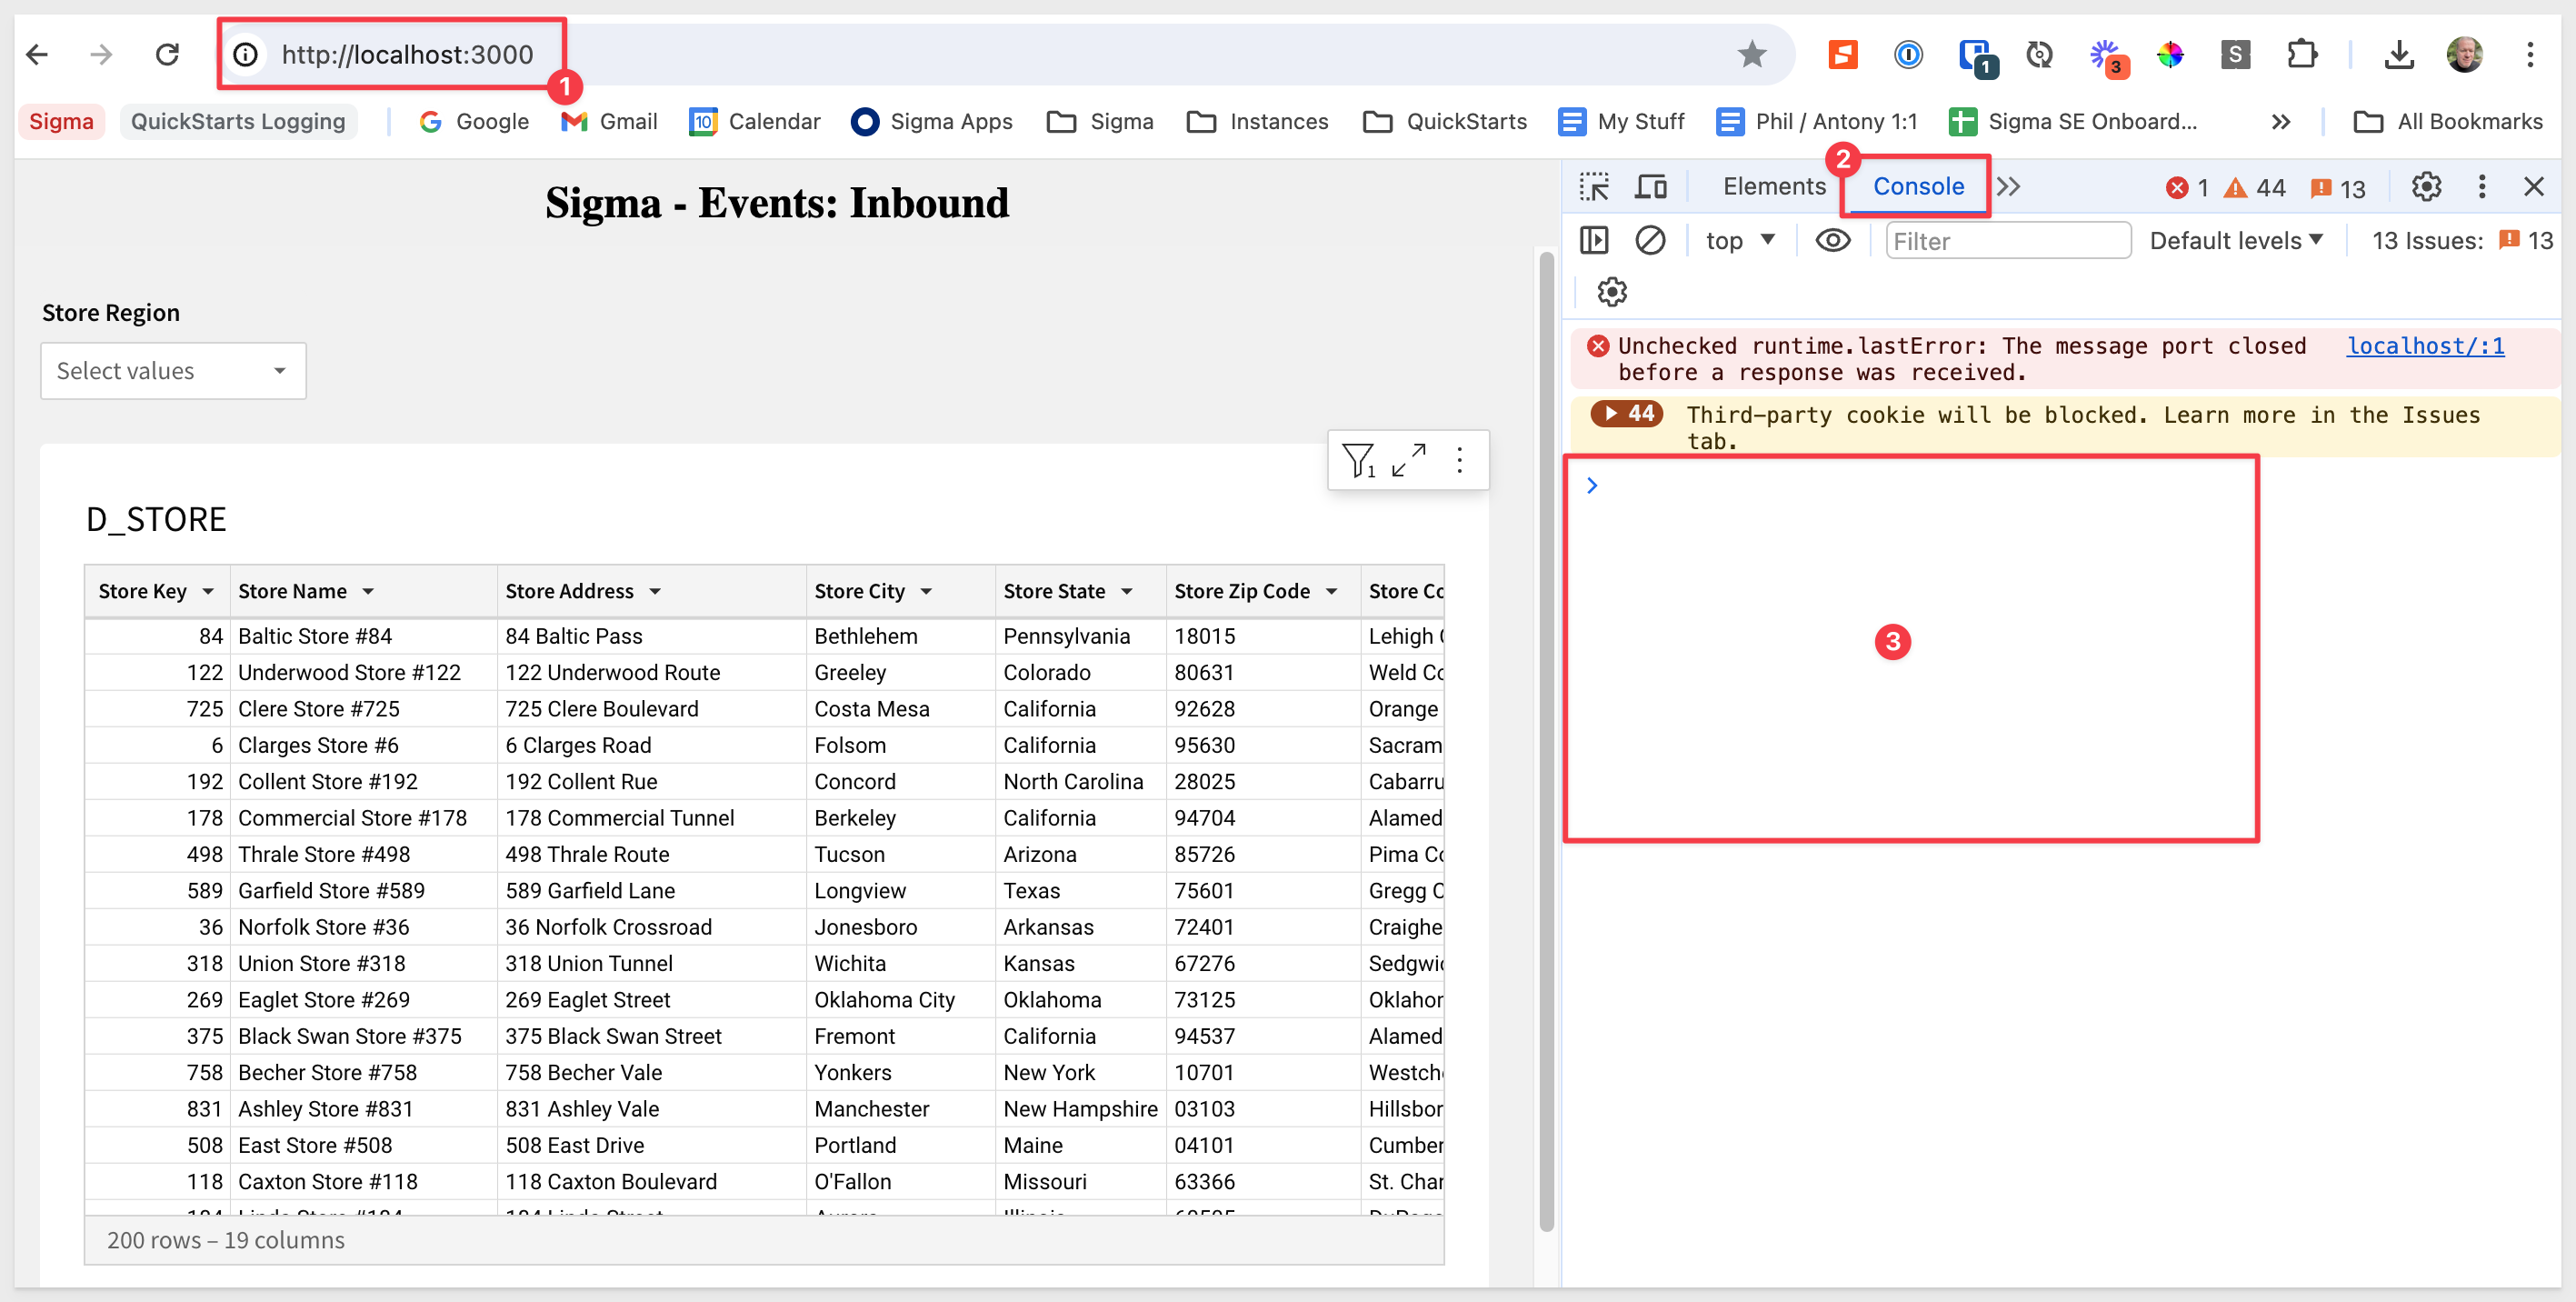
We will use the Inspector Console to send two JavaScript commands to the application.
This simulates Parent application controls (drop list selection, buttons, etc.) sending commands to the Sigma embed.
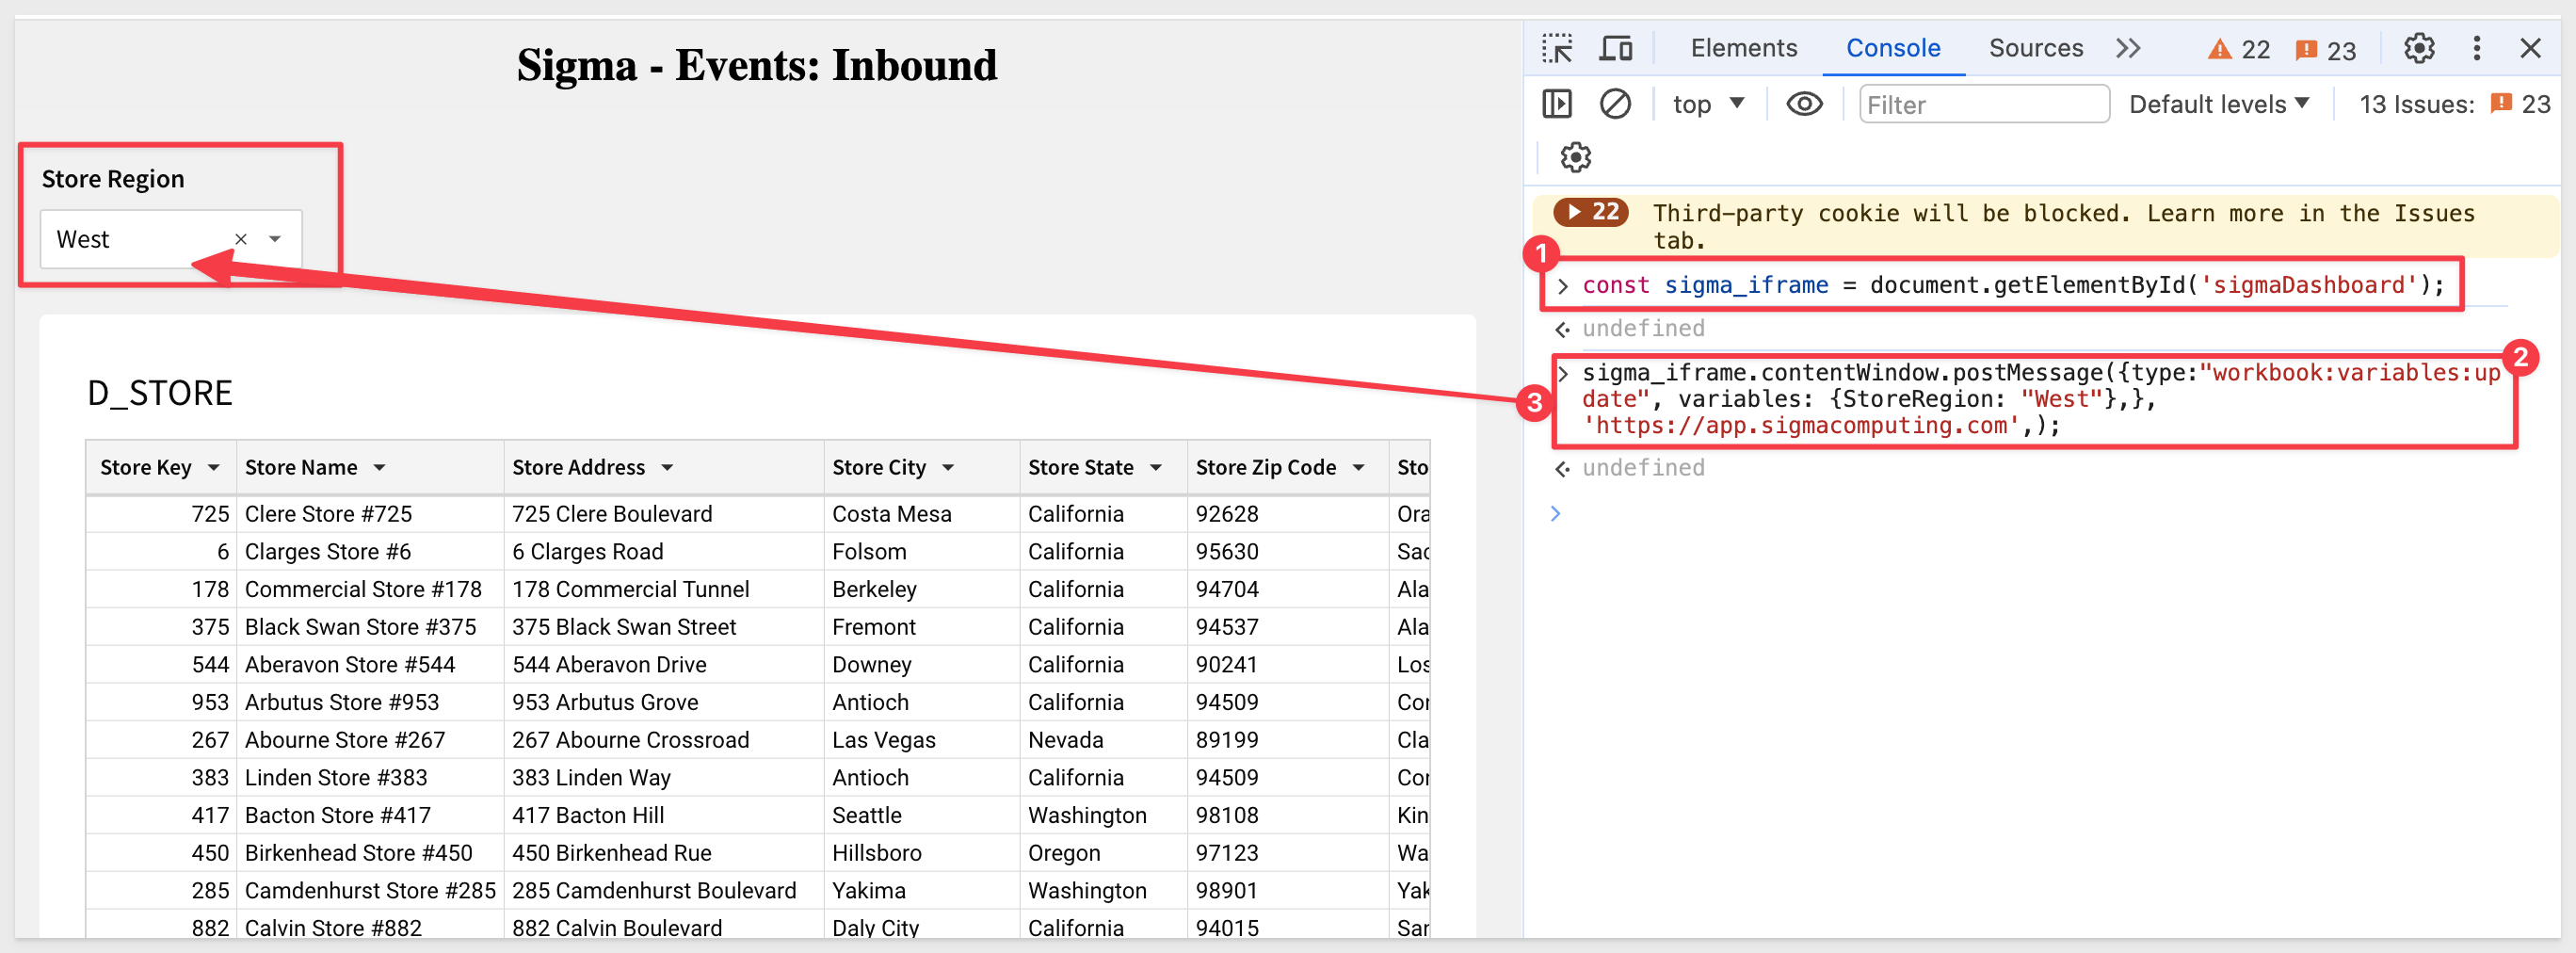
The first command give the Parent access to the iframe document window:
const sigma_iframe = document.getElementById('sigmaDashboard');
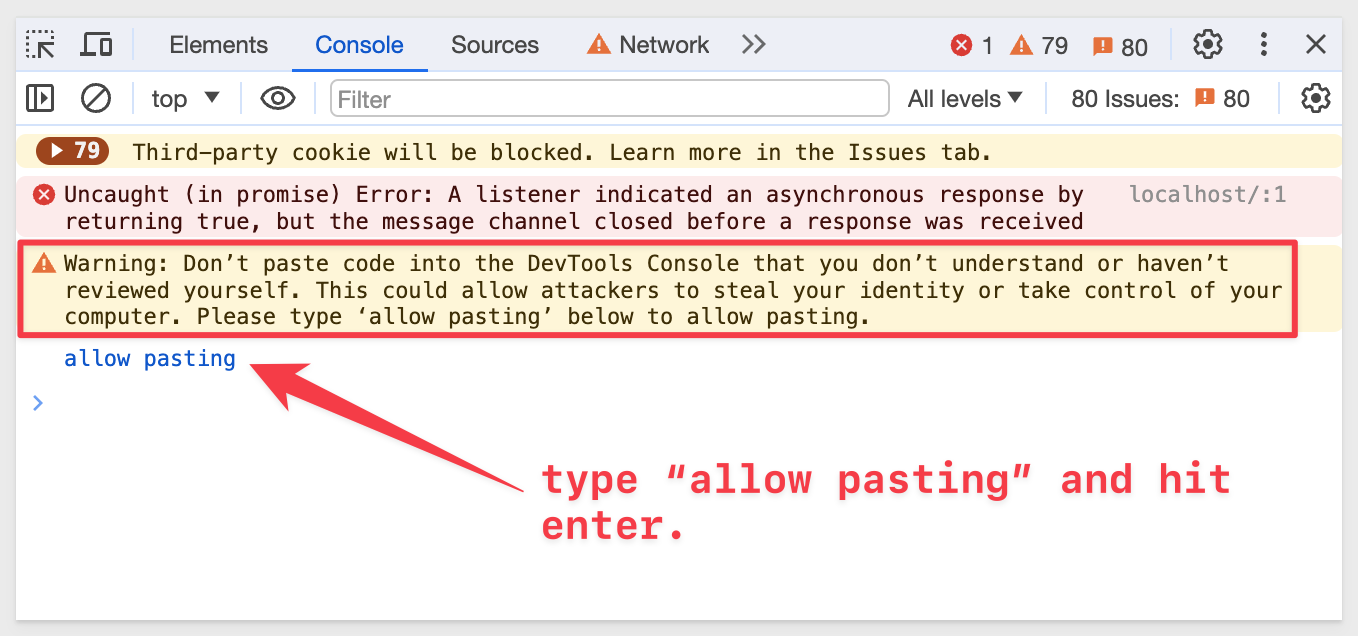
Chrome may through an error (for security reasons). You may need to allow pasting of code into Inspector:
Here is an explanation of the first command:
The second command sends a new value for the variable called "StoreRegion" to the Sigma iframe using the JavaScript postmessage method. PostMessage() is a global method that safely enables cross-origin communication. It's a lot like Ajax, but with cross-domain capability (ie: communication between two websites with different domains).
Here is an explanation of the second command:
sigma_iframe.contentWindow.postMessage({type:"workbook:variables:update", variables: {StoreRegion: "West"},}, 'https://app.sigmacomputing.com',);
Run each command one at a time. Inspector's Console should return "undefined" after each command is executed.
Your results should look like this after running each command:
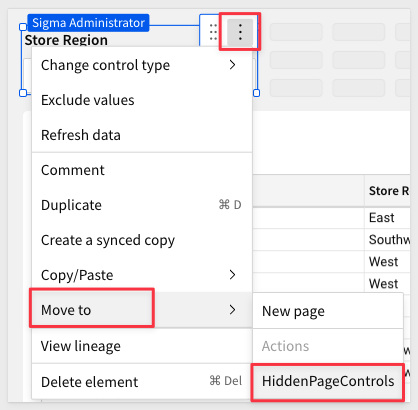
It is probably undesirable to have the Store Region control filter show in the embedded since you are driving the filtering from the Parent application. In this case, simply create a new page in Sigma and move the Control to that page. Since we are only embedding the workbook Page, the user can't see the new page. You can also hide the workbook page if you prefer.
Move the Filter Control to the new Page:
Publish your Sigma changes and then refresh the browser with the embed.
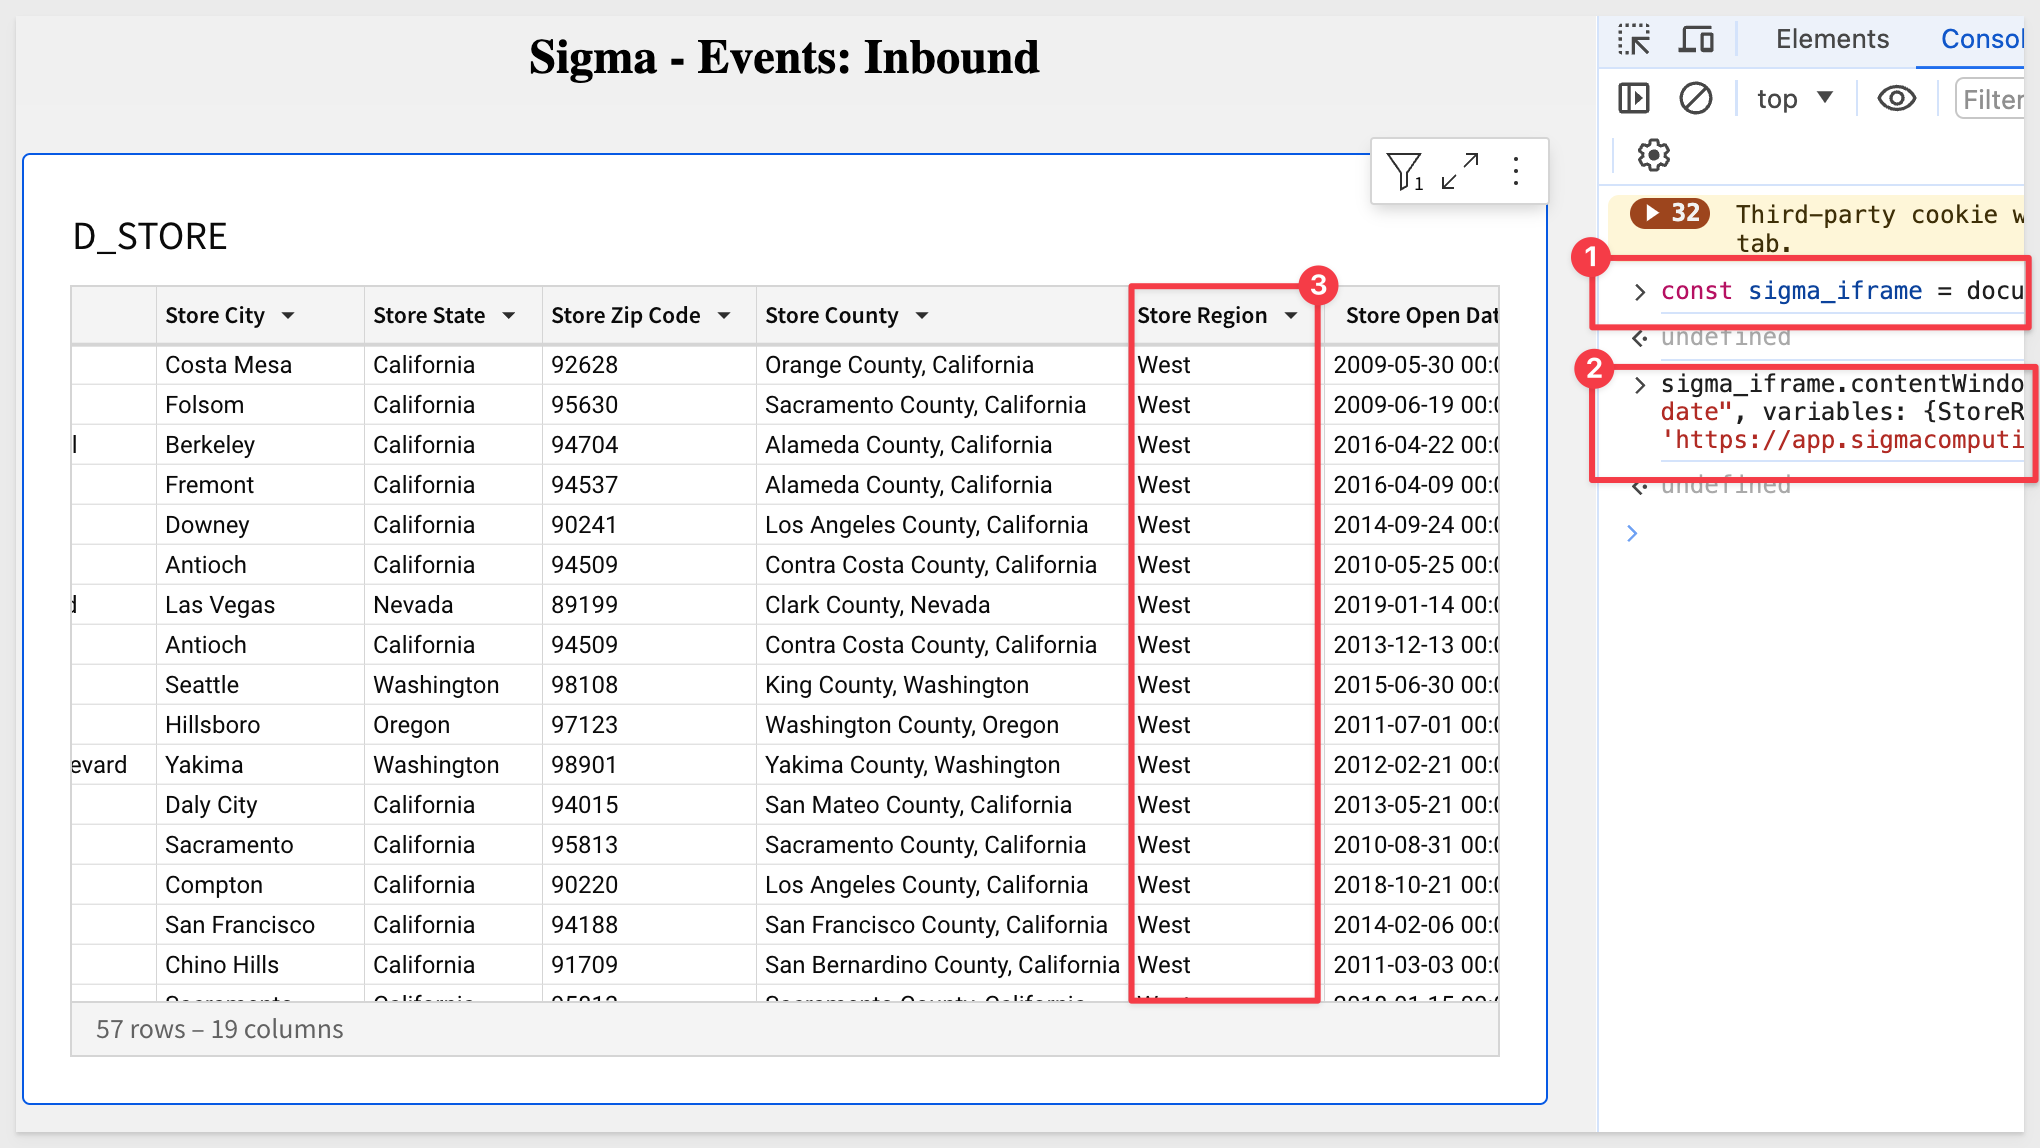
Execute both of the JavaScript commands in Inspector again.
Now the embed works as expected (filtering for West) but the page control is not displayed to the user:

Outbound events are communications in the opposite direction; from Sigma's iframe to the Parent.
The main difference is that the Parent application will need to be "listening" for events via code that needs to be added.
To see a full list of all the supported events, click here.
We will demonstrate using JavaScript in our HTML page. Once the Parent receives the message, it can decide how it is used.
In this example we will add a listener to the Parent and reuse the same embed from last section to generate an outbound event, changing the StoreRegion drop filter settings.
Close the terminal window (ending the session) from the previous exercise.
Locate the sigma_embed_events_outbound folder.
Open the embed-api.js file in this folder in a text editor and change the values for:
- Embed Path
- Embed Secret
- ClientID
- External_user_team (this is the Team that you shared this embed with)
- Account_type (this type must exist in your Sigma environment)
Save the file.
Open the index.html file for this project.
Recall that this is the Parent application. This is the same code that we have been using in the last two exercises but we now have added a "listener", a textbox to display the values received from Sigma and error handling code:
Listener:
Text Box:
Error Handling (see commented description):
Launch a new terminal window.
Execute the terminal command:
supervisor embed-api.js
In Chrome, refresh the page
http://localhost:3000
In Chrome, press your F12 key to open Inspector again and select the Console tab.
You should see Sigma Events now in the Inspector Console.
The workbook:loaded informs the Parent that the Sigma workbook embed has finished loading the metadata but has not started evaluating the workbook elements.
This is coming from the HTML.index logic that checks if the workbook has fully loaded yet:

Notice that two new Events appear in Inspector. The first is the console.log message we set to display when the user changed a filter (onchange) and second is the addition of Southwest,Midwest to the StoreRegion list:
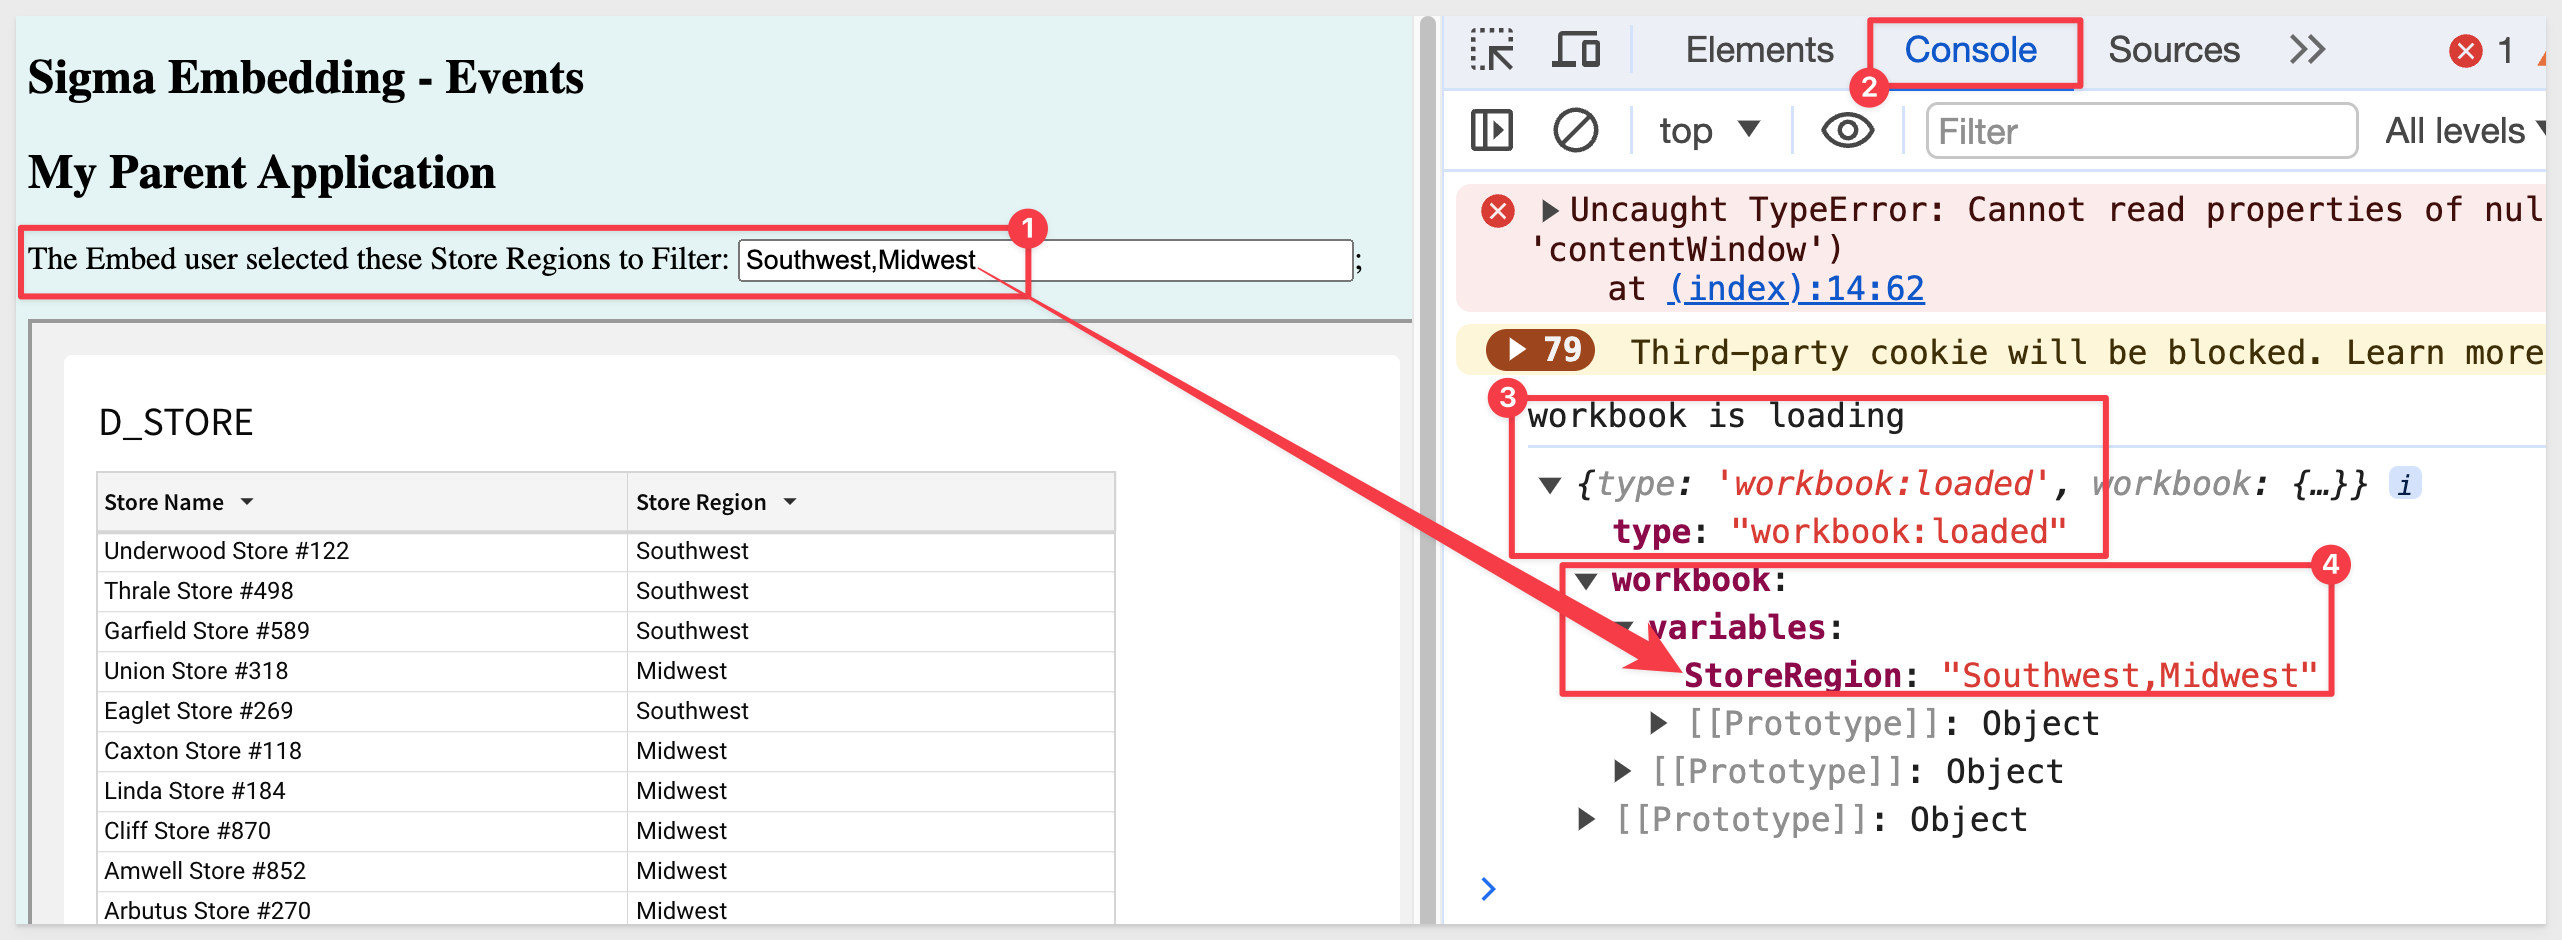
The values for Southwest,Midwest are driven by section 6 of the embed-api.js file:


For this example, we will reuse the same embed, but this time we will modify the embed-api.js script in the sigma_embed_events_URL folder.
We want to append the variable StoreRegion to be West regions, instead of the page default of All.
Close the terminal window (and end session) from the previous exercise.
Open the embed-api.js file in the sigma_embed_events_URL folder in a text editor and change the values for:
- Embed Path
- Embed Secret
- ClientID
- External_user_team (this is the Team that you shared this embed with)
- Account_type (this type must exist in your Sigma environment)
Scroll down to section 6.` You will see these lines:
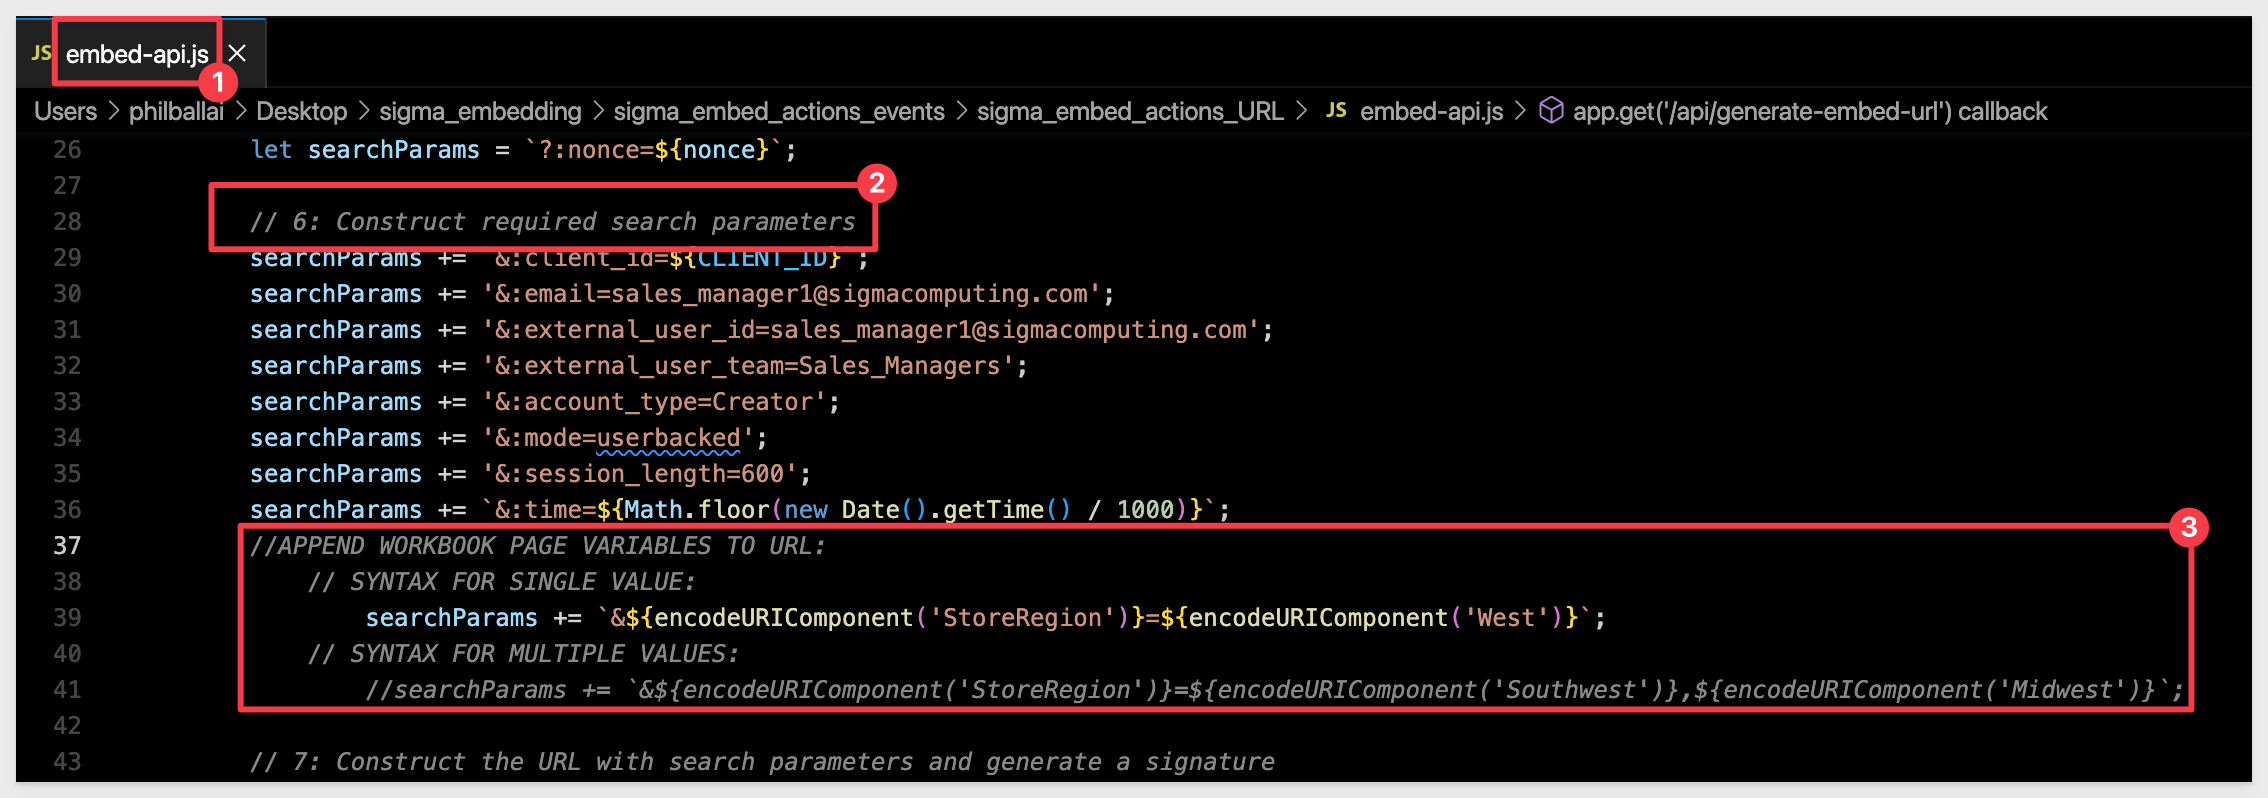
To make this method work we merely use the existing "searchParams" variable and append the required values to it using the encodeURIComponent() method.
To pass multiple values, comment line 39 and uncomment line 41 as shown below:

In line 41, we are appending "StoreRegion" and two values, Midwest and Southwest.
Notice line 39, which is an example of passing a single value. You can pass as many values as you like now that you have the syntax.
The JavaScript encodeURIComponent() method encodes certain chars that would normally be recognized as special chars for URIs so that many components may be included. Note that this method does not encode the ‘ character, as it is a valid character within URIs. Most commonly used to handle spaces and also handles special characters.
From the sigma_embed_events_URL folderlaunch a terminal window:
Execute the terminal command:
supervisor embed-api.js
In Chrome, refresh the page
http://localhost:3000
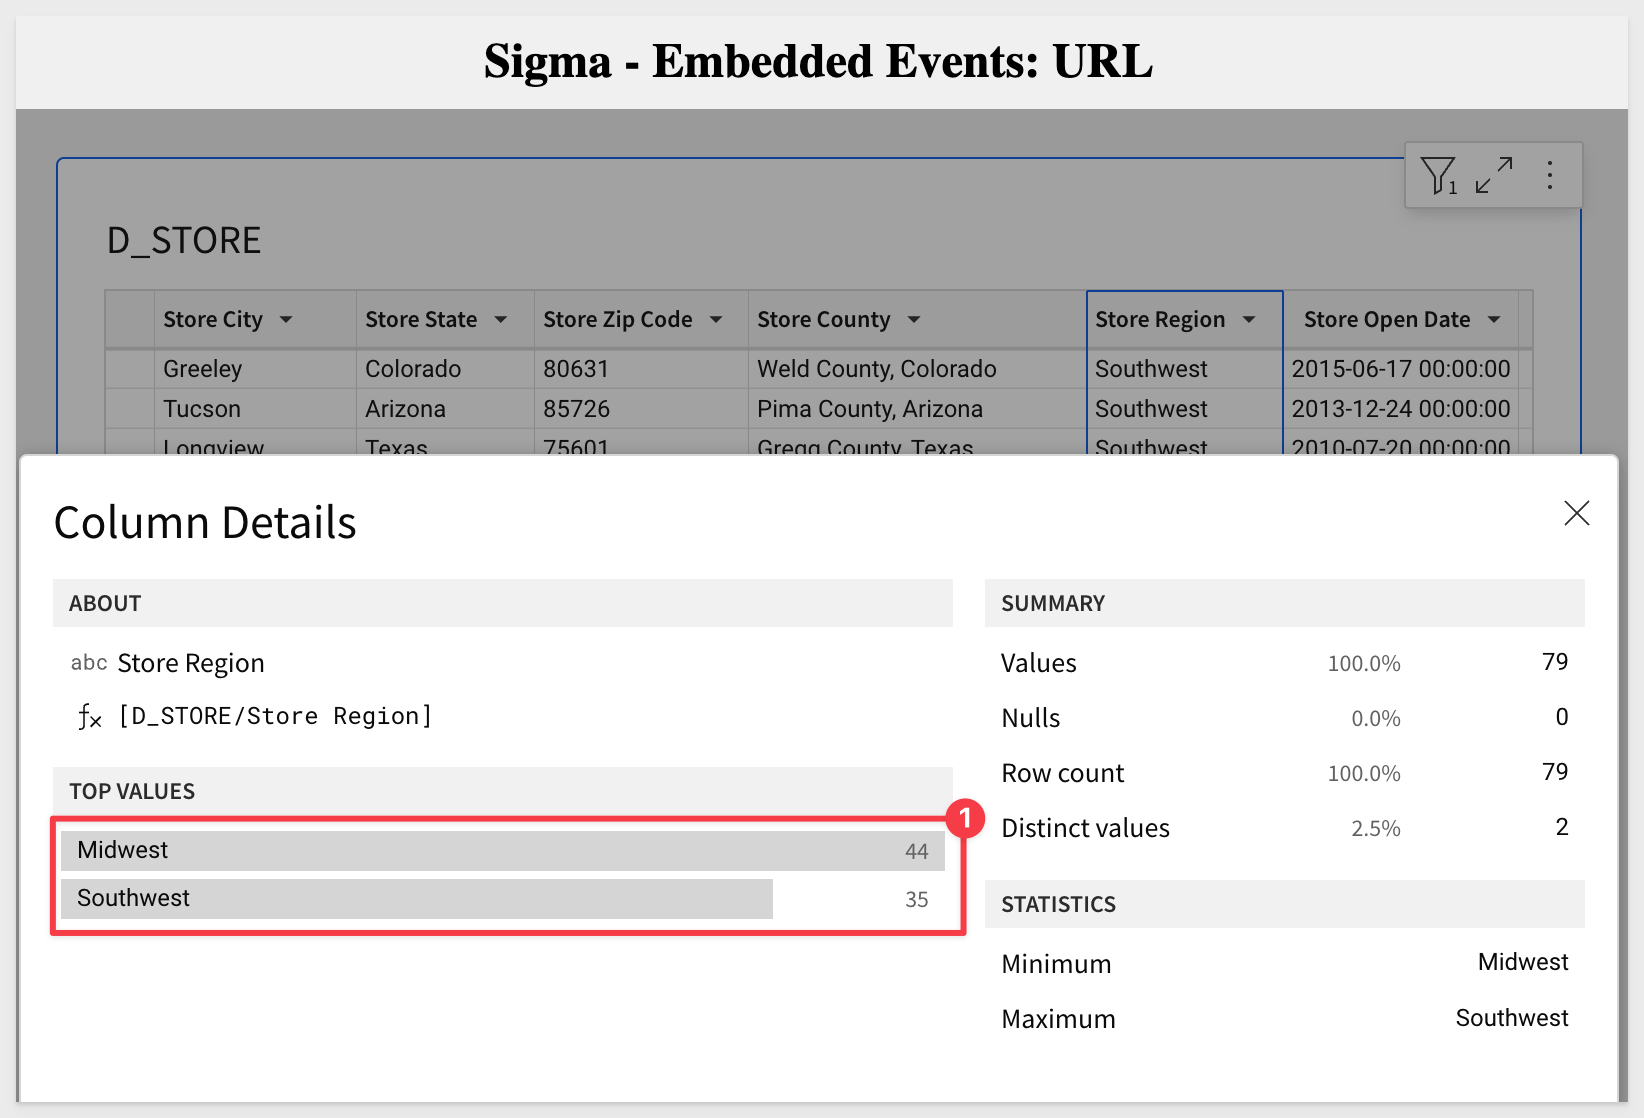
We should see the results as below (looking at Column Details for the Store Region column):
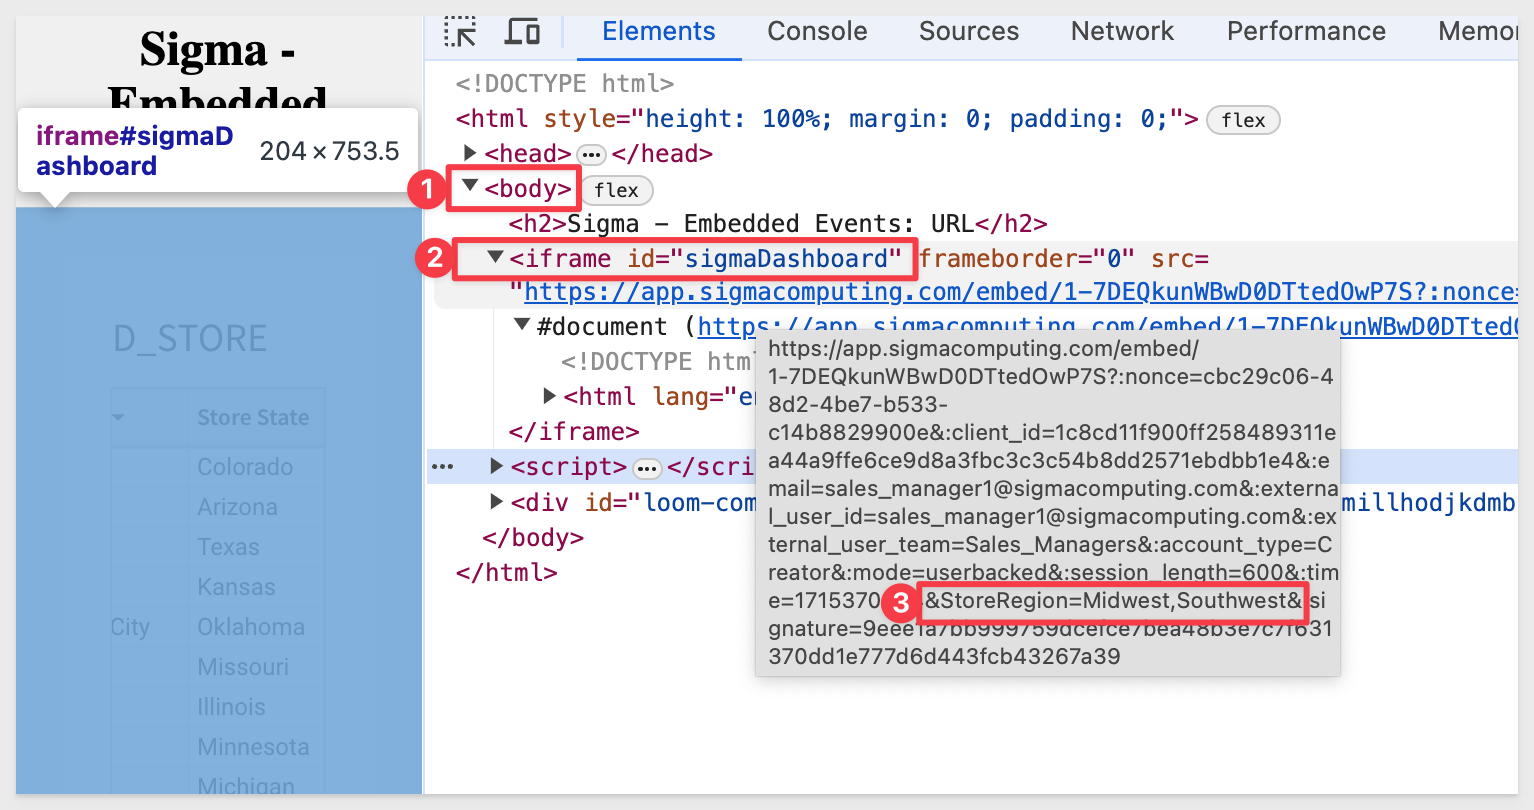
In Inspector, open the Elements tab and hover over the src=url that is listed. You can see the full URL and see where the variable values were assigned as below:

In this QuickStart will built functioning examples of Sigma embeds that use events to exchange messages using HTML and JavaScript.
Additional Resource Links
Be sure to check out all the latest developments at Sigma's First Friday Feature page!
Help Center Home
Sigma Community
Sigma Blog


