This QuickStart introduces you to Sigma embedding into Salesforce. This QuickStart assumes you have already taken the QuickStart Embedding 1: Prerequisites so that you have a sample environment to complete the tasks in this QuickStart.
We also recommend you take the the QuickStart Embedding 03: Secure Access.
Some steps may not be shown in detail as we assume you have taken these other two QuickStarts or are familiar with Sigma workflows.
For more information on Sigma's product release strategy, see Sigma product releases.
Target Audience
Semi-technical users who will be aiding in the planning or implementation of Sigma. Limited Salesforce and technical data skills are needed to do this QuickStart. It does assume some common computer skills like configuring software, navigating folders and edit/copy/paste operations.
Prerequisites
- A computer with a current browser. It does not matter which browser you want to use.
- Access to your Sigma environment. A Sigma trial environment is acceptable and preferred.
- Access to Salesforce. We recommend using a free Salesforce developer account.
- Some content to embed. You can embed a Workbook, Table or Visualization.
- Familiarity navigating Salesforce and minor administrative functions.
What You'll Learn
The exercises in this QuickStart will discuss and walk you through the steps to embed Sigma inside a Salesforce page.
What You'll Build
We will build a Salesforce page using Sigma content, embedded securely on a VisualForce page as shown below:
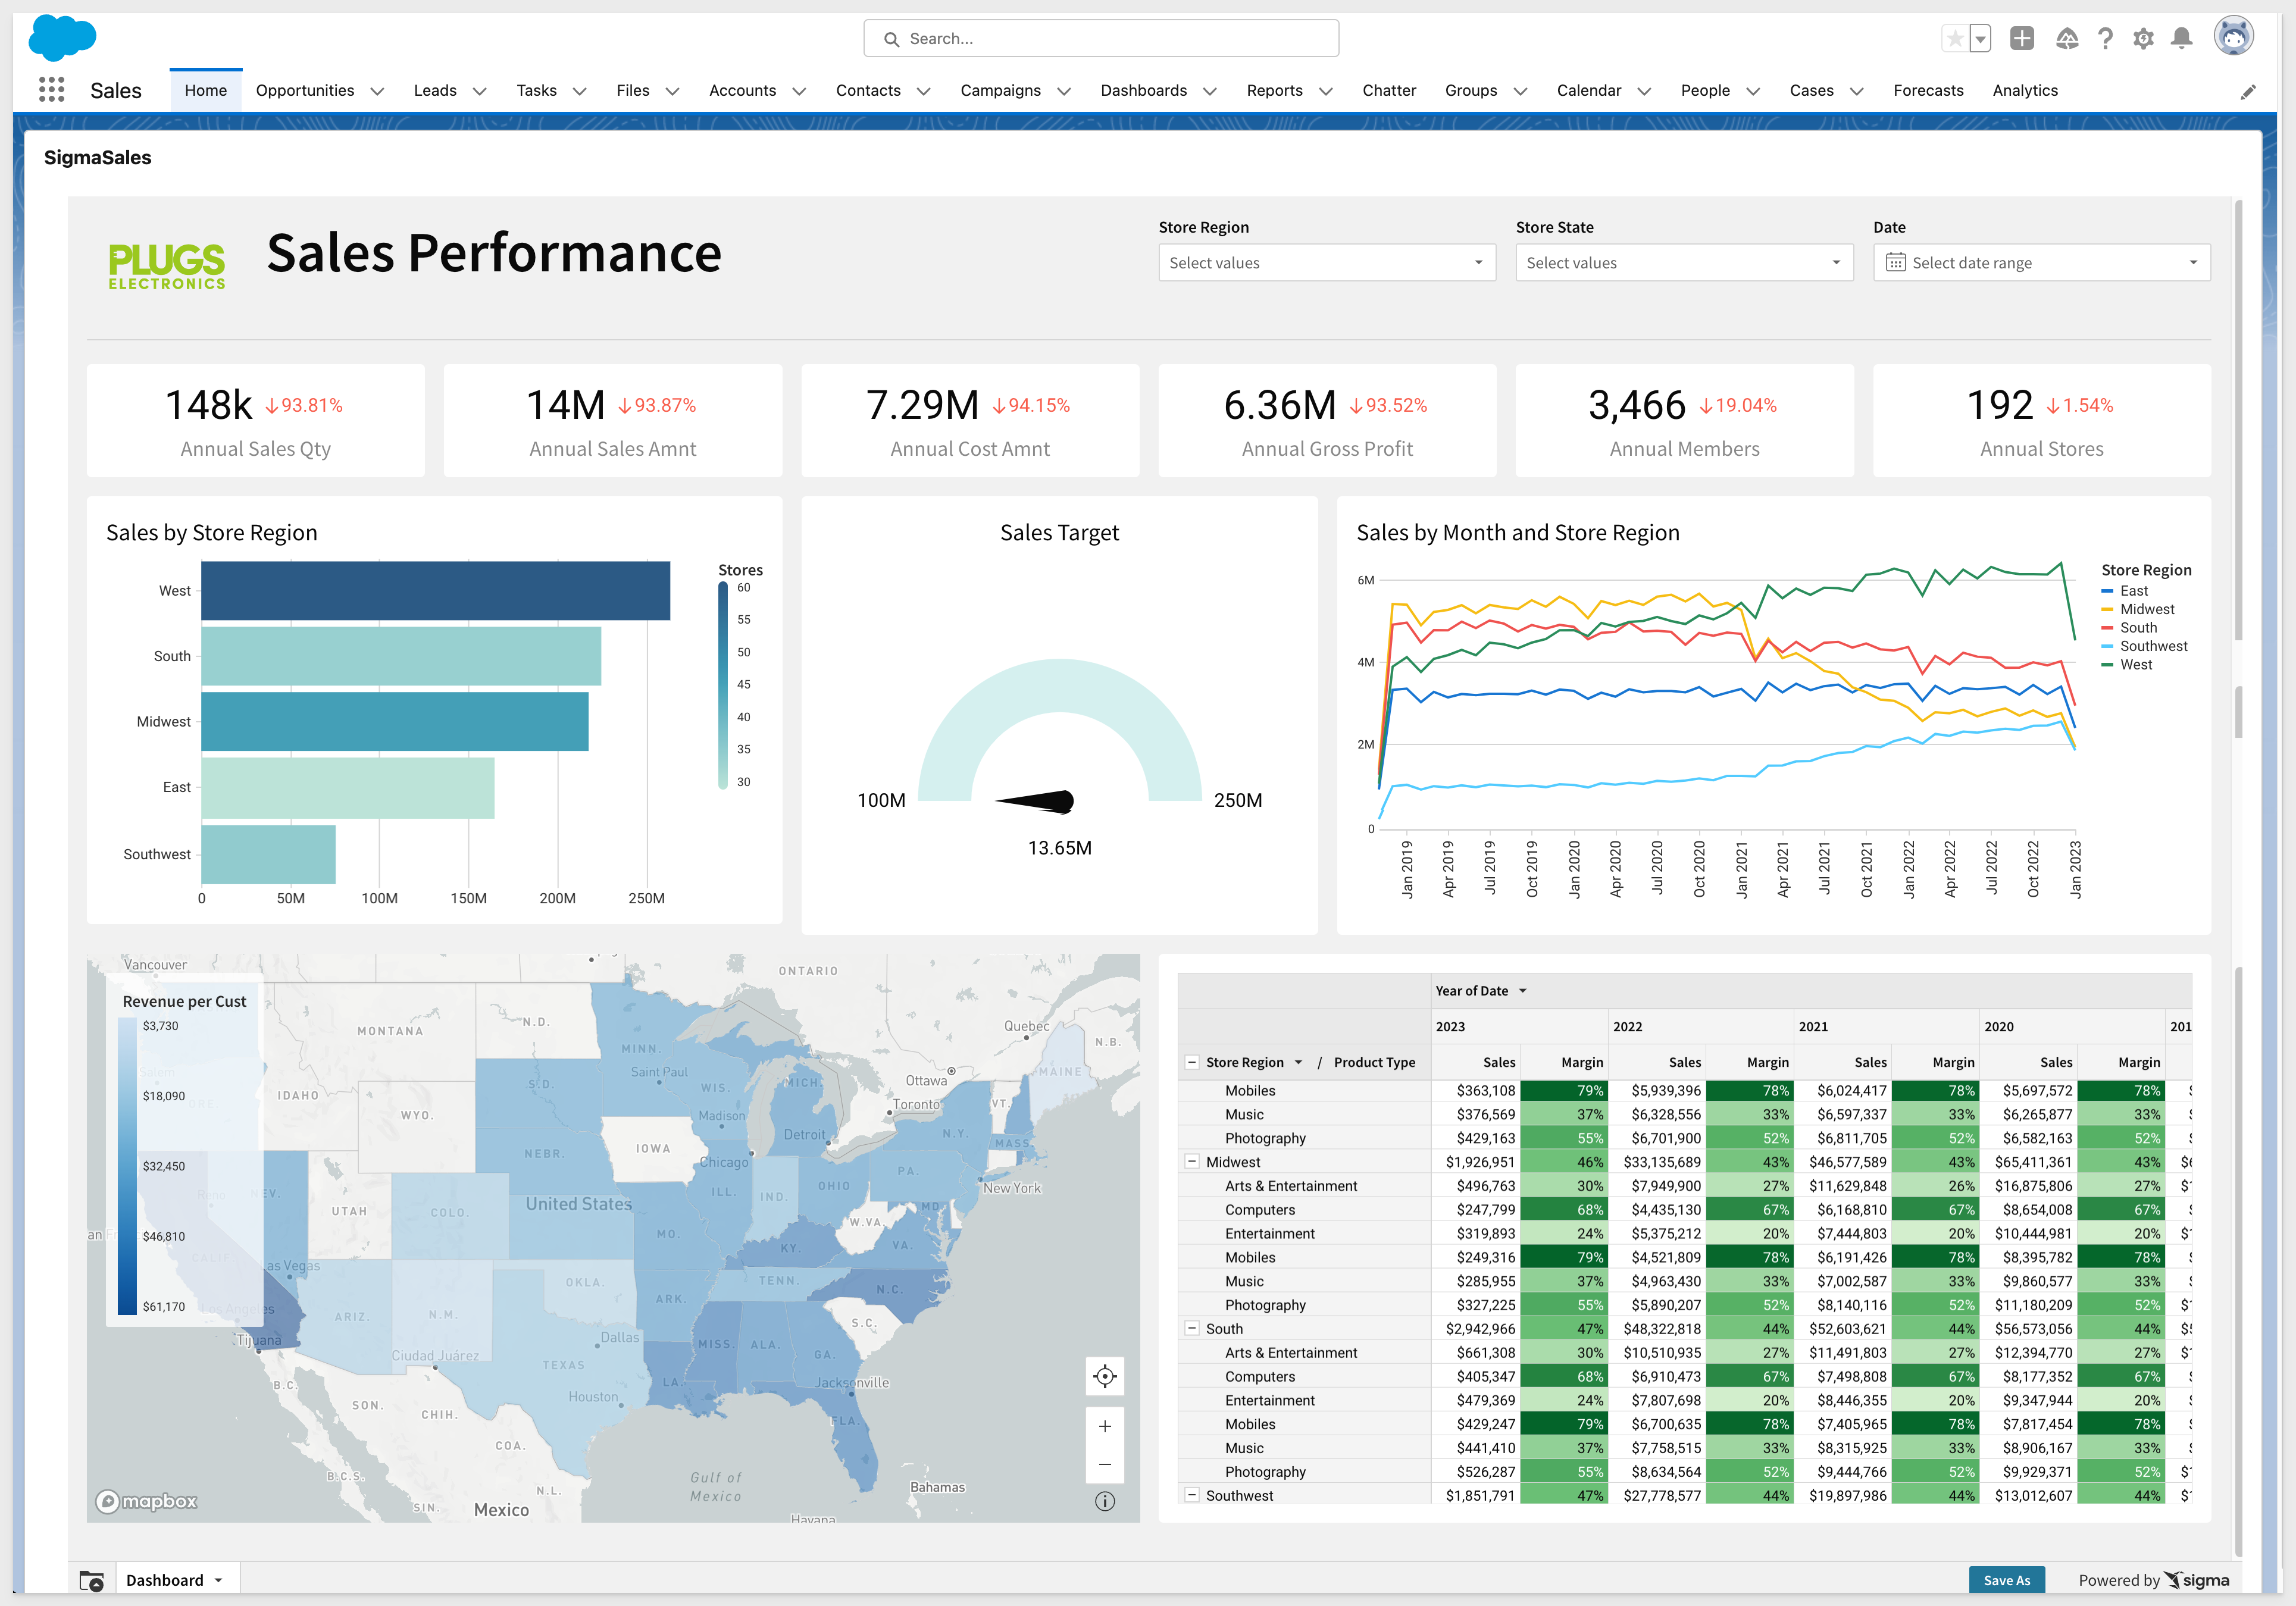

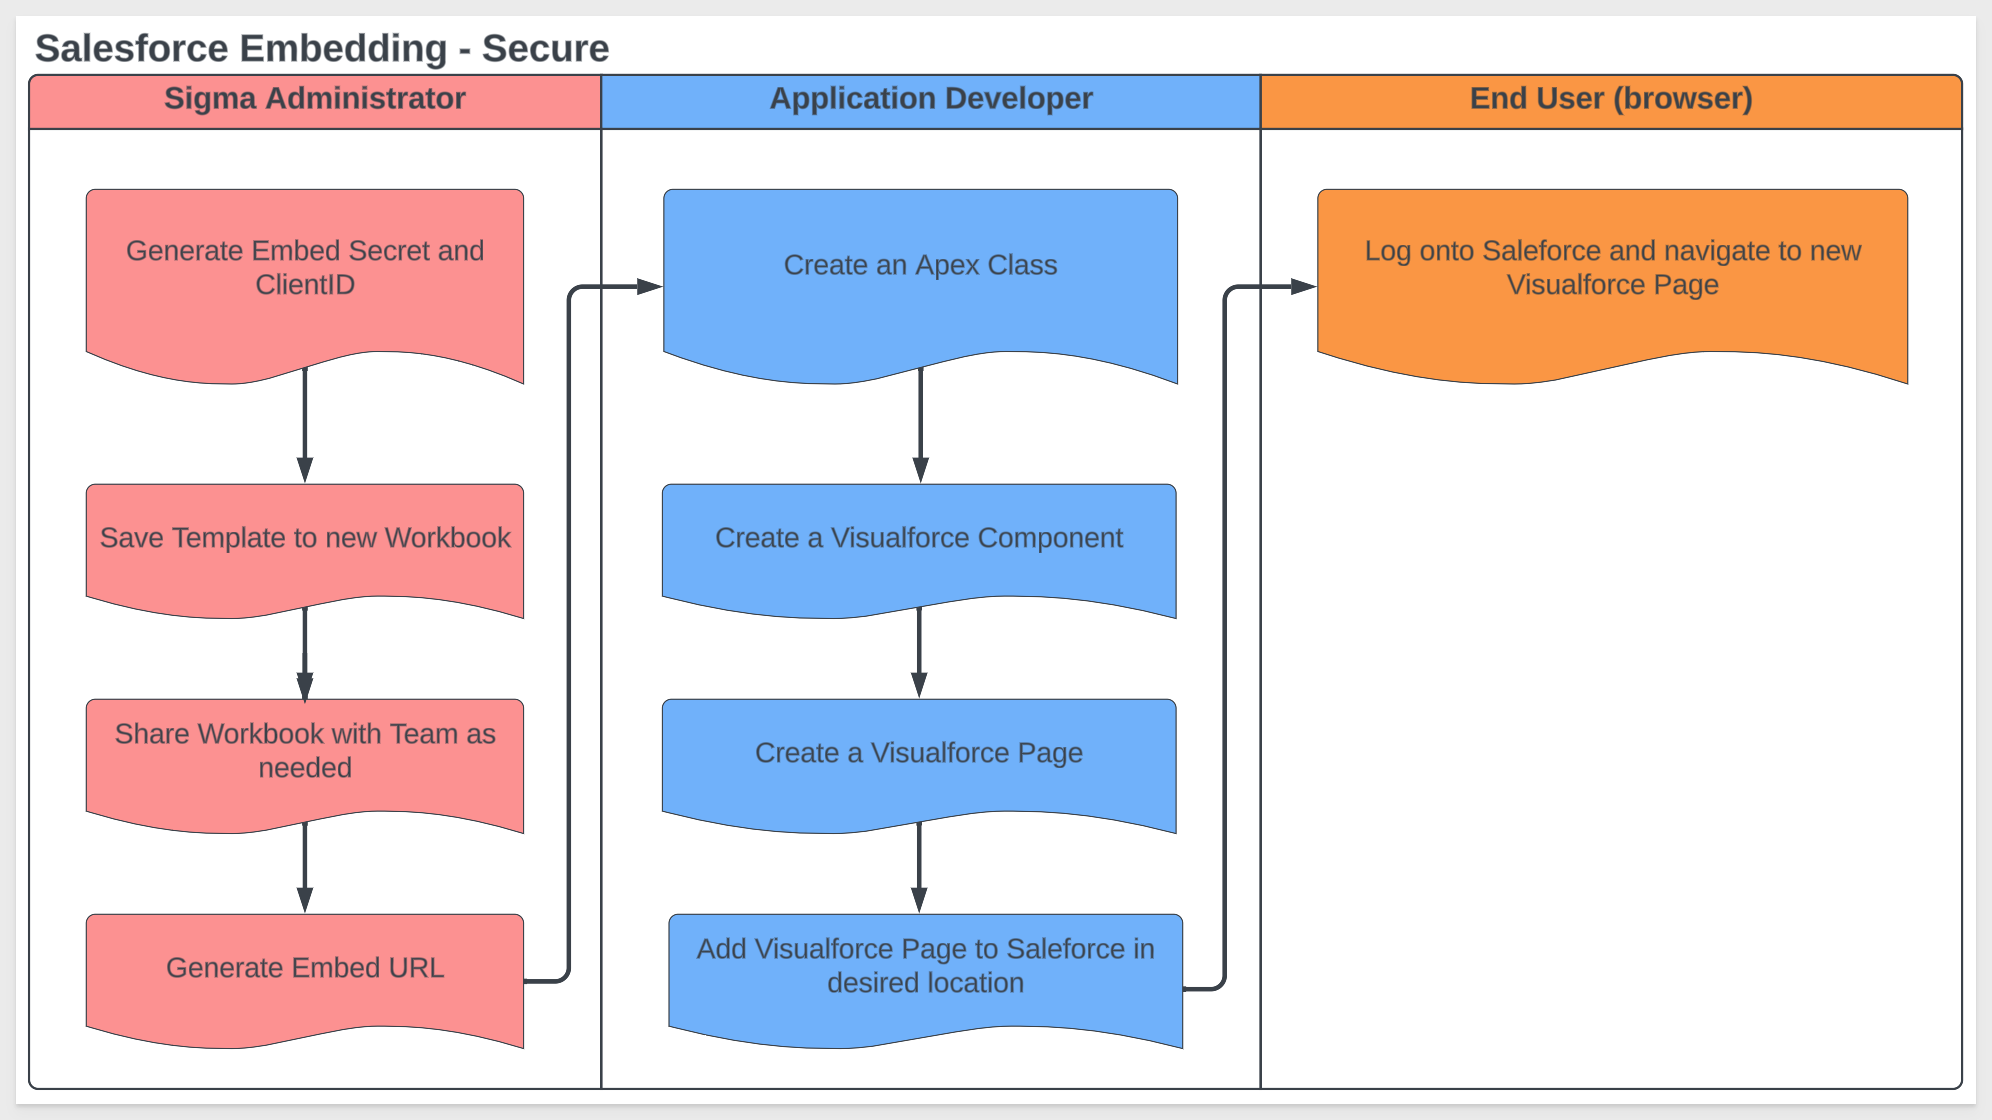
In this use case we will embed a Sigma Dashboard based on one of the samples provided in the Sigma trial account. The high-level process looks like this:
Sigma Client Credentials
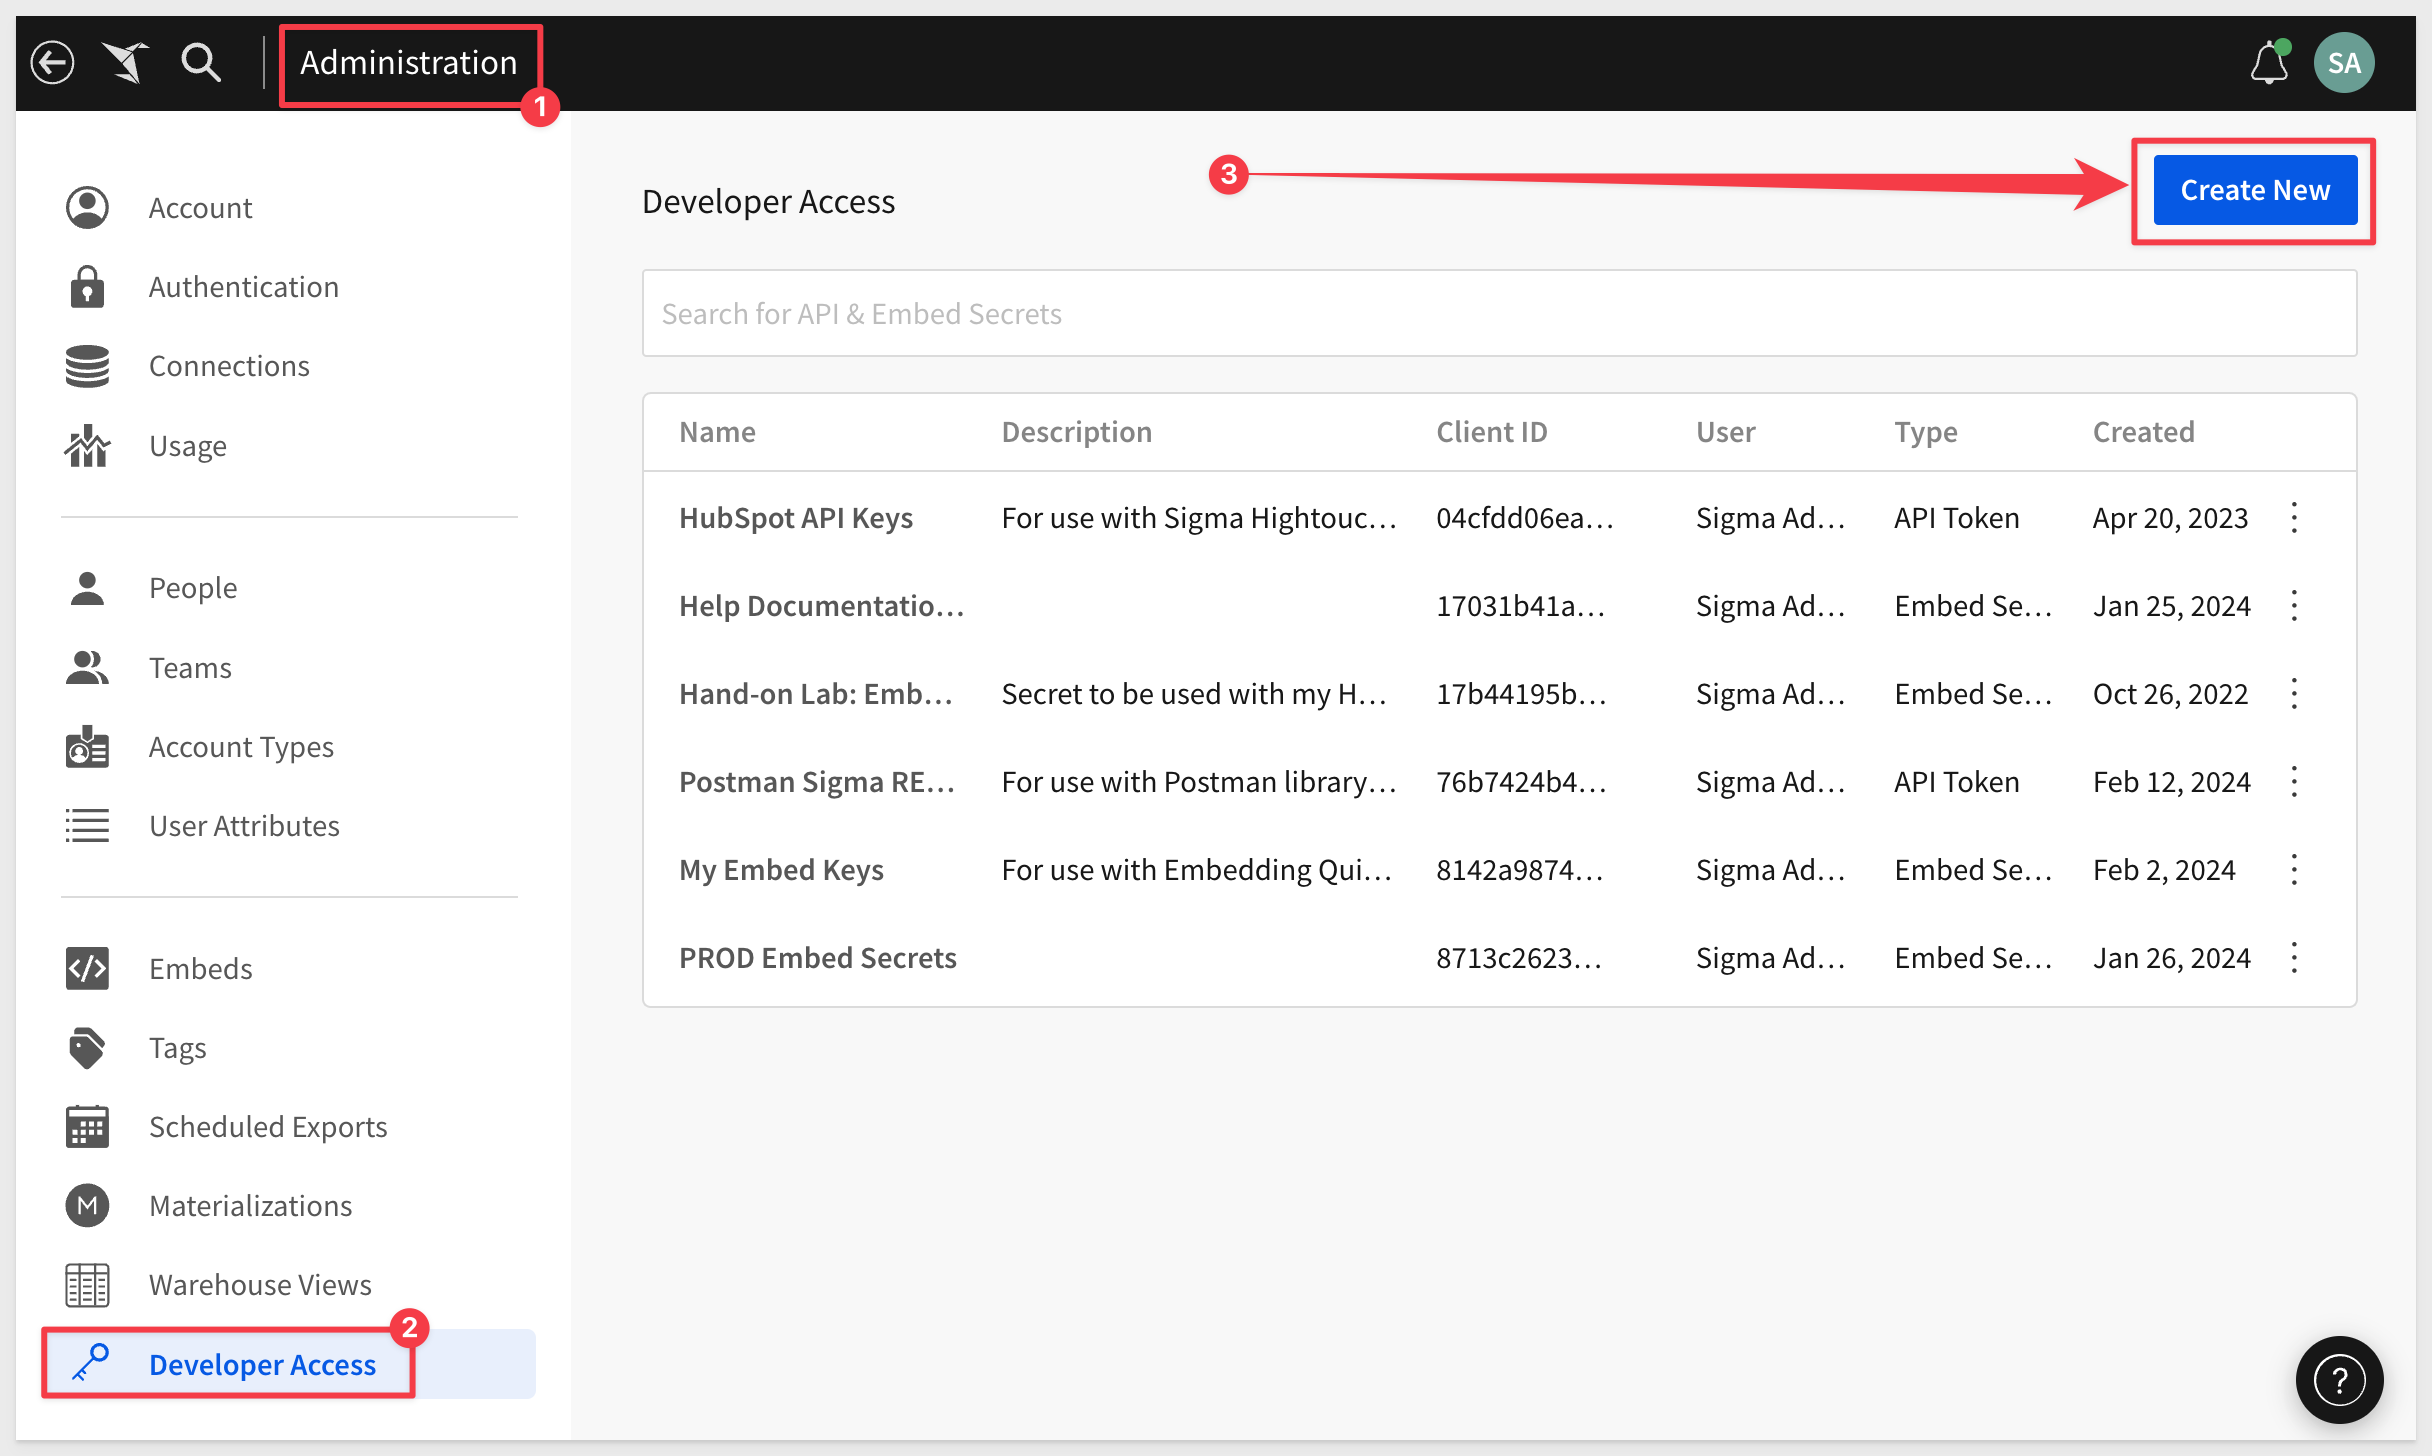
Login to Sigma and navigate to the Administration / Developer Access page.
Click the Create new button:
Create new `Client Credentials as:
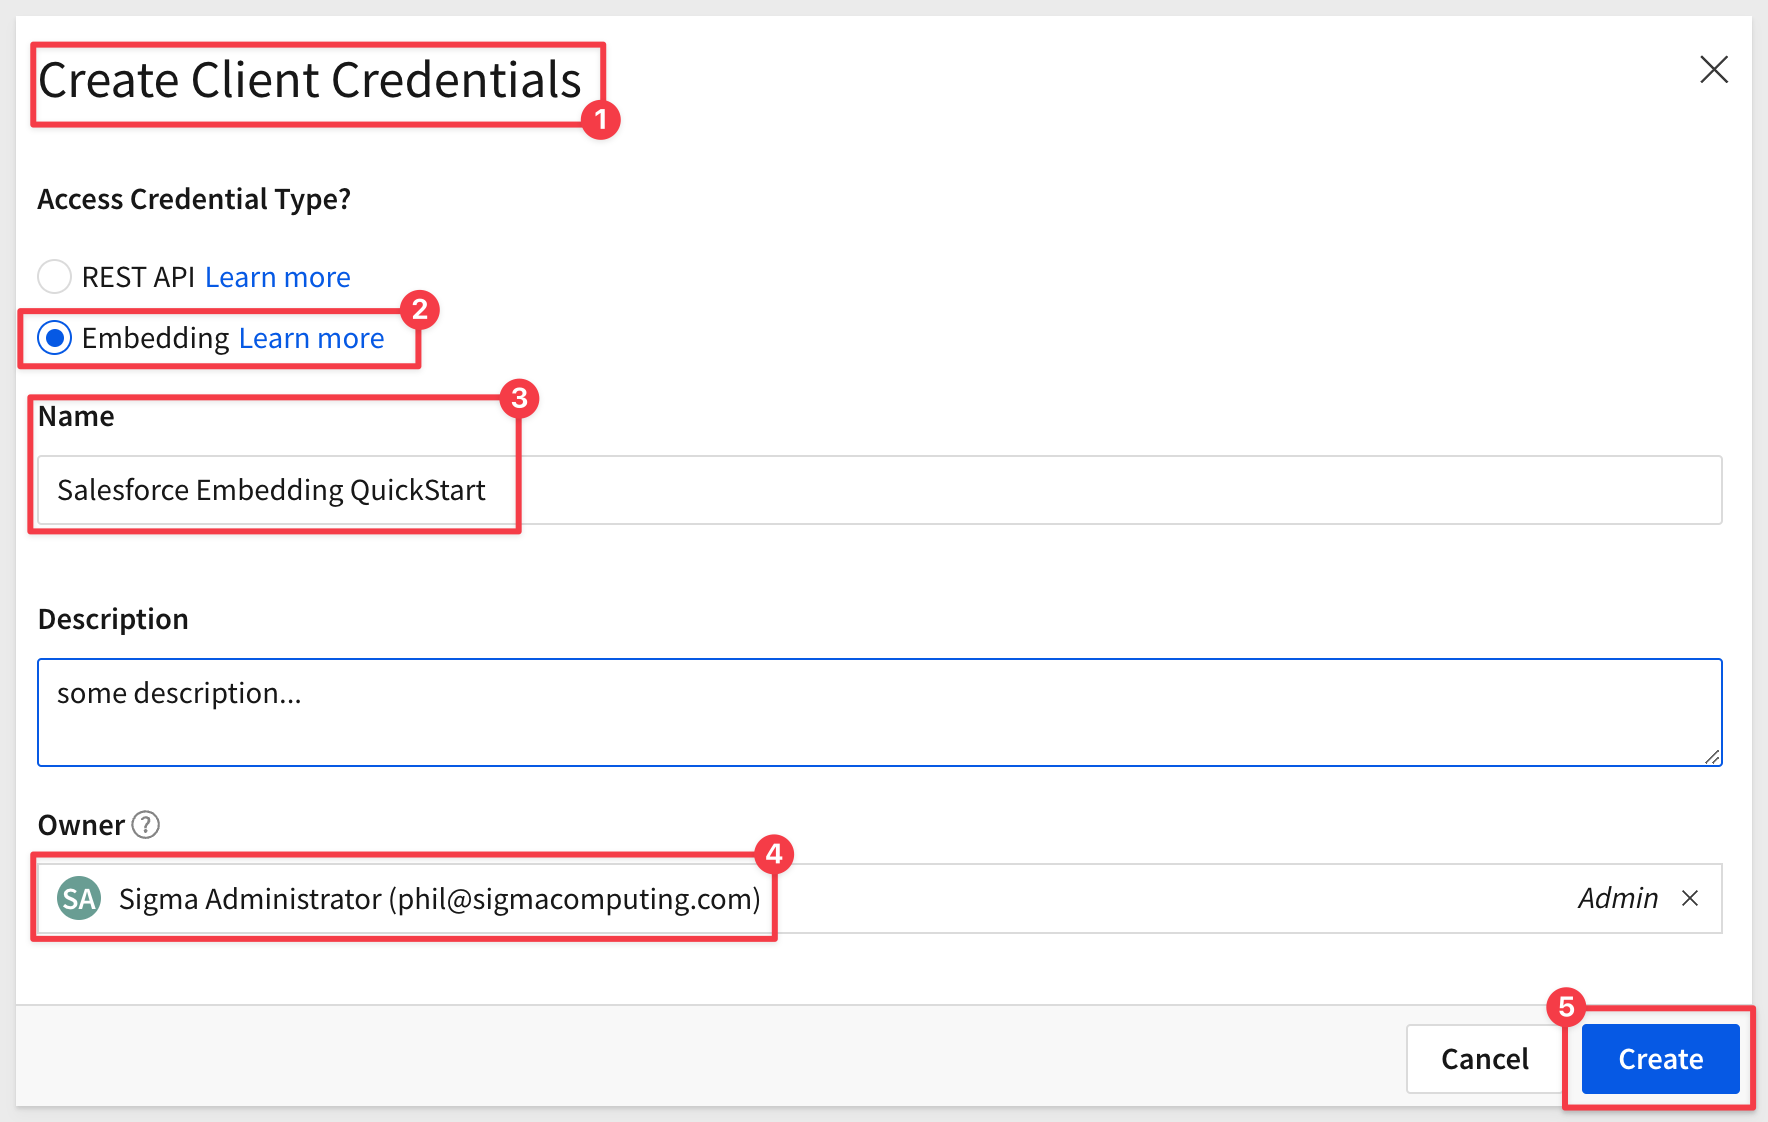
Copy the ClientID and Secret off to a text file. We will use them later on.
Sigma Content
Navigate to the Templates page.
Select Plugs Electronics Profit Planning Tool.
Dismiss the help popup and click the Dashboard tab (bottom of the page). This is the Page we want to embed.
Click the Save As button (upper right corner). Name the Workbook Salesforce Embed and click Save.
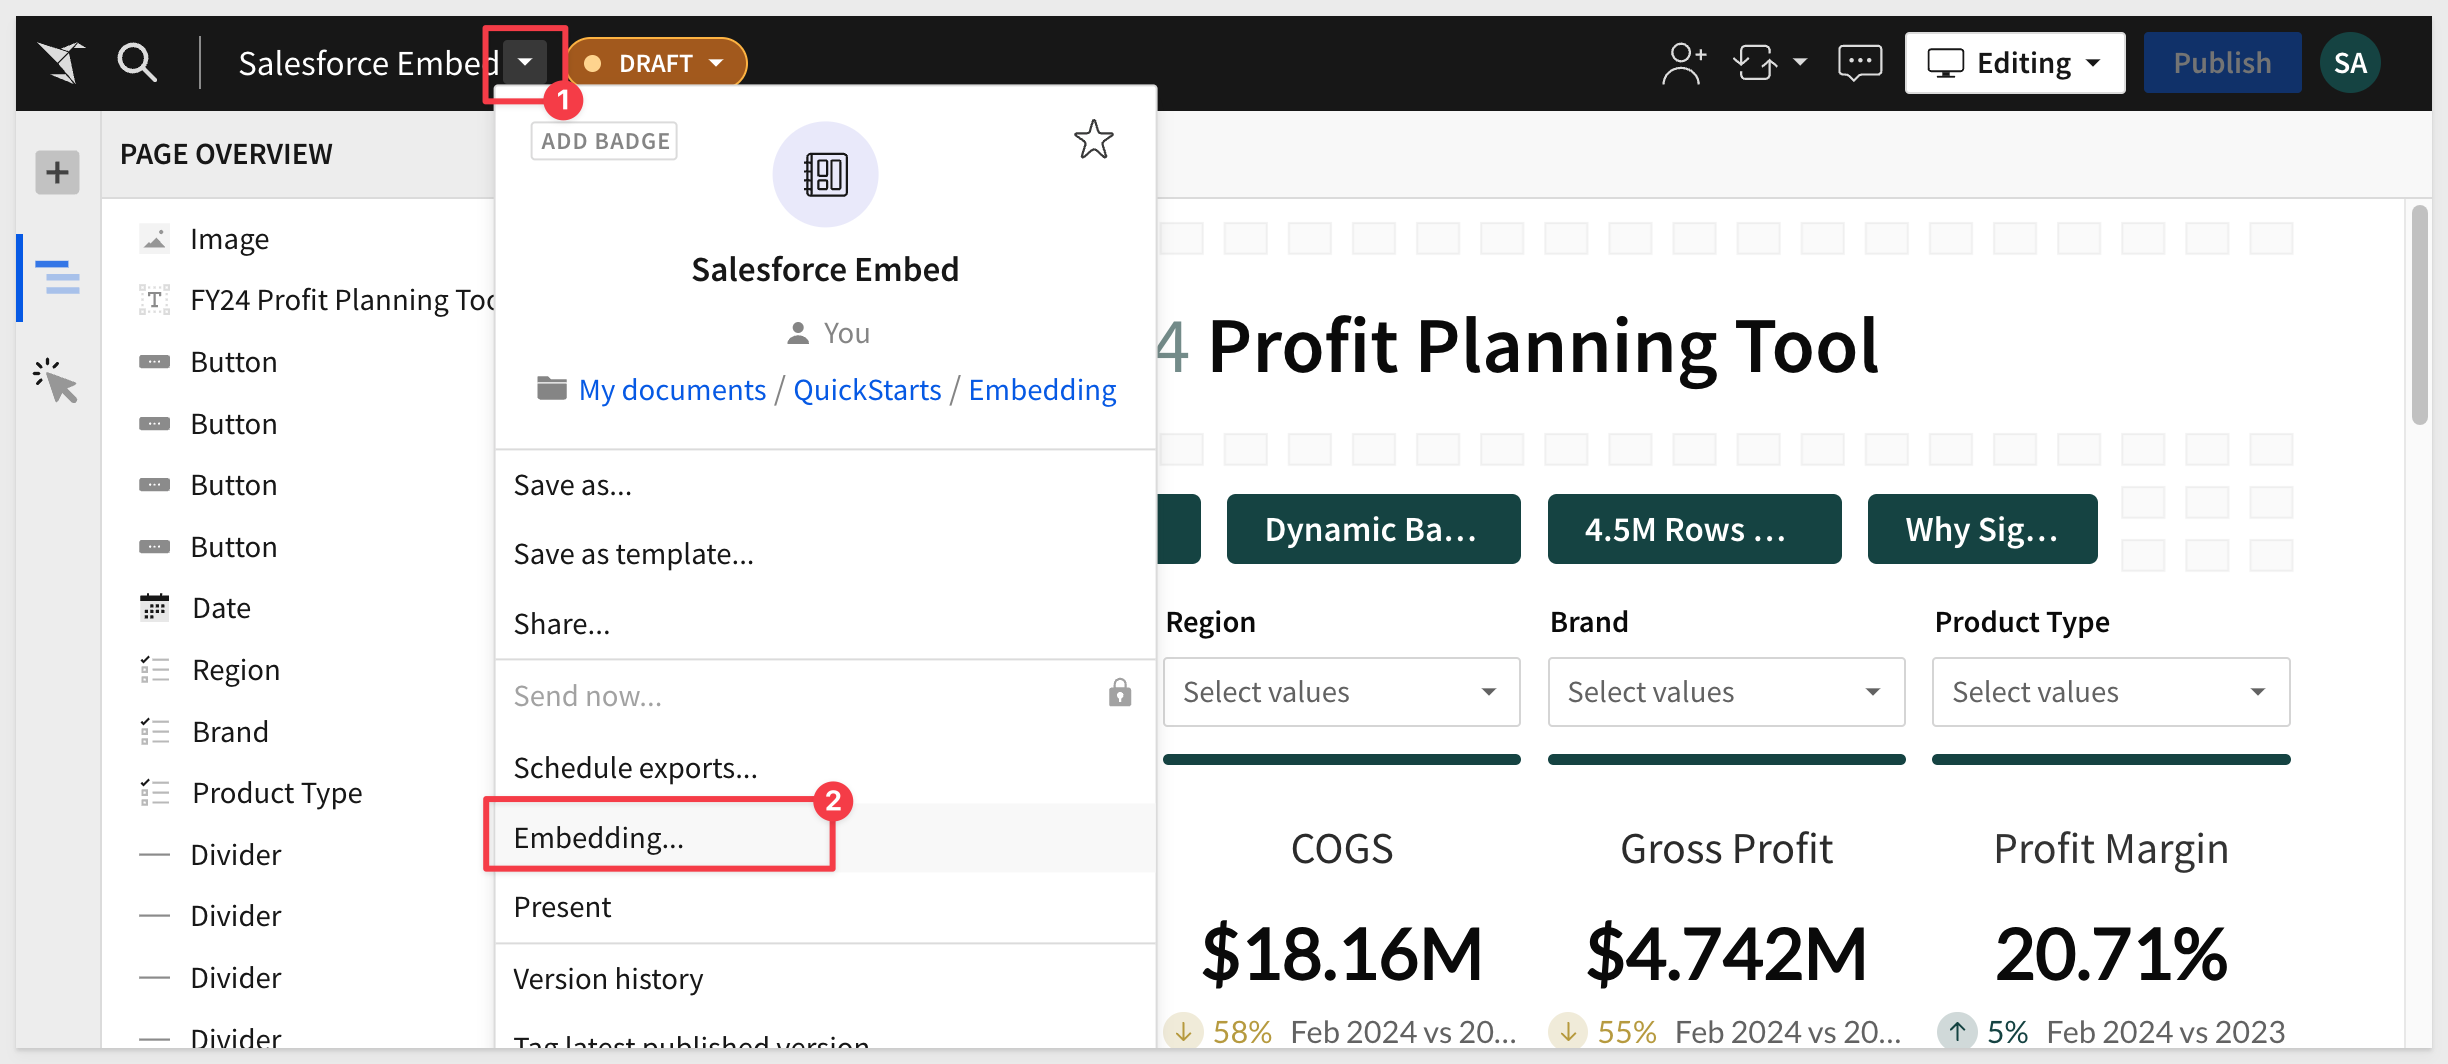
Click the label Salesforce Embed and select Embedding:
Select Profit Planning Tool to generate a URL for the single workbook page:
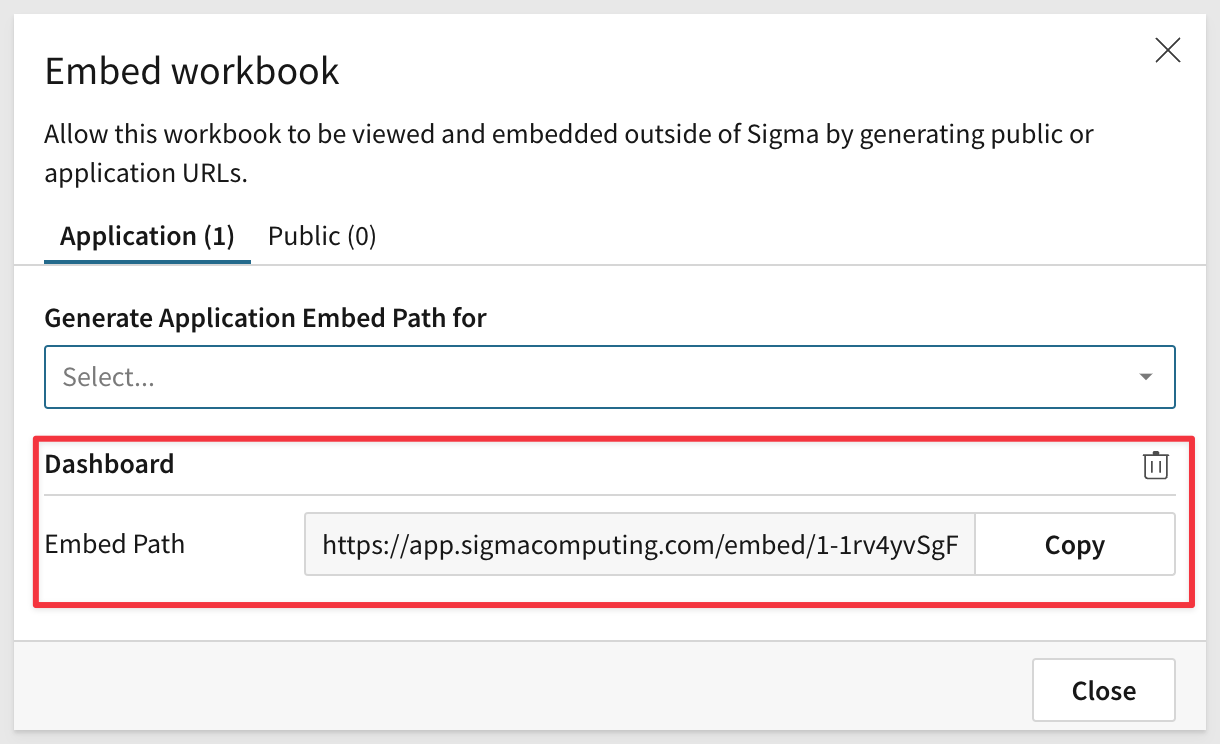
Click Copy to copy the Embed Path URL and save it into a text file for later use.
Lastly, Share the workbook with the Sales_Managers team:
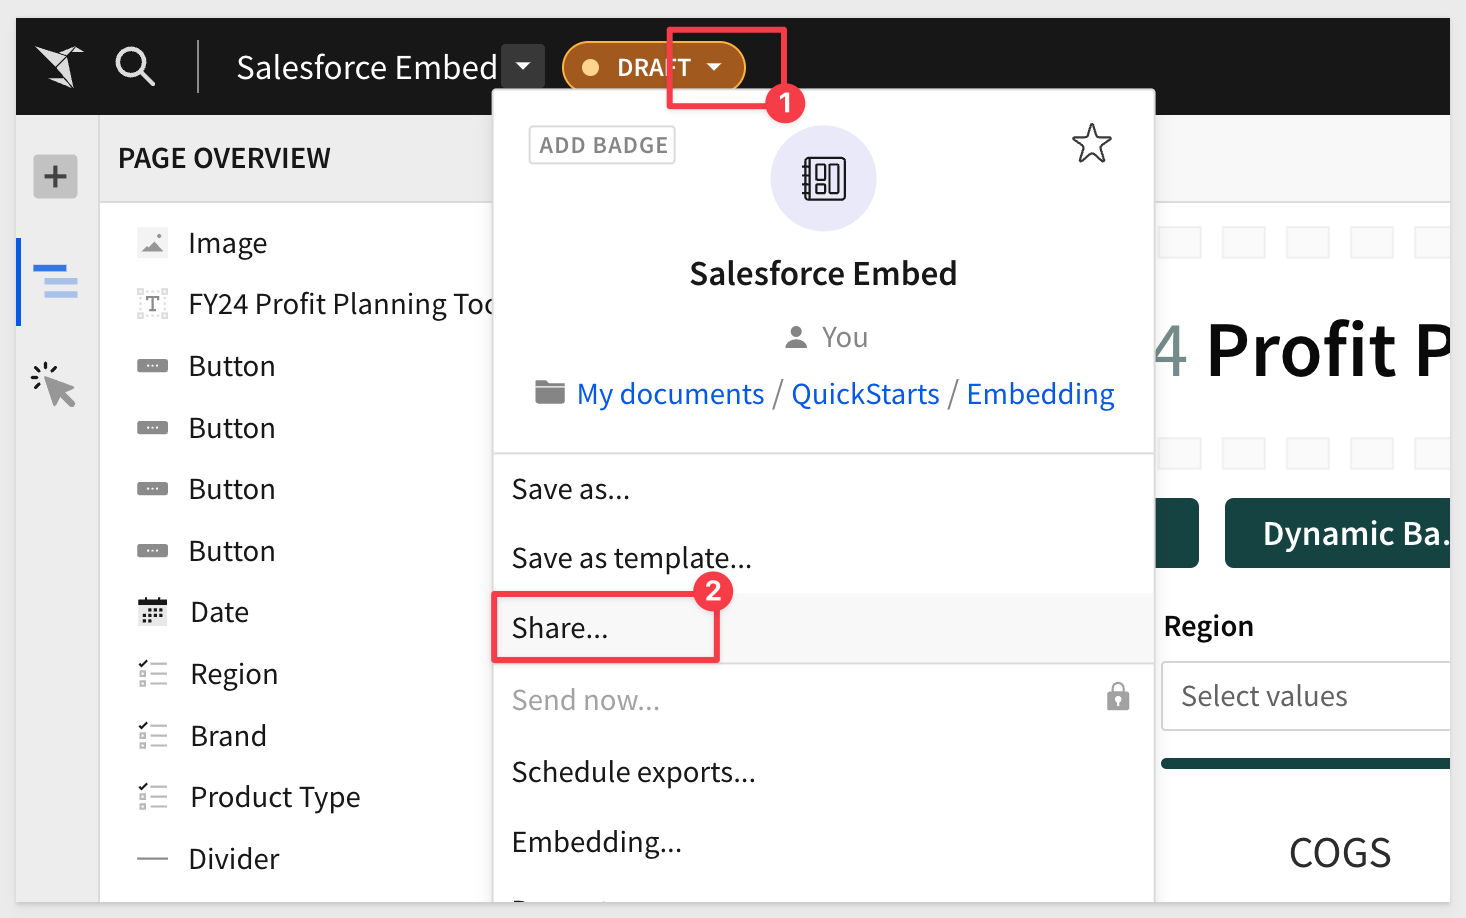
and...

Salesforce is highly flexible but can sometimes confuse non-administrative users who attempt to perform more advanced configurations. With that in mind, we will focus on creating a simple, secure embed. You may notice similarities to previous QuickStarts on embedding, along with specific requirements unique to Salesforce.
Salesforce has its own programming language called "Apex," an object-oriented language created by Salesforce that allows you to extend the platform's functionality and create custom cloud-based software applications.
Apex is specifically designed for accessing and manipulating data. The method we will be using in Salesforce requires three objects to be configured:
Apex Class:
You can think of a class as a template containing all the necessary information and instructions that you can build upon and create class instances called objects. Sigma will use an Apex class to dynamically create the secure URL used by the iframe. You can use the Class to pass both required and optional parameters including pulling variables from the Salesforce session to pass through to Sigma to enable Row Level Security and other useful functionality. Row Level Security was covered in the QuickStart: Embedding 06: Row Level Security.
Salesforce offers many pages to assist in this area. For example:
Visualforce Component:
This is a small, reusable piece of functionality—think widgets, panels, user interface elements, that kind of thing—that you use in Visualforce page markup. You can use standard Visualforce components in our case we will create a custom component for Sigma.
Visualforce Page:
The basic building block for application developers. A Visualforce page is similar to a standard Web page, but includes powerful features to access, display, and update your organization's data. We will embed Sigma into a Visualforce Page we will create.
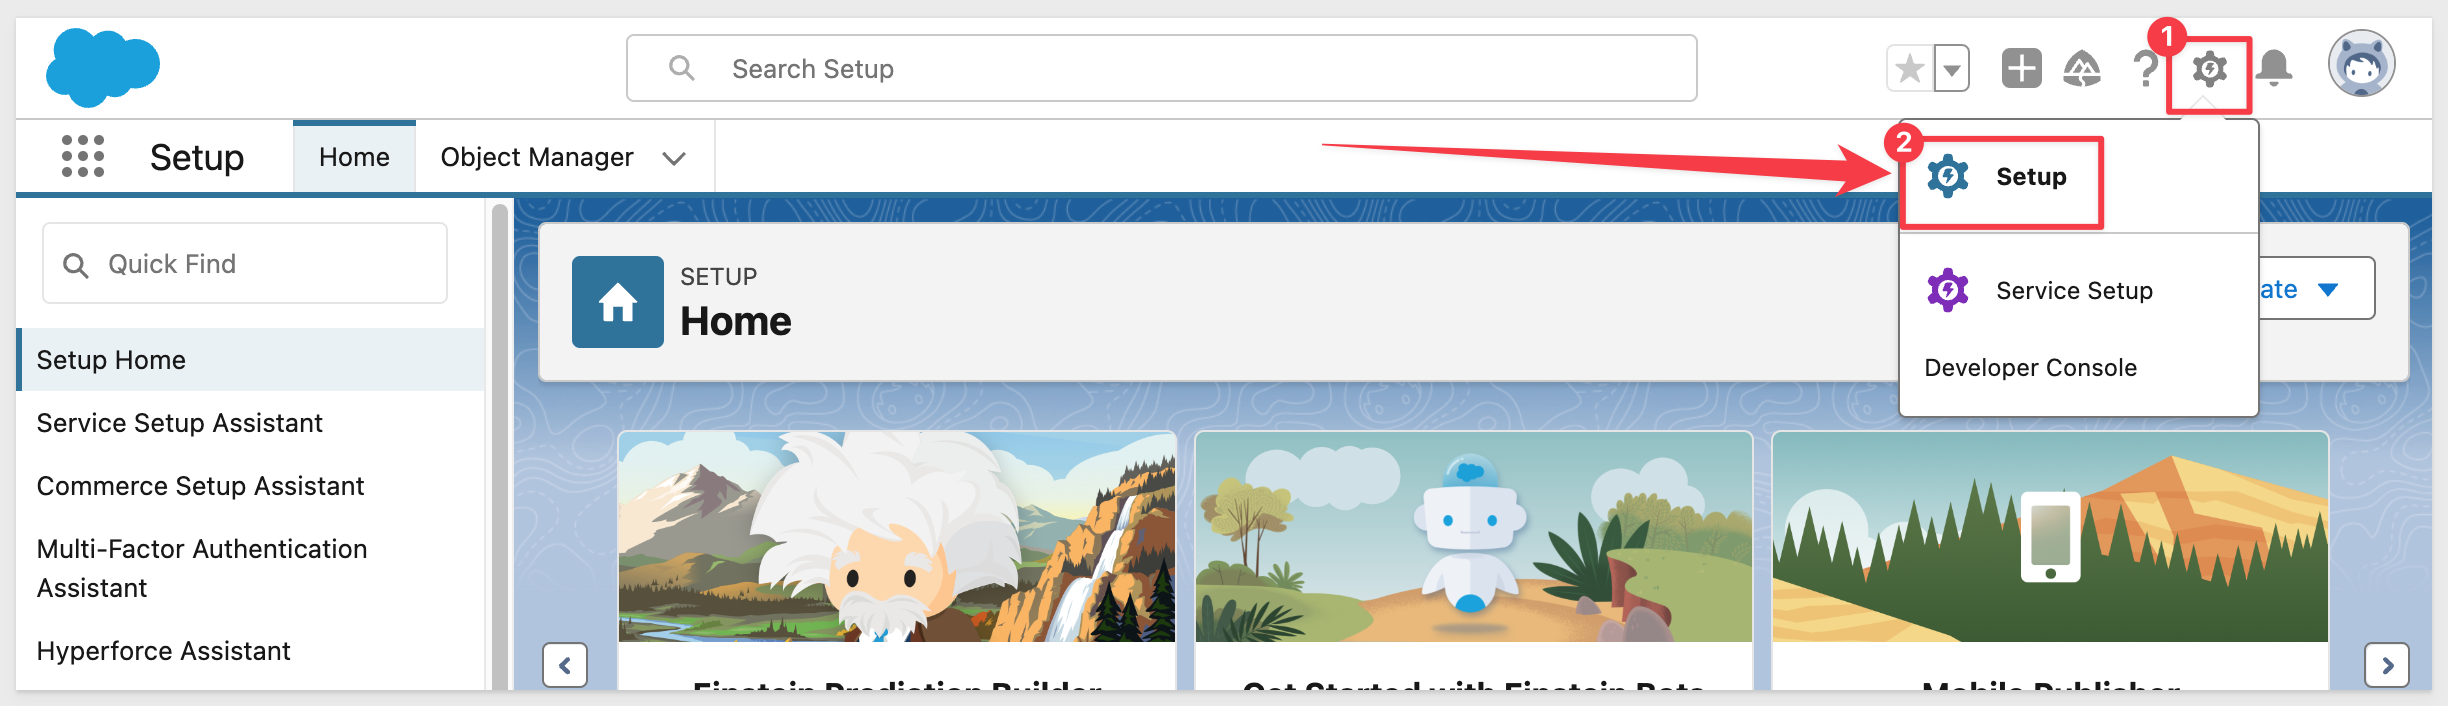
In Salesforce, login (admin rights required) and navigate to Setup using the gear icon in the upper right corner:
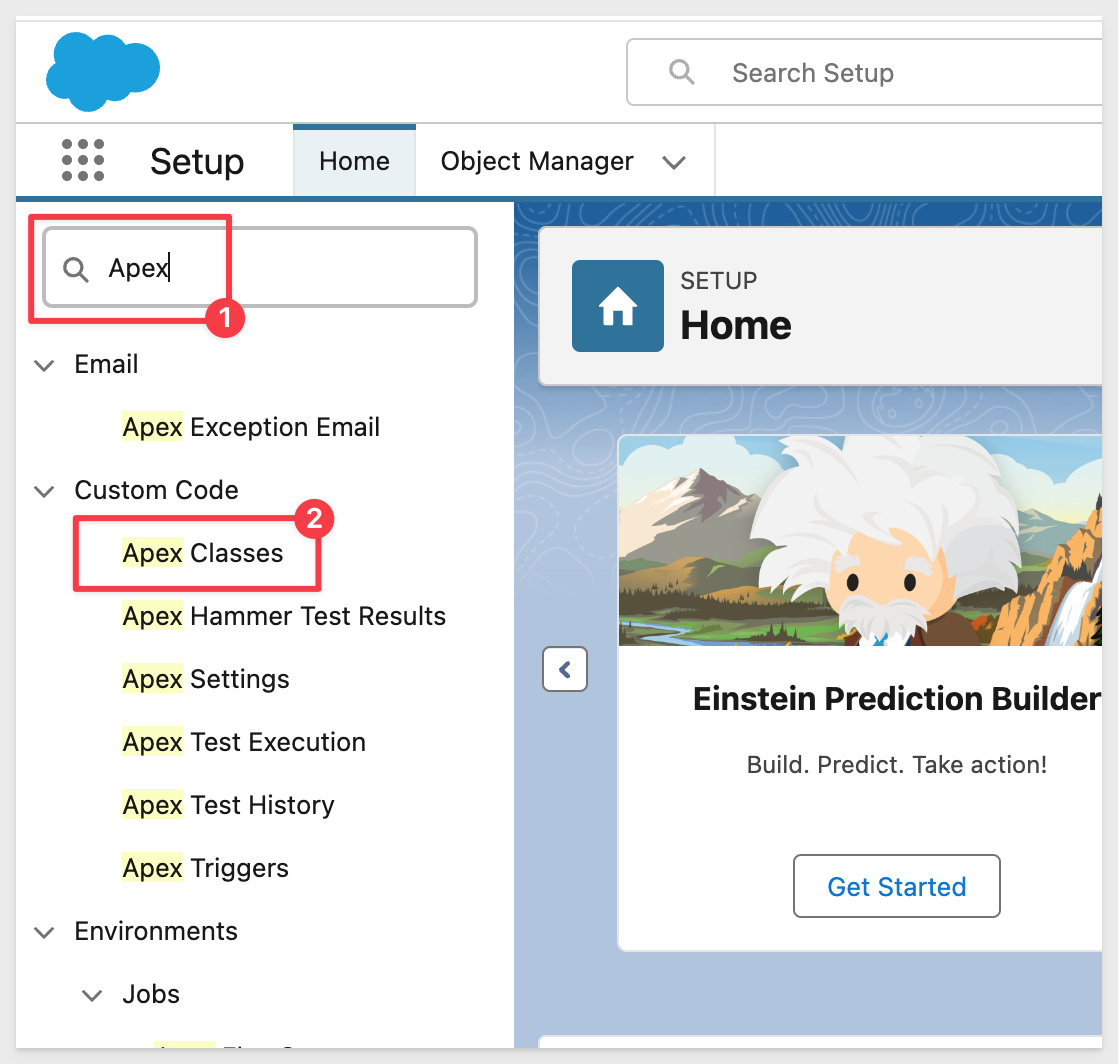
In the left sidebar menu use Quick Find to search for Apex Classes and select that:
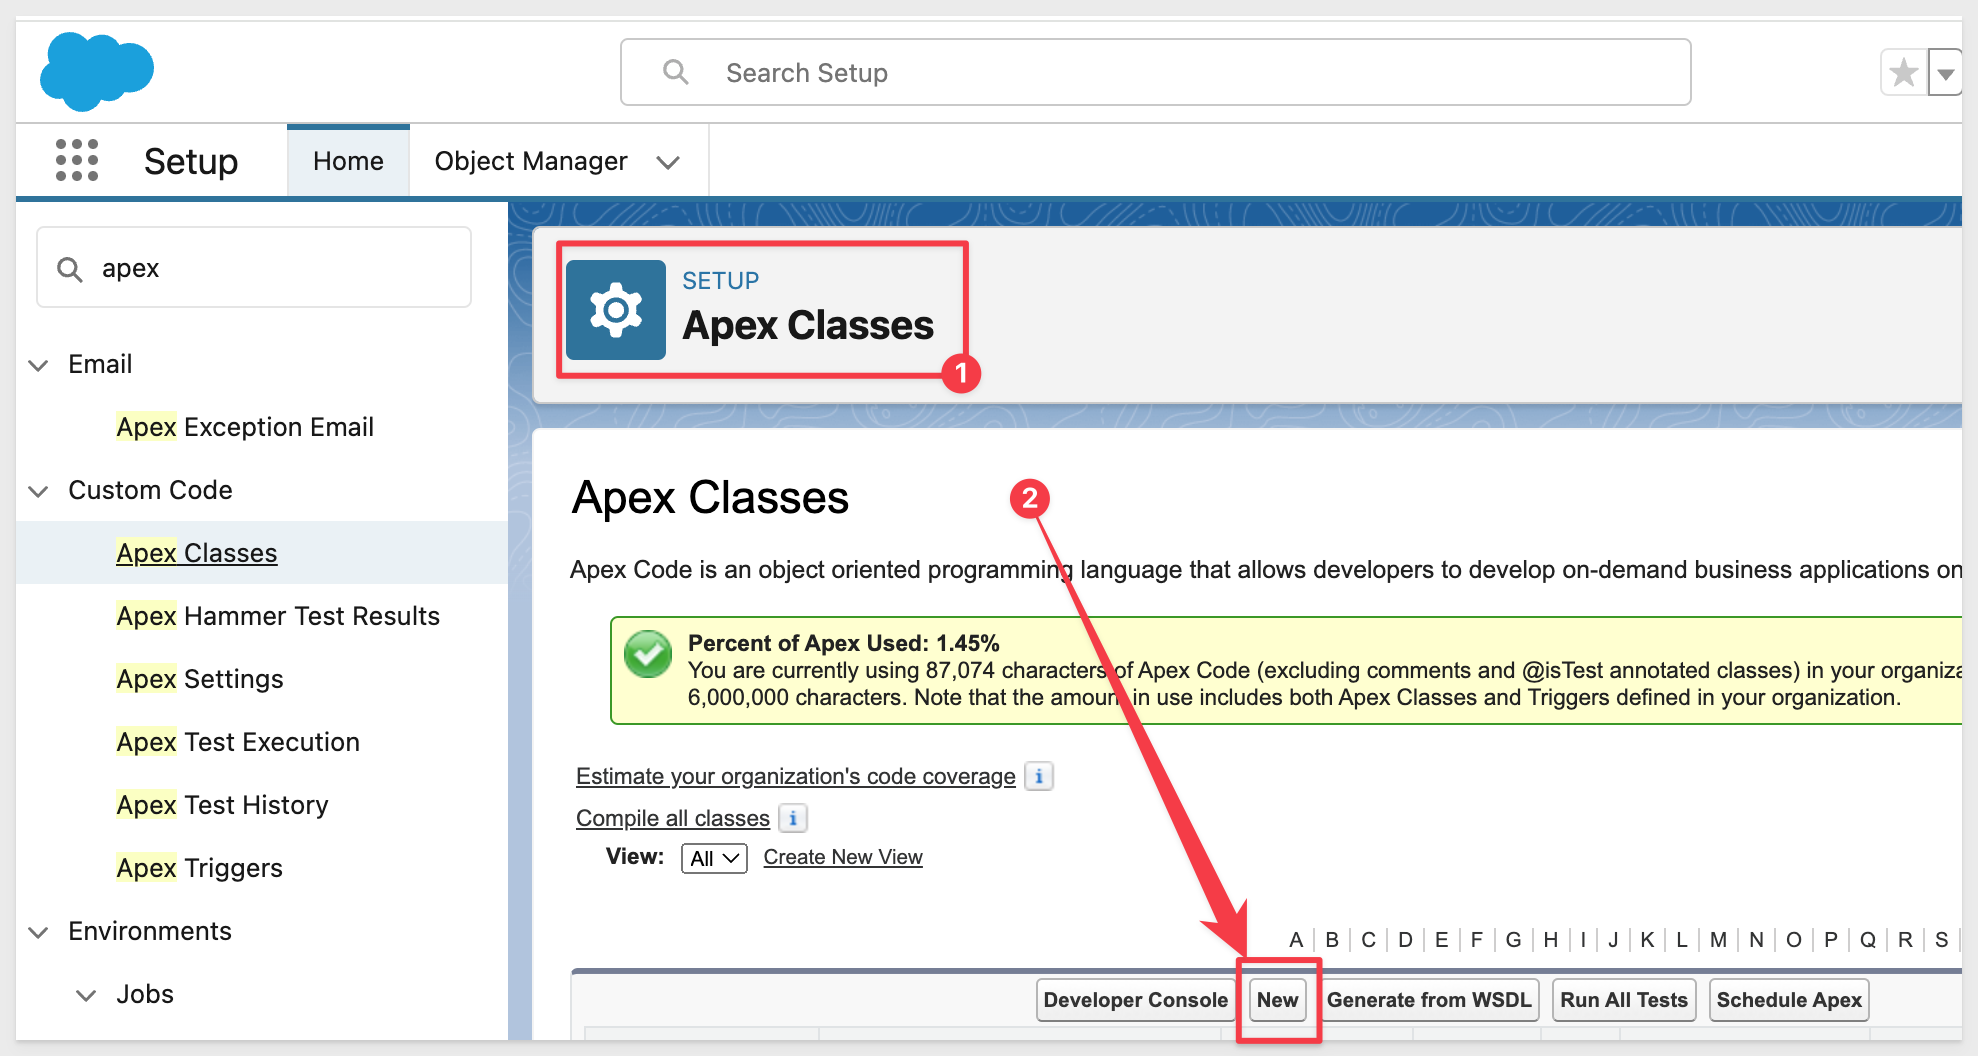
Click the New button to create a new Apex Class:
Paste the following code into the class window. The Apex Class name is defined in the class code itself as SigmaEmbedClass.
Click Save.
In the left sidebar menu use Quick Find to search for Visualforce and select Visualforce Components.
Create a new one called SigmaEmbedComponent and paste the following code into the window and save it:
Click Save.
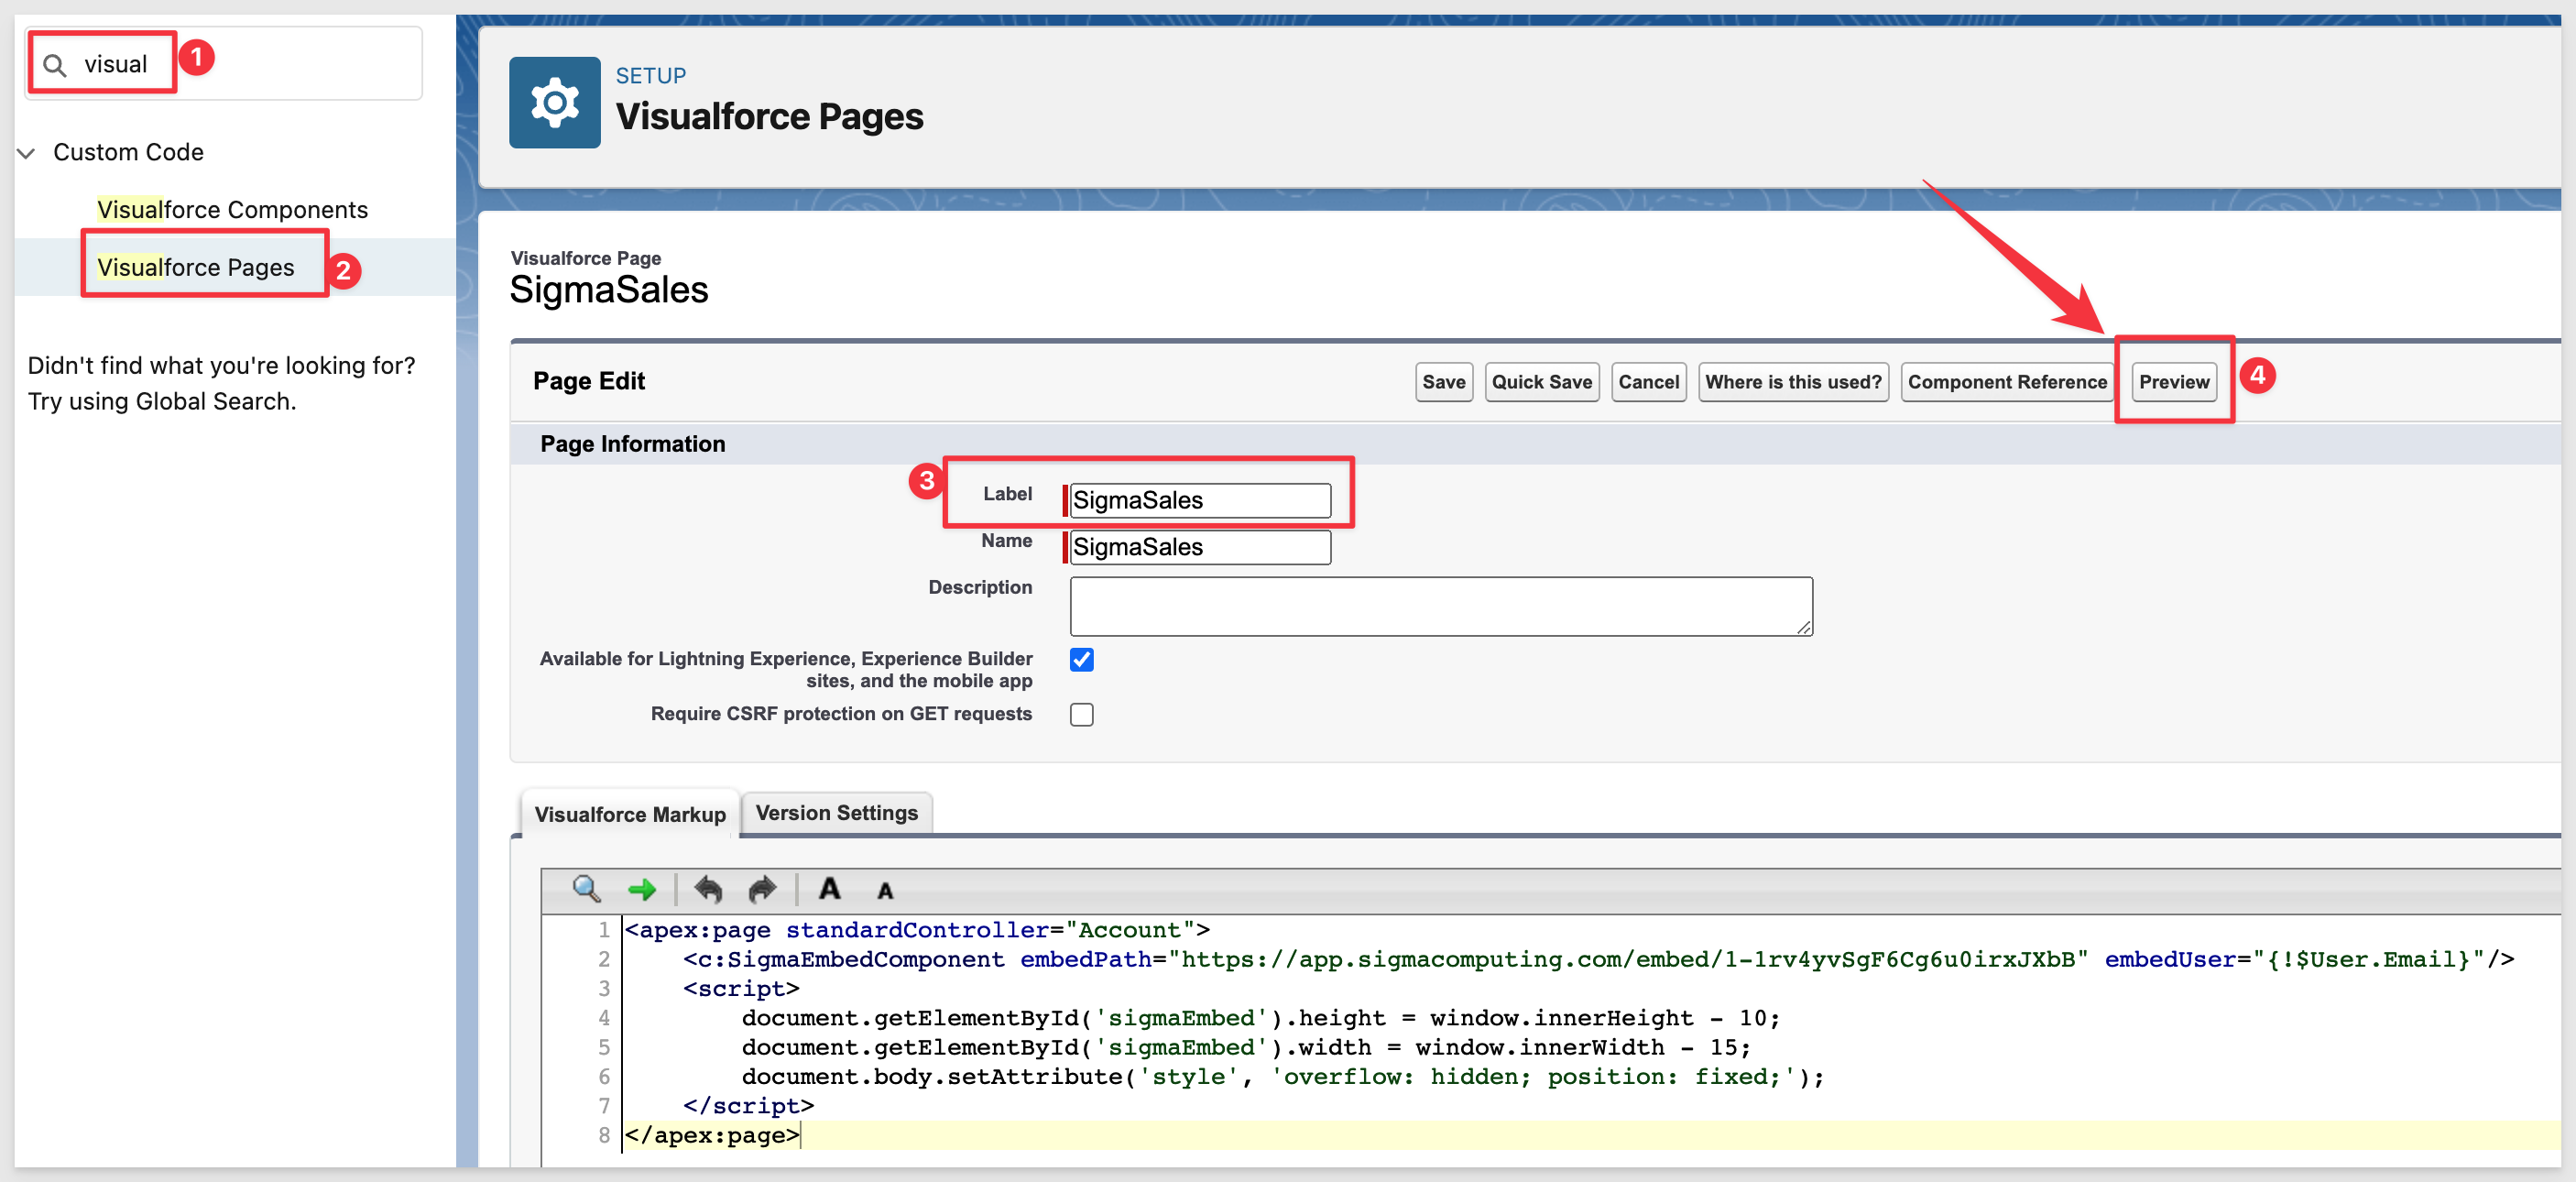
In the left sidebar menu use Quick Find to search for Visualforce and select Visualforce Pages.
Click Save:
Test your work by editing the Visualforce Page again and clicking Preview:
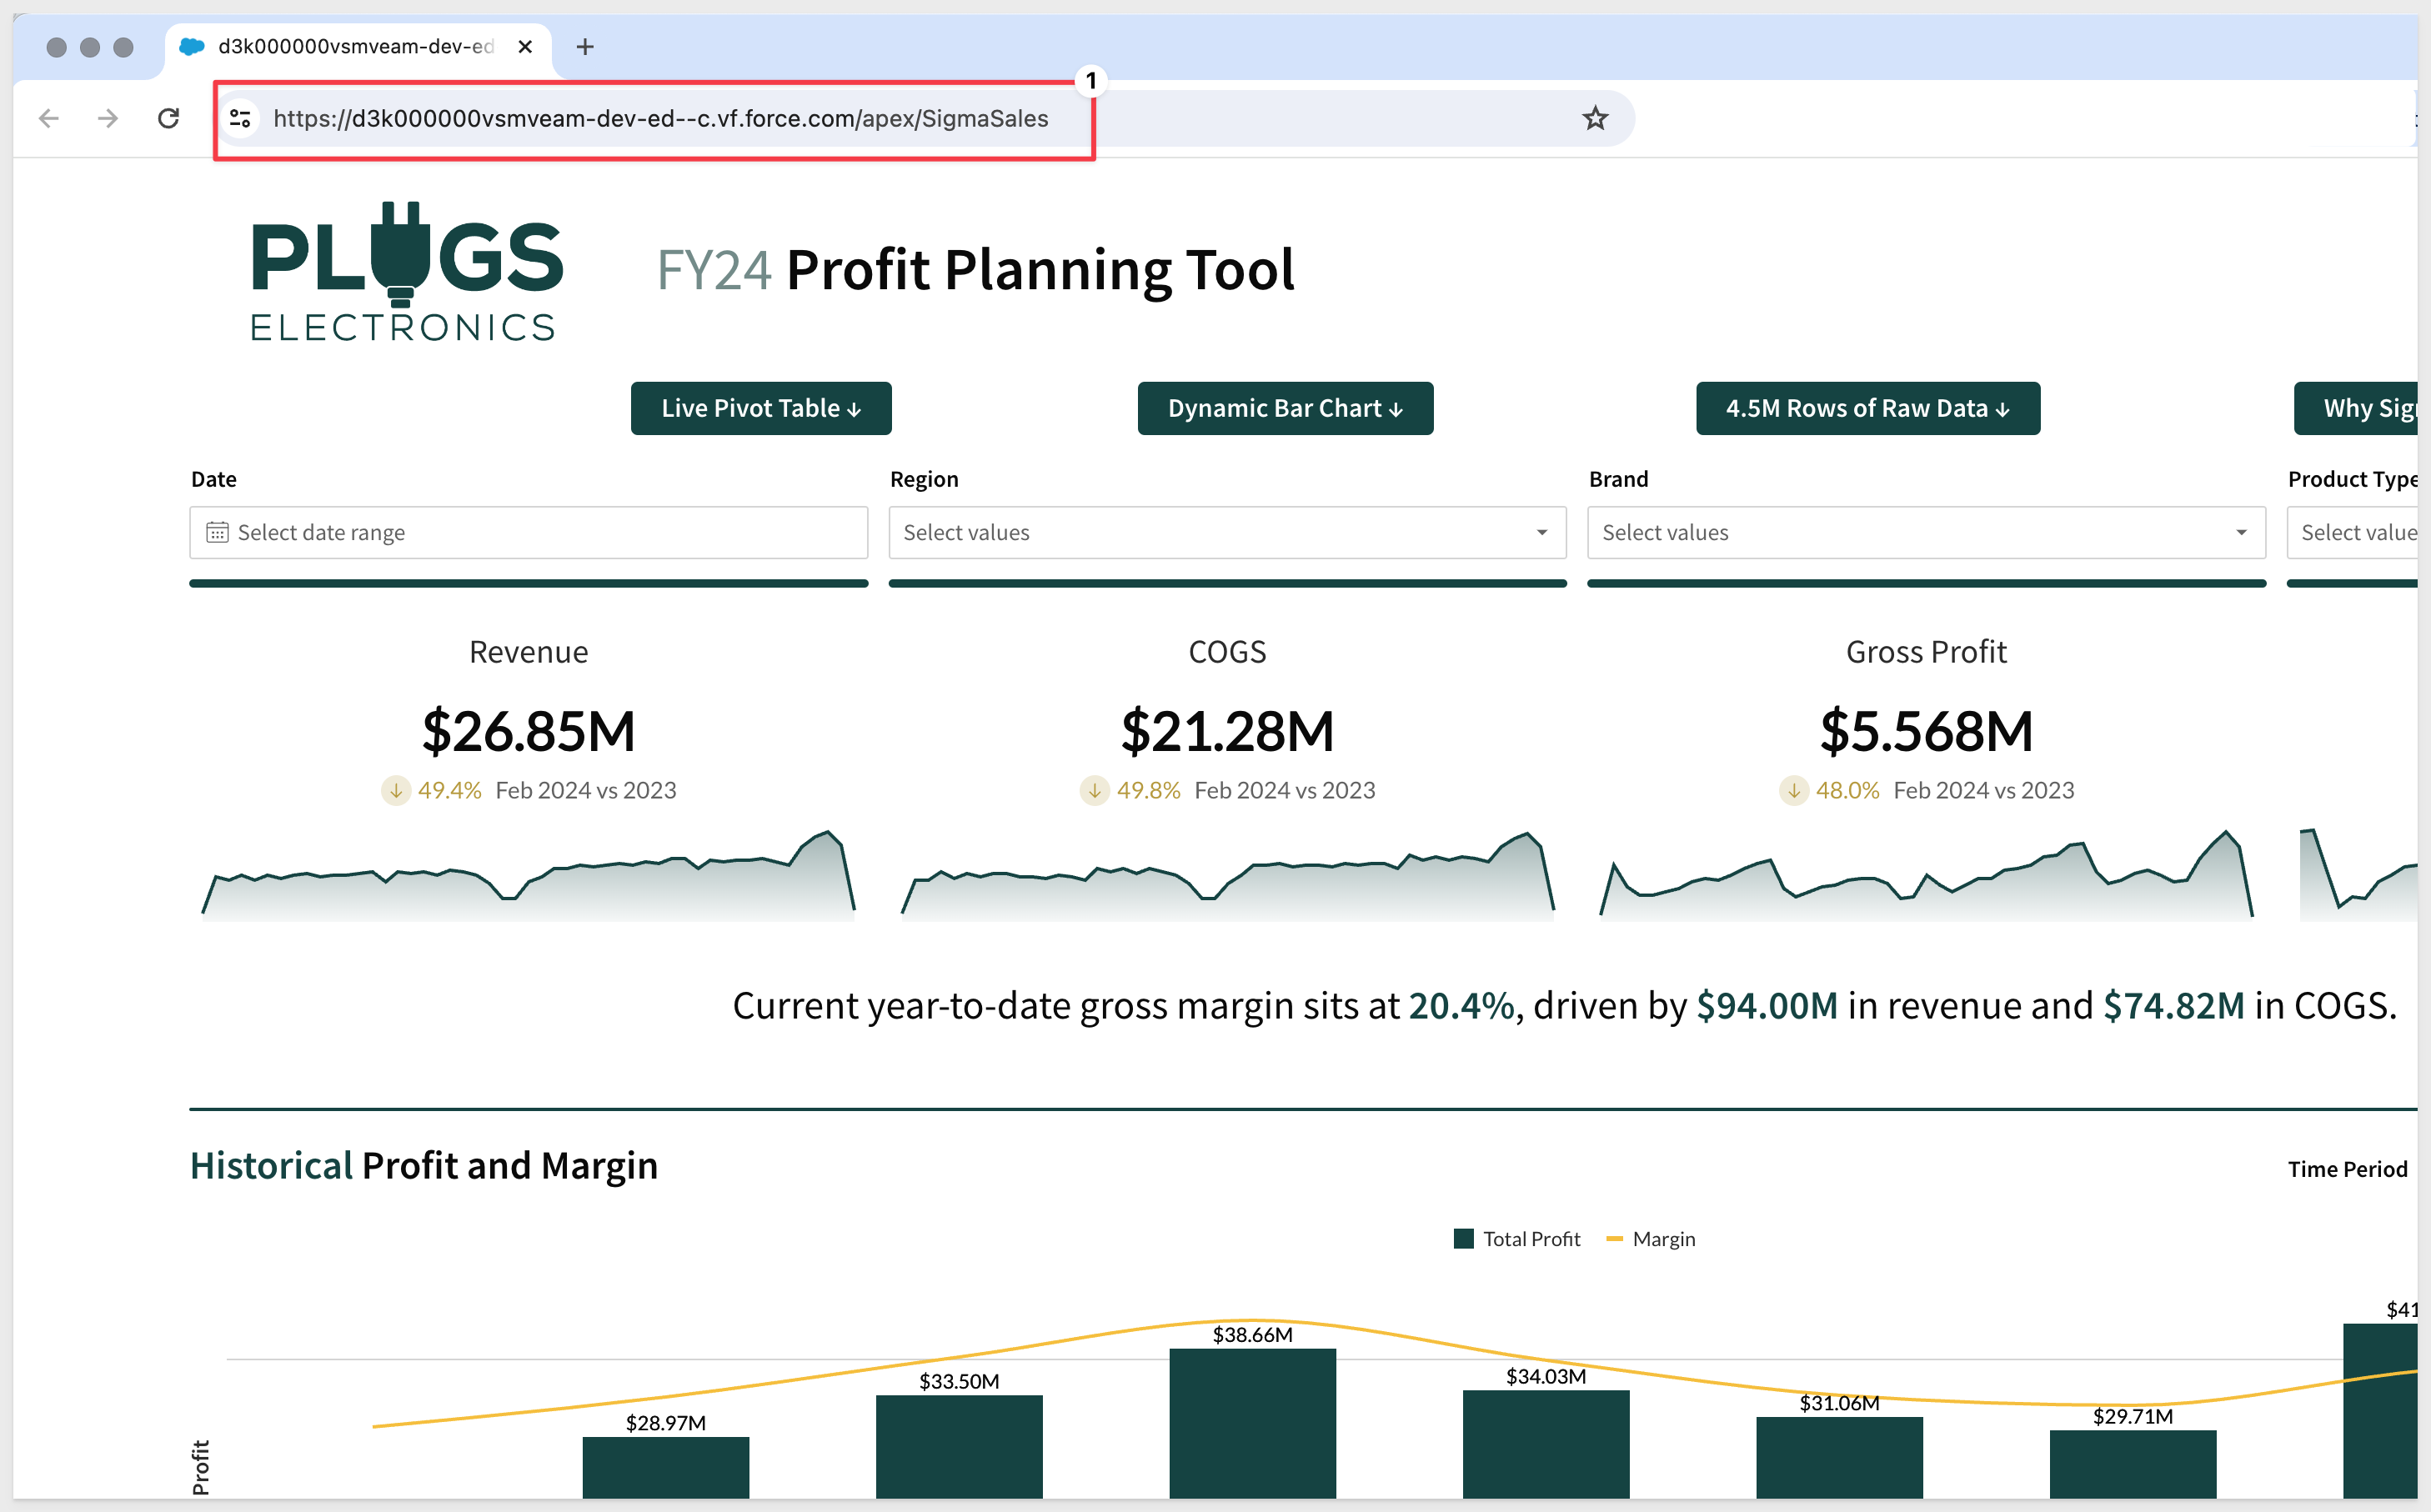
If you have done everything correctly, the Sigma Sales Dashboard page should appear as:
In the event the Insufficient Privileges error appears, the Visualforce page has to be shared with the profile:

Please refer to this Salesforce document to resolve the issue.
Now that we have a working embed, we can add this Visualforce page anywhere we want in Salesforce.
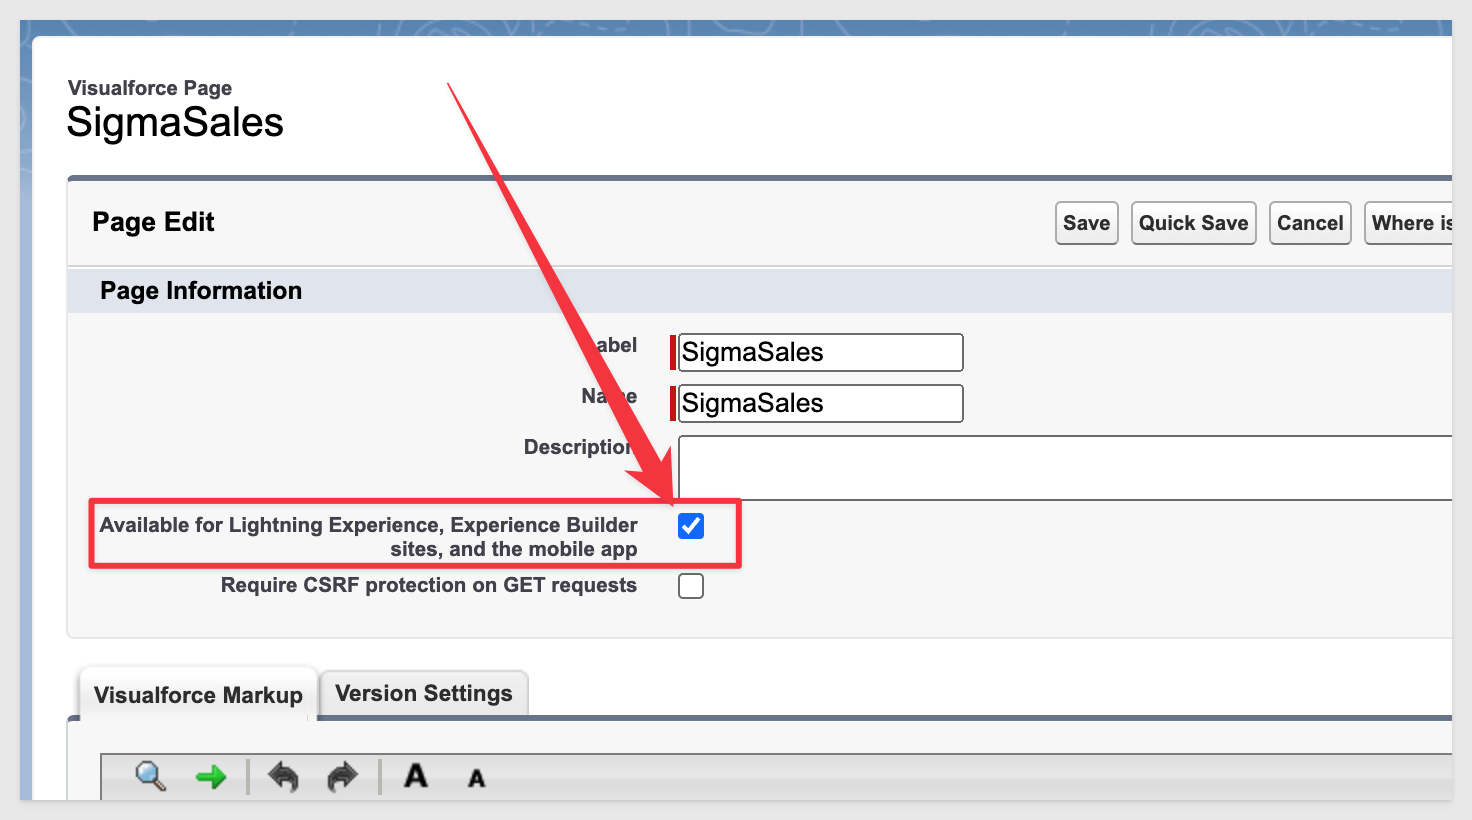
If you are using Salesforce Lightning you will need to click this checkbox on in your Visualforce page or you will not be able to add it to pages:
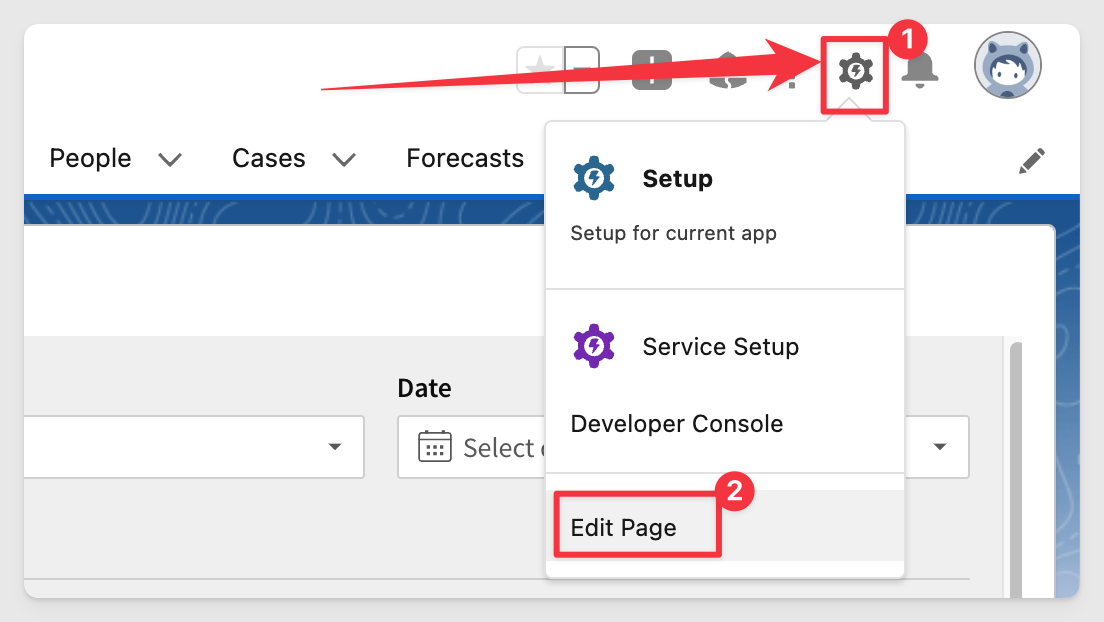
Navigate to a page that you want to embed onto. We will go to Sales / Home. Click Edit Page:
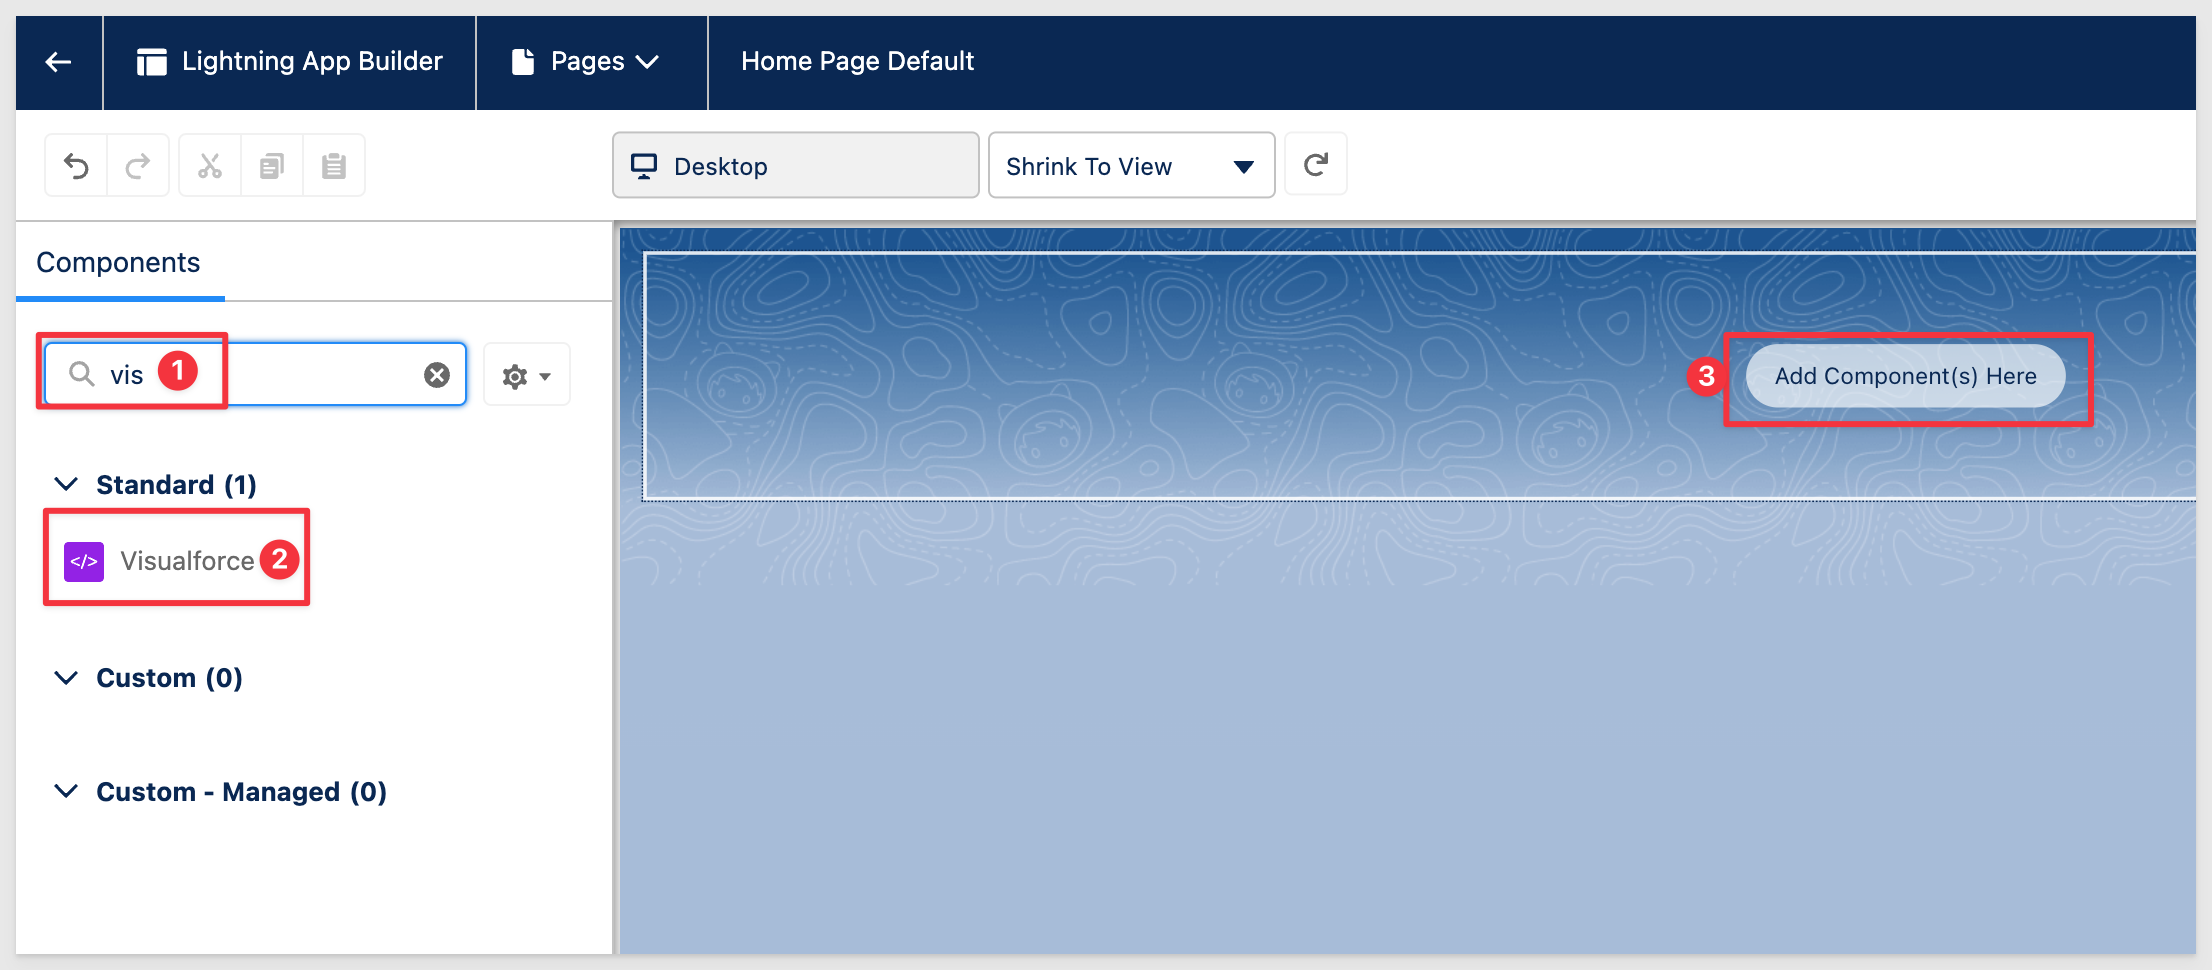
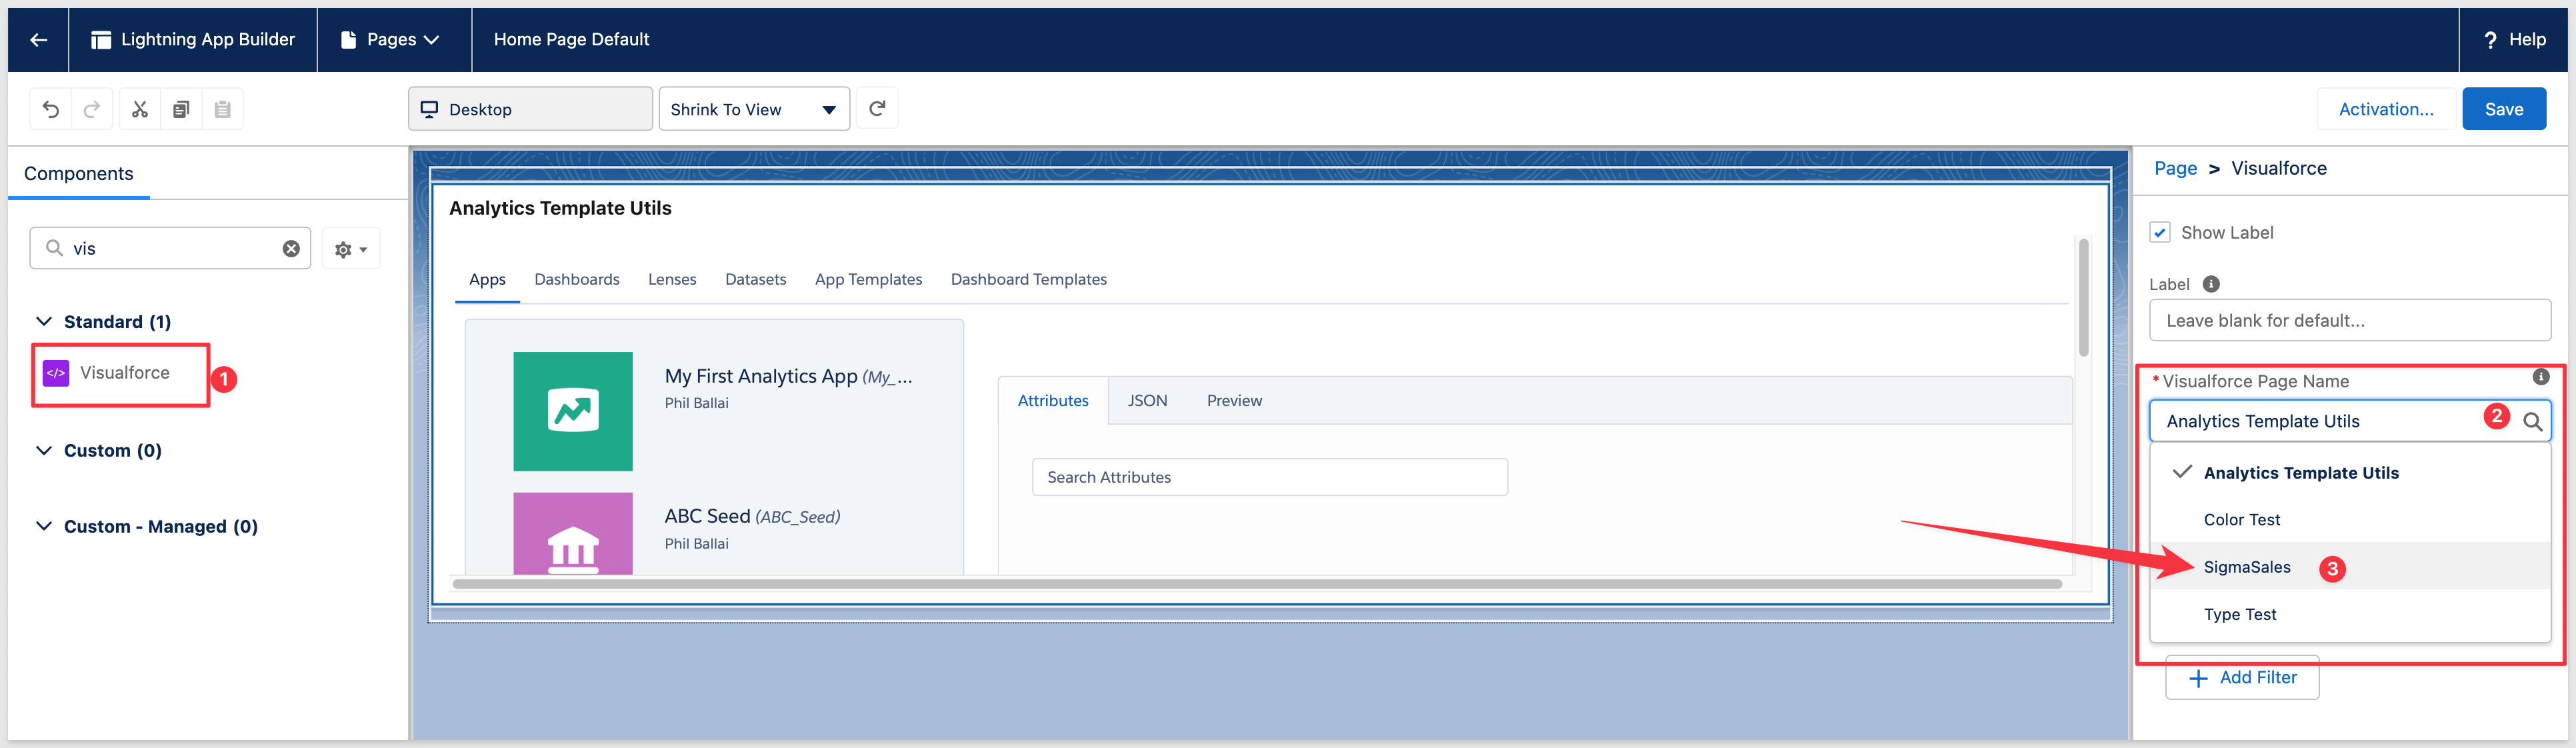
Depending on the page you select, you may want to remove existing Components or just add to it. In our case, we removed the existing content (using the small trash can in the upper right corner of the Component) and clicked the Add Component(s) Here button and selected Visualforce from the left sidebar menu:
We can then select SigmaSales from the right side menu as shown:
We will want to set the Height to 800 so that the Component is taller on the page: 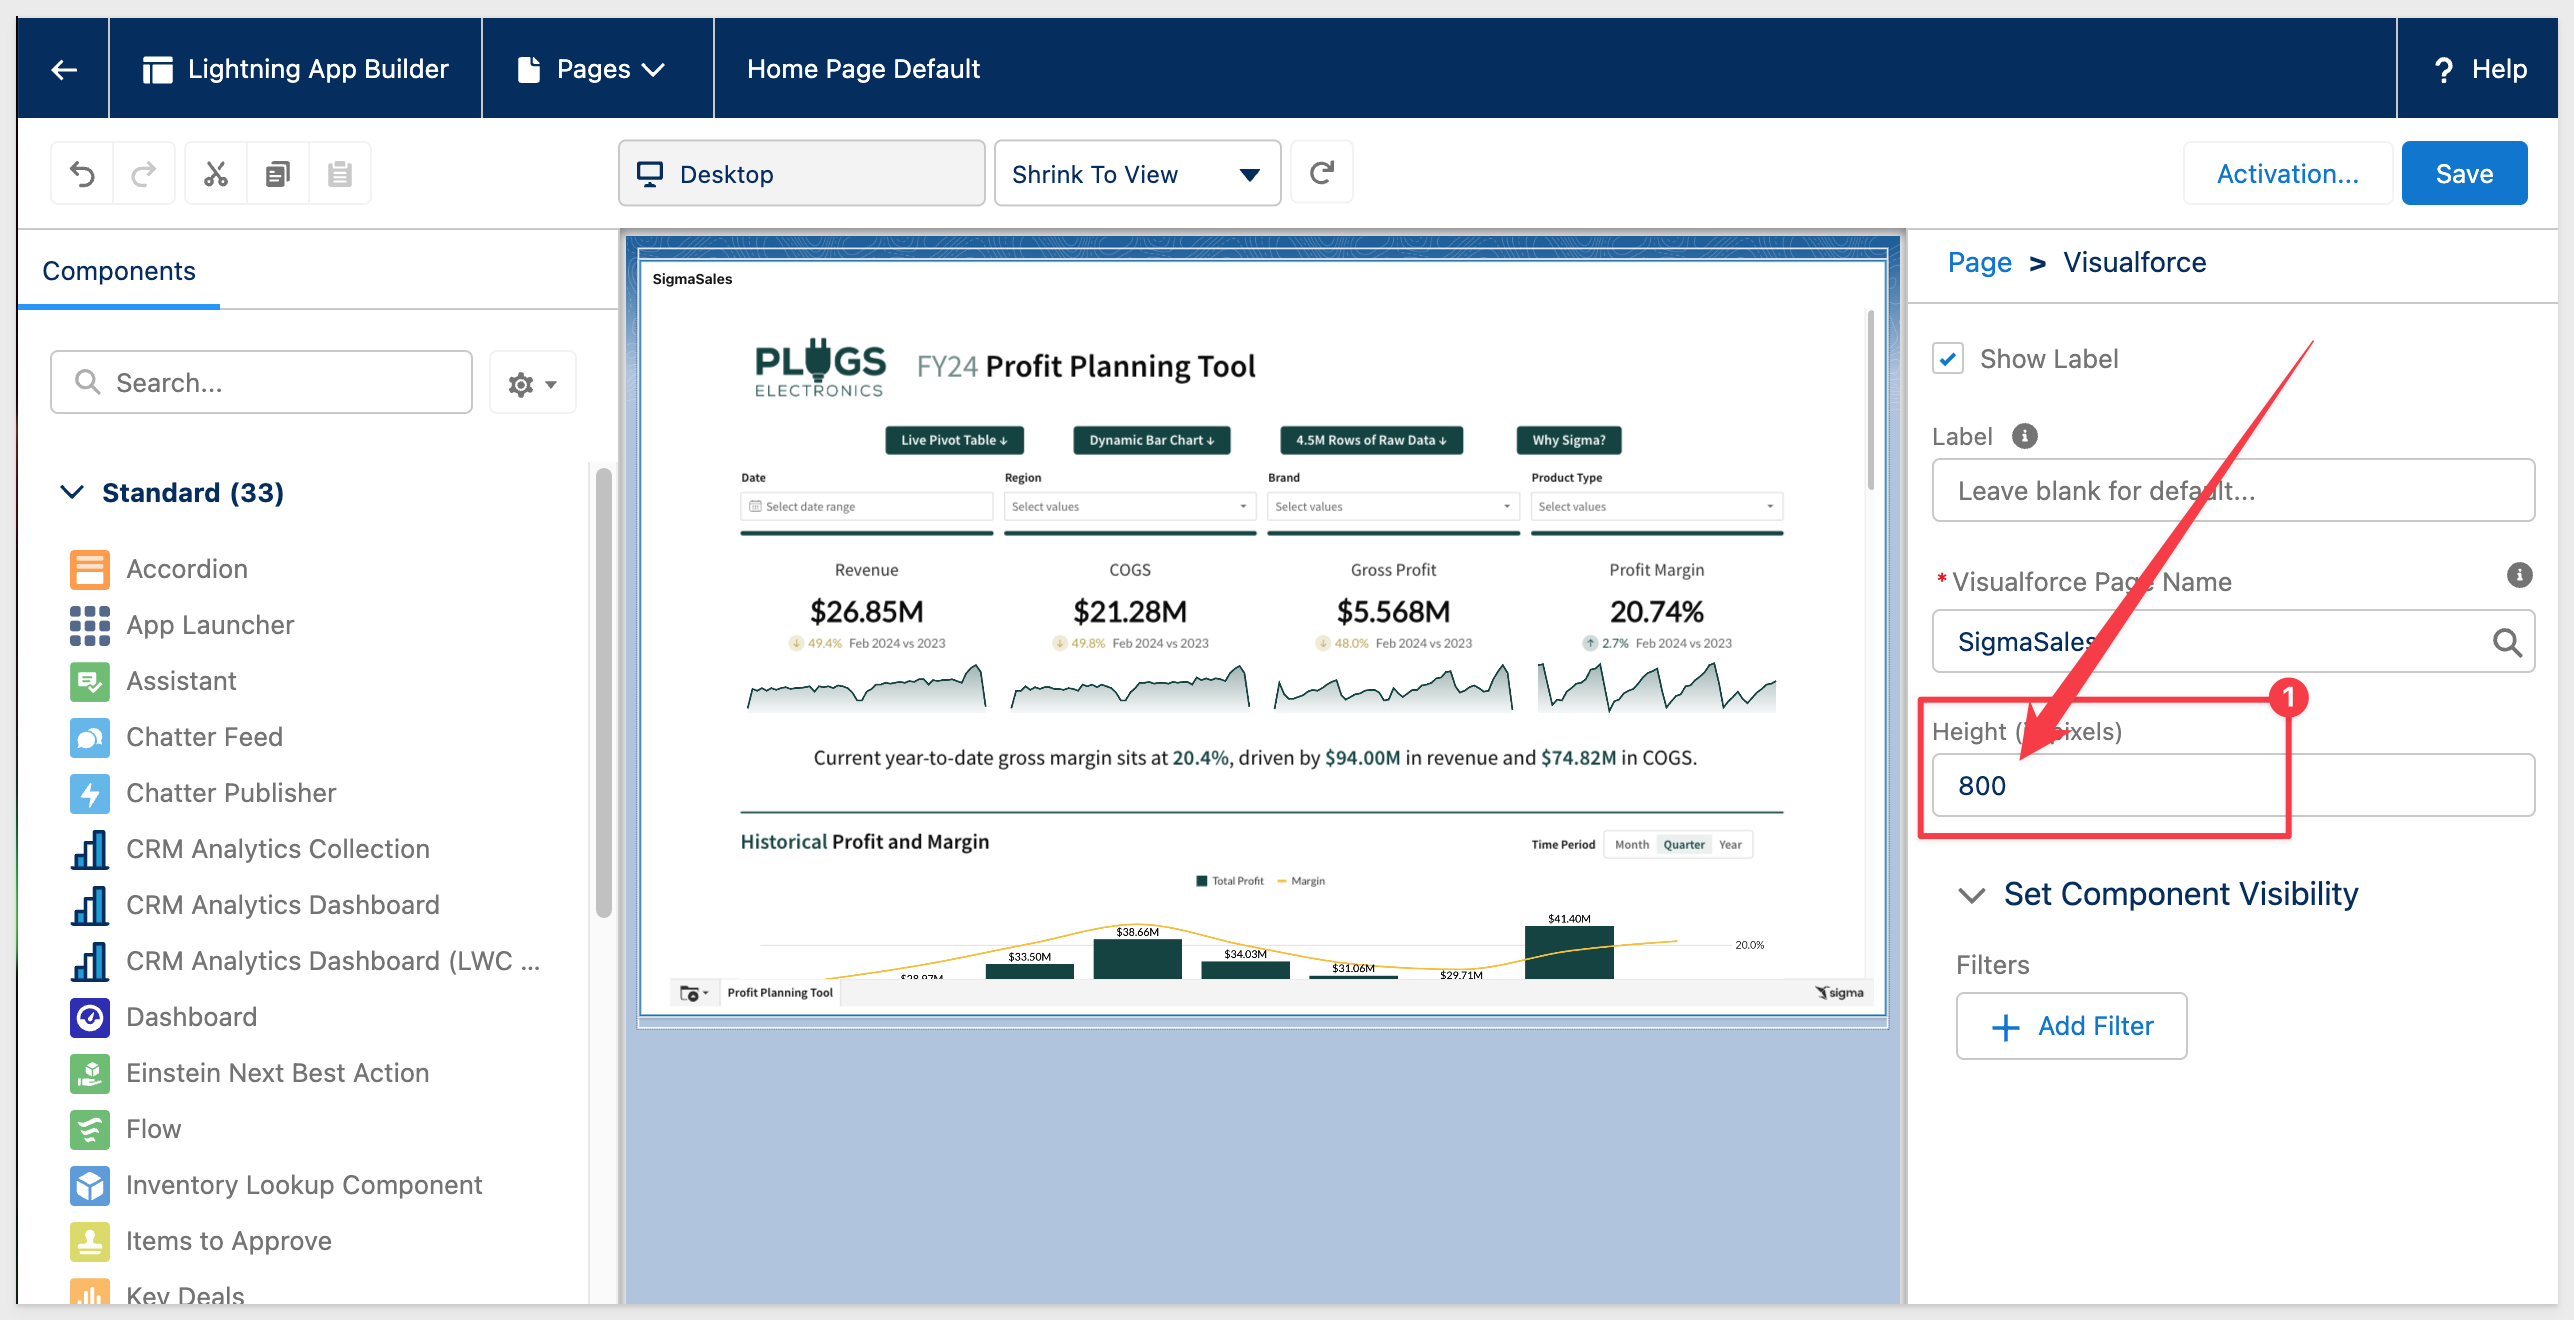 embe Click
 Save.
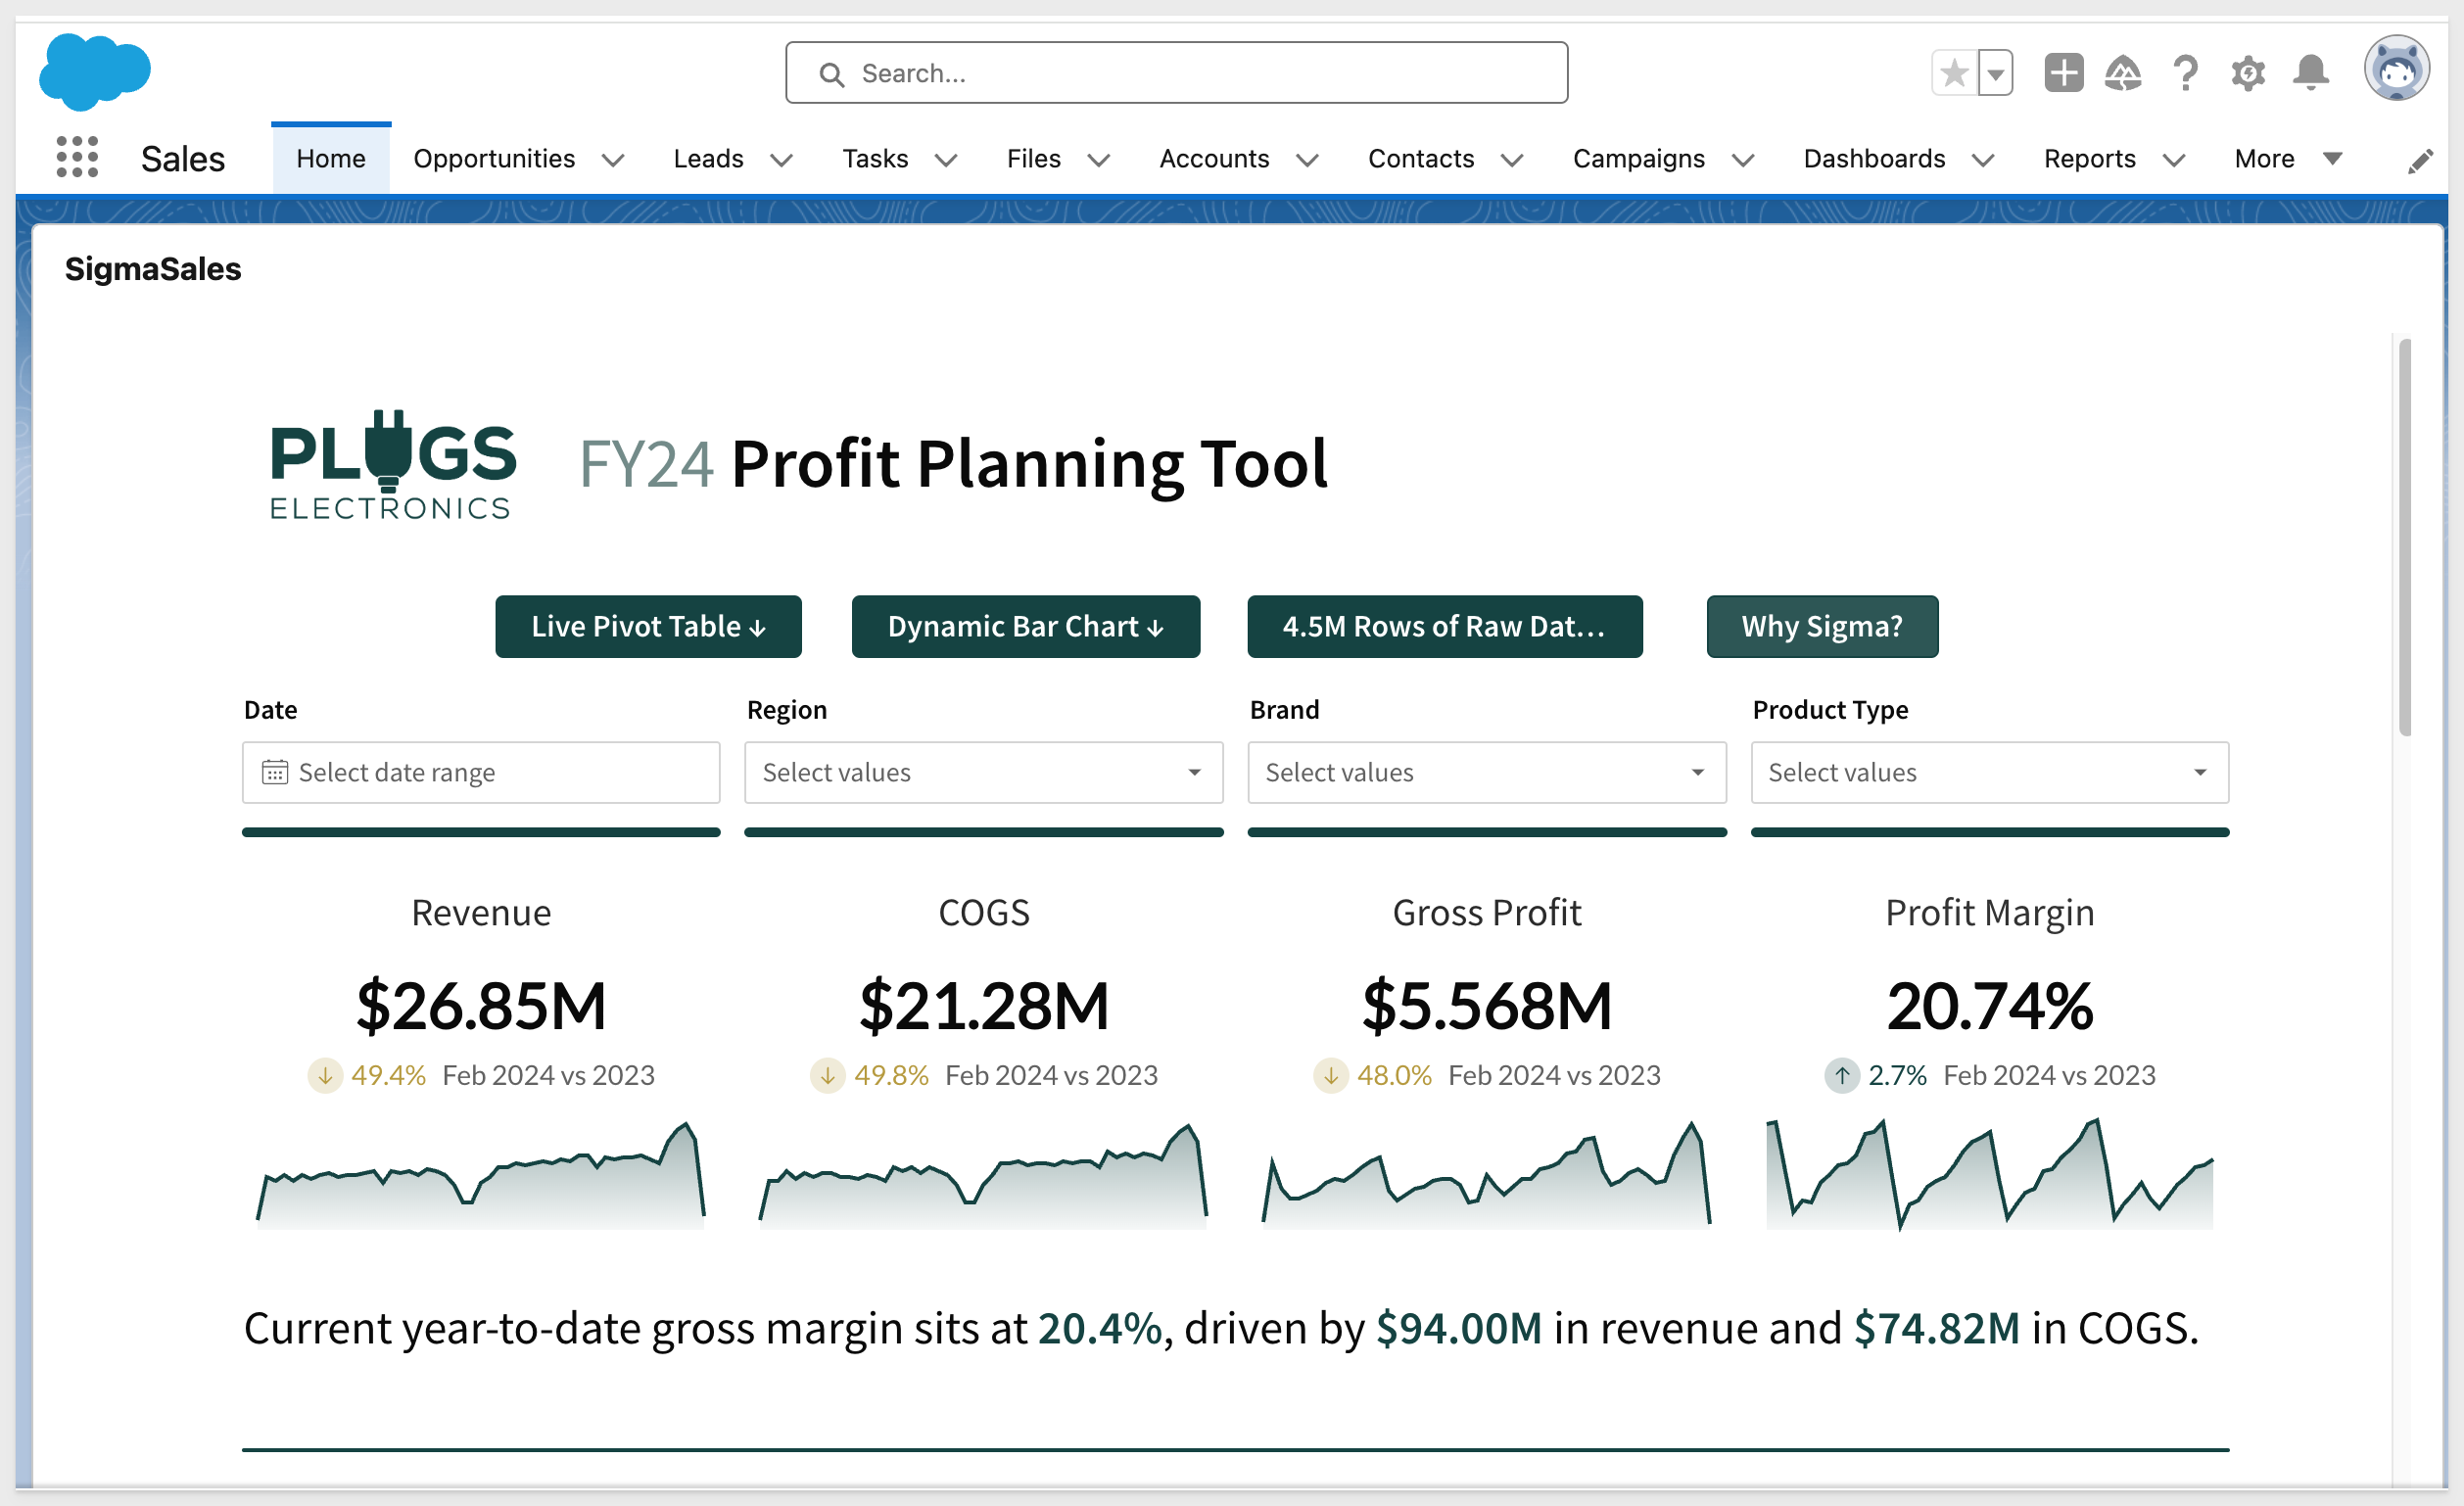
Navigate back to the Sales homepage (or the page where you decided to embed) and see the results:
It is often useful to enhance the level of interactivity between Salesforce and Sigma by passing values to Sigma when a user clicks a value in Salesforce.
For example, a user viewing an account list in Salesforce may want to select a specific account and have Sigma filter the embedded data to display information relevant to that account only.
Example: Salesforce AccountID
Lets use the example of a Salesforce user clicking on an opportunity and passing that unique AccountID to Sigma, where it will show the value in a workbook page.
The revised code blocks are provided below, with comments on what has been added.
The previous version was simple, with no dynamic components or interaction with Salesforce account data. It just displayed a Sigma embed in a static manner, without specific account-based customization.
Replacing the code with the following sections will providing an example of passing a value directly to a specific Sigma dashboard control from within Salesforce.
The Sigma control would then be used to filter the data displayed in the Sigma embed.
Apex Class
The revised code allows dynamic account selection, passing the selected accountId to Sigma and displaying it within Sigma using a specified control.
Major changes are:
1: Account Selection:
- The revised code queries a list of accounts from Salesforce, presenting them as selectable options.
- A selected account's Id is stored in
embed_accountand used to dynamically update the Sigma embed URL.
2: Dynamic URL Generation with Control ID:
- Instead of passing static session parameters, the revised URL includes the selected accountId using Sigma's control ID format;
SF_AccountID. - This enables Sigma to display specific data or text related to the selected account.
3: Improved Debugging and Default Values:
- Added debug statements to trace variable states.
- Initialized
selectedAccountIdwith a default placeholder text ("Select an account to show") for a clear indication of the initial state.
Here is the revised Apex class code, so we can just replace the existing class code in total and save after replacement.
Make sure to update the client_ID an secret values in this code:
public class SigmaEmbedClass {
    private string client_id = 'YOUR SIGMA CLIENT_ID';
    private string secret = 'YOUR SIGMA SECRET';
    public string embed_path { get; set; }
    public string embed_user { get; set; }
    public string embed_account { get; set; }
    public String selectedAccountId { get; set; }
    public List<Account> accounts { get; set; }

    public SigmaEmbedClass() {
        accounts = [SELECT Id, Name FROM Account LIMIT 10];
        // Set default placeholder text for the initial load
        selectedAccountId = 'Select an account to show';
        System.debug('Initial selectedAccountId set to: ' + selectedAccountId);
    }

    public PageReference selectAccount() {
        System.debug('selectAccount() called');
        System.debug('selectedAccountId before assignment: ' + selectedAccountId);

        // Update embed_account with the selected account ID when an account is chosen
        embed_account = selectedAccountId;

        System.debug('embed_account after assignment in selectAccount: ' + embed_account);
        return null;
    }

    private String generateRandomString(Integer len) {
        final String chars = 'ABCDEFGHIJKLMNOPQRSTUVWXYZabcdefghijklmnopqrstuvwxyz0123456789';
        String randStr = '';
        while (randStr.length() < len) {
            Integer idx = Math.mod(Math.abs(Crypto.getRandomInteger()), chars.length());
            randStr += chars.substring(idx, idx + 1);
        }
        return randStr;
    }
public String getGenerateIframeUrl() {
    System.debug('getGenerateIframeUrl() called');

    string url = this.embed_path + '?';
    url += ':nonce=' + generateRandomString(16);
    url += '&:allow_export=true';
    url += '&:time=' + json.serialize(datetime.now().getTime()/1000);
    url += '&:session_length=86400';
    url += '&:mode=explore';
    url += '&:external_user_id=' + EncodingUtil.urlEncode(this.embed_user, 'UTF-8');

    // Pass the account ID to the control ID in Sigma
    String controlId = 'SF_AccountID'; // Replace with the actual control ID
    url += '&' + EncodingUtil.urlEncode(controlId, 'UTF-8') + '=' + EncodingUtil.urlEncode(this.embed_account, 'UTF-8').replace('+', '%20');

    url += '&:client_id=' + this.client_id;
    url += '&:signature=' + EncodingUtil.convertToHex(Crypto.generateMac('HMacSHA256', Blob.valueOf(url), Blob.valueOf(this.secret)));

    System.debug('Generated URL with Control ID: ' + url);
    return url;
    }
}
Save the changes. Do not use Quick Save for this step.
Visualforce Component
This revised component code now dynamically passes the selected accountId from Salesforce to Sigma, allowing Sigma to display content based on that account selection.
Major changes are:
1: Dynamic Account Passing:
- The embedAccount attribute is now required, but its purpose has changed significantly: it directly links to embed_account in the
SigmaEmbedClass, which holds the dynamically selected account ID.
2: URL Construction with Dynamic Account Control ID::
- The
generateIframeUrlmethod inSigmaEmbedClassnow dynamically incorporates the selectedaccountIdvia a specified control ID ("SF_AccountID", which we will create shortly), which allows the Sigma embed to reflect account-specific content. This change means that each timegenerateIframeUrlis called, it reflects the current account selection, rather than a static embed. - The revised component leverages the
embedAccountdynamically to ensure that the URL in the iframe changes based on the user's selection in real-time, improving interactivity.
Here is the revised Visualforce component code, so we can just replace the existing component code in total and save after replacement:
<apex:component controller="SigmaEmbedClass">
    <apex:attribute name="embedPath" description="Embed URL generated by Sigma" type="String" required="true" assignTo="{!embed_path}"/>
    <apex:attribute name="embedUser" description="Salesforce user email" type="String" required="true" assignTo="{!embed_user}"/>
    <apex:attribute name="embedAccount" description="Salesforce Account ID" type="String" required="true" assignTo="{!embed_account}"/>
    <apex:iframe id="sigmaEmbed" src="{!generateIframeUrl}" frameborder="0"></apex:iframe>
</apex:component>
Quick Save the changes.
Visualforce Page
The revised page list some accounts from Salesforce and dynamically updates the Sigma embed based on the selected account. The Sigma embed will show the selected Account_ID passed from Salesforce.
The Salesforce account clicked will appear in the embed using a Sigma CONTROL ELEMENT > LIST VALUES control.
Major changes are:
1: Dynamic Account Selection with Command Link:
- Each account name in the
pageBlockTableis now paired with a "View in Sigma" link. When a user clicks this link, it triggers theselectAccountmethod inSigmaEmbedClass, updating theselectedAccountIdwith the clicked account's ID. - The use of
apex:paramwithin thecommandLinkensures that the correctaccountIdis passed to the controller, allowing Sigma to receive the specific account ID dynamically.
2: Conditional Display of Sigma Embed:
- A Salesforce
outputPanelwith embedPanel ID wraps the Sigma embed section, allowing it to be re-rendered dynamically when the selected account changes. - Conditional Salesforce
outputTextcomponents are used to show a placeholder message ("Select an account to show") if no account is selected, improving user guidance. - Once an account is selected, the outputText conditionally displays the
SigmaEmbedComponent, passing the dynamically updatedselectedAccountIdasembedAccount.
3: Embedding Sigma with Account-Specific Context:
- The
SigmaEmbedComponentin the embed panel now receives the selectedaccountIddynamically, updating the Sigma embed URL to reflect the current account context. - This dynamic embedding allows Sigma to display data or information specific to the chosen account, providing the desired interactivity.
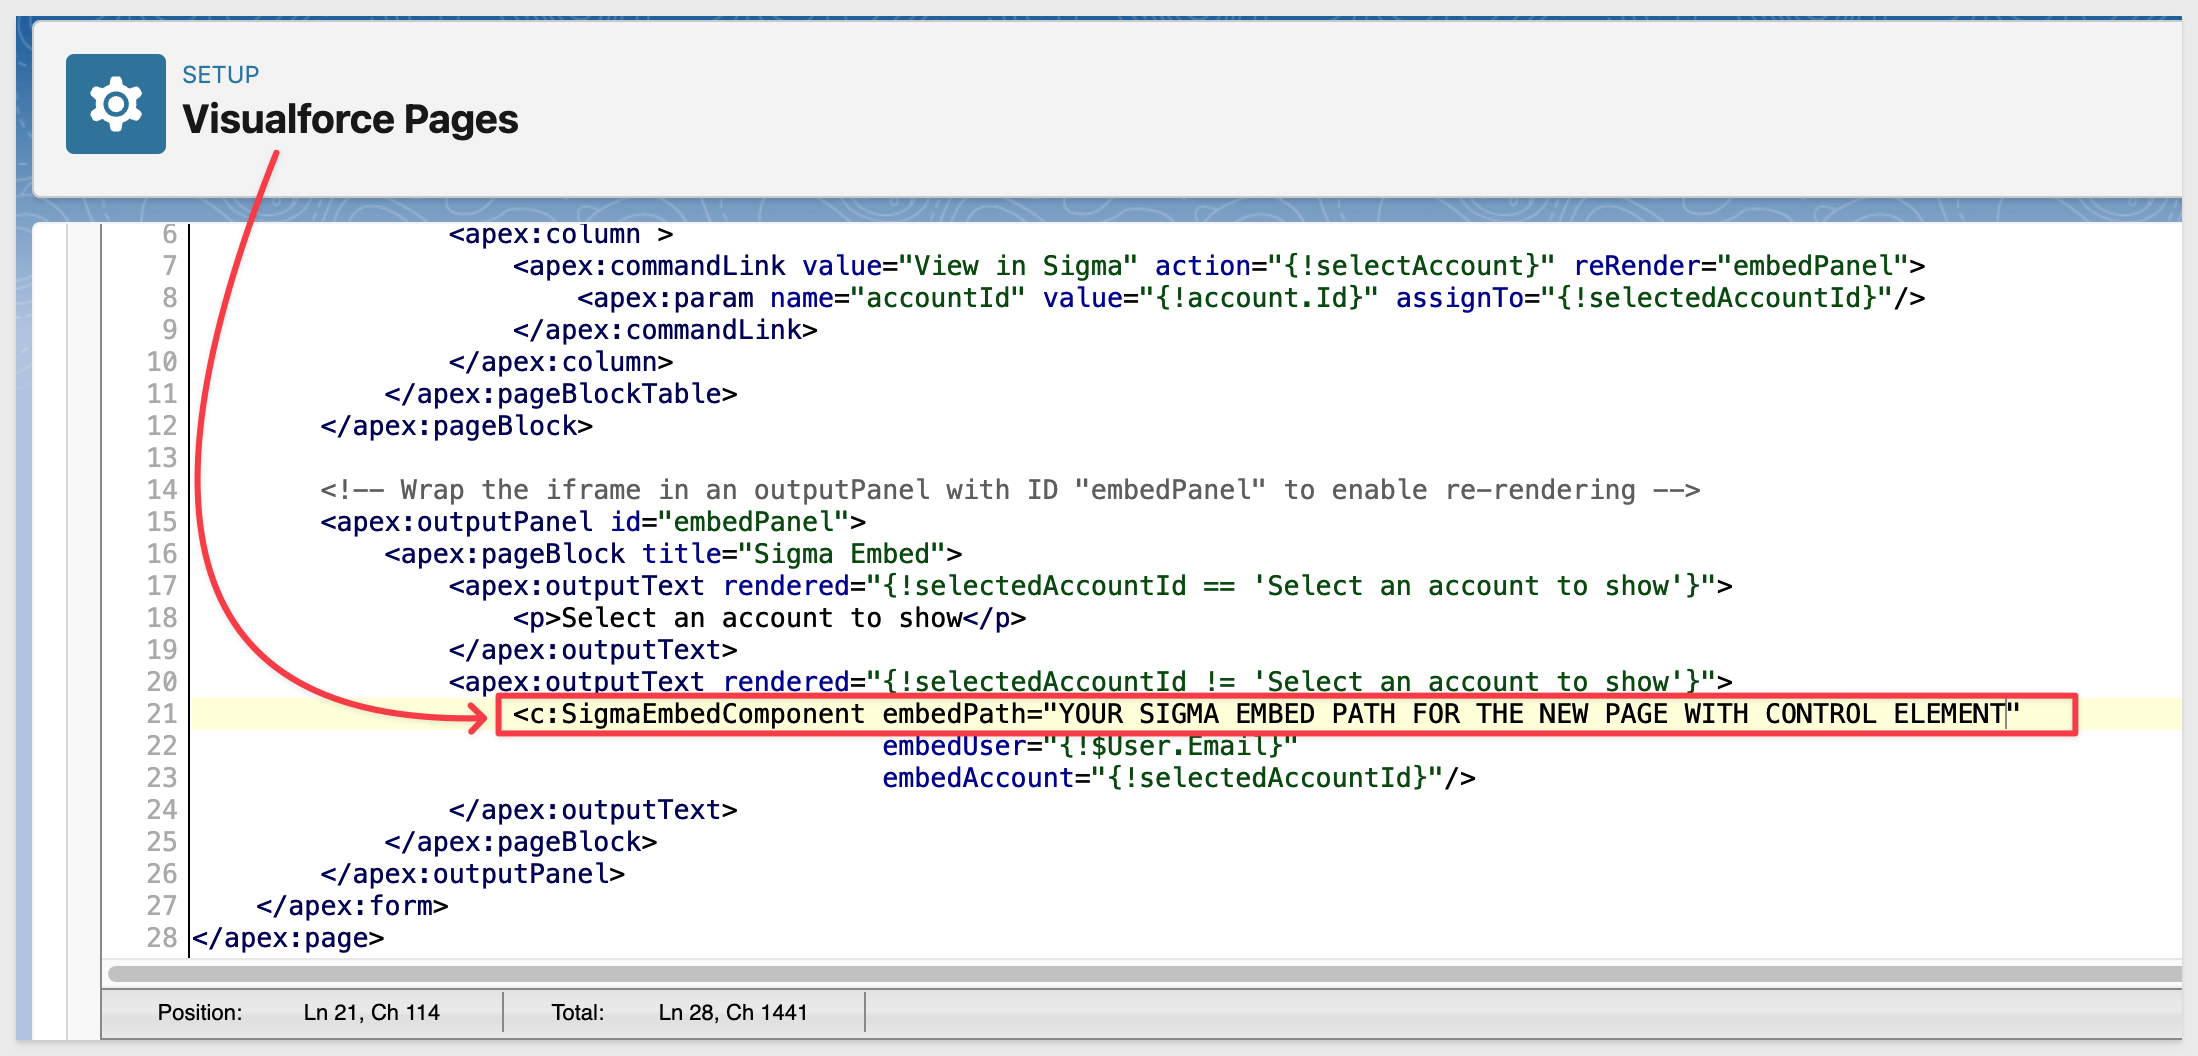
Here is the revised Visualforce page code, so we can just replace the existing page code in total and save after replacement:
<apex:page controller="SigmaEmbedClass">
    <apex:form >
        <apex:pageBlock title="Account List">
            <apex:pageBlockTable value="{!accounts}" var="account">
                <apex:column value="{!account.Name}"/>
                <apex:column >
                    <apex:commandLink value="View in Sigma" action="{!selectAccount}" reRender="embedPanel">
                        <apex:param name="accountId" value="{!account.Id}" assignTo="{!selectedAccountId}"/>
                    </apex:commandLink>
                </apex:column>
            </apex:pageBlockTable>
        </apex:pageBlock>

        <!-- Wrap the iframe in an outputPanel with ID "embedPanel" to enable re-rendering -->
        <apex:outputPanel id="embedPanel">
            <apex:pageBlock title="Sigma Embed">
                <apex:outputText rendered="{!selectedAccountId == 'Select an account to show'}">
                    <p>Select an account to show</p>
                </apex:outputText>
                <apex:outputText rendered="{!selectedAccountId != 'Select an account to show'}">
                    <c:SigmaEmbedComponent embedPath="YOUR SIGMA EMBED PATH FOR THE NEW PAGE WITH CONTROL ELEMENT"
                                           embedUser="{!$User.Email}"
                                           embedAccount="{!selectedAccountId}"/>
                </apex:outputText>
            </apex:pageBlock>
        </apex:outputPanel>
    </apex:form>
</apex:page>
Quick Save the changes.
User Attribute
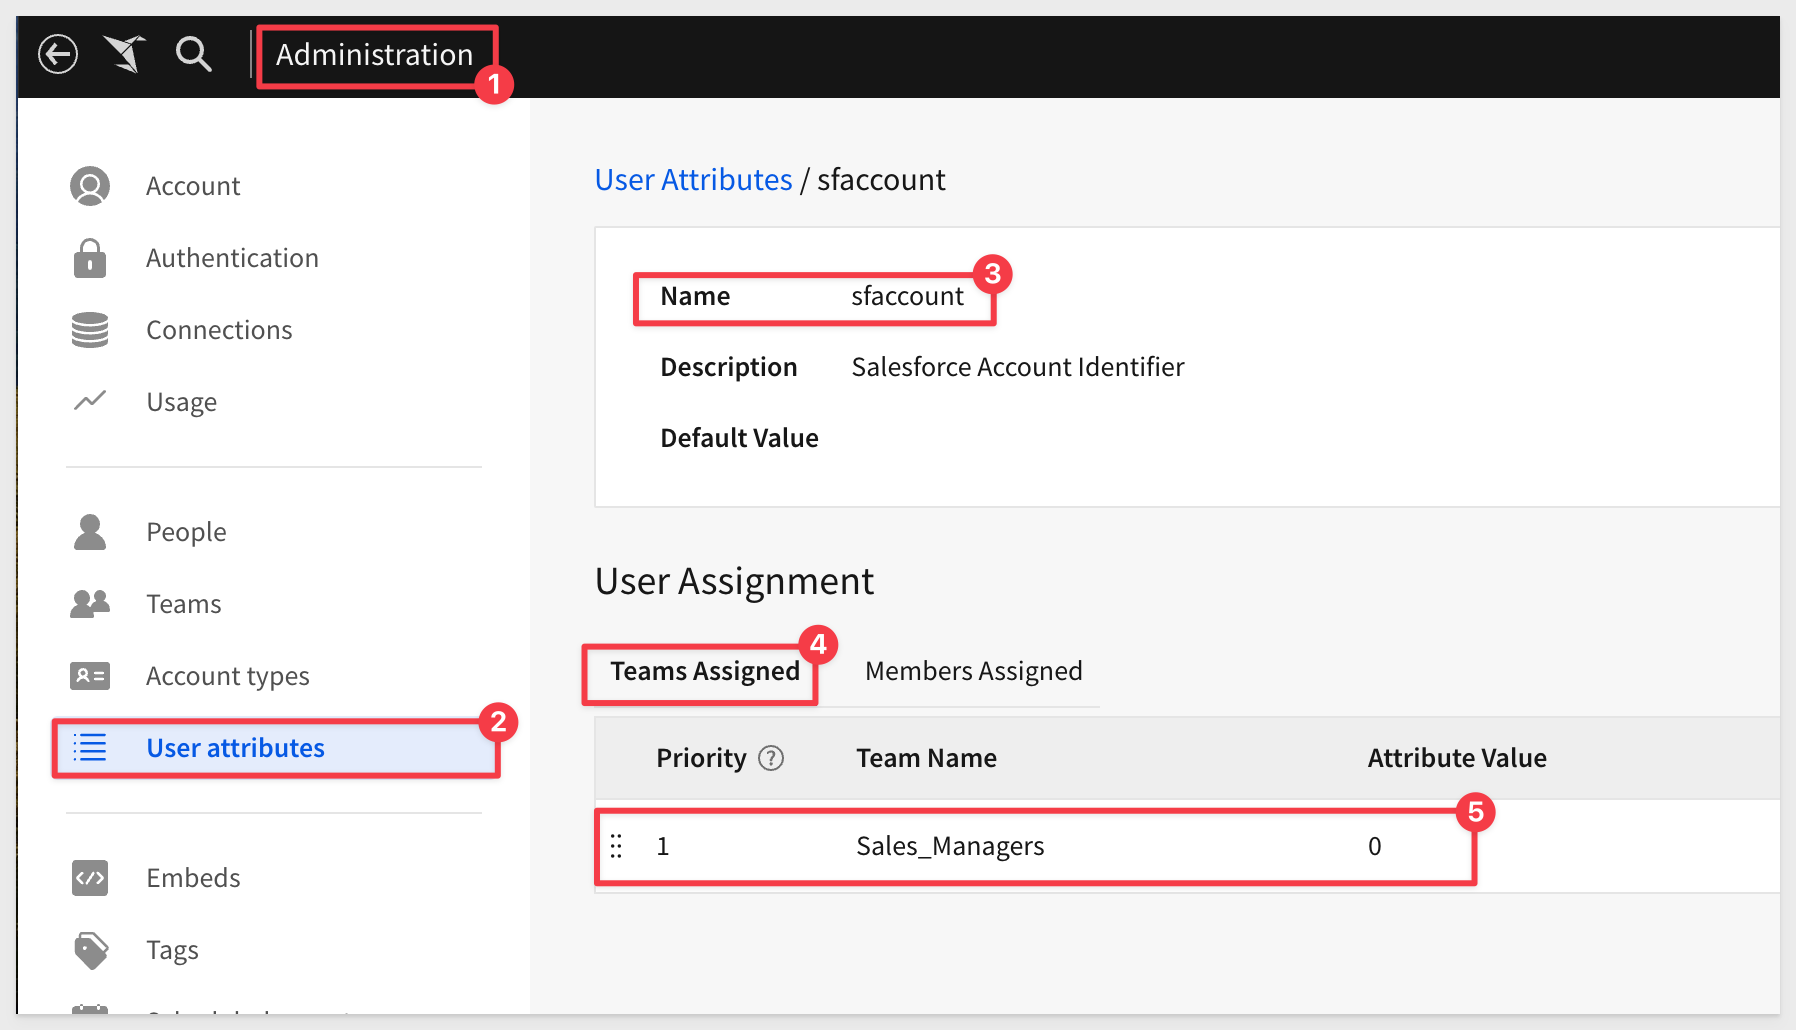
In Sigma, navigate to Administration > User Attributes and click the Create Attribute button.
Name the new attribute sfaccount.
Assign the new user attribute to the Sales_Managers team with a placeholder default value of 0.
Click Save:
Configure Sigma workbook
Navigate back to the Profit Planning Tool workbook we used for the embed, place it in Edit mode and add a new workbook page.
On the new page, add a new UI ELEMENT > CONTROLS > LIST VALUES.
Configure it's properties to be:
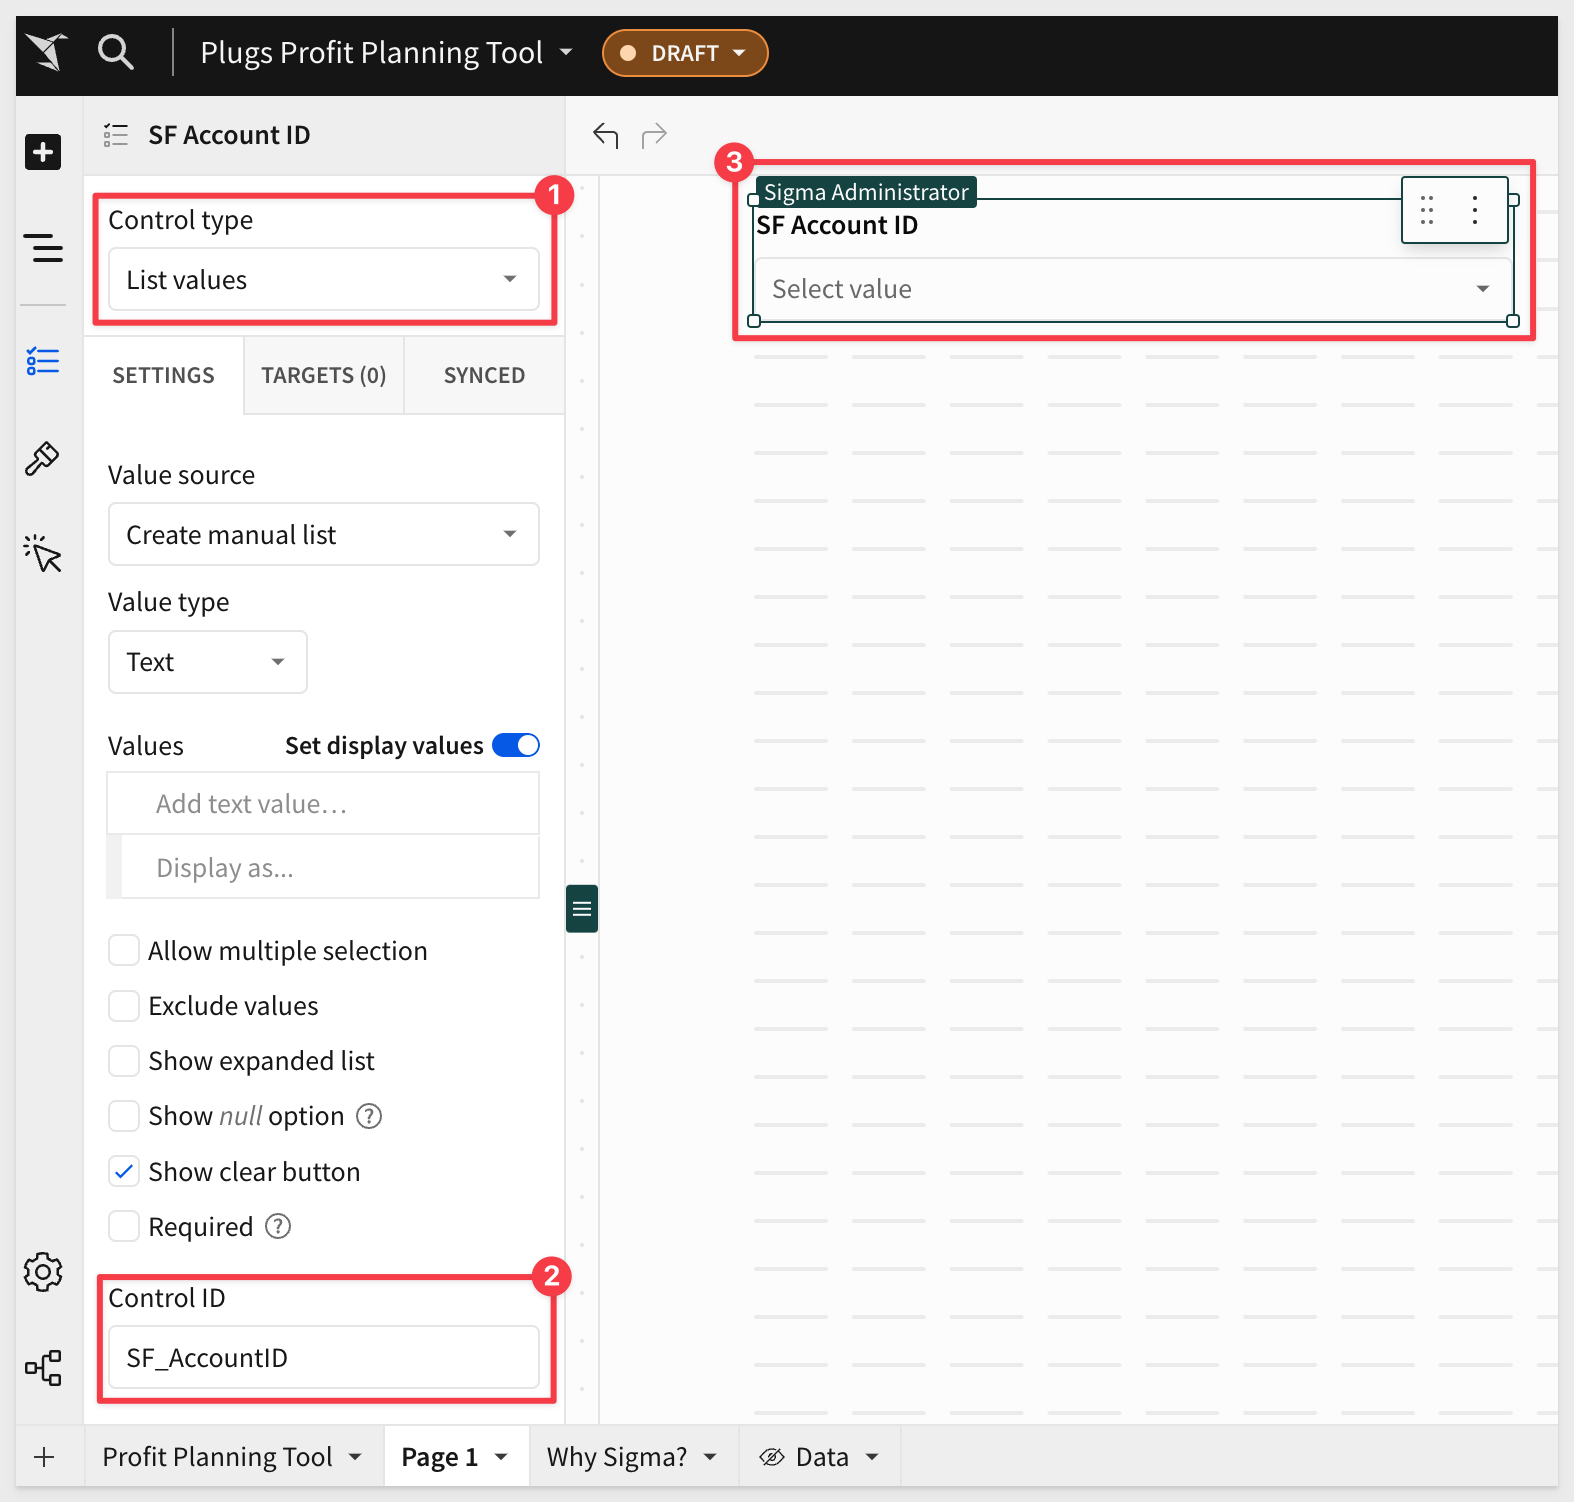
The Control_ID used needs to be SF_AccountID.
Publish the workbook.
Generate a new Embed path for the new page only:
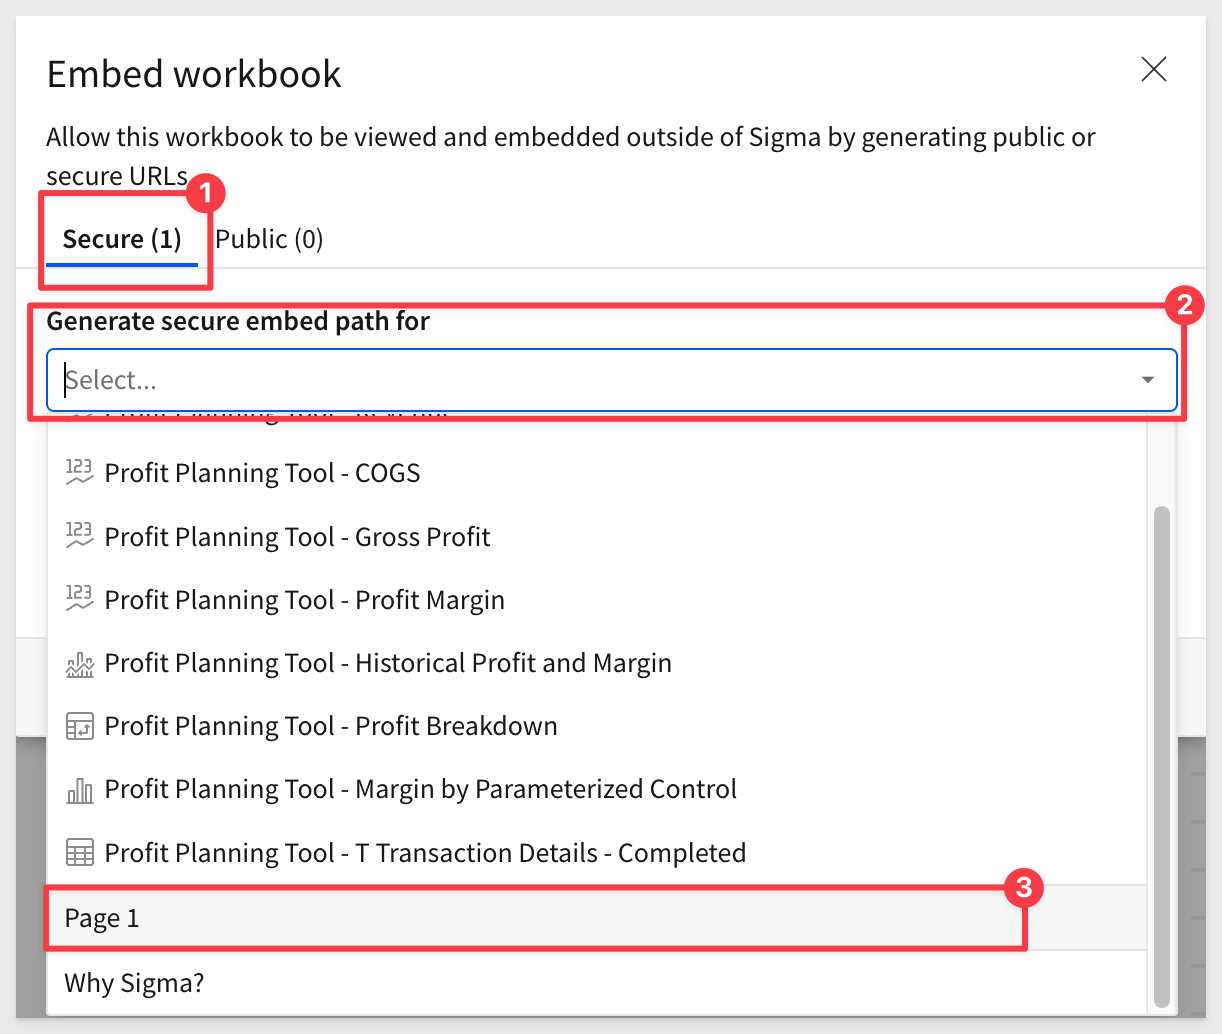
Copy this new Embed path and use the new url to update the Visualforce page code with this new URL:
Save the Visualforce page after updating the url.
Testing the changes
Click the Preview button to see the new Salesforce page render:
For more information on sing controls to filter data in Sigma, see Intro to control elements
In this QuickStart we embedded a Sigma Dashboard securely into a SalesForce VisualForce page, building on the lessons in previous embedding QuickStarts.
Additional Resource Links
Be sure to check out all the latest developments at Sigma's First Friday Feature page!
Help Center Home
Sigma Community
Sigma Blog