This QuickStart introduces Sigma embedding using parameterized queries.
Parameterized queries are especially useful when each embedded customer has their own database with the same schema.
While there are various ways to store customer data, this pattern is fairly common.
To accomplish this in Sigma, we'll use queries that leverage custom user attributes.
How it works
End users are authenticated by the parent application. When the user navigates to a parent page containing embedded Sigma content, the parent sends a request to Sigma via the embed API, containing a user attribute that specifies the target database and schema. Sigma parses that request, and applies the user attribute to the SQL query. The query is then evaluated by Sigma and, if needed, sent to the cloud data warehouse.
How Sigma performs calculations is beyond the scope of this QuickStart, but covered in-depth in the QuickStart Sigma's Query Engine.
This differs from other options Sigma offers for common architectural patterns.
Other options include:
Build and Secure Multi-Tenant Data Applications with Snowflake and Sigma
Embedding 07: Dynamic Role Switching with Snowflake
In this QuickStart, we will use the local host application we created in Embedding 01: Getting Started
For more information on Sigma's release strategy, see Sigma product releases
If something is not working as you expected, here's how to contact Sigma support
Target Audience
Semi-technical users who will be aiding in the planning or implementation of Sigma with embedding. No SQL or technical data skills are needed to complete this QuickStart. It does assume some common computer skills like installing software, using Terminal, navigating folders, and copy/paste operations.
Prerequisites
- A computer with a current browser. It does not matter which browser you want to use.
- Access to your Sigma environment.
- Embedding 01: Getting Started is required to complete this QuickStart.

Sigma supports the most common multi-tenant architectures, which are widely used to offer secure portal access with proper data separation.
The most common examples of this are:
1: One Snowflake account with per-customer databases:
Database names are different, but schema names are the same.
2: One Snowflake account with a single database and per-customer schemas:
Database and schema names are different.
3: Two Snowflake accounts with similarly structured databases and/or schemas, but different names:
This requires a connection-swapping user attribute along with custom user attributes for database and schema names.
The core design pattern, based on custom user attributes, offers flexibility to match a variety of architectural models.
While we've outlined three common use cases, the fundamental design pattern remains the same. For this QuickStart, we'll focus on use case #2, as the steps are largely the same for the other two, with only minor differences.
Imagine Sigma content embedded in a SaaS application used by multiple clients.
Each client accesses similar types of data (e.g., store sales), all stored in the same Snowflake account.
Database and schema names reflect each client's name.
For this demonstration, we'll assume the SaaS provider is a national retail distributor with clients selling goods across U.S. regions.
The distributor wants to embed Sigma into their client portal.
They prefer a shared dashboard to simplify training, support, and development as new clients are onboarded.
In this example, we'll use two clients: Client_A and Client_B.
Each client has a STORE_SALES table with the same structure, but their data is client-specific.
To demonstrate this setup, we'll use our trial Snowflake account to create per-customer databases and schemas.
Use the following Snowflake script to automate creation of roles, databases, schemas, and sample data.
Log into Snowflake as ACCOUNTADMIN.
Open a new SQL Worksheet.
The script below creates roles for Client_A and Client_B, sets up their databases and schemas, grants the required permissions, and inserts sample data into their STORE_SALES tables.
It also creates a default client (Client_Default) with a table containing a single row of dummy data. This will serve as the default in our later Sigma configuration. This ensures that if the parent application fails to send a database/schema value, Sigma falls back to the default without exposing other client data.
Copy and paste this code into the worksheet:
-- Use the ACCOUNTADMIN role and COMPUTE_WH warehouse
USE ROLE ACCOUNTADMIN;
USE WAREHOUSE COMPUTE_WH;

-- Step 1: Create Roles
CREATE OR REPLACE ROLE Client_A_Role;
CREATE OR REPLACE ROLE Client_B_Role;
CREATE OR REPLACE ROLE Client_Default_Role;

-- Step 2: Create Databases and Schemas
CREATE OR REPLACE DATABASE Client_A_DB;
CREATE OR REPLACE SCHEMA Client_A_DB.Client_A_Schema;

CREATE OR REPLACE DATABASE Client_B_DB;
CREATE OR REPLACE SCHEMA Client_B_DB.Client_B_Schema;

CREATE OR REPLACE DATABASE Client_Default_DB;
CREATE OR REPLACE SCHEMA Client_Default_DB.Client_Default_Schema;

-- Step 3: Create Tables and Insert Sample Data

-- Client_A
CREATE TABLE Client_A_DB.Client_A_Schema.STORE_SALES (
    sale_id INT,
    sale_date DATE,
    store_id INT,
    amount DECIMAL(10, 2)
);

INSERT INTO Client_A_DB.Client_A_Schema.STORE_SALES (sale_id, sale_date, store_id, amount) VALUES
(1, '2024-01-01', 100, 100.00),
(2, '2024-02-02', 200, 200.00),
(3, '2024-03-03', 300, 300.00),
(4, '2024-04-04', 400, 400.00),
(5, '2024-05-05', 500, 500.00);

-- Client_B
CREATE TABLE Client_B_DB.Client_B_Schema.STORE_SALES (
    sale_id INT,
    sale_date DATE,
    store_id INT,
    amount DECIMAL(10, 2)
);

INSERT INTO Client_B_DB.Client_B_Schema.STORE_SALES (sale_id, sale_date, store_id, amount) VALUES
(1, '2024-06-06', 600, 600.00),
(2, '2024-07-07', 700, 700.00),
(3, '2024-08-08', 800, 800.00),
(4, '2024-09-09', 900, 900.00),
(5, '2024-10-10', 1000, 1000.00);

-- Client_Default
CREATE TABLE Client_Default_DB.Client_Default_Schema.STORE_SALES (
    sale_id INT,
    sale_date DATE,
    store_id INT,
    amount DECIMAL(10, 2)
);

INSERT INTO Client_Default_DB.Client_Default_Schema.STORE_SALES (sale_id, sale_date, store_id, amount) VALUES
(1, '2024-01-01', 0, 0.00);

-- Step 4: Grant Permissions

-- Client_A
GRANT USAGE ON DATABASE Client_A_DB TO ROLE Client_A_Role;
GRANT USAGE ON SCHEMA Client_A_DB.Client_A_Schema TO ROLE Client_A_Role;
GRANT SELECT ON ALL TABLES IN SCHEMA Client_A_DB.Client_A_Schema TO ROLE Client_A_Role;

-- Client_B
GRANT USAGE ON DATABASE Client_B_DB TO ROLE Client_B_Role;
GRANT USAGE ON SCHEMA Client_B_DB.Client_B_Schema TO ROLE Client_B_Role;
GRANT SELECT ON ALL TABLES IN SCHEMA Client_B_DB.Client_B_Schema TO ROLE Client_B_Role;

-- Client_Default
GRANT USAGE ON DATABASE Client_Default_DB TO ROLE Client_Default_Role;
GRANT USAGE ON SCHEMA Client_Default_DB.Client_Default_Schema TO ROLE Client_Default_Role;
GRANT SELECT ON ALL TABLES IN SCHEMA Client_Default_DB.Client_Default_Schema TO ROLE Client_Default_Role;

-- Warehouse usage for client roles
GRANT USAGE ON WAREHOUSE COMPUTE_WH TO ROLE Client_A_Role;
GRANT USAGE ON WAREHOUSE COMPUTE_WH TO ROLE Client_B_Role;
GRANT USAGE ON WAREHOUSE COMPUTE_WH TO ROLE Client_Default_Role;

-- Step 5: Grant Permissions to ACCOUNTADMIN
GRANT SELECT ON ALL TABLES IN SCHEMA Client_A_DB.Client_A_Schema TO ROLE ACCOUNTADMIN;
GRANT SELECT ON ALL TABLES IN SCHEMA Client_B_DB.Client_B_Schema TO ROLE ACCOUNTADMIN;
GRANT SELECT ON ALL TABLES IN SCHEMA Client_Default_DB.Client_Default_Schema TO ROLE ACCOUNTADMIN;

GRANT USAGE ON WAREHOUSE COMPUTE_WH TO ROLE ACCOUNTADMIN;

-- Step 6: Replace "YOUR_SIGMA_USER" with your Snowflake user with ACCOUNTADMIN role
GRANT ROLE Client_Default_Role TO USER YOUR_SIGMA_USER;
GRANT ROLE Client_A_Role TO USER YOUR_SIGMA_USER;
GRANT ROLE Client_B_Role TO USER YOUR_SIGMA_USER;
Run the script. Once complete, you should see the message Statement executed successfully.
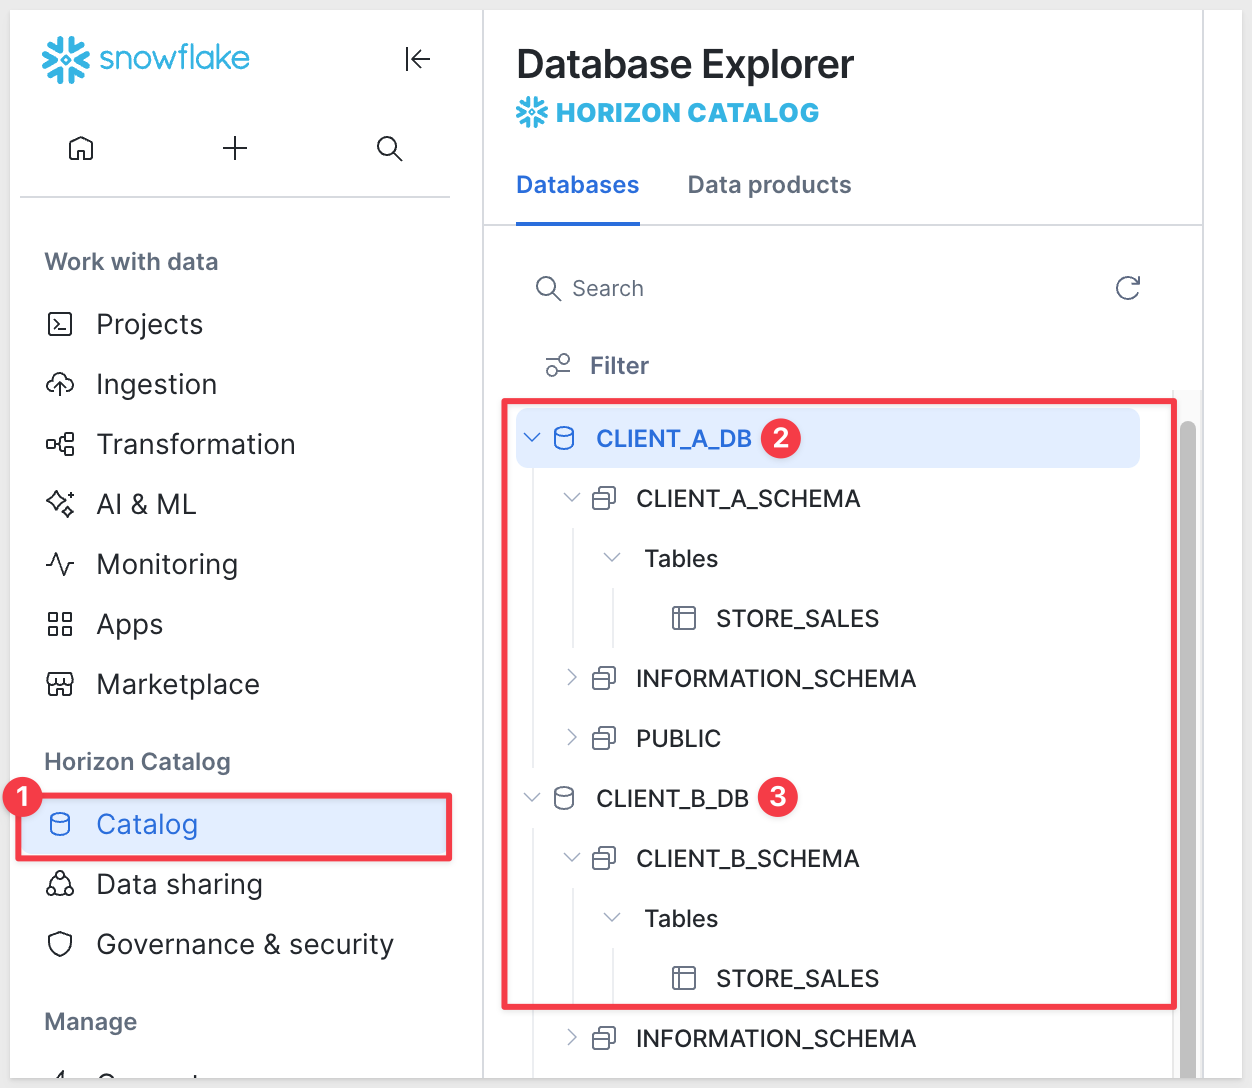
In the Databases tab, you'll see the new tables:
Log into Sigma as Administrator.
Create teams
Navigate to Administration > Teams and create the CLIENT_A and CLIENT_B teams:
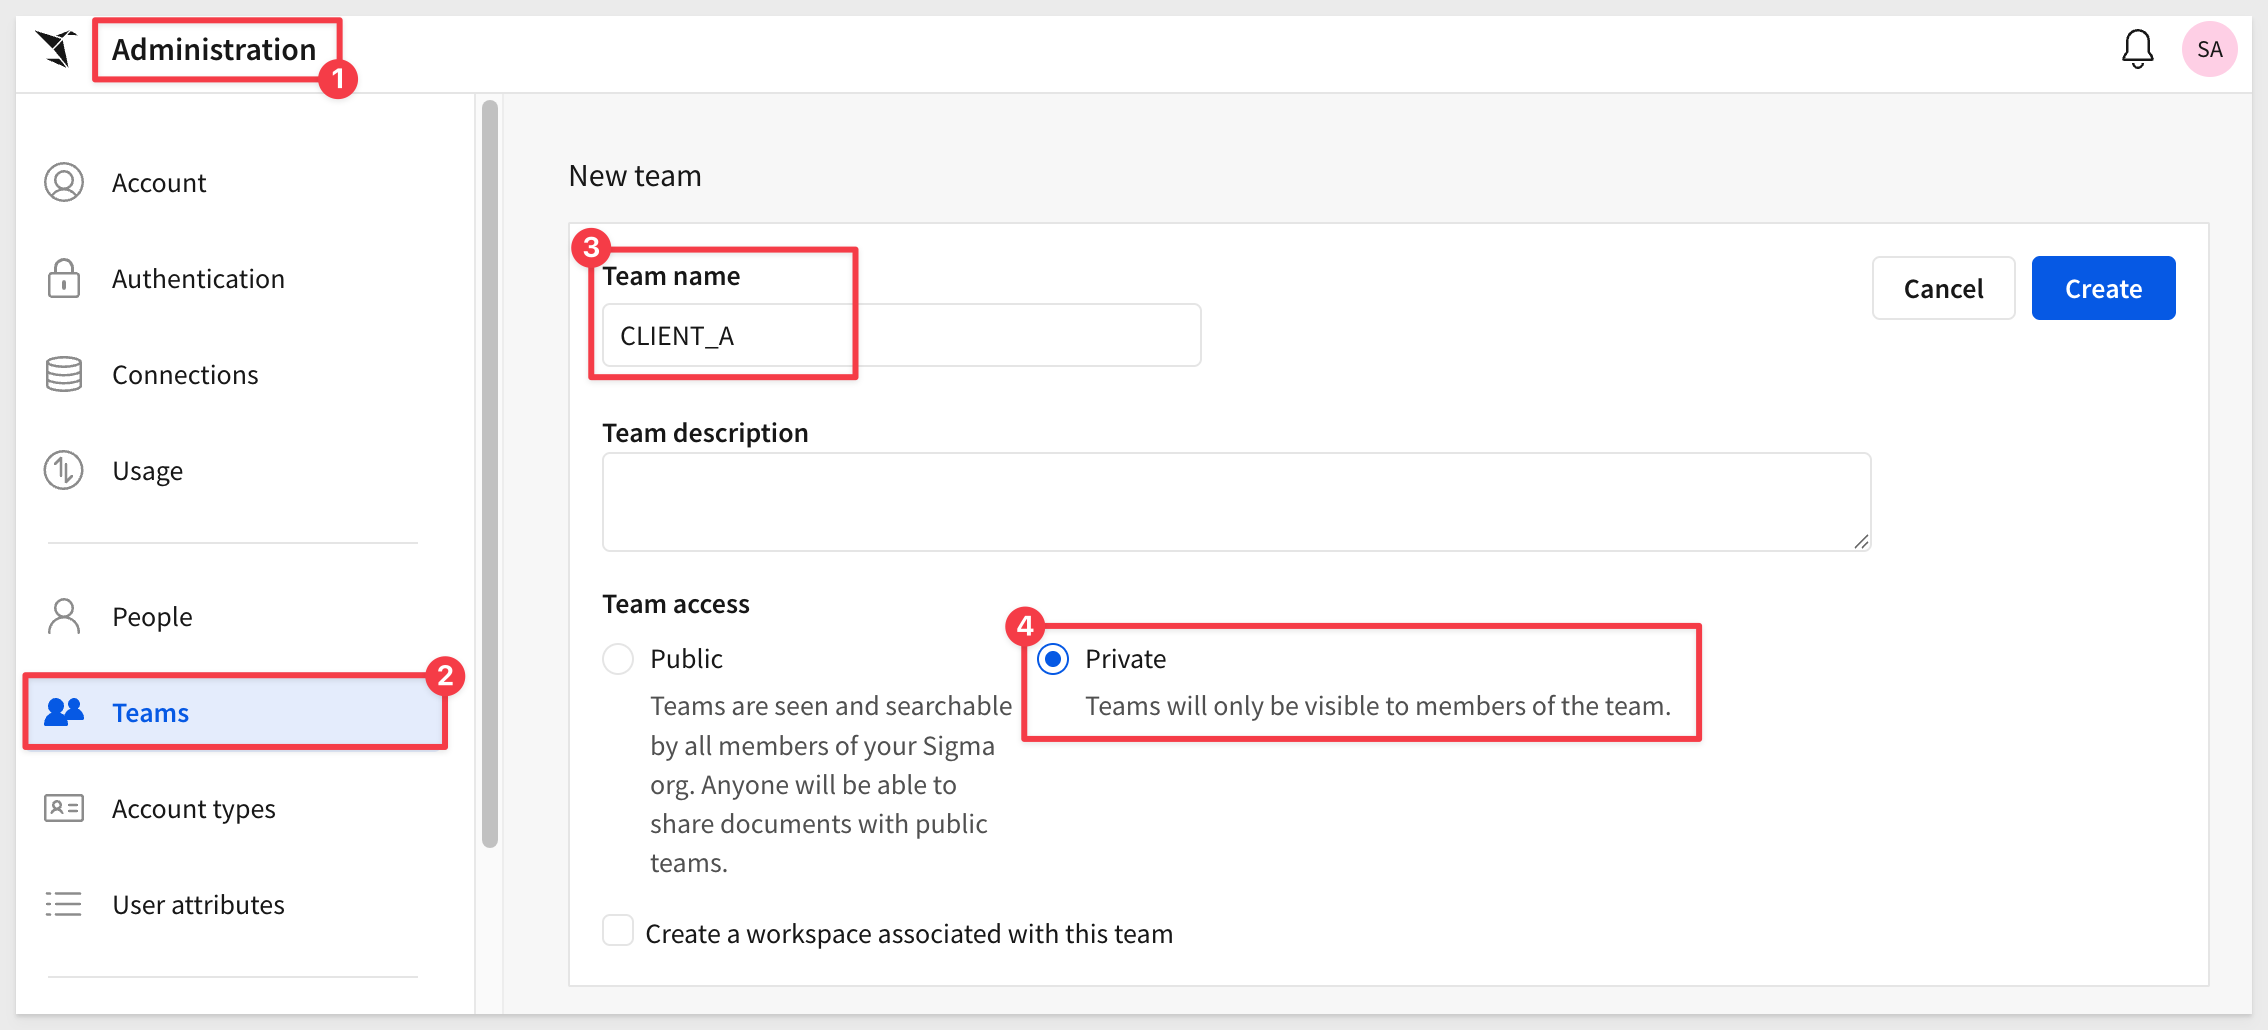
No need to assign anyone to these teams now.
Create custom user attributes
We need to create two attributes that will serve as placeholders for values passed from the host application at runtime.
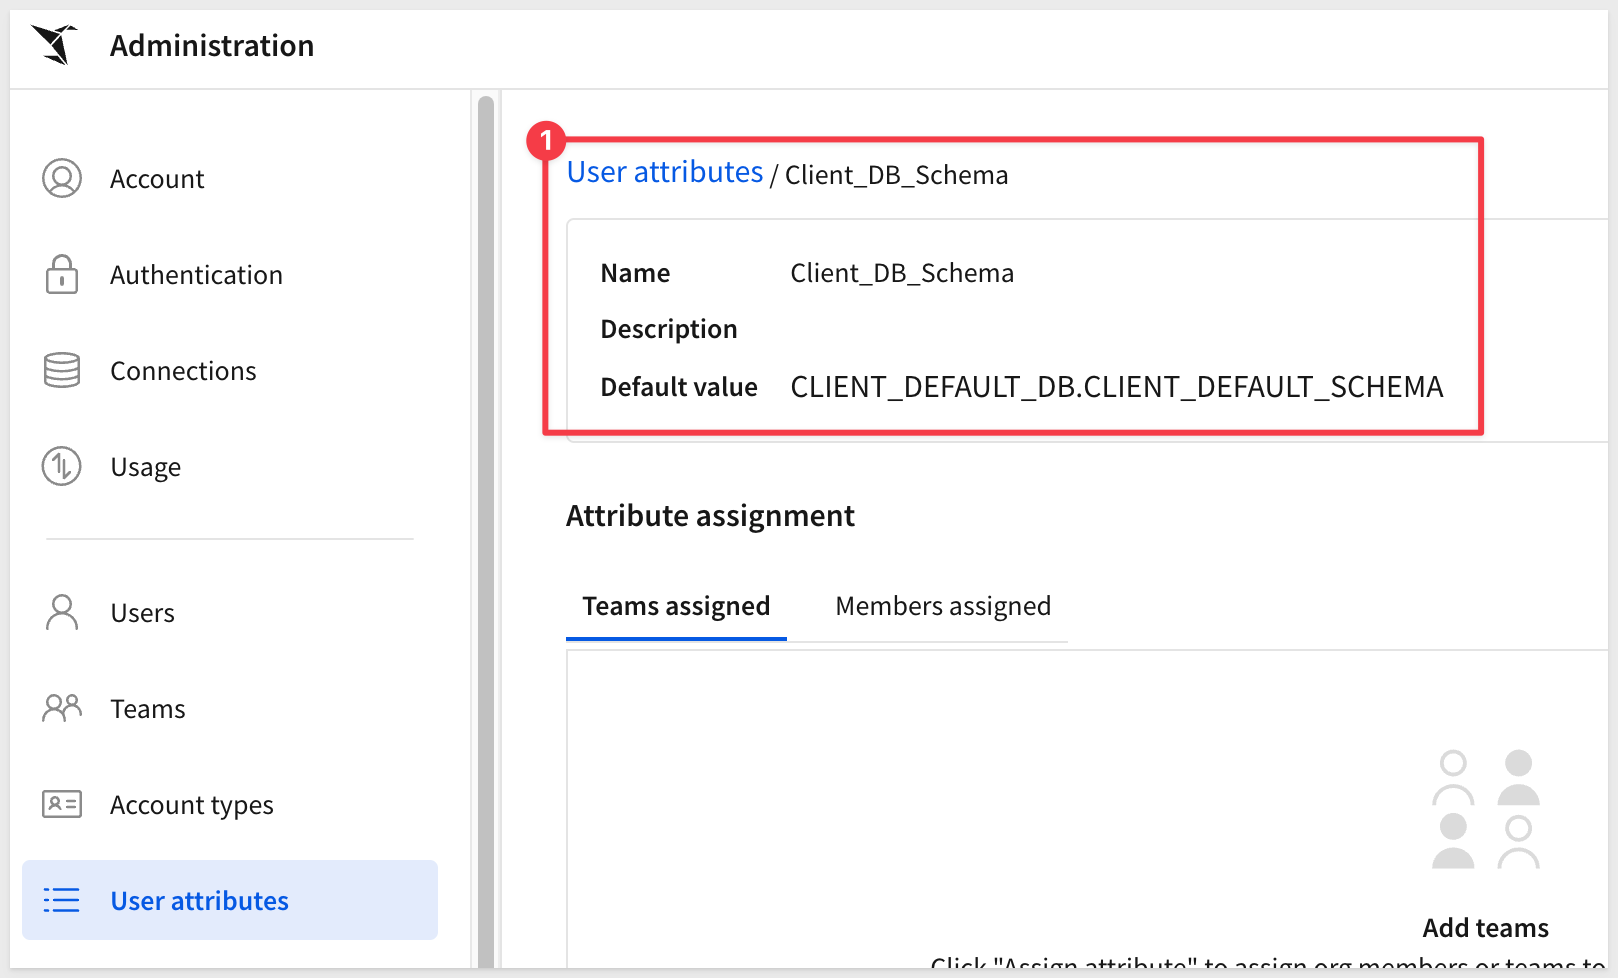
Navigate to Administration > User Attributes and click Create Attribute.
Give the attribute the name:
Client_DB_Schema
Set the default value to
CLIENT_DEFAULT_DB.CLIENT_DEFAULT_SCHEMA
Click Create:
Repeat the process, creating a second attribute named:
Client_Role
```

Set the default value to:
```copy-code
Client_Default_Role
Create Connection to Snowflake:
Create a new connection in Administration > Connections and name it Parameterized Queries QuickStart.
Configure the rest of the connection as shown below, adjusting for your Snowflake account and selecting Client_Role from the list menu:
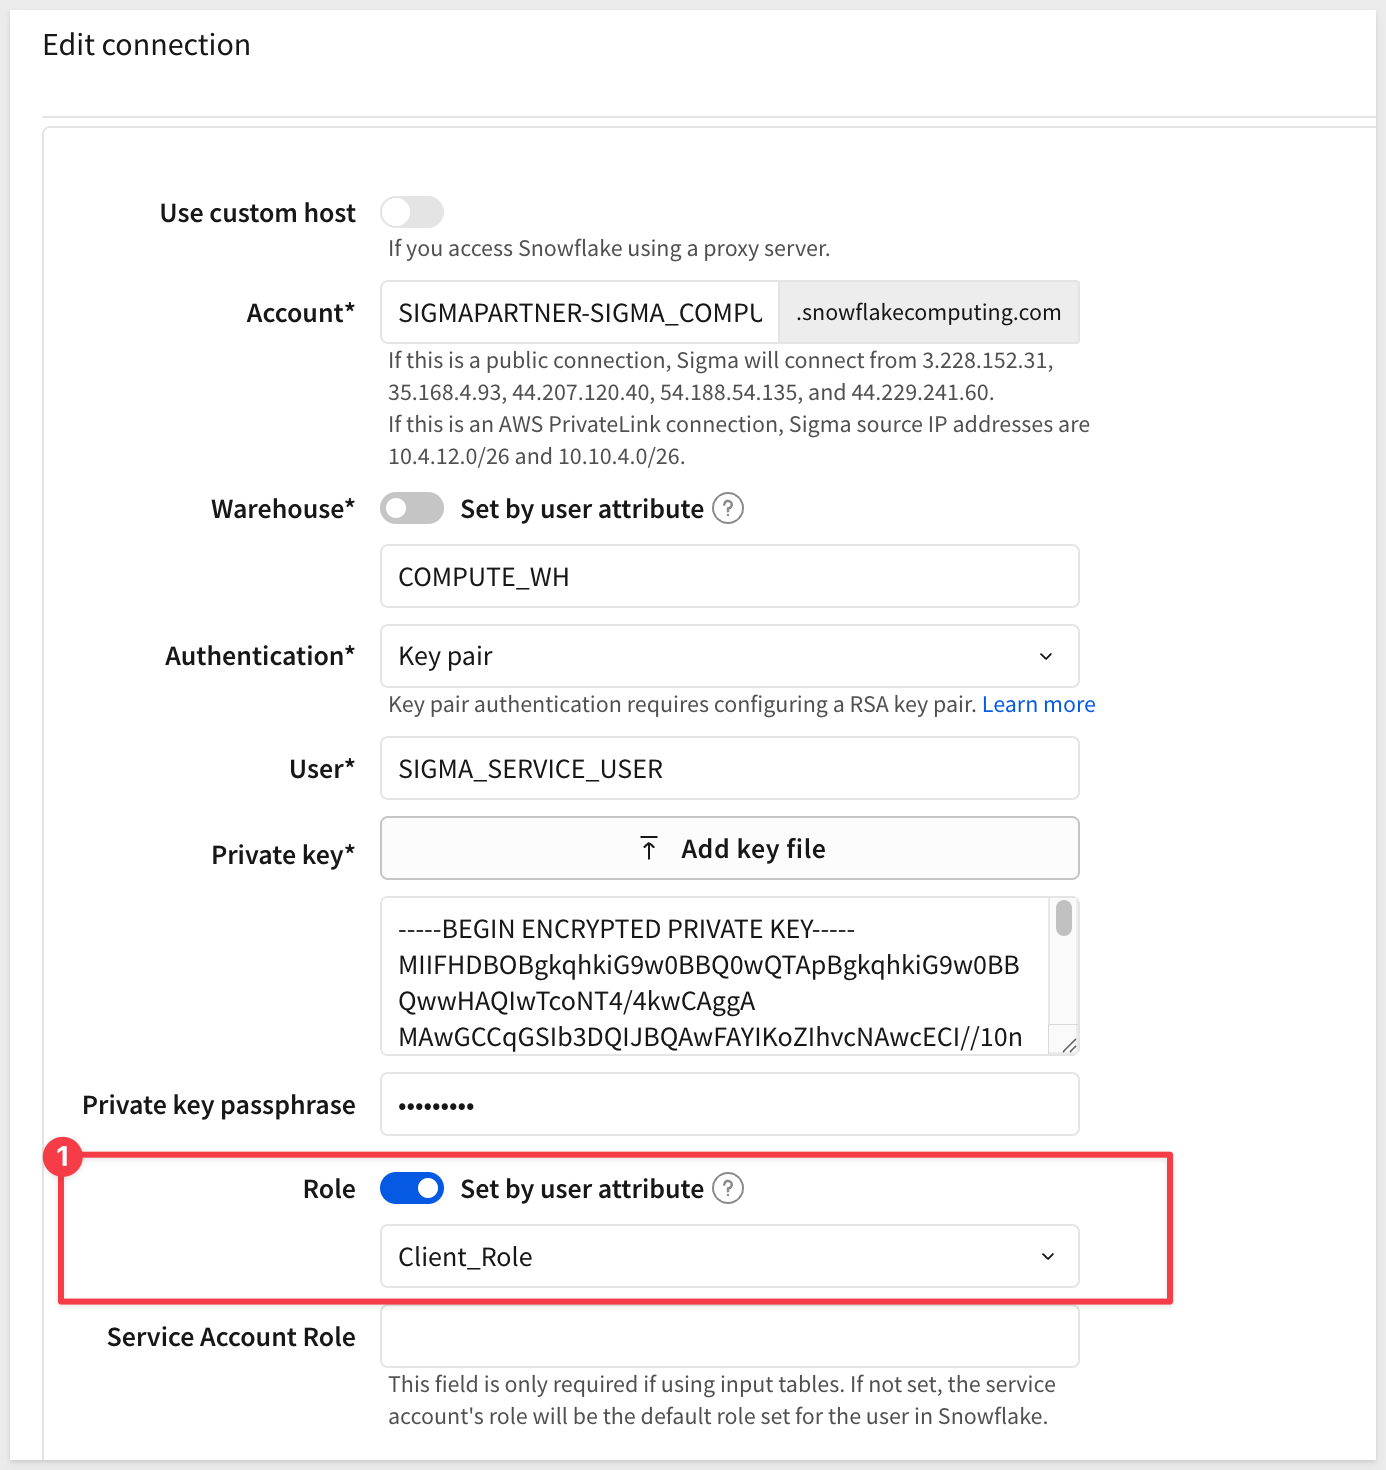
For more information, see Snowflake Key-pair Authorization
Click Save. Sigma will validate the connection, warning if there are any errors.
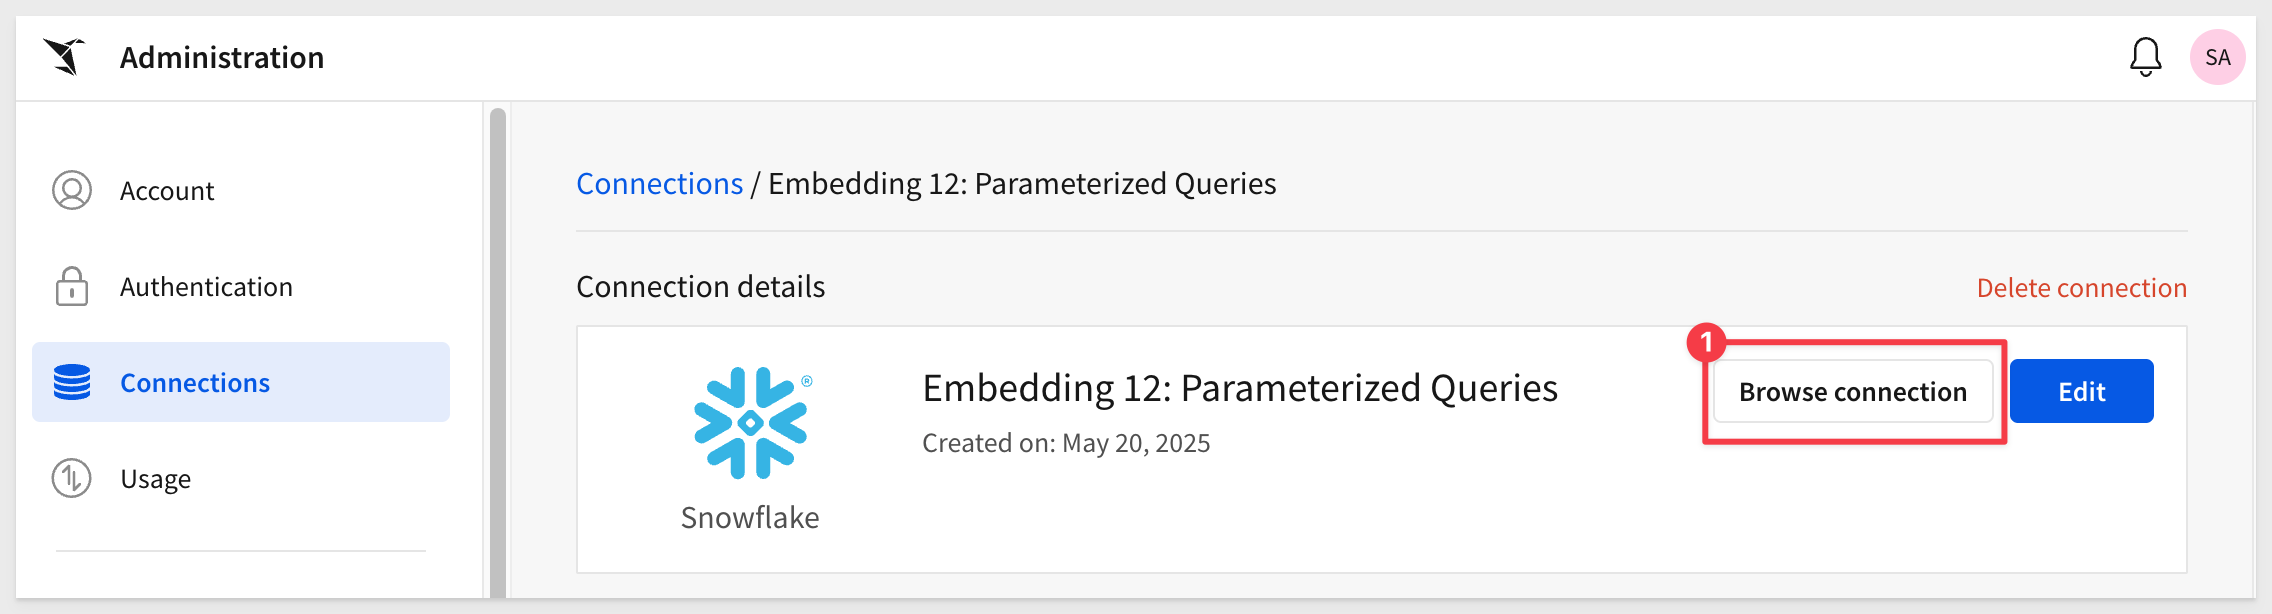
Click the Browse connection button:
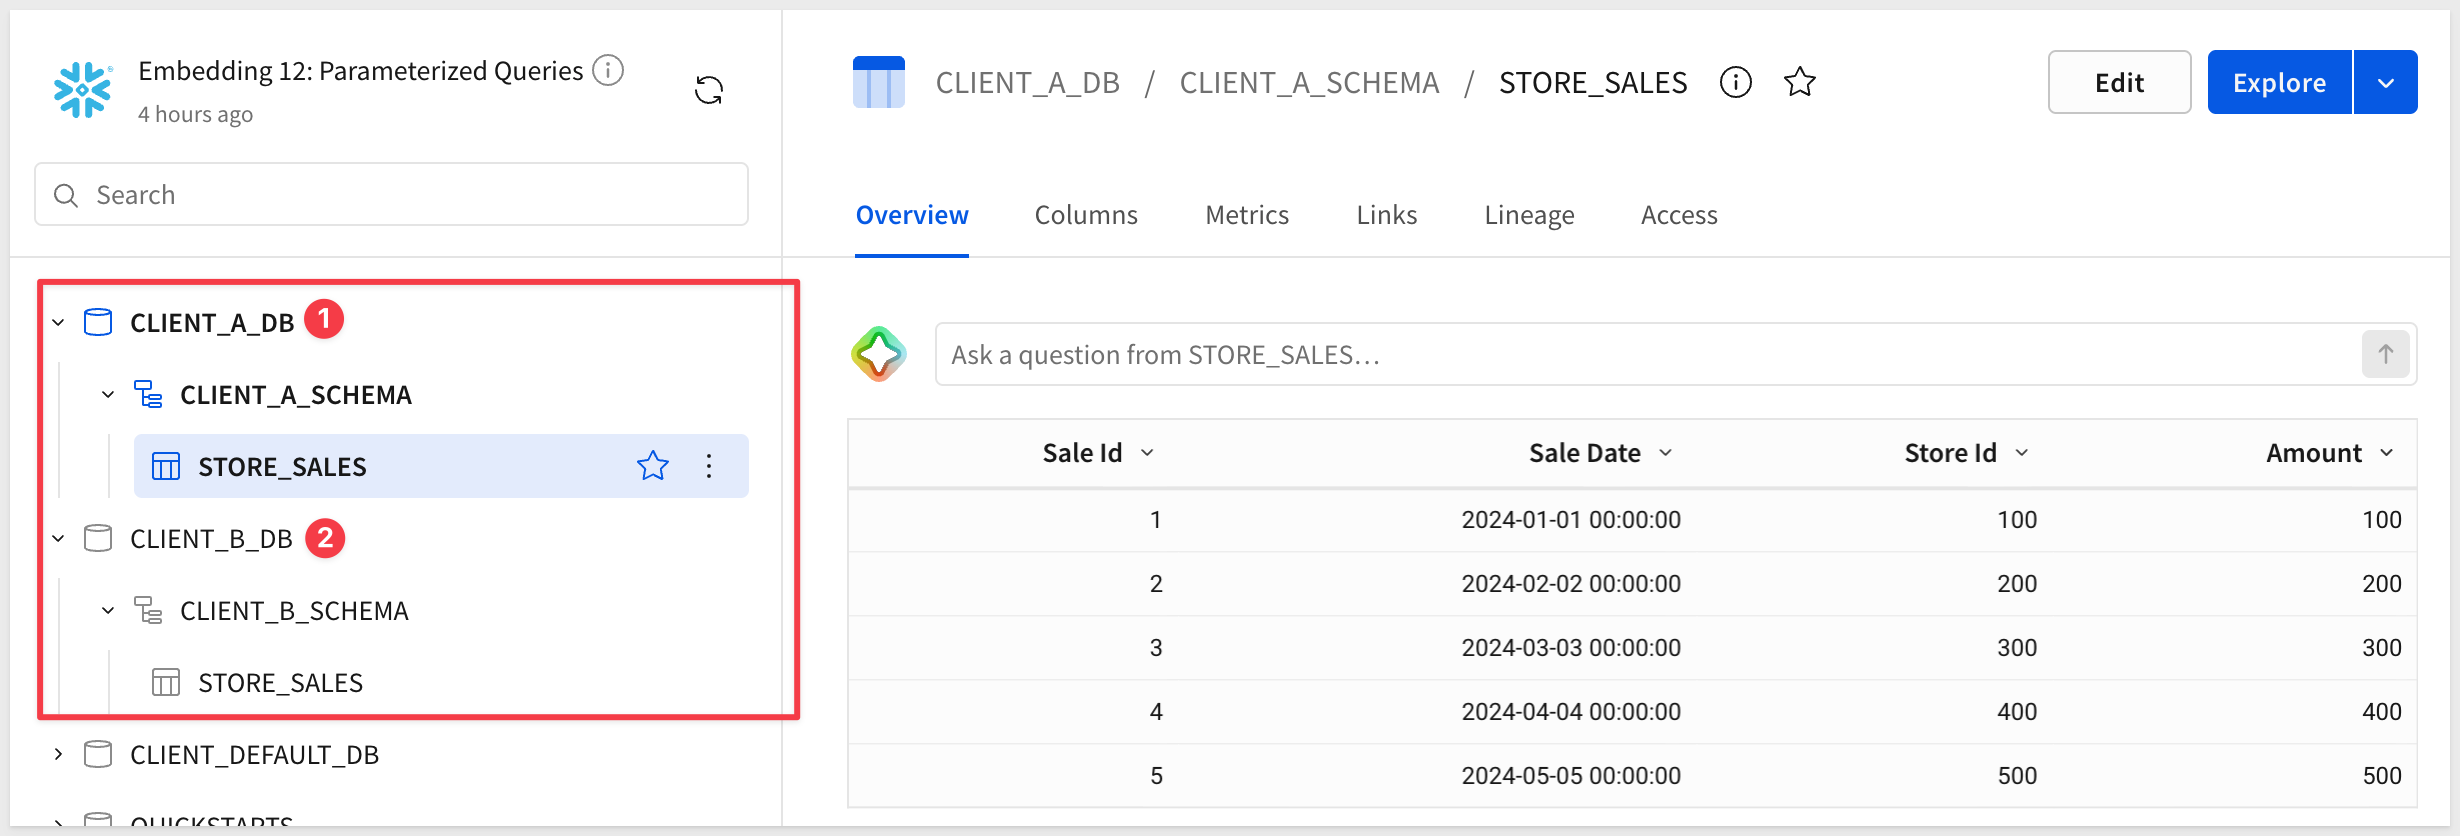
Make sure you can see all the client databases and schemas:
Create the workbook
Click the Explore button to open the STORE_SALES table in a new Sigma workbook. It does not matter if you were browsing the CLIENT_A_DB or CLIENT_B_DB database.
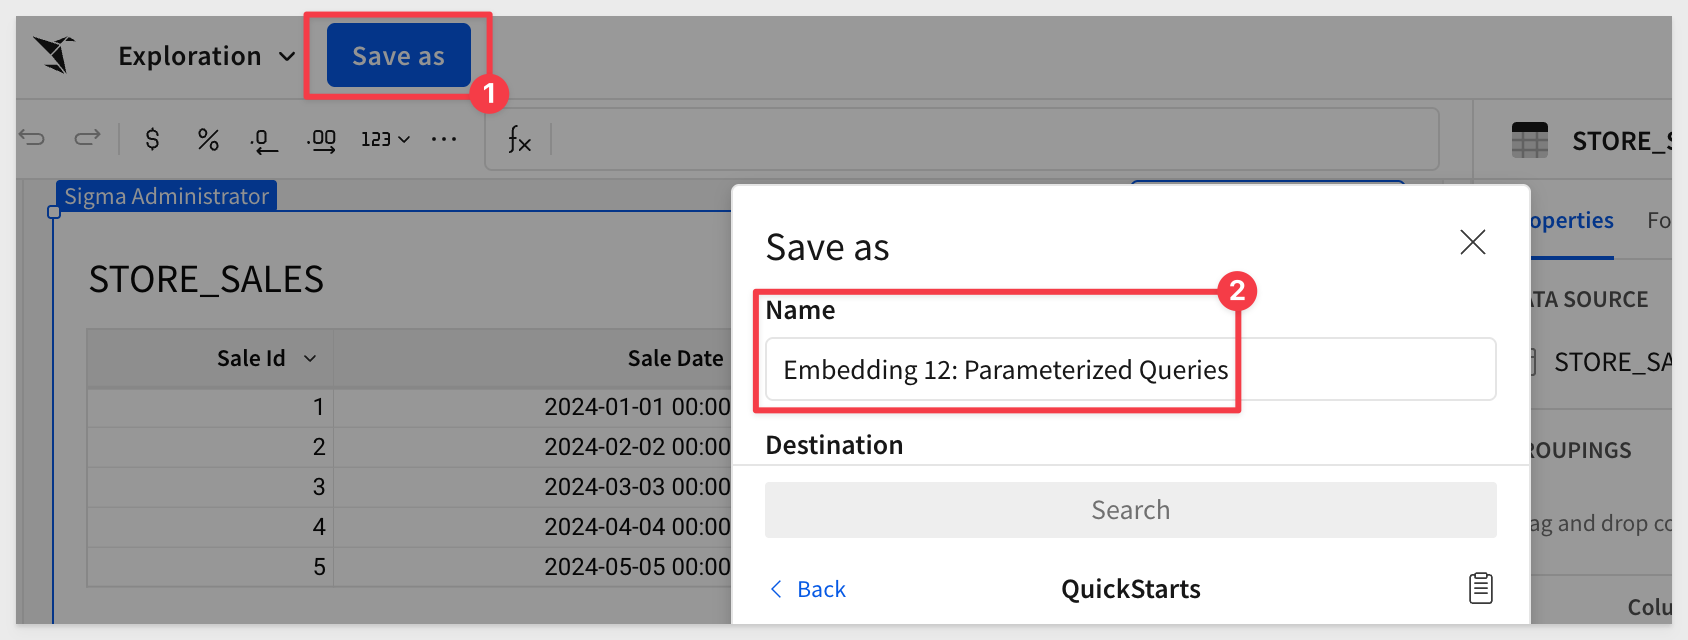
Use the Save As button to create the new workbook named:
Embedding 12: Parameterized Queries
It is really great that Sigma can just launch a connection to data directly into a familiar spreadsheet interface, creating optimized SQL on-the-fly for us in seconds.
However, we want to have a single workbook that provides all clients a common interface, using each client's data only.
The table on this page does not do that, so let's delete it:
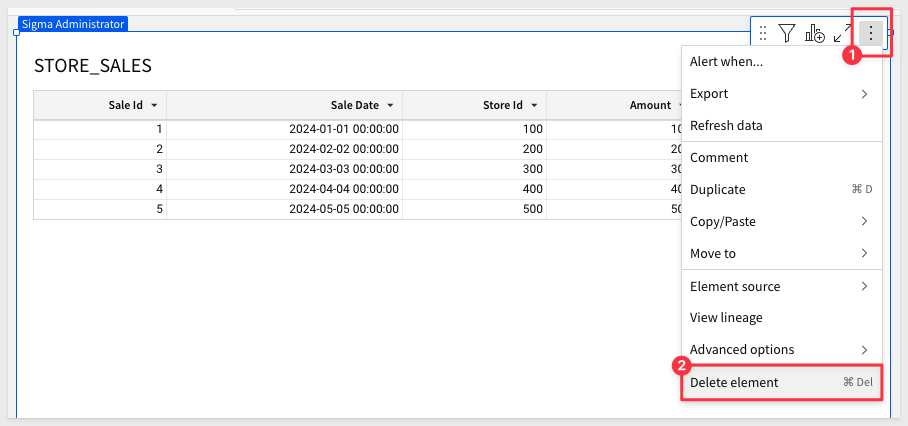
To accomplish that, we need to create a table based on parameterized SQL instead.
Using the Element bar, click Data > Table and SQL:
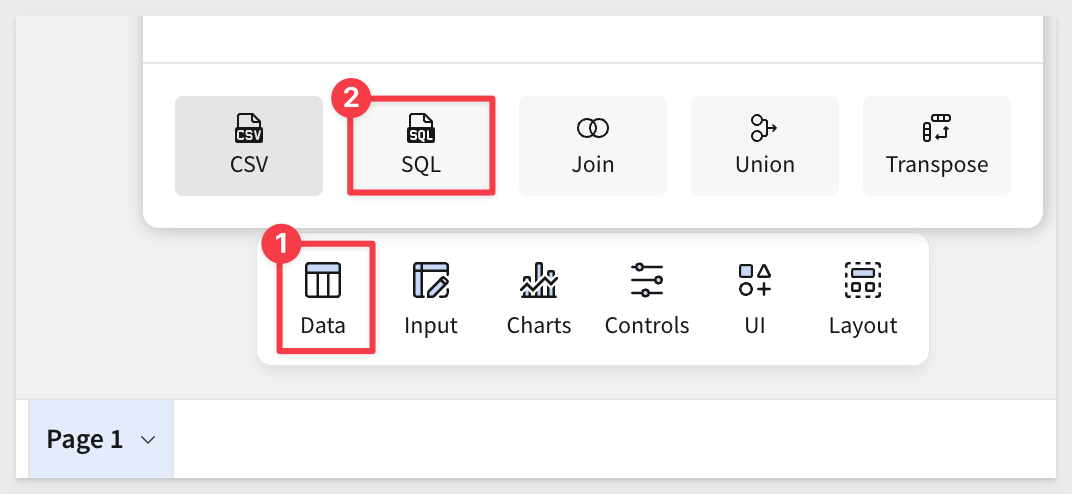
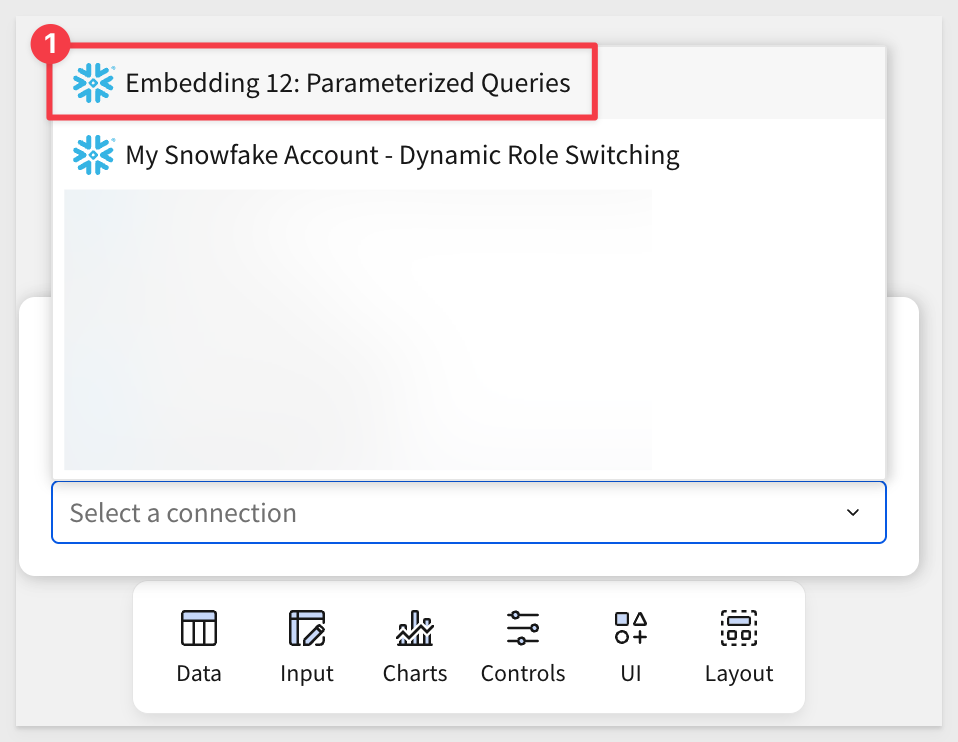
Select our new Embedding 12: Parameterized Queries connection:
We are now able to create a custom SQL statement to return data instead of Sigma doing it for us. We will use this to create a parameterized query.
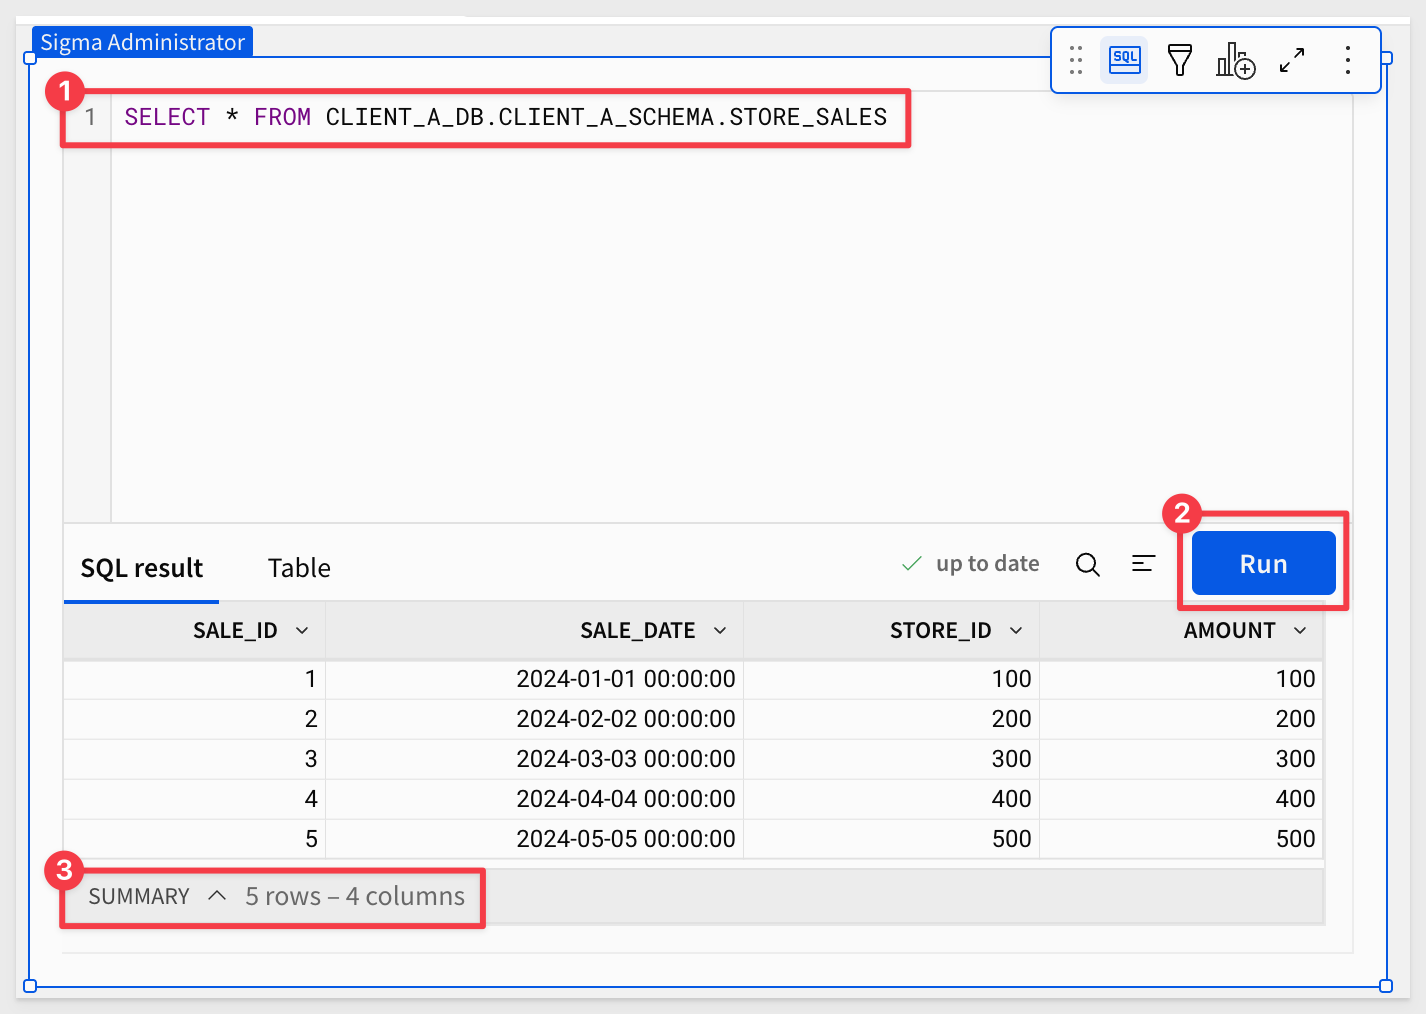
Copy and paste this code and click the Run button:
SELECT * FROM CLIENT_A_DB.CLIENT_A_SCHEMA.STORE_SALES
While our query is not yet parameterized, this verifies that we can retrieve data as expected:
Now replace the code to use our user attribute instead:
SELECT * FROM {{#identifier SplitPart(CurrentUserAttributeText('Client_DB_Schema'), '.', 1)}}.{{#identifier SplitPart(CurrentUserAttributeText('Client_DB_Schema'), '.', 2)}}.STORE_SALES;
We are presented with the single row of data from the Client_Default_DB table:
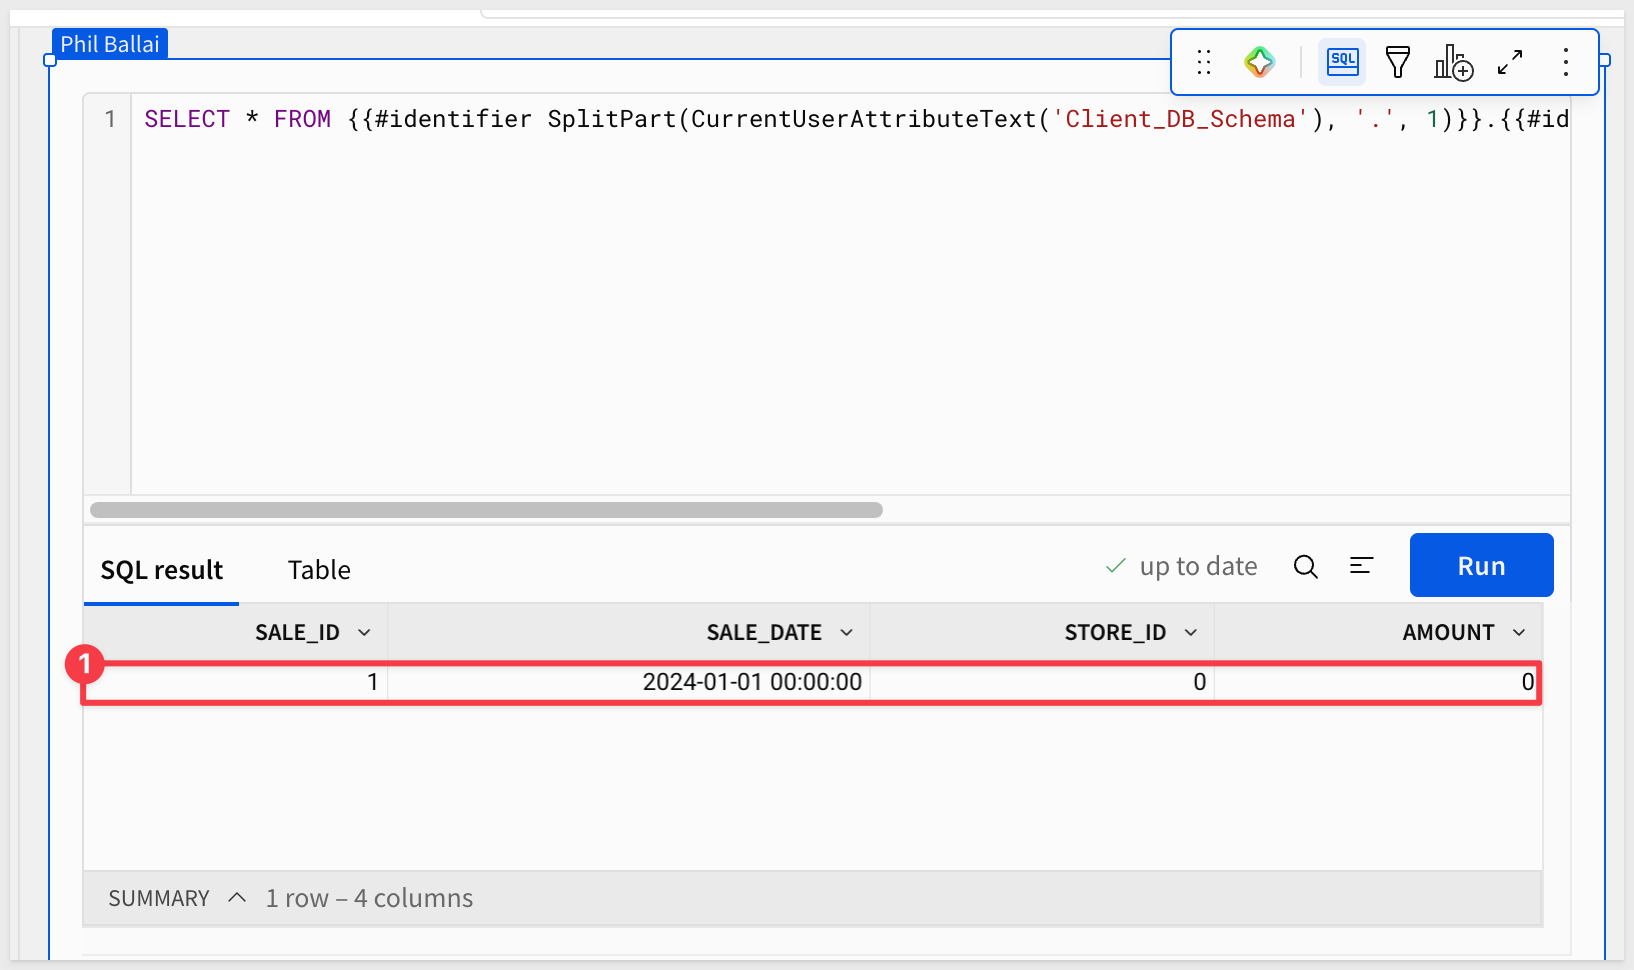
Recall that when we created the Client_DB_Schema user attribute we set a default value. This is why we are seeing data still, instead of a SQL error.
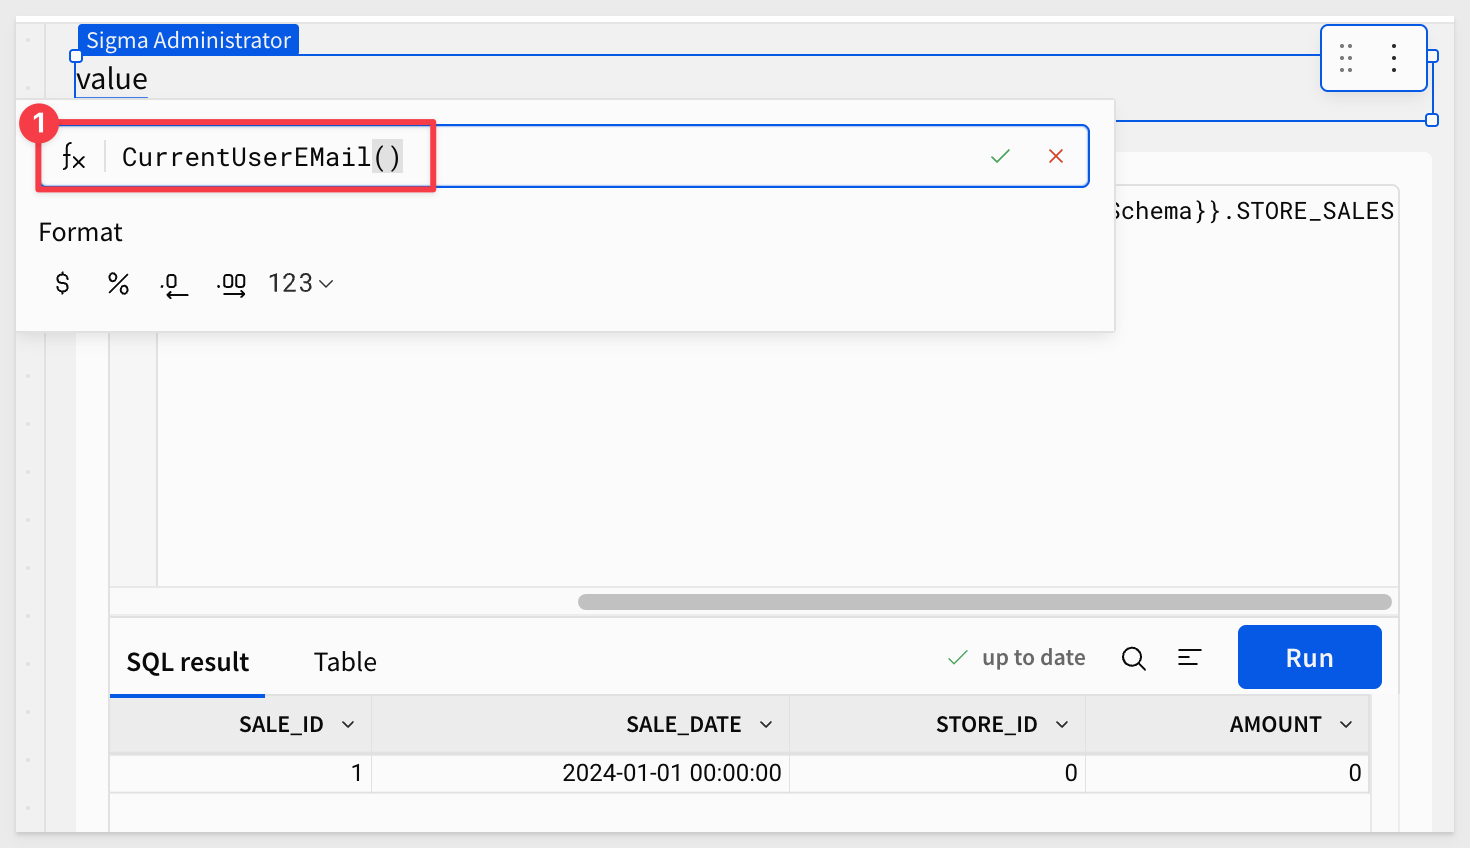
It may also be nice to know which user is accessing data when we test the embed later. This is easy enough to do.
Click the SQL icon in the upper right corner of the table to collapse the SQL editor.
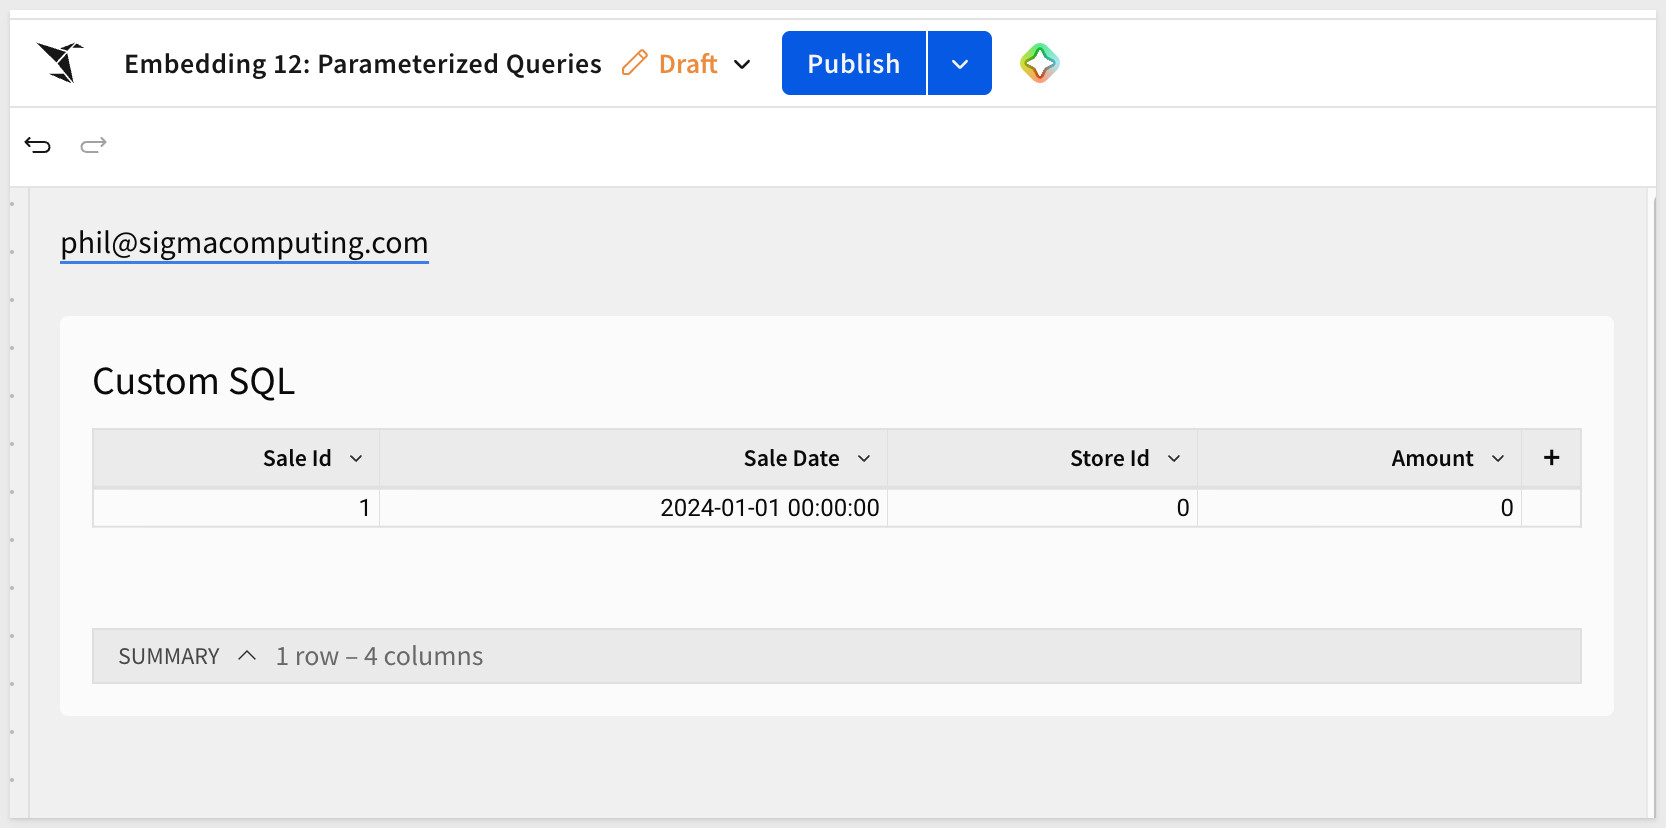
Add a new Text element from the UI element bar group and configure it by typing =CurrentUserEmail() and clicking the  :
:
At this point, the workbook looks like this:
Click Publish.
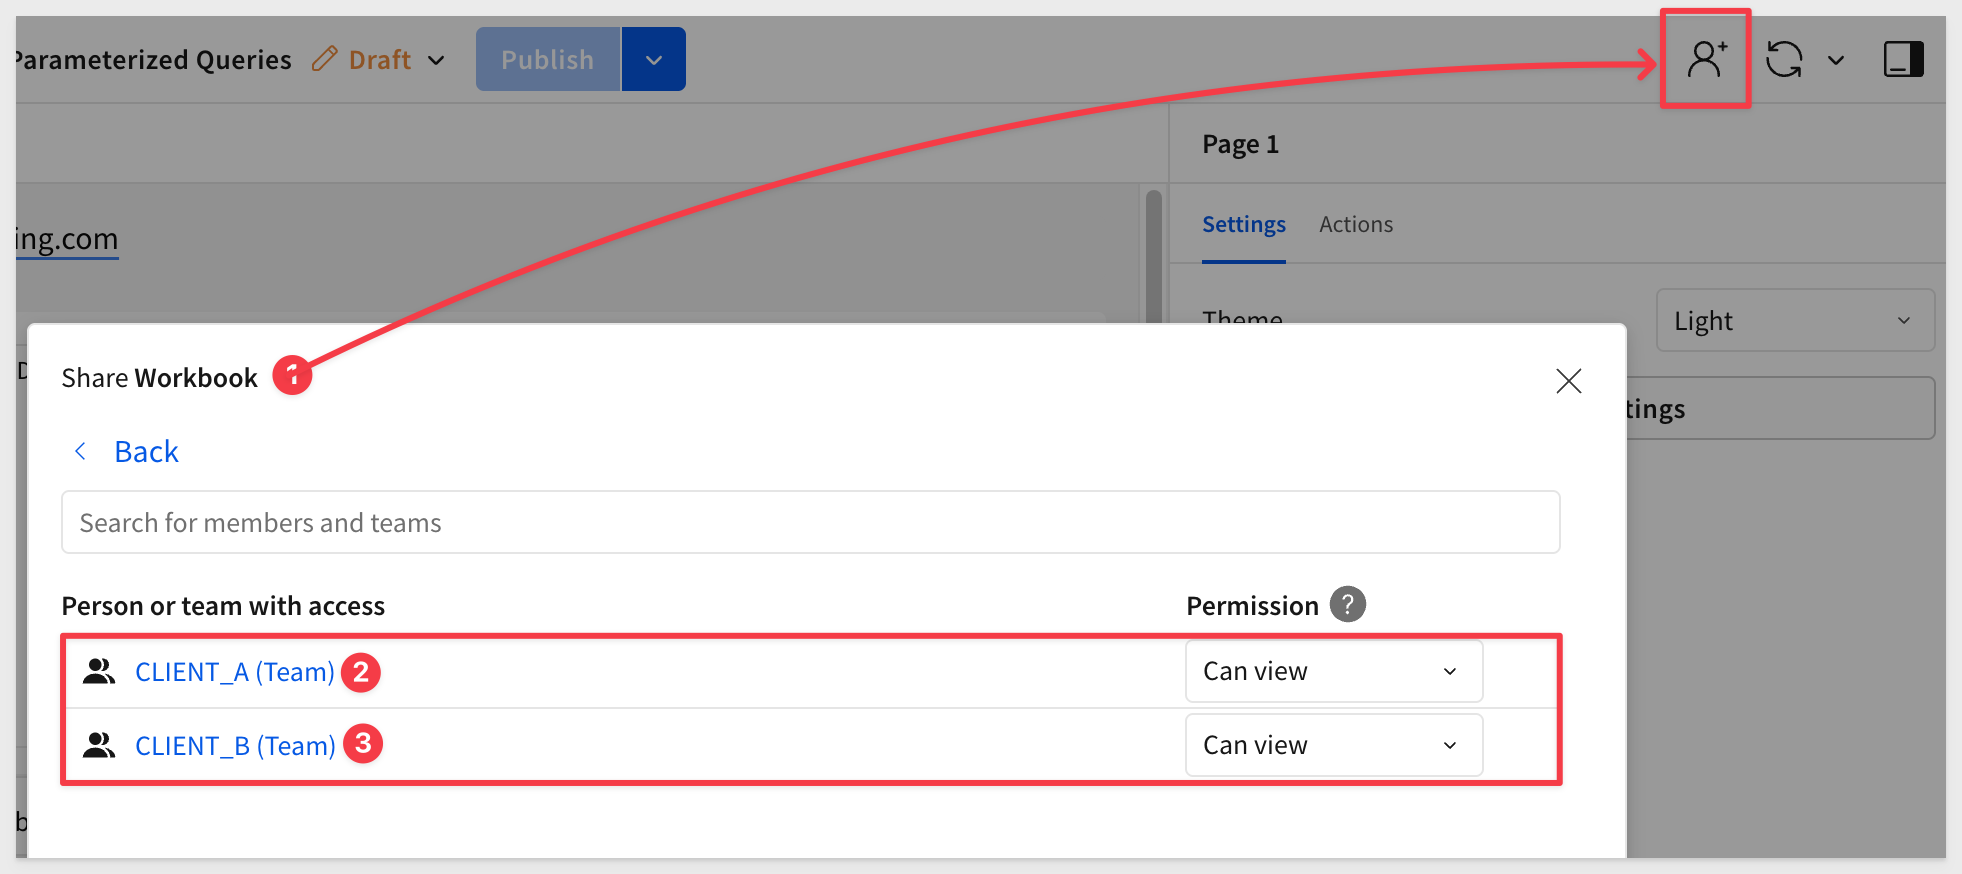
Share with teams
To be able to test this workbook, we need to share it with the two teams.
Add the CLIENT_A and CLIENT_B teams. Set the permission to Can View and select Share:
Embed URL
Open the workbook's menu and click Go to published version:
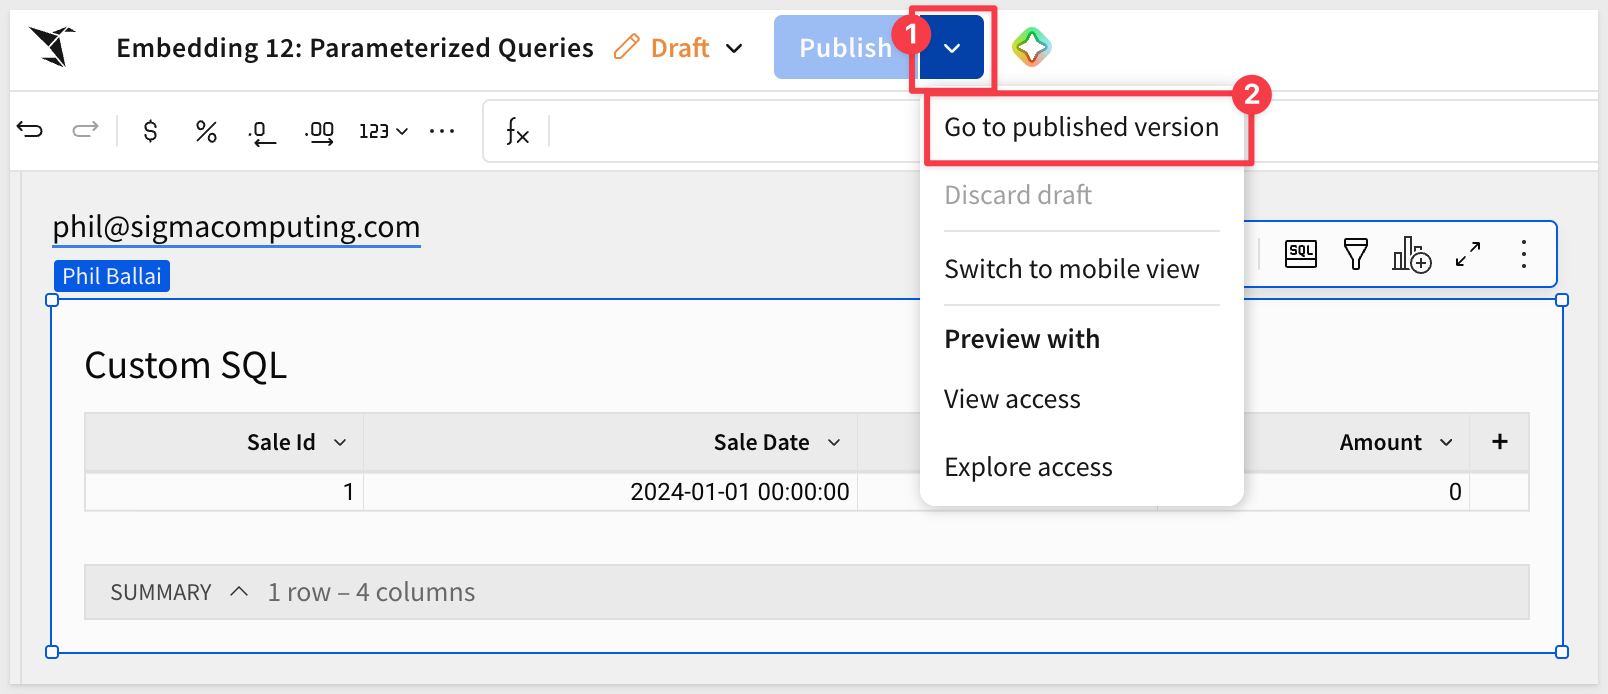
Copy the URL from the browser and store it in a text file; we will use that later.
In the QuickStart Embedding 01: Getting Started we deployed a host application locally.
For testing, we'll use the pre-built page that demonstrates this approach.
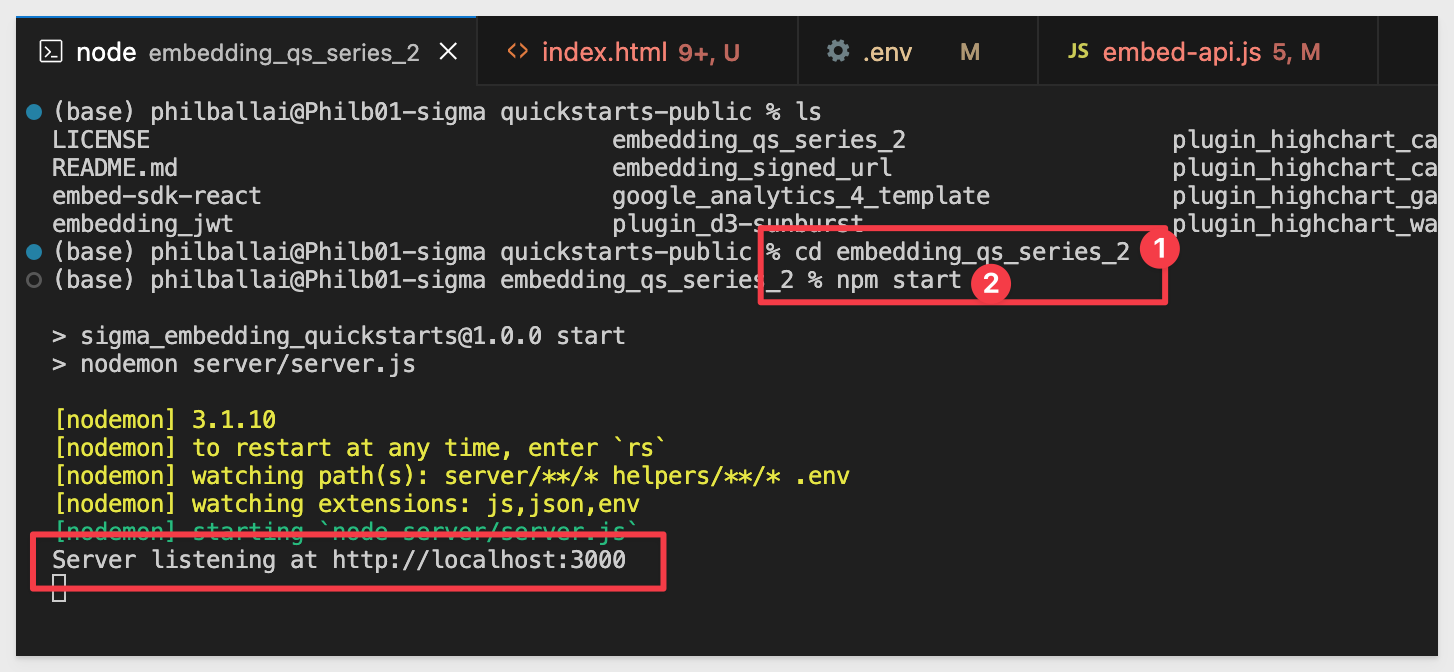
In VSCode, open a new Terminal session inside the embedding_qs_series_2 project and run the following command:
npm start
Now edit the .env file to update a few values.
The CLIENT_ID and SECRET from the Getting Started QuickStart should still be present and working. If they aren't configured, revisit the Getting Started QuickStart to complete that step.
In the # Embedding 12: Parameterized Queries section, we need to configure the values below, using the URL saved earlier for the PARAMETERIZED_QUERIES_BASE_URL value:
PARAMETERIZED_QUERIES_BASE_URL=
PARAMETERIZED_QUERIES_EMAIL=sales_person@client_a.com
PARAMETERIZED_QUERIES_ACCOUNT_TYPE=View
PARAMETERIZED_QUERIES_TEAMS=Client_A

PARAMETERIZED_QUERIES_ua_Client_Role=Client_A_Role
PARAMETERIZED_QUERIES_ua_Client_DB_Schema=CLIENT_A_DB.CLIENT_A_SCHEMA
Save the .env file.

In a browser, open:
http://localhost:3000/parameterized_queries/?mode=parameterized_queries
The table loads with the Snowflake data for Client_A and the user attributes that were passed are shown in the left sidebar:
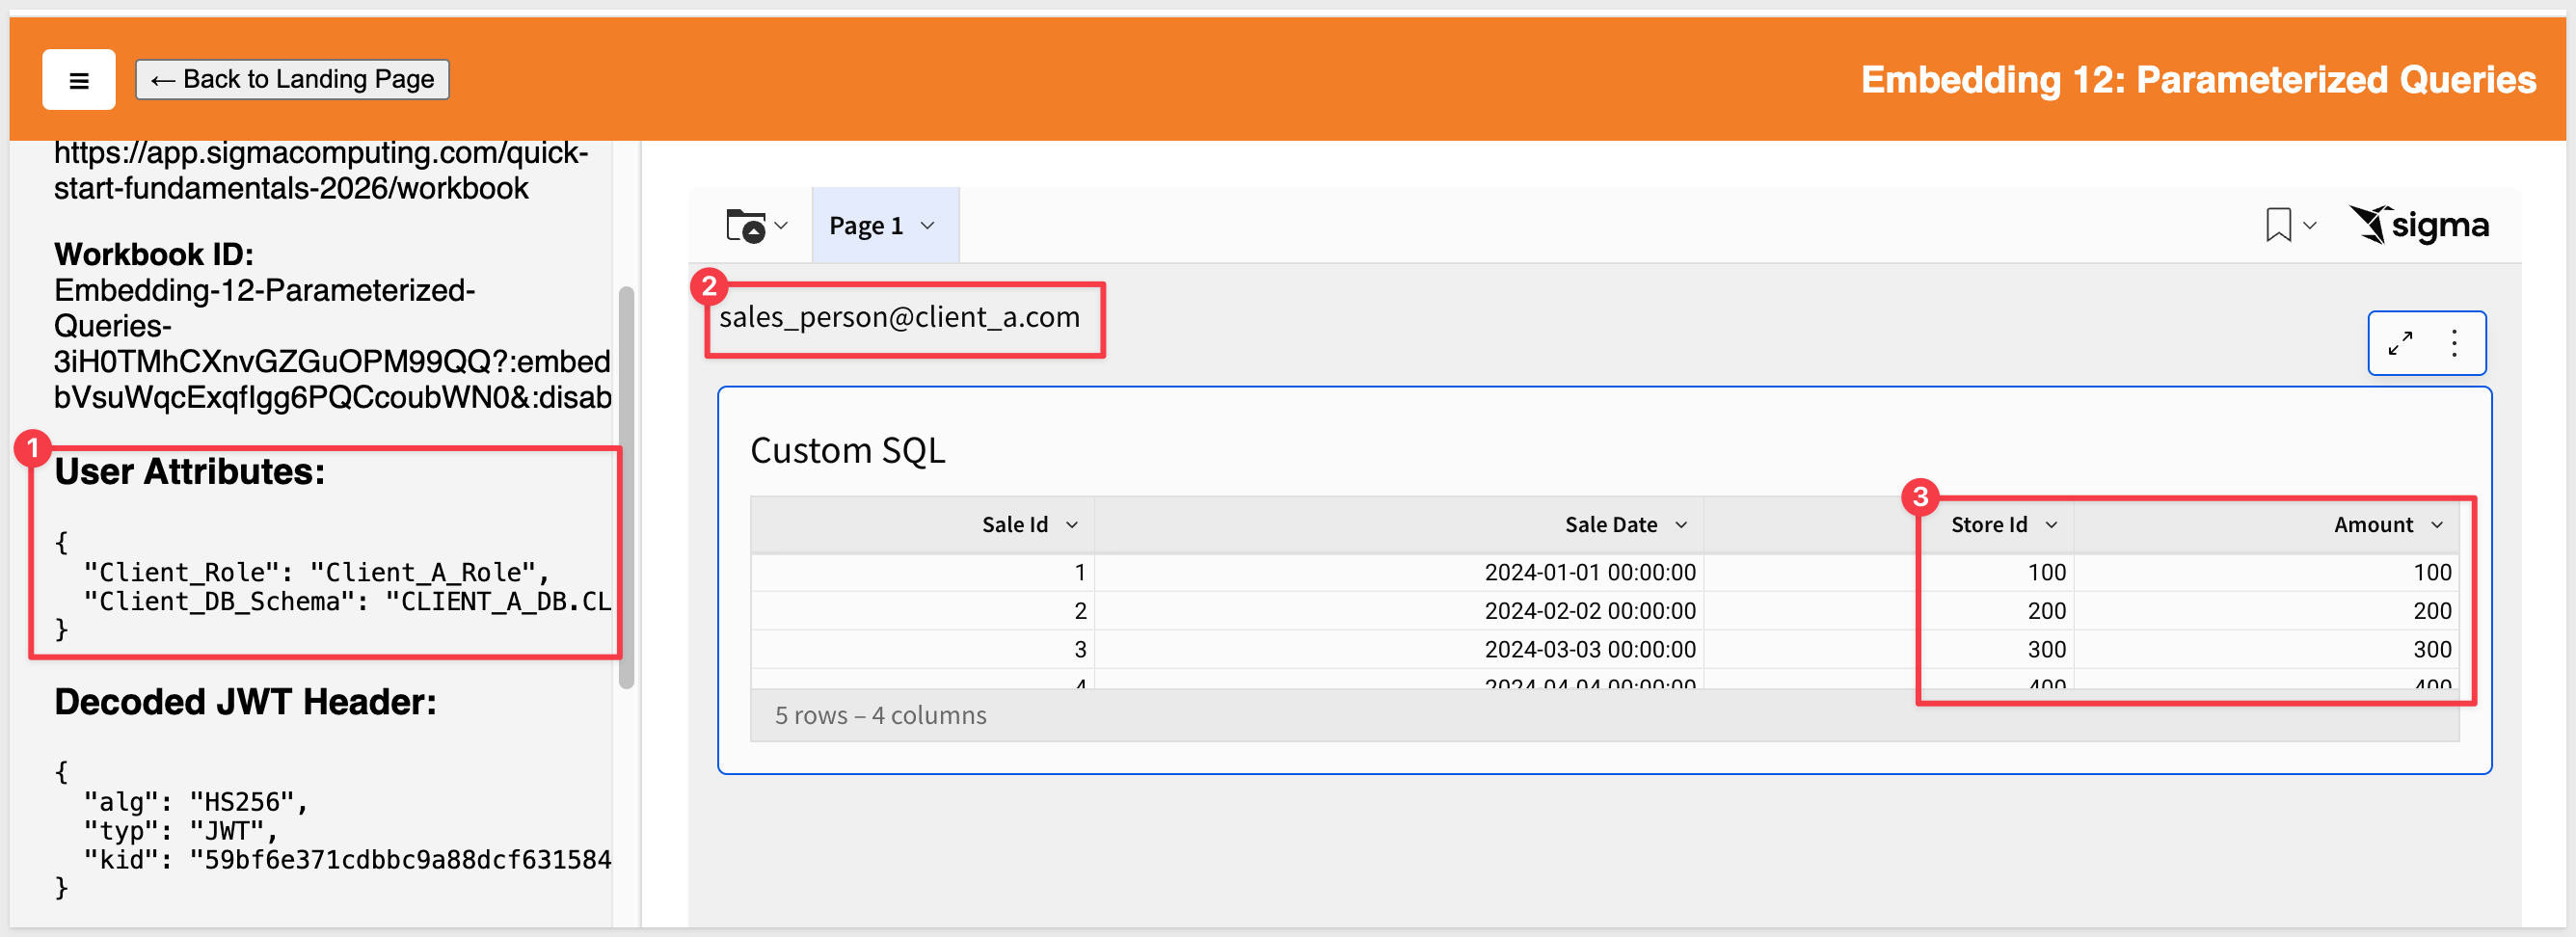
This configuration uses Snowflake's role-based access control to enforce data-level security.
Embed users are authenticated by the host application, which then passes user attributes to Sigma via the embed API. They are automatically added to Sigma and assigned to a team based on instructions from the host application.
Switch users
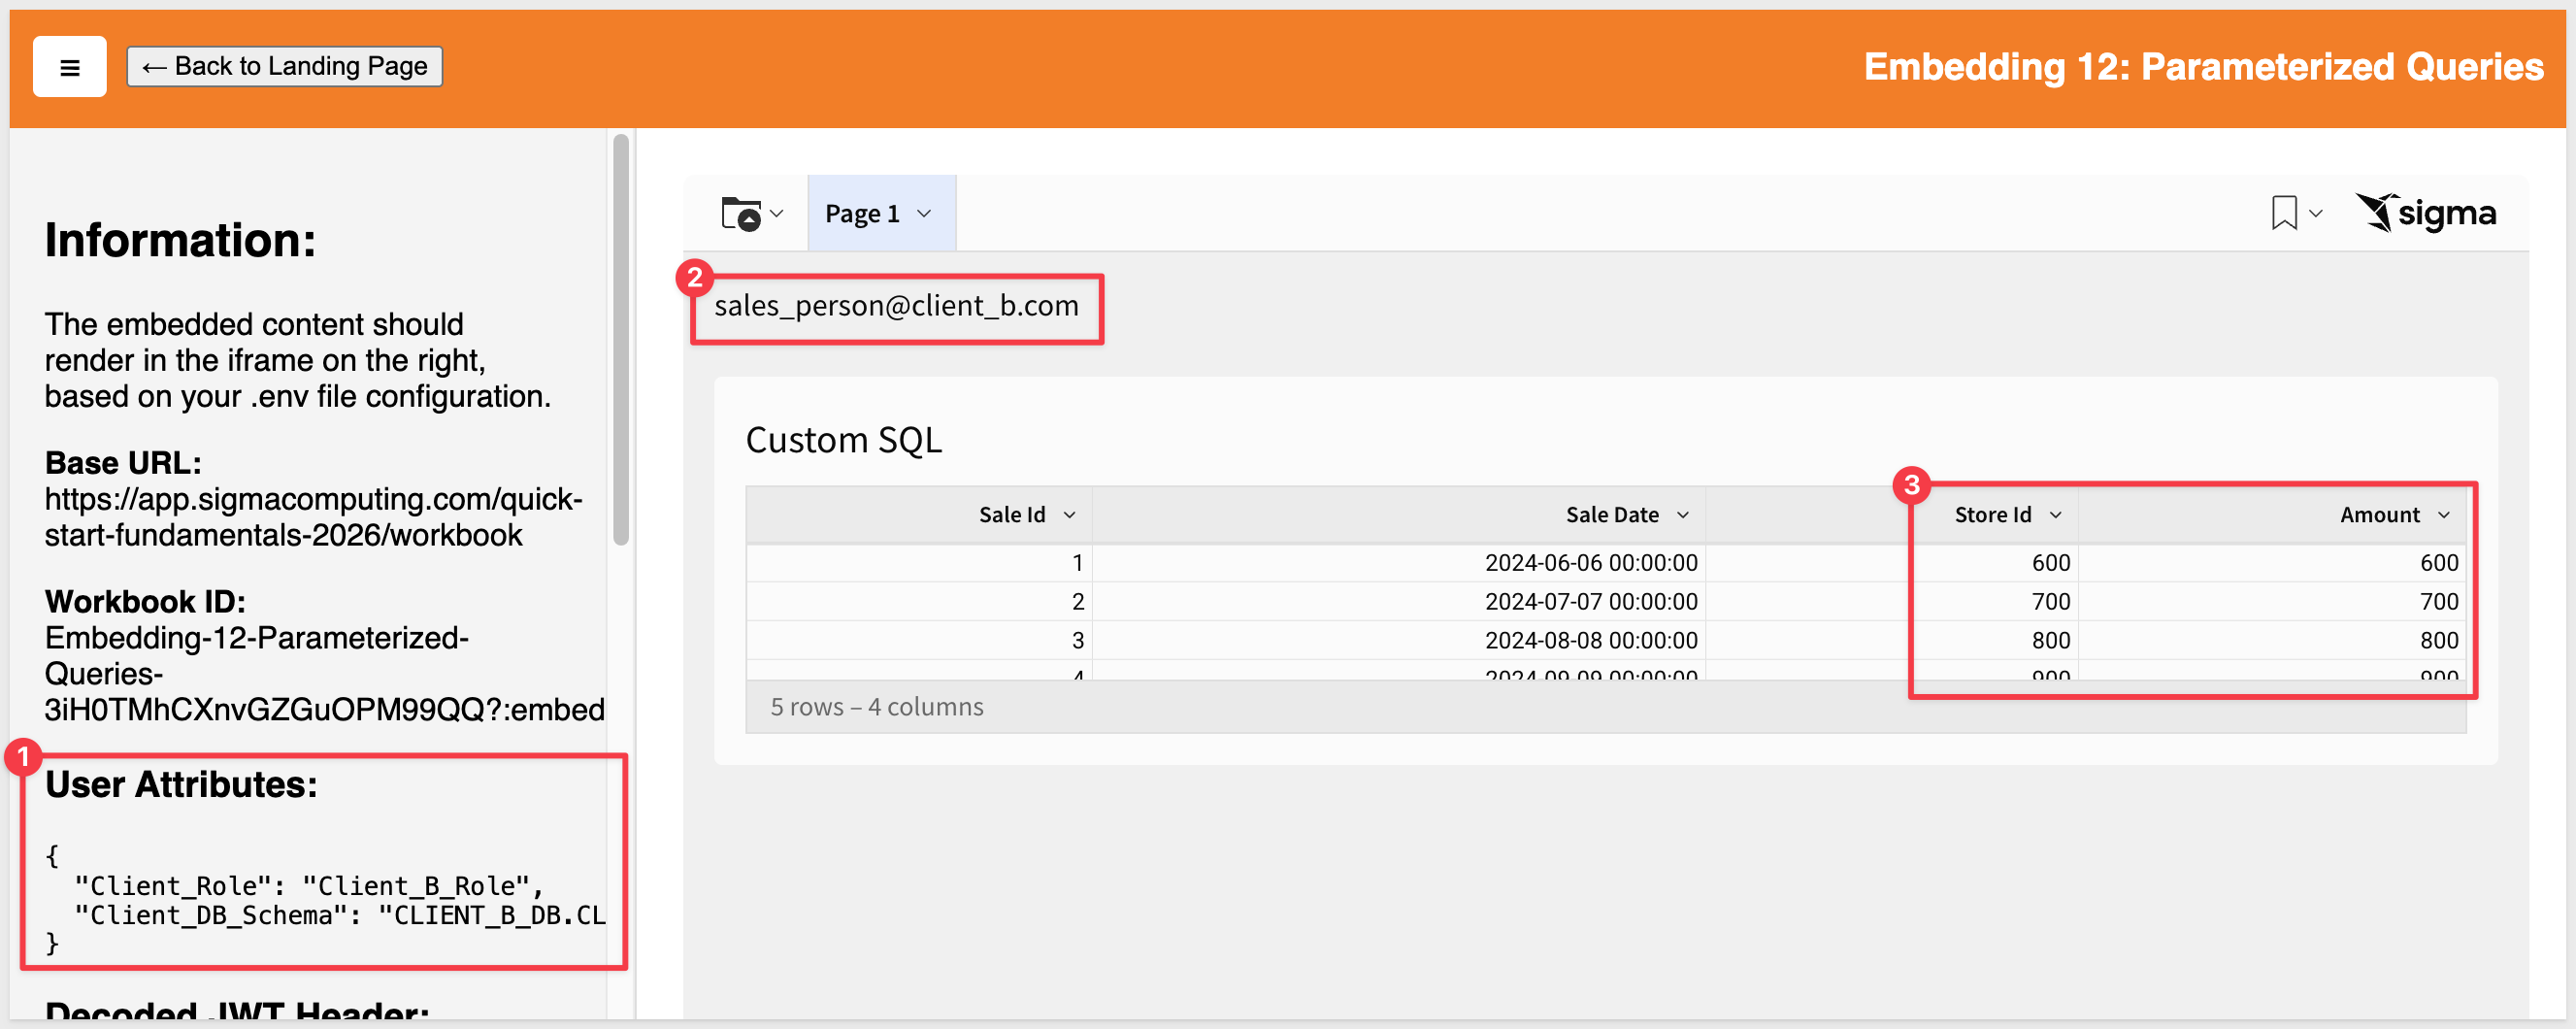
To simulate a different user, update the .env values for Client_B:
PARAMETERIZED_QUERIES_EMAIL=sales_person@client_b.com
PARAMETERIZED_QUERIES_ACCOUNT_TYPE=View
PARAMETERIZED_QUERIES_TEAMS=Client_B

PARAMETERIZED_QUERIES_ua_Client_Role=Client_B_Role
PARAMETERIZED_QUERIES_ua_Client_DB_Schema=CLIENT_B_DB.CLIENT_B_SCHEMA
Save the file and refresh the browser.
You should now see only Client_B data:
We can now deploy a Sigma dashboard that is shared across multiple clients, ensuring per-client data isolation through parameterized queries.
This QuickStart built the parameterized query pattern for Sigma embedding. A single workbook serves multiple clients, and a user attribute routes each session to the correct Snowflake database and schema at query time. Role selection at the connection, identifier substitution at the SQL layer, and a default-value fallback combine to keep each client's data isolated.
The pattern carries across warehouses. Any platform that separates tenants by identifier — database, schema, table, or column — can be addressed the same way: one user attribute per dimension, parsed with SplitPart and #identifier. The embed payload stays small, and isolation lives at the warehouse layer.
If your use case requires row-level security on top of parameterized queries, base the query off a data model instead. The workflow is slightly different, but the parameterization mechanics are the same. See Implementing Row-Level Security (RLS) for the RLS patterns.
Additional Resource Links
Blog
Community
Help Center
QuickStarts
Be sure to check out all the latest developments at Sigma's First Friday Feature page!