Sigma provides many methods to allow users and developers to interact with its systems including web-ui, REST API, Javascript Embed API and an SDK for the React framework.
The Embed-SDK for React offers a higher-level, developer-friendly interface that simplifies integration into applications, in contrast to Sigma's lower-level JavaScript Embed-API, which provides more granular control but may require additional coding
There are some reasons why developers might choose one over the other. Each method offers distinct advantages depending on the project requirements, developer expertise, and desired level of control or simplicity.2
Some of those reasons can be:
Simplification of Integration:
Ease of Use: An SDK typically provides higher-level abstractions and utilities that simplify integration into various frameworks and environments. It's often designed to handle common tasks, setup, and error handling more automatically.
Reduced Boilerplate Code: Using an SDK can significantly reduce the amount of code developers need to write themselves, as it often includes methods that encapsulate multiple steps of a process into single function calls.
Consistency and Reliability:
Standardized Code: SDKs provide a standardized way of interacting with an API, which can reduce errors and inconsistencies in how different developers or teams implement their solutions.
Maintained by Source: Since SDKs are usually provided and maintained by the source company (in this case, Sigma), they are likely to be well-supported and updated regularly, ensuring compatibility with the latest versions of the API.
Framework-Specific Integration:
Framework Optimizations: SDKs often include optimizations for specific programming frameworks (like React, Angular, or Vue.js). For example, a React SDK might use hooks or context providers to integrate more seamlessly with React apps.
Handling Dependencies: The SDK might automatically manage dependencies and interactions with other libraries, which can help in maintaining clean and efficient codebases.
Choosing between an SDK and directly using an API depends on the specific needs of your project, your team's expertise, and the level of custom functionality required.
SDKs are generally recommended for most standard implementations due to their ease of use, while direct API integration might be better suited for more customized or lower-level integrations.
Target Audience
Developers interested in evaluating Sigma software development kit ("SDK") for React
For more information on Sigma's product release strategy, see Sigma product releases
Prerequisites
- A computer with a current browser. It does not matter which browser you want to use.
- Access to your Sigma environment.
- Some familiarity with Sigma is assumed. Not all steps will be shown as the basics are assumed to be understood.
- A development environment of choice. We will demonstrate with Microsoft VSCode and related extensions

For this QuickStart, we will demonstrate using Visual Studio Code (VSCode), but you may use any IDE you prefer.
VSCode, is a source-code editor developed by Microsoft for Windows, Linux and macOS. Features include support for debugging, syntax highlighting, intelligent code completion, snippets, code refactoring, and embedded Git.
Install VSCode from Microsoft's download site
Run the installation with all defaults.
Open VSCode and make sure it loads without error.
For experienced developers who just want to see how to use the SDK in a React project, we provide the following information.
The pubic embed-sdk git repository is here
For react-embed-sdk:
Use the following command, depending on your package manager:
npm:
npm install @sigmacomputing/react-embed-sdk

yarn:
yarn add @sigmacomputing/react-embed-sdk

pnpm:
pnpm add @sigmacomputing/react-embed-sdk
For embed-sdk:
Use the following command, depending on your package manager:
npm:
npm install @sigmacomputing/embed-sdk

yarn:
yarn add @sigmacomputing/embed-sdk

pnpm:
pnpm add @sigmacomputing/embed-sdk
Building
The repo uses turbo for its build system. It currently has 3 packages:
- embed-sdk: "bare-bones" wrappers over postMessages
- react-embed-sdk: React hooks to easily use the embed-sdk
- docs: A bare-bone documentation / examples
To build:
pnpm run build
For additional information on Sigma embedding, see the documentation
There is also a QuickStart series on embedding here
We created a simple application, that you can add an embed to.
To save you time, we've stored all the necessary project files in a GitHub repository ("git repo"). Simply clone the git repo using a VSCode to download a copy to our local computer.
To clone the git repository in VSCode, click the link to Clone Git Repository:
We have made the source code available for this QuickStart's demonstration in a public GitHub repository.
While you may clone the entire repository (it is not that large), we want to avoid cloning sections of the repository that are not of immediate interest.
Instead, we will use VSCode and terminal to perform a git sparse-checkout of the specific project folder we are interested in. A few extra steps, but cleaner local project folder.
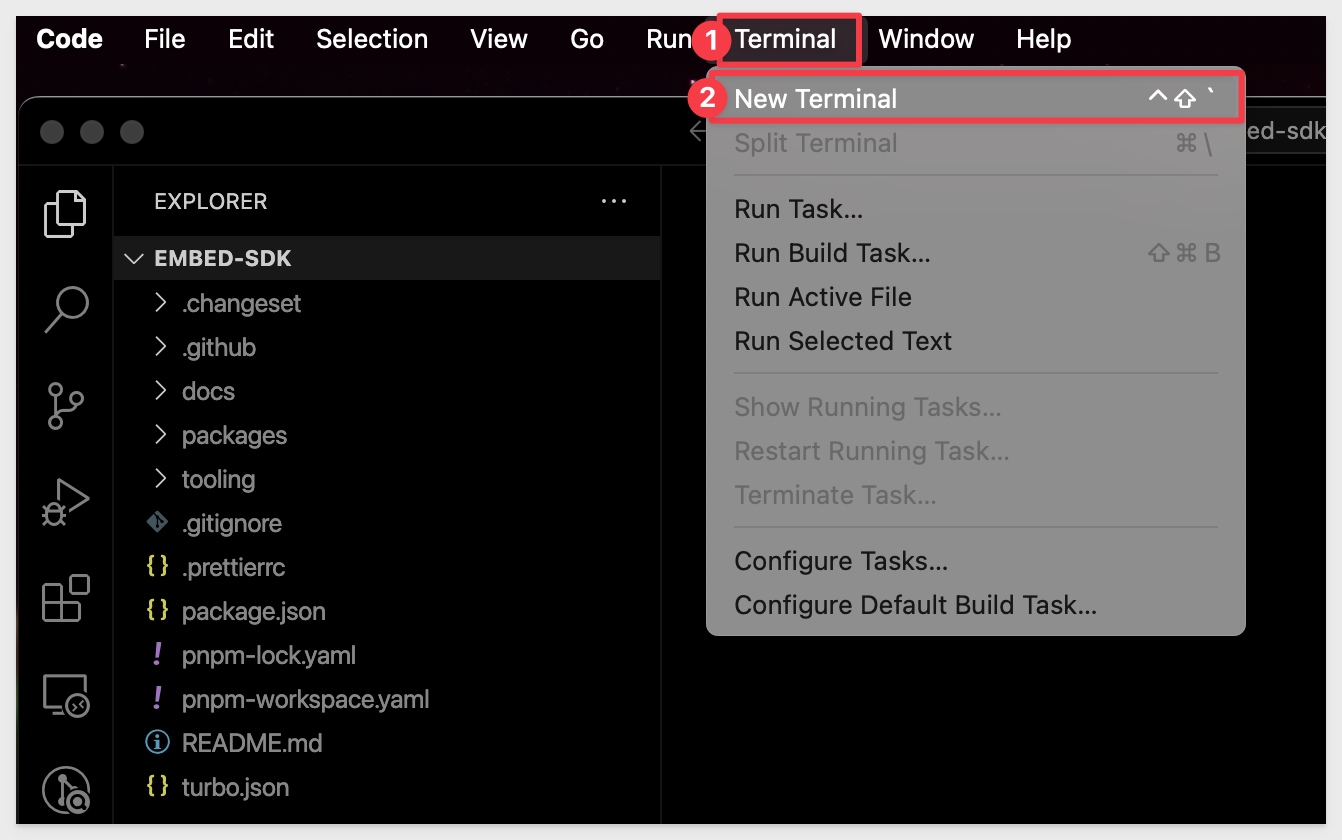
Open VSCode and a new terminal session.
In terminal, navigate to the desired directory where we want to clone the repo folder into.
For example:
cd {/path/to/your/directory}
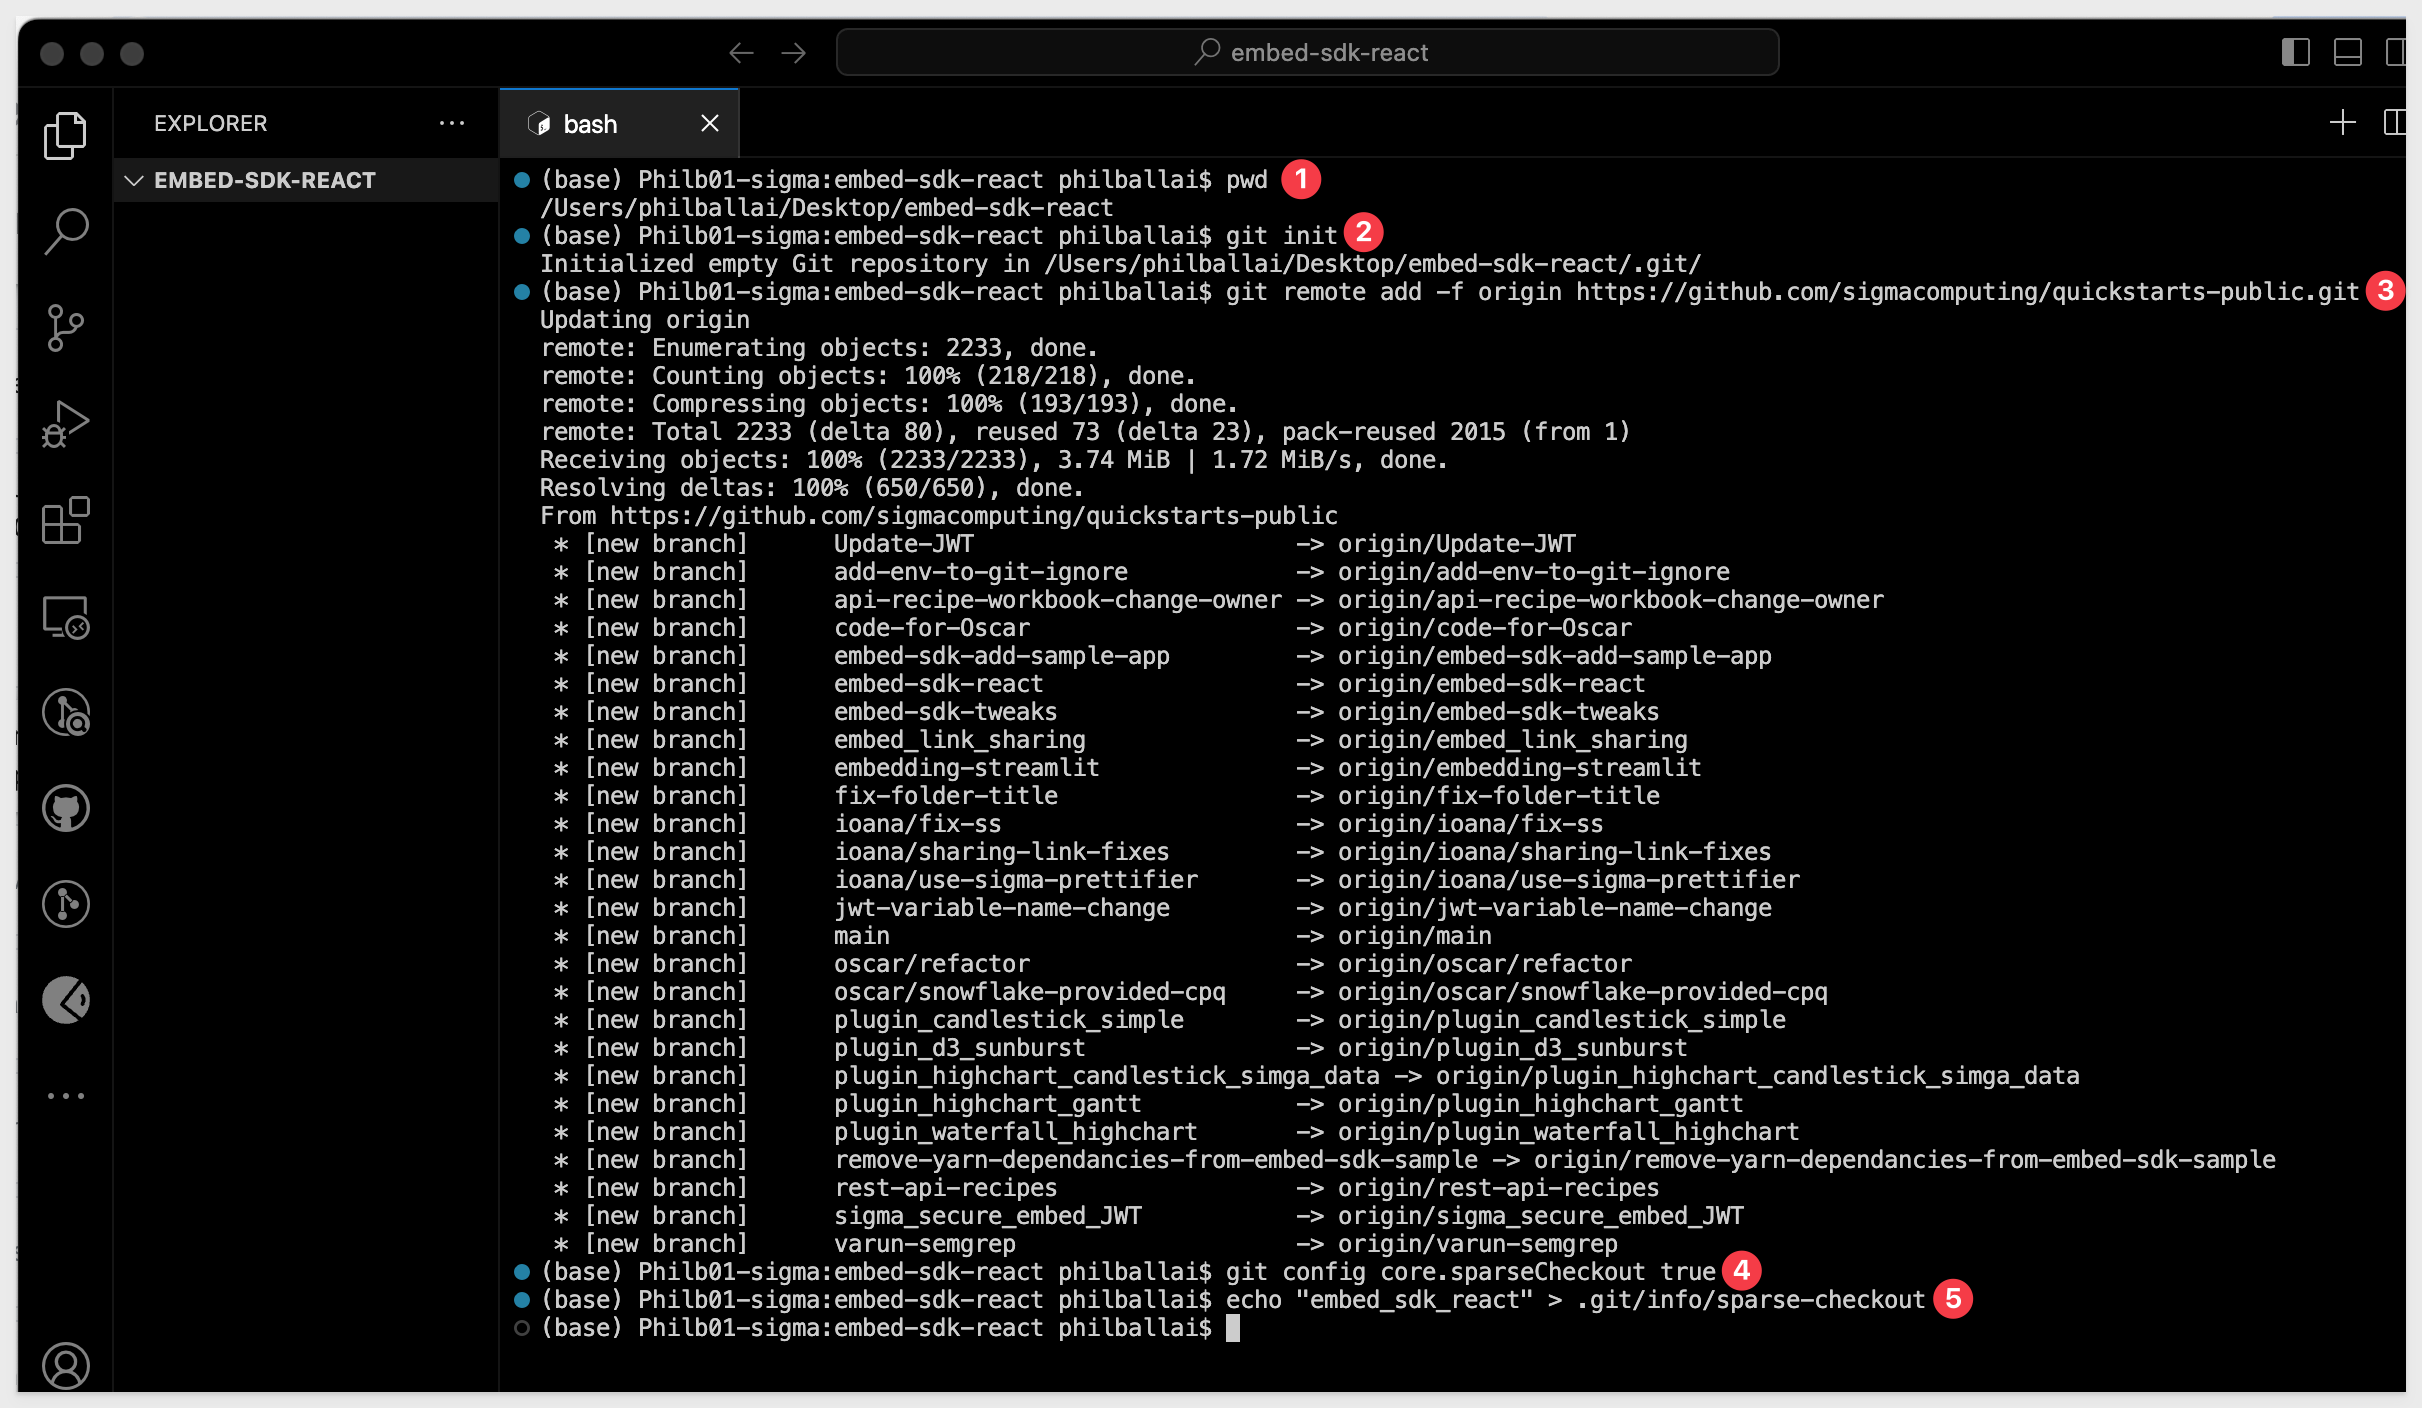
Execute the terminal command:
git init
Add the remote repository as the origin:
git remote add -f origin https://github.com/sigmacomputing/quickstarts-public.git
Enable sparse checkout:
git config core.sparseCheckout true
Specify the folder you want to clone by adding it to the sparse-checkout configuration:
echo "embed-sdk-react" > .git/info/sparse-checkout
At this point, we have run each command and not seen any errors:
Finally, pull the specified folder from the repository:
git pull origin main
We can now see the cloned project folder:

The folder contains the entire embed-sdk-react for you to explore, and there is a sample application we will use for demonstration.
Before we do that, we need to install a few other dependencies to prepare the project folder for initial use.
We need to install Node and other related packages. While this can be done manually, Homebrew allows us to install Node and pnpm with a simple command.
This avoids the need to manually download and install from the official websites.
Using VSCode, open a terminal session (or use the old session):
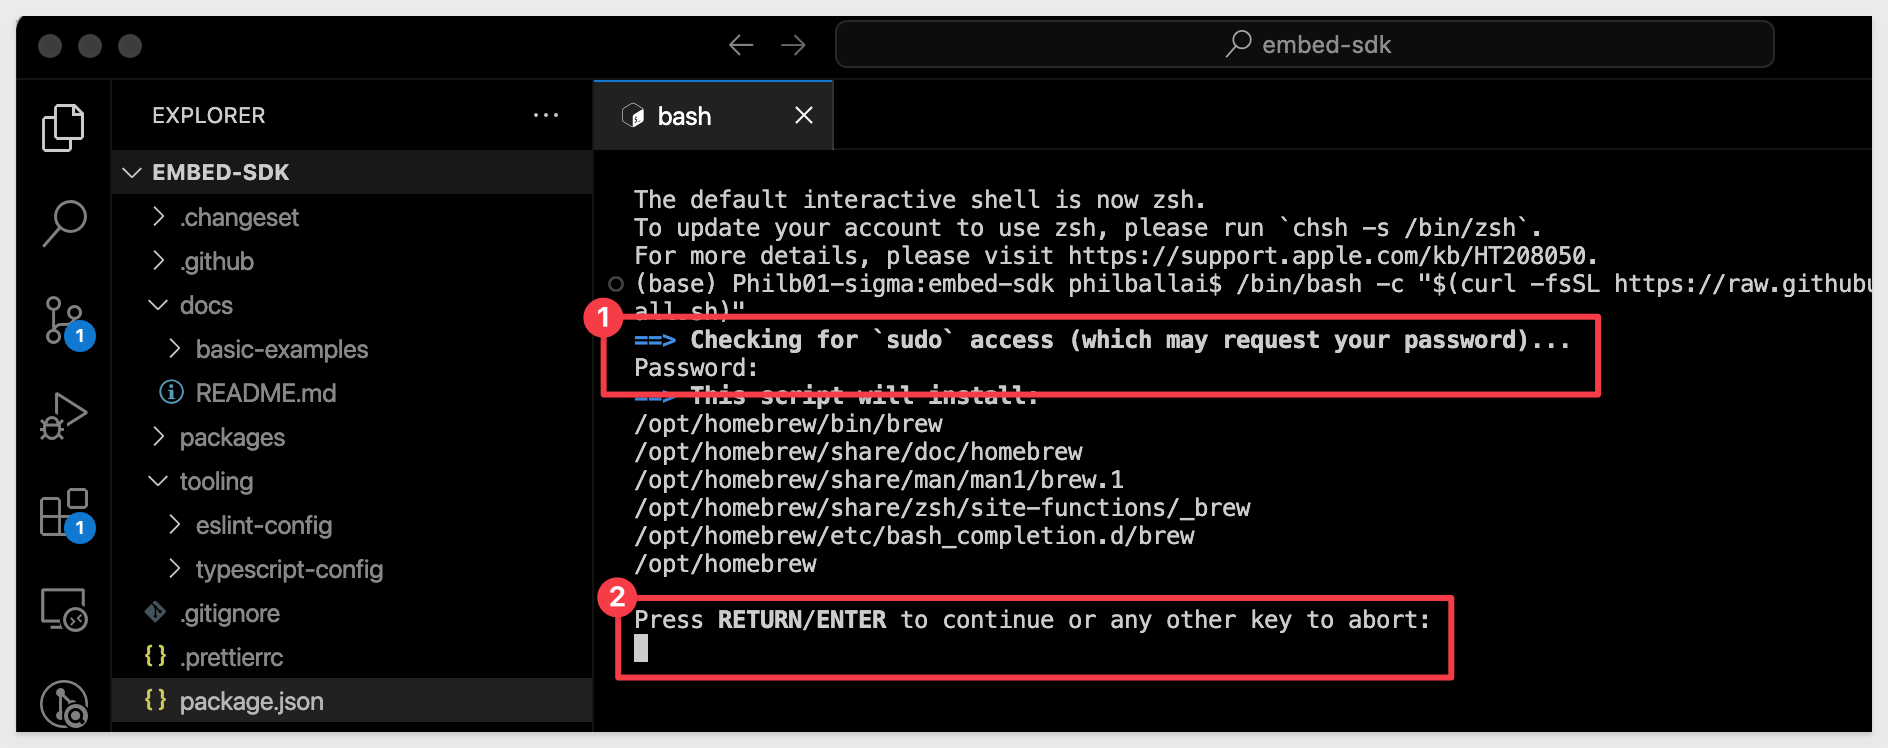
Paste the following command into terminal and press Enter. This command will download and install Homebrew:
/bin/bash -c "$(curl -fsSL https://raw.githubusercontent.com/Homebrew/install/HEAD/install.sh)"
The system will prompt for your system password, and then wait till enter is pressed:
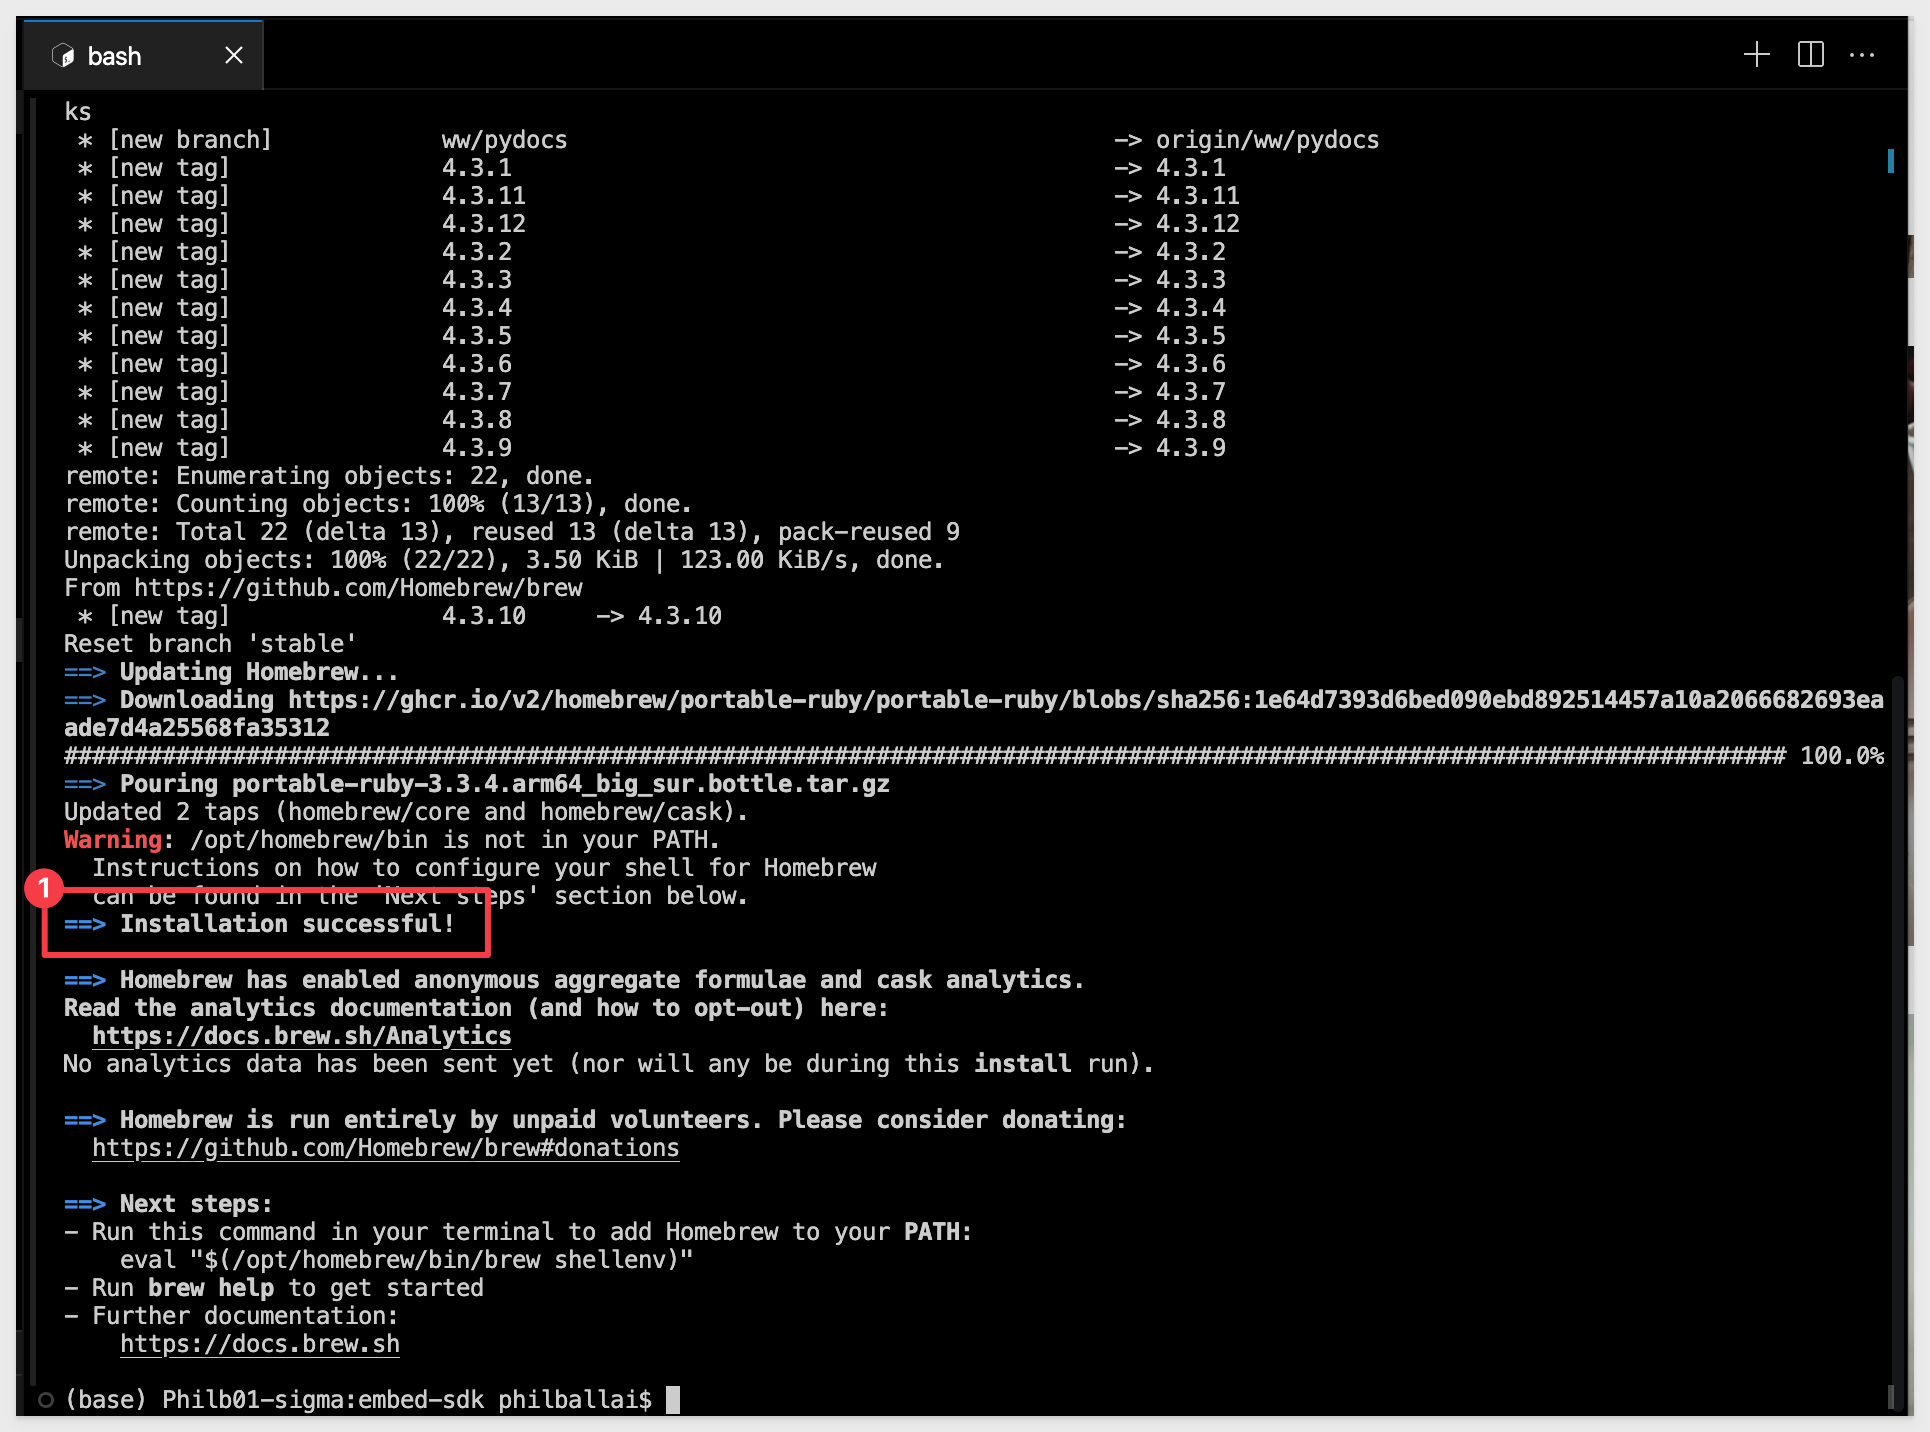
Homebrew will be downloaded and setup. Once completed, a success message will be shown:
To verify the installation, run the command:
brew --version
A version number should be returned. If not, review the next section.
Brew: command not found error
This error generally indicates that brew cannot be found by the terminal session. This can be resolved by manually adding Homebrew to the path.
In terminal, open your .zshrc file with this command (still in terminal):
nano ~/.zshrc
Add the following line at the end of the file to include Homebrew's path:
export PATH="/opt/homebrew/bin:$PATH"
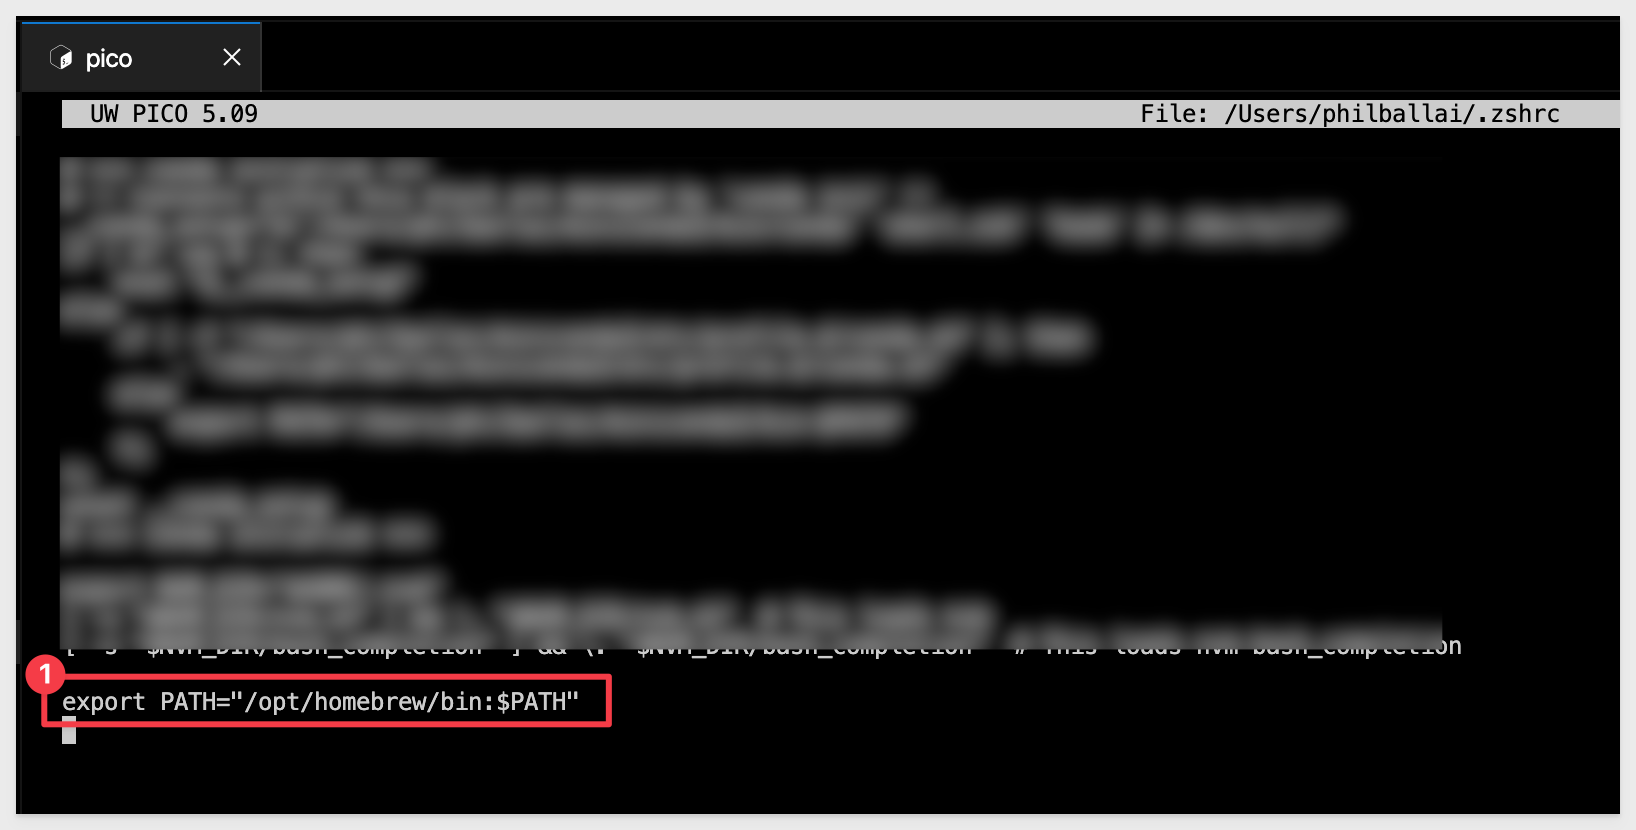
Save the changes, overwriting the existing file (the commands are shown on the editor's footer).
Close the editor after saving.
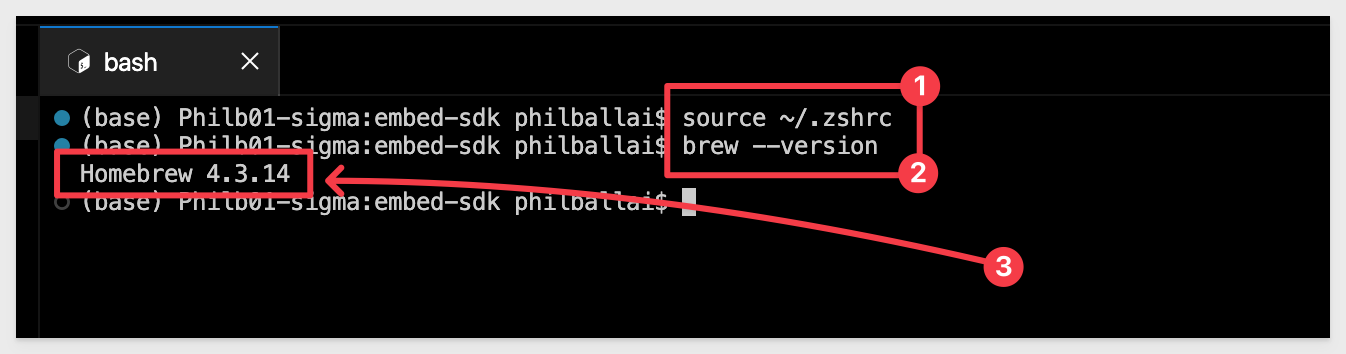
Reload your shell configuration by running this command:
source ~/.zshrc
The terminal prompt will reappear with no reply.
Retry brew verification:
brew --version
The expected response looks like this:
Runtime Environment - Node.js
Node.js (Node) is an open-source, cross-platform, back-end JavaScript runtime environment that runs on a JavaScript engine and executes JavaScript plaintext outside a web browser, which was designed to build scalable network applications.
We will install Node by using a terminal session in VSCode and leverage Homebrew via command line.
In VSCode, open a new terminal session and run the following command to check if Node is already installed:
node -v
In our case, we see a recent version number, so no need to install again:

If Node.js is not already installed, install it by running the following command:
brew install node
This command will download and install the latest stable version of Node along with npm (Node Package Manager) on your system. Once the installation is complete, you can verify the installation by checking the versions of Node.js as described earlier.
Additional Dependencies
Corepack
Corepack is a Node tool intended to manage package managers without needing global installs of these package managers. It comes pre-installed with Node starting from version 16.10, but we still need to enable it.
Run the following command to enable Corepack:
corepack enable
The terminal prompt will appear with no other message unless there is an error.
pnpm
pnpm is a package manager like npm or Yarn, known for its efficiency regarding disk space and speed.
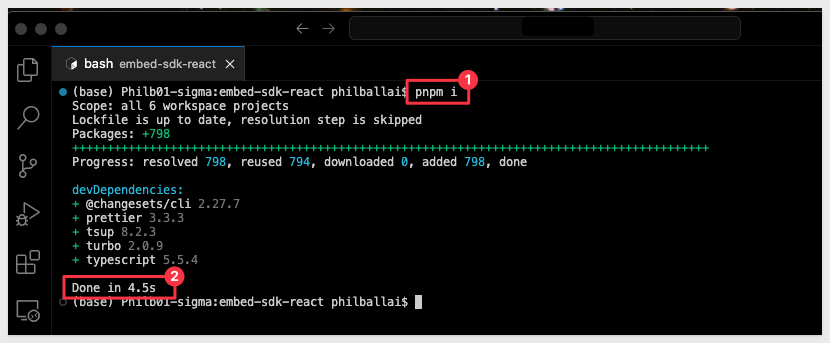
Running pnpm i installs the dependencies listed in your project's package.json file. It creates a node_modules directory where all your project's dependencies are stored and also updates the pnpm-lock.yaml file, which ensures that the same versions of the dependencies are installed every time you or anyone else runs pnpm install.
Before running the install, make sure terminal is in the embed-sdk-react directory:
cd {your path}/embed-sdk-react
Then run the install command:
pnpm i
If terminal throws an error "This project is configured to use yarn", confirm you are in the correct directory:
{your path}/embed-sdk-react
The results look like this:
We are ready to test the Embed-SDK application. Run the following command in terminal:
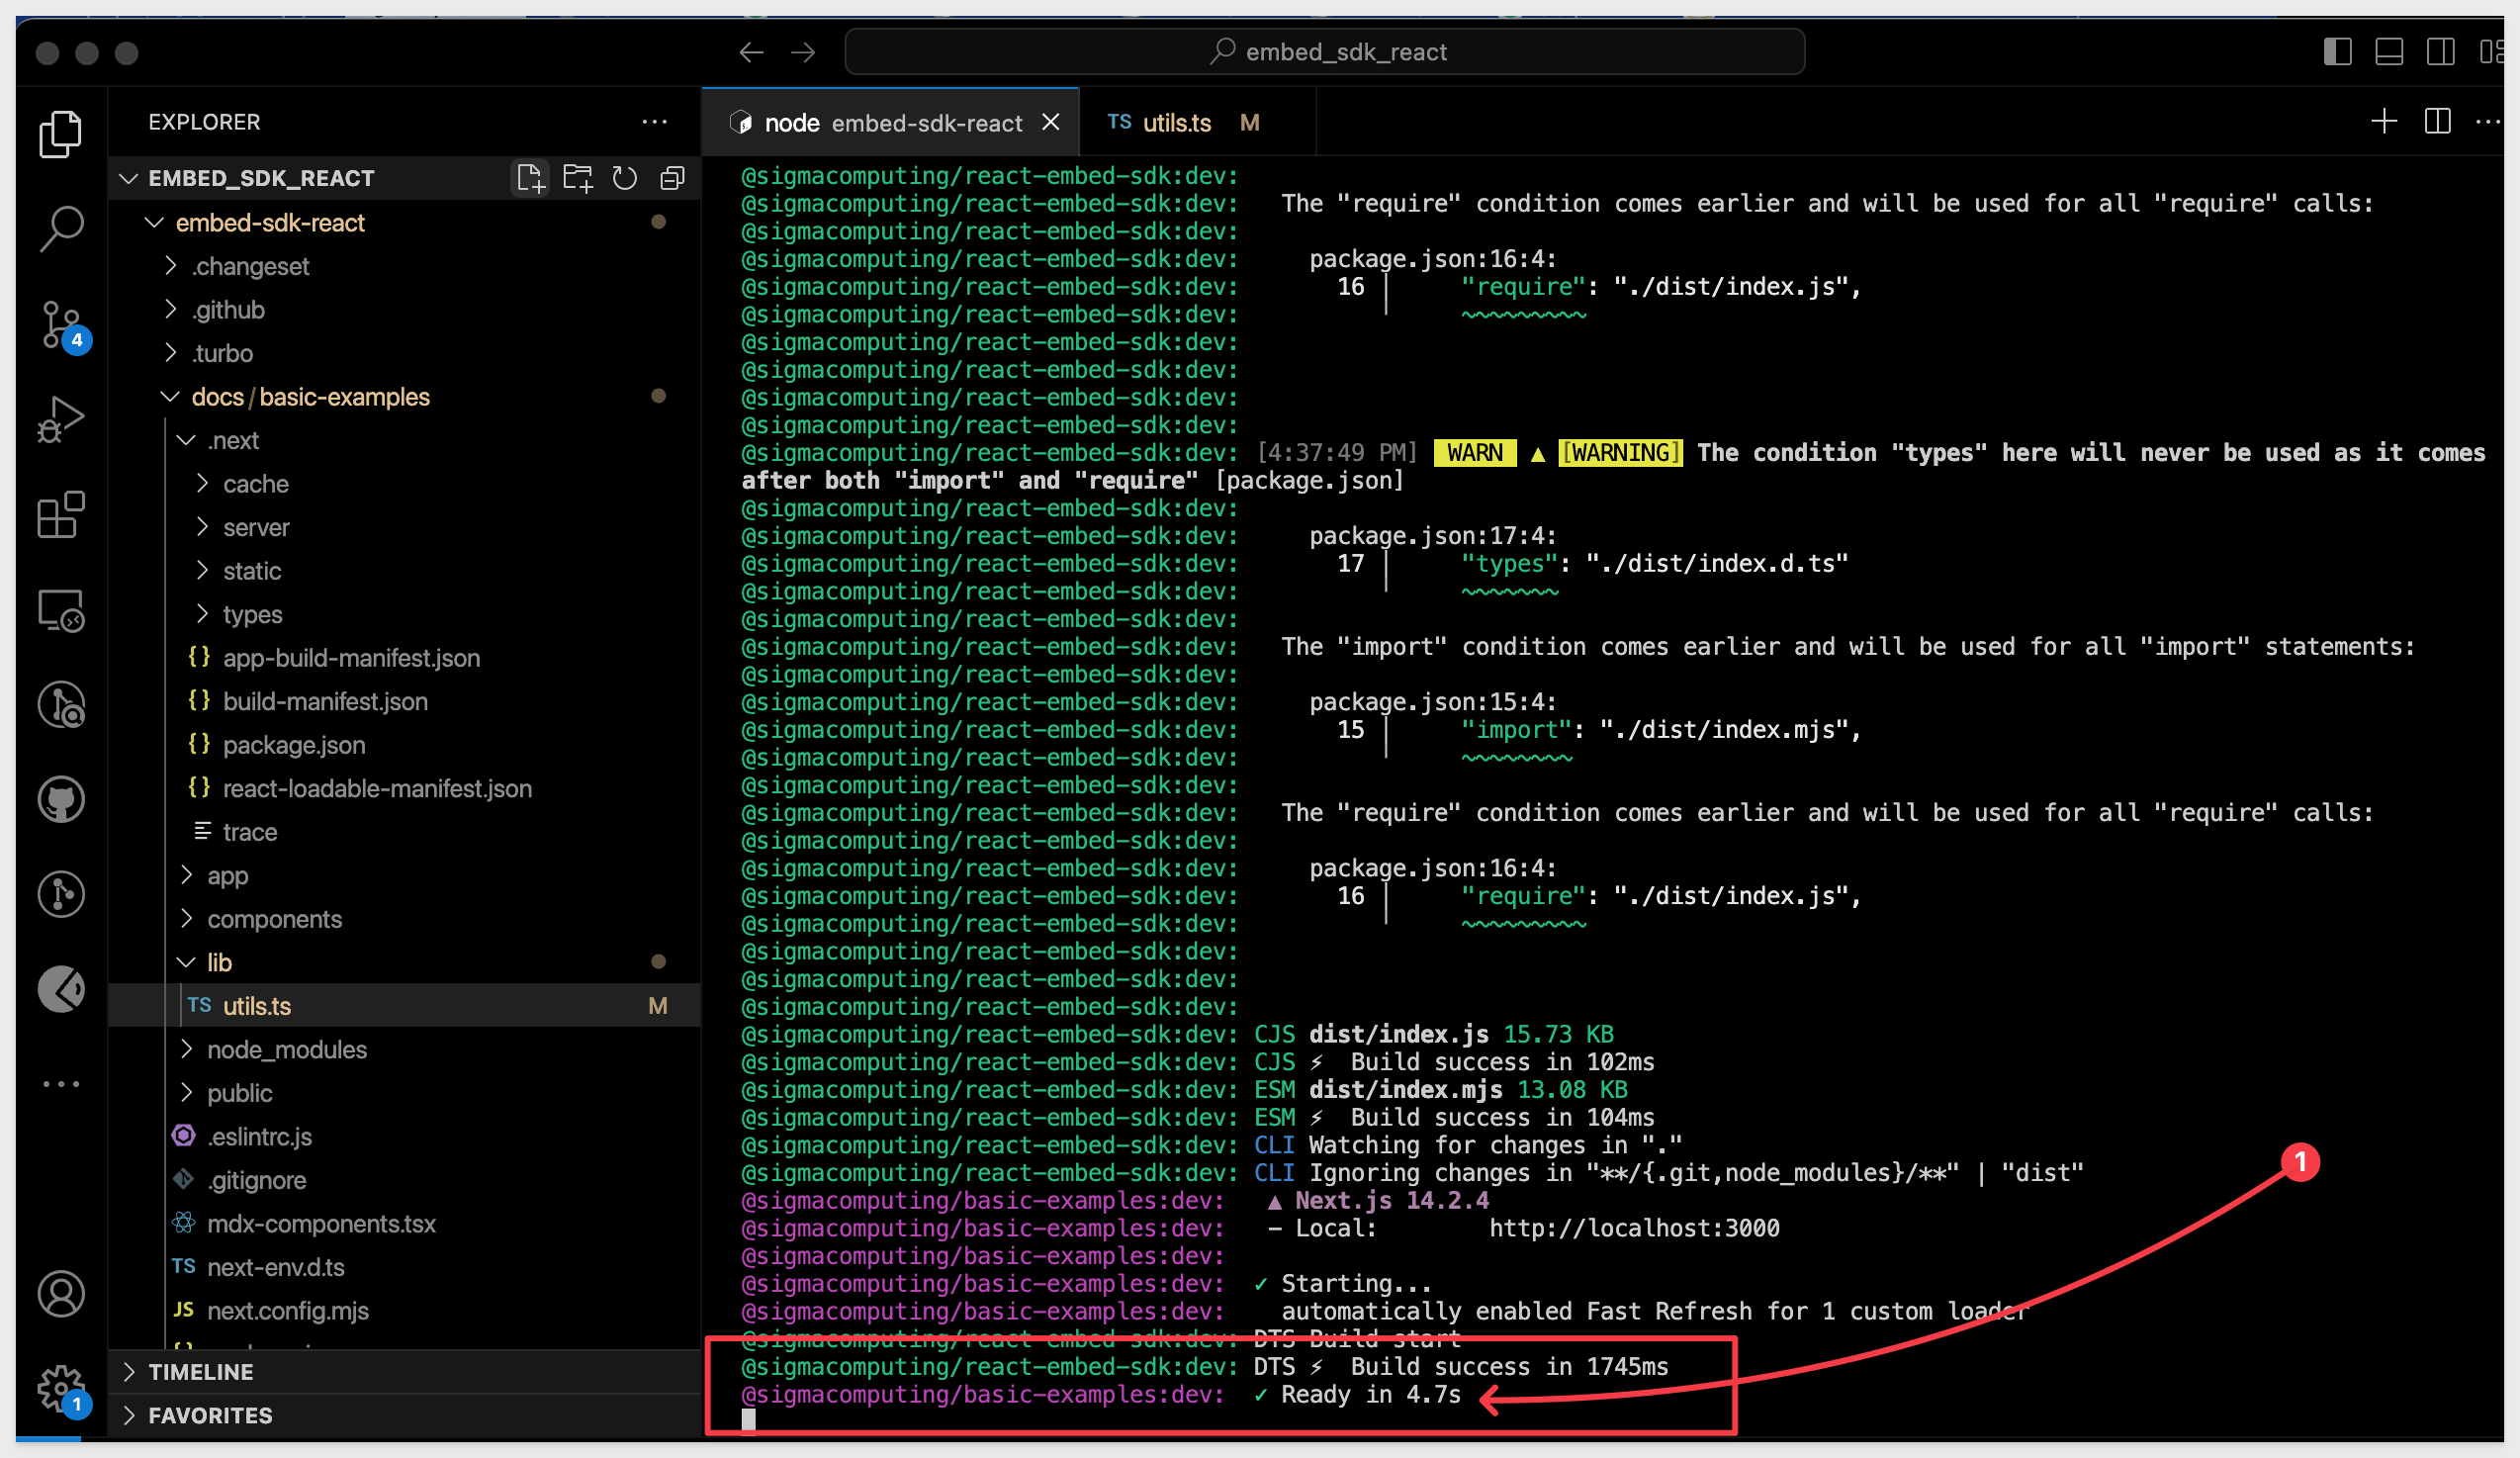
pnpm run dev
The first time, the system may prompt to allow network connections. Click Allow, as this is only running on our local machine, port 3000.
This starts the development server and when ready will appear like this.
Open a browser and navigate to:
http://localhost:3000
Sigma has provided a sample application page, with useful links.

In the next section we will look at how the embed is configured in code.
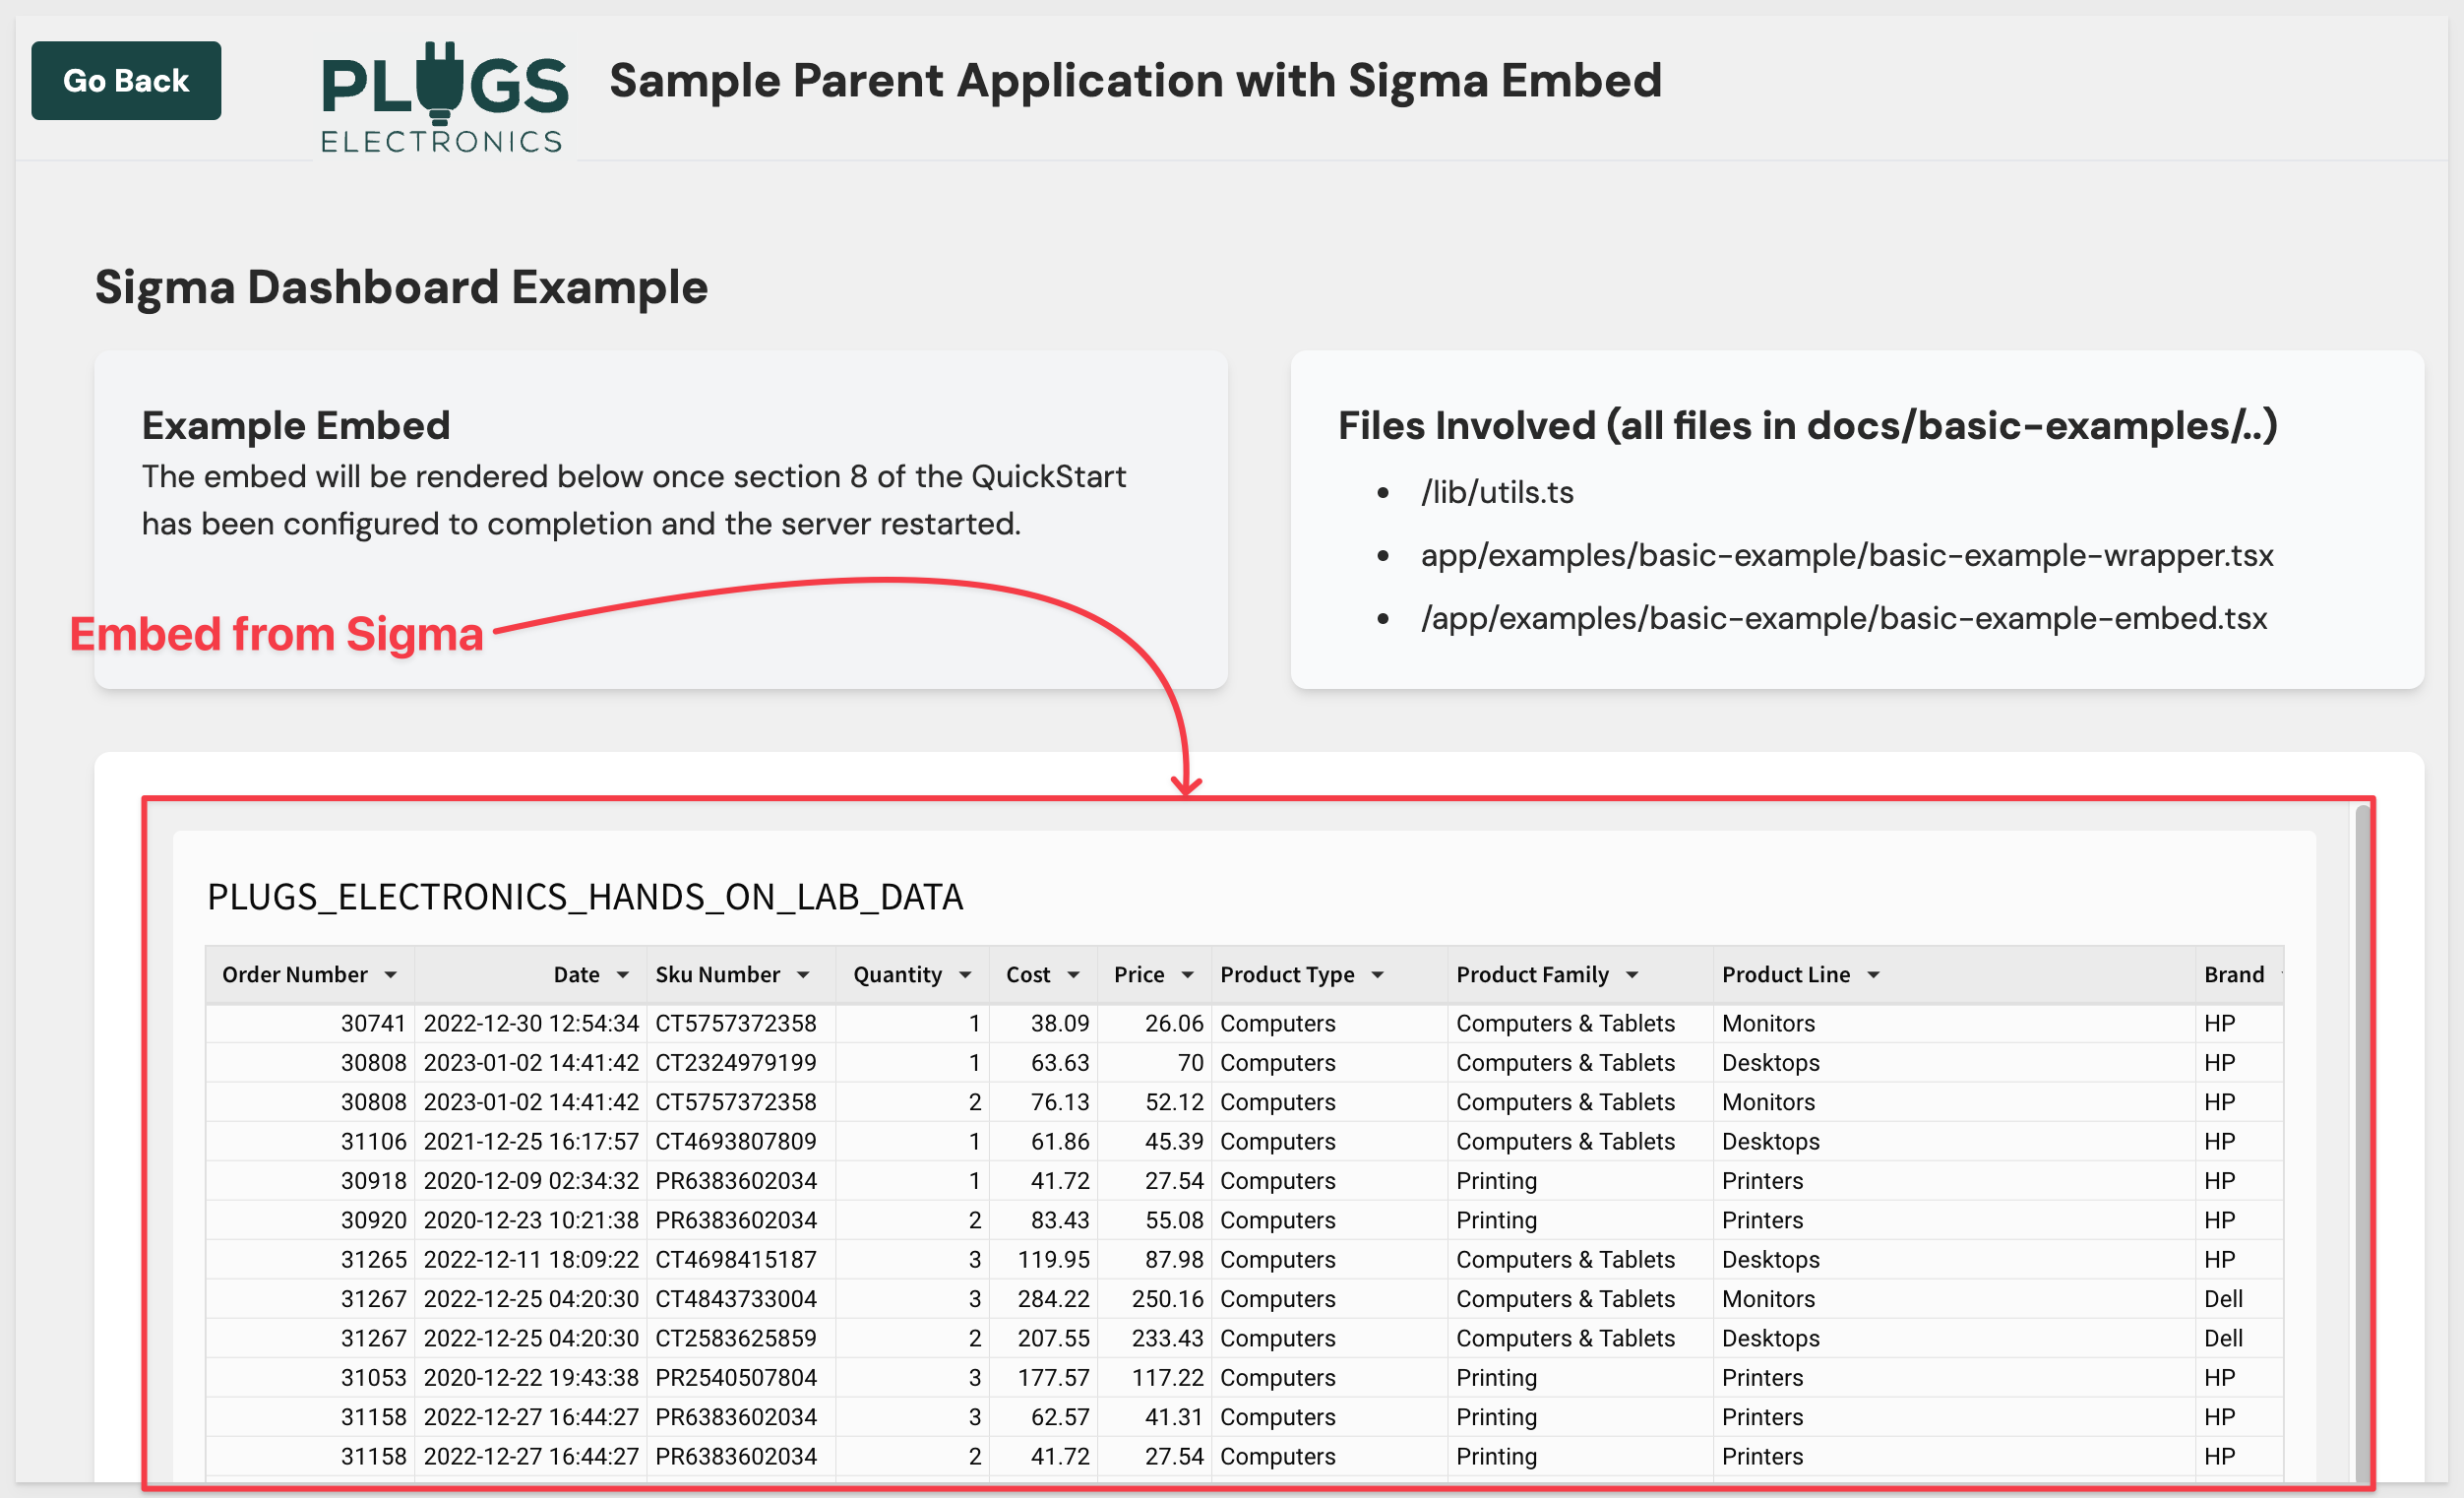
Before we load the Sample Application, let's review which files are involved in this sample application.
Primary source files
There are five files involved in this example embed:
- utils.ts: Defines utility functions and constants, including JWT generation logic and configuration parameters, to generate a secure embed URL for the Sigma dashboard.
- route.js: Generates a secure JWT embed URL for the Sigma dashboard and serves it via an API endpoint.
- basic-example-wrapper.tsx: Fetches the signed embed URL from the API and conditionally renders the basic-example-embed.tsx component once the URL is retrieved.
- basic-example-embed.tsx: Embeds the Sigma dashboard iframe into the React application, using the Sigma SDK's useSigmaIframe hook to manage loading and error states.
- page.mdx: Renders the webpage, SignedIframe, and logs the signed URL for console log display only.
Logging
When the sample application is running, the server displayed in VSCode's Terminal will show a one-time-use JWT embed URL for debugging purposes only.
While not required, we've included this to demonstrate and assist in debugging any issues you may encounter while customizing embed parameters.

We want to use your Sigma instance for this embed, so we will need to do a few things.
1: Embed credentials
Log into your own Sigma instance as Administrator and navigate to Administration > Developer Access and click the button to Create New client credentials.
Check the box on for Embedding, provide a name and assign the new credentials to a Sigma administrator for now.
Copy the Client Id and Secret values — you will paste them into utils.ts in the next step.
For more information on generating embed client credentials, see here
2: Create a new workbook
Create a new workbook in Sigma and add any available table to it. It does not matter at this point what content is added.
Save the workbook, the name does not matter at this point.
3: Share the Workbook
Click the share icon in the upper right corner.
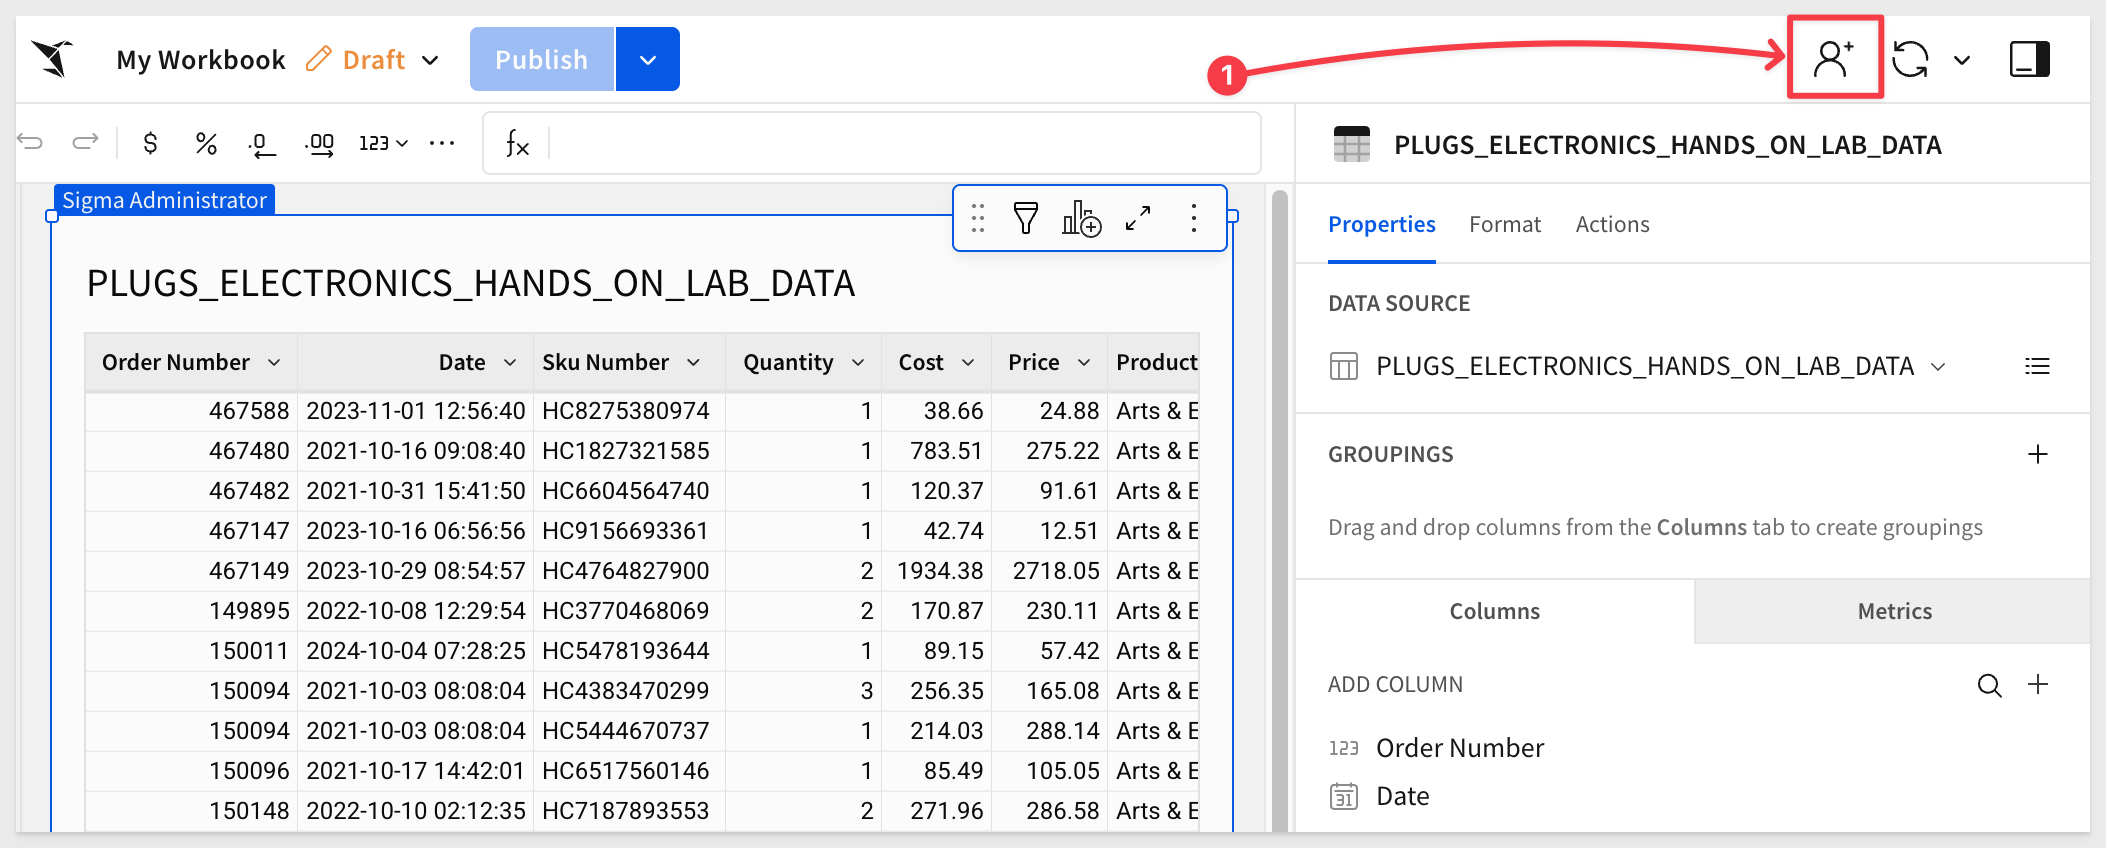
We are sharing ours with the Sales_People team:
For more information on teams in Sigma, see here
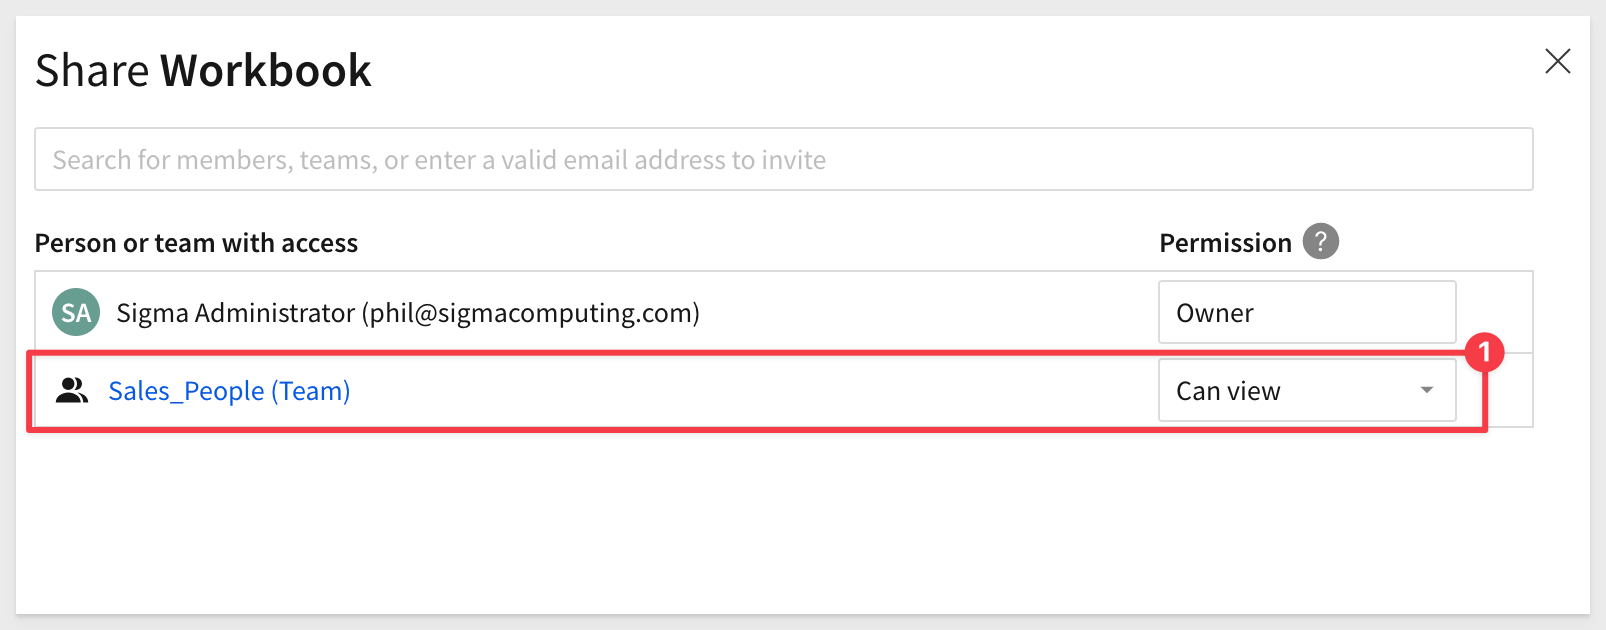
Embed Base URL
Sigma embedding uses the Base URL — the URL shown in the browser's address bar — to identify what is embedded.
Switch the workbook to the Published version, then copy the URL from the browser's address bar.
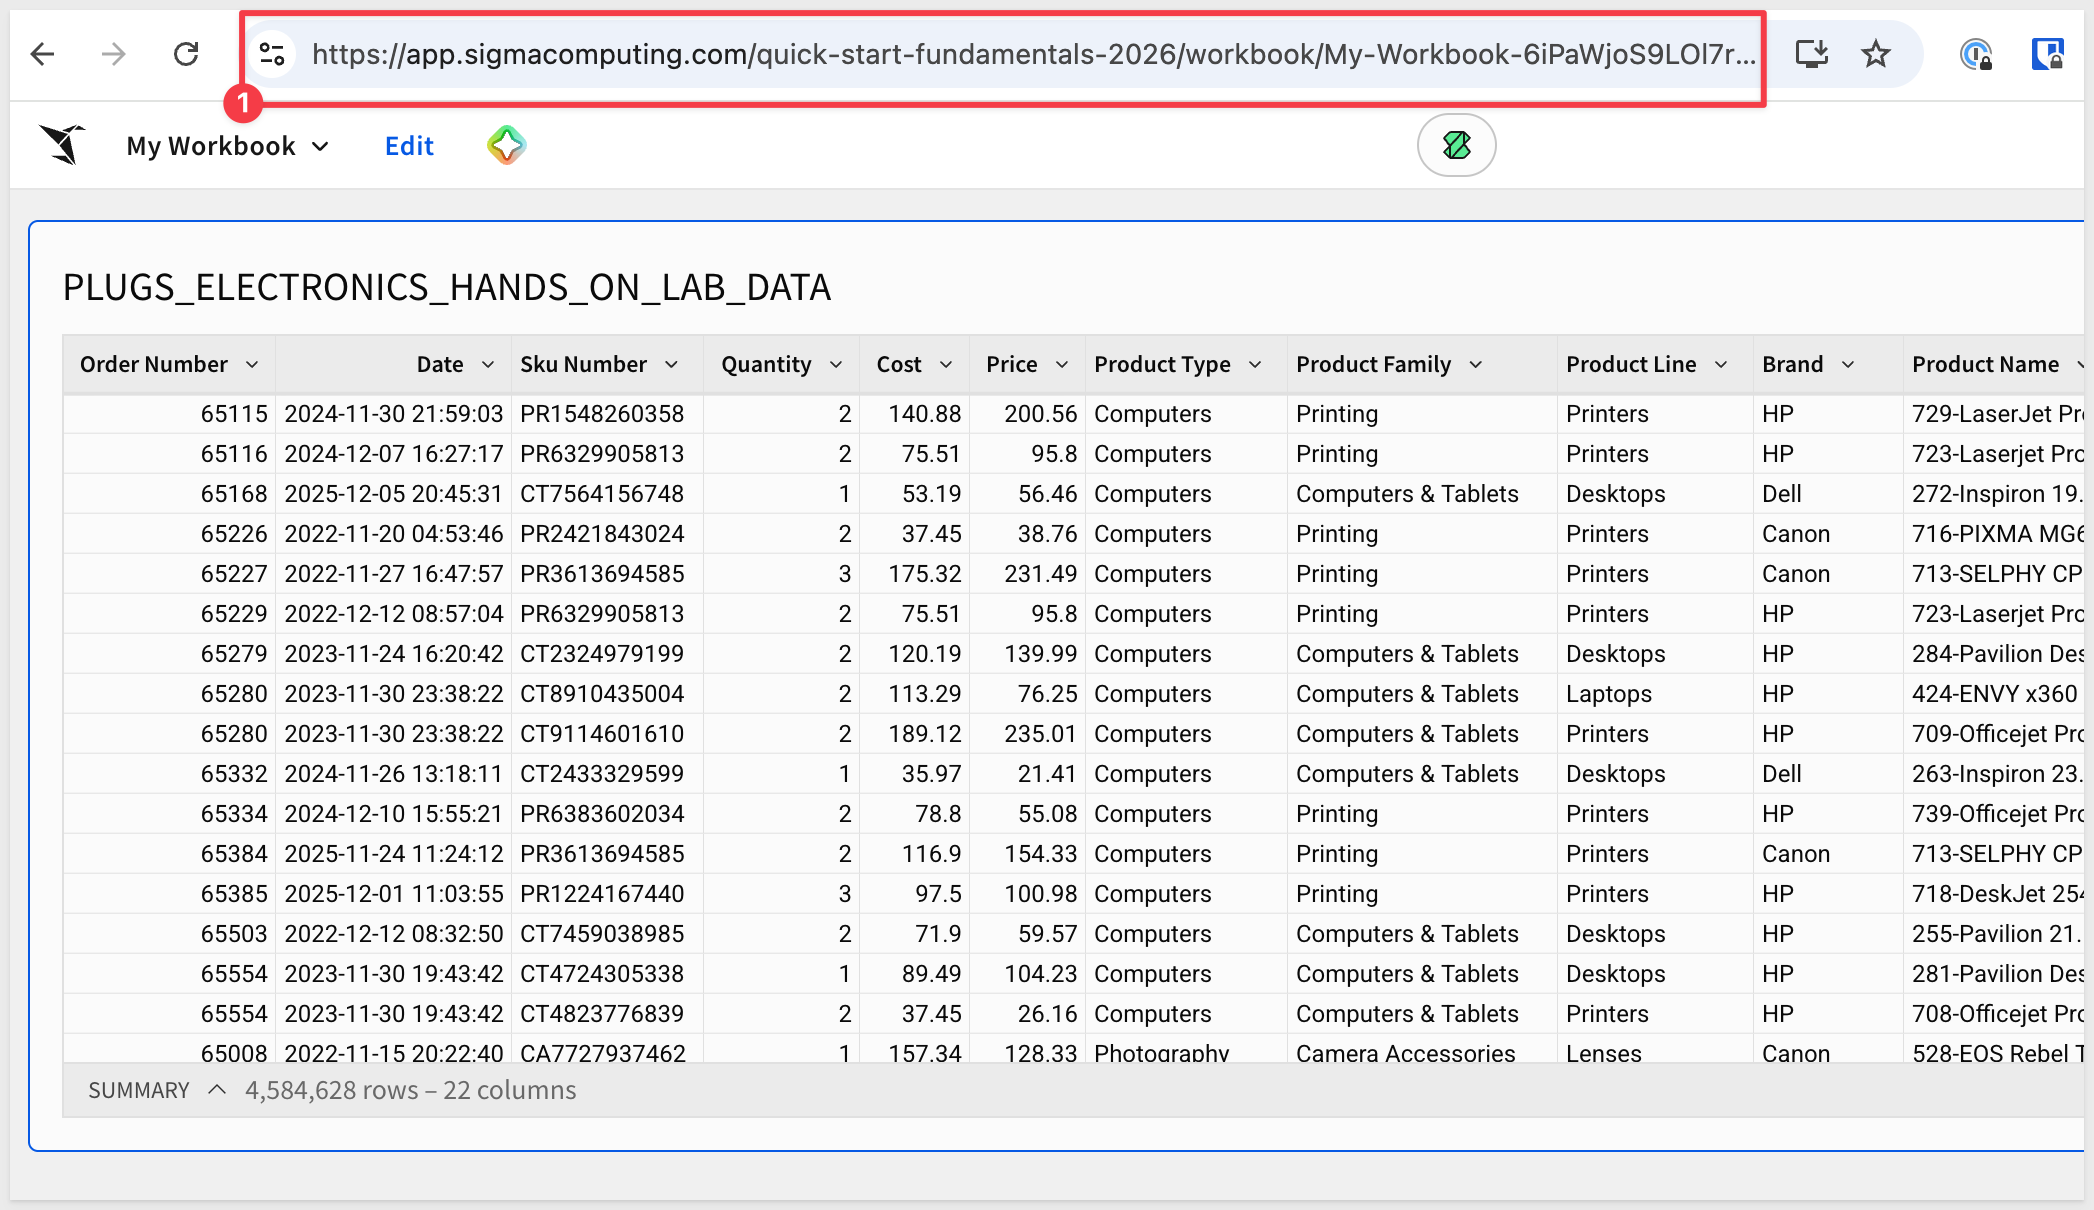
Open the project file /embed-sdk-react/docs/basic-examples/lib/utils.ts.
First, paste the Base URL you copied into the EMBED_PATH value.
Then update the remaining placeholder values:
CLIENT_ID: your embed client IDSECRET: your embed secretEMAIL: any properly formatted email address not tied to a native Sigma accountACCOUNT_TYPE:ProTEAM: the name of the team you shared the workbook with
Make sure the terminal session does not throw unexpected errors after saving the file.
Test the application
Refresh the browser using the url:
http://localhost:3000/examples/basic-example
The workbook we elected to embed is shown on the React application page, in the iframe as expected:
For more information on using parameters and user attributes in Sigma embedding scenarios, the following resources are available:
Embed URL Parameters documentation, see here
QuickStart on Parameters and User-Attributes
Implement inbound and outbound events in embeds documentation, see here
In this QuickStart we explored how to use the embedding SDK for React with Sigma.
Additional Resource Links
Blog
Community
Help Center
QuickStarts
Be sure to check out all the latest developments at Sigma's First Friday Feature page!