In this QuickStart, you'll build a customizable dashboard experience using Sigma's embedded plugin framework, enhanced by a hosted Angular plugin and a lightweight JavaScript host application.
Users will be able to dynamically configure dashboards by selecting KPIs and layout areas, and save those configurations using Sigma bookmarks and a local JSON database for extended metadata.
You'll learn how to:
- Register a plugin in Sigma
- Use a prebuilt Sigma workbook template to define dashboard areas and curated KPI elements
- Configure control logic to drive KPI selection and display behavior
- Host a parent application that tracks user selections and synchronizes them with Sigma bookmarks
REST API Usage 01: Getting Started
For more information on Sigma's product release strategy, see Sigma product releases
If something doesn't work as expected, here's how to contact Sigma support
Target Audience
This project is ideal for developers and data teams looking to offer flexible, self-service dashboard building inside a web app—without compromising governance or requiring custom front-end development from scratch.
Prerequisites
- Any modern browser will work.
- Access to your Sigma environment.
- Some familiarity with Sigma is assumed. Not all steps are shown, as the basics are assumed understood.
- Microsoft VSCode or other suitable development tool.

We need to prepare a workbook that allows users to select from a small set of curated content (charts, KPIs, tables, etc.) to create their own custom dashboard. This workbook will be embedded into a host application later.
Template
To make this process easier, we have created a template that has a few KPIs preconfigured already.
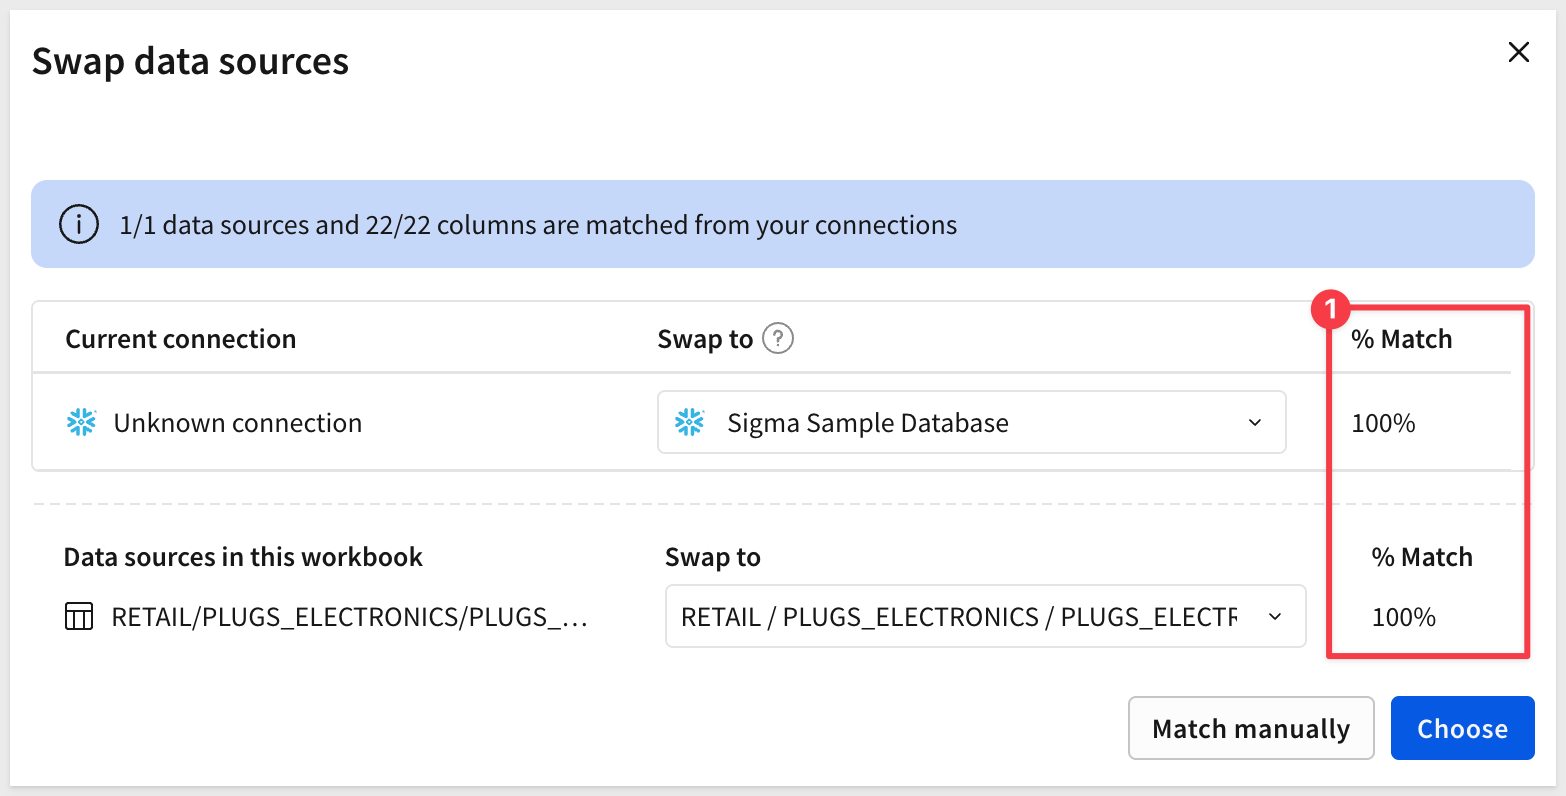
The template will prompt to Swap data sources. Since it uses Sigma provided sample data, the % Match should be 100%.
Click Choose:
Once done, the fully-built workbook is presented and we can Accept the swap:
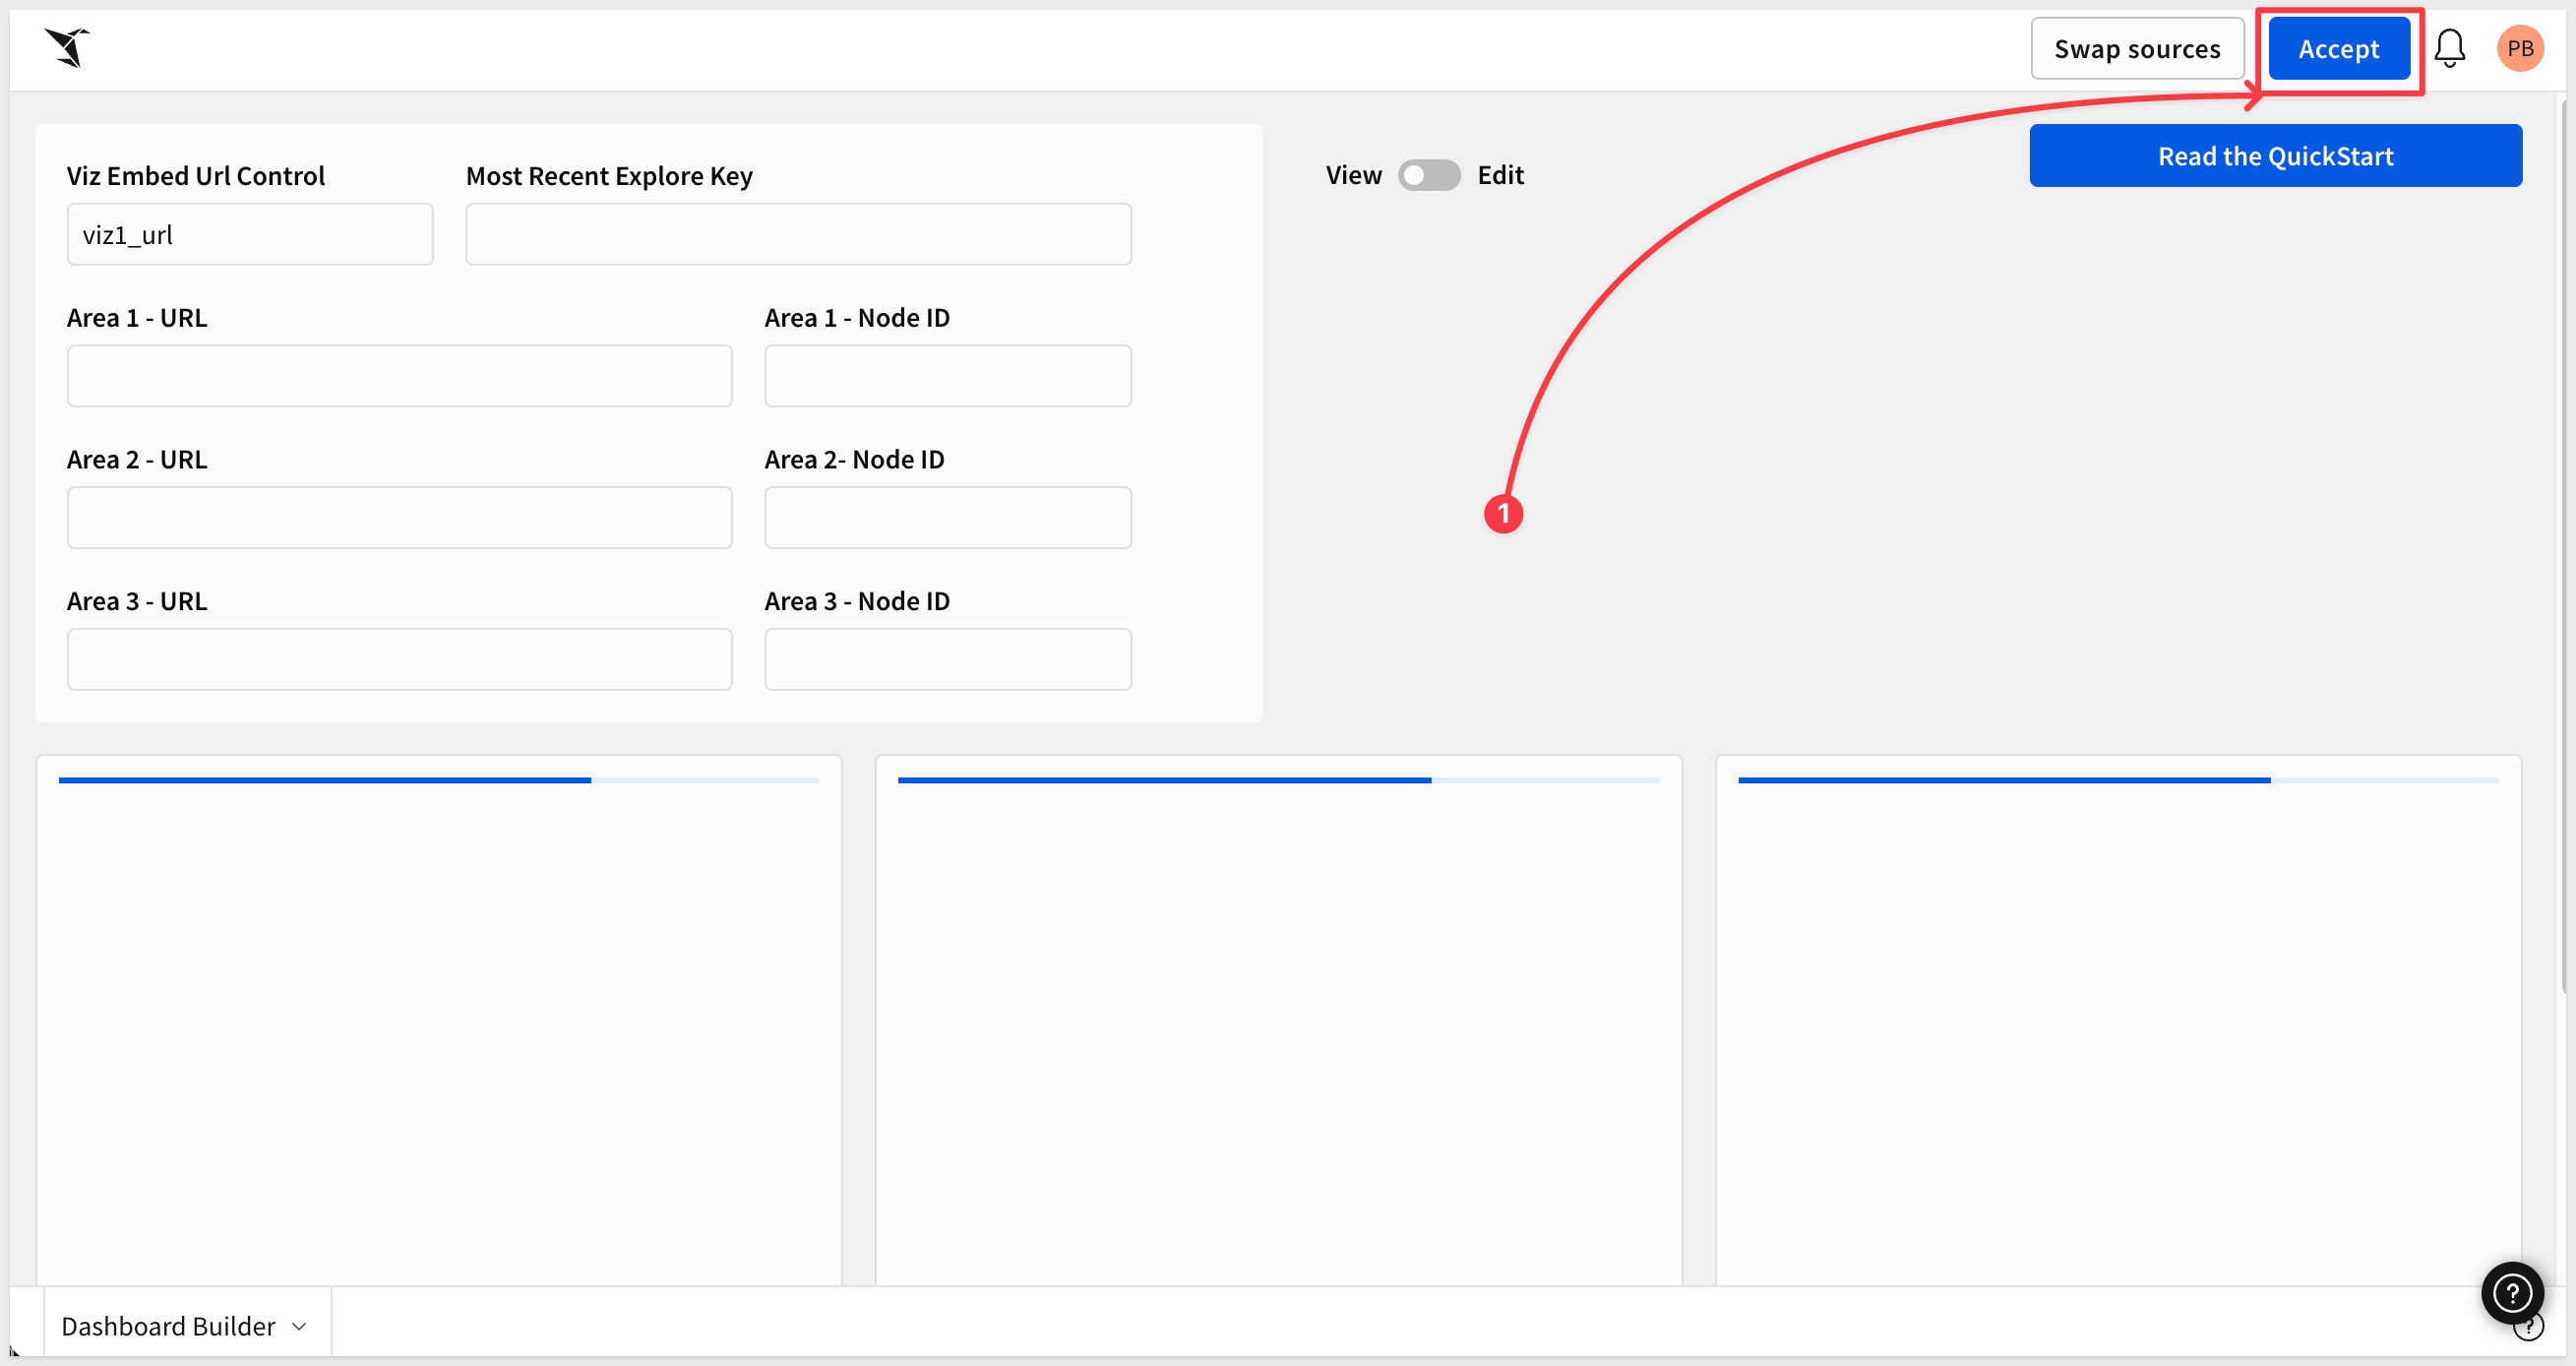
This creates a new (unsaved) workbook we can use for our embed:
Let's spend a few moments breaking down the structure. There are three page tabs.
Dashboard Builder Page:
1: Provides the embedded user three "containers" where elements may be placed. Elements can be selected from any of curated elements provided in the library by clicking an Edit button when in Edit mode.
Each container has an independent iframe element which is preconfigured for a click action to generate an iframe event when clicked:
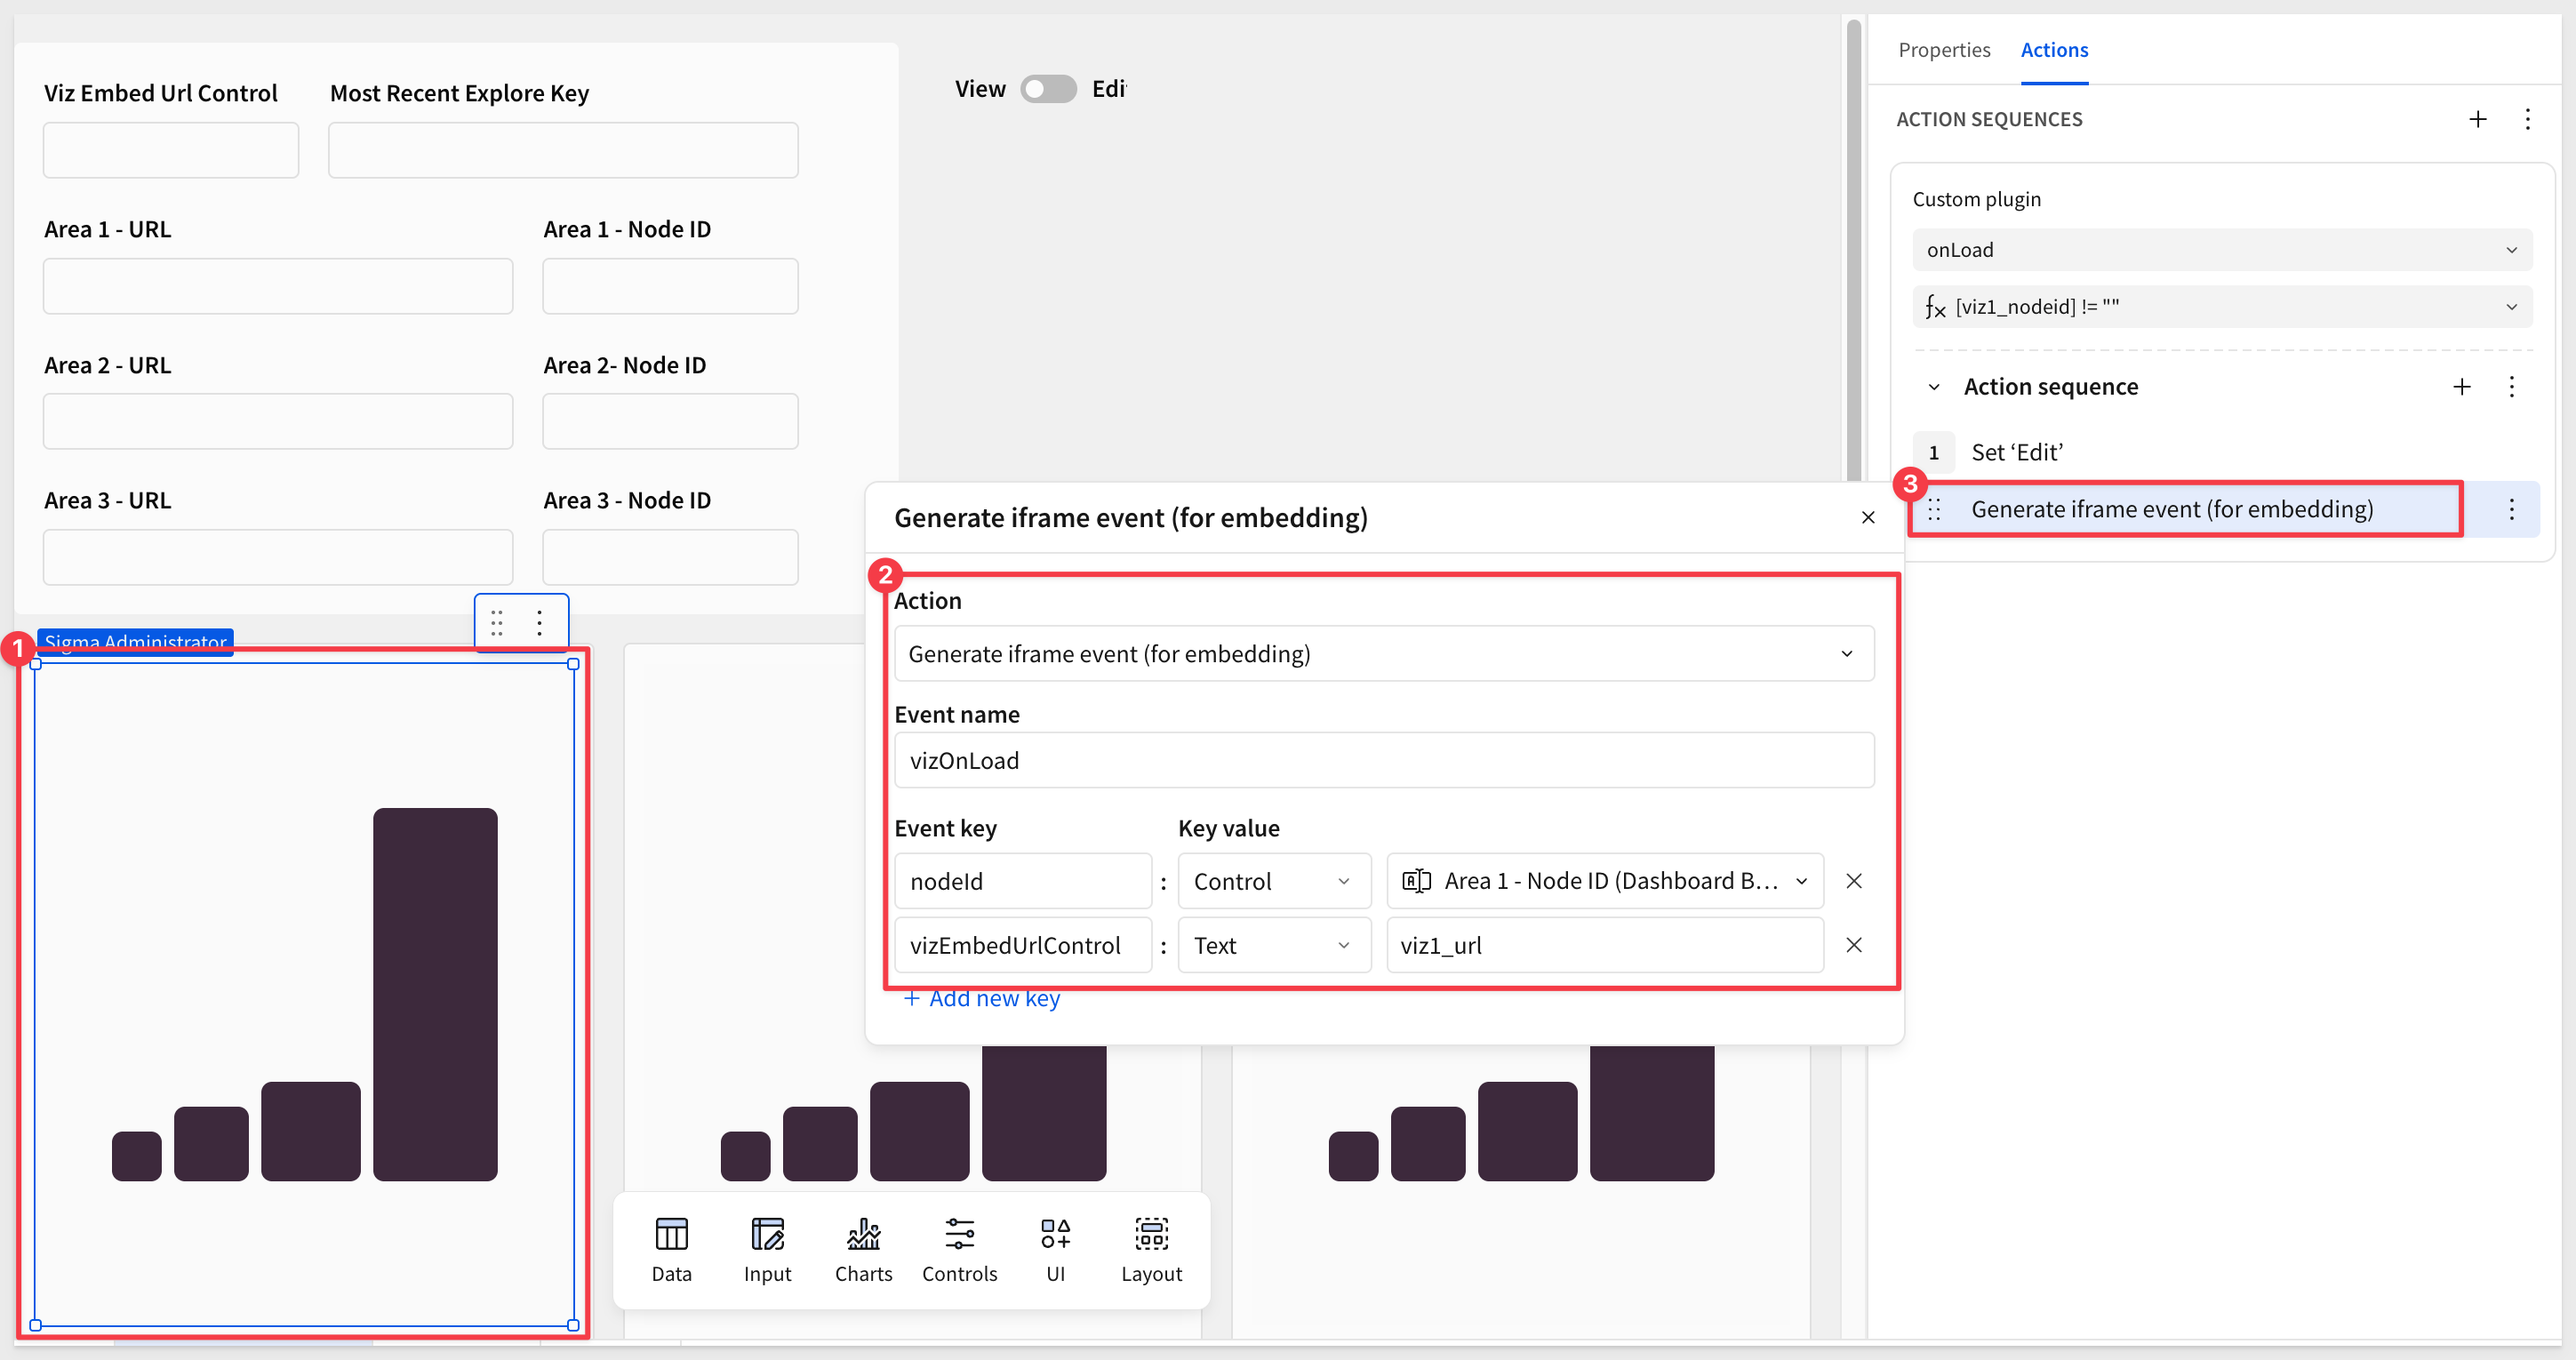
The action sets the nodeID and URL value (each area has a different static value assigned) once a KPI is selected for the selected area, if the nodeID is not empty.
2: The controls are shown on the Dashboard Builder page only so that we can see the values change as we make changes.
In order for the host application to know which control and "viz / container" is configured for which element, it needs to be able to construct the proper combination of URL, NodeID and most recent Explore key for each element the user has selected.
Storing the values in controls allows the dashboard to be changed by the user at any time, without affecting other users.
Once the user has saved a bookmark, the configuration data is written to a local JSON database.
4: A toggle control to allow the user to place the workbook into edit mode and select from the library.
If we click Edit, the modal appears, and displays the three KPIs that are curated for us on the Library page:
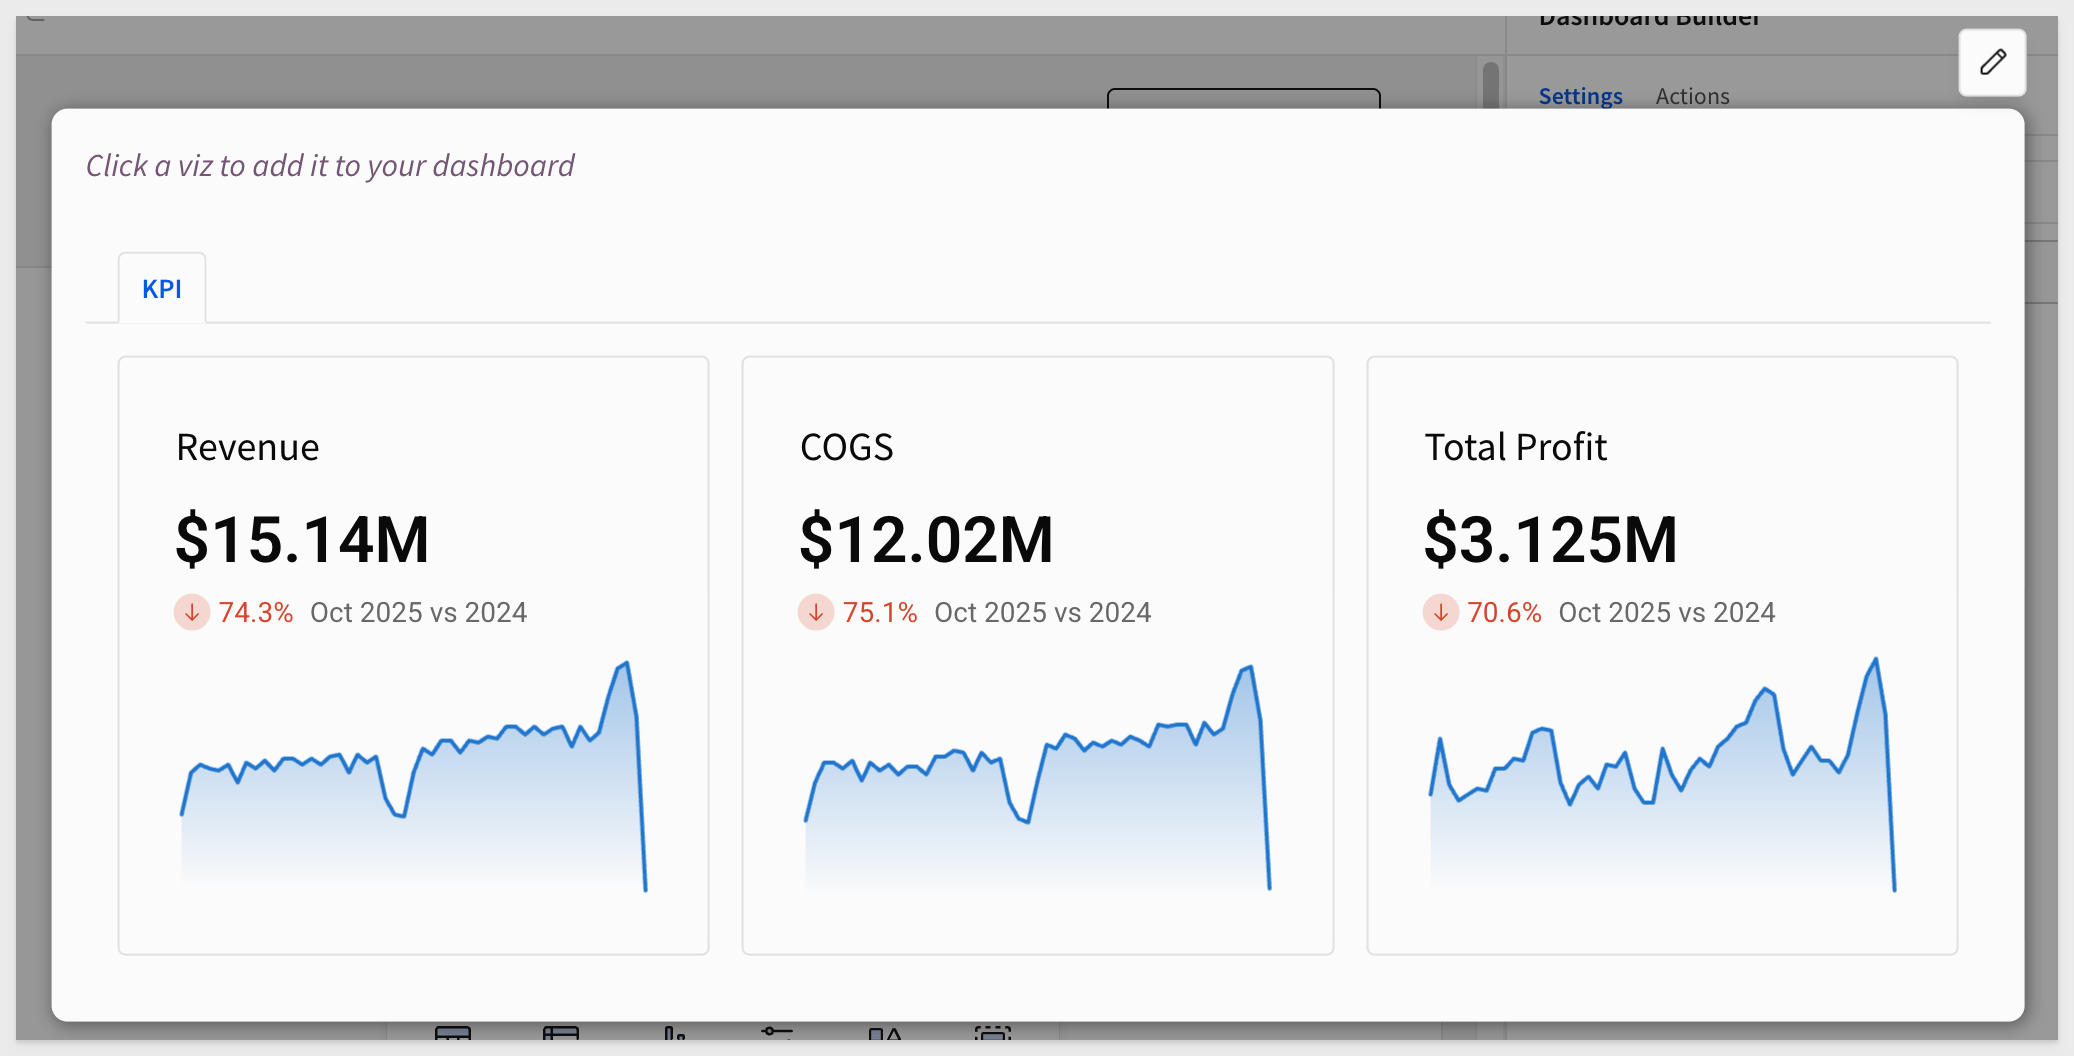
Library Page:
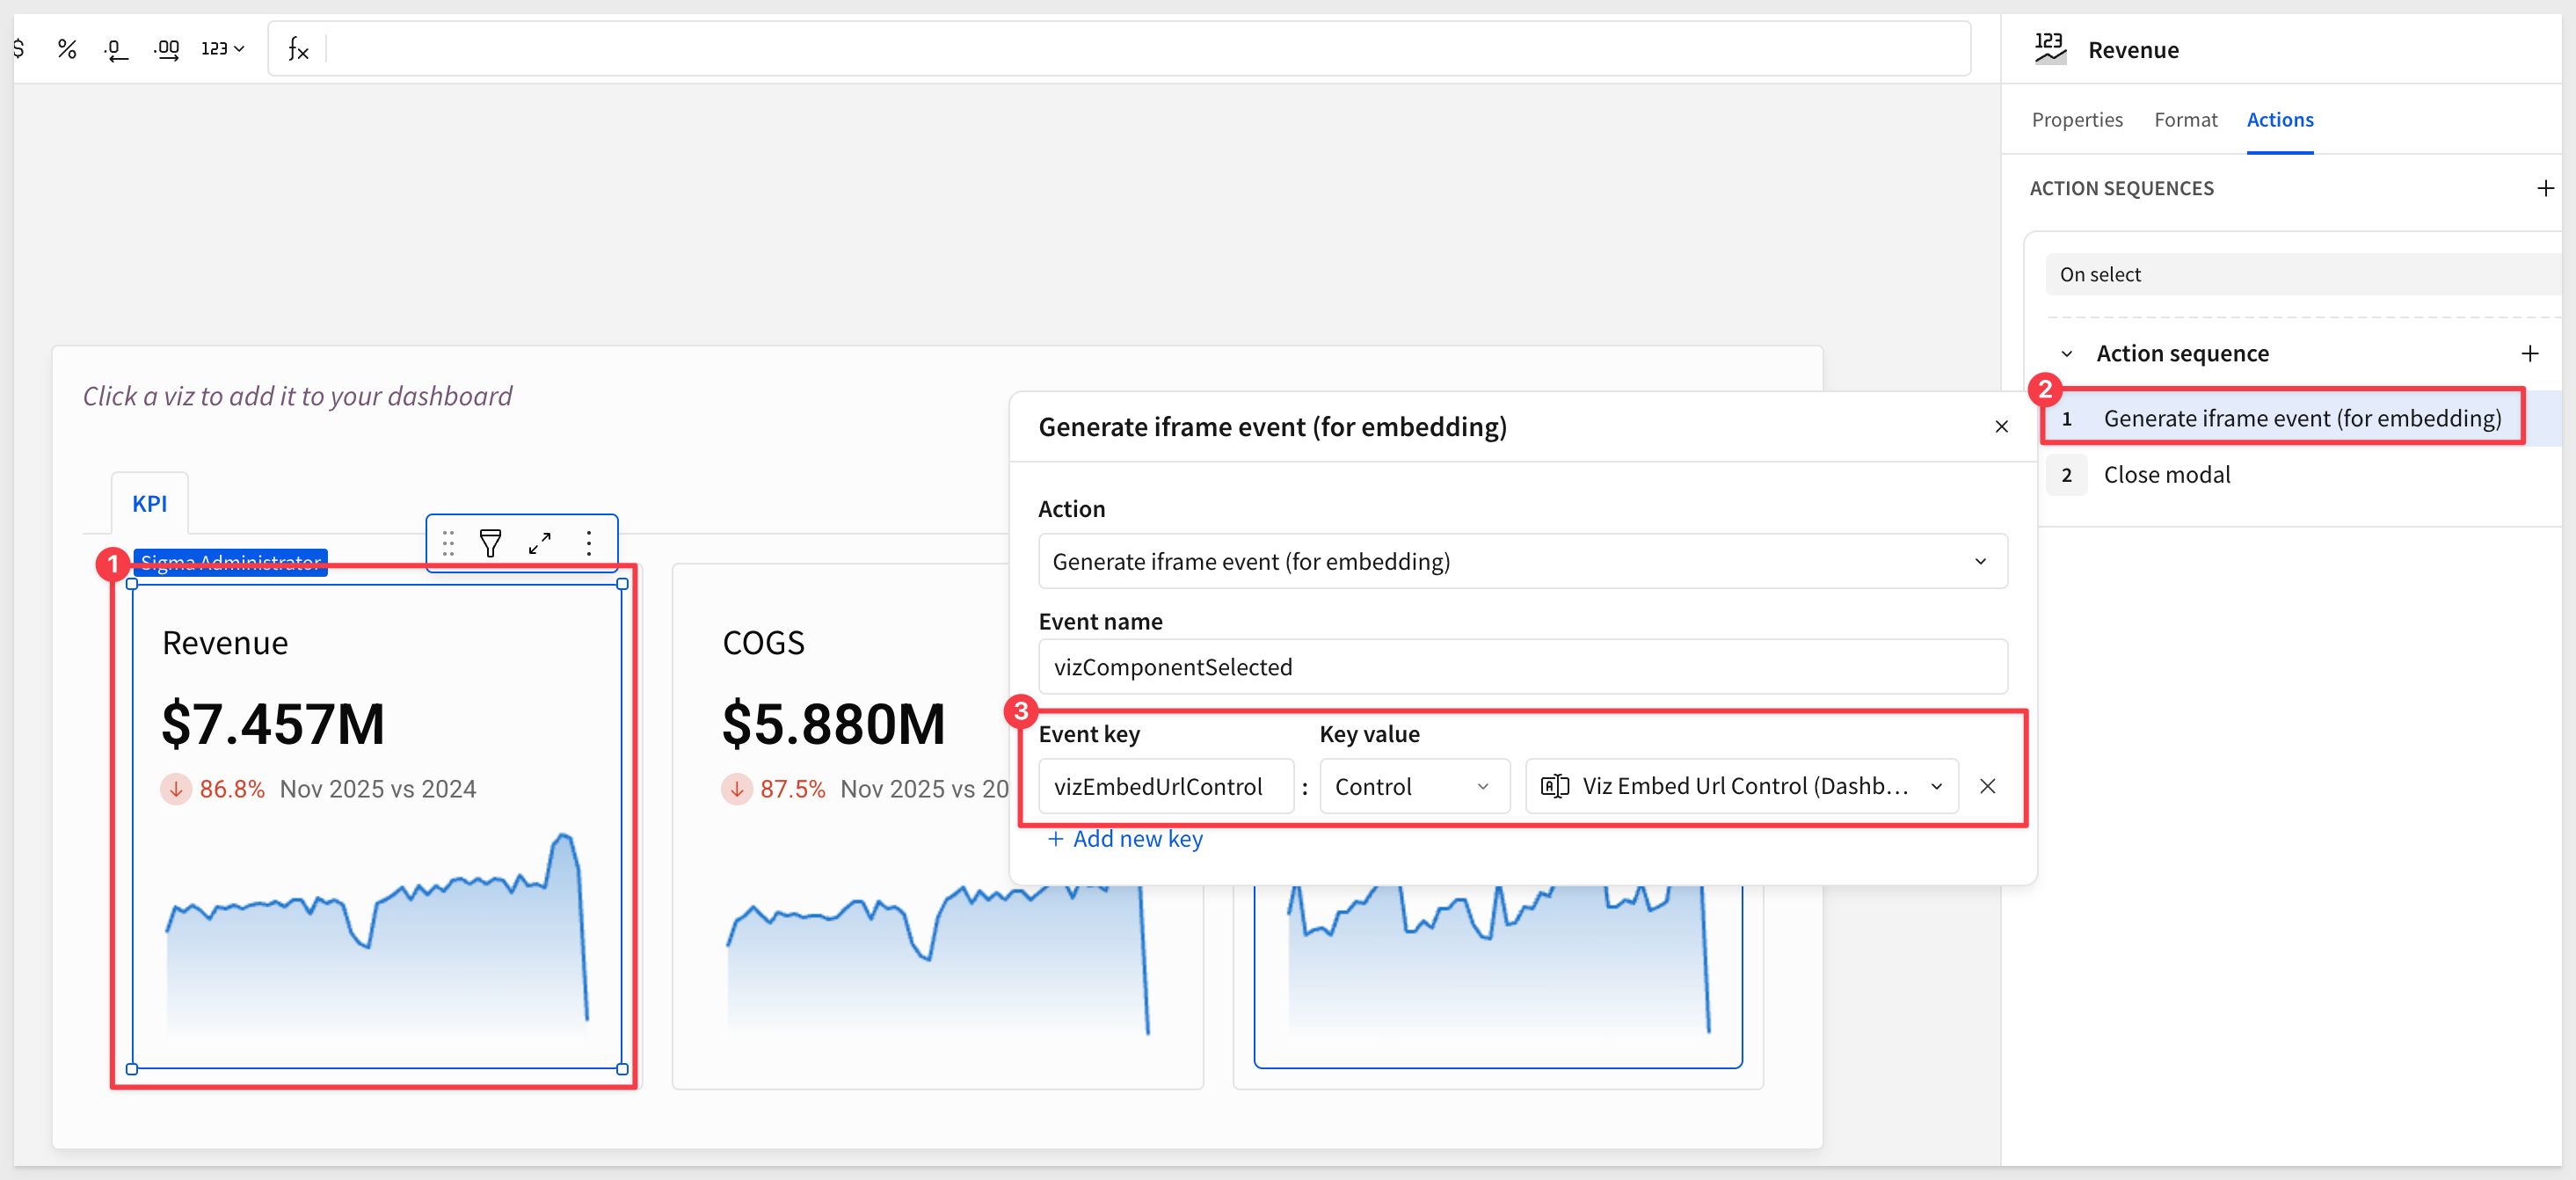
Houses the curated elements that users can select from. We have pre-built three KPIs for the QuickStart and included them in the template.
Looking at the actions for the Revenue KPI, we can see that when it is clicked, the vizEmbedUrlControl on the Dashboard Builder page is updated. This allows Sigma to know which KPI was selected by the user:
data Page:
Contains the source data table that drives the elements in the library, using Sigma sample data.
Click Save as, name the workbook Custom_Dashboard and save to the Embed_Users workspace.
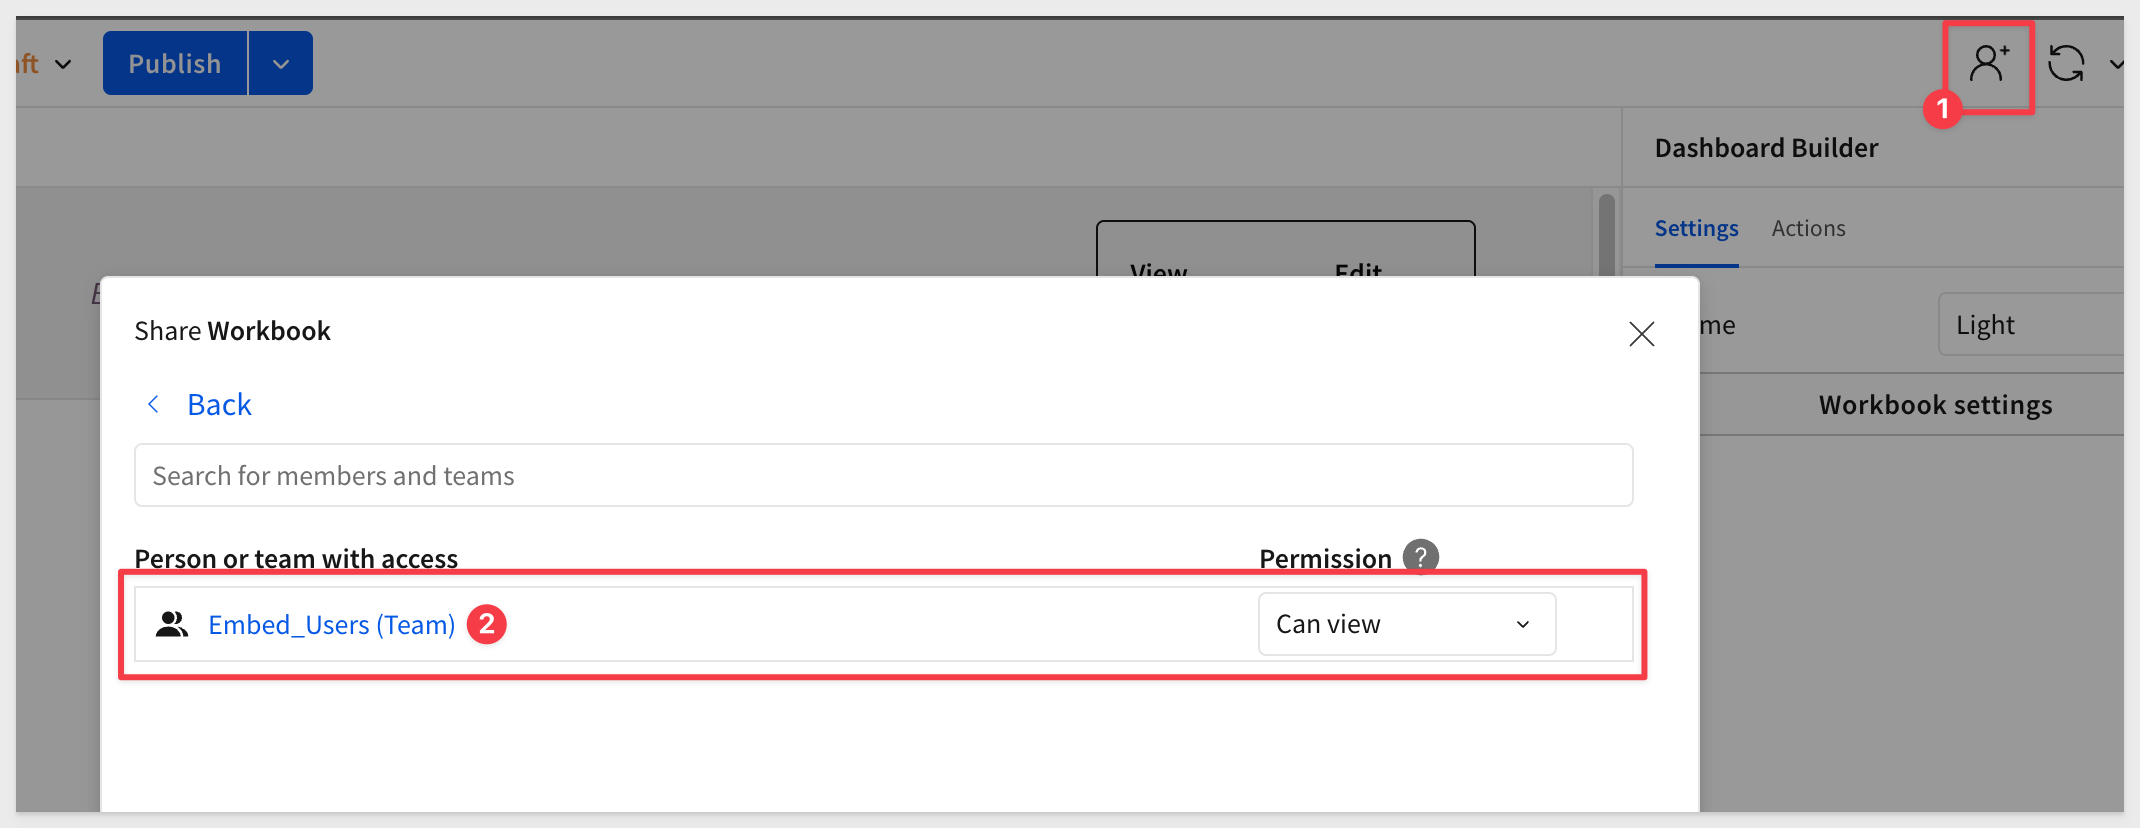
Share the workbook
Since we are using this workbook in an embed context, we only need to share it with a team and pass the team name to Sigma when identifying the embed user as a member of that team.
We will share with the Embed_Users team created in the REST API Usage 01: Getting Started QuickStart. If the team does not exist, create it—it will be required later.
To keep this simple, we will use a compiled version of the Dashboard Builder plugin code in a hosted environment. This means all we have to do is configure a plugin in Sigma and provide the URL's for production and development.
Log into Sigma as an administrator and navigate to Administration > Account > General Settings > Custom Plugins and click Add:
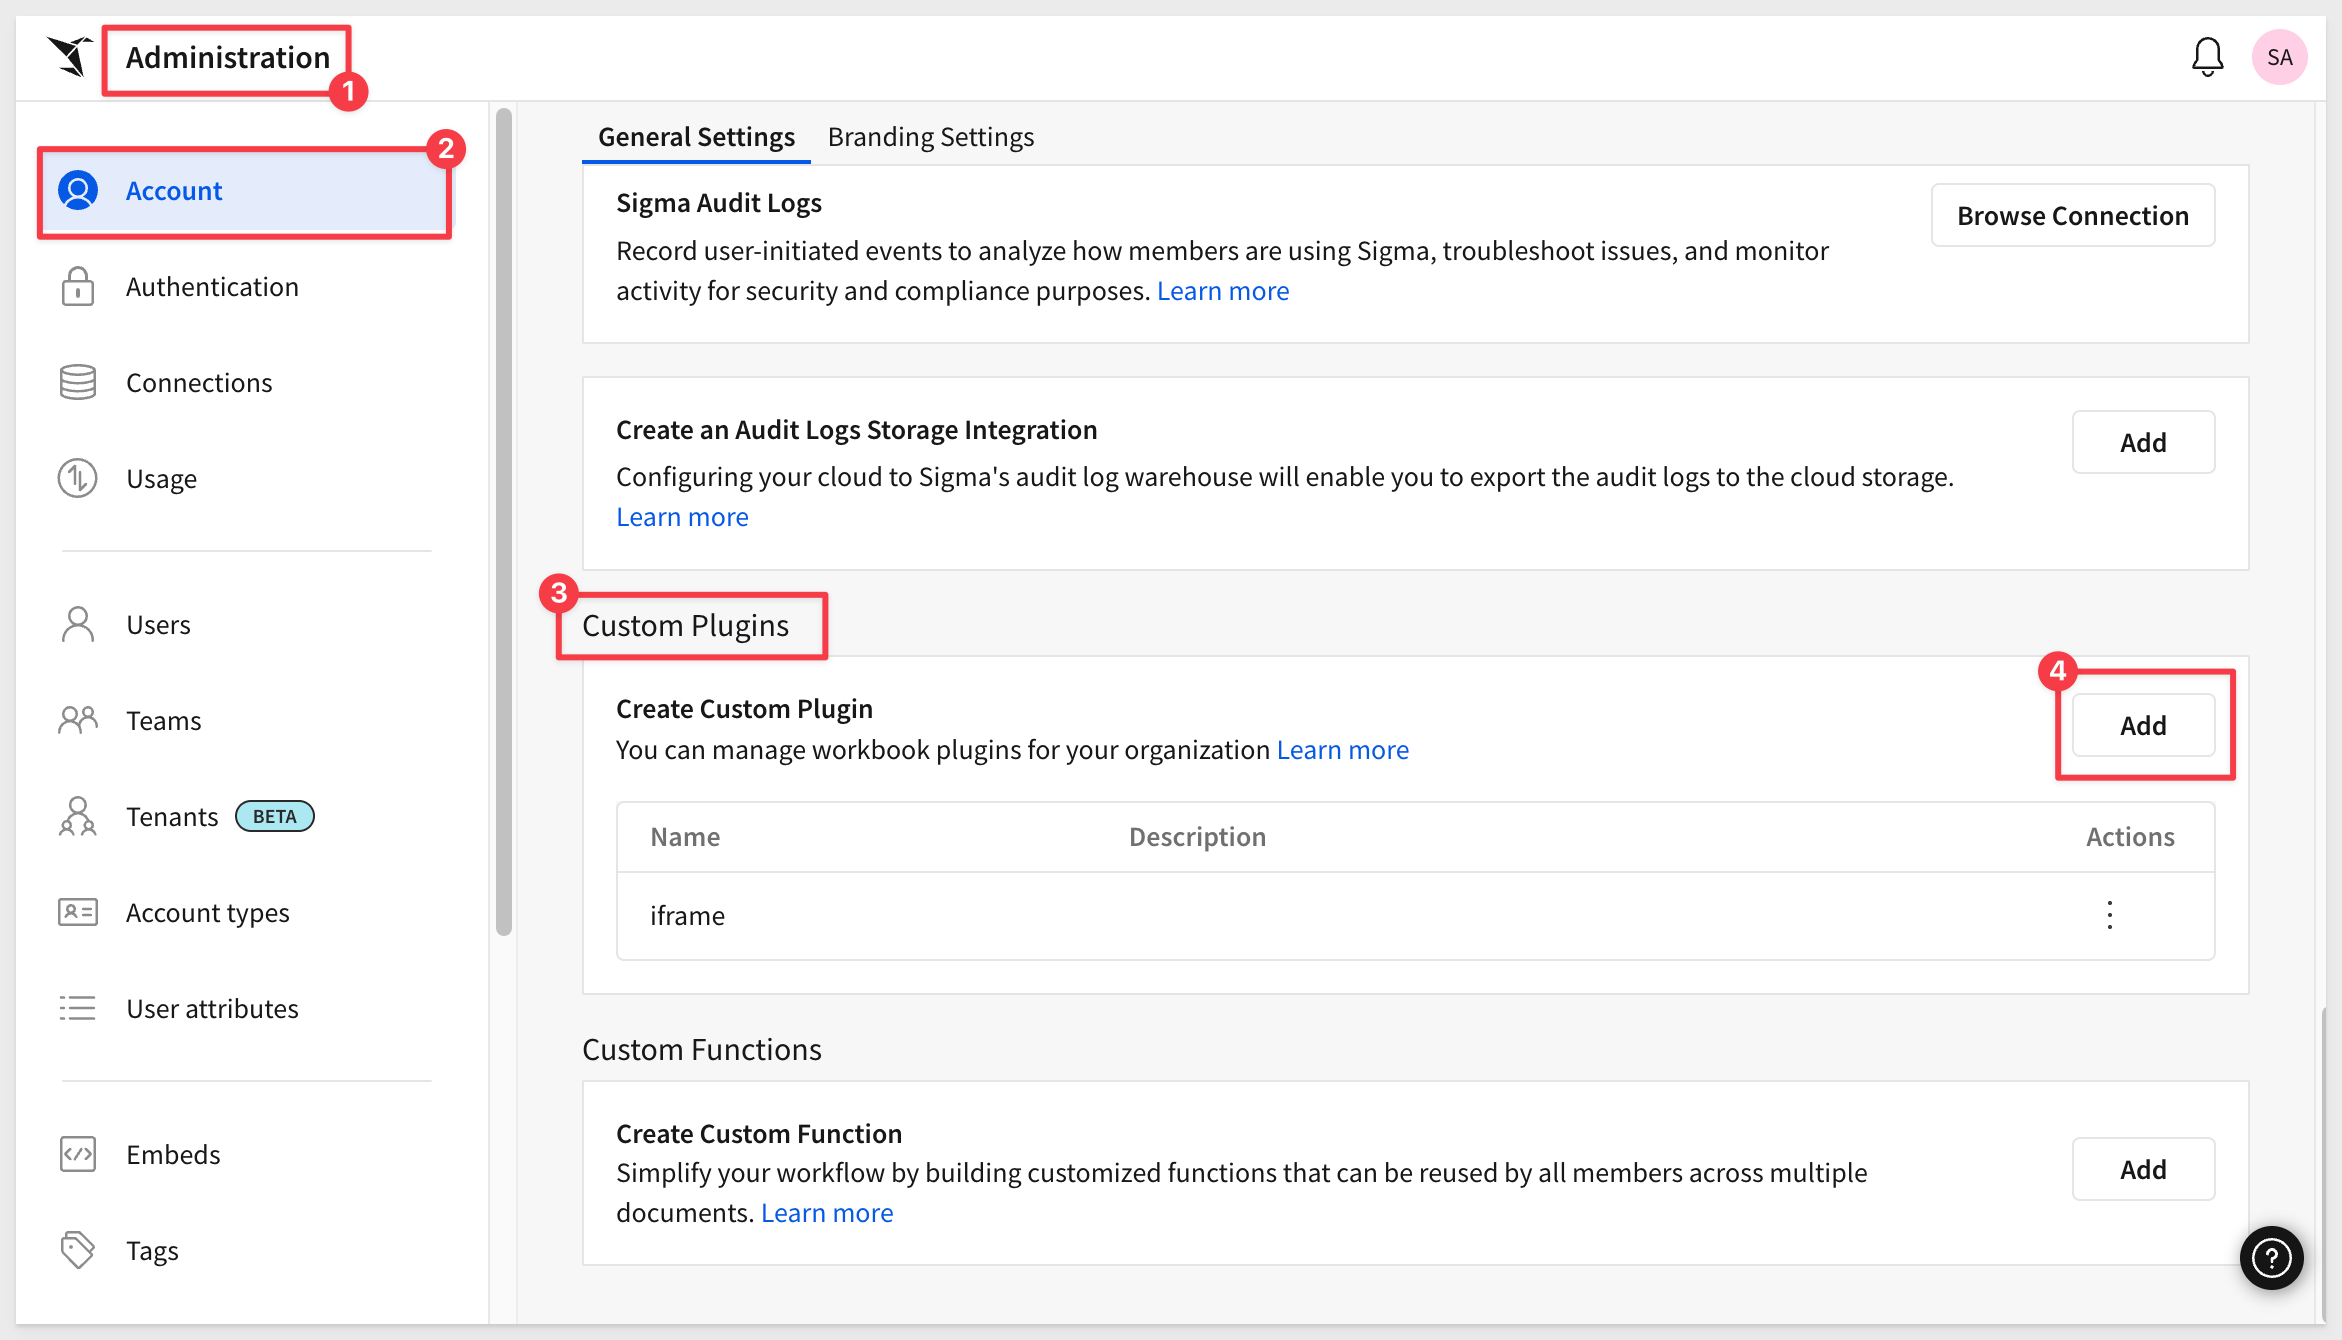
Name the plugin Dashboard Builder and set both the development and production URLs to:
https://plugins.sigmacomputing.com/dashboard-builder

Click Create Plugin:
The plugin is now registered with Sigma.
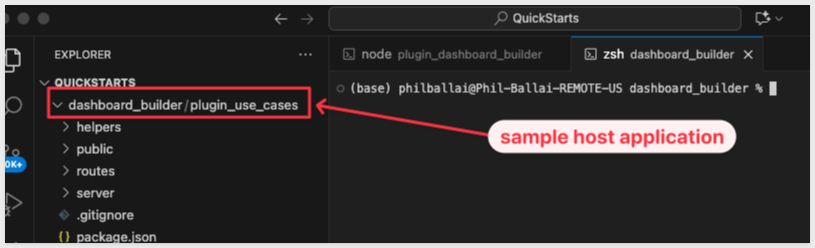
We'll use a simple JavaScript application that acts as the host or parent application. This simulates a custom application into which Sigma is embedded.
The source code for the hosted plugin we are using is also provided in this repository.
Clone the git project
Open the VS Code window that's running the plugin server.
We will use the same QuickStarts folder to store this new project.
Open a second terminal session, leaving the first one running (it's hosting the plugin):
In the second terminal, ensure you're in the QuickStarts folder, then run the following commands:
mkdir dashboard_builder
cd dashboard_builder
git init
Add the remote repository as the origin:
git remote add -f origin https://github.com/sigmacomputing/quickstarts-public.git
Enable sparse checkout:
git config core.sparseCheckout true
Specify the folder you want to clone:
echo "plugin_use_cases" >> .git/info/sparse-checkout
Pull the specified folder from the repository:
git pull origin main
You will now have two projects as shown below:
Install node for the project
npm install
Setup Local Database
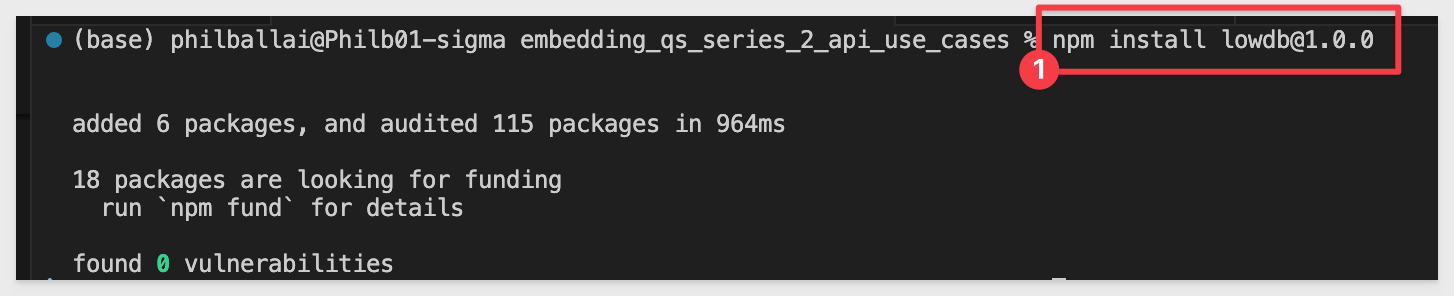
The only extra setup we need is installing a local database to store extended bookmark information. We will use a version of lowdb that supports commonJS for this.
Run the following command in terminal:
npm install lowdb@1.0.0
Lowdb installs very quickly:
Local database schema
The system maintains the local lowdb database in the multi-area-bookmarks.json file. Initially, it contains only header data:
{
  "_comment": "Default empty database for multi-area bookmarks. User bookmarks will be added here at runtime.",
  "bookmarks": {},
  "metadata": {
    "version": "1.0.0",
    "created": "2025-10-15T02:38:08.120Z"
  }
}
Sigma is the source of truth for bookmarks, using the following structure: For example, if we query via API we can see how a bookmark is structured in Sigma:
{
    "entries": [
        {
            "bookmarkId": "f1eda0f7-bd9e-4d64-b097-4bc4fdbcc72b",
            "name": "3",
            "isShared": true,
            "exploreKey": "7f574a68-5dab-45f4-85c5-78904e61a3c8"
        }
    ],
    "nextPage": null
}
Configure environment settings
In VSCode, open the .env file and add the required values for:
ORG_SLUG=
CLIENT_ID=
SECRET=
The ORG_SLUG is the name of your Sigma instance. This can be found in the URL. For example:

The CLIENT_ID and SECRET are generated in the Sigma administration panel, under developer access. Creating these values is discussed in the REST API Usage 01: Getting Started QuickStart.
Once configured, save the .env file.
When we saved the workbook earlier we used this name. In production, this value might be dynamic depending on your application's requirements.
Start the host application server
Run the following command in terminal:
cd plugin_use_cases
npm start
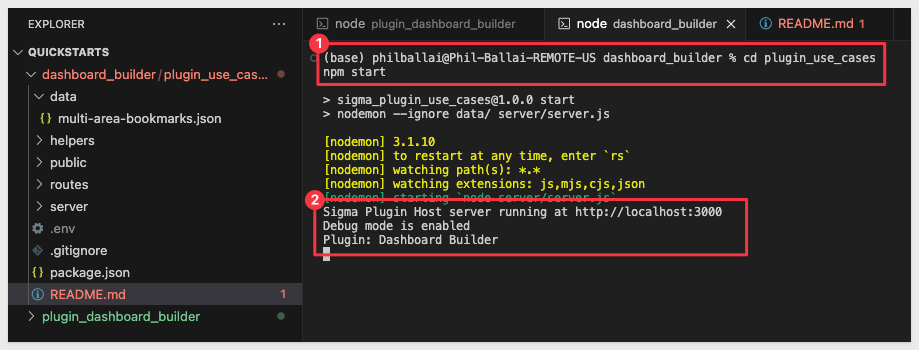
Browse to:
http://localhost:3000/dashboard-builder/
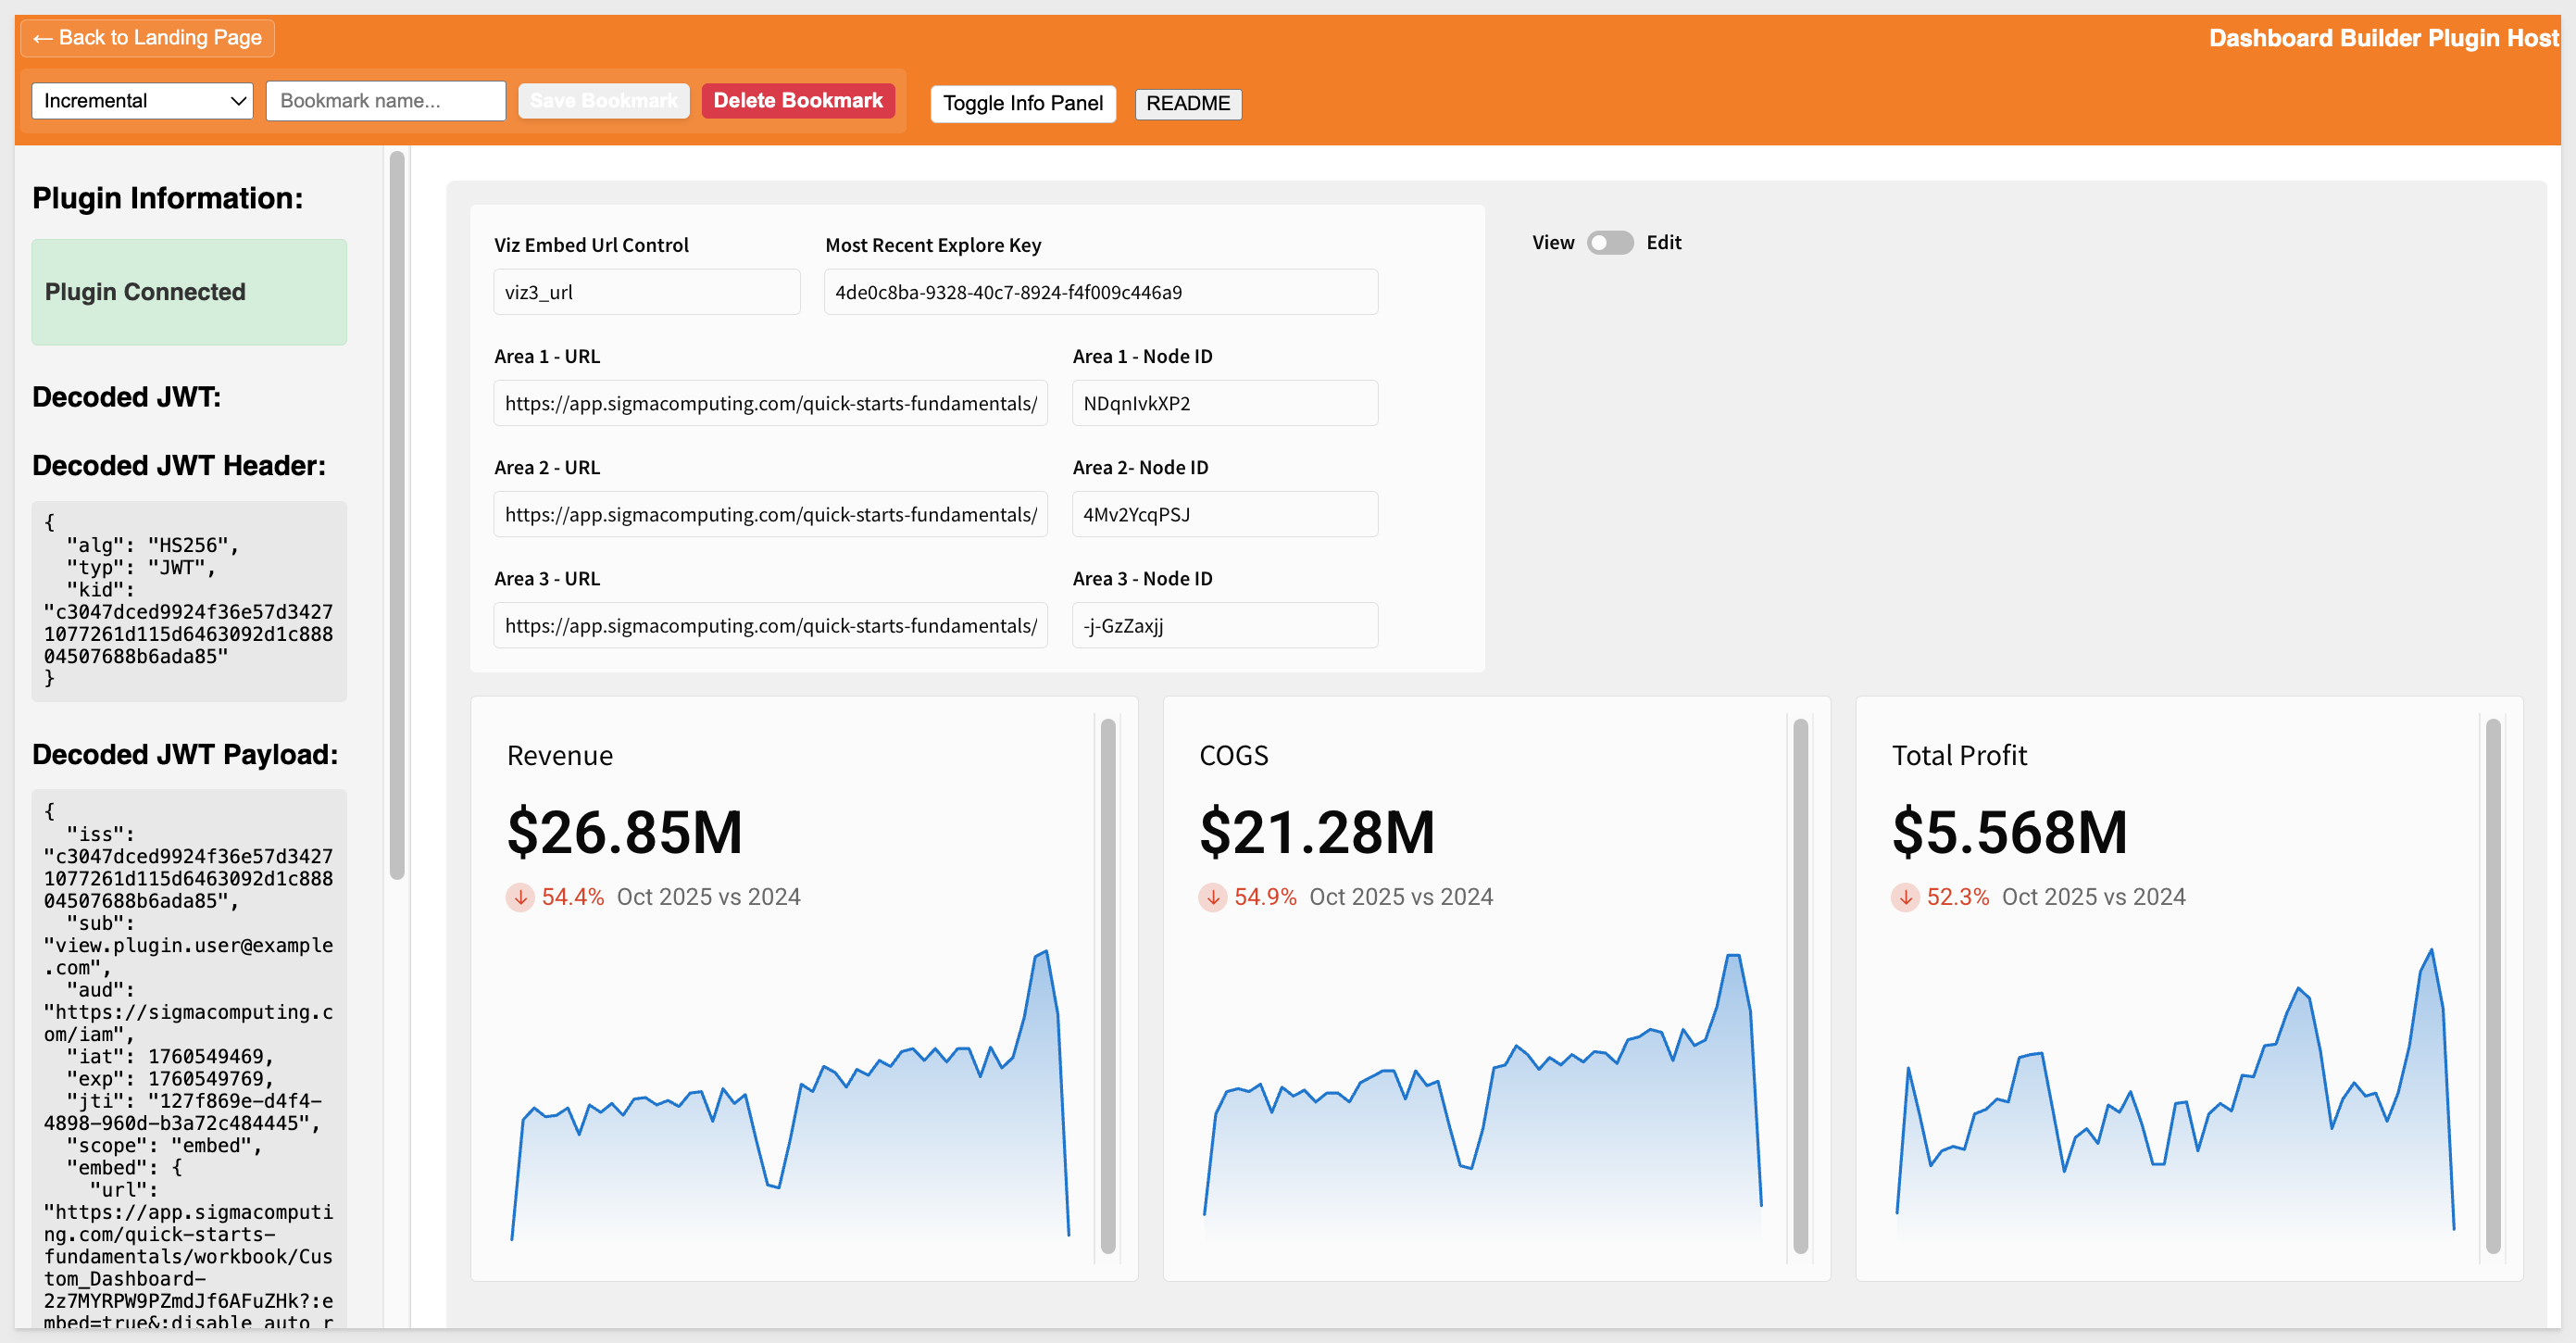
The page will render like this:
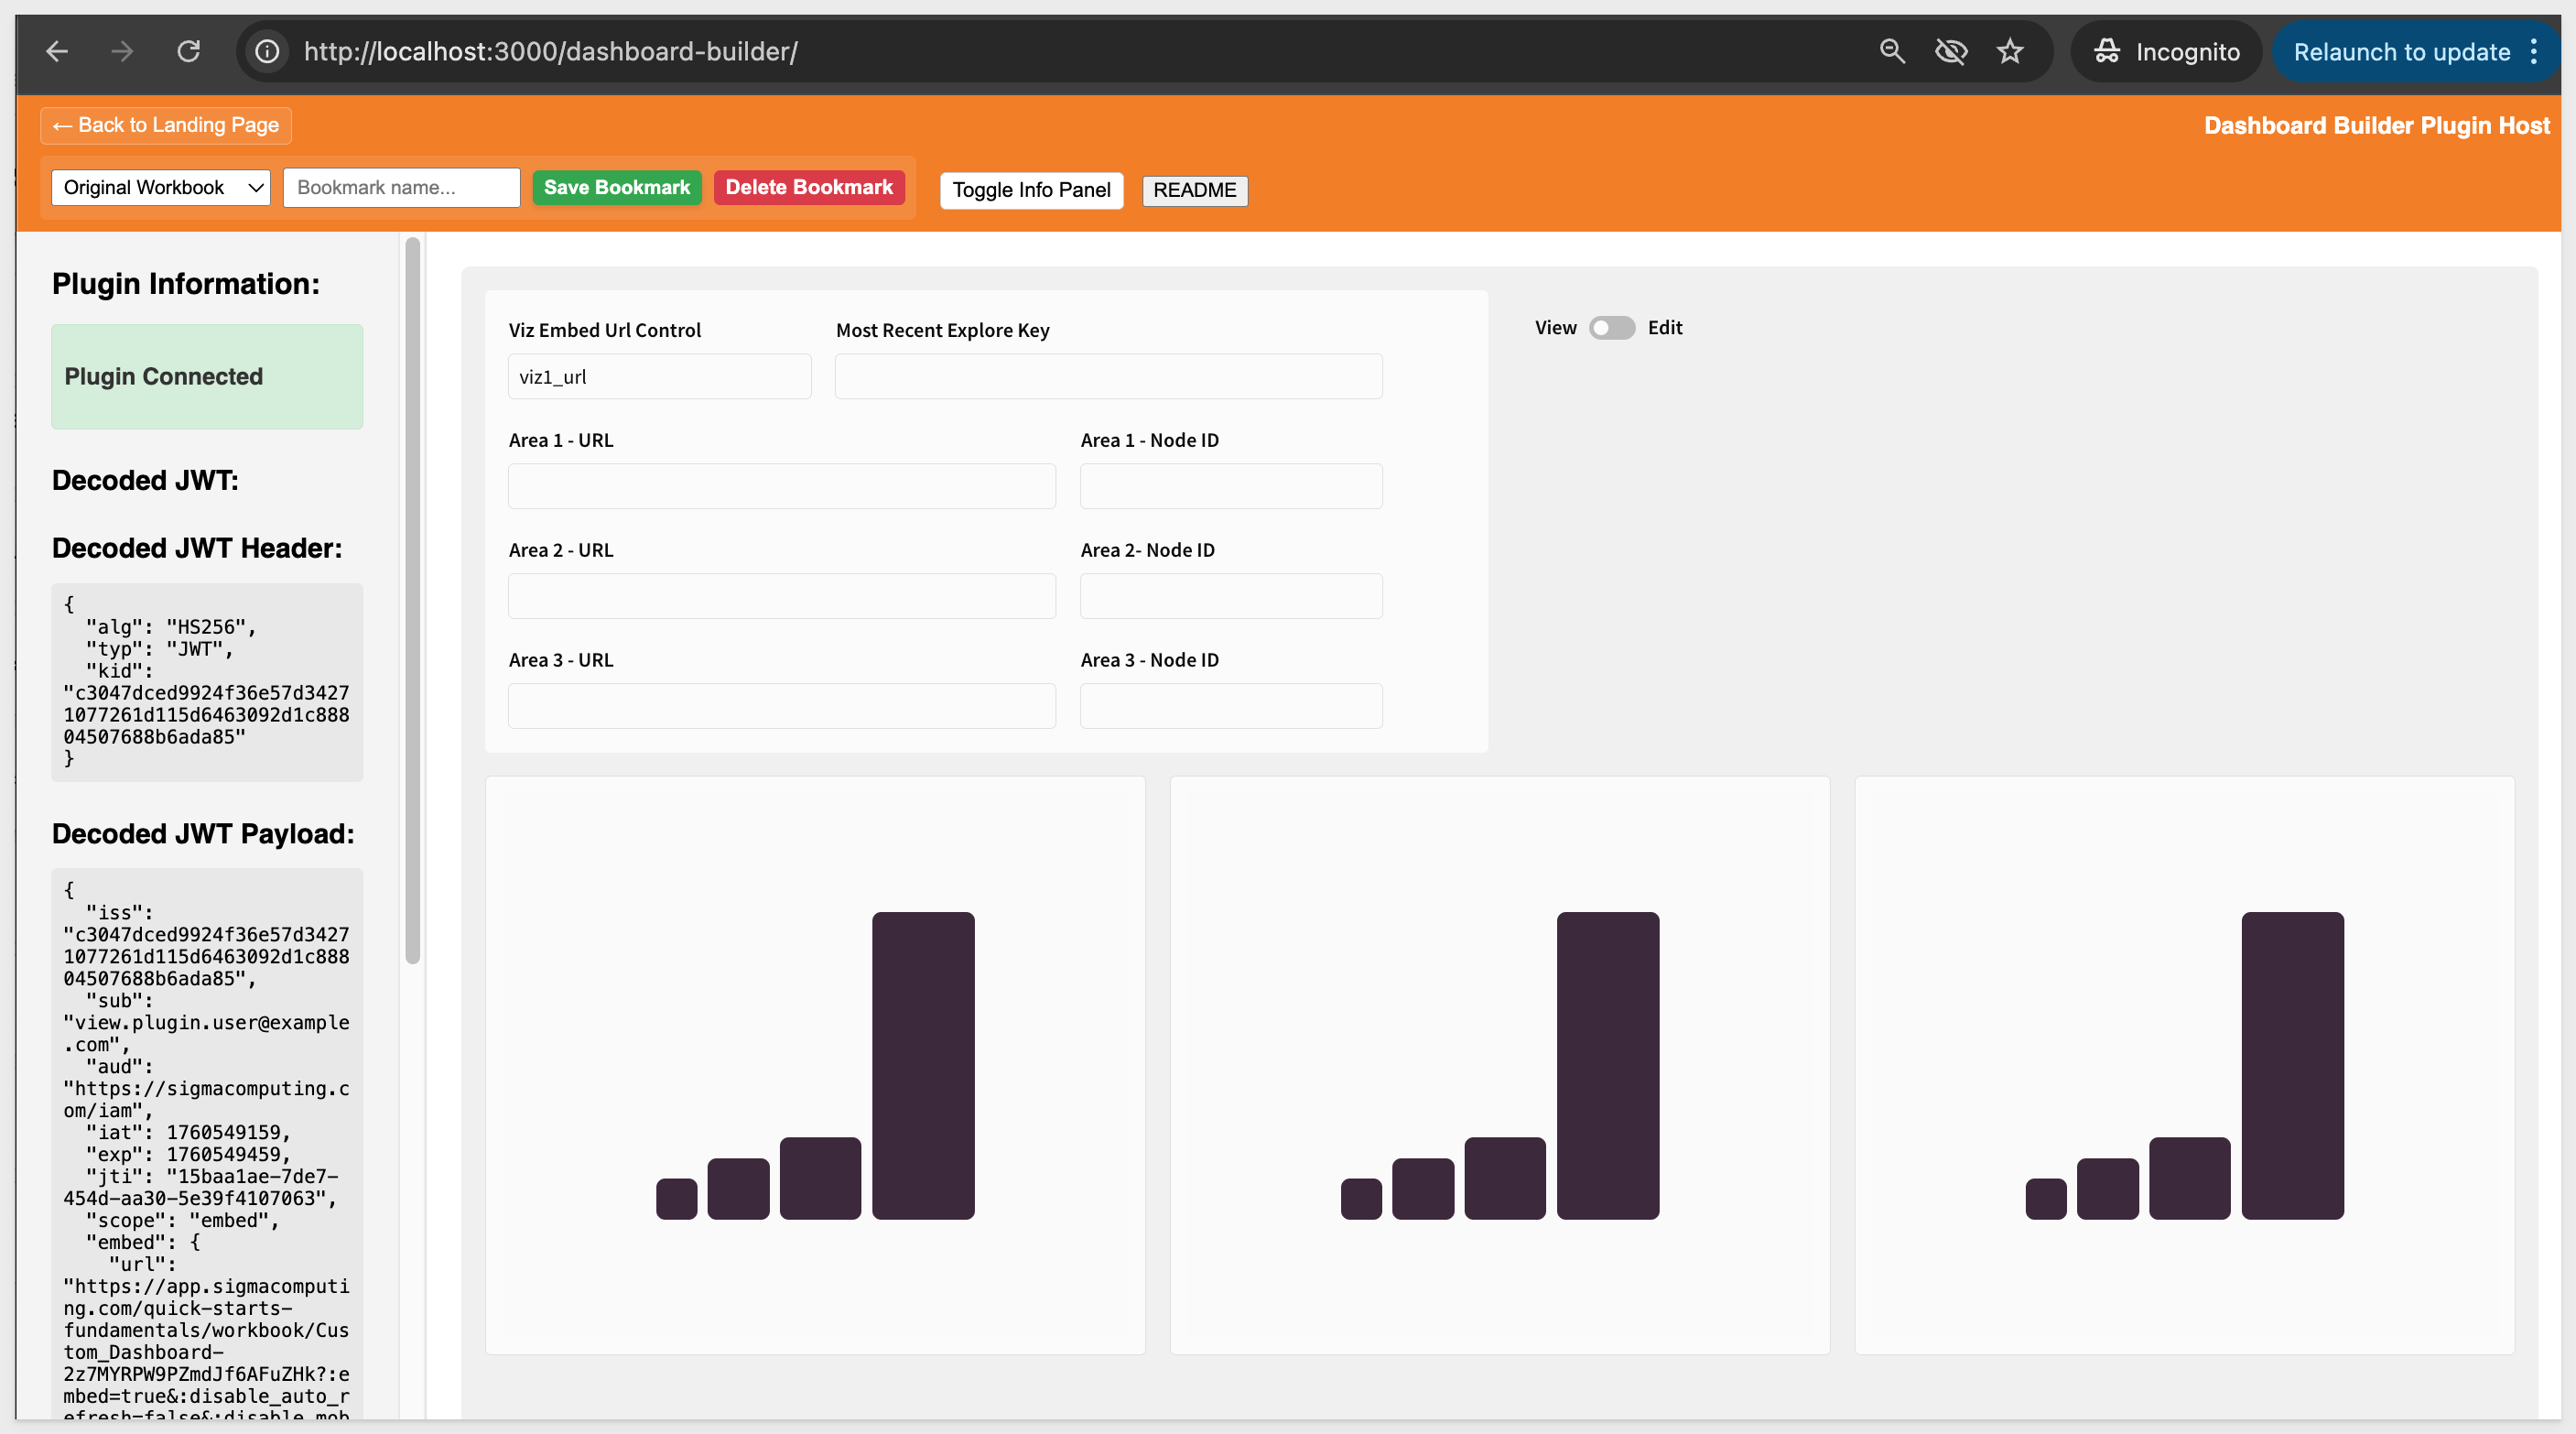
Let's run some quick validation tests to make sure everything works as expected. Here is a simple test plan to run through.
Test One: Single Area
- Toggle into
Editmode, click theEditbutton under Area 1 and select theRevenueKPI:
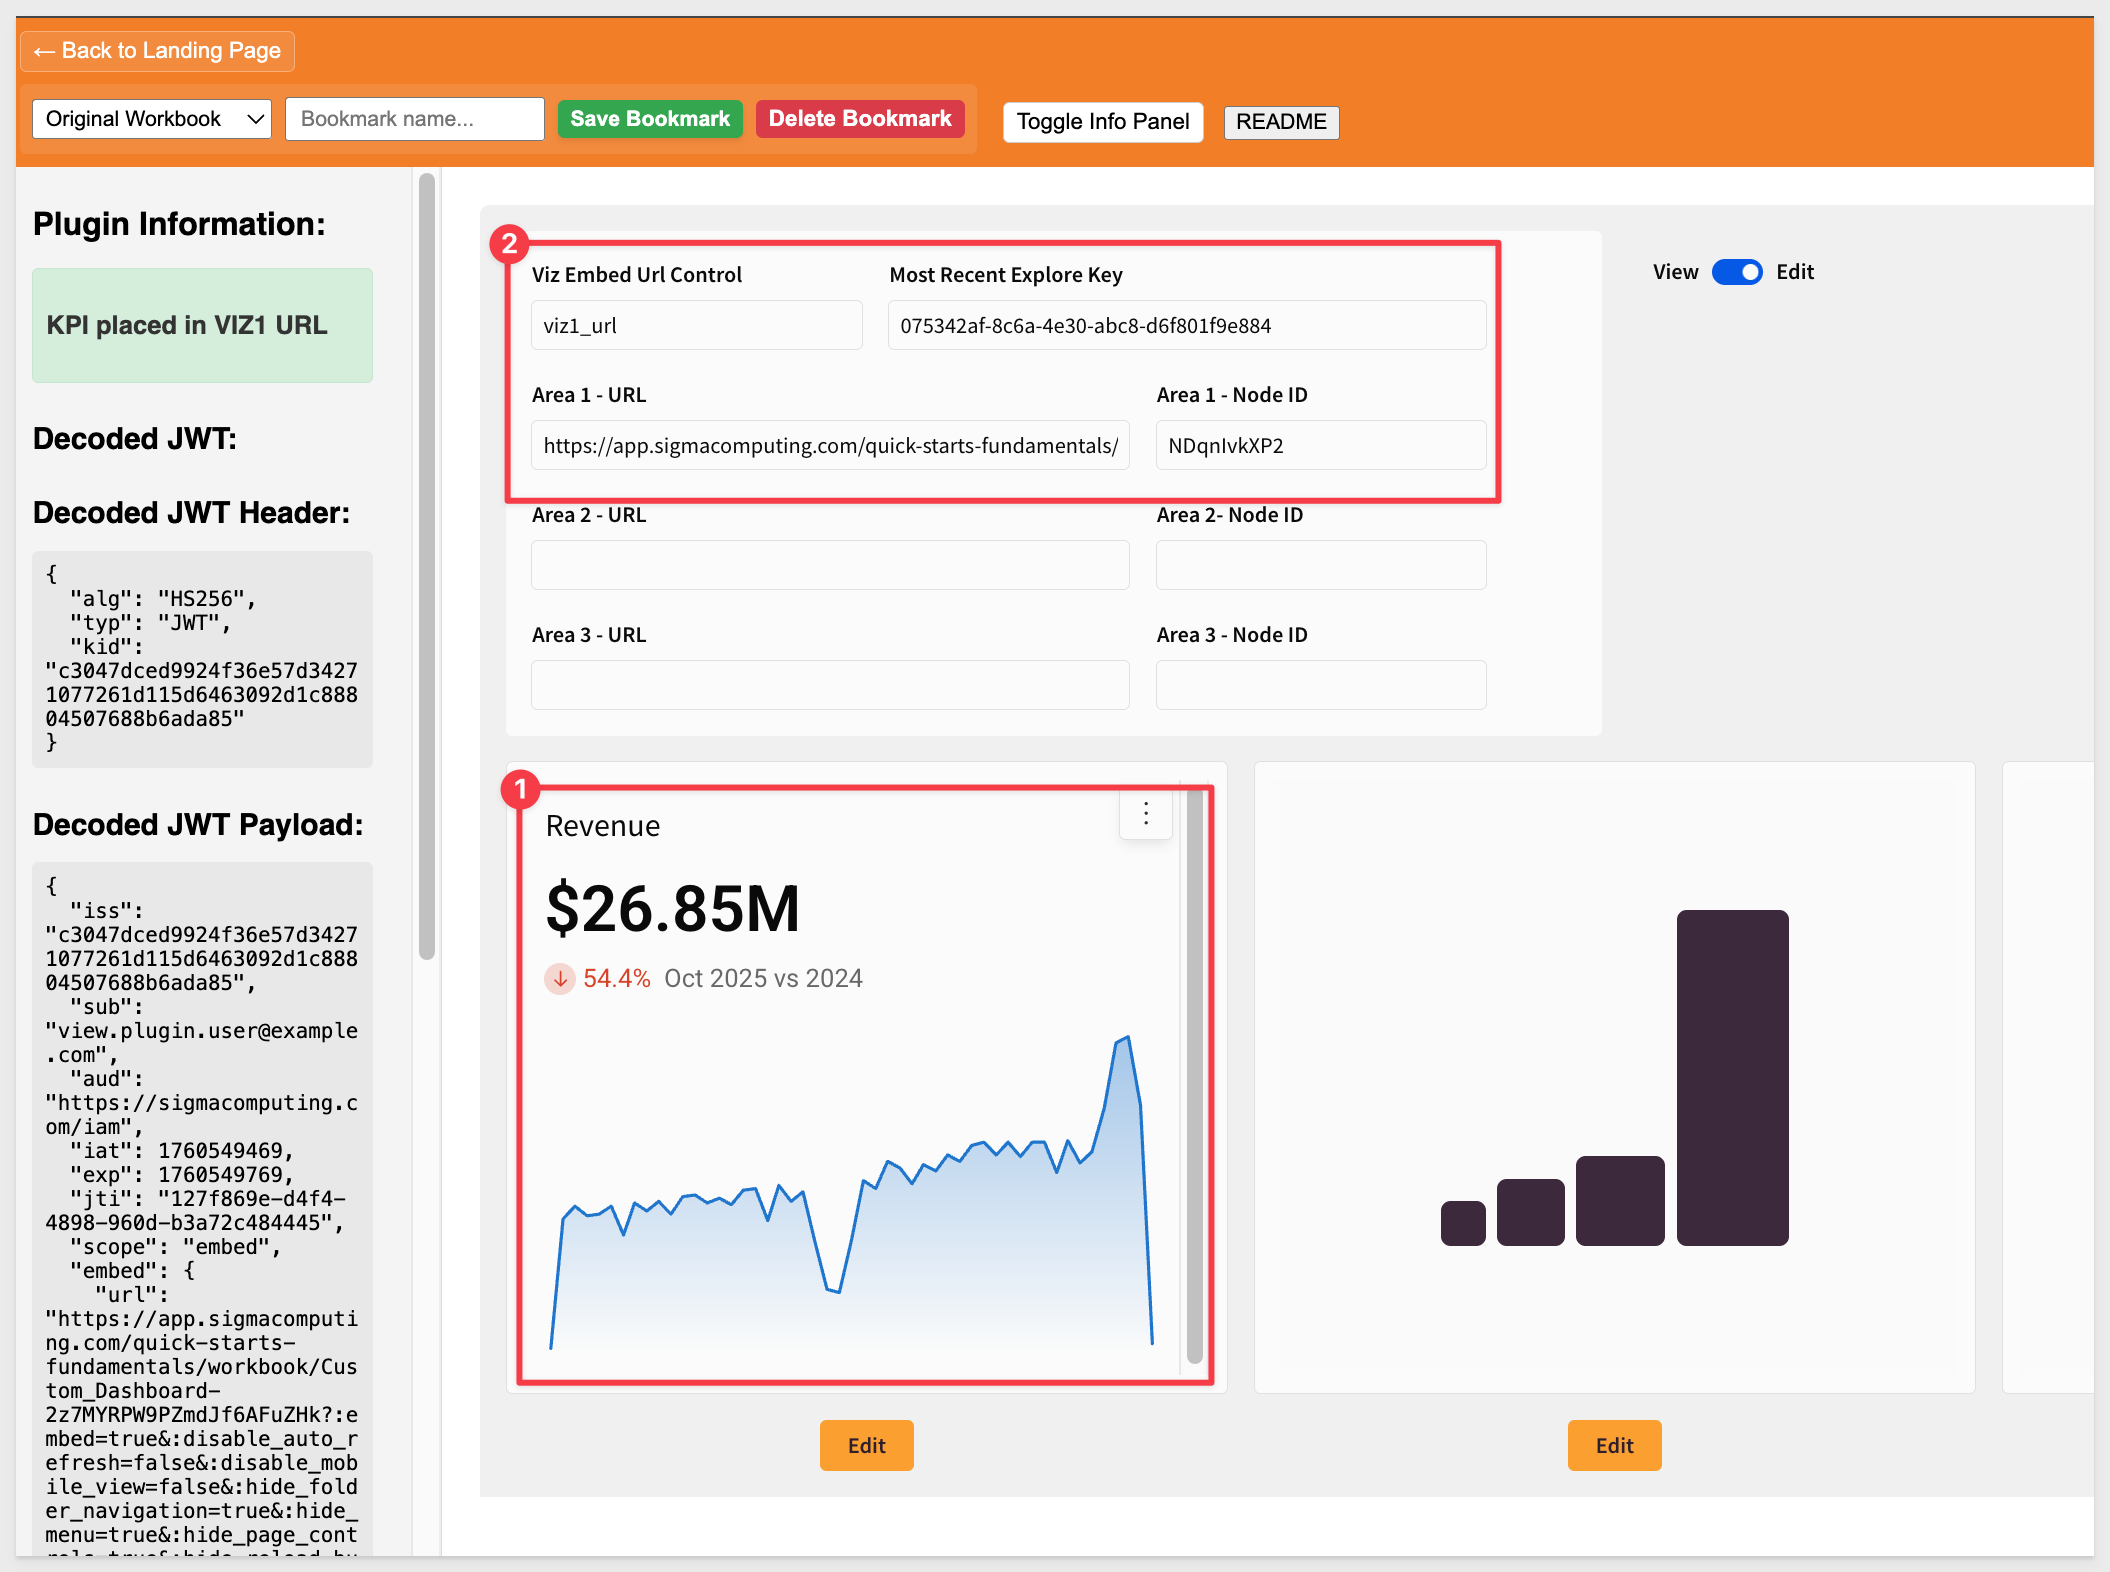
- Name a new bookmark
1and clickSave Bookmark:

- The dropdown should stay on
1and theRevenueKPI should be inArea 1. - Using the select control, switch between
Originaland1- Area 1 should restore correctly.
The rest of the tests are really similar so screenshots are not provided as the workflow and results are very similar to Test One.
Test Two: Dual Area
- Starting from the
Original Workbook, place KPI inArea 1 - Place KPI in
Area 2 - Save as bookmark
2 - Dropdown should stay on
2 - Switch between bookmarks - both areas should restore correctly
Test 3: Incremental Building:
- Select the
2bookmark - Add KPI to Area 3
- Save as bookmark
Incremental - Dropdown should stay on
Incremental - Switch between bookmarks and confirm the expected results display correctly.
After completing the last test, the local database file will look similar to this:
{
  "_comment": "Default empty database for multi-area bookmarks. User bookmarks will be added here at runtime.",
  "bookmarks": {
    "7a5ec4b2-9556-425d-9af9-9bf6f4eb3cb2": {
      "id": "7a5ec4b2-9556-425d-9af9-9bf6f4eb3cb2",
      "name": "1",
      "sigmaBookmarkId": "eeabb12f-e3fa-4f68-9de6-ff8a278e43aa",
      "workbookUrlId": "2z7MYRPW9PZmdJf6AFuZHk",
      "areas": {
        "viz1_nodeid": "NDqnIvkXP2",
        "viz2_nodeid": null,
        "viz3_nodeid": null
      },
      "created": "2025-10-15T17:33:36.498Z",
      "updated": "2025-10-15T17:33:36.498Z"
    },
    "6eddf721-b278-4f18-9d0c-973a753502b7": {
      "id": "6eddf721-b278-4f18-9d0c-973a753502b7",
      "name": "2",
      "sigmaBookmarkId": "b4c15d66-66de-407a-b404-d212d51da571",
      "workbookUrlId": "2z7MYRPW9PZmdJf6AFuZHk",
      "areas": {
        "viz1_nodeid": "NDqnIvkXP2",
        "viz2_nodeid": "4Mv2YcqPSJ",
        "viz3_nodeid": null
      },
      "created": "2025-10-15T17:41:17.823Z",
      "updated": "2025-10-15T17:41:17.823Z"
    },
    "1695501f-4e3c-4fe1-9512-6408f4468b40": {
      "id": "1695501f-4e3c-4fe1-9512-6408f4468b40",
      "name": "Incremental",
      "sigmaBookmarkId": "cc614723-306b-46e5-b7f1-55ddba106dfb",
      "workbookUrlId": "2z7MYRPW9PZmdJf6AFuZHk",
      "areas": {
        "viz1_nodeid": "NDqnIvkXP2",
        "viz2_nodeid": "4Mv2YcqPSJ",
        "viz3_nodeid": "-j-GzZaxjj"
      },
      "created": "2025-10-15T17:42:56.484Z",
      "updated": "2025-10-15T17:42:56.484Z"
    }
  },
  "metadata": {
    "version": "1.0.0",
    "created": "2025-10-15T02:38:08.120Z"
  }
}
The corresponding bookmarks in Sigma, queried using the List bookmarks in a workbook API call look like this:
{
    "entries": [
        {
            "bookmarkId": "cc614723-306b-46e5-b7f1-55ddba106dfb",
            "name": "Incremental",
            "isShared": true,
            "exploreKey": "637048d6-87b5-4699-a284-6cfe2896d065"
        },
        {
            "bookmarkId": "b4c15d66-66de-407a-b404-d212d51da571",
            "name": "2",
            "isShared": true,
            "exploreKey": "02a642bc-46da-44ef-8479-5e0a355530be"
        },
        {
            "bookmarkId": "3e8fa013-6465-4caa-aaaf-63589a0940dc",
            "name": "2",
            "isShared": true,
            "exploreKey": "949837ce-7602-4223-aa30-2e7770408c7d"
        },
        {
            "bookmarkId": "eeabb12f-e3fa-4f68-9de6-ff8a278e43aa",
            "name": "1",
            "isShared": true,
            "exploreKey": "075342af-8c6a-4e30-abc8-d6f801f9e884"
        }
    ],
    "nextPage": null
}
Click Delete Bookmark to remove the selected bookmark from both Sigma and the local database.
The plugin source code for this project is available in a public GitHub repository, should you want to explore it.
Project Setup
Open VS Code and start a new Terminal session.
Create a new directory in your preferred location (or use an existing one):
md dashboard_builder_plugin
cd dashboard_builder_plugin
Execute the terminal command:
git init
Add the remote repository as the origin:
git remote add -f origin https://github.com/sigmacomputing/quickstarts-public.git
Enable sparse checkout:
git config core.sparseCheckout true
Specify the folder you want to clone:
echo "plugin_dashboard_builder" >> .git/info/sparse-checkout
Pull the specified folder from the repository:
git pull origin main
Change directory to the new folder:
cd plugin_dashboard_builder
Node Version Management (optional but recommended for those having multiple versions of Node.js installed)
This reads the Node.js version (22.12.0) from the .nvmrc file.
nvm use
Install Yarn package manager:
npm install yarn
Start the Angular Live Development Server
yarn start
If prompted with Would you like to share pseudonymous usage data about this project with the Angular Team... enter N and press Enter.
The expected terminal output (ignoring warnings) is:
Angular Live Development Server is listening on localhost:4200, open your browser on http://localhost:4200/


✔ Compiled successfully.
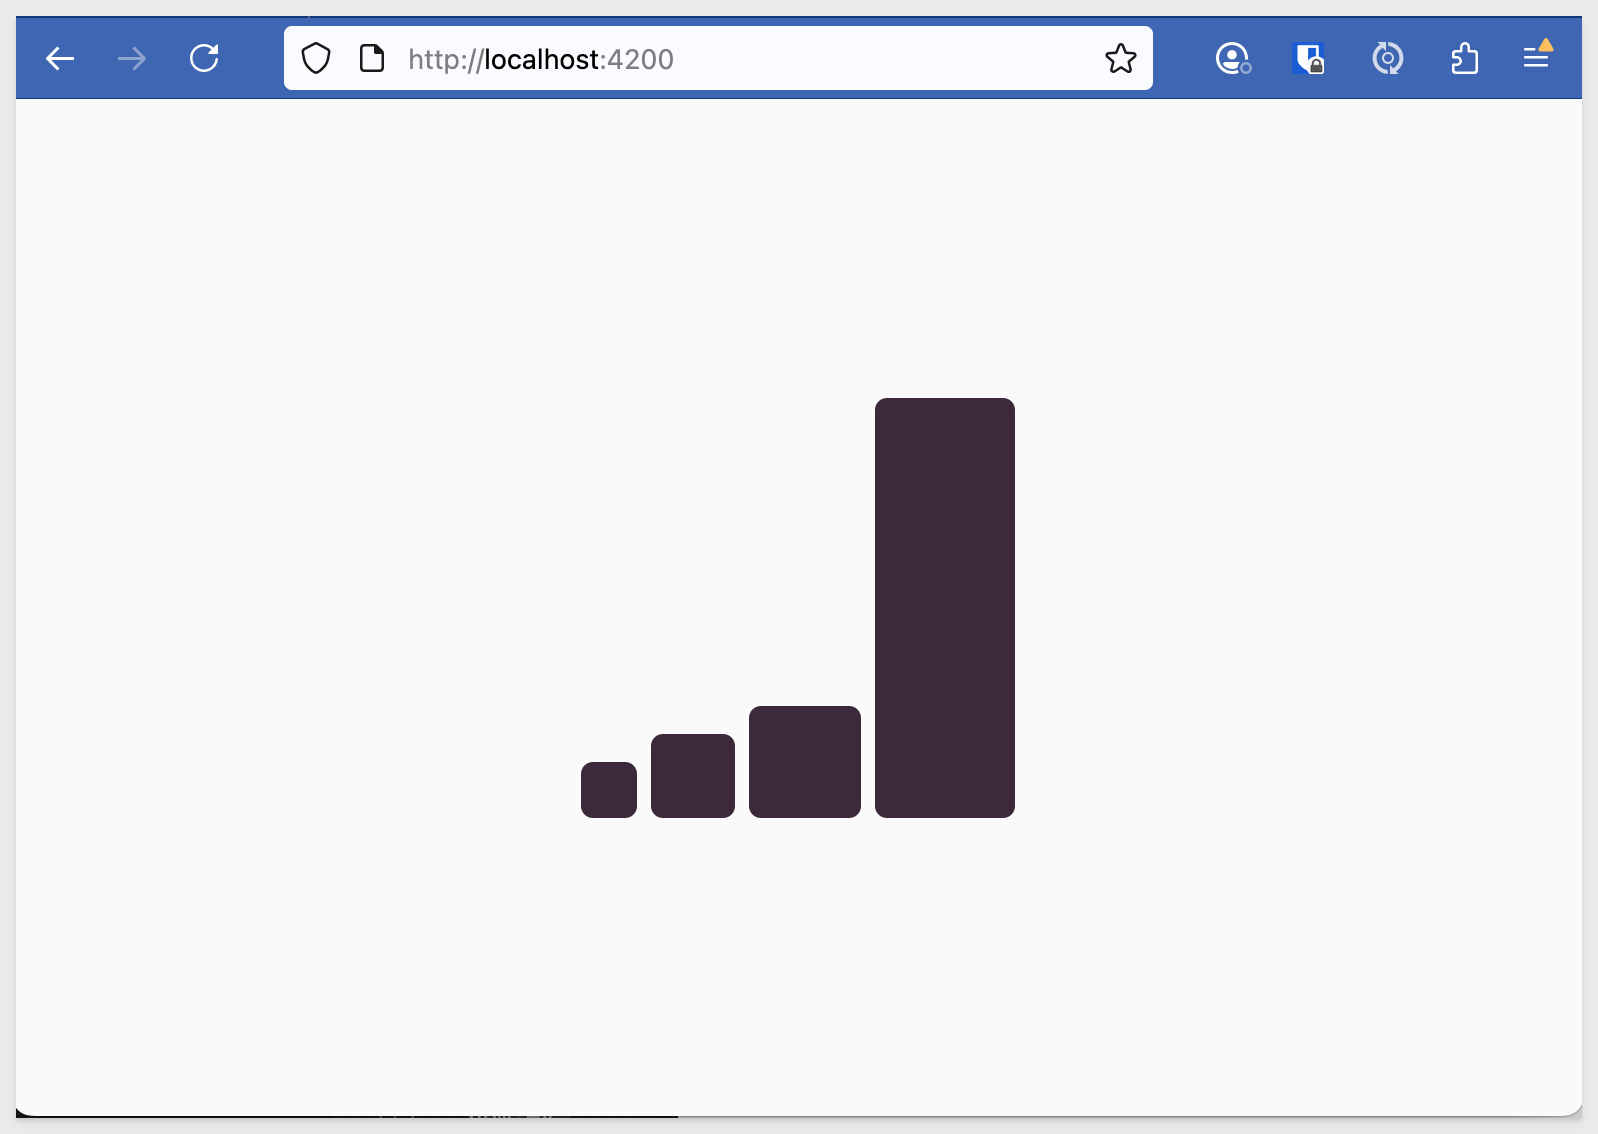
Open a browser and navigate to http://localhost:4200 (the default Angular port).
The page will render with a placeholder bar chart:
Key plugin files
This QuickStart does not require any changes or additional configuration for the plugin, so we won't cover it further than to point out the key files.
- src/app/main/main.component.ts:68-80 - Plugin configuration
- src/app/main/main.component.ts:118-136 - URL parsing logic
- src/app/main/main.component.ts:160-187 - Event registration
For a deeper dive in the plugin code and architecture, see the project readme
In this QuickStart, we walked through the complete setup of a Sigma plugin-powered dashboard builder, including:
- Registering and testing the plugin within Sigma
- Using a Sigma workbook template to define editable dashboard zones
- A local JavaScript application to simulate an embedded environment
- Persisting user-generated dashboards using Sigma bookmarks and a local JSON database
- Testing the full configuration across multiple user-generated bookmark scenarios
By the end, you created a working system that combines Sigma's governance and bookmark system with a responsive, dynamic UI—all powered by plugins and embeddable components.
Additional Resource Links
Blog
Community
Help Center
QuickStarts
Be sure to check out all the latest developments at Sigma's First Friday Feature page!