Embed live Sigma analytics inside Salesforce using Lightning Web Components — a static table embed and a dynamically filtered view driven by Salesforce context.
For more information on Sigma's product release strategy, see Sigma product releases
If something doesn't work as expected, here's how to contact Sigma support
Target Audience
Semi-technical users involved in planning or implementing Sigma embedding. No SQL or technical data skills are needed to complete this QuickStart. It does assume some common computer skills like installing software, using Terminal, navigating folders and copy/paste operations.
Prerequisites
- A computer with a current browser. Any modern browser will work.
- Admin access to a Sigma environment.
- Admin access to a Salesforce environment.

We'll move through this section quickly, assuming you've completed similar steps in Sigma before.
Log into Sigma as the Administrator, create a new workbook, and add a table element to the page.
Use the Sigma sample database to create a workbook containing one table.
Set the table's source to the ACCOUNT table from the Sigma Sample Database > APPLICATIONS > SALESFORCE schema:

We will use the Name column later in this exercise, we moved that to the first position.
Click Save as and name the workbook Use Case: Embed into Salesforce QuickStart.
Open the published version:

Copy the full URL from your browser — we'll use it in the next section
For more information on URL formats for JWT embedding, see What URL to use
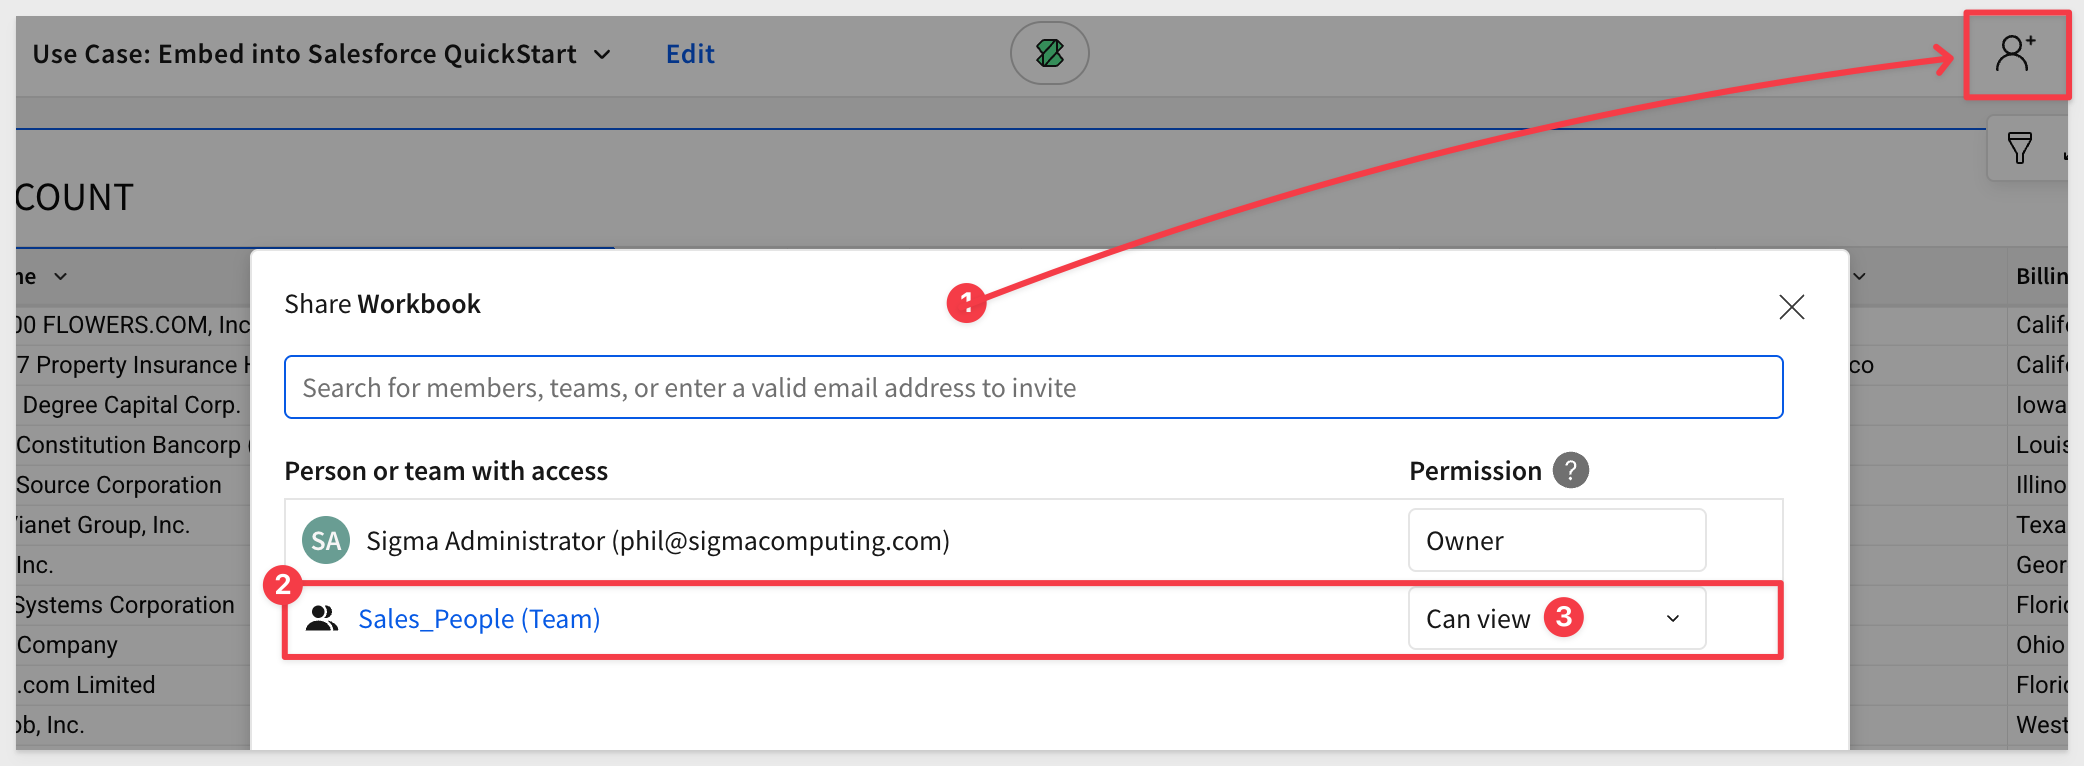
Share with team
Share the workbook with the Sales_People team we created in the Embedding 01: Getting Started QuickStart, granting Can view permission:
Sigma Embed Credentials
Now we'll generate credentials to secure the embed in Salesforce.
Navigate to Administration > Developer Access:

Click Create Newin the top-right corner. This opens the Create client credentials modal.
Under Select privileges choose Embedding.
Provide a Name and Description of your choice.
Under Owner, select an organization member with the account type you want to associate with the embed secret. For now, select yourself or another Administrator.

Click Create.
Copy the generated Client ID and Secret, and store them for later use
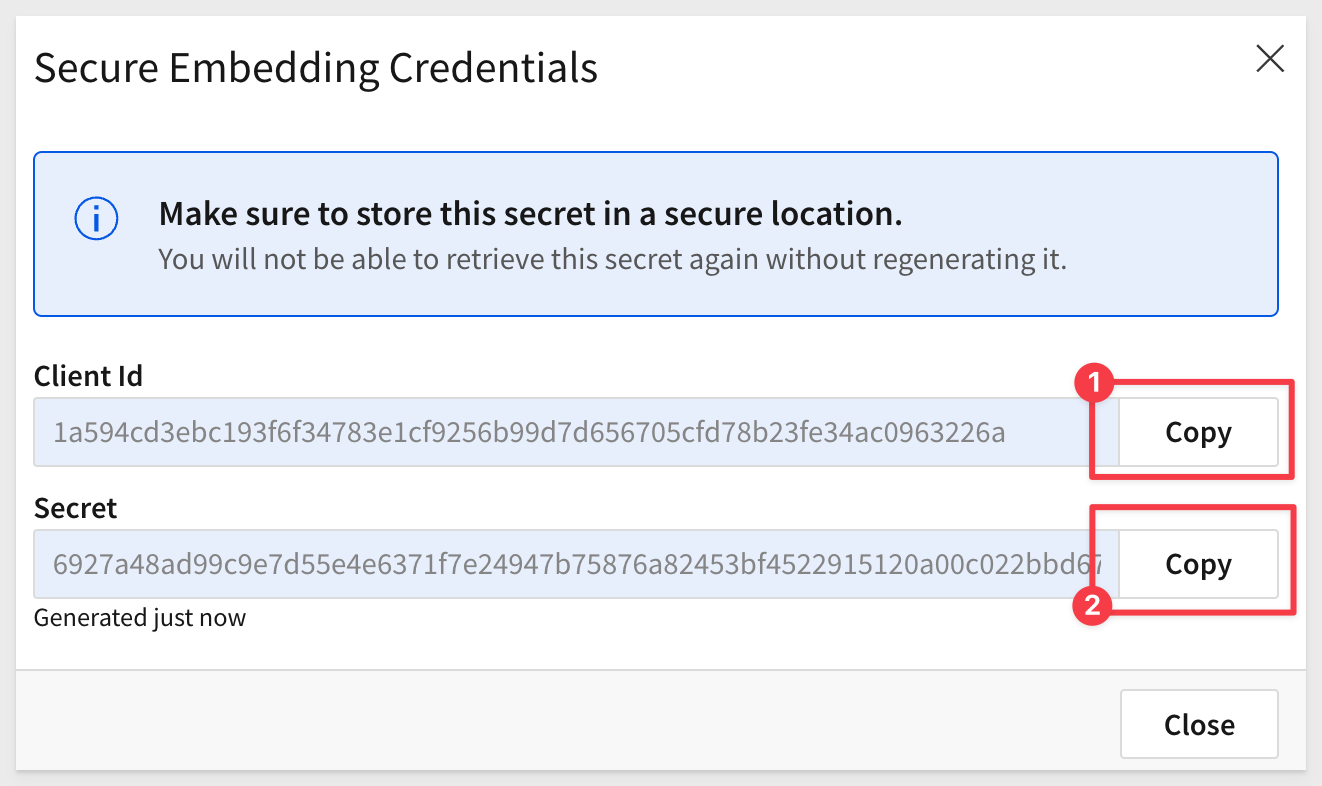
Click Close.
These credentials can be used for all embeds, but you may create as many credentials as you prefer.
Clone the Git Repository Project Folder
We have made sample project code available in a public GitHub repository to save time.
While you may clone the entire repository (it is not that large), we'll avoid cloning portions of the repository that aren't immediately relevant.
Instead, we will use VSCode and terminal to perform a git sparse-checkout of the specific project folder we are interested in.
This takes a few extra steps, but results in a cleaner local project folder.
Open VSCode and a new Terminal session.
Create a new directory in a location of your choice, using the command:
For example:
mkdir sigma_quickstarts
Change to the new directory:
cd sigma_quickstarts
Execute the terminal command:
git init
Add the remote repository as the origin:
git remote add -f origin https://github.com/sigmacomputing/quickstarts-public.git
No errors should show:

Enable sparse checkout:
git config core.sparseCheckout true
Specify the folder you want to clone by adding it to the sparse-checkout configuration and also clone to project configuration file:
echo "embedding_salesforce" >> .git/info/sparse-checkout
echo "embedding_salesforce/sfdx-project.json" >> .git/info/sparse-checkout
Pull the specified folder from the repository:
git pull origin main
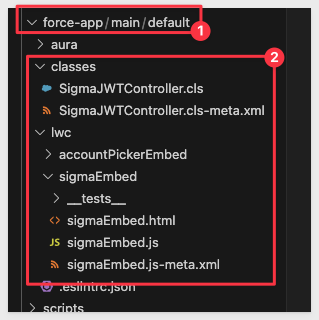
Once complete, your local sigma_quickstarts folder will contain the embedding_salesforce project:

In VSCode, click the Extensions icon, search for Salesforce ext and select the Salesforce Extension Pack:

Accept any warnings about publisher trust. The installation takes a few minutes.
The Salesforce Extension Pack depends on the Salesforce CLI under the hood.
In a browser, go to the Salesforce CLI page and download the version for your operating system.
Run the installer and follow the prompts. Nothing special here, just a standard installation.
Once installed, we can test it by running:
In VSCode, open a new terminal session.
sf --version
The terminal should return a version message, similar to: (OS dependent):
@salesforce/cli/2.89.8 darwin-arm64 node-v22.15.0
Authorize the Salesforce org
Run this in the VSCode terminal:
sf auth:web:login --alias myOrg --instance-url https://login.salesforce.com --set-default
A browser will open requesting that you log into your Salesforce org. Provide your credentials and login.
Salesforce will ask if it should allow access:

You'll see a message confirming: "Authentication Successful. You've successfully logged in. You can now close this browser tab or window."
The terminal will confirm that your org is connected to your local project:

We need to configure the embed parameters in our VSCode project files. Apart from other files mentioned in use case two, no other files were added to the project to make it work.
Use Case 1: Basic Sigma Embed
The project has four files to support the static embed, two of which require editing, located in the project as shown below:
1: sigmaEmbed.js
- Handles the LWC logic. On component load, it calls an Apex method to retrieve a signed JWT, then builds the full Sigma iframe URL. using your Base URL and workbook slug.
- We can refer to this as the Sigma embed API.
Open this file and replace the placeholders for {YOUR_ORG_SLUG} and {YOUR_WORKBOOK_ID} in the code-block below:
// This method is called when the component is inserted into the DOM
connectedCallback() {
    getSignedJWT()
        .then(jwt => {
            const baseUrl = 'https://app.sigmacomputing.com/{YOUR_ORG_SLUG}/workbook';
            const workbookSlug = 'Use-Case-Embed-into-Salesforce-QuickStart-{YOUR_WORKBOOK_ID}';
            const cacheBuster = `&_ts=${Date.now()}`;
            this.iframeUrl = `${baseUrl}/${workbookSlug}?:embed=true&:jwt=${jwt}${cacheBuster}`;
        })
        .catch(error => {
            console.error('Failed to fetch JWT:', error);
        });
 }
Save the file after editing.
2: SigmaJWTController.cls
The Apex class functions as your embed API — it signs a JWT server-side and provides it to the LWC, which then constructs the Sigma embed URL.
- This Apex class signs the JWT and contains:
- getSignedJWT() — the method called by the component
- Helper methods to encode the JWT and generate a UUID
- Your
clientIdandsecretfrom Sigma
Open this file and replace the placeholders for {YOUR_CLIENT_ID} and {YOUR_SECRET} in this code-block:
// Replace these with your actual Sigma credentials
    String clientId = '{YOUR_CLIENT_ID}';  // Your Sigma client ID
    String secret = '{YOUR_SECRET}';  // Your Sigma secret key
Save the file after editing.
3: sigmaEmbed.html
- Renders the Sigma embed using an iframe element. Once the iframeUrl is available, the workbook appears inside Salesforce.
- No edits required.
4: sigmaEmbed.js-meta.xml
- Makes the component usable inside the Lightning App Builder. Enables this LWC to be dropped on App or Record pages.
- No edits required.
Deploy to Org
In the VSCode terminal, run this command, making sure that you are in the embedding_salesforce folder:
sf deploy metadata --source-dir force-app/main/default/classes/SigmaJWTController.cls \
                   --source-dir force-app/main/default/classes/SigmaJWTController.cls-meta.xml \
                   --source-dir force-app/main/default/classes/SigmaJWTControllerTest.cls \
                   --source-dir force-app/main/default/classes/SigmaJWTControllerTest.cls-meta.xml \
                   --source-dir force-app/main/default/lwc/sigmaEmbed
This deploys: the Apex controller, the test class (required for Salesforce code coverage), the Lightning Web Component, and their metadata.

Now that you've deployed the component, we can put your sigmaEmbed Lightning Web Component onto a page.
Log into Salesforce, click on the gear icon and select Setup:

Search for App Builder in setup:
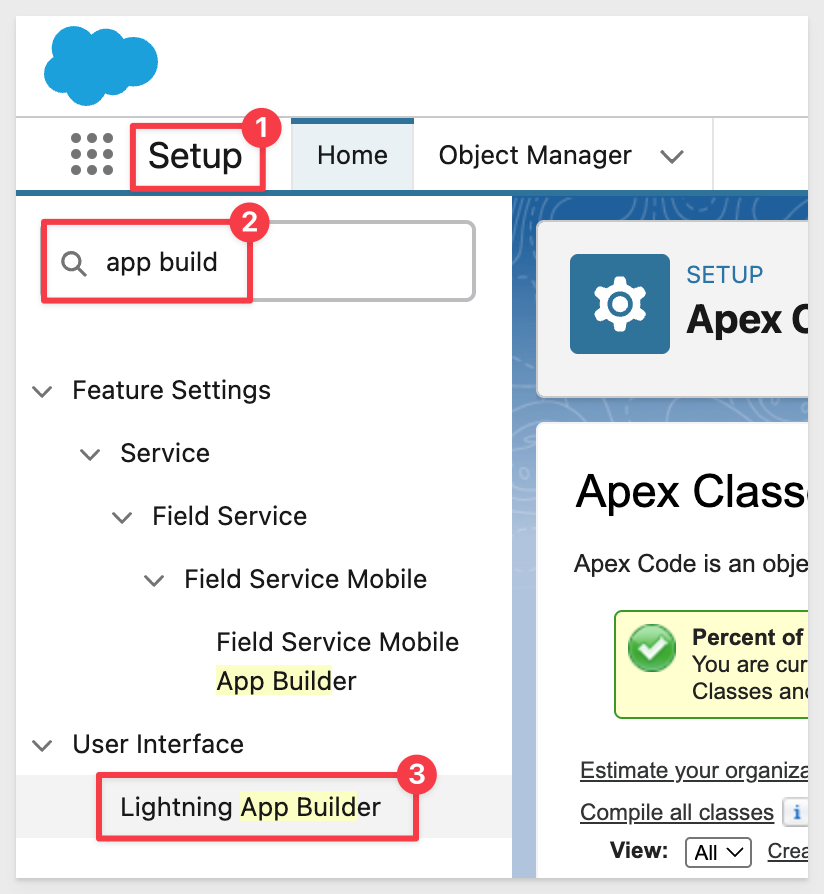
It's okay if you're briefly redirected through Salesforce Classic.
Click New, choose App Page and click Next
Name it something like Sigma Embed.
Choose a layout (One Region is fine).
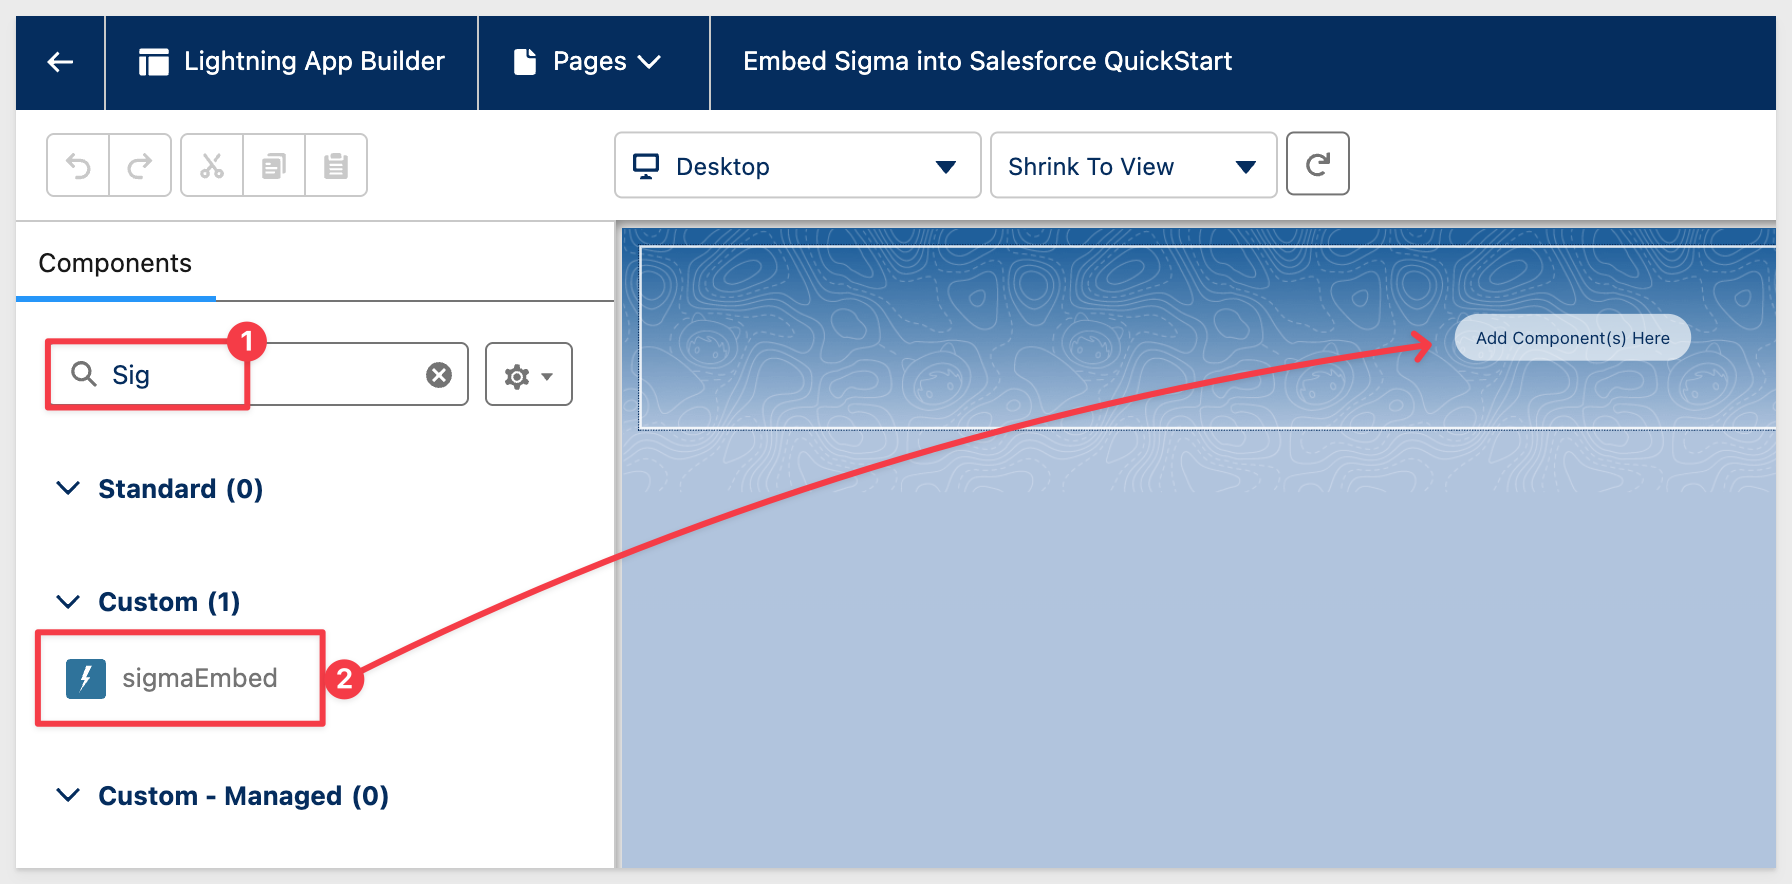
Search for Sig in the Components list.
Drag the sigmaEmbed component onto the canvas:
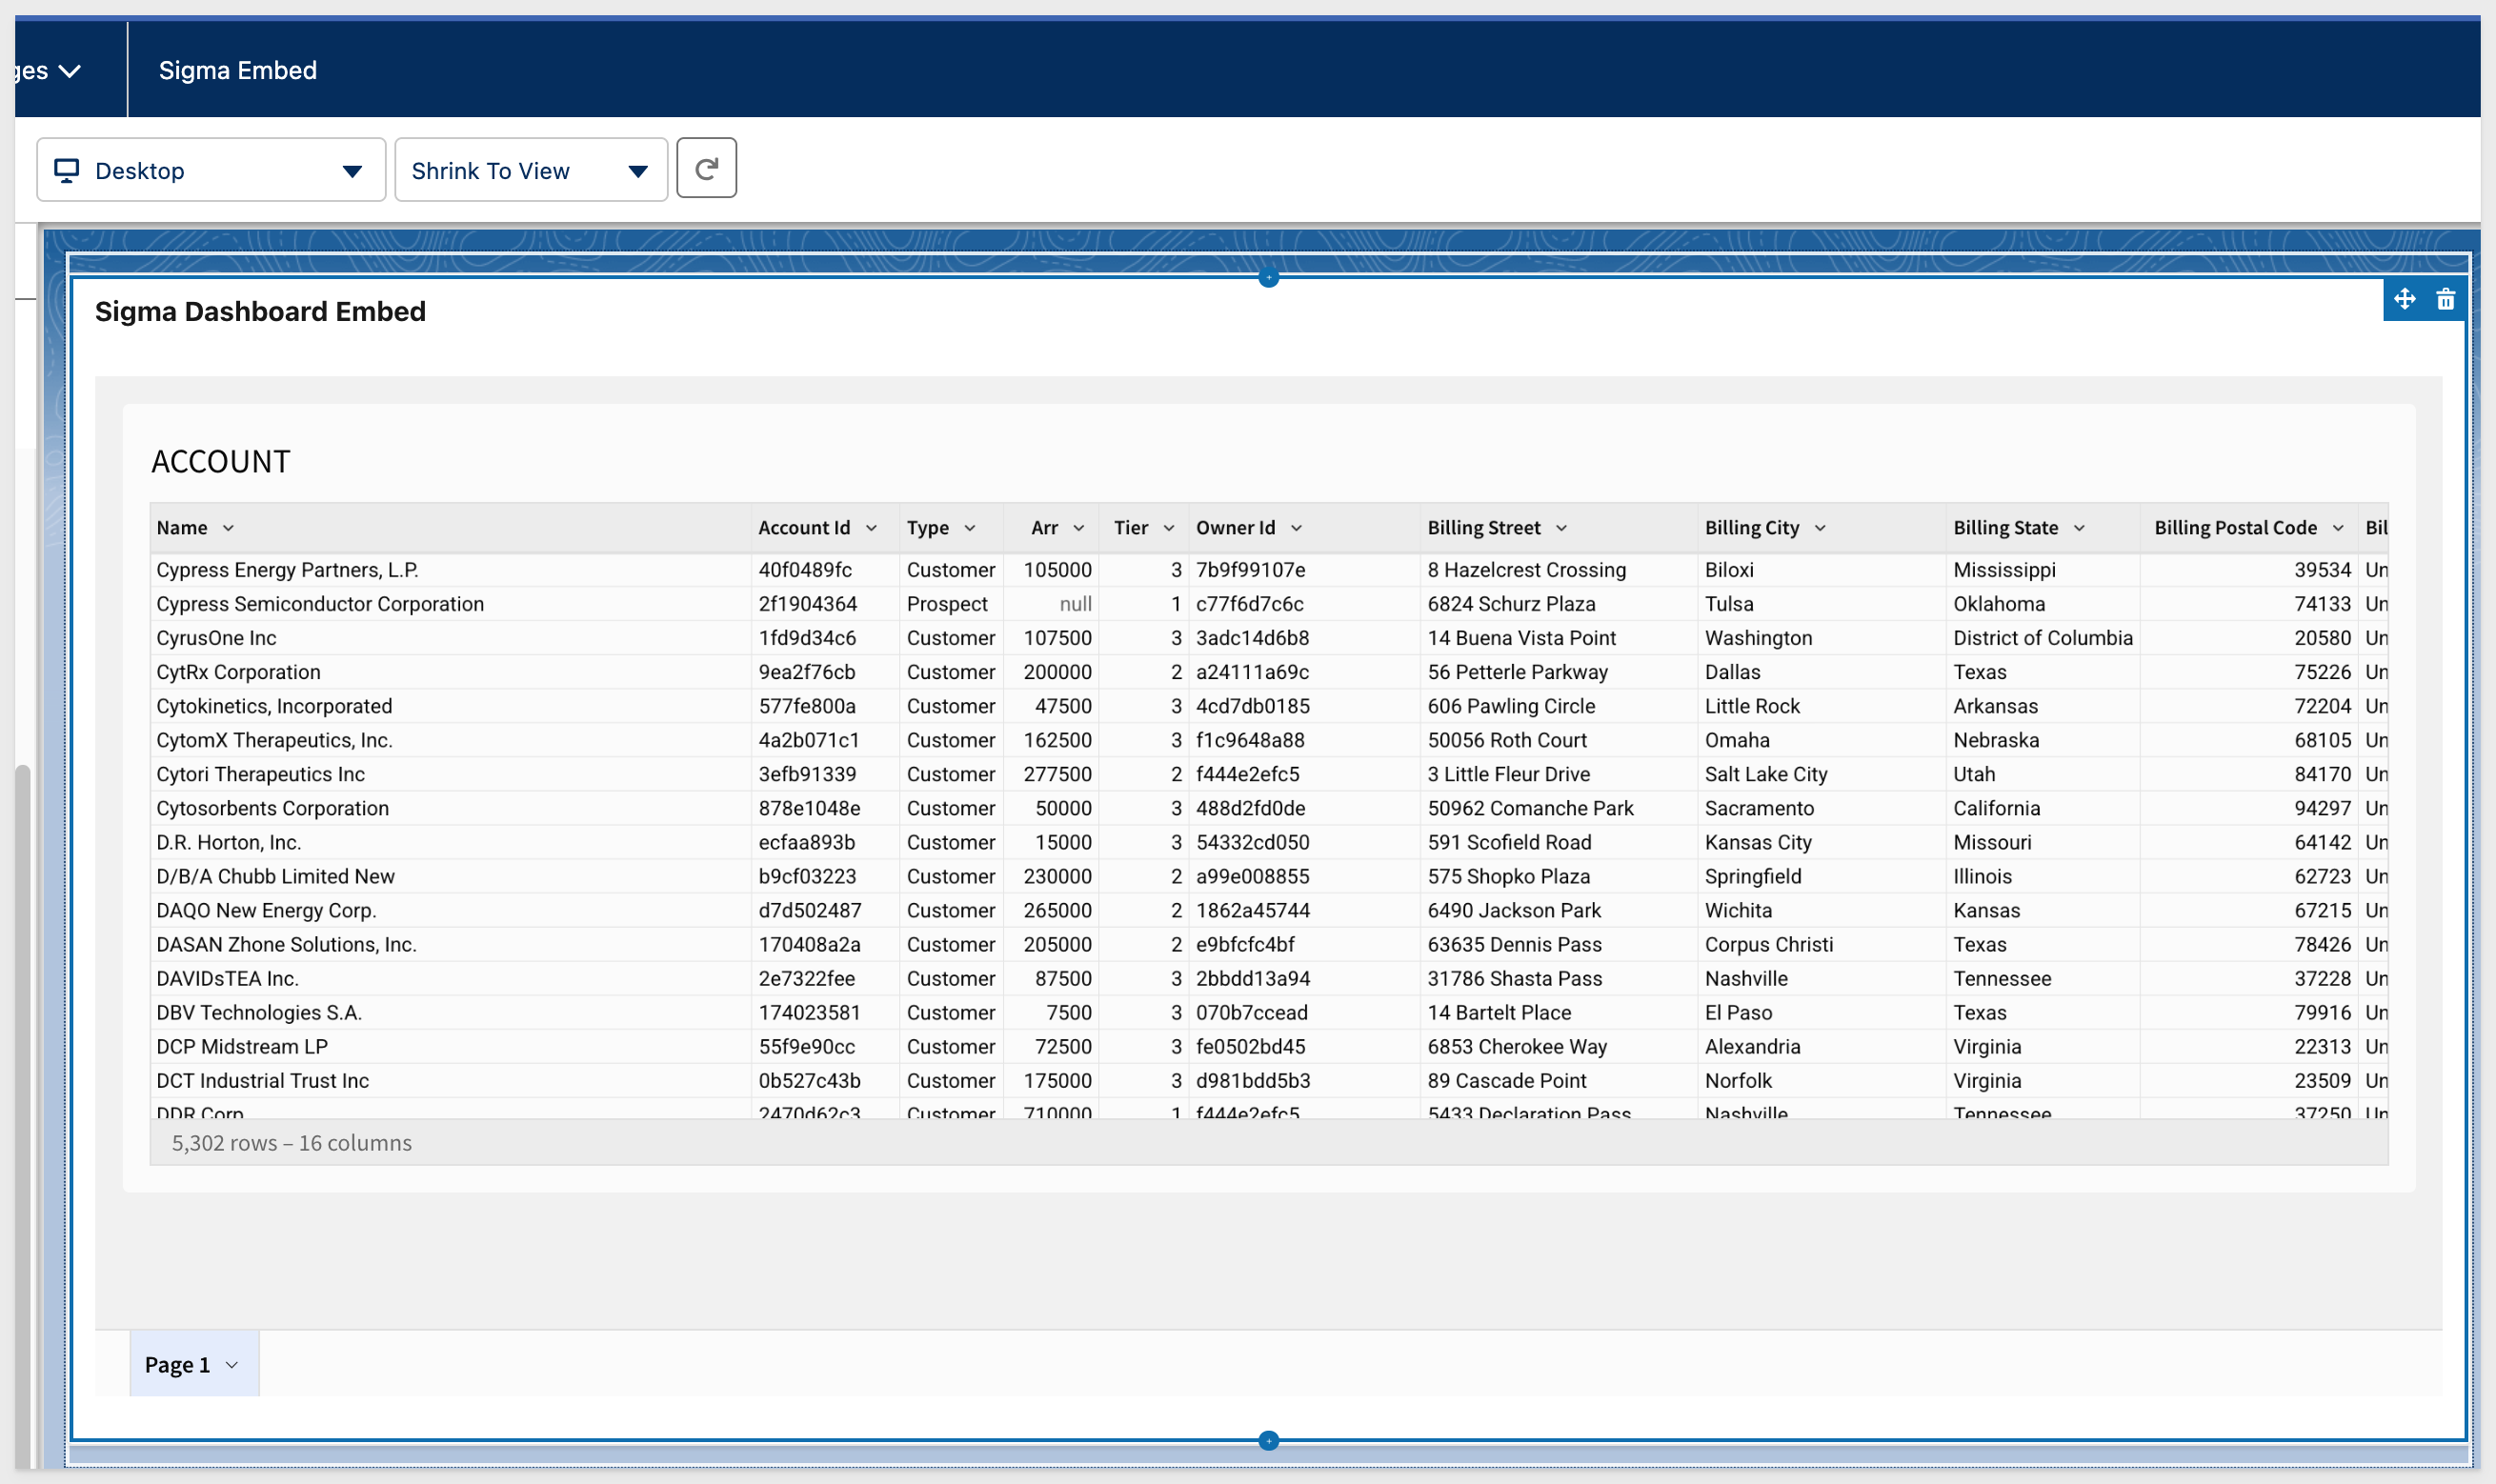
It should initially display "Loading Sigma dashboard..." by default followed by the embedded content:
Click save.
Decide where this page should appear in Salesforce by clicking Activate and selecting the LIGHTNING EXPERIENCE tab. Then click Add page to app.
Use the up/down arrows to position Sigma Embed where you'd like it to appear in the app navigation:

Click Save.
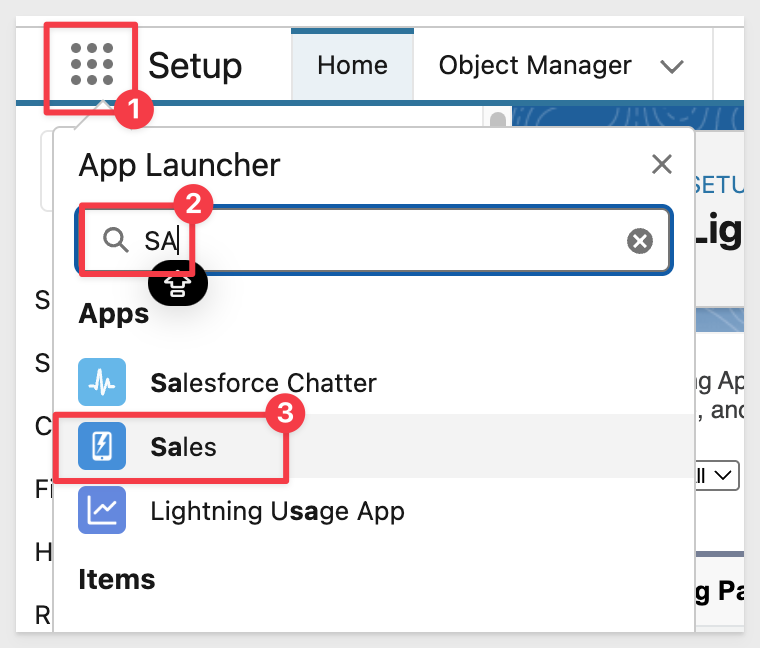
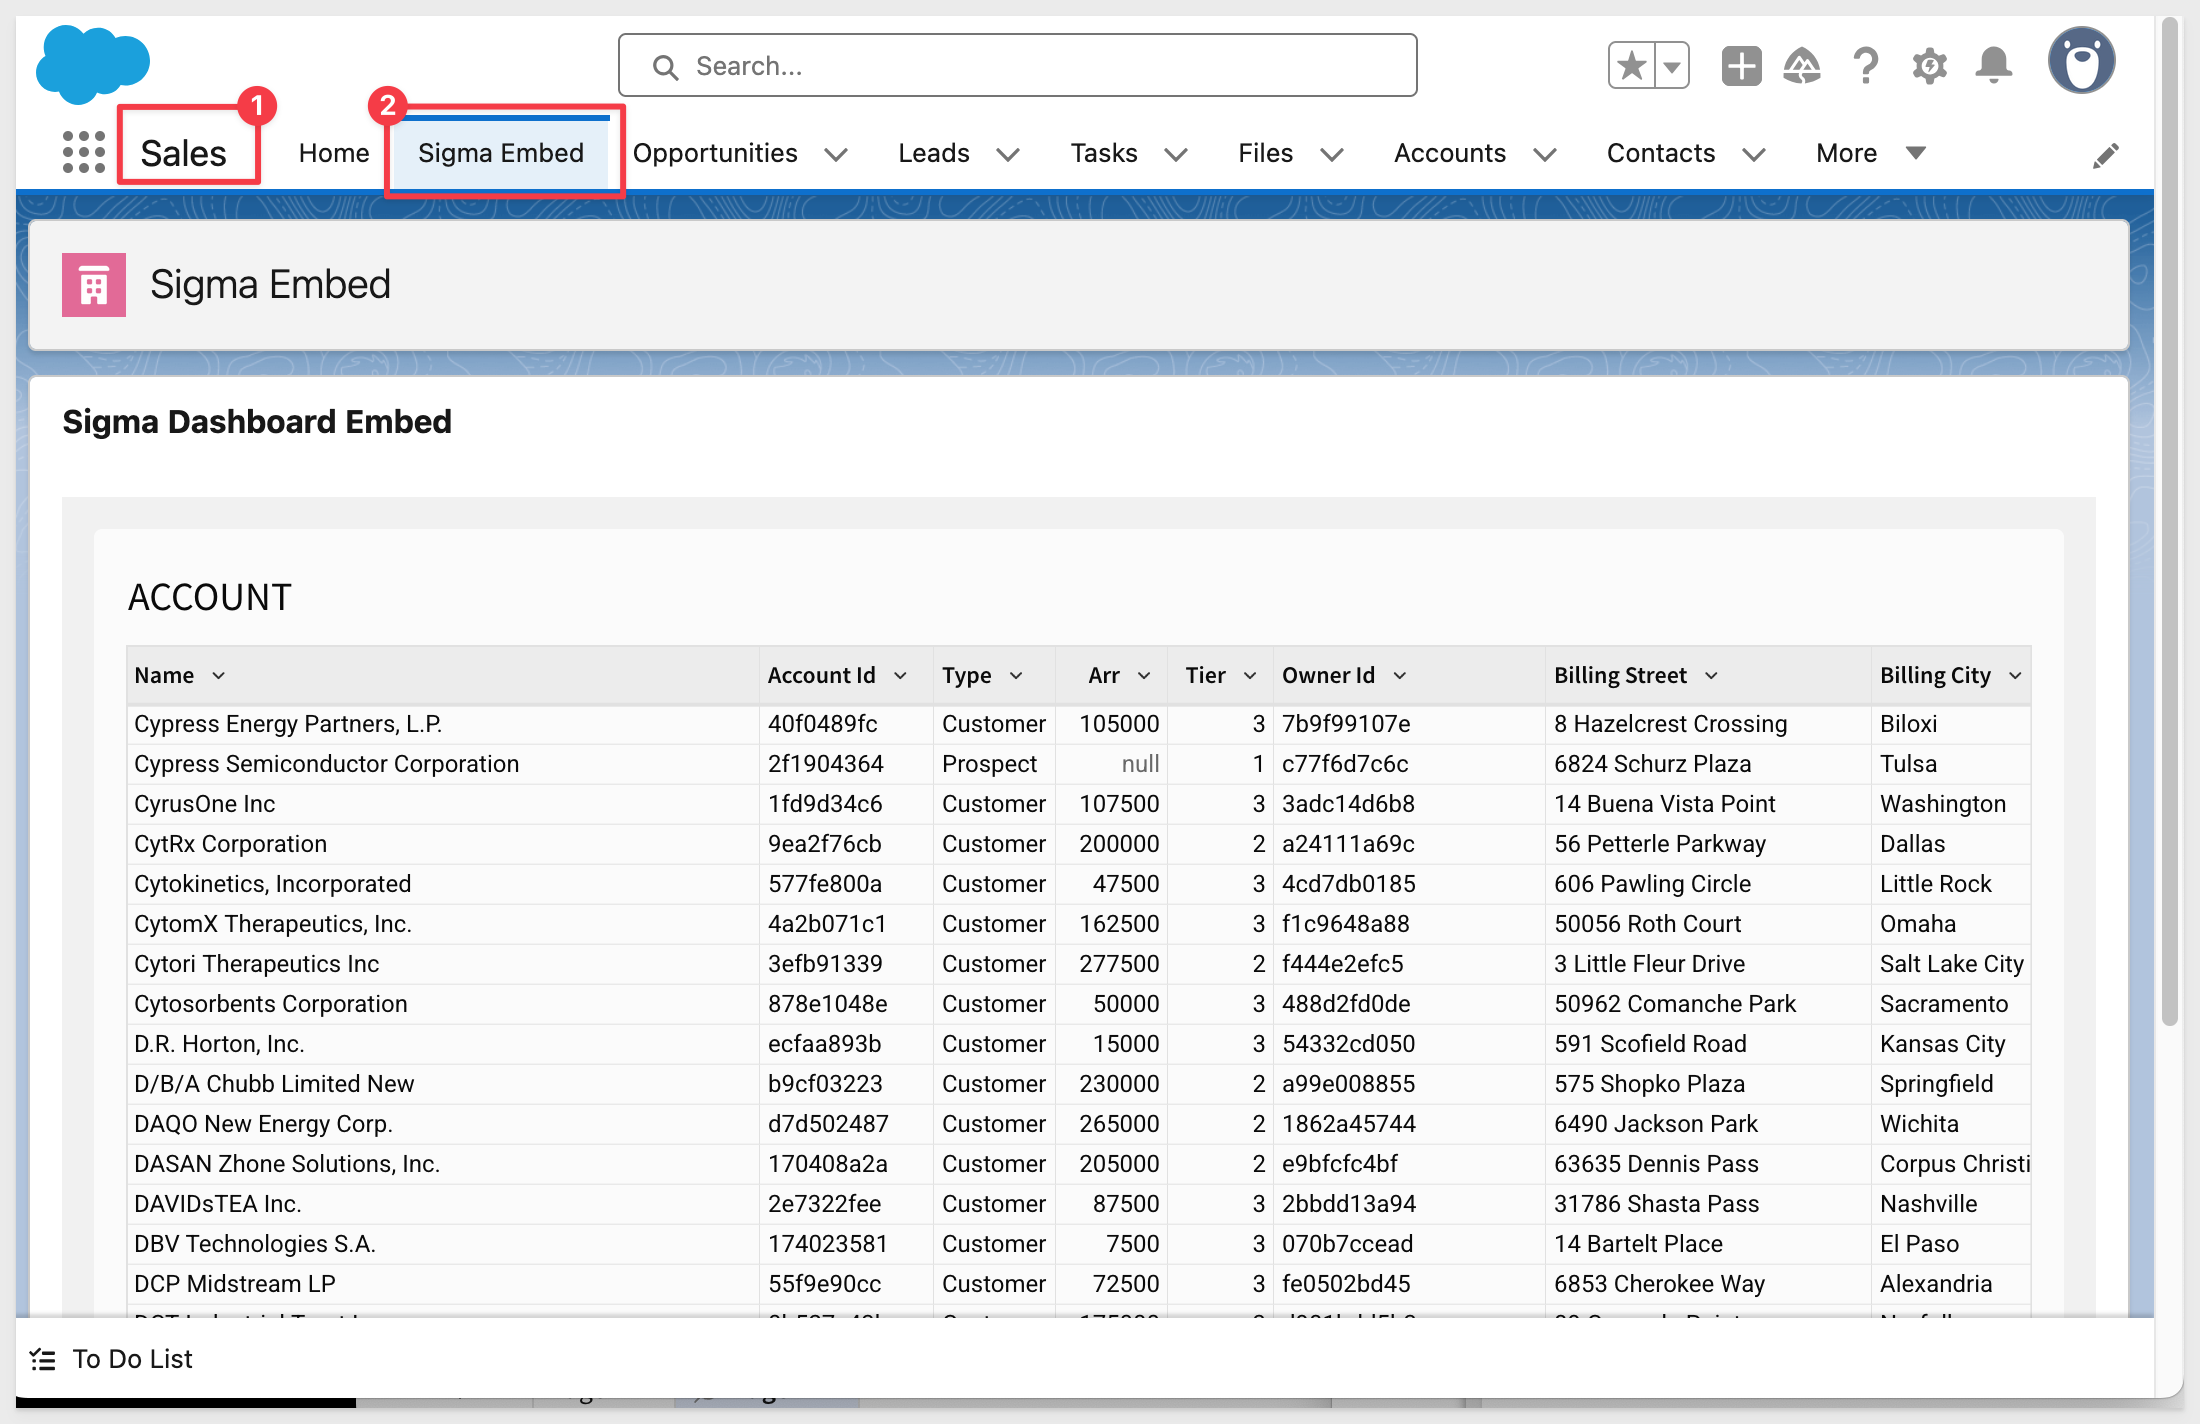
Navigate to the Sales page in Salesforce:
Now we can use the Sigma embed as if it was natively part of Salesforce!
For more information, see Create and manage account types
It is often useful to enhance the level of interactivity between Salesforce and Sigma by passing values to Sigma when a user clicks a value in Salesforce.
For example, a user viewing an account list in Salesforce may want to select a specific account and have Sigma filter the embedded data to display information relevant to that account only.
Example: Salesforce Account Name
Let's use the example of a Salesforce user selecting an account and passing that unique Account Name to Sigma, where it will show the value in a workbook page.
The previous version was simple, with no dynamic components or interaction with Salesforce account data. It just displayed a Sigma embed in a static manner, without specific account-based customization.
Now we will add a select list in Salesforce to allow a user to select an account name. The selected account name will be passed to Sigma where it will be used to filter the account table that is embedded on the Salesforce page.
To simplify this demo, we'll show a dropdown of Salesforce Accounts — when the user selects one, it updates a Sigma text input control to show that Account ID (or name).
In a real application, this value could be dynamically retrieved from Salesforce record context or user interaction.
Use Case 2: Control Sigma from Salesforce
The project has three additional files to support this use case.We'll reuse the already deployed SigmaJWTController.cls; only one of the new files requires editing:
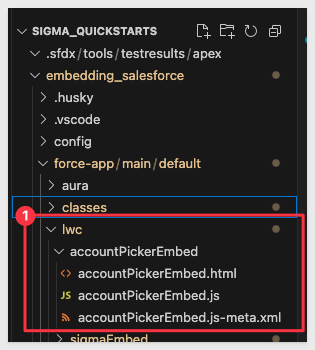
1: accountPickerEmbed.html
- A lightning-combobox, which renders a dropdown selector in the UI.
2: accountPickerEmbed.js
- Frontend logic for handling user selection and JWT/token loading.
- Dynamically sets the iframe src with the JWT and selected Account name passed as a parameter to Sigma (e.g., &SF_AccountName=...).
Open this file and replace the placeholders for {YOUR_ORG_SLUG} and {YOUR_WORKBOOK_ID} in the code-block below:
    const baseUrl = 'https://app.sigmacomputing.com/{YOUR_ORG_SLUG}/workbook';
    const workbookSlug = 'Use-Case-Embed-into-Salesforce-QuickStart-{YOUR_WORKBOOK_ID}';
3: accountPickerEmbed.js-meta.xml
- Metadata file that makes the component available in App Builder.
- Specifies that this component can be added to AppPage or RecordPage.
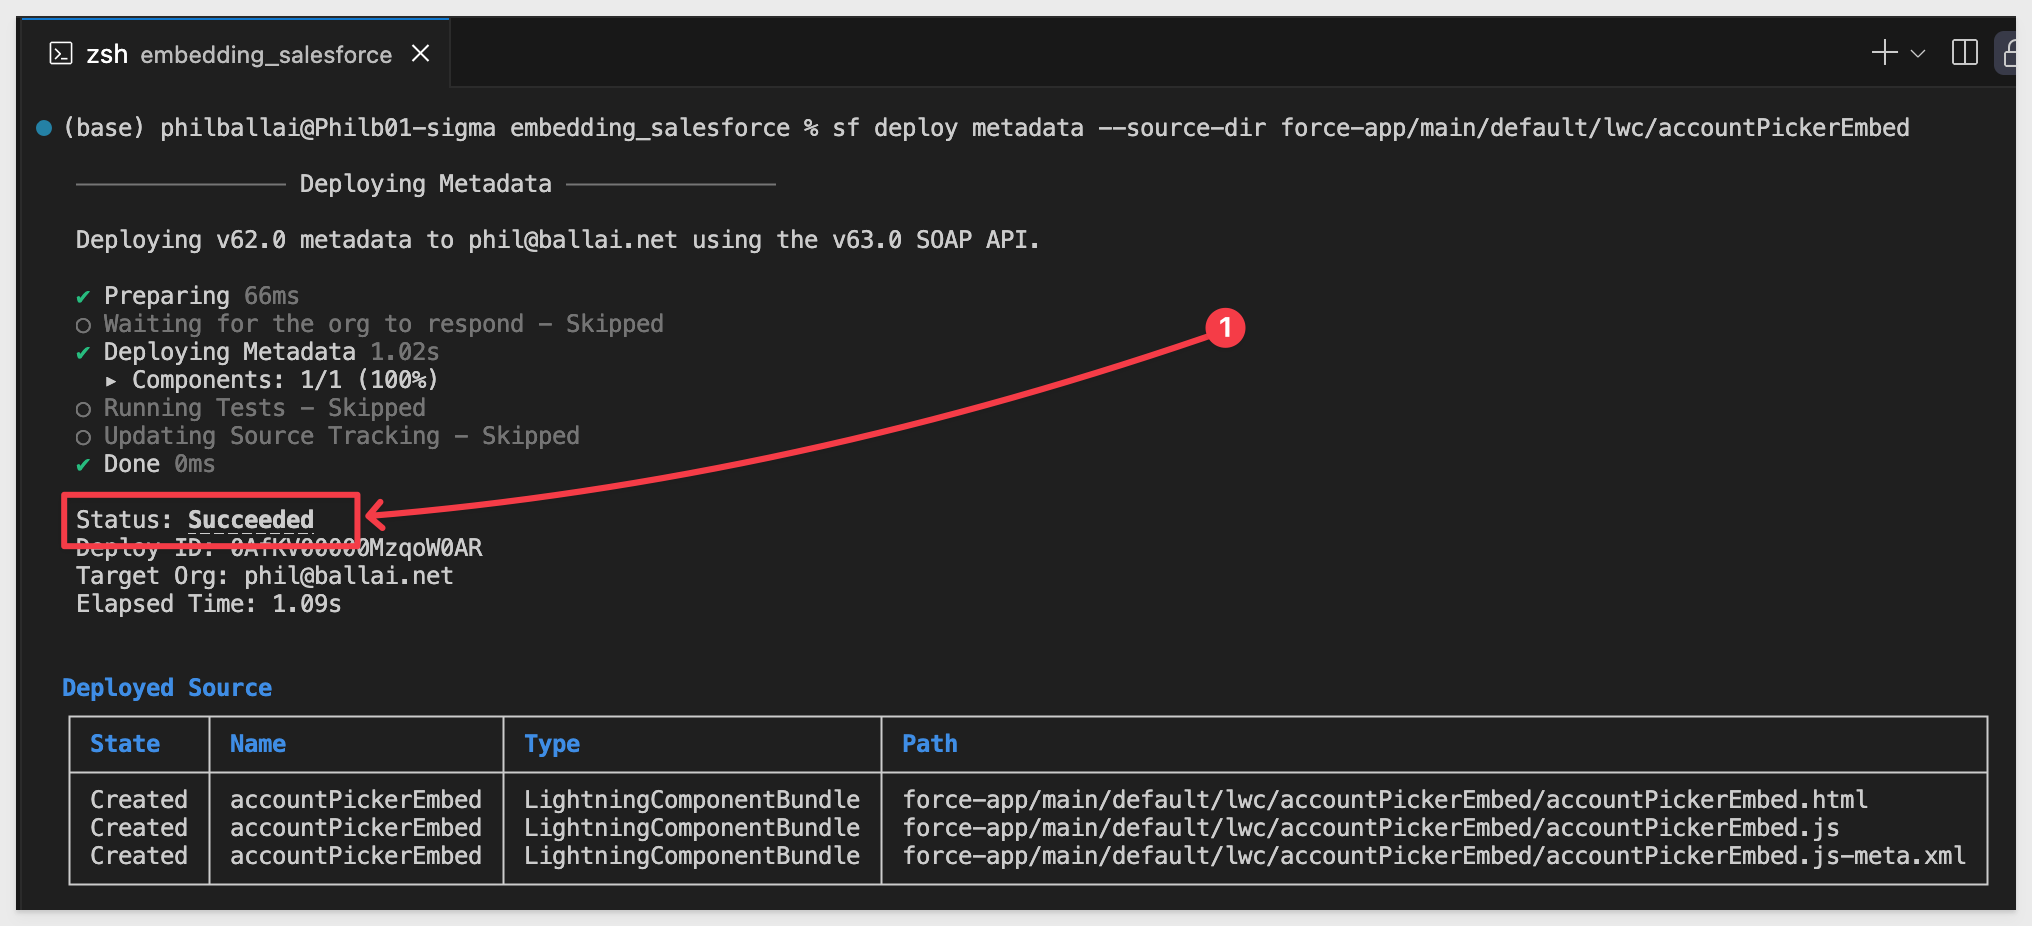
We can deploy this set of files using the terminal command:
sf deploy metadata --source-dir force-app/main/default/lwc/accountPickerEmbed
Next, we need to configure the extra functionality in Sigma.
User Attribute
In Sigma, navigate to Administration > User Attributes and click the Create Attribute button.
Name the new attribute sfaccount.
Click Create:

Add a control in Sigma
Open the Use Case: Embed into Salesforce QuickStart workbook in Sigma and place it in Edit mode.
Add a new Controls > List value control to the page.
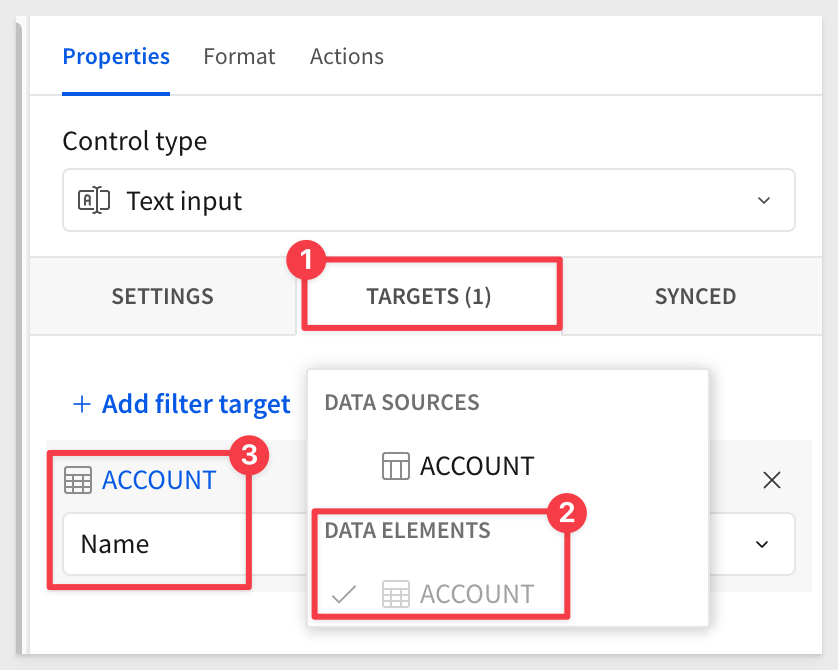
Configure its properties to be:

The Control_ID used needs to be SF_AccountName as that is what is being referenced in the file accountPickerEmbed.js.
Set the target column to Name in the ACCOUNTS table under DATA ELEMENTS:
Publish the workbook.
If we refresh the Salesforce page, we can see the new control:
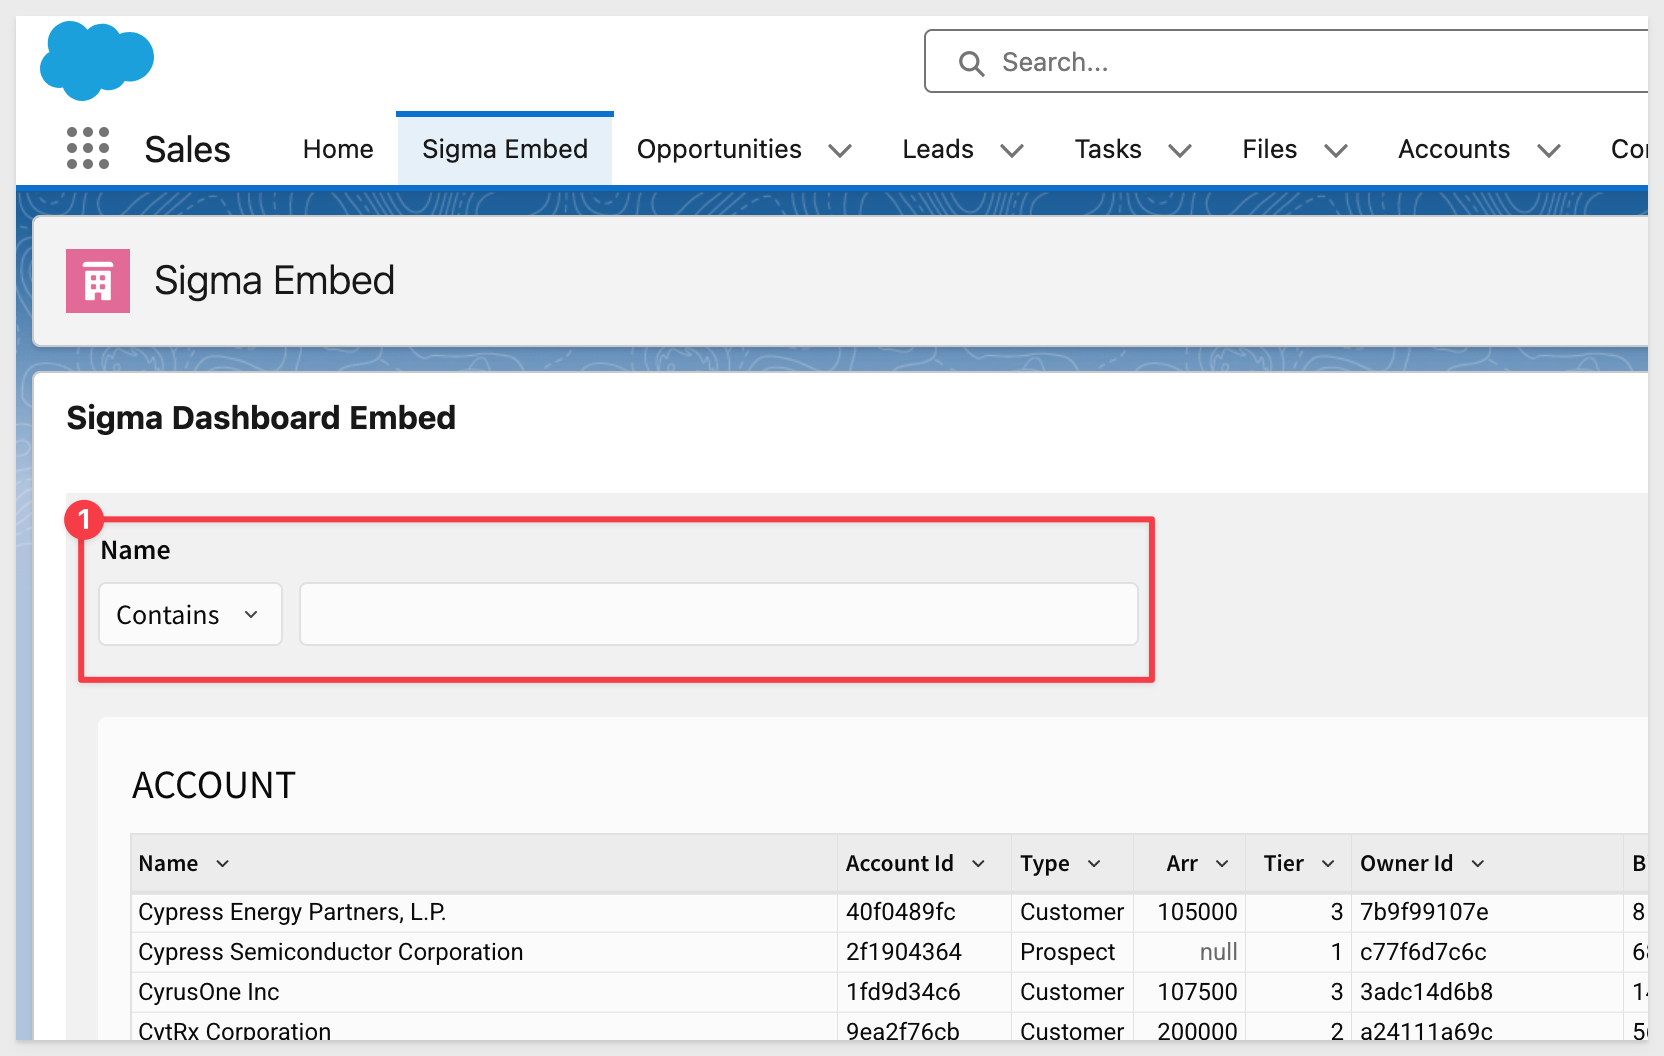
We are exposing this Sigma control in the embed only for demonstration purposes.
Since we left the Sigma control visible, we can see that happen in testing. In production, we would hide the Sigma control as the user would not need to see it in this use case.
Add the Salesforce control to the page
In Salesforce, return to Setup > Lightning App Builder and add the accountPickerEmbed custom control to the page:

Click Save.
Before we test, recall that we said the Salesforce sample data (at the time of this QuickStart) does not align with the Sigma sample data but we'll work around that.
Here is what we did.
We modified the query in SigmaJWTController.cls to populate the list control to return only the value Cooper, ensuring it appears once.
Then we trimmed off the rest of any remaining characters:
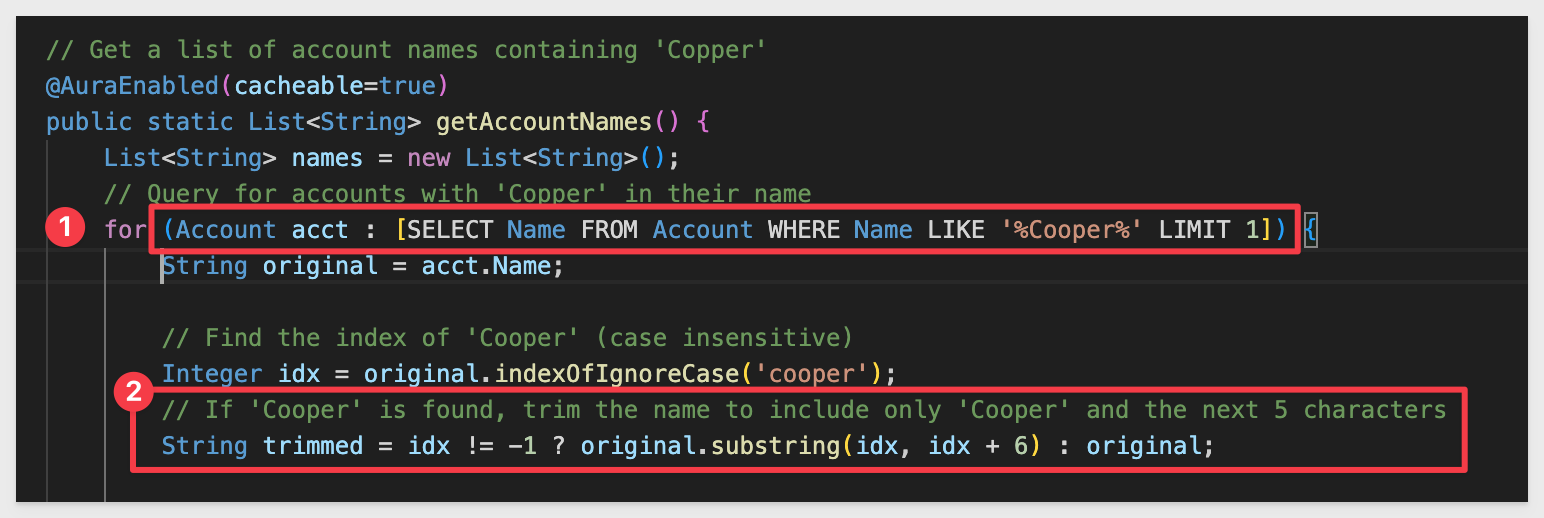
This is because we found that all the account names in Salesforce have random numbers appended to them:

When Cooper is passed to Sigma, it can be used with a Contains filter on the table.
We know that we have some records that match that value and the specific data returned isn't important for this demonstration. We just wanted to make sure something is returned that made sense.
Save the Sigma Embed page in the Lightning App Builder and return to the Sales > Sigma Embed page in Salesforce.
Now we can see how the Lightning control can pass data to filter a table in the Sigma embed:

In this QuickStart, you learned how to securely embed a Sigma dashboard into Salesforce using Lightning Web Components.
We walked through two core use cases:
- A static embed that displays a Sigma workbook inside a Salesforce page
- An interactive embed that filters Sigma content based on a value selected from a Salesforce dropdown
Additional Resource Links
Be sure to check out all the latest developments at Sigma's First Friday Feature page!
Help Center Home
Sigma Community
Sigma Blog