Sigma connects directly to your cloud data warehouse and pushes every query down to it, so the people closest to the business can explore live data without extracts or copies. MotherDuck brings that same model to DuckDB in the cloud, and Sigma extends it with a spreadsheet-like interface, governed data models, and AI that works from the data you already trust.
This QuickStart demonstrates how we will connect a new MotherDuck account to Sigma, model sample sales data, build a workbook with charts and an action sequence, add an agent, and then ask questions of the same data from the Sigma homepage and from Claude.
Along the way you'll learn how to:
- Create free Sigma and MotherDuck trial accounts
- Load sample data into MotherDuck and create a read-only token for Sigma
- Connect MotherDuck to Sigma
- Create a data model and build a workbook with charts and controls
- Add an action sequence and an agent to the workbook
- Ask questions of your data model from the Sigma homepage and from Claude
For more information on Sigma's product release strategy, see Sigma product releases
If something doesn't work as expected, here's how to contact Sigma support
Target Audience
The typical audience for this QuickStart includes users of Excel, common Business Intelligence or Reporting tools, and semi-technical users who want to try out or learn Sigma with MotherDuck.
Prerequisites
- Any modern browser is acceptable.
- A Sigma trial account with Admin access.
- A MotherDuck account (a free trial is sufficient).
- A Claude account, for the final section.

Sigma is fully managed software-as-a-service, so there is nothing to install. A trial gives you an Admin account where we can create the connection, the data model, and the workbook.
If you do not already have a Sigma account, register for a Sigma free trial and follow the prompts to create your organization and profile.
After activation, bookmark your Sigma URL for easy access.
Our data will come from MotherDuck.
Sign up
If you do not already have a MotherDuck account, register for a free trial at motherduck.com and complete the account setup.
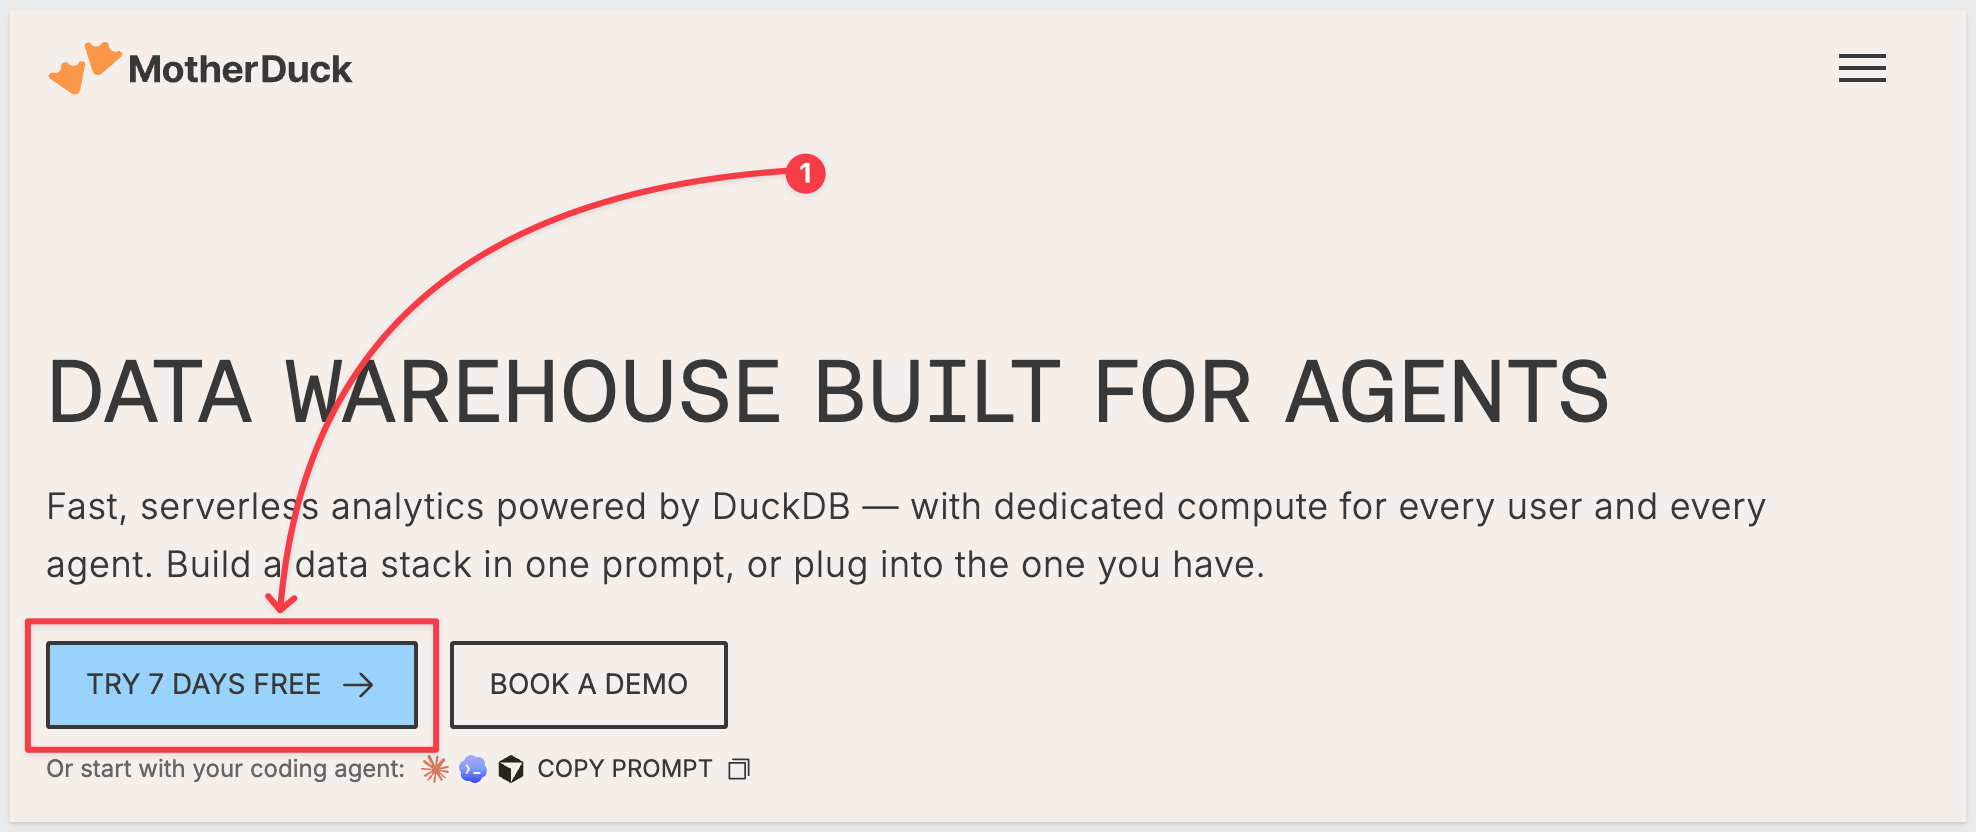
Once the trial is set up, log into MotherDuck.
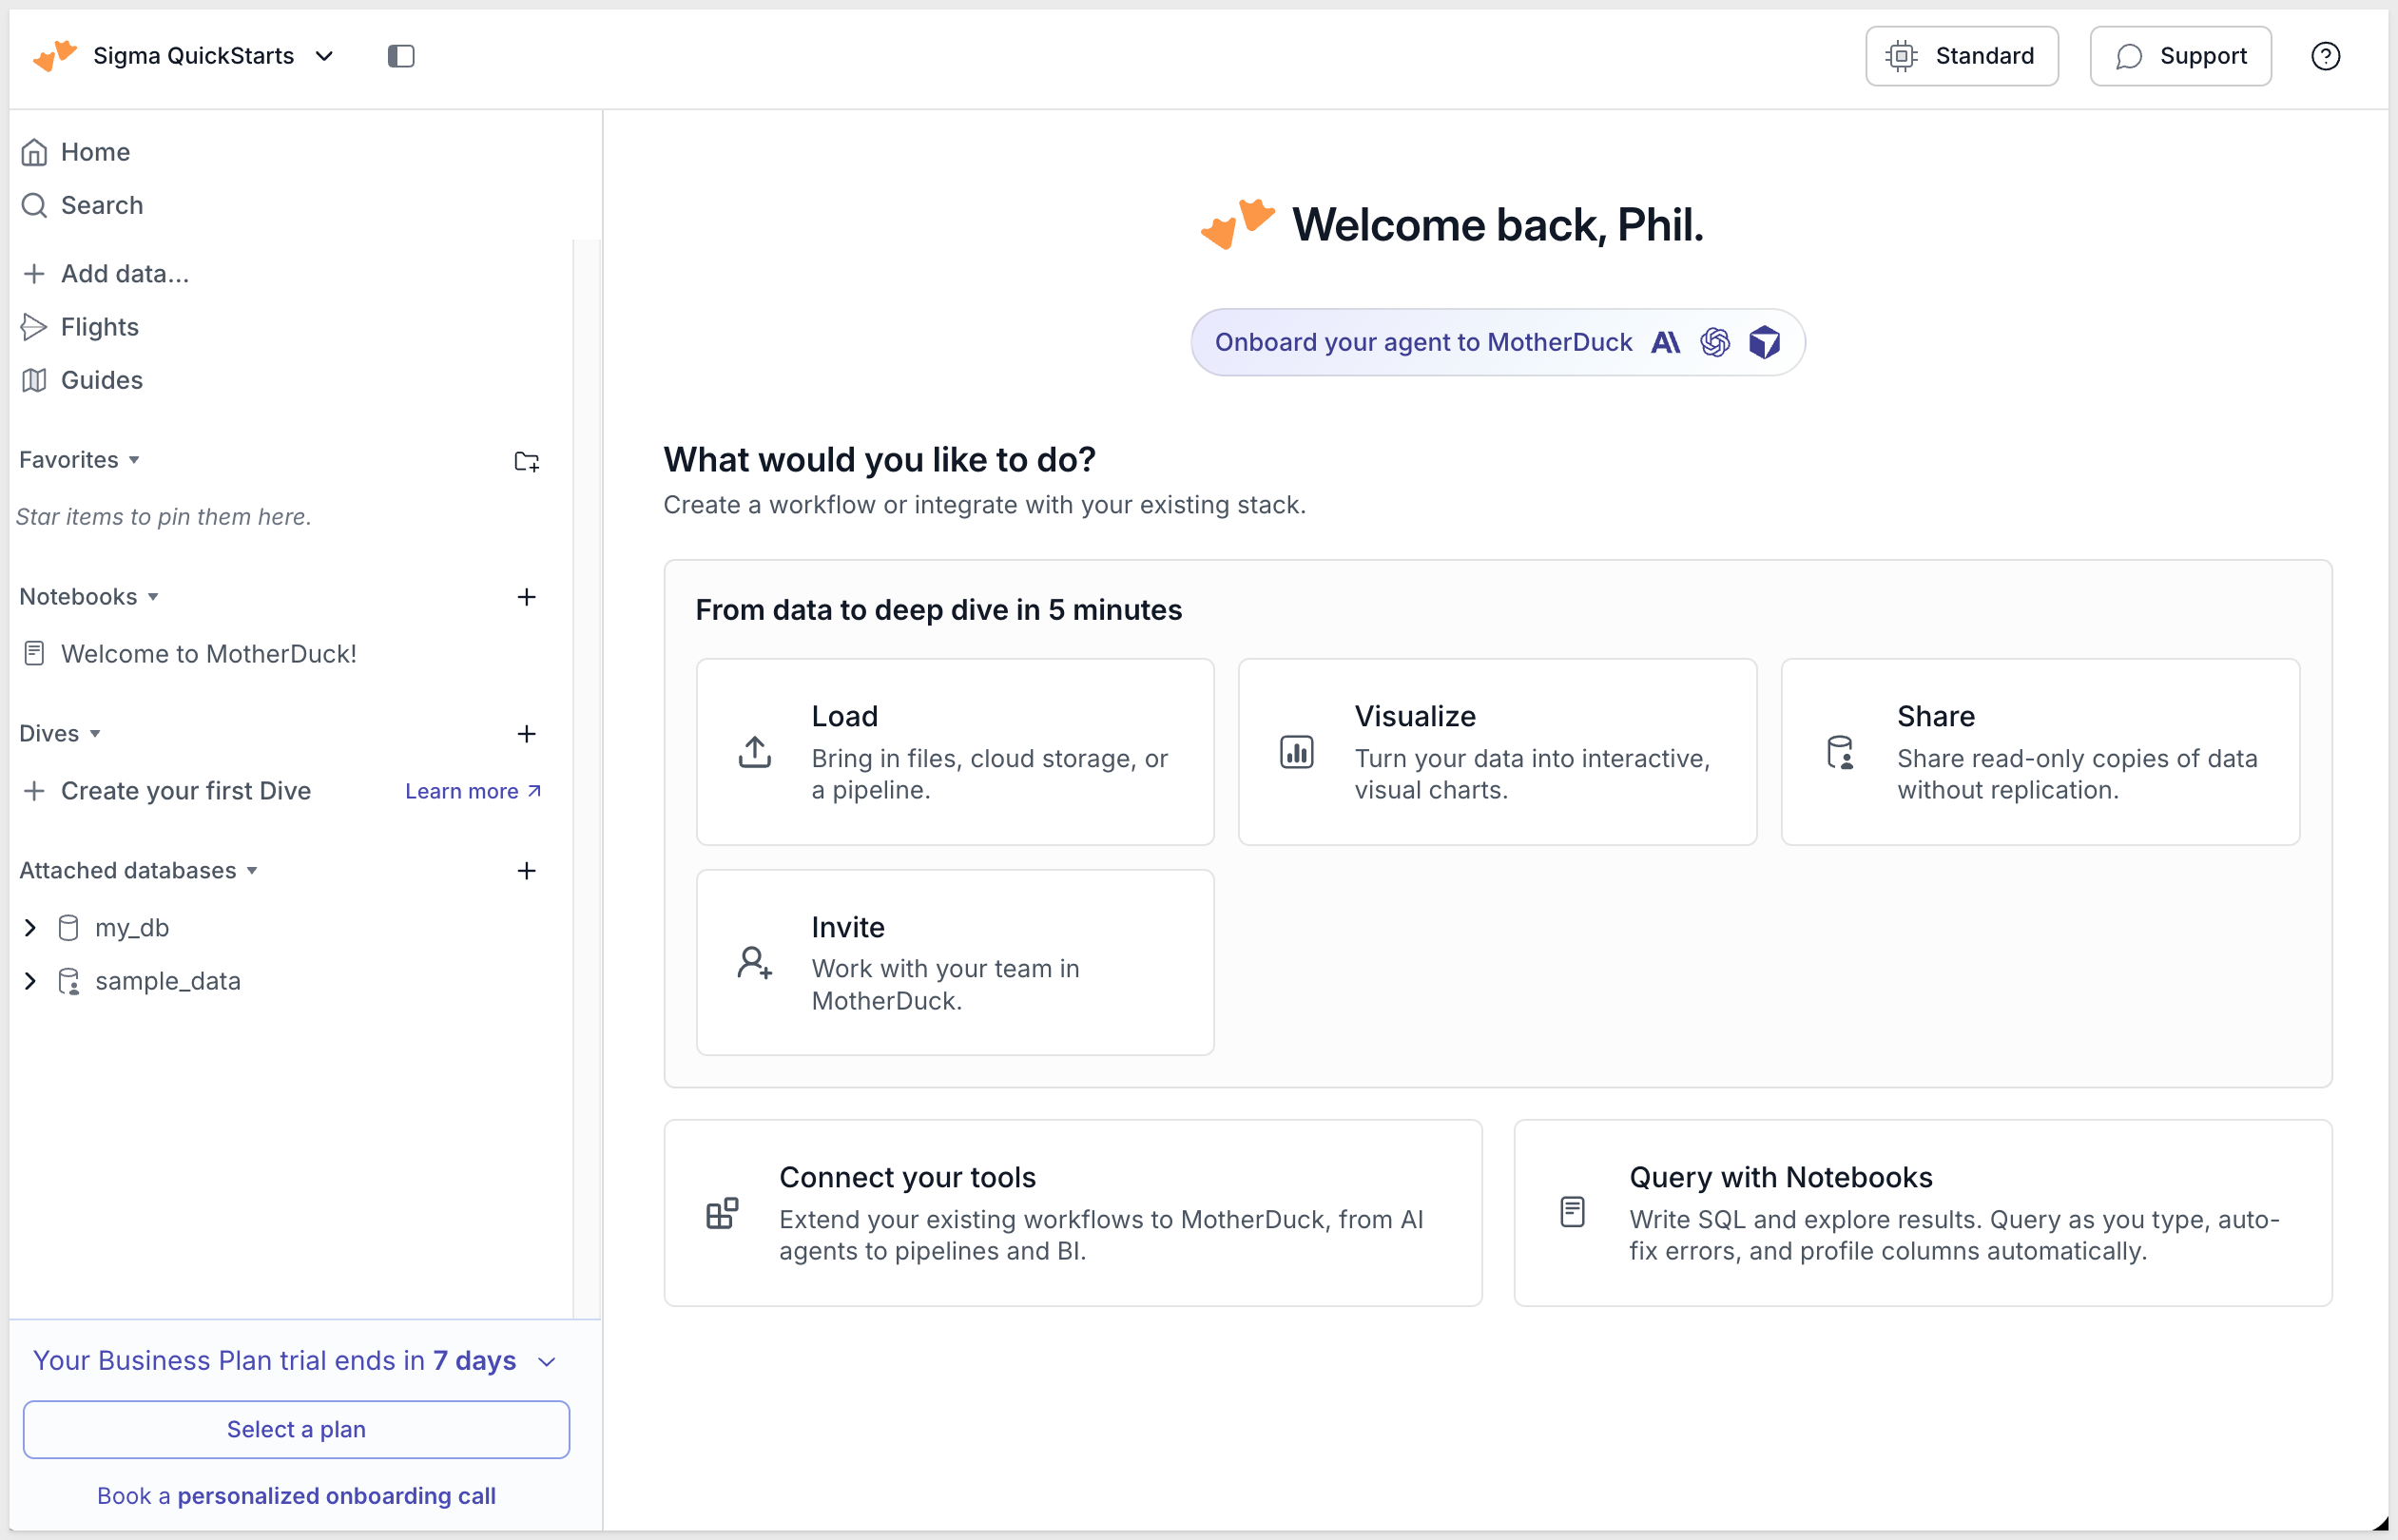
Load the sample data
We will create a small retail dataset directly in MotherDuck using SQL. It has three tables: products, customers, and orders.
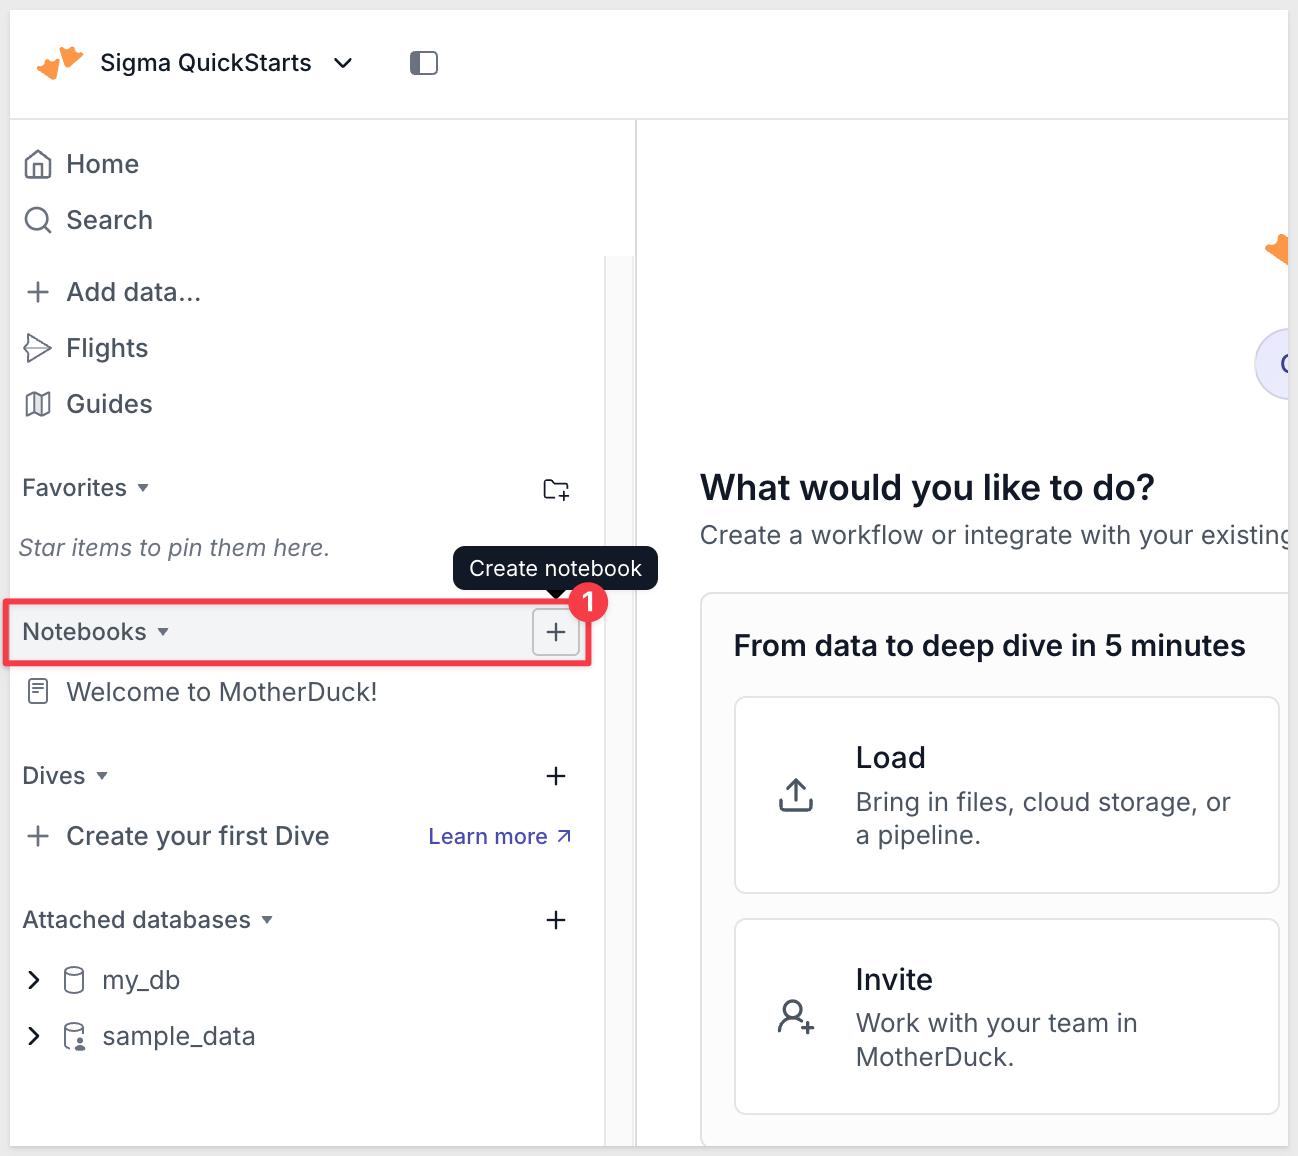
In the MotherDuck UI, open a new notebook.
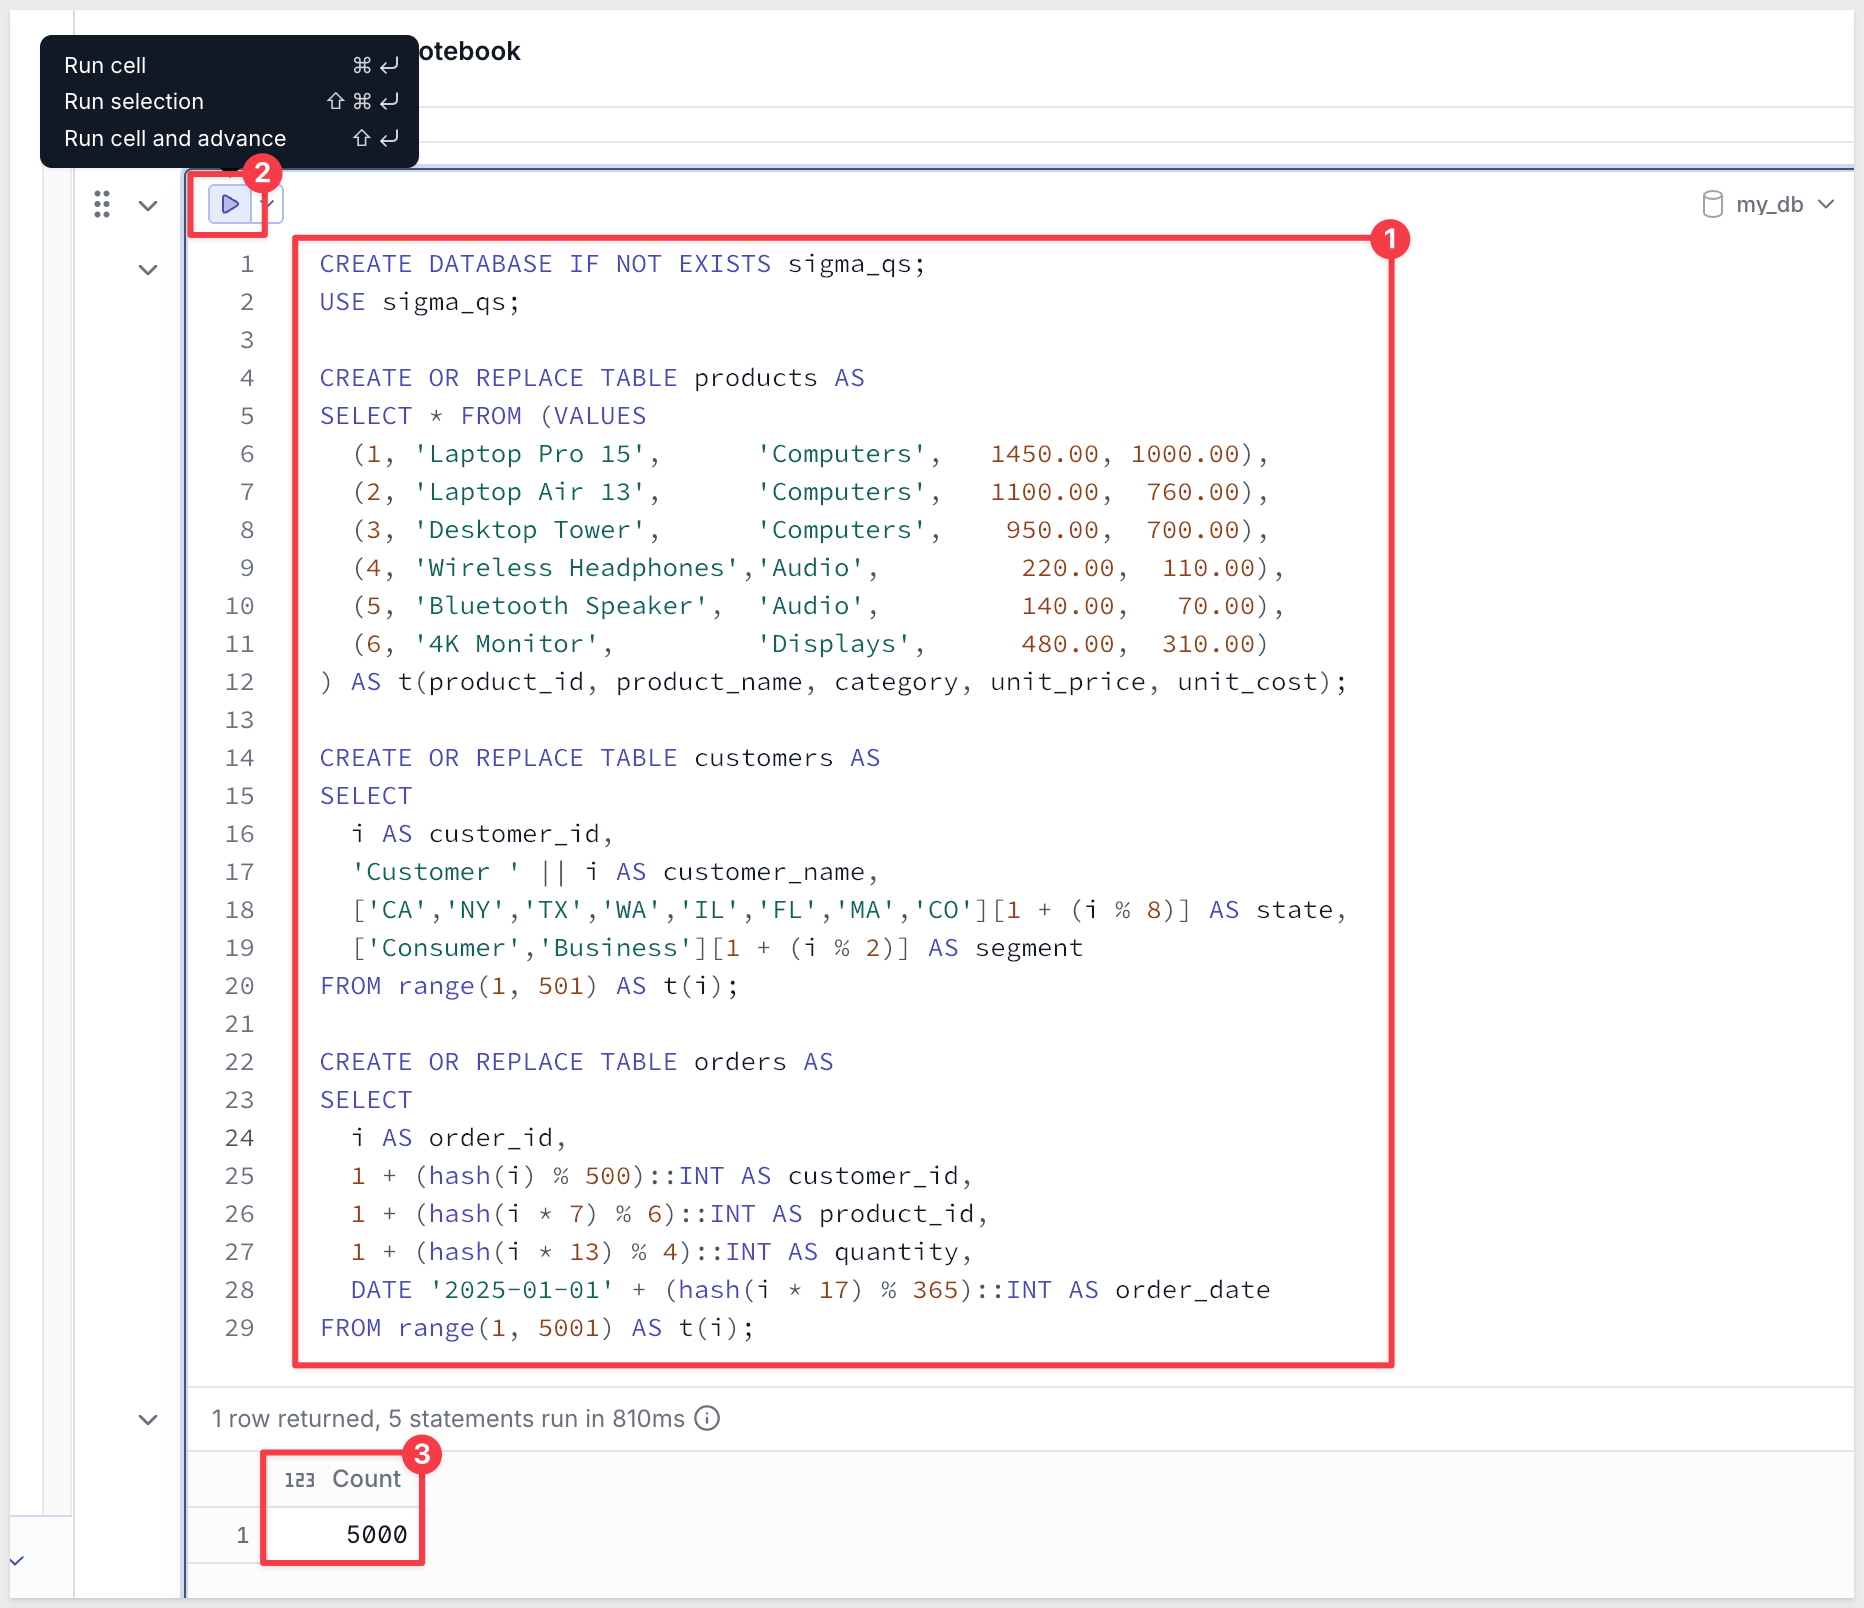
Run the following:
CREATE DATABASE IF NOT EXISTS sigma_qs;
USE sigma_qs;

CREATE OR REPLACE TABLE products AS
SELECT * FROM (VALUES
  (1, 'Laptop Pro 15',      'Computers',   1450.00, 1000.00),
  (2, 'Laptop Air 13',      'Computers',   1100.00,  760.00),
  (3, 'Desktop Tower',      'Computers',    950.00,  700.00),
  (4, 'Wireless Headphones','Audio',         220.00,  110.00),
  (5, 'Bluetooth Speaker',  'Audio',         140.00,   70.00),
  (6, '4K Monitor',         'Displays',      480.00,  310.00)
) AS t(product_id, product_name, category, unit_price, unit_cost);

CREATE OR REPLACE TABLE customers AS
SELECT
  i AS customer_id,
  'Customer ' || i AS customer_name,
  ['CA','NY','TX','WA','IL','FL','MA','CO'][1 + (i % 8)] AS state,
  ['Consumer','Business'][1 + (i % 2)] AS segment
FROM range(1, 501) AS t(i);

CREATE OR REPLACE TABLE orders AS
SELECT
  i AS order_id,
  1 + (hash(i) % 500)::INT AS customer_id,
  1 + (hash(i * 7) % 6)::INT AS product_id,
  1 + (hash(i * 13) % 4)::INT AS quantity,
  DATE '2030-01-01' + (hash(i * 17) % 365)::INT AS order_date
FROM range(1, 5001) AS t(i);
You should see 5000 rows.
Create a Read Scaling token
Sigma connects to MotherDuck with a read-only Read Scaling token.
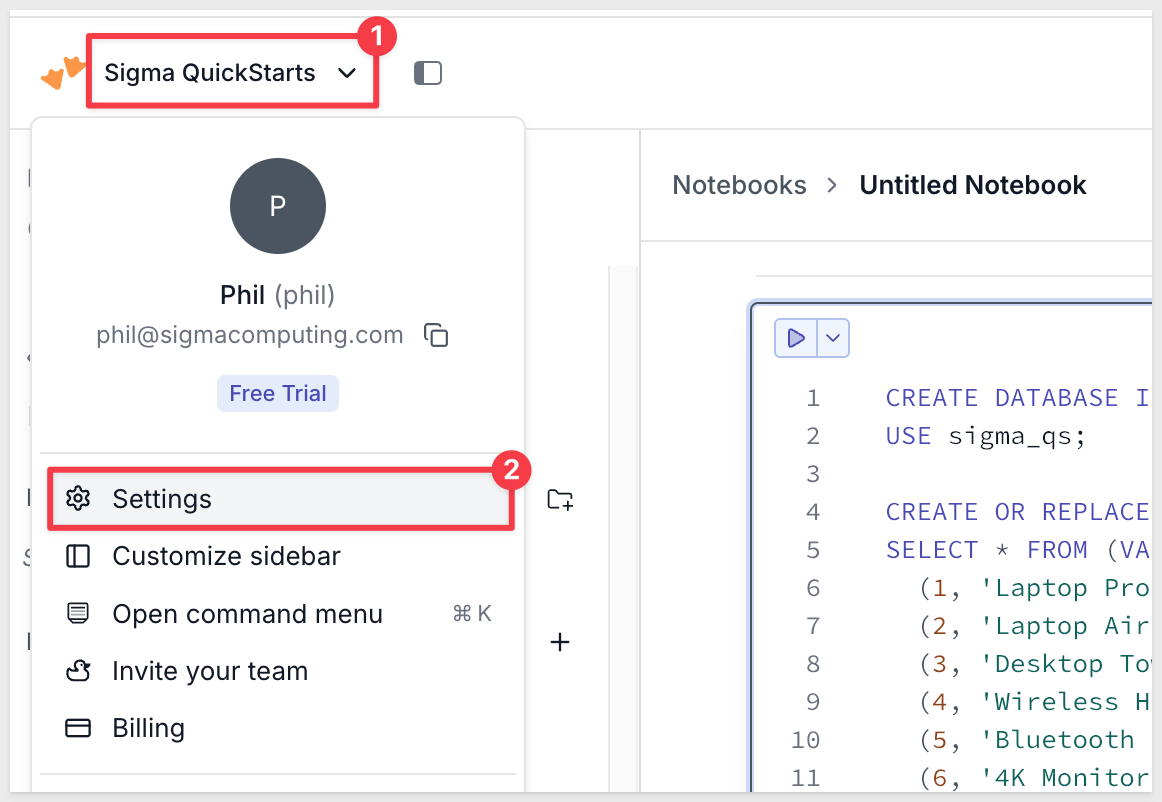
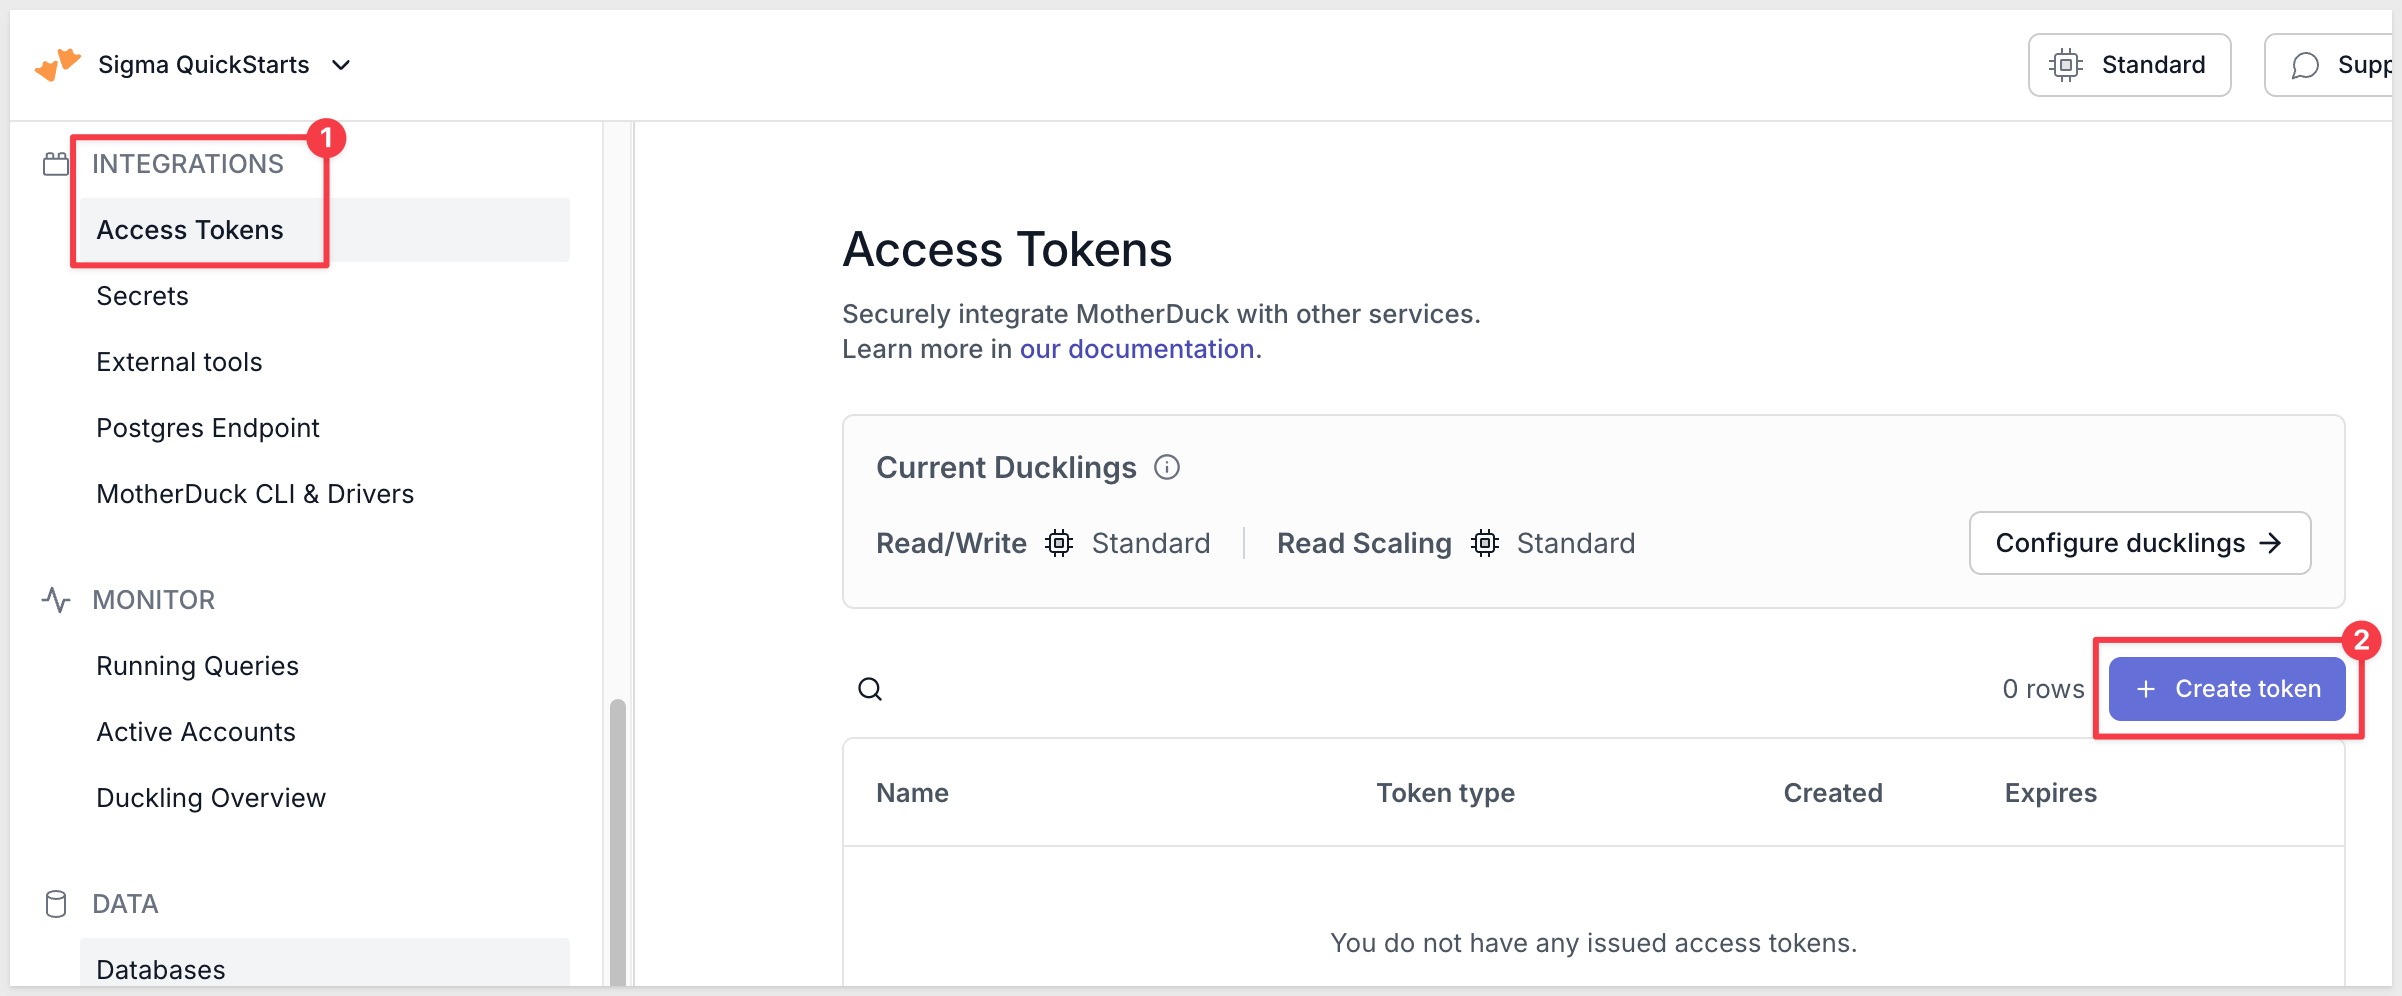
In MotherDuck, click your organization name > Settings. In the left menu under INTEGRATIONS, select Access Tokens.
Scroll down to Integrations and click the + Create token button.
Set Name to Sigma. The Description is optional.
The Token type defaults to Read/Write Token. Open the dropdown and change it to Read Scaling Token, since Sigma queries MotherDuck read-only.
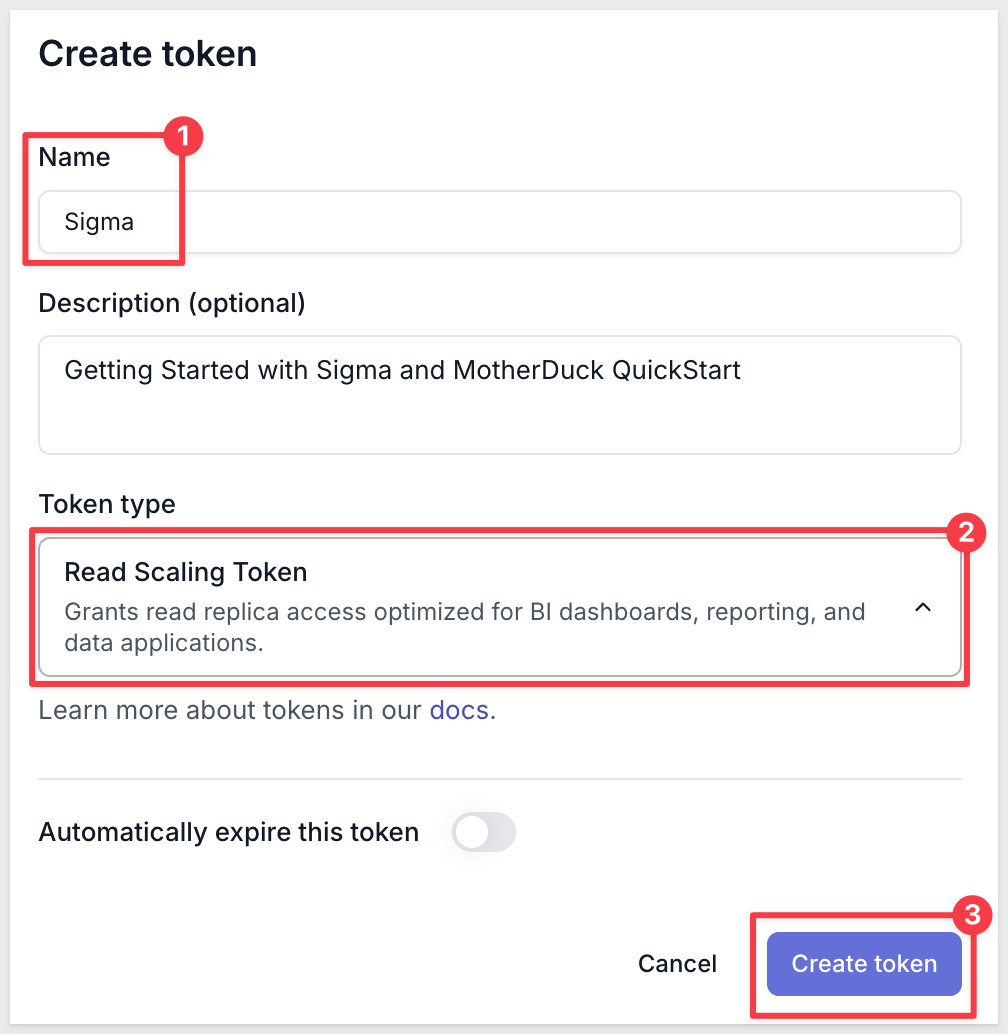
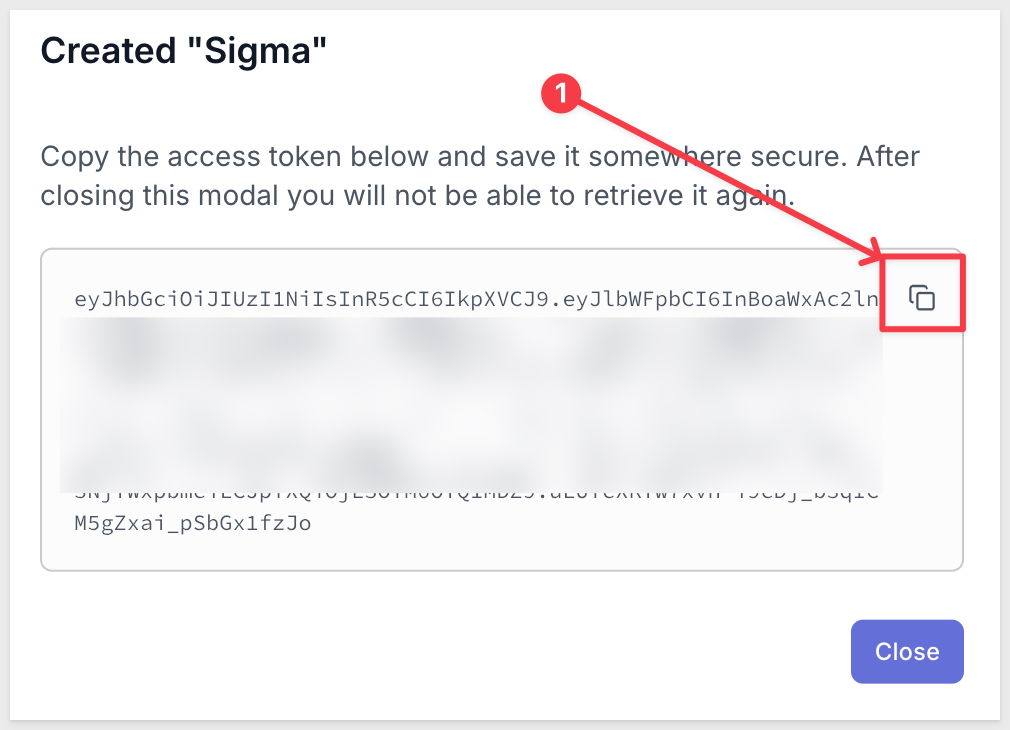
Leave Automatically expire this token off for this QuickStart, then click Create token. Copy the token and store it somewhere safe.
Find your Postgres endpoint
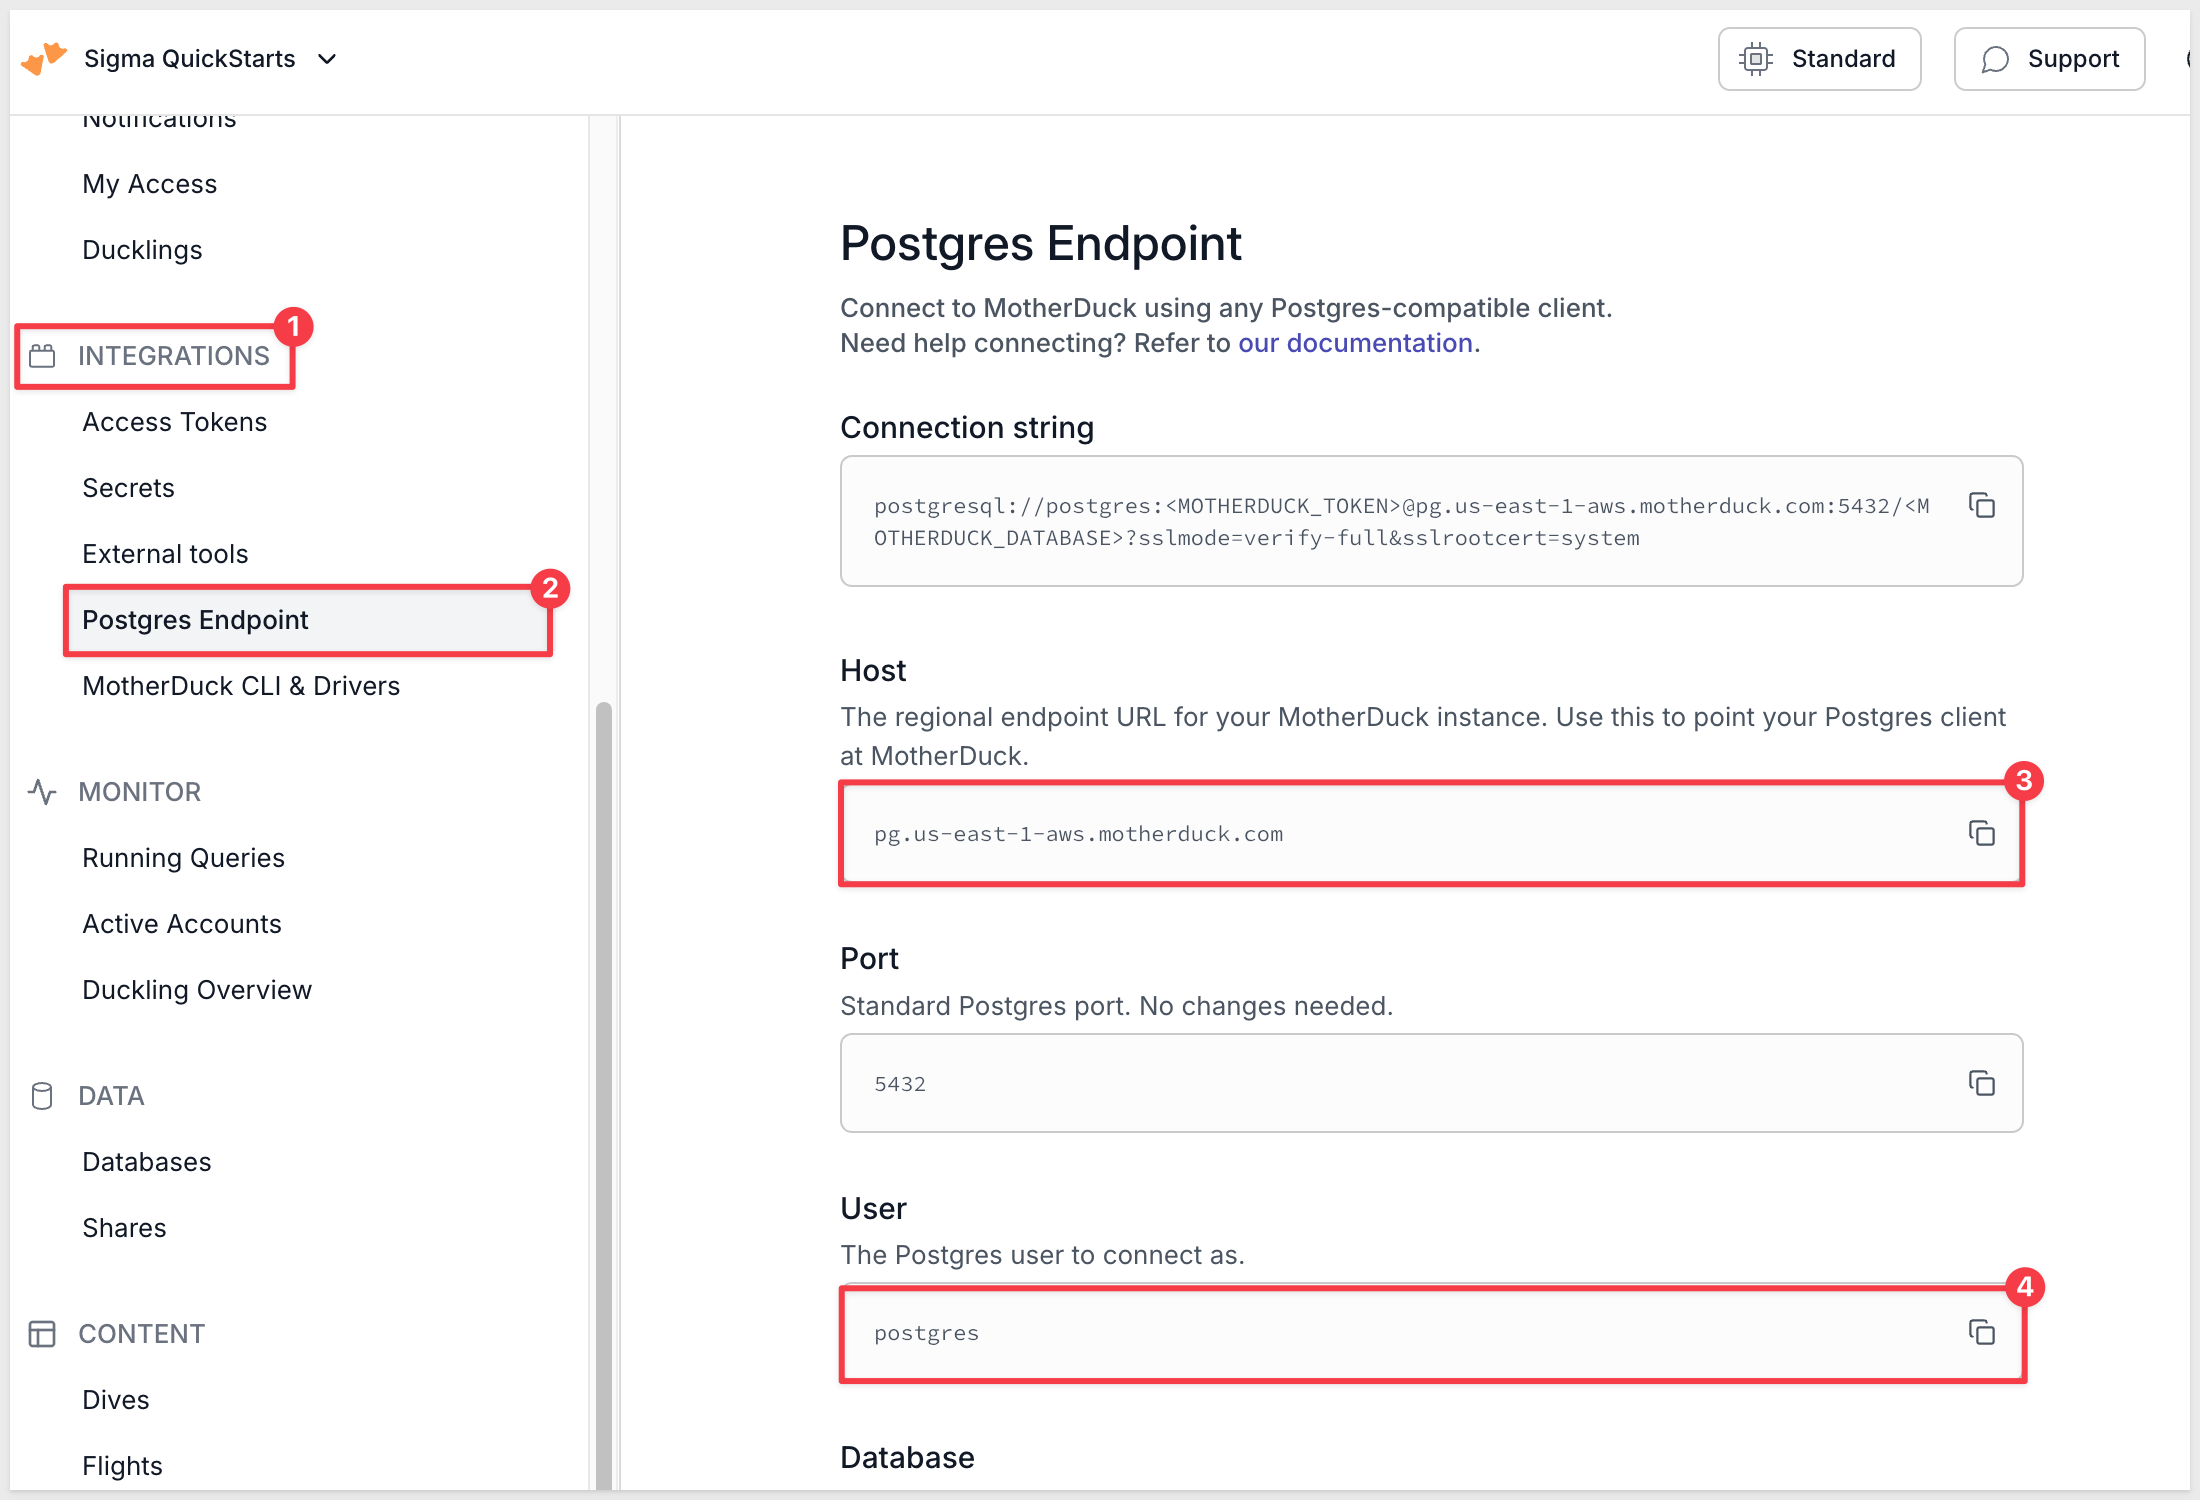
Sigma connects through the MotherDuck Postgres endpoint. In the same INTEGRATIONS menu, select Postgres Endpoint and copy the host name (for example, pg.us-east-1-aws.motherduck.com) and the user name.
Open your Sigma URL and sign in. The home page is organized for quick access to the main functions, which are numbered and described below:
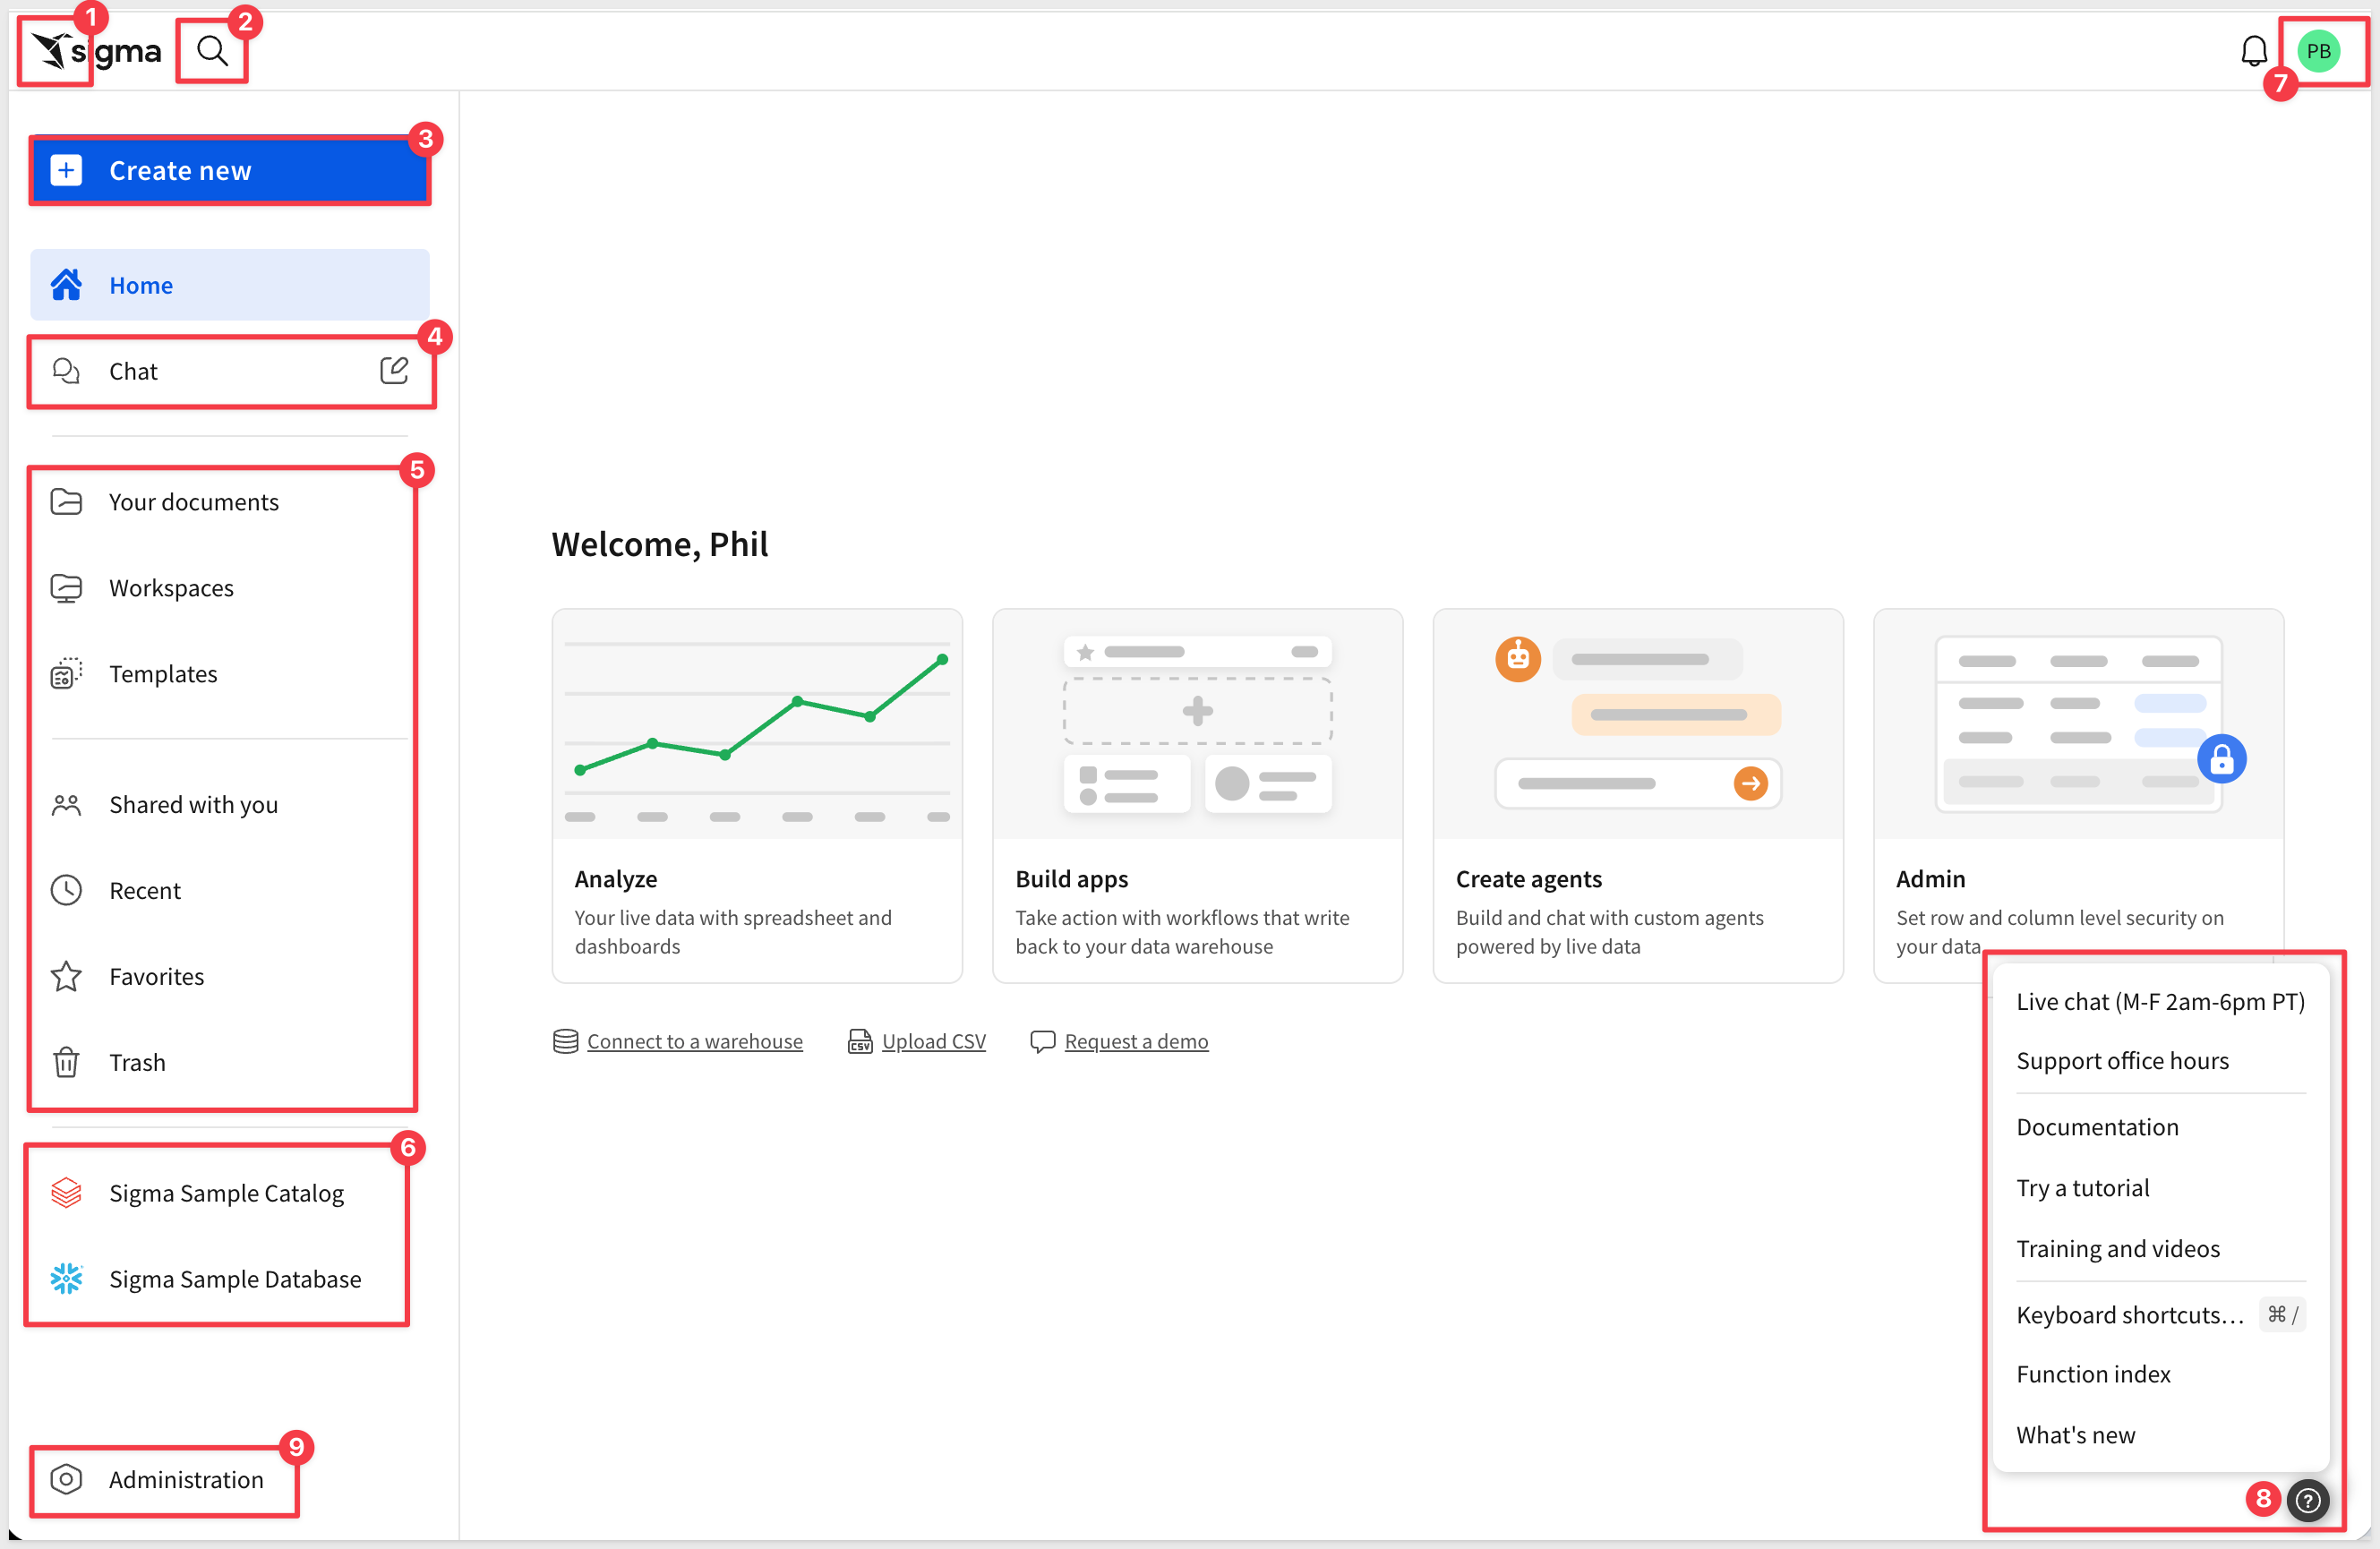
 Sigma logo: Click the Sigma logo in the upper left corner to return to the home page from anywhere in Sigma.
 Search: Search for content within Sigma.
 Create New: Use this anytime you want to create new content.
- Workbook: our spreadsheet-like UI for exploring, analyzing, and visualizing data
- Report: design and schedule pixel perfect reports
- Data model: define shared tables and metrics that workbook builders start from
- SQL query: query your connected data source directly using SQL
- CSV upload: add a file from your computer
 Chat: Ask questions of your data in plain language using Sigma Assistant.
 Your documents:
- Your documents: a personal folder for content you have created.
- Workspaces: organize and share content with specific members or teams.
- Templates: standardize and share workbook structures for quick, consistent reuse.
- Shared with you: items others have shared directly with you.
- Recent and Favorites: quick access to items you use most.
- Trash: the typical recycle bin functionality.
 Connections: Lists the data sources available to you in the left menu (trials include the Sigma Sample Catalog and Sigma Sample Database). Selecting one shows the tables you can access. Our MotherDuck connection will appear here once we create it in the next section.
 User Profile: Your initials in the top right open your preferences and sign out.
 Help: The
? icon in the bottom right opens Live chat, Documentation, tutorials, training videos, and What's new. Sigma is fanatical about supporting our customers, so use it.
 Administration: At the bottom of the left menu, this is where connections, users, and account types are managed. It is only shown to users with administrative permissions.
The landing page cards give quick starting points: Analyze your live data with a workbook, Build apps with workflows that write back to your data warehouse, Create agents powered by live data, and Admin for row and column level security.
If you want to see what is new in Sigma, check the Release Notes or the monthly First Friday Features summary.
Creating a connection requires an Admin account type, or an account type with the Manage connections permission enabled. Your trial account was created with your user as an administrator already.
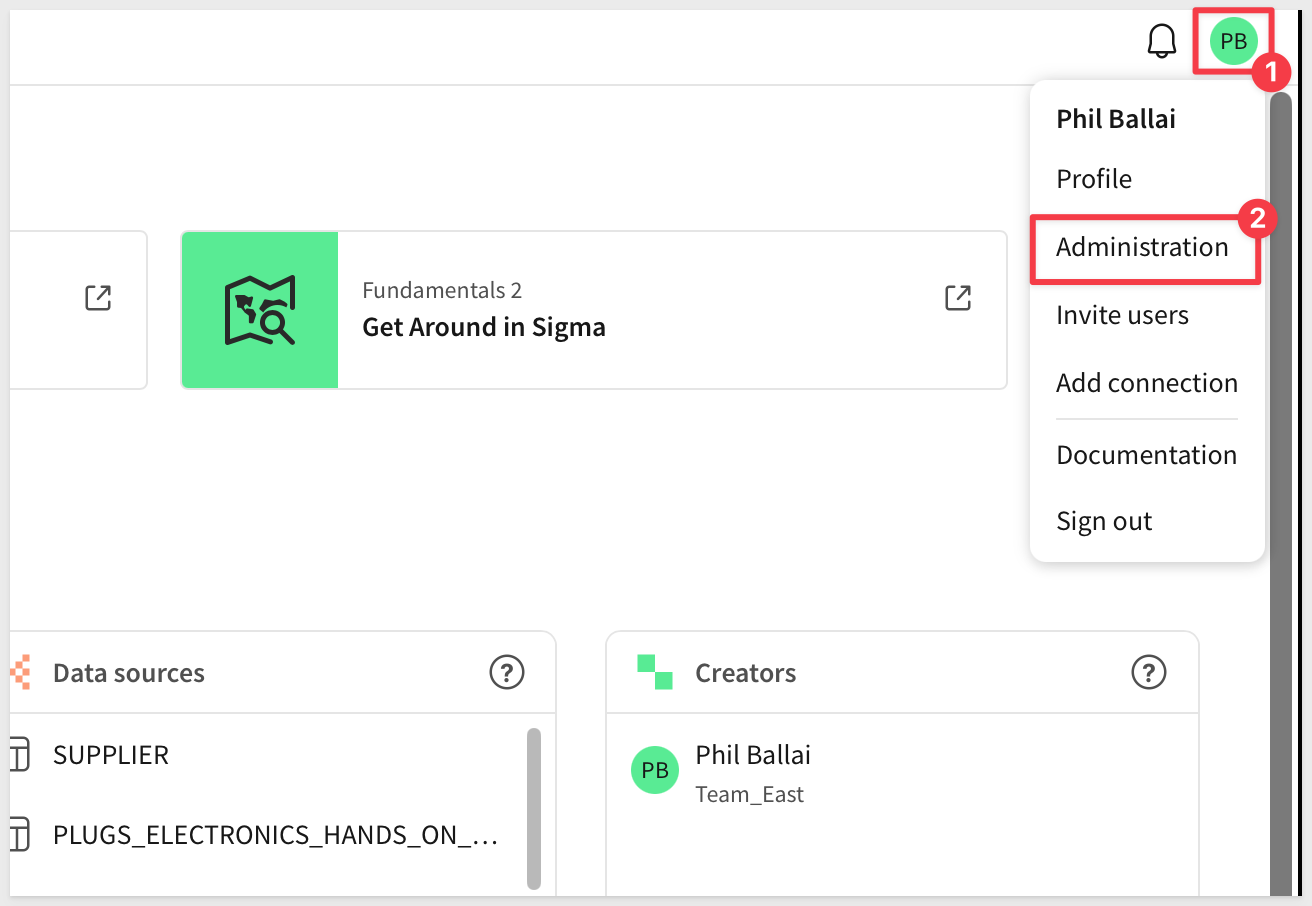
Click your user profile icon in the top right corner of the page and select Administration.
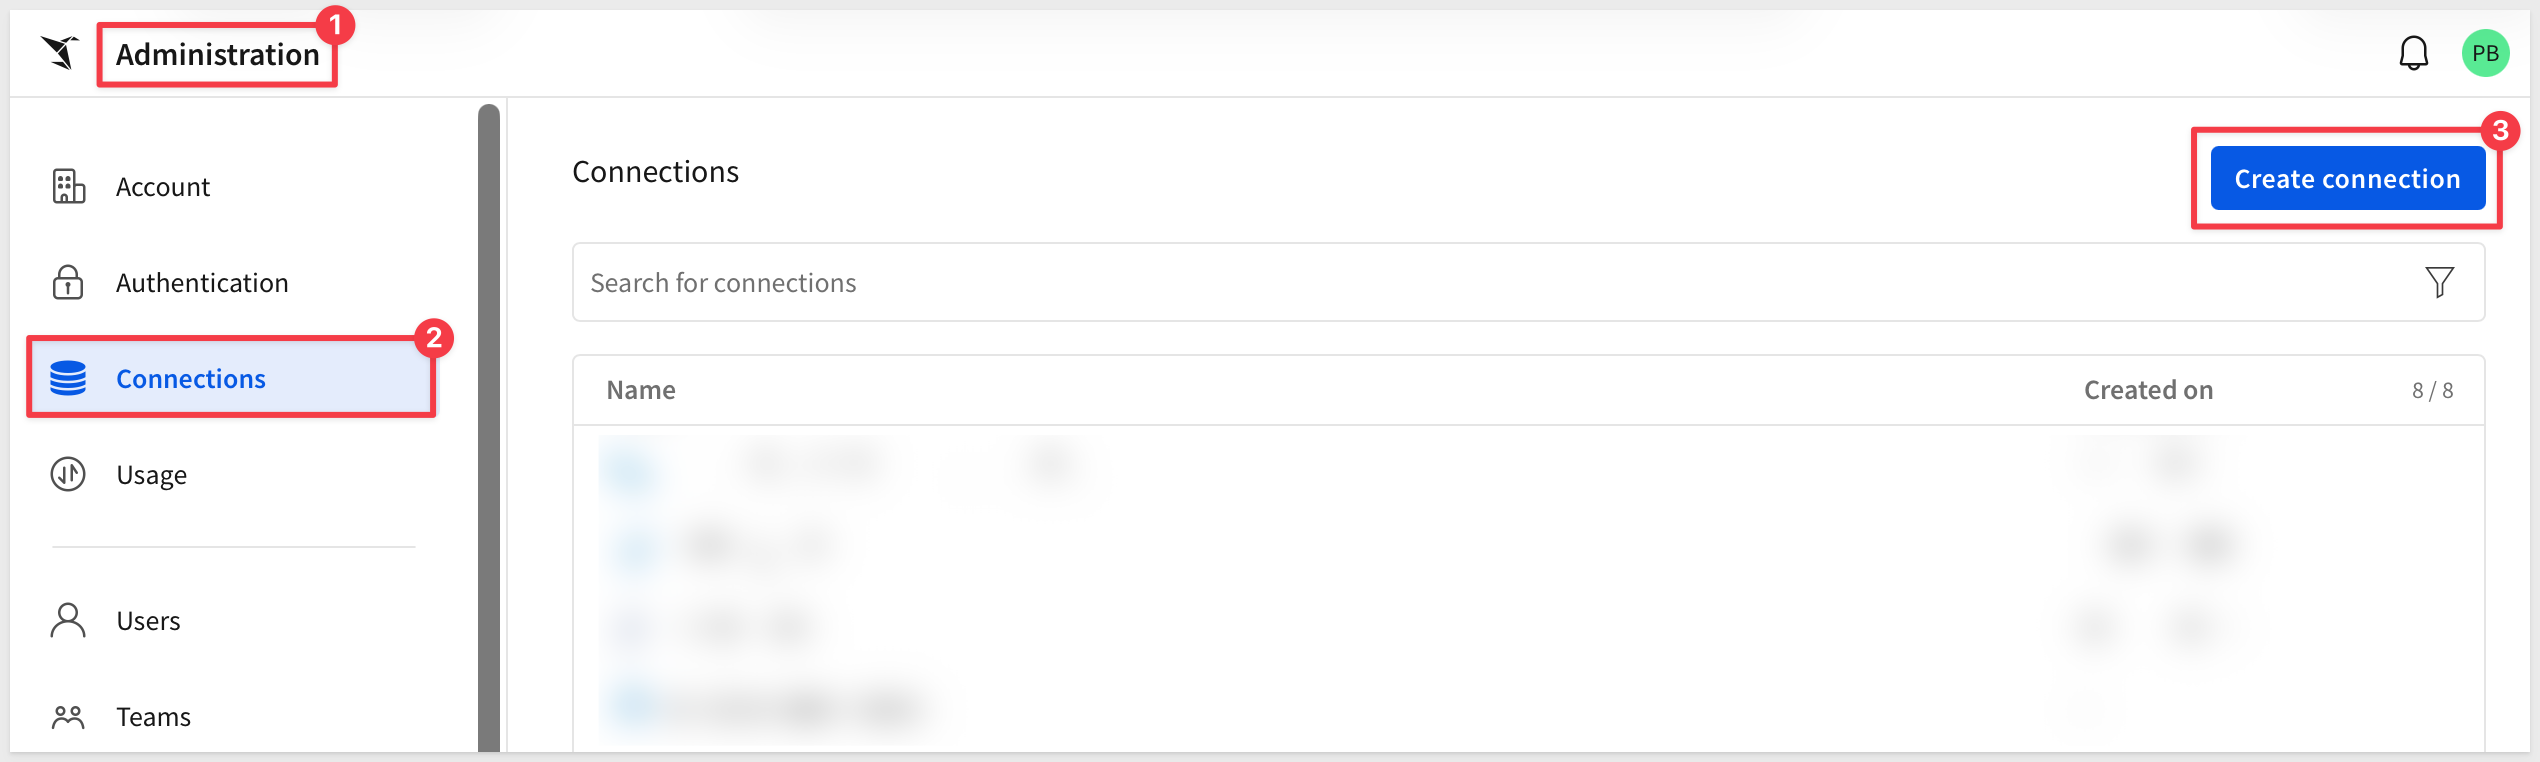
Select Connections and then Create Connection.
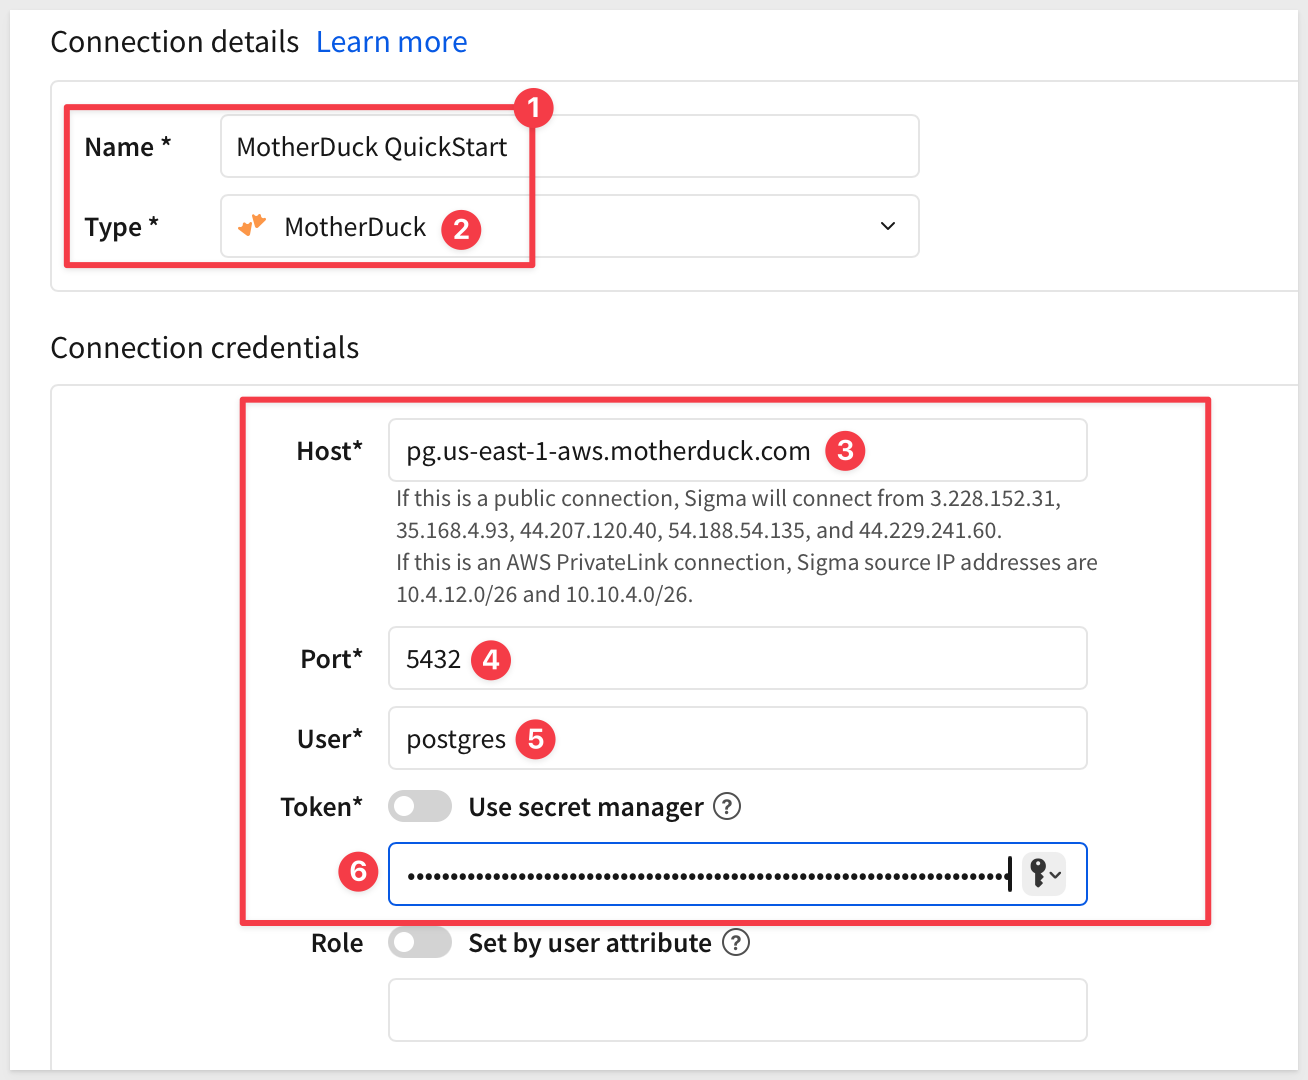
Under Connection Details, set:
- Name:
MotherDuck QuickStart - Type:
MotherDuck
Under Connection credentials, enter:
- Host:
{your-postgres-endpoint-host} - Port:
5432 - User:
{your-postgres-endpoint-user} - Token:
{your-read-scaling-token}
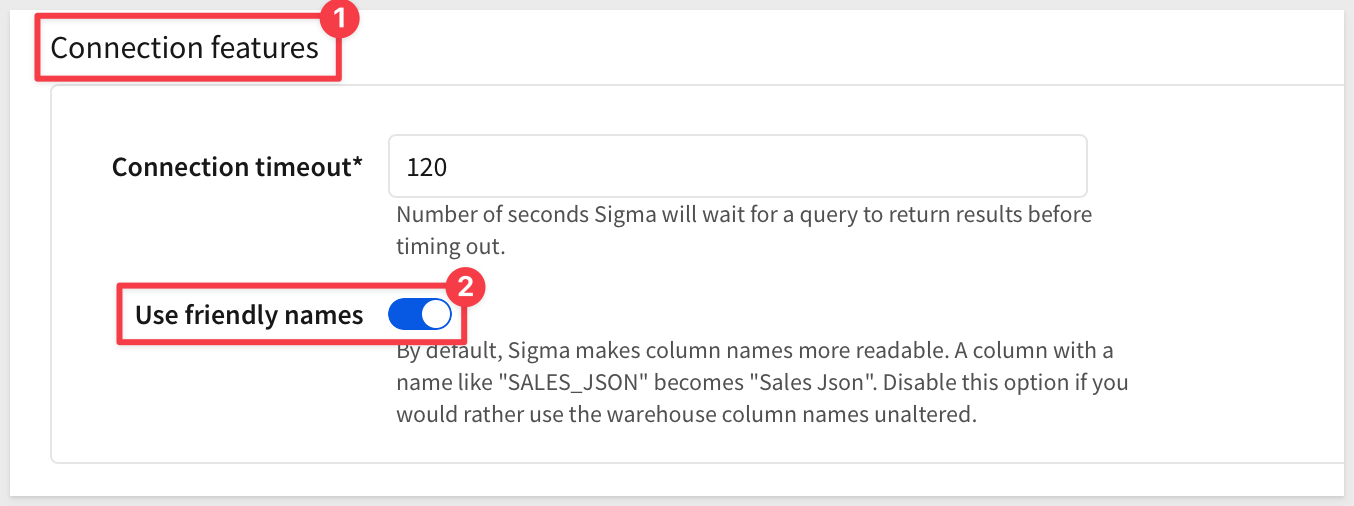
Under Connection features, leave the Connection timeout at the default and turn Use friendly names on so column names are more readable.
Click Create.
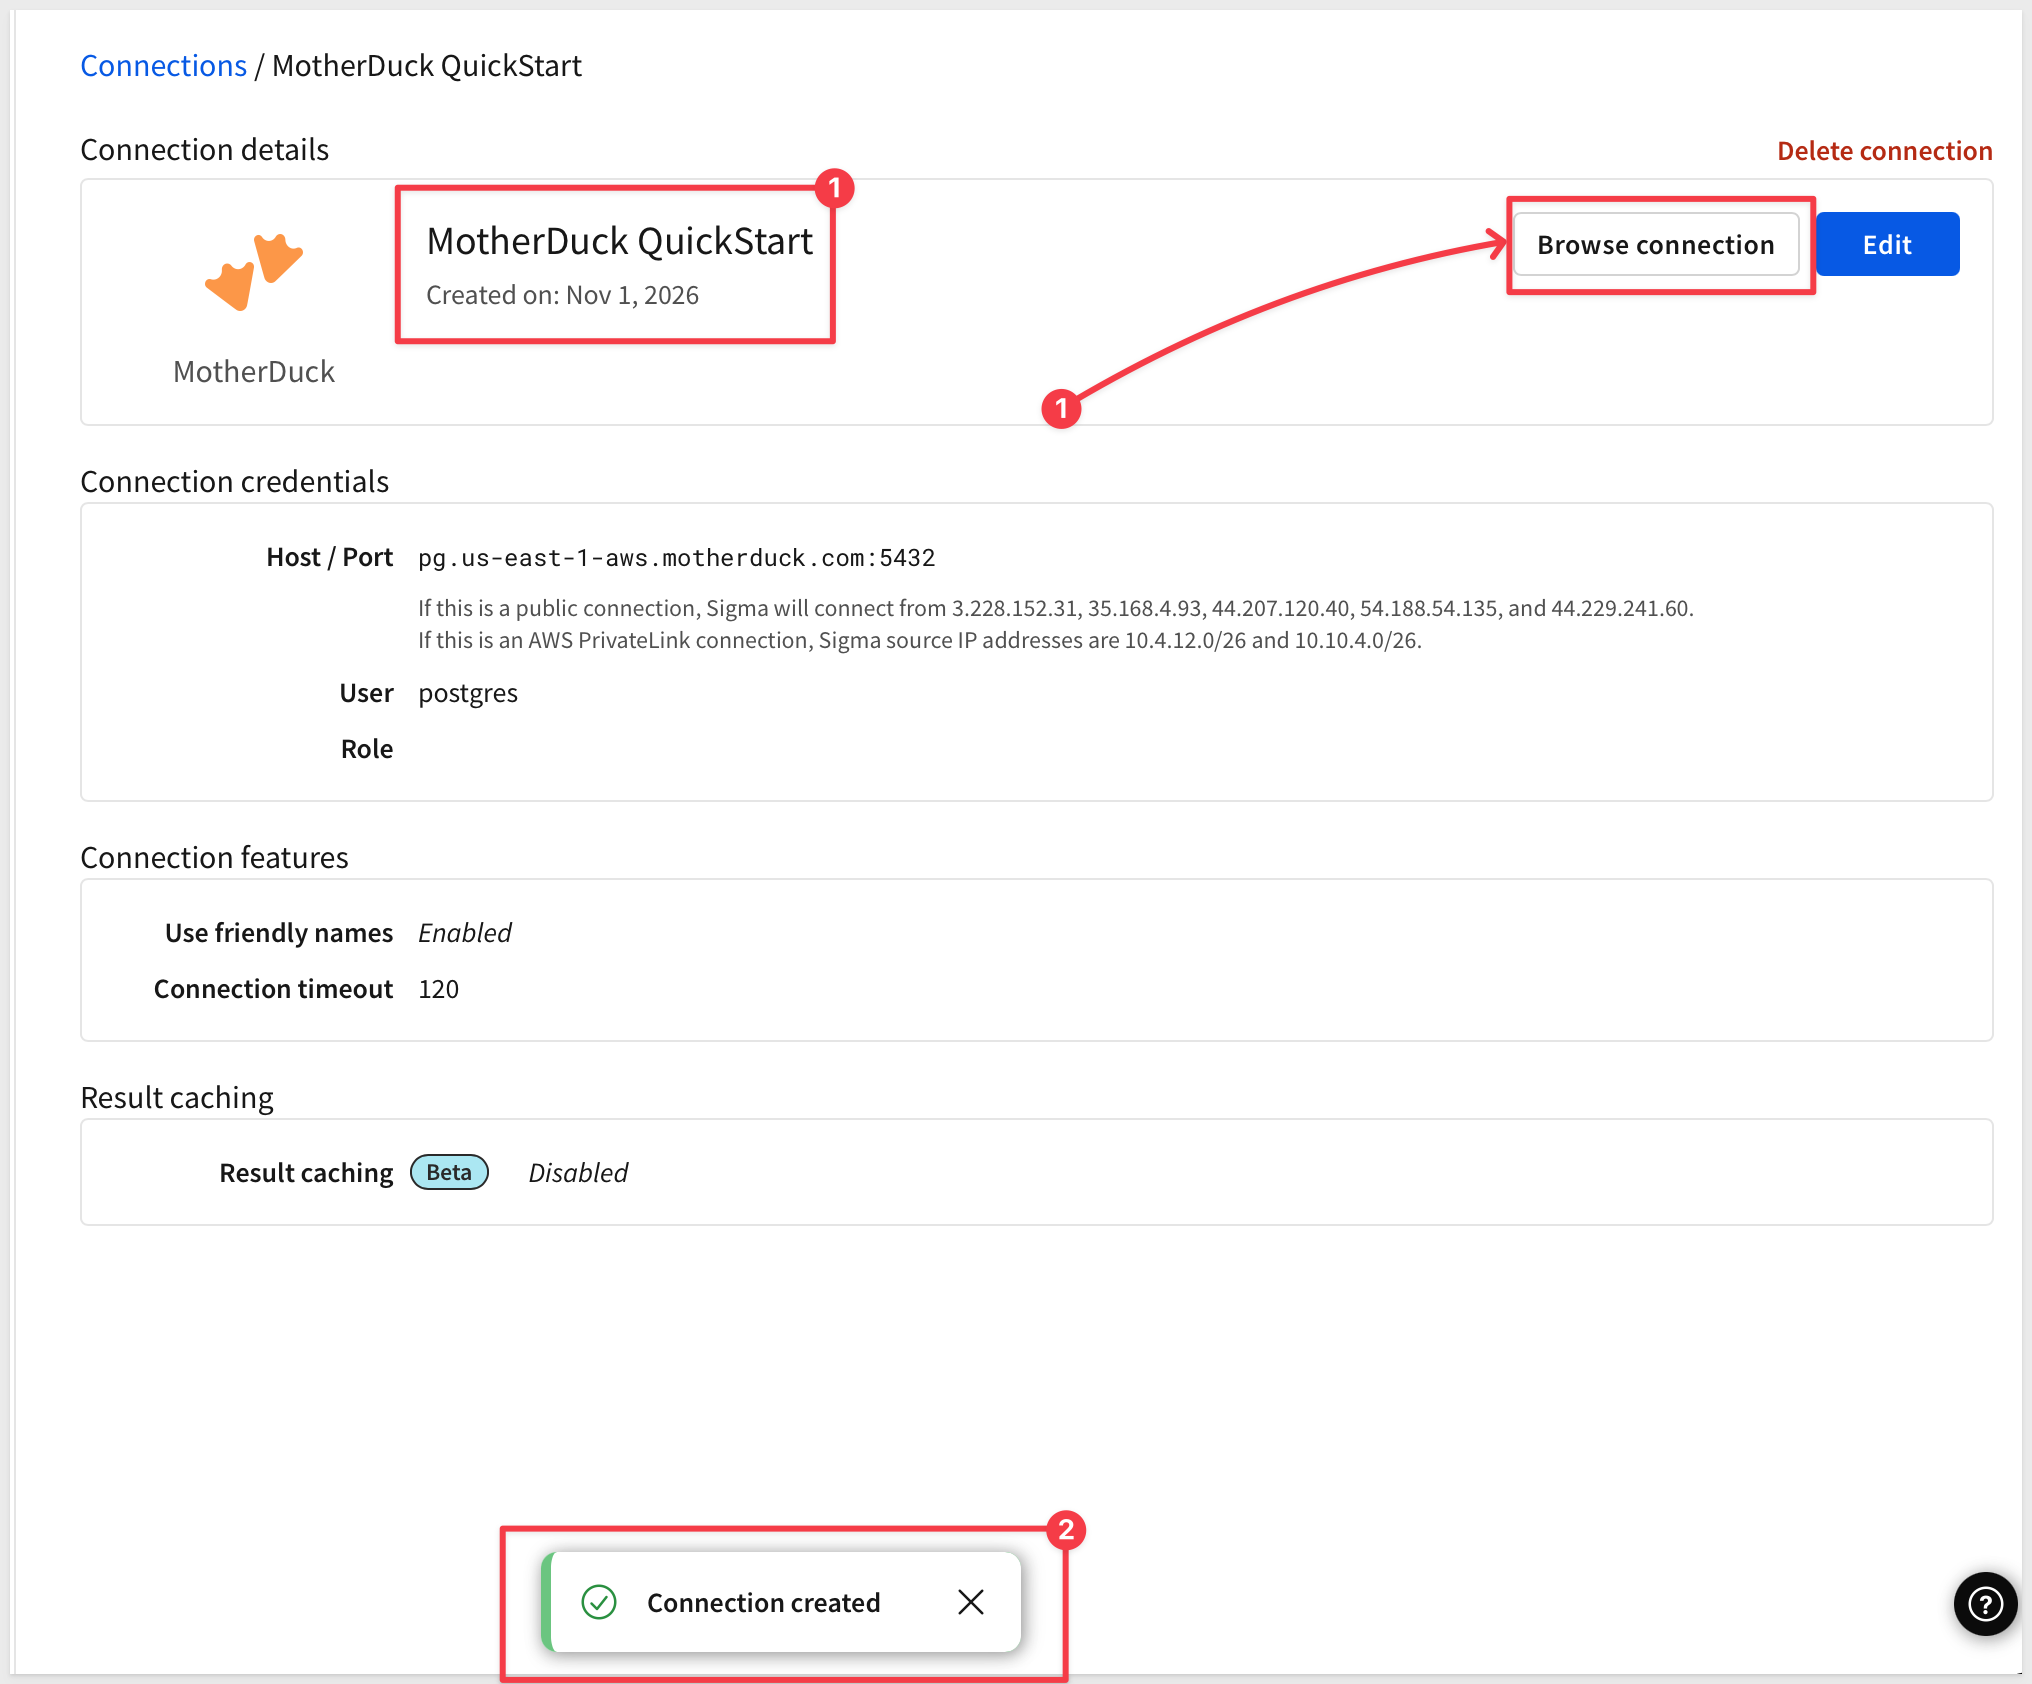
Next, we grant users access to the connection. Click Browse Connection, then Add permission.
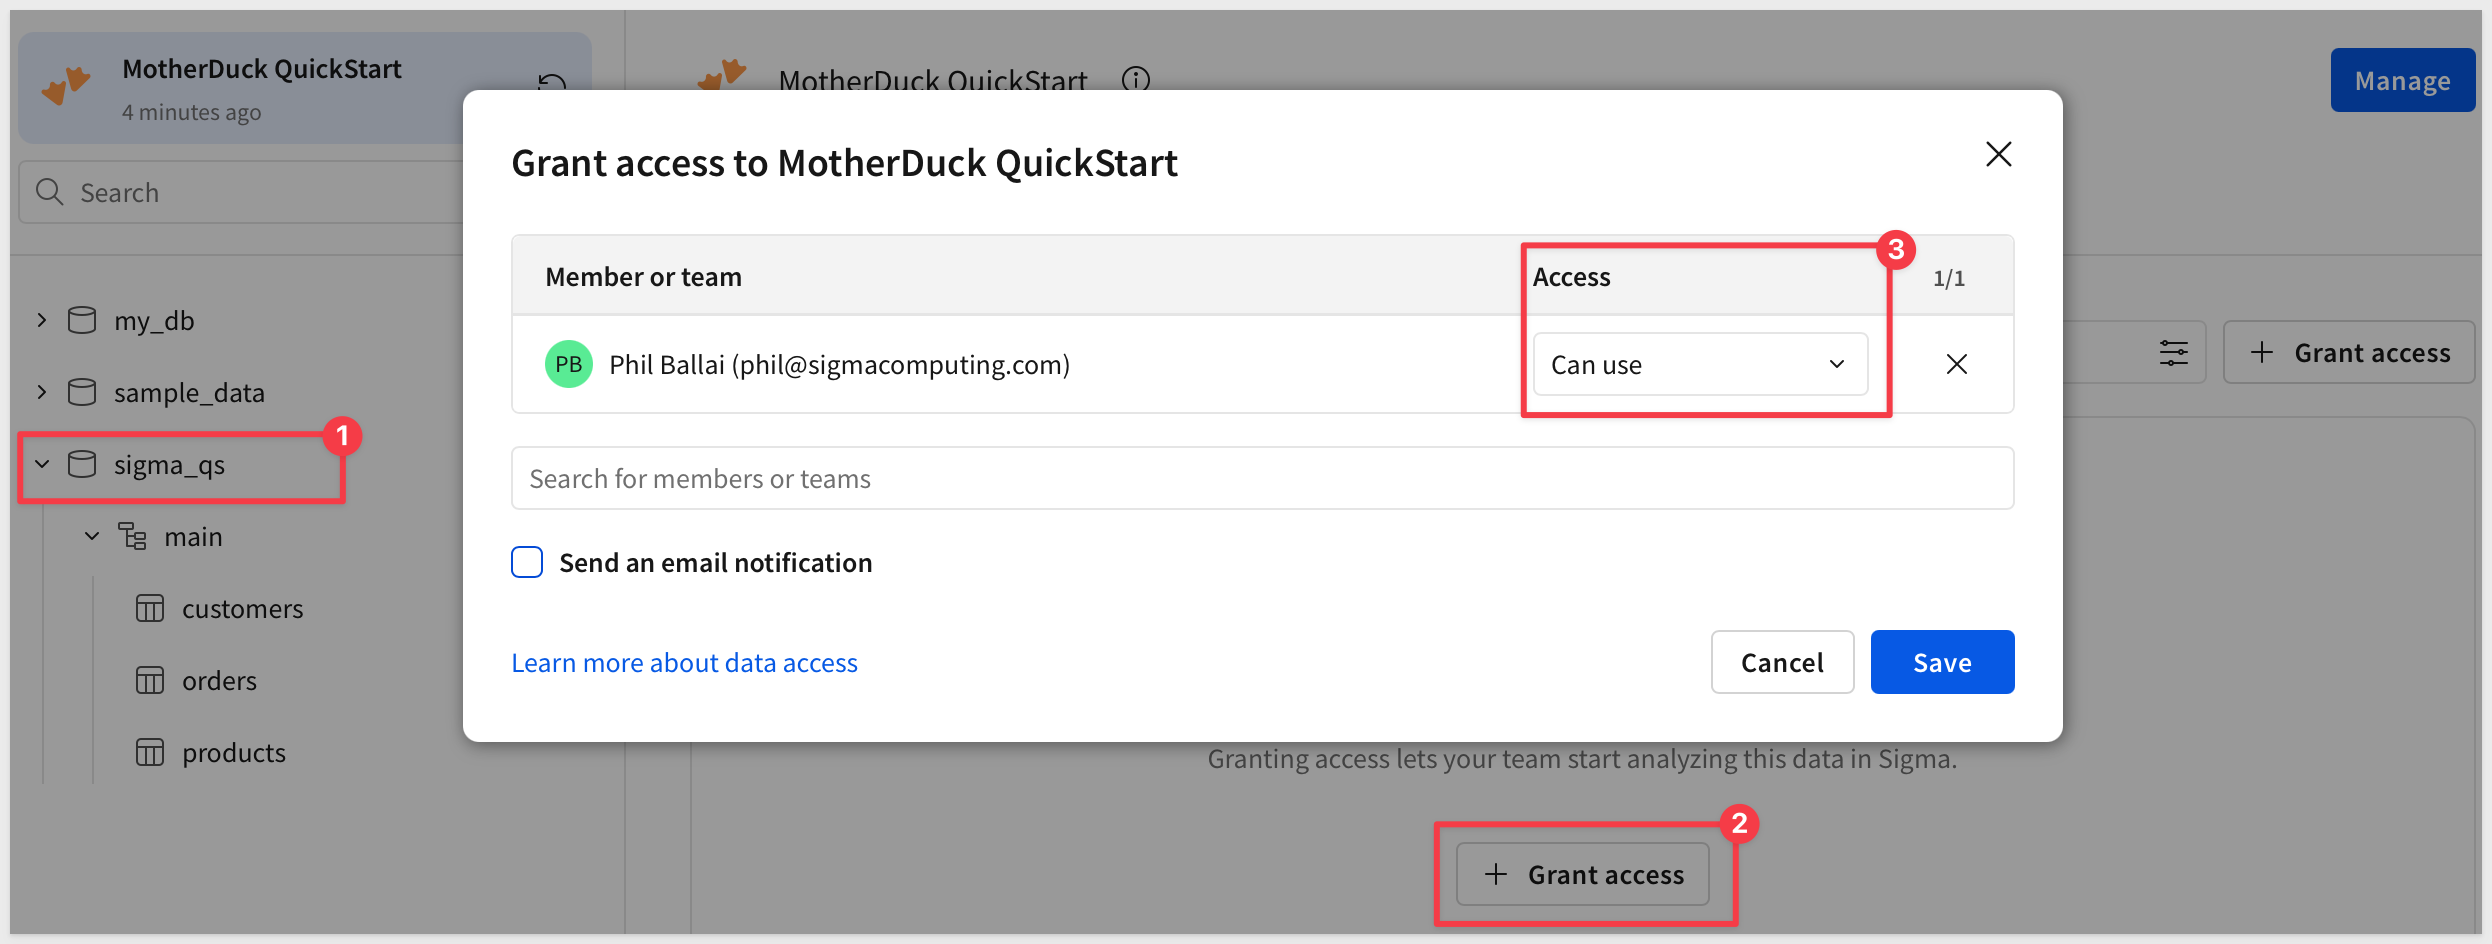
The Grant access to MotherDuck QuickStart dialog opens. You can add your own account and set the Access level to Can use. To give others access, click Search for members or teams and select them.
For each member or team, open the Access dropdown and choose one of:
Can useCan use & annotateCan adminCan write only
Choose Can use for everyone in this QuickStart. Because Sigma reads from MotherDuck without writing to it, Can write only does not apply here.
Leave Send an email notification unchecked, and click Save.
For more information, see Data access overview
Open the connection and confirm the sigma_qs database and its products, customers, and orders tables are visible.
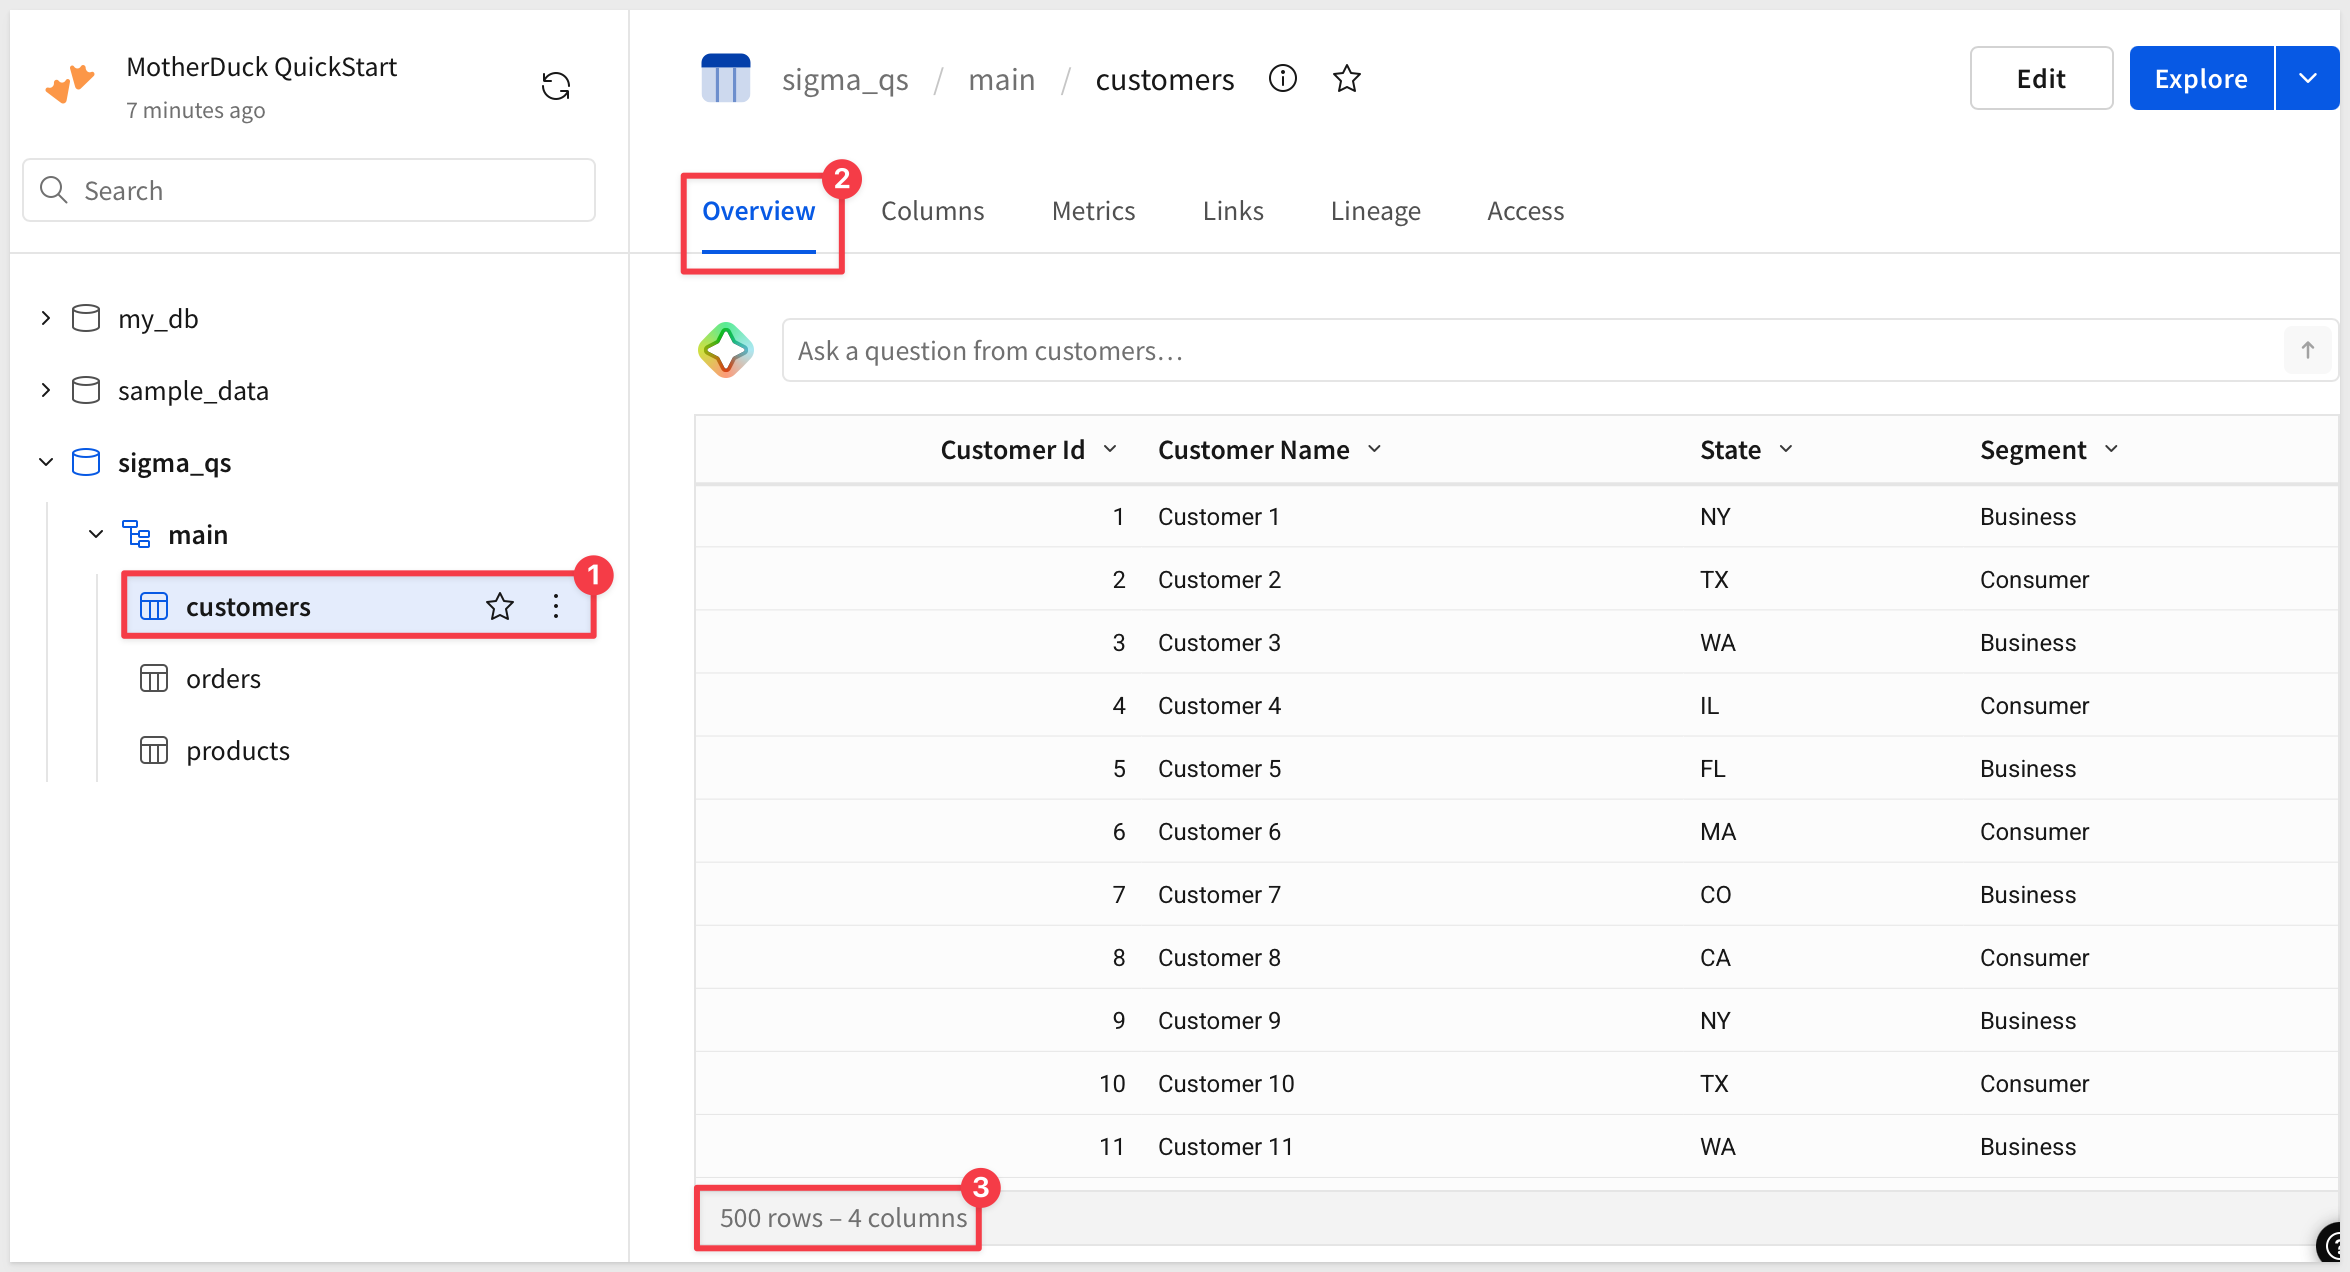
For the latest information on the MotherDuck connection in Sigma, see Connect to MotherDuck
Use case
You are a data analyst at a retailer that sells computers, audio, and display products. The sales team wants to do ad-hoc analysis of orders and work from trusted calculations, such as Revenue and Profit, without redefining them in every analysis.
A data model lets us define that once and share it.
Create the base table
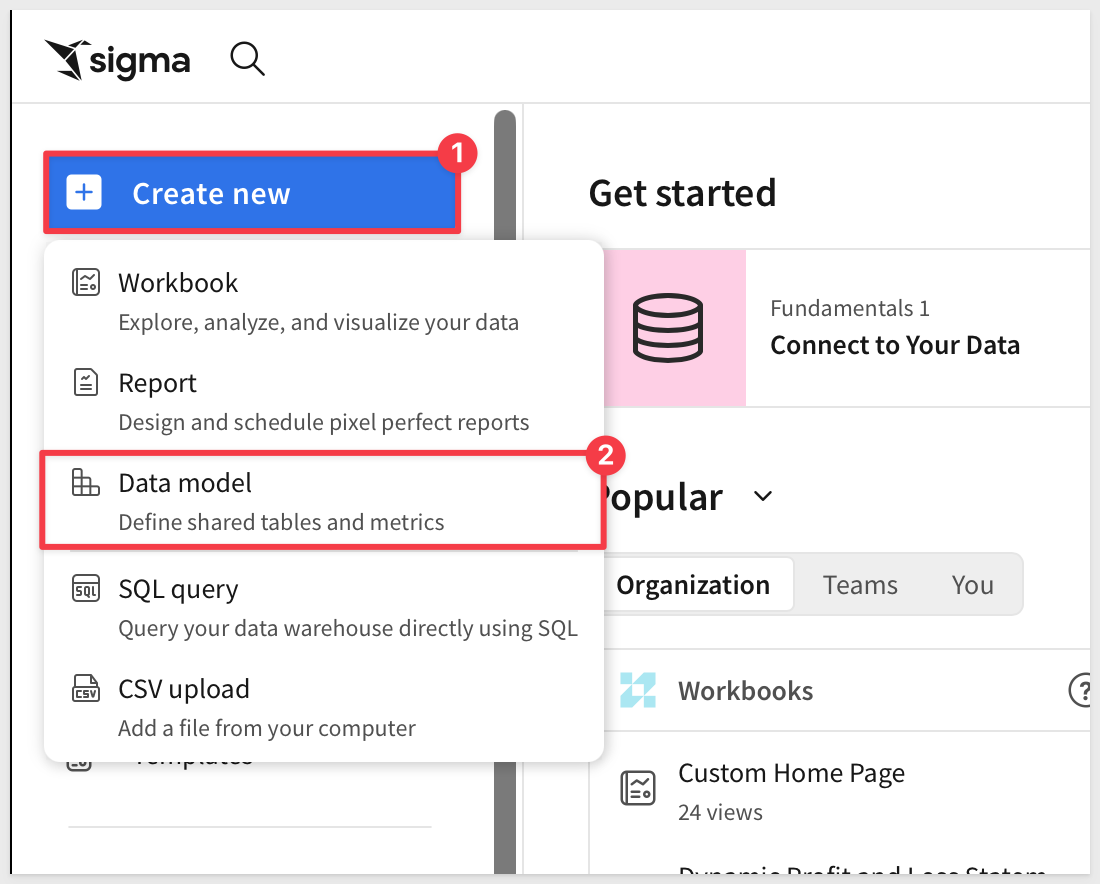
From the Sigma homepage, click Create new > Data model.
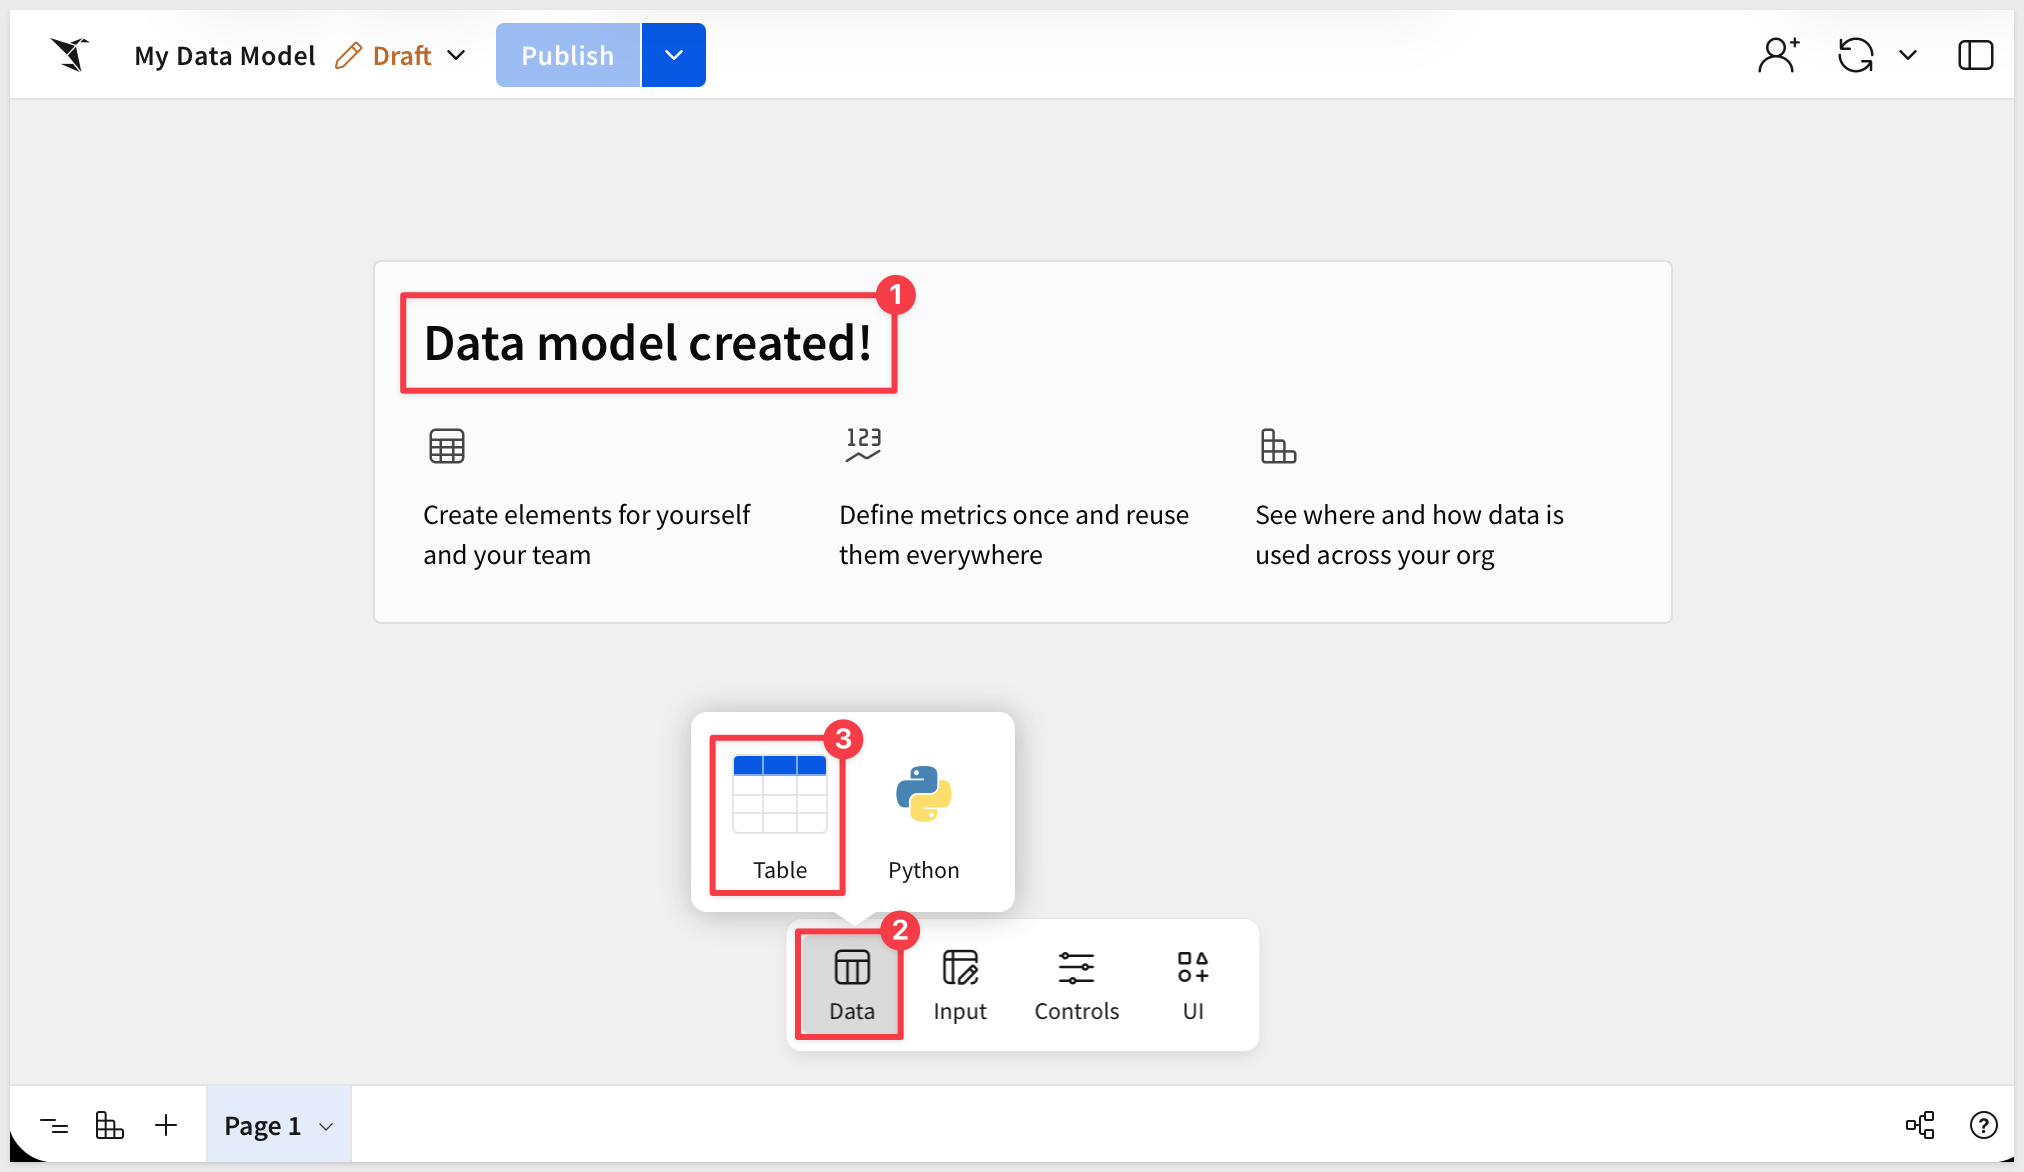
From the Element bar, add a Table element.
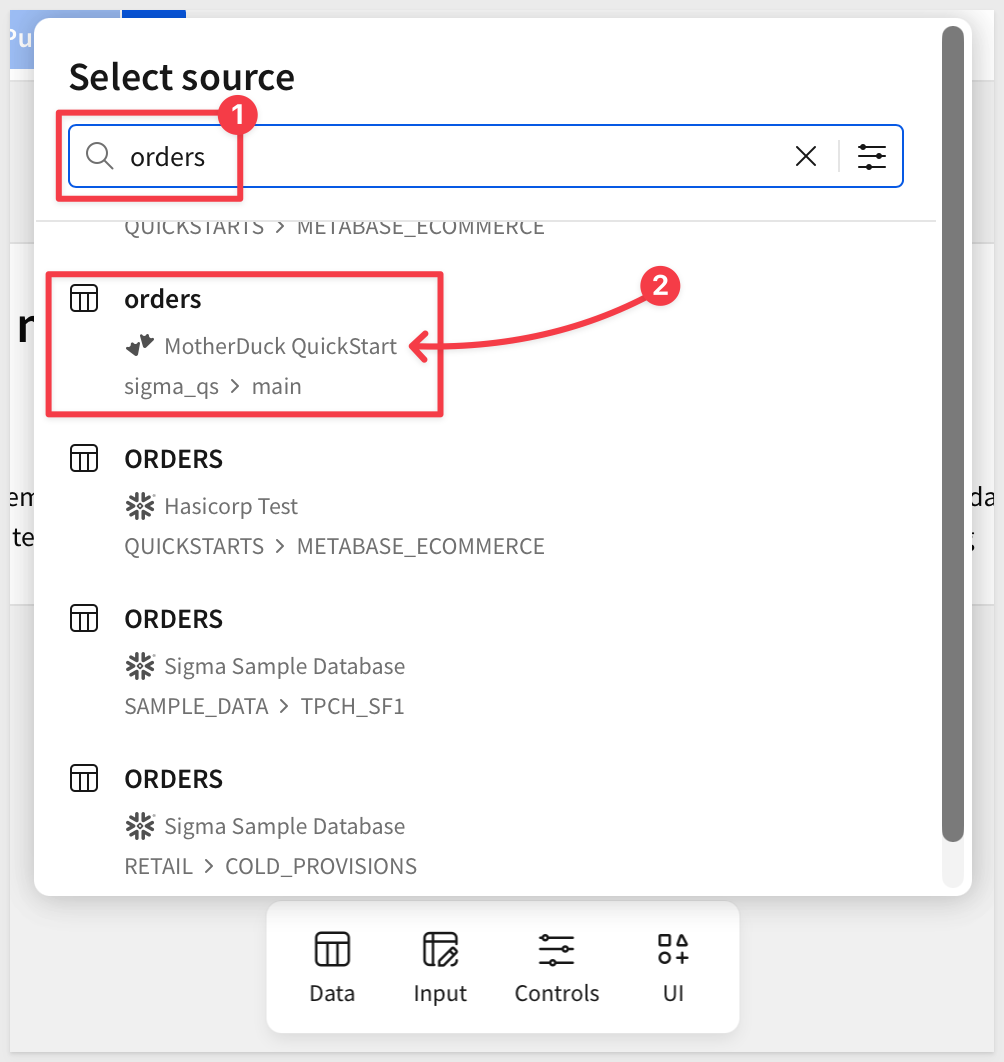
In Select source, search for and select the orders table, in the MotherDuck QuickStart connection, sigma_qs database.
Rename the table to Orders.
Join the other tables
Since the sales team will always need customer and product details alongside each order, we can join those tables directly into the base table.
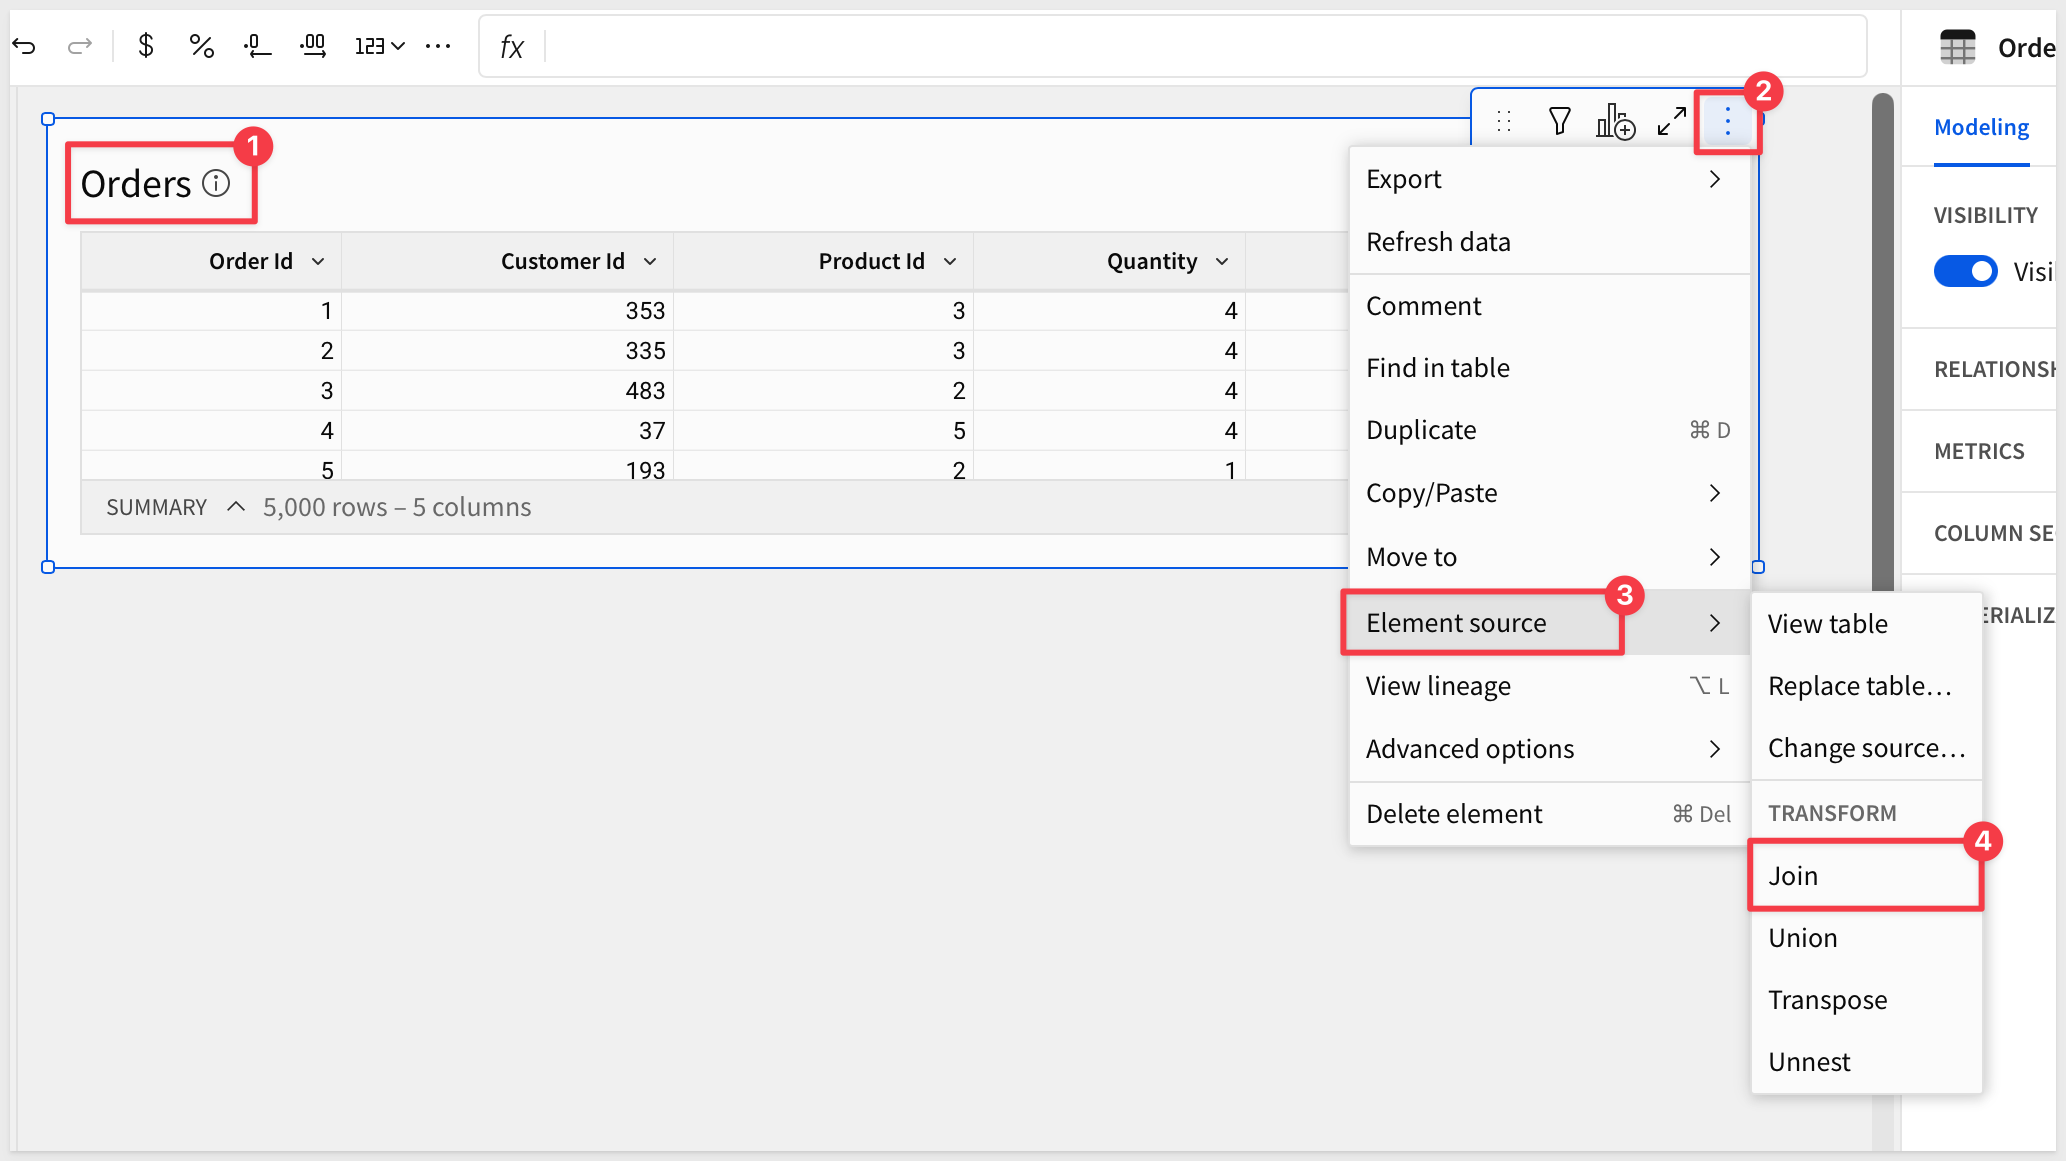
From Orders, select Element source > Join from the table menu:
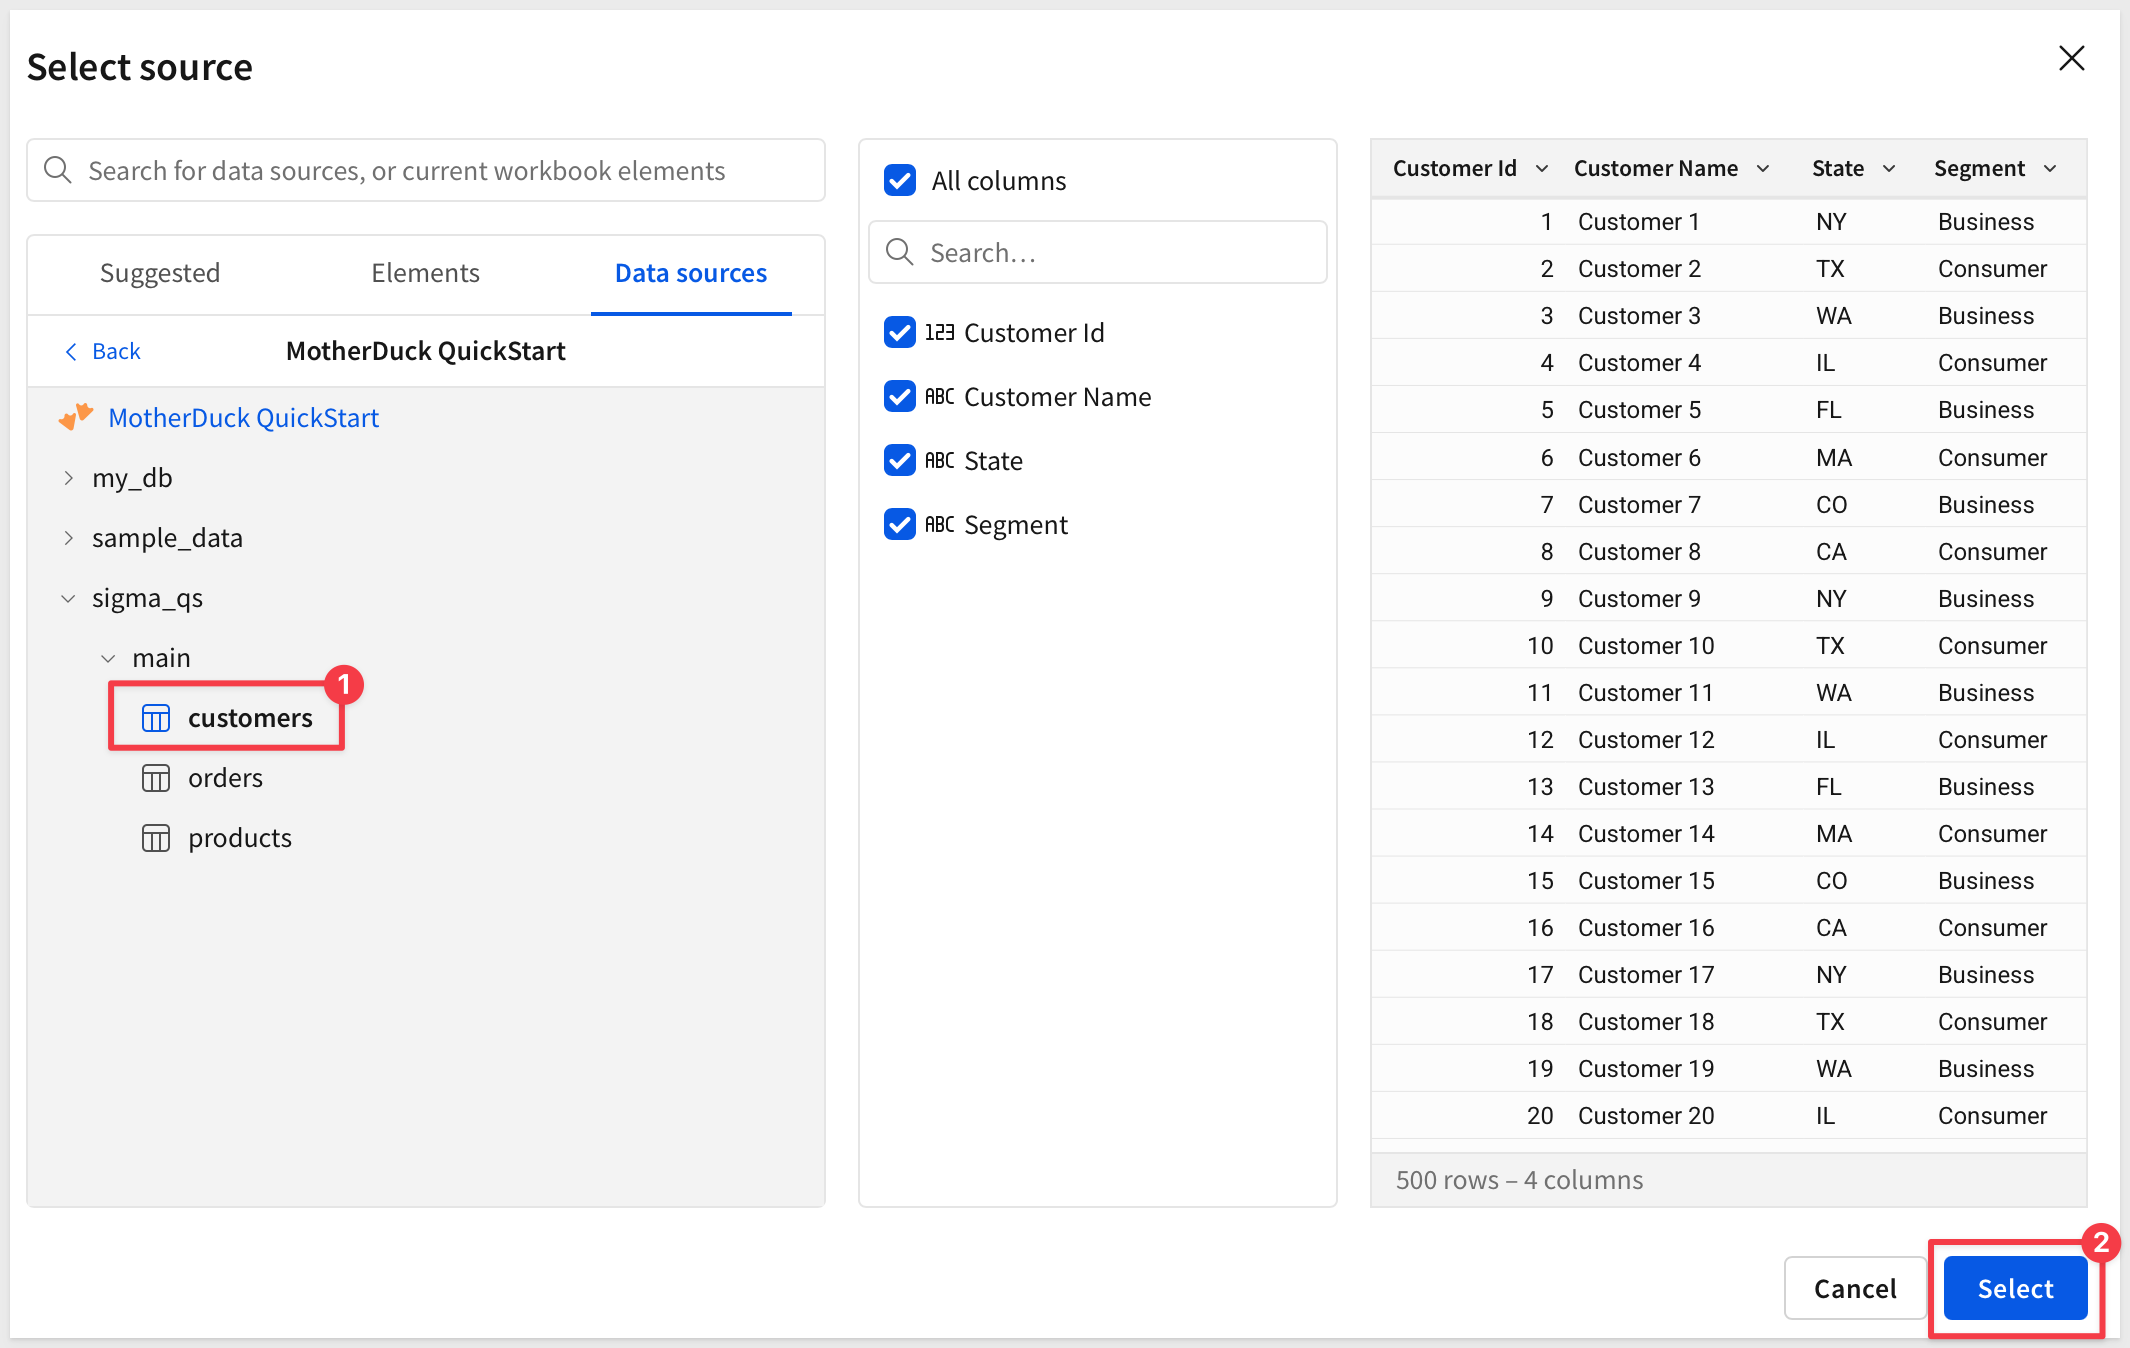
Search for the customers table (in the MotherDuck QuickStart connection, sigma_qs database), and accept all columns.
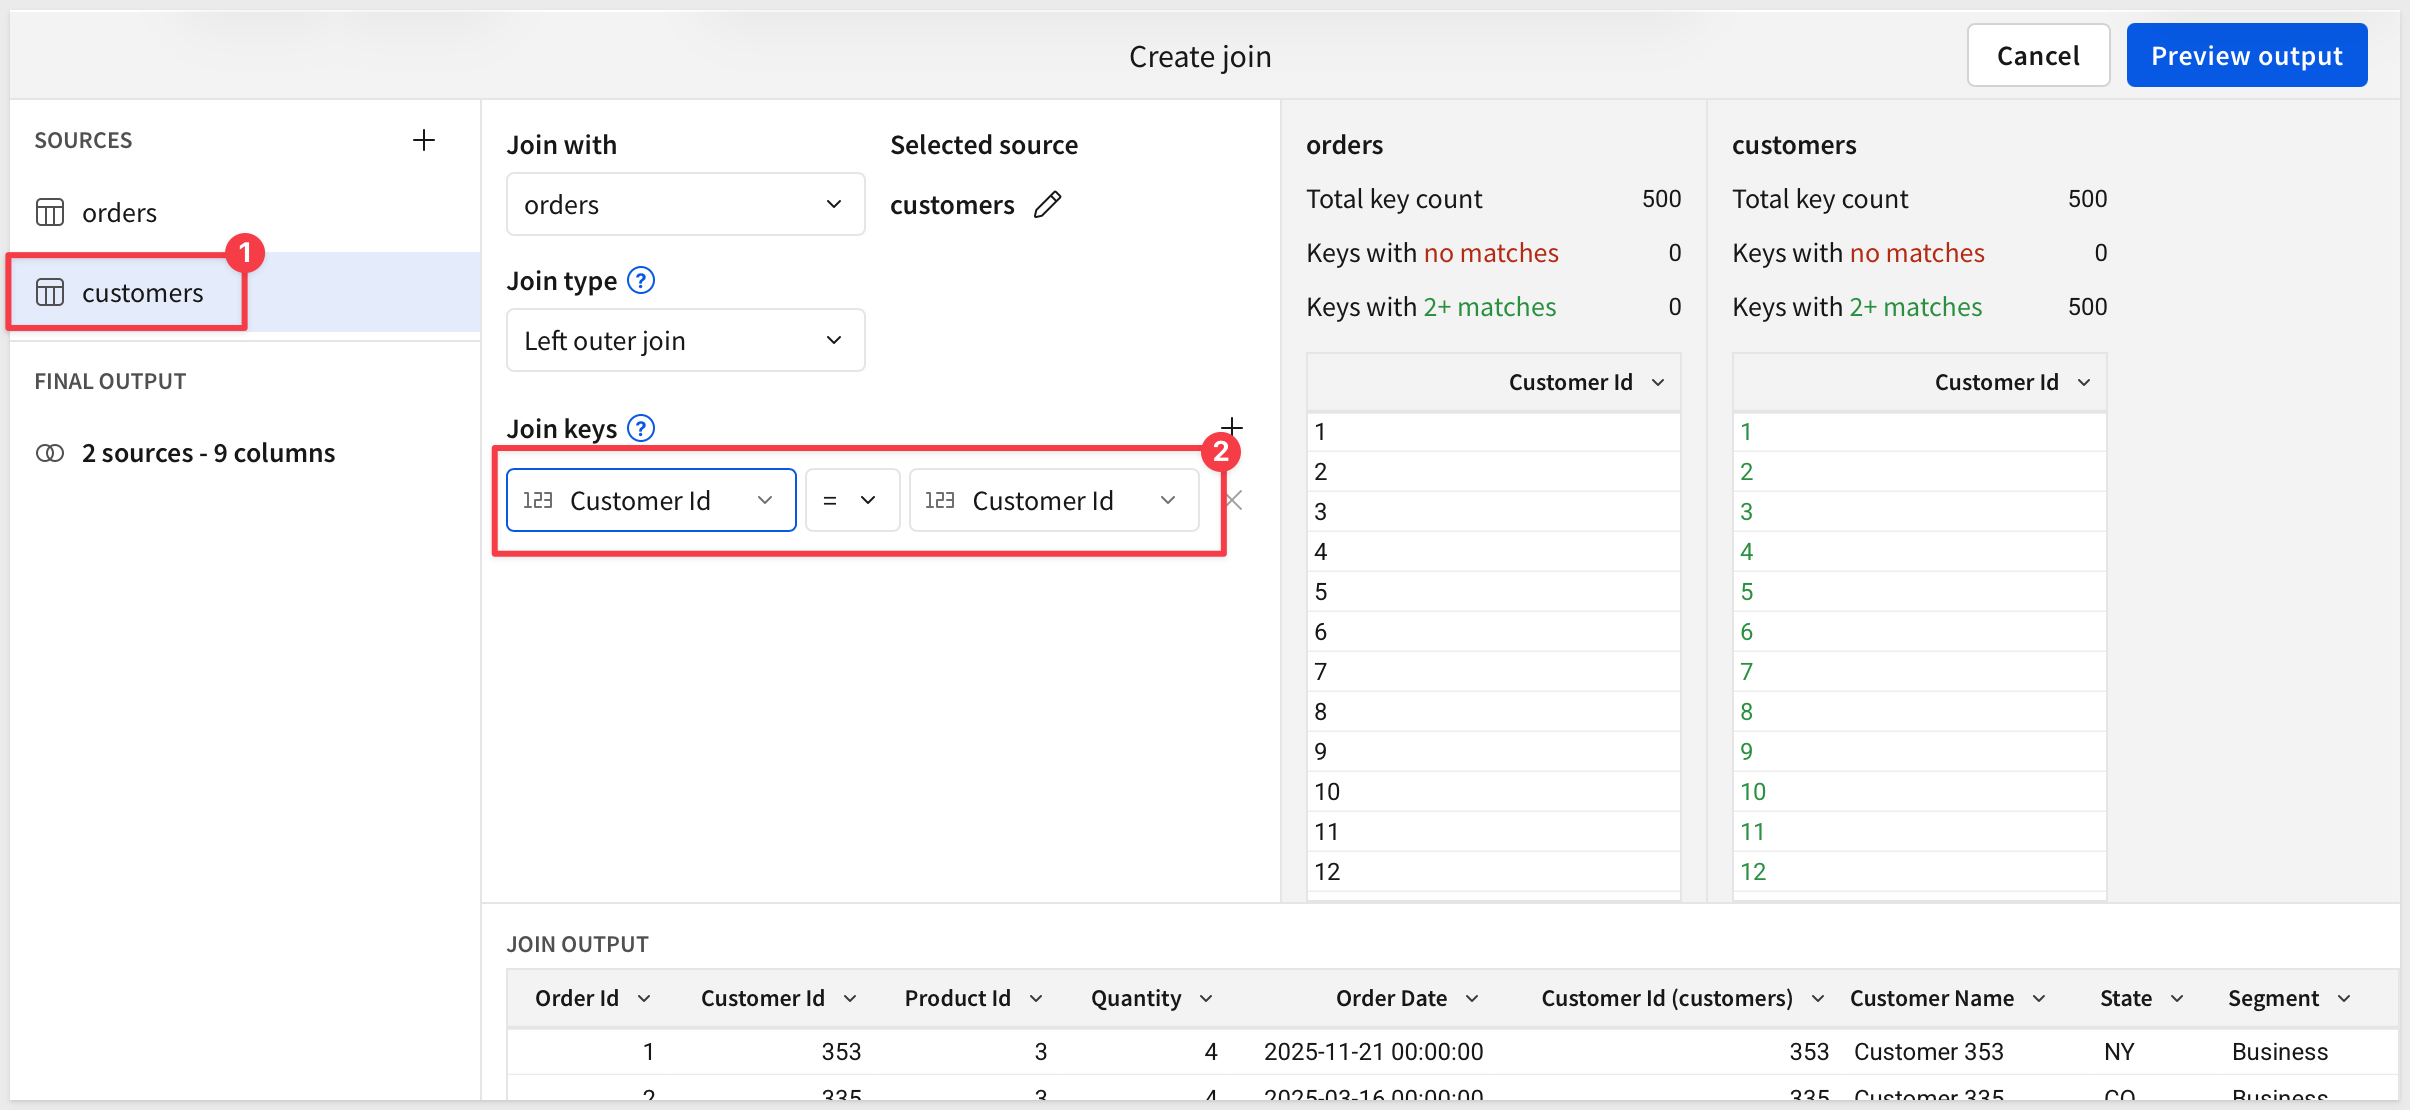
Set the Join keys to Customer Id.
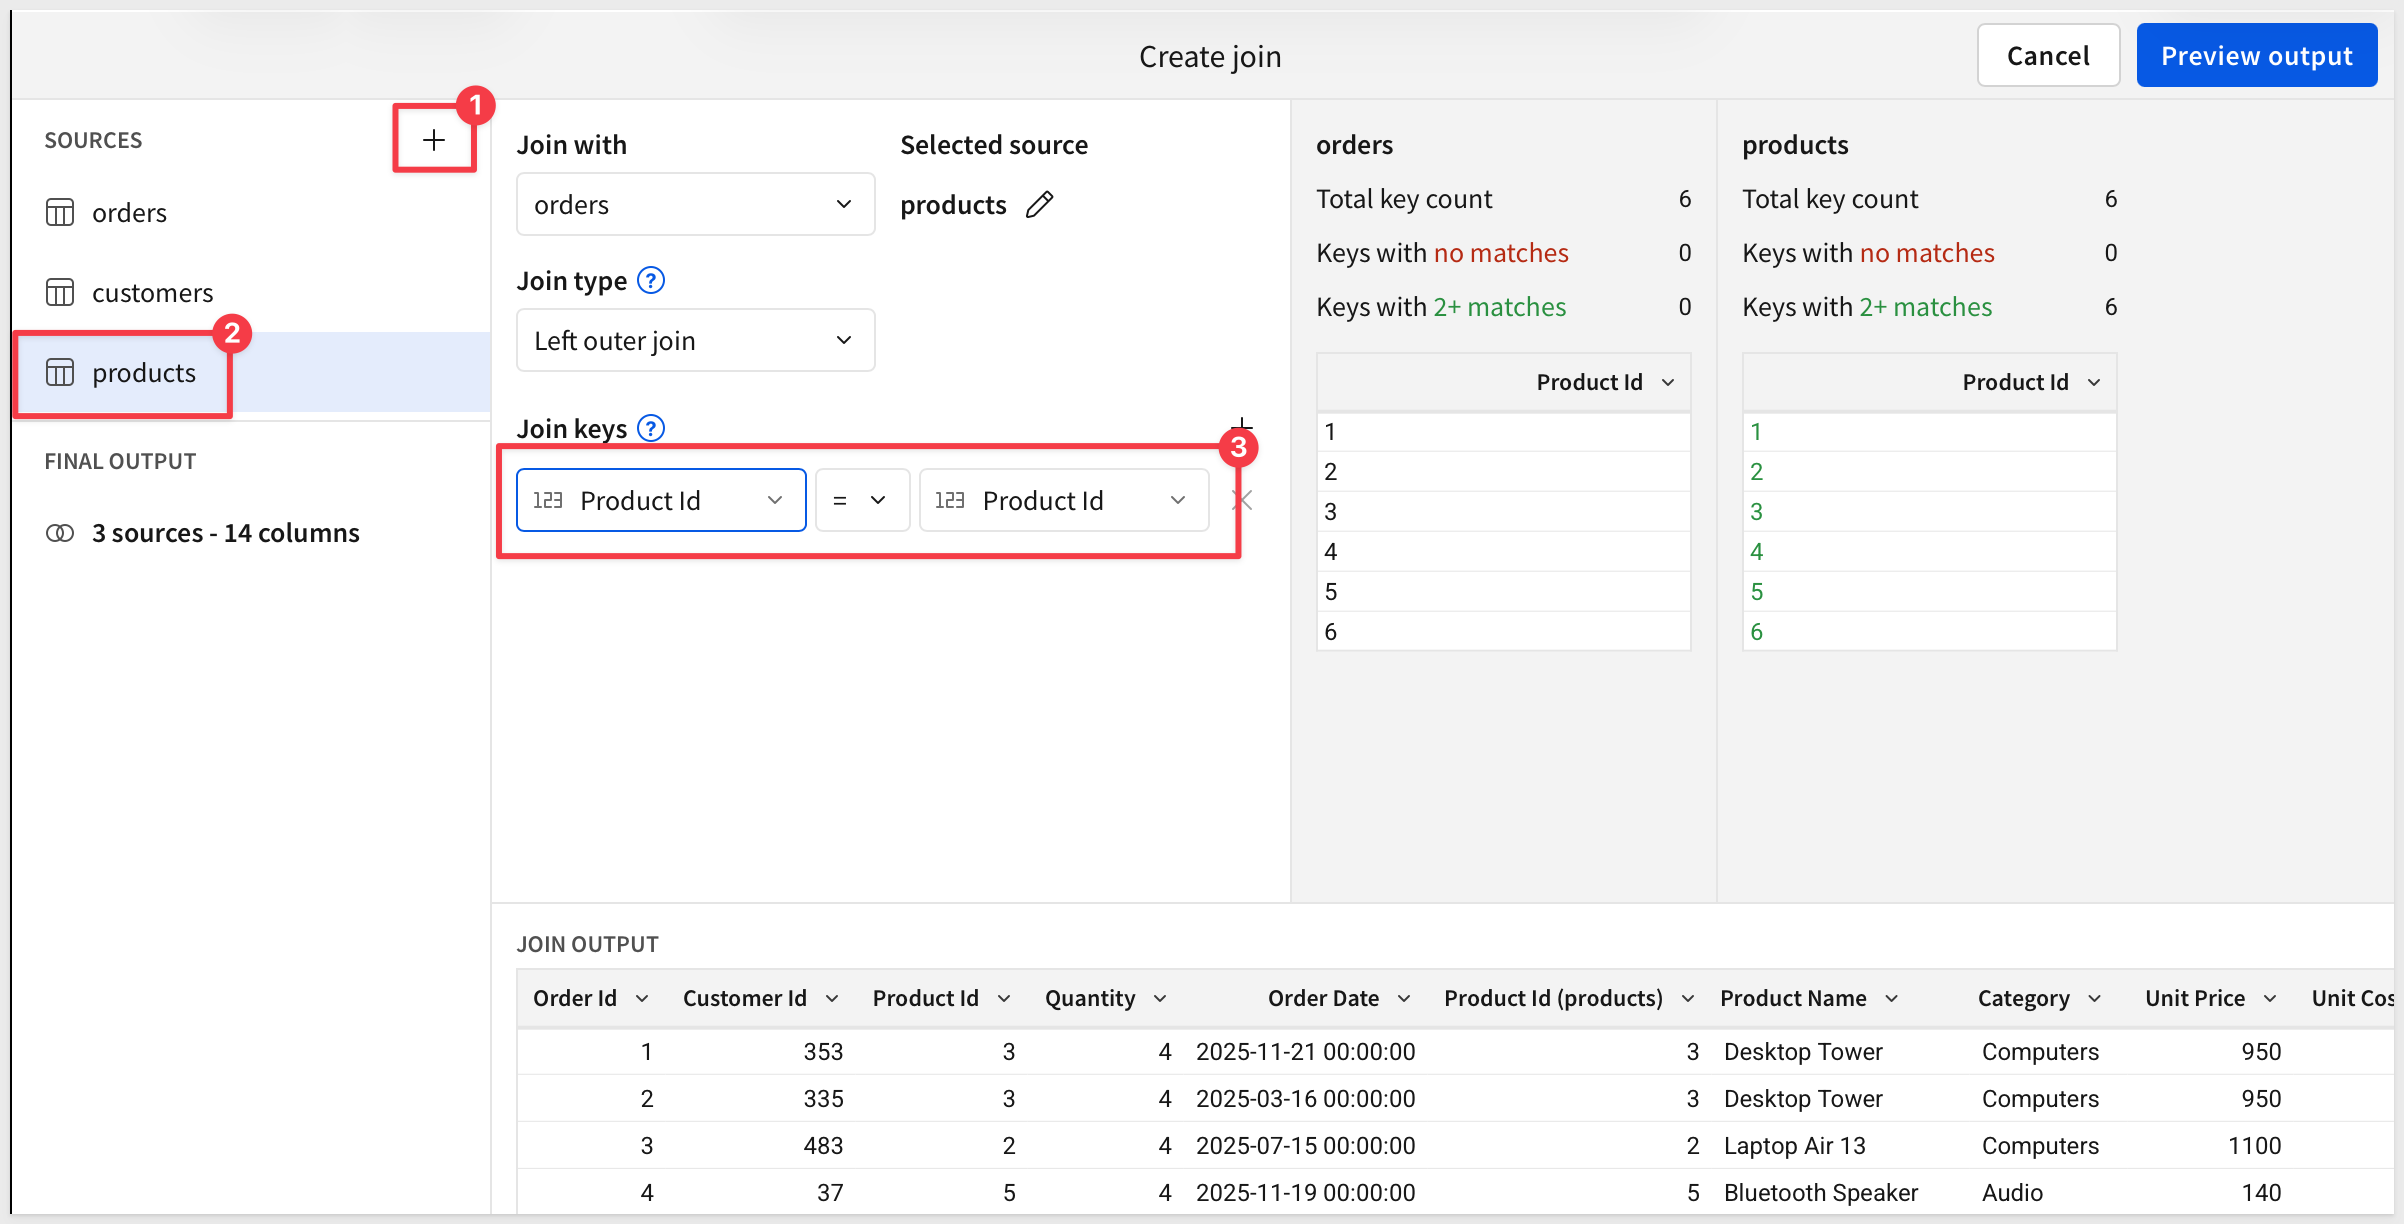
Click the + icon to add another table to the join, select the products table, and set the Join keys to Product Id:
Click Preview output. Sigma shows the lineage of the joins and gives us the opportunity to deselect columns we do not need, such as the duplicate Customer Id and Product Id key columns.
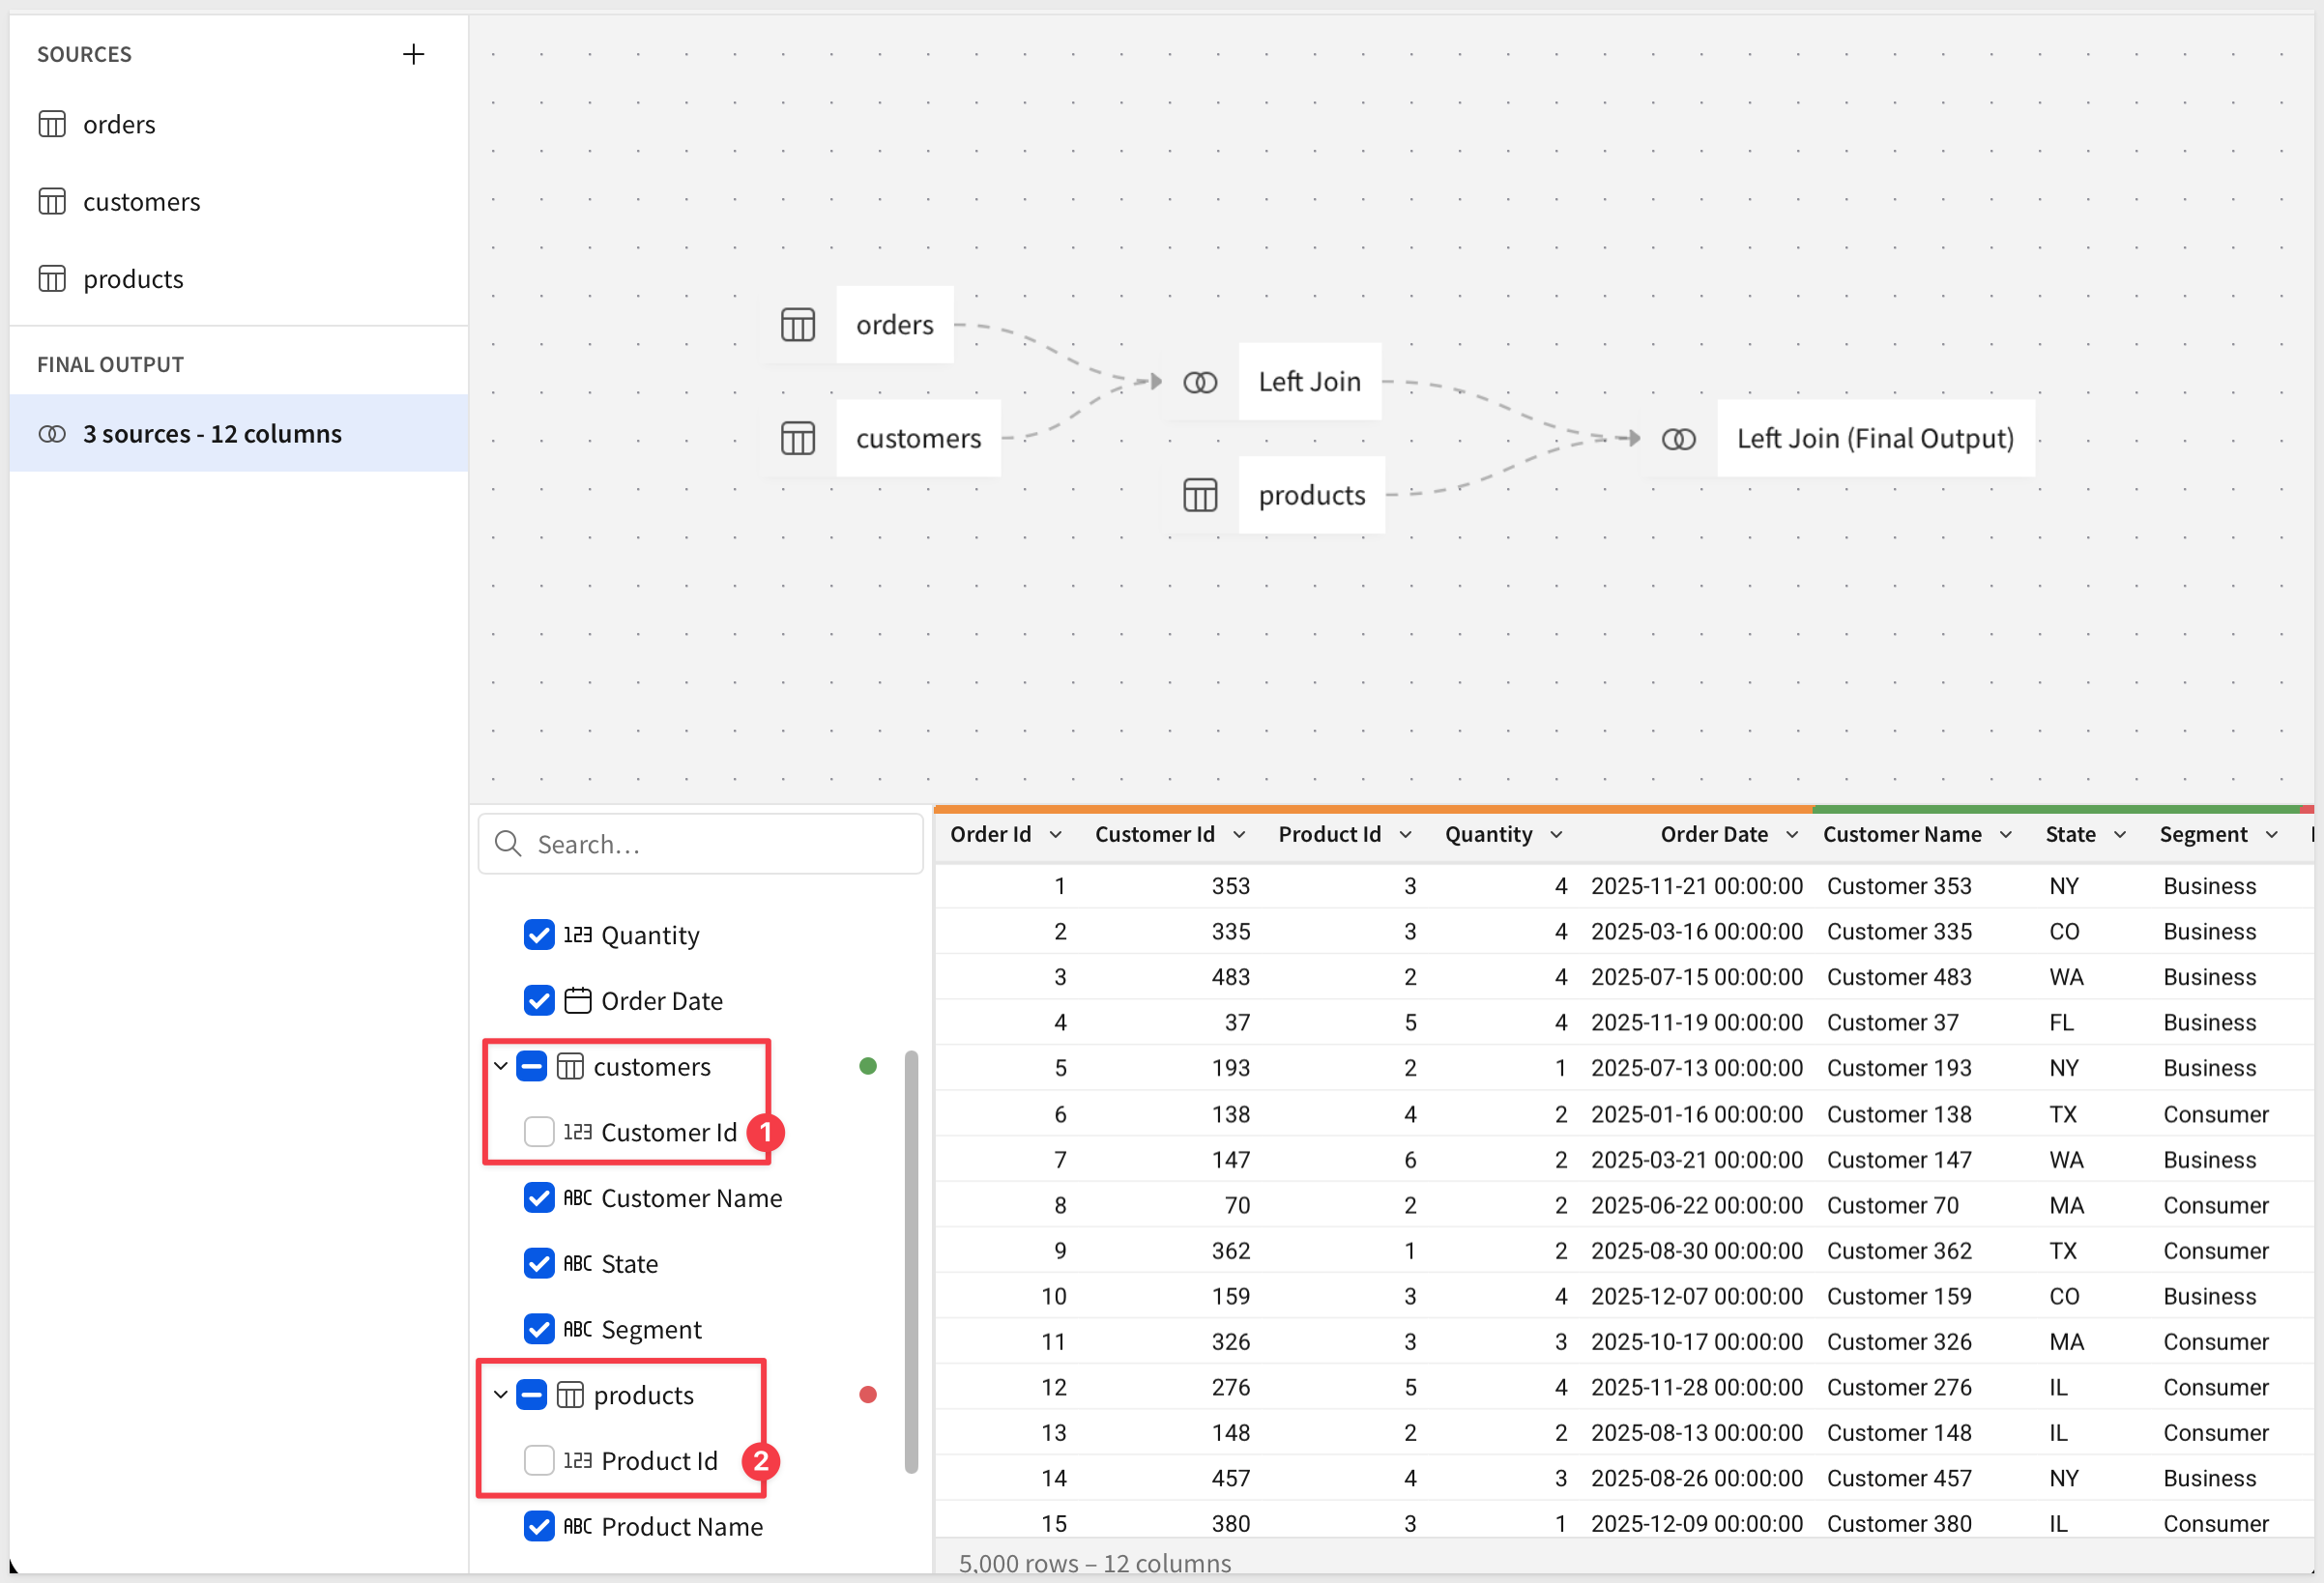
Click Done.
Add calculated columns
Revenue and Profit use the quantity from Orders and the unit price and unit cost from products.
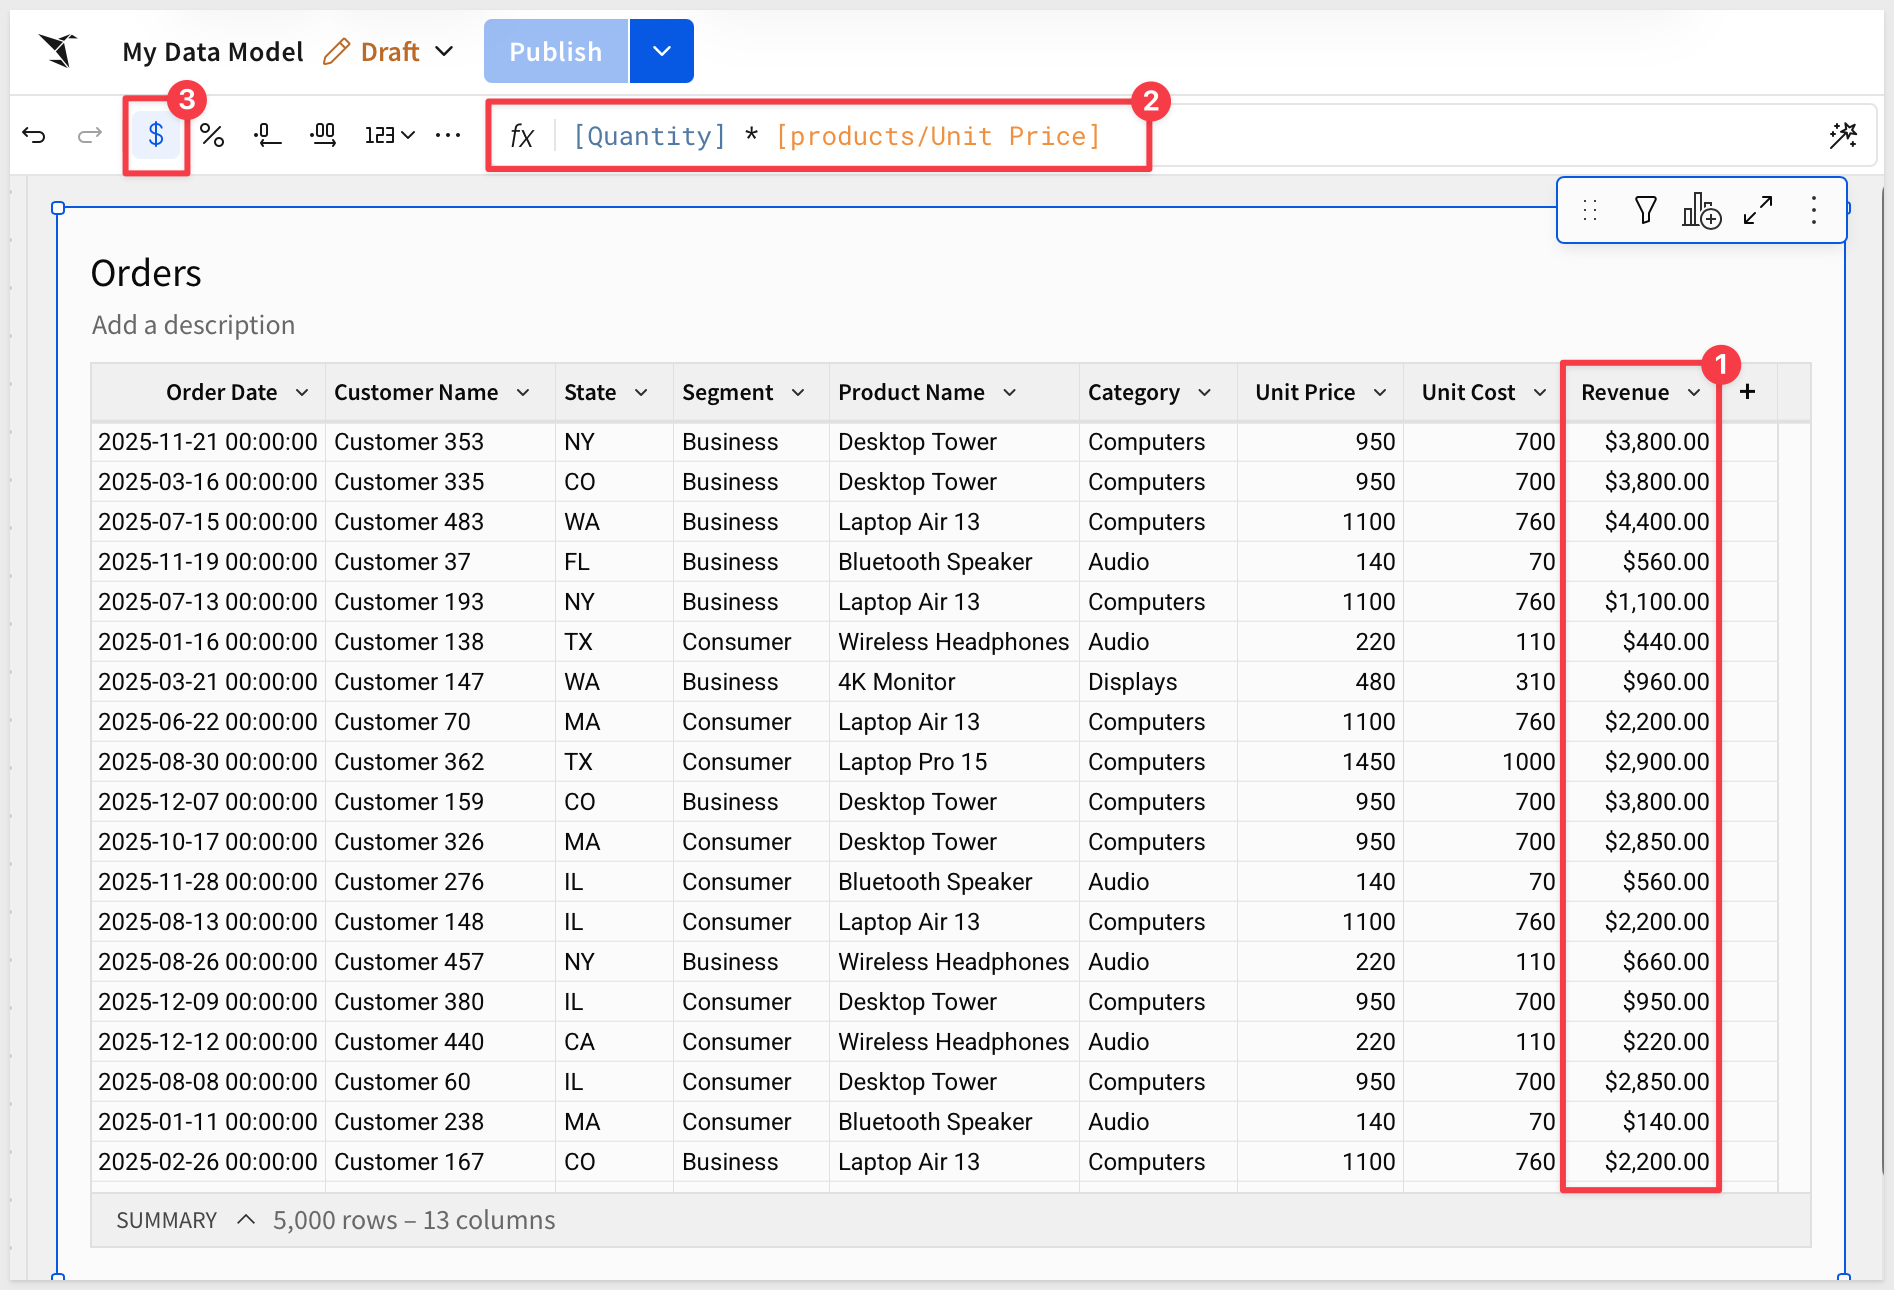
Add a new column to Orders by clicking the + in the column to the right of the last column. Rename it to Revenue, and set the formula to:
[Quantity] * [products/Unit Price]
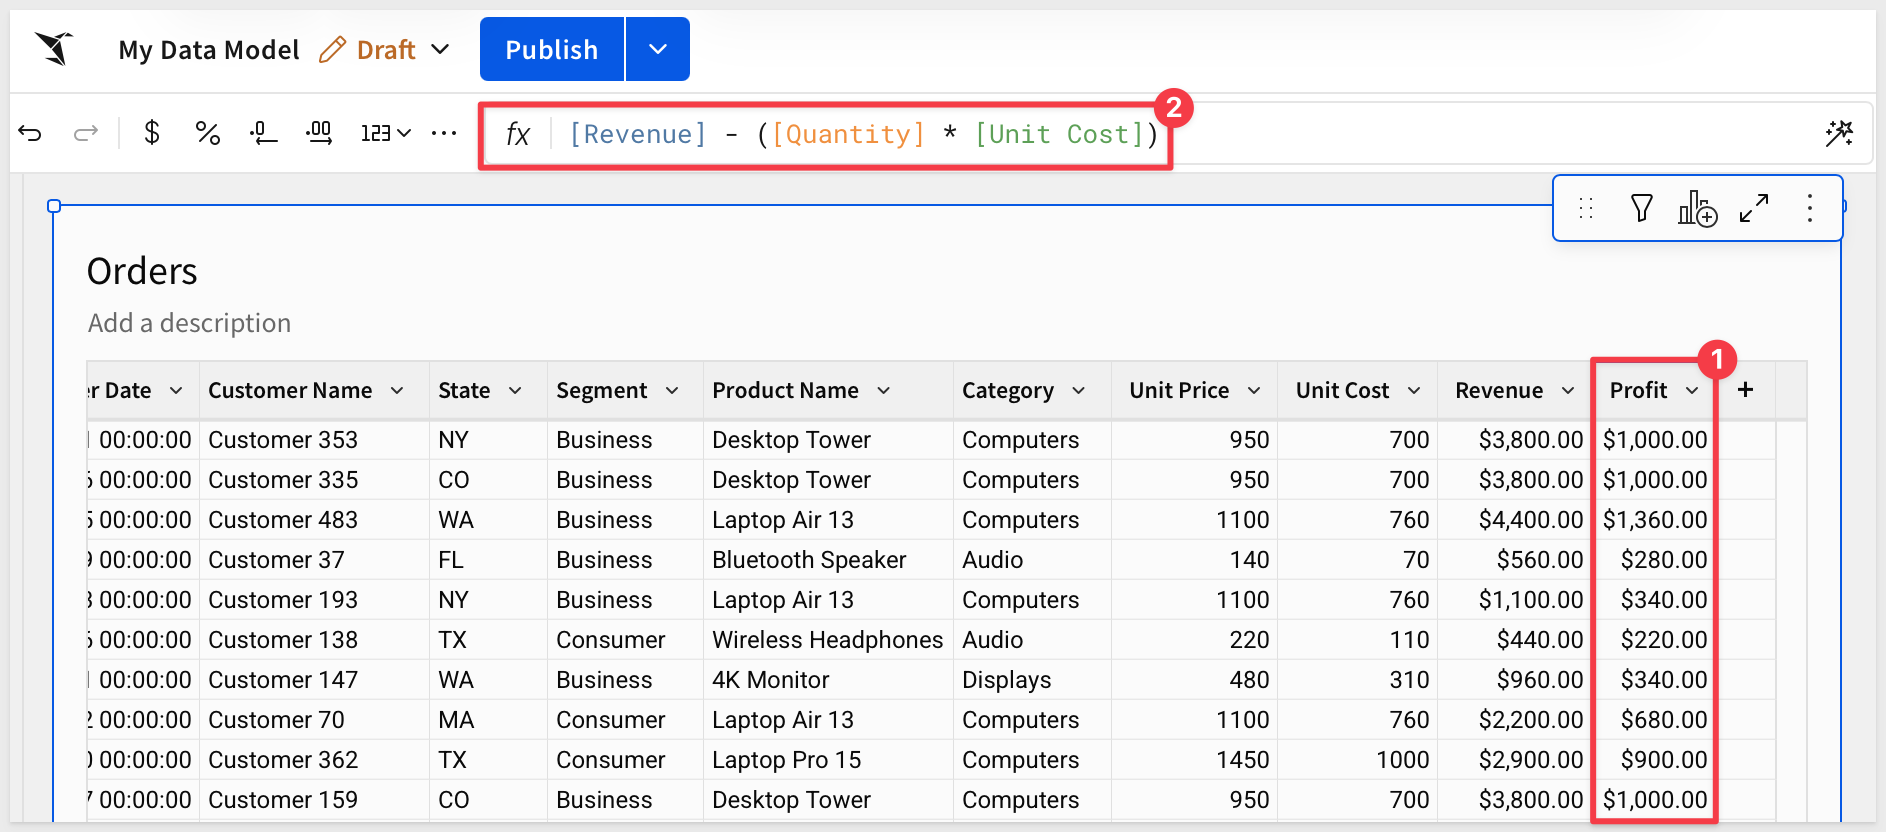
Add another column, rename it to Profit, and set the formula to:
[Revenue] - ([Quantity] * [Unit Cost])
Publish
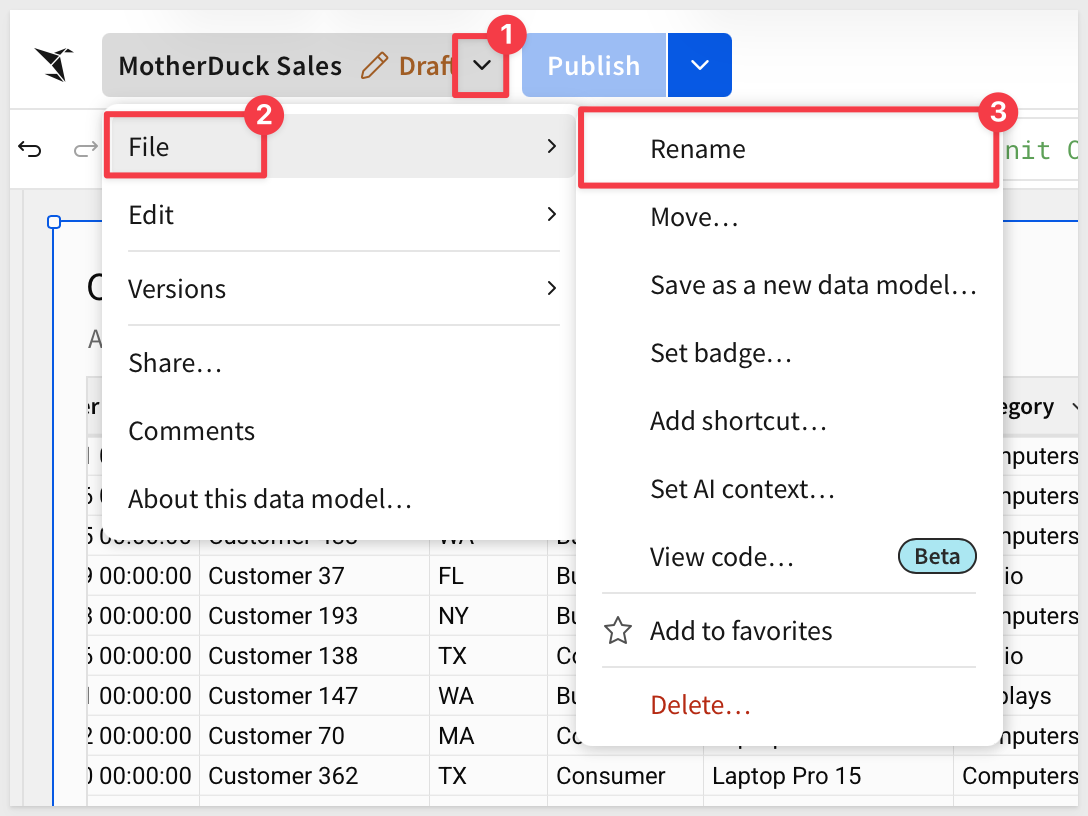
Rename the data model to MotherDuck Sales and click Publish.
For more information, see Get started with data modeling
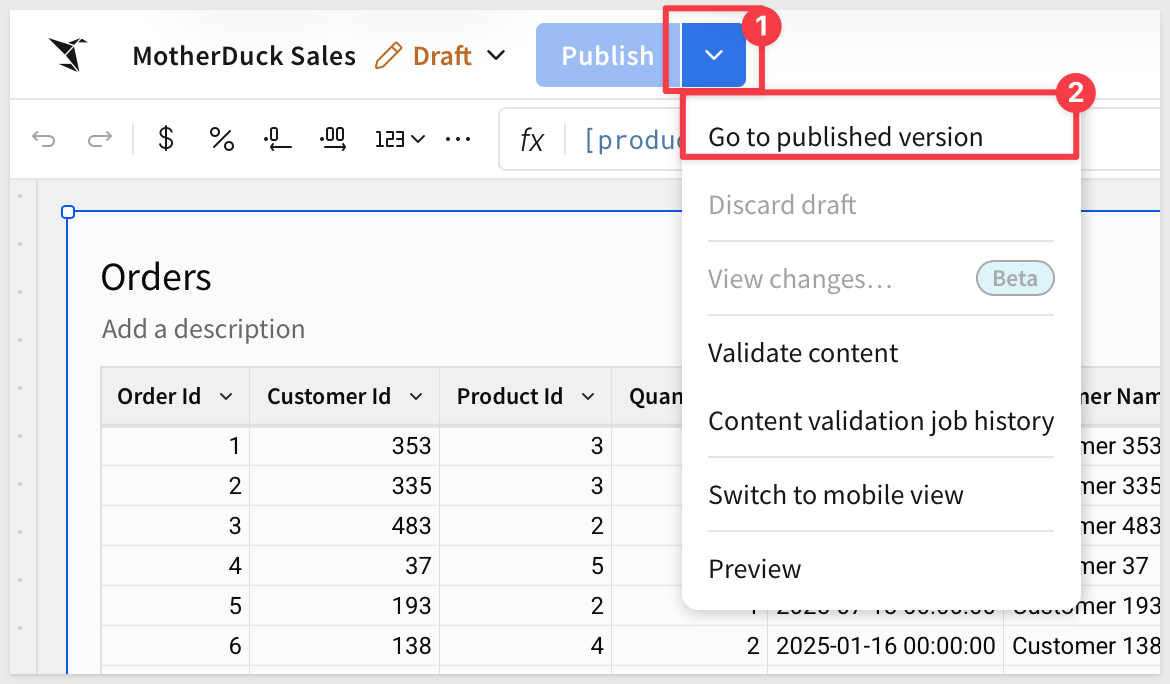
The data model is currently in Edit mode. Open the Publish menu and select Go to published.
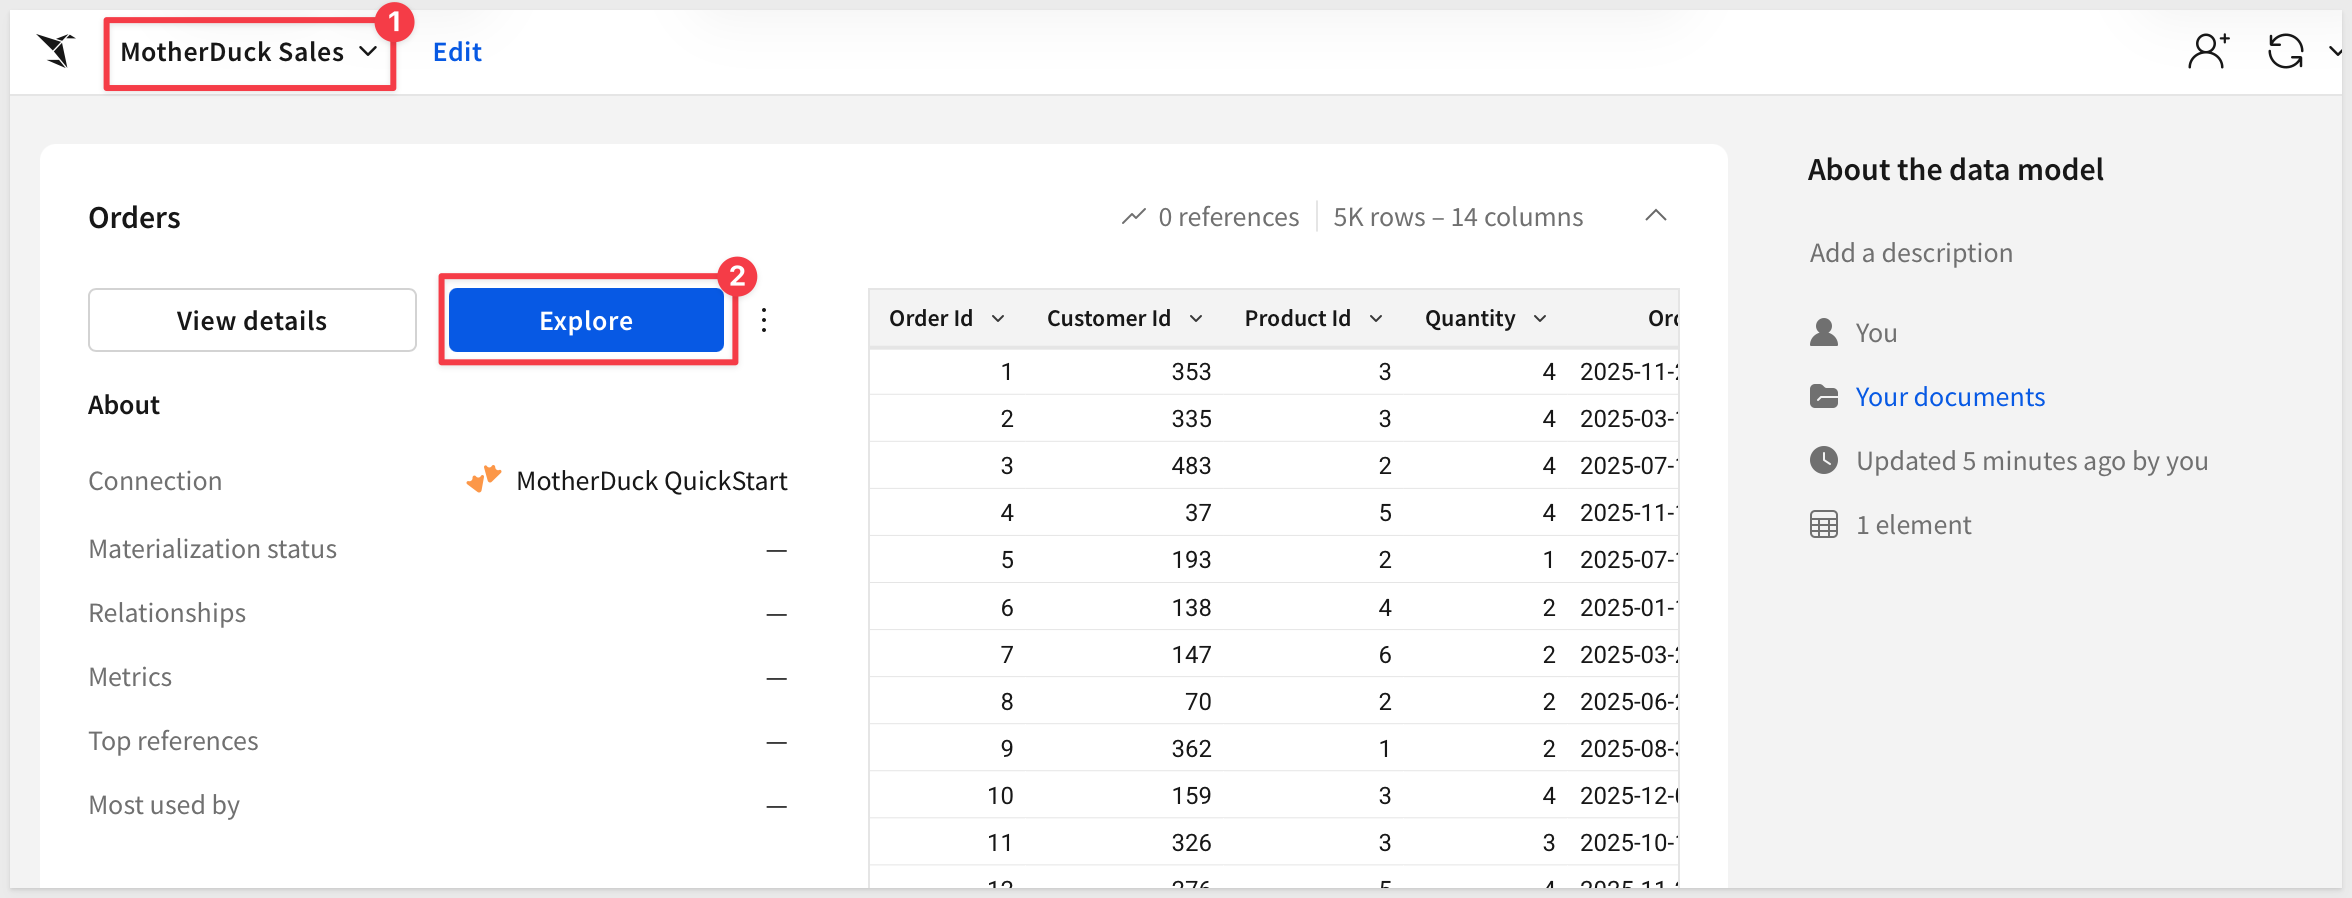
Click Explore. Sigma opens a workbook with the Orders table loaded. Because the data comes from a model, the calculations are consistent and trusted.
Add charts
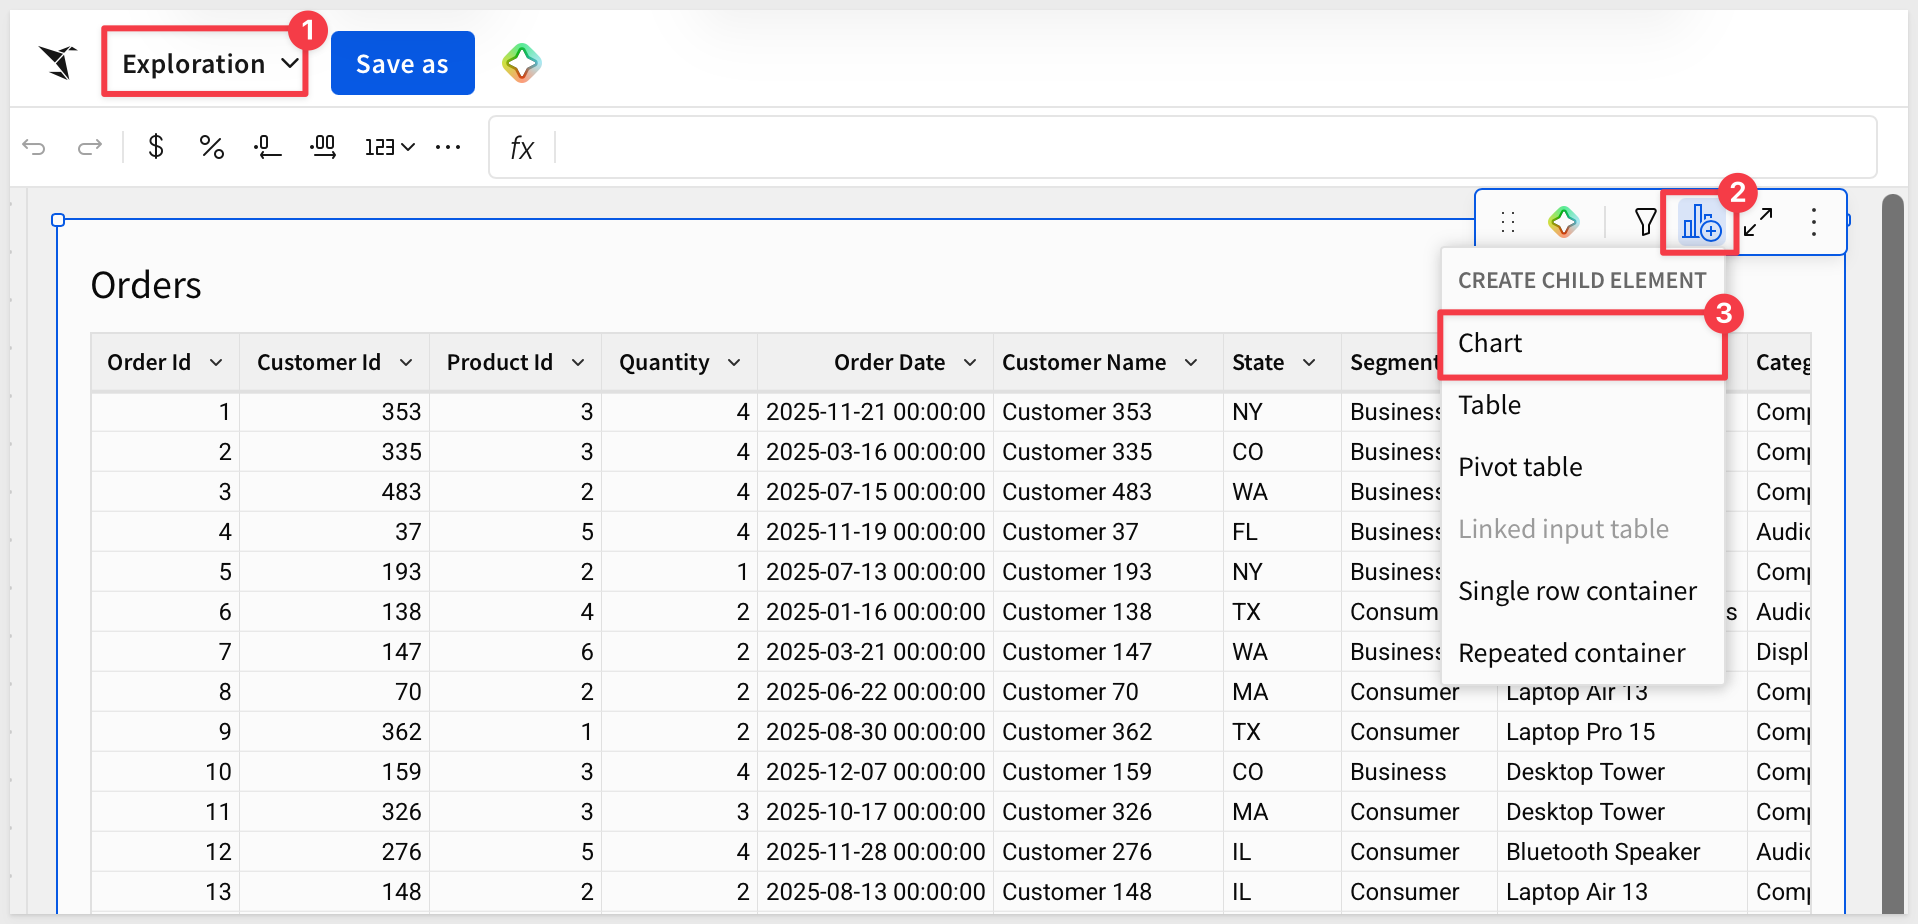
We are now in an unsaved workbook.
Select the Orders table, click Create child element, and select Chart.
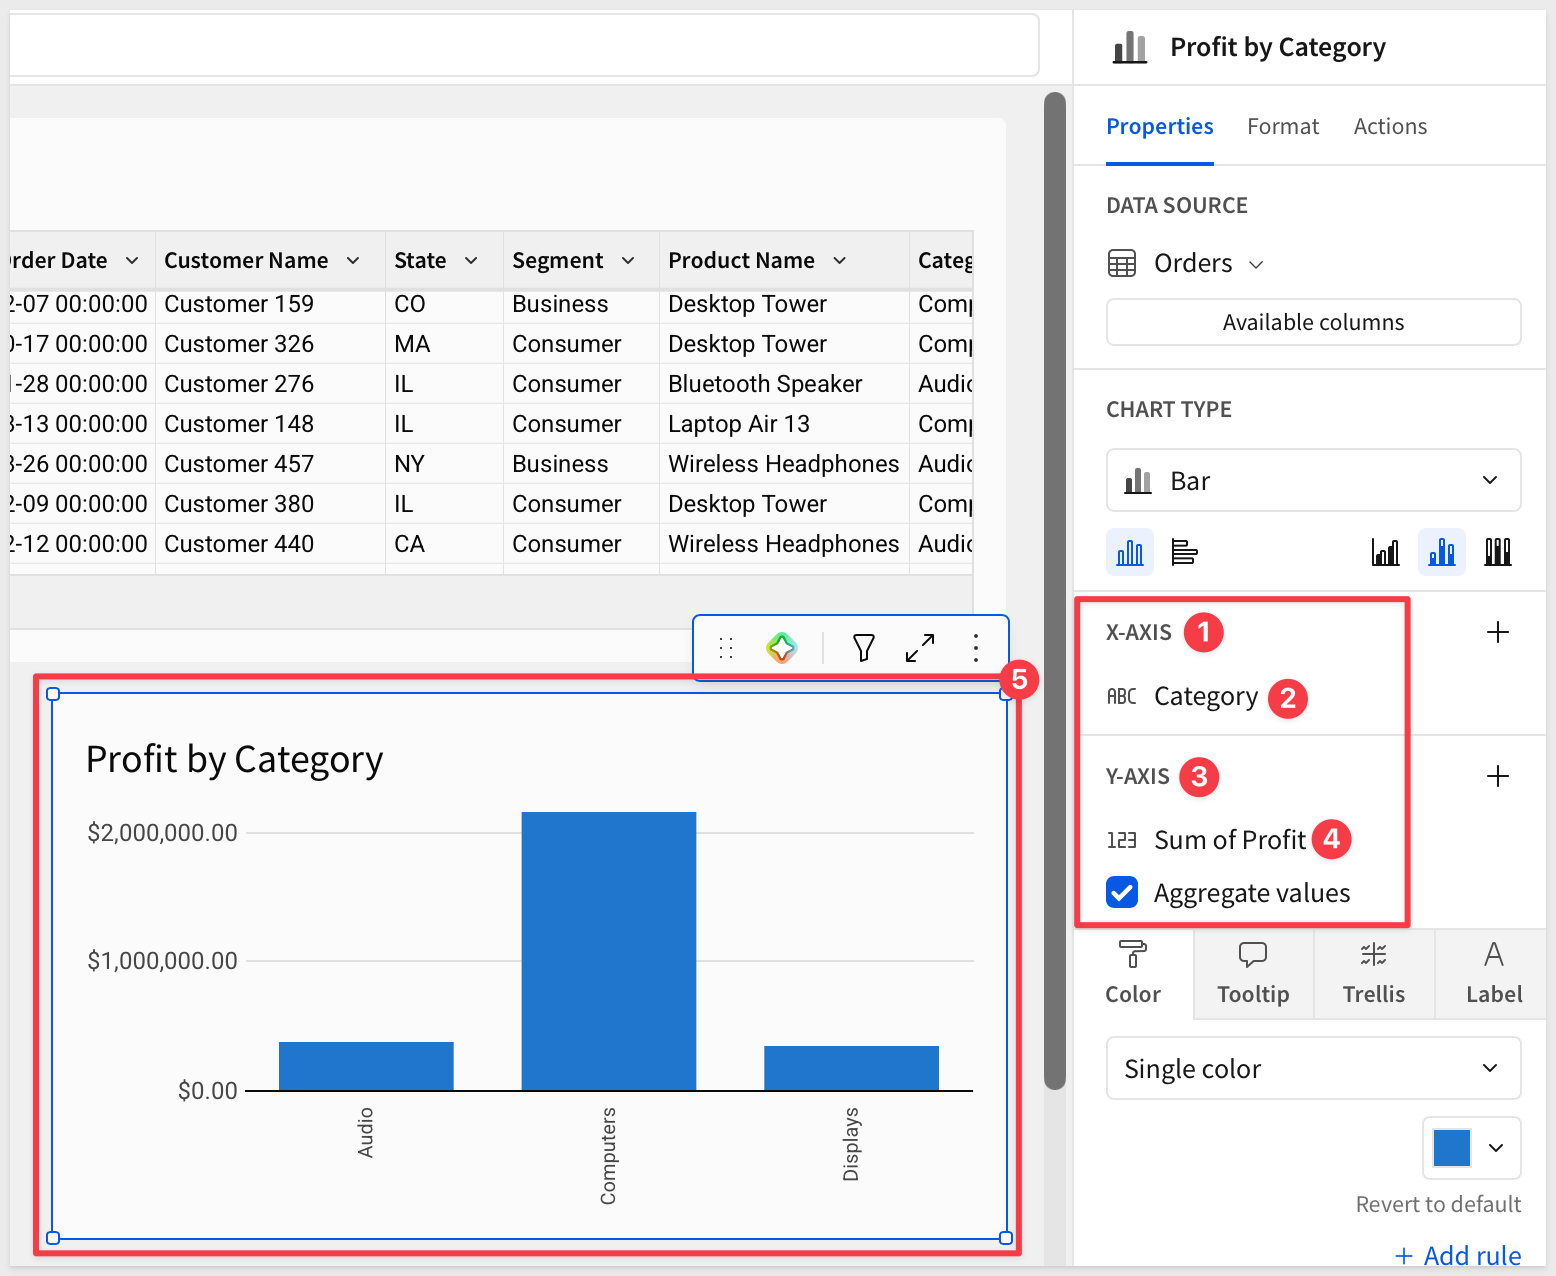
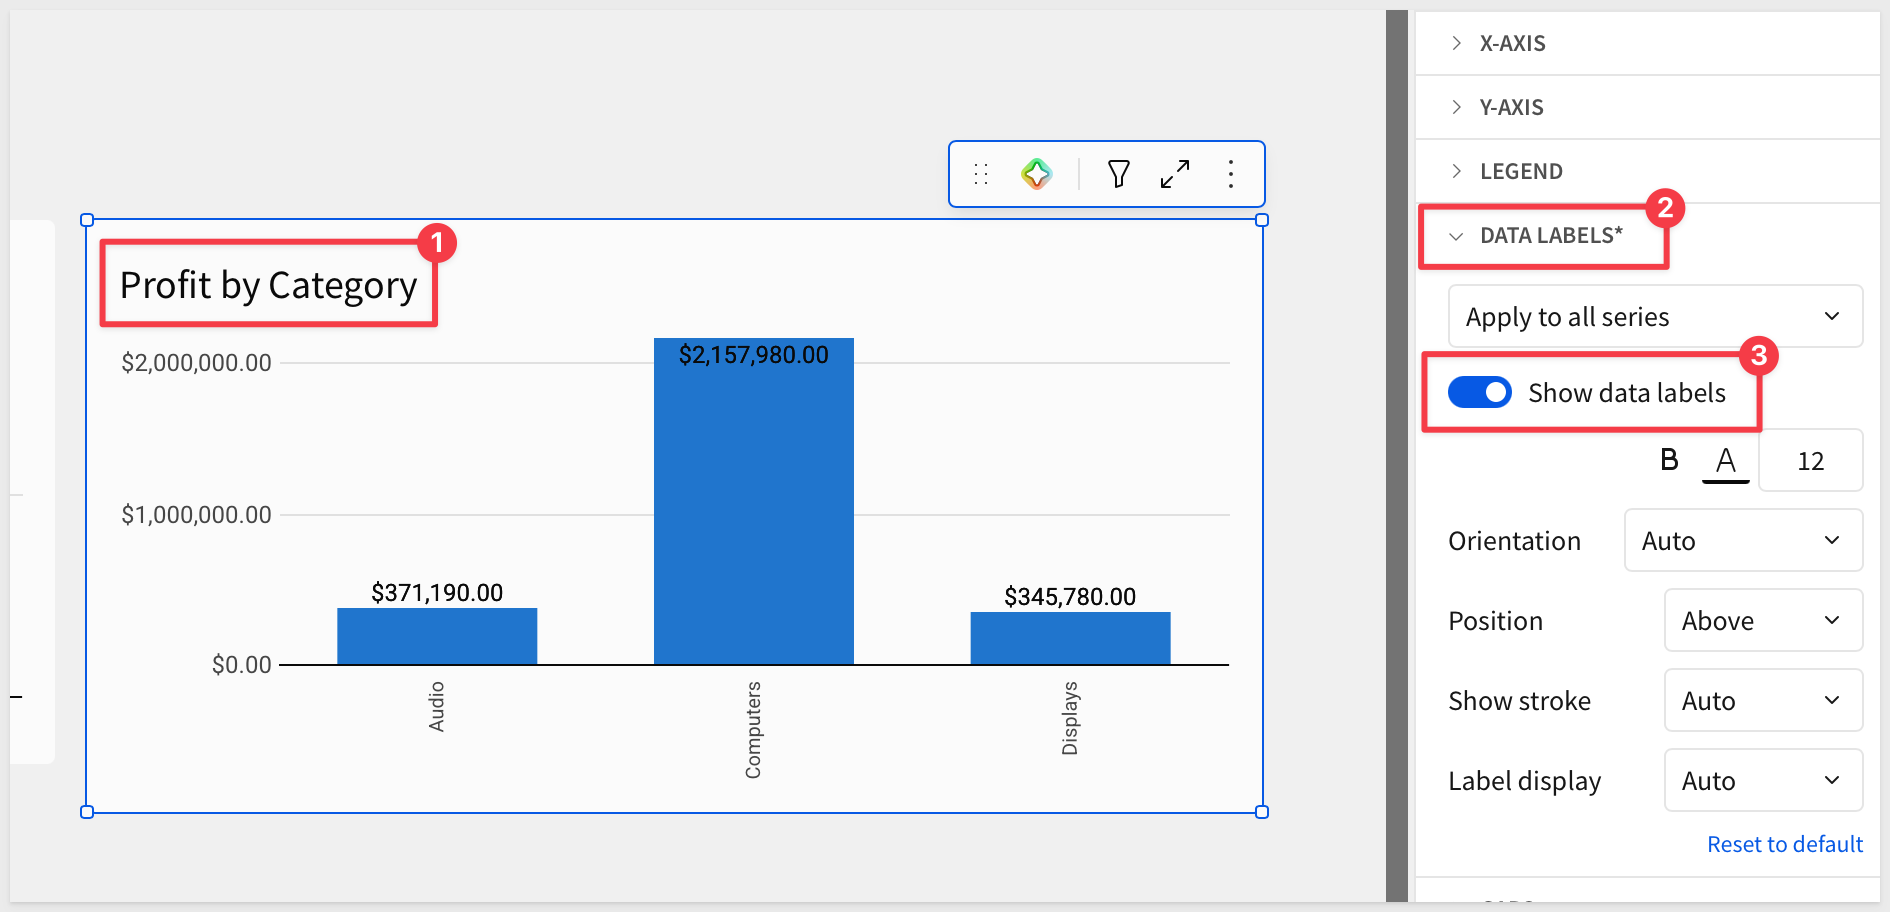
Select a Bar chart. Add Category to the X-Axis and Profit to the Y-Axis. Sigma aggregates the value to Sum of Profit.
Rename the chart Profit by Category.
Add a line chart
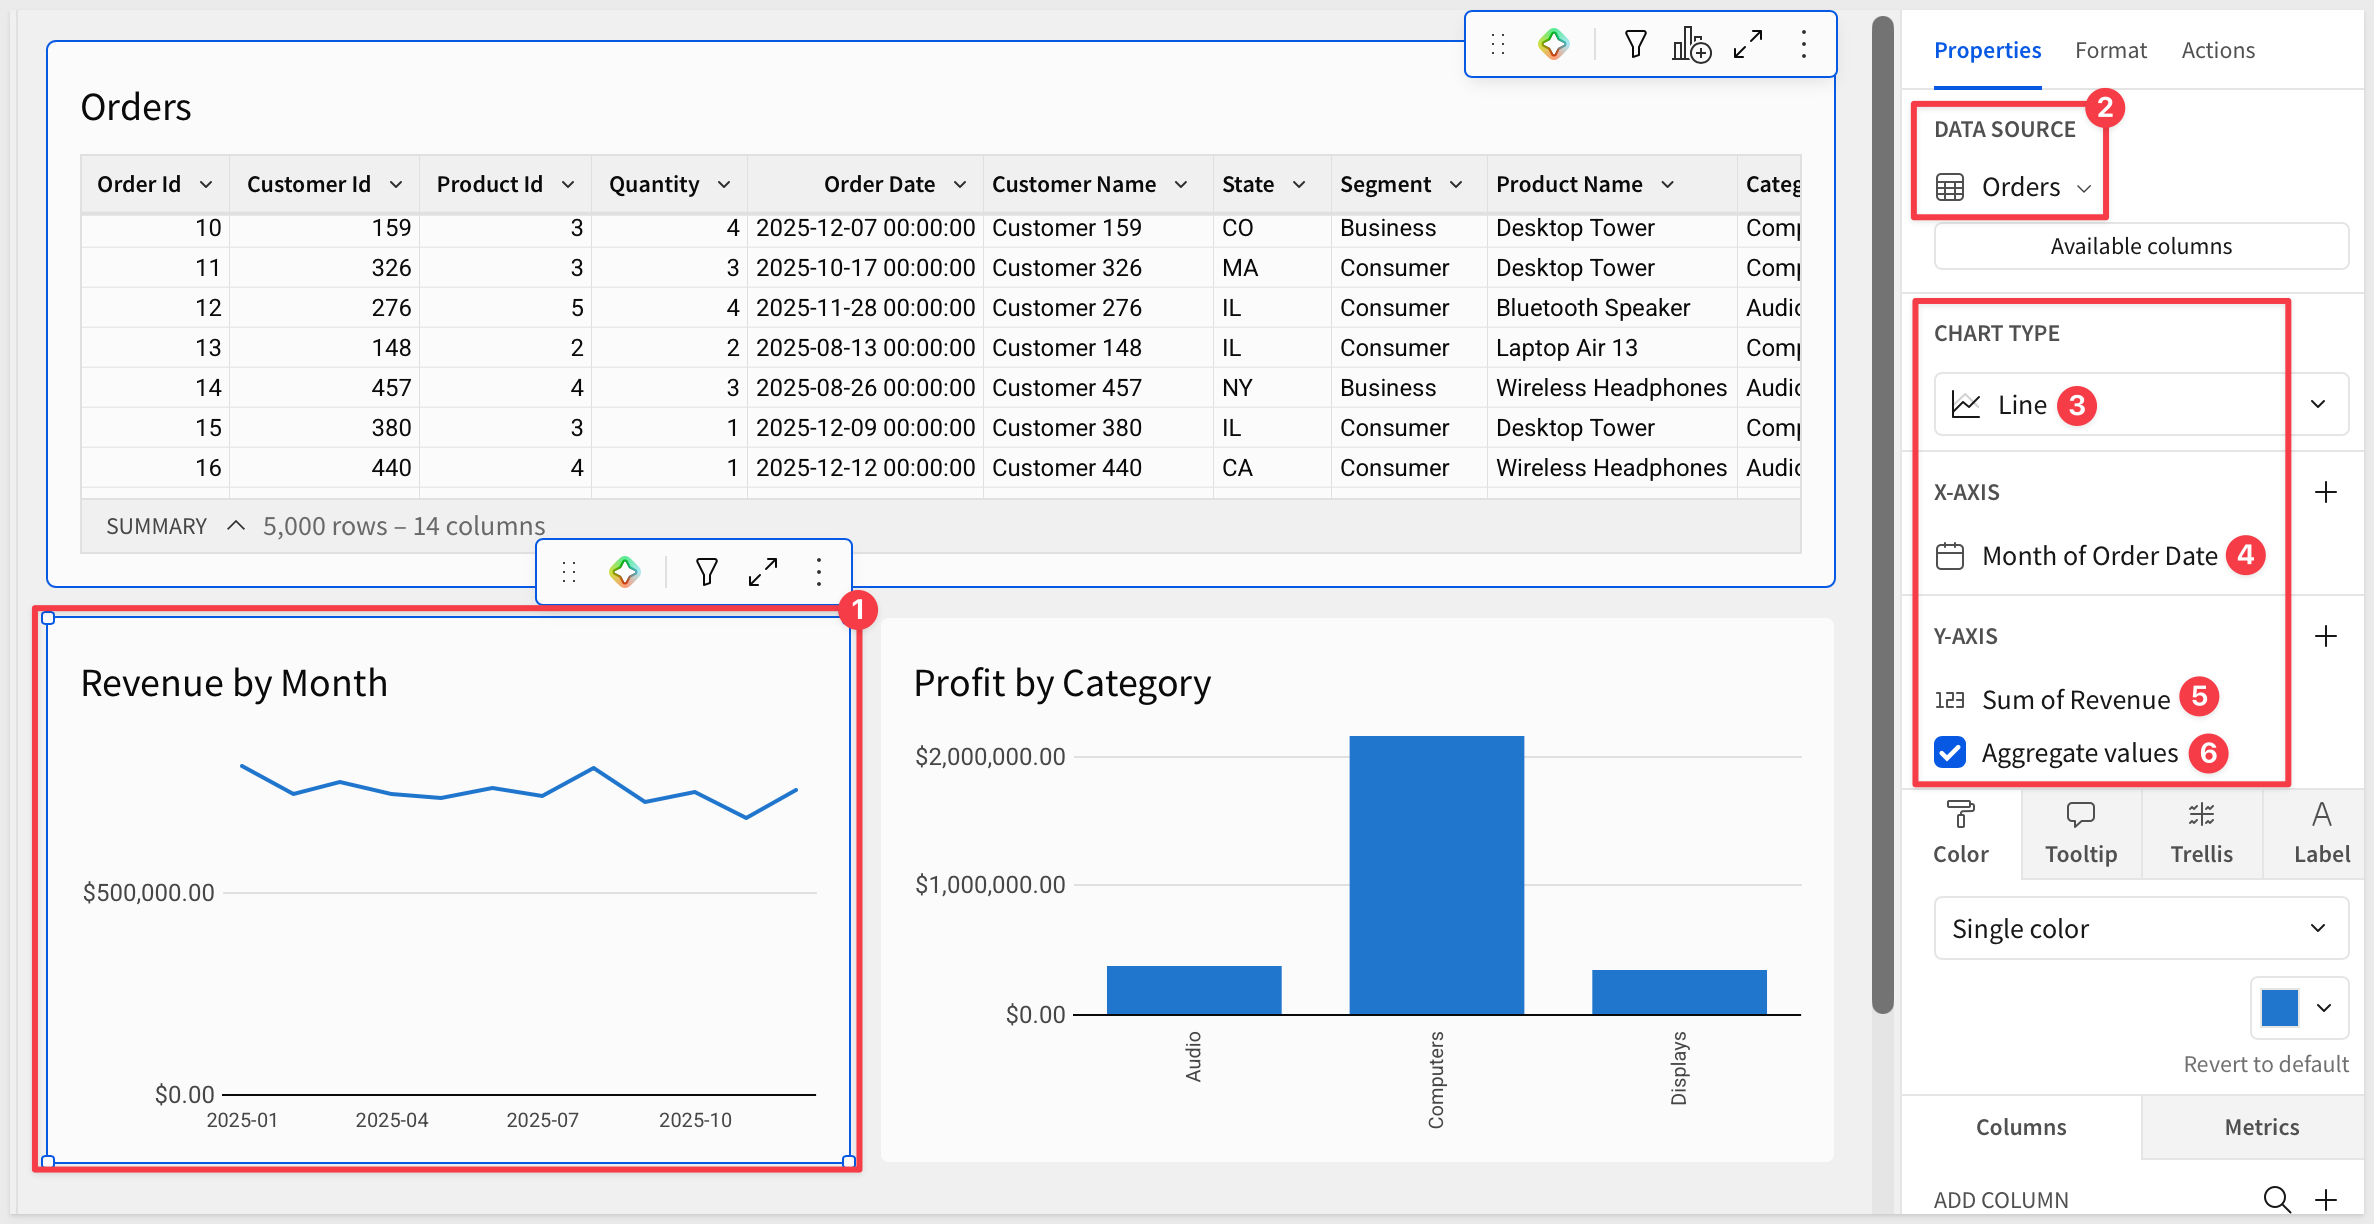
From the Element bar > Charts group, add a Line chart sourced from Orders.
Drag Order Date to the X-Axis, change the date aggregation to Month.
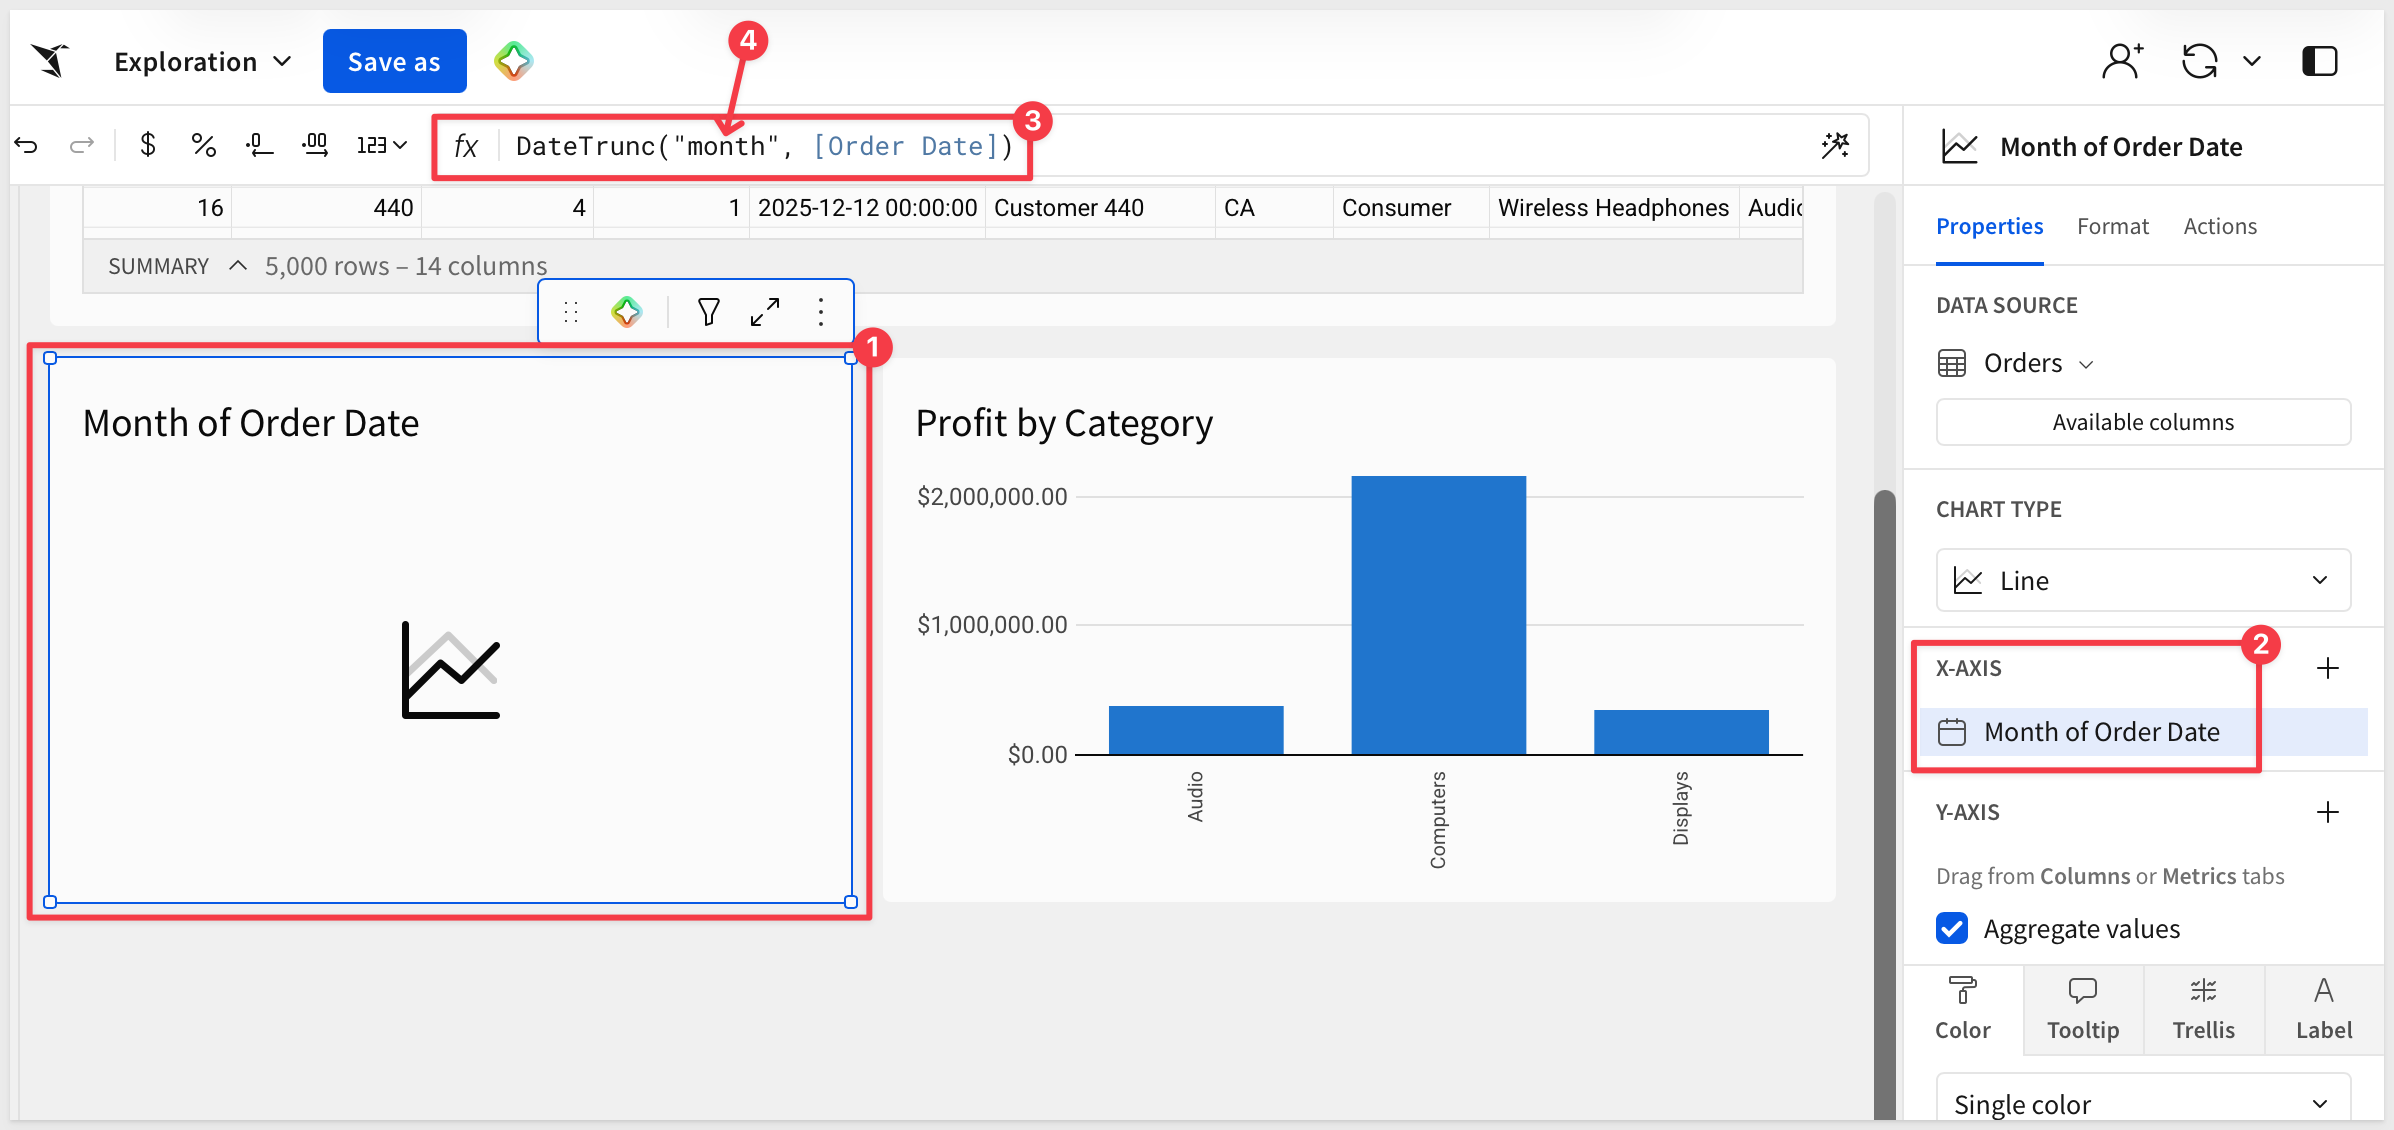
Place Revenue on the Y-Axis.
Rename the chart Revenue by Month.
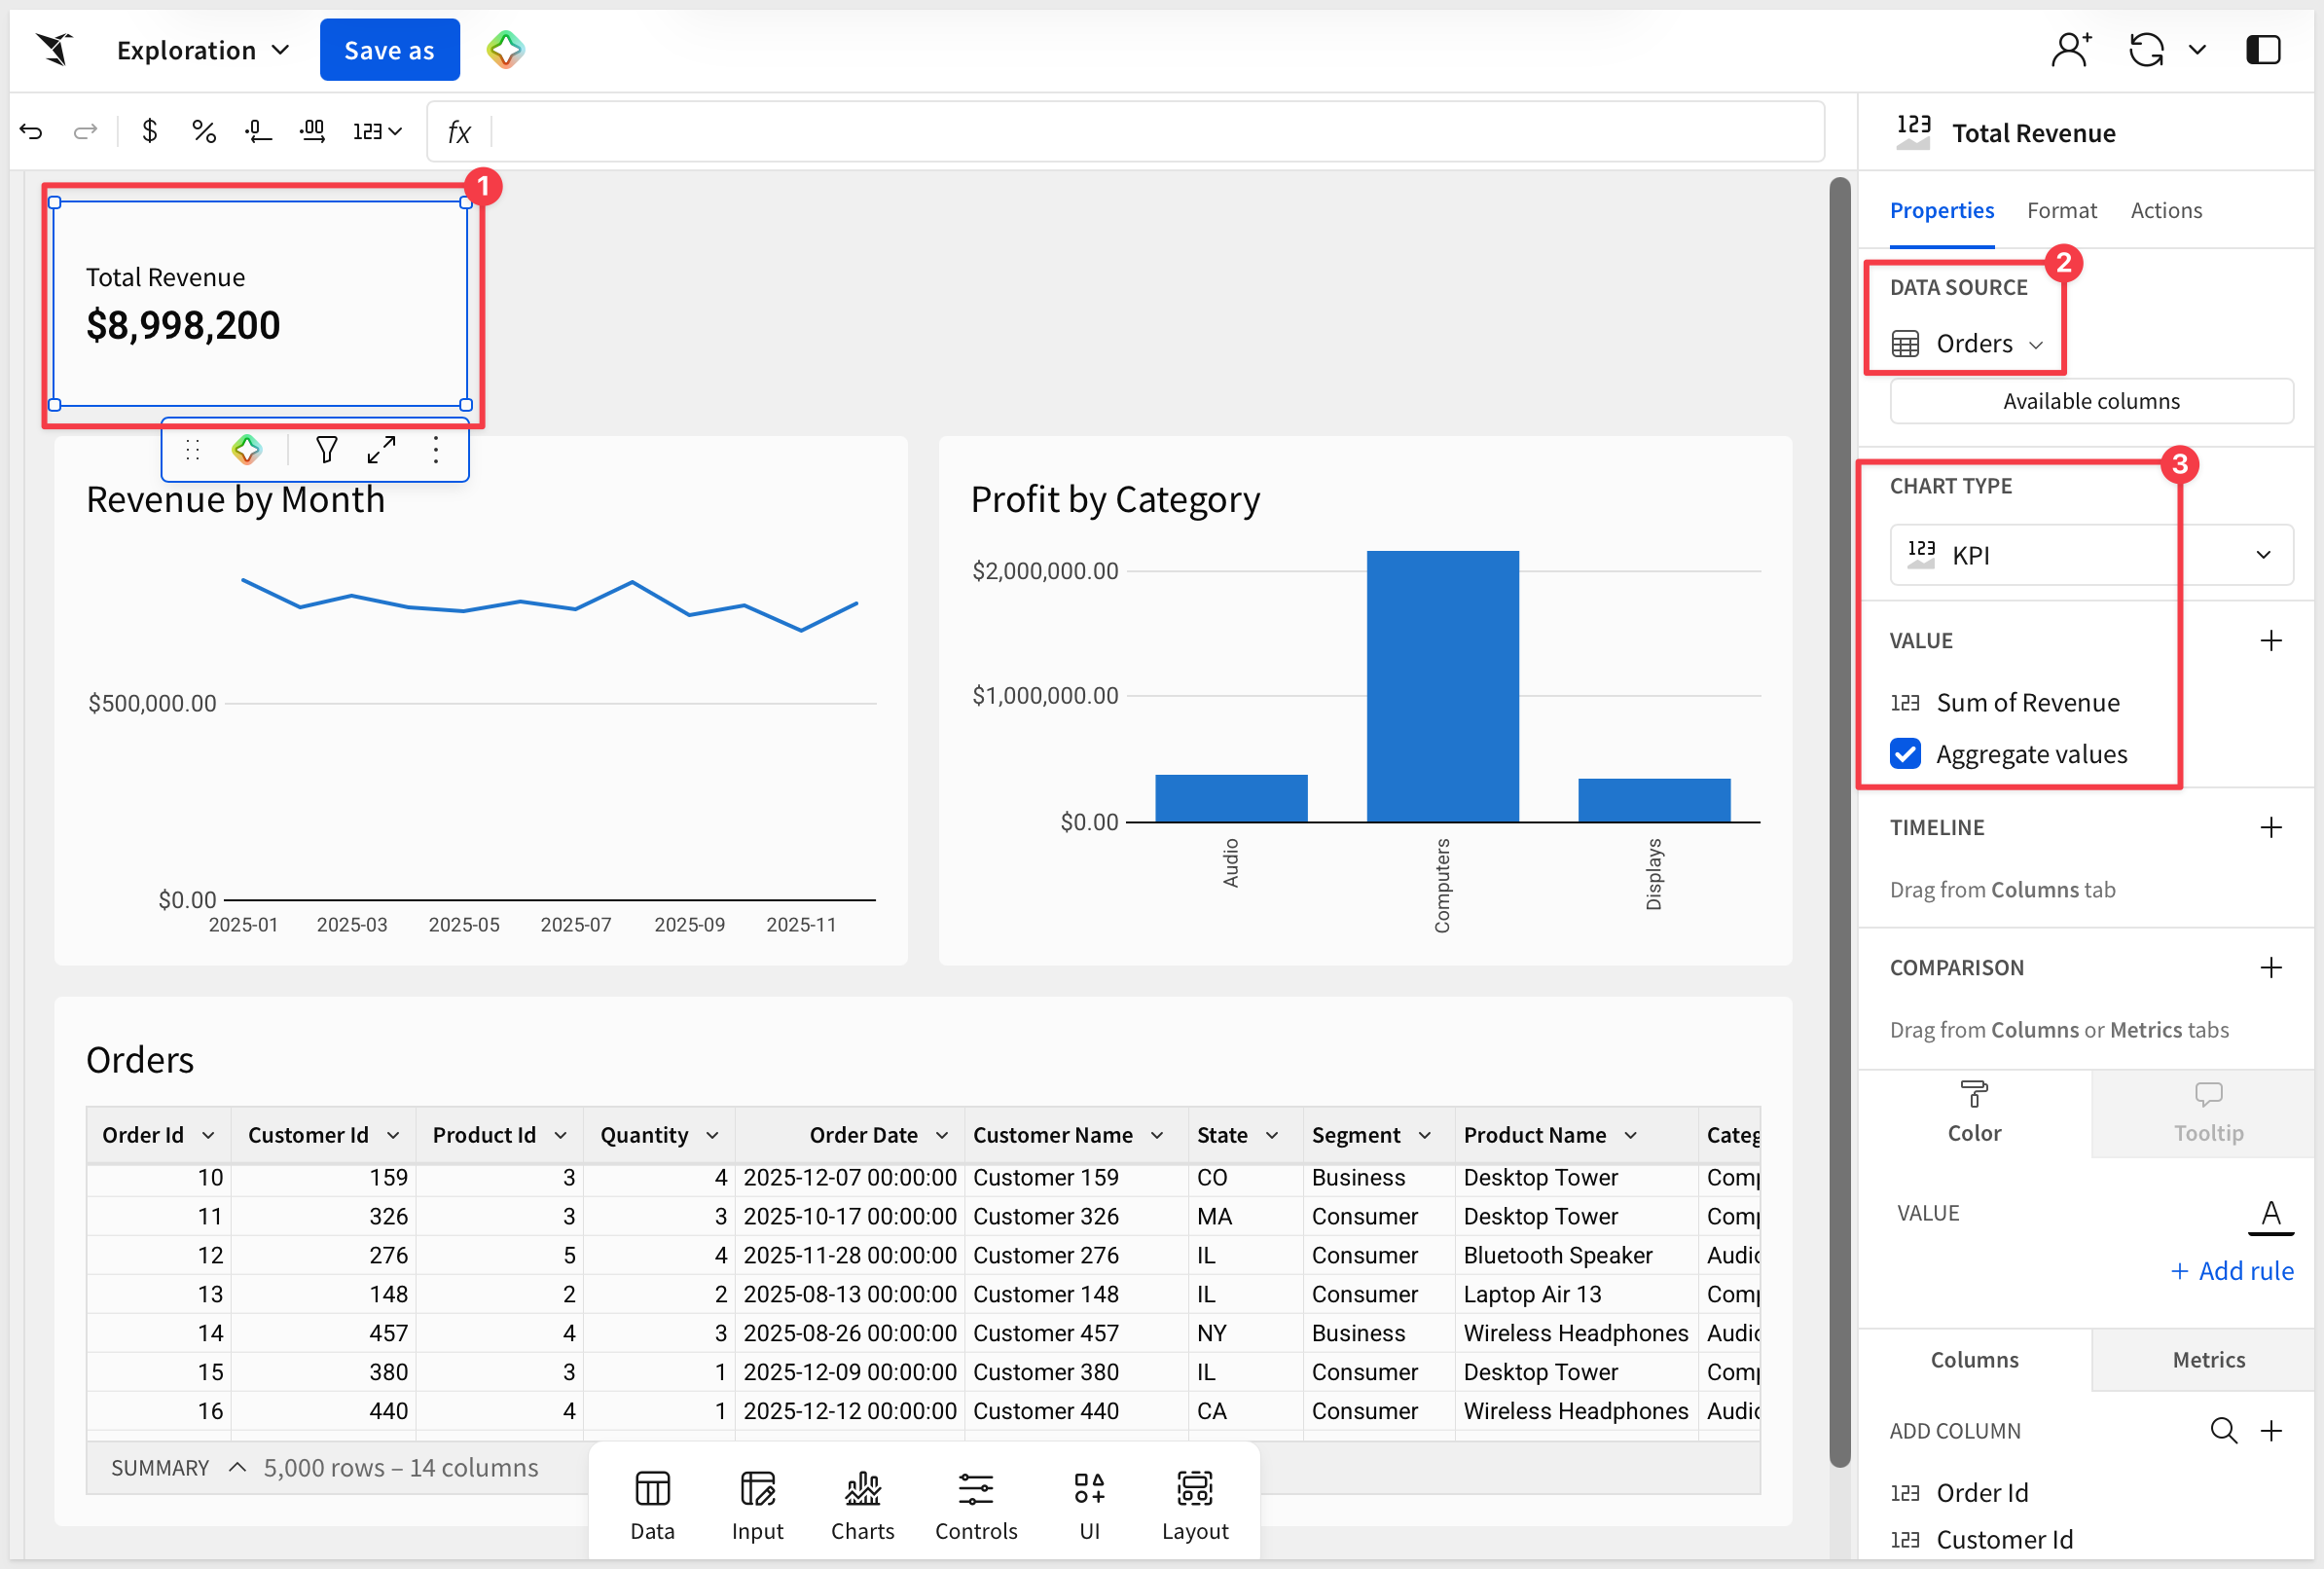
Add a KPI chart sourced from Orders showing Sum of Revenue.
For more information, see Intro to layout elements
Add a filter control
From the Orders table, open the column menu for State, select Add control.
In the Element panel, configure the control to not Show null option and also give it a Control ID.
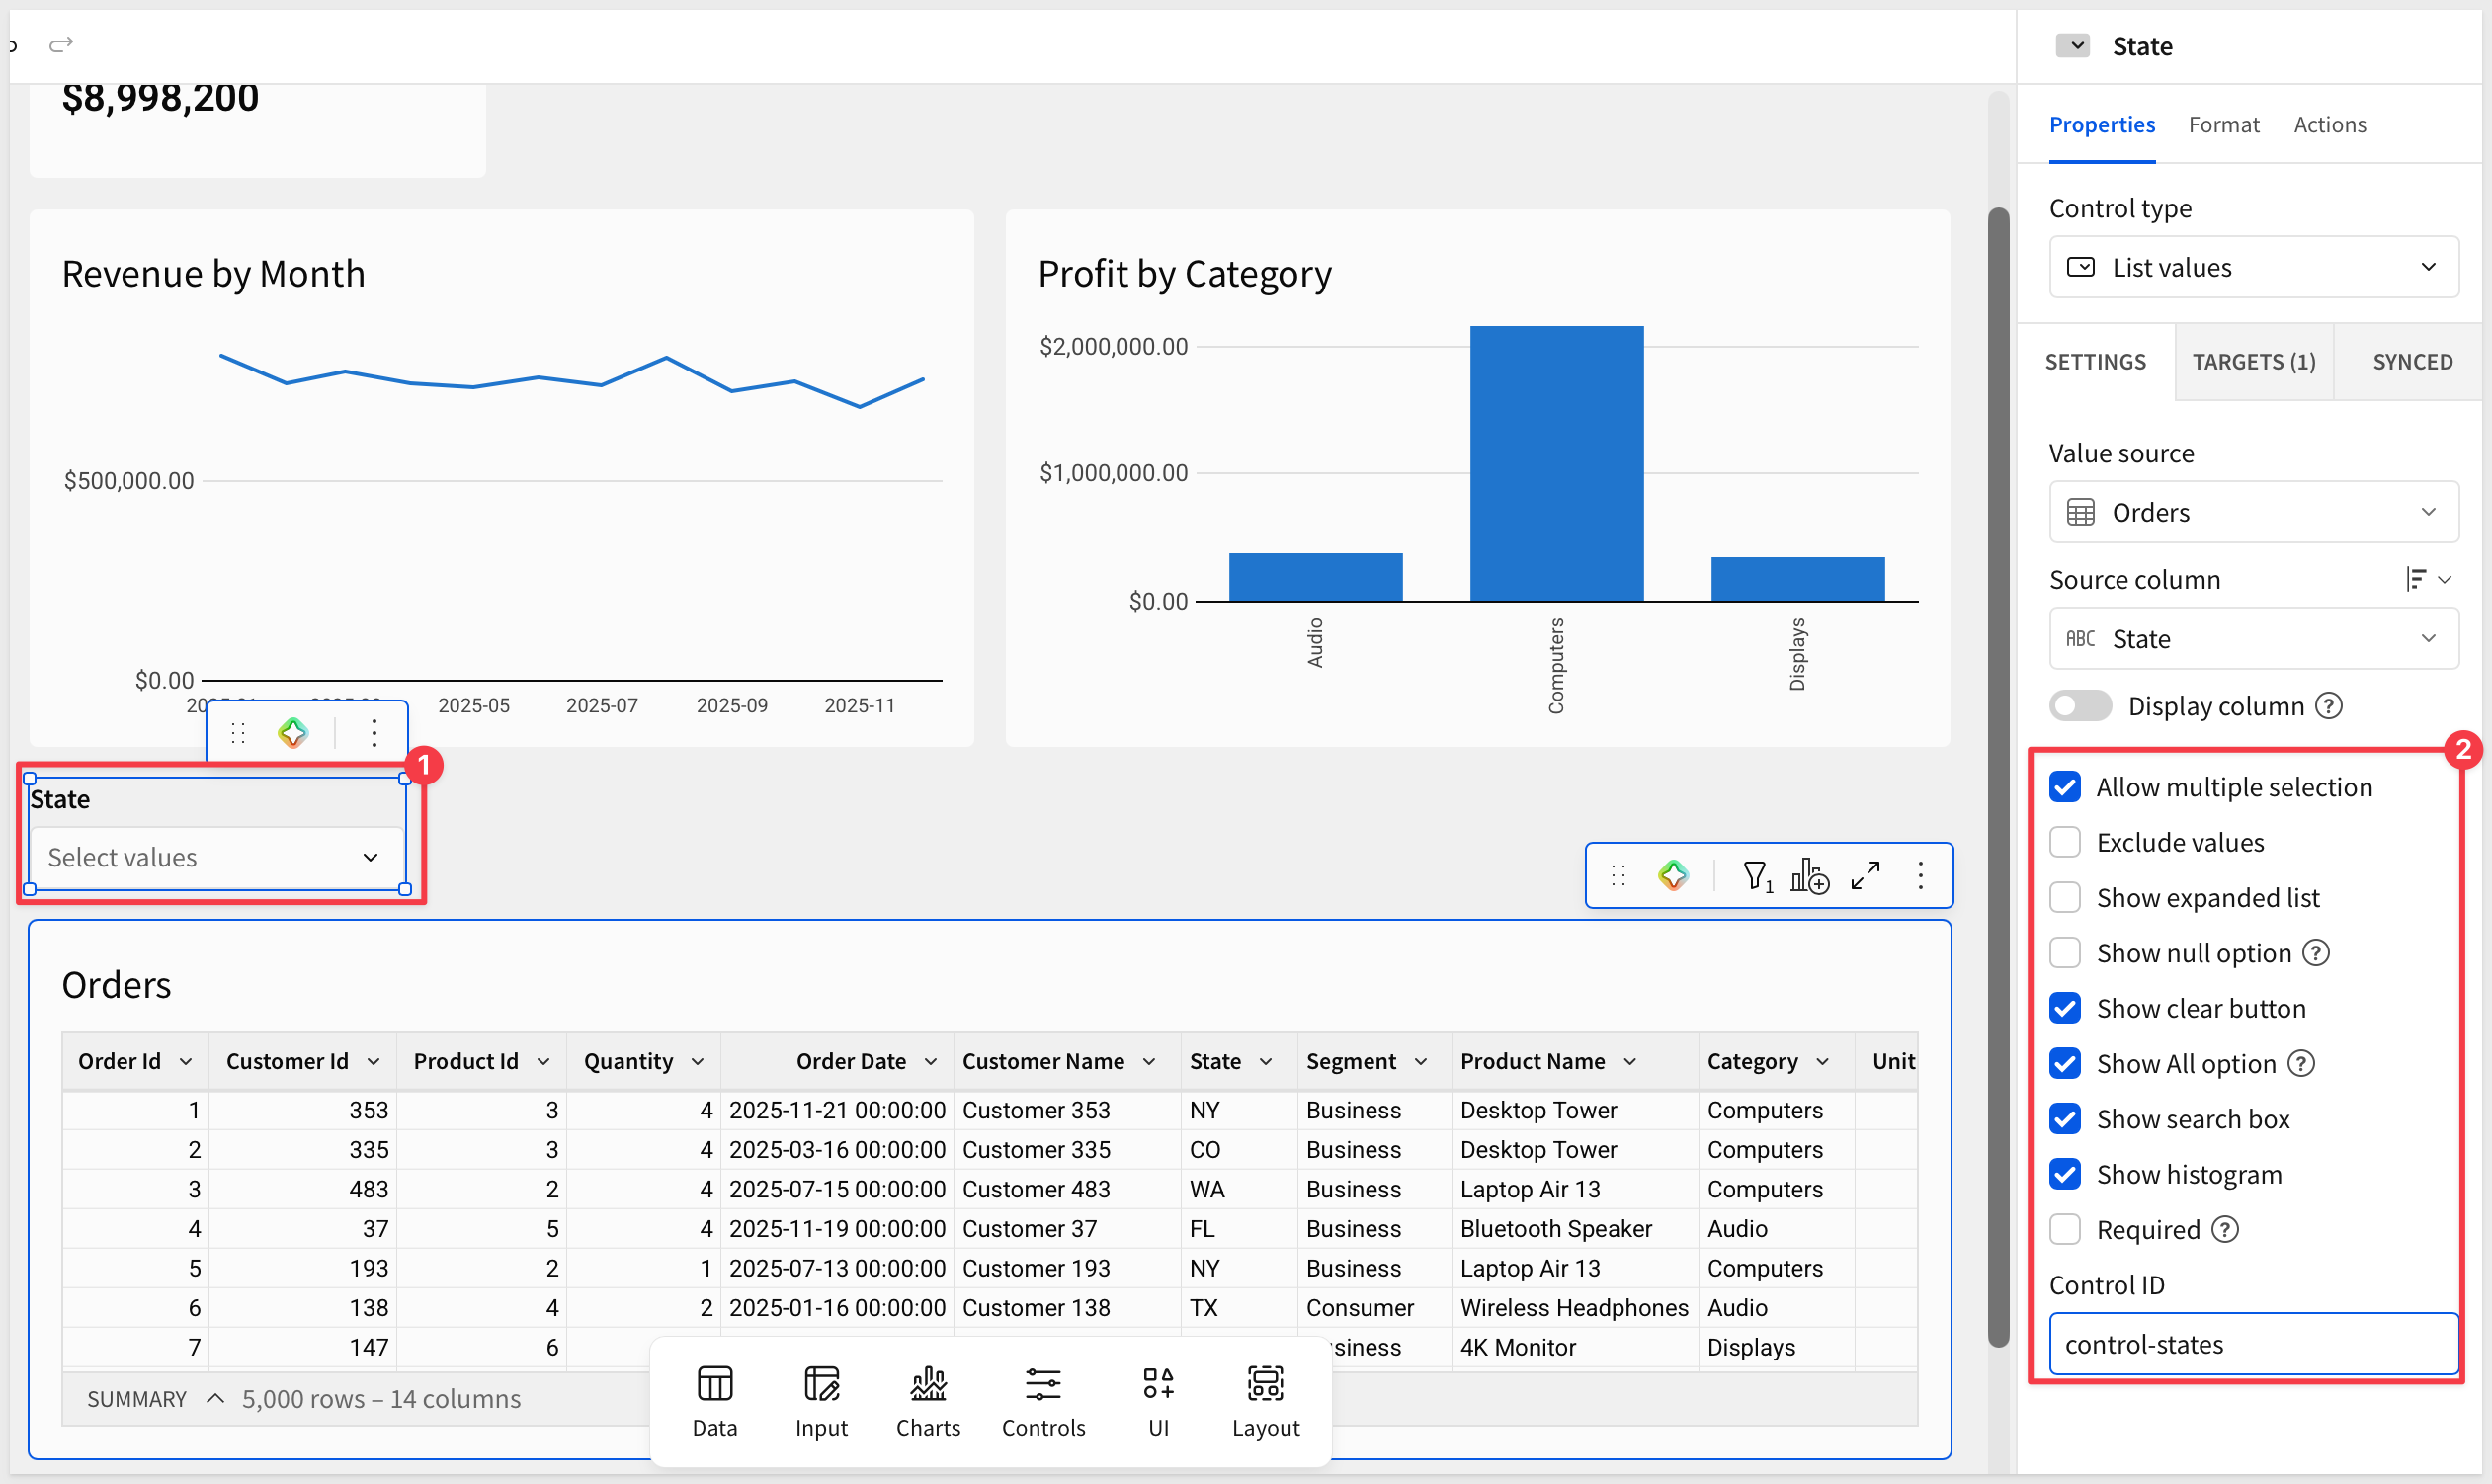
The Control ID allows us to target the control programmatically if we want, which enables additional interactivity and workflows.
Because the charts use Orders as their source, they automatically react to the State filter without any additional configuration.
Select a few states and confirm that every element responds.
Click Save As and name the workbook MotherDuck Sales Analysis.
Action sequences let workbook users trigger a series of steps from a click on a chart, table, or button. We will use one to turn the Profit by Category chart into a drill-down: click a bar and a window opens listing the orders behind it.
Add a category control
Place the workbook in Edit mode.
From the Element bar, select Controls and add a List values control. In the Element panel, set:
- Source:
Orders - Column:
Category - Control ID:
category-filter
Turn off Show null option and Allow multiple selection.
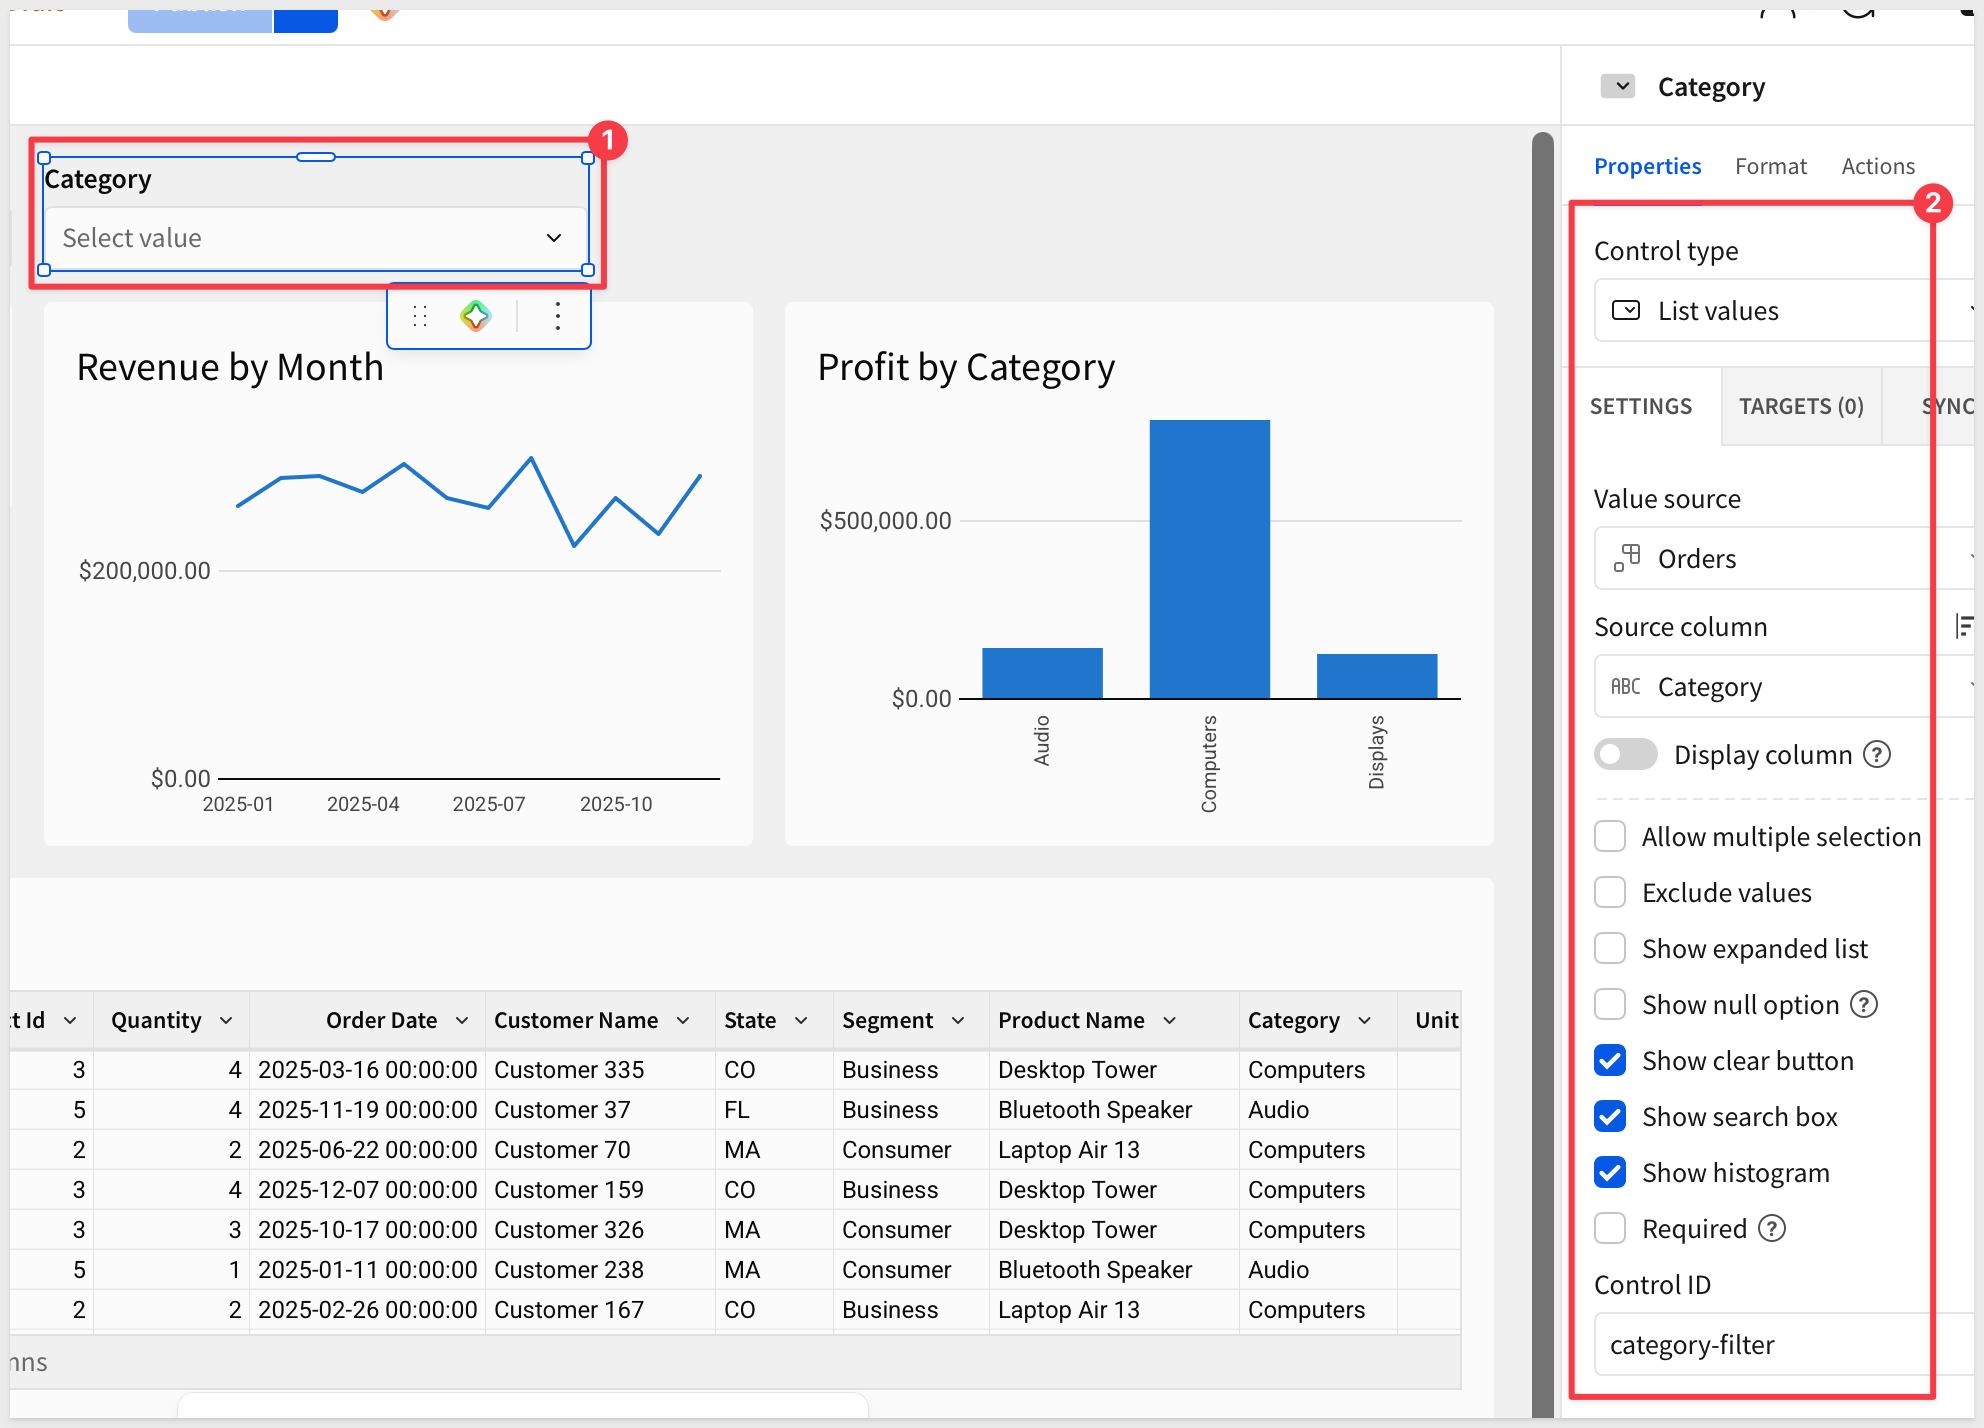
We will leave this control's targets empty for now and set them once the modal exists.
Add a modal
From the page control at the lower left corner of the page, select Add modal.
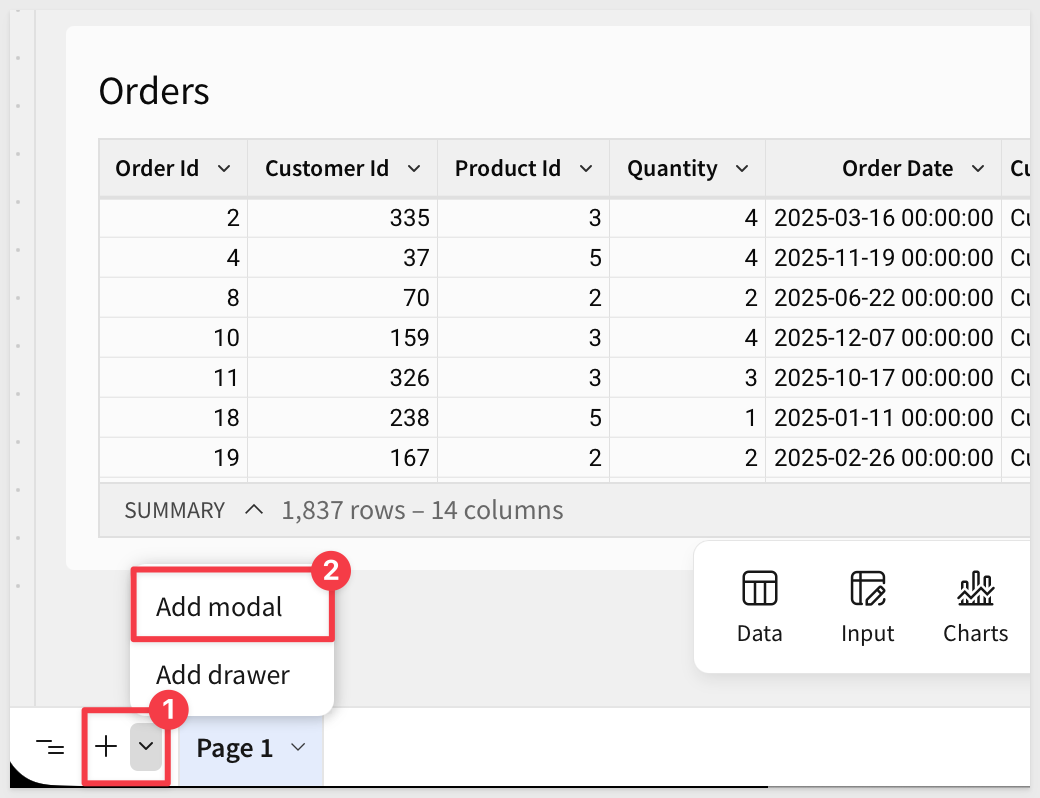
Rename it to Category Orders.
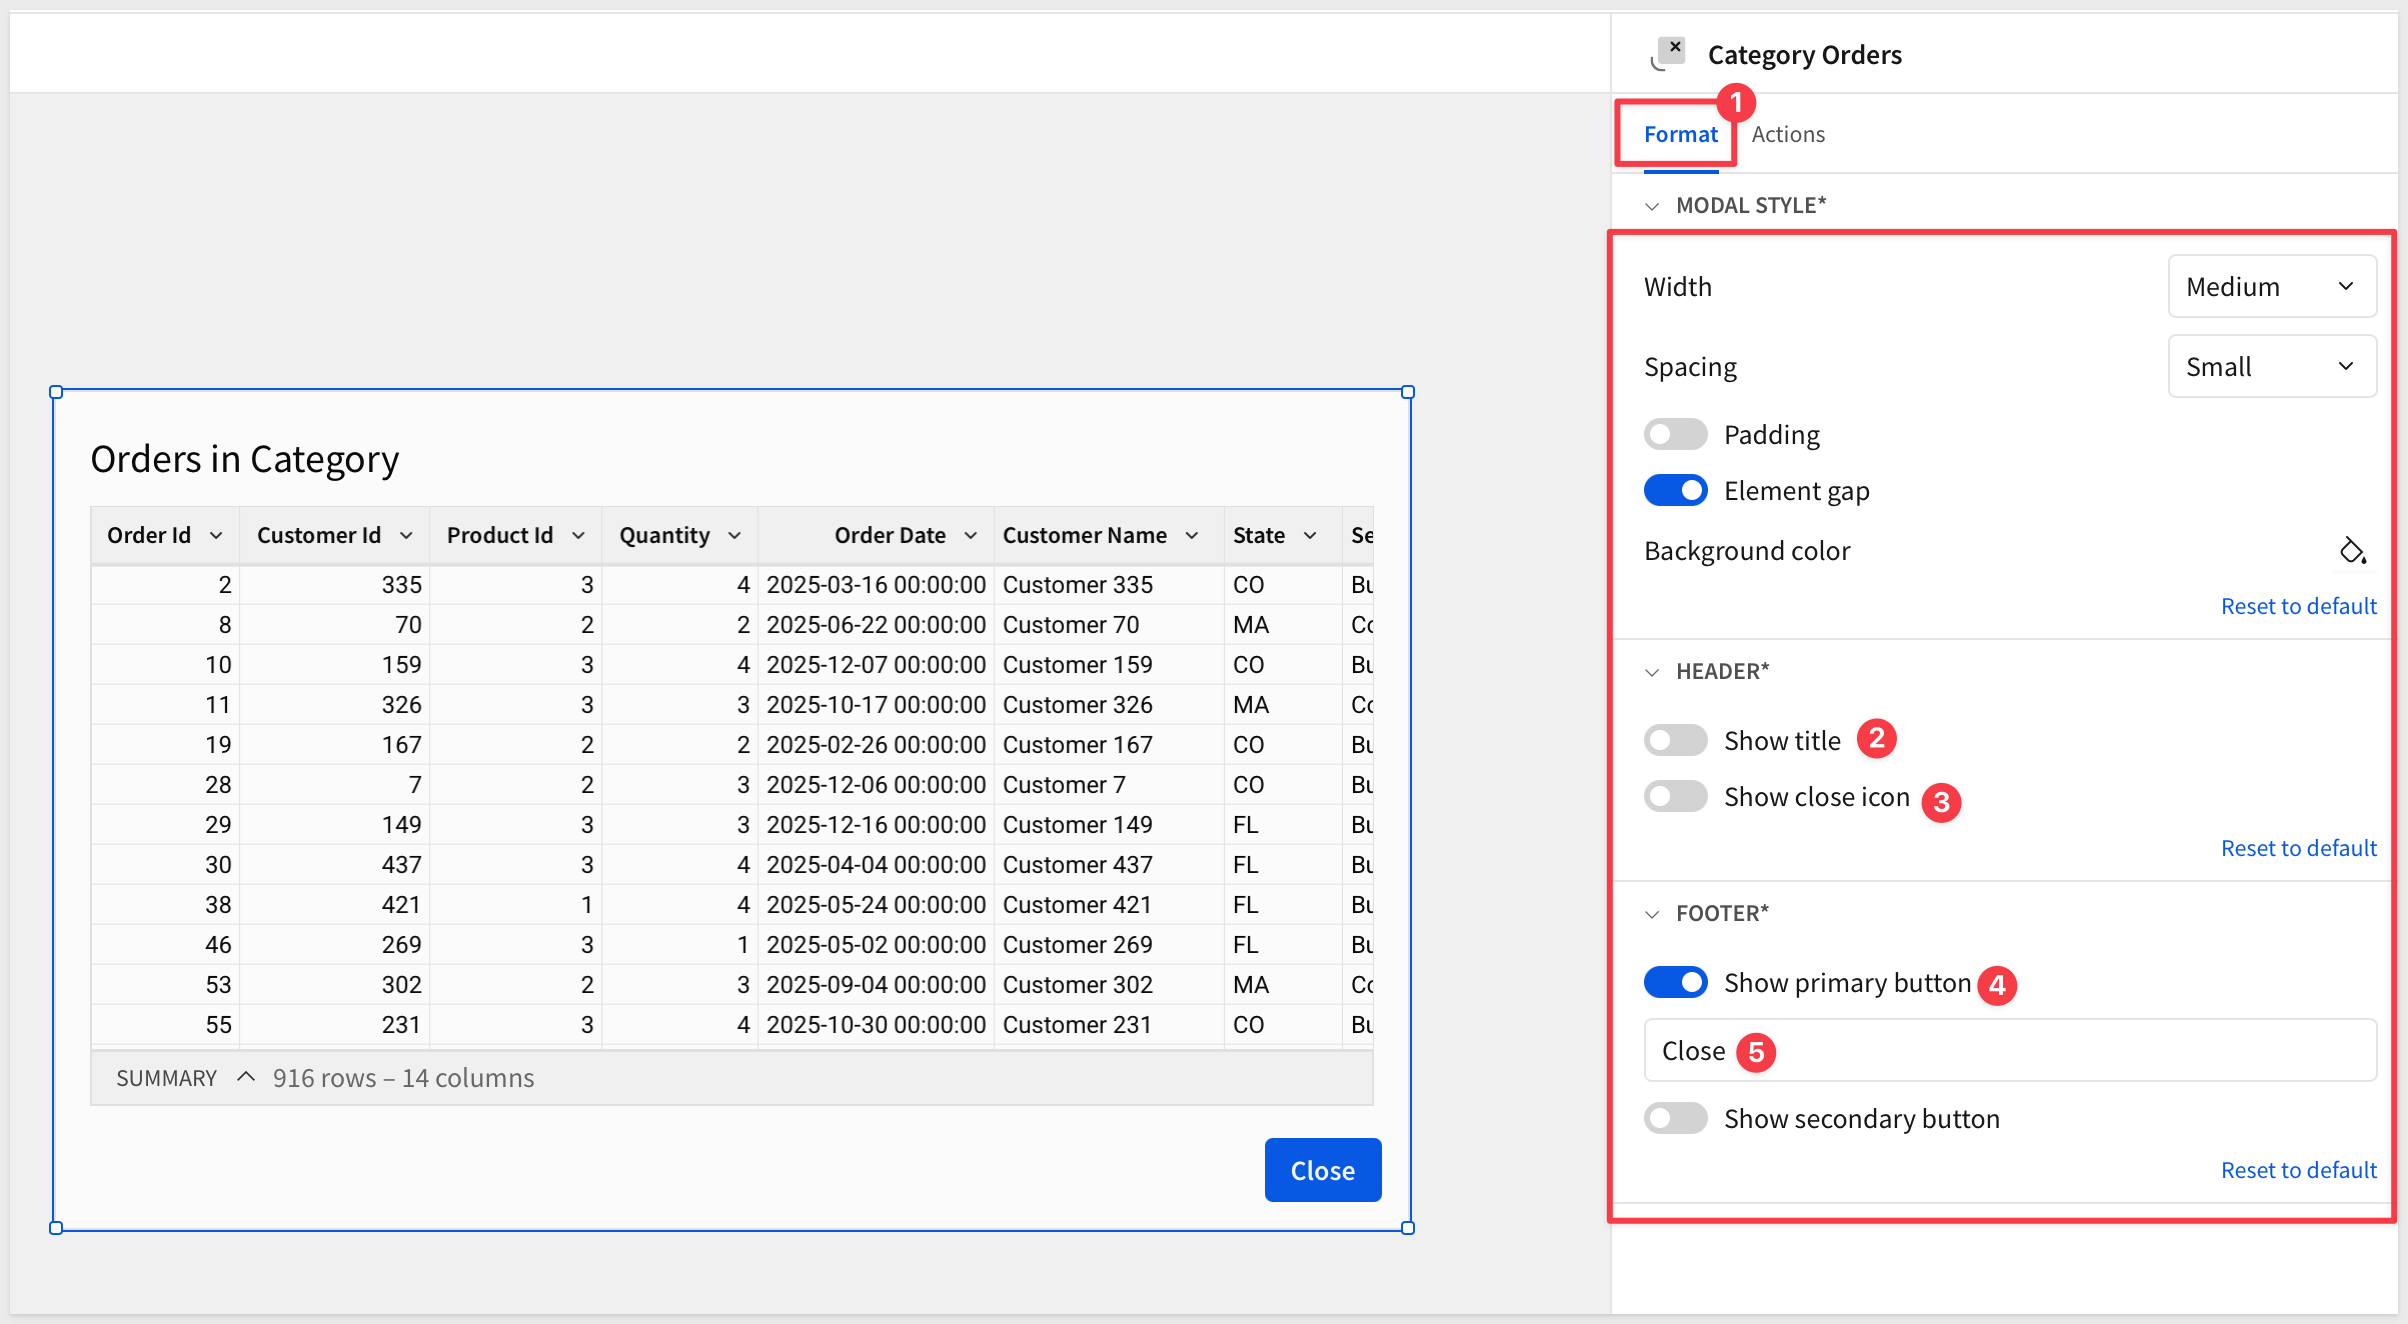
Inside the modal, add a Table sourced from Orders, and rename it to Orders in Category.
Disable Show close icon and change the Show primary button text to Close.
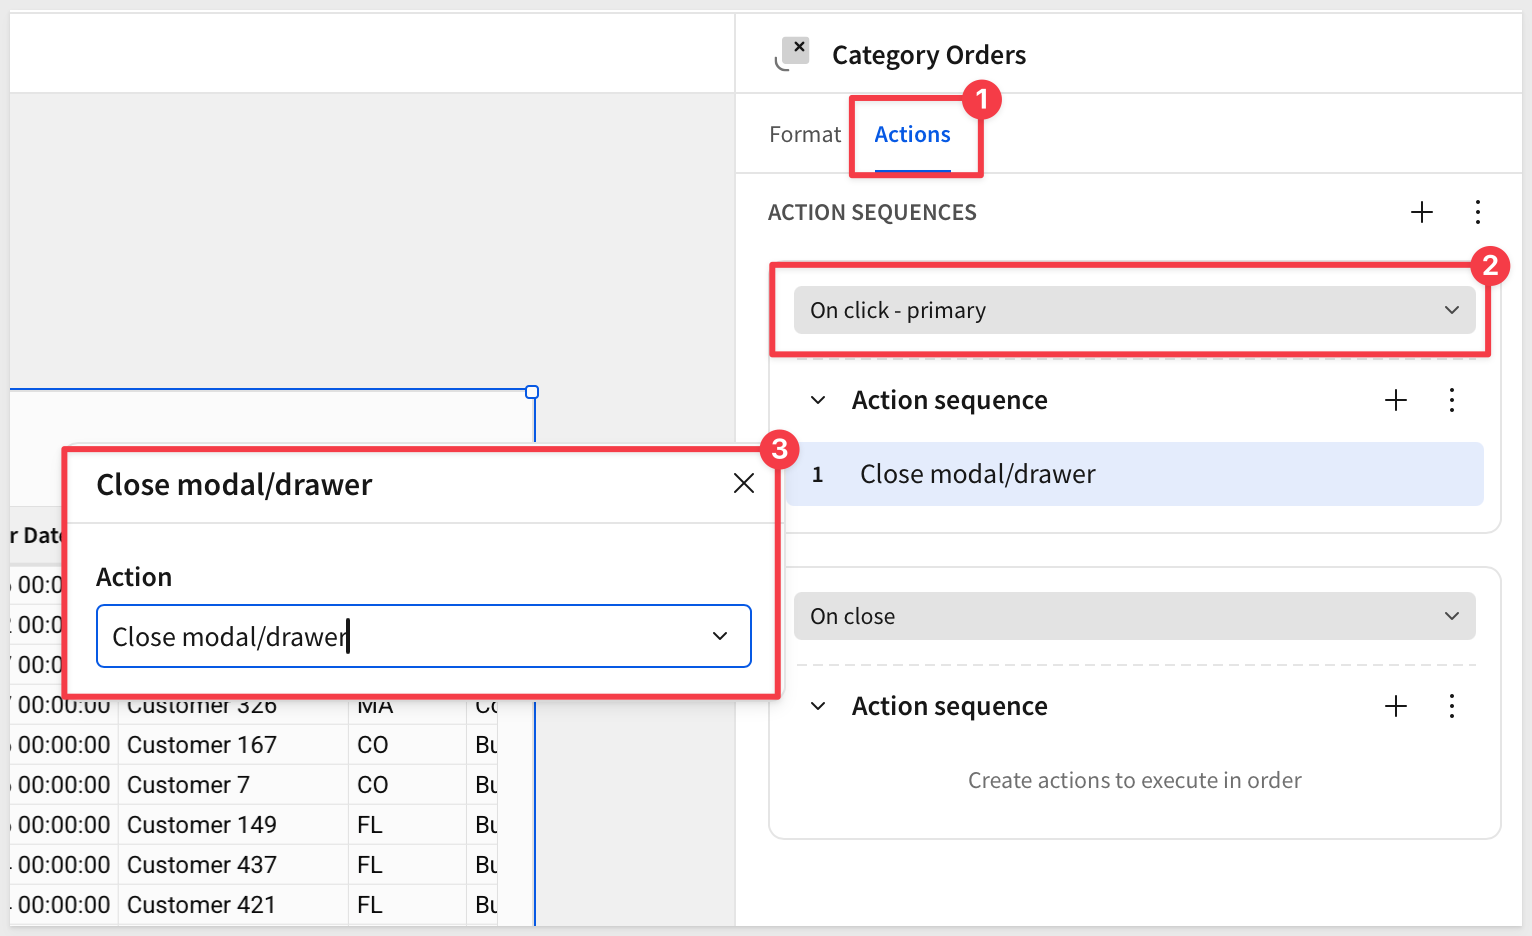
Under Actions, we can configure the Close button to simply close the modal.
Return to the Page 1 page.
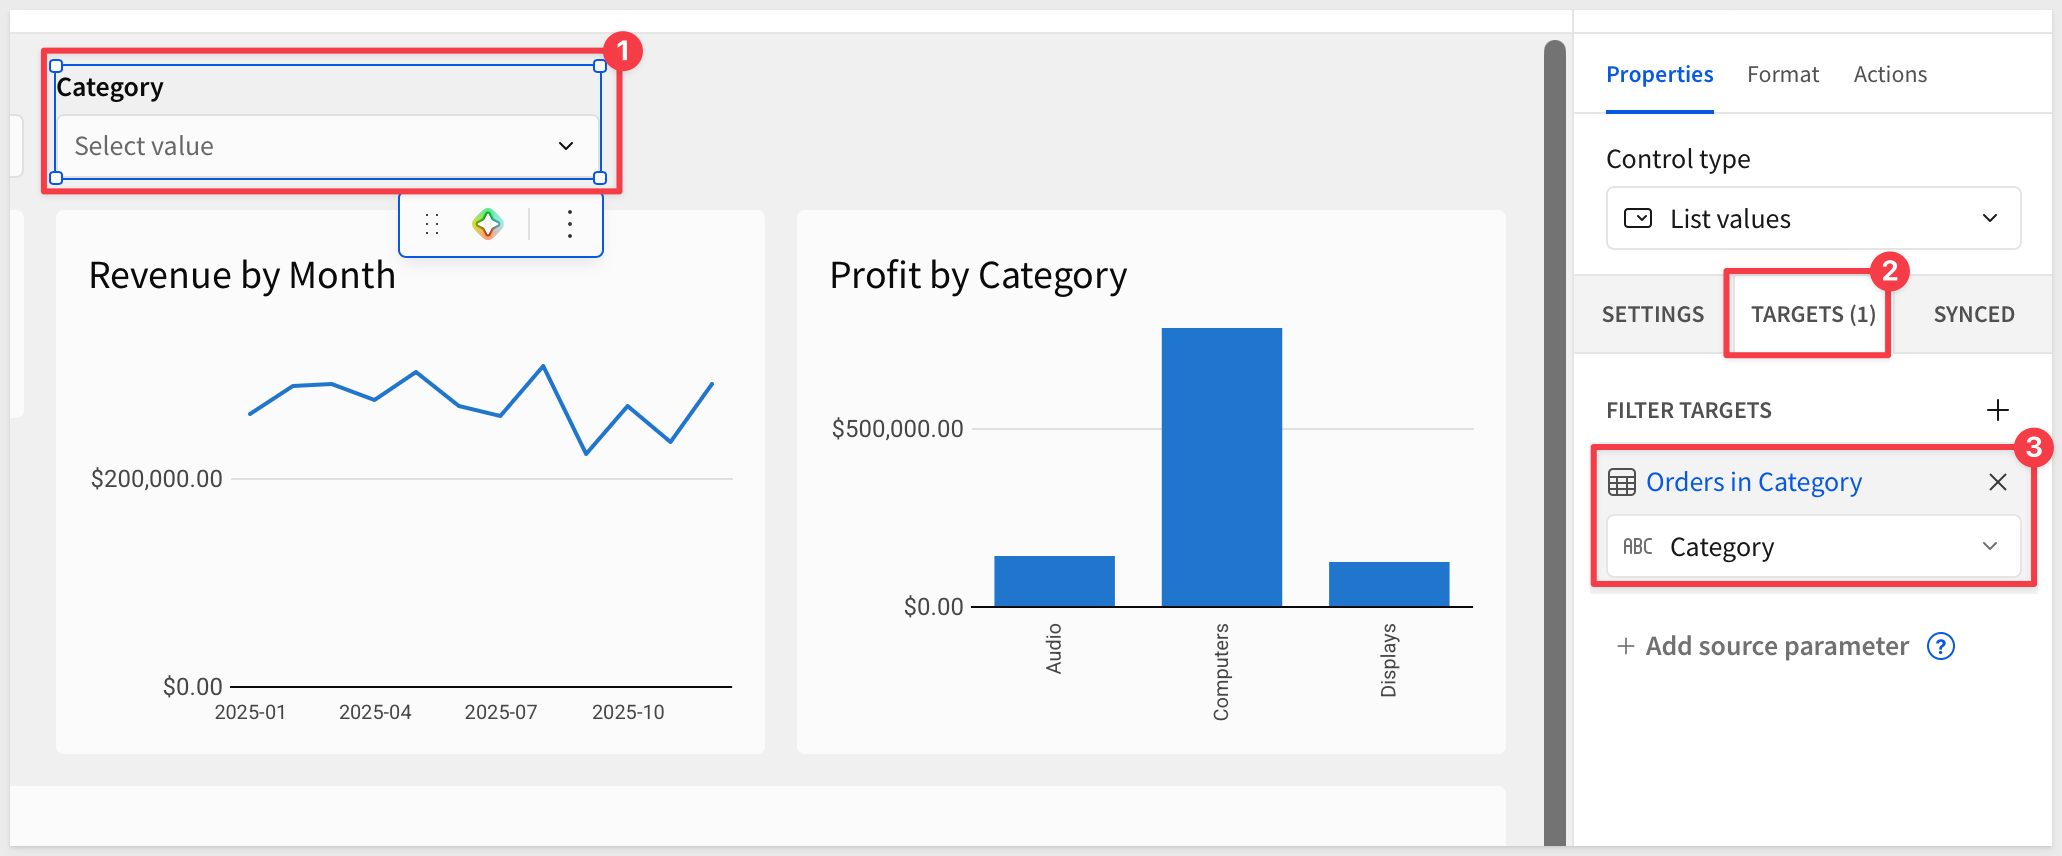
Select the category-filter control and, in its Targets, add only the Orders in Category table. Because the charts are not targeted, they keep showing every category.
Create the action sequence
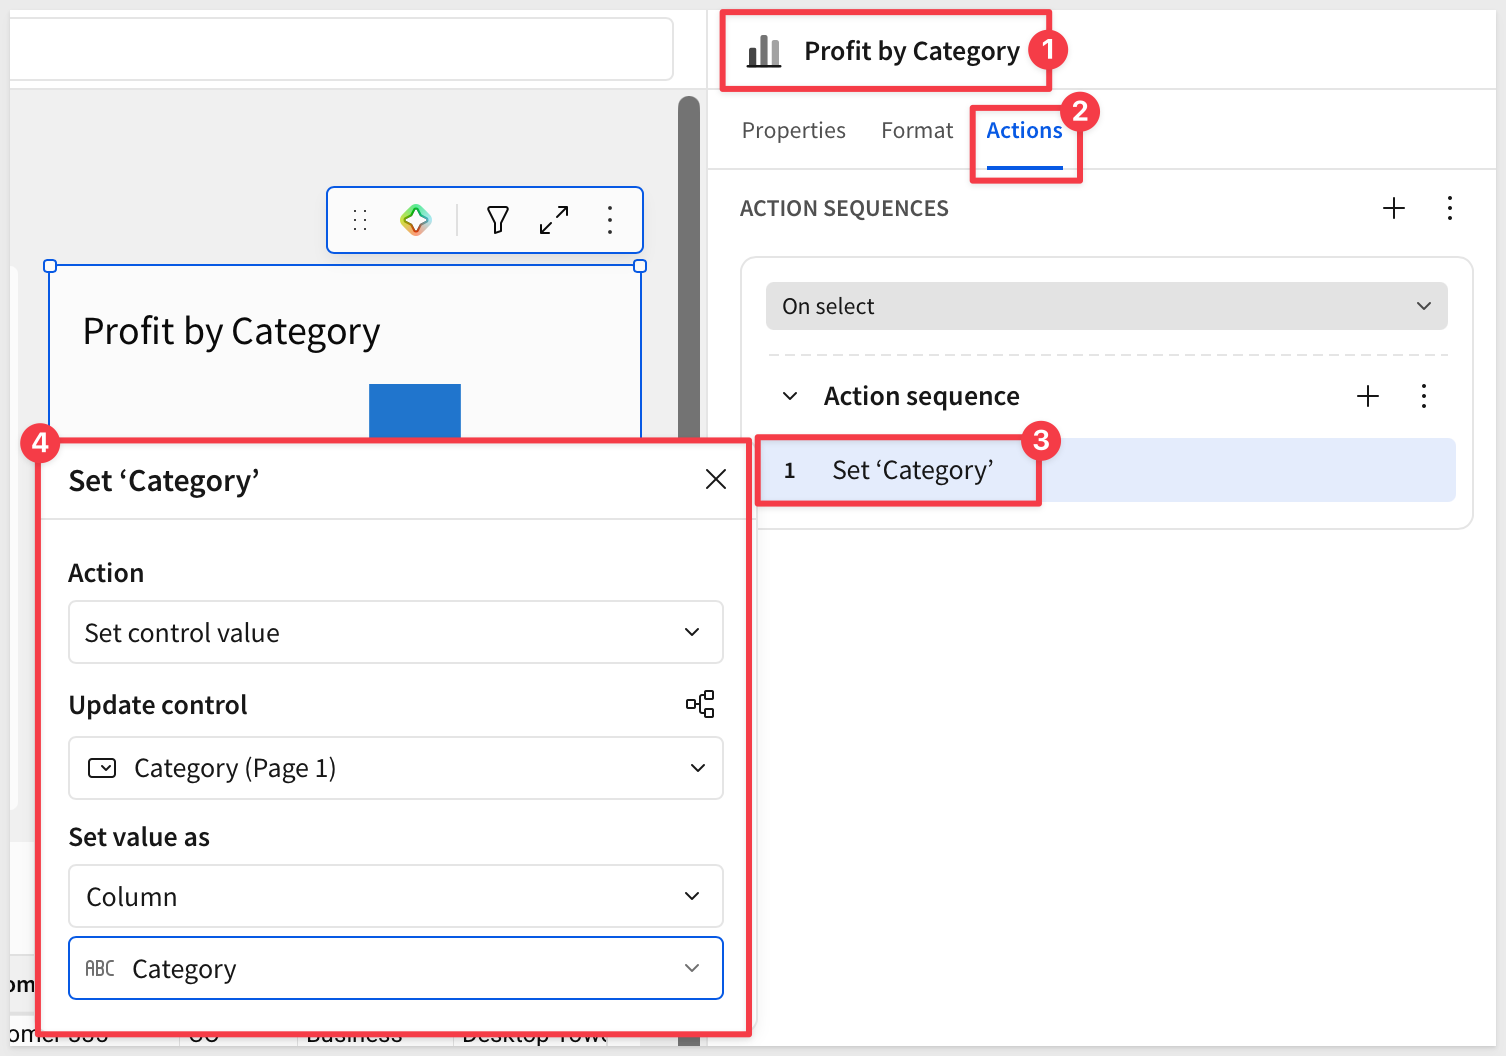
Select the Profit by Category chart. In the Element panel, open Actions and add a trigger for when a bar is selected.
Add the first action, Set control value:
- Control:
category-filter - Value: the selected
Categoryfrom the chart
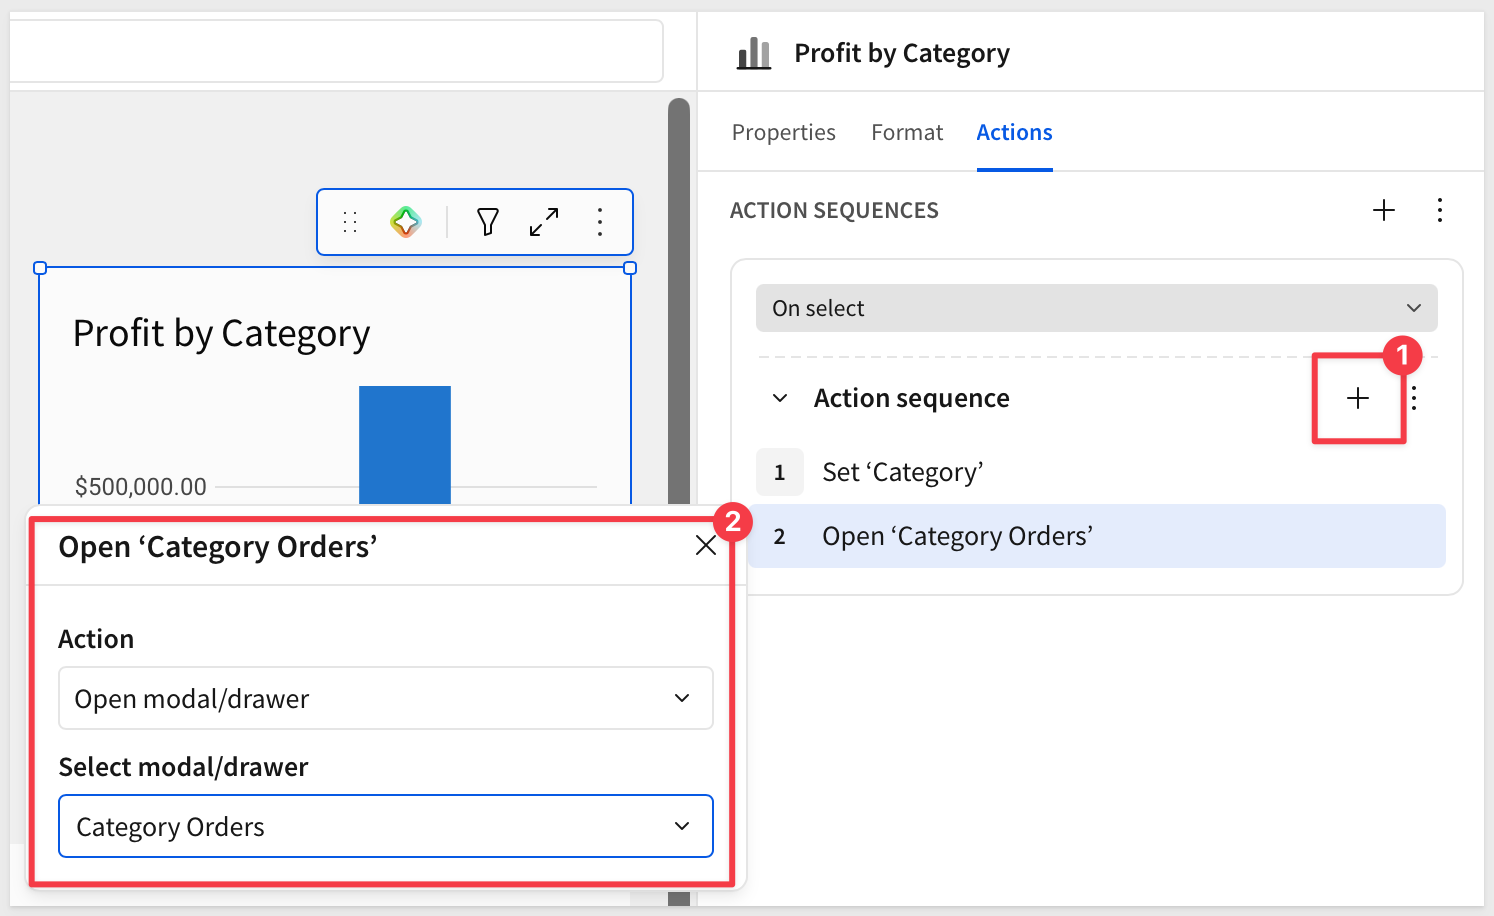
Add a second action, Open modal, and select Category Orders.
Test the interaction
Click Publish and go to the published version of the workbook.
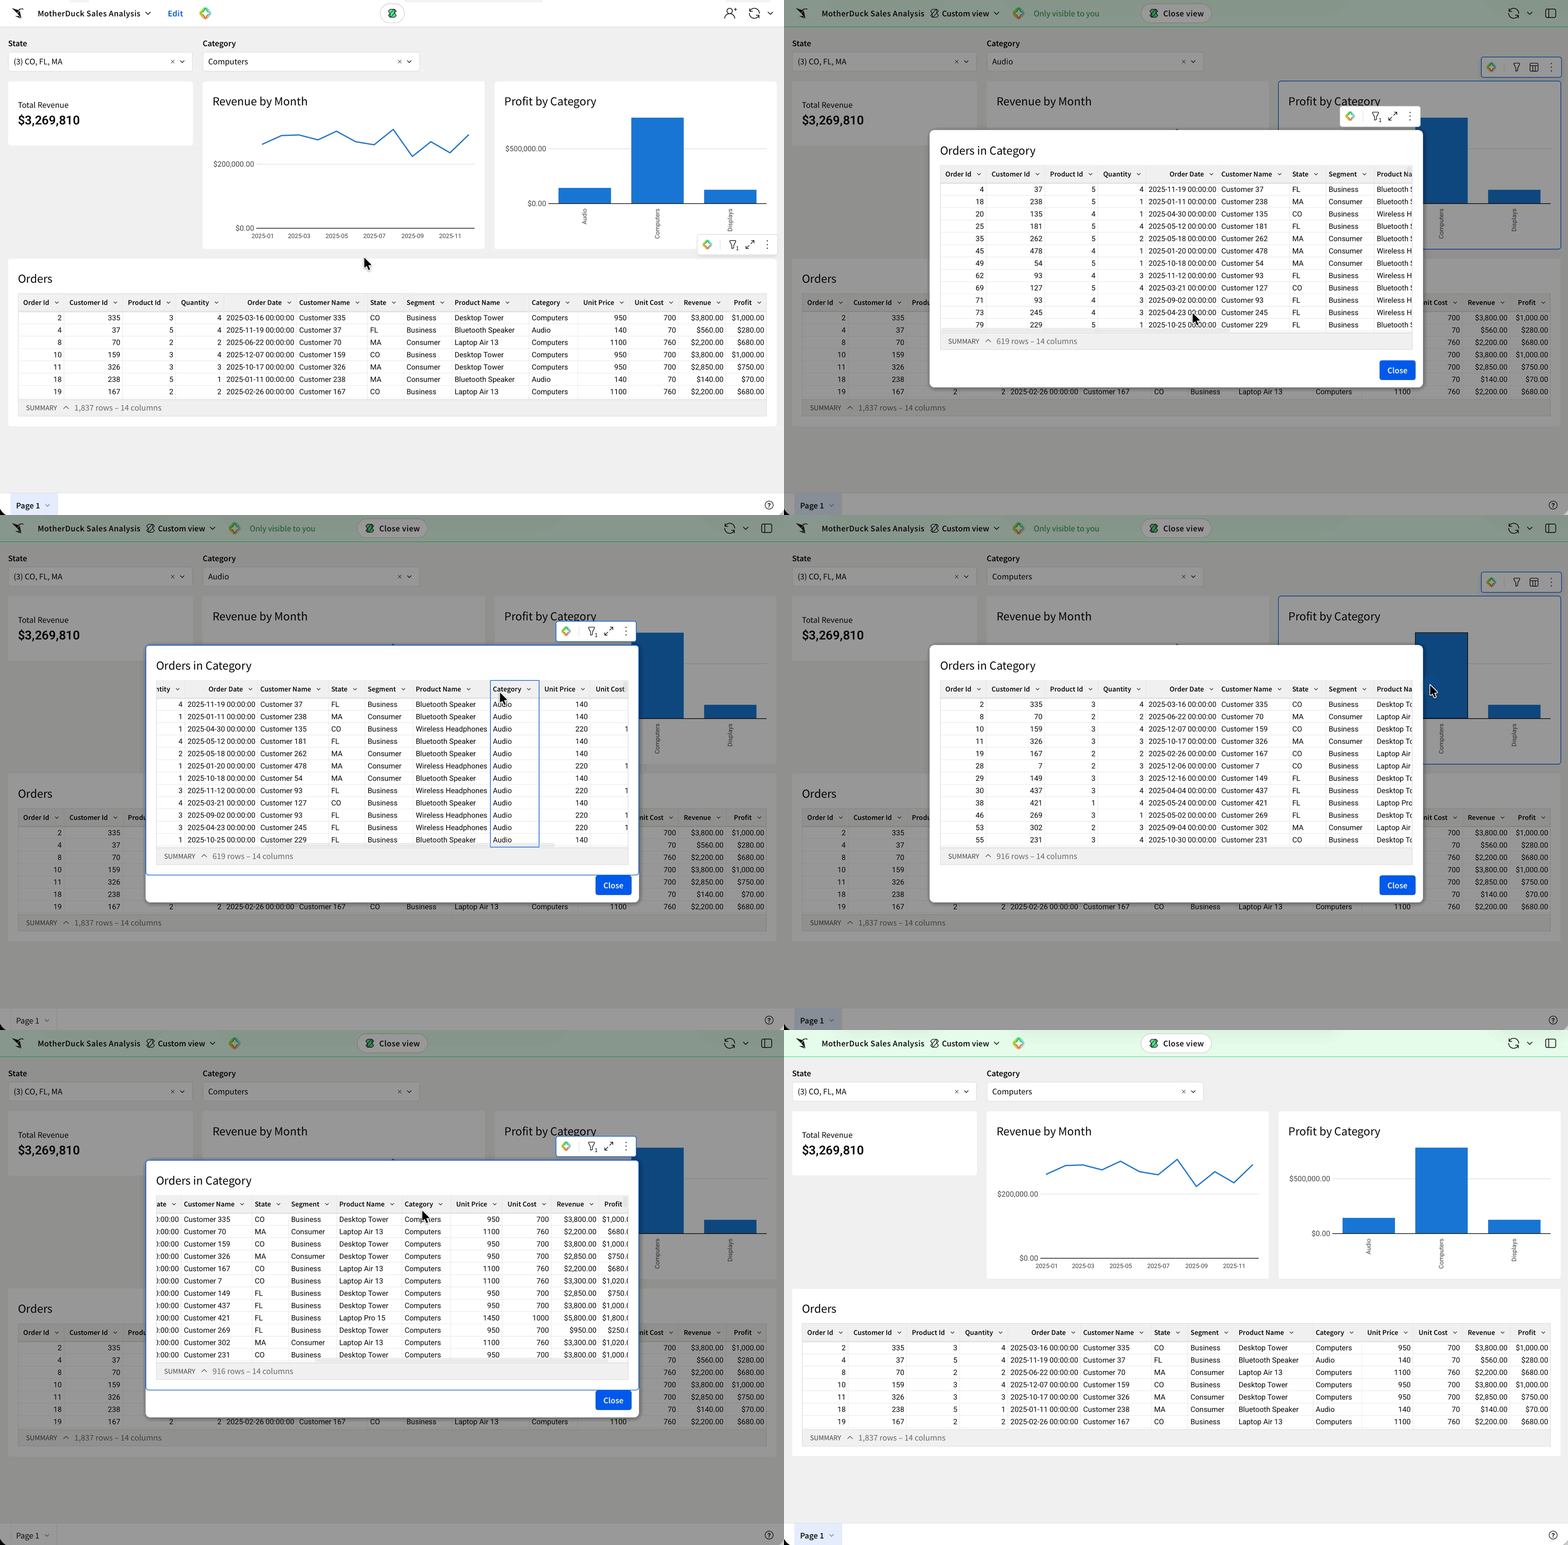
Click a bar in Profit by Category, such as Audio. The modal opens with the Orders in Category table showing only orders for that category.
Close the modal, click a different bar, and confirm the table updates.
For more information, see Intro to actions
Sigma has a built-in Sigma Assistant that lets anyone ask questions of their data in plain language, and agents let us shape that experience. We will start with Sigma Assistant in the published workbook, then build an agent and a chat element that limit what data it can use and give it a persona.
Ask Sigma Assistant a question
Click Publish to publish the workbook, then open the published version.
Open Sigma Assistant from the published workbook and ask:
Which product category earns the most profit?
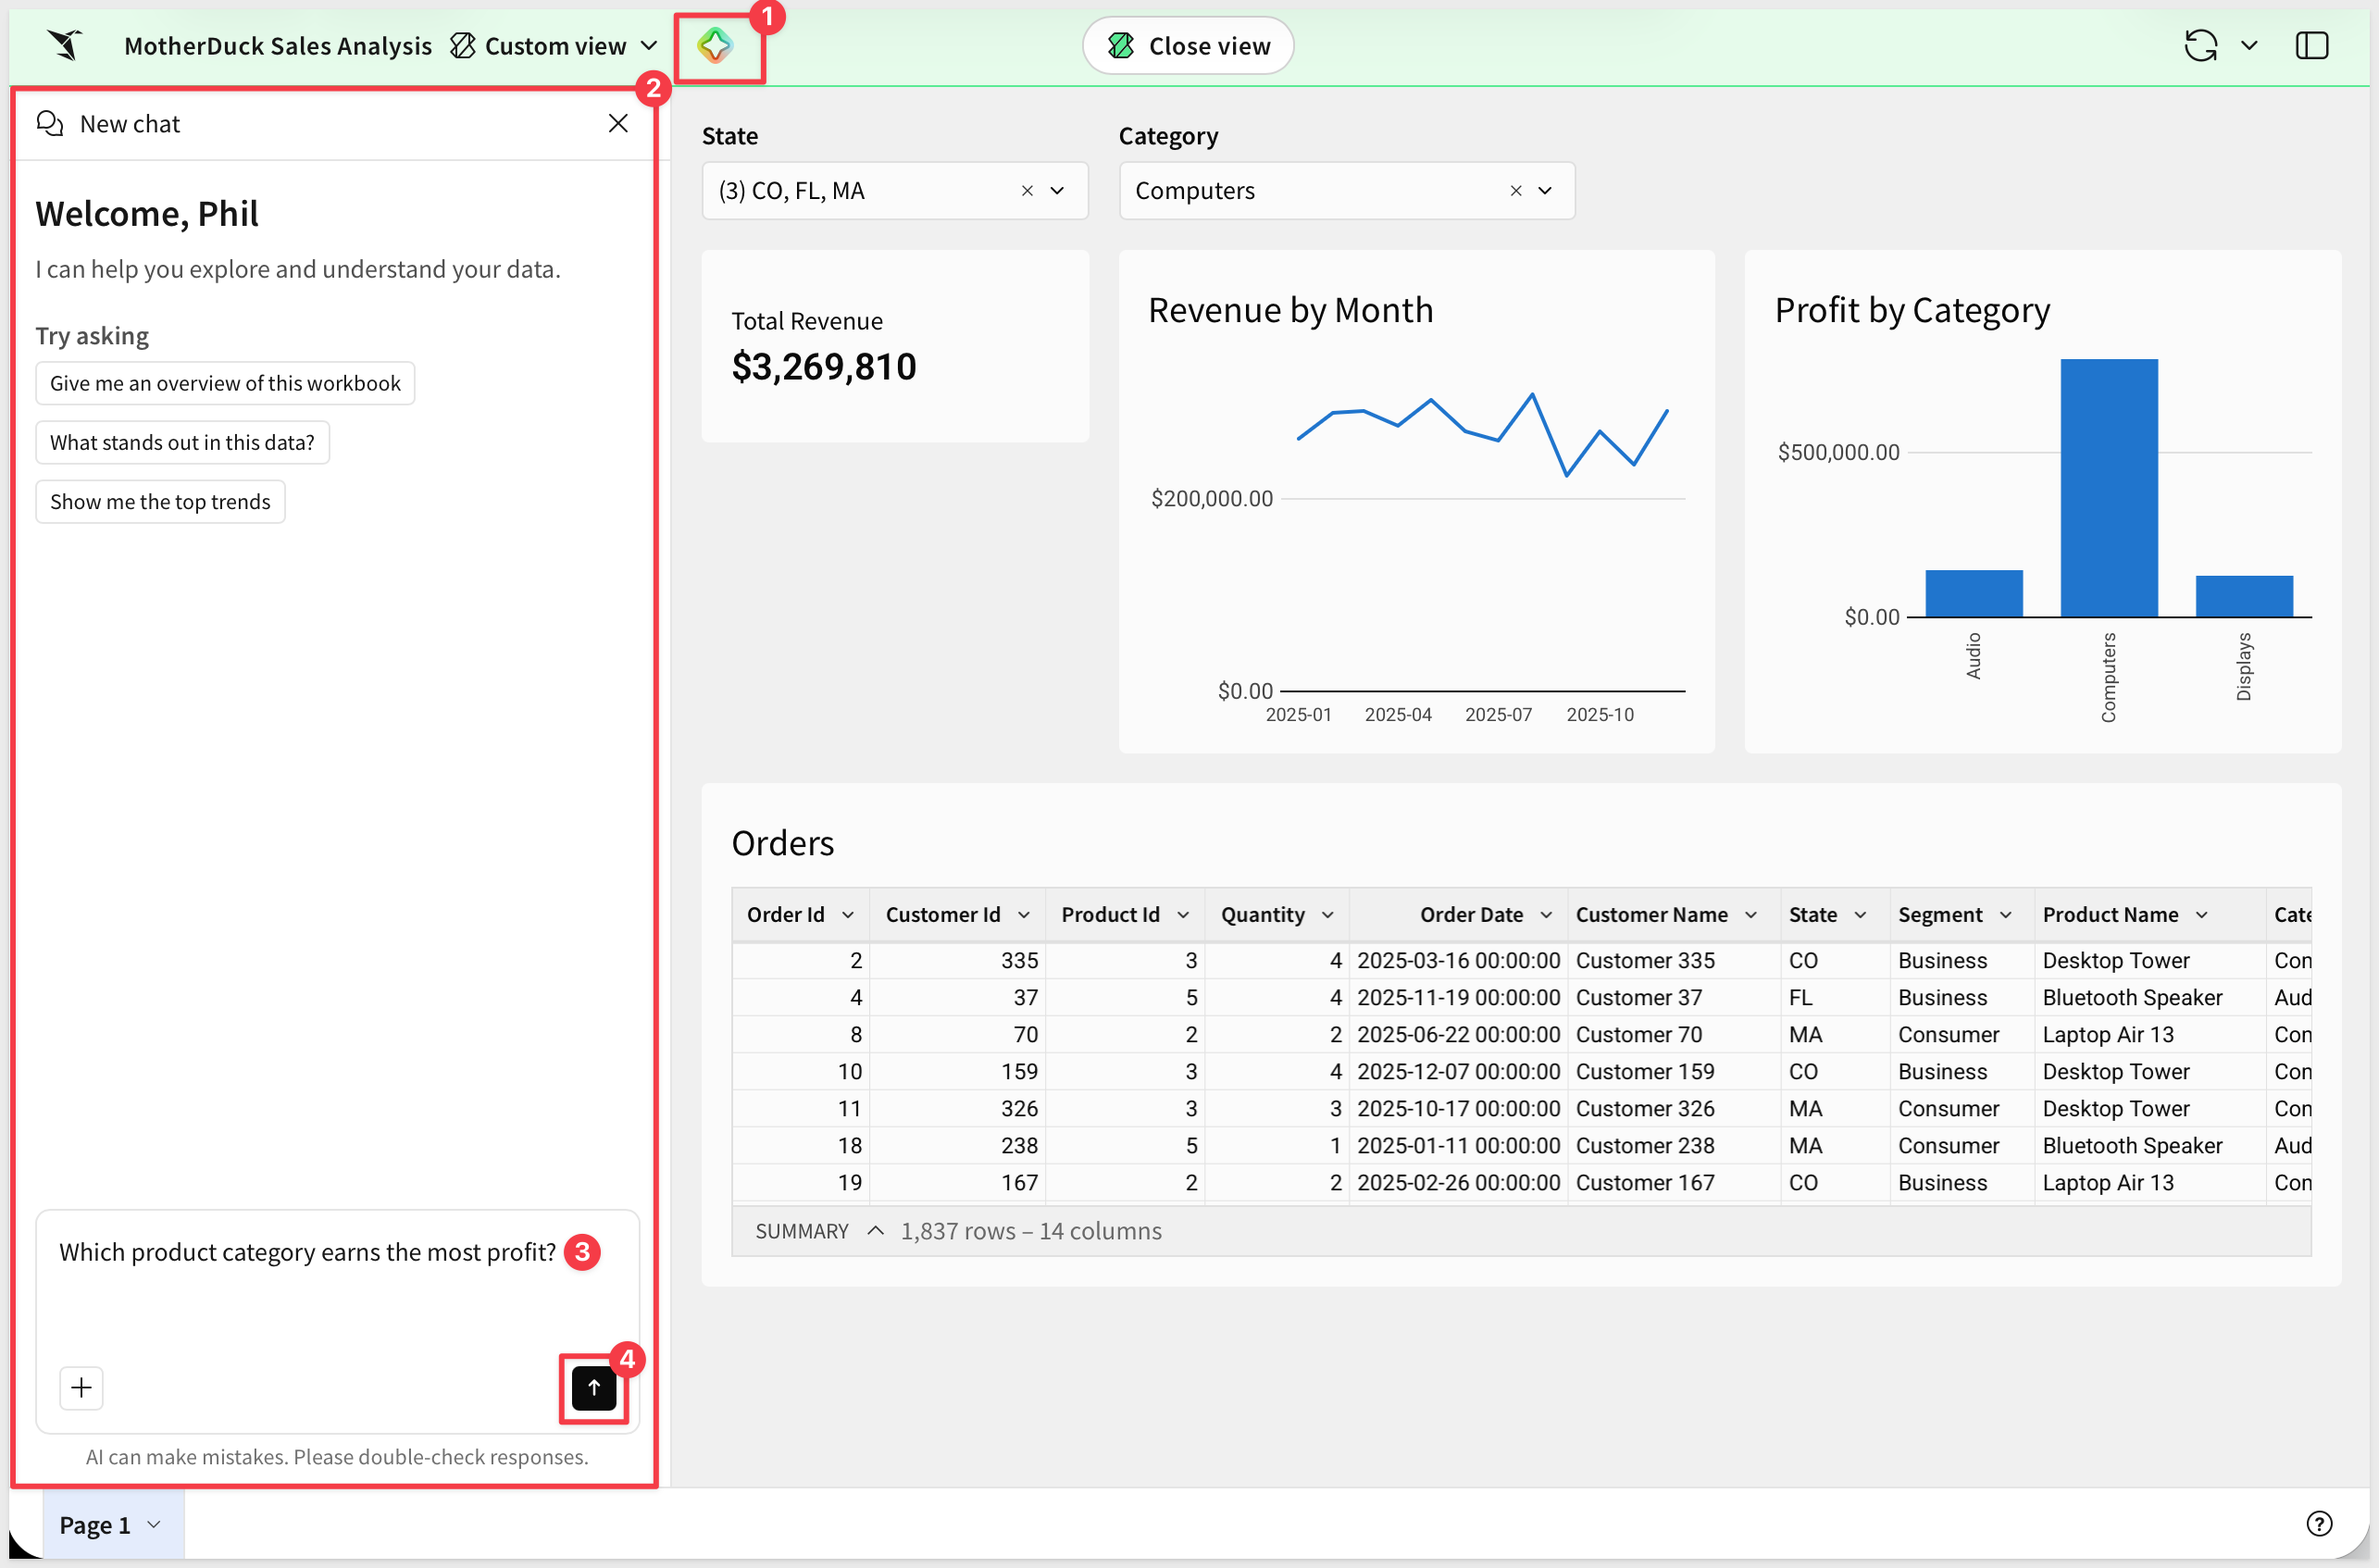
Sigma Assistant answers using the workbook's data. Compare the answer with the Profit by Category chart to confirm the value.
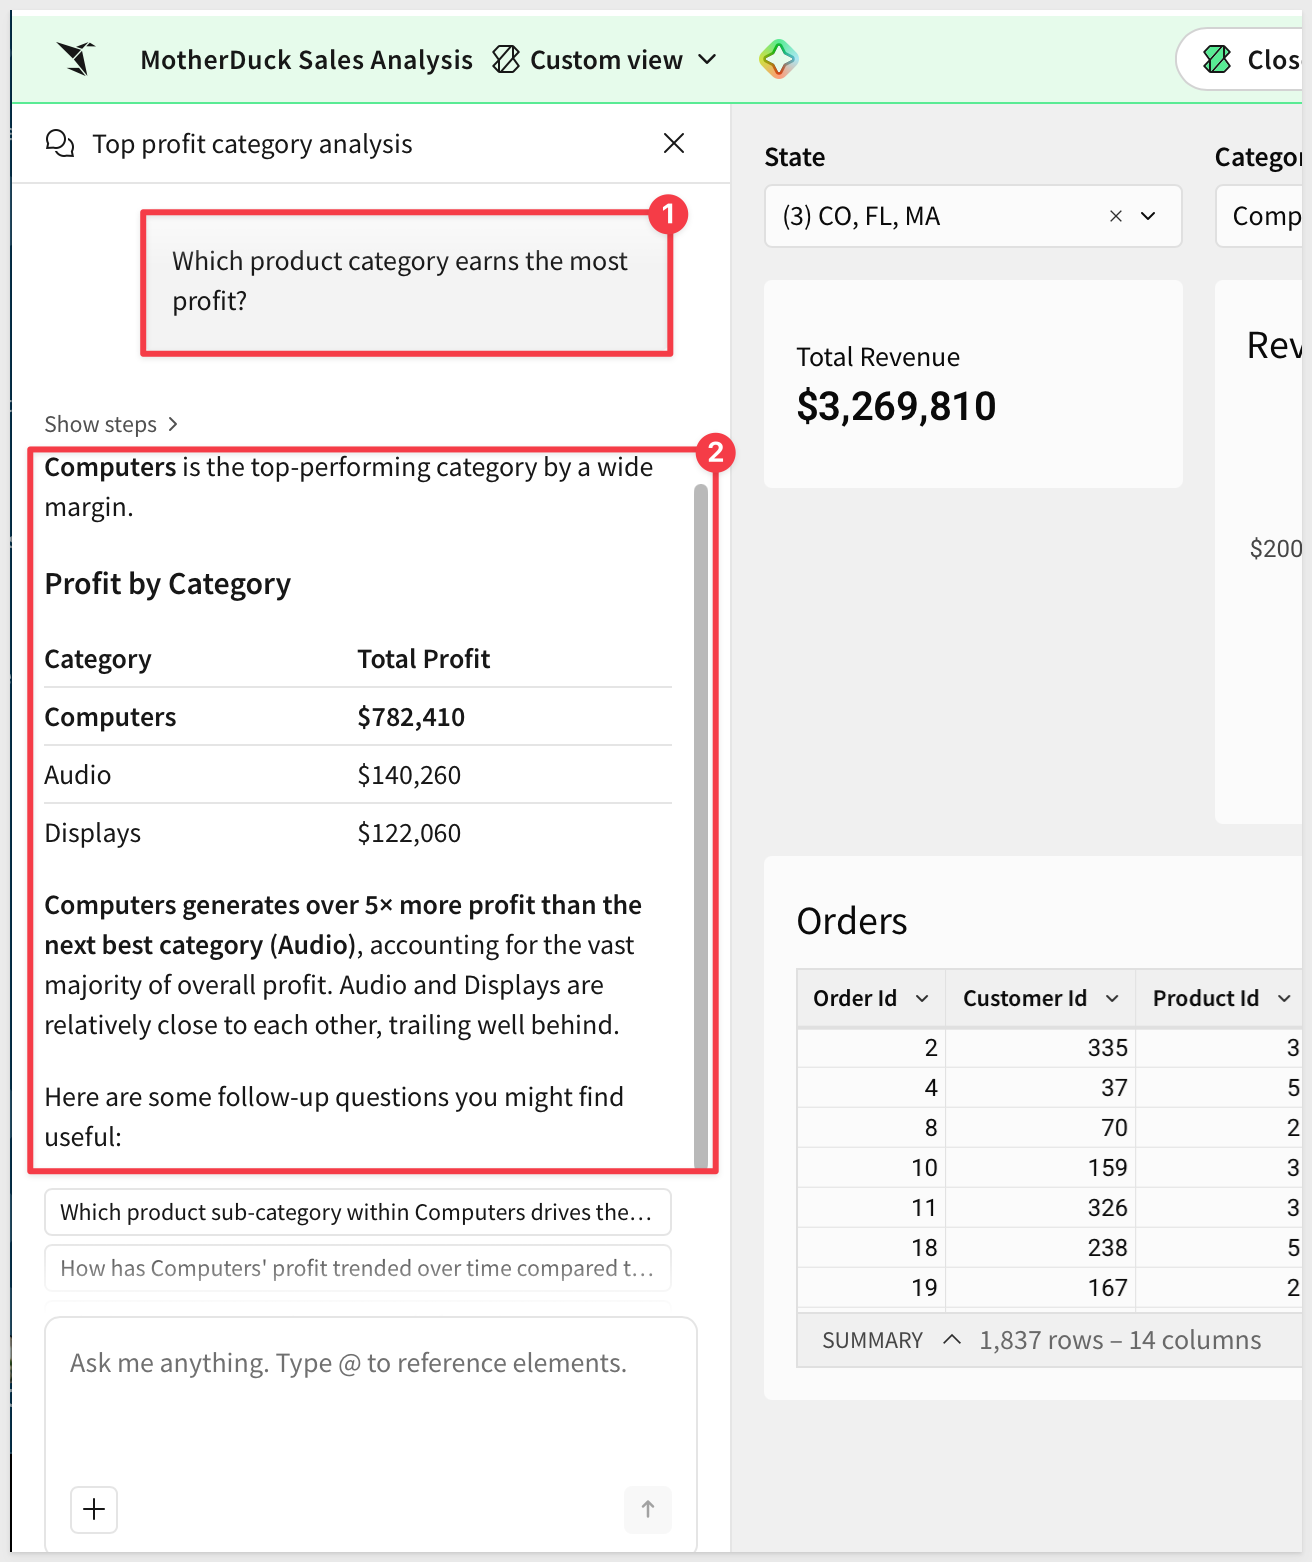
Sigma Assistant is a general-purpose way to ask questions. An agent gives us control over two things it does not: which data it can see, and how it responds. We will set both next.
Create the agent
Sigma Assistant is ready to use as soon as you open it. A Sigma agent is something you design, which makes it a good fit when a team needs consistent, purpose-built answers. Building one gives us:
- A defined data scope: the agent works only from the data sources we attach, so its answers stay within data we have chosen and governed.
- A persona and instructions: we decide the role it plays, how it phrases answers, and what it should do when the data cannot answer a question.
- A greeting: a fixed opening message tells users what this agent is for.
- Reuse: one agent can power chat elements on any page of the workbook, so everyone using it gets the same behavior.
Click a blank area of the canvas to deselect any element. In the right panel, click the Agents tab, then click the + button to create a new agent.
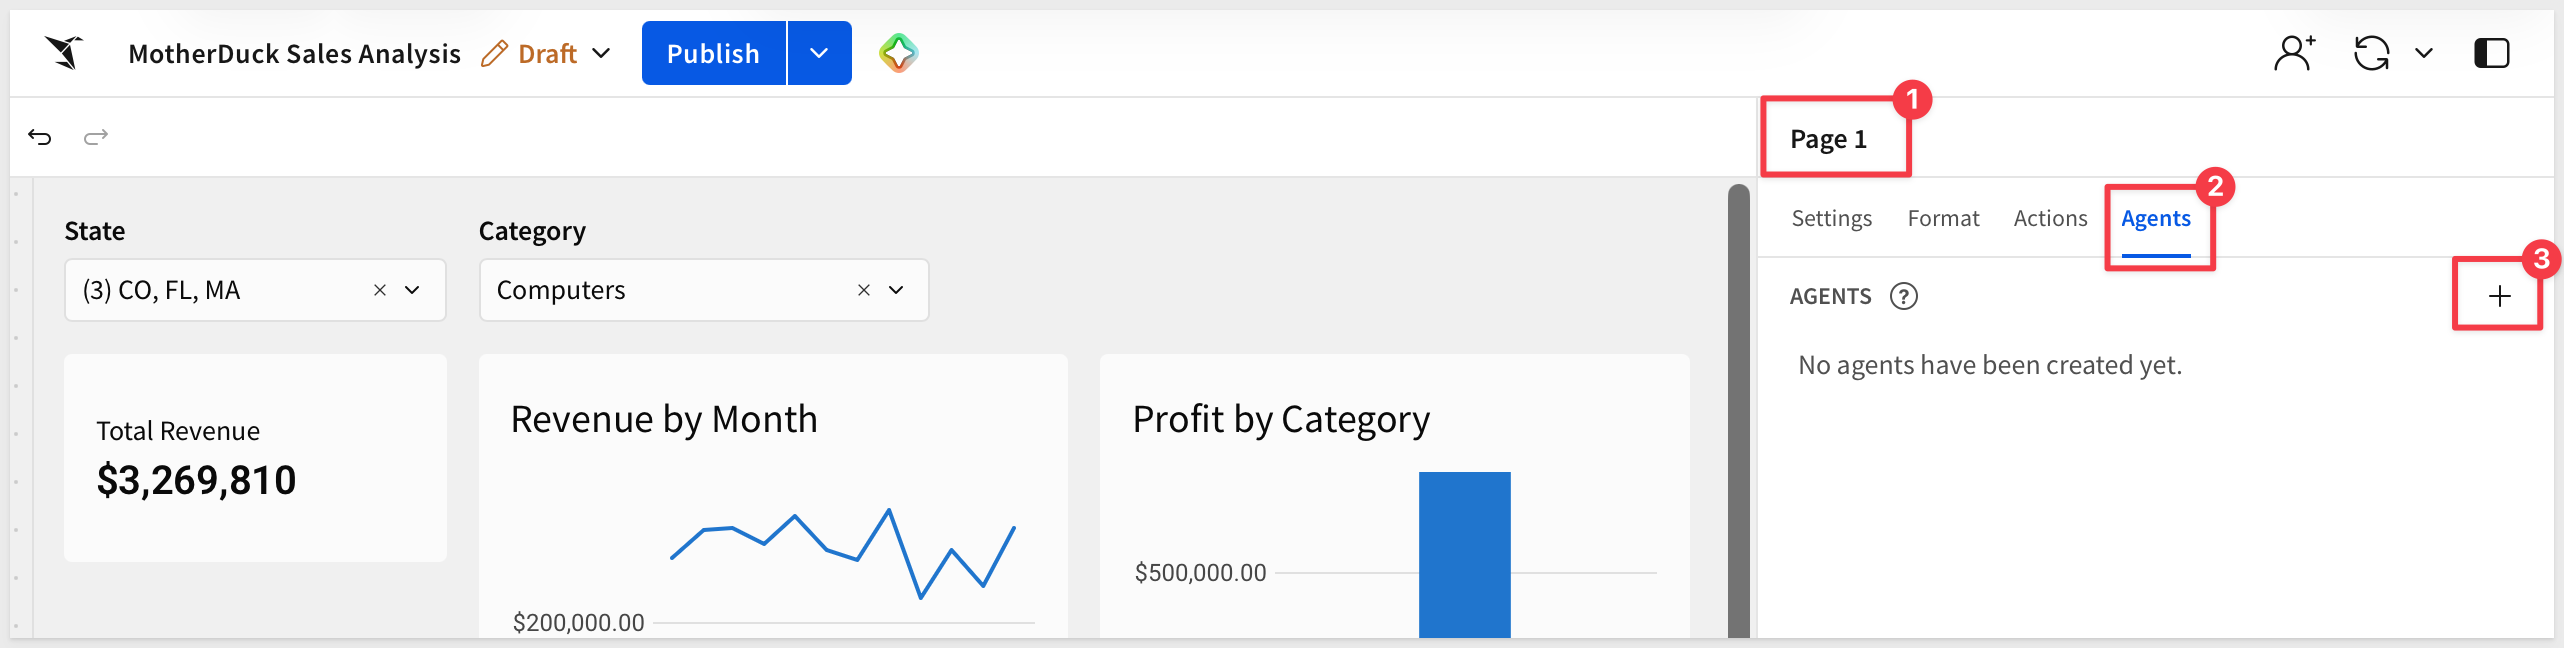
Click the pencil icon and change the default name from Agent 1 to:
Sales Analyst
Add the data source
Under Data sources, click Add data source (+) and select the MotherDuck Sales data model.
Define the persona
Click the Instructions tab and enter:
You are Sam, a friendly sales analyst for a retailer that sells computers, audio, and display products. Answer questions using the Orders table: orders, customers, products, quantities, revenue, and profit.

When responding:
- Speak in a clear, upbeat, plain-English style, like a trusted colleague
- Lead with the answer, then add one sentence of context
- Use exact figures from the data, and format revenue and profit as dollars
- If a question can't be answered from the Orders table, say so rather than guessing
Set a greeting
Click Greeting, enable Fixed, then enter:
Hi, I'm Sam. Ask me about orders, revenue, and profit by product, category, customer state, or month.
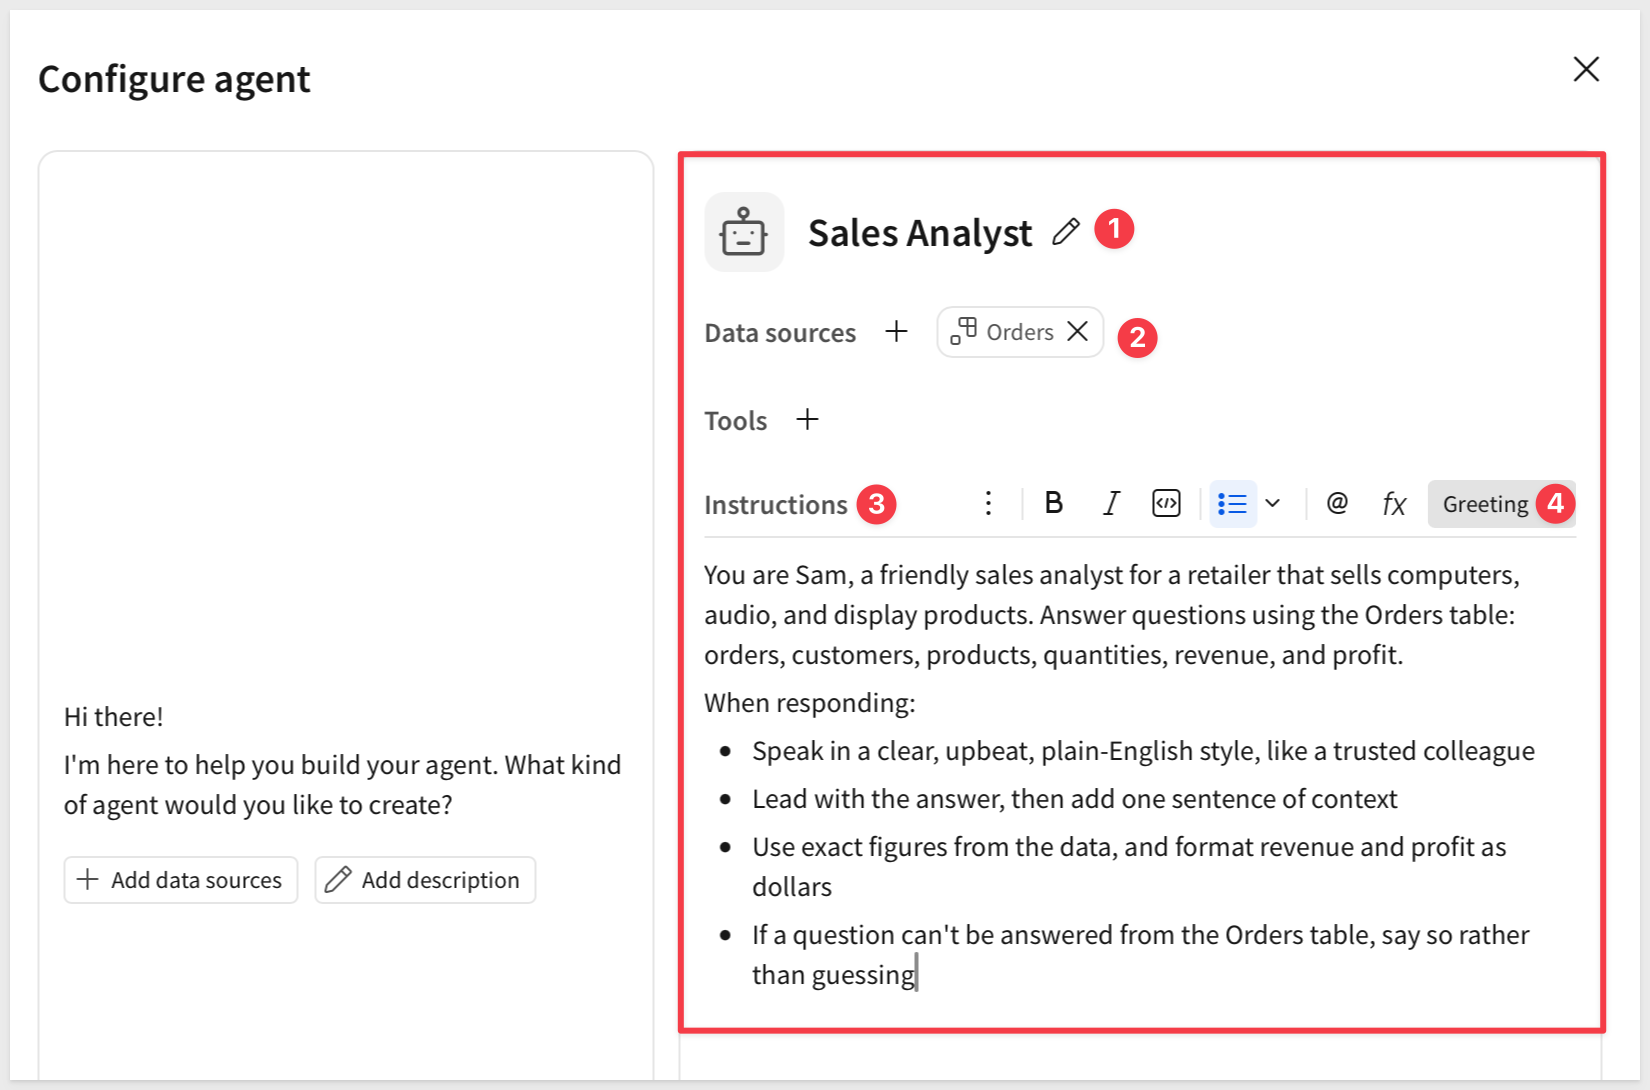
Click Save. Sales Analyst now appears in the Agents panel with a data source and instructions attached.
Add a chat element
A chat element is the interface that puts the agent in front of a user.
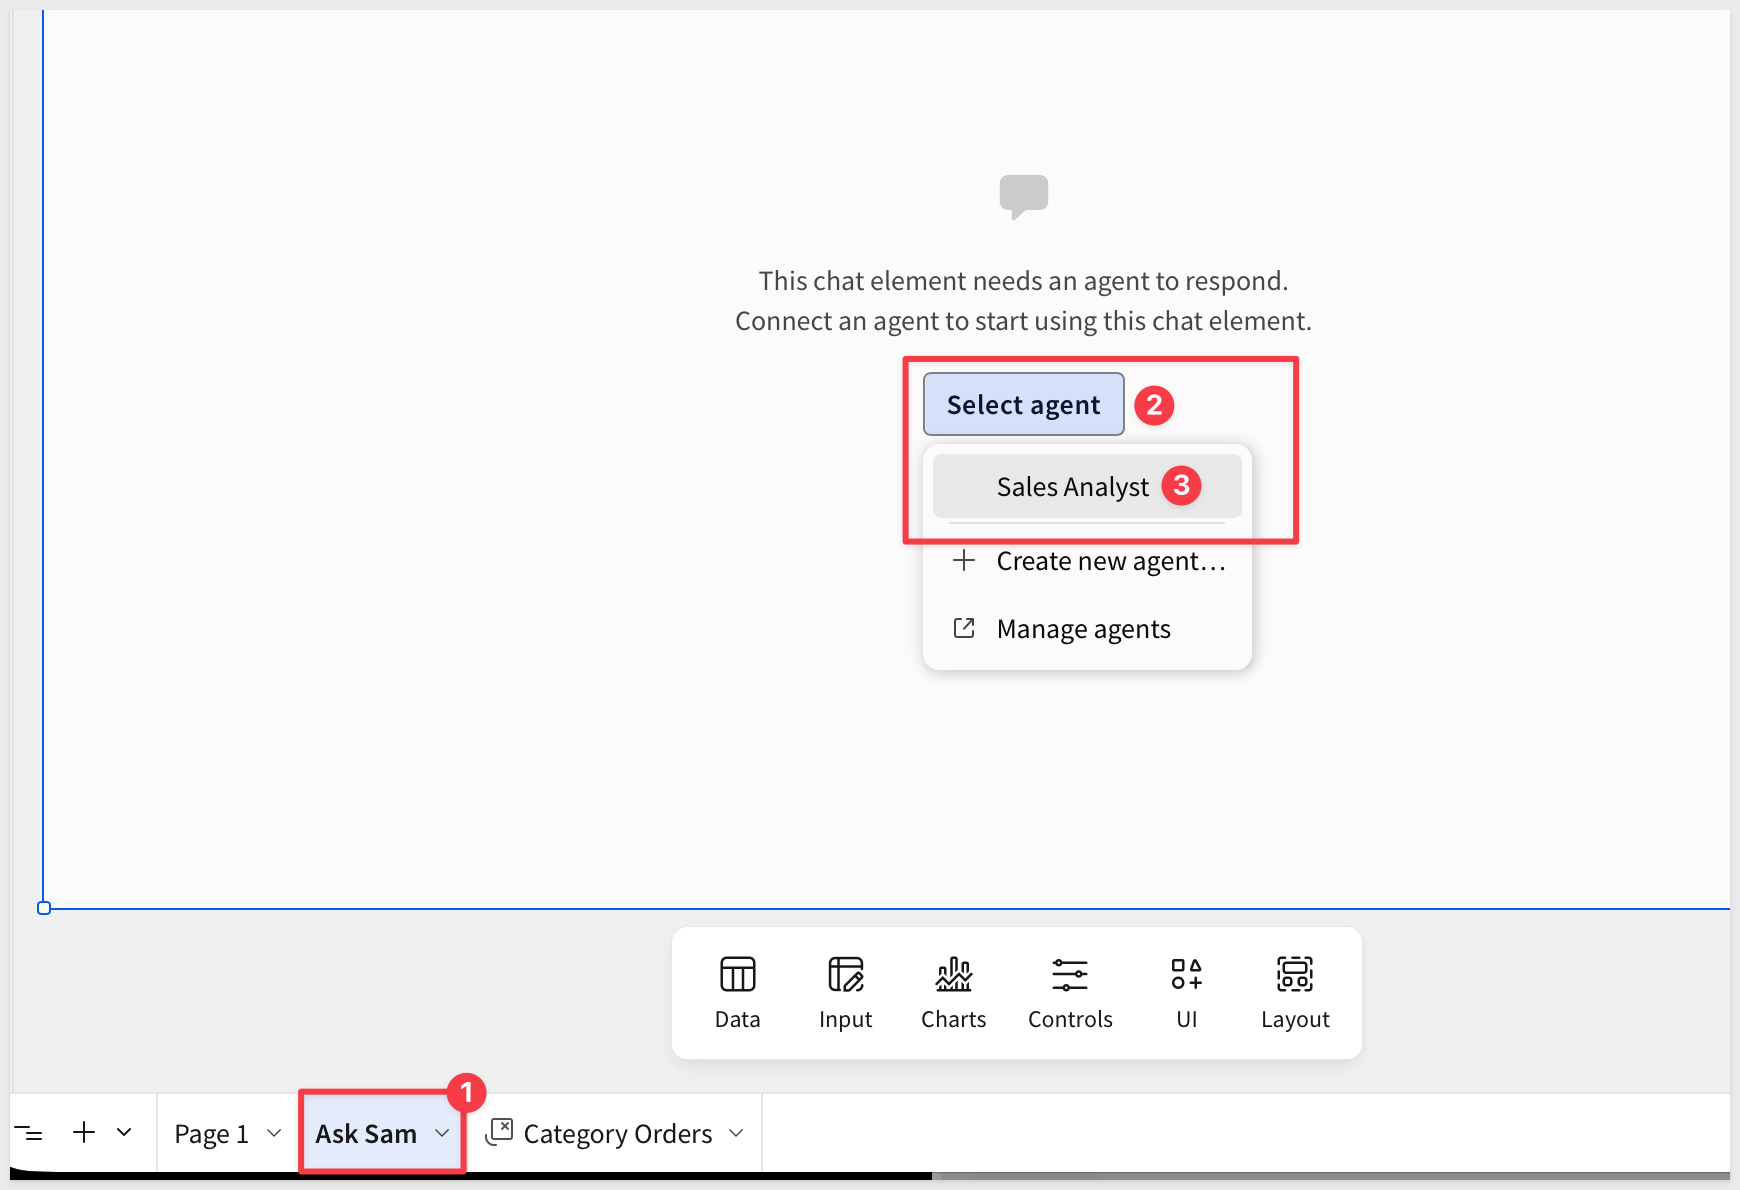
Click + next to the page tabs to add a new page and rename it to:
Ask Sam
On the new page, use the Element bar to add UI > Chat. With the chat element selected, choose Sales Analyst as its agent.
Ask a question
Click Publish. In the published view, ask:
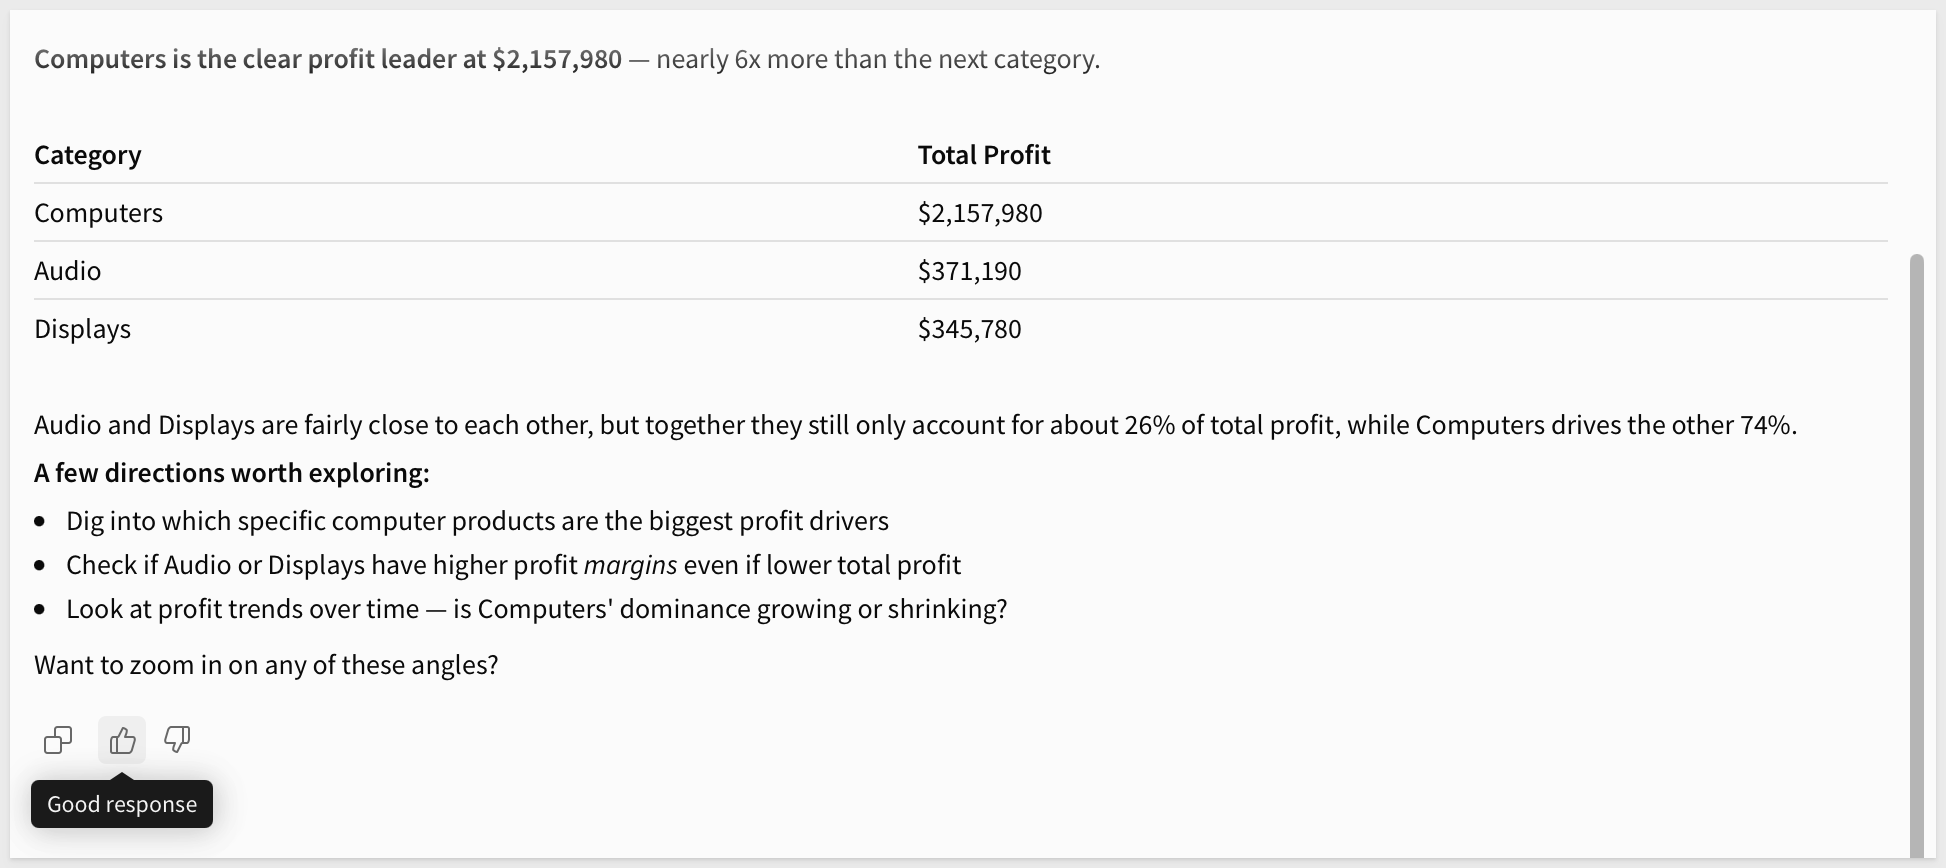
Which product category earns the most profit?
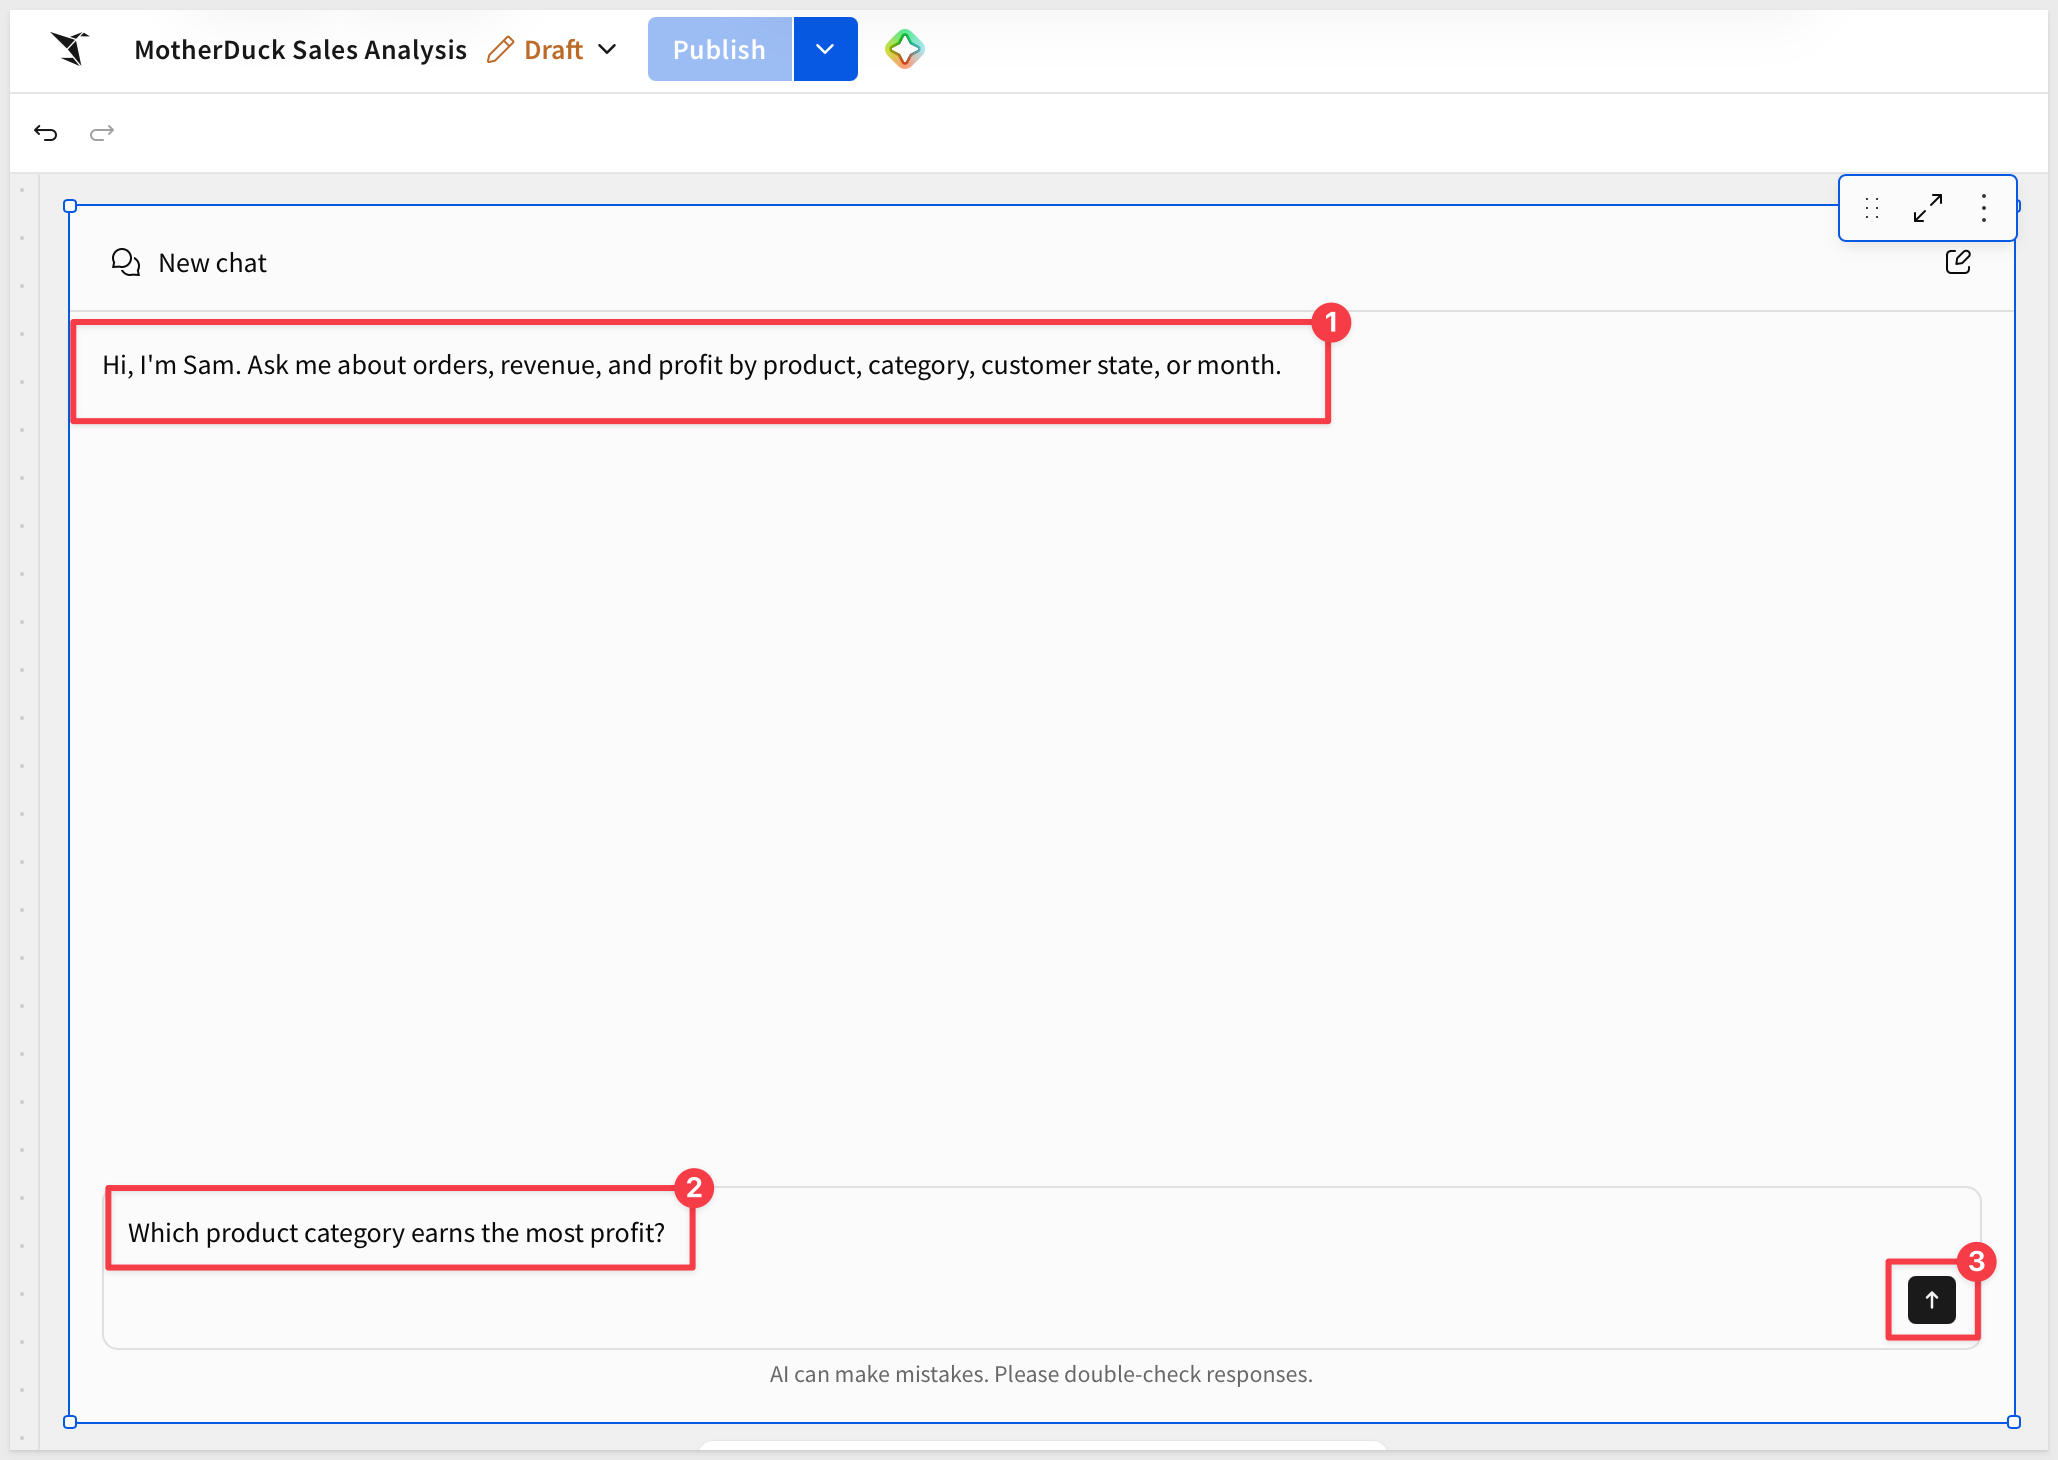
This is the same question we asked Sigma Assistant. The value matches, but Sam leads with the answer and adds one sentence of context, in the voice we defined.
Now test the boundary with something the data cannot answer:
Did our last email campaign increase sales?
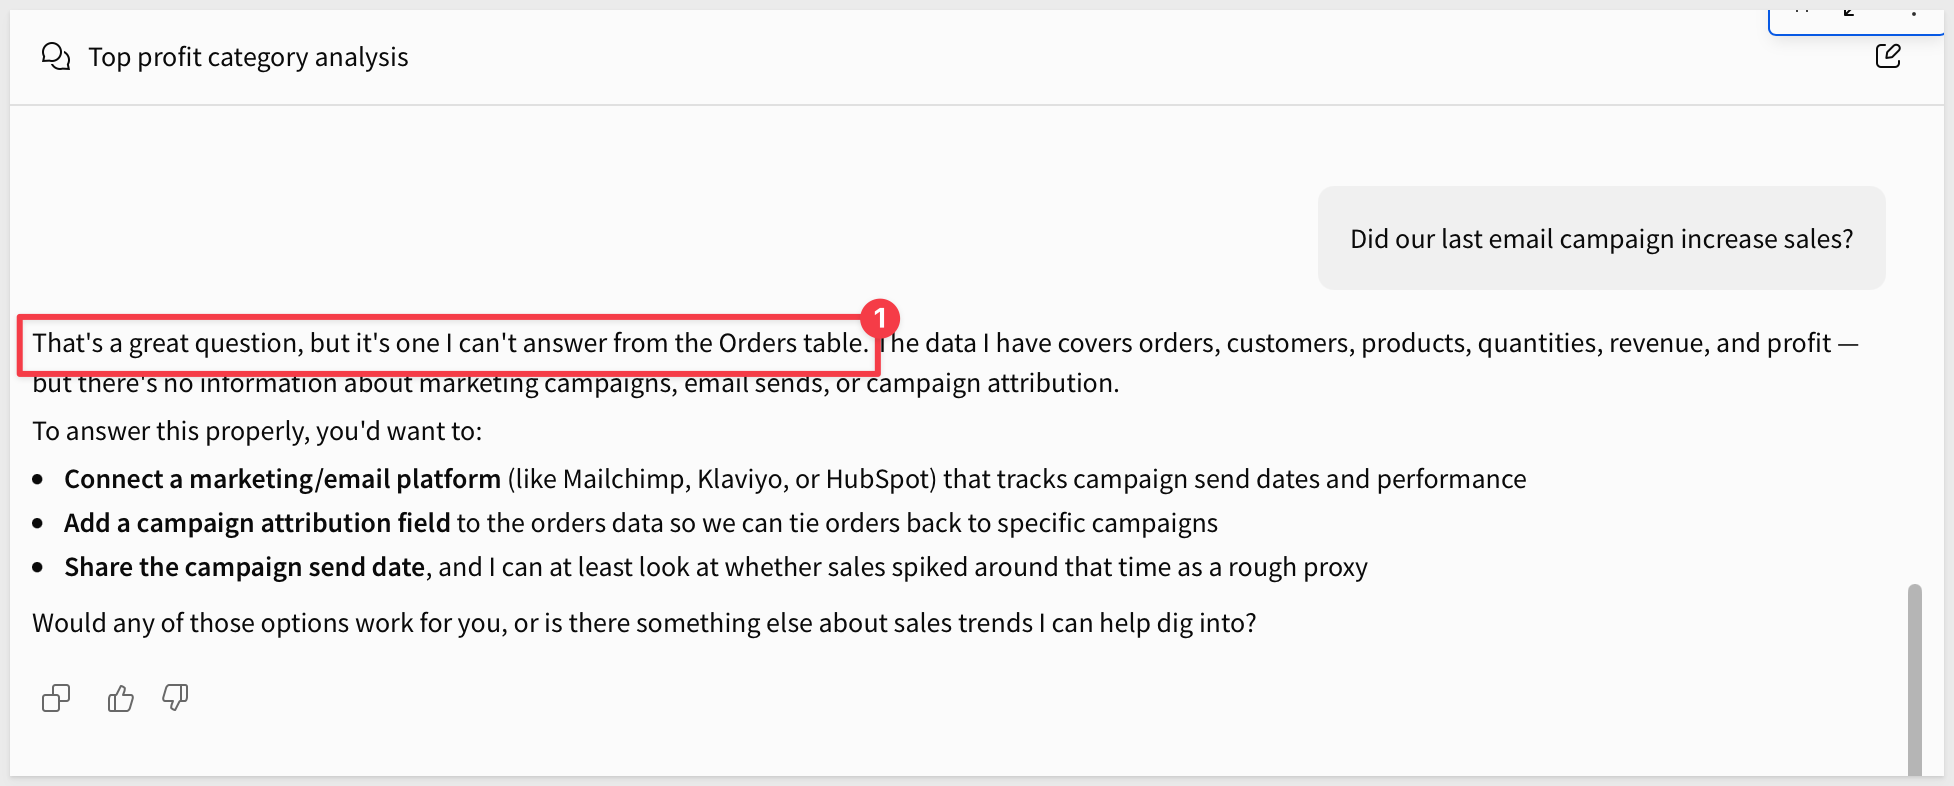
The Orders table has no campaign information, so Sam should say it does not have that information instead of guessing. If it answers as though it does, make the last instruction more explicit.
For more information, see Chat with an agent
The workbook and agent are not the only way to reach our data. Because the MotherDuck Sales data model is published, anyone with access can ask questions of it directly from the Sigma homepage using Sigma Assistant, without opening a workbook first.
Start a chat
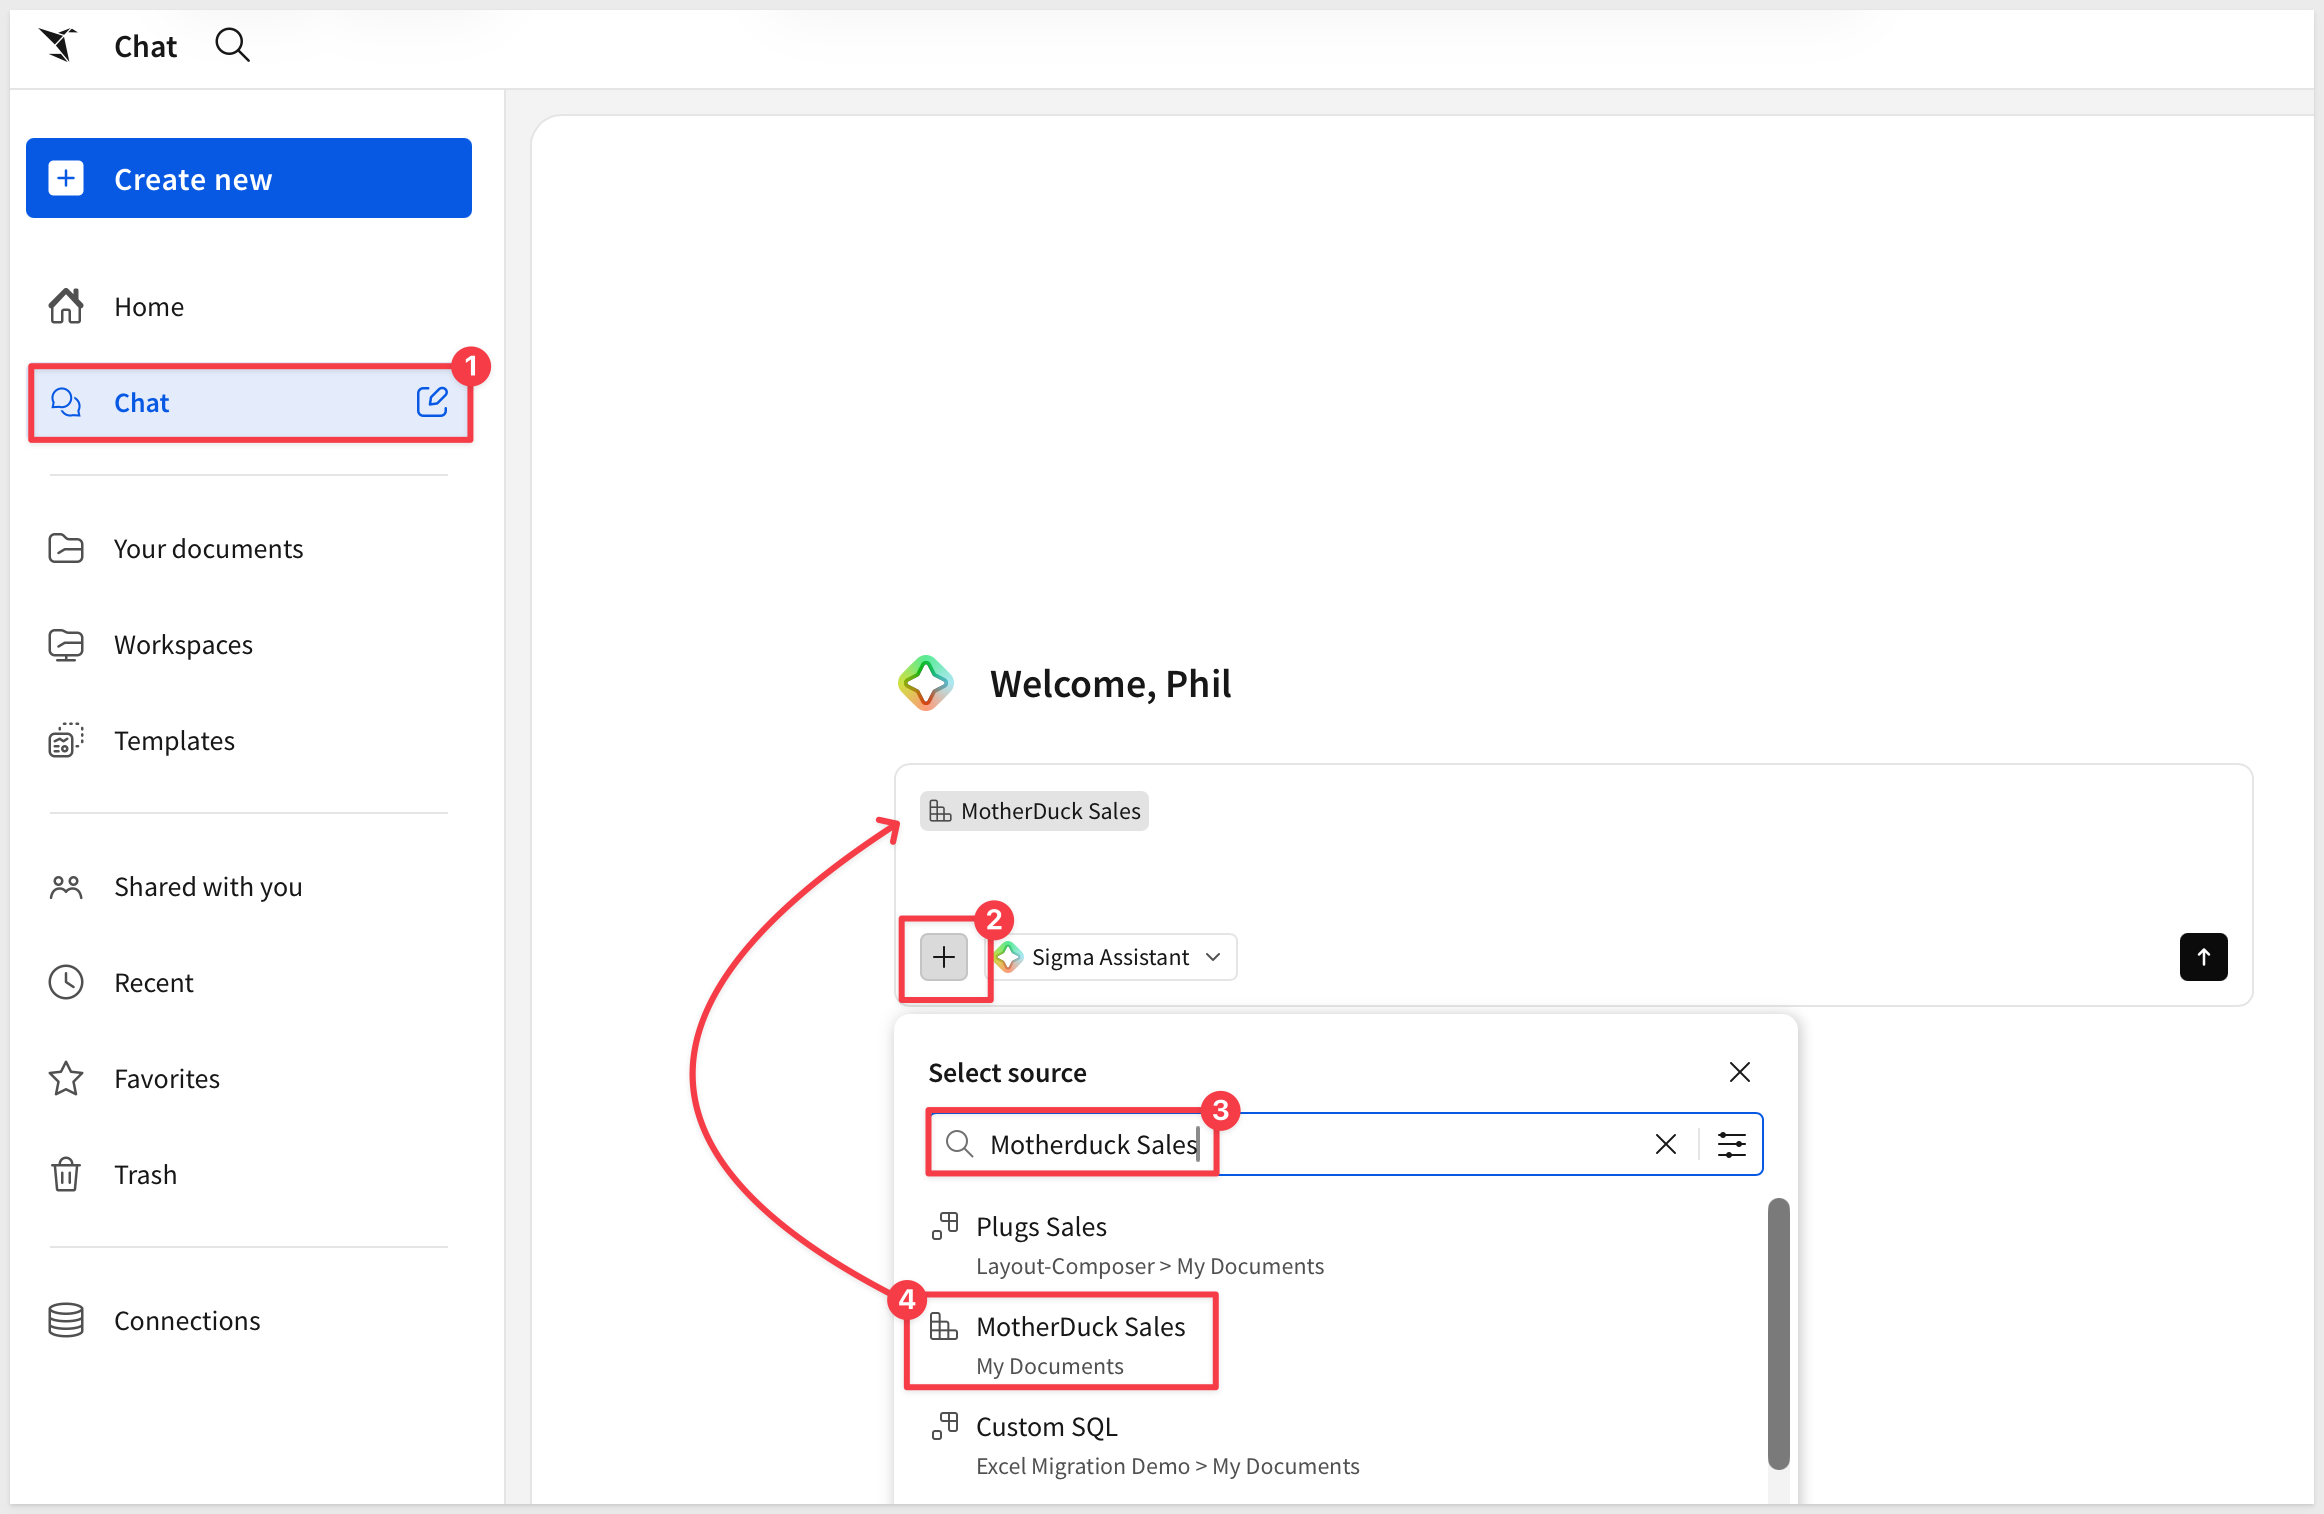
Click the Sigma logo to return to the homepage, then click Chat in the left menu.
Choose the data model
Select the MotherDuck Sales data model as the data source for the conversation.
Ask questions
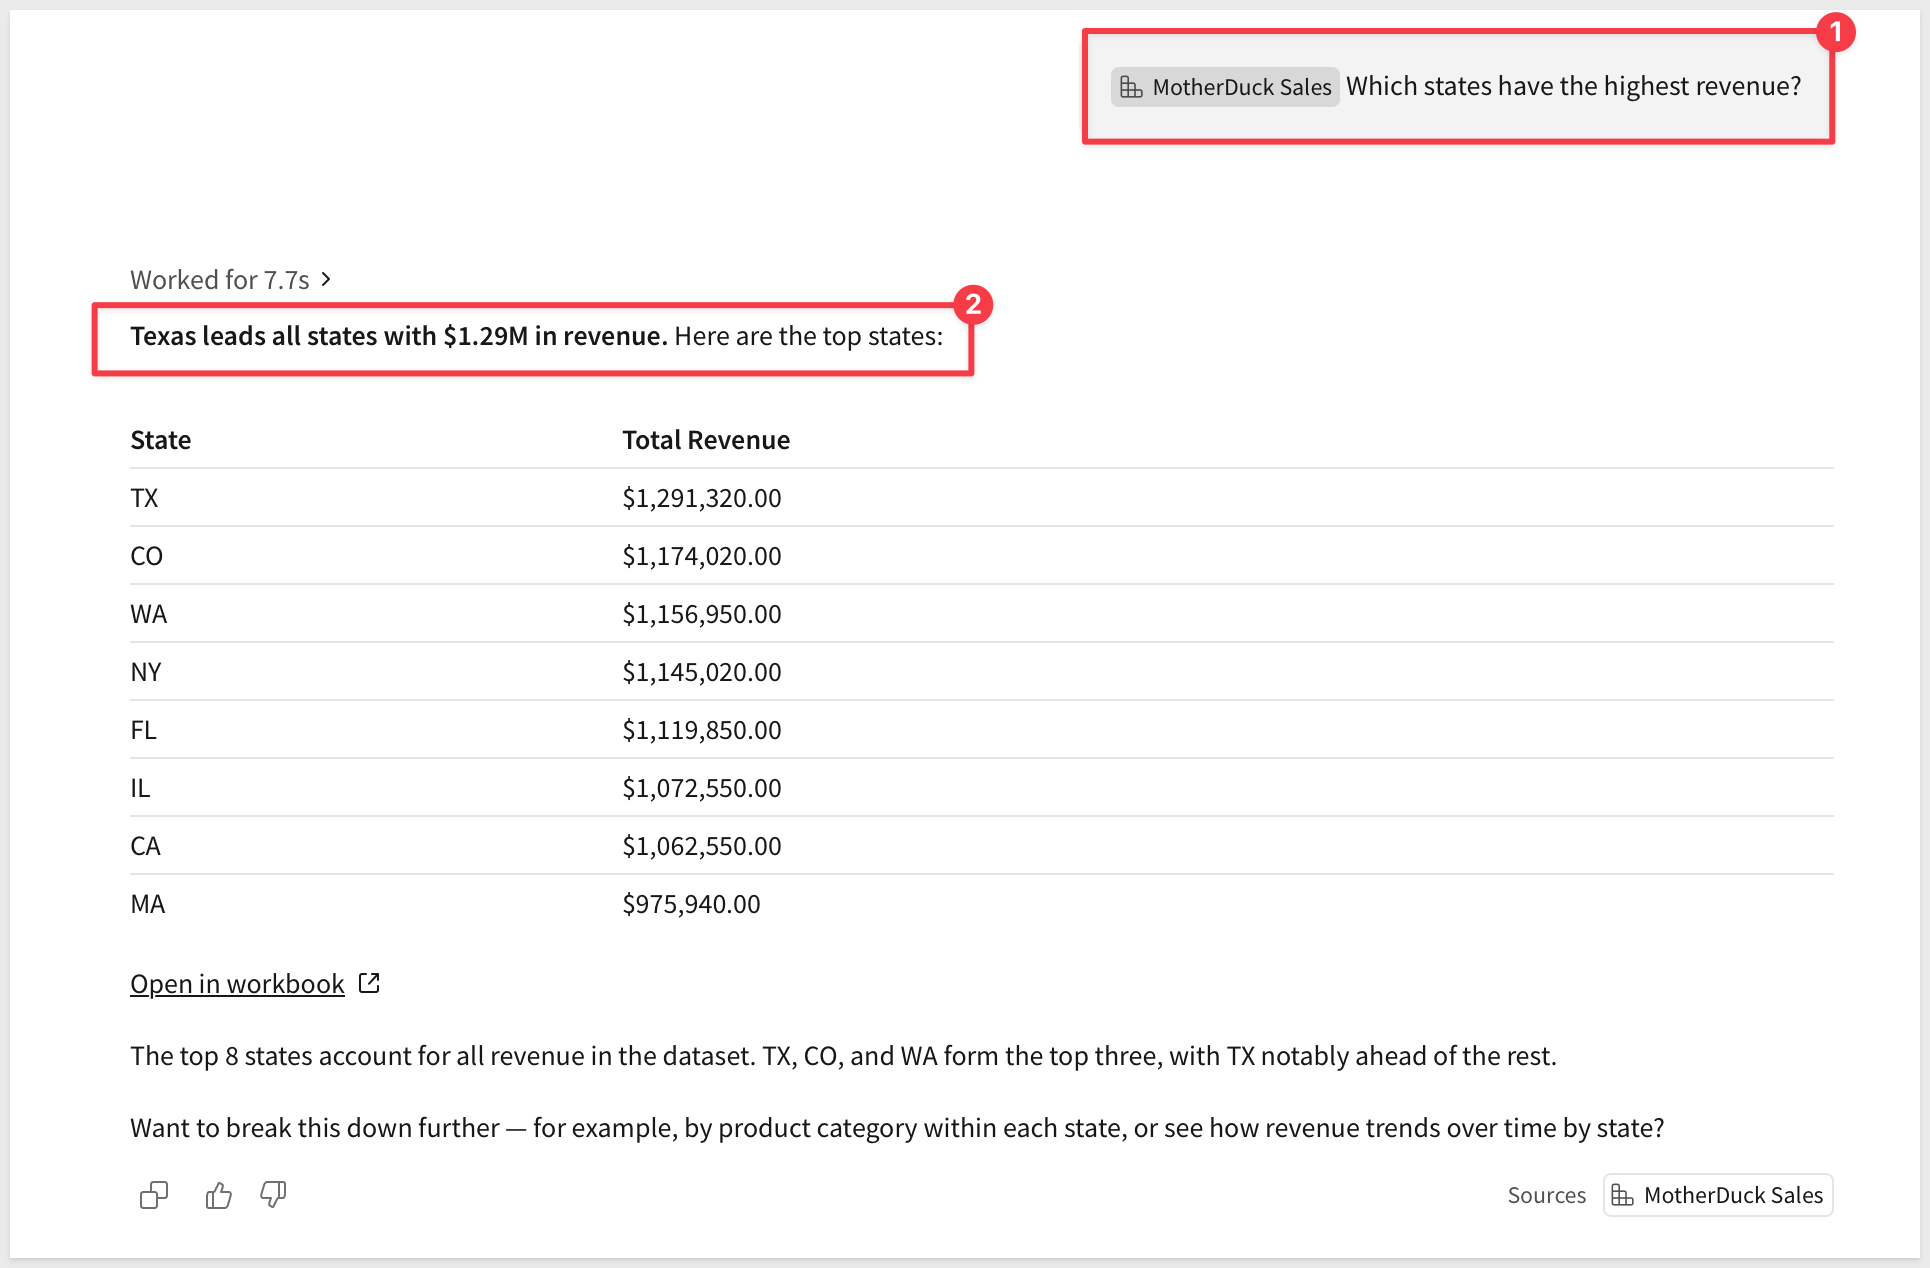
Ask:
Which states have the highest revenue?
Then ask a follow-up:
What was total profit by category?
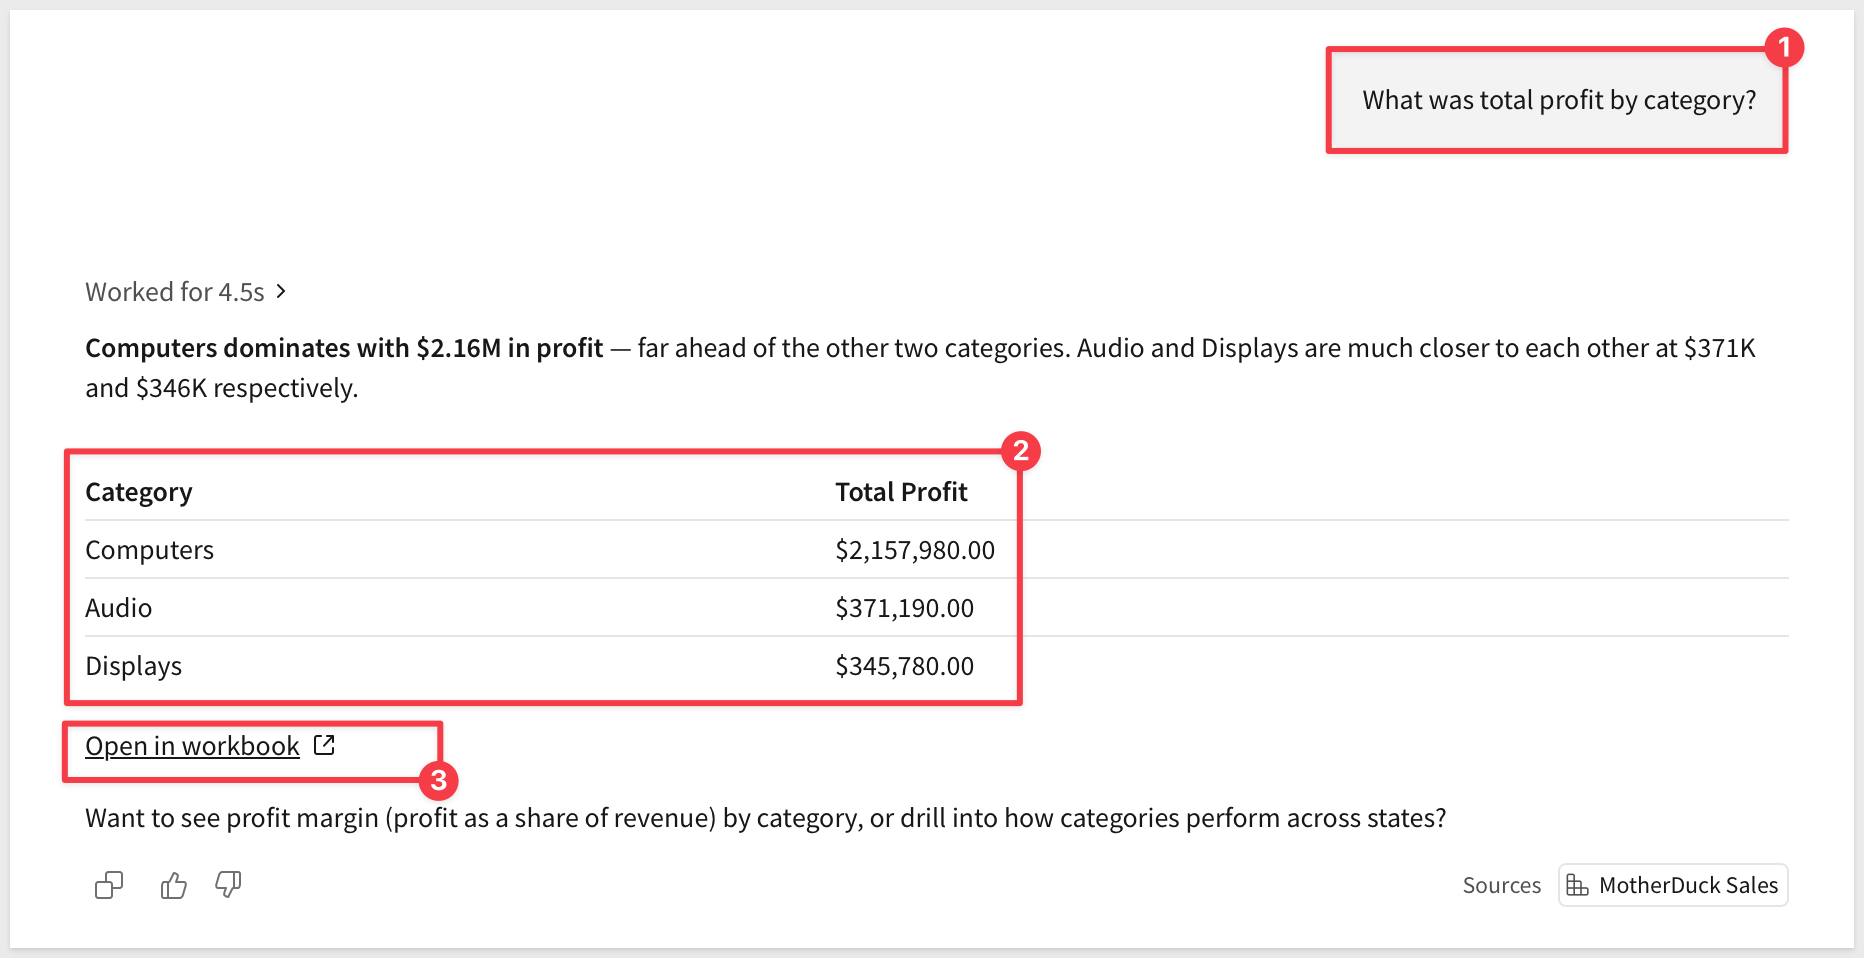
Click the Open in workbook link.
Sigma opens a new workbook with the Orders table grouped for us by Category.
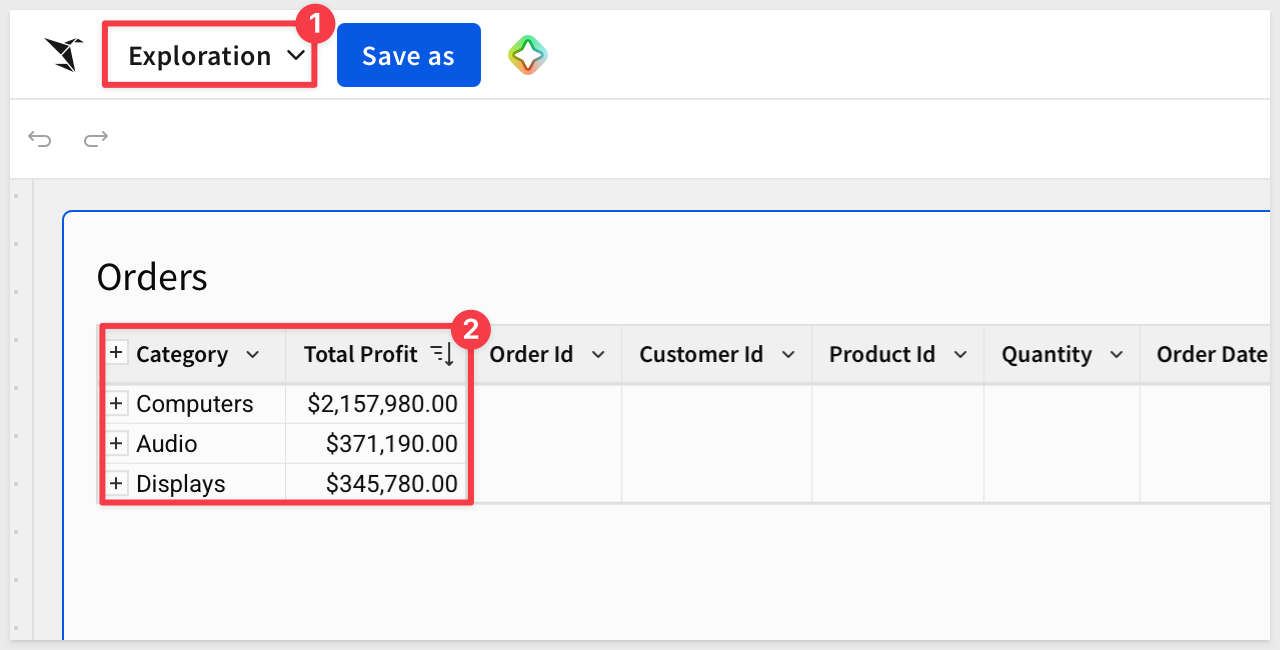
Compare the profit values with the Profit by Category chart in the workbook. They match because Sigma Assistant answers from the Revenue and Profit definitions we published in the data model, not from its own interpretation of the raw tables.
The Sigma connector for Claude lets you ask questions of your Sigma content and data models from Claude, with Sigma's permissions and governance still applied to every answer. It authenticates with OAuth, so no additional credentials or API keys are needed.
Enable the data source
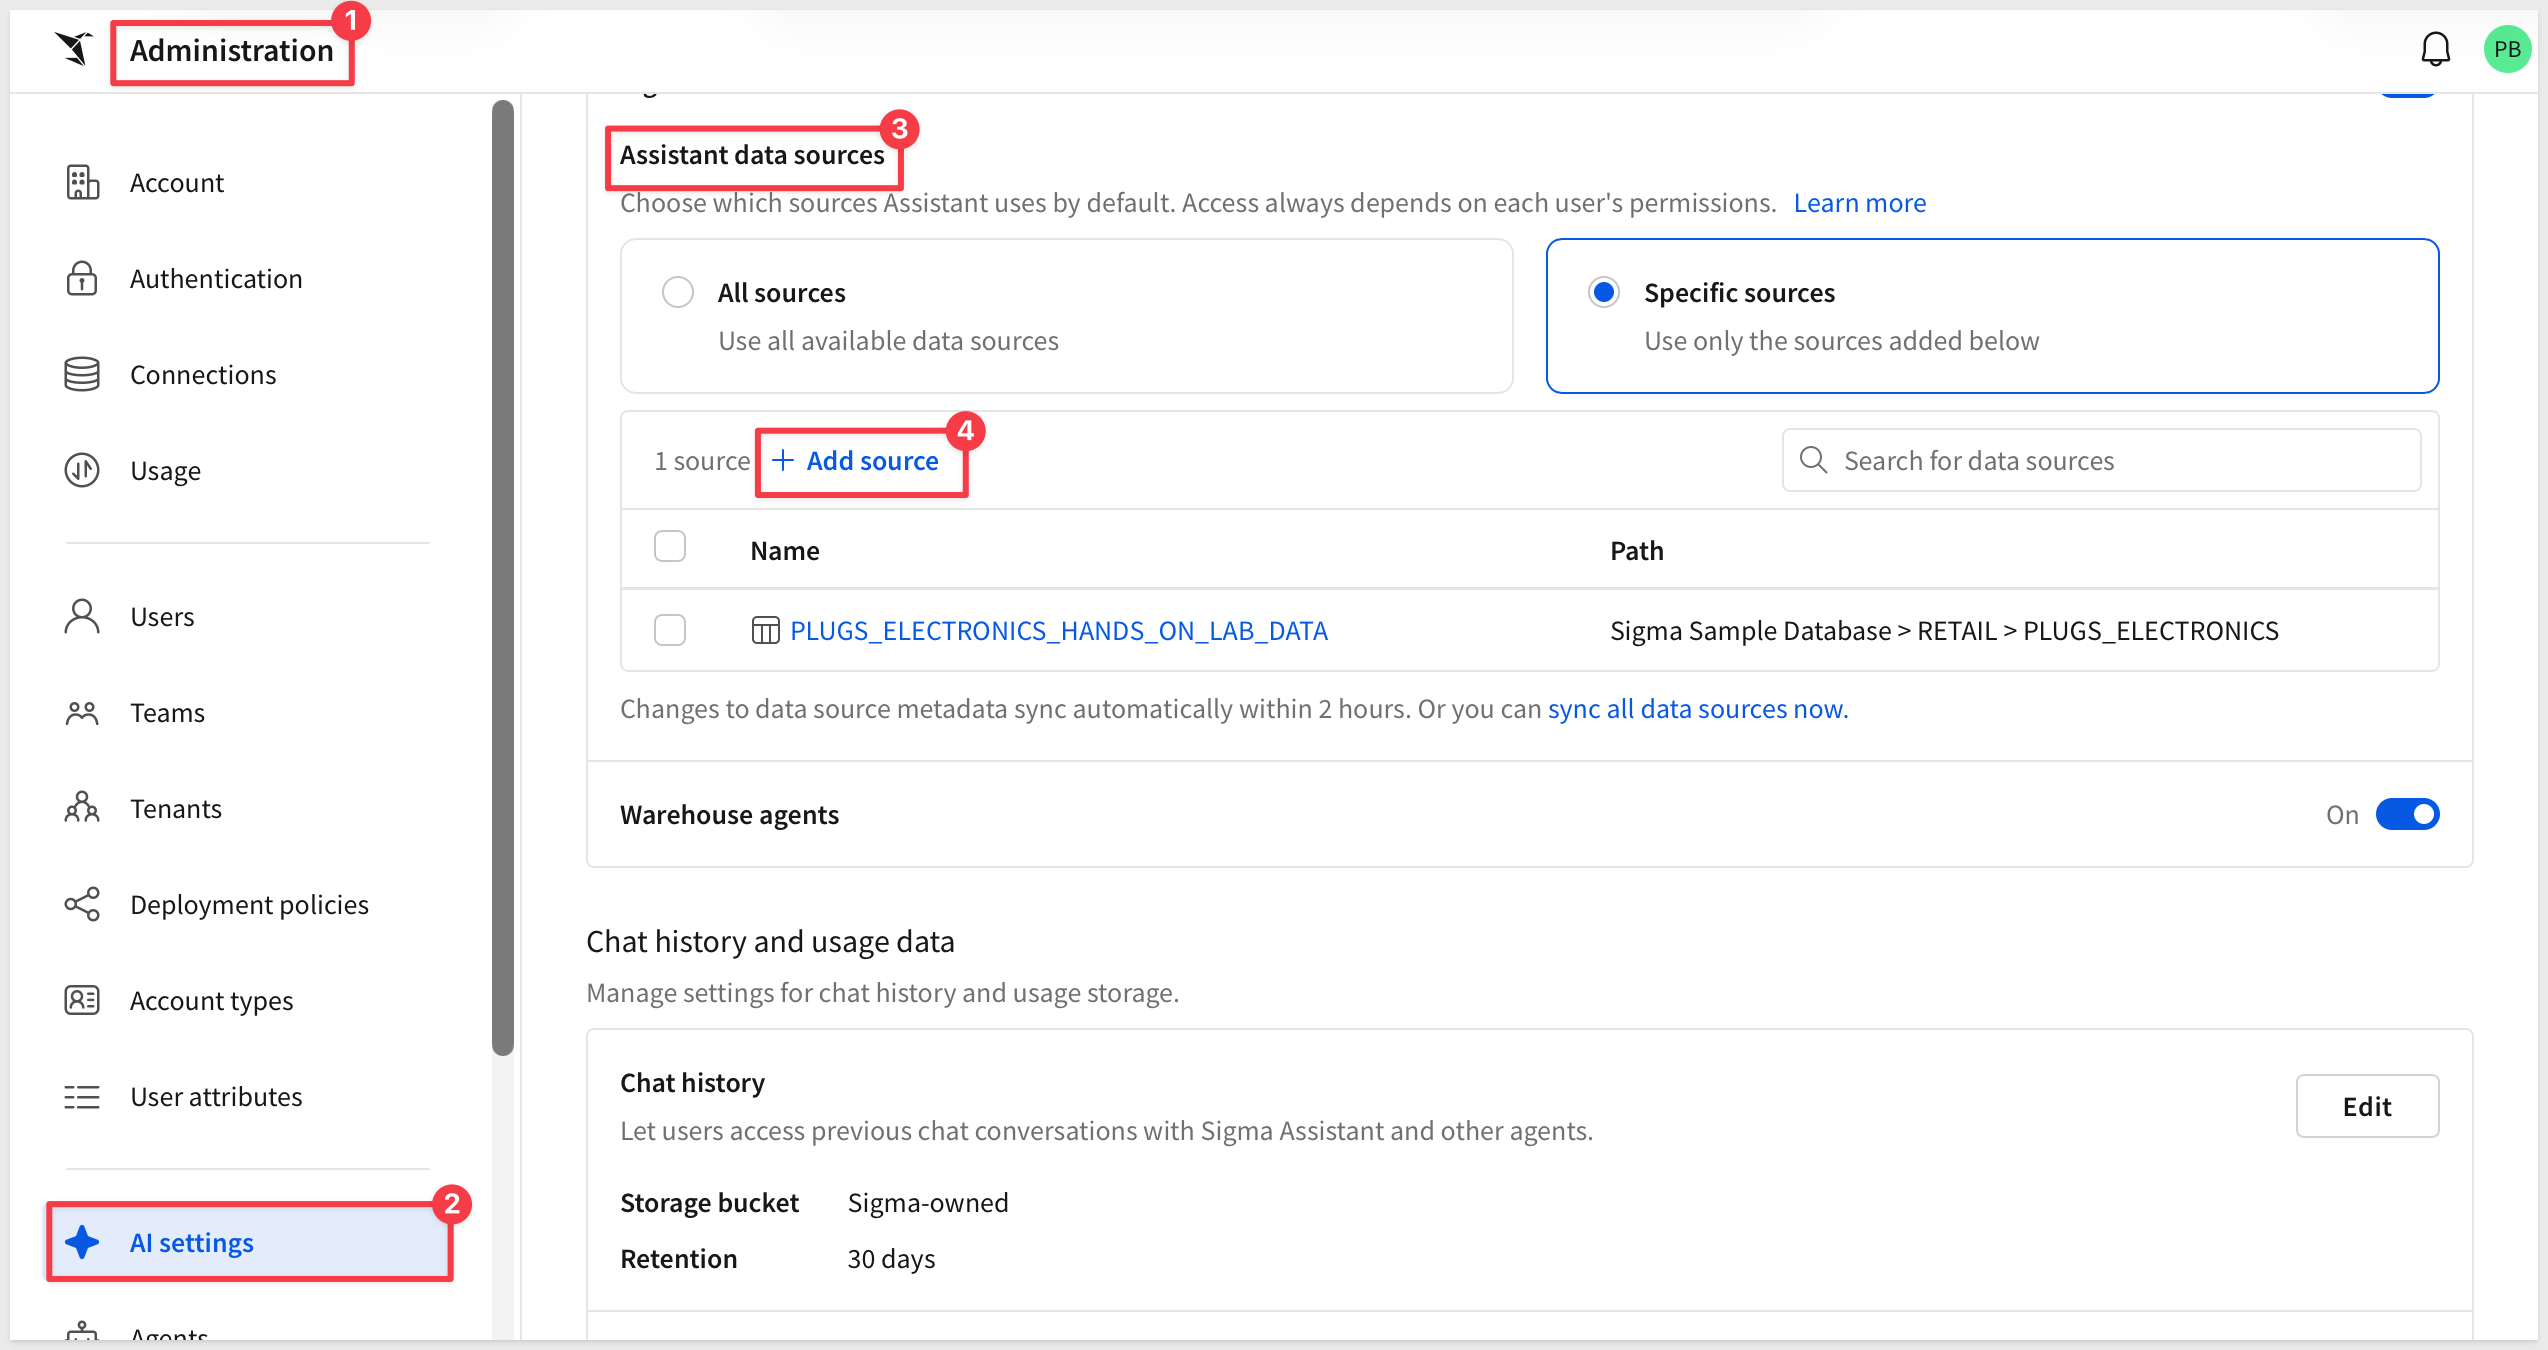
Before Claude can query our data, the data source must be enabled in Sigma's AI settings. This is a one-time step for a Sigma administrator.
In Sigma, navigate to Administration > AI settings and select the Assistant tab.
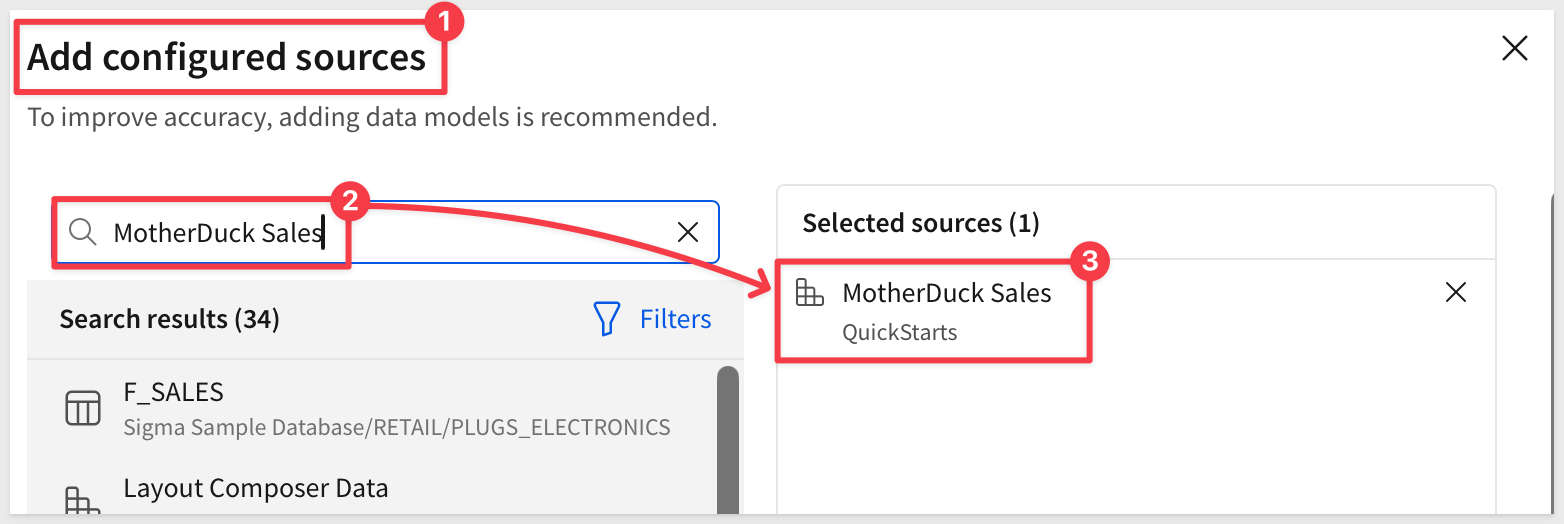
Click Add source, search for MotherDuck Sales, select the data model, and click Add.
Get the connection details from Sigma
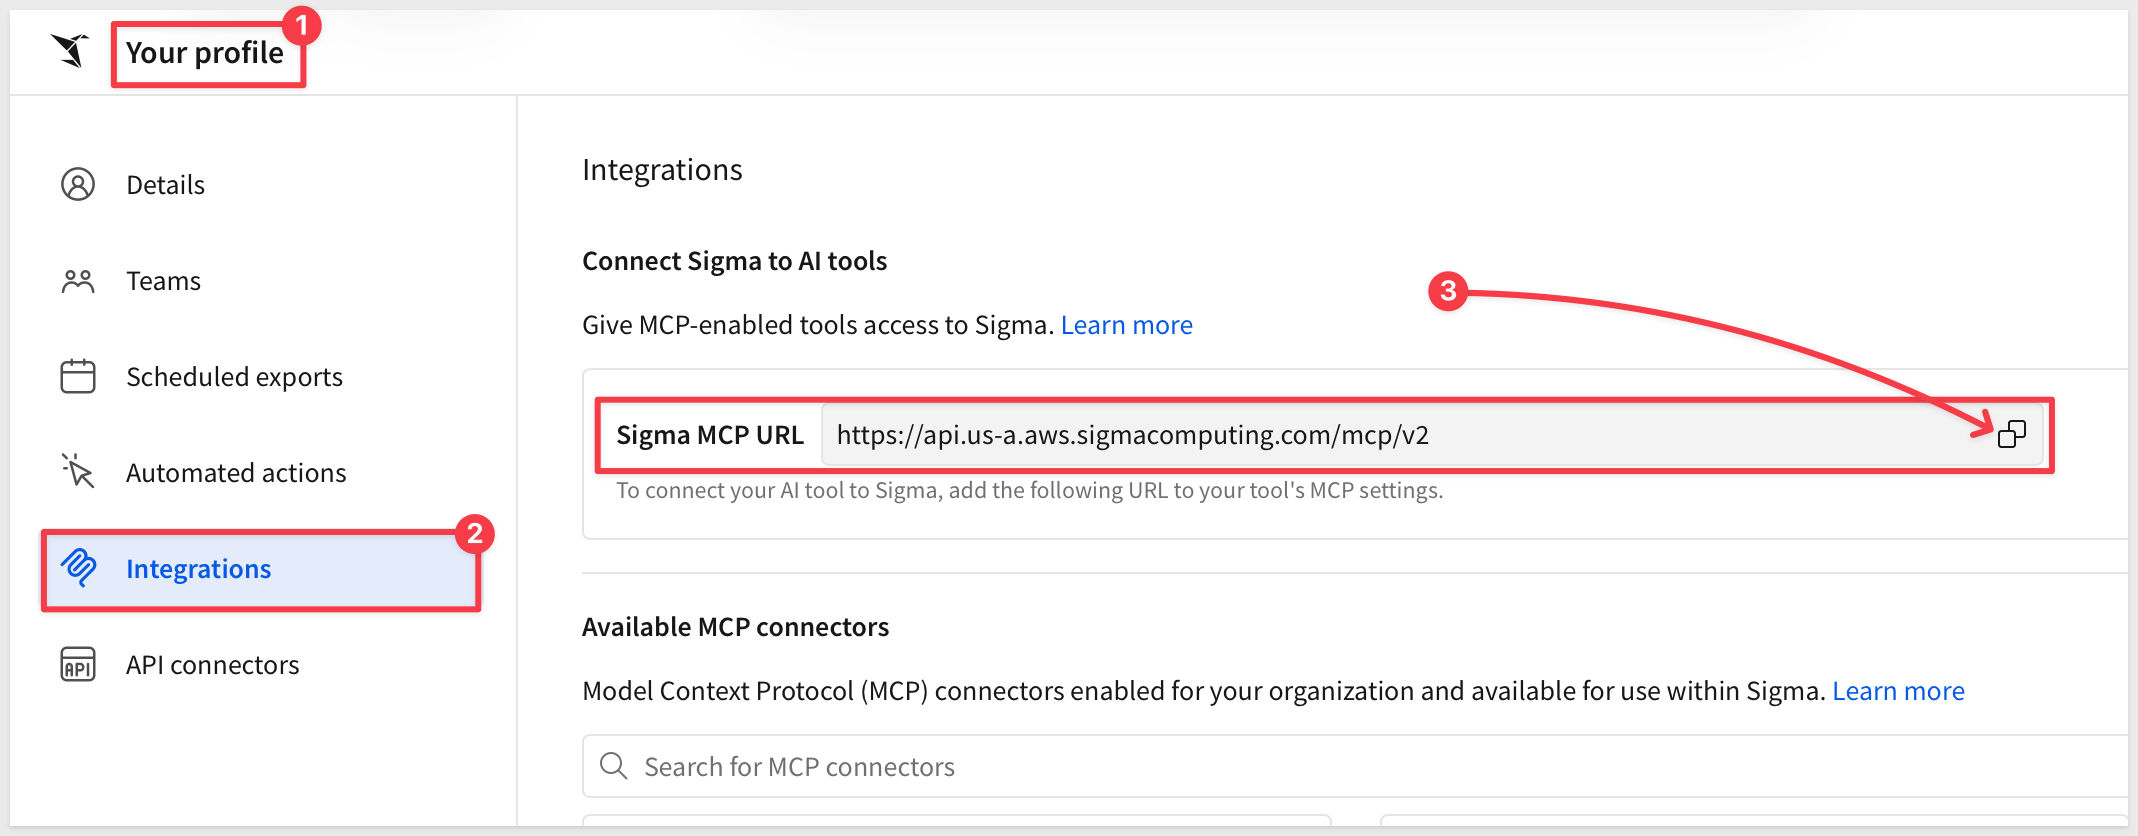
We need two values from Sigma to give to Claude. Copy both to a text file.
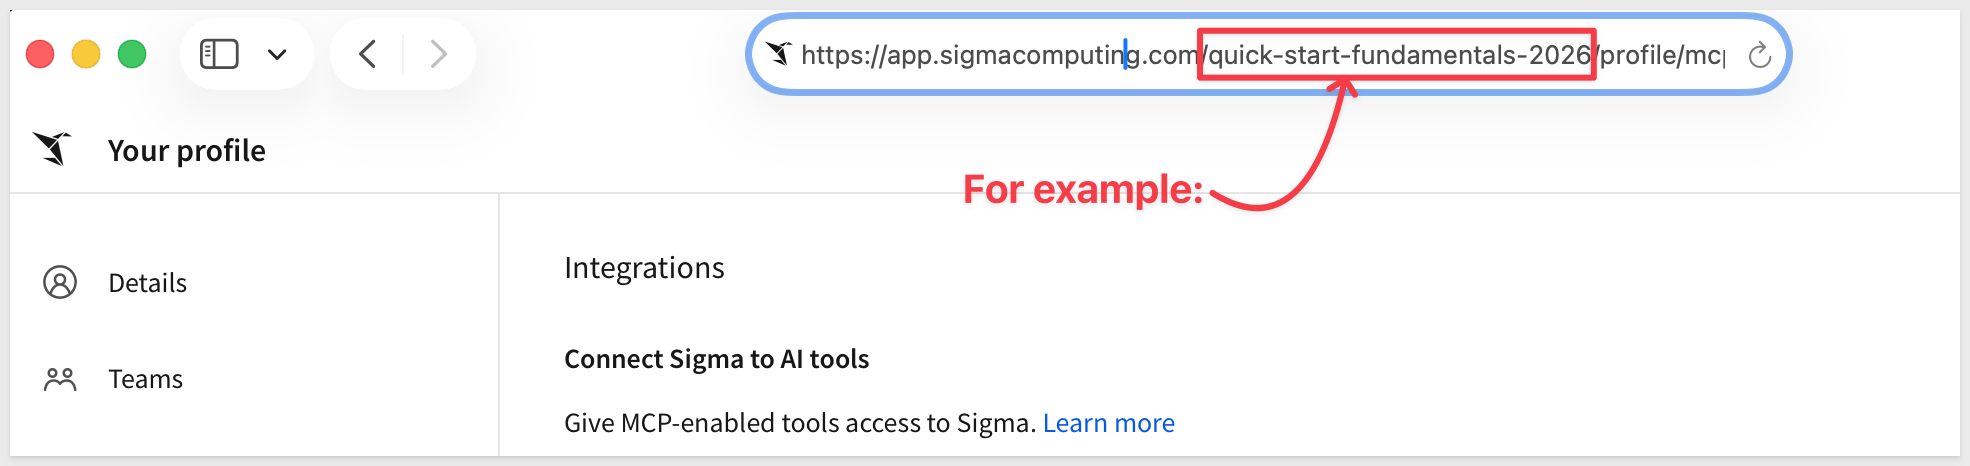
1. MCP URL: click your profile icon in the upper right corner and select Profile. Select Integrations, then under Connect Sigma to AI tools, click the copy icon next to the Sigma MCP URL.
2. Organization name: this is part of the URL Sigma uses in your browser.
Add the Sigma connector to Claude
Log into the Claude desktop app if you have it installed, or use your browser.
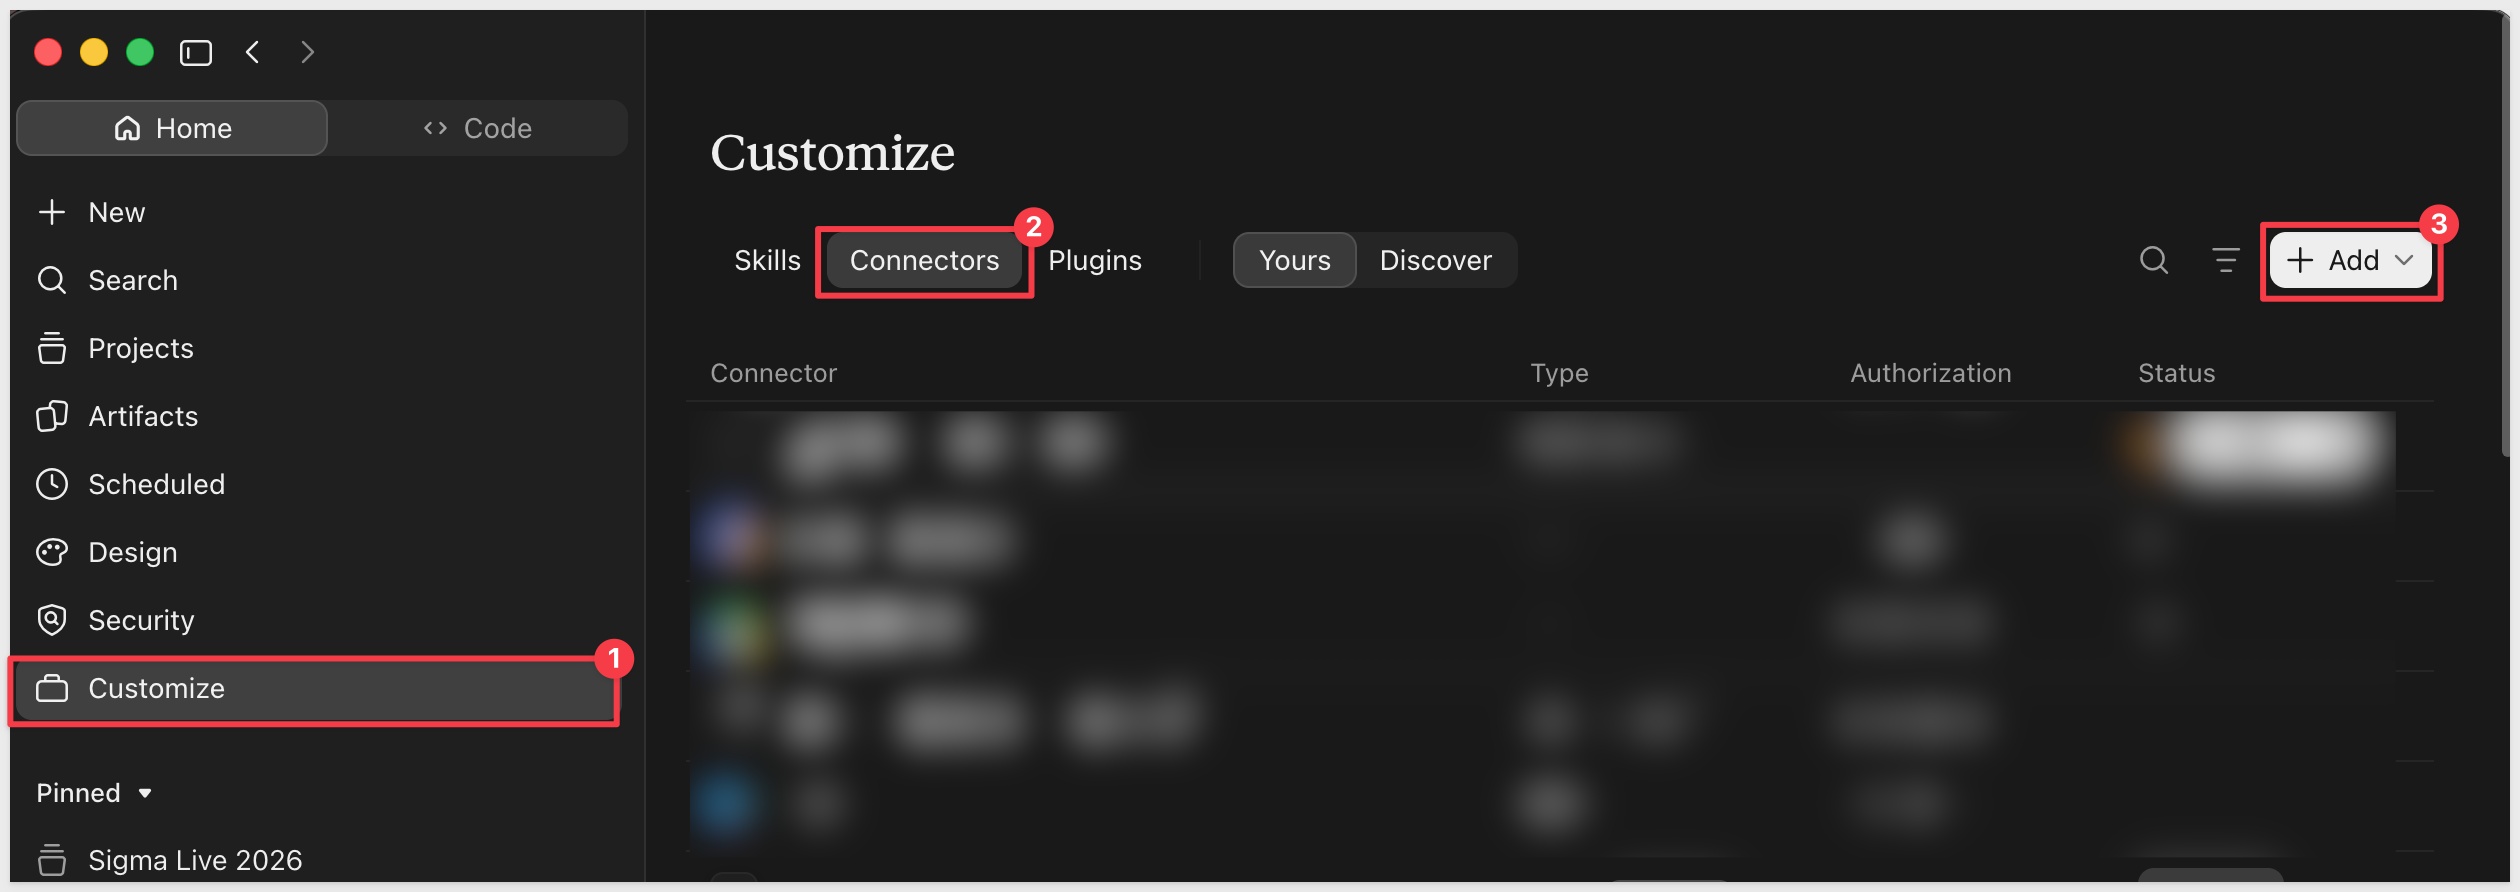
1. Click Customize from the left sidebar, select Connectors, click +, and select Browse connectors.
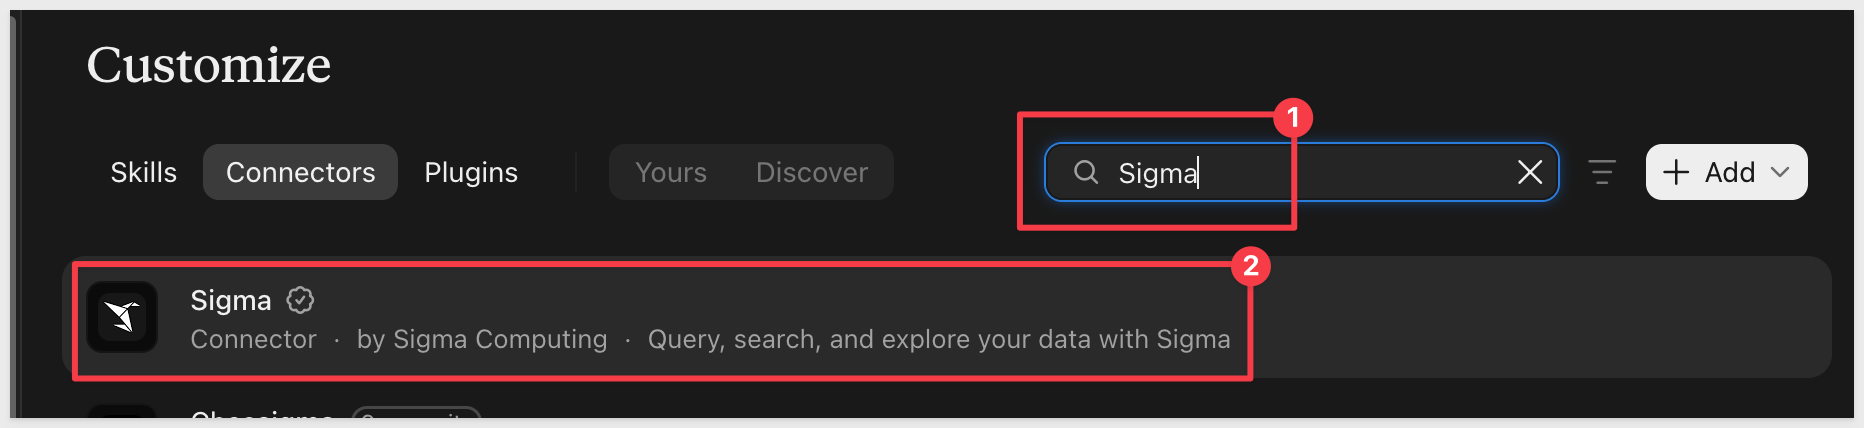
2. Search for Sigma and click to select it.
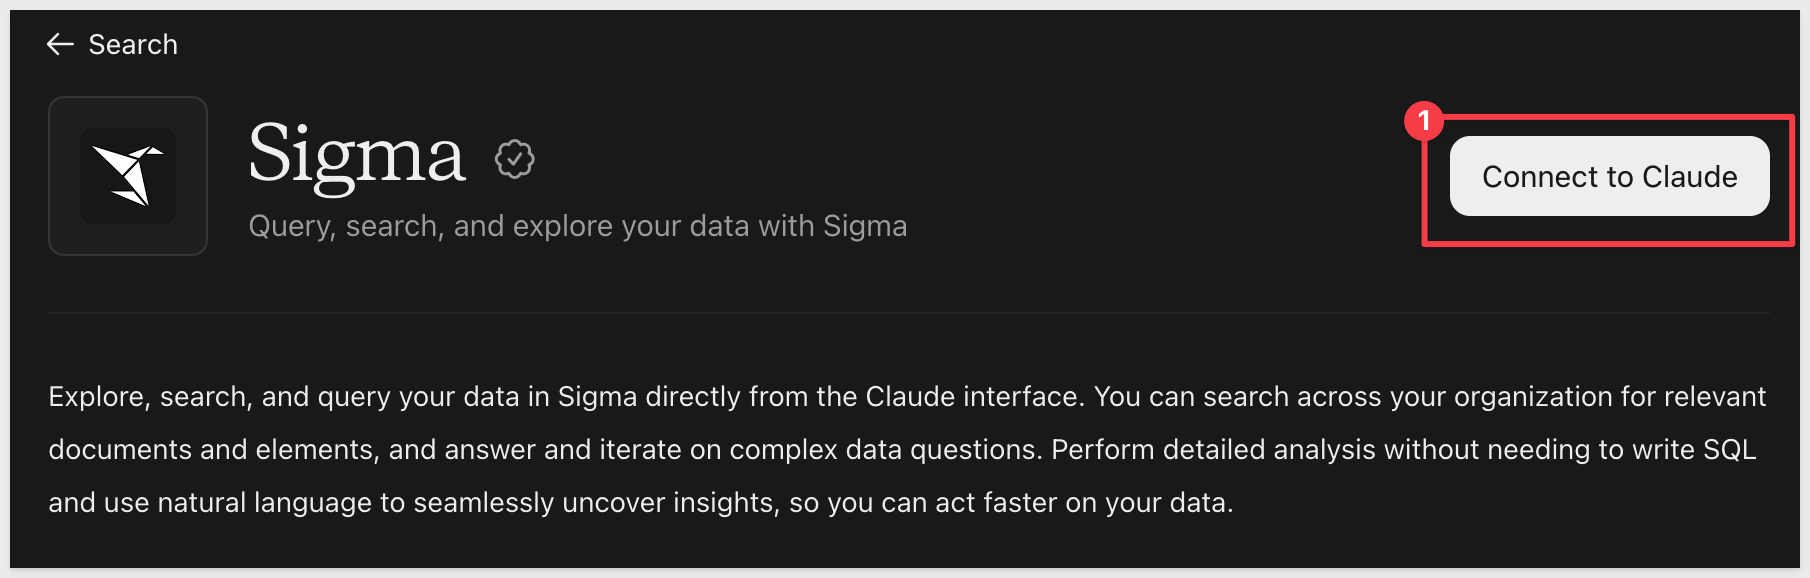
3. Click the Connect to Claude button.
4. Paste the MCP URL copied from Sigma and click Continue.
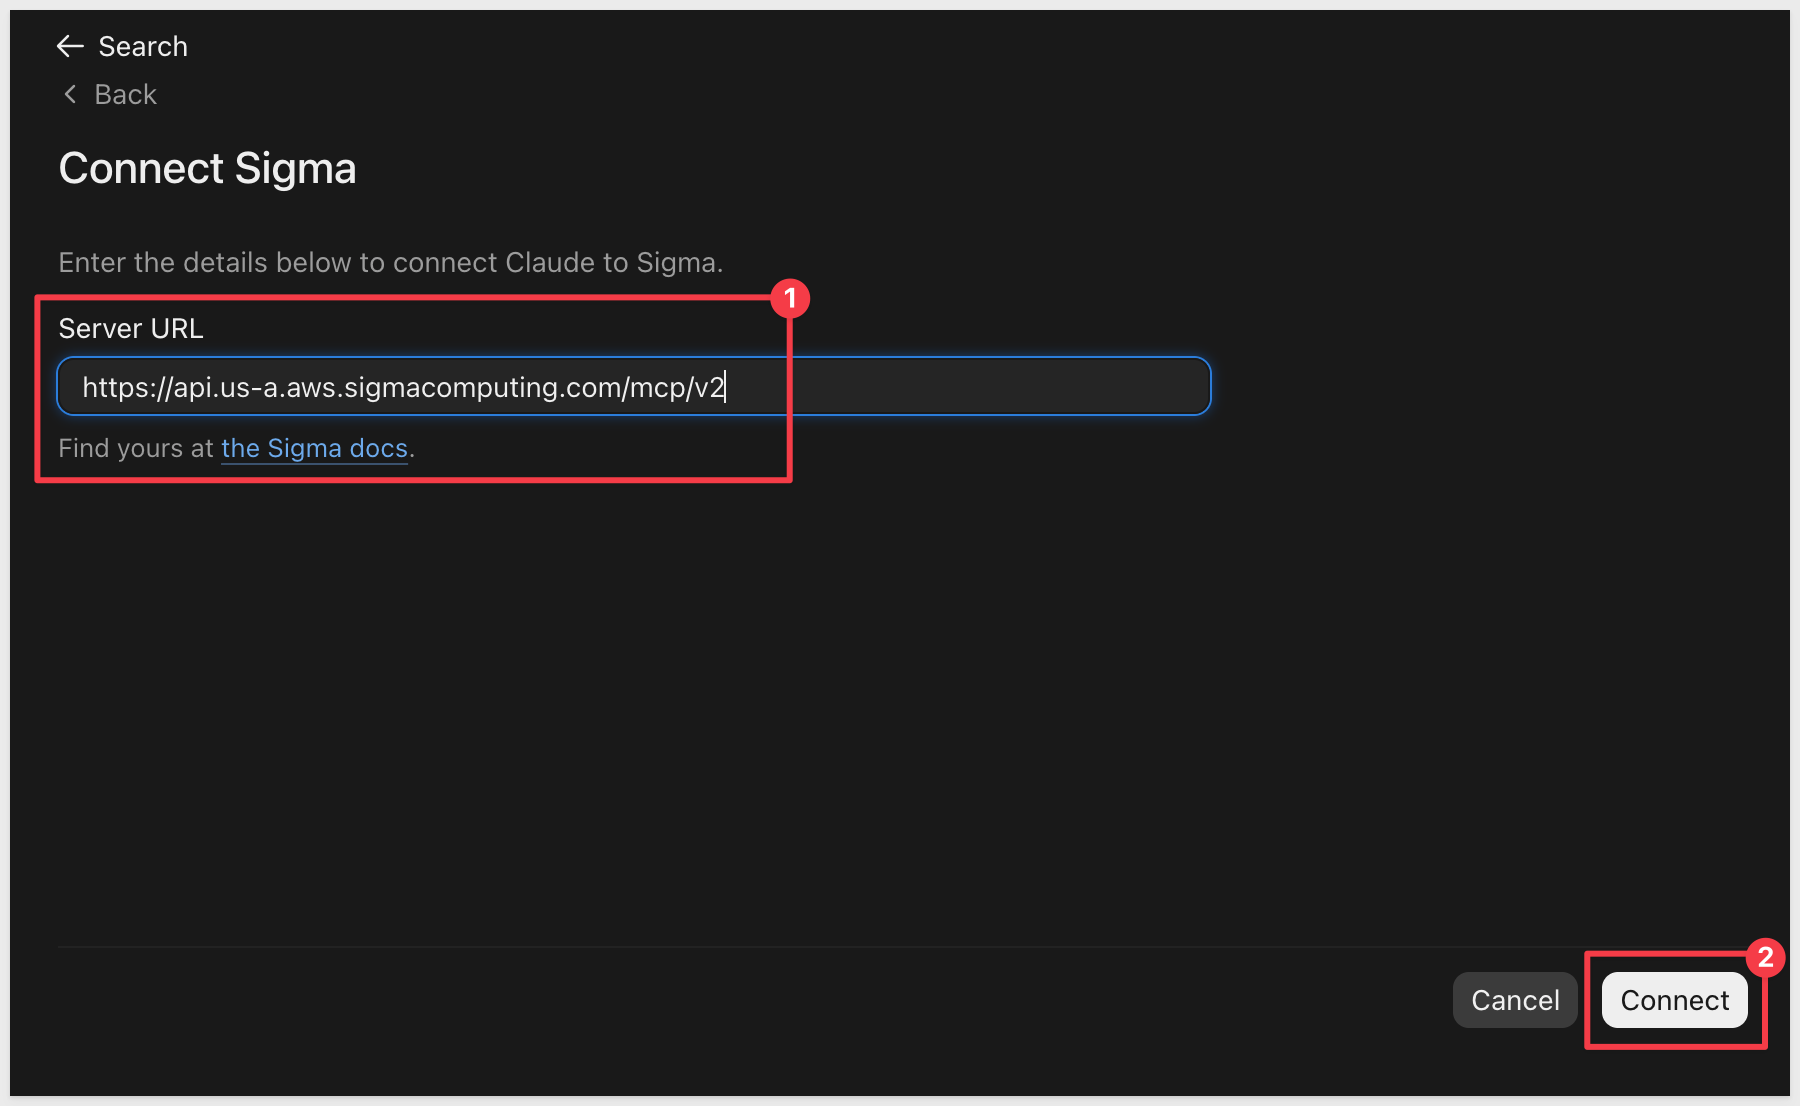
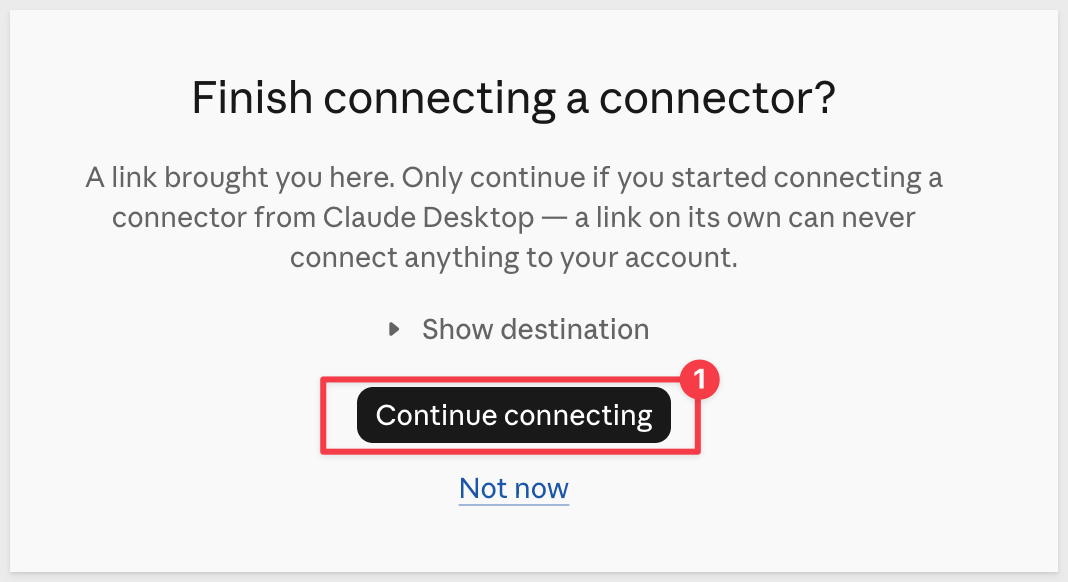
5. A browser tab opens where you can log into Claude.
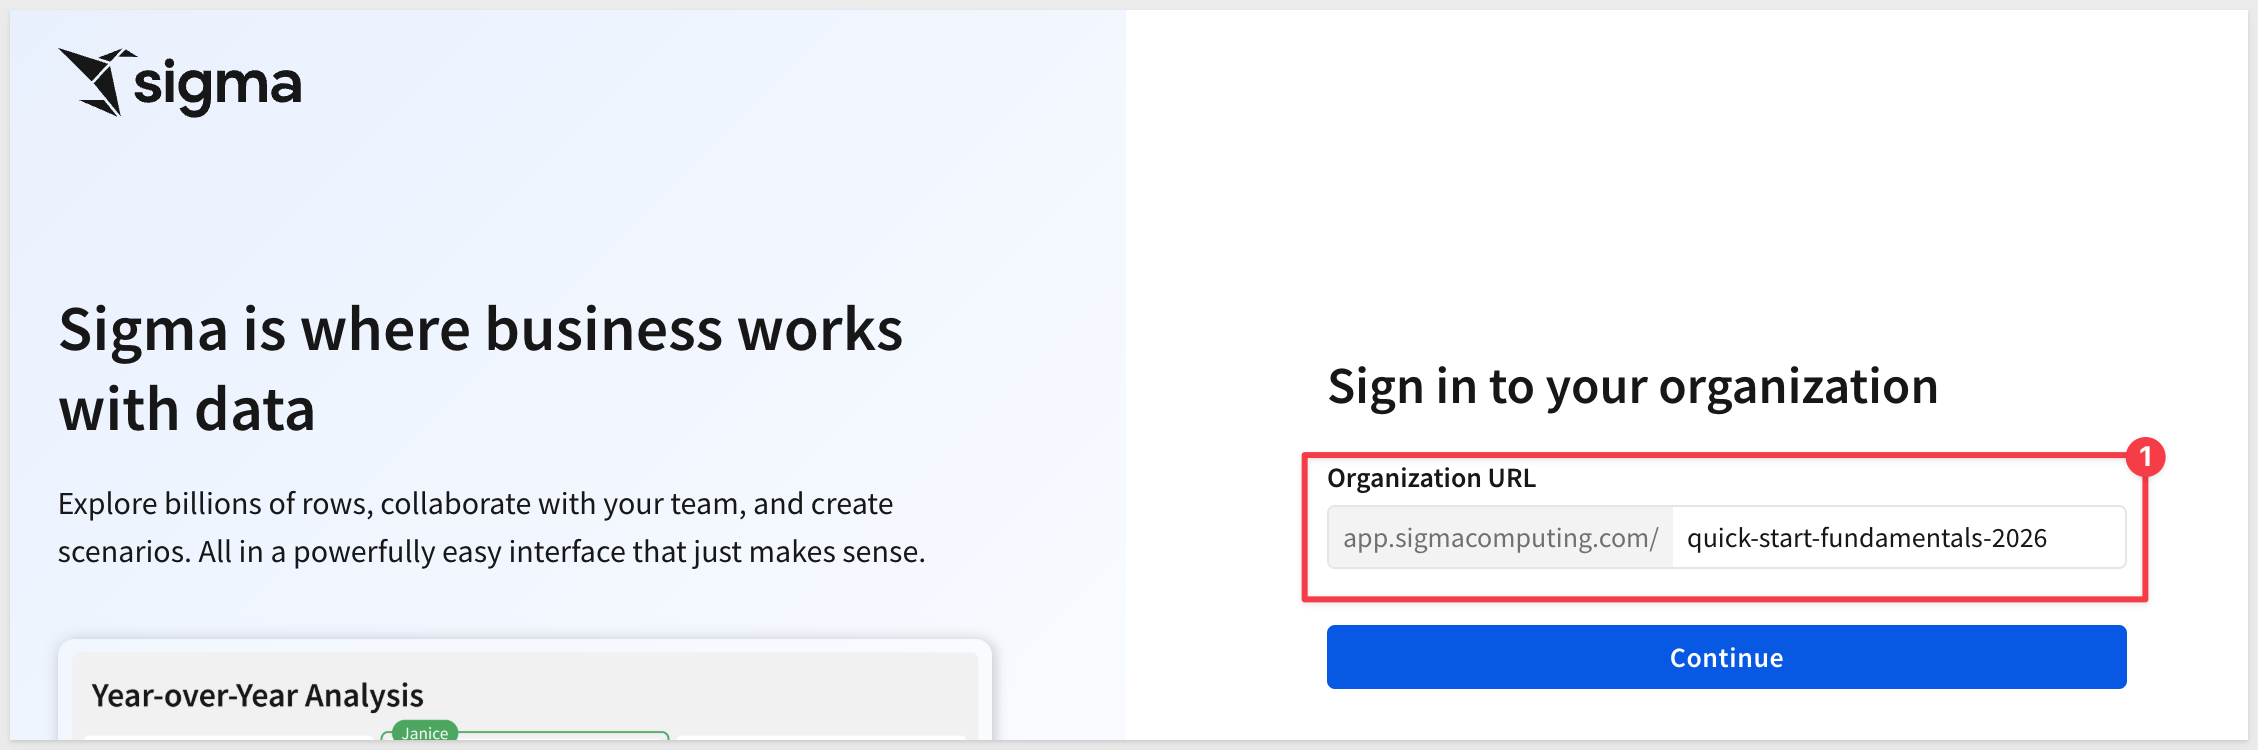
6. Enter your Sigma organization name and click Continue.
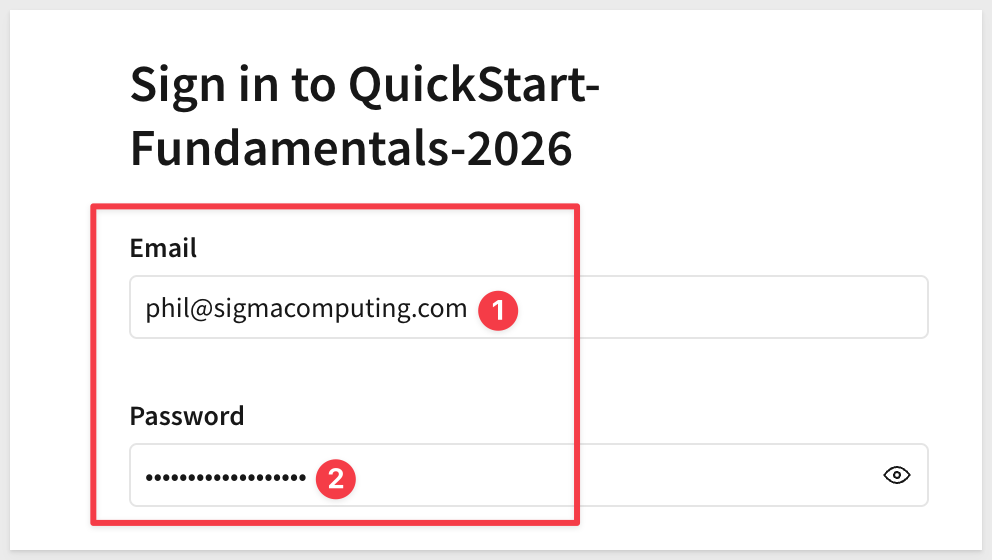
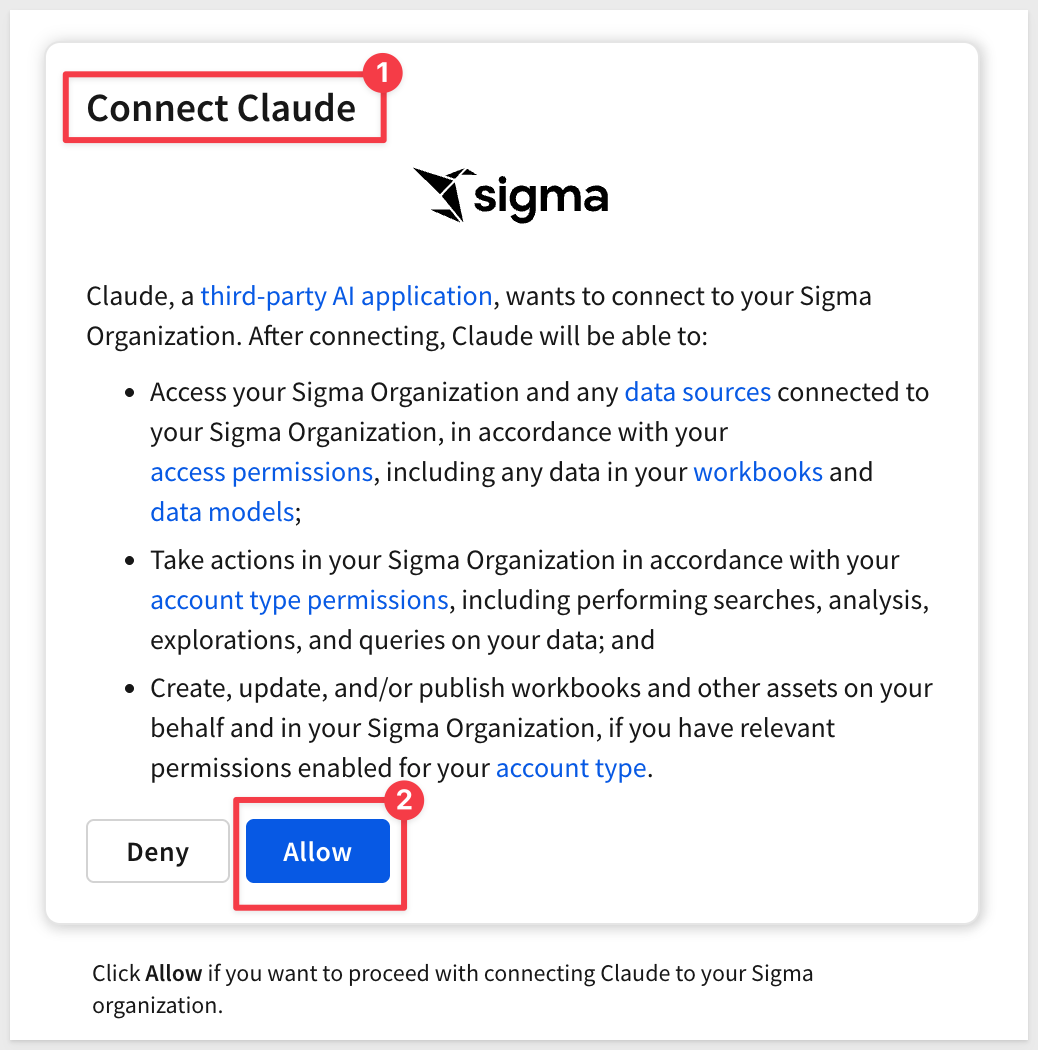
7. Provide your Sigma credentials and log in. When Claude prompts you, click Allow.
8. Review the operations Sigma permits through Claude and Approve them. For this QuickStart, Always allow for all tools is convenient.
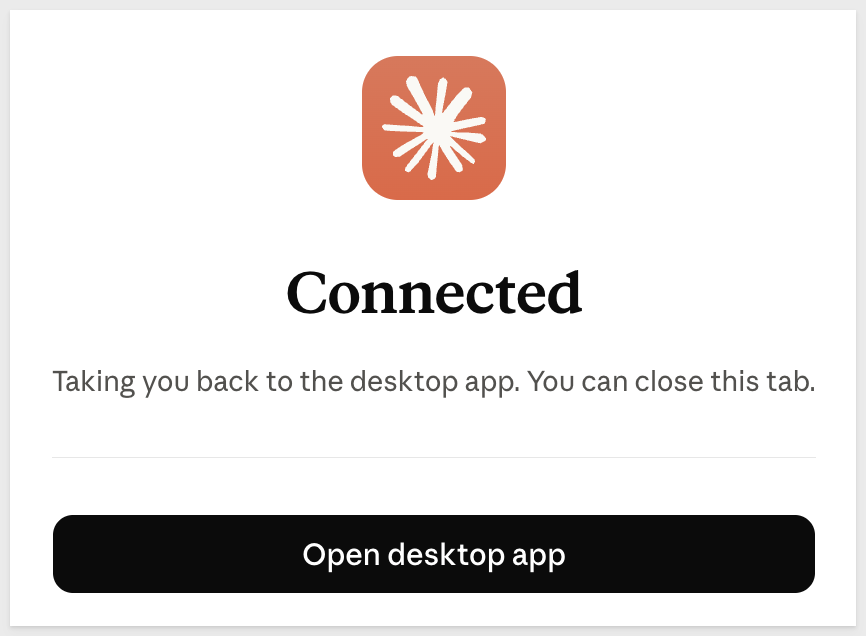
Because the desktop app is installed (in this example), Sigma returns us to it.
Sigma works with several AI providers. For more information, see Use the Sigma MCP Server
Configure permissions for Sigma in Claude
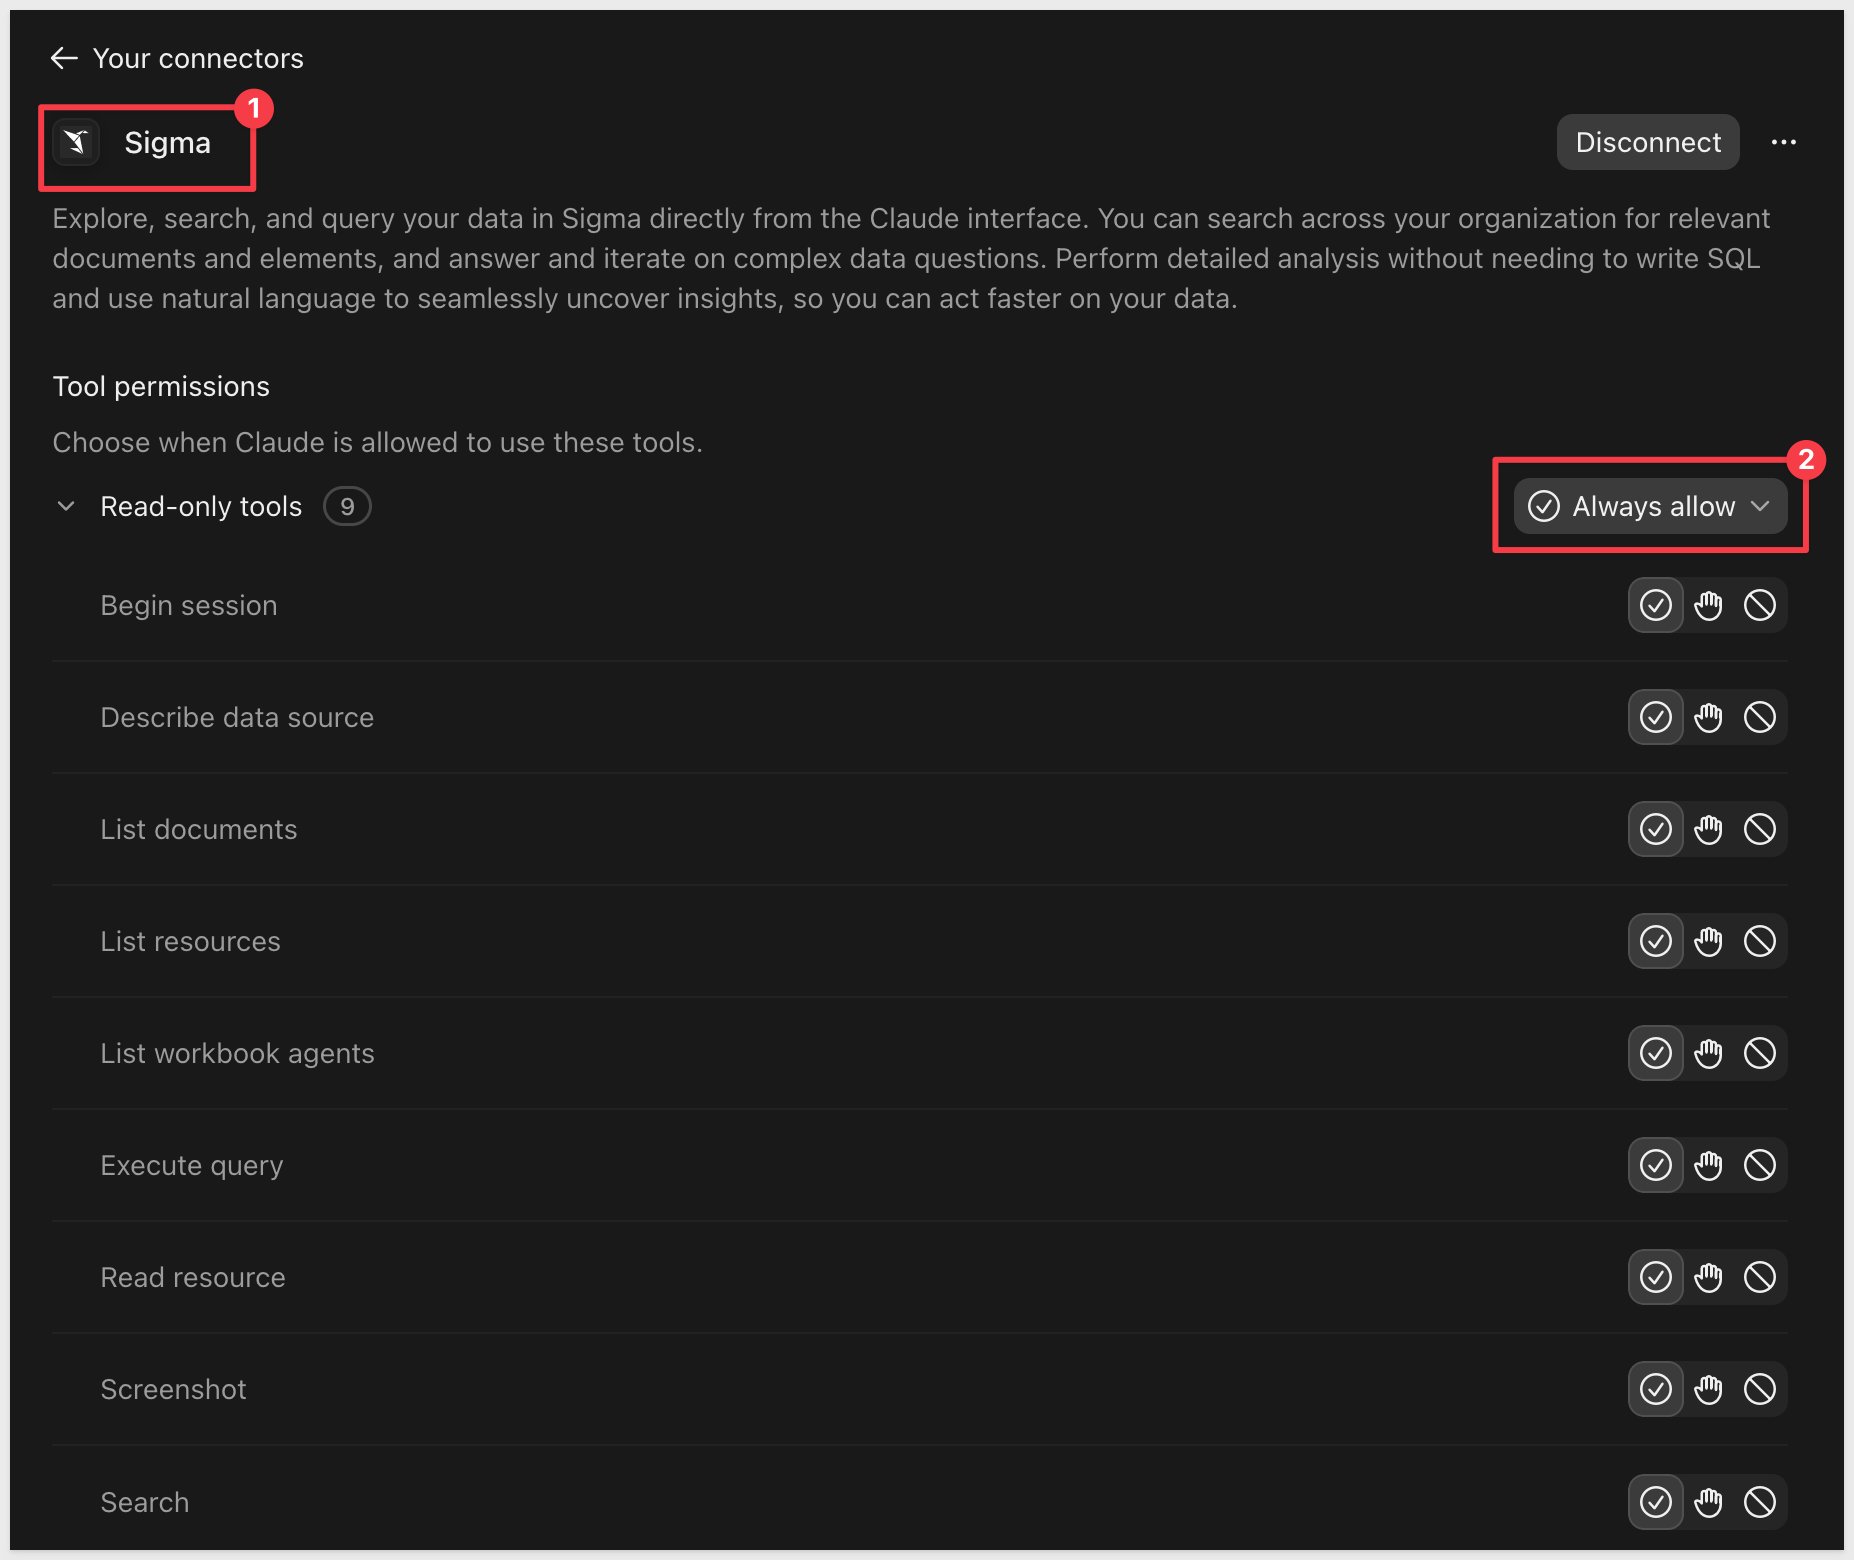
Under Connectors > Your connectors open the Sigma connector.
Permissions are fine-grained but we will Always allow the Read-only tools group.
Ask Claude about your data
Start a new chat in Claude and ask:
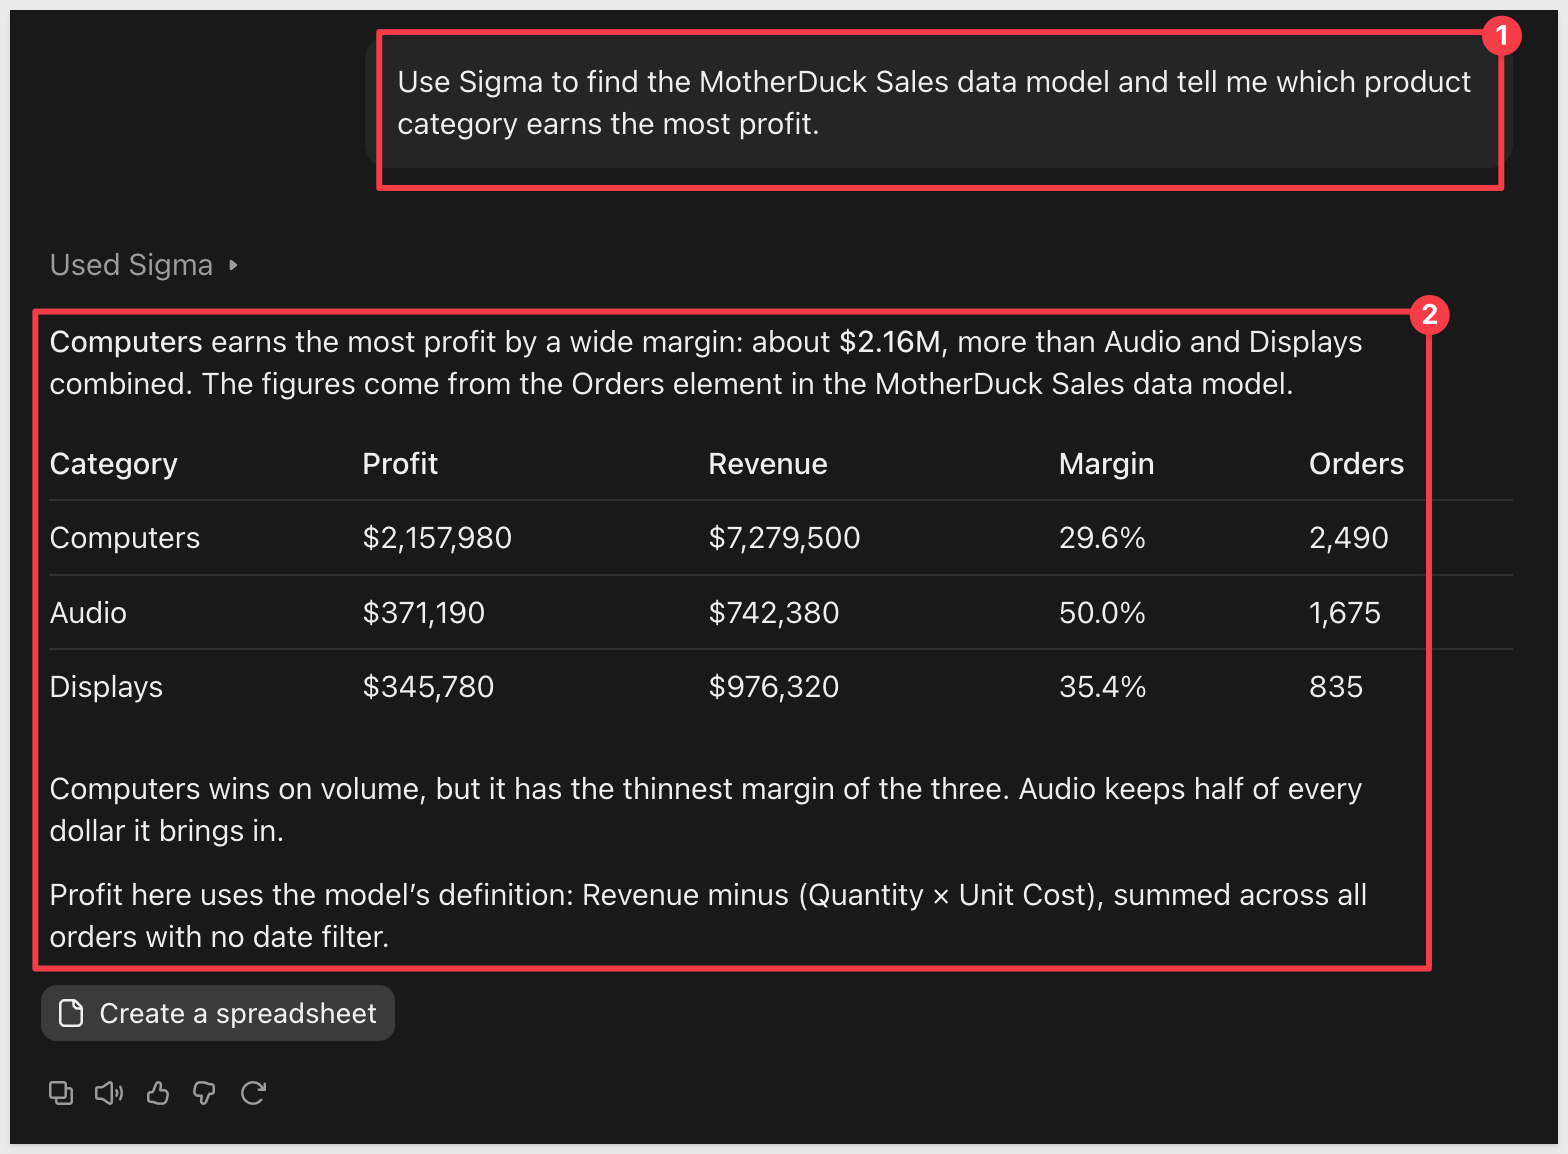
Use Sigma to find the MotherDuck Sales data model and tell me which product category earns the most profit.
Claude searches your Sigma organization, finds the data model, queries it, and returns the answer with an explanation of how it got there. Compare the result with the Profit by Category chart.
Try a follow-up:
Use Sigma to show monthly revenue for the MotherDuck Sales data model and point out the strongest month.
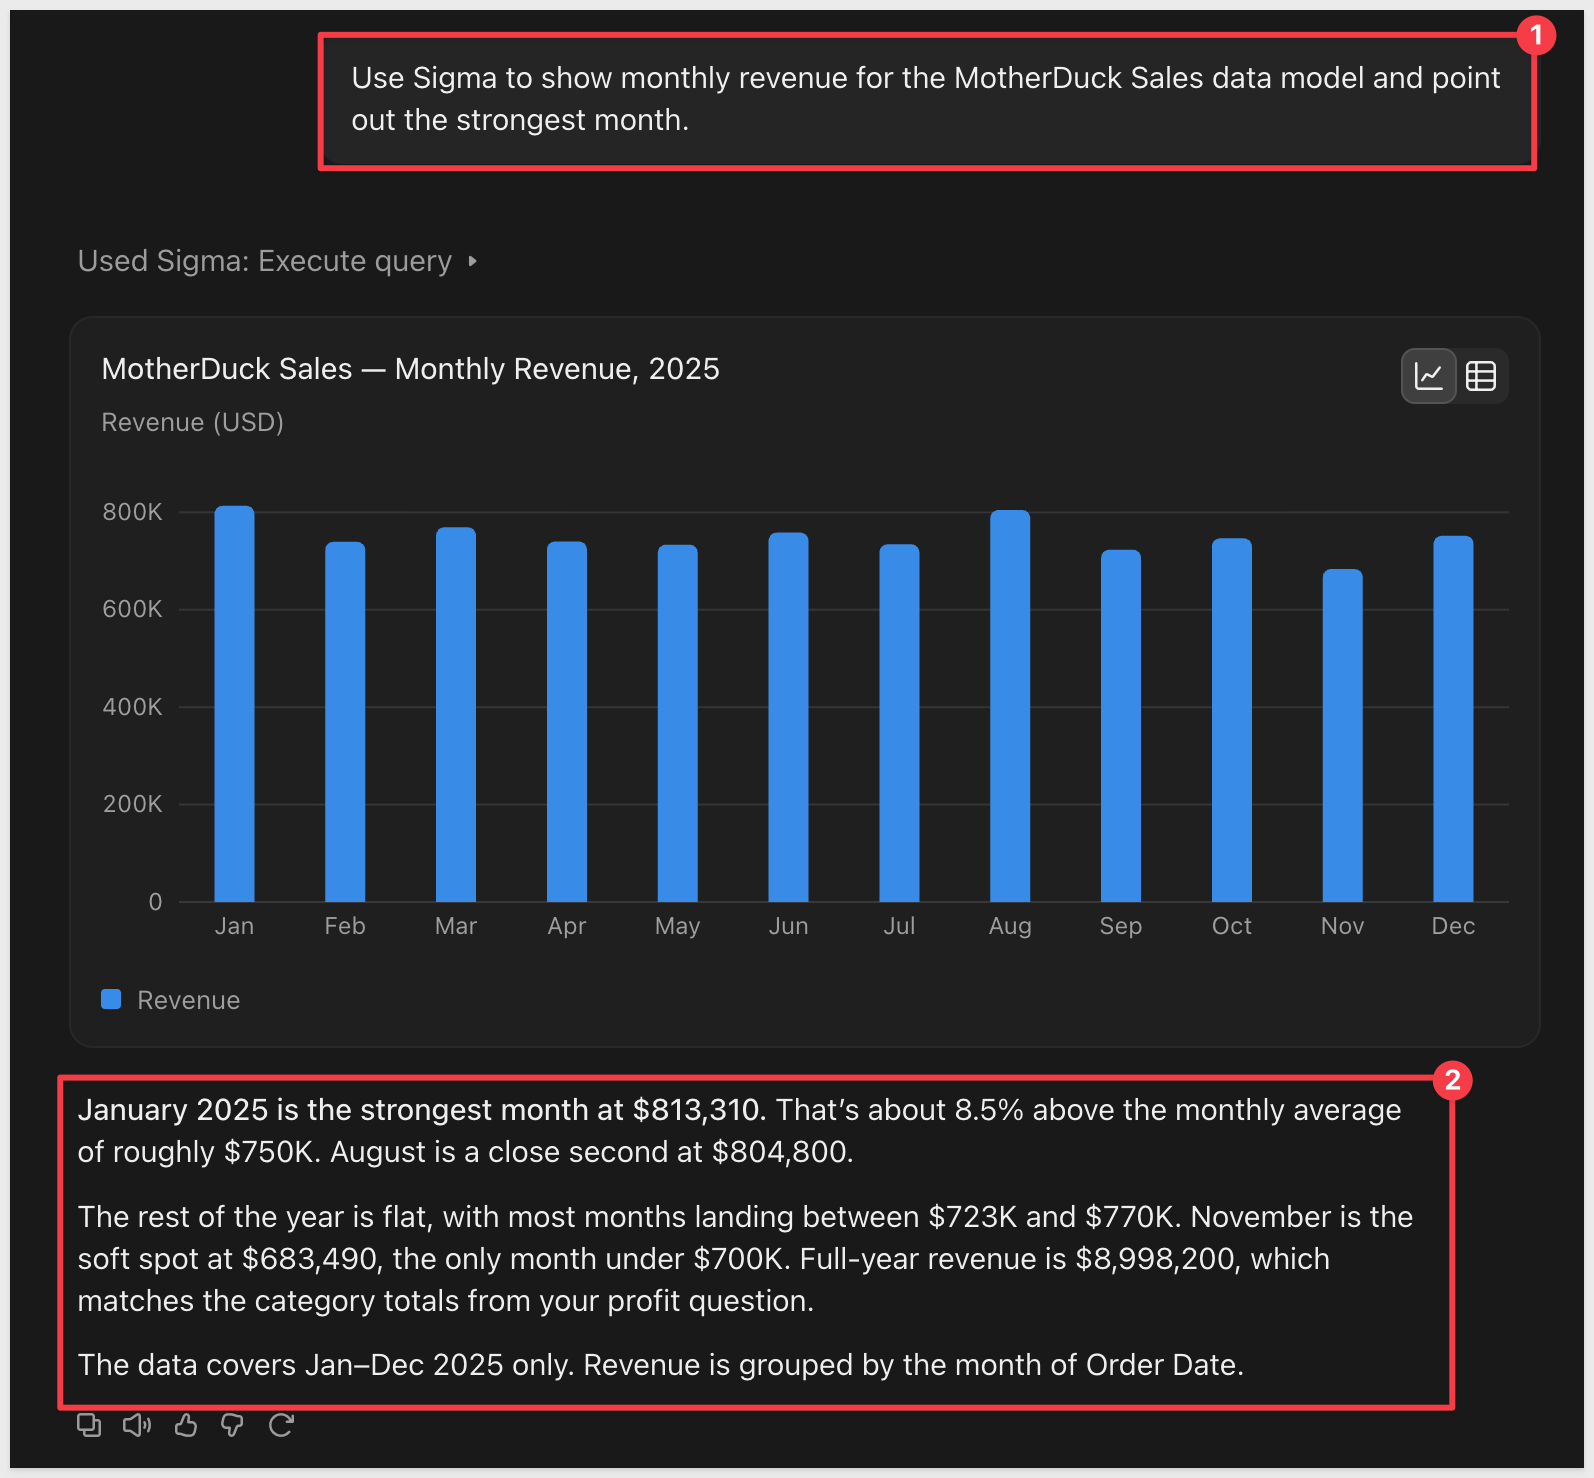
We built a sales analytics experience on live MotherDuck data, from a new trial account to answers delivered in Sigma and in Claude. Sigma queried MotherDuck directly and read-only, so the data stayed in one place and every result reflected its current state.
The data model ties everything together. We defined Revenue and Profit once, and the workbook, the action sequence, Sigma Assistant, the agent, and Claude all used those same definitions. That keeps an answer consistent no matter who asks the question or where they ask it.
Several of the patterns are reusable beyond this example:
- Model first, then explore: joining tables and defining calculations in a data model gives workbook builders a trusted starting point instead of a blank table.
- Turn charts into starting points: an action sequence can take someone from a summary to the rows behind it in a single click, with no write access required.
- Shape what AI can see and say: an agent limits the data it works from and gives its answers a consistent persona, which suits a team that needs predictable, purpose-built answers.
- Meet people where they work: the same published data model answers questions from the Sigma homepage and from Claude, with Sigma's permissions applied each time.
Swap in your own MotherDuck databases and the same steps apply: connect, model, build, and then let people ask questions in whichever way suits them.
Additional Resource Links
Blog
Community
Help Center
QuickStarts
Be sure to check out all the latest developments at Sigma's First Friday Feature page!