This QuickStart is part of a series of QuickStarts designed to instruct new users on how to use Sigma's unique data capture feature, input tables.
Sigma is the first and only platform to allow users to securely write back data to rows or columns without overwriting the data in the warehouse.
Input tables are Sigma-managed warehouse tables through which users can add their own data and integrate it into their analysis.
Through this QuickStart, we will walk through why to use an input table, how to use Sigma to create one, import data, and join input table data with existing warehouse data.
We will be working with some common sales data from our fictitious company Plugs Electronics, reusing content we created in the QuickStart Fundamentals 1: Getting Around.
For more information on Sigma's product release strategy, see Sigma product releases.
Target Audience
Sigma combines the unlimited power of the cloud data warehouse with the familiar feel of a spreadsheet, with no limit on the amount of data you wish to analyze. Sigma is awesome for users of Excel and even better for customers who have millions of rows of data.
The typical audience for this QuickStart includes users of Excel, common Business Intelligence or Reporting tools, and semi-technical users who want to try out or learn Sigma. Everything is done in a browser, so you already know how to use that. No SQL or technical skills are needed to do this QuickStart.
Prerequisites
- A computer with a current browser. It does not matter which browser you want to use.
- Completion of the QuickStart "Fundamentals 1: Getting Around"
- Access to your Sigma environment. A Sigma trial environment is acceptable and preferred.
- If have not already, you can sign up for a Sigma Trial here:

When data isn't in the warehouse, it usually requires a cumbersome technical or human process to ETL data into the warehouse. Now, users who need to add data to the warehouse can do so directly.
With input tables, what can be built in Sigma changes from one-way transformations of raw data (traditional BI) into a bi-directional data application platform.
Input tables give users the power to augment, adjust, interact, and create "what-if" scenarios in real-time, without changing the source data.
Input tables can also be use as sources for tables, pivot tables, and visualizations, or incorporate the data using lookups and joins. And when you create warehouse views for input tables, you can reuse the manually entered data across your broader data ecosystem.
Sigma customers already use input tables for:
- Manual data entry of key values
- Analytic Modeling
- scenario
- forecast
- territory planning
- sales planning
- supply chain
- categorizations
- many more...
There is a QuickStart that walks through how to build various common use cases.
There are times when capturing a small amount of data from a Sigma user can be very valuable to the business.
However, this can also present some challenges:
- Will you have to build some new application to capture the data?
- When is the right time to capture the data?
- Can we tell who changed the data?
- Can we restrict this functionality to a few users?
- Will the users accept another tool?
- Once we have the data, how will it relate to existing warehouse data?
- Lots of other questions to be sure!
Since users are already using Sigma (or spreadsheets and should be using Sigma instead!), input tables can help solve this problem.
Why not just create a Sigma workbook and augment it with the ability for the user to enter small amounts of data in real time?
Sigma will do the heavy lifting of presenting a familiar user interface, restrict the functionality to those permitted to use it and store the new data in your warehouse.
Allowing users to supplement warehouse data opens a world of possibilities.
We will demonstrate how this can be done using a simple example.
Use case description
There is a need for various employees to update the delivery status of orders, adding comments. We don't want to provide access to other internal systems to enable this process.
Sigma can easily solve this challenge using input tables and our curated warehouse table, PLUGS_DATA, without wasting software developers or database administrators valuable time.
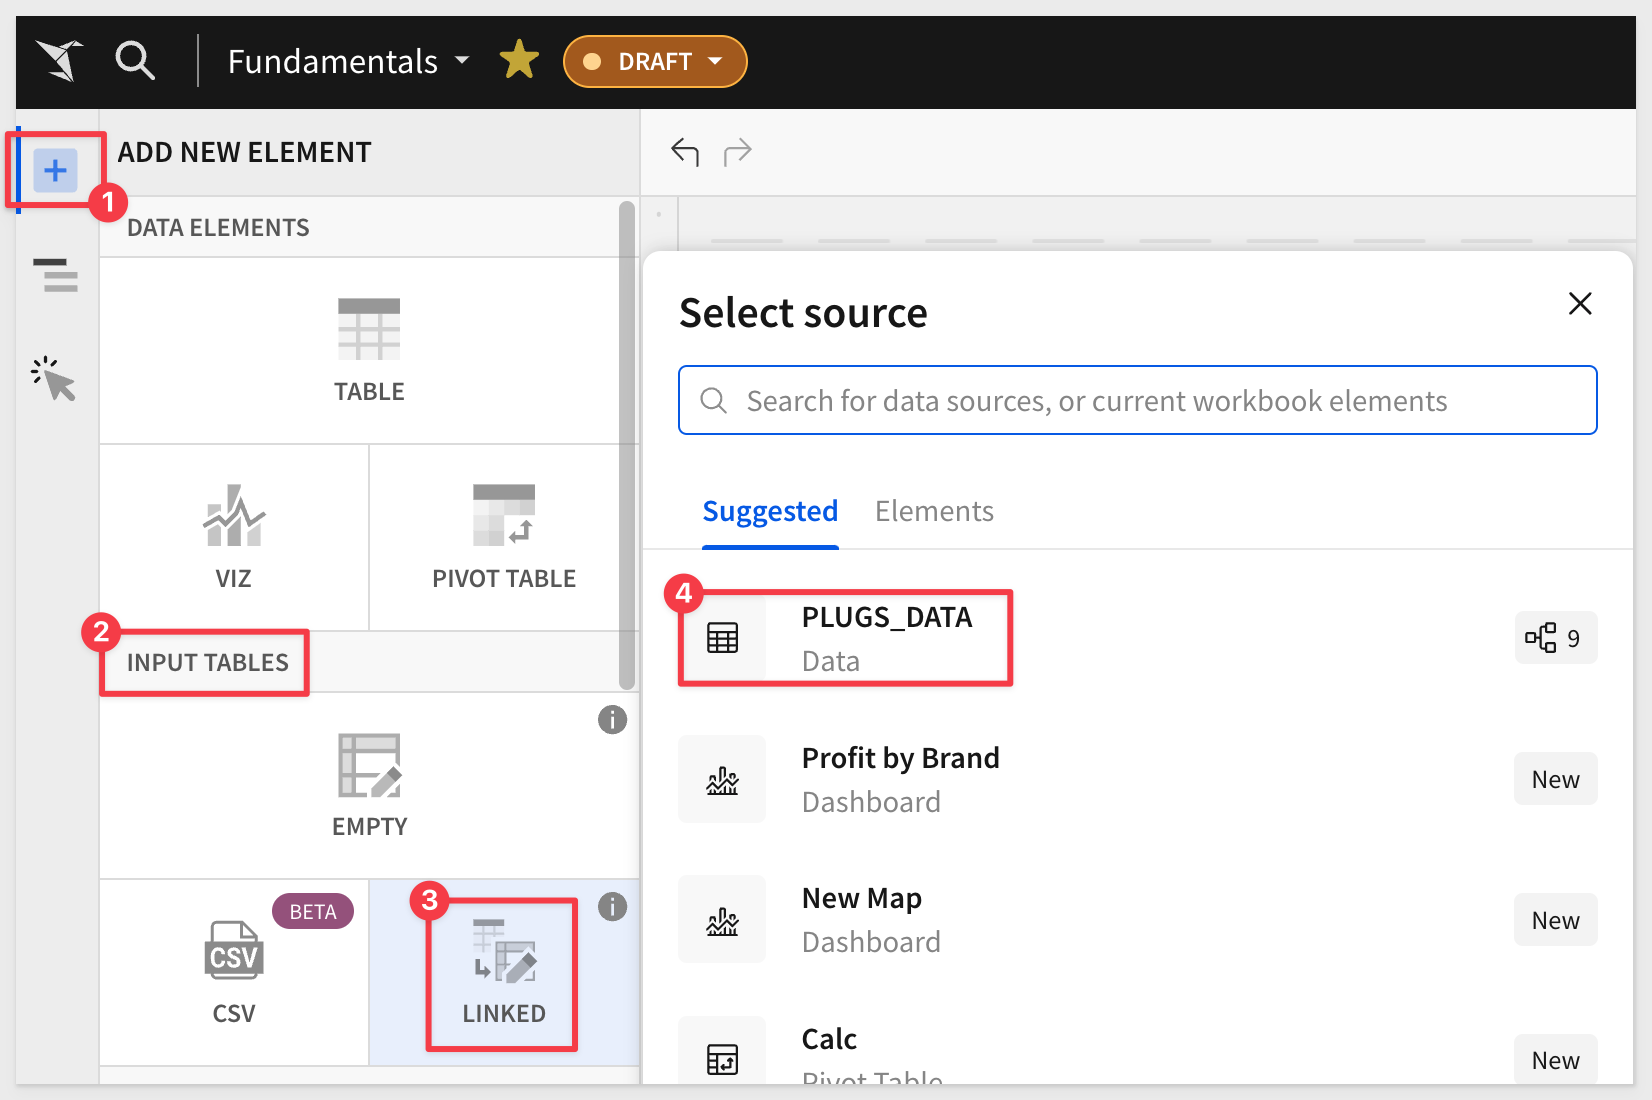
In our workbook, create a new page and rename it to Input Tables.
Click the + icon and scroll to INPUT TABLES and select LINKED.
In the source selector, click to select the PLUGS_DATA table on the Data page:
There are actually three types of input tables to choose from.
- EMPTY: supports data entry independent of existing data.
- CSV: supports data entry with pre-populate editable data from a CSV upload.
- LINKED: supports data entry alongside existing data from other elements in the same workbook, via a lookup.
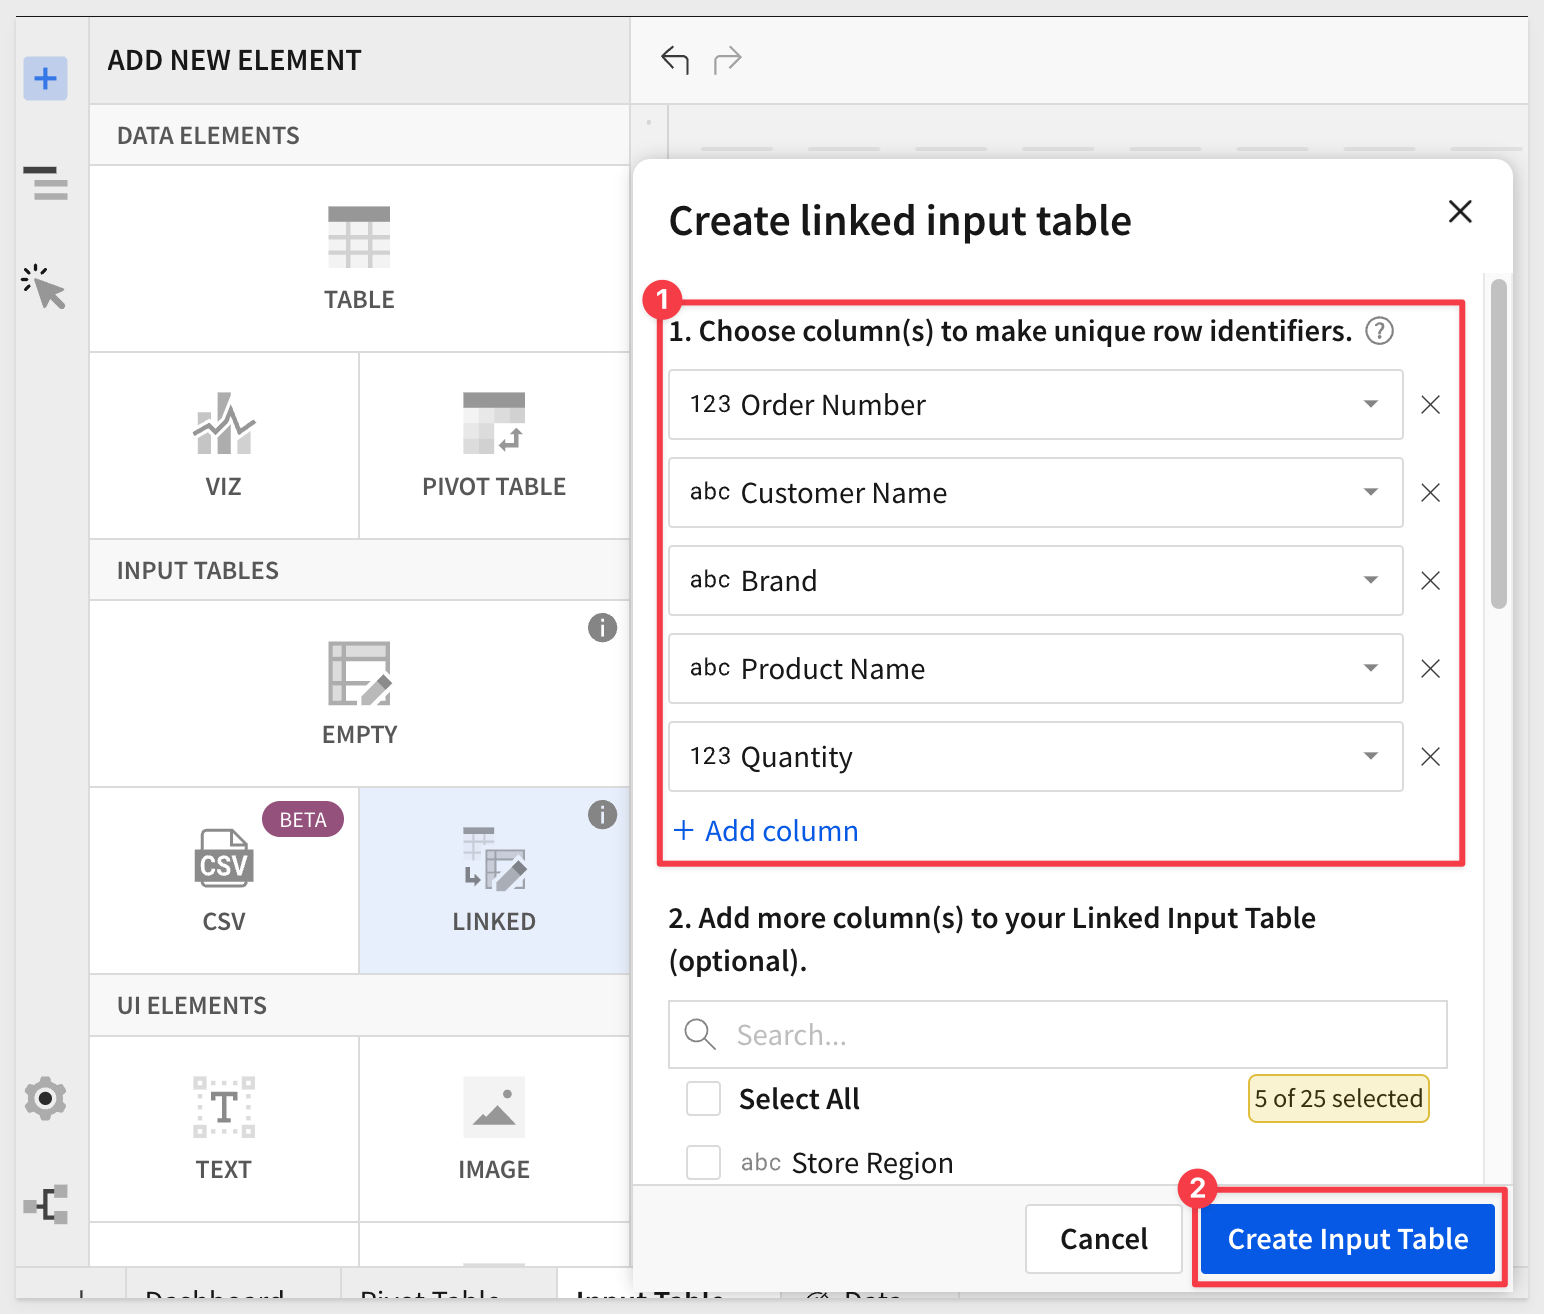
Choose the following columns to include from the PLUGS_DATA table and click Create Input Table:
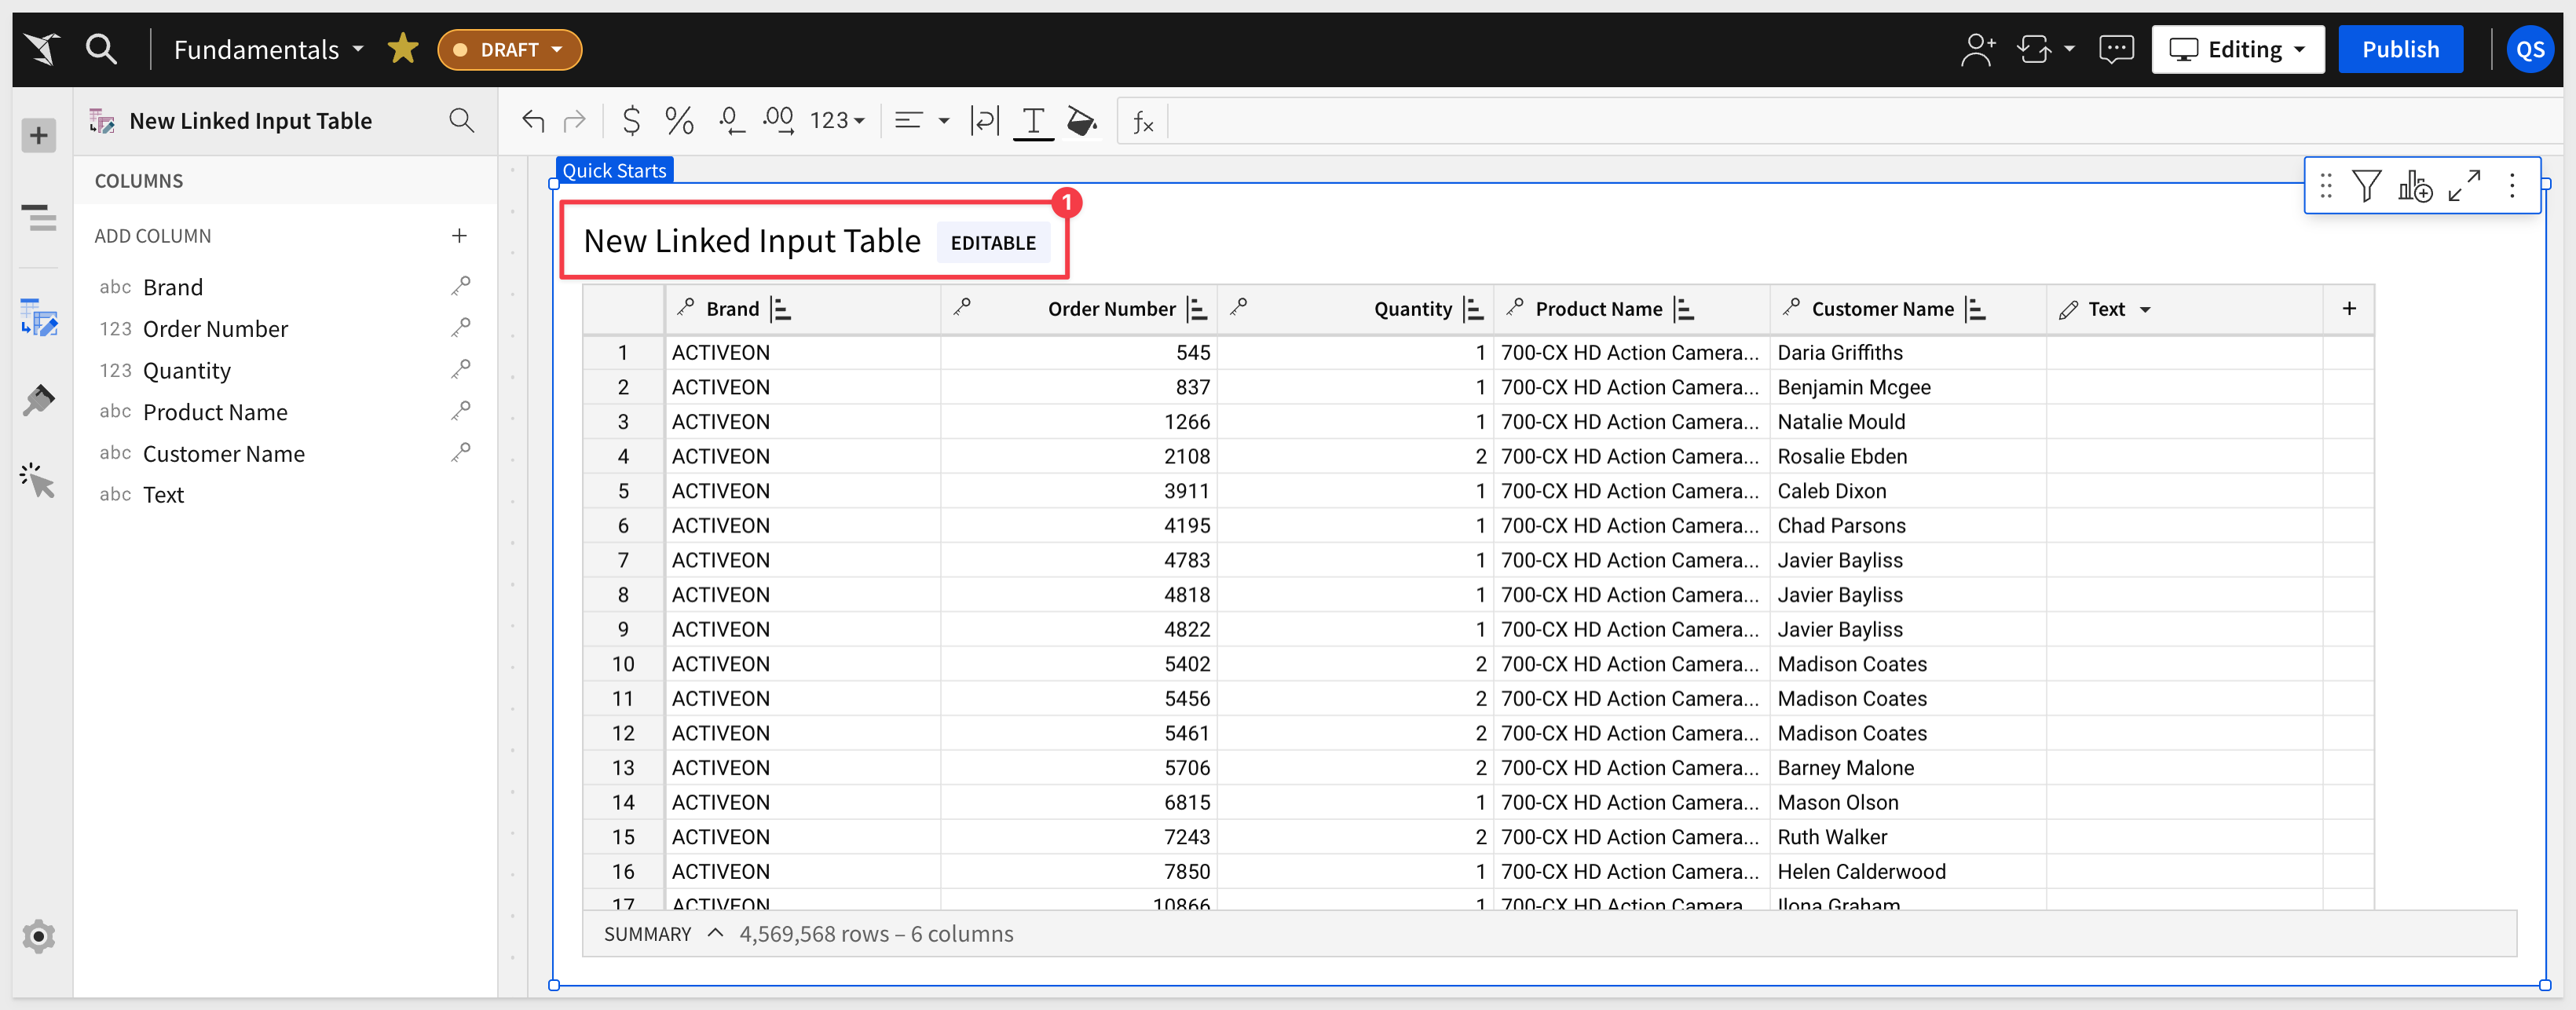
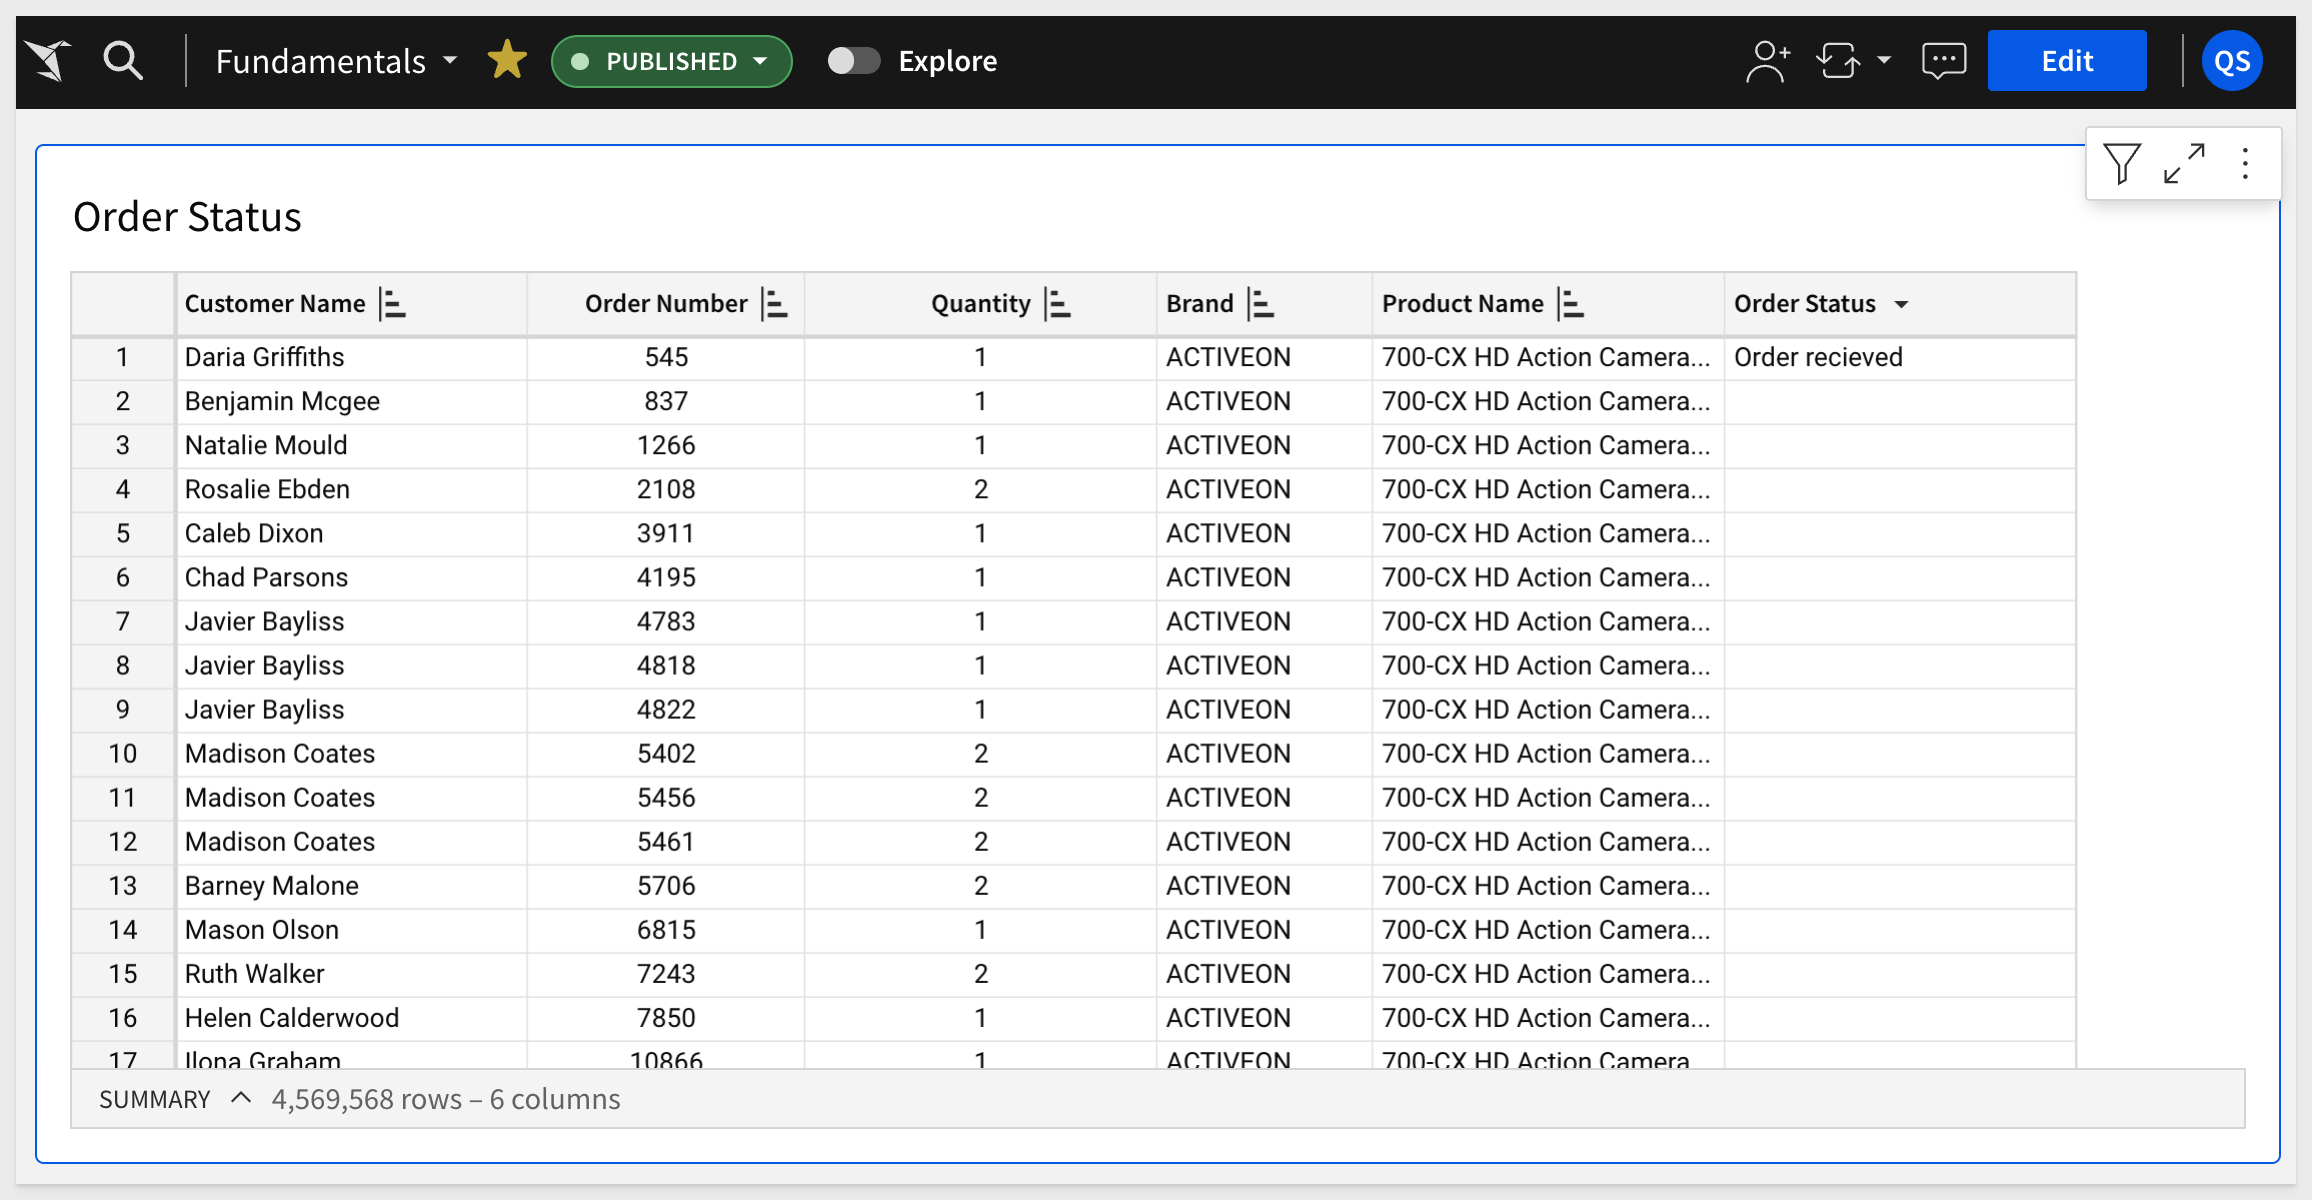
We now have an input table with columns from the PLUGS_DATA table:
Rename the input table to Order Status.
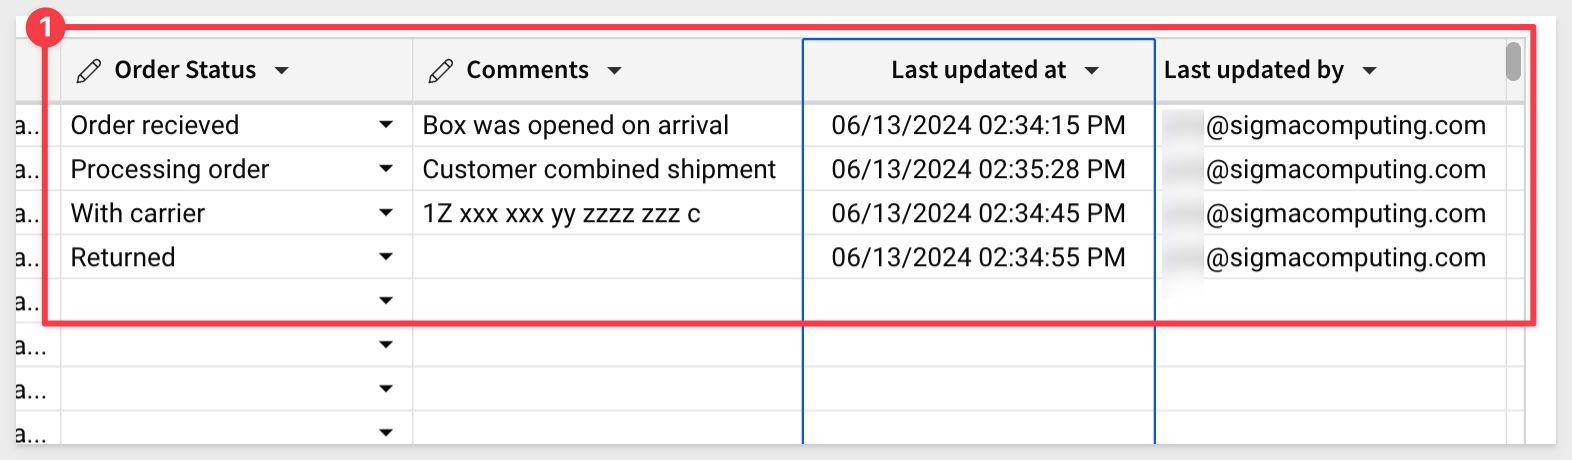
Observe that the columns that have been linked from the PLUGS_DATA table have a key icon (#1 in the image below) while there is another column (#2 in the image below) that does not.
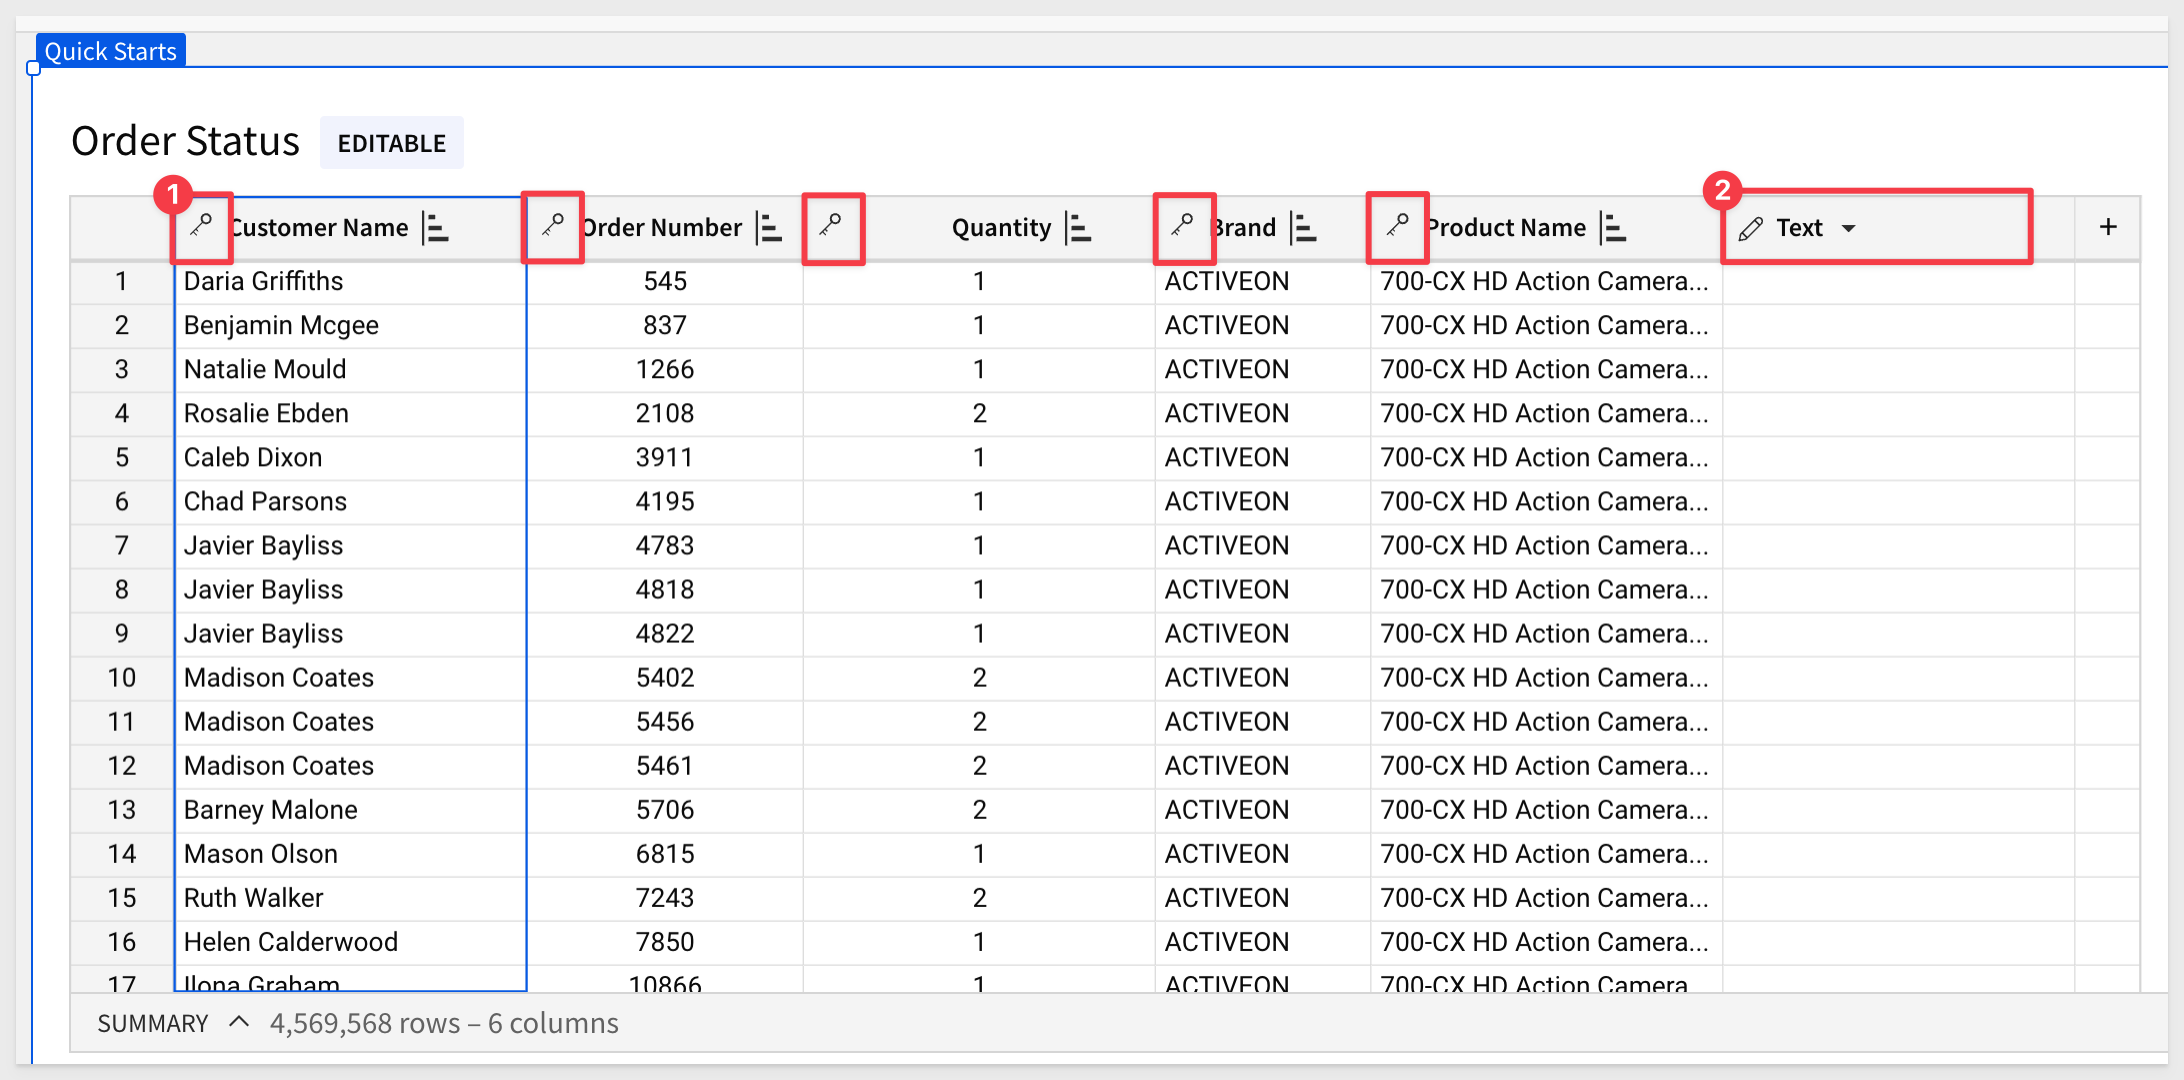
The lock indicates that those columns are not editable. The Text column was added by Sigma as an starting point for adding more input table columns.
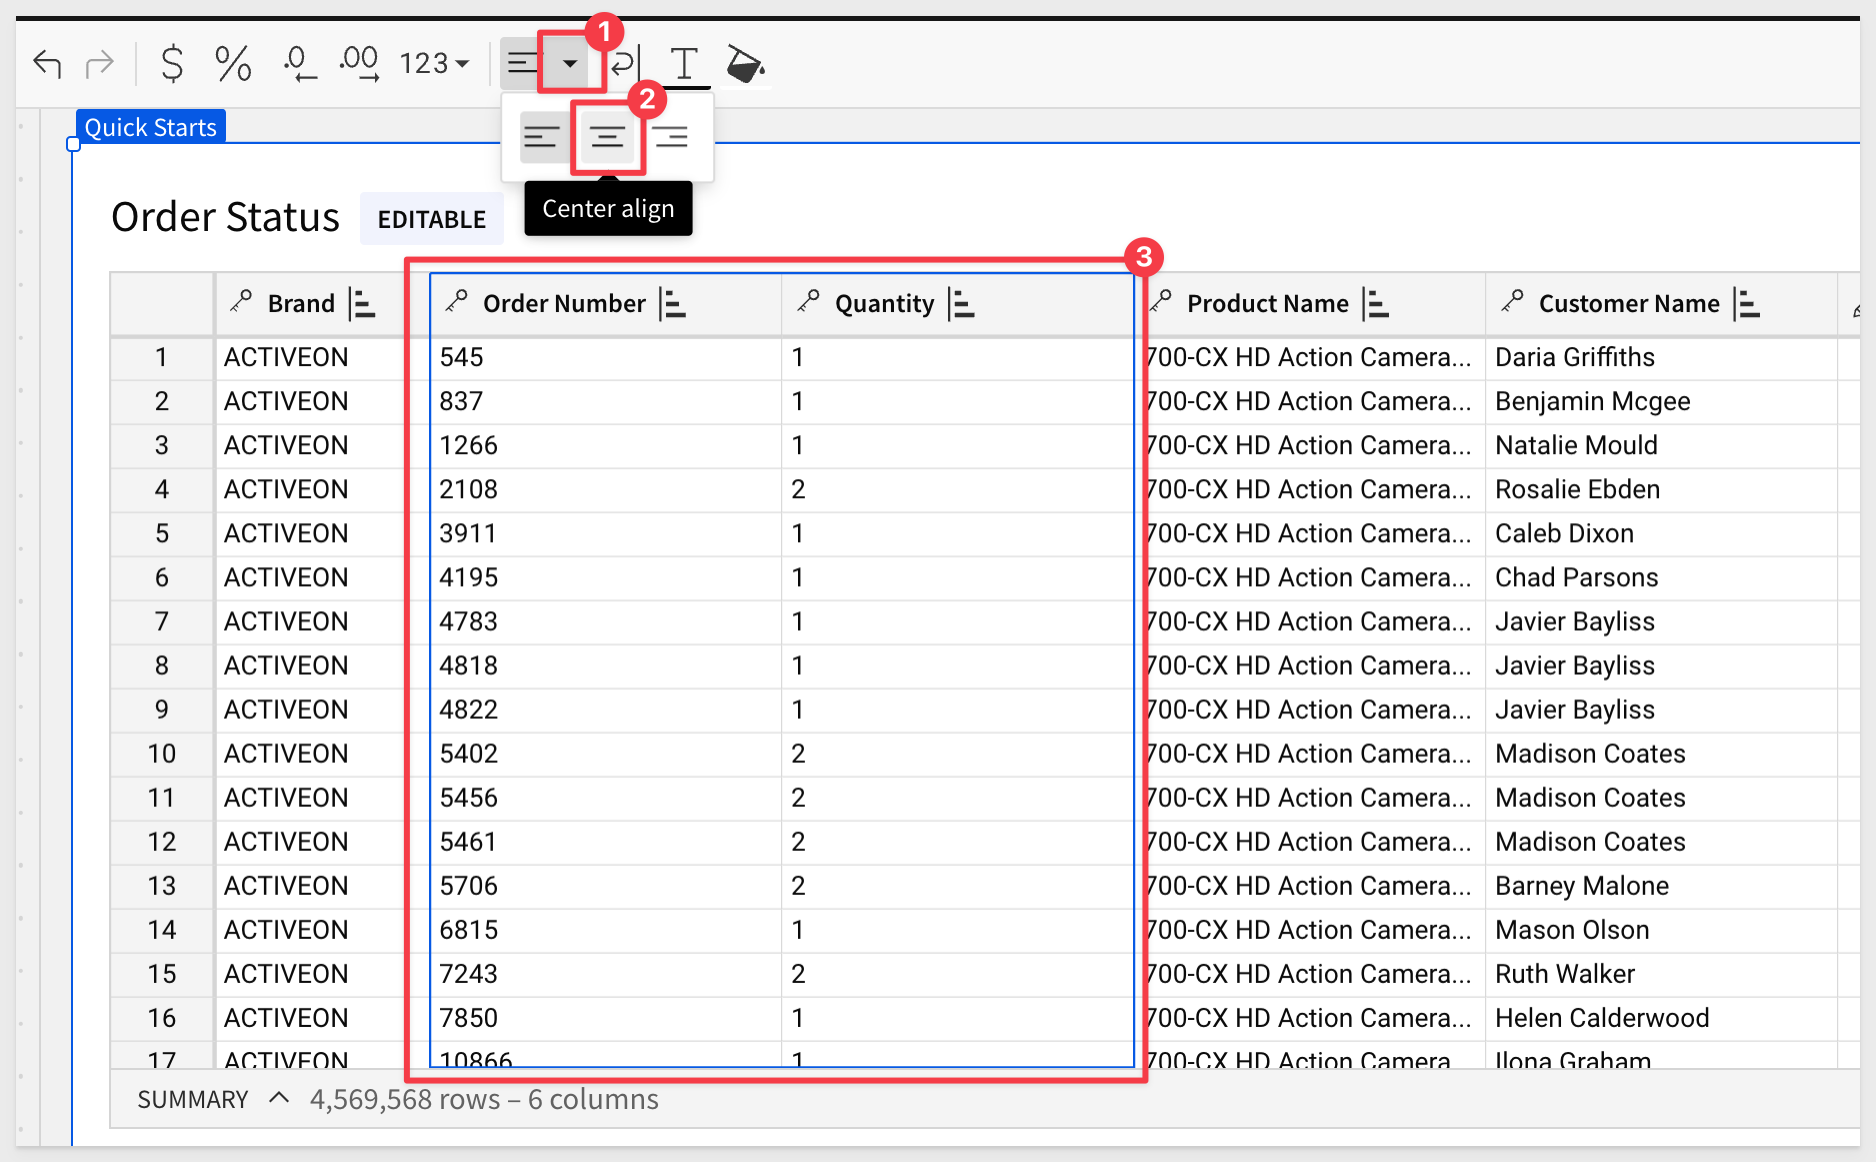
We also reordered our columns, assuming that an employee might be on the phone with a customer and want to easily locate the customer's order by name, order number, and have a few order details on hand too.
Lets center the Order Number and Quantity columns:
Click Publish.
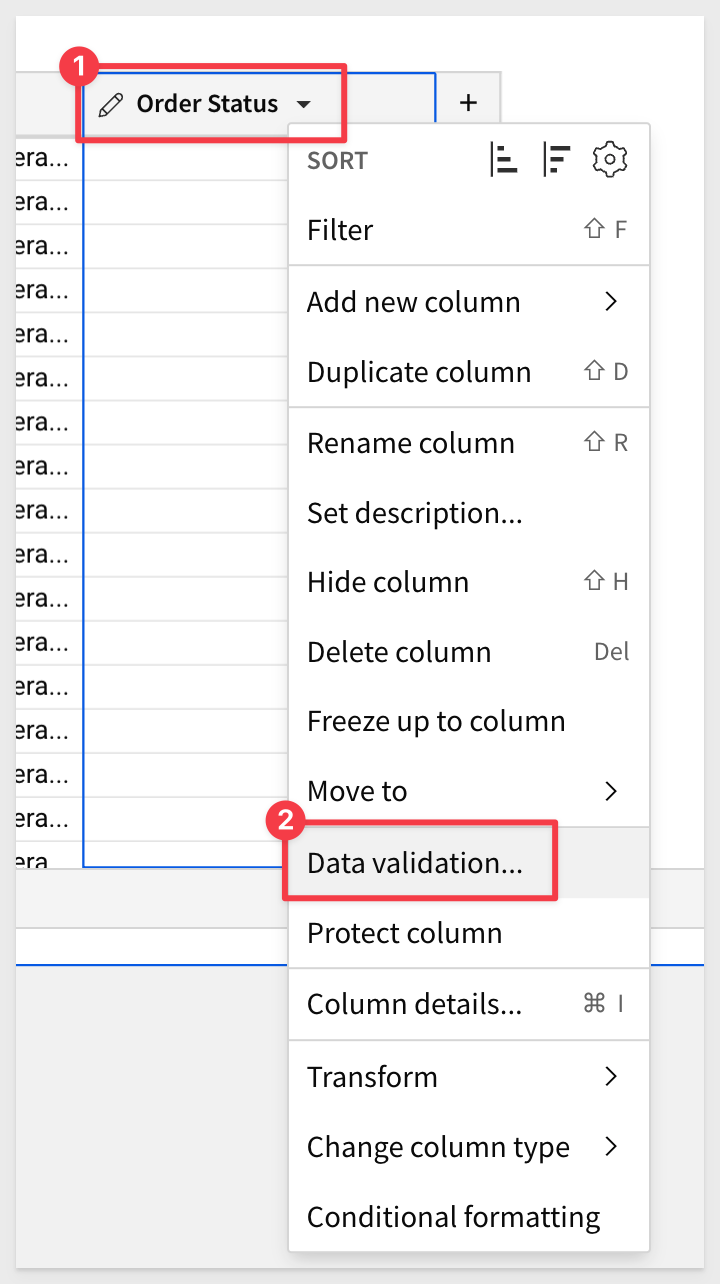
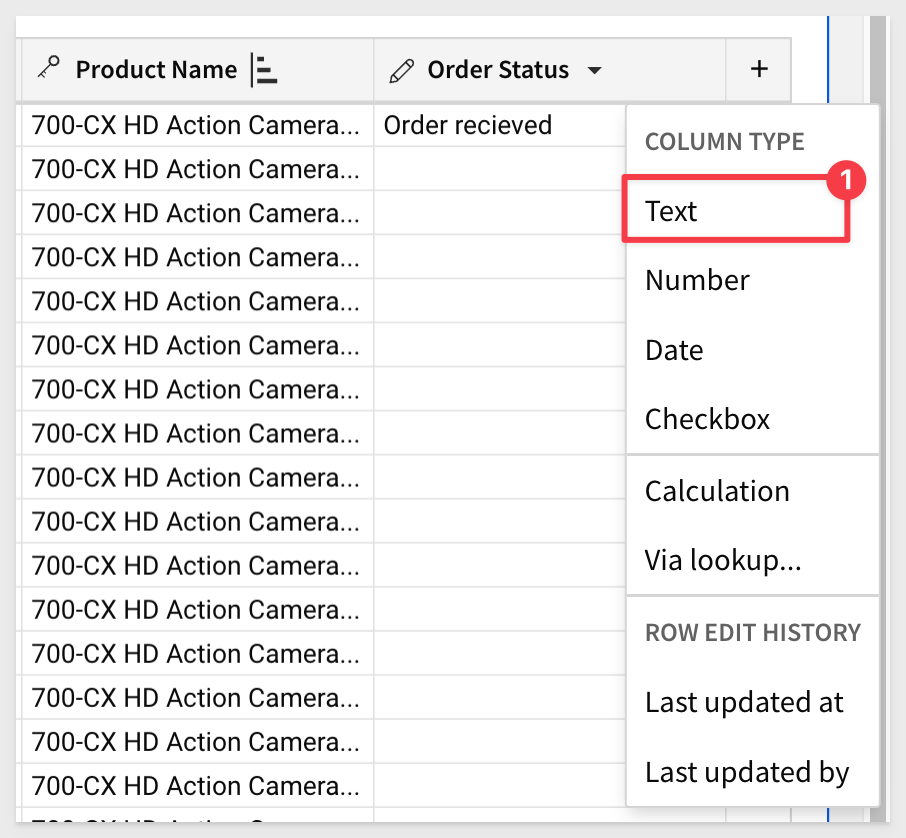
We don't want employees making mistakes manually typing the order status. We want them to pick from a valid list.
Change the Text column name to Order Status by double-clicking the word Text.
Click the Order Status menu and select Data validation:
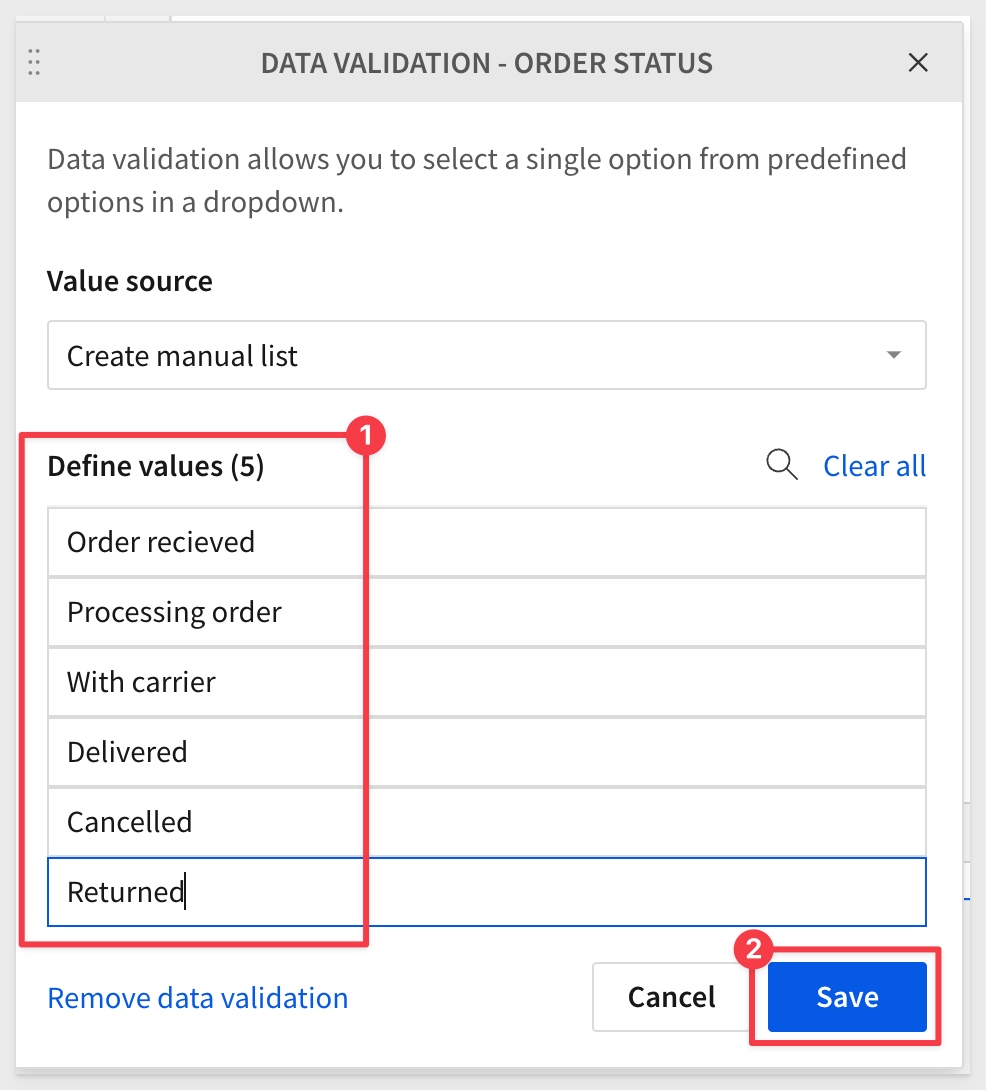
We will use a manual list, but the option can also be data driven if preferred:
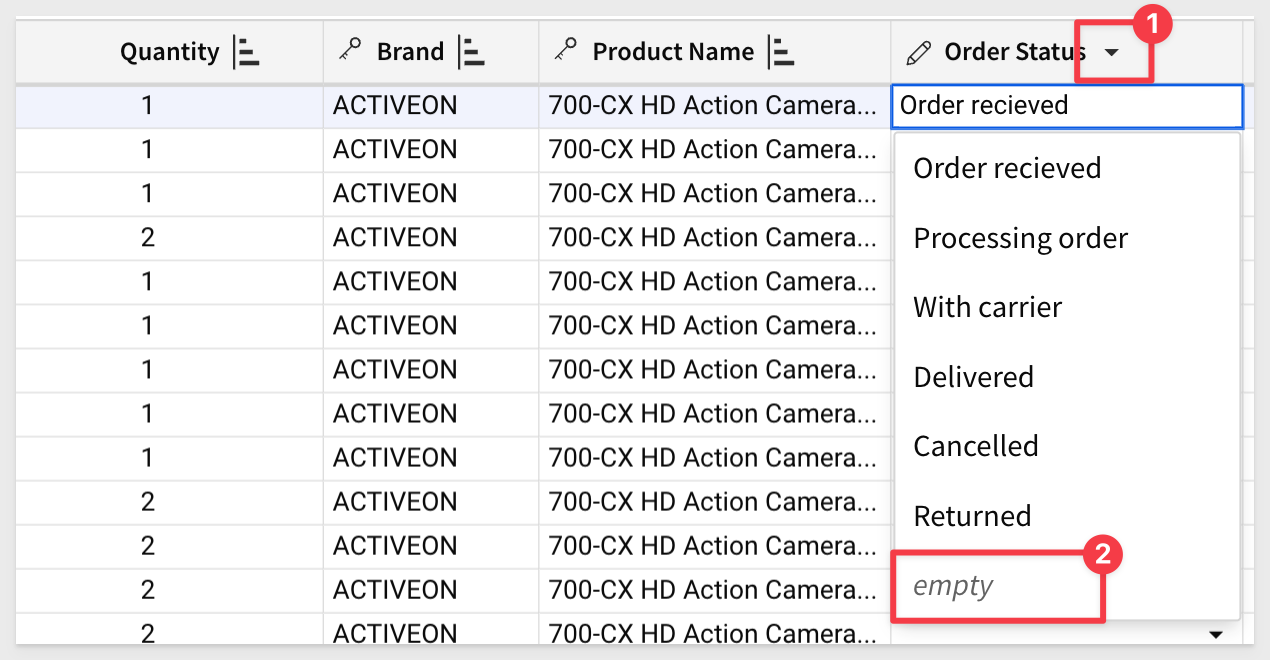
Now the users can just select from a list of validate status, or clear the cell out as well (#2 in the image below):
Click Publish.
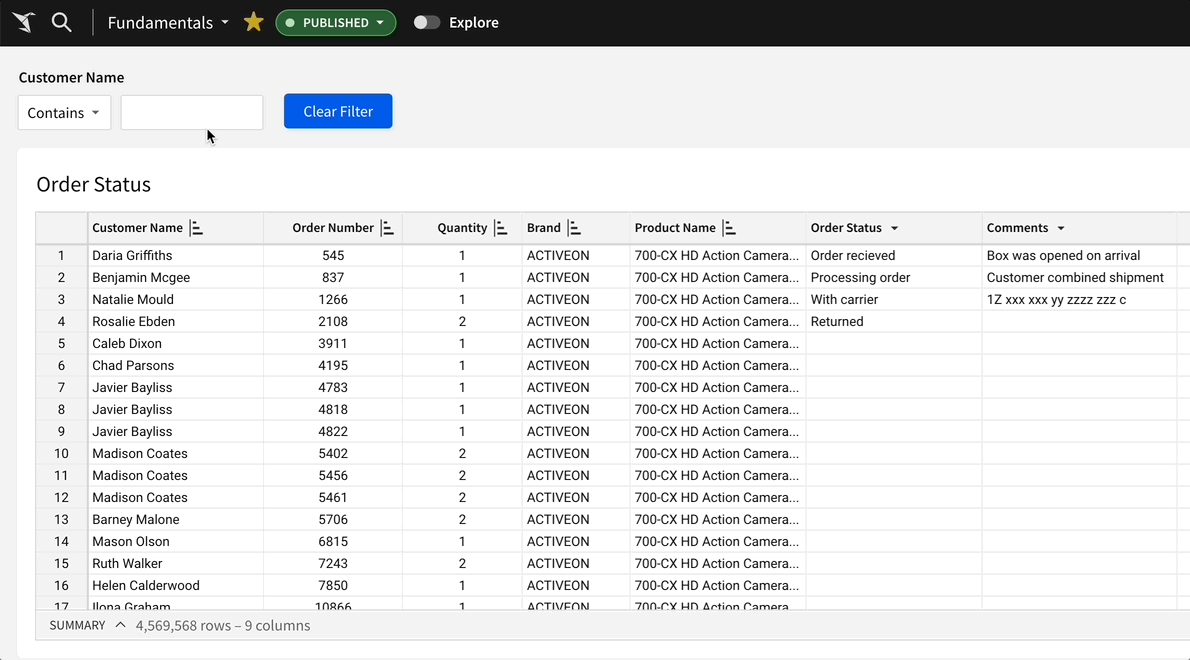
Our Order Status page now looks like this, when looking at the published version:
Notice that in the published version, we cannot change any cells until we click the Edit button.
This means that viewers can still work with the data, but only users with the edit permission will be able to change the status of any orders.
Sigma workbooks can get really expansive, and it can be useful to visually see and add the source data and relationships.
Sigma provides a quick way to see that using the View lineage option:

Lineage allows you to quickly see all the elements and their relationships:
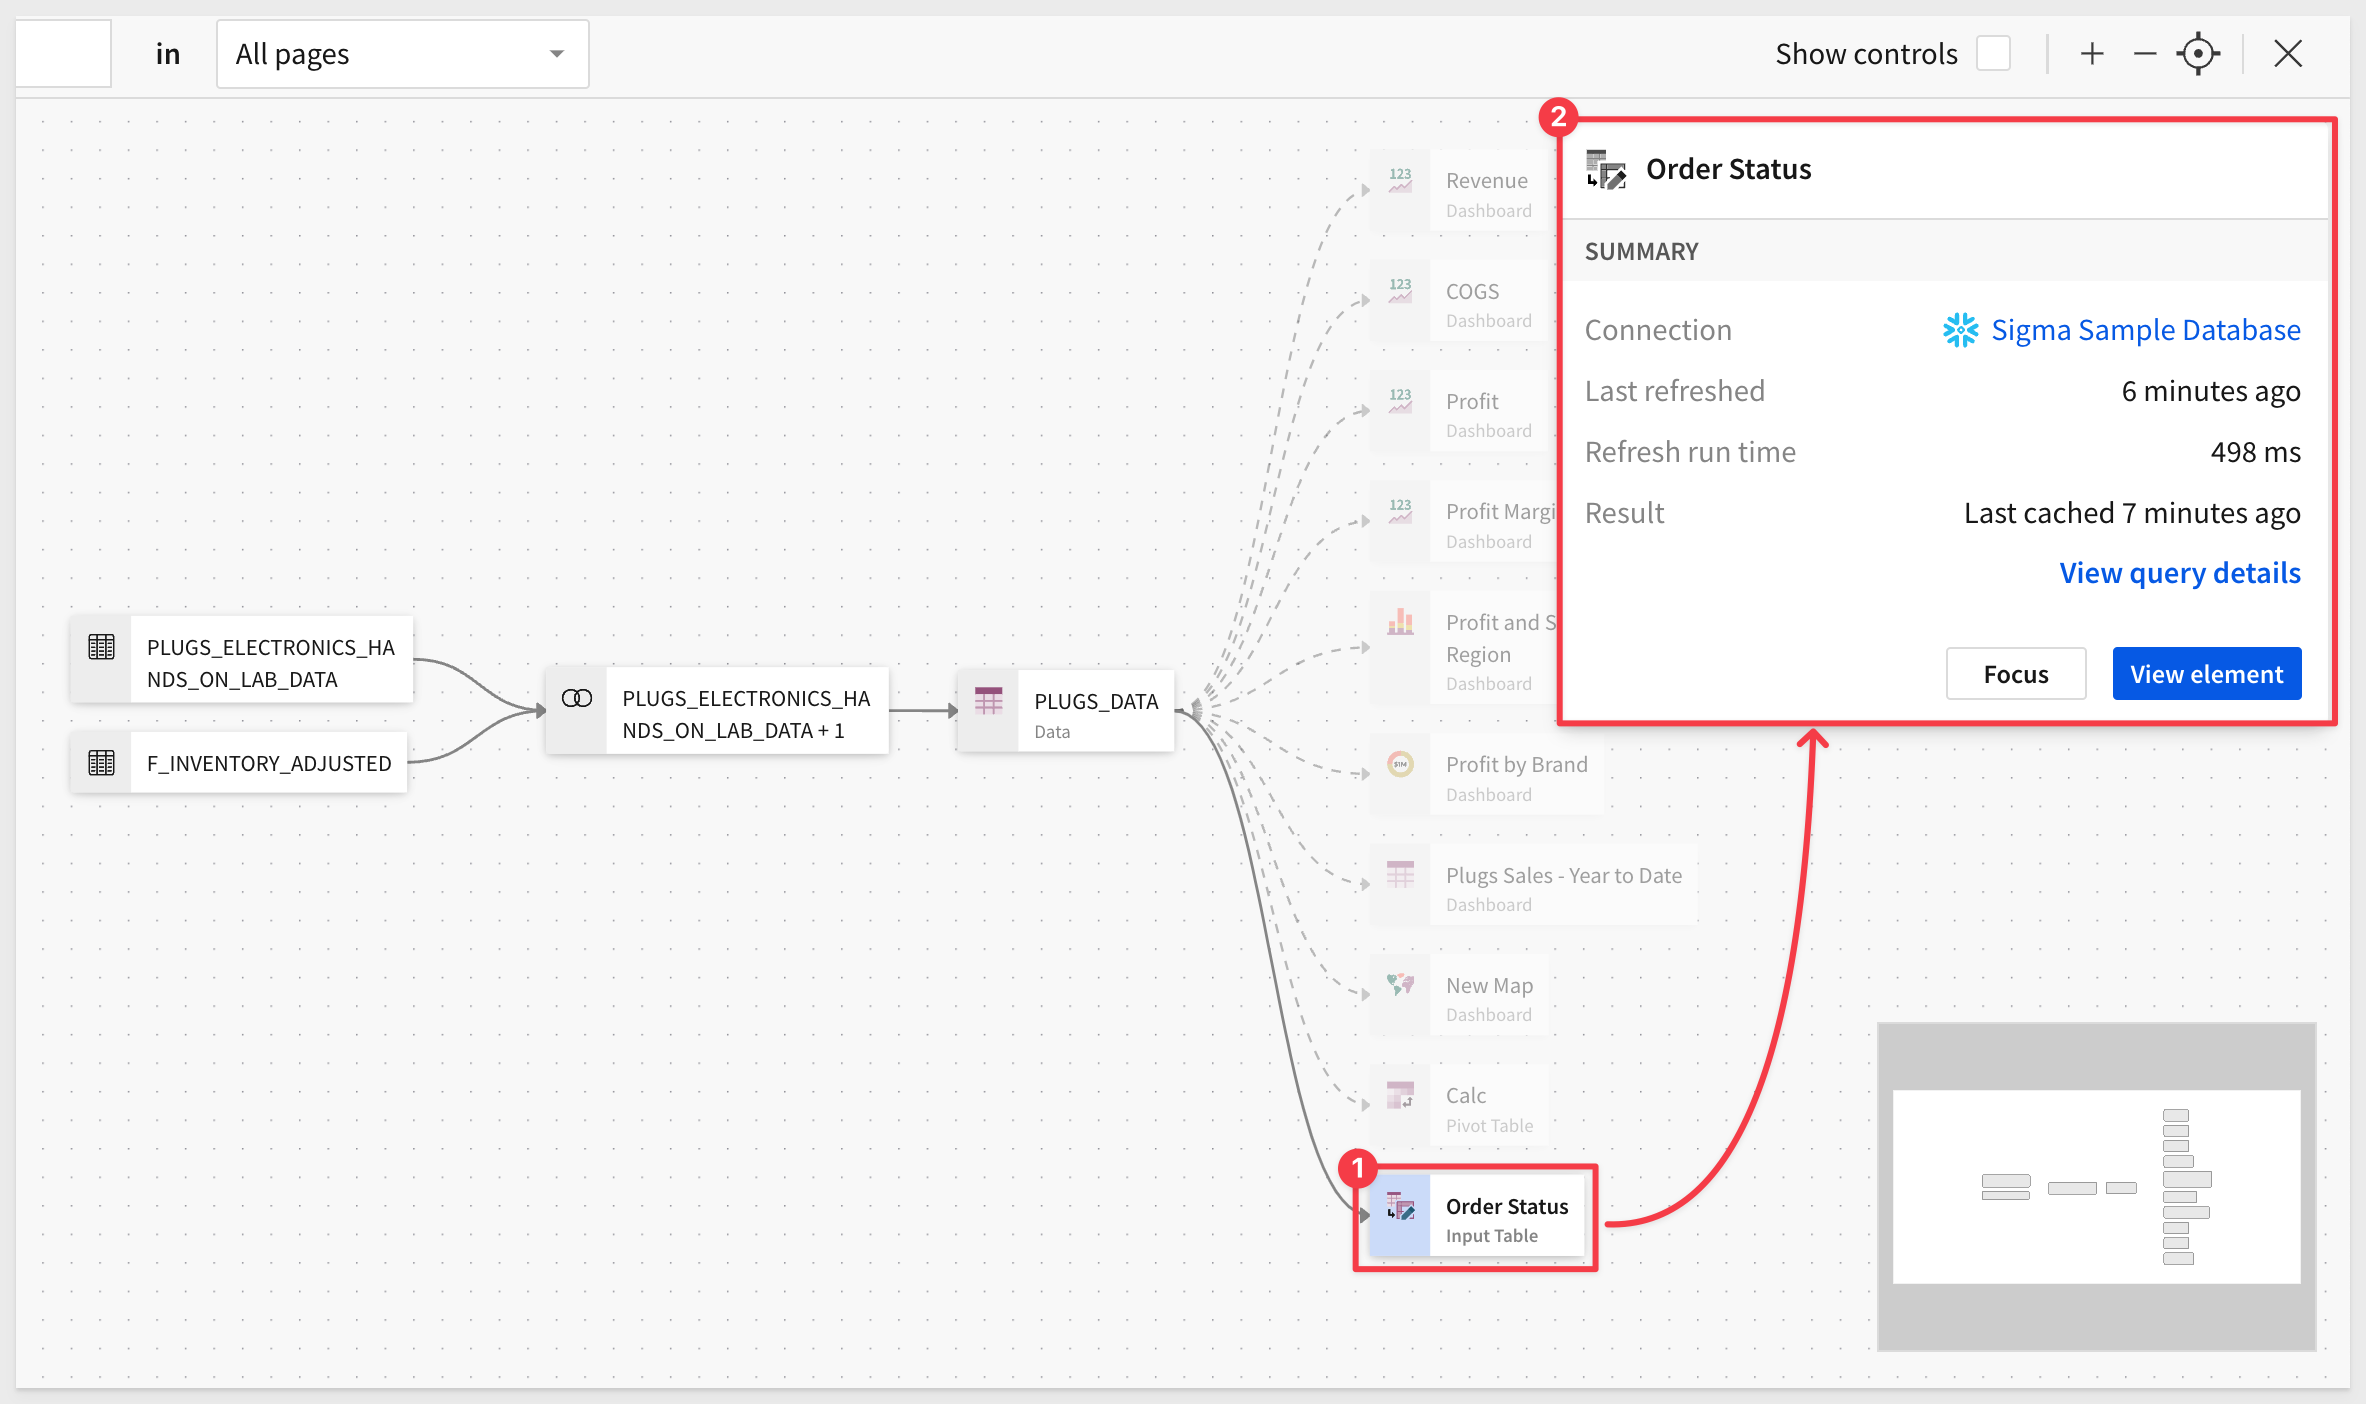
Clicking the Show controls checkbox also will show any control elements and their targets:
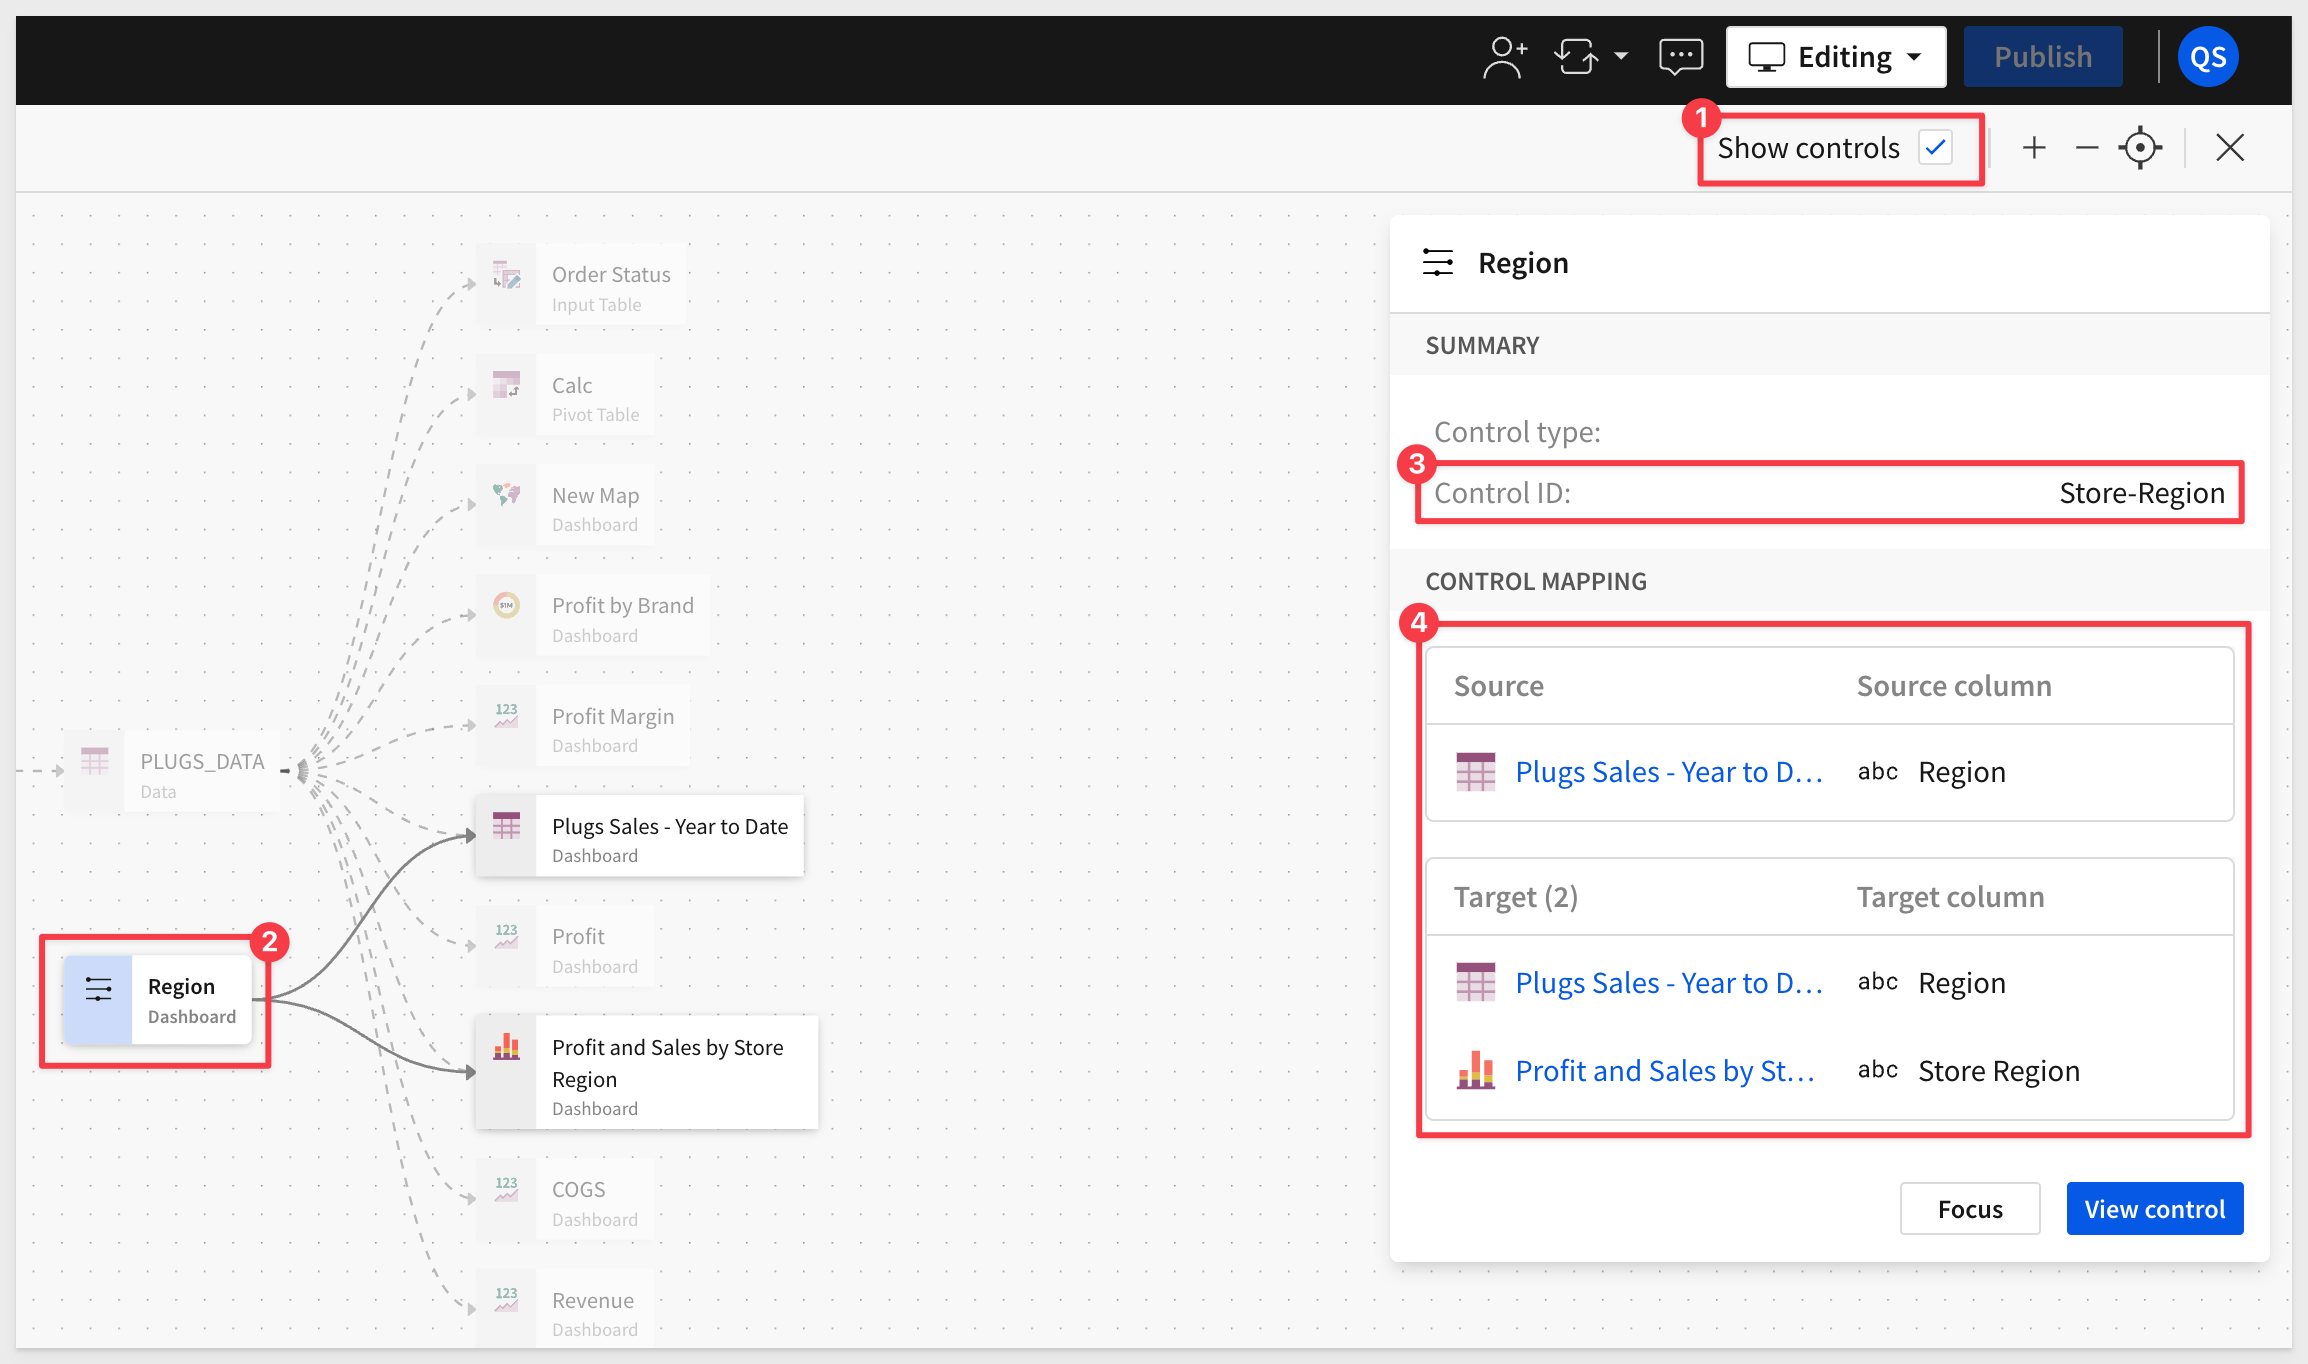
To learn more about workbook data lineage, see here.
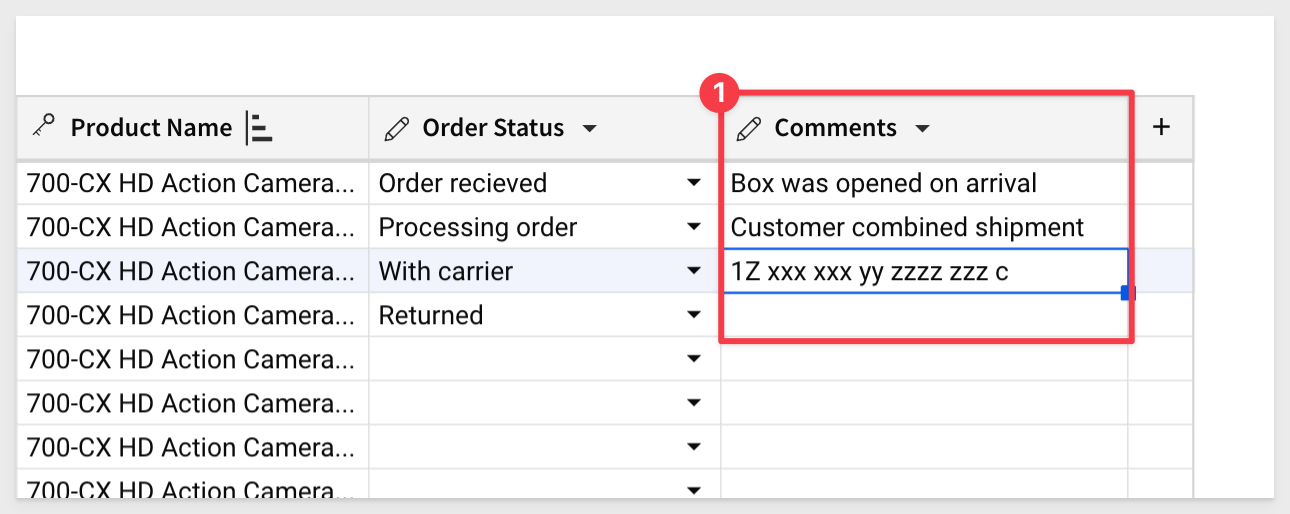
We want users to have a place to add comments about order status as they make changes.
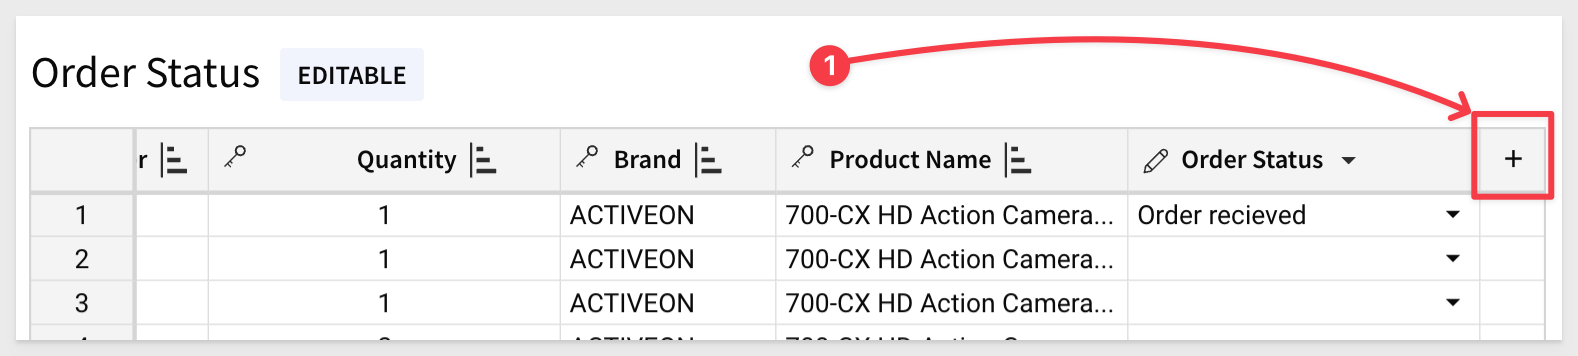
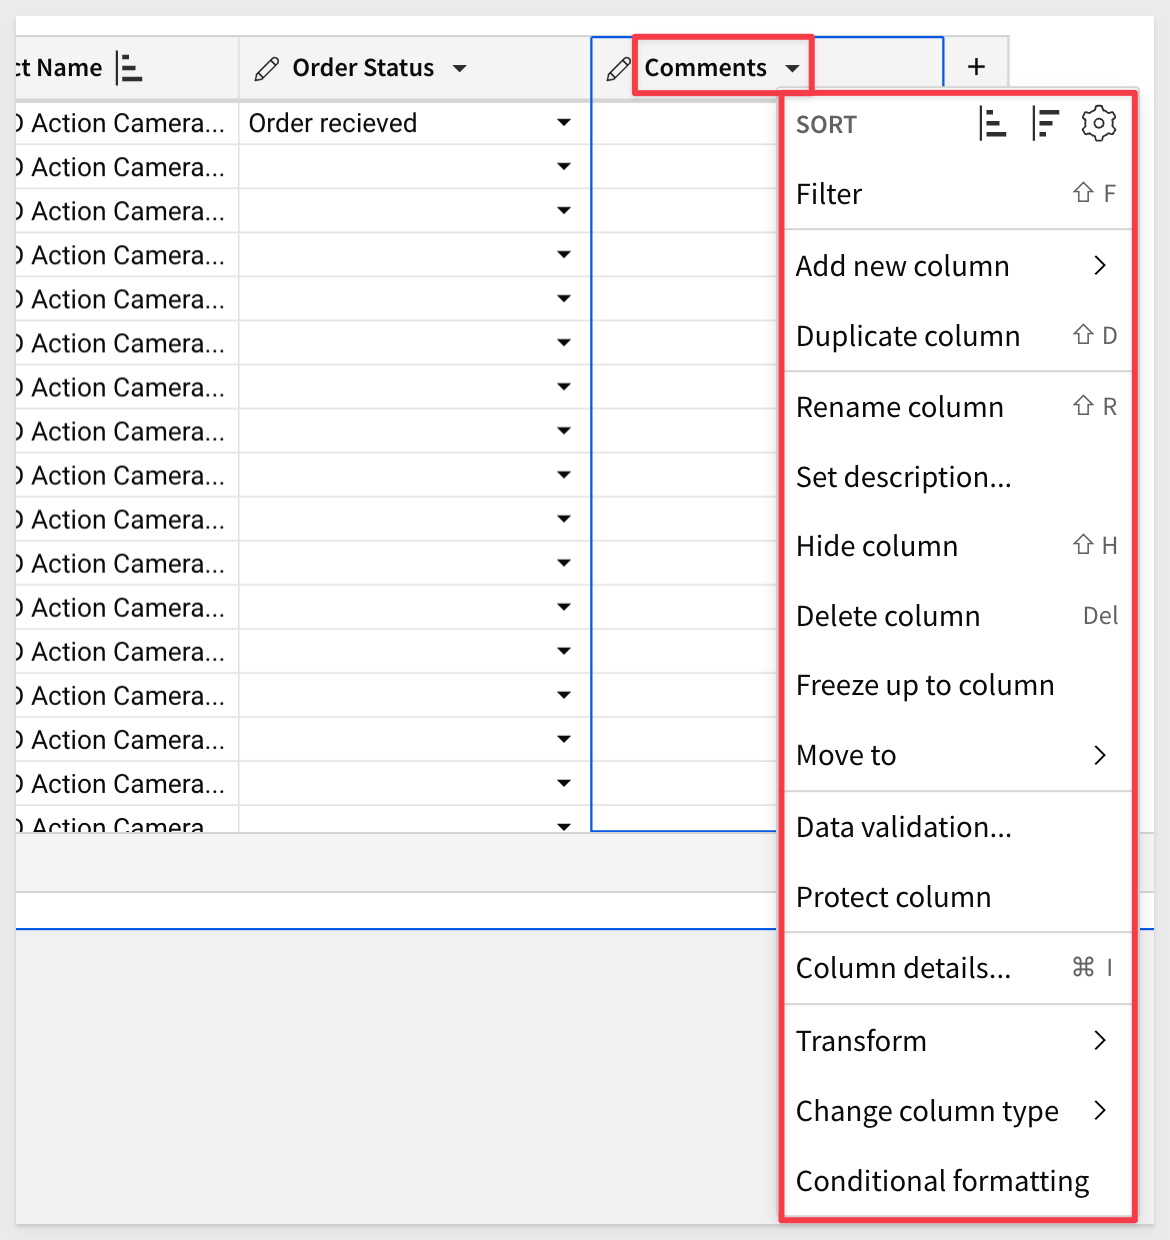
Adding columns to input tables is the same as for regular tables, except these new columns are written back to the warehouse.
With the workbook in Edit mode, click the + in the column header of the last column:
In the column type list, select Text, since this will be a comments column:
Rename the column to Comments and click to open its menu. Input table columns have all the same features as regular tables.
Now users can add free-form comments as they update orders:
Click Publish.
Sigma input table provide two built-in columns that can be exposed easily.
Adding another column, we can see that there are two history columns available to add:
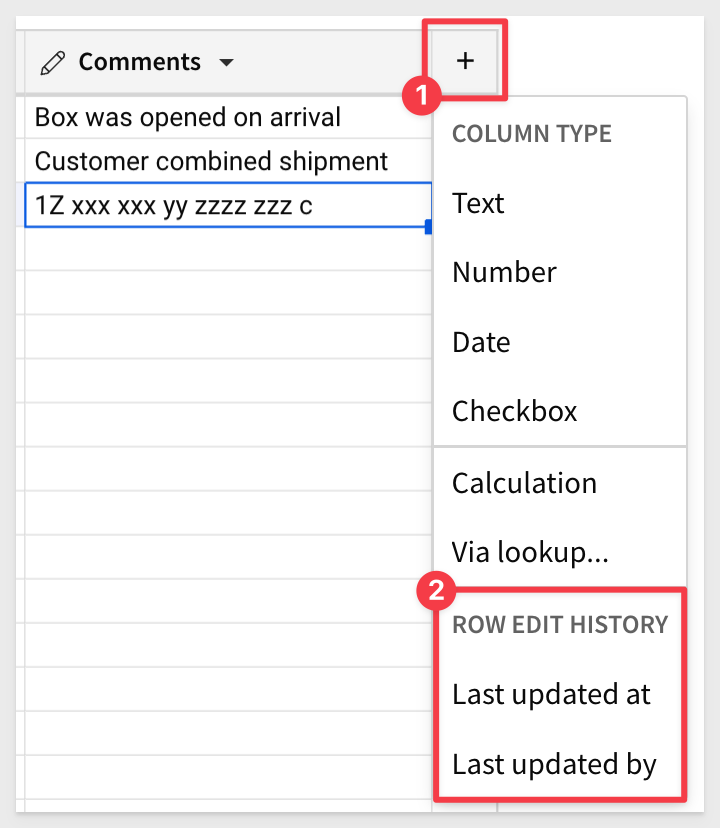
Adding both of these will provide information on who made the last edit, and when.
These four columns are written back to the warehouse, each time the user makes a change.
Click Publish.
Any type of table can be made more useful with some filtering, especially when the data gets large.
Filtering in Sigma is really easy, and it only takes seconds to do.
Imagine a scenario where a customer calls and wants to check their order status, but does not have the order number.
We need a quick way to find their orders, using their name.
In other fundamentals QuickStarts, we used the + in the element panel to add a control filter.
This is fine, but lets do it a different way.
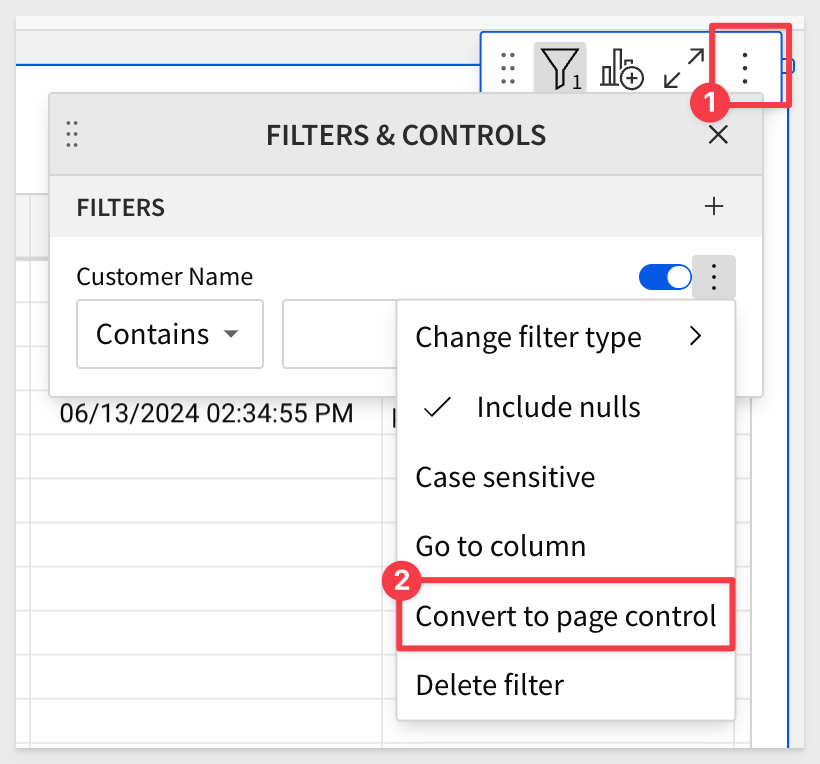
This time, click the Customer Name menu and select Filter.
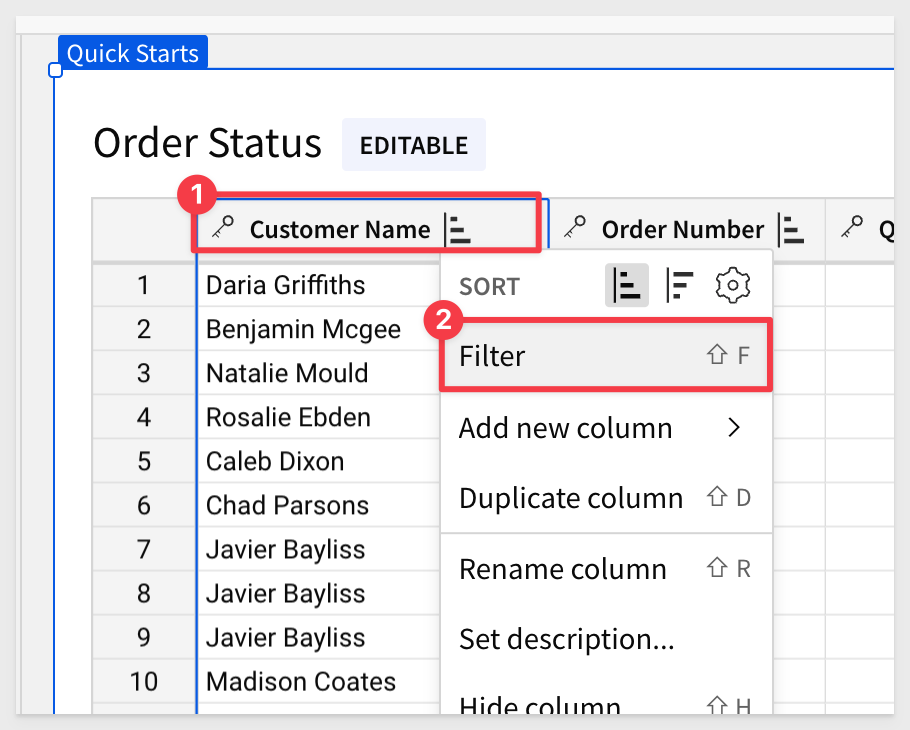
This opens the selected column as a filter for the Order Status table.
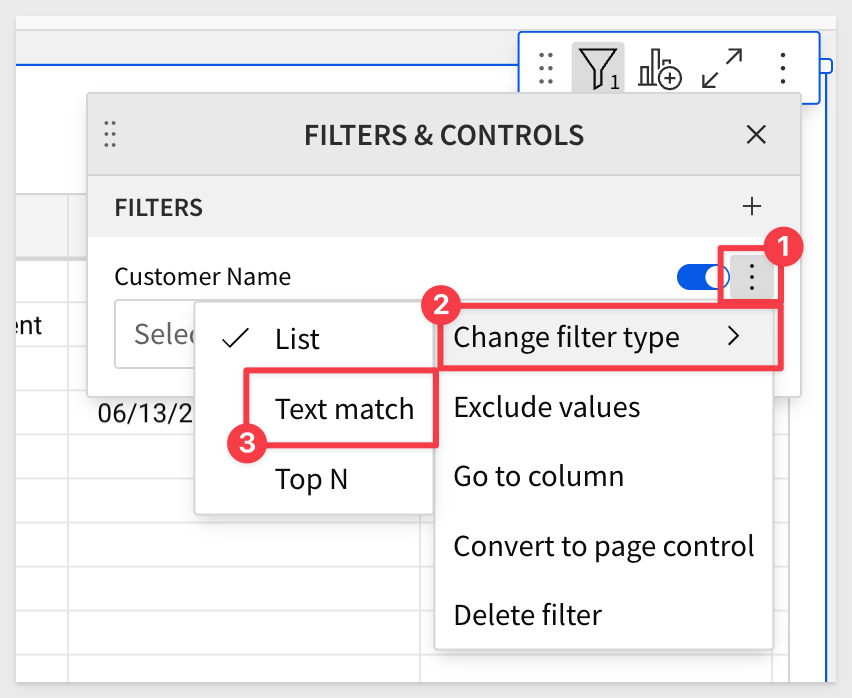
Click the 3-dots icon and Change filter type to Text match.
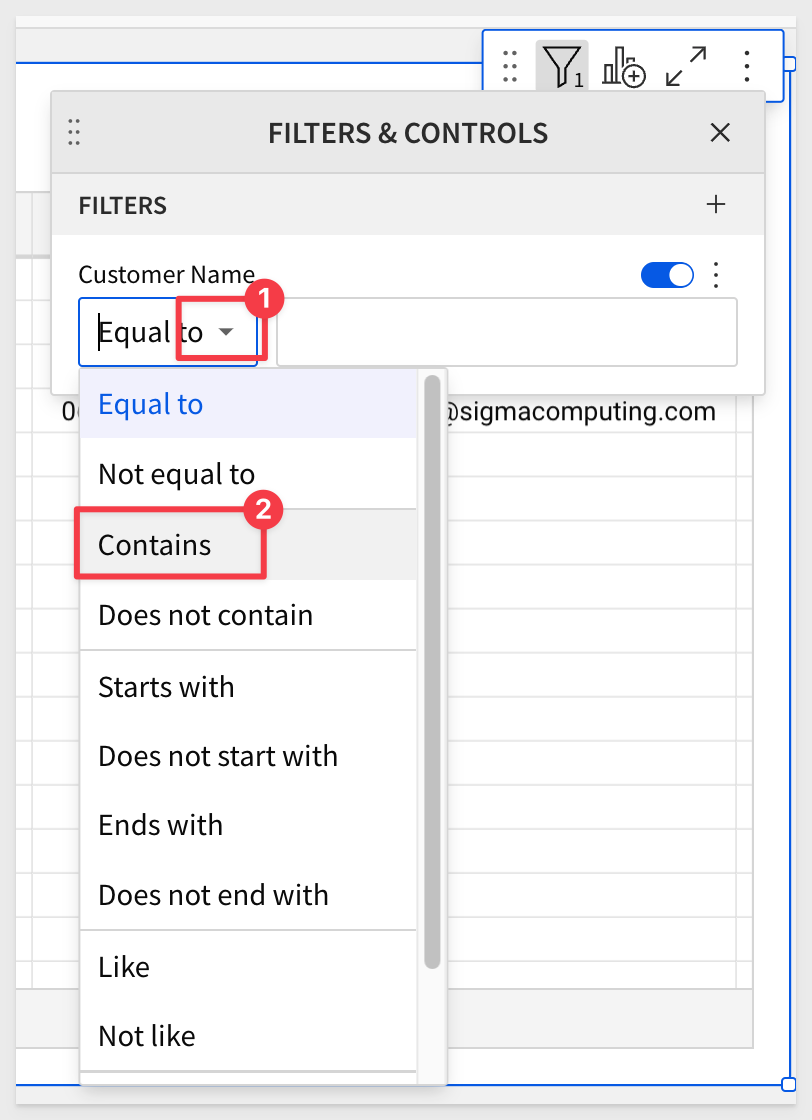
We also want to use Contains instead of Equal to so we can get results more quickly and avoid having to spell the whole name:
We have our filter, but don't want to have to make the user click the filter icon to expose it. That is too many clicks!
Open the 3-dot menu and select Convert to page control:
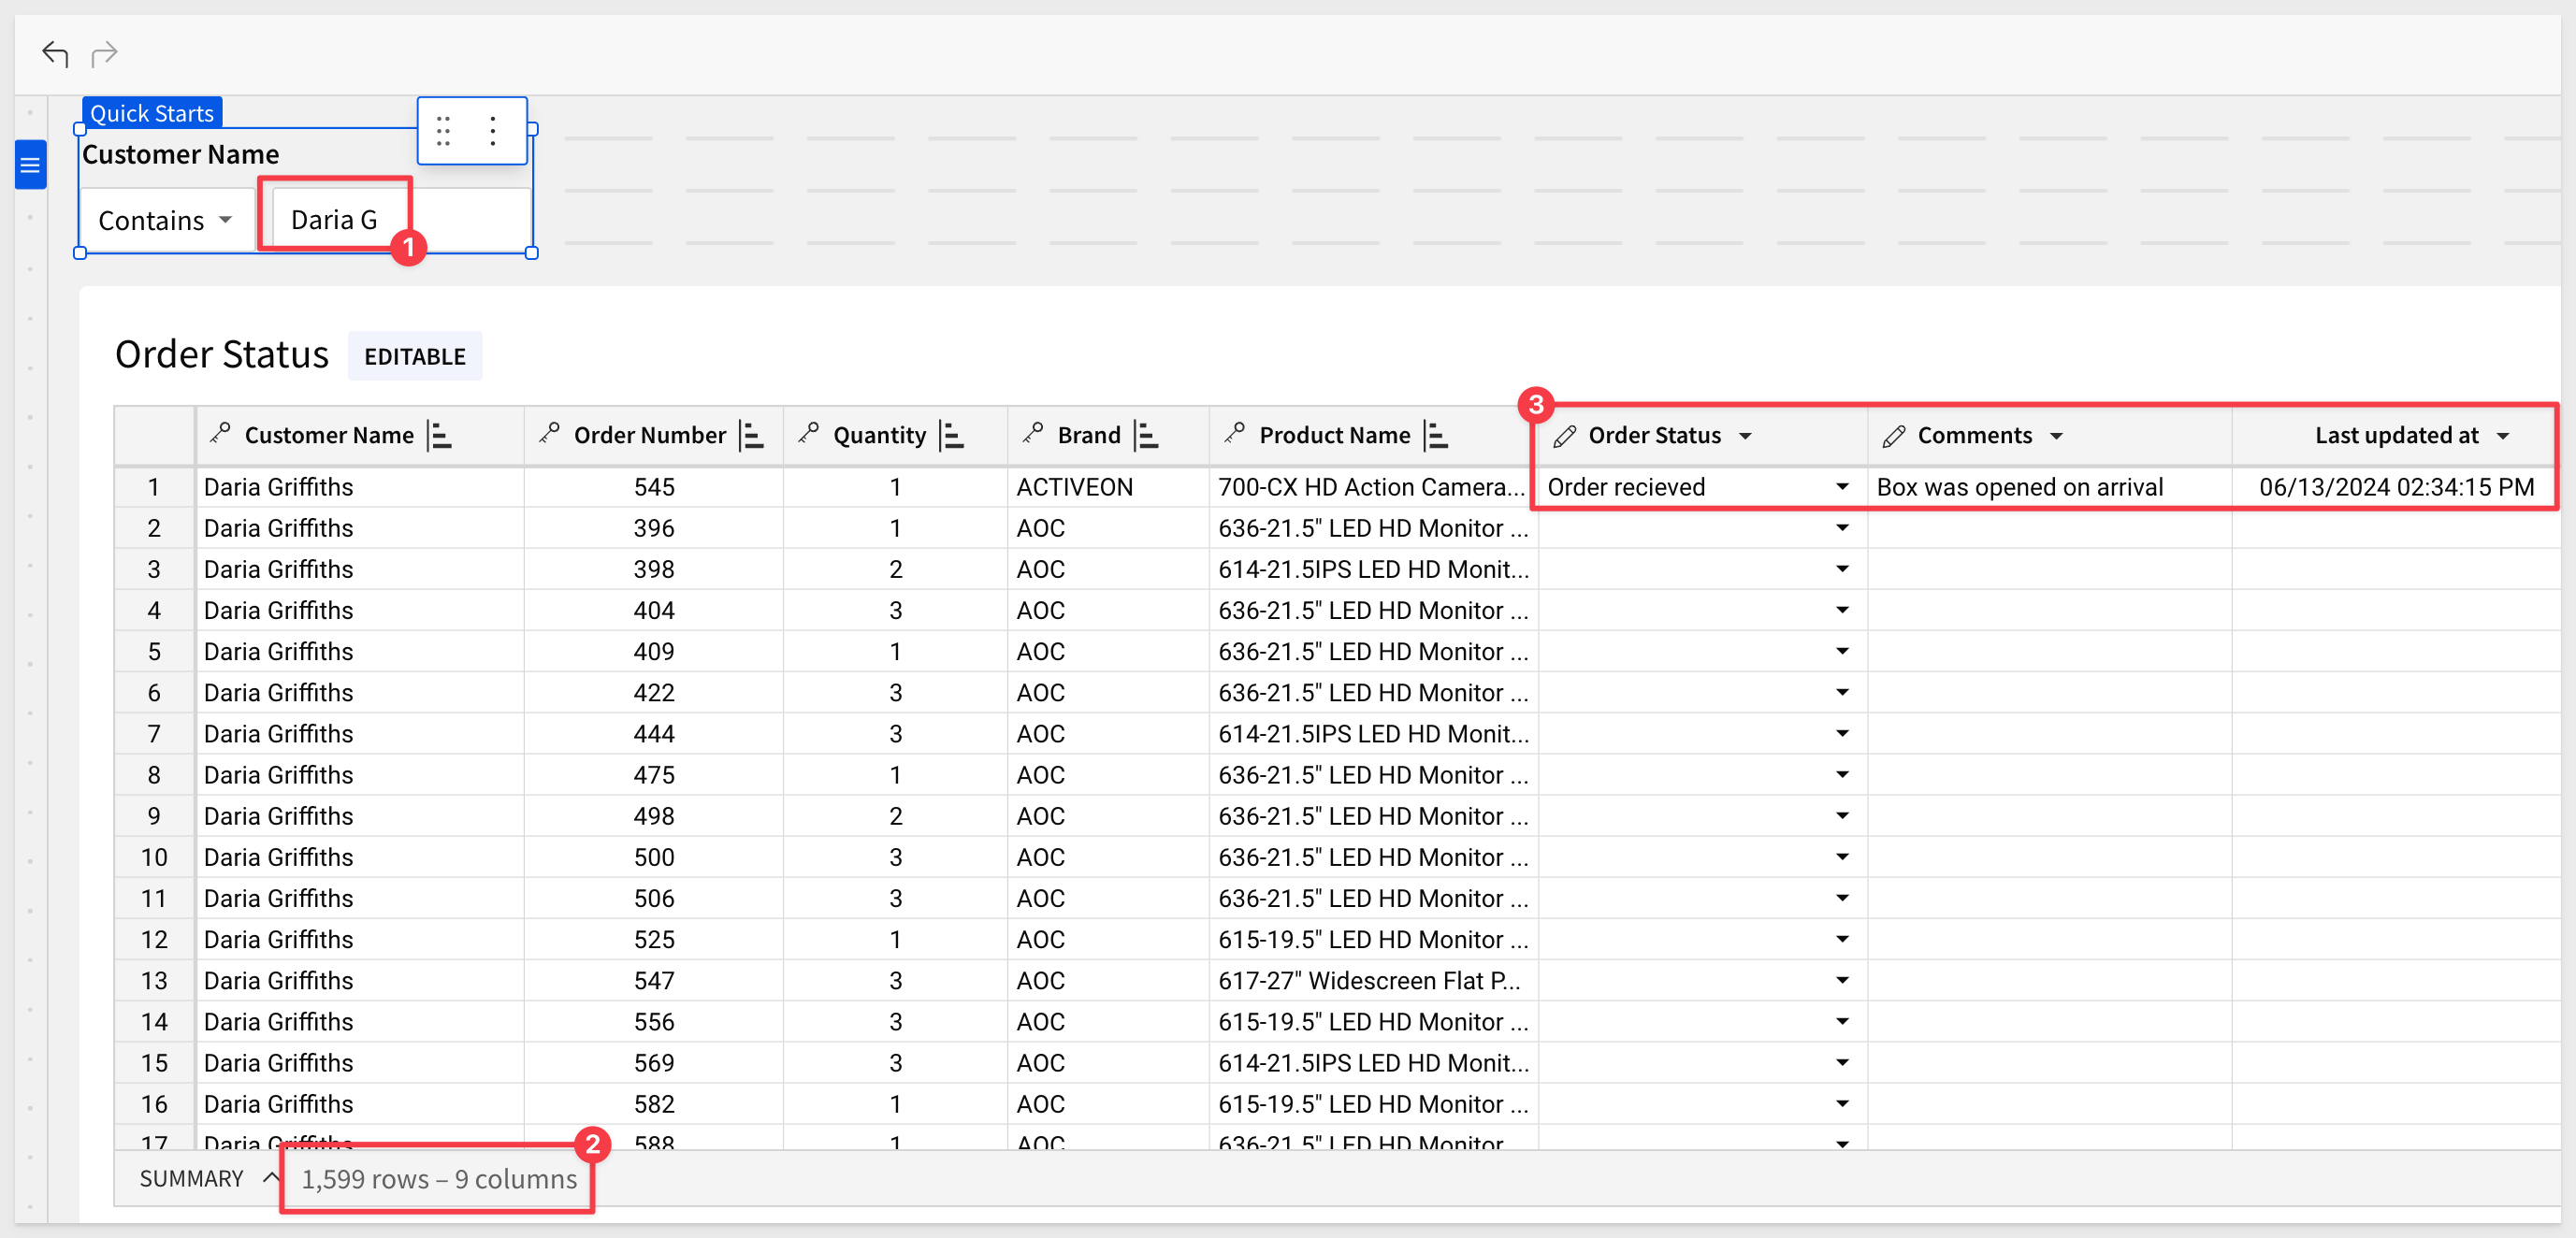
Type Daria G and hit enter.
We can quickly see that Daria has a recent order.
Click Publish.
Actions brings even more interactivity that can be configured within and across workbook elements.
By automating responses to specific user interactions, we can create efficient workbook workflows that produce quick and relevant data insights.
Lets use a simple example to get you familiar with actions.
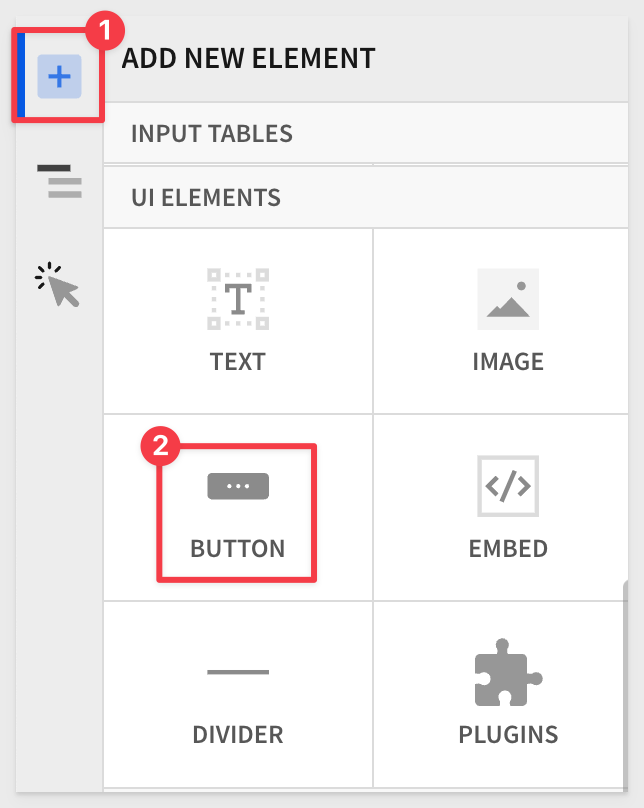
Use the element panel, + icon to add a new Button element to the page. Drag it next to the Customer Name filter control:
Change the button's label to Clear Filter:
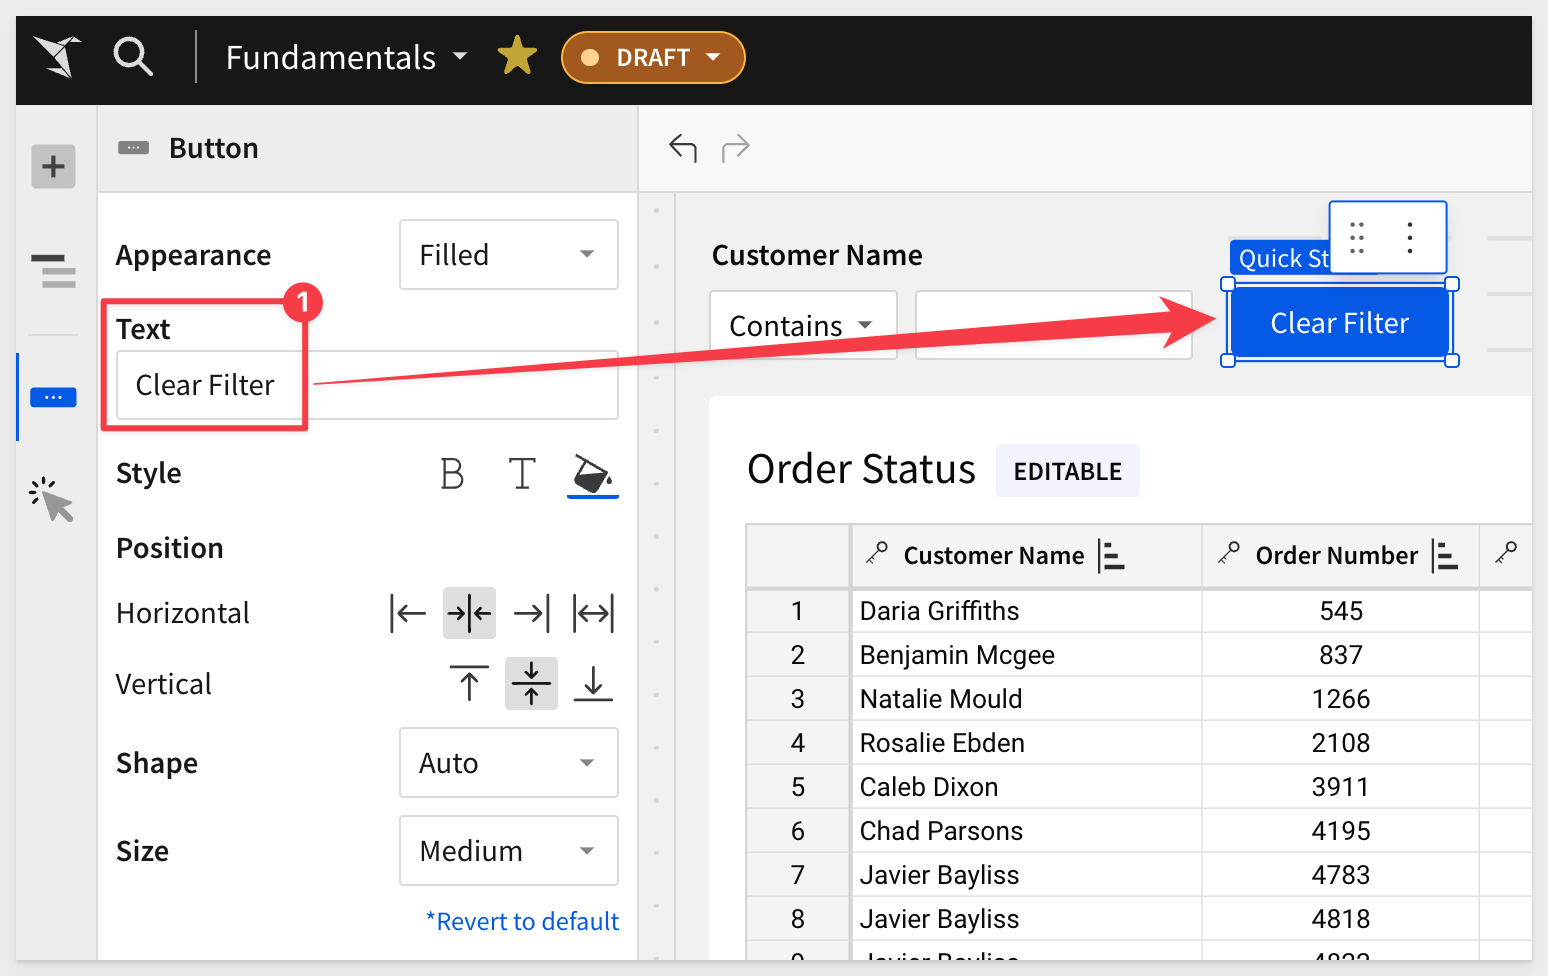
With the new button selected, click the actions icon and Add action:
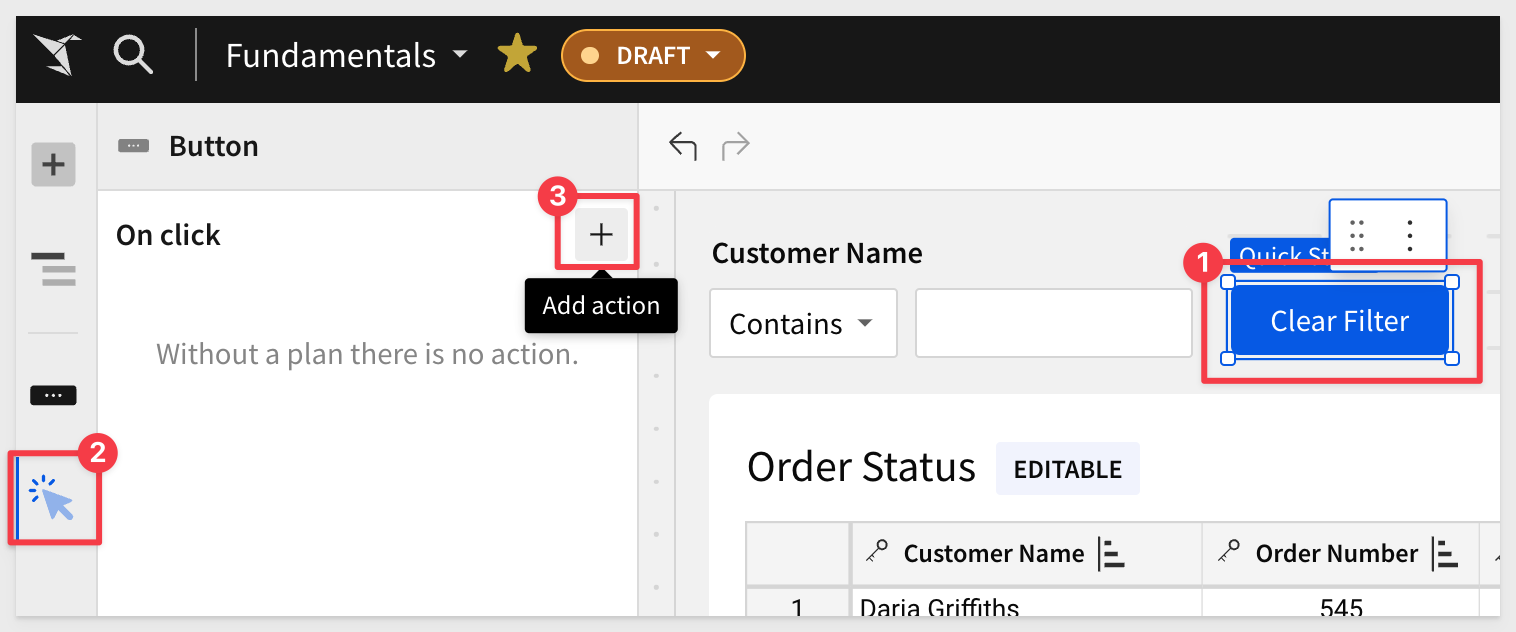
Set the control value to Clear control:
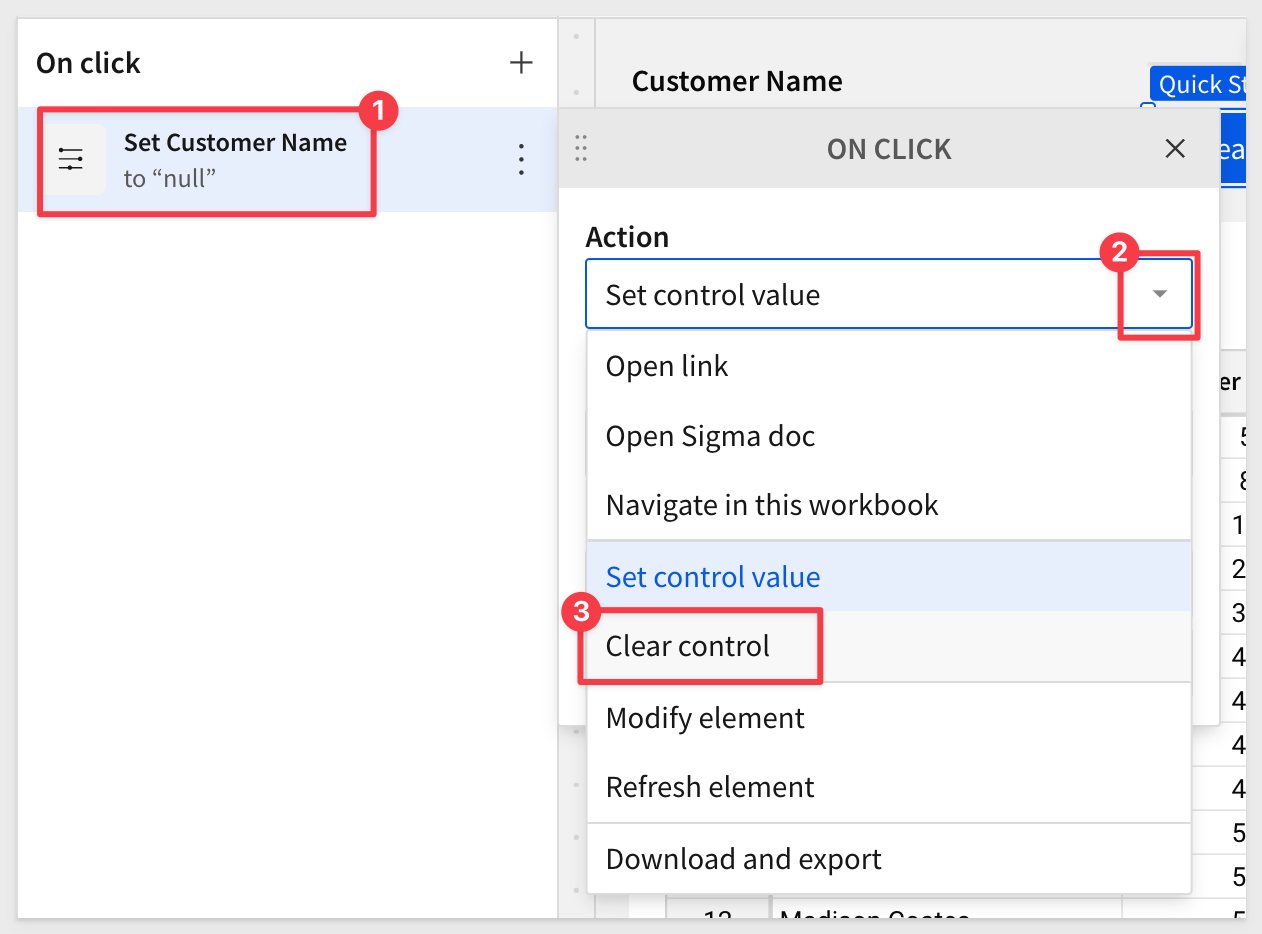
Select the Control as our Customer Name filter:
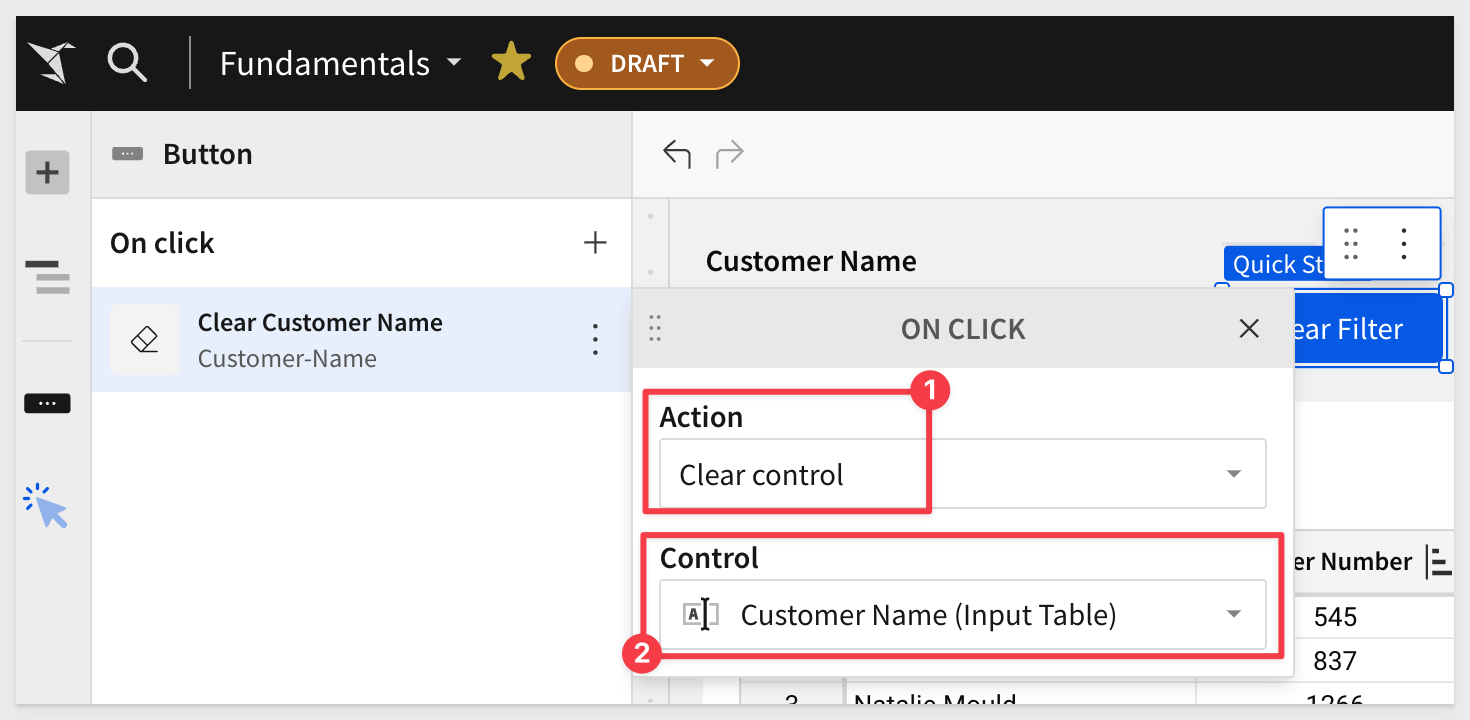
Click Publish.
Users can now reset the filter by clicking the Clear Filter button:
While this was a simple example, actions enable really interesting data-driven application workflows in Sigma.
To learn more about actions, see here.
In this QuickStart we covered the basic functionality provide by Sigma input tables. We explored a simple use case and demonstrated just how easy it can be to solve business problems without long development cycles or purchasing additional software applications.
Click here to move to the next QuickStart in this series.
Additional Resource Links
Be sure to check out all the latest developments at Sigma's First Friday Feature page!
Help Center Home
Sigma Community
Sigma Blog