Keeping HubSpot contact lists up to date is essential for effective marketing and sales processes and accurate reporting and analytics. High quality data leads to a better experience for both your organization and your contacts.
Traditionally, data teams export contacts as CSVs and send them to marketing teams, who upload them into tools like HubSpot. The downside is that the data in those CSVs quickly become outdated whenever the business has new leads or users. With each update, the CSV has to be re-exported by the data team and re-uploaded by the marketing team. This is a time-consuming and error-prone manual process.
If you're leveraging a BI tool like Sigma to define lists of target users, you can rely on those definitions to sync contacts to marketing tools like HubSpot or Marketo dynamically using Hightouch.
This QuickStart walks through using a Sigma workbook and Hightouch to sync contacts into HubSpot, but you could apply the same general steps for syncing any contacts into any other marketing tool.
The use-case is creating and maintaining a marketing campaign that targets the most loyal customers in the United States only. We need an easy way to get the data from the Snowflake warehouse over to HubSpot, where we will run the campaign from. We don't have development resources to do this right now so we have to do it ourselves.
For more information on Sigma's product release strategy, see Sigma product releases.
Target Audience
Businesses who need to move data from one place to another while allowing end-users to directly work with the data and make decisions about which data is selected, how it is organized and even provide additional data to enrich it prior to it landing in the target system.
Prerequisites
- A computer with a current browser. It does not matter which browser you want to use.
- Access to your Sigma environment. A Sigma trial environment is acceptable and preferred.
- A Snowflake account with the proper administrative and security admin access. A trial environment is acceptable.
- A Hightouch account. A trial environment is acceptable.
- A HubSpot account. A trial environment is acceptable.
What You'll Learn
We will connect to data in our Snowflake warehouse, use Sigma to orient and enrich it, and leverage Hightouch to copy it to HubSpot where we will see our transformed data land.
What You'll Build
At a high-level, the QuickStart will cover each of these areas:
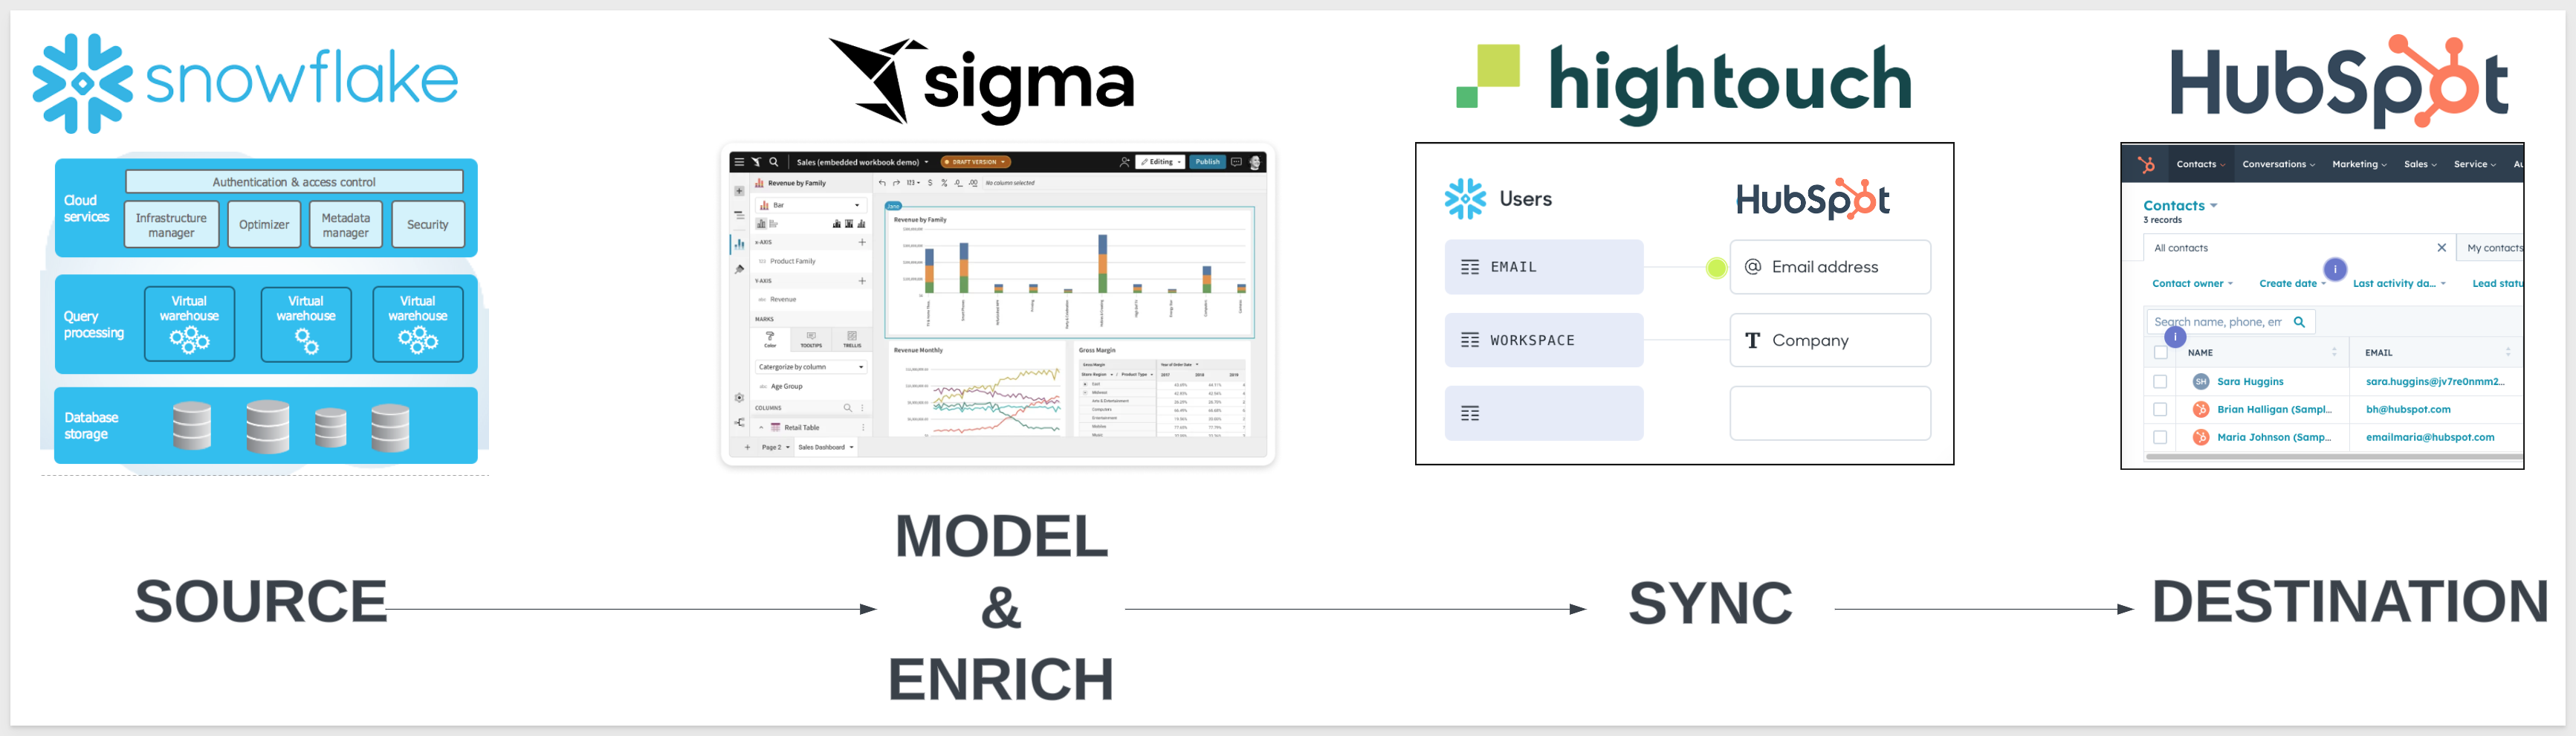

We will start by connecting Sigma to Snowflake and using the Snowflake sample database.
Login into Sigma (as Administrator).
Navigate to Administration > Connections:
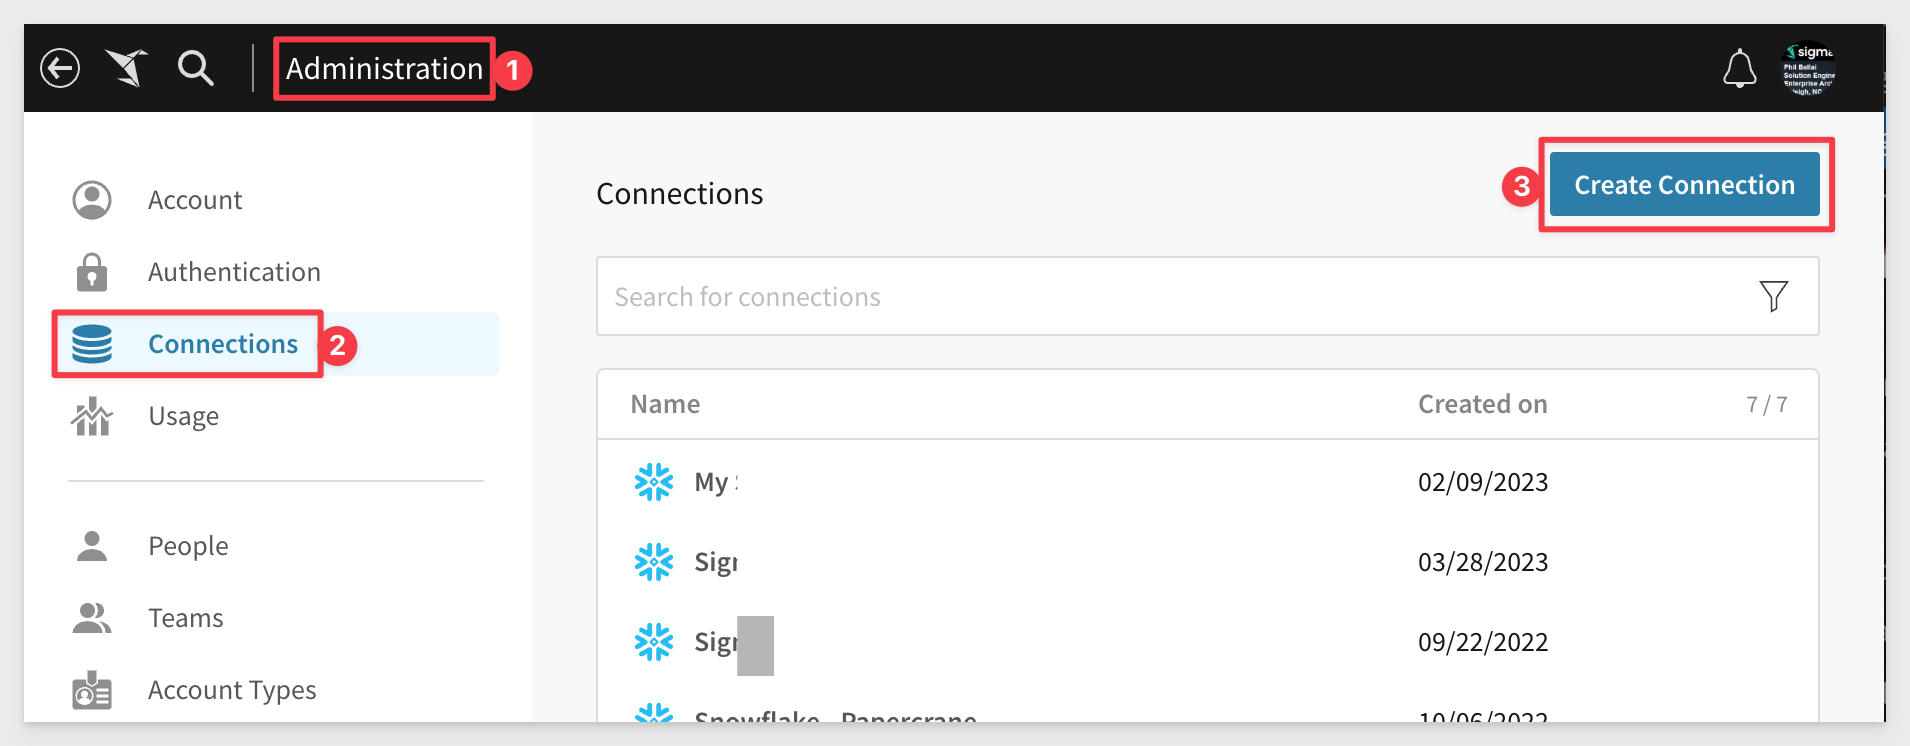
Click Create Connection
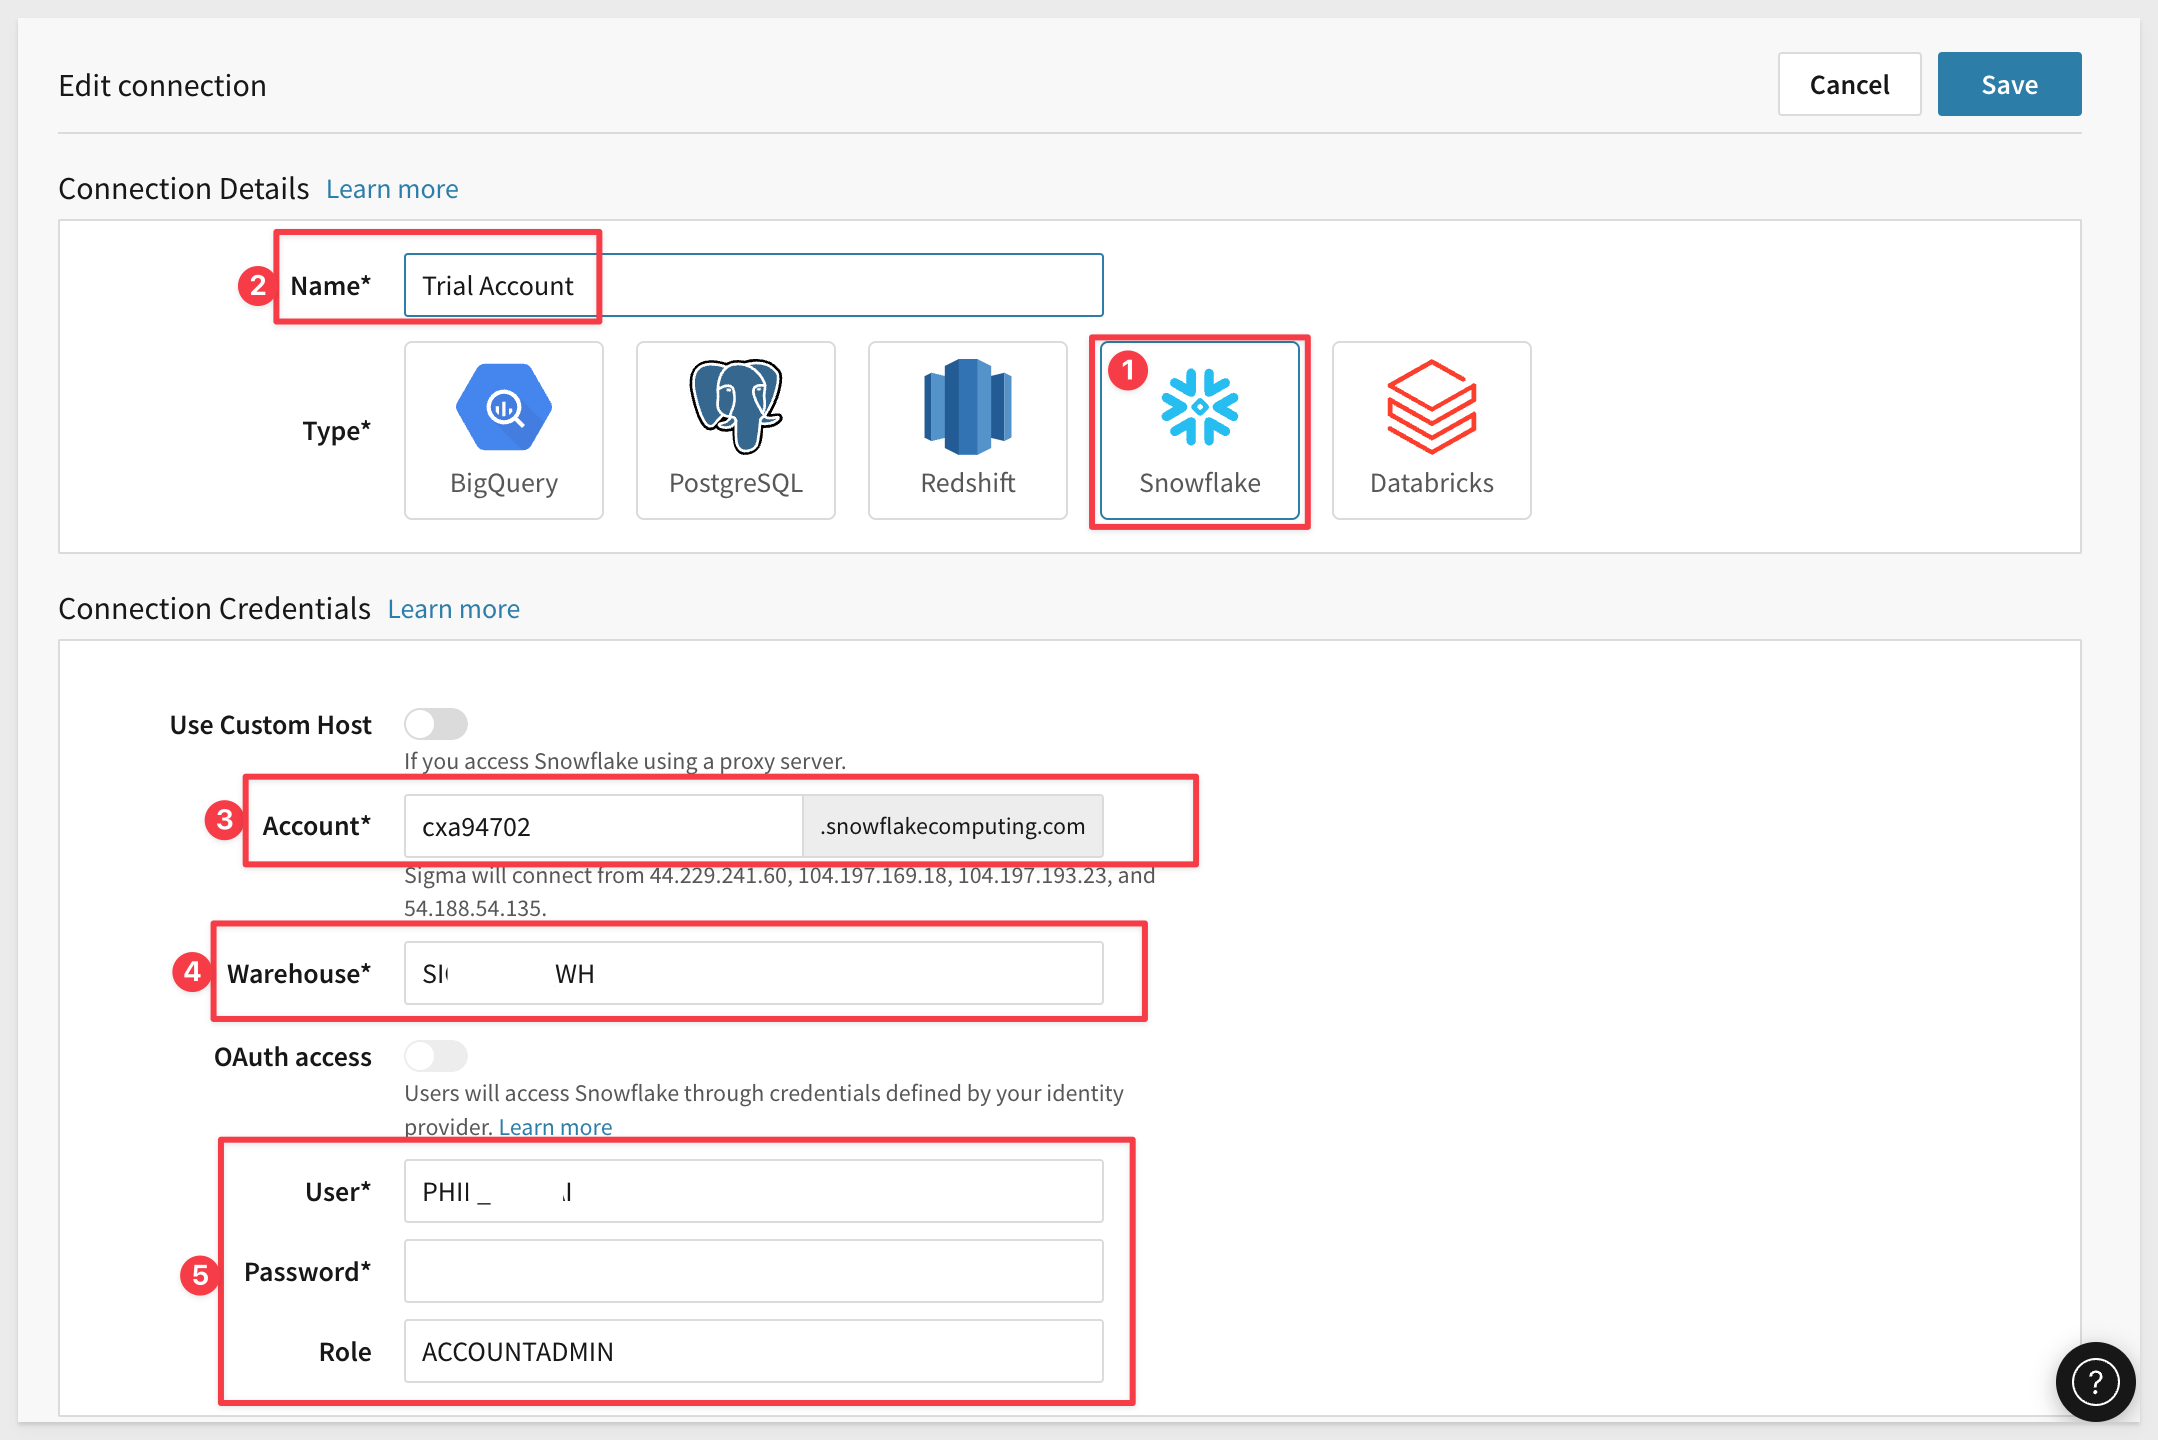
Select type as Snowflake, provide a user-friendly name and then the Connection Credentials required to log into the Snowflake account. We will use the Snowflake Role of ACCOUNTADMIN to keep things simple.
Save the connection, and if everything is correct, the connection will be added.
Before we move on, we also need to enable write access so that Sigma can write data back to Snowflake. We will use this to allow Sigma users to add small amounts of data to a table. This table is held separate from other Snowflake data but can be used to augment existing data. We will discuss this more as we go but for now, let's enable that.
Before we can enable write access, we need to give the user-provided data a place to live in Snowflake and "allow" a Snowflake role to use it. This is straightforward and here are the steps.
Log onto your Snowflake trial account and open a new Worksheet:
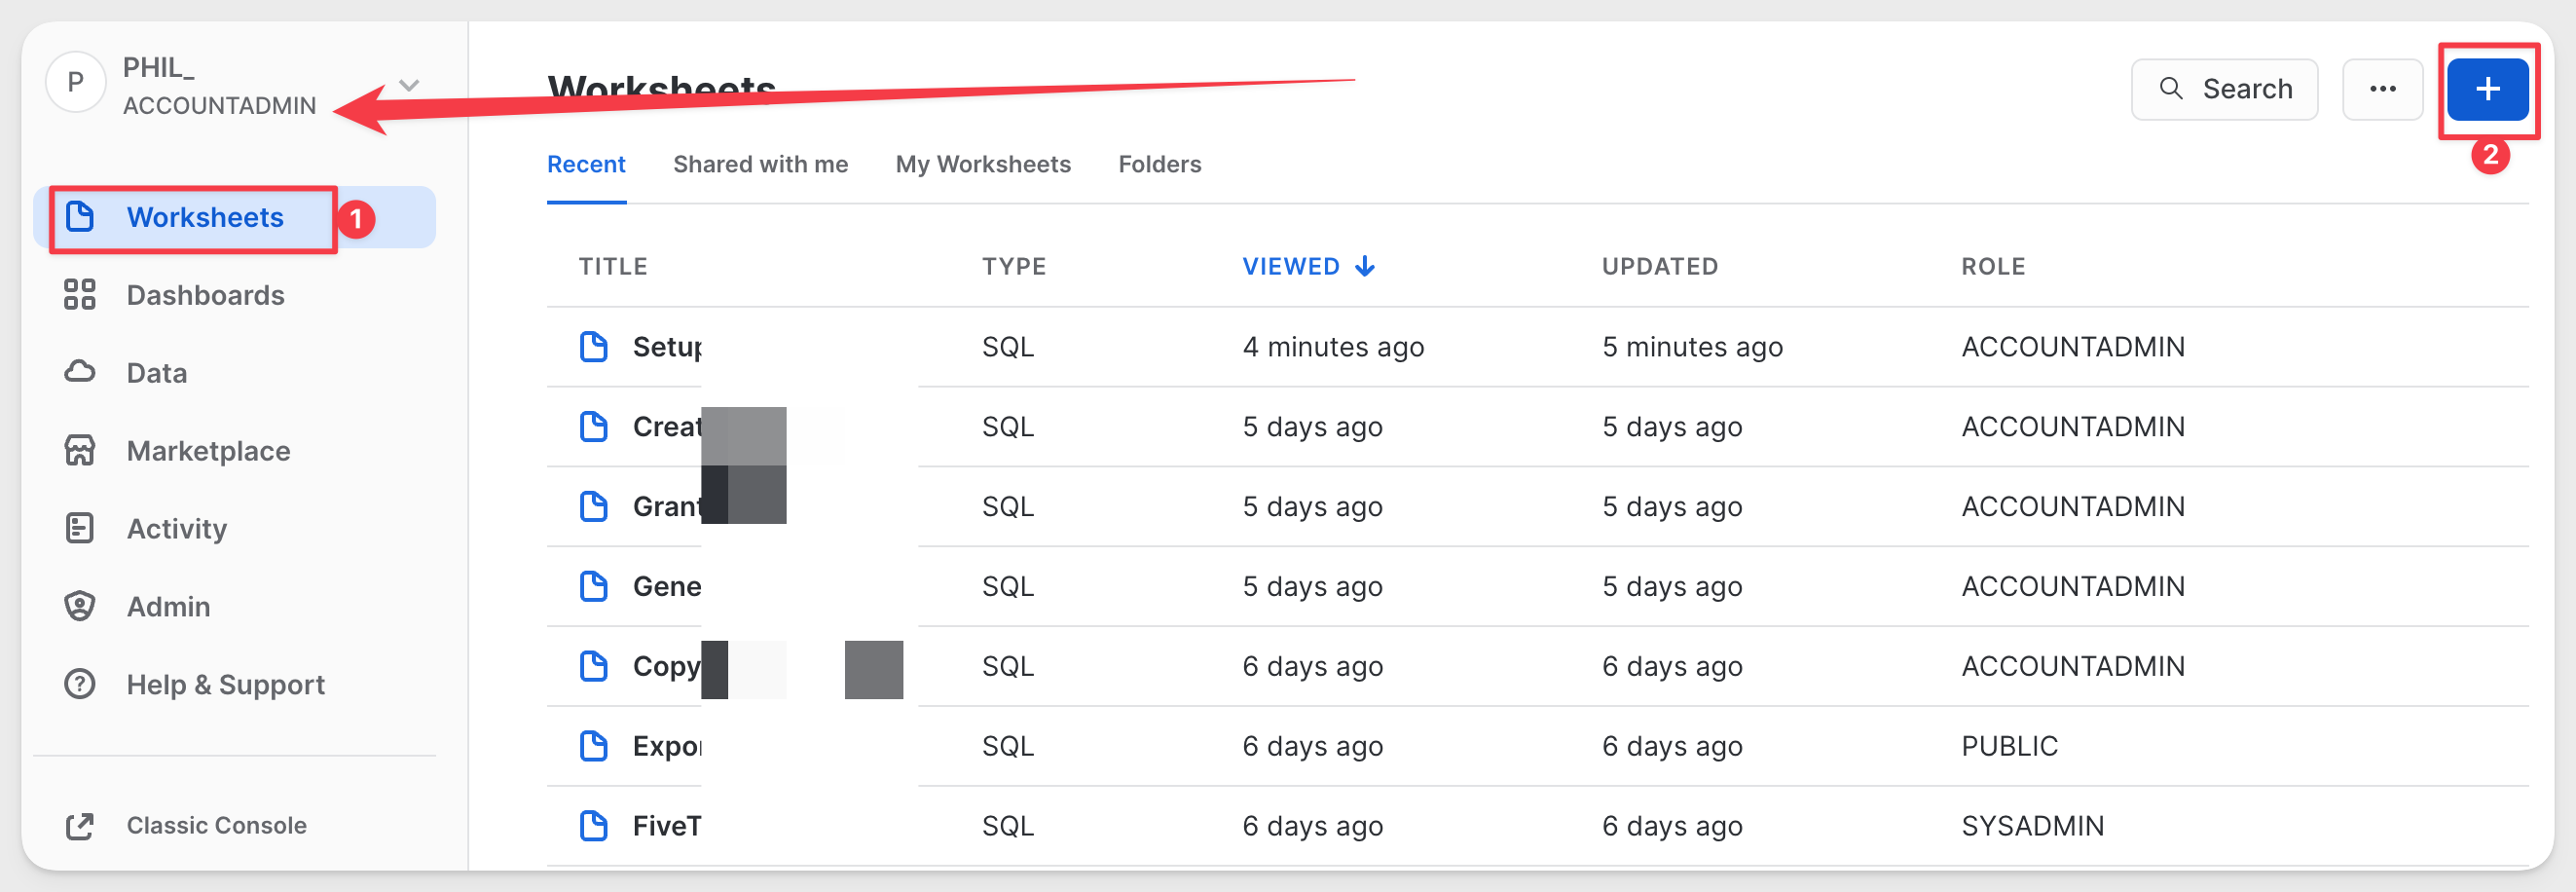
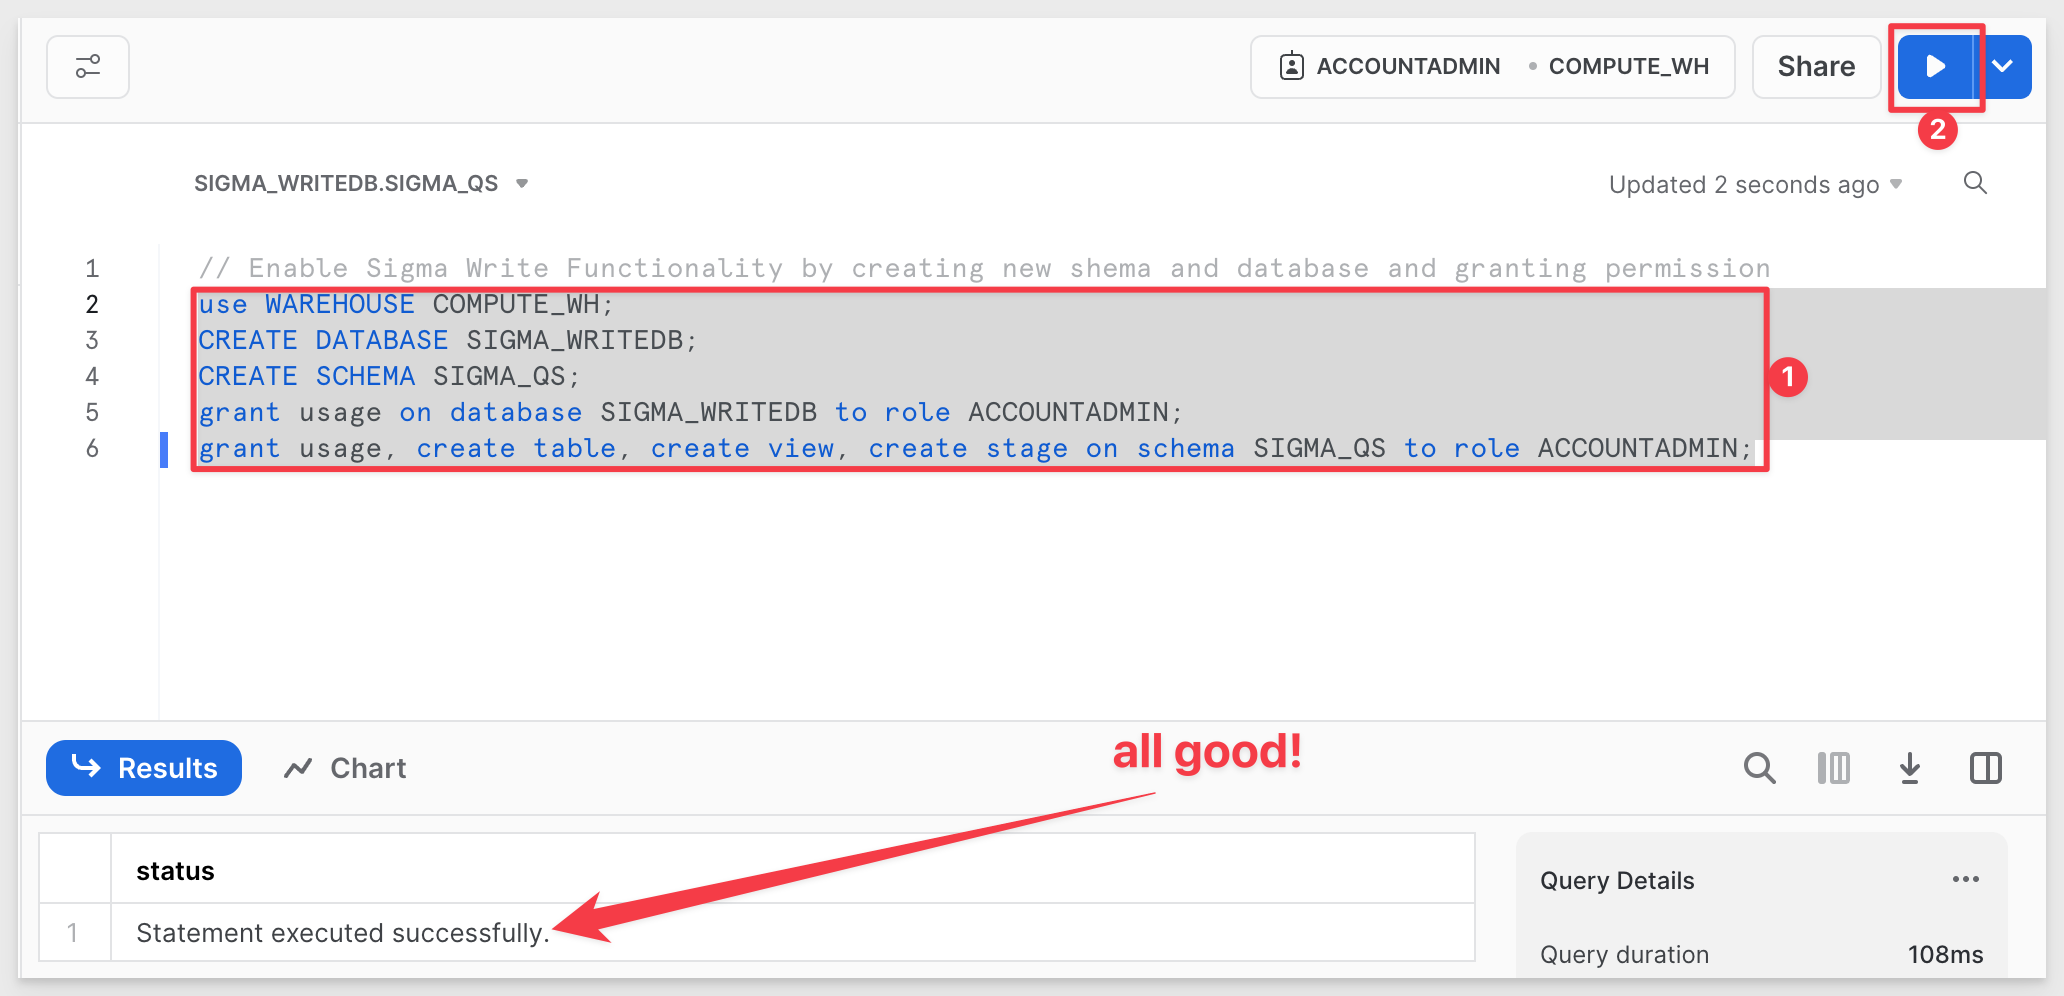
Copy and paste the following code into the new Worksheet:
// Enable Sigma Write Functionality by creating new shema and database and granting permission
use WAREHOUSE COMPUTE_WH;
CREATE DATABASE SIGMA_WRITEDB;
CREATE SCHEMA SIGMA_QS;
grant usage on database SIGMA_WRITEDB to role ACCOUNTADMIN;
grant usage, create table, create view, create stage on schema SIGMA_QS to role ACCOUNTADMIN;
This uses the Snowflake default Compute_WH and then creates a schema, database and grants require permission to the ACCOUNTADMIN role. Recall that in the Sigma connection, we are using this role already.
After pasting the code, use the mouse and select it all and click the arrow to run it. You should see a success message:
Return to Sigma, Administration > Connections and open the Snowflake connection we created earlier.
Click the Manage button and then Edit. Scroll down till you see Write Access.
Enable it and provide the values:
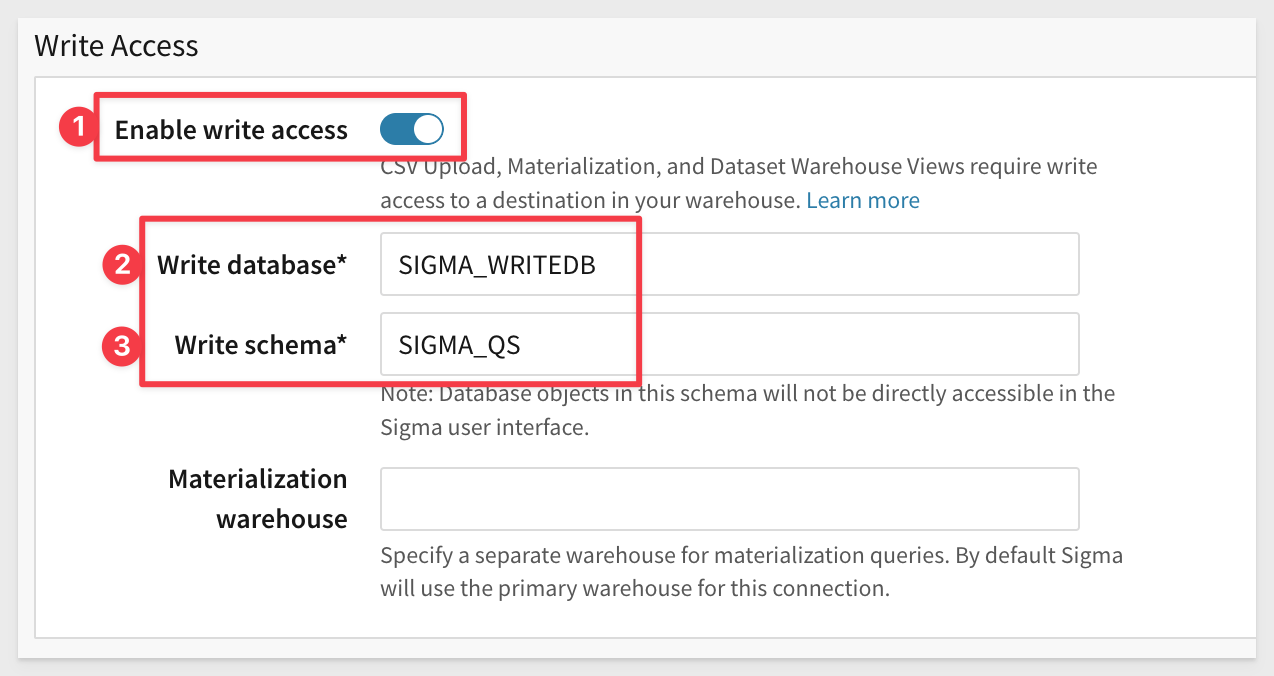
Before clicking Save you are required to reenter your Snowflake password. Do that and then click Save.
If all is correct, the connection will be tested and you return to the Connections page.
Now that we have a connection (with write access) to data, we want to filter for the records that the marketing campaign wants to target. We then want to provide marketing a way to triage the data further by augmenting the source data with additional information.
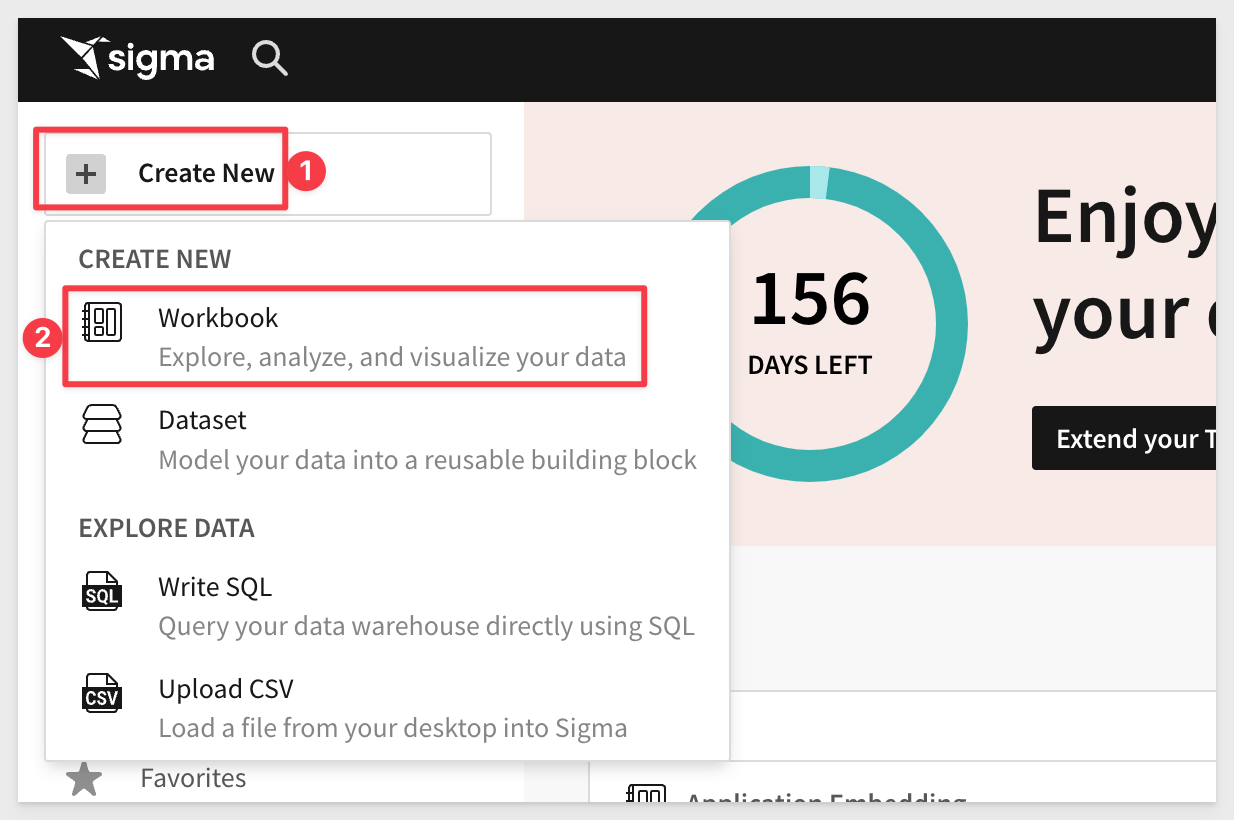
Click + Create new and select Workbook:
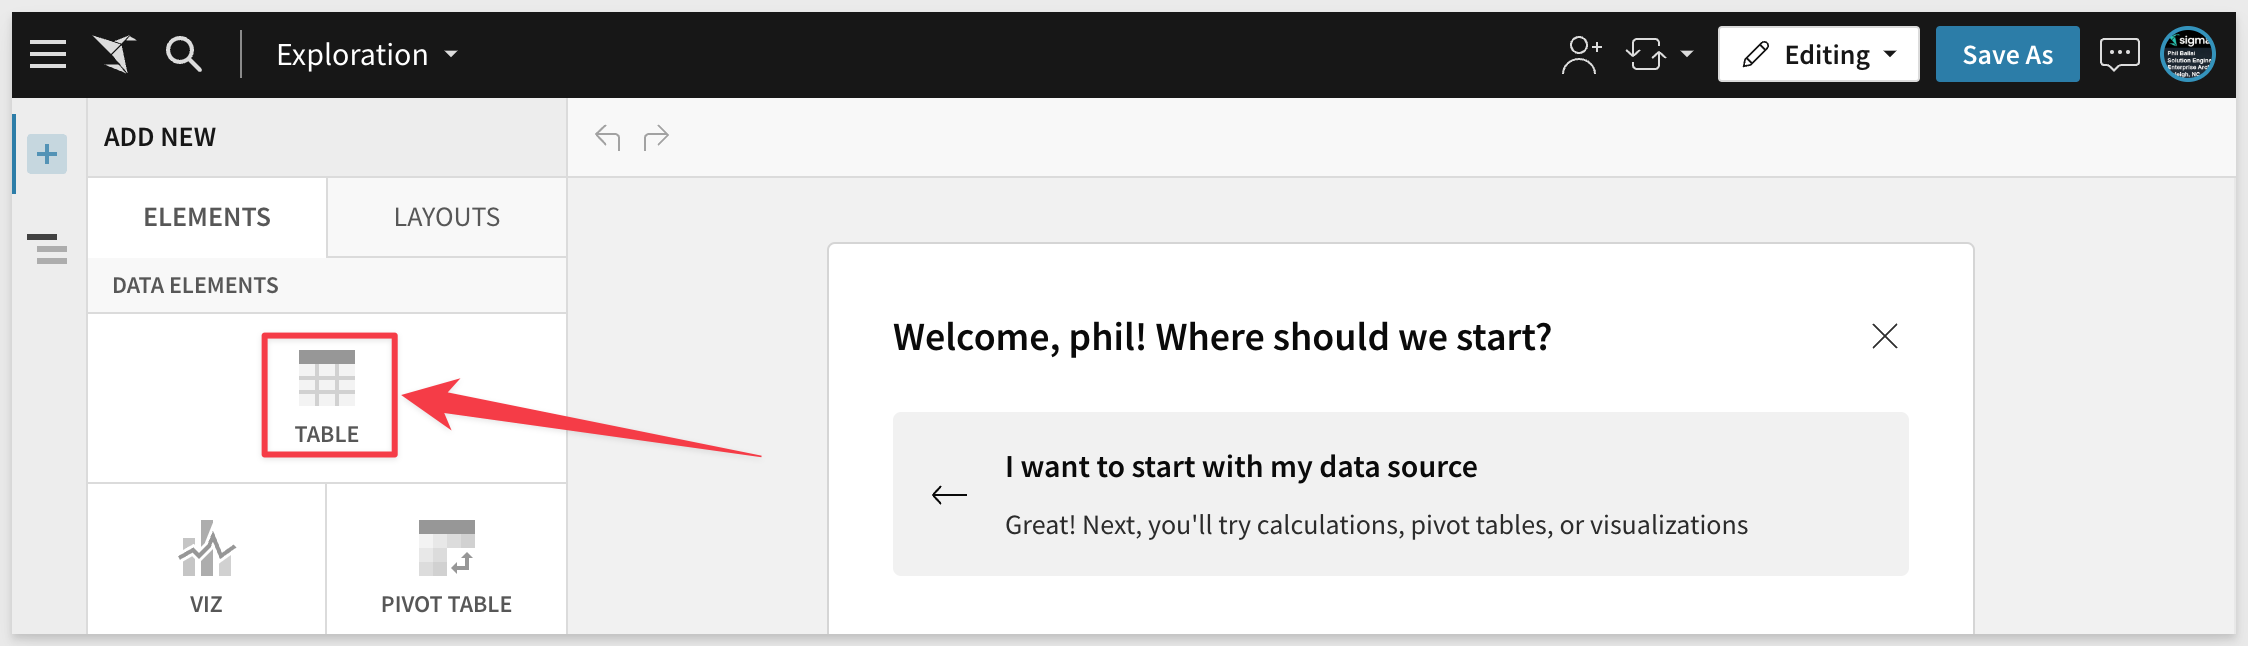
Click to add a new Table:
Next click Tables and Datasets.
Navigate to the Snowflake Trial connection that we created and then select the table Customer and click the Select button:
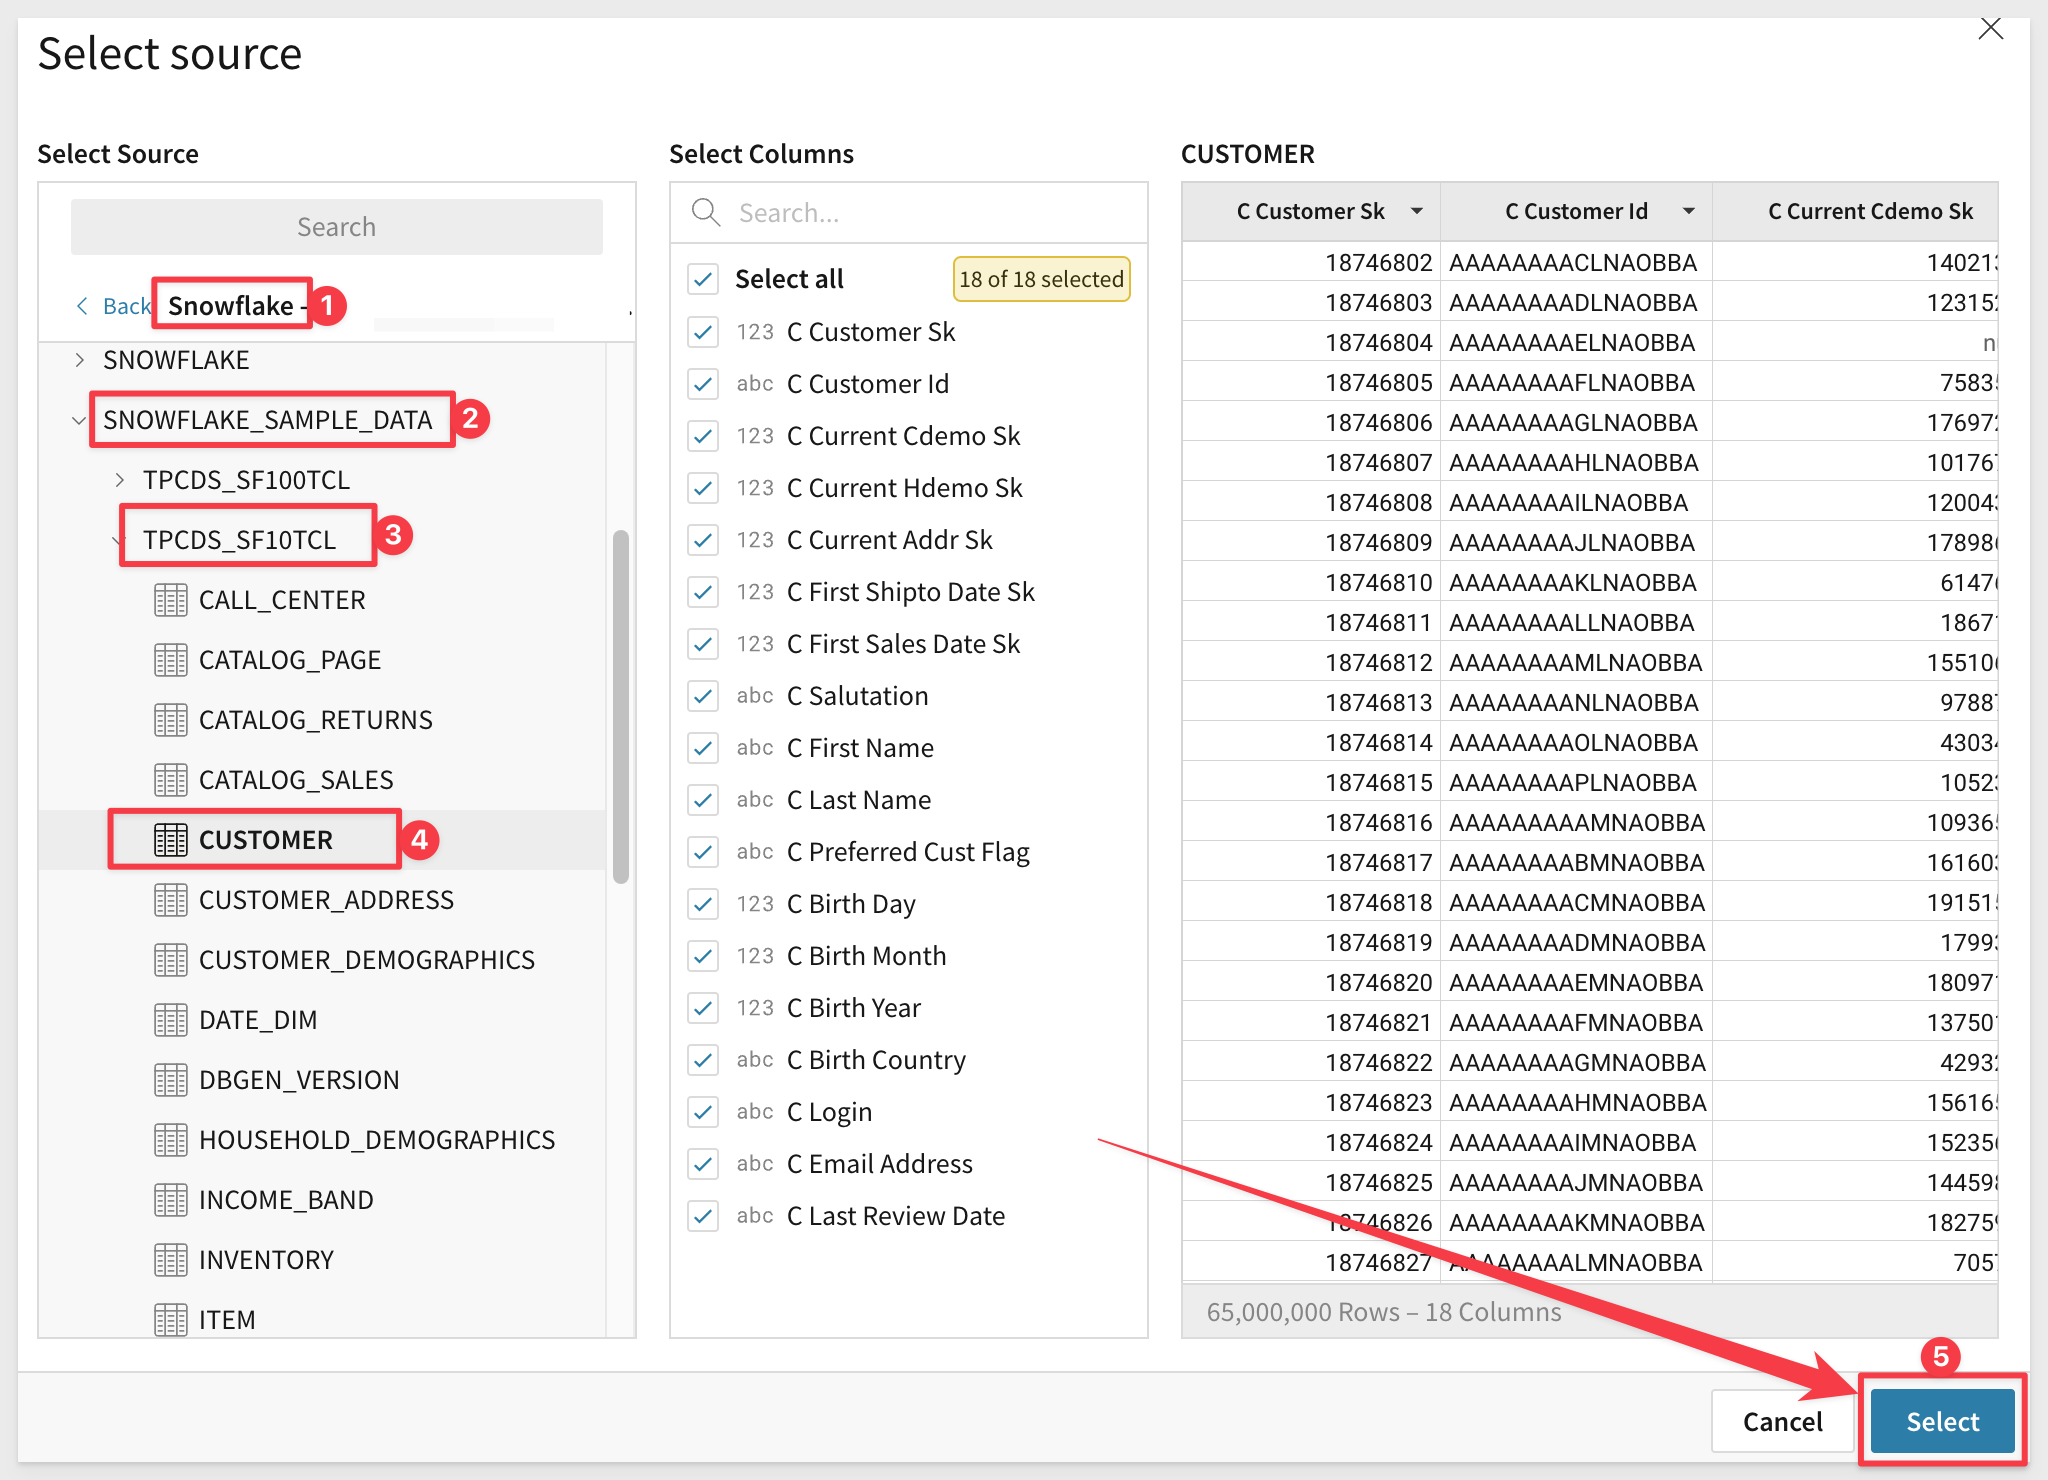
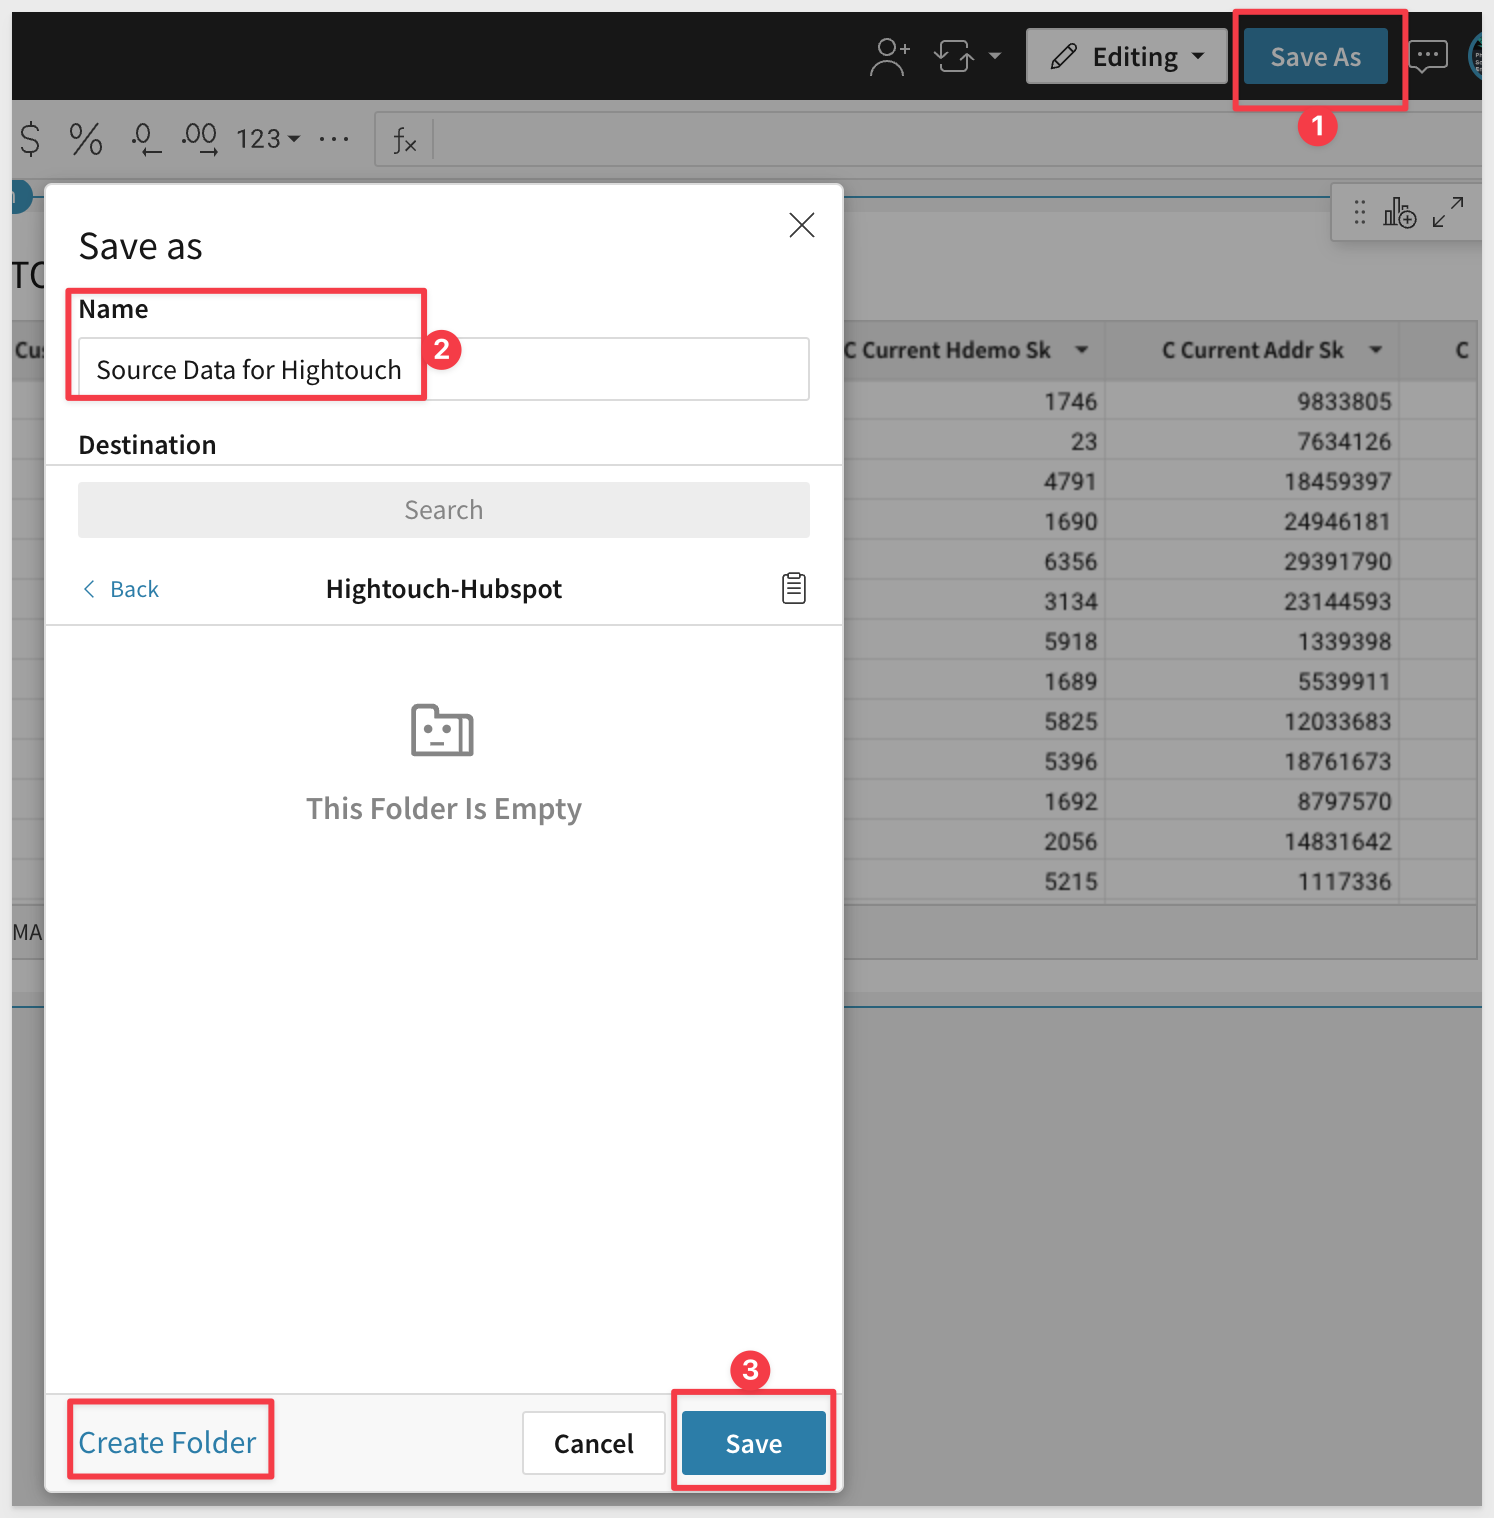
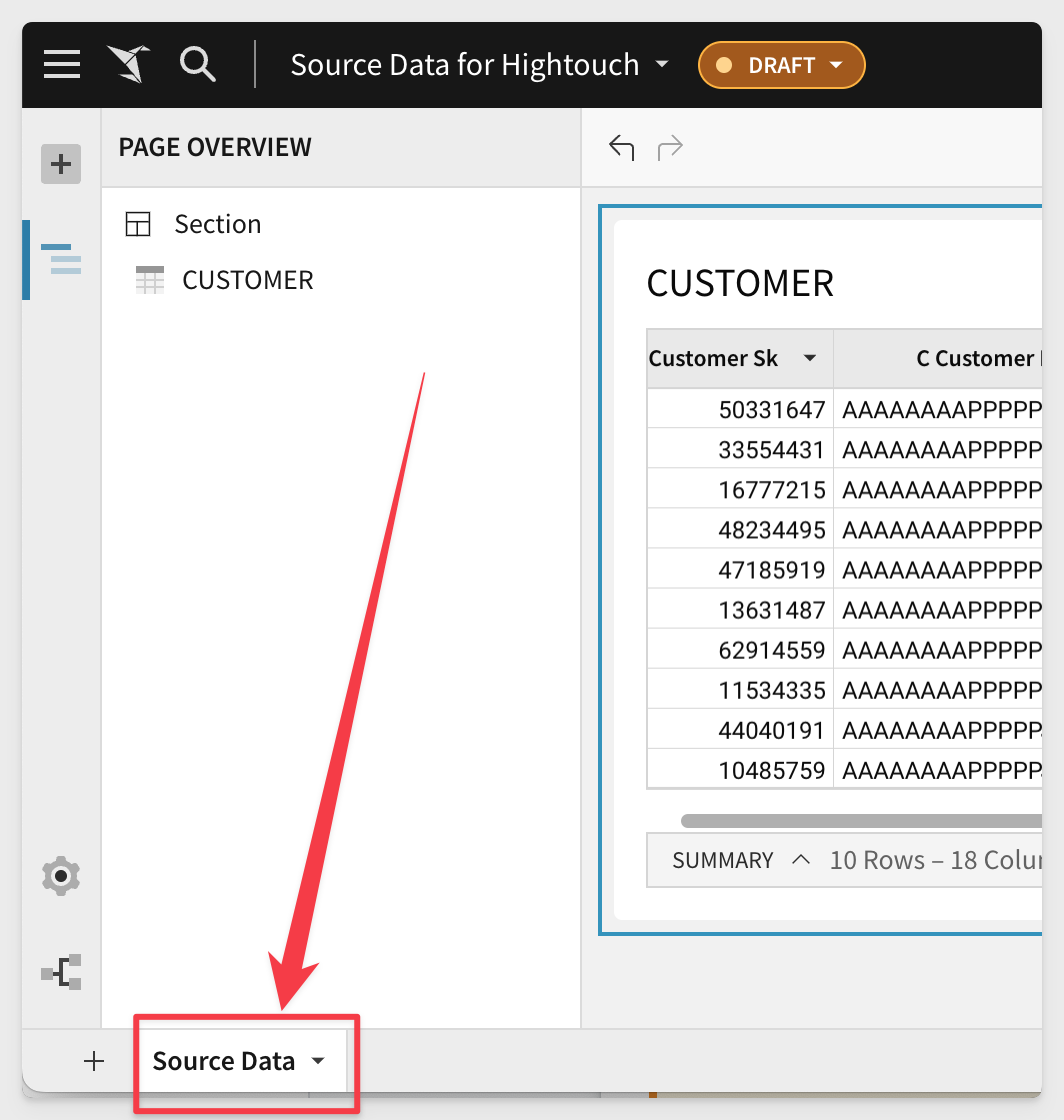
Now is a good time to save our Workbook. Click the Save As button in the upper right corner and name it Source Data for Hightouch:
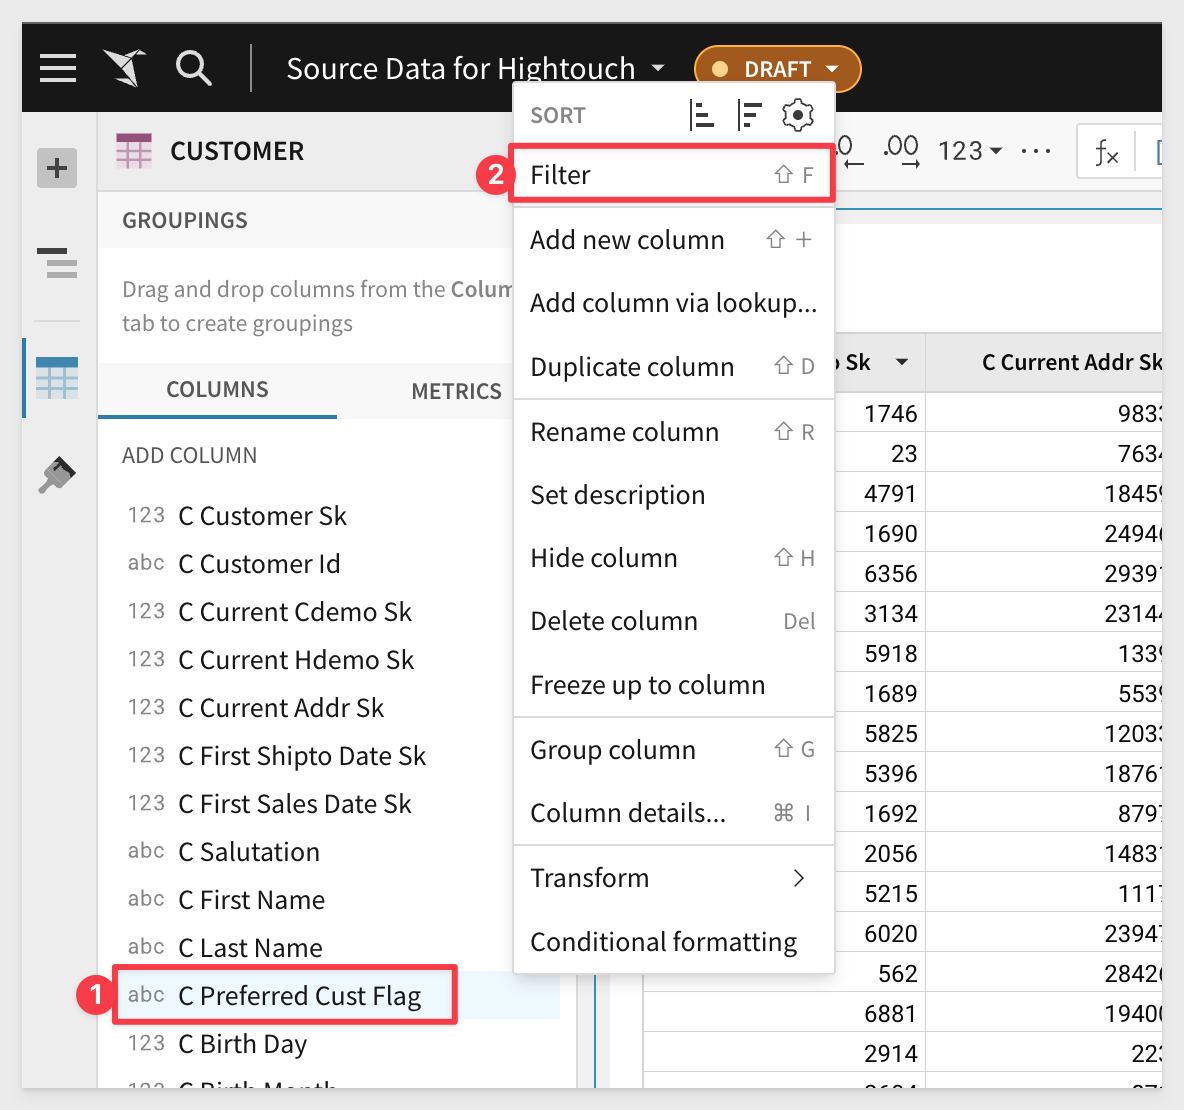
The Customers table we are using is large (65,000,000 Rows – 18 Columns) and we don't want to use that much data to demonstrate this workflow so let's limit the size with a few filters.
Recall that marketing wants only US customers who are the most loyal.
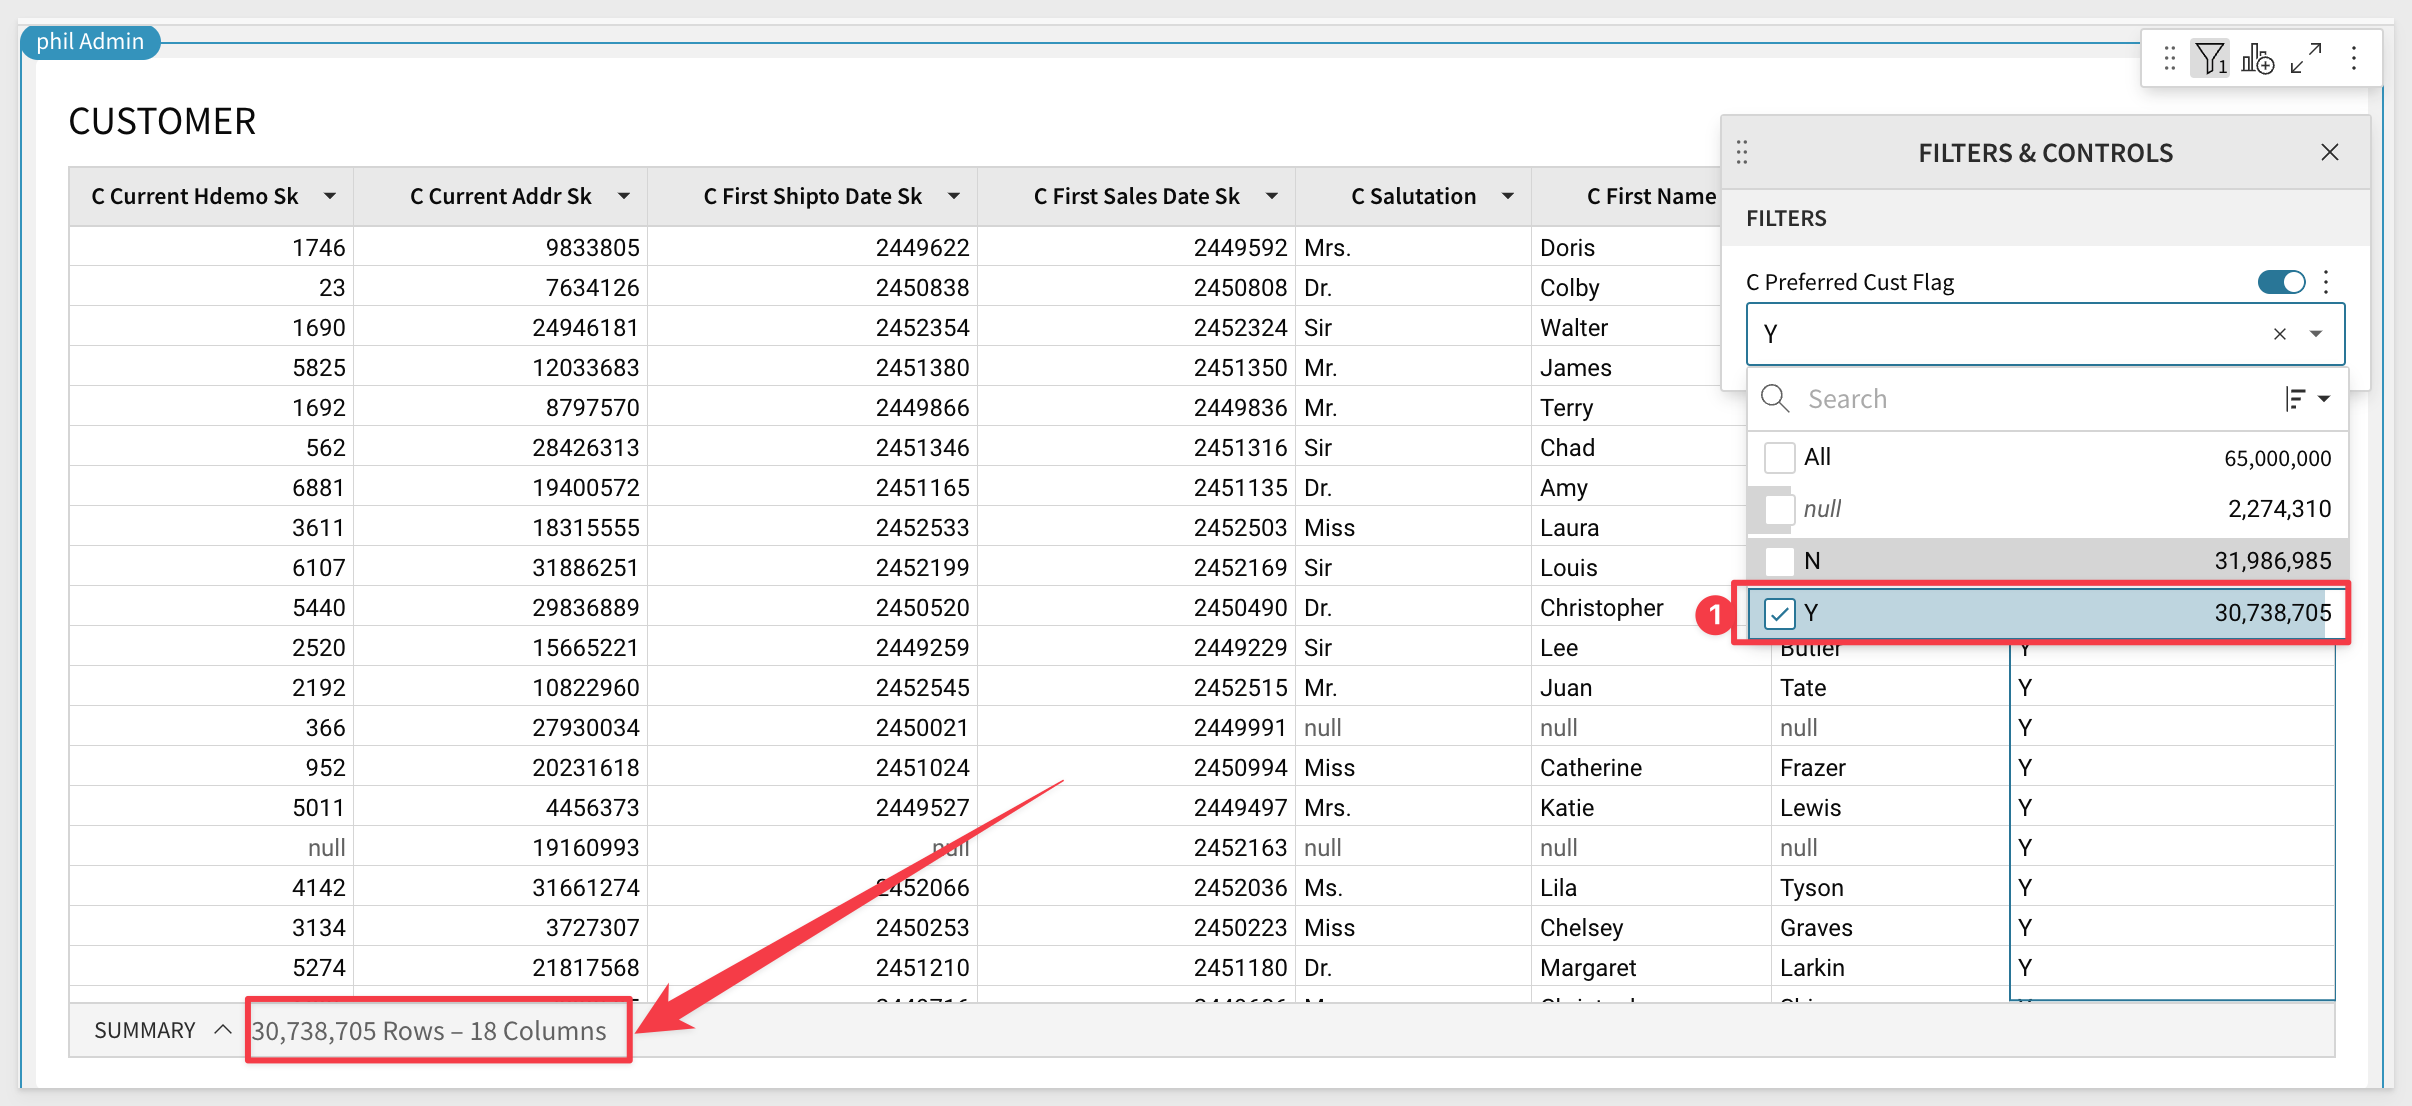
For the first filter (with Workbook in Edit), click on the column C Preferred Cust Flag and select Filter:
Select Y. That brings our row count down quite a bit:
Now add filters for the columns, C Birth Country and C Customer id. Your filter configuration should look like this when done:
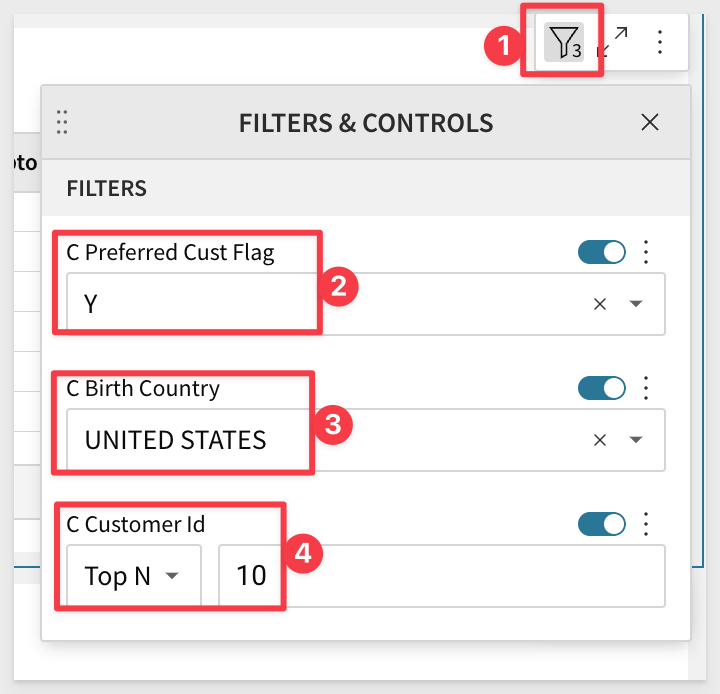
We now have a much smaller dataset for our demonstration (10 rows).
Before we move on, let's rename the Workbook Page to Source Data as shown (2x-click the page tab):
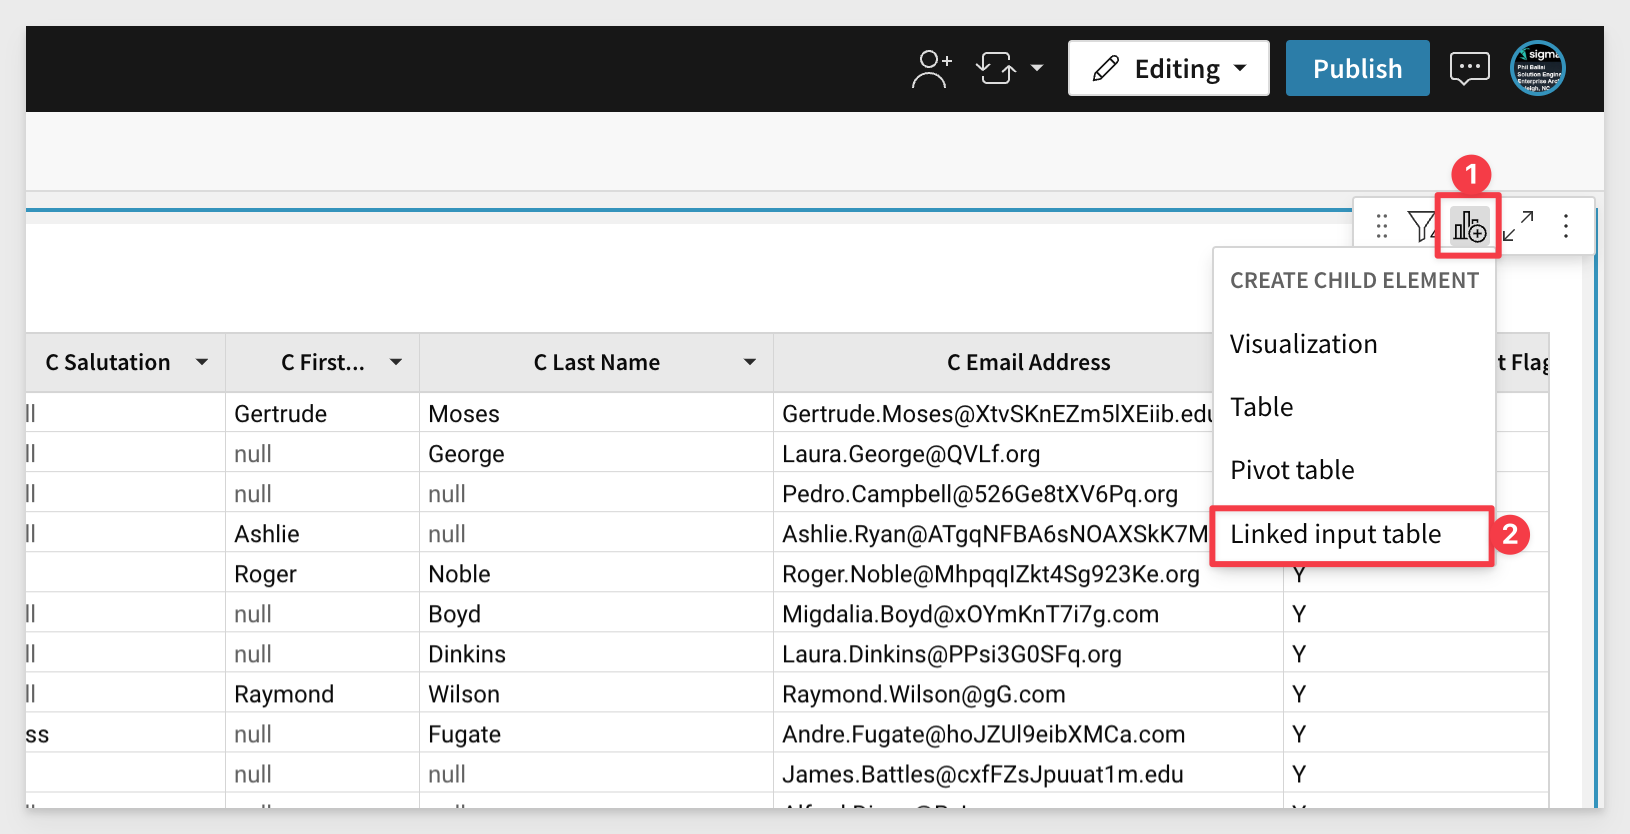
We will use this data as our source, but we want the user to be able to add values to each row for Lifecycle Stage and Sync to Hubspot using Sigma.
We will use a Sigma Input Table for this task.
Learn more about Sigma Input Tables here
We want the marketing team to triage (and supplement data) in these rows before we send it to HubSpot. Input Tables allow us to do that.
On the Customer table click to add a Child Element and Linked Input Table:
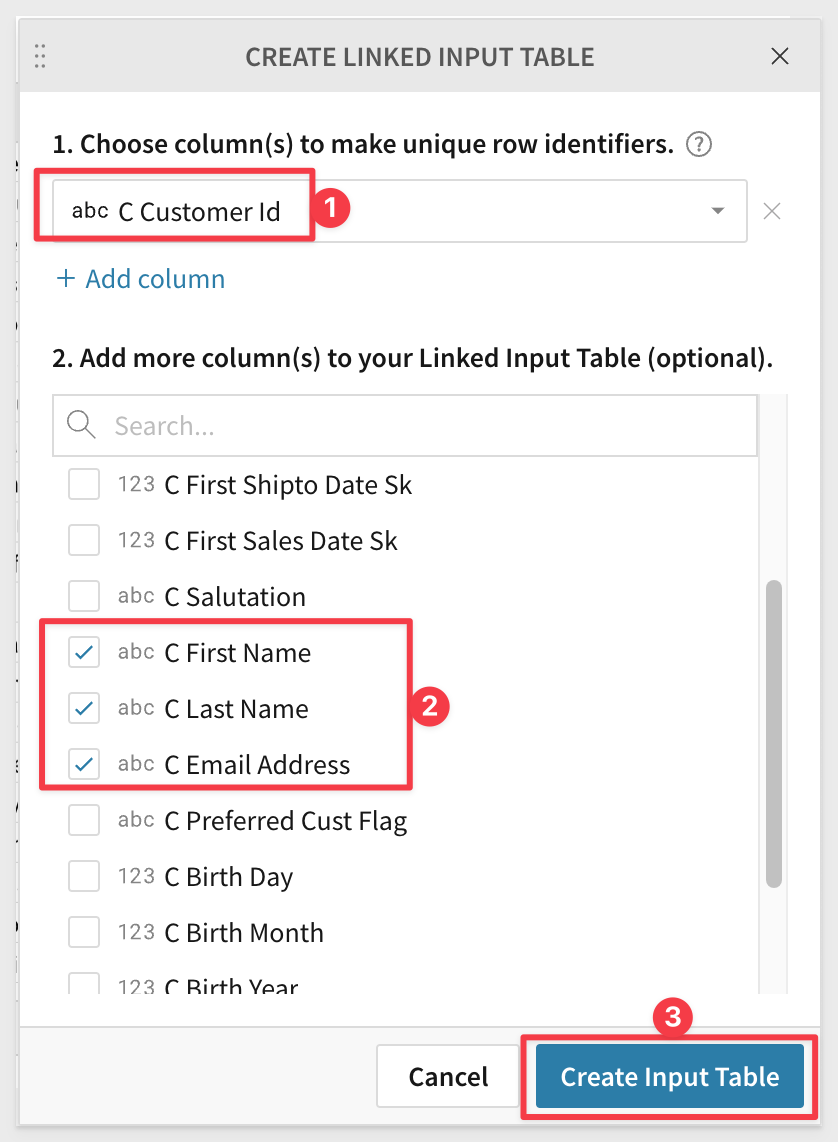
We are prompted to select how we want to join the new input table to the source and which additional columns we want to include.
Configure as: shown and click Create Input Table:
Rename the new Input Table (by 2x-clicking on its default title) to Lead Management.
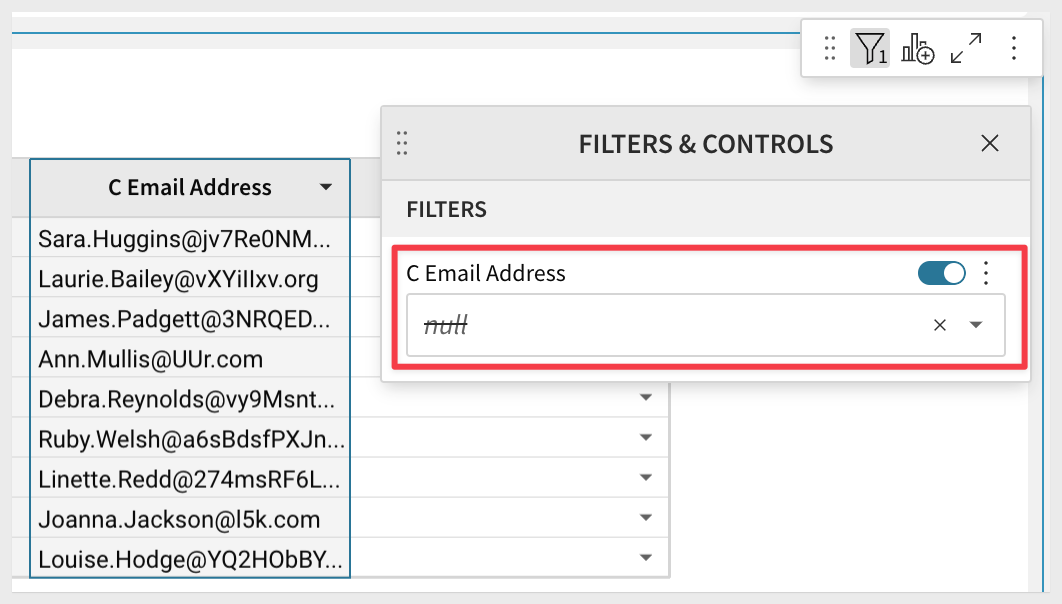
It seems a null value has made it through for an email address. We should probably filter for nulls at the source data but for now, let's just filter it here:
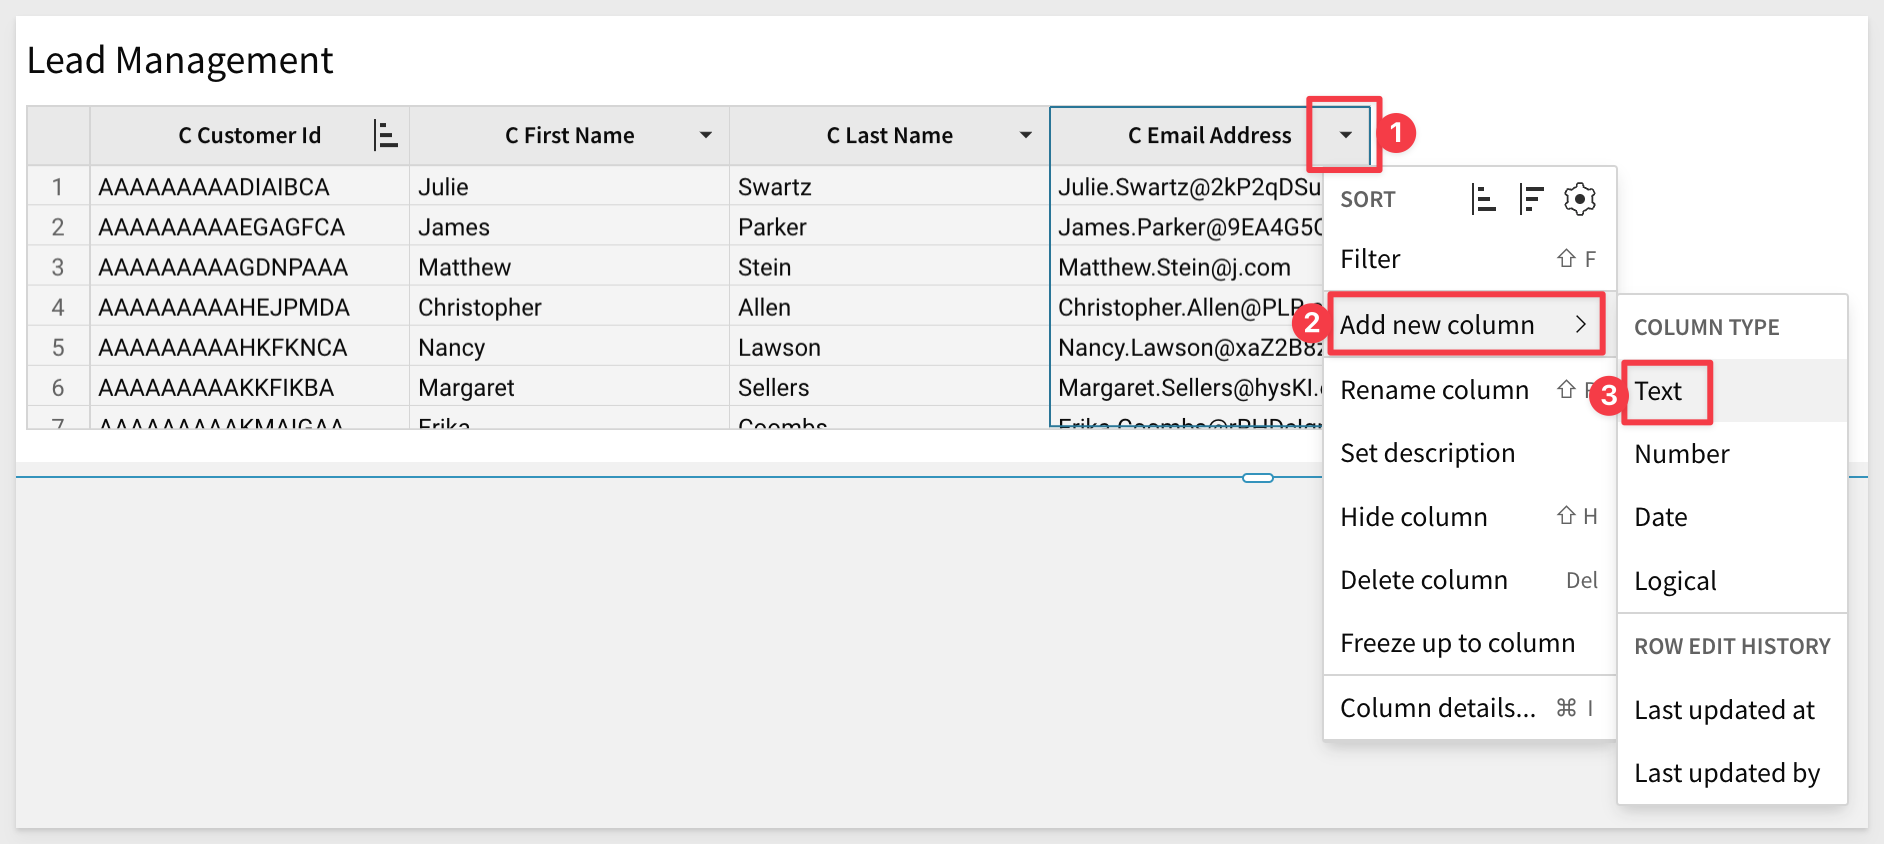
Click to add a New Column > Text:
Rename the column (by 2x-clicking it's name in the header) to Lifecycle Stage:
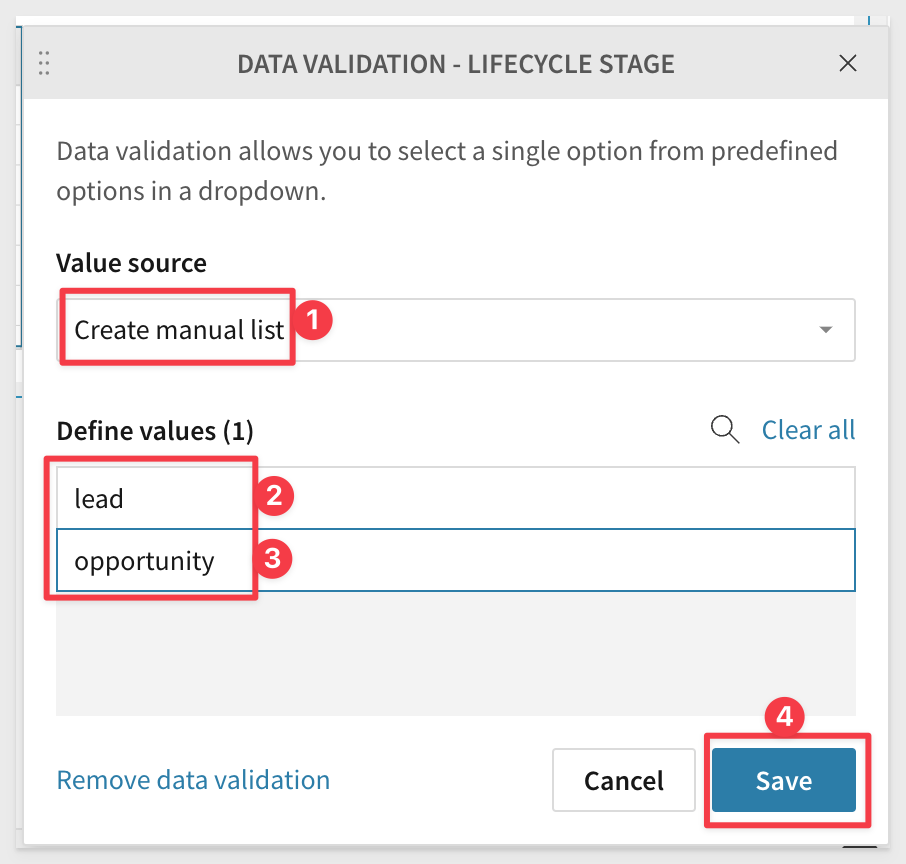
We want users to select from a list of allowed values. This is called data validation.
Click the new column and select Data Validation:

The Value source will be Create manual list and we want that.
For list values, enter lead and hit enter and then add another called opportunity.
HubSpot natively supports these values. Note that for the sync to work properly, you need to enter the internal values, for example "marketingqualifiedlead" and not "Marketing Qualified Lead".
Click Save when done:
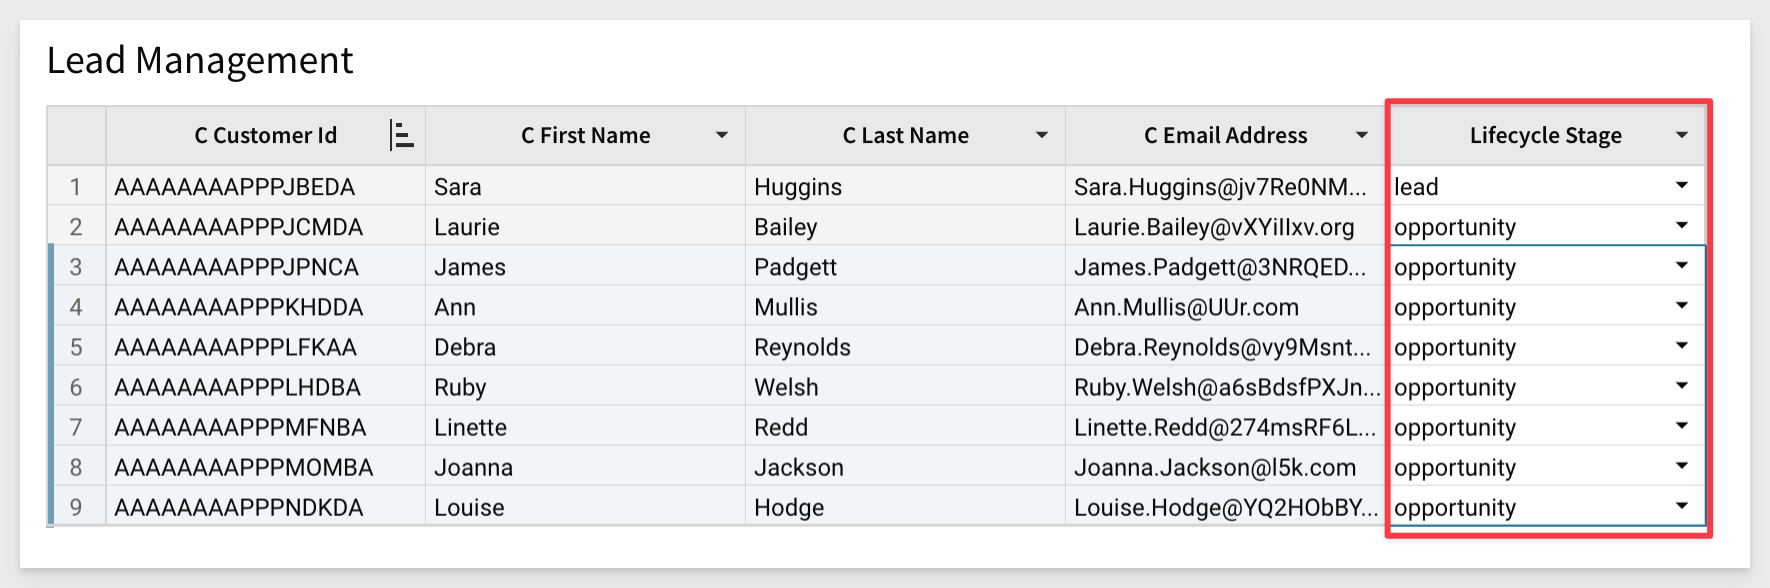
Now users can select from the allowed list for each row as they triage the list:
We need another column so the users can indicate if the row is approved to send to HubSpot.
We do this using the same Add new column method, but this time select a Column Type as Logical. This will let the user select True or False, with true being approved.
Rename the column to Sync to HubSpot.
Lastly, let's move this table to another page and rename the new page, Lead Approval:
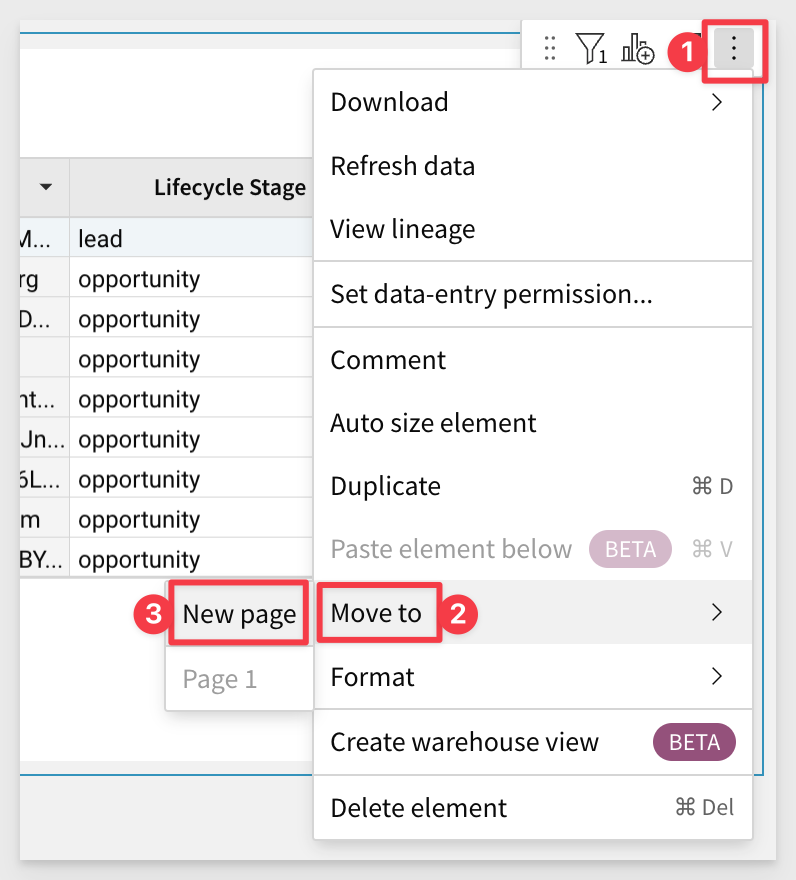
Now that the Lead Management table has been validated, we need to use it to create a table based on only approved leads. This is done using the same methods as before.
Create a Child table off the Lead Management table.
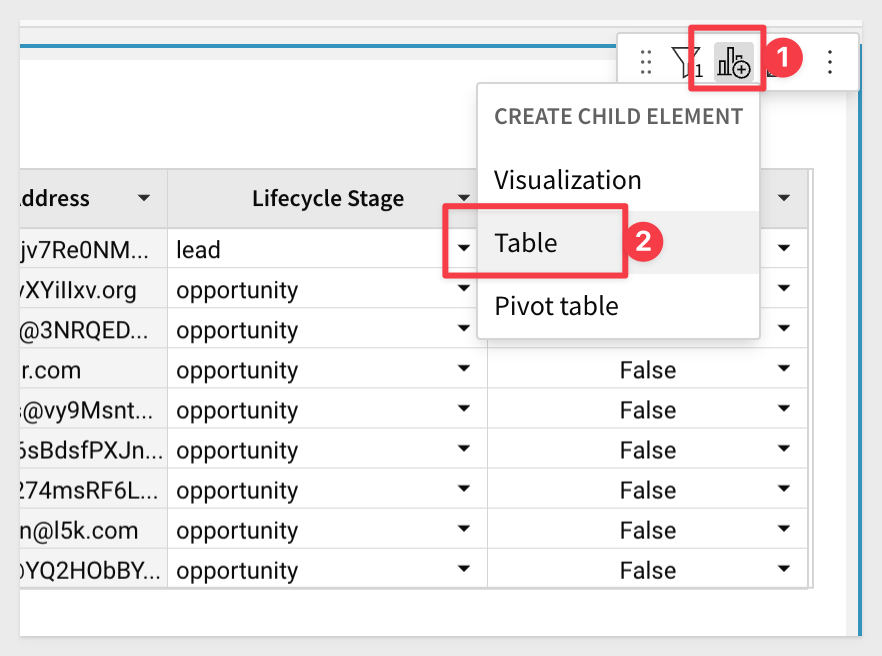
Change the new table name to Approved Leads.
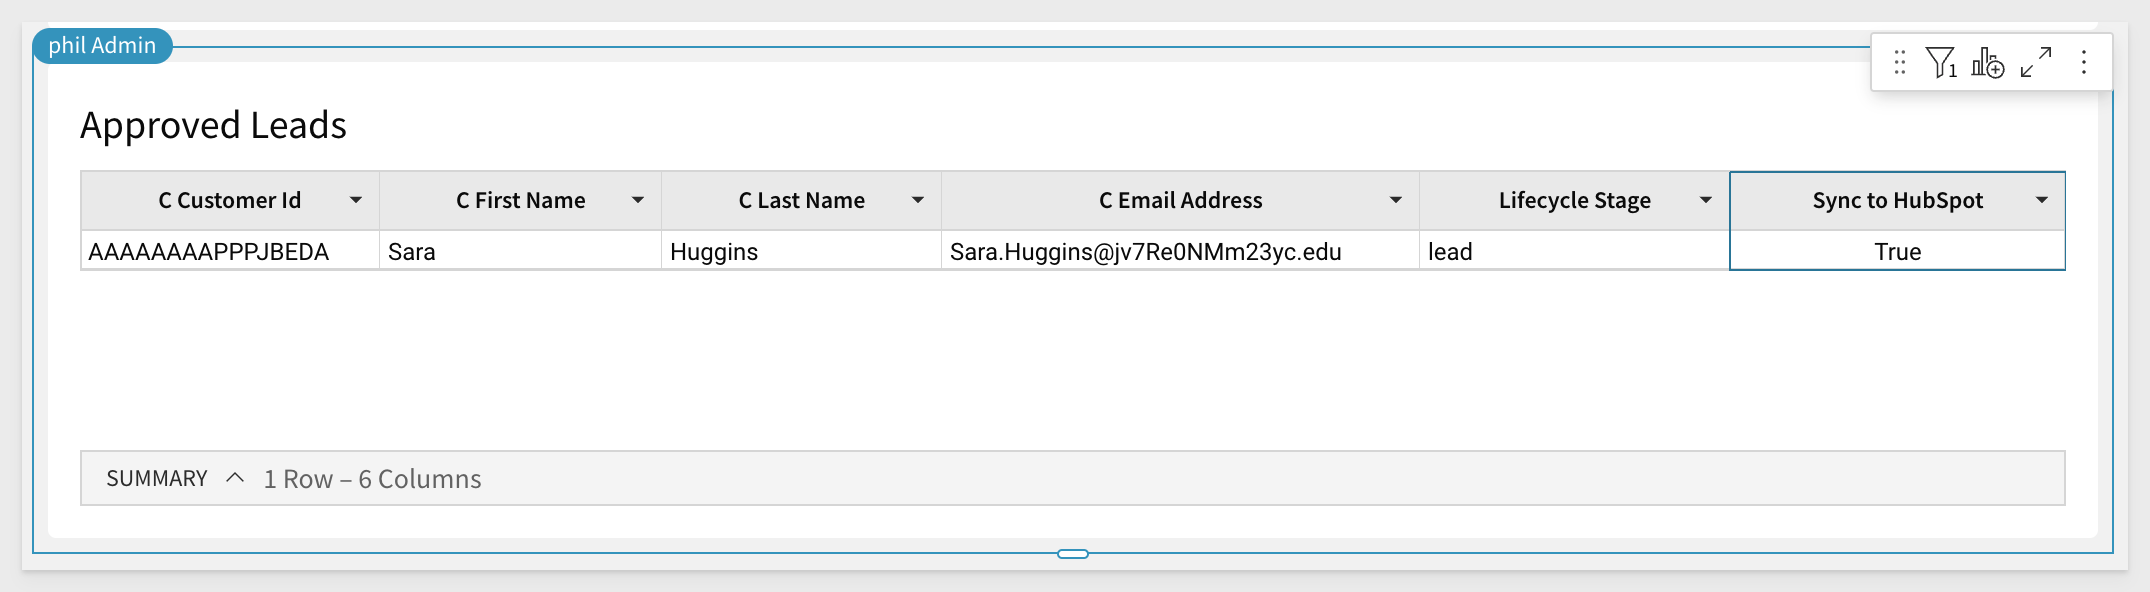
Set a Filter on the Sync to HubSpot column and only show True rows:
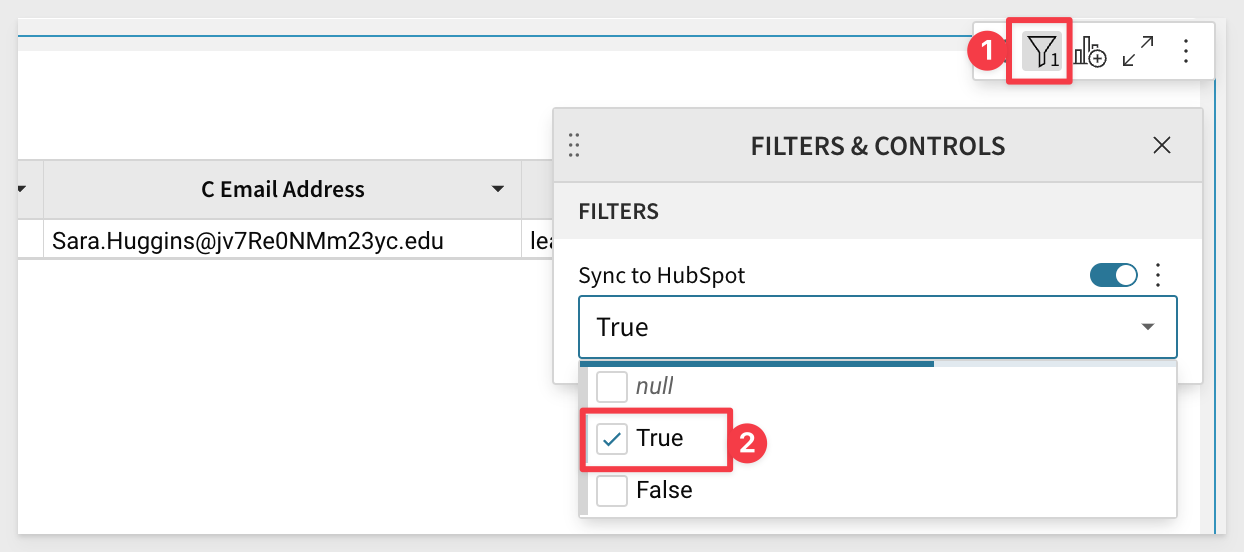
We now have the row(s) we want to sync to HubSpot. We are sending one row to make this as simple as possible for demonstration only.
Before we leave Sigma, we need to create a set of keys that will allow HubSpot to access our Sigma content.
Navigate to Administration > APIs & Embed Secrets and click Create New:

Select API Token, give it a friendly name, description and assign an Owner. For this demonstration, we need to use our own Sigma account. If we used a different account (i.e., a Service Account), we would need to also share the Workbook with that Service Account.
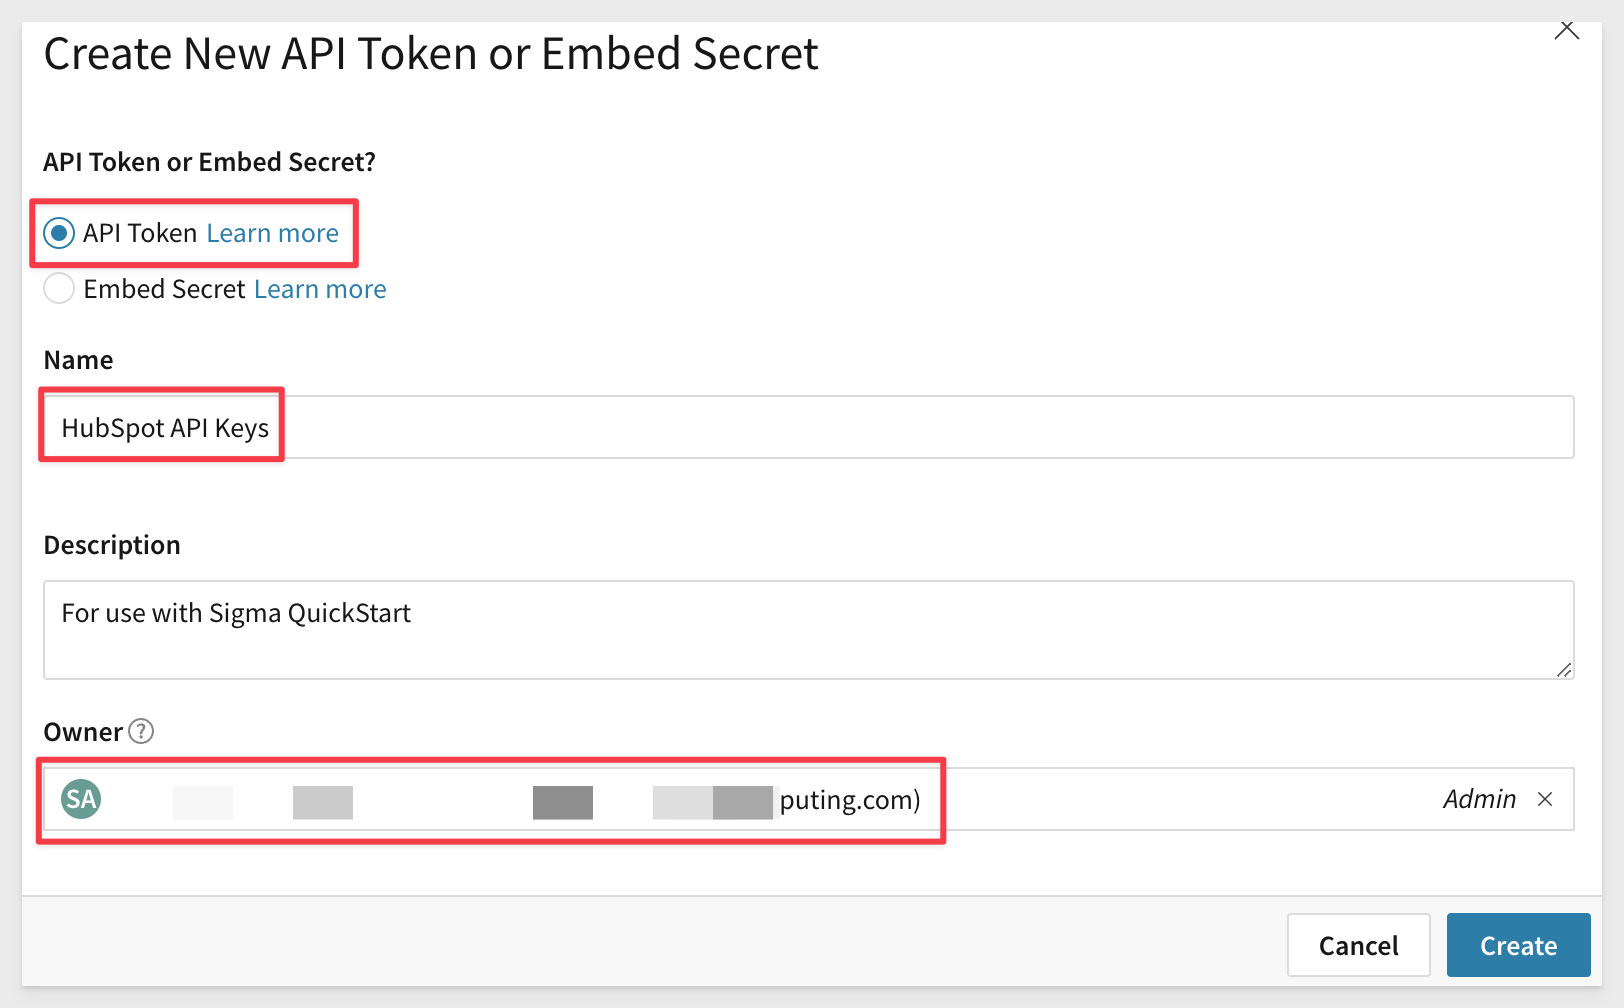
Click Create.
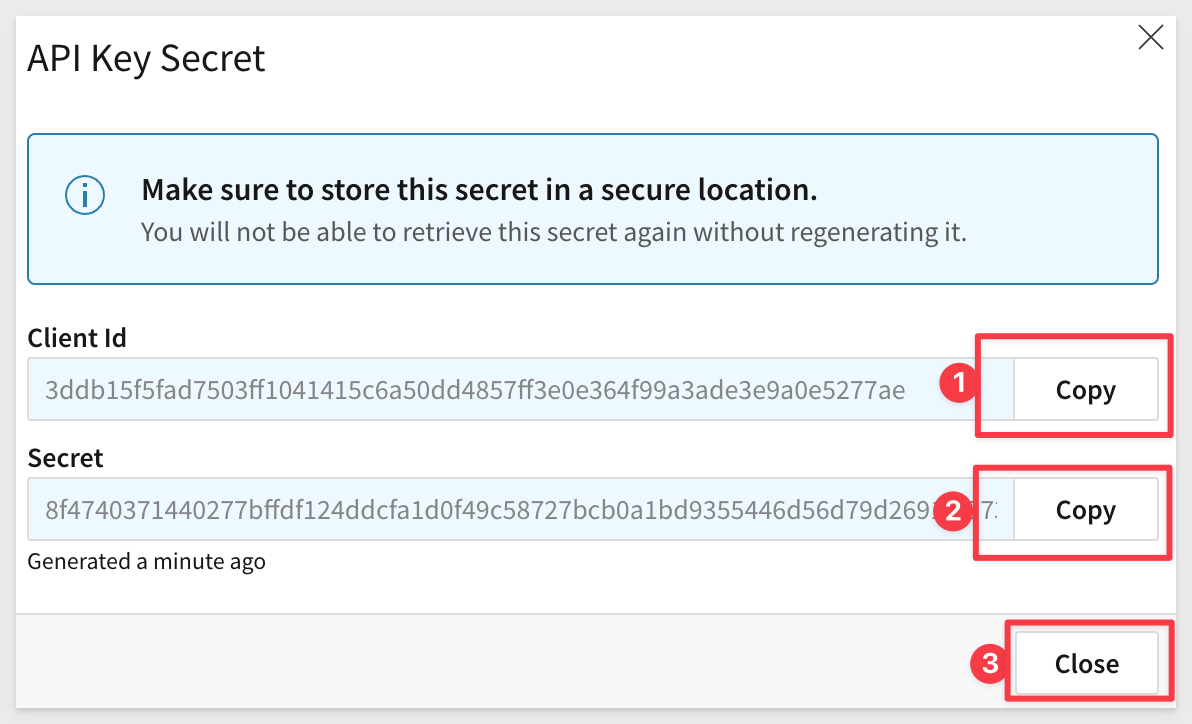
Copy the Client Id and Secret values and save them in a text file (or other secure location). We will need to use these later.
Hightouch is a software platform that empowers businesses to synchronize their data from any data warehouse into the SaaS tools and platforms their business runs on. It helps companies to integrate their customer data, sales data, and other types of information, eliminating the need for manual data entry or complex coding.
This allows businesses to make better decisions based on the most up-to-date information available. Hightouch can also help automate workflows and data management processes, leading to increased efficiency and productivity.
The Hightouch integration with Sigma allows customers to leverage the power of both platforms together to create high-value solutions using modern, easy to use web-based platforms.
More information about getting started with Hightouch is here.
Define Source Connection
A source is where your organization's business data lives. The Hightouch extension uses Sigma as a modeling method, not a data source. In other words, Sigma provides the SQL query, not the query results.
Before using Sigma to query the data, you must create a source in Hightouch that connects to the same data warehouse used by Sigma.
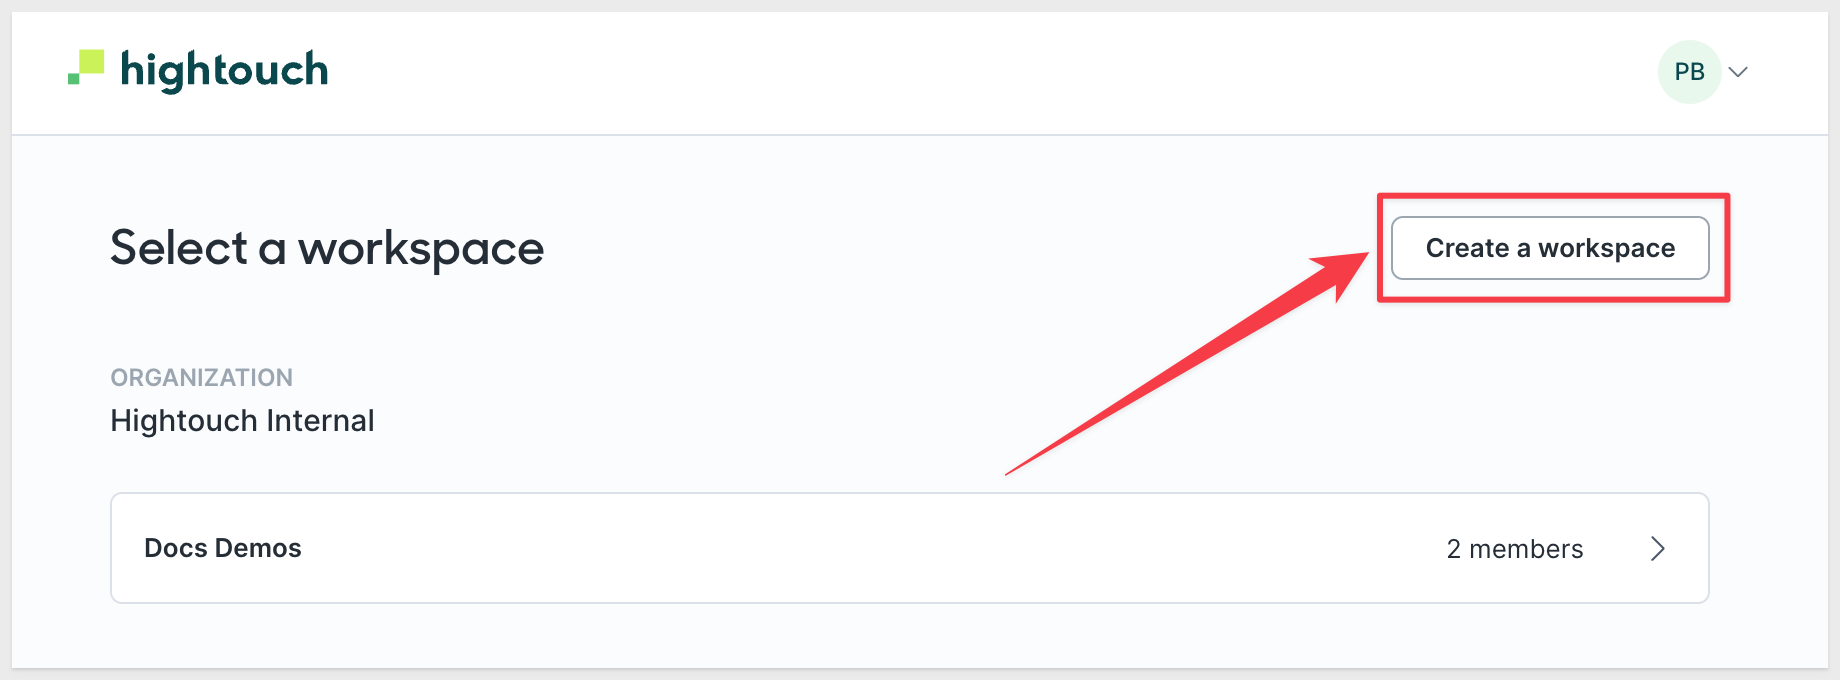
Login to Hightouch.
If this is the first time using Hightouch, click Create Workspace for our project:
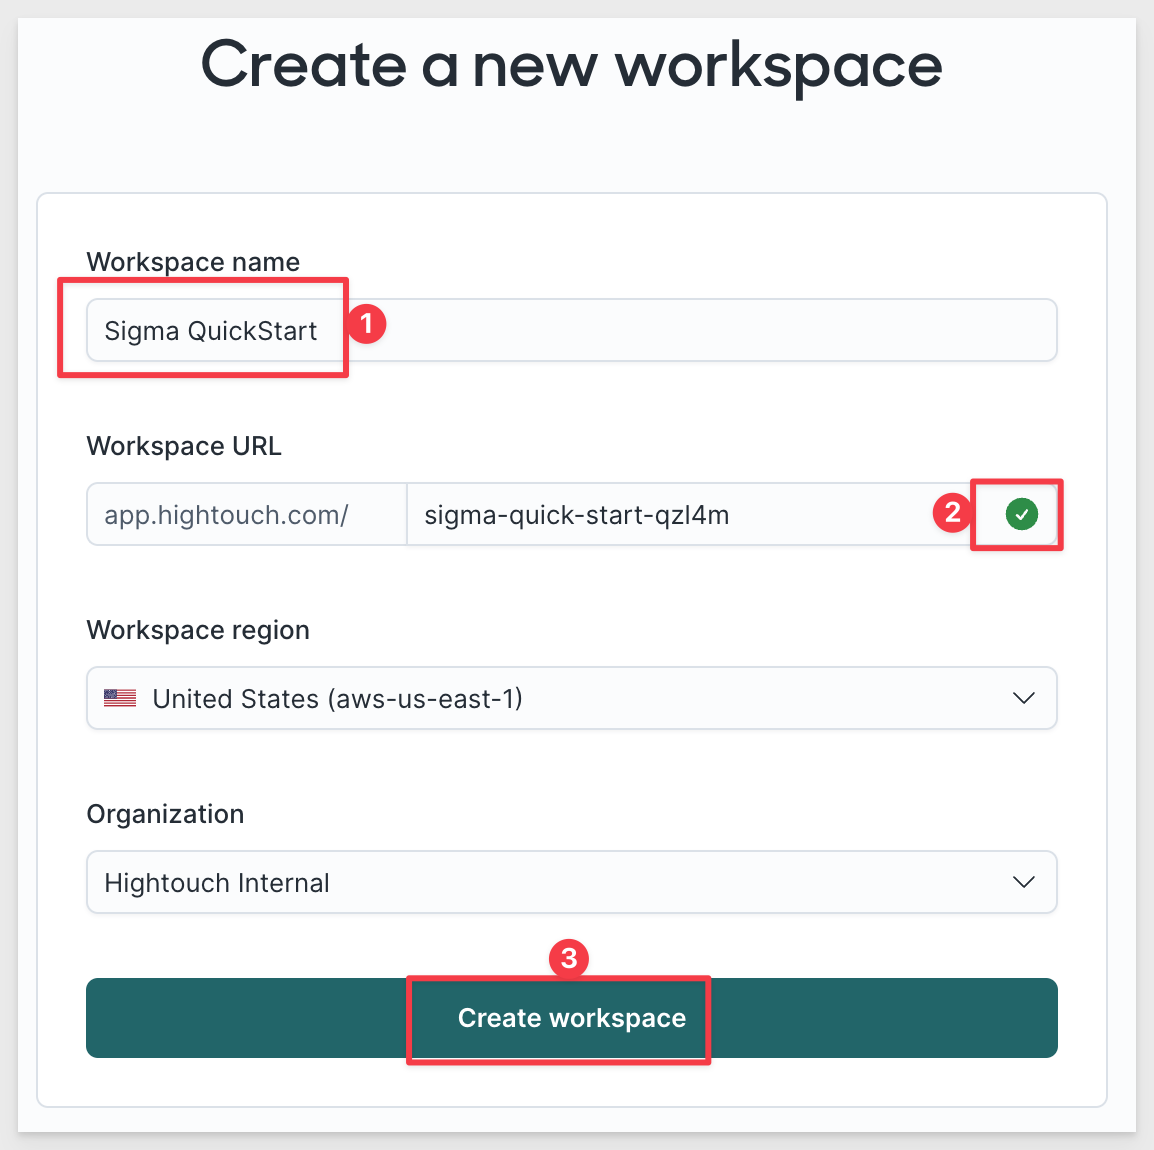
Give it a name. The Workspace URL will check to make sure it is not being used already (as shown by the green checkmark). If all is good, click Create Workspace:
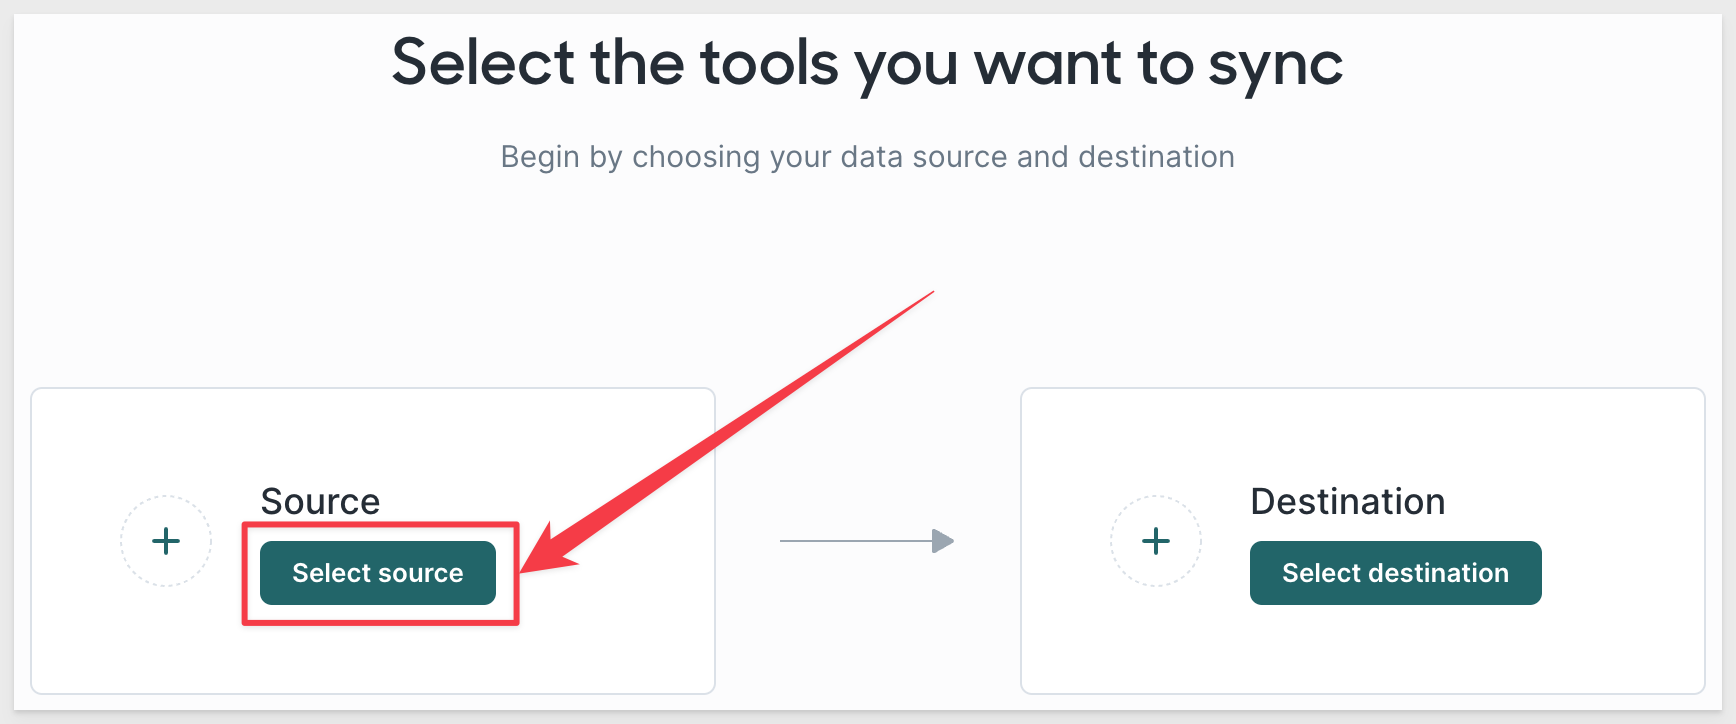
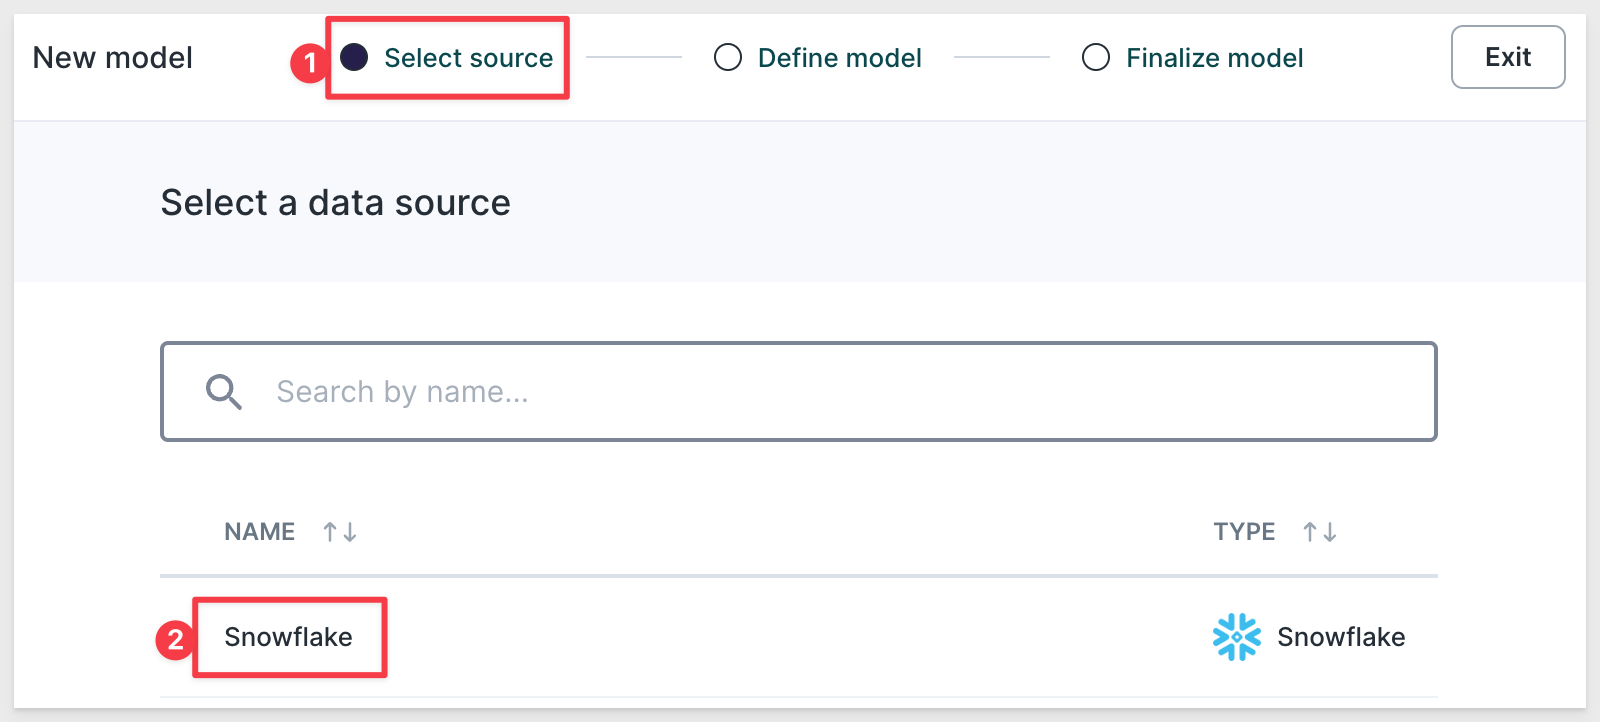
Now we need to select our source of data. Click Select source:
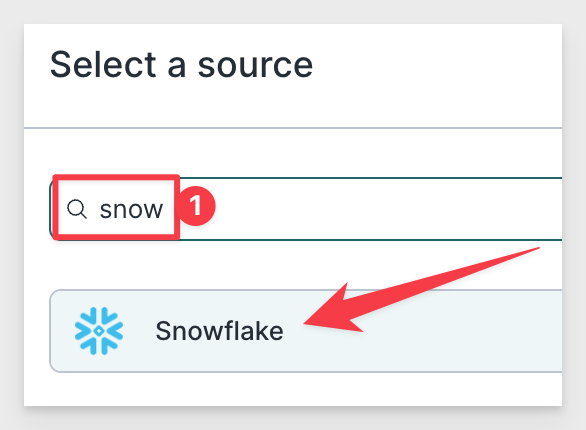
Type snow in the textbox and click to select Snowflake:
We are returned to the Select your destination page.
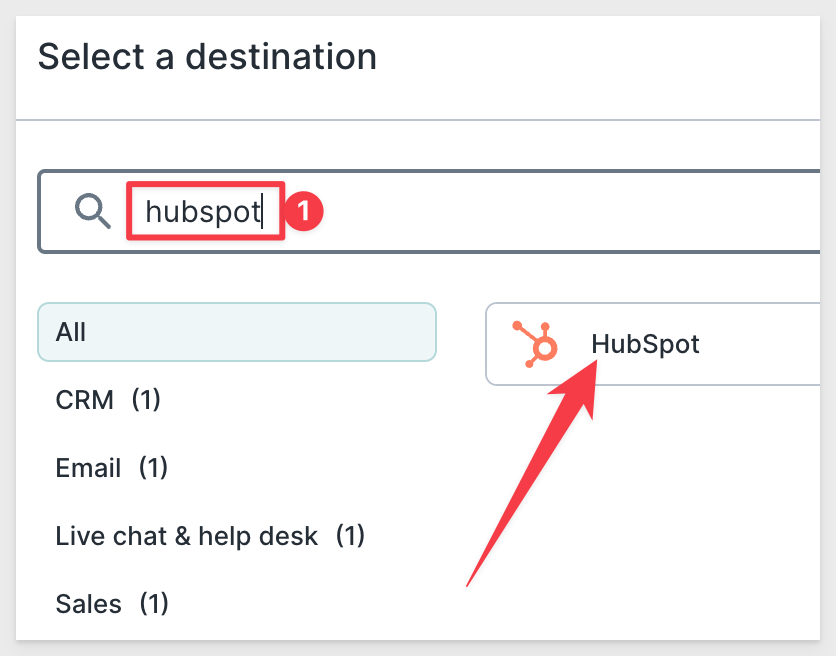
Click the Select destination button.
Type HubSpot in the textbox and click to select HubSpot:
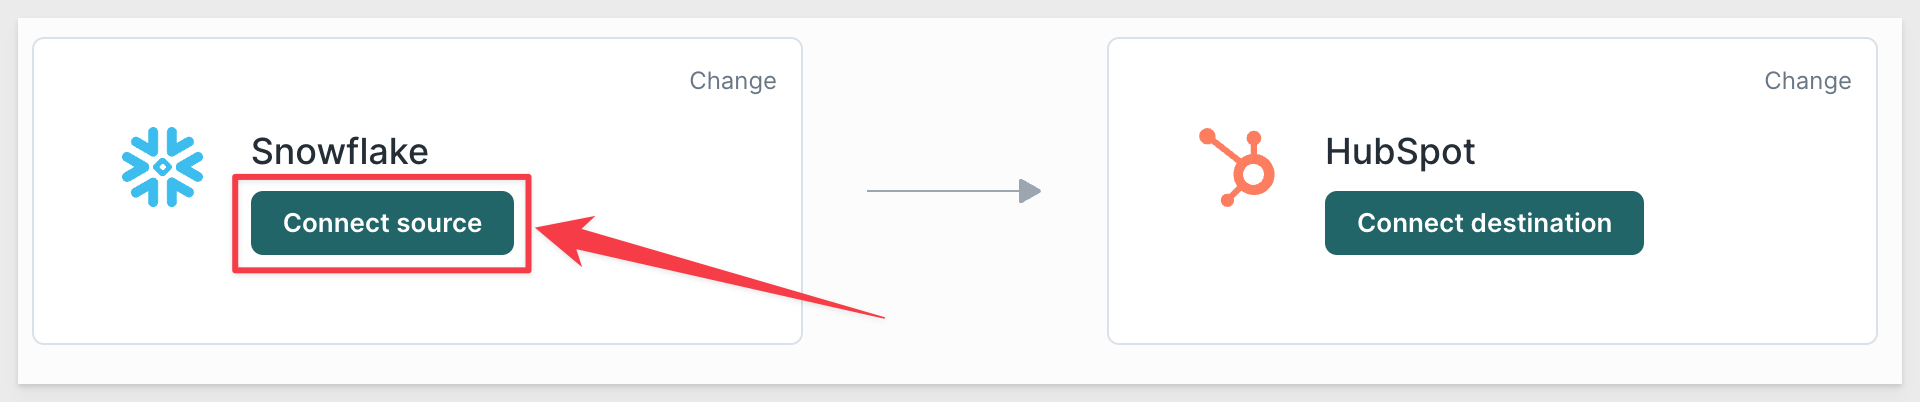
We are now on a page where we can click to configure source/destination details. Click Connect source:
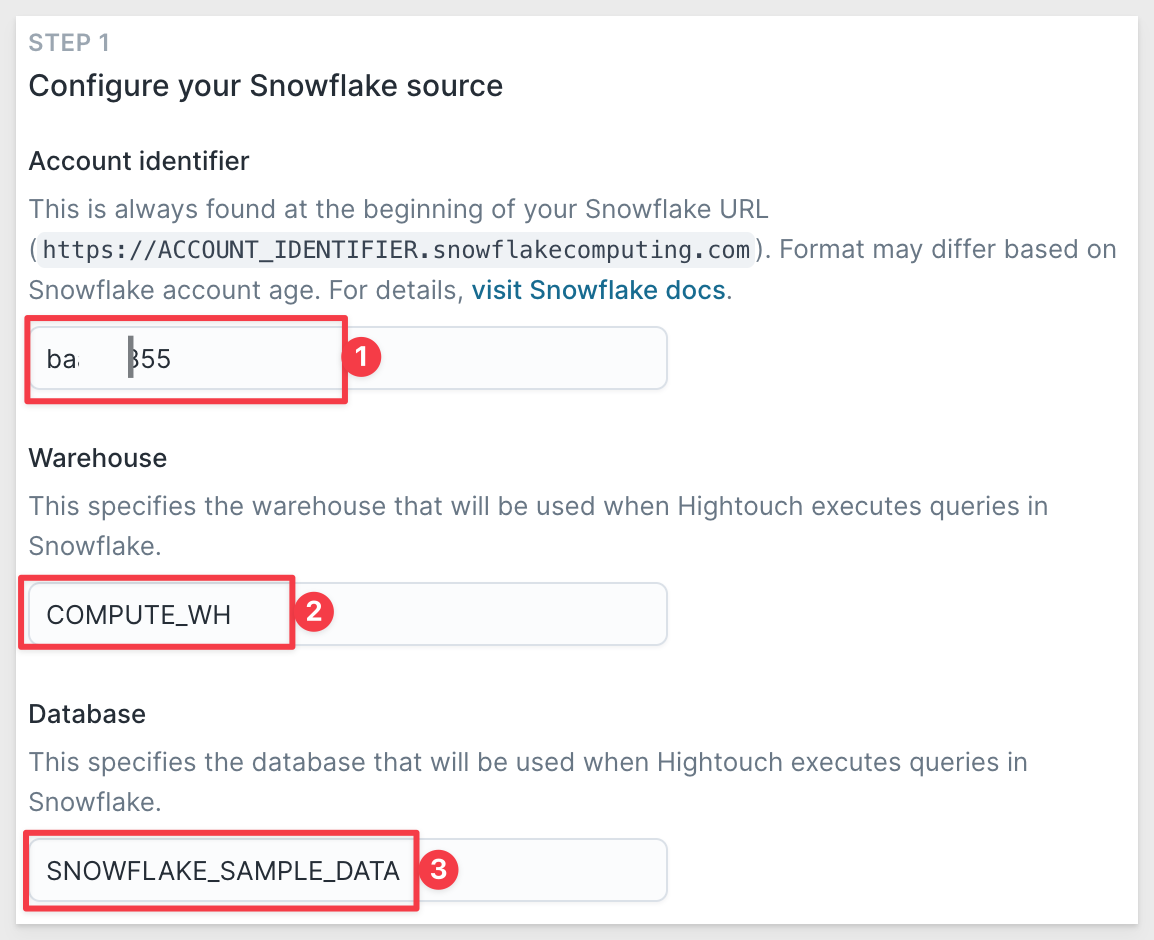
Snowflake Source
This is the same configuration data as used earlier when configuring Snowflake in Sigma:
Sync Engine
We will use the default, Standard sync engine. For very large jobs, using the Lightning sync engine provides improved performance.
Credentials
Provide your Snowflake credentials. We will use the Password method and the ACCOUNTADMIN role. Using this role is not recommended in production but makes demonstration easier.

Once all is provided, click the Continue button on the lower left corner of the page.
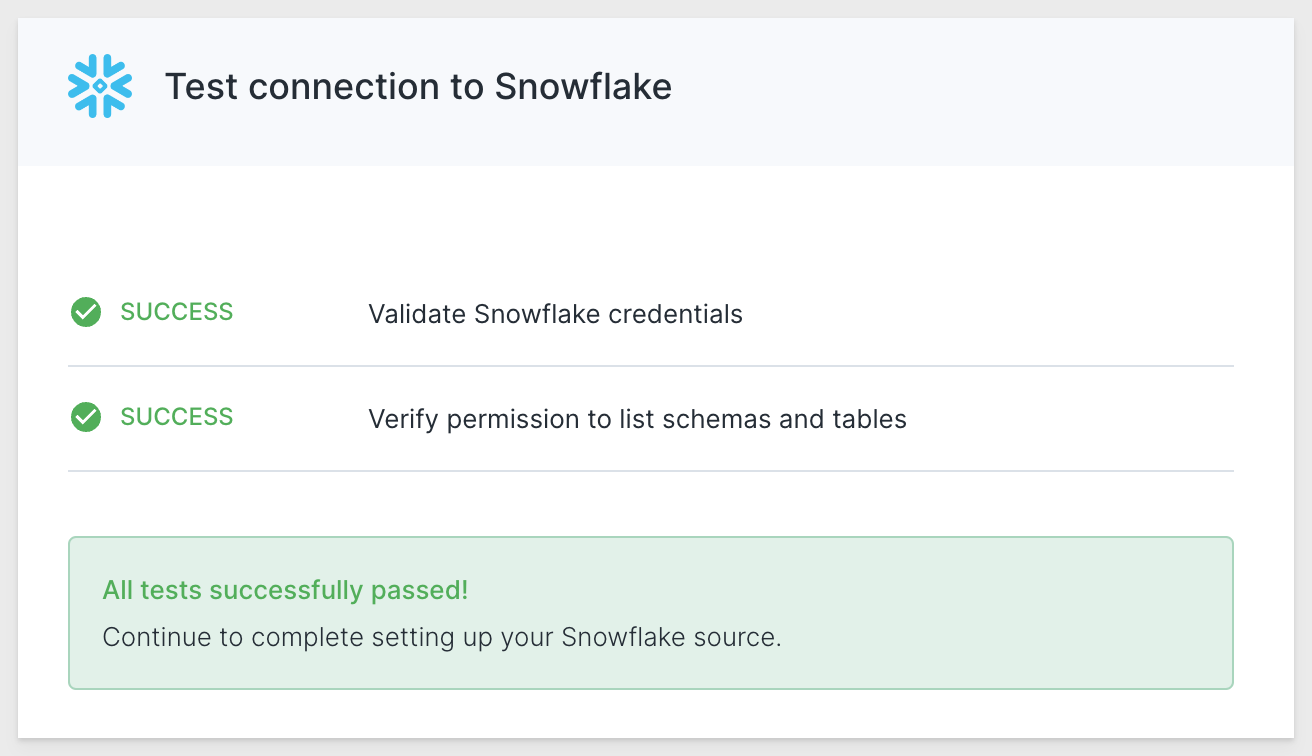
Hightouch will validate the connection and if all is good, we can move on to configure the Connect Destination step.
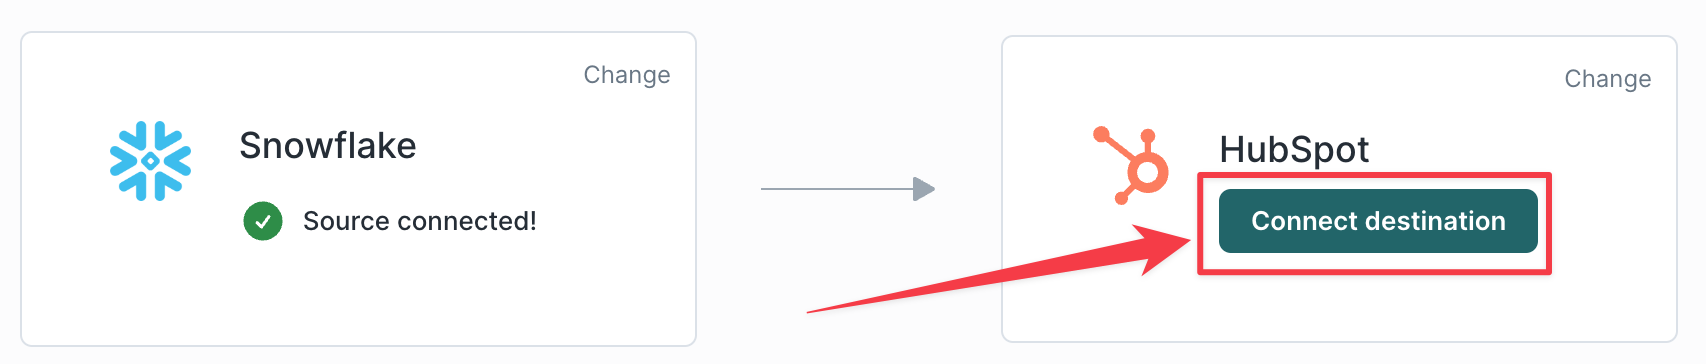
Click Continue, give the source a friendly name and click Finish.
Click Connect Destination:
Click to select OAuth as the authentication method, then click the Log in to HubSpot button:
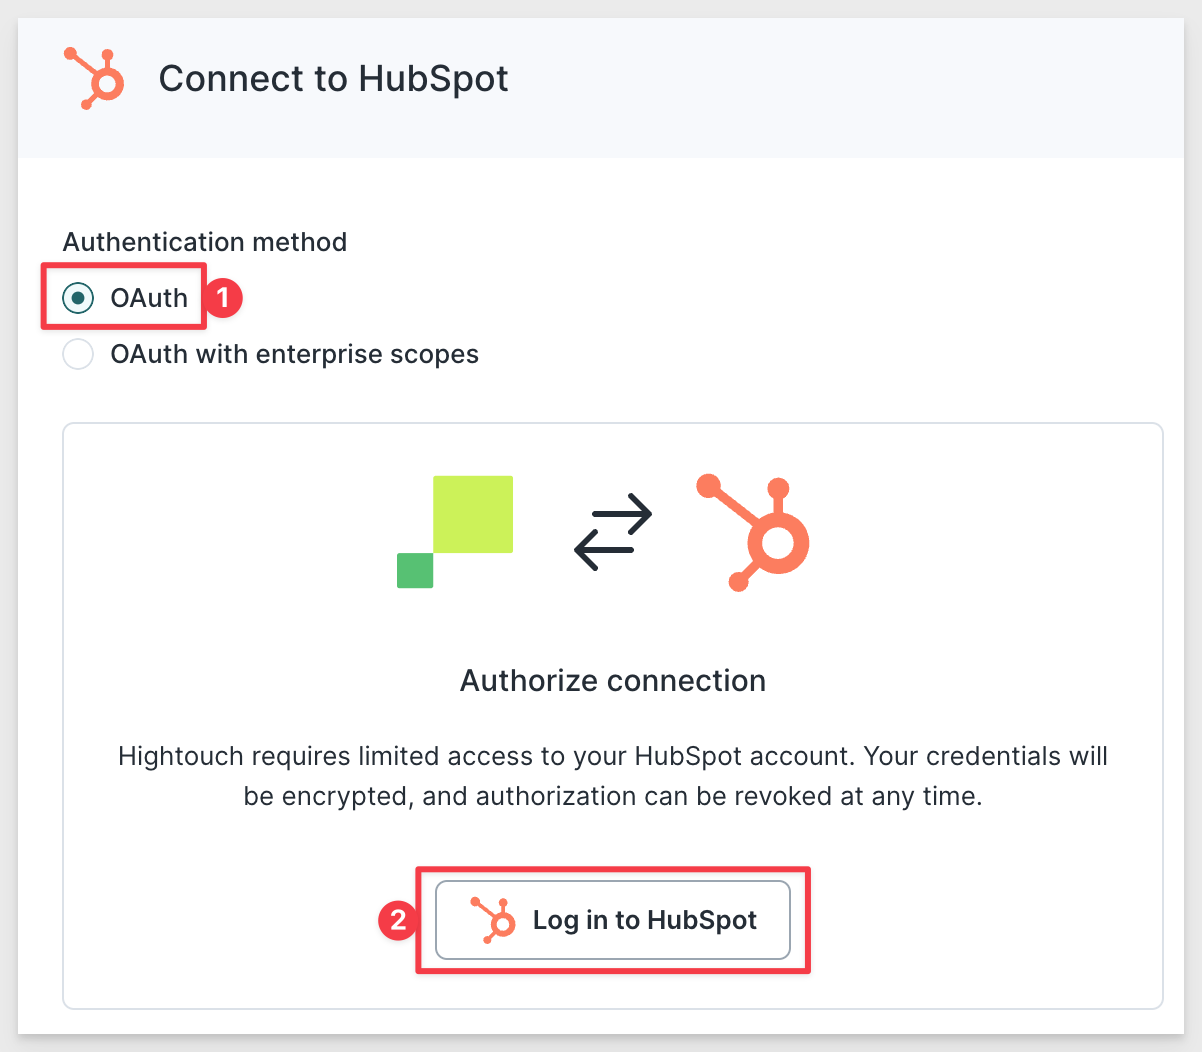
We are taken to the HubSpot login page where we can login to the trial account we set up in the prerequisites.
If you were already logged into HubSpot, you will be prompted to select an account:
Since we are in a trial, we only have one account. Click Choose account:

Hightouch is requesting permission from you to allow it to connect to this Hubspot account. Scroll to the bottom of the page and click Connect app.
We are returned to the Connect to HubSpot page where we need to click Test connection before we can move on:
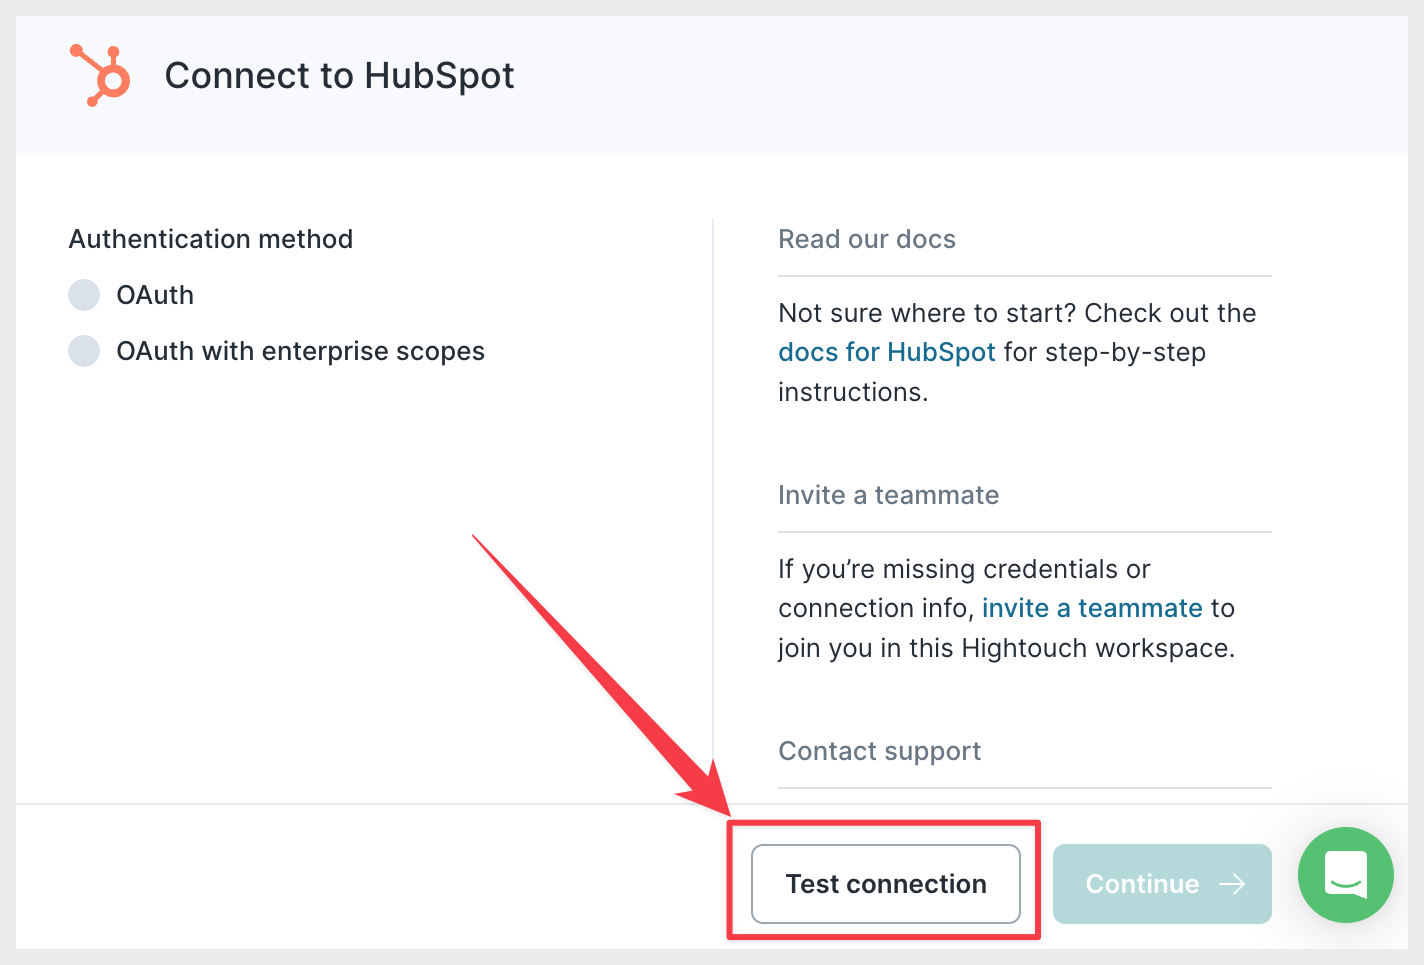
If all is well, we should get a success message:
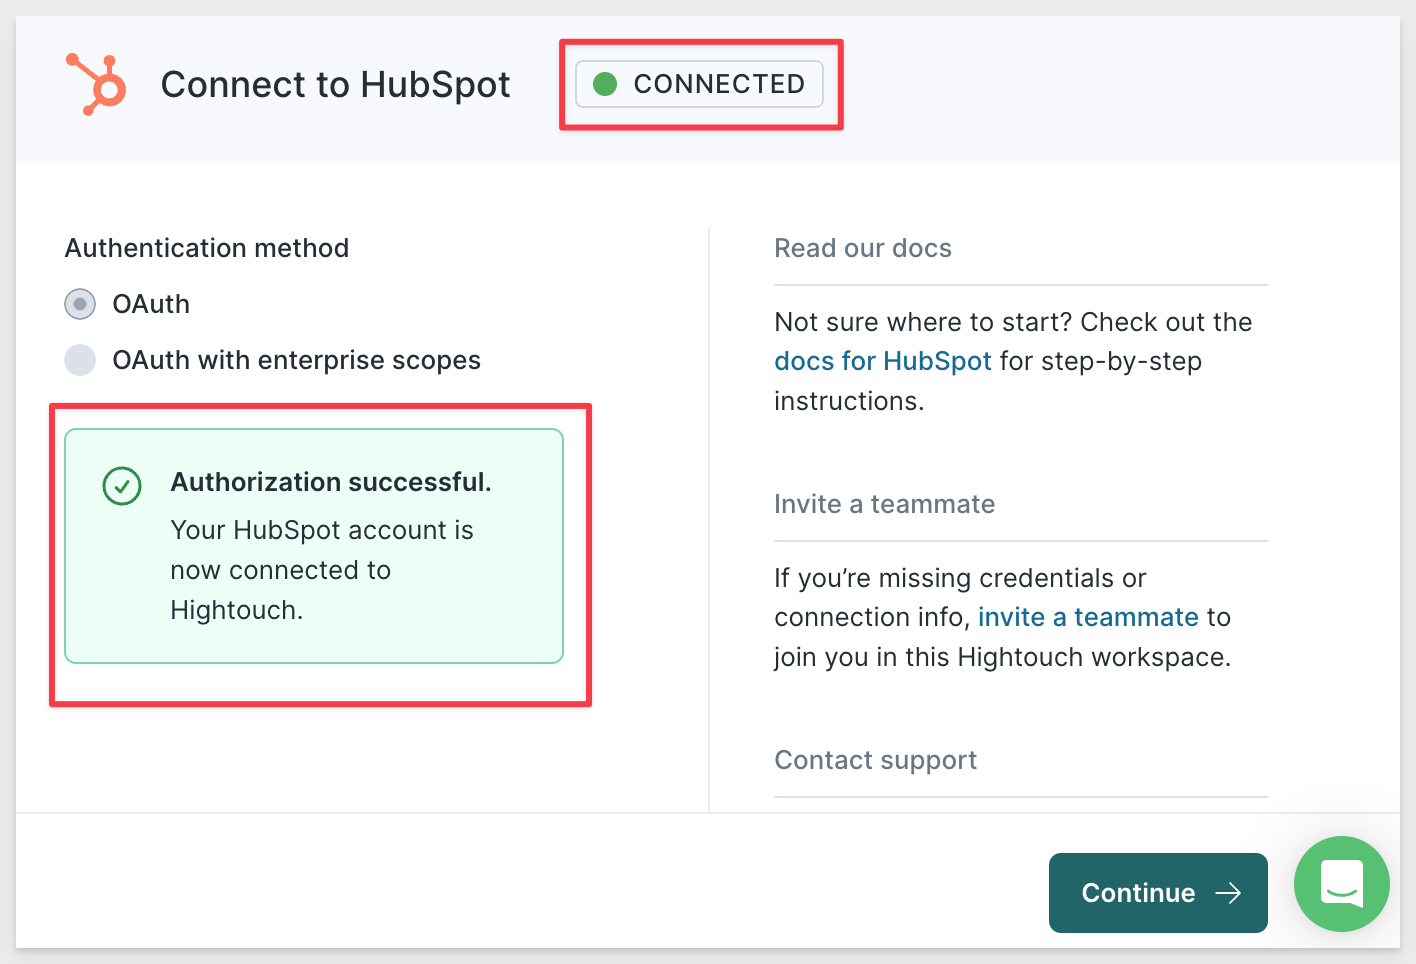
Click Continue, give the destination a friendly name and click Finish.
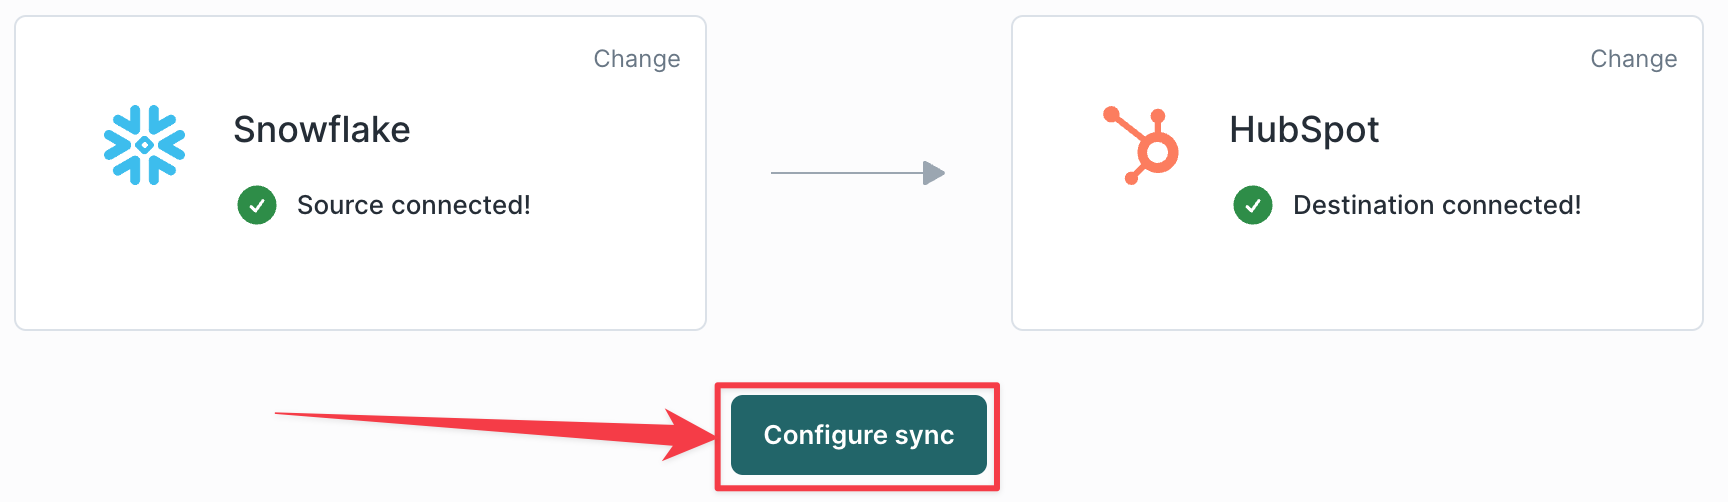
We are setup with connections now and can click Configure sync:
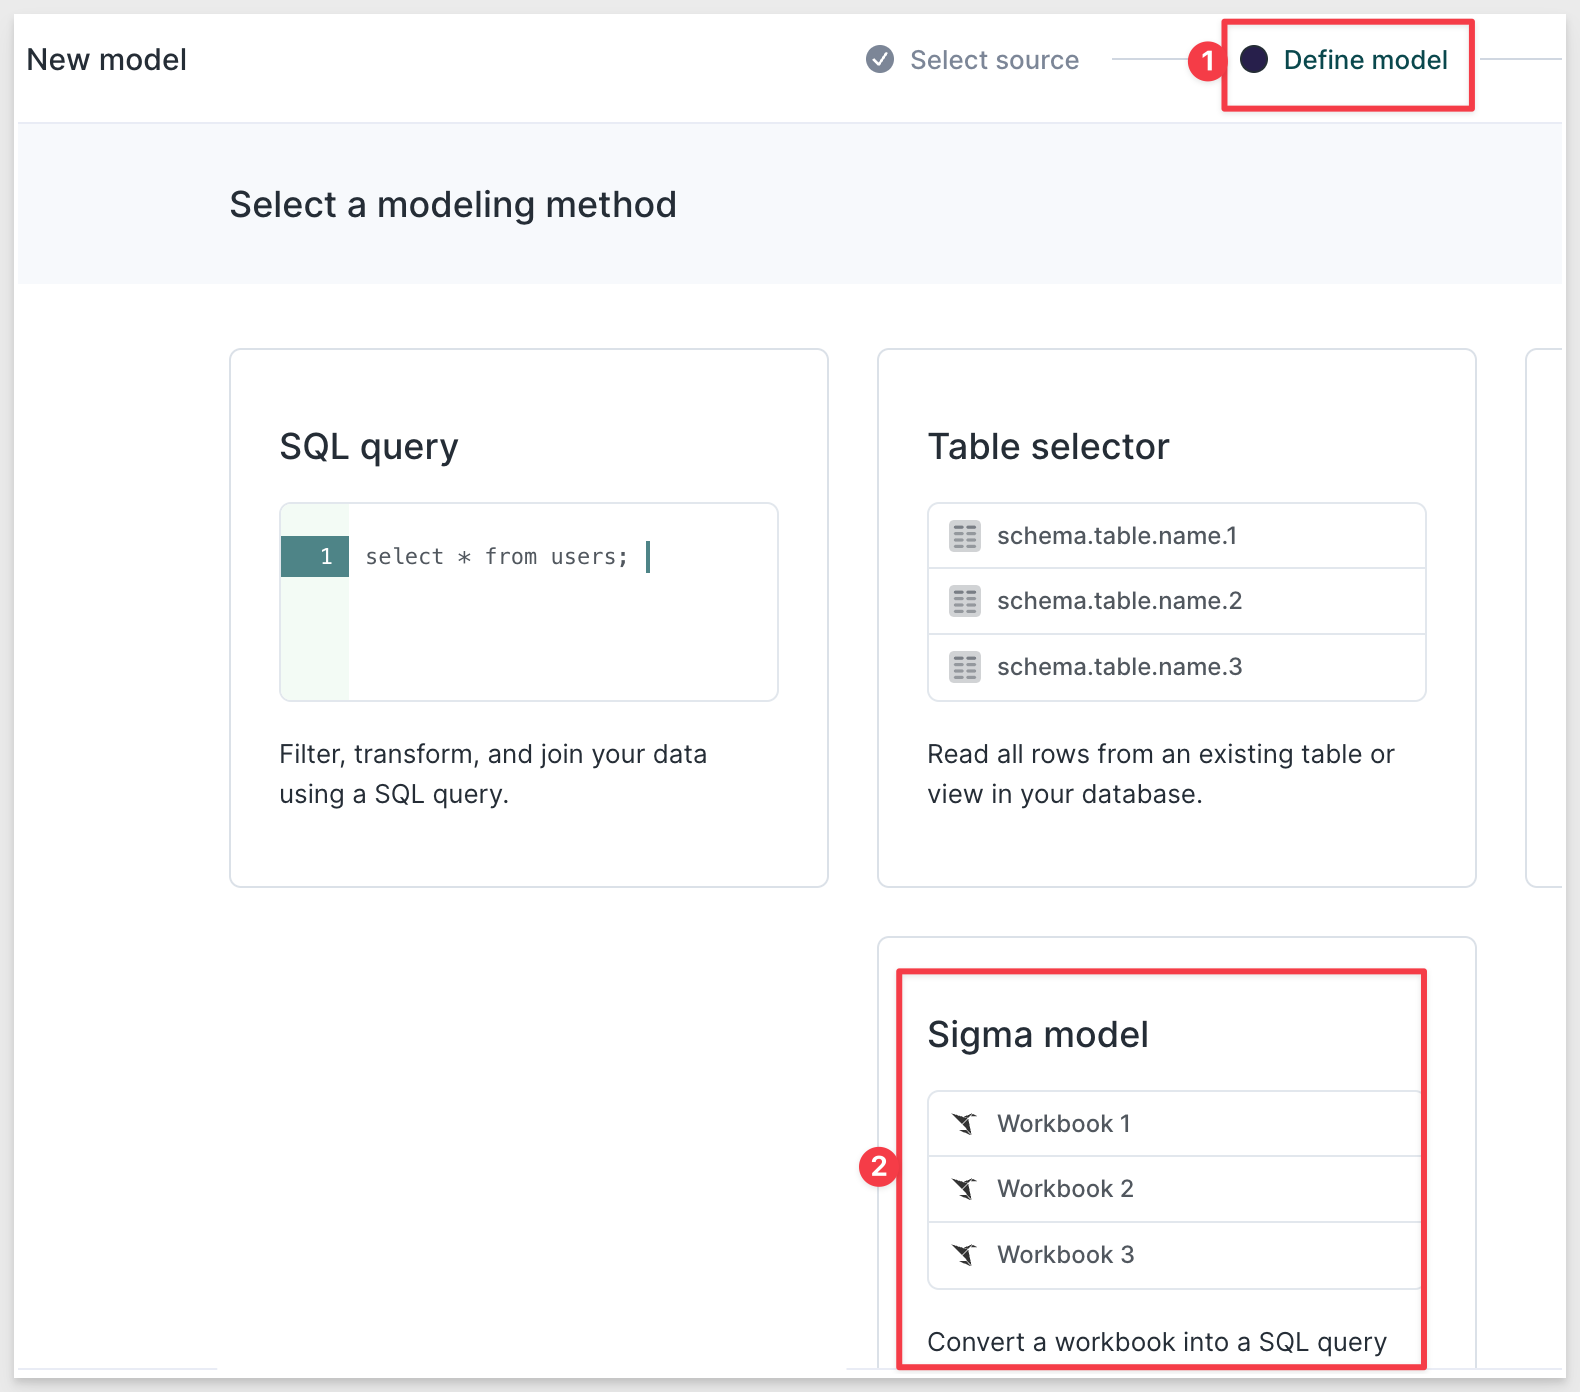
Query your source we are at the starting point of the integration with Sigma. We need to configure this. Select Configure Sigma:
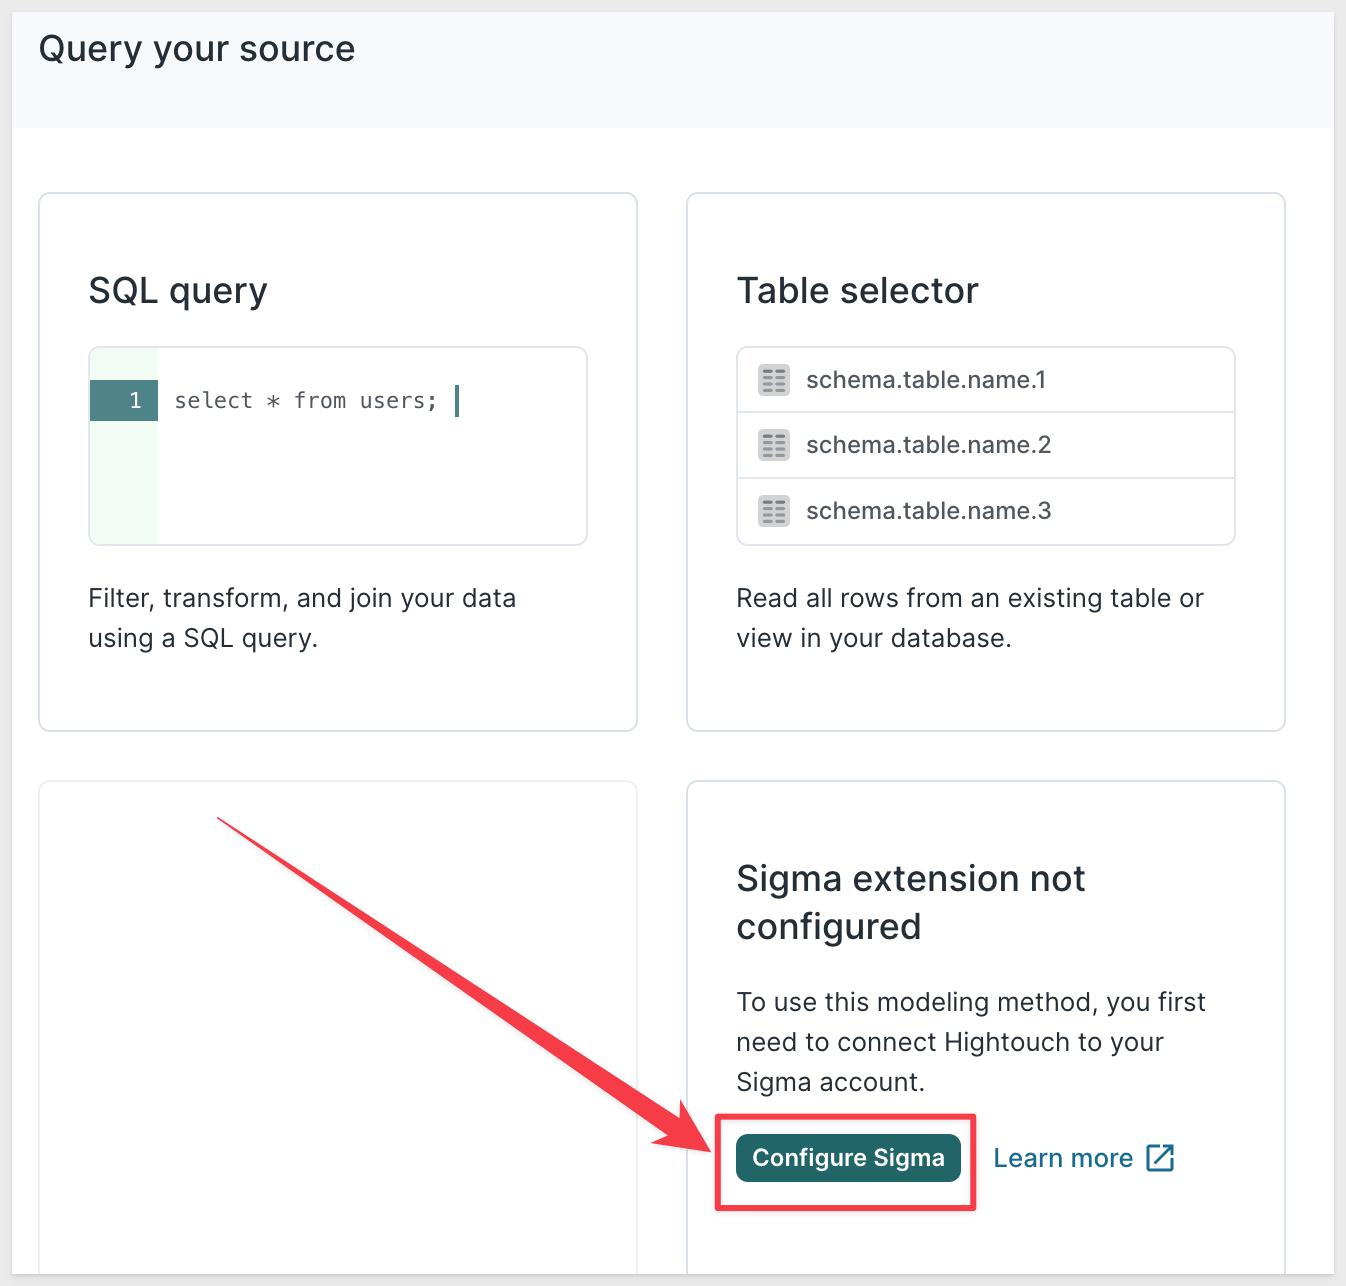
Click Configure extension.
Remember those Sigma API keys we created earlier? Locate them (wherever you saved them off to) and copy and paste the values for Client Id and Client Secret accordingly.
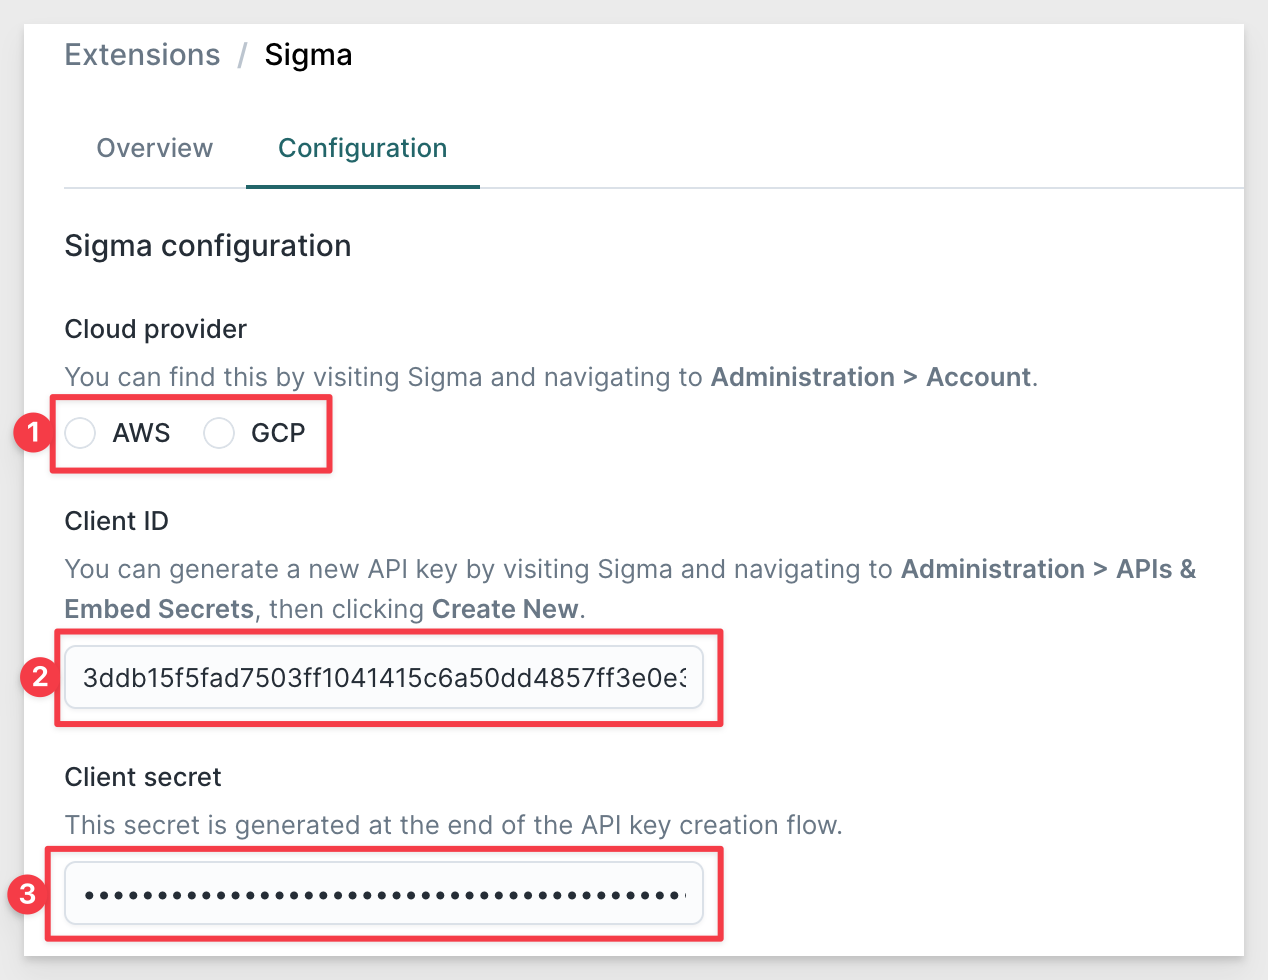
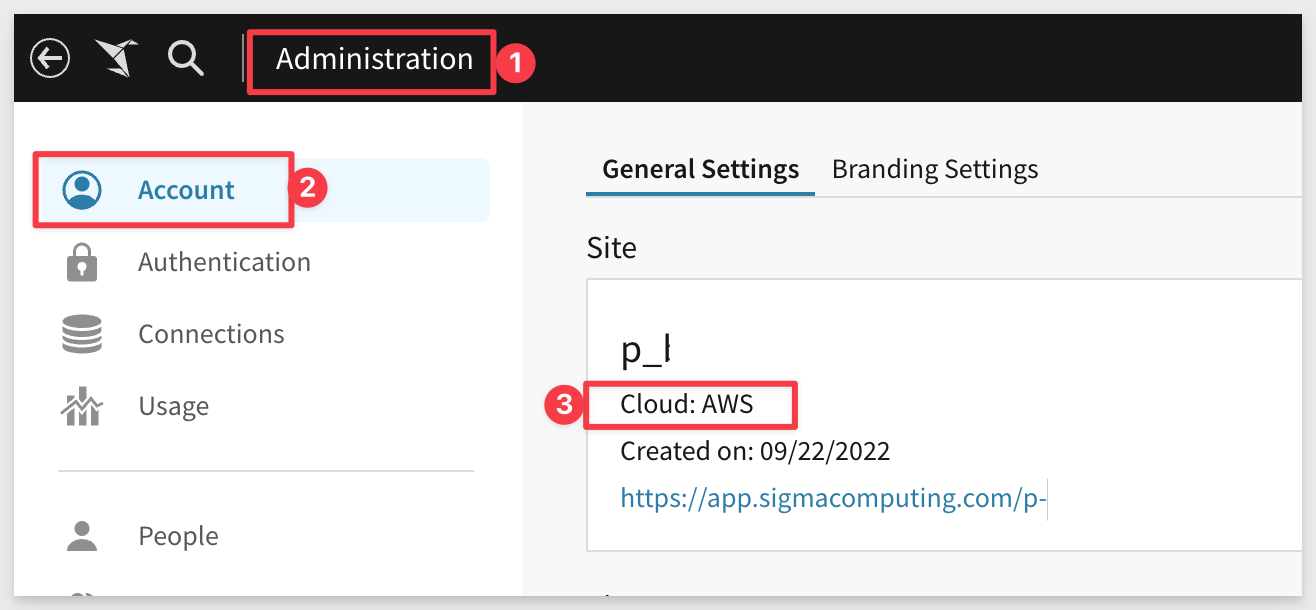
To determine which cloud provider is hosting Sigma, you can navigate to Sigma Administration > Account:
When ready, click Connect. The connection will be tested and return success if valid:
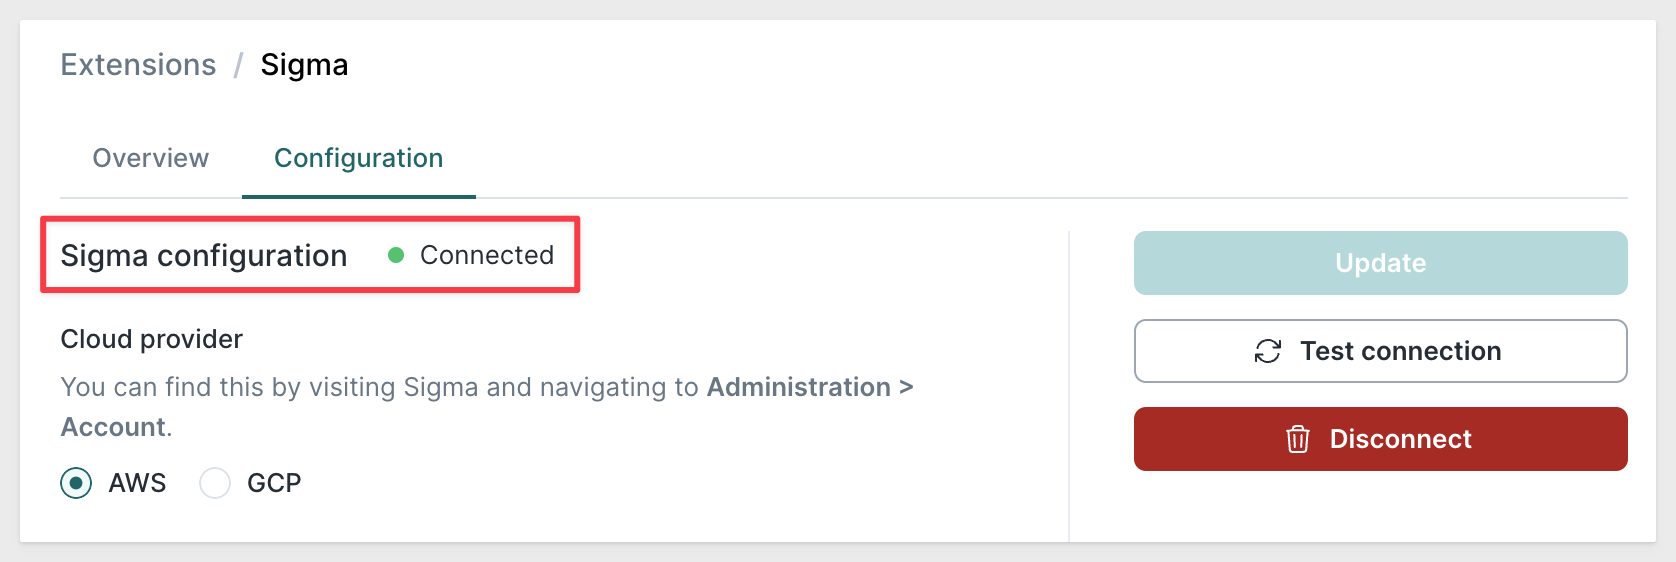
If the test fails, you need to confirm and re-enter your credentials.
Once finished, your source appears on the Sources overview page and can be used to set up models.
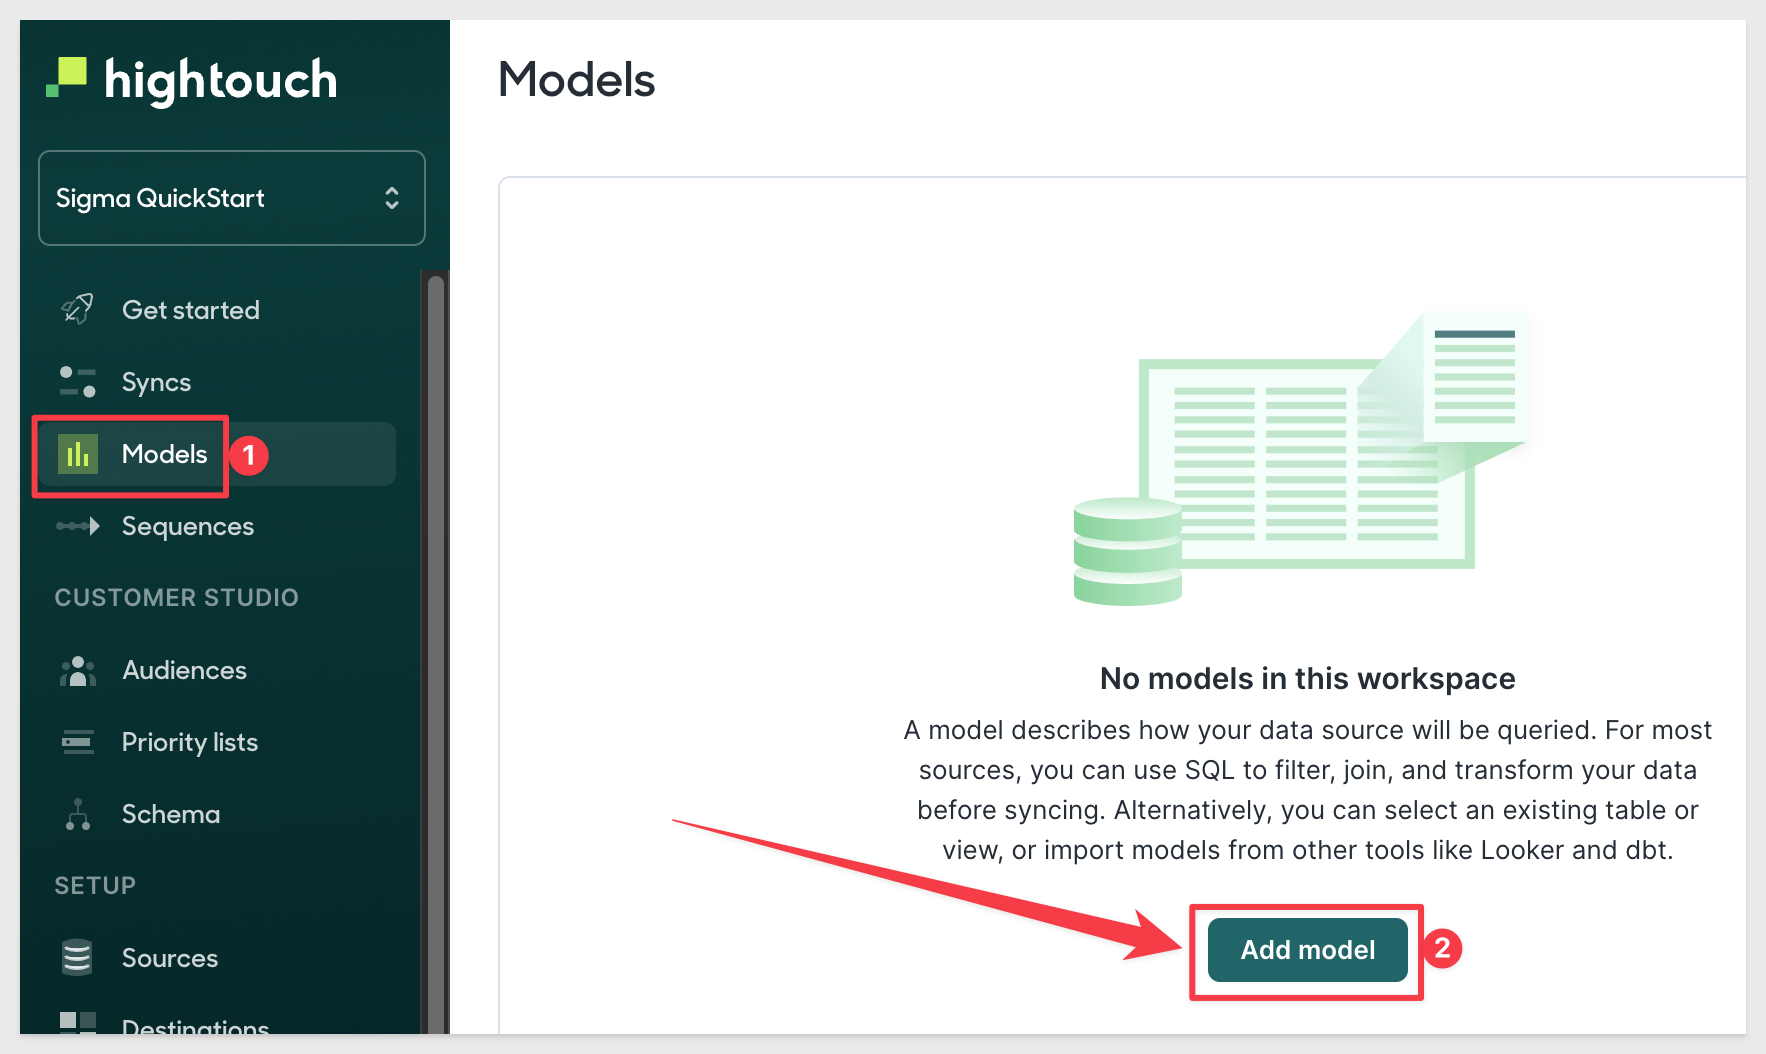
Create Data Model
Hightouch models define what data to pull from your source. We'll use the Sigma workbook we defined for the contact list to set up a model in Hightouch.
In Hightouch, go to the Models overview page and click Add model:
Select by 2x-clicking on the source you've just connected:
In Define model click on the Sigma model:
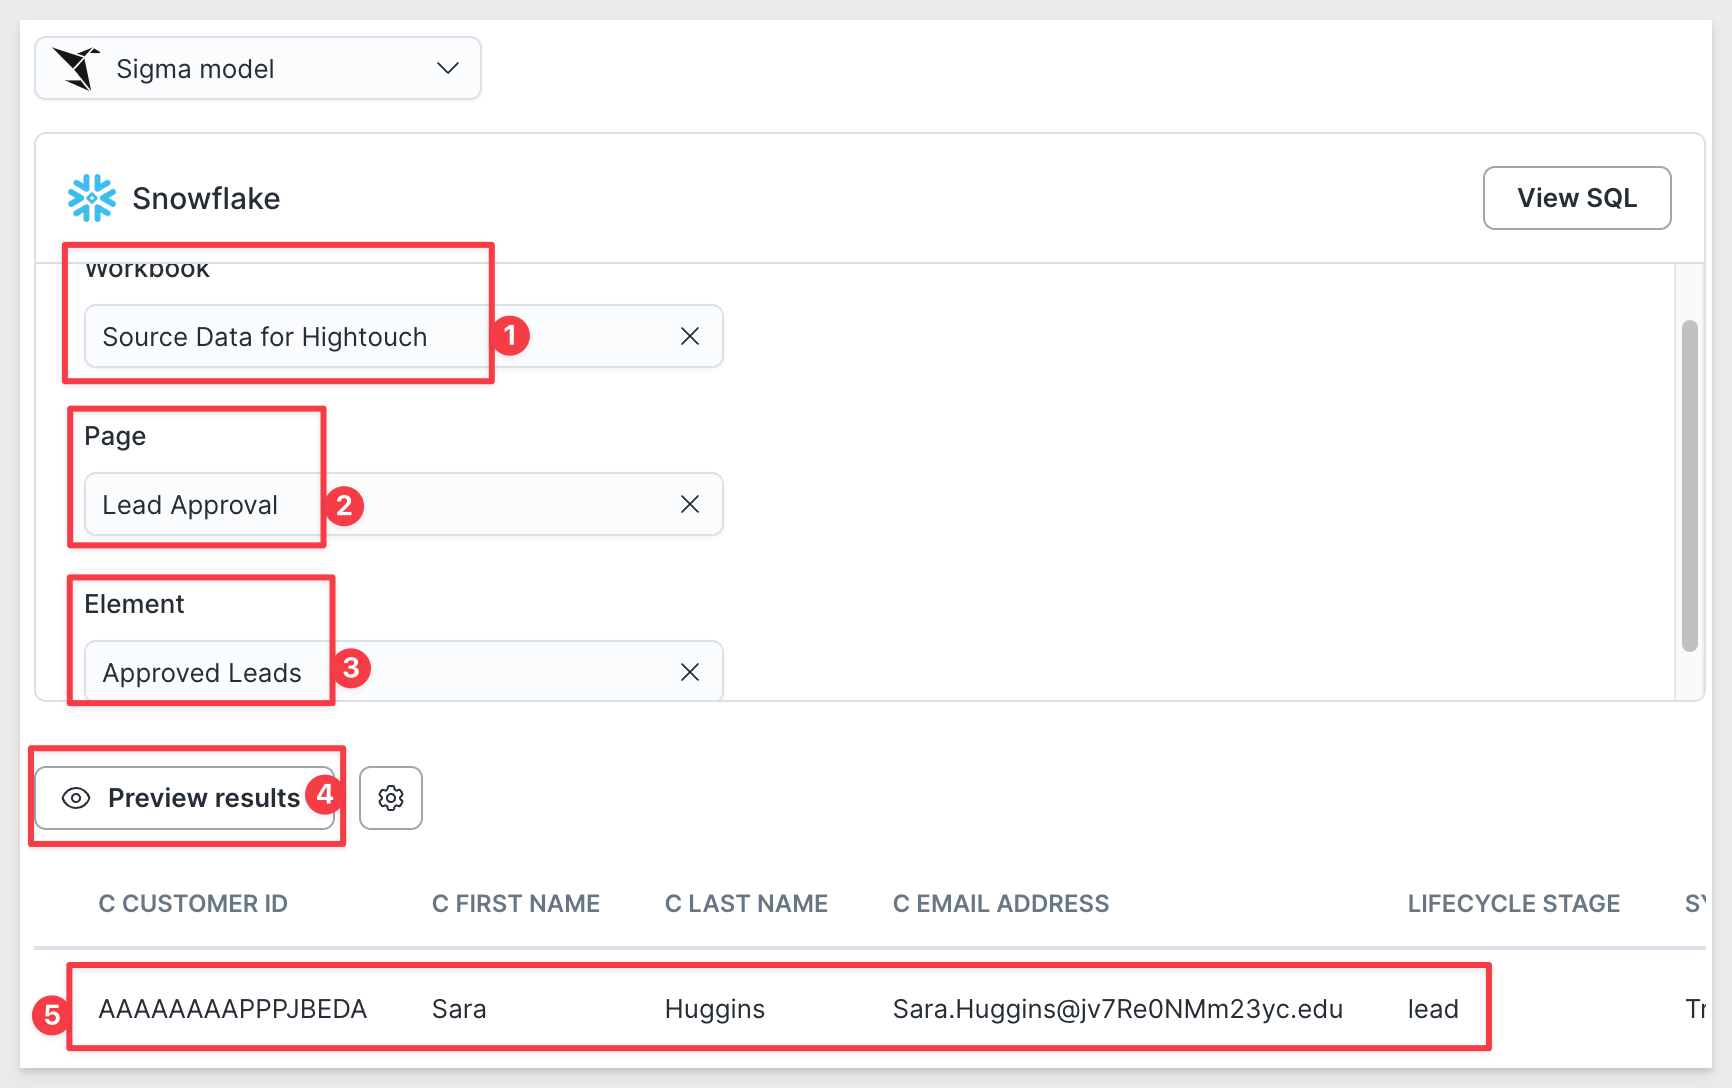
Select the workbook, page, and element that contain our Approved Leads.
Before continuing, you must preview your model to ensure it's querying the data you're interested in. By default, the preview is limited to the first 100 records. Once validation is complete, click Continue.
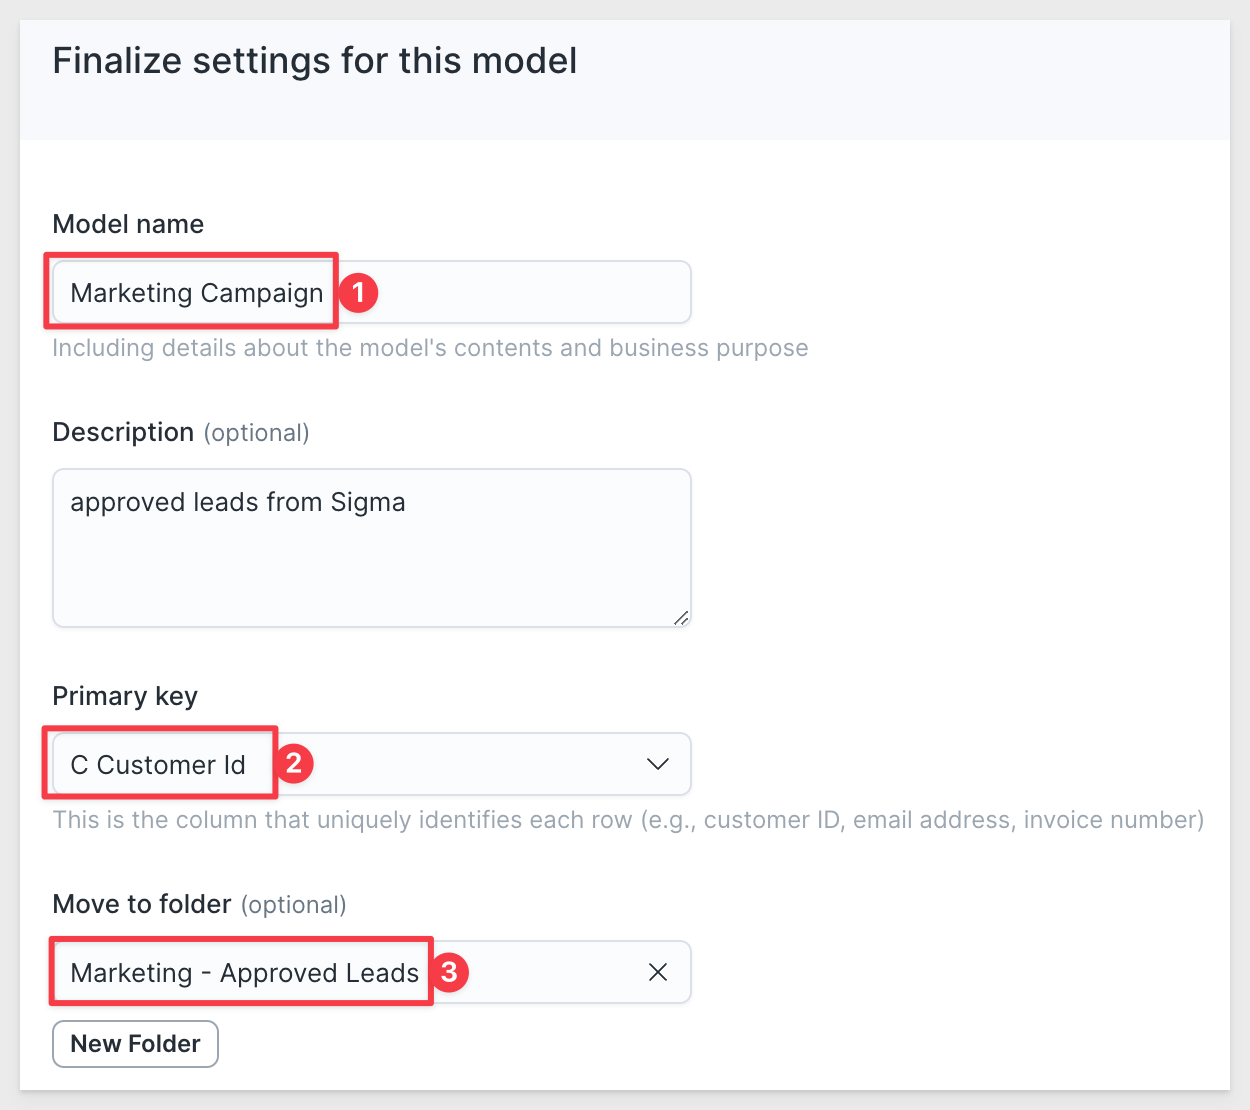
Name your model; for example, "Approved leads"
Select a Primary key. A primary key should be a column with unique identifiers. For example, a customer ID or email address can be a primary key.
Move to folder is optional and used to organize your work.
Click Finish.
We are now ready to Add sync to perform the job as configured.
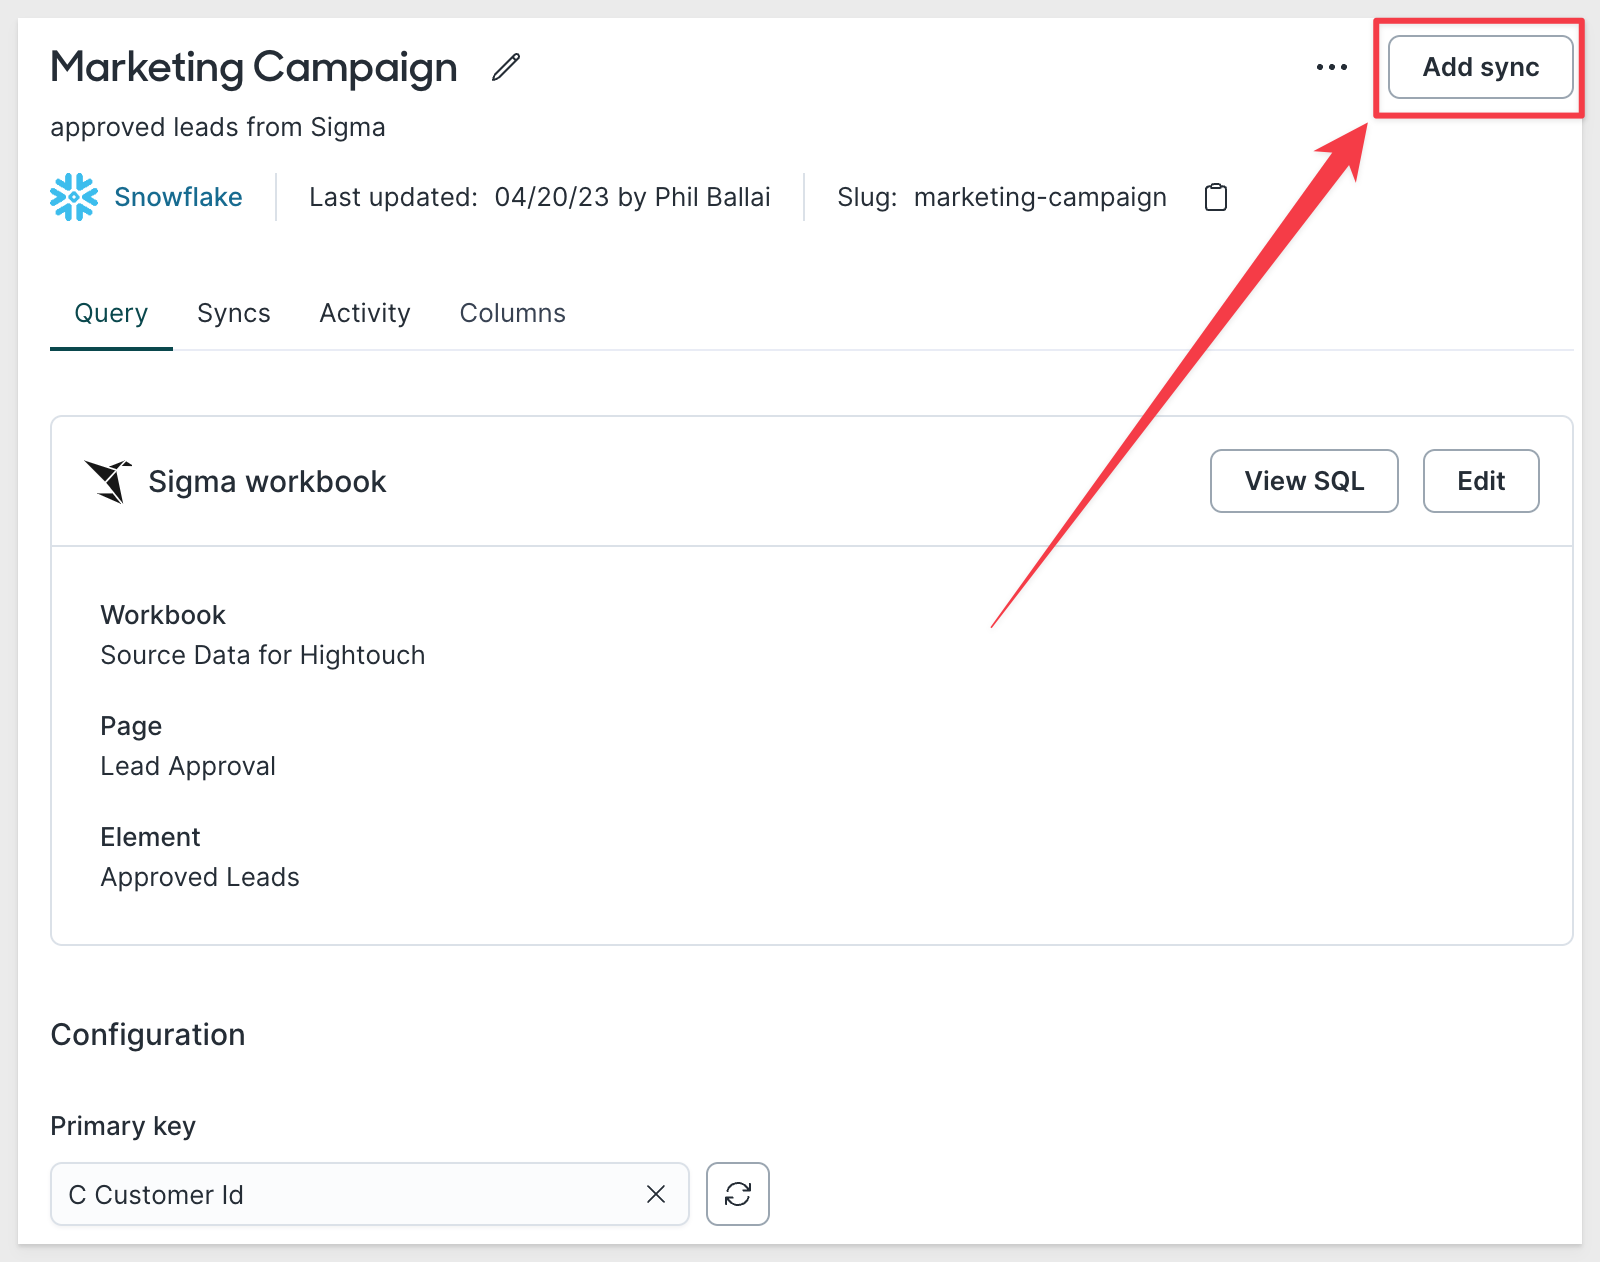
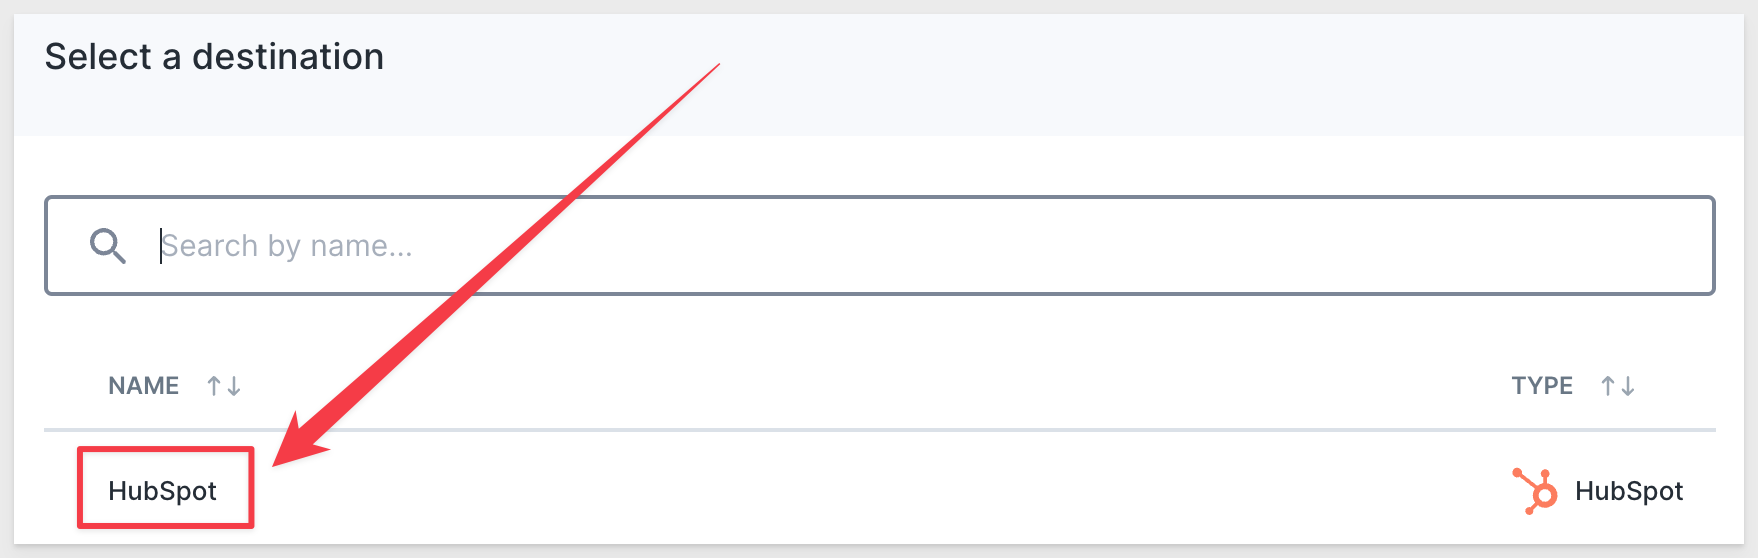
Select our HubSpot destination we set up earlier:
In Configure sync to HubSpot, select the following:
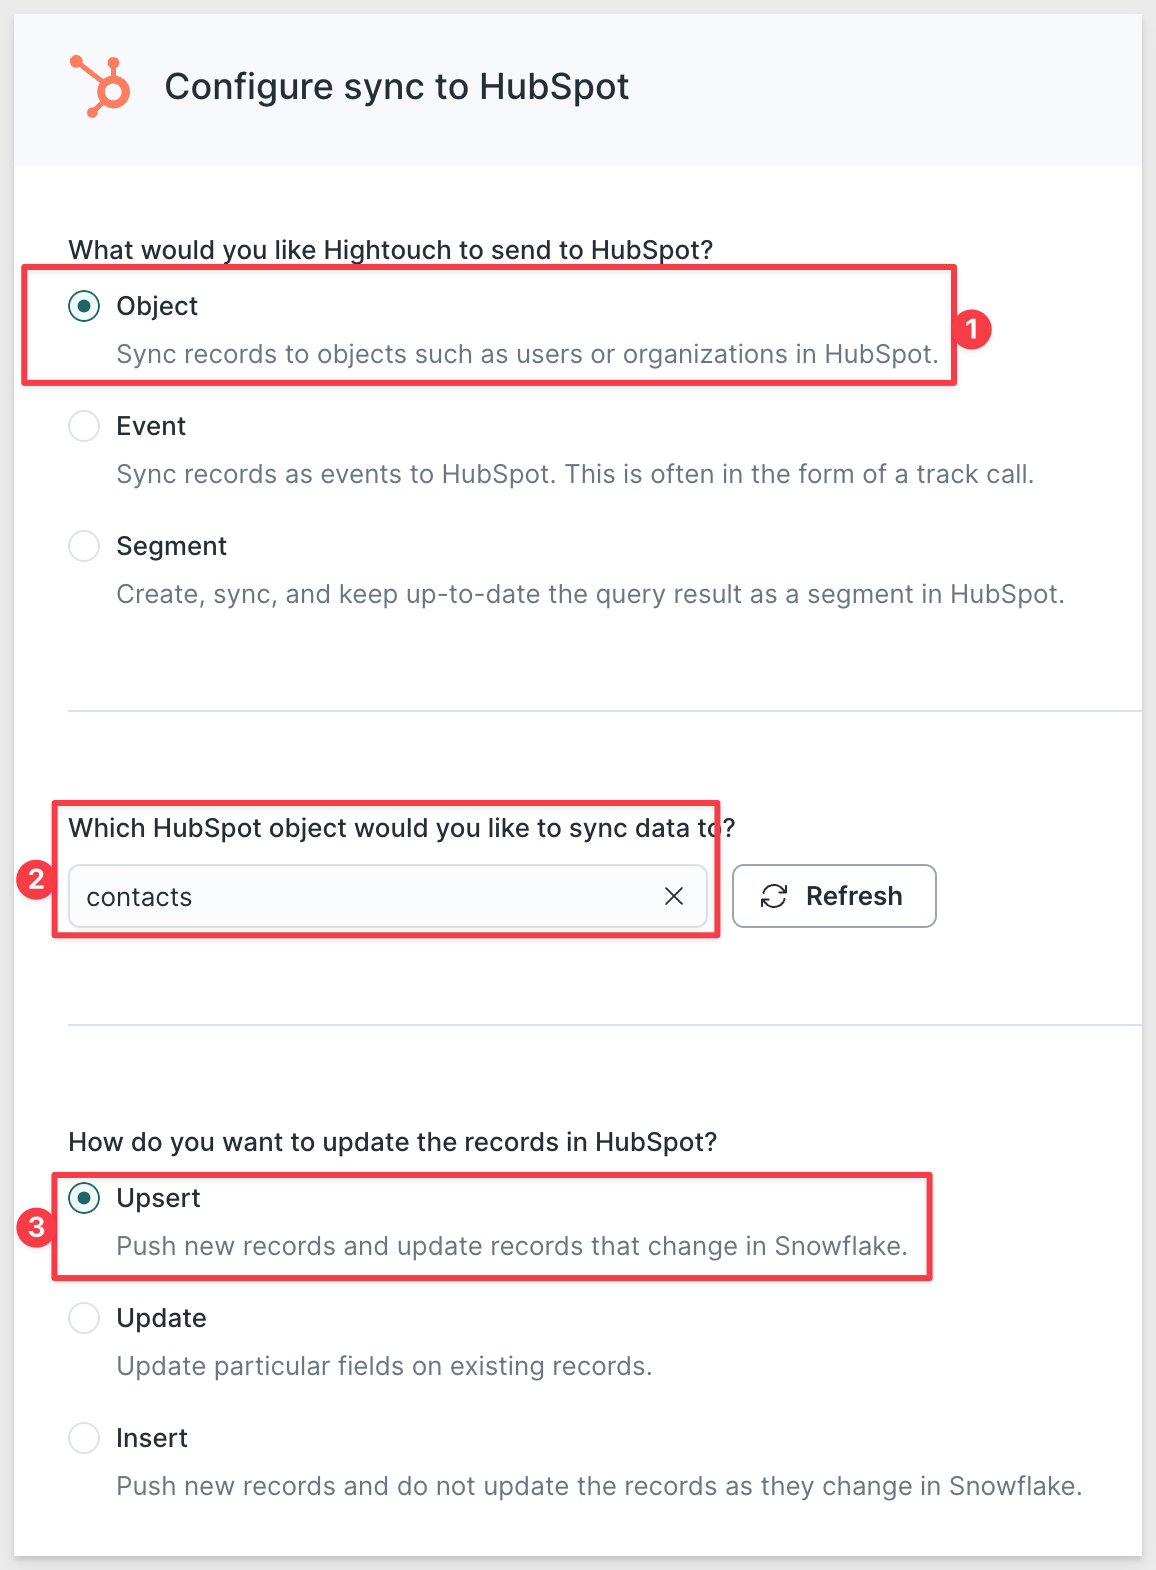
Here, we choose to upsert contacts into HubSpot. Hightouch supports syncing other HubSpot objects and also supports just updating or just inserting them. In our case, we want to both update existing contacts and insert new ones, so we chose "upsert".
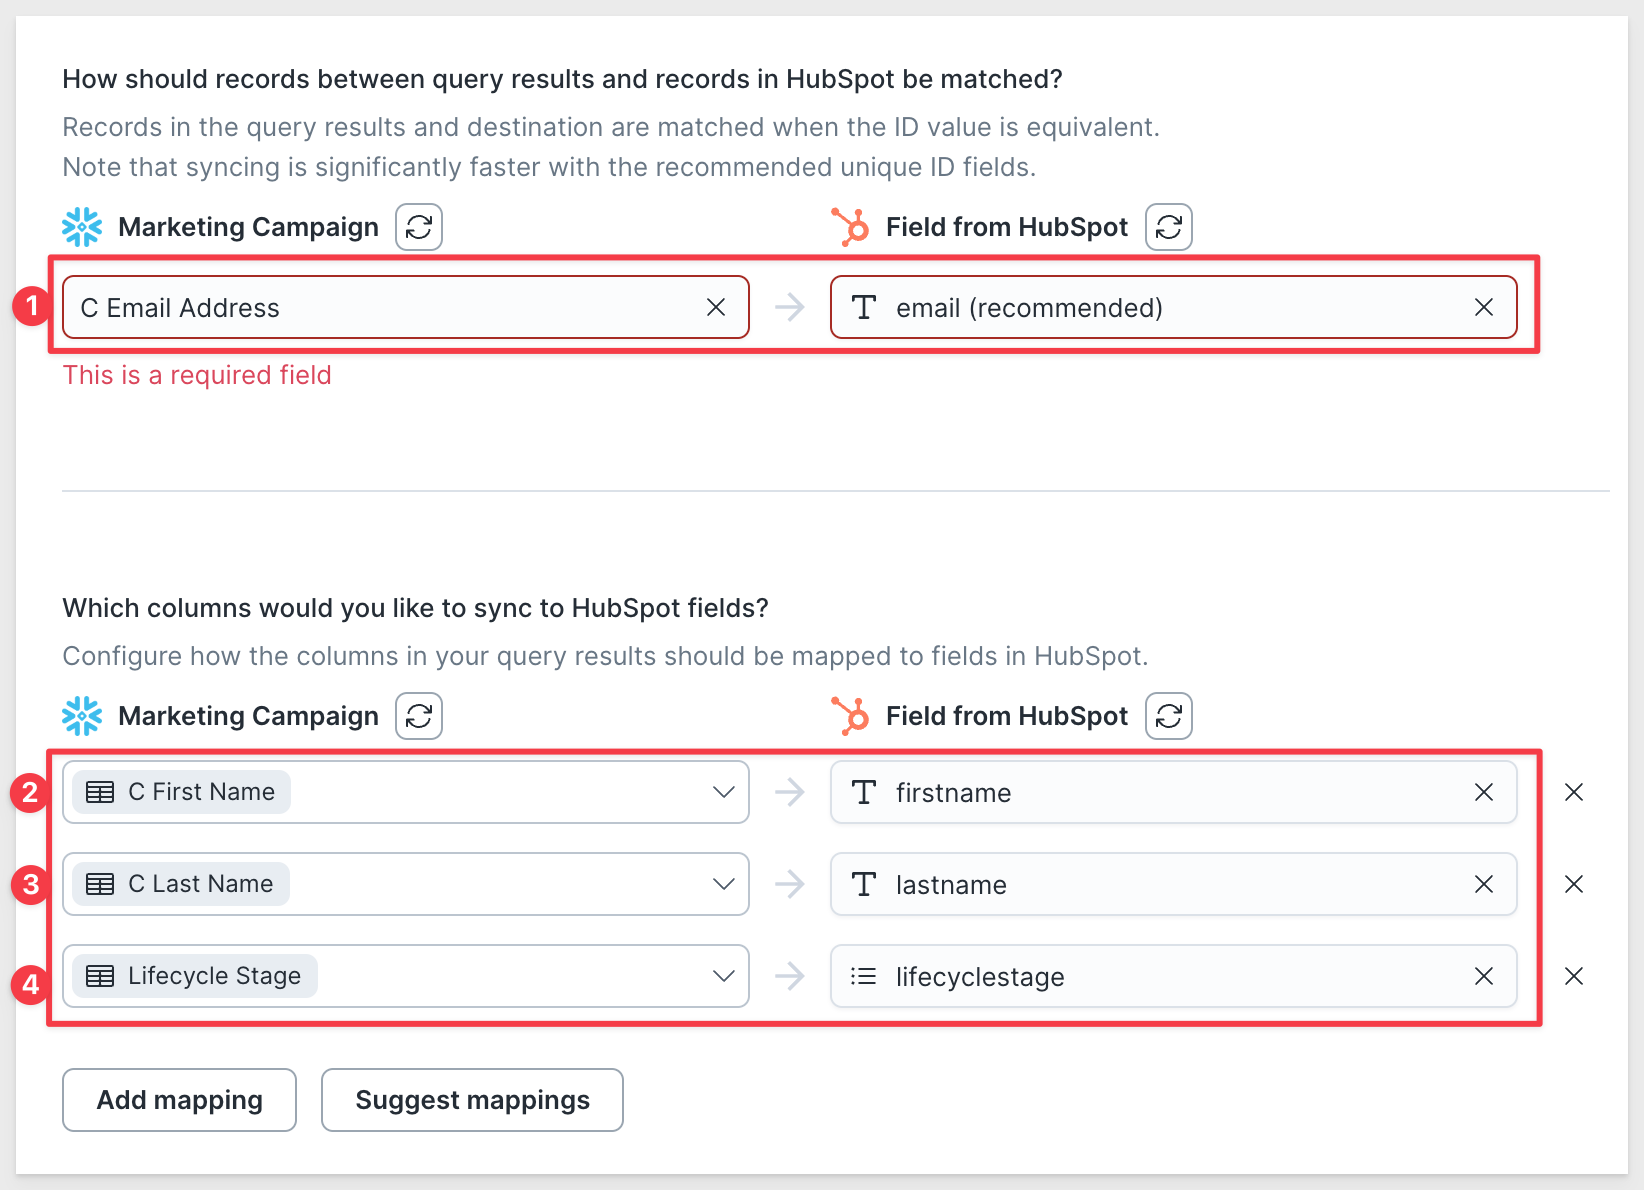
Scroll down and select the column to match records on. In this case, we're selecting to match on the email column in HubSpot. Hightouch recommends this column for record matching contacts since its a property that HubSpot automatically deduplicates on.
Next, select which columns should be included in the sync and which columns they should be mapped to in HubSpot:
A cool feature is to test before we continue on. Click Test. We can select a row (we only have one) to see what Hightouch will be sending to HubSpot. This can be useful when troubleshooting sync issues.
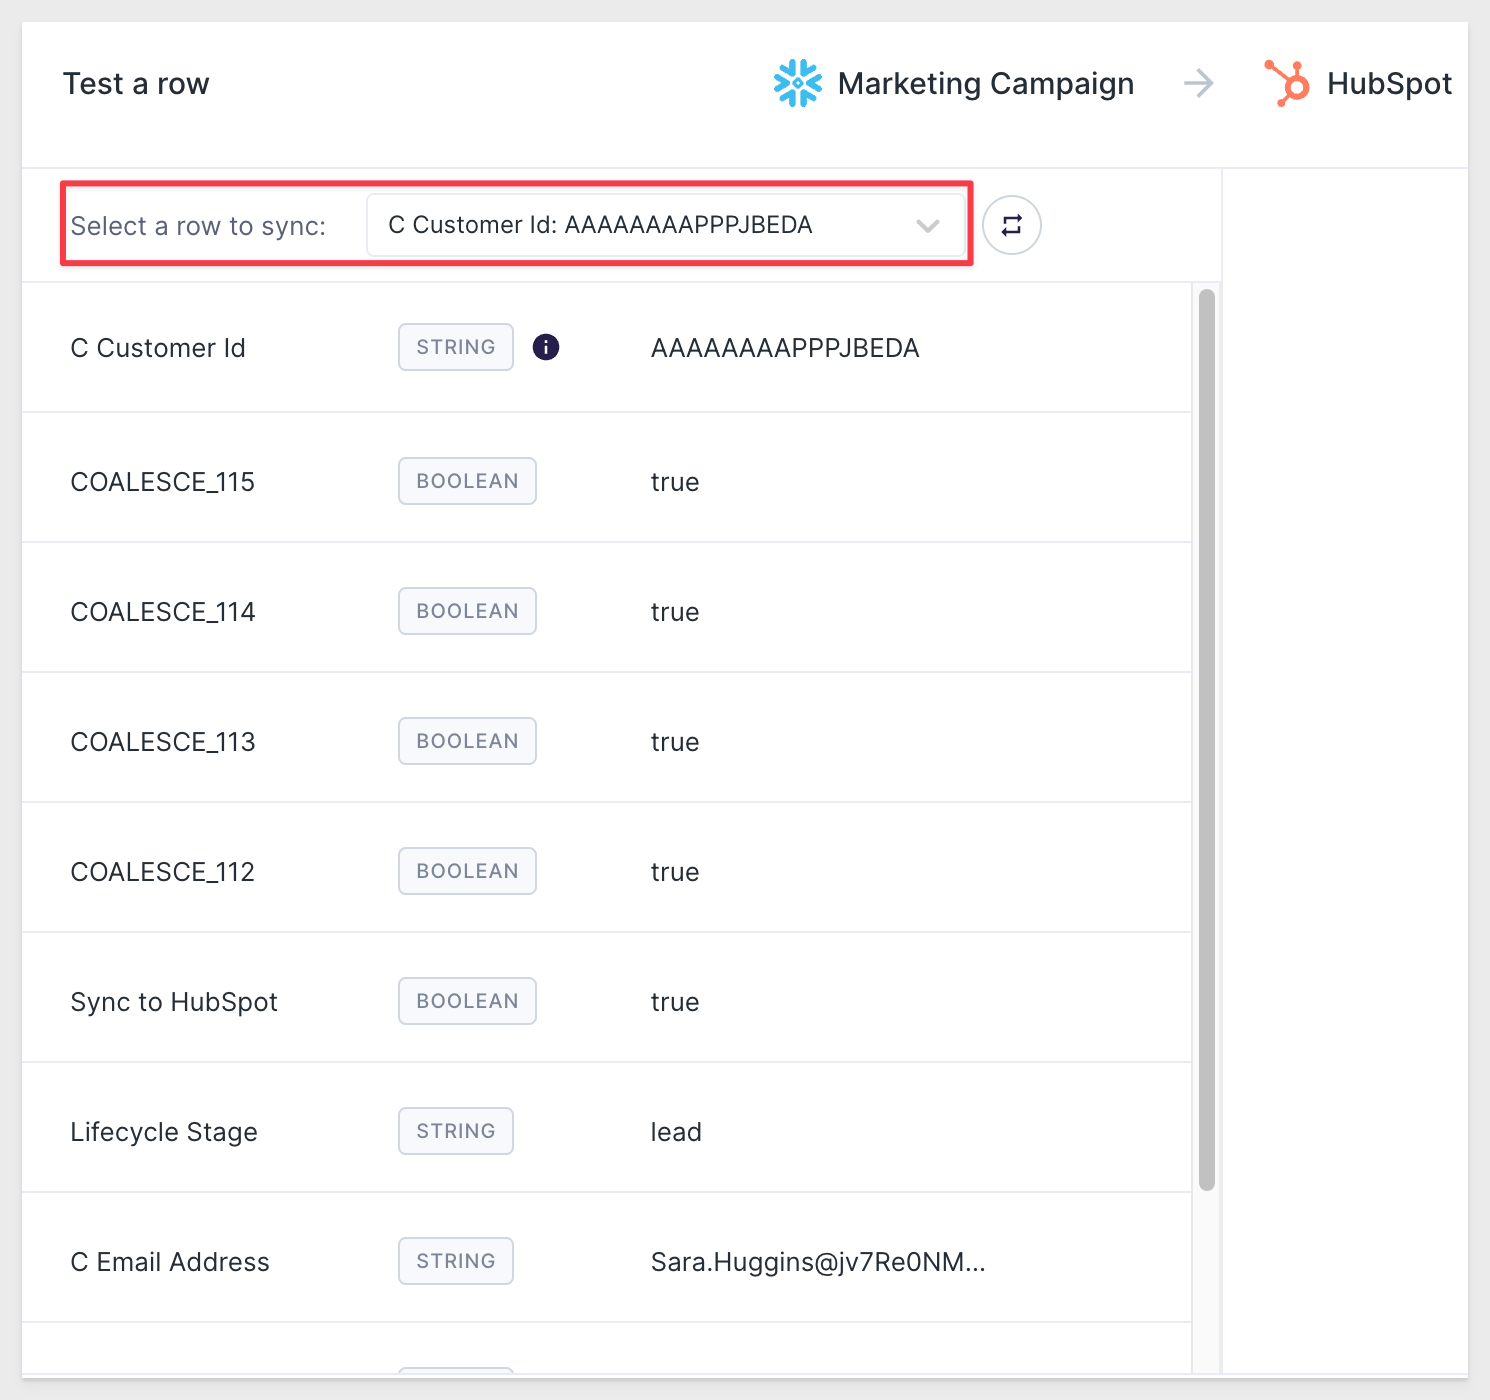
If all looks good, click the Close.
Click Continue.
Before continuing, you must preview your model to ensure it's querying the data you're interested in. By default, the preview is limited to the first 100 records. Once validation is complete, click Continue.
Name your model; for example, "Approved leads"
Select a Primary key. A primary key should be a column with unique identifiers. For example, a customer ID or email address can be a primary key.
Click Finish.
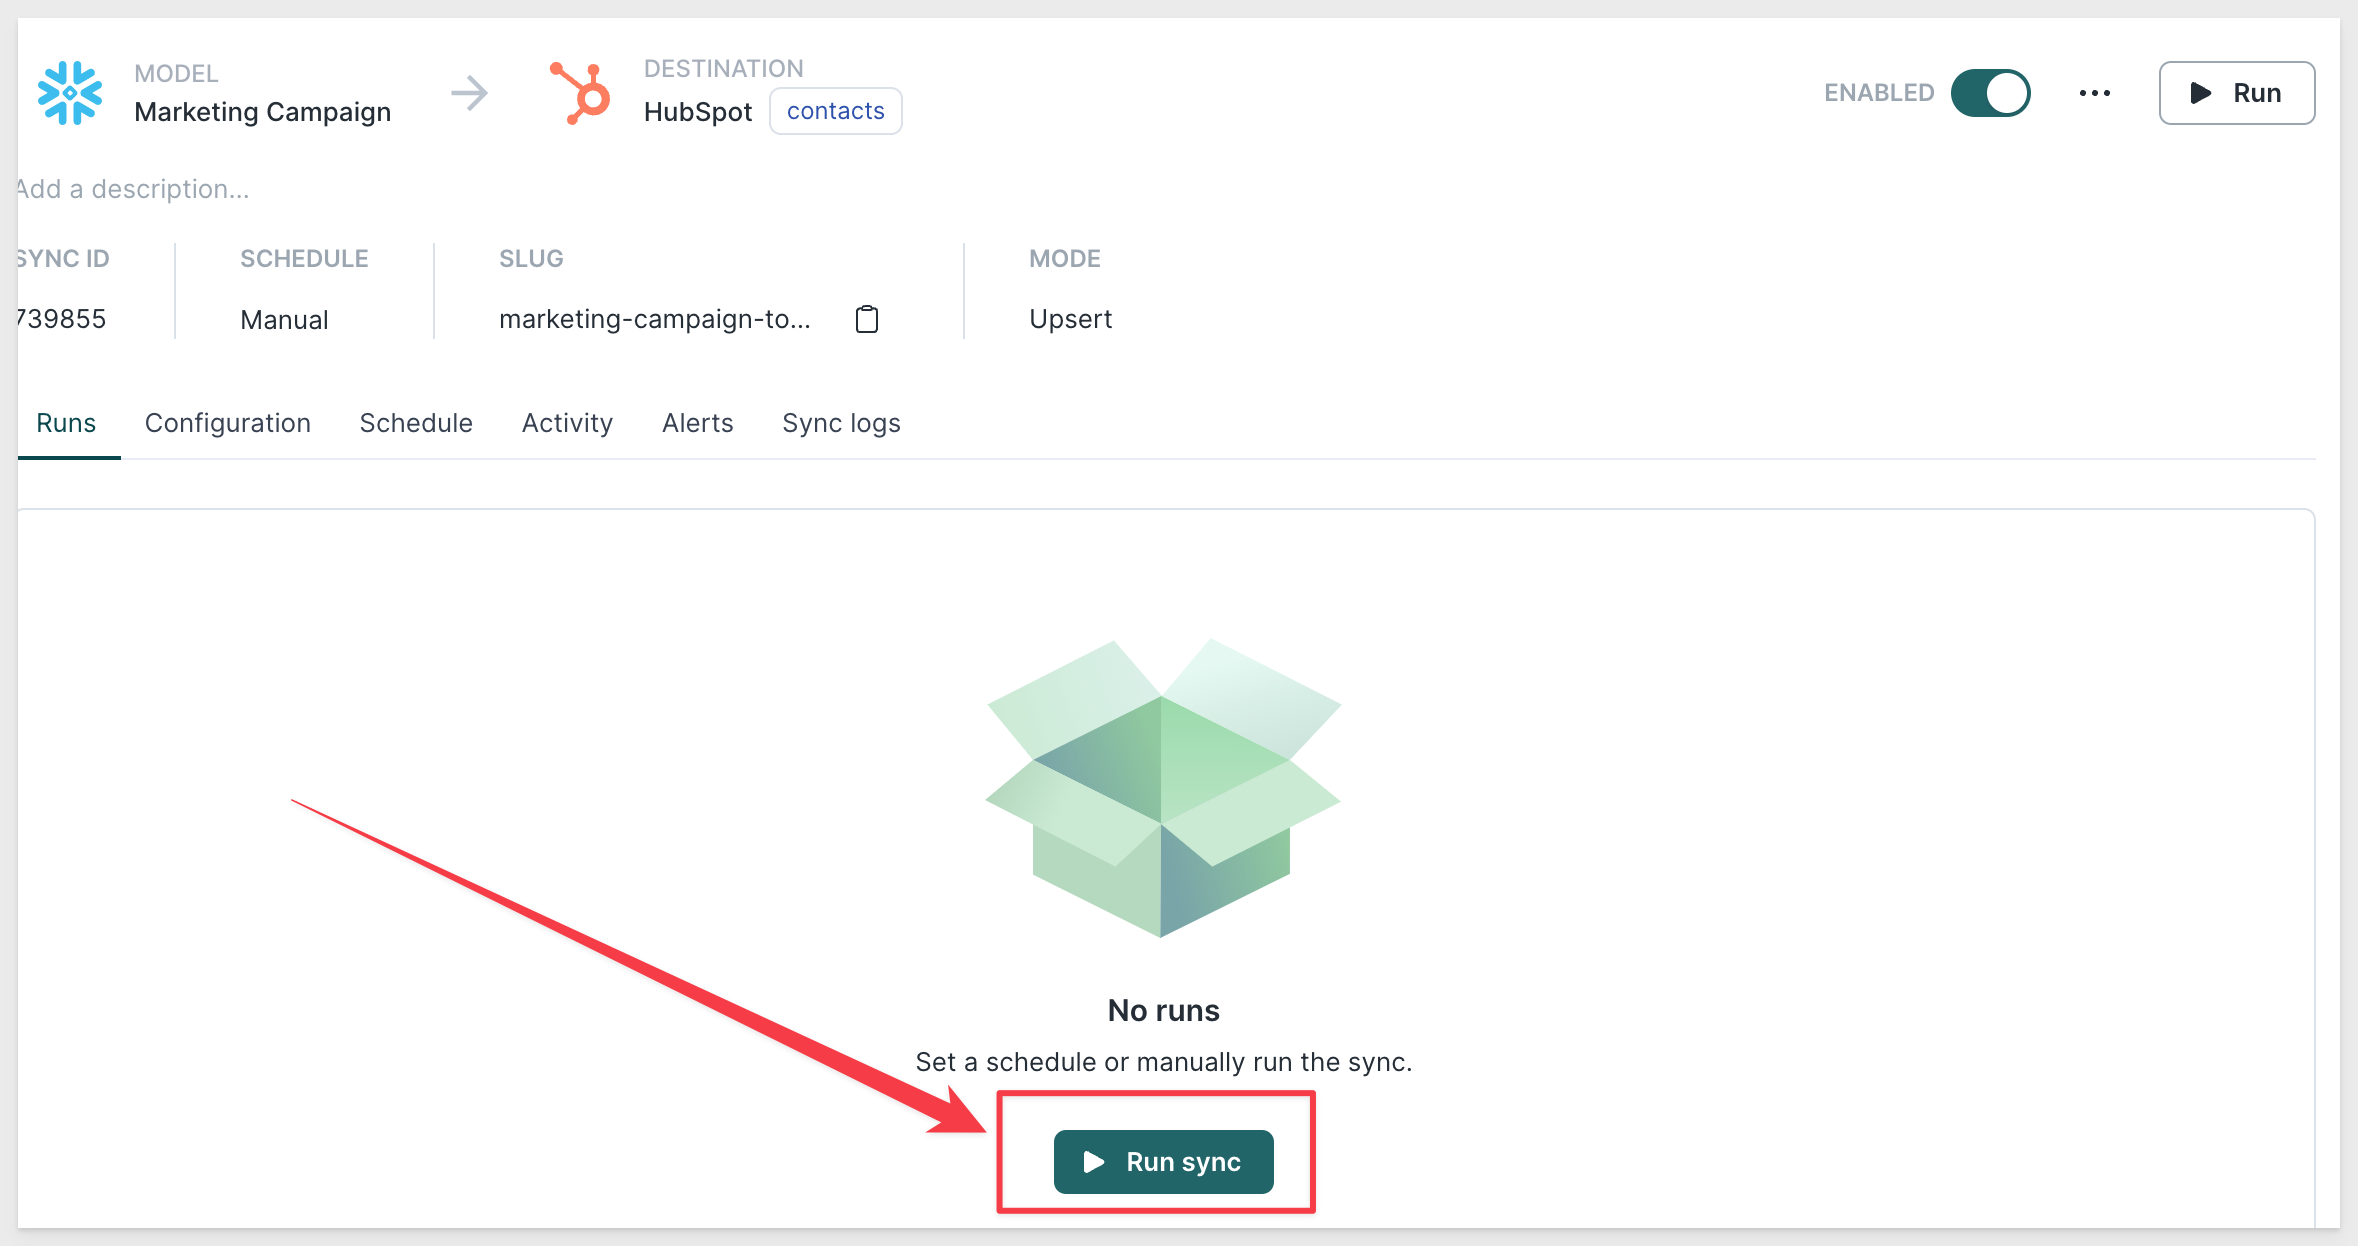
In Finalize settings for this sync, select Manual and click Finish.
Click Run sync:
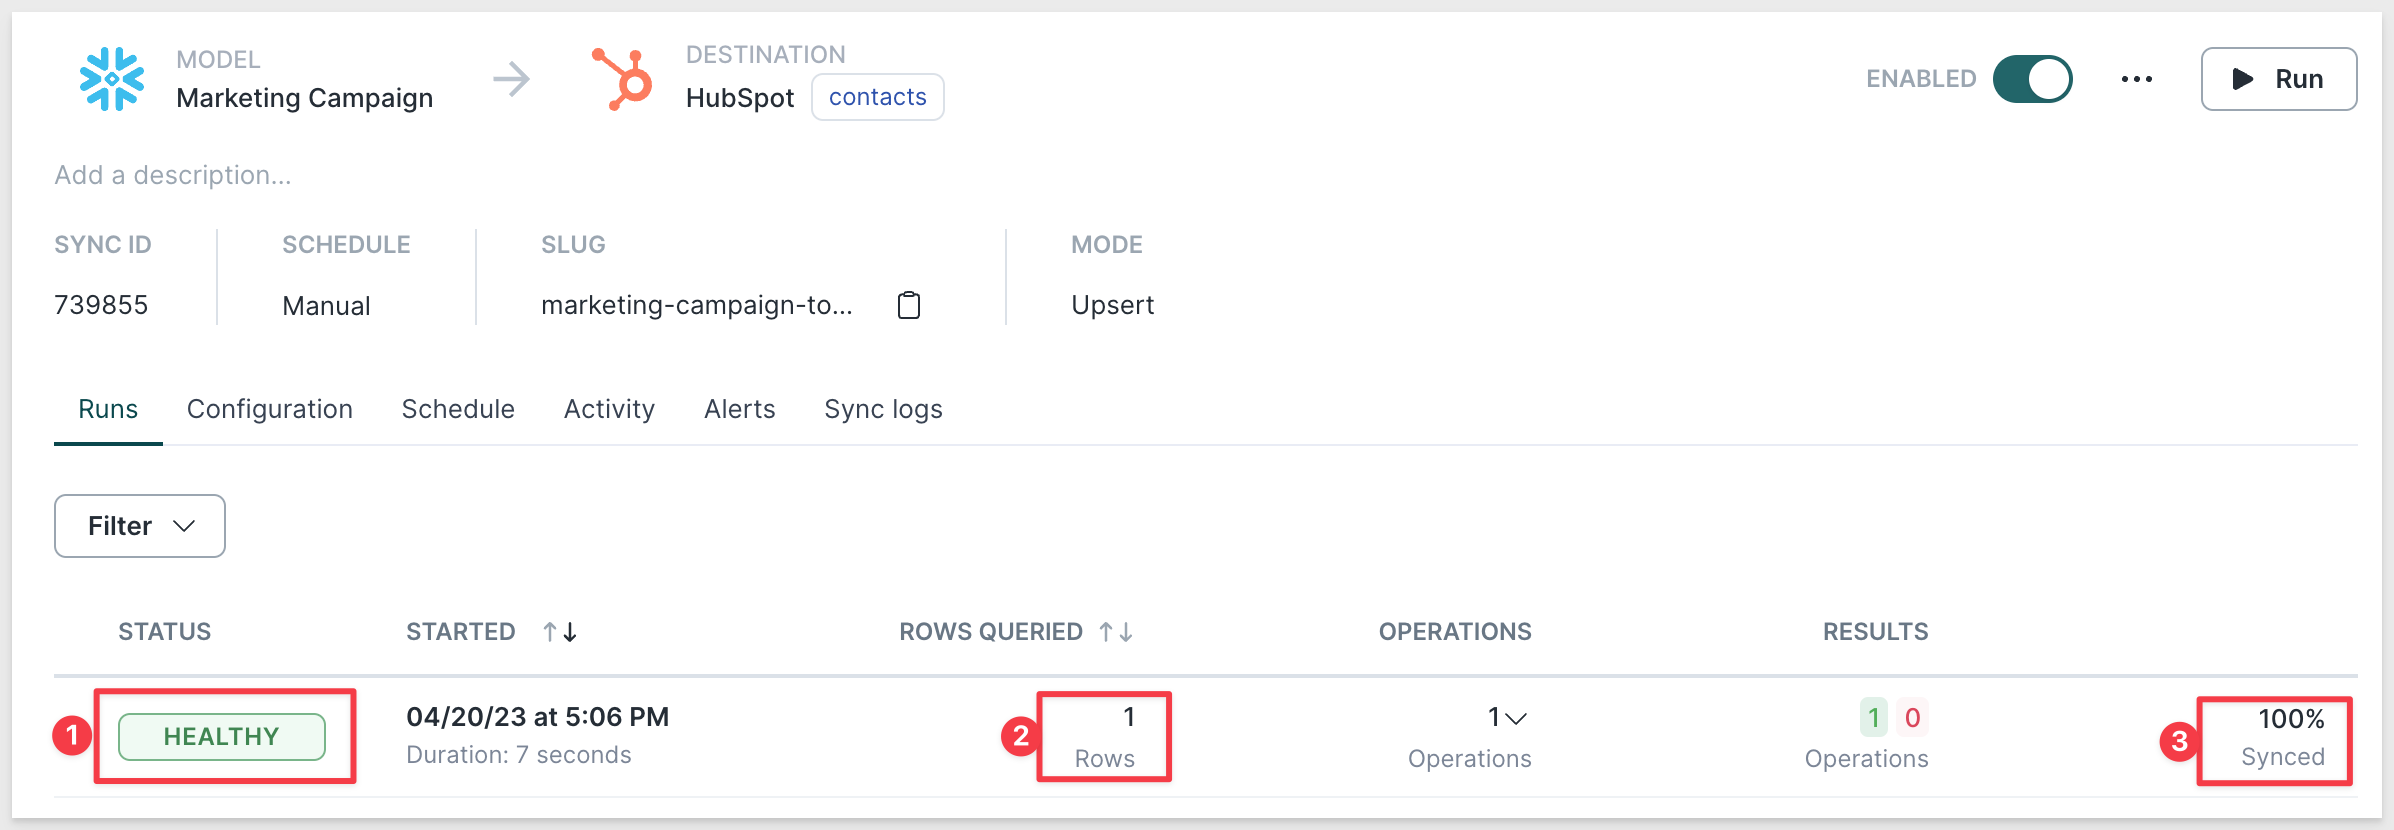
The sync is queued for start and once completed we should get a status of Healthy:
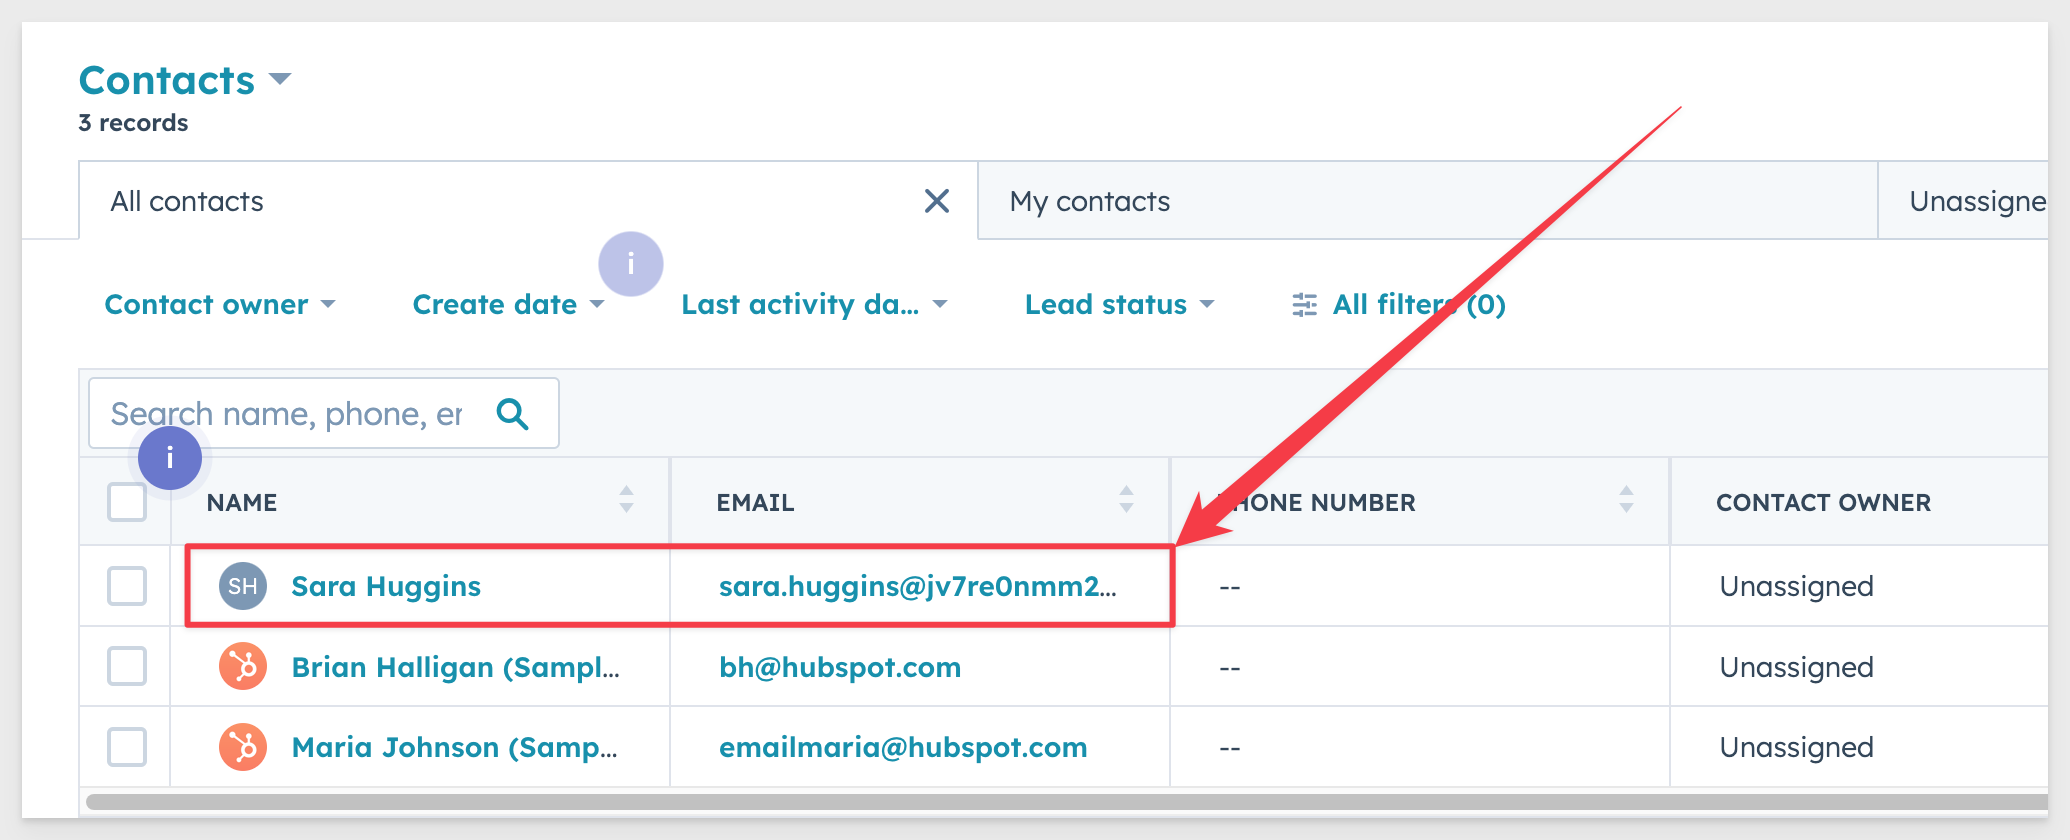
The last thing we need to do is see the data landed in HubSpot.
Log into the HubSpot trial account we created and navigate to Contacts.
There we see the one record we added (Sara Huggins) along with the two default rows provided by the HubSpot trial.
There is some refinement we could do to make Sarah's record more complete but hopefully we demonstrated the workflow well enough that it would be easy to take that task on and quickly complete it.
With your contact lists dynamically updating in HubSpot, you can skip the manual labor of updating them every time they change and instead focus on perfecting your campaign.
We covered connecting to data in our warehouse, using Sigma to orient and enrich it, leveraged Hightouch to copy it from source to HubSpot where we saw our transformed data land.
Additional Resource Links
Be sure to check out all the latest developments at Sigma's First Friday Feature page!
Help Center Home
Sigma Community
Sigma Blog