Connect Sigma to AWS Secrets Manager so database credentials live in your own vault instead of being typed directly into a Sigma connection.
Along the way you'll learn how to:
- Connect AWS Secrets Manager to Sigma and complete the trust handshake
- Add a secret in Sigma and map it to the right key or path
- Attach a secret to a connection using the secret manager toggle
- Track where each secret is being used with the
Secret accesstab
For more information on Sigma's product release strategy, see Sigma product releases
If something doesn't work as expected, here's how to contact Sigma support
Target Audience
This QuickStart is for Sigma organization admins and security teams responsible for managing connection credentials, particularly those who already store secrets in AWS Secrets Manager.
Prerequisites
- Admin account type in your Sigma organization.
- Access to an AWS Secrets Manager instance. If you don't already have a secret stored, this QuickStart walks through creating one.
- Permission to create IAM policies and roles in the AWS account that owns the secret.
- A Snowflake connection using key pair authentication — this guide's running example stores the private key and passphrase as secrets. If you don't already have a key pair generated, see Snowflake Key-pair Authorization before continuing.
- Some familiarity with Sigma is assumed. Not all steps will be shown, as the basics are assumed to be understood.

Before Sigma can reference a secret, it needs a trusted integration with the secret manager that stores it. AWS Secrets Manager uses AWS Security Token Service (STS) cross-account role assumption — Sigma assumes a role in your AWS account rather than holding a long-lived AWS key.
Create an IAM policy in AWS
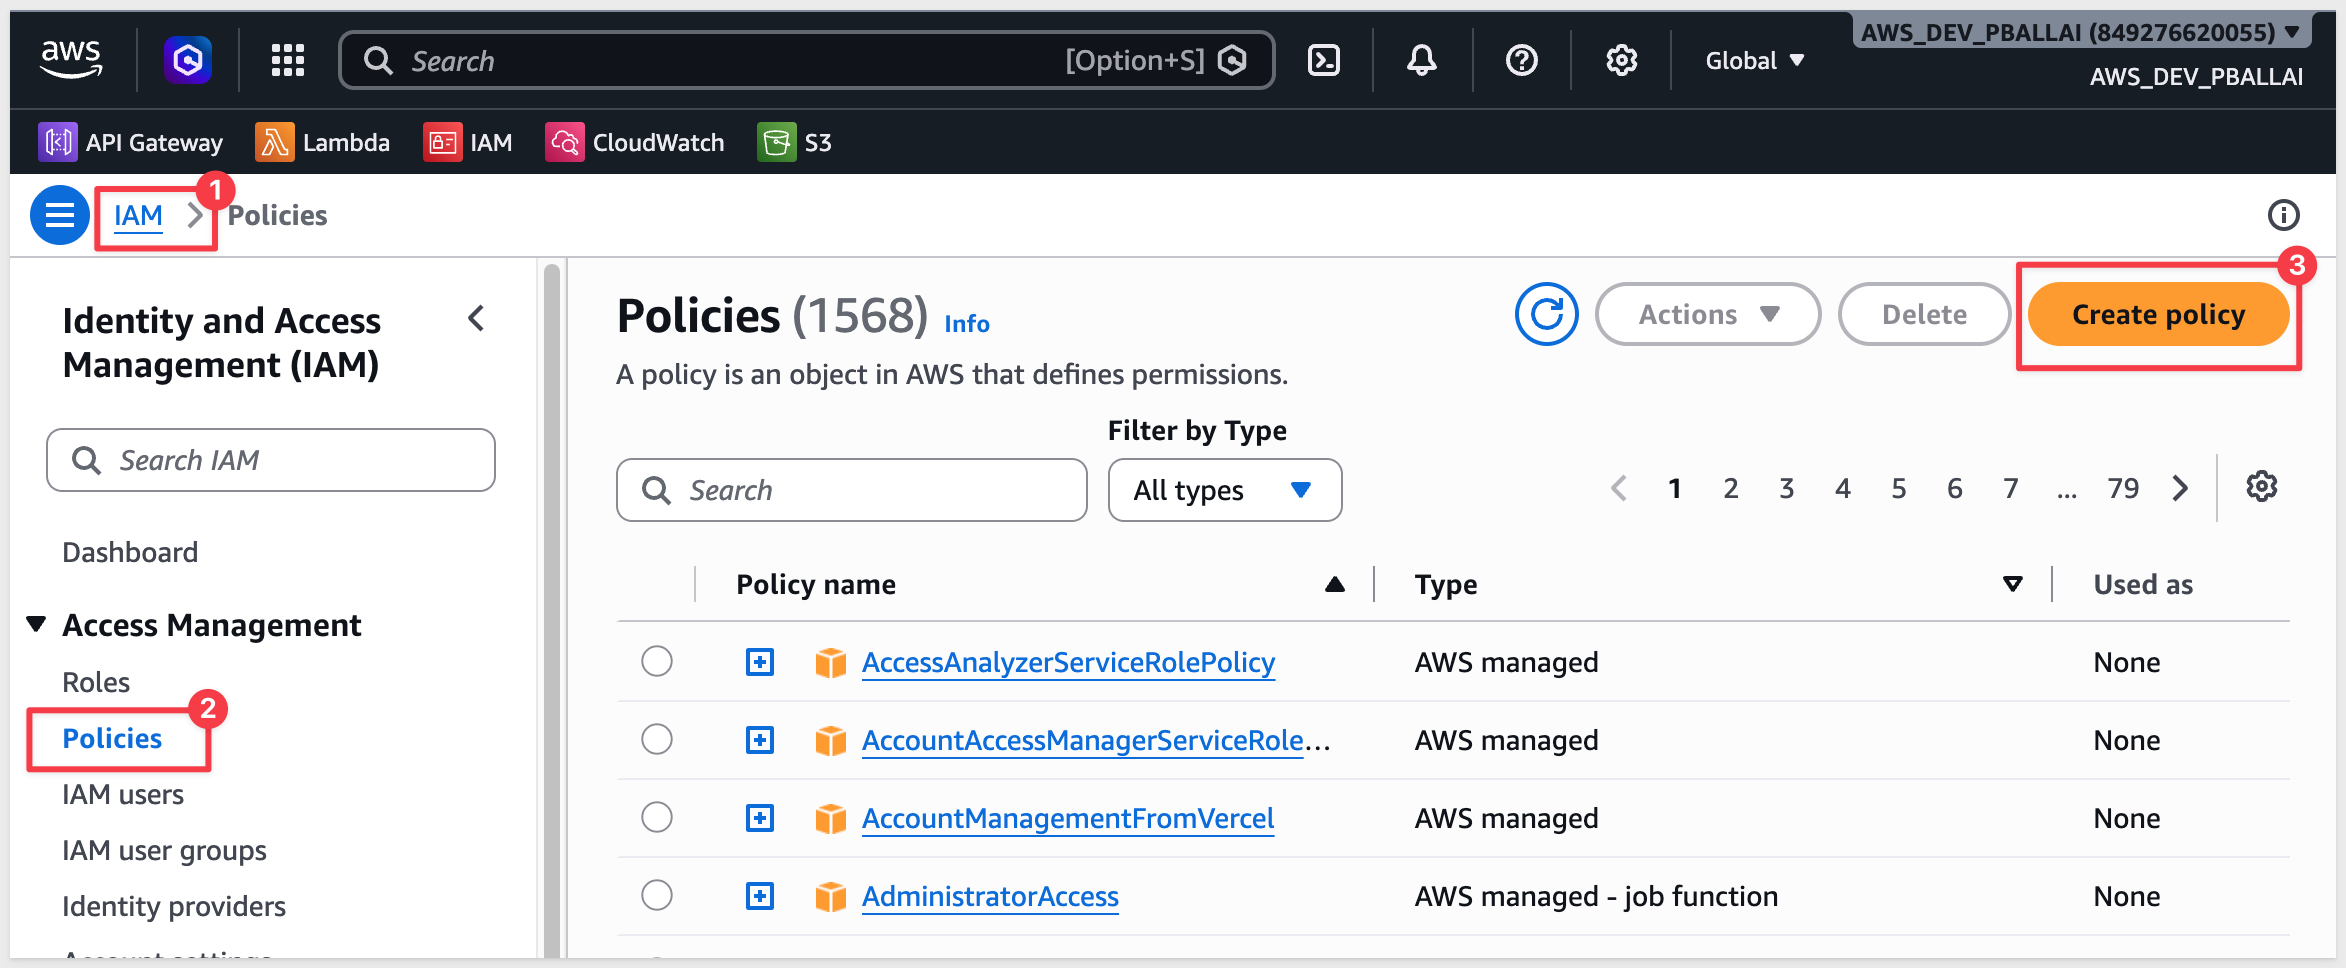
Log in to the AWS Management Console as an administrator and open the IAM console. In the left navigation menu, click Policies, then Create policy:
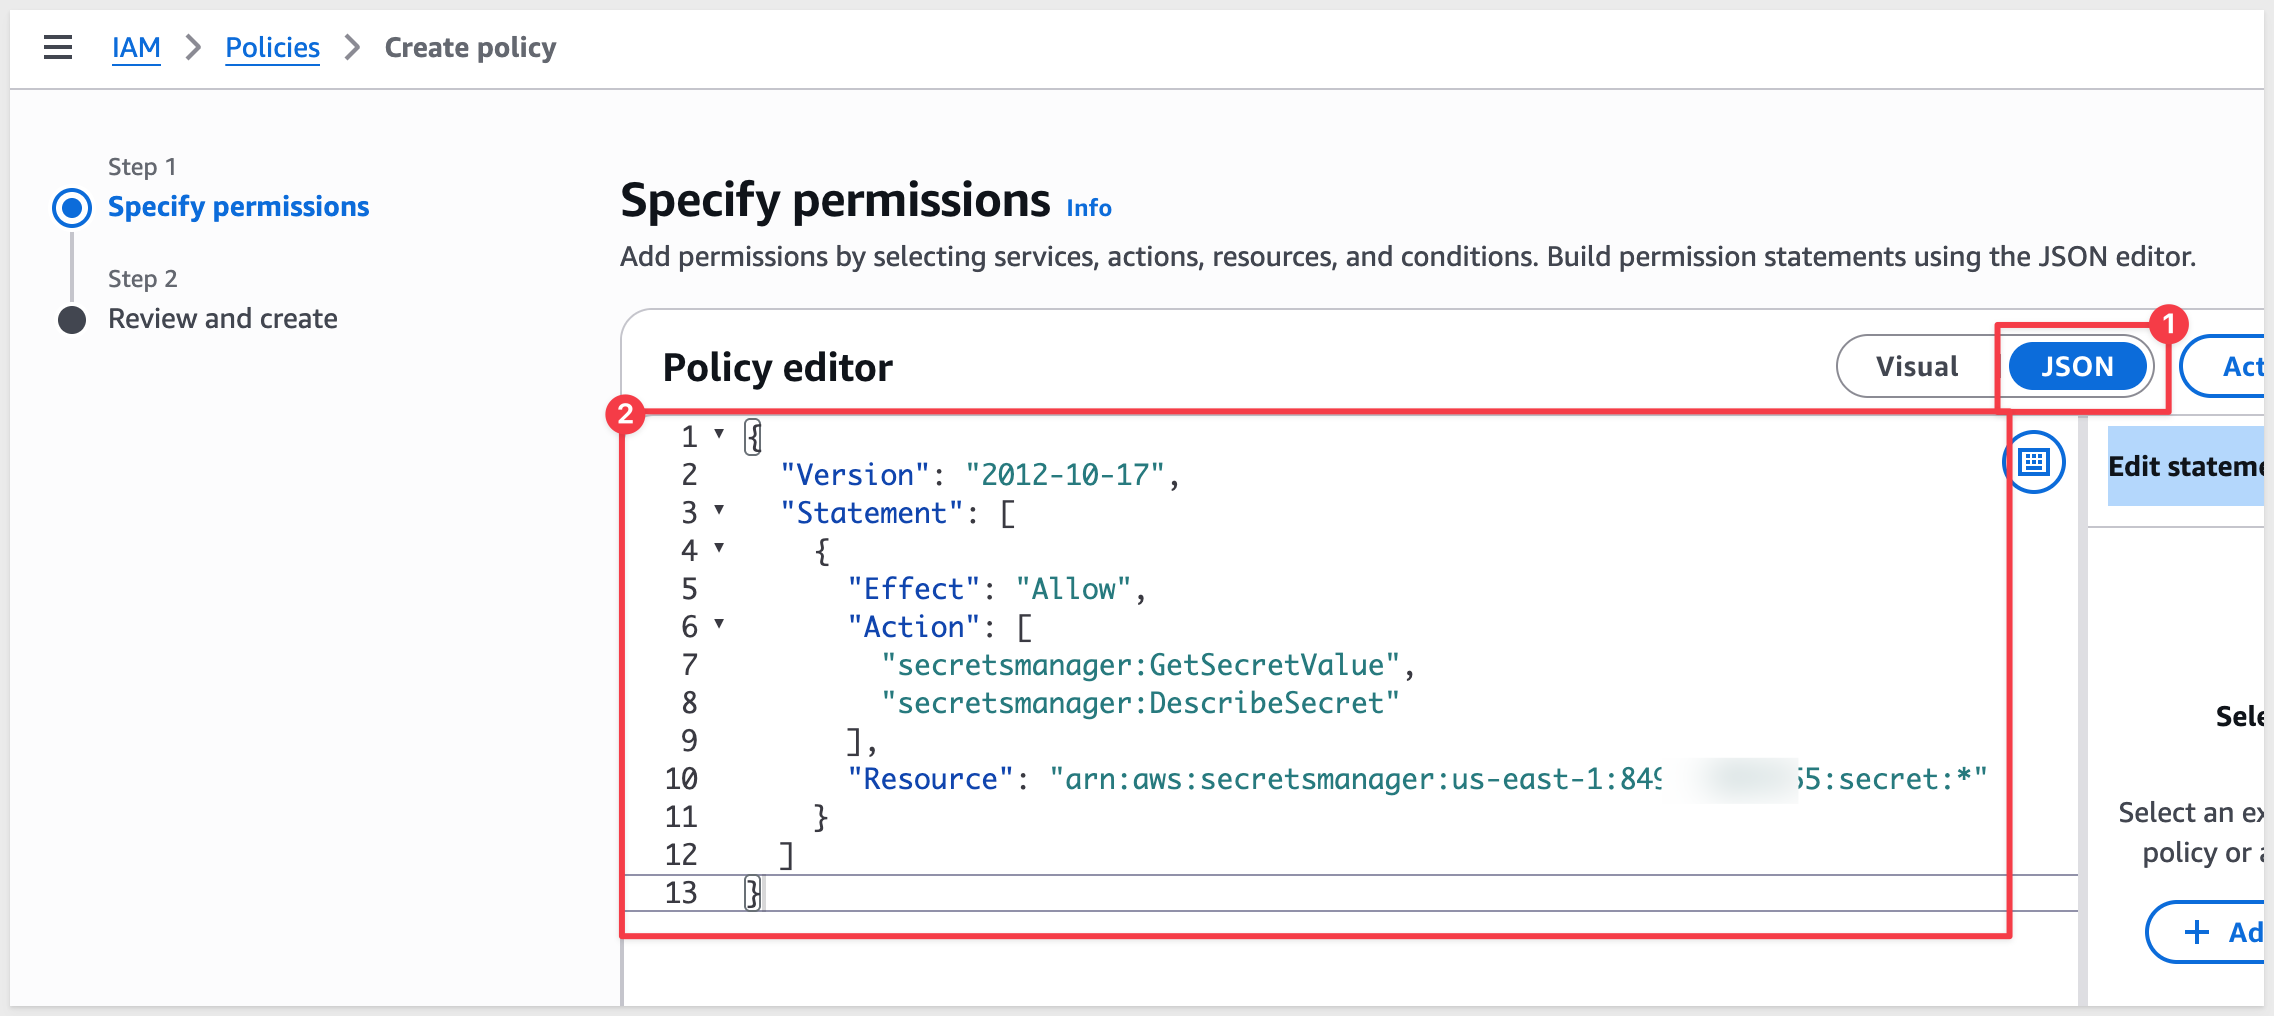
Select the JSON tab and paste a policy (replacing the sample JSON) that grants read access to your secrets:
{
  "Version": "2012-10-17",
  "Statement": [
    {
      "Effect": "Allow",
      "Action": [
        "secretsmanager:GetSecretValue",
        "secretsmanager:DescribeSecret"
      ],
      "Resource": "arn:aws:secretsmanager:{region}:{aws-account-id}:secret:*"
    }
  ]
}
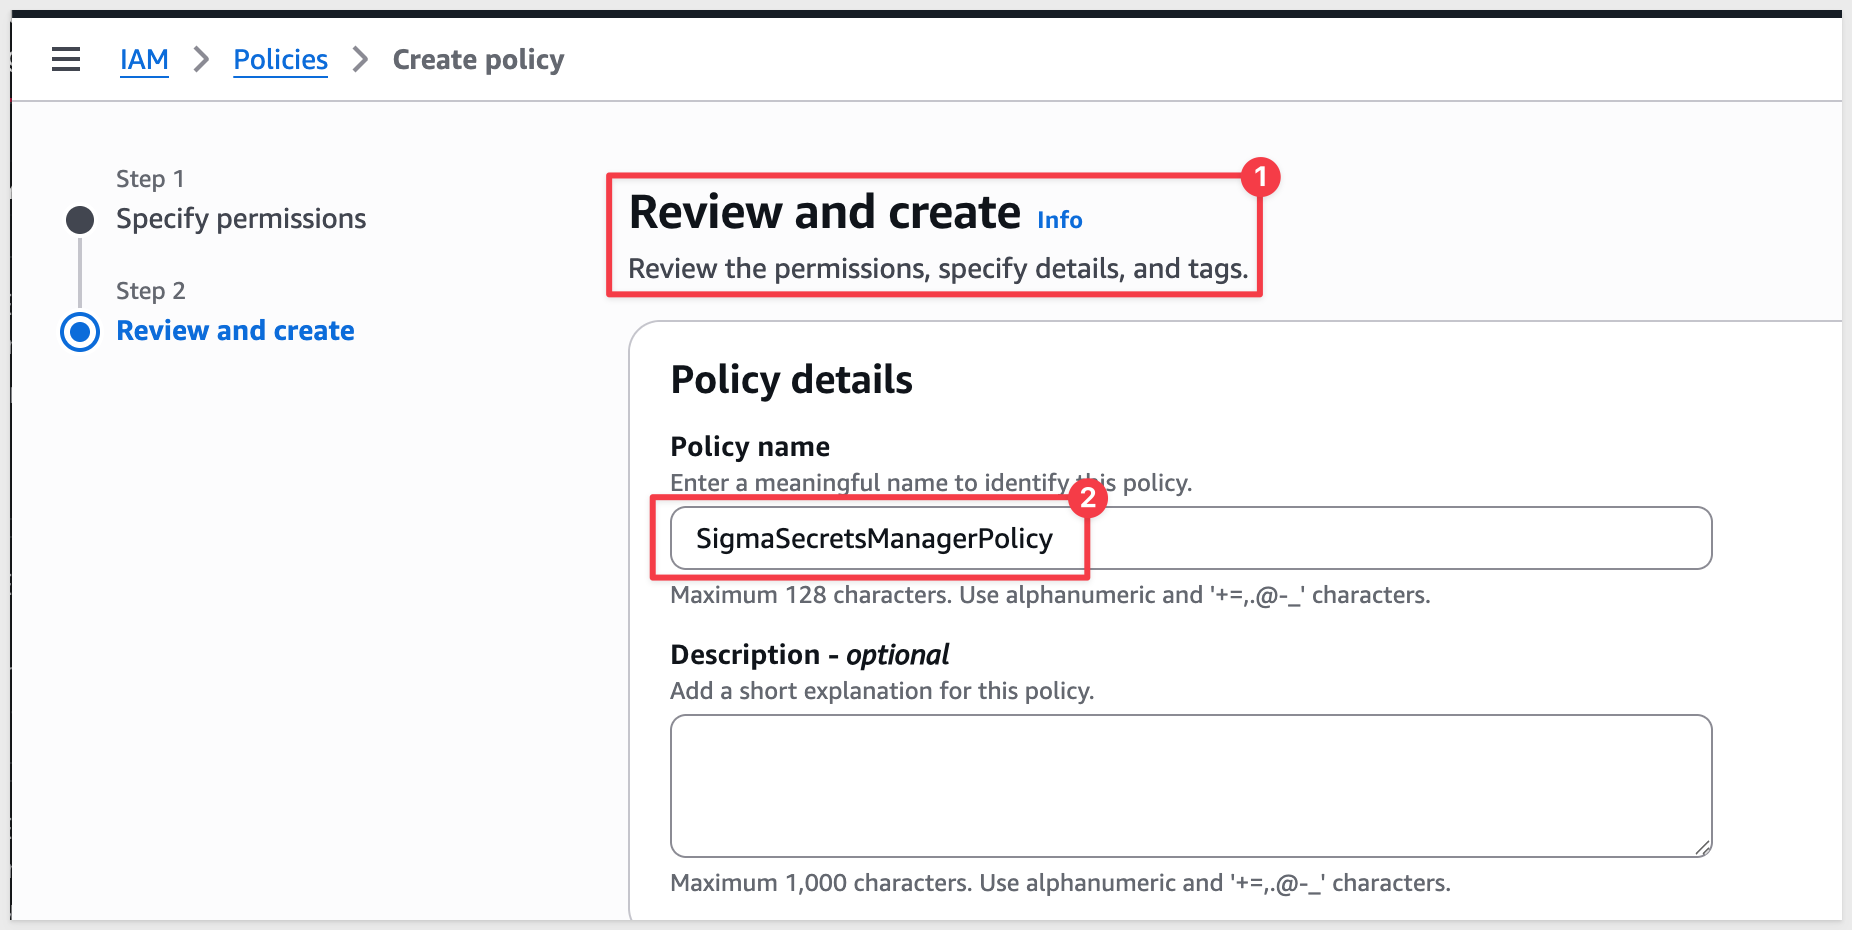
Scroll down and click Next, enter a policy name (for example, SigmaSecretsManagerPolicy), and scroll down to click Create policy:
Create an IAM role in AWS
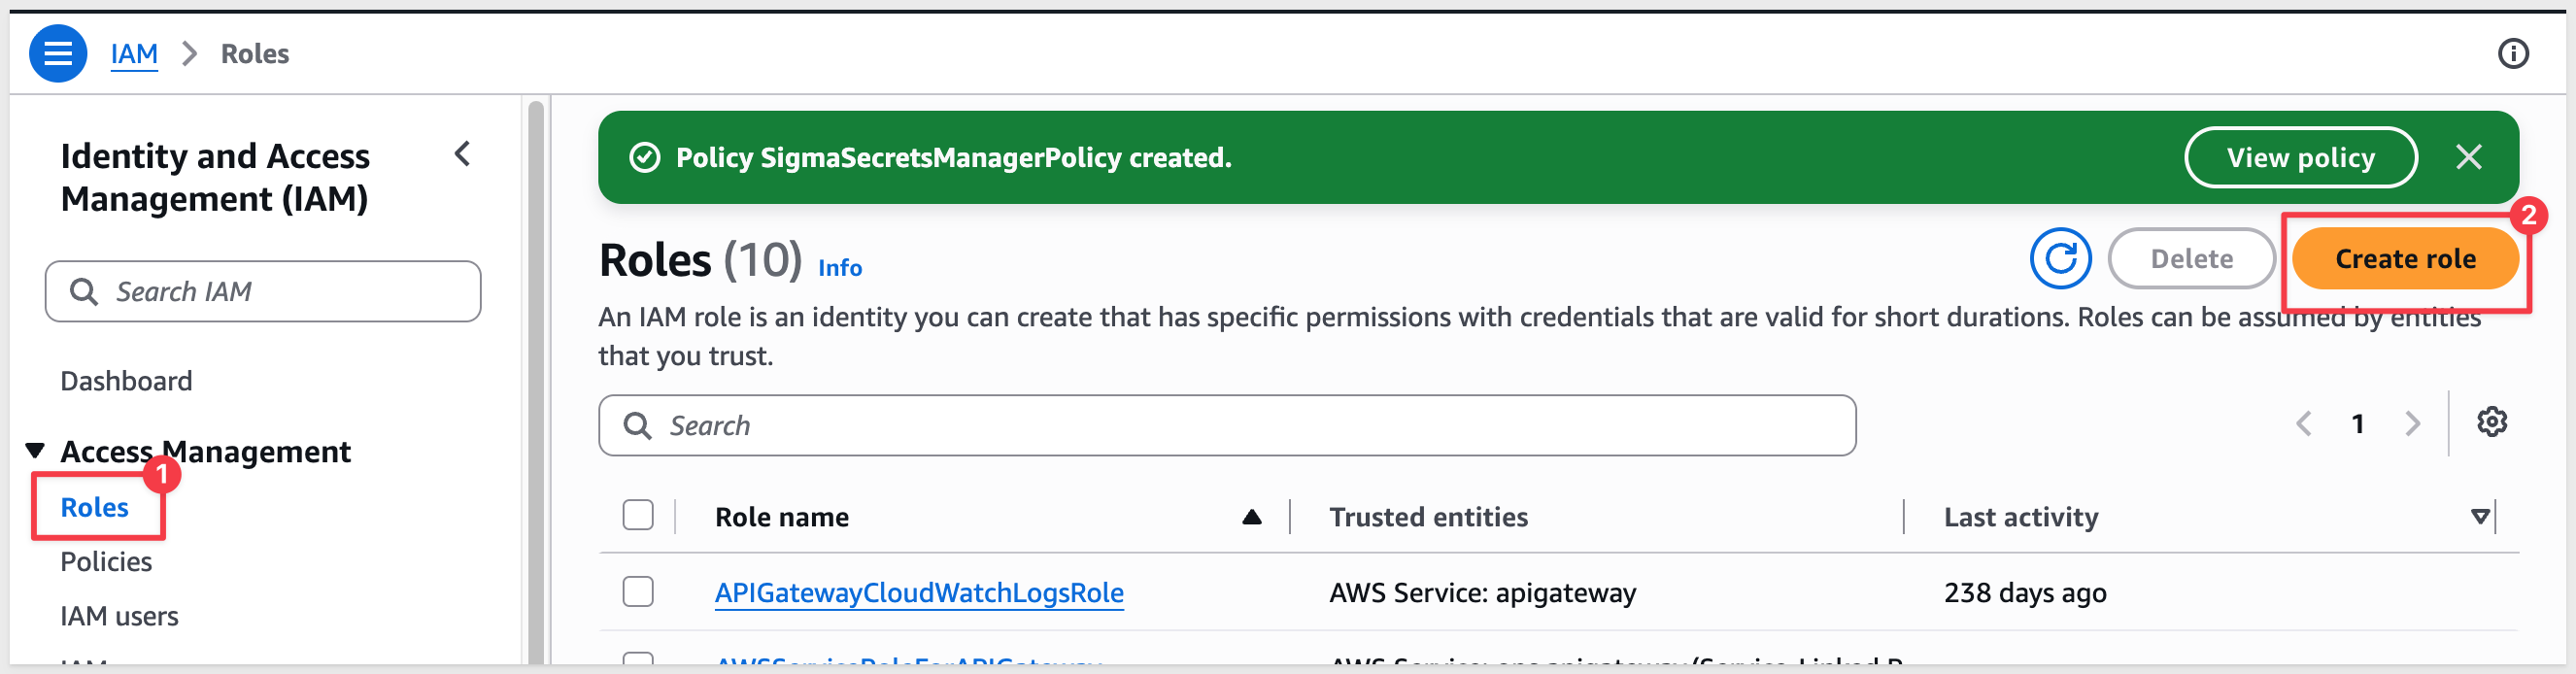
In the IAM console, click Roles, then Create role.
Select AWS account as the trusted entity type, then fill in:
- Account ID: enter your own 12-digit AWS account ID as a temporary placeholder — you'll replace this with Sigma's IAM Principal ARN in a later step
- Select
Require external IDand enter a temporary placeholder value (for example,0000) — you'll replace this with Sigma's generated External ID in a later step - Leave
Require MFAunchecked
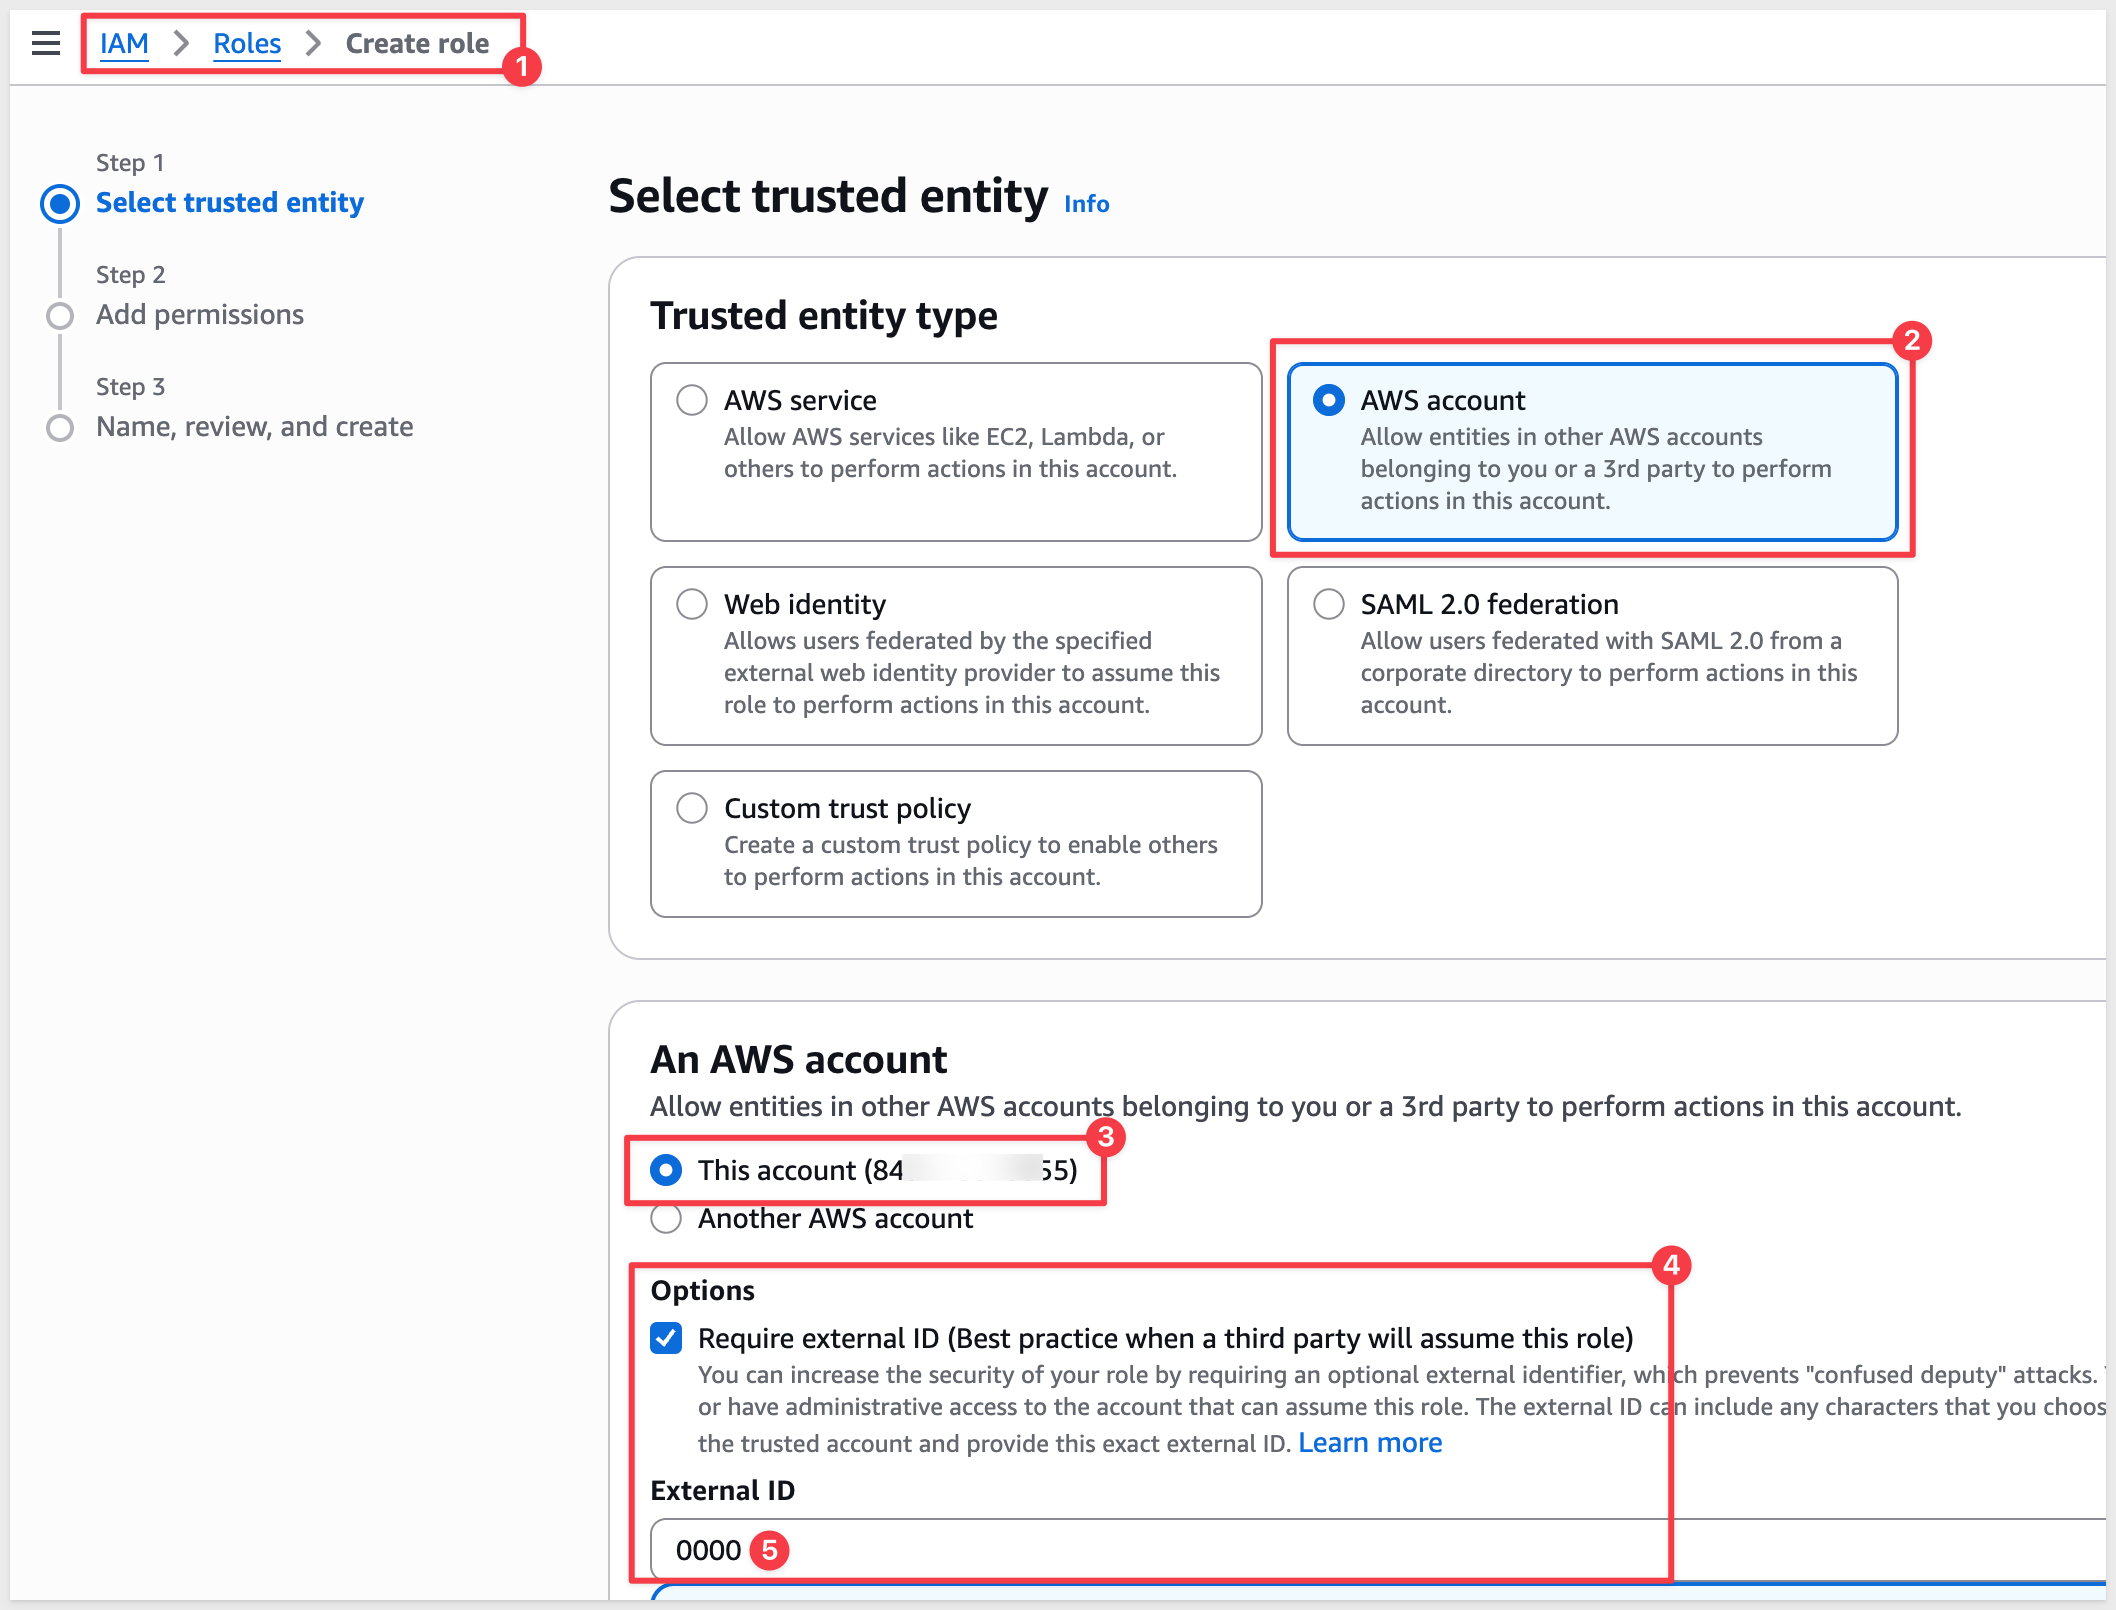
Click Next.
- Select the policy you created above (
SigmaSecretsManagerPolicy), clickNextagain.
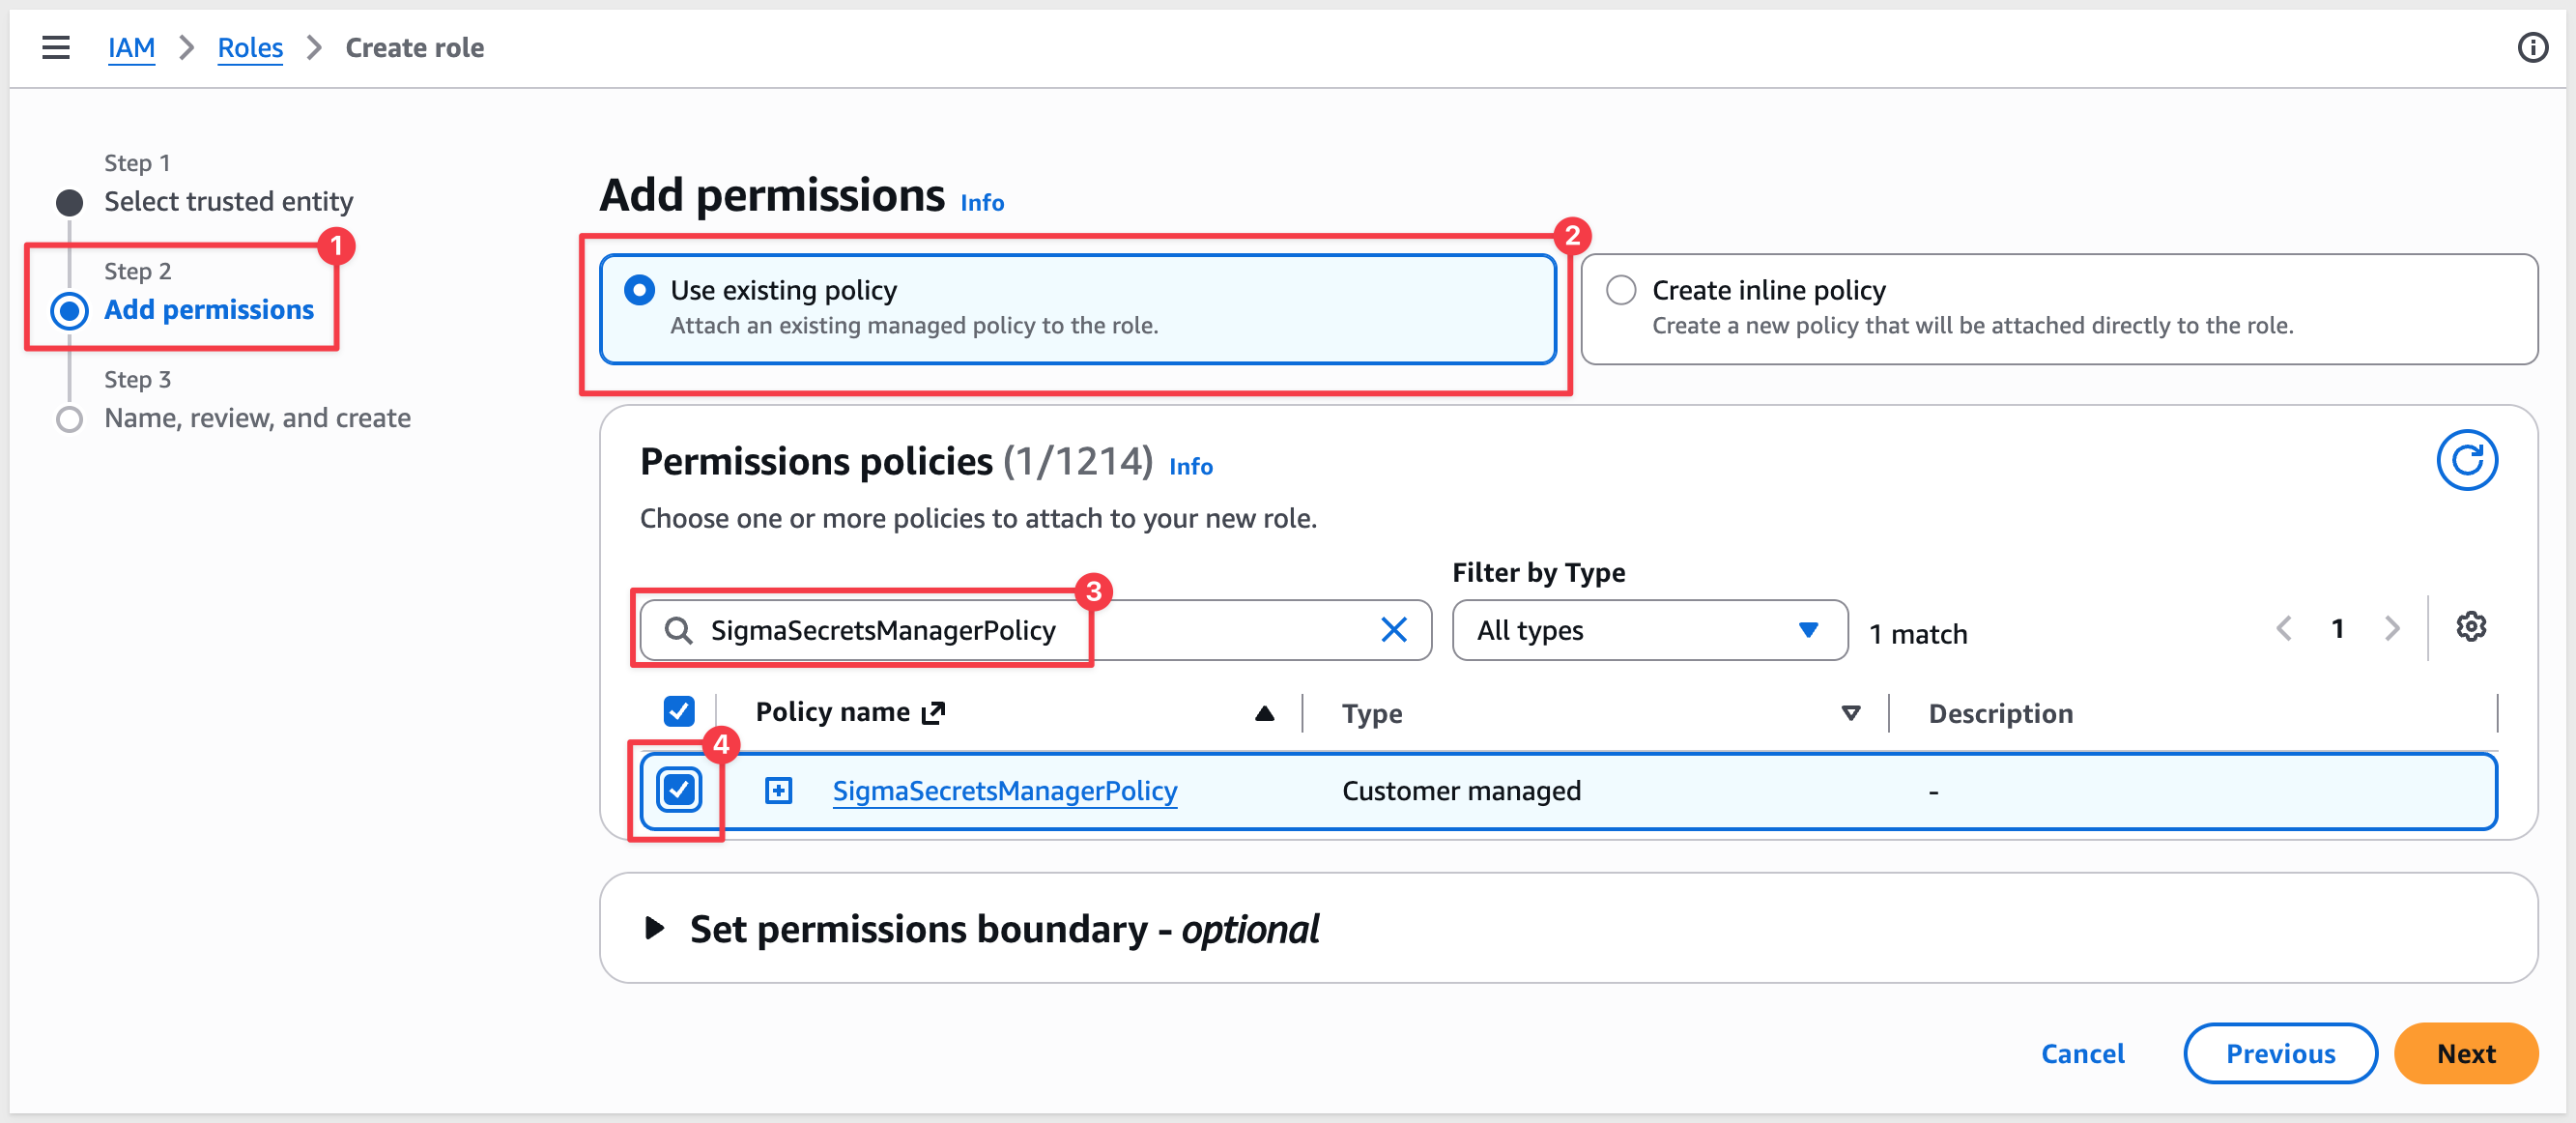
- Enter a role name (for example,
SigmaSecretsManagerRole), and scroll down to clickCreate role.
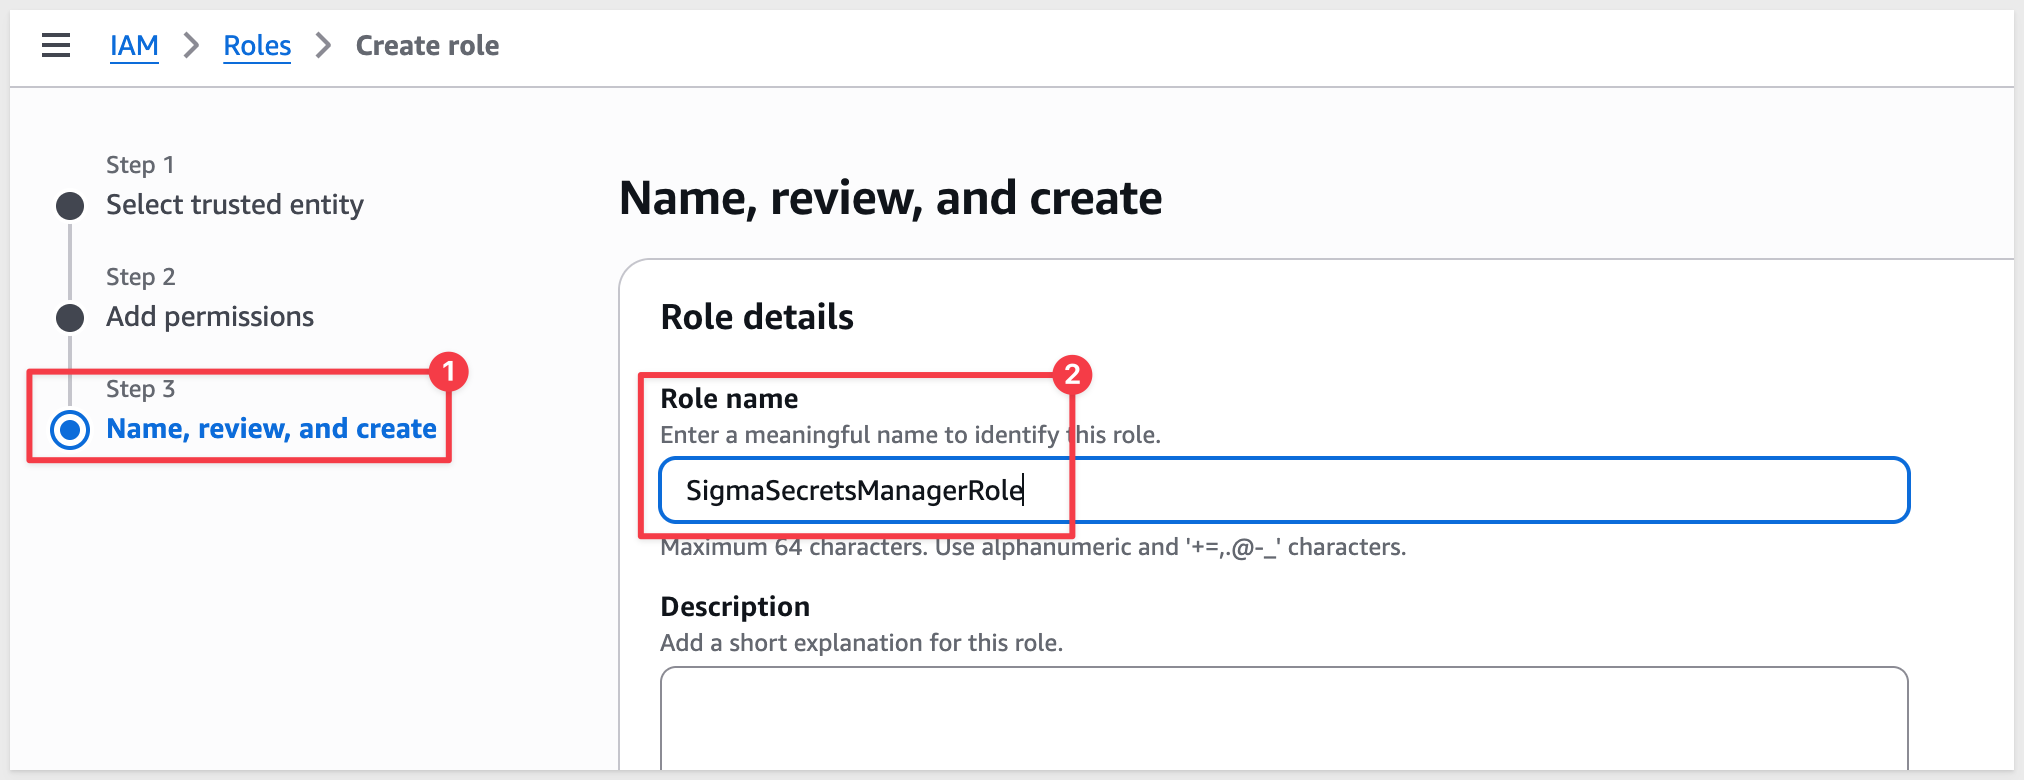
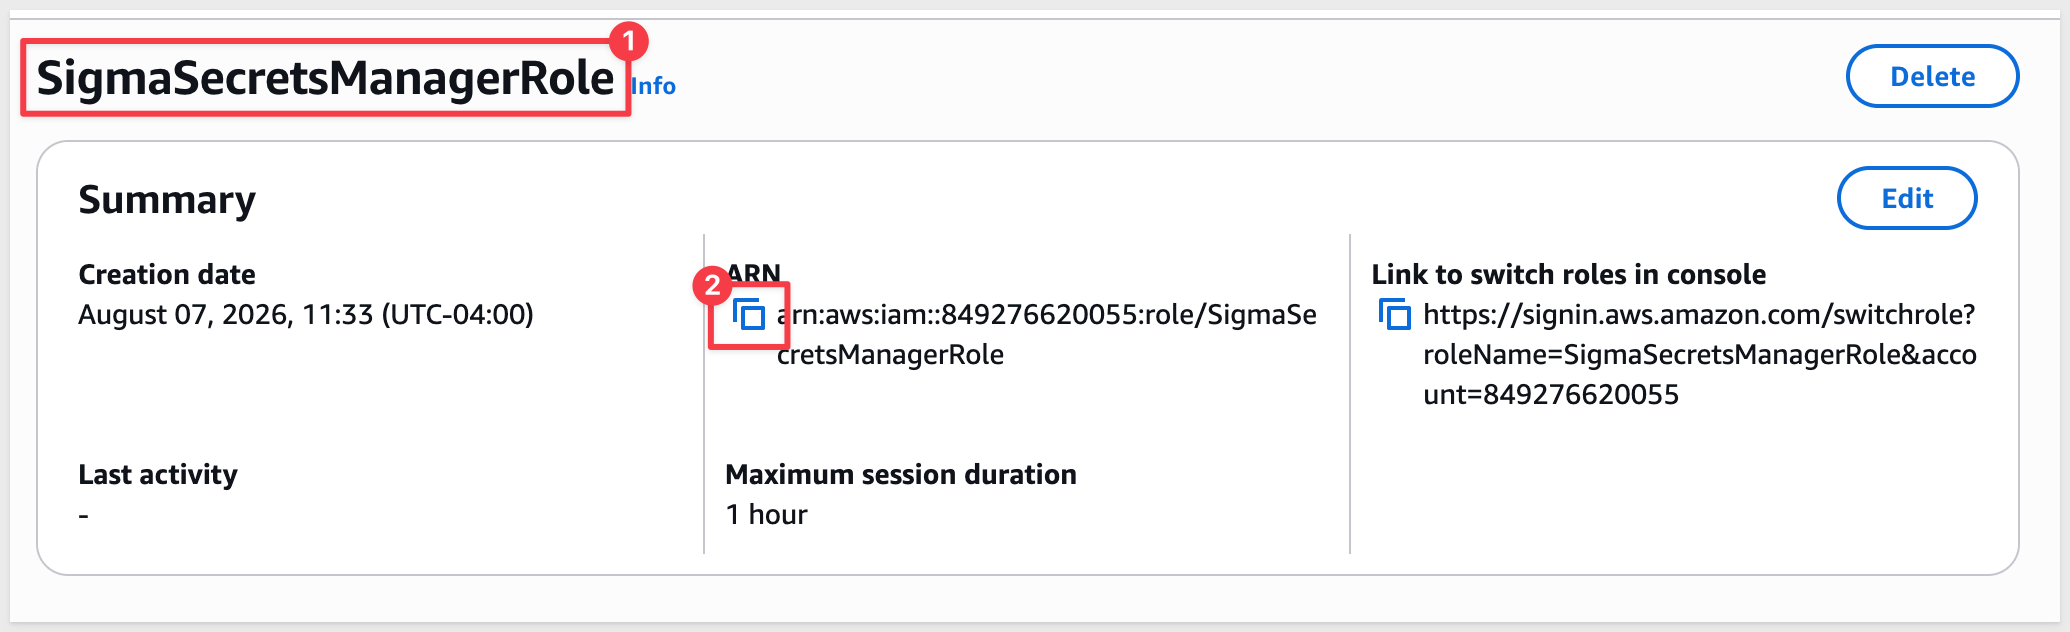
- Open the new role.
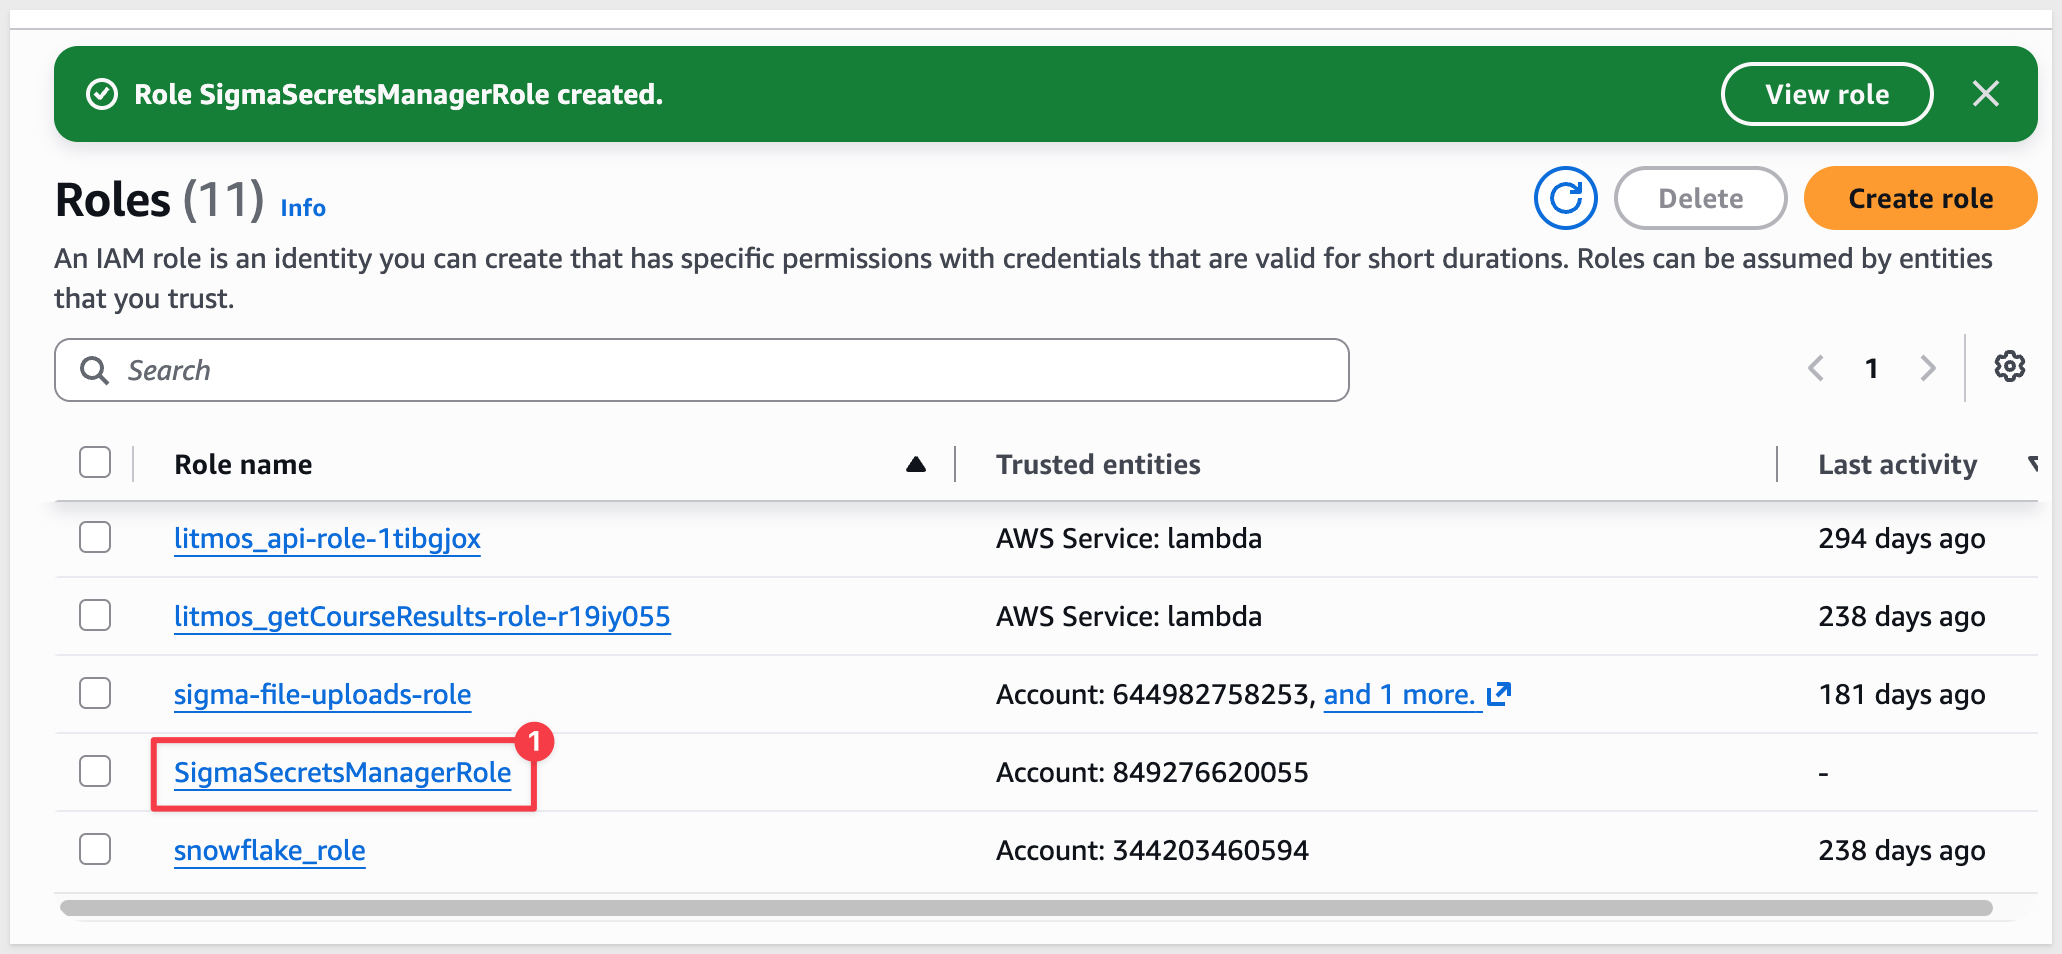
- Copy its Role ARN — you'll need it in the next step.
Register the integration in Sigma
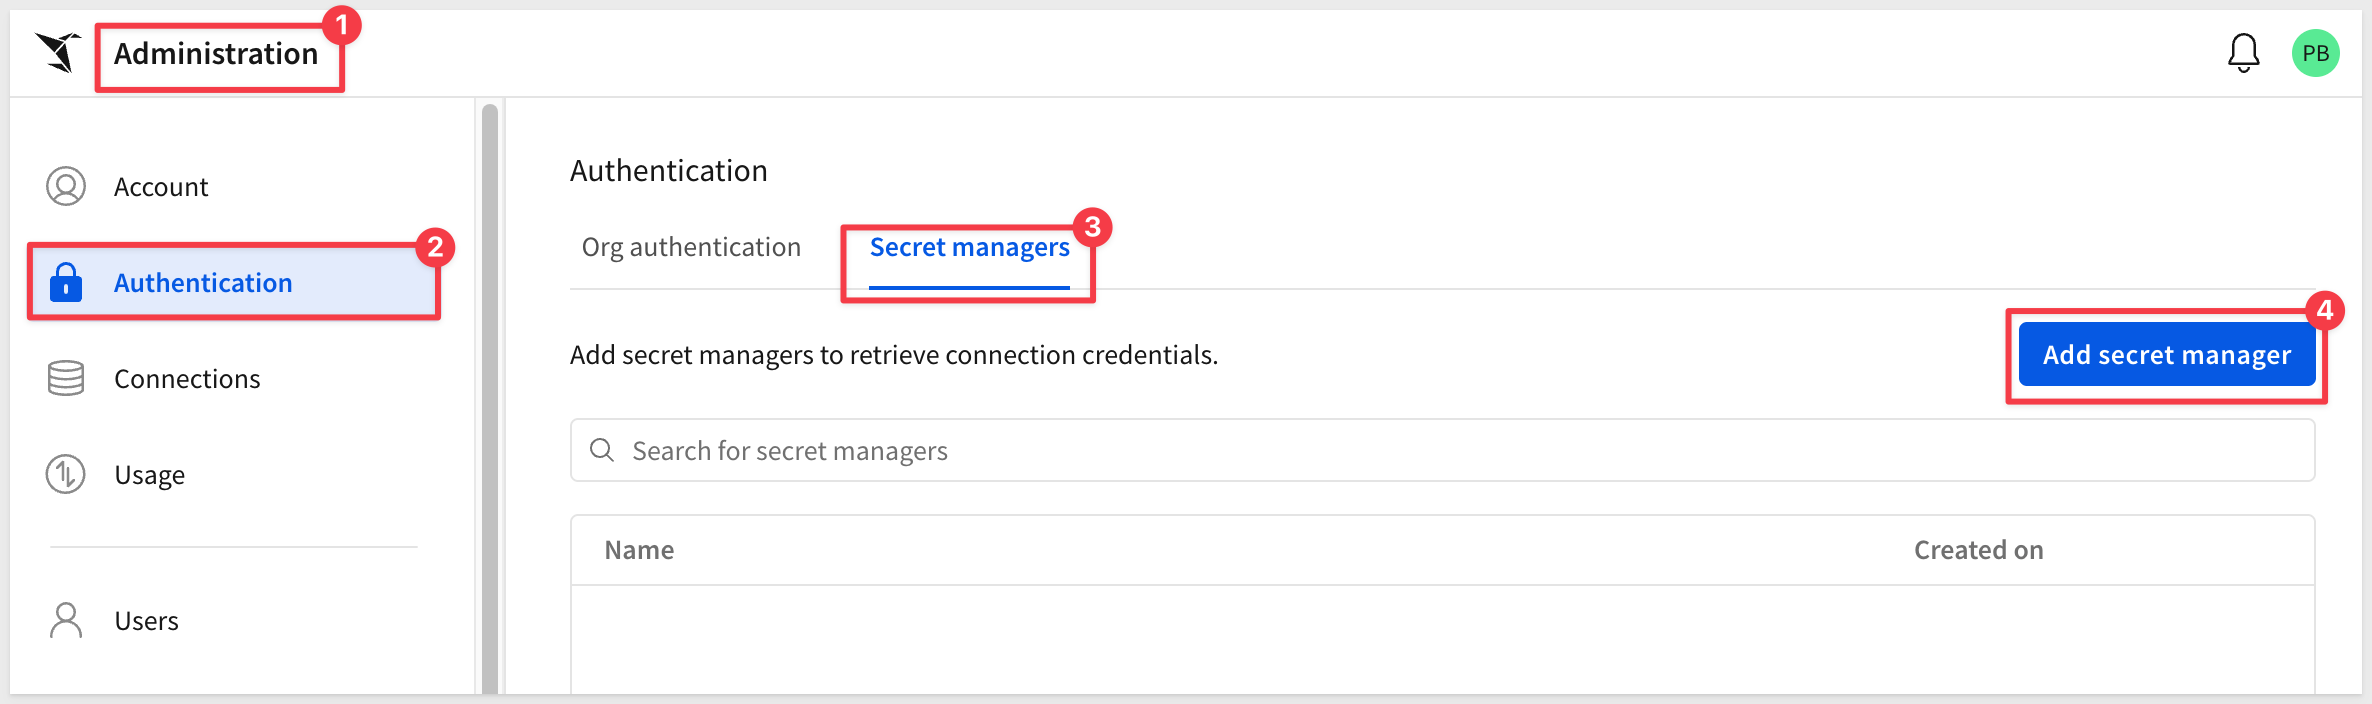
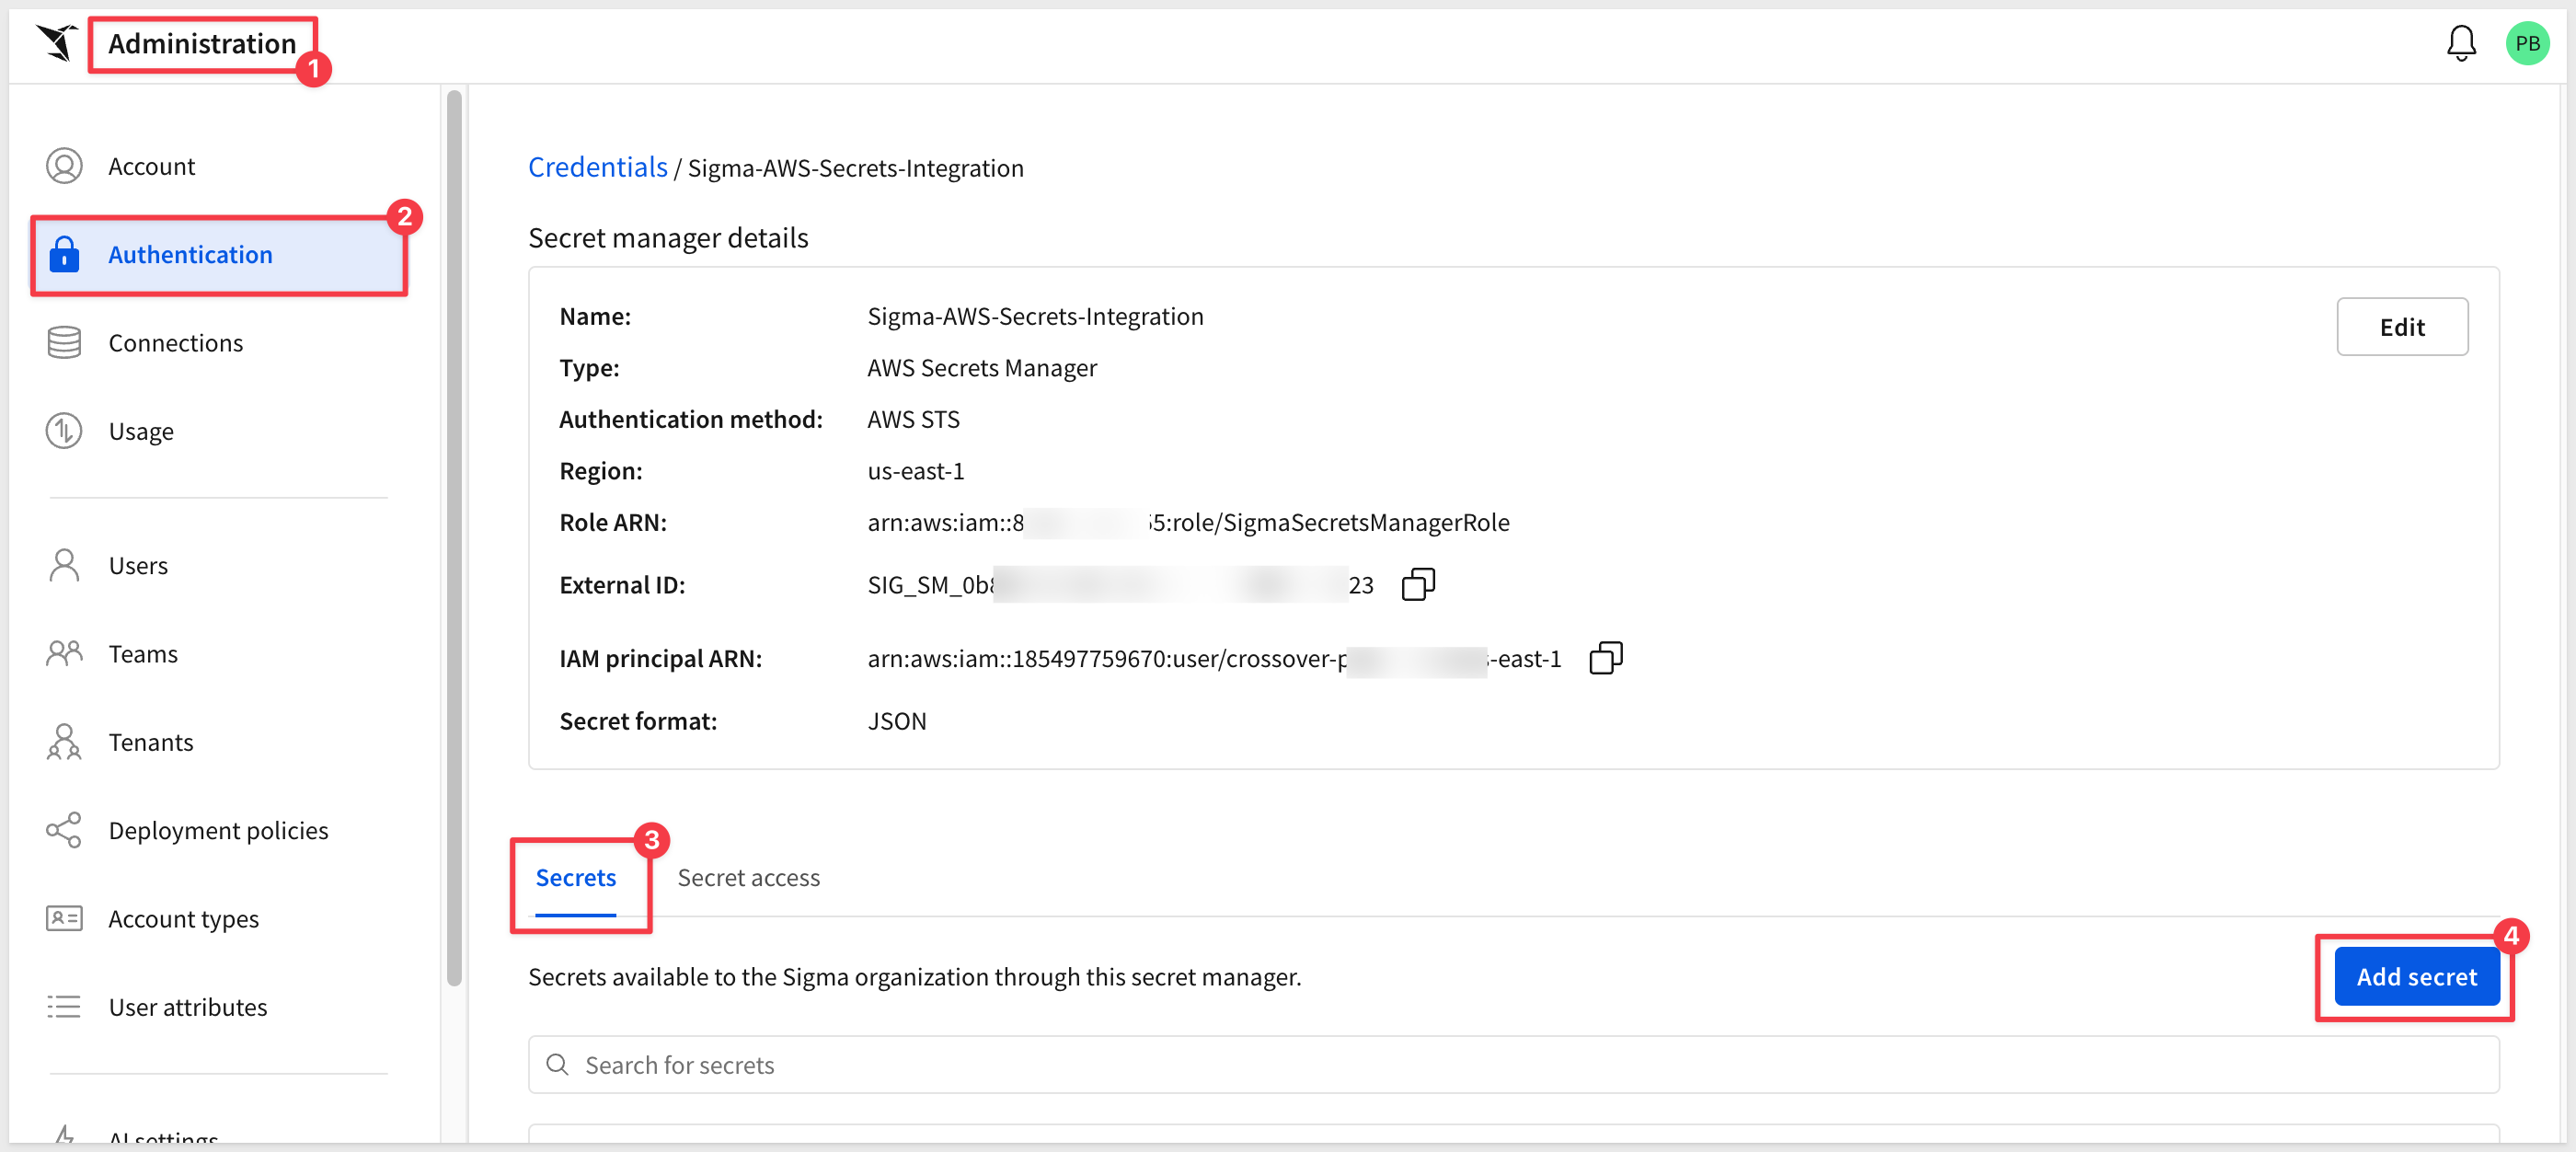
In Sigma, navigate to Administration > Authentication > Secret Manager, then click Add secret manager:
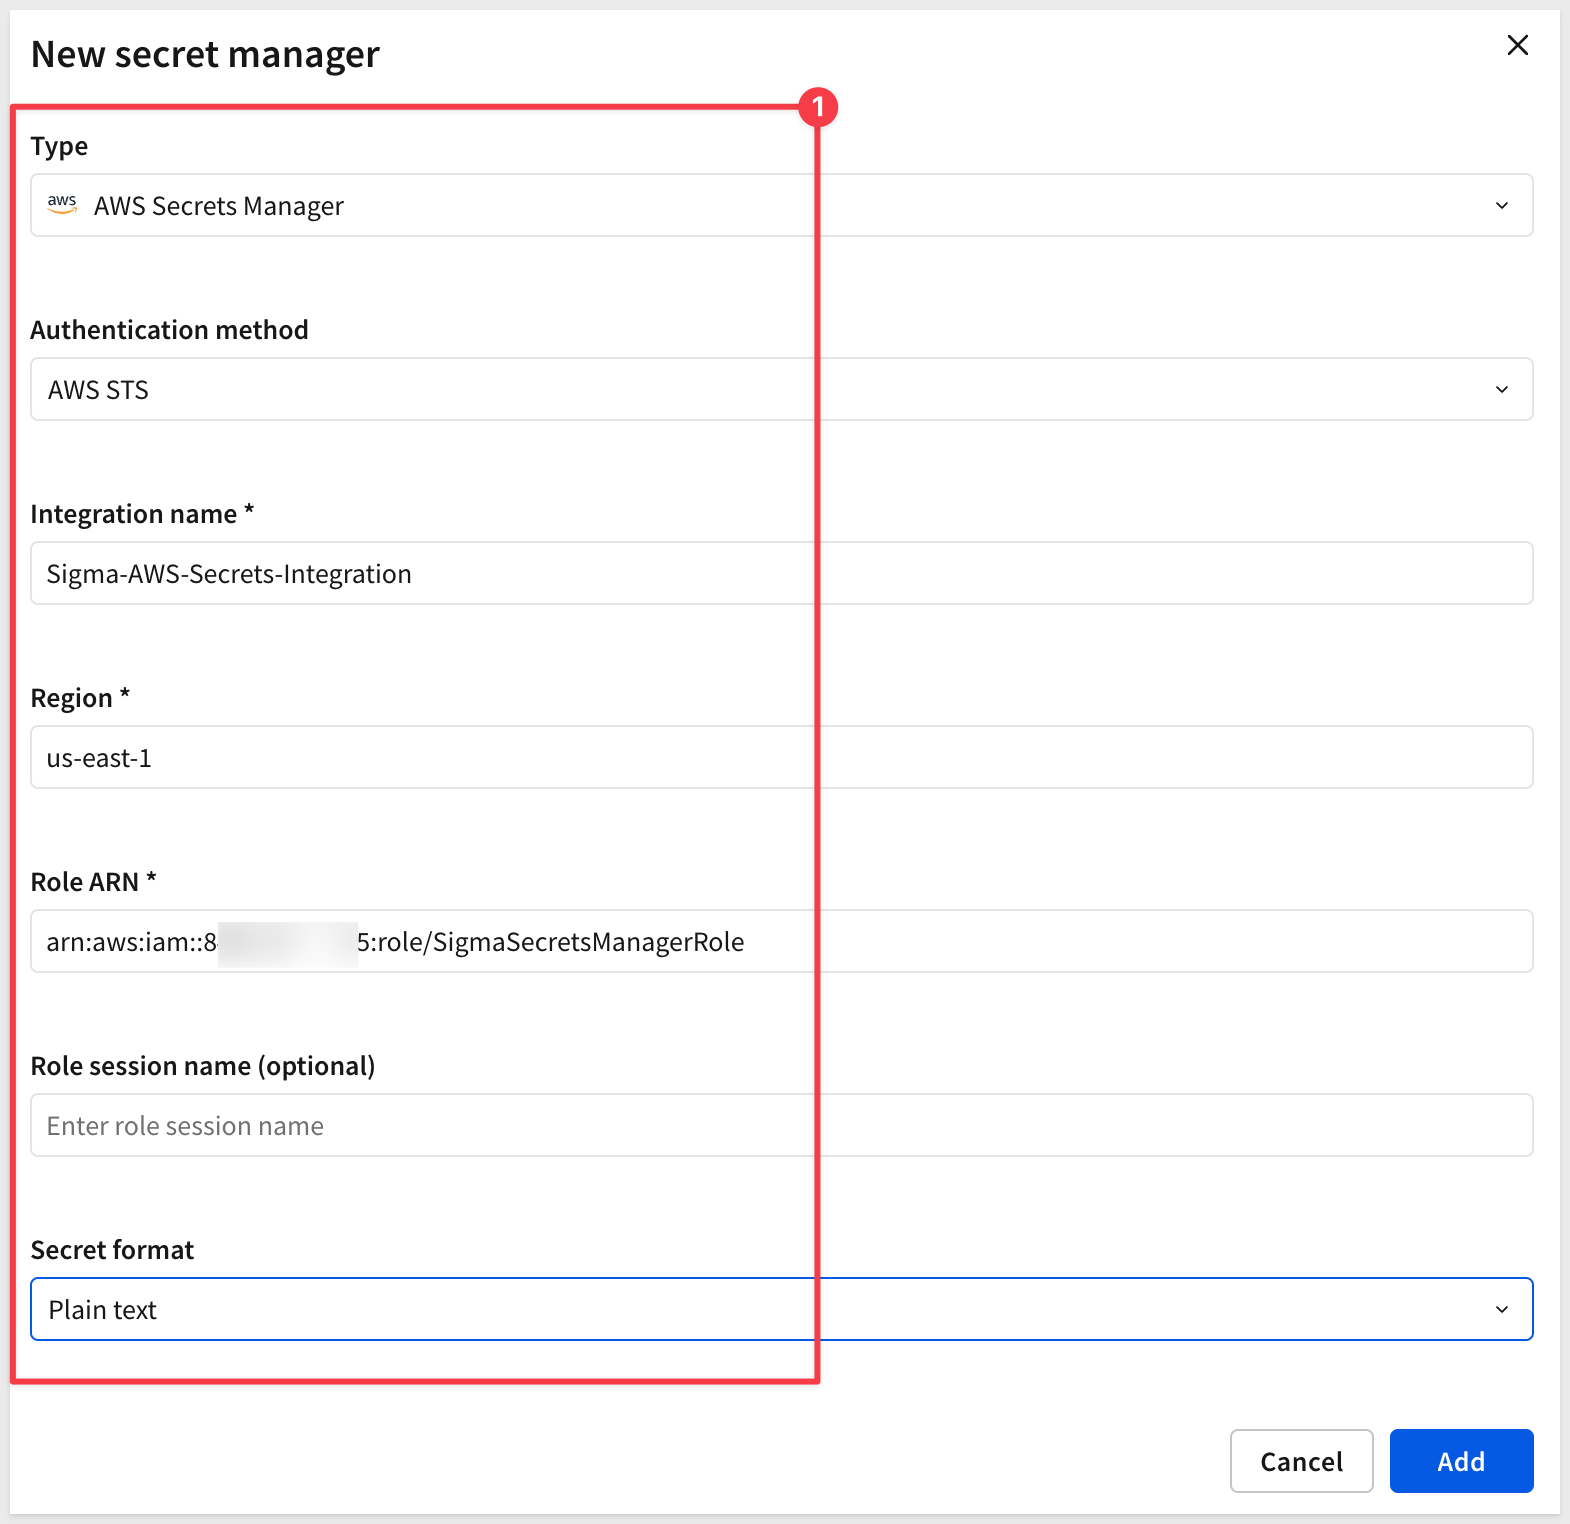
Select AWS Secrets Manager as the type and select AWS STS as the authentication method, then fill in:
- Integration name: a descriptive name for this integration (
Sigma-AWS-Secrets-Integration) - Region: the AWS Region where your secrets reside (for example,
us-east-1) - Role ARN: the Role ARN you copied from AWS
- Role session name (optional): a custom session identifier for tracking requests in AWS CloudTrail
- Secret format: select
Plain text
The default format for secrets is JSON with Plain text, Base64, or Base64-encoded JSON as options. Pick based on the shape of what you're storing: JSON fits structured credentials with multiple related fields — AWS Secrets Manager's built-in templates (for example, "Credentials for RDS database") store username and password as JSON key-value pairs by default, and JSON lets you reference a specific field with a Key path. Plain text fits a single atomic value — a password, an API key, or a multi-line value like a private key or certificate, where forcing it into a JSON string risks losing line breaks (see the Snowflake key pair example later in this guide):
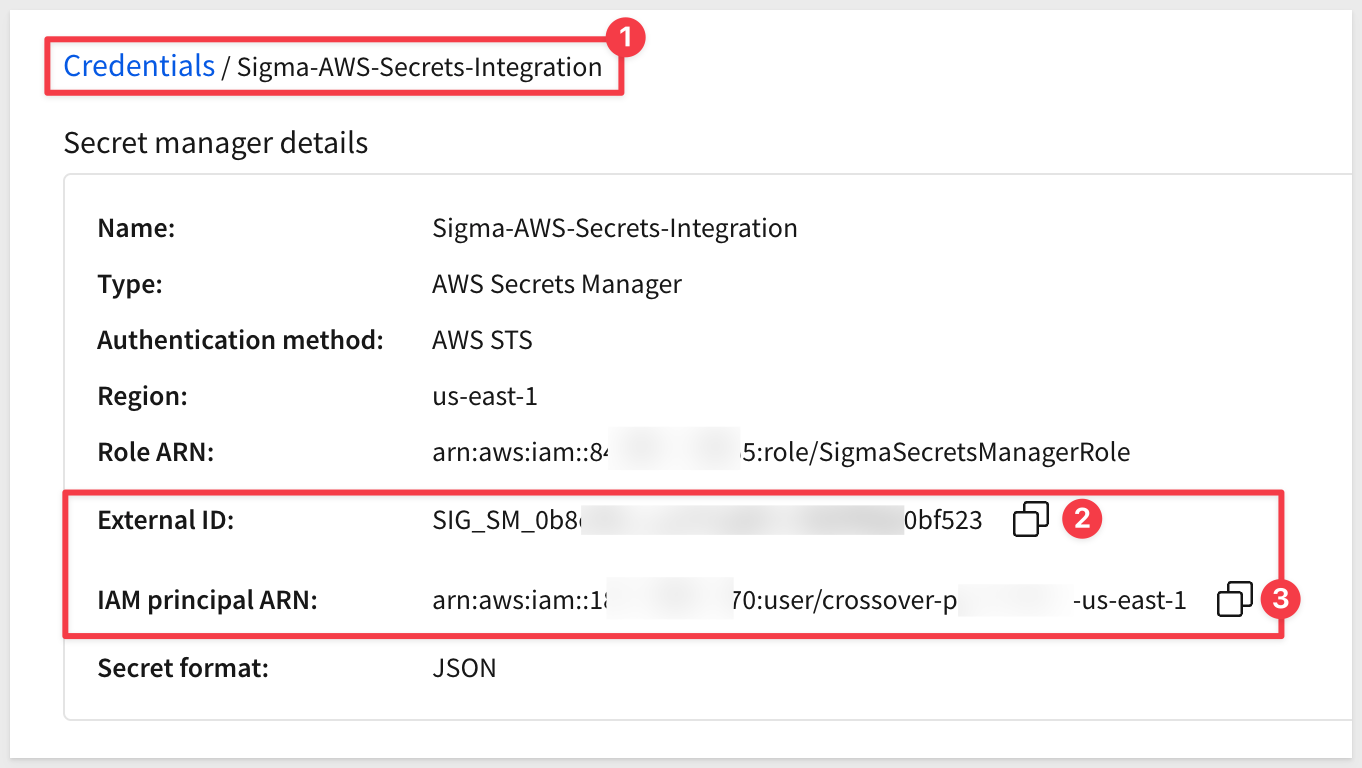
Click Add, then open the new integration from the list and record the generated IAM Principal ARN and External ID.
Complete the trust handshake in AWS
Return to the AWS IAM console and select the role you created (SigmaSecretsManagerRole). Open the Trust relationships tab, click Edit trust policy:
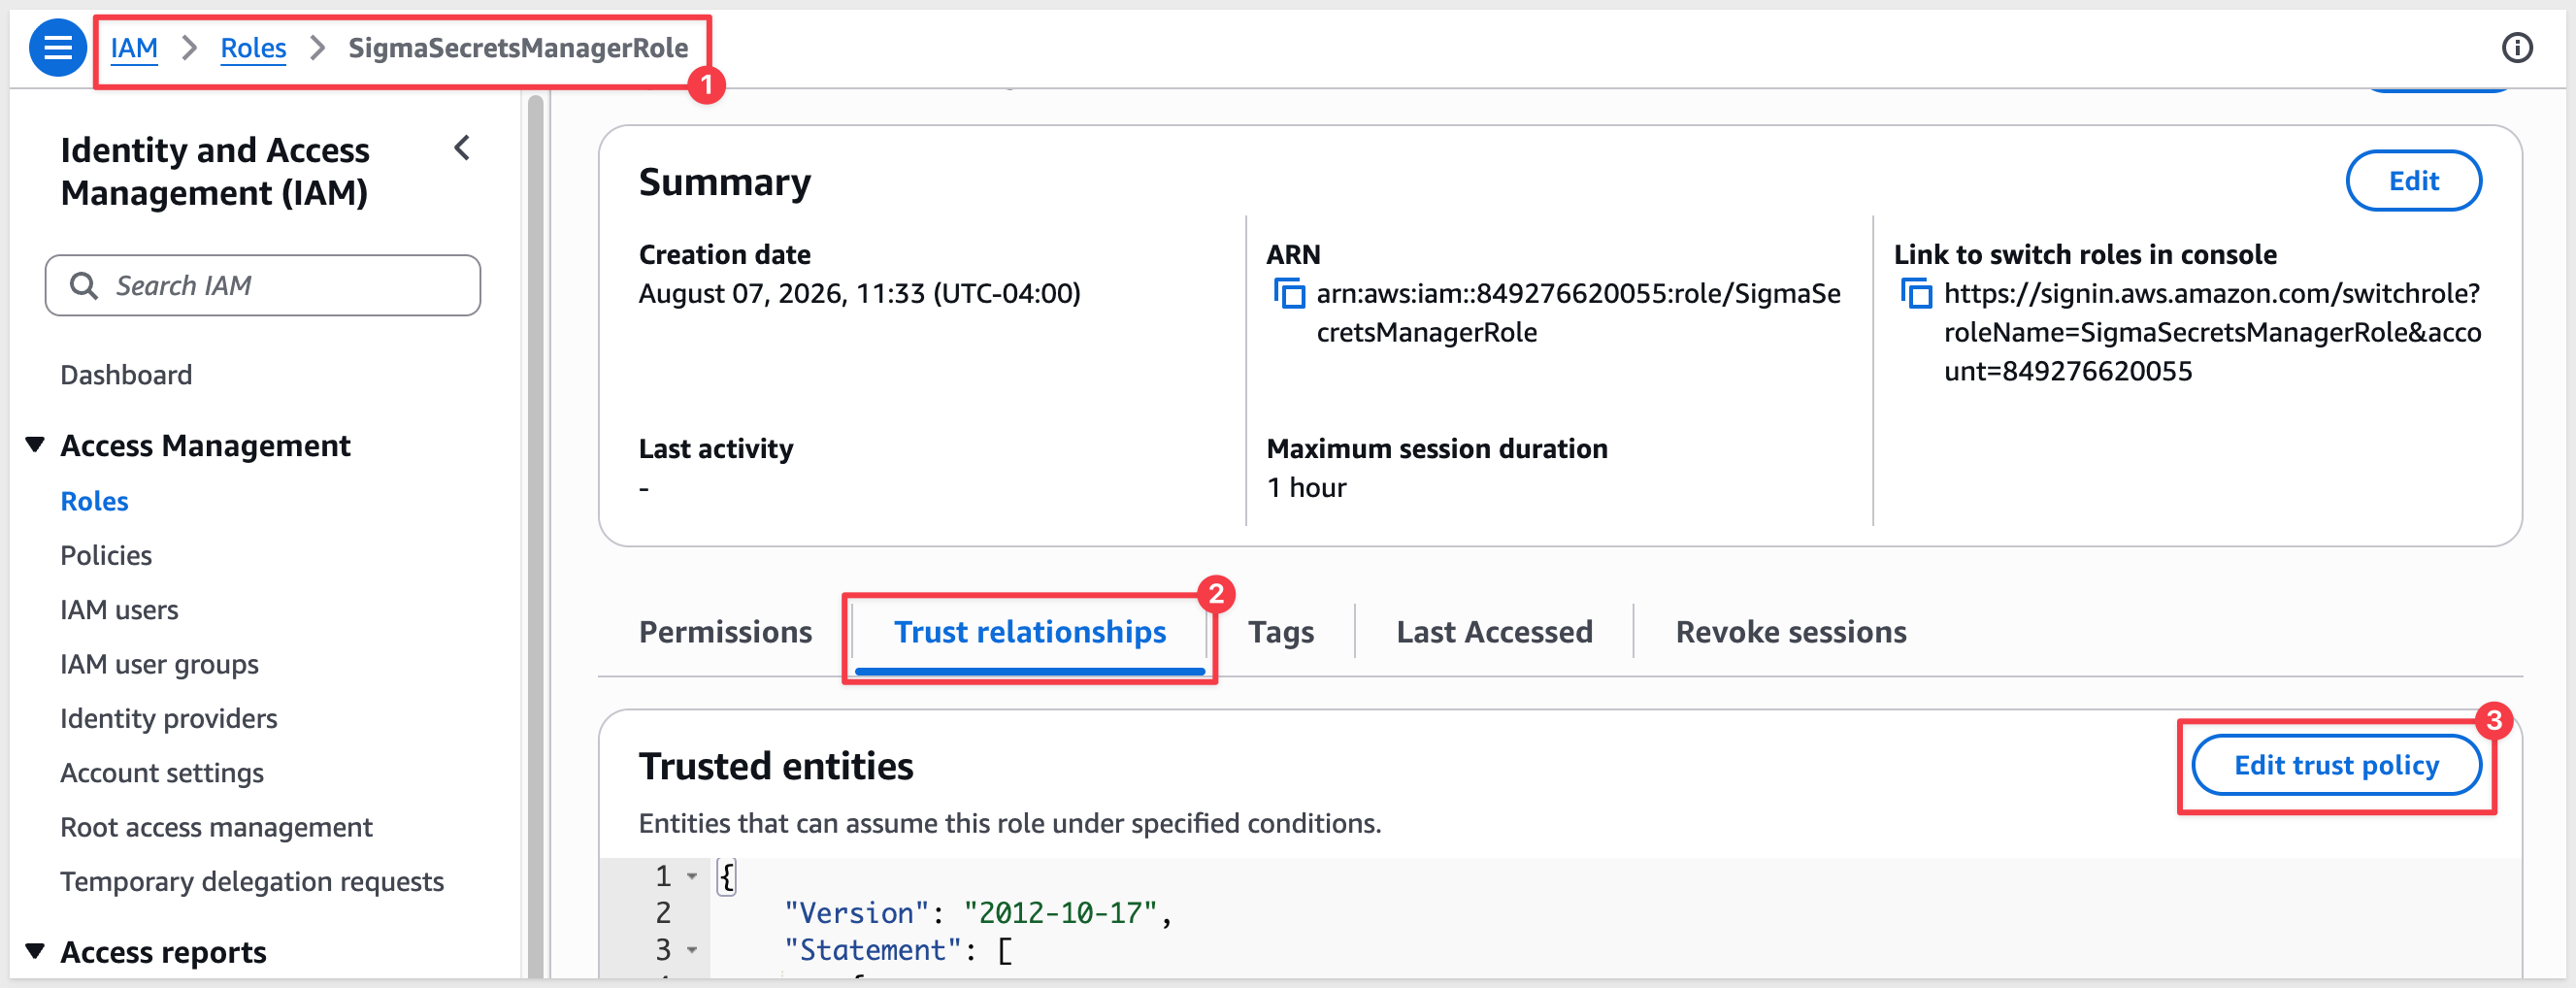
Replace the placeholder values with the IAM Principal ARN and External ID Sigma generated:
{
  "Version": "2012-10-17",
  "Statement": [
    {
      "Effect": "Allow",
      "Principal": {
        "AWS": "{iam-principal-arn-from-sigma}"
      },
      "Action": "sts:AssumeRole",
      "Condition": {
        "StringEquals": {
          "sts:ExternalId": "{external-id-from-sigma}"
        }
      }
    }
  ]
}
Click Update policy. Sigma can now assume the role and read secrets from this AWS account.
With the trust handshake complete, create your two secrets in AWS Secrets Manager, then reference them in Sigma. Sigma only stores a reference to each one — the values themselves stay in AWS Secrets Manager, never in Sigma.
Create secrets in AWS Secrets Manager
A Snowflake key pair connection needs two separate credential pieces — the private key and its passphrase — so you'll create two secrets, one per value. Each gets attached to a different field on the connection later in this guide.
Private key secret:
Open the AWS Secrets Manager console, click Store a new secret:
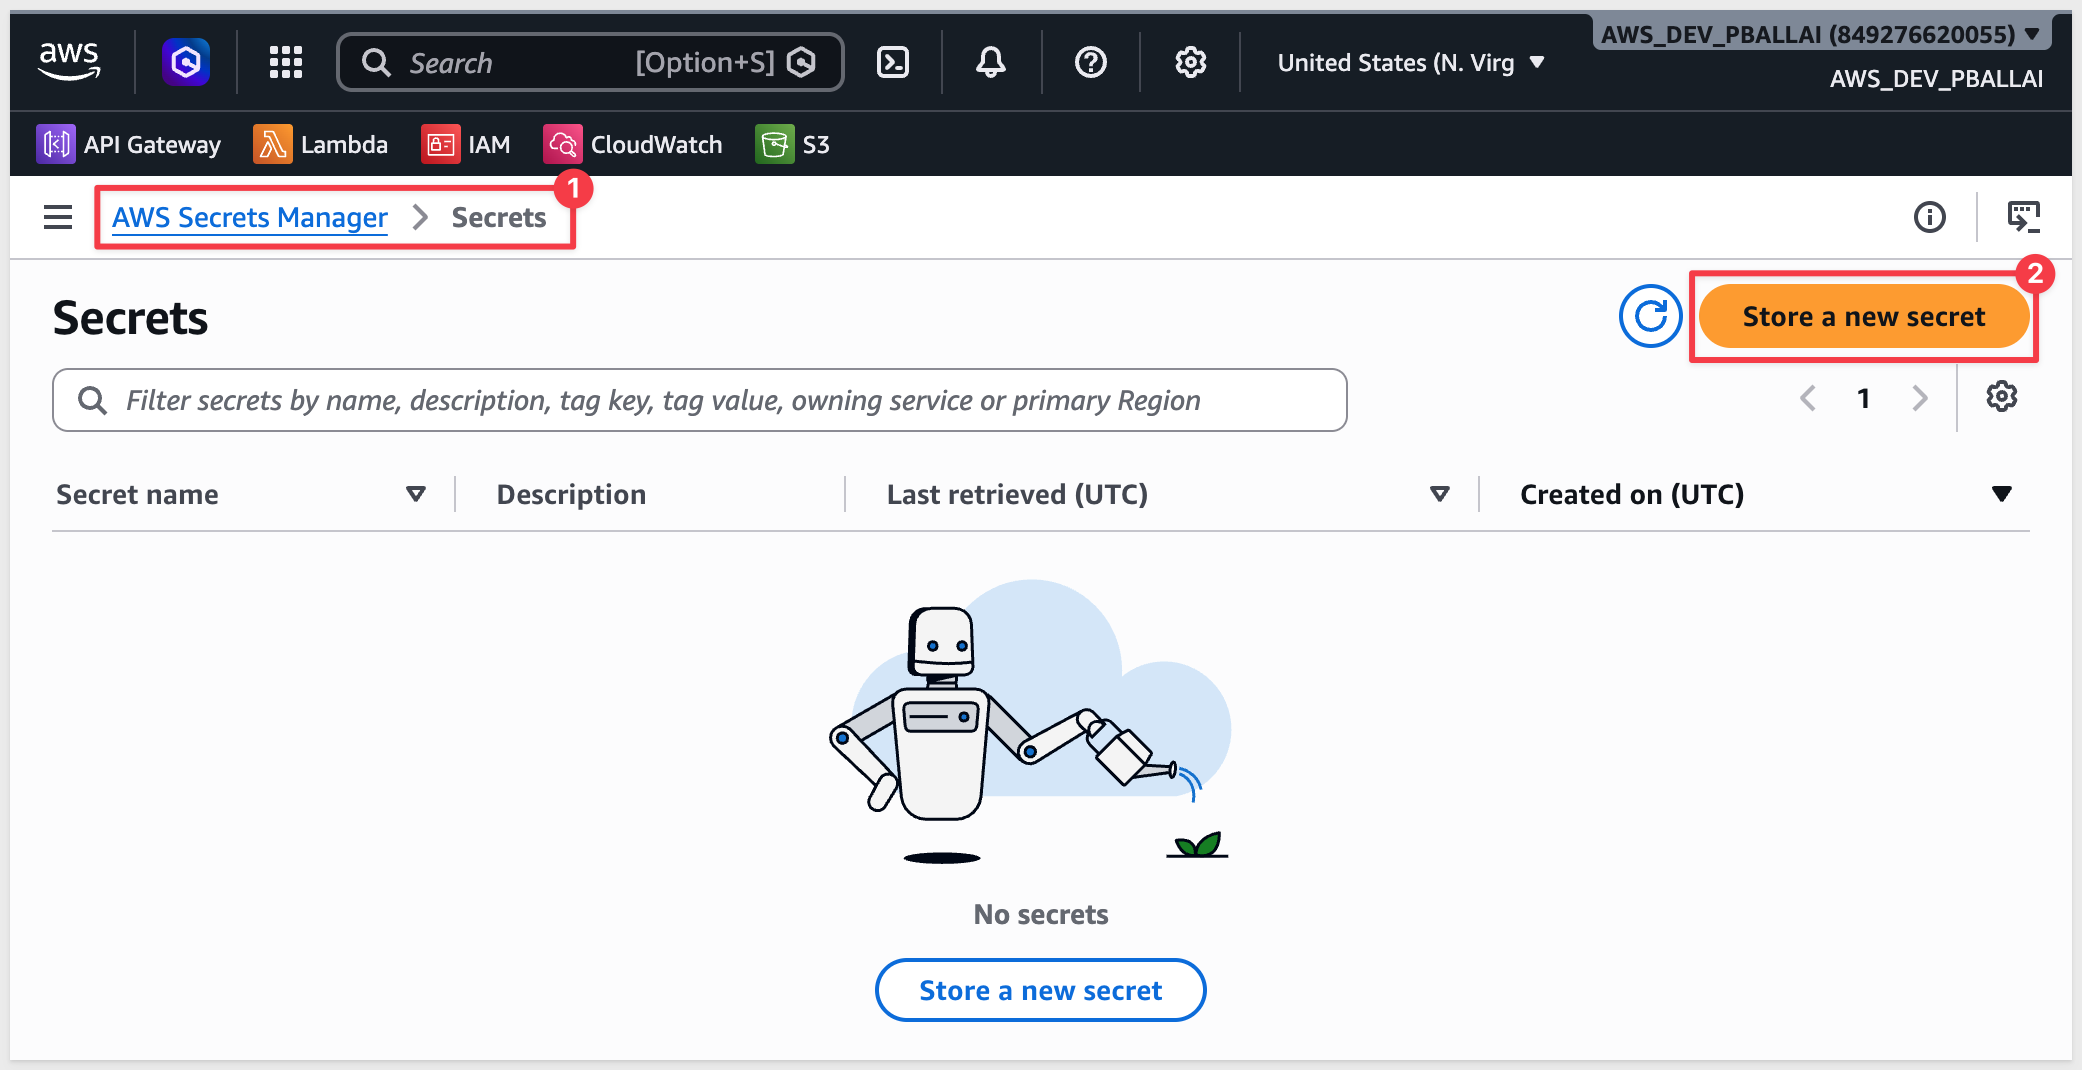
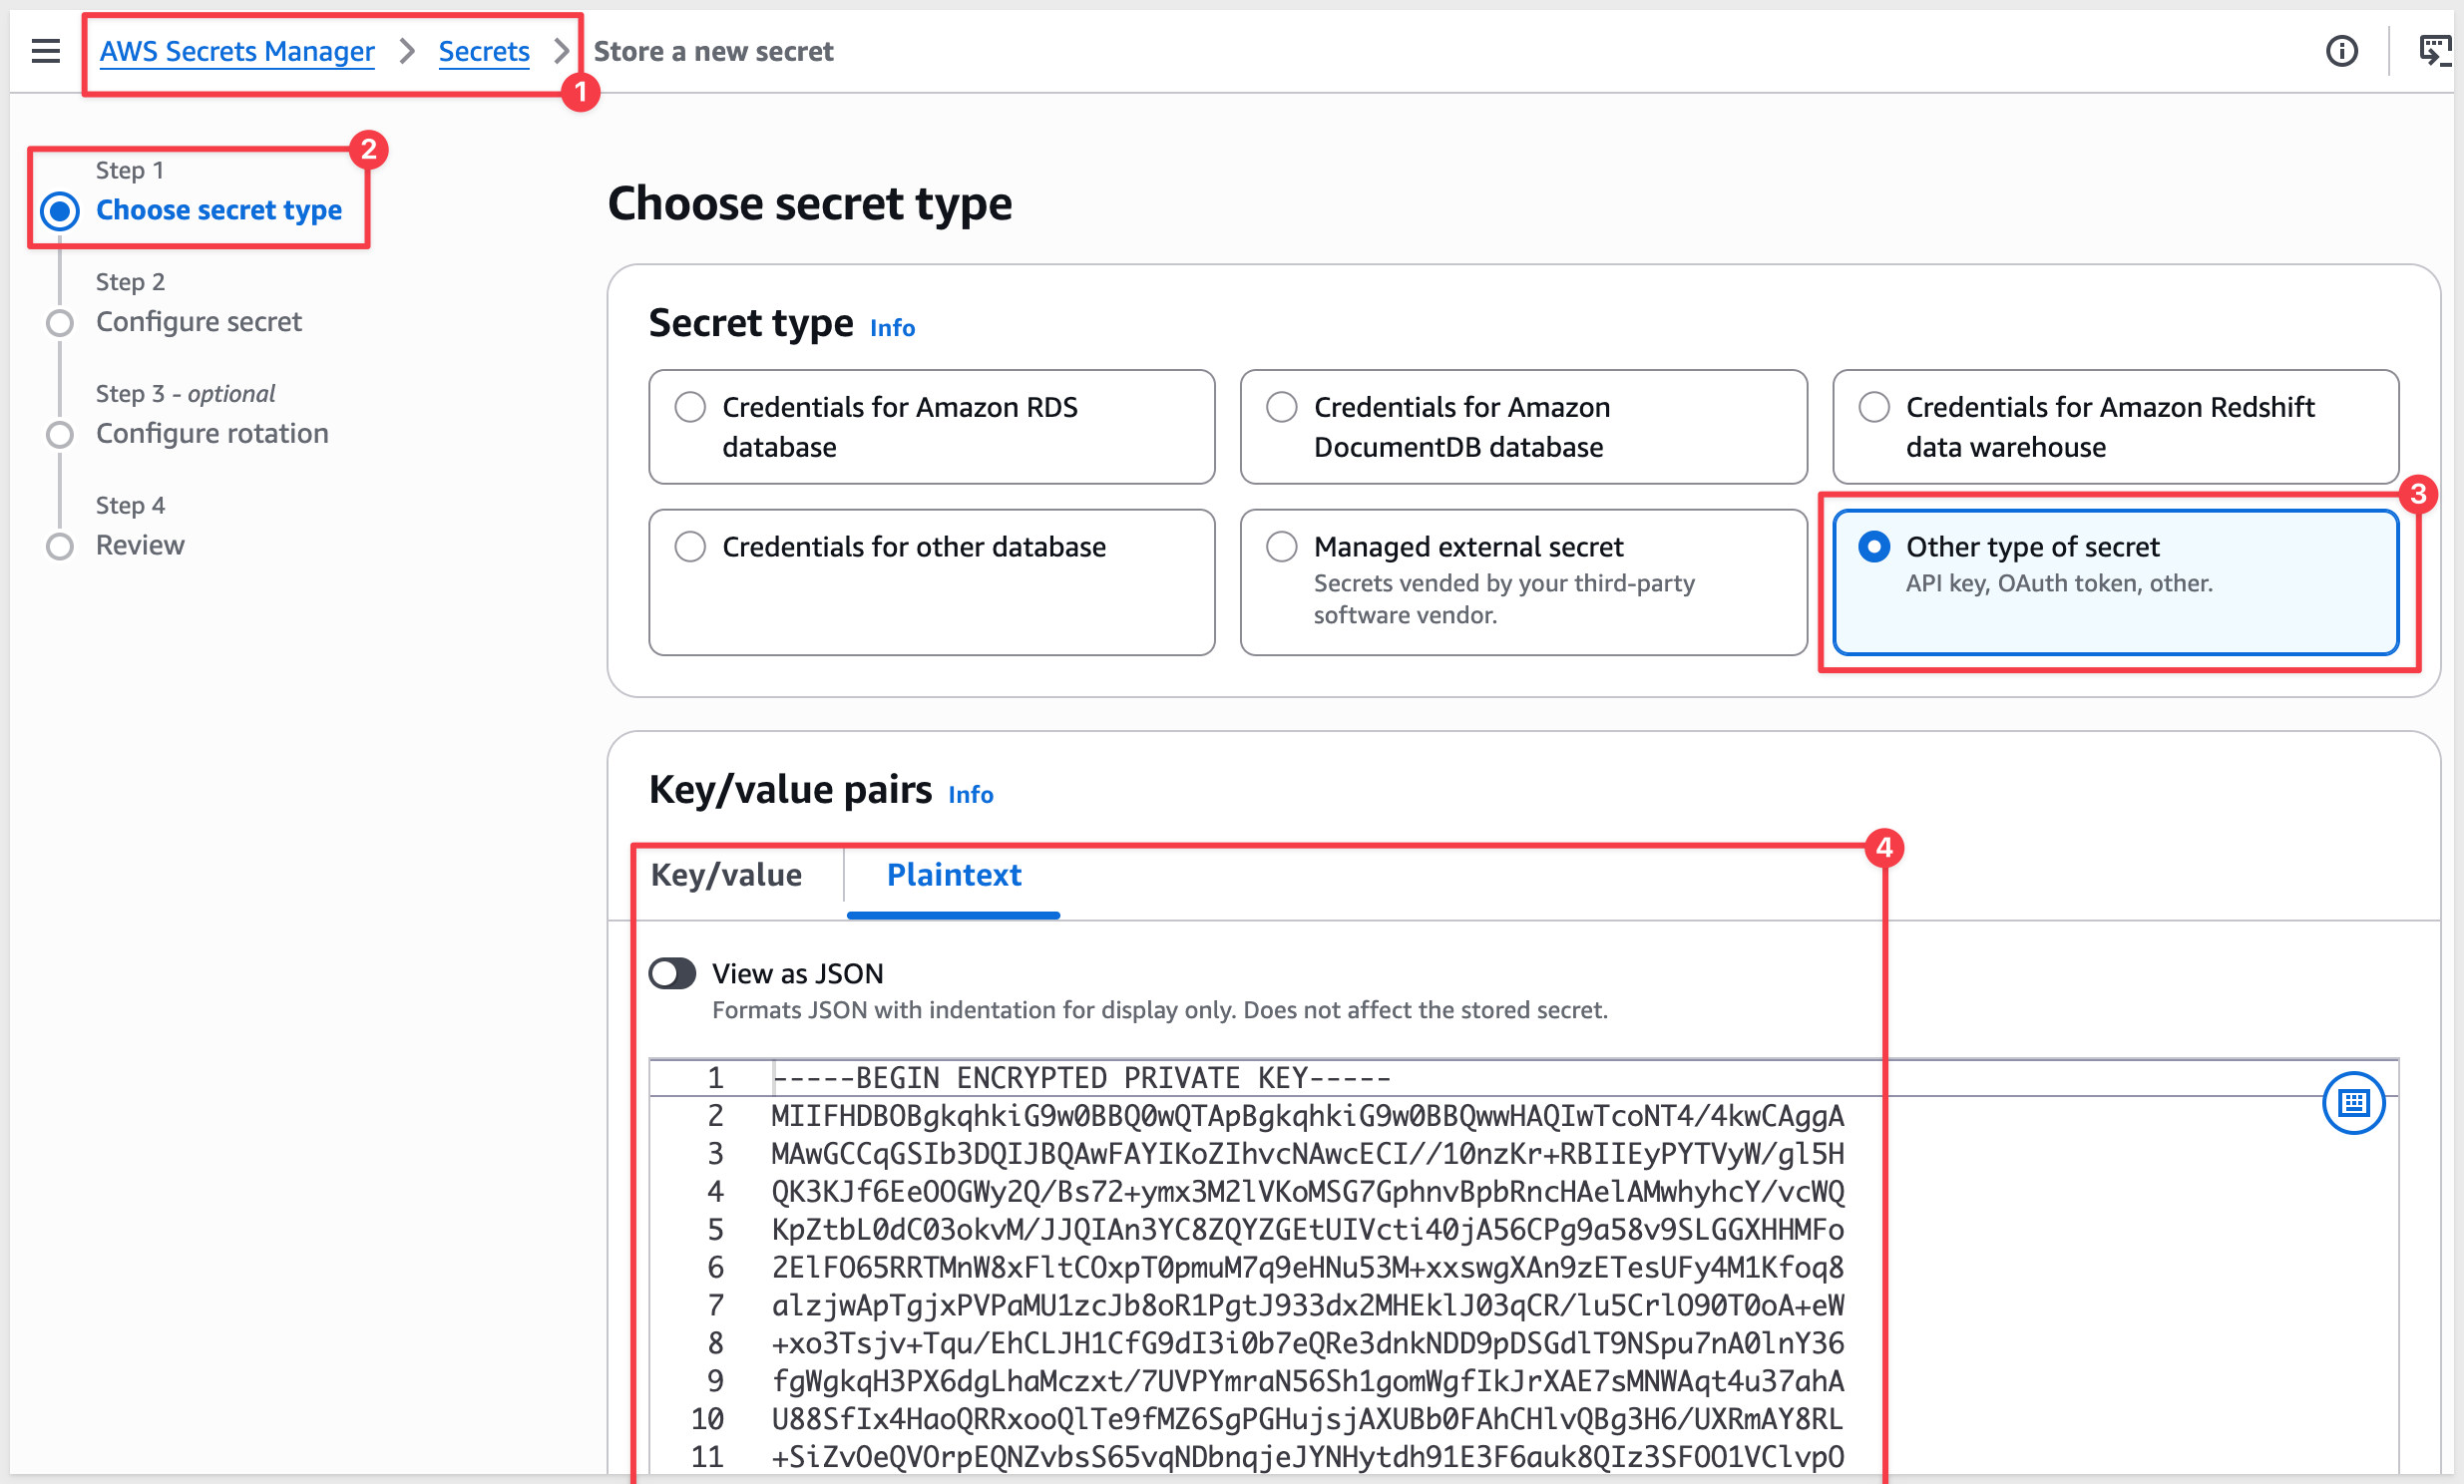
Select Other type of secret, then click the Plaintext tab.
Paste your full encrypted private key — including the -----BEGIN ENCRYPTED PRIVATE KEY----- and -----END ENCRYPTED PRIVATE KEY----- lines — keeping its original line breaks exactly as they are. Choose the default encryption key (aws/secretsmanager) unless your organization requires a customer-managed key.
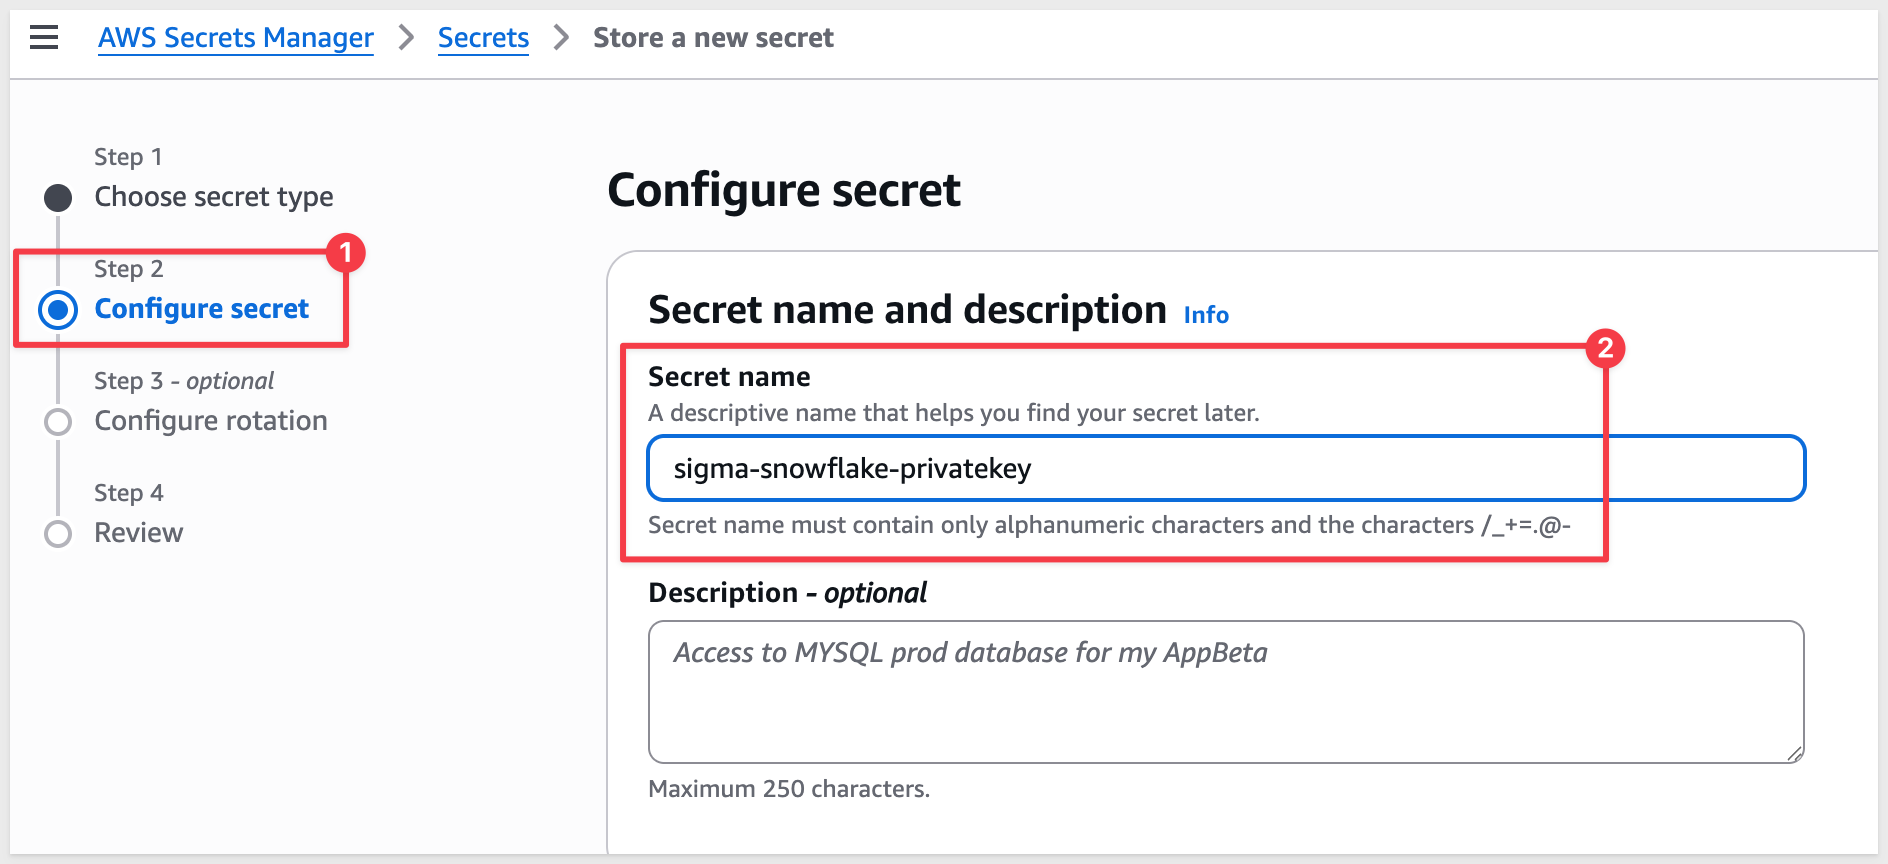
Click Next, enter a secret name (for example, sigma-snowflake-privatekey):
Click Next through the remaining screens (automatic rotation is optional, and this walkthrough skips it), then click Store on the final Review page.
The new secret is not listed until the page is refreshed.
Passphrase secret:
Repeat the same steps — Store a new secret > Other type of secret > Plaintext tab — but this time paste only the raw passphrase (the passphrase that is paired with the private key), with nothing else around it: no quotes, no braces, no trailing space or newline.
Name it something you'll recognize later (for example, sigma-snowflake-passphrase), then Store.
Add the secrets in Sigma
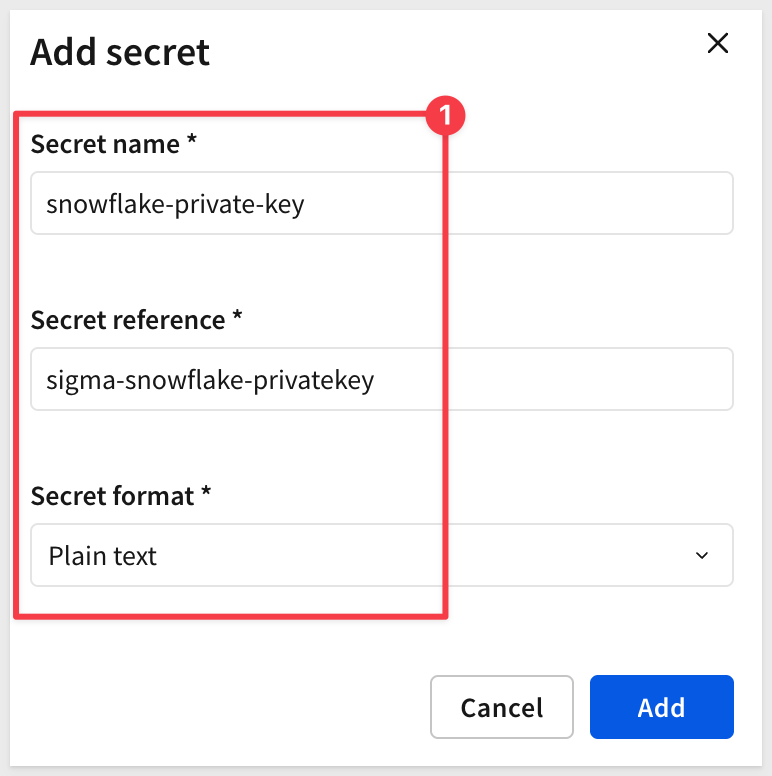
In Sigma, navigate to Administration > Authentication > Secret Manager, then open the integration you created. On the Secrets tab, click Add secret:
Private key secret — fill in:
- Secret name: a friendly label for Sigma, for example:
snowflake-private-key
- Secret reference: the AWS secret's own name, for example:
sigma-snowflake-privatekey
- Secret format:
Plain text— the private key is a single raw value, not JSON
Click Add:
Passphrase secret — repeat the same steps with:
snowflake-passphrase
as the Secret name,
sigma-snowflake-passphrase
as the Secret reference, Secret format = Plain text, and Key path left blank.
Click Add.
Both secrets now appear in the Secrets list for this integration.
Confirm Sigma can retrieve both secrets
Before attaching these secrets to a connection, confirm the trust handshake actually works for each one. Open a secret, click the 3-dot menu > Test:
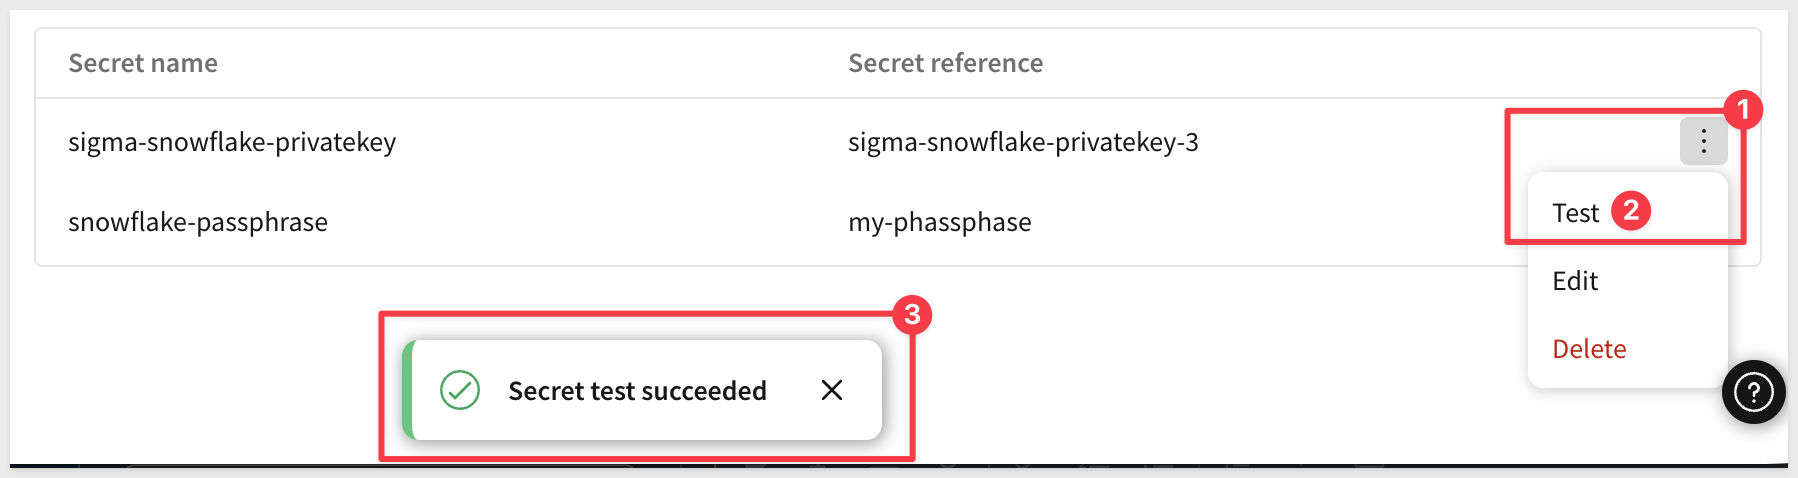
If Test fails, double check that the IAM role's trust policy has the exact IAM Principal ARN and External ID Sigma generated, and that the IAM policy's Resource ARN covers the secret you're referencing.
With a secret added and confirmed working, attach it to whichever connection field needs it. This section uses a Snowflake connection configured with key pair authentication as the running example — if you don't already have a Snowflake key pair, see Snowflake Key-pair Authorization for how to generate one before continuing.
Each sensitive credential field on a connection — Password, Private key, Private key passphrase, depending on the connection type — has its own Use secret manager toggle, so you can mix secret-manager-backed fields with directly-entered ones on the same connection.
Enable the secret manager toggle on a connection
In Sigma, navigate to Administration > Connections, then open the connection you want to update (or create a new one).
On the Private key field, turn on Use secret manager, then fill in:
- Secret manager: the integration you created earlier (for example,
Sigma-AWS-Secrets-Integration) - Secret:
snowflake-private-key
Repeat for Private key passphrase, this time selecting snowflake-passphrase as the secret.
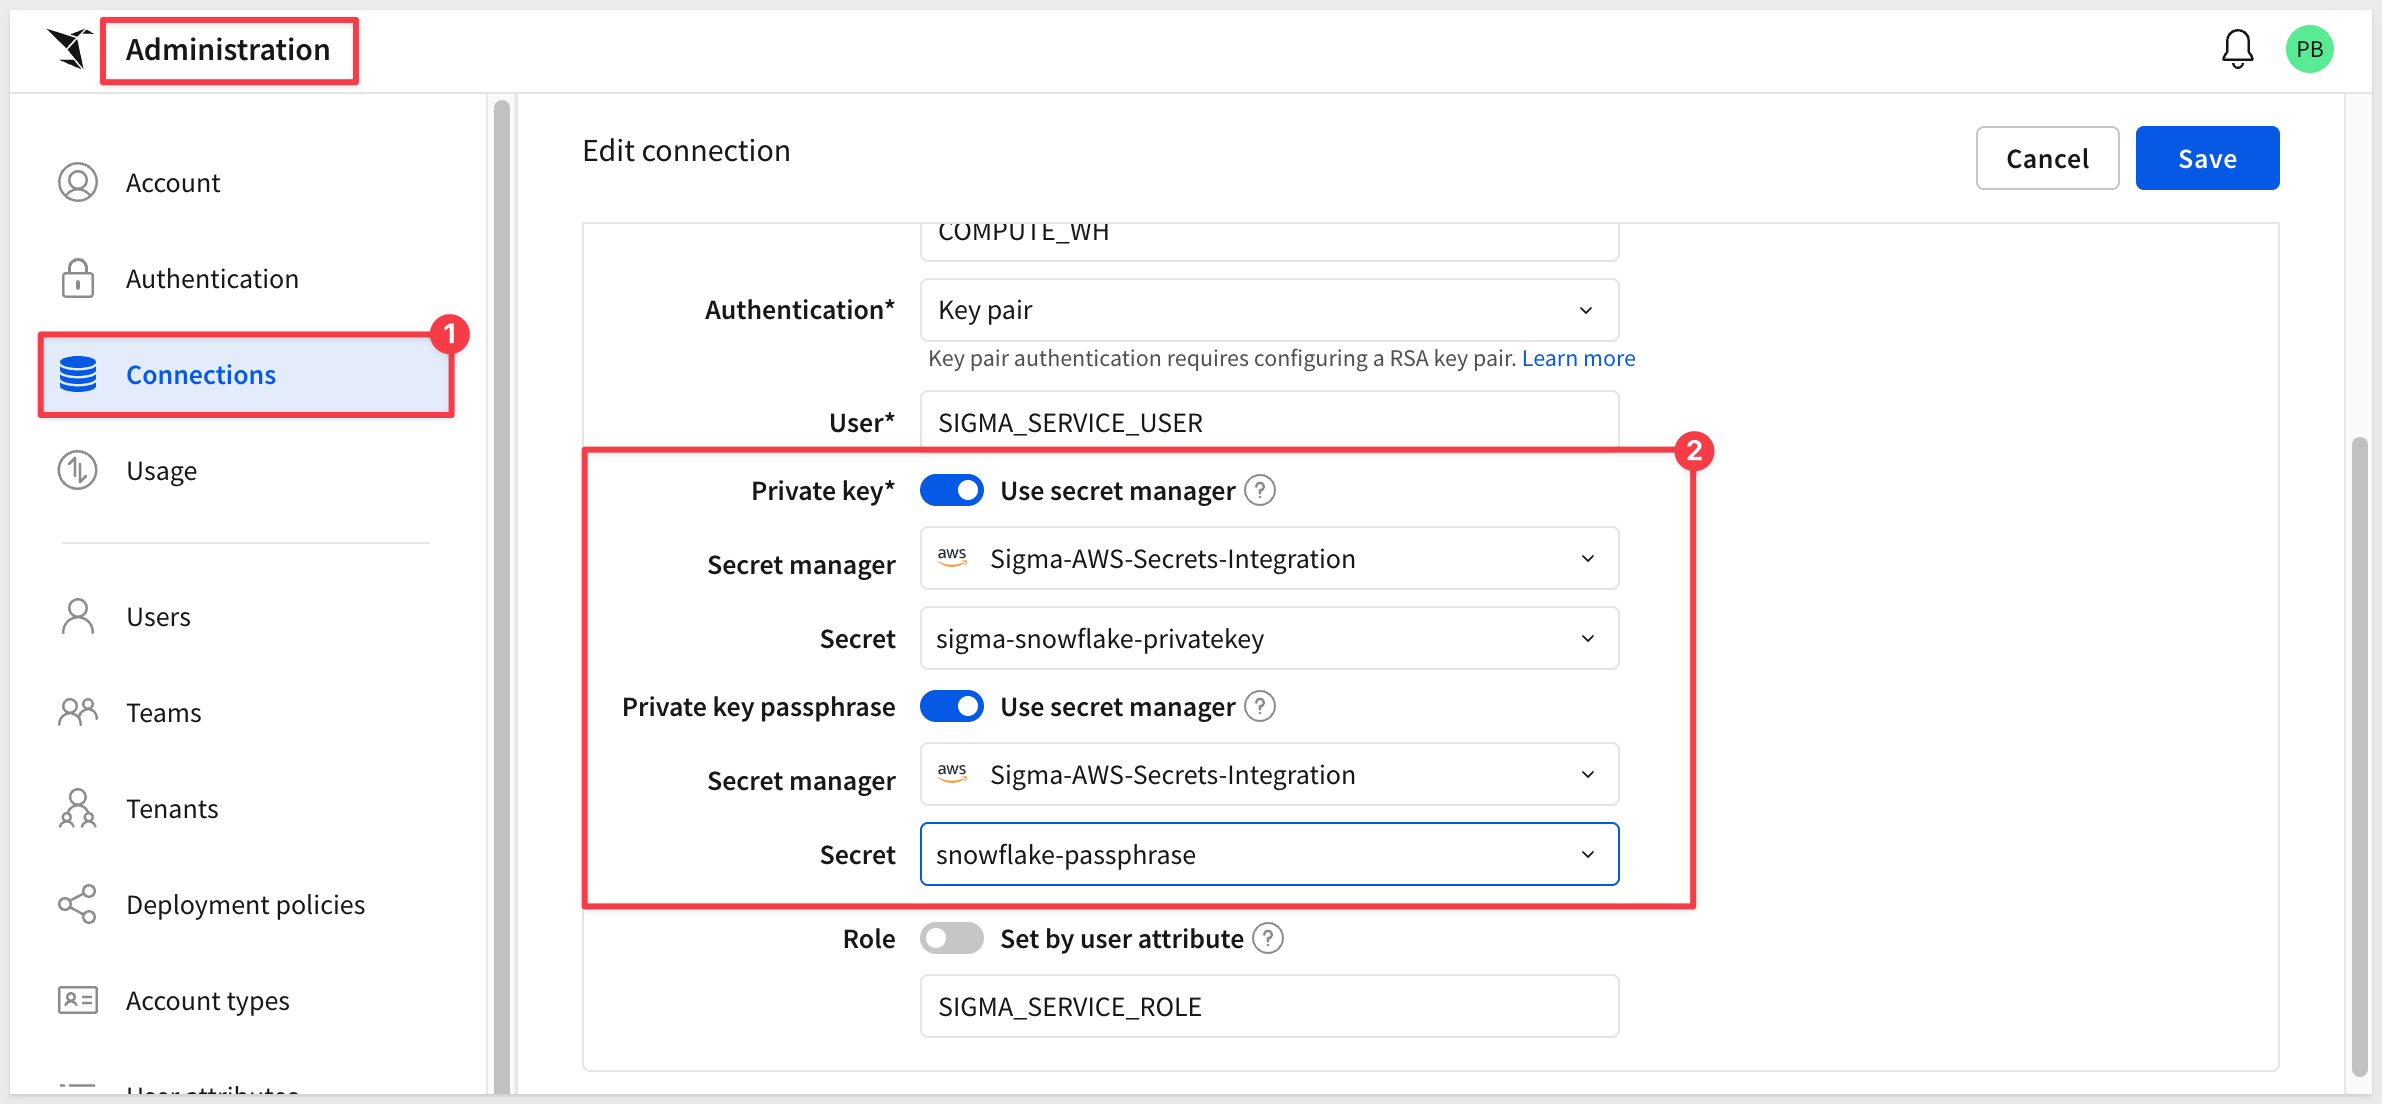
Click Save.
If everything is correct, a success message will appear. If not, an error will appear at the top of the page.
Confirm the connection still works — Browse the connection, open a workbook that uses it, or run a query against it, to verify the secret-manager-backed credentials authenticate correctly.
Before rotating or deleting a secret, confirm what's actually depending on it — Sigma tracks this for you, so you don't have to find out the hard way.
Check the Secret access tab
In Sigma, navigate to Administration > Authentication > Secret Manager, then open your integration and click the Secret access tab:
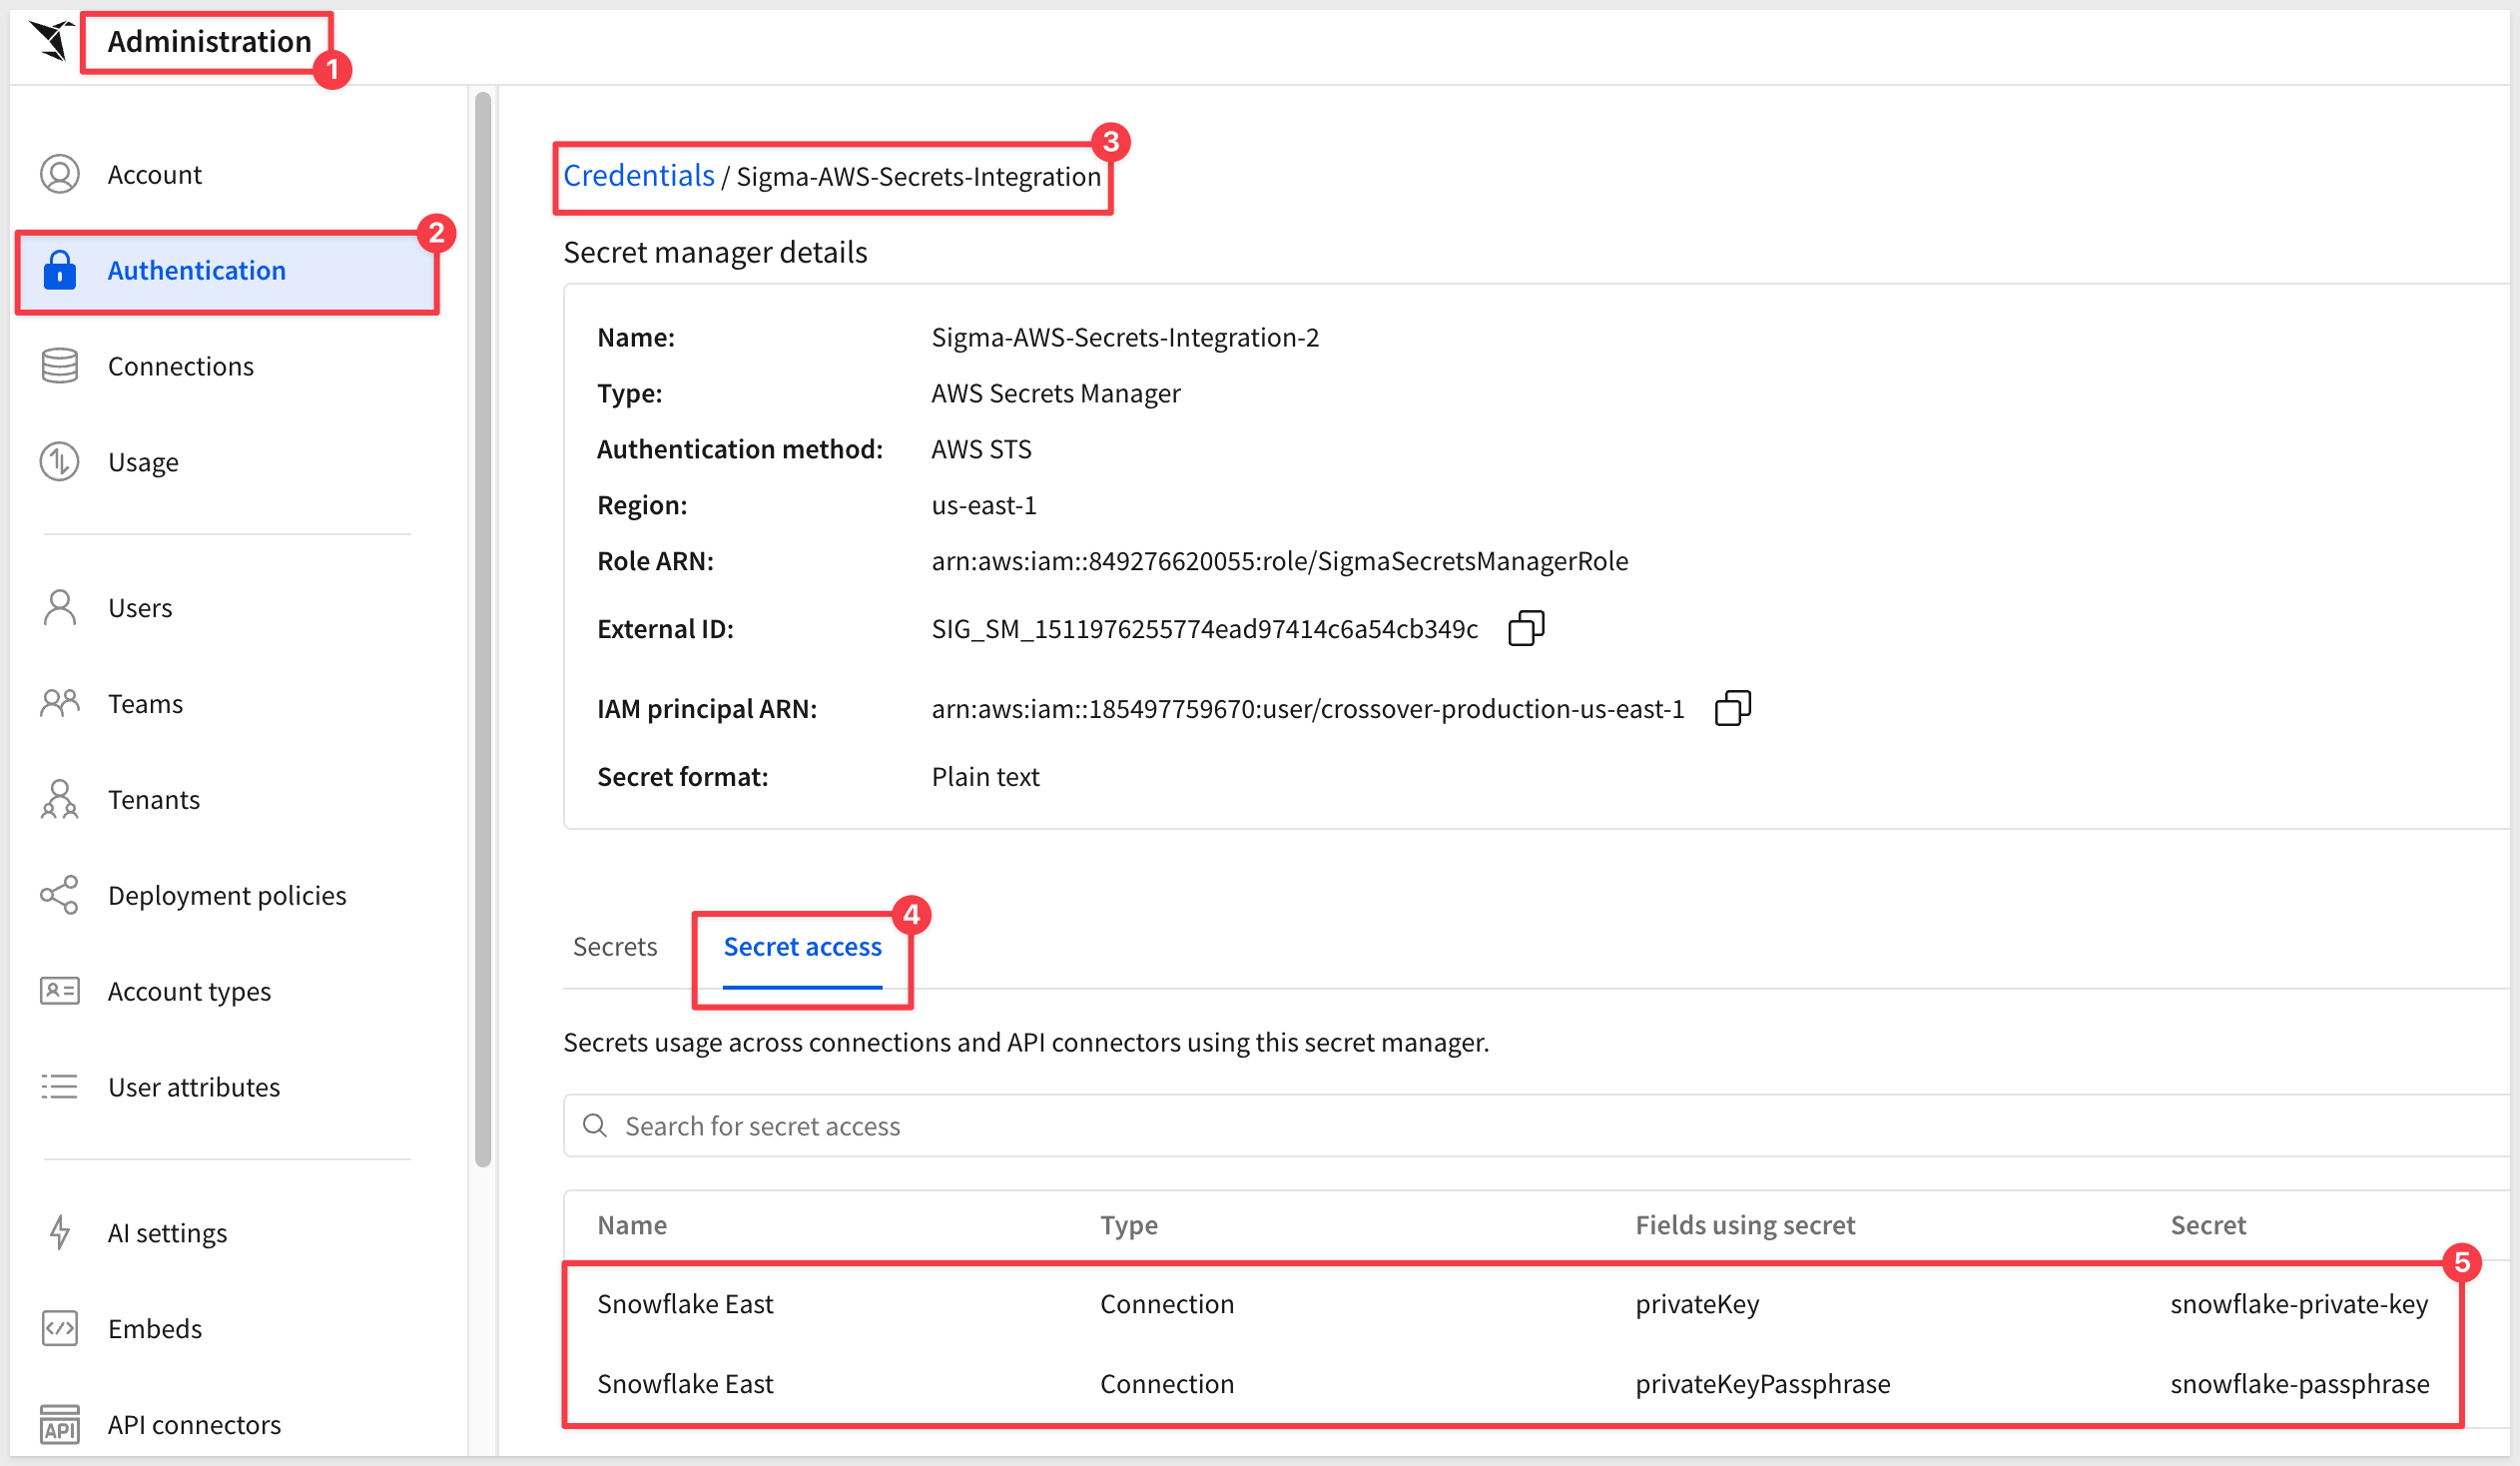
This lists every connection and API connector currently referencing a secret from this integration — check here before rotating a value in AWS or removing a secret from Sigma, so nothing breaks unexpectedly downstream.
Secret manager integrations involve a lot of moving pieces — AWS IAM, Sigma's own configuration, and the shape of the secret's underlying value. Most problems trace back to one of the issues below.
Multi-line values losing their line breaks
AWS's Key/value tab is a single-line input, not a multi-line textarea. Pasting a multi-line value — a private key, a certificate — into it can silently flatten all the real line breaks into spaces. If you need to store multi-line content, use the Plaintext tab instead, and verify the result by reopening the secret and checking that it still spans multiple lines.
The "Plaintext" tab shows the raw value, not a "cleaned up" one
Viewing a secret under AWS's Plaintext tab does not prove it was created as plain text — it just displays whatever the raw stored string is. If a secret was actually created via the Key/value tab, its Plaintext view will still show the JSON wrapper (for example, {"mykey":"myvalue"}), not a stripped-down plain value. If you see a JSON wrapper where you expected plain text, you need to edit the secret and retype the value directly under Plaintext.
"Failed to retrieve secret from your secret manager" on every secret at once
If this error shows up for secrets that previously worked — not just a new one — the problem is usually the trust relationship, not any individual secret. Check that the AWS IAM role's trust policy sts:ExternalId still matches the External ID shown on the integration's detail page in Sigma. If the integration is ever deleted and recreated, Sigma generates a new External ID and IAM Principal ARN, and the AWS-side trust policy needs to be updated to match — otherwise every secret tied to that integration fails, since Sigma can no longer assume the role at all.
Changes not taking effect immediately
After fixing something on either side — the AWS secret's value, the IAM trust policy, the Sigma integration — refresh the Sigma page before retrying Test or the connection. Stale cached state can make a real fix look like it didn't work.
We connected Sigma to AWS Secrets Manager and built a credential flow where nothing sensitive gets typed directly into a Sigma connection — the private key and passphrase for a Snowflake key pair connection live entirely in AWS, and Sigma only ever holds a reference to each one.
The trust mechanism behind this — AWS STS cross-account role assumption, gated by an External ID Sigma generates — means Sigma never holds a long-lived AWS key at all. It assumes a role, on demand, and that trust can be revoked from either side without touching the other. The same pattern extends to any other AWS-backed credential you'd rather manage centrally than paste into a connection form.
The payoff compounds once a secret is wired up this way: rotate a value in AWS Secrets Manager, and every connection referencing it picks up the change automatically, with nothing to update in Sigma. The Secret access tab means you always know what depends on a given secret before you touch it — turning credential rotation from a guessing game into a lookup.
If your organization already treats AWS Secrets Manager as the system of record for credentials, this is how that practice extends to Sigma instead of carving out an exception for it.
Additional Resource Links
Blog
Community
Help Center
QuickStarts
Be sure to check out all the latest developments at Sigma's First Friday Feature page!