Connect Sigma to HashiCorp Vault so database credentials live in your own vault instead of being typed directly into a Sigma connection.
Along the way you'll learn how to:
- Connect HashiCorp Vault to Sigma and complete the trust handshake
- Add a secret in Sigma and map it to the right key or path
- Attach a secret to a connection using the secret manager toggle
- Track where each secret is being used with the
Secret accesstab
For more information on Sigma's product release strategy, see Sigma product releases
If something doesn't work as expected, here's how to contact Sigma support
Target Audience
This QuickStart is for Sigma organization admins and security teams responsible for managing connection credentials, particularly those who already store secrets in HashiCorp Vault.
Prerequisites
- Admin account type in your Sigma organization.
- Access to a HashiCorp Vault instance — self-hosted HashiCorp Vault, including Vault Enterprise, is supported at this time. If you don't already have one, this QuickStart walks through spinning up a local Vault dev server for testing.
- A Snowflake connection using key pair authentication — this guide's running example stores the private key and passphrase as secrets. If you don't already have a key pair generated, see Snowflake Key-pair Authorization before continuing.
- Some familiarity with Sigma is assumed. Not all steps will be shown, as the basics are assumed to be understood.

Before Sigma can reference a secret, it needs a trusted integration with the secret manager that stores it. HashiCorp Vault uses Self-Signed JWT authentication — Sigma acts as a JWT issuer, and Vault verifies tokens Sigma signs rather than Sigma holding a long-lived Vault token.
Set up a local Vault dev server
For a quick way to get a testable Vault instance for this QuickStart, run Vault locally in dev mode and expose it through a tunnel. This is a fast path for testing this integration — it isn't a production setup.
ngrok setup
This method does require you to create a free account with ngrok.com. ngrok is developer infrastructure that routes and secures traffic to your apps, APIs, and AI models — an account is required because ngrok ties every tunnel to an authenticated user, so it can rate-limit and shut down abuse of its infrastructure. Even the free tier won't open a tunnel without an authtoken tied to an account.
Sign up at ngrok.com, then go directly to Your Authtoken under Getting Started in the left nav.
That page shows your actual token plus the exact command to save it, with a Copy button:
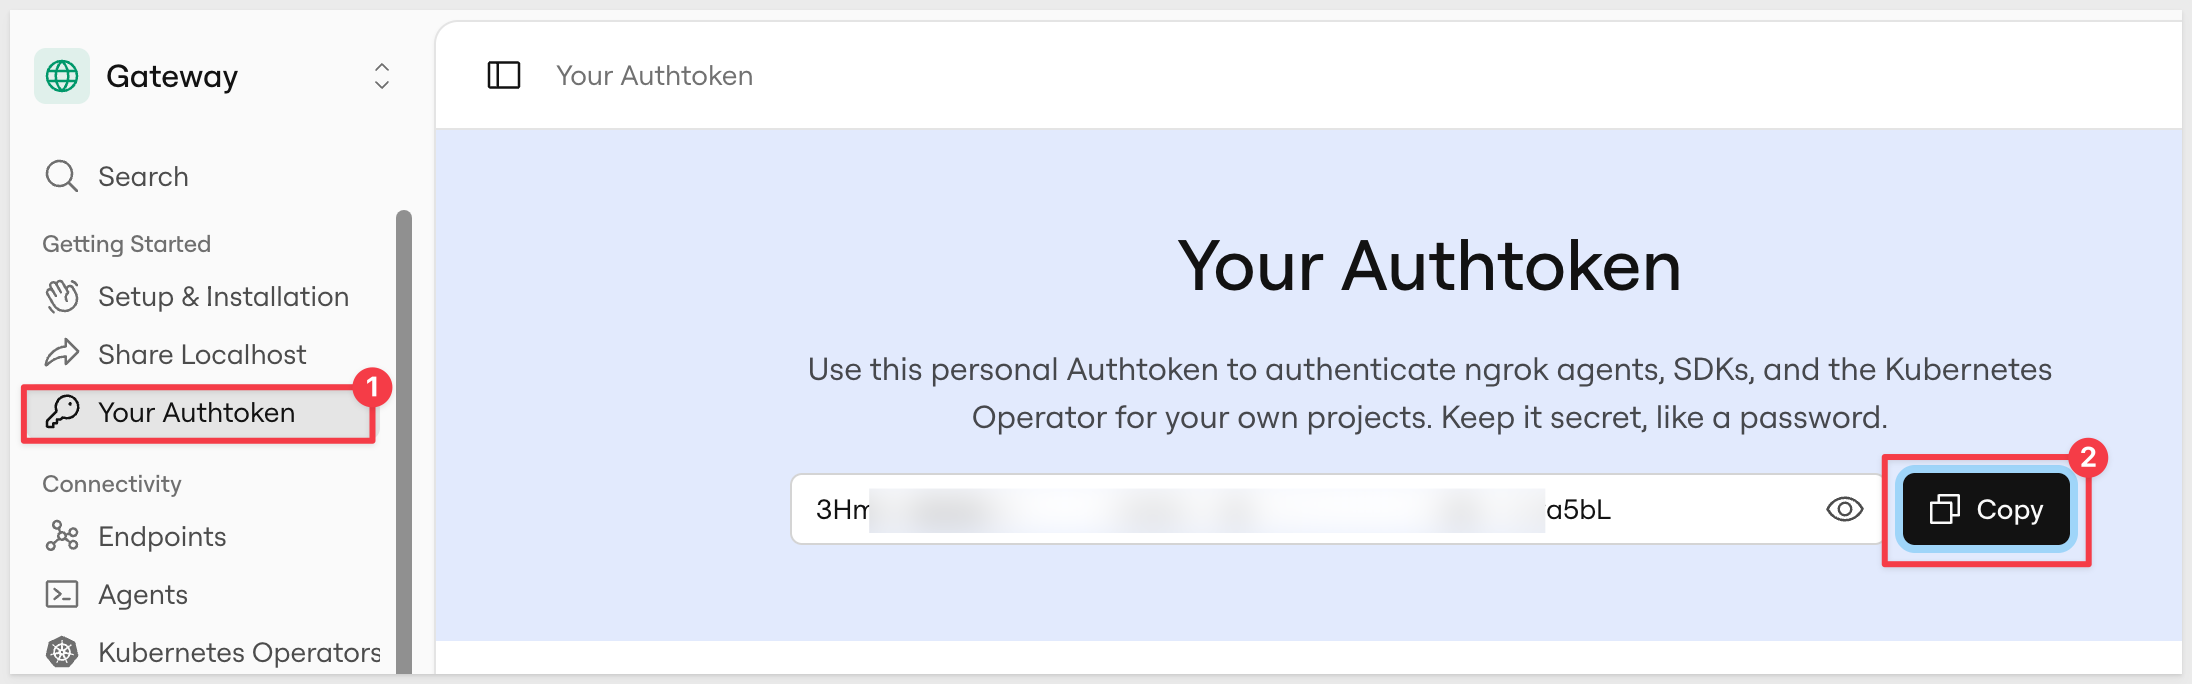
Open a terminal session and run it:
brew install ngrok/ngrok/ngrok
ngrok config add-authtoken {your-authtoken}
This installs ngrok and writes the token to local storage:

Set up Vault
Create a working folder for this walkthrough and move into it:
mkdir sigma-vault-test
cd sigma-vault-test
Install Vault and start a dev server:
brew tap hashicorp/tap
brew install hashicorp/tap/vault
vault server -dev
Vault prints a root token and an "Unseal Key" to the terminal on startup — copy the root token, you'll need it for the CLI commands below.
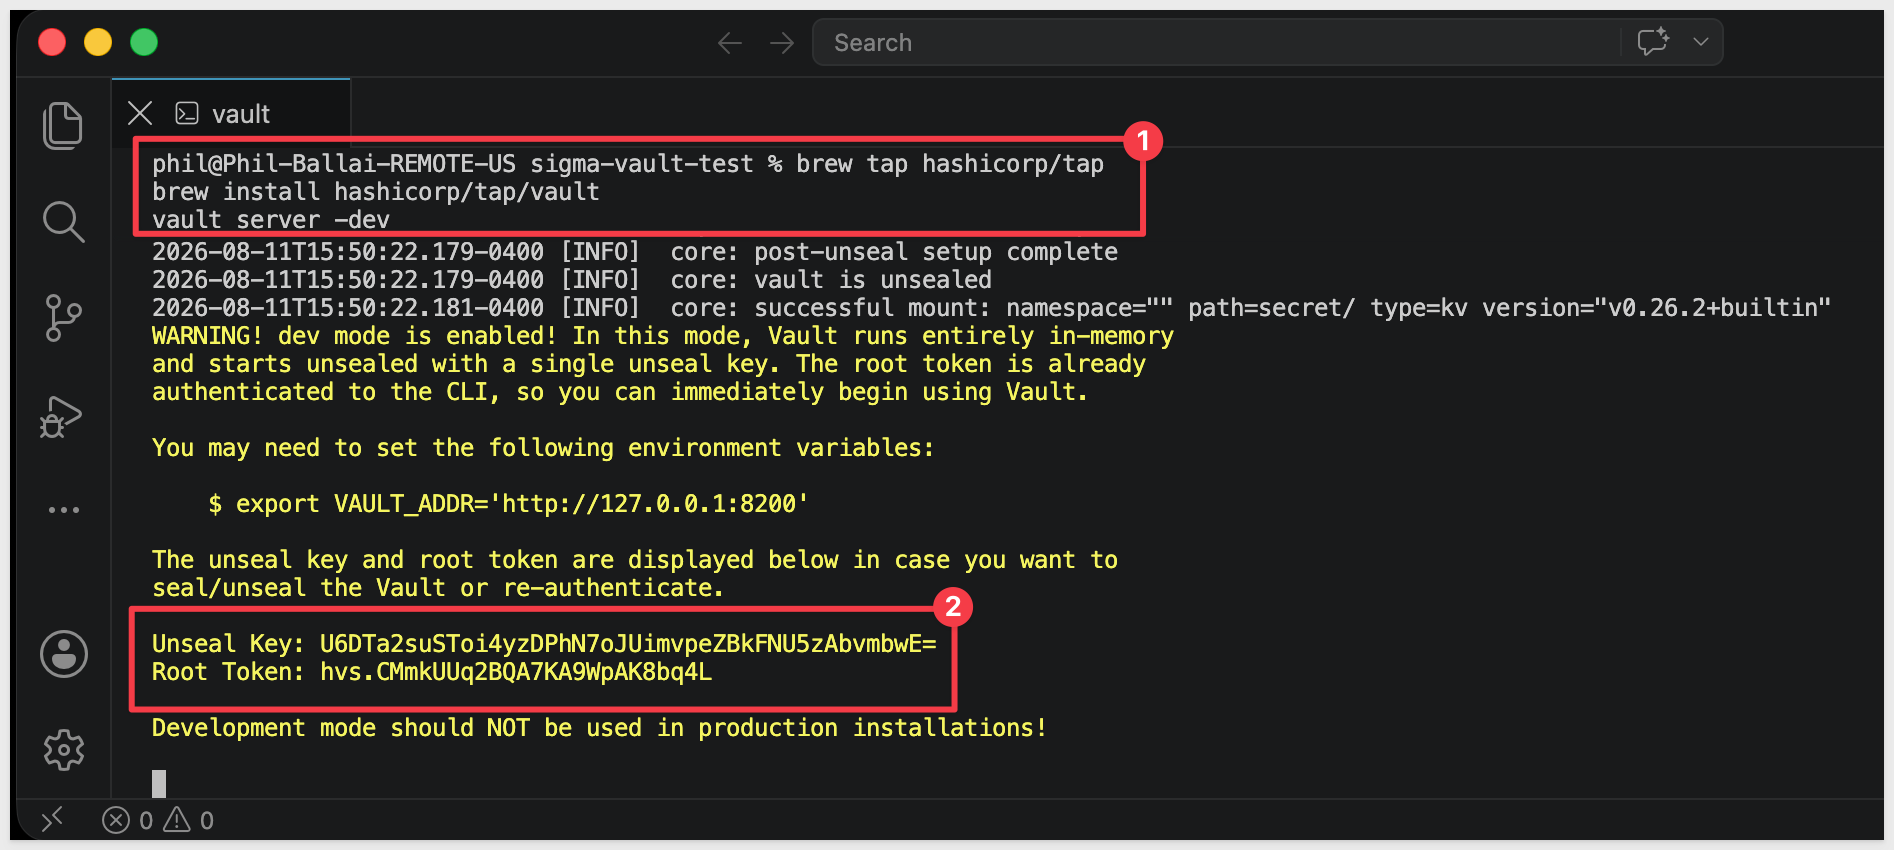
In a new terminal tab, point the Vault CLI at your dev server:
export VAULT_ADDR='http://127.0.0.1:8200'
export VAULT_TOKEN='{root-token-from-startup-output}'
Now expose it over HTTPS with the tunnel — ngrok is already installed and authenticated from the setup above, so just start it:
ngrok http 8200
ngrok prints a Forwarding URL like https://{random-subdomain}.ngrok-free.app — that's your Vault URL for registering the integration in Sigma. Vault itself is still just speaking plain HTTP on localhost:8200; the tunnel is what terminates HTTPS, so Sigma sees a valid HTTPS endpoint either way:
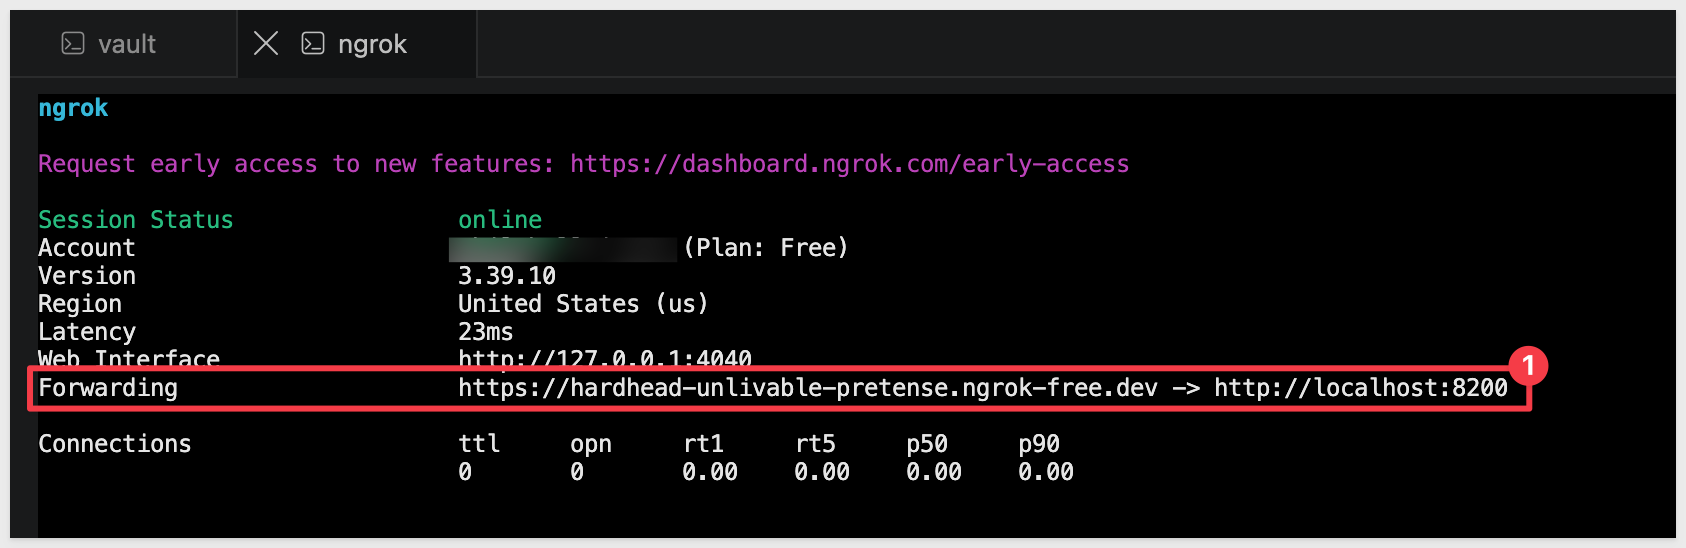
In that third tab, point the Vault CLI at your dev server again — environment variables don't carry over to a new tab:
export VAULT_ADDR='http://127.0.0.1:8200'
export VAULT_TOKEN='{root-token-from-startup-output}'
We left off here, in the third tab with VAULT_ADDR and VAULT_TOKEN already exported.
In that tab, run the following to create a policy granting read-only access to the secret path(s) you want Sigma to reach. Every {curly-brace} placeholder needs a real value substituted in — for this guide's running example, that's the default secret/ KV mount and a hashicorp-* glob covering both secrets you'll store below:
vault policy write sigma-secrets-policy - <<EOF
path "secret/data/hashicorp-*" {
  capabilities = ["read"]
}
path "sys/mounts" {
  capabilities = ["read", "sudo"]
}
EOF
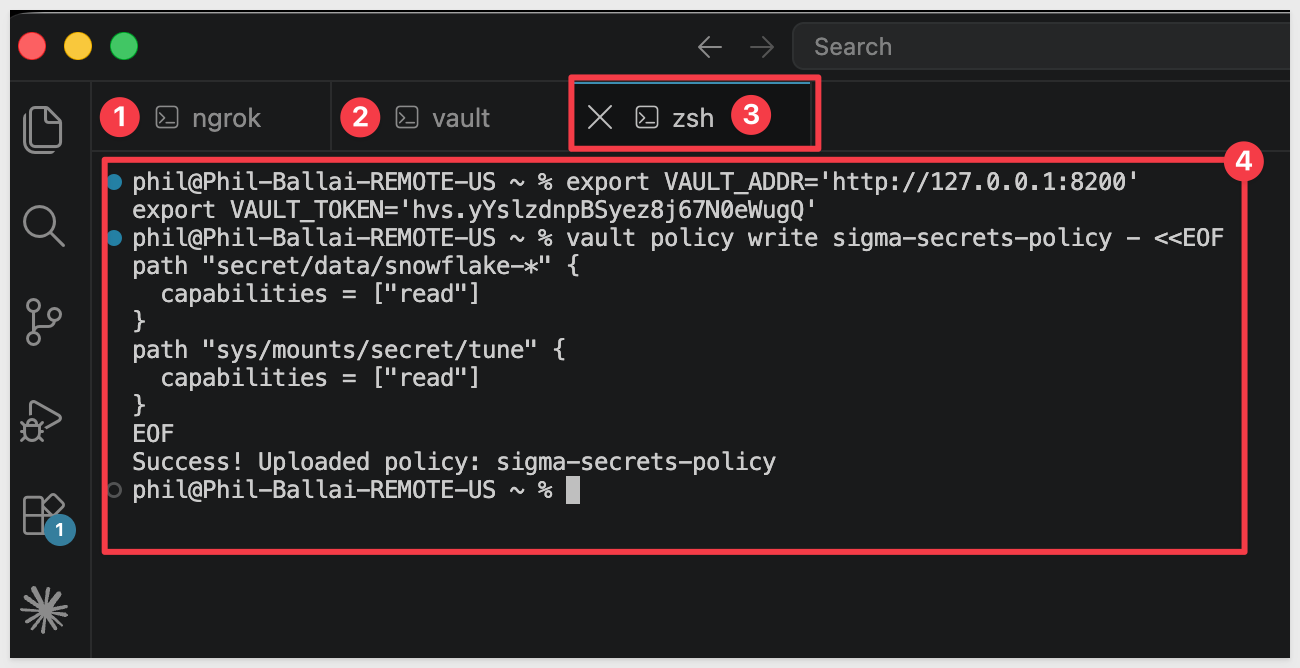
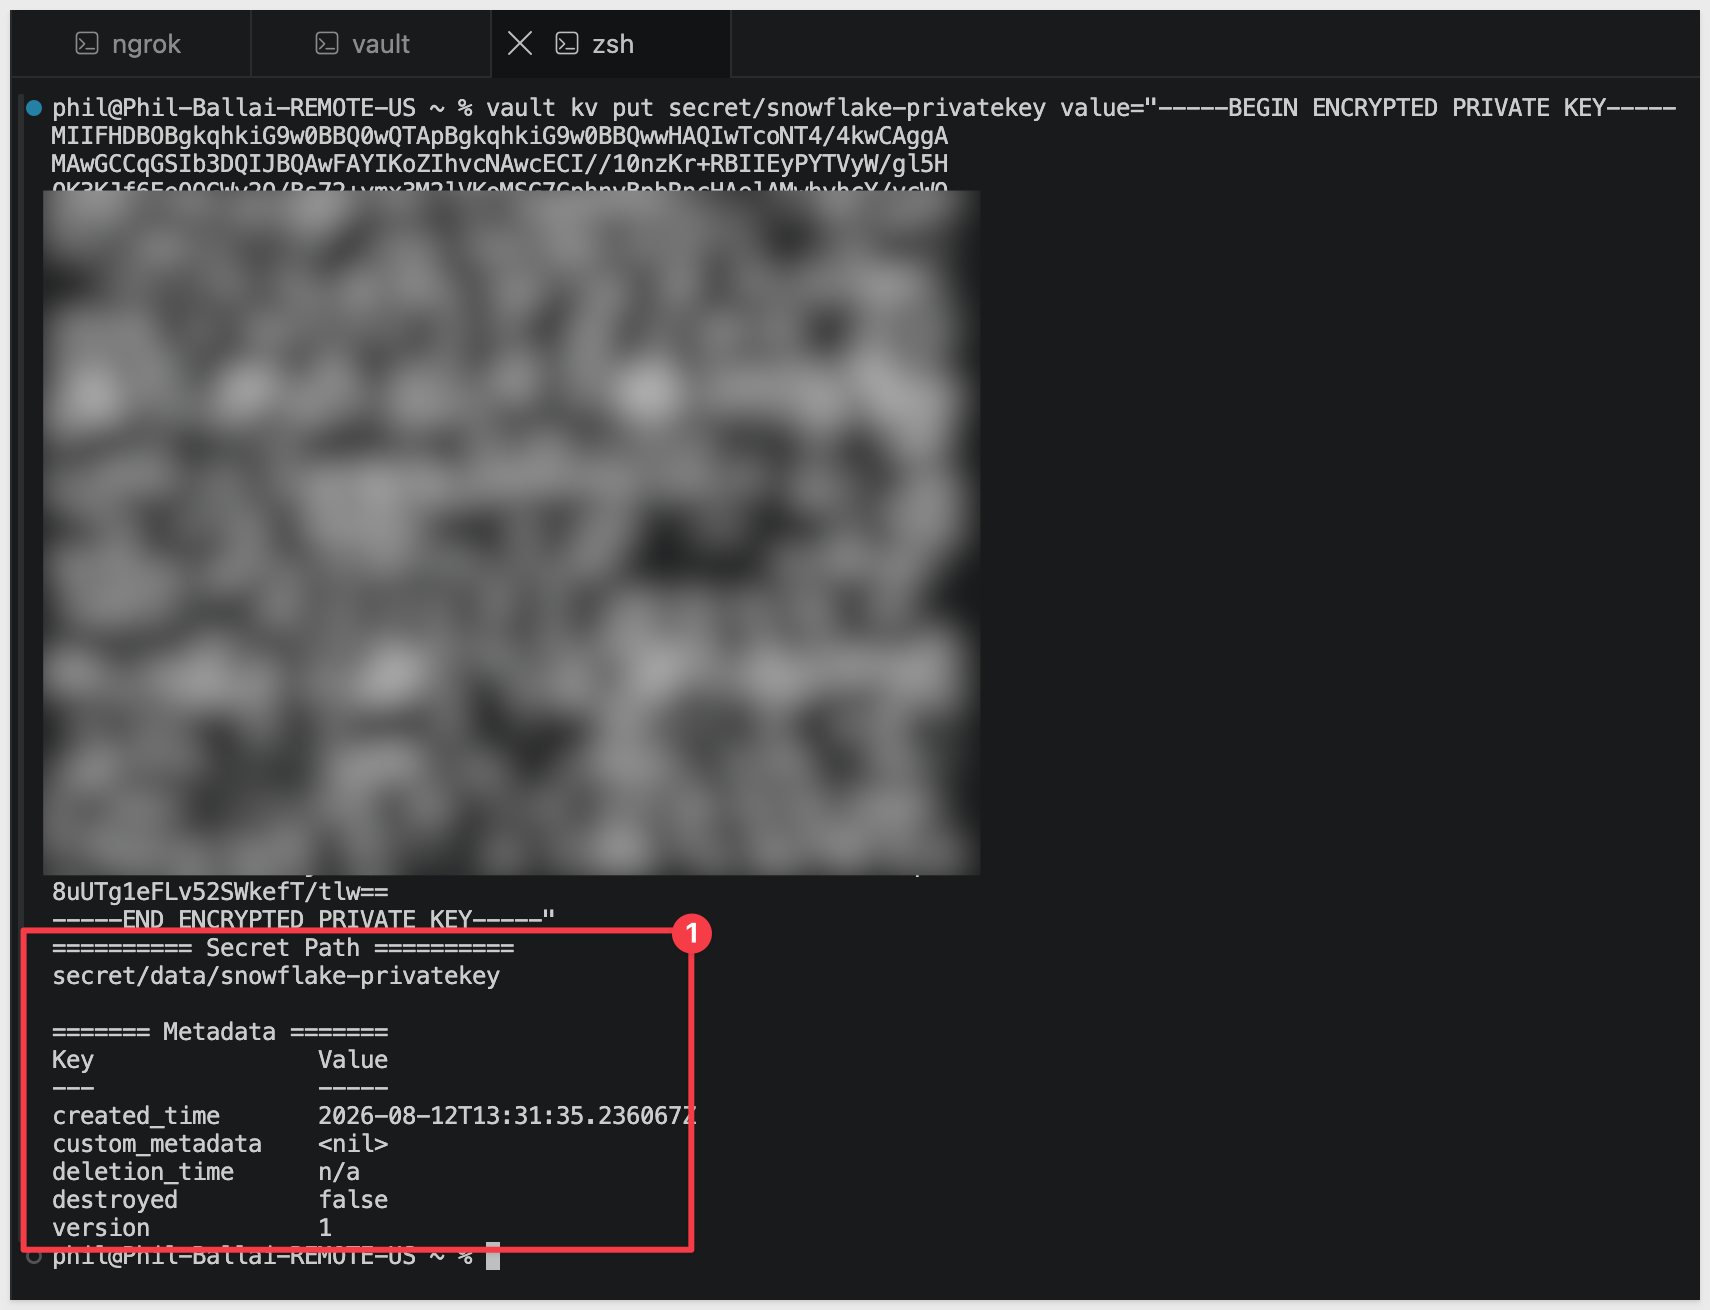
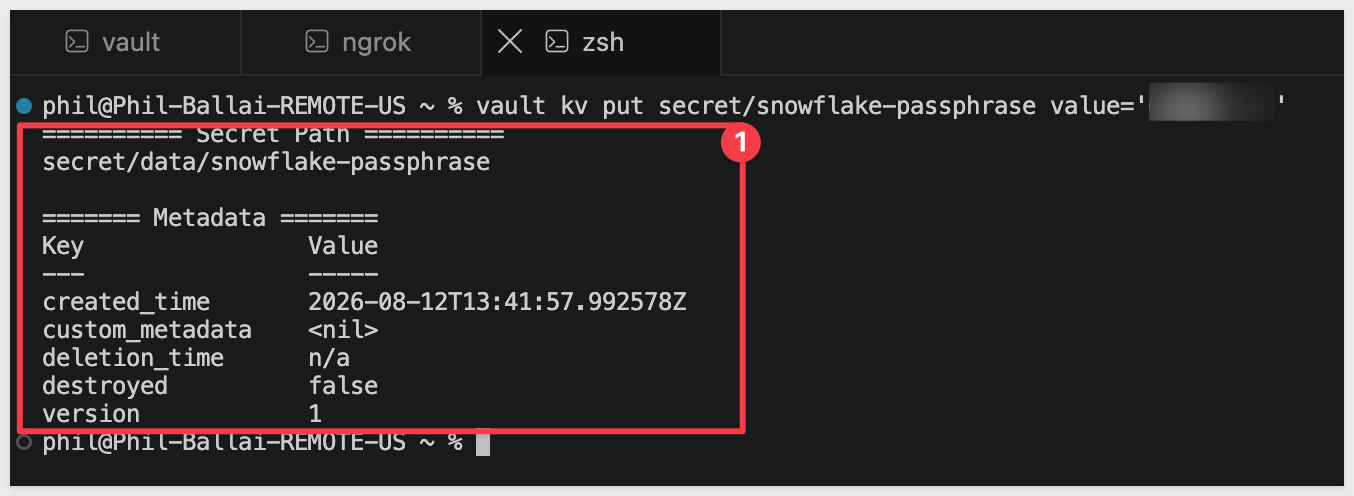
That policy only grants read access — it doesn't create anything. If you don't already have a secret stored at that path, write one now, matching this guide's running example. Use single quotes around the value, not double quotes — passphrases often contain !, which triggers your shell's history expansion (a confusing event not found error) unless it's inside single quotes:
vault kv put secret/hashicorp-privatekey value='{your private key contents}'
vault kv put secret/hashicorp-passphrase value='{your passphrase}'
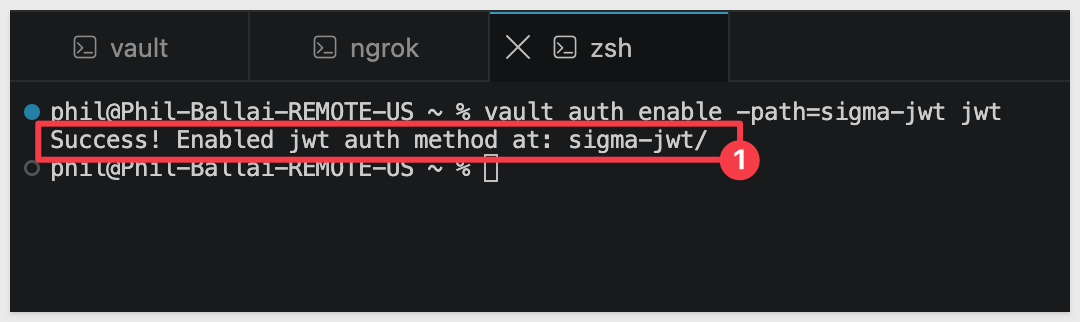
Enable the JWT auth method at a mount path of your choosing — this example uses sigma-jwt:
vault auth enable -path=sigma-jwt jwt
The Vault role that ties this all together needs a Subject ID that Sigma generates when you register the integration — that happens in the next step, so hold off creating the role until Complete the trust handshake in Vault below, once you actually have that value.
Register the integration in Sigma
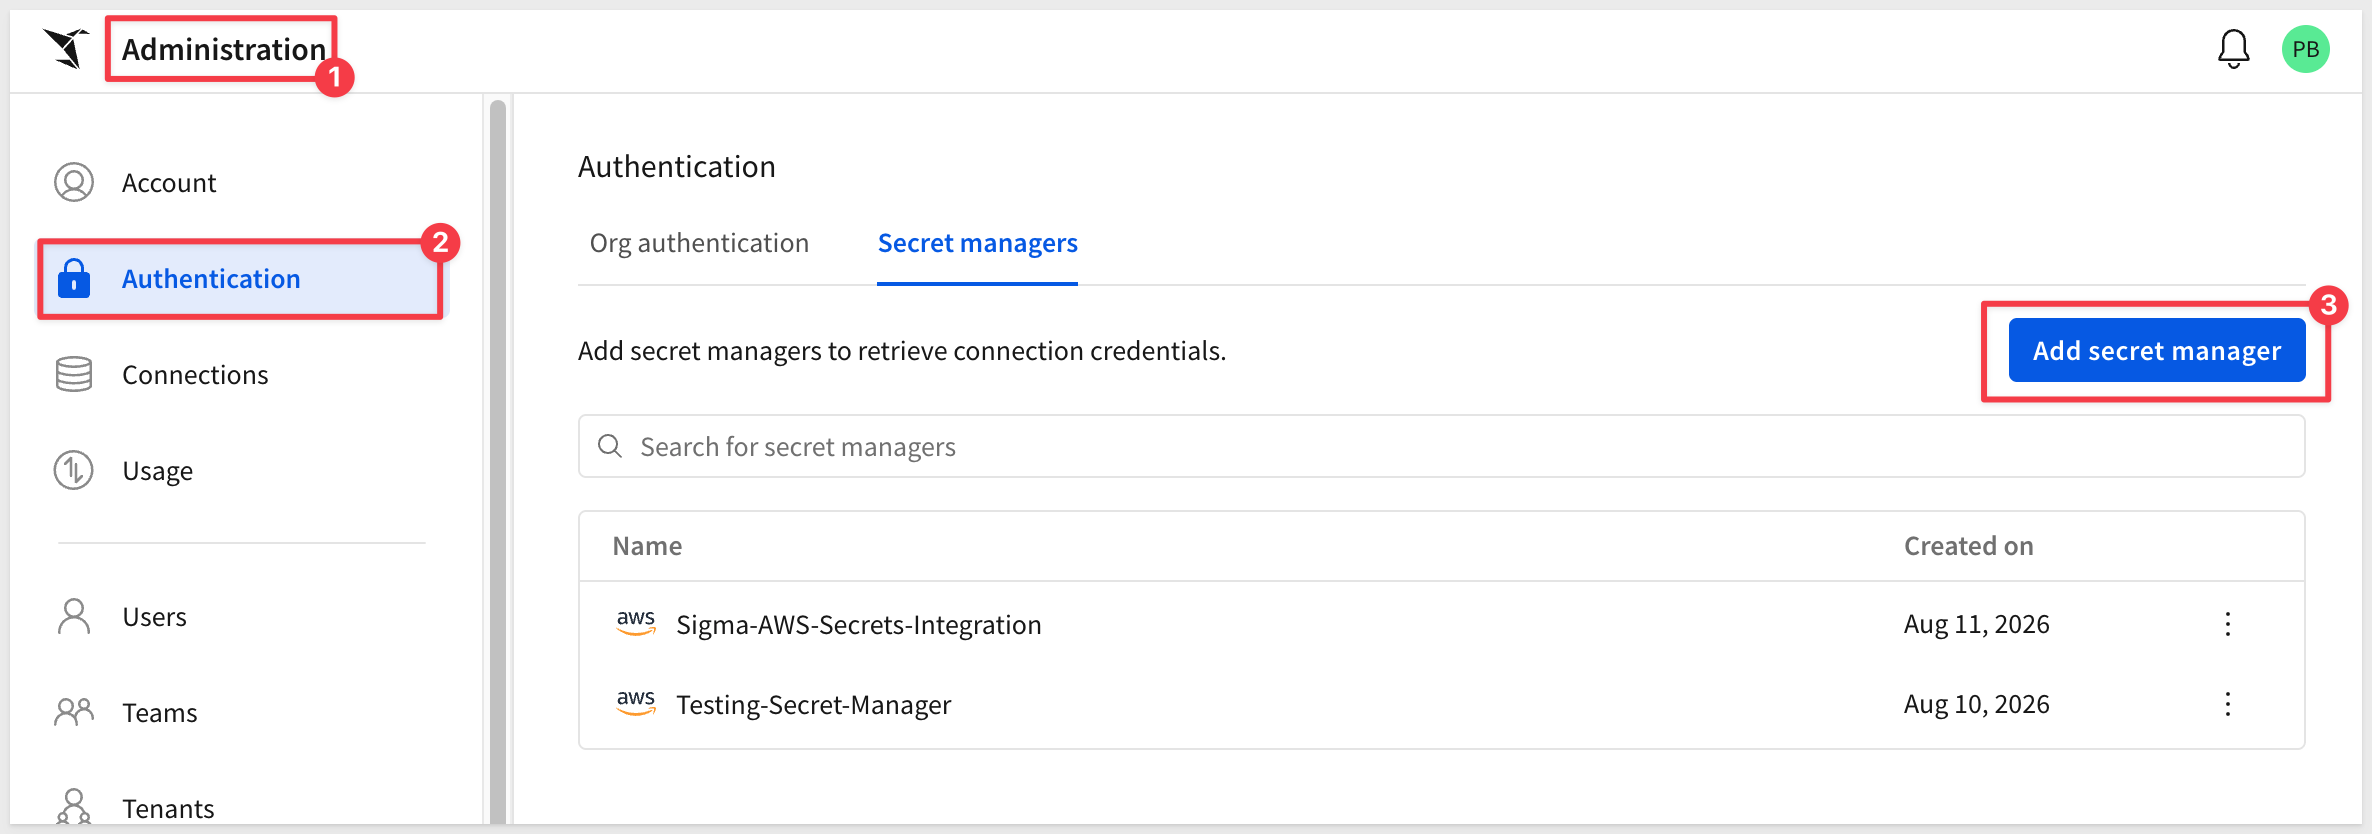
In Sigma, navigate to Administration > Authentication > Secret Manager, then click Add secret manager:
Select HashiCorp Vault as the type and Self-Signed JWT as the authentication method, then fill in:
- Integration name: a descriptive name for this integration (for example,
HashiCorp-Sigma-Integration-local) - Vault URL: your Vault instance's HTTPS address — if you're using the local dev server above, that's your tunnel's
ForwardingURL. This must be reachable from Sigma's cloud servers, so a local address likehttp://127.0.0.1:8200won't work — use the actualhttps://{...}.ngrok-free.appURL ngrok gave you. - Mount path:
sigma-jwt(or whatever you named it above) - Vault role:
sigma-secrets-policy— a name for the role you'll create in Vault in the next step; it doesn't need to exist yet - CA certificate (optional): only needed if your Vault instance uses a private or self-signed certificate. Not applicable if you're following the local dev server + tunnel setup above (ngrok's certificate is already publicly trusted) — but likely needed for a self-hosted Vault Enterprise instance using an internal CA.
- Audience ID: any value you choose (for example,
sigma-vault-integration) — you'll use this same value when creating the role next
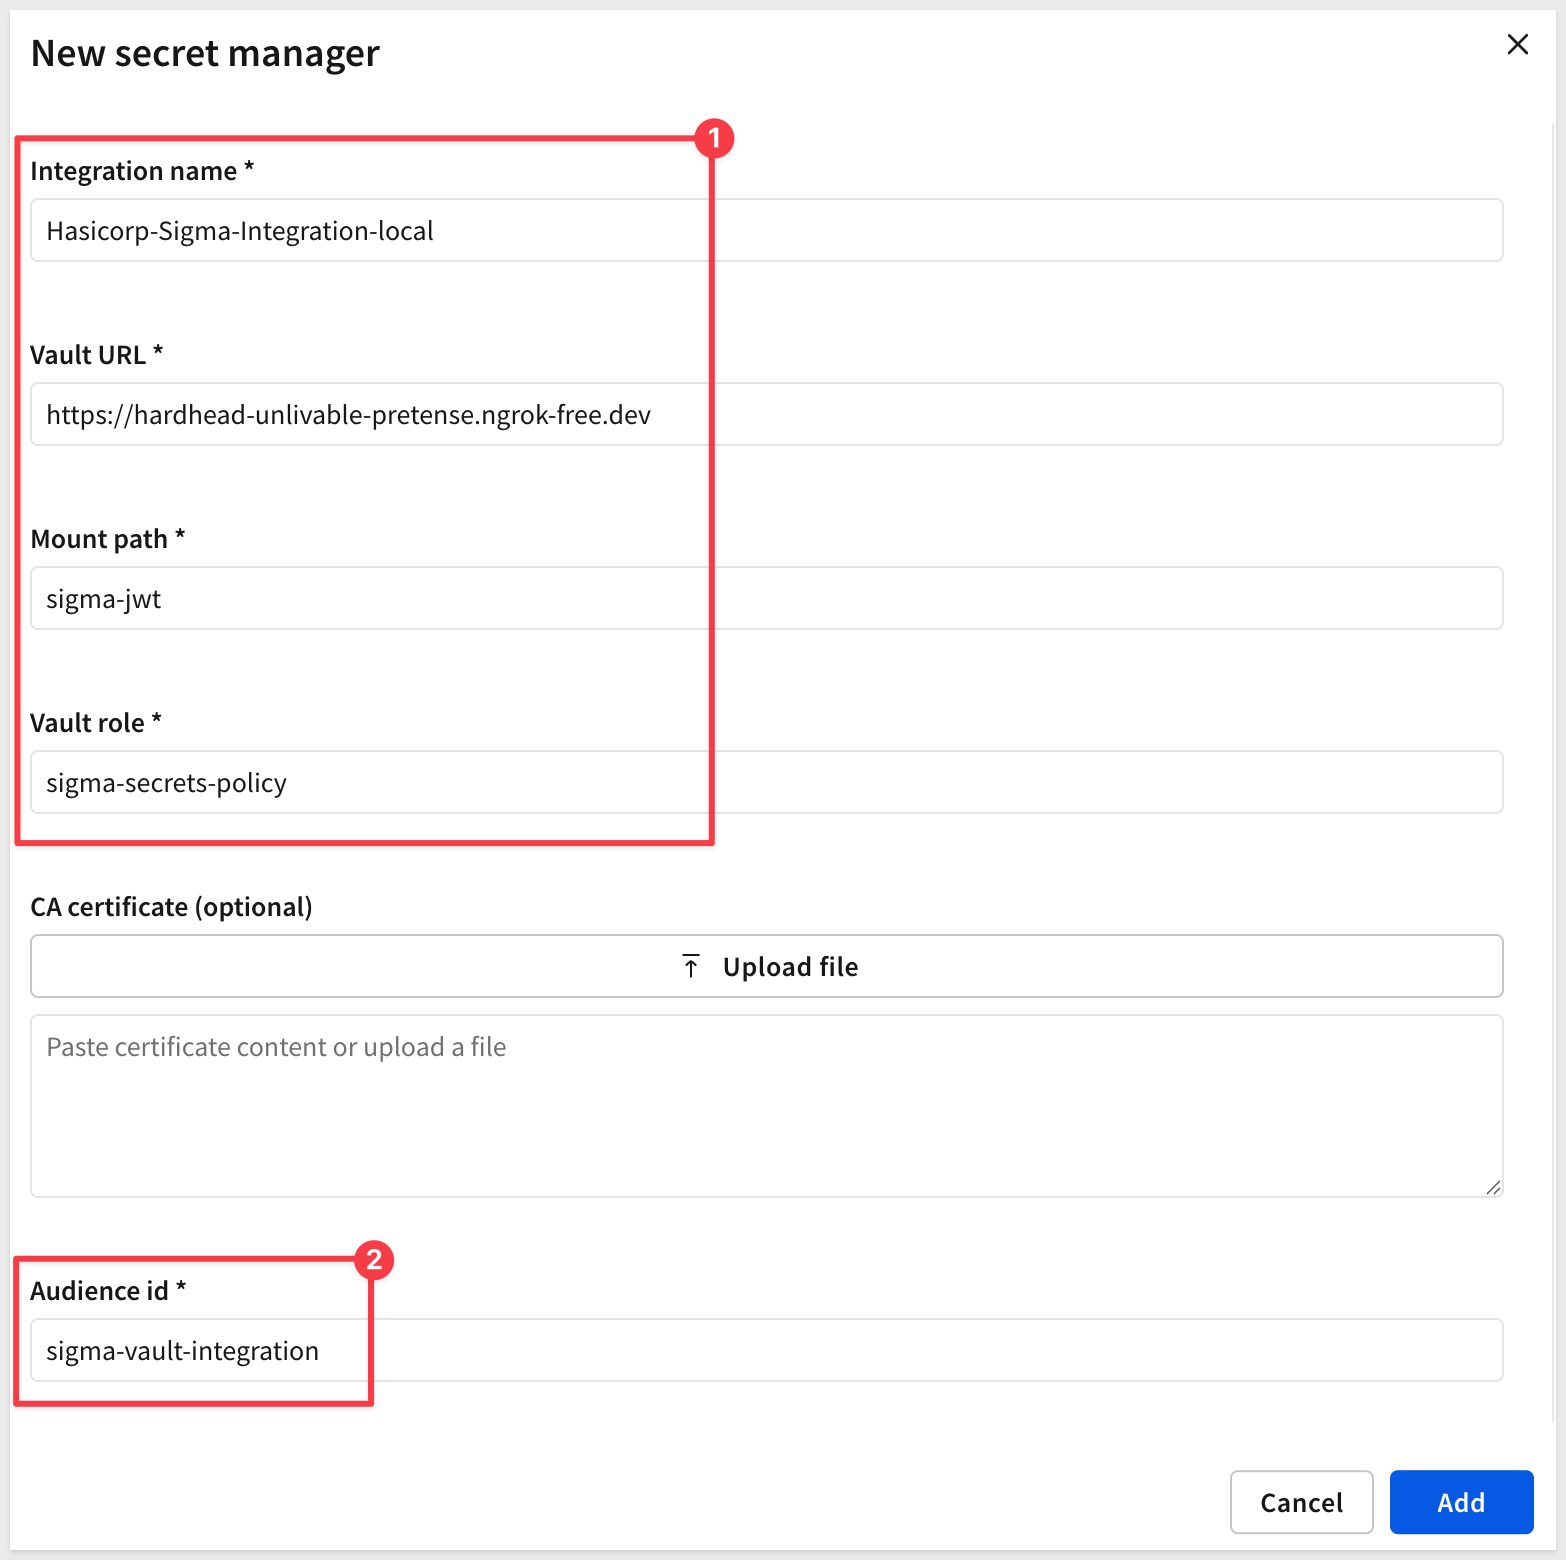
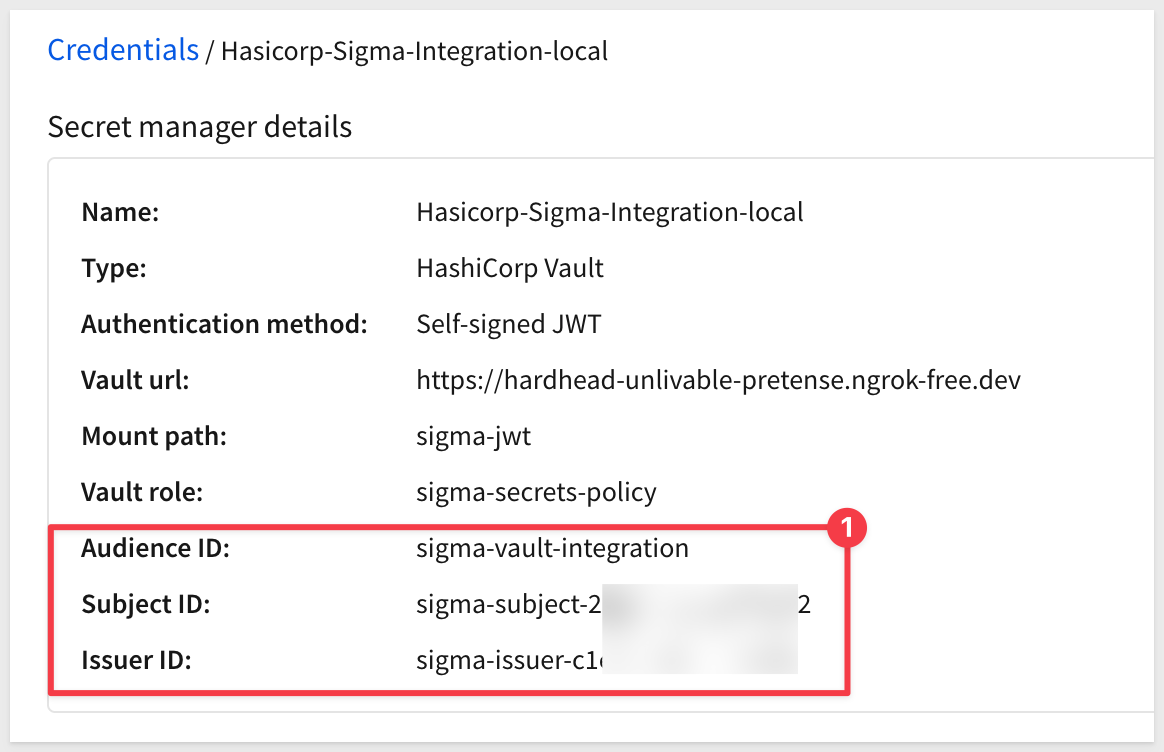
Click Add, then open the new integration from the list and record the generated Subject ID and Issuer ID.
Complete the trust handshake in Vault
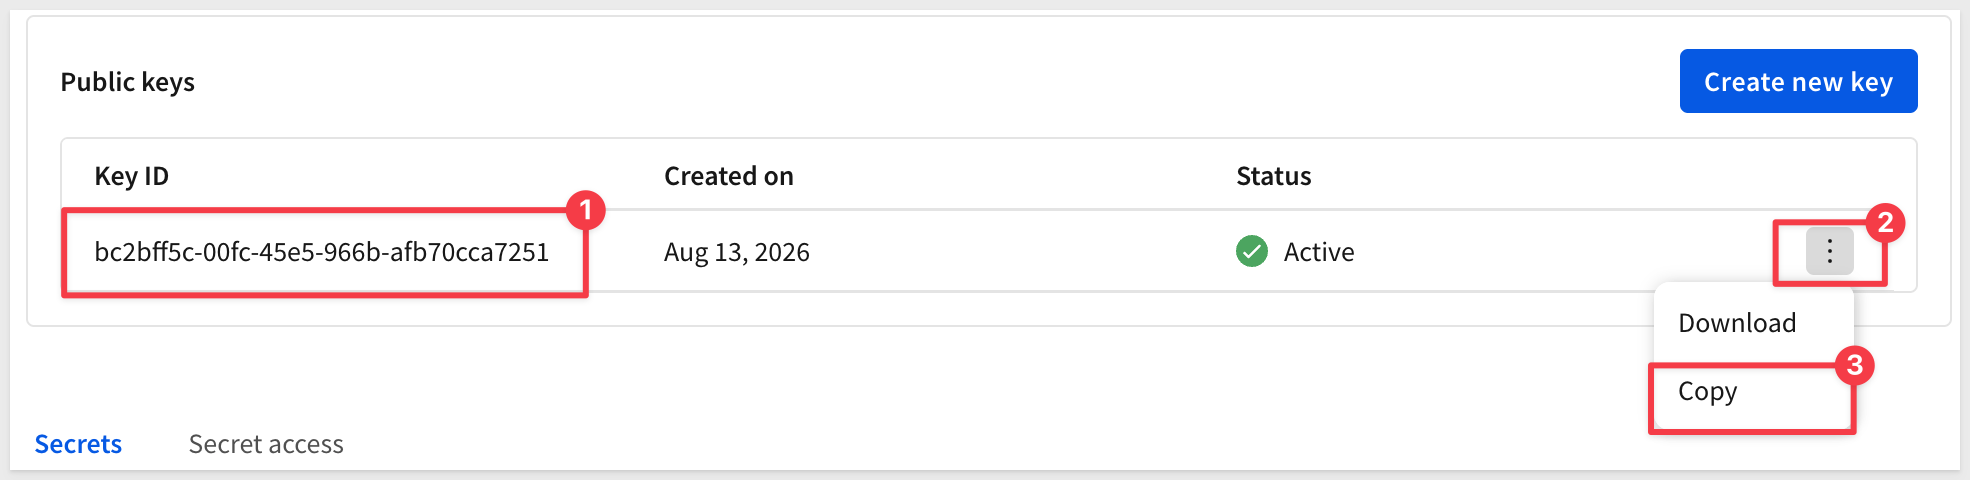
Using the Subject ID, Issuer ID, and the copied Public Key Sigma generated, configure Vault's JWT auth method to trust Sigma as a token issuer:
vault write auth/sigma-jwt/config \
  bound_issuer="{issuer-id-from-sigma}" \
  jwt_validation_pubkeys="{public-key-from-sigma}"
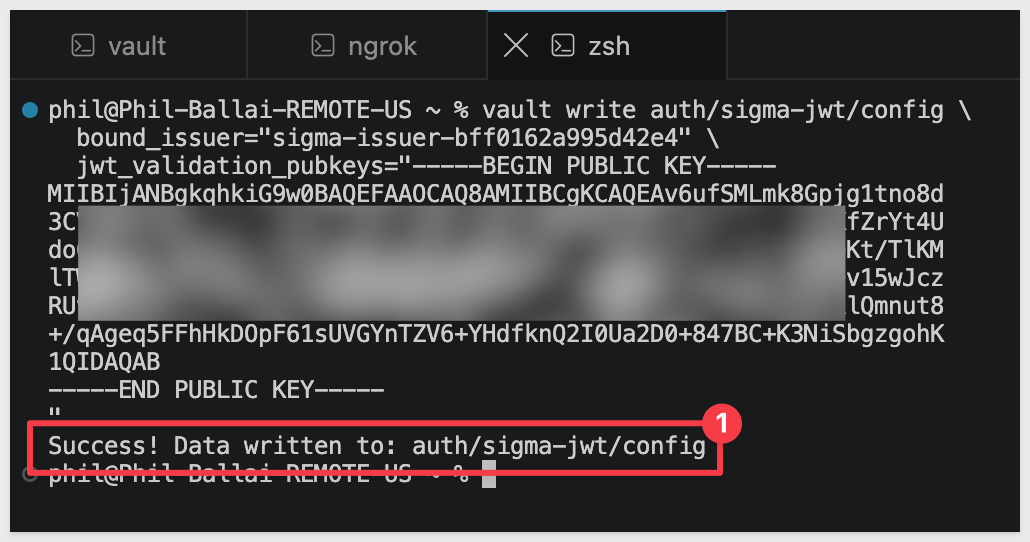
Now create the Vault role, using the Subject ID Sigma generated and the same Audience ID value you chose and entered into Sigma's form above:
vault write auth/sigma-jwt/role/sigma-secrets-policy \
  role_type="jwt" \
  bound_audiences="{your-audience-id}" \
  bound_subject="{subject-id-from-sigma}" \
  user_claim="sub" \
  policies="sigma-secrets-policy" \
  ttl="1h"
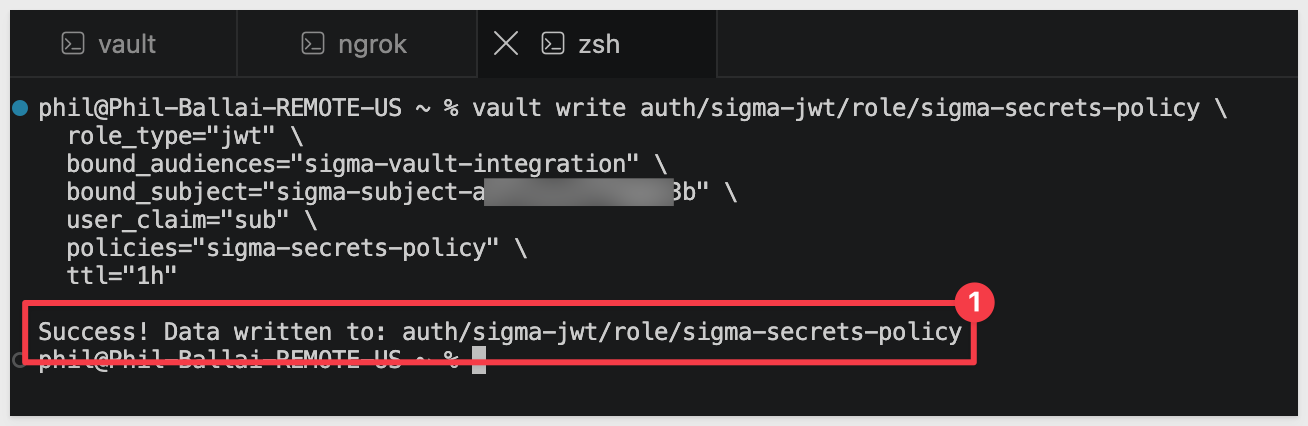
With the trust handshake complete, reference your two Vault secrets in Sigma. Sigma only stores a reference to each one — the values themselves stay in Vault, never in Sigma.
Add the secrets in Sigma
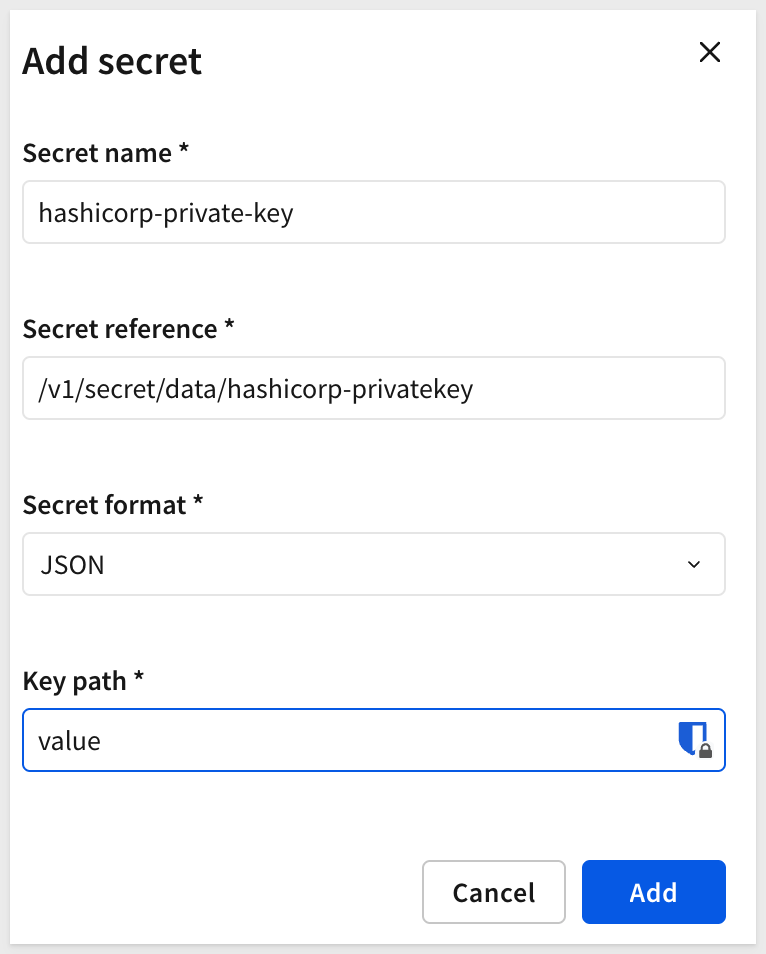
In Sigma, navigate to Administration > Authentication > Secret Manager, then open the integration you created. On the Secrets tab, click Add secret:
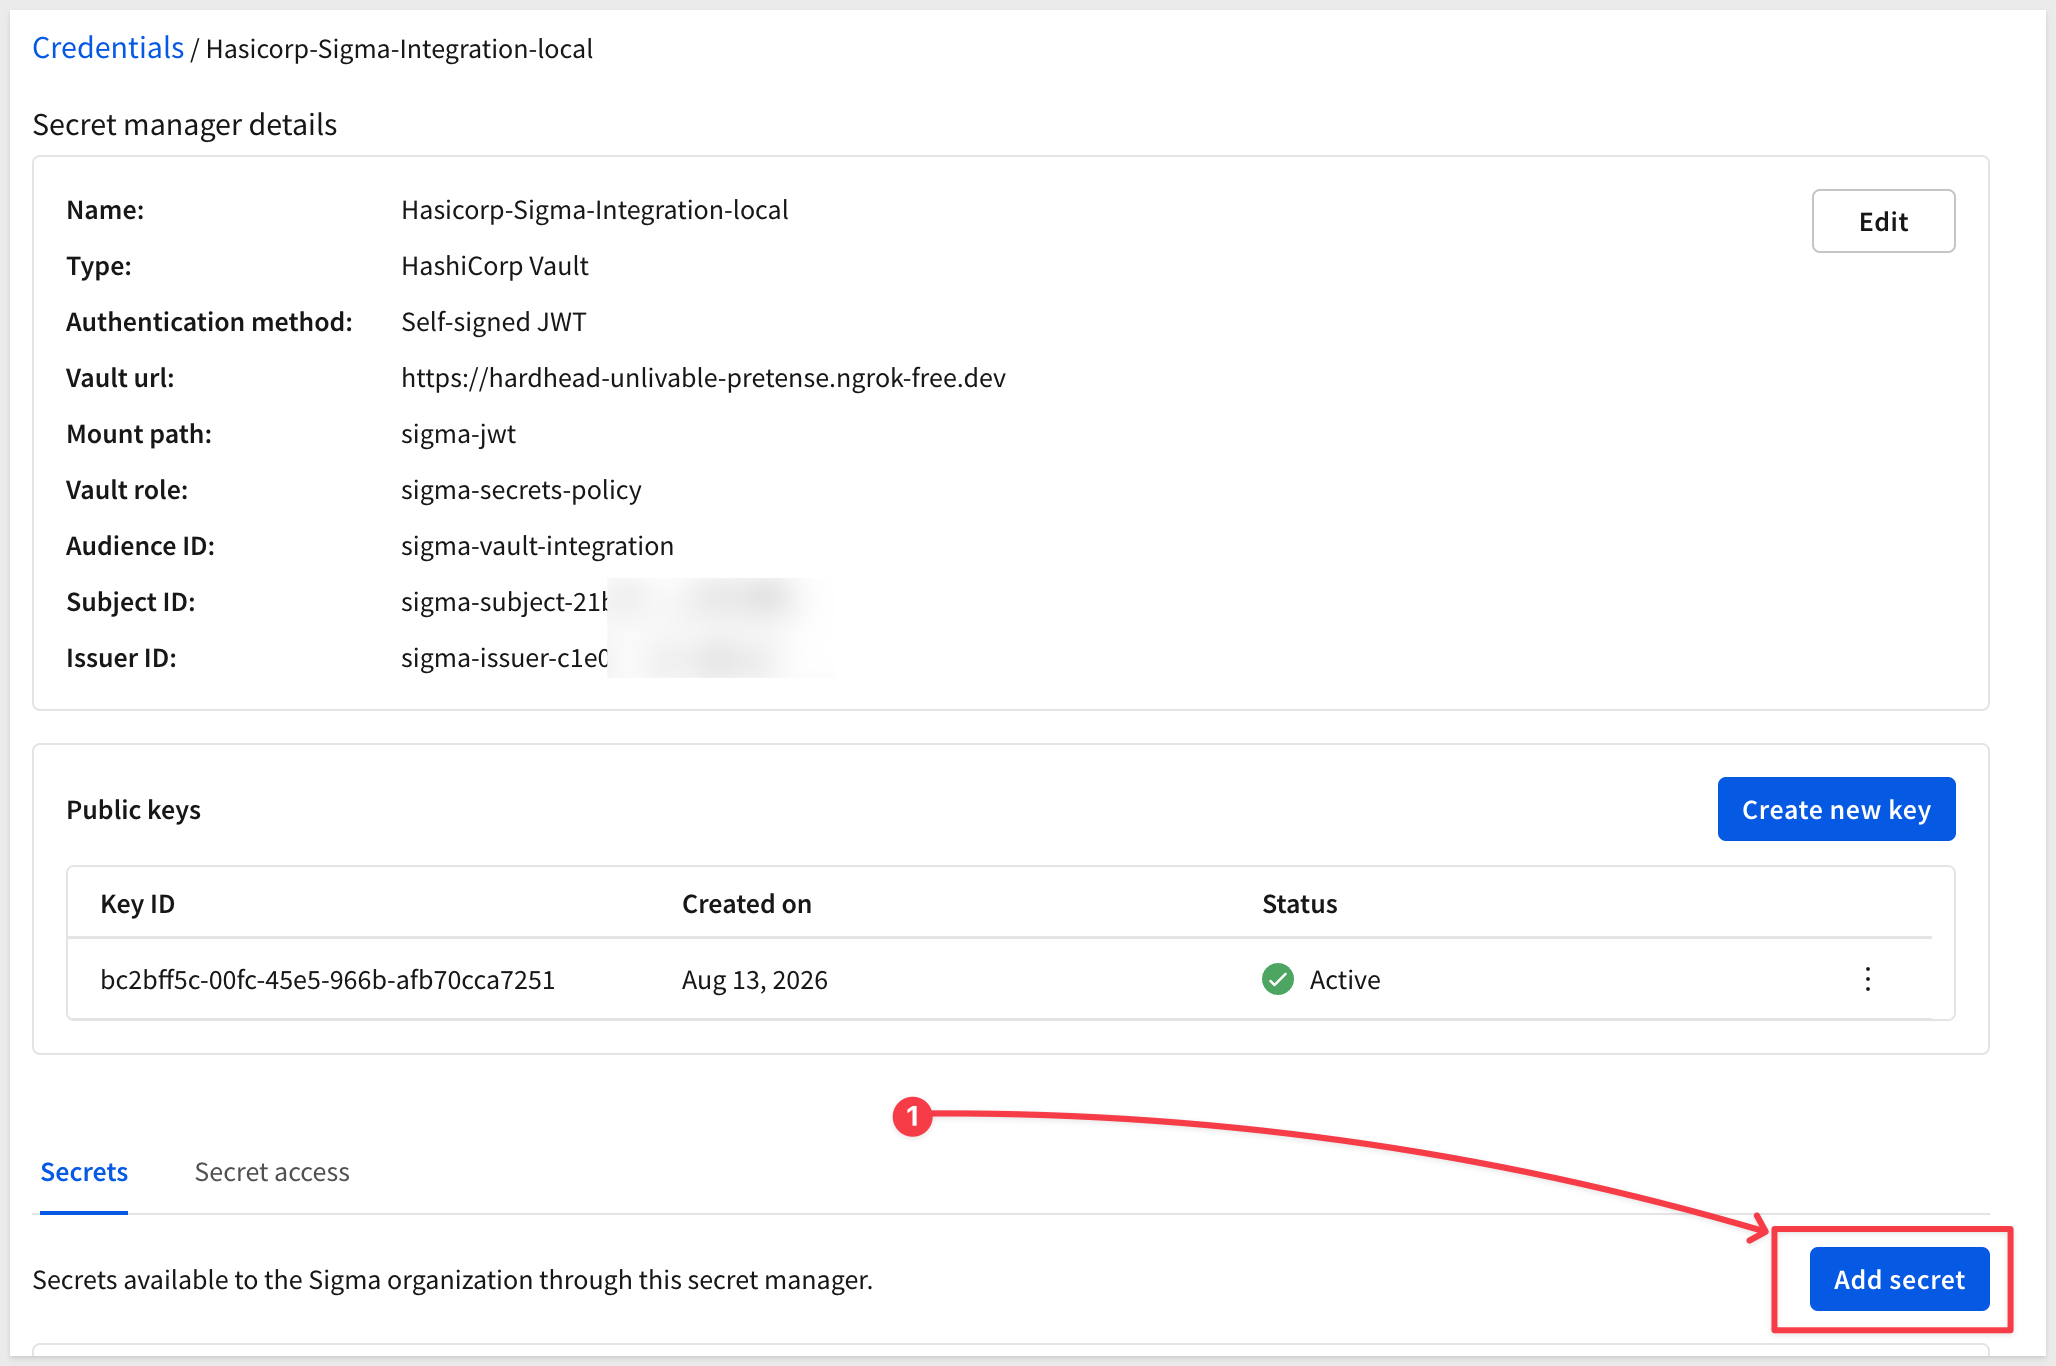
Private key secret — fill in:
- Secret name: a friendly label for Sigma, for example:
hashicorp-privatekey
- Secret reference: the full Vault API path, not the CLI-shorthand path — Sigma doesn't auto-detect your KV version or construct the path for you, so it needs
/v1/{mount}/data/{path}for a KV v2 mount, for example:
/v1/secret/data/hashicorp-privatekey
- Secret format:
JSON—vault kv putalways stores secrets as JSON key-value pairs, even for a single value - Key path:
value
— this matches the key name (value=) used when you wrote the secret with vault kv put
Click Add:
Passphrase secret — repeat the same steps with the Secret name:
hashicorp-passphrase
The Secret reference (the full API path, same as above):
/v1/secret/data/hashicorp-passphrase
Secret format = JSON, and Key path = value.
Click Add.
Both secrets now appear in the Secrets list for this integration.
Confirm Sigma can retrieve both secrets
Before attaching these secrets to a connection, confirm the trust handshake actually works for each one. Open a secret, click the 3-dot menu > Test:
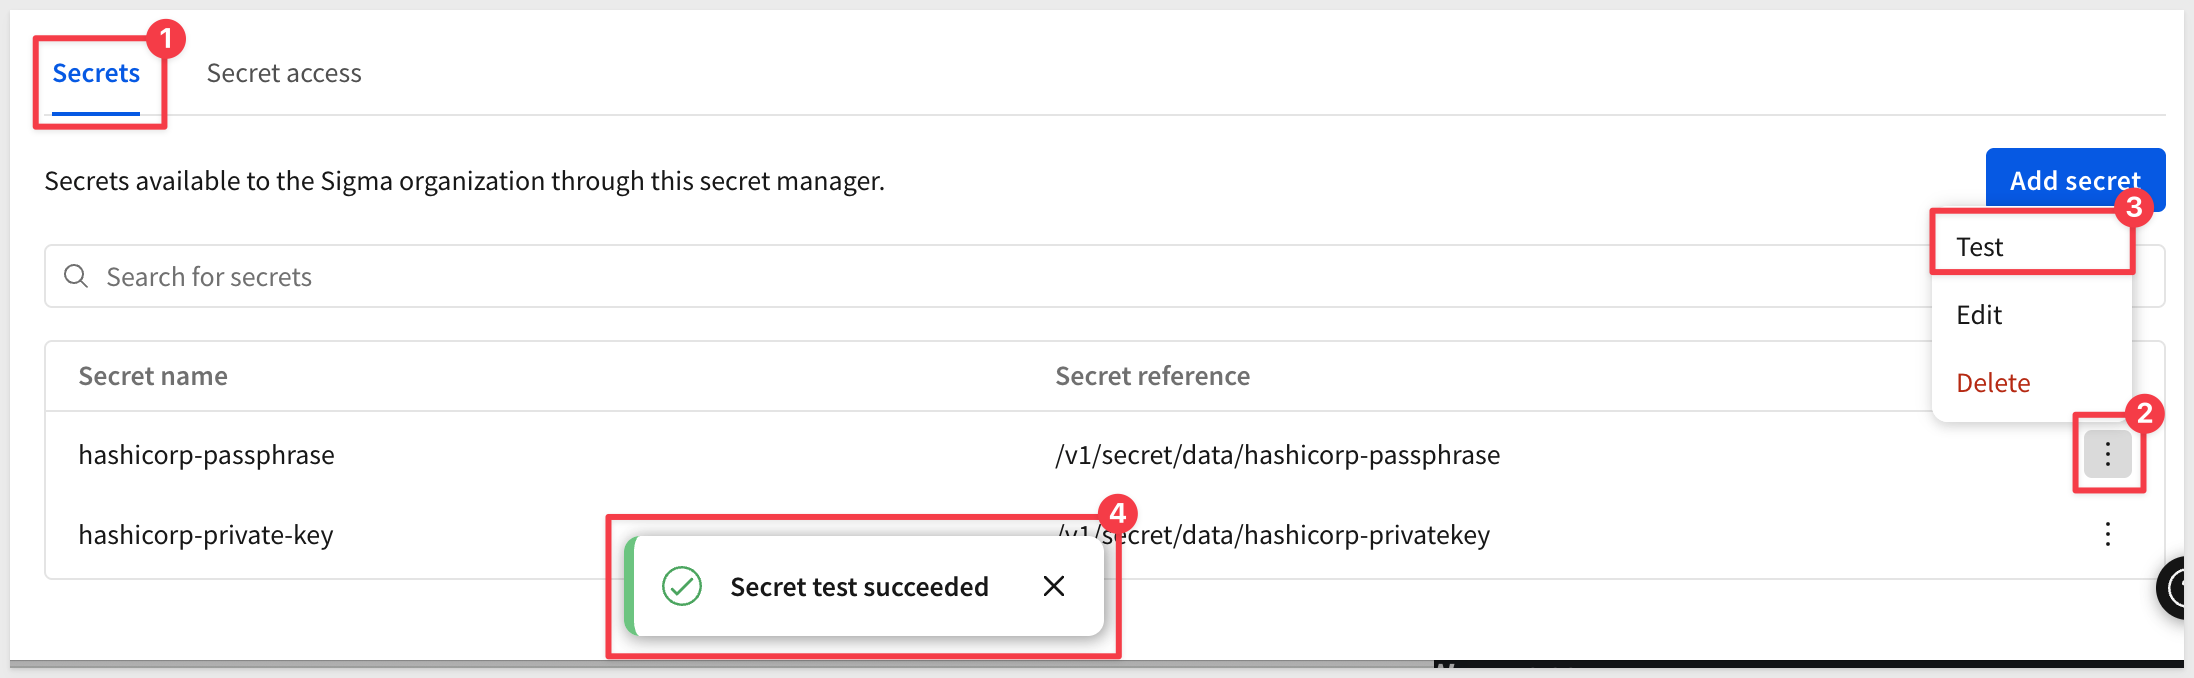
If Test fails, double check that bound_issuer and jwt_validation_pubkeys in auth/sigma-jwt/config match Sigma's Issuer ID and the key copied via the 3-dot menu (not the Key ID), and that the role's bound_subject/bound_audiences match Sigma's Subject ID and the Audience ID you chose when registering the integration.
With a secret added and confirmed working, attach it to whichever connection field needs it. This section uses a Snowflake connection configured with key pair authentication as the running example — if you don't already have a Snowflake key pair, see Snowflake Key-pair Authorization for how to generate one before continuing.
Each sensitive credential field on a connection — Password, Private key, Private key passphrase, depending on the connection type — has its own Use secret manager toggle, so you can mix secret-manager-backed fields with directly-entered ones on the same connection.
Enable the secret manager toggle on a connection
In Sigma, navigate to Administration > Connections, then open the connection you want to update (or create a new one).
On the Private key field, turn on Use secret manager, then fill in:
- Secret manager: the integration you created earlier
- Secret:
hashicorp-privatekey
Repeat for Private key passphrase, this time selecting hashicorp-passphrase as the secret:
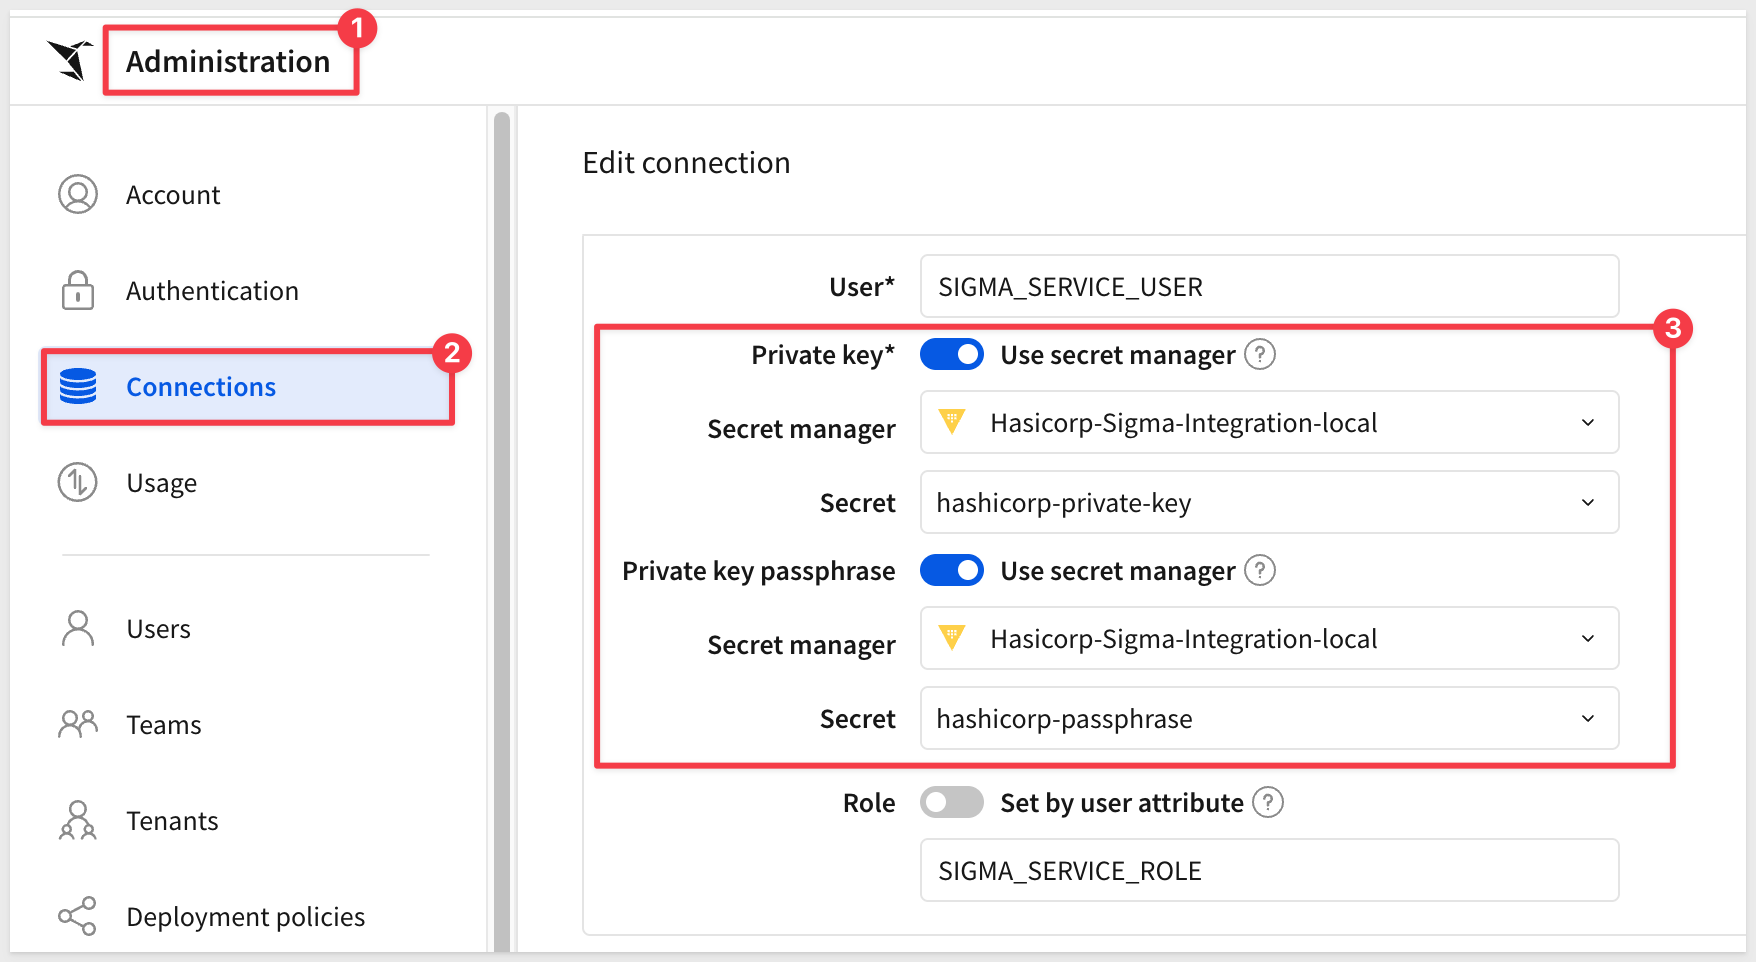
Click Save.
If everything is correct, a success message will appear. If not, an error will appear at the top of the page.
Confirm the connection still works — Browse the connection, open a workbook that uses it, or run a query against it, to verify the secret-manager-backed credentials authenticate correctly.
Before rotating or deleting a secret in Vault, confirm what's actually depending on it — Sigma tracks this for you, so you don't have to find out the hard way.
Check the Secret access tab
In Sigma, navigate to Administration > Authentication > Secret Manager, then open your integration. Click the Secret access tab, next to Secrets.
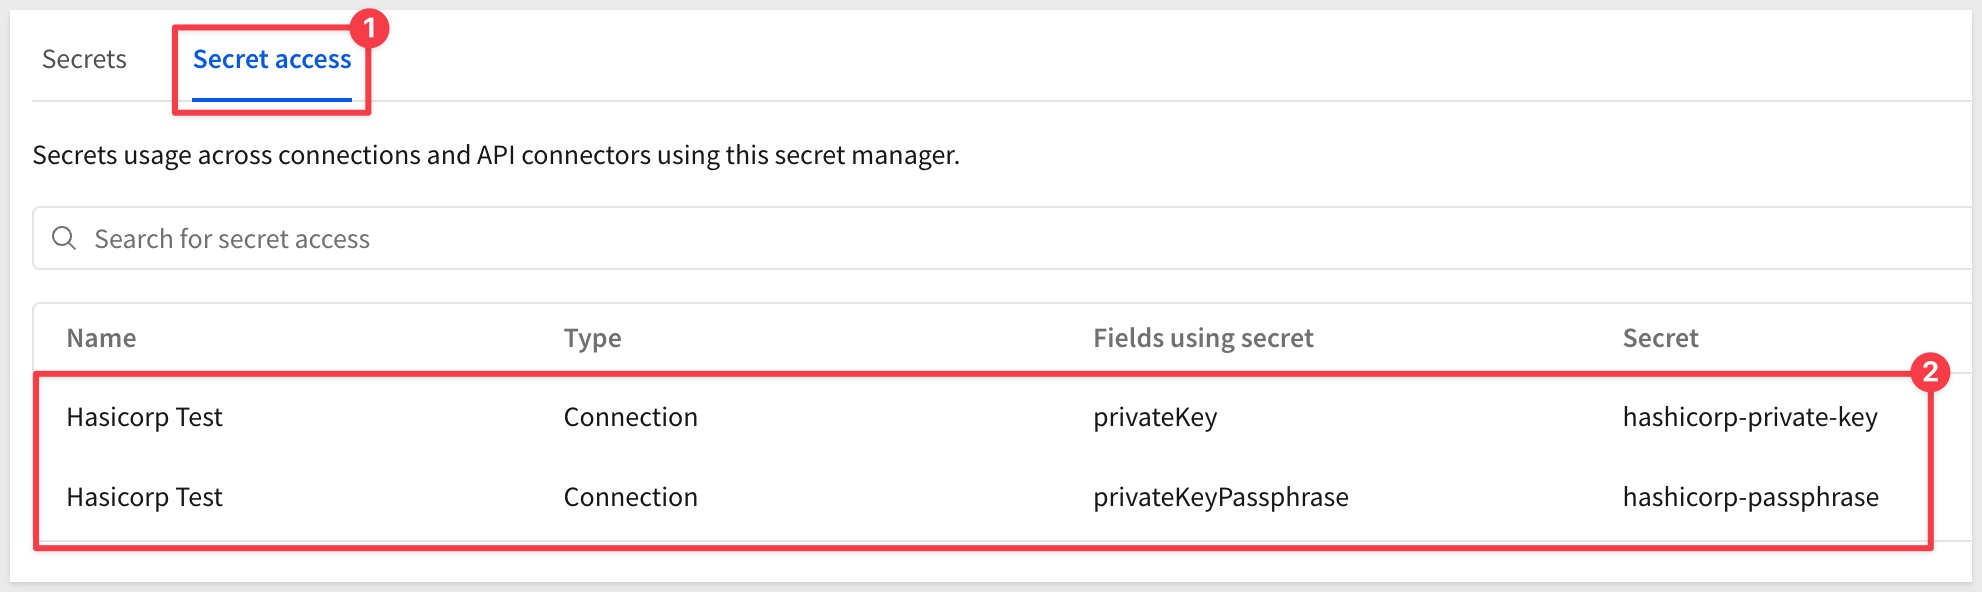
This lists every connection and API connector currently referencing a secret from this integration — check here before rotating a value in Vault or removing a secret from Sigma, so nothing breaks unexpectedly downstream.
Secret manager integrations involve a lot of moving pieces — Vault's own auth model, Sigma's configuration, and the shape of the secret's underlying value. Most problems trace back to one of the issues below.
"zsh: event not found" when running a "vault kv put" command
This happens for two reasons stacked together: pasting curly/smart quotes (" ") instead of straight ones, which your shell doesn't recognize as quotes at all, combined with a value containing ! — common in generated passwords — which triggers your shell's history expansion unless it's genuinely protected by quotes. Retype the command with straight single quotes around the value (value='YourPassword!'), not double quotes — single quotes are the only ones that reliably suppress ! expansion.
Vault "Test" fails even though login succeeds
Sigma does not auto-detect your KV secrets engine version or build the read path for you — Secret reference needs the full Vault API path, not the CLI-shorthand path vault kv commands use. For a KV v2 mount (Vault's default), that's /v1/{mount}/data/{path}, for example /v1/secret/data/hashicorp-privatekey — not secret/hashicorp-privatekey. Getting this wrong still lets the JWT trust handshake succeed (you'll see a valid login), but the actual secret read comes back empty.
"GET /v1/sys/mounts" returns 403 Forbidden
Vault treats the sys/mounts endpoint as root-protected, requiring the sudo capability even for read access — a plain capabilities = ["read"] on that path isn't enough. Add sudo alongside read in your policy's sys/mounts block.
A connection still fails after fixing a secret's value, even though the secret's own "Test" passes
If you corrected a secret's value after an earlier mistake (a wrong passphrase, a corrupted key), the individual secret's Test will reflect the fix immediately — but an existing connection that already references it can hold onto stale state and keep failing anyway. Refreshing the page doesn't always clear this. If toggling Use secret manager off and back on for the affected field doesn't help, create a new connection rather than continuing to edit the old one — this reliably picks up the current, correct secret value.
We connected Sigma to HashiCorp Vault and built a credential flow where nothing sensitive gets typed directly into a Sigma connection — the private key and passphrase for a Snowflake key pair connection live entirely in Vault, and Sigma only ever holds a reference to each one.
The trust mechanism behind this is different from a typical shared-secret setup: Sigma signs its own login requests with a key pair it generates and manages internally, and Vault verifies those signatures against the public key you gave it — no long-lived Vault token ever changes hands. It's the same category of machine-to-machine trust as AWS's role-assumption model, just built on JWTs instead of STS, and it extends to any other Vault-backed credential you'd rather centralize than paste into a connection form.
The payoff compounds once a secret is wired up this way: rotate a value in Vault, and every connection referencing it picks up the change automatically, with nothing to update in Sigma. The Secret access tab means you always know what depends on a given secret before you touch it — turning credential rotation from a guessing game into a lookup.
If your organization already treats Vault as the system of record for credentials, this is how that practice extends to Sigma instead of carving out an exception for it.
Additional Resource Links
Blog
Community
Help Center
QuickStarts
Be sure to check out all the latest developments at Sigma's First Friday Feature page!