Sigma has always been known as a leader in analytics, giving teams a direct line to explore and understand their data without waiting on engineering to build something new.
Sigma has extended that same direct connection to writing data, not just reading it – letting teams update, correct, and enrich tables in their data platform right where they live, without exporting to a spreadsheet or standing up a custom write-back pipeline.
If you've used Sigma input tables before, a Sigma table takes a different approach to that same idea. Instead of holding data inside a single workbook, it turns an existing table in your data platform into a shared, governed surface that any workbook, app, or outside system can read and write – the same live data, reusable everywhere, rather than used in a single workbook or manually copied for reuse.
The two aren't the same thing today, and this QuickStart doesn't assume one replaces the other – which fits depends on whether the data needs to live and move with one workbook, or be shared more broadly.
This QuickStart demonstrates how to use Sigma tables to turn an existing table into a shared, editable data source entirely within the Sigma UI. The data used will come from, and be stored in, Snowflake.
During this demonstration, we will enable admin-controlled write access on a table, edit it directly inside a workbook, add rows a few different ways, build actions that update and delete rows from a right-click menu, and track every change with an audit log along the way.
Along the way you'll learn how to:
- Enable write access on a database table in Snowflake to turn it into a Sigma table
- Reference a Sigma table in a workbook and edit data directly in the grid
- Modify a Sigma table's schema by adding, renaming, and deleting columns
- Add new rows to a Sigma table directly in the grid
- Build actions that update and delete rows from a right-click context menu
- Configure audit logging to track who changed what, and when
For the most recent information on Sigma tables, see: Sigma tables overview
For more information on Sigma's product release strategy, see Sigma product releases
If something doesn't work as expected, here's how to contact Sigma support
Target Audience
Sigma admins and data teams evaluating Sigma tables for operational write-back use cases – capturing edits, corrections, or supplemental data directly against a table in the data platform without standing up a separate application.
Prerequisites
- Any modern browser is acceptable.
- Access to your Sigma environment, with an Admin account type or ownership of the target table.
- Sigma tables enabled for your organization.
- A Snowflake connection with privileges to manage grants on the target schema.
- Ability to create a database, schema, and table in Snowflake -- this QuickStart provides a sample dataset to load, so you don't need an existing table with a primary key already in place.
- Some familiarity with Sigma is assumed. Not all steps will be shown, as the basics are assumed to be understood.

Sigma tables work against a real table in your data platform, so this QuickStart needs one to practice on.
Rather than asking you to shape your own table to fit along the way, we will load a small, ready-made dataset. The data represents a support ticket queue that already has everything a Sigma table needs: a primary key, and a few columns worth editing.
You may notice the table has both a Ticket Id and a Ticket Number. That's deliberate – more on why later, once it actually matters.
USE ROLE ACCOUNTADMIN;
USE WAREHOUSE COMPUTE_WH;

CREATE DATABASE IF NOT EXISTS QUICKSTARTS;
CREATE SCHEMA  IF NOT EXISTS QUICKSTARTS.SIGMA_TABLES_DEMO;
USE SCHEMA QUICKSTARTS.SIGMA_TABLES_DEMO;

CREATE OR REPLACE FILE FORMAT sigma_tables_csv_format
  TYPE = CSV
  FIELD_DELIMITER = ','
  FIELD_OPTIONALLY_ENCLOSED_BY = '"'
  NULL_IF = ('', 'NULL')
  EMPTY_FIELD_AS_NULL = TRUE
  PARSE_HEADER = TRUE;

CREATE OR REPLACE STAGE sigma_tables_demo_stage
  URL = 's3://sigma-quickstarts-main/sigma-tables/'
  FILE_FORMAT = sigma_tables_csv_format;

CREATE OR REPLACE TABLE TICKETS (
  TICKET_ID     VARCHAR,
  TICKET_NUMBER NUMBER,
  SUBJECT       VARCHAR,
  STATUS        VARCHAR,
  PRIORITY      VARCHAR,
  ASSIGNED_TO   VARCHAR,
  CREATED_DATE  TIMESTAMP_NTZ
);

COPY INTO TICKETS FROM @sigma_tables_demo_stage/sigma-tables-sample-data.csv MATCH_BY_COLUMN_NAME = CASE_INSENSITIVE;

ALTER TABLE TICKETS ADD PRIMARY KEY (TICKET_ID) RELY;

GRANT USAGE                  ON DATABASE QUICKSTARTS                          TO ROLE SIGMA_SERVICE_ROLE;
GRANT USAGE                  ON SCHEMA   QUICKSTARTS.SIGMA_TABLES_DEMO        TO ROLE SIGMA_SERVICE_ROLE;
GRANT CREATE TABLE           ON SCHEMA   QUICKSTARTS.SIGMA_TABLES_DEMO        TO ROLE SIGMA_SERVICE_ROLE;
GRANT SELECT                 ON ALL    TABLES IN SCHEMA QUICKSTARTS.SIGMA_TABLES_DEMO TO ROLE SIGMA_SERVICE_ROLE;
GRANT SELECT                 ON FUTURE TABLES IN SCHEMA QUICKSTARTS.SIGMA_TABLES_DEMO TO ROLE SIGMA_SERVICE_ROLE;
GRANT UPDATE, INSERT, DELETE ON ALL    TABLES IN SCHEMA QUICKSTARTS.SIGMA_TABLES_DEMO TO ROLE SIGMA_SERVICE_ROLE;
GRANT UPDATE, INSERT, DELETE ON FUTURE TABLES IN SCHEMA QUICKSTARTS.SIGMA_TABLES_DEMO TO ROLE SIGMA_SERVICE_ROLE;

SELECT * FROM QUICKSTARTS.SIGMA_TABLES_DEMO.TICKETS;
Click to Run all and verify the data landed correctly:
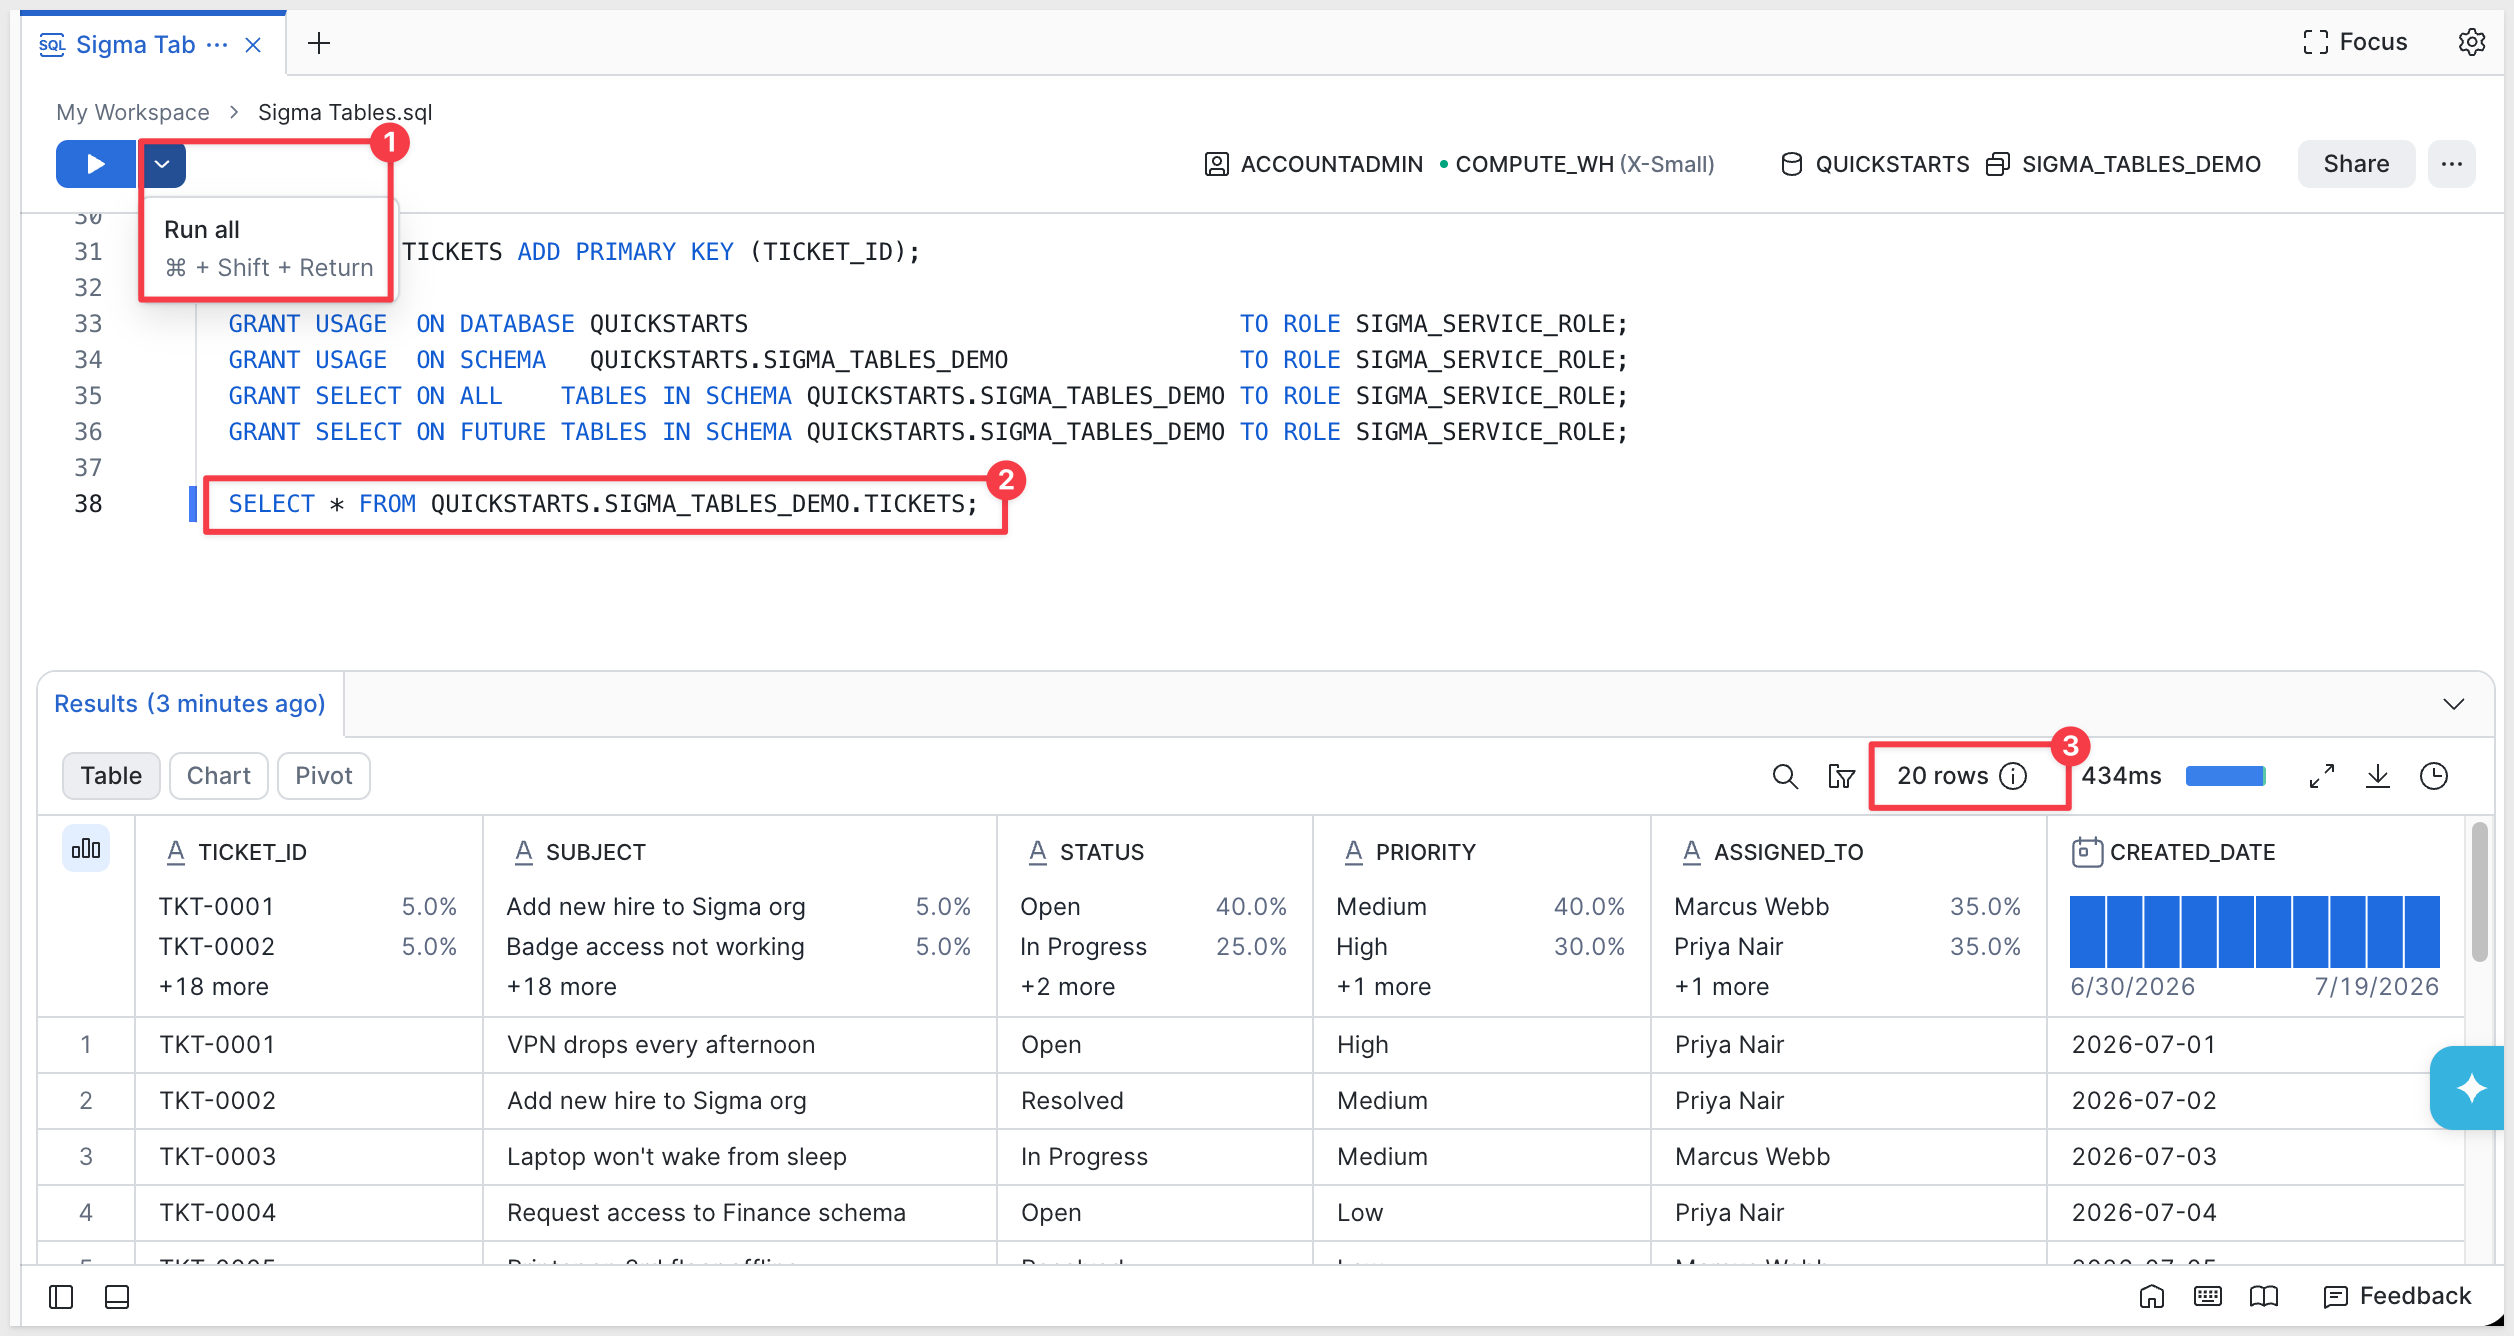
Expected results:
ROW_COUNT:20DISTINCT_STATUSES:4
You now have a TICKETS table – open tickets, a few resolved, a few closed – ready to turn into a Sigma table.
Turning an existing database table into a Sigma table means turning on write access for it, from Sigma. The Snowflake-side privileges are already in place from "Prepare the Demo Data" – what's left is access granted inside Sigma.
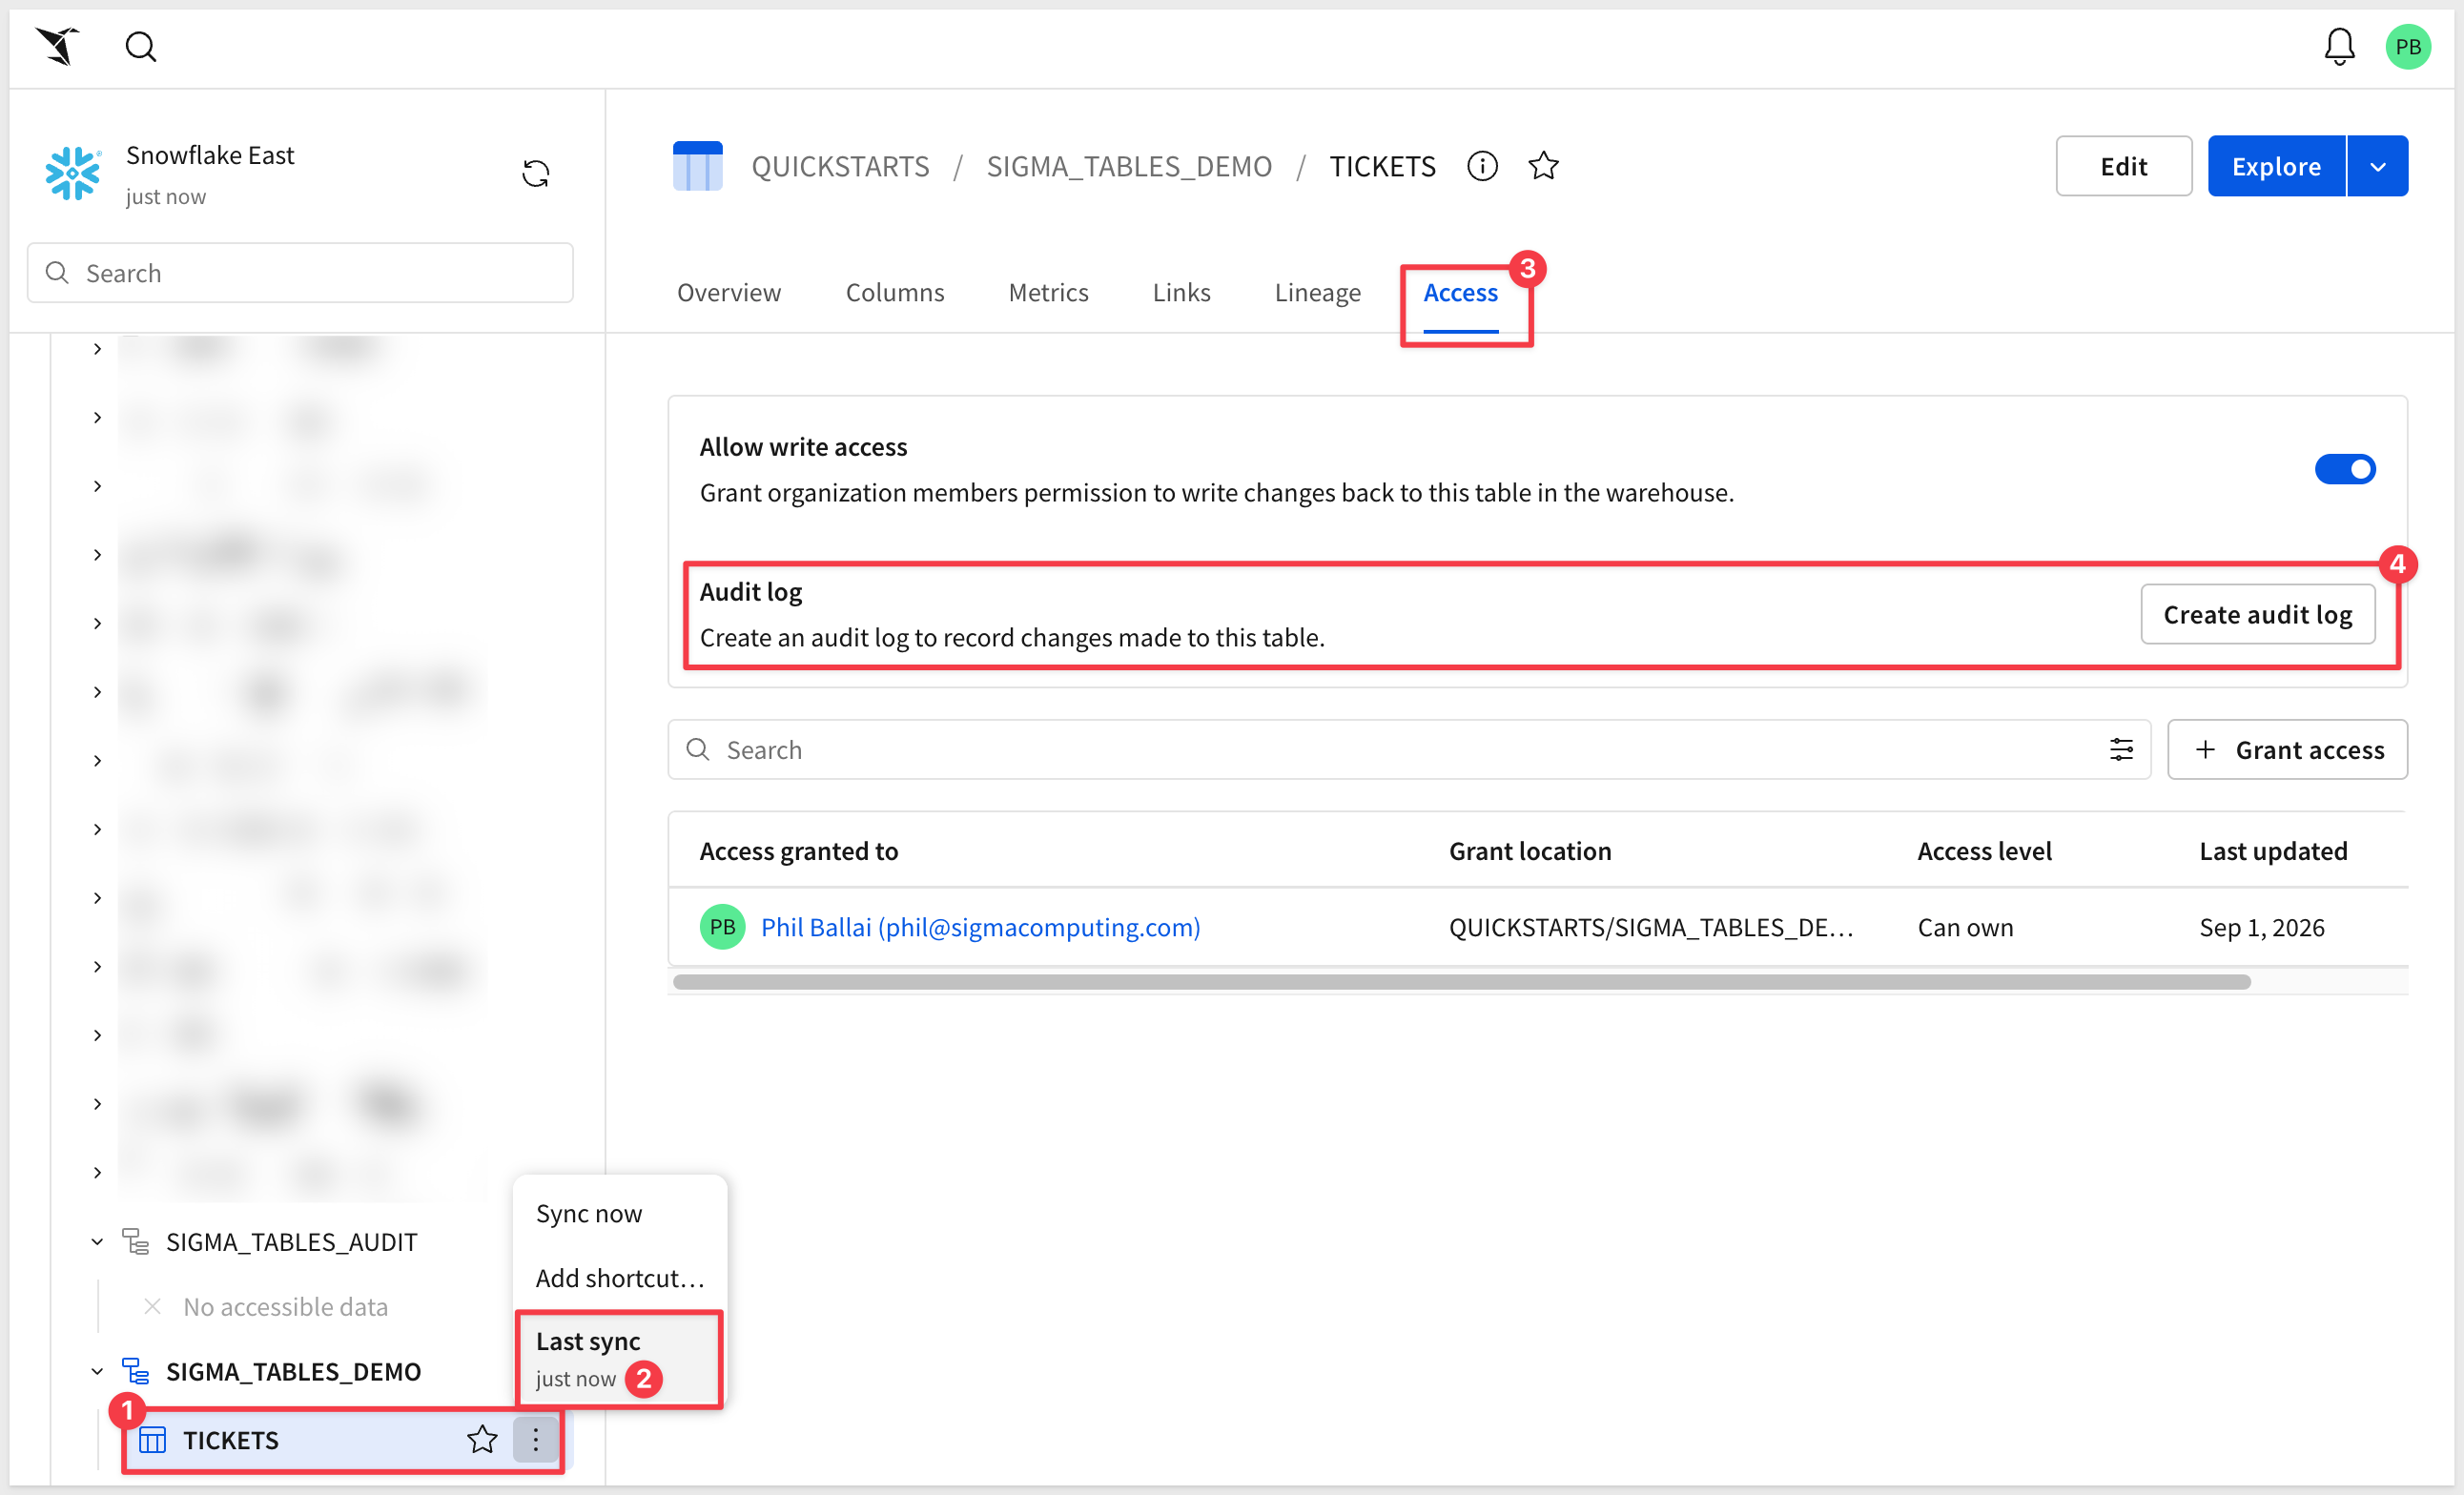
1. In Sigma, browse to the table through the connection explorer: your Snowflake connection, then QUICKSTARTS > SIGMA_TABLES_DEMO > TICKETS. Select the Access tab.
Toggle on Allow write access. This grants organization members permission to write changes back to this table in the warehouse:
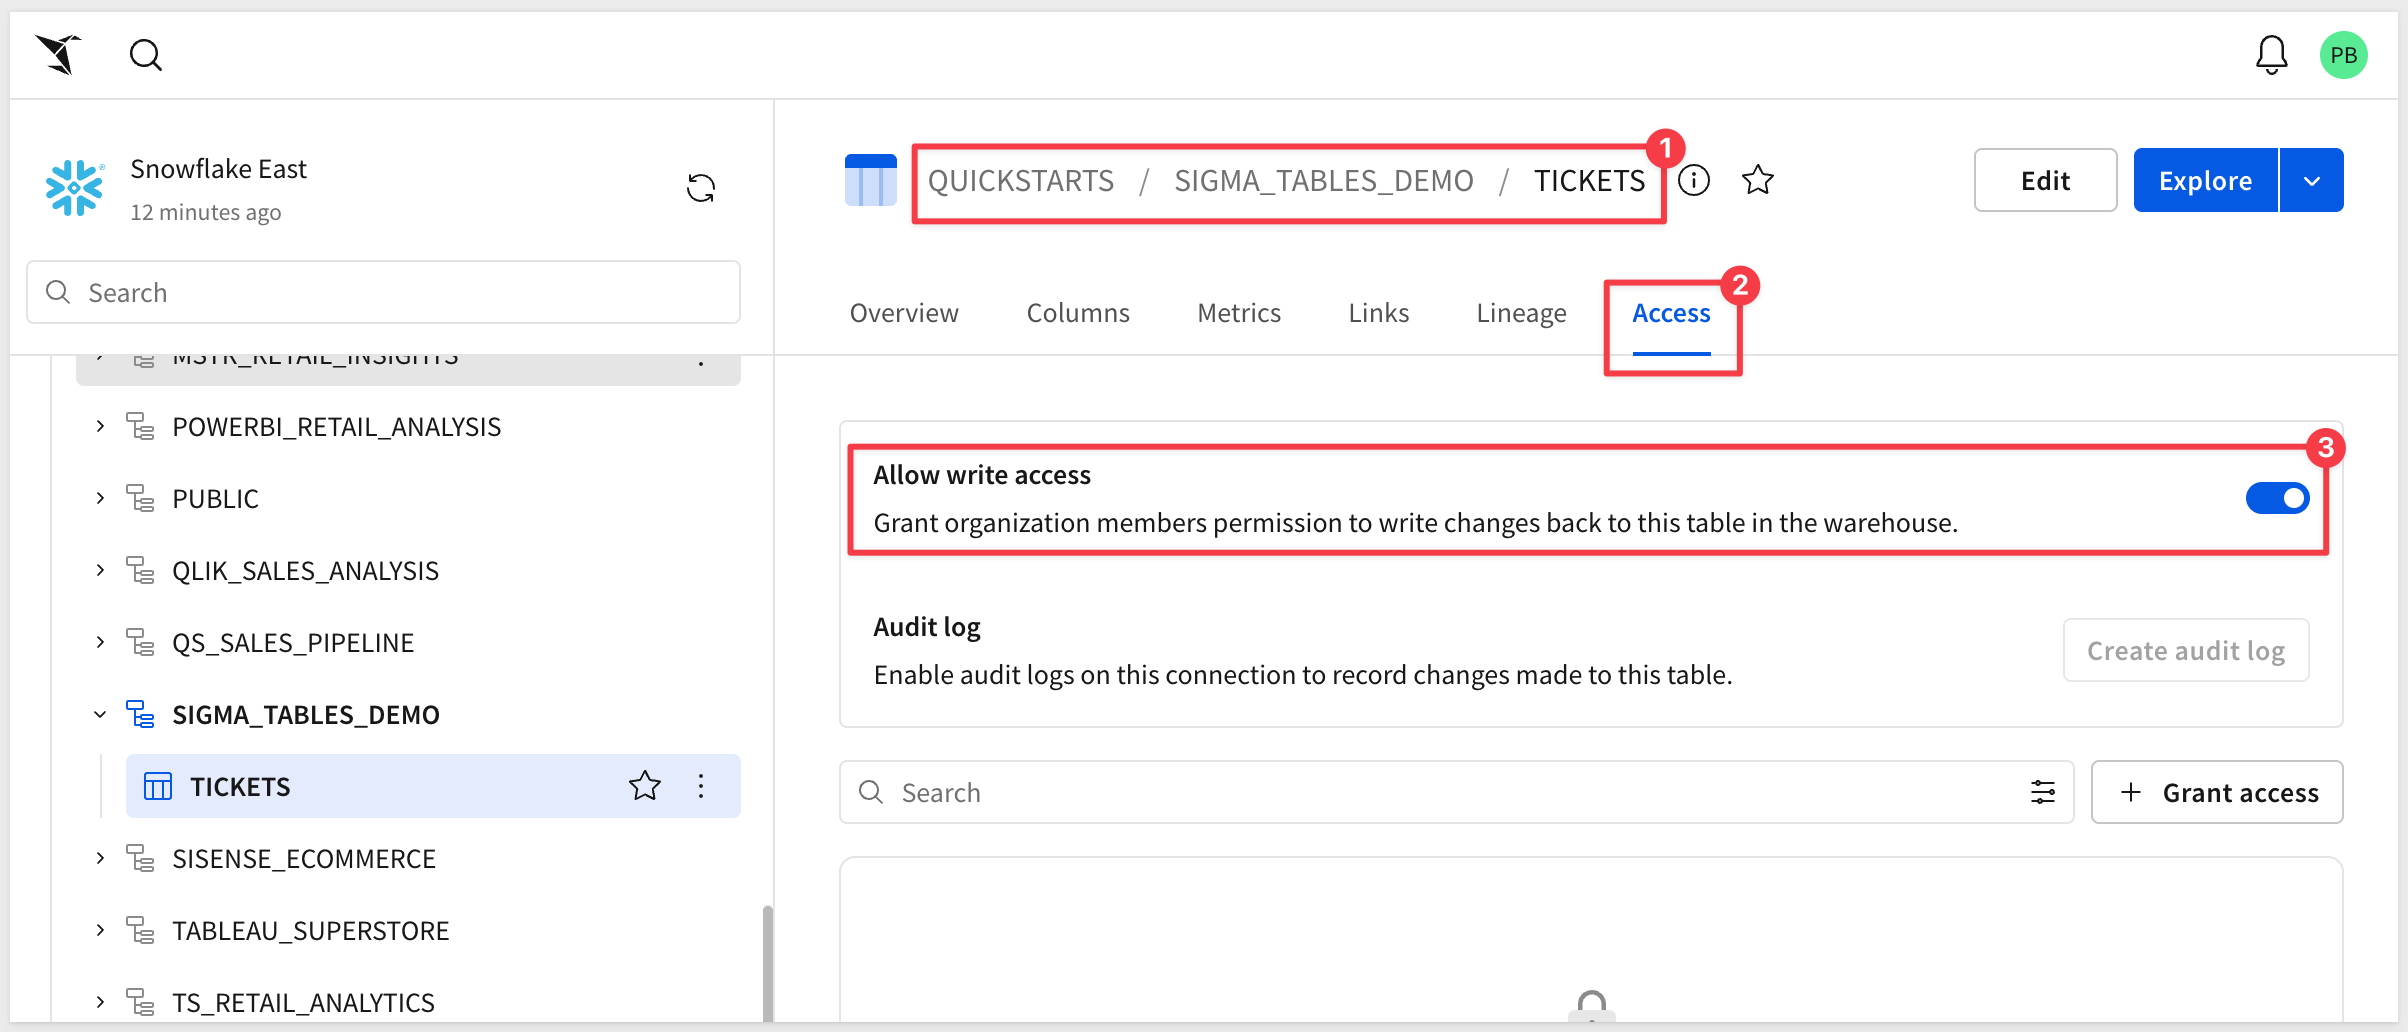
2. No one has access to the table yet, even with write access turned on.
Click Grant access, search for yourself (or whoever needs to work with the table), and choose Can own.
Can own is what this QuickStart uses going forward, since later sections also change the table's structure, not just its data.
For the full breakdown of access levels and how to configure them for other users, see Configure data access for Sigma tables
Click Save:
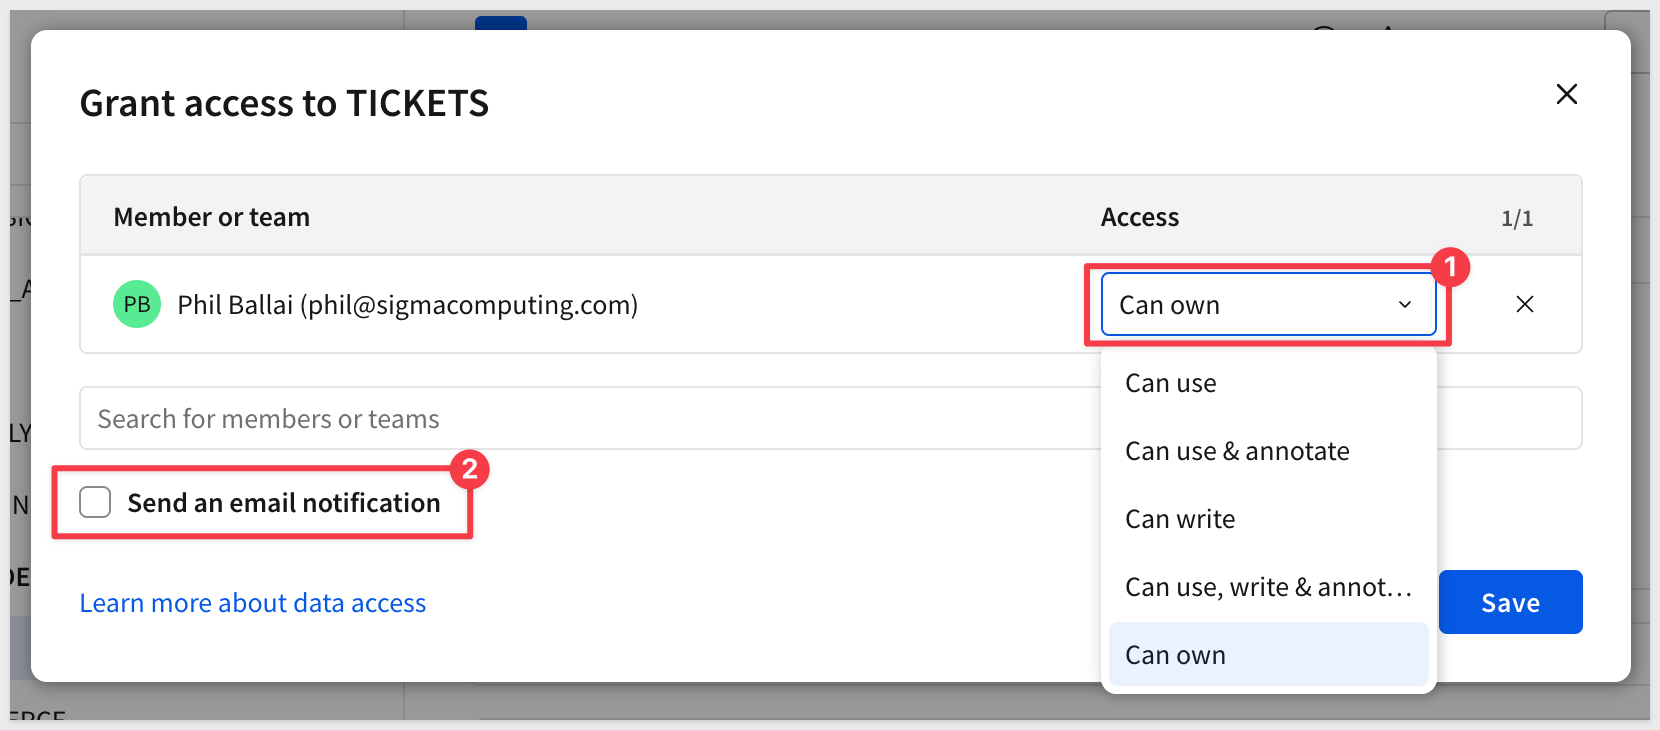
TICKETS is now a Sigma table. It's still the same table in Snowflake – Sigma didn't copy it anywhere – but it can now be edited from Sigma, with every change written straight back to Snowflake.
One more change while we are here to demonstrate how to deal with potential data type issues.
Click the Edit button.
Click the Columns tab and change the CREATED_DATE column Format to Date time.
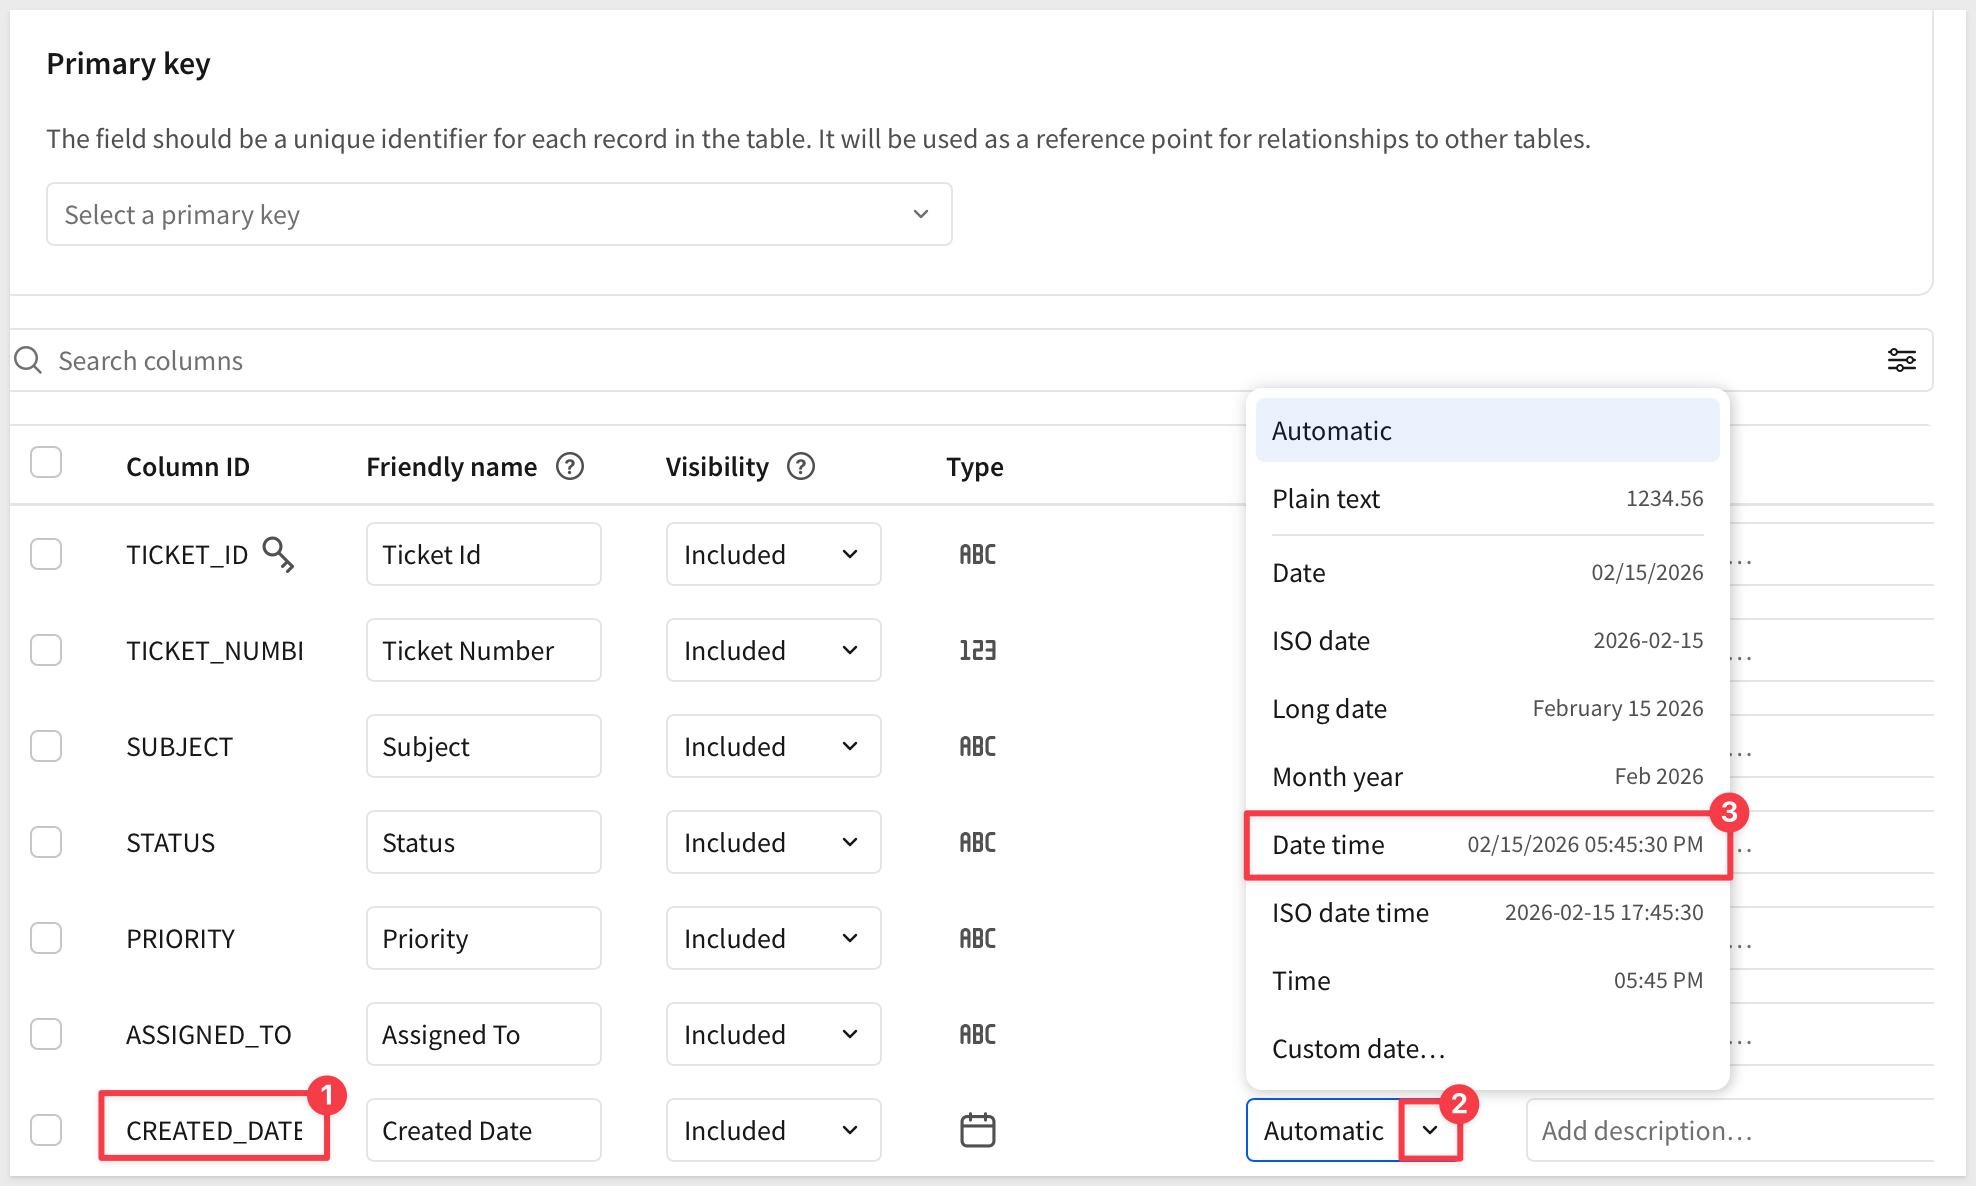
Click Publish to save the change.
Enable Audit Logging
Sigma table audit logs are append-only tables Sigma creates in your data platform. You can view an audit log and add it to a workbook the same way you would any other table in the connection. Each entry in the audit log records details about an individual data or schema change that was attempted or committed.
1. In Snowflake, create a schema for the audit log to write to, and give your Sigma service identity access to it:
USE ROLE ACCOUNTADMIN;
USE WAREHOUSE COMPUTE_WH;

CREATE SCHEMA IF NOT EXISTS QUICKSTARTS.SIGMA_TABLES_AUDIT;

GRANT USAGE        ON SCHEMA QUICKSTARTS.SIGMA_TABLES_AUDIT TO ROLE SIGMA_SERVICE_ROLE;
GRANT CREATE TABLE ON SCHEMA QUICKSTARTS.SIGMA_TABLES_AUDIT TO ROLE SIGMA_SERVICE_ROLE;
GRANT SELECT ON ALL    TABLES IN SCHEMA QUICKSTARTS.SIGMA_TABLES_AUDIT TO ROLE SIGMA_SERVICE_ROLE;
GRANT SELECT ON FUTURE TABLES IN SCHEMA QUICKSTARTS.SIGMA_TABLES_AUDIT TO ROLE SIGMA_SERVICE_ROLE;
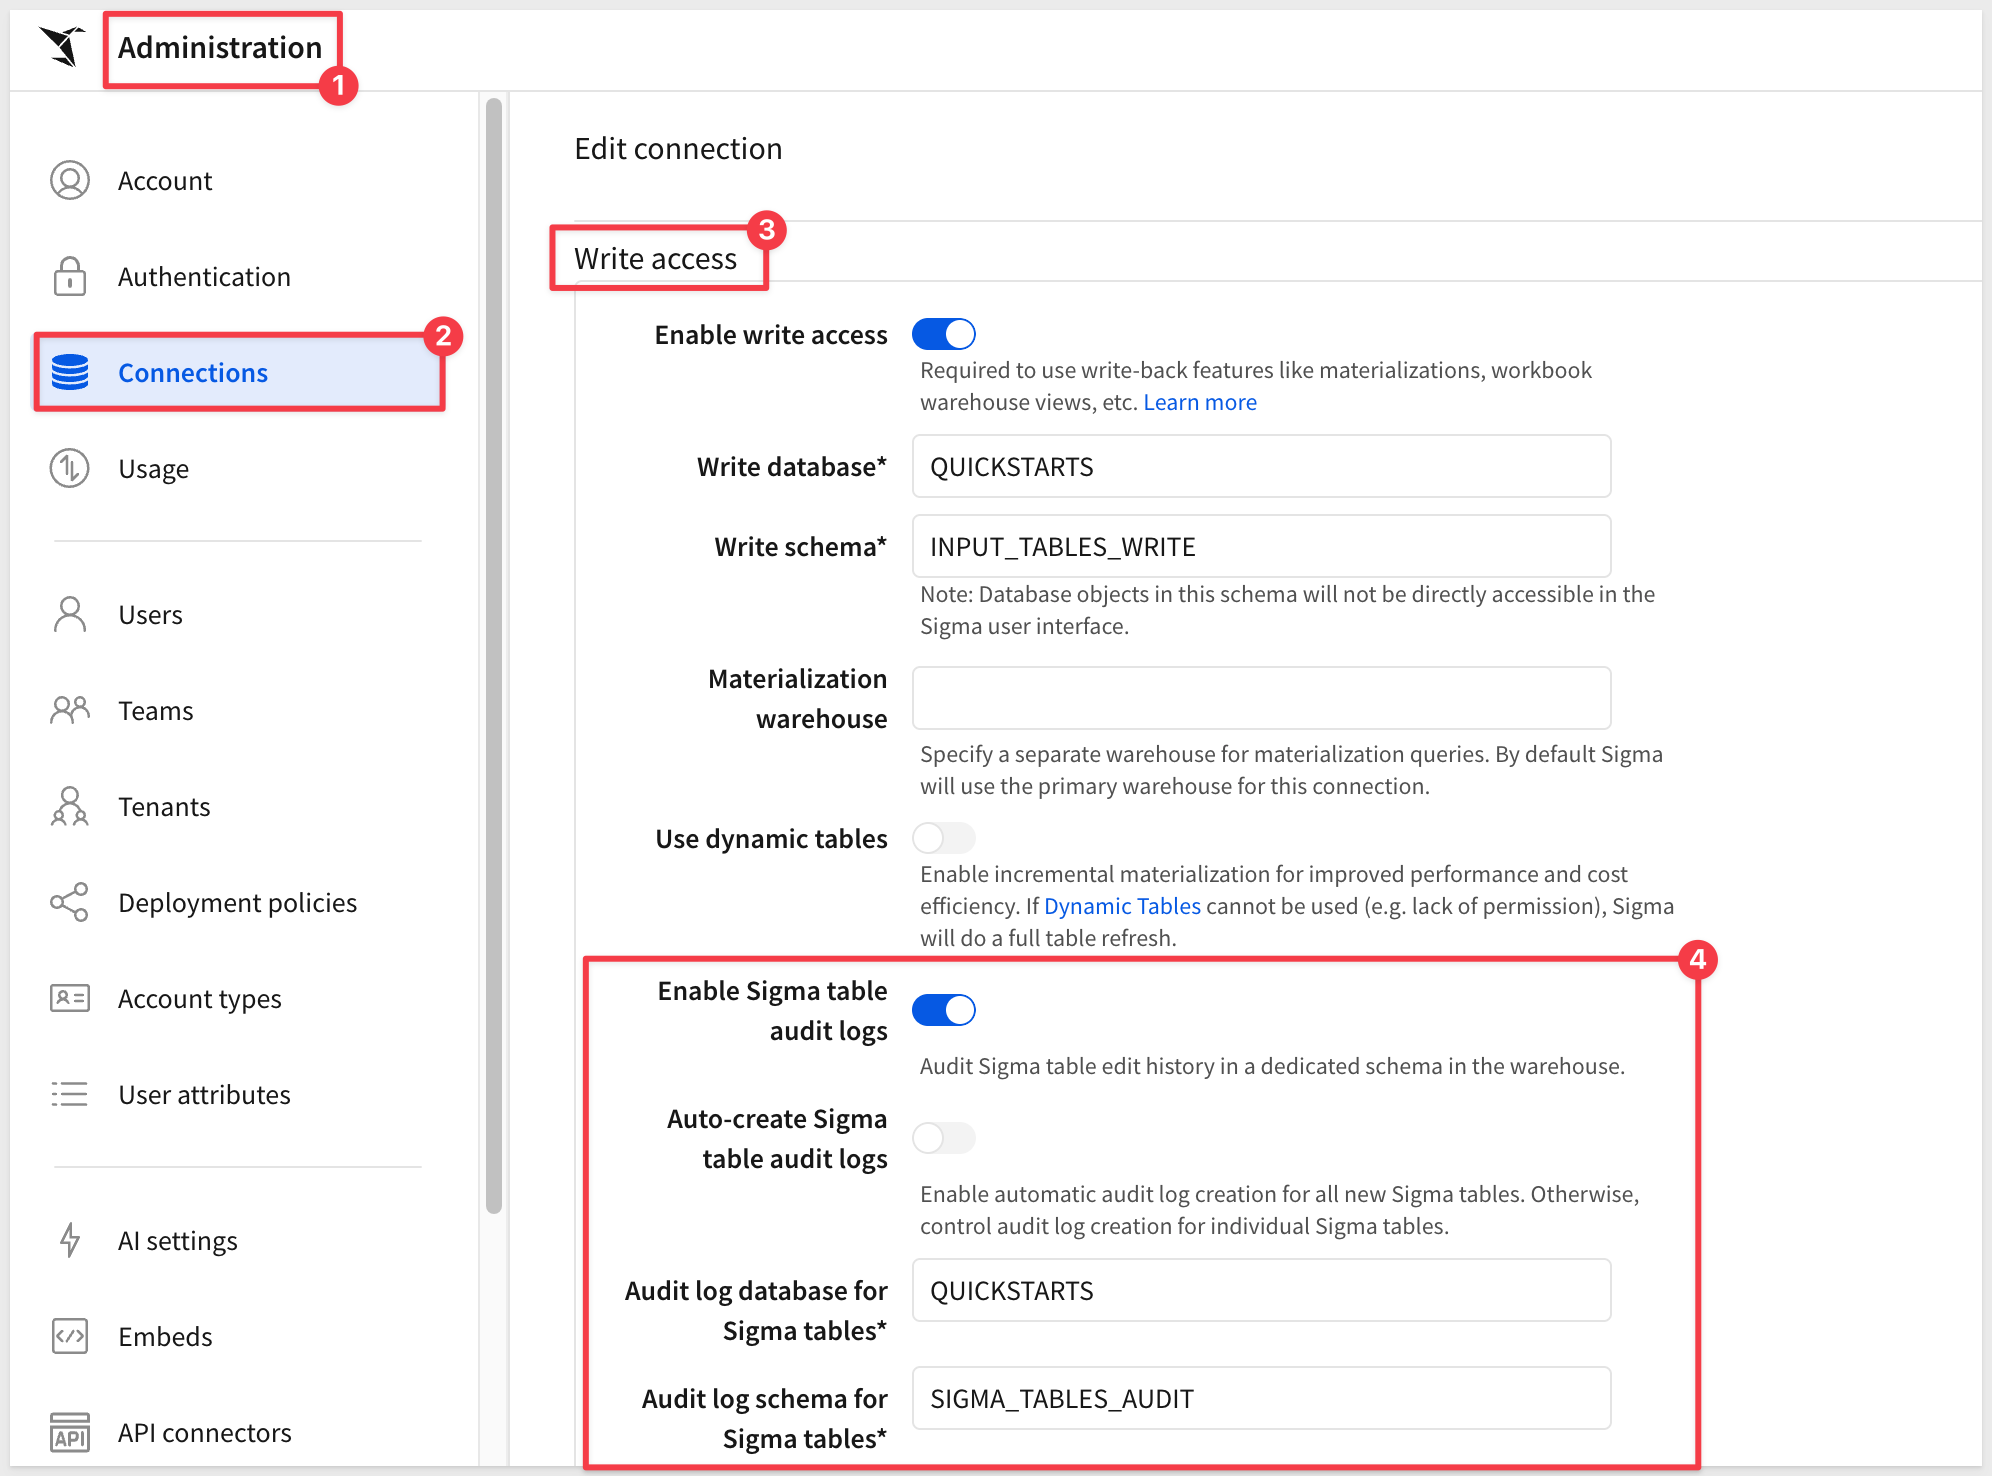
2. In Sigma, go to Administration > Connections, select your Snowflake connection, and turn on Enable Sigma table audit logs.
3. For Audit log database for Sigma tables and Audit log schema for Sigma tables, enter QUICKSTARTS and SIGMA_TABLES_AUDIT – the schema you just created.
Leave Auto-create Sigma table audit logs on if you want every future Sigma table on this connection to get an audit log automatically; turn it off to create them one table at a time instead.
Save the changes.
4. Back on the TICKETS table's Access tab, click Create audit log.
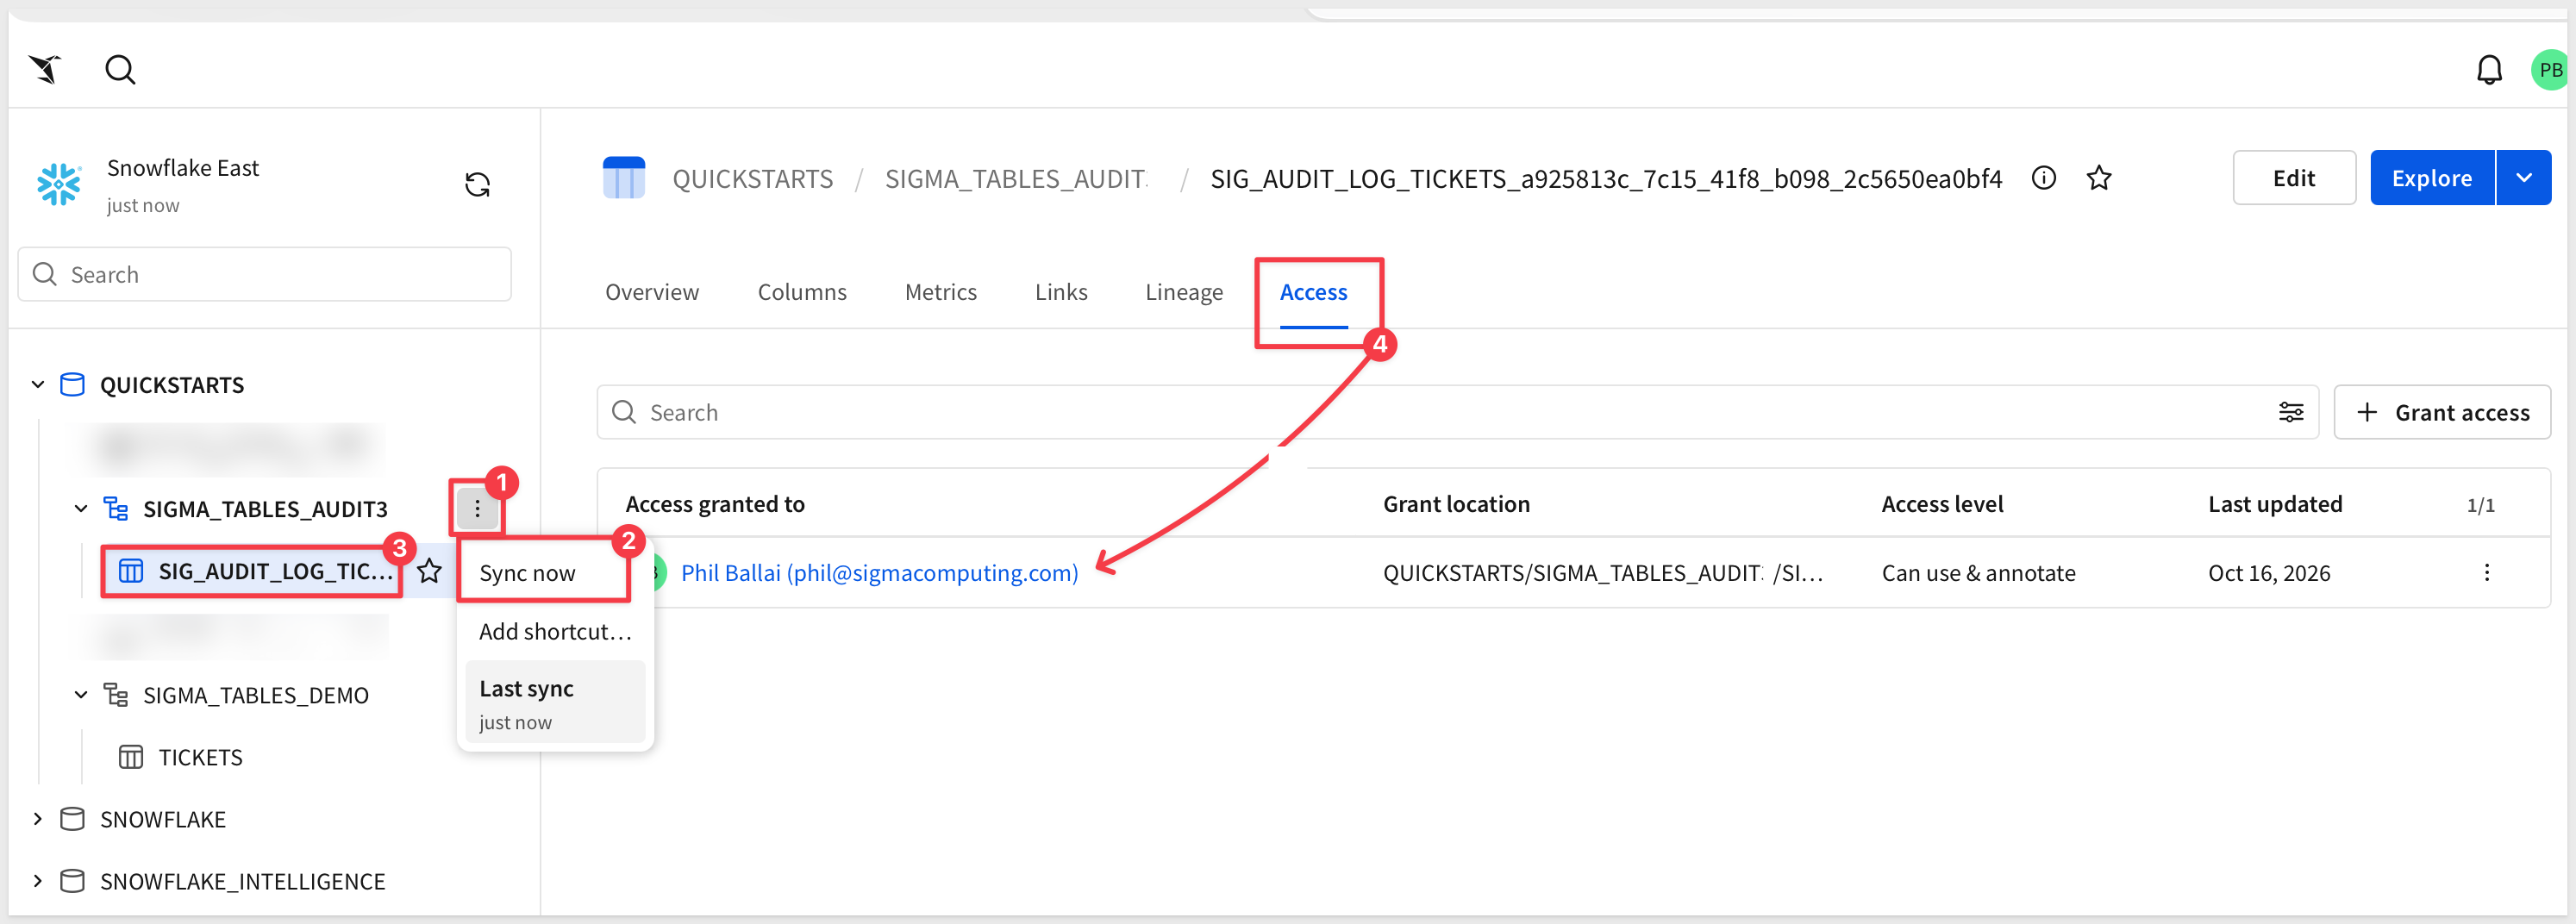
Once created, we can Sync the SIGMA_TABLES_AUDIT table and observe the new log table appear (the name will vary).
Notice that a grant has been automatically added for us:
A Sigma table doesn't need its own dedicated workbook – reference it from any workbook that needs it, the same way you'd add any other table. Since it's still the same table in Snowflake, edits made in one workbook show up everywhere else TICKETS is used.
1. From the TICKETS table page – the same page you were just on to grant access – click Explore.
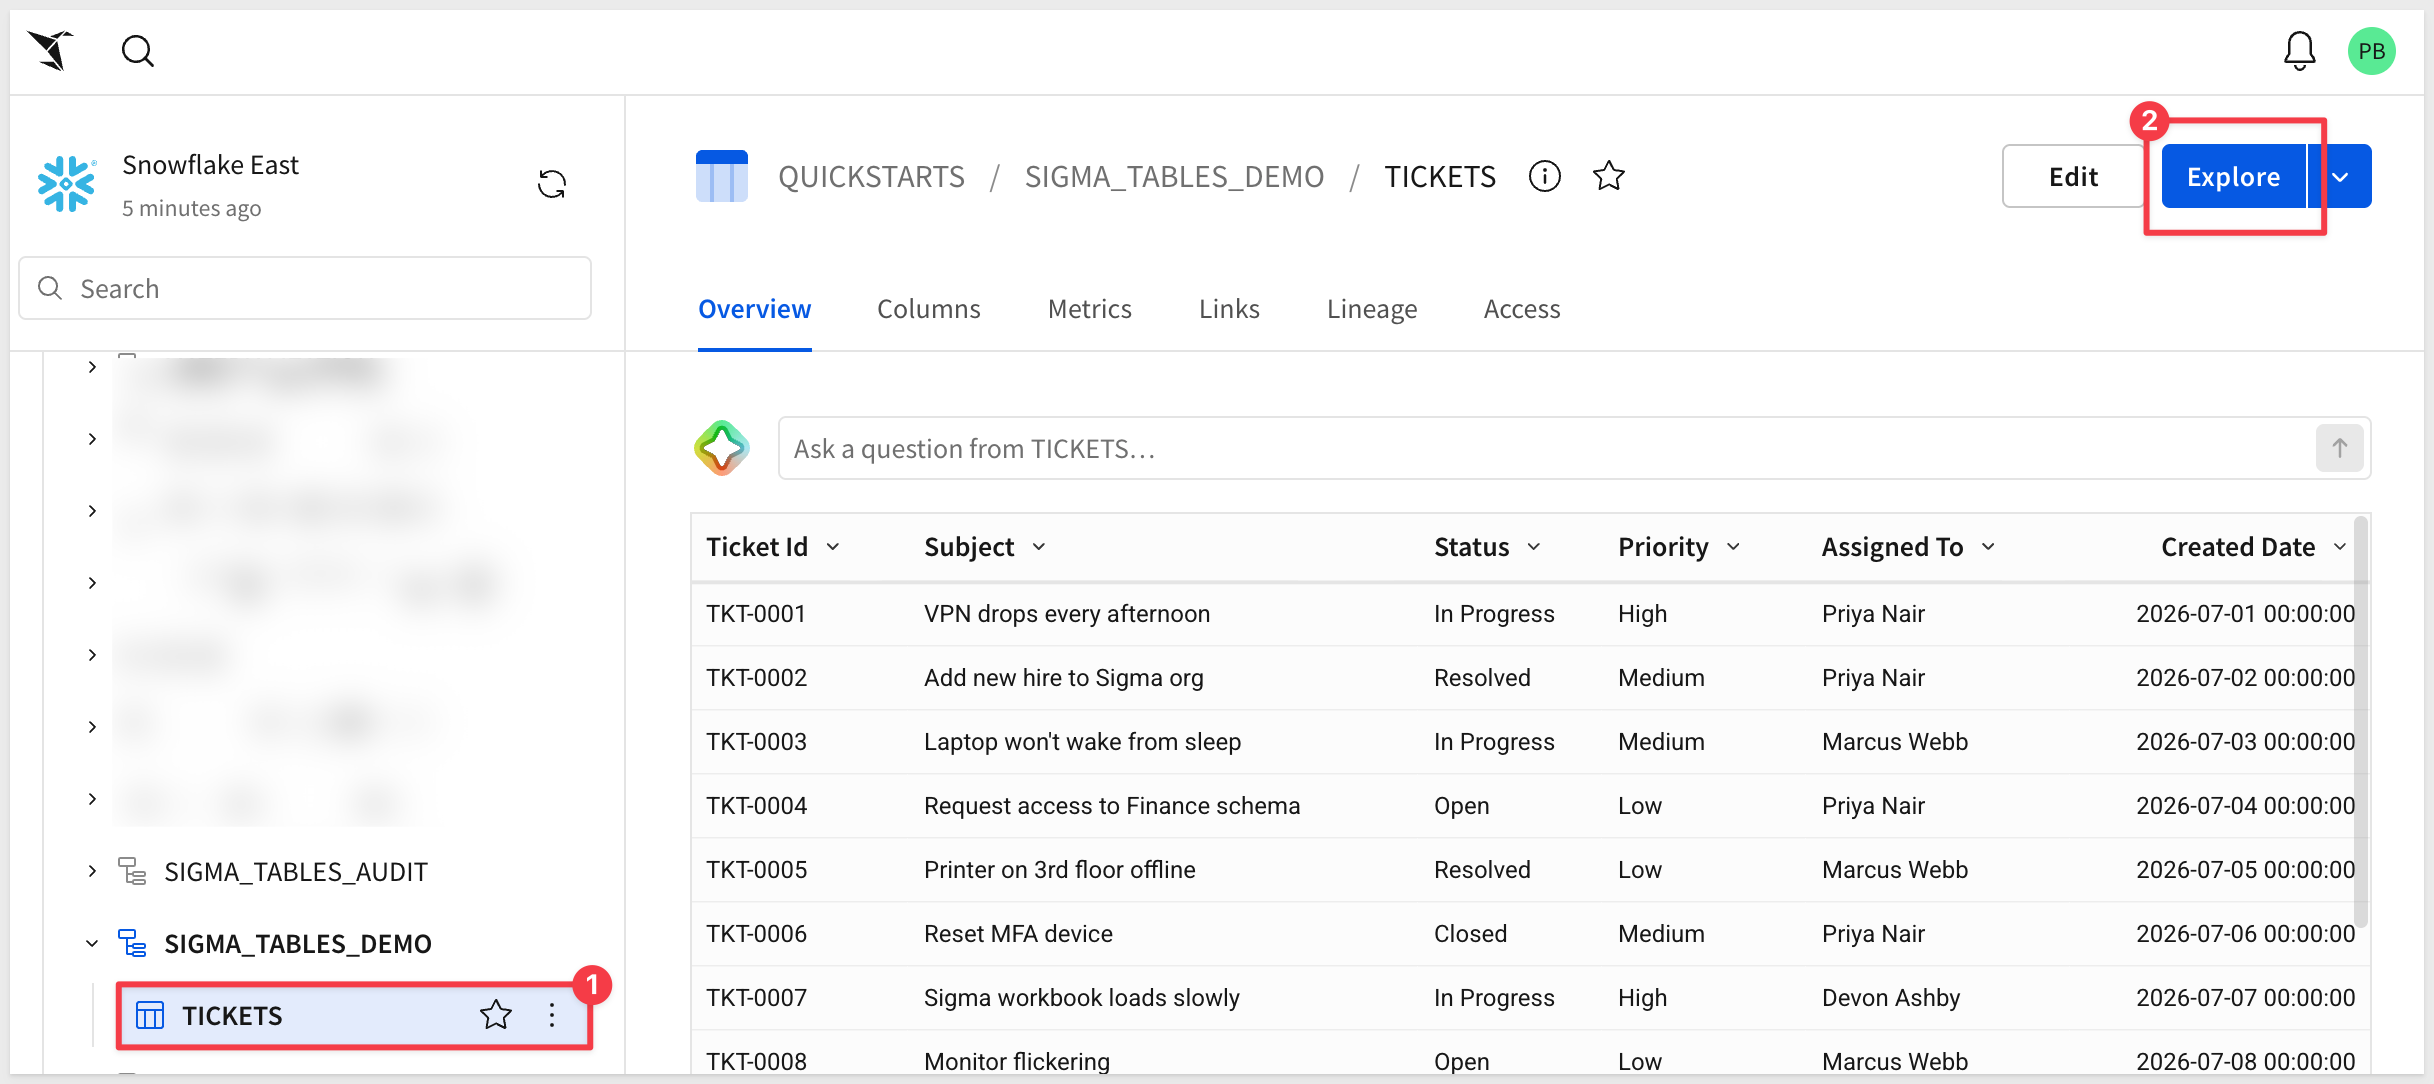
Sigma opens a new workbook draft with TICKETS already added as a table element, ready to edit.
Click Save as and name the new workbook:
Sigma Tables QuickStart
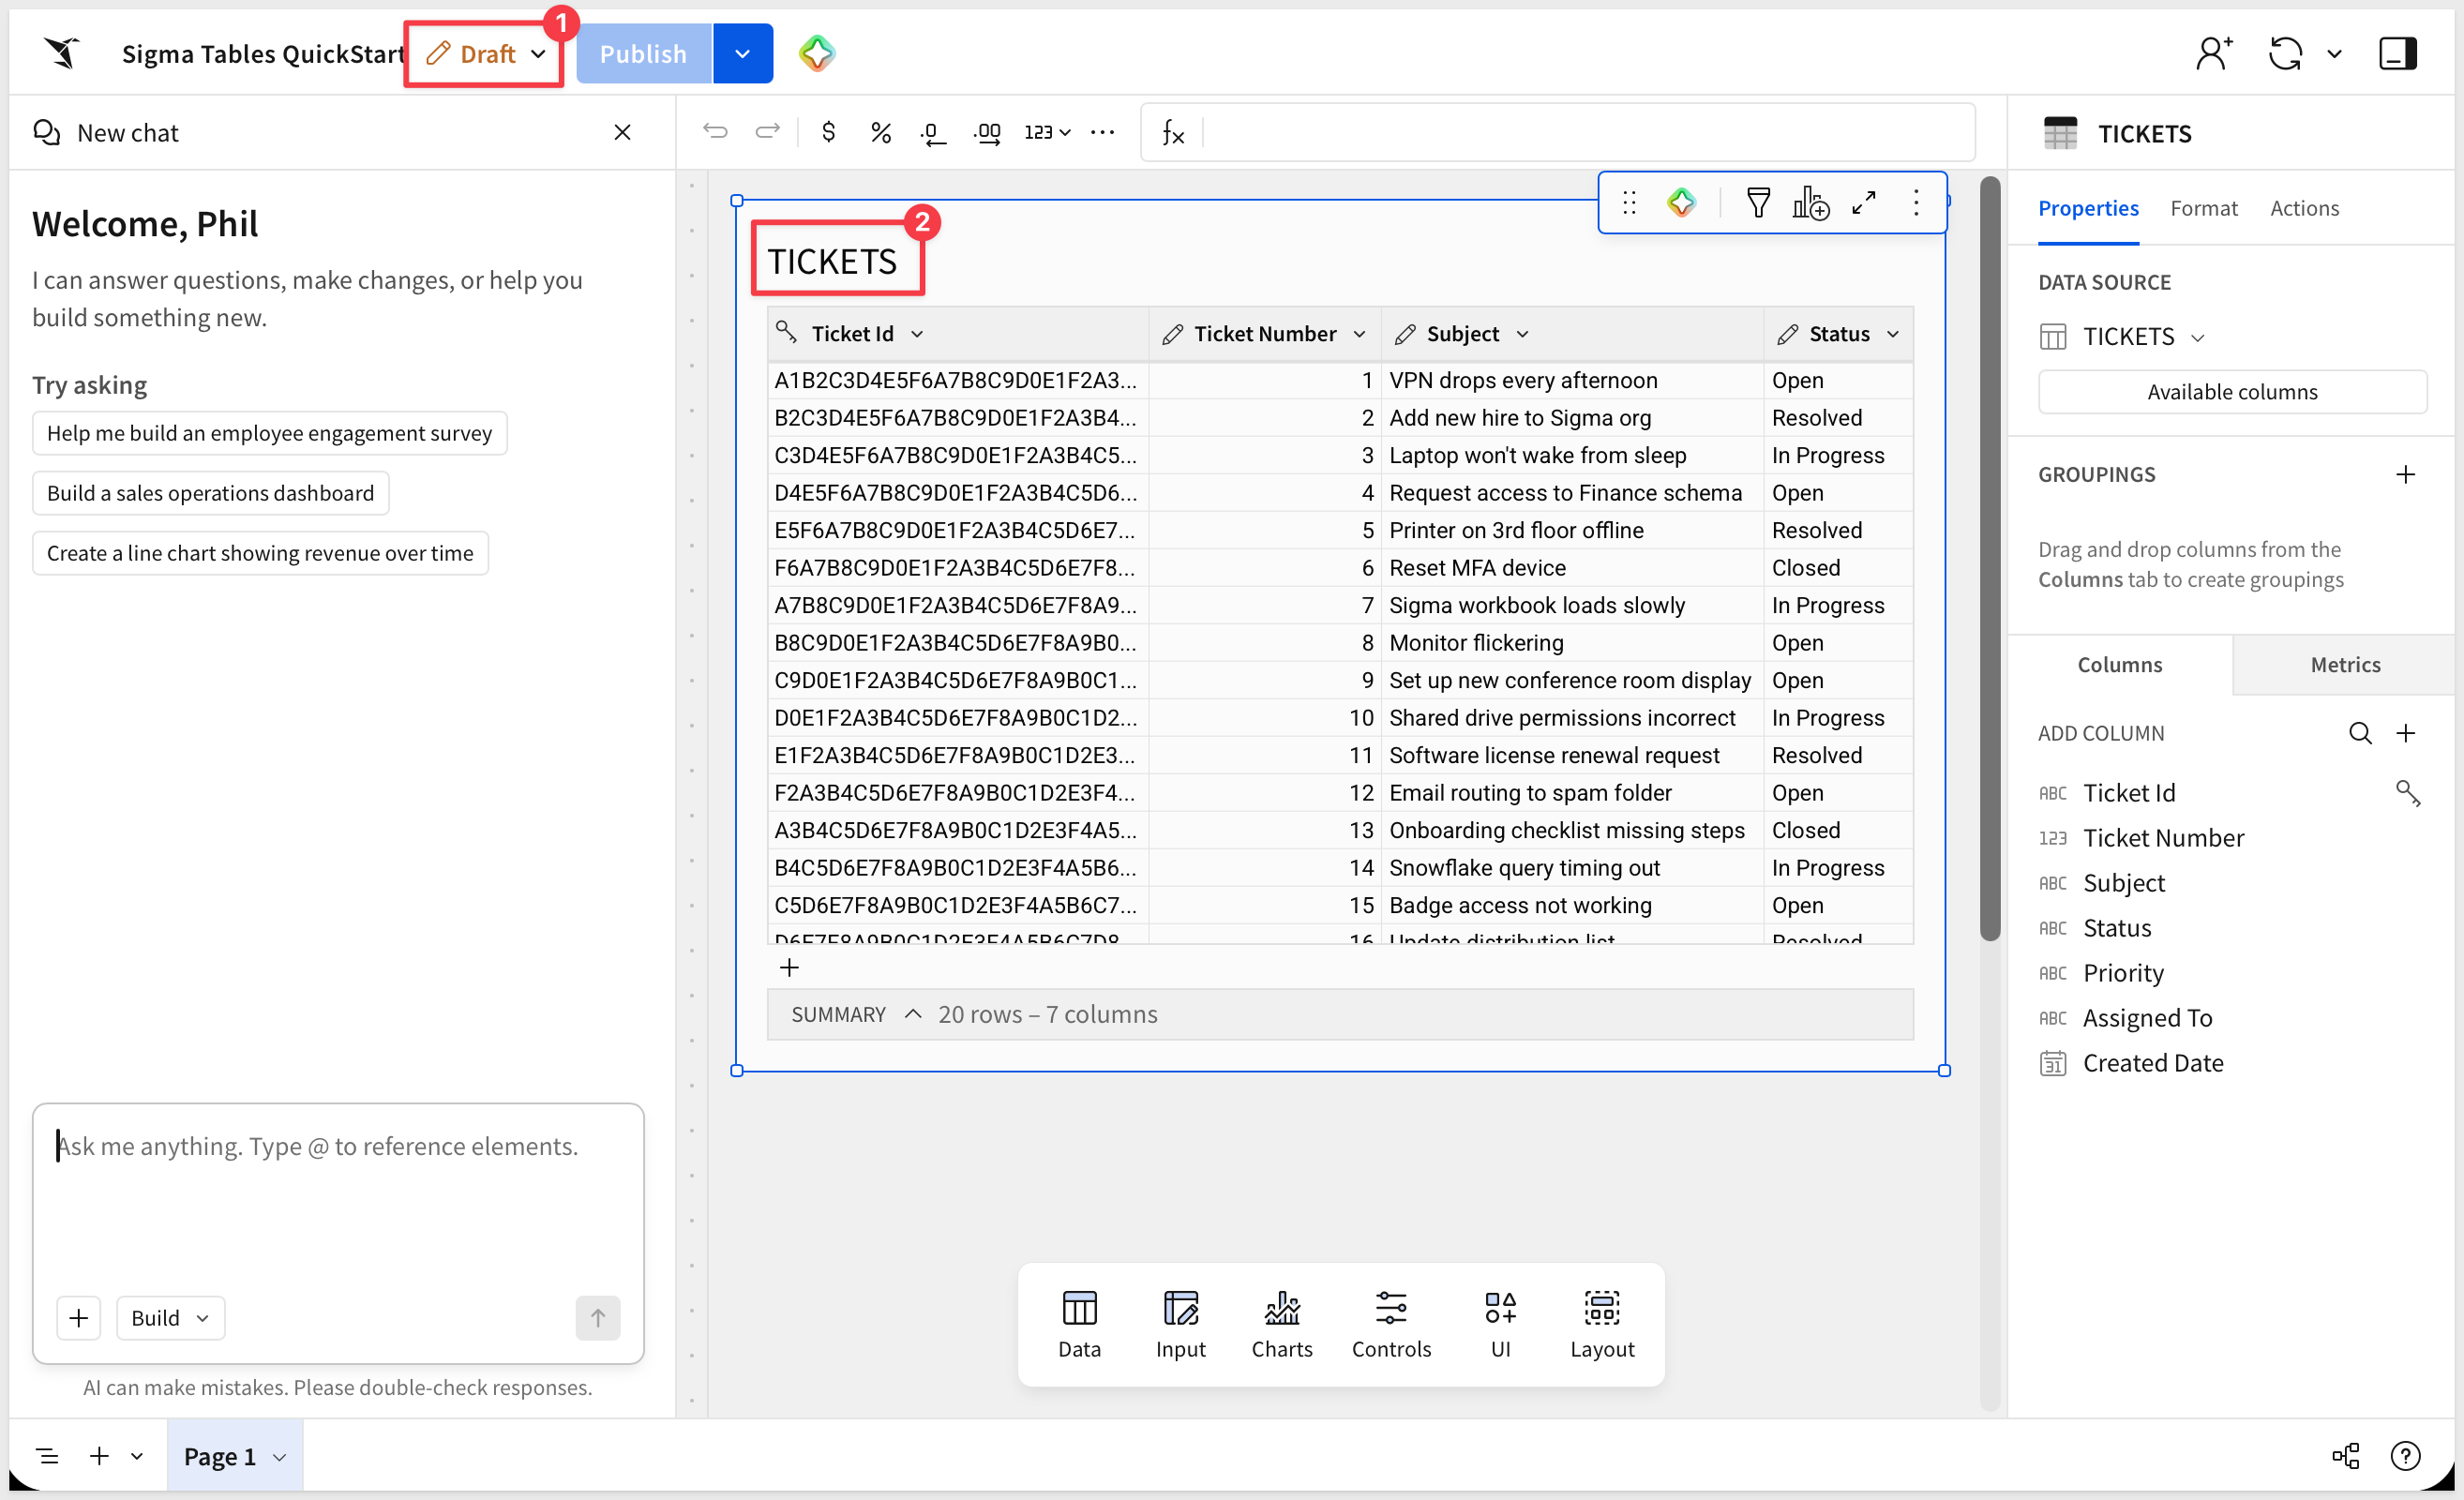
Editing a Sigma table works like editing any spreadsheet cell – select it, type a new value, and press Enter.
What's different from a regular Sigma table is where that value ends up: written straight back to TICKETS in Snowflake, not just changed on screen.
It doesn't matter whether the workbook is in draft or published mode – with Can own access on the table, editing a cell writes straight to Snowflake either way. A Sigma table edit isn't a workbook change waiting to be published; it's a live write to the underlying table.
1. In the workbook, select a cell in an editable column. For example change the STATUS on ticket number 1 to In Progress and press Enter.
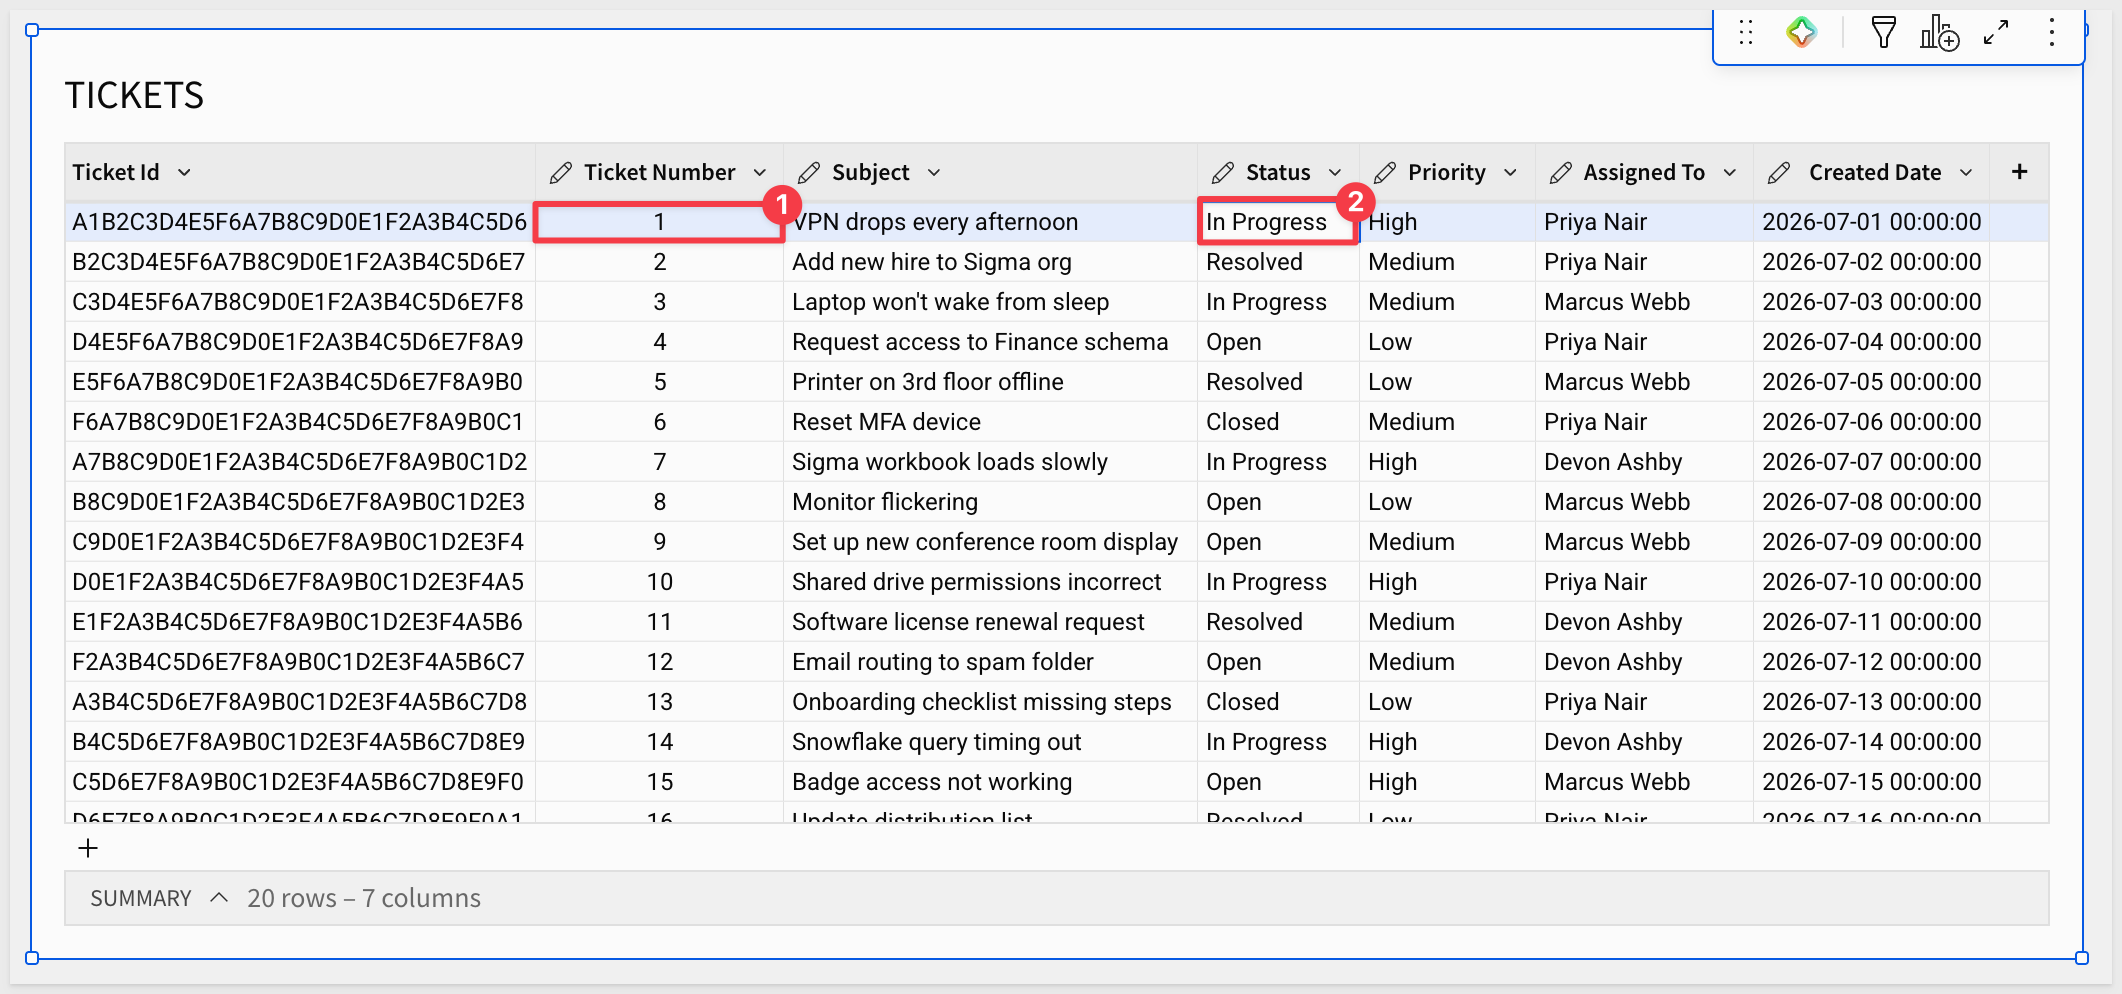
The change writes back to TICKETS in Snowflake immediately – no publish step required.
Anyone else with access to this Sigma table, in this workbook or any other, sees the update the next time their view refreshes.
We can verify the change landed in Snowflake for TICKET_NUMBER 1:
SELECT * FROM QUICKSTARTS.SIGMA_TABLES_DEMO.TICKETS
WHERE TICKET_NUMBER = '1';
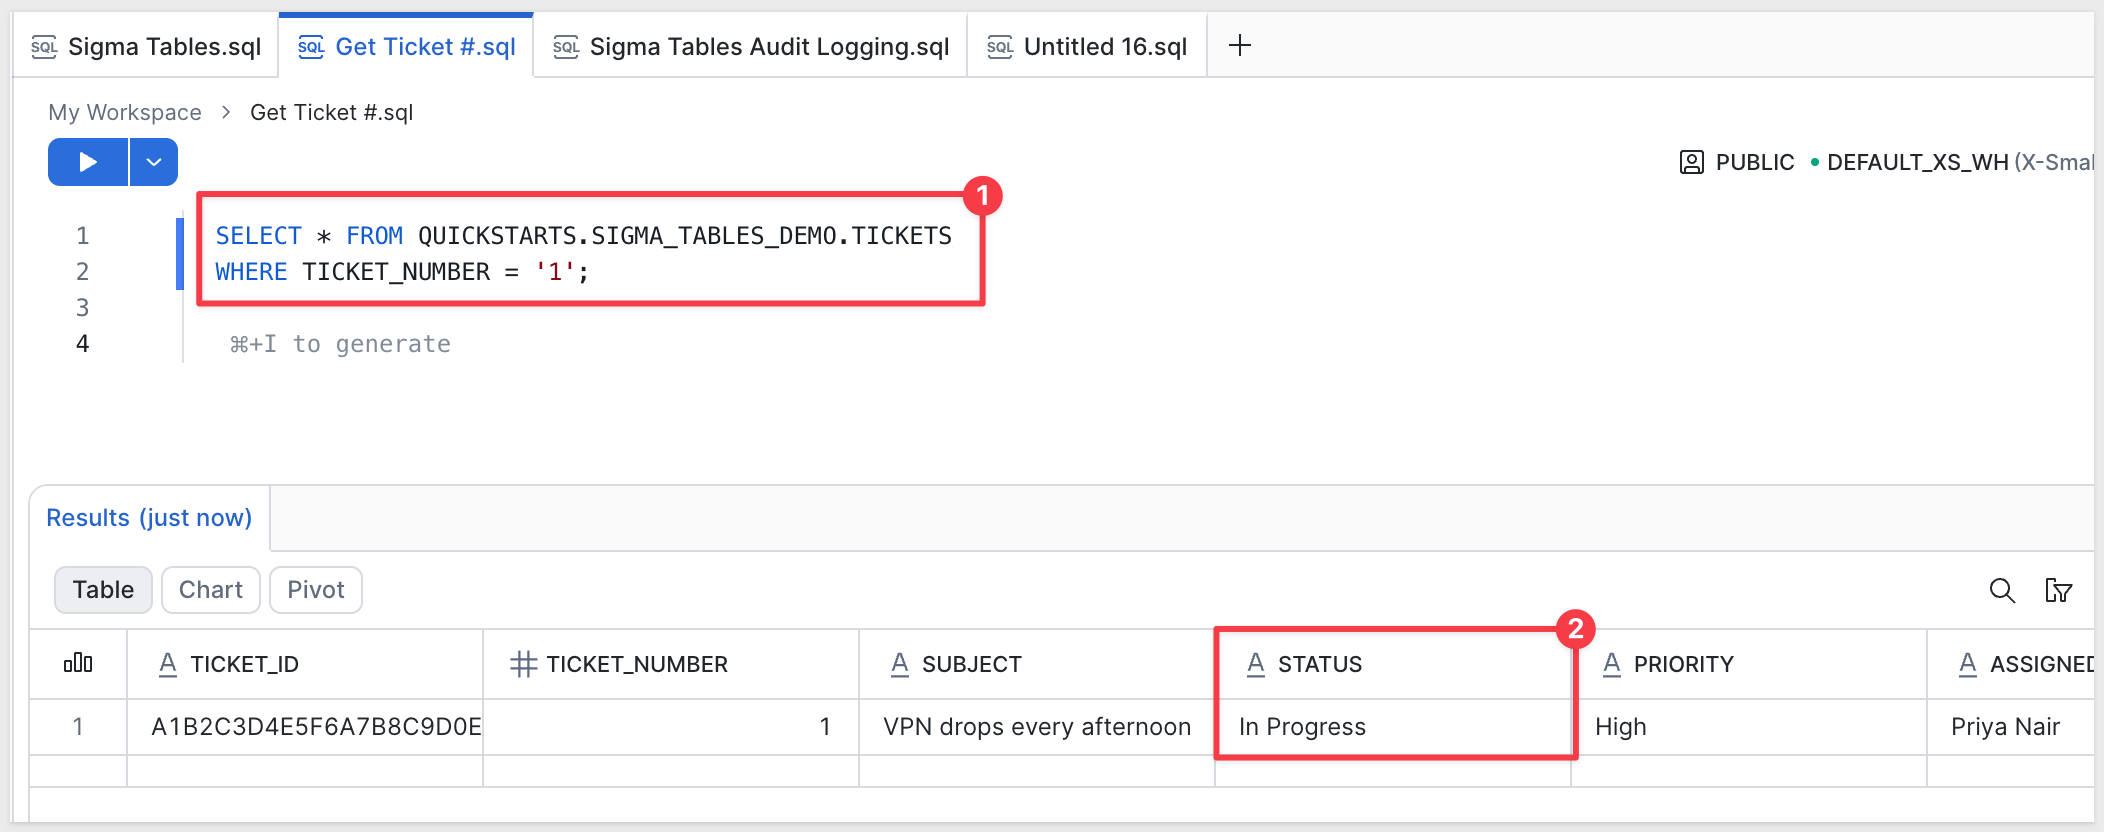
You can also paste a block of values copied from a spreadsheet or another source directly into the grid, to update multiple cells at once the same way.
Viewing the change in Audit Log
The audit log also shows this edit activity by looking at the log table in the QuickStarts > Sigma_Tables_Audit > SIG_AUDIT_LOG_XXX connection browser:
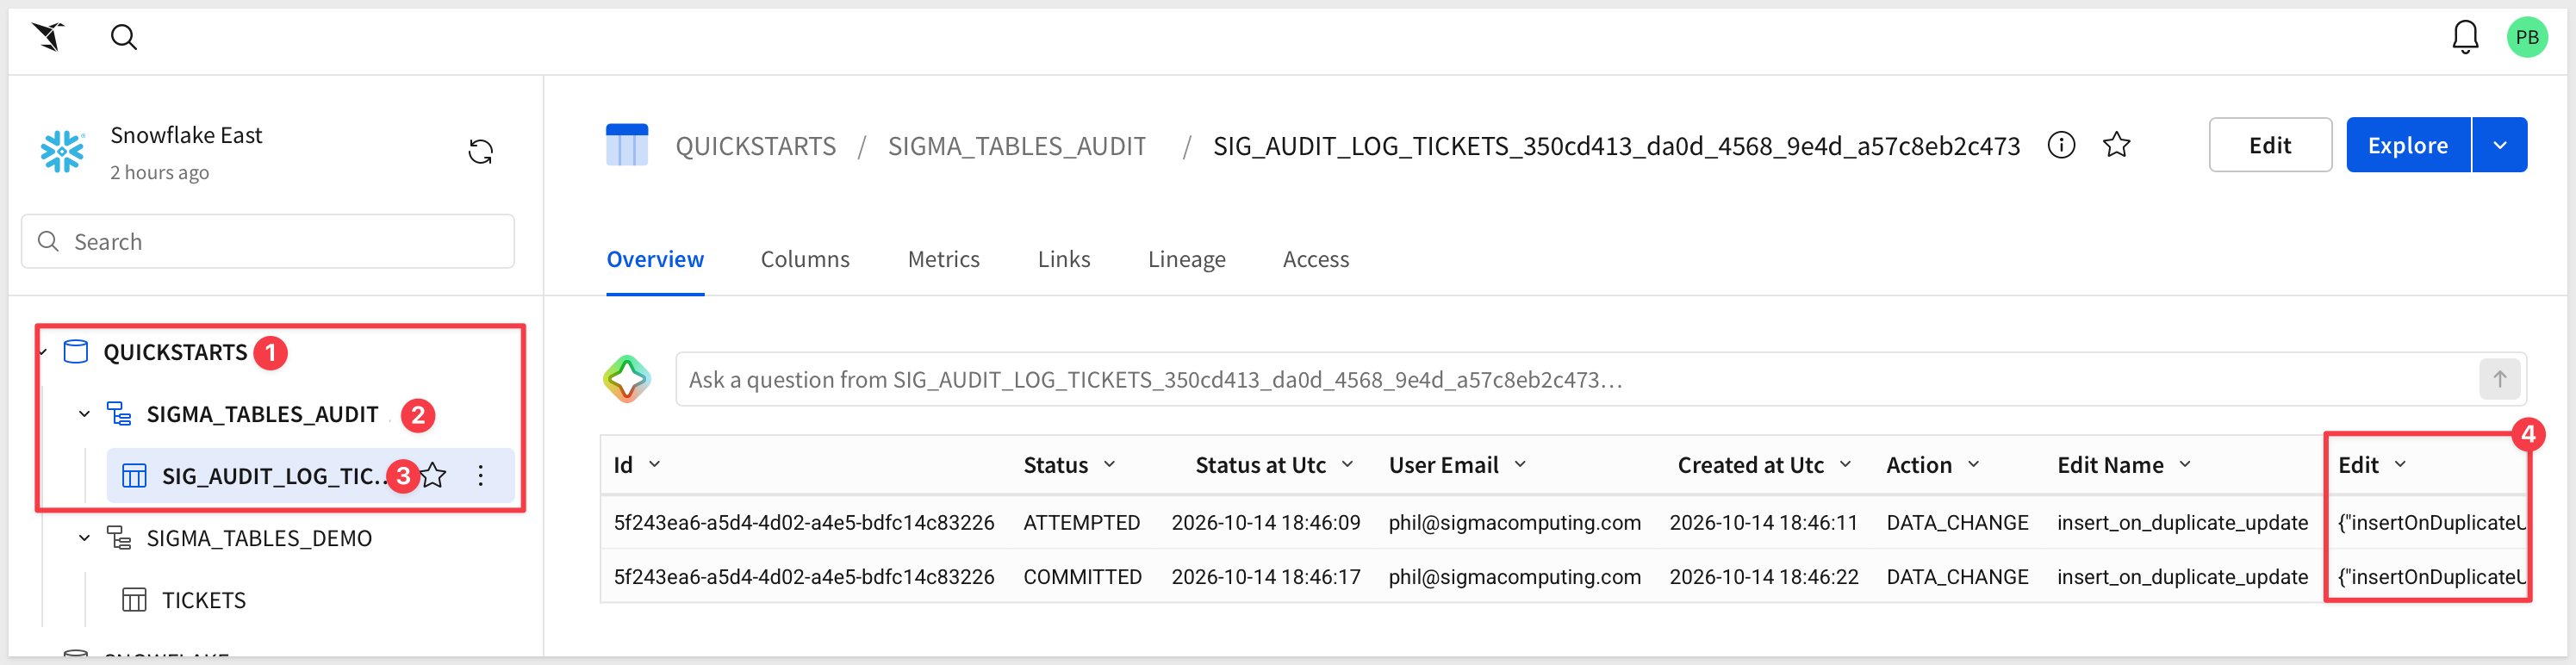
Double-click into the COMMITTED row, Edit cell to see the status value we changed:
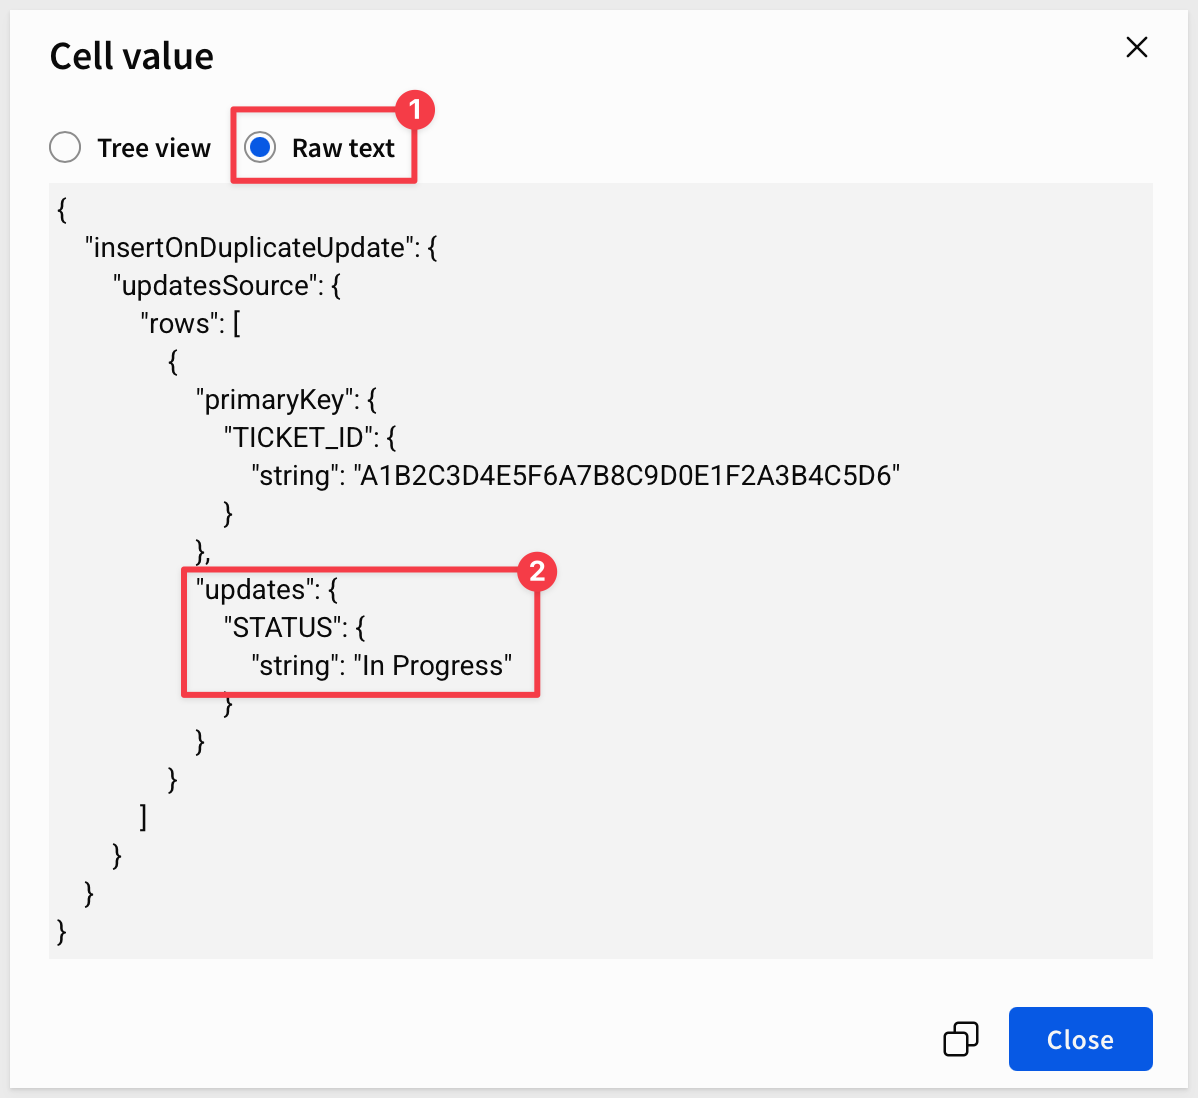
A Sigma table's schema isn't fixed once write access is on. Add a column when you need to capture something new, rename one for clarity, or remove one you no longer need – all without leaving Sigma or touching Snowflake directly.
1. In Snowflake, transfer ownership of the table to your Sigma service identity:
GRANT OWNERSHIP ON TABLE QUICKSTARTS.SIGMA_TABLES_DEMO.TICKETS TO ROLE SIGMA_SERVICE_ROLE COPY CURRENT GRANTS;
2. Schema changes happen on TICKETS's own page in the connection explorer – the same page used earlier to grant write access – not inside a workbook.
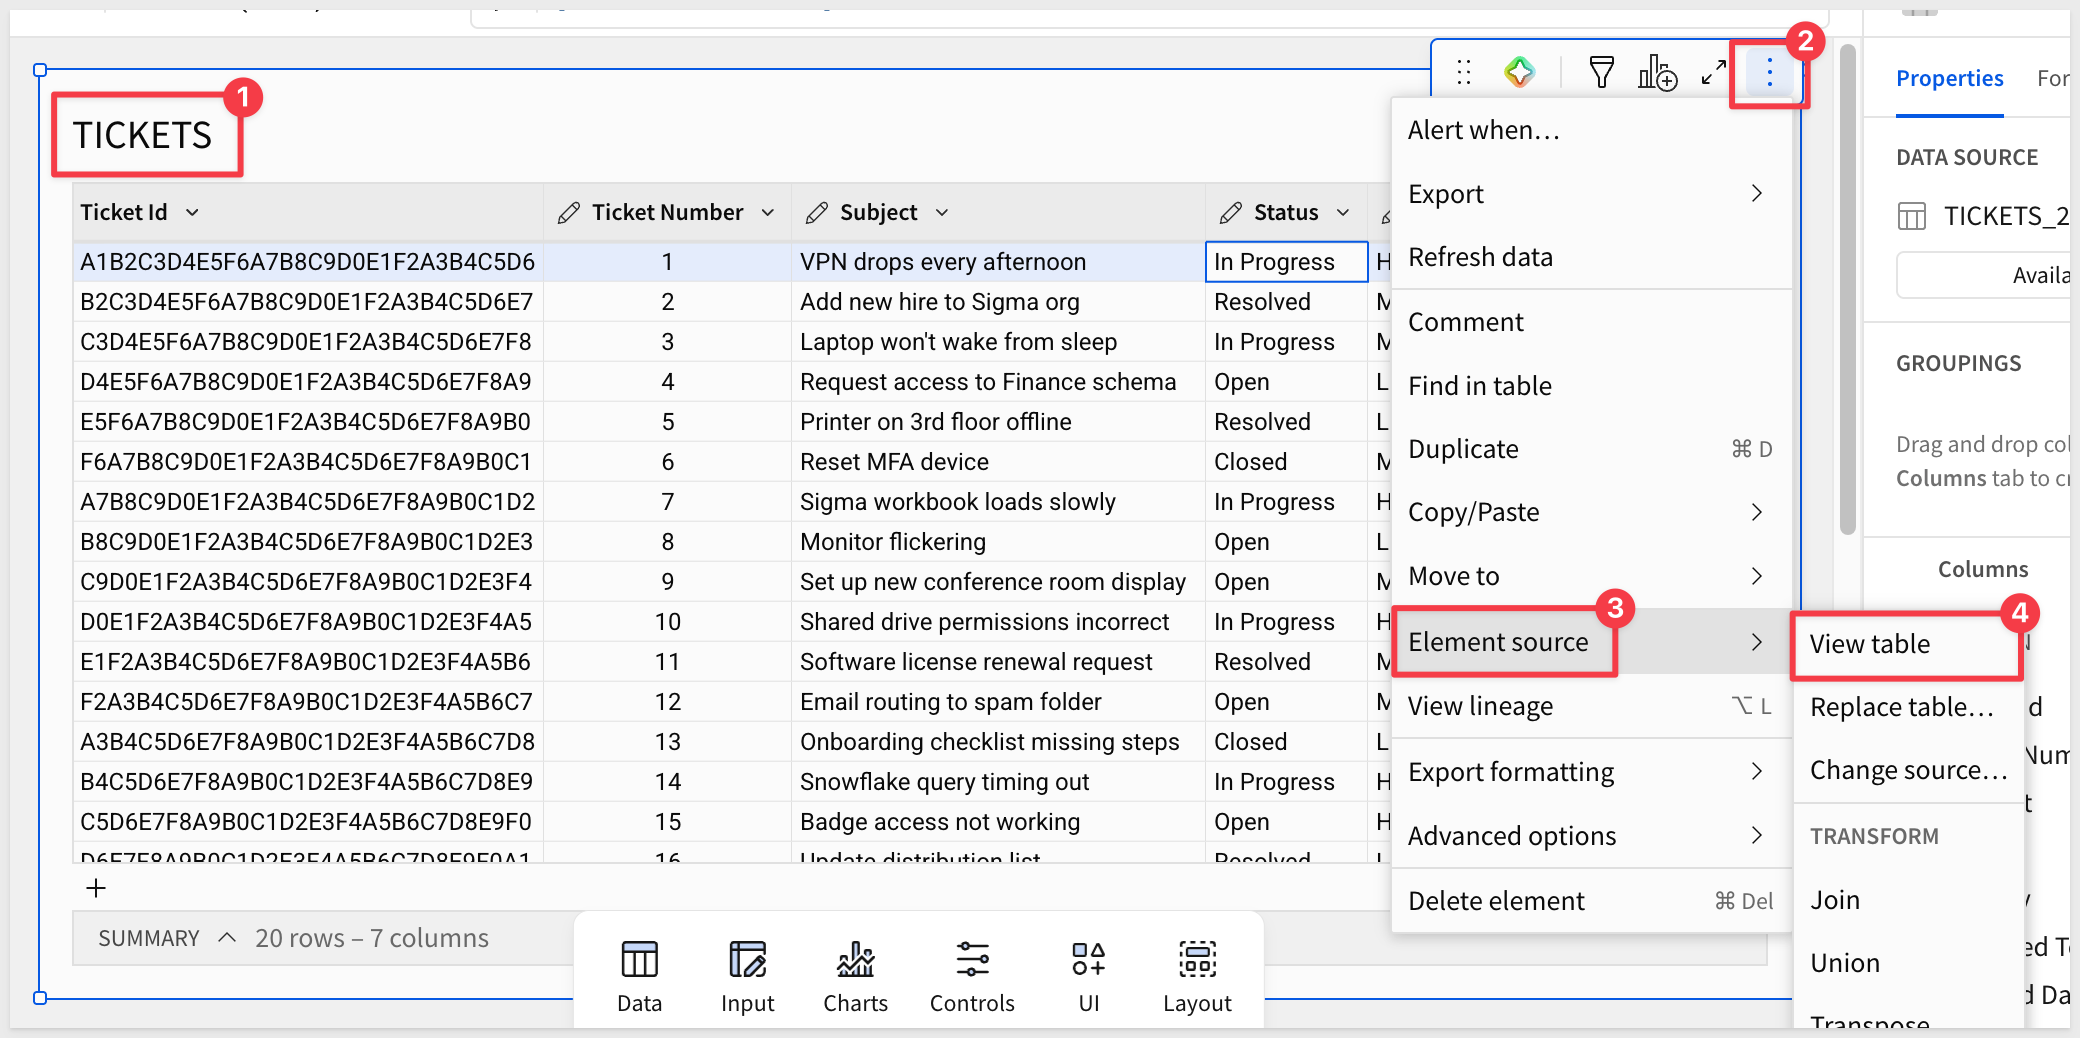
If you're still in the workbook from the last section, there's a shortcut: open the TICKETS table element's menu and select Element source > View table to jump straight there instead of browsing the connection tree from scratch.
3. Click Edit and open Columns, and click + Add column.
4. In the new row, fill in a Column ID and Friendly name, choose a data type from the Type dropdown, and set Visibility to Included.
For example, a text column named RESOLUTION_NOTES to capture how a ticket was closed out. The remaining fields are optional.
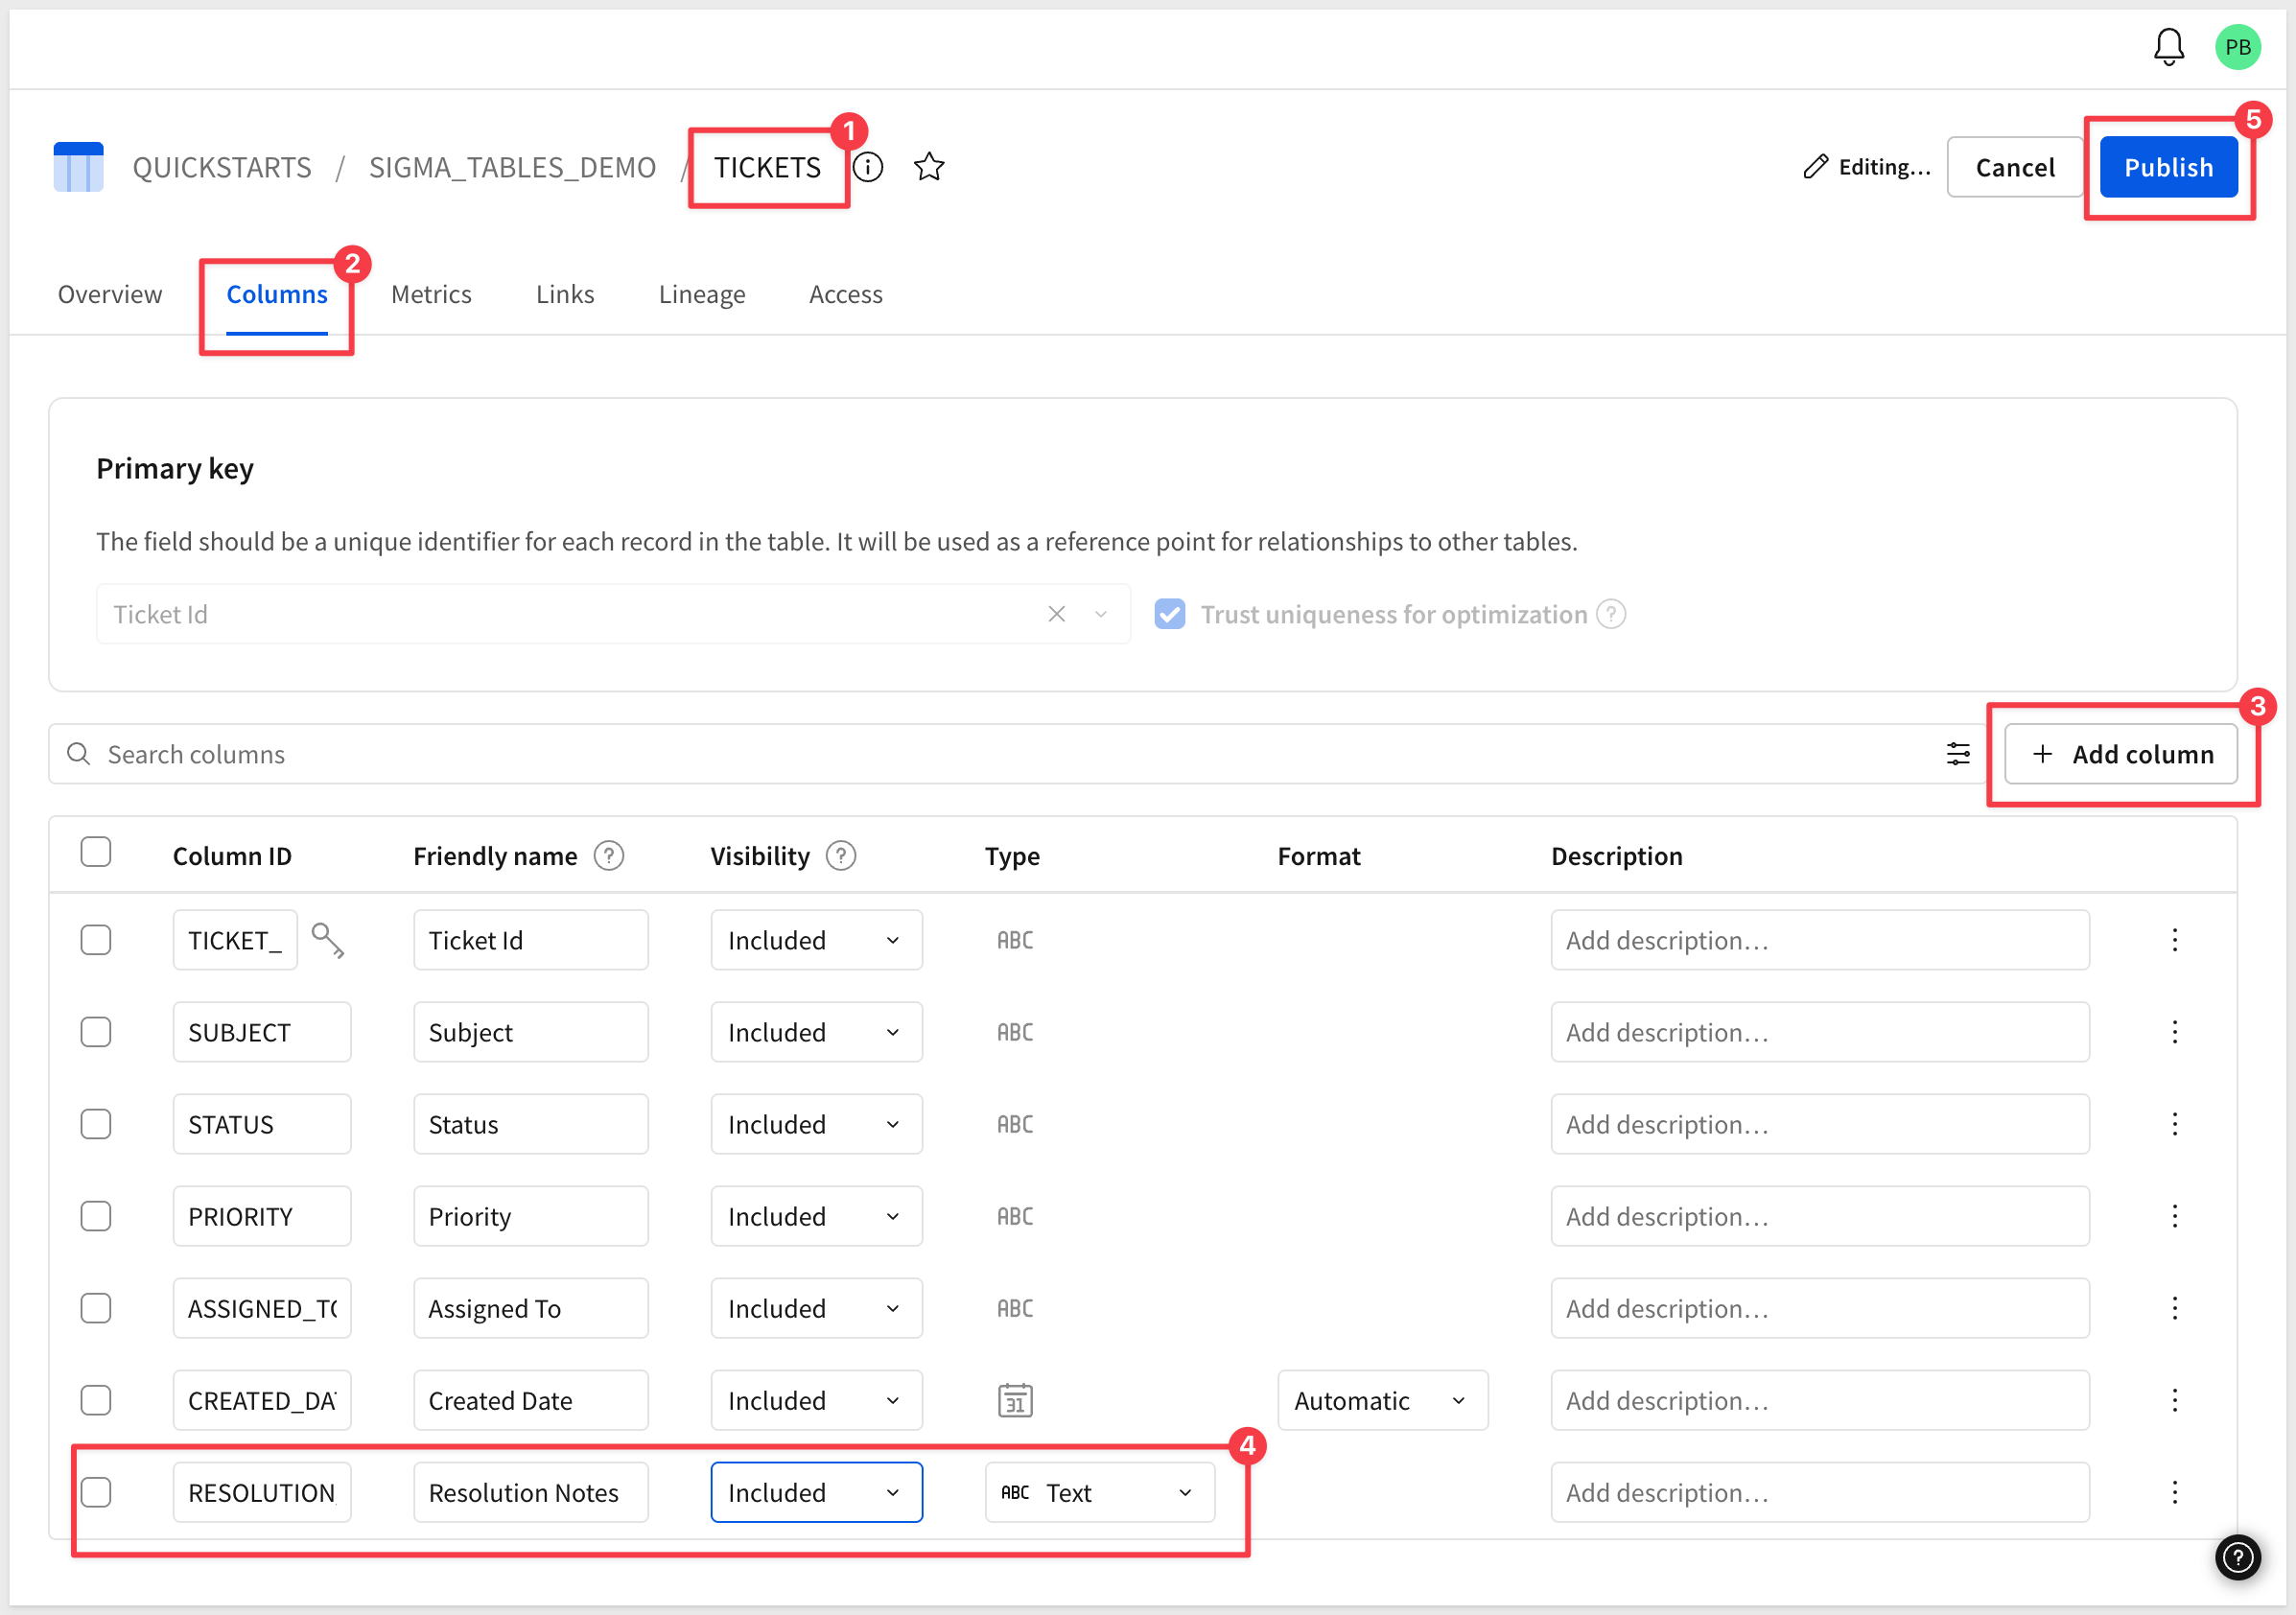
5. Click Publish to save the change.
6. Back in your workbook, refresh the page first. Select the TICKETS table element. In the Properties panel's Data Source section, click Available columns.
7. In the Source columns modal, check the box next to Resolution Notes (or whatever new column you added), then close the modal.
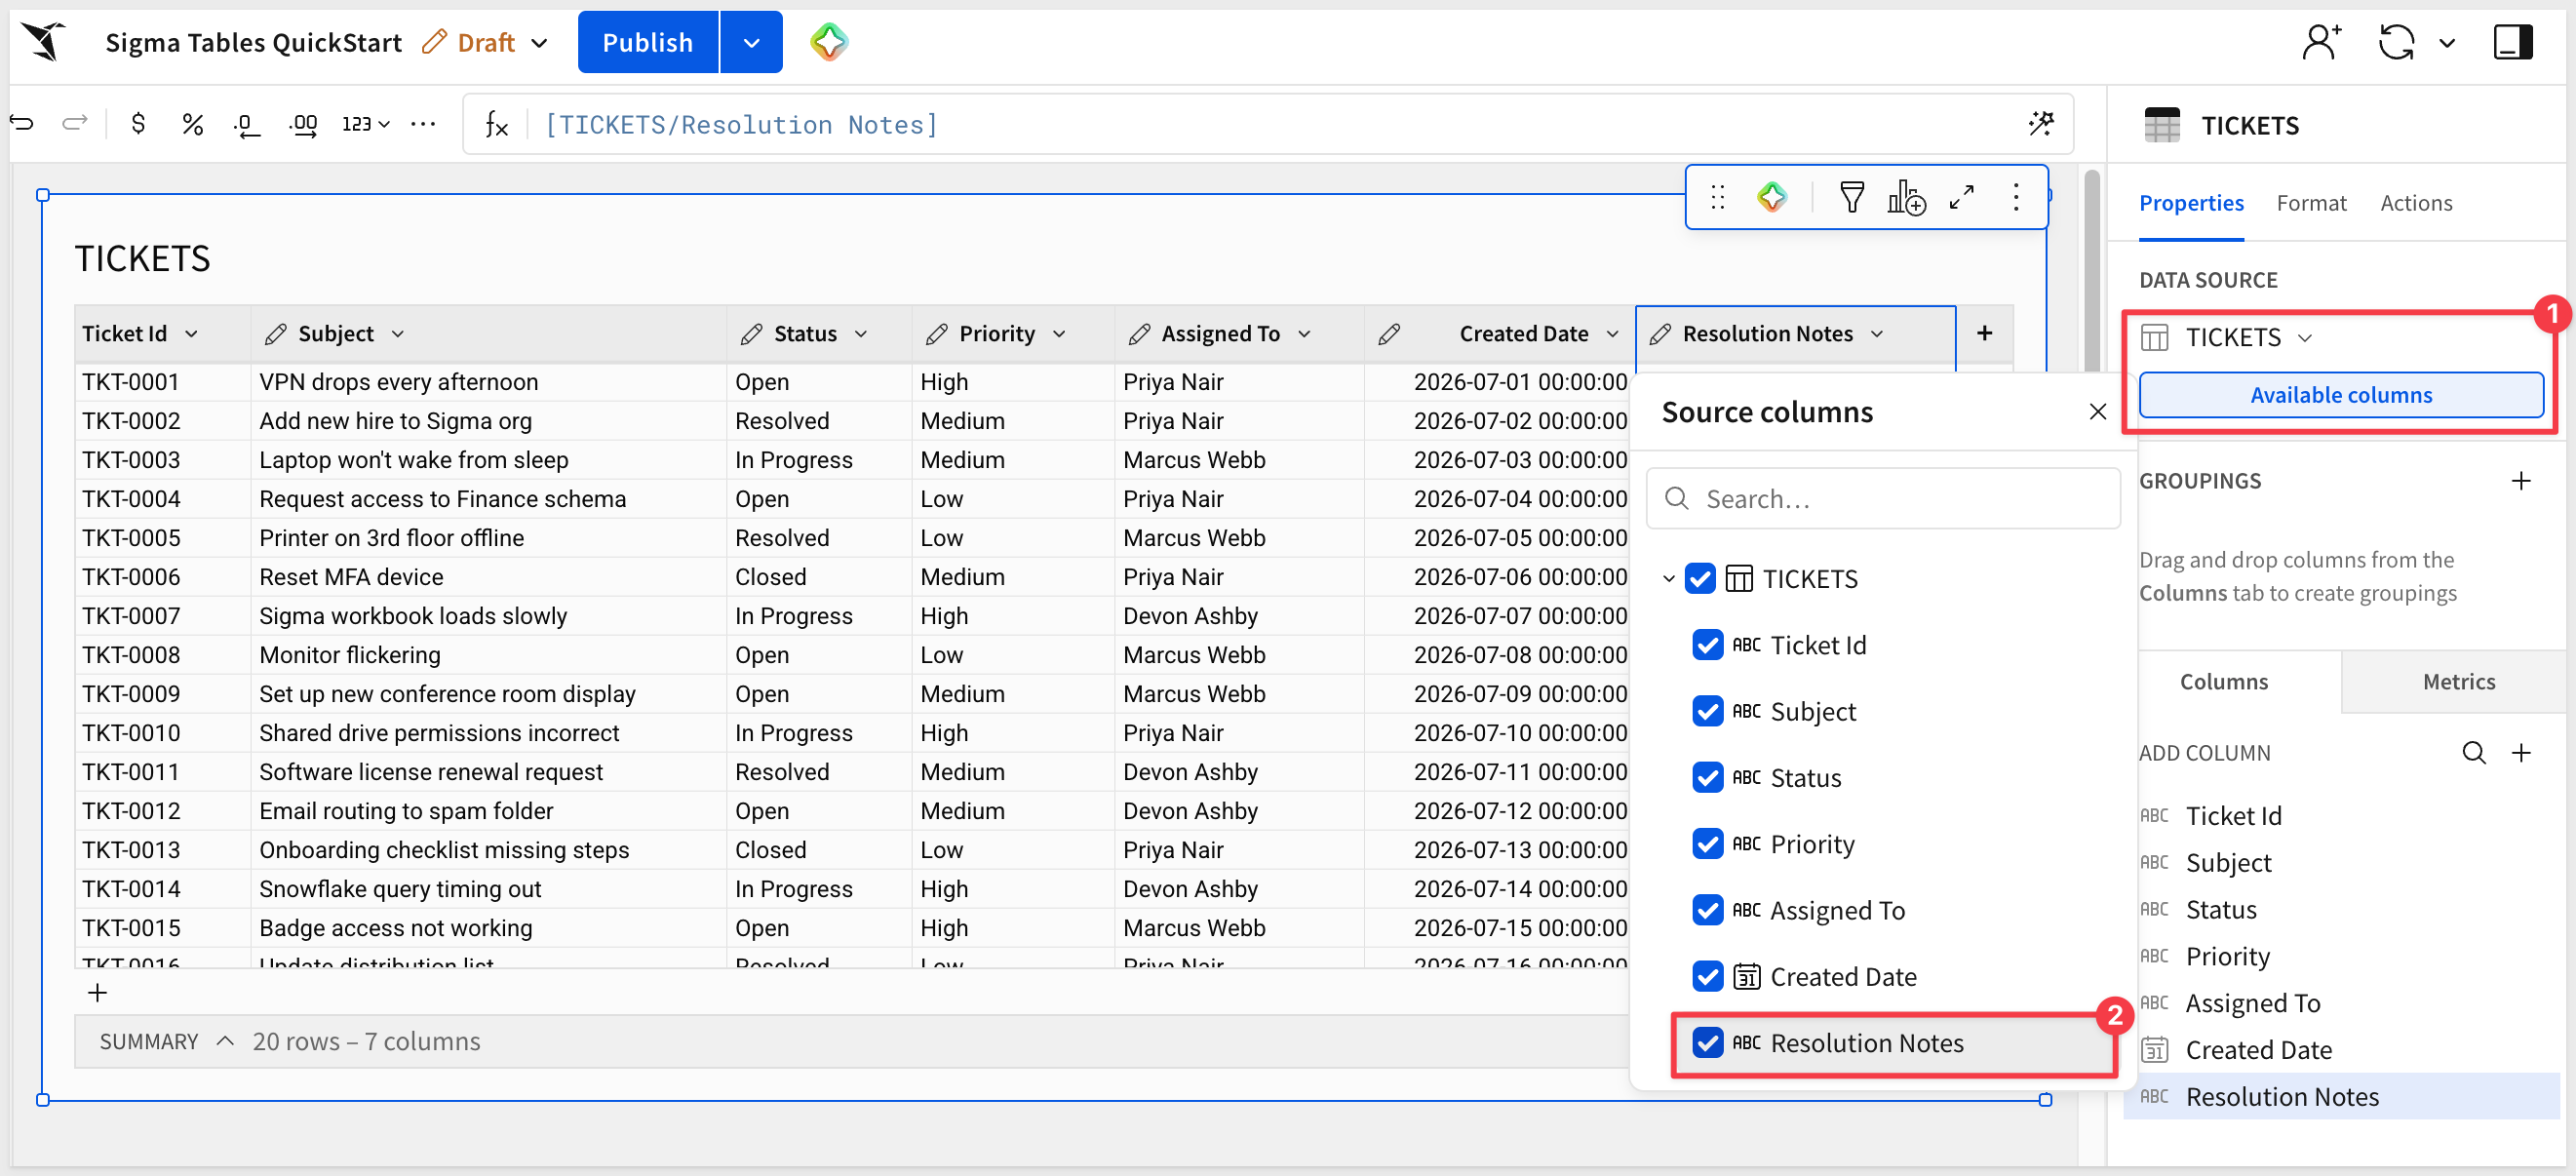
The new column now appears in the grid, ready to edit like any other.
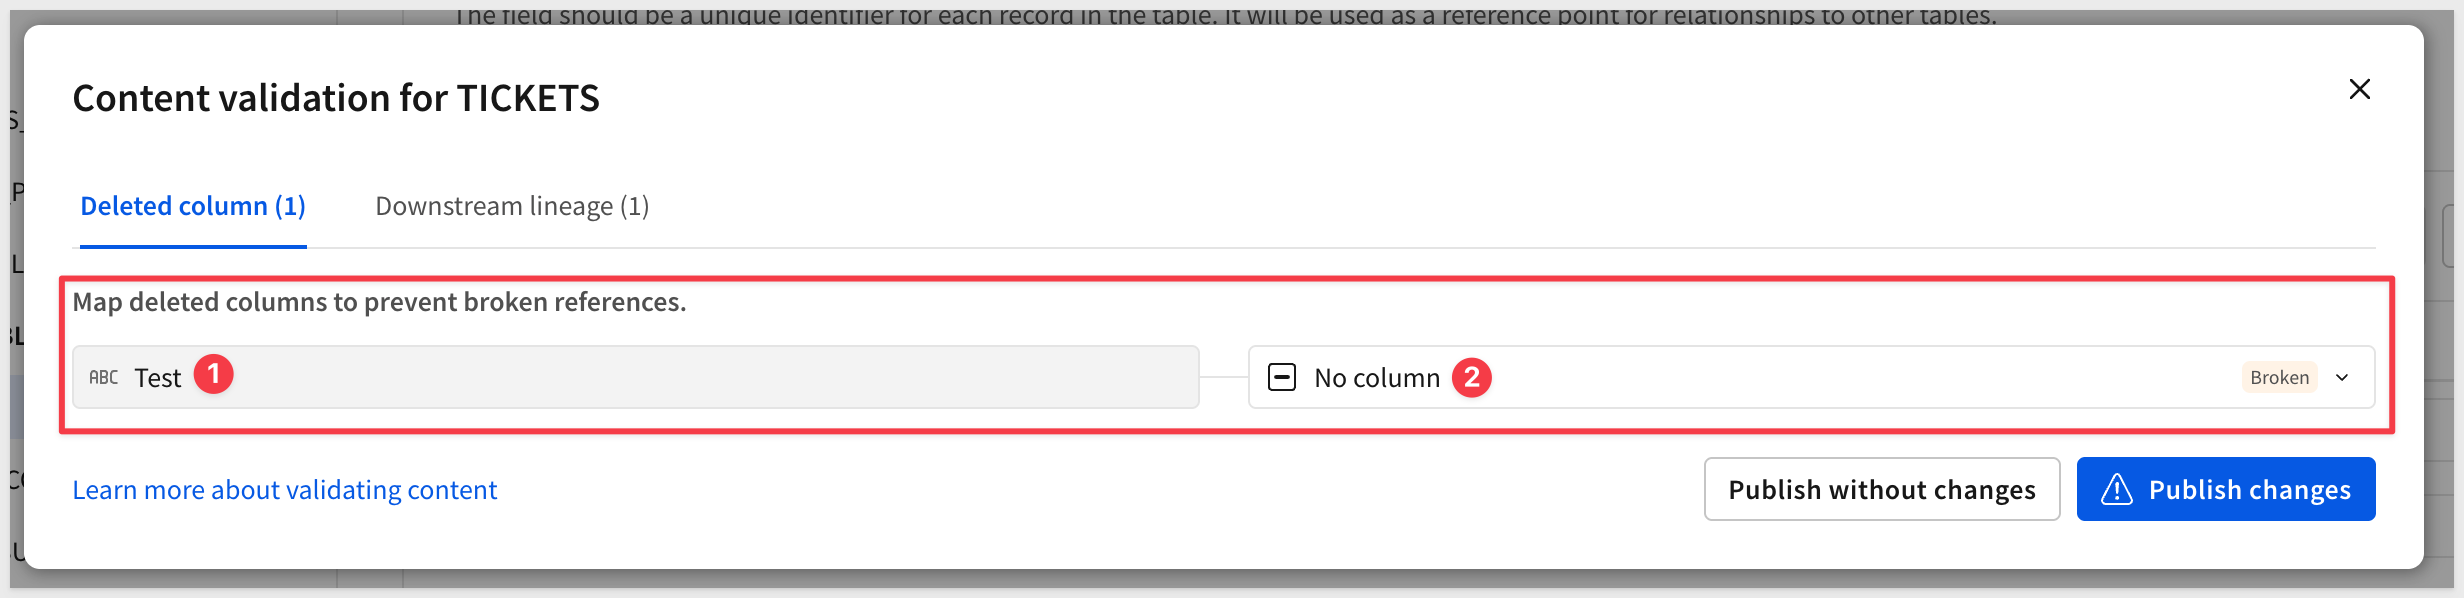
If you delete a column that other elements in your workbooks depend on, Sigma asks you to pick a replacement before the deletion goes through, so a chart or calculation doesn't silently break.
For example, we added and then deleted a Test column and were warned:
A Sigma table needs new rows just as often as it needs existing ones corrected – a new ticket comes in and needs to be logged. Sigma lets you add it directly in the grid, with no extra setup.
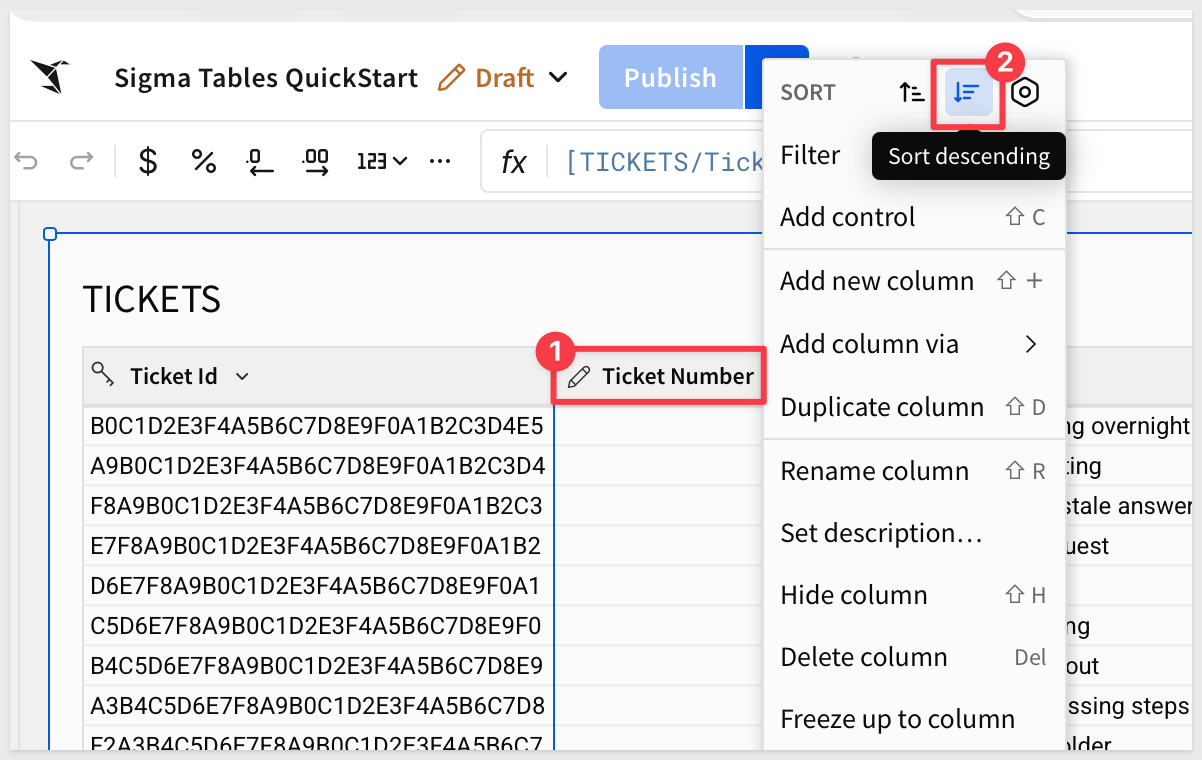
Before adding anything, let's sort Ticket Number descending, so the newest ticket lands at the top of the grid – that way, the new row you add is immediately visible, right where you're already looking, instead of buried at the bottom.
1. Click the dropdown arrow on the Ticket Number column header and choose Sort descending.
Add a Row Directly in the Grid
The simplest way to add a row doesn't need a button, an action, or any setup at all.
1. Scroll to the bottom of the TICKETS table element. Click the + that appears below the last row.
Sigma generates Ticket Id for this row automatically, so you don't enter it yourself.

2. Sigma adds a blank row.
Set Ticket Number to one higher than the first row (21).
Fill in values the same way you'd edit any other cell – type into Subject, Status, Priority, Assigned To, and Created Date, then press Enter to commit each one.
Since it was sorted by Ticket Number, the new row should appear at the top of the table.

This works well enough for a one-off addition by someone already comfortable in the grid, but it doesn't scale to a repeatable workflow or a less technical audience. A guided form is generally the preferred way to let that kind of audience add or update rows – that pattern is already covered in depth across several other Sigma QuickStarts.
For a sense of what's possible, browse the AI Apps and App Templates QuickStart categories.
Typing into the grid works for one-off changes. For anything repeatable – marking a ticket resolved, clearing out closed ones – build an action that updates or deletes a specific row in TICKETS, without typing into the grid by hand.
An action is a trigger paired with an effect – the trigger is what the user does, and the effect is what happens to the table. Buttons and actions built on Sigma tables give you a real interface for changing data – an intake form, an approval queue, a status tracker – built entirely in Sigma, without standing up a separate application.
A standalone button doesn't have a natural answer to "which row?" – it isn't attached to any particular row, so it has no row to match against. Instead, this section attaches each action to a custom context menu item, added to the table itself: right-click any row, and the row you clicked becomes the one the action acts on, the same way Column pulls a value from "the currently selected row" elsewhere in Sigma.
Update a Row
1. Select the TICKETS table element, open the Format tab, and expand Custom context menu.
2. Click + Add an option and label it Mark Resolved.
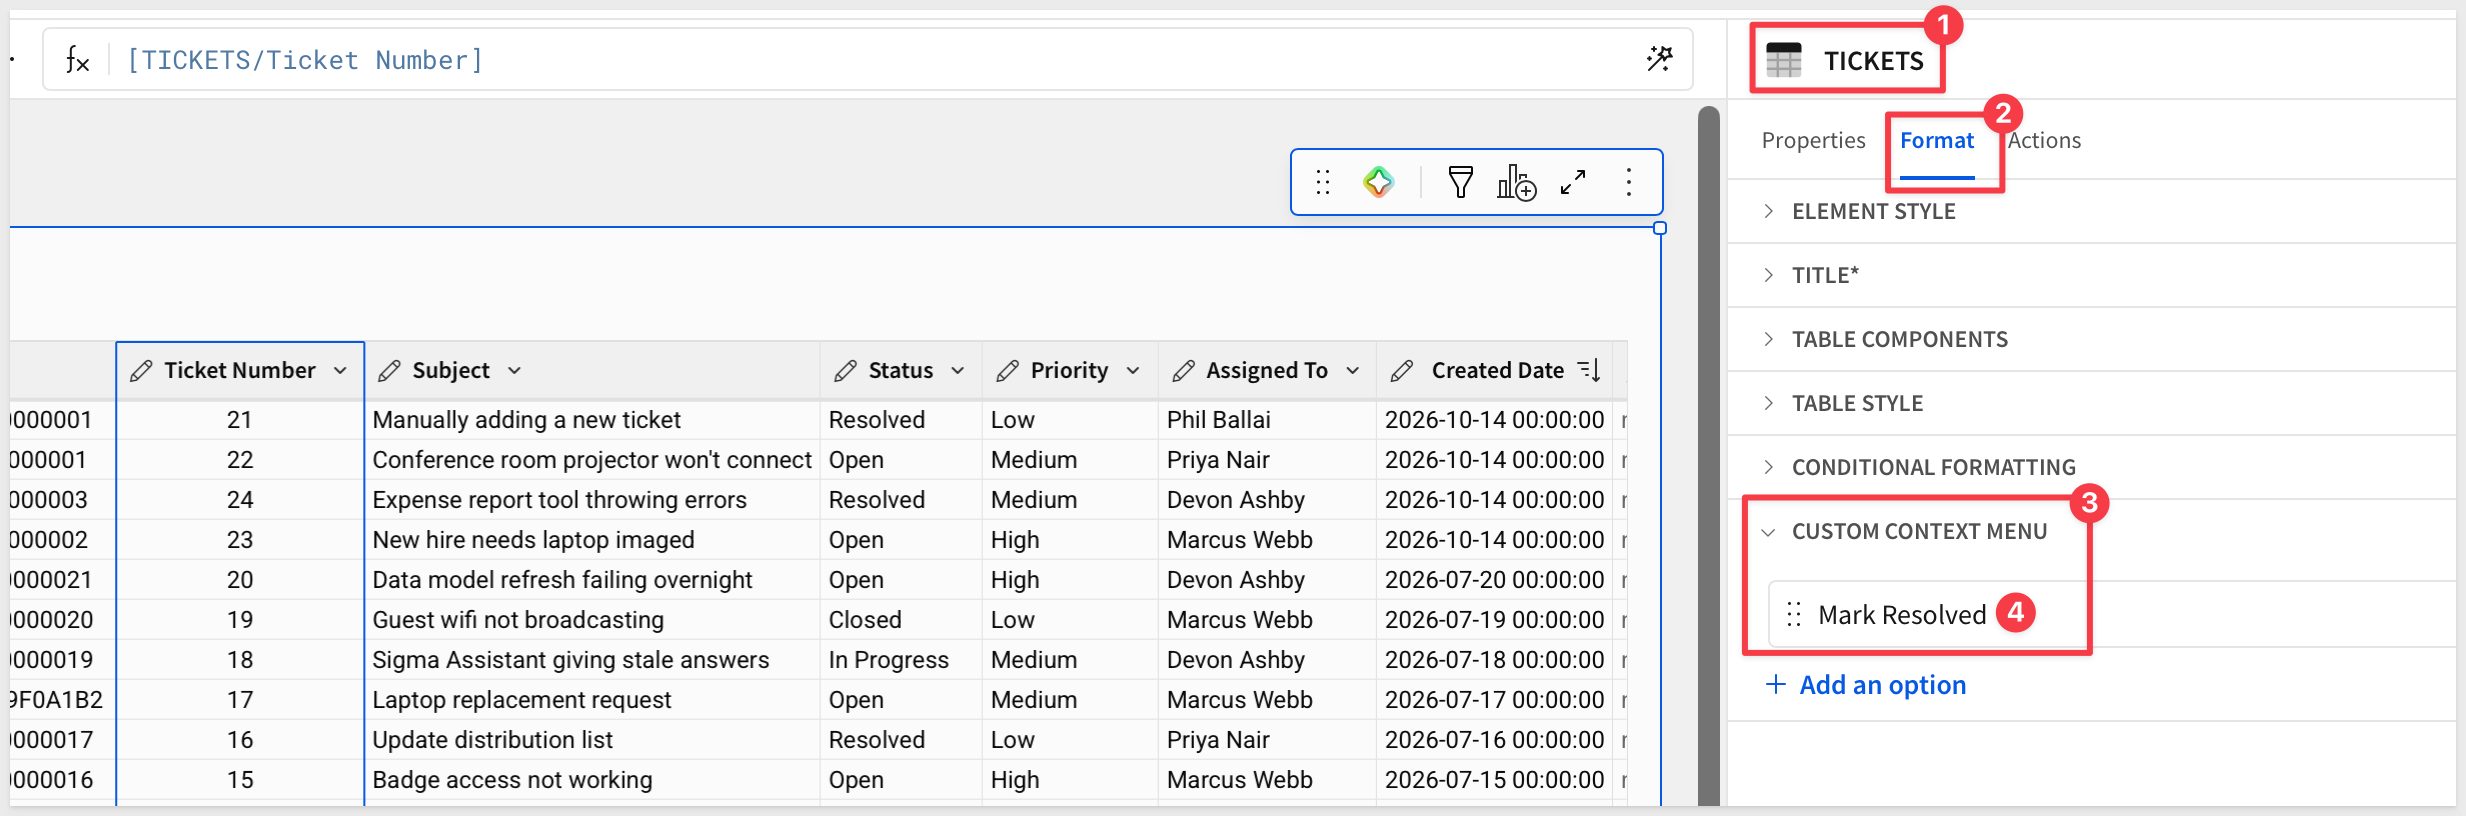
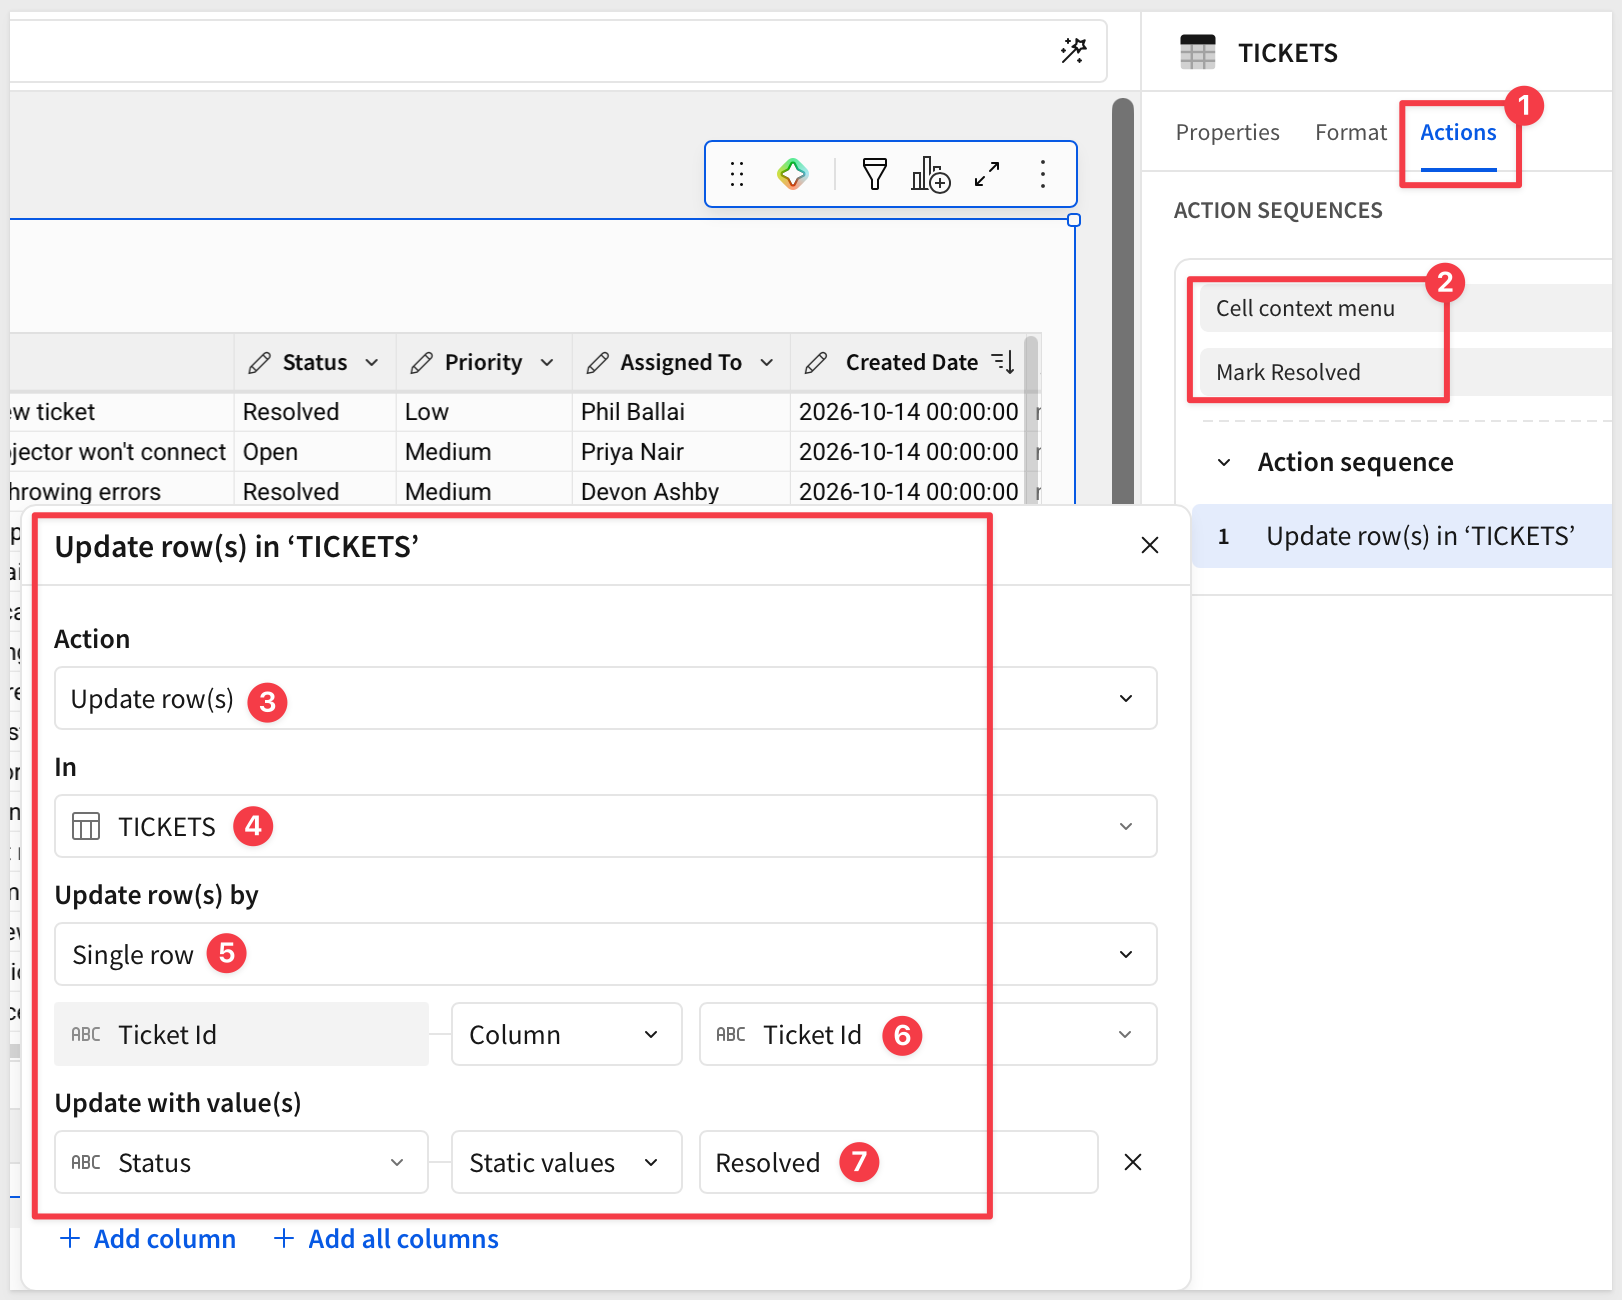
3. Switch to the table element's Actions tab. Under Action sequences, find Cell context menu and select Mark Resolved beneath it – the same option you just created in Format.
Click Add action and, under Sigma tables, choose Update row(s), then set In to TICKETS.
4. For Update row(s) by, choose Single row, then set the primary key value source to Column.
Matching still works against Ticket Id even though you hid it from the grid; hiding a column only affects what's displayed, not what the table itself can reference.
5. Under Update with value(s), set Status to Resolved.
6. Publish, then right-click any row and choose Mark Resolved to test it.
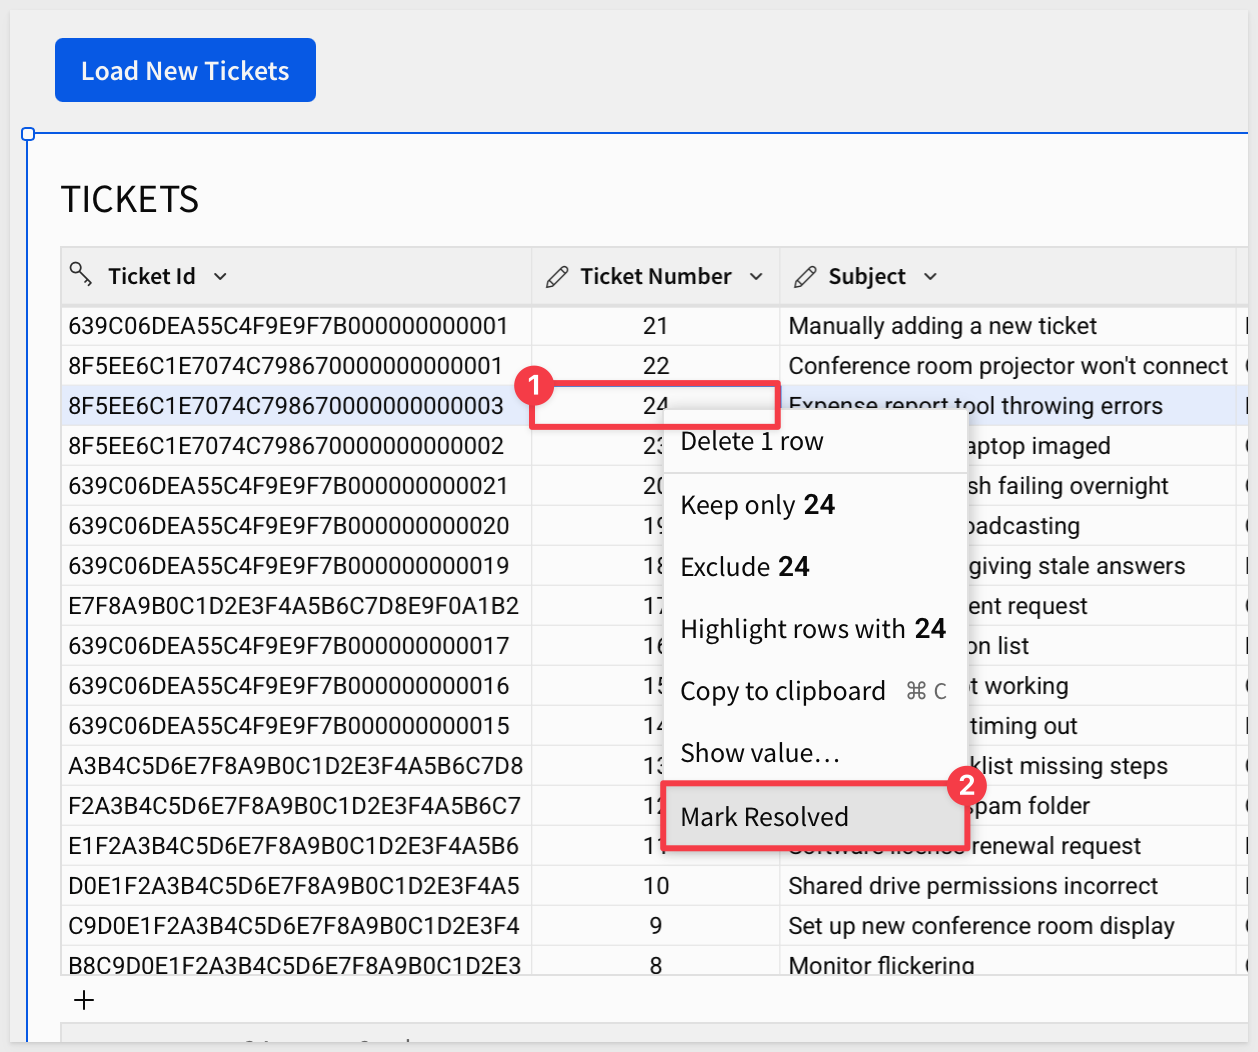
Watch closely as the change happens fast. Of course, with Sigma you can build popups to warn users about an action before committing them.
Delete a Row
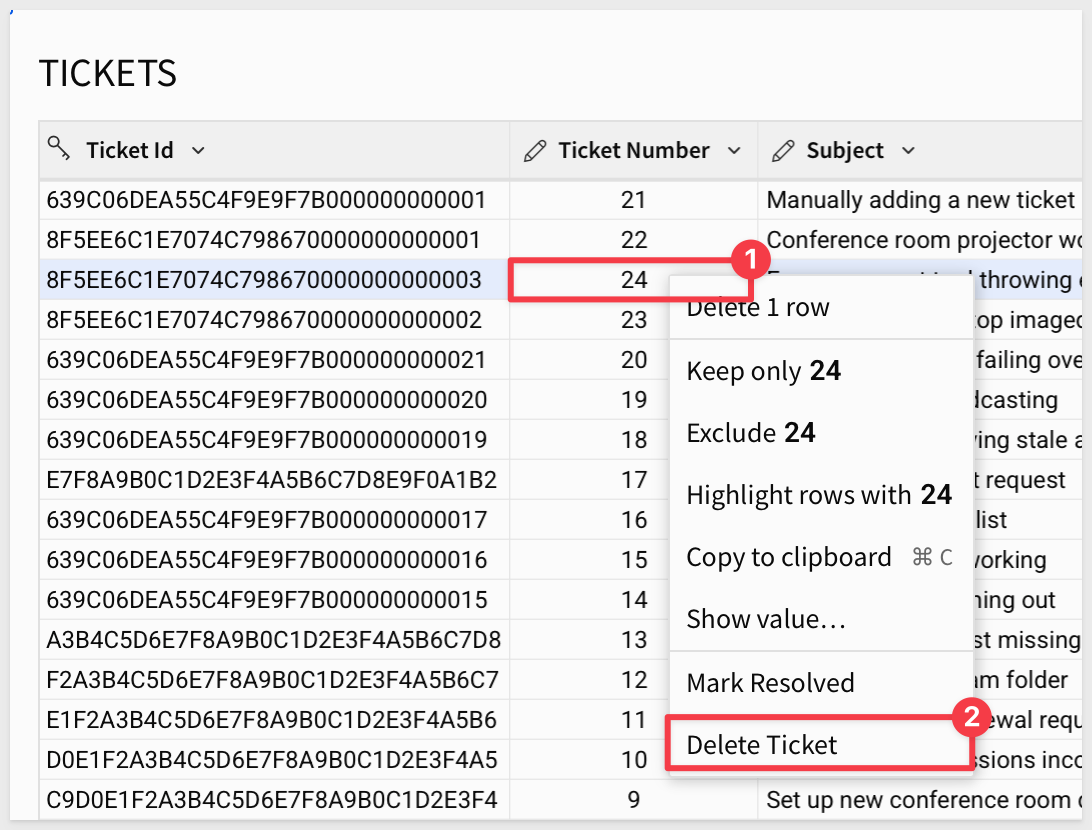
1. Back in Custom context menu, click + Add an option again and label it Delete Ticket.
2. Back in the table element's Actions tab, find Delete Ticket under Cell context menu and add a new action sequence: under Sigma tables, choose Delete row(s), set In to TICKETS, and for Delete row(s) by, choose Single row, matched the same way as the update action.
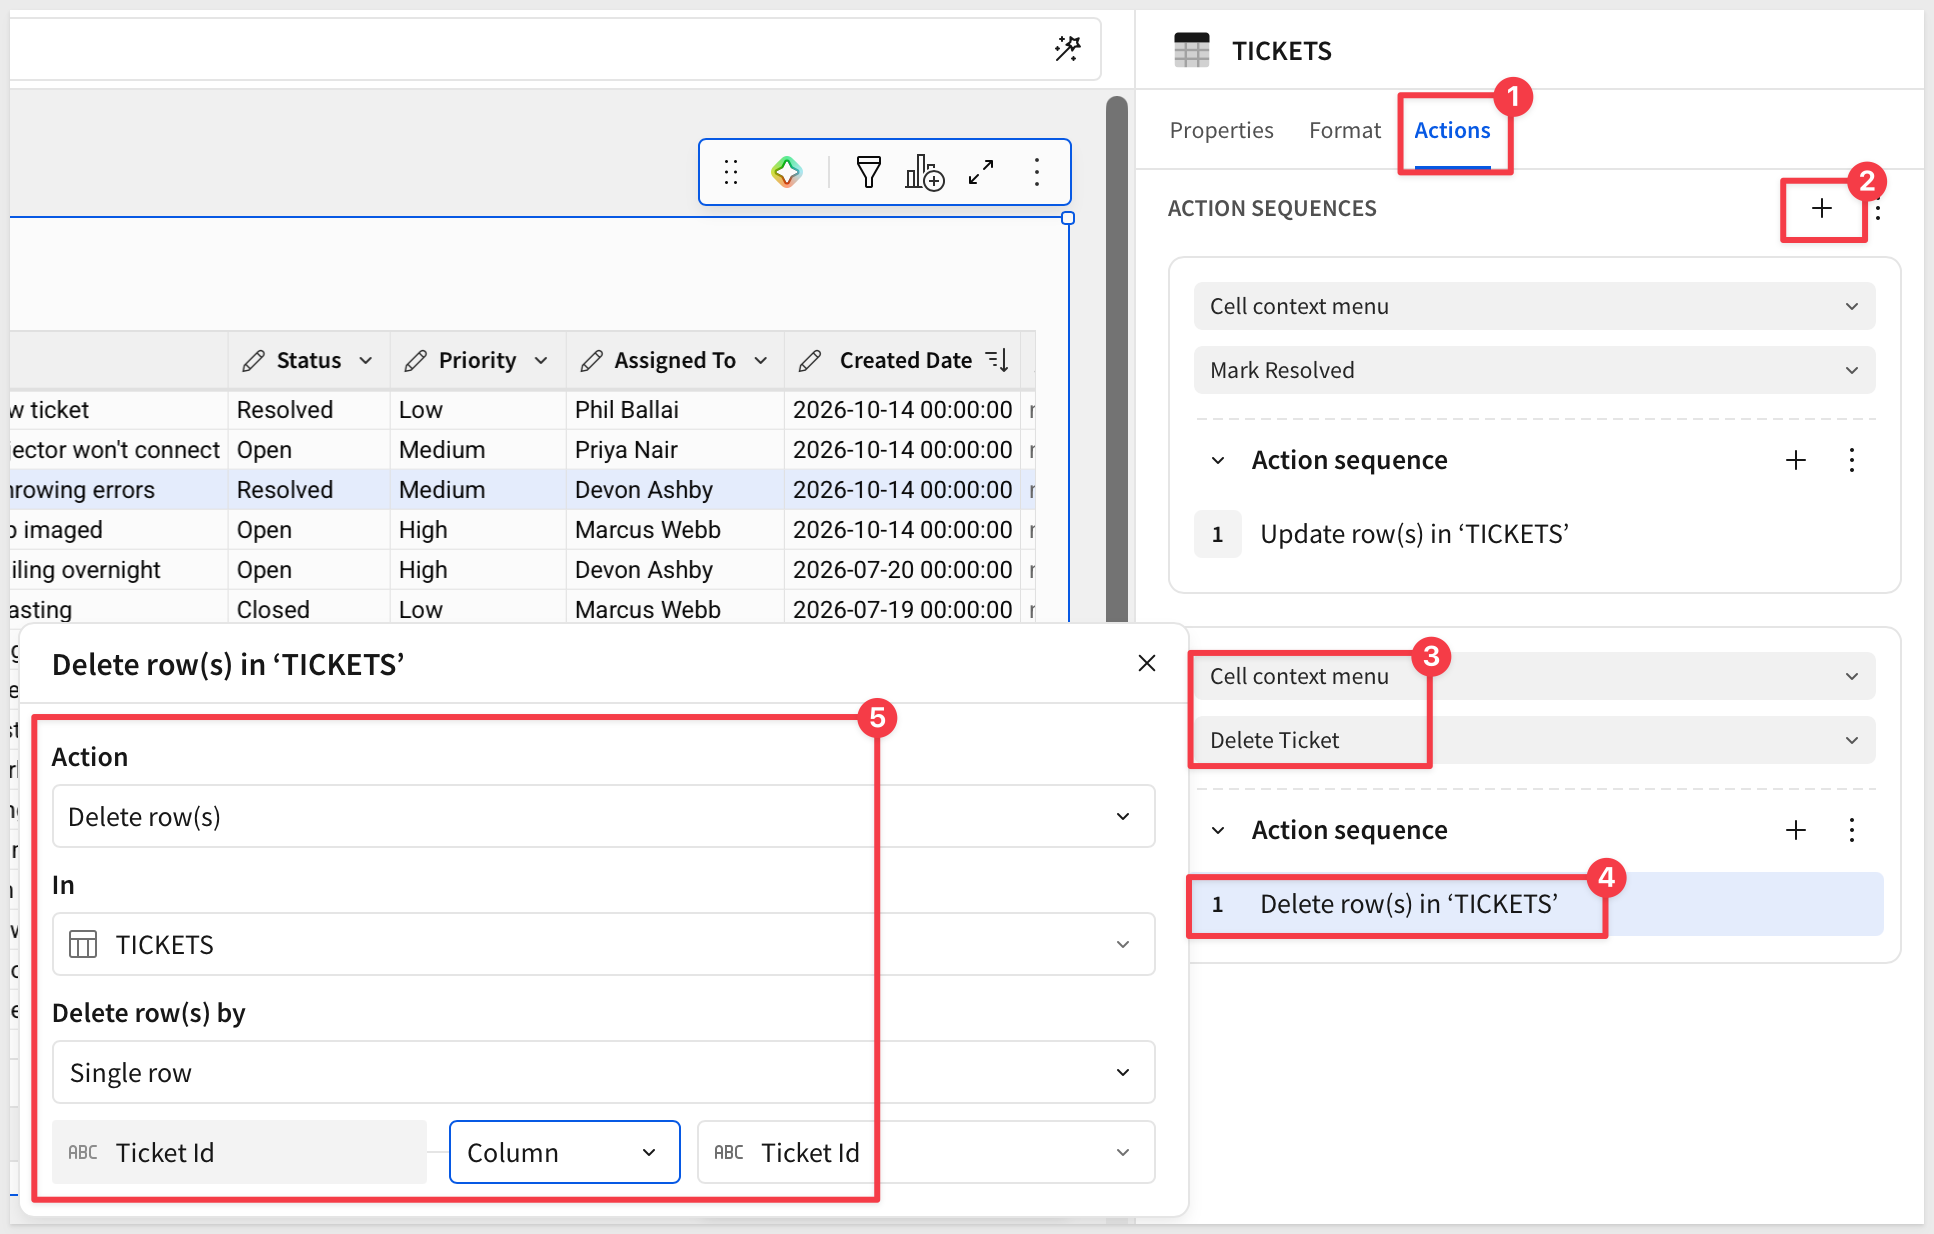
3. Publish, then right-click a row you don't mind losing and choose Delete Ticket to test it.
We built the full lifecycle of a Sigma table on top of a real table in Snowflake: enabling write access, referencing it in a workbook, editing data, schema, and rows directly in the grid, and updating and deleting rows with actions – all while every change was captured in an audit log along the way.
A few things are worth carrying into your own work:
- A Sigma table is still just a table. Joining it to other data, filtering it, building calculations against it all work the same as with any other table in Sigma – write access adds a capability, it doesn't wall the table off from the rest of your data model.
- Table access and workbook access are two separate controls, and both have to agree. Test that deliberately rather than assuming – impersonating a user at the access level you're granting is a fast way to confirm it behaves the way you expect.
- An action is a trigger paired with an effect. A right-click on a row is the trigger, and updating or deleting that row is the effect. That pattern isn't specific to a support ticket queue: it's the same mechanism behind an approval queue, an intake form, or a status tracker, the kind of patterns found across the AI Apps and App Templates QuickStart categories.
Additional Resource Links
Blog
Community
Help Center
QuickStarts
Be sure to check out all the latest developments at Sigma's First Friday Feature page!