Forms are one of those features that seem simple on the surface but unlock a lot. They give you a clean, structured way to collect data from users — and because Sigma forms are bound directly to input tables, everything submitted goes straight to the warehouse. No exports. No copies. No manual reconciliation.
In this QuickStart, we'll build a customer return request form for Plugs Electronics, our fictitious electronics retailer. Customer service reps will use it to log return requests. Managers will see the results instantly — without touching the form itself.
Here's what we'll build:
- An input table to store return request data
- Column-level data validation tied to live warehouse data
- A form with multiple field types: dropdowns, radio buttons, date pickers, checkboxes, and free text
- A returns analysis view that updates as submissions come in
By the end, you'll have a working pattern you can adapt to any data entry workflow — expense reporting, incident logging, inventory requests, or anything else that involves structured input and downstream analysis.
For more information on Sigma's product release strategy, see Sigma product releases
If something is not working as you expect, here's how to contact Sigma support
Target Audience
Sigma builders who want to create structured data entry workflows that connect directly to the warehouse — without building a separate application or copying data out of Sigma.
Prerequisites
- A computer with a current browser. Chrome is recommended.
- Access to your Sigma environment. A trial is fine.
- Some familiarity with Sigma workbooks is assumed. If you're new to Sigma, complete the Getting Started QuickStart first — otherwise feel free to skip it.

Log into Sigma as Administrator and create a New workbook.
From the Element bar, click Input and drag an Empty input table onto the page:
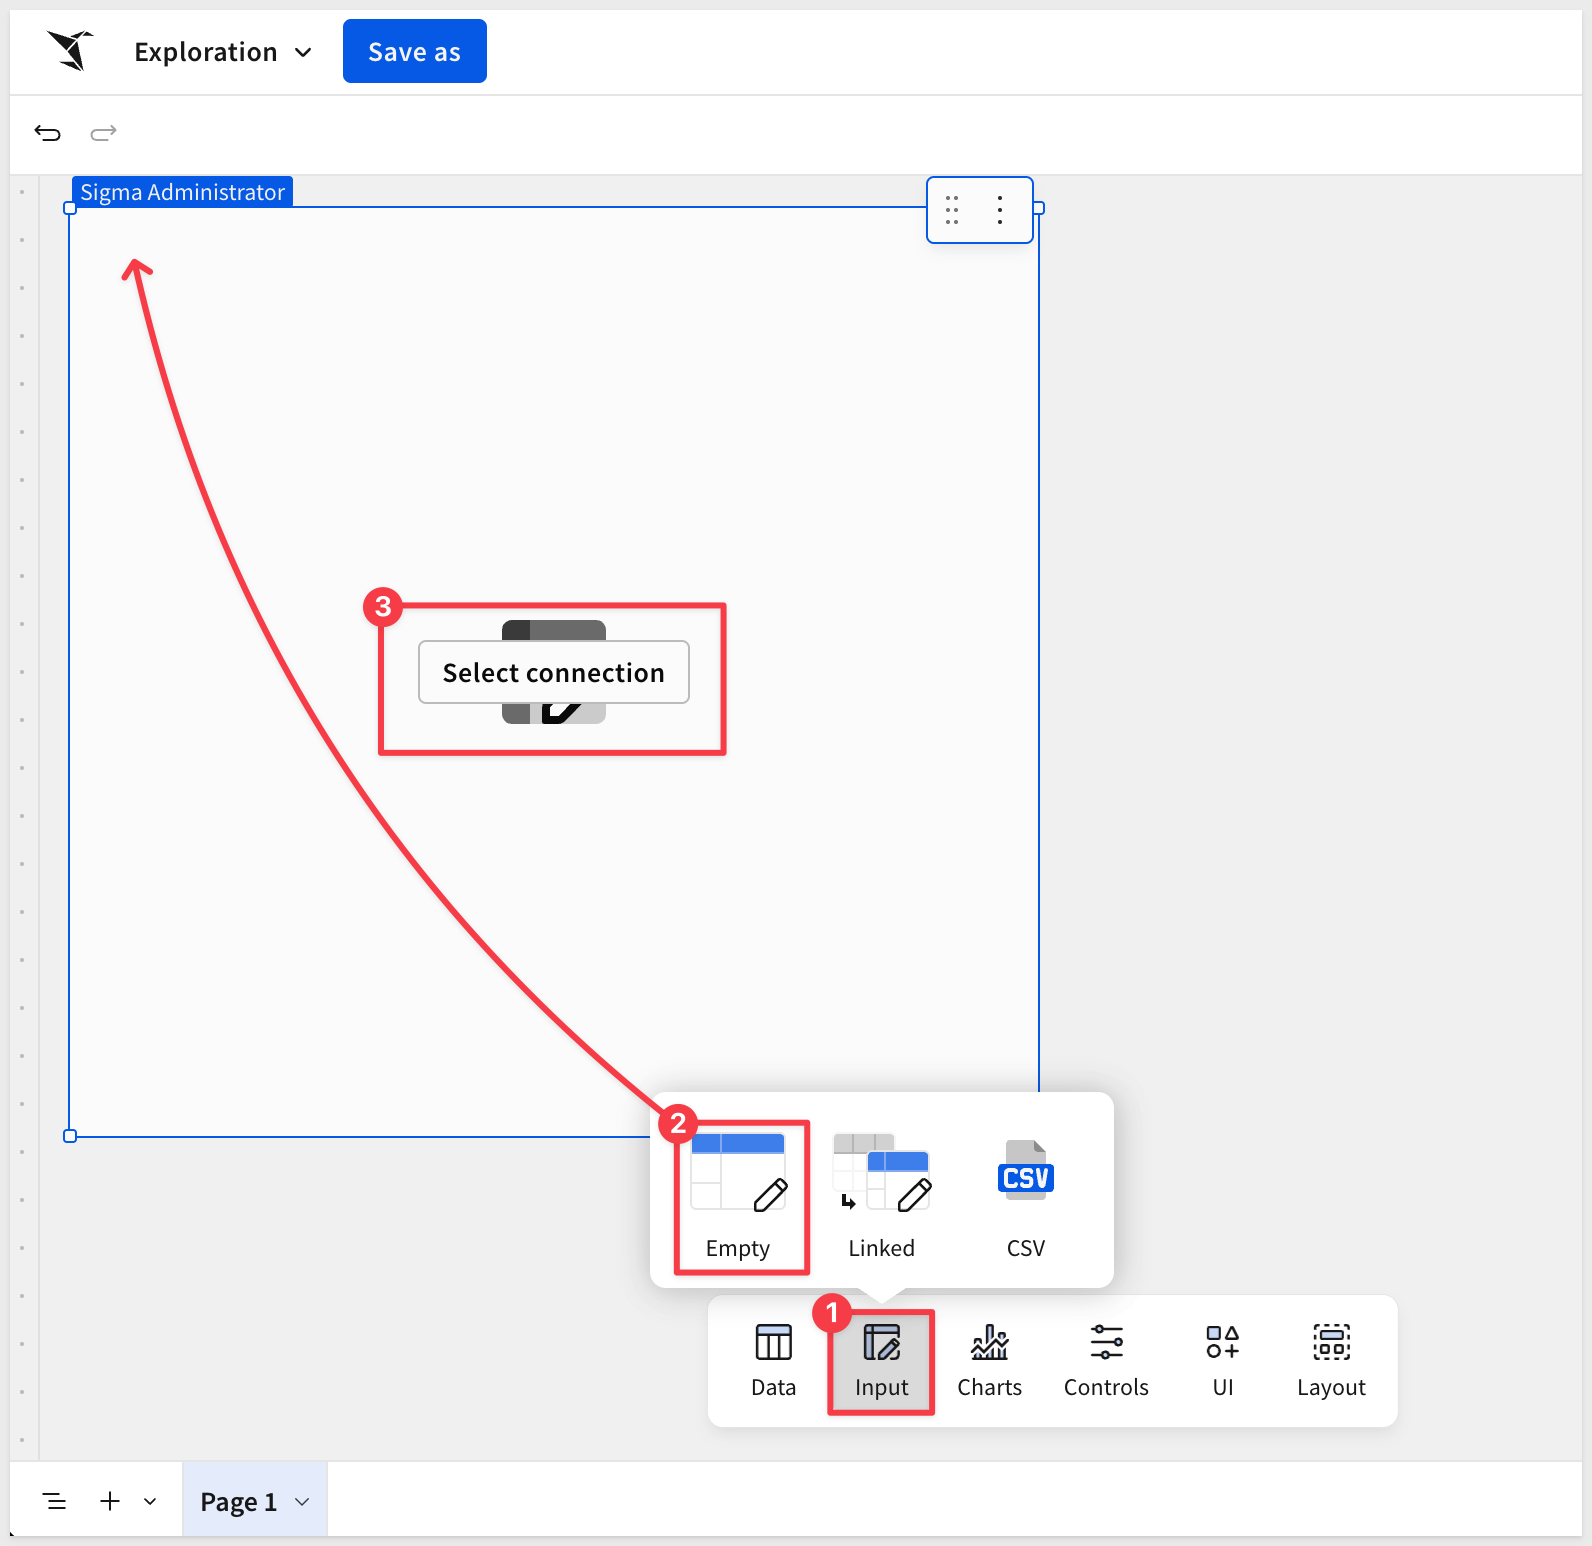
Click Select connection, choose Sigma Sample Database, and click Create:
Rename the input table to Return Requests.
Click Save as and save the workbook as Customer Return Management QuickStart.
Add columns
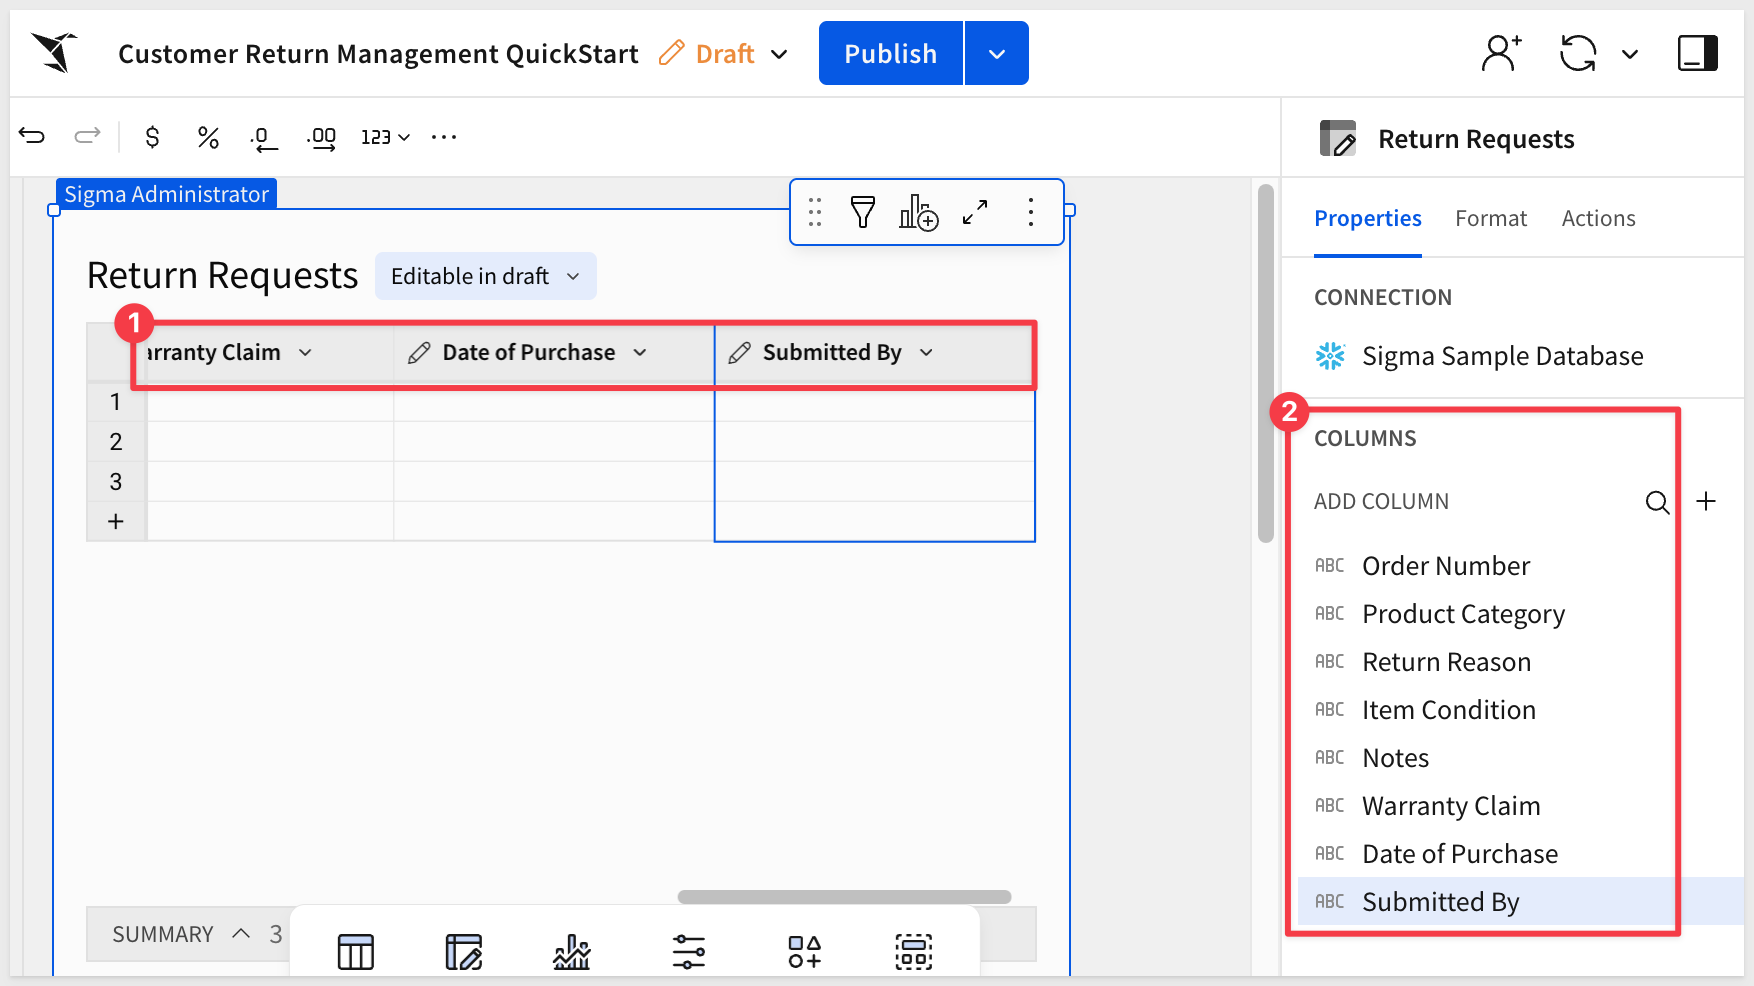
The input table starts with a single column. We need to add seven more — one for each field in the return request form.
Rename the first column to Order Number.
With Order Number selected, press Shift D seven times to add seven more columns, then rename them:
Product Category
Return Reason
Item Condition
Notes
Warranty Claim
Date of Purchase
Submitted By
Keyboard shortcuts: Mac OS
Keyboard shortcuts: Microsoft Windows
Delete any blank input table rows that may have been created.
In the next section, we'll configure each one — setting the data type, applying validation rules, and connecting a few columns to live warehouse data.
With all eight columns in place, we need to configure their data types and add validation where it matters.
Good validation here means fewer errors in the warehouse — and a better experience for whoever fills out the form.
Set column types
Three columns need their type changed from the default Text:
Click the Warranty Claim column header, open the column menu, select Change column type, and set the type to Checkbox:
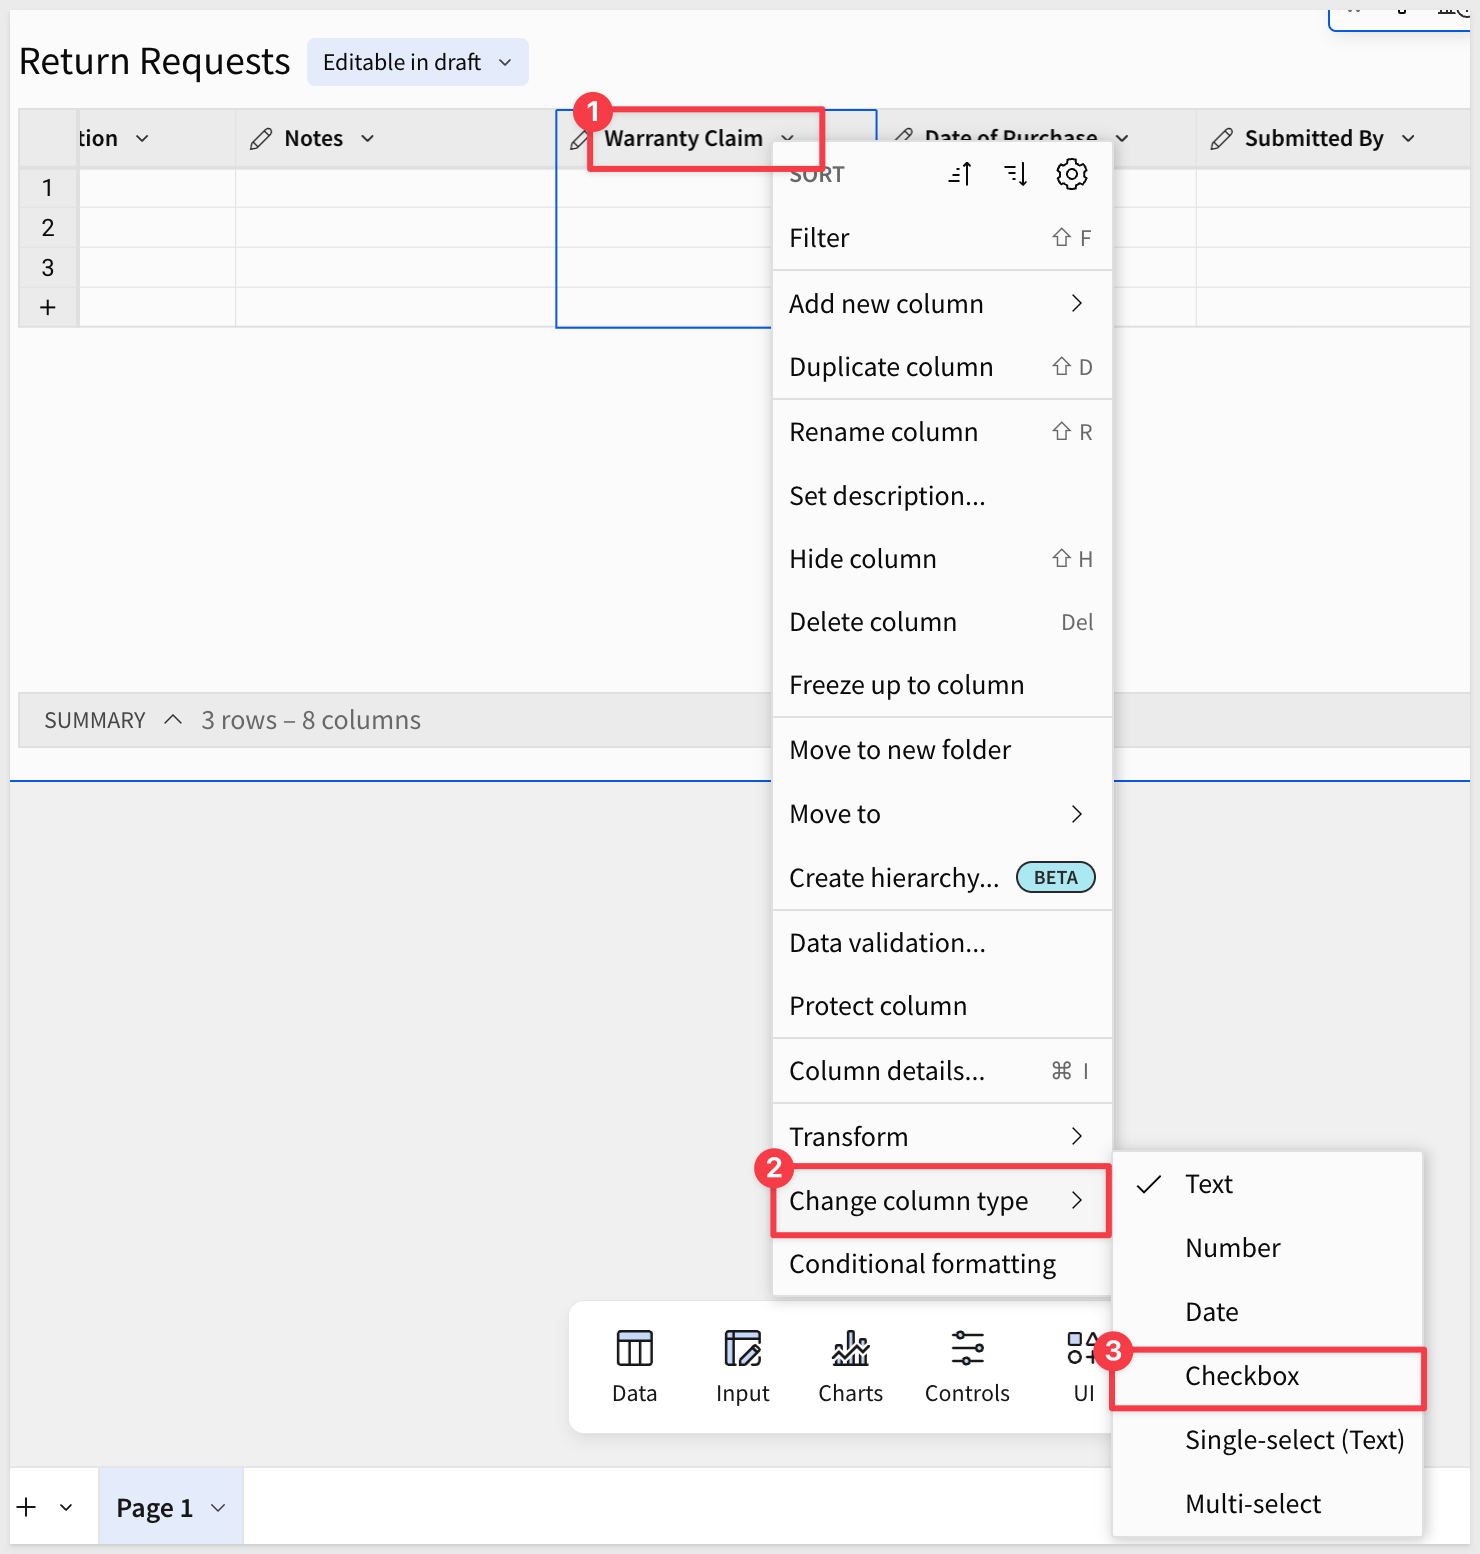
Do the same process for Date of Purchase column header, but set the type to Date.
The remaining columns stay as Text.
Validate Return Reason
Return Reason should be a fixed list — we don't want reps typing freeform values that make analysis harder later.
Select the Return Reason column header menu and change the column type to Single-select.
Choose Manual list and add these values, then click Save:
Defective Product
Wrong Item Received
Changed Mind
Damaged in Shipping
Not as Described
Other

Validate Item Condition
Repeat the same process for Item Condition. Use a Manual list with these values:
Unopened
Opened – Like New
Opened – Used
Damaged
Validate Product Category from warehouse data
For Product Category, we want to pull values directly from the Sigma Sample Database rather than maintaining a static list. This keeps the options in sync with actual product data.
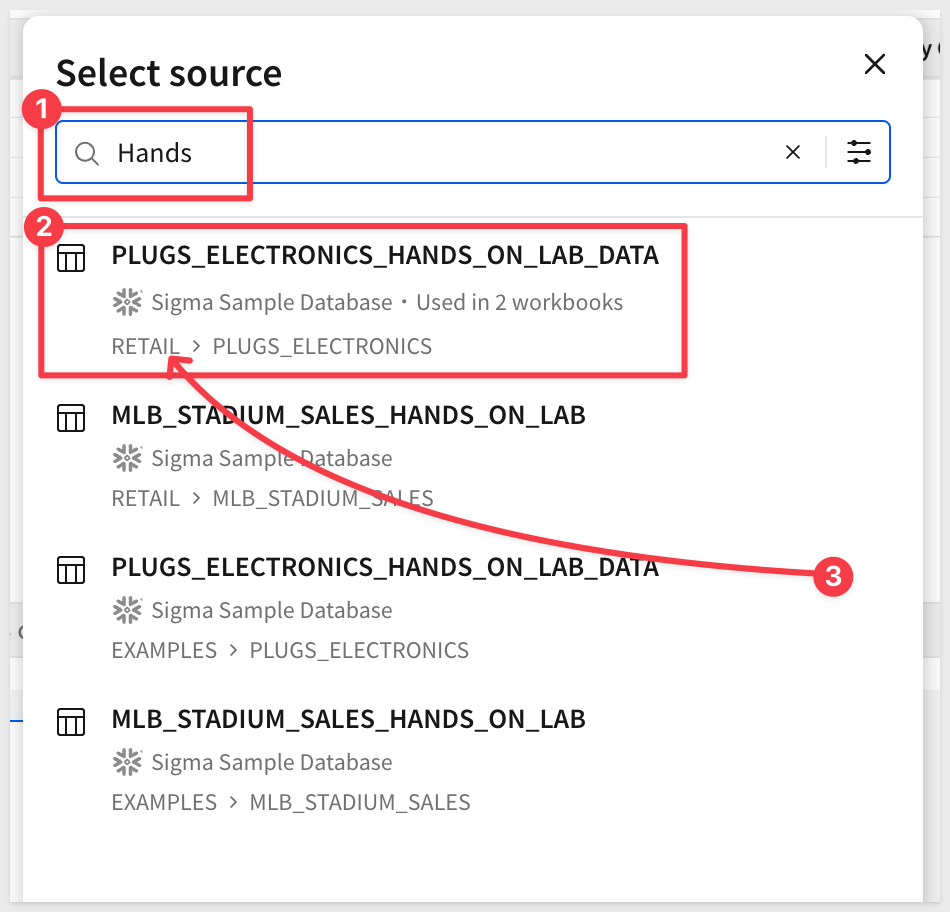
From the Element bar, drag a new Table onto the page and click Select source.
It is easier to just search for Hands and select to PLUGS_ELECTRONICS_HANDS_ON_LAB_DATA from the RETAIL schema:
In the Element panel, delete all columns except Product Type:
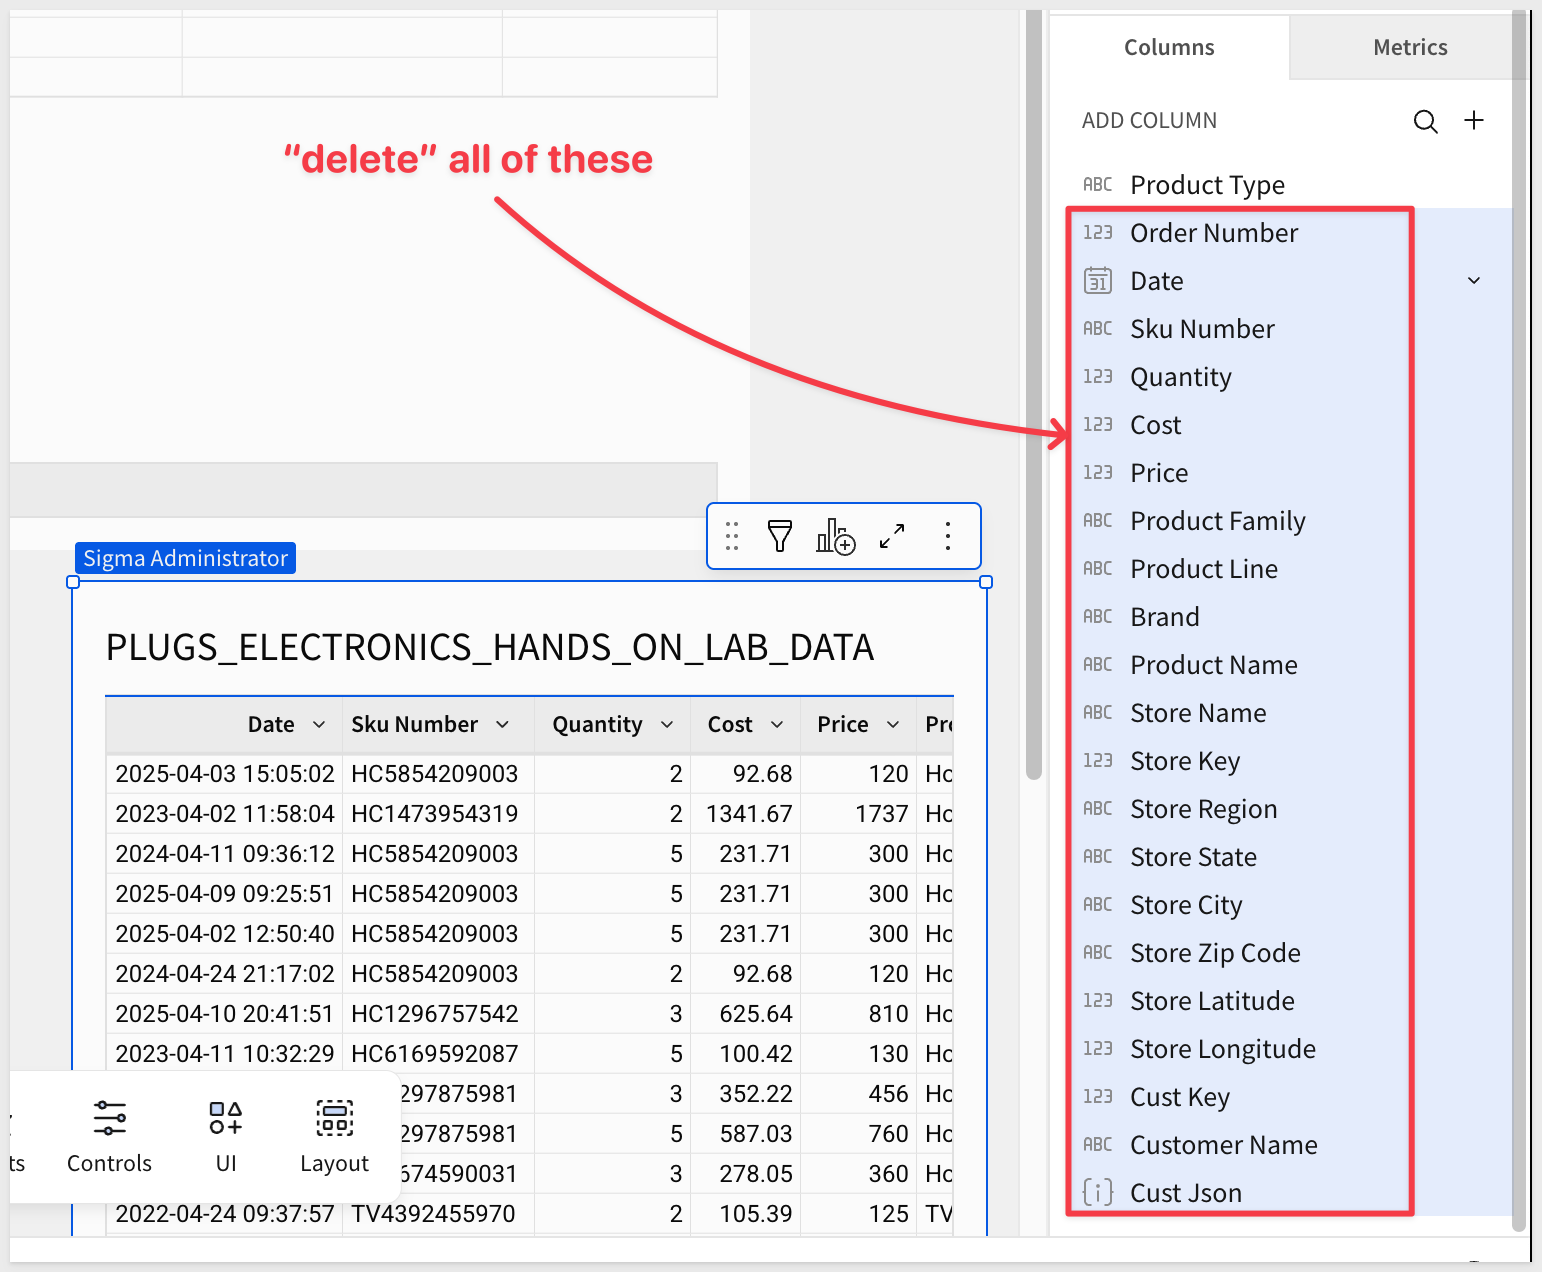
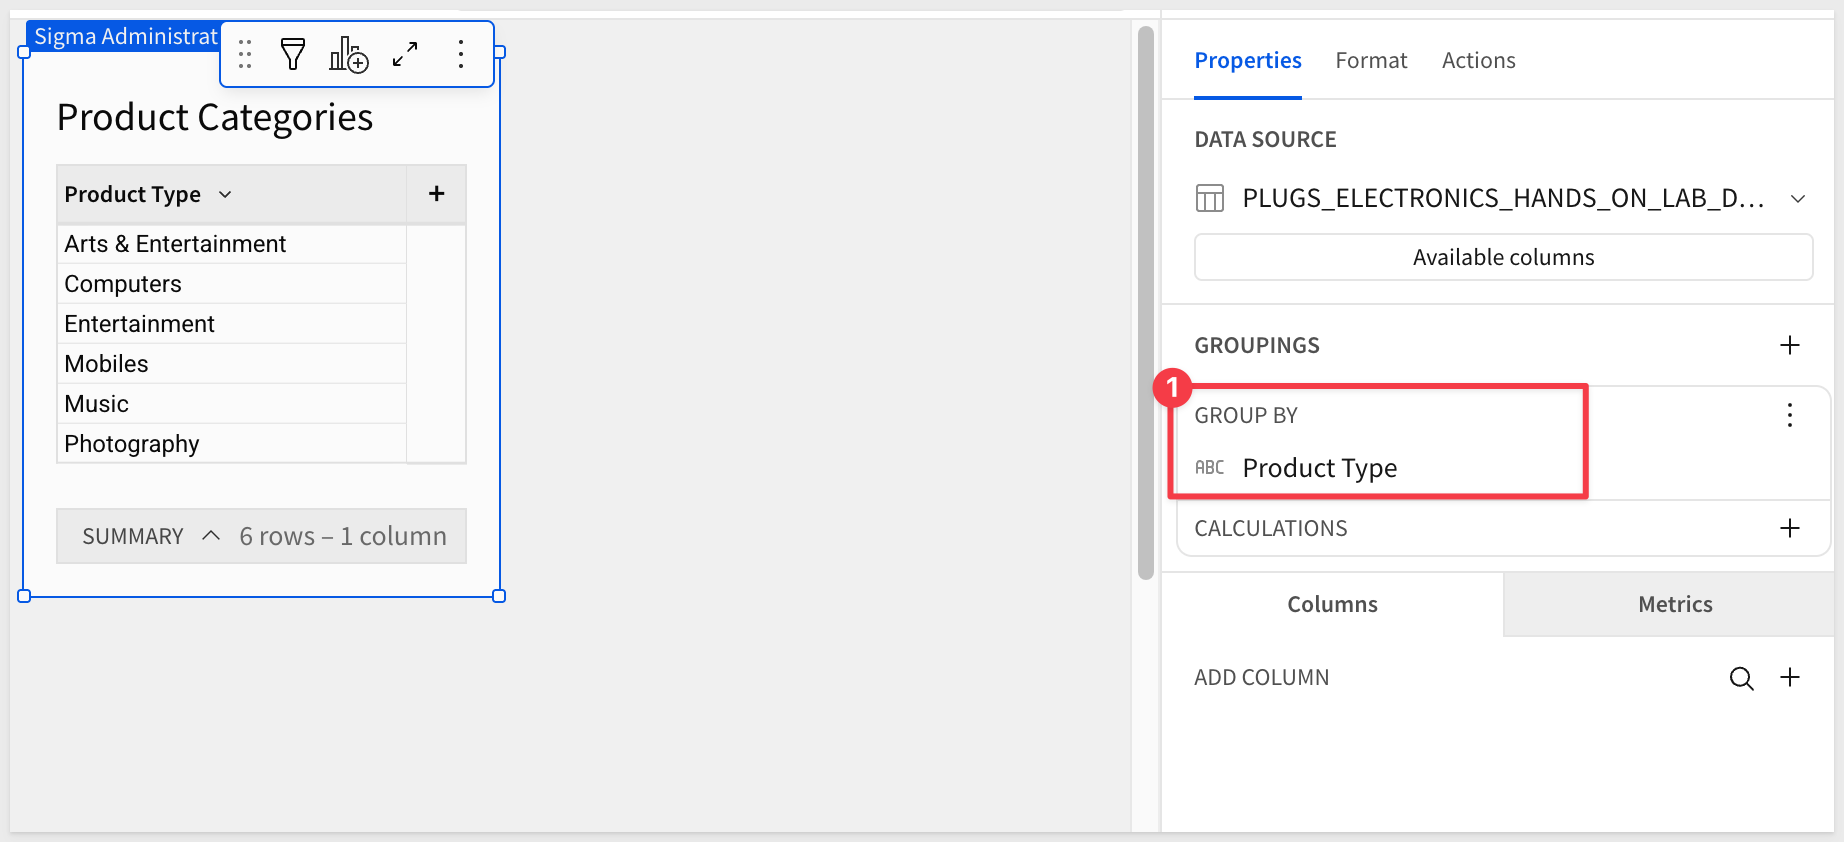
Rename the table to Product Categories.
Group by Product Type to collapse duplicates:
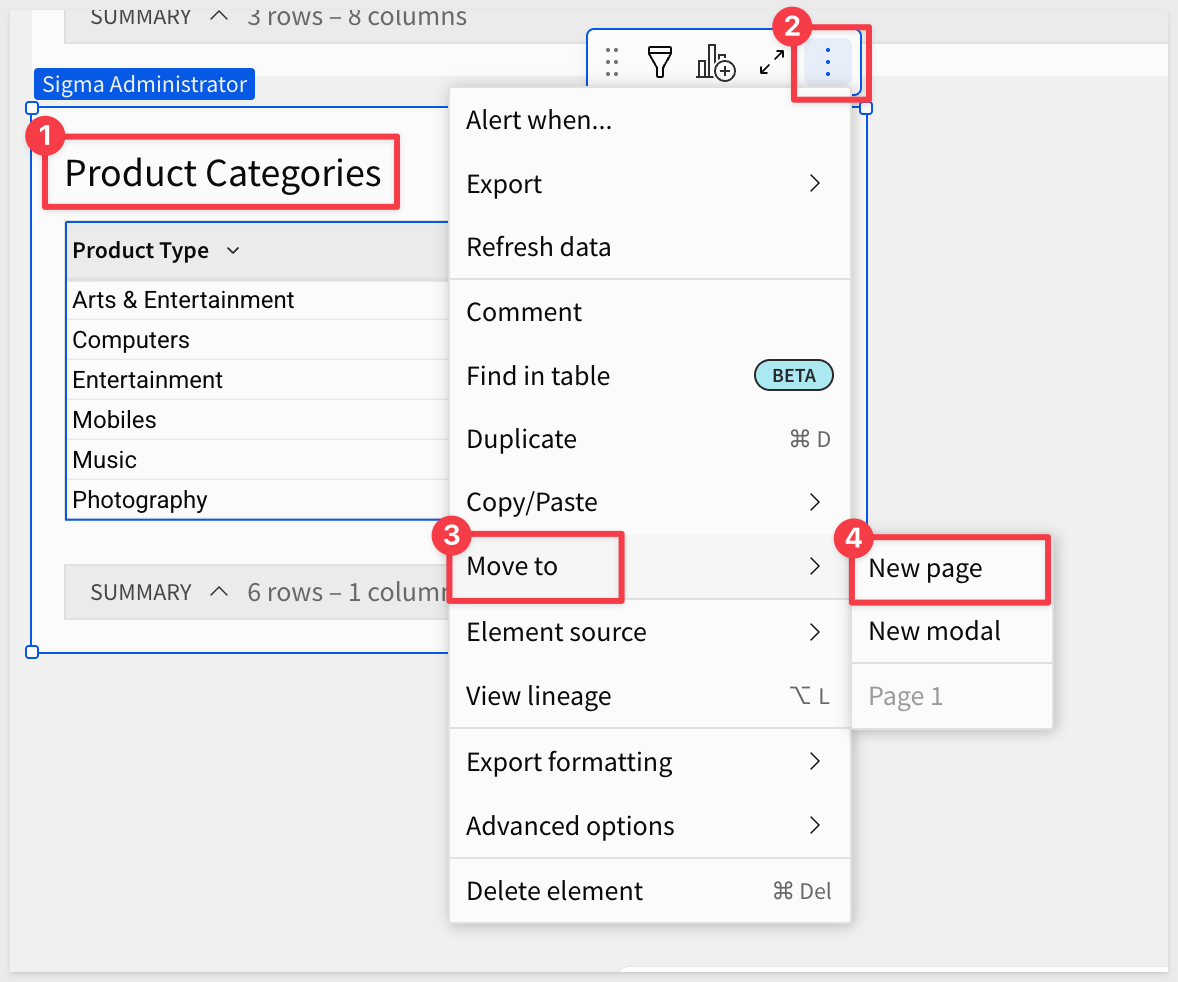
Move this table to a new page and rename the page to Data:
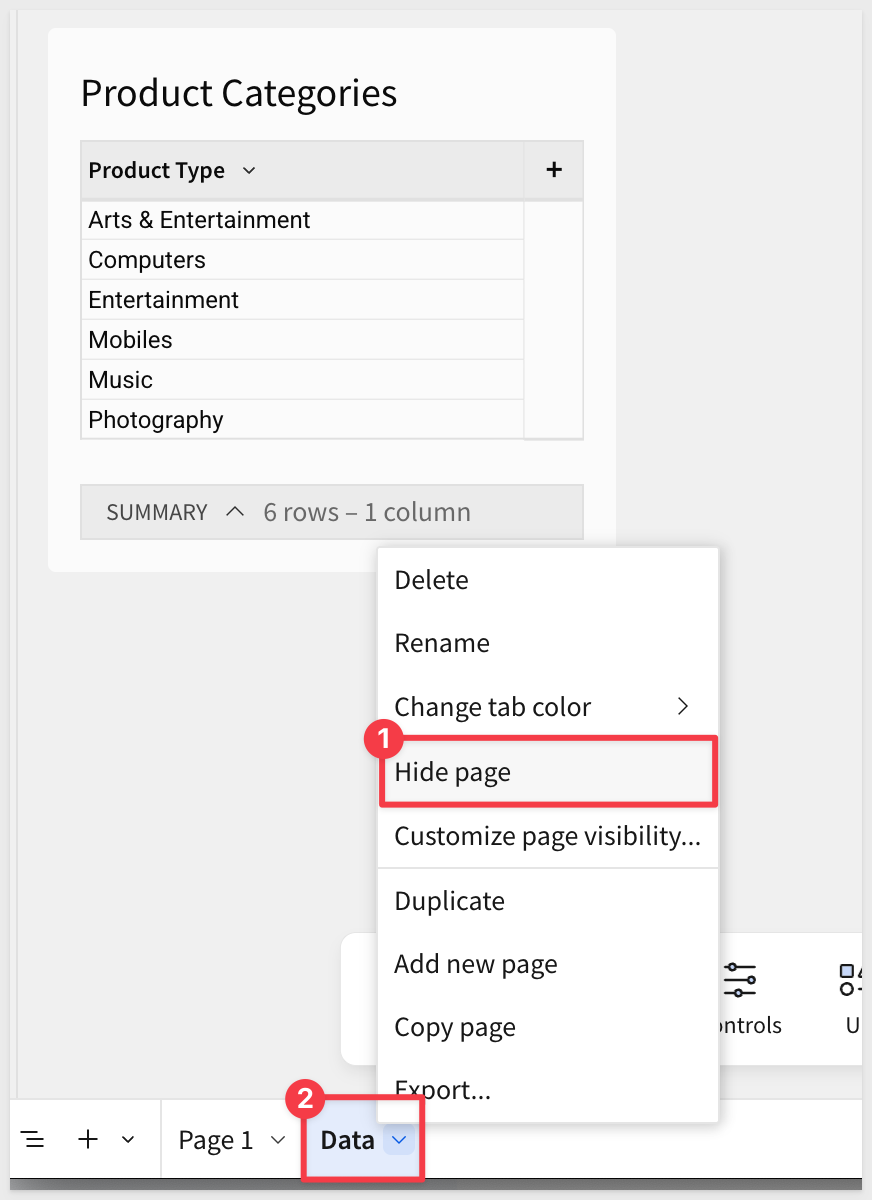
Set the Data page to be Hidden:
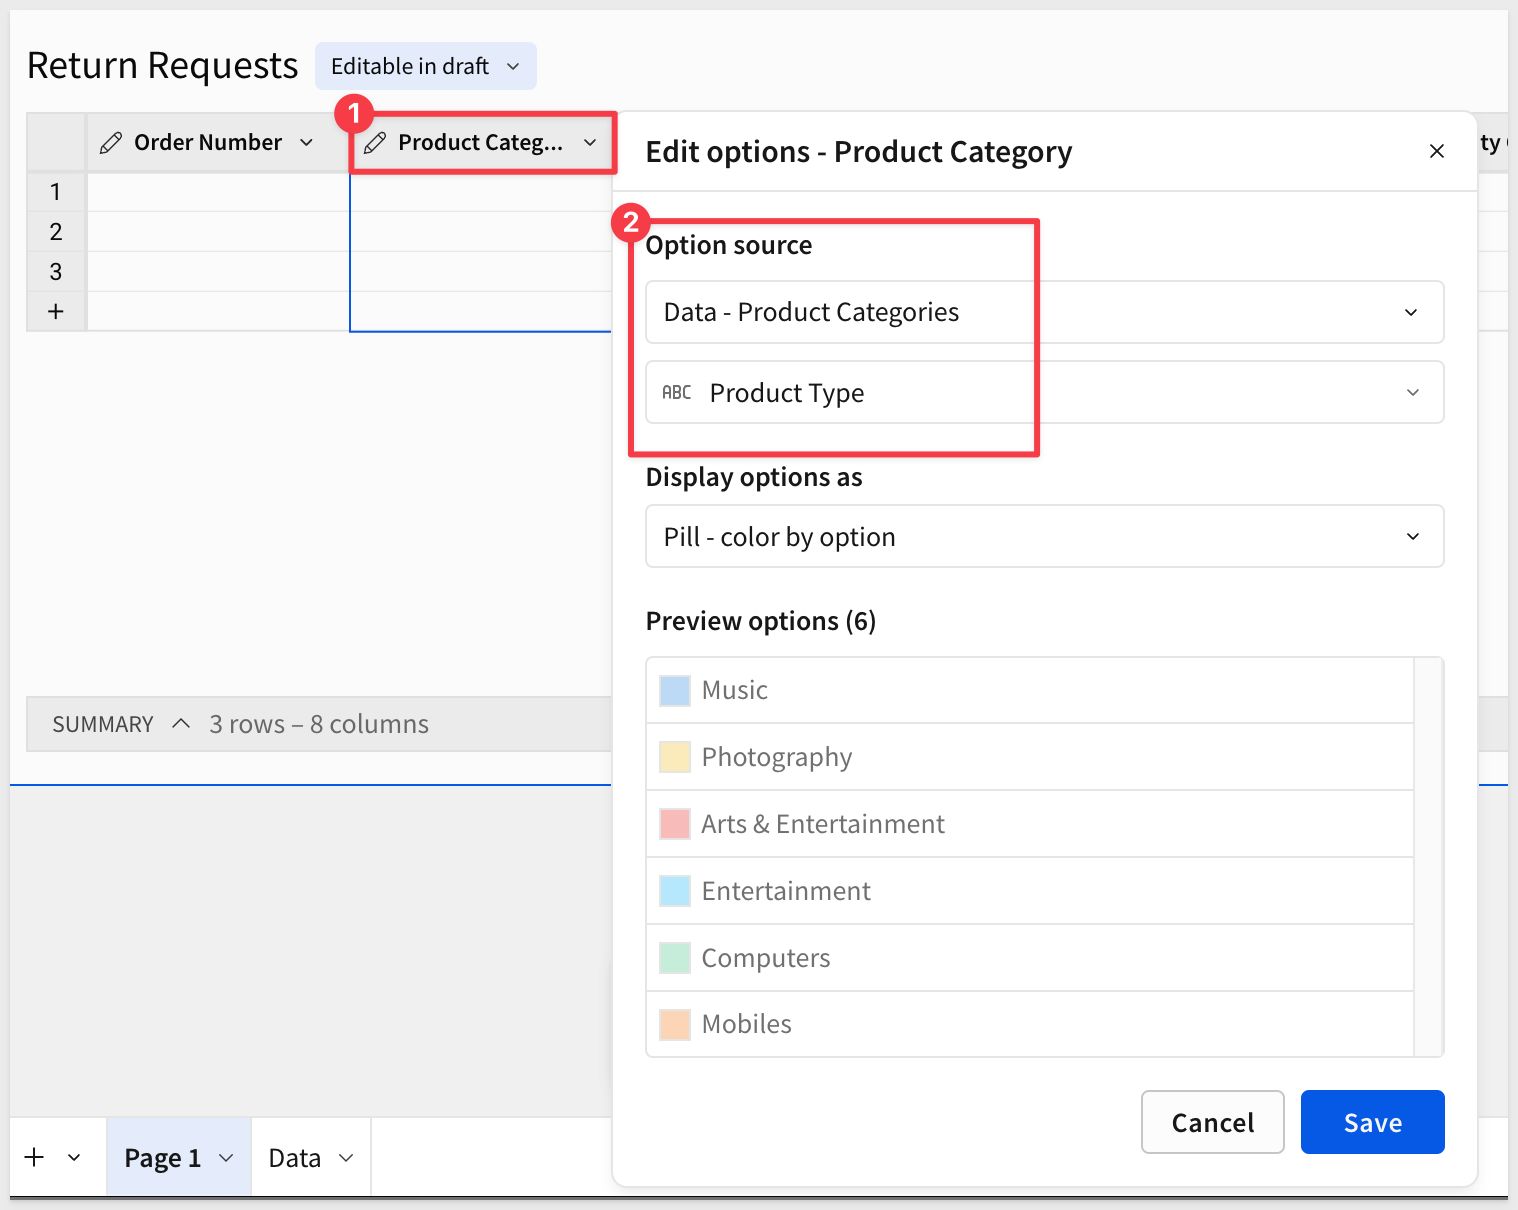
Back on Page 1, change the Product Category column to Single-select.
Select From data source and set the Option source to the Product Categories table on the Data page, using the Product Type column:
For more information on data validation in input tables, see Apply data validation to input table columns.
All columns are now configured. The form we create in the next section will automatically inherit these types and validation rules.
With the input table configured, creating the form takes just a few clicks.
On the Return Requests input table, click the Create child element icon and select Form:
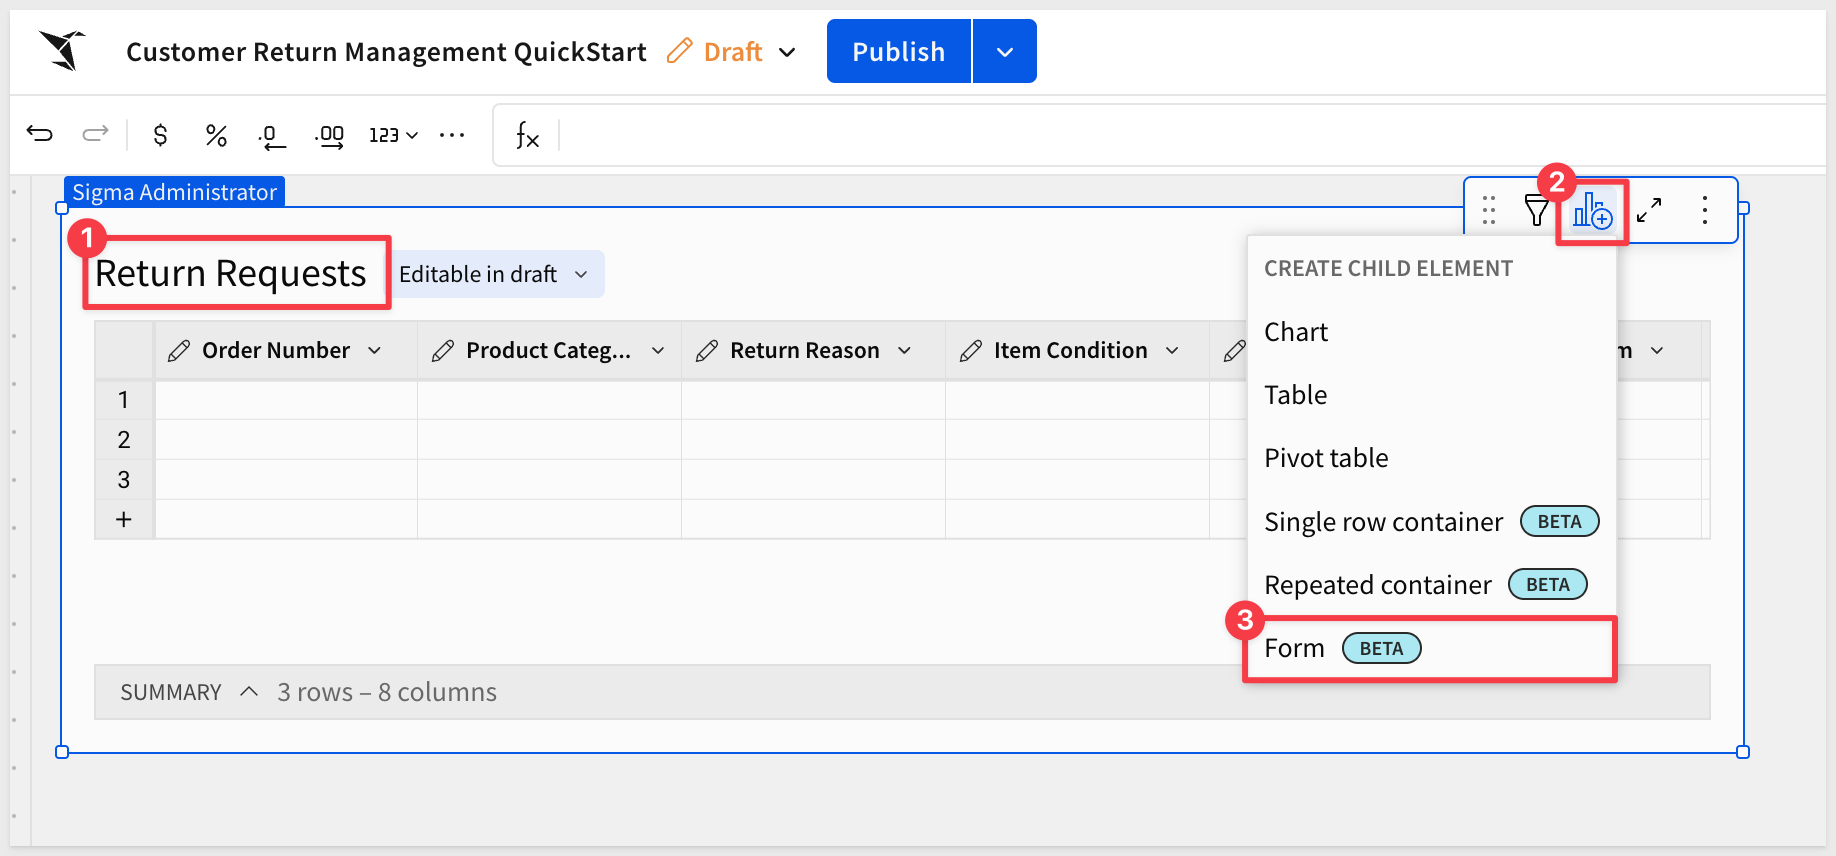
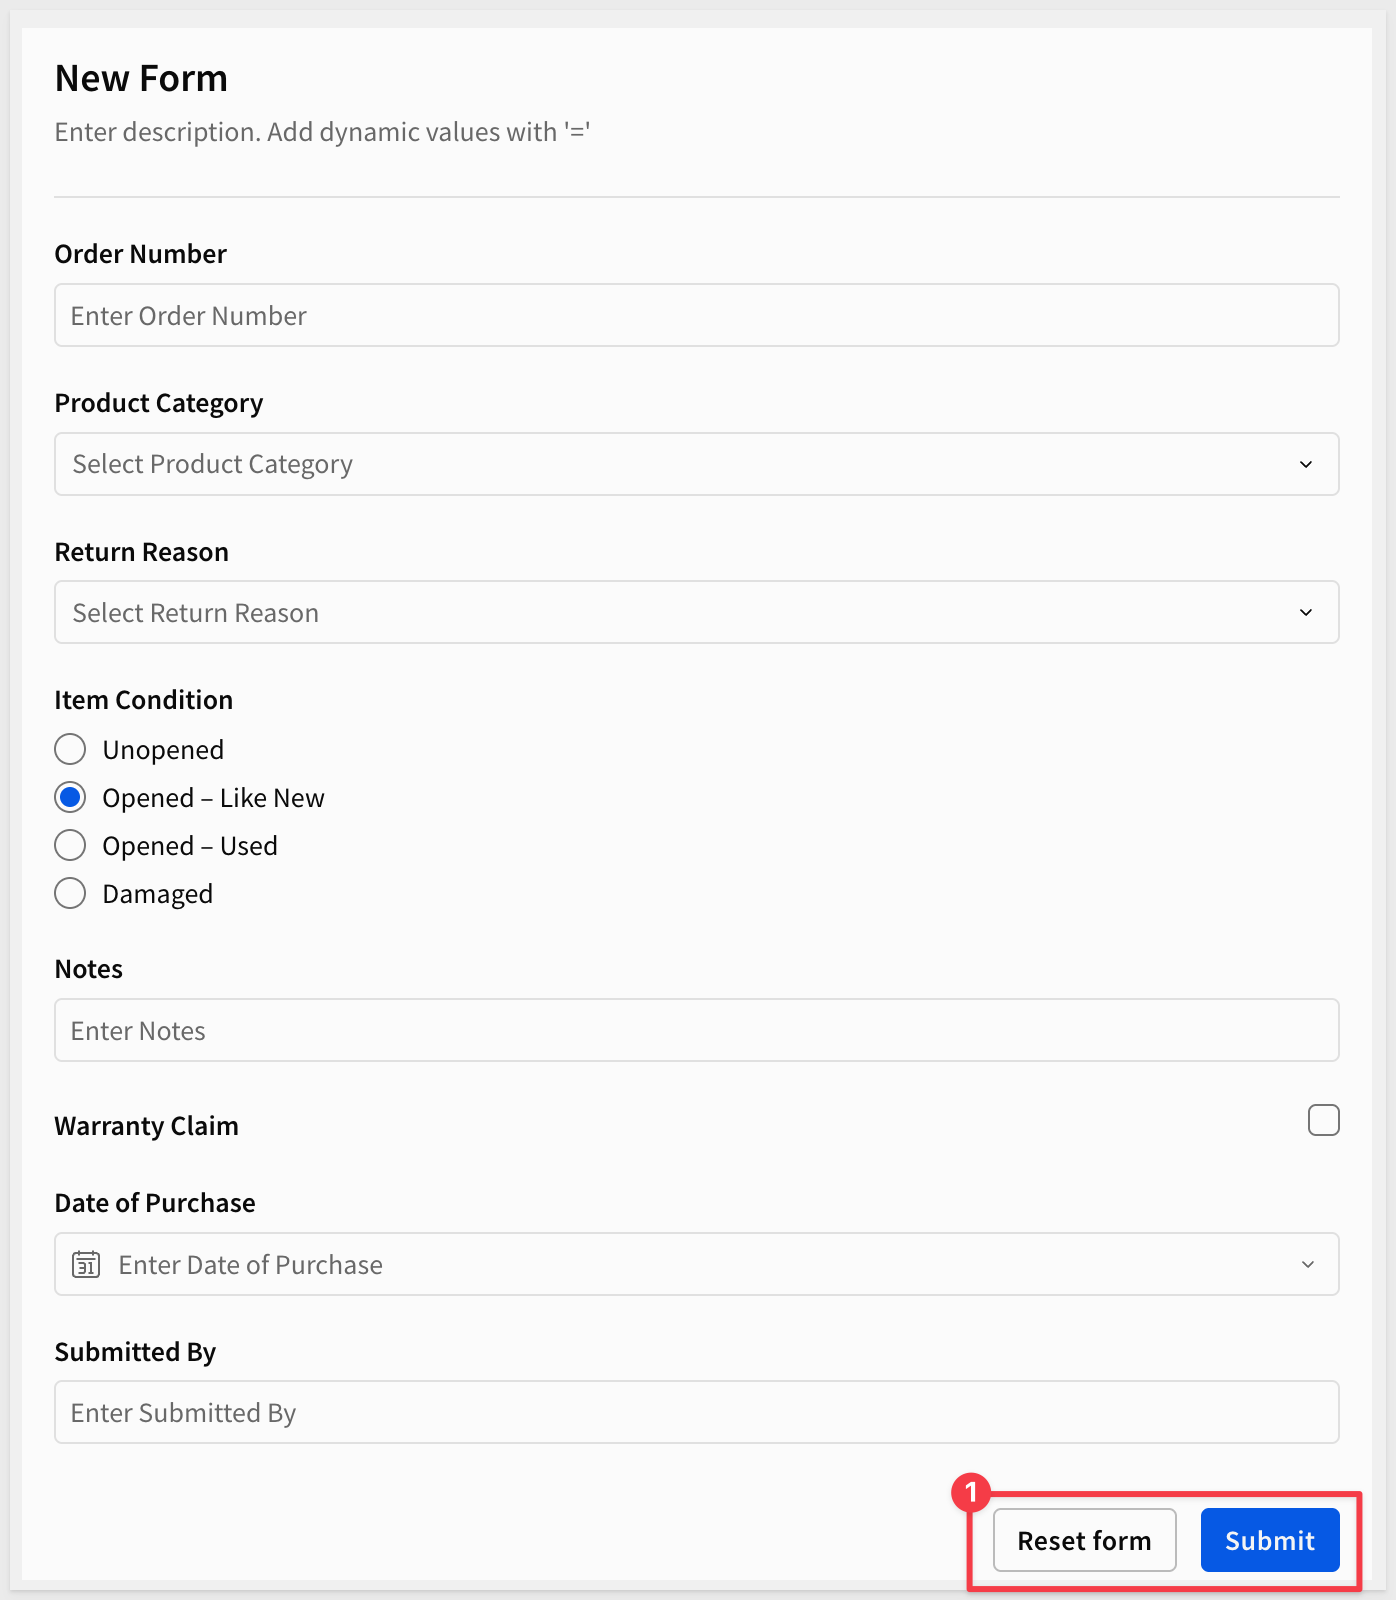
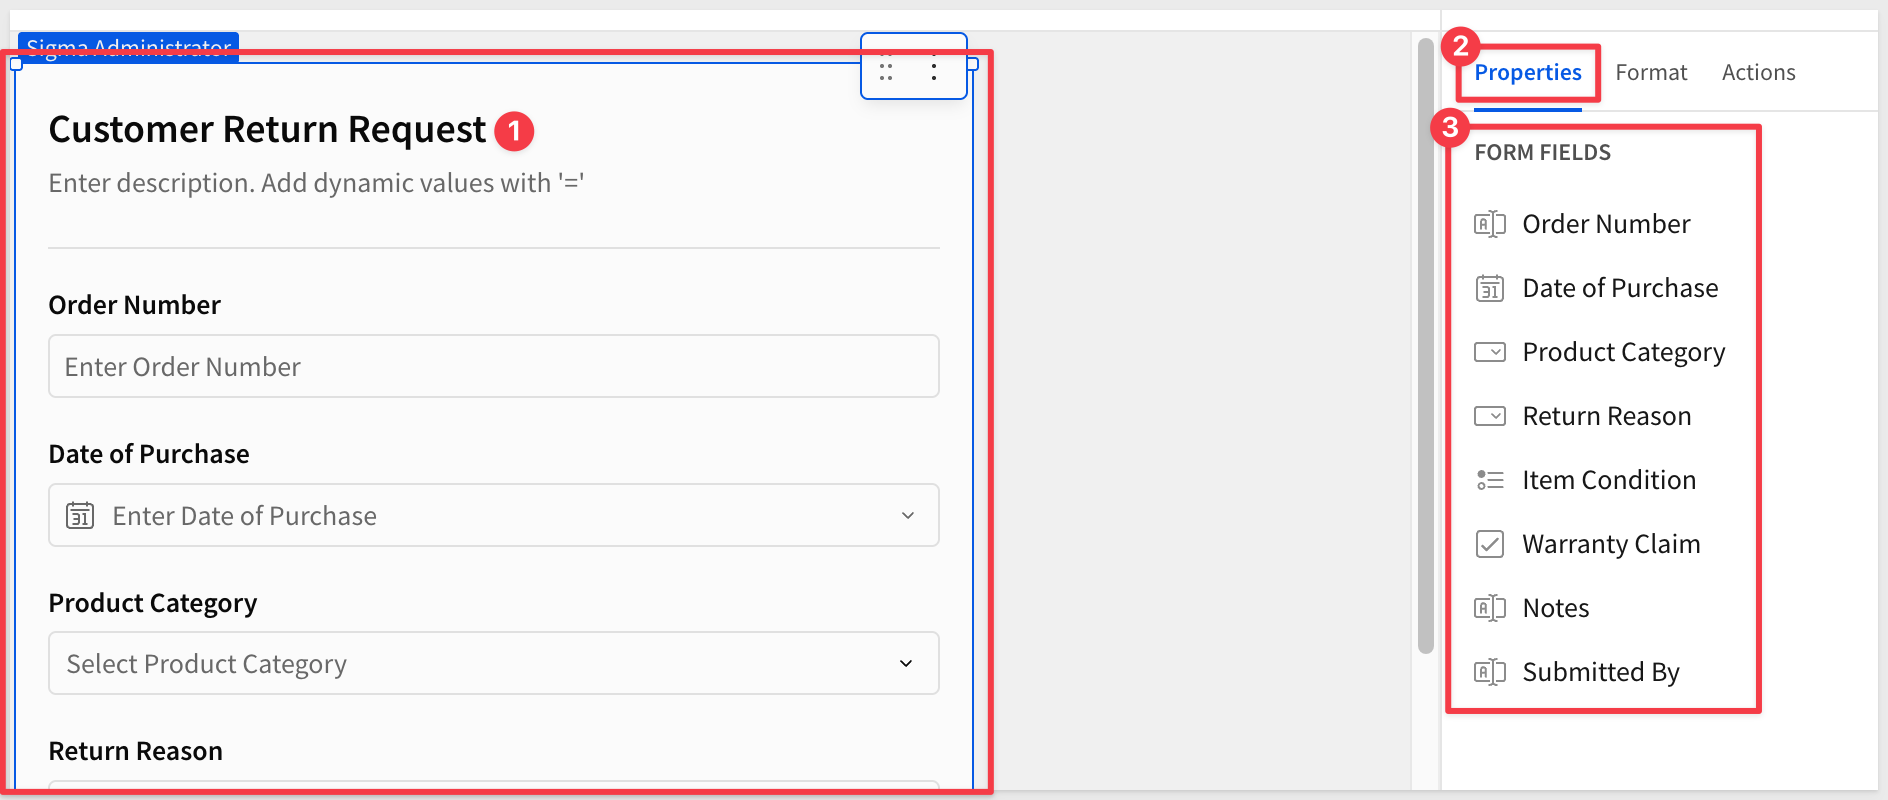
Sigma automatically creates a form bound to the Return Requests input table. Every column is mapped to a form field — including the types and validation rules we just set.
Notice that Sigma also created two actions on the Submit button automatically: one to insert a row into the input table and one to clear the form after submission. You don't need to configure these manually:
For more information on form actions, see Create actions that modify forms.
Organize the workbook pages
Let's configure this so the form is on its own page, cleanly separated from the input table.
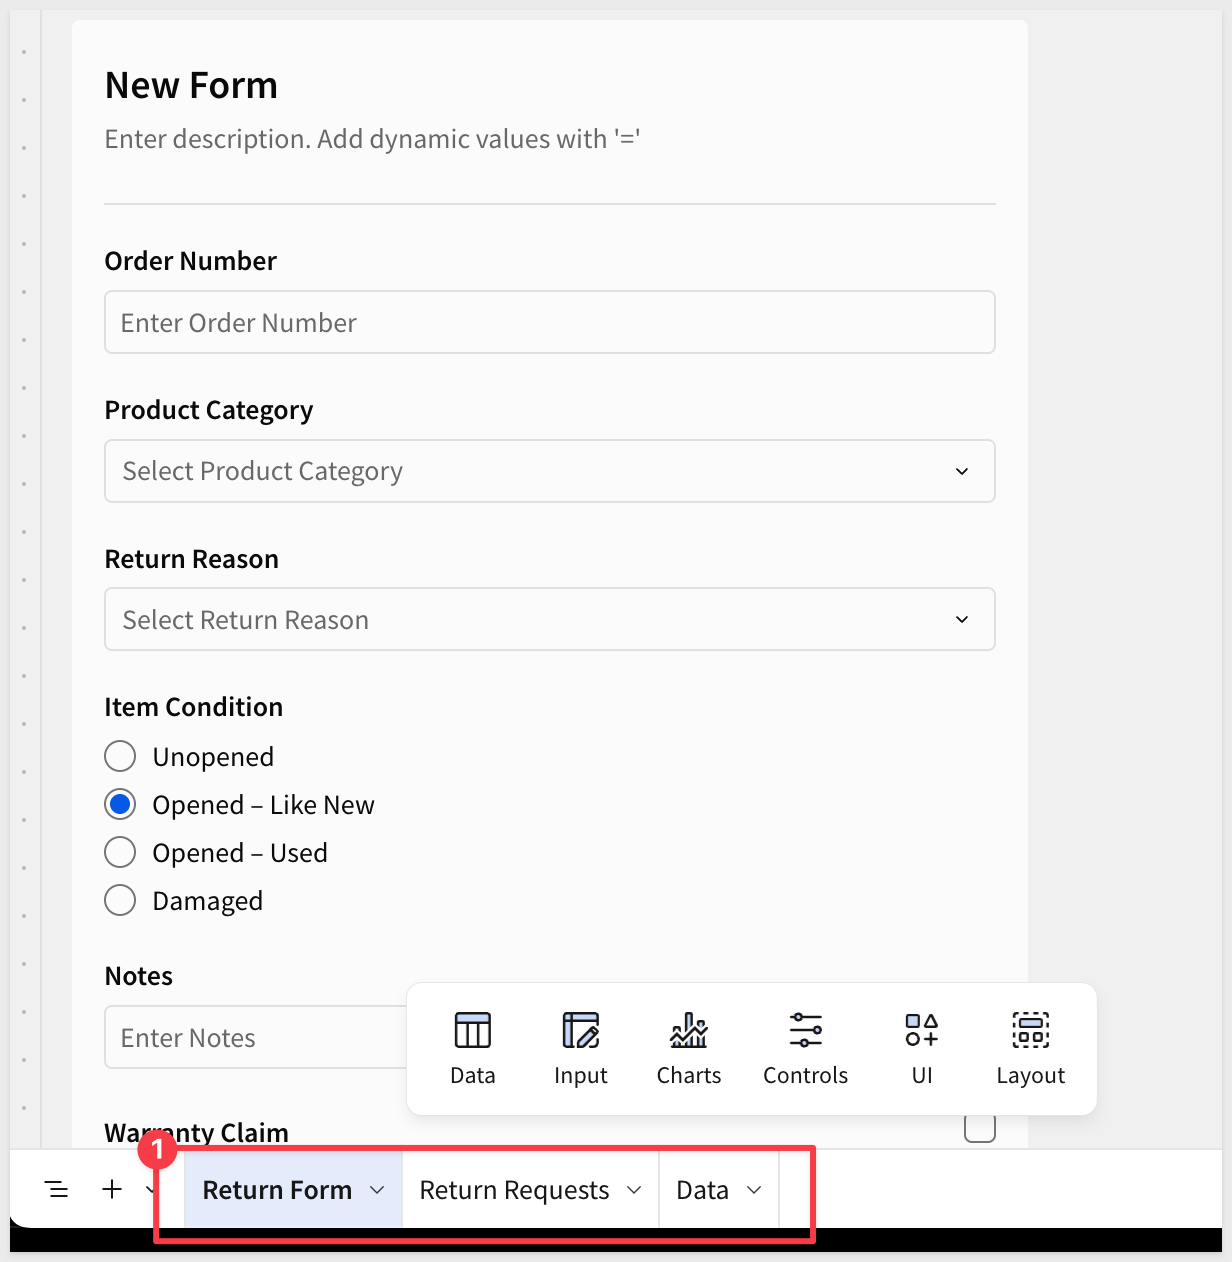
Right-click the form element and select Move to > New page. Rename the new page Return Form.
Rename Page 1 to Return Requests.
The workbook now has three pages: Return Form (the form), Return Requests (the input table) and Data (hidden, with the product category reference table).
The auto-generated form works, but a few adjustments make it more useful in practice — clearer labels, logical field order, required fields, and better input controls for the people filling it out.
Rename the form title
Click the form title and change it from New Form to Customer Return Request.
Reorder fields
The default field order follows the column order in the input table. Let's put them in a sequence that makes sense for a customer service rep working through a return.
In the Element panel, drag the fields into this order:
Order NumberDate of PurchaseProduct CategoryReturn ReasonItem ConditionWarranty ClaimNotesSubmitted By
By reordering the column list, the form automatically adjusts for us:
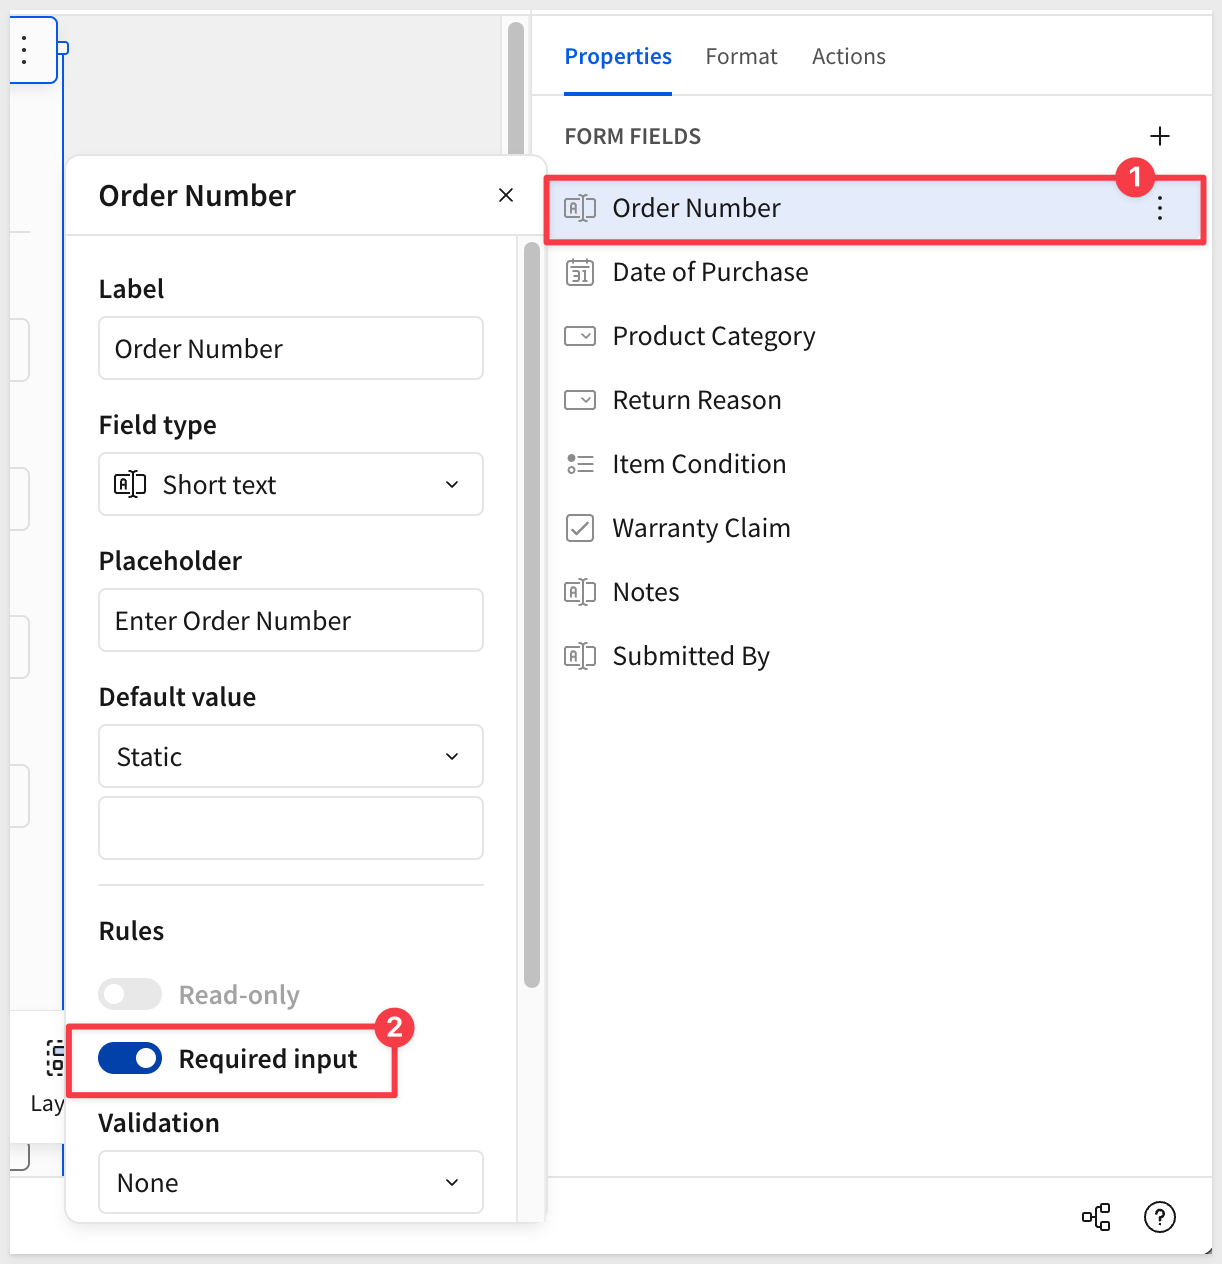
Mark required fields
Some fields are essential — without them, the return can't be processed. Select each of the following fields and enable the Required input toggle in the Element panel:
Order NumberProduct CategoryReturn ReasonItem Condition
Adjust field input types
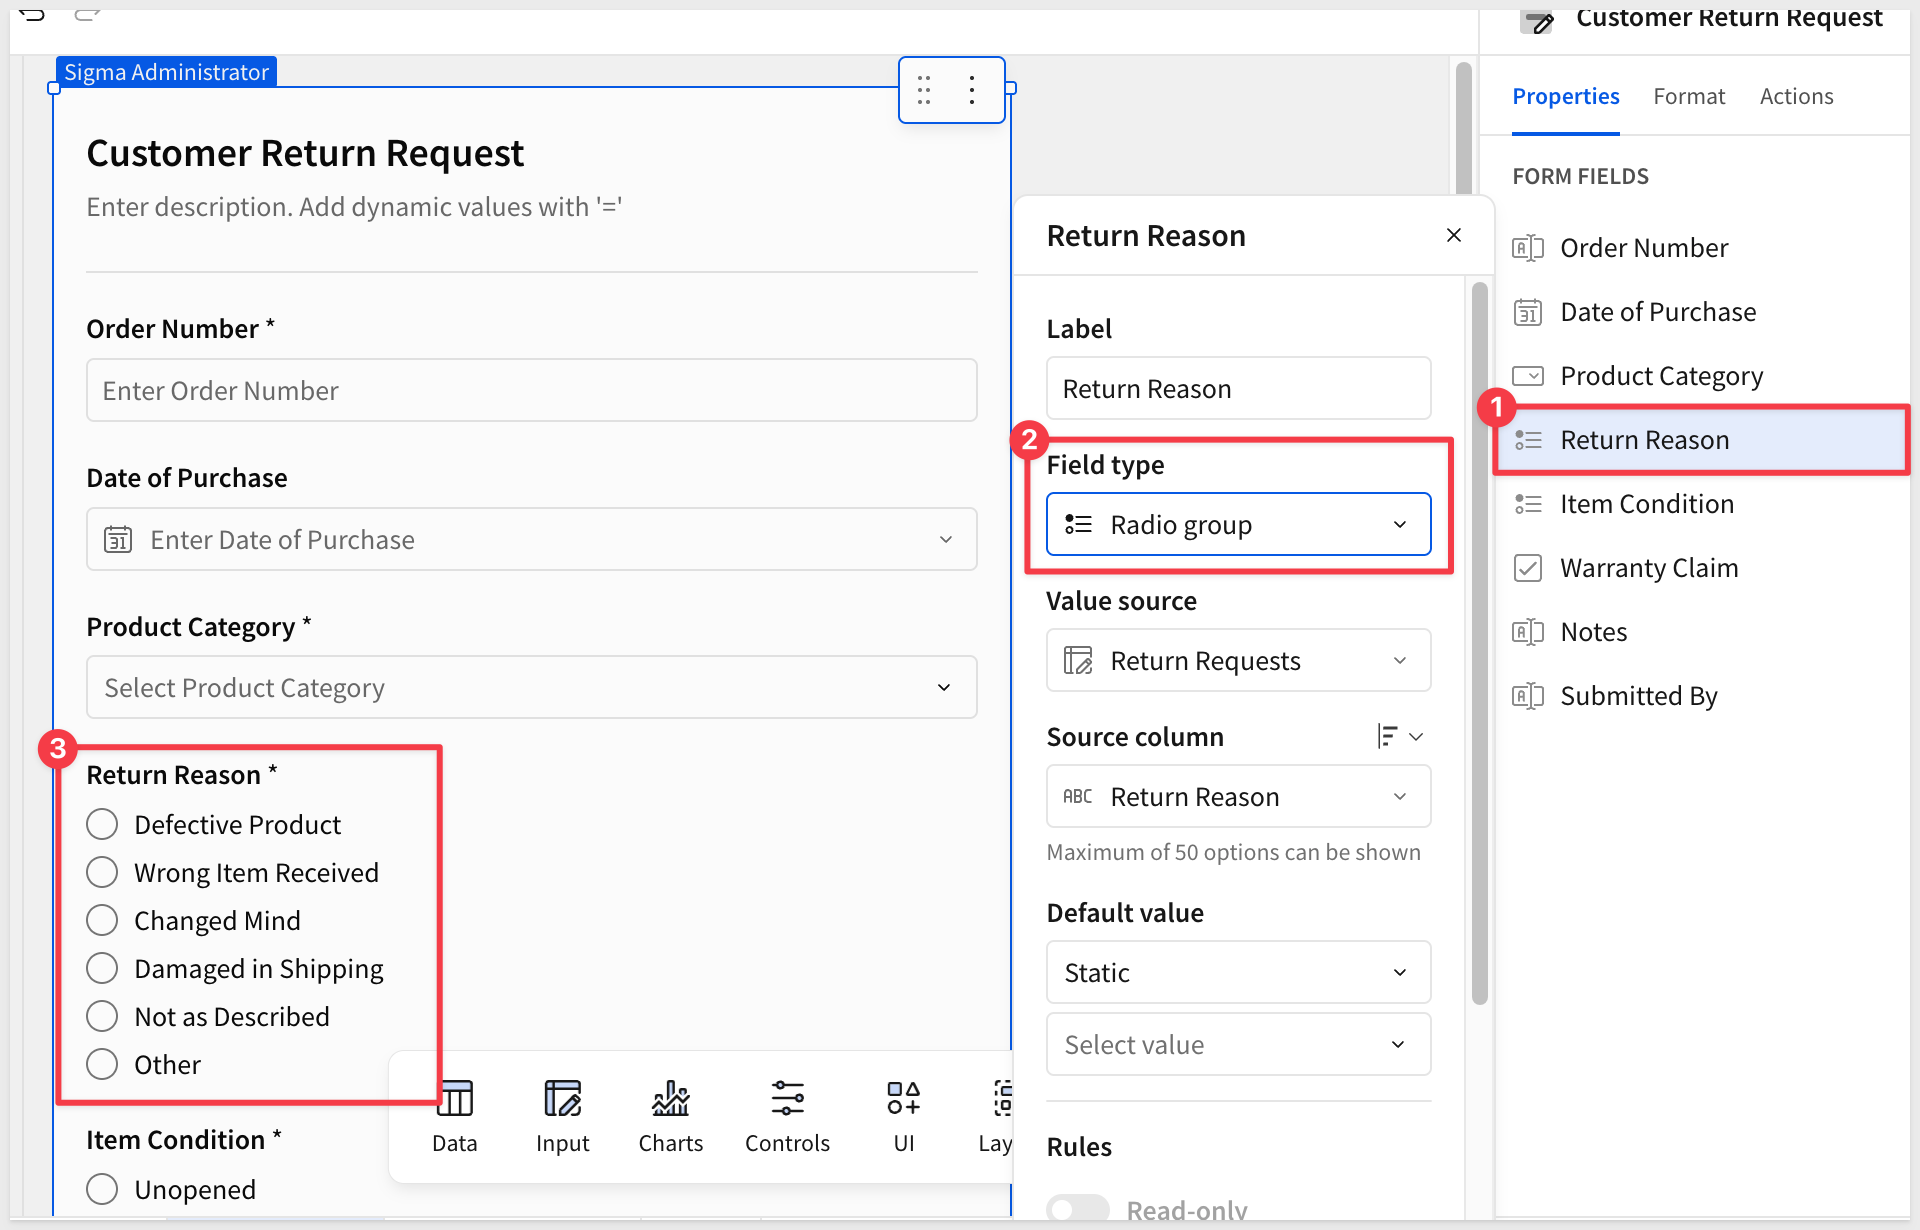
Single-select columns default to a dropdown in the form. For short lists like Return Reason, radio buttons are faster to use — the options are visible at a glance without opening a menu.
Click the Return Reason field. In the Element panel, change the Field type to Radio group:
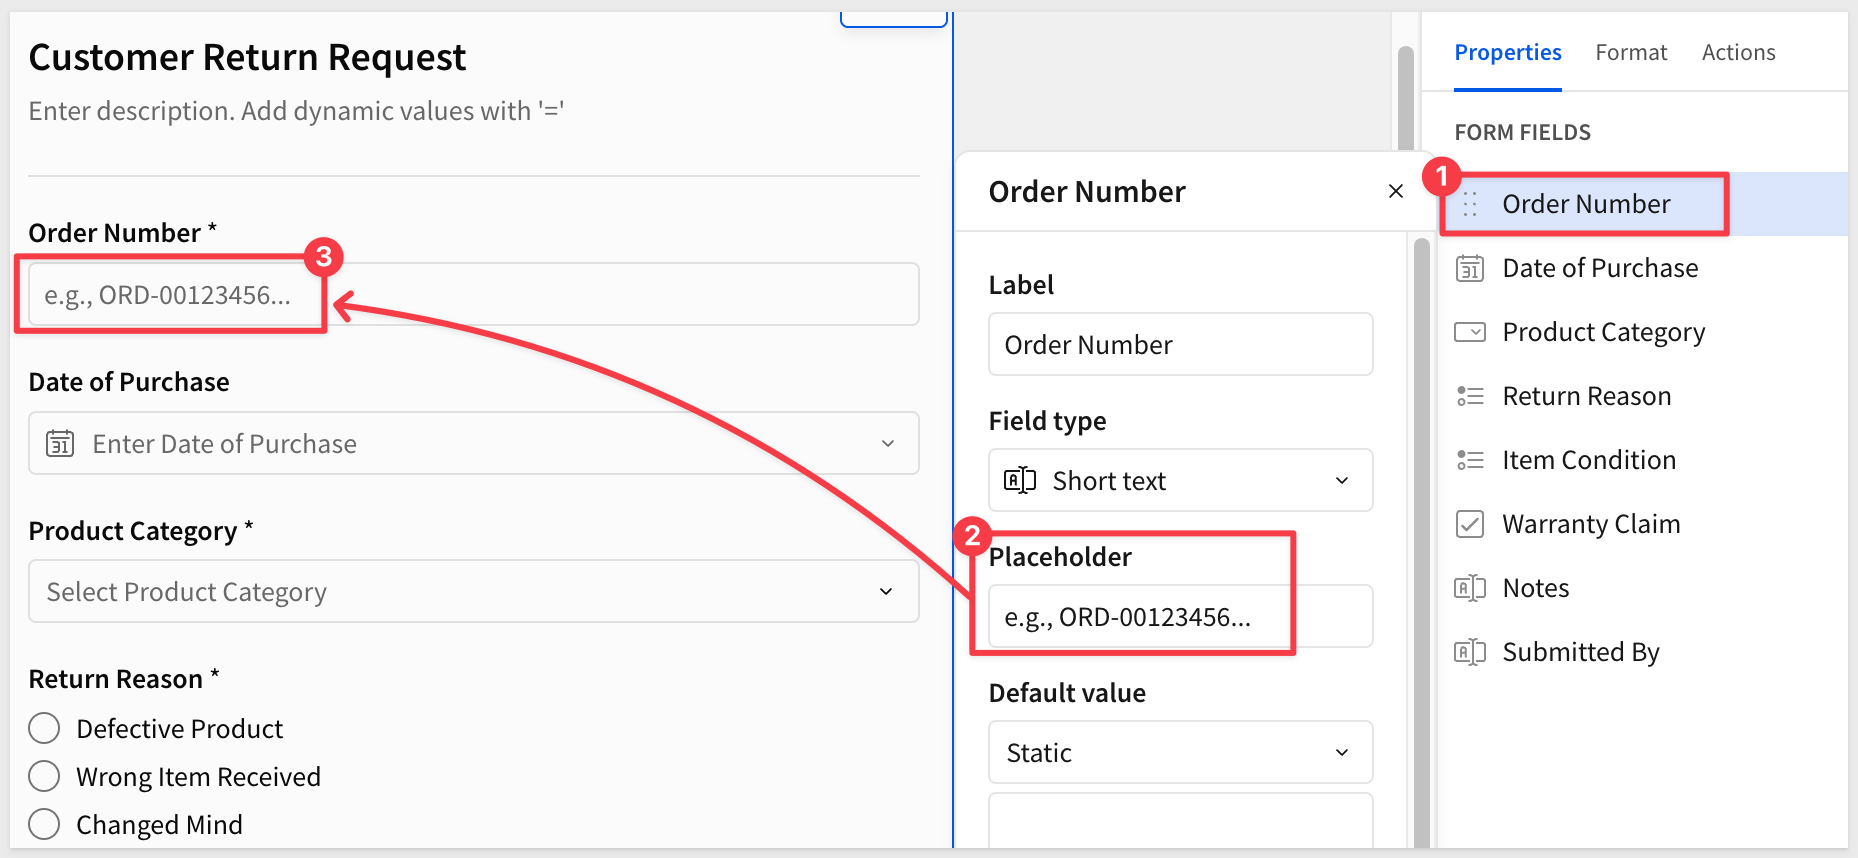
Add placeholder text
Let's add a short hint inside the Order Number field to help reps know what format to enter.
Click the field and add placeholder text under Placeholder:
e.g., ORD-00123456...
Before publishing the workbook, let's confirm the form works end-to-end — submission writes to the input table and the form clears cleanly afterward.
Check draft mode
Input tables can be configured to allow edits in Draft mode, which lets us test without publishing first.
Confirm the Return Requests input table is set to allow Draft edits by clicking the input table settings icon and checking the Governance options:
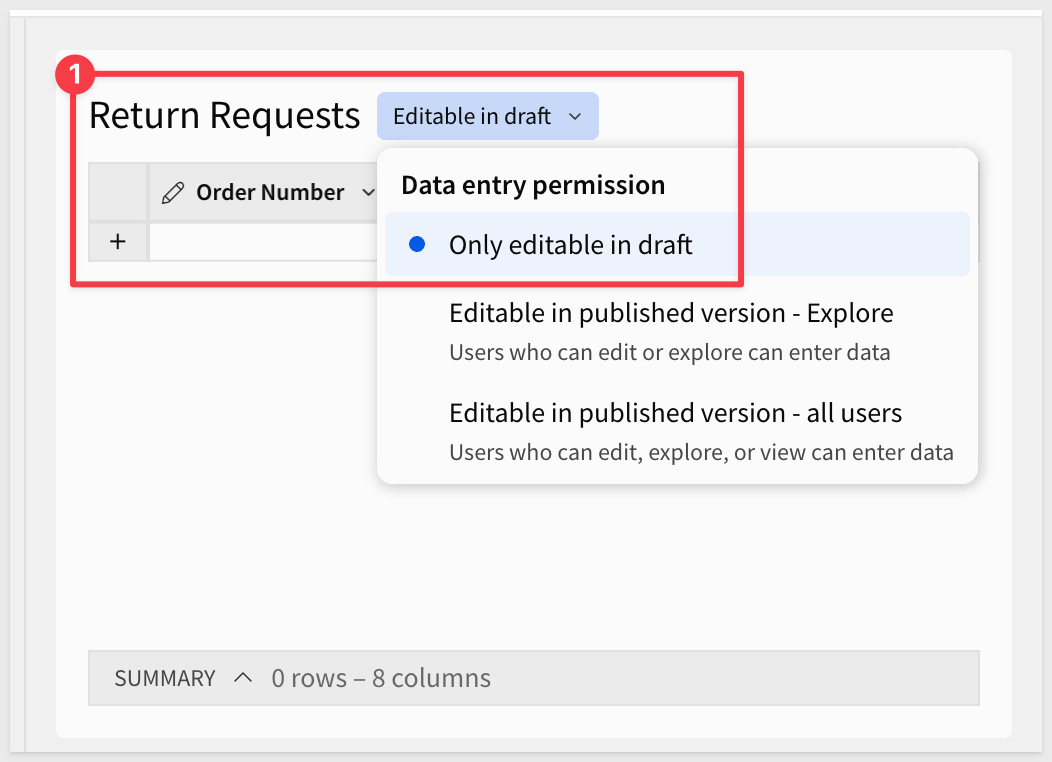
For more information, see Configure data governance options in input tables.
Submit a test entry
Navigate to the Return Form page and fill in the form using this sample data:
Order Number:
ORD-00123456
Date of Purchase: select any recent date
Product Category: Mobiles
Return Reason: Defective Product
Item Condition: Opened - Used
Warranty Claim: checked
Notes:
Customer reports device stopped charging after two weeks.
Submitted By: your name
Click Submit.
The form clears immediately — that's the auto-created Clear form action firing after the insert.
Confirm the row
Navigate to the Return Requests page. The submitted row should be visible in the input table:

Test validation
To confirm required fields are enforced, Submit an empty form. The form will block submission and highlight the missing required fields:

The form is working. In the next section, we'll build out the analysis view that surfaces patterns across all submitted returns.
The form handles data capture. Now let's build the view that turns those submissions into something useful for a manager reviewing return trends.
Load sample data
With only one or two submitted rows, the analysis views will be sparse. If you want to see what the page looks like with realistic volume, download this sample dataset and import it into the Return Requests input table first.
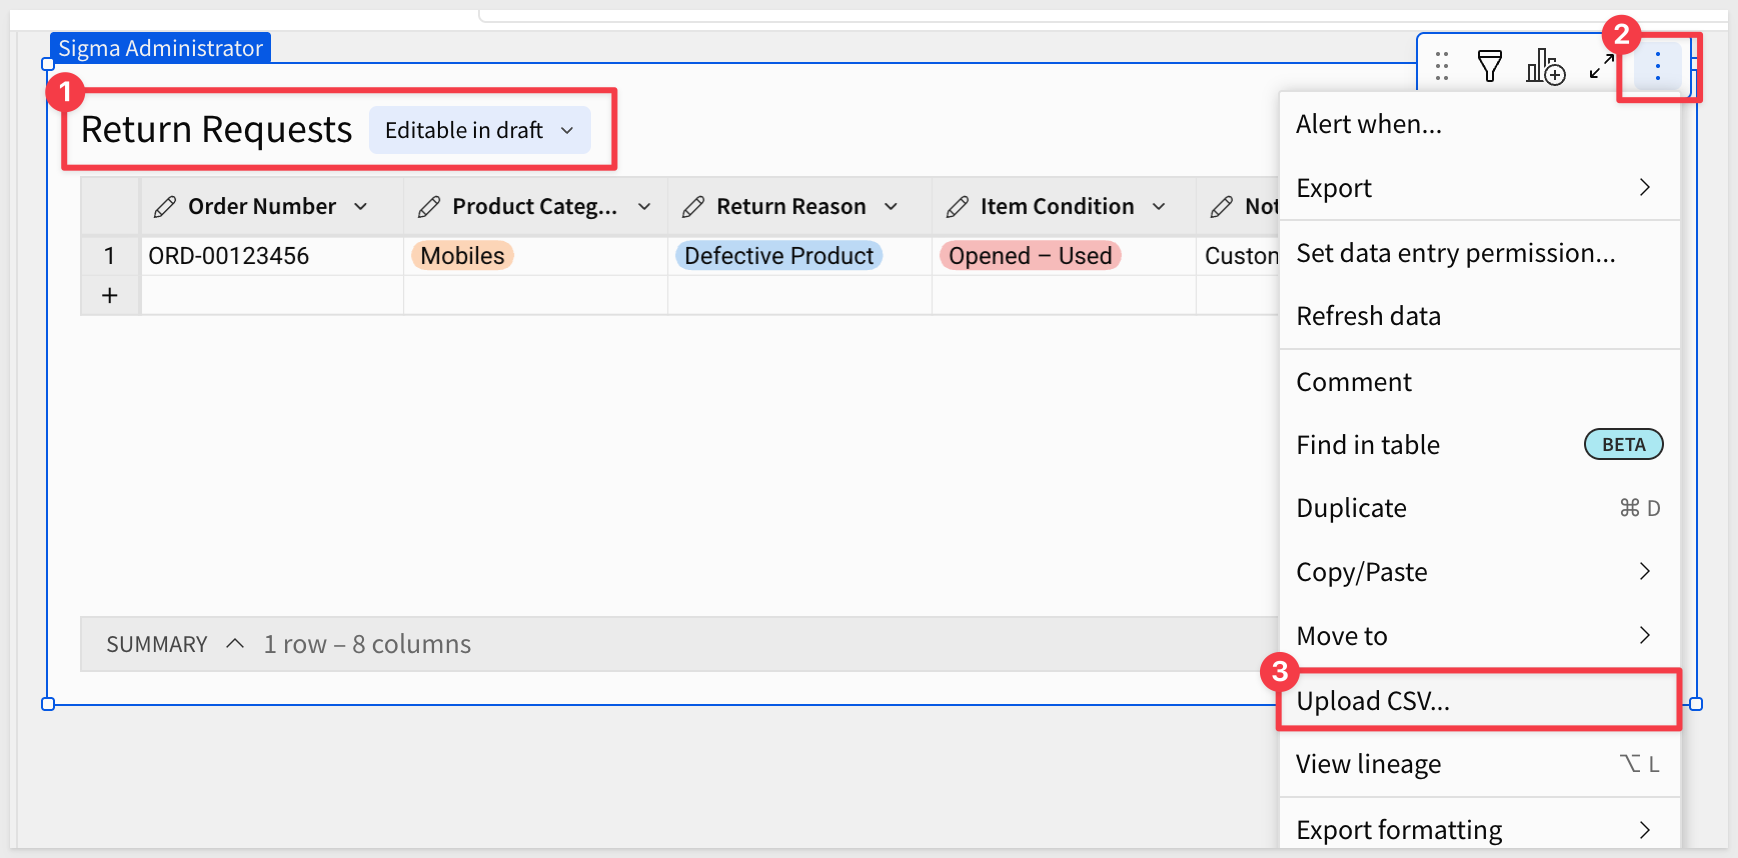
On the Return Requests page, open the input table menu and select Upload CSV:
Select the downloaded file and confirm the column mapping:

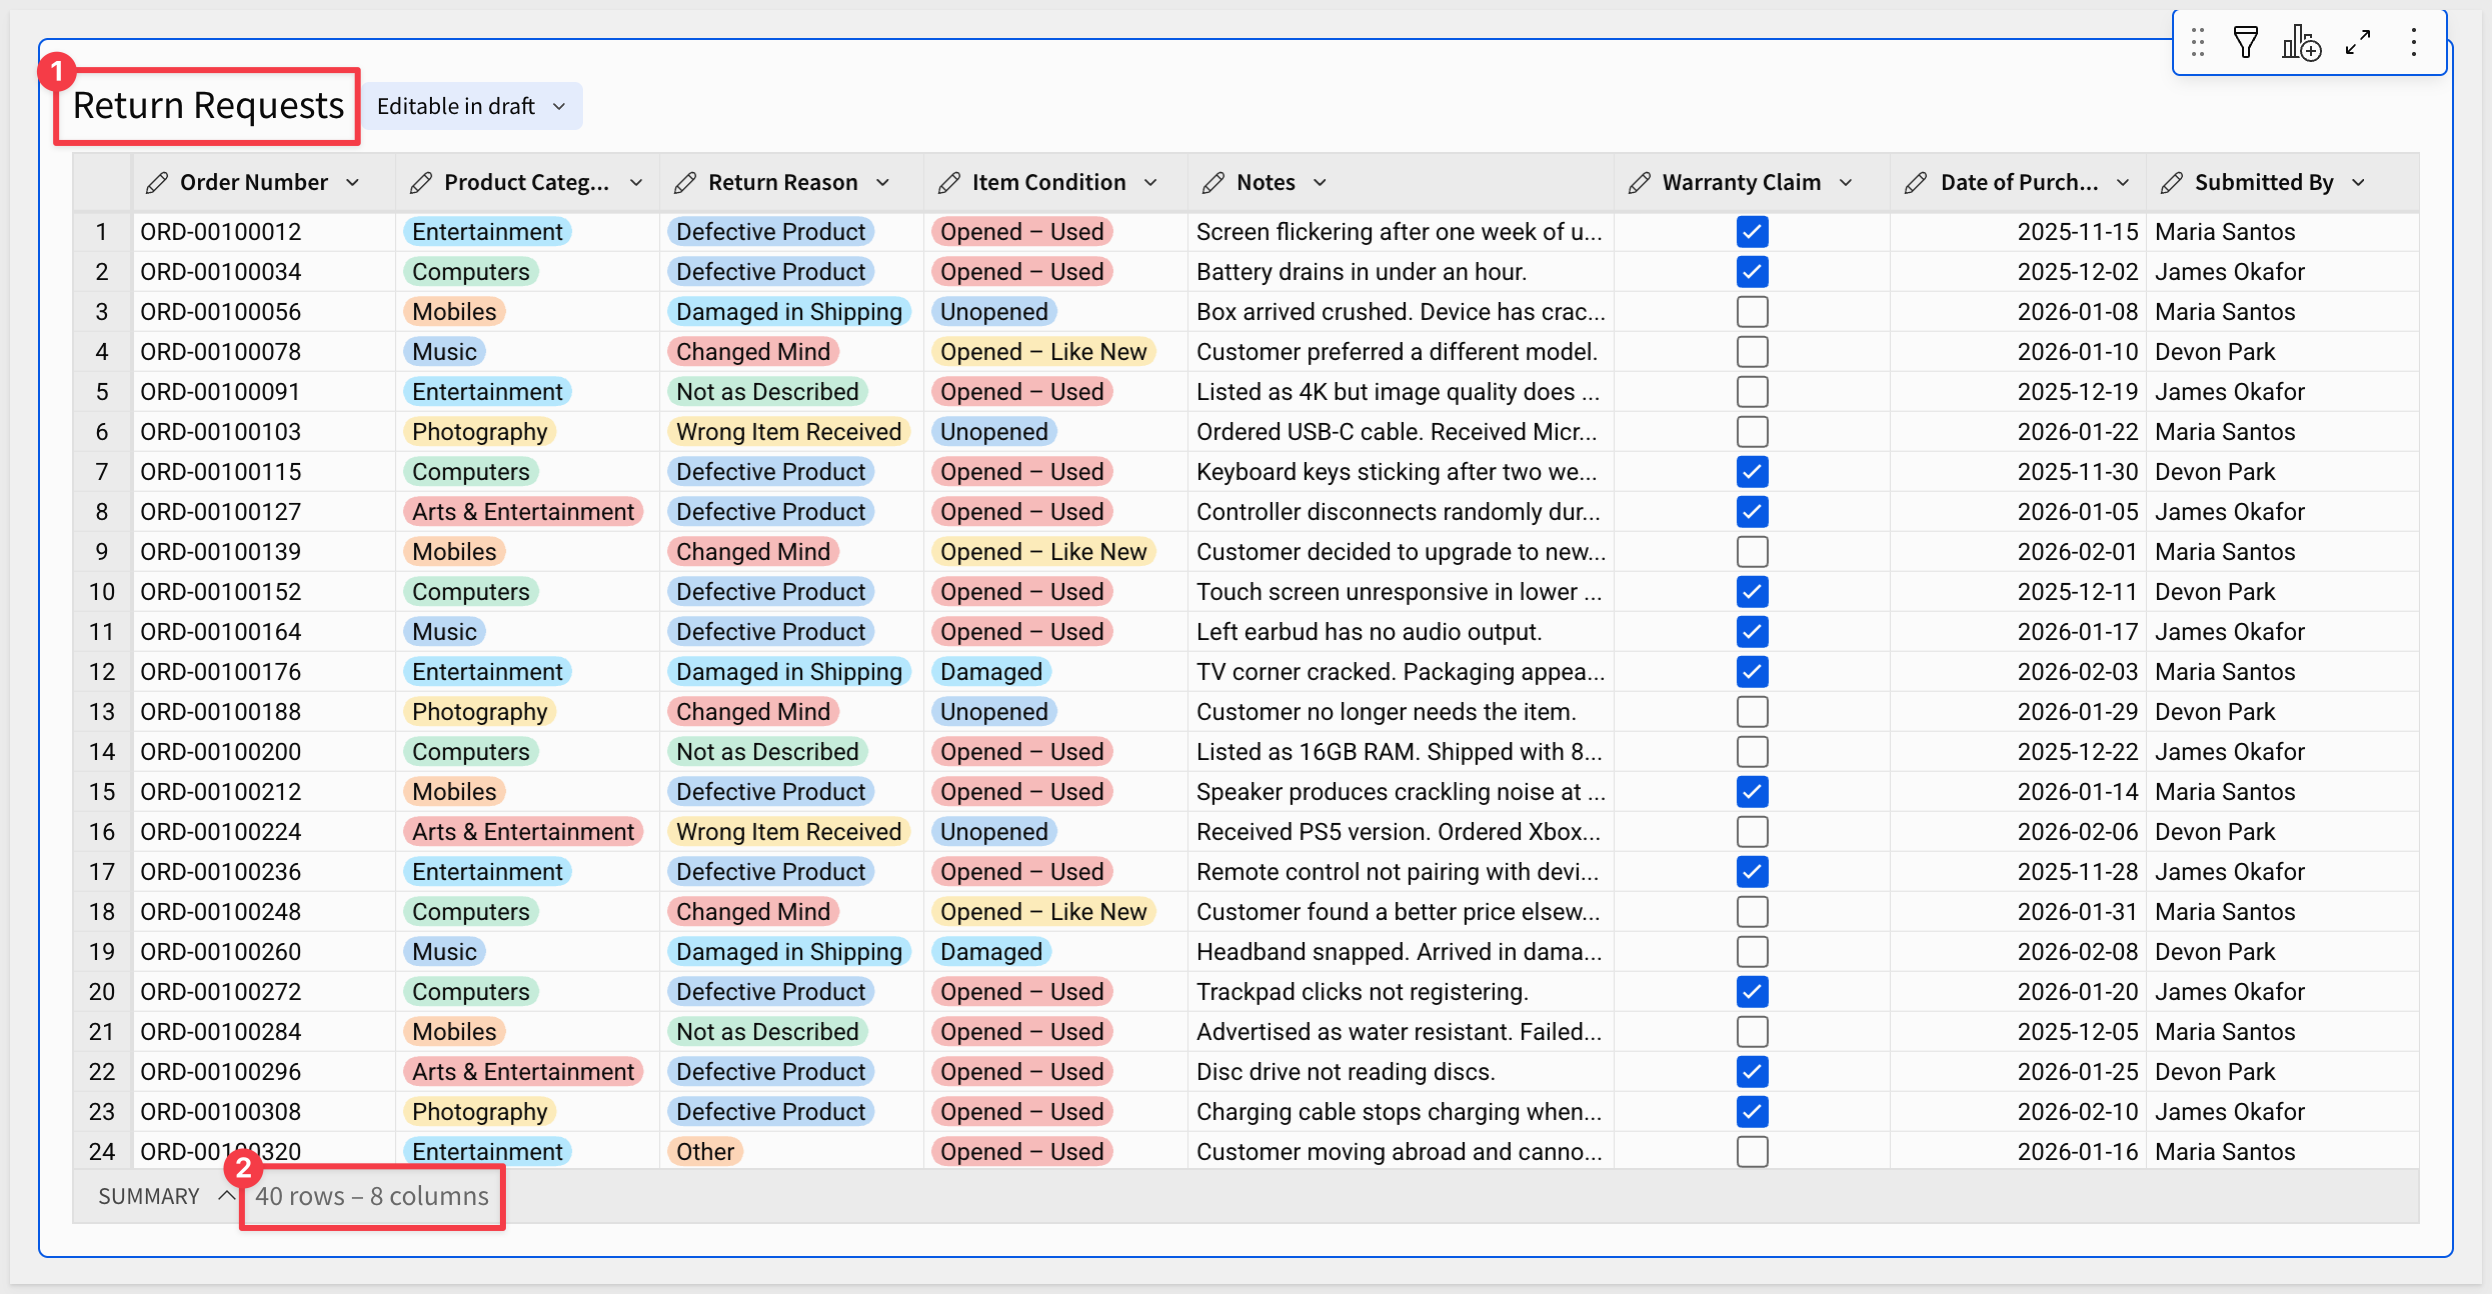
Once imported, the input table will have 40 rows across multiple product categories and return reasons — enough to make the analysis views meaningful:
Add an analysis page
Add a new page to the workbook and rename it Returns Analysis.
Returns by reason
On the Return Requests page, from the Element bar, add a Child table from the Return Requests input table.
Move the new child table to the Returns Analysis page.
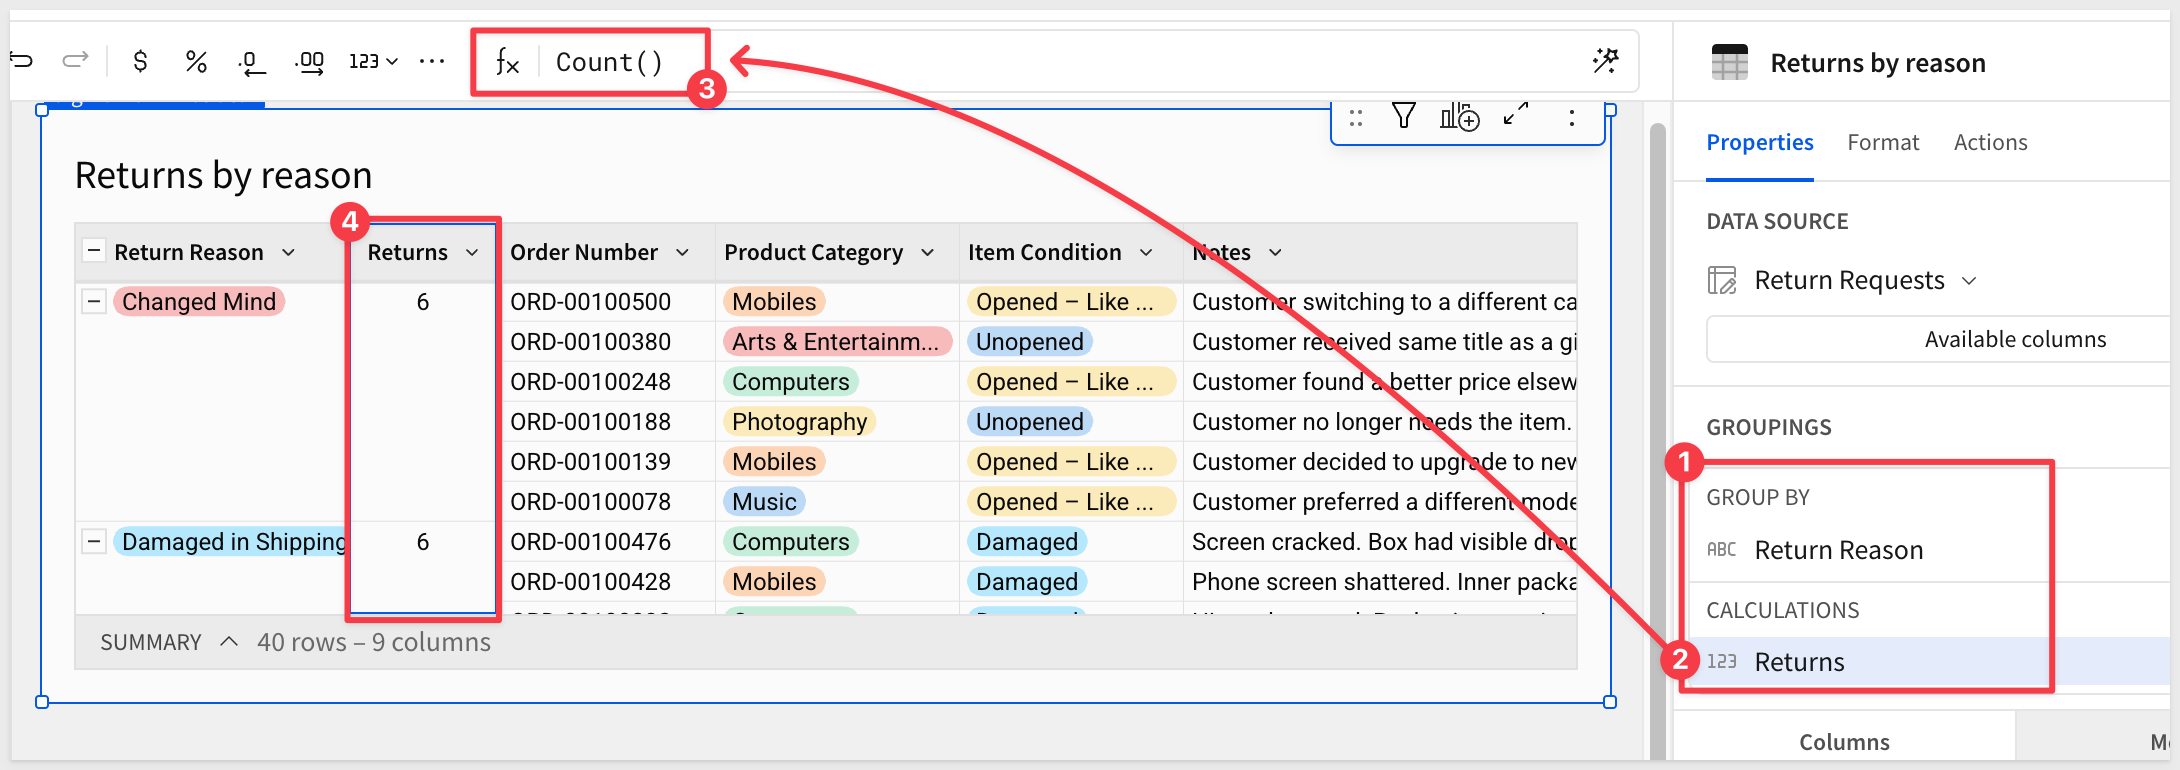
In the Element panel, drag Return Reason to GROUPINGS.
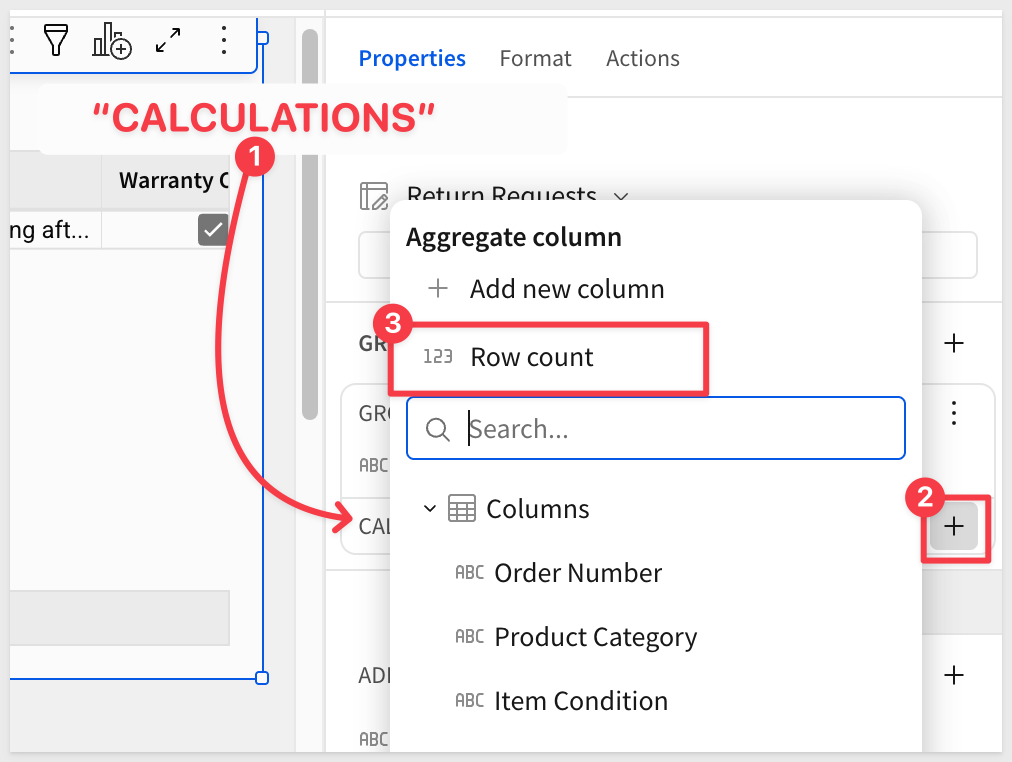
Add a row count by clicking + next to CALCULATIONS and selecting Row count. Rename that column Returns:
Rename the table Returns by reason.
This gives managers an instant summary of why returns are coming in — without touching the form or the raw input table:
Returns by product category
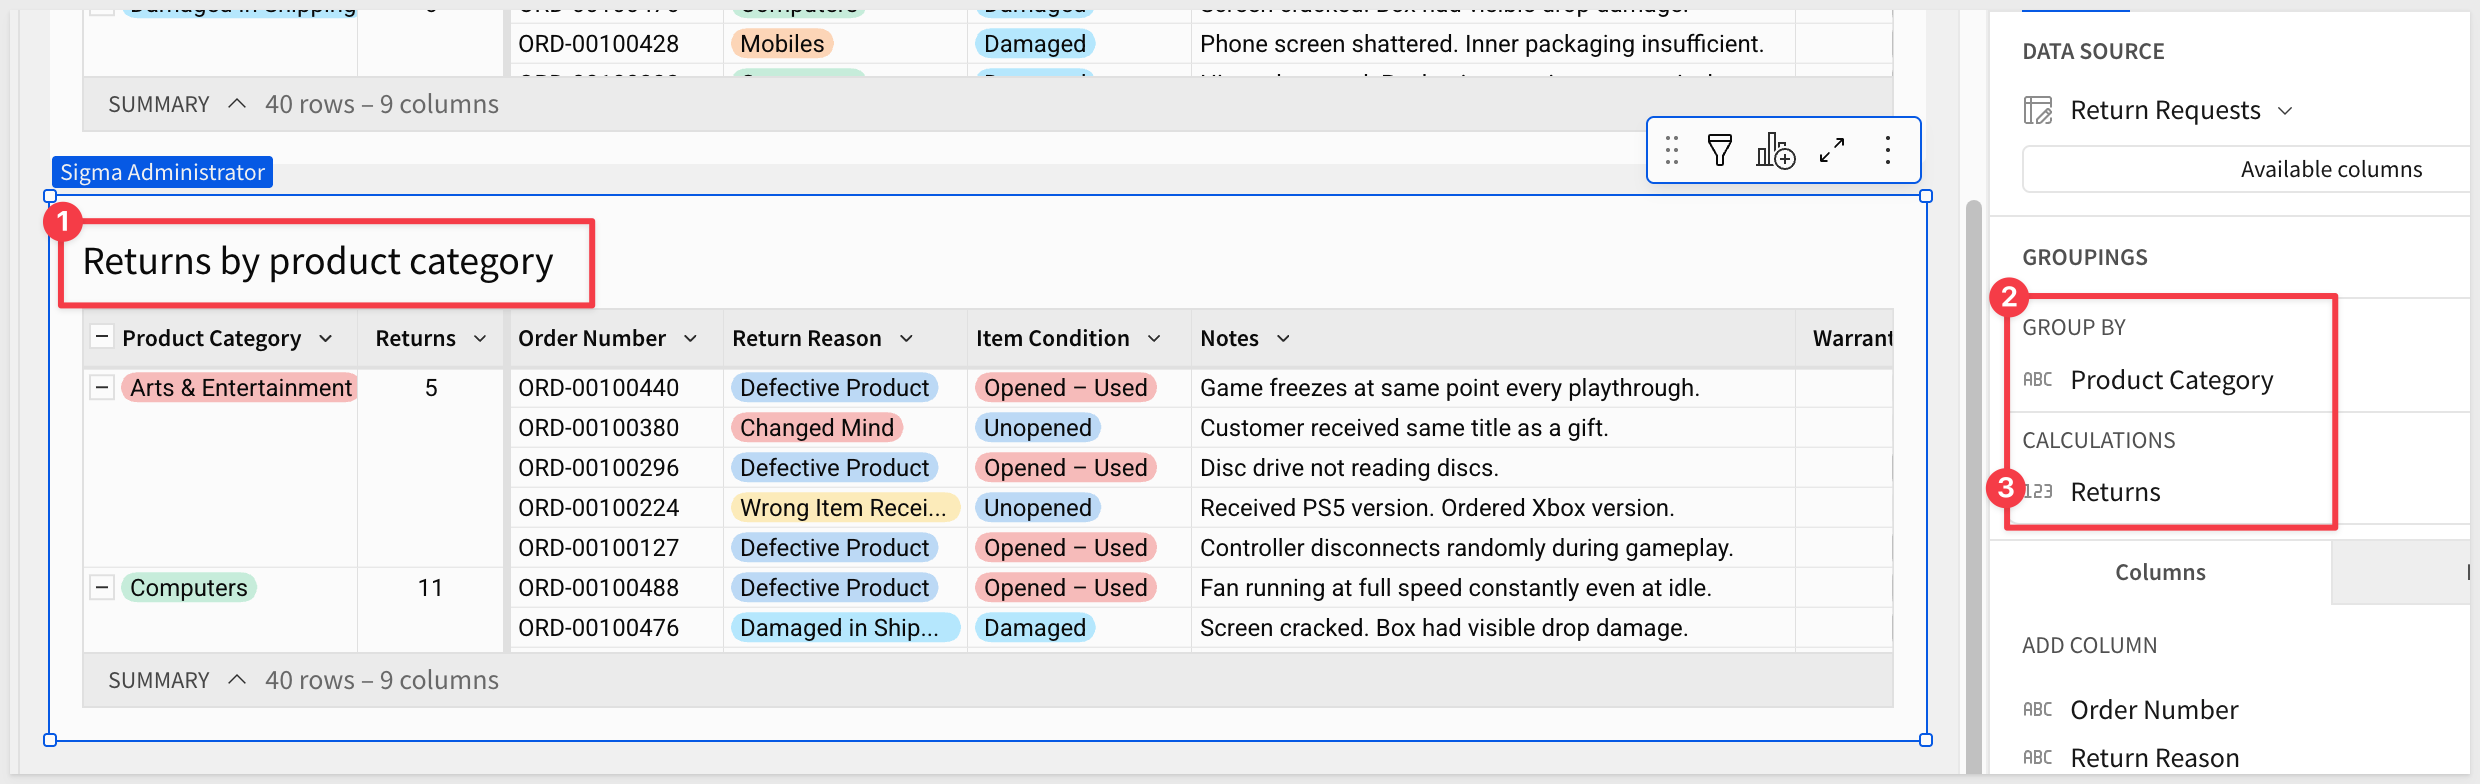
On the Return Requests page, create another Child table from the Return Requests input table and move it to the Returns Analysis page.
In the Element panel, drag Product Category to GROUPINGS. Add Row count and rename it Returns. Sort descending by Returns.
Rename the table Returns by product category.
Warranty claims
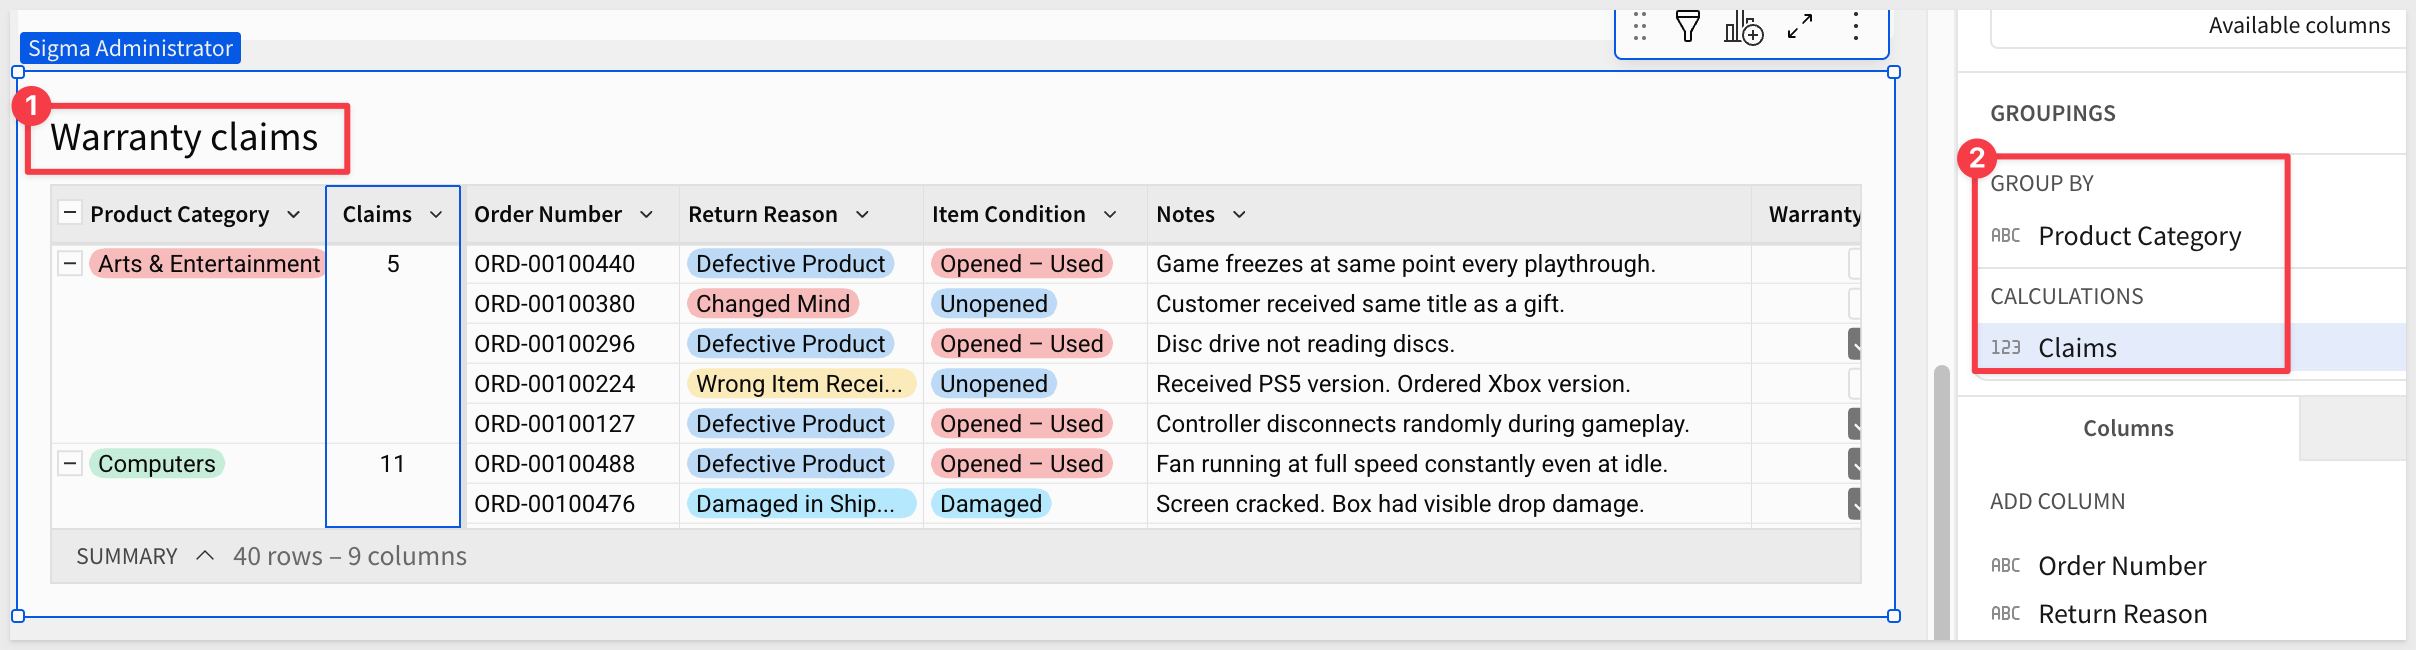
Create one more Child table from the Return Requests input table and move it to the Returns Analysis page.
Rename the table Warranty claims.
Drag Product Category to GROUPINGS. Add Row count and rename it Claims:
Add a filter on Warranty Claim where the value is true.
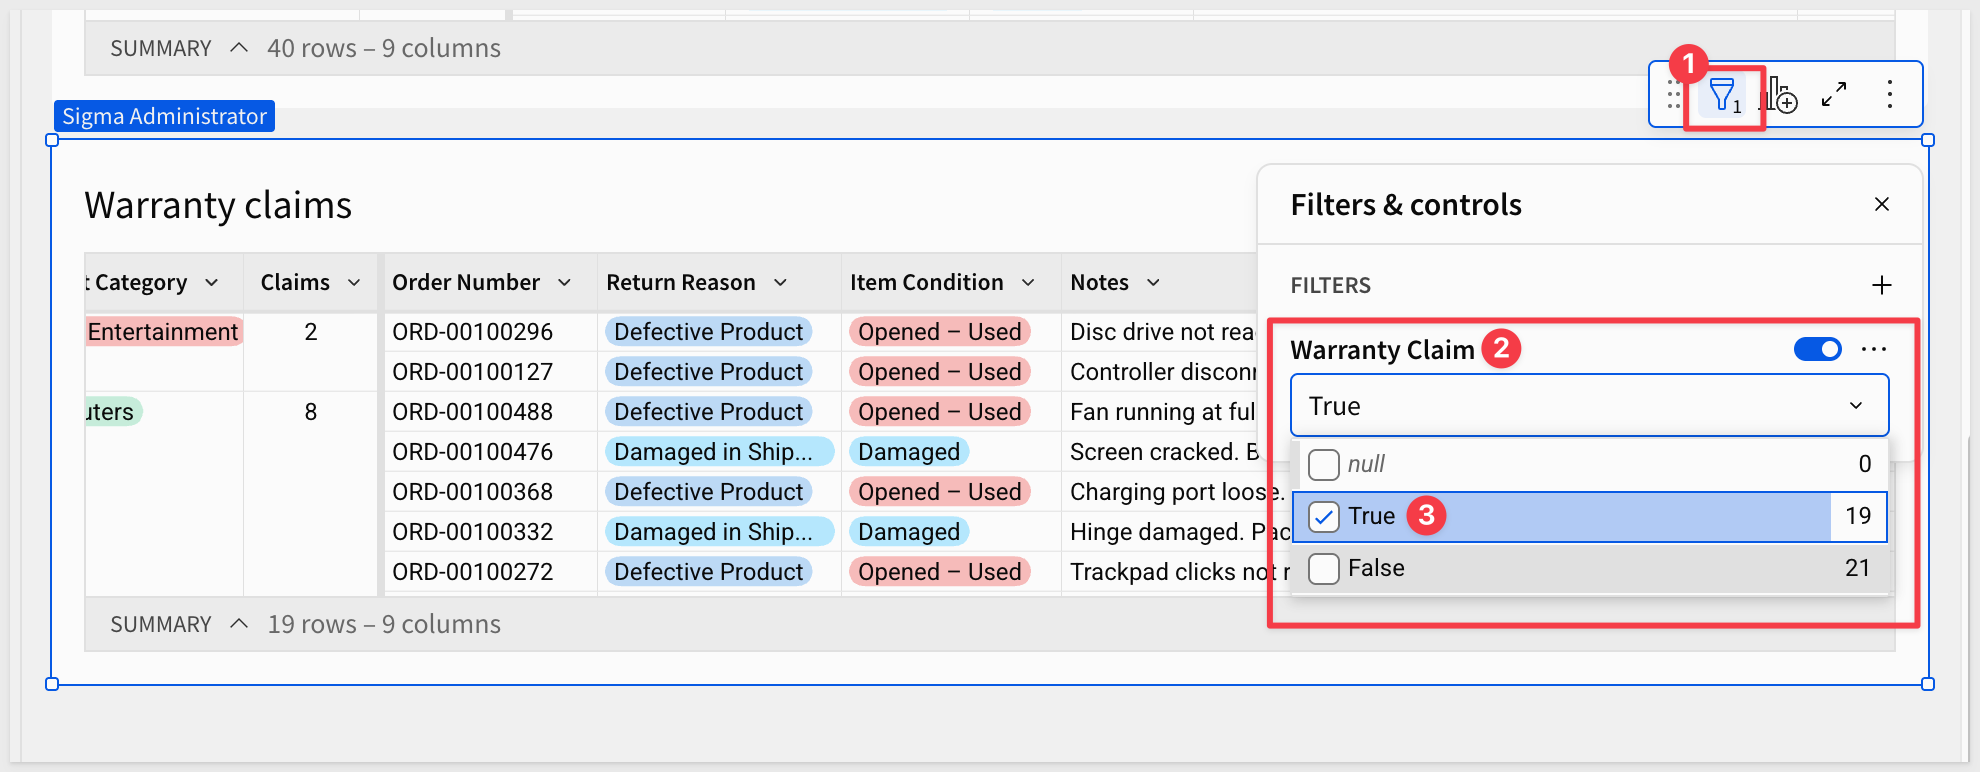
This view tells the team which product categories are generating the most warranty-related returns — a useful signal for product quality discussions.
Visualize return reasons
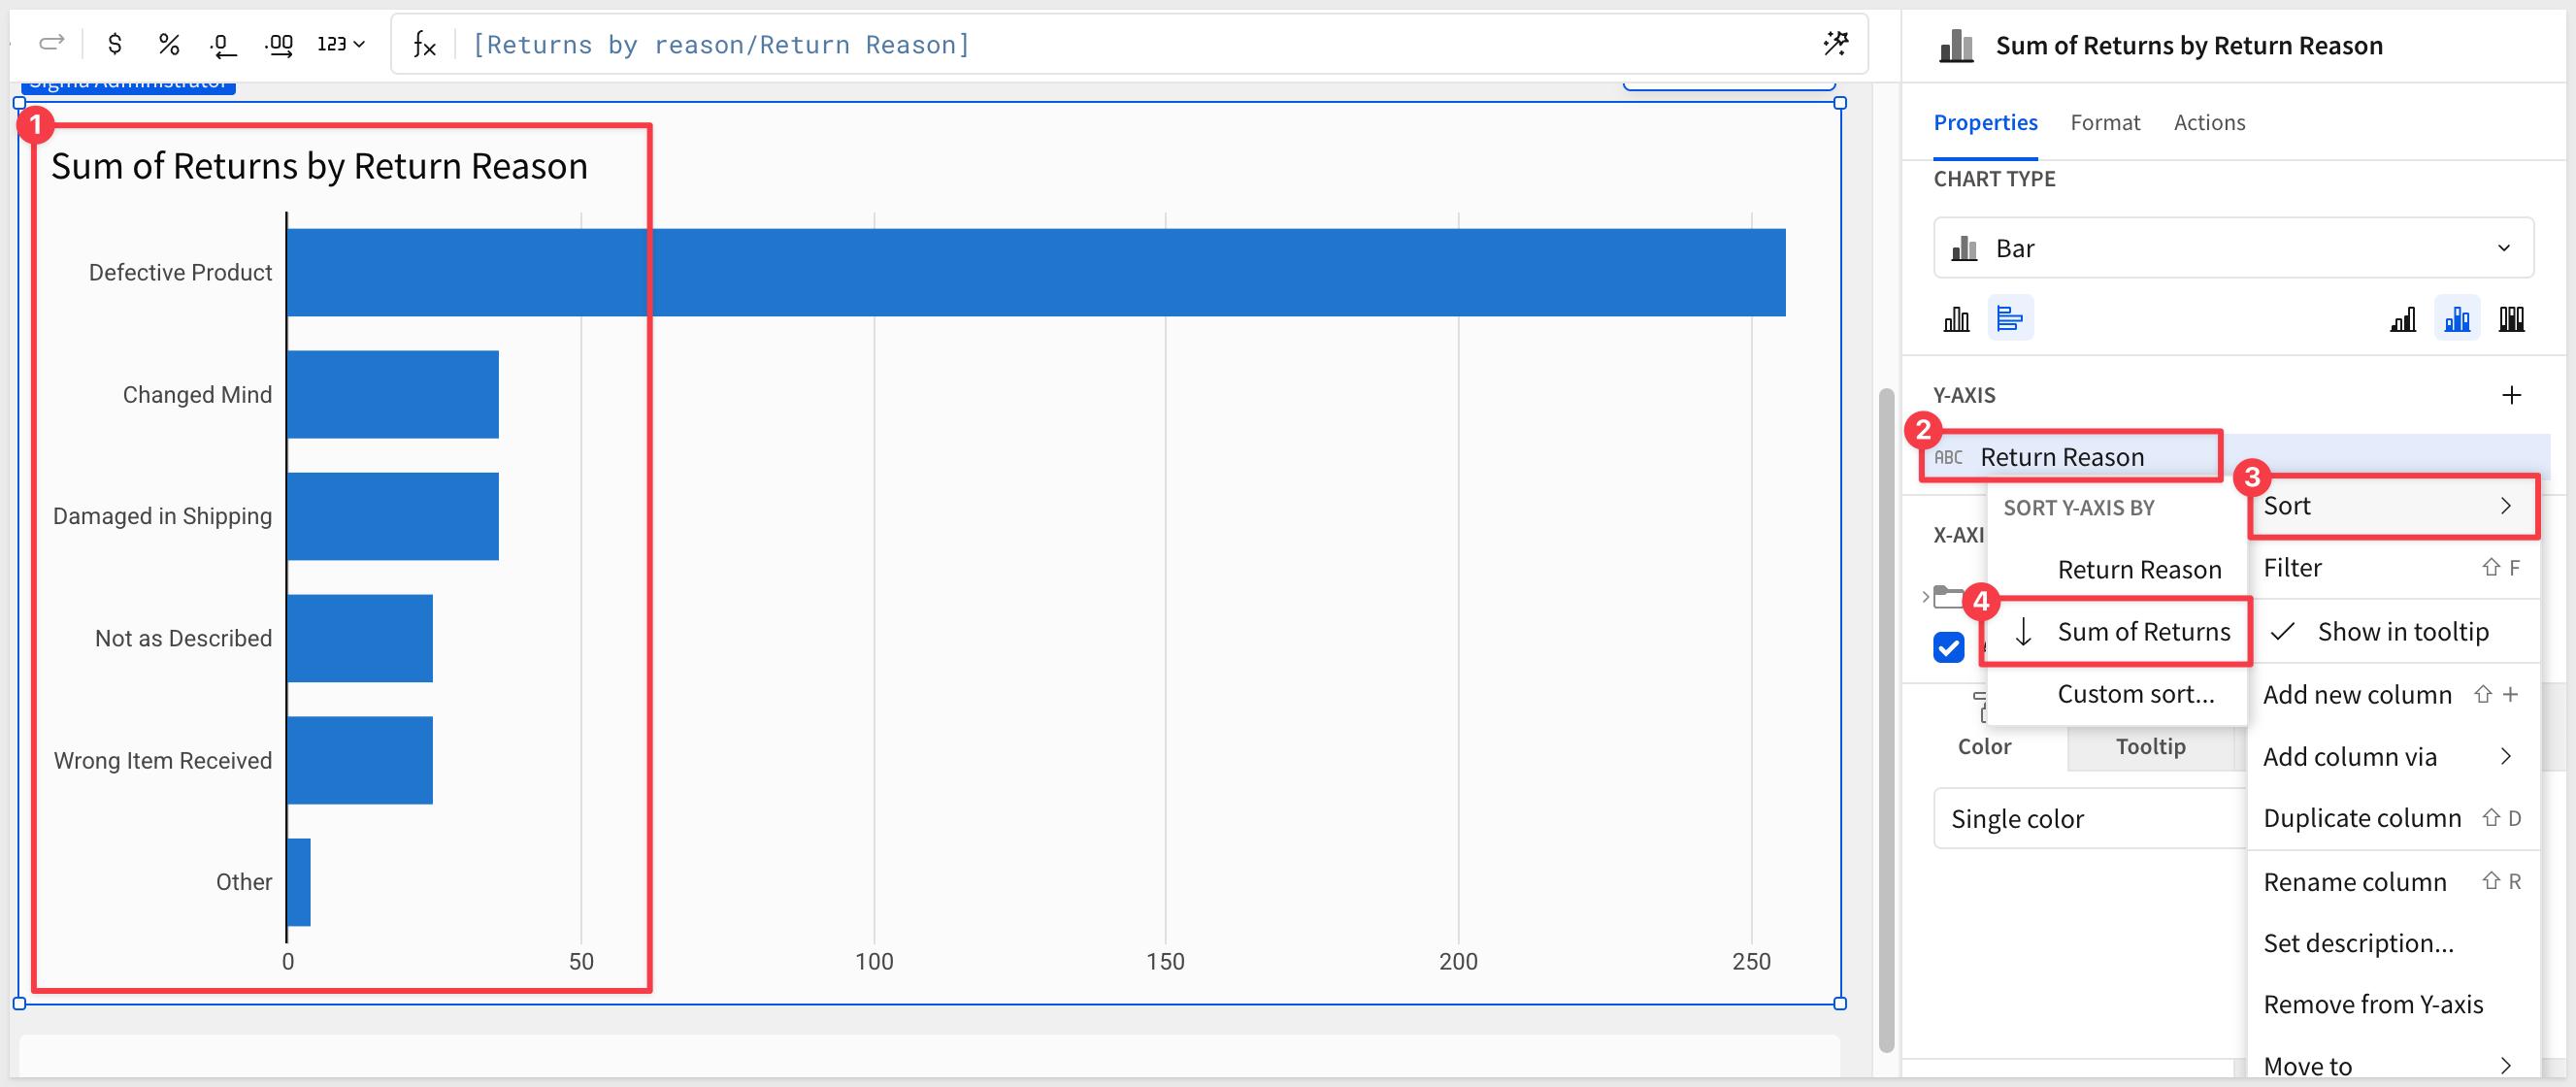
Select the Returns by Reason table and click Create child element > Chart.
In the Element panel, set the chart type to Bar. Drag Return Reason to the X axis and Returns to the Y axis.
Sort the Y-AXIS on Sum of Returns descending:
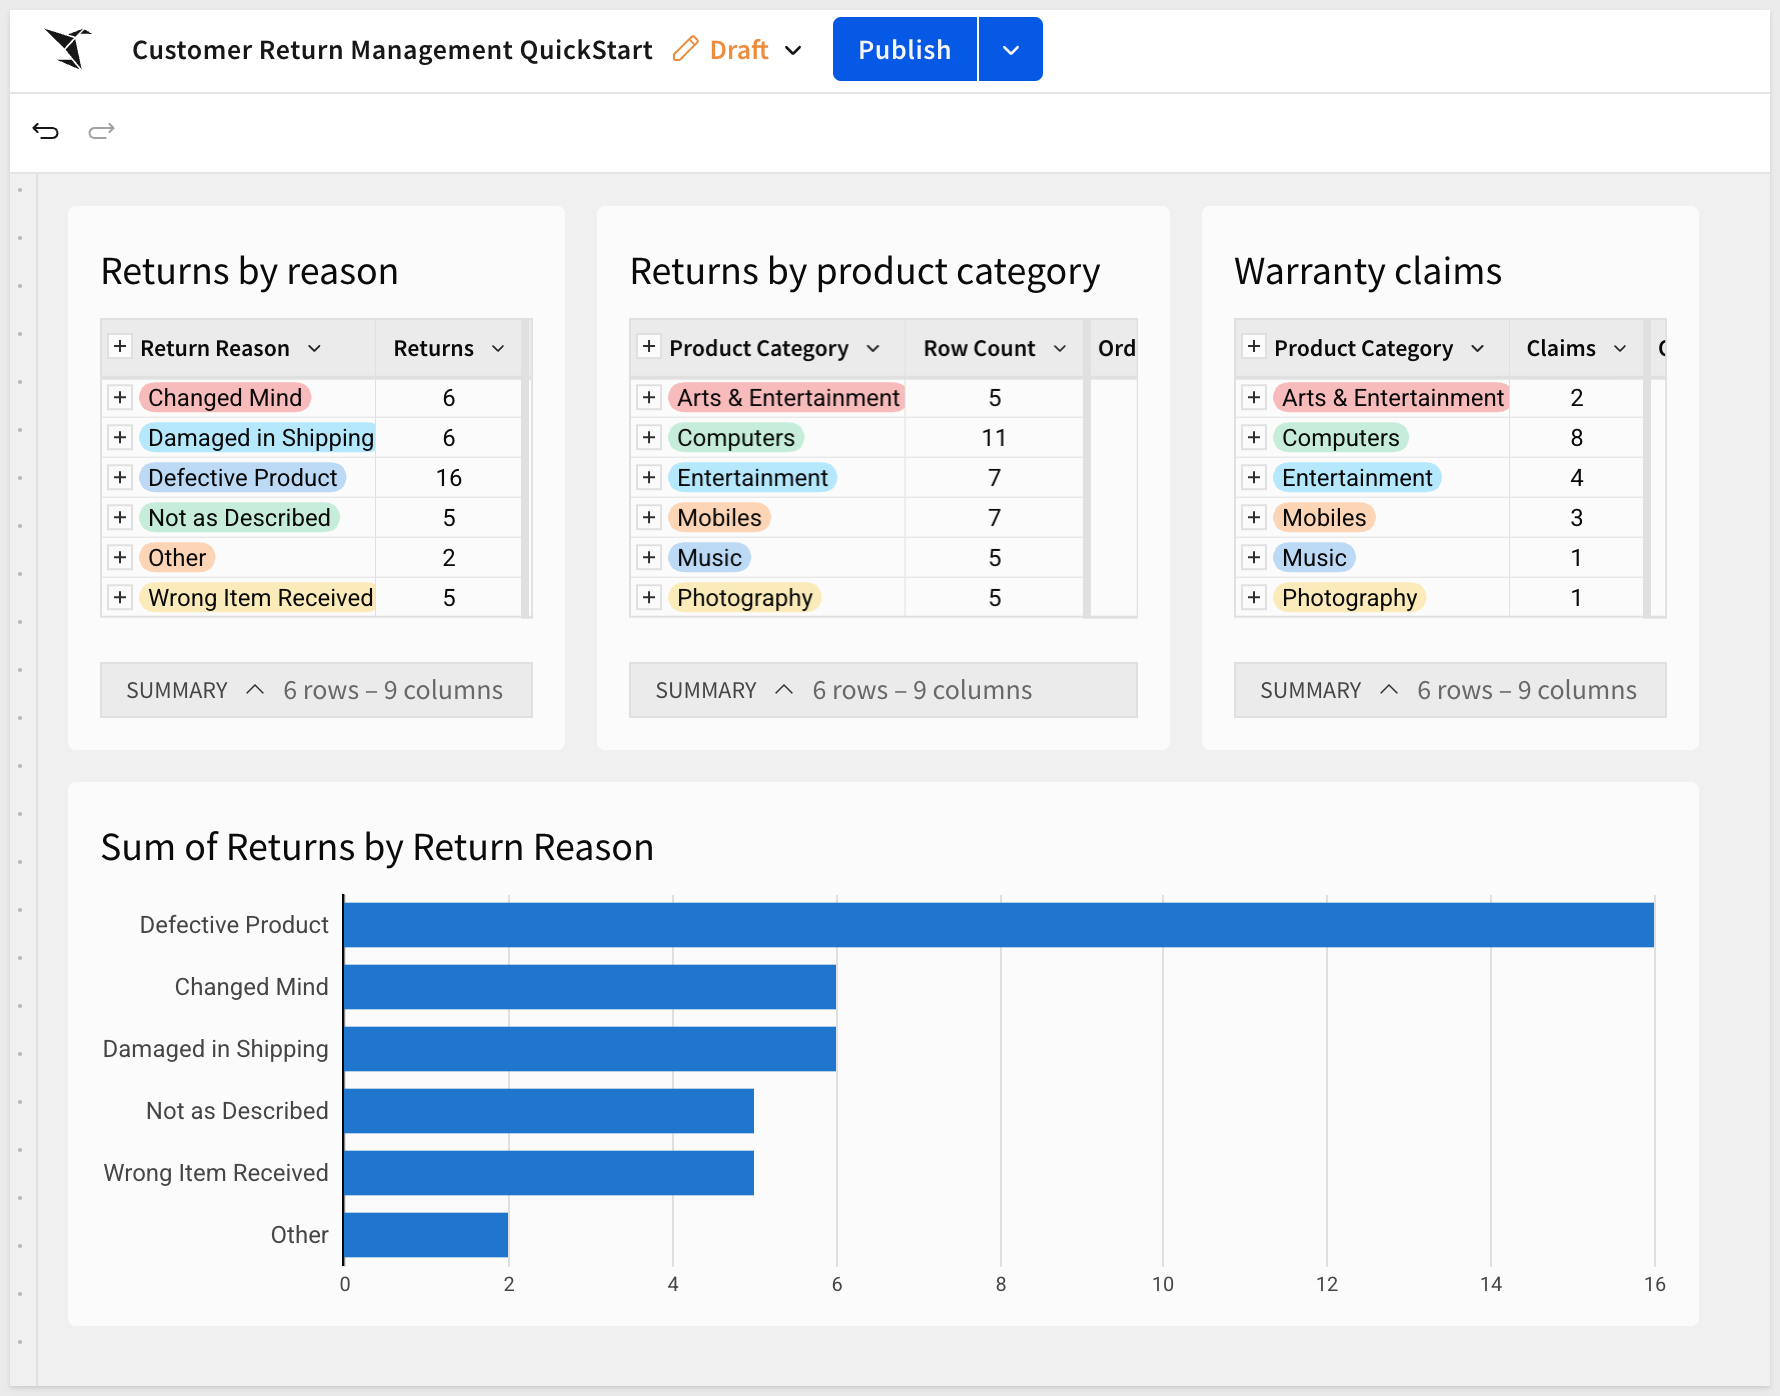
As new submissions come in through the form, every table and chart on this page updates automatically — no refresh, no export, no manual step:
You built a complete data entry workflow — from an empty workbook to a published form that writes directly to the warehouse, enforces data quality, and feeds live analysis.
The pattern you used here isn't specific to return requests. The same approach applies to expense reporting, incident logging, audit checklists, inventory requests, or any other workflow that involves structured input and downstream reporting. The form changes; the architecture doesn't.
A few techniques worth carrying forward:
- Column types and validation drive the form. Configure the input table well and the form inherits it automatically. Single-select columns with manual or warehouse-backed lists keep data clean at the source — before it ever reaches the warehouse.
- Child tables preserve lineage. Each analysis table was created directly from the input table, not duplicated from another child. This keeps data lineage clear and prevents unintended filters or calculations from carrying over silently.
- Hidden pages keep workbooks clean. Reference data that supports validation doesn't need to be visible to users. Move it to a hidden page and it stays live and functional without cluttering the experience.
- Analysis updates automatically. There's no separate reporting step. As submissions come in, every grouped table and chart on the Returns Analysis page reflects the current data — no export, no refresh, no reconciliation.
Additional Resource Links
Blog
Community
Help Center
QuickStarts
Be sure to check out all the latest developments at Sigma's First Friday Feature page!