This QuickStart introduces Sigma API Actions by connecting to the Open-Meteo Weather API, a free weather data service that requires no authentication.
You'll build a workbook from scratch that allows users to select a city from a list and fetch current weather details in real-time.
Along the way you'll learn how to:
- configure API connectors with both static and dynamic parameters
- bind list controls to drive Action inputs
- parse and map JSON responses for analysis and visualization
For more information on Sigma's product release strategy, see Sigma product releases
If something doesn't work as expected, here's how to contact Sigma support
Target Audience
The typical audience for this QuickStart includes users of Excel, common Business Intelligence or Reporting tools, and semi-technical users who want to try out or learn Sigma.
Prerequisites
- Any modern browser is acceptable.
- Access to your Sigma environment.
- Some familiarity with Sigma is assumed. Not all steps will be shown, as the basics are assumed to be understood.

Open-Meteo Weather API Account
While there are services that require credentials, we want to demonstrate using one that doesn't require credentials, as that is a simple first example.
We will use the Open-Meteo API in this QuickStart.
API Connectors
API Connectors in Sigma define the endpoint that will be called by our Sigma workbook actions. Given that, it makes sense to first configure the endpoint we want to call and then we can configure an action to request data from it.
Log into Sigma as an administrator and navigate to Administration > API connectors and click Create connector.
We will configure a simple example to request weather data with the location and temperature format hard-coded.
Name: The name of the connector as it appears to users in a workbook.
Use this name:
Current Temp - Hard Coded
Description: [optional] A custom description that helps users identify the connector and verify its contents.
Base URL: Select the HTTP method GET and use this URL for the request:
Use this URL:
https://api.open-meteo.com/v1/forecast?latitude=20.7702&longitude=-156.2682&timezone=auto&temperature_unit=fahrenheit¤t_weather=true
Headers: [optional] Set a header for the request. None required.
Params: [optional] Set query and path parameters for the request. To set path parameters, you must include /:param in the Base URL. You can then select whether to populate the path param with Static or Dynamic values.
None required.
Body: [optional] Enter a request body.
None required.
Farther down we can see a preview of the endpoint and credentials settings (no authentication is required for this API):
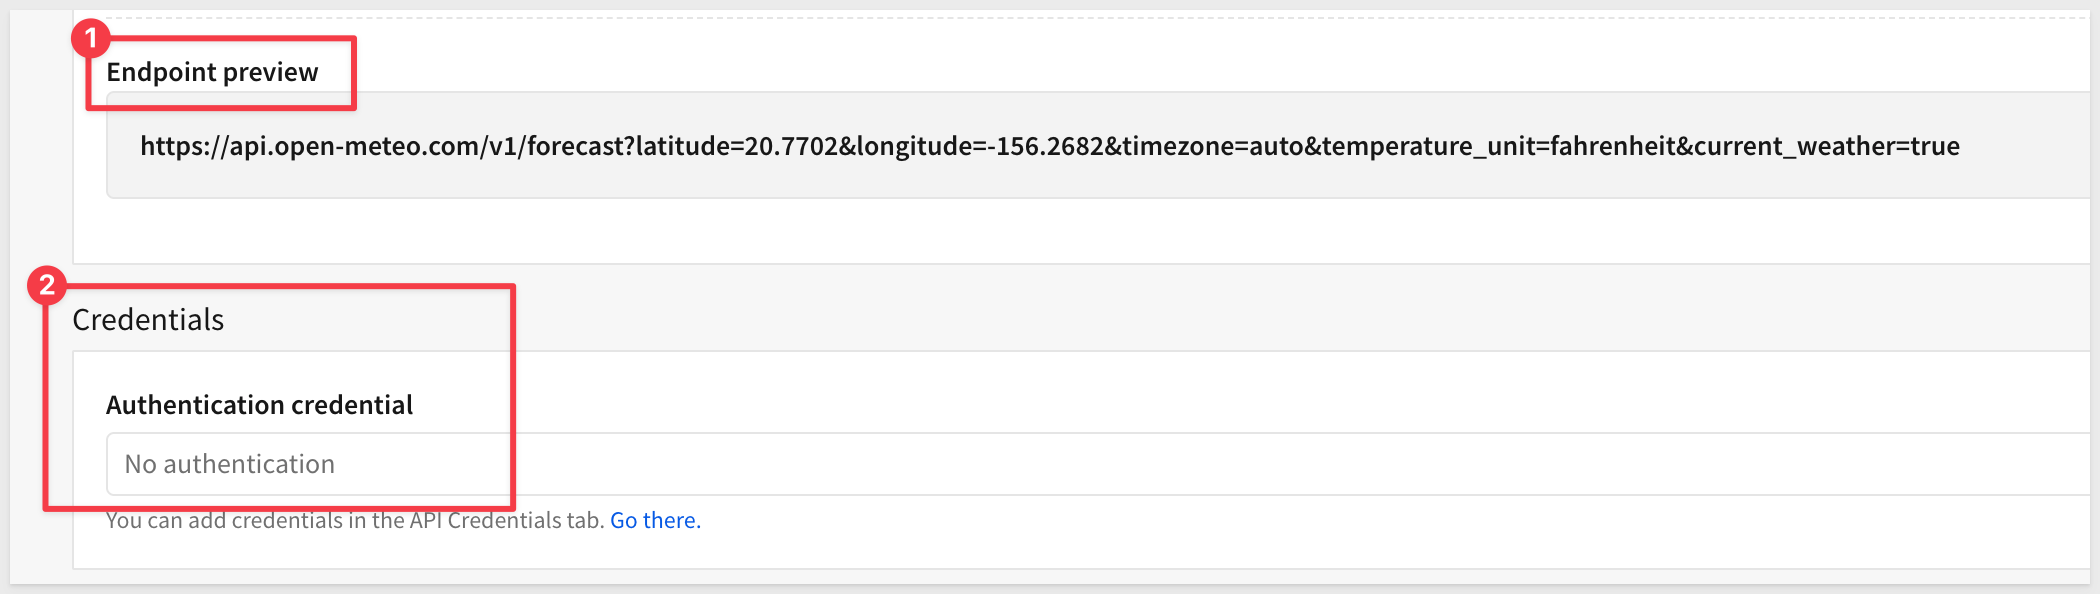
Credentials: [optional] Select a credential from your configured API credentials in Sigma.
None required.
For more information, see Add a new API credential to Sigma
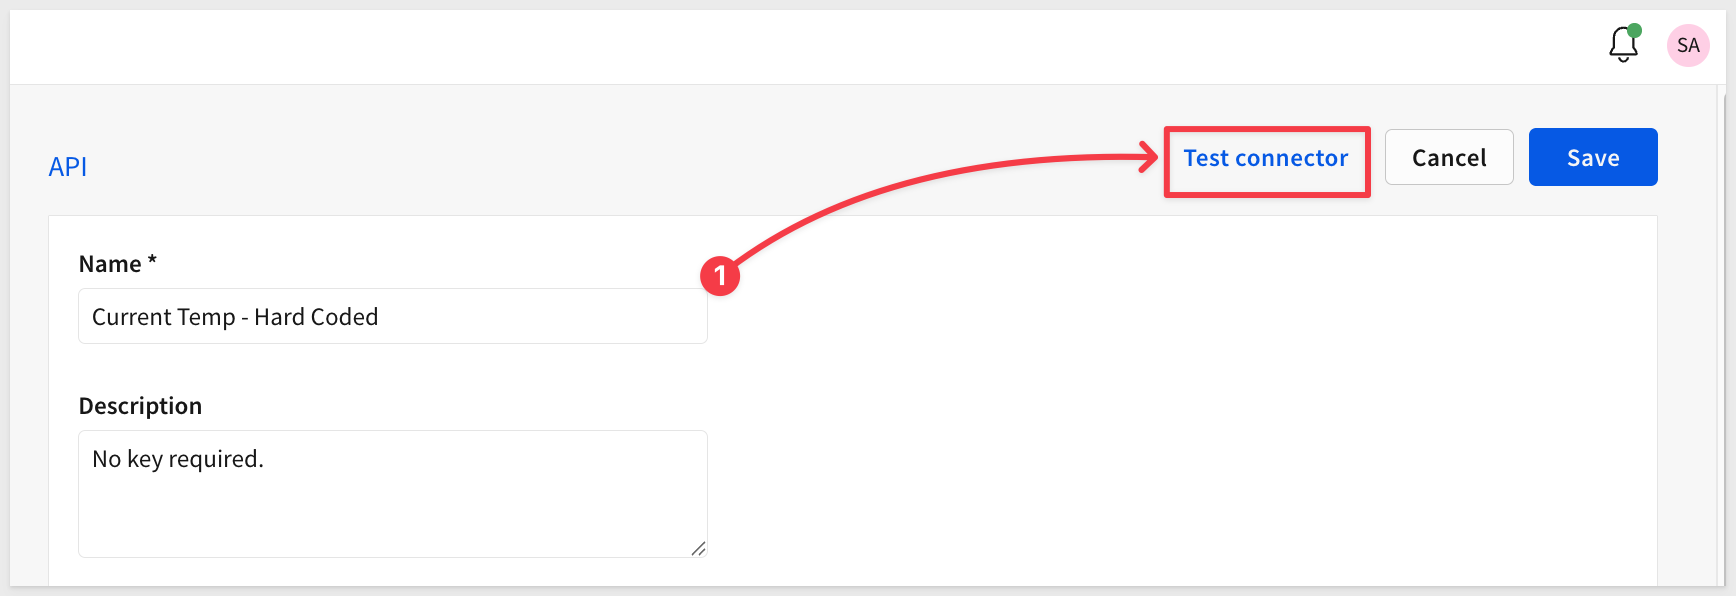
Testing the connection
Since no authentication is required, we can just click Test connector:
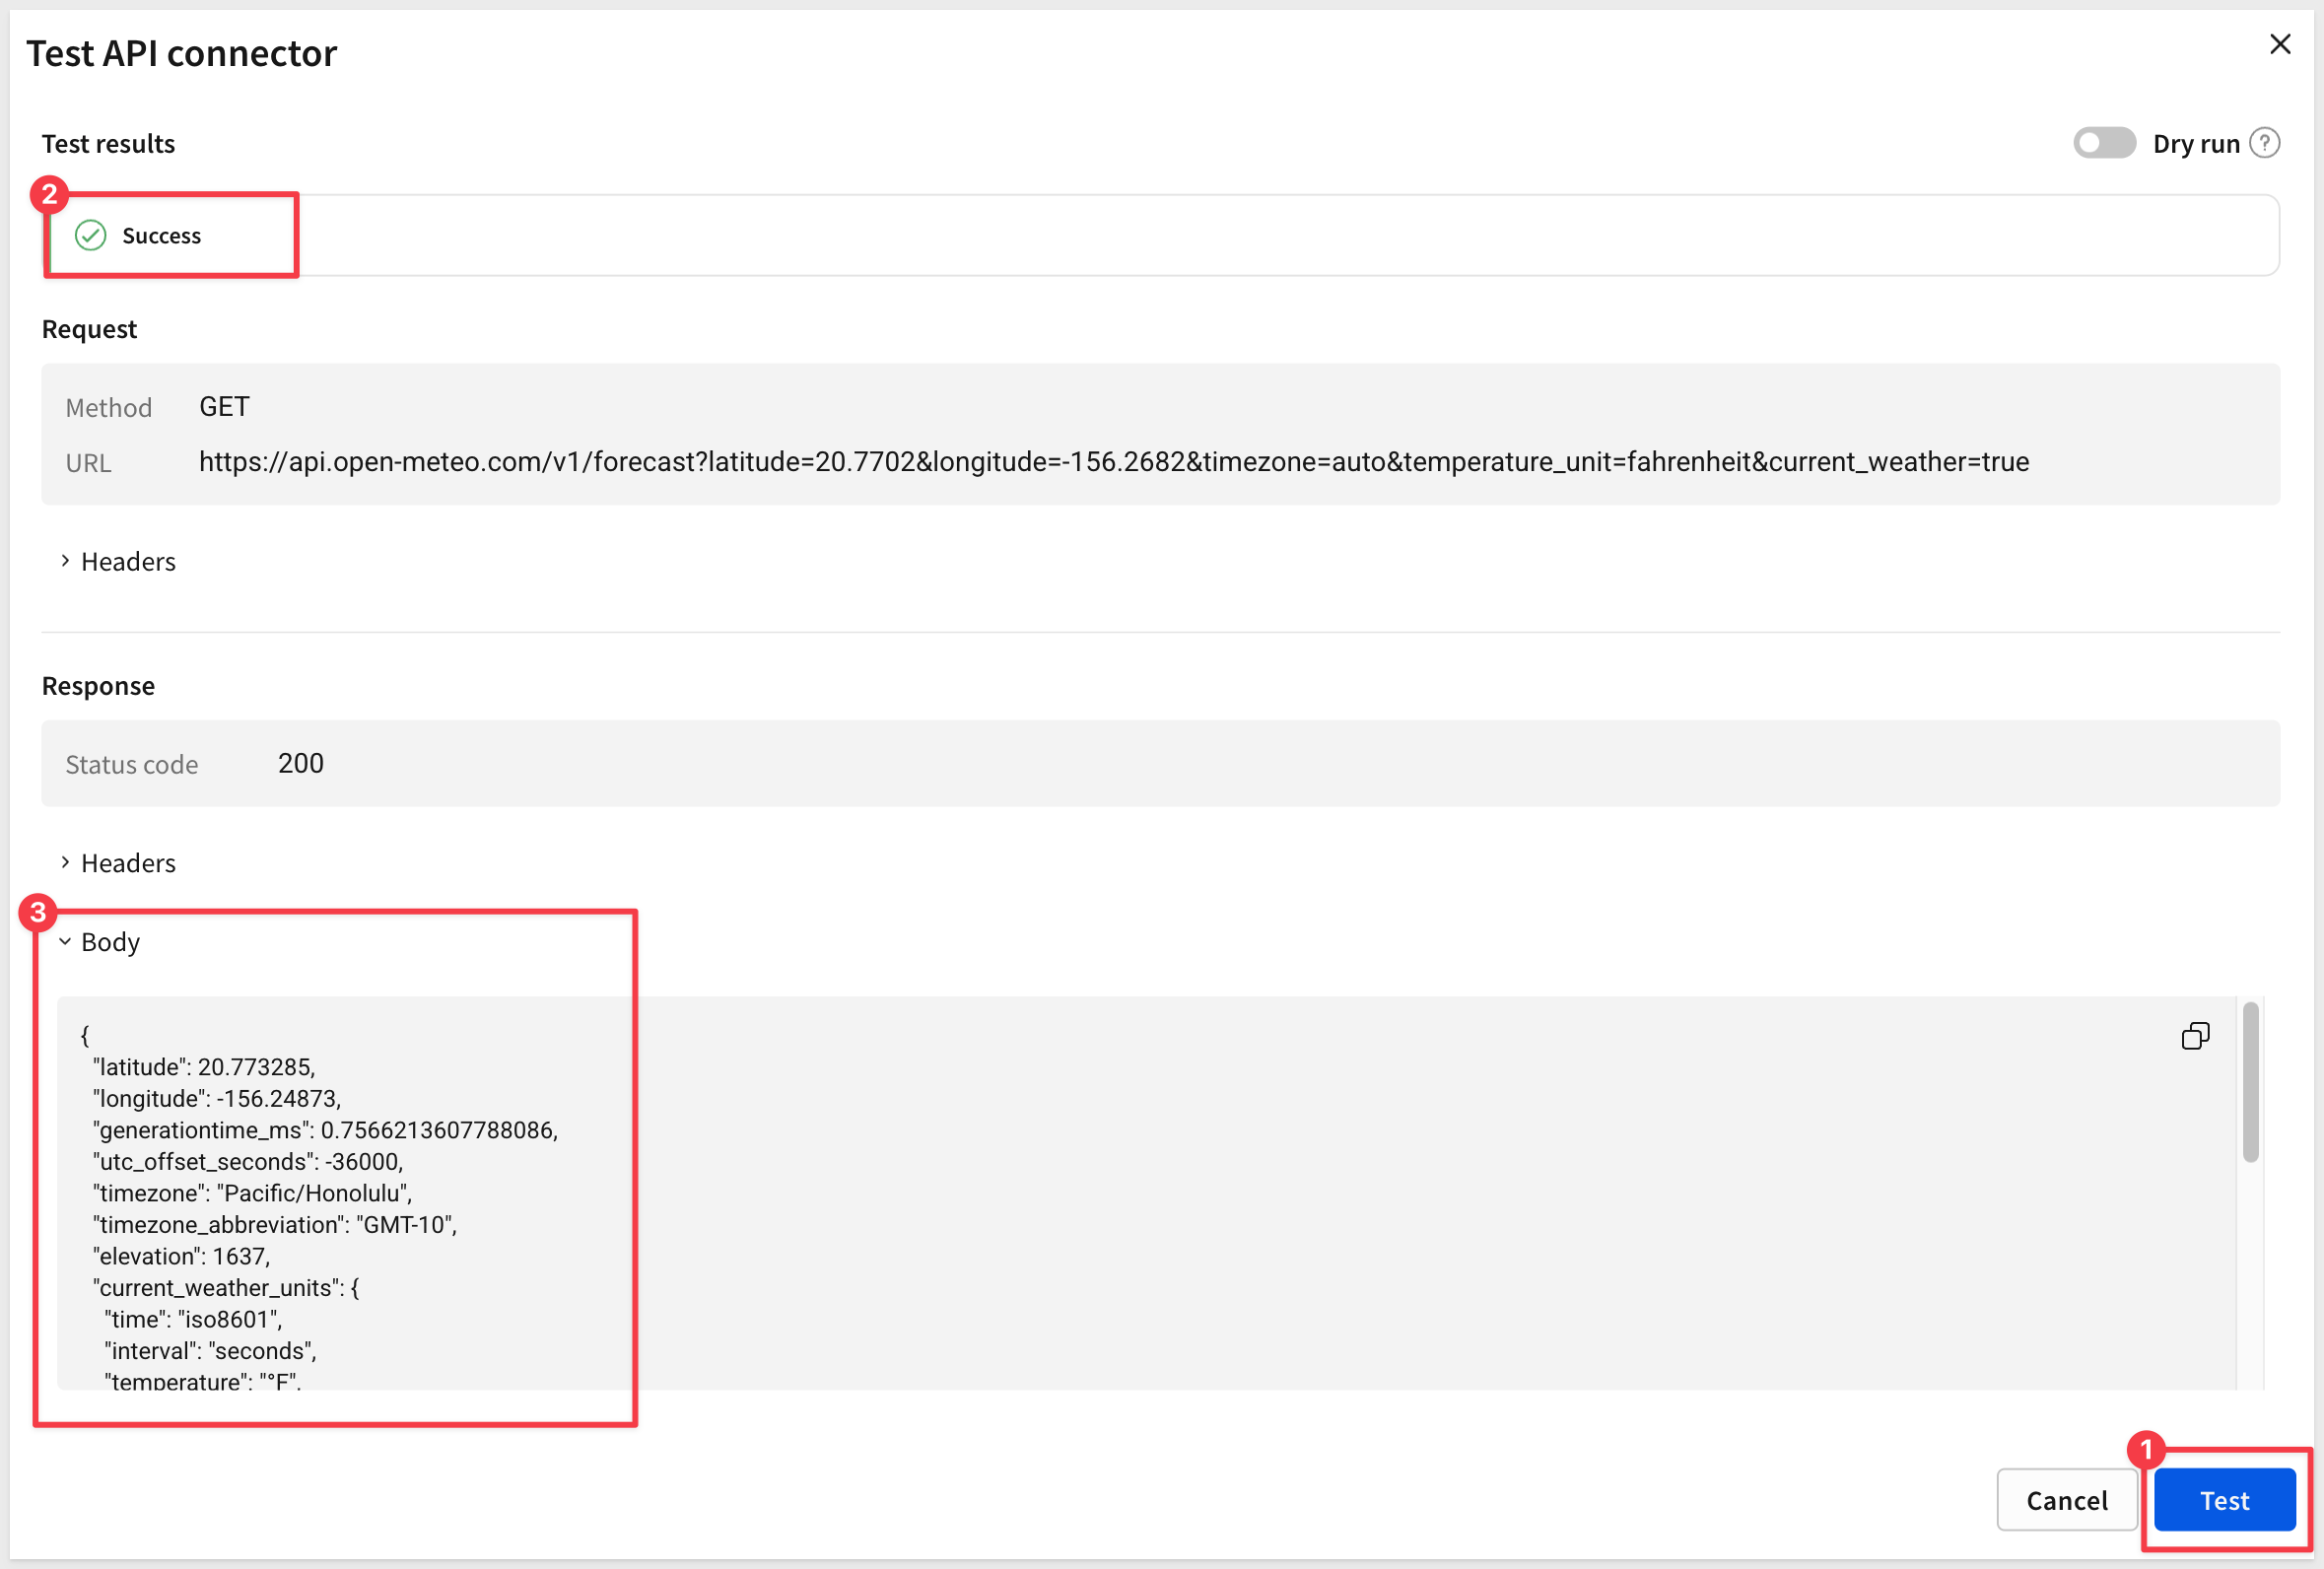
We have the option to do a Dry run which just pings the endpoint but in this case, we want to get a response so we leave that option off.
If the connector is configured correctly we expect a 200 response with the data in the body:
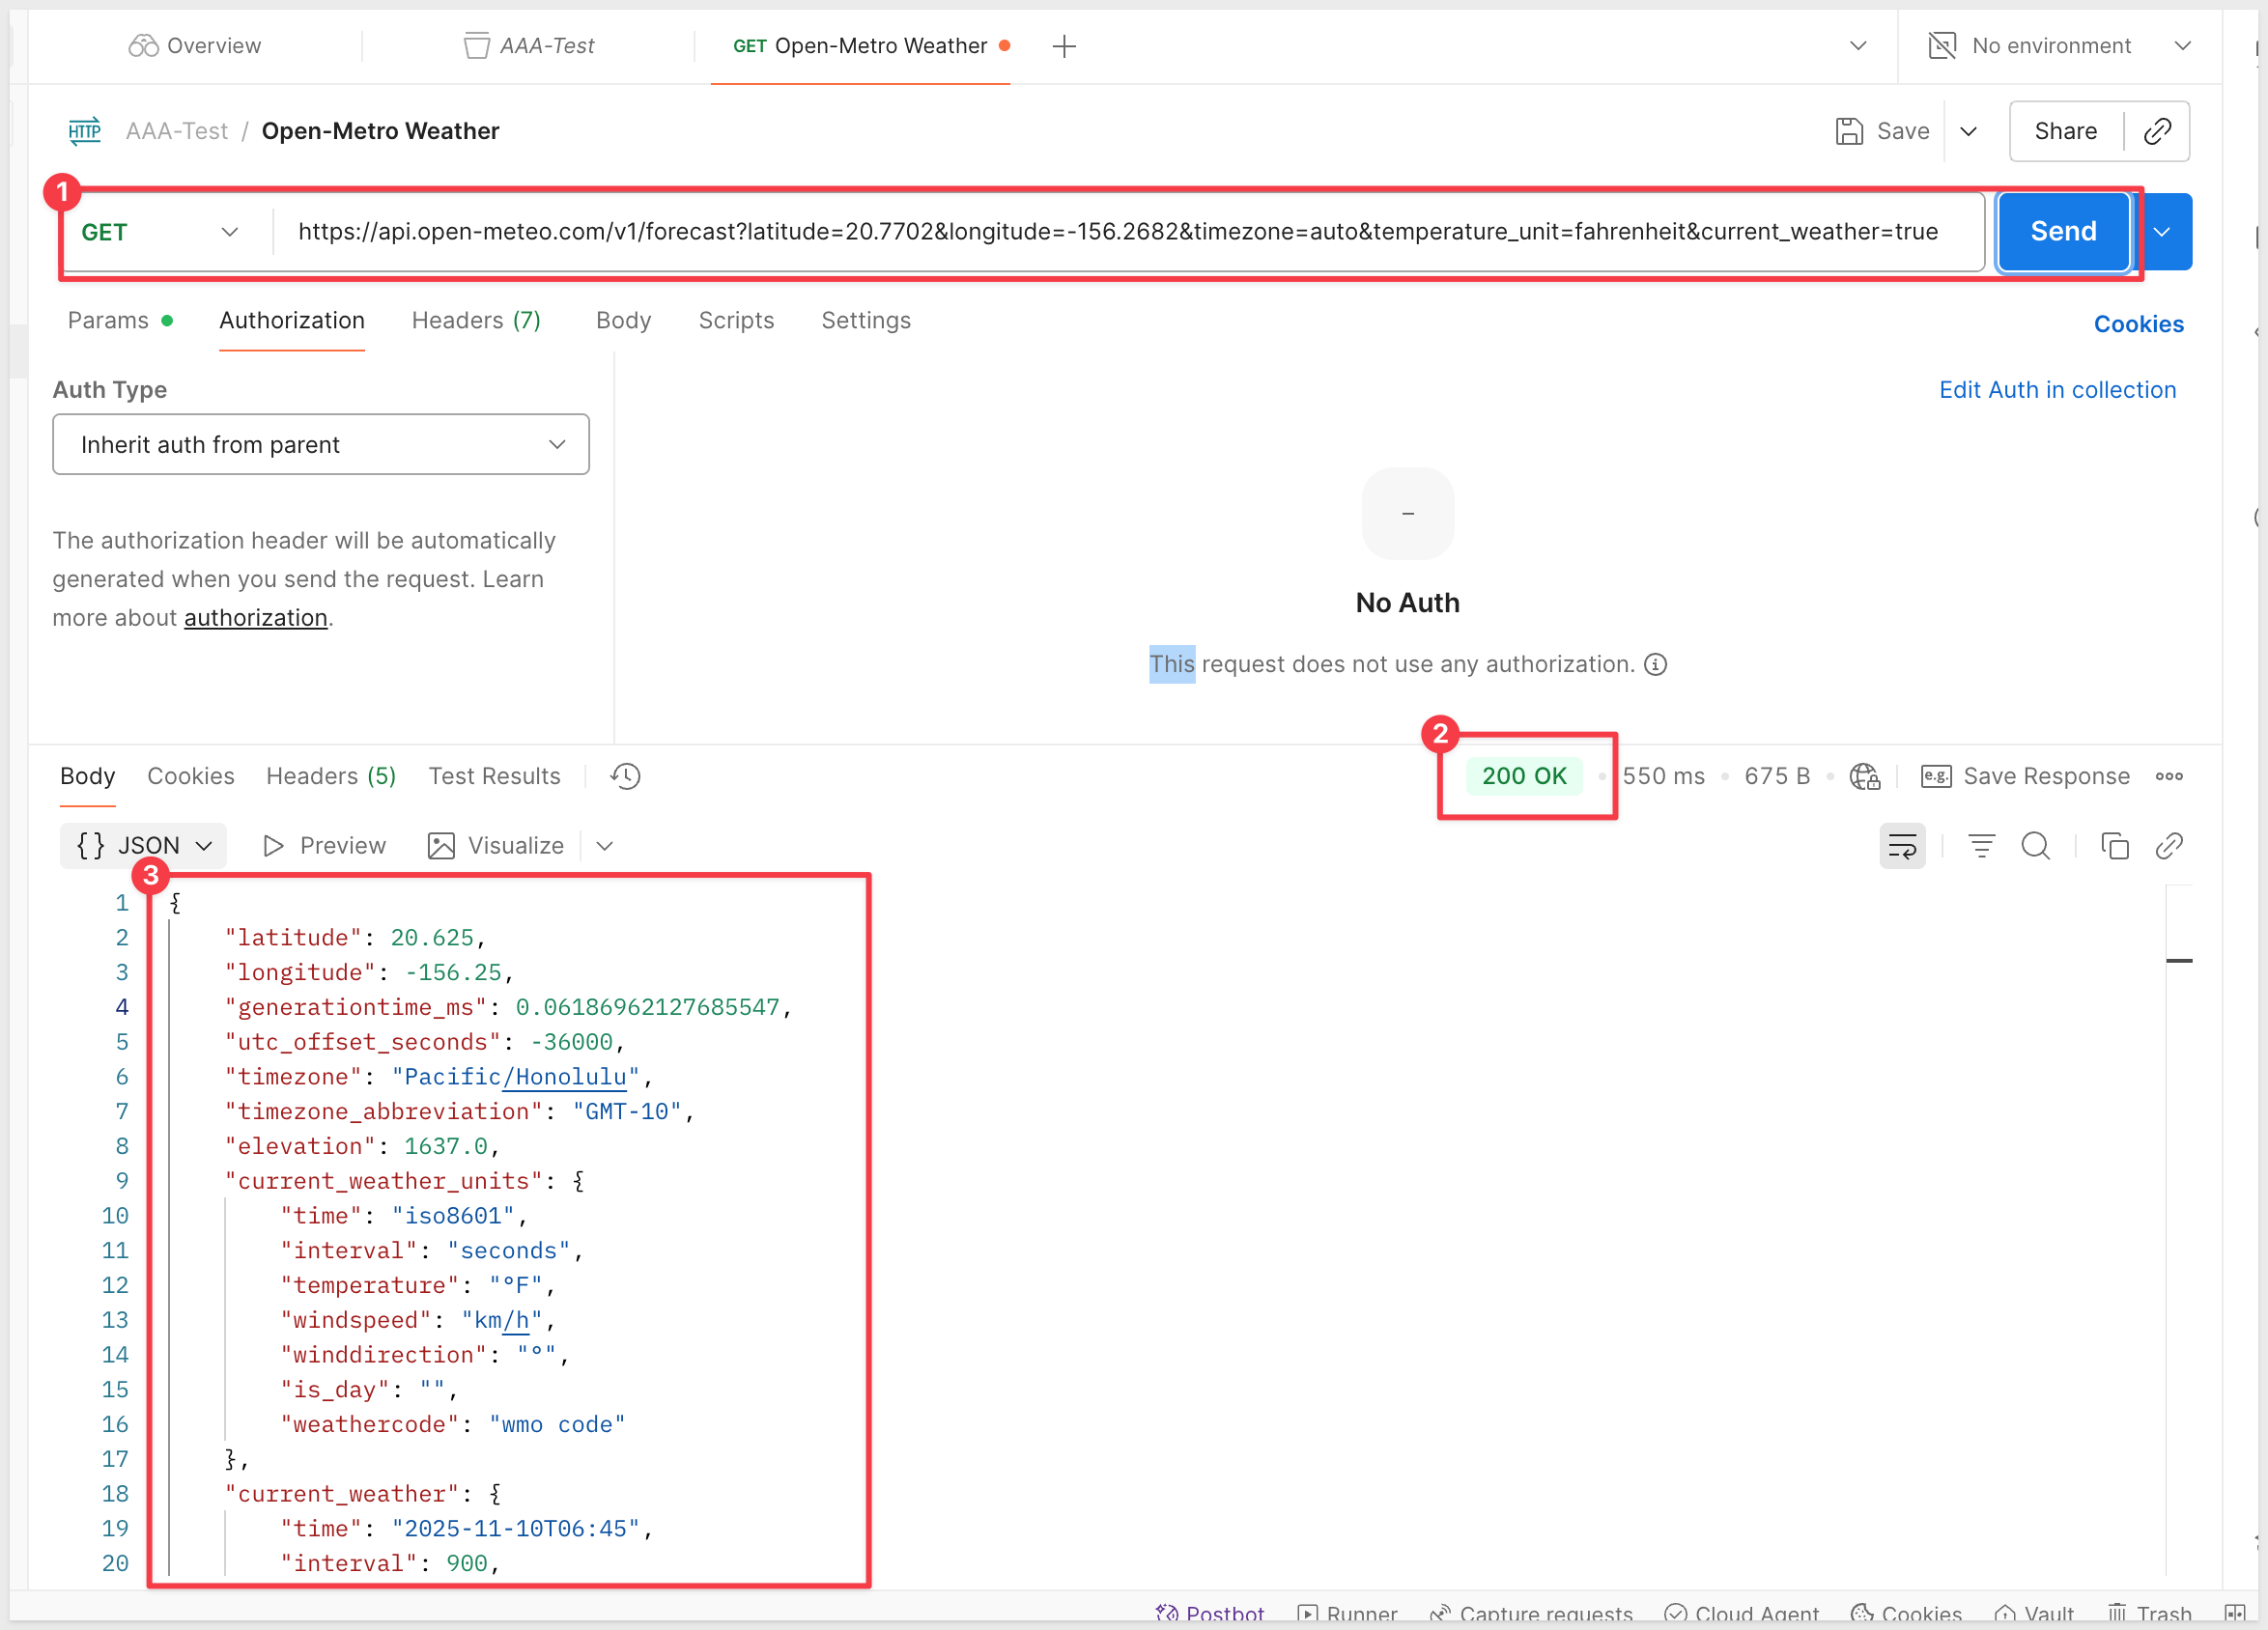
If you prefer to use a third-party tool like Postman, that is also fine:
Copy and paste the preview URL into Postman to see if we get the expected response.
For example, a quick test in Postman to check the response:
Save the working API connector.
Now that we have an API connector configured, let's create a workbook to use it.
Create a New Workbook
Log into Sigma and click the Create New button in the top left corner.
Select Workbook.
Add City Data
We'll create a table of cities with coordinates that users can select from to fetch weather data.
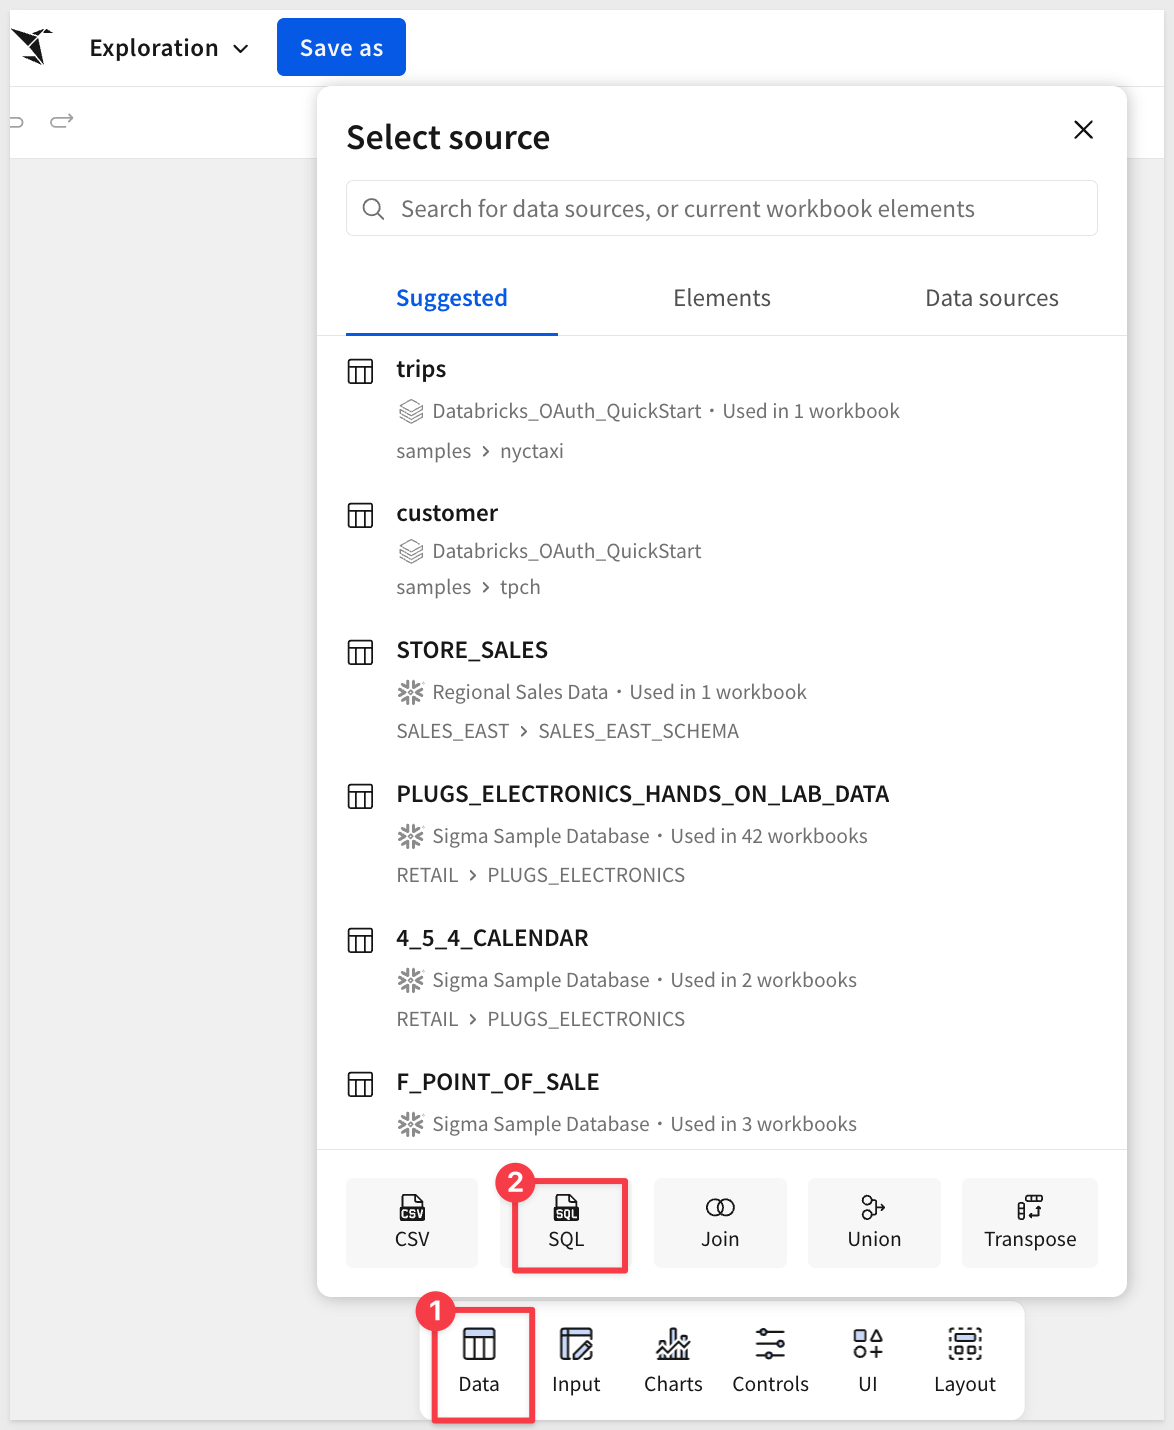
Using the Element bar, add a new Table from the Data group. Select SQL as the source.
Select the Sigma Sample Database for the connection to use:
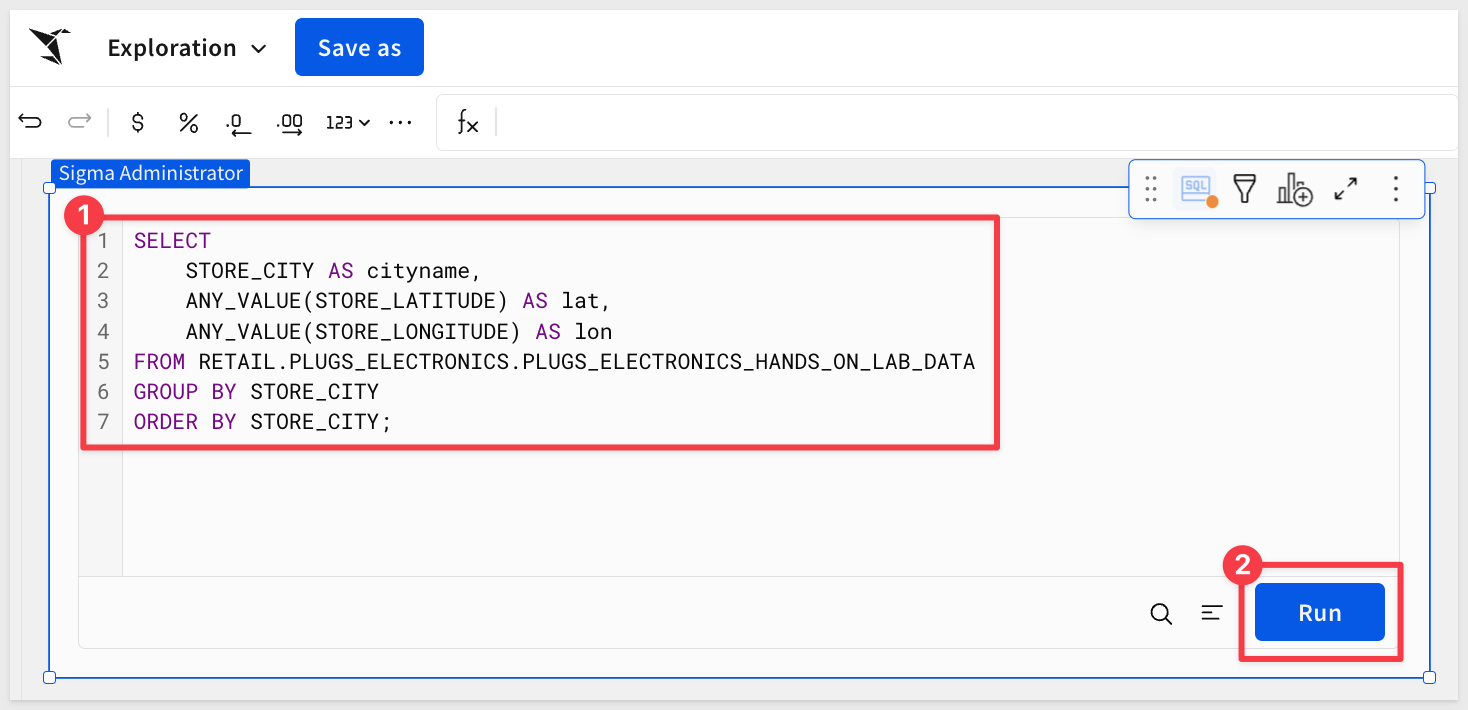
Paste the following SQL:
SELECT
    STORE_CITY AS cityname,
    ANY_VALUE(STORE_LATITUDE) AS lat,
    ANY_VALUE(STORE_LONGITUDE) AS lon
FROM RETAIL.PLUGS_ELECTRONICS.PLUGS_ELECTRONICS_HANDS_ON_LAB_DATA
GROUP BY STORE_CITY
ORDER BY STORE_CITY;
Click Run to execute the query:
The element will return data. Click the SQL icon to hide the SQL query:
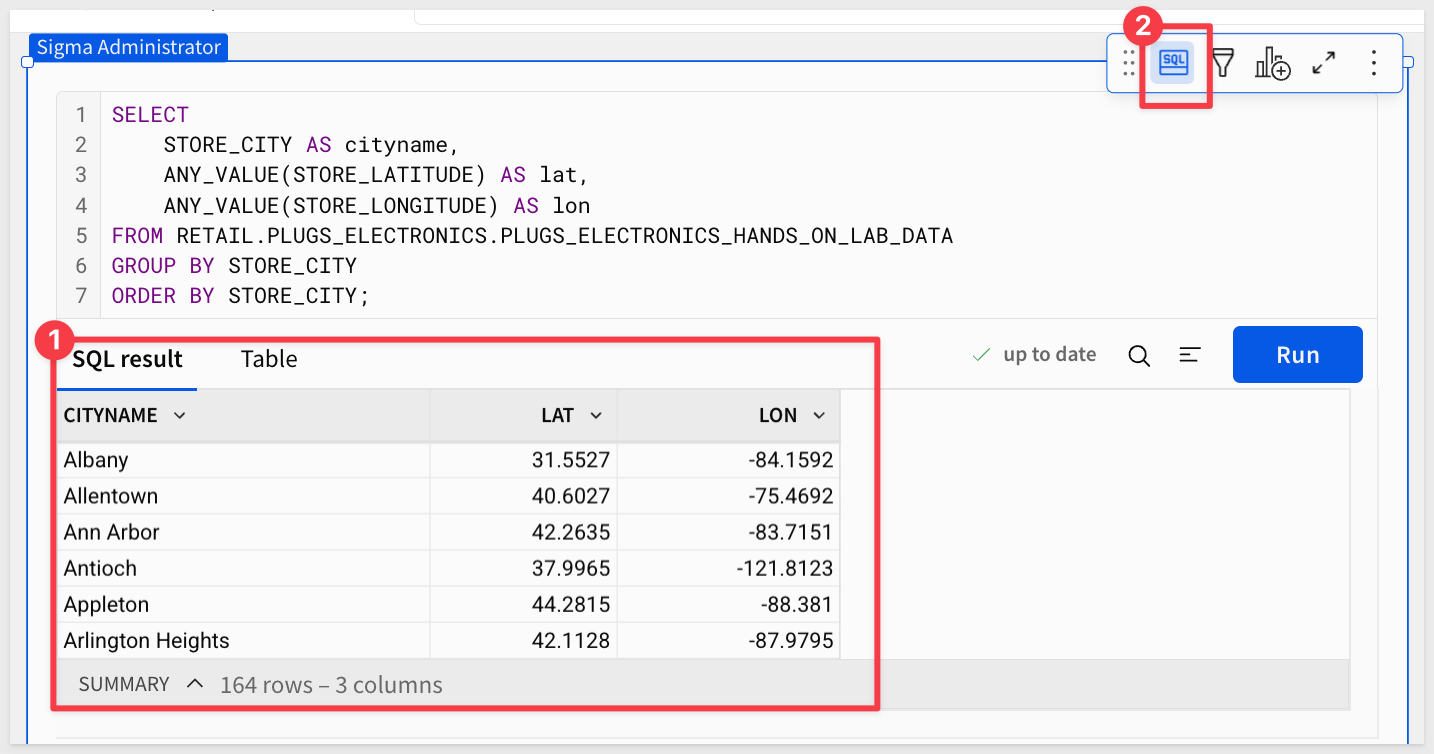
Rename this element to Cities.
Rename the current workbook page to Data.
Add a Text Area Control
Create a new workbook page and rename it Raw-Response.
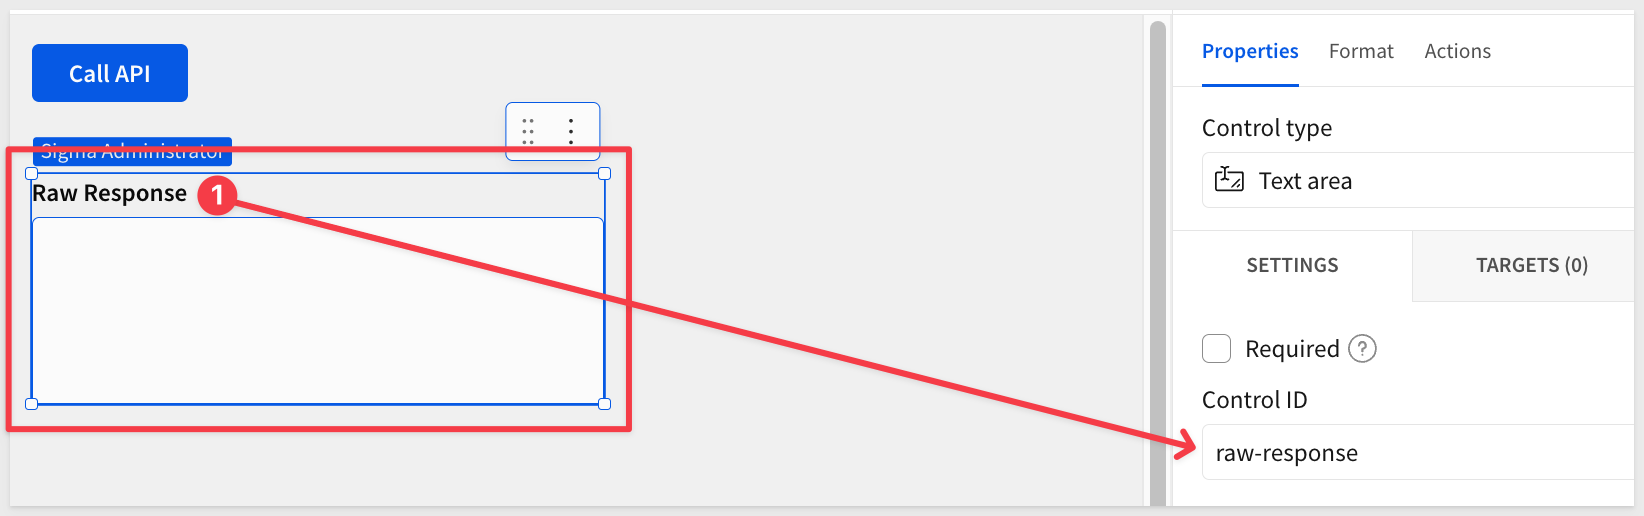
Add a new Text area control from the Controls group on the Element bar.
This control will be used to display the raw API response when we call the weather API.
Rename this control to Raw Response and set its Control ID to raw-response.
Add a Button
Add a Button element to the page from the UI group.
Change the button text to Call API.
Now we can configure the button's actions:
Select the Call API button and click + adjacent to Action sequence in the Element panel.
Action 1: Clear ‘Raw Response'
This action clears any previous API response from the text area.
Action type: Set control value
Control: Raw Response
Value: Leave blank (this clears the control)
Actions are saved as you add them.
Action 2: Call ‘Current Temp - Hard Coded'
This action calls the API connector we configured earlier.
Add another action.
Action type: Call API
API Connector: Current Temp - Hard Coded
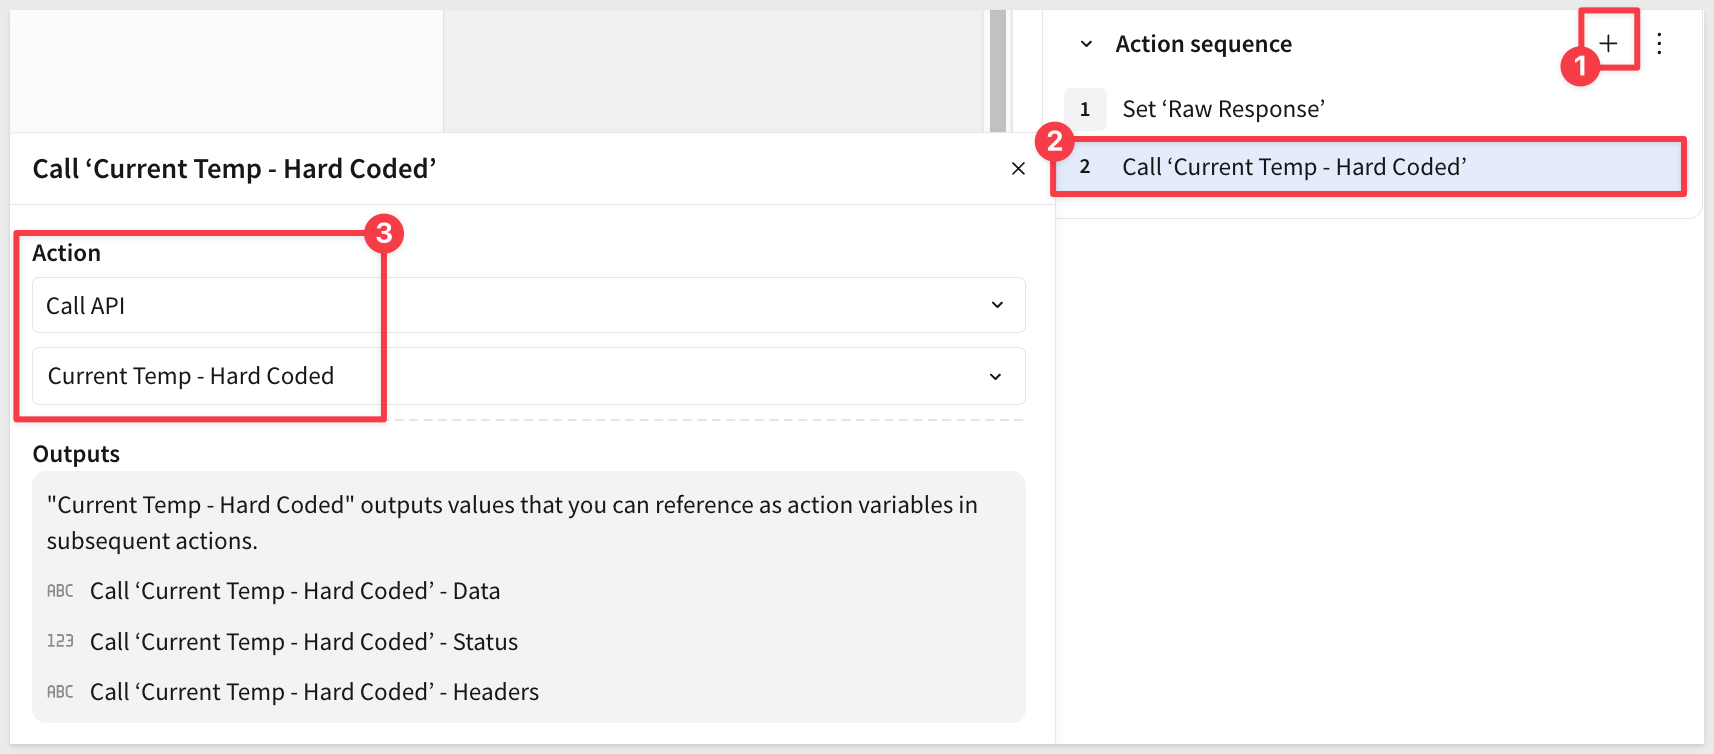
Notice the Outputs section shows three action variables that can be referenced in subsequent actions:
Call 'Current Temp - Hard Coded' - Data(the API response body)Call 'Current Temp - Hard Coded' - Status(the HTTP status code)Call 'Current Temp - Hard Coded' - Headers(the response headers)
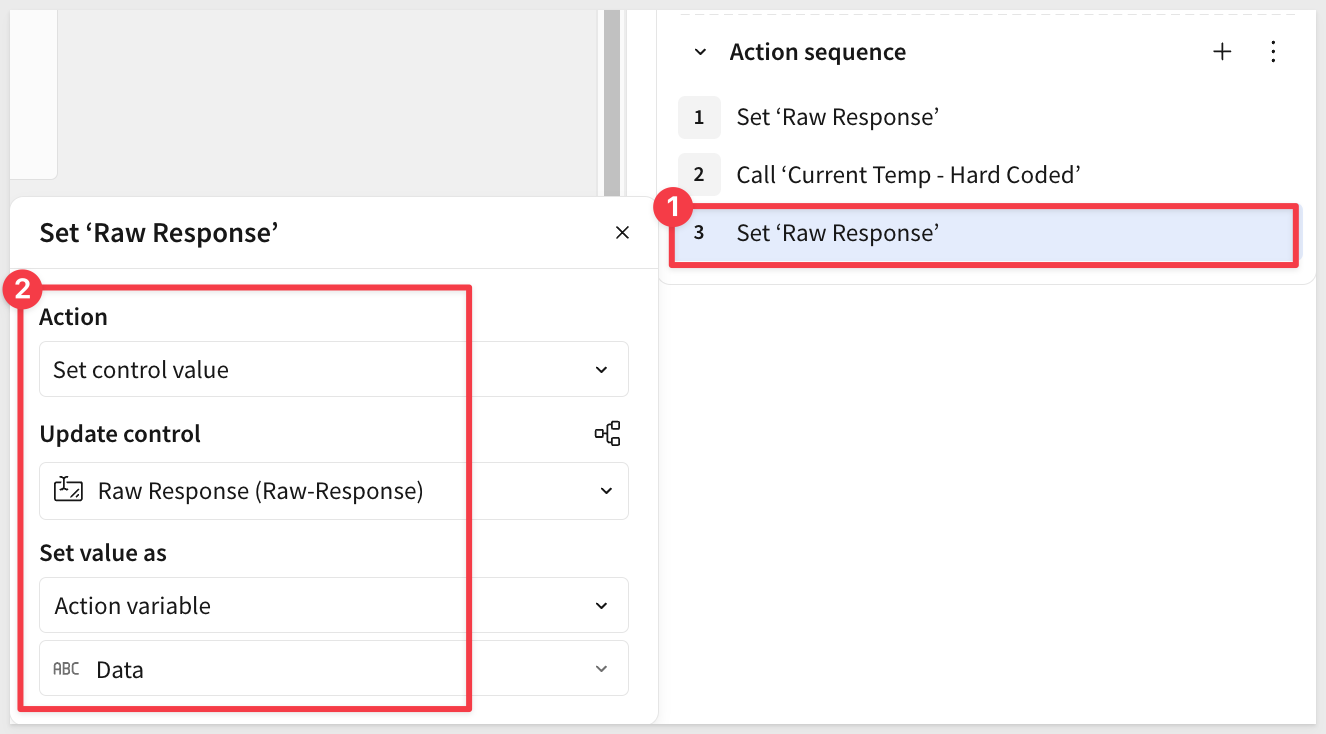
Action 3: Set ‘Raw Response'
This action displays the API response in the text area control.
Click Add action to create the third action.
Action type: Set control value
Control: Raw Response
Value: Click the reference icon and select Call 'Current Temp - Hard Coded' - Data
Your action sequence should now look like this:
Test the API Call
Click the Call API button to see the raw response from Open-Meteo:
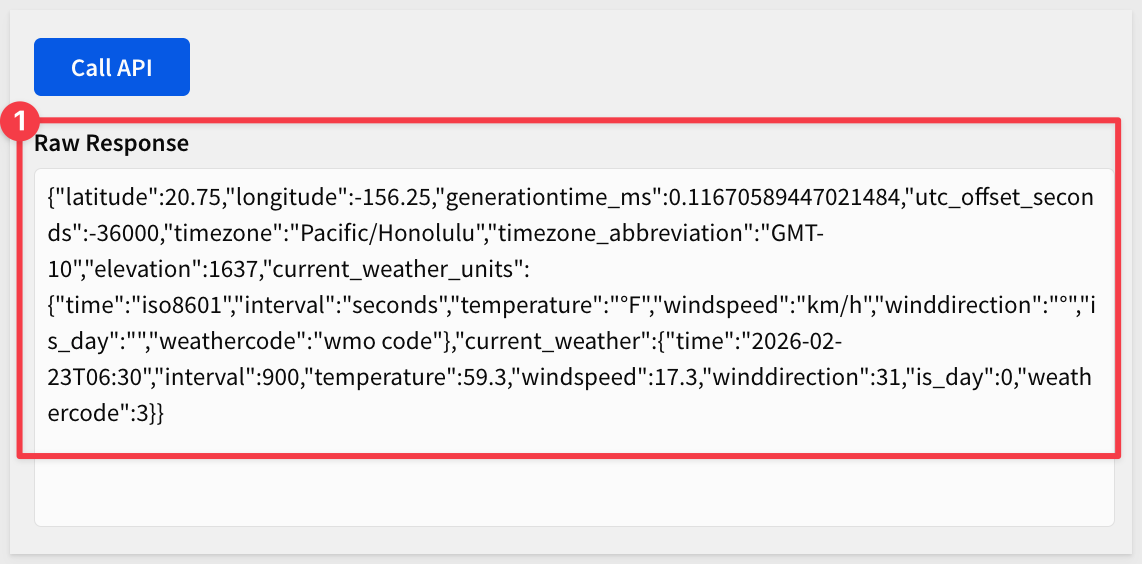
Now that we see how to get data, we need to format the data so that we can reliably read values from it.
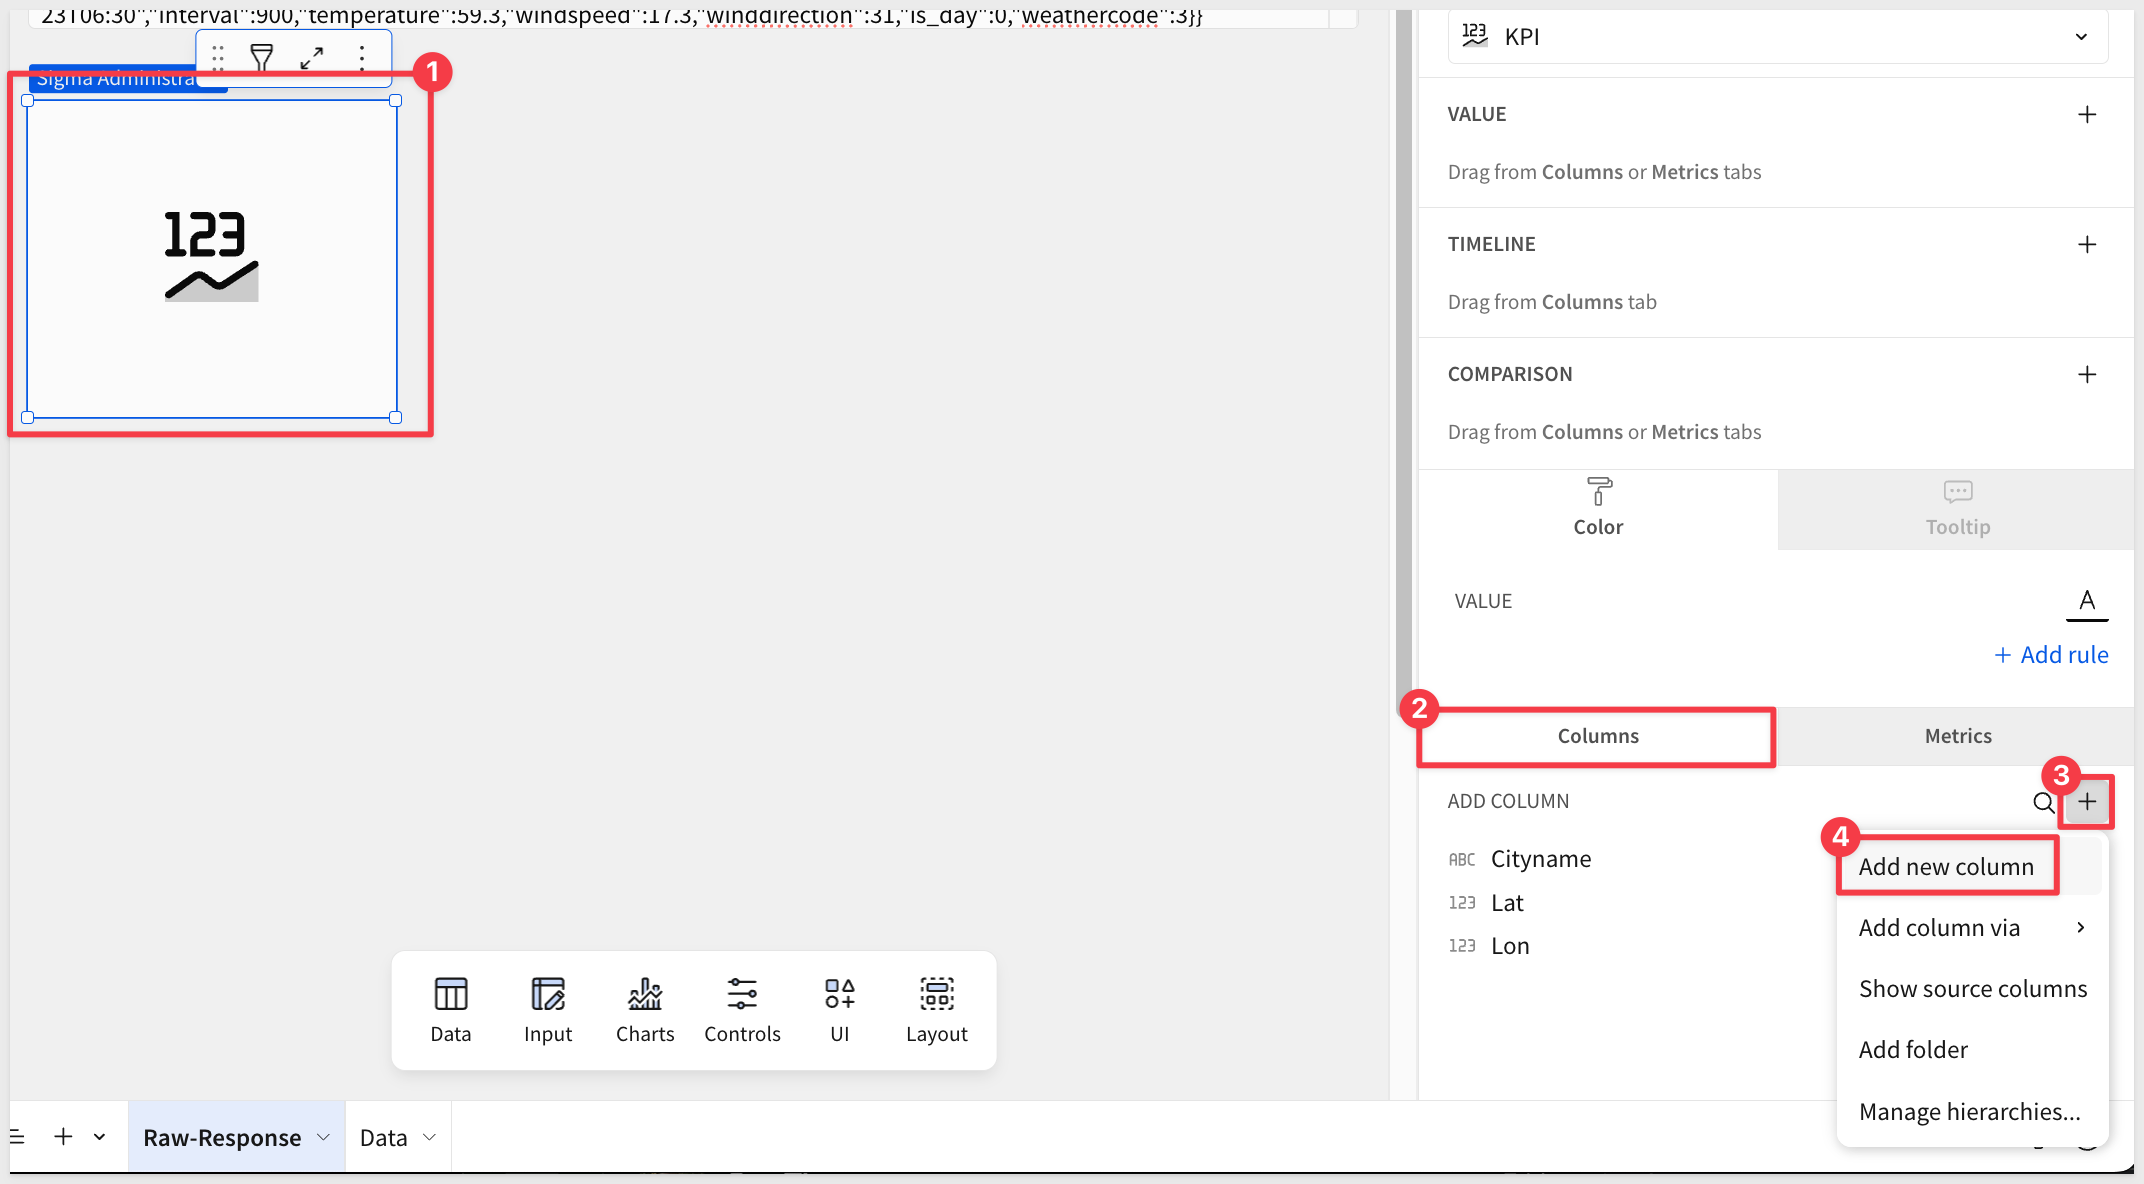
Since the data is raw, we can easily convert it to JSON using a formula. Let's use a KPI chart to show the current temperature from the raw response.
Add a new KPI chart from the Charts group.
Set its source to use the Cities table on the Data page.
Before this will work, we need to convert the raw response to JSON by adding a new column to the KPI using the Json conversion function:
Set the formula to:
Json([Raw-Response])
Rename the new column to Convert Raw Response to Json.
Once converted, we can parse the temperature from the JSON by adding another new column and setting its formula to:
Number([Convert Raw Response to Json].current_weather.temperature)
Rename this new column to Temperature and move it to the KPI chart's VALUE group.
Clicking the button displays the current temperature for our hard-coded location.

Now we want to allow the user to get the temperature from any city that is in the Cities table, via a list select control.
Return to Administration > API connectors and add a new one.
Name: Current Temp - City Select
Base URL: Select the HTTP method GET and use this URL for the request:
Use this URL:
https://api.open-meteo.com/v1/forecast
Params: Add four query parameters:
KEY                 TYPE          VALUE
latitude            Dynamic
longitude           Dynamic
current_weather     Static        true
temperature_unit    Static        fahrenheit

Also check the endpoint preview (at the bottom of the page) carefully. Small mistakes will cause API call failures:

Add a List Select Control
Return to your workbook and the Raw-Response page.
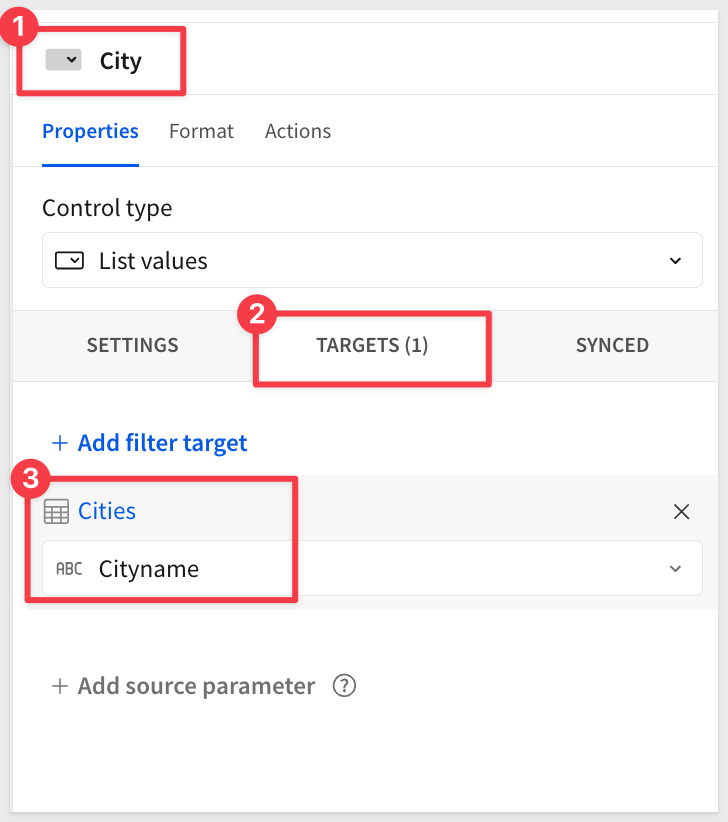
Add a new List select control to the page and configure it to get the Cityname from the Cities page:
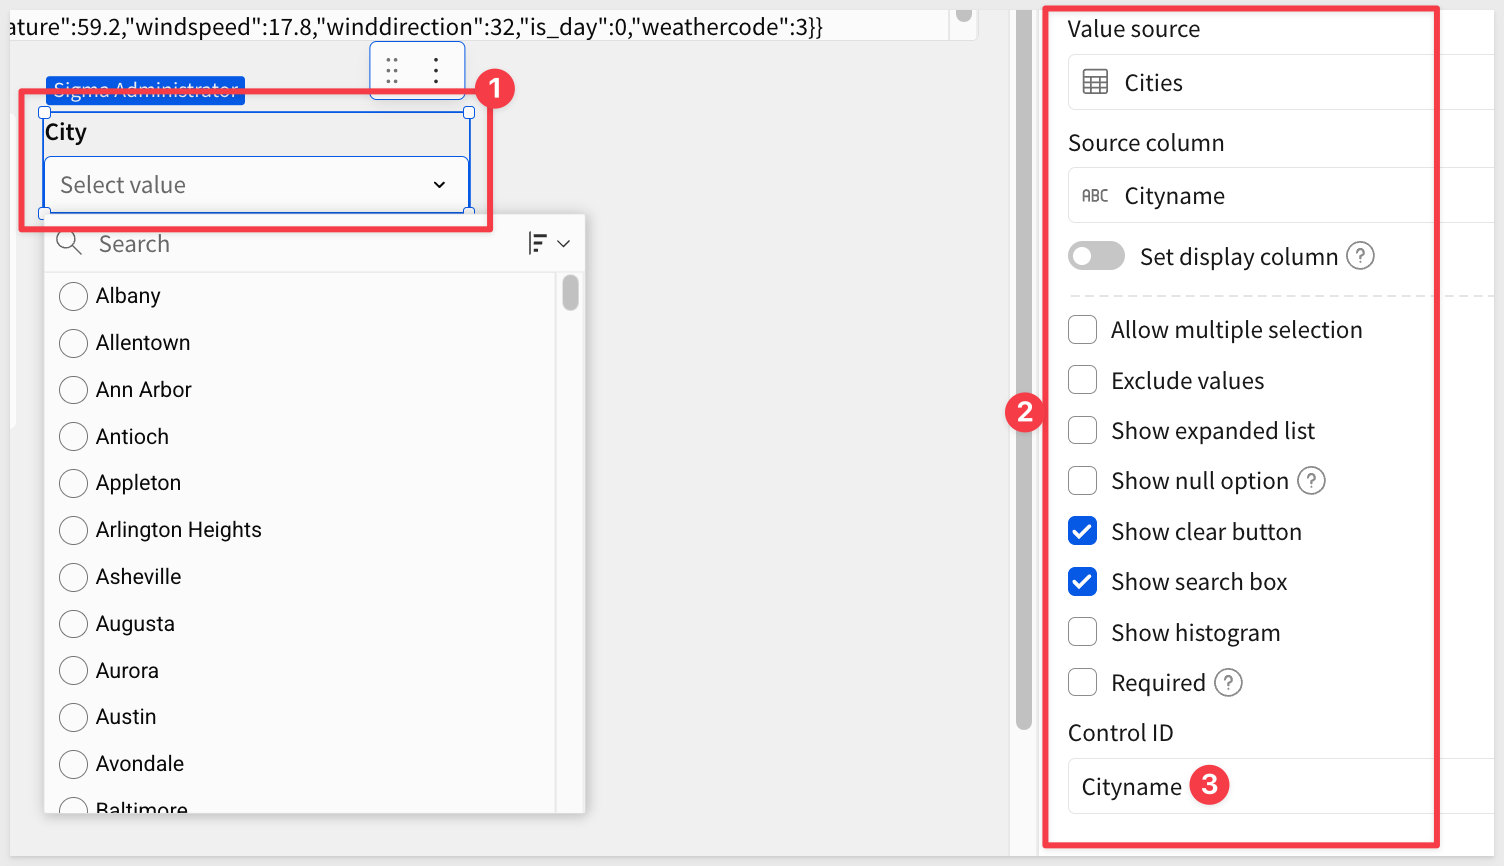
Set the list control to target the Cityname column of the Cities table:
Add three Text controls to the page from the UI group.
For each text control, press the = key to enter formula mode and set the formulas as follows:
Text control 1:
[Cities/Cityname]

Text control 2:
[Cities/Lat]
Text control 3:
[Cities/Lon]
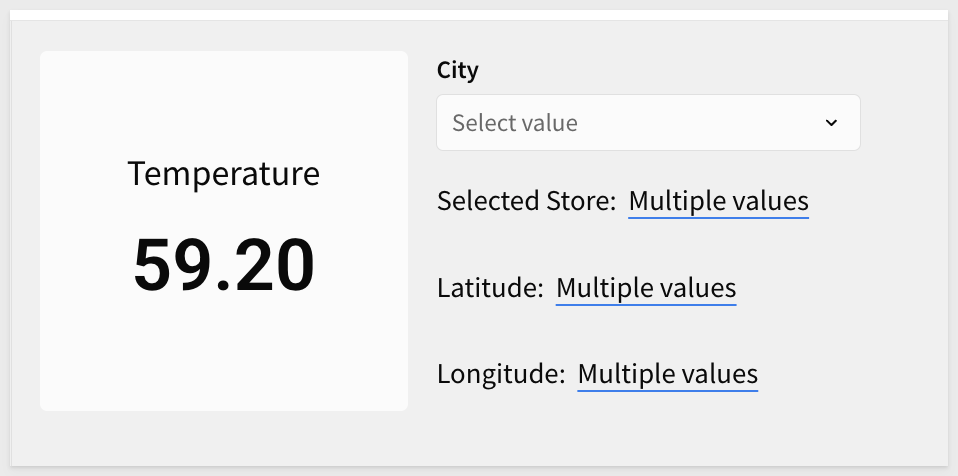
The text controls will show Multiple values until a city is selected from the list control:
Before we configure actions, let's organize the page layout.
Move the list select control to the right of the Call API button.
Select the three text controls showing cityname, latitude, and longitude, and place them in a container:
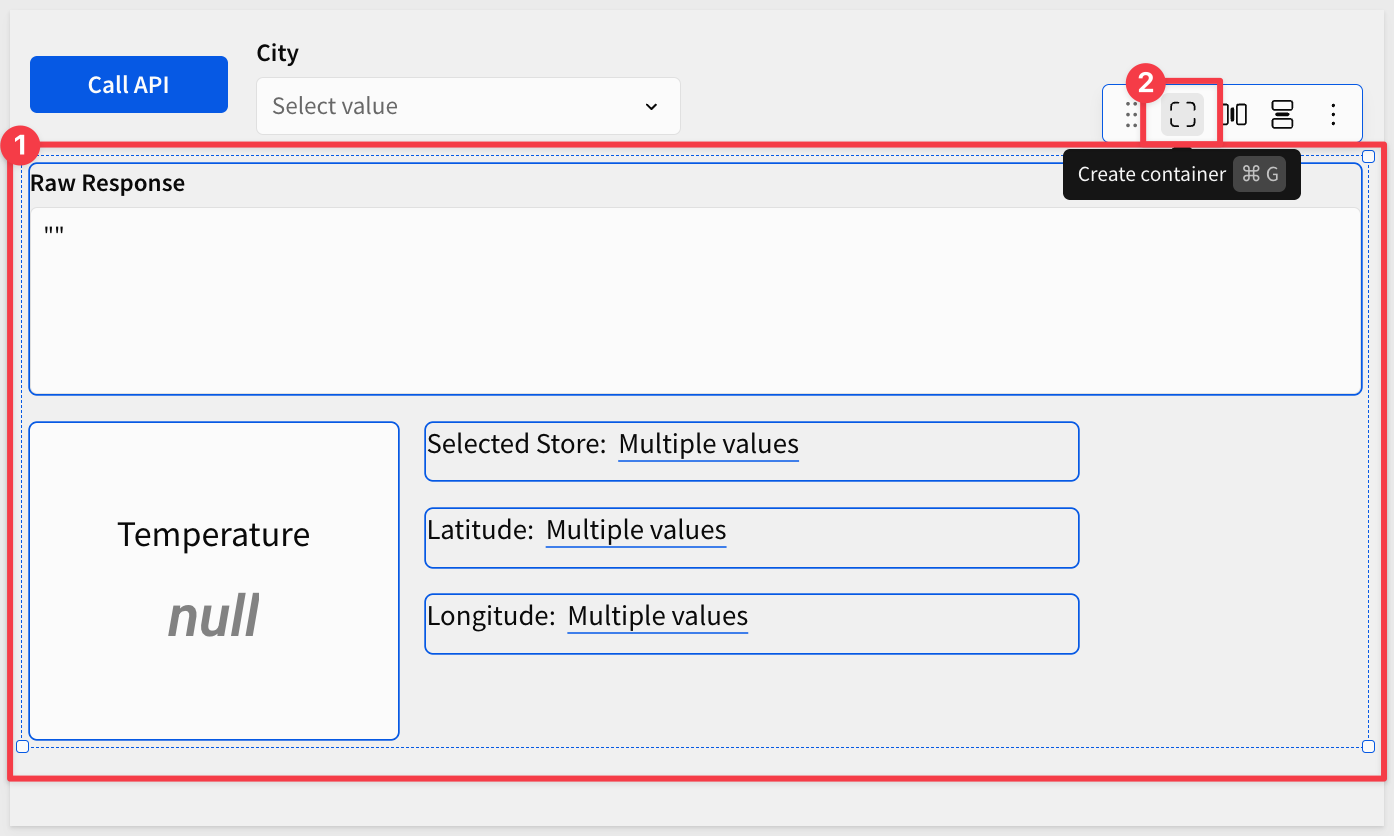
This allows us to target all the elements in the container at once from an action, saving time.
Add Actions to the list control
Now we'll configure the list control to call the new API connector when a city is selected.
Select the list control and click + adjacent to Action sequence in the Element panel.
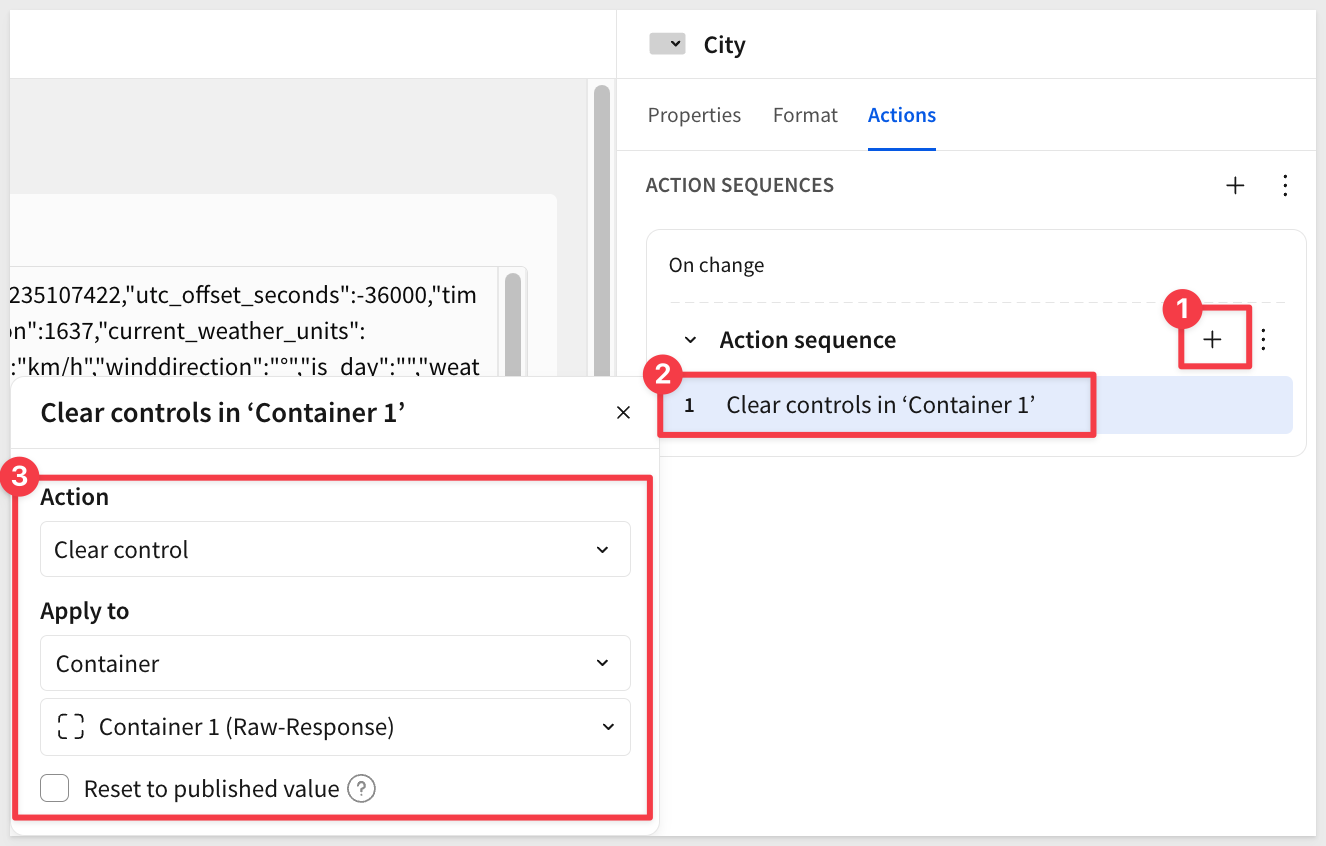
Action 1: Clear controls in ‘Container 1'
This action clears the text controls showing the selected city, latitude, and longitude.
Action type: Clear control value
Control: Select the container holding the three text controls
Action 2: Clear ‘Raw Response'
This action clears the previous API response.
Add another action.
Action type: Clear control value
Control: Raw Response
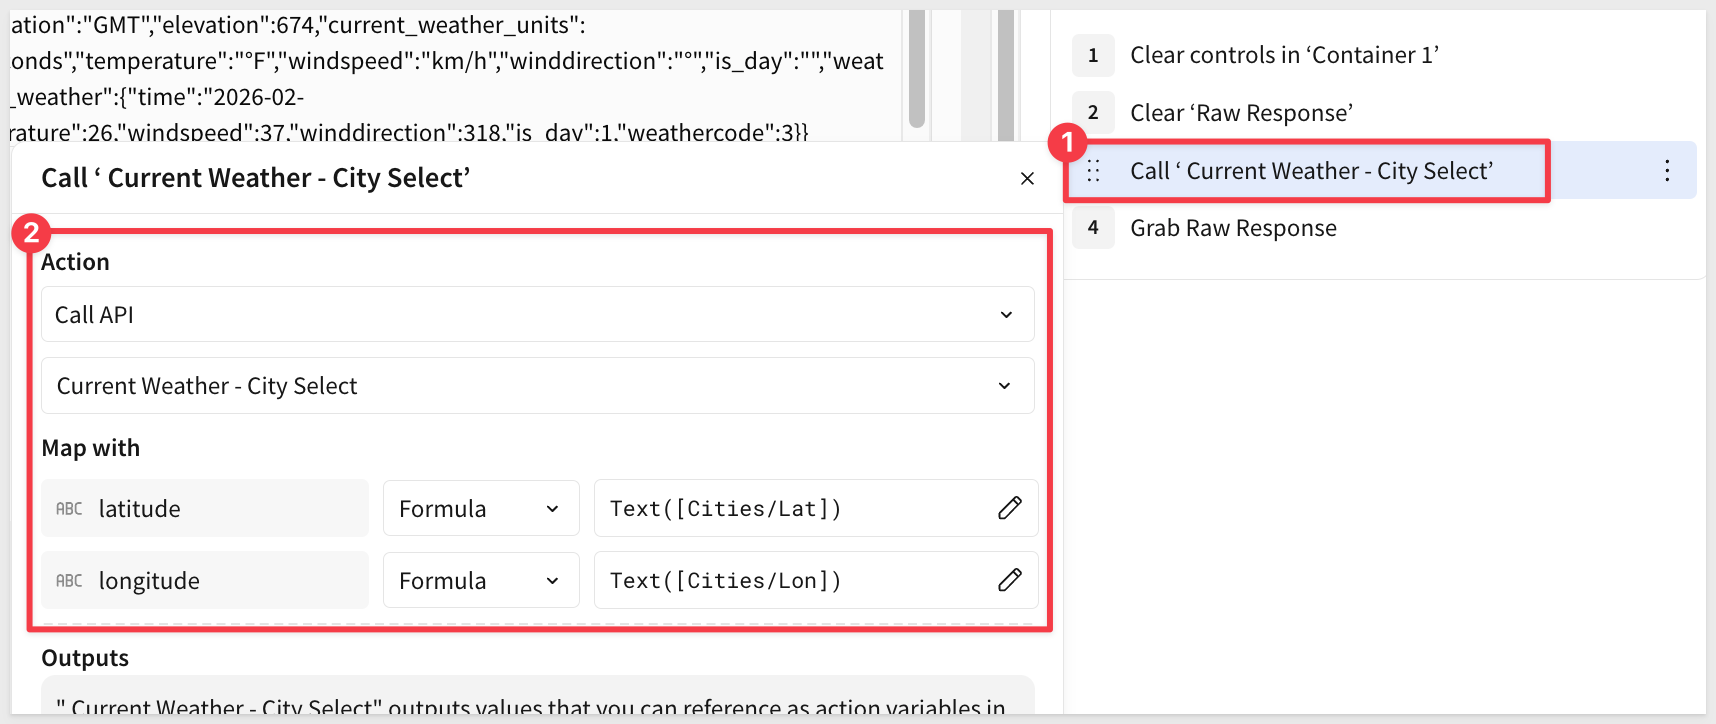
Action 3: Call ‘Current Temp - City Select'
This action calls the new API connector with dynamic latitude and longitude parameters.
Add another action.
Action type: Call API
API Connector: Current Temp - City Select
In the Map with section, map the API parameters to columns from the Cities table. We need to convert the latitude and longitude values to text format using the TEXT() function.
latitude: Click the mapping dropdown, select Formula, and enter:
TEXT([Cities/Lat])
longitude: Click the mapping dropdown, select Formula, and enter:
TEXT([Cities/Lon])
Action 4: Set ‘Raw Response'
This action displays the new API response in the text area control.
Add another action.
Action type: Set control value
Control: Raw Response
Set value as: Action variable > Data
Your complete action sequence should now have four actions configured.
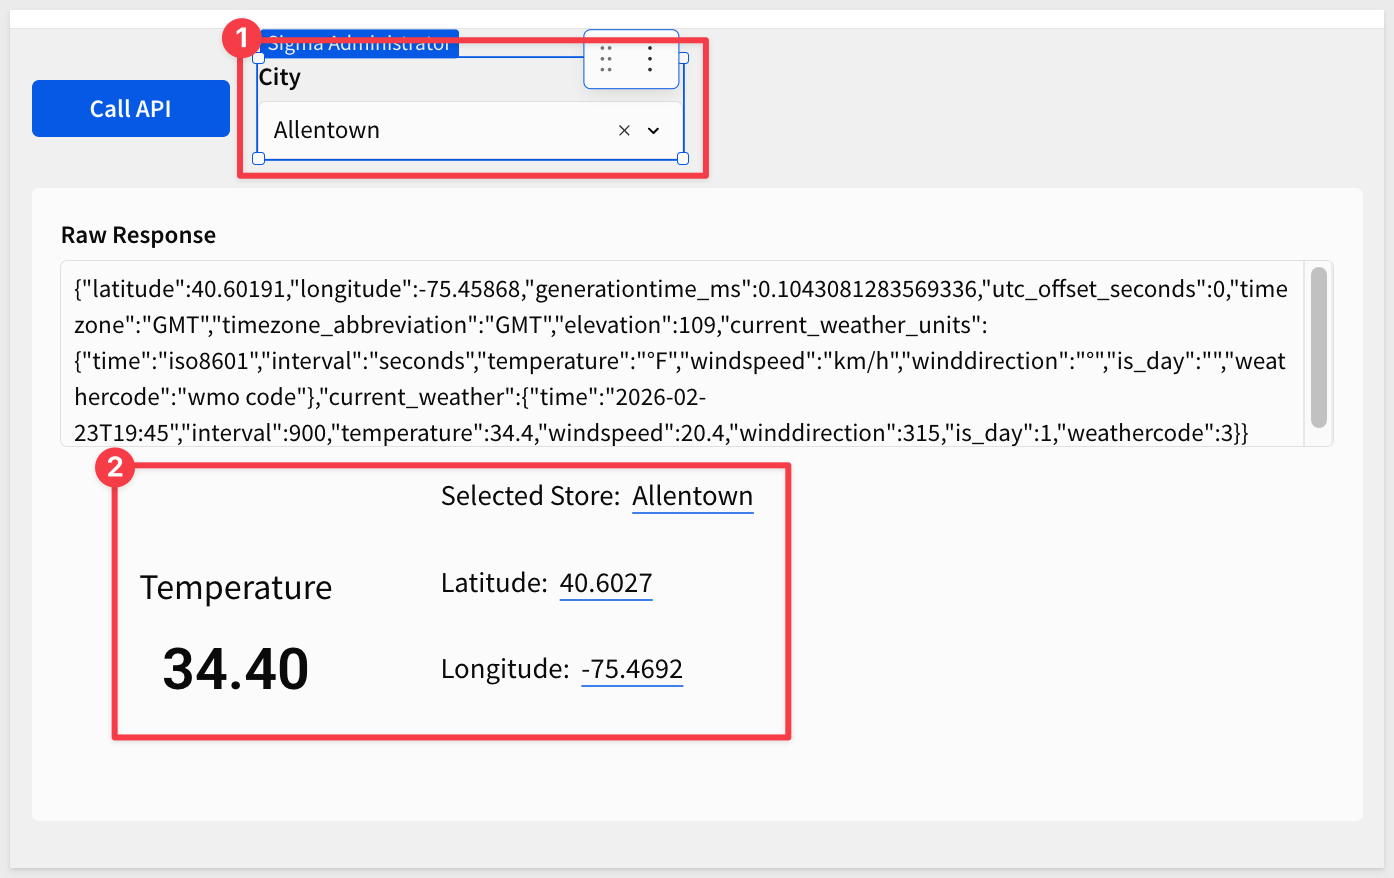
Test the Dynamic API Call
Select a city from the list control to see it work:
In this QuickStart, we explored the fundamentals of Sigma API Actions by building a simple weather data application. You learned how to:
- Configure API connectors with both static and dynamic parameters
- Create actions that call external APIs from Sigma workbooks
- Parse JSON responses using Sigma's built-in functions
- Build interactive experiences using controls to drive API inputs
- Handle data type conversions for API compatibility
These techniques form the foundation for integrating any REST API into your Sigma workbooks, enabling you to combine cloud data warehouse analytics with real-time external data sources.
Additional Resource Links
Blog
Community
Help Center
QuickStarts
Be sure to check out all the latest developments at Sigma's First Friday Feature page!