If your team already reviews every code change through pull requests, runs CI on every commit, and deploys through automated pipelines, a Sigma workbook shouldn't be the one piece of the stack that still changes by clicking around in a UI.
Workbooks as Code lets you define an entire workbook — pages, charts, KPIs, filters, layout — as a single YAML file, so it moves through the same git-based process as the rest of your application code: version control, peer review, automated validation, and CI/CD deployment.
In this QuickStart, you'll wire up exactly that pipeline. Along the way you'll learn how to:
- Read and edit a workbook spec in YAML
- Authenticate to Sigma's REST API using client credentials
- Set up and configure a working GitHub Actions pipeline for a Sigma workbook
- Open a pull request and watch CI validate the spec automatically
- Merge a change and watch it deploy to the live workbook
- Detect and resolve drift when someone edits the workbook directly in the Sigma UI
This QuickStart focuses on the workbook itself — layout, charts, KPIs, controls.
If you'd rather manage the underlying data model as code, see the companion Data Models as Code QuickStart, which covers the same version control, code review, and CI/CD pattern applied to data models via JSON specs.
For more information on Sigma's product release strategy, see Sigma product releases
If something doesn't work as expected, here's how to contact Sigma support
Target Audience
This QuickStart is designed for developers, data engineers, and technical admins who want to manage Sigma workbooks programmatically and treat them like any other piece of version-controlled application code.
Prerequisites
- A Sigma account with API access enabled
- API credentials (Client ID and Secret) - see Generate API client credentials
- A GitHub account and familiarity with git, branches, and pull requests
- Permission to create, edit, and publish workbooks
- Basic understanding of YAML

Client credentials (a unique client ID and client secret) are required to authenticate to Sigma's REST API.
Sigma uses the client ID to identify your application and the client secret to verify your identity. Together, these credentials enable secure, programmatic access to Sigma's API endpoints using OAuth 2.0 authentication.
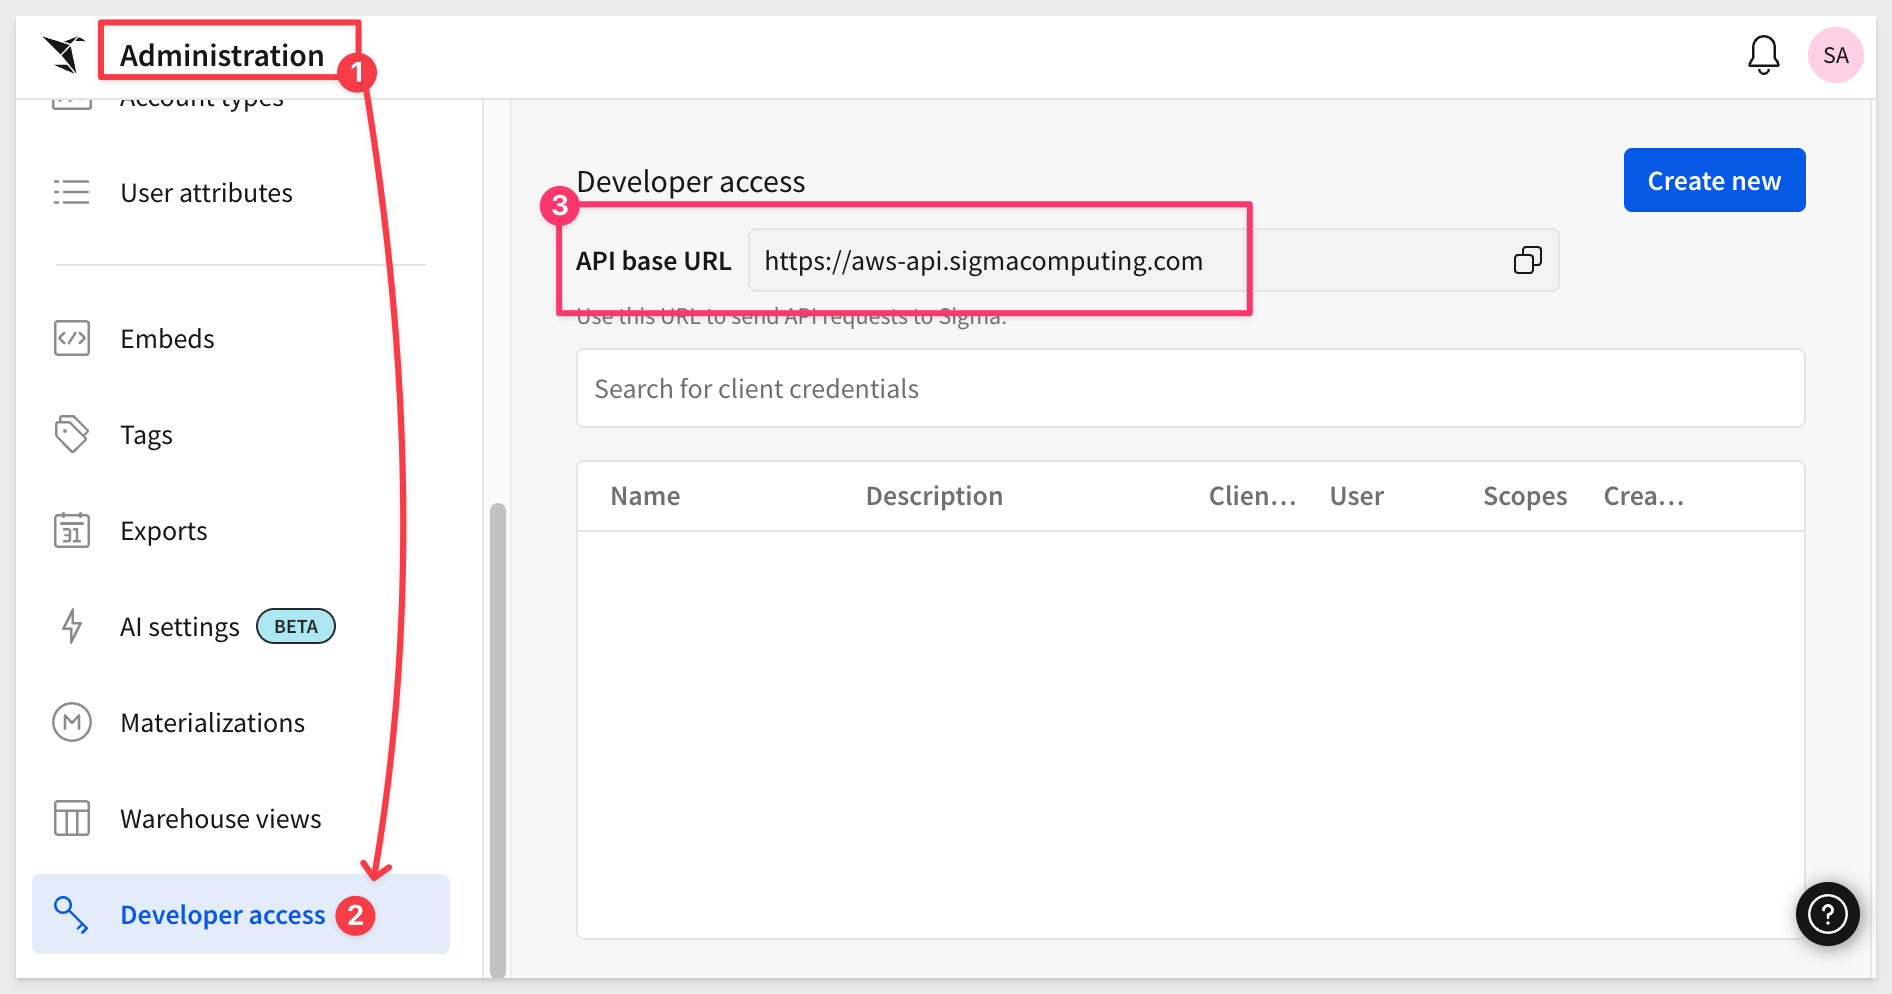
Navigate to Administration and select Developer access.
Click Create New:
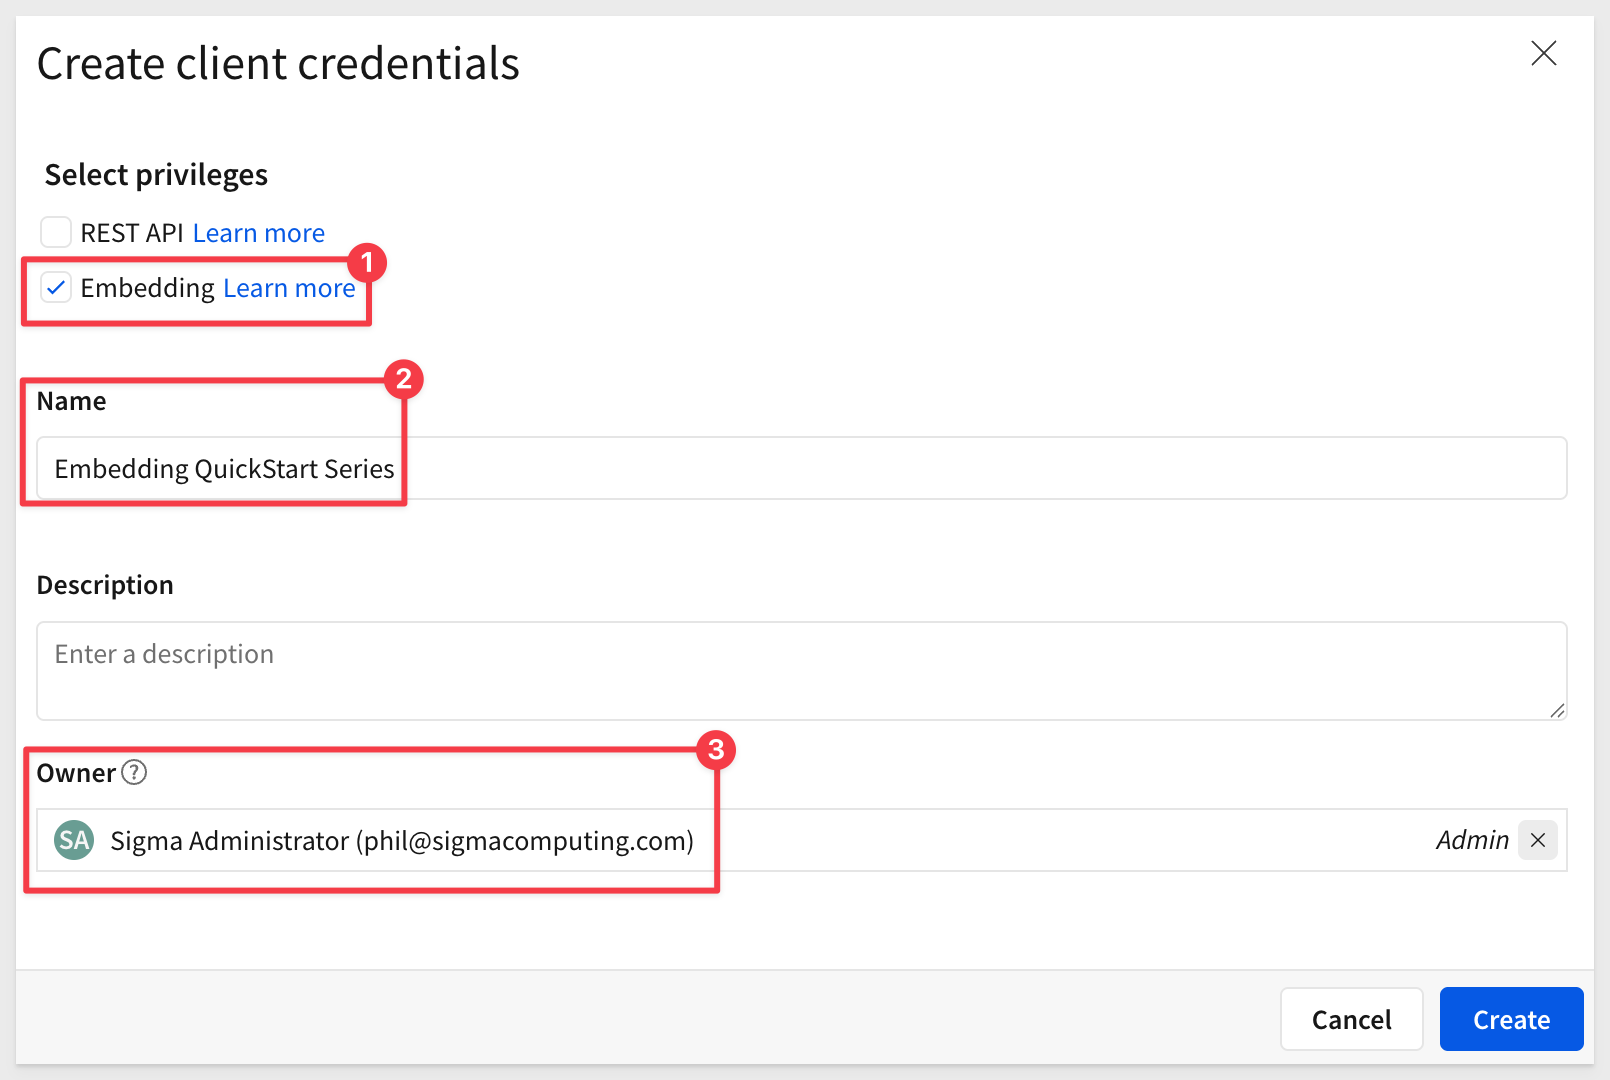
In the Create client credentials modal, select REST API, give it a name, and assign an administrative user as the owner.
Click Create.
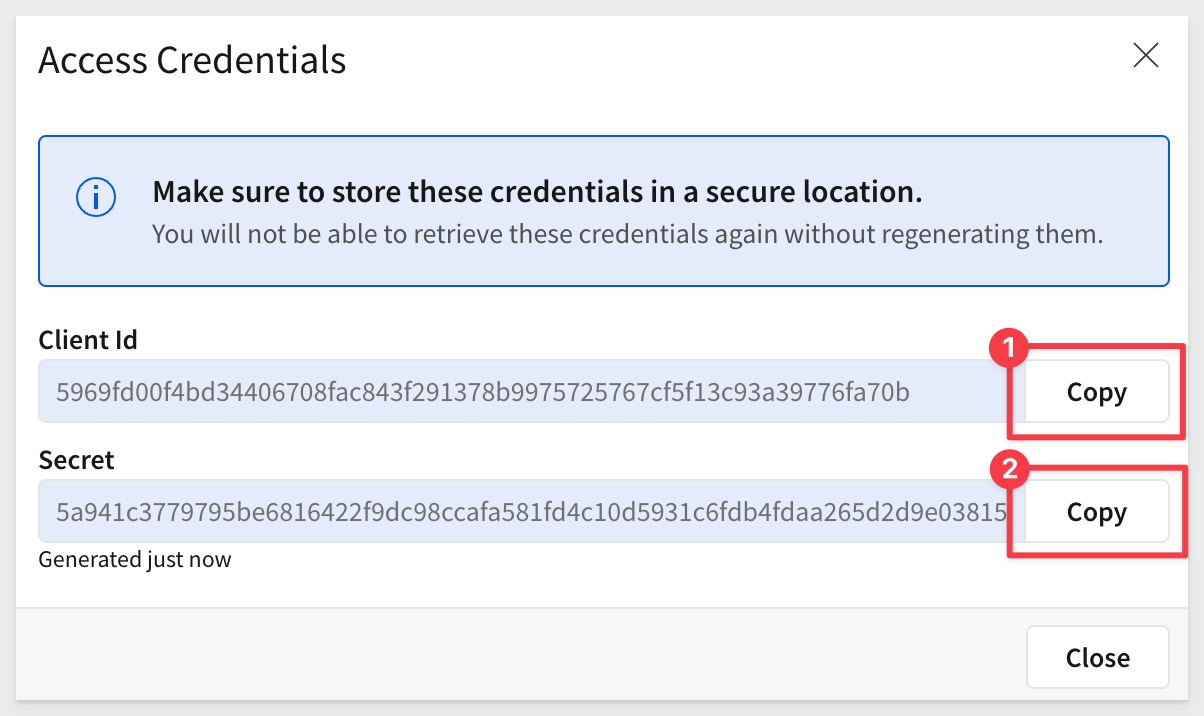
Copy and paste the Client ID and Secret - you'll add them as GitHub secrets in the next section.
Every reader starts from the same working example - spec, scripts, and GitHub Actions workflows already wired together - so the rest of this QuickStart is about the git/CI workflow itself, not building a workbook spec from a blank file.
Copy the Project Into Your Own Repository
We've built a complete, working example - spec, scripts, and GitHub Actions workflows - and maintain it inside Sigma's quickstarts-public repository, under sigma-workbooks-as-code-demo-main/.
This QuickStart's automation runs as GitHub Actions inside your own repository, and GitHub only runs workflows defined at a repository's root. Since quickstarts-public is a large monorepo covering every Sigma QuickStart, you won't fork it directly - instead, you'll pull out just this one folder and push it into a new, empty repository of your own, so its .github/workflows folder lands at that repository's root.
Open a Terminal session and create a new directory to work in:
mkdir sigma_quickstarts
cd sigma_quickstarts
Clone just the project folder using sparse-checkout, the same technique used in the companion Data Models as Code QuickStart:
git init
git remote add -f origin https://github.com/sigmacomputing/quickstarts-public.git
git config core.sparseCheckout true
echo "sigma-workbooks-as-code-demo-main" >> .git/info/sparse-checkout
git pull origin main
cd sigma-workbooks-as-code-demo-main
You now have the project files locally, but they're not in a repository of your own yet - just a sparse checkout of quickstarts-public. The next few steps create an empty destination repository on GitHub, then push this folder into it.
Create a new, empty repository under your own GitHub account at github.com/new:
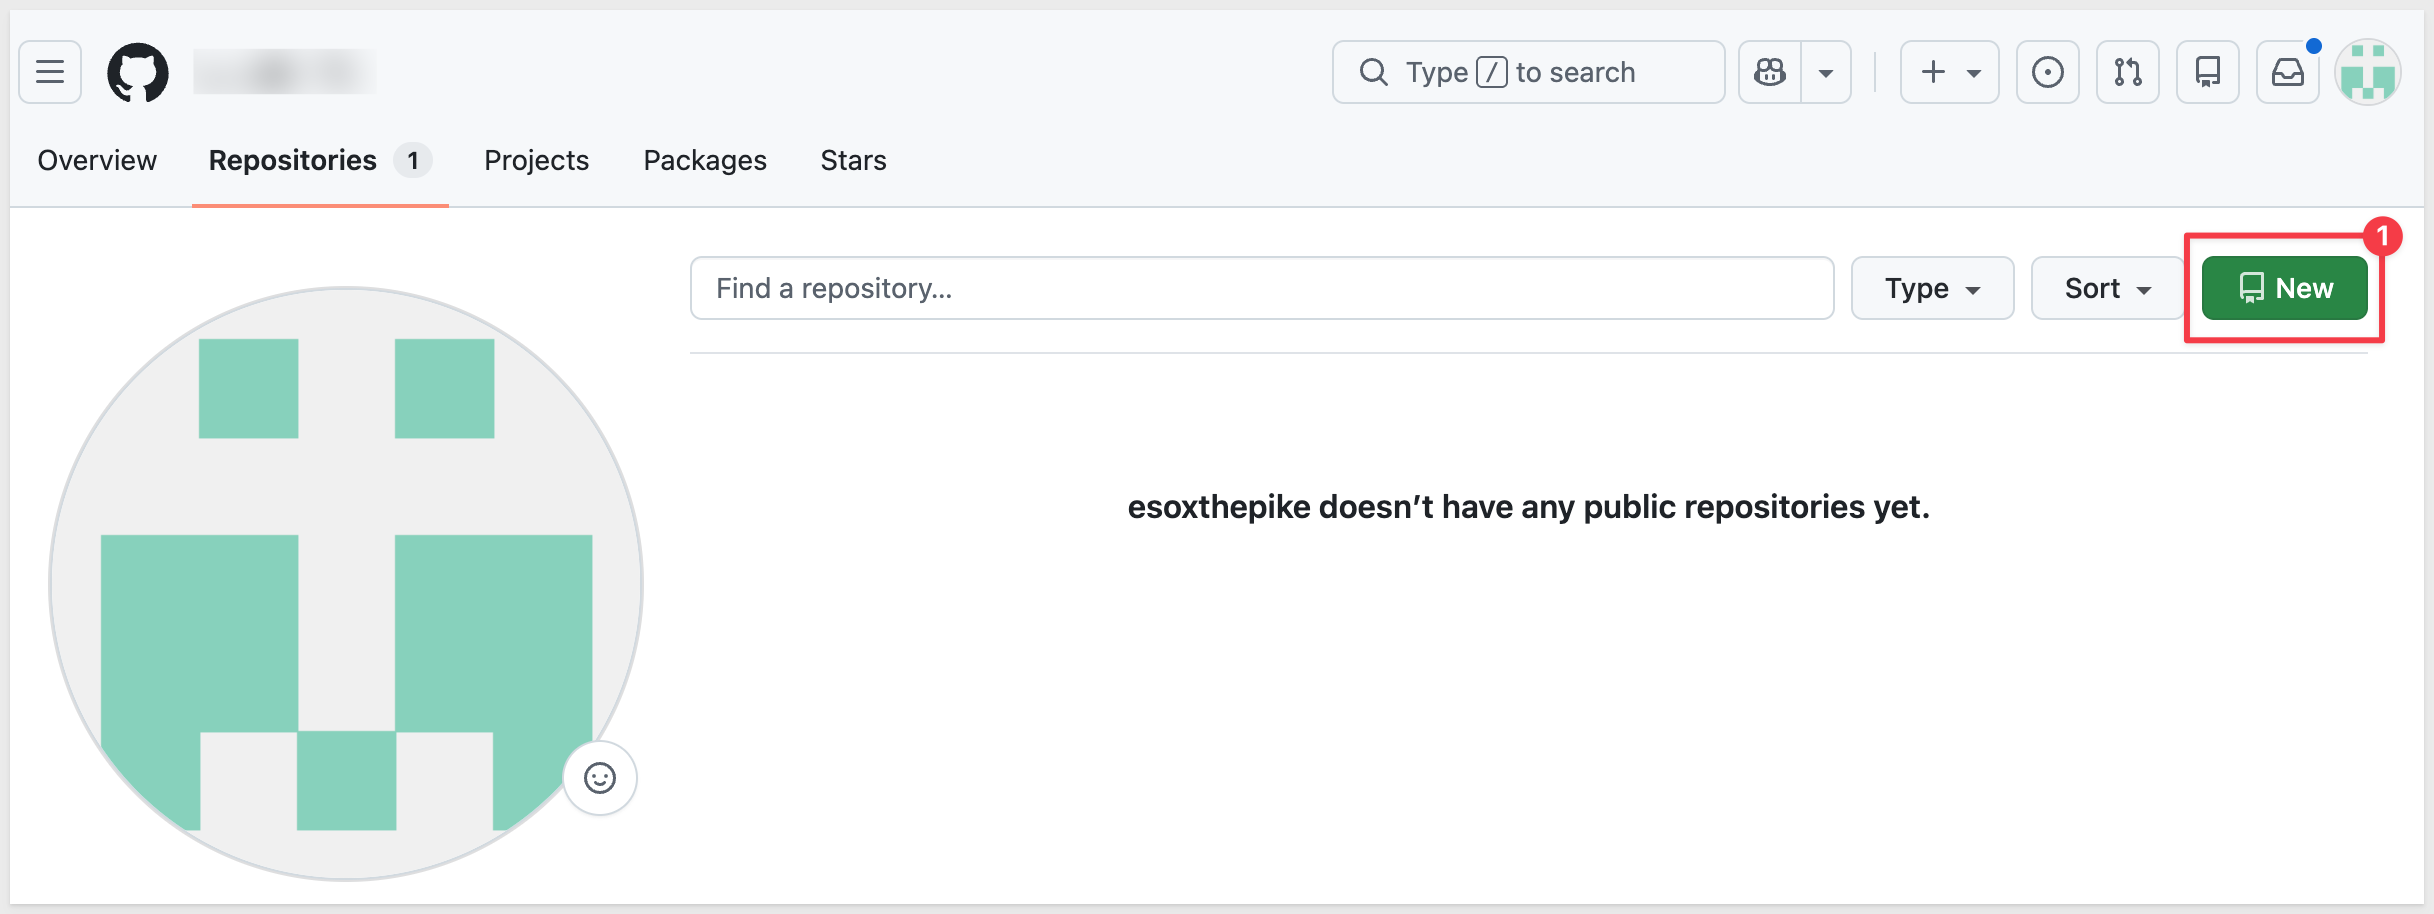
Name it:
sigma-workbooks-as-code-demo
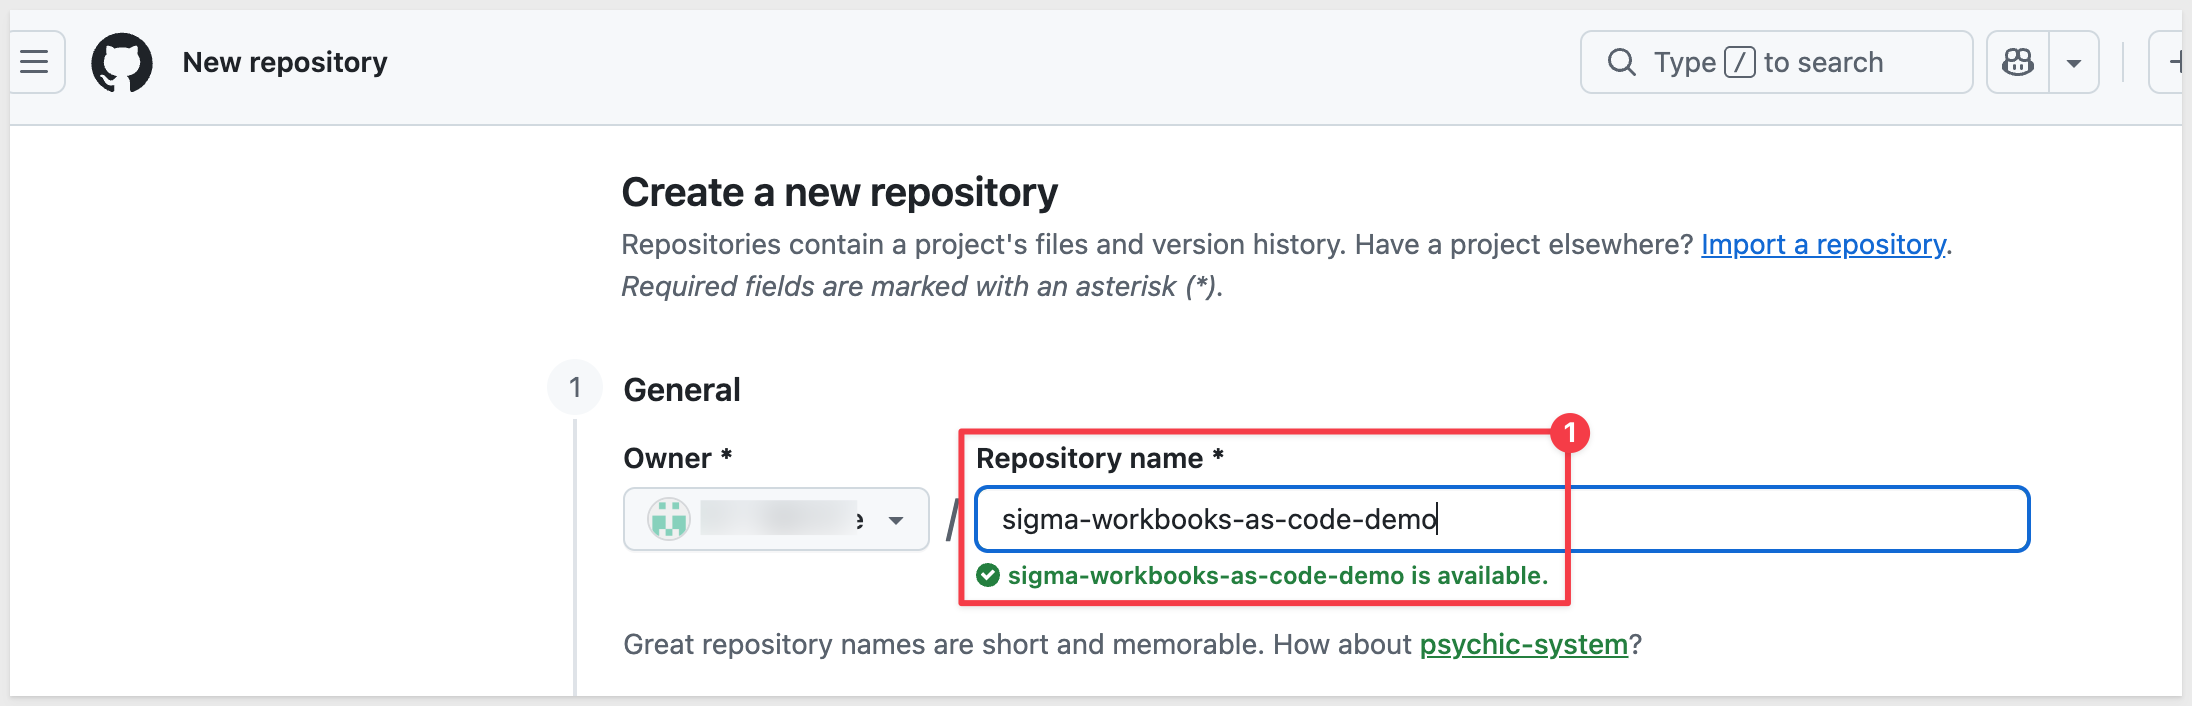
Click Create repository.
With that done, return to terminal and confirm you're inside the extracted project folder, not the sparse-checkout parent directory - this matters because the parent directory has its own .git pointing at quickstarts-public, and running the next block from there fails silently partway through instead of erroring immediately:
pwd
The output should end in sigma_quickstarts/sigma-workbooks-as-code-demo-main. If it just ends in sigma_quickstarts, run cd sigma-workbooks-as-code-demo-main first.
Now turn this folder into its own repository and push it to the one you just created (be sure to replace YOUR_GITHUB_USERNAME):
git init
git add .
git commit -m "Initial commit: Workbooks as Code demo"
git branch -M main
git remote add origin https://github.com/YOUR_GITHUB_USERNAME/sigma-workbooks-as-code-demo.git
git push -u origin main
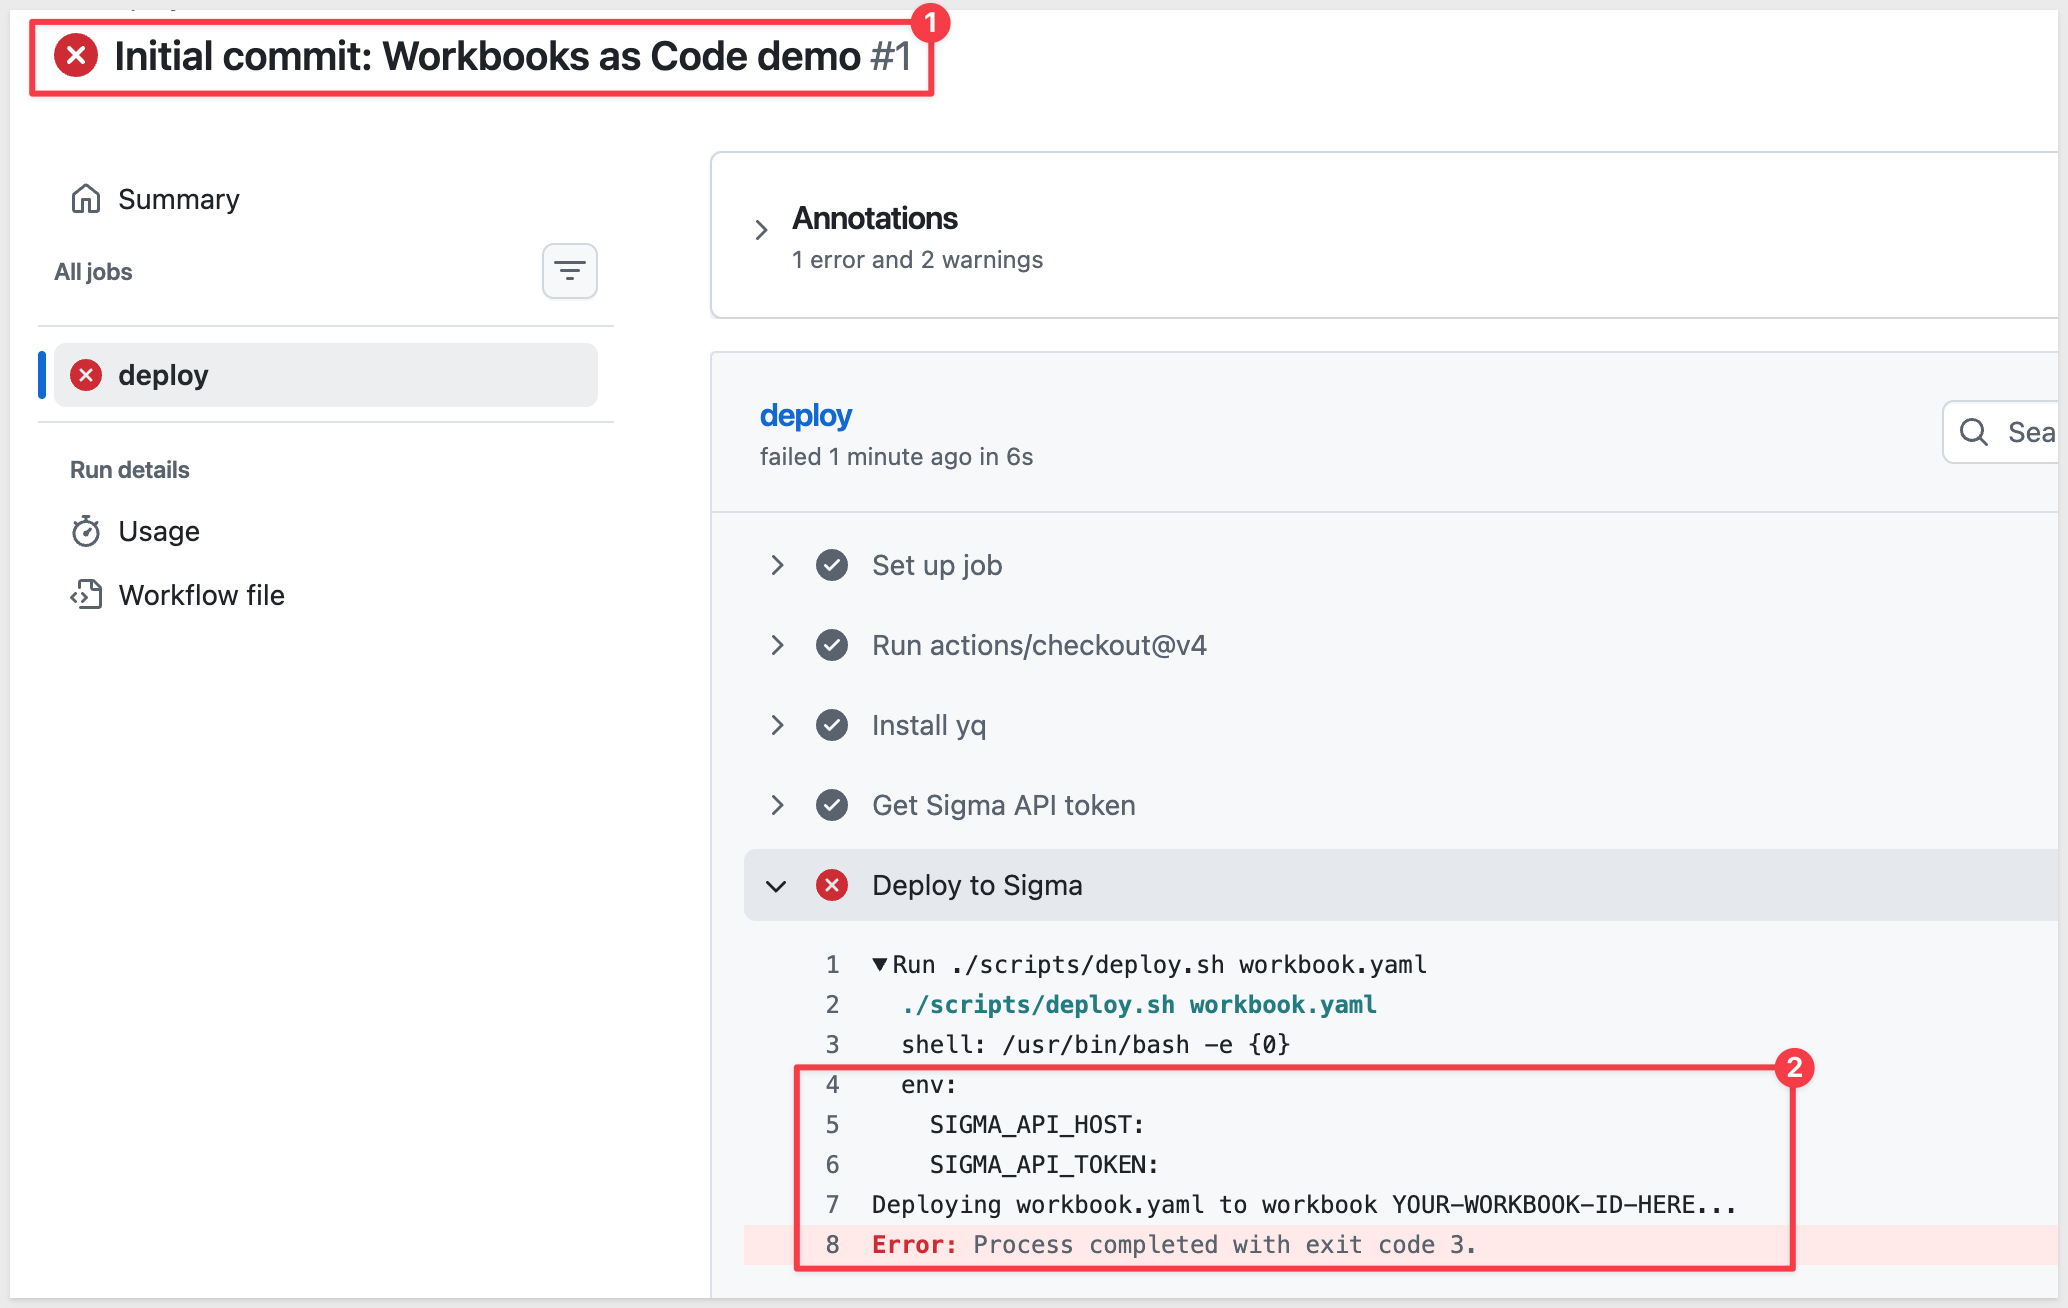
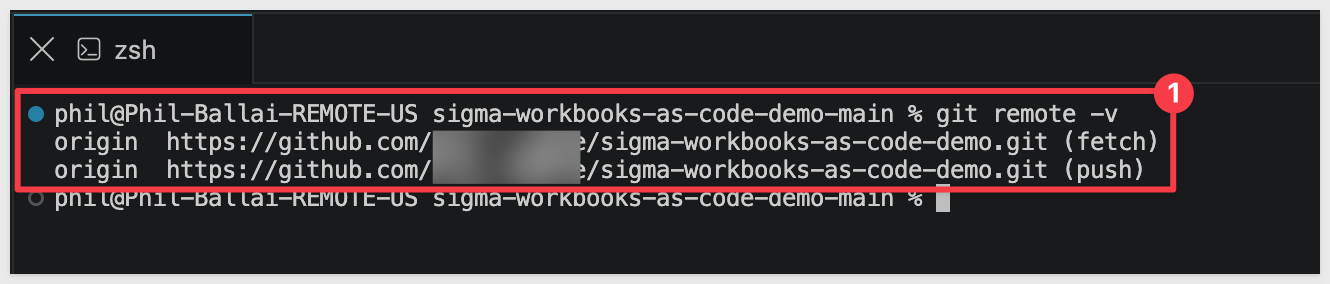
Confirm origin points at your own new repository:
git remote -v
You should see the project structure:
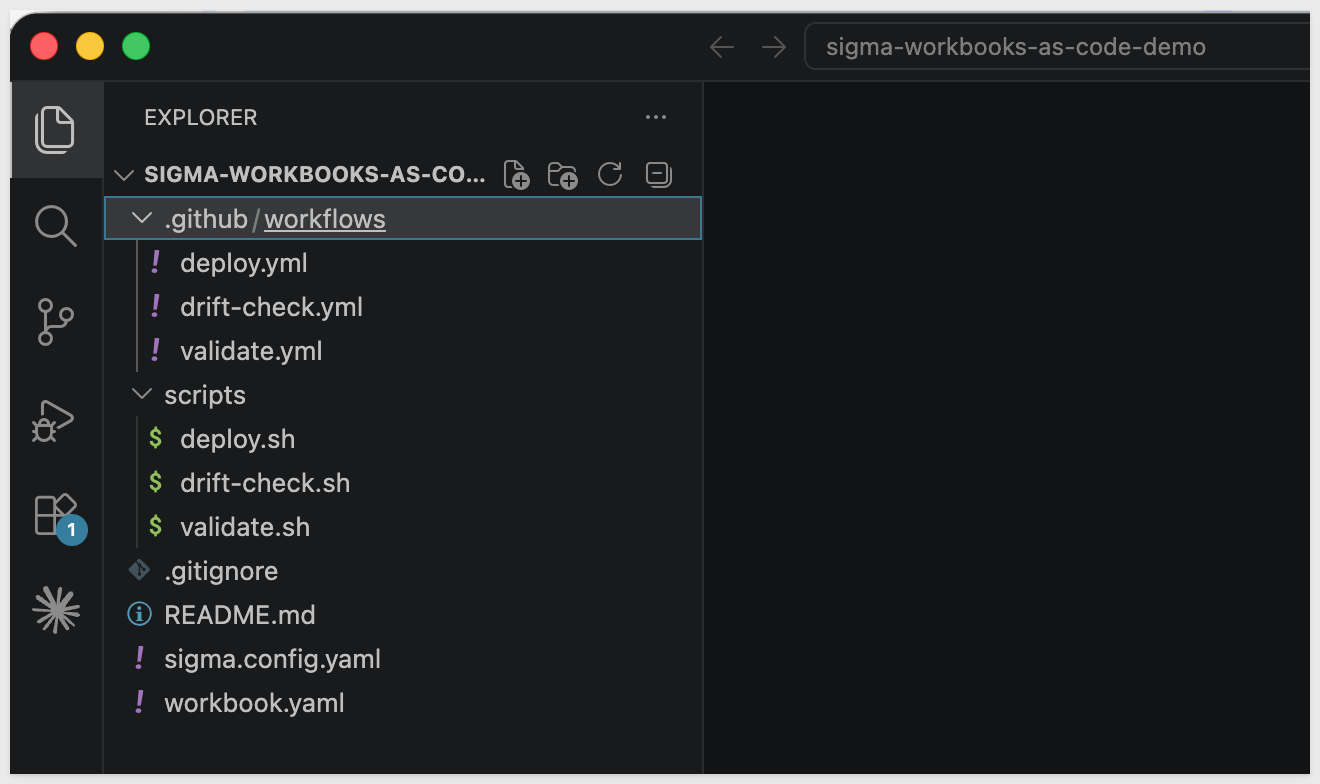
The folder contains:
- workbook.yaml: The workbook spec - single source of truth for the entire workbook, covered in the next section
- sigma.config.yaml: Config pointing at your target workbook ID and API host
- scripts/: The same validate, deploy, and drift-check logic the GitHub Actions workflows call
- .github/workflows/: The three automations this QuickStart walks through
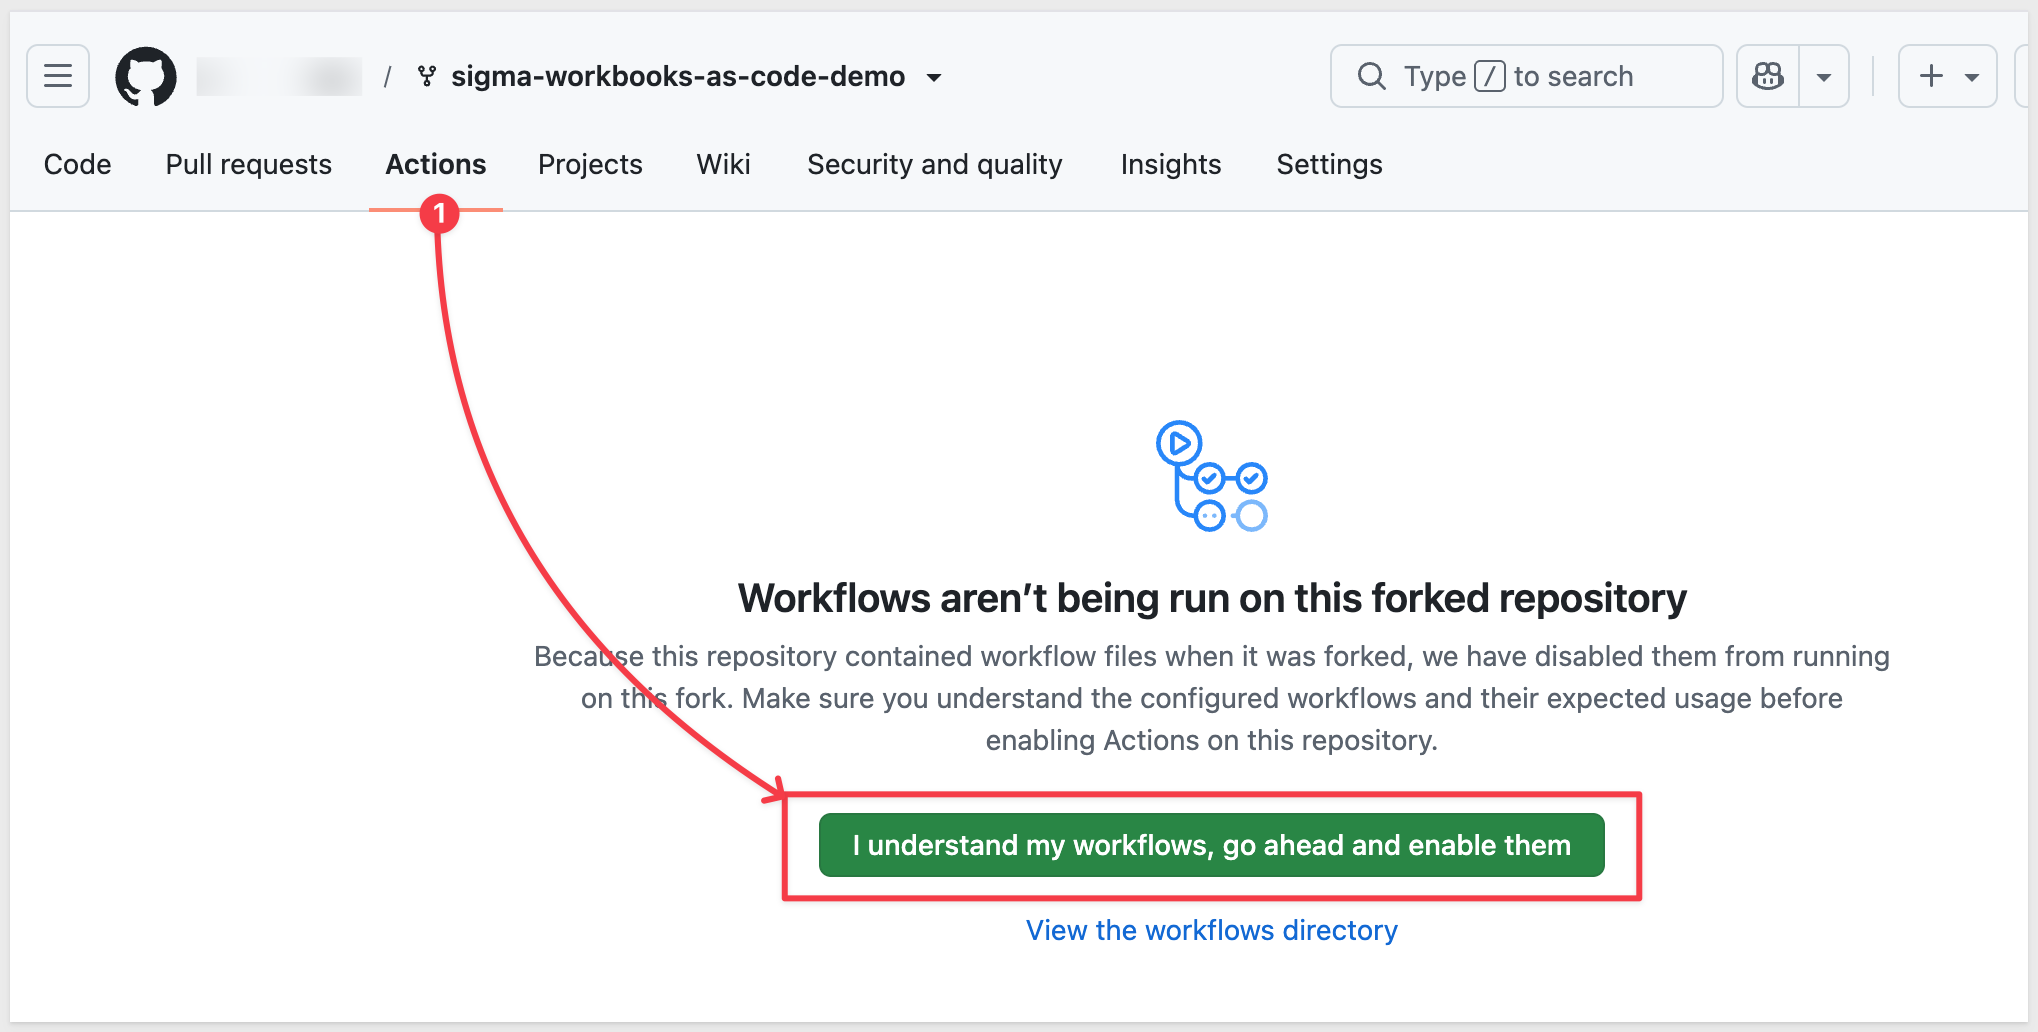
Confirm GitHub Actions Is Enabled
Since you pushed to a brand-new repository you own (rather than forking one), GitHub Actions should already be enabled - the disabled-by-default behavior only applies to forks, as a security precaution against running an upstream owner's workflows automatically.
Open the Actions tab in your new repository and confirm you see the workflows listed (Validate Workbook Spec, Deploy Workbook, Drift Check) rather than a banner asking you to enable them.
Instead of a local .env file, this QuickStart's automation runs inside GitHub Actions - so your credentials need to live in your repository's settings, where the validate, deploy, and drift-check workflows can read them.
Add Repository Secrets
In your repository on GitHub, go to Settings > Secrets and variables > Actions.
Under the Secrets tab, click New repository secret:
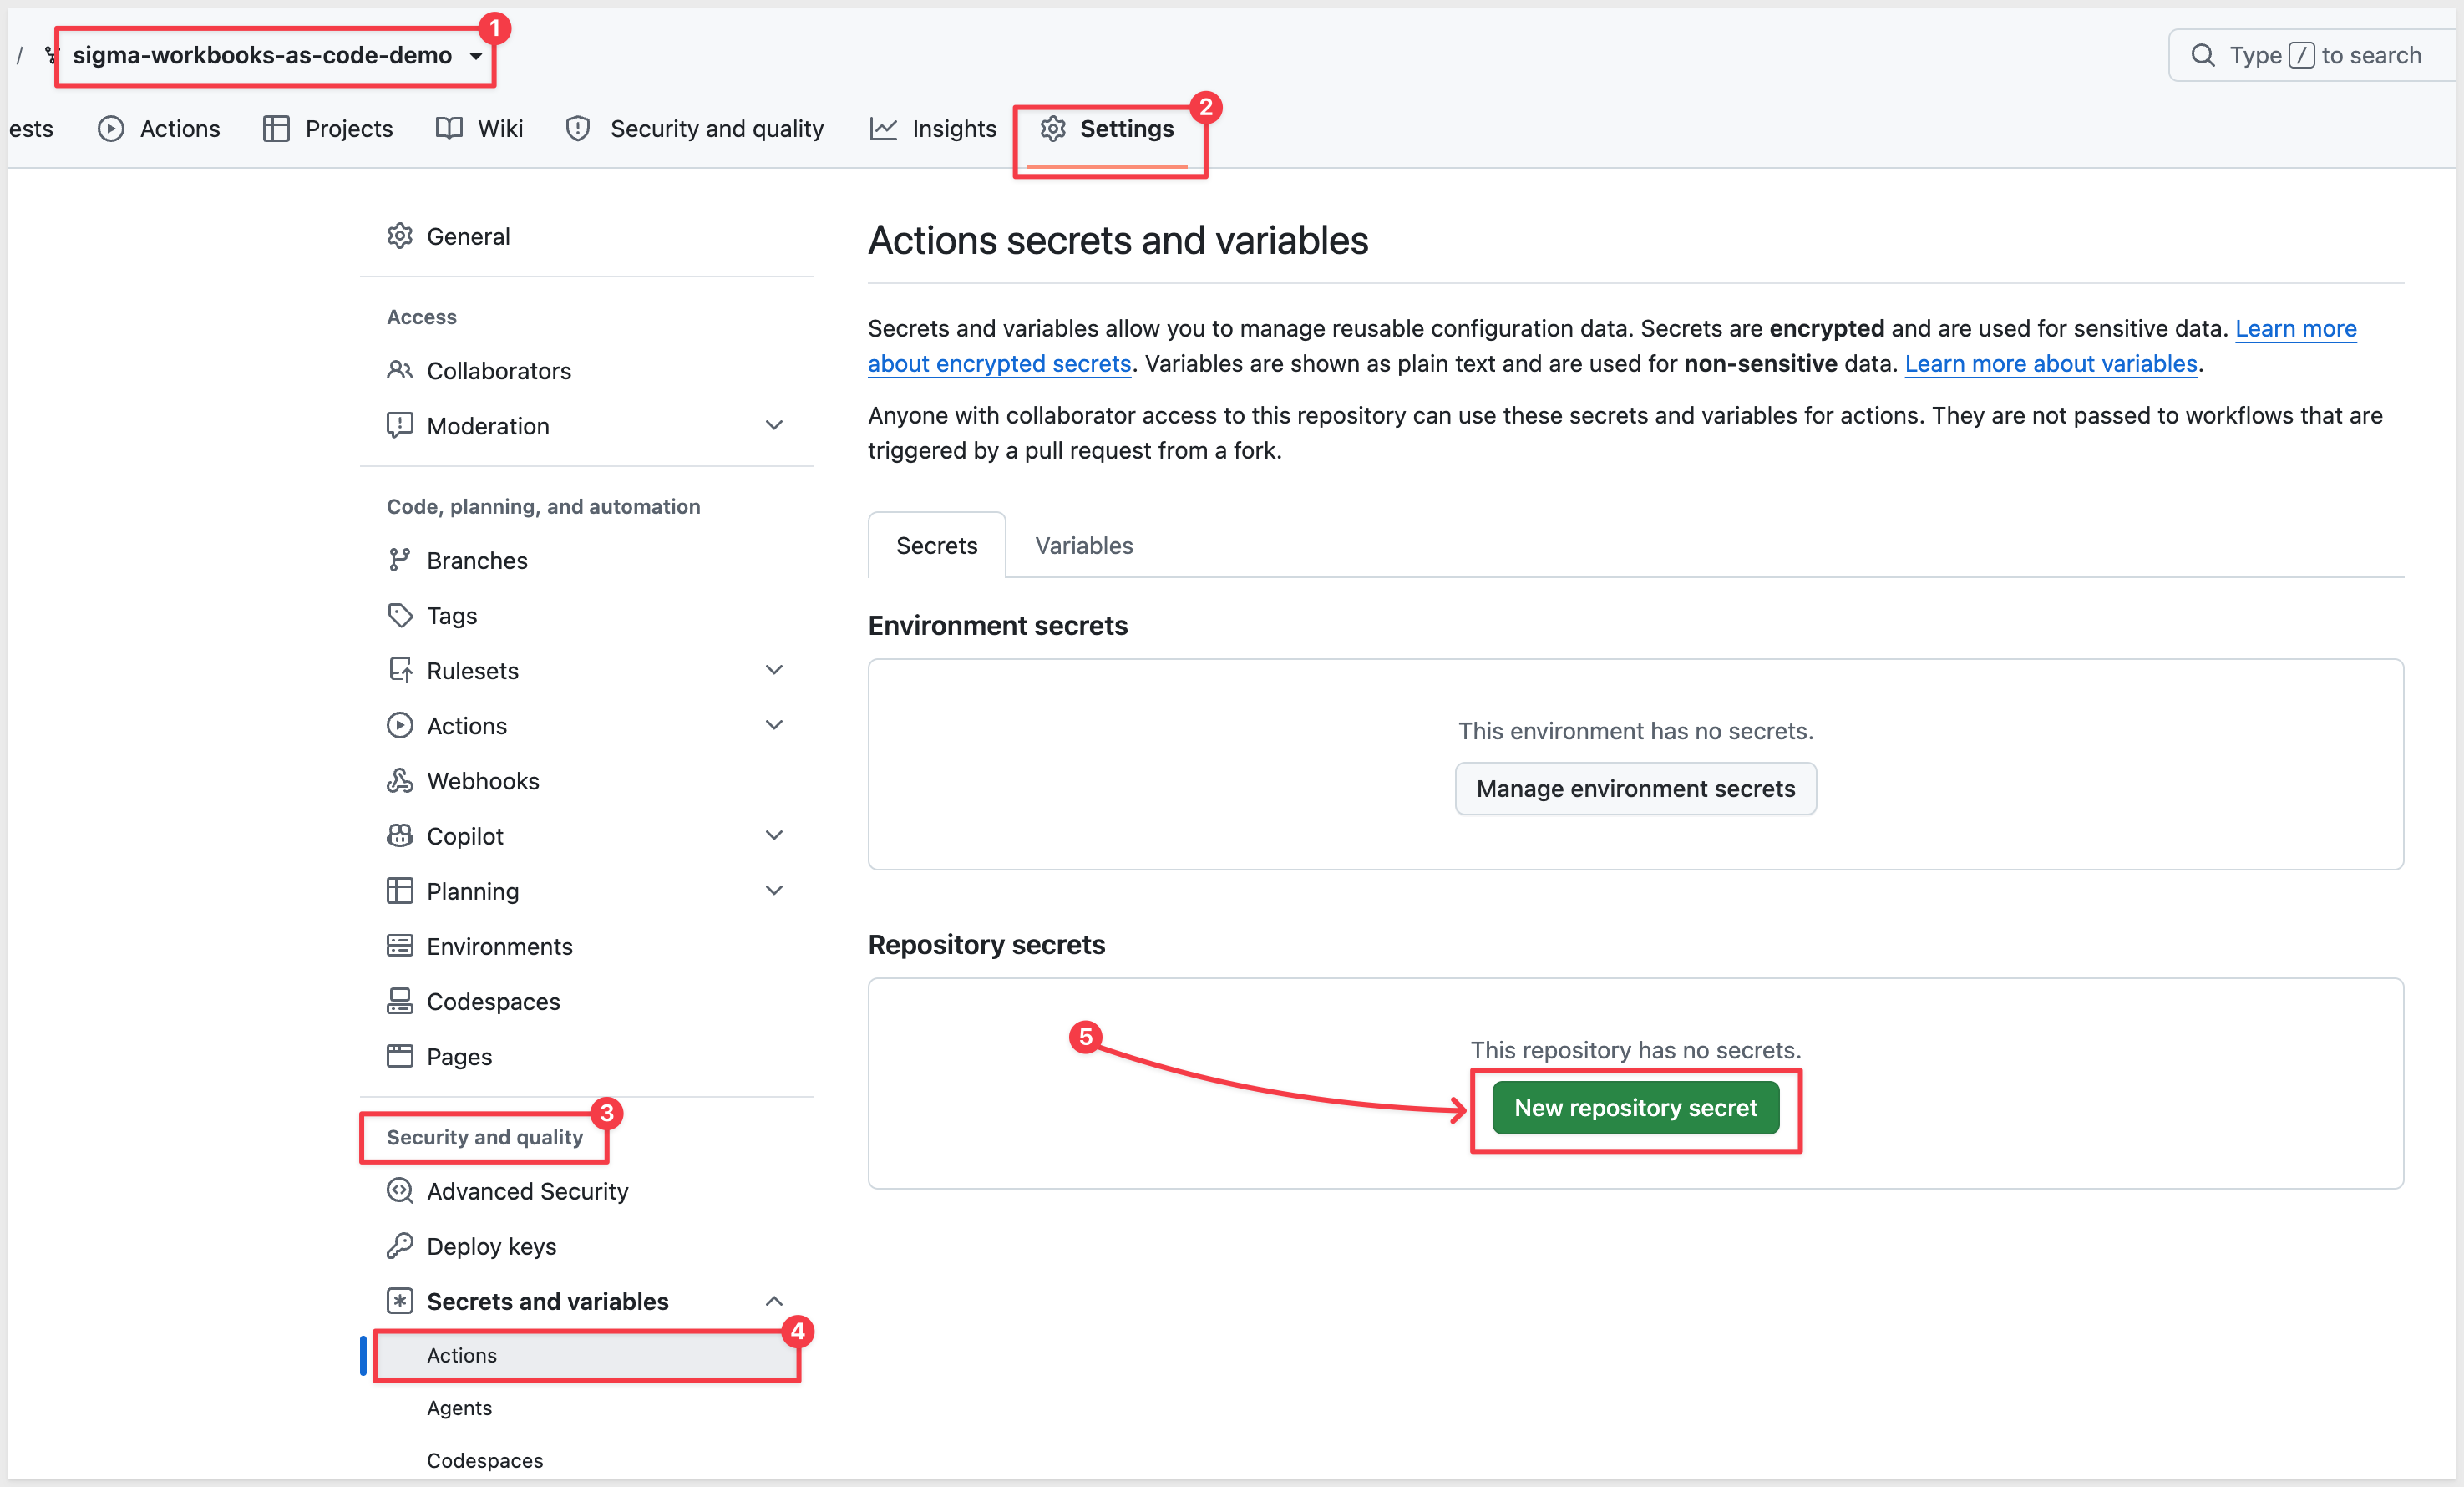
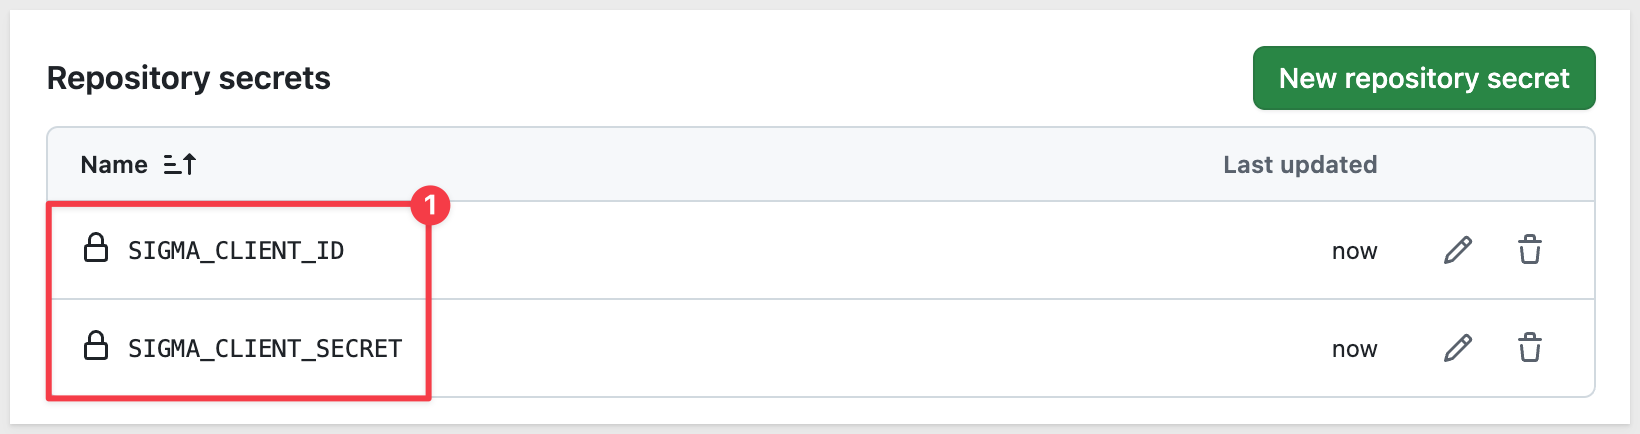
Add each of the following:
Name | Value |
| The Client ID from the previous section |
| The Client Secret from the previous section |
Add a Repository Variable
Switch to the Variables tab and click New repository variable:
Name | Value |
| Your Sigma region's API host (see below) |
Finding your API host: This depends on your Sigma cloud region.
Cloud | API Host |
AWS US |
|
AWS Canada |
|
GCP |
|
This matches the API Base URL you noted in the Developer access section earlier.
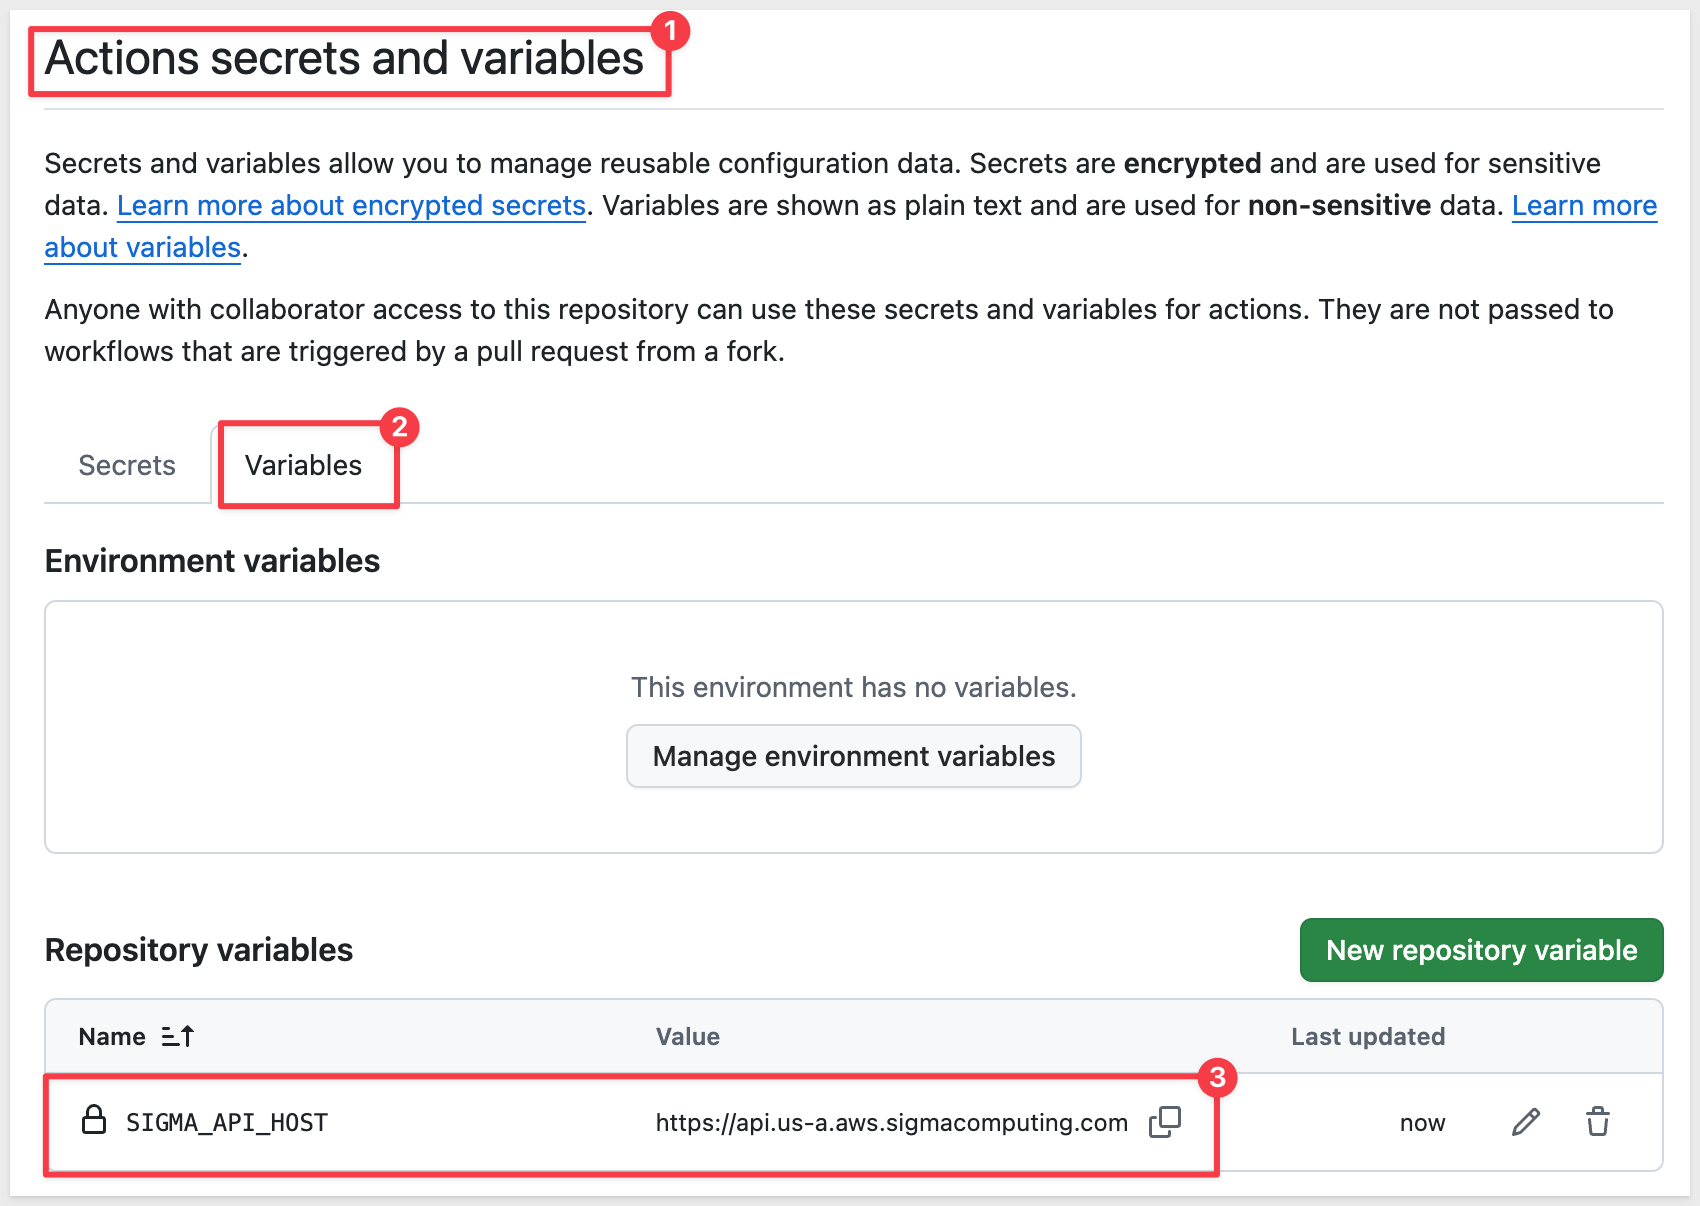
With SIGMA_CLIENT_ID, SIGMA_CLIENT_SECRET, and SIGMA_API_HOST in place, every workflow in this repo can authenticate to your Sigma account automatically - no local .env file, no copying tokens between commands.
Everything about a workbook - pages, charts, KPIs, filters, layout - lives in one file: workbook.yaml. Let's look at how it's put together before you start editing it.
The demo workbook this spec builds is Plugs Electronics — Sales Overview, a sales dashboard driven entirely by inline SQL sample data - no external data model required:
Basic Structure
At the top level, a workbook spec has a name, an optional folder, and a contents block containing everything else:
name: "Plugs Electronics — Sales Overview"
folderId: "YOUR-FOLDER-ID-HERE"
description: "Sales performance dashboard managed via GitHub."
contents:
  kind: workbook
  schemaVersion: 1
  pages: [...]
  elements: [...]
  layout: |
    ...
name/description: Display name and description shown in SigmafolderId: Where the workbook lives - find this the same way you'd find any folder ID, via the URL orGET /v2/filescontents.pages: An array of pages - just page metadata (id, name, visibility), not their contentscontents.elements: A single flat array holding every element in the workbook - which page each one belongs to is determined entirely by thelayoutblock, covered below, not by anything on the element itselfcontents.layout: An XML block placing every element - on every page, including hidden ones - onto a grid
Pages and Hidden Data Pages
The demo spec has two pages - just metadata, no elements nested inside:
pages:
  - id: page-data
    name: Data
    visibility: hidden      # holds the source table - readers never see this page

  - id: page-overview
    name: Sales Overview     # the actual dashboard
Setting visibility: hidden on the Data page keeps the raw source table out of the way - end users only ever see the Sales Overview page. This is the same hidden-page pattern used in ordinary Sigma workbooks, just expressed in YAML instead of clicked together in the UI.
The Source Element
contents.elements holds every element in the workbook. The source element for the hidden Data page is a table sourced from inline SQL:
- id: sales-source
  kind: table
  name: Sales Data
  source:
    kind: sql
    connectionId: "YOUR-CONNECTION-ID-HERE"
    statement: |
      SELECT DATE '2024-01-01' AS "Date", 100.00 AS "Revenue"
      UNION ALL SELECT DATE '2024-02-01', 200.00
  columns:
    - id: col-revenue
      name: Revenue
      formula: '[Custom SQL/Revenue]'
source.kind: sql: Runs custom SQL against any warehouse connection - swap inkind: data-modelhere to reference an existing Sigma data model insteadconnectionId: Your Sigma connection UUID, covered in the next section- On the SQL source element itself, columns reference the raw query output with the
[Custom SQL/ColumnName]prefix
Downstream Elements and Cross-Element Formulas
Everything on the Sales Overview page references the hidden source table by name, not by re-querying it:
- id: kpi-revenue
  kind: kpi-chart
  name: Total Revenue
  source:
    kind: table
    elementId: sales-source
  columns:
    - id: kr-val
      name: Revenue
      formula: "Sum([Sales Data/Revenue])"
      format:
        kind: number
        formatString: "$,.0f"
  value: { columnId: kr-val }
Formula references follow one rule:
- On the source element itself, reference columns with
[Custom SQL/ColumnName] - On every downstream element, reference the source by name instead:
[ElementName/ColumnName]- here, that's[Sales Data/Revenue], since the source table is namedSales Data
Formulas use standard Sigma syntax - Sum(...), CountDistinct(...), DateTrunc(...) - the same functions you'd use writing a formula in the UI.
Element Kinds and Controls
The demo spec uses a handful of element kind values:
Kind | Used for |
| The hidden source table, and the Sales Detail table on the dashboard |
| The four KPI cards (Revenue, Profit, Orders, Units), each with month-over-month comparison |
| Revenue by Region |
| Revenue by Product Type |
| The Date Range and Store Region filters |
| Groups elements for layout (the header row, the KPI row) |
| The dashboard title |
Controls filter other elements by referencing them explicitly:
- id: ctrl-region
  kind: control
  name: Store Region
  controlType: list
  mode: include
  selectionMode: multiple
  filters:
    - source: { kind: table, elementId: sales-source }
      columnId: col-store-region
Layout
The layout block is XML describing a 24-column grid, one gridColumn and gridRow range:
<Page type="grid" gridTemplateColumns="repeat(24, 1fr)" id="page-overview">
  <Container elementId="kpi-row" type="grid" gridColumn="1 / 25" gridRow="5 / 10" ...>
    <Element elementId="kpi-revenue" gridColumn="1 / 6" gridRow="1 / 5"/>
    <Element elementId="kpi-profit" gridColumn="6 / 11" gridRow="1 / 5"/>
  </Container>
  <Element elementId="table-detail" gridColumn="1 / 25" gridRow="17 / 35"/>
</Page>
gridColumn="1 / 13" spans the left half of the page, "13 / 25" the right half. Container groups a set of elements (like the KPI cards) into their own sub-grid, so you can reposition the group without touching each element's coordinates individually.
With credentials and secrets in place and the spec structure making sense, the last thing to do before this pipeline is live is point it at your own Sigma connection, a folder, and a target workbook.
Find Your Connection ID
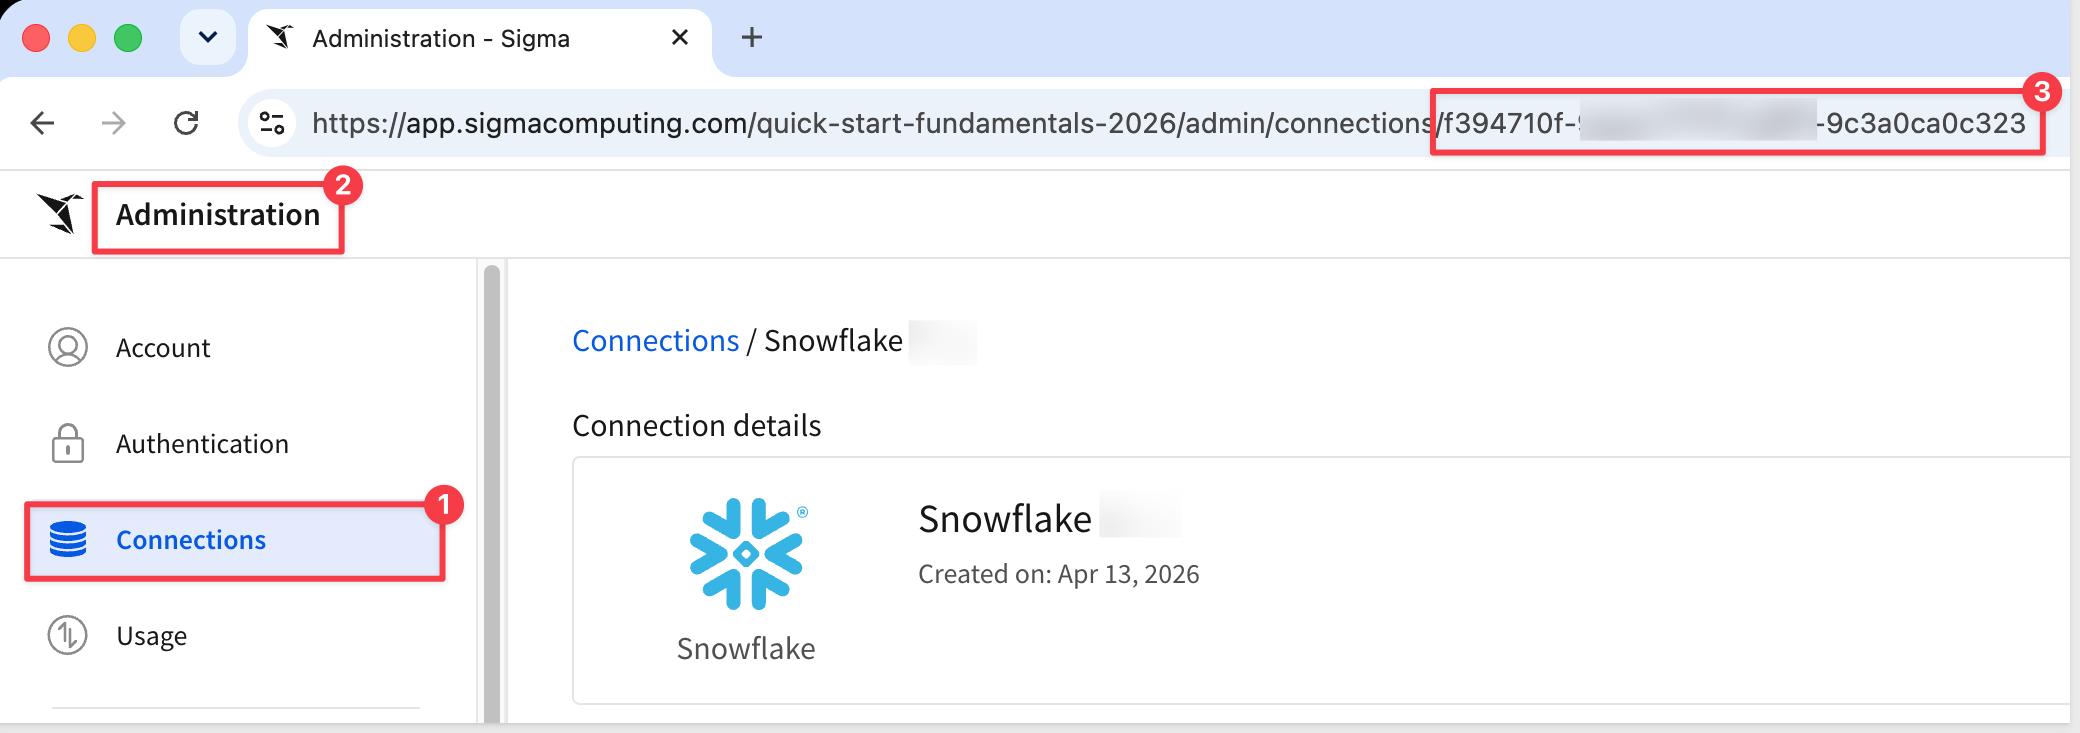
The demo spec's source element runs custom SQL against a connection you choose. Go to Administration > Connections, click your connection, and copy the UUID from the URL.
Find or Create a Target Folder
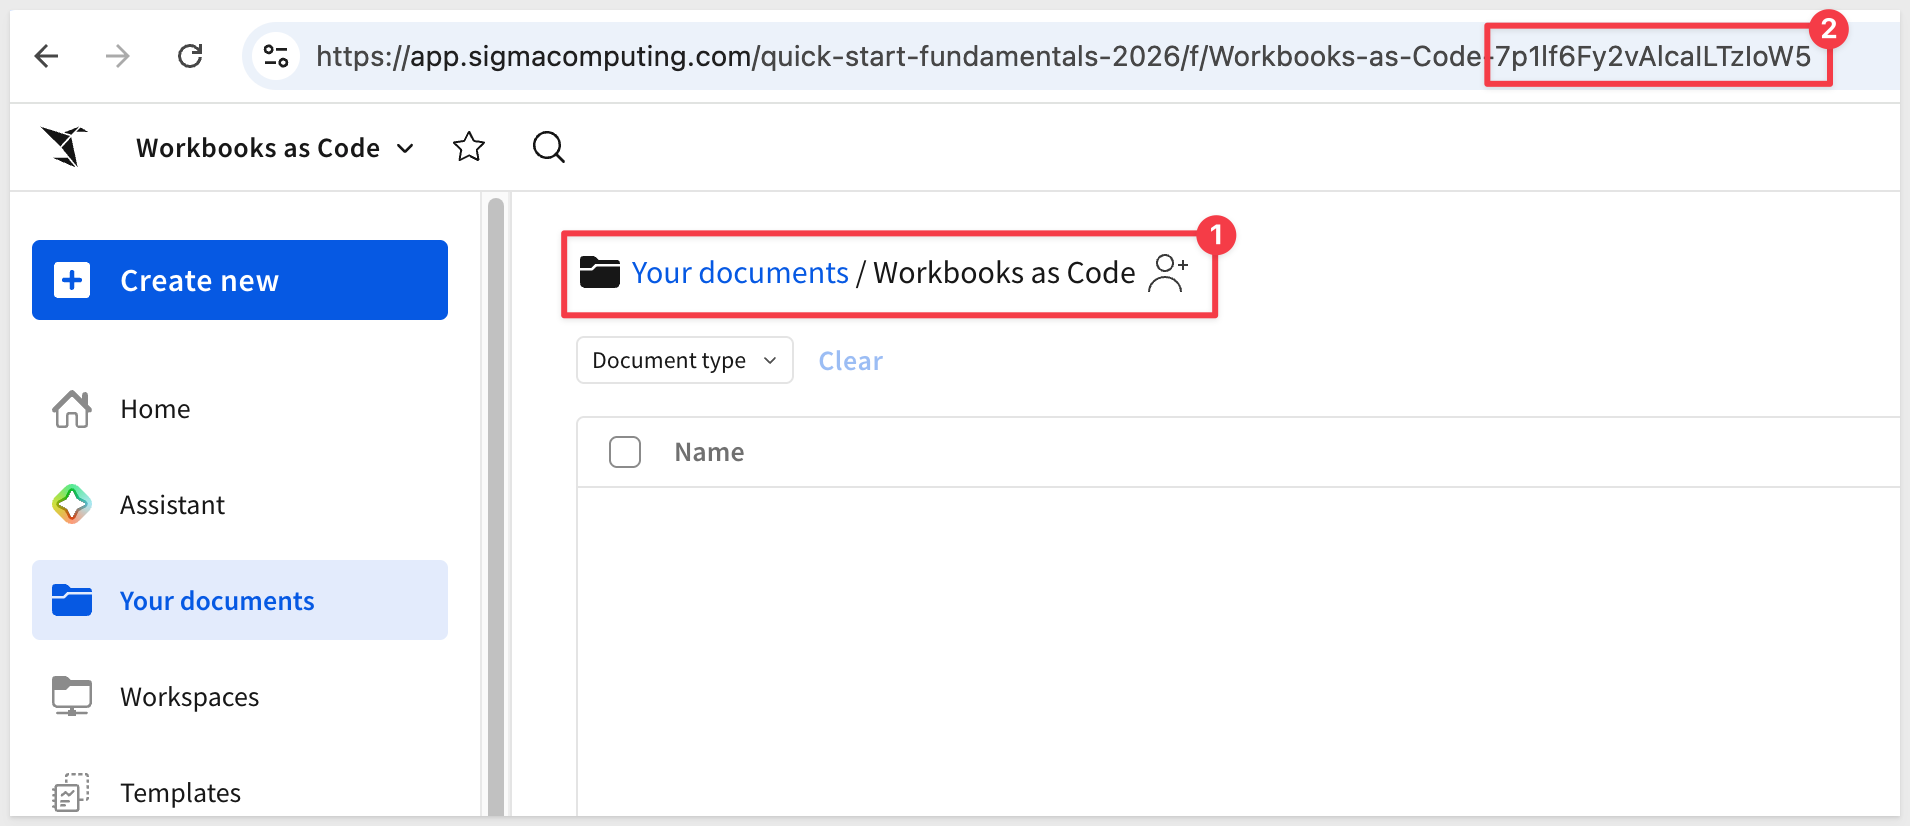
The workbook.yaml file requires a folderId that needs to point at a real folder in your own org - the demo ships with a placeholder ("YOUR-FOLDER-ID-HERE") folder ID, which doesn't exist in your Sigma account.
Use an existing folder, or create a new one to keep this QuickStart's output together. Open it in Sigma and copy its ID from the URL.
For example:
Create a Target Workbook
The deploy workflow updates an existing workbook by ID - it doesn't create one. Create a blank workbook to serve as that target, then click Save as - make sure to save it inside the folder you created in the previous step.
Give it a name:
WBC QuickStart
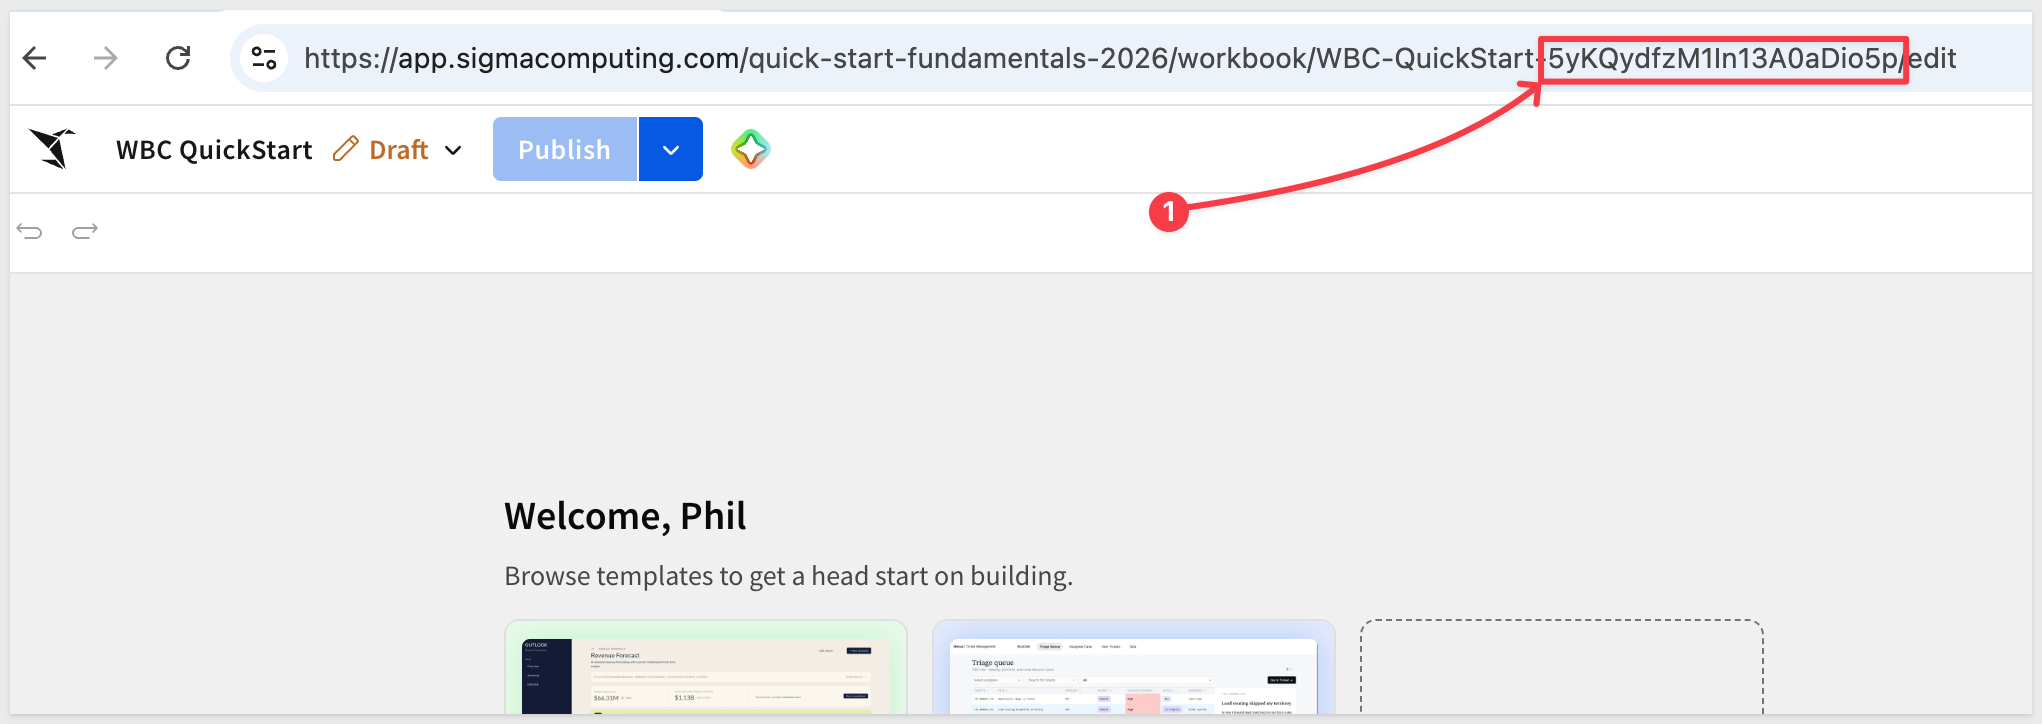
Open the new workbook and copy its ID from the URL.
Save the changes.
Update the Config Files
In the local clone of the repo, open sigma.config.yaml and set workbook_id to the ID you just copied:
workbook_id: "YOUR-WORKBOOK-ID-HERE"
api_host: "https://aws-api.sigmacomputing.com"
spec_file: "workbook.yaml"
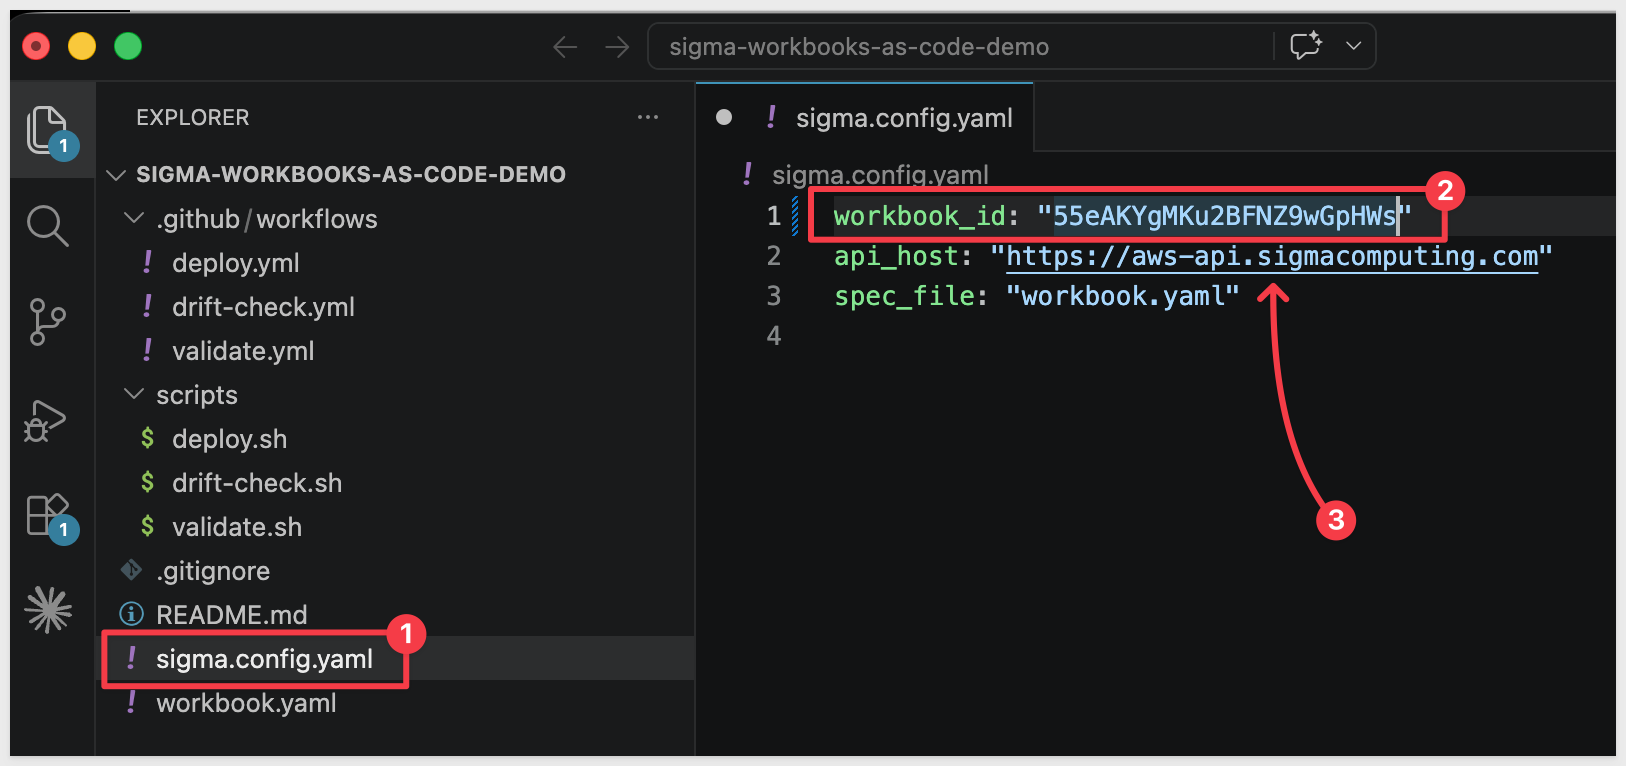
Then open workbook.yaml and search for and replace the top-level folderId with the folder ID from earlier in this section, and the connectionId on the sales-source element with your own connection UUID:
folderId: "YOUR-FOLDER-ID-HERE"
source:
  kind: sql
  connectionId: "YOUR-CONNECTION-ID-HERE"
Deploy for the First Time
This first push is just wiring up configuration, not a reviewable content change, so commit it straight to main:
git add sigma.config.yaml workbook.yaml
git commit -m "Configure connection and target workbook"
git push origin main
Since this push modifies workbook.yaml on main, it triggers the Deploy Workbook workflow automatically. Open the Actions tab in your repository and watch it run:
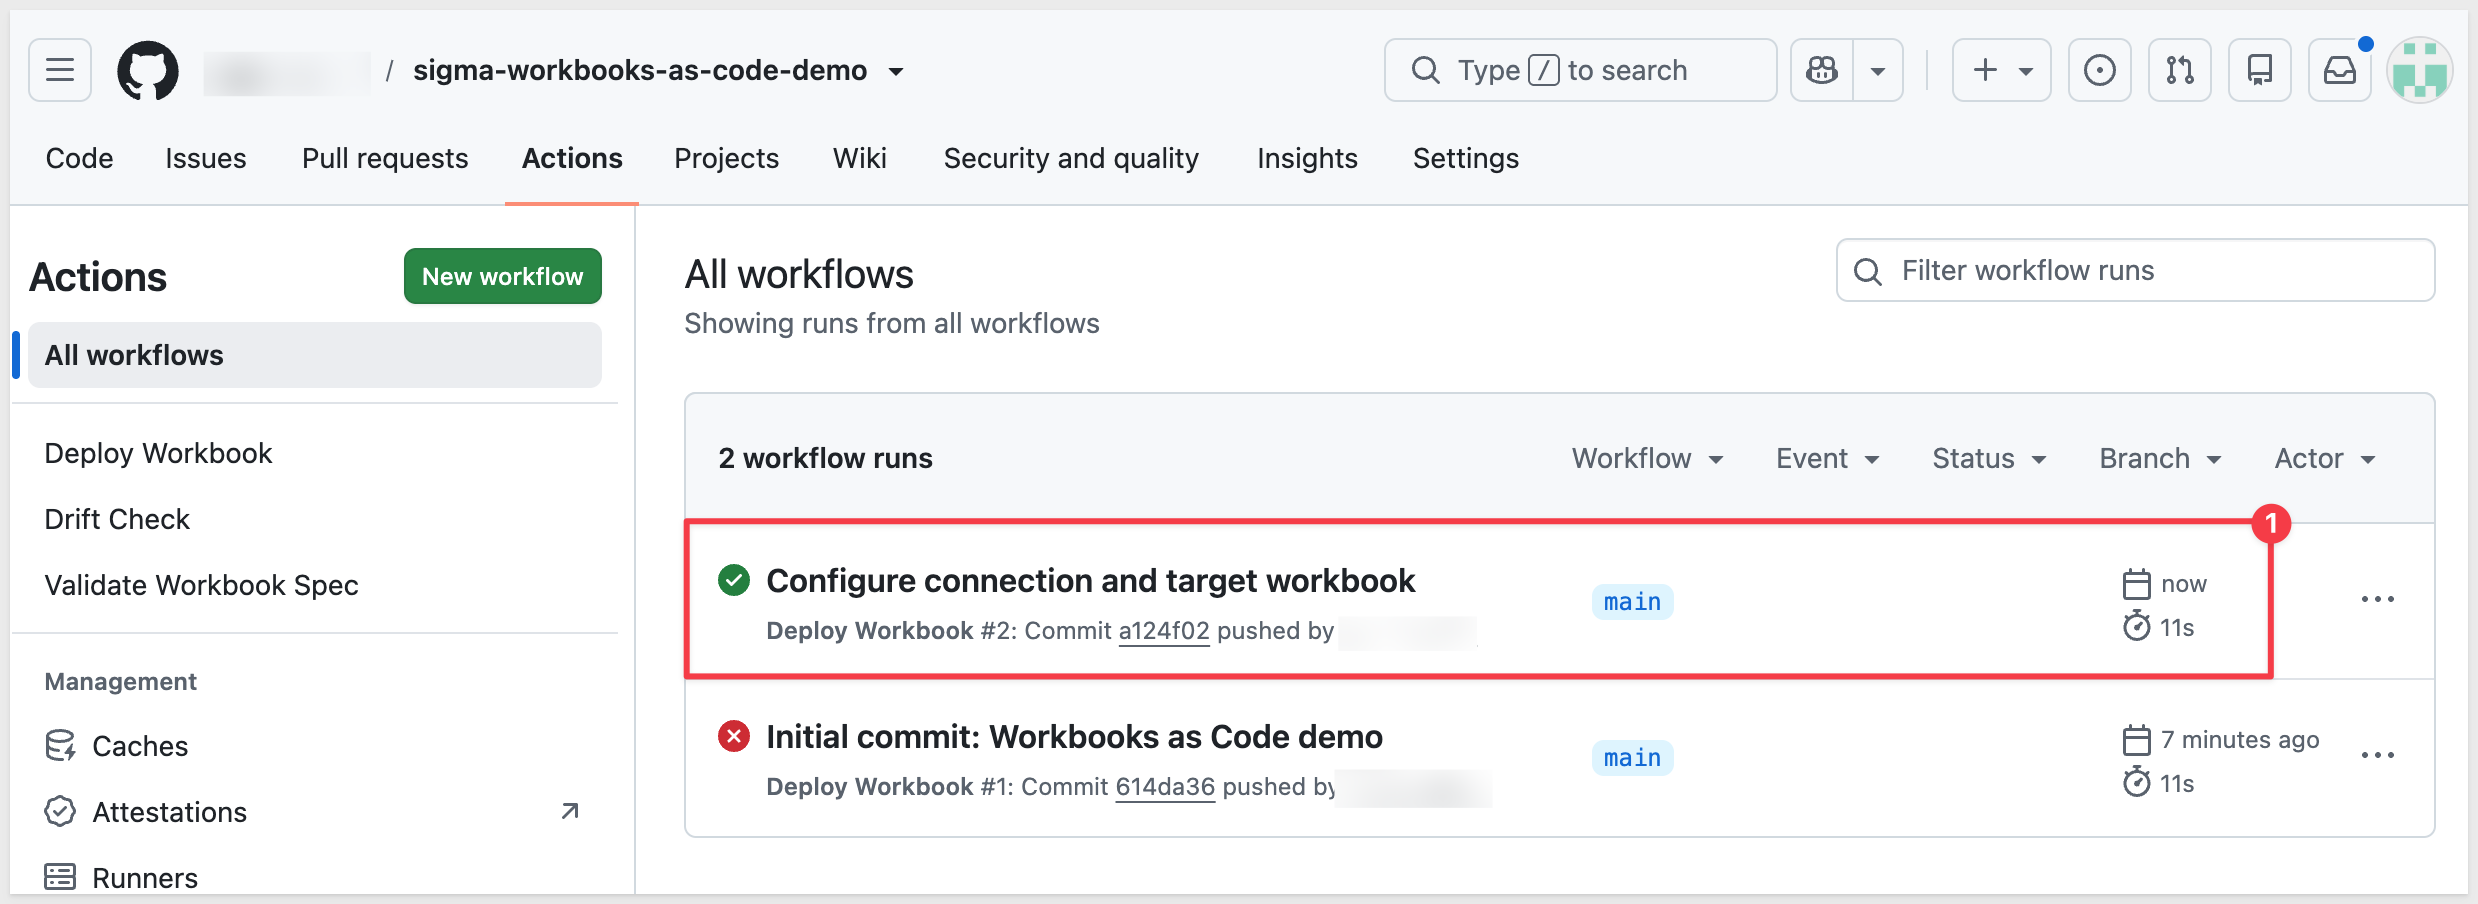
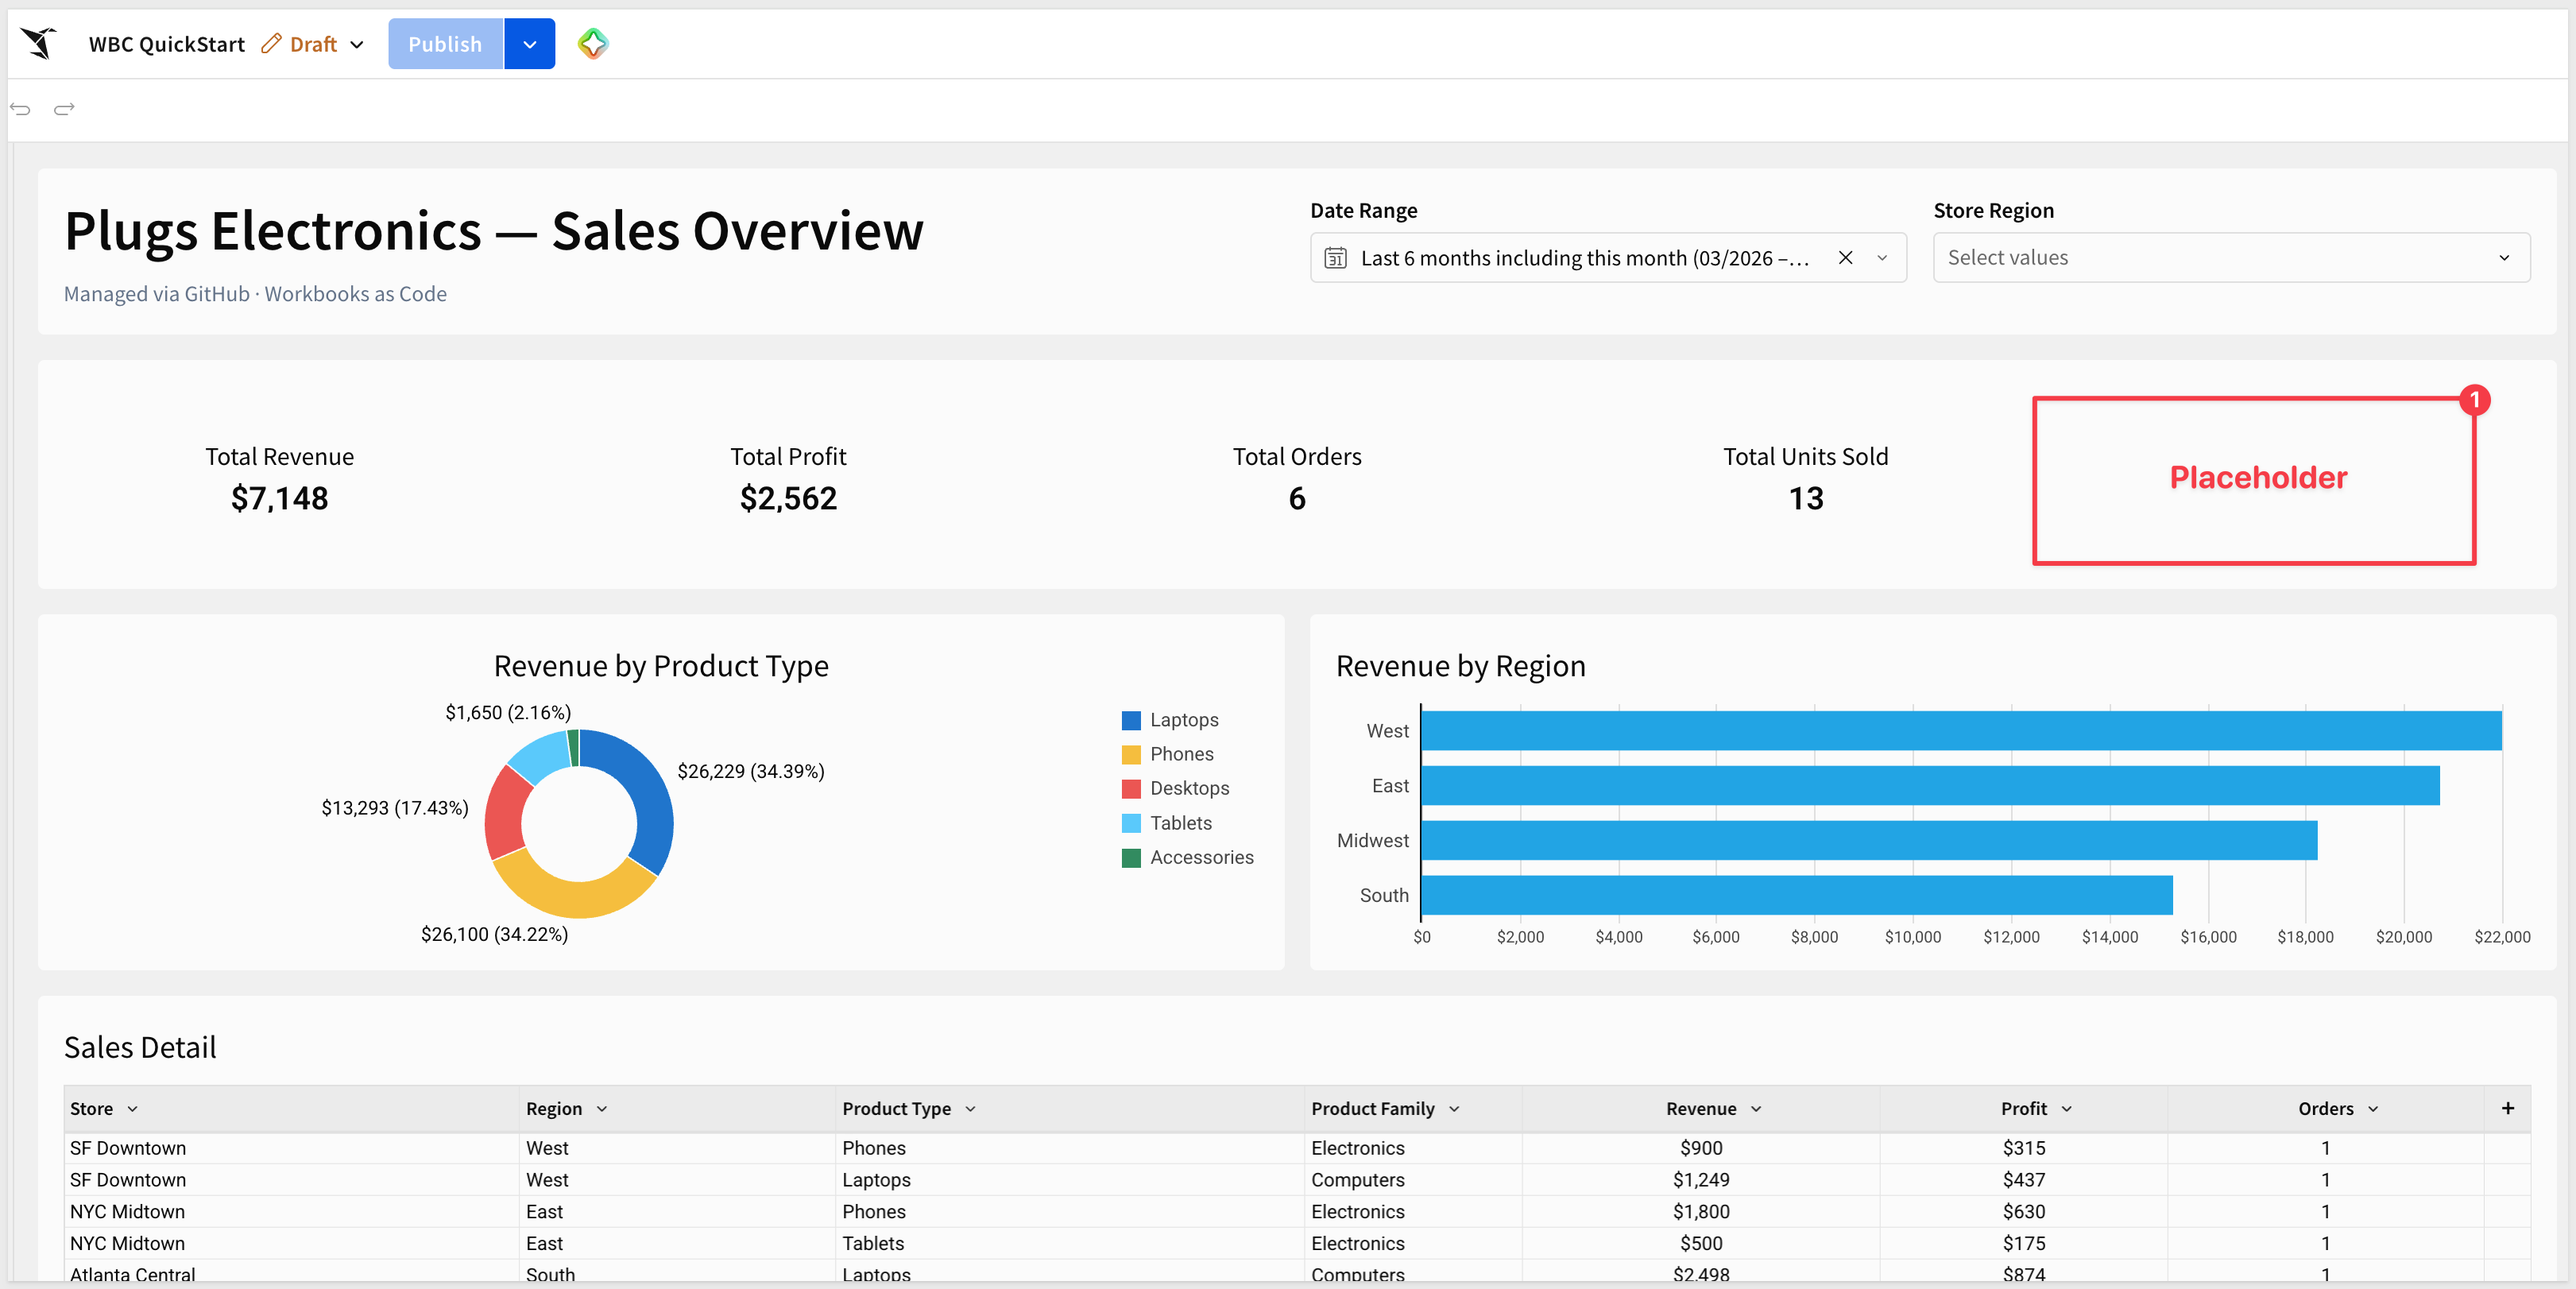
Once it finishes, close and reopen your target workbook in Sigma - you should see the full Plugs Electronics — Sales Overview dashboard: KPI cards, region and product breakdowns, and the detail table, all generated from a single YAML file.
We left a space for another KPI that will be added in the next section:
With the pipeline live, main is protected from here on. Every real change - the kind of thing worth a second set of eyes - goes through a feature branch and a pull request instead of a direct push.
Create a Branch
git checkout -b add-margin-kpi
Set Up YAML Linting in Your Editor (optional)
You're about to hand-edit workbook.yaml for the first time - adding a whole new element, not just swapping a placeholder value. A property nested one level too shallow, silently becoming a sibling of the block it was meant to belong to, still produces perfectly valid YAML - just not the structure you meant. Nothing throws a syntax error; the API just rejects the resulting spec once you push, with an error that can be hard to trace back to a mis-nested property.
If you're using VS Code, install these two extensions before you start editing:
- YAML (
redhat.vscode-yaml) - catches genuine YAML syntax errors live (the kind that fail to parse at all), with the exact line highlighted - Indent Rainbow (
oderwat.indent-rainbow) - colors each indentation level, so a property nested one level too shallow or too deep is visually obvious at a glance
Add a Gross Margin KPI
Open workbook.yaml and search for the last KPI in the workbook (Total Units Sold).
Add a new KPI element to contents.elements, right before the - id: chart-by-product line:
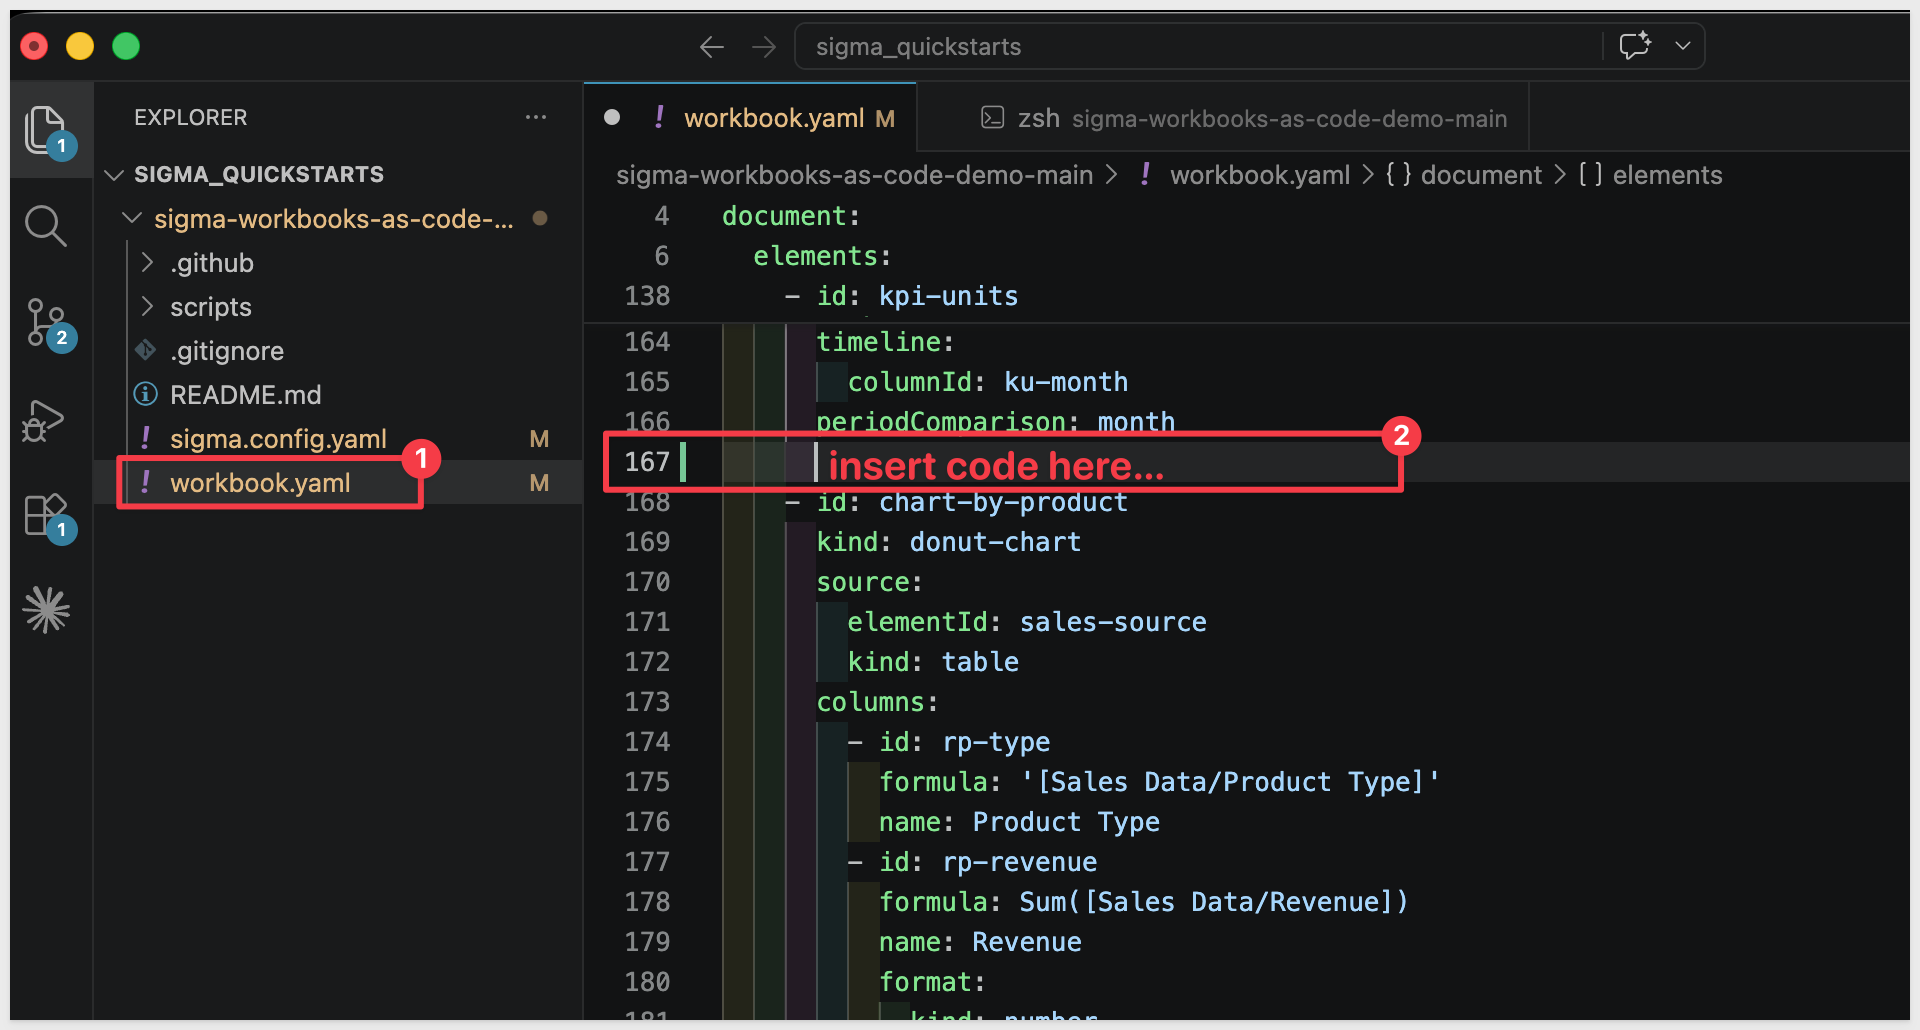
    - id: kpi-margin
      kind: kpi-chart
      source:
        elementId: sales-source
        kind: table
      columns:
        - id: km-val
          formula: Sum([Sales Data/Profit]) / Sum([Sales Data/Revenue])
          name: Margin
          format:
            kind: number
            formatString: 0.0%
        - id: km-month
          formula: DateTrunc("month", [Sales Data/Date])
          name: Month
      value:
        columnId: km-val
        fontSize: 20
      name:
        text: Gross Margin
        fontSize: 16
      layout:
        anchor: center
        verticalAnchor: top
      comparison:
        colorGood: '#16a34a'
        colorBad: '#dc2626'
      trend:
        visibility: hidden
        shape: line
      timeline:
        columnId: km-month
      periodComparison: month
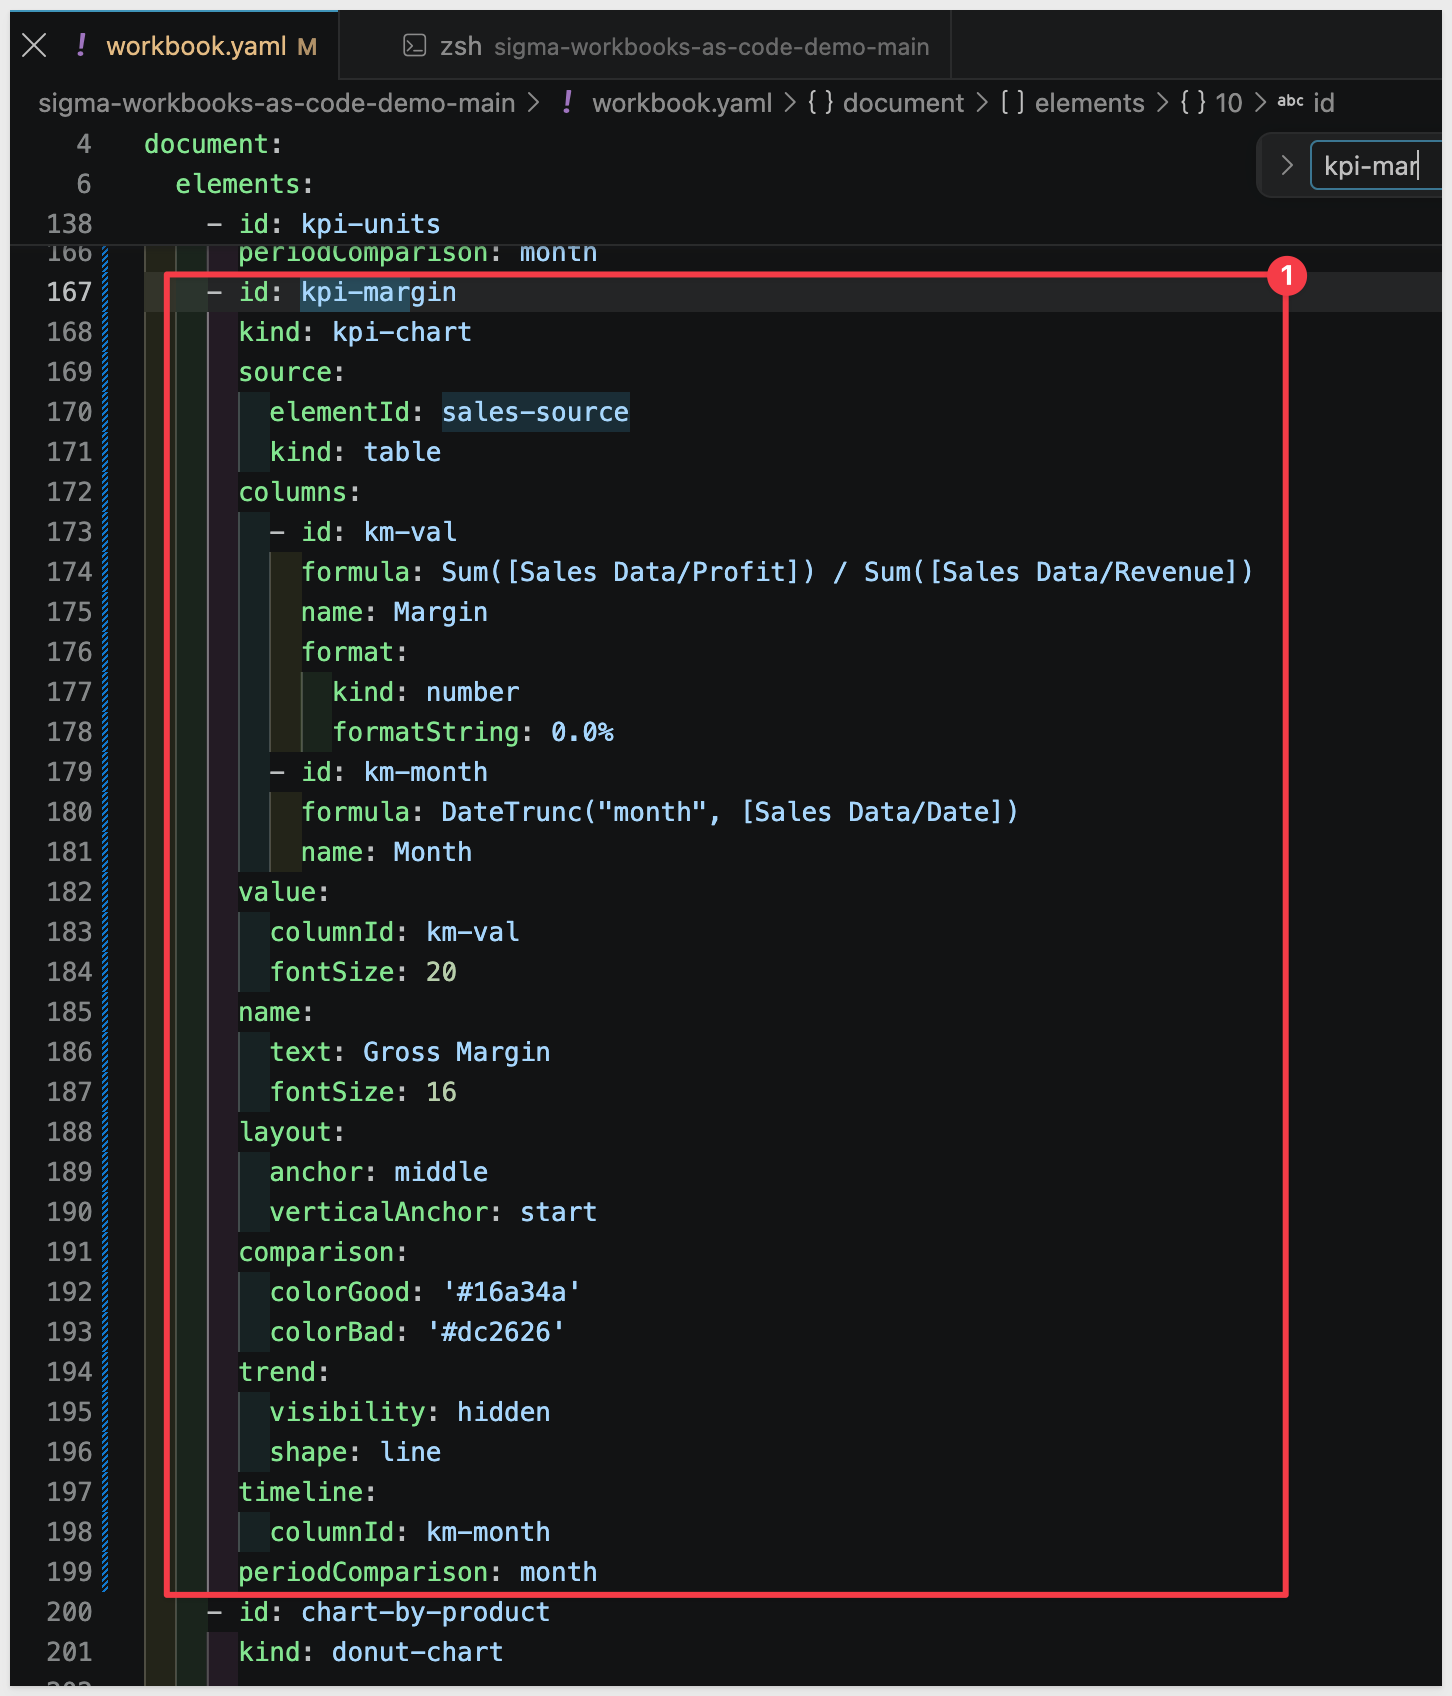
Then add its placement inside kpi-inner-row, the nested Container holding the four existing KPIs, right after kpi-units - a new element always needs one, per the rule from the last section:
<Element elementId="kpi-margin" gridColumn="11 / 13" gridRow="1 / 5"/>
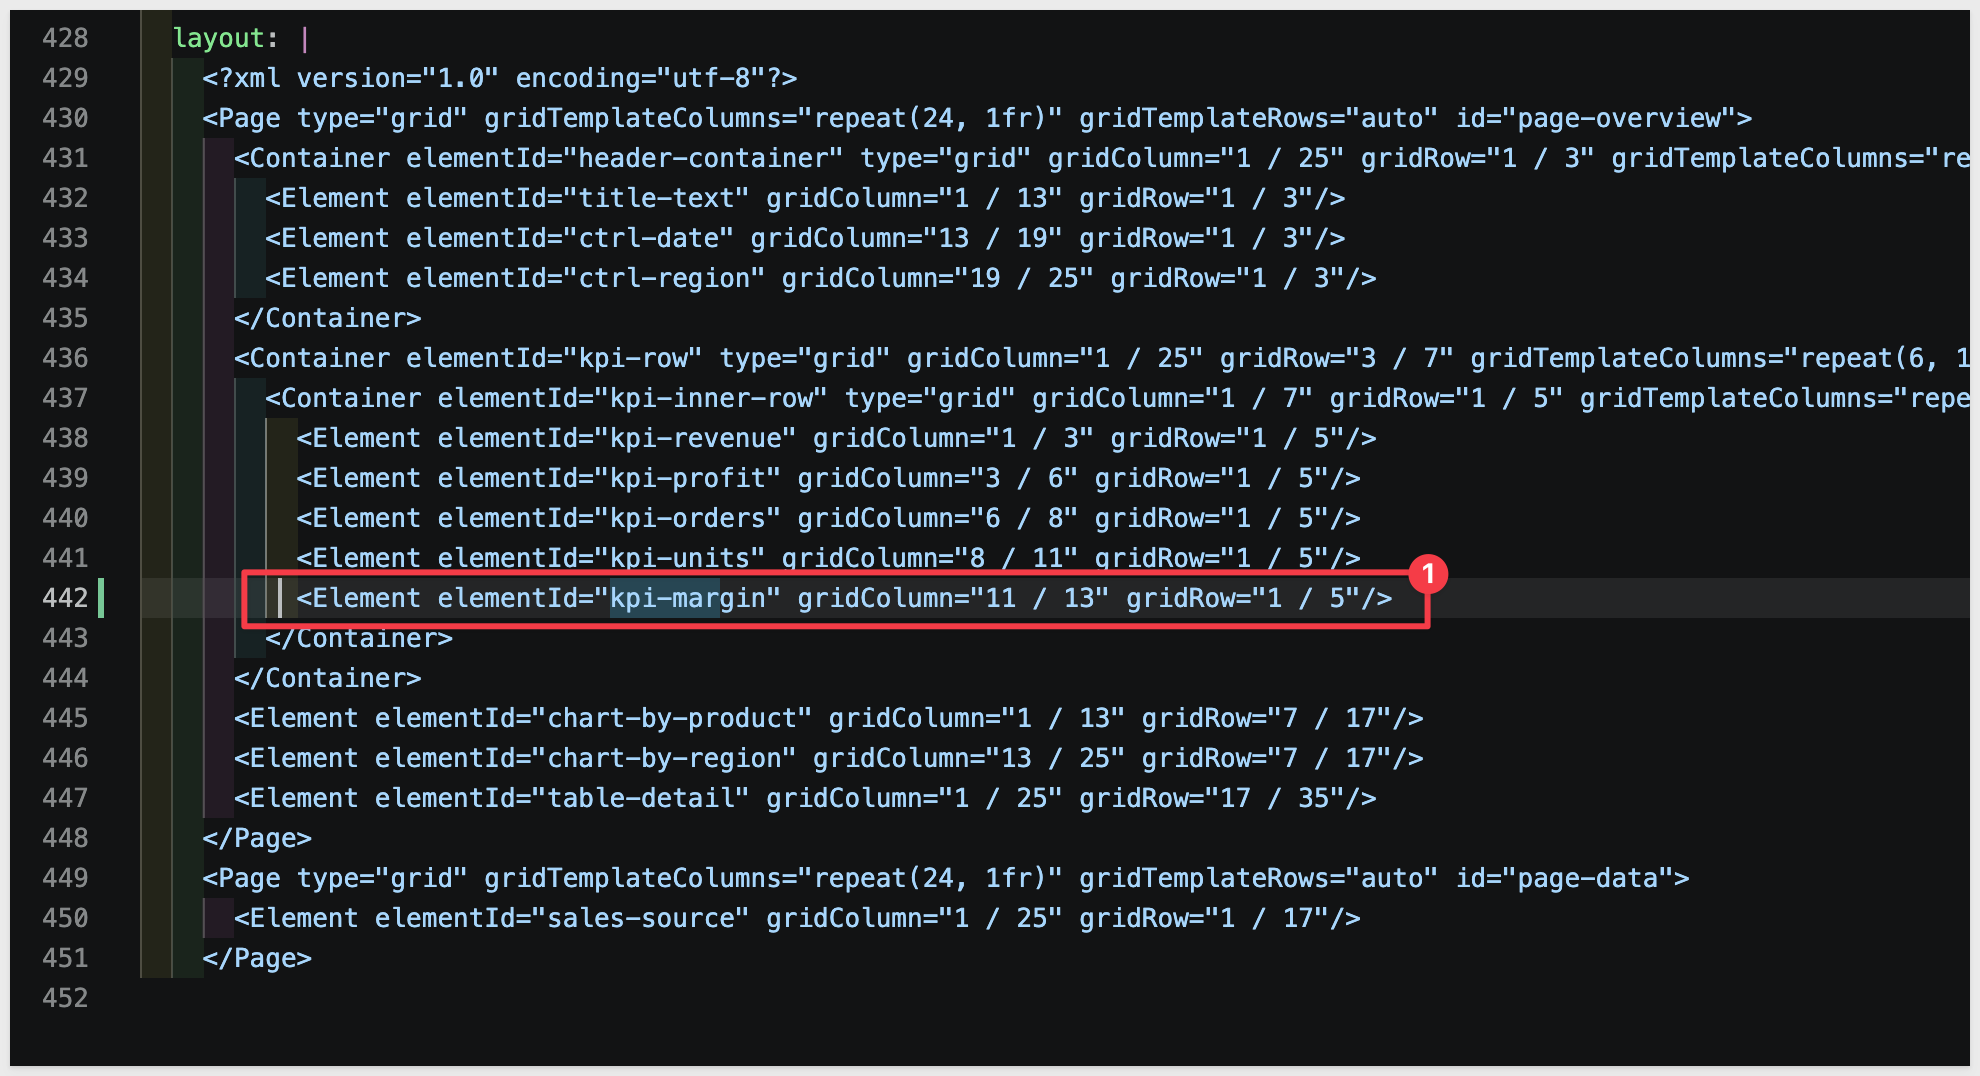
Save the changes.
Commit and Push the Branch
git add workbook.yaml
git commit -m "Add gross margin KPI"
git push -u origin add-margin-kpi
Open a Pull Request
gh pr create --title "Add gross margin KPI" --body "Adds a Gross Margin % KPI card to the Sales Overview page."
No gh CLI? Open your repository on GitHub - it'll show a banner offering to open a PR from your newly pushed branch.
Watch CI Validate Automatically
Opening the PR triggers the Validate Workbook Spec workflow. Open the Actions tab, or check the PR page itself - GitHub shows the check running inline.
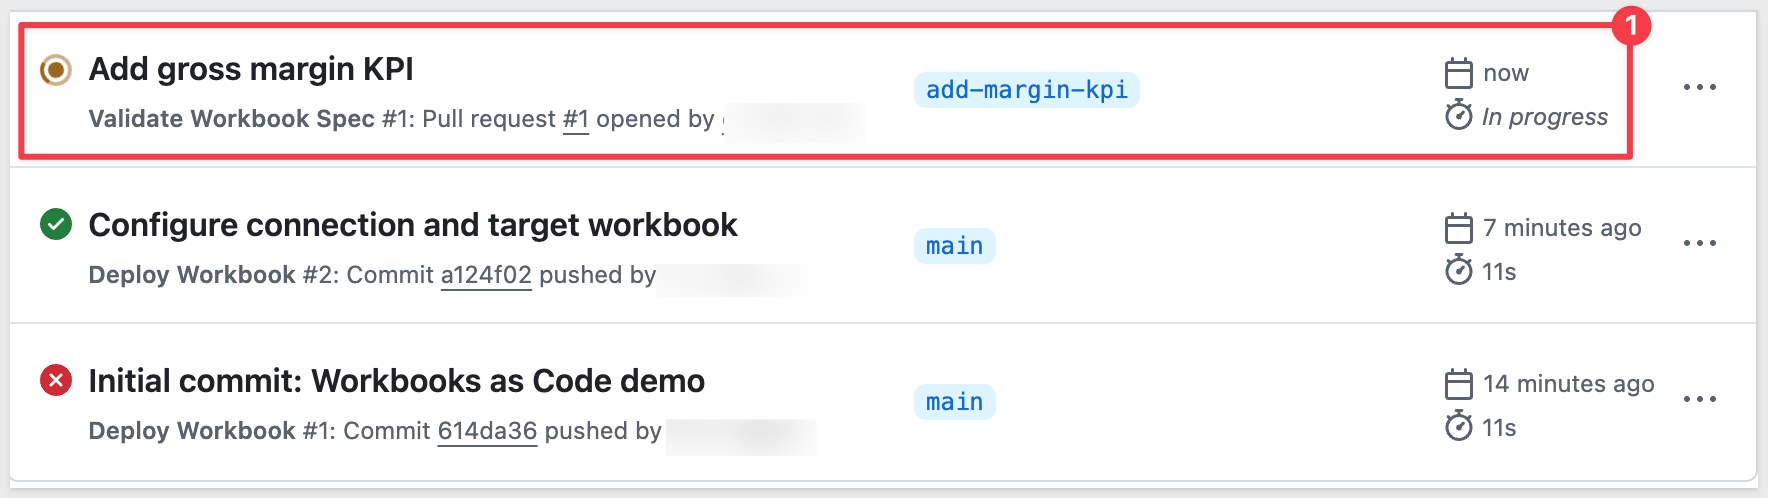
Once it finishes, the PR shows a green check: the spec compiles, every formula and element reference resolves, and the layout is valid.
Merge and Watch It Deploy
With a green check, this change has been reviewed (by CI, and by anyone else on your team) - it's ready to merge.
gh pr merge --merge
No gh CLI? Click Merge pull request on the PR page instead.
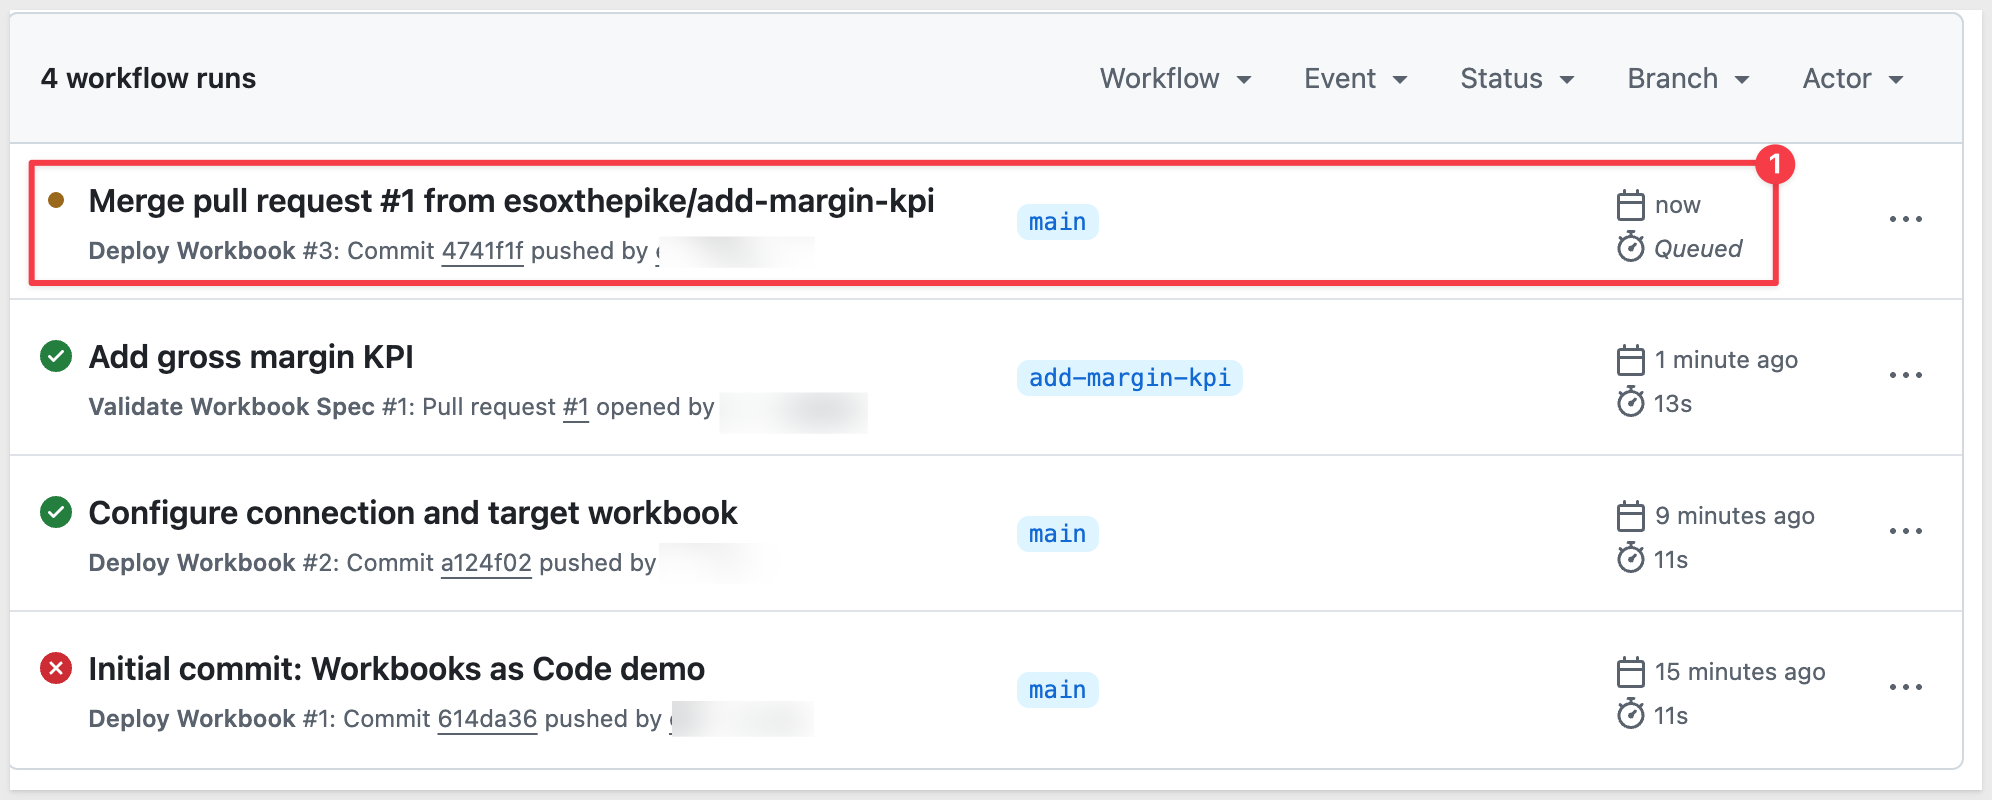
Merging pushes the change to main - and just like the very first push in "Configure and Deploy for the First Time," that triggers the Deploy Workbook workflow automatically. The difference this time: instead of a direct push to an unprotected branch, this deploy is the result of a change that went through a branch, a pull request, and an automated check - the full loop this QuickStart is about.
Open the Actions tab and watch Deploy Workbook run.
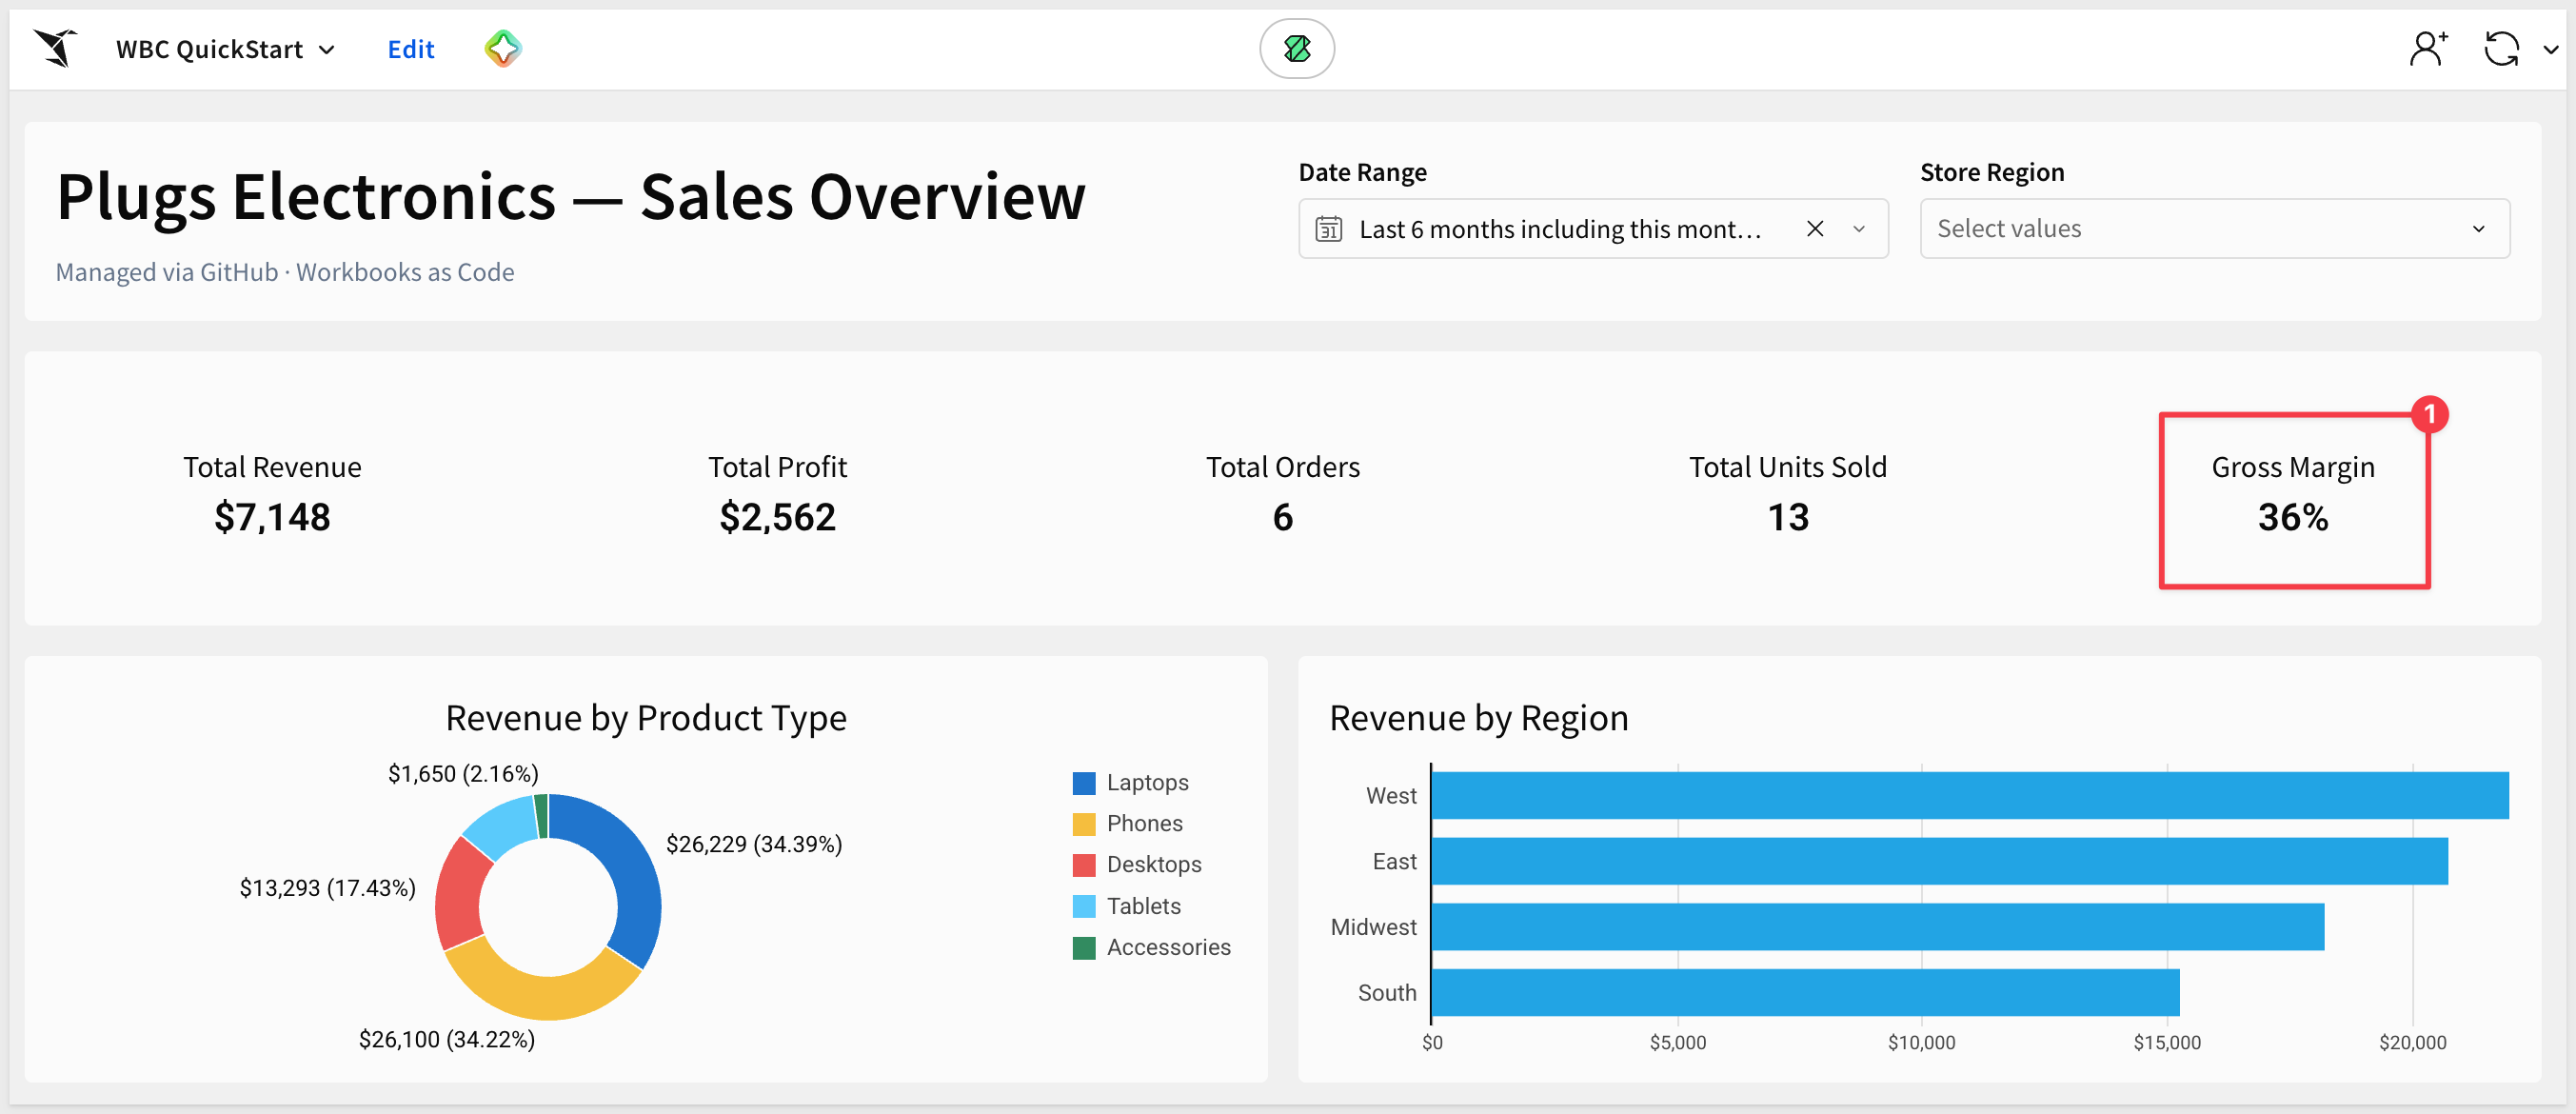
Once it finishes, open your target workbook - the Gross Margin KPI is now live, deployed with zero manual clicks in the Sigma UI.
Sigma's own permissions control who can edit a workbook, but they say nothing about how - anyone with edit access can still change the live workbook directly in the UI, bypassing git and the review process entirely.
drift-check.yml is the safety net for exactly that - it periodically compares the live workbook against workbook.yaml, and opens a pull request the moment they disagree.
Make a Change Directly in Sigma
Simulate the scenario this workflow exists for: open your target workbook in Sigma and change the dashboard title to DRIFT TEST, directly in the UI - no git, no pull request:
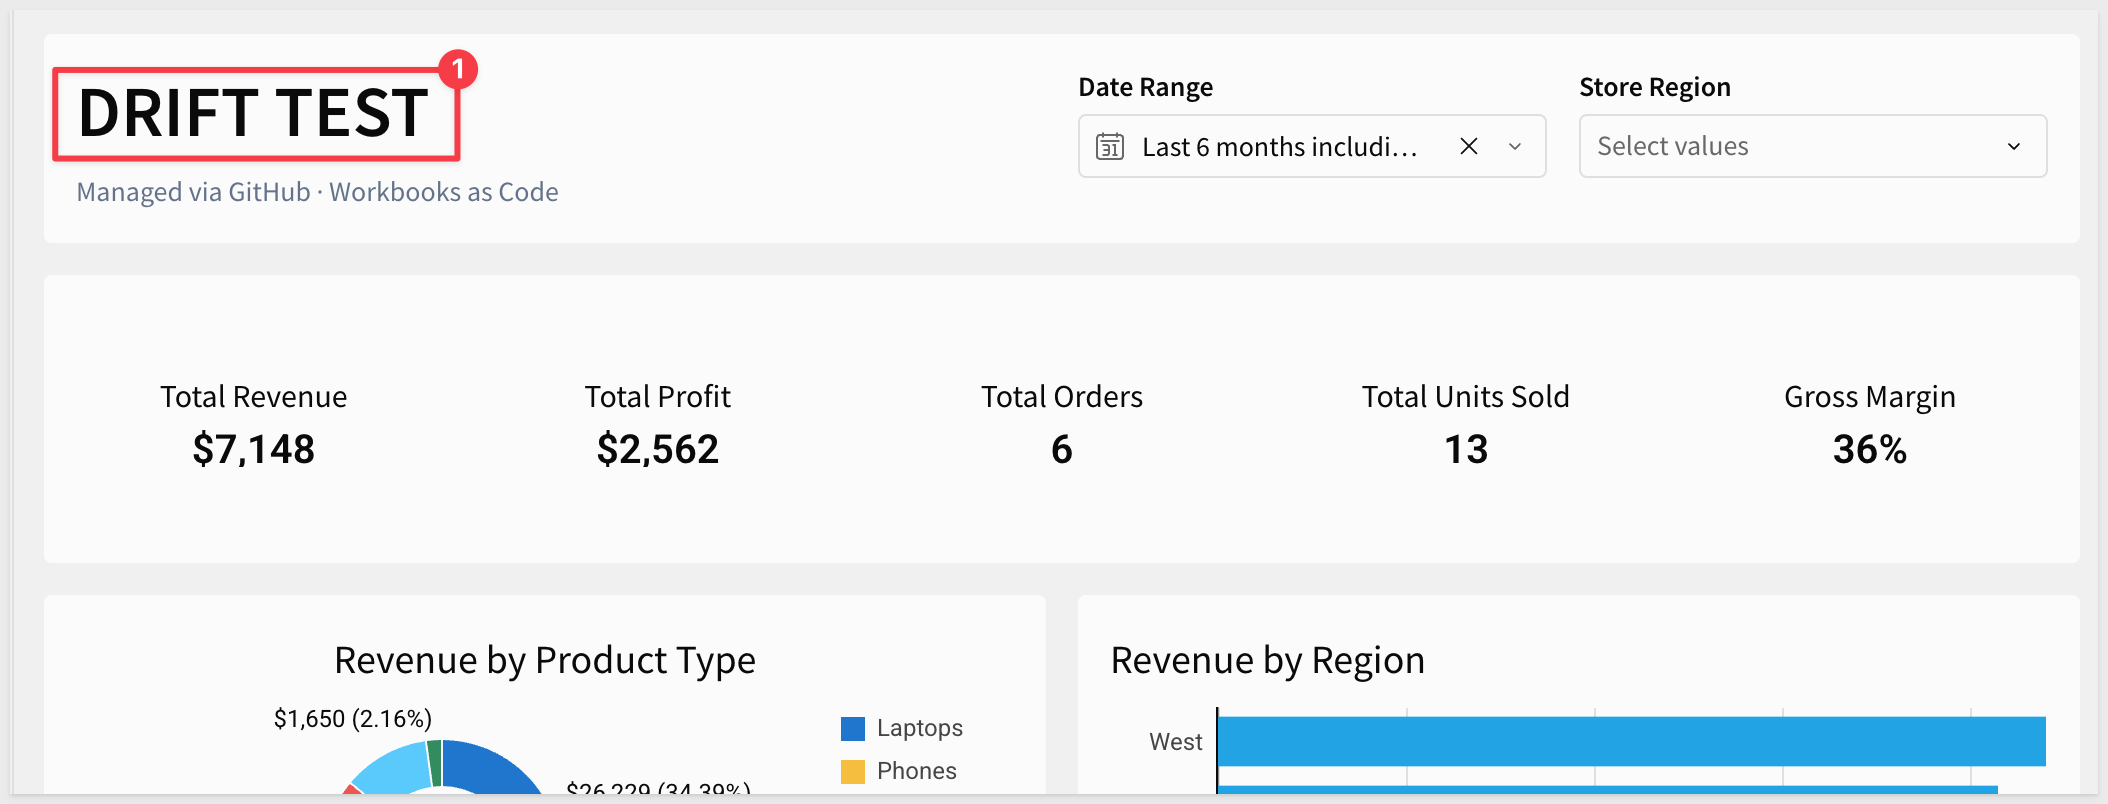
Publish the change.
Allow GitHub Actions to Open Pull Requests
Every other pull request in this QuickStart was opened by you, from your own account. drift-check.yml is the first workflow that opens one itself, as github-actions[bot] - and GitHub blocks that by default, even with pull-requests: write declared in the workflow.
In your repository, go to Settings > Actions > General, scroll to Workflow permissions, and check Allow GitHub Actions to create and approve pull requests.
Trigger the Drift Check
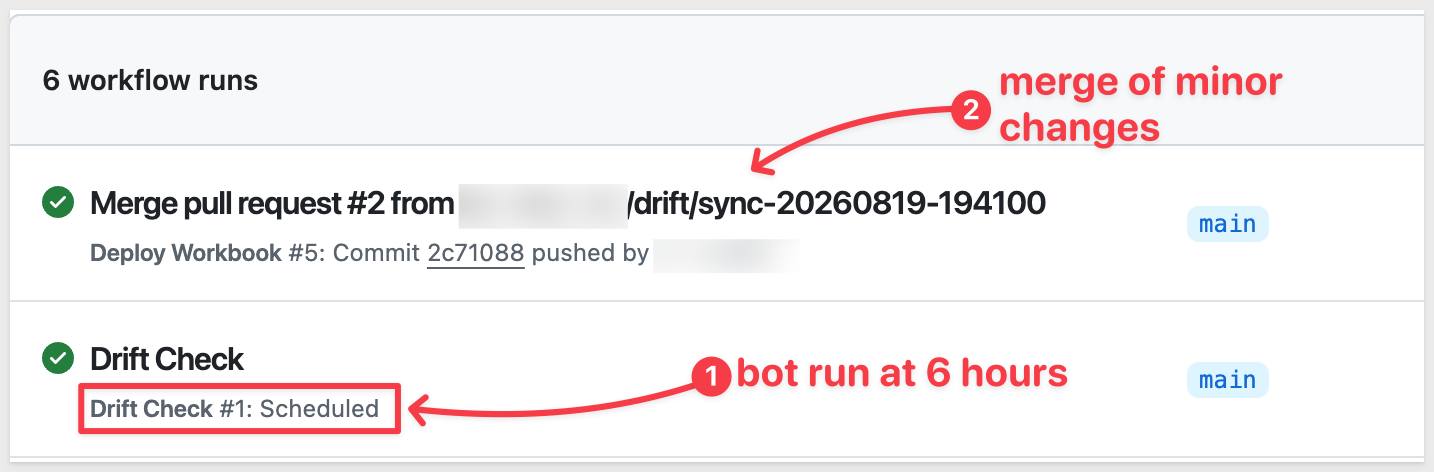
drift-check.yml runs on a schedule (every 6 hours) so production doesn't depend on anyone remembering to run it - but for this QuickStart, its workflow_dispatch trigger lets you run it on demand instead of waiting:
gh workflow run drift-check.yml
No gh CLI? Open the Actions tab, select Drift Check from the sidebar, and click Run workflow:
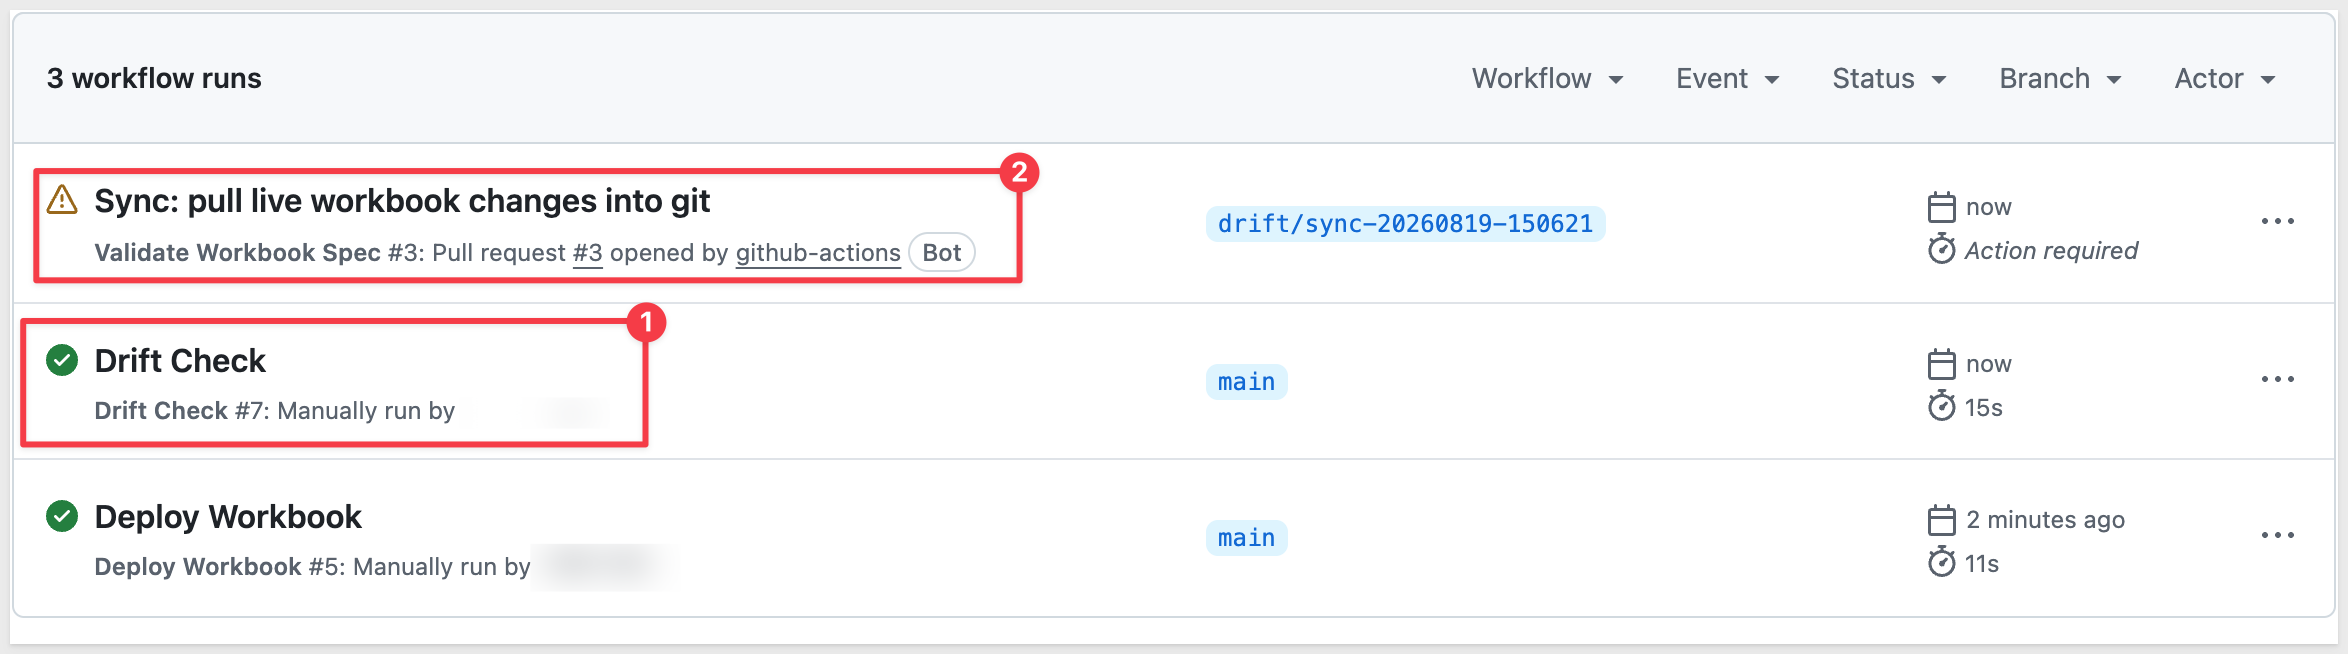
Review the Drift PR
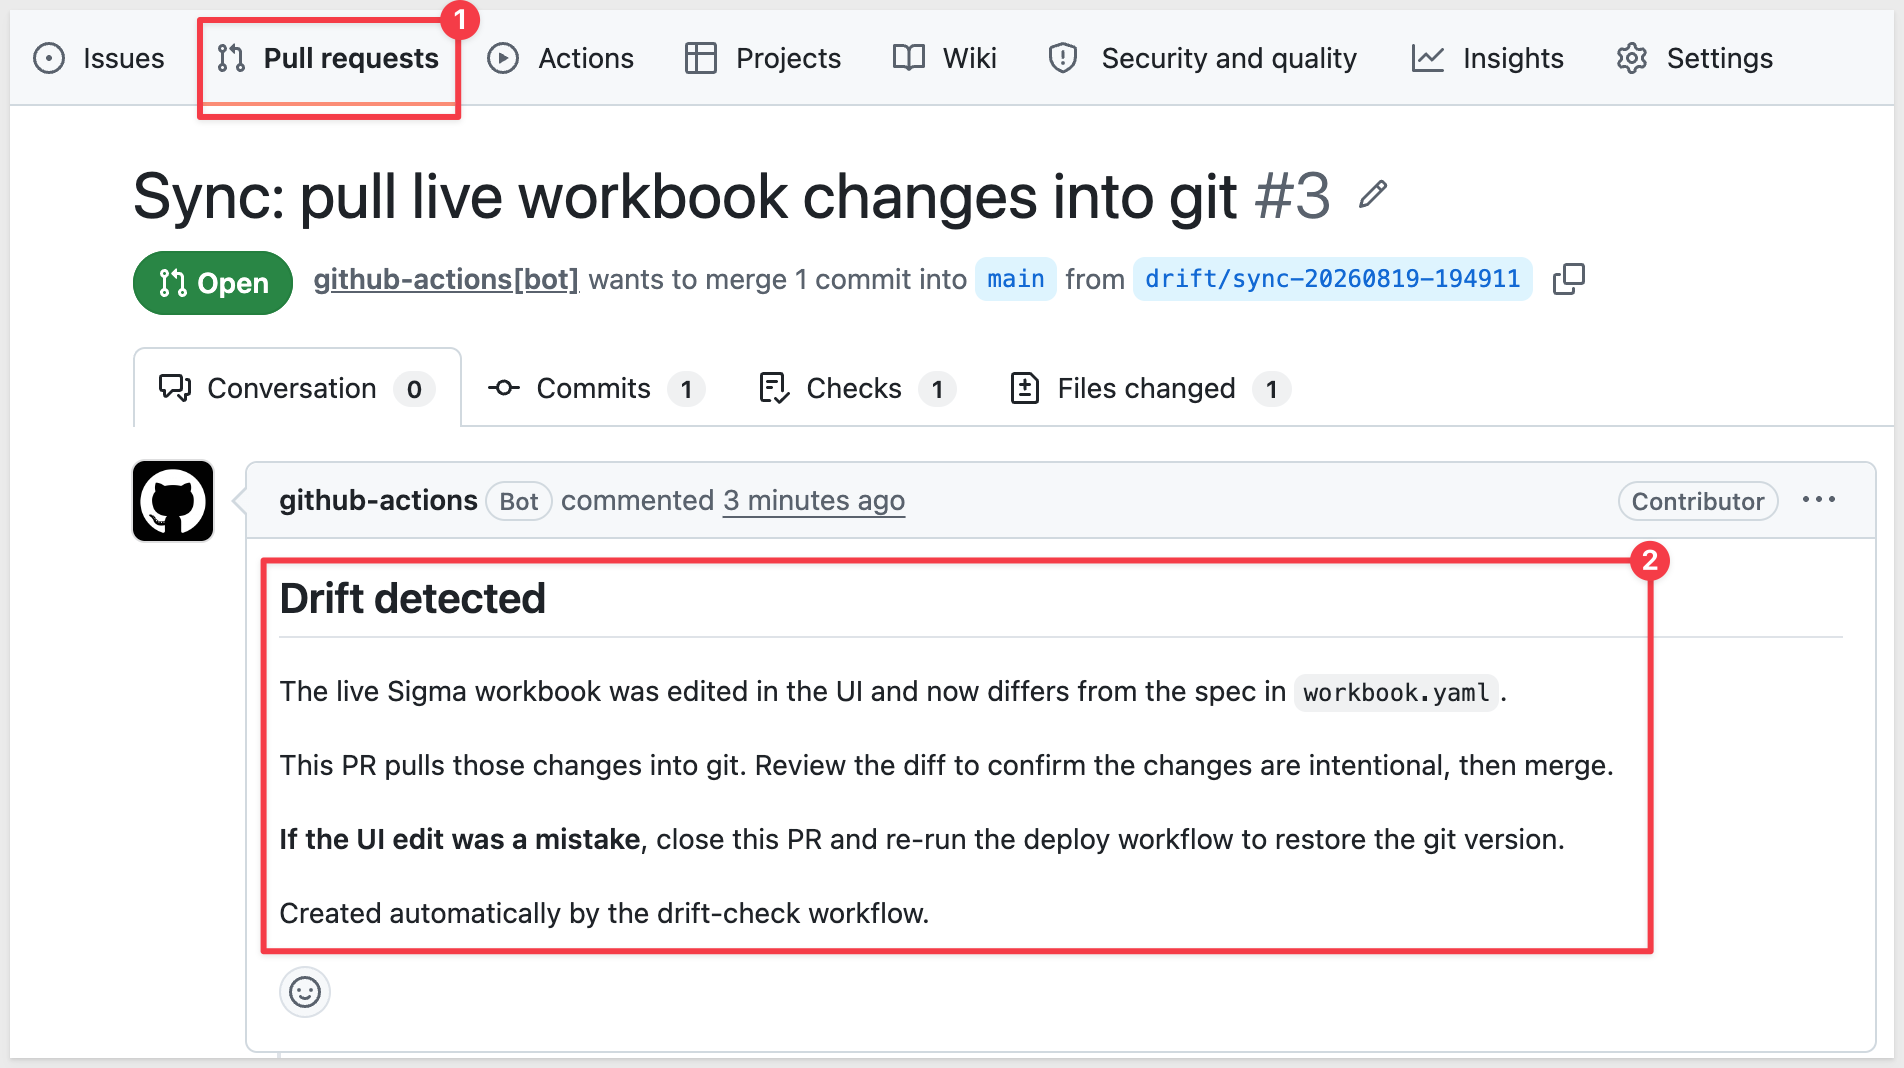
Check the Pull requests tab - a new PR titled Sync: pull live workbook changes into git, on a branch like drift/sync-20260819-140502, pulls the live spec's current state into workbook.yaml.
Open the Files changed tab to see exactly what changed - in this case, the retitled dashboard.
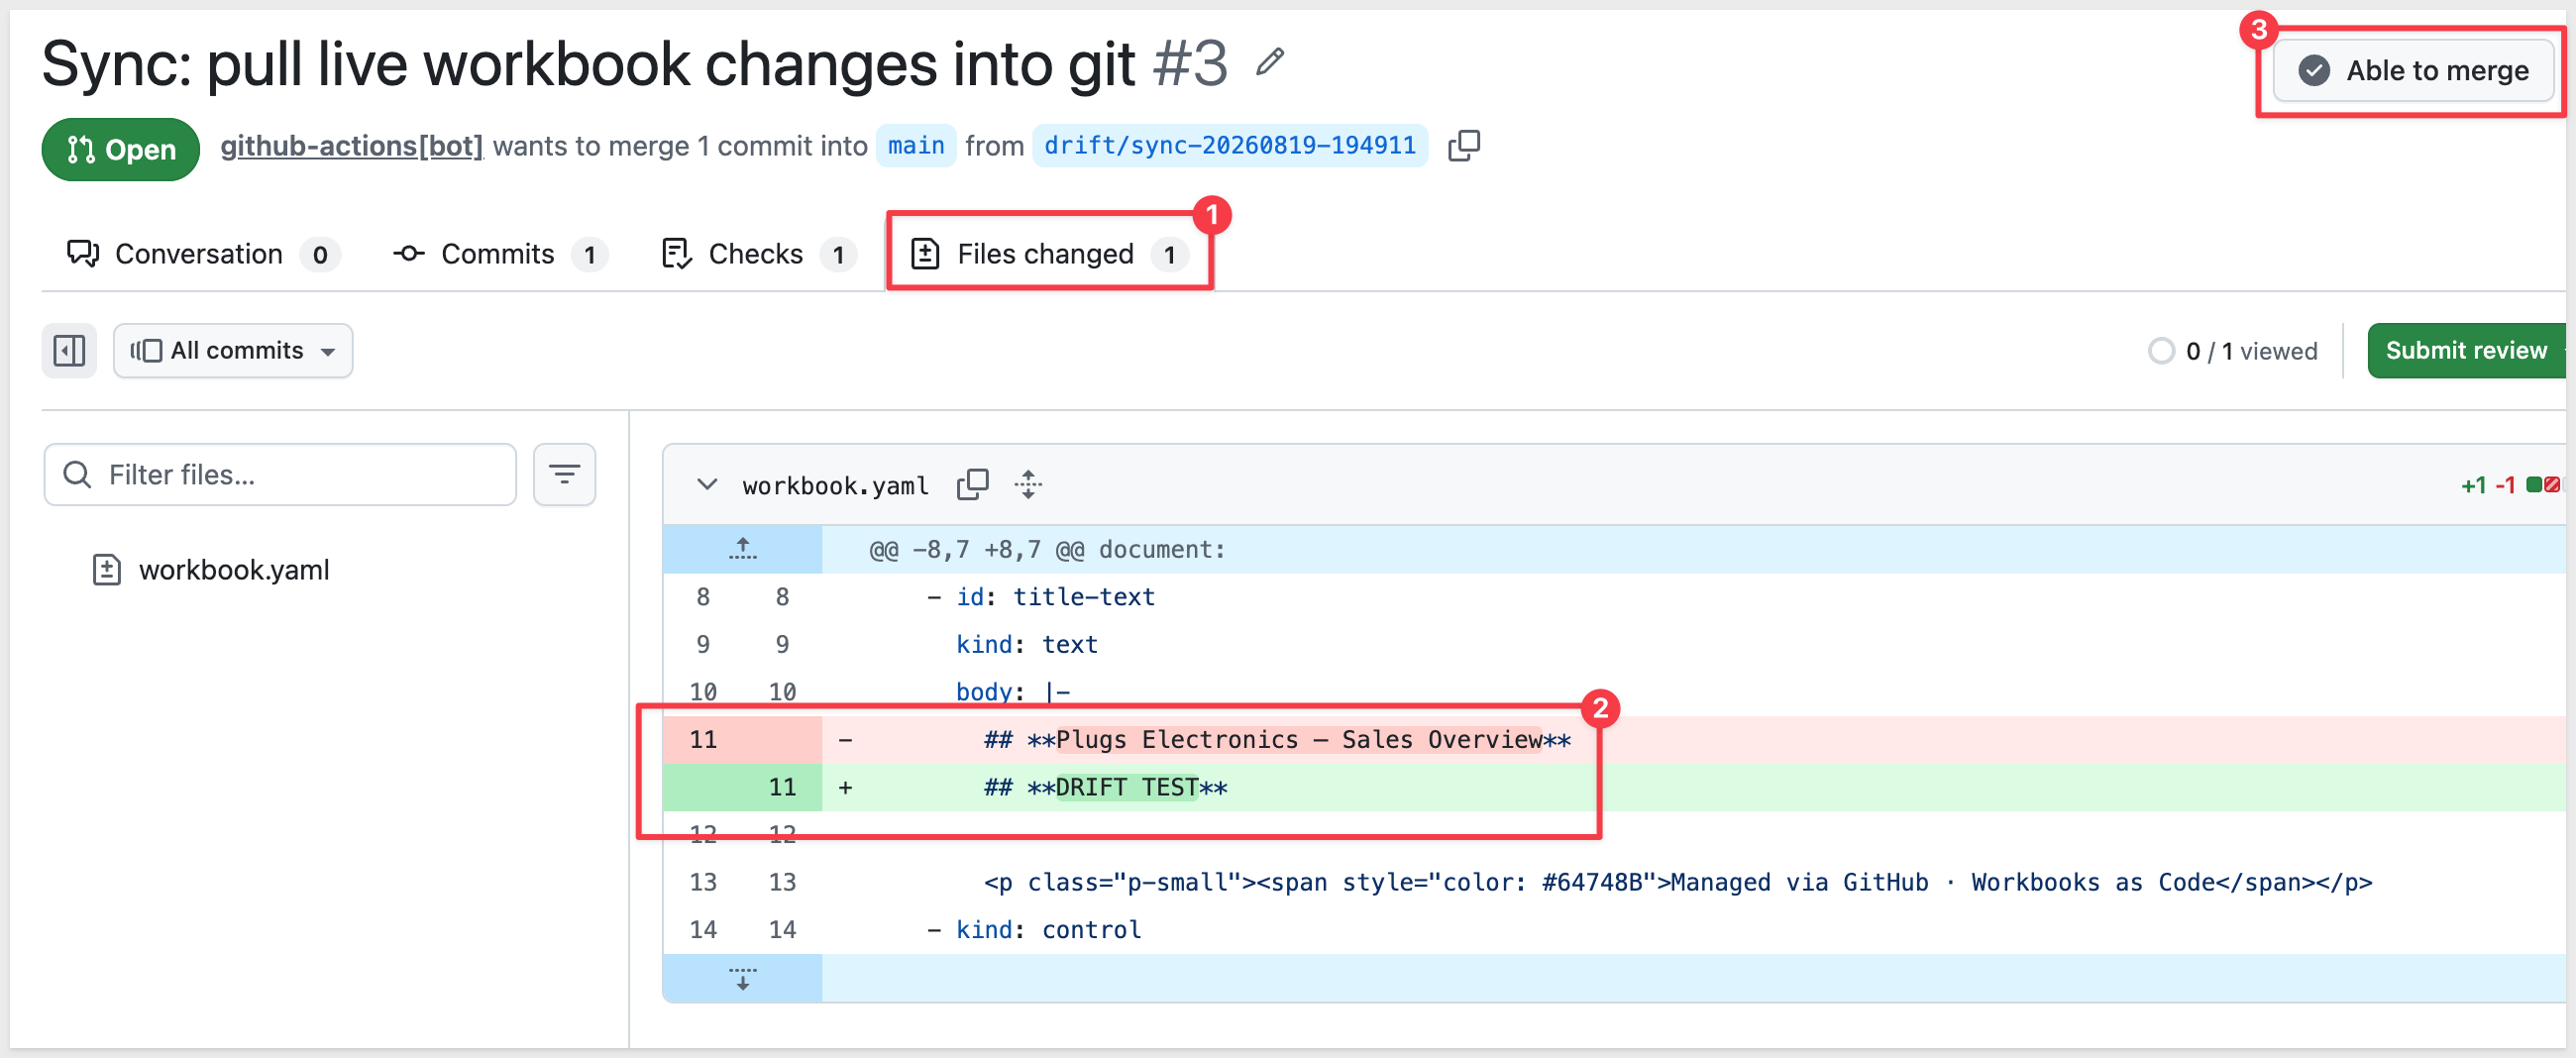
Merge the pull request.
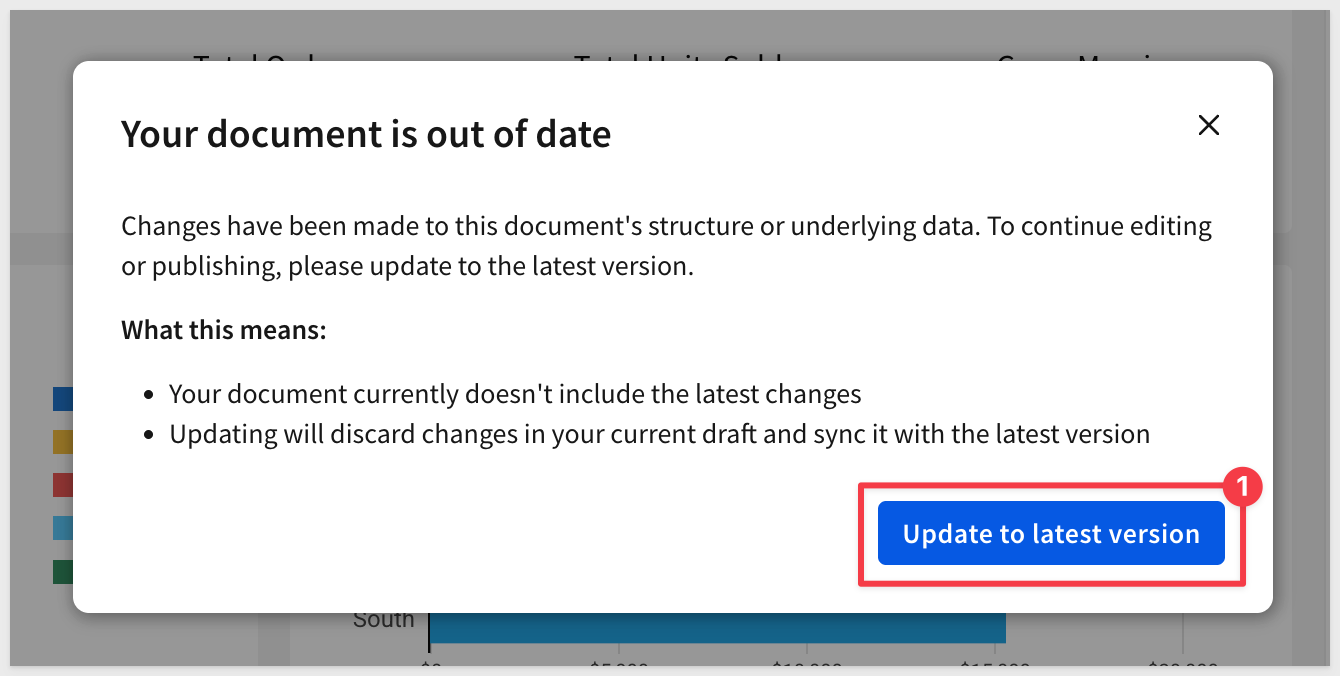
Return to Sigma, open the workbook and place it in Edit mode. Sigma will prompt you to Update to the latest version:
Automated Drift Checking
Everything up to this point was triggered by hand, for the sake of seeing it work - drift-check.yml's real job is running unattended, on its 6-hour schedule, so nobody has to remember to check.
The drift check only compares contents (elements, layout, pages) to decide whether drift exists, and only rewrites that same block when it pulls the live spec into a PR - the top-level name, folderId, and description in workbook.yaml stay exactly as you last committed them either way.
For example, after 6 hours, the schedule fires on its own and opens a PR without anyone triggering it:
Whenever a drift PR shows up for real - whether triggered manually like earlier in this section, or automatically on the schedule - you have two options, and both are legitimate:
- Keep the change: merge the PR. The UI edit is now reflected in
workbook.yaml, reviewed like any other change. - Revert the change: close the PR without merging, then re-run the deploy workflow (
gh workflow run deploy.yml) - it pushes git's version back over the live workbook, undoing the UI edit.
We built a complete CI/CD pipeline for a Sigma workbook: a single YAML file defining every page, chart, KPI, and layout coordinate, managed through the same git workflow as any other piece of application code. A pull request validates a proposed change before anyone sees it live. A merge deploys it automatically. A scheduled check catches anyone who edits the live workbook directly, and gives you a reviewable path back to consistency instead of a silent, permanent fork between what's in git and what's actually running.
None of this is specific to the Plugs Electronics demo. The same pattern - spec in git, validate on PR, deploy on merge, detect drift on a schedule - applies to any workbook your team wants to manage this way, and the YAML structure itself (pages, elements, cross-element formulas, grid layout) carries over directly to workbooks you build from scratch.
If you're also managing the underlying data models as code, the companion Data Models as Code QuickStart covers the same pattern applied to data models via JSON specs - together, they cover both halves of a fully version-controlled Sigma deployment.
Additional Resource Links
Blog
Community
Help Center
QuickStarts
Sigma REST API Reference
Be sure to check out all the latest developments at Sigma's First Friday Feature page!