This QuickStart introduces you to Sigma embedding using dynamic connection & role switching with Snowflake (DRS) to limit the data exposed to a user based on values passed to Sigma at runtime.
DRS allows runtime swapping of the Snowflake warehouse and role for a Sigma connection. There are ways to leverage this using one or both warehouse and/or role along with different methods to restrict data access in Snowflake itself.
This QuickStart will cover how to implement DRS using user attributes defined in Sigma, with a JWT embed.
Many customers will use Snowflake's column masking functionality and also manage their Snowflake row access policy in a table. Sigma fully supports these methods though we'll keep this simple and focused on the main task: DRS.
To simplify setup, we'll use trial accounts and the provided Snowflake ACCOUNTADMIN role for the scripts we will run in Snowflake.
In this QuickStart, we will use the local native application we created in Embedding 01: Getting Started
For more information on Sigma's product release strategy, see Sigma product releases
If something is not working as you expect, here's how to contact Sigma support
Target Audience
Semi-technical users who will be aiding in the planning or implementation of Sigma with embedding. No SQL or technical data skills are needed to complete this QuickStart. It does assume some common computer skills like installing software, using Terminal, navigating folders and copy/paste operations.
Prerequisites
- A computer with a current browser. It does not matter which browser you want to use.
- Access to your Sigma environment.
- Embedding 01: Getting Started is required to complete this QuickStart.

Let's start by logging into our Snowflake trial account, verify that you are using the ACCOUNTADMIN role and that a warehouse (e.g., COMPUTE_WH) is available:
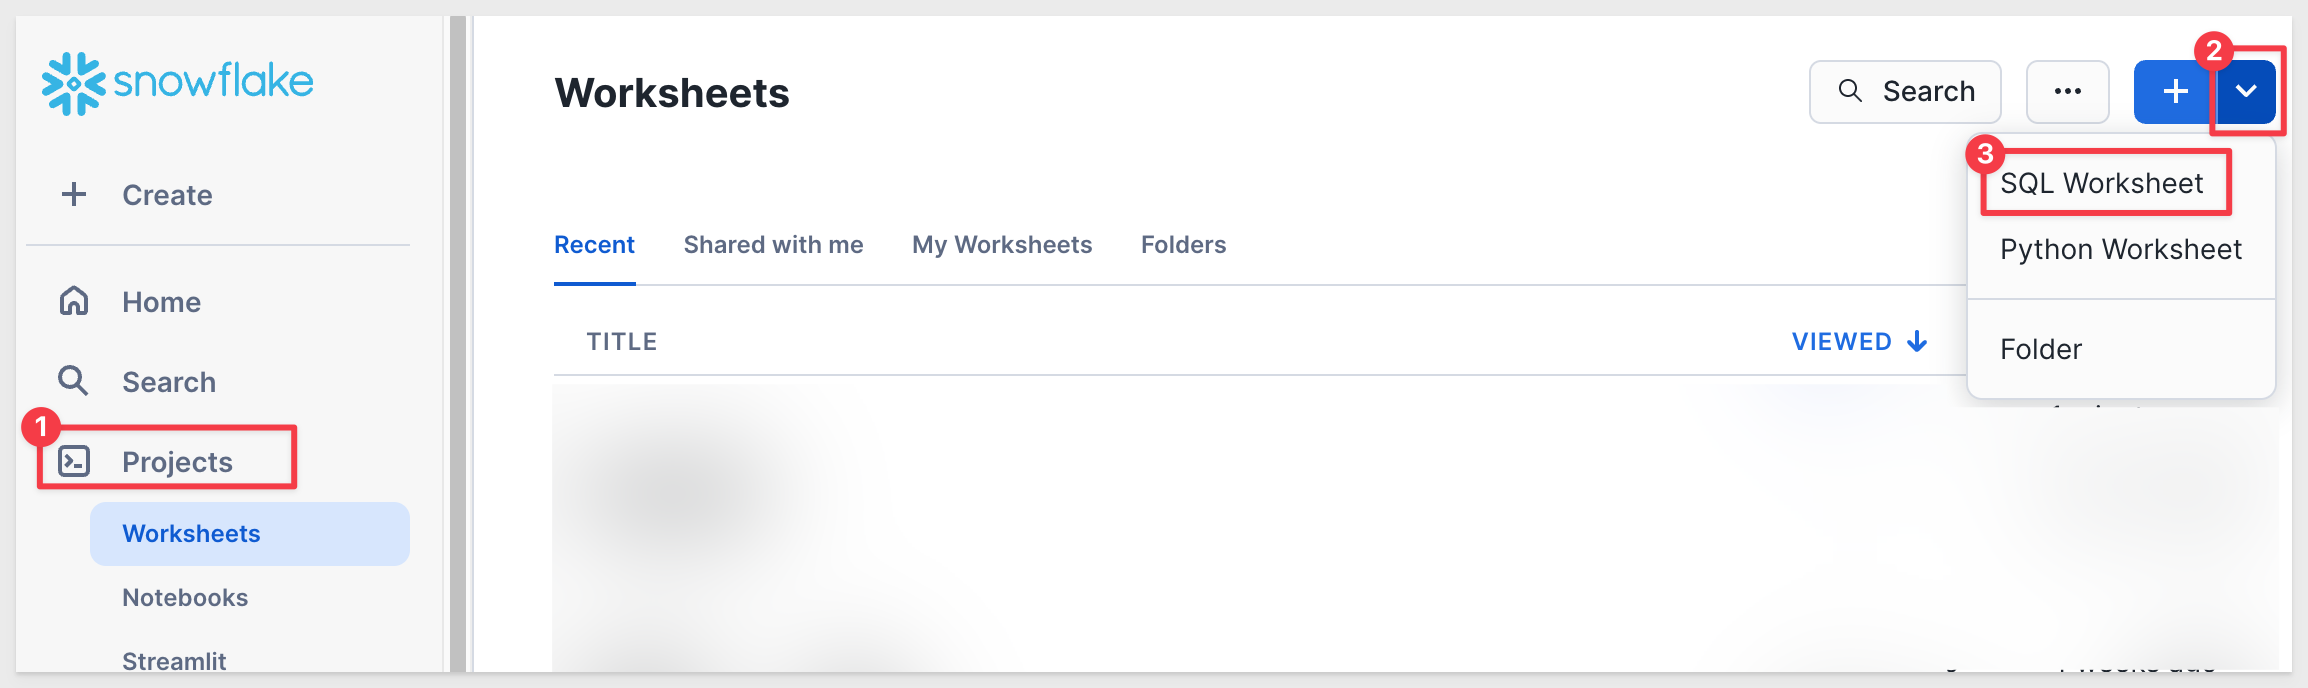
Navigate to the Projects tab, click the + Worksheet button, and selectSQL Worksheet:
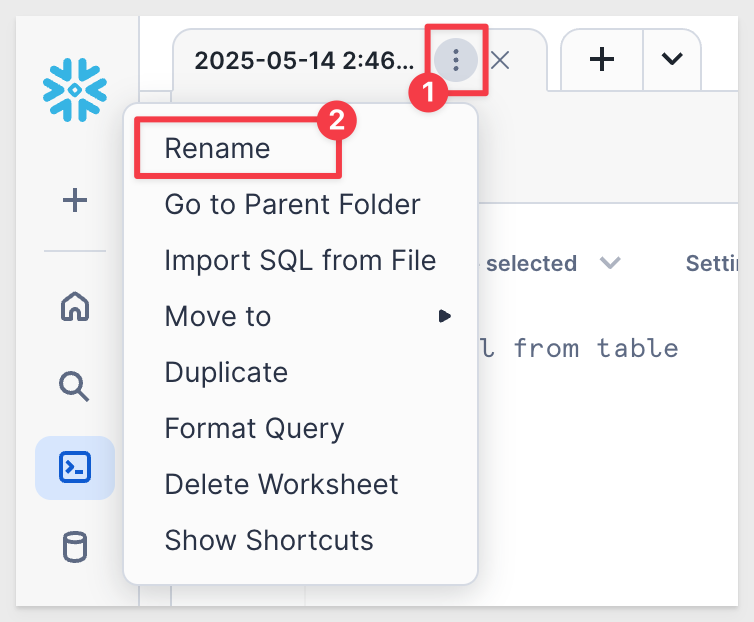
Click the three vertical dots (shown below) and rename the worksheet to Sigma_DRS_Configuration_Scripts:
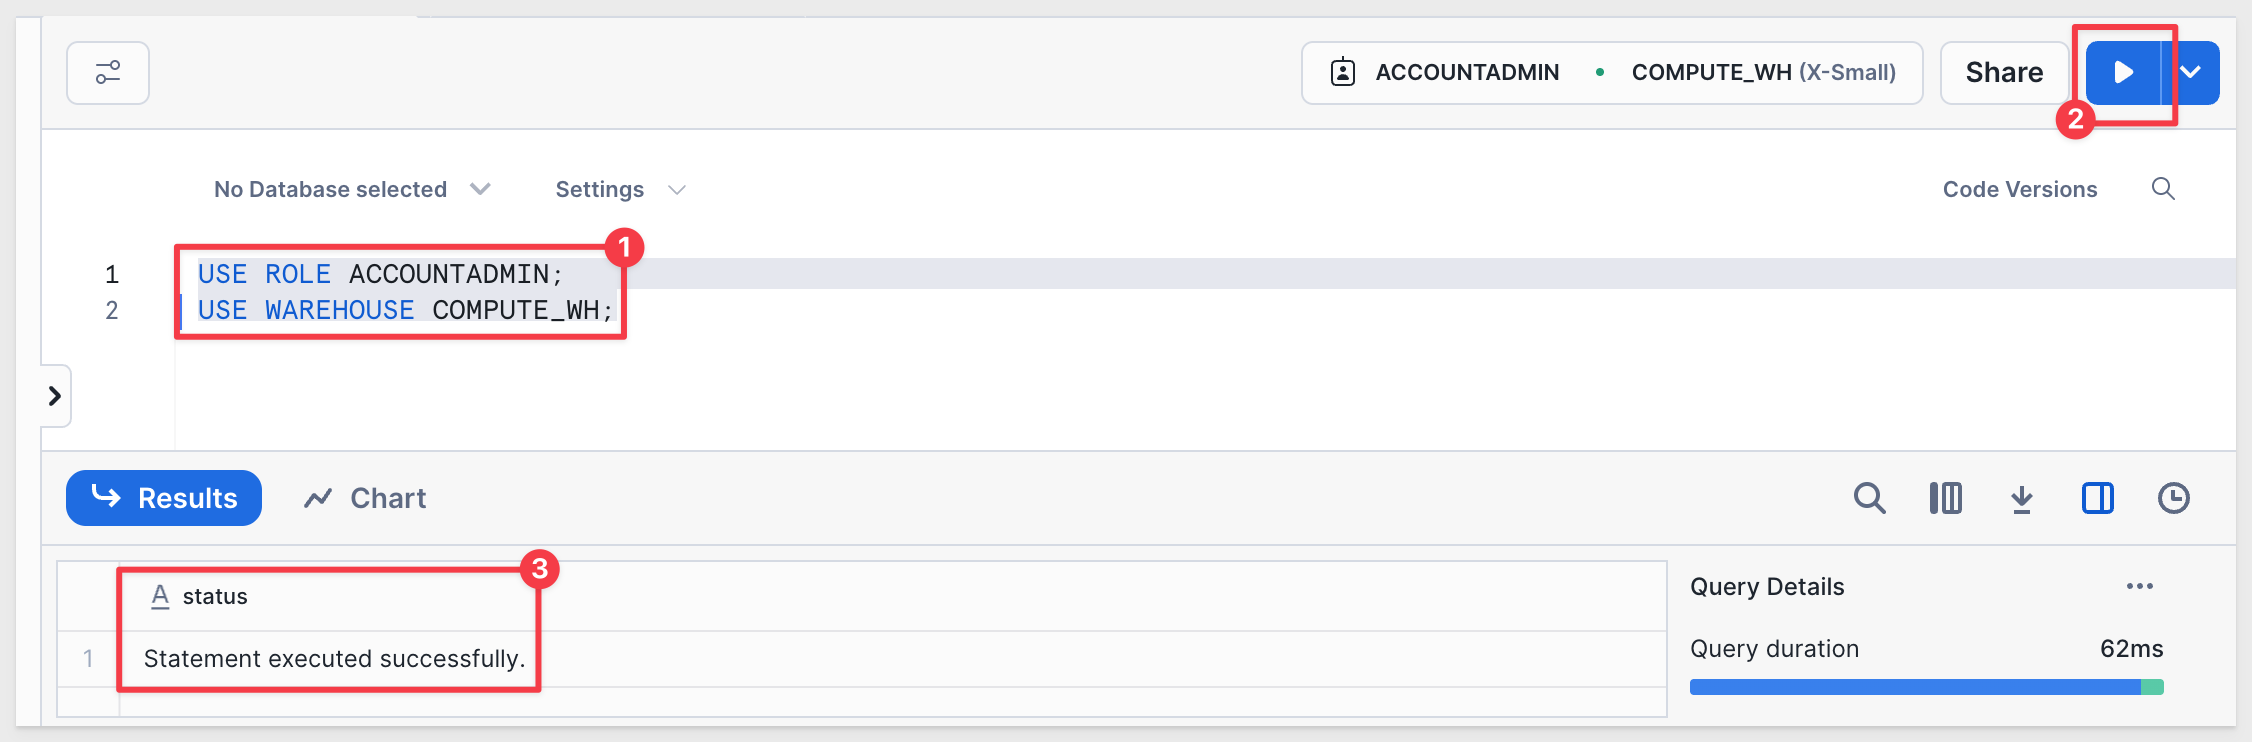
Run the following commands to confirm or switch your active role and warehouse to ACCOUNTADMIN and COMPUTE_WH:
USE ROLE ACCOUNTADMIN;
USE WAREHOUSE COMPUTE_WH;
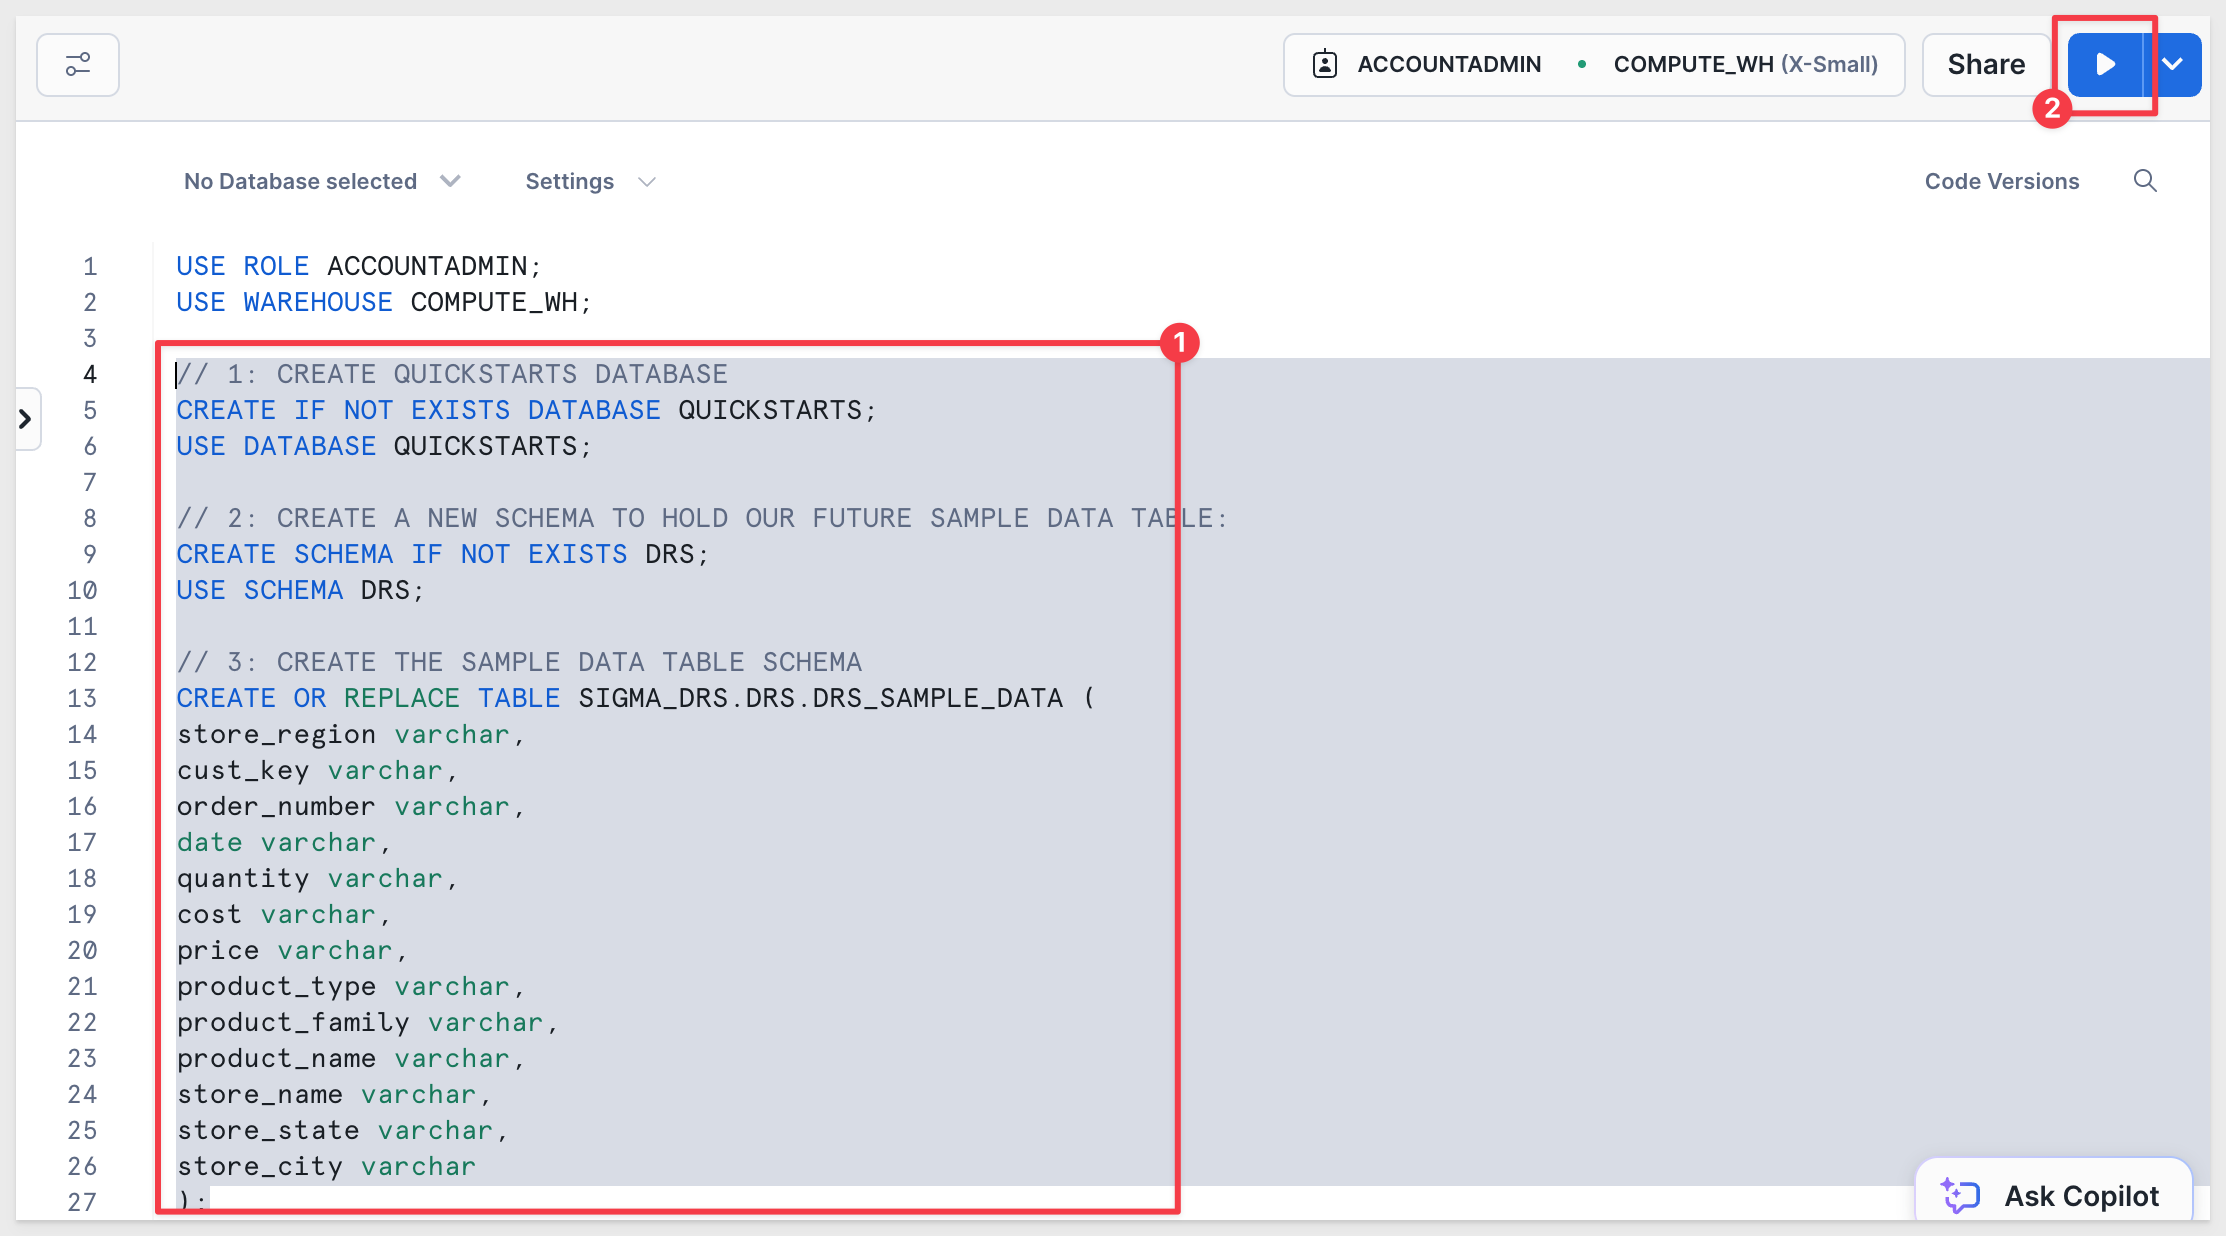
The following commands will create a database, schema and table we will use. Copy, paste, and run the following group of commands by highlighting them and clicking the run button:
// 1: CREATE QUICKSTARTS DATABASE
CREATE DATABASE IF NOT EXISTS QUICKSTARTS;
USE DATABASE QUICKSTARTS;

// 2: CREATE A NEW SCHEMA TO HOLD OUR SAMPLE DATA TABLE:
CREATE SCHEMA IF NOT EXISTS DRS;
USE SCHEMA DRS;

// 3: CREATE THE SAMPLE DATA TABLE SCHEMA
CREATE OR REPLACE TABLE DRS.SAMPLE_DATA (
store_region varchar,
cust_key varchar,
order_number varchar,
date varchar,
quantity varchar,
cost varchar,
price varchar,
product_type varchar,
product_family varchar,
product_name varchar,
store_name varchar,
store_state varchar,
store_city varchar
);
You should see a confirmation message that the table SAMPLE_DATA was successfully created.
Click the Databases tab and refresh the list.
You should now see a new schema named DRS in the QUICKSTARTS database, containing a table called SAMPLE_DATA:

Now that we have an empty table, we can load data from a public S3 bucket.
We'll copy the data into a Snowflake stage and then load it into our table.
Copy / paste and run the following commands:
// 4: CREATE OR REPLACE SCHEMA FOR EXTERNAL STORAGE OF CSV FILE
CREATE STAGE IF NOT EXISTS S3_DATA URL='s3://sigma-quickstarts-main/embedding/DRS_Sample_Data.csv';

// 5: COPY INTO DRS_Sample_Data  FROM  's3://sigma-quickstarts-main/embedding/DRS_Sample_Data.csv';
COPY INTO SIGMA_DRS.DRS_DATA.DRS_SAMPLE_DATA FROM @S3_DATA;

// 6: CONFIRM DATA IS LANDED IN SNOWFLAKE TABLE:
SELECT * FROM DRS_SAMPLE_DATA;
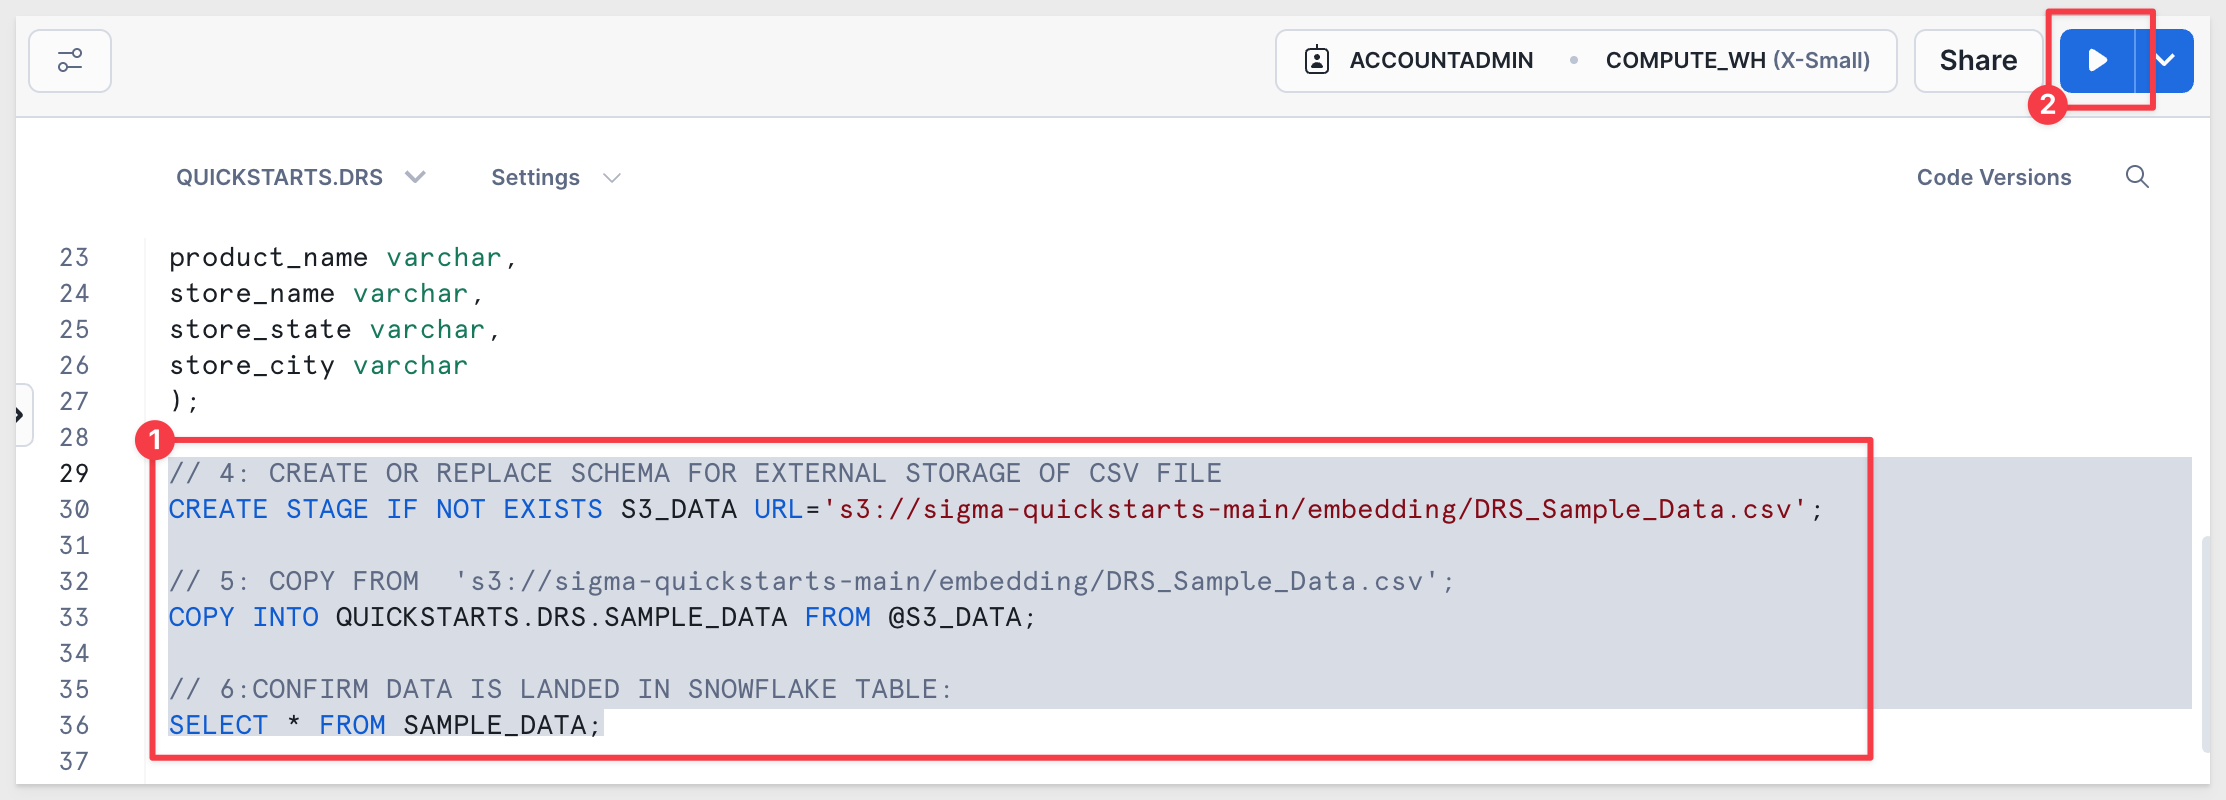
The final command should return 35 rows. You'll notice that the STORE_REGION column includes 20 rows for East, 10 for West, and 5 for South:

We need to create a few roles in Snowflake so that Sigma can reference them for dynamic role switching.
Copy, paste, and run the following commands together. Ensure you see a success message:
// ----------------------------------------------------------------------------------------------------------
// SECTION 2: ROLE CONFIGURATION
// ----------------------------------------------------------------------------------------------------------

// 1: CREATE ROLES FOR OUR USE CASES:
CREATE OR REPLACE ROLE DRS_Executive;
CREATE OR REPLACE ROLE DRS_West;
CREATE OR REPLACE ROLE DRS_East;
CREATE OR REPLACE ROLE DRS_Default;

// 2: GRANT USAGE ON WAREHOUSE COMPUTE_WH TO ROLES
GRANT USAGE ON WAREHOUSE COMPUTE_WH TO ROLE DRS_Executive;
GRANT USAGE ON WAREHOUSE COMPUTE_WH TO ROLE DRS_West;
GRANT USAGE ON WAREHOUSE COMPUTE_WH TO ROLE DRS_East;
GRANT USAGE ON WAREHOUSE COMPUTE_WH TO ROLE DRS_Default;

// 3: GRANT USAGE PERMISSION ON THE DATABASE TO NEW ROLES:
GRANT USAGE ON DATABASE QUICKSTARTS TO DRS_Executive;
GRANT USAGE ON DATABASE QUICKSTARTS TO DRS_West;
GRANT USAGE ON DATABASE QUICKSTARTS TO DRS_East;
GRANT USAGE ON DATABASE QUICKSTARTS TO DRS_Default;

// 4: GRANT SELECT ON SCHEMA TO NEW ROLES:
GRANT USAGE ON SCHEMA QUICKSTARTS.DRS TO DRS_Executive;
GRANT USAGE ON SCHEMA QUICKSTARTS.DRS TO DRS_West;
GRANT USAGE ON SCHEMA QUICKSTARTS.DRS TO DRS_East;
GRANT USAGE ON SCHEMA QUICKSTARTS.DRS TO DRS_Default;

// 5: ALLOW NEW ROLES TO QUERY TABLE WE CREATED:
GRANT SELECT ON ALL TABLES IN SCHEMA QUICKSTARTS.DRS TO ROLE DRS_Executive;
GRANT SELECT ON ALL TABLES IN SCHEMA QUICKSTARTS.DRS TO ROLE DRS_West;
GRANT SELECT ON ALL TABLES IN SCHEMA QUICKSTARTS.DRS TO ROLE DRS_East;
GRANT SELECT ON ALL TABLES IN SCHEMA QUICKSTARTS.DRS TO ROLE DRS_Default;
You should receive the message: Statement executed successfully. 1 objects affected.
We are now ready to define our Snowflake Row Access Policy. Follow the same process as before using these new commands:
GRANT SELECT ON ALL TABLES IN SCHEMA QUICKSTARTS.DRS TO ROLE DRS_East;
// ----------------------------------------------------------------------------------------------------------
// SECTION 3: CREATE ROW ACCESS POLICY BASED ON REGION COLUMN
// ----------------------------------------------------------------------------------------------------------
// 1: Create the Row Access Policy
USE ROLE ACCOUNTADMIN;
USE QUICKSTARTS.DRS;
CREATE OR REPLACE ROW ACCESS POLICY DRS_REGION AS (STORE_REGION STRING) RETURNS BOOLEAN -> CASE
WHEN 'DRS_EXECUTIVE' = CURRENT_ROLE() THEN TRUE
WHEN 'DRS_WEST' = CURRENT_ROLE()
AND STORE_REGION = 'West' THEN TRUE
WHEN 'DRS_EAST' = CURRENT_ROLE()
AND STORE_REGION = 'East' THEN TRUE
WHEN 'DRS_Default' = CURRENT_ROLE()
AND STORE_REGION = '' THEN TRUE
WHEN 'ACCOUNTADMIN' = CURRENT_ROLE() THEN TRUE
ELSE FALSE
END;
SHOW ROW ACCESS POLICIES;
// 2: APPLY THE ROW ACCESS POLICY TO THE TABLE
ALTER TABLE QUICKSTARTS.DRS.SAMPLE_DATA
ADD ROW ACCESS POLICY DRS_REGION
ON (STORE_REGION);
```
You should receive a message in Snowflake `Statement executed successfully.`
### Roles and quick test in Snowflake
In the next section, we will test each role individually to observe how many rows are returned.
<aside class="positive">
<strong>IMPORTANT:</strong><br> Replace the YOUR_SNOWFLAKE_USERNAME_HERE (remove the brackets too) with your Snowflake username.
</aside>
```copy-code
// ----------------------------------------------------------------------------------------------------------
// SECTION 4: TEST OUT ROLES AND SEE DIFFERENT RESULTS. *** RUN ONE ROLE AT A TIME ***
// ----------------------------------------------------------------------------------------------------------
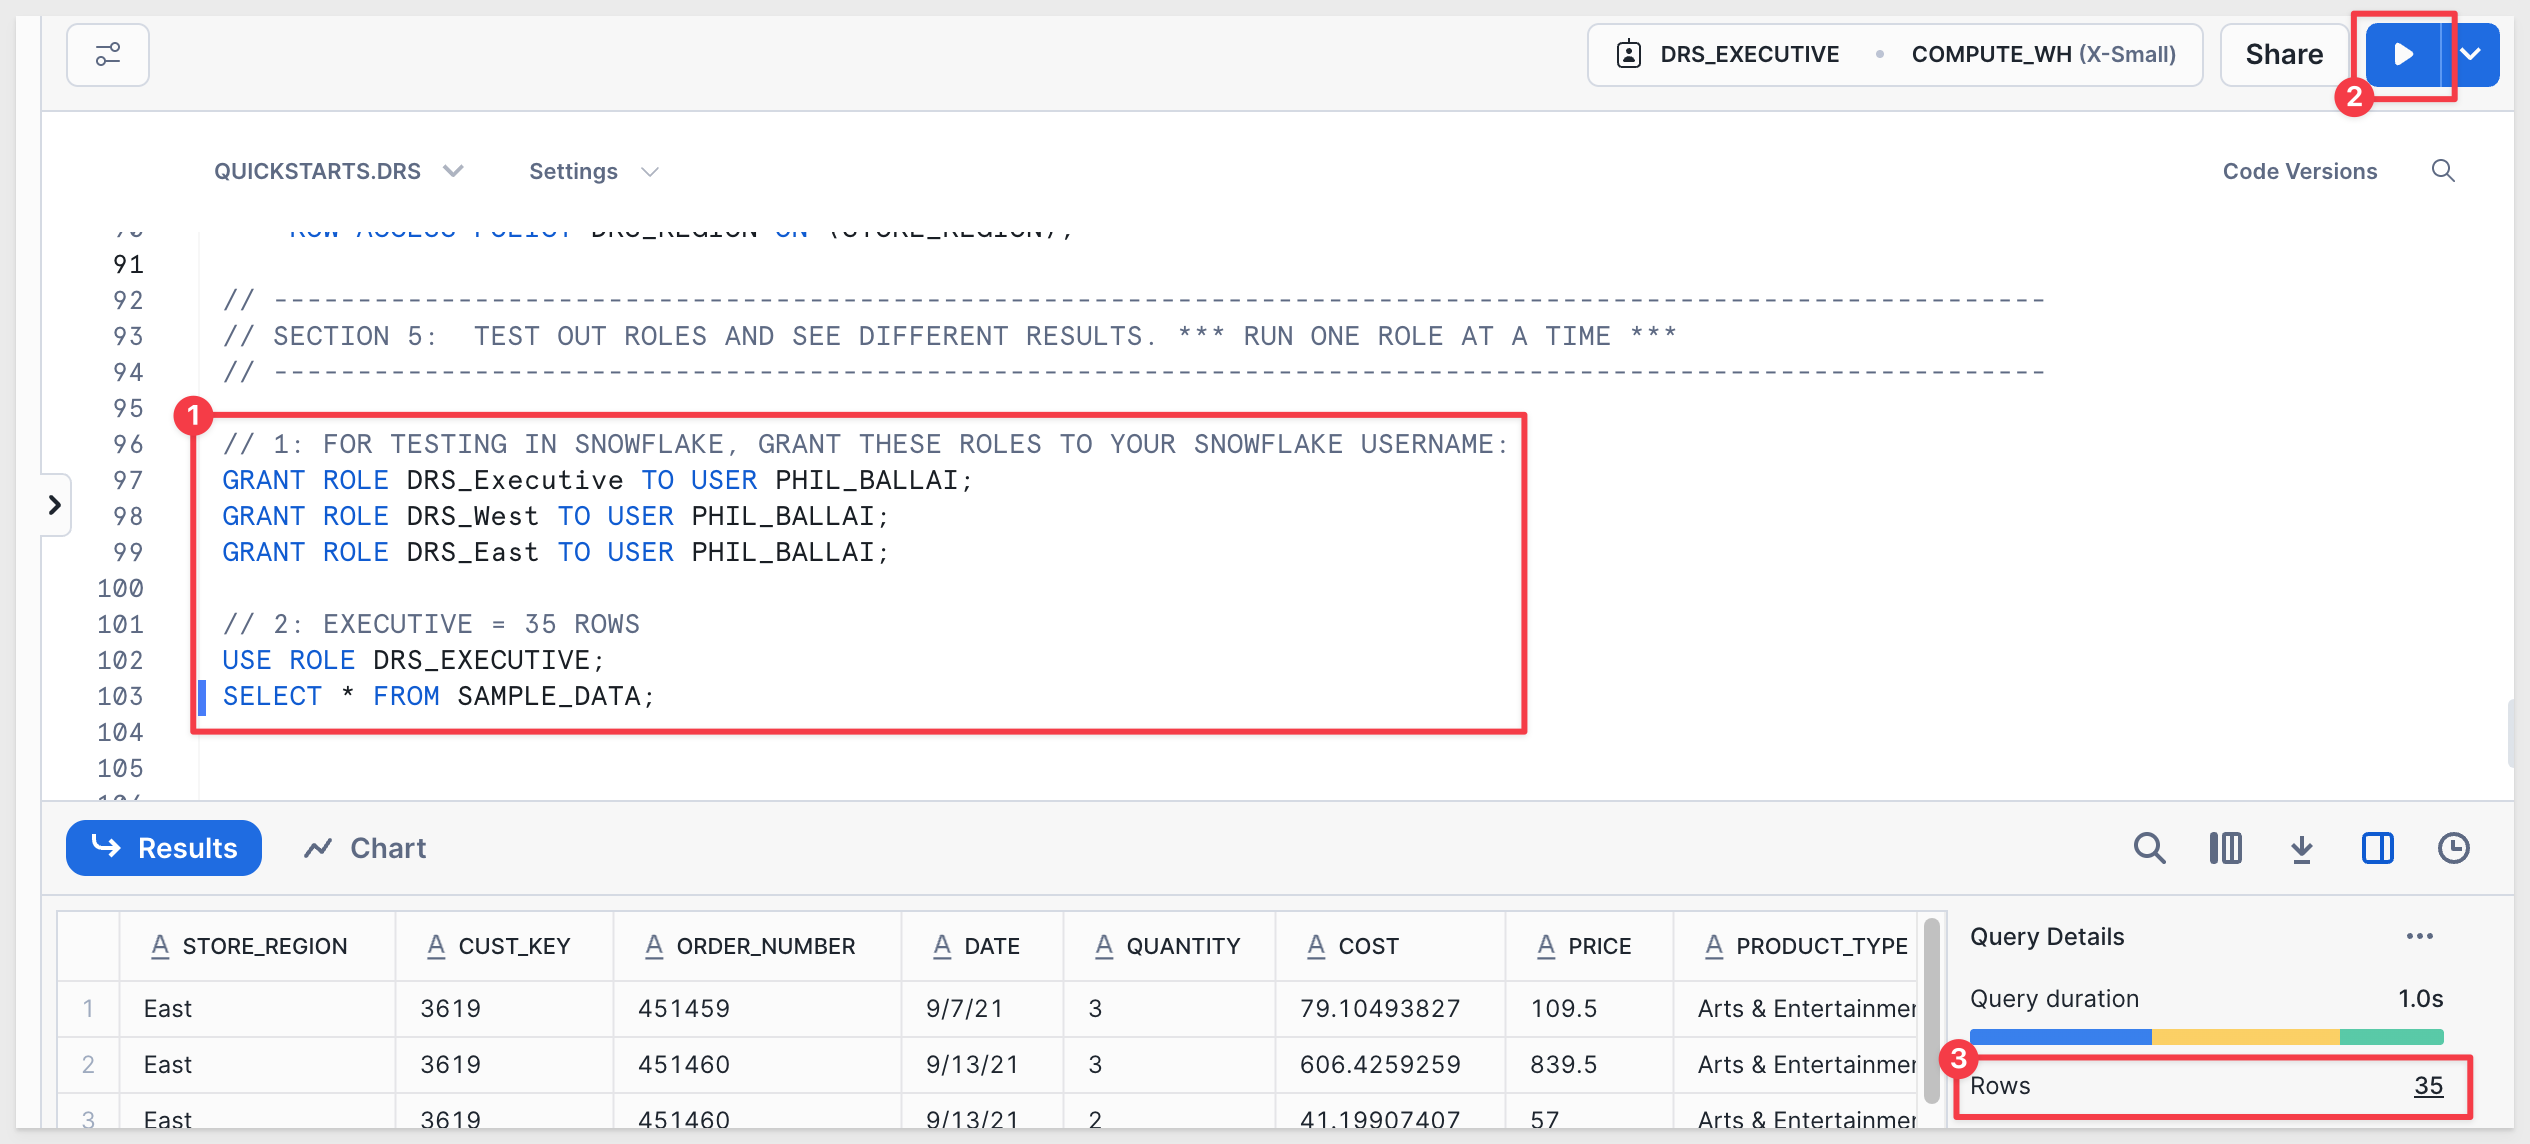
// 1: FOR TESTING IN SNOWFLAKE, GRANT THESE ROLES TO YOUR SNOWFLAKE USERNAME:
GRANT ROLE DRS_Executive TO USER {YOUR_SNOWFLAKE_USERNAME_HERE};
GRANT ROLE DRS_West TO USER {YOUR_SNOWFLAKE_USERNAME_HERE};
GRANT ROLE DRS_East TO USER {YOUR_SNOWFLAKE_USERNAME_HERE};
GRANT ROLE DRS_DEFAULT TO USER {YOUR_SNOWFLAKE_USERNAME_HERE};
// 2: EXECUTIVE = 35 ROWS
USE ROLE DRS_EXECUTIVE;
SELECT * FROM SAMPLE_DATA;
As DRS_EXECUTIVE, we expect to see all 35 rows:
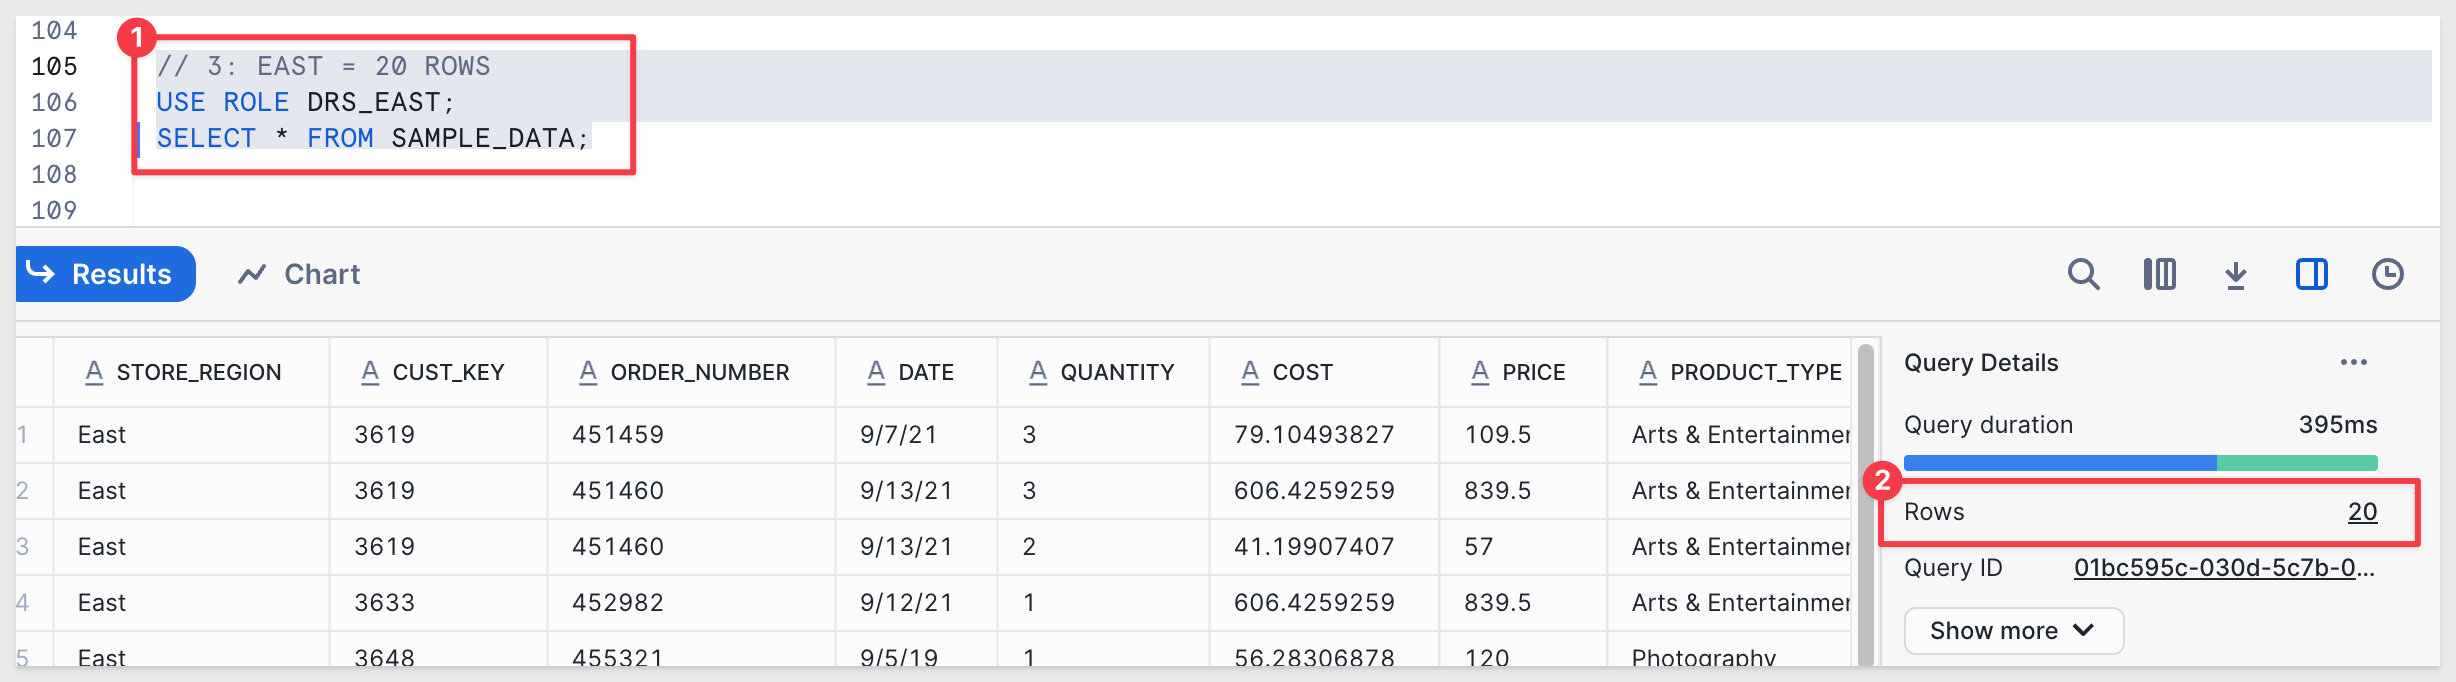
As DRS_EAST, we expect to see 20 rows:
// 3: EAST = 20 ROWS
USE ROLE DRS_EAST;
SELECT * FROM SAMPLE_DATA;
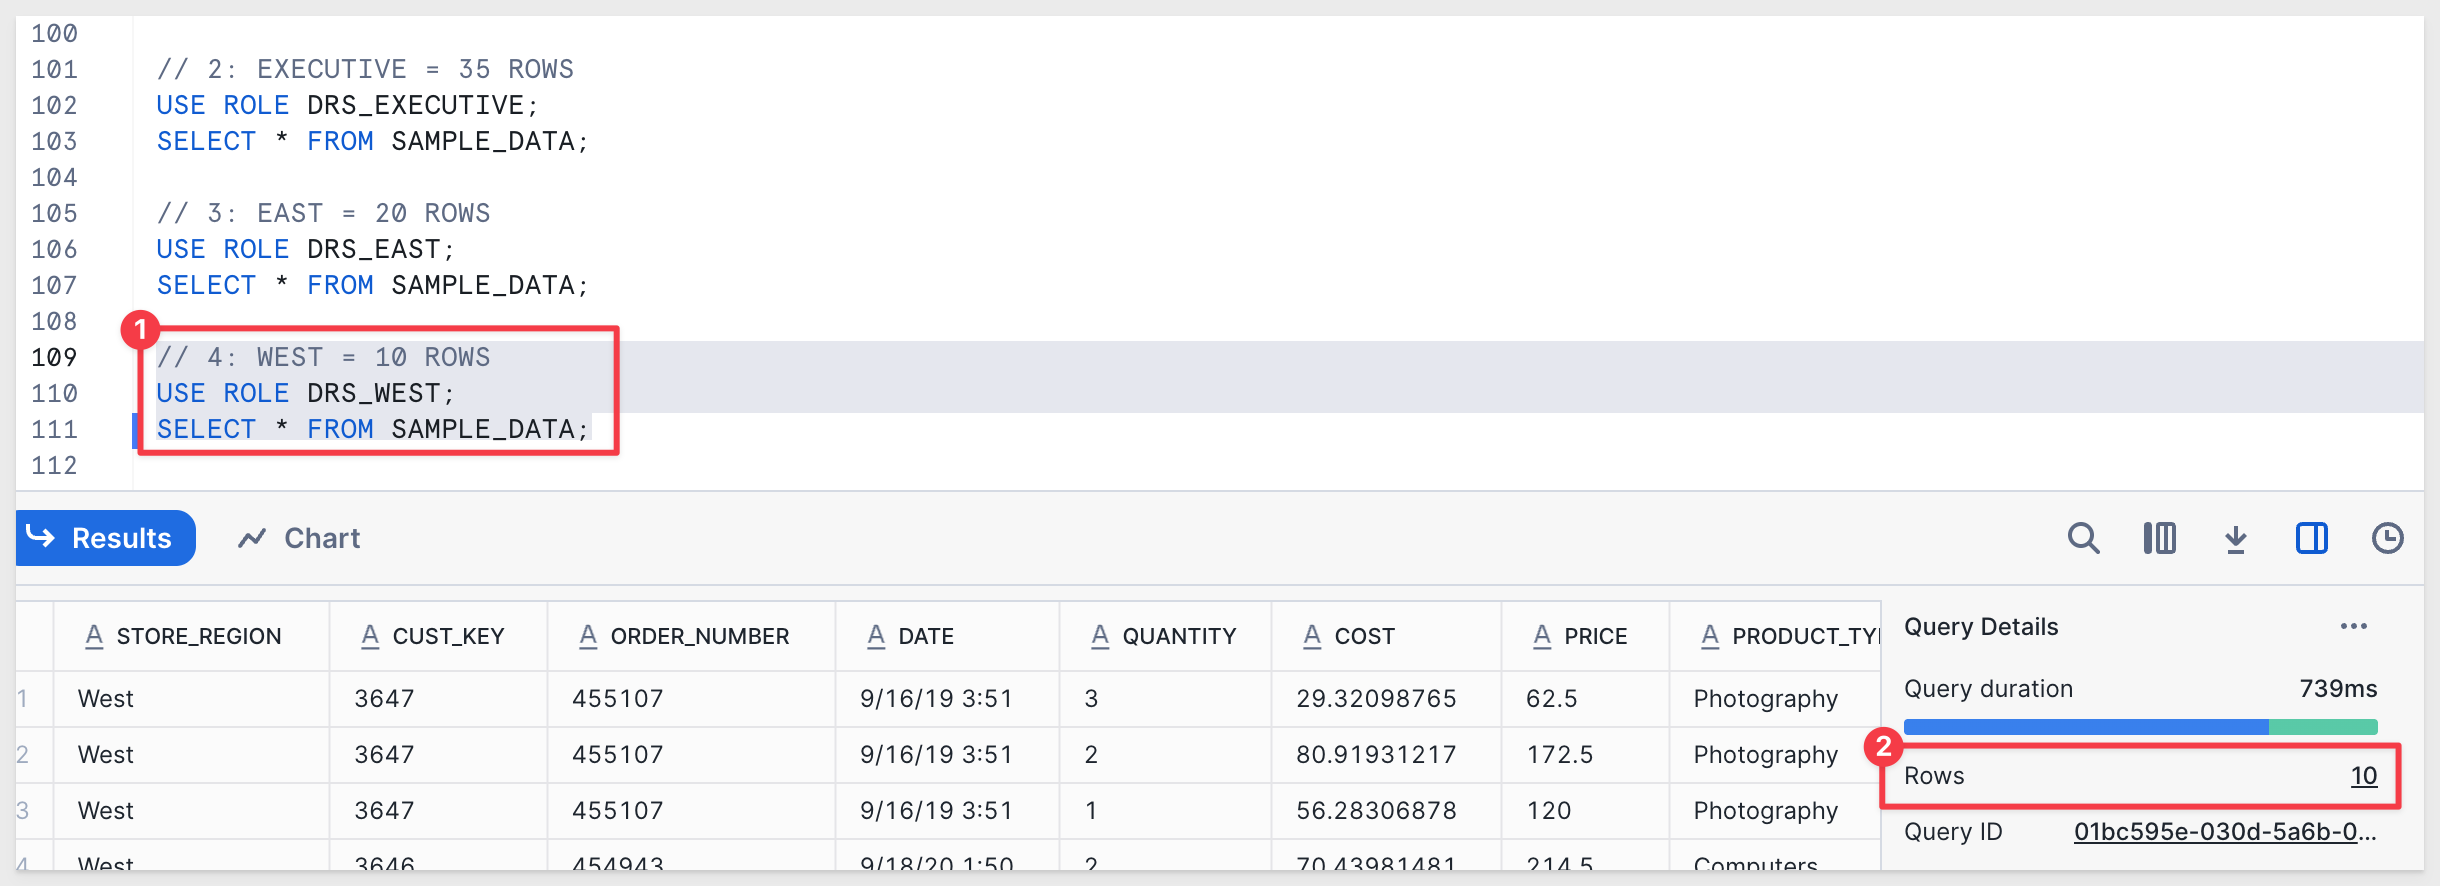
10 rows for DRS_WEST:
// 4: WEST = 10 ROWS
USE ROLE DRS_WEST;
SELECT * FROM SAMPLE_DATA;
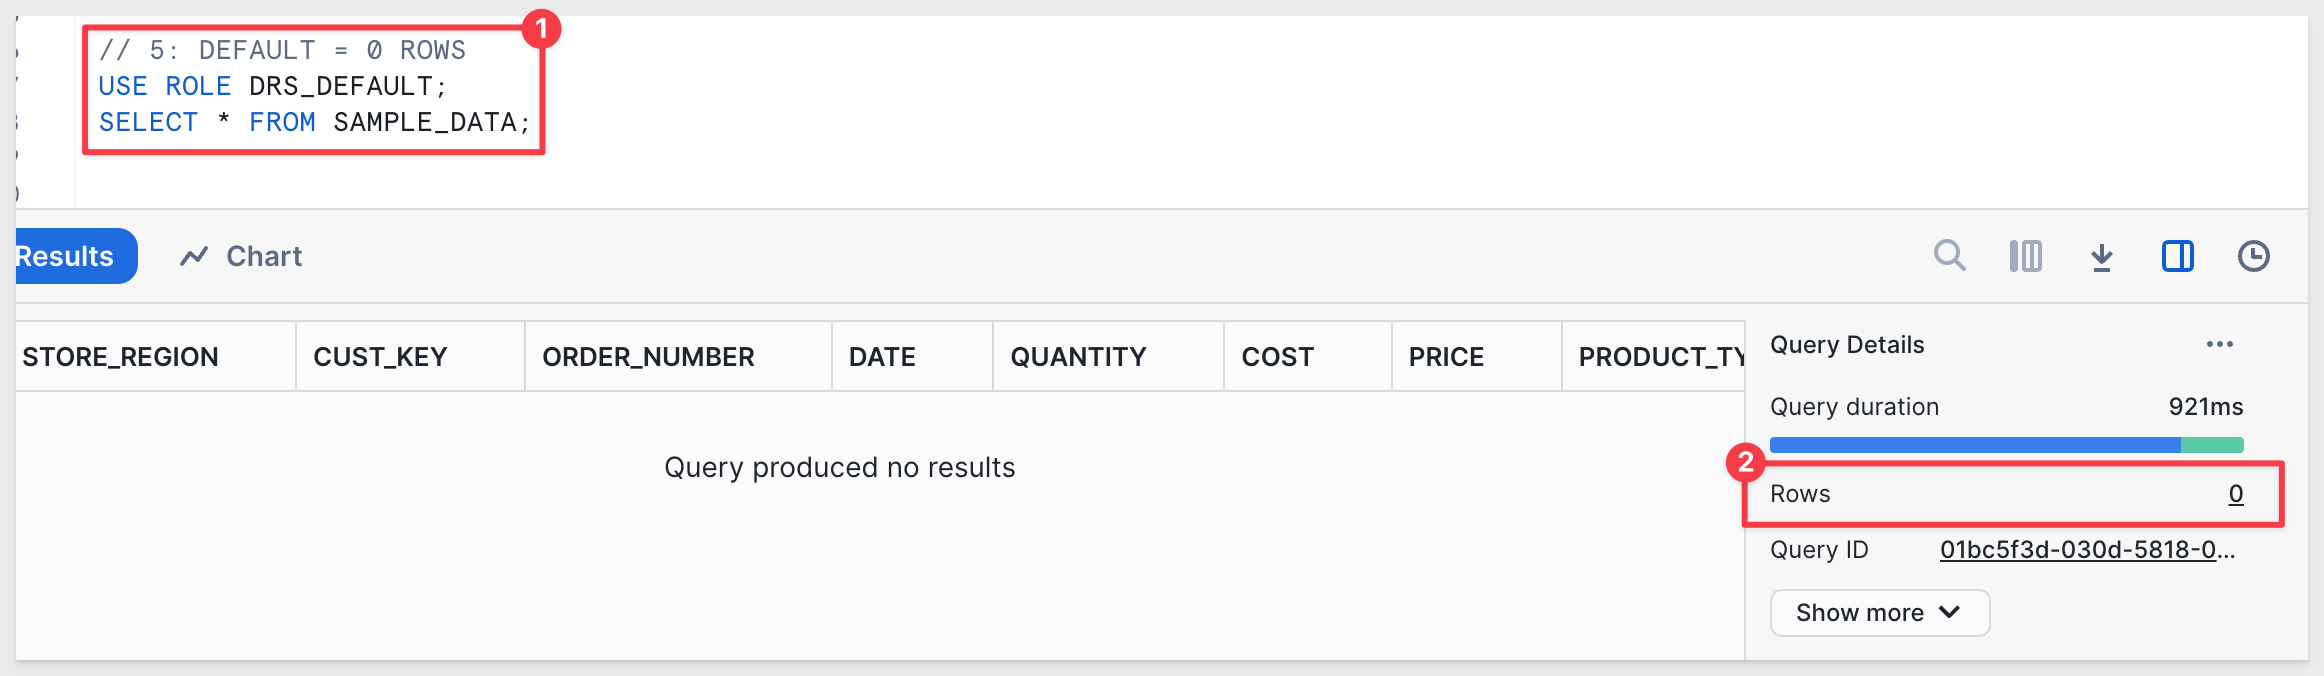
// 5: DEFAULT = 0 ROWS USE ROLE DRS_DEFAULT; SELECT * FROM SAMPLE_DATA;
Sigma supports dynamically assigning the warehouse and role at runtime, using user attributes.
For more information, see Configure user attributes
Log into Sigma as an Administrator.
Navigate to Administration > User Attributes and click Create Attribute.
Configure the new user attribute as shown.
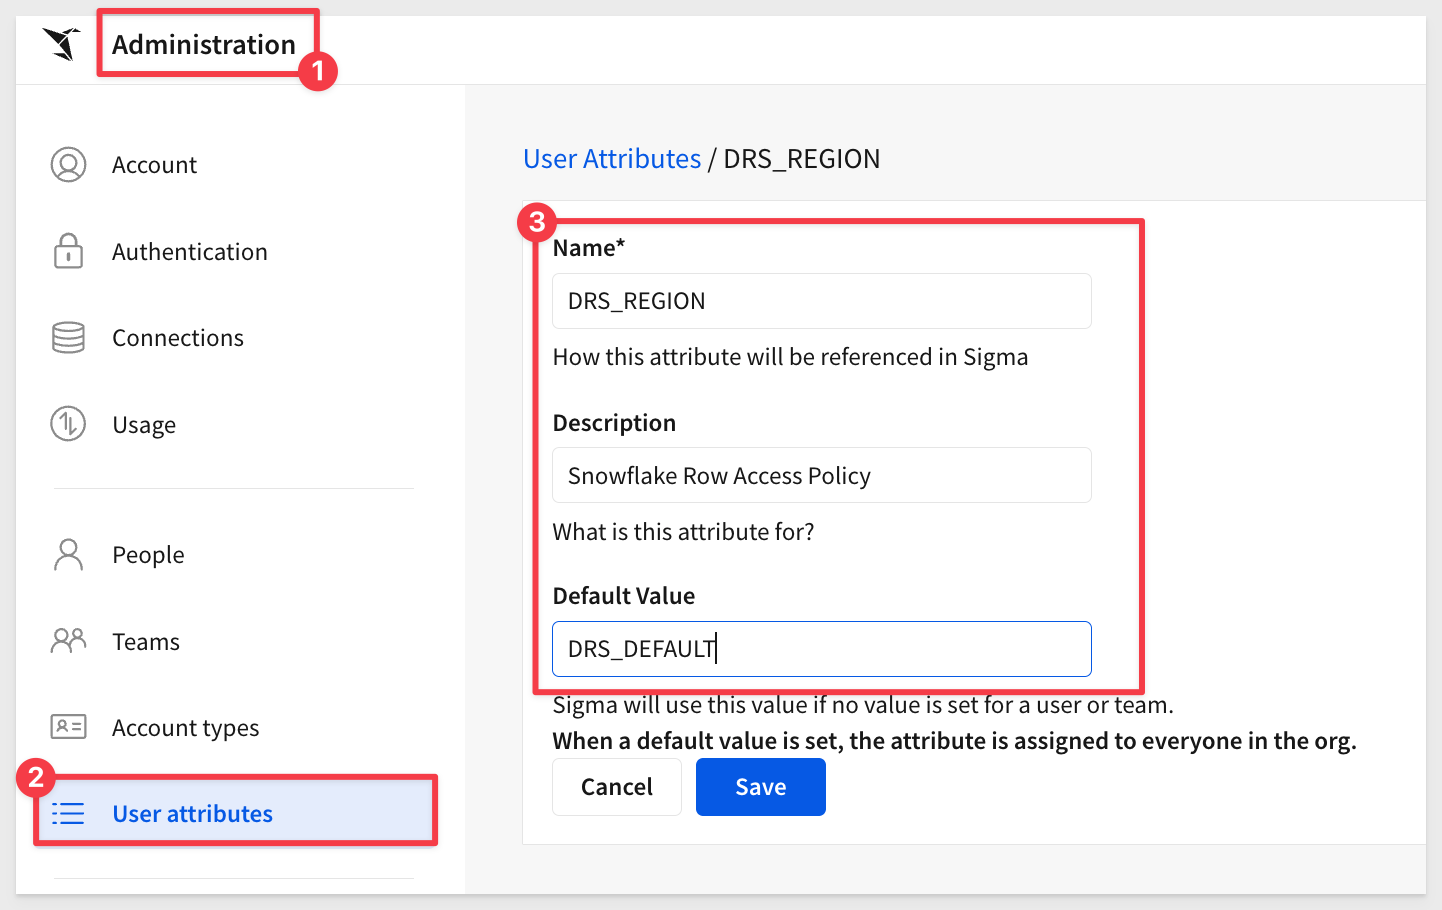
Click Create.
Snowflake will evaluate the passed value as a role assignment. We don't need to manually assign the user attribute to any team or member.
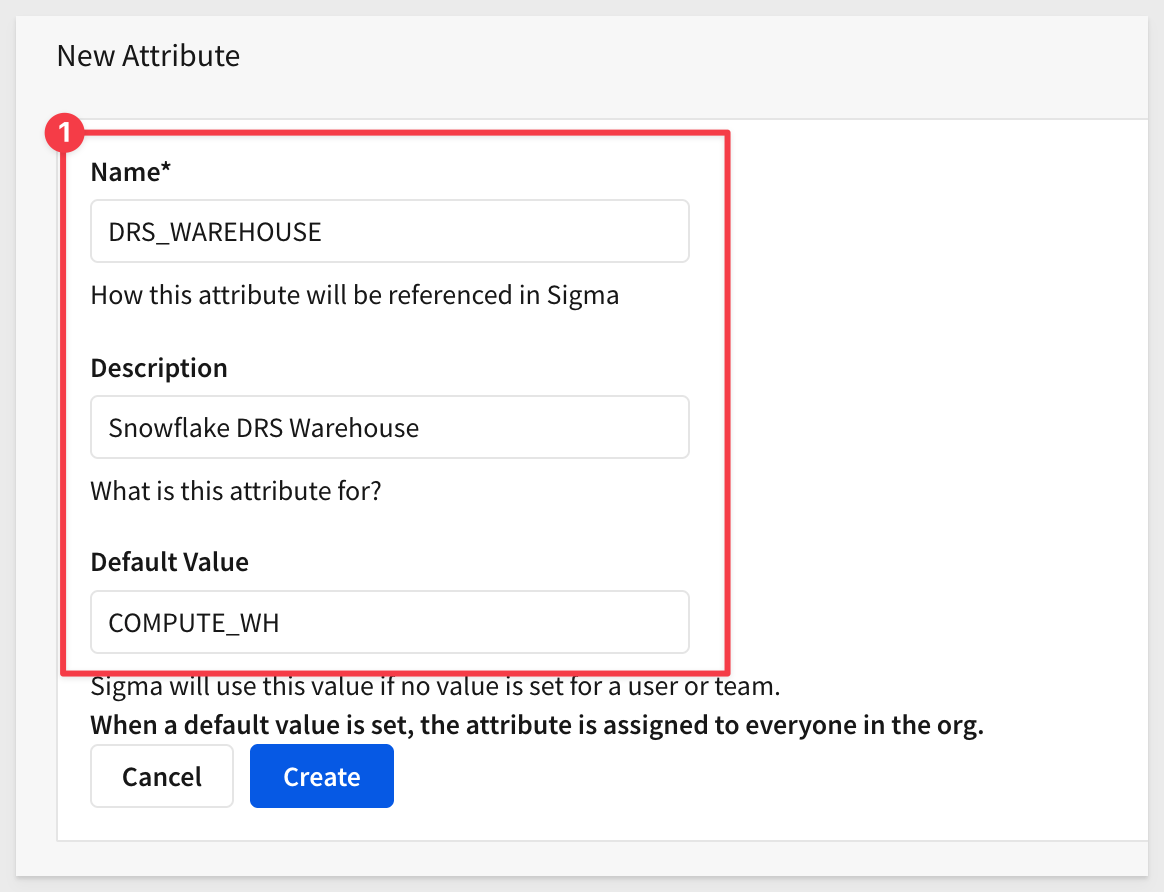
Create another User Attribute for warehouse as shown and click Create:
Navigate to Administration / Connection and edit the connection called Snowflake Trial Account.
Click the  bars in
 Role and select the new user attribute called DRS_REGION should be available.
Repeat the same steps for Warehouse.
Save the connection (you will need to supply your Snowflake account password again).
Create a Connection to Snowflake
Navigate to Administration > Connections and create a new connection to our Snowflake account.
For more information, see Connect to Snowflake
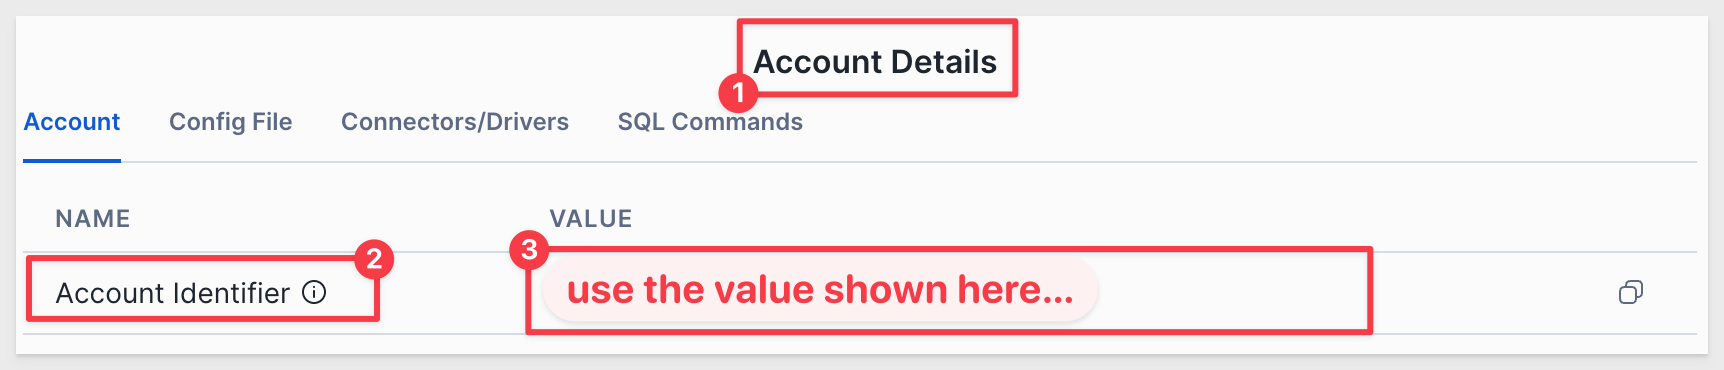
You will need your Snowflake details to connect. To get the account url from Snowflake, click on View account details as shown below:
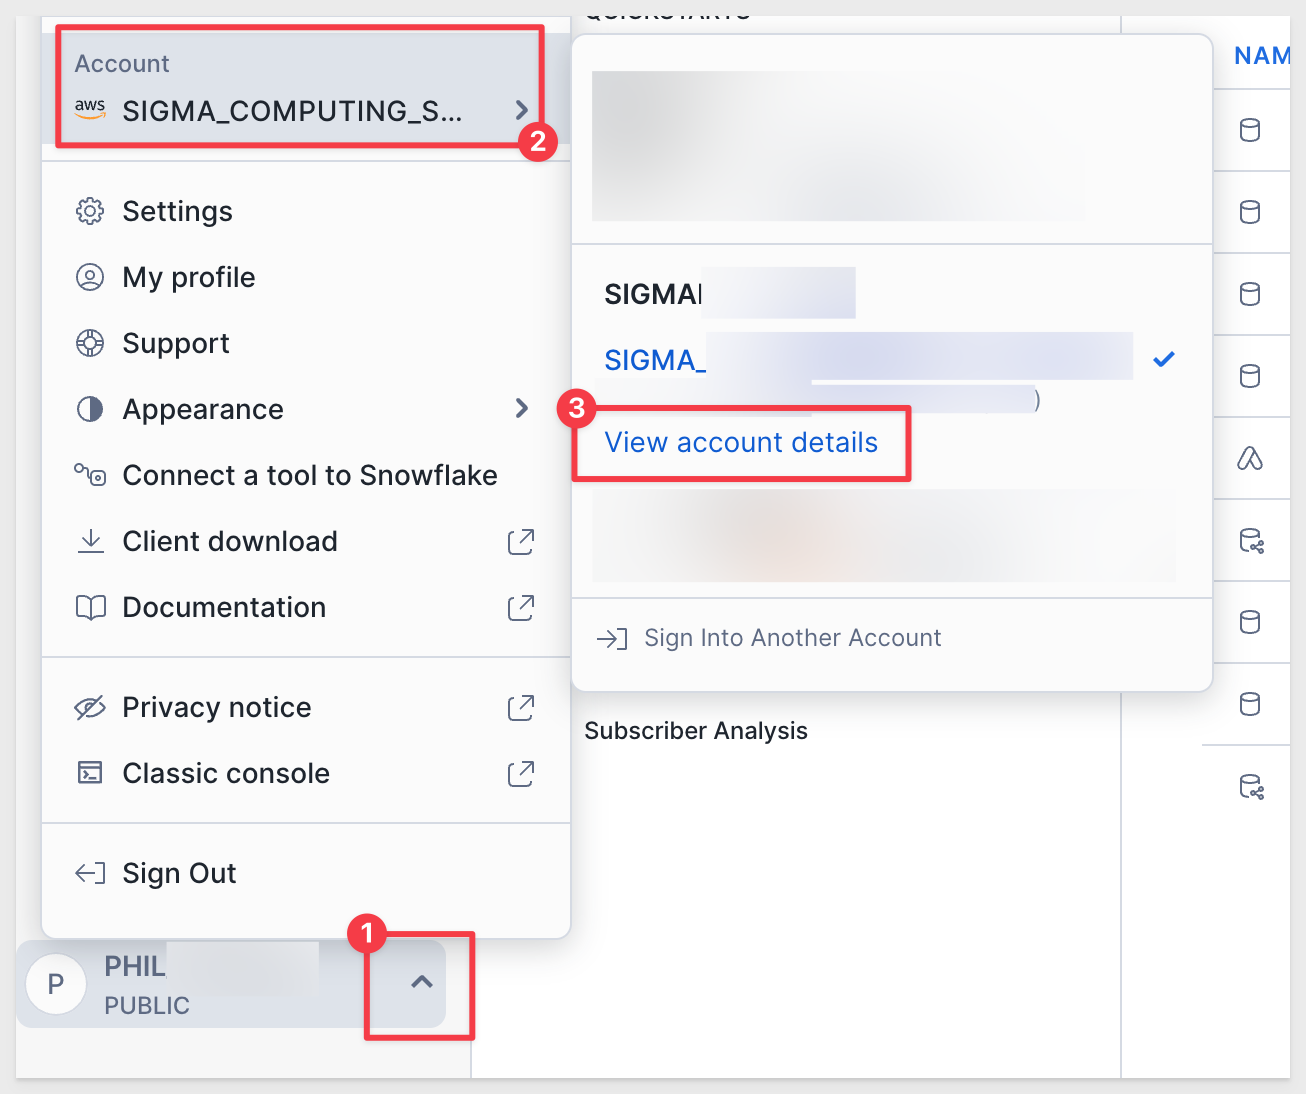
Use the value shown under Account Identifier:
Use this Account URL to configure a new connection in Sigma, replacing the information for your Snowflake instance:
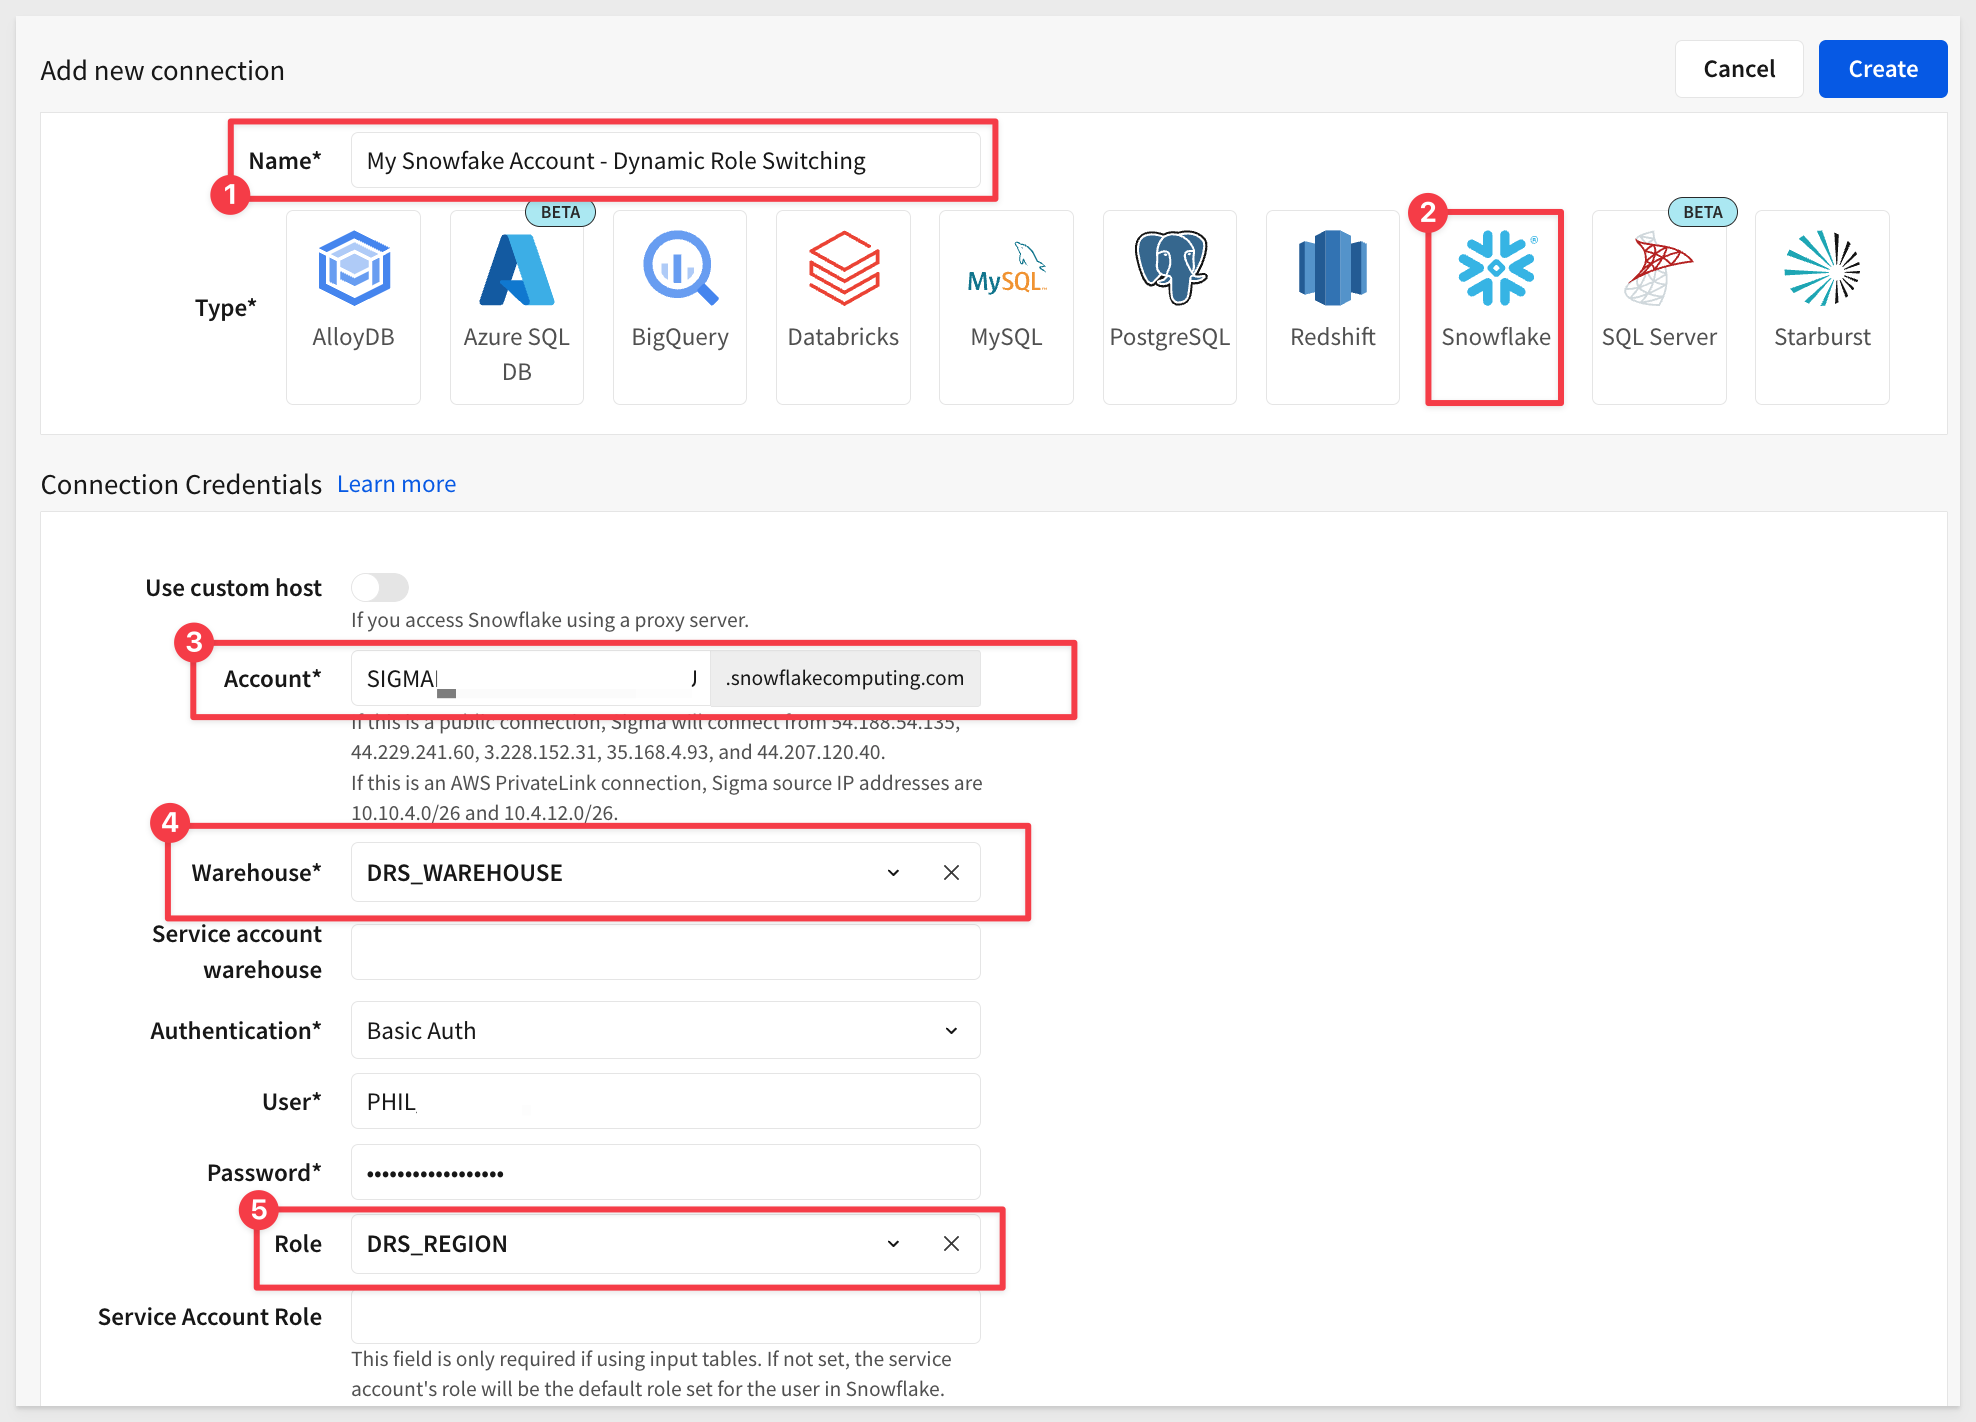
Click Create. Sigma will validate the connection based on your configuration. Once done, the connection information will display with no error messages.
For more information, see:
Connect to Snowflake with key pair authentication
Connect to Snowflake with OAuth
There is a QuickStart, Snowflake Key-pair Authorization
Create New Sigma Team
Navigate to Administration > Teams and click Create team.
Name the team DRS_Team and click Create:
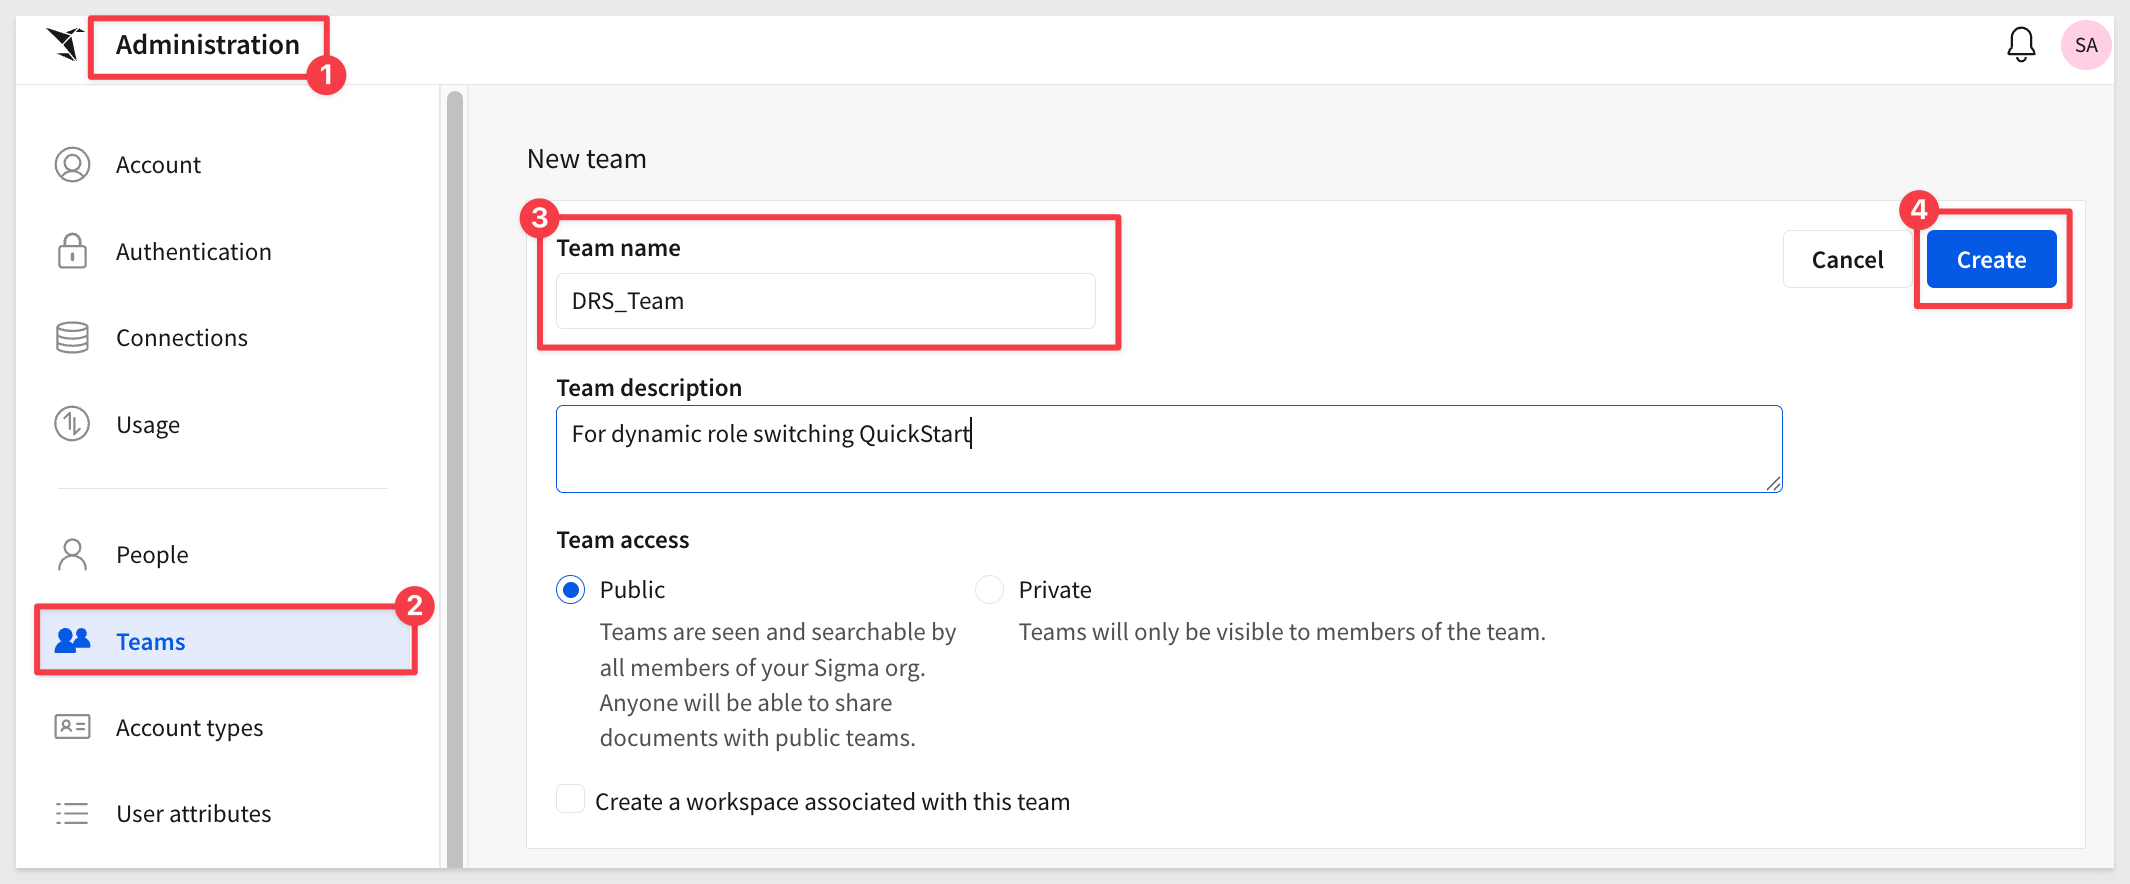
We'll use this team later to control the data shown to embedded users based on their Snowflake role.
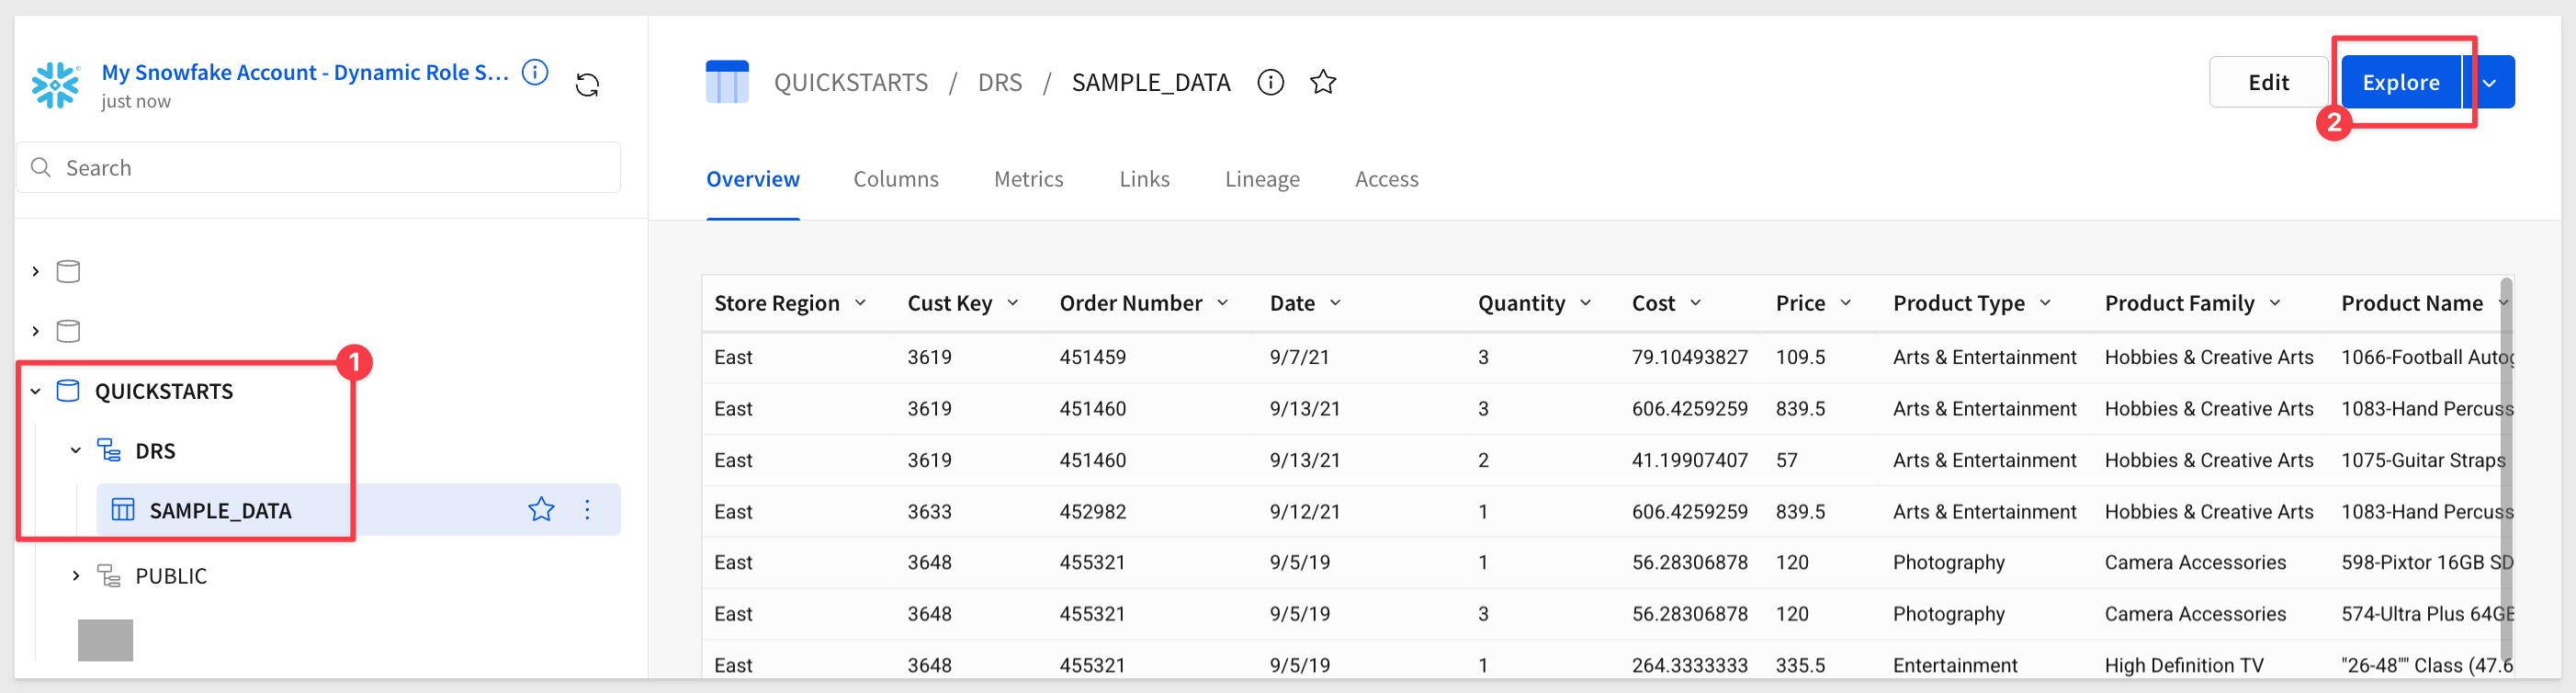
Instead of creating a new workbook in Sigma, we can browse the Connections from the homepage:
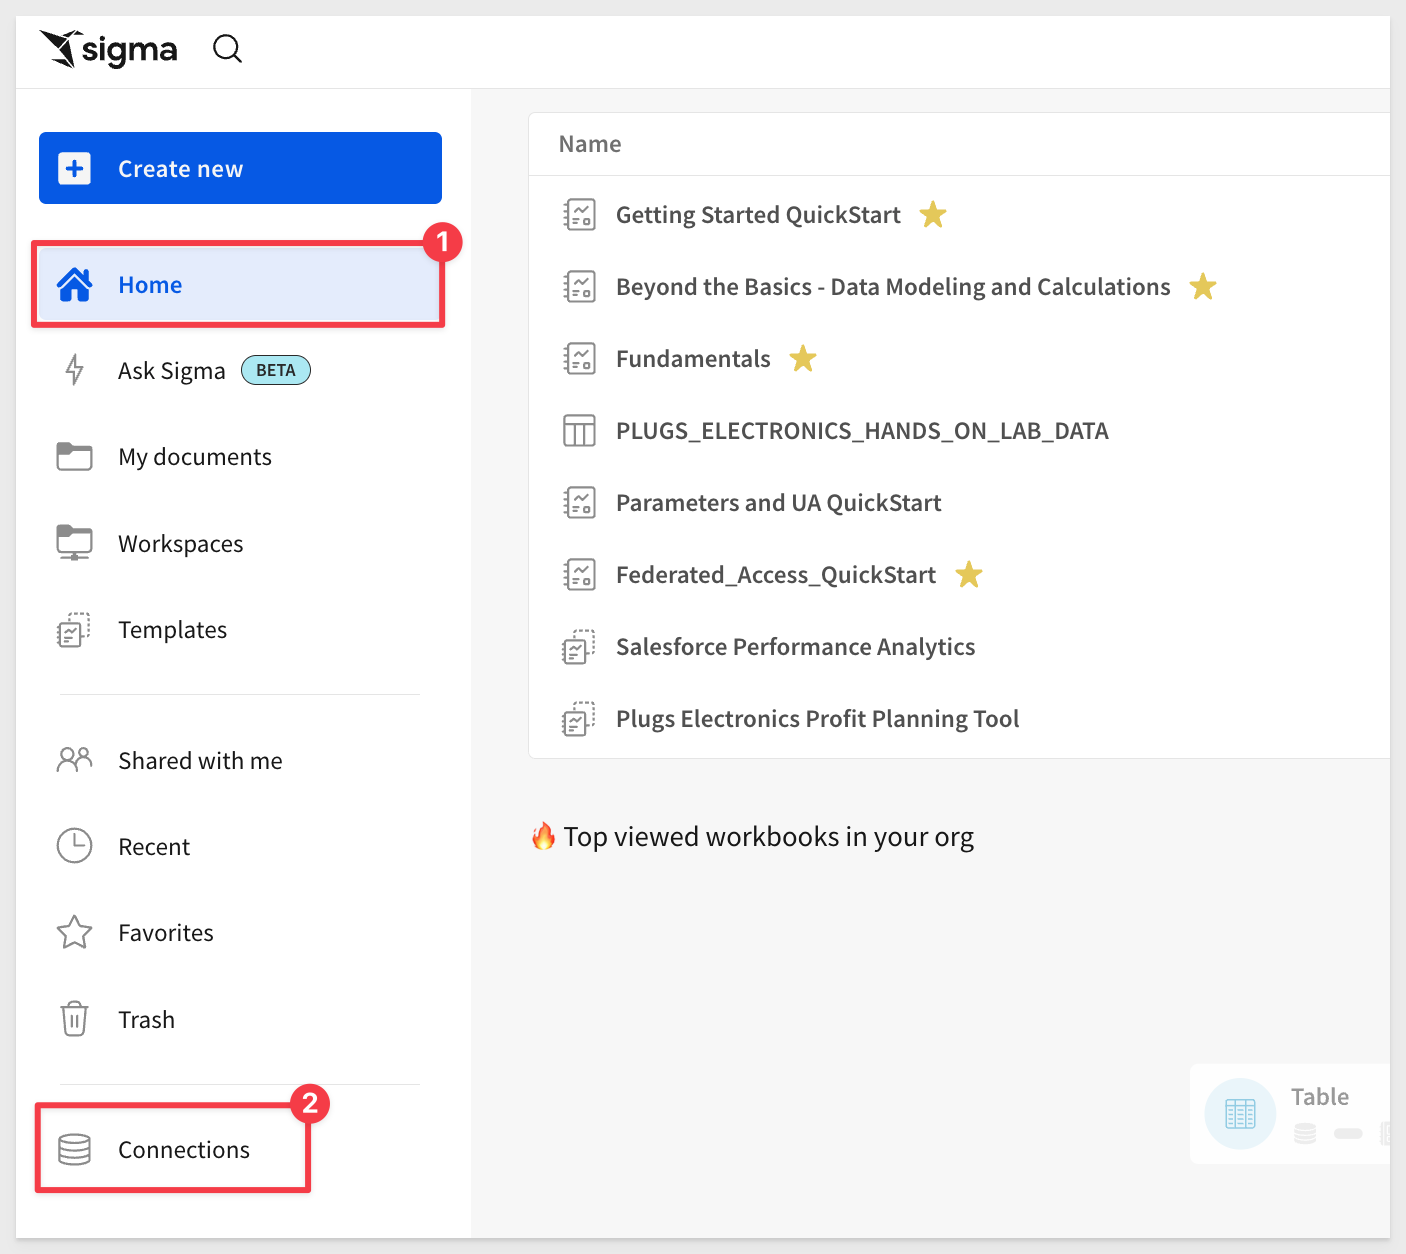
Select the connection you created earlier; ours was named My Snowflake Account - Dynamic Role Switching.
Open the QUICKSTARTS > DRS > SAMPLE_DATA table and click Explore:
Let's add two Text boxes from the element bar to display the current user's warehouse and role:
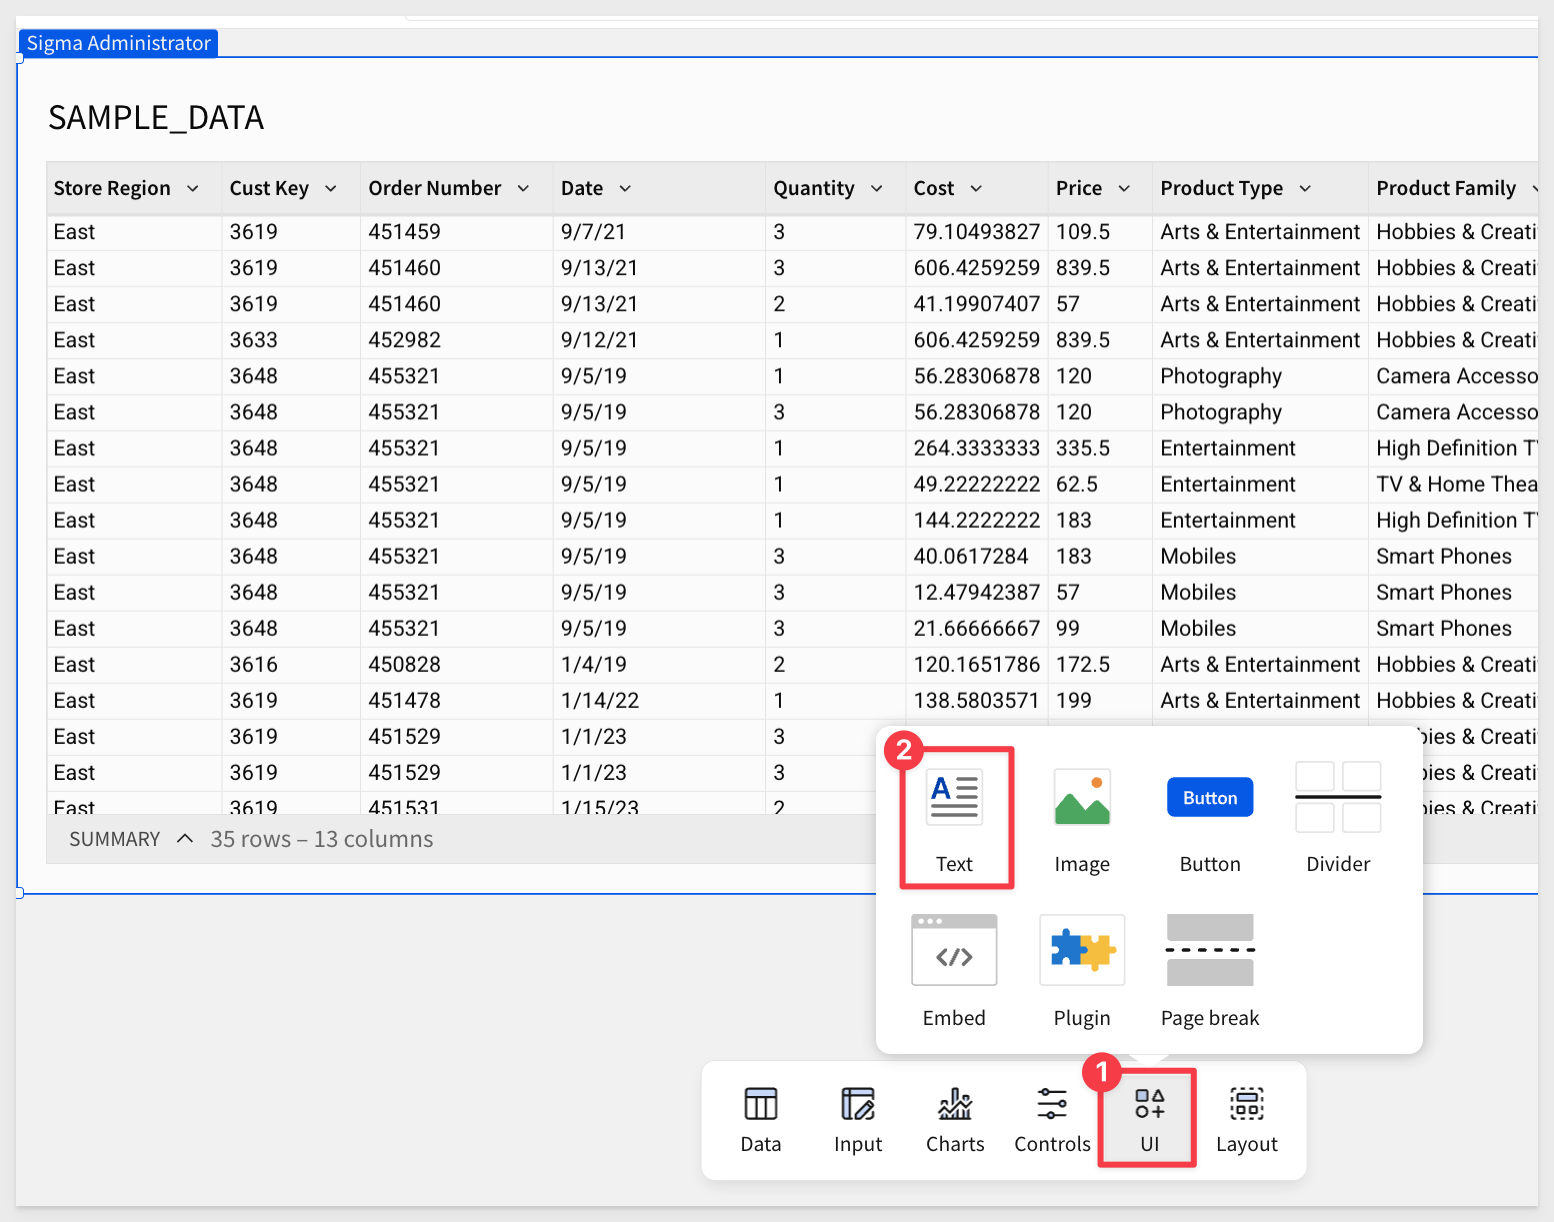
Configure each text box as follows:
ROLE TEXTBOX FUNCTION:
=CurrentUserAttributeText("DRS_REGION")
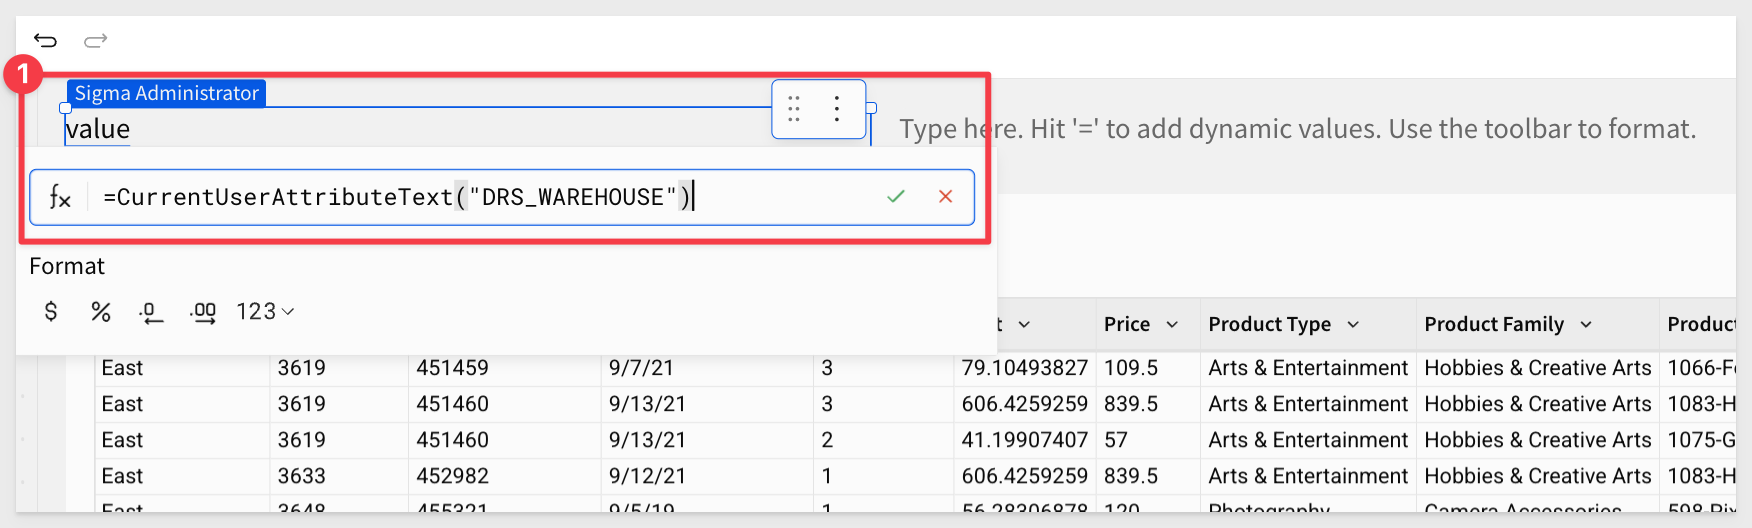
WAREHOUSE TEXTBOX FUNCTION:
=CurrentUserAttributeText("DRS_WAREHOUSE")
The workbook now looks like this. Some additional text description was added to each text box but that is optional. Add text after the function is set and showing a value. You can then type additional text before or after the formula result:
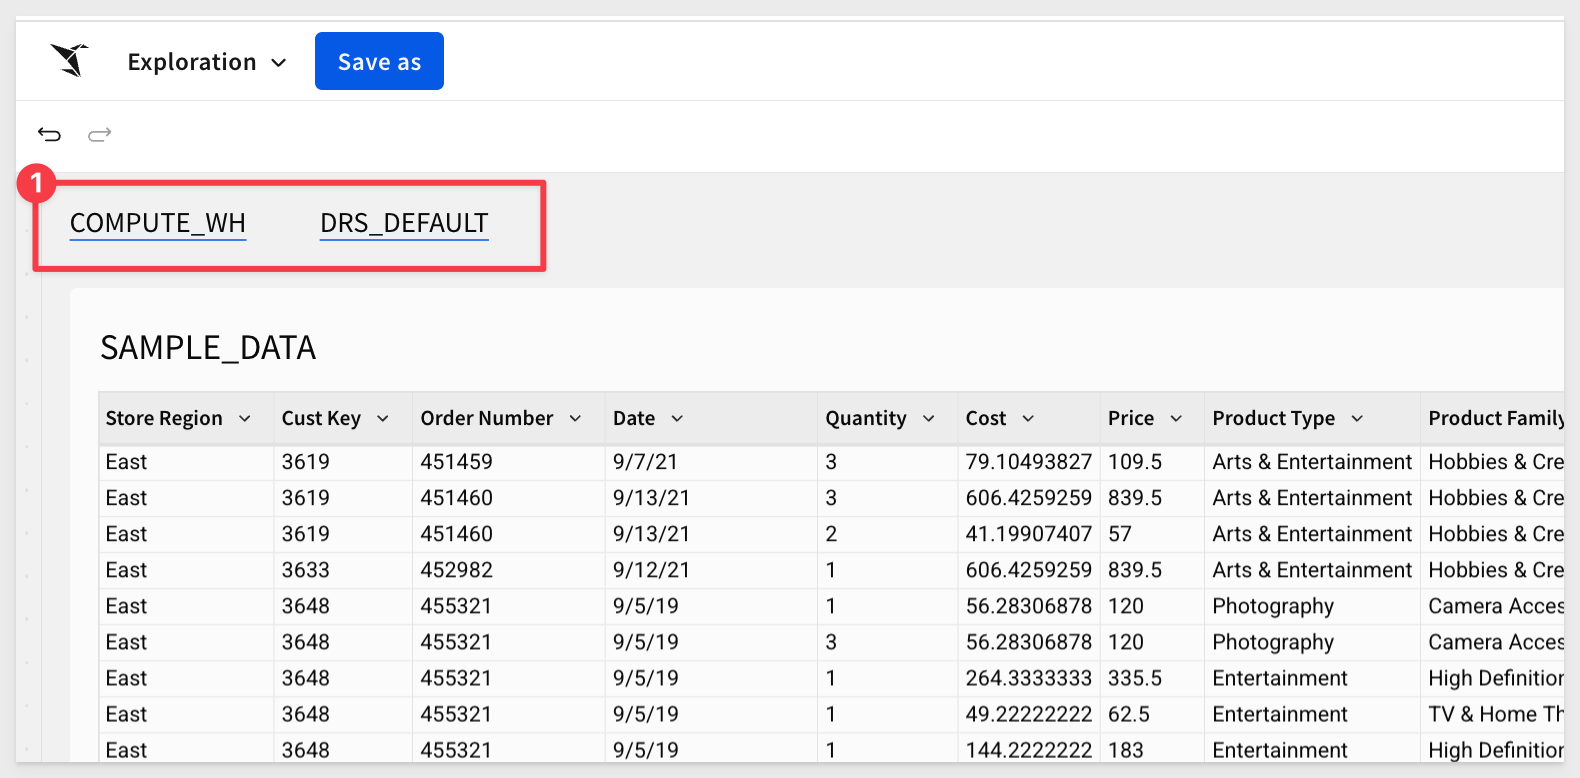
The values initially shown are the User Attribute default values we set earlier.
Click Save as and name the workbook Dynamic Role Switching QuickStart.
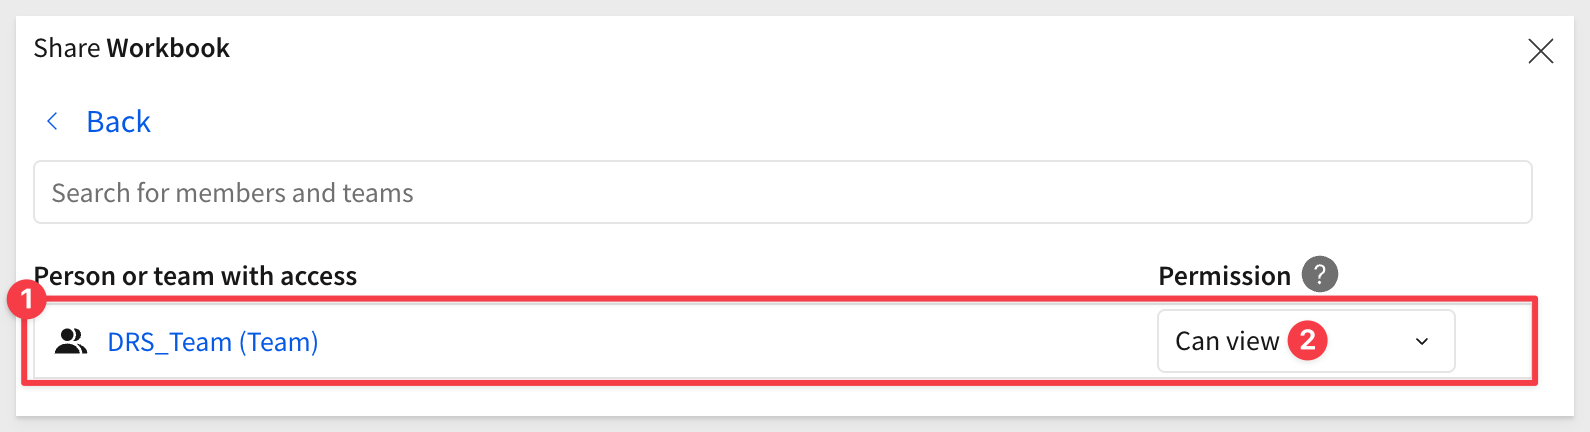
Click the  in the upper right corner and share the workbook with the
 DRS_Team with Can View access:
When we saved the workbook, it was also automatically published. The published URL is what we want to copy for this embed.
Copy the published URL to use in the embed.
We are now ready to test the embed in our native application.
We will move through this quickly, as it is assumed you have done similar configurations before in the Getting Started QuickStart.
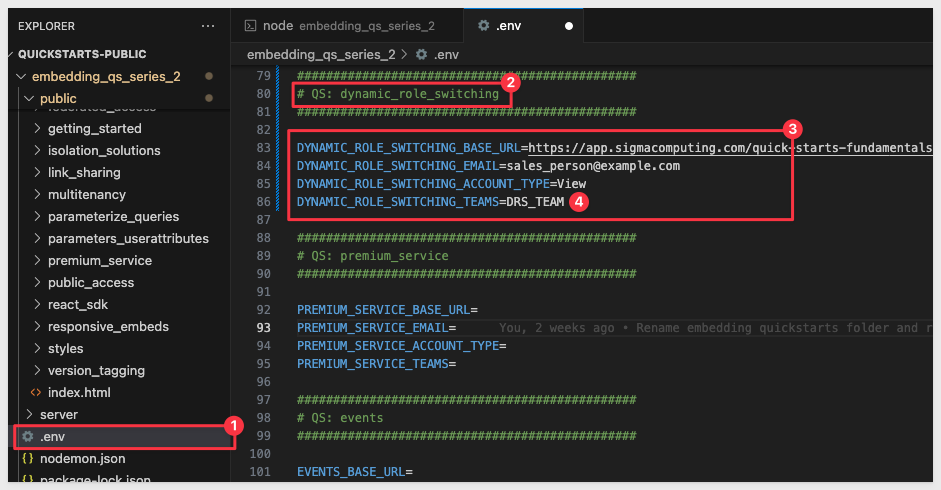
In VSCode, open the embedding_qs_series_2 project and edit the .env file, adding the URL to the # QS: dynamic_role_switching section and setting the parameters as shown, using your own base URL:
In VSCode > Terminal, start the local web server:
npm start
In a browser, open:
http://localhost:3000/dynamic_role_switching/?mode=dynamic_role_switching
The embed loads but all No data is shown. This is because we have not passed a value for DRS_REGION:
Additionally, the embed-api.js includes a fallback mechanism to ensure that if no value for DRS_REGION is sent or if an invalid one is, data is not displayed.
This adds a small layer of effort, but it aligns with best practices for data security.
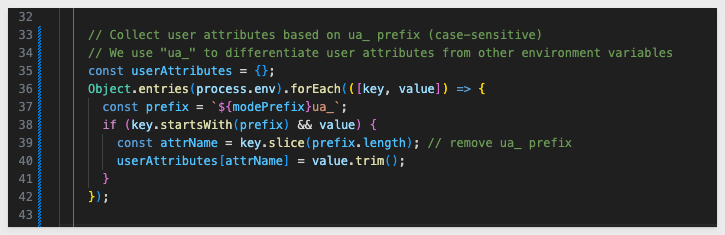
User Attribute Collection Block
This block extracts user attributes from the .env file that are specific to the current QuickStart mode (e.g., DYNAMIC_ROLE_SWITCHING_ua_DRS_REGION).
It looks for environment variables starting with a prefix like DYNAMIC_ROLE_SWITCHING_ua_.
It removes the prefix and adds the attribute to the userAttributes object.
This structure is then injected into the JWT.
This allows each QuickStart to independently declare user attributes (if you decide to do that later) without interfering with others and supports runtime customization for security controls like RLS or Snowflake role switching.
This is the code block in embed-api.js:
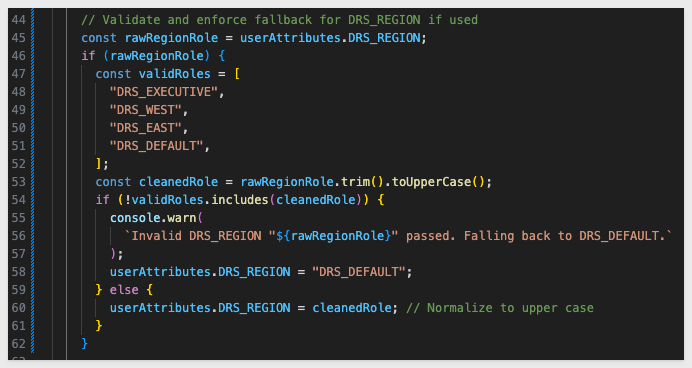
DRS_REGION Validation Block
This code ensures that the value passed for DRS_REGIONis valid and safe to use for Snowflake role switching.
If an unrecognized role (like DRS_SOUTH) is passed, it replaces it with DRS_DEFAULT.
It prevents runtime errors in Snowflake by blocking invalid roles and ensures graceful fallback behavior.
This is the code block in embed-api.js:
Let's configure the DRS_REGION user attribute in the .env file.
In the # QS: dynamic_role_switching section, set the UA parameter:
# dynamic_role_switching USER ATTRIBUTES
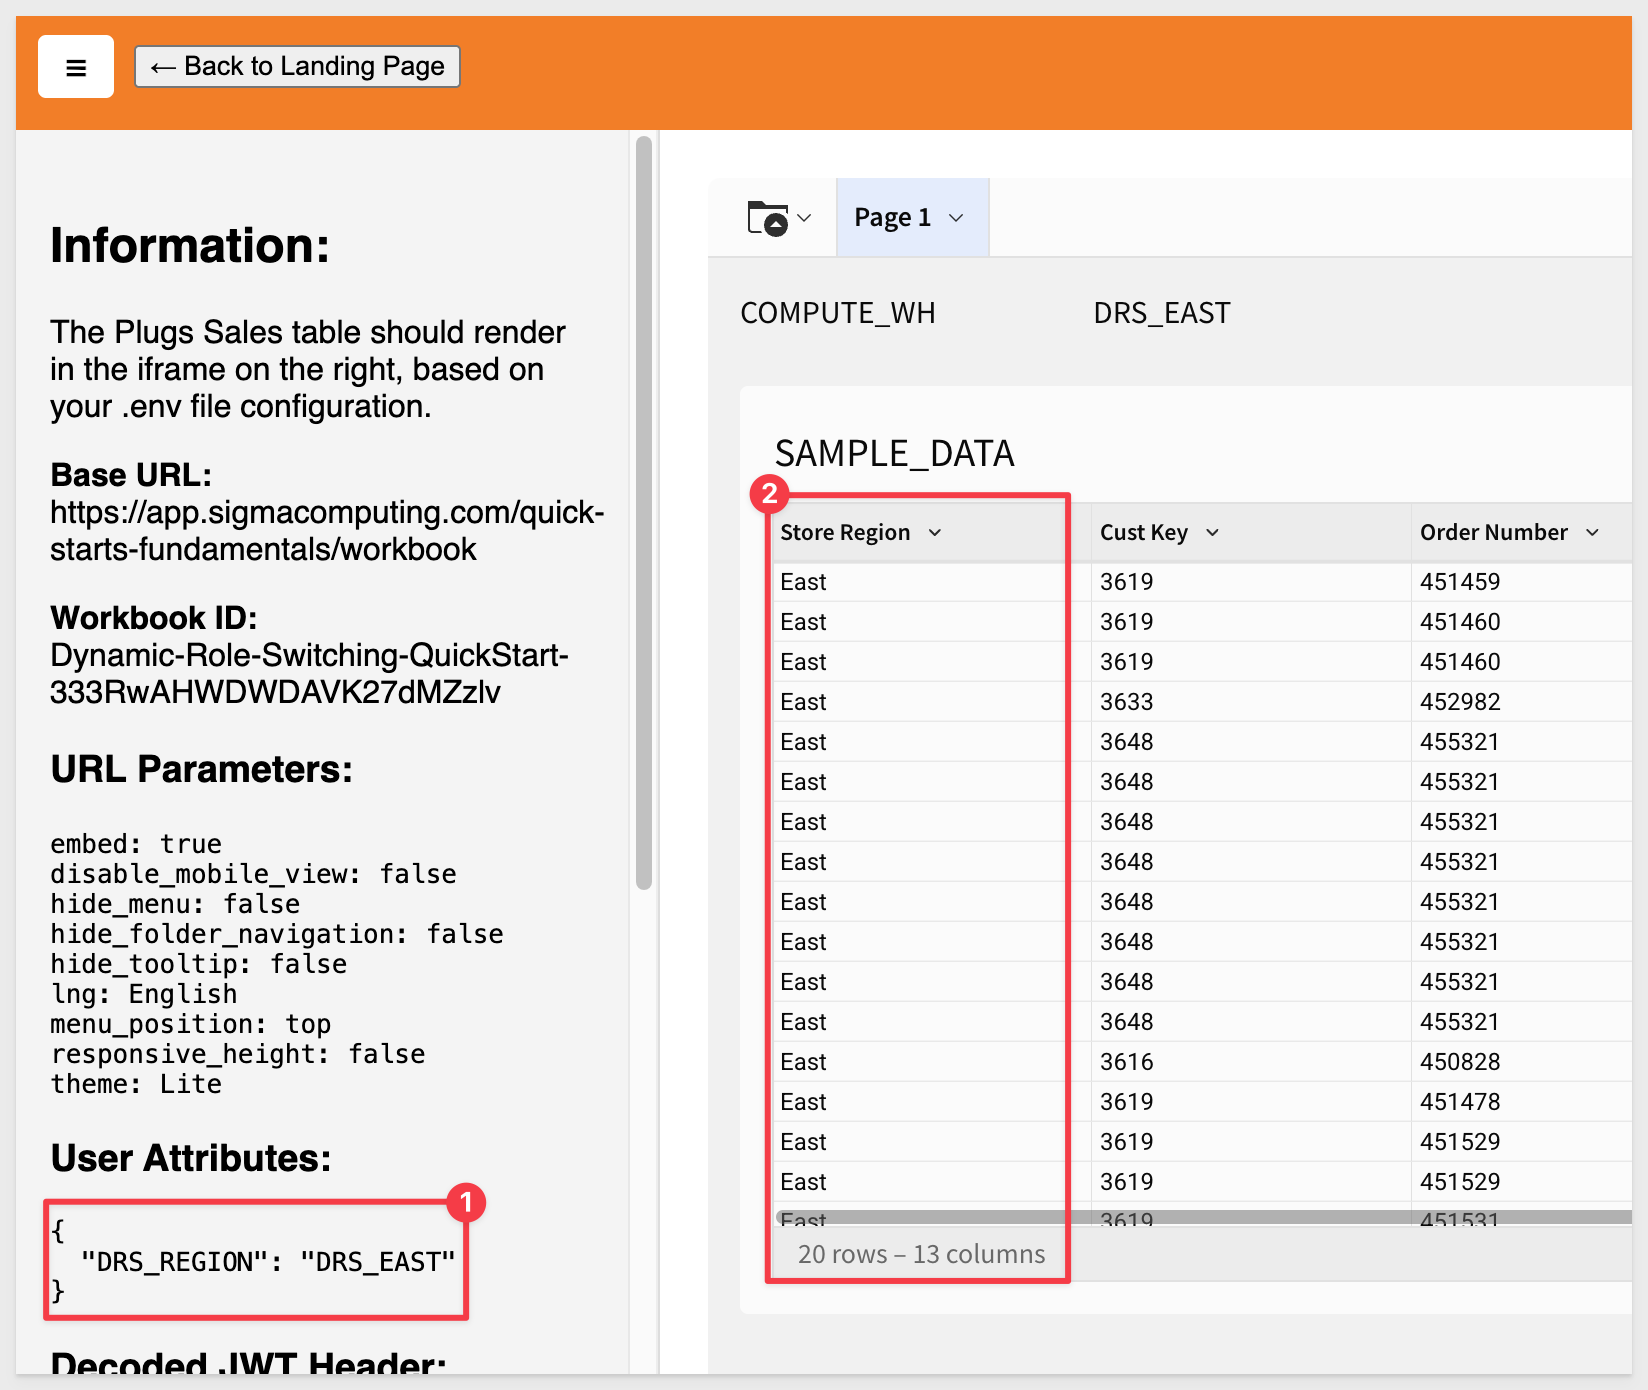
DYNAMIC_ROLE_SWITCHING_ua_DRS_REGION=DRS_EAST
Save the file.
Reload the browser to see all 20 rows in the East region:
Test changing the UA to DRS_WEST. This should return 10 rows for the West region.
Try sending no value. Our fall-back logic will apply the DRS_DEFAULT role and show No data:
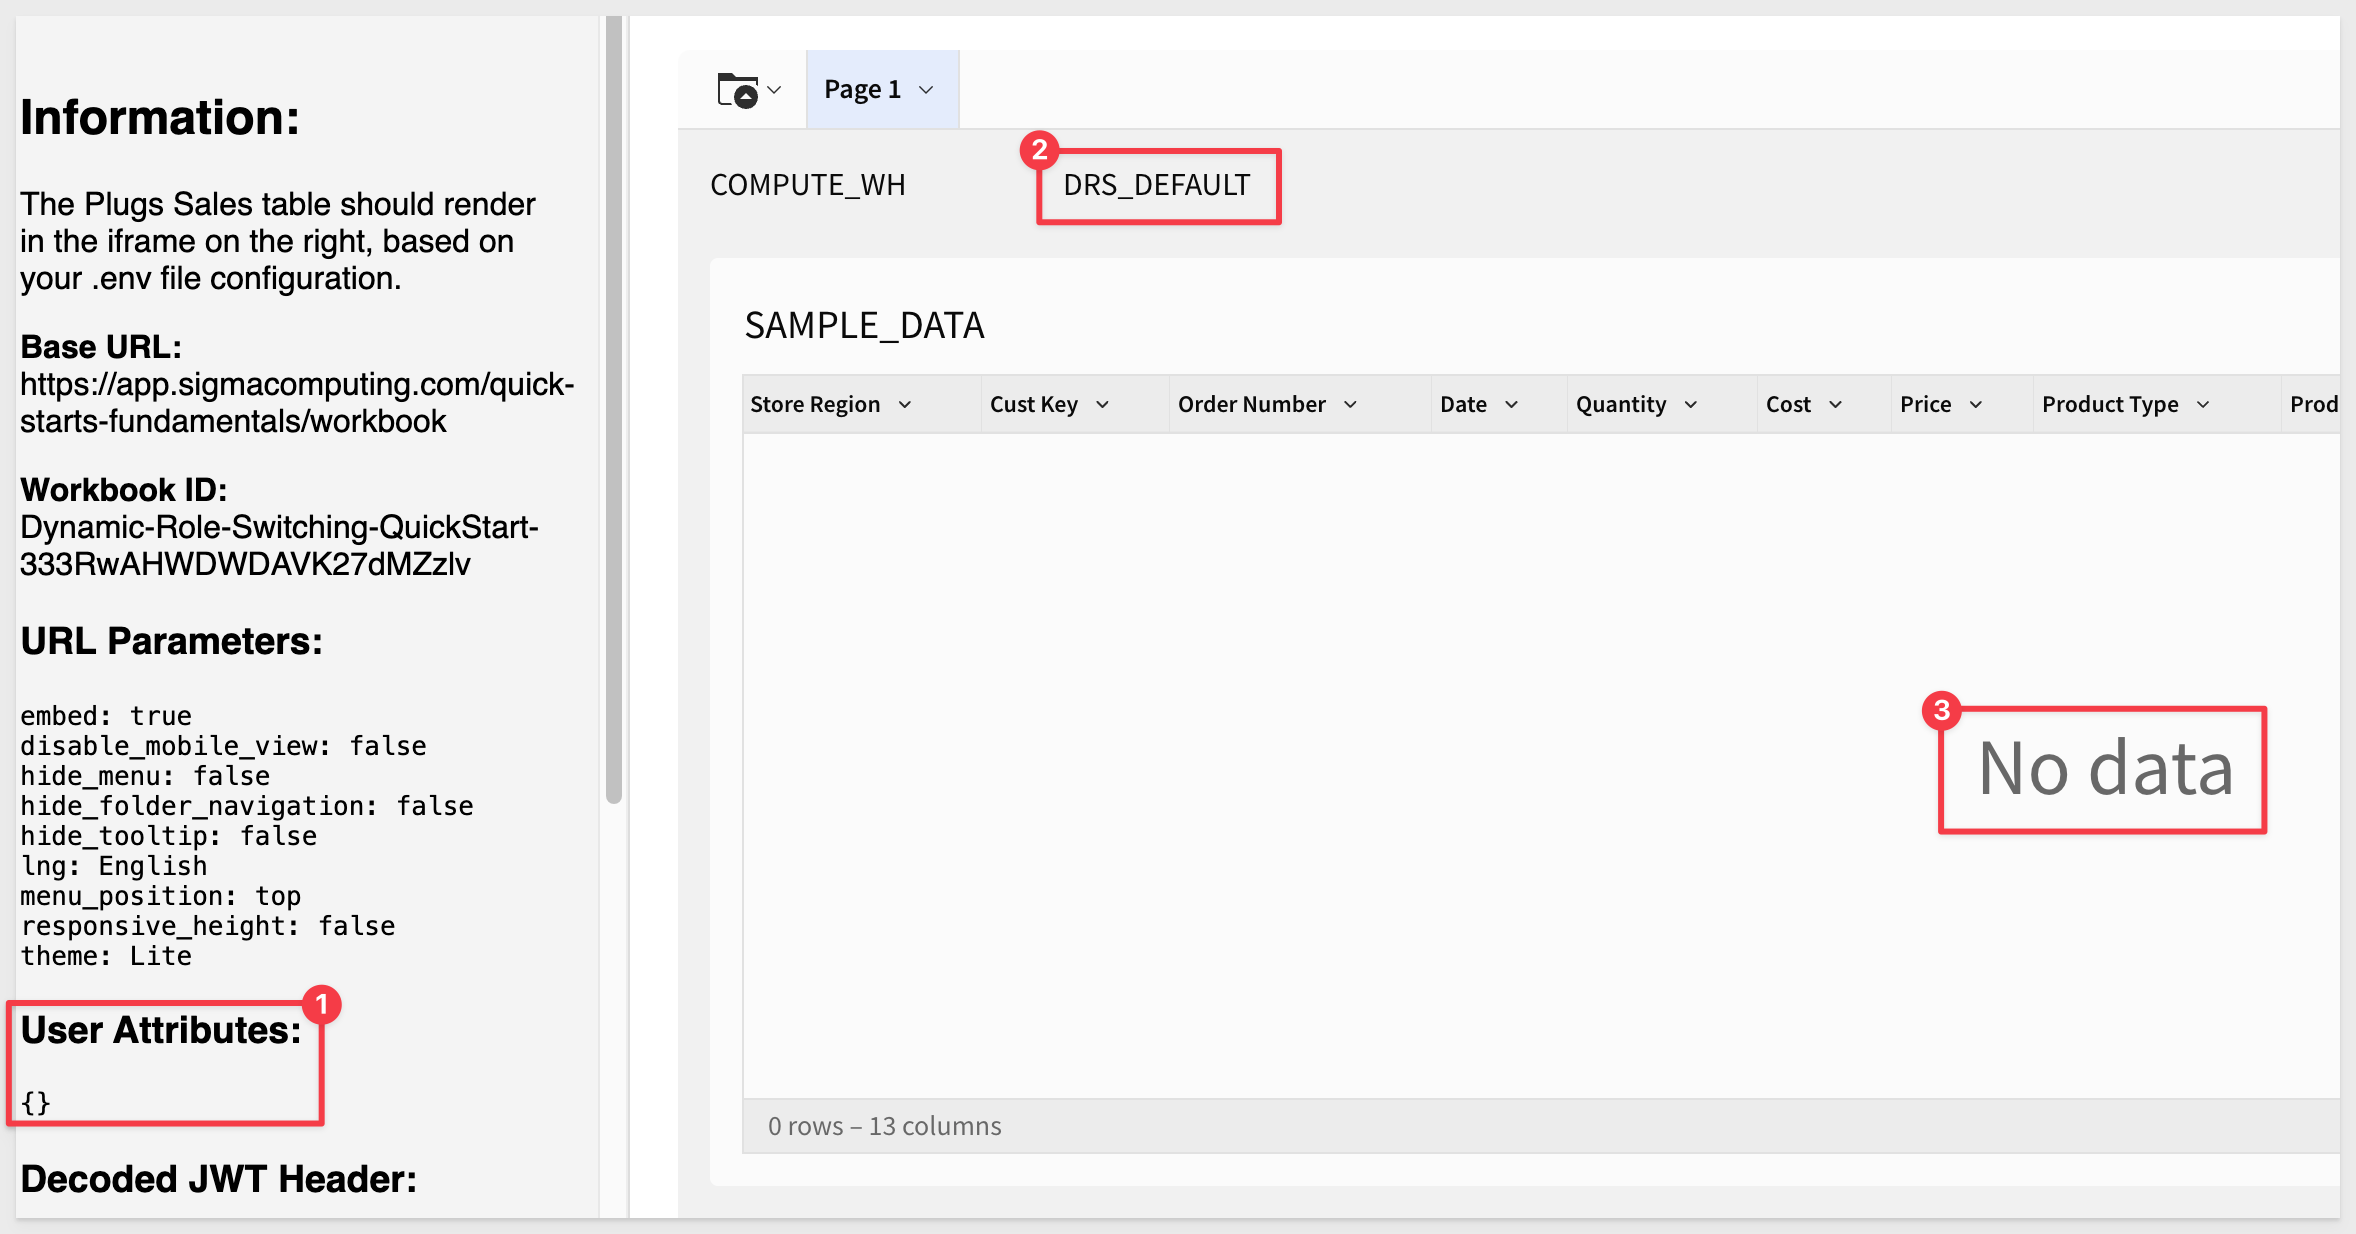
It will also display No data if an invalid or misspelled role is passed.
Since we've already walked through the configuration process, we'll move through this example quickly.
We already created a user attribute for warehouse in Sigma. Next, we'll create a second warehouse in Snowflake.
Create Warehouse
In Snowflake, run the following script:
// ----------------------------------------------------------------------------------------------------------
// SECTION 4: CREATE A SECOND WAREHOUSE AND GRANT USAGE PERMISSION ON THE WAREHOUSES TO NEW ROLES:
// ----------------------------------------------------------------------------------------------------------

USE ROLE ACCOUNTADMIN;
CREATE WAREHOUSE COMPUTE_WH2 WAREHOUSE_SIZE=SMALL AUTO_SUSPEND = 5;
GRANT USAGE ON WAREHOUSE COMPUTE_WH2 TO DRS_Executive;
GRANT USAGE ON WAREHOUSE COMPUTE_WH2 TO DRS_West;
GRANT USAGE ON WAREHOUSE COMPUTE_WH2 TO DRS_East;
USE WAREHOUSE COMPUTE_WH2;
Once the query is completed, Snowflake will return Statement executed successfully.
Now, update the .env file to add the required user attribute:
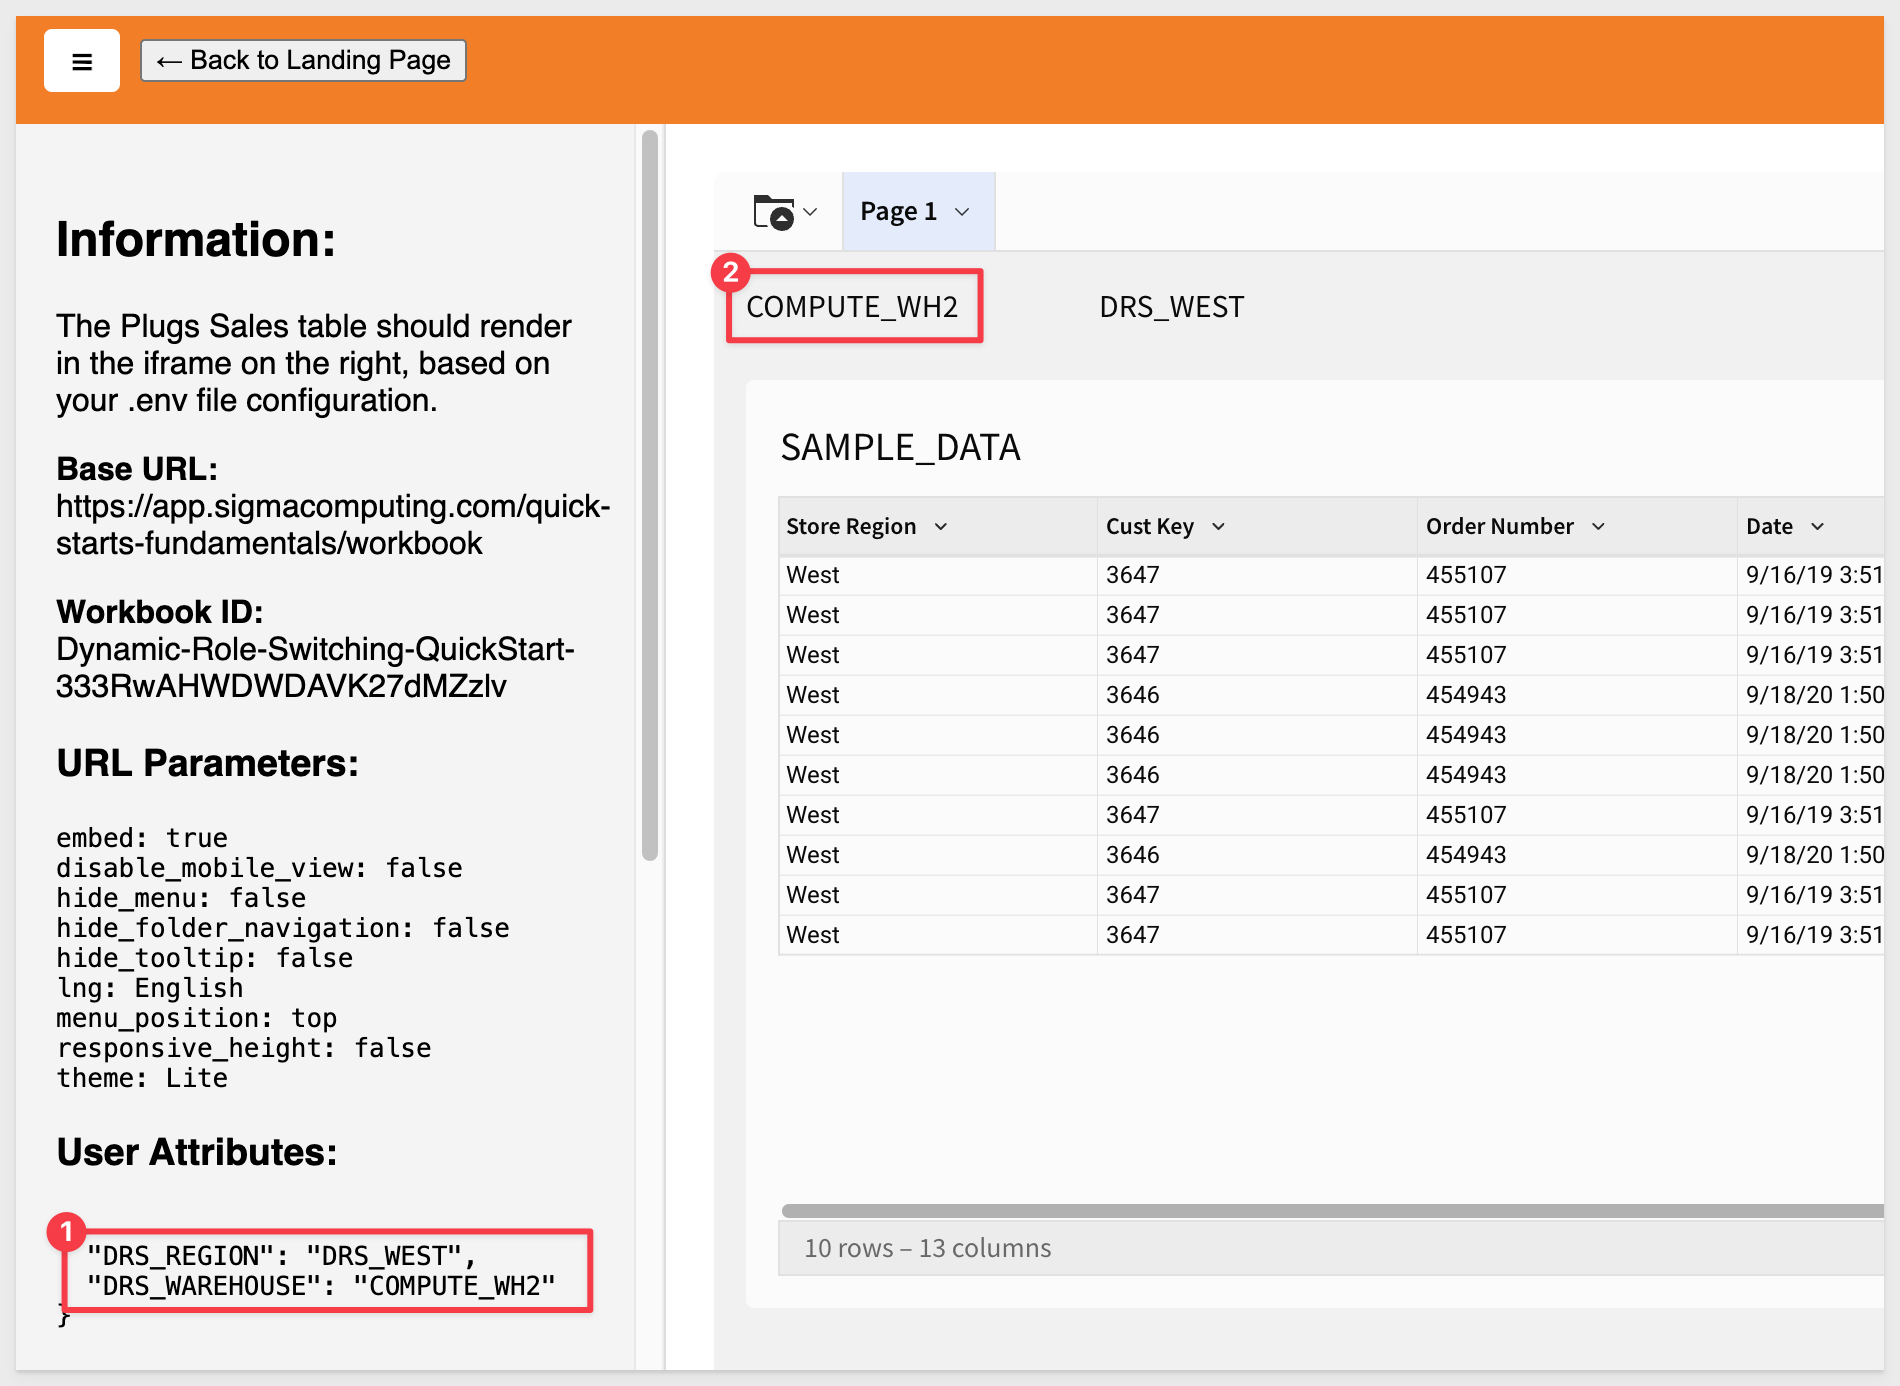
DYNAMIC_ROLE_SWITCHING_ua_DRS_WAREHOUSE=COMPUTE_WH2
Save the file.
Refresh the browser:
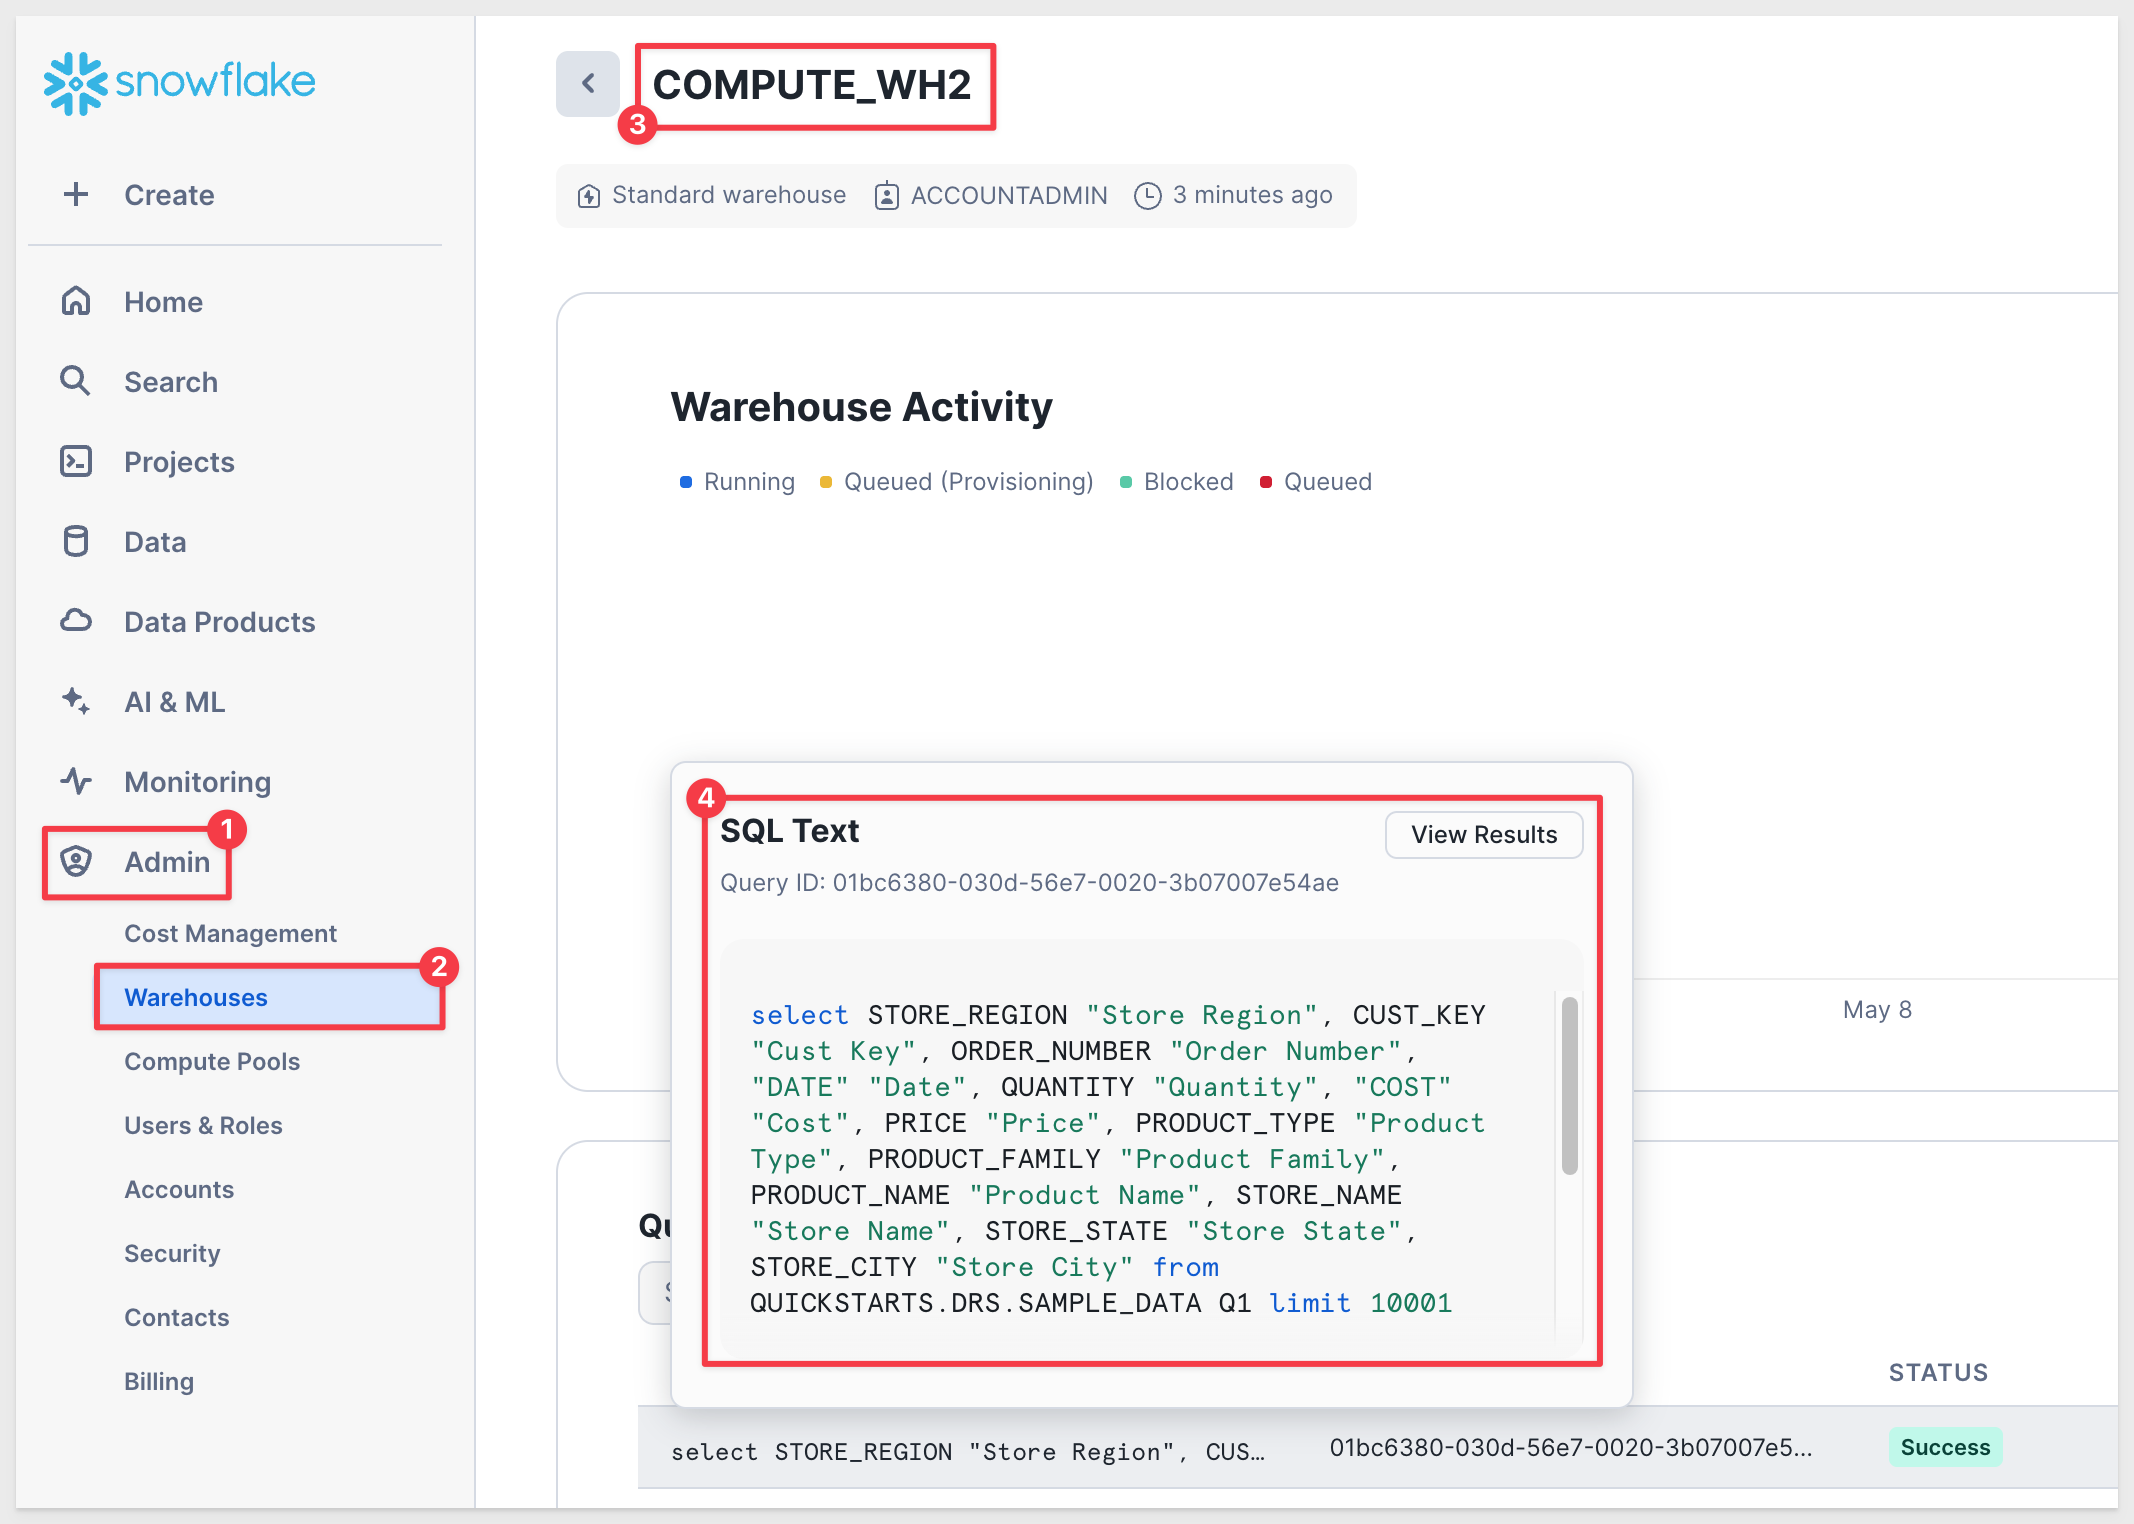
We confirm that COMPUTE_WH2 is being used in the Admin section of Snowflake:
In this QuickStart, we created Snowflake assets and a row access policy, and demonstrated how to use Sigma's dynamic connection and role switching (DRS) to control data visibility at runtime. By passing user attributes through a secure embed using JWT, we limited the data exposed to each user based on their assigned Snowflake role—ensuring secure, scalable, and flexible access control.
Additional Resource Links
Blog
Community
Help Center
QuickStarts
Be sure to check out all the latest developments at Sigma's First Friday Feature page!