Sigma supports Basic Auth (username + password) and OAuth for new Snowflake connections.
With this feature release, we've added support for the key pair authentication method (public key + private key) for Snowflake connections.
Snowflake supports key pair authentication using a combination of public and private RSA key pairs. The private key remains with the client (Sigma), while the corresponding public key is stored by the holder of the correct public key (in this case, Snowflake).
Using public and private keys for encryption and decryption, commonly known as public-key cryptography or asymmetric cryptography, offers multiple benefits to businesses:
Some specifics:
The main idea is that Snowflake can verify the client's identity without the client ever revealing its private key.
Each public key corresponds to only one private key.
Private keys can be associated with one or multiple public key holders (for example, multiple Sigma connections, if you prefer to use one private key).
Data encrypted with the private key can only be decrypted with the public key, and vice versa.
Together, they encrypt and decrypt messages. In this context, the messages are Sigma's connections to Snowflake as configured in Sigma.
For authentication purposes, Sigma uses the private key to generate a digital signature. A digital signature assures that the person/service sending the message is who they claim to be.
The client decrypts the signature using the public key and compares the hash to its own computed hash. If the values match, Sigma's authentication is confirmed.
We'll discuss RSA encryption further in the next (optional) section, which is provided for its educational value.
For more information on Sigma's product release strategy, see Sigma product releases.
Target Audience
Sigma administrators interested in implementing RSA connection encryption via key pair authorization and key rotation.
Prerequisites
- A computer with a current browser. It does not matter which browser you want to use.
- Access to a Sigma environment.
- Access to a Snowflake environment. Enterprise is required for trial account testing
- Some familiarity with Sigma is assumed. Not all steps will be shown as the basics are assumed to be understood.
Snowflake uses RSA 2048-bit encryption for its support of key pair authorization.
Sigma can leverage this support through its custom Go driver, which is used to create connections to Snowflake.
It's important to have a general understanding of RSA encryption (RSA) to fully appreciate its effectiveness. We'd be remiss not to mention the three inventors behind RSA, who developed it back in 1977. In fact, the name RSA is derived from their initials:
While RSA has evolved over the years, its core security principle remains rooted in the challenge of factoring semi-prime numbers.
A semi-prime number is a natural number that is the product of two prime numbers.
Factoring a semi-prime results in two prime numbers.
A genuine example of a semi-prime is the number 15. 15 is the product of two prime numbers: 3 and 5. So, 15 is a semi-prime because it is the product of the prime numbers 3 and 5.
There is no known algorithm that can factor large semi-primes in polynomial time (relative to the number of digits in the semi-prime). All known algorithms require time that grows at least exponentially with the size of the semi-prime, making them infeasible for very large semi-primes.
Quantum algorithms, like Shor's algorithm, have the potential to factor semi-primes in polynomial time. However, as of this writing, large-scale quantum computers capable of running Shor's algorithm efficiently are still in the realm of future possibilities. If they become a reality, they could challenge cryptographic systems that rely on the difficulty of semi-prime factoring, including RSA.
The contest
The RSA Factoring Challenge was introduced by RSA Laboratories on March 18, 1991, offering cash rewards to those who could successfully factor specific numbers.
The organizers released a list of semi-primes (numbers with precisely two prime factors) known as the RSA numbers and attached a cash prize for the successful factorization of select numbers from the list. The smallest of them, a 100-decimal digit number dubbed RSA-100, was successfully factored by April 1, 1991.
Consequently, RSA-100 is no longer seen in commercial applications today. As of 2020, the largest yet-to-be-factored RSA number is RSA-250.
Several larger RSA numbers remain un-factored and are projected to stay that way for a considerable duration.
You can read more about the content here:
As previously highlighted, Snowflake employs RSA-2048, a number that has resisted factorization attempts even with a cash incentive of $200,000.
RSA-2048 is widely regarded as nearly impossible to factor given our current technological capabilities. It may remain so for many years, barring significant breakthroughs in integer factorization or a surge in computational power.
Naturally, both Sigma and Snowflake will make necessary adjustments should advancements occur in this domain.
An example of what a RSA-2048 number looks like is:


Key pair authentication is a method used to authenticate a user or service (like a Sigma connection) based on a pair of keys: a private key, which remains confidential, and a public key, which is shared.
In the context of Snowflake, users or services can authenticate using RSA-2048 private keys instead of traditional passwords.
Key rotation refers to the act of substituting an existing key with a new one, thereby bolstering security.
Here are the basic steps involved:
1. Key Pair Generation:
The user or service generates a pair of keys (private and public). This is typically accomplished using OpenSSL.
2. Public Key Registration with Snowflake:
The public key is then registered with Snowflake.
3. Sigma Connection Creation and Configuration:
After generating the keys, a Sigma connection is created and set up using the private key from step 1.
4. Authentication:
To authenticate a Sigma connection request, Snowflake issues a challenge to Sigma. Sigma then verifies its identity using its private key, without ever exposing it.
5. Key Rotation:
After a predetermined period or under specific conditions, the old key pair is retired and replaced with a new one. The fresh public key is then registered with Snowflake, and the cycle repeats.
We will use OpenSSL to generate our encrypted private key.
Generally, it is safer to generate encrypted keys, although Sigma does support unencrypted private keys too. Sigma recommends communicating with your internal security and governance officers to determine which key type to generate prior to completing this step.
How OpenSSL is installed depends on your operating system; we are using Mac and macOS has shipped with OpenSSL preinstalled since 2000. If you are running a different O/S, consult OpenSSL's documentation.
You can also review the setup that Snowflake recommends here.
Step 1: Private Key
Step 1: Open a new Terminal session:
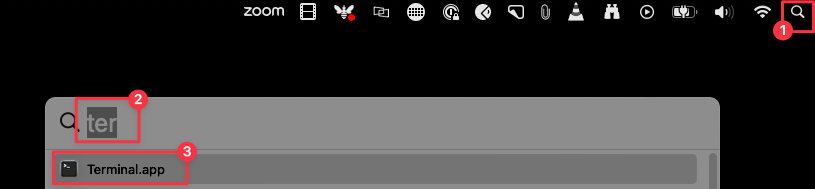
Run the following command:
openssl genrsa 2048 | openssl pkcs8 -topk8 -v2 des3 -inform PEM -out rsa_2048_private_key.p8
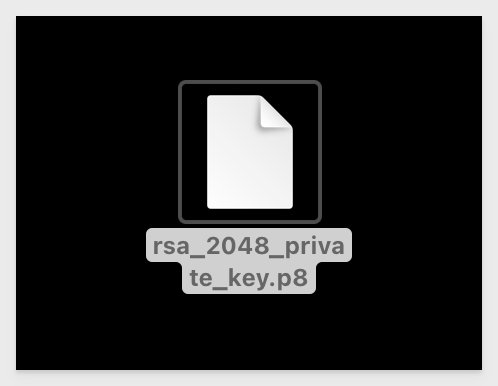
We will place this new file in a folder, on our Desktop.
You will be promoted to enter an encryption key. We will use 1234 for our passphrase. You can choose your own value or use this one. Just make sure to save your encryption key value somewhere safe if you use your own value.

A new file called rsa_2048_private_key.p8 is created on our Desktop:
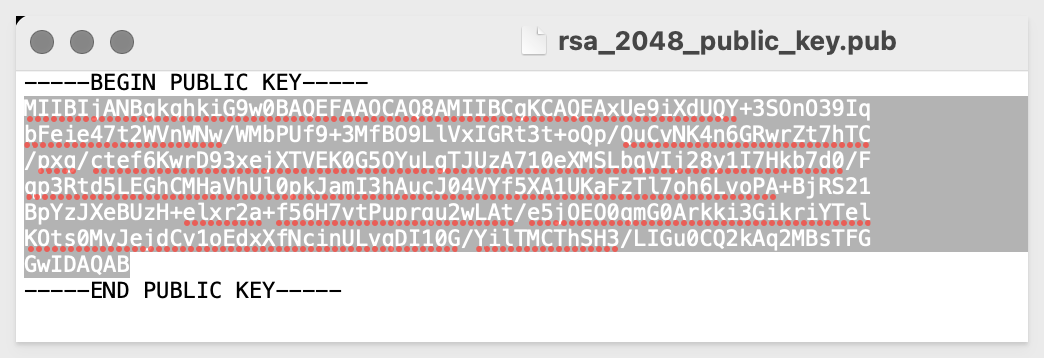
Step 2: Public Key Generation
From the command line, generate the public key by referencing the private key.
The command generates the public key in PEM format.
The following command assumes the private key is encrypted and contained in the file named: rsa_2048_private_key.p8.
openssl rsa -in rsa_2048_private_key.p8 -pubout -out rsa_2048_public_key.pub
You will be prompted for the passphrase (encryption key) we created earlier. Enter that 1234; unless you created your own, then provide that instead:

We now have 2 keys on our desktop, one private and one public:

Step 3: Store Keys Securely
Copy the public and private key files to a local directory for storage. Record the path to the files. Note that the private key is stored using the PKCS#8 (Public Key Cryptography Standards) format and is encrypted using the passphrase you specified in the previous step.
However, the file should still be protected from unauthorized access using the file permission mechanism provided by your operating system. It is your responsibility to secure the file when it is not being used.
We will now assign our public key to a Snowflake user. It is best practice to create a user that is dedicated for this purpose to avoid connection interruption when users are removed from Snowflake (for example, when they leave the company).
This is referred to as a Service Account user and is designed to serve only the purpose of enabling authentication for a particular external application, service or API.
Log into your Snowflake environment, using a user who has the admin role.
Step 1: Snowflake Script:
Since we are using a Snowflake trial account and the provided Snowflake_Sample_Data, there are some limitations that we will handle in the script.
Run each command in the script, one at a time to make sure they run without error. There are nine commands.
For example, copying the value of the public key, without headers/footers:
-- 1: Change Role to ACCOUNTADMIN
USE ROLE ACCOUNTADMIN;

-- 2: Resume default warehouse to use:
ALTER WAREHOUSE COMPUTE_WH RESUME;

-- 3: Set the compute_wh as active:
USE WAREHOUSE COMPUTE_WH;

-- 4: Set database to sample data:
USE DATABASE SNOWFLAKE_SAMPLE_DATA;

-- 5: Create Service Account Role:
CREATE OR REPLACE ROLE sigma_service_account_role comment = 'For Sigma Key Auth QuickStart';

-- 6: Grant privileges to the newly created role on one Snowflake sample database:
-- The Snowflake Sample Database is shared asset and that limits what privileges are allowed. This is ok, we will work around that:
GRANT IMPORTED PRIVILEGES ON DATABASE SNOWFLAKE_SAMPLE_DATA TO ROLE sigma_service_account_role;

-- 7: Create a Service Account user for new Sigma Connection:
CREATE OR REPLACE USER sigma_service_account
    password = 'a*Gu2sc9DBk*8c'
    login_name = 'sigma_service_account'
    display_name = 'sigma_service_account'
    first_name = 'sigma'
    last_name = 'service_account'
    must_change_password = false
    disabled = false
    default_warehouse = sigma_quickstart_wh
    default_namespace = SNOWFLAKE_SAMPLE_DATA
    default_role = sigma_service_account_role
    rsa_public_key = 'PROVIDE YOUR PUBLIC KEY, WITHOUT THE HEADER AND FOOTER TEXT'
    comment = 'For Sigma Key Auth QuickStart';

-- 8: Grant the role to the user
GRANT ROLE sigma_service_account_role to user sigma_service_account;

-- 9: Grant warehouse usage to role:
GRANT USAGE ON WAREHOUSE COMPUTE_WH TO ROLE sigma_service_account_role;
Once all the script steps are run and verified, we can move on to the next step.
Now that we have setup Snowflake with our service account user, role and assigned the public key, we are ready to add a new connection in Sigma
Log into Sigma (as administrator) and navigate to Administration > Connections and click Create Connection:
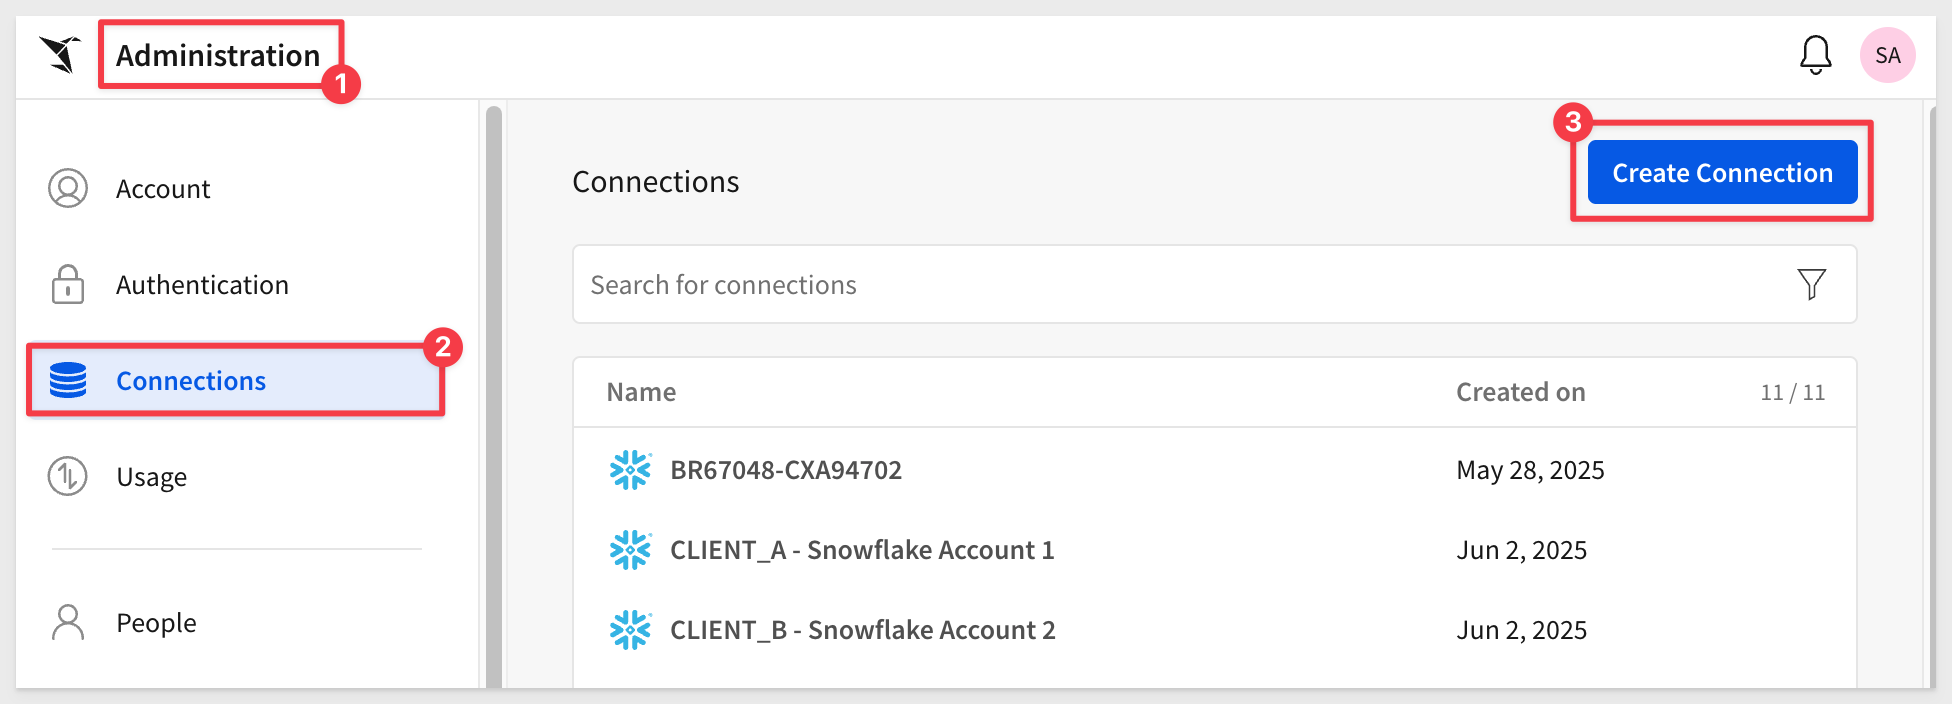
Give your connection a name and fill out the required fields:
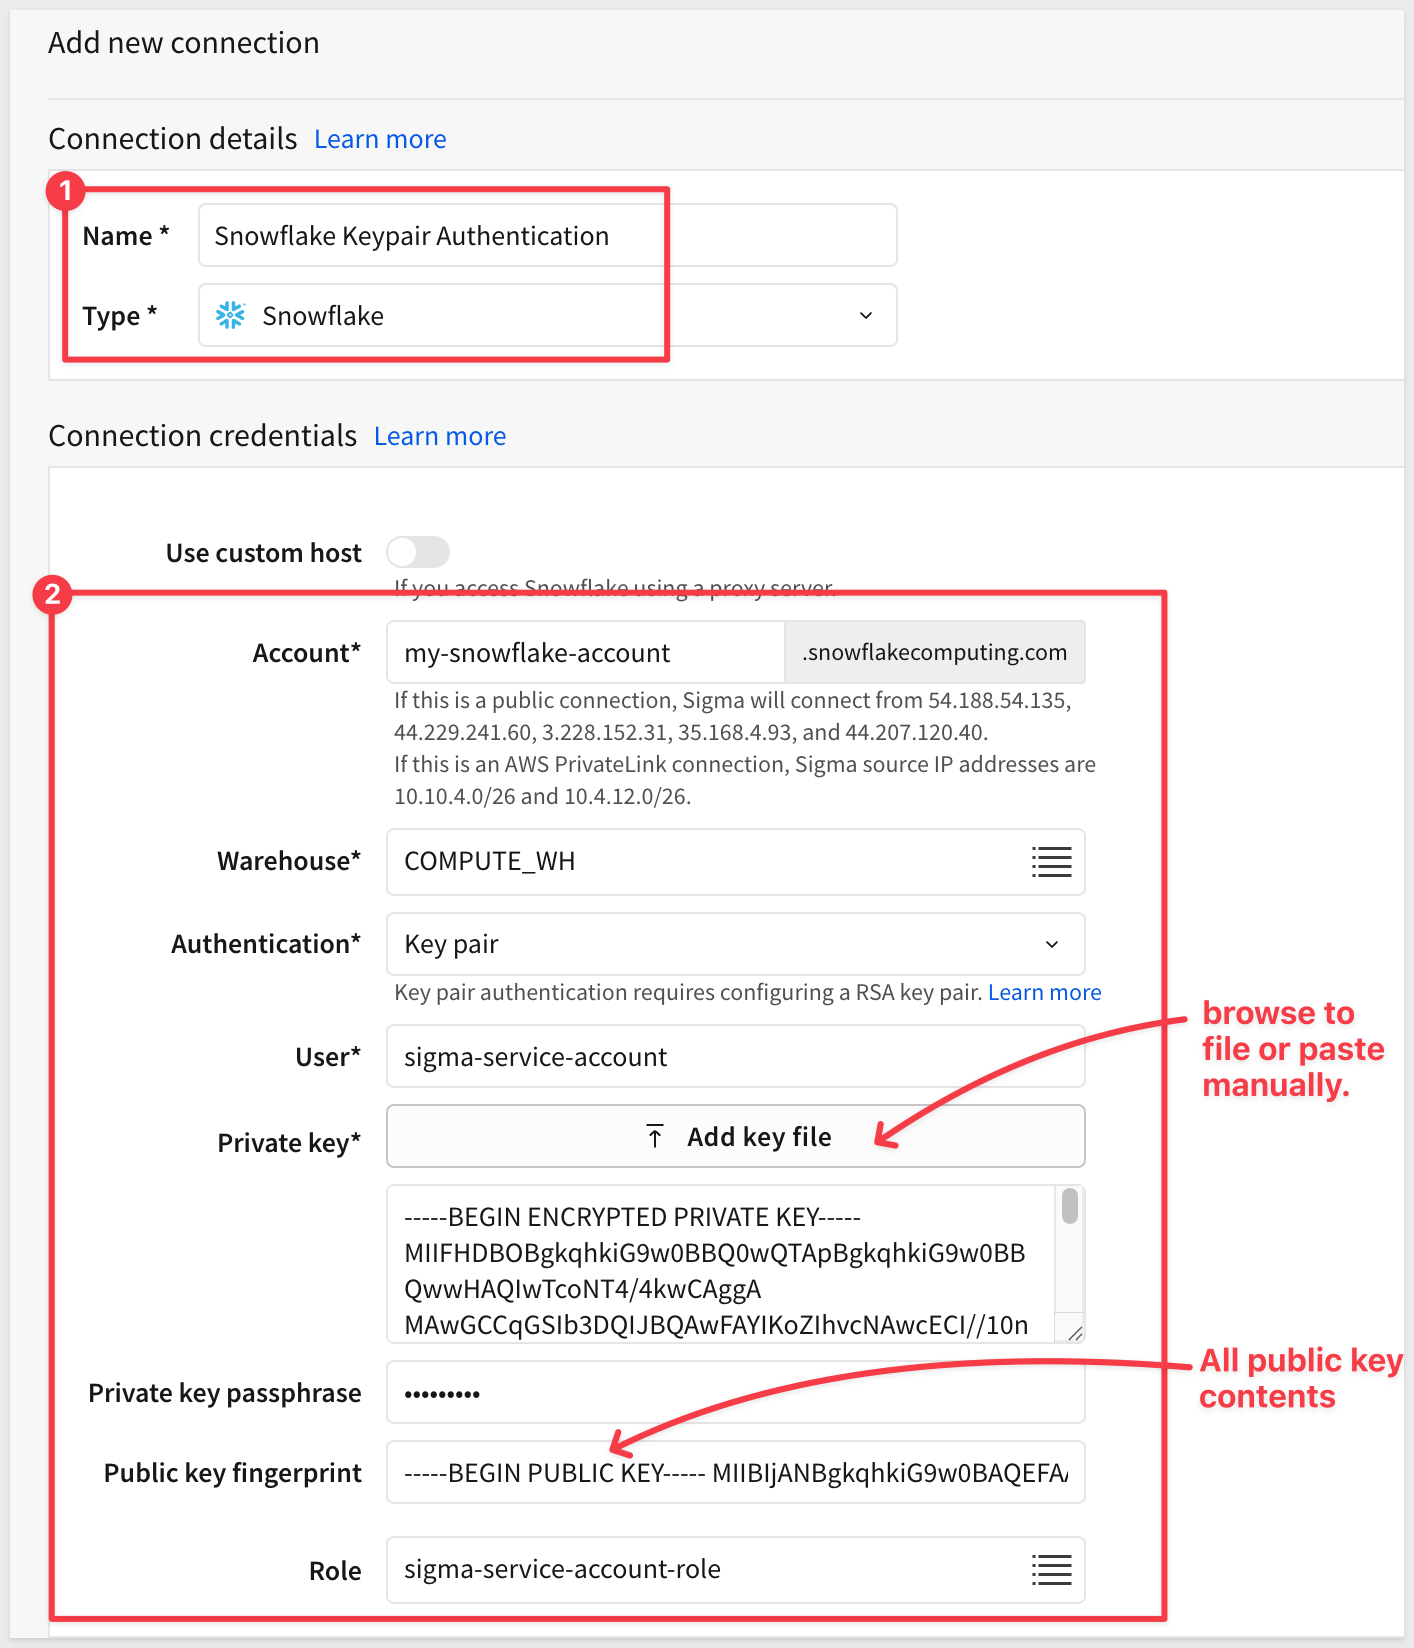
Sigma will establish the connection if after a few seconds you should receive a  message at the bottom of the page.
You may now click the Browse Connection button:
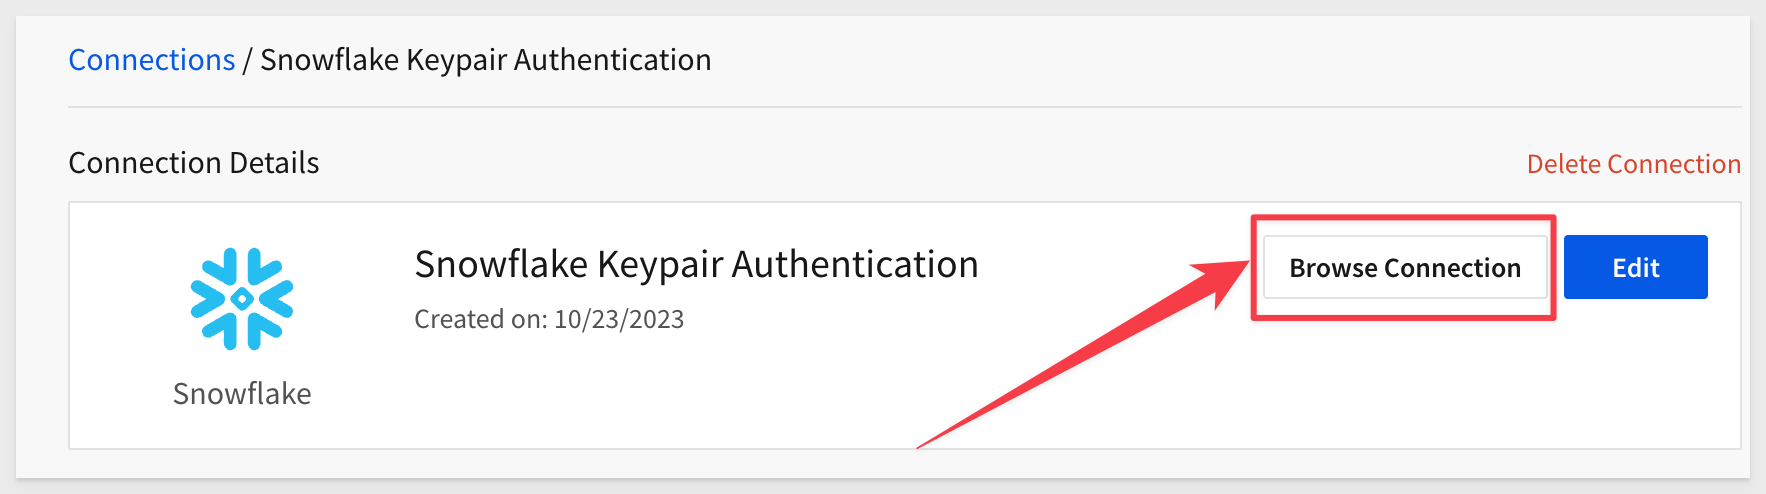
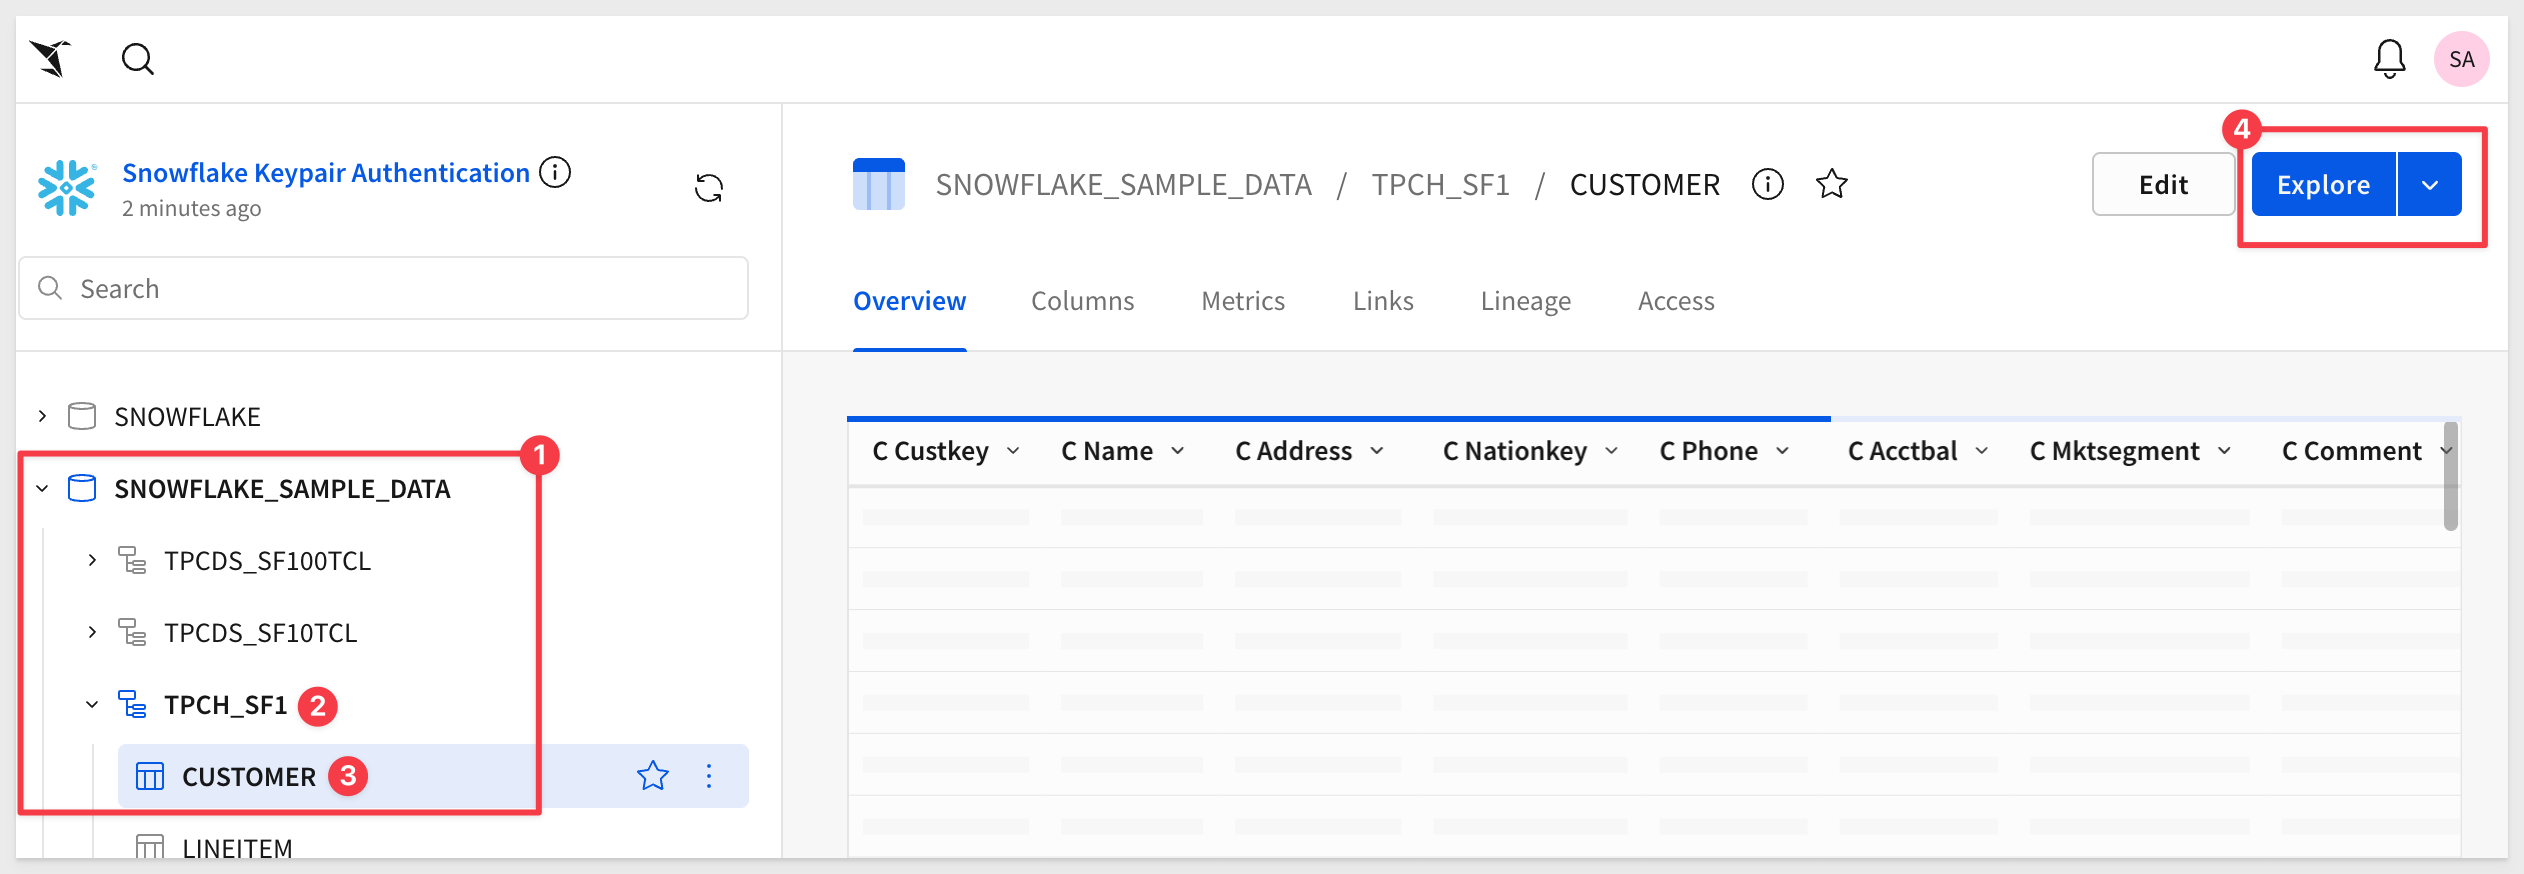
We can now navigate the data assets that our Snowflake role allows, for our service account user.
If we want to go further into the data, we are able to Explore and enter the standard Sigma exploration workflow:
Snowflake supports multiple active keys to allow for uninterrupted rotation. You can manually rotate your public and private keys based on whatever expiration schedule you follow internally.
This process can be automated via the Snowflake and Sigma APIs as well.
In Snowflake, you can use the RSA_PUBLIC_KEY and RSA_PUBLIC_KEY_2 parameters to associate up to two public keys with a single user; in our case, the sigma_service_account user.
The manual steps are as follows:
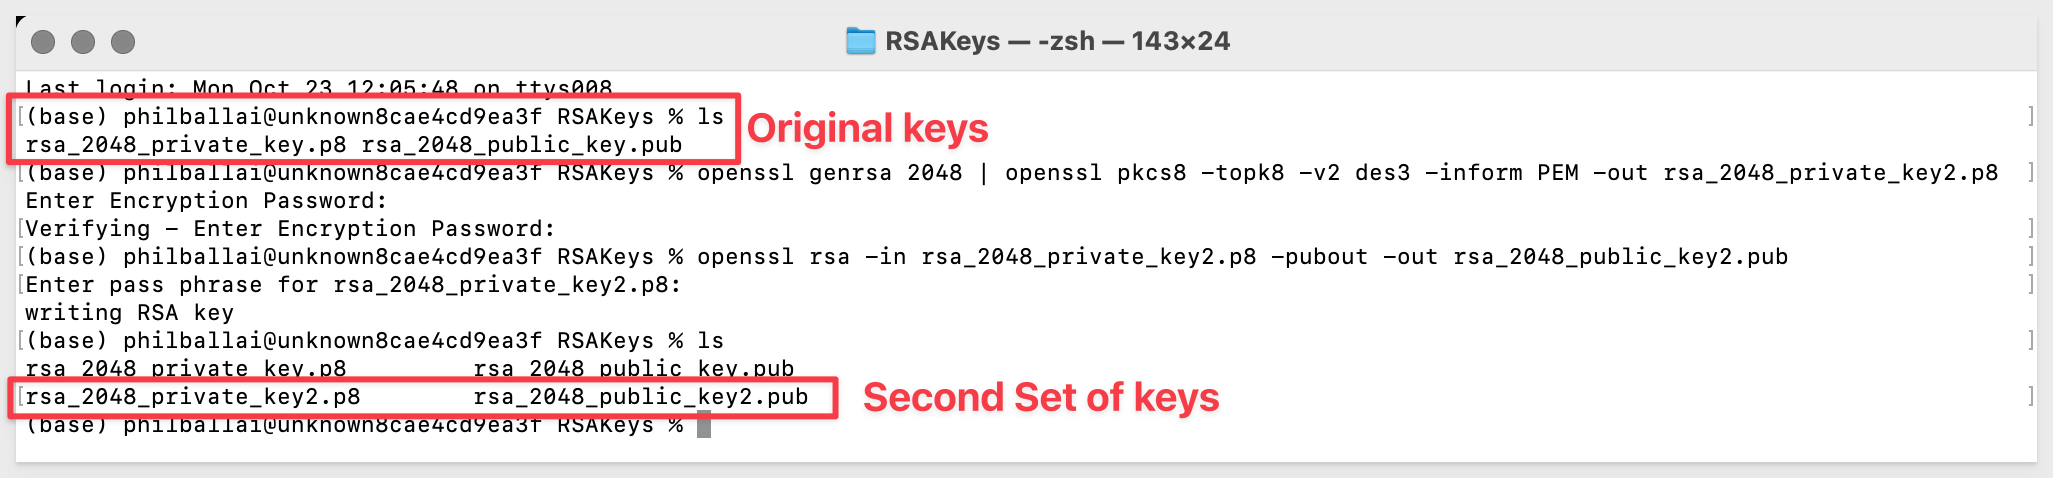
1: Generate a new public and private key pair:
Private Key
openssl genrsa 2048 | openssl pkcs8 -topk8 -v2 des3 -inform PEM -out rsa_2048_private_key2.p8
Set the password to 1234 for testing purposes.
Public Key
openssl rsa -in rsa_2048_private_key2.p8 -pubout -out rsa_2048_public_key2.pub
We now have the original keys and the new keys, the new keys have a 2 appended to the name:
2: Set second public key for their snowflake user by running the snowflake command on Snowflake (use your key, replacing "YOUR PUBLIC KEY 2 HERE"):
alter user sigma_service_account set rsa_public_key_2='YOUR PUBLIC KEY 2 HERE';
3: Update the private key and private key passphrase for their snowflake connection configuration on Sigma:
In Sigma, navigate to Administration > Connections > Snowflake Keypair Authentication and click the Edit button:
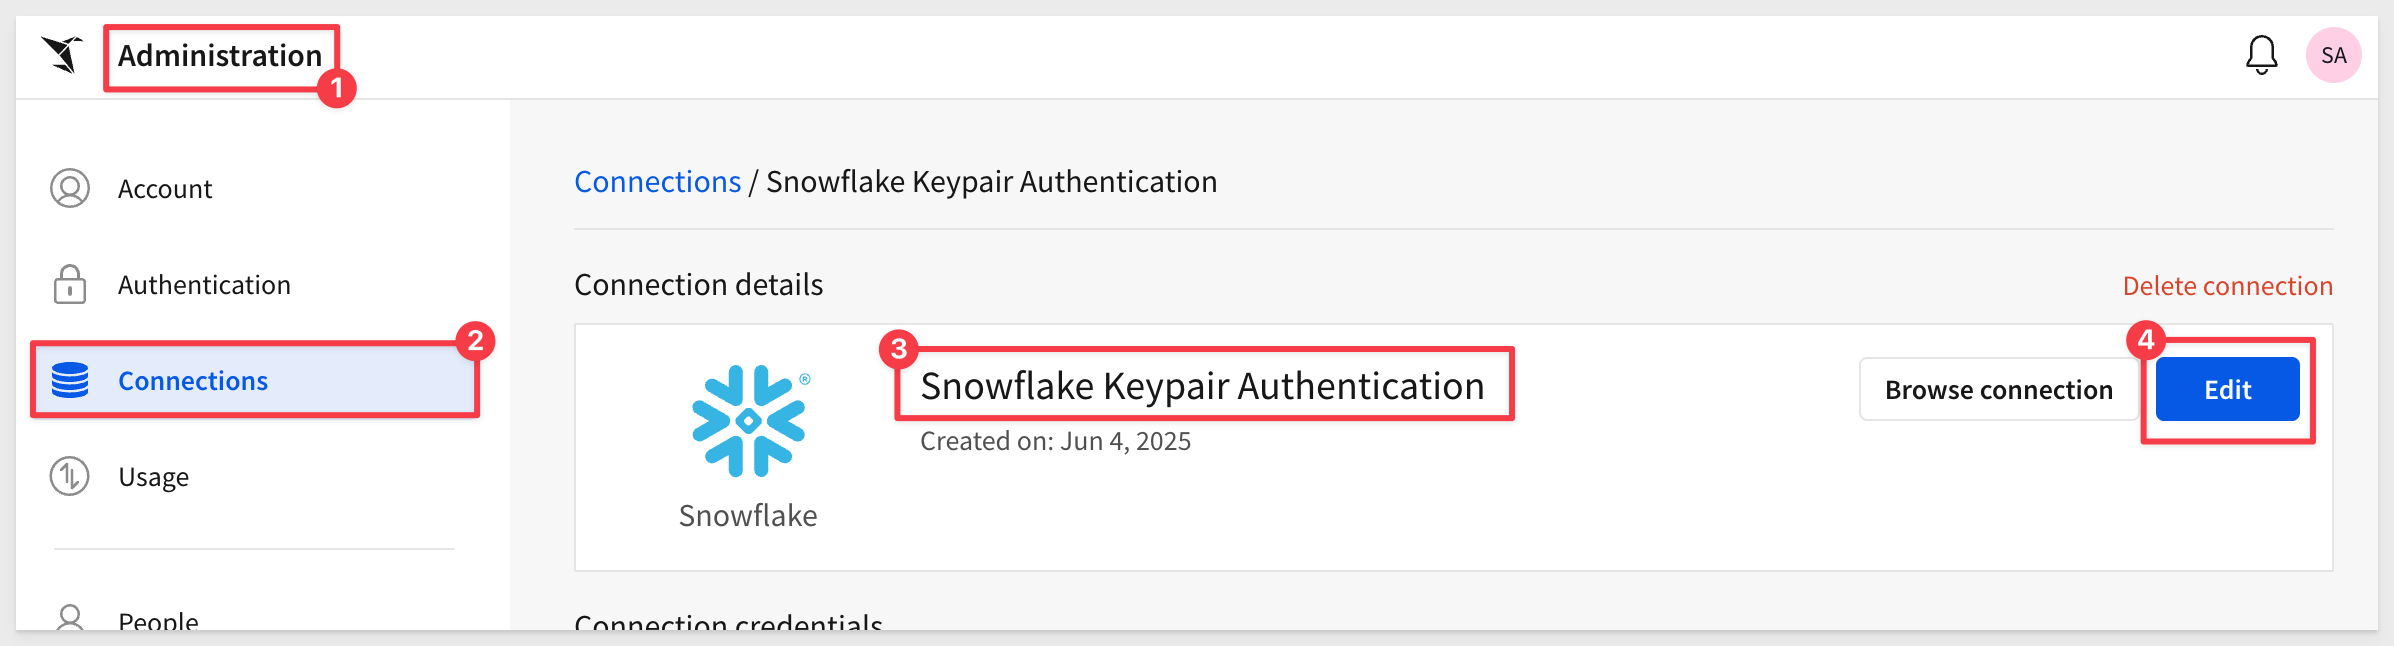
We will need to provide the new Private Key and Private Key Passphrase (1234 or whatever passphrase you created when creating private key 2):
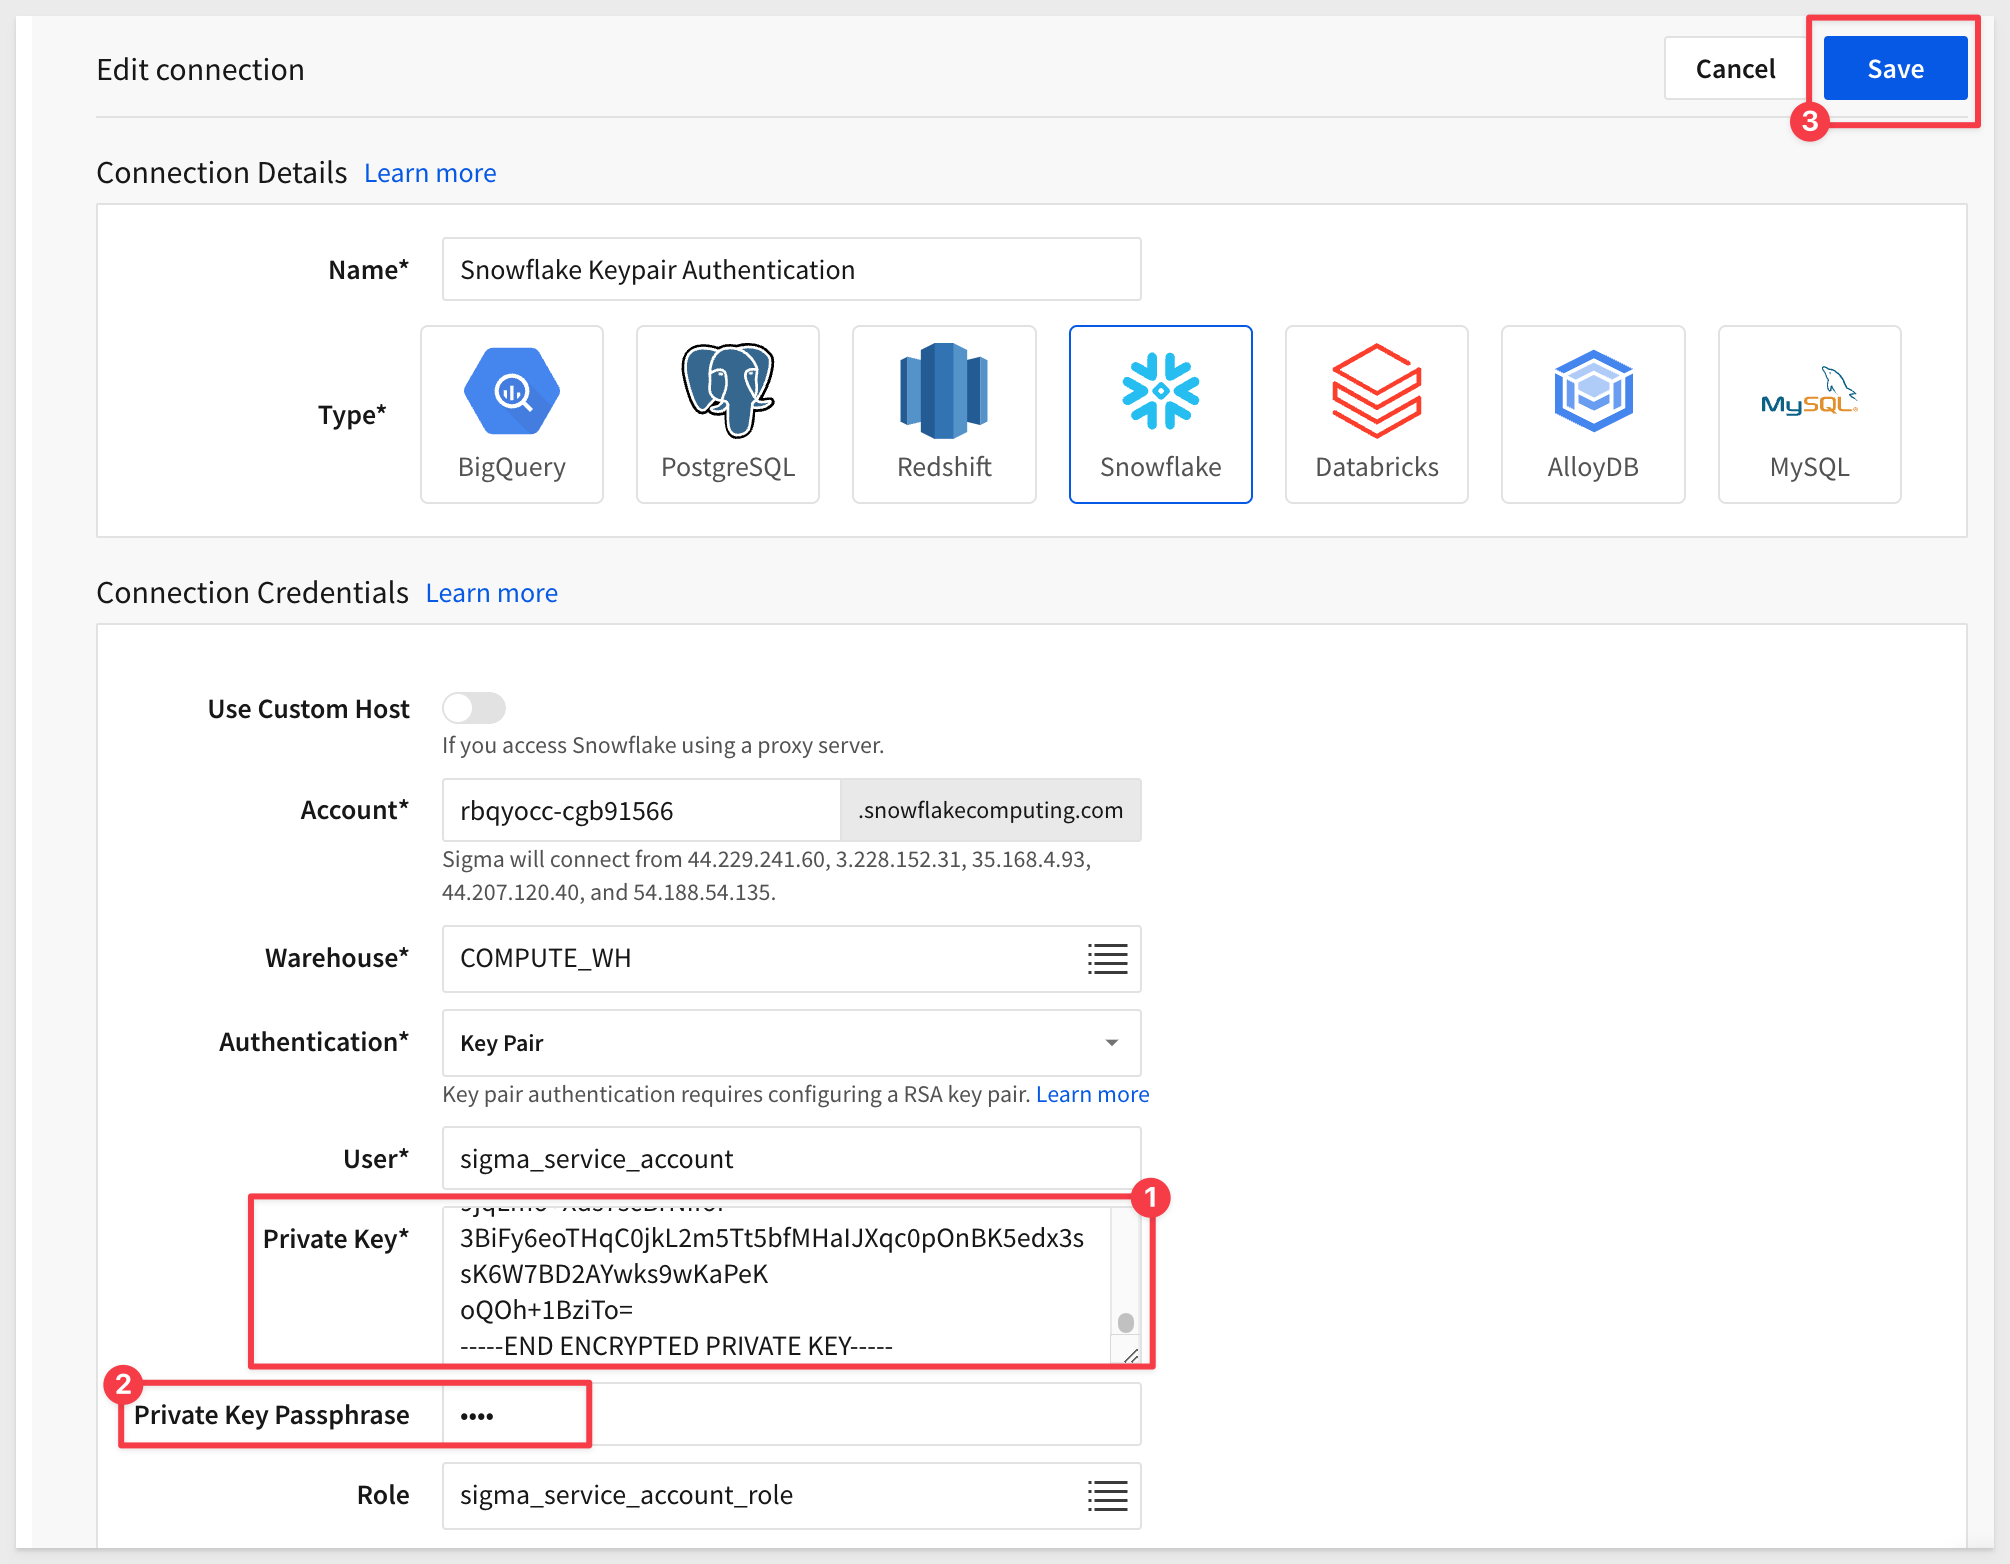
Click Save.
Sigma will update the connection and if successful, will display  .
.
4: Remove the old public key from the user profile by running the snowflake command on Snowflake:
ALTER USER sigma_service_account UNSET rsa_public_key;
Running the following command in Snowflake allows us to see if the old public key has been removed:
DESC USER sigma_service_account;
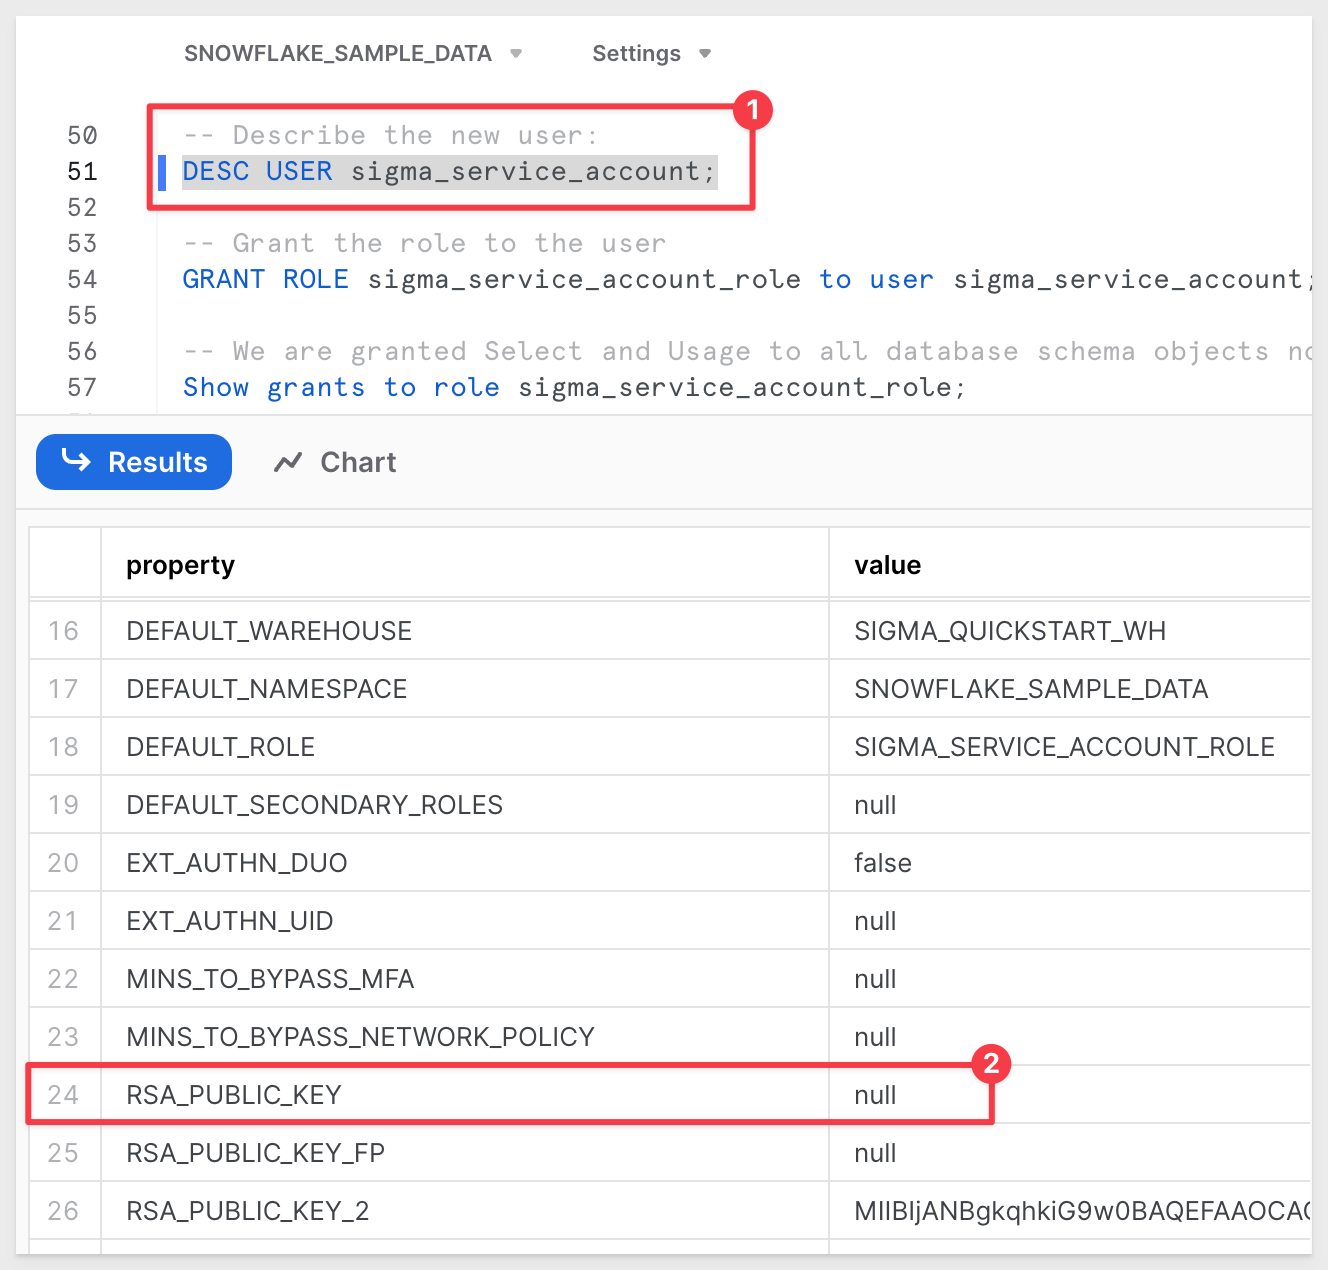
The key rotation is now in place and working and the old public and private keys are removed.
As mentioned earlier, it is possible to create and update a Sigma connection via a RESTful API.
We will demonstrate how to do that using the popular program Postman
If you would like to learn how to use Postman with the Sigma API, reference this QuickStart
If you are familiar with APIs and prefer to review Sigma's swagger reference, that is here
The general API documentation is here
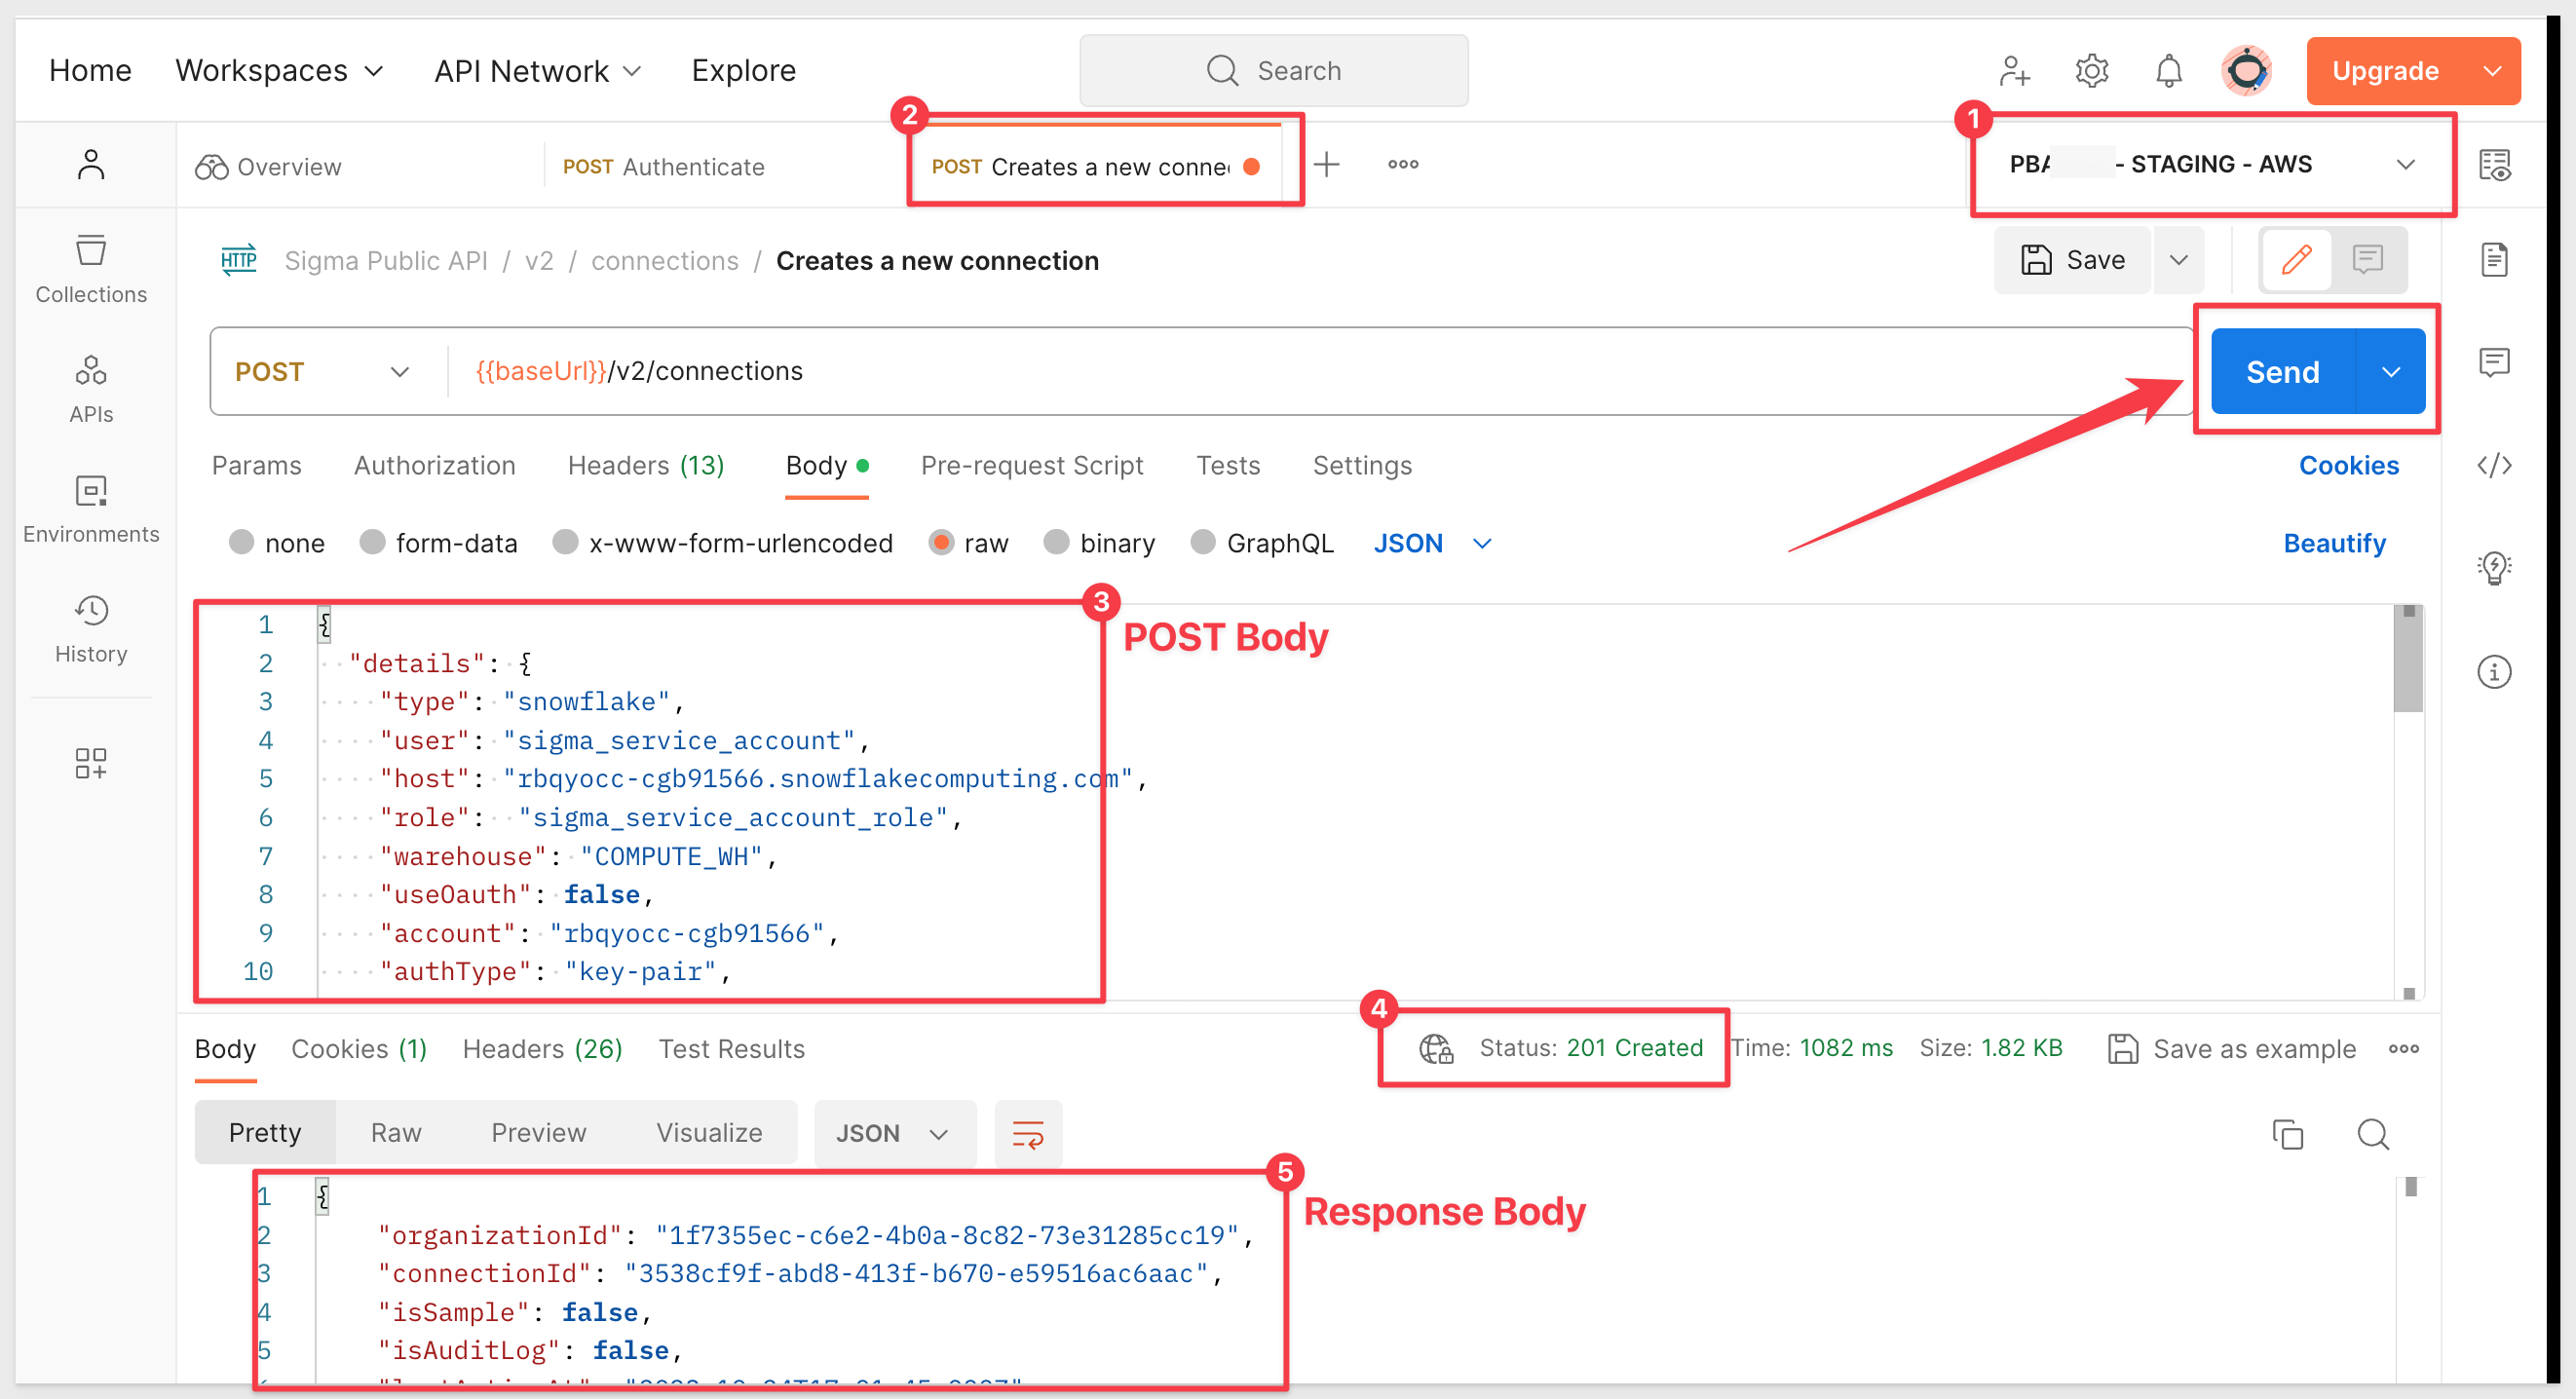
Create a new Sigma Connection with Key Pair Auth:
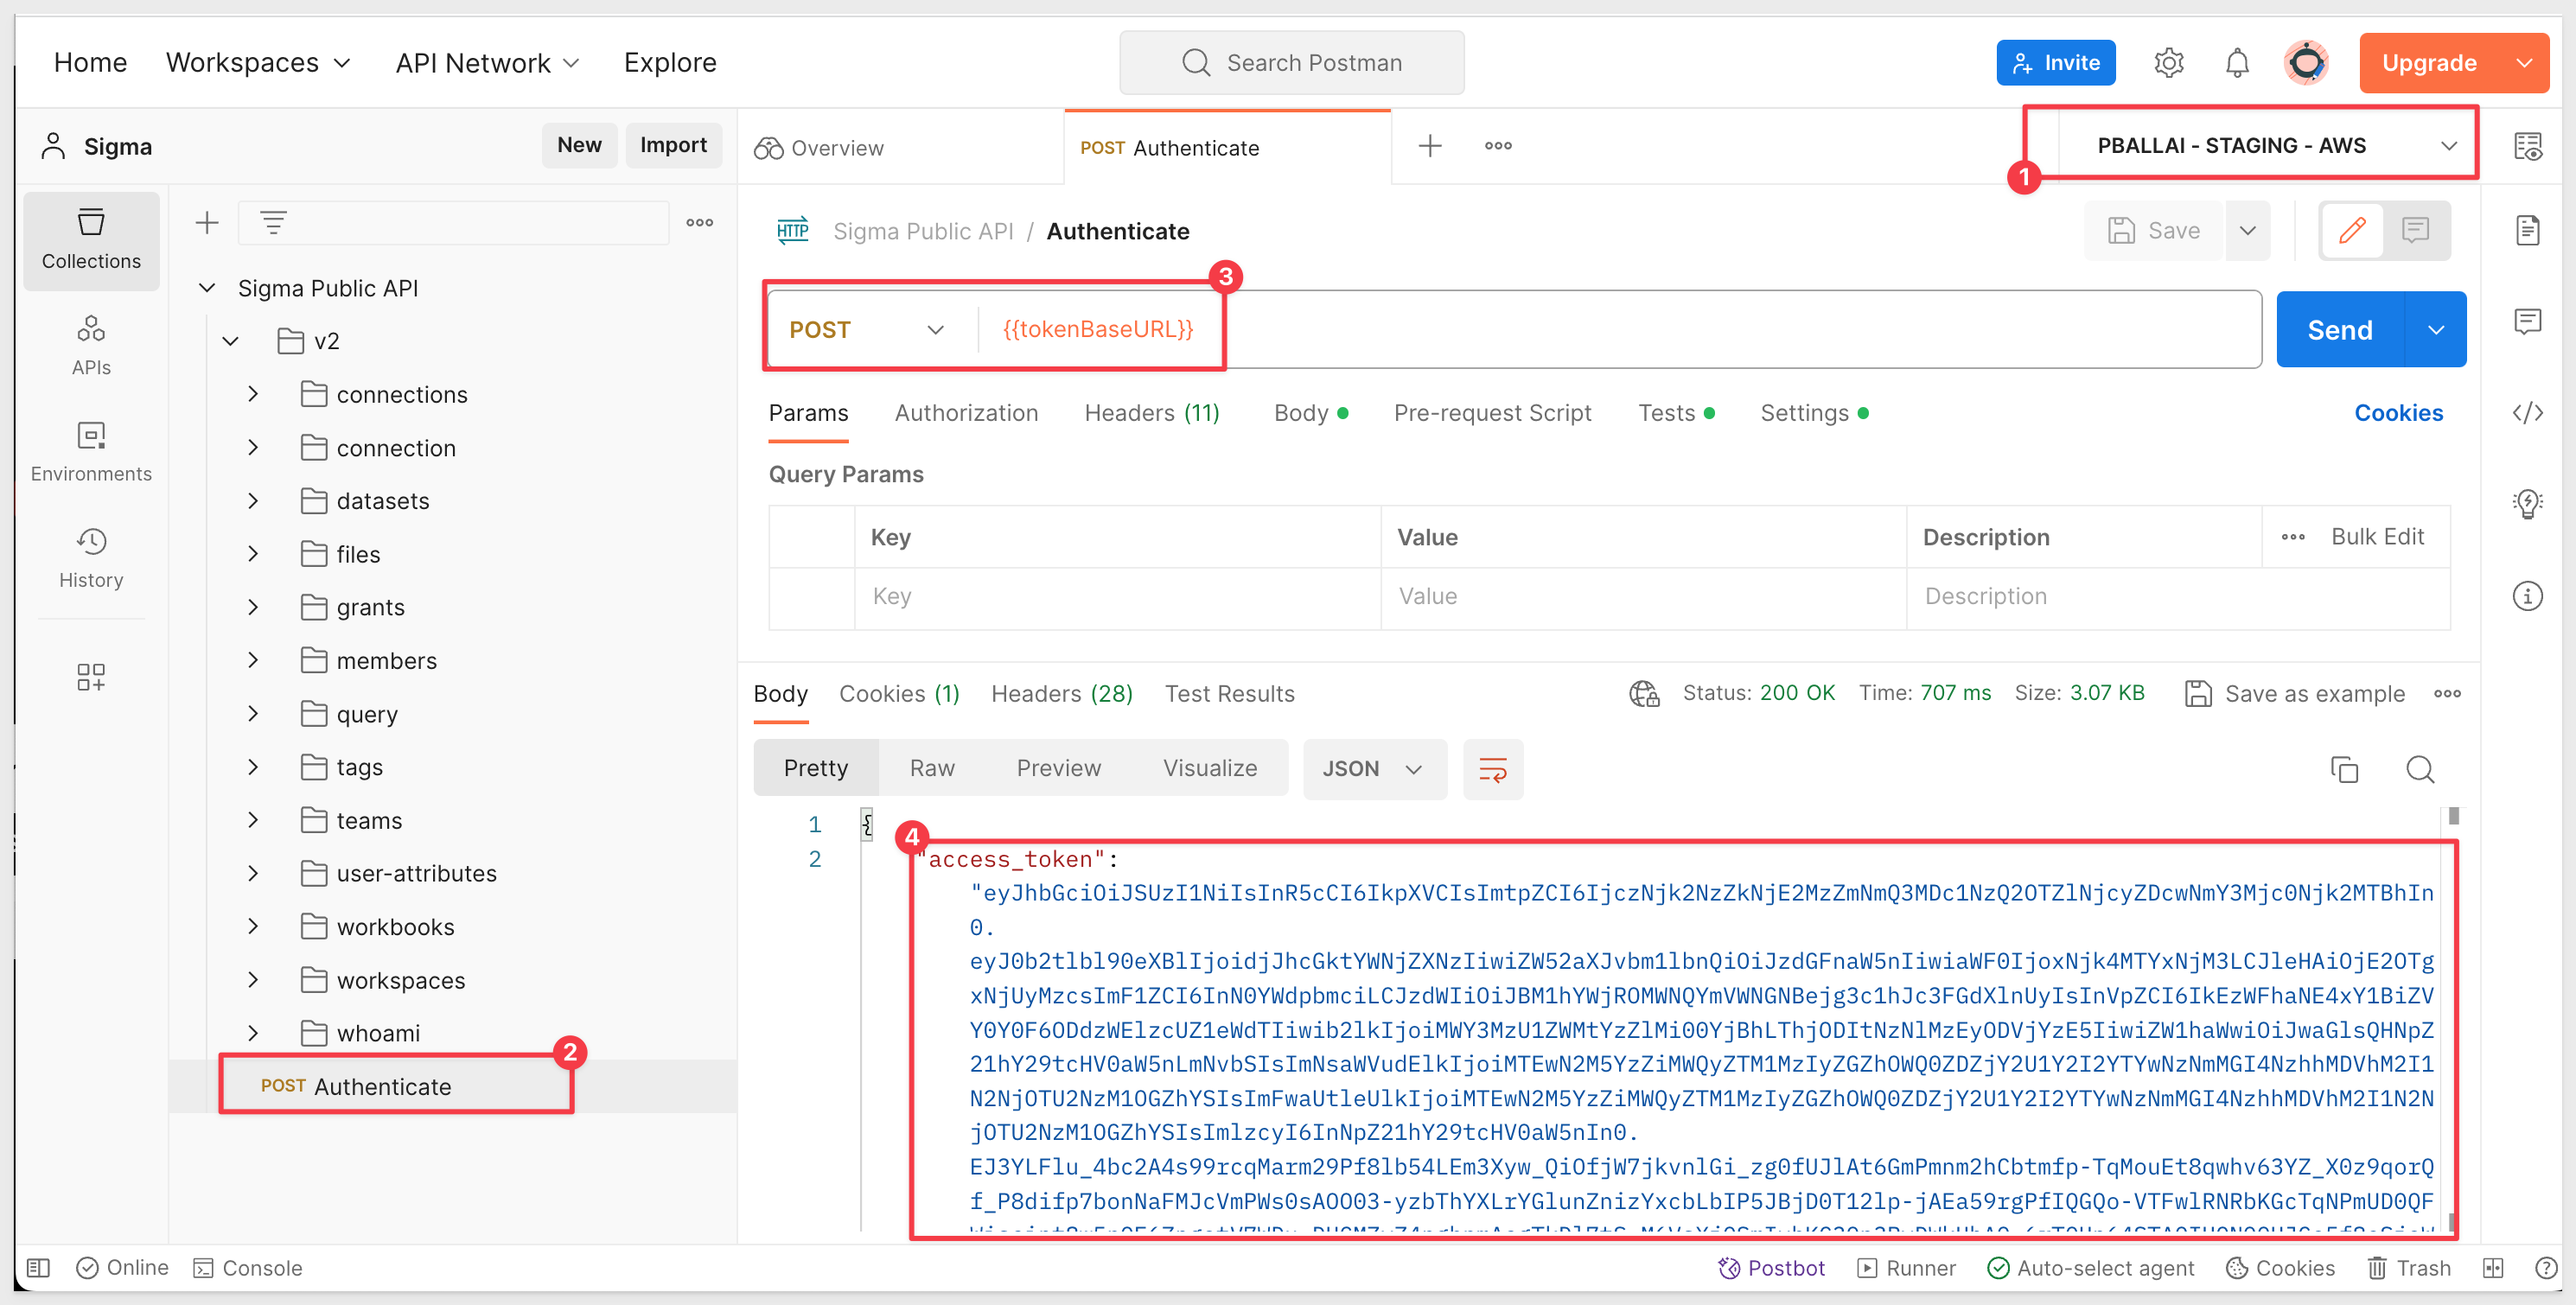
1: In Postman, open the Sigma Public API and select the Authenticate method.
2: Be sure to have a Postman Environment setup (reference the Sigma with Postman QuickStart) for your configuration details.
3: Click Send. We should receive a response that includes our "access token" (also known as "bearer token").
4: Open the method v2 > connections > POST Creates a new connection.
5: Paste the following code in the Body of the POST method. Replace values as required:
{
  "details": {
    "type": "snowflake",
    "user": "sigma_service_account",
    "host": "YOUR SNOWFLAKE ACCOUNT.snowflakecomputing.com",
    "role":  "sigma_service_account_role",
    "warehouse": "COMPUTE_WH",
    "useOauth": false,
    "account": "YOUR SNOWFLAKE ACCOUNT",
    "authType": "key-pair",
    "privateKey": "YOUR PRIVATE KEY WITH HEADER AND FOOTER",
    "privateKeyPassphrase": "1234"
  },
  "name": "Encrypted-Key-Pair-via-API",
  "description": {},
  "timeoutSecs": 600,
  "useFriendlyNames": false
}
IMPORTANT:
The API will not automatically handle line breaks if you just paste your private key into the body of the POST message.
The private key needs to be formatted so that it is interpreted as a single string,
Options include:
Replacing Newlines with \n:
Replace actual newlines with the characters "\n". This ensures that the multi-line RSA key becomes a single string that's easier to transmit in many API payloads.
For our simple test, we will use this method. You can manually add the "/n" to each line or use your browser's inspection feature to grab the string as a JSON literal.
In order to copy the key as JSON, open your browser's inspector and then open the key pair auth connection we created earlier in Sigma and edit it. Change the name (add a "1" to the end of its name for example), reenter your private key and passphrase and click Save.
In inspector, copy the private key as a JSON literal. This can be found under Network > check as shown:
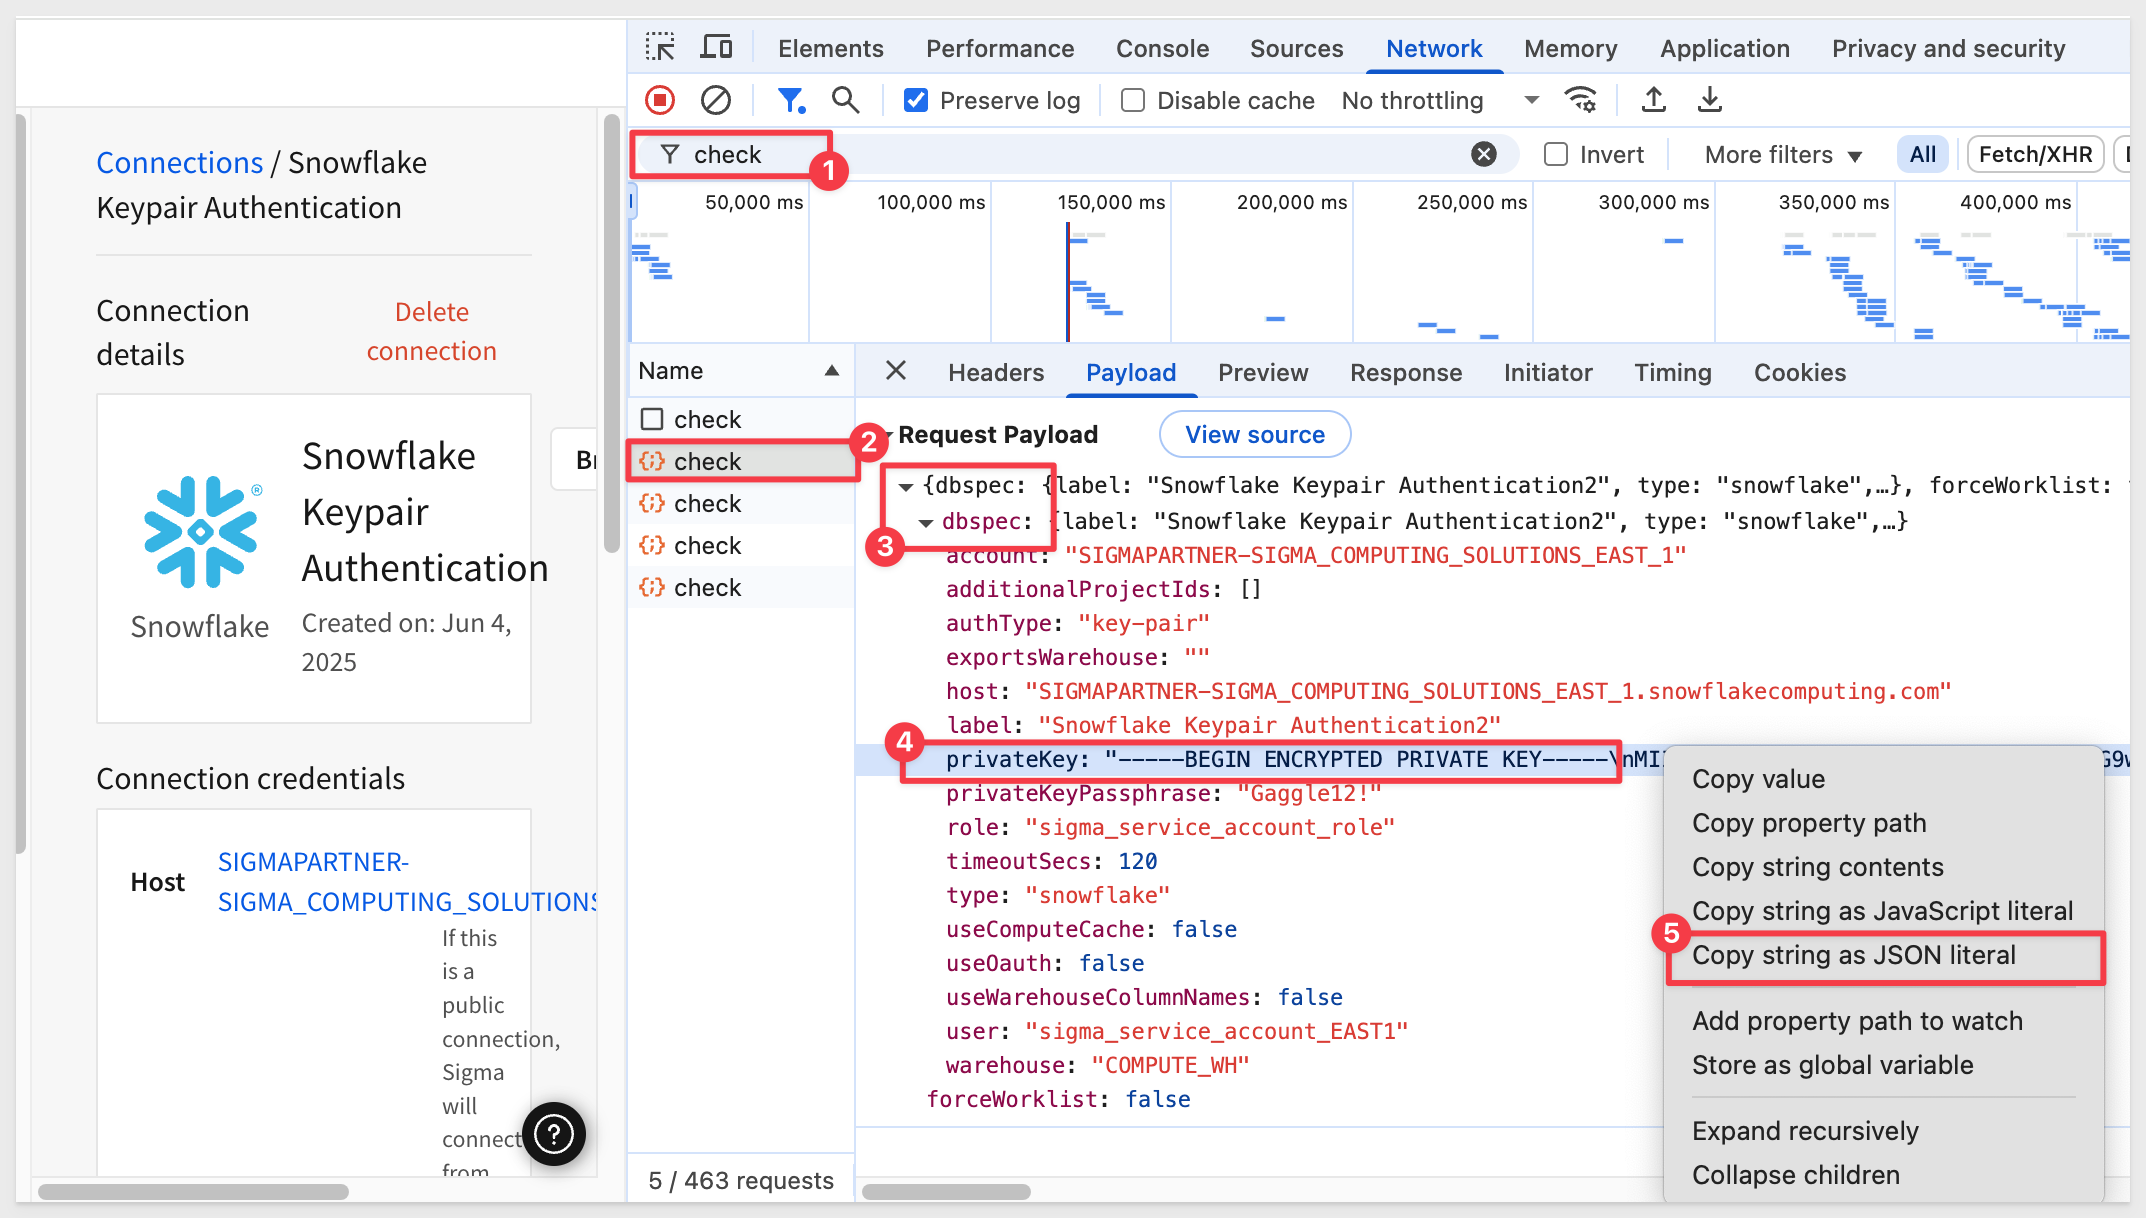
This can now be used in our Postman POST method for private key and will include the line breaks for us.
Reading the RSA Key from a File:
Storing your private key in a file (and ensuring it's kept secure) allows you to read it into your script without having to hard-code it.
Using a Script to Call the API:
Using a script to call the API can be a more flexible and automated approach than using tools like Postman, especially when there are additional preprocessing steps involved. Third-party key management software is useful in this regard and has additional advantages such as centralizing enterprise key management.
5: Run the POST to create the connection
If successful, you should receive a response body and a Status=201 Created:
6: In Sigma, Administration > Connections, we see our new connection:

Although we will not cover write access in this QuickStart, Sigma key pair authentication supports the functionality that is enabled by providing access (in the Sigma connection configuration) to a Snowflake resource.
Specifically, these include CSV upload, materialization, input tables, and dataset warehouse views, all require write access to a destination in your warehouse.
Once you have your Sigma connection to Snowflake configured for key pair authentication, enabling write access is the same as if the connection was using basic authorization.
For more information, see Set up write access
In this QuickStart we learned the features and benefits of key pair authentication and some background on the RSA encryption algorithm. Next, we covered how to make key pair authorization work in Sigma and Snowflake and how to rotate the keys manually.
Additional Resource Links
Be sure to check out all the latest developments at Sigma's First Friday Feature page!
Help Center Home
Sigma Community
Sigma Blog