This QuickStart demonstrates how to implement connection-level OAuth with PKCE for Sigma embedding with Databricks, enabling secure, user-specific data access in embedded analytics.
What You'll Learn
In this QuickStart, you'll implement a complete OAuth 2.0 authentication flow that allows each embedded user to query Databricks using their own credentials. This approach ensures:
Enhanced Security: OAuth with PKCE (Proof Key for Code Exchange) protects against authorization code interception, making it ideal for embedded applications where client secrets cannot be safely stored.
User-Level Data Governance: Each user queries Databricks with their own permissions, ensuring row-level security and data access policies are enforced at the source—not just in Sigma.
Automatic Token Management: Access tokens are short-lived (60 minutes) and automatically refreshed, reducing the risk of token compromise while maintaining seamless user experience.
Complete Audit Trail: All Databricks queries execute under the authenticated user's identity, providing clear audit logs that track exactly who accessed what data and when.
What You'll Build
You'll create a Node.js application that:
- Authenticates users with Databricks via OAuth 2.0 with PKCE
- Manages tokens securely using server-side sessions with automatic refresh
- Encrypts OAuth tokens using Sigma's encryption SDK before passing to embedded content
- Generates signed JWTs that contain encrypted user credentials for Sigma embedding
- Embeds Sigma dashboards that query Databricks using each user's specific permissions
The application demonstrates both the technical implementation and the security best practices required for production deployment.
For more information on Sigma's product release strategy, see Sigma product releases
If something doesn't work as expected, here's how to contact Sigma support
Target Audience
Developers and technical users implementing Sigma embedding with OAuth. Basic familiarity with Node.js, environment variables, and OAuth concepts is recommended.
Prerequisites
- Any modern browser is acceptable.
- Access to your Sigma environment.
- Some familiarity with Sigma is assumed. Not all steps will be shown, as the basics are assumed to be understood.
- Access to your Databricks Environment with administrative privileges.

When embedding Sigma with Databricks, you have two primary authentication approaches: organization-level OAuth and connection-level OAuth. This QuickStart focuses on connection-level OAuth with PKCE (Proof Key for Code Exchange), which provides several key advantages for embedded analytics.
Why Connection-Level OAuth?
Connection-level OAuth with PKCE allows each user to authenticate directly with Databricks using their own credentials.
This approach offers:
- Enhanced Security: PKCE protects against authorization code interception attacks, making it ideal for public clients like single-page applications and mobile apps.
- User-Level Data Access: Each embedded user queries Databricks with their own permissions, ensuring data governance and row-level security are enforced at the source.
- Simplified Token Management: Access tokens are short-lived (typically 1 hour) and automatically refreshed, reducing the risk of token compromise.
- Audit Trail: All queries run under the authenticated user's identity, providing clear audit logs in Databricks.
Connection-Level vs Organization-Level OAuth
The key difference lies in how tokens are managed:
Connection-Level OAuth (This QuickStart):
- Each user authenticates individually with Databricks
- Tokens are scoped to specific connections
- Supports PKCE for enhanced security
- Ideal for embedded scenarios where user identity matters
Organization-Level OAuth:
- Uses a single service account or shared credentials
- All users query through the same identity
- Simpler setup but less granular access control
- Better for scenarios where all users have the same data permissions
OAuth Flow Overview
The authentication flow follows these steps:
- User initiates login from your application
- Application generates a PKCE code challenge and redirects to Databricks
- User authenticates with Databricks credentials
- Databricks redirects back with an authorization code
- Application exchanges code + PKCE verifier for access and refresh tokens
- Tokens are encrypted and passed to Sigma for secure embedding
- Sigma workbook loads with user's Databricks permissions applied
For more detailed information on OAuth and PKCE fundamentals, see OAuth with PKCE for Secure Integration
To enable OAuth authentication between Sigma and Databricks, you'll create an app connection in the Databricks Account Console.
Navigate to App Connections
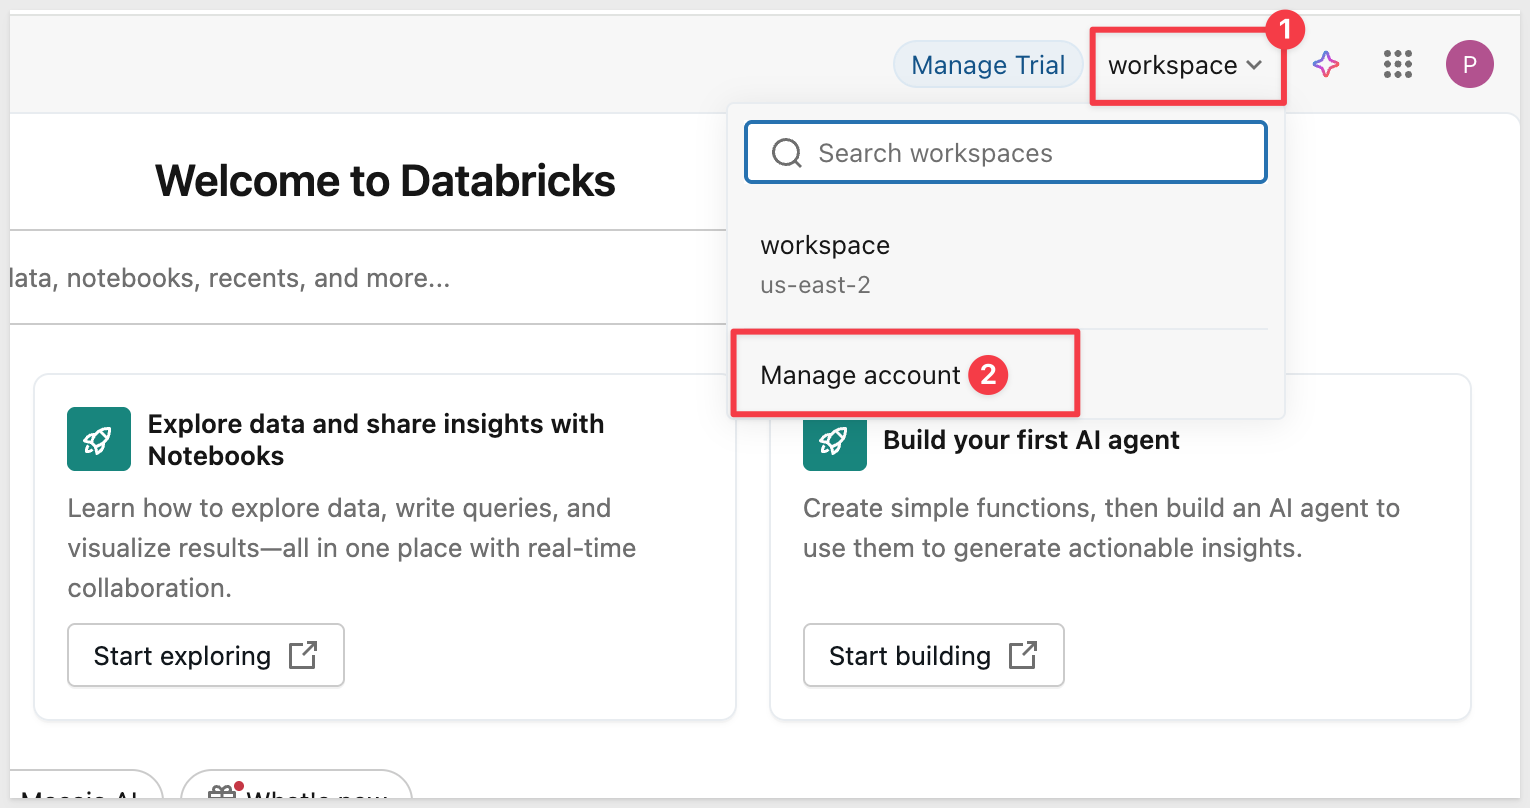
Log into Databricks and click your user profile icon in the upper right corner.
Select workspace and Manage account:
In the Account Console, click on Settings (gear icon), then click the App connections tab.
Click the Add connection button:

Configure the OAuth App
Fill out the connection form with the following values:
Application Name:
Sigma Embedding
Redirect URLs: Sigma requires three redirect URLs for OAuth to work properly - one for connection authorization, one for embedded workbook access, and one for the locally hosted application we will provision later. Enter all three URLs based on your Sigma cloud instance (one per line).
AWS (most common):
https://aws-api.sigmacomputing.com/api/v2/oauth/1/authcode
https://aws-api.sigmacomputing.com/v2/auth/oauth/databricks/callback
http://localhost:3000/auth/databricks/callback
Azure:
https://azure-api.sigmacomputing.com/api/v2/oauth/1/authcode
https://azure-api.sigmacomputing.com/v2/auth/oauth/databricks/callback
http://localhost:3000/auth/databricks/callback
GCP:
https://api.sigmacomputing.com/api/v2/oauth/1/authcode
https://api.sigmacomputing.com/v2/auth/oauth/databricks/callback
http://localhost:3000/auth/databricks/callback
Access scopes:
- Check
All APIs(required for Sigma OAuth authentication flow - includes SQL access)
Client secret:
- Keep
Generate a client secretchecked
Token TTL values:
Access token TTL: Leave at60minutes (default)Refresh token TTL: Leave at10080minutes (7 days - default)
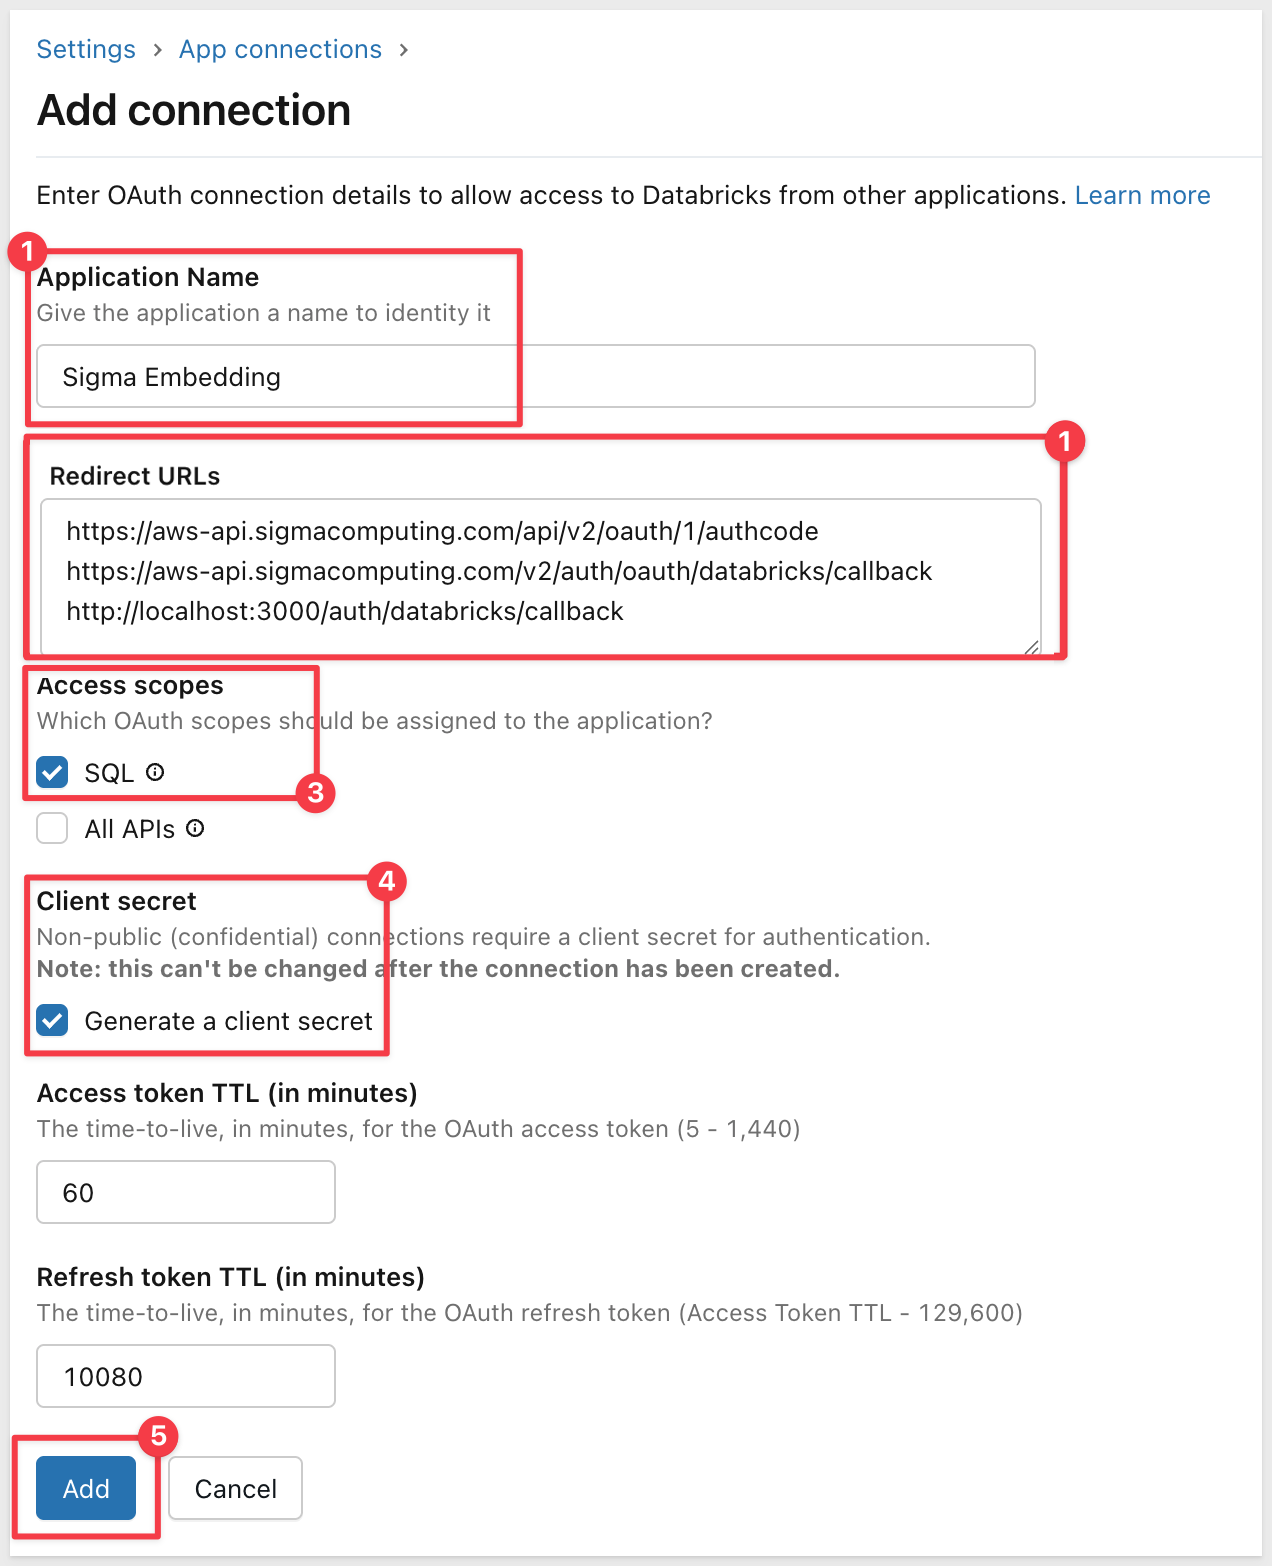
Click Add.
Save Client Credentials
After creating the connection, Databricks displays the Client ID and Client Secret:
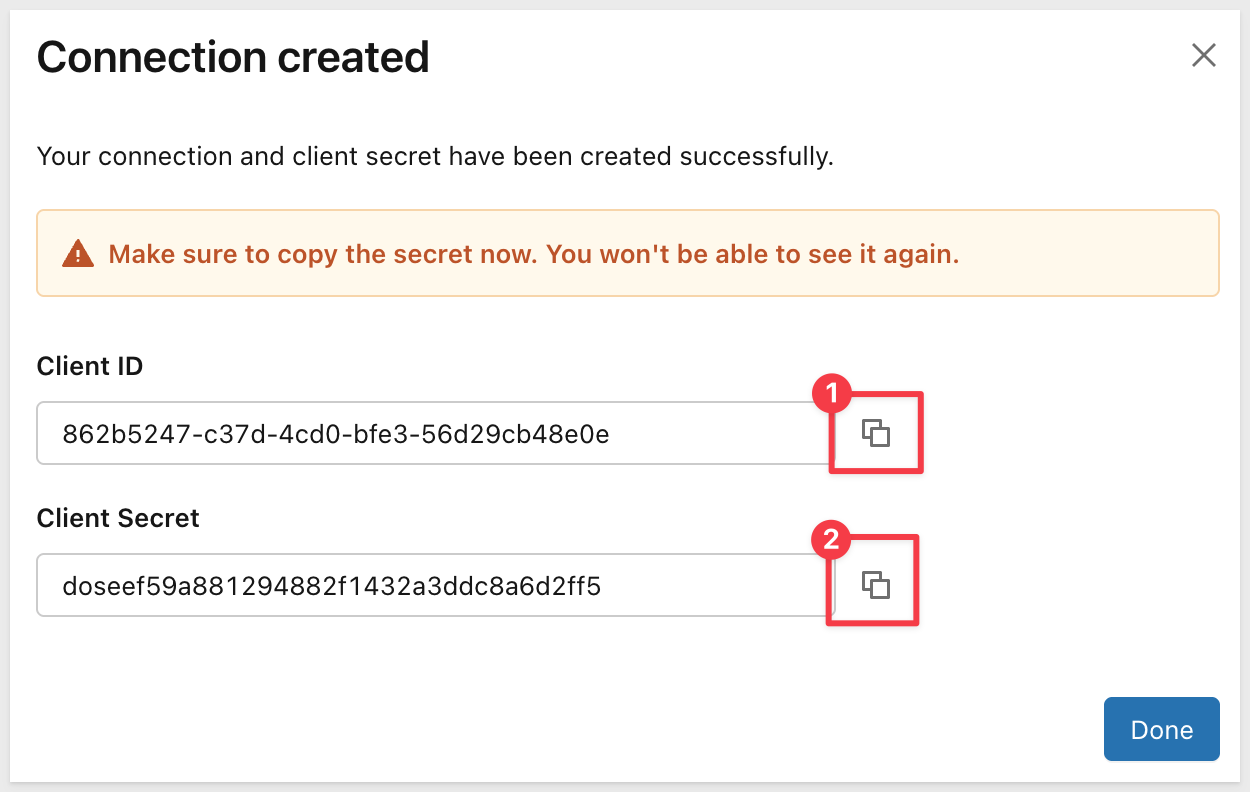
Copy these values to a secure location - you'll need them when configuring the .env file later.
Click Done.
If you're using a Databricks trial account for this QuickStart, you'll need to configure authentication to avoid using third-party authenticator apps like Google Authenticator. This step is specific to trial accounts without corporate SSO.
Why This Configuration is Needed for Trial Accounts
Databricks trial accounts typically don't have corporate SSO configured. By default, they may require Multi-Factor Authentication (MFA) using apps like Google Authenticator. For this QuickStart demonstration, we'll configure Databricks to use simpler email-based authentication instead.
Production vs Trial:
- Production with SSO: Users authenticate through your identity provider (Okta, Azure AD, etc.) - no changes needed
- Trial accounts: Configure to use one-time passcodes via email to avoid setting up authenticator apps
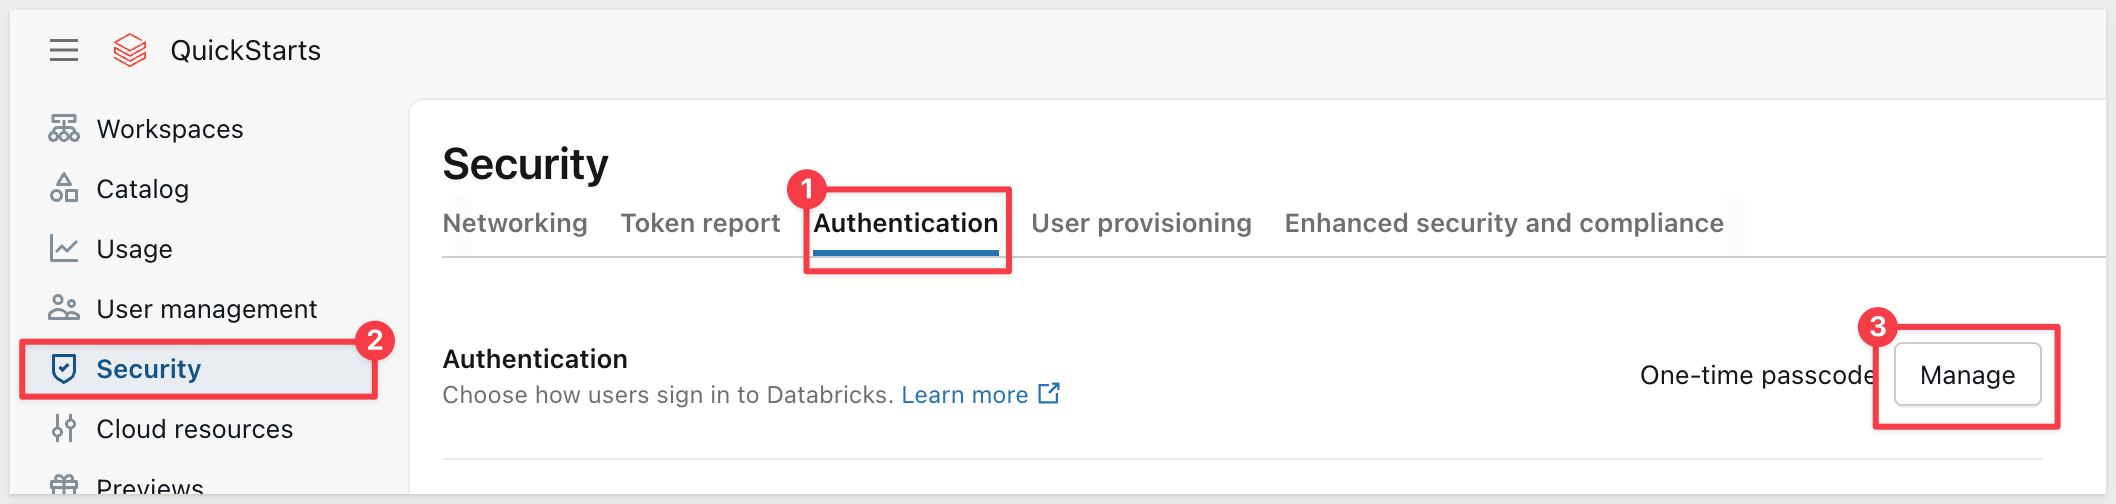
Configure Authentication Method
In the Databricks Account Console, go to Security → Authentication.
Under Authentication, click Manage:
You'll see two options:
- Single sign-on with my identity provider - Use this if you have corporate SSO configured
- Sign-in with email or external providers - Use this for trial accounts
For trial accounts, select "Sign-in with email or external providers".
Under Choose sign-in options, make sure "One-time passcode" is checked. If you're using a Google email for your Databricks trial account, also check the Google authentication option:

This allows users to authenticate using a one-time code sent to their email address, avoiding the need for Google Authenticator or other MFA apps.
Click Update to save the authentication configuration.
With this configuration, when you authorize the Sigma connection to Databricks, you'll simply enter a code sent to your email rather than using an authenticator app.
We need to create a connection to Databricks in Sigma.
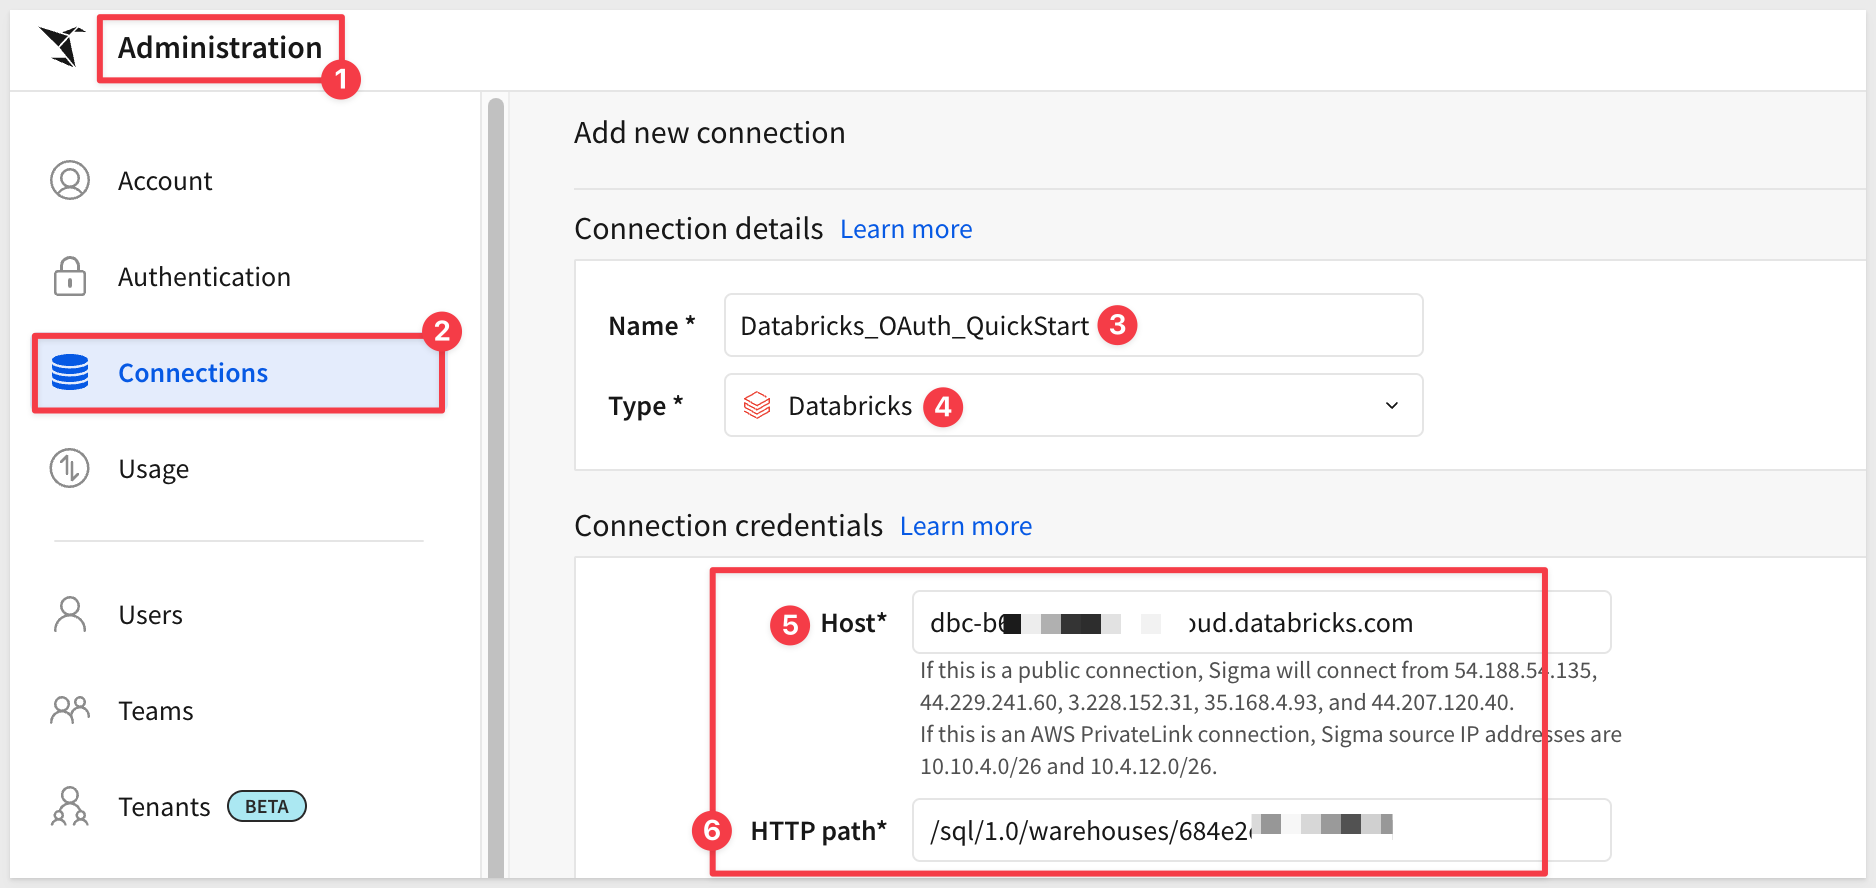
Log into Sigma as an admin and navigate to Administration > Connections.
Click Create Connection.
Select Type and choose Databricks.
In the Connection credentials section we need to provide a name and then fetch two values from Databricks.
- Connection Name:
Databricks_OAuth_QuickStart(or your preferred name)
We need to get some values from Databricks:
- Server Hostname: This is your Databricks workspace URL without https://
- HTTP Path: This comes from your Databricks SQL warehouse
Get Connection Details from Databricks
In another browser tab, return to Databricks.
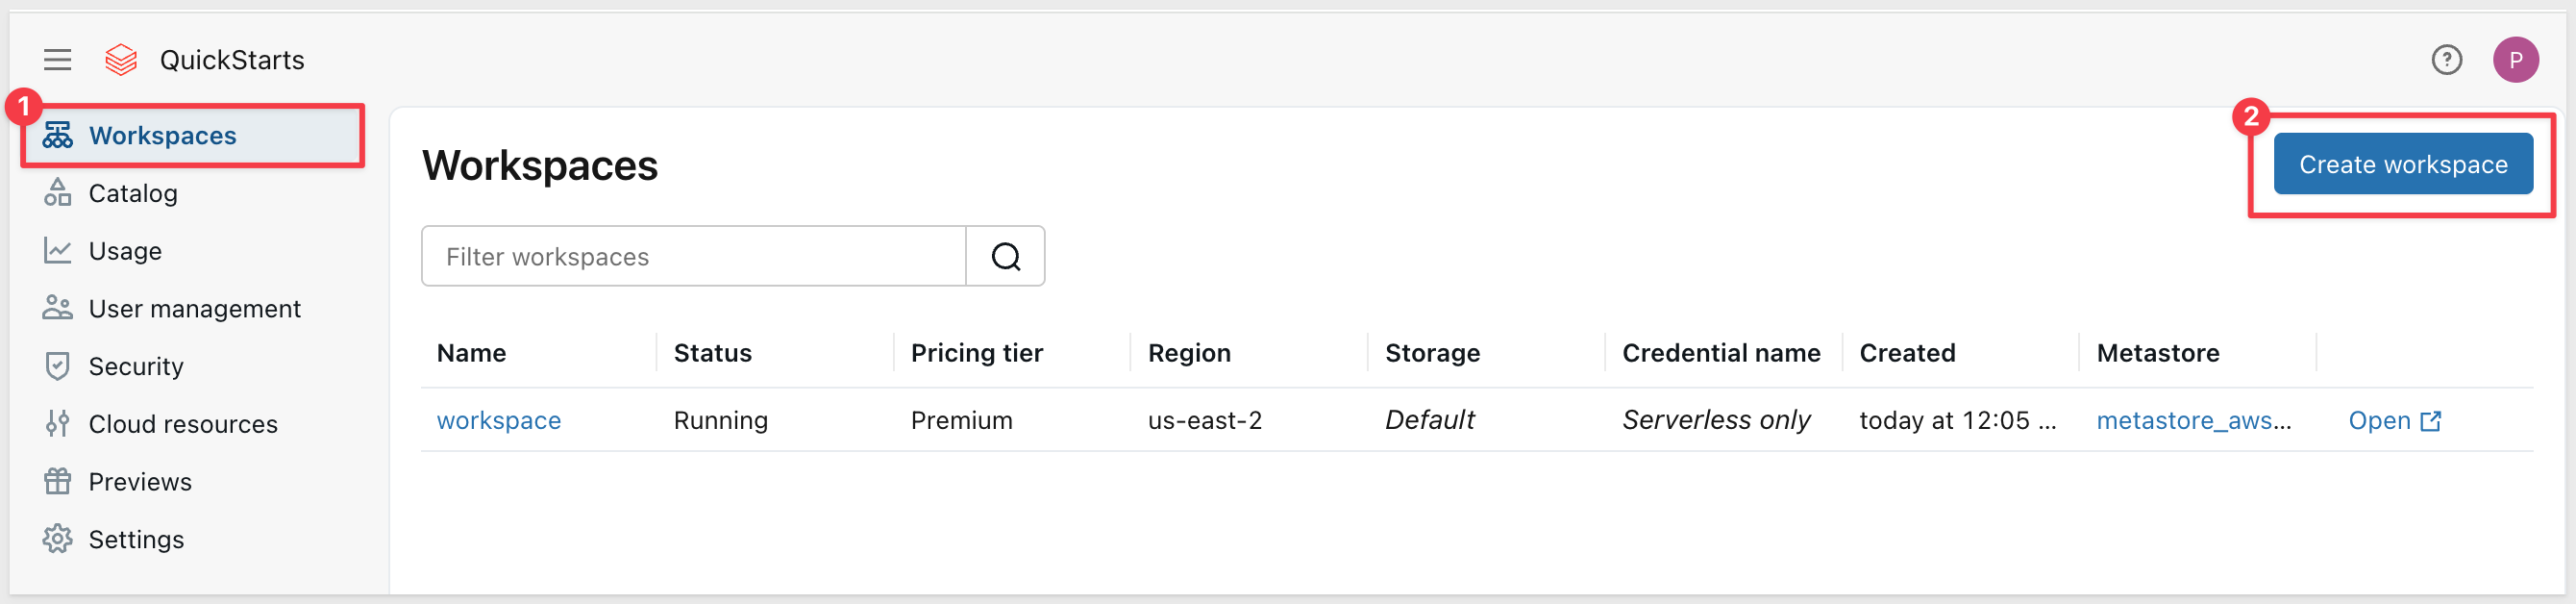
If you don't have a workspace yet:
- In the Databricks Account Console, click
Workspacesin the left sidebar - Click
Create workspace:
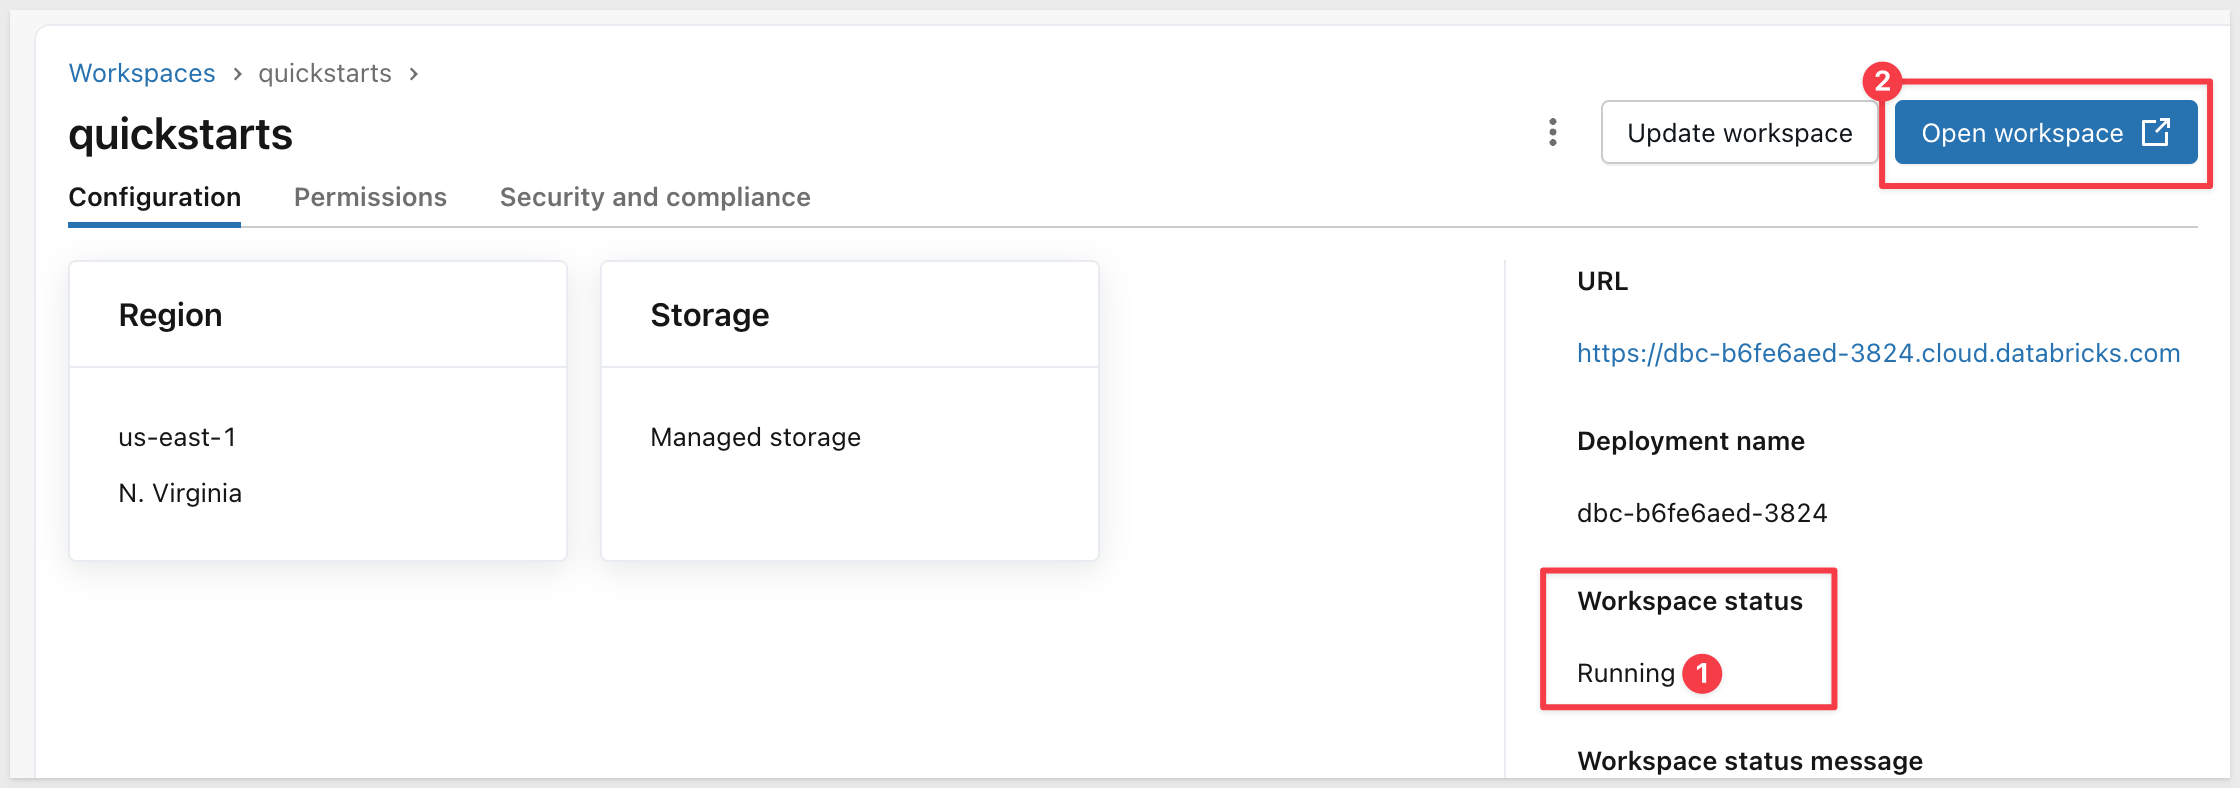
- Follow the prompts to create a new workspace (select your cloud provider and region)
- The workspace takes a minute or so to provision (as indicated on the right sidebar)
- Once provisioned, click the
Open workspacebutton:
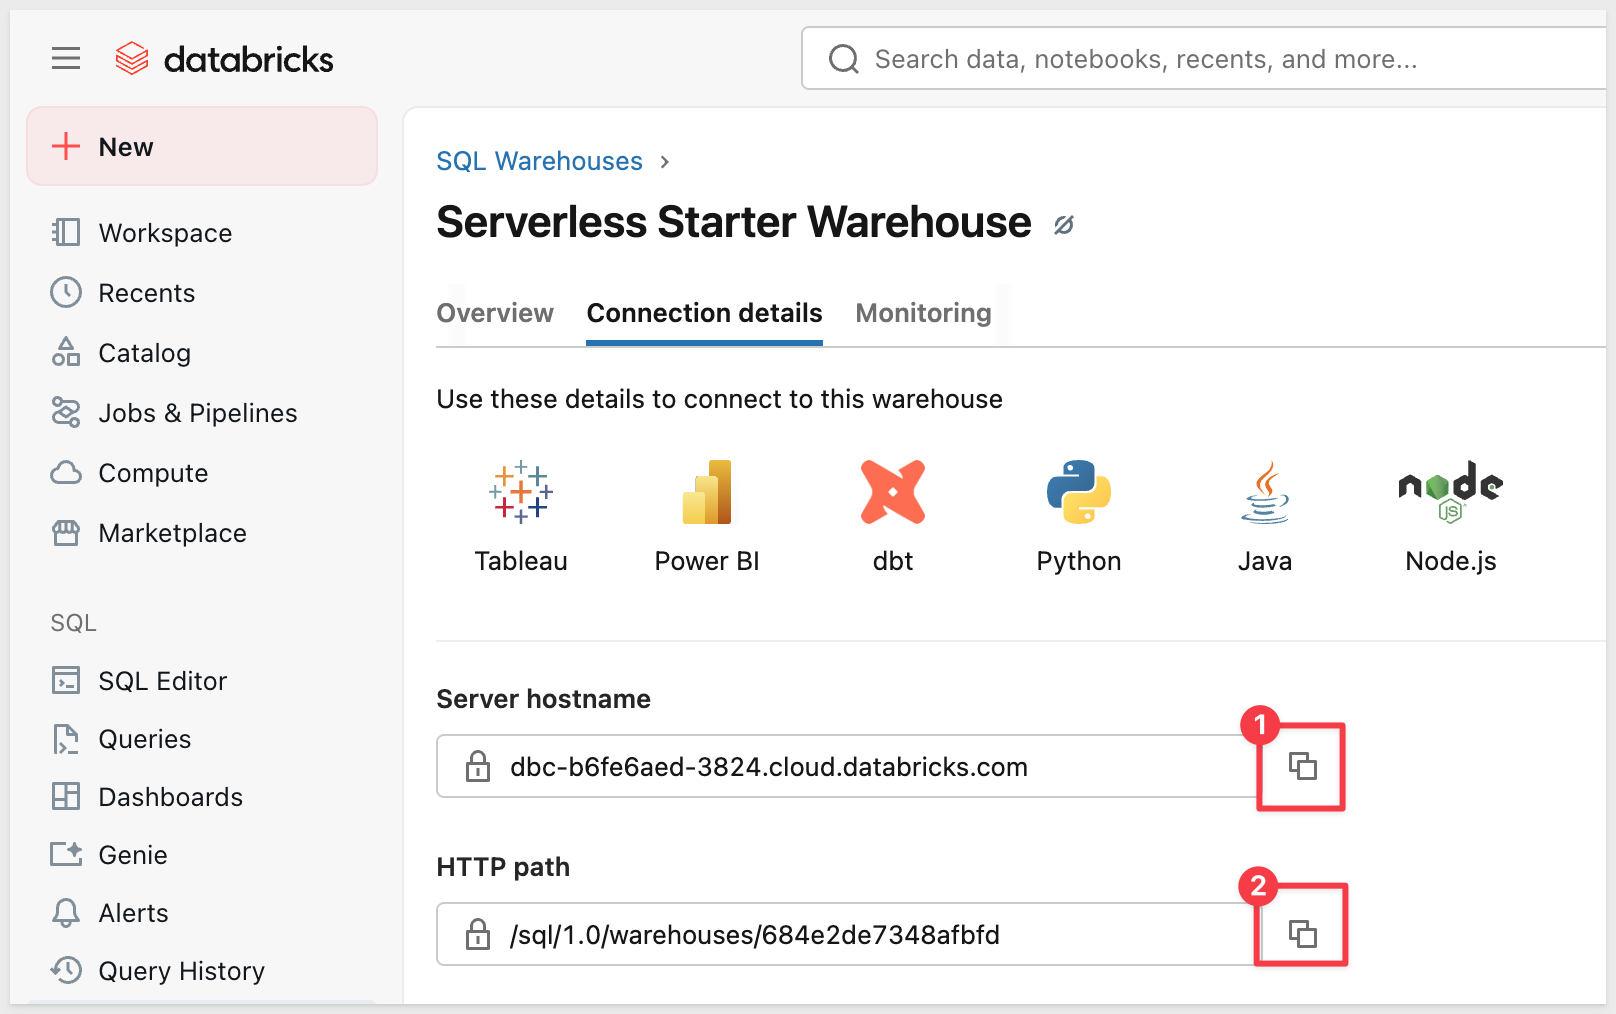
Access SQL Warehouses: Once inside a Databricks workspace, click SQL warehouses in the left sidebar (under the SQL grouping).
Click your SQL warehouse name, then click the Connection details tab.
Copy the Server hostname and HTTP path values:
Configure Connection in Sigma
Return to Sigma and paste the Server hostname and HTTP path values into the connection form.
Set the Authentication method to OAuth:
Select OAuth Provider
In the OAuth section, you need to select the correct provider based on where your Databricks workspace is hosted.
Identify your Databricks cloud provider by looking at your workspace URL:
Azure Databricks:
- URL pattern:
https://adb-1234567890123456.2.azuredatabricks.net - Contains:
azuredatabricks.net - Select:
Databricks on Azure
AWS Databricks:
- URL pattern:
https://dbc-12345678-1234.cloud.databricks.com - Contains:
cloud.databricks.com - Select:
Databricks on AWS
GCP Databricks:
- URL pattern:
https://12345678901234.5.gcp.databricks.com - Contains:
gcp.databricks.com - Select:
Other(then configure manually)
Add OAuth Credentials
After selecting the OAuth provider, you'll see fields for OAuth configuration:
Metadata URL: This QuickStart uses workspace-level OAuth to avoid Microsoft/SSO authentication complexities in trial accounts. The Metadata URL format is:
For AWS Databricks:
https://<your-workspace-host>/oidc/v1/.well-known/openid-configuration
For example:
https://dbc-220fa1cd-21d9.cloud.databricks.com/oidc/v1/.well-known/openid-configuration
For Azure Databricks:
https://<your-workspace-host>/oidc/v1/.well-known/openid-configuration
For example:
https://adb-1234567890123456.2.azuredatabricks.net/oidc/v1/.well-known/openid-configuration
Replace
Client ID: Paste the Client ID from the Databricks OAuth app you created earlier
Client Secret: Paste the Client Secret from the Databricks OAuth app
Tick the boxes for Require PKCE and Use JWT...:
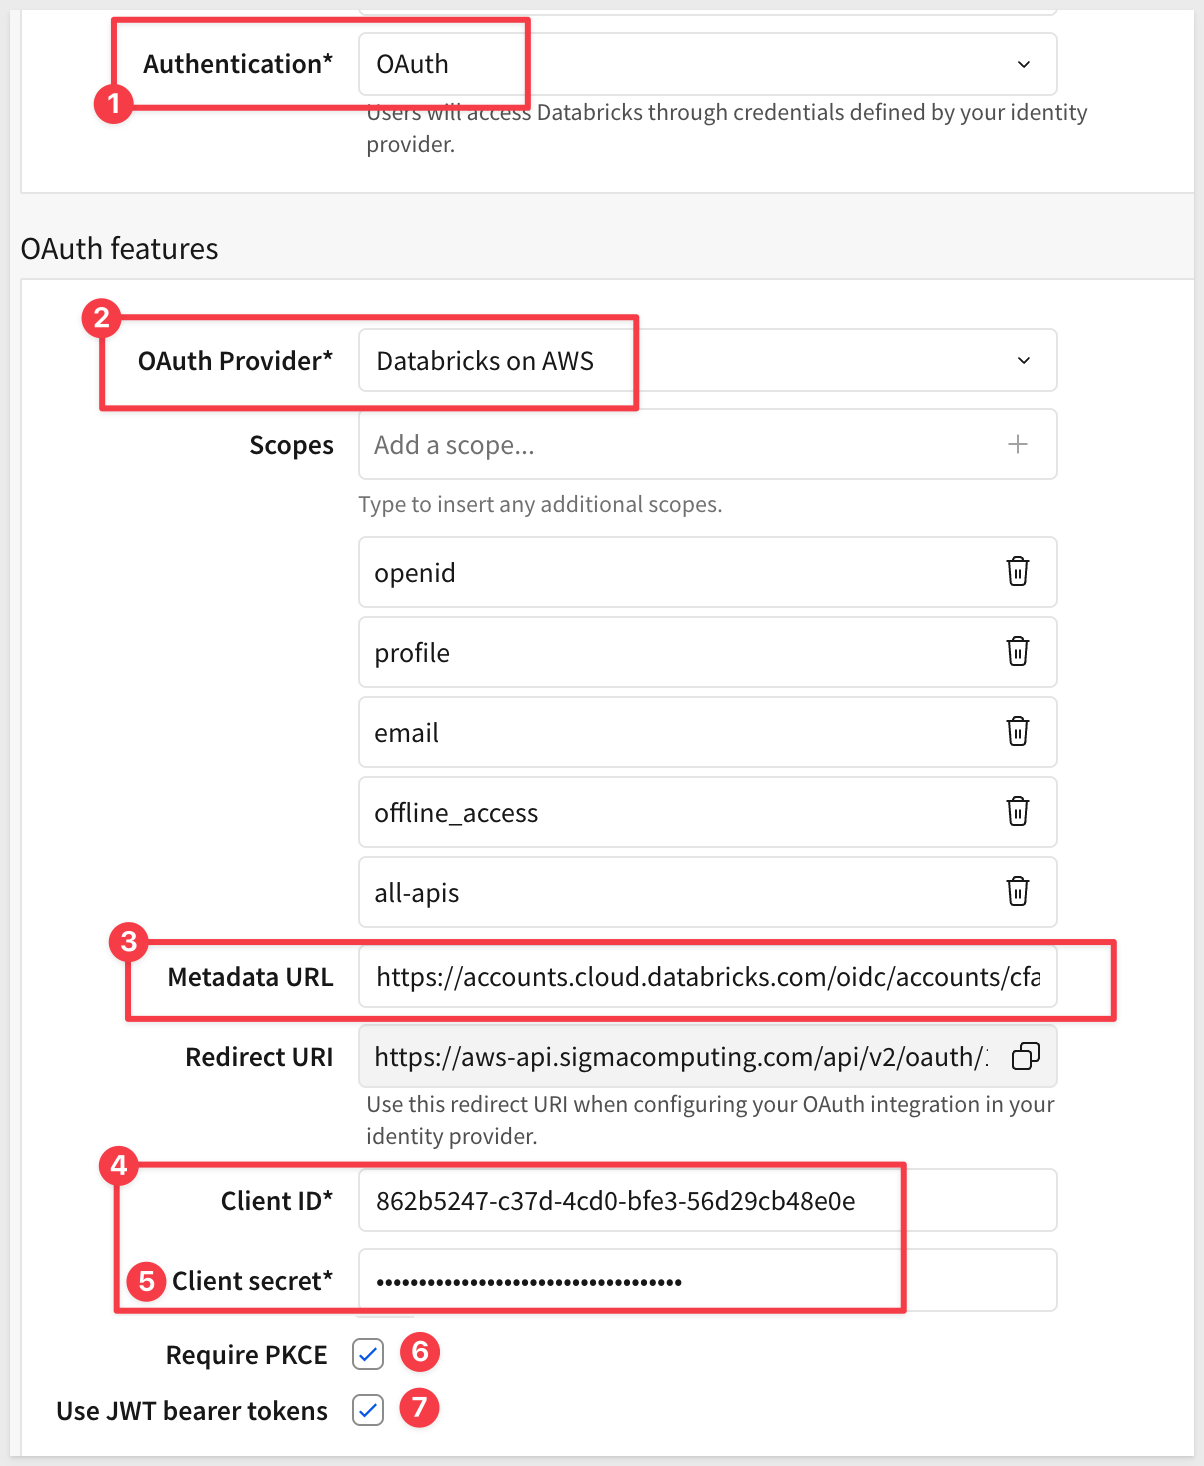
Click Create to save the connection.
Authorize Your OAuth Connection
Before you can use the Databricks OAuth connection, you need to complete the OAuth authorization flow.
After creating the connection, you'll see the connection details page. Click the Browse button to view the connection's data sources:
You'll see a warning message: "Sign in to view this connection" with the message "Your OAuth session has expired. Sign in to view this connection."
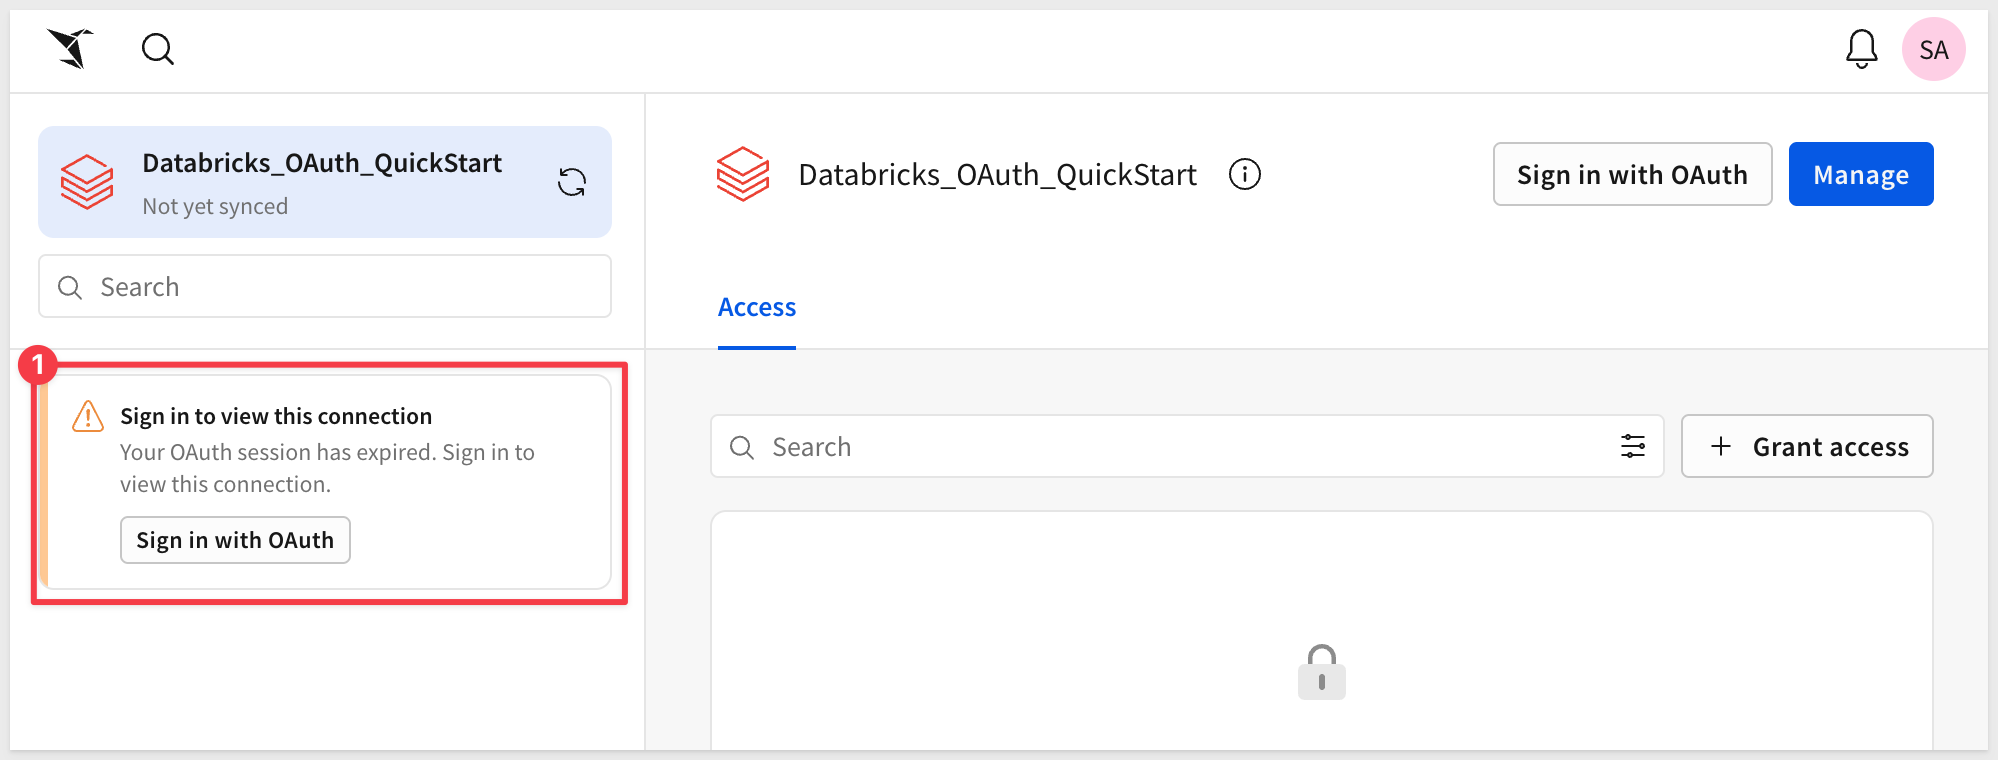
Click the Sign in with OAuth button.
This will redirect you to Databricks where you'll:
- Log in with your Databricks credentials (if not already logged in)
- Review the permissions Sigma is requesting
- Click
AlloworAuthorizeto grant Sigma access
After authorizing, you'll be redirected back to Sigma. You'll see the connection's Access tab showing No one has access to this connection.
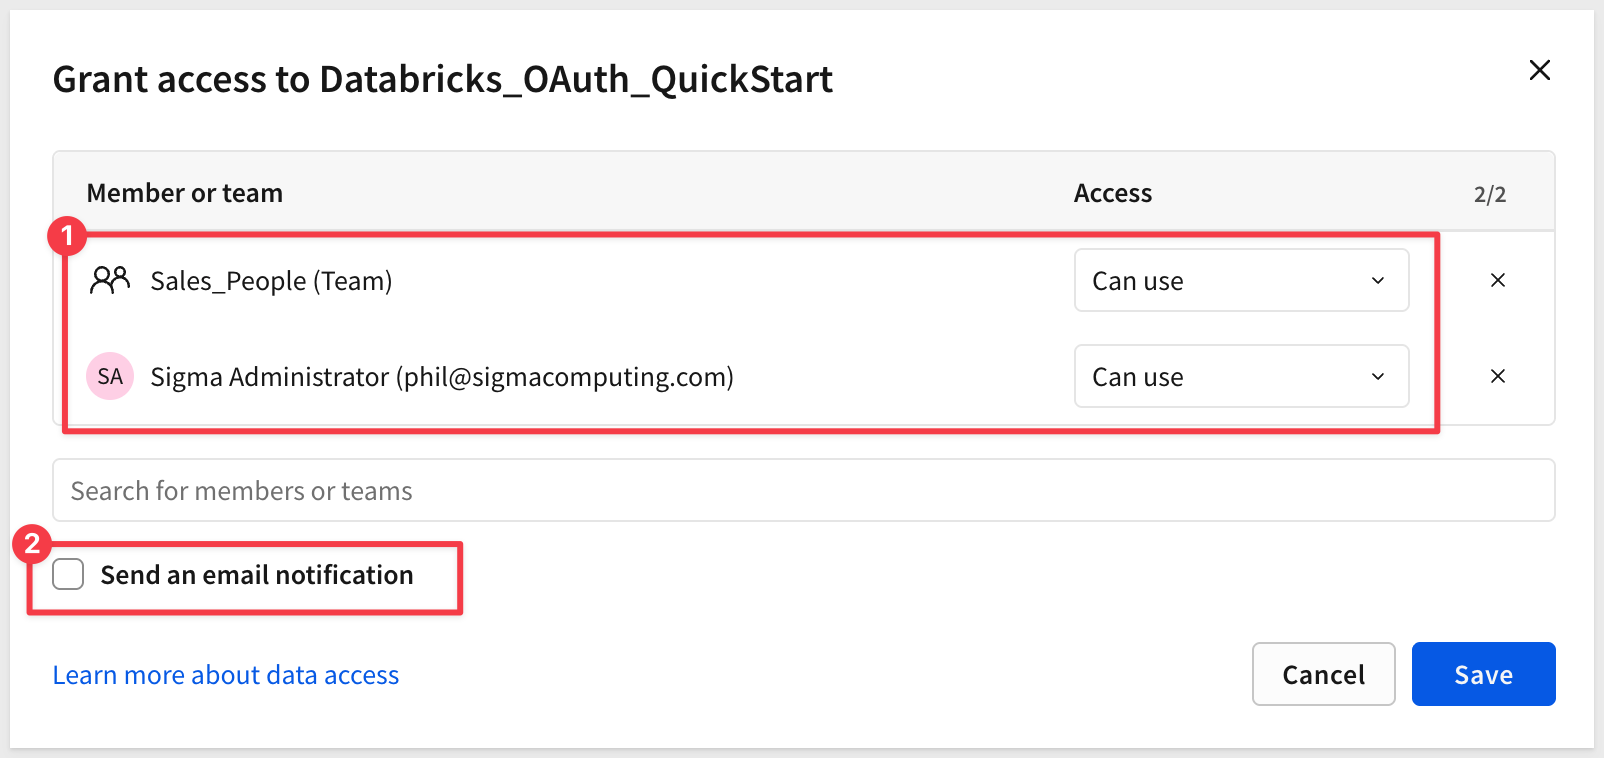
Grant Connection Access
Before you can use the connection, you need to grant access to users or teams.
Click the Grant access button in the top right.
Search for and select:
- Your admin user account
- The
Sales_Peopleteam (or the team you're using for embedded users)
Select the appropriate access level (typically Can use for embedded users) and confirm:
Verify Connection Access
After granting access, click the Browse button (or navigate to the Sources tab) to verify the connection is working.
You should see the Databricks database structure in the left sidebar:
- Expand samples
- Expand nyctaxi
- Verify you can see the trips table
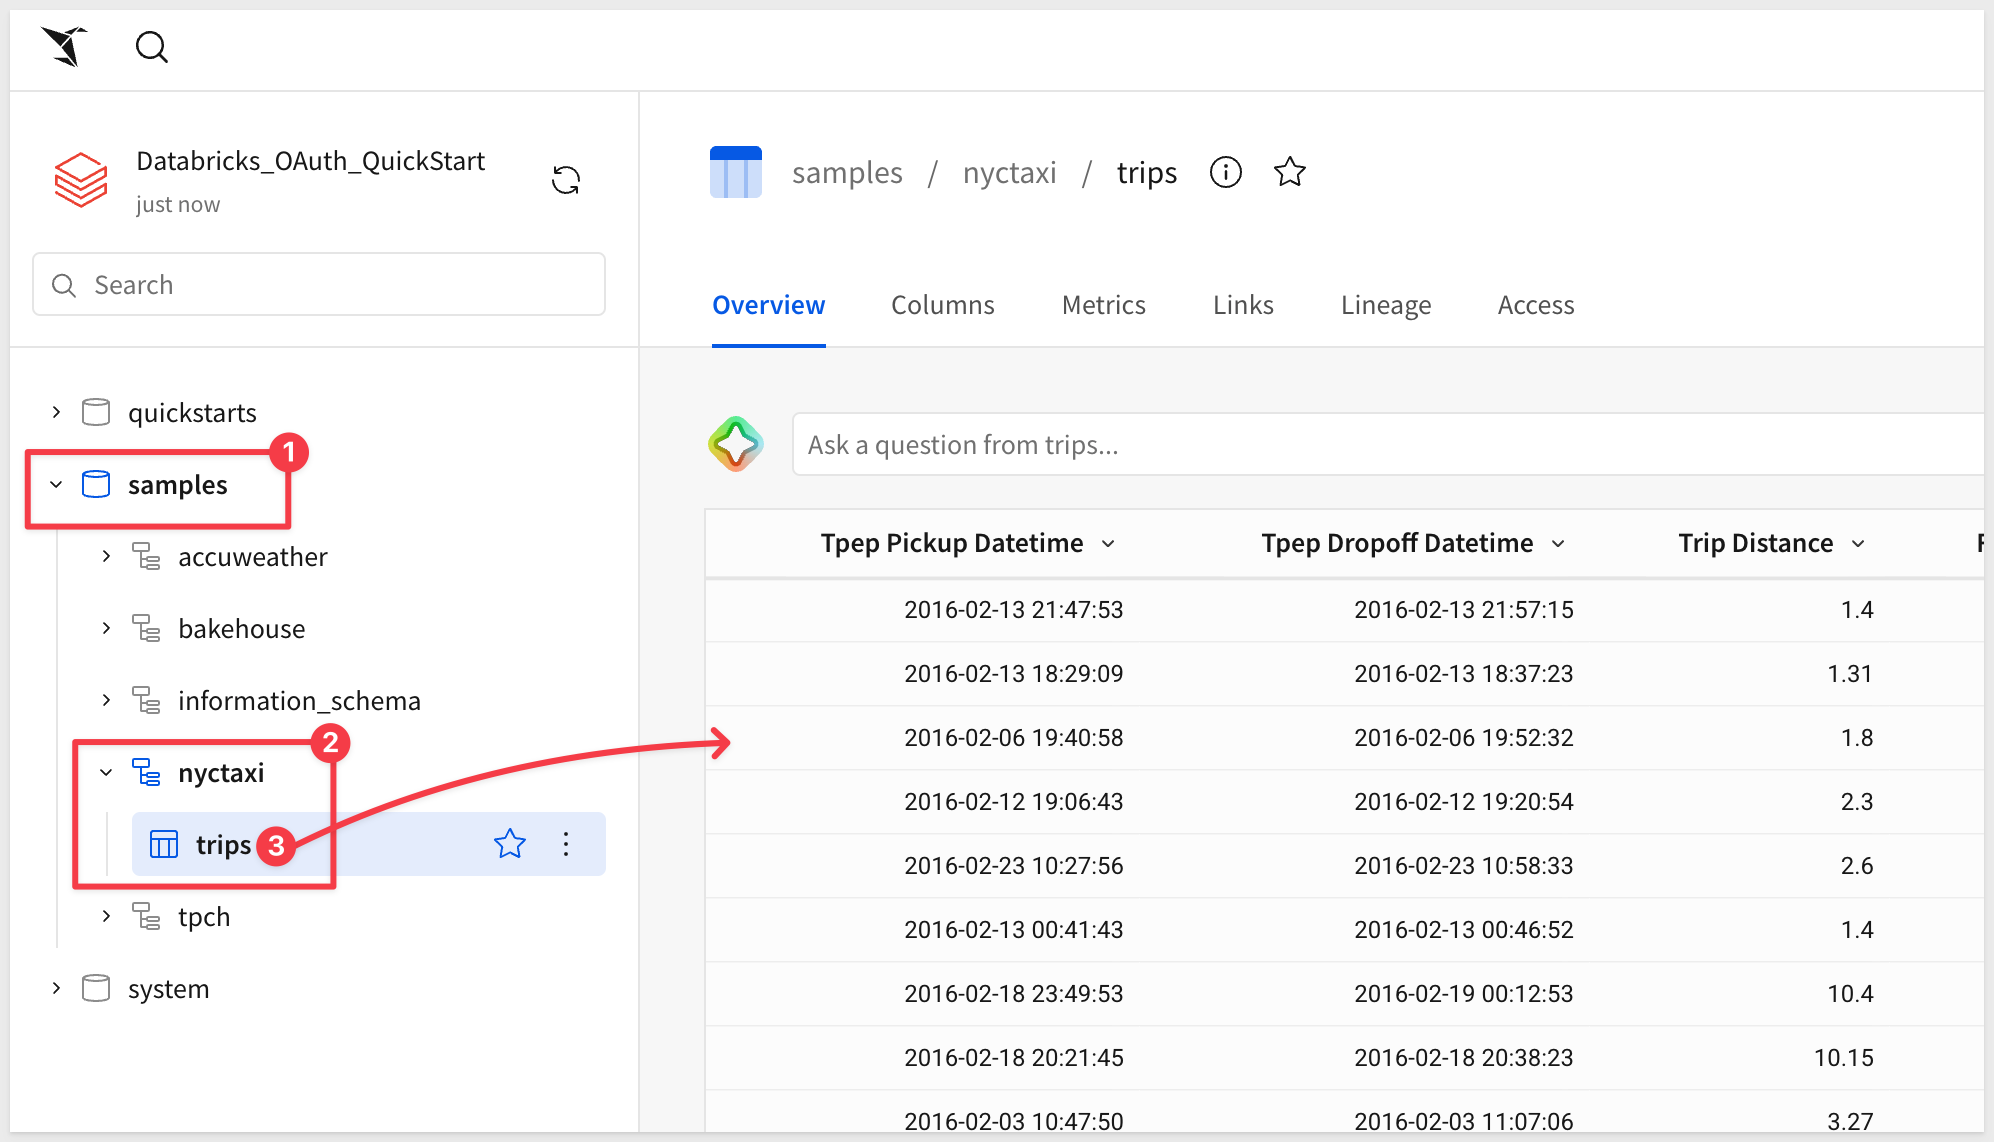
This confirms the OAuth connection is properly configured and ready to use.
Get the Connection ID
After authorizing the connection, you'll need the Connection ID for later configuration.
Return to Administration > Connections and select the Databricks_OAuth_QuickStart connection.
Look at the browser URL - it will look like one of these formats:
https://app.sigmacomputing.com/your-org/admin/connections/1a2b3c4d-5e6f-7g8h-9i0j-k1l2m3n4o5p6
The string at the end (e.g., 1a2b3c4d-5e6f-7g8h-9i0j-k1l2m3n4o5p6) is your Connection ID.
Copy this value and save it temporarily - you'll add it to the .env file later when we set up the local application.
Any Sigma URL can be embedded, assuming the proper permissions are passed along as parameters.
Sigma is flexible and offers different workflows for creating content based on the source data.
For example, we could first create a data model, set permissions on it, and then save it off for later use in a workbook.
We would then create a workbook with a table that shows data from the data model we saved earlier. This is a great way to ensure that downstream content is using trusted data that has been properly constructed and secured prior to use.
If you are interested in data modeling in Sigma, see: Fundamentals 10: Data Modeling
To minimize the steps, we will leverage a different workflow.
Create a Workbook with Databricks Sample Data
In Sigma, return to the homepage and click the + Create new button and click Workbook:
Drag a new Table from the Data group on the Element bar:
Click Select source.
In the connection browser, navigate to your Databricks_OAuth_QuickStart connection (the OAuth connection you created earlier).
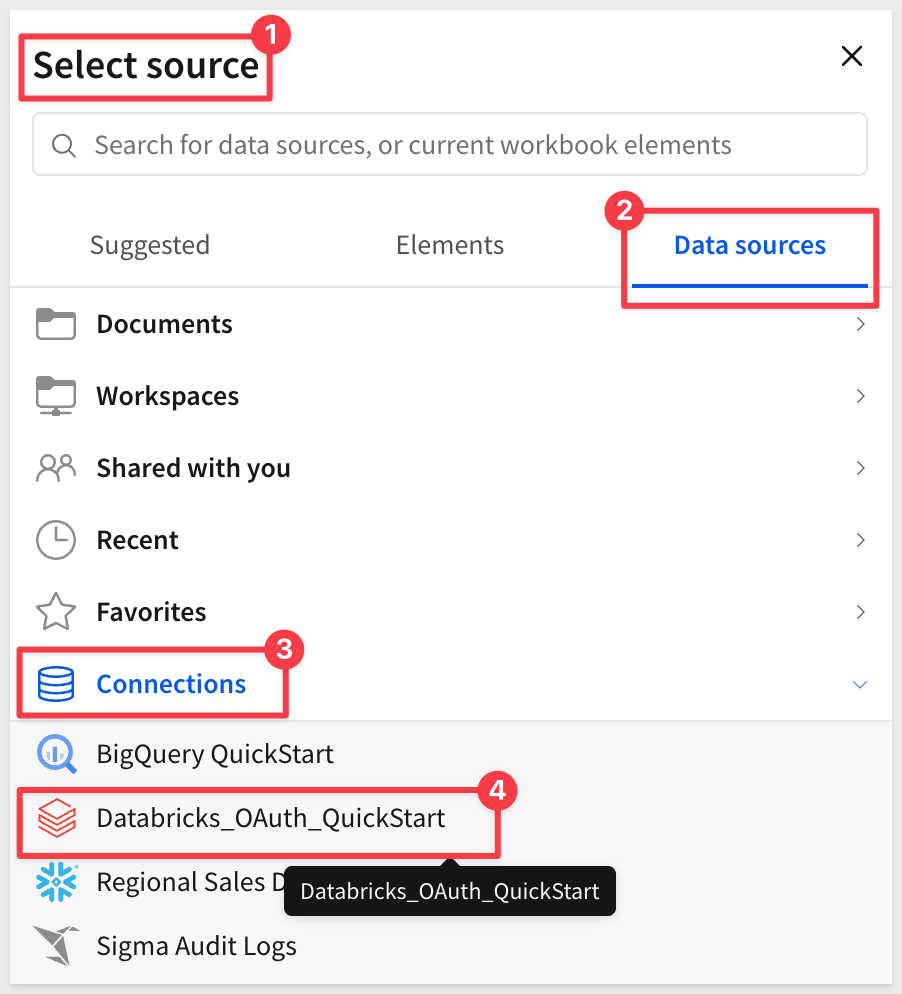
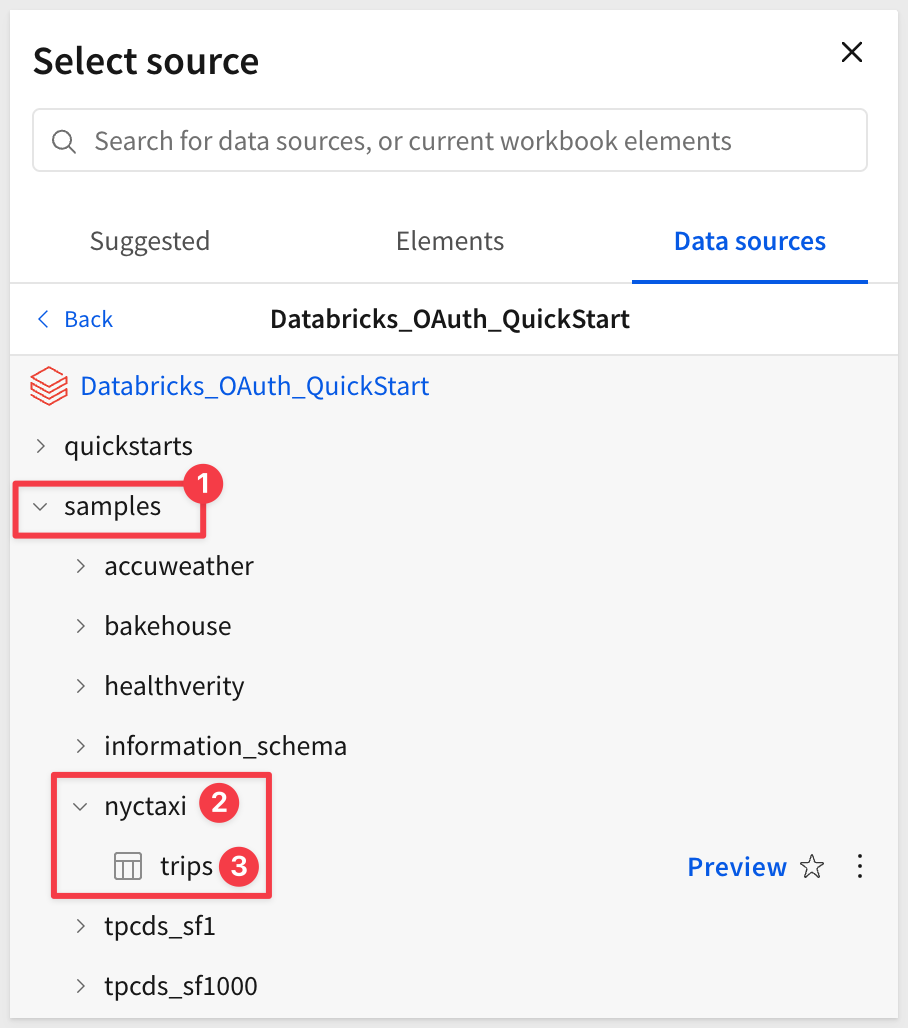
Expand the connection and navigate to the samples database (available in all Databricks workspaces).
Expand nyctaxi and select the trips table:
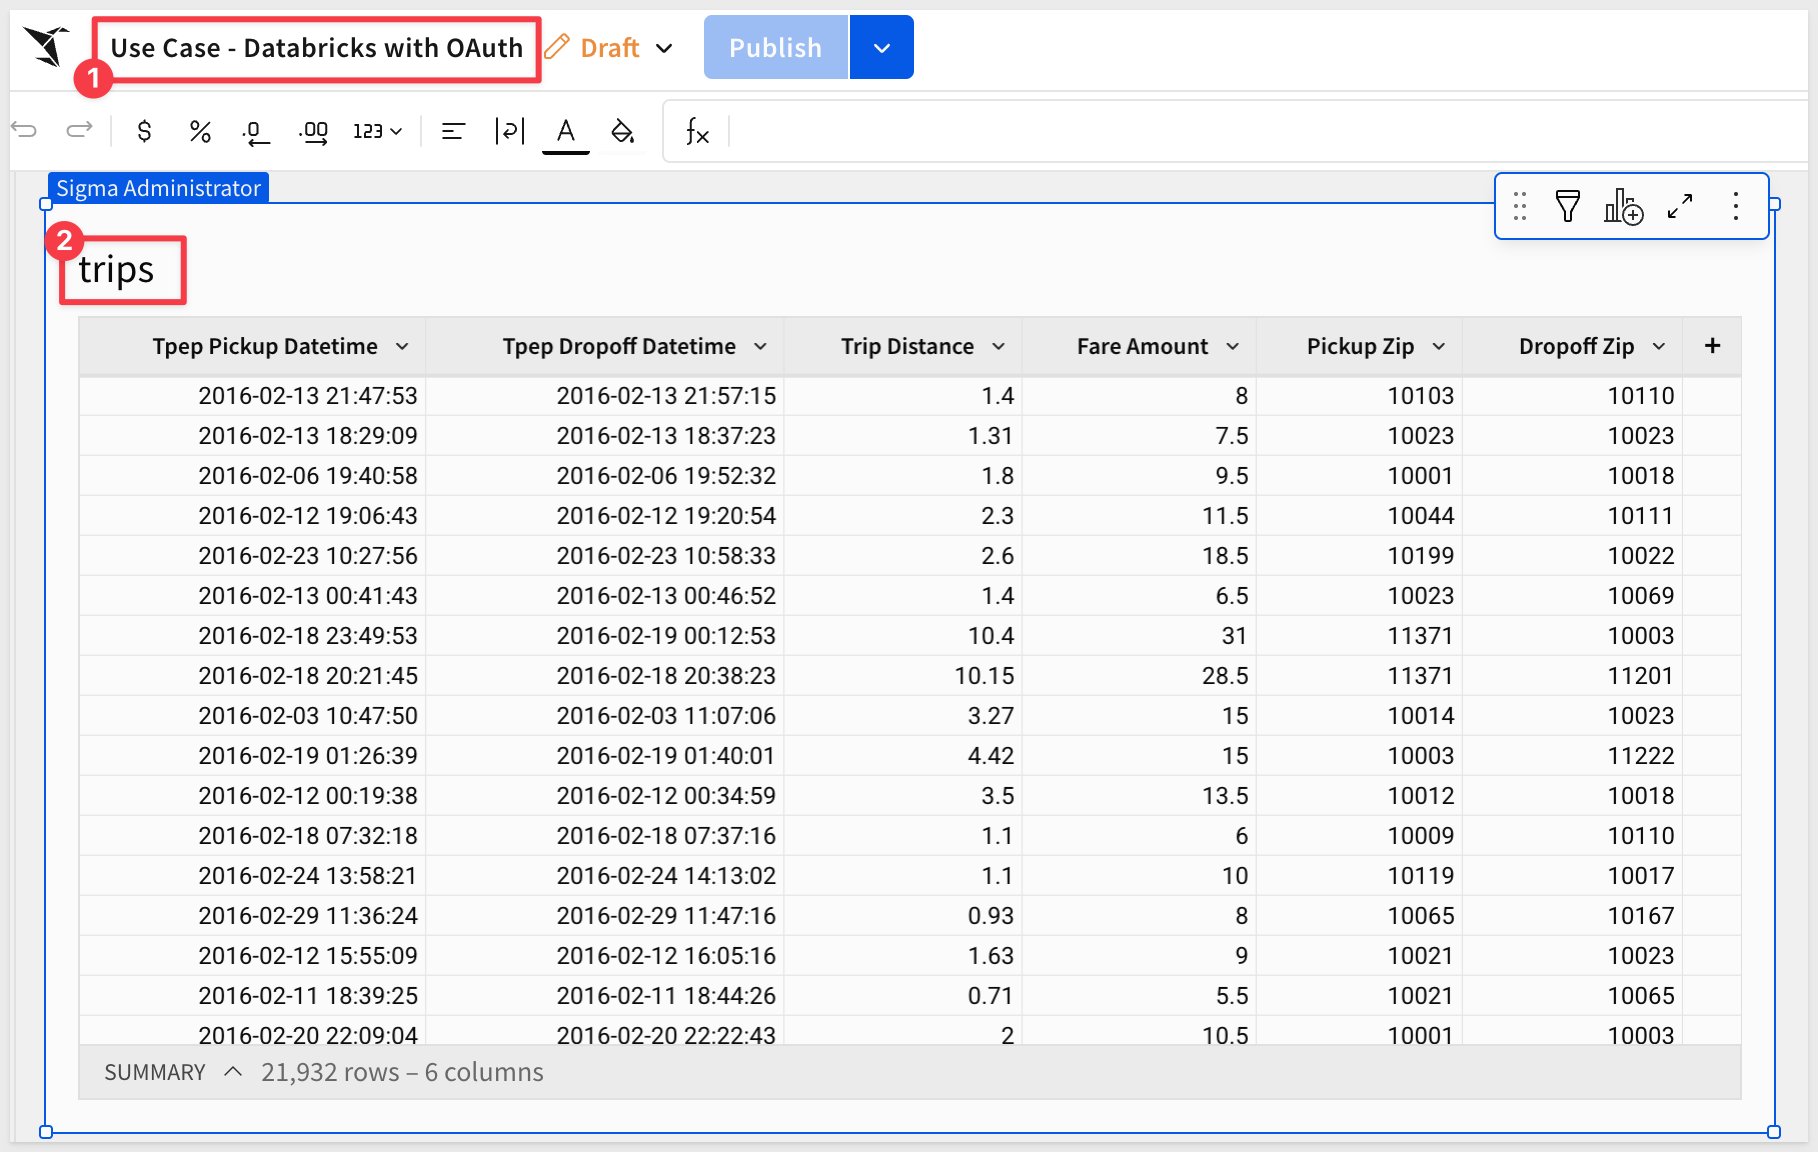
This opens the selected table in a new (unsaved) workbook that carries the temporary name Exploration:
The table shows NYC taxi trip data including pickup/dropoff times, locations, fares, and passenger counts.
Click the Save as button and save the workbook with the name Use Case - Databricks with OAuth:
Share Workbook with Team
Before the workbook can be embedded for users in the Sales_People team, you need to share it with them. Create the team if it does not exist from previous QuickStarts.
Click the Share button in the top right of the workbook.
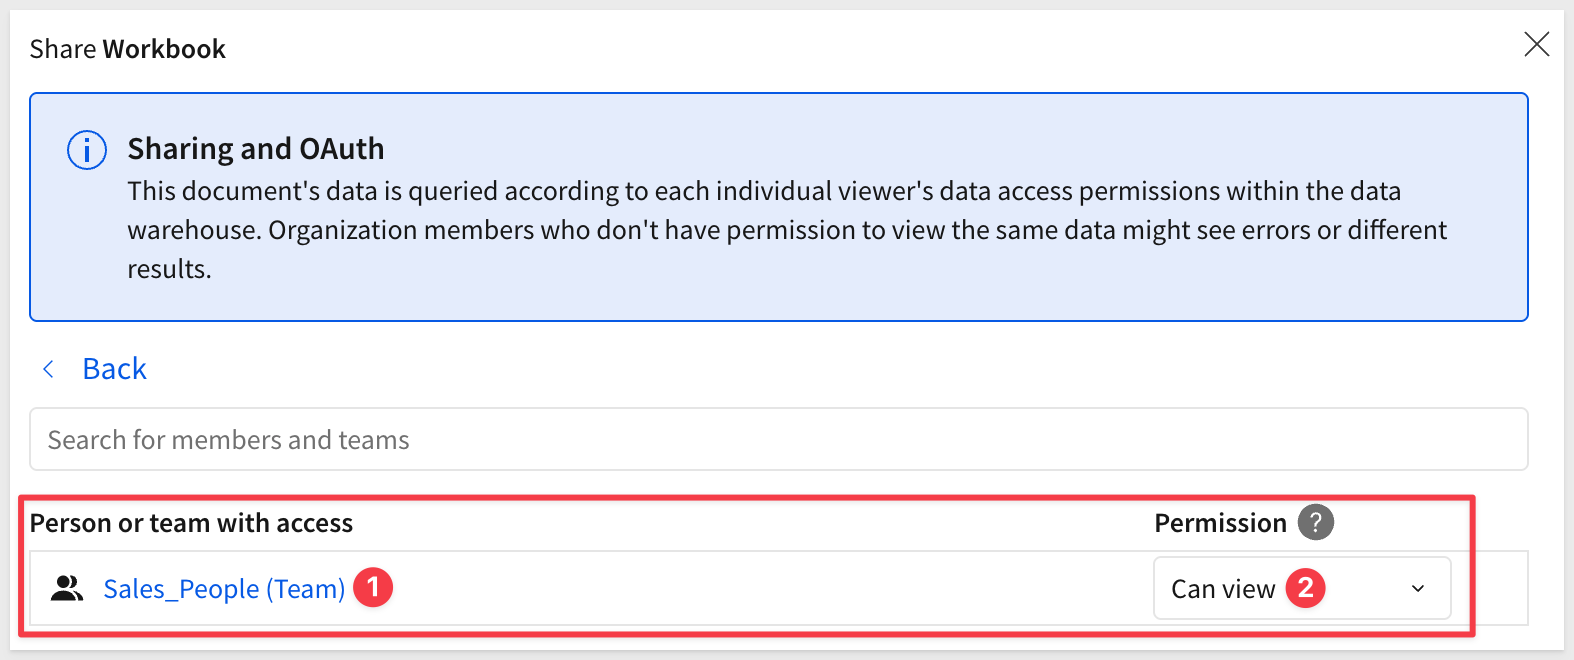
In the share dialog:
- Search for
Sales_Peopleteam - Select the team from the dropdown
- Set the permission level to
Can view - Click
ShareorAddto confirm:
Base URL
Sigma embedding uses the Base URL (the URL shown in the browser's address bar) to identify what is shown in any embed.
This allows any Sigma workbook, page, or element(s) to be embedded.
Switch the workbook to the Published version:

Then just copy the URL and save it for later use.
Client credentials (a unique client ID and embed secret) are the foundation of secure embedding.
Sigma uses the client ID to determine which embed secret is referenced in a request. Each time a request is made, the server-side embed API uses the embed secret to generate an encrypted signature.
Together, the client ID and embed secret create a robust security framework for server-side interactions with Sigma.
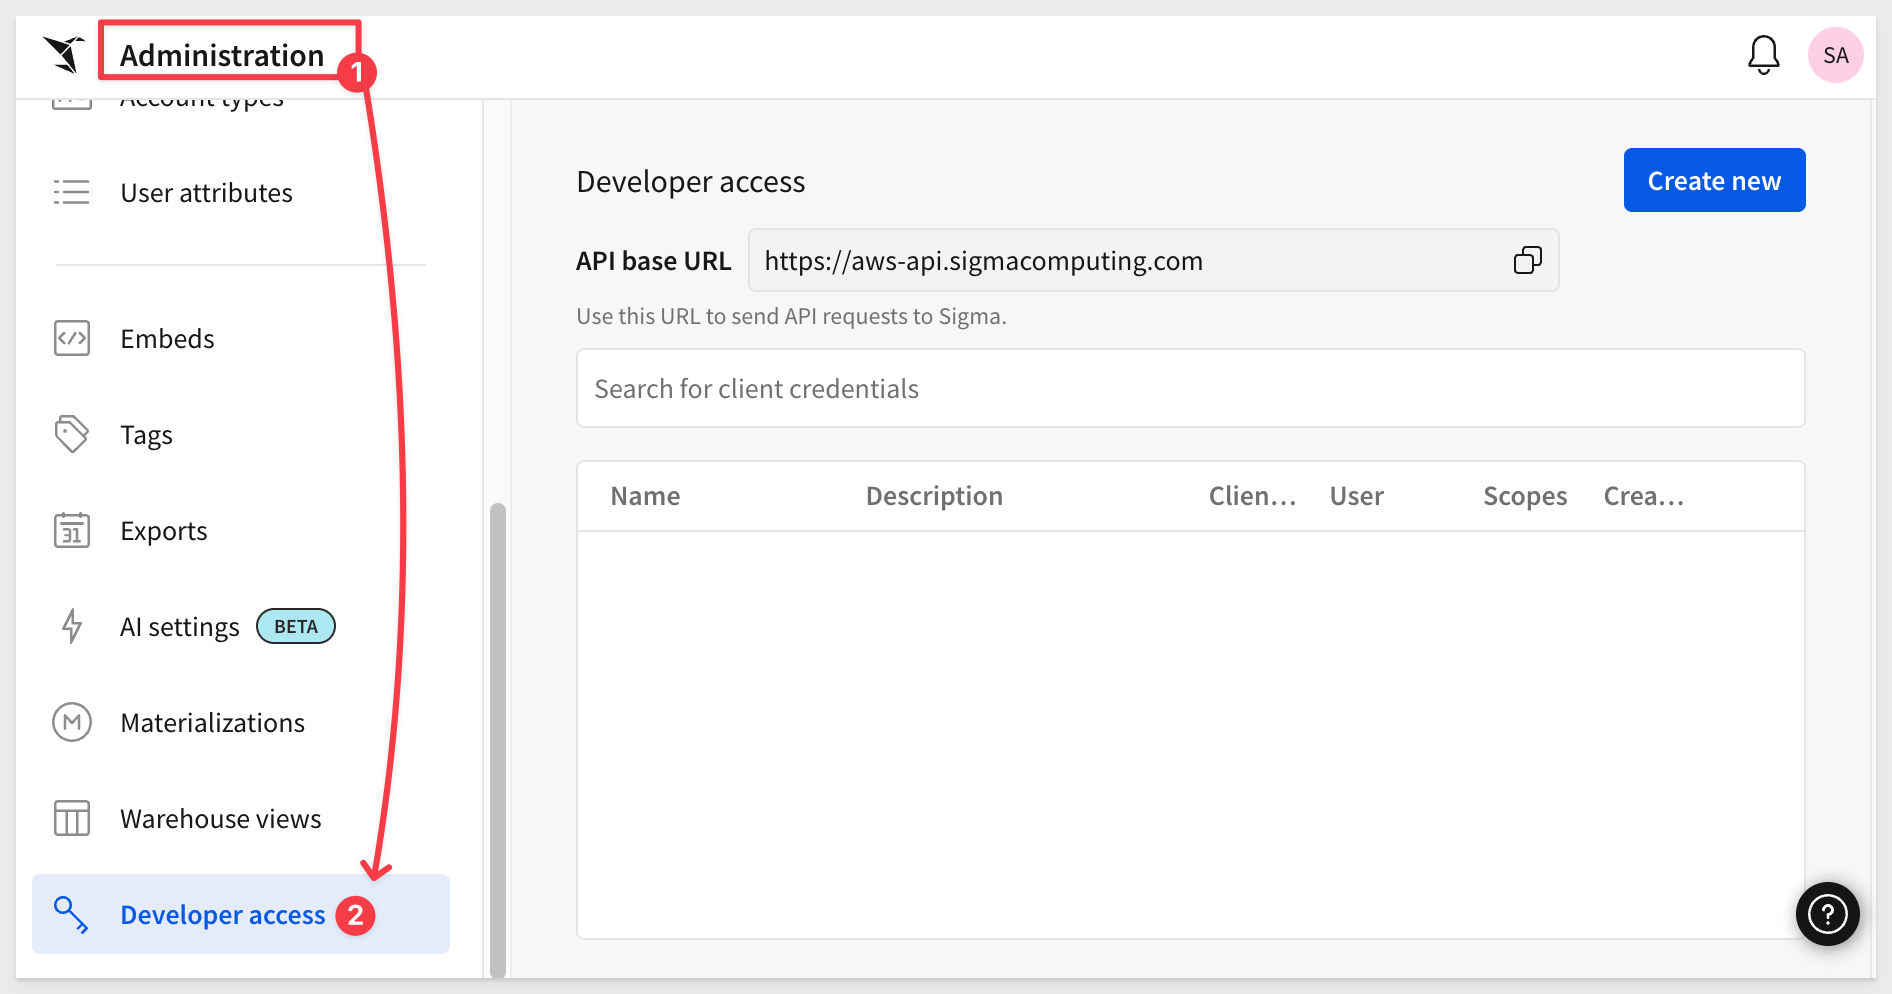
Navigate to Administration and scroll down to Developer Access.
Click Create New:
In the Create client credentials modal, select Embedding, give it a name, and assign an administrative user as the owner.
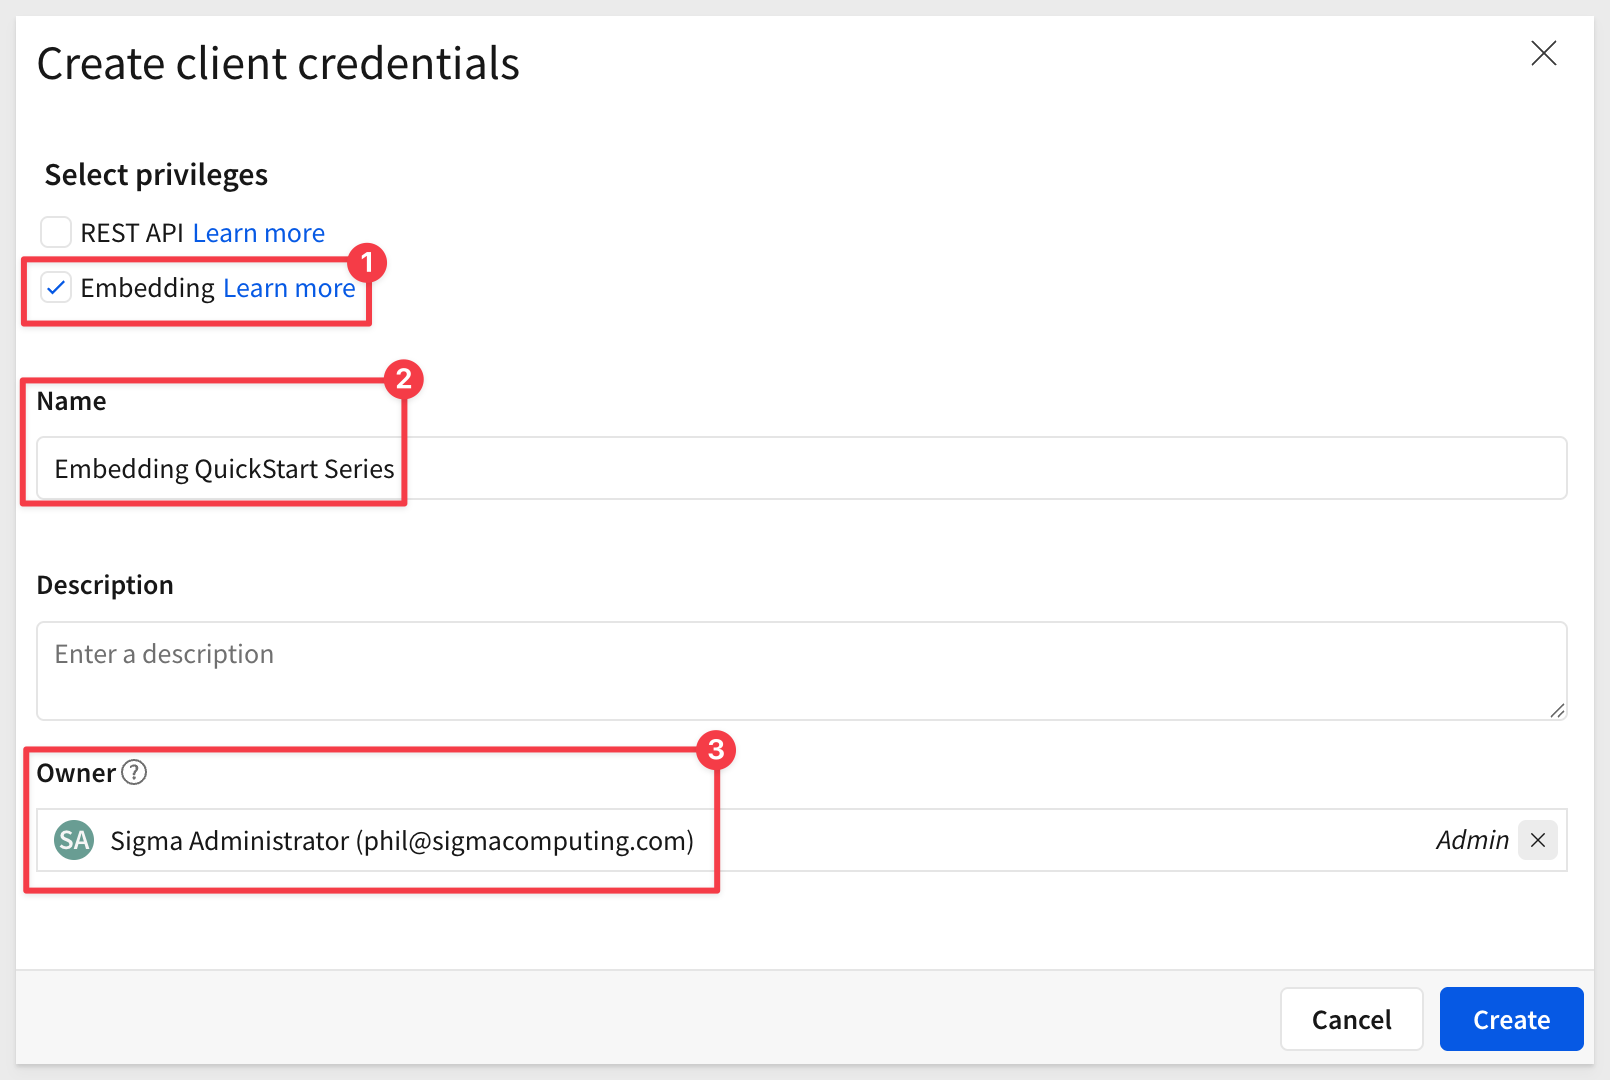
Click Create.
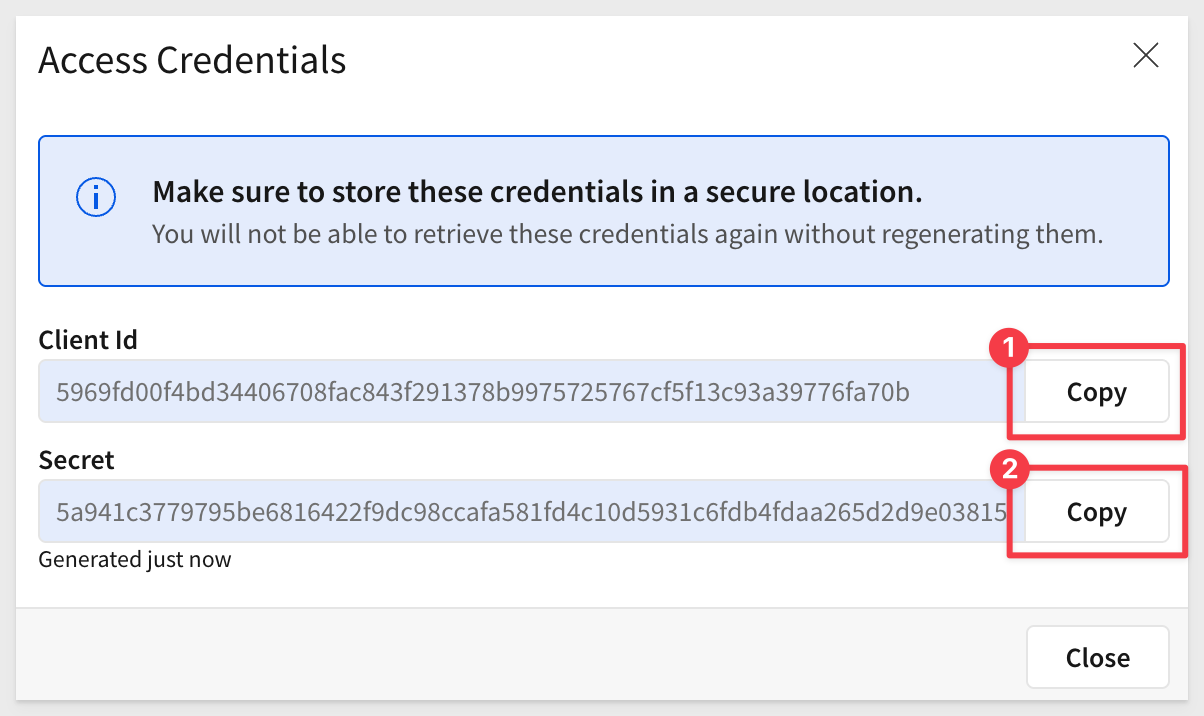
Copy and paste the Client ID and Secret into the respective locations in the .env file, in the # Shared by all QuickStarts grouping.
Clone the Git Repository Project Folder
We have made sample project code available in a public GitHub repository to save time.
While you could clone the entire repository, we'll use sparse-checkout to clone only the specific folder we need, keeping your local project cleaner.
We will use VSCode and the terminal to perform a git sparse-checkout of the specific project folder we are interested in. This involves a few extra steps, but results in a cleaner local project folder.
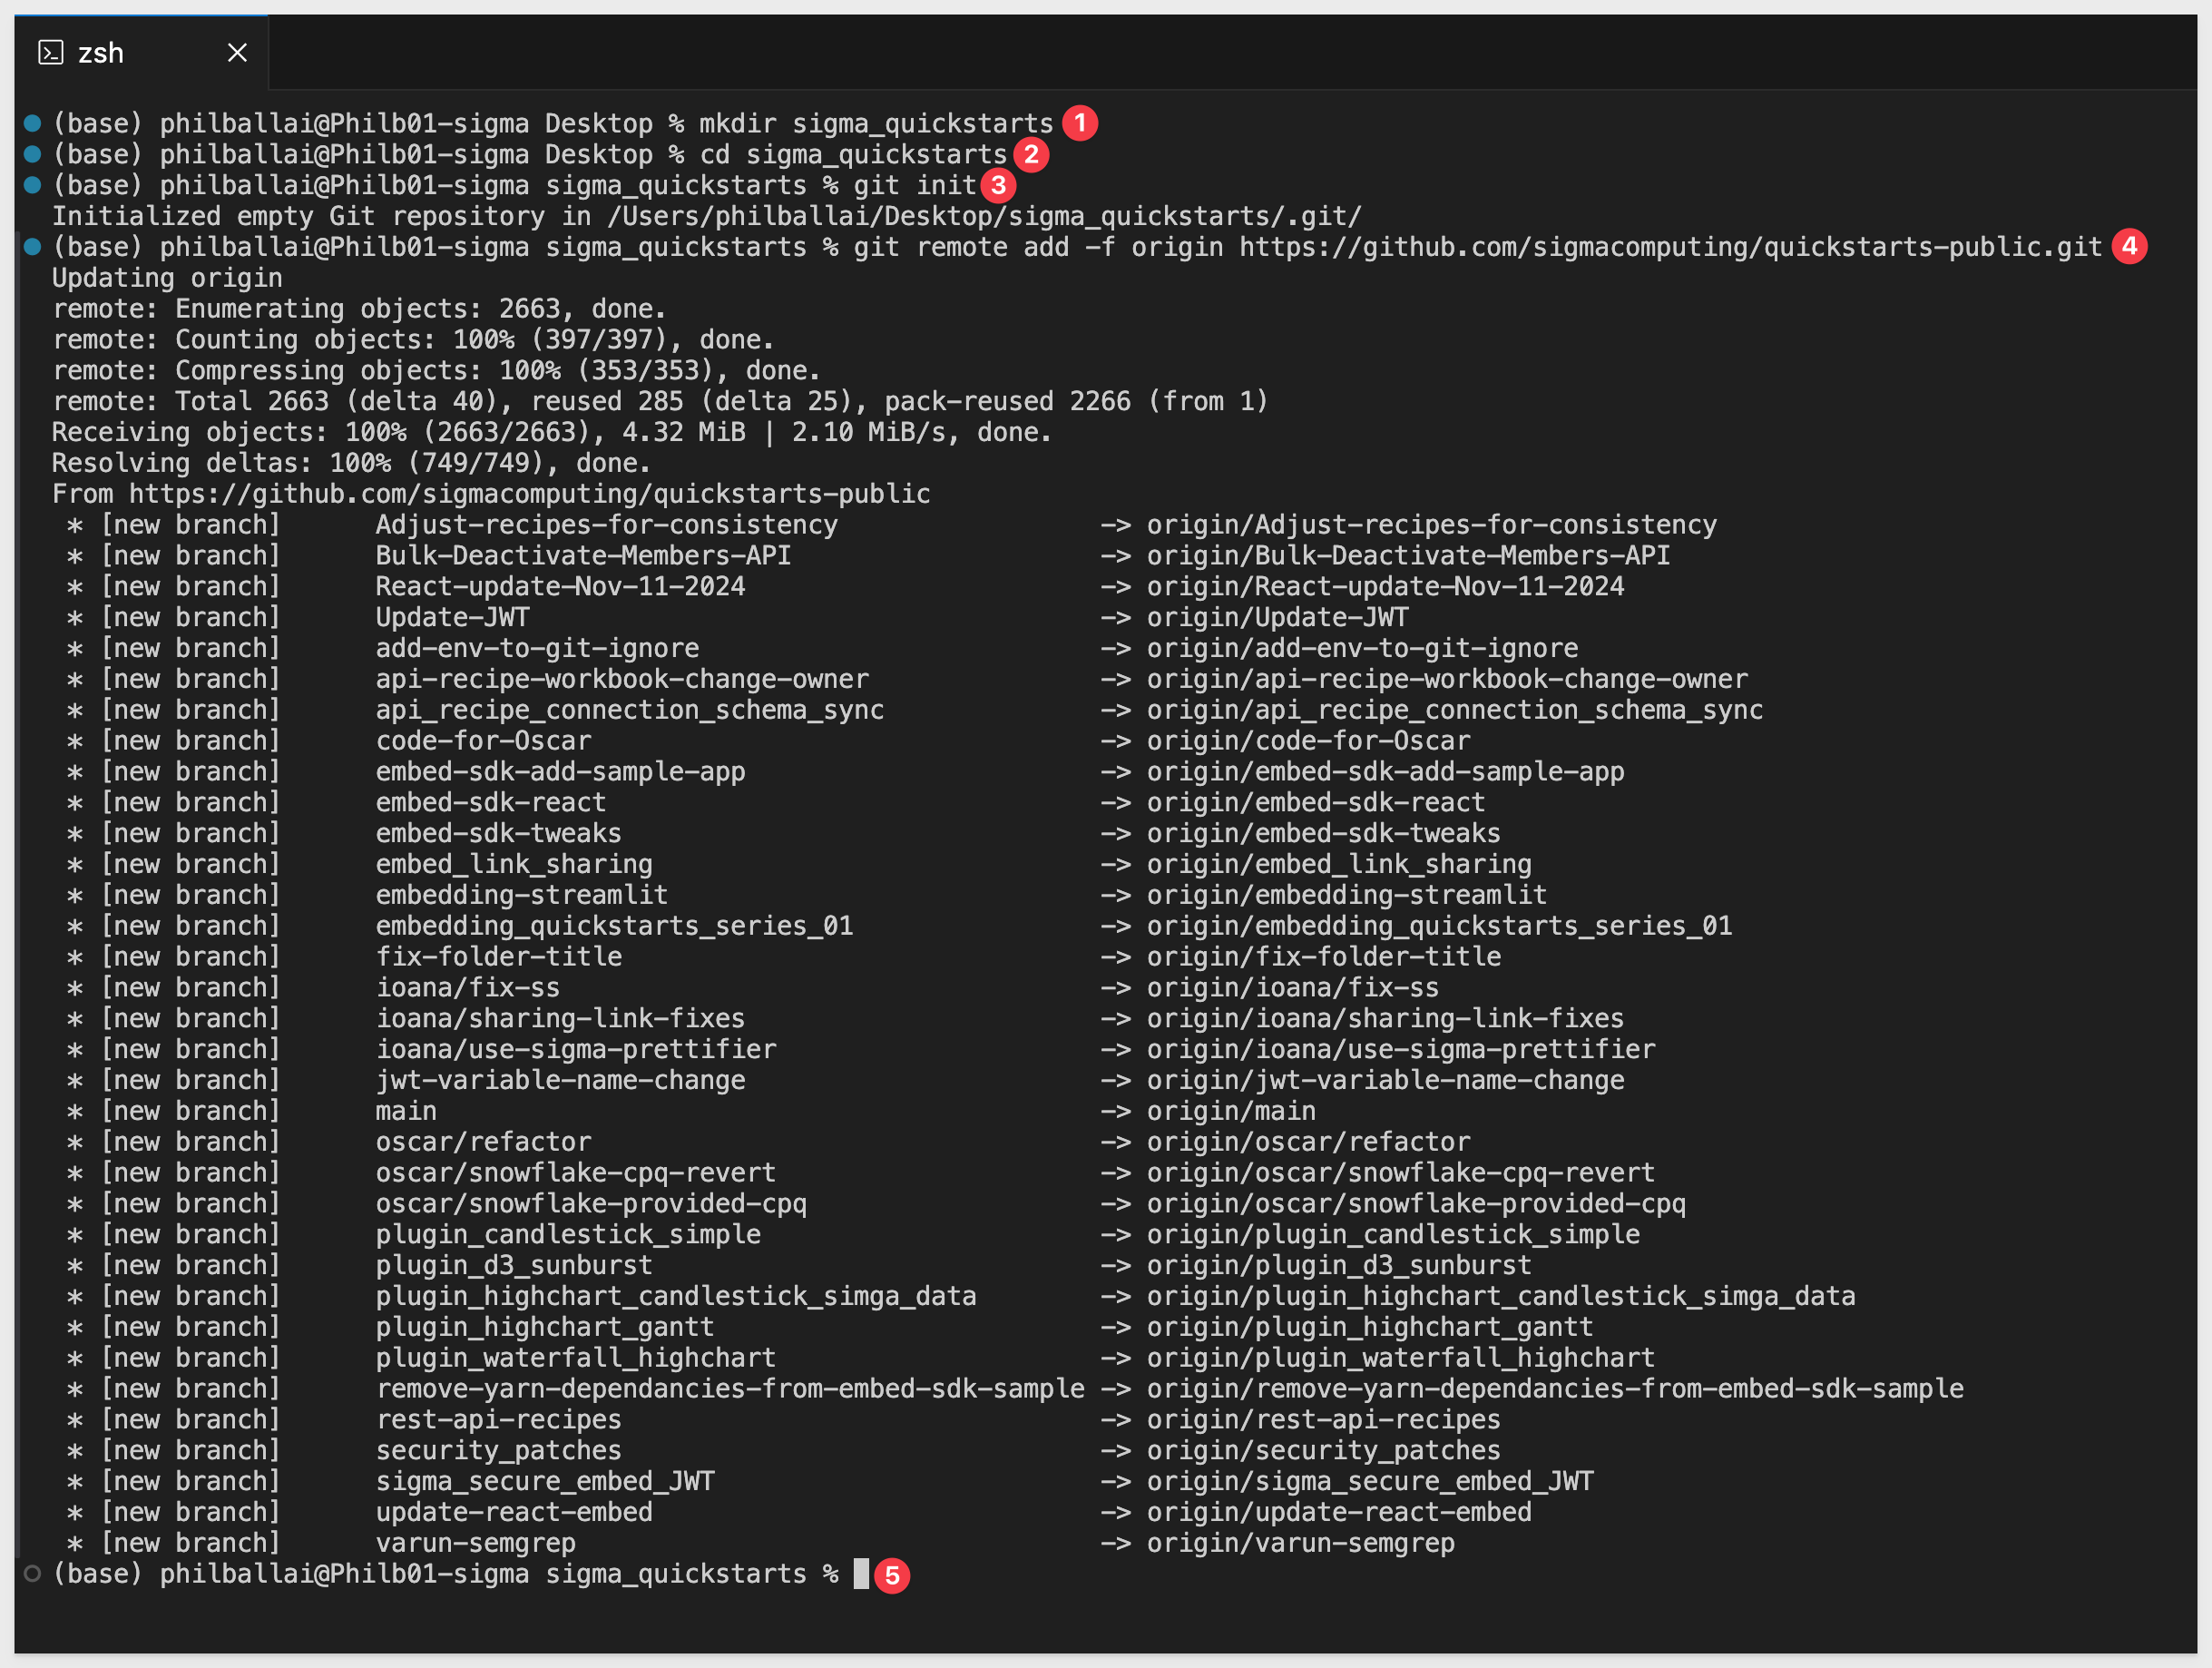
Open VSCode and a new Terminal session.
Create a new directory in a location of your choice, using the command:
For example:
mkdir sigma_quickstarts
Change to the new directory:
cd sigma_quickstarts
Execute the terminal command:
git init
Add the remote repository as the origin:
git remote add -f origin https://github.com/sigmacomputing/quickstarts-public.git
No errors should show:
Enable sparse checkout:
git config core.sparseCheckout true
Specify the folder you want to clone by adding it to the sparse-checkout configuration:
echo "embedding_qs_series_2" >> .git/info/sparse-checkout
Pull the specified folder from the repository:
git pull origin main
Change directory to the new folder:
cd embedding_qs_series_2
Finally, load node into the local project:
npm install
After the command runs, click the button to Open Folder:

Using the folder navigation, locate your folder and click Open.
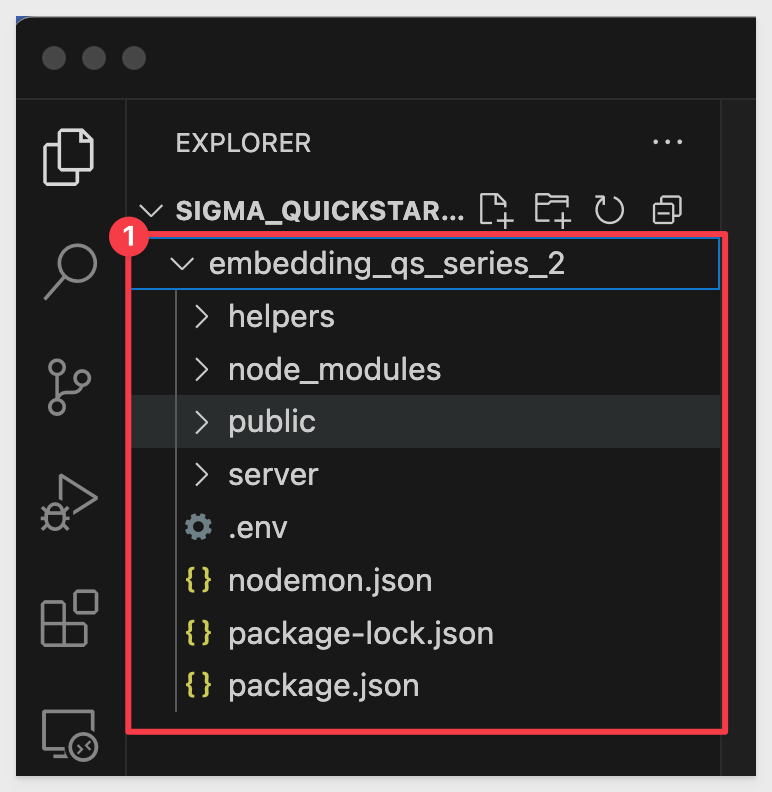
We can now see the project called SIGMA_QUICKSTARTS with a folder called embedding_qs_series_2:
Install Dependencies
The Databricks OAuth application requires several Node.js packages for OAuth authentication, session management, and Sigma embedding.
Navigate to the databricks_oauth folder:
cd public/databricks_oauth
Install the application dependencies:
npm install
This installs the following key packages:
- express & express-session: Web server and session management
- @sigmacomputing/node-embed-sdk: Sigma embedding with OAuth token encryption
- axios: HTTP client for Databricks API calls
- dotenv: Environment variable management
The Databricks OAuth application demonstrates a complete implementation of connection-level OAuth with PKCE for Sigma embedding.
Application Structure
The application is located in public/databricks_oauth/ and consists of several key components:
Core Files:
server.js: Express server with OAuth routes and session managementlogin.html: Login page with "Login with Databricks" buttonindex.html: Dashboard page that displays the embedded Sigma workbook
Helper Modules (helpers/folder):
pkce.js: PKCE code challenge and verifier generation (RFC 7636)databricks-auth.js: Databricks OAuth functions (authorize, token exchange, refresh)embed-api-oauth.js: Sigma JWT generation with encrypted OAuth tokens
Additional Tools:
databricks-token-cli.js: Standalone CLI tool for testing token generation
How It Works
- User Login: User clicks "Login with Databricks" → redirects to Databricks with PKCE challenge
- OAuth Callback: Databricks redirects back with auth code → exchange for access/refresh tokens
- Token Storage: Tokens stored securely in server-side session
- Sigma Embedding: Access token encrypted and passed to Sigma in JWT
- Auto-Refresh: Tokens automatically refreshed before expiration
Environment file (.env)
The .env file contains configuration settings for the embedding server and each QuickStart. It helps separate runtime parameters (variables) like client secrets and user identity from the source code.
The file is organized into three key sections:
1: Global Settings:
Shared across all QuickStarts (e.g. CLIENT_ID, SECRET, SESSION_LENGTH, PORT).
2: Default Embed User:
Provides fallback identity parameter values (EMAIL, ACCOUNT_TYPE, TEAMS) to be used if not overridden by a specific QuickStart.
3: QuickStart-Specific Blocks:
Each QuickStart has a dedicated section (e.g. GETTING_STARTED_BASE_URL) that may override the user, team, base URL, and so on.
The .env file provides fallback logic for each JWT:
- The code checks if QuickStart-specific settings exist (like GETTING_STARTED_EMAIL).
- If not found or blank, it falls back to the default user values defined in the shared block.
This allows you to maintain a consistent test user by default, and easily override it per QuickStart as needed for different workflows.
Open the .env file. We will copy and paste key values as we progress through sections of this QuickStart:
Now we need to configure the .env file with all the values we've collected throughout this QuickStart.
Return to VS Code and open the .env file located at:
embedding_qs_series_2/.env
The file is shared across all QuickStarts in this series. We'll configure both the shared settings and the Databricks OAuth-specific section.
1. Shared Sigma Embedding Settings
Locate the # Shared by all QuickStarts section and add your Sigma embedding client credentials:
CLIENT_ID=your-sigma-client-id-here
SECRET=your-sigma-secret-here
2. Default Embed User Settings
The default embed user settings are already configured:
EMAIL=sales_person@example.com
ACCOUNT_TYPE=View
TEAMS=Sales_People
You can leave these as-is, or customize them for your organization.
3. Databricks OAuth Configuration
Scroll to the bottom of the .env file and locate (or add) the # Use Case: Databricks OAuth section.
Configure the following values with the information you've collected:
1. Sigma Embedding Settings Set the workbook URL you copied earlier:
DATABRICKS_OAUTH_BASE_URL=https://app.sigmacomputing.com/your-org/workbook/your-workbook-id
Leave these optional overrides blank (they'll use the default embed user settings):
DATABRICKS_OAUTH_EMAIL=
DATABRICKS_OAUTH_ACCOUNT_TYPE=
DATABRICKS_OAUTH_TEAMS=
2. Databricks OAuth Configuration Set your Databricks workspace host (copy from your workspace URL):
DATABRICKS_HOST=https://dbc-1234567890-1234.cloud.databricks.com
Set your Databricks account ID (optional for workspace-level authentication, but keep it for reference):
DATABRICKS_ACCOUNT_ID=12345678-1234-1234-1234-123456789012
Set the OAuth app credentials from the Databricks app connection you created:
DATABRICKS_OAUTH_CLIENT_ID=12345678-1234-1234-1234-123456789abc
DATABRICKS_OAUTH_CLIENT_SECRET=your-secret
Set the redirect URI (must exactly match your Databricks OAuth app configuration):
DATABRICKS_REDIRECT_URI=http://localhost:3000/auth/databricks/callback
Set the authentication level to workspace (for this QuickStart):
DATABRICKS_AUTH_LEVEL=workspace
3. Databricks Connection ID in Sigma Set the Connection ID you copied from the Sigma connection URL:
DATABRICKS_CONNECTION_ID=ABCdef123GHI456jkl789MNO012pqr
4. Additional Settings Set a session secret (change this in production):
DATABRICKS_SESSION_SECRET=change-this-to-random-string-in-production
Leave token file saving disabled for web app mode:
DATABRICKS_SAVE_TOKEN_TO_FILE=false
Save the .env file.
Start the Application
Navigate to the databricks_oauth directory:
cd public/databricks_oauth
Start the server:
node server.js
You should see output confirming the server is running:
============================================================
Sigma Embedding with Databricks OAuth Server
============================================================
Server running at: http://localhost:3000
Login page: http://localhost:3000/login.html
Health check: http://localhost:3000/health
============================================================
Databricks Host: https://dbc-536d031c-0593.cloud.databricks.com
Auth Level: workspace
Sigma Base URL: https://app.sigmacomputing.com/quick-starts-fundamentals/workbook/Use-Case-Databricks-with-OAuth-6w2cUiJlvQeG1rI5rqQehC
============================================================
Now that the application is running, let's test the complete OAuth authentication flow.
Access the Login Page
Open your browser and navigate to:
http://localhost:3000/login.html
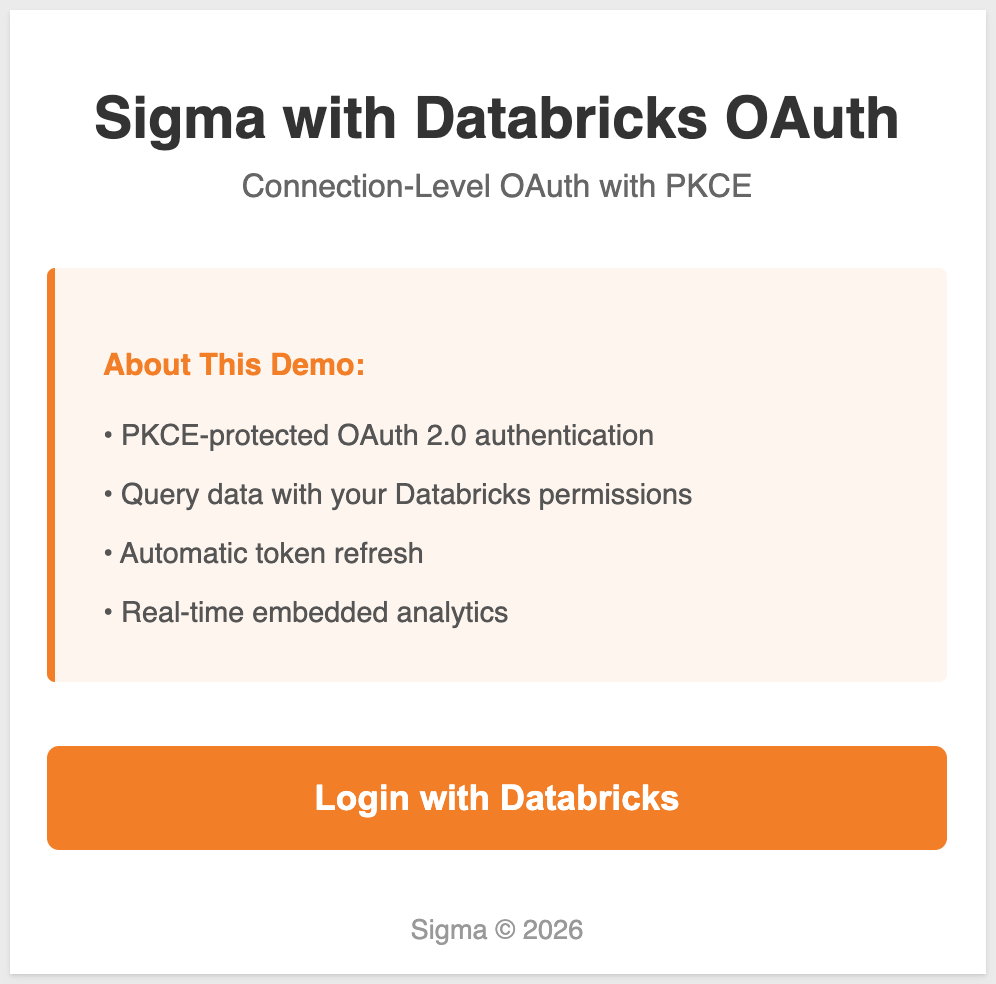
You should see the login page with a "Login with Databricks" button:
Initiate OAuth Authentication
Click the Login with Databricks button.
This triggers the OAuth flow:
- Your browser redirects to Databricks
- The application generates a PKCE code challenge
- Databricks prompts you to authenticate
Authenticate with Databricks
Enter your Databricks credentials if prompted, then click Allow or Authorize to grant the application access.
The application requests the following permissions:
- SQL: Query data from Databricks
- All APIs: Full API access for OAuth flow
- offline_access: Ability to refresh tokens
View the Embedded Dashboard
After successful authentication, you'll be redirected back to the dashboard page at:
http://localhost:3000/dashboard
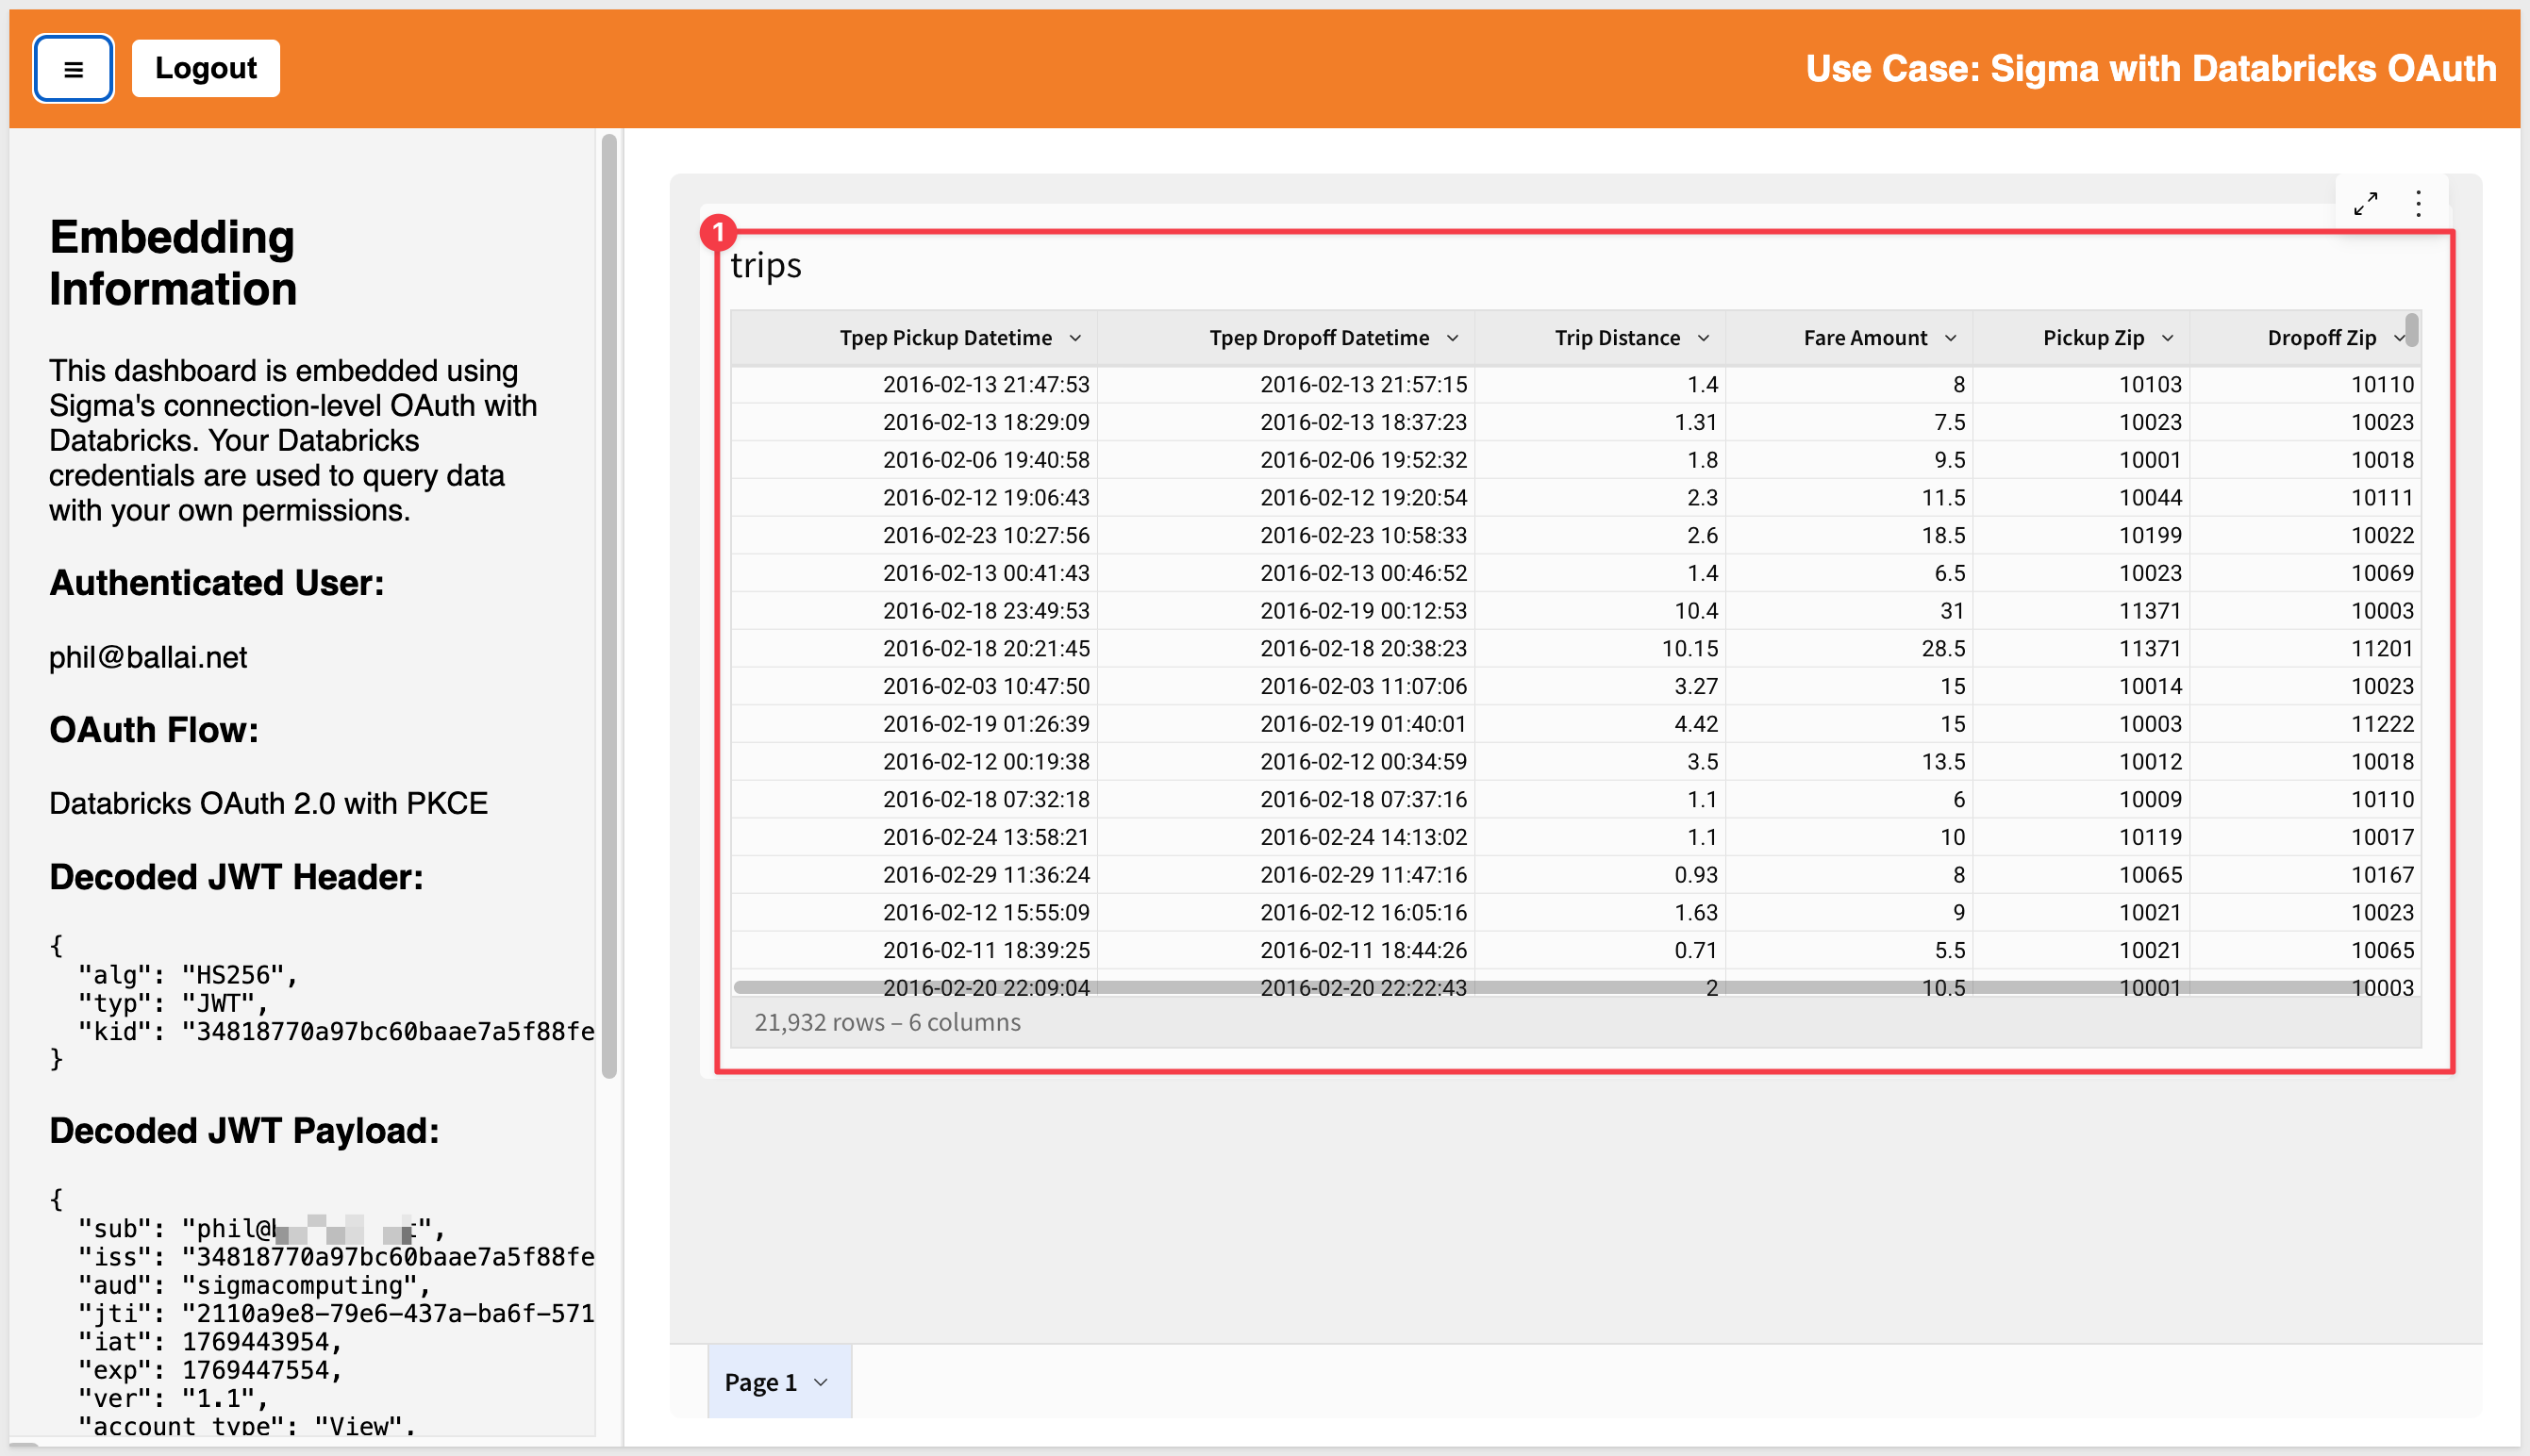
The page displays:
- Your authenticated Databricks user email at the top
- The embedded Sigma workbook showing NYC taxi trip data
- A logout button
Verify the OAuth Token Flow
The application has successfully:
- Authenticated you with Databricks via OAuth 2.0 with PKCE
- Retrieved and stored your access and refresh tokens
- Encrypted your Databricks access token
- Generated a signed Sigma JWT with the encrypted token
- Embedded the Sigma workbook with your user context
You can interact with the workbook just like any Sigma dashboard: filter data, drill down, and explore. All queries execute with your Databricks permissions:
Test Token Refresh (Optional)
The application automatically refreshes tokens 5 minutes before expiration. To test this:
- Leave the dashboard open for about 55 minutes (access tokens typically last 60 minutes)
- Interact with the workbook (e.g., apply a filter)
- Check the server console logs - you should see token refresh messages
Logout
Click the Logout button to end your session. This:
- Destroys the server-side session
- Clears all stored tokens
- Redirects back to the login page
Understanding how OAuth tokens are passed to Sigma is critical for troubleshooting connection-level OAuth implementations.
JWT Payload Structure
The application generates a JWT (JSON Web Token) that contains the encrypted Databricks access token. The JWT payload includes:
{
  "sub": "sales_person@example.com",      // User email
  "iss": "<sigma-client-id>",             // Sigma client ID
  "aud": "sigmacomputing",                // Required audience
  "jti": "<unique-id>",                   // Unique token ID
  "iat": 1234567890,                      // Issued at timestamp
  "exp": 1234571490,                      // Expiration timestamp
  "ver": "1.1",                           // CRITICAL: Must be "ver" as STRING
  "account_type": "View",                 // Sigma account type
  "teams": ["Sales_People"],              // Team membership
  "connection_oauth_tokens": {            // Encrypted OAuth tokens
  "<connection-id>": "<encrypted-token>"
  }
}
Token Encryption Process
The Databricks access token is encrypted before being added to the JWT:
- Generate Databricks Token: User authenticates → Databricks returns access token
- Encrypt Token: Use
@sigmacomputing/node-embed-sdkto encrypt the token with your Sigma secret - Build JWT: Add encrypted token to JWT payload under
connection_oauth_tokens[connectionId] - Sign JWT: Sign the complete payload with your Sigma secret using HS256 algorithm
- Pass to Sigma: Append JWT to embed URL as
:jwt=parameter
The encryption ensures the Databricks access token is never exposed in the browser or network traffic.
Code Reference
In helpers/embed-api-oauth.js, the key code is:
const { encrypt } = require('@sigmacomputing/node-embed-sdk');

// Encrypt the Databricks access token
const encryptedToken = encrypt(sigmaSecret, databricksAccessToken);

// Build JWT payload - note "ver" as string!
const payload = {
  sub: email,
  iss: sigmaClientId,
  aud: 'sigmacomputing',
  jti: uuid(),
  iat: now,
  exp: expirationTime,
  ver: '1.1',  // Must be "ver" as STRING
  account_type: accountType,
  teams: teamsArray,
  connection_oauth_tokens: {
    [connectionId]: encryptedToken
  }
};

// Sign the JWT
const token = jwt.sign(payload, sigmaSecret, {
  algorithm: 'HS256',
  keyid: sigmaClientId
});
Common Issues and Solutions
Error: "connection_oauth_tokens is only supported in ver 1.1"
- Cause: Using
version: 1.1(number) instead ofver: '1.1'(string) - Solution: Change the JWT field name to
verand use a string value'1.1'
Error: "Invalid encrypted token"
- Cause: Token encryption failed or wrong secret used
- Solution: Verify you're using the correct Sigma embed secret for encryption
Error: "Sign in to view this connection"
- Cause: Metadata URL mismatch between Sigma connection and application
- Solution: Ensure both use workspace-level OAuth (not account-level)
Error: "Personal Microsoft accounts are not supported"
- Cause: Using account-level OAuth with trial account
- Solution: Use workspace-level OAuth with workspace metadata URL format
Before deploying connection-level OAuth with Databricks to production, consider these important security and operational best practices.
Security Hardening
1. Environment Variables
- Never commit
.envfiles to source control - Use environment-specific secrets management (AWS Secrets Manager, Azure Key Vault, etc.)
- Rotate OAuth client secrets periodically
- Change
DATABRICKS_SESSION_SECRETto a cryptographically random value
2. Session Security
// In production, enable secure session cookies
app.use(session({
  secret: process.env.DATABRICKS_SESSION_SECRET,
  resave: false,
  saveUninitialized: false,
  cookie: {
    secure: true,        // Require HTTPS
    httpOnly: true,      // Prevent XSS
    sameSite: 'strict',  // Prevent CSRF
    maxAge: 24 * 60 * 60 * 1000
  }
}));
3. HTTPS Requirements
- Deploy application behind HTTPS (required for secure cookies)
- Update Databricks OAuth app redirect URI to use
https://instead ofhttp://localhost - Configure SSL/TLS certificates
4. Token Storage
- Current implementation stores tokens in server-side sessions (secure)
- For distributed systems, use Redis or similar for session storage
- Never store OAuth tokens in browser localStorage or cookies
OAuth App Configuration
Production Redirect URIs: Update your Databricks OAuth app to include production callback URLs:
https://your-domain.com/auth/databricks/callback
https://aws-api.sigmacomputing.com/api/v2/oauth/1/authcode
https://aws-api.sigmacomputing.com/v2/auth/oauth/databricks/callback
Remove the localhost redirect URI from production apps.
Authentication Method Selection
For Production with Corporate SSO:
- Use account-level OAuth with your identity provider (Okta, Azure AD, etc.)
- Configure Databricks authentication to use your corporate SSO
- Update Sigma connection metadata URL to account-level format:
plaintext
https://accounts.cloud.databricks.com/oidc/accounts/{ACCOUNT_ID}/.well-known/openid-configuration
- Update.env:DATABRICKS_AUTH_LEVEL=accountFor Production with Workspace-Level Auth: - Keep workspace-level OAuth (as demonstrated in this QuickStart) - Simpler authentication, but limited to single workspace - Better for scenarios without enterprise SSO ### Monitoring and Logging Add Production Logging:javascript
// Log OAuth events for audit trail
console.log('[OAuth] User authenticated:', {
email: userEmail,
timestamp: new Date().toISOString(),
tokenExpiry: new Date(tokenExpiresAt).toISOString()
});
// Monitor token refresh events
console.log('[OAuth] Token refreshed for user:', userEmail);
Monitor Token Expiration:
- Set up alerts for failed token refresh attempts
- Track token expiration patterns to optimize refresh timing
- Log authentication failures for security monitoring
Error Handling
Improve User-Facing Errors:
// Instead of generic error redirects
res.redirect('/login.html?error=authentication_failed');

// Provide specific, actionable messages
res.redirect('/login.html?error=token_expired&message=Please+sign+in+again');
Graceful Degradation:
- Handle network failures during OAuth callback
- Provide clear error messages when Databricks is unavailable
- Implement retry logic for transient failures
Performance Optimization
Token Refresh Strategy:
- Current implementation refreshes 5 minutes before expiration
- Adjust based on your usage patterns and token TTL
- Consider proactive refresh for long-running sessions
Session Management:
- Clean up expired sessions periodically
- Set appropriate session TTL based on security requirements
- Use Redis or similar for distributed session storage
Compliance and Audit
Data Governance:
- All queries run with user's Databricks permissions (row-level security enforced)
- Audit logs in Databricks show actual user identity
- Sigma embedding logs capture user email and teams
Access Control:
- Grant Sigma connection access only to required teams
- Use Sigma's team-based permissions for workbook access
- Regularly review OAuth app permissions in Databricks
Token Lifecycle:
- Access tokens: 60 minutes (configurable in Databricks OAuth app)
- Refresh tokens: 7 days (configurable in Databricks OAuth app)
- Session cookies: 24 hours (configurable in Express session)
In this QuickStart, you implemented connection-level OAuth with PKCE for Sigma embedding with Databricks, creating a Node.js application that authenticates each user individually and passes their encrypted credentials to Sigma. This ensures embedded users query Databricks with their own permissions, providing true user-level data governance and complete audit trails.
The working implementation demonstrates how every query runs under the authenticated user's identity, automatically enforcing row-level security and access policies at the source.
Additional Resource Links
Blog
Community
Help Center
QuickStarts
Be sure to check out all the latest developments at Sigma's First Friday Feature page!