Eliminate shared credentials between Sigma and Snowflake by configuring OAuth — four scenarios: basic setup, Snowflake integration, Okta auto-provisioning, and writeback.
We will not cover all the various configuration options available in Okta or Snowflake, as that is outside the scope of a QuickStart. Please refer to the respective vendors documentation for those details.
For more information on Sigma's product release strategy, see Sigma product releases.
Target Audience
Sigma administrators interested in implementing single-sign-in using the OAuth security model.
Prerequisites
- A computer with a current browser. It does not matter which browser you want to use.
- Access to a Sigma environment.
- Access to a Snowflake environment. Enterprise is required for trial account testing
- Access to a IdP environment. We will be using an Okta developers account
- Some familiarity with Sigma is assumed. Not all steps will be shown as the basics are assumed to be understood.

OAuth, which stands for Open Authorization, is an open standard developed by the Internet Engineering Task Force (IETF) for access delegation.
It provides a secure way for applications to access user information without requiring the user to expose their passwords.
As the time of this QuickStart, the most widely used version of OAuth is 2.0, which is based on IEFT RFC6749.
The OAuth 2.0 authorization framework enables a third-party application to obtain limited access to an HTTP service.
This can be done either on behalf of a resource owner by orchestrating an approval interaction between the resource owner and the HTTP service, or by allowing the third-party application to obtain access on its own behalf.
OAuth allows third-party services (i.e., Sigma) to exchange tokens (with Snowflake for example) for authentication, enabling secure and streamlined access to user resources.
Why Use OAuth?
Enhanced Security:
OAuth significantly improves security by allowing users to grant access to their data without sharing their passwords. This minimizes the risk of credentials being exposed or stolen.
Granular Access Control:
With OAuth, users can control the level of access granted to third-party applications. This means they can specify which resources or data the application can access and for how long.
Reduced Administrative Overhead:
OAuth simplifies user management by allowing seamless integration with identity providers like Okta. This reduces the need for manual user provisioning and de-provisioning.
Seamless User Experience:
OAuth allows users to authorize applications quickly and easily, providing a smooth and hassle-free authentication process. This improves user experience by reducing the need for repeated logins and password entries.
Interoperability:
OAuth is widely adopted and supported by many major platforms and services, making it a versatile solution for authentication and authorization across different systems and applications.
It is widely used as a way to grant websites or applications limited access to a user's information without exposing their passwords. OAuth allows third-party services to exchange tokens for authentication, enabling secure and streamlined access to user resources.
Benefits of Using OAuth with Sigma
By using OAuth, Sigma users can securely connect to Snowflake (or another supported Cloud Data Warehouse, CDW), ensuring that their data access is controlled and monitored. OAuth facilitates the secure exchange of tokens, minimizing the risk of exposing sensitive credentials.
Centralized Permission and Access Control
Sigma does not use its own permission system but instead relies on Snowflake's credentials for user authentication. This is achieved through the Sigma logon UI in combination with OAuth. By using OAuth, users can log into Sigma using their Snowflake credentials, ensuring that Snowflake manages all user permissions and access controls.
Alternative to Sigma-Managed Permissions
In scenarios where organizations prefer to use CDW-based user permission and access control, OAuth provides an alternative to having Sigma manage table access for various users. This allows organizations to maintain a consistent and centralized permission strategy, leveraging Snowflake's robust access control features.
Simplified Integration
OAuth simplifies the integration process between Sigma and Snowflake, reducing the complexity of managing credentials and access permissions. Instead of Sigma managing individual user permissions, Snowflake handles all data access and logon credentials for every user, streamlining the entire process.
Improved Compliance
OAuth helps organizations comply with security and privacy regulations by providing robust access control mechanisms and minimizing the exposure of sensitive credentials. By leveraging Snowflake's permission system, organizations can ensure that all access controls and compliance requirements are uniformly enforced.
By using OAuth, you enhance the security, control, and user experience of your data access processes, ensuring a seamless and secure interaction between Sigma and the cloud data warehouse. This configuration leverages Snowflake's existing infrastructure to manage user credentials and permissions, reducing administrative overhead and improving overall security.
OAuth provides a secure way for applications to access user information using tokens instead of passwords.
This process involves several key steps to ensure secure and delegated access. Below is an illustrated flow of how OAuth works with Sigma and Snowflake:
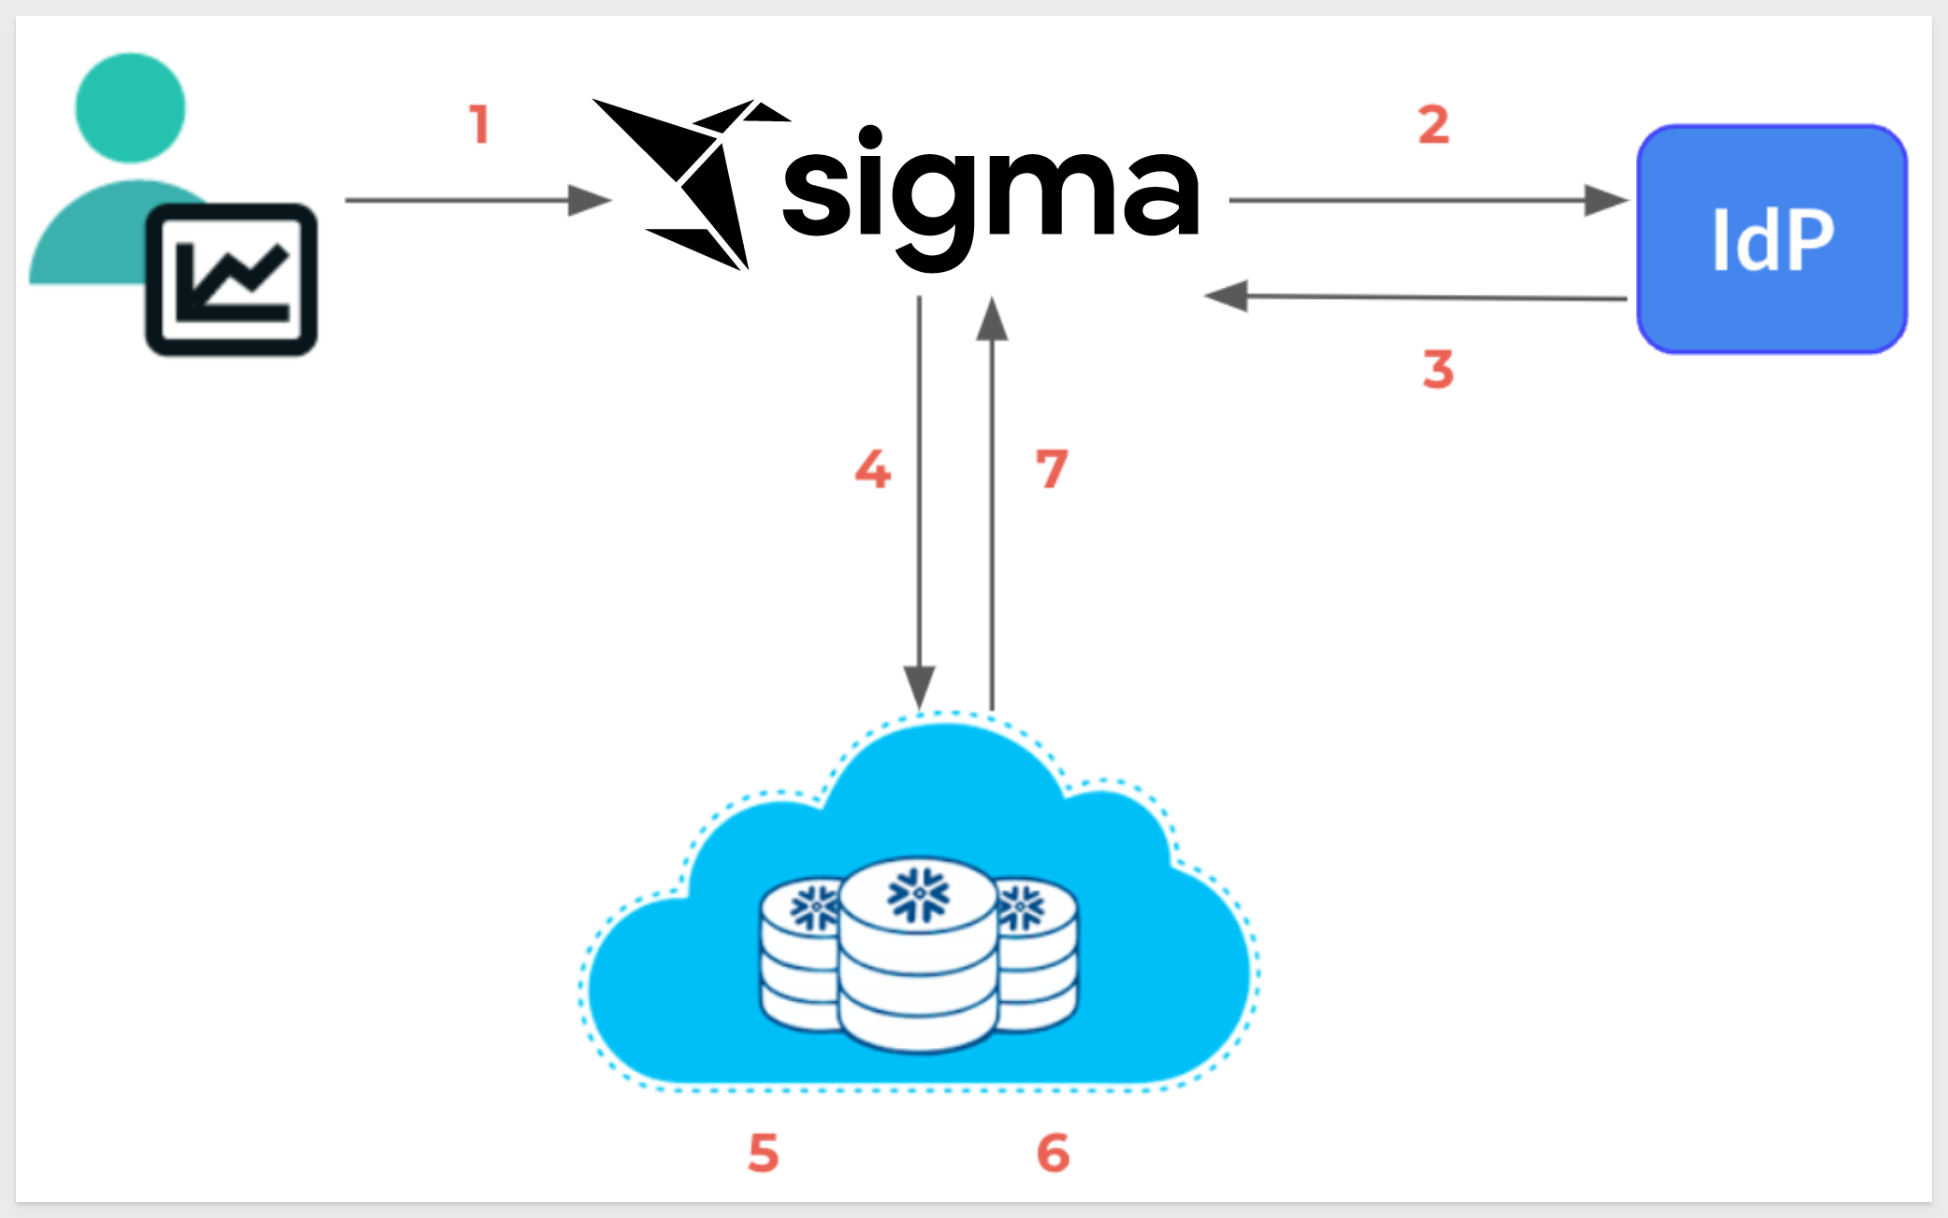
By the numbers
1: User connects to Sigma
The user initiates a connection to Sigma, signaling the start of the authentication process.
2: IdP verifies user information
Sigma redirects the user to the Identity Provider (IdP) for authentication. The IdP verifies the user's credentials, identity, account type, team membership and more.
3: The IdP authorization server sends an OAuth token to Sigma
Upon successful verification, the IdP's authorization server issues an OAuth token and sends it to Sigma.
4: Sigma passes a connection string to Snowflake with the OAuth token
Sigma includes the OAuth token in a connection string and forwards it to Snowflake, requesting access to the required data.
5: Snowflake validates the OAuth token
Snowflake receives the connection request and validates the OAuth token to ensure it is authentic and has the appropriate permissions.
6: Snowflake performs a user lookup
Snowflake performs a lookup to map the OAuth token to the corresponding user within its system.
7: On verification, Snowflake creates a session for the user to access data in Snowflake based on their Snowflake role(s)
Once the token is verified and the user is identified, Snowflake creates a session for the user, granting access to the data based on their Snowflake roles.
This process ensures that user credentials are never exposed directly to third-party applications. Instead, OAuth tokens are used to securely delegate access, providing a streamlined and secure method for connecting Sigma to Snowflake.
Configuring OAuth with Snowflake and Sigma will allow you to pass Snowflake roles to Sigma organization members.
This is accomplished by establishing a chain of trust between your IdP, Snowflake warehouse, and Sigma.
In order to use OAuth with Sigma, we need to have administrative access to an IdP. We will demonstrate using Okta, but any of the other popular IdPs can be substituted.
Other popular IdP providers are Azure AD (Microsoft), Amazon AWS Identity and Access Management (IAM), Google Identity Platform, Auth0, OneLogin, Ping Identity and so on.
Okta offers free developers accounts, and we will log into one and demonstrate the process.
Create a text file
Before we start configuring things, let's create a text file (any text editor is fine to use) to hold a few values as we create them.
Temporarily holding these values will make things a little easier for us as we go, especially since we want to use incognito/private browser sessions.
Create the following placeholders in the text file:
TEST USER CREDENTIALS:
EMAIL =
PASSWORD =

OKTA:
METADATA URI =
CLIENT ID =
CLIENT SECRET =
EXTERNAL_OAUTH_ISSUER =
EXTERNAL_OAUTH_JWS_KEYS_URL =
AUTHORIZATION SERVER = Sigma OAuth QuickStart Server
APPLICATION = Sigma OAuth QuickStart
TESTING SCOPE = session:role-any

SNOWFLAKE:
TRIAL ACCOUNT URL =
SECURITY INTEGRATION =

SIGMA:
Sign-in redirect URIs = https://aws-api.sigmacomputing.com/api/v2/oauth/1/authcode
Sign-out redirect URI =
TRIAL ACCOUNT URL =
BEARER TOKEN =
Save the file with blank values for now.
We are still in Okta as administrator.
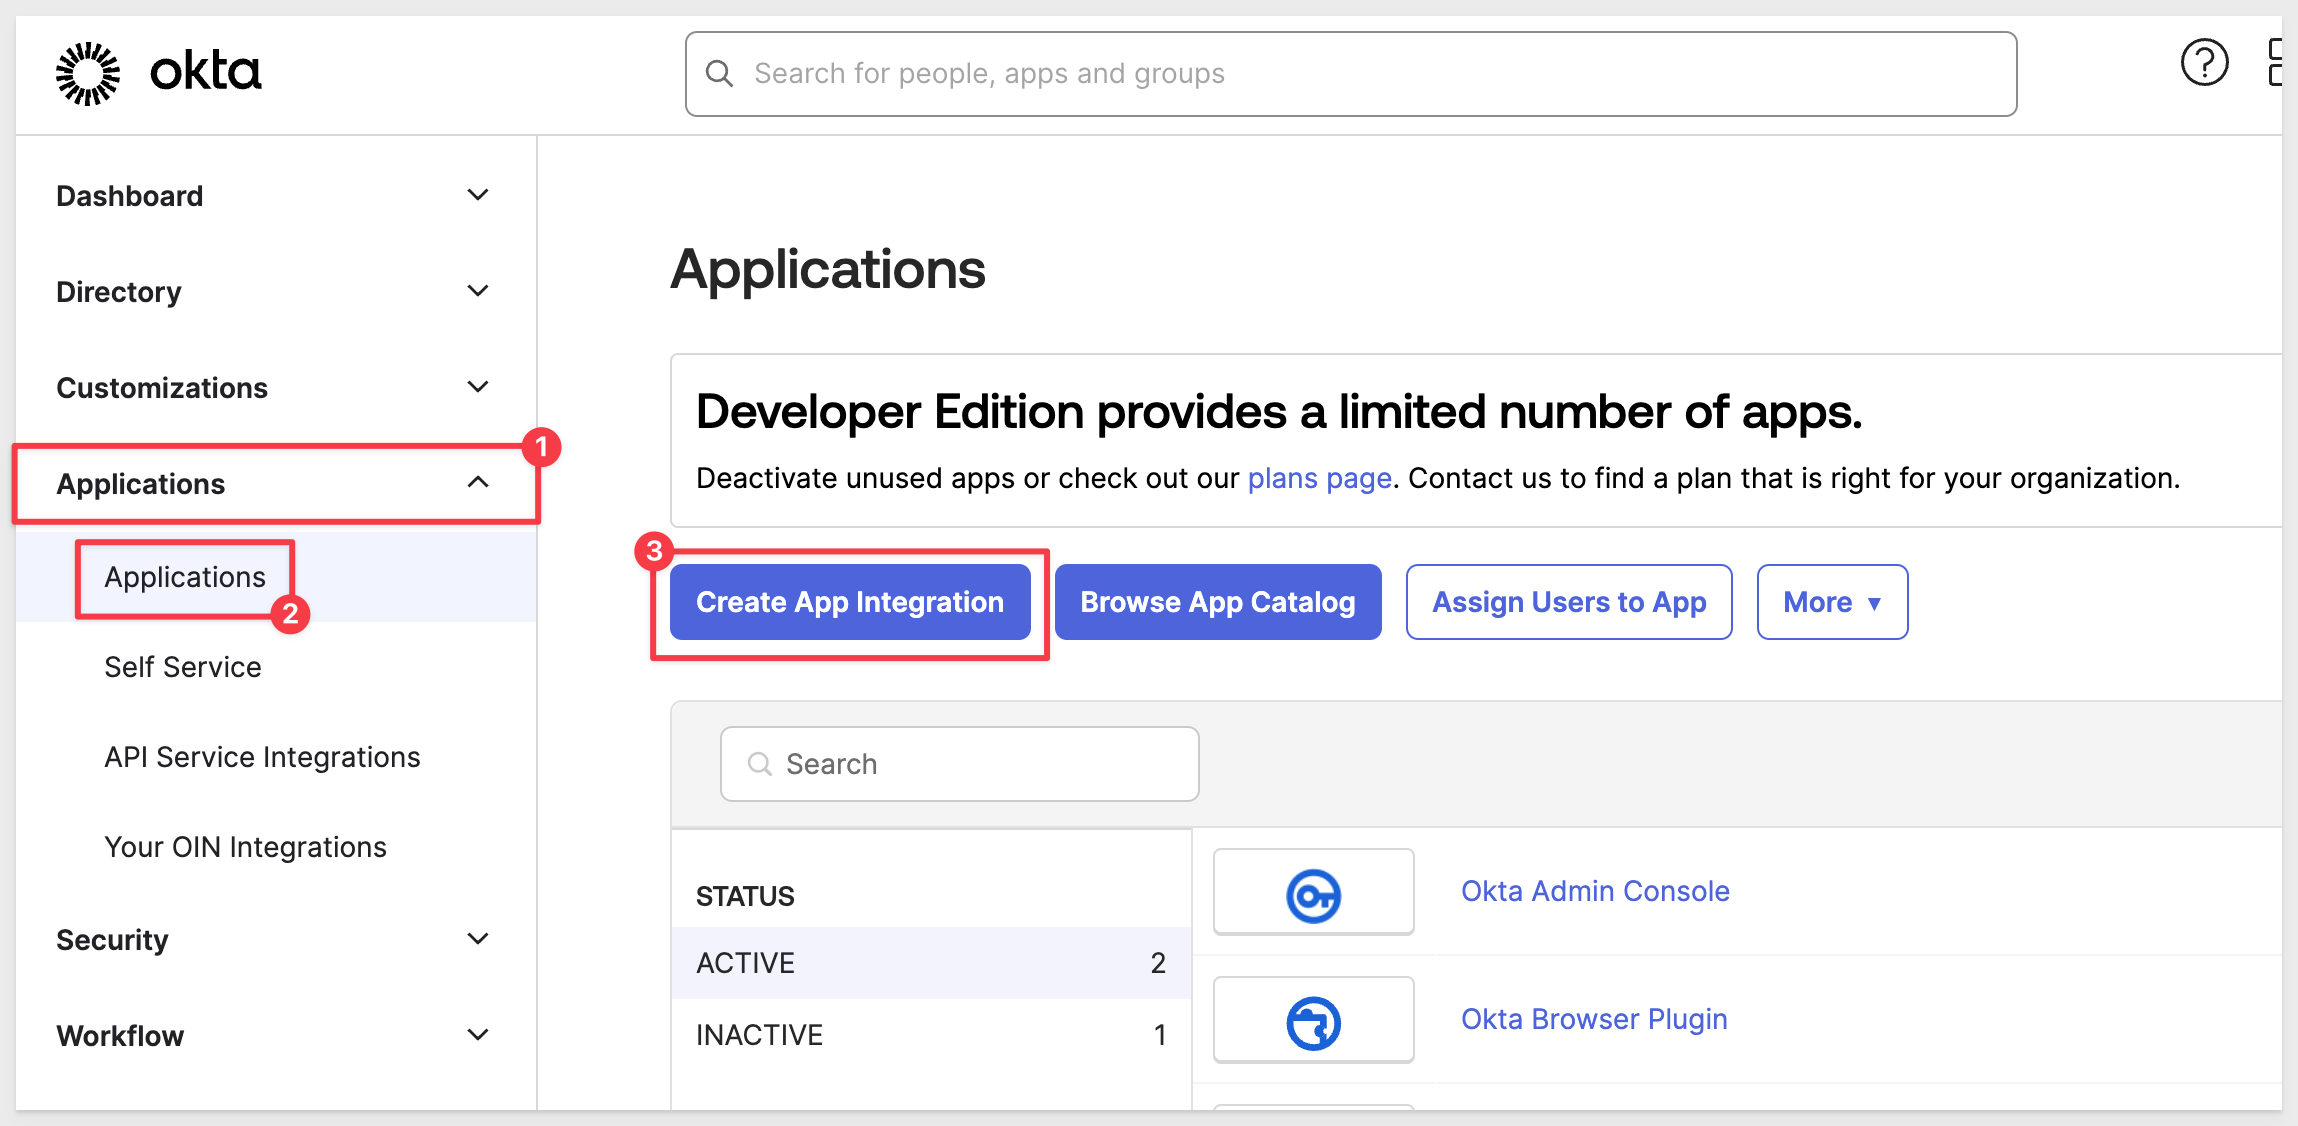
From the Okta admin dashboard, scroll down to Applications and Applications. Click the button to Create App Integration:
Select OIDC - OpenID Connect and Web Application:
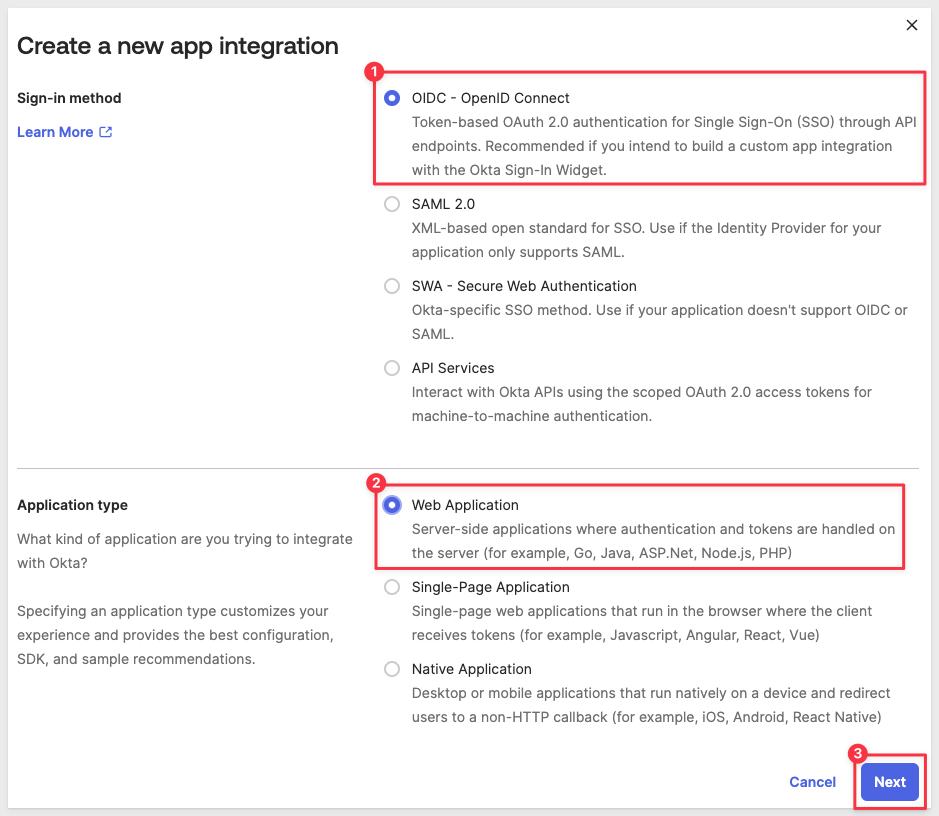
Click Next.
Enter a name for your app, such as Sigma OAuth QuickStart.
Give your app a logo if you want.
Click on the Refresh Token checkbox.
Enter the Sign-in redirect URIs for Sigma. Remove the default one by clicking on the x button and then click + Add URI
If running Sigma on AWS, use:
https://aws-api.sigmacomputing.com/api/v2/oauth/1/authcode
If running Sigma on Azure use:
https://api.us.azure.sigmacomputing.com/
If running Sigma on GCP use:
https://api.sigmacomputing.com/api/v2/oauth/1/authcode
Configuring a Sign-out redirect URI is optional. This is the page the users will see upon logout from Sigma.
We will use (replacing {YOUR-SIGMA-ORGANIZATION-NAME} with our Sigma trials organization name):
https://app.sigmacomputing.com/{YOUR-SIGMA-ORGANIZATION-NAME}/login
Update the text file with the sign-in redirect URI and sign-out redirect URI values.
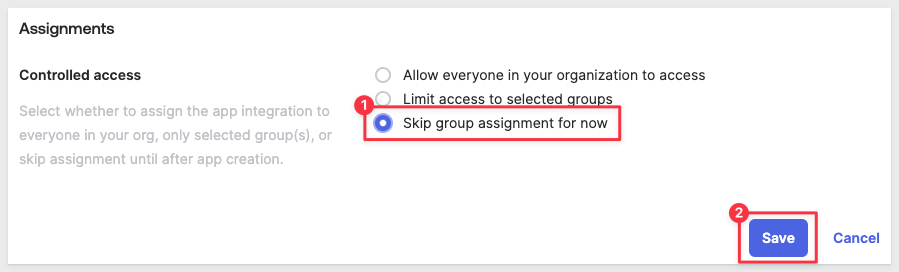
Scroll down to Assignments and choose if the new app is assigned to specific groups or users.
This is where we would normally assign the app to the necessary users or groups that will need access.
Just select Skip group assignment for now and click Save:
The configuration should look similar to this now:

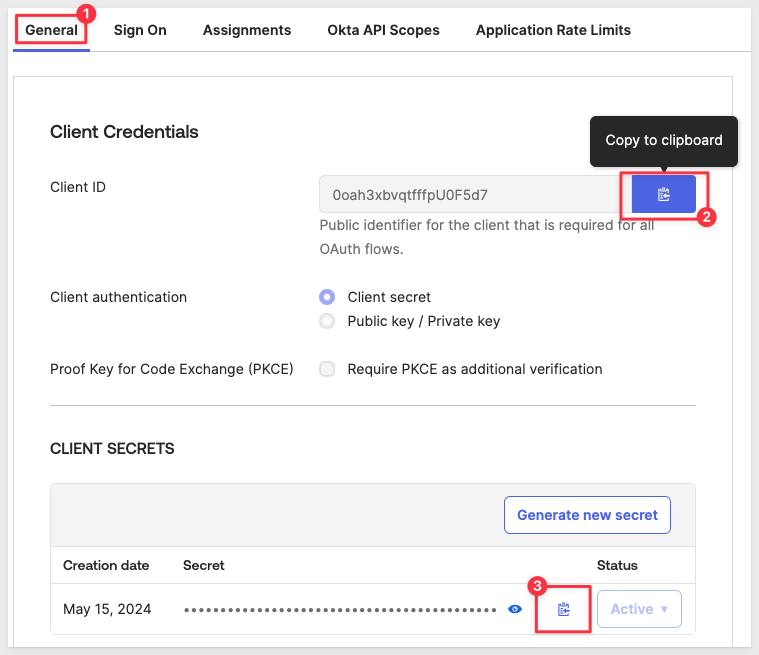
Retrieve Client ID and Client Secret
After saving, you will be redirected to the new applications settings page.
Navigate to the General tab (if not already there).
Under the Client Credentials section, copy both the Client ID and Client Secret off to our text file for use later.
Okta provides buttons to allow quick copy of each value.
These credentials are required for the Sigma configuration:
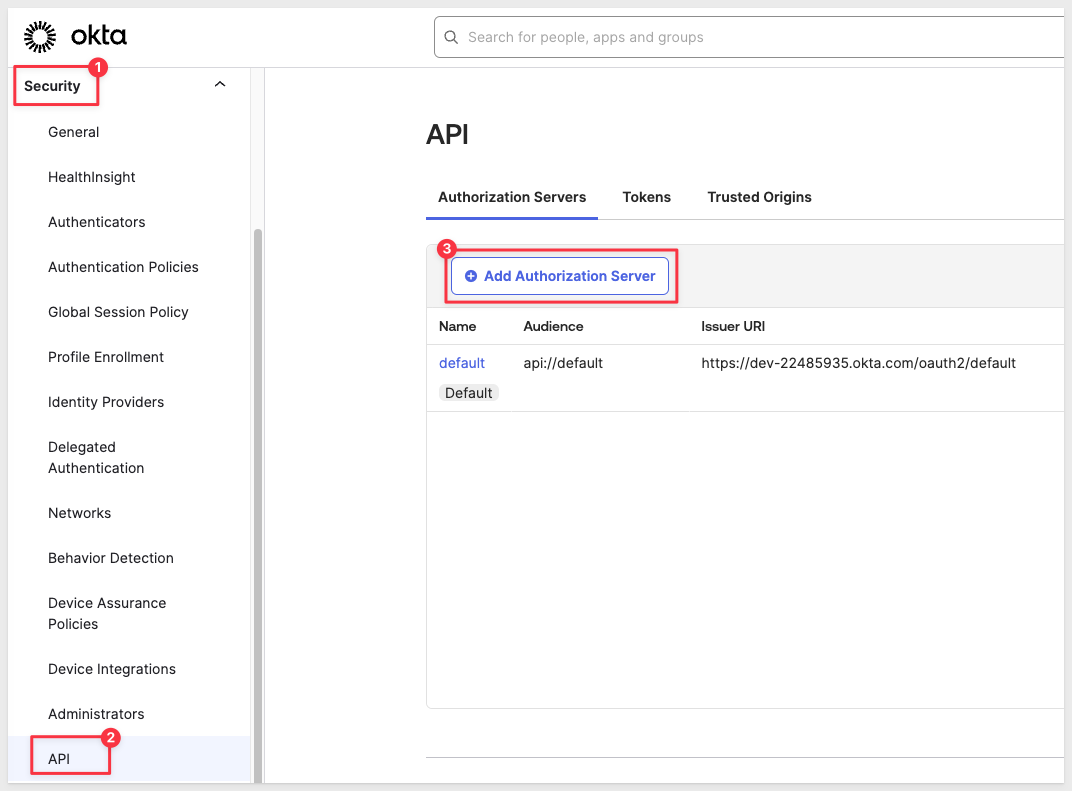
From the Okta admin dashboard, Navigate to Security > API in the left-hand sidebar.
In the Authorization Servers tab, click on the Add Authorization Server button:
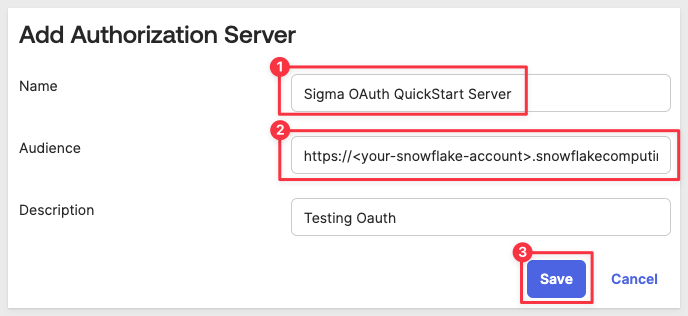
Enter a name for your authorization server, such as Sigma OAuth QuickStart Server.
Provide a description for the authorization server if desired.
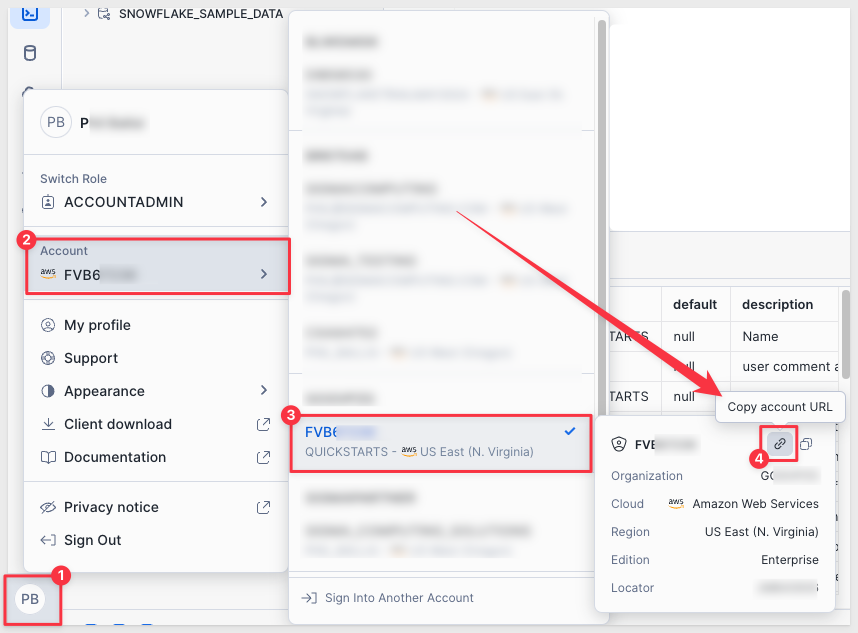
For Audience, we must provide the URL of the Snowflake account we intend to use later, when we create a Sigma connection to Snowflake.
For example:
https://<your-snowflake-account>.snowflakecomputing.com
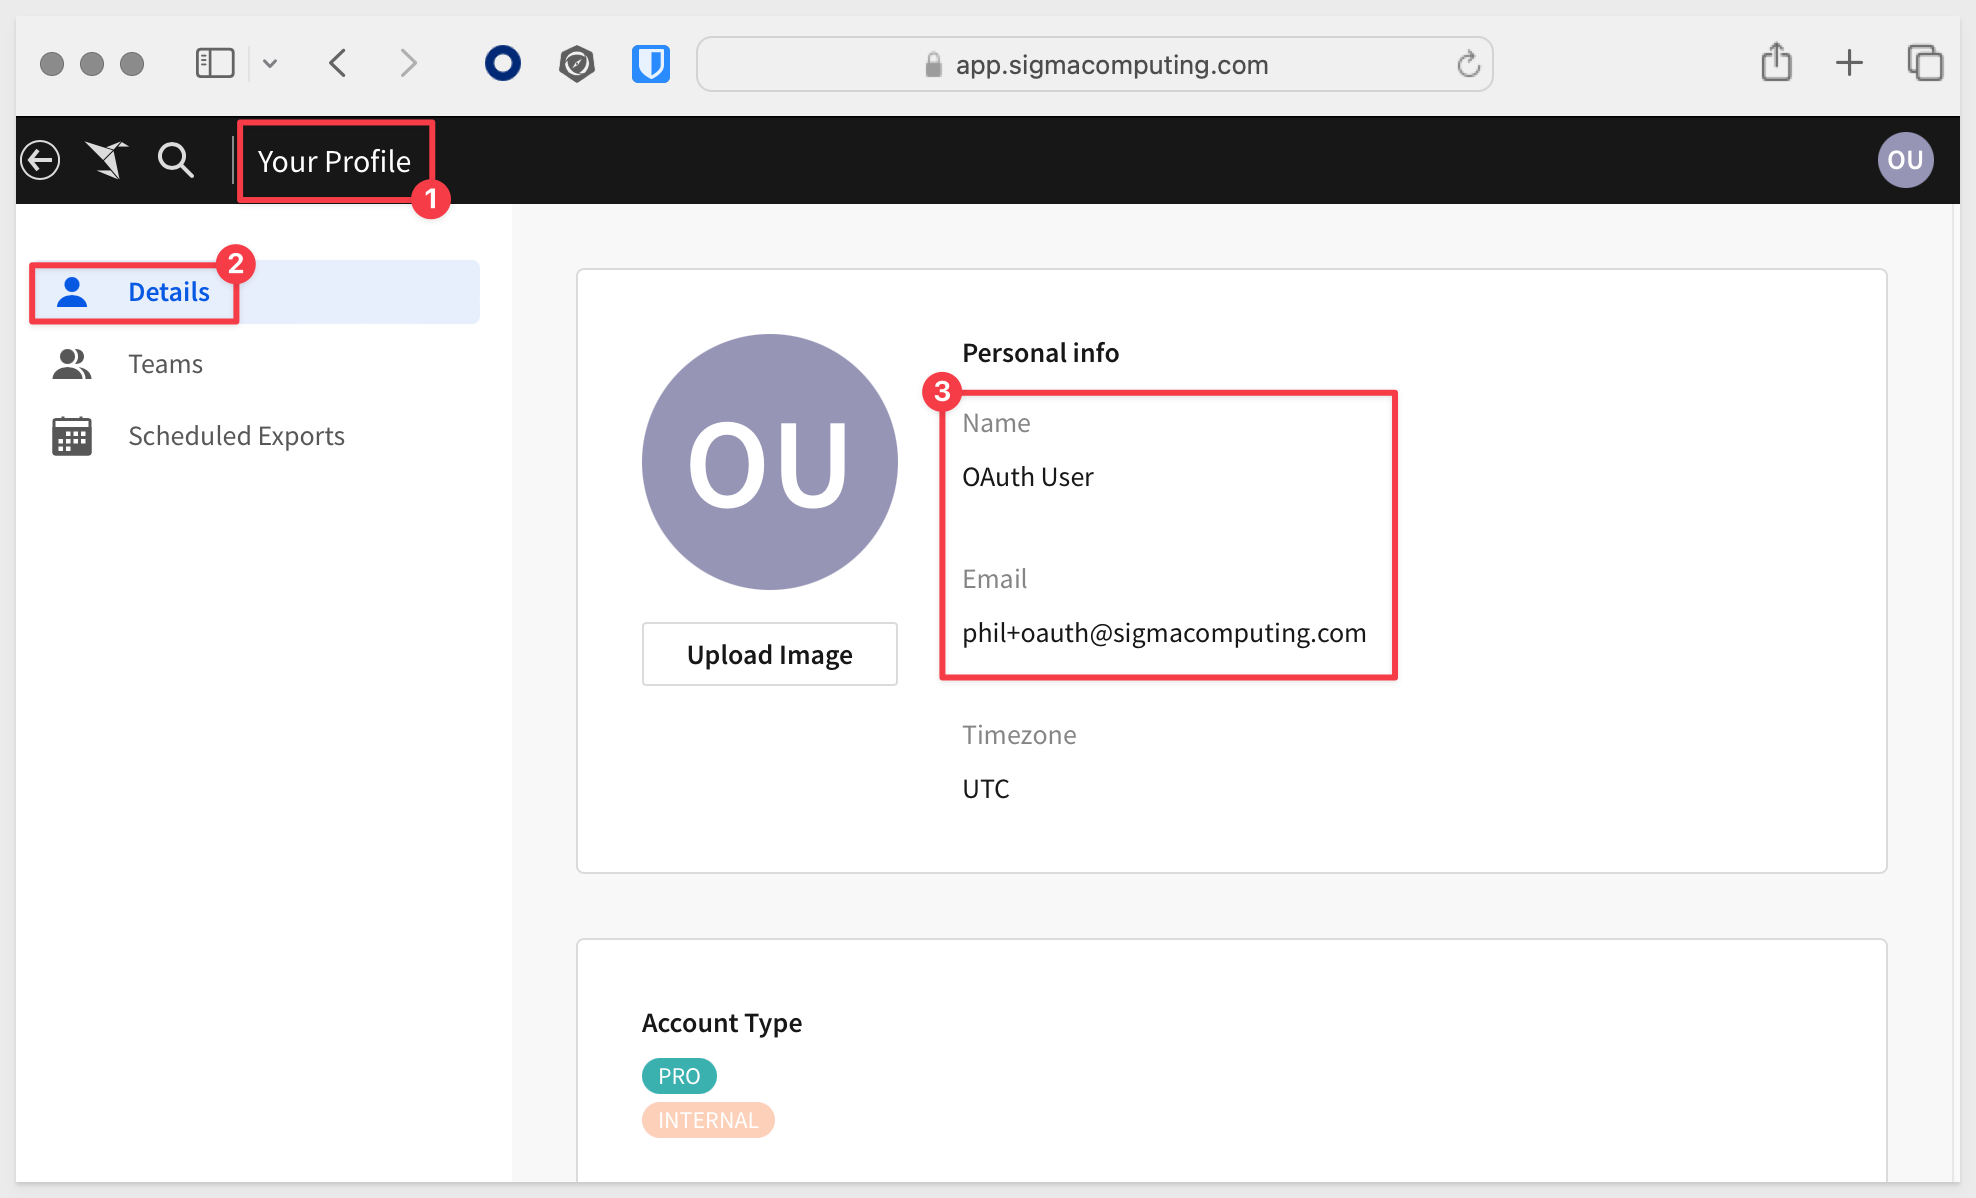
If you don't know where to find this, log into your Snowflake account and click on the profile icon, as shown below, to copy the URL:
Paste the URL into Okta and click Save:
After saving, Okta will return us to the Sigma OAuth QuickStart Server page.
Scroll down to copy the Metadata URI:
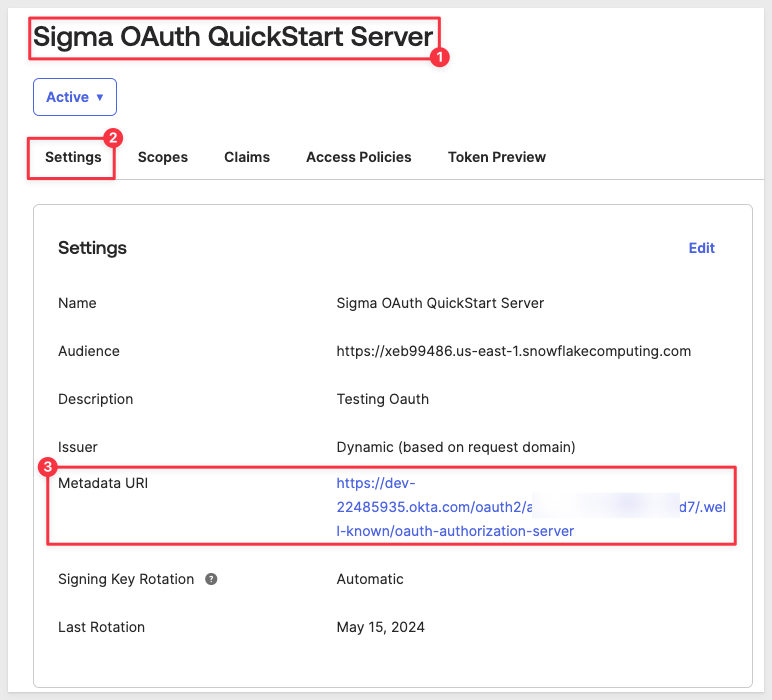
Copy the Metadata URI off to our text file for later use.
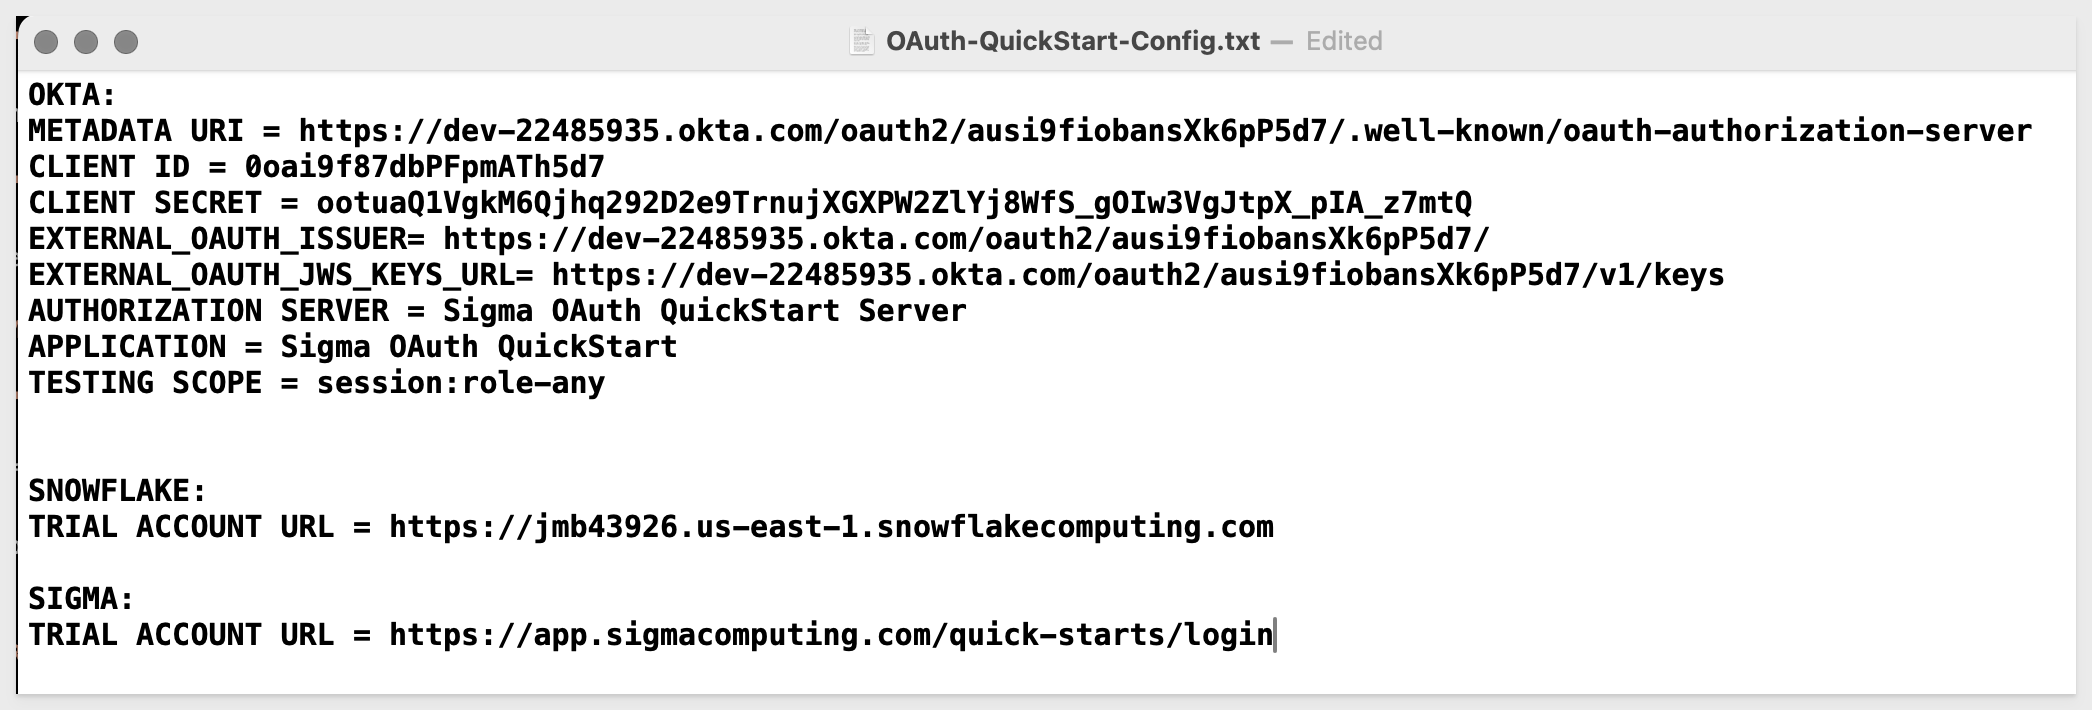
The Metadata URI is also the value for EXTERNAL_OAUTH_ISSUER and EXTERNAL_OAUTH_JWS_KEYS_URL in our text file. with some edits.
For EXTERNAL_OAUTH_ISSUER, delete the trailing /.well-known/oauth-authorization-server from the URL.
For EXTERNAL_OAUTH_JWS_KEYS_URL, delete the trailing /.well-known/oauth-authorization-server and replace with /v1/keys.
For example, the text file should look similar to this, except with your values:
Add scope to auth server
Click the Scopes tab and the + Add Scope button:

Under Edit Scope configure as shown, adding a scope named session:role-any:
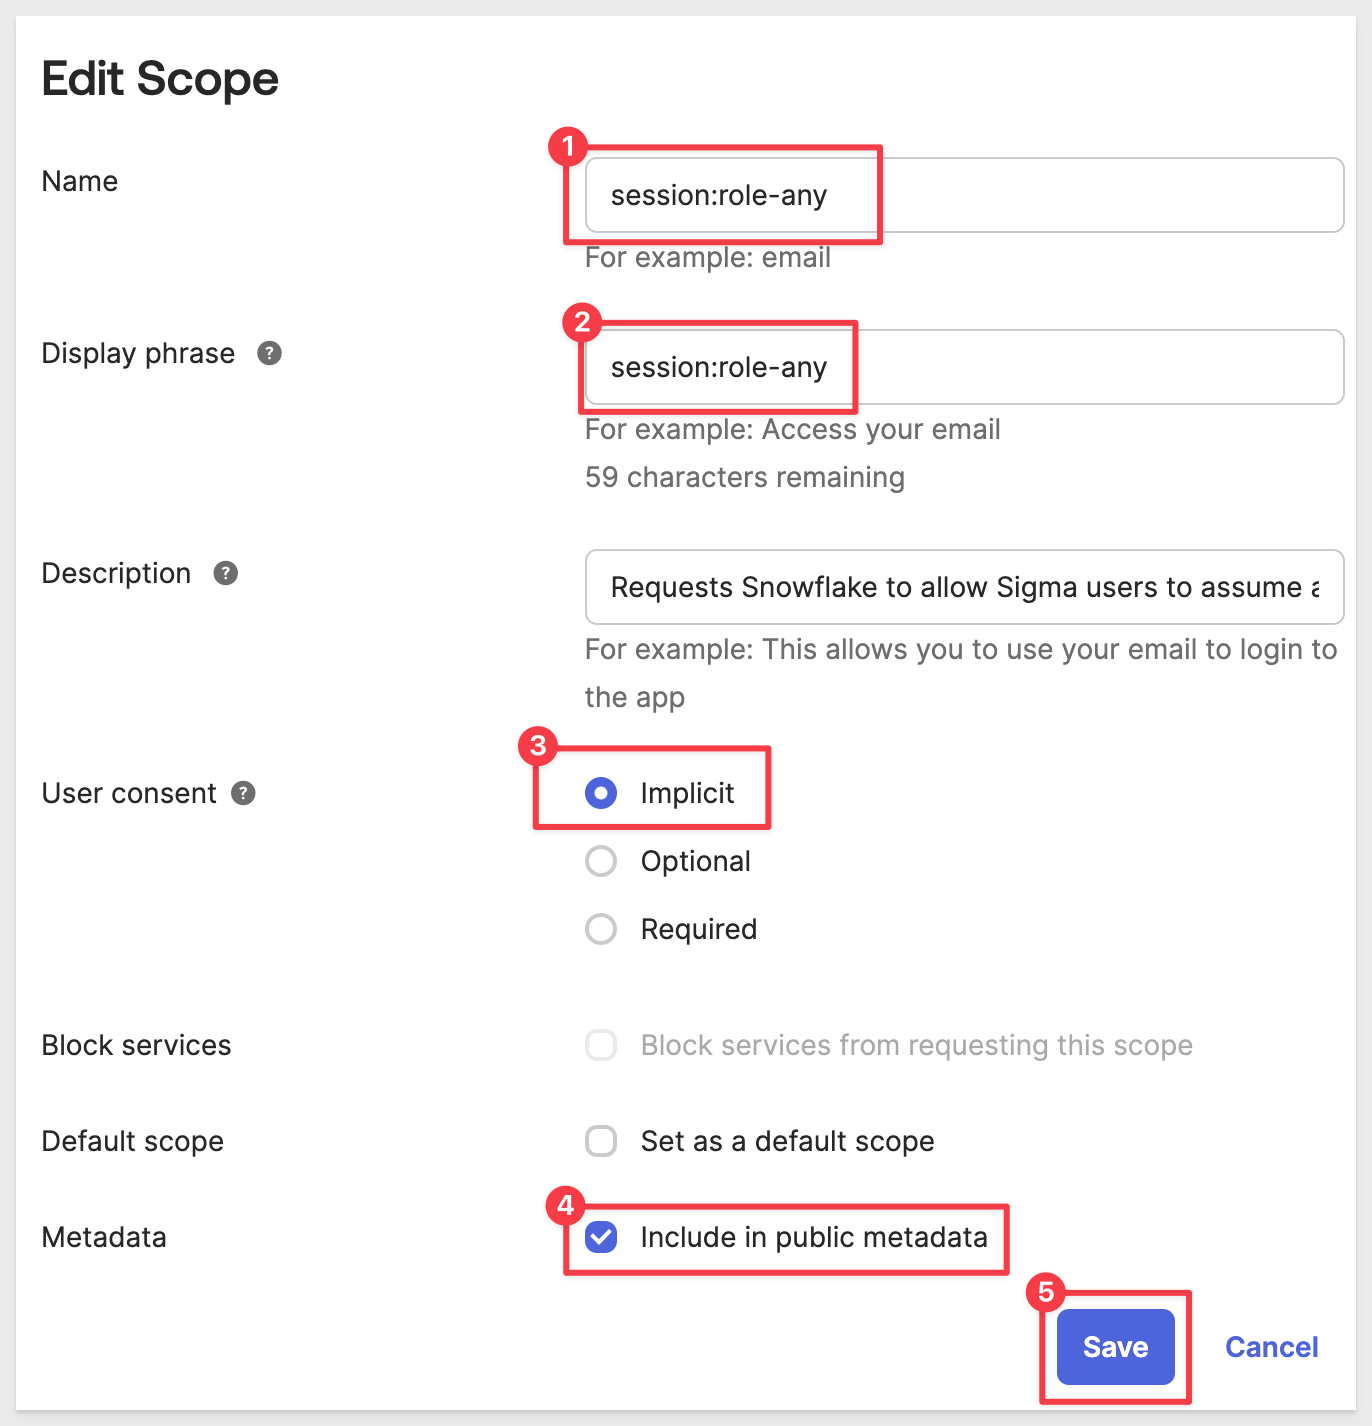
Click Save.
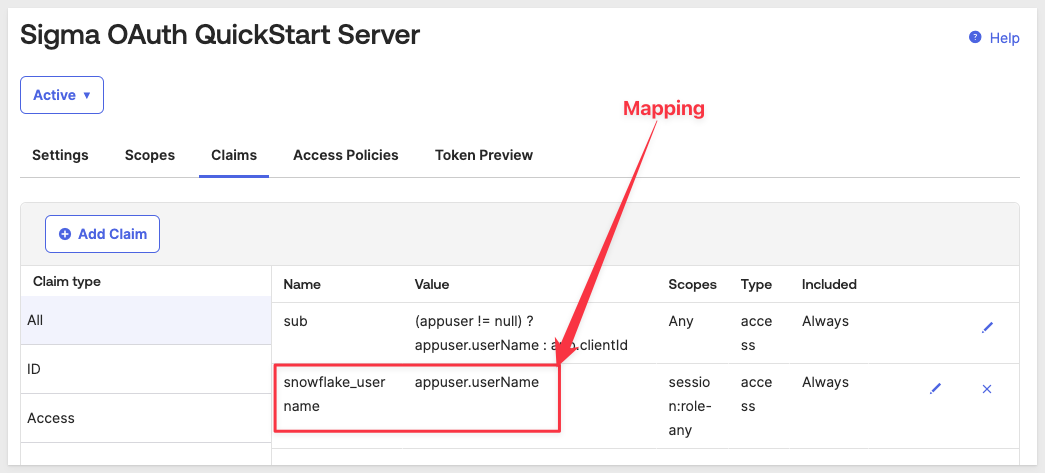
Add claim to auth server
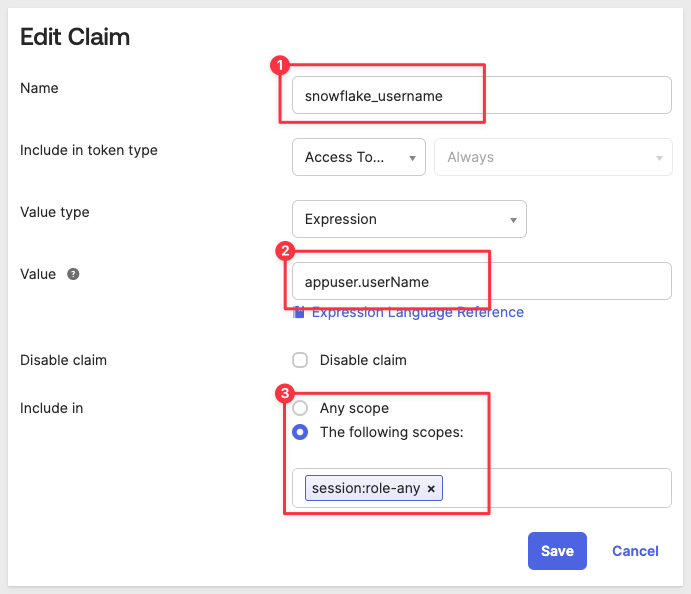
Click the Claims tab and the Add Claim button:

Under Add Claim configure as shown:
Add access policy to auth server
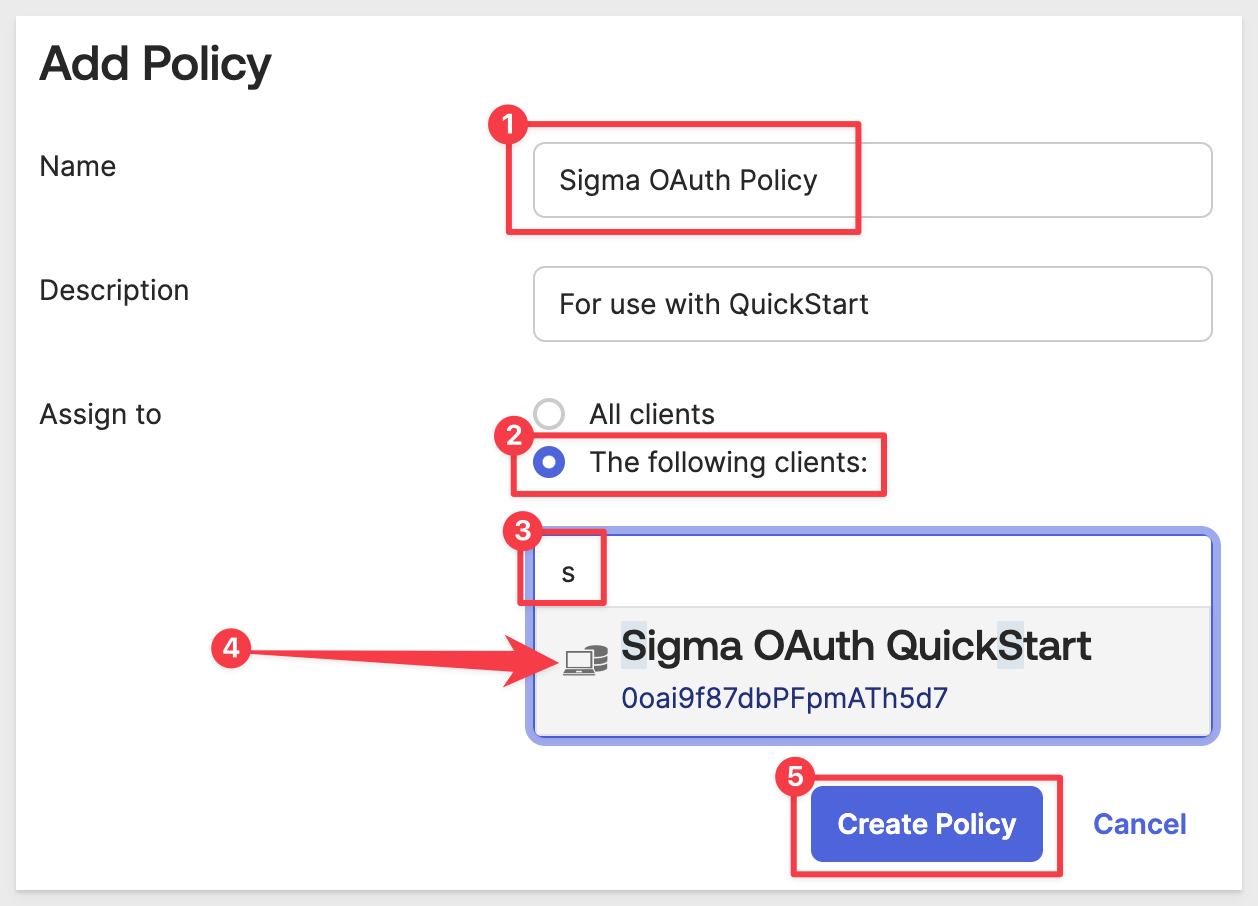
Click the Access Policies tab and the Add Policy button:
Under Add Policy configure as shown. Number 3 shows searching the available Okta apps to find our Sigma OAuth QuickStart app. Select that one and click Create Policy:
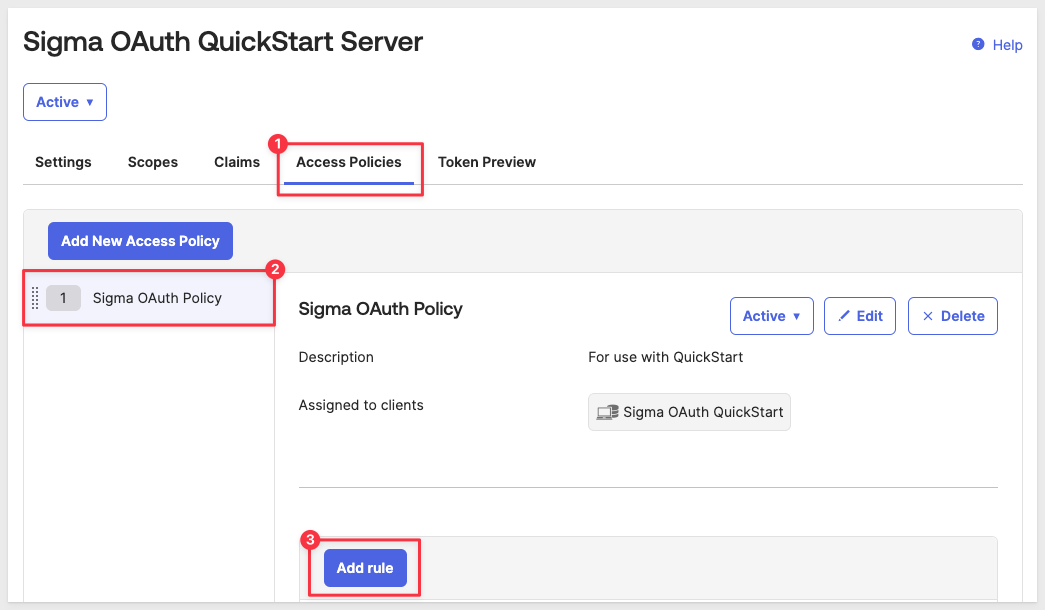
With the policy created, we can click the Add rule button:
Configure the rule as shown below:
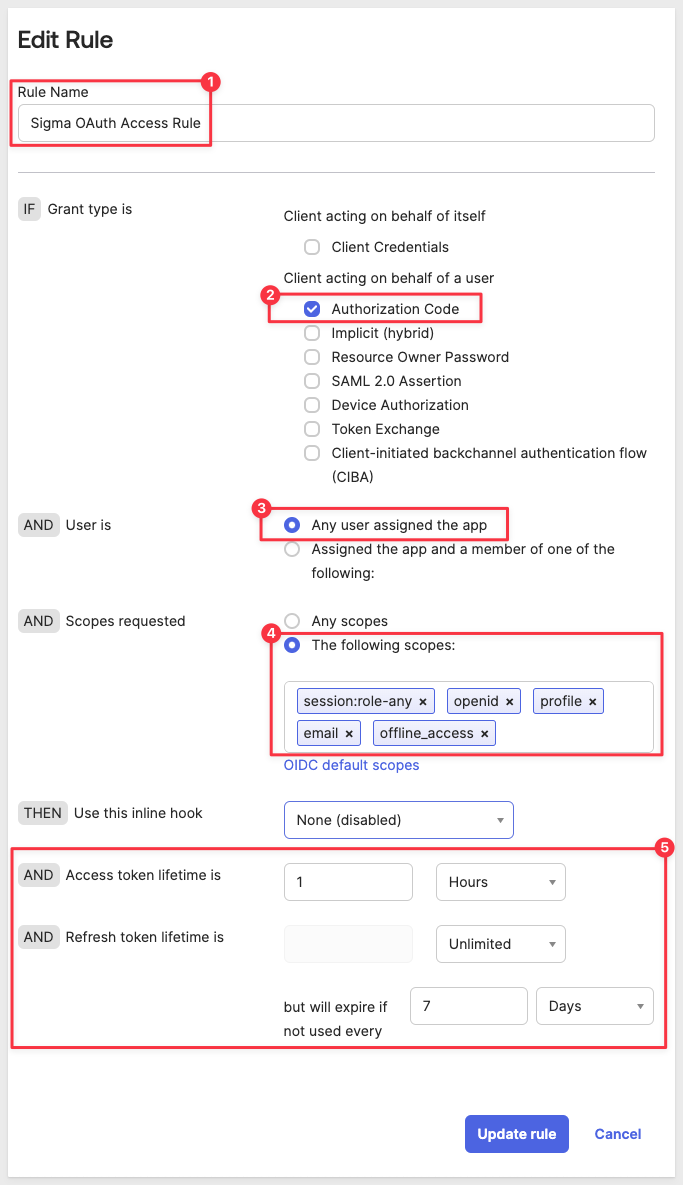
Click Create rule.
As previously mentioned, we will use a single email as our test user in all three systems. It can be any email you prefer, but you will need to accept an email in order to complete account setup in Sigma.
People in OKTA will be mapped to both Sigma and Snowflake (once we fully complete the configuration).
Add test user in Okta
Log into the Okta admin console with admin credentials.
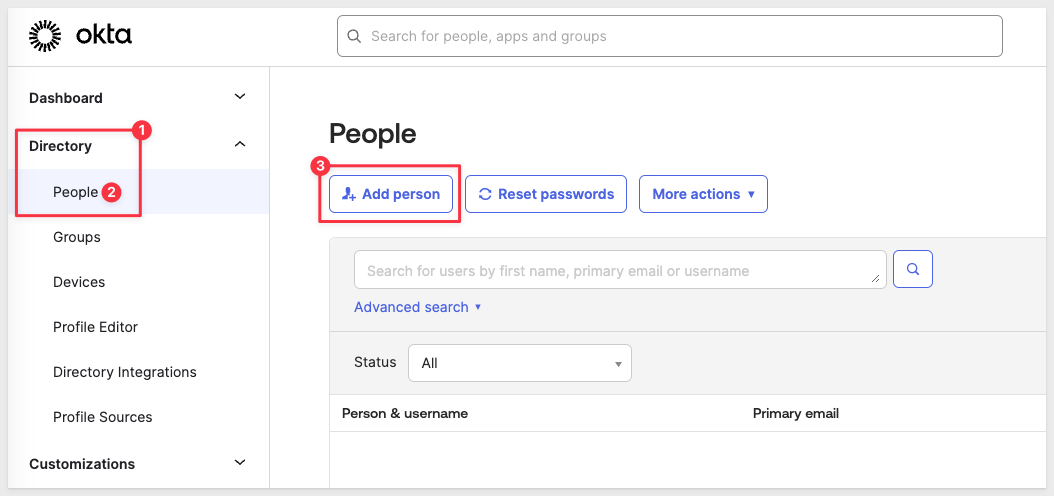
Navigate to Directory > People and click Add person:
Add your test user's email, taking care to manually set a password.
Make note of this email/password in our text file.
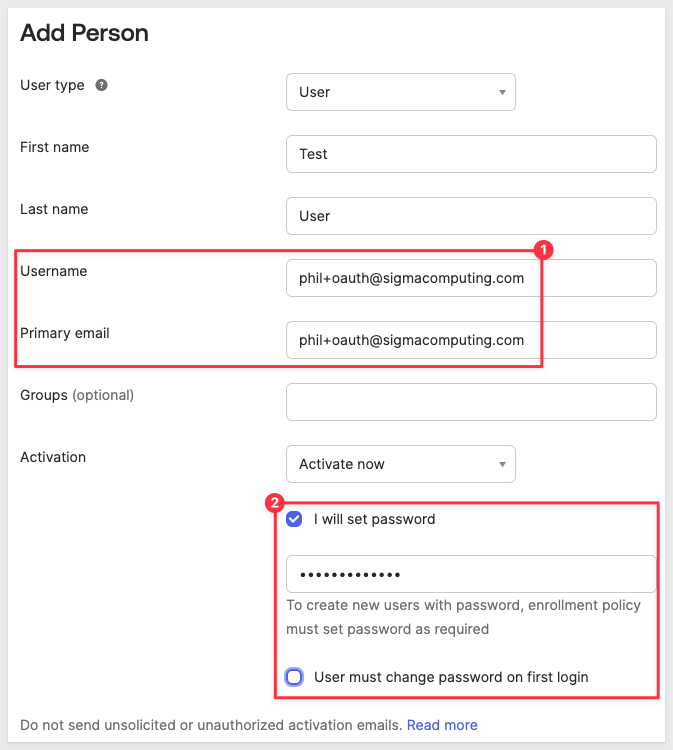
Add user in Sigma
Add the same user/password in Sigma. We selected to use the Pro license type but it does not matter for this exercise.
If you don't know how, see Invite new organization members.
Add users in Snowflake
Run the following sql script in the Snowflake trial account, editing for your values:
-- 1: Set account admin role for script:
USE ROLE ACCOUNTADMIN;

-- 2: Set database to sample data:
USE DATABASE SNOWFLAKE_SAMPLE_DATA;

-- 3: Create Role:
CREATE OR REPLACE ROLE SIGMA_OAUTH_ROLE comment = 'For Sigma OAuth QuickStart';

-- NOTE: The Snowflake Sample Database is shared asset and that limits what privileges are allowed. This is ok, we will work around that.

-- 4: Grant privileges to the newly created role on one Snowflake sample database:
GRANT IMPORTED PRIVILEGES ON DATABASE SNOWFLAKE_SAMPLE_DATA TO ROLE SIGMA_OAUTH_ROLE;

-- 5: Create a TEST user for new Sigma Connection:
CREATE OR REPLACE USER "YOUR-TEST-USER-EMAIL"
    password = 'YOUR-TEST-USER-PASSWORD'
    login_name = "YOUR-TEST-USER-EMAIL"
    display_name = "YOUR-TEST-USER-EMAIL"
    first_name = 'TEST'
    last_name = 'USER'
    must_change_password = false
    disabled = false
    default_warehouse = compute_wh
    default_namespace = SNOWFLAKE_SAMPLE_DATA
    default_role = SIGMA_OAUTH_ROLE
    comment = 'For Sigma OAuth QuickStart';

-- 6: Grant the role to the user:
    GRANT ROLE SIGMA_OAUTH_ROLE TO USER "YOUR-TEST-USER-EMAIL";

-- 7: Grant warehouse usage to role:
    GRANT USAGE ON WAREHOUSE COMPUTE_WH TO ROLE SIGMA_OAUTH_ROLE
What about admin access in Snowflake
When creating your Snowflake trial account, what email address did you use for admin access?
Let's pause and think about this a second. We just added our test user account to Okta, Sigma and Snowflake, but we have not yet created a Snowflake connection in Sigma.
We will do that later, but when we do, we must log in using SSO and use the Sigma email address so that we can access the administrative section of Sigma.
If the Sigma admin user's email address is not also added to Snowflake, it will not be possible to add the connection in Sigma using SSO. We would get an error similar to this one if the admin user is not in Snowflake too:

Bottom line; we need to also add the Sigma administrators email (IF IT DOES NOT ALREADY EXIST) using the same Snowflake script we just ran to add our test user to Snowflake.
If it already exists in Snowflake, skip this part of this section.
Go ahead and add the Sigma administrator to Snowflake, taking care to adjust the script for the new values:
-- 1: Set account admin role for script:
USE ROLE ACCOUNTADMIN;

-- NOTE: The Snowflake Sample Database is shared asset and that limits what privileges are allowed. This is ok, we will work around that.

-- 2: Create a SIGMA ADMIN USER:
CREATE OR REPLACE USER "YOUR-SIGMA-ADMIN-EMAIL"
    password = 'YOUR-SIGMA-ADMIN-PASSWORD'
    login_name = "YOUR-SIGMA-ADMIN-EMAIL"
    display_name = "YOUR-SIGMA-ADMIN-EMAIL"
    first_name = 'SIGMA'
    last_name = 'ADMIN'
    must_change_password = false
    disabled = false
    default_warehouse = COMPUTE_WH
    default_namespace = SNOWFLAKE_SAMPLE_DATA
    default_role = SIGMA_OAUTH_ROLE
    comment = 'For Sigma OAuth QuickStart';

-- 3: Grant the role to the user:
    GRANT ROLE sigma_oauth_role TO USER "YOUR-SIGMA-ADMIN-USER-EMAIL";

-- 4: Grant warehouse usage to role:
    GRANT USAGE ON WAREHOUSE COMPUTE_WH TO ROLE SIGMA_OAUTH_ROLE
Error: Could not connect to database
There are many possible places where incorrect configuration can throw an error. In the case of this error, shown below, the Snowflake admin user has not been assigned a default role:

If you never have seen this error, GREAT!. If you do get it when attempting to add the OAuth-enabled Snowflake connection in Sigma, we just need to update the Snowflake admin user to have a default role.
For example, our Snowflake admin user is named "QUICKSTARTS" so the script to run in Snowflake to provision the a default role is this:
-- Update the user default role
ALTER USER QUICKSTARTS SET
    DEFAULT_ROLE = SIGMA_OAUTH_ROLE;
In practice, this issue is not likely to occur, but in trial accounts, lots of things can happen as "experiments" are performed.
Now that we have a test user, we need to give them an Okta assignment to the Sigma OAuth QuickStart app we created earlier.
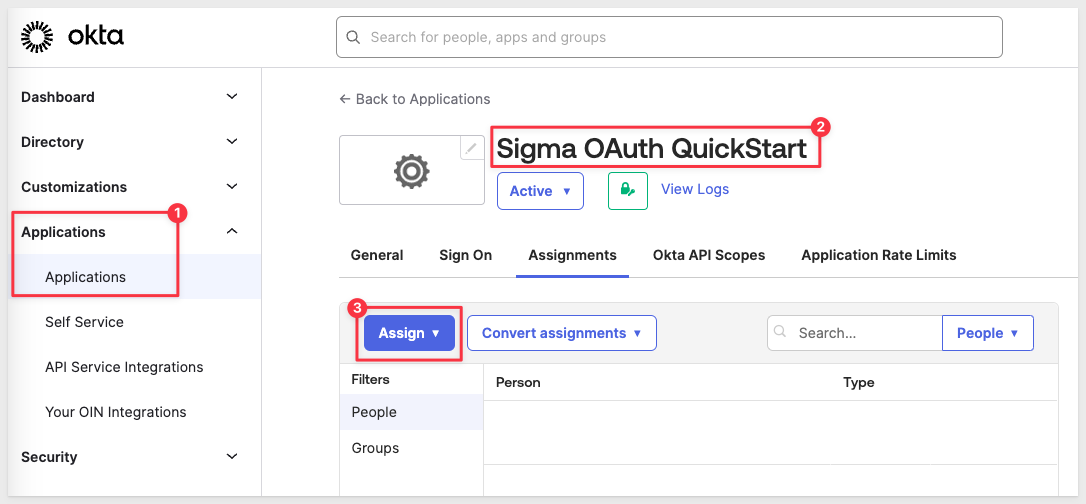
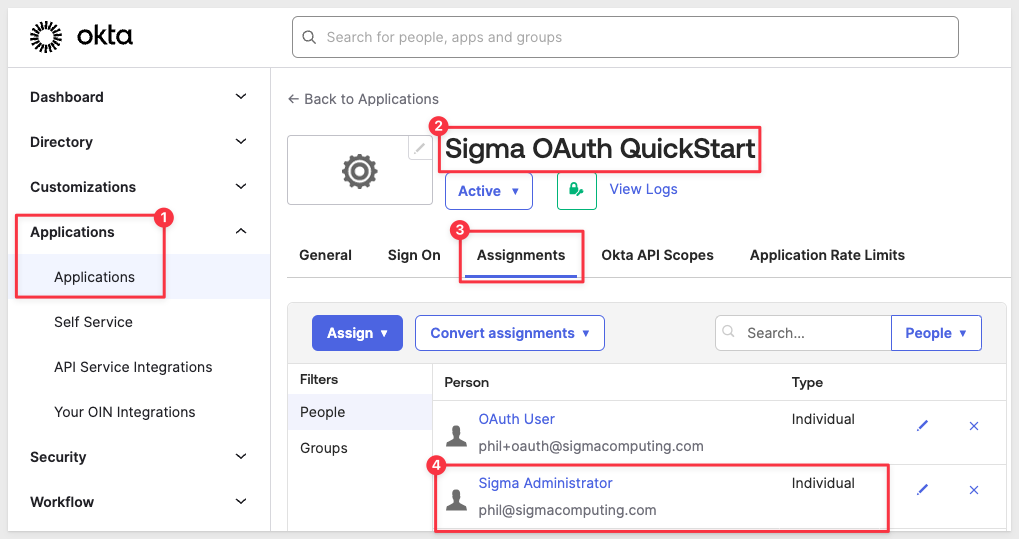
In Okta, navigate to Applications > Applications and click to select the Sigma OAuth QuickStart app and then select the Assignments tab. Select Assign and Assign to People:
Click the Assign button for our test user.
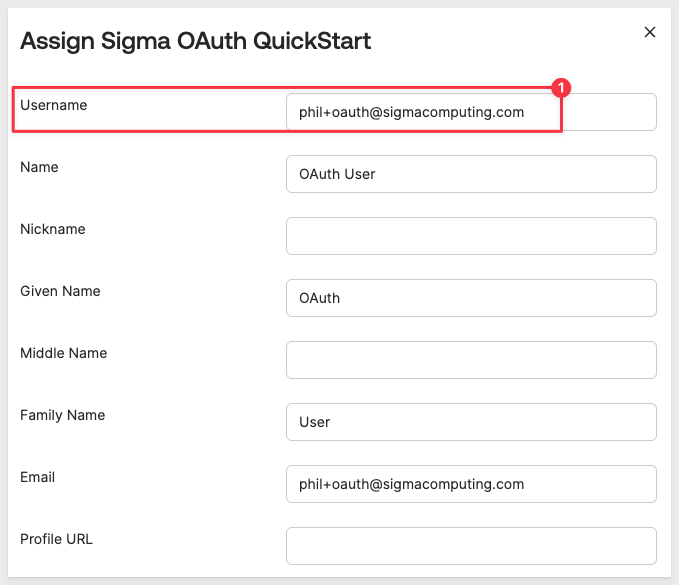
Wait for the modal to appear called Assign Sigma OAuth QuickStart to People, scroll to the bottom and click Save and Go Back.
Click Done.
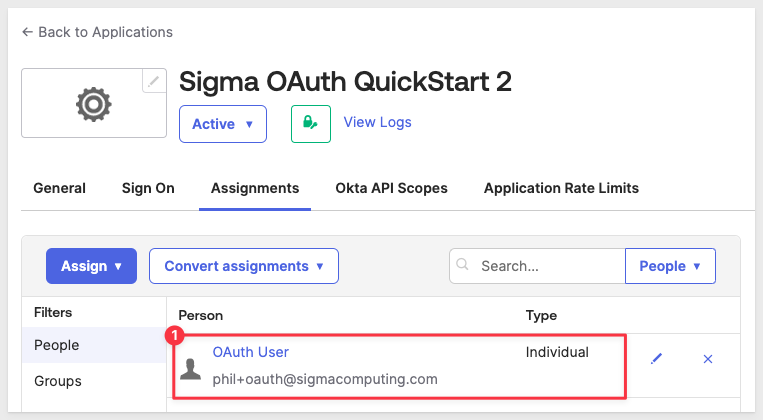
Our test user is now assigned to our Okta application:
Okta token preview
Okta provides a method to validate our test user can obtain a valid token, based on a configuration.
Navigate to Security > API > Authorization Servers > Sigma OAuth QuickStart Server and the Token Preview tab.
Fill out the form and click Preview Token:
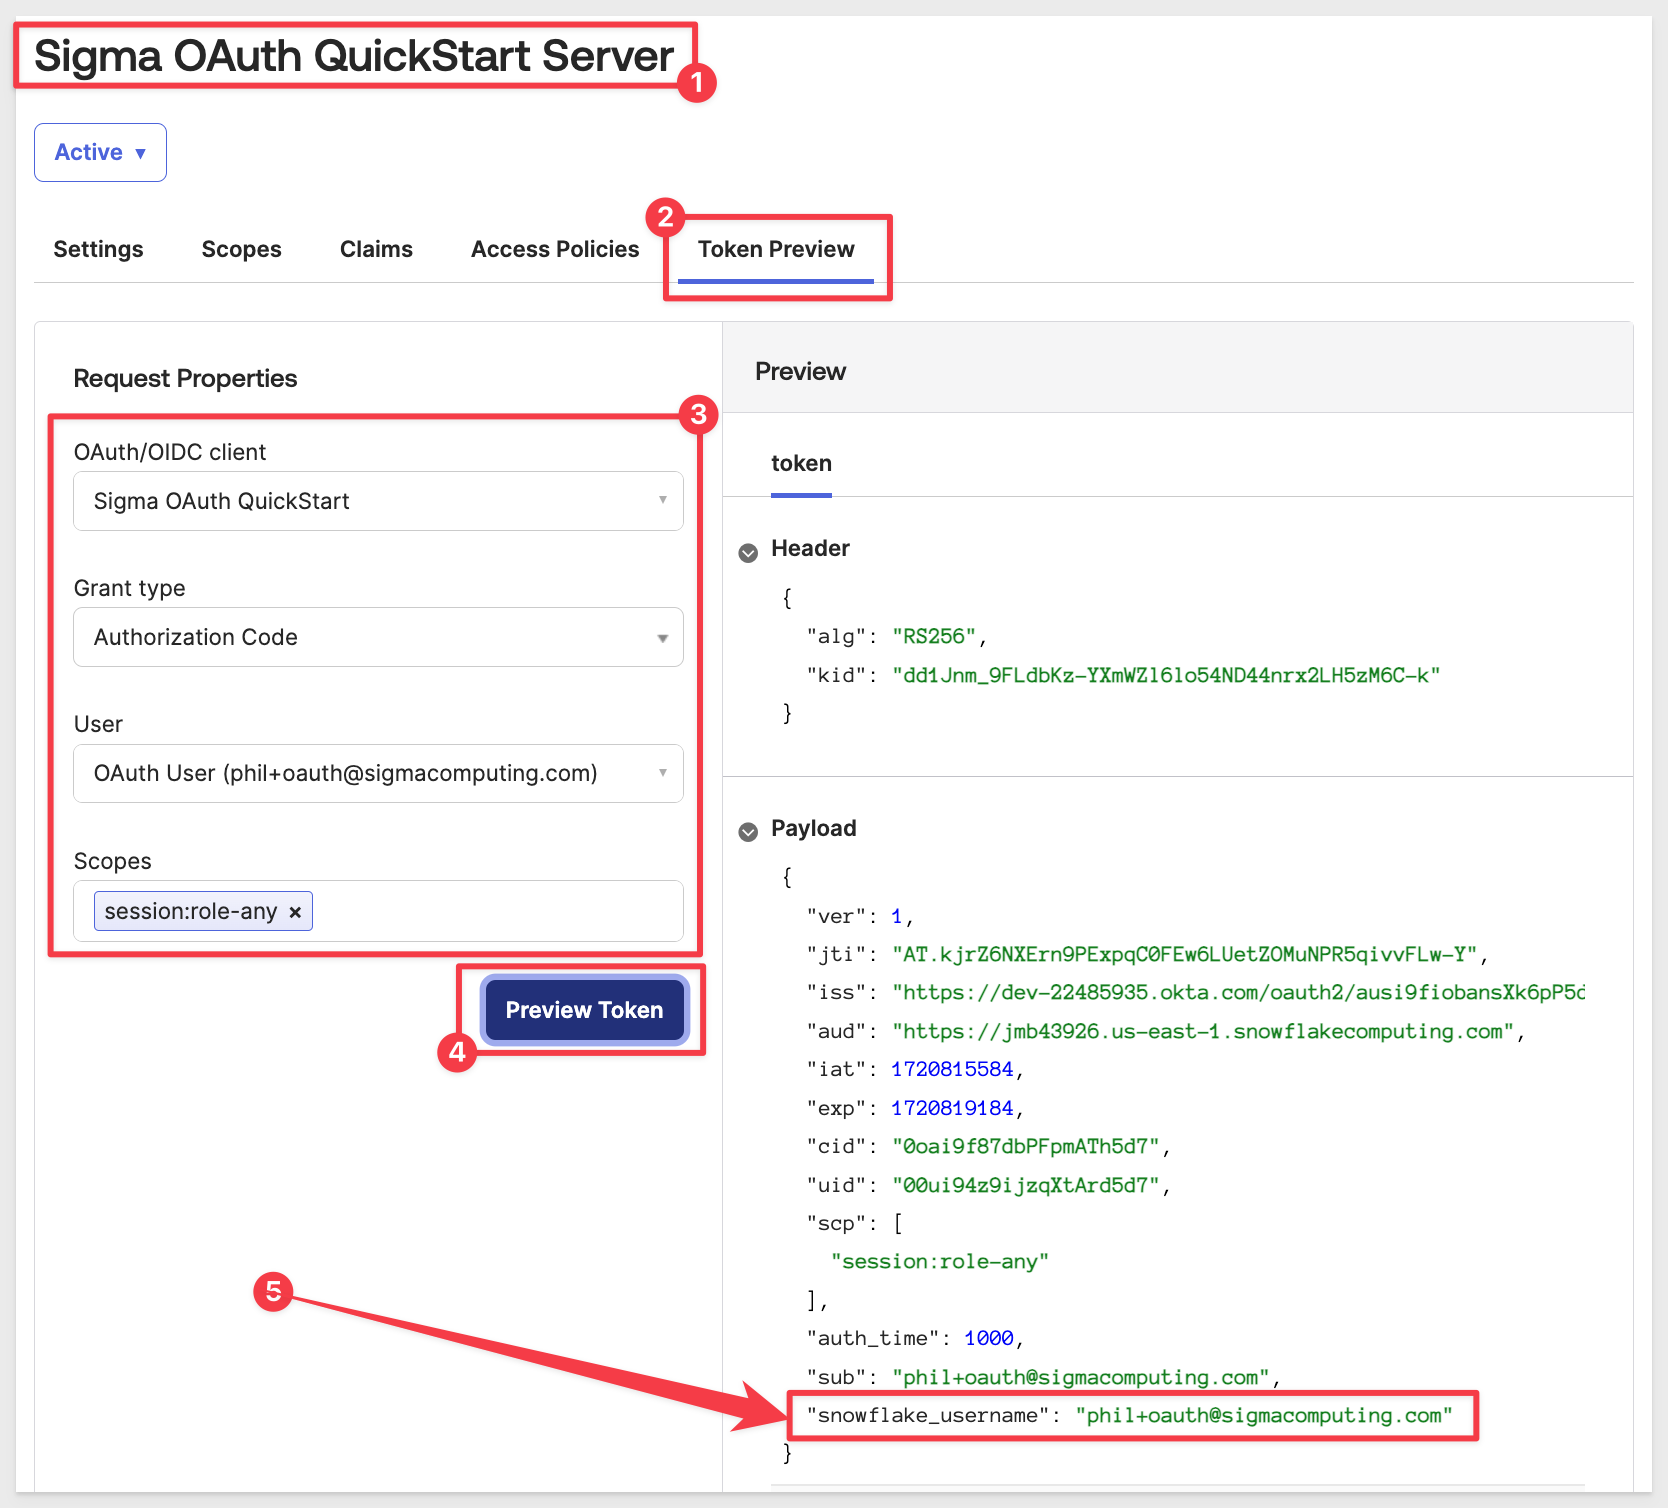
We can see that the value for our claim called snowflake_username is returning our test users email address. This is the value that will be passed from Okta to Snowflake when we try to use an OAuth enabled Snowflake connection in Sigma.
If you are unable to get a valid token in this page, something is not configured correctly.
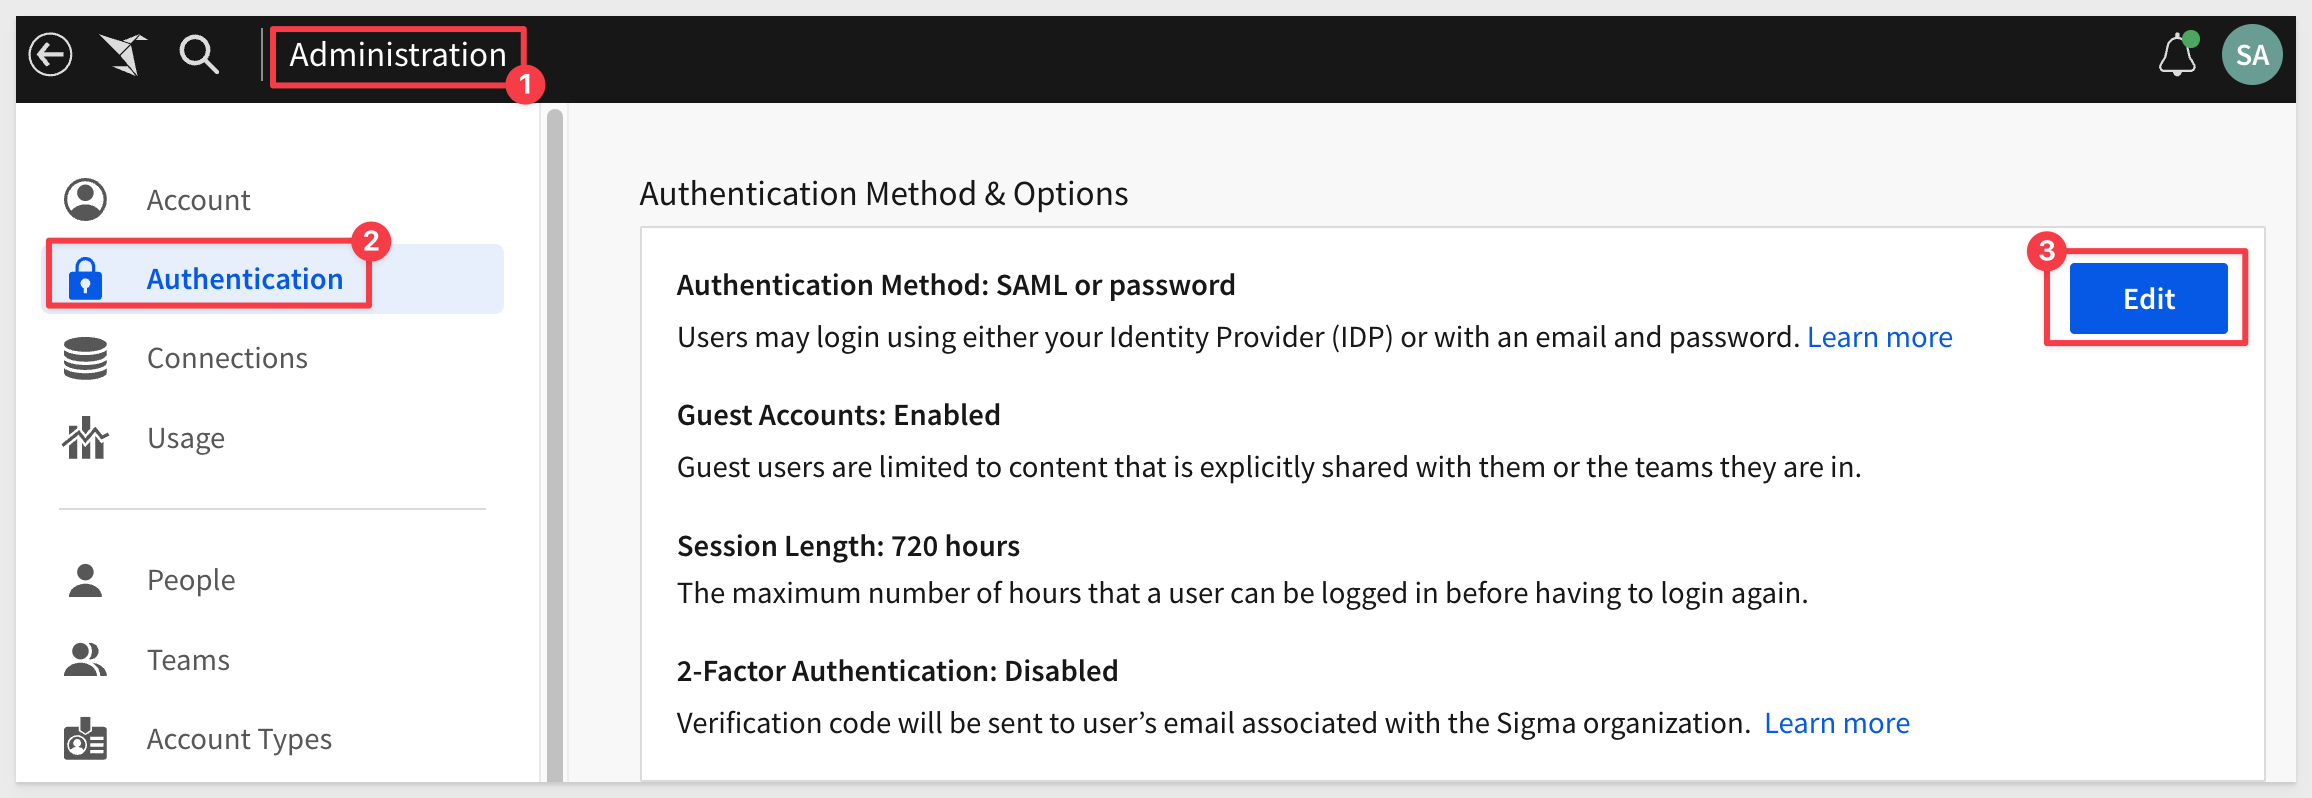
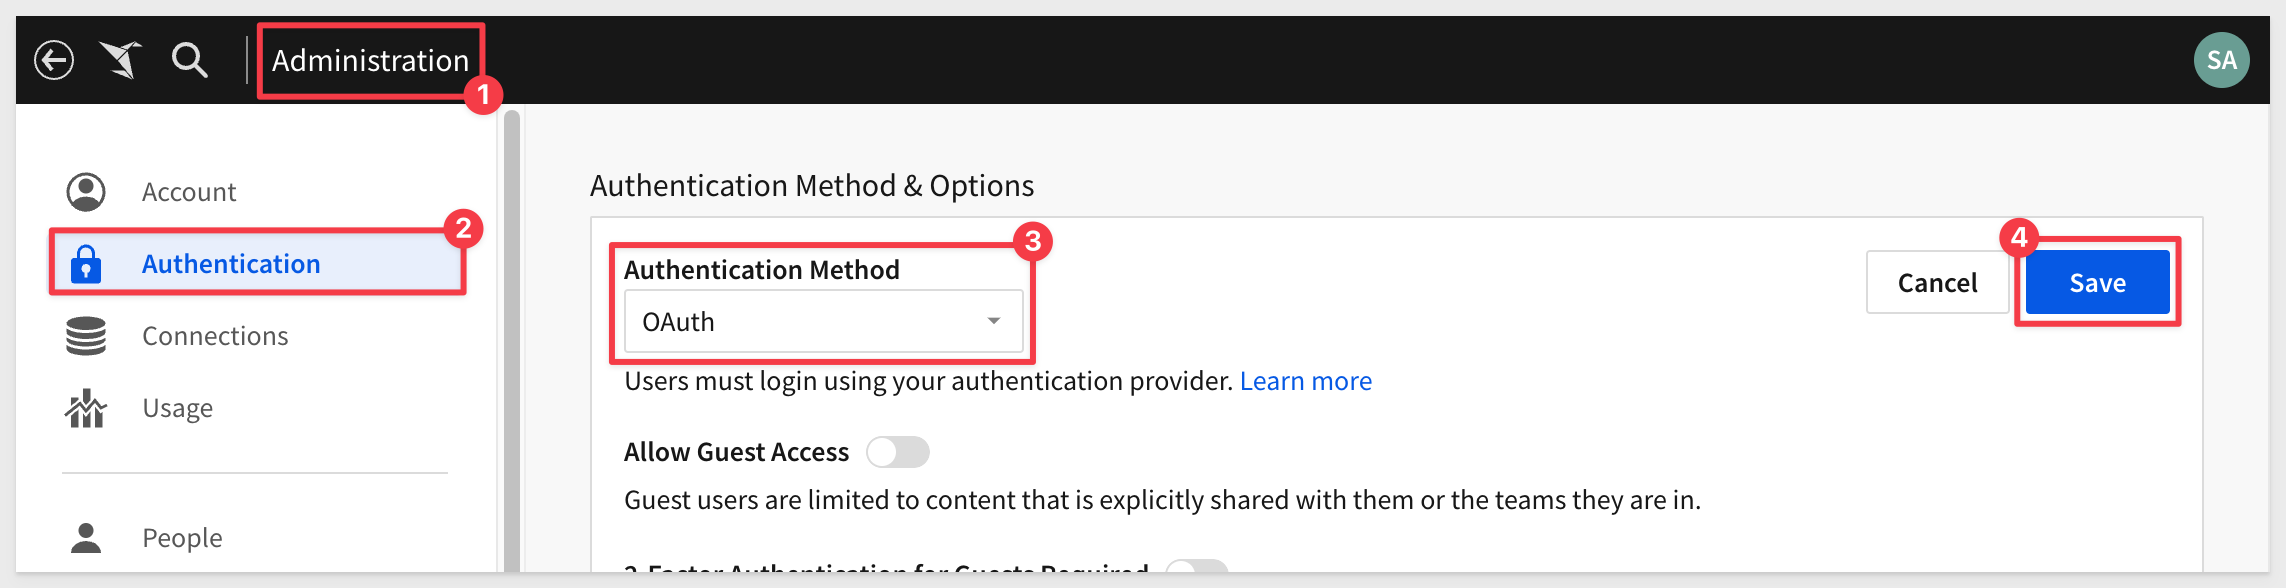
Log into Sigma as Administrator and navigate to Administration > Authentication. Click Edit:
For Authentication Method select OAuth or password.
To keep this simple for now, disable Guest access and 2-Factor Authentication:
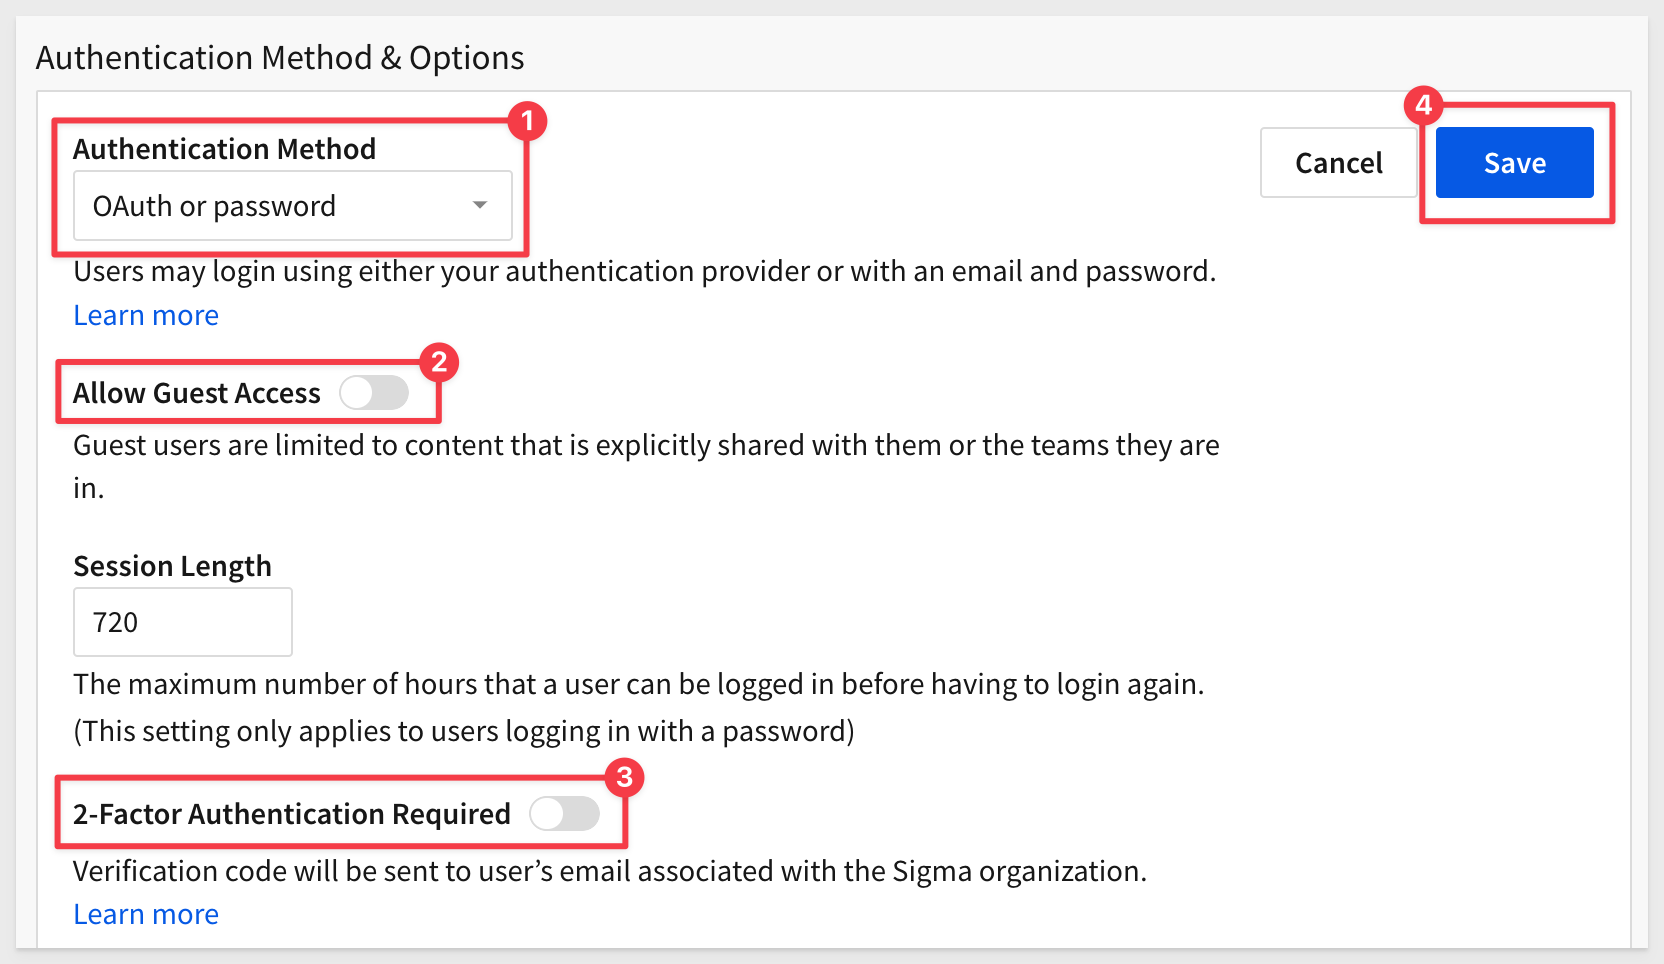
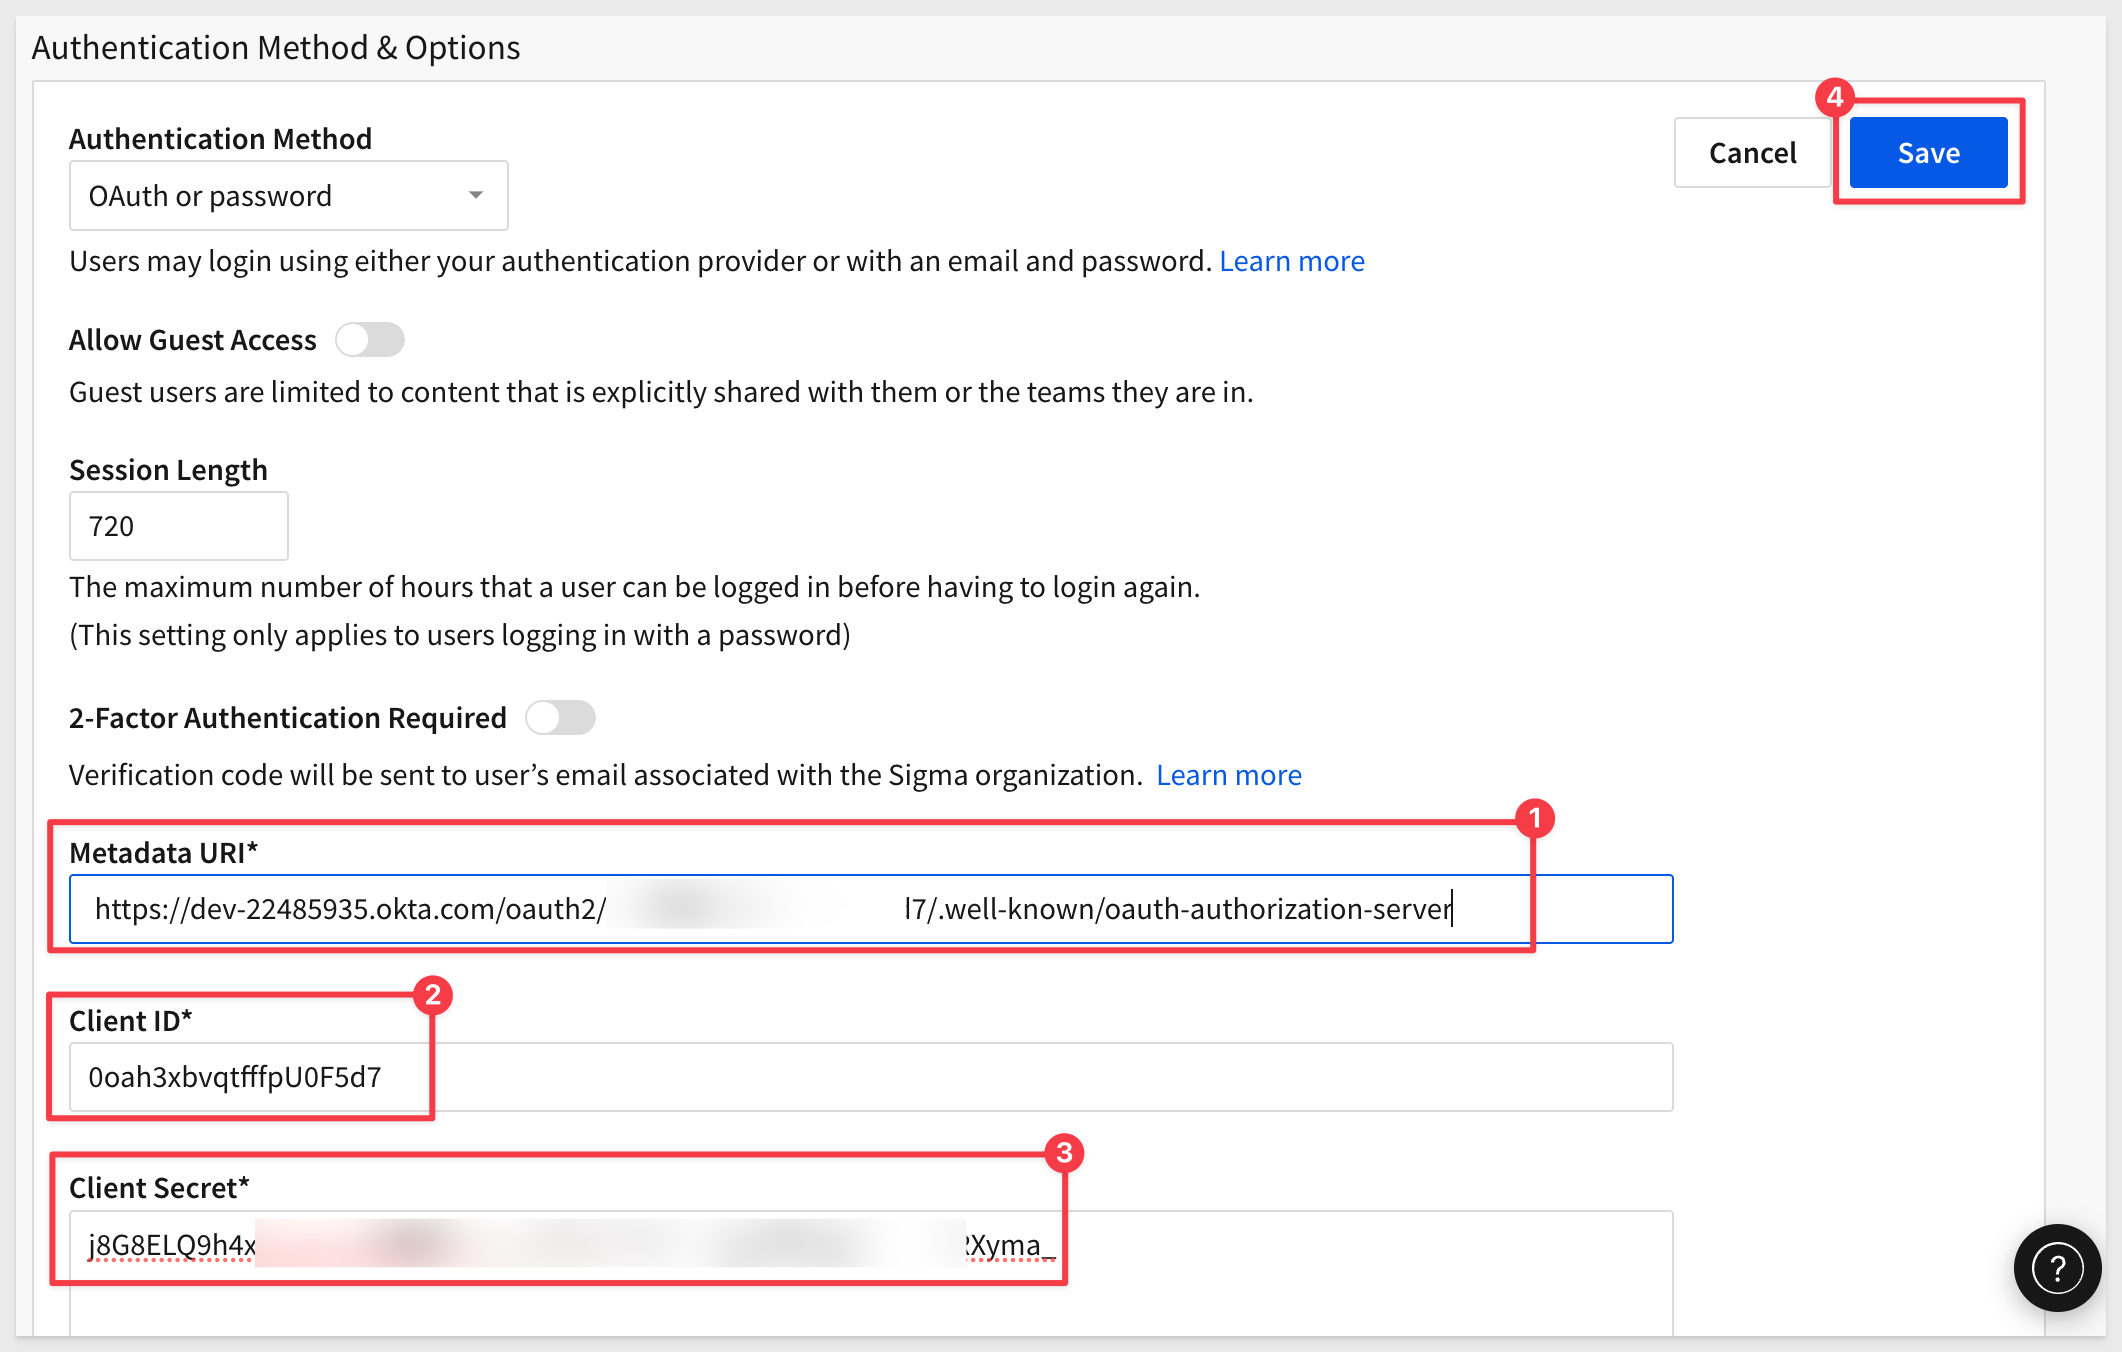
Scroll down and enter the values for Metadata URI, Client ID and Client Secret we saved from Okta earlier, and click Save:
Login to Sigma with OAuth - Test
Open a new incognito (or private) browser window and navigate to your Sigma login page. You can copy it from the text file, if you made note of it there.
We want to click the button or link to Sign in with SSO:
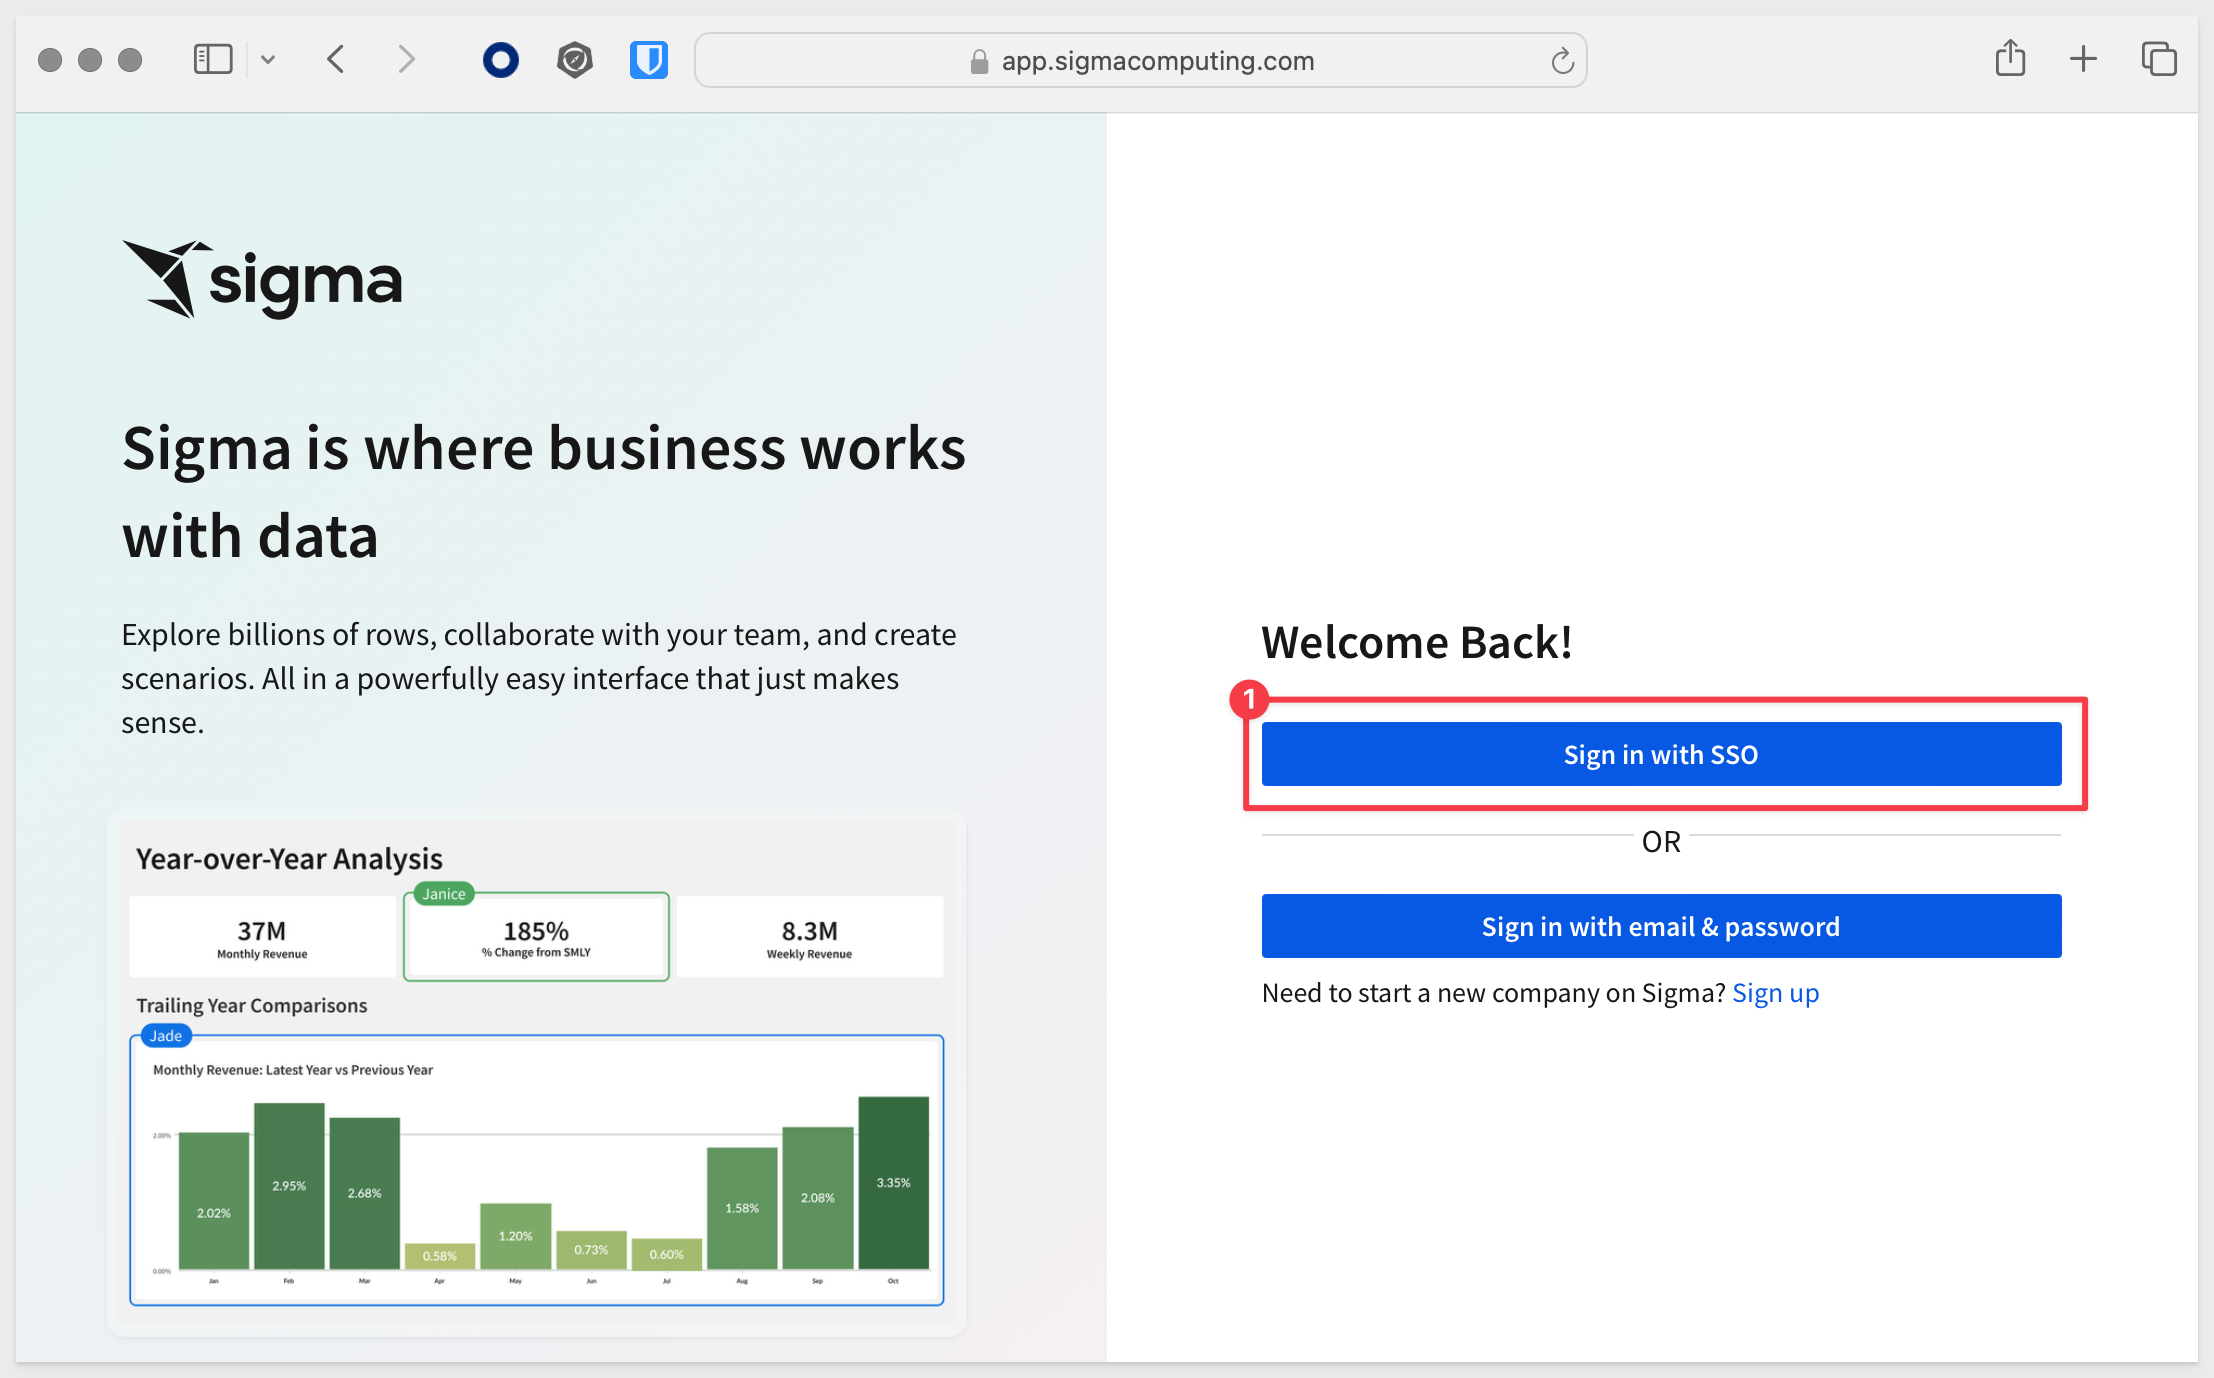
Sigma will redirect the login request to Okta. Login using the test users email/password.
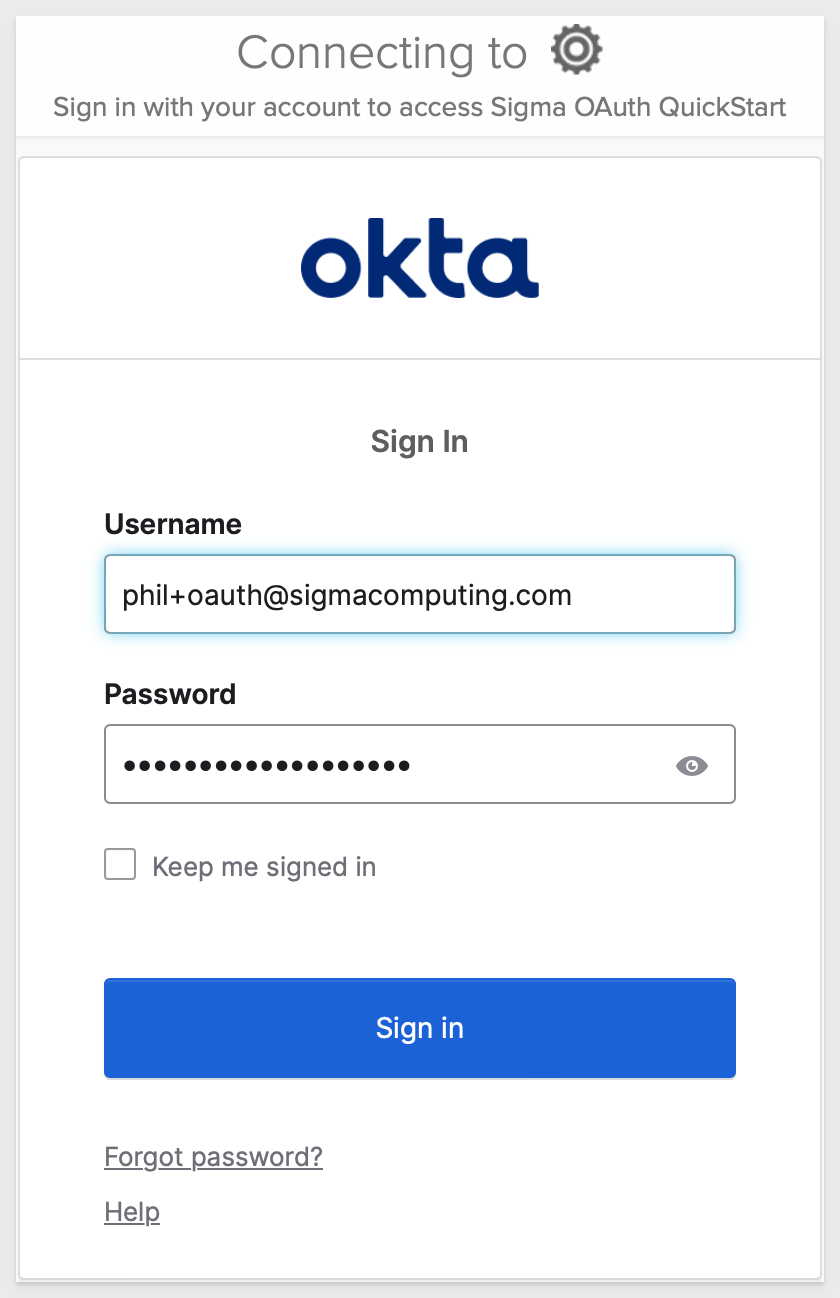
We the configurations were done correctly, we will successfully access Sigma:
If all you needed was basic OAuth, you are done.
Next, we will configure an OAuth-based Sigma connection to Snowflake.
The Sigma connection to Snowflake will use a Snowflake Security Integration to enable OAuth communications.
A Snowflake Security Integration configuration is a setup process that allows Snowflake to integrate with external security providers for authentication and authorization purposes. This configuration enables Snowflake to securely handle user identities and access controls by leveraging external identity providers, such as Okta, Azure AD, or other OAuth and SAML-compliant services.
Log in to your Snowflake account with the necessary ACCOUNTADMIN privileges.
Create a Security Integration:
We will use the previously copied EXTERNAL_OAUTH_ISSUER and EXTERNAL_OAUTH_JWS_KEYS_URL in the Snowflake security integration configuration.
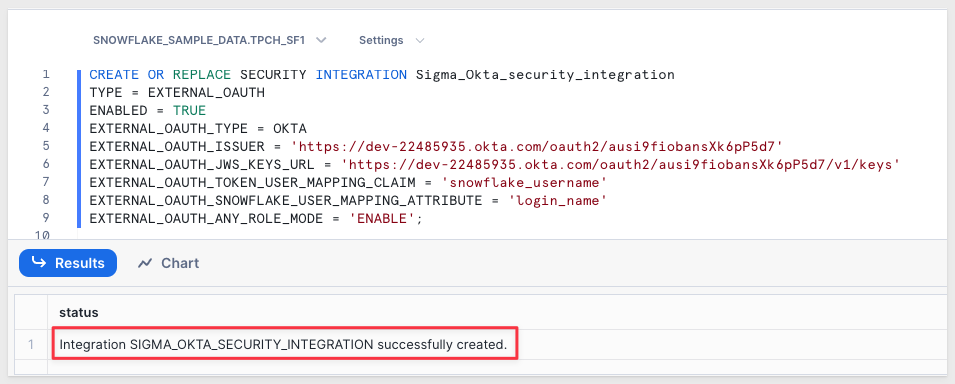
Run the following script in a Snowflake SQL Worksheet, changing the values for EXTERNAL_OAUTH_ISSUER and EXTERNAL_OAUTH_JWS_KEYS_URL for your values:
CREATE OR REPLACE SECURITY INTEGRATION Sigma_Okta_security_integration
TYPE = EXTERNAL_OAUTH
ENABLED = TRUE
EXTERNAL_OAUTH_TYPE = OKTA
EXTERNAL_OAUTH_ISSUER = 'YOUR VALUE'
EXTERNAL_OAUTH_JWS_KEYS_URL = 'YOUR VALUE'
EXTERNAL_OAUTH_TOKEN_USER_MAPPING_CLAIM = 'snowflake_username'
EXTERNAL_OAUTH_SNOWFLAKE_USER_MAPPING_ATTRIBUTE = 'login_name'
EXTERNAL_OAUTH_ANY_ROLE_MODE = 'ENABLE';
EXTERNAL_OAUTH_AUDIENCE_LIST =
The expected result is:
Explanation of each script parameter:
With Snowflake configured, we can move on to create an OAuth enabled connection to Snowflake in Sigma.
Before we can create an OAuth connection to Snowflake in Sigma, we need to first log into Sigma using OAuth and the Sigma administrator account (not the test user).
There are some configuration errors that can cause common issues when we try to log onto Sigma using SSO. You may not see these issues, but we want to mention them just in case you do.
1: Okta presents the login screen, but when the Sigma admin credentials are used, an error occurs that looks like this:

The most likely reason for this is that the Sigma administrators email is not assigned to the Okta application. Check that it is assigned here:
2: Trying to add the Snowflake connection in Sigma when logged in with username/password will also fail, as OAuth must be used first:

Understanding that, log into Sigma using SSO and navigate to Administration > Connections and click Create Connection.
Configure a Snowflake connection using the name Snowflake - OAuth Enabled.
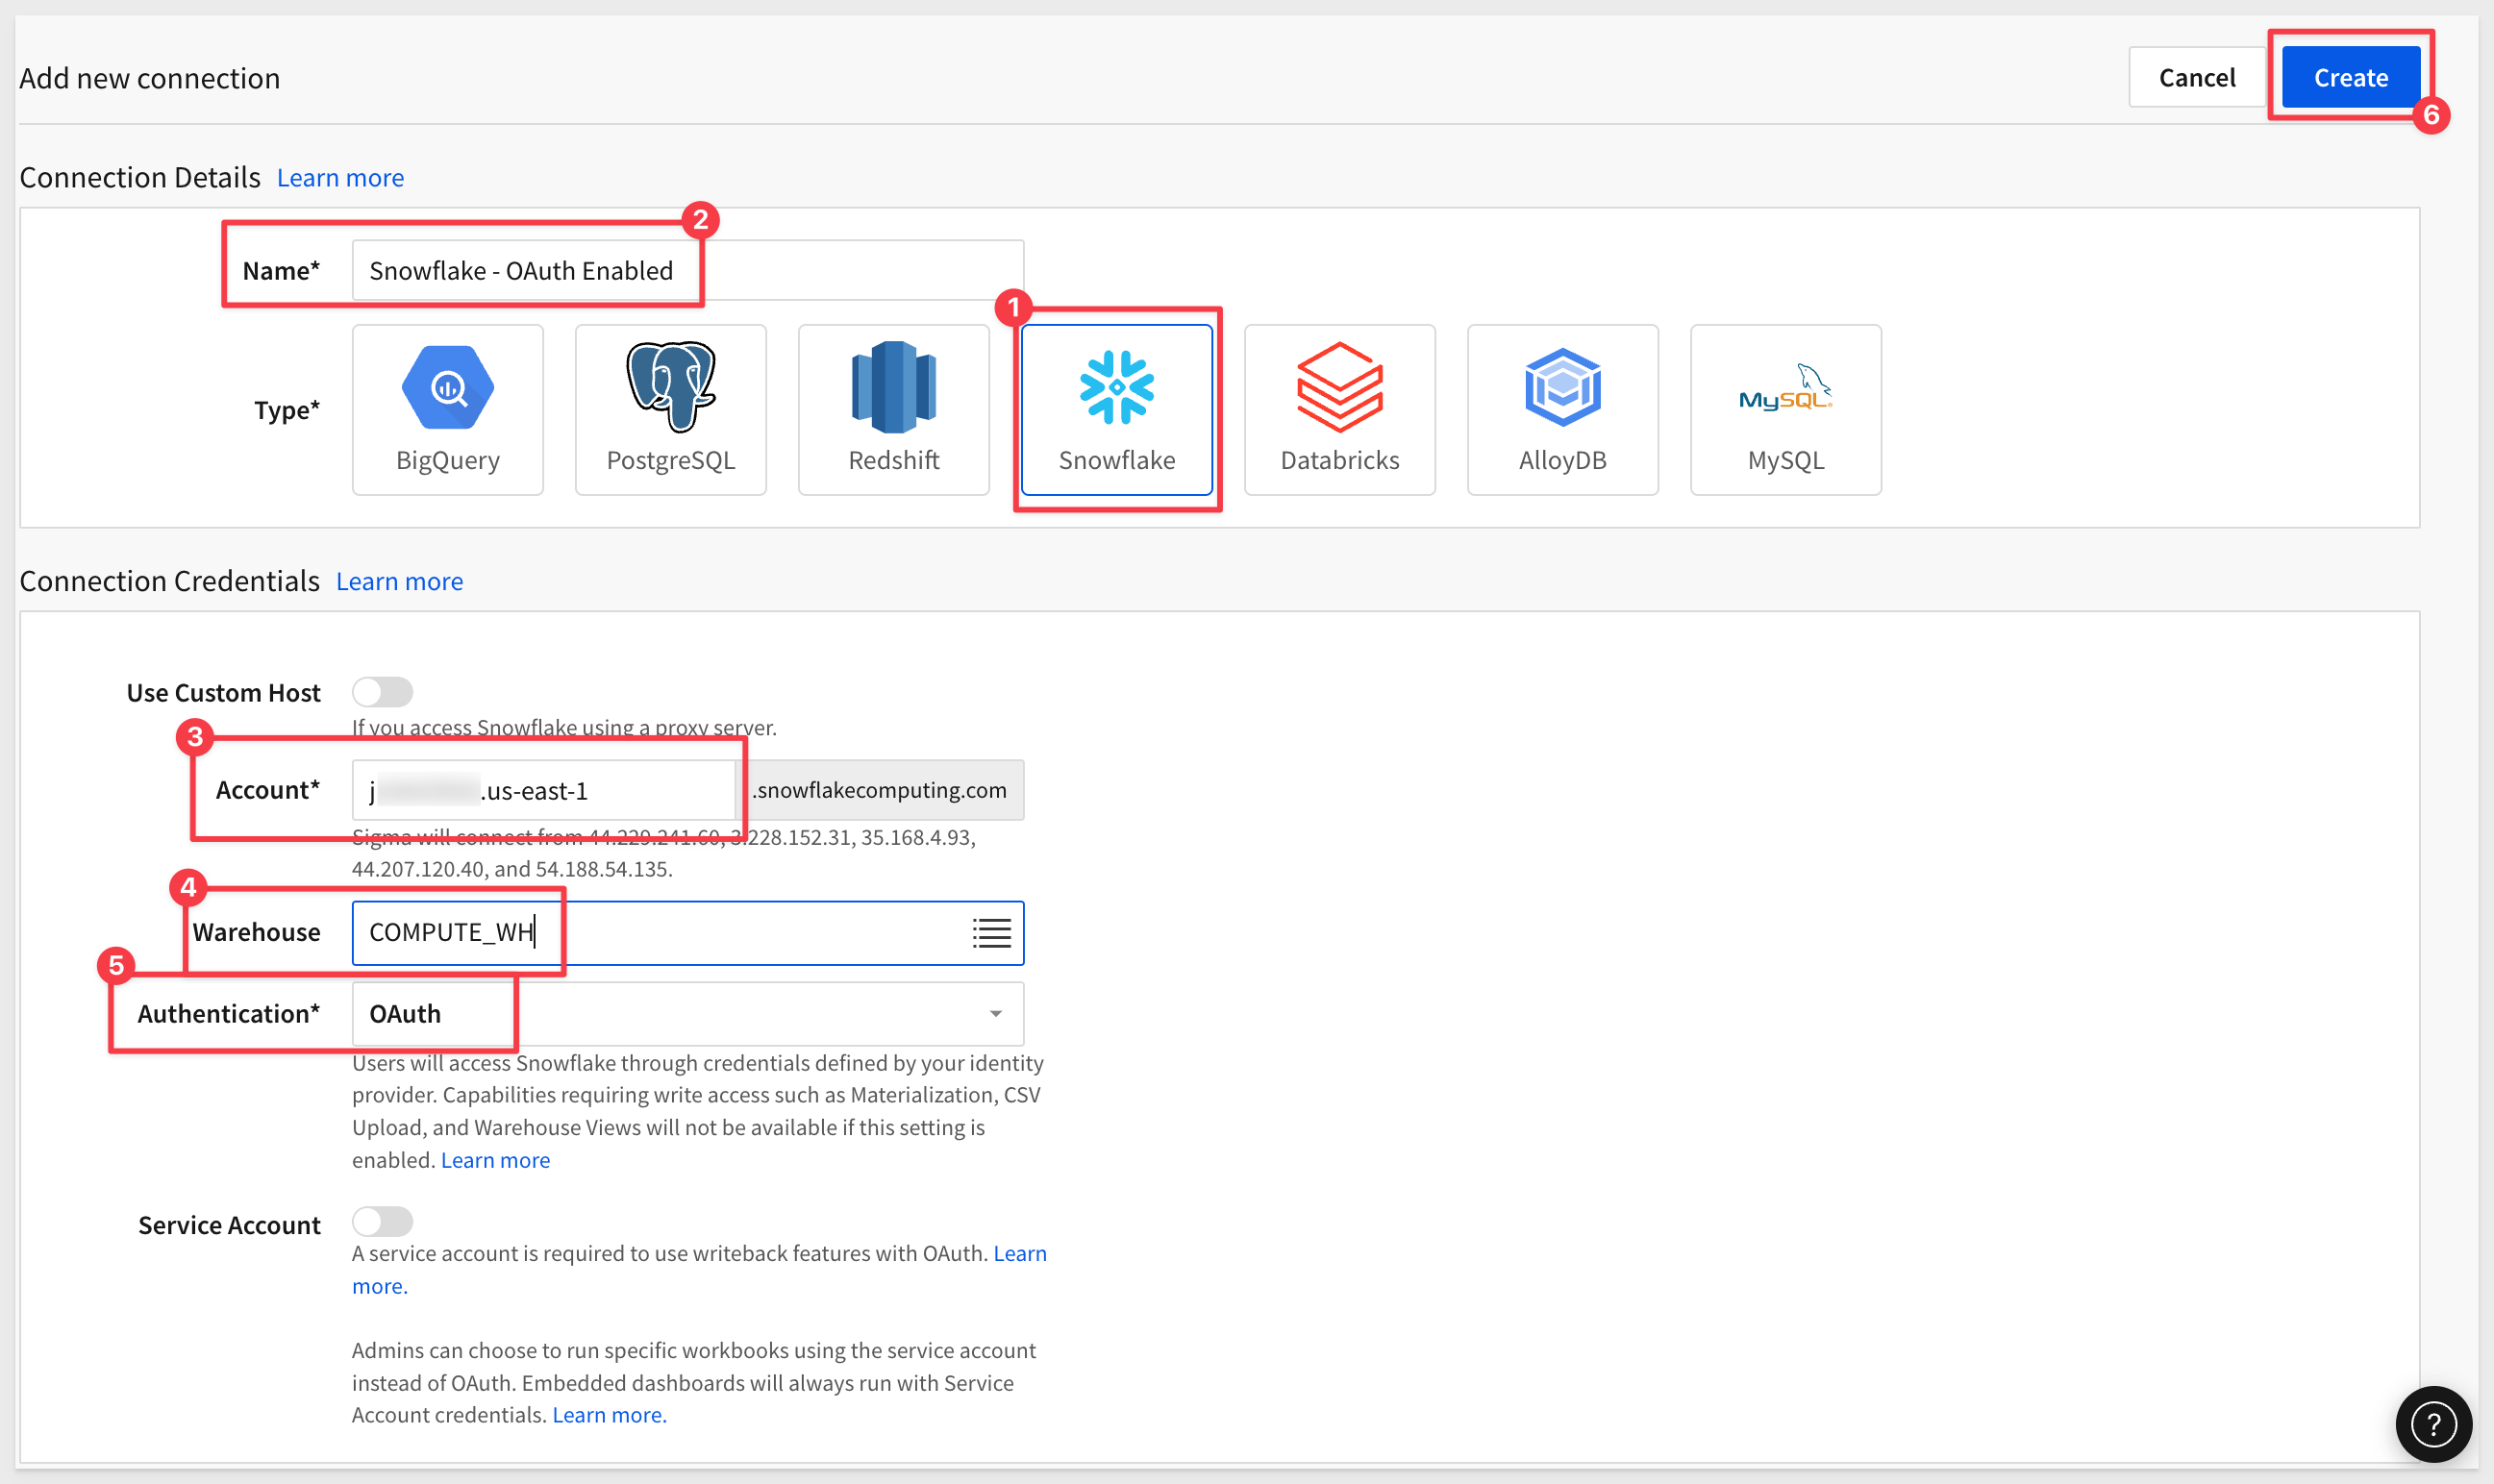
Click Create.
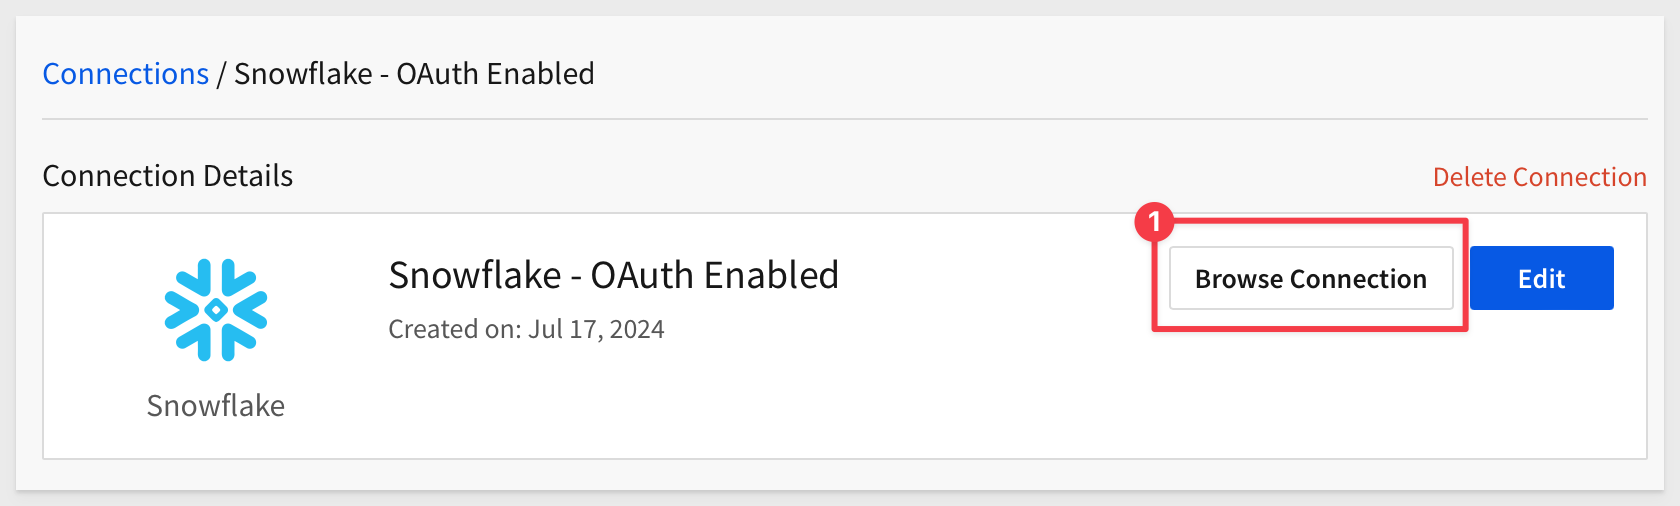
Sigma will try to establish the connection. When it is ready, we can click on the Browse Connection button:
And see the available data:
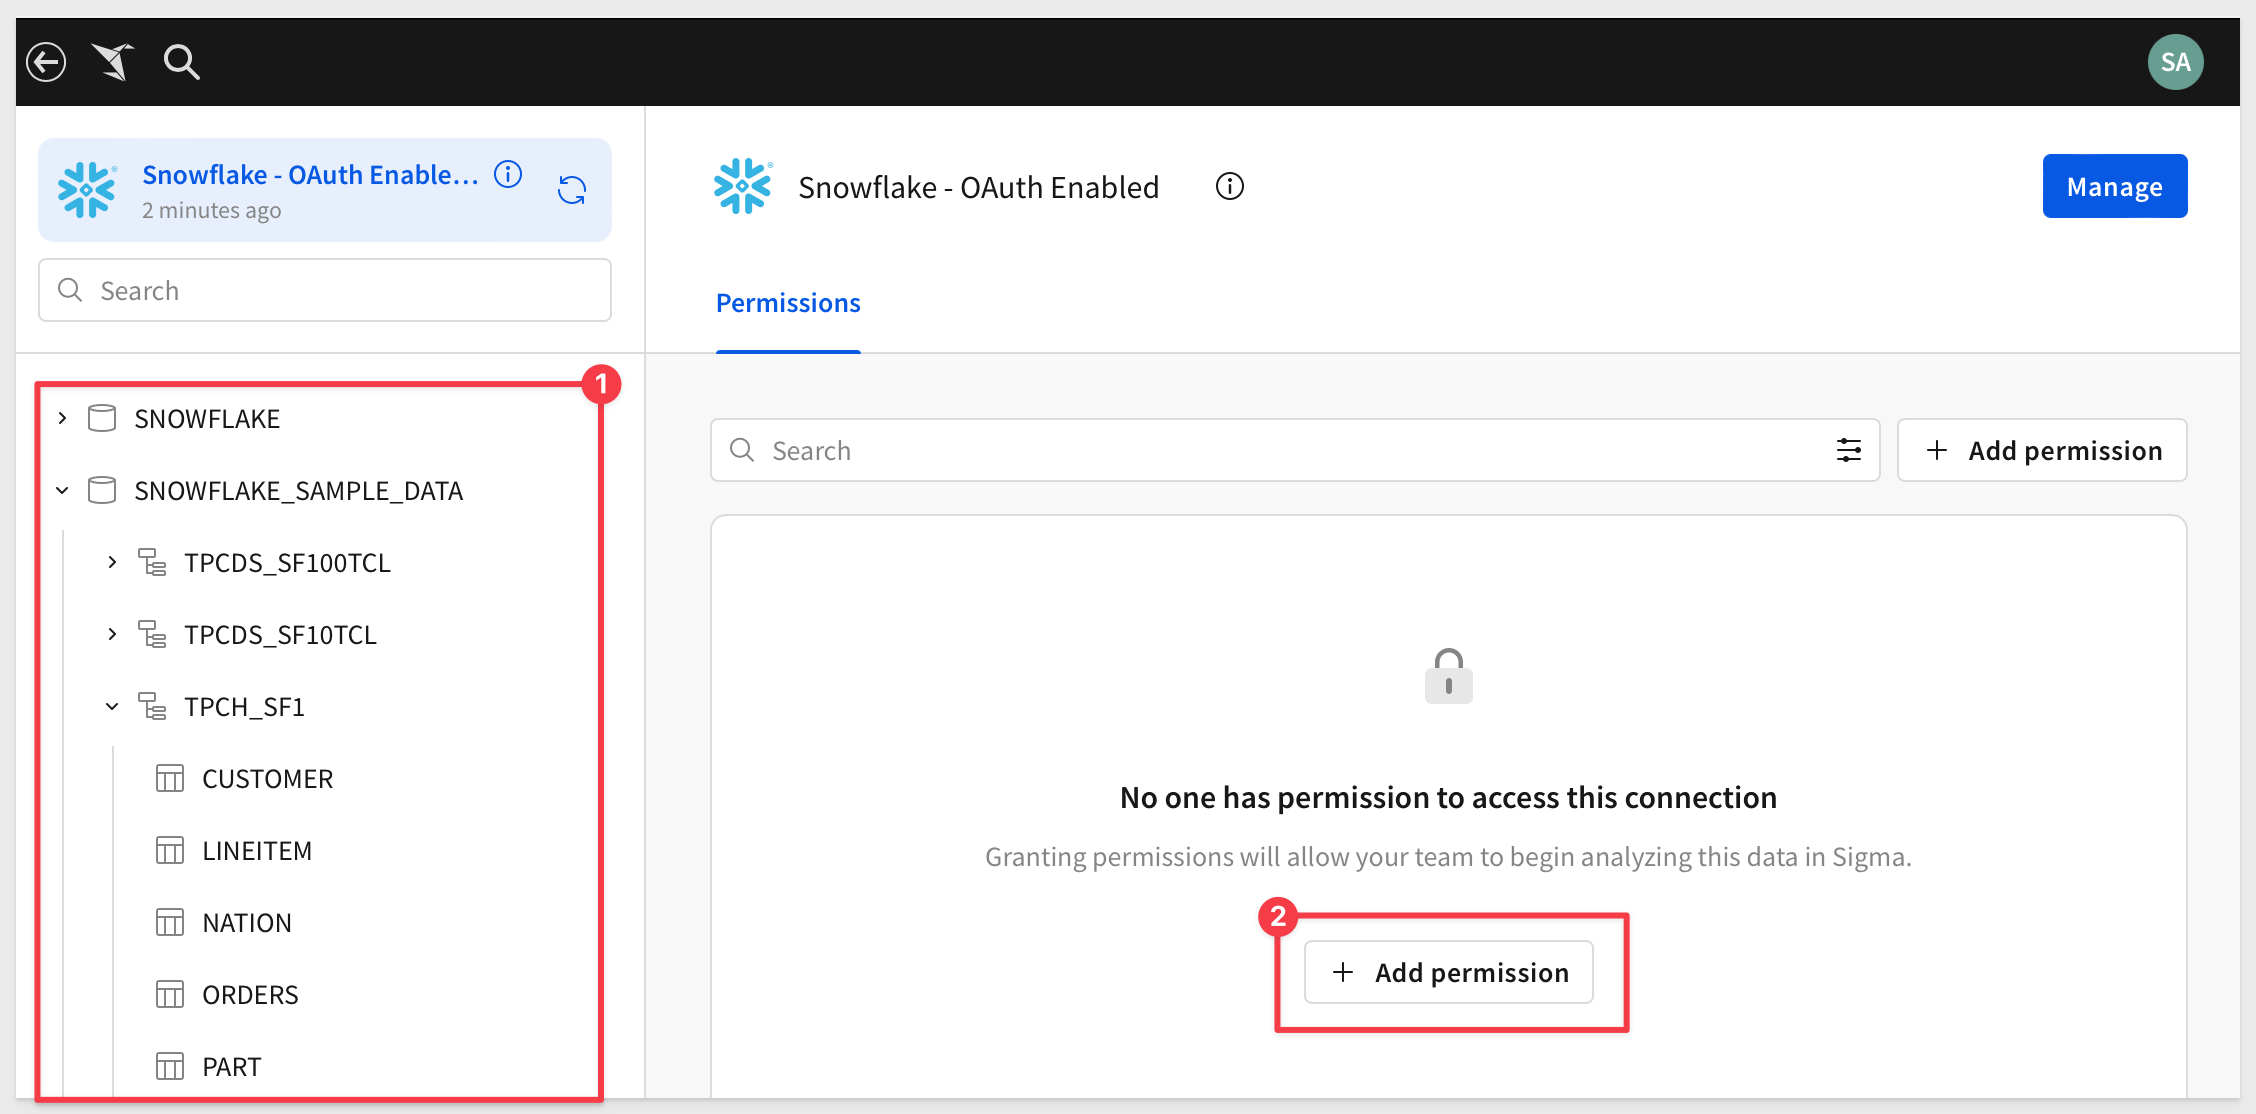
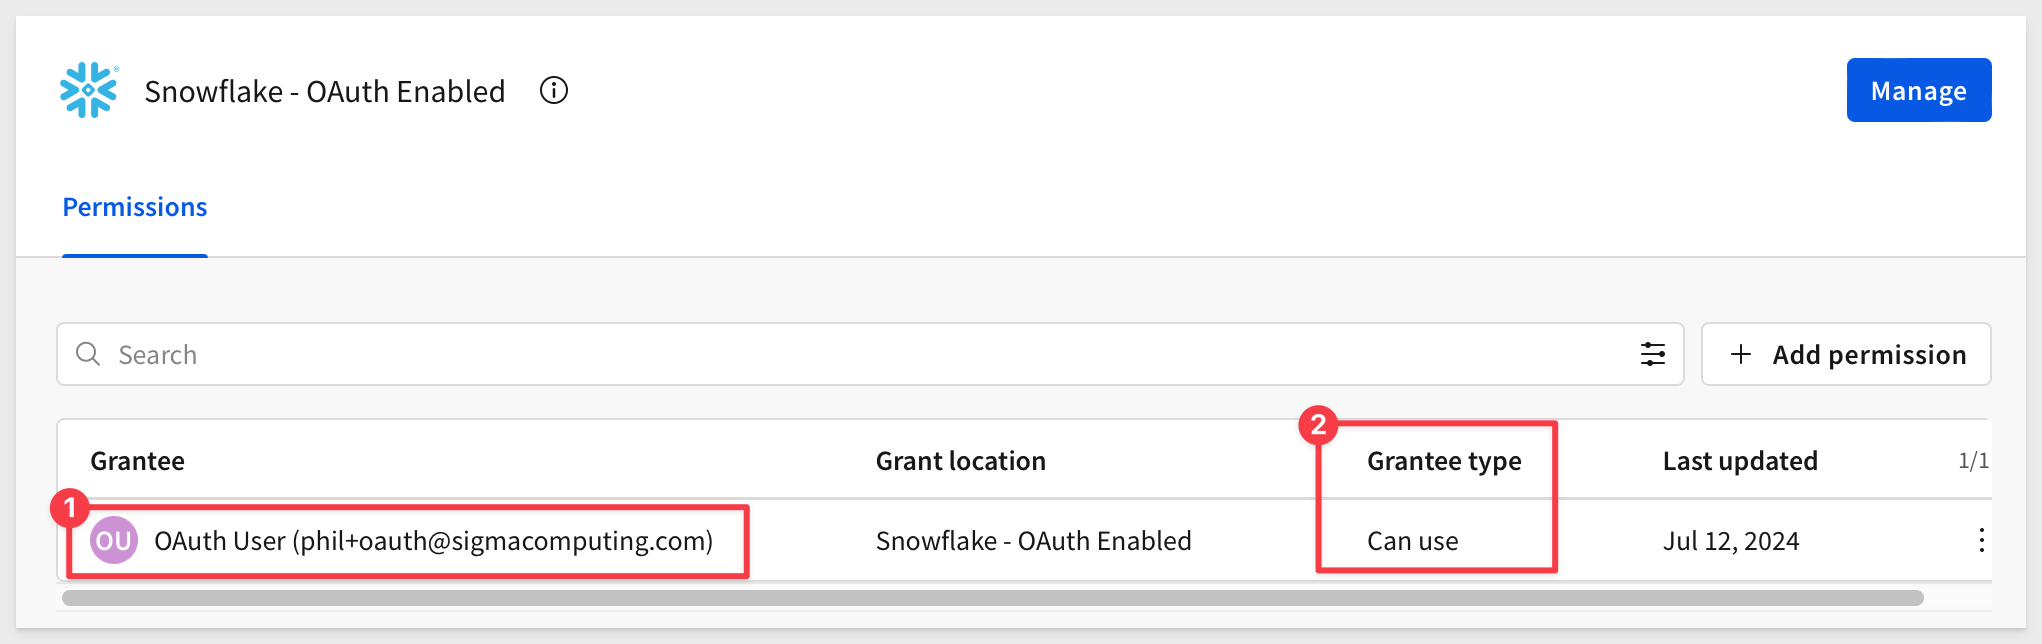
We will want to grant permission to our test user to use this connection:
Test OAuth
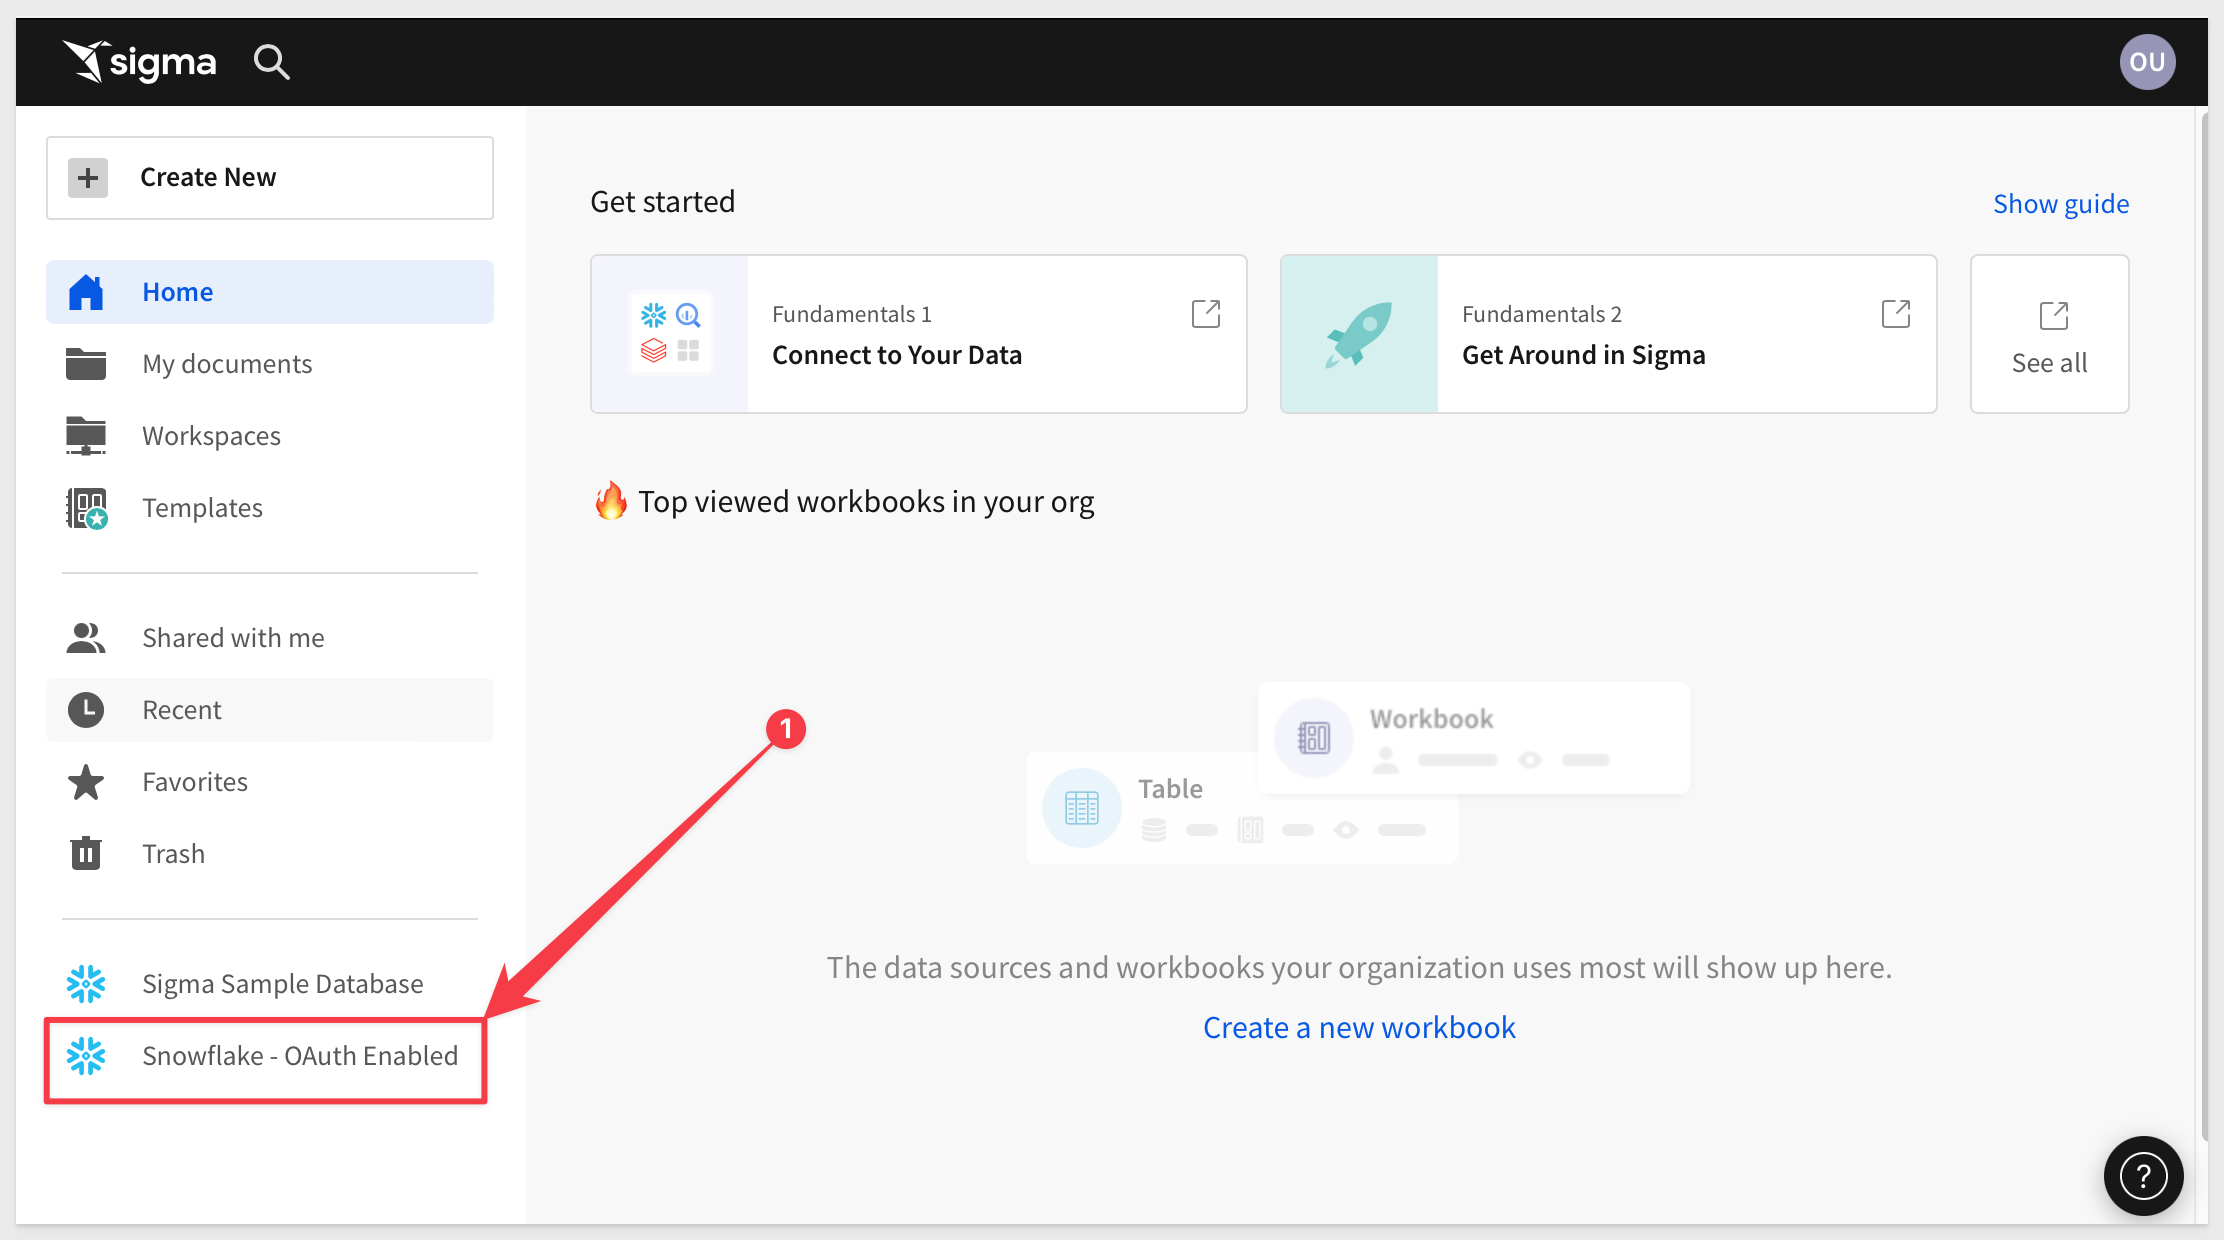
Open a new incognito/private browser session and login using the test users credentials.
If all is well, we should now see the Snowflake OAuth enabled connection, and be able to click into it and browse the data available to the role sigma_oauth_role:
If you are able to browser the data, we are done with this section.
To leverage user and group auto-provisioning from your IdP to Sigma, we utilize the Security Assertion Markup Language (SAML) in addition to the OAuth configuration we previously completed.
SAML provisioning automates the creation of user accounts when users first attempt SSO and do not yet have an account in Sigma.
Beyond automatic user creation, SAML facilitates the granting and revoking of team memberships as part of the provisioning process.
With this setup, user management in Sigma is no longer necessary, as it is handled by the IdP.
This topic can become quite expansive. In the spirit of keeping a QuickStart "quick," we will move through this quickly, providing just an overview of how it works
The setup and configuration of SAML in Okta is also demonstrated in the QuickStart, Single Sign-On with Sigma and Okta.
For detailed Sigma SAML documentation, see Single sign-on with SAML.
Step 1: Disable password authentication in Sigma
In order to make IdP provisioning available in Sigma, we need to disable password login as an option.
Log into Sigma as administrator and navigate to Administration > Authentication and click Edit.
Select OAuth from the list and click Save (the Client secret will be required to perform this step):
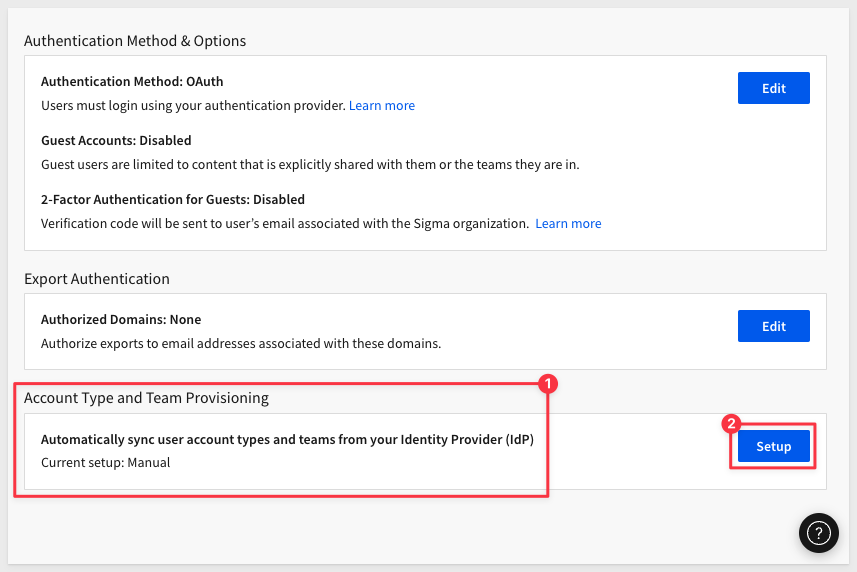
Step 2: Enable Sigma Account Type and Team Provisioning
Scroll down to Account Type and Team Provisioning which appears after password authentication is removed. Click Setup:
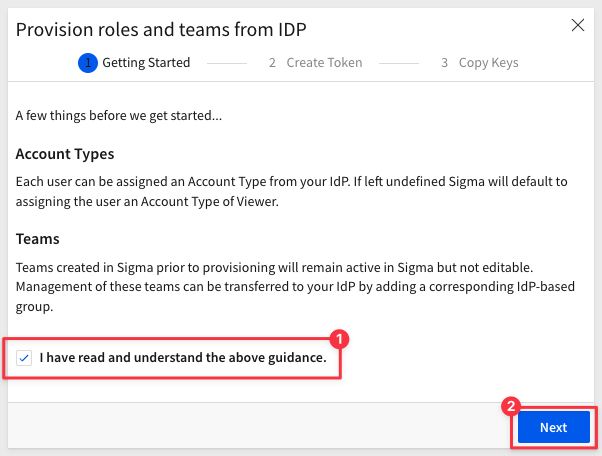
Sigma will present a three-step process. Click on the checkbox to accept the guidance in step 1.
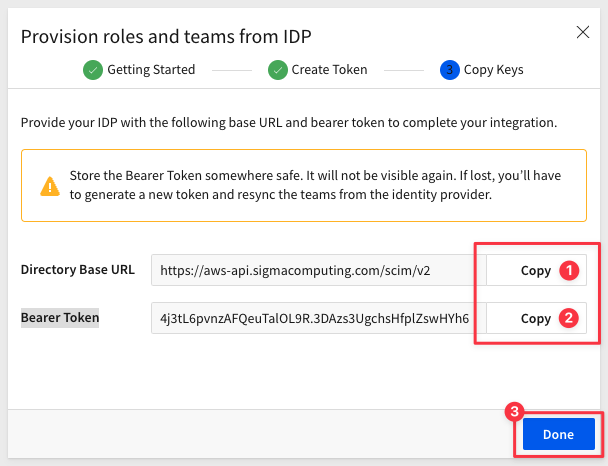
Provide a name for the token and click Next:

Sigma generates two values for us. Copy each of these off to our text file for later use. Click Done:
Step 3: Create Okta SAML 2.0 Application
We need to create an integration point that is based on SAML for this use case. We also need to leave the existing Sigma OAuth QuickStart Okta application in-place and active.
This time, we will take advantage of Okta's App Catalog, which Sigma is a member of. It makes the configuration of Okta applications simple as the integration work is done for us, except for a few details we must provide.
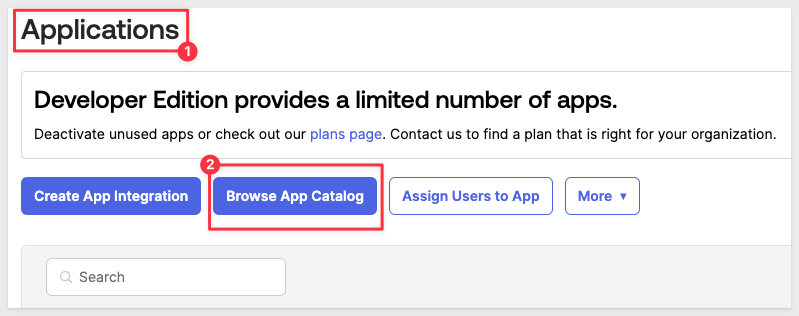
In Okta, navigate back to Applications and click the button to Browse App Catalog:
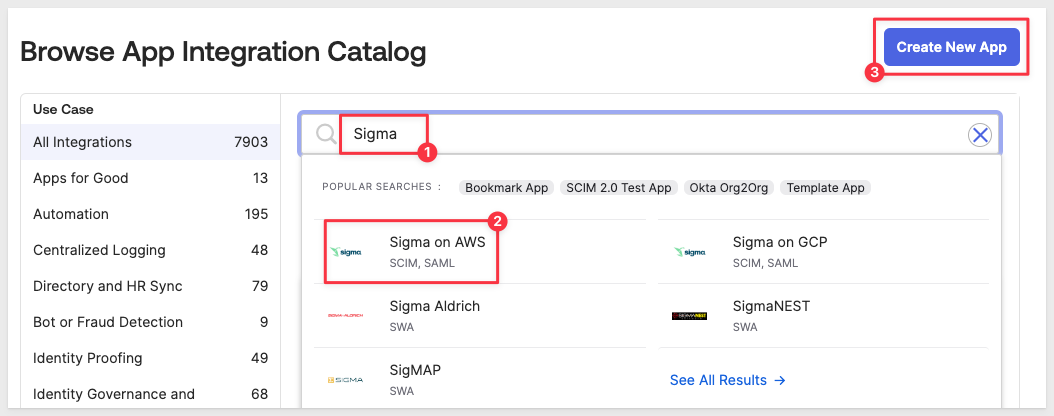
Type Sigma into the search bar and select either Sigma on AWS or Sigma on GCP depending on where your Sigma instance is hosted: and click Create New App:
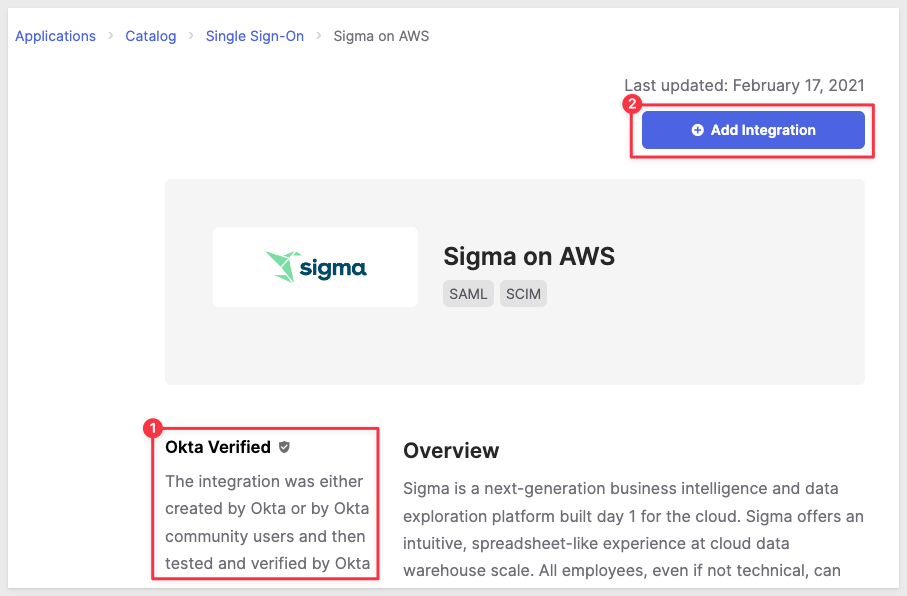
Okta informs us that the Sigma integration is Okta Verified. Click + Add Integration:
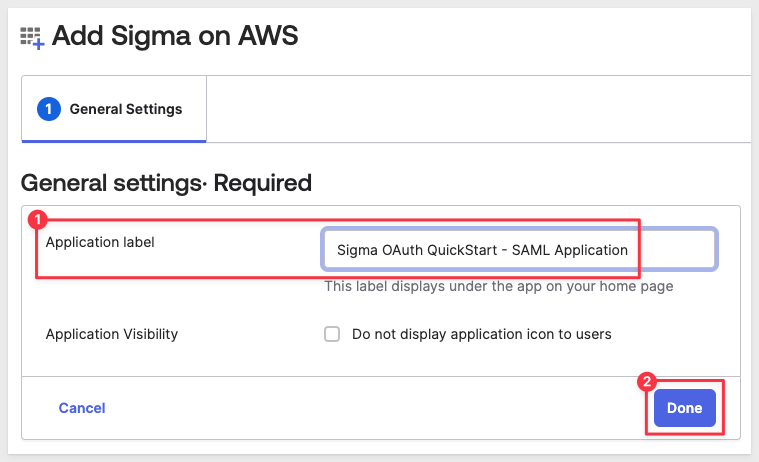
Name the new application Sigma OAuth QuickStart - SAML Application and click Next:
Step 4: Create API Integration
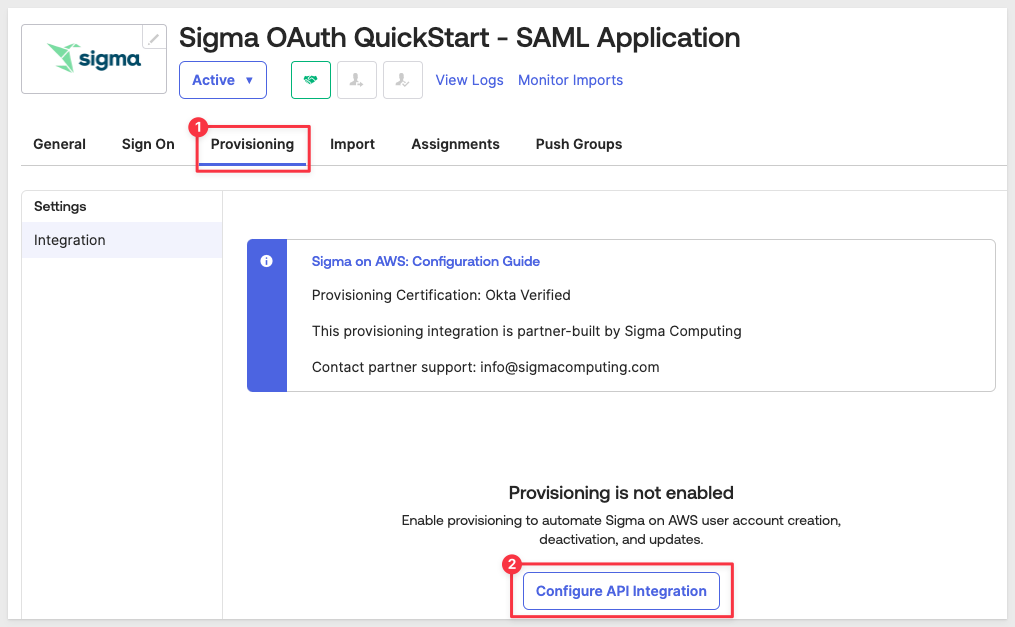
Before we assign this new Okta application to users, we need to configure the integration with our specific Sigma instance.
Click on the Provisioning tab and then click Configure API Integration:
Clink on the checkbox for Enable API Integration and provide the Sigma Bearer Token that we stored in our text file earlier.
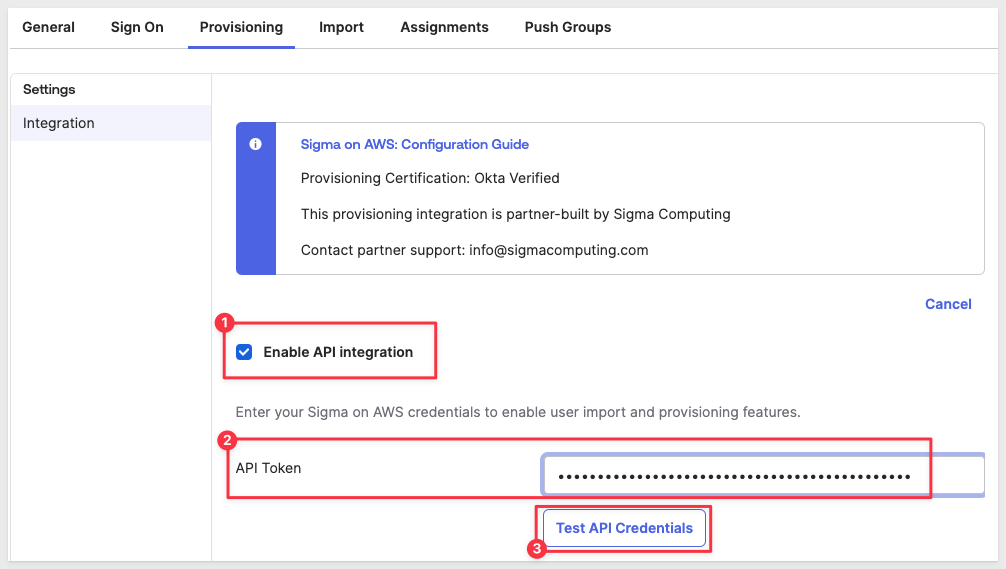
Clicking Test API Credentials should result in a message Sigma on AWS was verified successfully!.
Click Save.
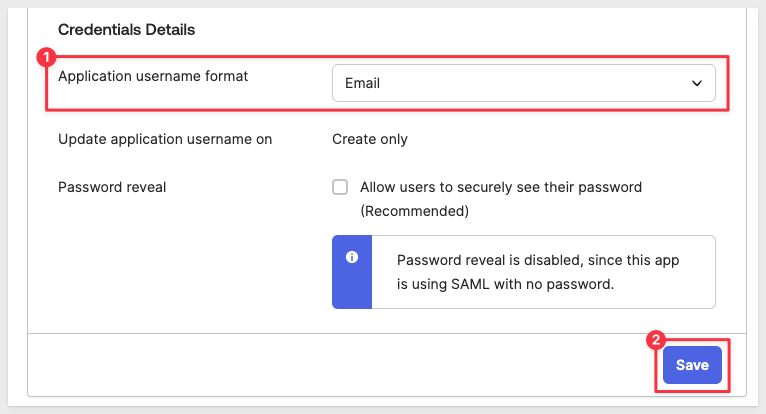
Step 5: Set email as primary username
In the Sign On tab, click Edit and scroll down to Credentials Details.
Change the Application username format to email instead of Okta username. Click Save:
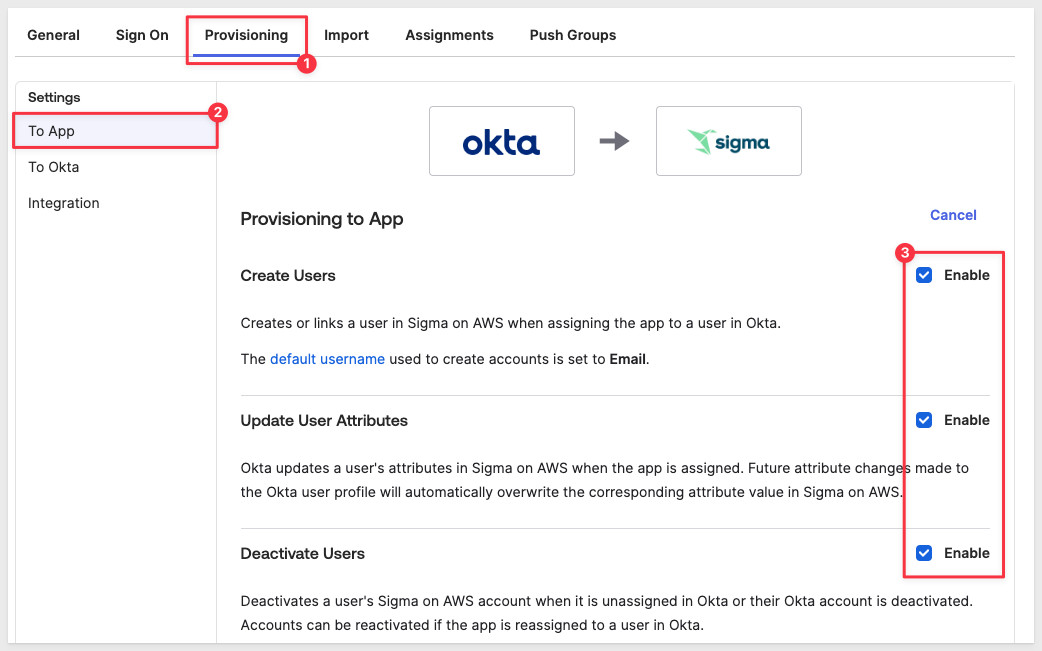
Step 6: Enable Provisioning to App
On the Provisioning tab, click Edit in the Provisioning to App section.
Enable all three options and click Save:
Step 7: Adjust Okta profile for User Type
We need to match the user types in Okta to the default (and any custom) account types in Sigma. In this way, users added in Okta can be mapped to an account type in Sigma, to assure role-based access control policies in Sigma are enforced.
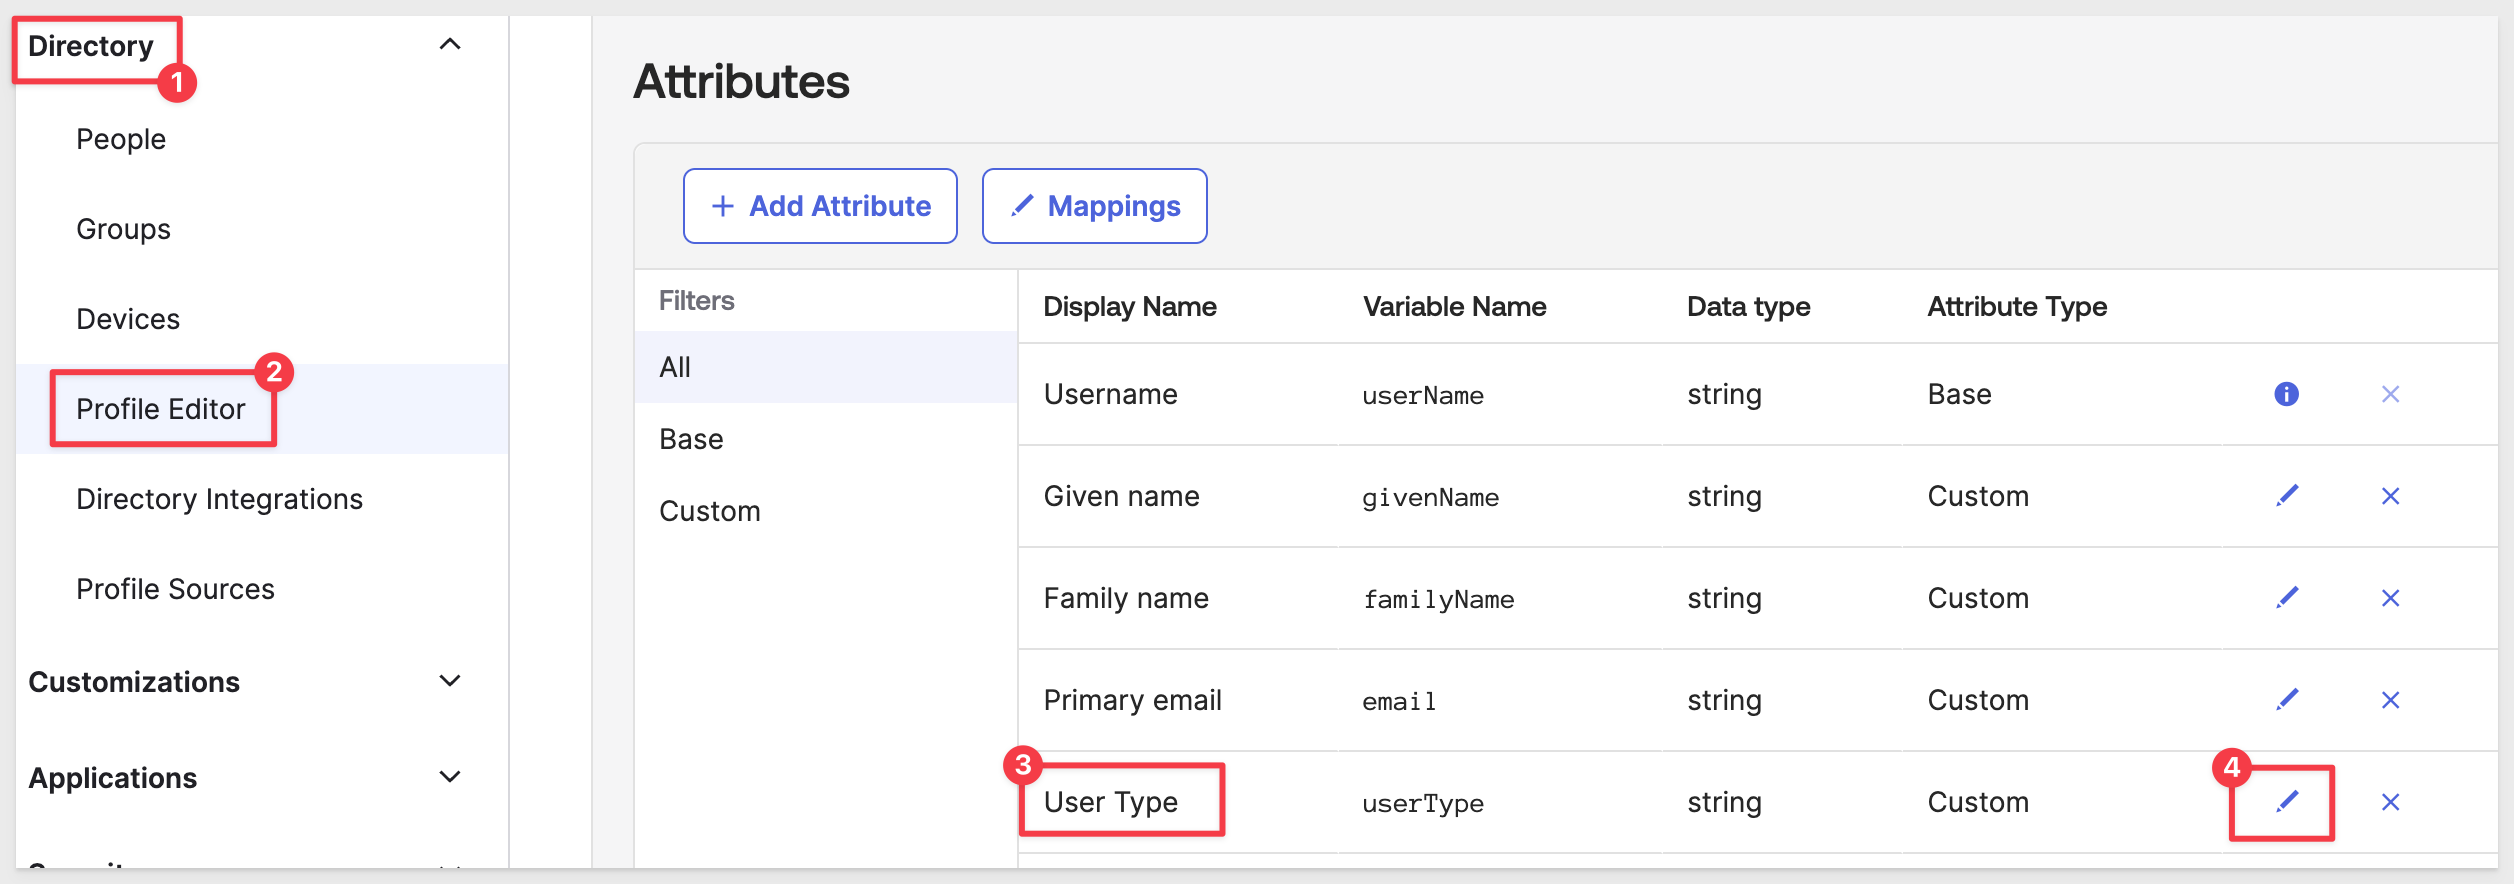
In Okta, navigate to Directory > Profile Editor and click on the Sigma OAuth QuickStart - SAML Application User profile.
Scroll down to Attributes and click on the pencil icon for User Type:
Remove any existing Attribute members and add the ones shown below (this assumes s Sigma Trial instance is being used):
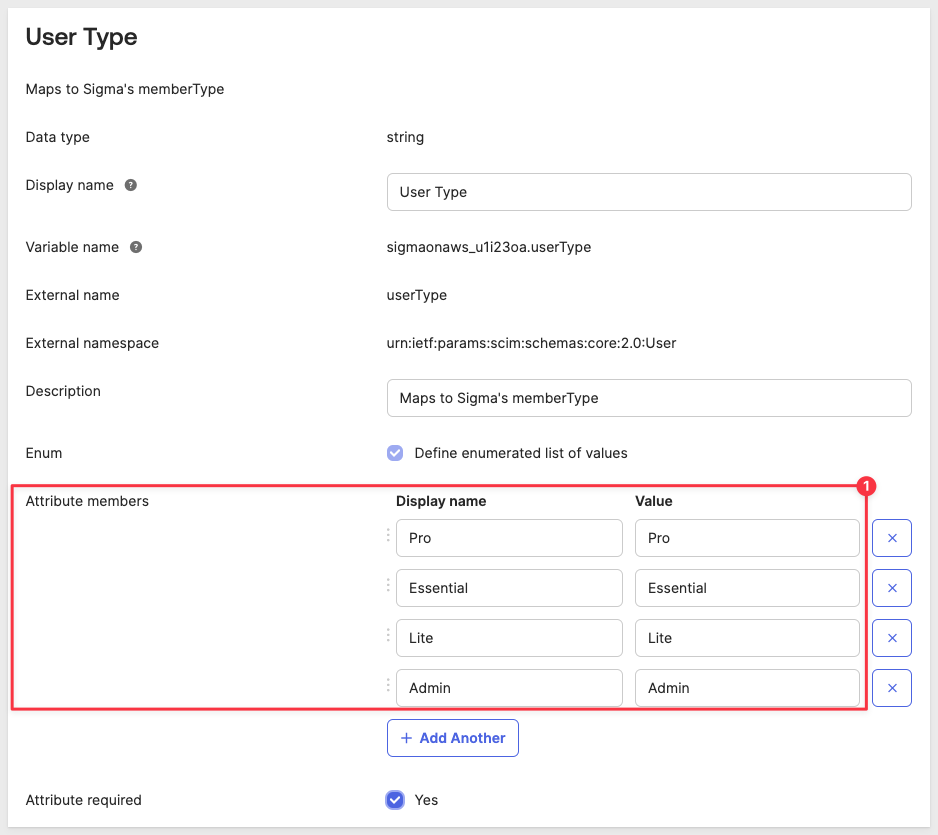
Click on the checkbox for Attribute required.
Click Save Attribute.
Step 8: Add a user (Okta person)
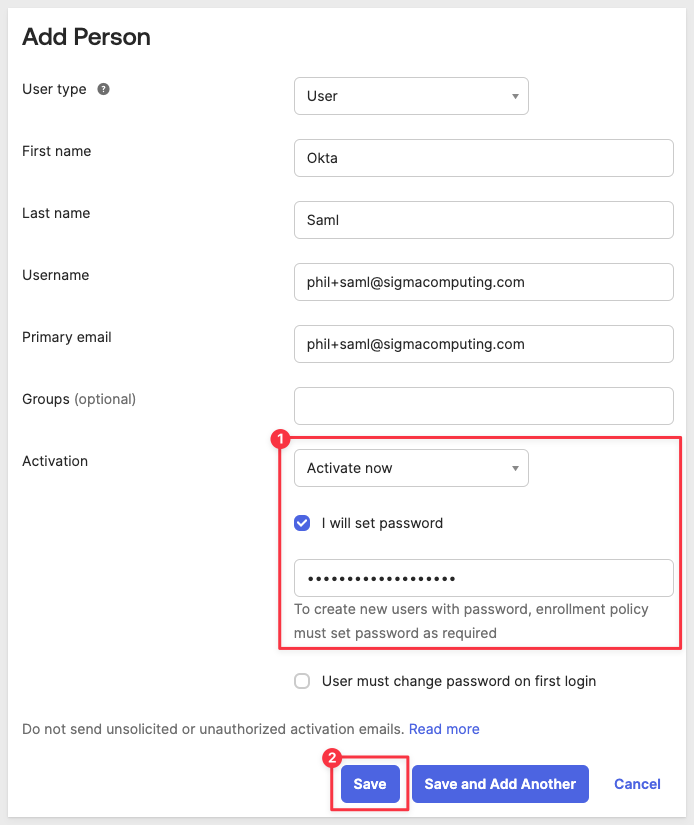
In Okta, add a new user and verify they appear in Sigma.
Navigate to Directory > People and click Add person. Fill out the form for the new user and click Save.
Step 9: Assign user to applications
There are a few paths for this; we will show one workflow.
We need to add the new user to both the OAuth and SAML applications we created in Okta, since both are being used.
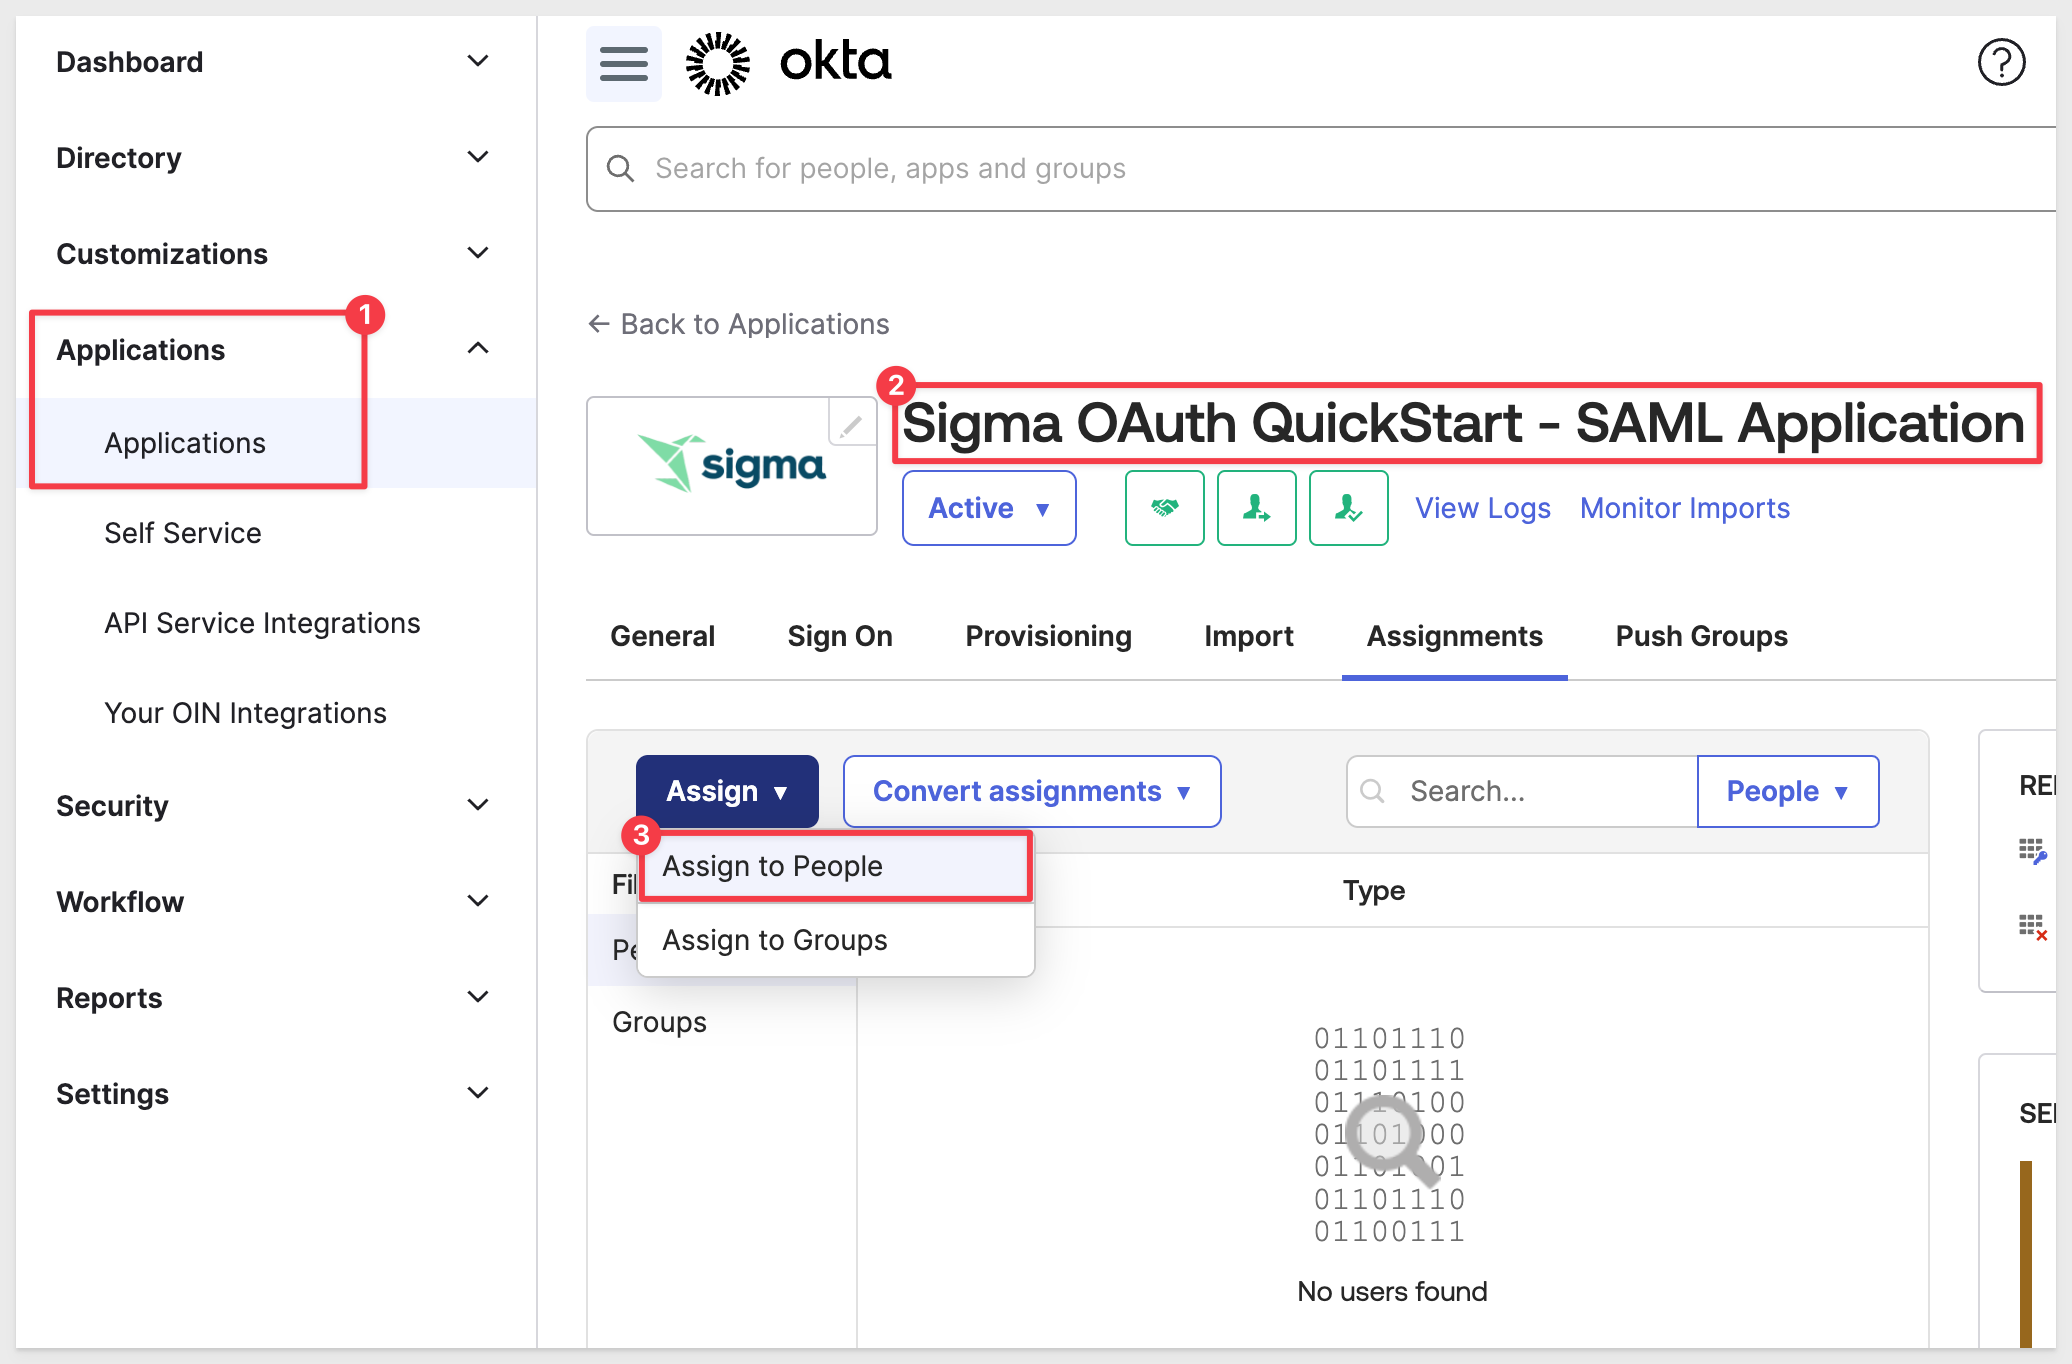
Navigate to Applications > Applications and click the link for Sigma OAuth QuickStart - SAML Application.
Click Assign and then Assign to People:
Select the new user from the list of available and click Assign.
In the next modal window, select a User Type from the list. We selected Pro, but it does not matter right now in this example. Click Save and Go Back:
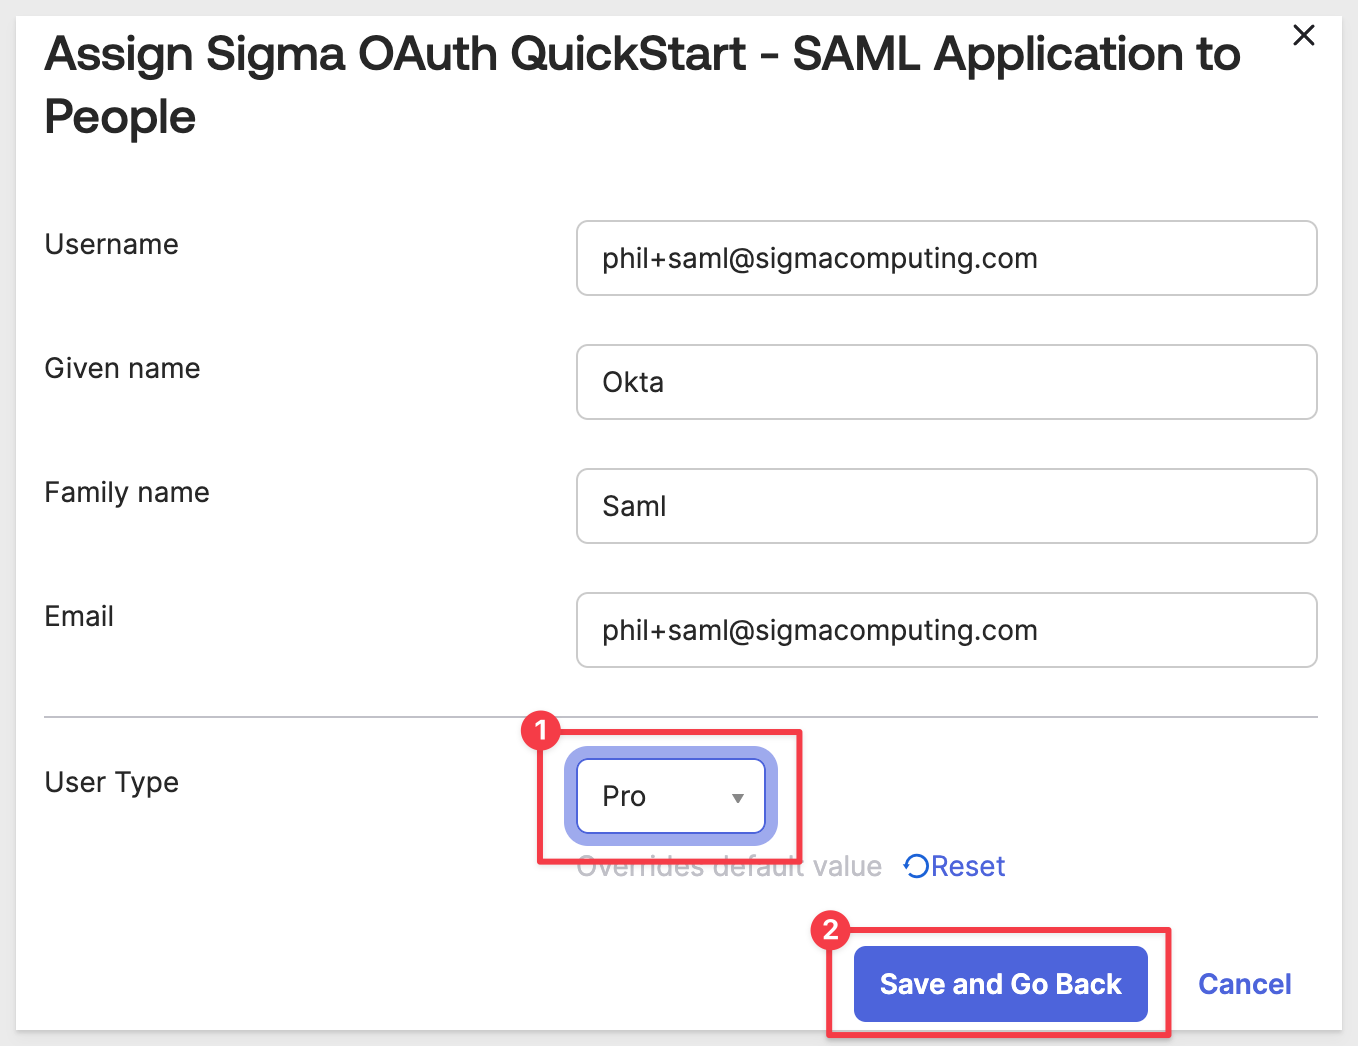
The user now shows Assigned. Click Done.
Repeat the process, adding the new user to the Sigma OAuth QuickStart application as well.
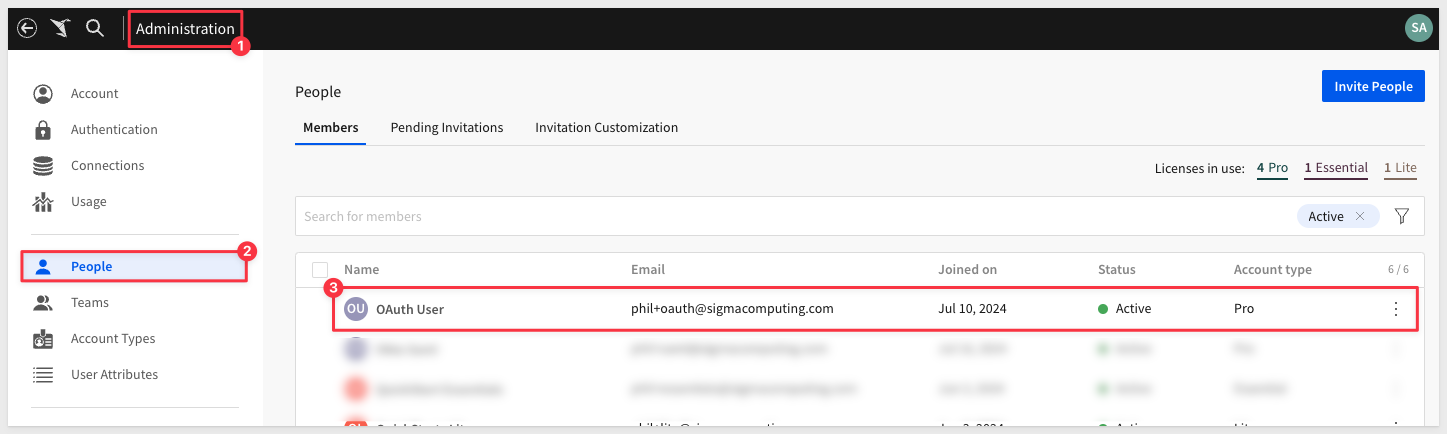
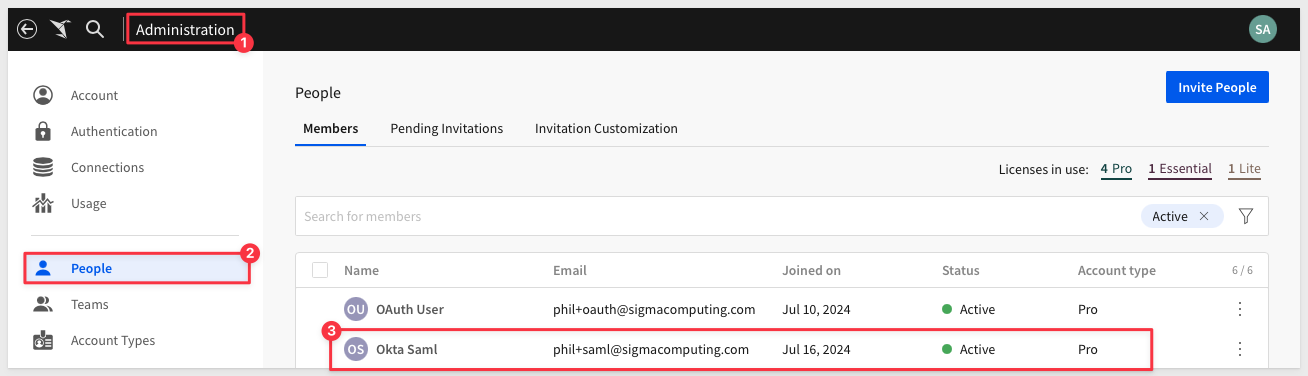
Step 10: Verify user in Sigma
Login into Sigma as administrator and verify that the new user was created there, with the specified account type:
We are done with Okta at this point, so it is ok to log out of that. We will not need it in the next section.
When data isn't in the warehouse, it usually requires a cumbersome technical and people process to ETL data into the warehouse. Now, users who need to add data to the warehouse can do so directly.
Sigma Input Tables are perfect for this requirement and there are many others too. Here a just a few examples:
Common Use Cases for Input Tables | |
|
|
To read more about these input table use cases, see Sigma Input Tables: Use Cases
Sigma allows you to leverage the benefits of OAuth permission management with Write-back features like input tables, warehouse views, workbook materializations, and CSV uploads. While is great, we do not want any authenticated Snowflake user to automatically have access to the data that is written back to the warehouse from Sigma Write-back.
To avoid this, Sigma requires a Snowflake service account that has been granted the CREATE privilege on the edit log destination schema in Snowflake. This way, data that is written back can be managed in a more controlled way.
When your organization utilizes input tables, enabling OAuth with write access will also require you to designate a Snowflake schema as the input table edit log destination.
Snowflake Service Account
Before we can enable Write-back in Sigma, we need to create a a few objects and grants in Snowflake, and a service account.
We will break this into discrete steps, just so that we can explain in-between. These steps could easily be done at once.
In the Snowflake portal, create a new SQL worksheet and copy/paste the following code blocks, adjusting for your desired values, and running them one at a time. Ensure that each operation is successful before moving on to the next.
Create a service account
-- Switch to admin role:
USE ROLE ACCOUNTADMIN;

-- Create a role for the service account user:
CREATE ROLE IF NOT EXISTS SIGMA_SERVICE_ACCOUNT_ROLE;

-- Create service account user:
CREATE OR REPLACE USER SIGMA_SERVICE_ACCOUNT
  PASSWORD = 'a*Gu2sc9DBk*8c'
  LOGIN_NAME = 'SIGMA_SERVICE_ACCOUNT'
  DISPLAY_NAME = 'SIGMA_SERVICE_ACCOUNT'
  FIRST_NAME = 'SIGMA'
  LAST_NAME = 'SERVICE_ACCOUNT'
  DEFAULT_ROLE = SIGMA_SERVICE_ACCOUNT_ROLE
  COMMENT = 'For Sigma OAuth QuickStart'
  DEFAULT_WAREHOUSE = COMPUTE_WH
  MUST_CHANGE_PASSWORD = FALSE
  DISABLED = FALSE;

-- Grant service account role for the service account user:
GRANT ROLE SIGMA_SERVICE_ACCOUNT_ROLE TO USER SIGMA_SERVICE_ACCOUNT;

-- Also grant the service account role to my admin user so that they can see write-back log table data in the Snowflake UI
GRANT ROLE SIGMA_SERVICE_ACCOUNT_ROLE TO USER {YOUR_SNOWFLAKE_ADMIN_USERNAME};
Run the script to create the account, making sure Snowflake responds with Statement executed successfully.
Create Write-back database and schema
-- Switch to admin role:
USE ROLE ACCOUNTADMIN;

-- Set a default database (This one exists in Snowflake trials but may not exist in your instance)
USE DATABASE SNOWFLAKE_SAMPLE_DATA;

-- Create a database to store Write-back table data:
CREATE DATABASE IF NOT EXISTS SIGMA_WRITE_BACK;
USE DATABASE SIGMA_WRITE_BACK;
CREATE SCHEMA IF NOT EXISTS INPUT_TABLES;

-- Create a database to store Write-back logs:
CREATE DATABASE IF NOT EXISTS SIGMA_WRITE_BACK_LOGS;
USE DATABASE SIGMA_WRITE_BACK_LOGS;
CREATE SCHEMA IF NOT EXISTS INPUT_TABLES_LOG;
Grants
-- Switch to admin role:
USE ROLE ACCOUNTADMIN;

-- Set a default database (This one exists in Snowflake trials but may not exist in your instance)
USE DATABASE SNOWFLAKE_SAMPLE_DATA;

-- Grant USAGE on the databases to the role:
GRANT USAGE ON DATABASE SIGMA_WRITE_BACK TO ROLE SIGMA_OAUTH_ROLE;
GRANT USAGE ON DATABASE SIGMA_WRITE_BACK_LOGS TO ROLE SIGMA_SERVICE_ACCOUNT_ROLE;

-- Grant privileges on the schema to the role:
GRANT USAGE, CREATE TABLE, CREATE VIEW, CREATE STAGE ON SCHEMA SIGMA_WRITE_BACK_LOGS.INPUT_TABLES_LOG TO ROLE SIGMA_SERVICE_ACCOUNT_ROLE;
GRANT USAGE, CREATE TABLE, CREATE VIEW, CREATE STAGE ON SCHEMA SIGMA_WRITE_BACK.INPUT_TABLES TO ROLE SIGMA_OAUTH_ROLE;

-- Grant usage on COMPUTE_WH to service account user:
GRANT USAGE ON WAREHOUSE COMPUTE_WH TO ROLE SIGMA_SERVICE_ACCOUNT_ROLE;
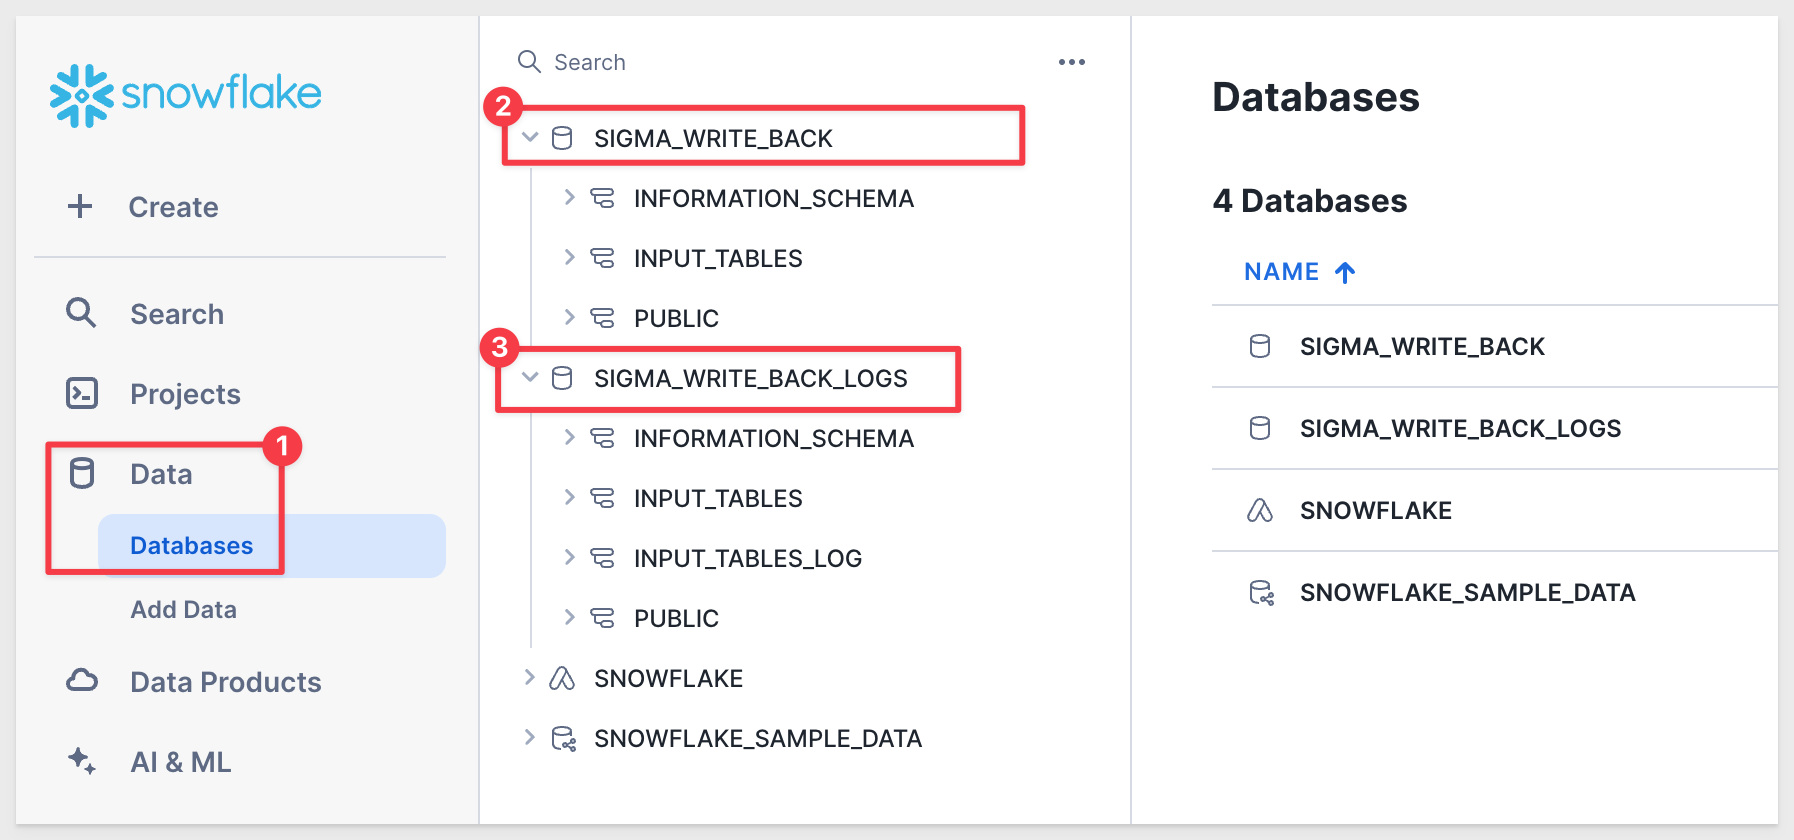
We can check to verify that the two database and schema have been created as expected.
Enabling Sigma Write-back
In Sigma, navigate to Administration > Connections and edit the Snowflake - OAuth Enabled connection.
Scroll down to Write Access and click the Enable write access toggle to on.
Provide the information for the service account and related details:

Click Save. Sigma will warn you that Existing documents will likely break. This refers to input tables that were created prior to this connection configuration change. In this instance, click Save to proceed as we have not created any input tables previously on this connection.
Migration for existing input tables is discussed here.
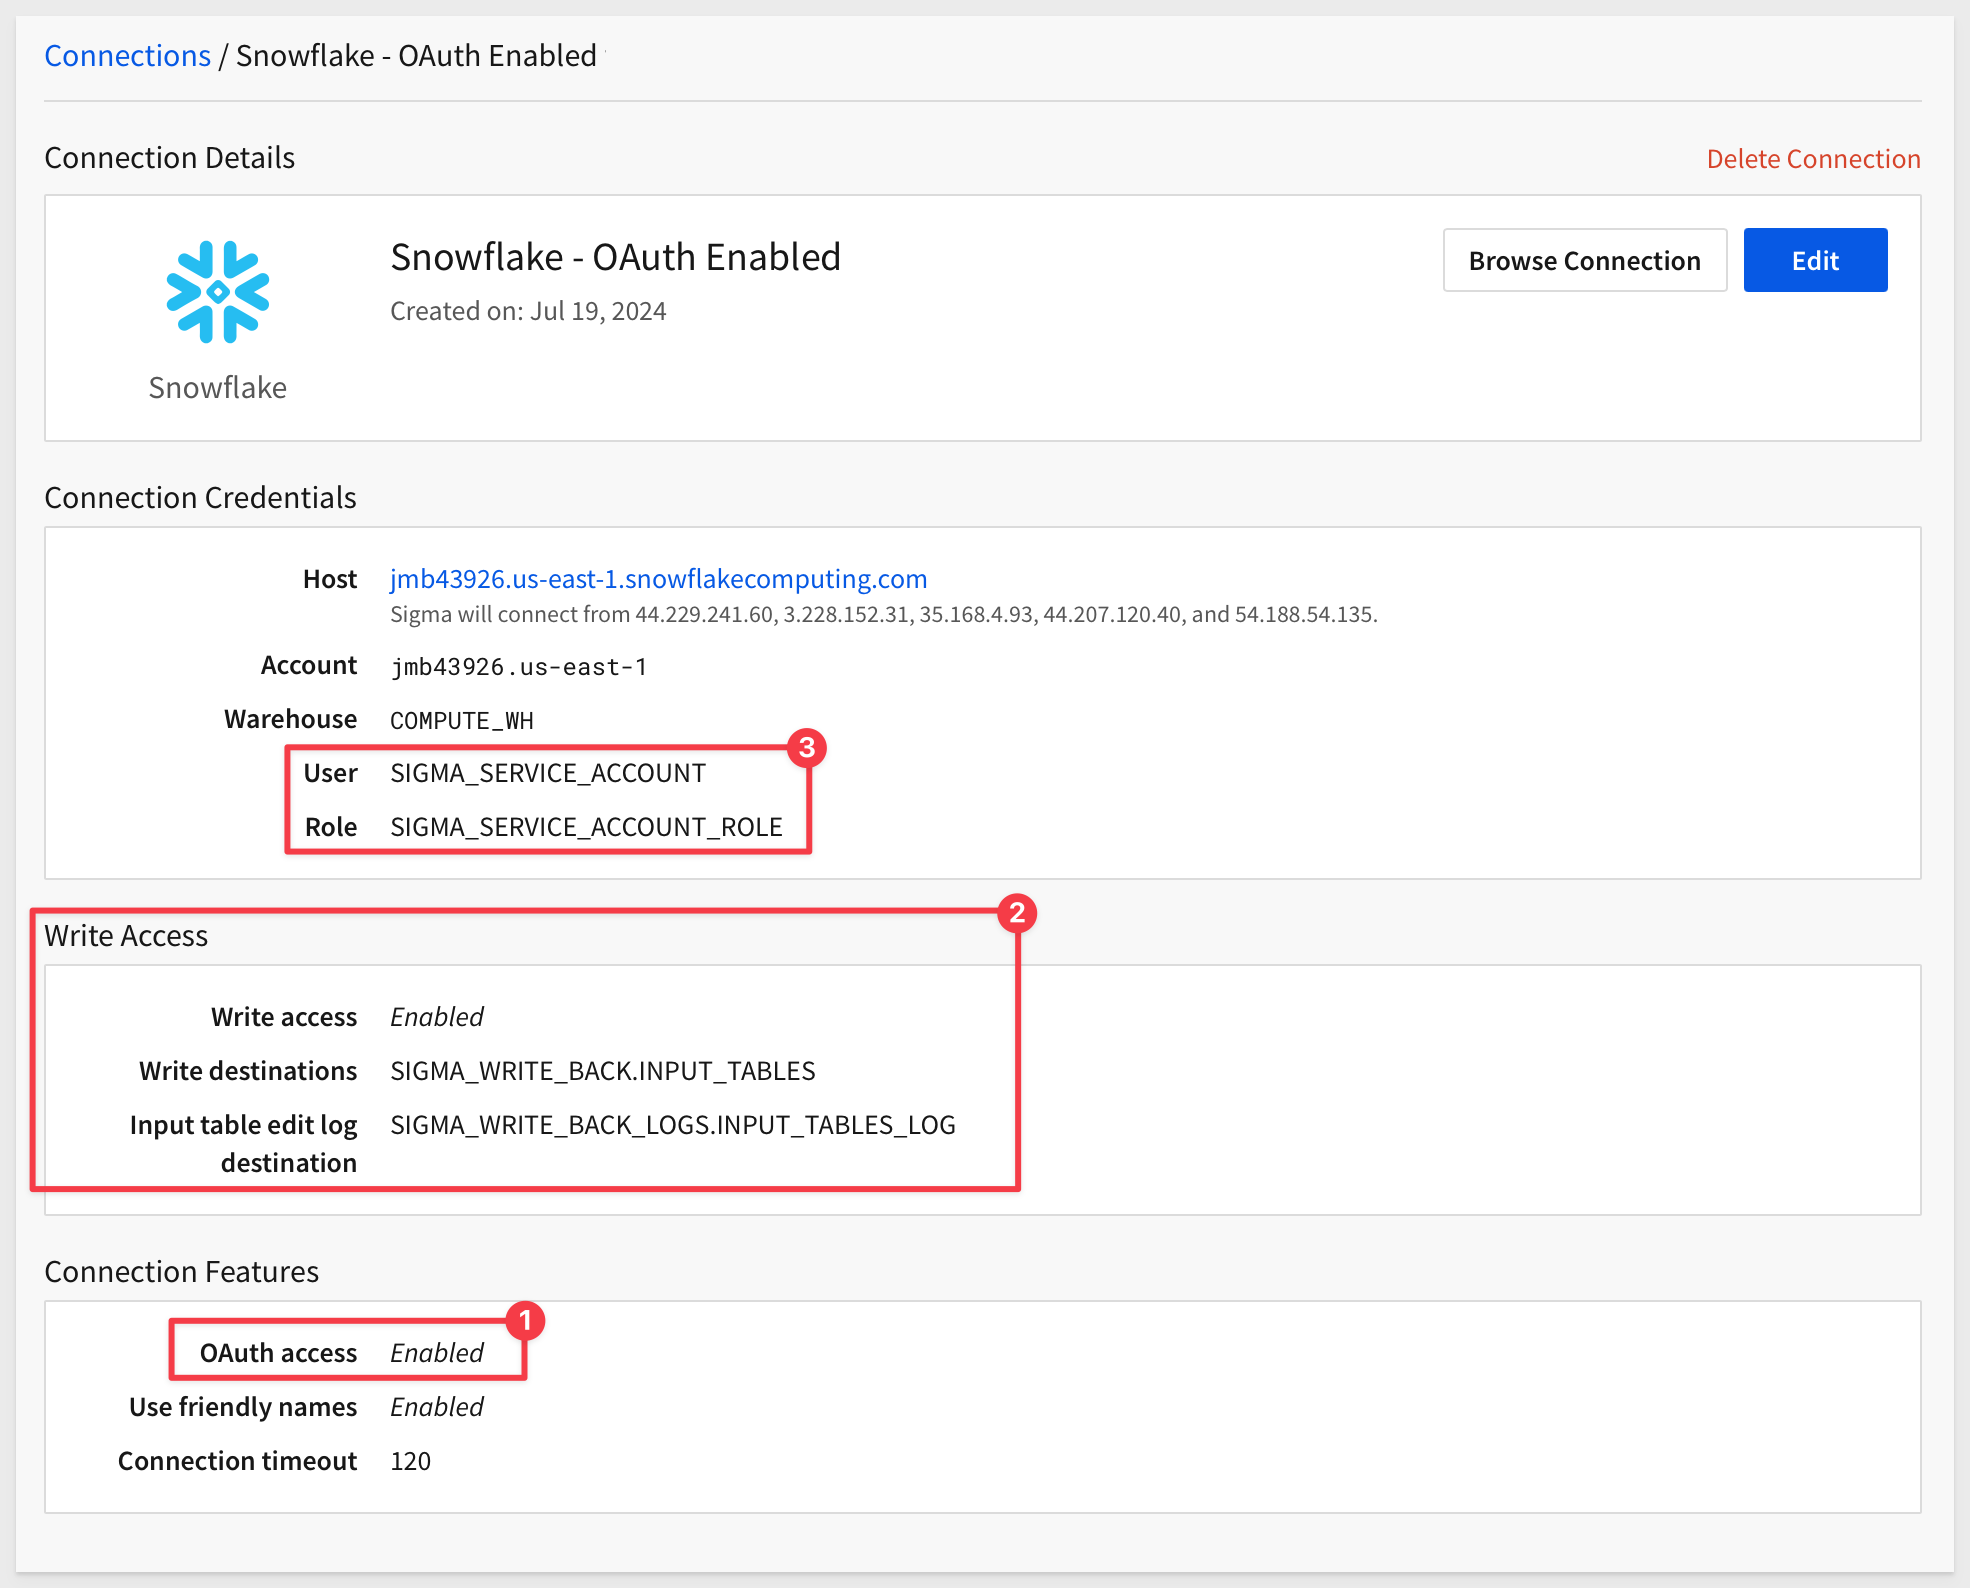
The connection will now show that Oauth is still enabled (number 1 in the image below) and Write Access is configured (number 2) and the Write Access Logs will use the specified service account and role (number 3):
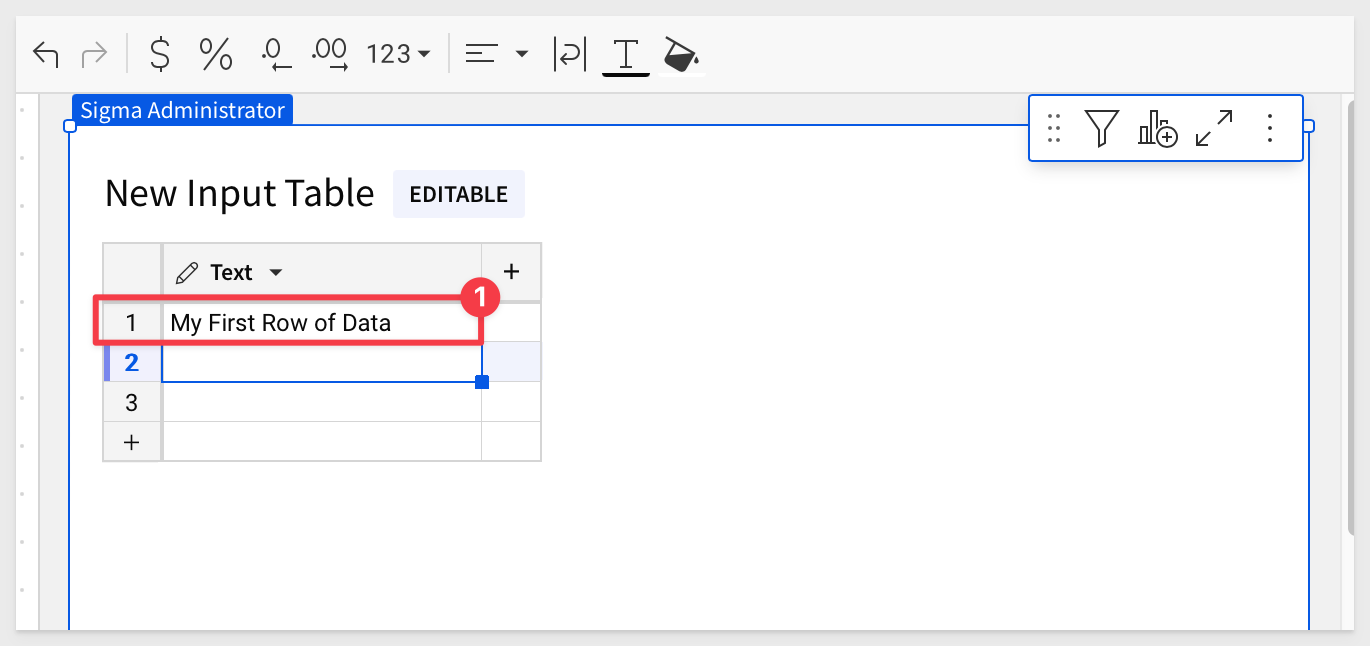
Create an input table
In Sigma, create a new workbook and add a new input table.
Be sure to select the connection `Snowflake - OAuth Enabled' so that our input table data and logs are stored where we configured them to be.
Enter some text into the first row of the new input table and hit Enter:
In Snowflake, switch roles to use the SIGMA_OAUTH_ROLE:
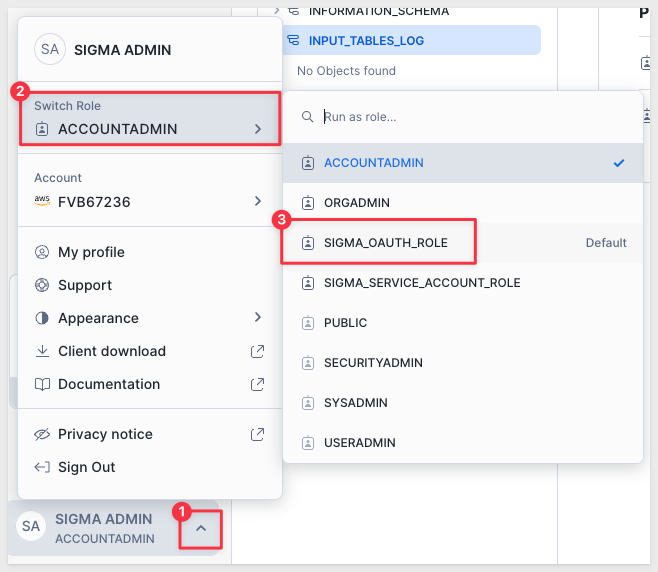
Recall from the previous steps that this role has the permission to read/wite to the SIGMA_WITE_BACK database and related schema.
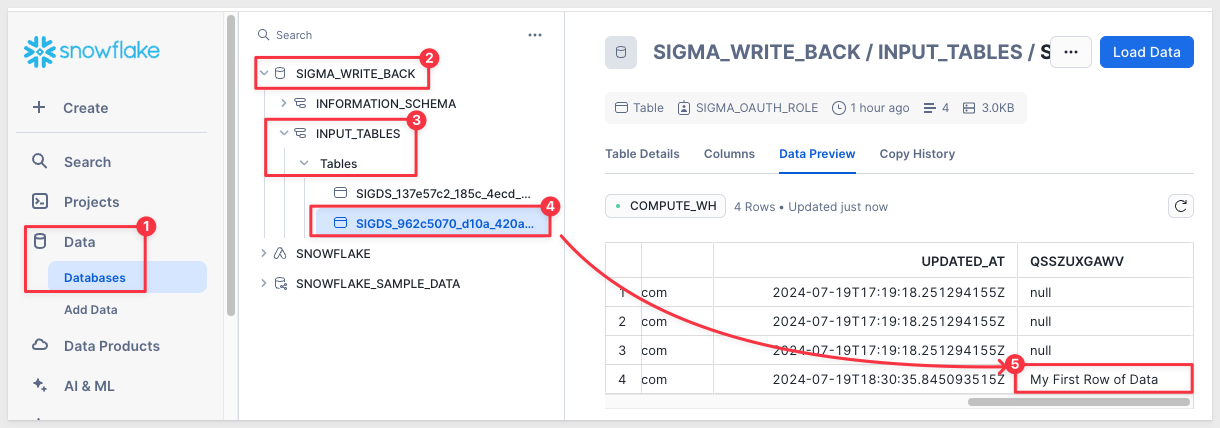
Expanding the hierarchy, we can see that our row of data is present in the new input table table:
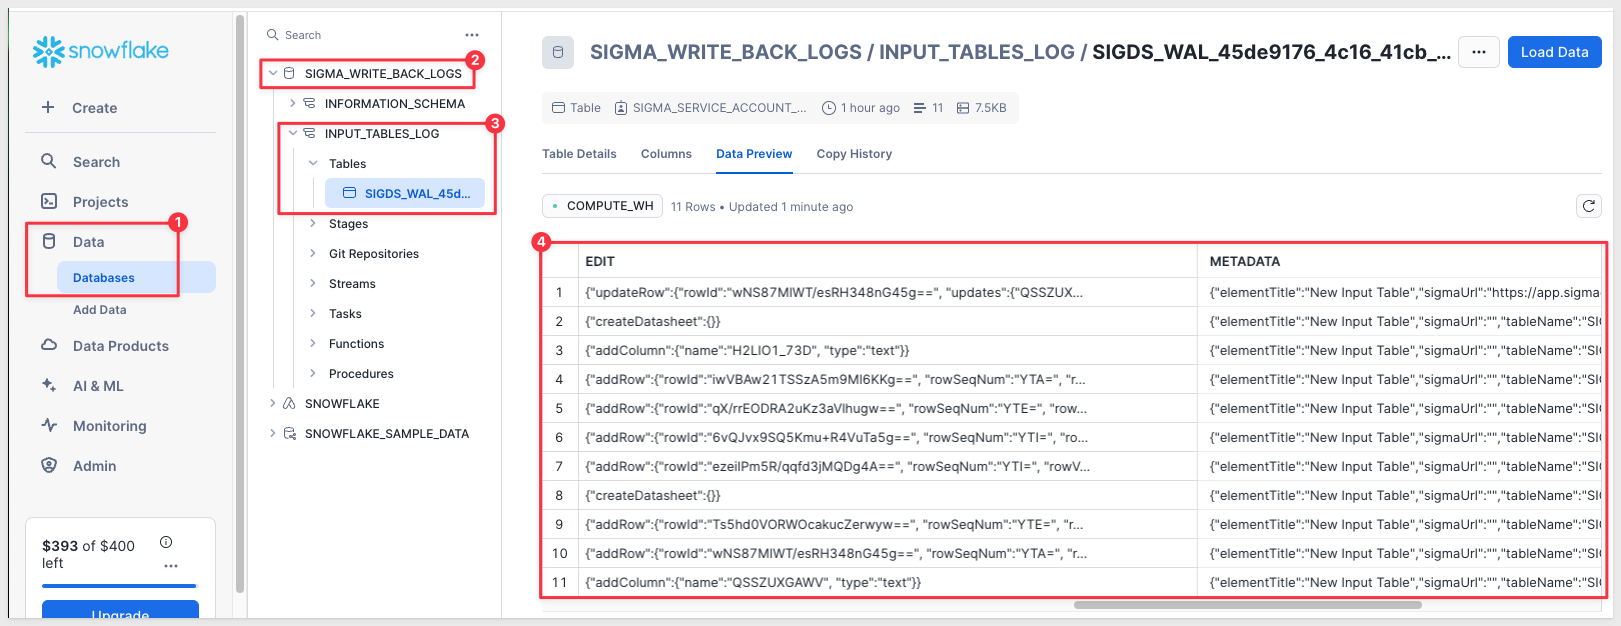
Switch roles once again to use the SIGMA_SERVICE_ACCOUNT_ROLE, allowing us to access the SIGMA_WRITE_BACK_LOG database and tables where we can see the log details for when we added one row of data to the new input table:
If you are interested in setting up Write-back in an OAuth enabled connection, see Configure OAuth with write access
Input tables created by others?
This demonstration covers input tables that are created by one user. What about input tables that might be created and saved in the same Write-back location, but by other Sigma users?
Of course, users with the correct Snowflake grants can create and work with input tables, as we have already done.
However, if we want to have other users access them too, we need to create a grant for that.
This Snowflake example (and incomplete) script shows the general idea of what needs to be executed as part of a configuration.
GRANT ALL ON ALL FUTURE TABLES TO <> ON SCHEMA <>
In this QuickStart we covered using OAuth with Sigma and Snowflake using Okta as our IdP. Integrations like this can be quite complex, so we endeavored to keep things as simple as possible to discuss and demonstrate the basics. We hope you found this useful and time well spent.
Additional Resource Links
Blog
Community
Help Center
QuickStarts
Be sure to check out all the latest developments at Sigma's First Friday Feature page!