Build a local web application to test Sigma embedding — the prerequisite environment for the entire embedding series.
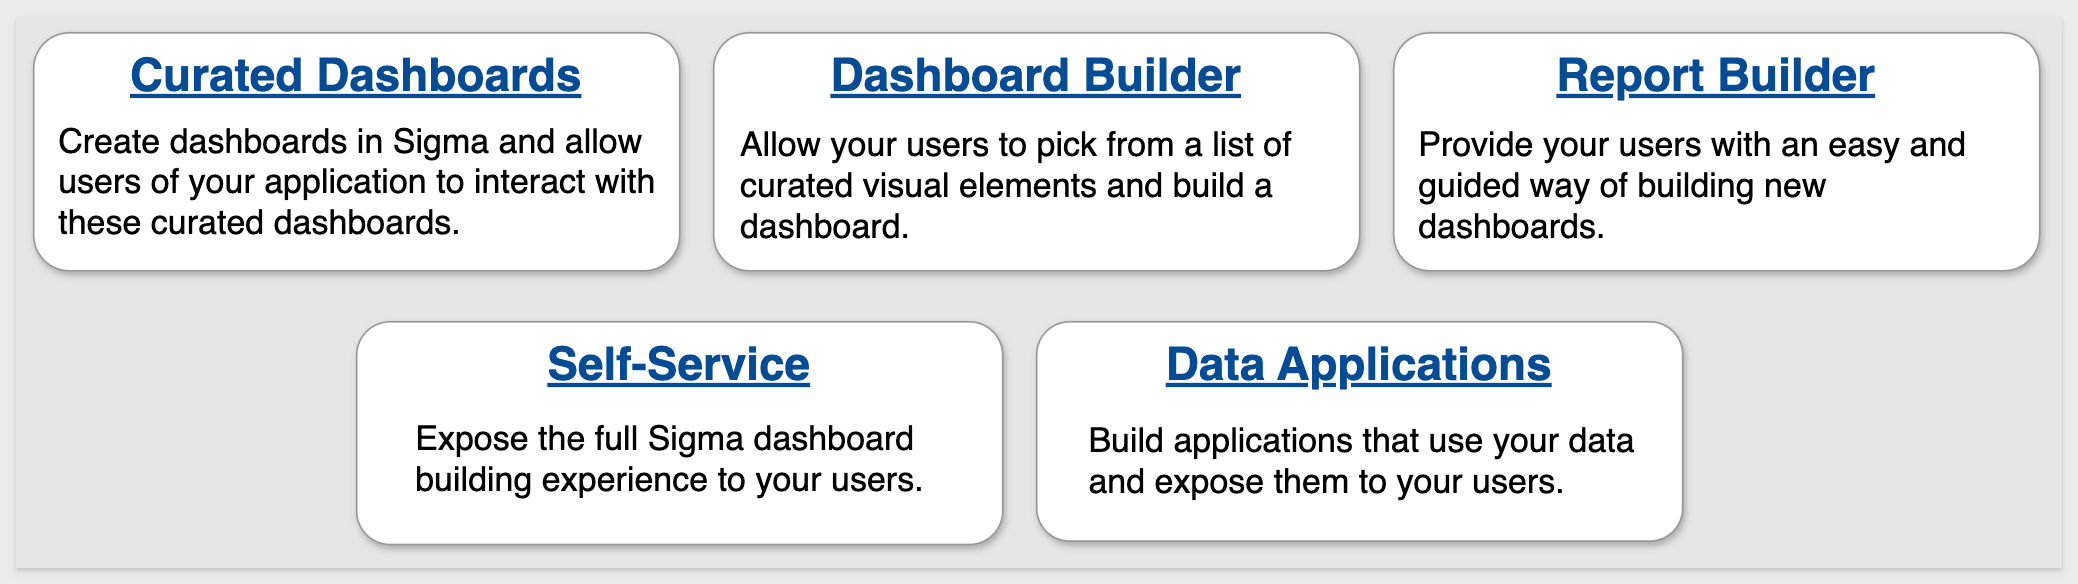
We have broken the different types of embeds into separate documents based on use cases, allowing users to focus on those areas of interest and improve overall readability and supportability of each document.
This QuickStart is foundational to all the other embedding QuickStarts.
Sigma also provides an embed sandbox that is built into the product. For more information, see Test an embed URL in the embed sandbox
The local web application (e.g., host application) refers to the customer-developed application that Sigma is embedded into.
We will use code from a public Git repository, VS Code, Node.js, Javascript and HTML in this QuickStart series.
For those interested, there is a comprehensive ebook, The Ultimate Guide To Embedded Analytics
For more information on Sigma's product release strategy, see Sigma product releases
If something is not working as you expect, here's how to contact Sigma support
Target Audience
Semi-technical users who will be aiding in the planning or implementation of Sigma with embedding. No SQL or technical data skills are needed to complete this QuickStart. It does assume some common computer skills like installing software, using Terminal, navigating folders and copy/paste operations.
Prerequisites
- A computer with a current browser. It does not matter which browser you want to use.
- Access to your Sigma environment.
- Some familiarity with Sigma is assumed. Not all steps will be shown, as the basics are assumed to be understood.
- Microsoft VSCode or other suitable development tool.

There are two types of embedding in Sigma: Secure with JWT and Public. We will cover public in another QuickStart as that is very straightforward and not as common a use case.
Secure embedding with JSON Web Tokens (JWT)
JWT is the preferred method for secure embedding with Sigma. JWT which is an open, industry-standard RFC 7519 method for representing claims securely between two parties.
JWT is used when a company embeds Sigma content within its own application, ensuring secure, tenant-aware access and a personalized user experience.
For example, a company may have an internal web site that employees have to log into using single sign-on where they want to provide a dashboard that only shows data filtered for each employee's region.
Another common use case is where a company has a web portal that their customers or partners can securely log into to see data filtered for their own organization.
Sigma also allows you to extend or create custom secure embed experiences as well.
These are the high-level use cases of JWT embedding that are most commonly seen:
Sigma supports embedding in other third-party applications like Salesforce or Streamlit:
QuickStart Use Case: Embed into Salesforce
QuickStart Use Case: Secure Embedding into Streamlit
Benefits of JWT
Signing your secure embed URLs with JWTs has several advantages:
- JWTs are compact, URL-safe tokens that can be digitally signed, ensuring that the data they contain is tamper-proof.
- Embed developers no longer have to use the Sigma UI to generate embed paths; they may use the URL instead.
- Embedding workbooks, pages and individual visualizations is supported.
- JWT-signed embed URLs can authenticate internal Sigma users to access embedded content with the same email address they use for their Sigma account.
- When using JWT-signed URLs with Sigma, you have the option to disable automatic embed user account provisioning for non-Sigma users, effectively restricting your embed content to the users you have explicitly provisioned in Sigma or your IdP.
We will cover JWT more in the next section.
Public embedding
The simplest use case we provide is called public embedding.
Customers use this when security is not required, but there is a need to embed Sigma content.
For example, embedding some KPIs or charts on a company's public website that anyone can see.
We demonstrate Public embedding in a separate QuickStart: Embedding 16: Public Access
A JSON Web Token (JWT) is a compact, URL-safe means of representing claims to be transferred between two parties.
The claims in a JWT are encoded as a JSON object that is used as the payload of a JSON Web Signature (JWS) structure or as the plaintext of a JSON Web Encryption (JWE) structure, enabling the claims to be digitally signed or integrity protected with a Message Authentication Code (MAC) and/or encrypted.
The remaining discussion in this section is intended for those less familiar with JWT, how it is structured, its structure, transaction flow, and benefits. Feel free to jump to the next section if you just want a demonstration of JWT in Sigma.
In the typical workflow, a client requests embedded content using a JSON Web Token (JWT), and the server processes, validates, and serves the embedded content based on user credentials and environment variables.
Here is a simplified authentication flow:

What follows is a more in-depth description of the JWT workflow in Sigma.
Step-by-Step JWT Flow:
1. Client Request (i.e., end user's web browser):
The client (e.g., the end-user's browser in the host application) sends a request to the server to obtain a URL for accessing embedded Sigma content. This request may include user-related information, such as identity or a general request for access to Sigma content.
2. Server-Side JWT Generation (i.e., customer-created embed API):
Credential Handling:
The server securely manages the necessary credentials to generate the JWT, such as the secret key (EMBED_SECRET) and client ID (EMBED_CLIENT_ID). These credentials ensure that the JWT is properly signed and trusted by Sigma.
User Claims:
The server retrieves or determines relevant claims about the user (from the customer's authentication provider), such as their email (sub), roles, or team memberships. These claims are vital for defining what the user can do in the embedded Sigma content and ensure that permissions are enforced correctly.
JWT Creation:
The server combines these user claims with the necessary credentials to create a JWT. The JWT is signed using the server's secret key, ensuring its integrity and authenticity. The JWT contains claims that specify key information, including:
- Who the user is (email, user roles)
- What permissions they have
- How long the JWT is valid (expiry or exp claim)
This process ensures each JWT is unique, secure, and reflects the user's specific access rights.
3. Response with Signed URL:
The server responds to the client with a signed URL, which includes the JWT as a query parameter. For example, the URL might look like:
https://app.sigmacomputing.com/<org-slug>?jwt=<jwt>
This URL includes the signed JWT that will be used to authenticate and authorize the user when they access the embedded Sigma content.
4. Client Accesses the Signed URL:
When the client (e.g., the end-user's browser in the host application) loads the signed URL, Sigma verifies the JWT. Sigma ensures that:
- The JWT signature is valid, confirming that the token has not been tampered with.
- The claims (like sub, roles, exp) are still valid, checking whether the user is authorized and whether the token is within its allowed time frame.
- Replay protection is enforced by validating the jti (JWT ID) claim, ensuring that the token is not reused maliciously.
5. Sigma Provides Embedded Content:
If the JWT passes all verification checks (valid claims, signature, jti uniqueness, etc.), Sigma delivers the requested embedded content. The content provided matches the user's permissions and scope, ensuring that users can only access what they are authorized to view.
This workflow ensures secure, one-time use access to Sigma's embedded content, protecting both user data and application integrity.
Structure of JWT:
An actual JWT is composed of three parts: Header, Payload, and Signature, which are concatenated with periods (.) to form a single string:
Header: Typically consists of two parts: the type of token (JWT) and the signing algorithm (e.g., HMAC SHA256).
Payload: Contains the claims. Claims are statements about an entity (typically, the user) and additional data. There are three types of claims: registered, public, and private claims.
Signature: Used to verify that the sender of the JWT is who it says it is and to ensure that the message wasn't changed along the way.
Claims in Sigma
1. Registered Claims: These are predefined, standardized claims that are recommended to be used in a JWT. They have specific purposes and are commonly recognized across implementations.
Examples:
- sub (Subject): This claim identifies the subject of the JWT, usually the user. In Sigma, it is often the email of the user accessing the embedded content.
- iss (Issuer): This claim identifies the issuer of the JWT. In Sigma, it is the
Client_IDused to issue the token. - jti (JWT ID): This is a unique identifier for the JWT. It's used to prevent the JWT from being replayed.
2. Public Claims: These are claims that can be defined at will by those using JWTs.
Examples:
- account_type: The type of account the user has (e.g., Build, Act, Analyze).
- teams: Indicates the teams to which a user belongs.
3. Private Claims: These are custom claims created to share information between parties that agree on using them but do not need to be registered or standardized. They are specific to the application and are not meant to be shared beyond the agreed-upon parties.
Examples:
- custom user attributes
- eval_connection_id
For more information on JWT claims in Sigma, see Create an embed API with JSON Web Tokens
Clone the Git Repository Project Folder
We have made sample project code available in a public GitHub repository to save time.
While you may clone the entire repository (it is not that large), we want to avoid cloning portions of the repository that aren't immediately relevant.
Instead, we will use VSCode and terminal to perform a git sparse-checkout of the specific project folder we are interested in. This involves a few extra steps, but results in a cleaner local project folder.
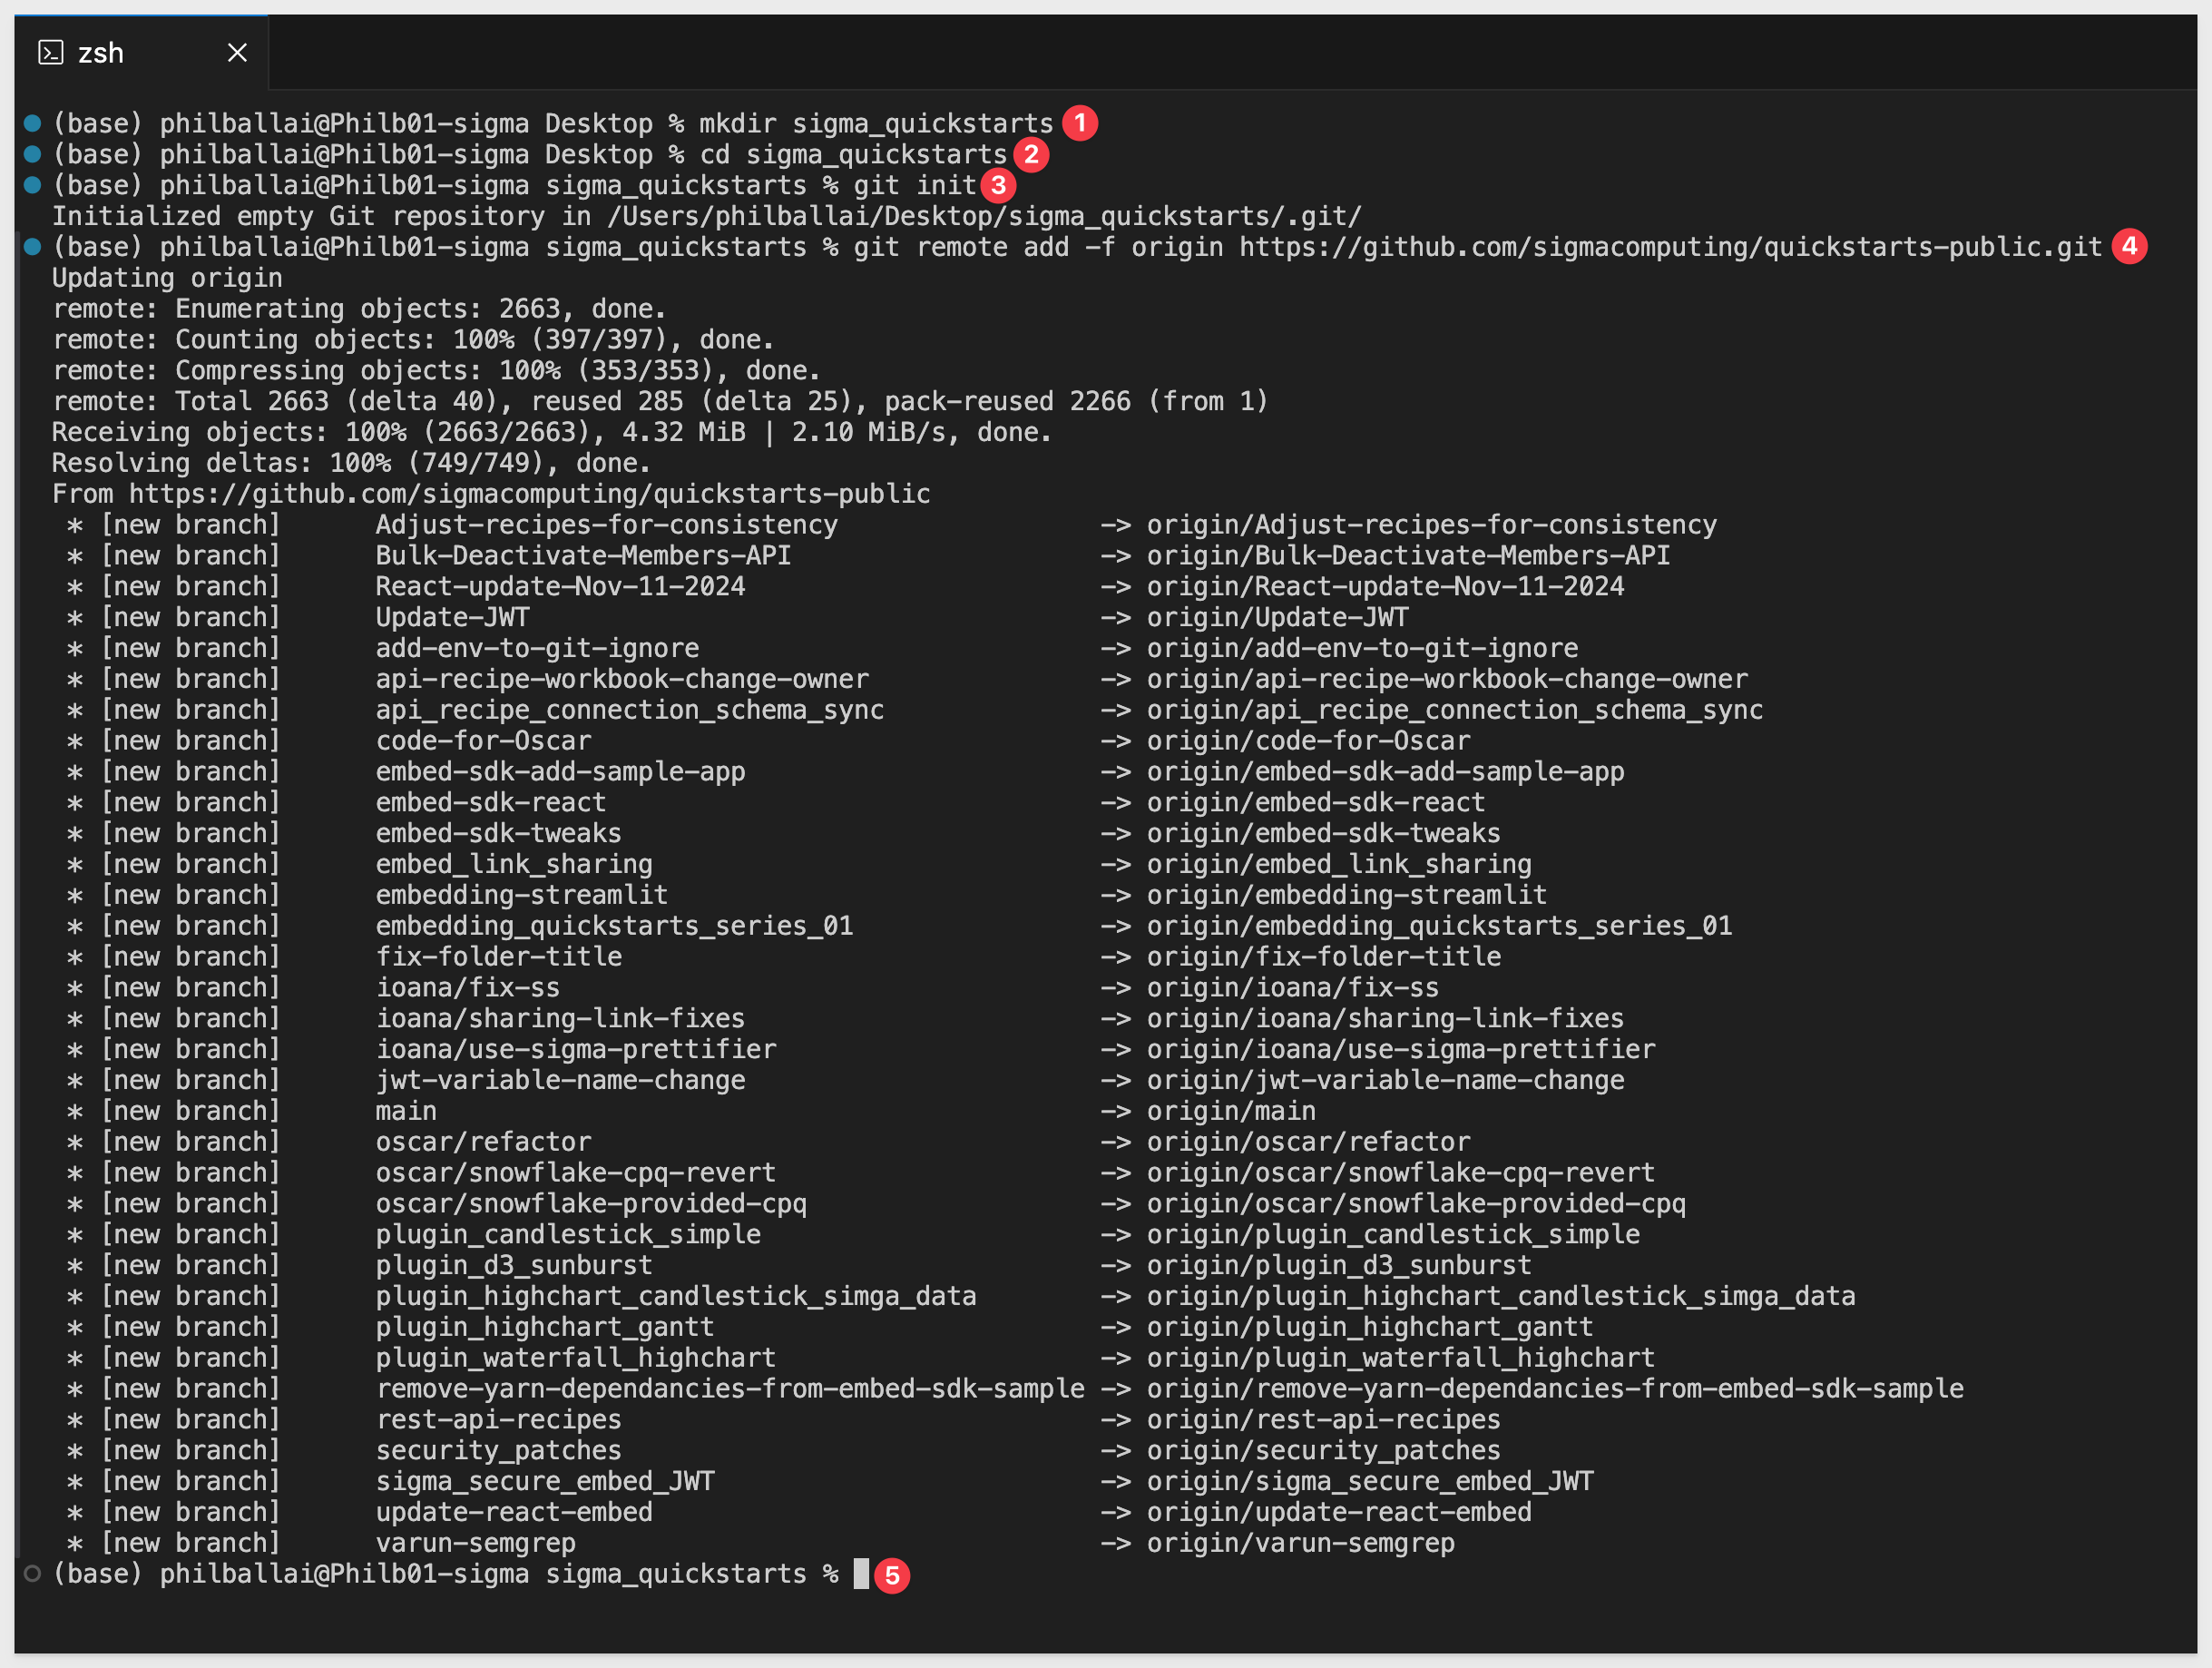
Open VSCode and a new Terminal session.
Create a new directory in a location of your choice, using the command:
For example:
mkdir sigma_quickstarts
Change to the new directory:
cd sigma_quickstarts
Execute the terminal command:
git init
Add the remote repository as the origin:
git remote add -f origin https://github.com/sigmacomputing/quickstarts-public.git
No errors should show:
Enable sparse checkout:
git config core.sparseCheckout true
Specify the folder you want to clone by adding it to the sparse-checkout configuration:
echo "embedding_qs_series_2" >> .git/info/sparse-checkout
Pull the specified folder from the repository:
git pull origin main
Change directory to the new folder:
cd embedding_qs_series_2
Finally, load node into the local project:
npm install
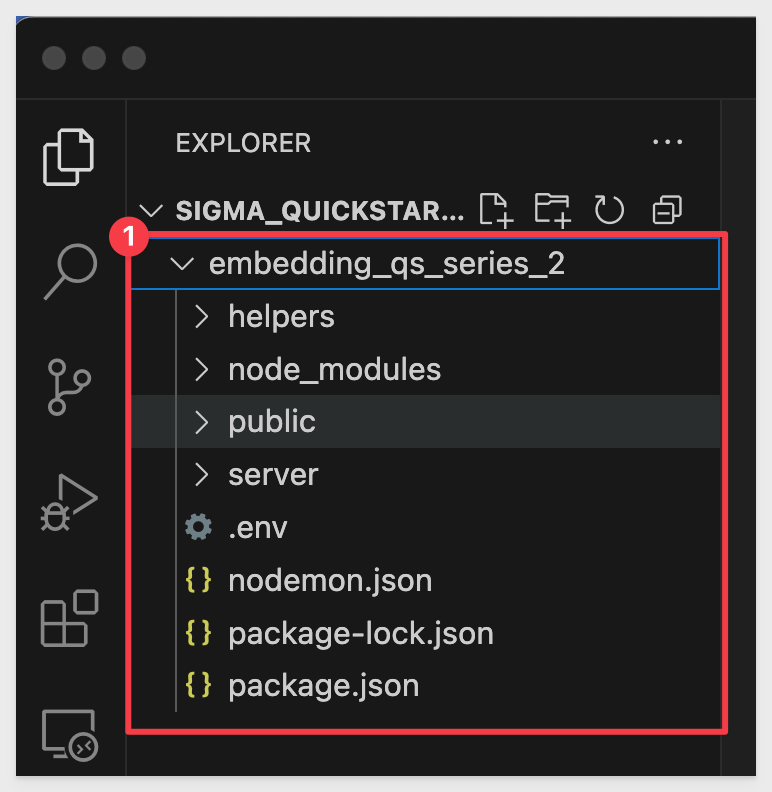
After the command runs, click the button to Open Folder:

Using the folder navigation, locate your folder and click Open.
We can now see the project called SIGMA_QUICKSTARTS with a folder called embedding_qs_series_2:
Additional node.js packages
We need to install two Node.js packages that provide some additional "convenience functionality".
1: jsonwebtoken
We use this package to decode a JWT in the VSCode terminal. This allows us to read the payload and header data from the token without verifying its authenticity. This is helpful when you need to inspect the information embedded in the token for non-secure contexts or for inspection/debugging purposes.
2: nodemon:
This package is a development tool that automatically restarts our Node.js application whenever it detects changes in specific code files. This streamlines development by eliminating the need to manually restart the server after each change.
To install these two packages, open a new terminal window in VSCode in the project folder.
Run the command:
npm install jsonwebtoken
and
npm install nodemon
The expected output is:

The project has almost everything we need, but we will need set up some things in Sigma that will be used throughout this QuickStart series.
The sample app is built with Node.js, HTML, and JavaScript.
Each QuickStart includes its own index.html file inside the corresponding QuickStart folder.
We took some liberties with styling and layout, but there are just a few core files you need to understand:
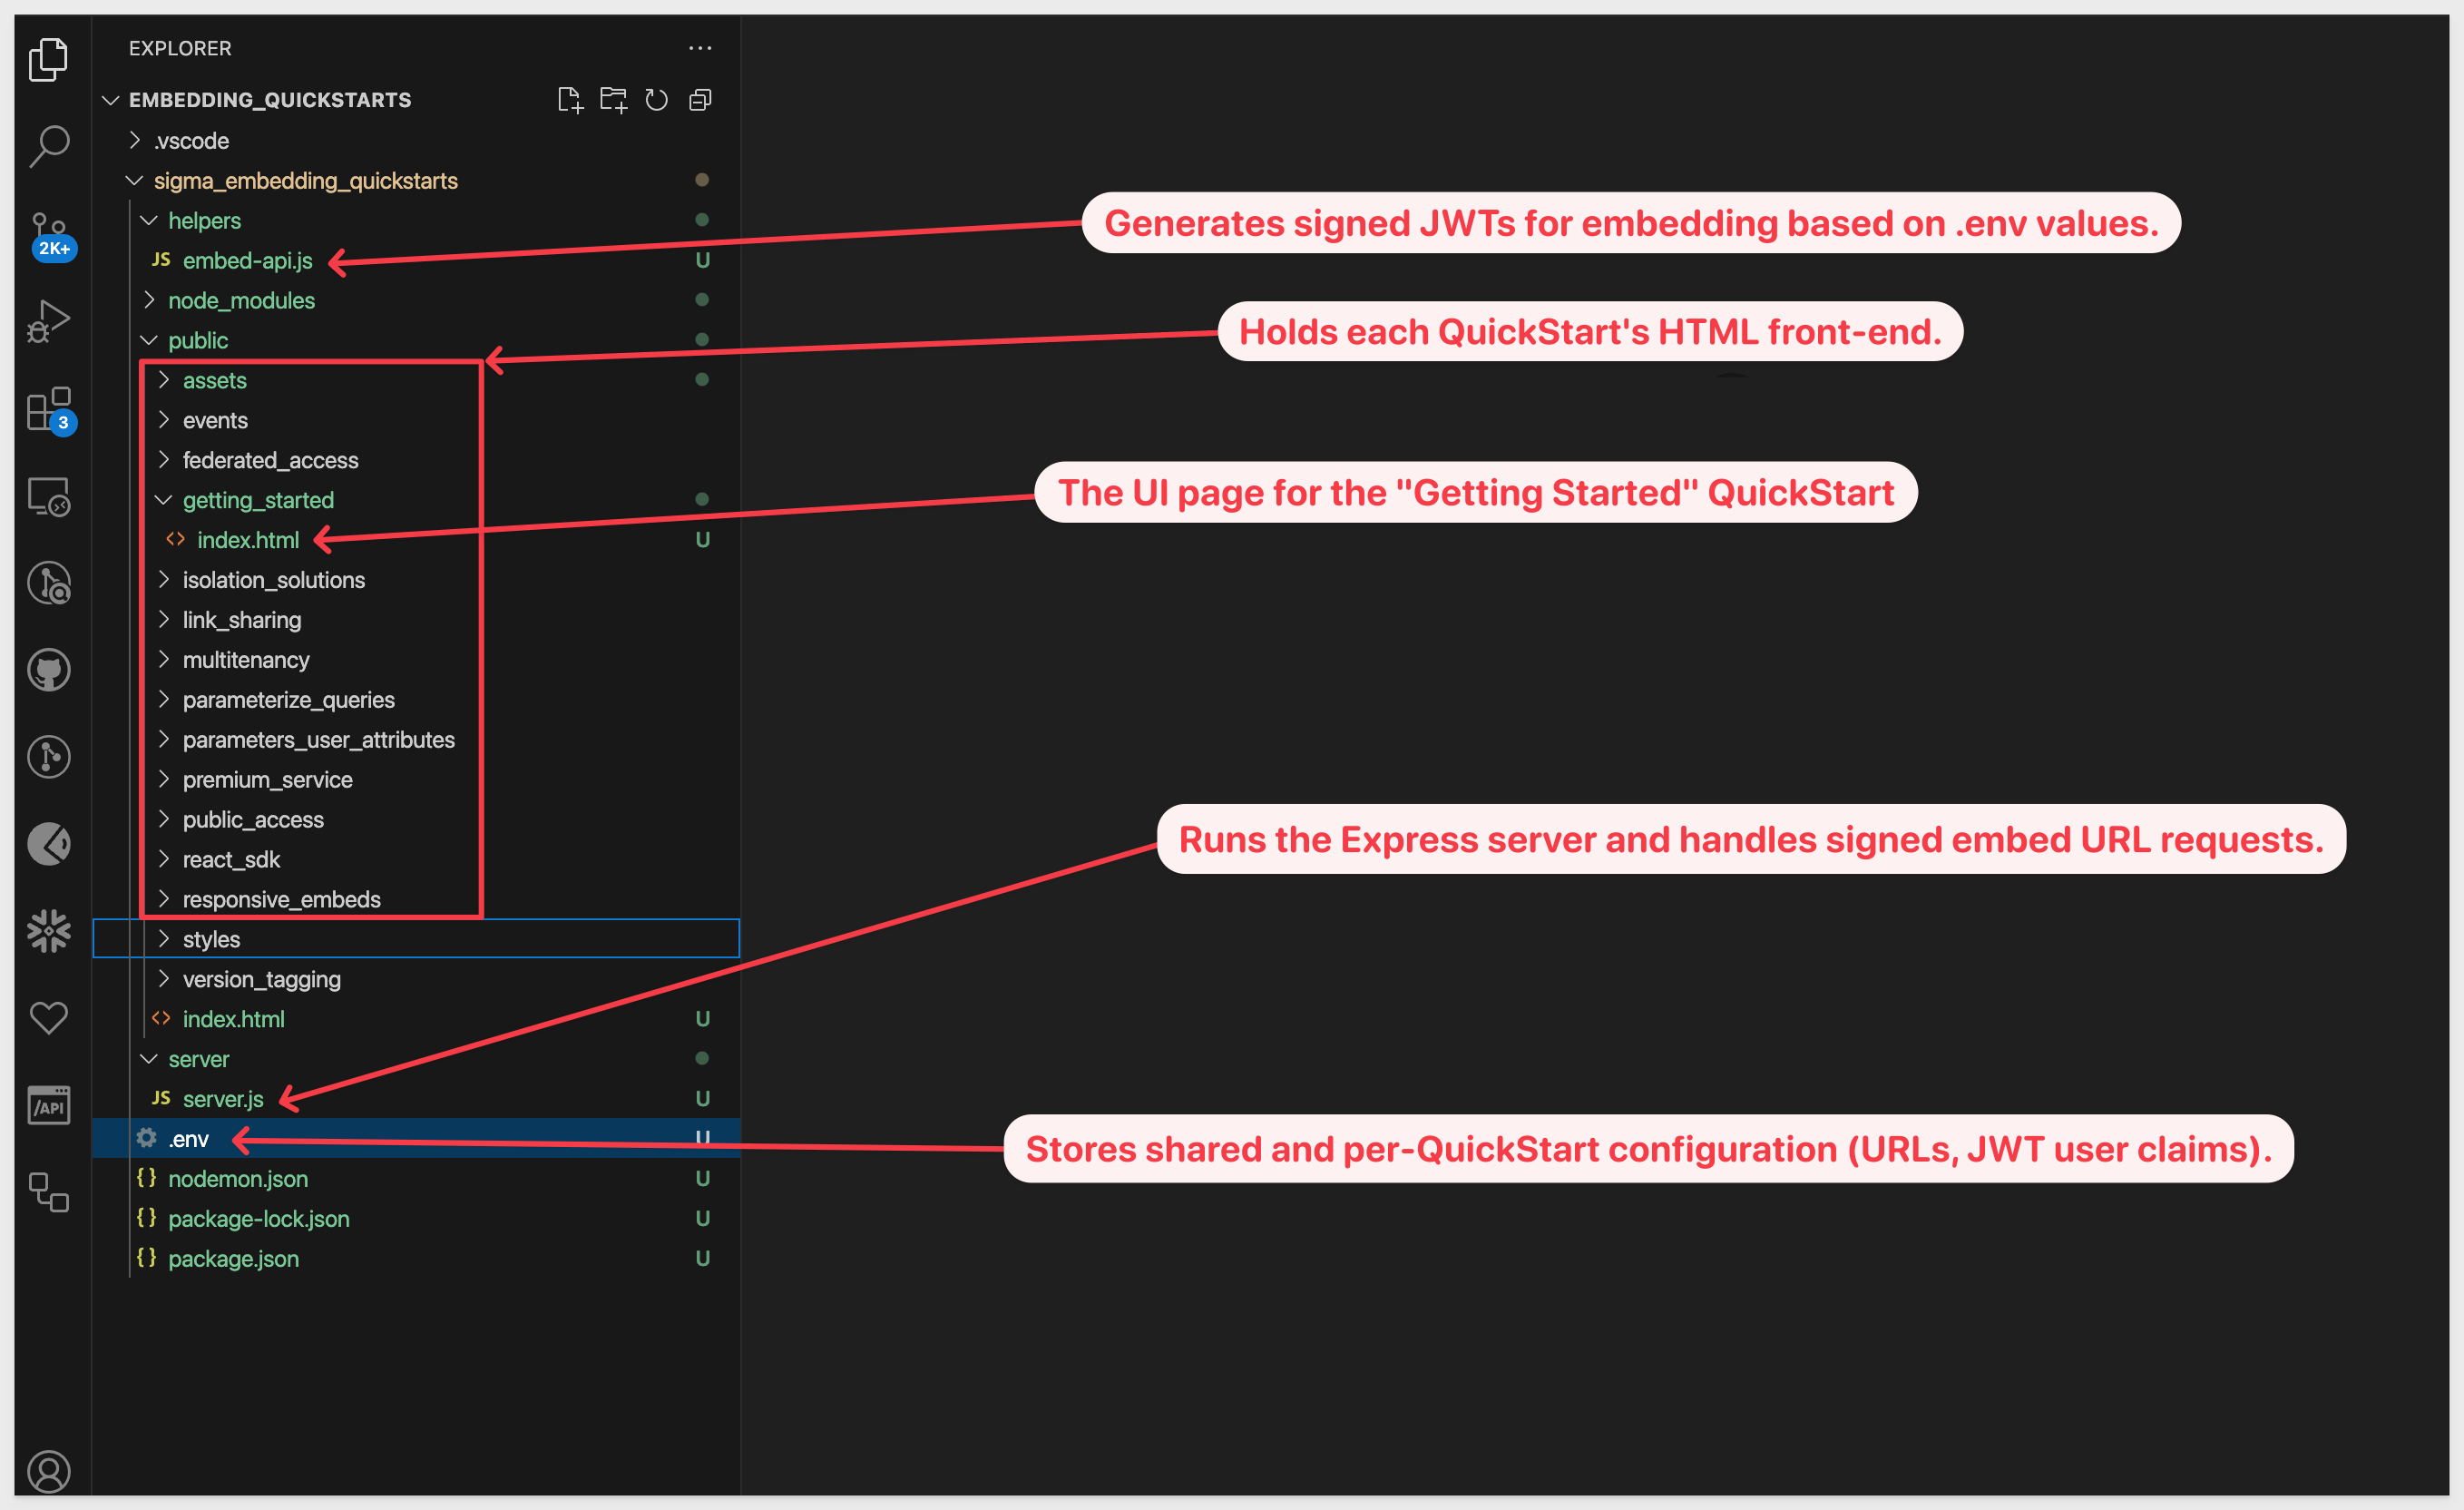
Environment file (.env)
The .env file contains configuration settings for the embedding server and each QuickStart. It helps separate runtime parameters (variables) like client secrets and user identity from the source code.
The file is organized into three key sections:
1: Global Settings
Shared across all QuickStarts (e.g. CLIENT_ID, SECRET, SESSION_LENGTH, PORT).
2: Default Embed User
Provides fallback identity parameter values (EMAIL, ACCOUNT_TYPE, TEAMS) to be used if not overridden by a specific QuickStart.
3: QuickStart-Specific Blocks
Each QuickStart has a dedicated section (e.g. GETTING_STARTED_BASE_URL) that may override the user, team, base URL, and so on.
The .env file provides fallback logic for each JWT:
- The code checks if QuickStart-specific settings exist (like GETTING_STARTED_EMAIL).
- If not found or blank, it falls back to the default user values defined in the shared block.
This allows you to maintain a consistent test user by default, and easily override it per QuickStart as needed for different workflows.
Open the .env file. We will copy / paste key values as we progress through sections of this QuickStart:

Using Sigma, we'll create content leveraged by the QuickStart embed series. This will make things easier later.
We need to provision Account Types, Teams, and Workspaces in Sigma. This will allow us to group users and set various permissions.
Sigma has some features that will make this easier for us.
Users
We already have an administrative user, and we will add additional users on-the-fly from our host application.
Recall that embed users are added at runtime—the first time they access any content embedded in the parent application.
Their permission level is also set automatically by the embed API, via a required parameter that specifies the Sigma account type they are assigned.
Account Types
Account types enable the selection of granular permissions that determine how users access and interact with data and documents in Sigma.
Each user is assigned a single account type and can only have one at a time.
Sigma provides a few default account types and these support the common use cases. Administrators can also create custom account types to allow or restrict specific Sigma features.
To keep things simple, we'll use two of the default account types:
- View: This is recommended for users who need access to prepared data and insights.
- Build: Recommended for users who model, transform, and analyze data.
For more information see: Create and manage account types
Teams
Teams let you create user groups in Sigma. When you grant access and permissions to a team, the grants apply to all members assigned to the team.
For more information see: Create and manage teams
We want to create a team in Sigma so our embed users can be assigned to it.
Log into Sigma, using an administrator account.
Navigate to Administration > Teams and click Create team:
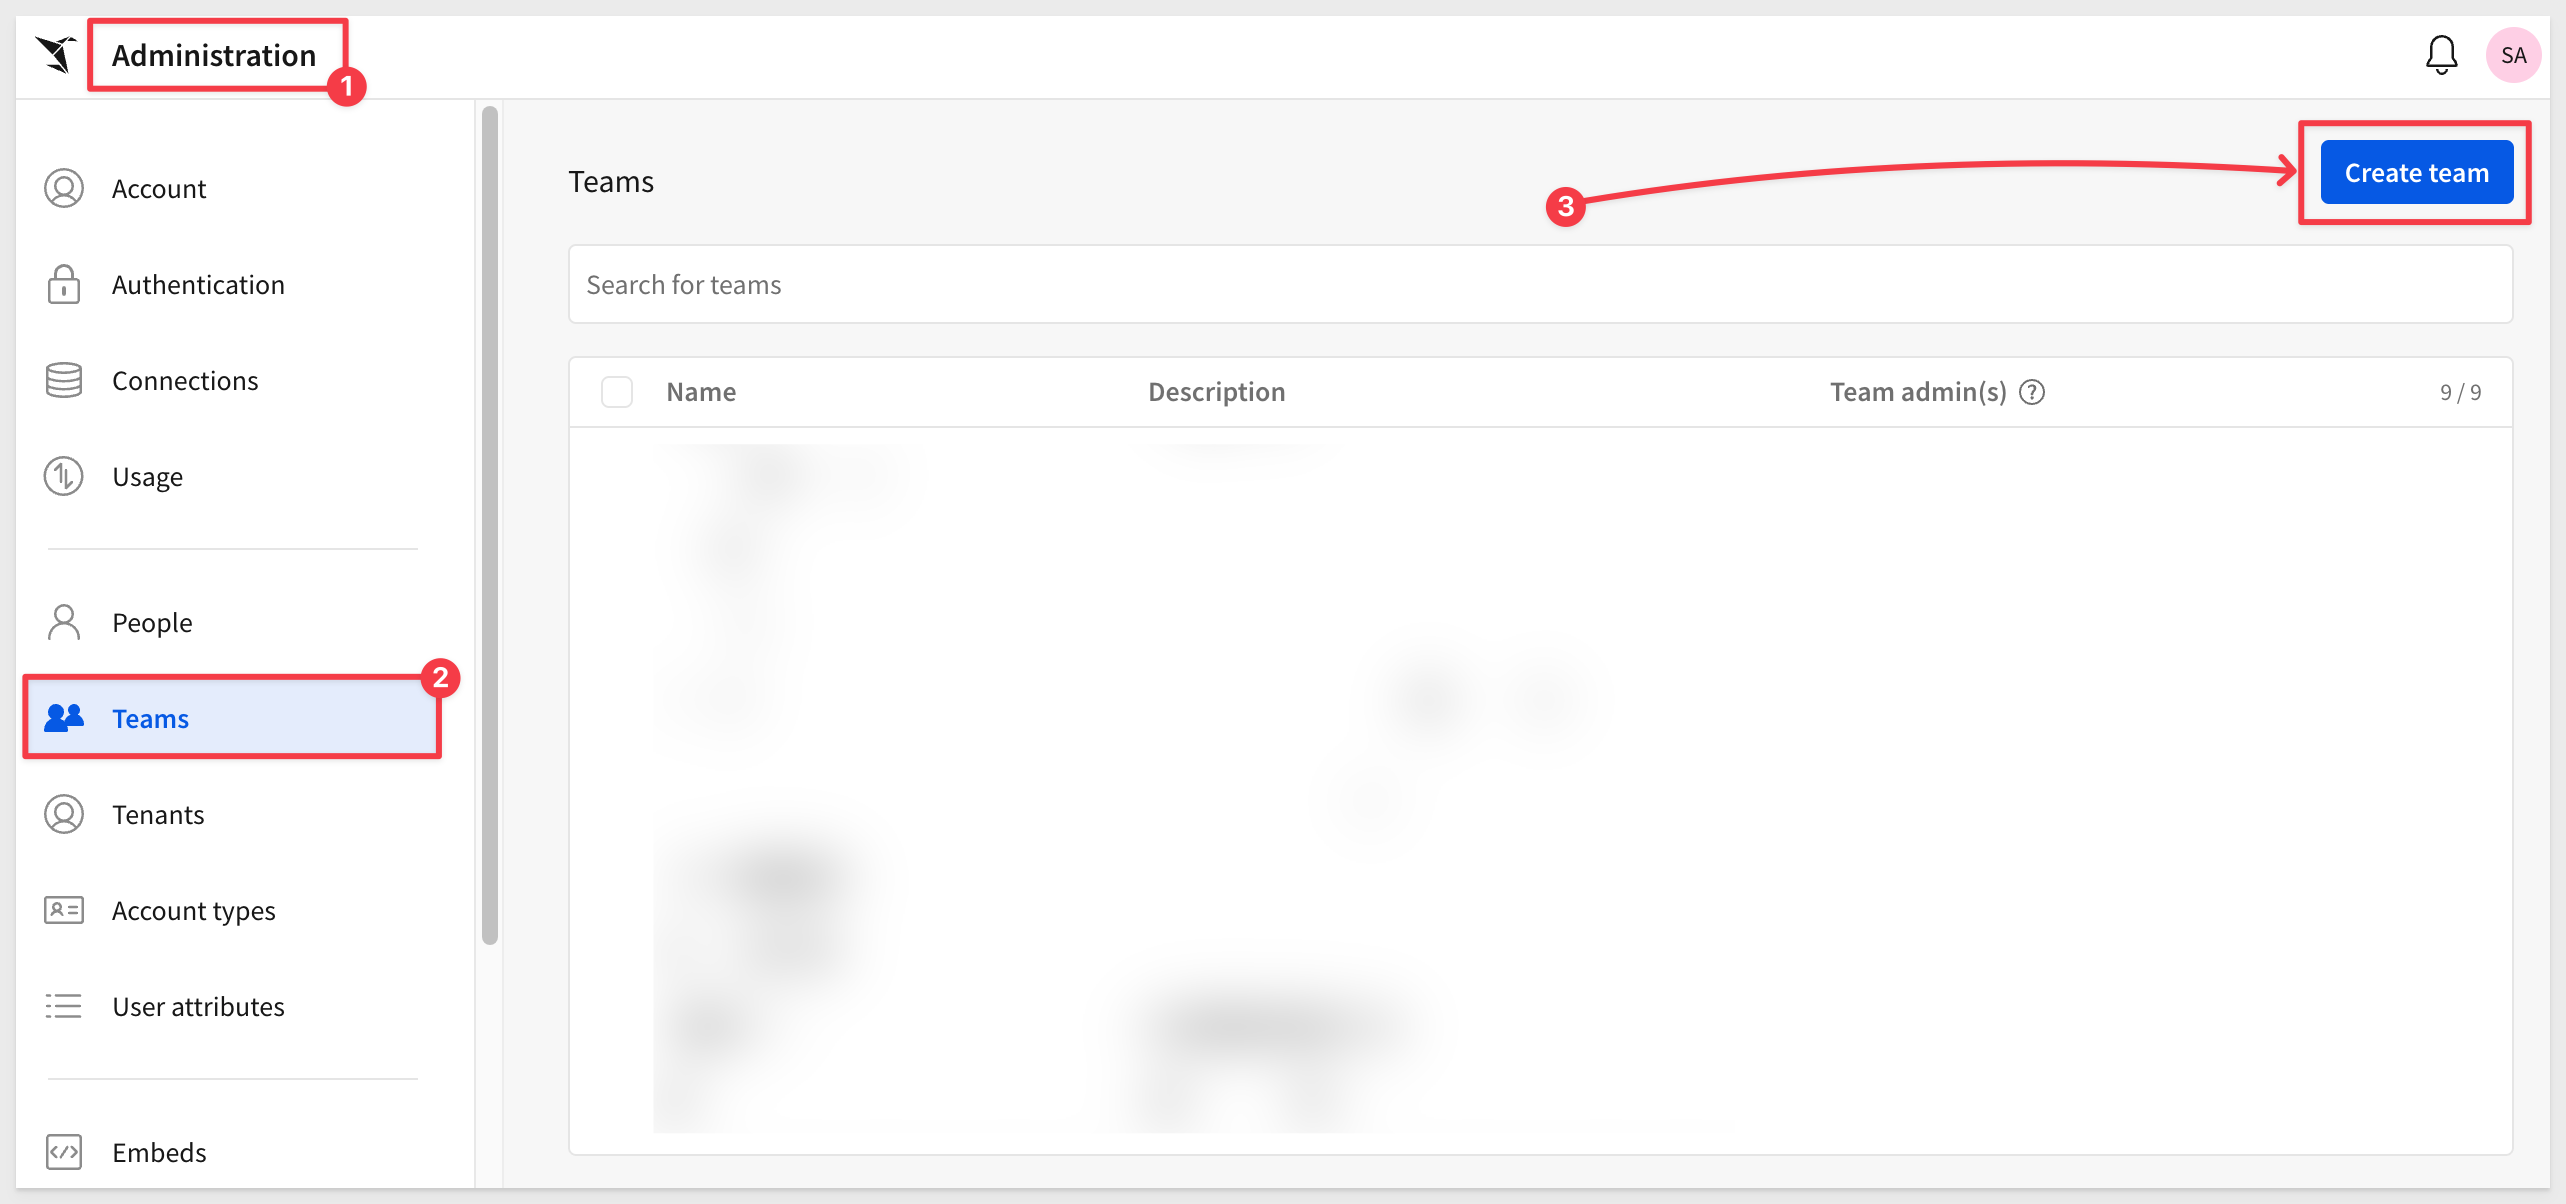
Name the team Sales_People, check the box to also create a workspace. Click Create.
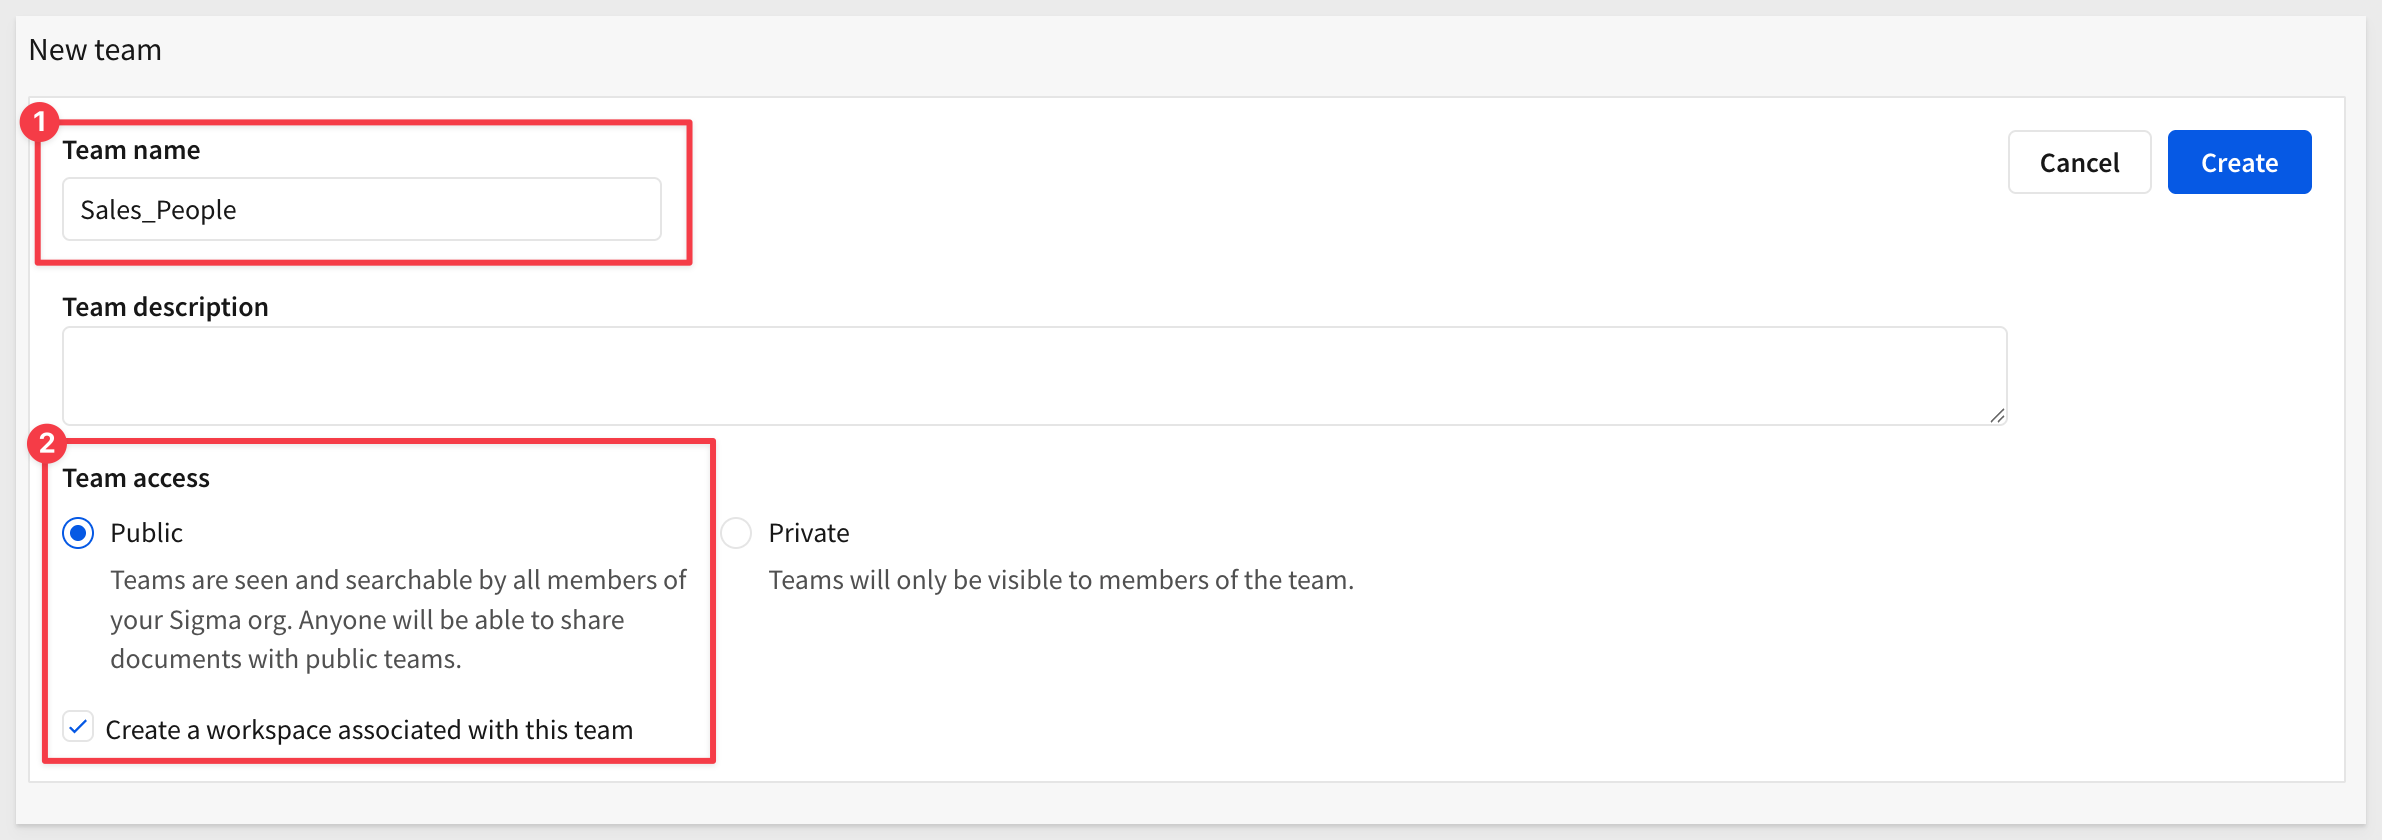
Create another team called Sales_Managers, set the team to Private and check the box to also create a workspace. Click Create:

Exit Administration by clicking the Sigma  icon.
icon.
Workspaces allow folders and documents to be compartmentalized, categorized, and easily shared with the correct users.
They can be shared among users and teams via permission grants.
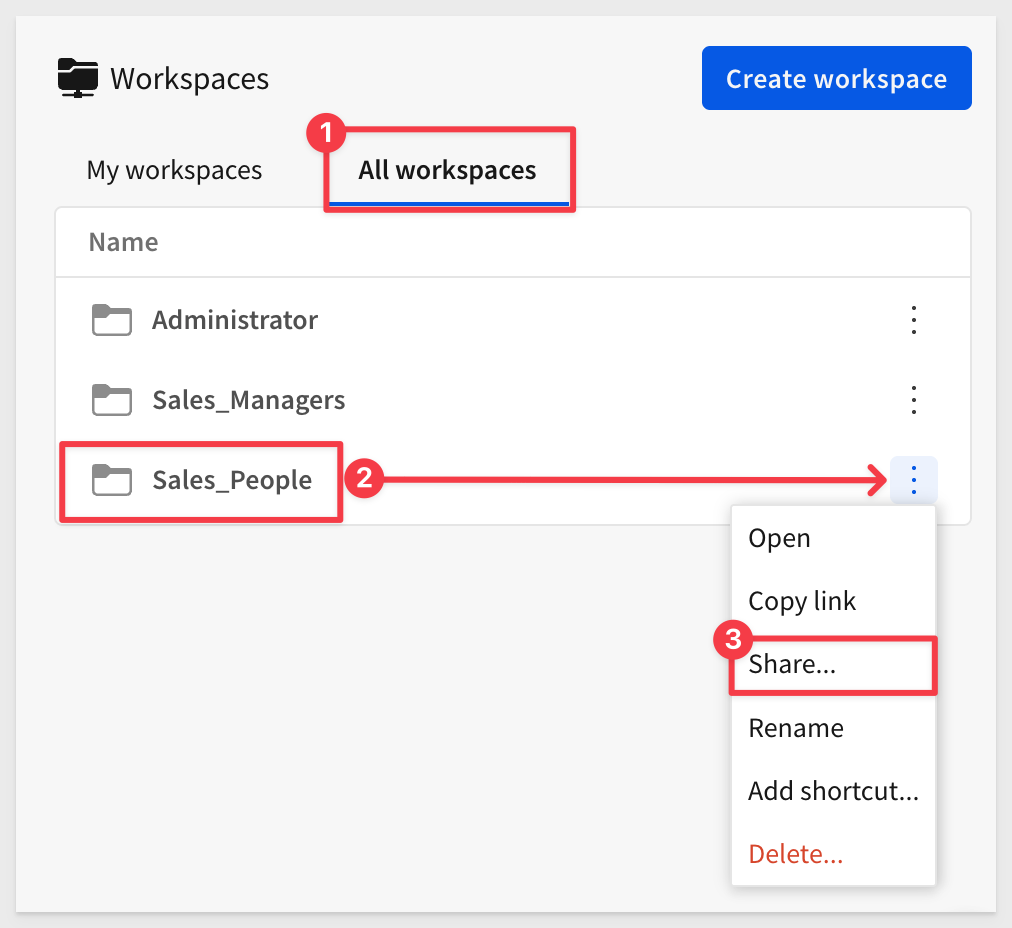
Workspaces are managed by organization admins, but admins are not automatically granted permission to other team workspaces. However, admins can access an additional ALL WORKSPACES tab.
Native Sigma users (those who log in directly to Sigma) will have access to workspaces when they are shared with a team they belong to, or explicitly shared with them.
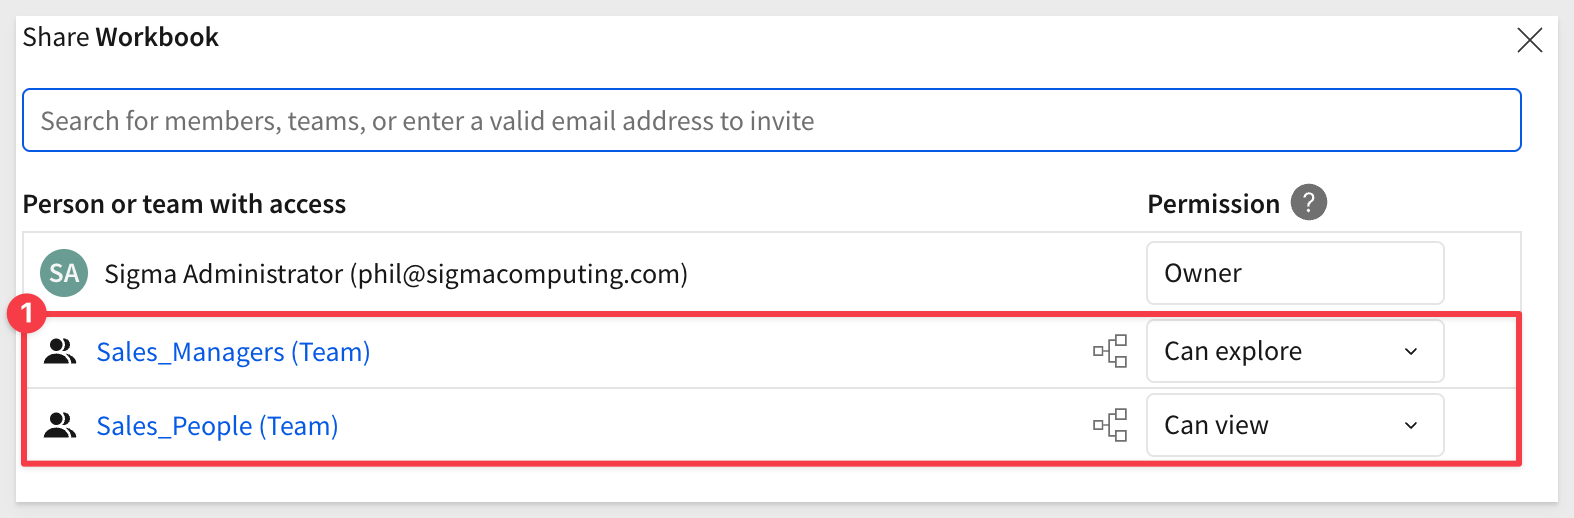
For example, if we want to give all the users who are members of the Sales_Managers team access to the Sales_People workspace, we can click Share...:
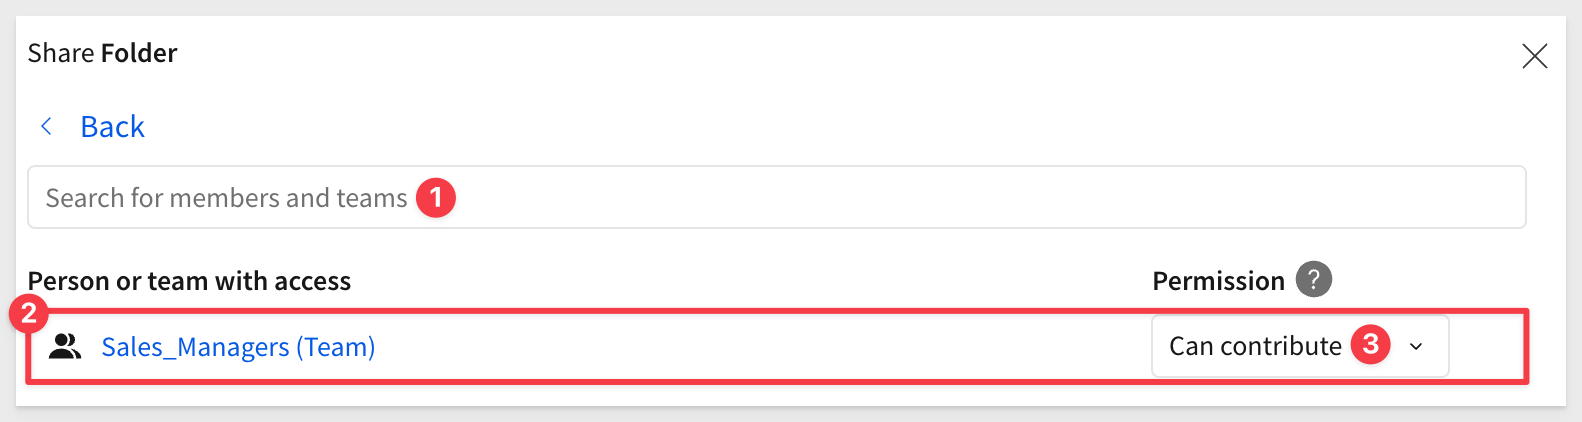
We can search for the team and give them a specific permission level. In this case, we will give the Can contribute permission to the Sales_Managers team:
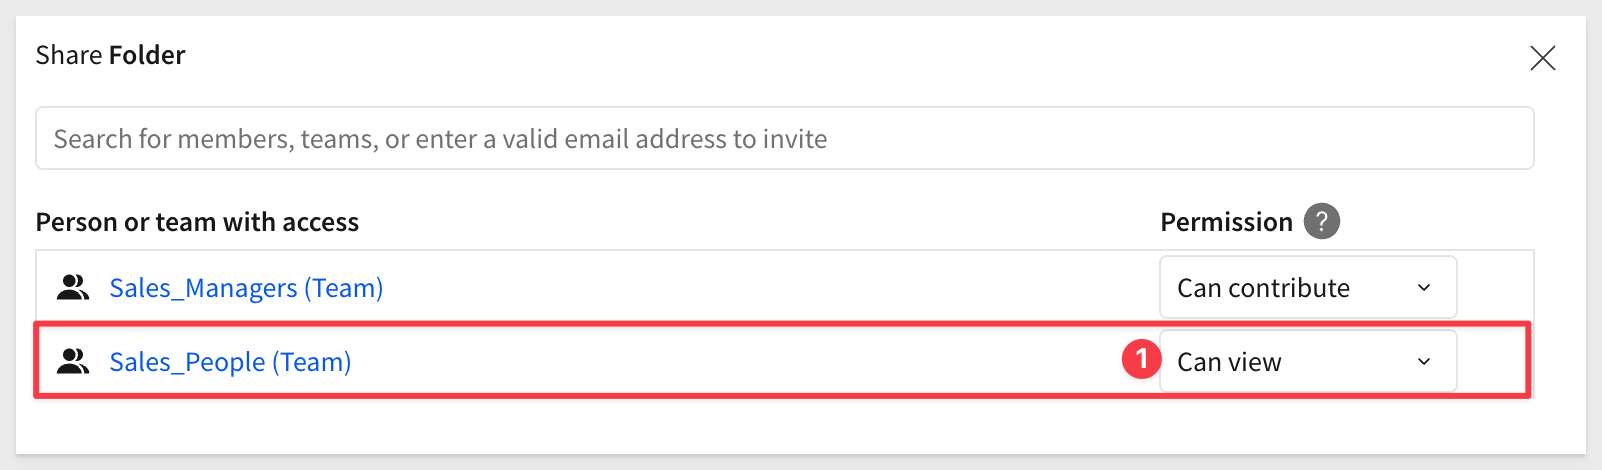
If we reopen the Share... model for Sales_People, we can also adjust the Sales_People to View only:
If we open the Share... model for the Sales_Manager workspace we see that members of the Sales_People team will have no access to the workspace:
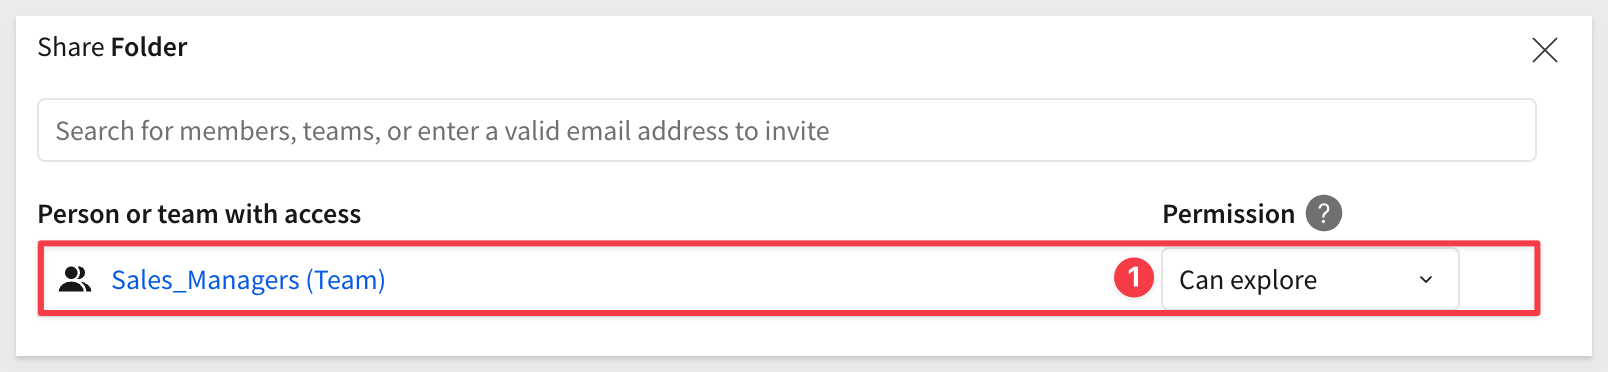
Let's grant them Can explore permission. This implies that workbooks in this workspace are curated by someone else. Managers can explore the data to the lowest level of granularity, but cannot contribute new content.
In both workspaces, the administrator has Can manage permissions.
This functionality provides a lot of flexibility in how users access shared work.
There are many ways to provide user separation. In a typical smaller organization, we'd likely have teams for business users like Finance, Operations, and others.
For more information, see: Manage workspaces
Client credentials (a unique client ID and embed secret) are the foundation of secure embedding.
Sigma uses the client ID to determine which embed secret is referenced in a request. Each time a request is made, the server-side embed API uses the embed secret to generate an encrypted signature.
Together, the client ID and embed secret create a robust security framework for server-side interactions with Sigma.
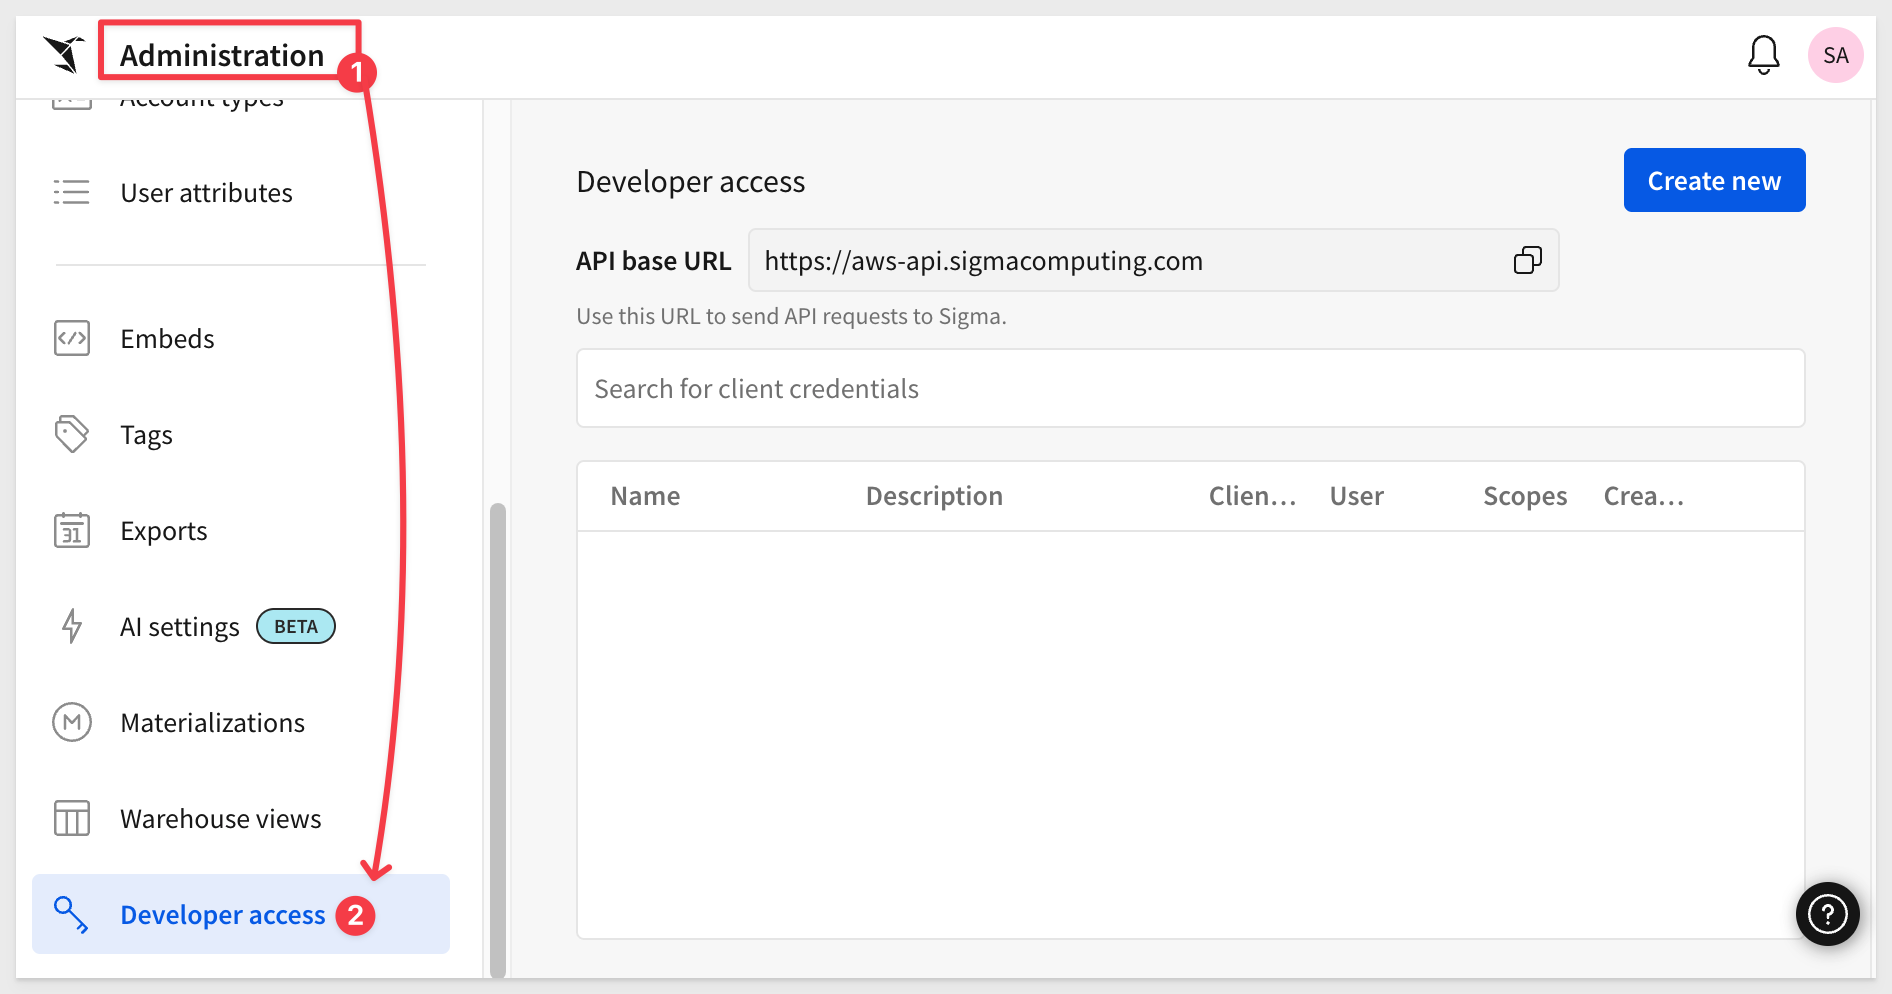
Navigate to Administration and scroll down to Developer Access.
Click Create New:
In the Create client credentials modal, select Embedding, give it a name, and assign an administrative user as the owner.
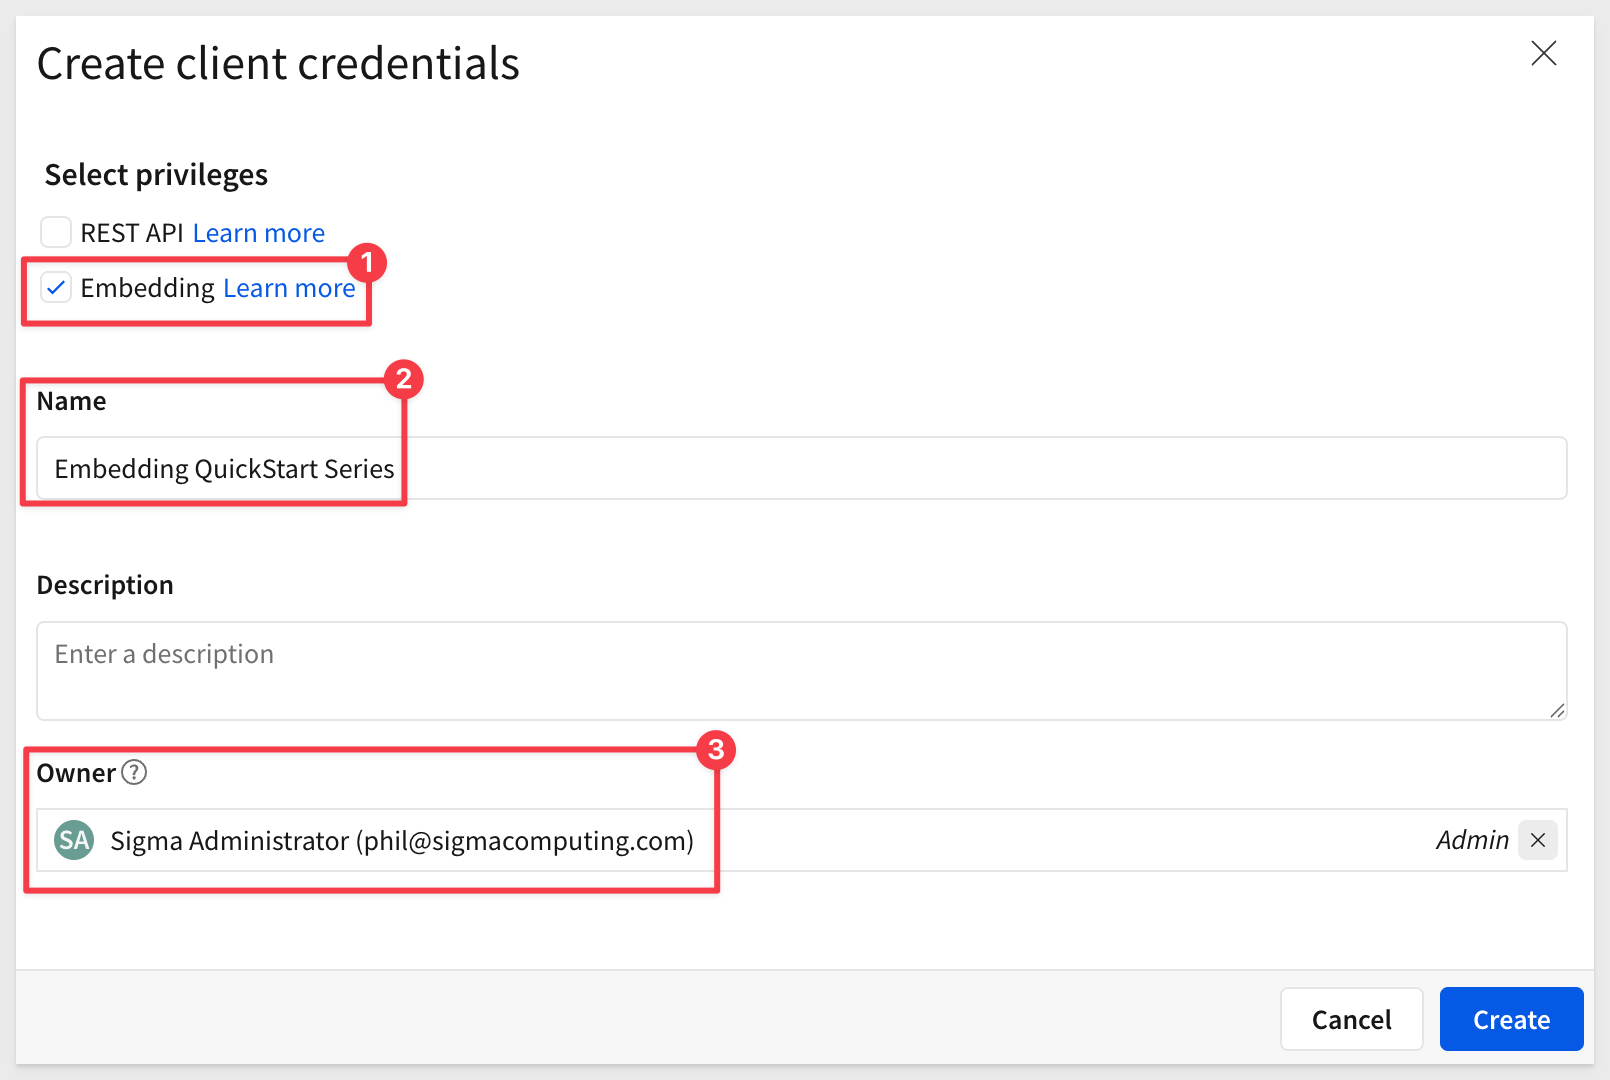
Click Create.
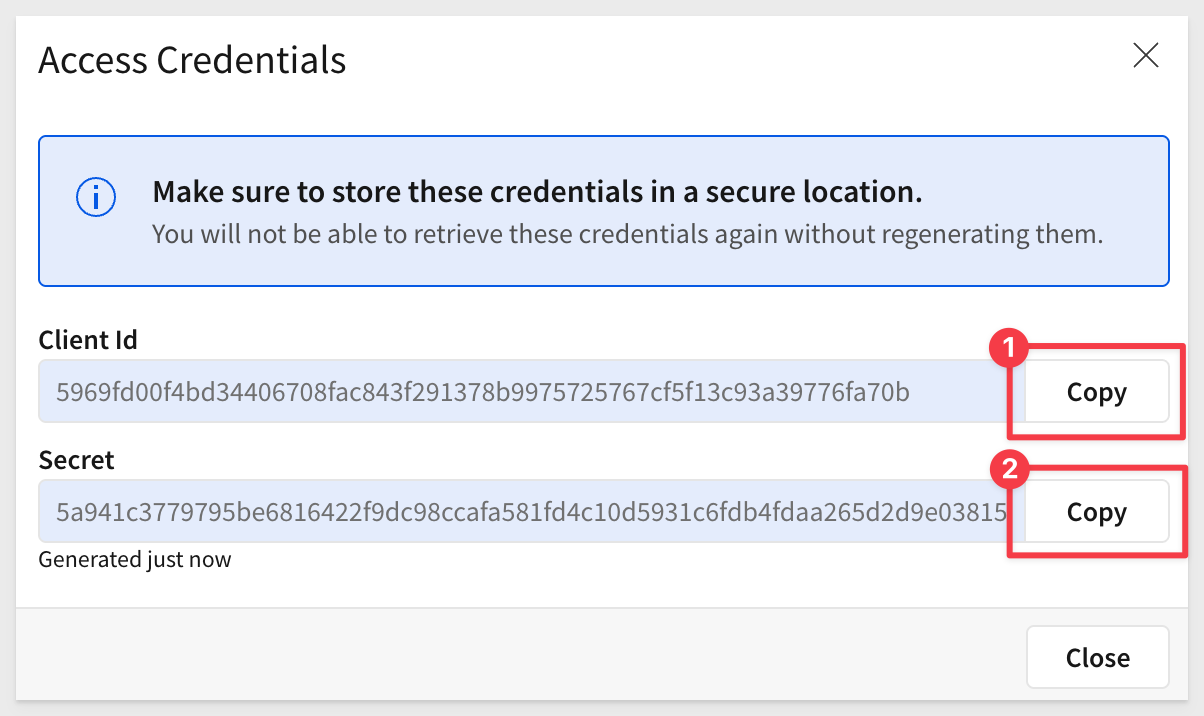
Copy and paste the Client ID and Secret into the respective locations in the .env file, in the # Shared by all QuickStarts grouping.
Any Sigma URL can be embedded, assuming the proper permissions are passed along as parameters.
Sigma is flexible and offers different workflows for creating content based on the source data.
For example, we could first create a data model, set permissions on it, and then save it off for later use in a workbook. We would then create a workbook with a table that shows data from the data model we saved earlier. This is a great way to ensure that downstream content is using trusted data that has been properly constructed and secured prior to use.
If you are interested in data modeling in Sigma, see: Fundamentals 10: Data Modeling
To minimize the steps, we will leverage a different workflow.
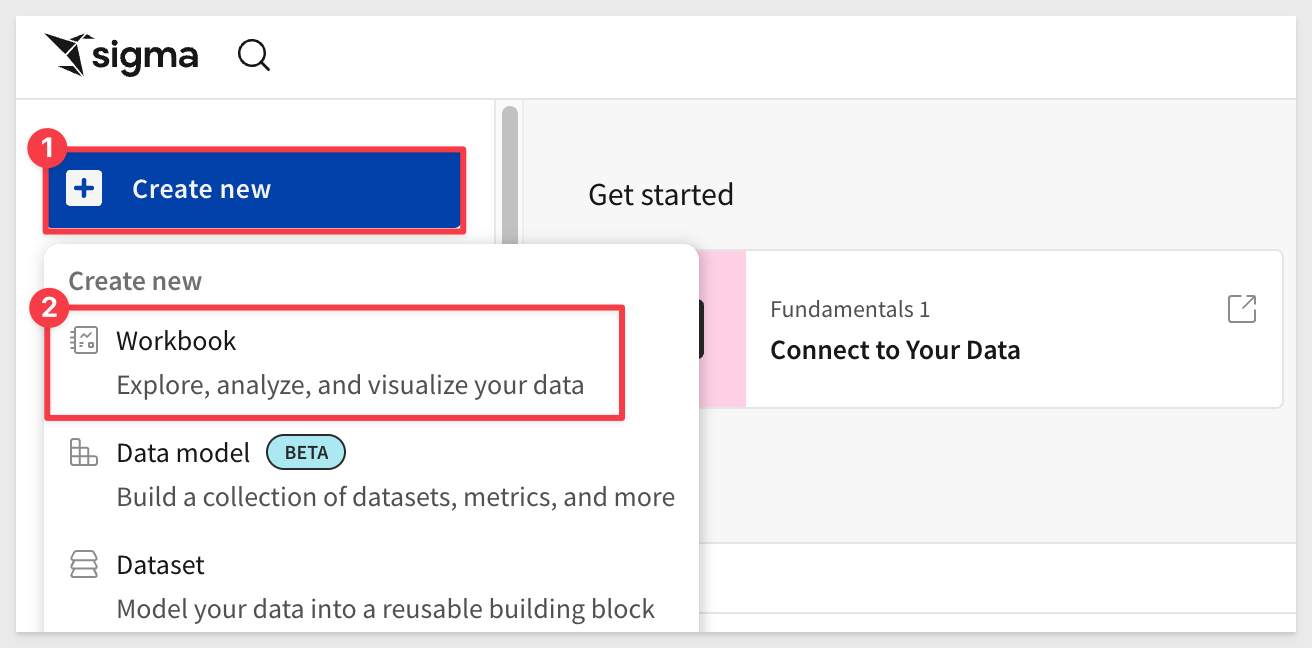
Create a Workbook with Sample Data
In Sigma, return to the homepage and click the + Create new button and click Workbook:
Drag a new Table from the Data group on the Element bar:
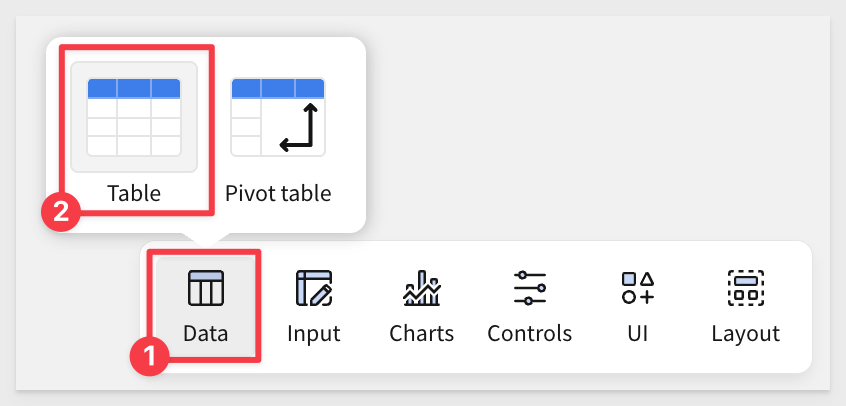
Click Select source
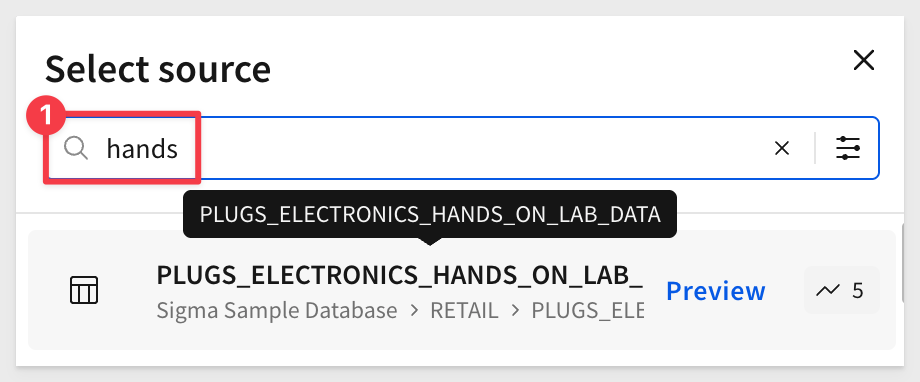
Sigma allows users to search for tables by name; type hands in the search bar and select the PLUGS_ELECTRONICS_HANDS_ON_LAB_DATA table from the RETAIL schema:
This opens the selected table in a new (unsaved) workbook that carries the temporary name Exploration:
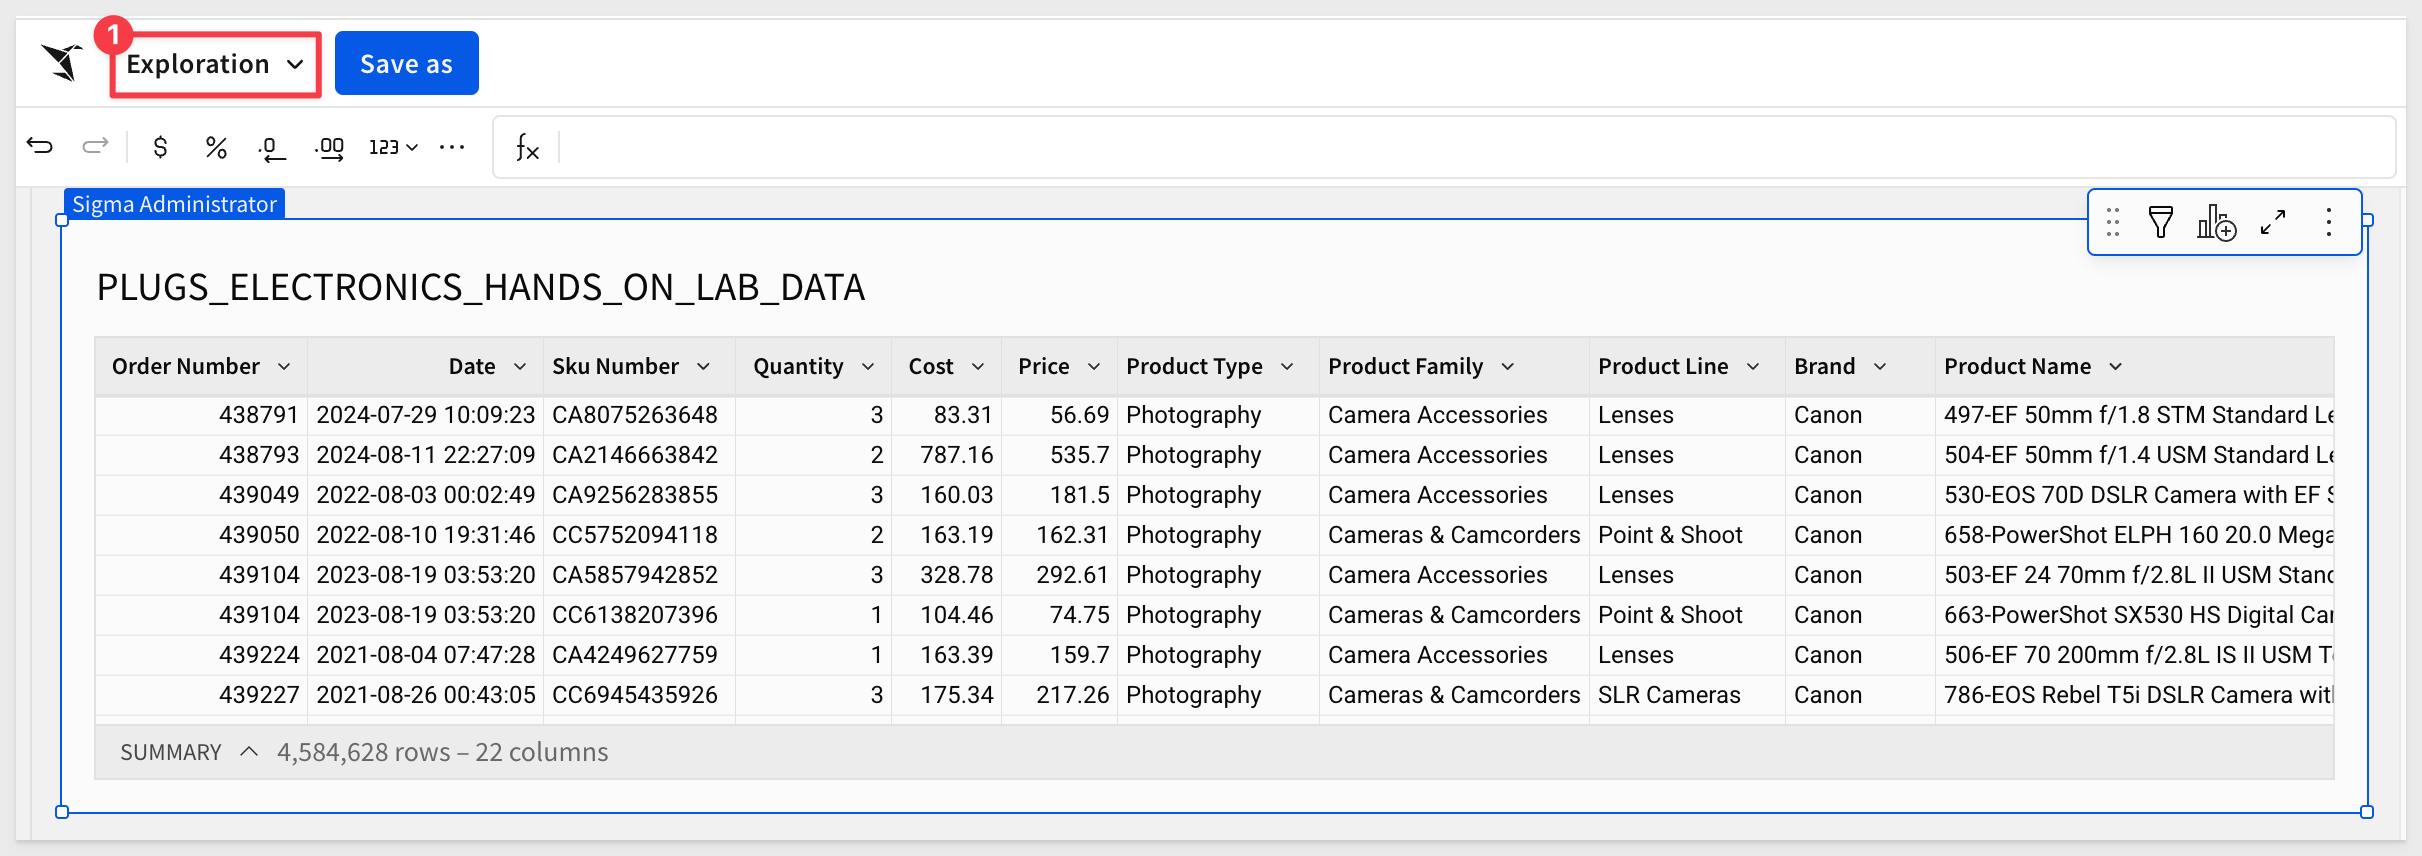
We can rename the table by double-clicking on the table name and changing it to Plugs_Sales_Transactions.
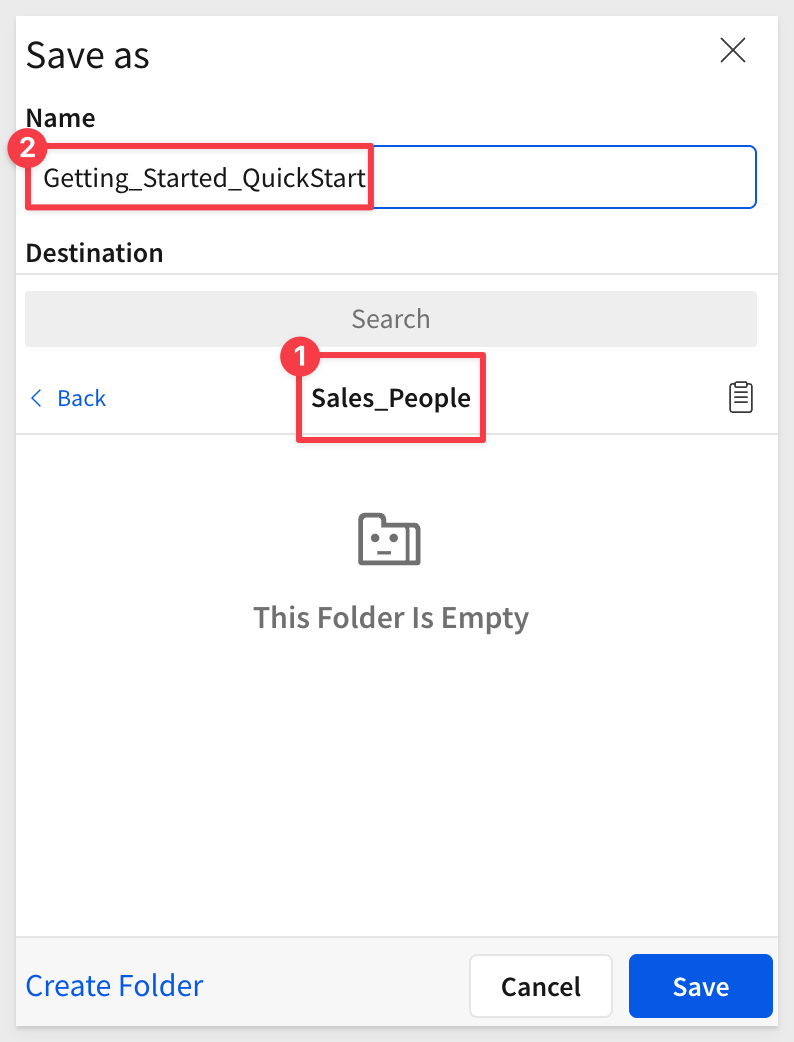
Click the Save as button, navigate to the Sales_People workspace and save the workbook with the name Getting_Started_QuickStart.
You may have noticed that Sigma provides Folders, a My Documents folder, as well as Workspaces. This enables a variety of use-cases to be possible with regards to how documents are stored, managed and shared with others.
Share the Workbook
Check the sharing settings:
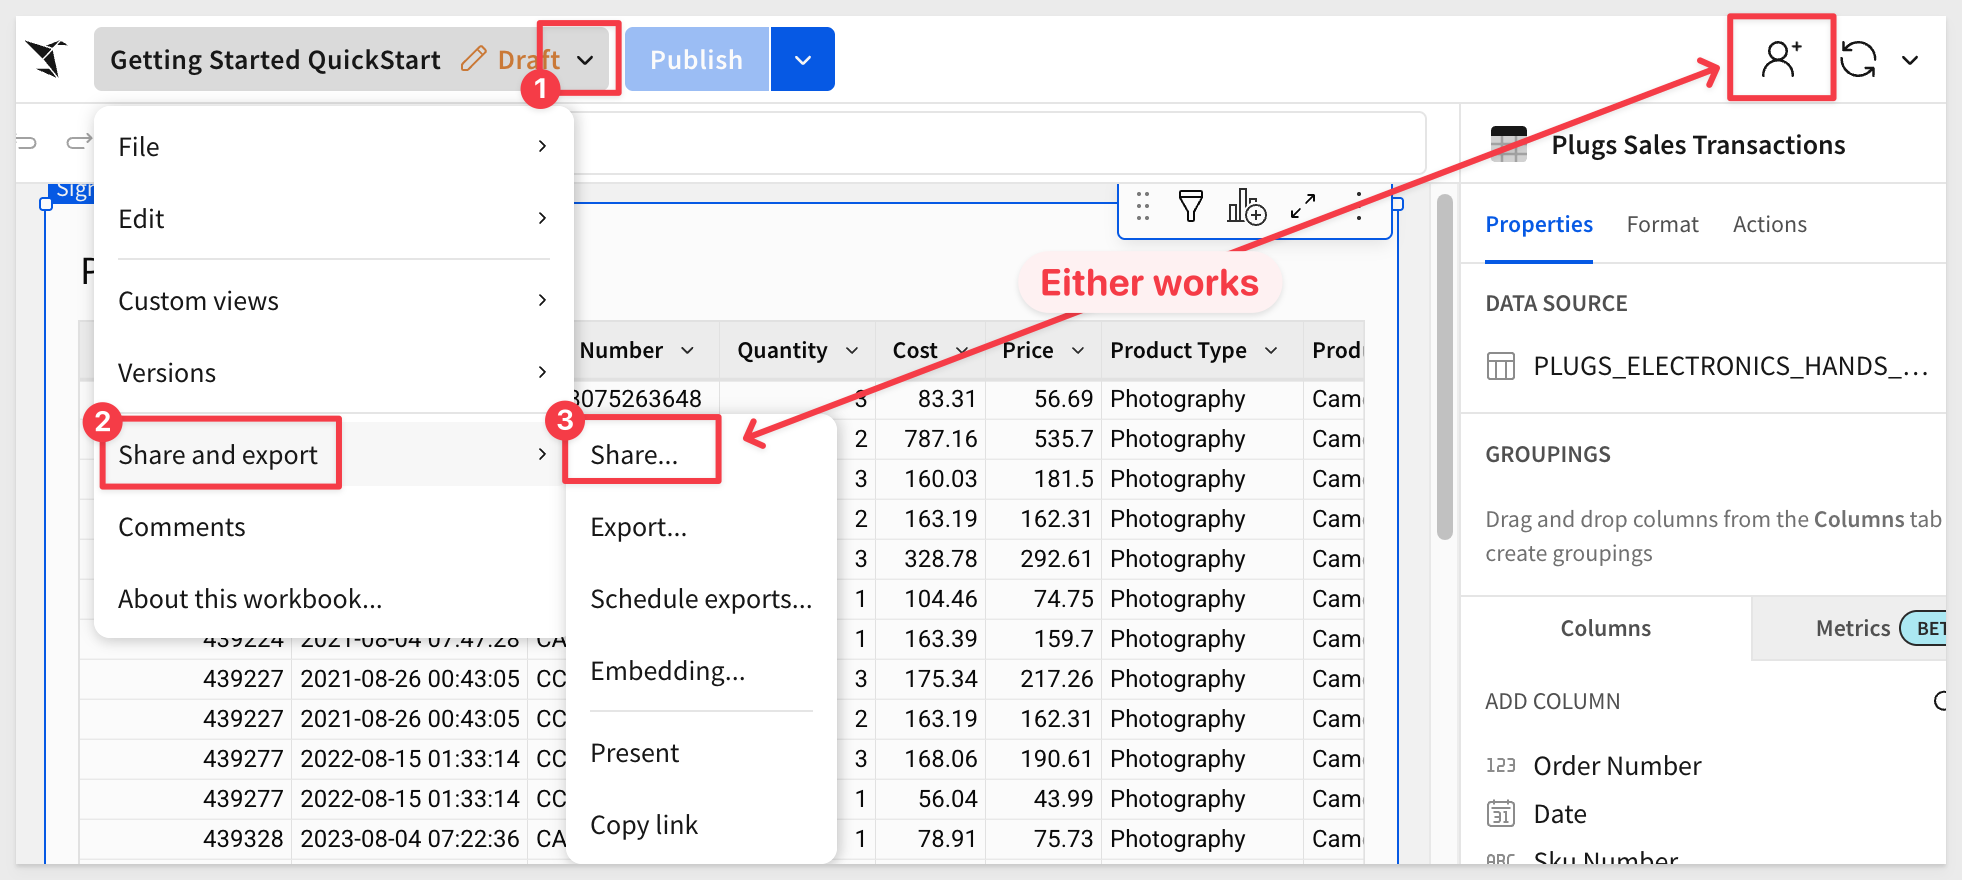
Our two teams are already listed, as the permissions are inherited from the workspace, which is assigned to the Sales_People team.
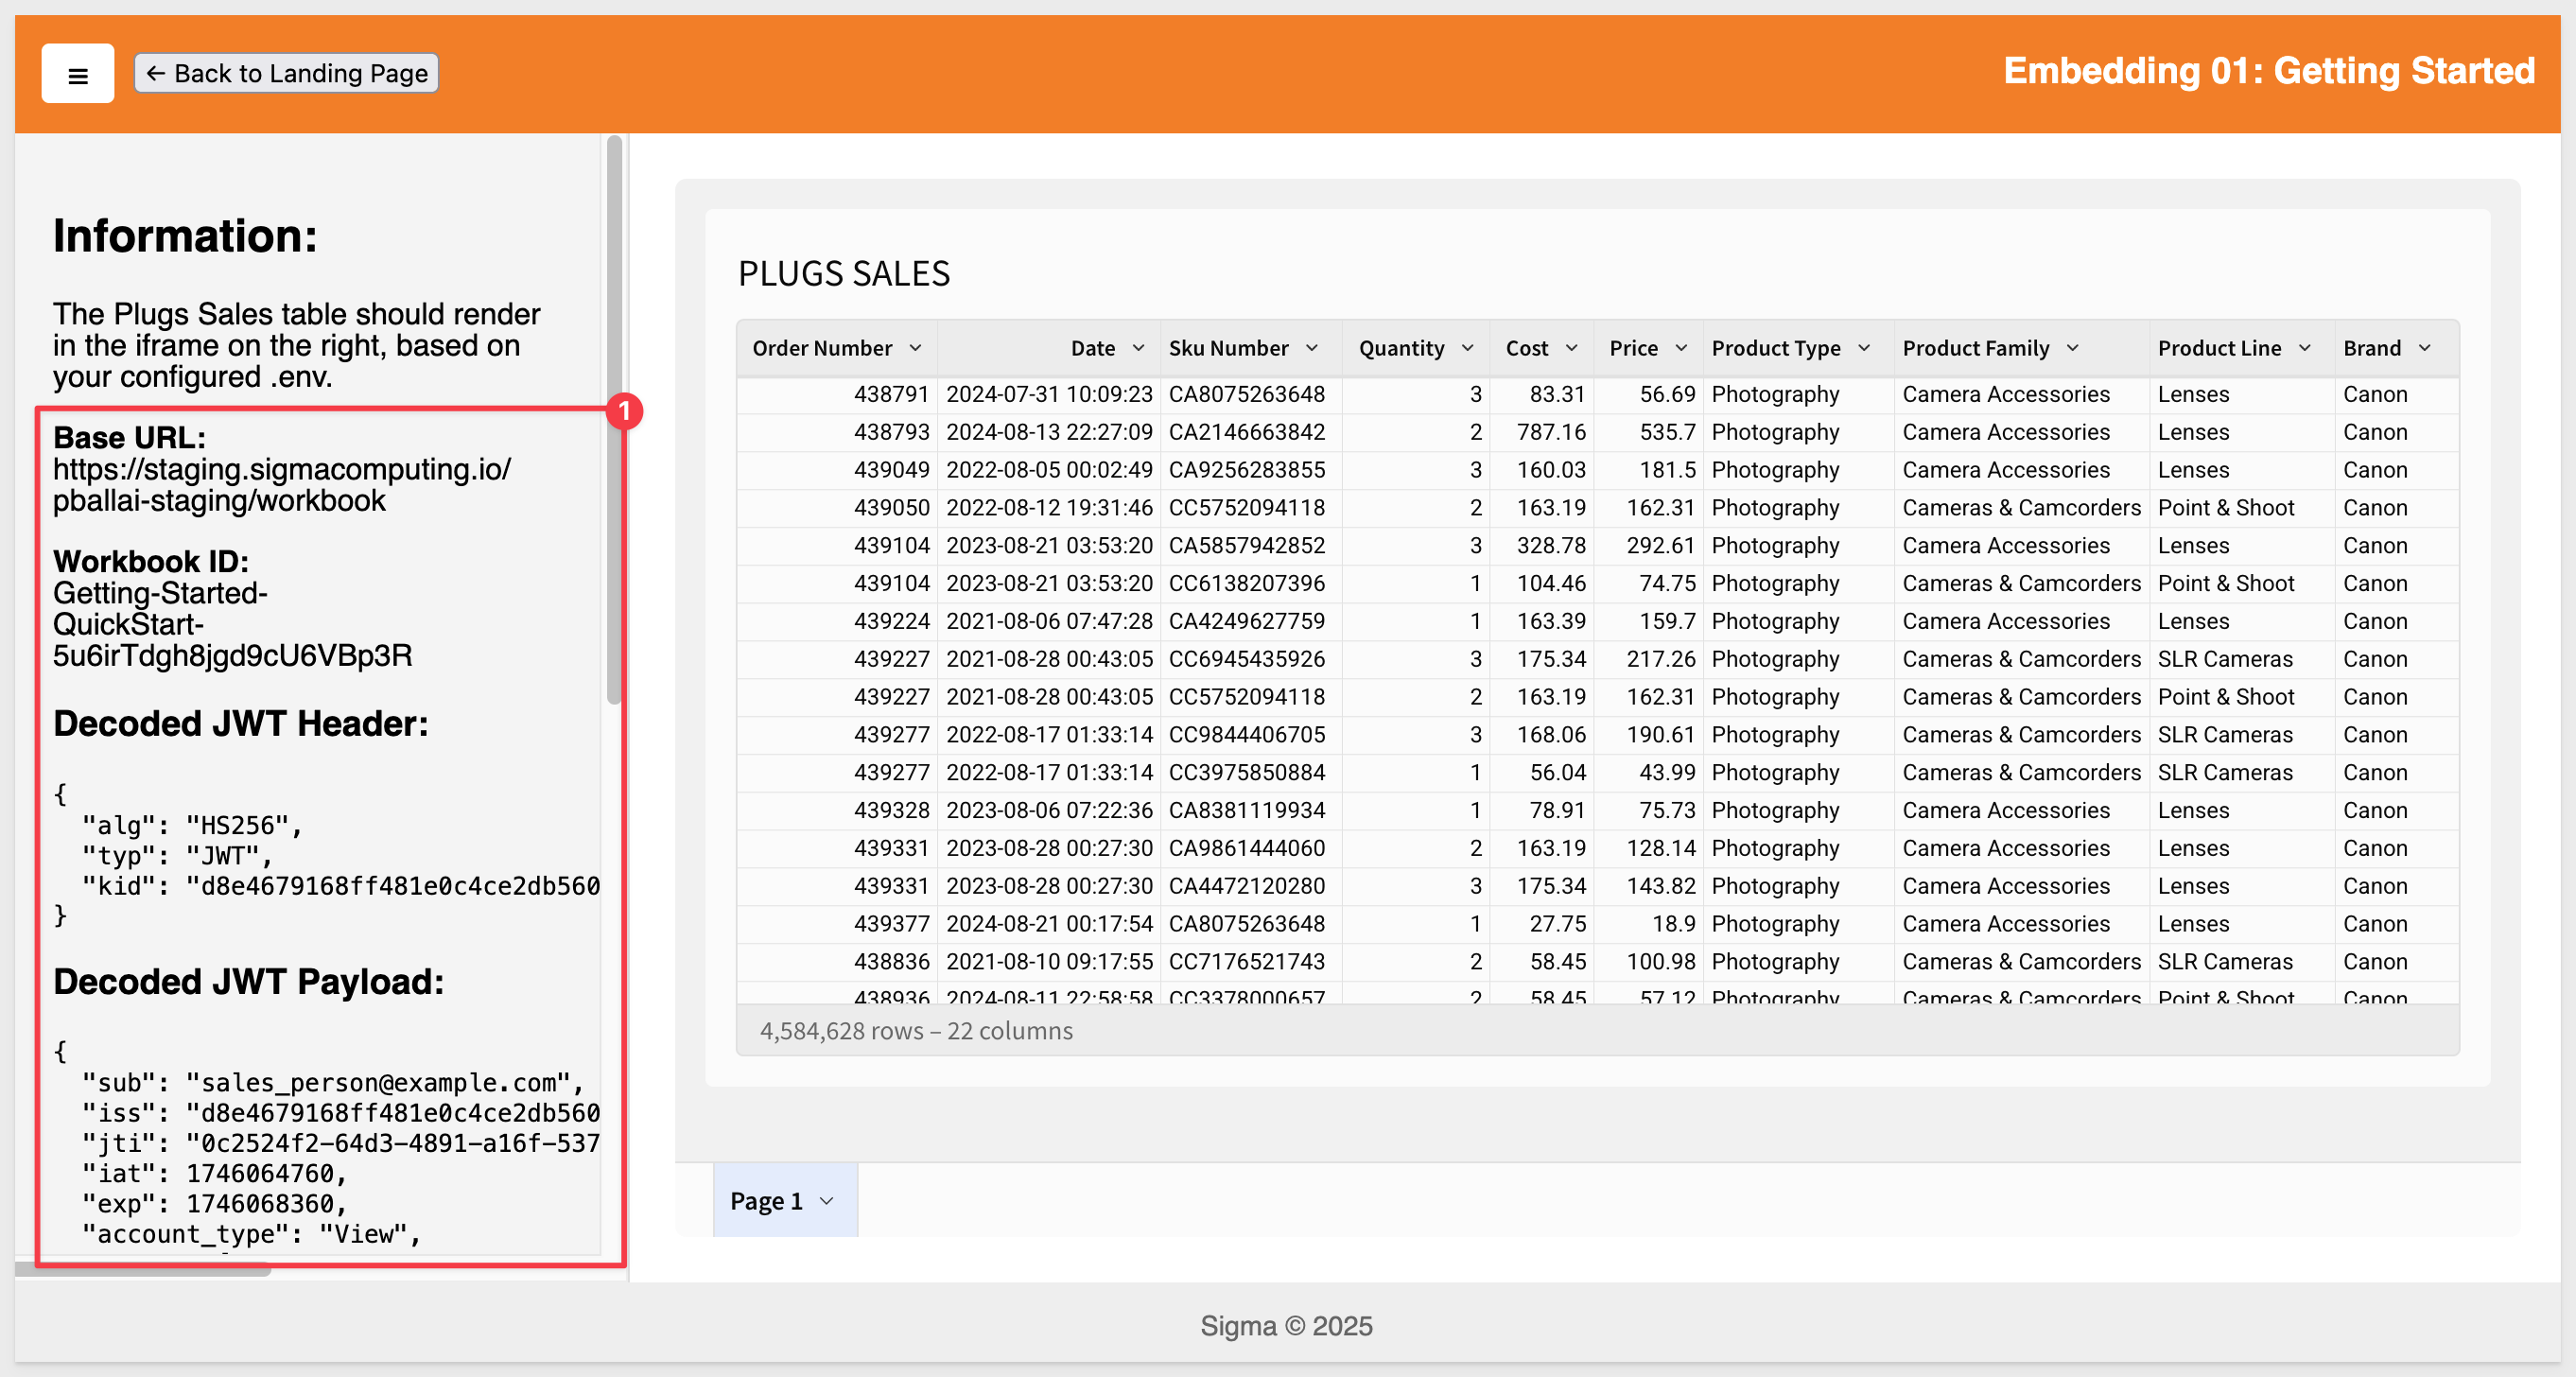
Sigma embedding uses the Base URL (the URL shown in the browser's address bar) to identify what is shown in any embed.
This allows any Sigma workbook, page, or element(s) to be embedded.
For example, we can grab the Base URL for the Sigma Assistant page from the browser and use it to embed Sigma Assistant inside the host application.
Switch the workbook to the Published version:
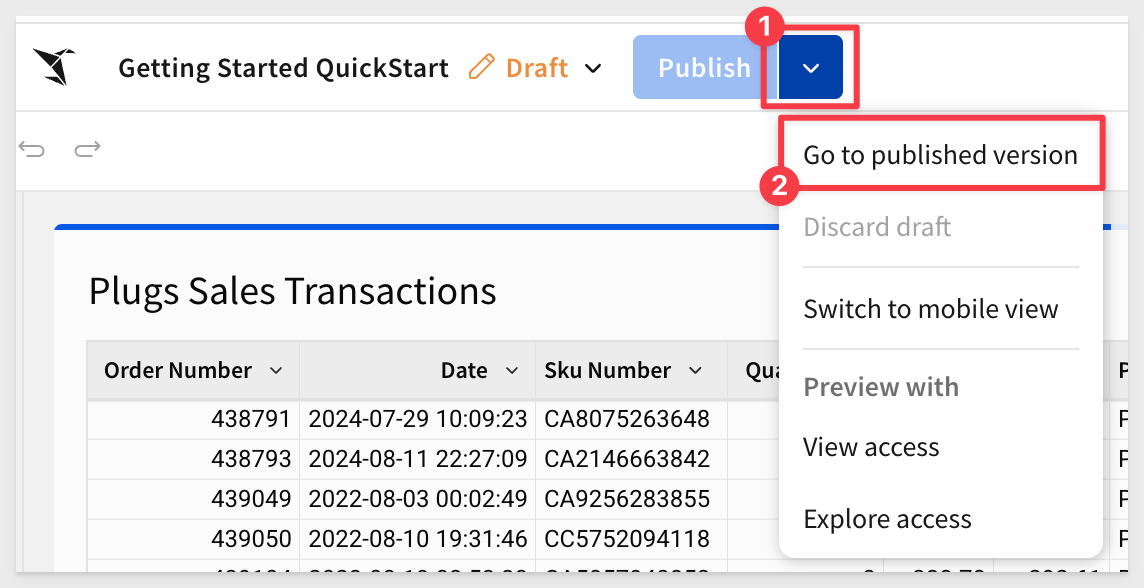
Select the Plugs_Sales_Transactions table, then copy the URL:
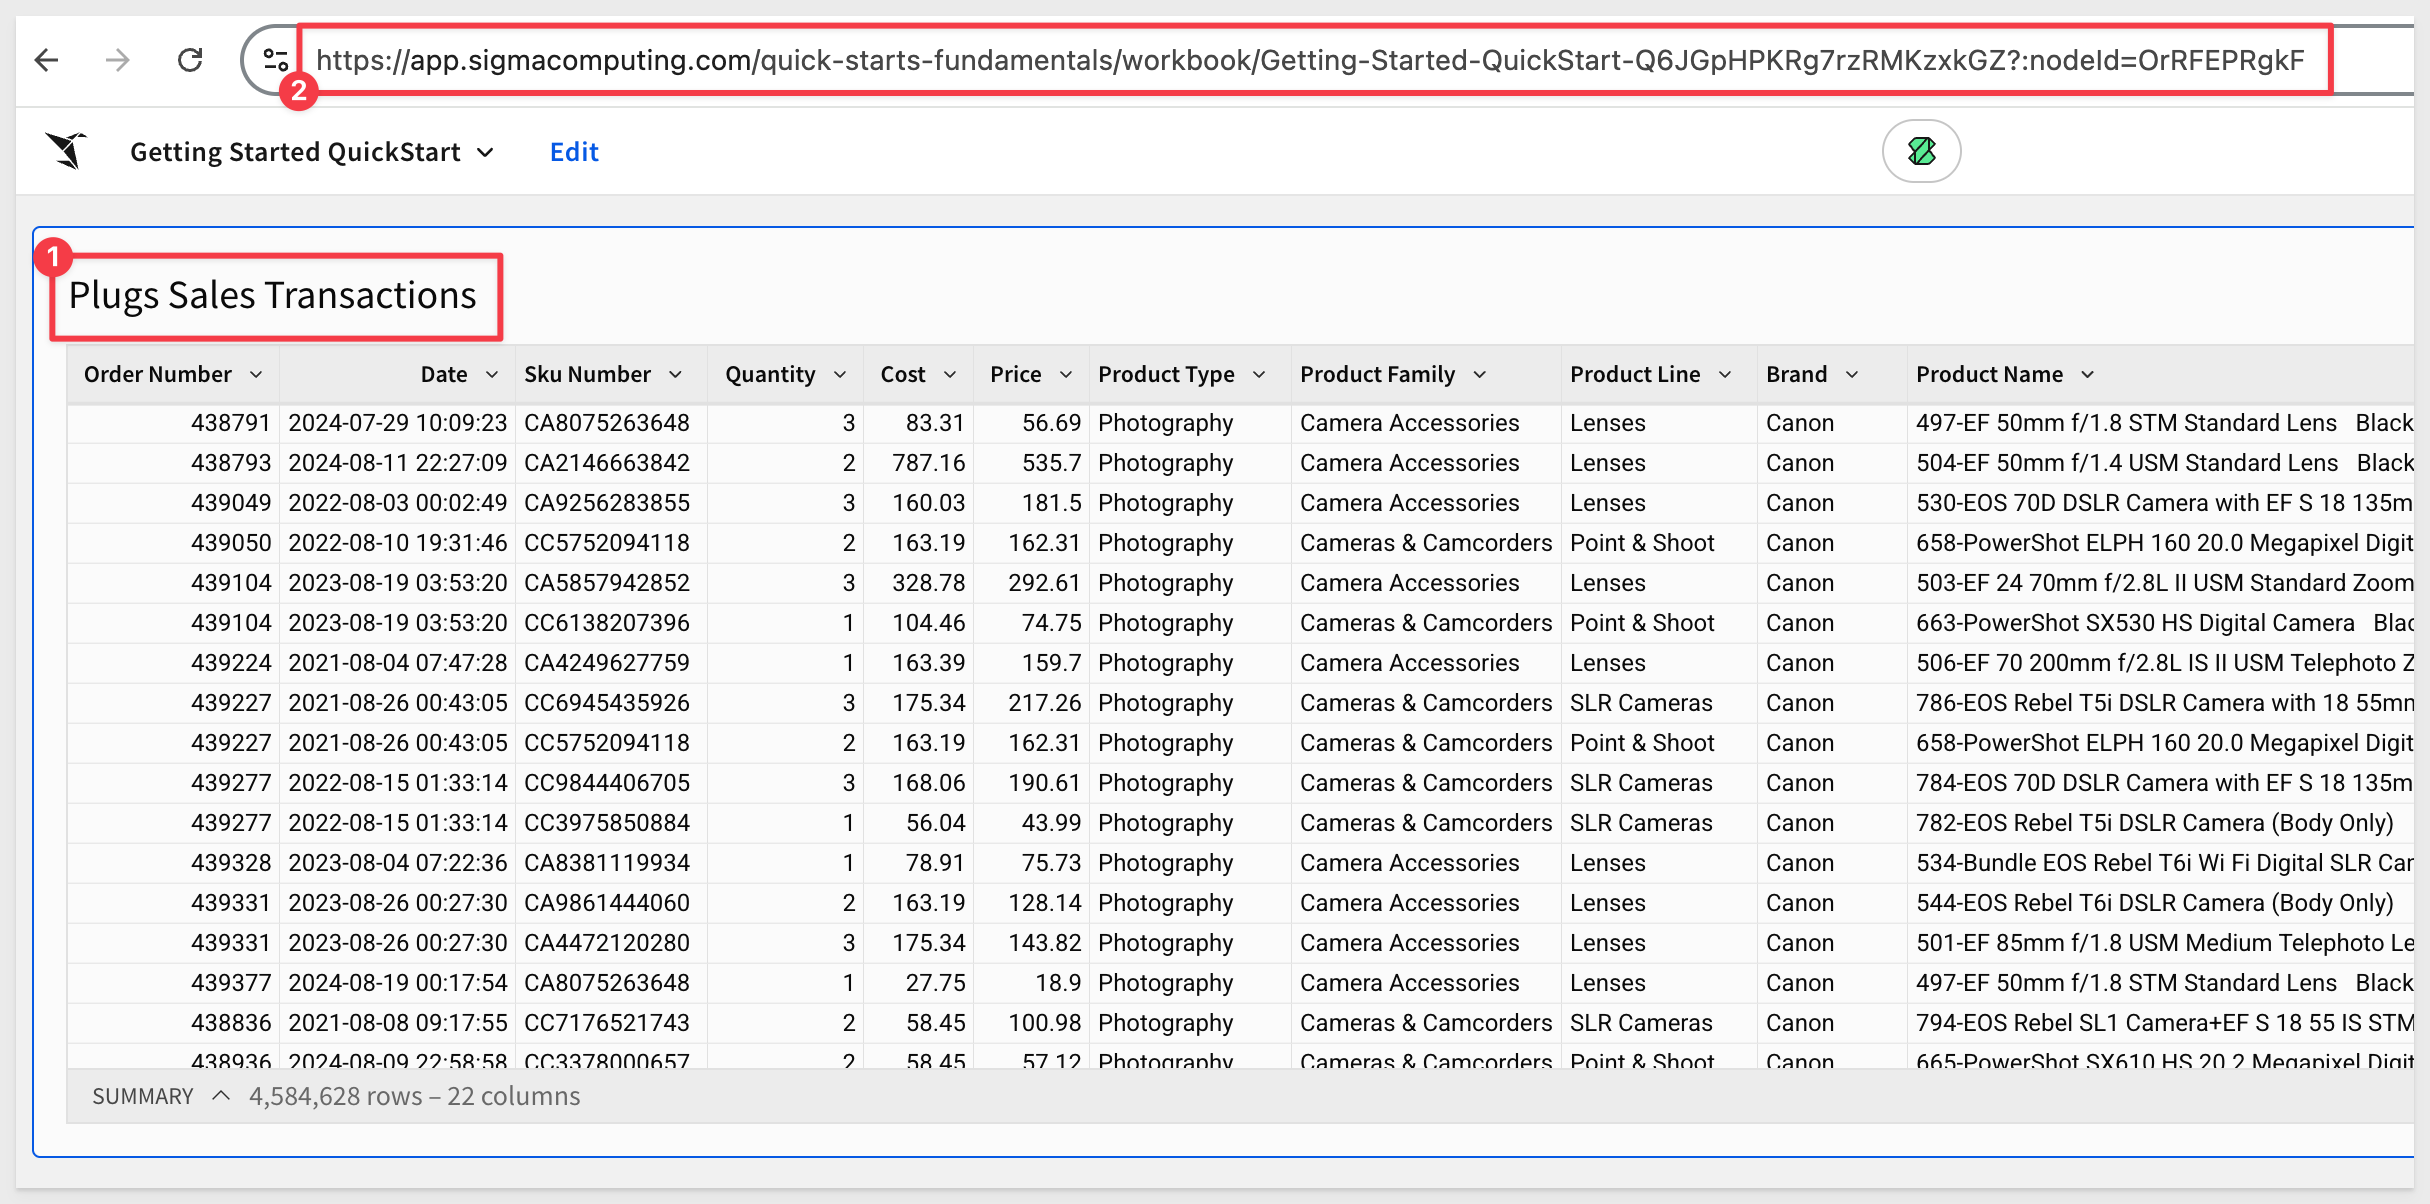
Paste the Base URL into the .env file in the # QS: getting_started group.
Let's make the embed work in the Git project set up earlier.
Return to VS Code and open the .env file (if not still open).
We have a few more parameters to configure.
For ACCOUNT_TYPE use View.
For EMAIL, use any address that is not already associated with a native Sigma account.
For more information, see Turn off automatic embed user creation
For TEAMS use Sales_People.
For example: 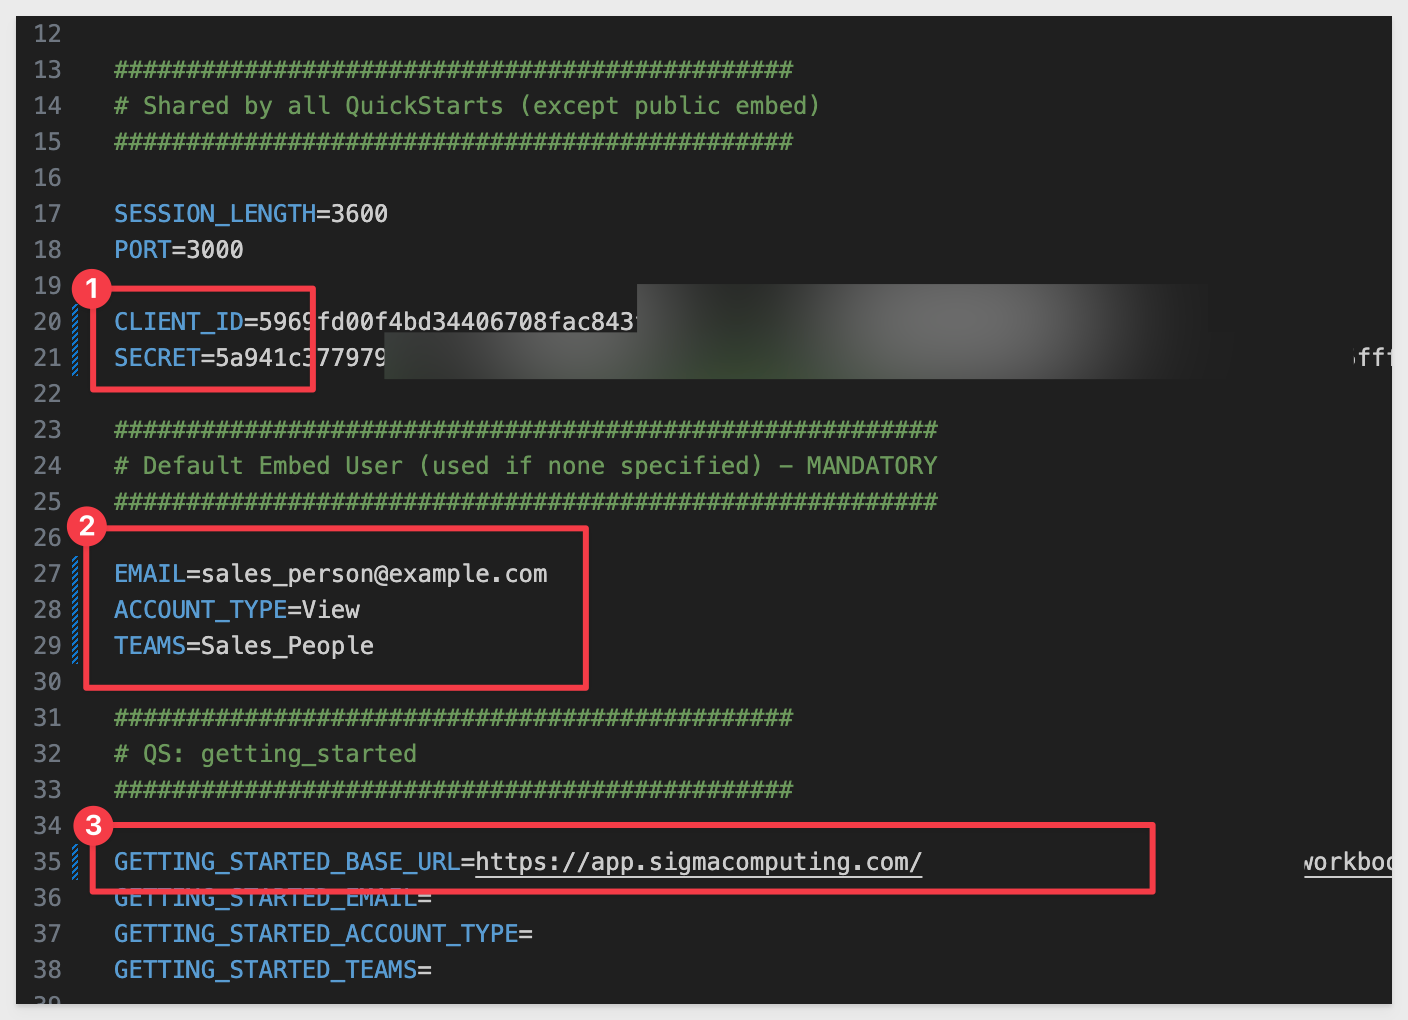
Save the changes.
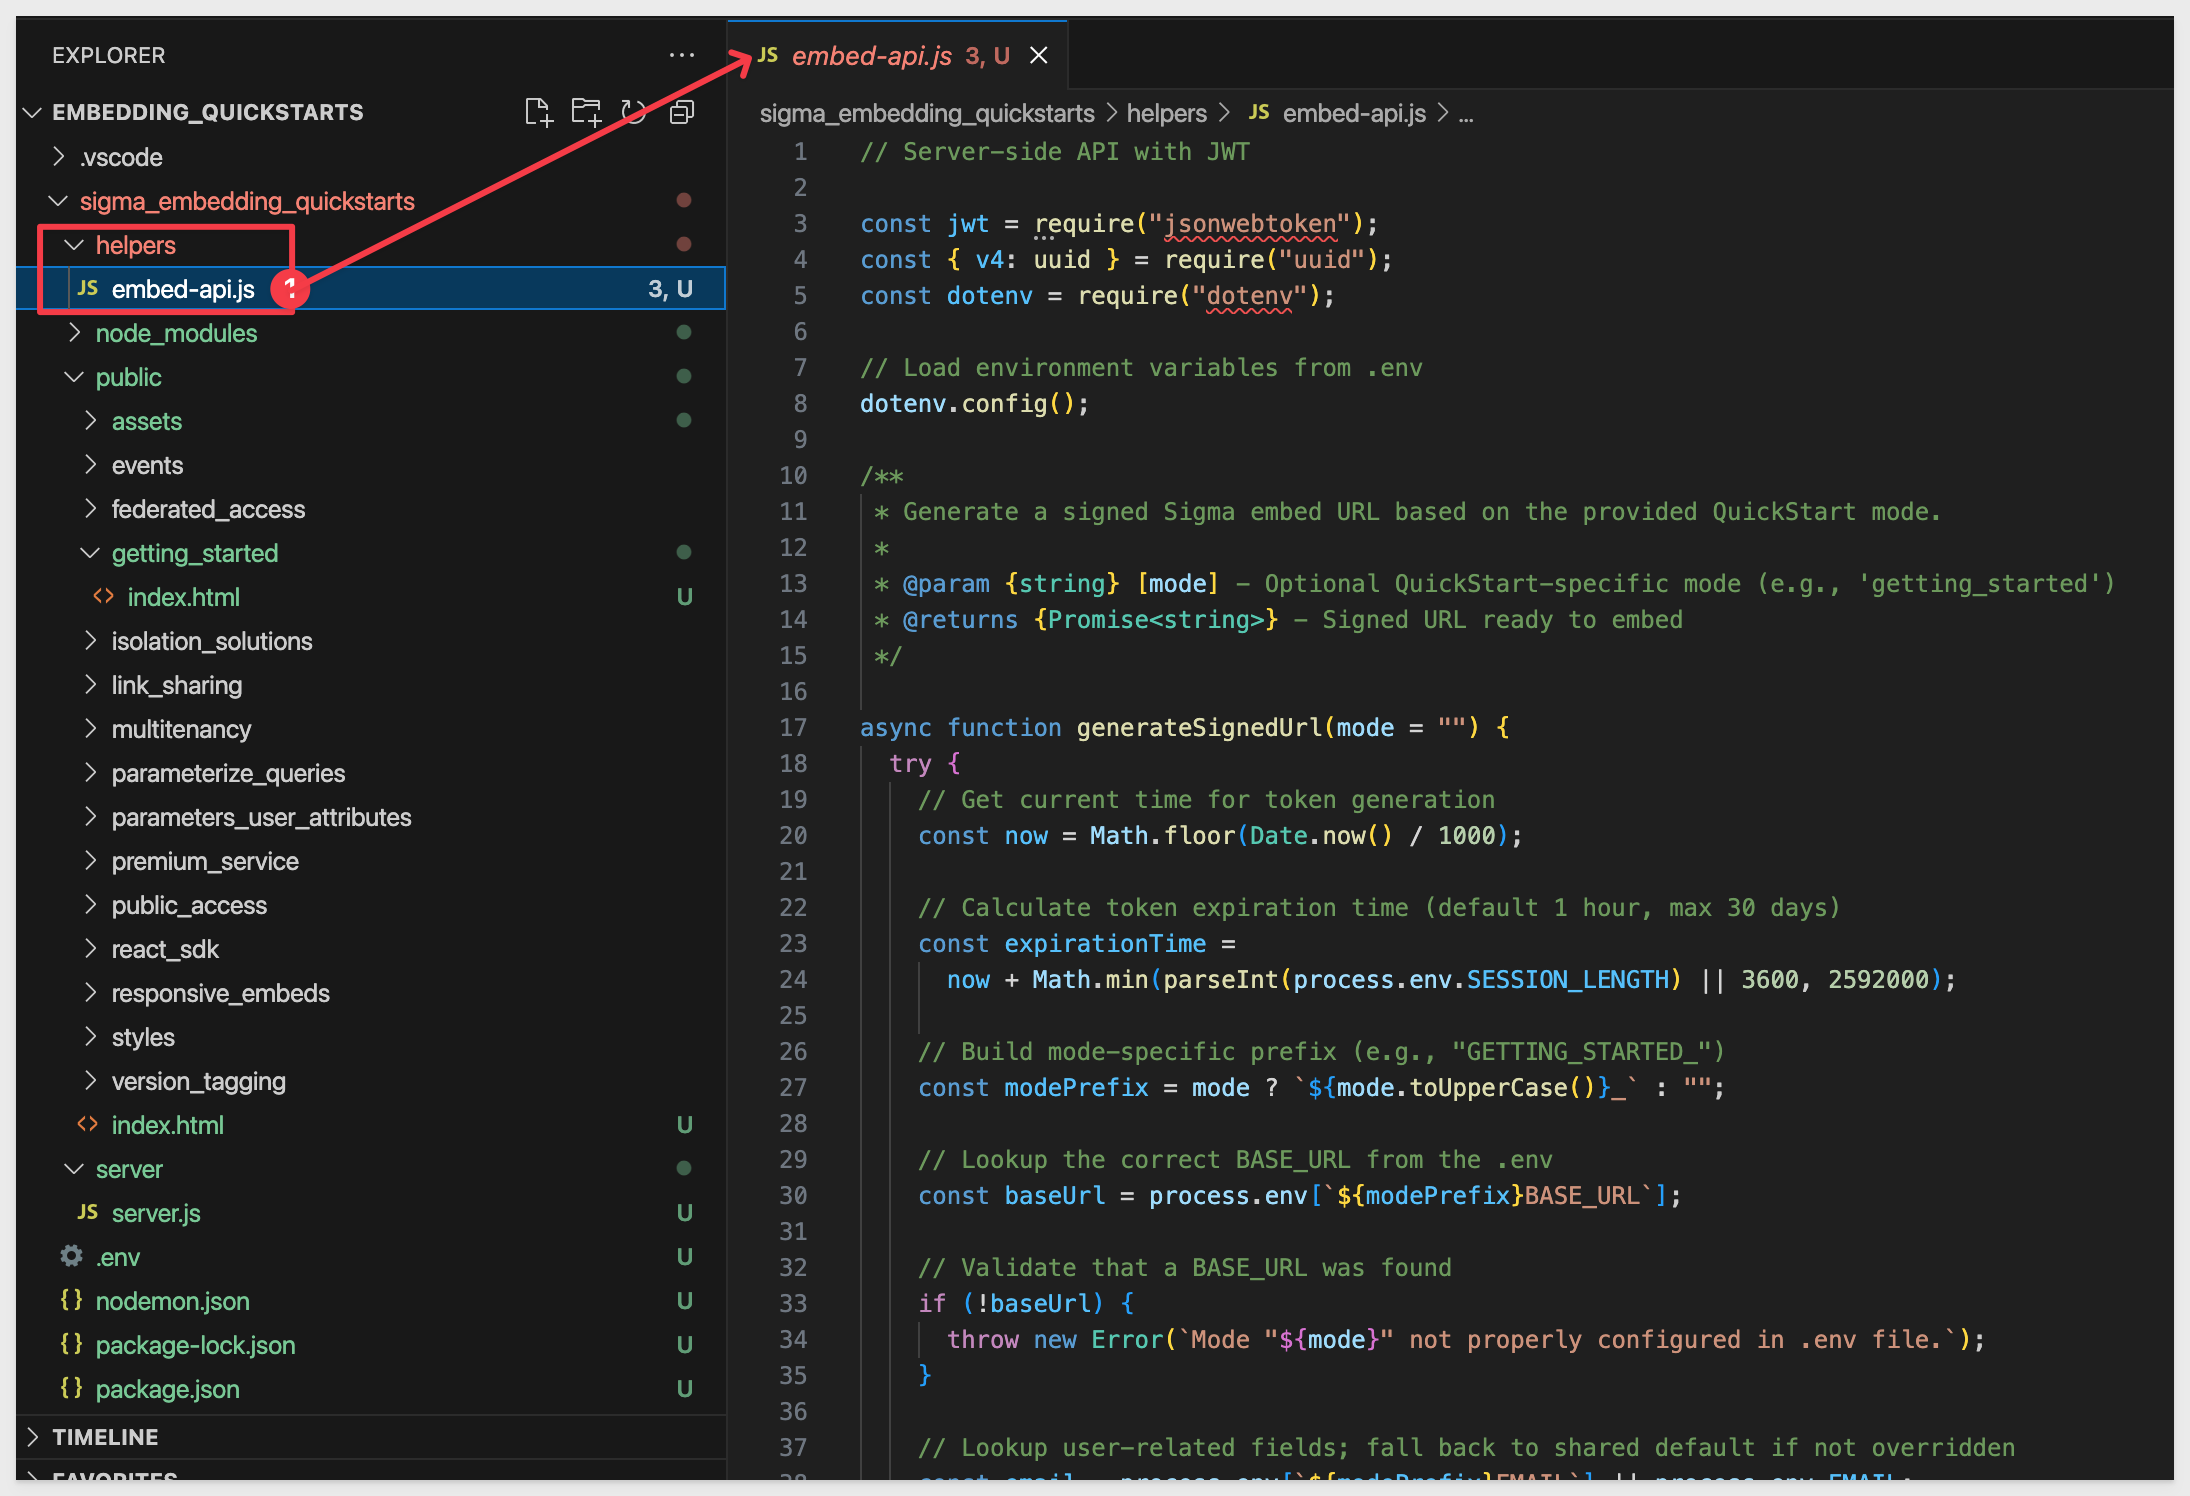
Embed-API Script
The embed-api.js script is fully commented to explain what each part does. The file is stored in the helpers folder.
Start Express
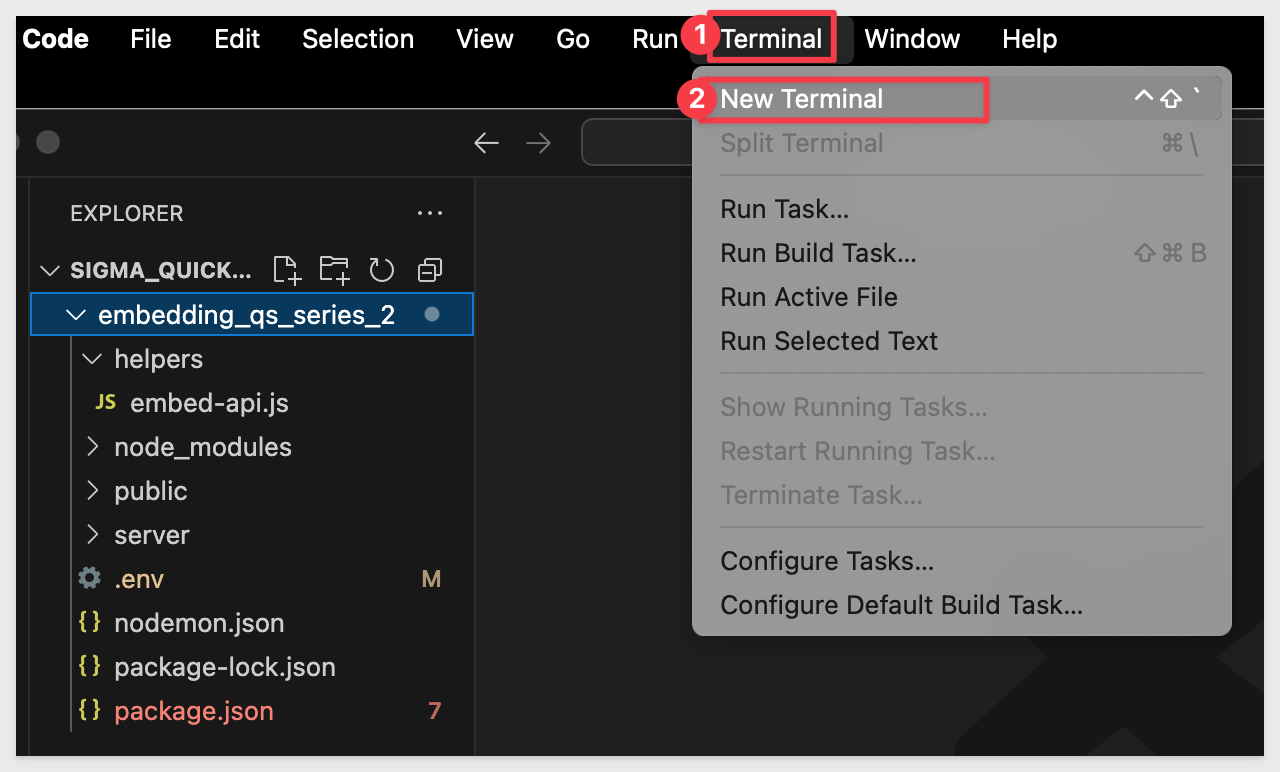
Open Terminal inside VSCode:
Change the directory using the following command:
cd embedding_qs_series_2
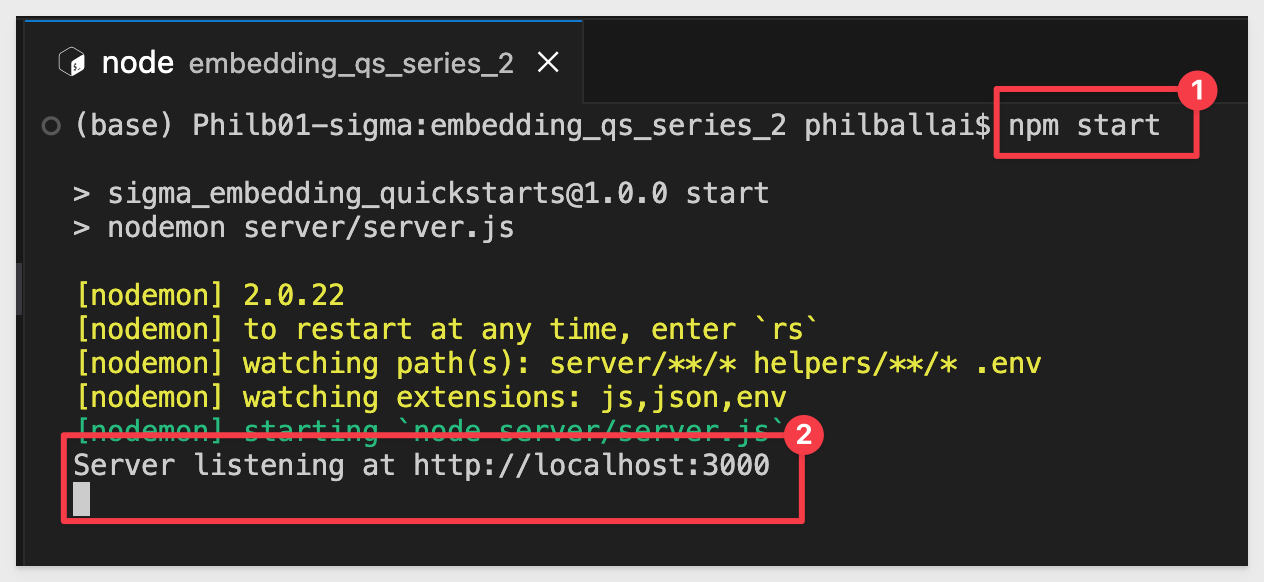
Start the Express server:
npm start
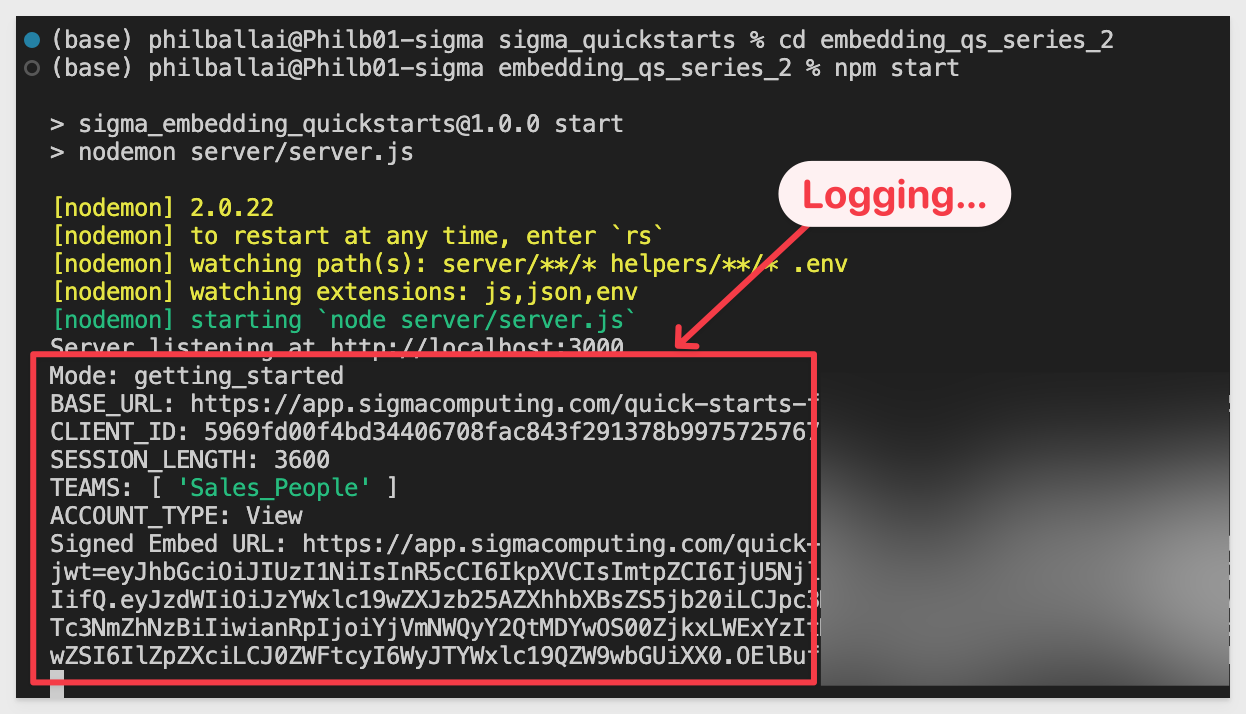
The server is started when it displays Server listening at http://localhost:3000.
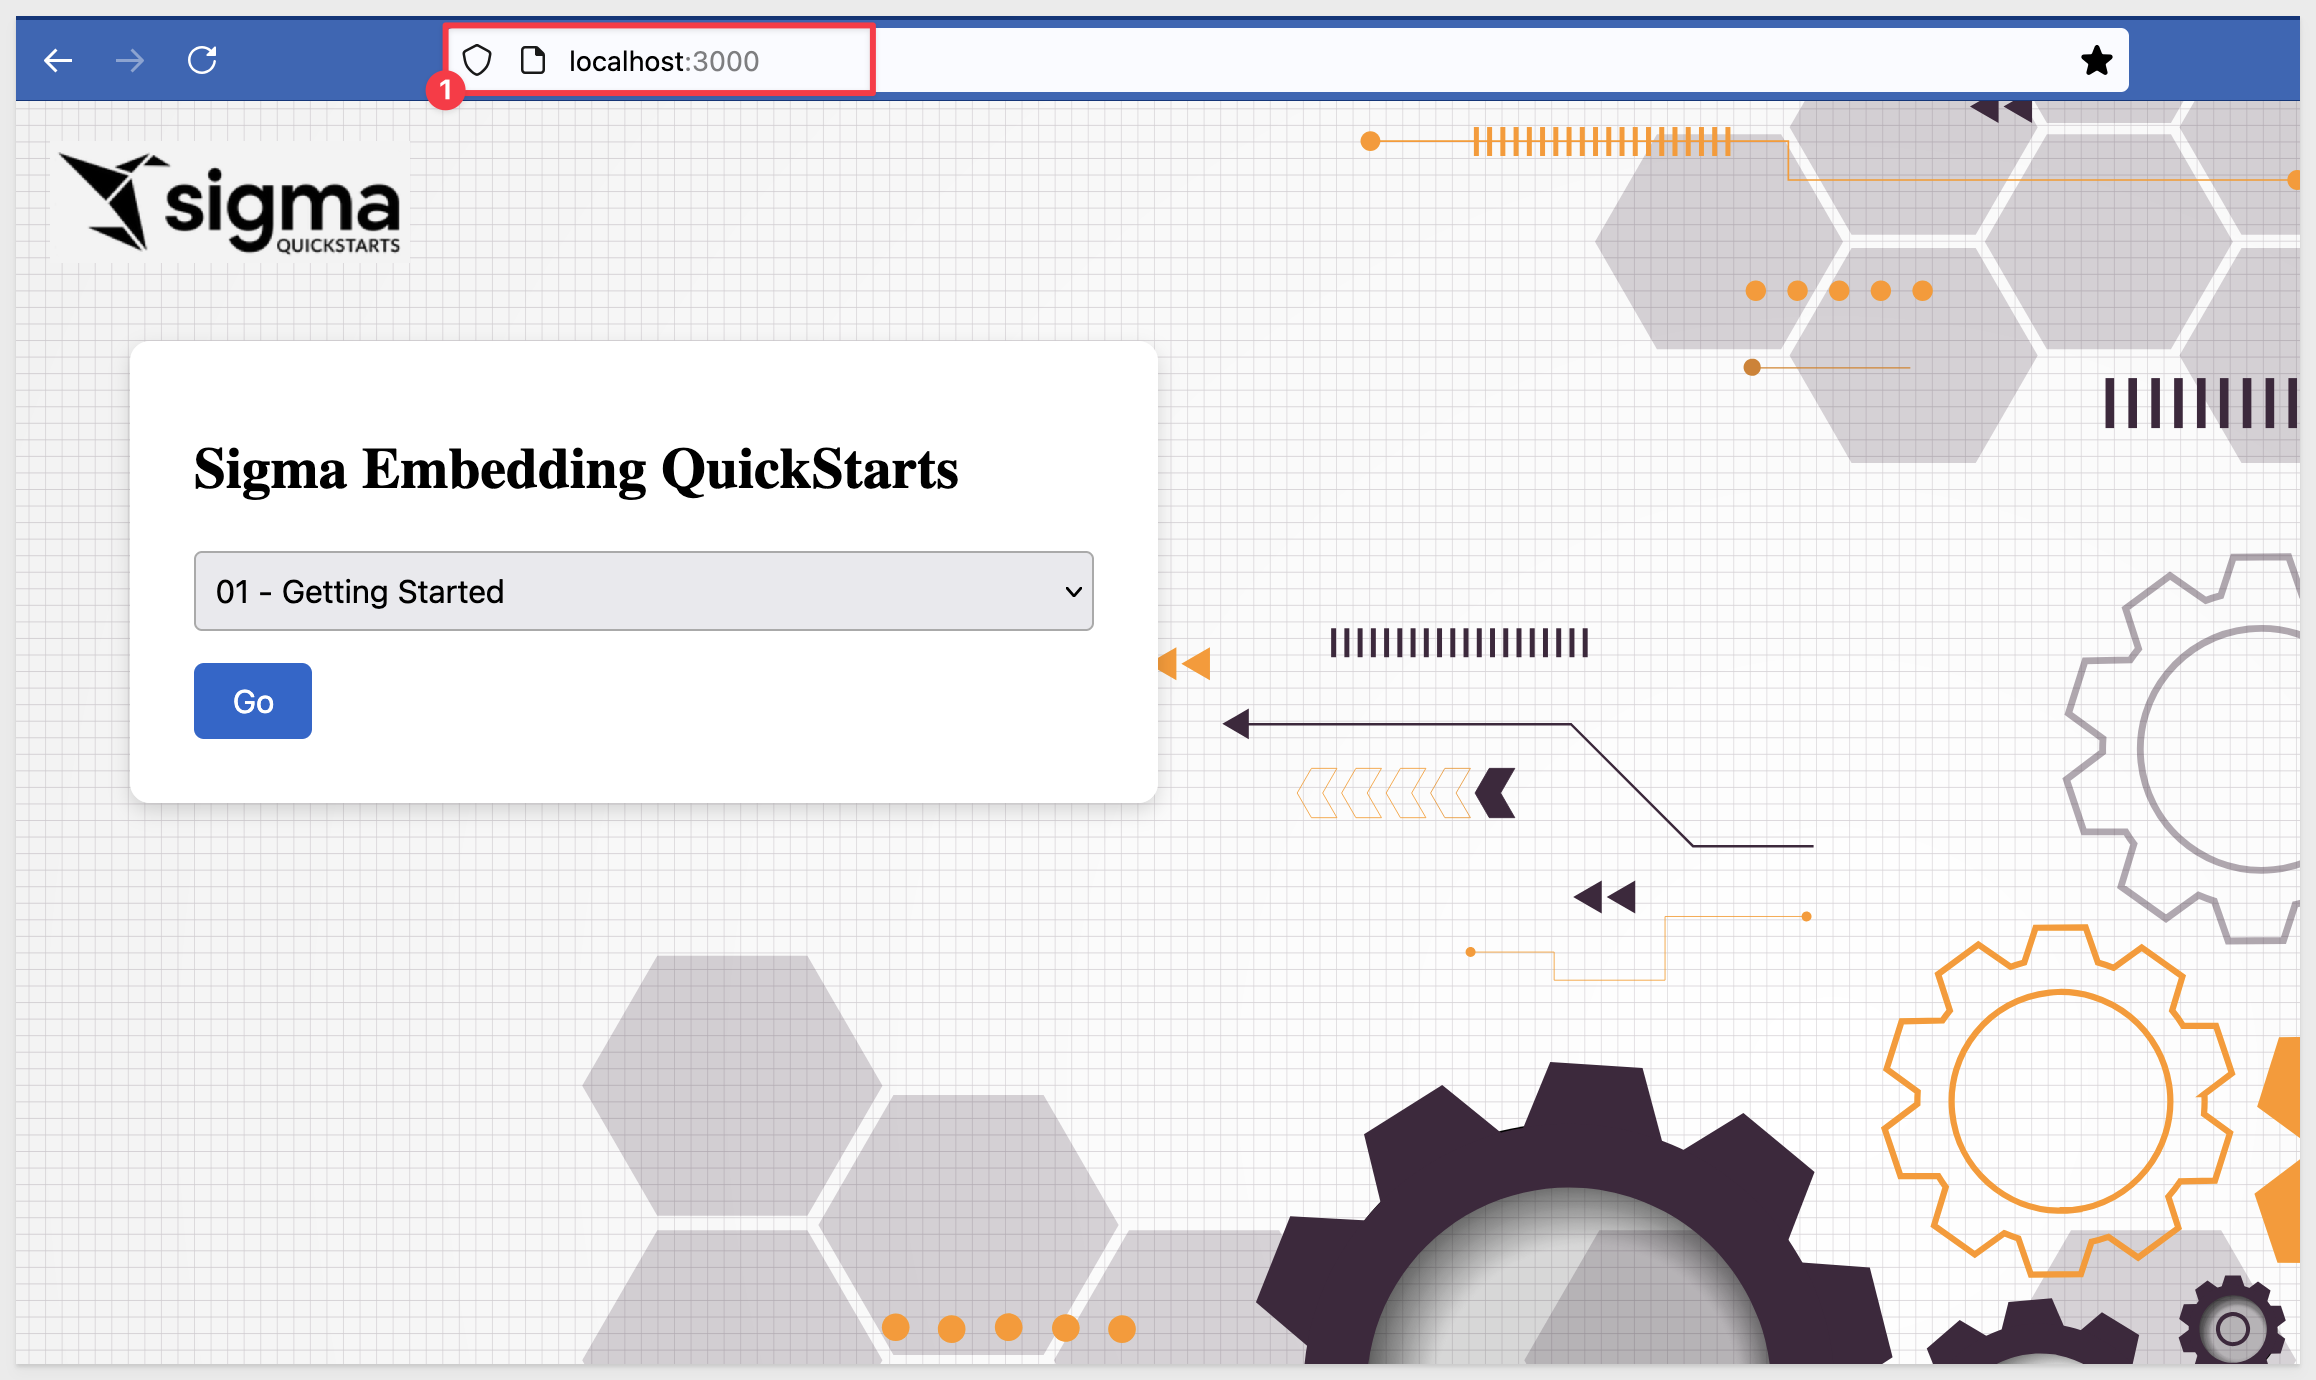
Now we can launch the Getting Started QuickStart from the landing page by browsing to localhost:3000 and clicking Go:
The Getting Started page comes with a side-panel that displays the base URL and the Workbook ID (on separate lines), confirmation that we are using HS256 encryption and the decoded JWT payload.
The actual token appears lower on the side panel for anyone who wants to validate it using a third-party site like JWT.io:
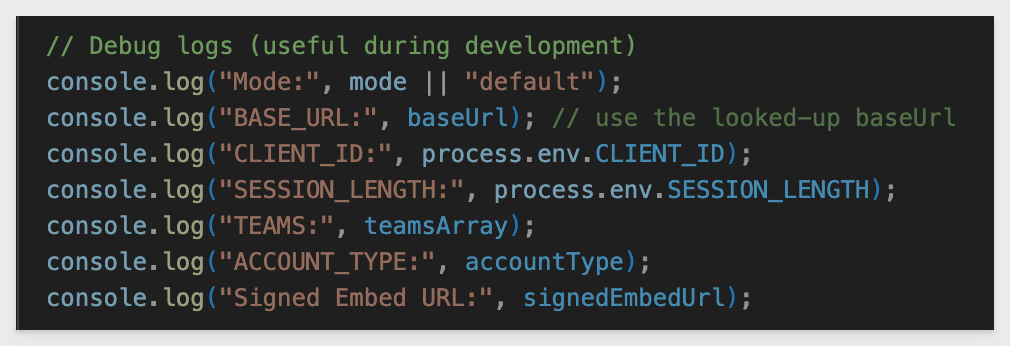
Once the local Express server is running, logging output appears in the console each time a page with an embed is reloaded:
Sigma also provides an "in-product" embed sandbox that allows you to test your embed before integrating it into the host application. This allows you to view the content from the embed user's perspective to verify security settings and other configurations.
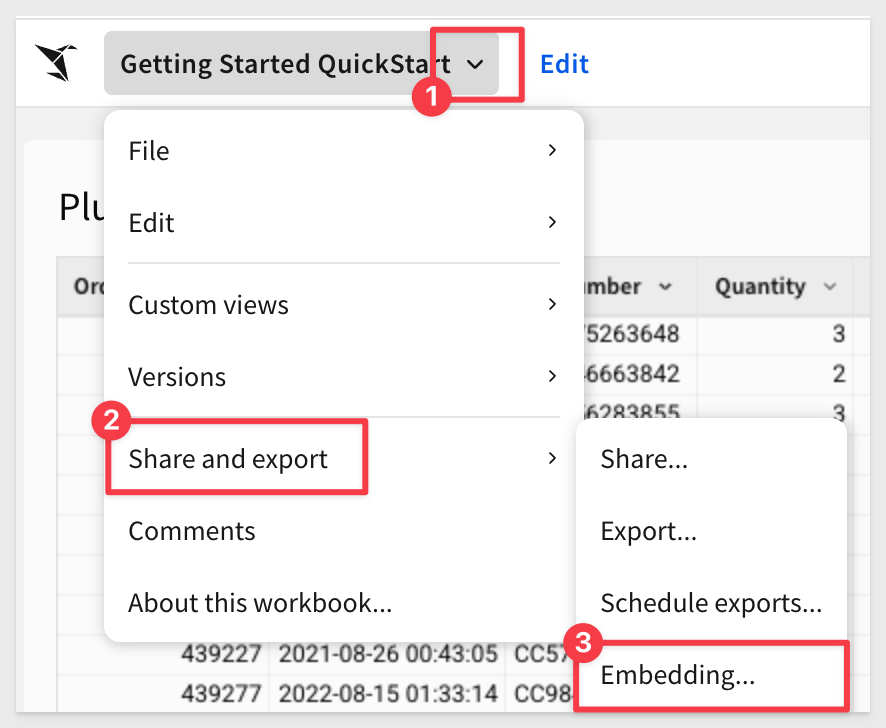
Open the workbook's menu and select Share and export, then Embedding...:
Select JWT, choose Page 1 - Plugs Sales Transactions from the list control, and click Test:
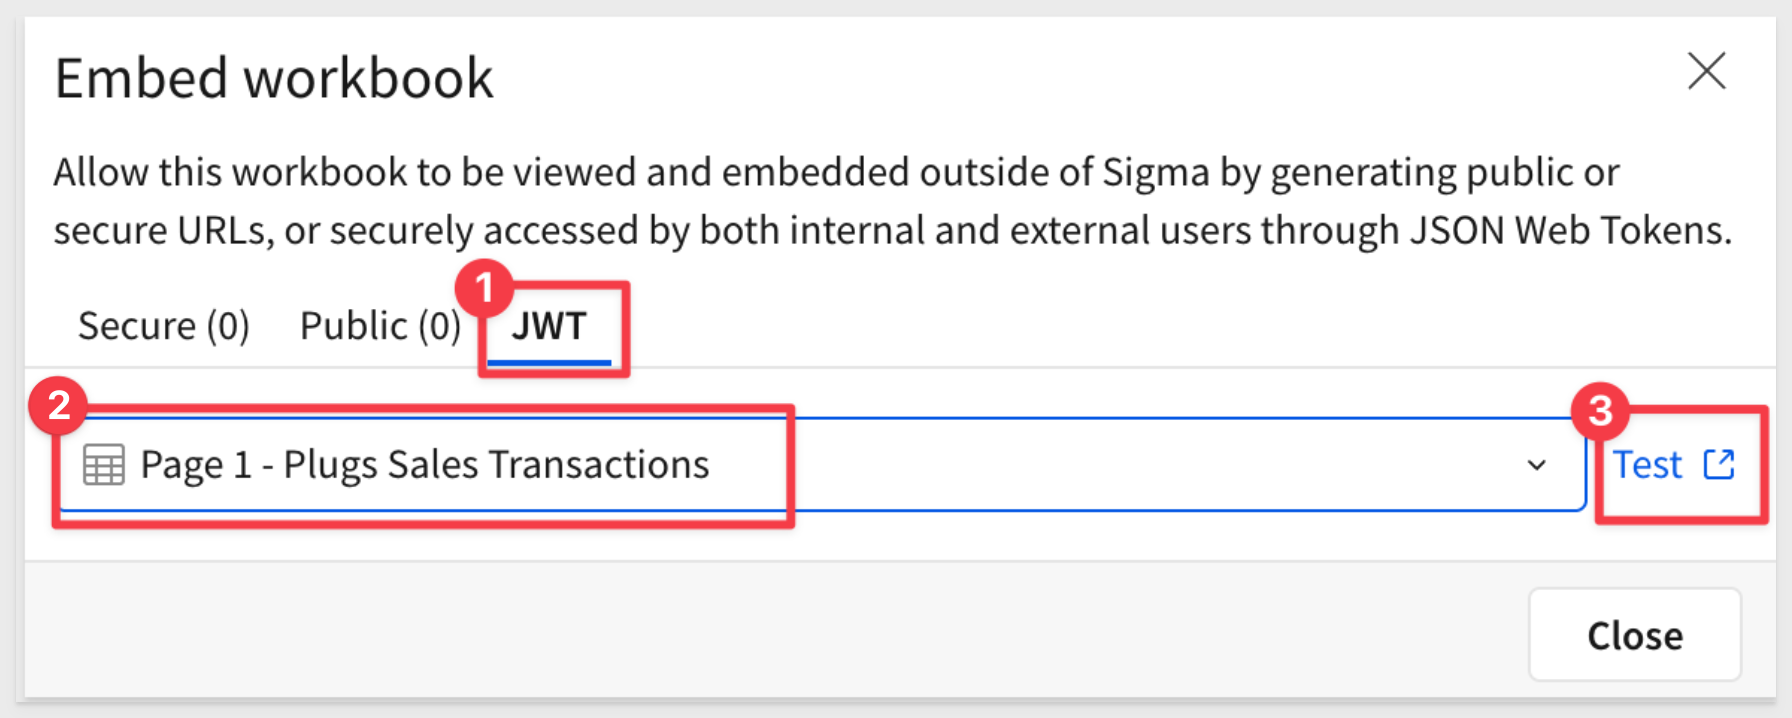
This opens the embedding sandbox with the selected element pre-configured.
Select your Client credentials and click Load embed to see the result:
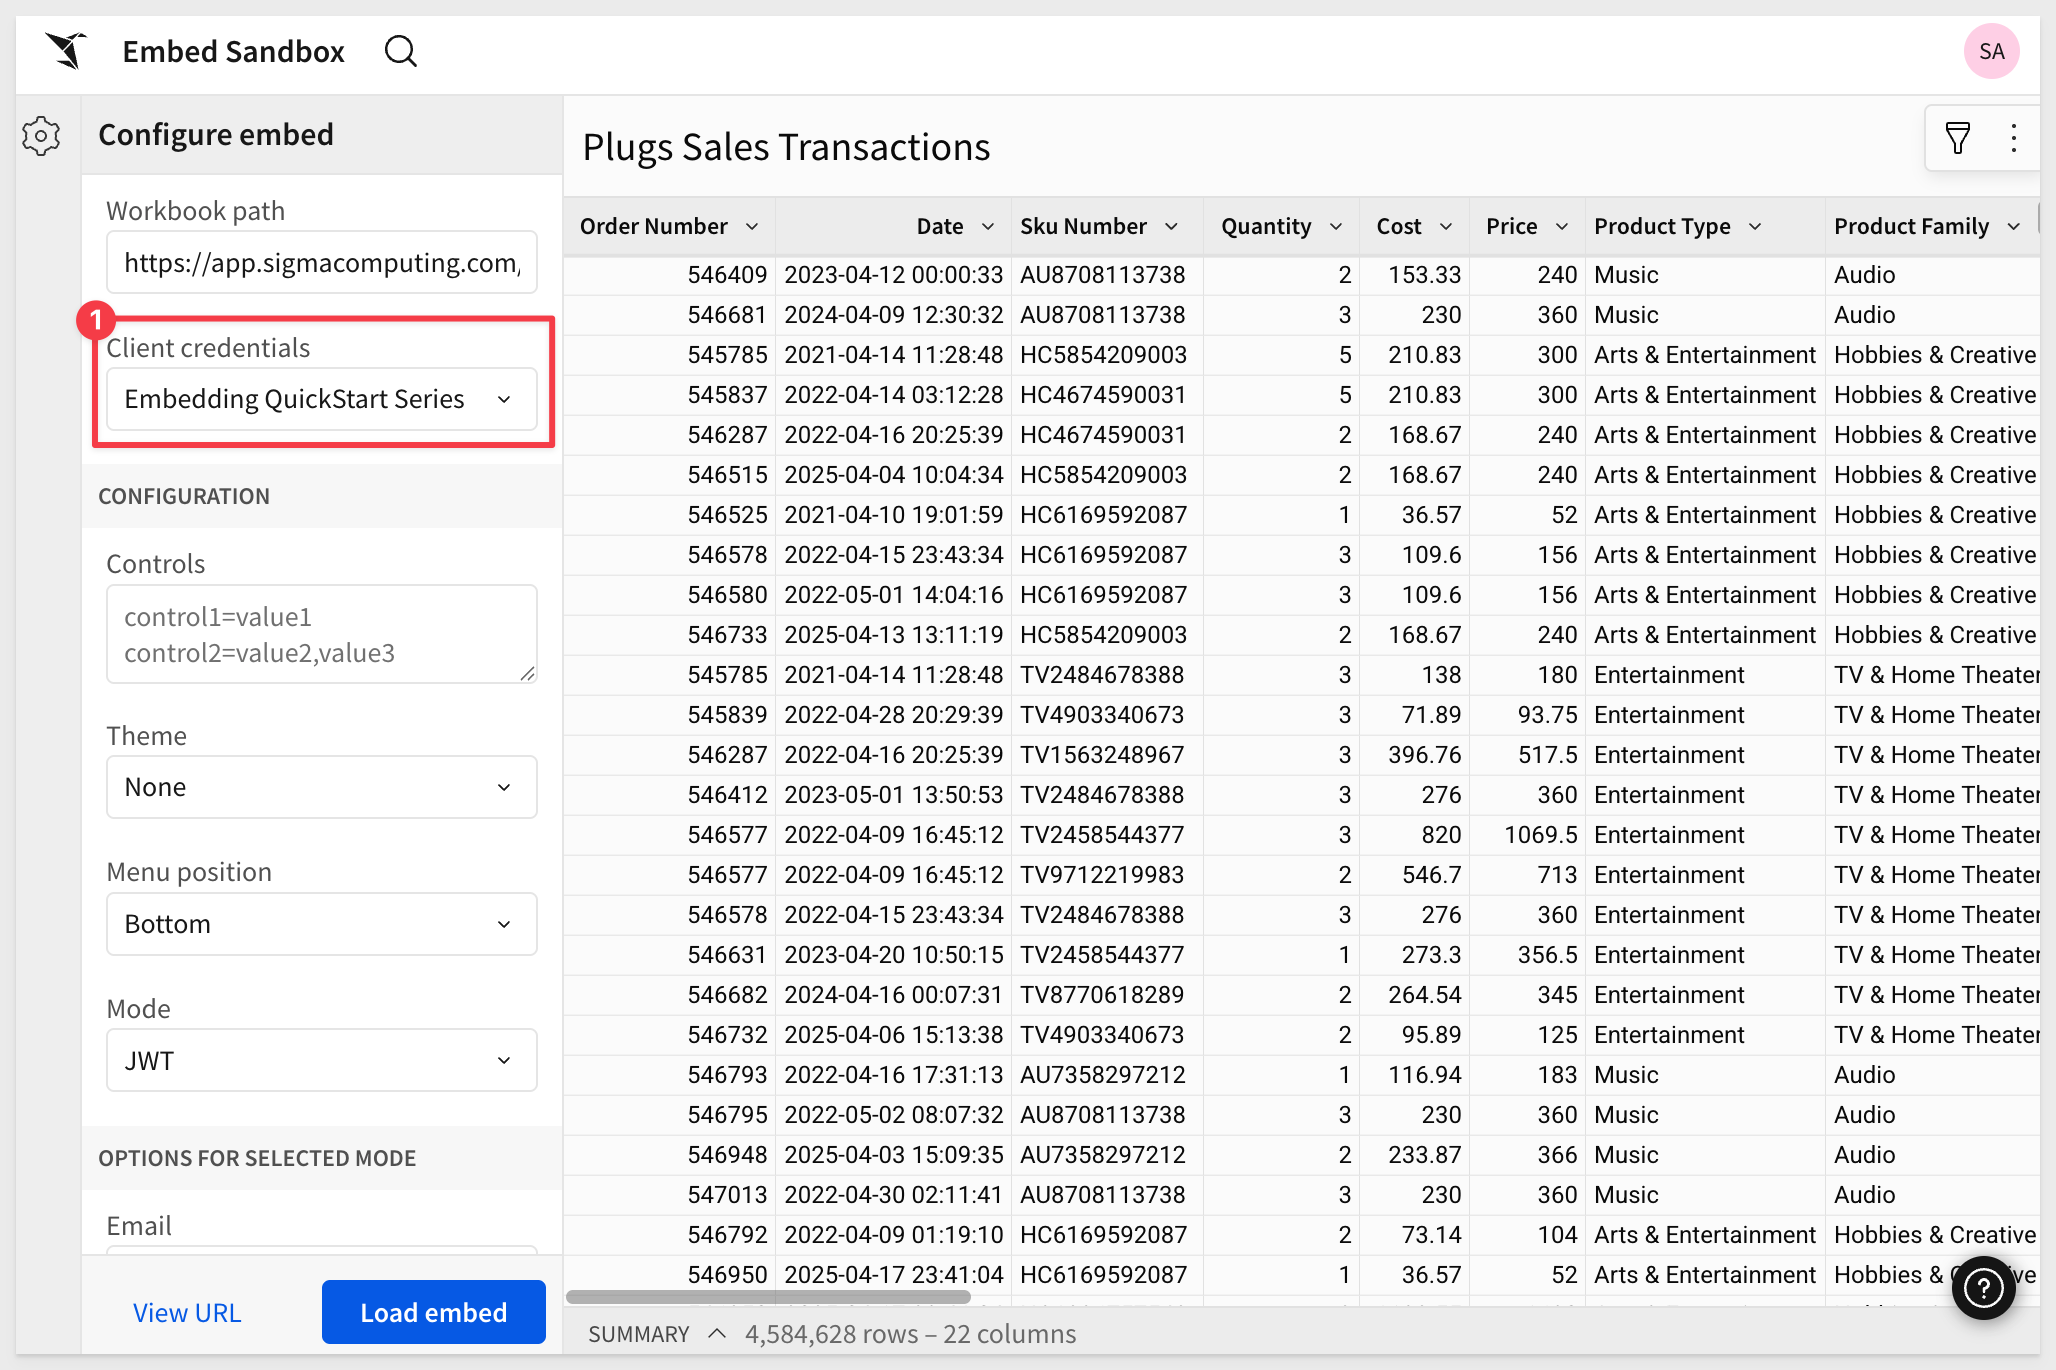
You can adjust a variety of options to test different scenarios, which can help save time during initial testing.
For more information, see Test an embed URL in the embed sandbox
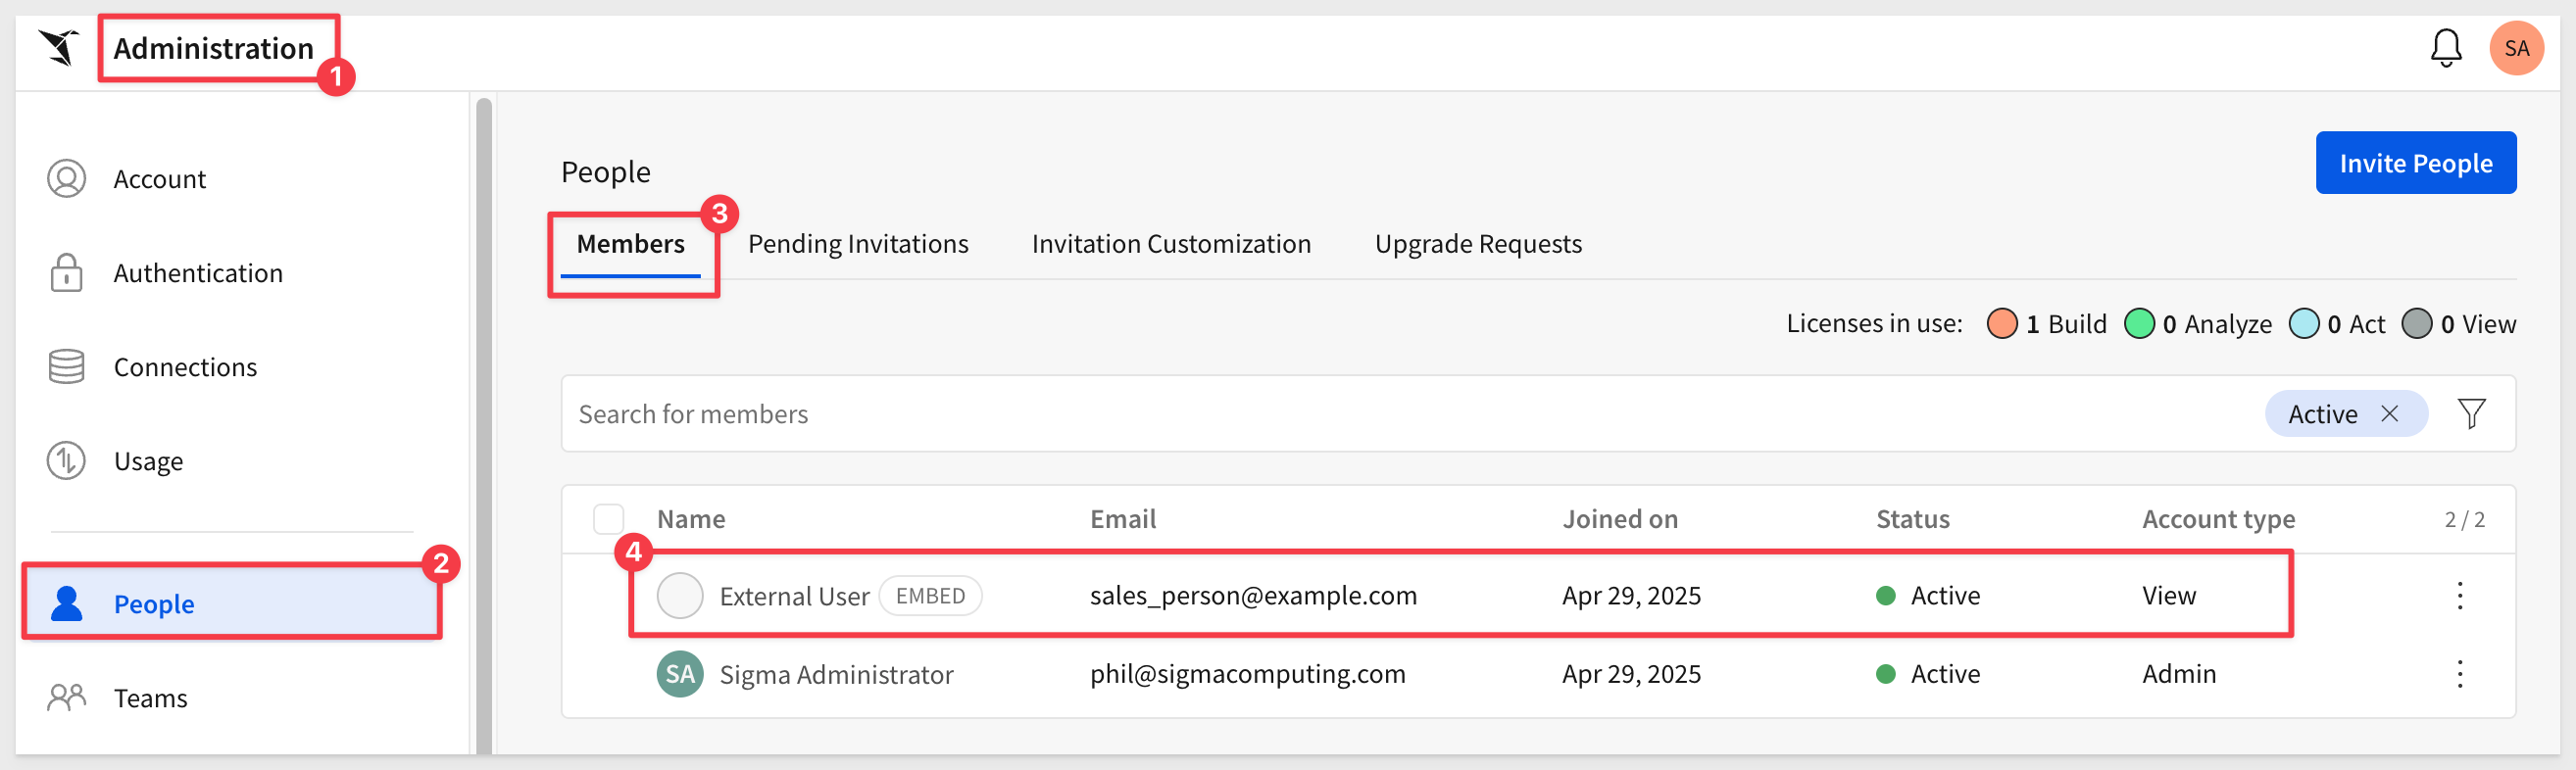
There are a few ways to see what embed users are doing in Sigma. After a user accesses a page in the host application that contains embedded content, they are automatically added to the Members list in Administration > Users:
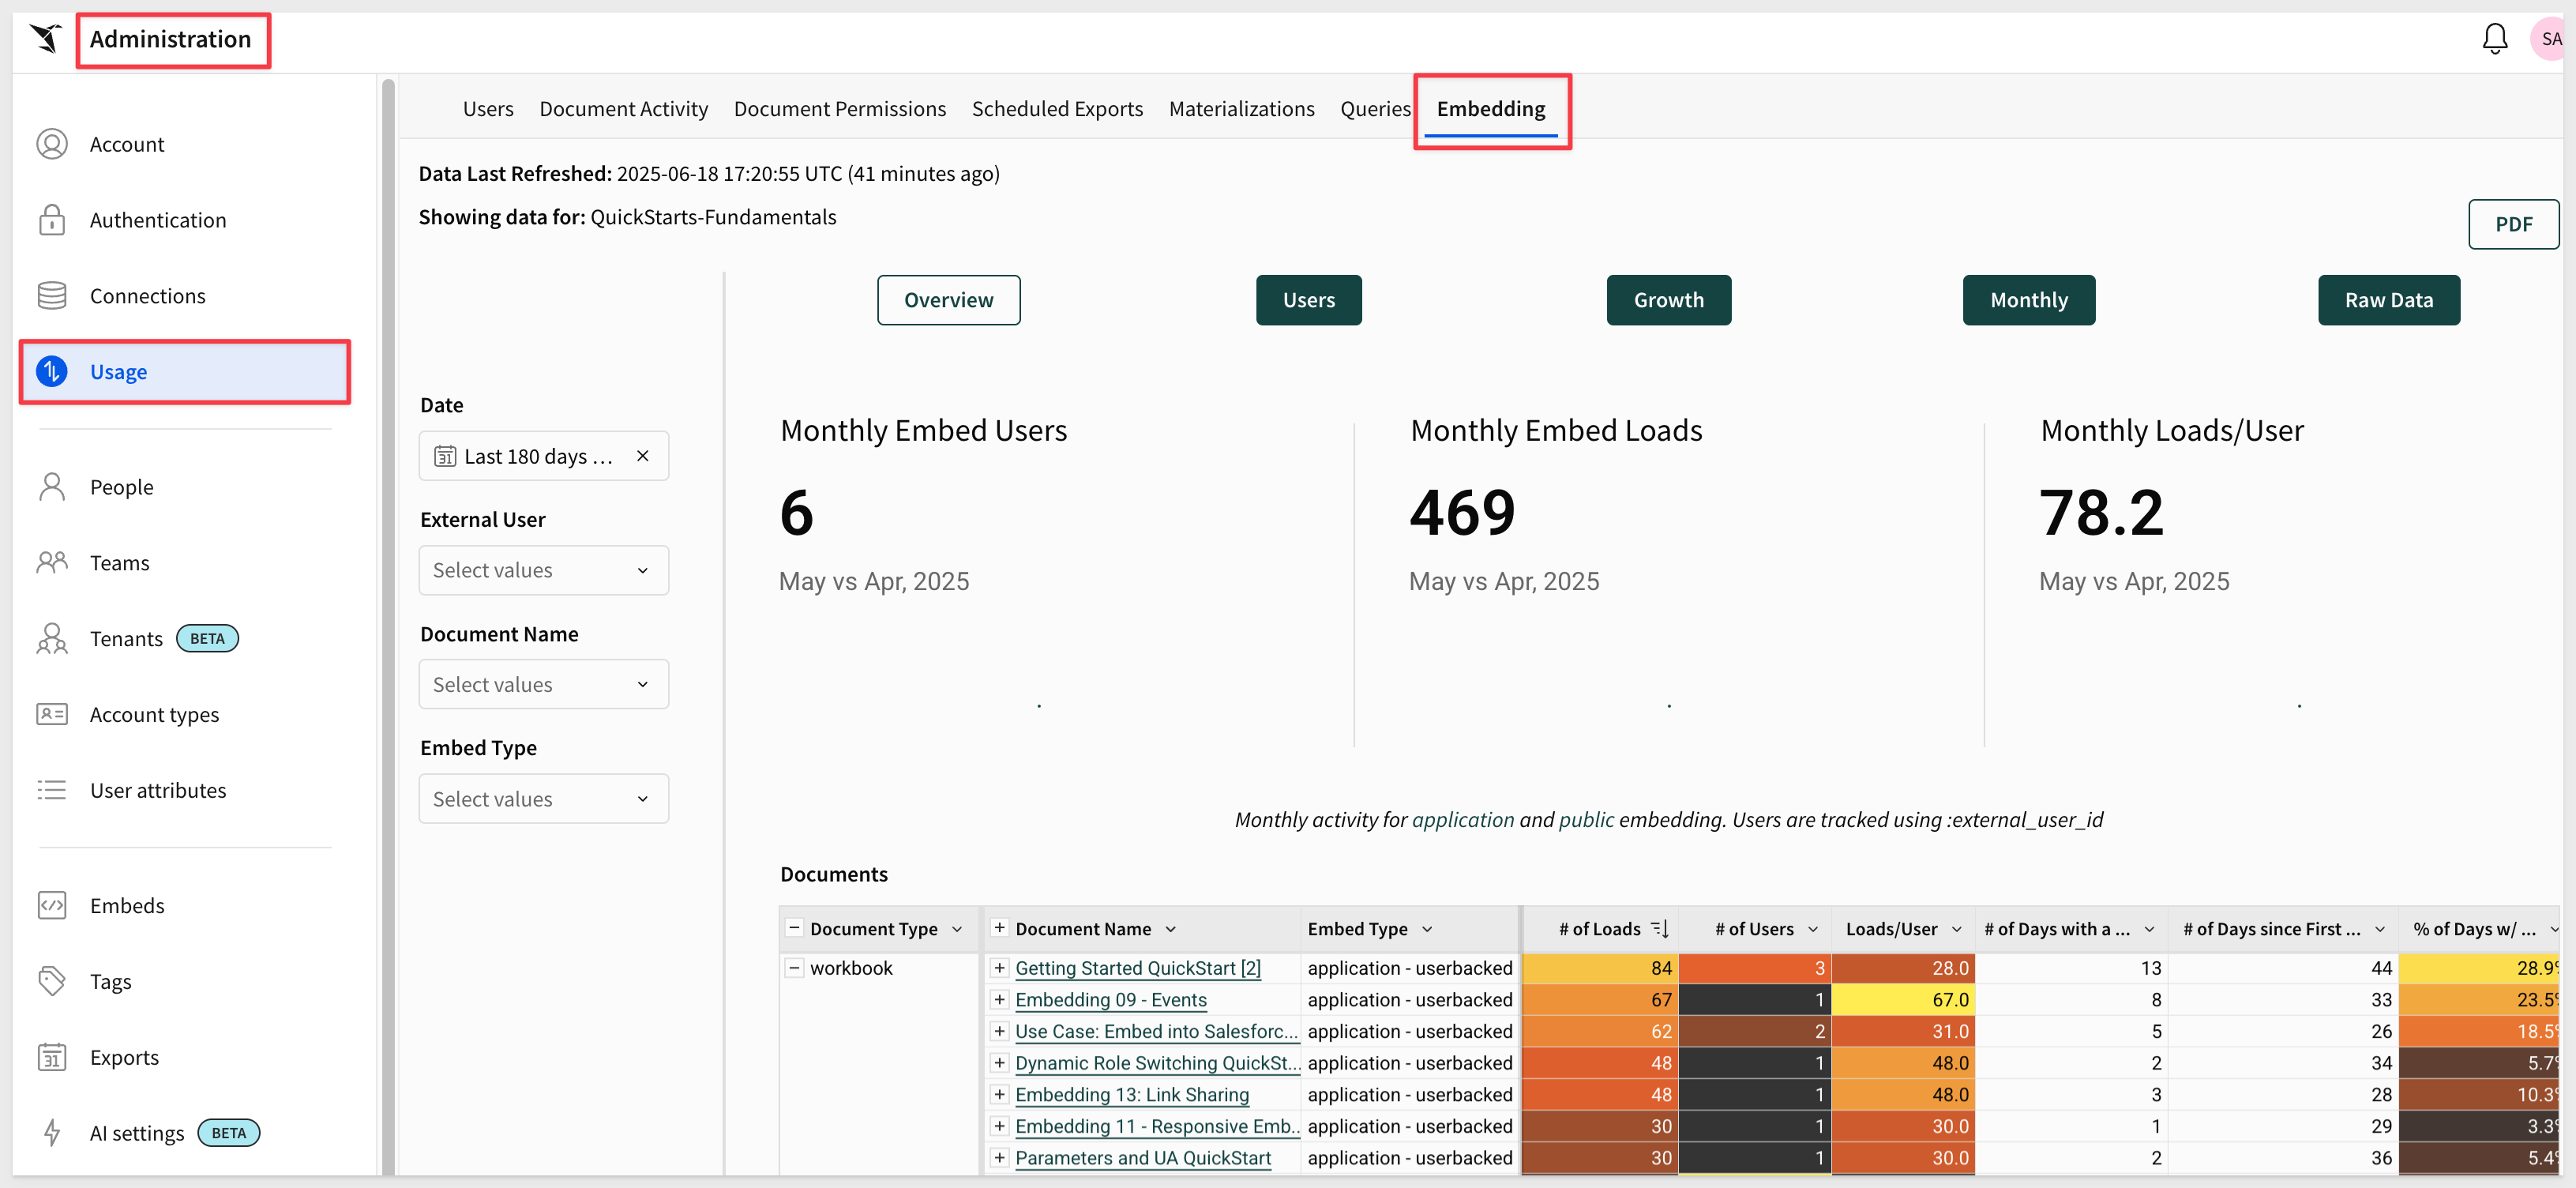
Usage Reporting
Sigma provides administrators canned usage reports for a variety of things including embedding:
Audit Logging
Customers can also enable audit logging and manually analyze raw event logs if preferred. Logs can be exported for integration with external systems. To learn more, see Access and explore audit logs
Customers can enable audit logging and manually analyze raw event logs if preferred. Logs can be exported for integration with external systems.
To learn more, see Access and explore audit logs
In this QuickStart, we explored the fundamentals of secure embedding in Sigma using JSON Web Tokens (JWT).
We set up client credentials, created a basic embedded application using Node.js and VSCode, configured user access through Sigma's team and workspace structure, and tested embed behavior using both Sigma's sandbox and a local server.
Along the way, we decoded JWTs, examined embed permissions, and demonstrated how to manage fallback logic in the .env file for flexible configuration across embedding scenarios.
Additional Resource Links
Blog
Community
Help Center
QuickStarts
Be sure to check out all the latest developments at Sigma's First Friday Feature page!