This QuickStart introduces you to Version Tagging in a Sigma embedded environment to manage promotion of workbooks via third-party CI/CD tools. Examples of popular Continuous Integration / Continuous Development (CI/CD) tools include GitLab, Jenkins, Circle CI, Bamboo and many others.
Version tagging allows you to employ a software development lifecycle to control workbook versions, using tags. For example, Sigma can have development, staging, and production versions of a workbook and migrate changes as needed. This allows you to control which workbook versions are available to your users.
When you create a tag and assign it to a workbook, you essentially freeze the state of that workbook. The process of tagging a workbook creates a duplicate that can be shared with other stakeholders and users.
For example, you can create a "Production" tag and assign it to a workbook that is used by embed users. Moreover, you can tag additional versions of the same workbook such as "Development" or "Staging". These versions can be used by different stakeholders in your company for various purposes. Once reviewed, you can migrate this copy to production for your users via the CI/CD tool of your choice.
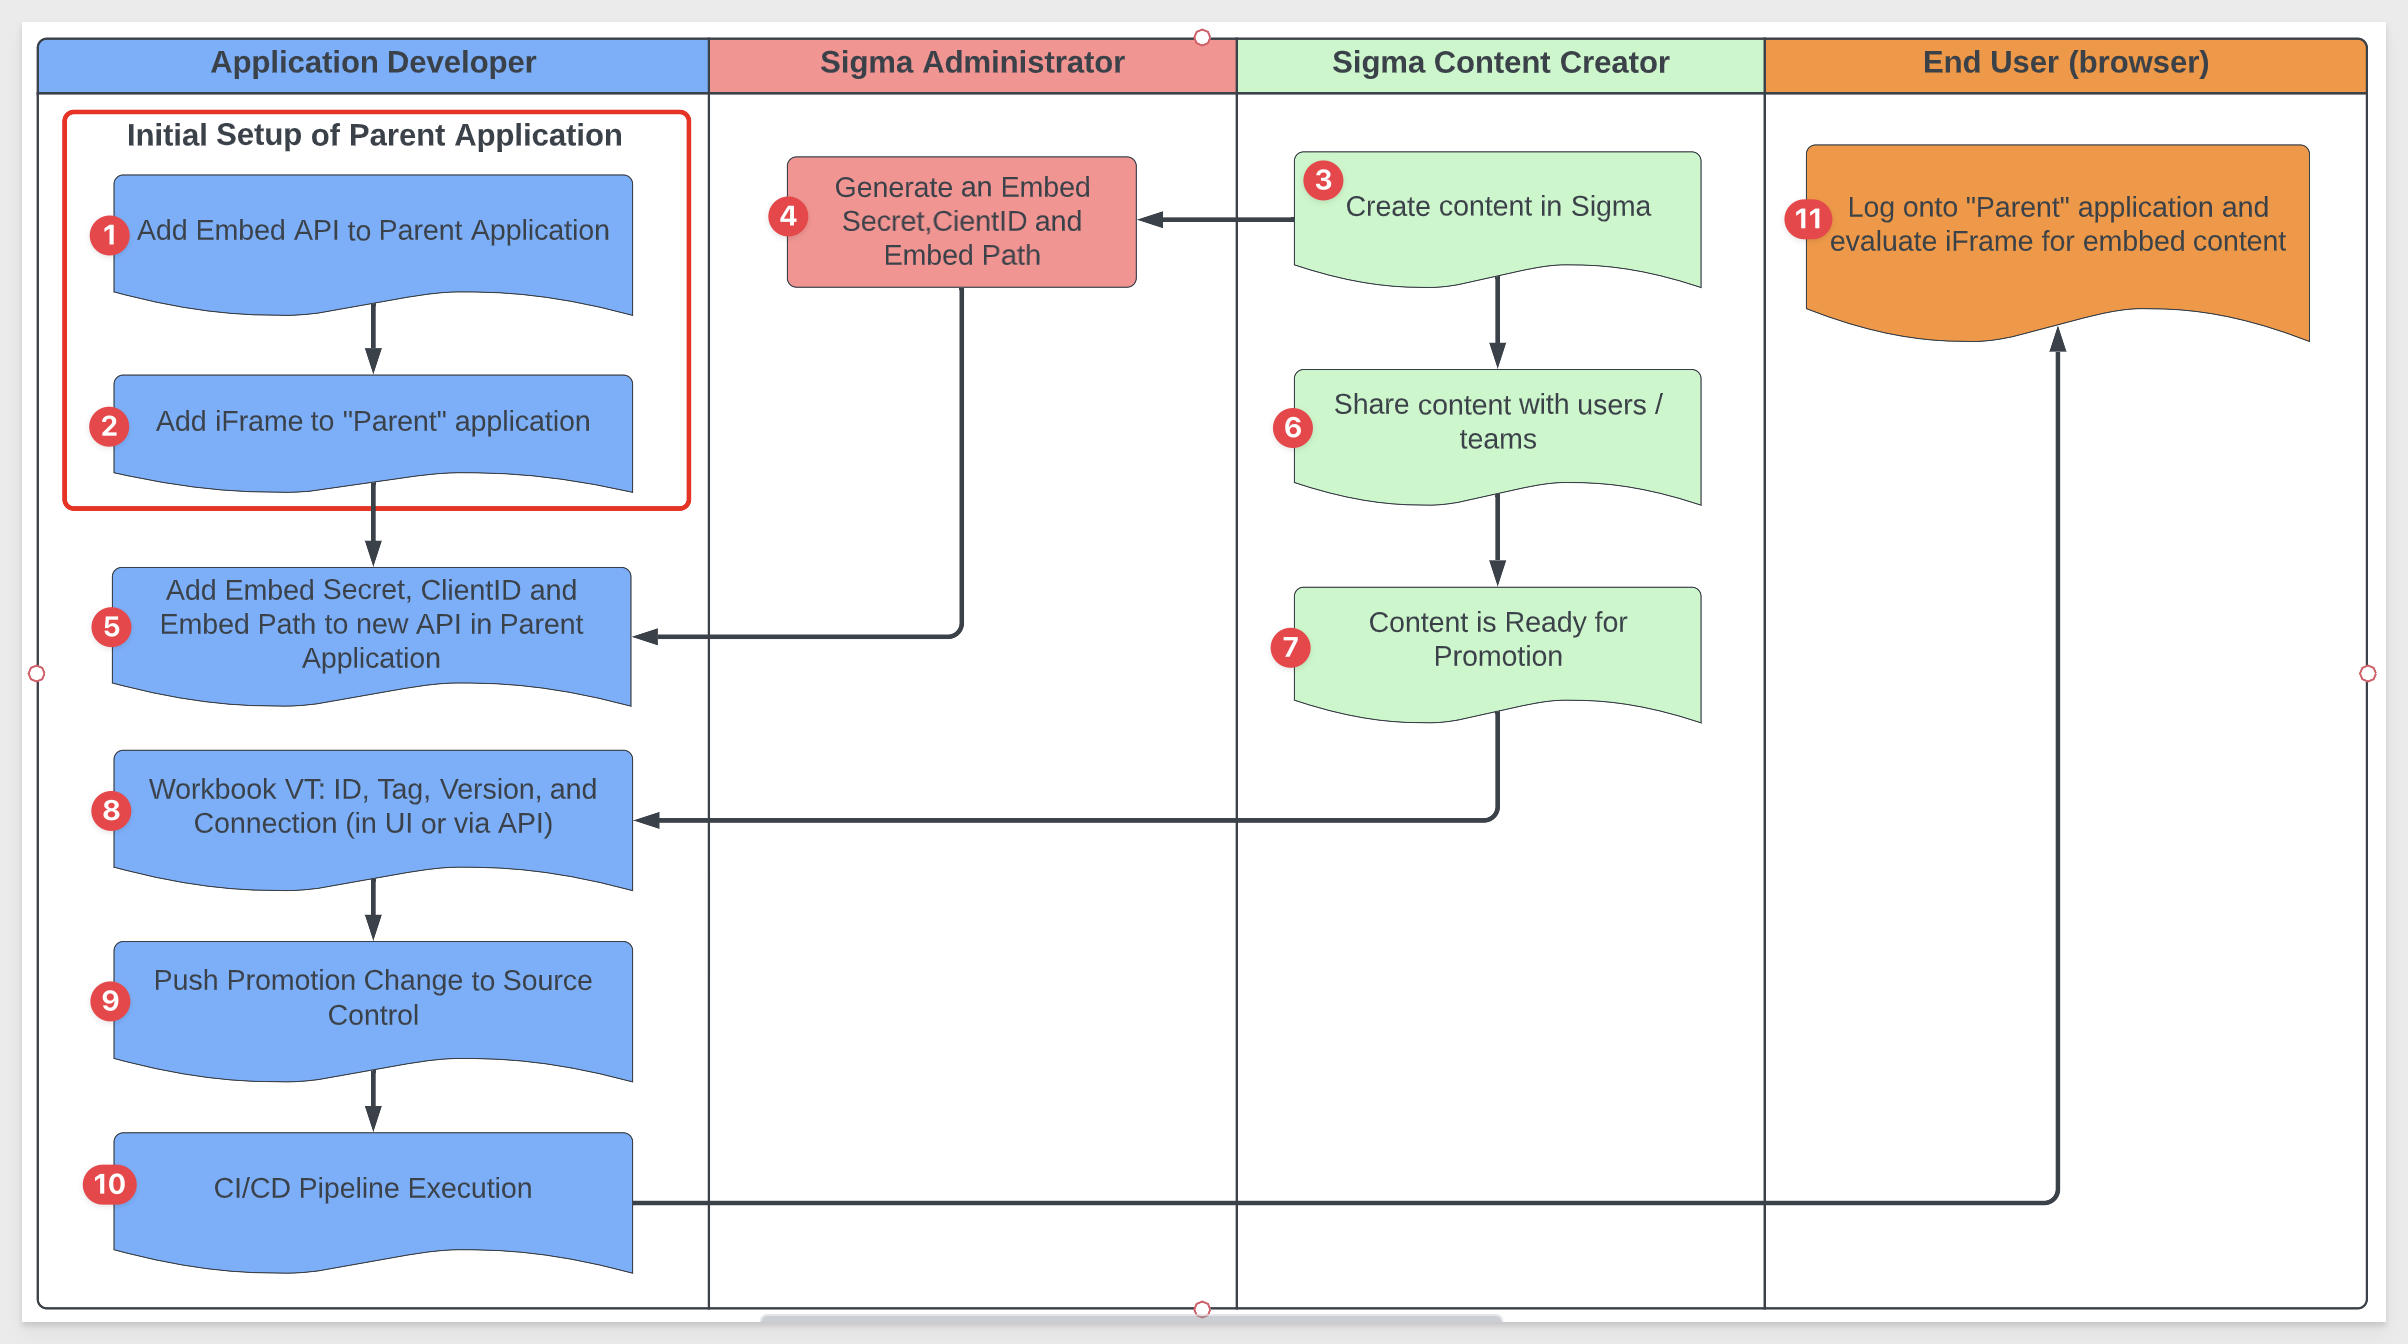
The tagging design is flexible but at a high level, this is the workflow involved:
In this QuickStart, we will demonstrate using Postman to simulate a CI/CD workflow and make manual edits to our local host application to evaluate the results of our API calls. In this way, we can demonstrate how a customer application using source control and pipelines could be used to make the same workflow work without asking the QuickStart user to create an excess amount of setup to become familiar with the tag workflow in Sigma.
Some steps may not be shown in detail as we assume you have completed any prerequisites and are familiar with Sigma workflows.
In this QuickStart, we will use the local host application we created in Embedding 01: Getting Started
For more information on Sigma's product release strategy, see Sigma product releases
If something is not working as you expect, here's how to contact Sigma support
Target Audience
Semi-technical users who will be aiding in the planning or implementation of Sigma with embedding. No SQL or data engineering skills are needed to complete this QuickStart. It does assume some common computer skills like installing software, using Terminal, navigating folders and copy/paste operations.
Prerequisites
- A computer with a current browser. It does not matter which browser you want to use.
- Access to your Sigma environment.
- Embedding 01: Getting Started is required to complete this QuickStart.
- A Snowflake account with the proper administrative and security admin access for our use case data.
- Completion of the QuickStart, "Sigma API with Postman" or an API tool that you use instead.

We will need to create three schemas in Snowflake, each containing the same tables, with names and data adjusted to reflect the schema name.
We've provided a Snowflake script to help you set this up.
USE ROLE ACCOUNTADMIN;
USE WAREHOUSE COMPUTE_WH;

// 1: CREATE OR REPLACE DATABASE AND SET IT TO CURRENT
CREATE OR REPLACE DATABASE QUICKSTARTS;
USE DATABASE QUICKSTARTS;

// 2: CREATE SCHEMAS
CREATE SCHEMA IF NOT EXISTS VT_DEV;
CREATE SCHEMA IF NOT EXISTS VT_PROD;

// 3: CREATE AND LOAD DEV TABLES
USE SCHEMA VT_DEV;
CREATE OR REPLACE TABLE VT_DEV.company (company varchar);
CREATE OR REPLACE TABLE VT_DEV.company_country (company varchar, company_country varchar);
insert into vt_dev.company values ('Company 1 Dev');
insert into vt_dev.company values ('Company 2 Dev');
insert into vt_dev.company values ('Company 3 Dev');
insert into vt_dev.company_country values ('Company 1 Dev', 'Company 1 Country Dev');
insert into vt_dev.company_country values ('Company 2 Dev', 'Company 2 Country Dev');
insert into vt_dev.company_country values ('Company 3 Dev', 'Company 3 Country Dev');

// 4: CREATE AND LOAD PROD TABLES
USE SCHEMA VT_PROD;
CREATE OR REPLACE TABLE VT_PROD.company (company varchar);
CREATE OR REPLACE TABLE VT_PROD.company_country (company varchar, company_country varchar);
insert into vt_prod.company values ('Company 1 Prod');
insert into vt_prod.company values ('Company 2 Prod');
insert into vt_prod.company values ('Company 3 Prod');
insert into vt_prod.company_country values ('Company 1 Prod', 'Company 1 Country Prod');
insert into vt_prod.company_country values ('Company 2 Prod', 'Company 2 Country Prod');
insert into vt_prod.company_country values ('Company 3 Prod', 'Company 3 Country Prod');

// 6: CREATE ROLES FOR OUR USE CASES:
CREATE OR REPLACE ROLE VT_DEV;
CREATE OR REPLACE ROLE VT_PROD;

// 7: GRANT USAGE PERMISSION ON THE DATABASE TO NEW ROLES:
GRANT USAGE ON DATABASE QUICKSTARTS TO VT_DEV;
GRANT USAGE ON DATABASE QUICKSTARTS TO VT_PROD;

// 8: GRANT SELECT ON SCHEMA TO NEW ROLES:
GRANT USAGE ON SCHEMA QUICKSTARTS.VT_DEV TO VT_DEV;
GRANT USAGE ON SCHEMA QUICKSTARTS.VT_PROD TO VT_PROD;

// 9: ALLOW NEW ROLES TO QUERY TABLE WE CREATED:
GRANT SELECT ON ALL TABLES IN SCHEMA QUICKSTARTS.VT_DEV TO ROLE VT_DEV;
GRANT SELECT ON ALL TABLES IN SCHEMA QUICKSTARTS.VT_PROD TO ROLE VT_PROD;

// 10: CREATE USERS FOR EACH ROLE
CREATE OR REPLACE USER vtag_dev PASSWORD='Dev99!' MUST_CHANGE_PASSWORD = FALSE;
GRANT ROLE VT_DEV TO USER vtag_dev;

CREATE OR REPLACE  USER vtag_prod PASSWORD='Prod99!' DEFAULT_ROLE = VT_PROD MUST_CHANGE_PASSWORD = FALSE;
GRANT ROLE VT_PROD TO USER vtag_prod;

//11: GRANT WAREHOUSE USAGE TO NEW ROLES:
GRANT USAGE ON WAREHOUSE COMPUTE_WH TO ROLE VT_DEV;
GRANT USAGE ON WAREHOUSE COMPUTE_WH TO ROLE VT_PROD;
Once the script completes Snowflake will return Statement executed successfully.
We verified that the data exists by running the following query for each schema:
select * from vt_dev.company_country;
select * from vt_prod.company_country;
For example, for production, we see Prod appended to the row data:

In this use case, we'll use two separate connections to the same Snowflake account.
Log into Sigma as an Administrator and head to the Administration / Connections page.
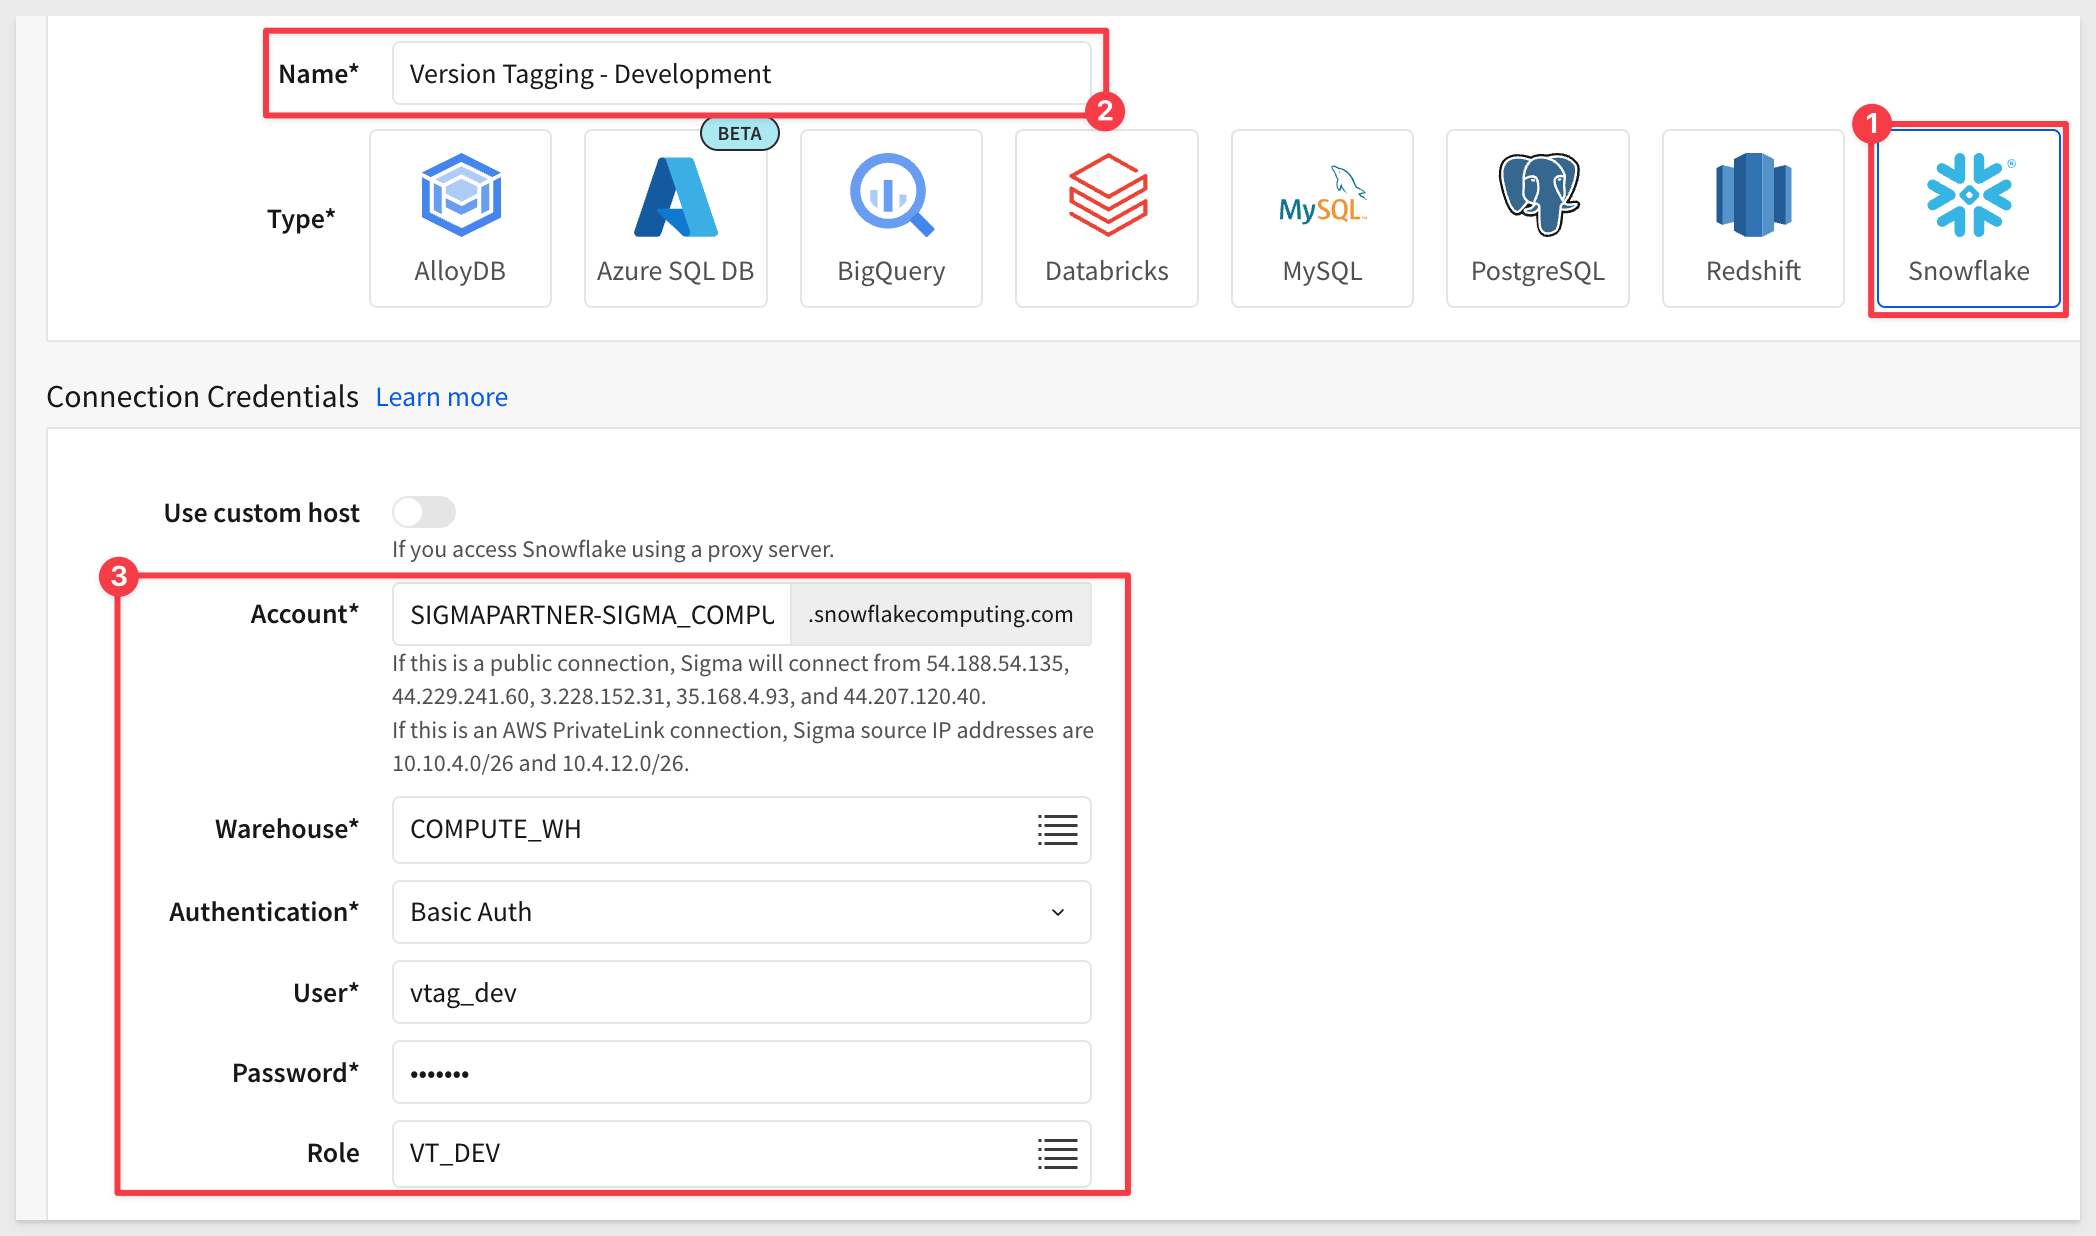
Click Create Connection, select Snowflake and fill out the form.
The values for User, Password, and Role were defined in our Snowflake script as:
Connection Name:                  User:           Password:       Role:
Version Tagging - Development     vtag_dev        Dev99!          VT_DEV
Version Tagging - Production      vtag_prod       Prod99!         VT_PROD
Use your Snowflake ACCOUNT IDENTIFIER for Account.
Authentication is Basic Auth.
For Warehouse use COMPUTE_WH.
Click Save, and Sigma will validate the connection.
To learn how to set up key-pair authentication in Sigma, see Snowflake Key-pair Authorization
Before we add the other two connections (Staging and Prod), let's take a moment to ensure the Dev data is fully reachable.
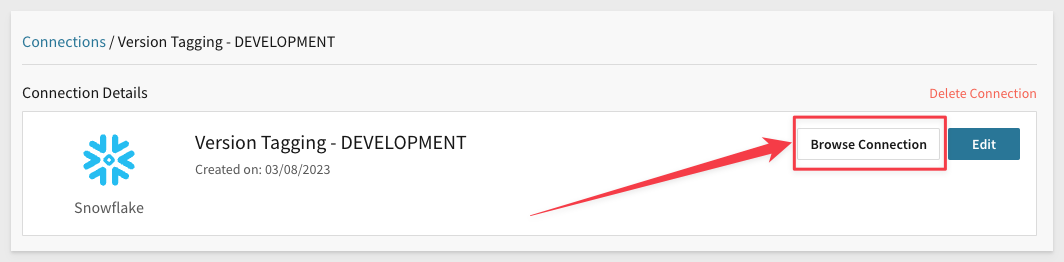
In the new connection, click the Browse Connection button:
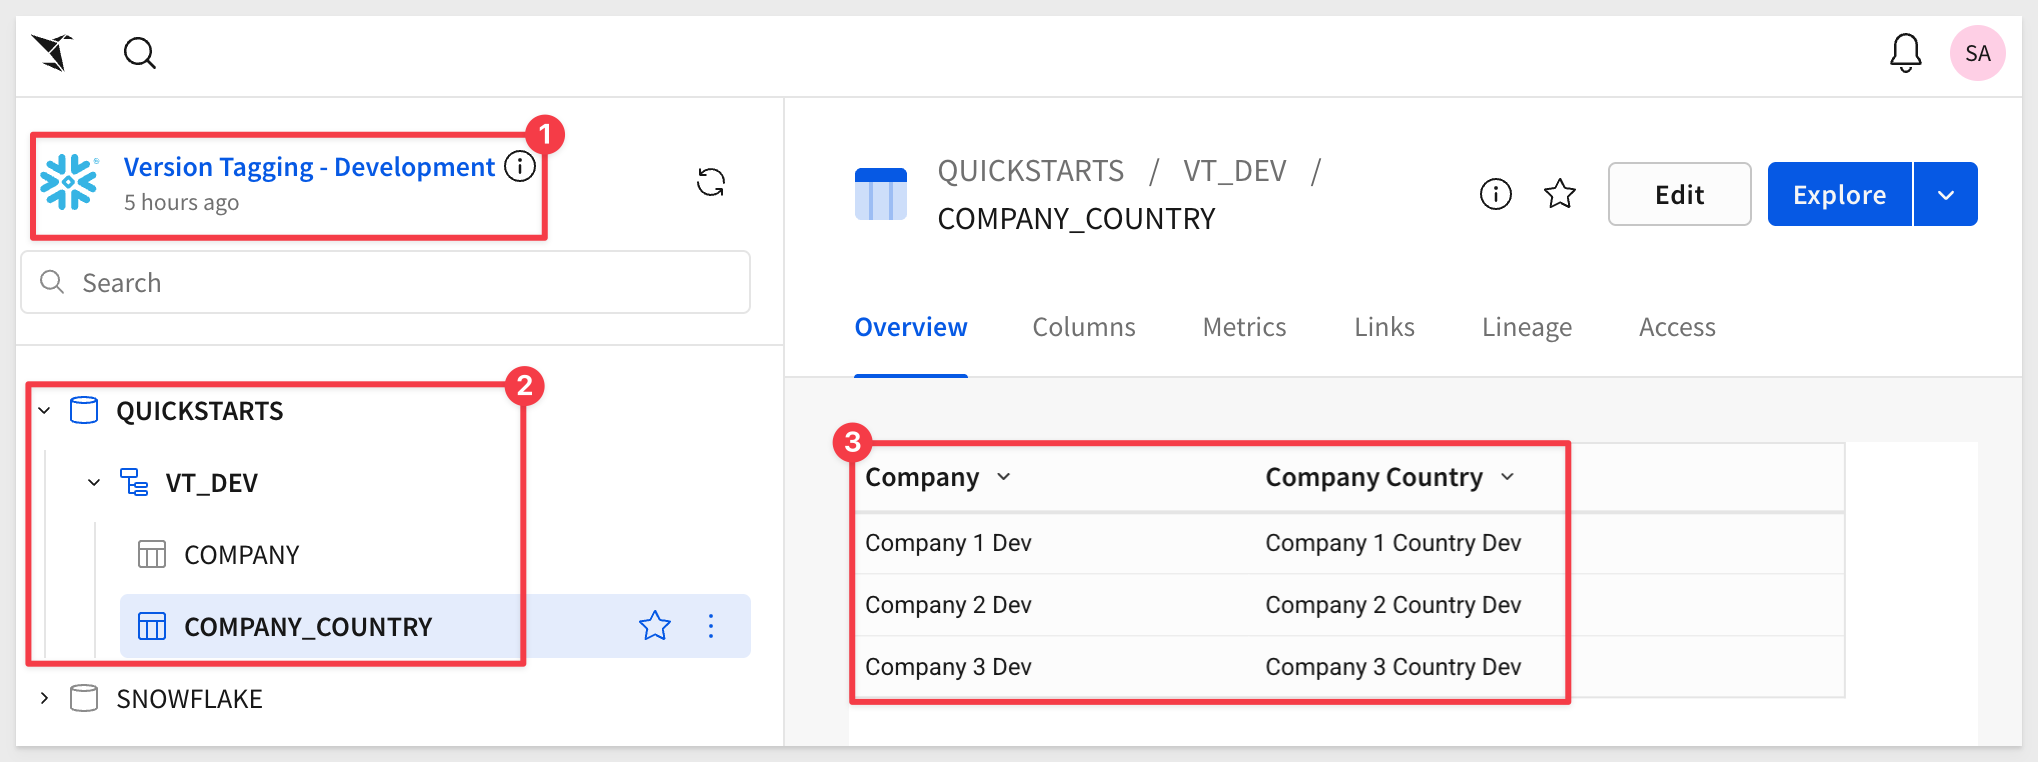
Verify that you can see table data for the Company and Company Country tables.
Now repeat the process, adding new connections for Staging and Prod. Be sure to use the correct User and Role for each accordingly.
You should now have two working connections. The main difference is the table data for each.

Navigate to the Administration / Tags page.
Click Create Tag to add a new tag.
Set the name to Development. (Pick any color you prefer — it won't affect this example).
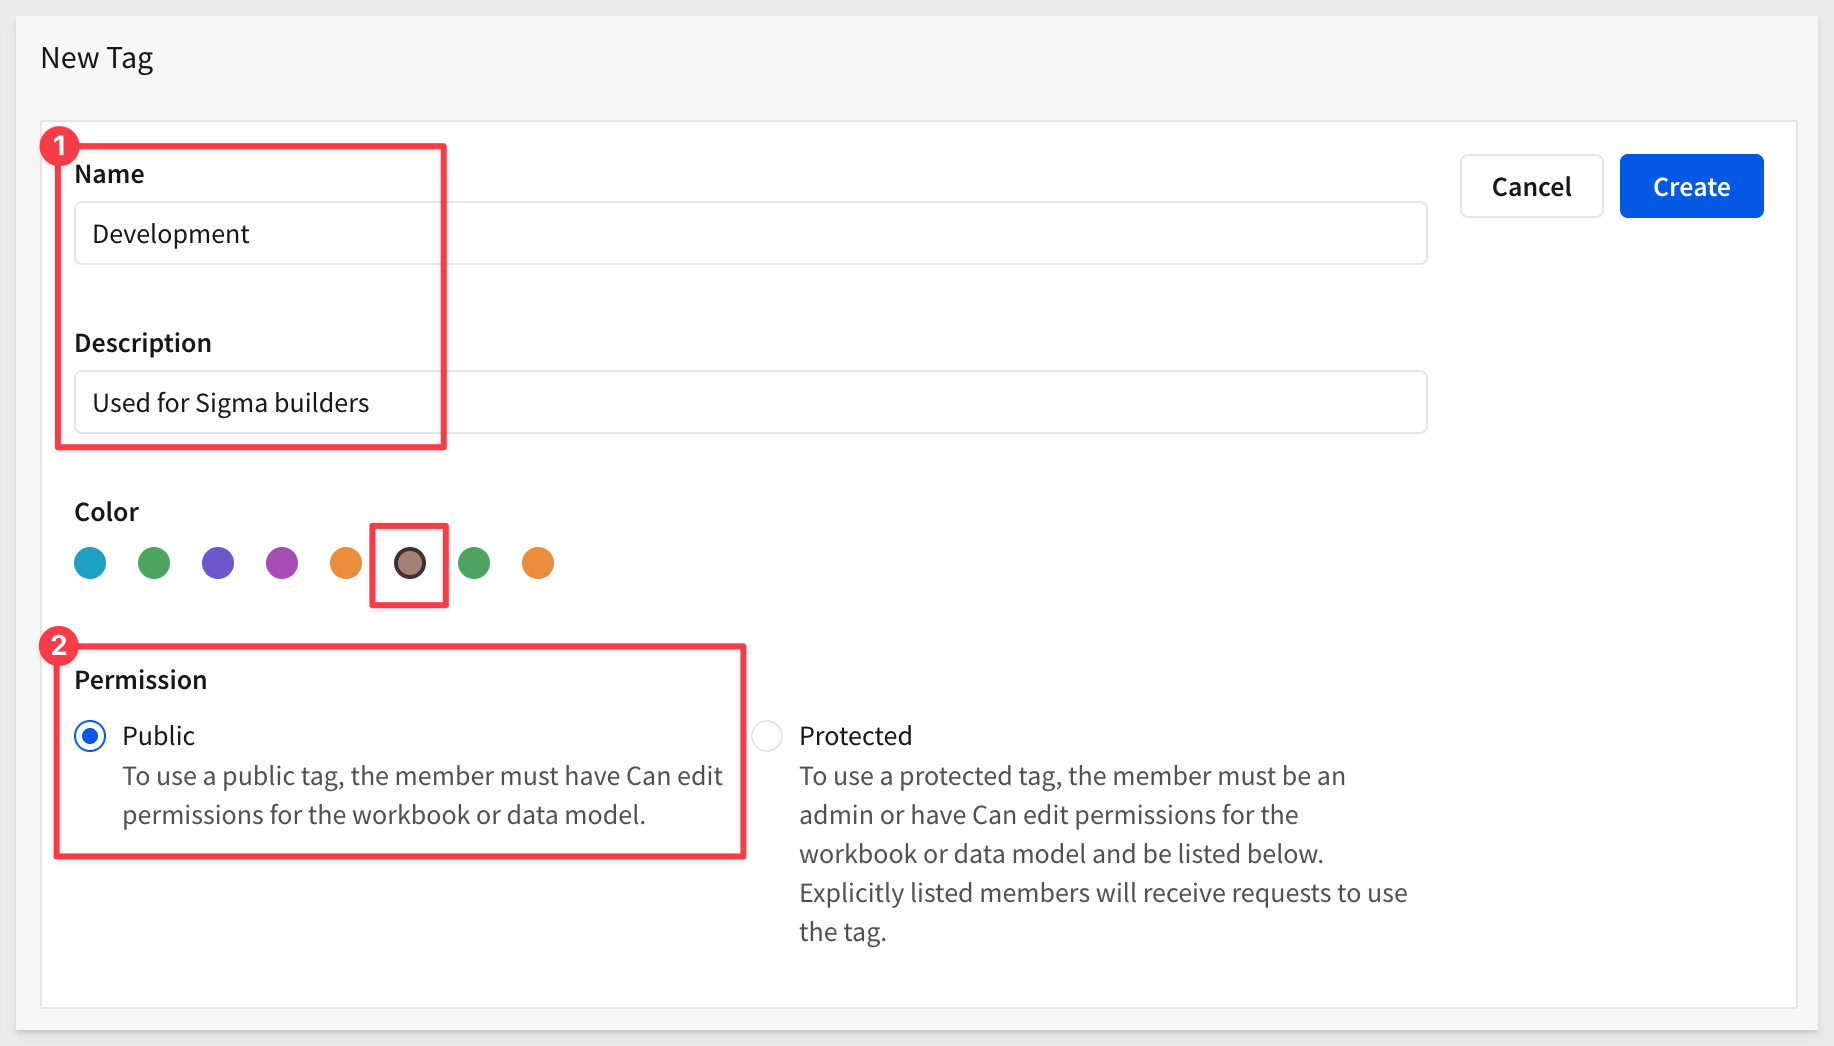
To read more about tags, see Create and manage version tags
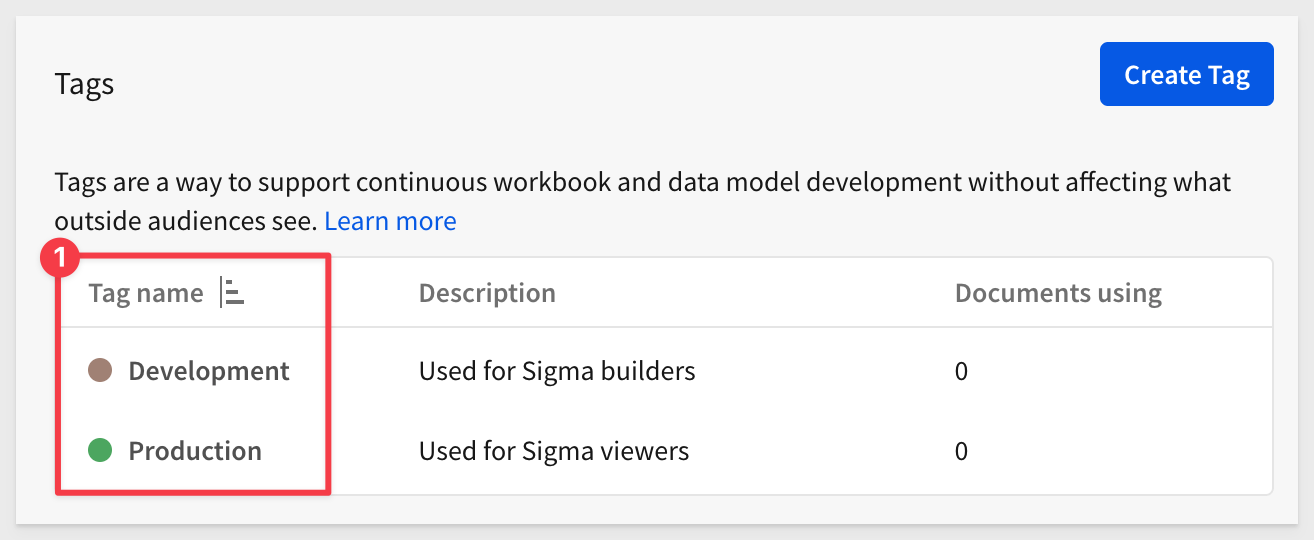
Repeat the process to add a Production tag. You should now have two tags:
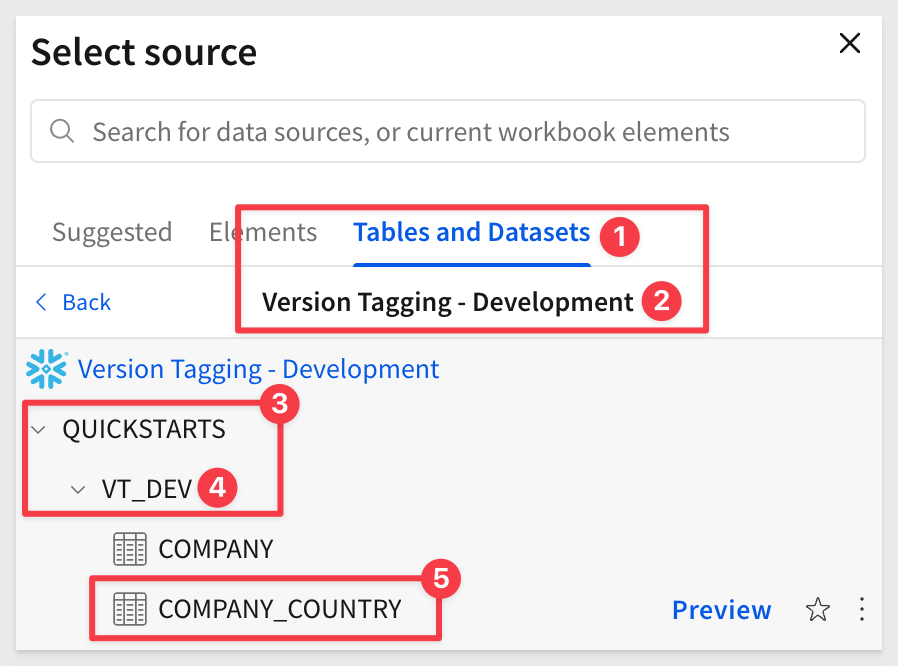
Create a new workbook, use the Element bar to add a Data > Table element to the page. For the source, select the Version Tagging - DEVELOPMENT connection.
Select the Sigma_VT > Company_Country table:
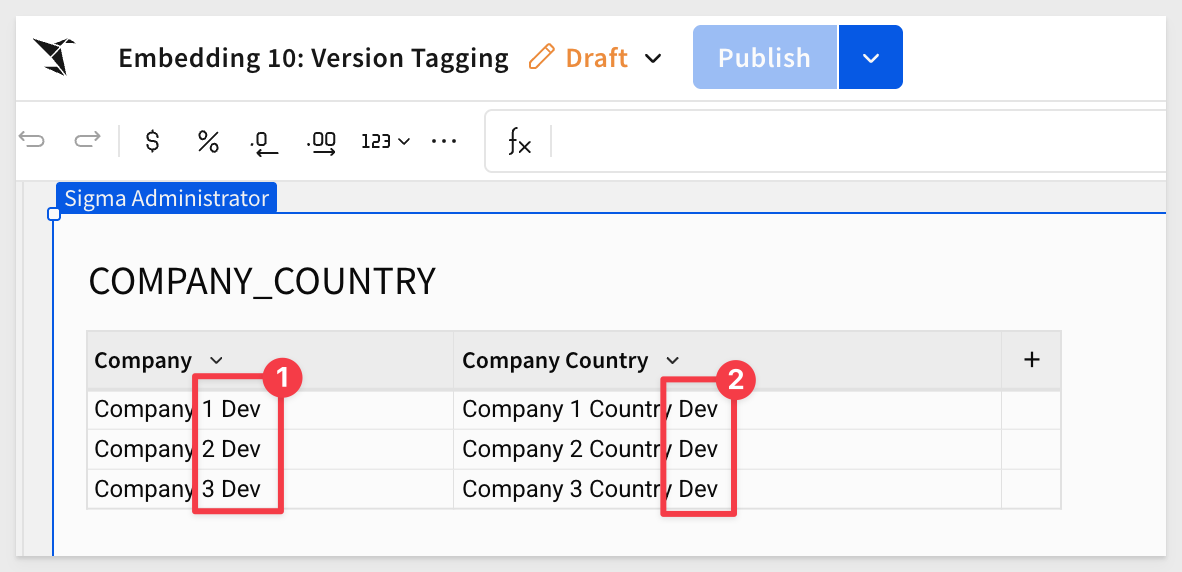
Click the Save As button and name the workbook Embedding 10: Version Tagging.
Notice that the rows in the table contain the word Dev appended to each value. This is what we would expect given we are using the Development Connection.
Open the workbook menu and select Version > Version history:
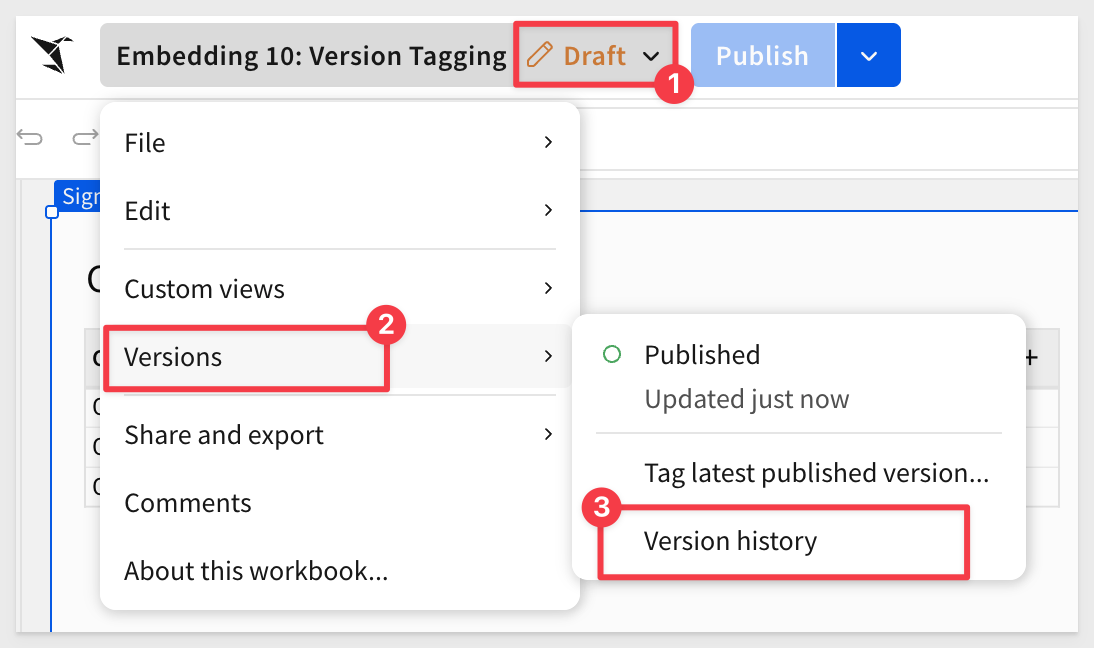
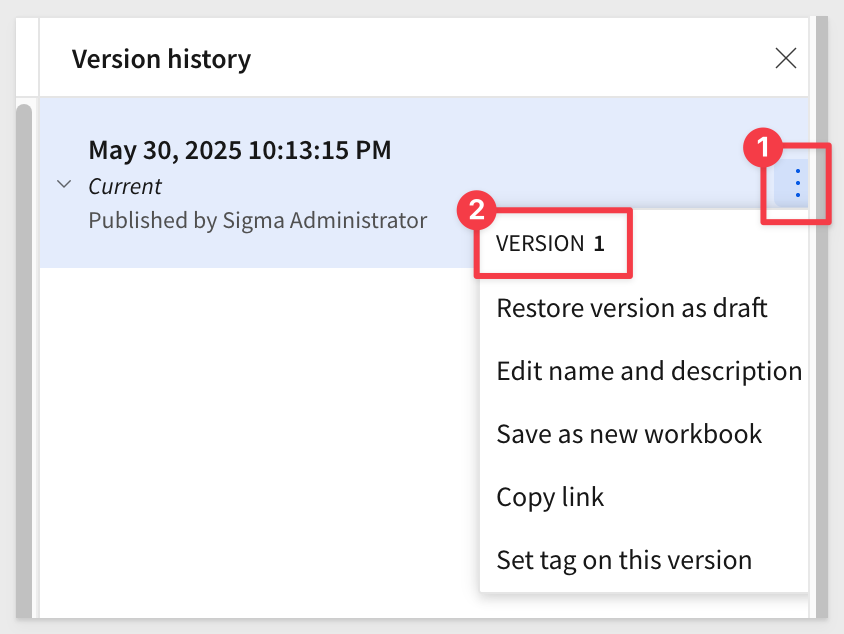
This opens a sidebar showing all changes made that have been made as the workbook has been updated.
In this case, we are on VERSION 1:
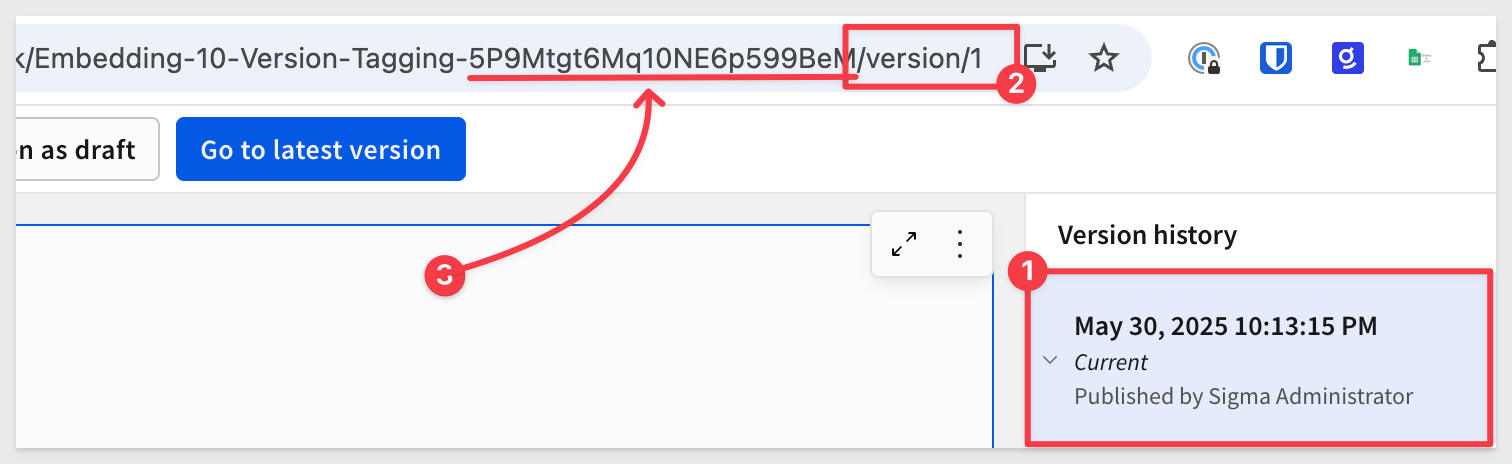
Click the top entry in Version History and note the version number at the end of the URL.
Also note the string next to #3 — this is the workbook GUID. It is useful to know this when using the REST API manually:
Click the Go to latest version button and then click Edit.
Change the table title to County_List, hit Enter and then Publish.
Sigma recorded that change and then another change when we published it:
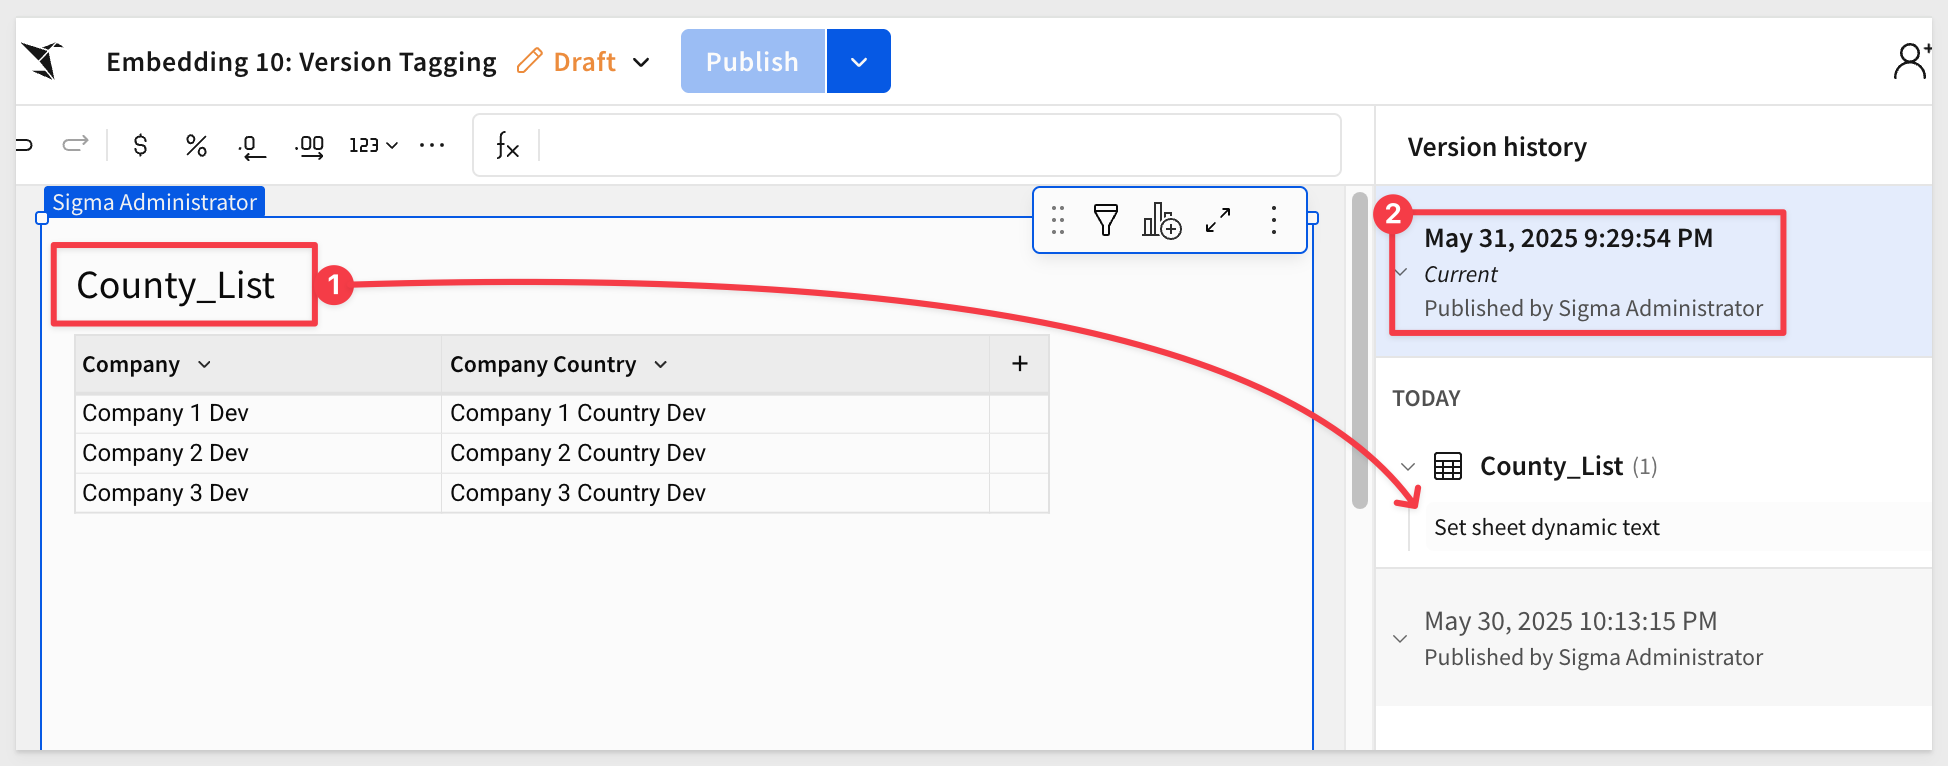
Sigma also incremented the version from v1 to v2.
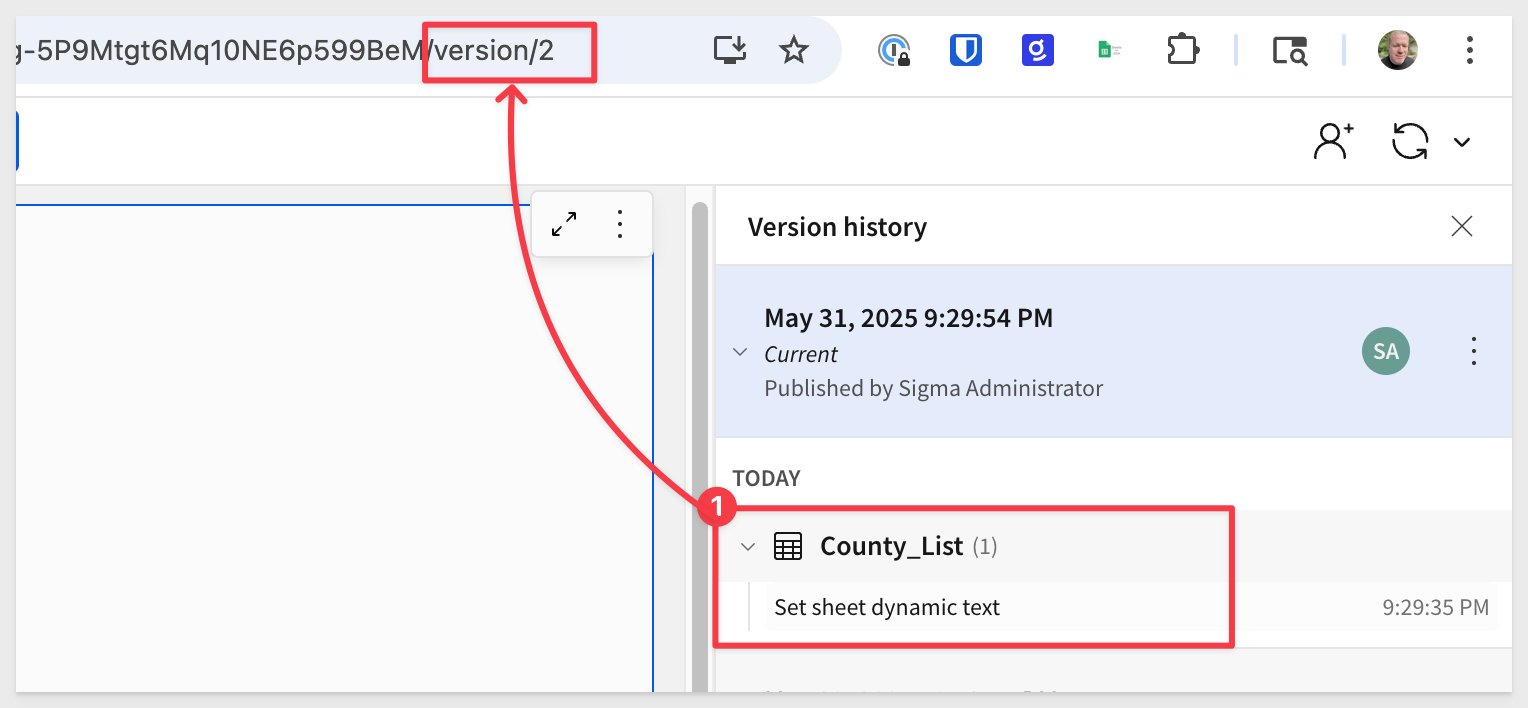
We will reference version number 2 in our API call later when we promote to production.
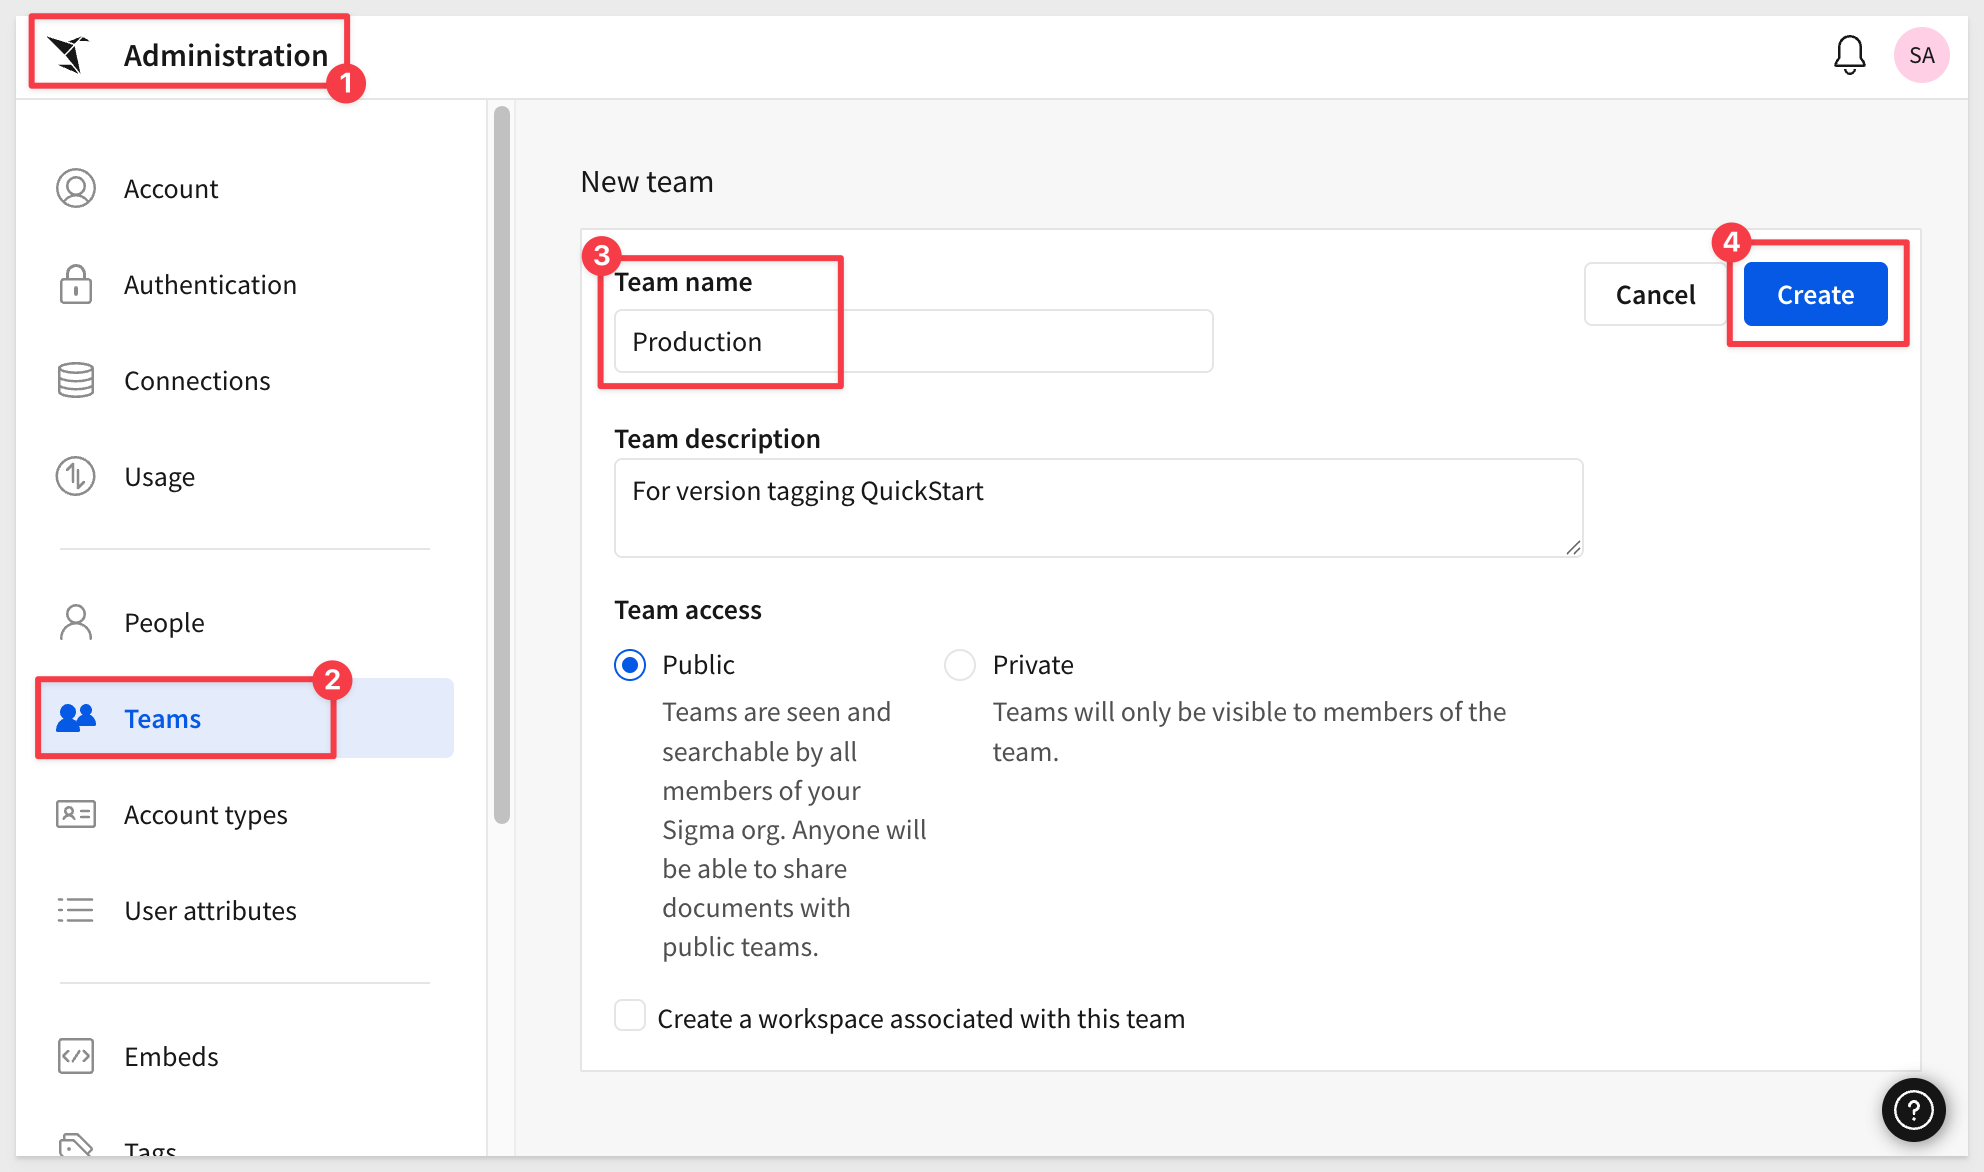
Add a New Sigma Team
Since we have a Production tag, we want to add a new Team in Sigma to allow an embed user access to the workbook in the host application, instead of reviewing it in the Sigma UI.
Create a new team called Production:
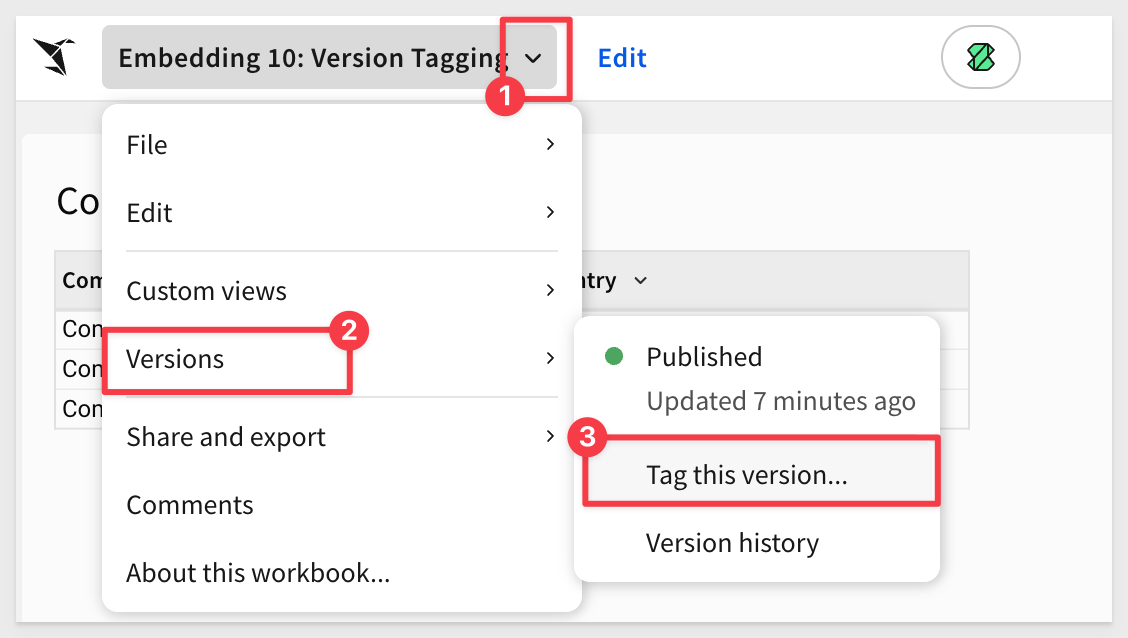
Tag the workbook
Return to the Embedding 10: Version Tagging workbook.
Open the workbook menu and select Versions > Tag this version...:
Set the tag for this workbook as shown below:
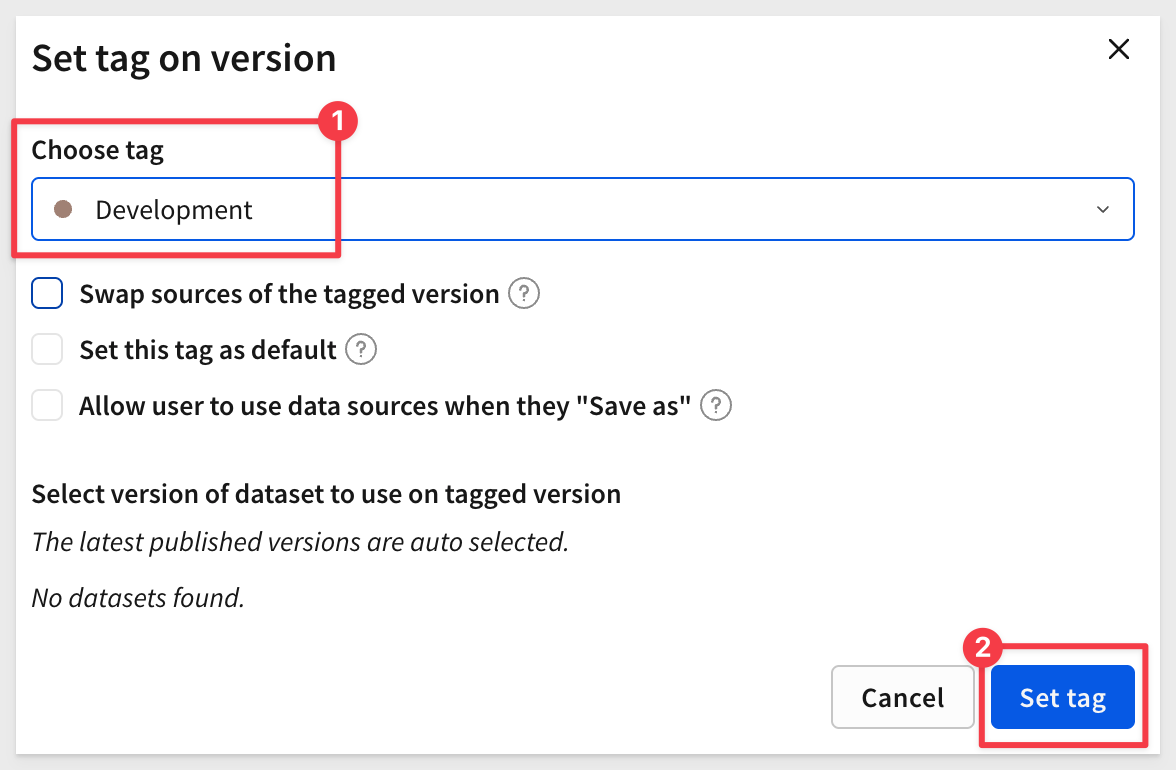
We do not need to swap data sources right now as we are already using the Development data when we created the workbook.
Before we get into the promotion workflow, we need to make sure that our parent application with the Sigma embed is working.
Finally, copy the URL from your browser and store it in a text file — we'll use it later.
In the QuickStart "Embedding 01: Getting Started", we deployed a native application locally.
For testing, we'll use the pre-built embed page that demonstrates this approach.
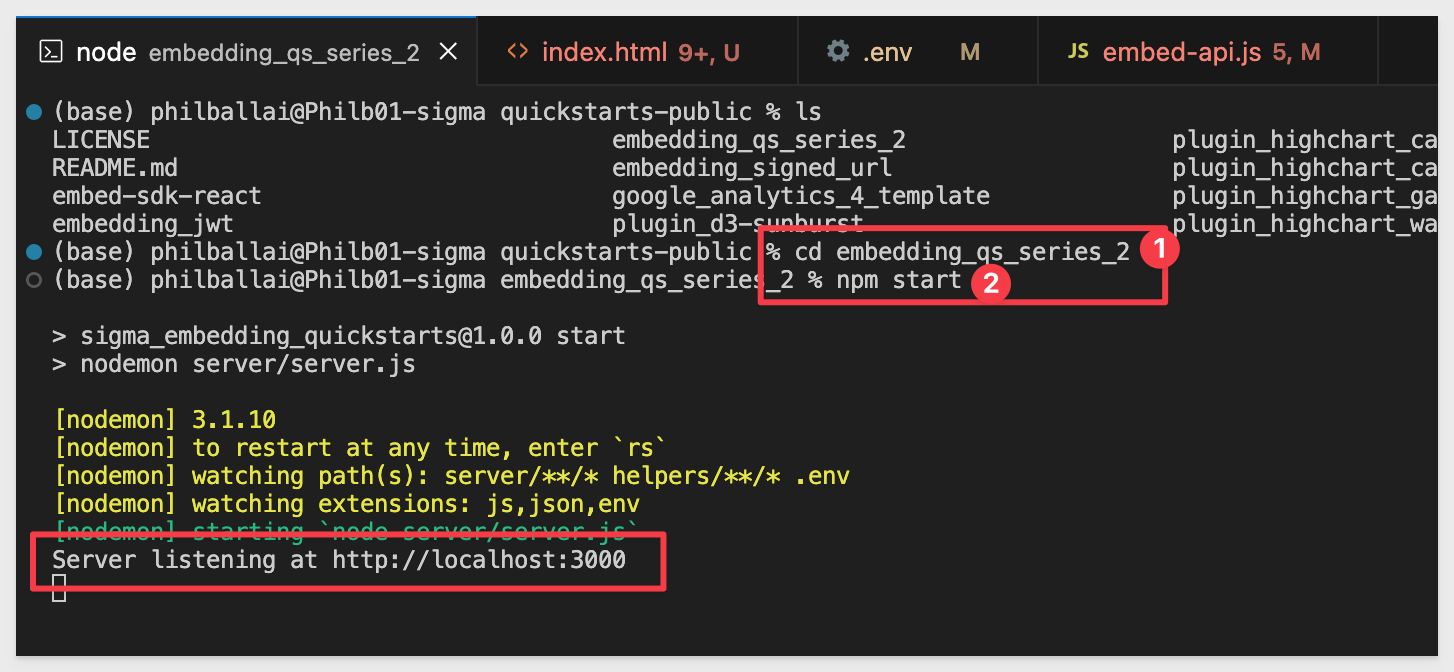
In VSCode, open a new Terminal session inside the embedding_qs_series project and run the following command:
npm start
Now edit the .env file to update a few values.
The CLIENT_ID and SECRET values from the Getting Started QuickStart should still be present and working. If they're missing or misconfigured, revisit the Getting Started QuickStart to complete that step.
In the # QS: version_tagging section, we need to configure the values below, using the URL saved earlier for the VERSION_TAGGING_BASE_URL= value.
Use only the required portion of the URL, as explained in the documentation, What URL to use
For example, in our URL we removed the trailing section composed of this:
?:nodeId=RWw-kr3_UG
This is the section that needs the URL:
VERSION_TAGGING_BASE_URL=
VERSION_TAGGING_BASE_EMAIL=sales_person@example.com
VERSION_TAGGING_BASE_ACCOUNT_TYPE=View
VERSION_TAGGING_BASE_TEAMS=Production
Save the .env file.
In a browser, open:
http://localhost:3000/version_tagging/?mode=version_tagging
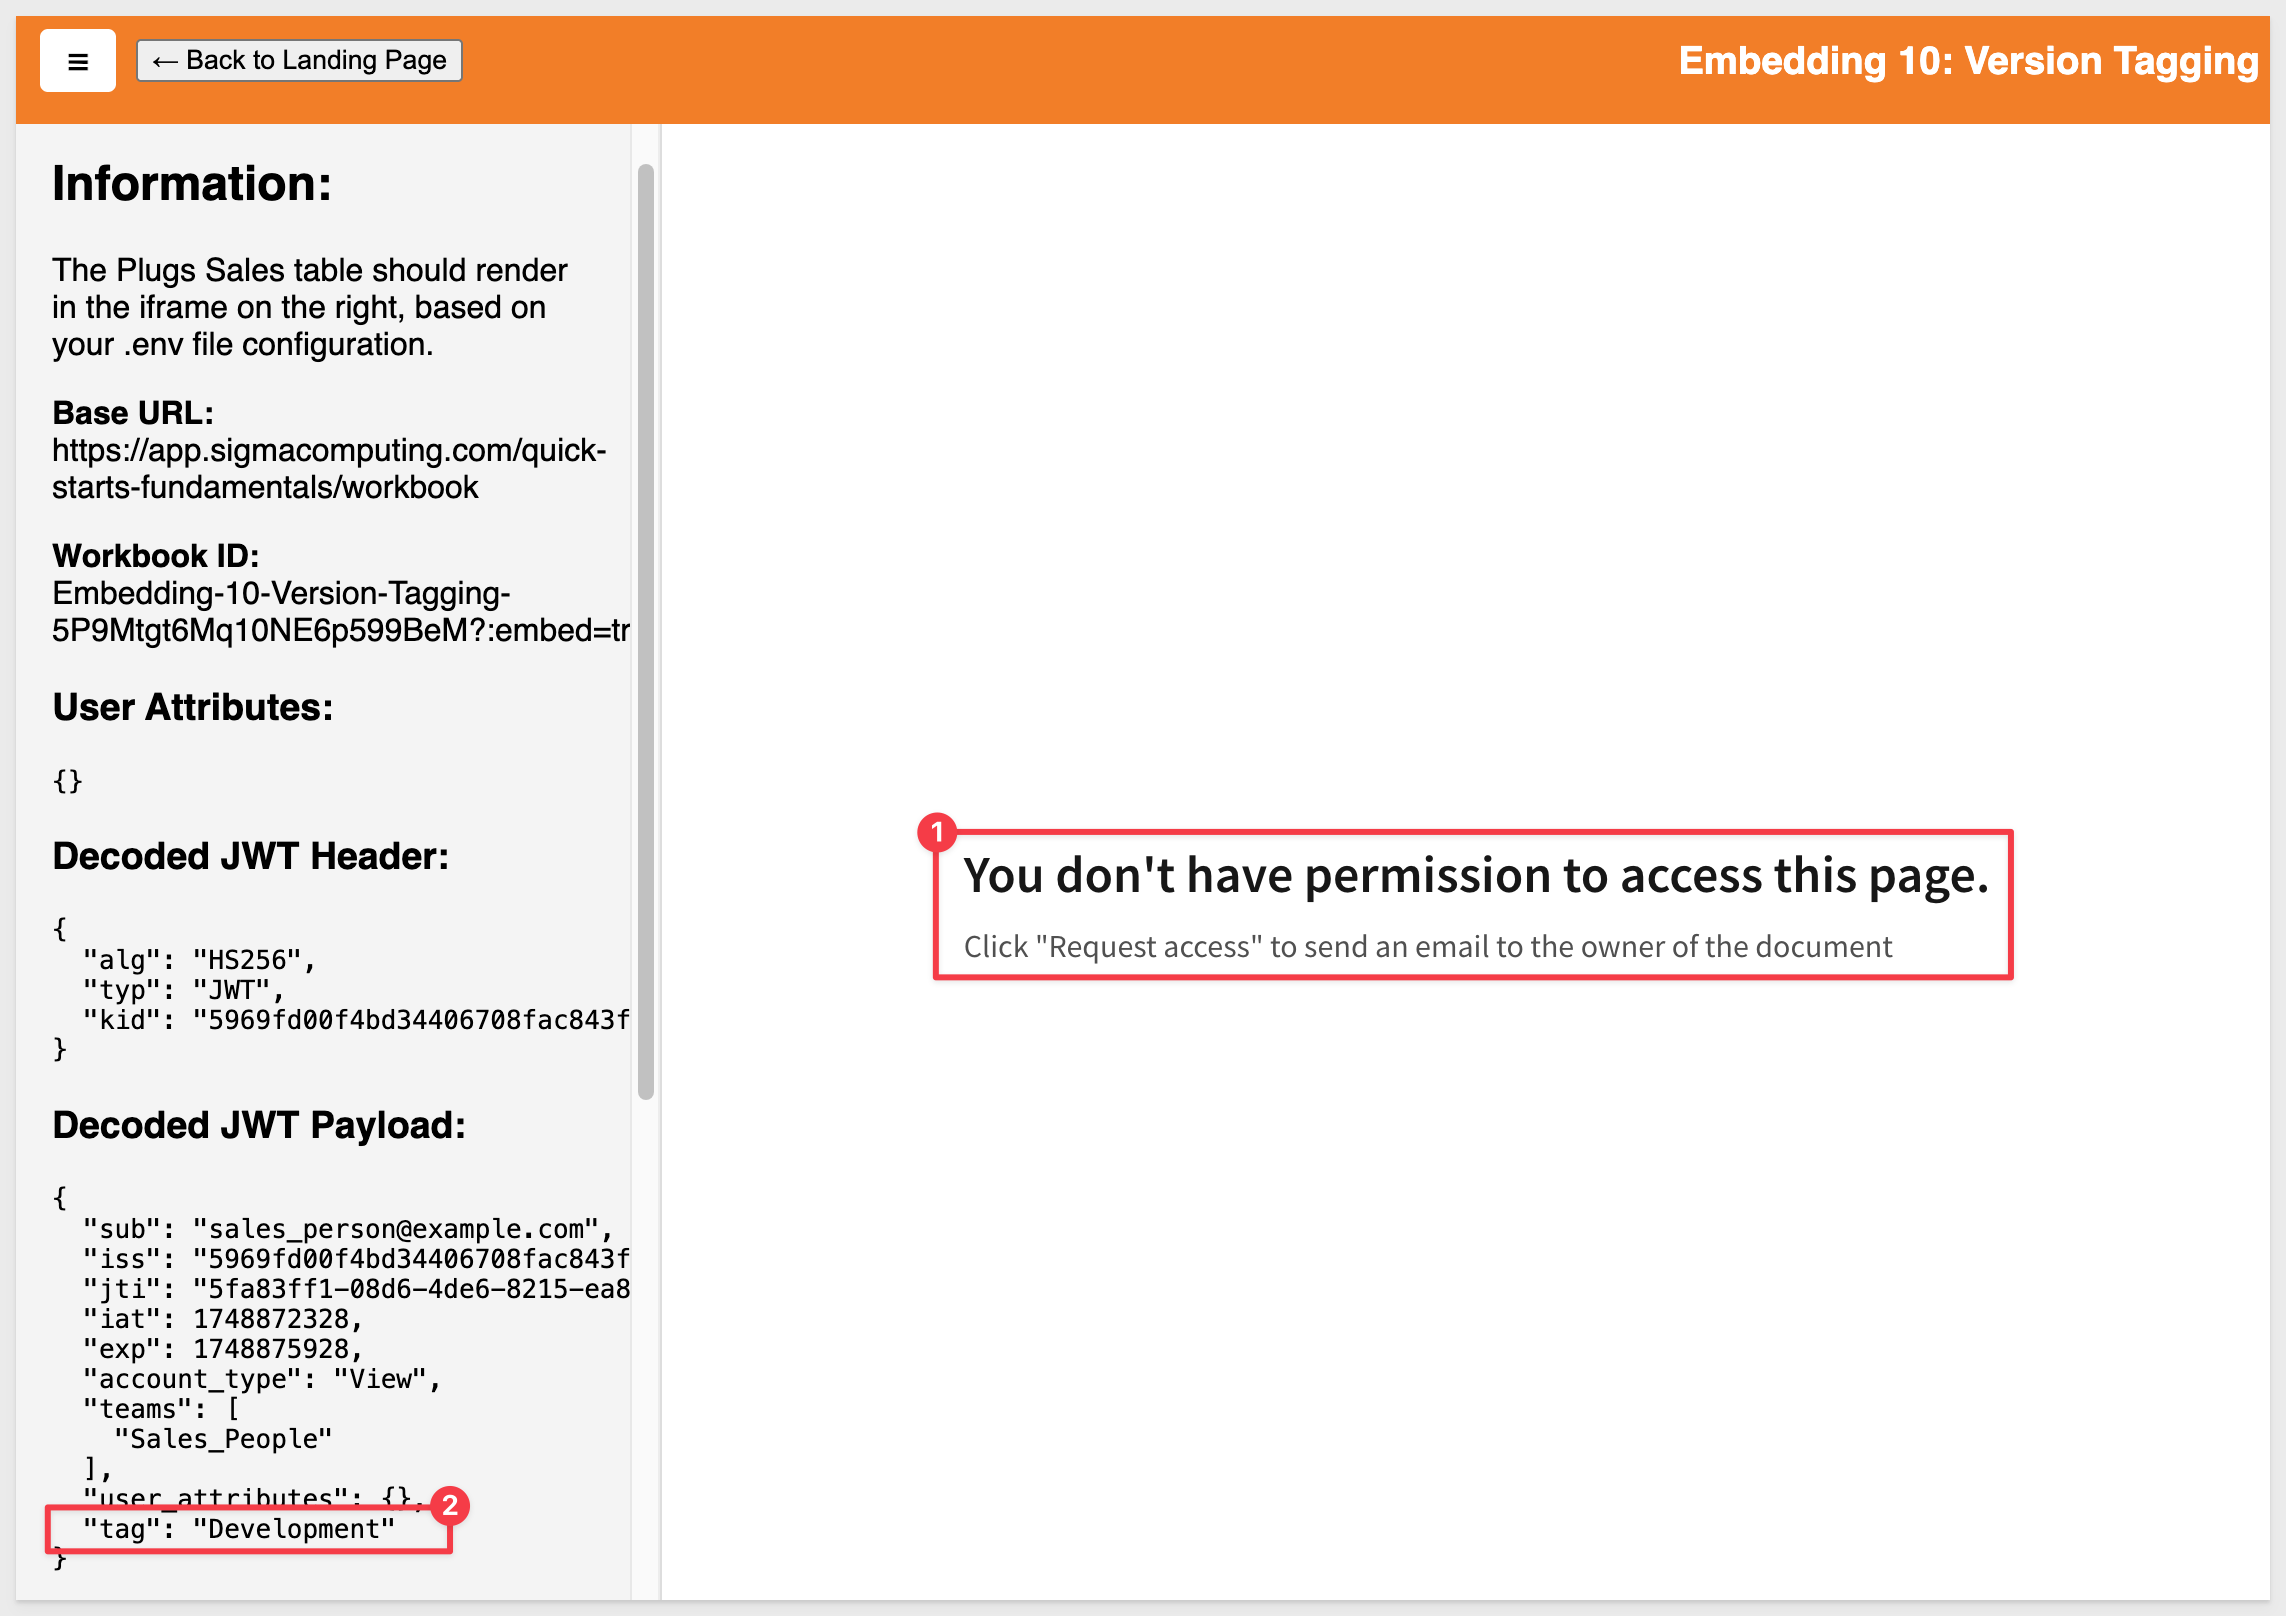
We should get an error You don't have permission to access this page..
This is because the embedded workbook has not been shared to our Production team yet and we don't have a Development team either. This is the expected result.
At this point we could share the workbook with the Production team but it still won't render as the embedded workbook is assigned the Development version anyway.
What we want to do is promote the workbook to Production, ensure that it is using the production Snowflake data and pass the pass the Production tag using the .env file at runtime.
Do not share the workbook just yet. We need to promote the workbook to Production first, so it becomes available to share with the Production team.
In this section, we'll use a combination of REST API calls and one edit to embed-api.js simulating a CI/CD workflow promotion to production.
We will demonstrate this using Postman, which many developers are already familiar with.
In order to use the Sigma API, we must first get a new bearer token. Follow the instructions in the Sigma API with Postman QuickStart.
We will use the API to tag the workbook with with updated values for the Production tag, workbook version, production connection, and production path.
This will create a new copy of the workbook (as a tagged version). The original state of the workbook is also retained if we want to roll back to it later.
First, we need to use the REST API to obtain the required references. We will need to obtain the following unique identifiers:
- workbookUrlId
- Development connection
- Development path
- Production connection
We will use these values to update the Sigma workbook (in json format) using a REST POST message.
Using a text editor (to temporarily hold the JSON) update each value that you obtain from the Postman calls.
Sample POST body for workbook tag update:
{
    "workbookId": "6DceMEz0RArq6F82wa02ha",
    "workbookVersion": 2,
    "tag": "Production",
    "grantSourceAccess": true,
    "sourceMappingConfig": [
      {
        "fromConnectionId": "b44fef40-b1b3-4059-b530-7e3eac51e712",
        "toConnectionId": "0c750f29-607b-4437-a824-d287431f69e8",
        "paths": [{ "fromPath": ["SIGMA_VT", "VT_DEV", "COMPANY_COUNTRY"], "toPath": ["SIGMA_VT", "PROD", "COMPANY_COUNTRY"] }]
      }
    ],
    "sourceVersions": {}
  }
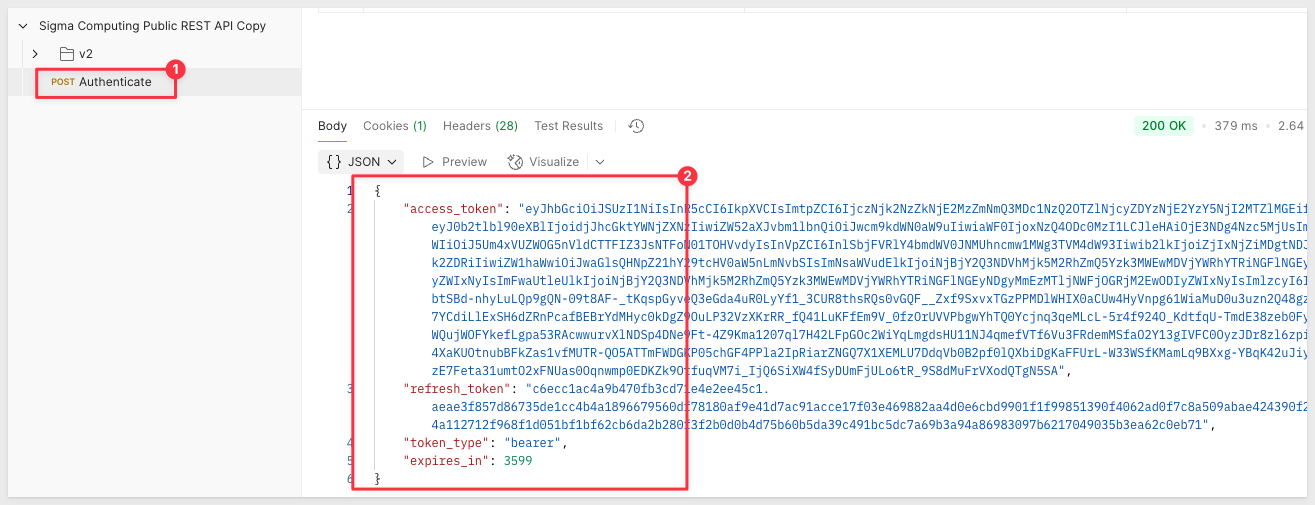
Open Postman and use the Authenticate method to get a bearer token:
Open the request named Returns a workbook based on workbookId in the workbooks folder. This will get the list of all workbooks.
Click Send and locate the workbook named Embedding 10: Version Tagging in the return:
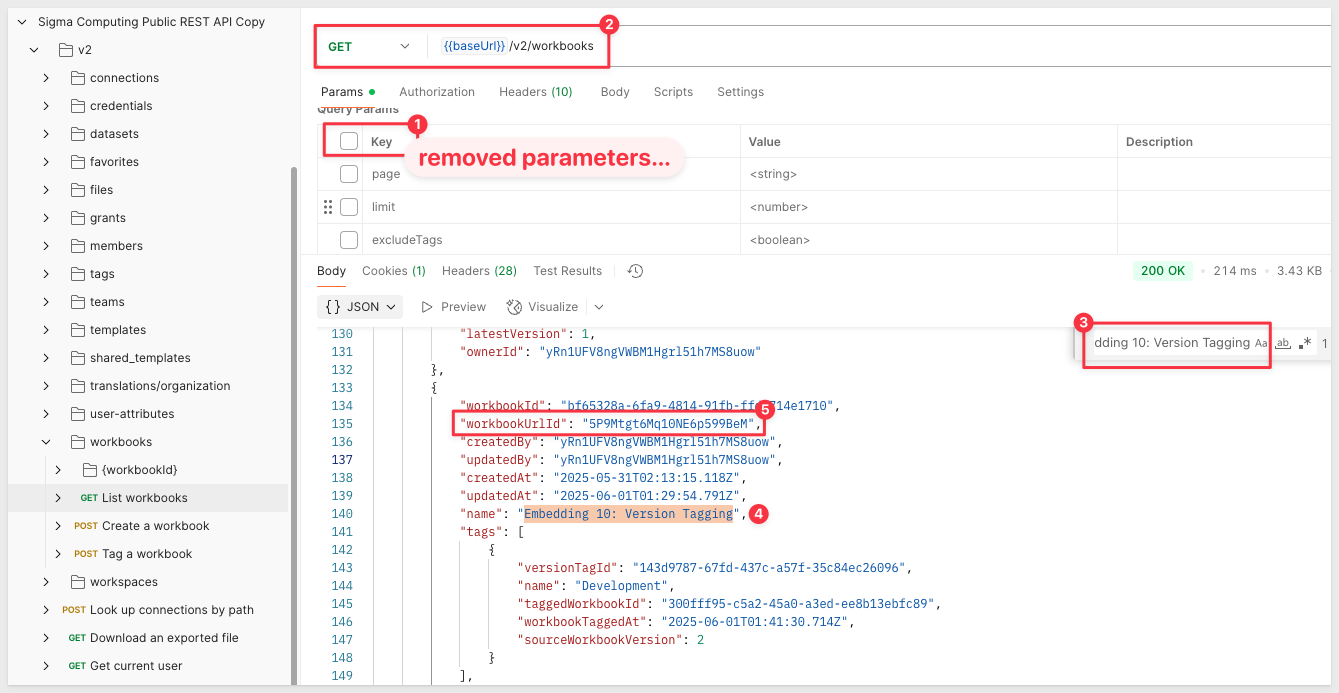
Note the workbook's sourceWorkbookVersion value. This is the version number for the workbook and we want to carry that forward when we promote.
Copy its workbookUrlId value and update the JSON sample for workbookId.
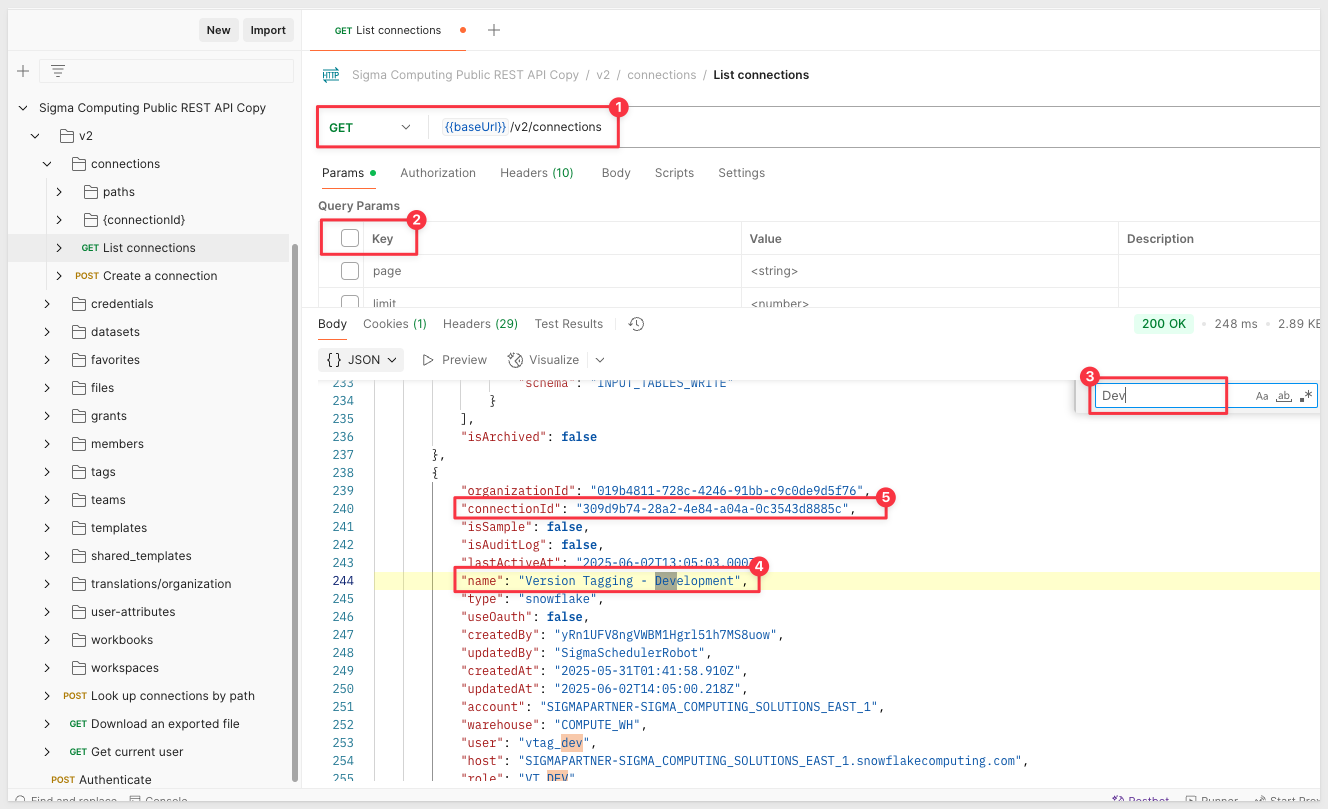
We now need to get the GUIDs for the development and production Sigma connections using the method Returns a list of available connections:
Copy the two GUIDs (one for development and another for production) from the return and update the json code.
For example, for development, we searched for and found:
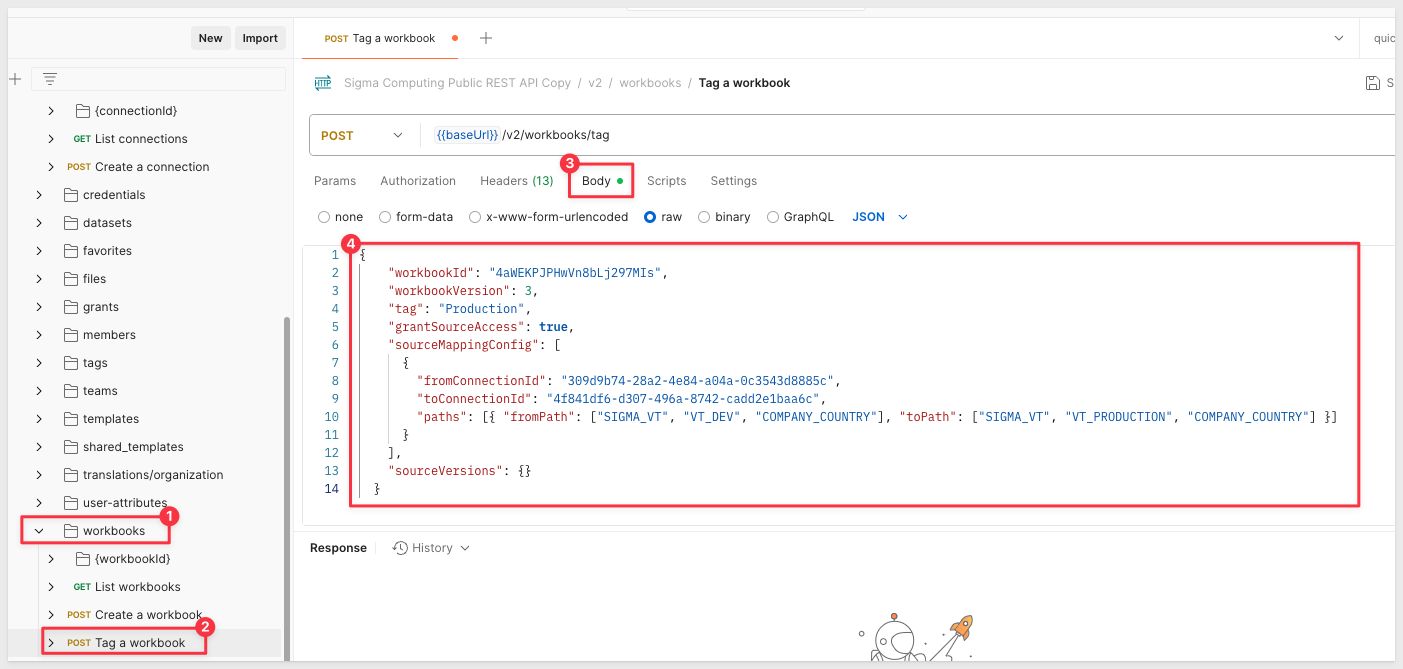
Use the values to update the sample POST body workbook tag update values. For example:
{
    "workbookId": "5P9Mtgt6Mq10NE6p599BeM",
    "workbookVersion": 2,
    "tag": "Production",
    "grantSourceAccess": true,
    "sourceMappingConfig": [
      {
        "fromConnectionId": "309d9b74-28a2-4e84-a04a-0c3543d8885c",
        "toConnectionId": "4f841df6-d307-496a-8742-cadd2e1baa6c",
        "paths": [{ "fromPath": ["SIGMA_VT", "VT_DEV", "COMPANY_COUNTRY"], "toPath": ["SIGMA_VT", "VT_PROD", "COMPANY_COUNTRY"] }]
      }
    ],
    "sourceVersions": {}
  }
Promote
Open the Tag a workbook method and revise the Body with the adjusted values:
Click Send to submit the API request. A 200 Status should be returned. The API should return with a 200 Status.
We have now tagged the workbook to Production and a taggedWorkbookVersion = 1:

Returning the Sigma workbook (and refreshing the page), we can see the workbook was tagged Production in its Version history:
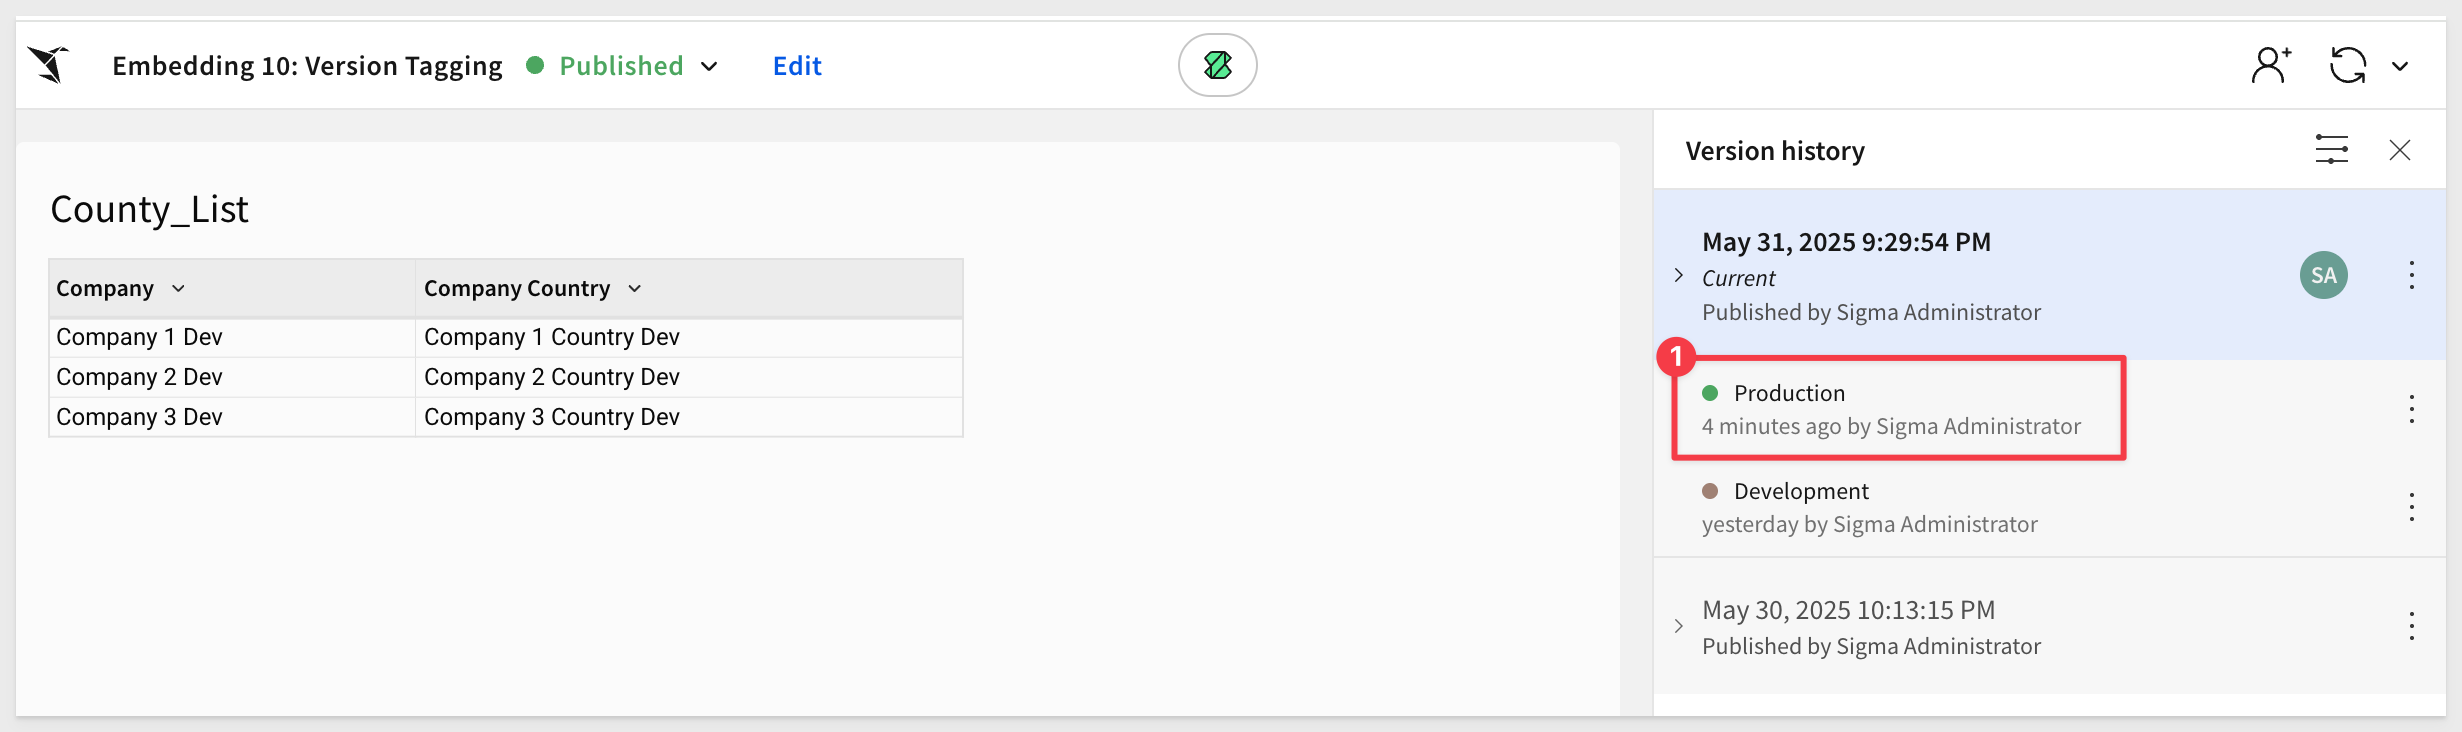
This was done by the API call we made.
Share with team
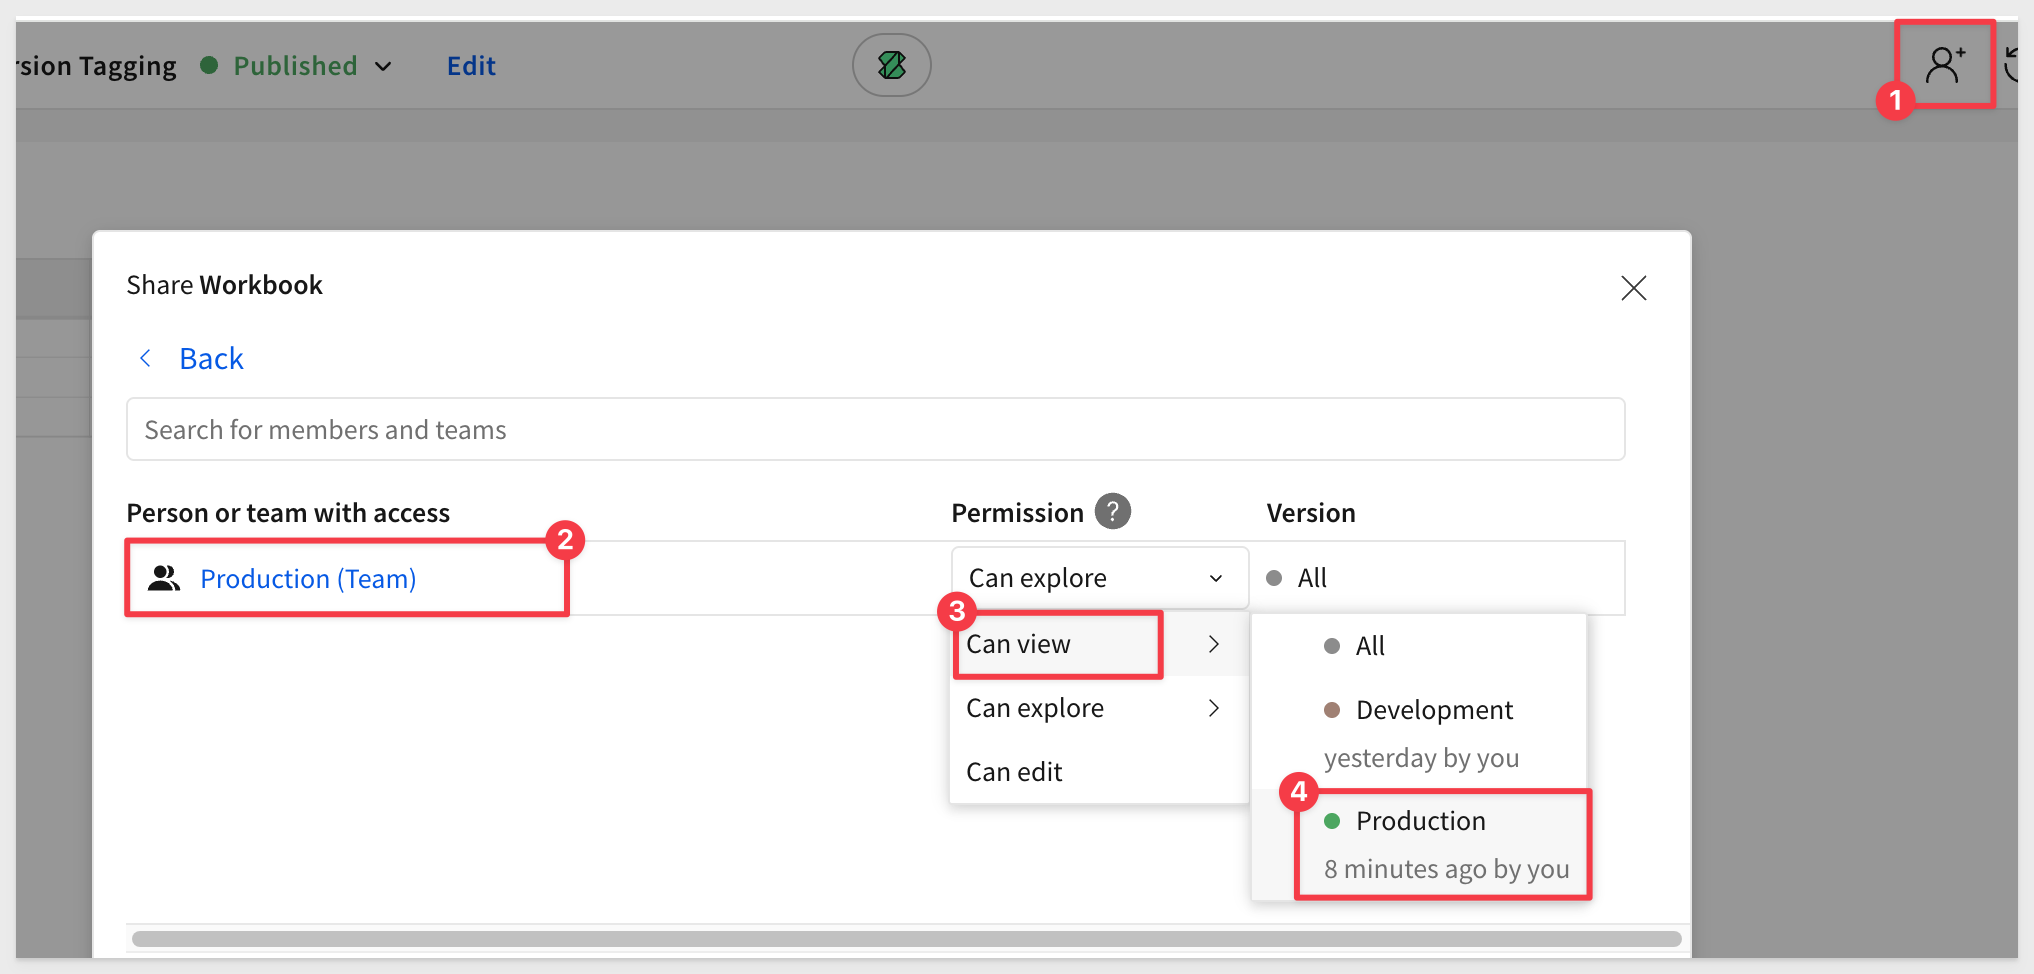
Share the workbook with the Production team. You can grant the Production team different levels of permission and also the ability to access one or more workbook tags too.
We will limit the team to just View and the Production tag:
Revise .env
Append /tag/Production to the value of VERSION_TAGGING_BASE_URL and VERSION_TAGGING_TEAMS to Production:

Save the changes.
Refresh the sample host application page.
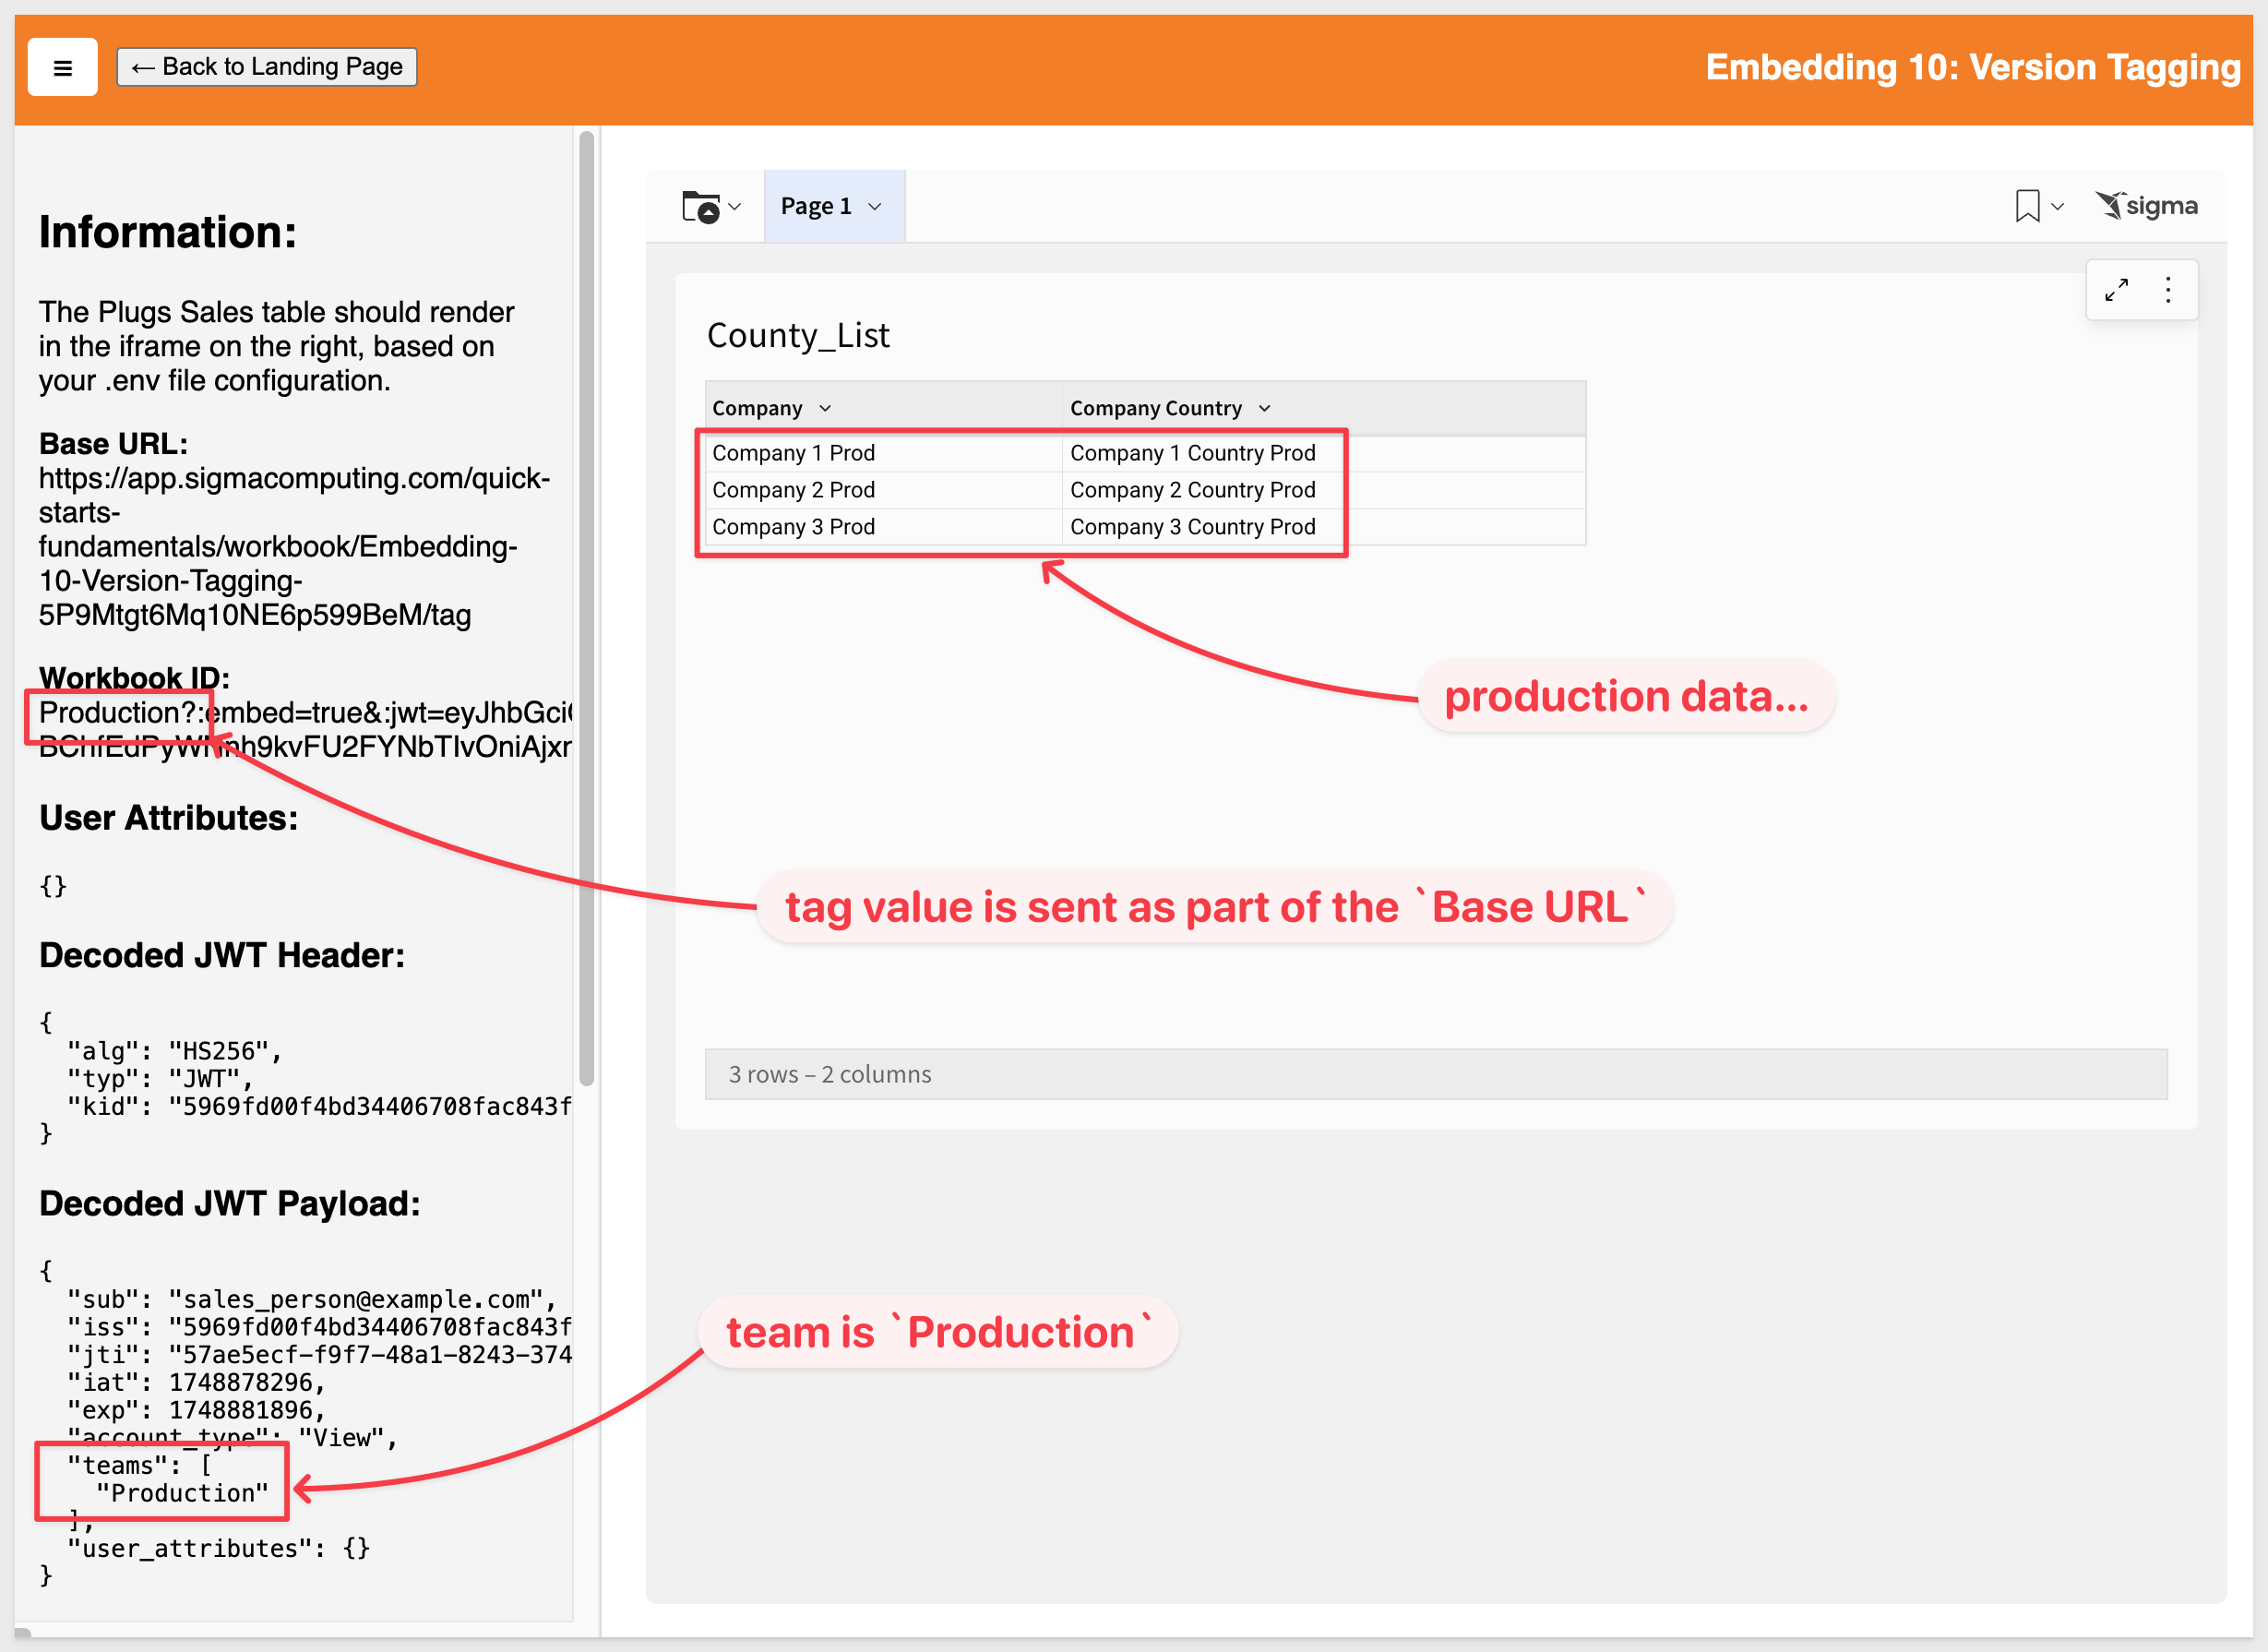
You should now see the table using the production connection's data:
Reverting from production to development
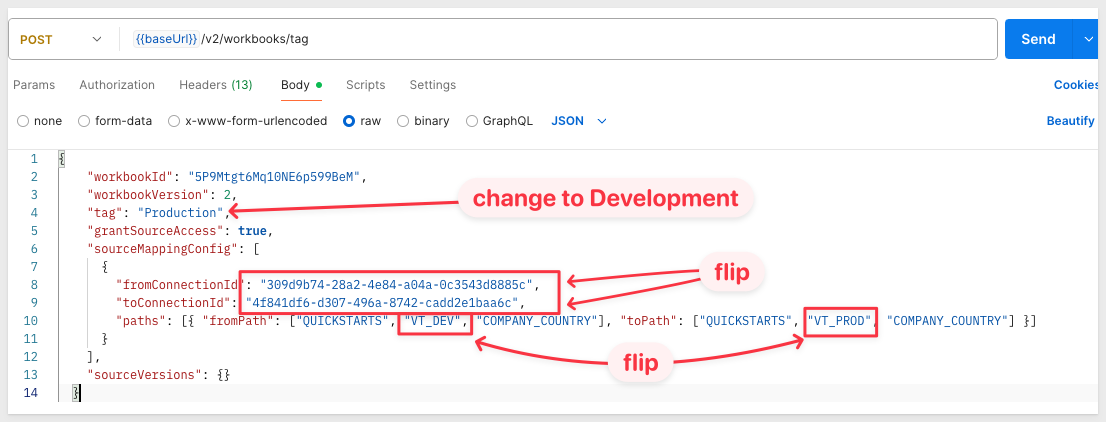
To revert, rerun the Tag a workbook API call, changing the tag to Development and flipping the values as shown:
Next, adjust .env for development, setting the value for VERSION_TAGGING_BASE_URL to have /tag/Development appended to it.
Save the changes.
However, when we refresh the host application, we still see the production data. This is because the Production team is not permitted to see the Development tag.
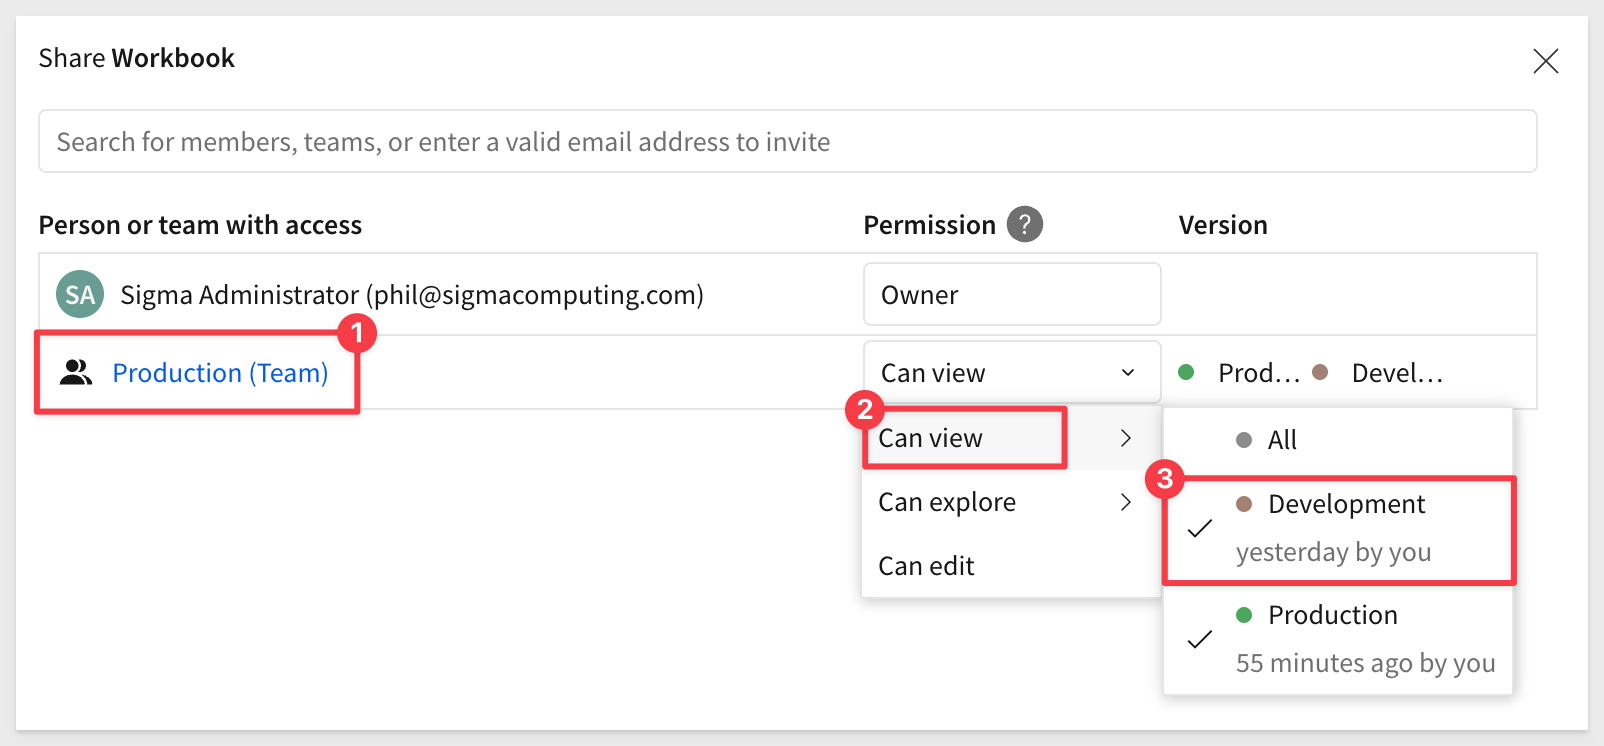
Enable the Production team to access the Development tag:
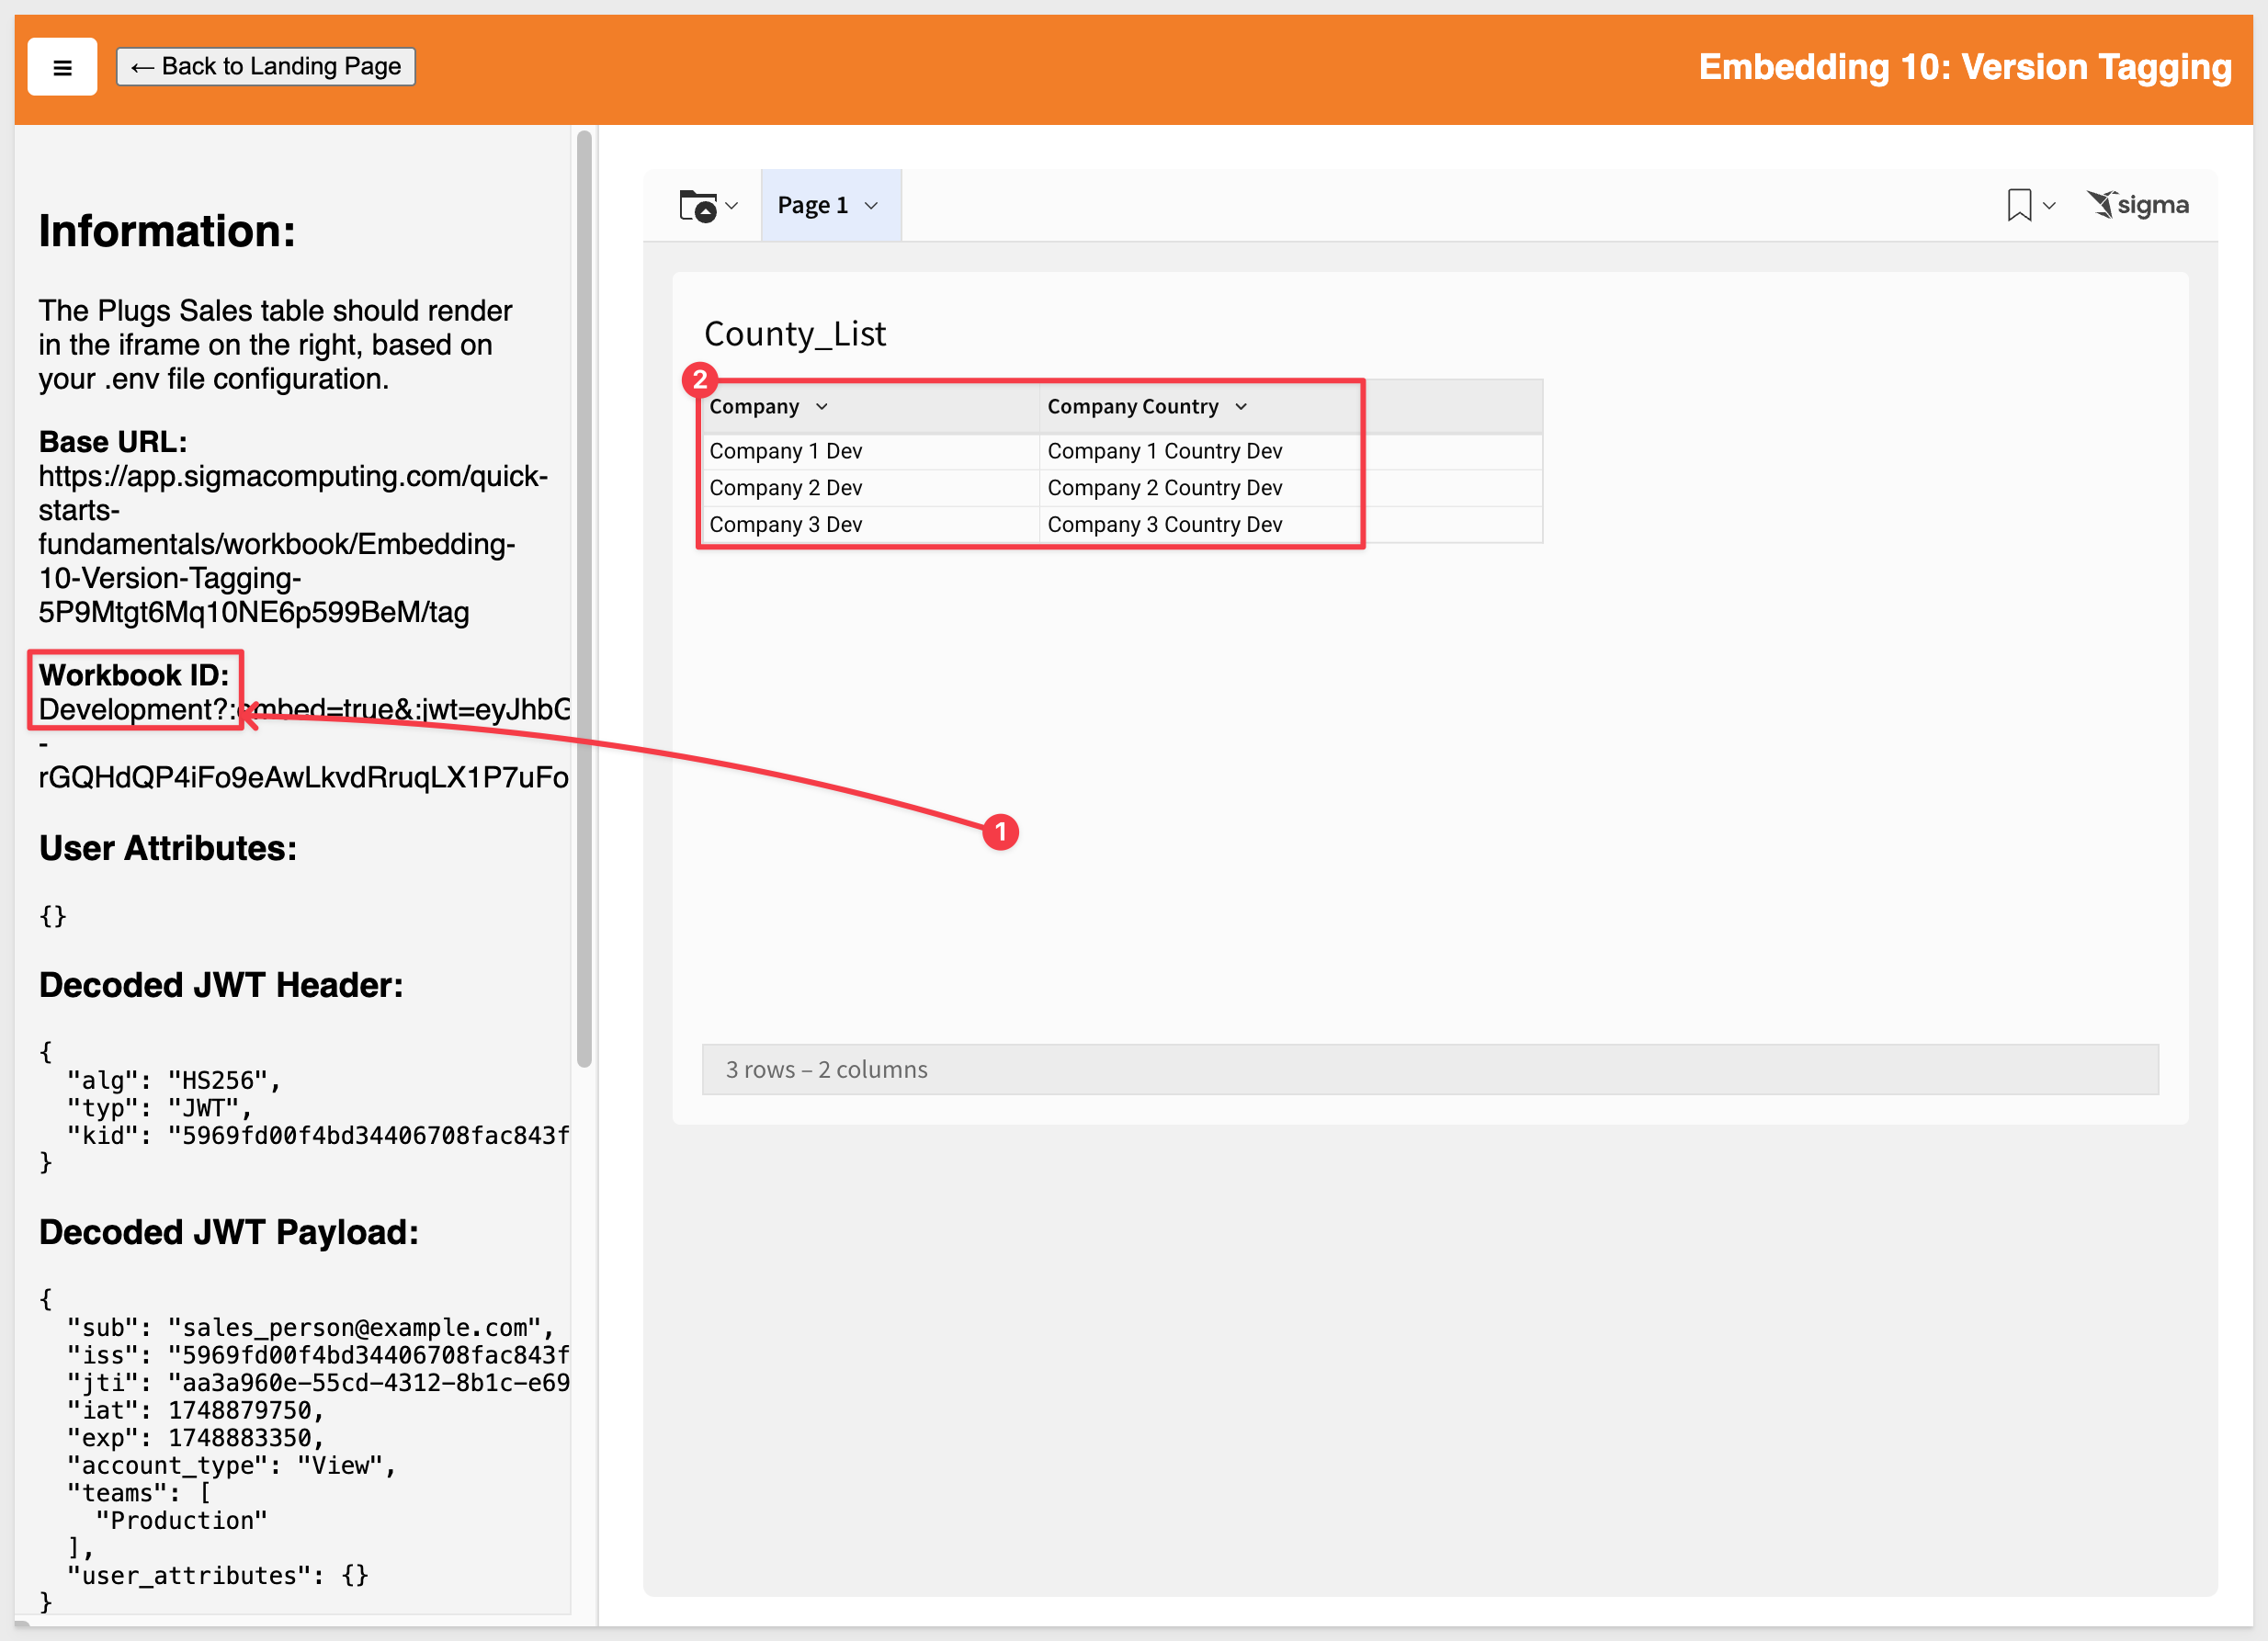
You should now see the development data shared with the Production team:
In this QuickStart, we reviewed how to use Sigma's Version Tagging to manually manage a CI/CD workflow that promotes or demotes a workbook while updating the underlying data shown to the embedded user.
Additional Resource Links
Blog
Community
Help Center
QuickStarts
Be sure to check out all the latest developments at Sigma's First Friday Feature page!