This QuickStart provides insight into the different methods available for content creators to limit data access to a user, based on an implementation of row-level security (RLS) in Sigma.
While there are several options that we will explore, RLS should always be applied as close to the data as possible. In the case of Sigma, that is at the data model used to drive workbooks.
There are four methods to apply RLS at the data model level:
1: CurrentUserEmail()
Returns True if the email of the logged-in user viewing the data matches some column data.
2: CurrentUserTeam()
Returns True if the current user is a member of any of the Team(s) that have been granted access to the data.
3: User Attributes
You can create and assign user attribute(s) to users (members) or Teams. You can use this functionality in a data model to enforce row-level security using the function CurrentUserAttributeText in a formula. User Attributes are custom keys you create and assign values to, per user or team.
4: Custom SQL
If your data model is derived from a custom SQL query, you may use any of the first three methods as criteria in a WHERE clause.
It is also possible to apply data security at the warehouse level, but that is not in the scope of this QuickStart.
For more information on Sigma's product release strategy, see Sigma product releases
If something is not working as you expect, here's how to contact Sigma support
Target Audience
This QuickStart is intended for anyone looking to implement row-level security in Sigma, ensuring that each logged-in user can only access the data they are authorized to see.
Prerequisites
- A computer with a current browser. It does not matter which browser you want to use.
- Access to your Sigma environment.
- Some familiarity with Sigma is assumed. Not all steps will be shown as the basics are assumed to be understood.

We will first create a new Data model using Sigma's sample data, and add a few columns that we will use to evaluate the different methods of RLS.
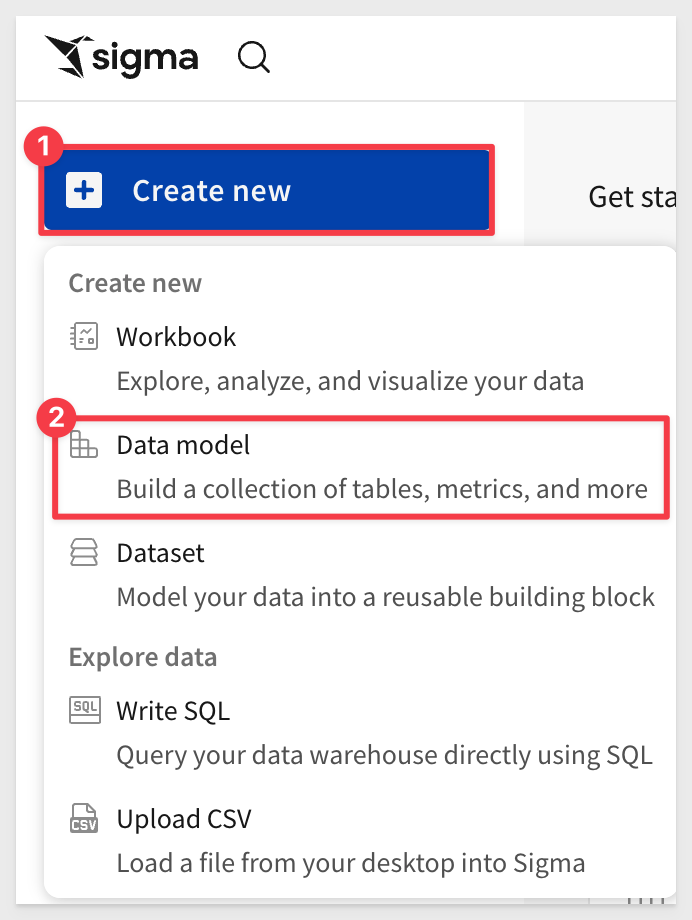
Log into Sigma as Administrator and click the Create New button and select Data model:
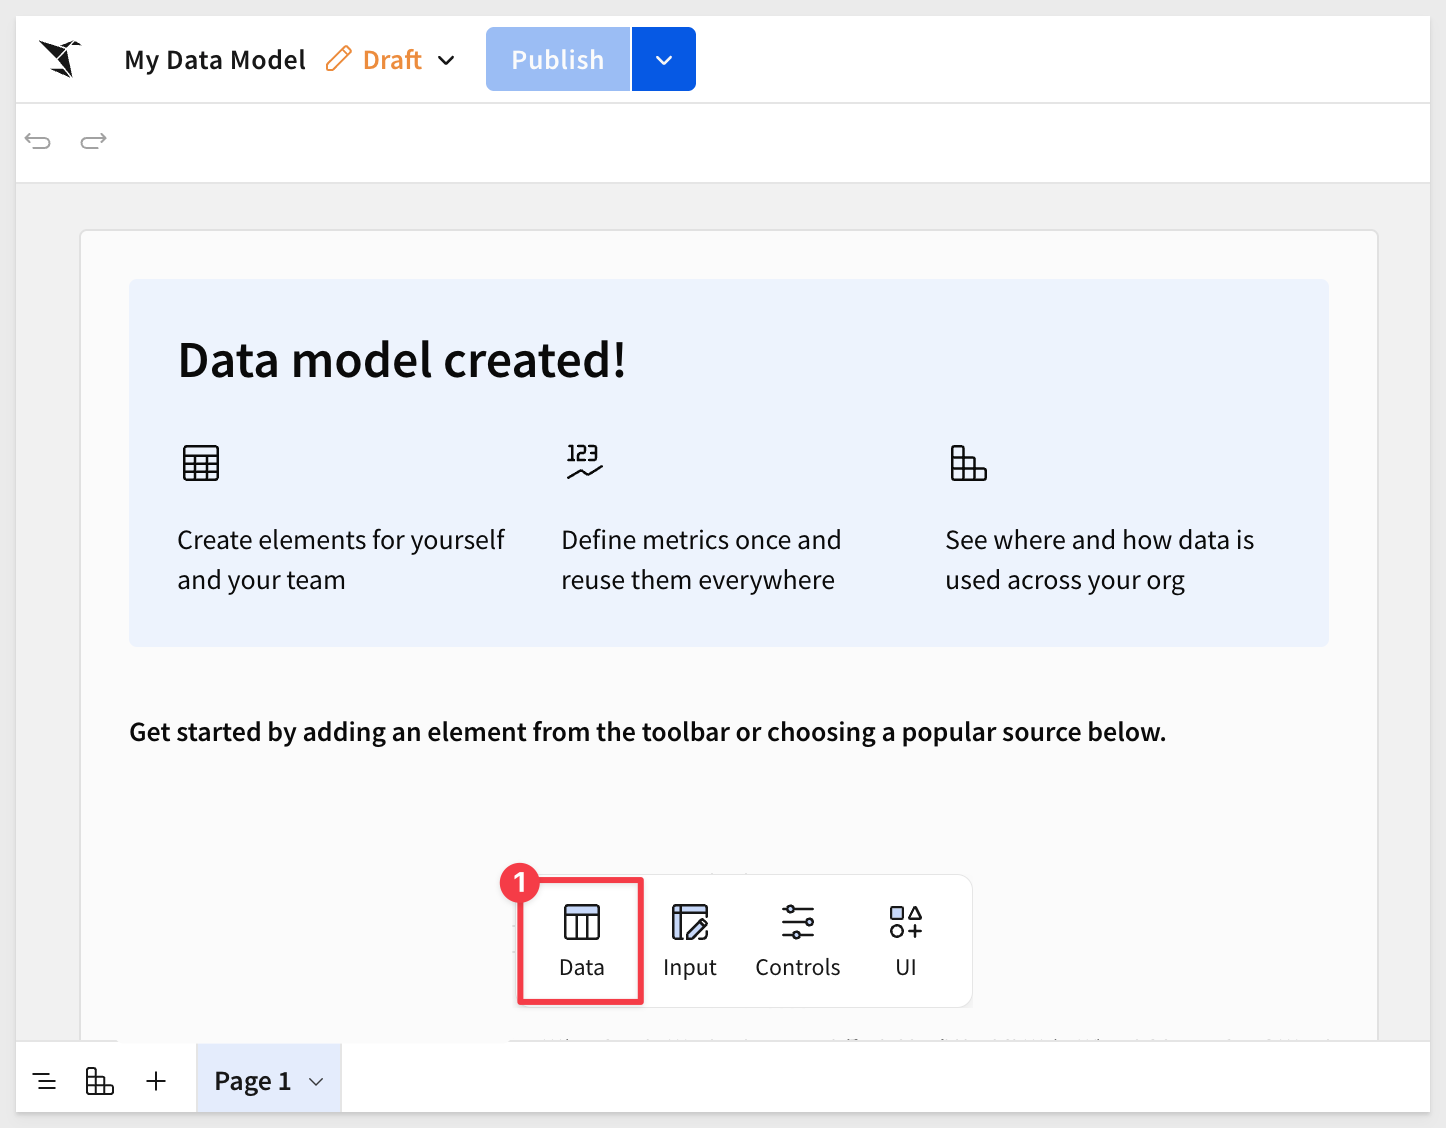
Select Data > Table from the element bar:
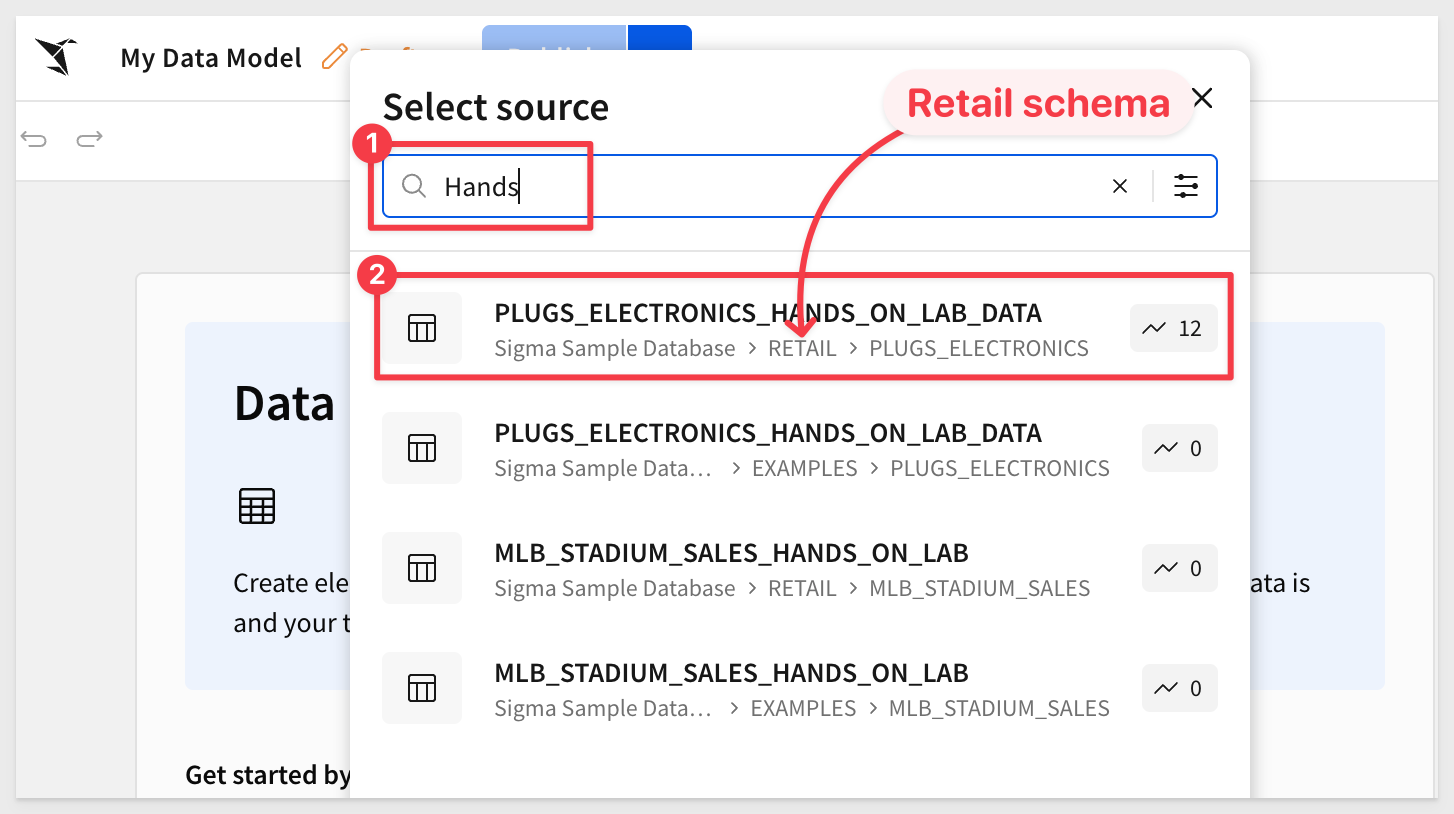
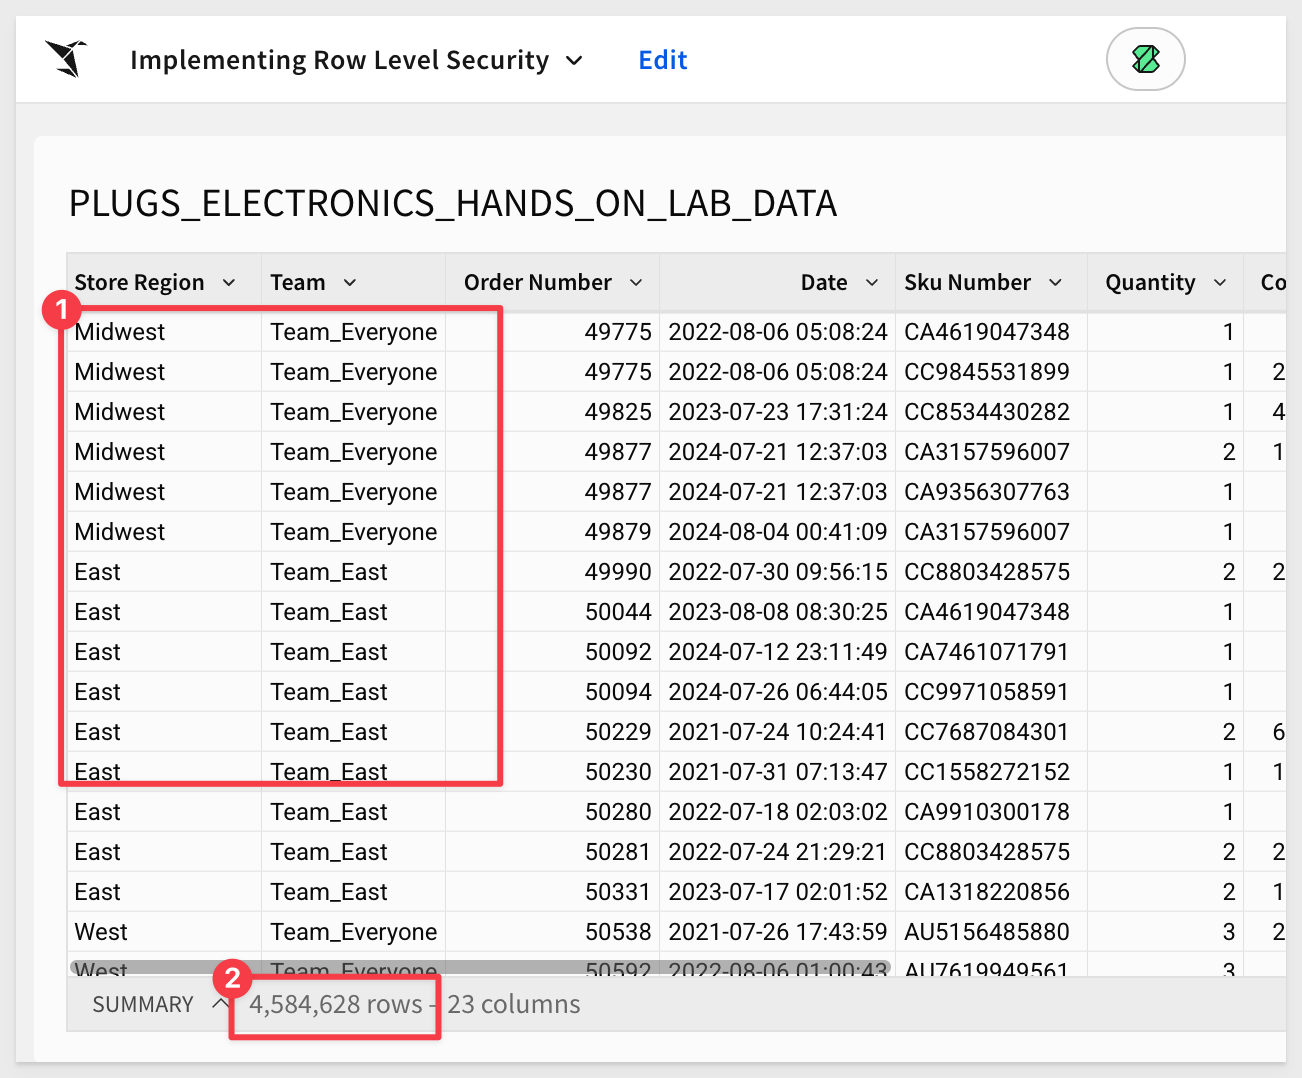
Search for Hands and select Plugs Electronics Hands On Lab table from the Retail schema:
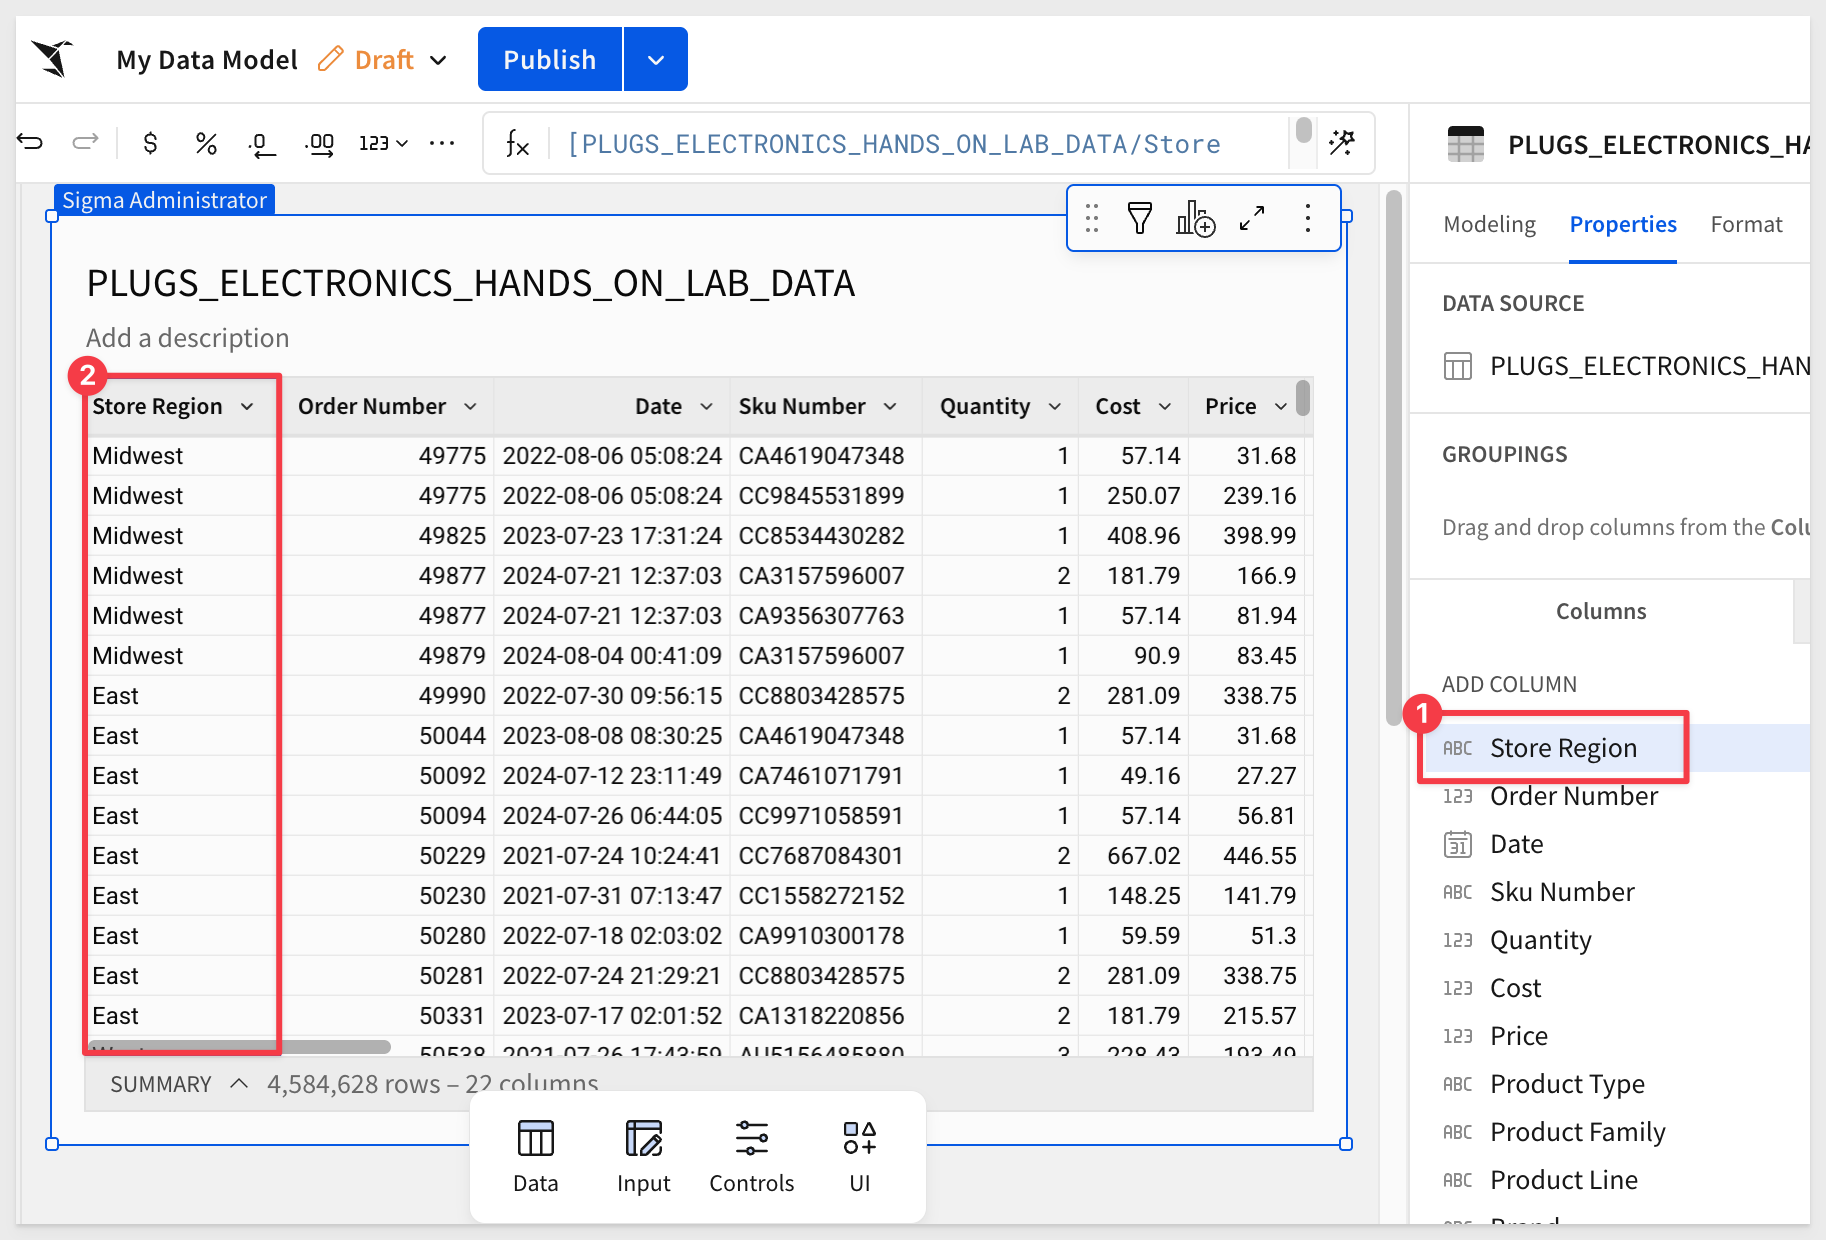
Let's assume that we want to limit data based on the Region where each transaction occurred. This table has a Store Region column, so we can use that for each of our test cases.
Drag the Store Region column to the first position:
The table does not have email or Team columns that we need for our test case, so we will add them using simple Sigma functions.
Add email column:
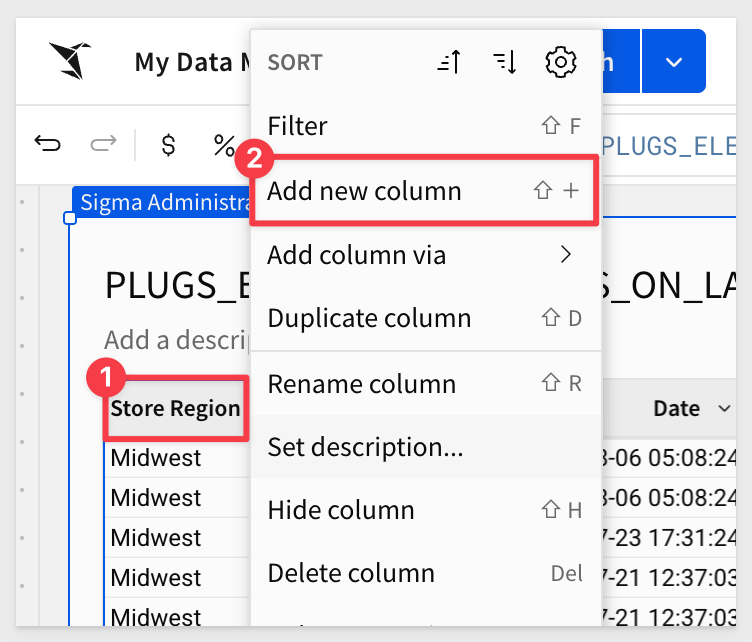
Now, from the Worksheet tab, click the Store Region dropdown menu and select Add a new column:
Double-click the new column's header and rename the column Email.
We want to have Sigma populate this column for us (because the data is not in our base table) and we want to make it obvious for our use cases.
Sigma has a function that allows for this called Switch
Switch will evaluate the Store Region column and based on the data in each row, will add an email that we specify, in the Email column.
Let's assume that our email will be evaluated and we are only allowed to see the East region. All other regions will be assigned a fictitious email for testing purposes.
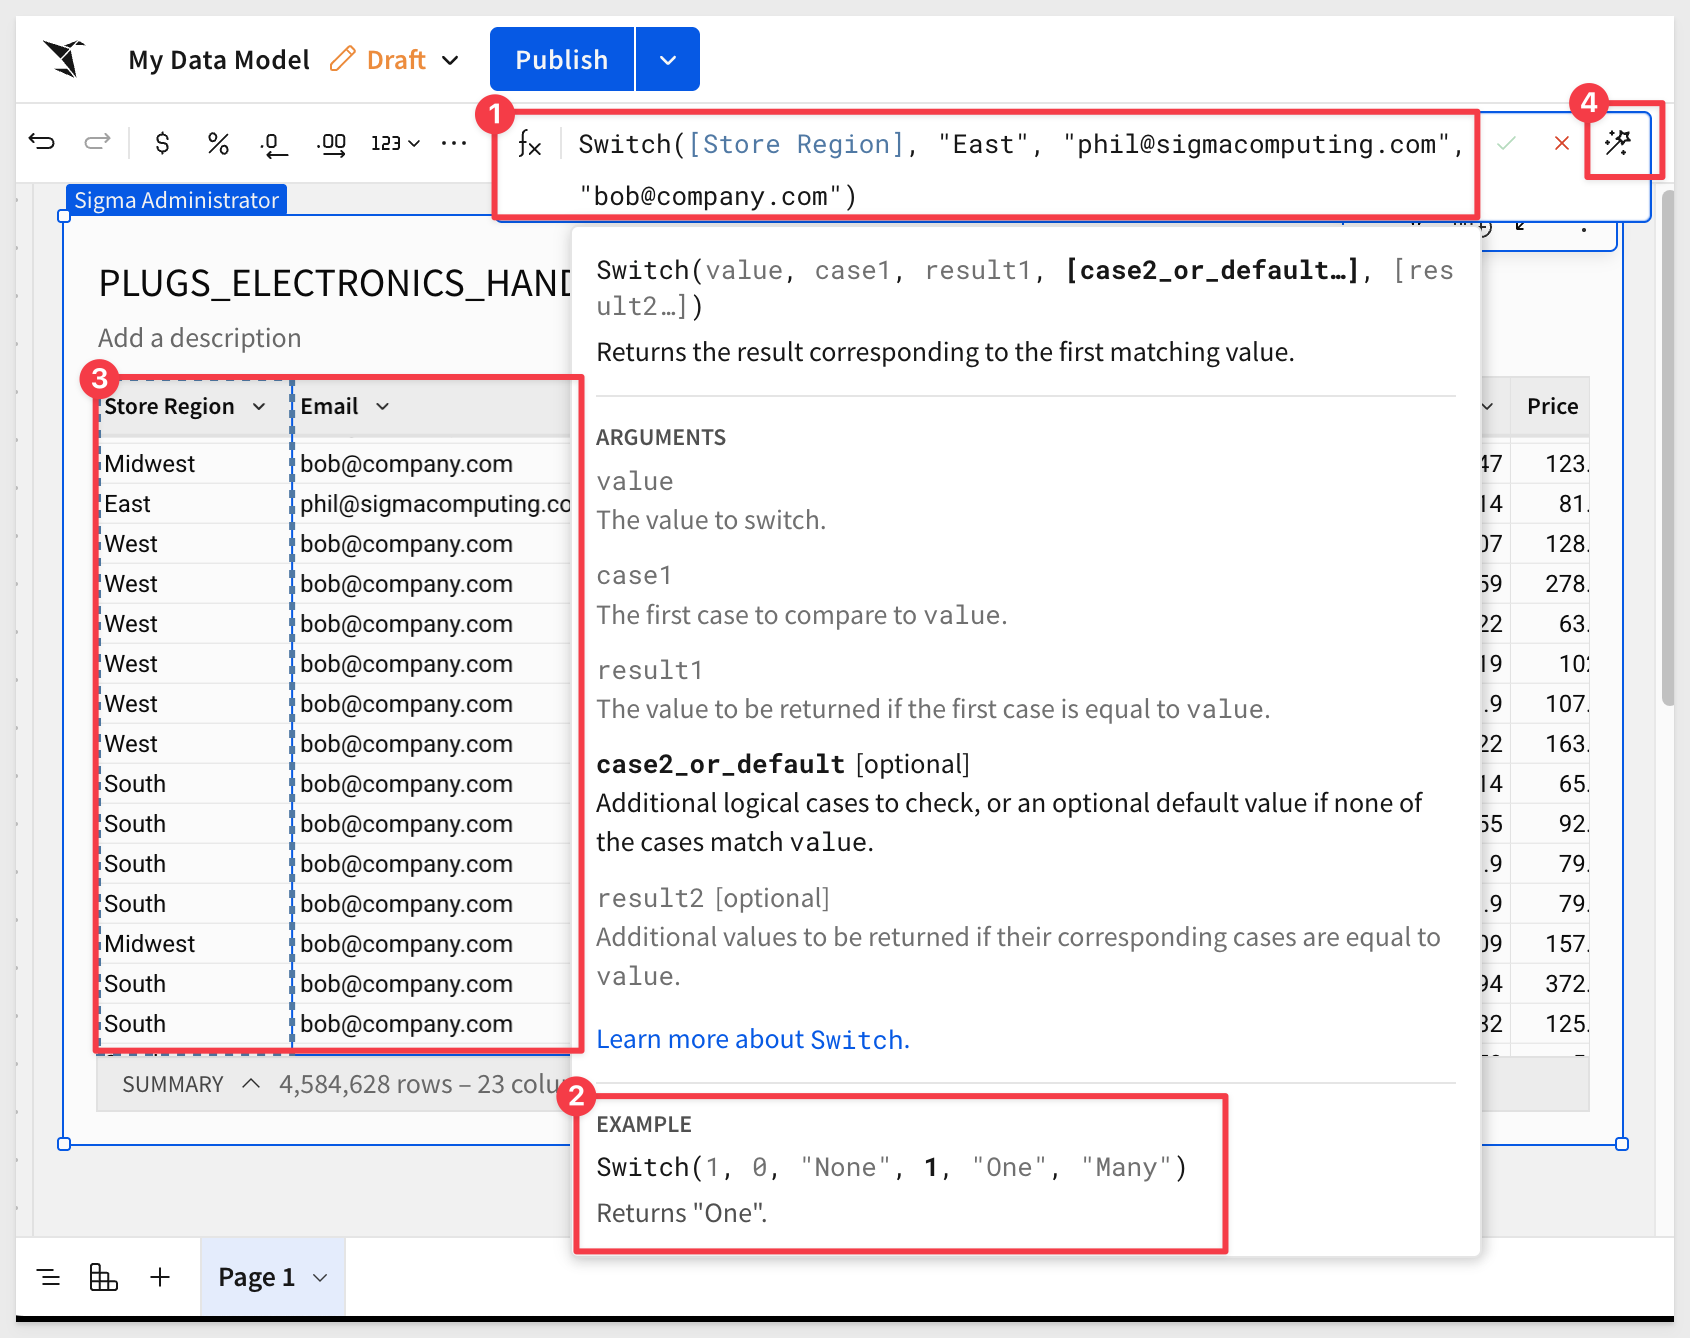
In the formula bar for Email enter the following formula:
Switch([Store Region], "East", "phil@sigmacomputing.com", "bob@company.com")
Sigma evaluates the formula for accuracy and provides instructions and an example. If everything is correct, a green checkmark appears.
The magic wand icon is Sigma's AI formula assistant. For more information, see Use AI with formulas
Email now shows phil for rows with East and bob for all the other rows:
Add team column:
We will now just repeat the same exercise only this time, our new column should be named Team and the function for the column modified to match a Sigma team name (that we have yet to create, we will do that later).
Switch([Store Region], "East", "Team_East", "Team_Everyone")
Our Switch function allows any member of Team_East to see the East Store Region rows. Team_Everyone will see everything else.
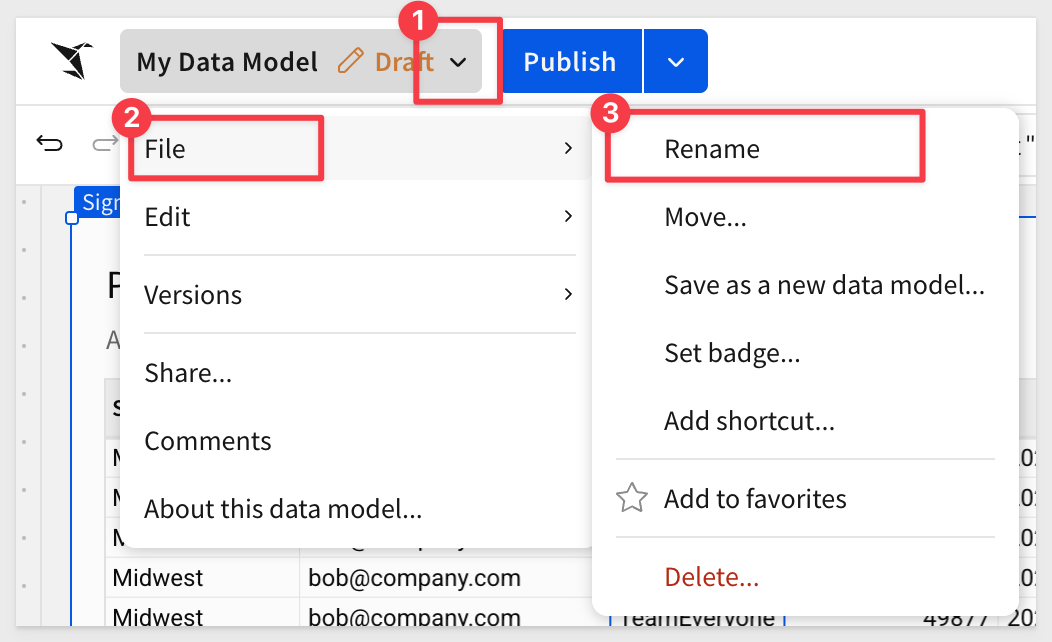
Rename the data model RLS_QuickStart:
Click Publish.
Adding RLS based on email is now pretty simple. We will add another column for a test email address. This column will evaluate the address of the user who is currently logged into Sigma, based on the CurrentUserEmail function and the Email column, returning a boolean (true/false).
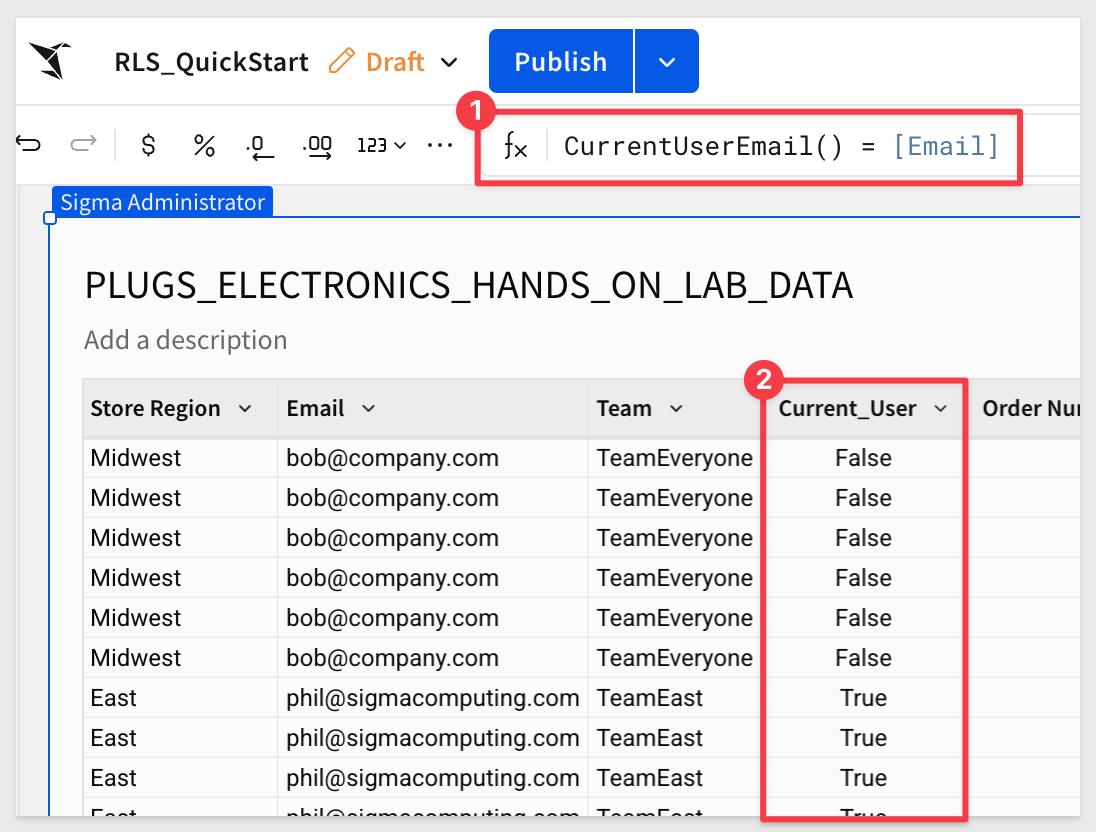
Add a new column and name it Current_User.
Set the new column's formula to:
CurrentUserEmail() = [Email]
When there is a match, the row's cell is set to True; otherwise False:
Now it is just a matter of setting a filter on the Current_User column so that the table only shows the rows that are True:

A final cleanup step is to hide the Email and Current_User columns; users do not need to see them. We moved the Current_User column next to Email for clarity:
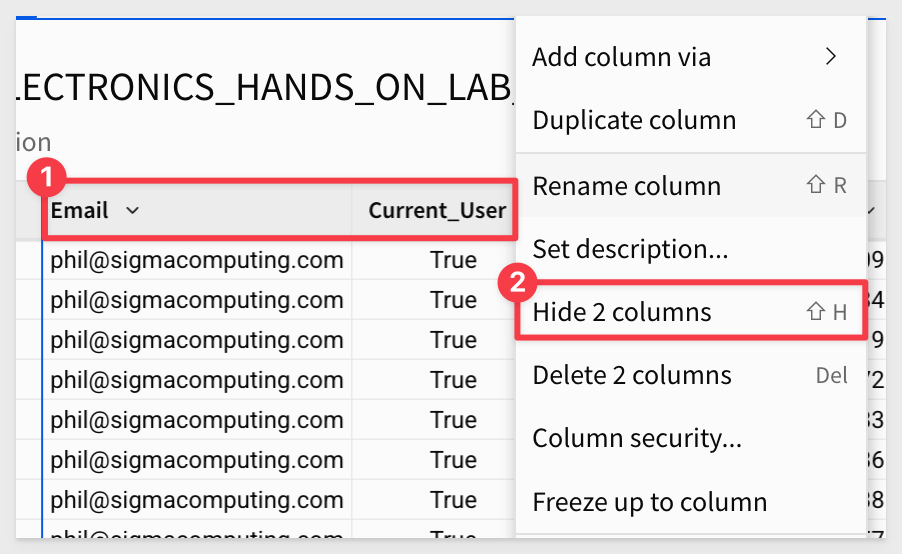
Click Publish.
A quick test
Up until now, we have been working in a data model. Let's take a look at what users will see.
Switch to the Published view:

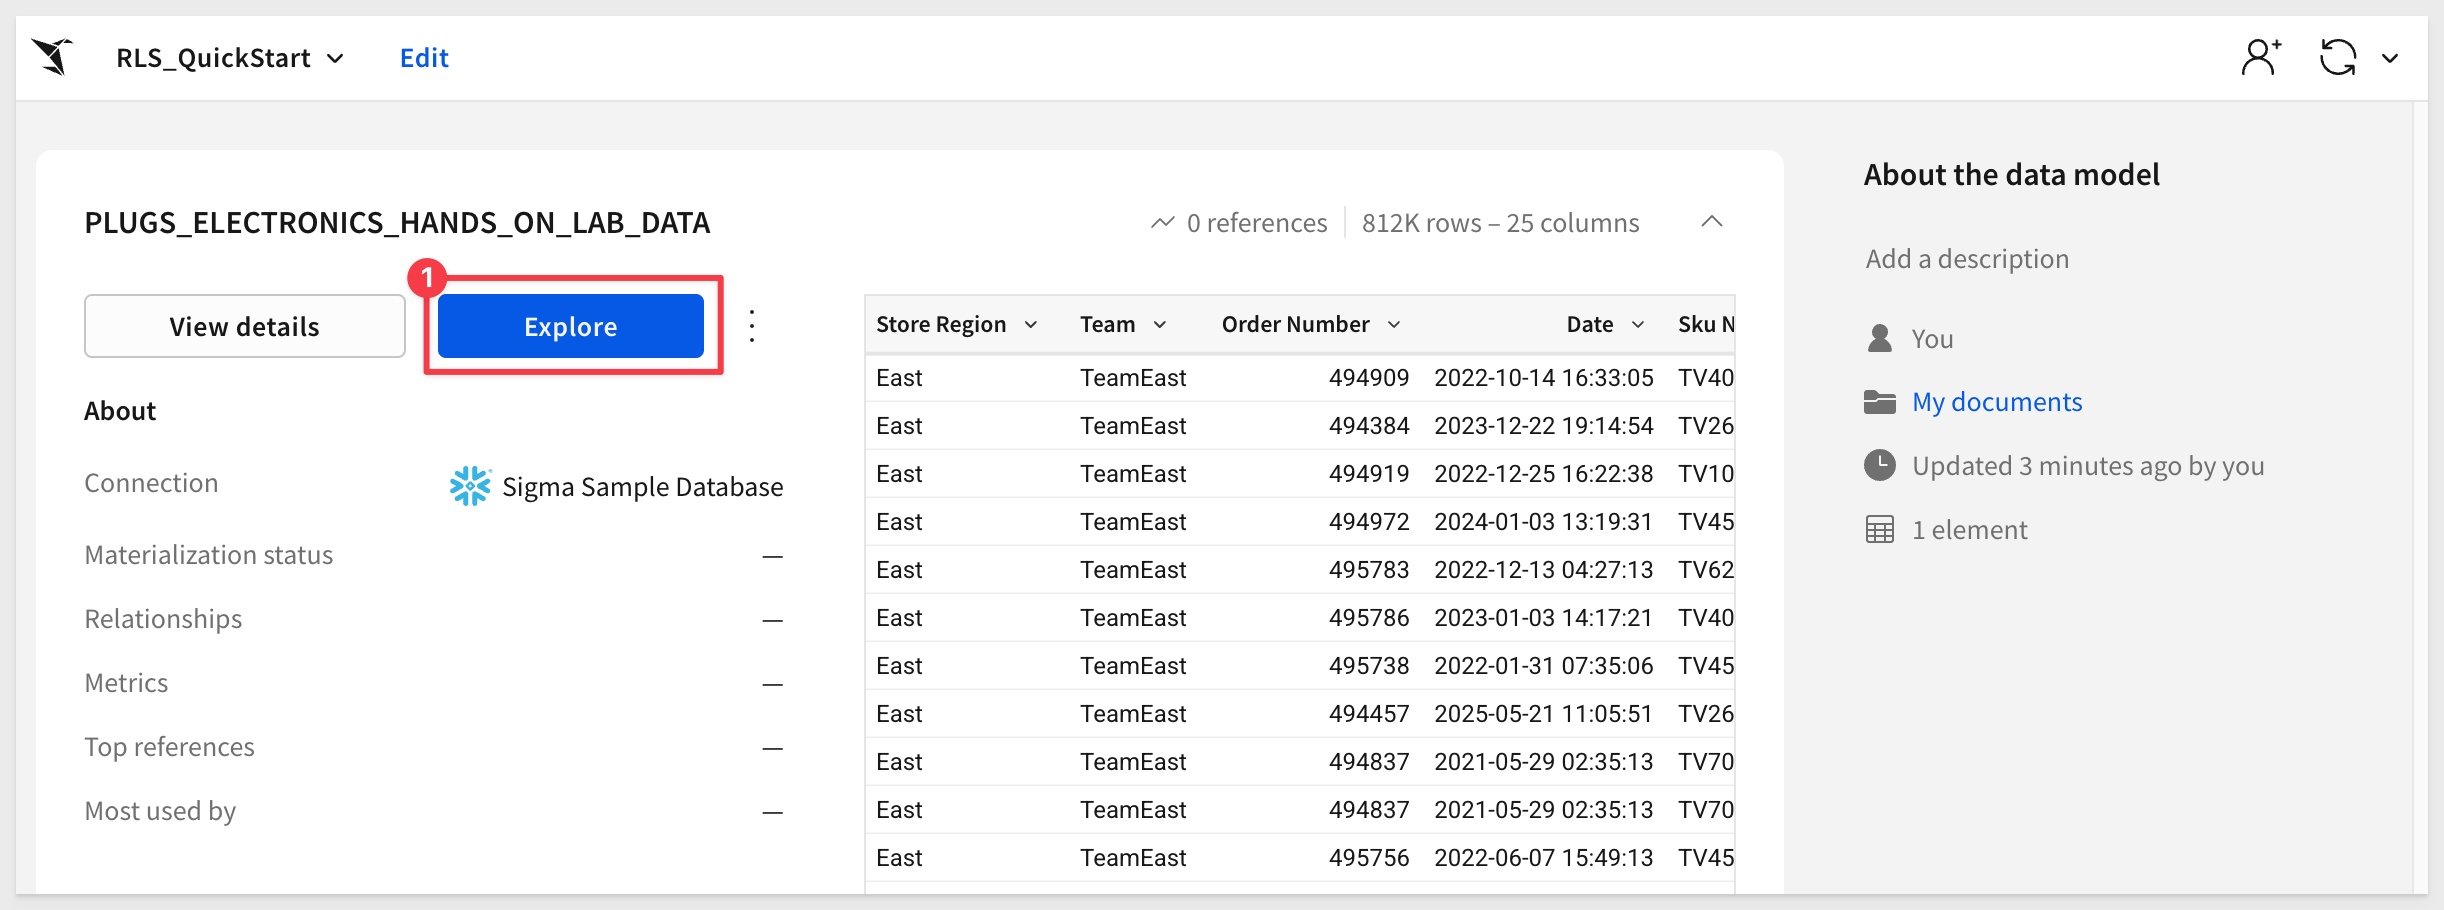
This "landing page" for our data model provides lots of useful information, although, since we just created it, much of it is not populated:
For more information, see Get started with data modeling
Click Explore.
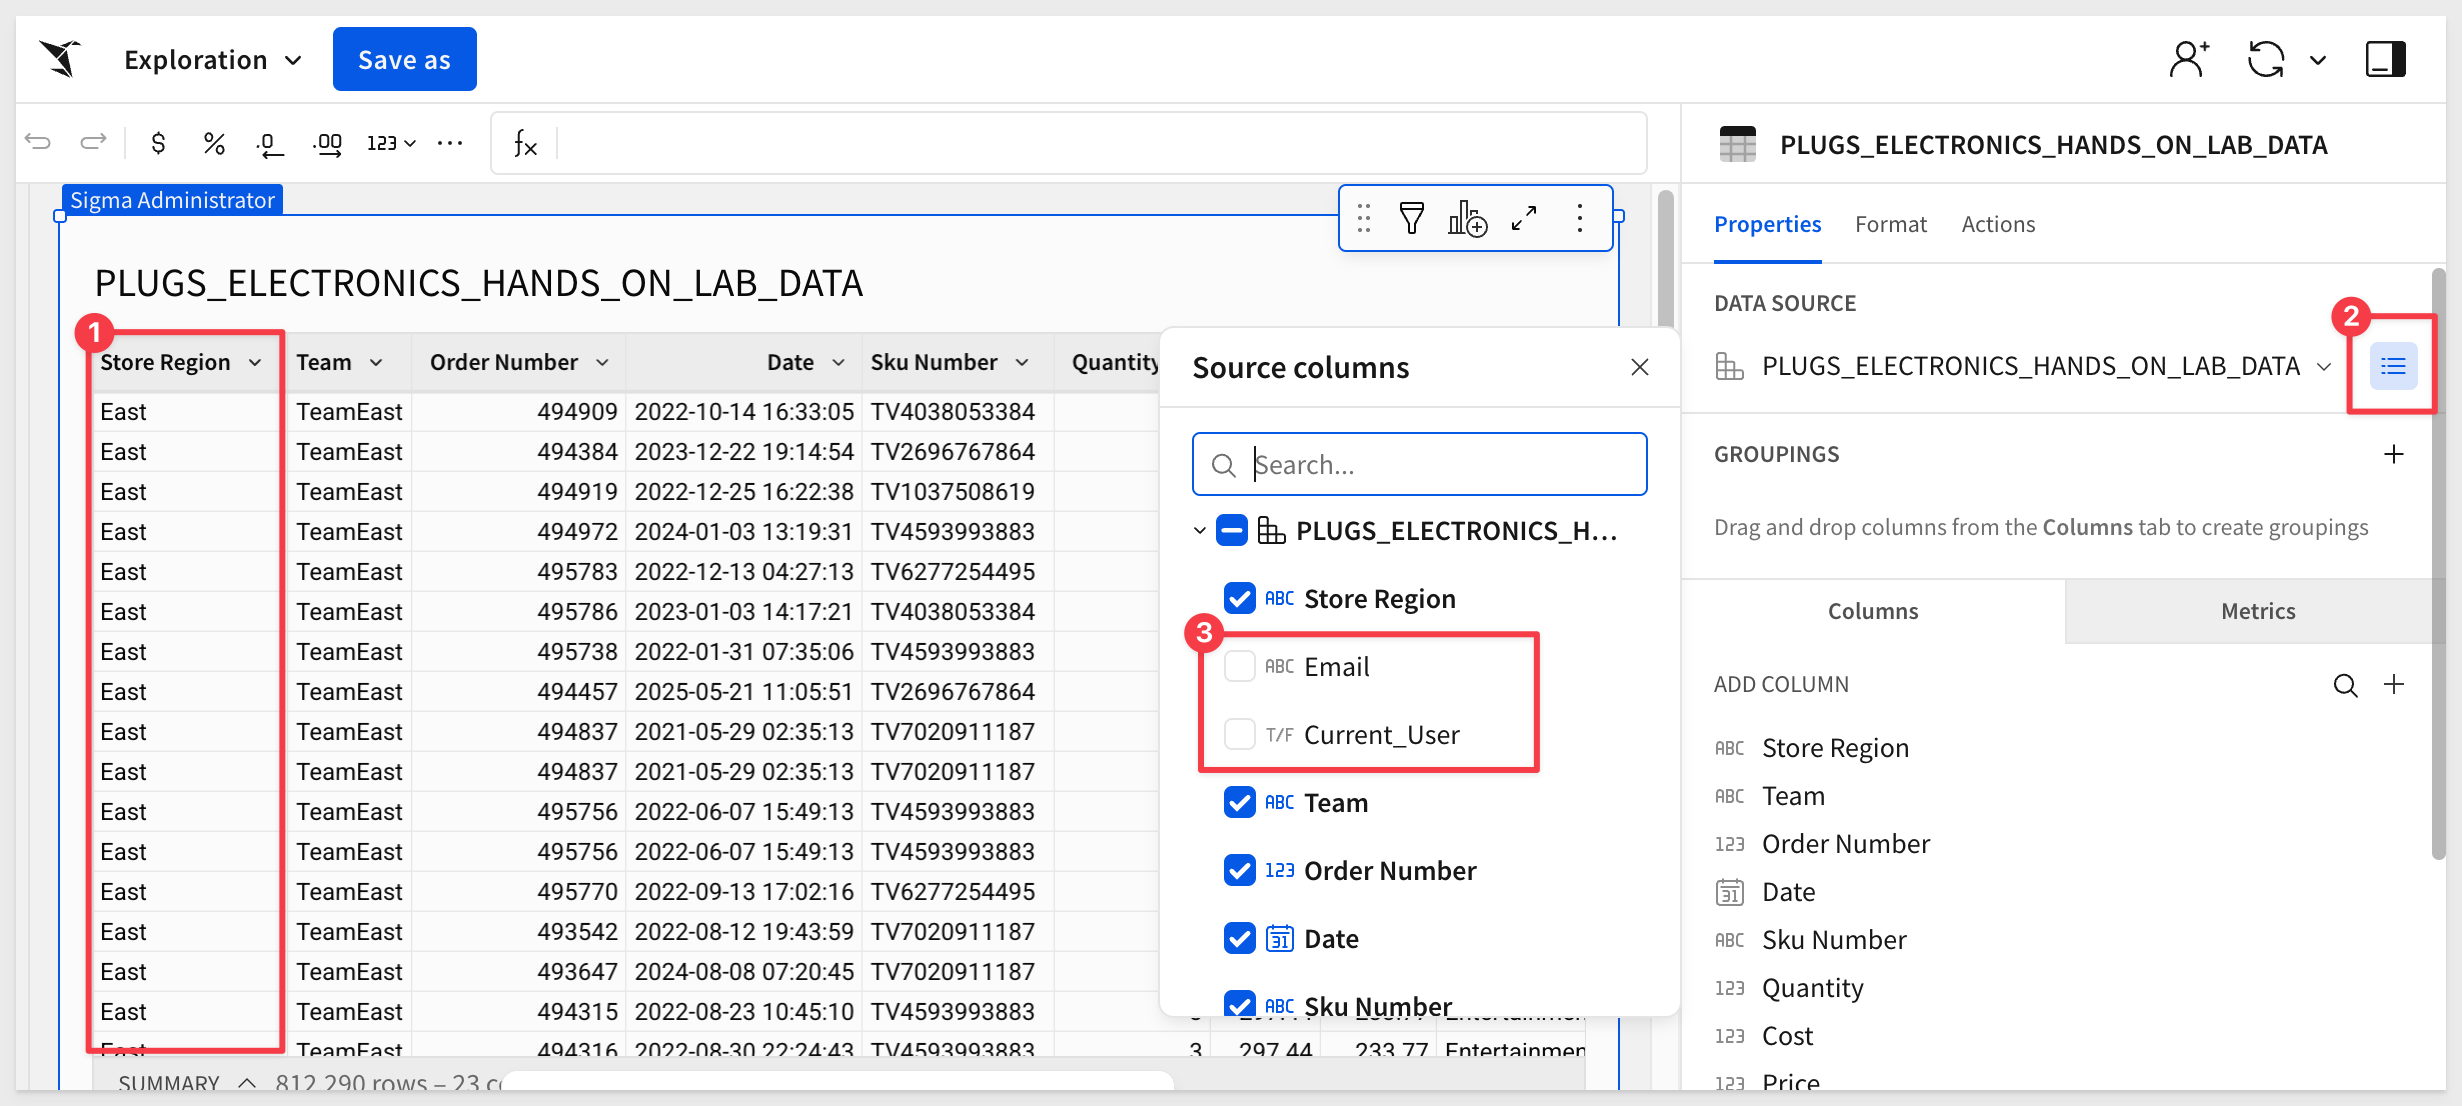
We are placed into an unsaved workbook with our table. The Store Region is restricted to East (as expected). The two hidden columns are not shown but they are still accessible to a workbook builder.
This is useful for troubleshooting purposes but in some cases, may not be desirable due to regulatory or compliance requirements. In those cases, these columns would be further secured using Column-Level Security in the data model.
To learn more about Column-Level Security in data models, see the QuickStart: Implementing Column Level Security
Click Save as and name the new workbook Implementing Row-Level Security.
Now we have a workbook that builders can use to create other content and the region filtering on email will just work, since that is built into the data model. Users could also just use this workbook directly once it is shared to them.
That's it! Simple right?
The workflow for team-based RLS is similar to CurrentUserEmail in terms of the table function and table filter. The difference is that the user's data rights are evaluated based on which team(s) they are a member of.
To demonstrate this, we need to create some teams and add our users to them for RLS to work.
Before we add teams, let's configure the data model to use CurrentUserTeam.
Click the  icon to return to the Sigma homepage and open the
 RLS_QuickStart data model.
Click the Edit link at the top of the page.
Let's keep our email work in place but disable the filter that enables it to be enforced:
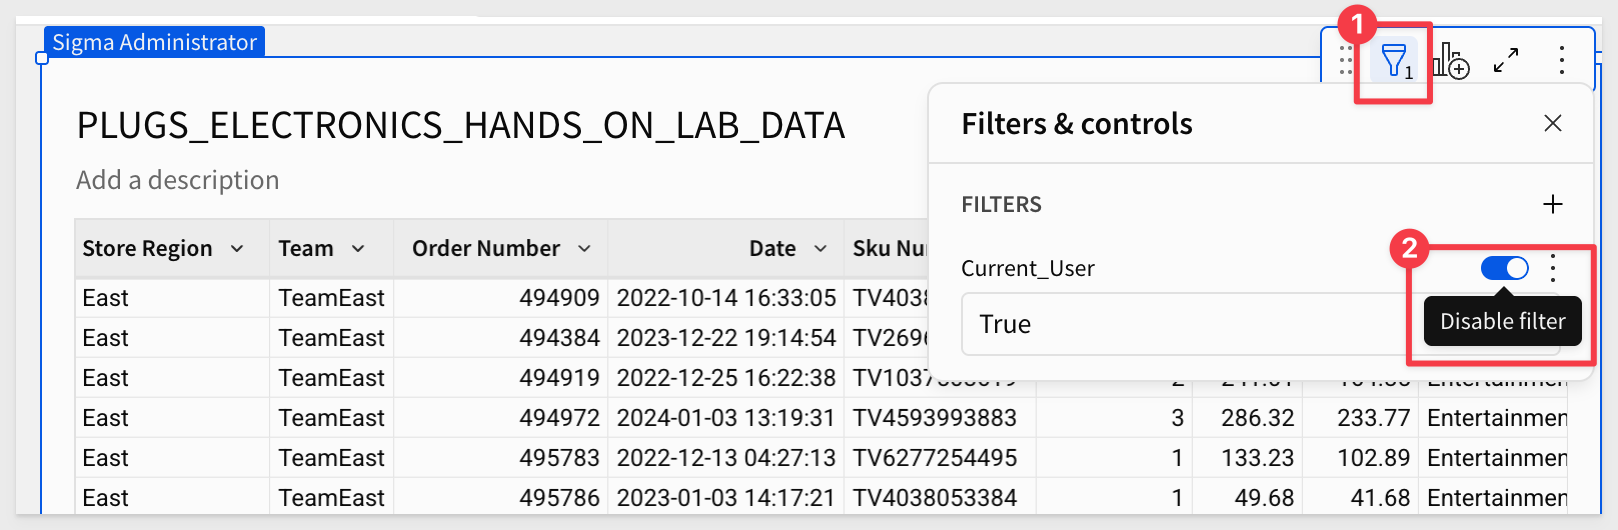
The table's row count should then return to approximately 4.5M rows.
Add team column
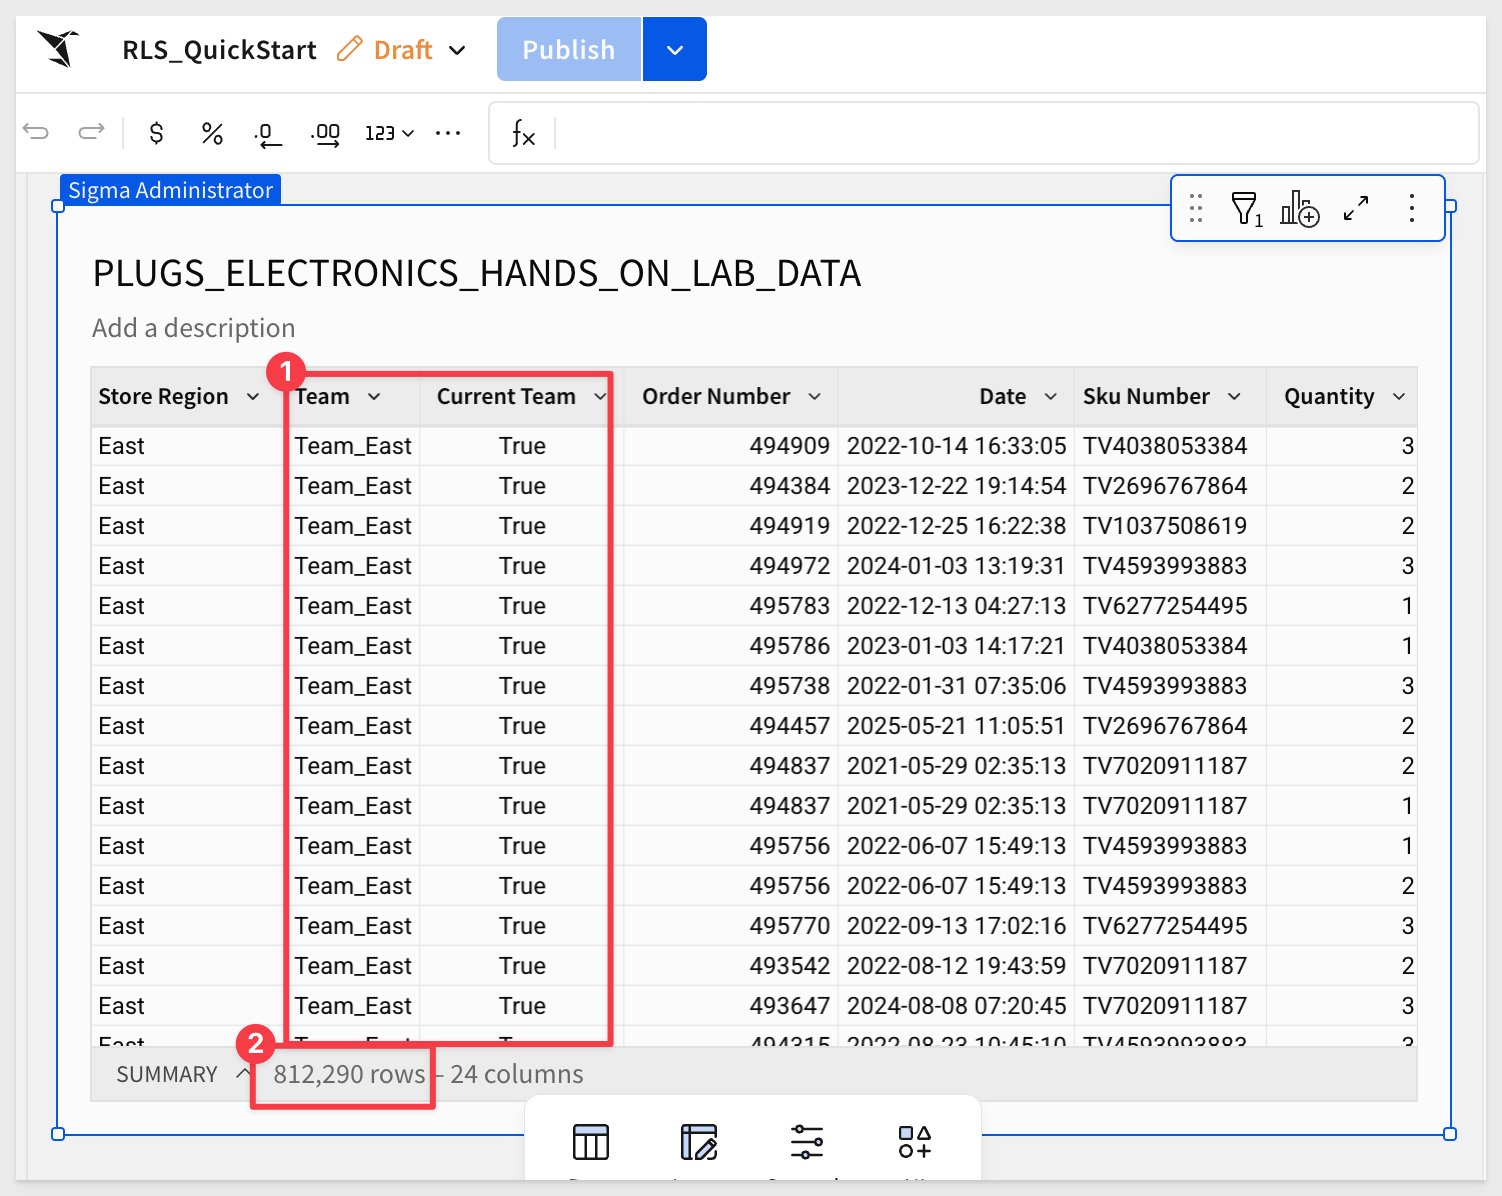
Now we can do the same steps, this time adding a new column called Current Team, setting its formula to:
CurrentUserInTeam([Team])
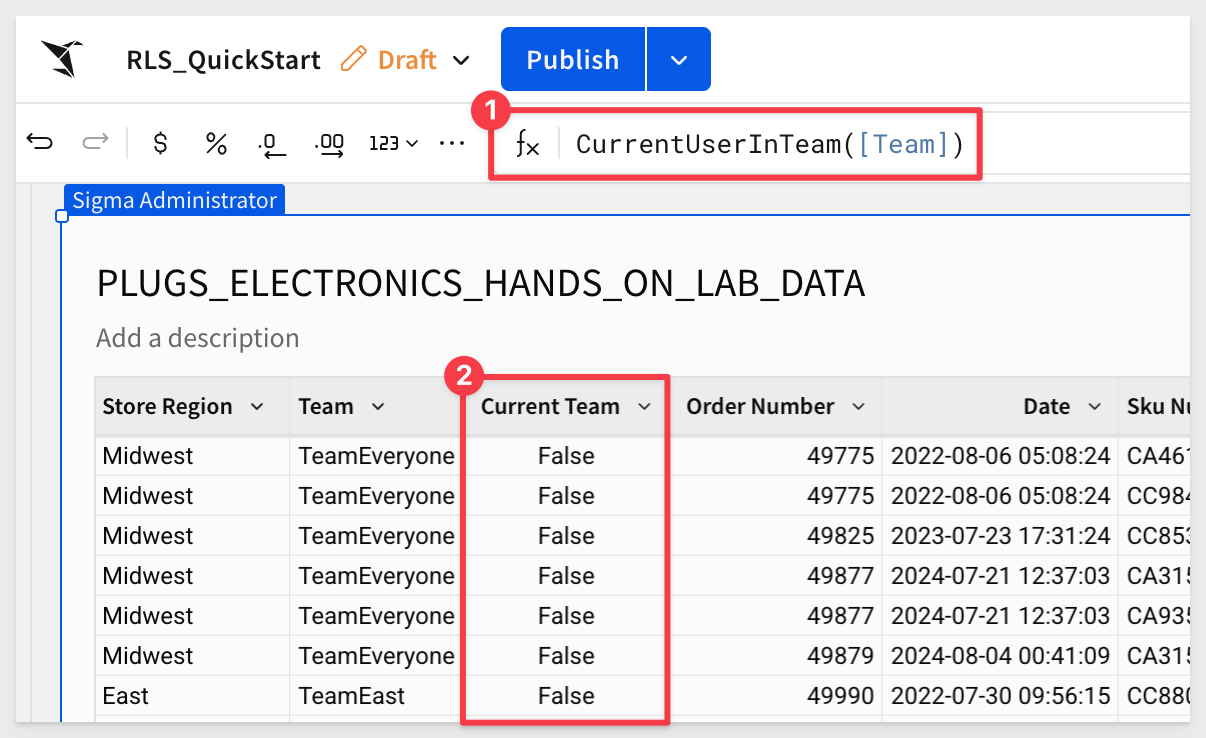
Once you have applied the formula, all the rows under Current Team will be False because the current user (you) is not a member of our two teams (Team_East and Team_Everyone), which have not been created yet.
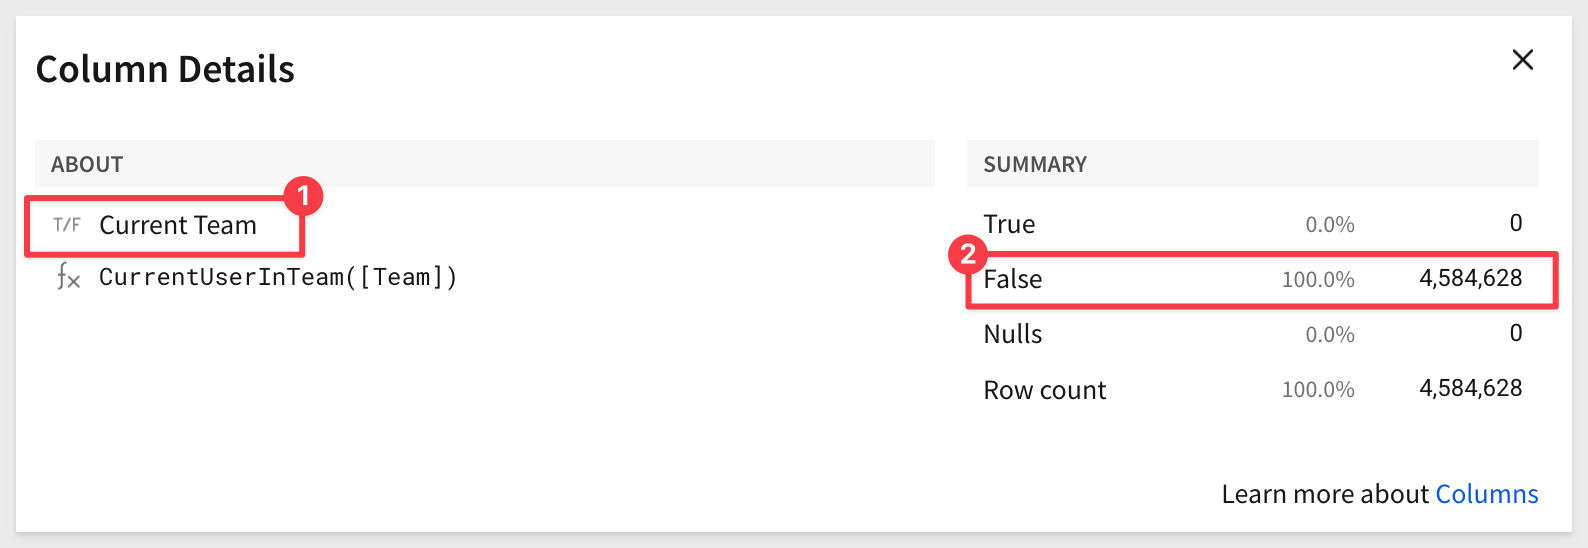
Sigma provides Column details to let us quickly see the shape of the data in a column:
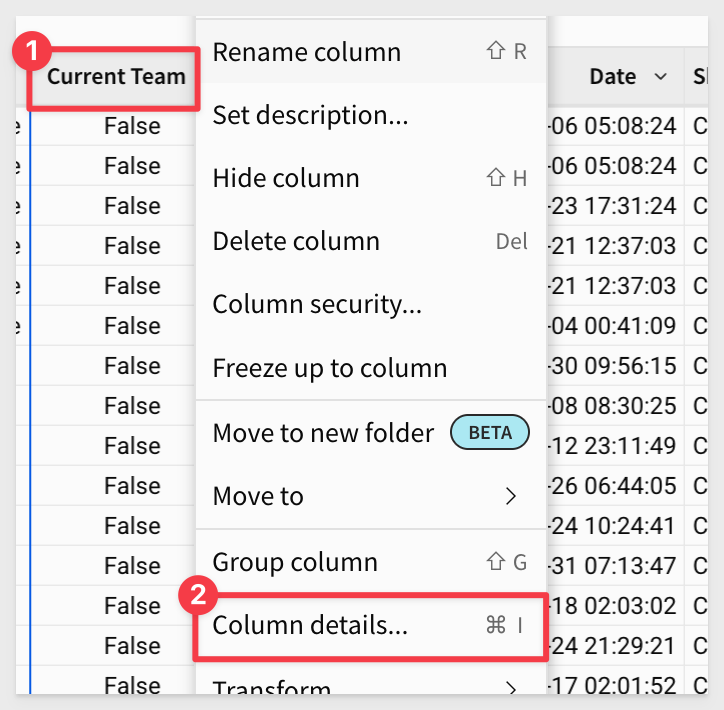
This is a convenient way to confirm that all the cells for Current Team are indeed False:
Click Publish.
Create teams
We need to create those teams and assign members.
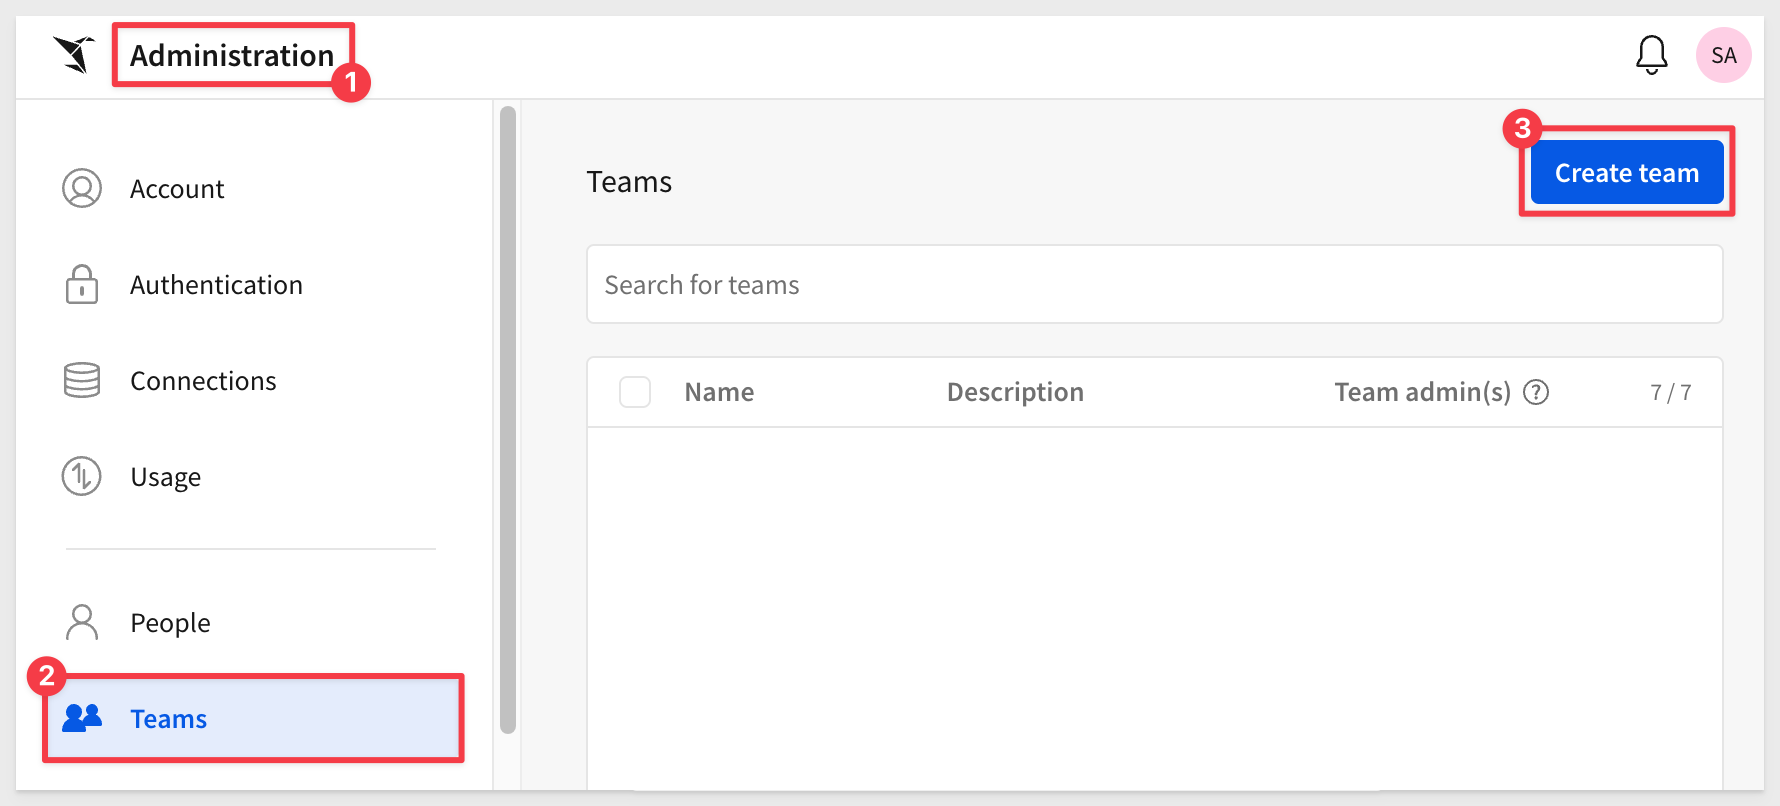
Return to the homepage and then click the Administration link.
Now click Teams from the left sidebar and then click Create Team:
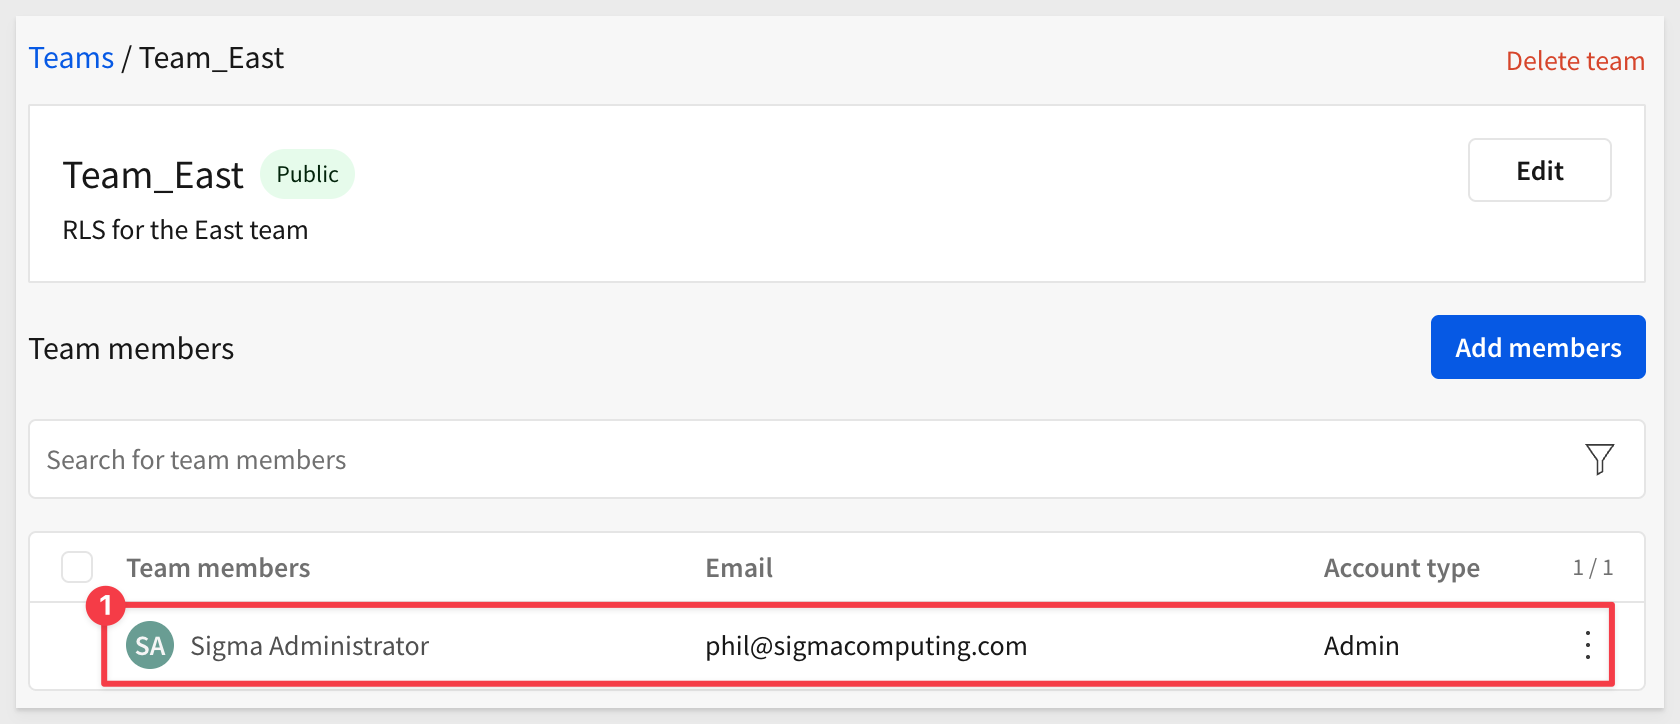
Name the team Team_East and click Create
There are a few options on this screen but we will not cover them all here. For more information, see Manage Teams
It is easy to add new members by clicking the Add Members button.
Click Add members and add yourself:
Repeat the process to add a second team named Team_Everyone but this time we won't add any members.
Navigate back to the Implementing Row-Level Security workbook. We see there are approximately 4.5M rows displayed. What went wrong?
After we added the Current Team column we did not add the required filter!
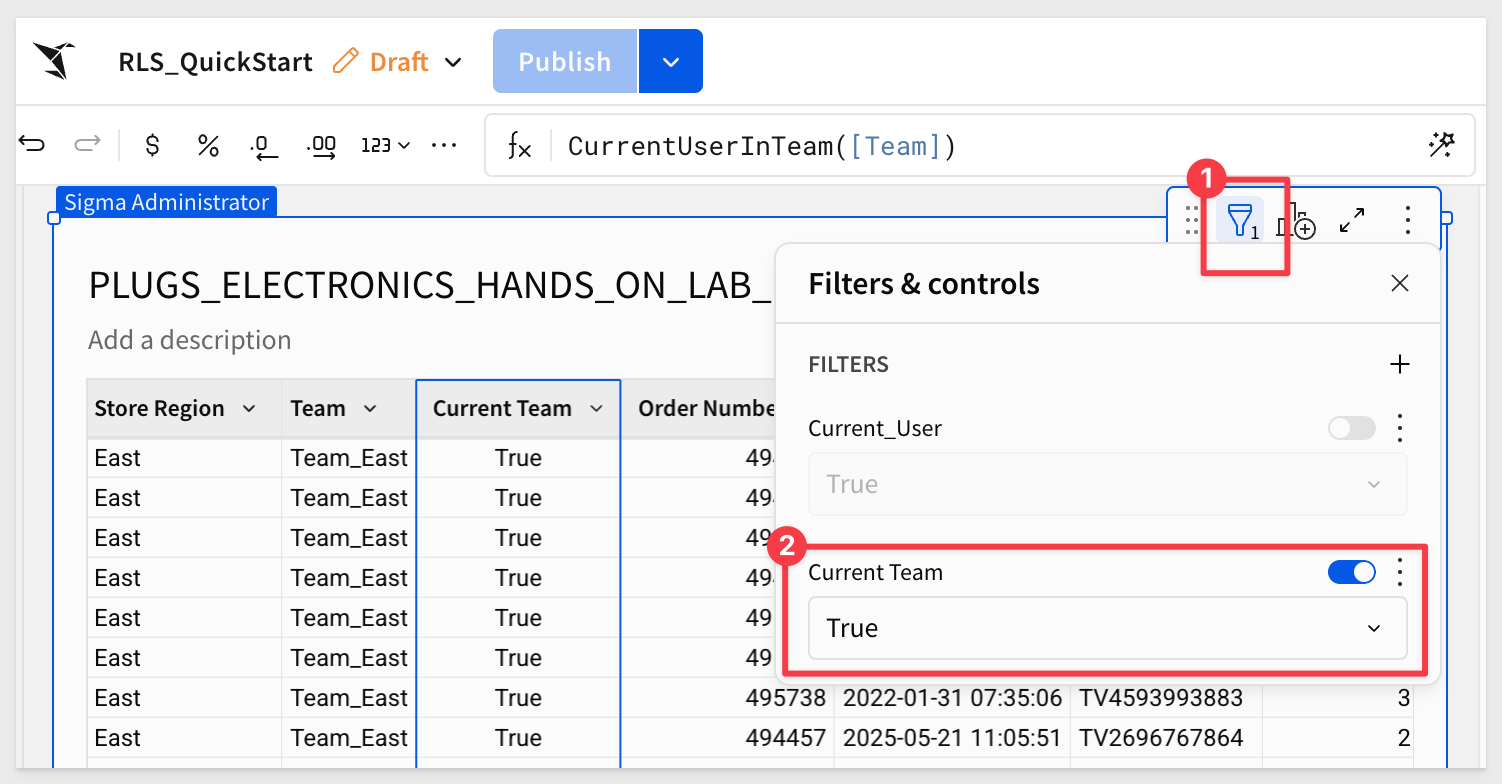
Return to the RLS_QuickStart data model and add that filter:
Publish this data model and return to the workbook.
Now we get the results we want: Current Team is all True, we only see East rows for Store Region and the row count is lower:
You can hide these two columns; you know how to do that now. Just make sure to do it in the data model and not the workbook.
What happens if we add ourselves back into Team_Everyone?
User Attributes (UA) can be used to provide a customized experience for Sigma teams or members (users). UAs do not depend on email or team membership to work and allow you to apply RLS to any column in a data model.
You assign them using a function in a data model column to provide row-level security.
Once you create a UA, you assign it to a team or individual users. The UA is then applied to a data model to enforce row-level security in a similar manner as we have done with CurrentUserEmail and CurrentUserTeam, but this time we use the function CurrentUserAttributeText in the formula.
Create user attribute
Navigate to Administration > User Attributes and click Create.
Name the new UA Region, and leave the default value blank. Click Create.
Sigma allows us to assign this UA to either an existing Team or individual users.
We will assign ourselves and set the Assigned Value to East only:
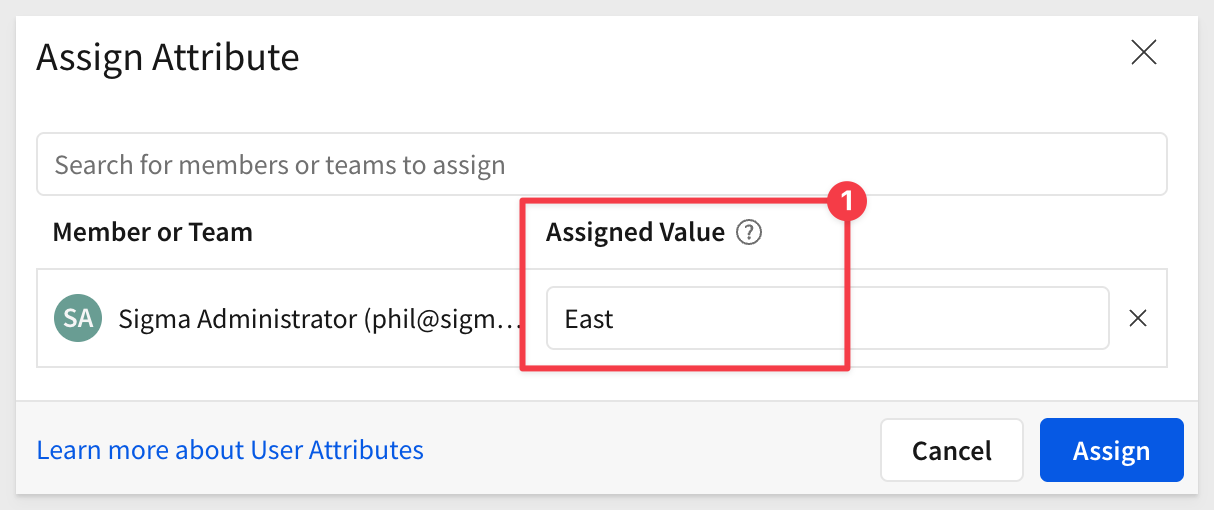
Click Assign.
Configure the data model
Return to the data model, put it in Edit mode.
Disable the filter for Current Team.
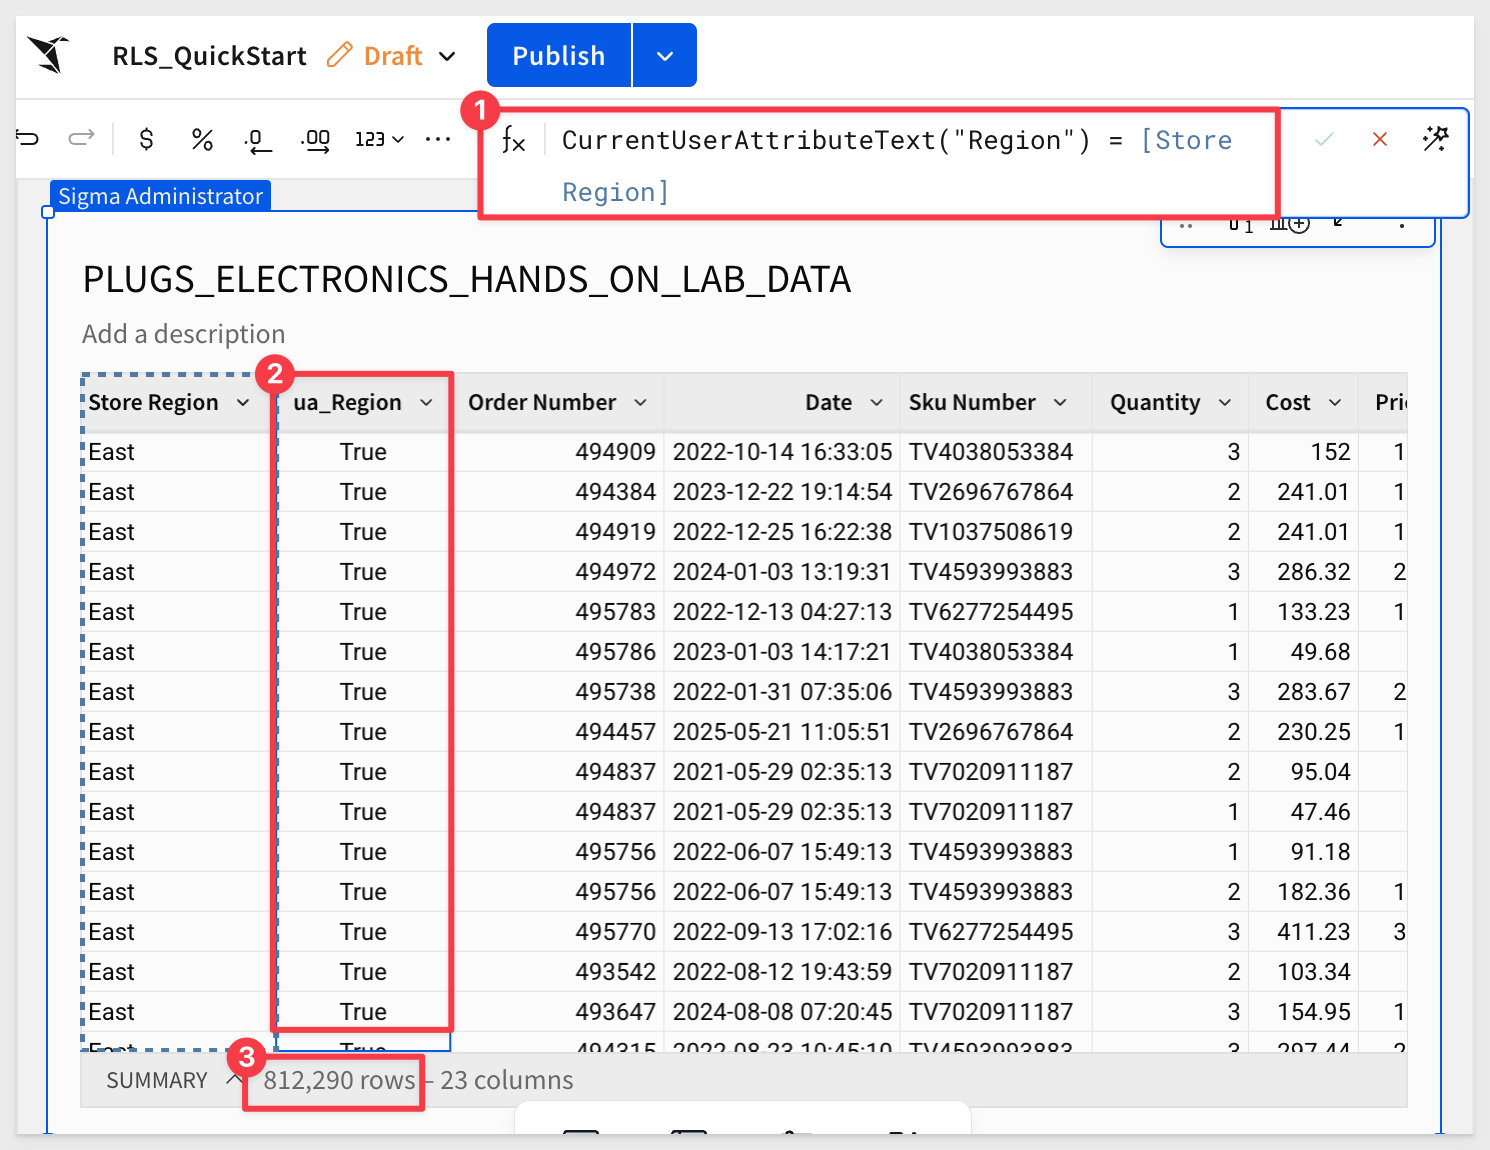
Add a new column next to Store Region, rename it ua_Region and set its formula to:
CurrentUserAttributeText("Region") = [Store Region]
Add a filter on ua_Region to show only the True rows:
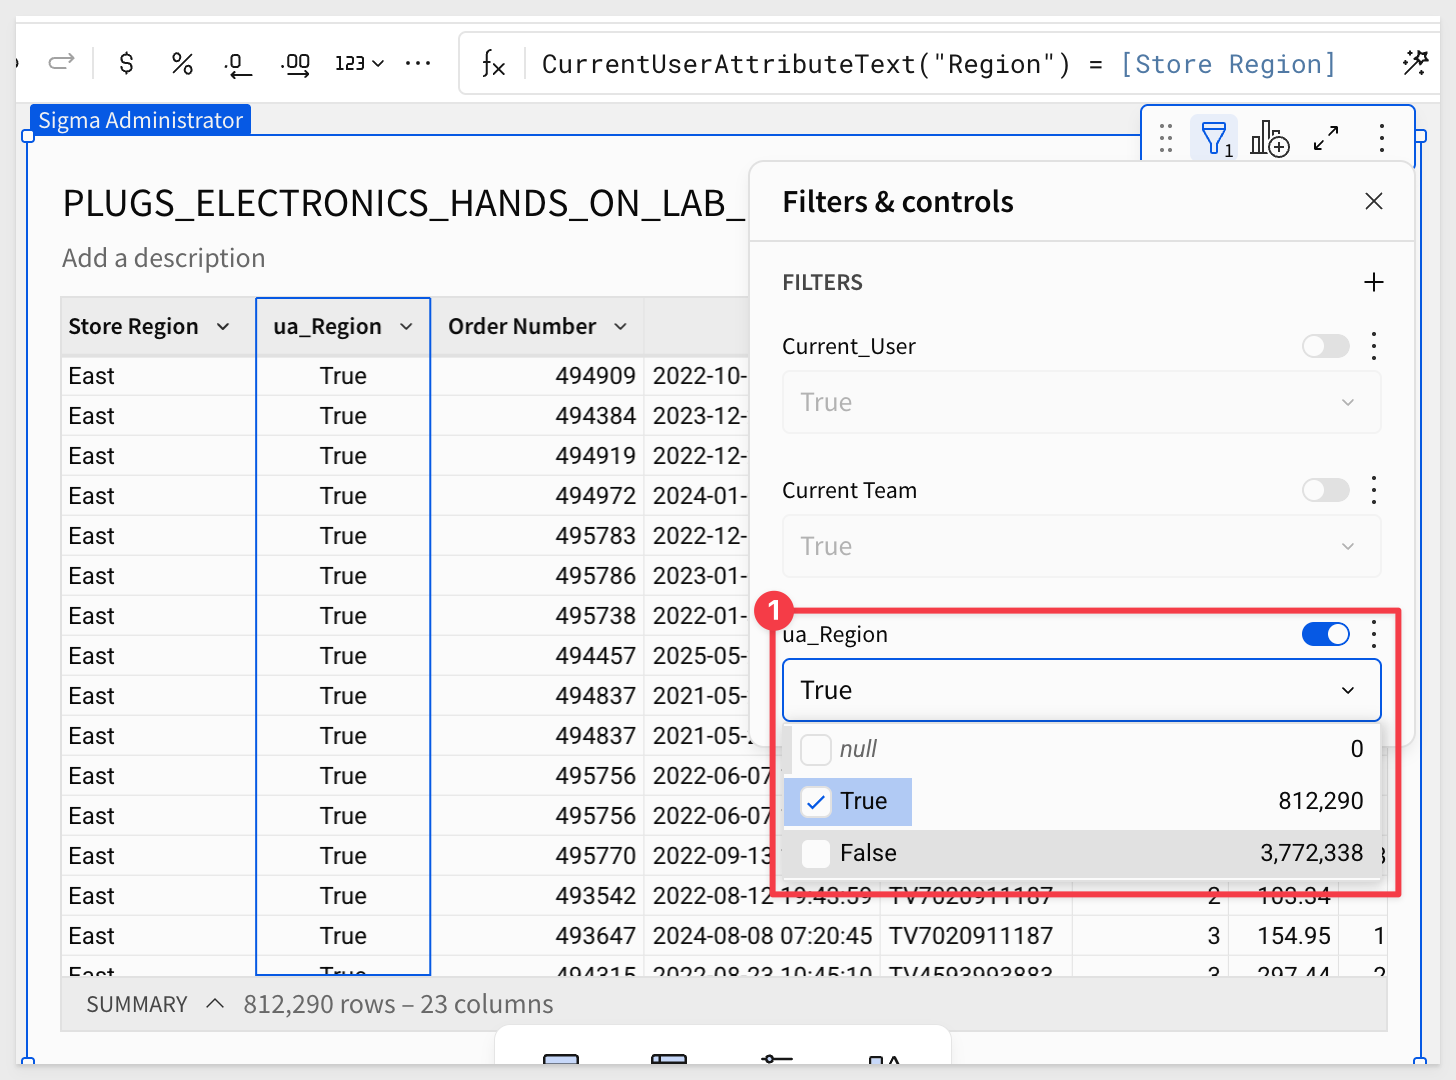
With the filter applied, we can see that there is only one Store Region shown for East and we have the expected ~812K rows of data:
Hide the ua_Region column.
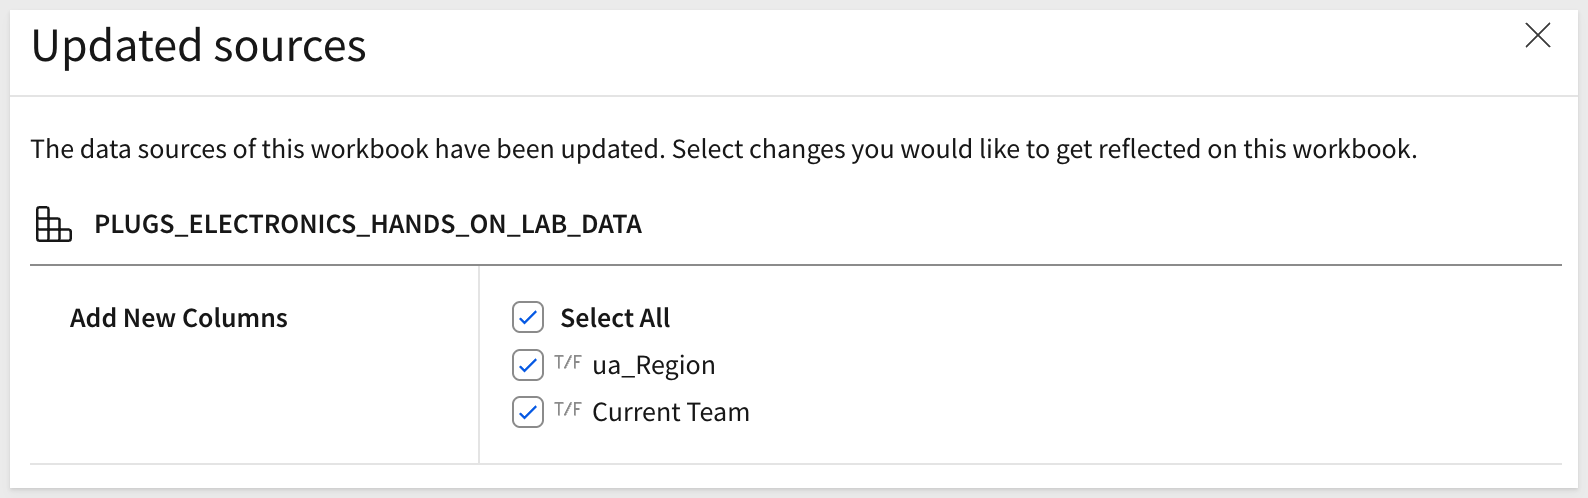
You can Publish this data model and check the workbook if you like. The results will be the same, with no indication to the user that data is being restricted — but there is a notice that the source has been updated.
Since we made the changes, we know what they are. Click Select All and then Update:
We could add ourselves to Team_Everyone and test that all approximately 4.5M rows are shown, but we will skip that — we already demonstrated this behavior in the team RLS section, and the workflow is the same.
Since we've already successfully configured a UA for region, we can leverage it in a custom SQL data model to provide RLS.
This method can be used anywhere in the SQL statement for any UA.
Navigate back to the data model and click Edit.
Create a new Page and rename it to RLS_SQL_Query.
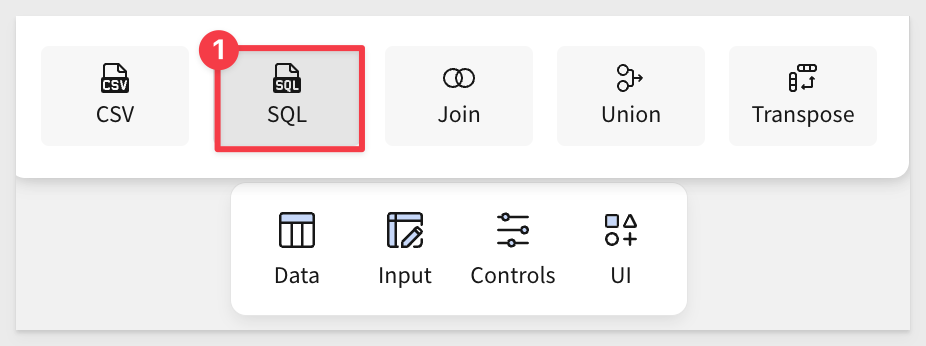
Use the Element bar to add a Table to the page but this time, select SQL as the source:
Use the Sigma Sample Database for the connection.
Our workbook now has an element to allow custom SQL code. It also lets us explore the contents of the Sigma Sample Database in the right-side Element panel:
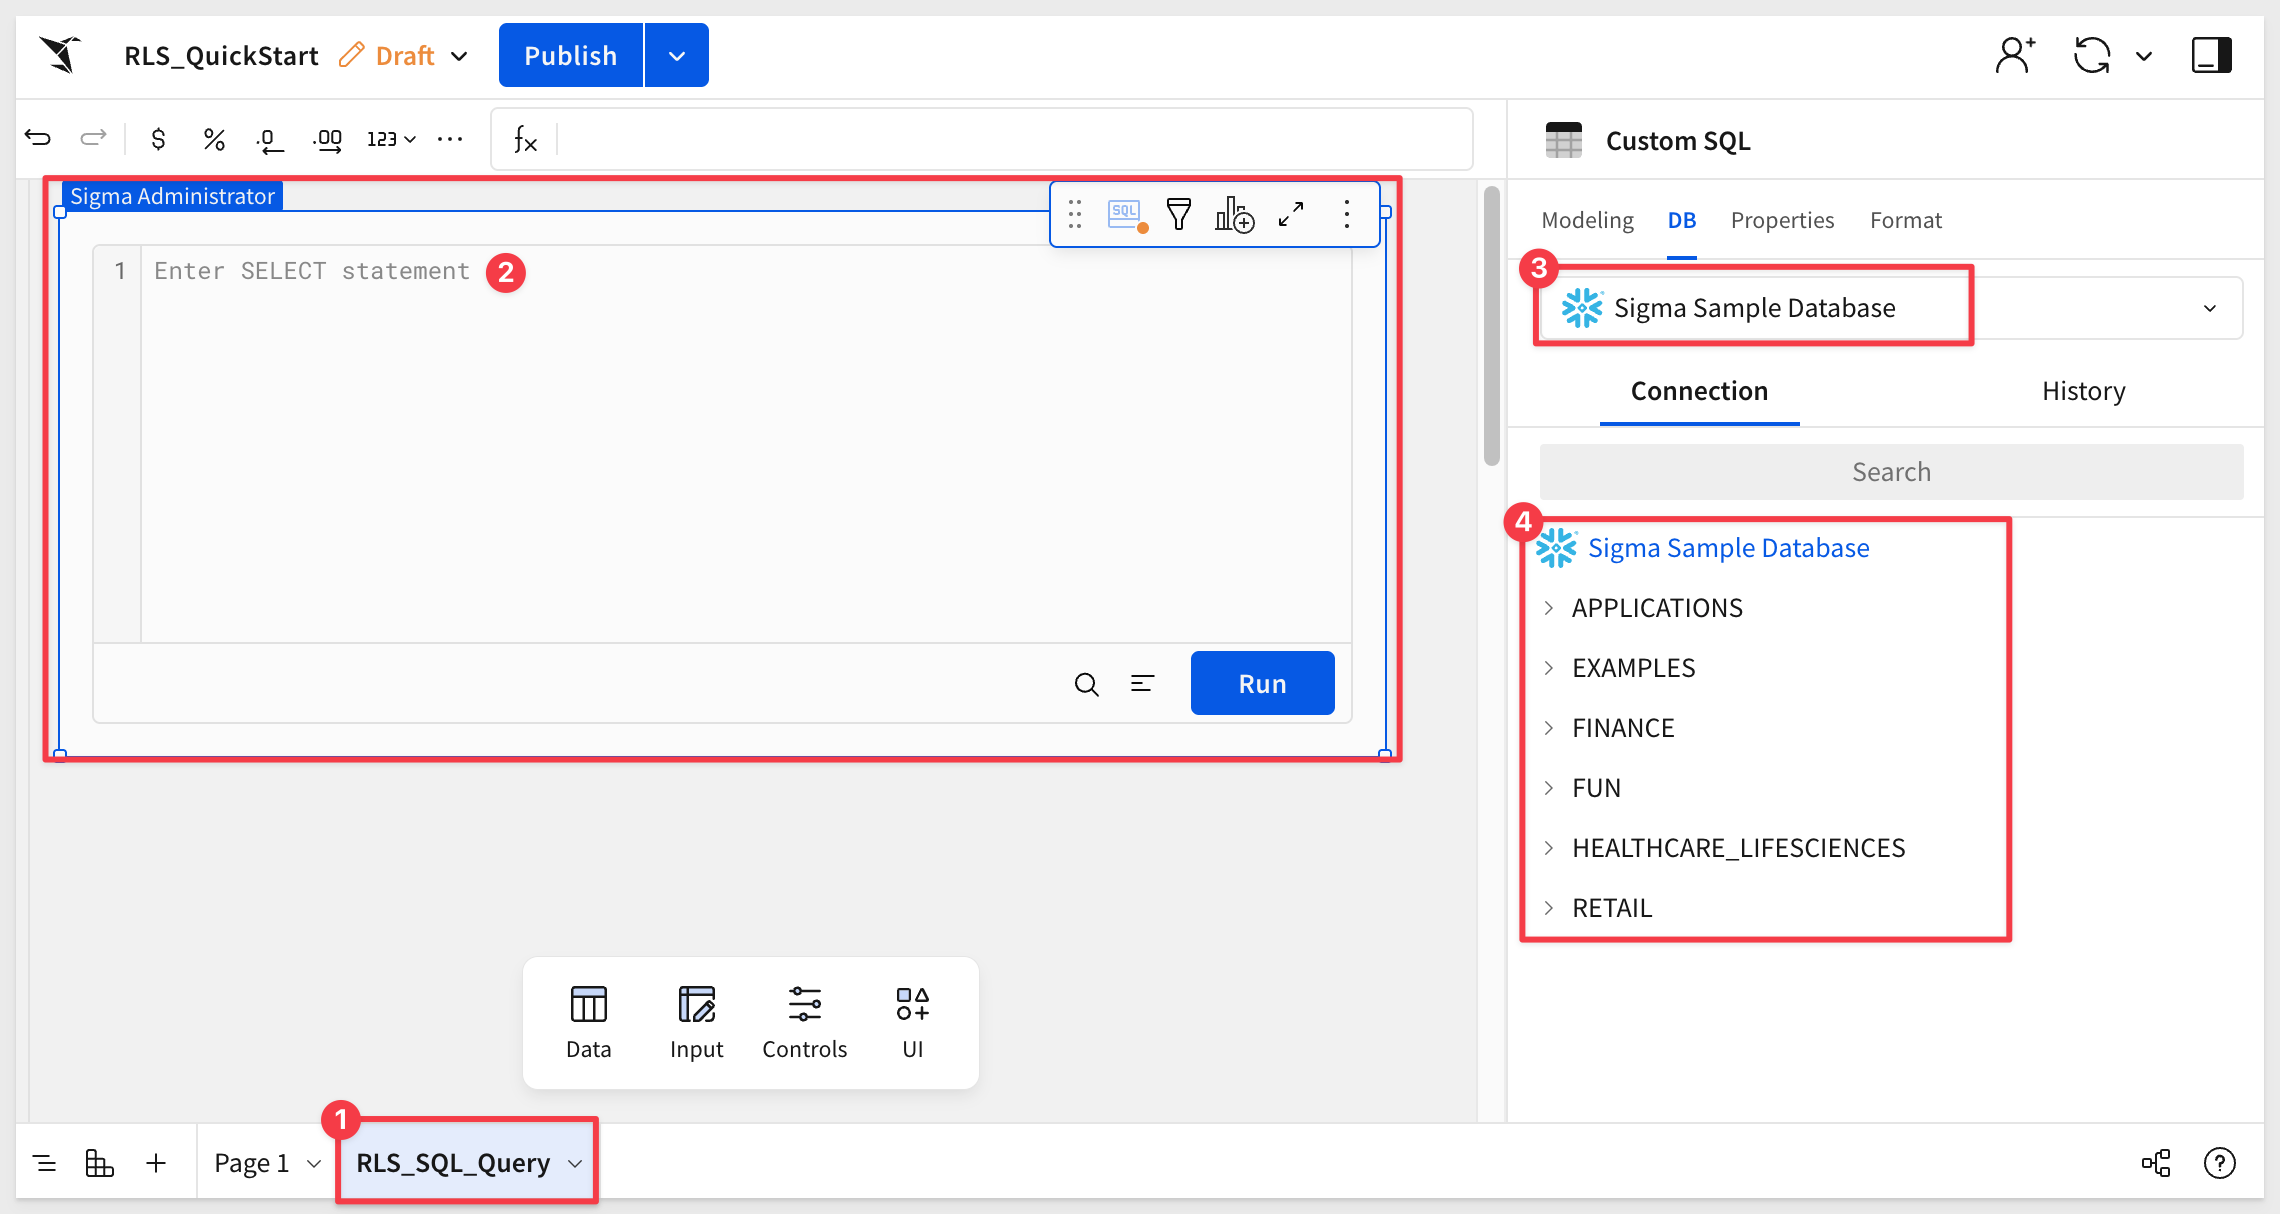
In the large open whitespace, paste the following code:
SELECT * FROM RETAIL.PLUGS_ELECTRONICS.PLUGS_ELECTRONICS_HANDS_ON_LAB_DATA
WHERE STORE_REGION = {{system::CurrentUserAttributeText::Region}}
AND Date >= DATEADD(DAY, -90, CURRENT_DATE)
This SQL code will get the last 90 days of data, and further limit the return based on the UA Region and its membership, which was set to ourselves in the last section. Since the default value for the UA is East, that is what is enforced.
Click Run. You will now only see rows where Store Region = East:

While this method feels like fewer steps, not all users are comfortable writing SQL. For those who are, it is a great option to have.
All we need to do is maintain the UA membership, and the query will enforce it.
This QuickStart walked through four ways to enforce row-level security in Sigma — matching the logged-in user's email, evaluating team membership, applying user attributes, and templating user attributes into custom SQL. All four are applied at the data model, so any workbook built on top inherits the restrictions automatically.
The patterns are reusable across business contexts. Any column that maps to who should see what — region, account, business unit, cost center — can drive RLS with the same techniques. Centralizing the rules at the data model keeps them in one place, avoids re-enforcing them per workbook, and gives downstream builders a safe starting point.
To learn more about Sigma Data Models, see the QuickStart: Fundamentals 10: Data Modeling
To learn more about Column-Level Security in data models, see the QuickStart: Implementing Column Level Security
Additional Resource Links
Be sure to check out all the latest developments at Sigma's First Friday Feature page!
Help Center Home
Sigma Community
Sigma Blog