This QuickStart walks new Sigma administrators through the core setup tasks needed to stand up and manage a Sigma environment.
Along the way you'll learn how to:
- Align stakeholders on your initial use case before you start building
- Set up authentication, account types, teams, workspaces, licensing, and support/security portal access
- Plan your cloud warehouse connection strategy, data security, and the consumption-driving features that get the most value out of Sigma — write-back, API connectors, and external storage integration
- Set up auditing and cost monitoring
- Configure AI features and set your organization's AI strategy
- Apply your organization's branding to Sigma
- Establish a versioning and promotion process (WDLC)
- Build an onboarding training plan and foster a user community
For more information on Sigma's product release strategy, see Sigma product releases
If something doesn't work as expected, here's how to contact Sigma support
Target Audience
Sigma administrators, along with the broader project team and Sigma Customer Success Manager (CSM), who are planning and implementing a new Sigma environment.
Prerequisites
- Any modern browser is acceptable.
- Access to your Sigma environment.
- Some familiarity with Sigma is assumed. Not all steps will be shown, as the basics are assumed to be understood.

Before you touch a single setting in Sigma, align your stakeholders on what you're actually building. Every decision in the rest of this guide — security, connections, branding — is easier to make with a real use case in mind instead of a hypothetical one.
Bring together your project sponsor, IT or security contact, and the first group of business users, and agree on:
- Who the first use case is for — a single team, a department, or an external-facing audience
- What decision or workflow the first workbook or app needs to support
- Which data sources it depends on, and who owns access to them
- What "done" looks like, and by when
Document the answers somewhere your stakeholders can revisit — a shared doc or our prepared Summary Checklist works well for this. You'll refer back to it throughout the rest of this guide.
If your first use case is an AI-powered app, see AI Apps Fundamentals for a walkthrough of what you can build.
For a general first workbook, Fundamentals 01: Overview covers Sigma's core building blocks.
Security in Sigma isn't a single switch — it's a set of interlocking decisions: how users sign in, what they're allowed to do once they're in, how they're grouped, and who can request more access. Sigma centralizes all of these controls, so your security model scales with your organization instead of becoming a growing list of one-off exceptions.
Authentication
Decide how users will sign in and receive a license before you invite anyone. Sigma supports three authentication methods, in the order Sigma recommends evaluating them:
- SAML — single sign-on through your identity provider (Okta, Azure AD, and similar). Users authenticate once against an identity provider your organization already manages, and Sigma trusts the resulting assertion.
- OAuth — delegated sign-in through an OAuth-compatible identity provider. It offers a similar centralized-identity model to SAML, and is the right fit when your provider supports OAuth but not SAML.
- Username/password — Sigma manages credentials directly, with no external identity provider involved. It's the fastest to turn on, but Sigma doesn't recommend it for production, since none of your organization's password or MFA policies apply to it.
For help choosing between them, see Sigma's considerations for choosing an authentication method — this reflects Sigma's Customer Success Architecture best practices.
Provisioning — how a user actually gets a Sigma account — is a separate decision from authentication:
- SCIM — paired with SAML or OAuth, your identity provider automatically creates, updates, and removes Sigma users, and keeps their Team membership in sync, as people join, move, or leave. It's a no-code integration; no custom scripting required.
- Just-in-time (JIT) provisioning — a Sigma account is created automatically the first time a user signs in through SSO.
- Manual invite — an admin adds users one at a time, or in bulk via CSV import.
Loop in your IT or identity team early — most organizations land on SCIM so user lifecycle (adds, removes, role and Team changes) stays in sync with their identity provider instead of being managed by hand in Sigma.
For example, Sigma makes it easy to configure the required values for SAML:
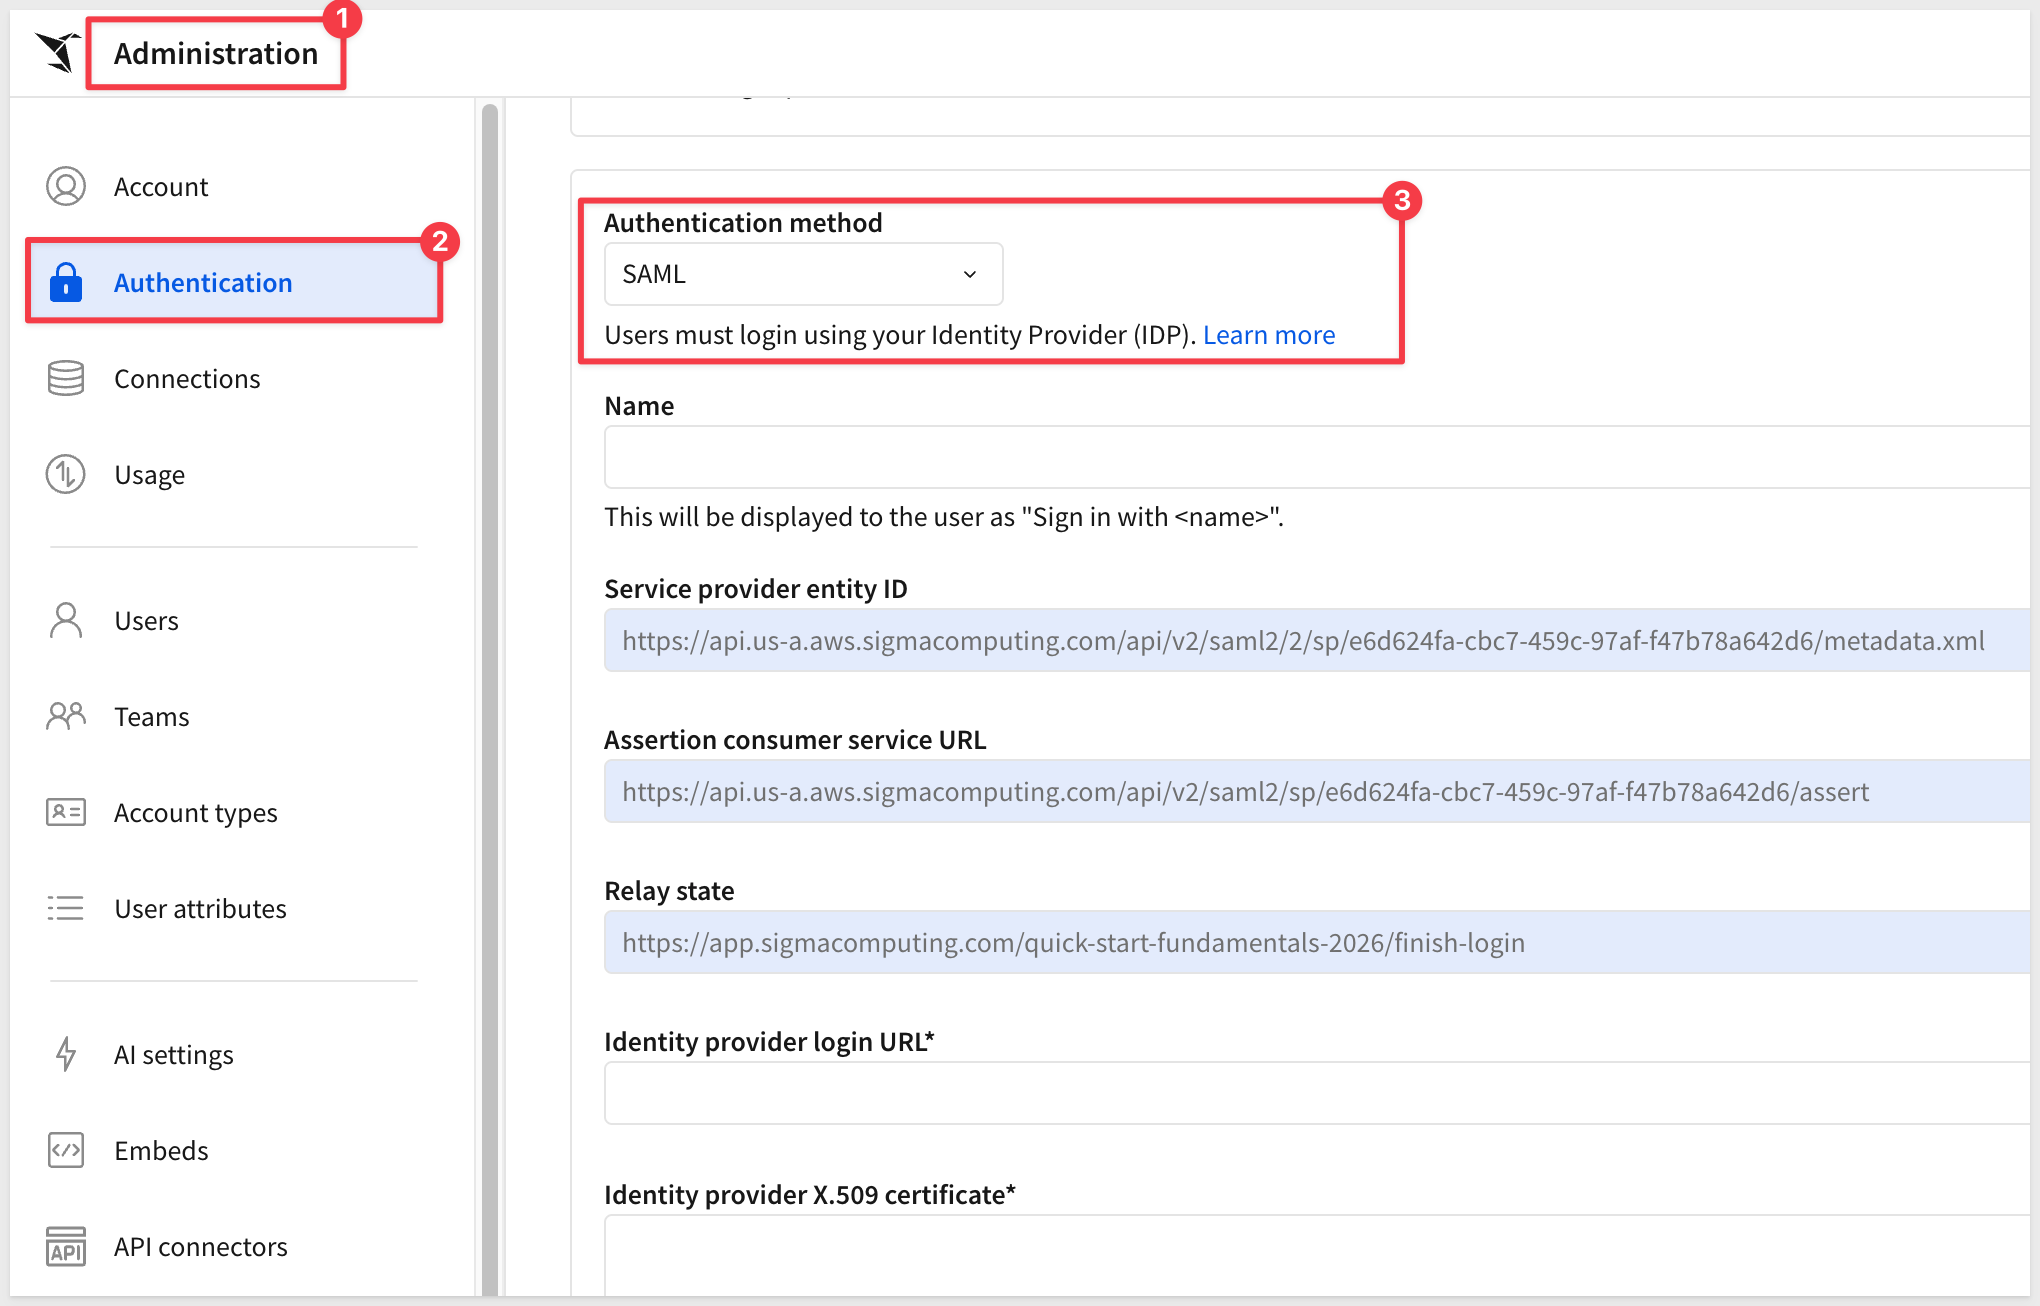
For setup steps, see Manage authentication
Check out the many Quickstarts in the security category
Account Types
Sigma controls what a user can do (ie: Role-based access control) through account types.
Account types are named permission groupings — they control feature-level capabilities like exploring, exporting, or editing input tables across every workbook a user touches:
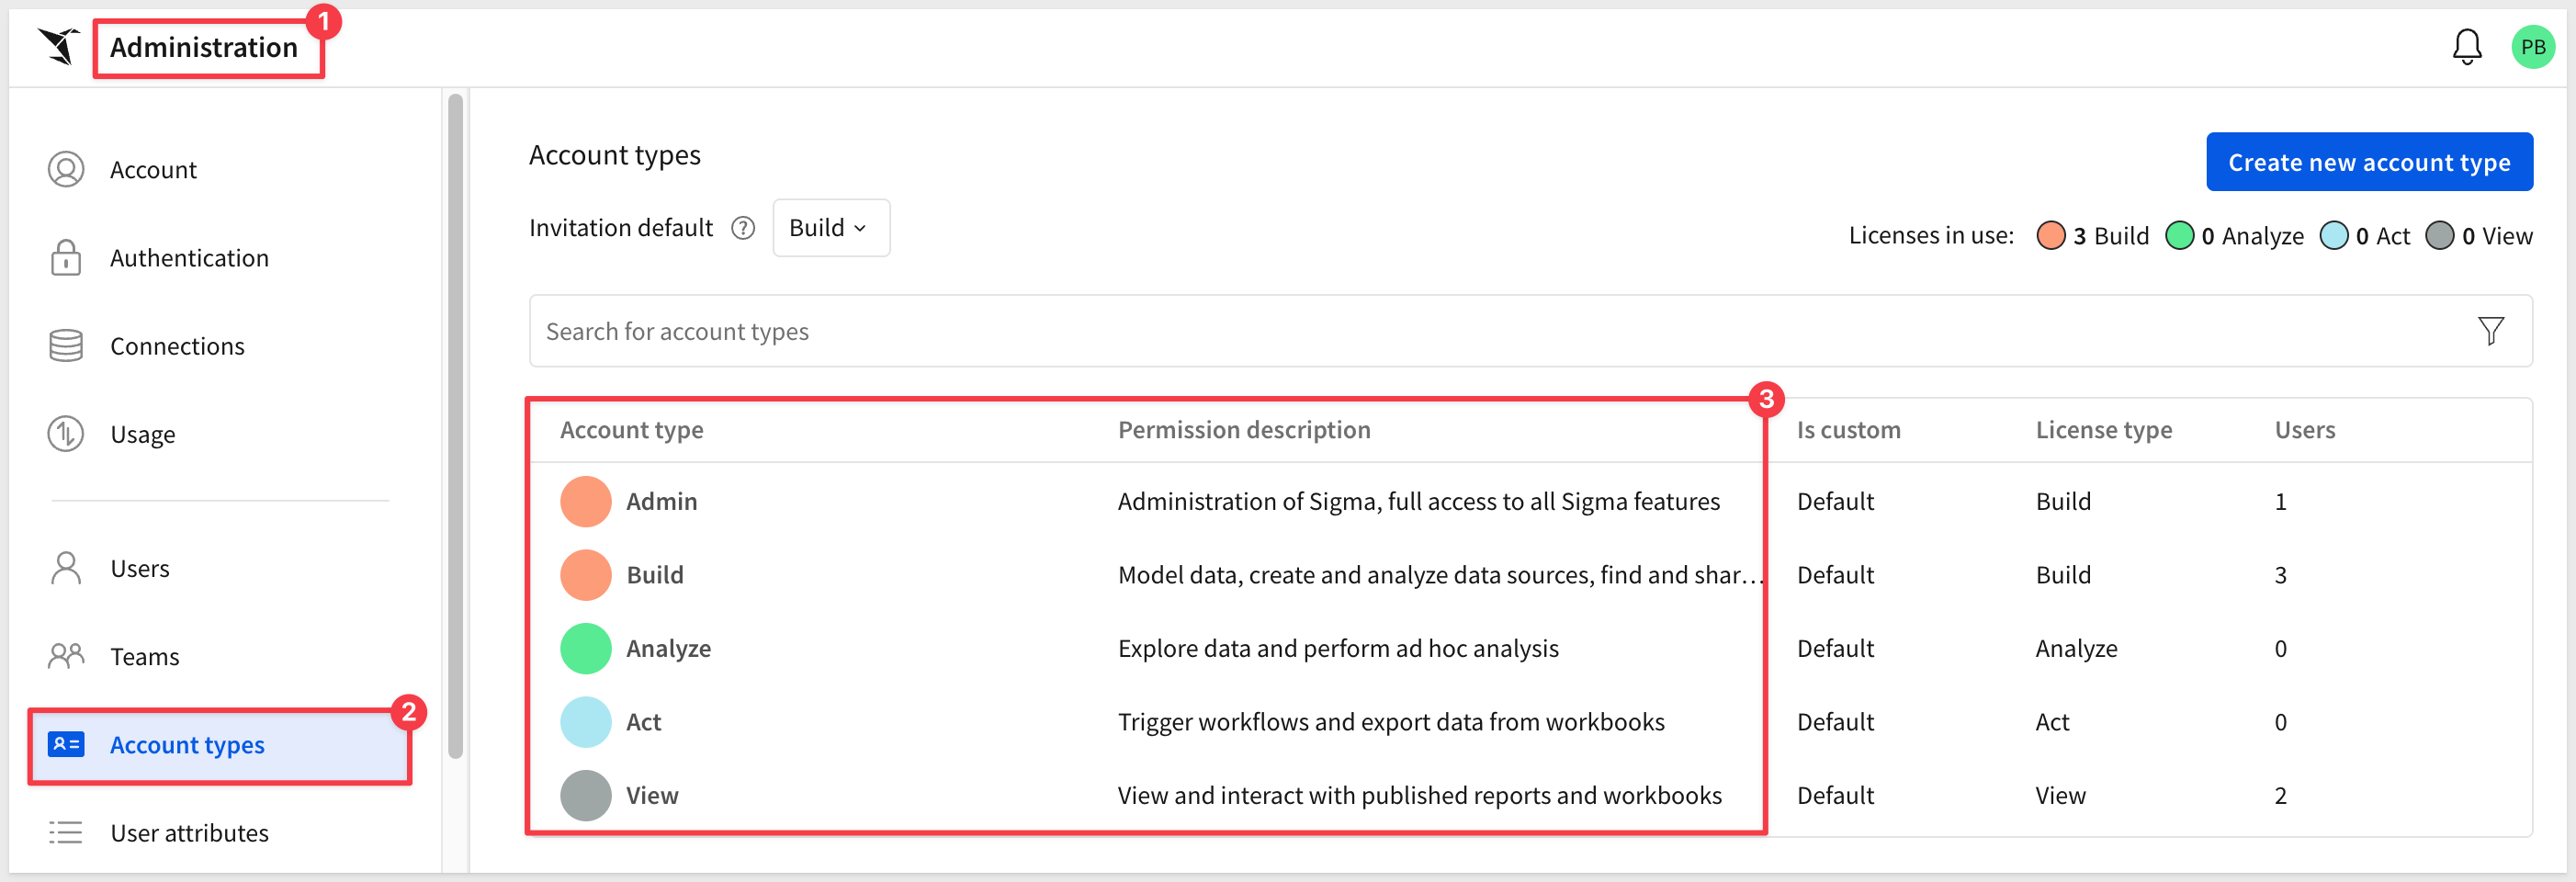
Permissions are additive, so turning on a feature like export access also grants the related capabilities that depend on it.
For example, the default View account type provides:
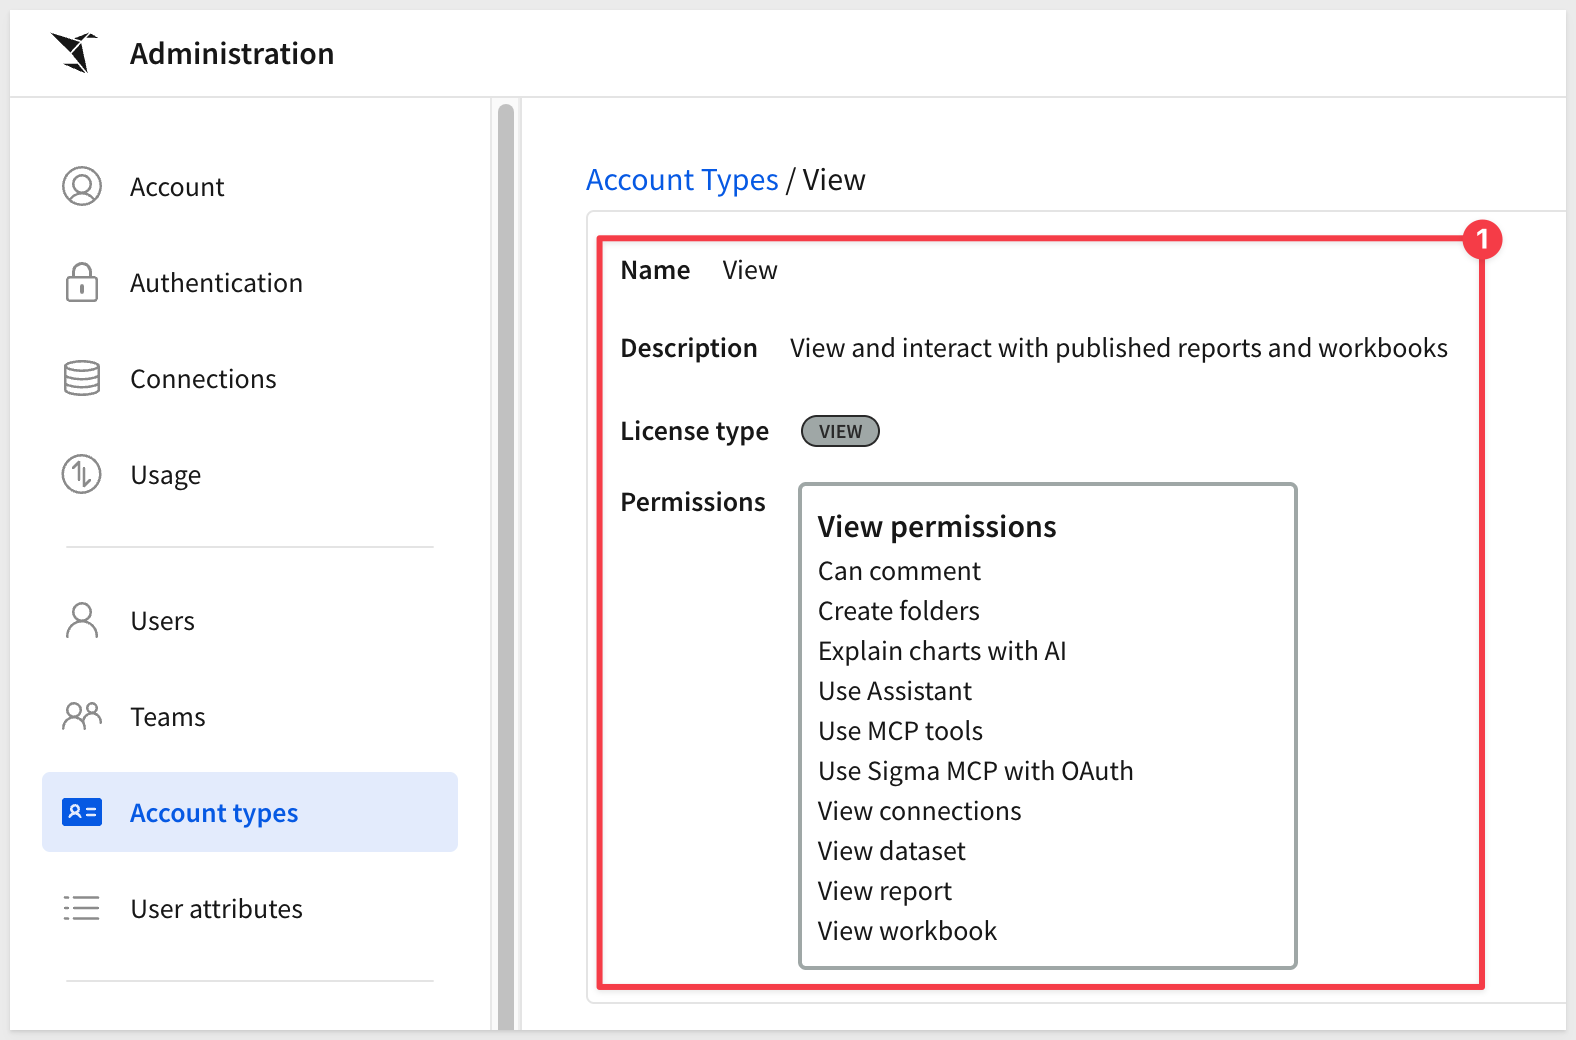
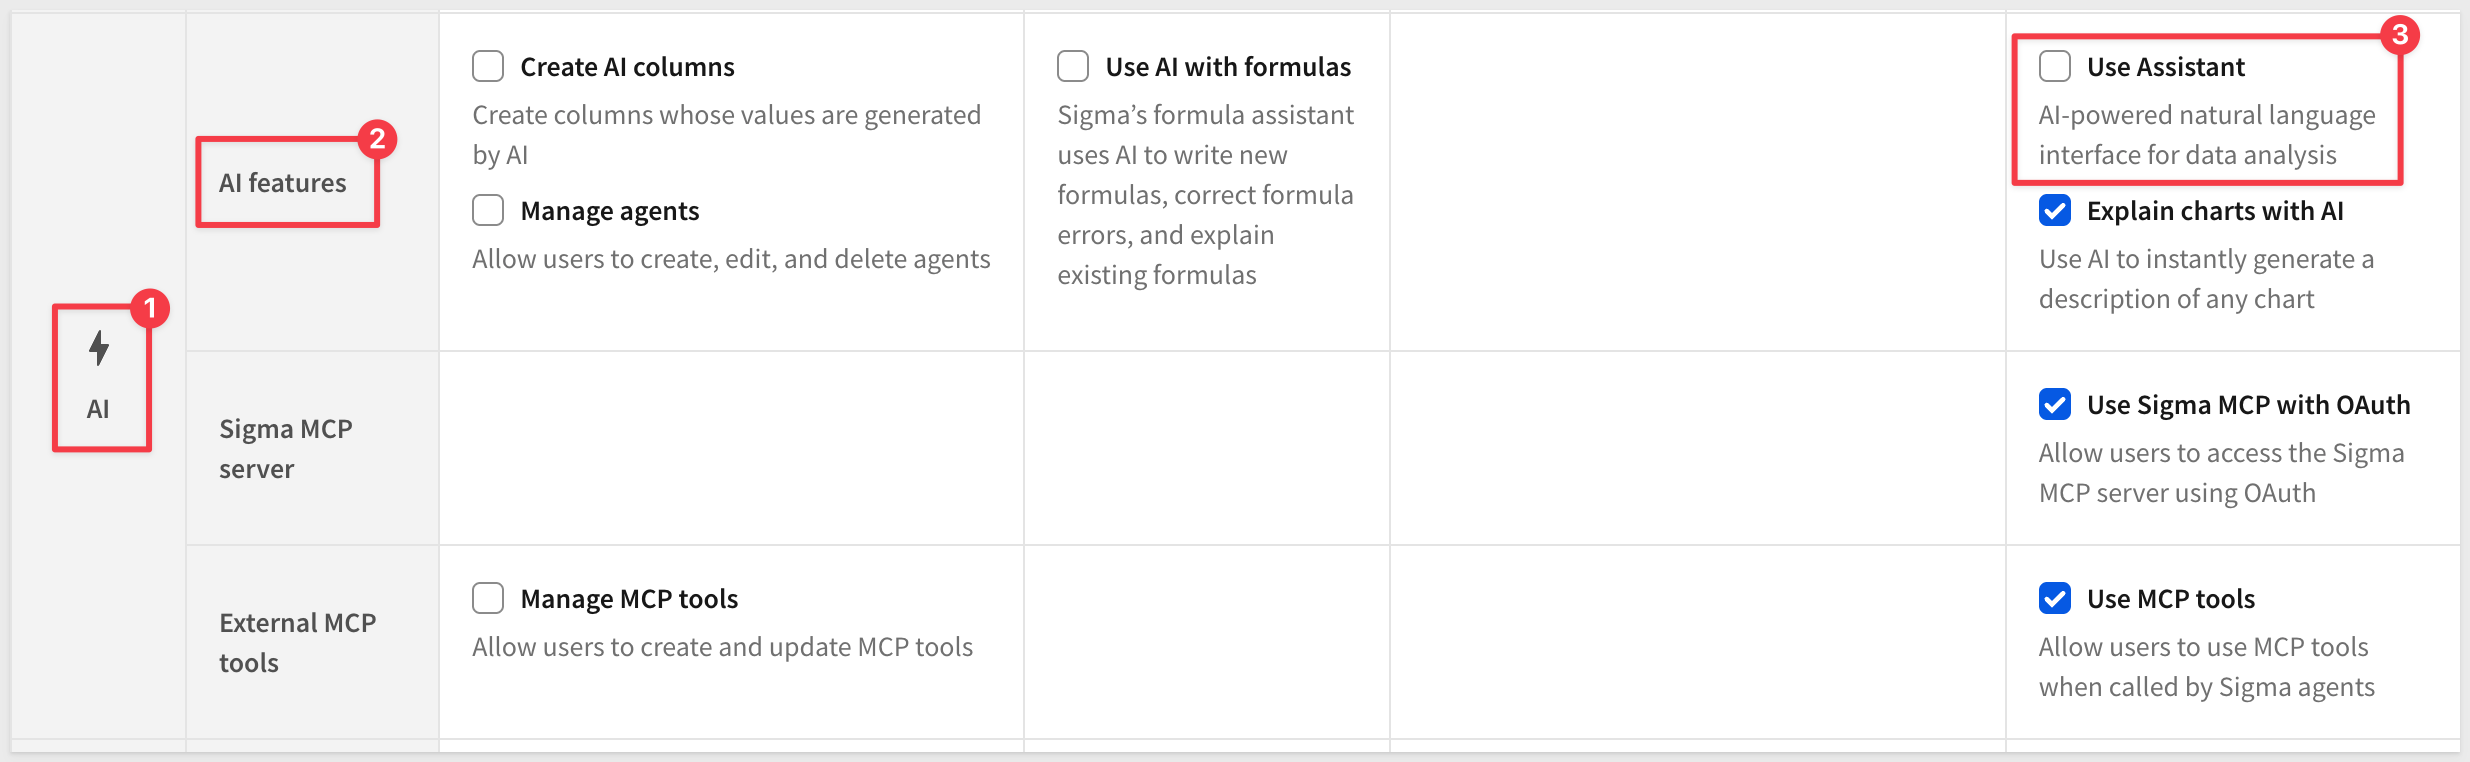
Start from Sigma's default account types, and create custom account types only when two groups of users genuinely need different feature sets — for example, we can disable View users from using Sigma Assistant:
Teams
Teams group users for licensing and content-sharing purposes. They also make permission management easy at scale — access, controls, grants, and customization can all be assigned once at the Team level and applied to everyone in it, instead of configured per user. Align your Team structure with your planned Workspace structure (below) so permissions stay predictable as you scale:
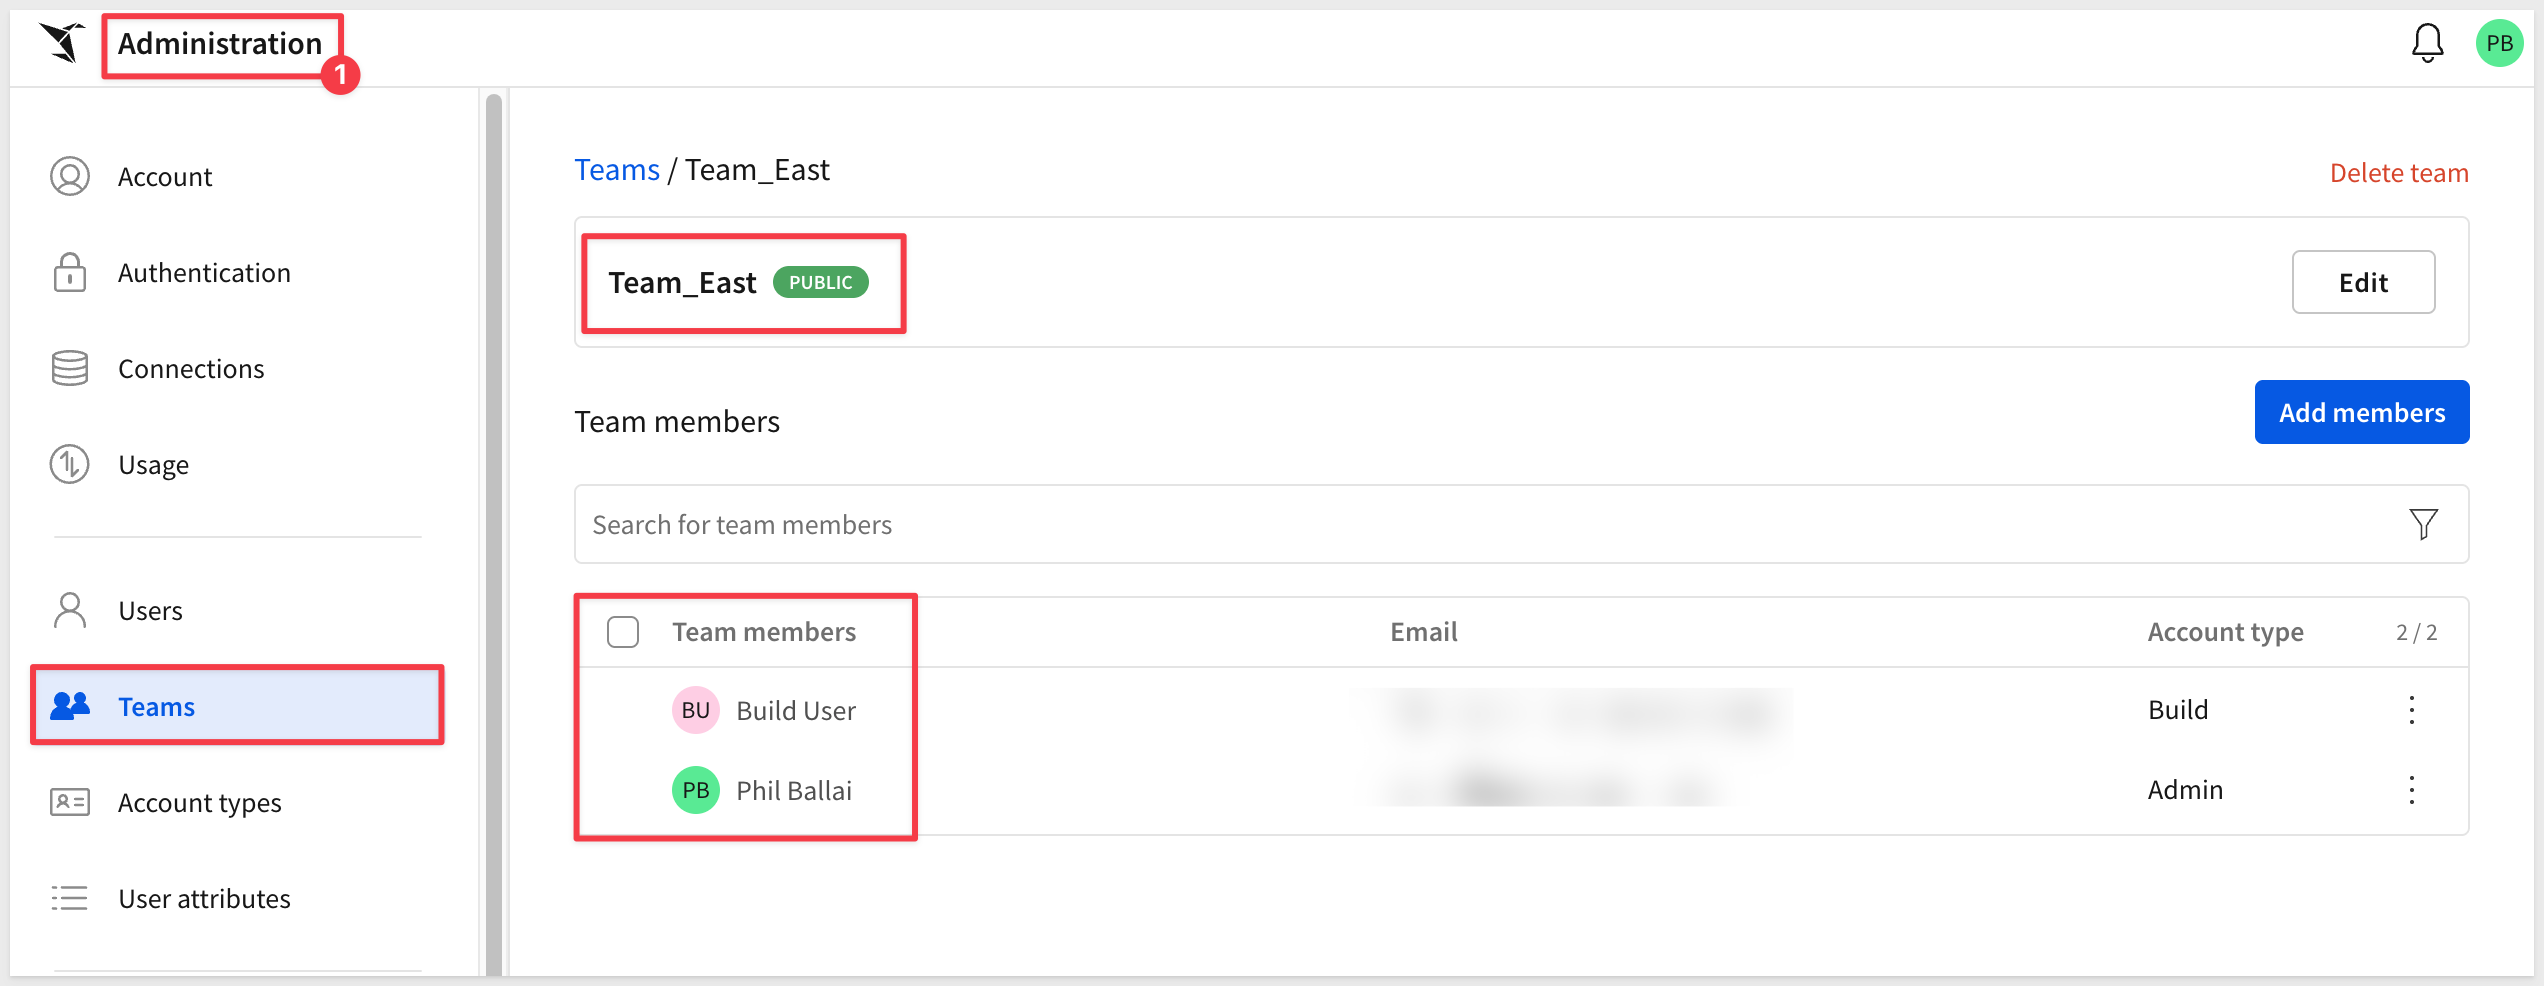
For setup steps, see Manage teams
For information on impersonation, see Impersonate users
Workspaces
Workspaces are where your folder hierarchy and content permissions live. Start with a single workspace organized into folders that mirror your Team structure, and apply folder-level permissions so each Team only sees what's relevant to them — this keeps content easy to find and avoids fragmenting assets before you actually need to.
Create a separate workspace only when a set of documents needs genuinely exclusive access that folder-level permissions can't provide, such as content for an external audience or a distinct legal entity.
Users also have access to All Workspaces so they can quickly see ones they are assigned to:
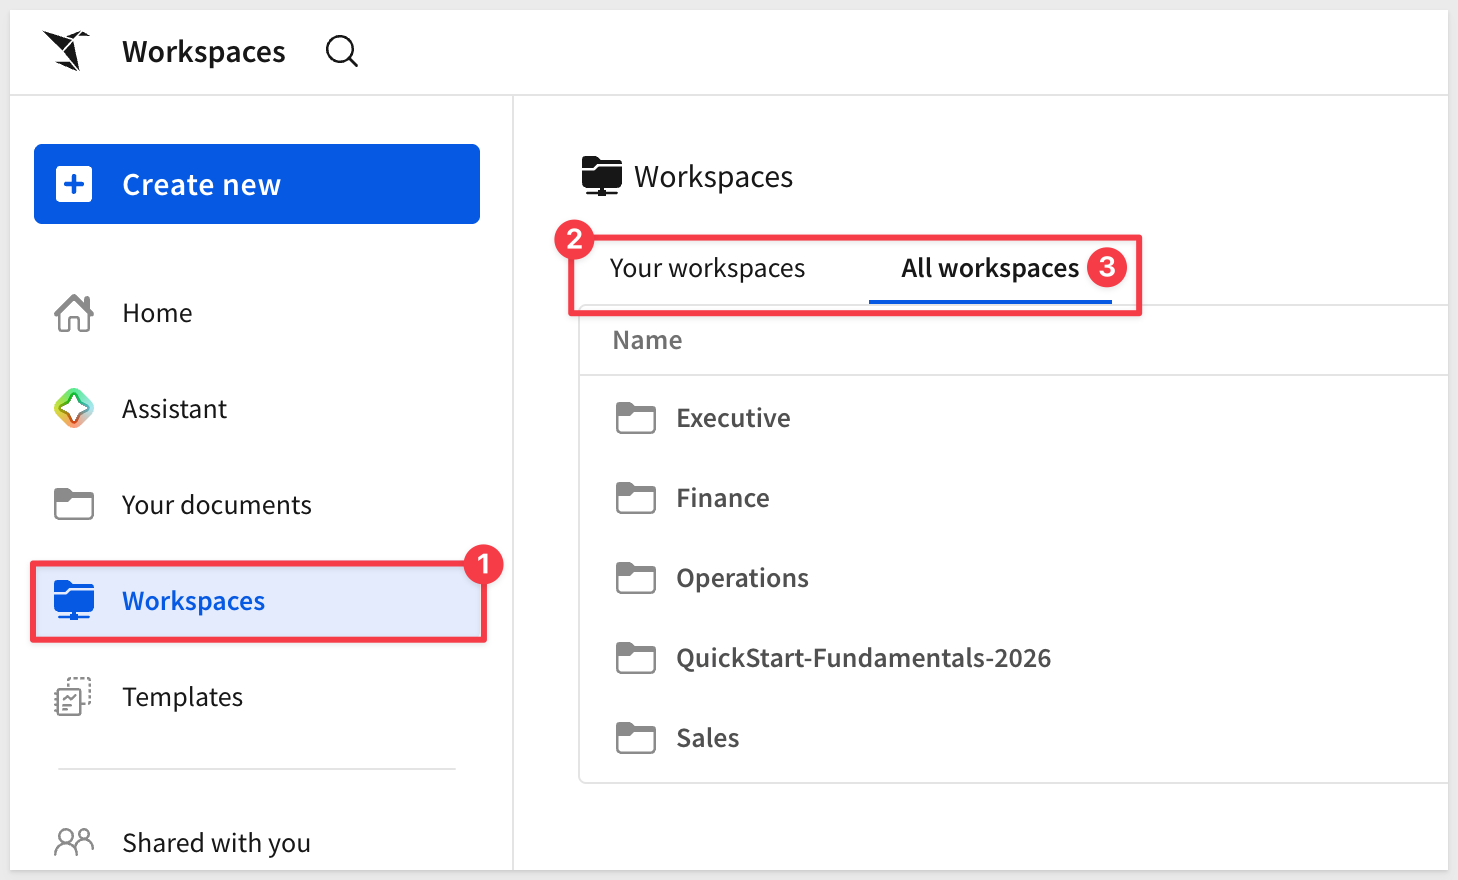
For setup steps, see Manage workspaces
Licensing and Upgrade Requests
Users may ask for a higher license tier once they need more capability than their current account type allows. Some common approaches are:
- Sigma's native upgrade request option, built into the product
- An internal request platform or ticketing system your organization already uses
- Simple email requests routed to your Sigma admins
Pick whichever fits your existing IT request process — the goal is that users have one clear path to ask, and admins have one clear place to approve.
It is easy for admins to see and act on new requests:
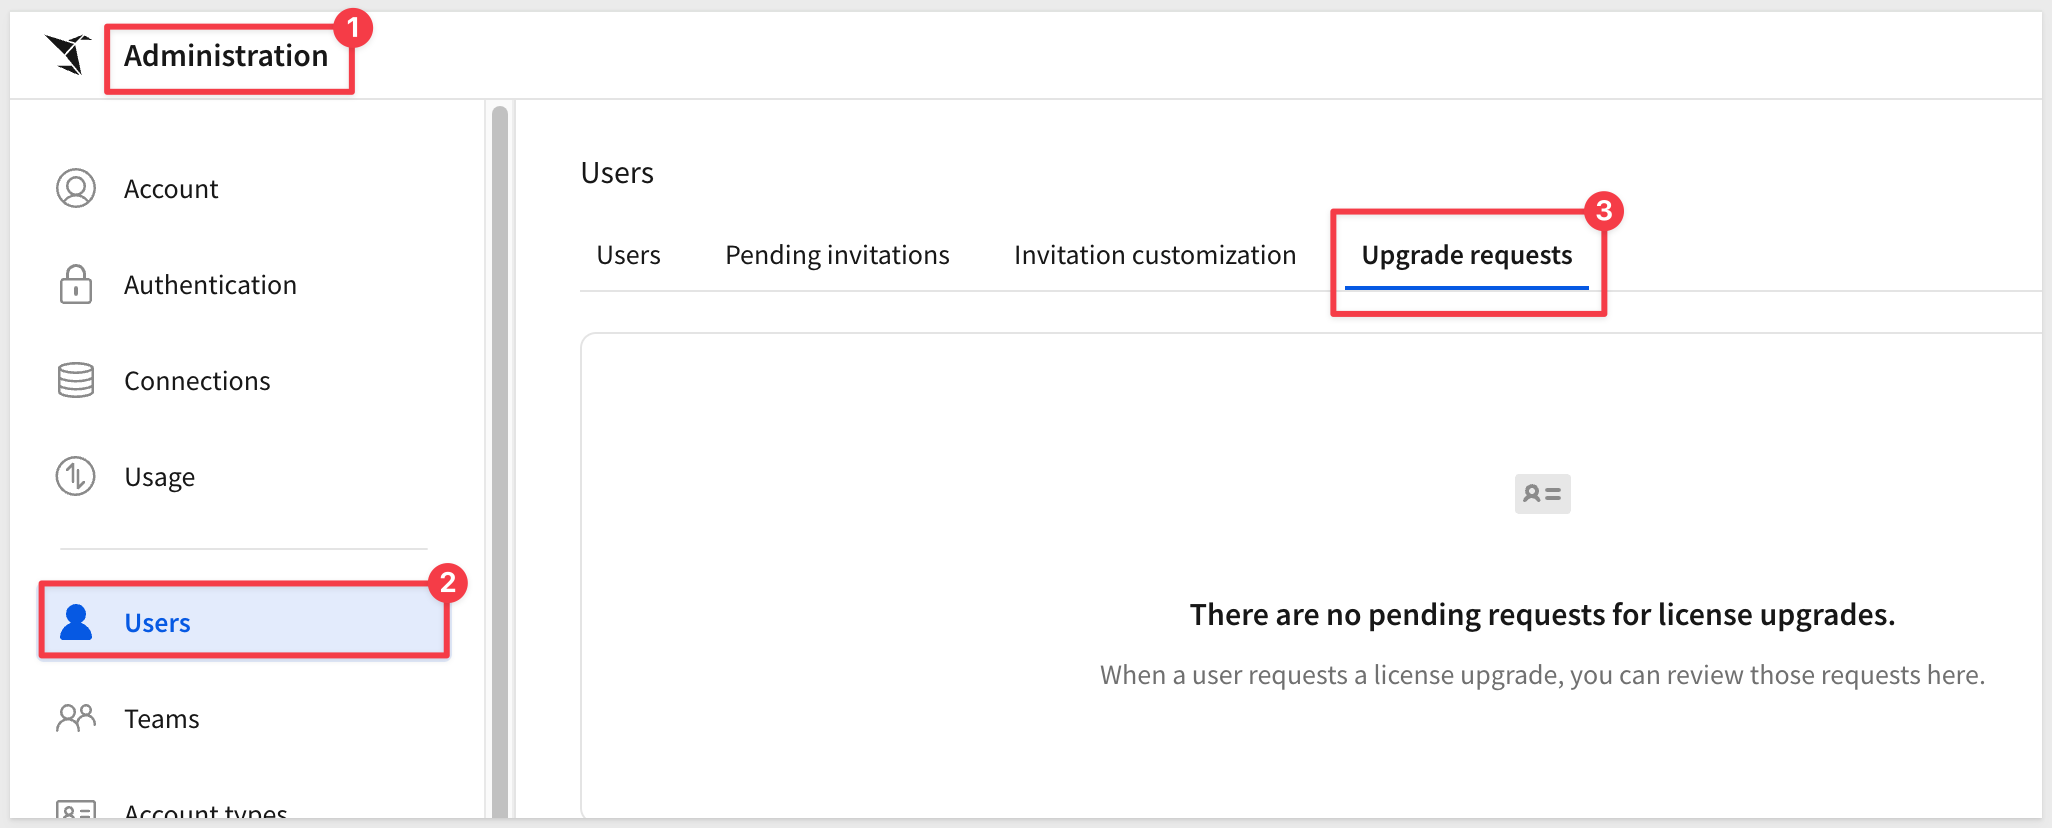
For more information, see Account type and license overview
To manage account upgrade requests settings, see Enable or disable account upgrade requests
Support and Security Portal Access
Contact your Customer Success Manager (CSM) to get your organization set up with:
- Sigma's Security Portal — self-serve access to security and compliance documentation (SOC 2 reports, and similar).
- Sigma's Support Portal — where your team can log and track support tickets.
Grant access to your admins, plus your security team if they need direct access to compliance documentation.
A connection is how Sigma authenticates to your cloud data warehouse, or CDW (Snowflake, Databricks, BigQuery, and others), so it can query your data live, without copying or storing it in Sigma. Every workbook, data model, and input table depends on one, so how you set connections up shapes how the rest of your organization accesses data.
For the list of supported warehouses, see Create a connection to the data warehouse
Connection Strategy
Decide how many connections to expose, and to whom. Common patterns are:
- A single shared connection for simplicity
- Multiple connections split by environment, team, or region
- Dynamic connection switching by role, so different users hit different warehouses or databases from the same workbook
- PrivateLink, if your network security requirements call for it
- Customized query timeouts per connection
Keep a separate connection for test/QA versus production, so you can validate changes without risking live data. Build your data models on top of these connections first — that gives you one place to centralize logic and control feature access, rather than repeating it across every workbook.
For setup steps, see Connect to data sources
If your use case calls for it, Snowflake and Databricks connections also support Python queries through Sigma's Python element, letting builders run Python code directly against your warehouse from within a workbook. Each connection type needs its own setup for this, so decide early whether to enable it.
For setup steps, see Set up a Snowflake connection for Python, and Set up a Databricks connection for Python
Data Security
Choose how Sigma authenticates to your warehouse, since it determines where access control is enforced:
- Service Account — each user logs in to Sigma with their own identity, but Sigma queries the warehouse under one shared, single identity. Access is enforced at the Sigma level, so you'll need row-level security (RLS) or column-level security (CLS) to filter data per user.
- OAuth — each user logs in to both Sigma and the warehouse using their own, individual identity. Access is enforced by the warehouse itself, at the cost of managing roles there instead of in Sigma. Connection-level OAuth is only available for Snowflake, Databricks, and BigQuery connections.
- Service Account with dynamic roles (Snowflake and PostgreSQL) — a hybrid: Sigma queries under a shared service account, but assigns a different warehouse role per user or Team based on a Sigma user attribute, so warehouse-side RBAC still applies without requiring individual OAuth identities.
See Sigma's OAuth setup guide for connection-level OAuth configuration, and dynamically assigning roles on a connection for the hybrid approach.
If your organization isn't yet mature enough on warehouse-side RBAC to rely on it, you can maintain your permission structure inside Sigma instead — see the Access to CDW Tables section below.
Within Sigma, RLS and CLS give you finer control on top of any of these approaches:
- Row-level security filters rows automatically based on a Sigma user attribute matched against a column value — for example, restricting each rep to their own region. The filter reapplies every time the workbook loads.
- Column-level security removes restricted columns entirely at the data model level, rather than just hiding them in the workbook.
While you're building, test as yourself to confirm you aren't blocked by your own rules, then have another admin verify cross-team visibility before you roll out broadly.
For QuickStarts, see Implementing Row-Level Security (RLS) and Implementing Column Level Security (CLS)
For the very latest information, see Set up row-level security and Configure column-level security
Access to CDW Tables
Decide whether builders can browse and query warehouse tables directly from Sigma, or whether they're limited to the curated data models you publish:
- Direct table access — builders can explore some or all connected warehouse tables and build their own data models or workbooks from scratch.
- Data-model-only access — builders work exclusively from the data models you publish, with no direct access to the underlying warehouse tables.
You can manage which tables are visible at three levels — per connection, per Sigma Team, or per Sigma user — so you can open direct access broadly for a trusted platform team while keeping most builders scoped to governed data models.
For setup steps, see Manage access to data and connections
Write-back Access
Plan for write-back from day one, not as something to bolt on only if a specific use case calls for it.
Through input tables and forms, users write data directly back into your warehouse, closing the loop between analysis and action instead of exporting findings somewhere else to act on them.
Write-back also doubles as a performance-tuning tool, which is where it pays off even if you never build a single input table: writing query results back into the warehouse caches them for reuse, speeding up downstream workbooks and cutting your warehouse compute costs — many customers with no input tables at all set up write-back for exactly this.
Decide on your write-back schema strategy: one shared schema, or several split by team or purpose. Splitting by team or purpose requires OAuth, since it depends on each user's own warehouse role reaching the right schema — on a shared service account, every write lands under the same warehouse identity, so a single shared schema is the only option.
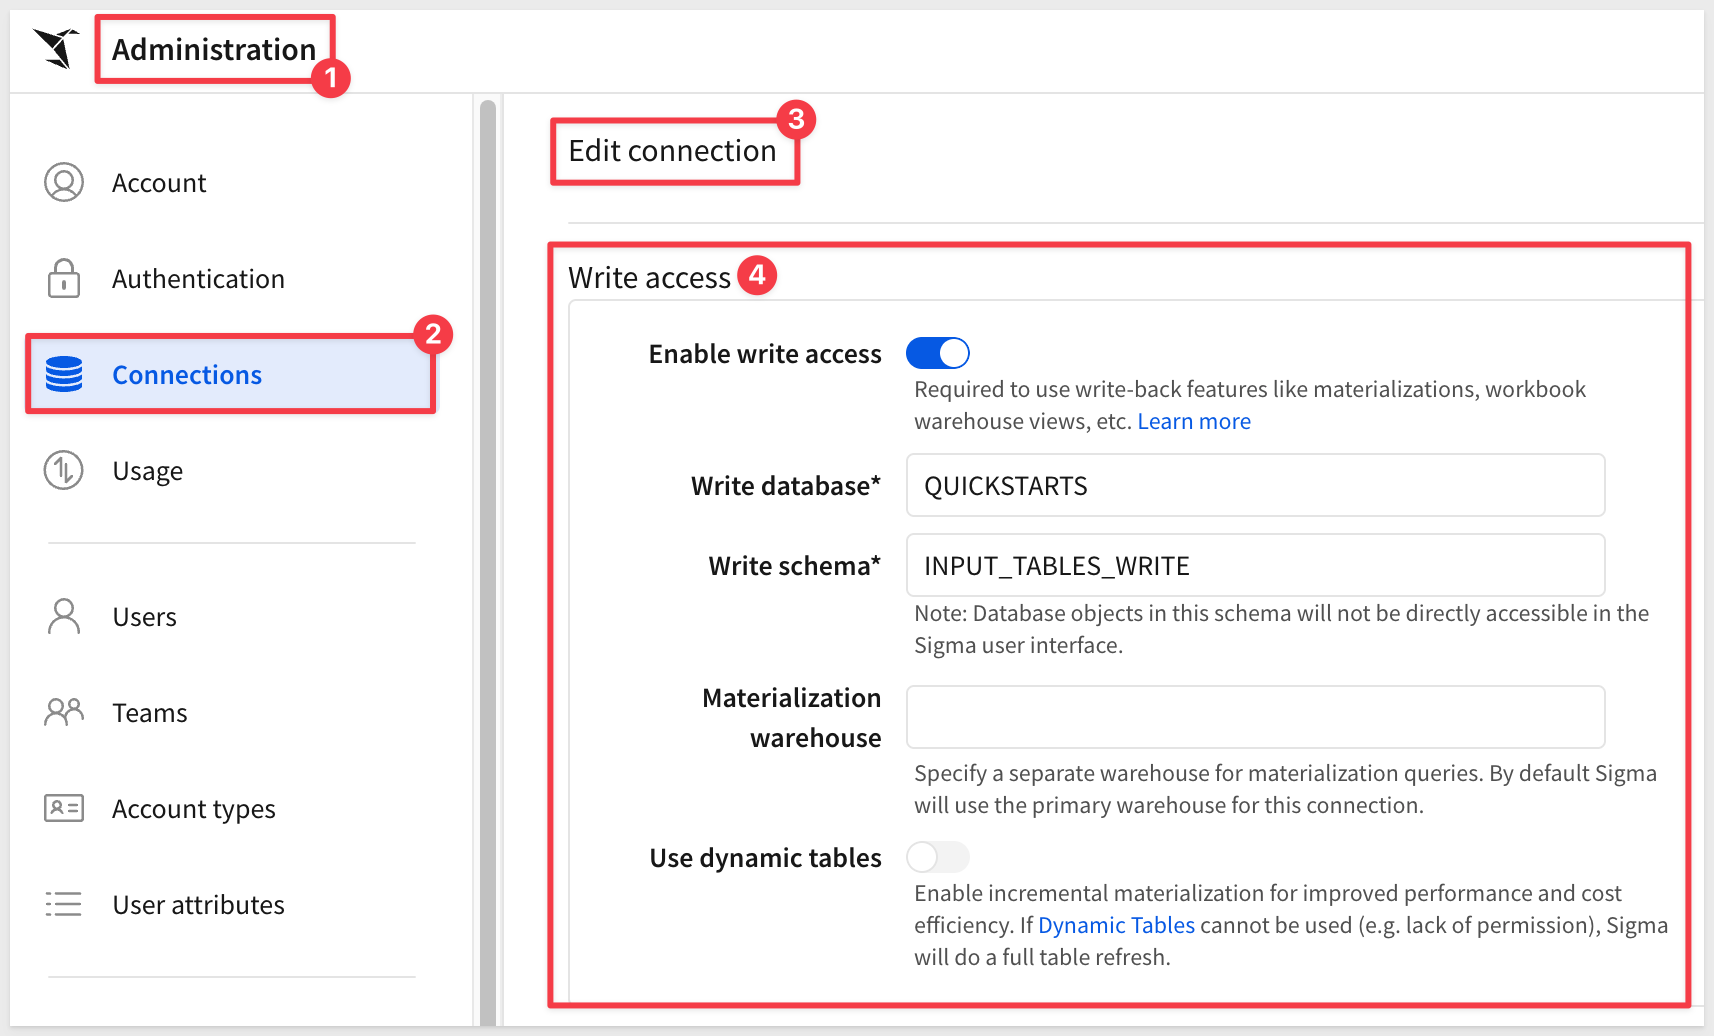
Write access requires two permissions to line up:
- Connection level — the write-back schema itself must be accessible (an admin-configured setting on the connection)
- Account type level — the user needs the "Edit input tables" feature permission
Where you want more control than a spreadsheet-style input table offers, use a form instead — forms validate entries, and you can scope which fields a given user sees with page-level visibility rules.
For setup steps, see Set up write access
External Storage Integration
An external storage integration points Sigma at a cloud storage bucket you own — Amazon S3, Google Cloud Storage, or Azure Blob Storage — instead of Sigma-managed storage, so you control data location, retention, and encryption directly.
It also powers several features many customers rely on even without input tables: file upload columns, CSV upload staging, exporting to cloud storage, and Sigma's universal result cache, which caches query results to speed up workbooks and reduce warehouse compute costs. Some features, like file upload columns, require a customer-owned bucket to work at all; others default to Sigma-managed storage but can be pointed at your own bucket instead.
For setup steps, see External storage integration overview
API Connectors
Beyond querying your warehouse, Sigma can call external systems directly — a ticketing system, a CRM, an internal REST API — through API connectors and API Actions triggered from a button, a row action, or a form submission. That turns a workbook from a read-only report into something that can kick off a real workflow — filing a ticket, updating a CRM record, or triggering a downstream job — without the user leaving Sigma.
Configure API credentials and connectors from Administration > API Connectors, and govern who can use each one the same way you govern warehouse connections — per user or per Team. Sigma can generate a connector directly from a SaaS application's OpenAPI specification, so you're not hand-writing every endpoint definition yourself.
For example, to connect to Jira Cloud's REST API v3:
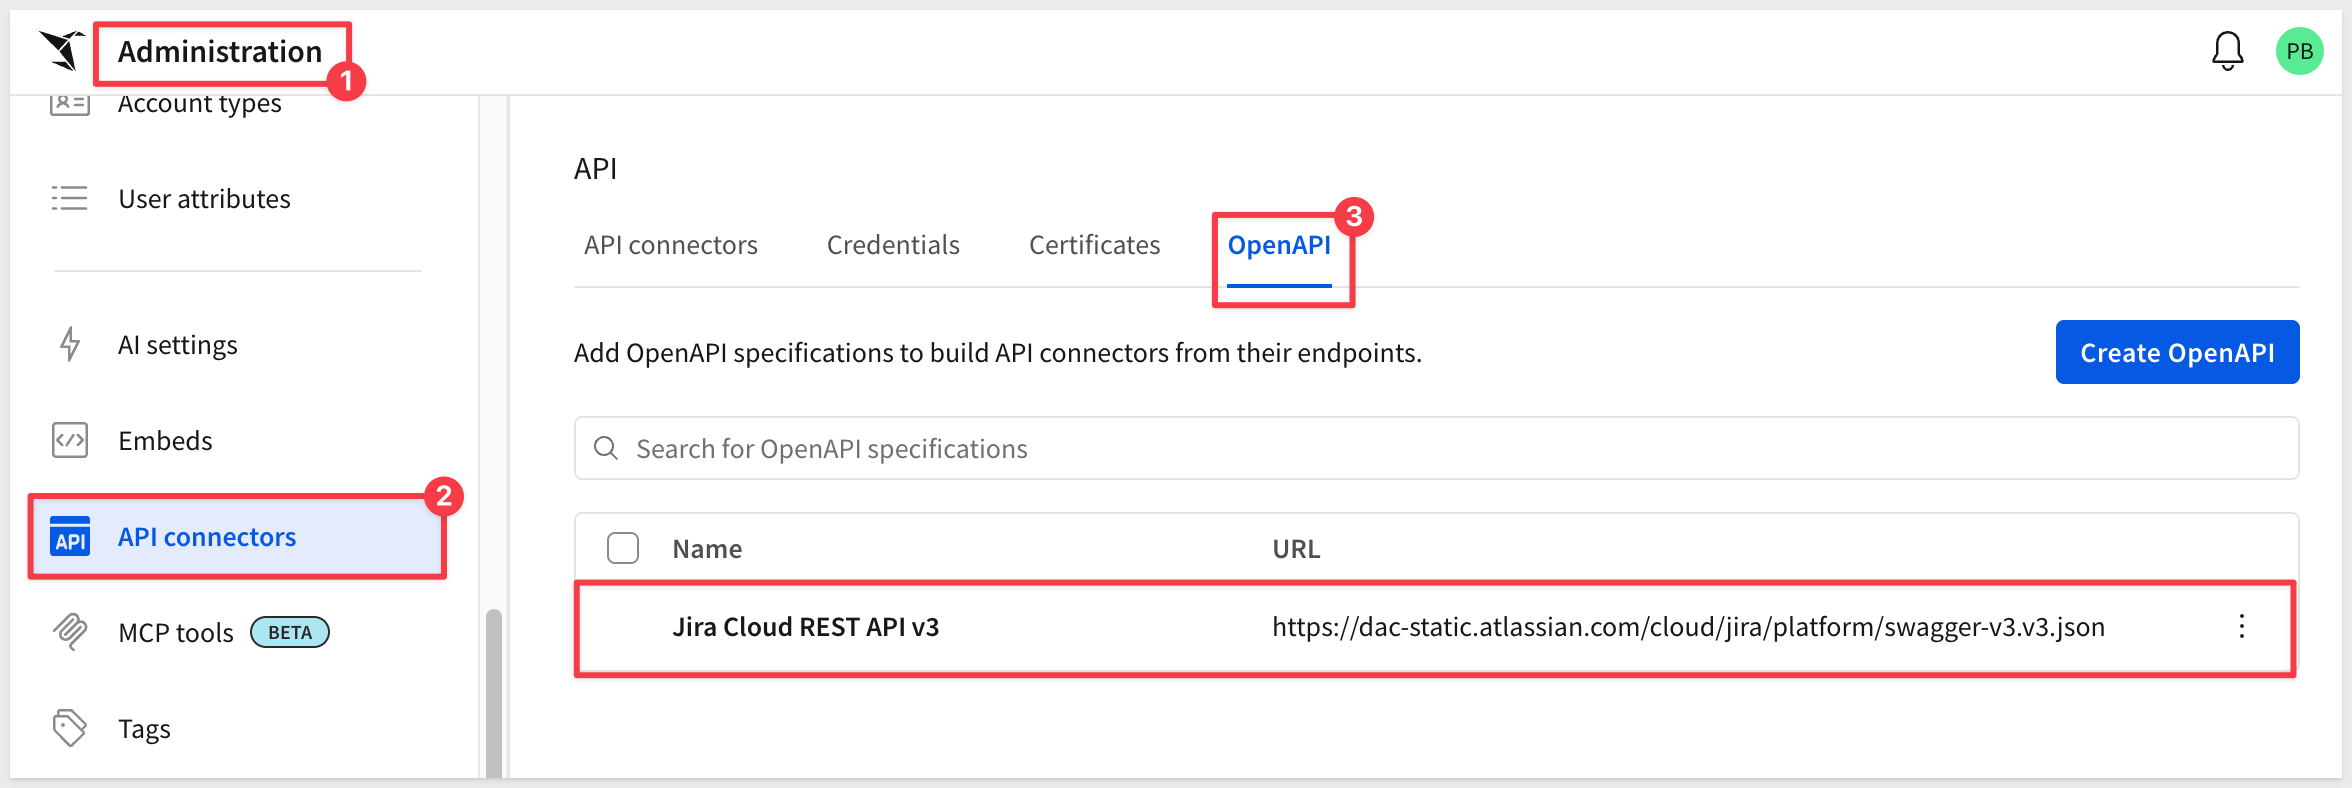
For setup steps, see Configure API credentials and connectors in Sigma
For a hands-on walkthrough, see Tutorial: Configure API credentials, connectors, and actions for the Sigma REST API
For a QuickStart, see API Actions - Getting Started
Every organization eventually asks the same two questions: who did what, and what is this costing us? Sigma answers both natively — audit logs and usage data show up as regular Sigma connections, so you explore them the same way you'd explore any other data source, instead of digging through a separate admin tool.
Audit logs only capture activity from the moment you turn them on — there's no retroactive history to enable later.
That makes this one of the first things worth setting up in a new environment, right alongside authentication and your warehouse connection, rather than something to circle back to once you notice you need it.
Audit Logs
Once enabled, Sigma exposes user activity through a dedicated Sigma Audit Logs connection you can query and build workbooks against like any other data source.
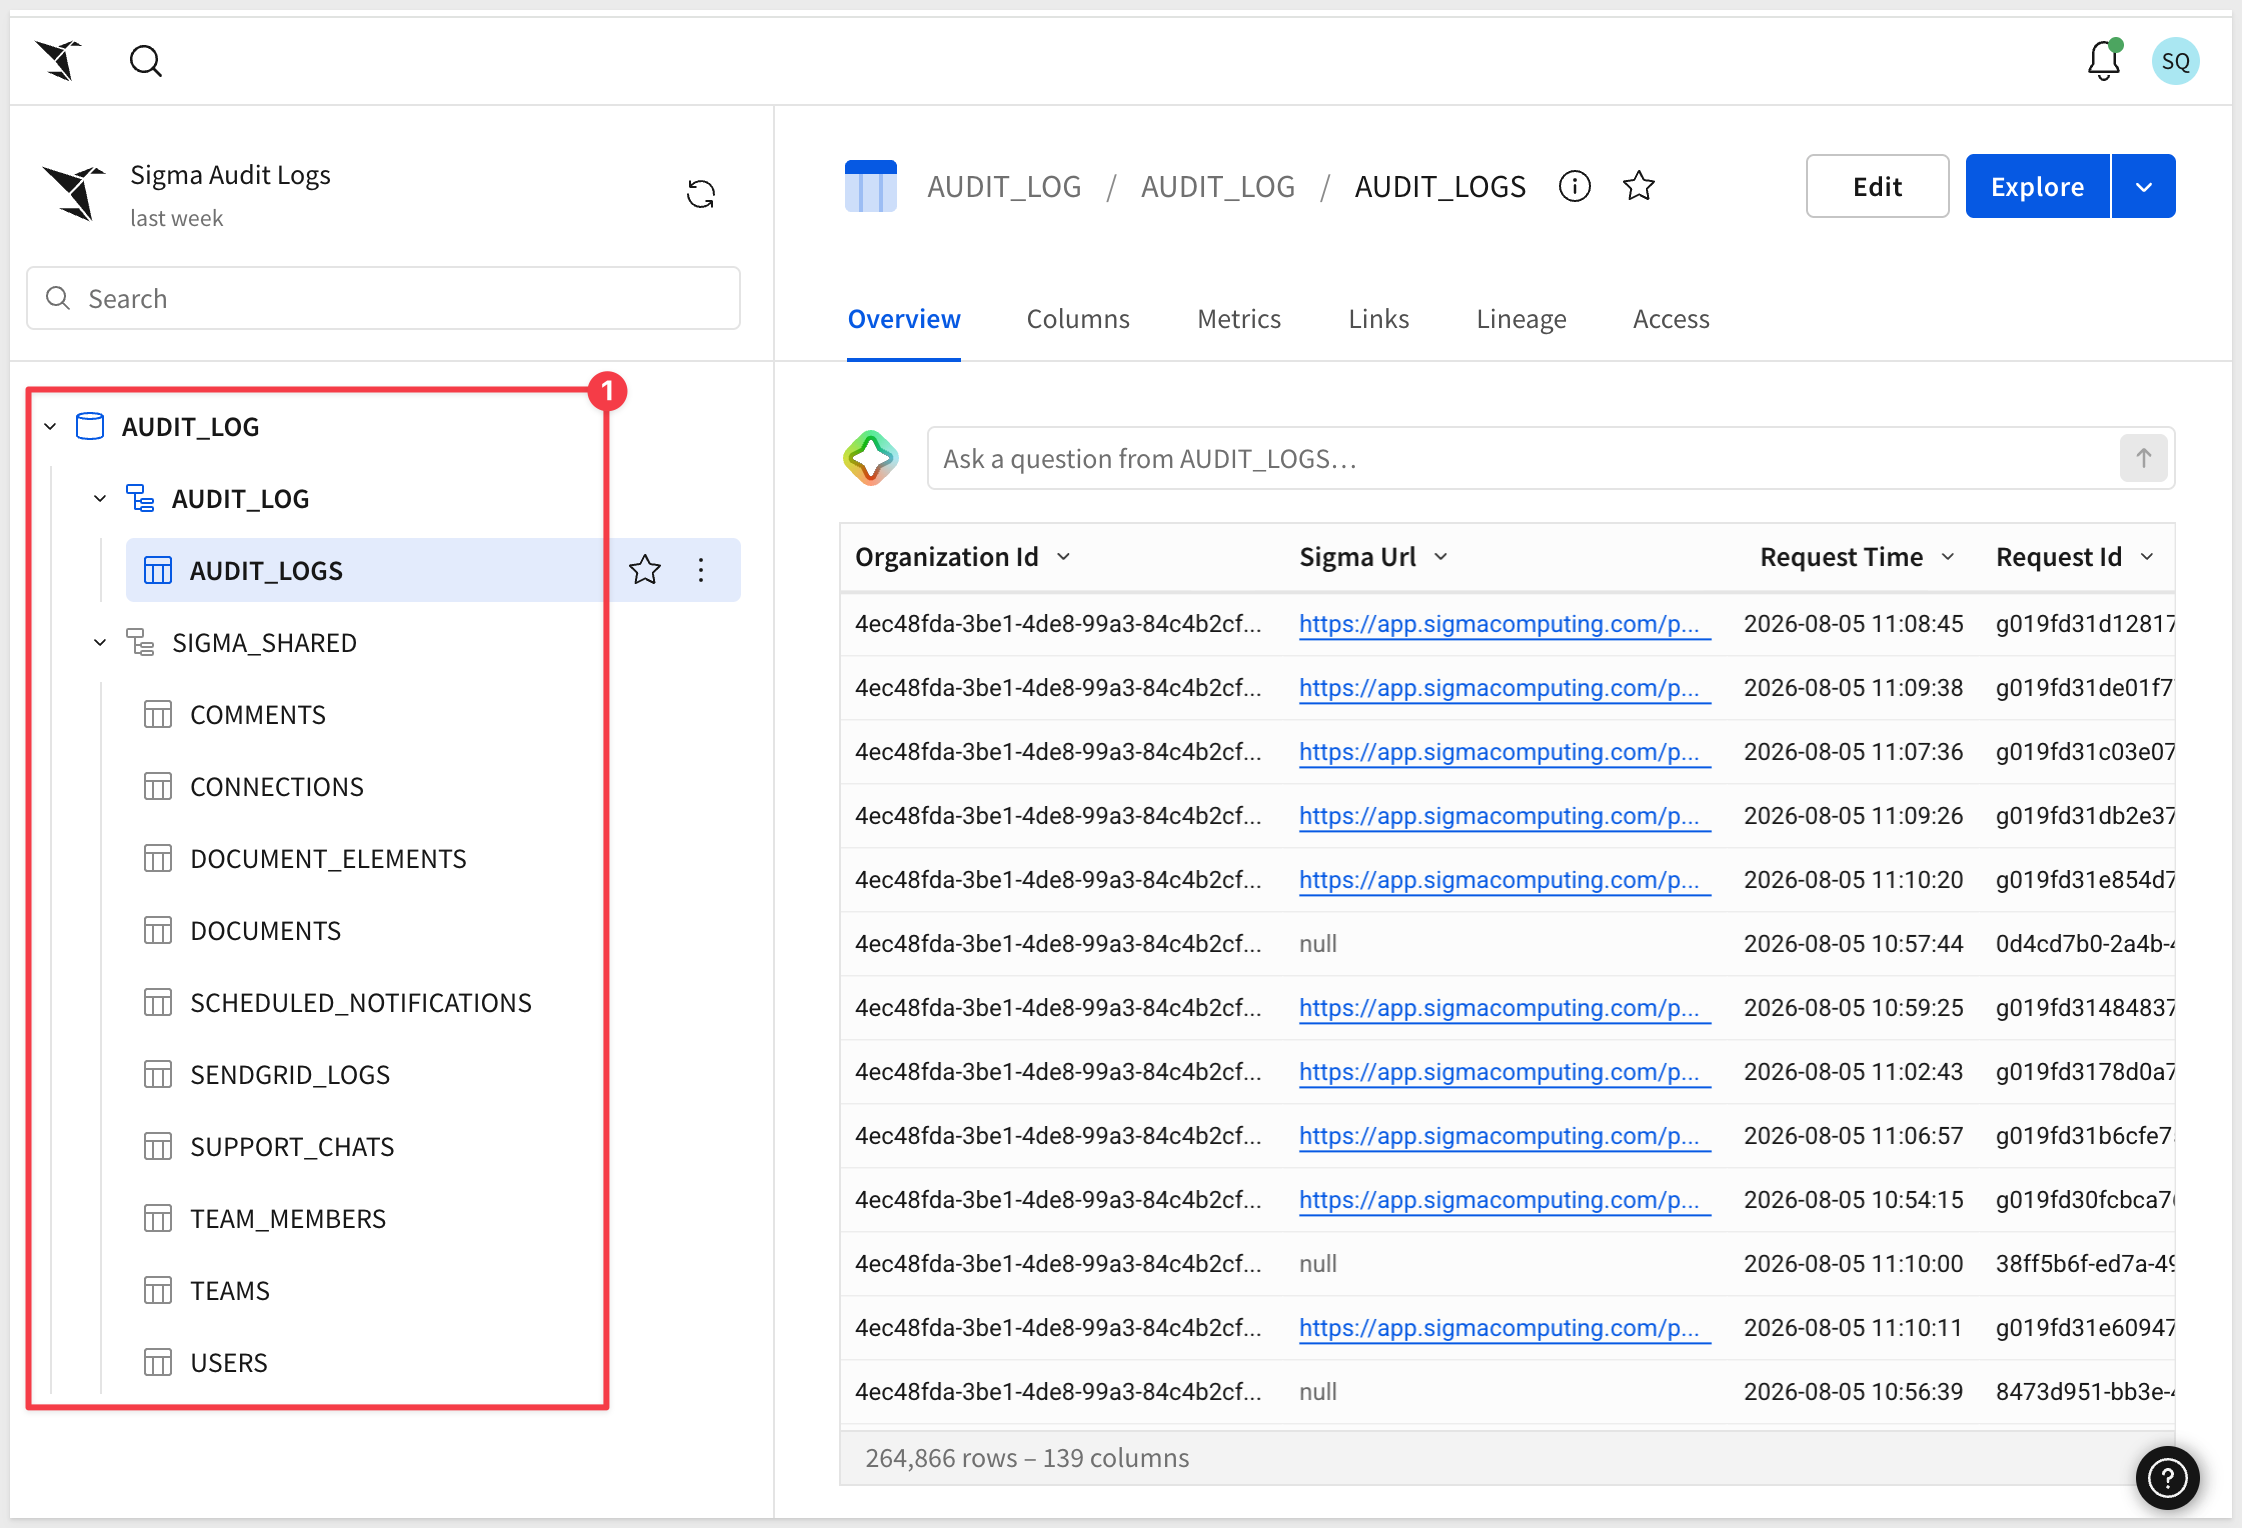
Audit logs are retained for 30 days by default, which is enough to explore but not enough to rely on for compliance or historical trend analysis.
Enabling Sigma Audit Logs and setting up a storage integration are two separate steps on the same settings page — turning on logging doesn't automatically export it anywhere, so if you need longer retention, set up the storage integration too, not just the connection:
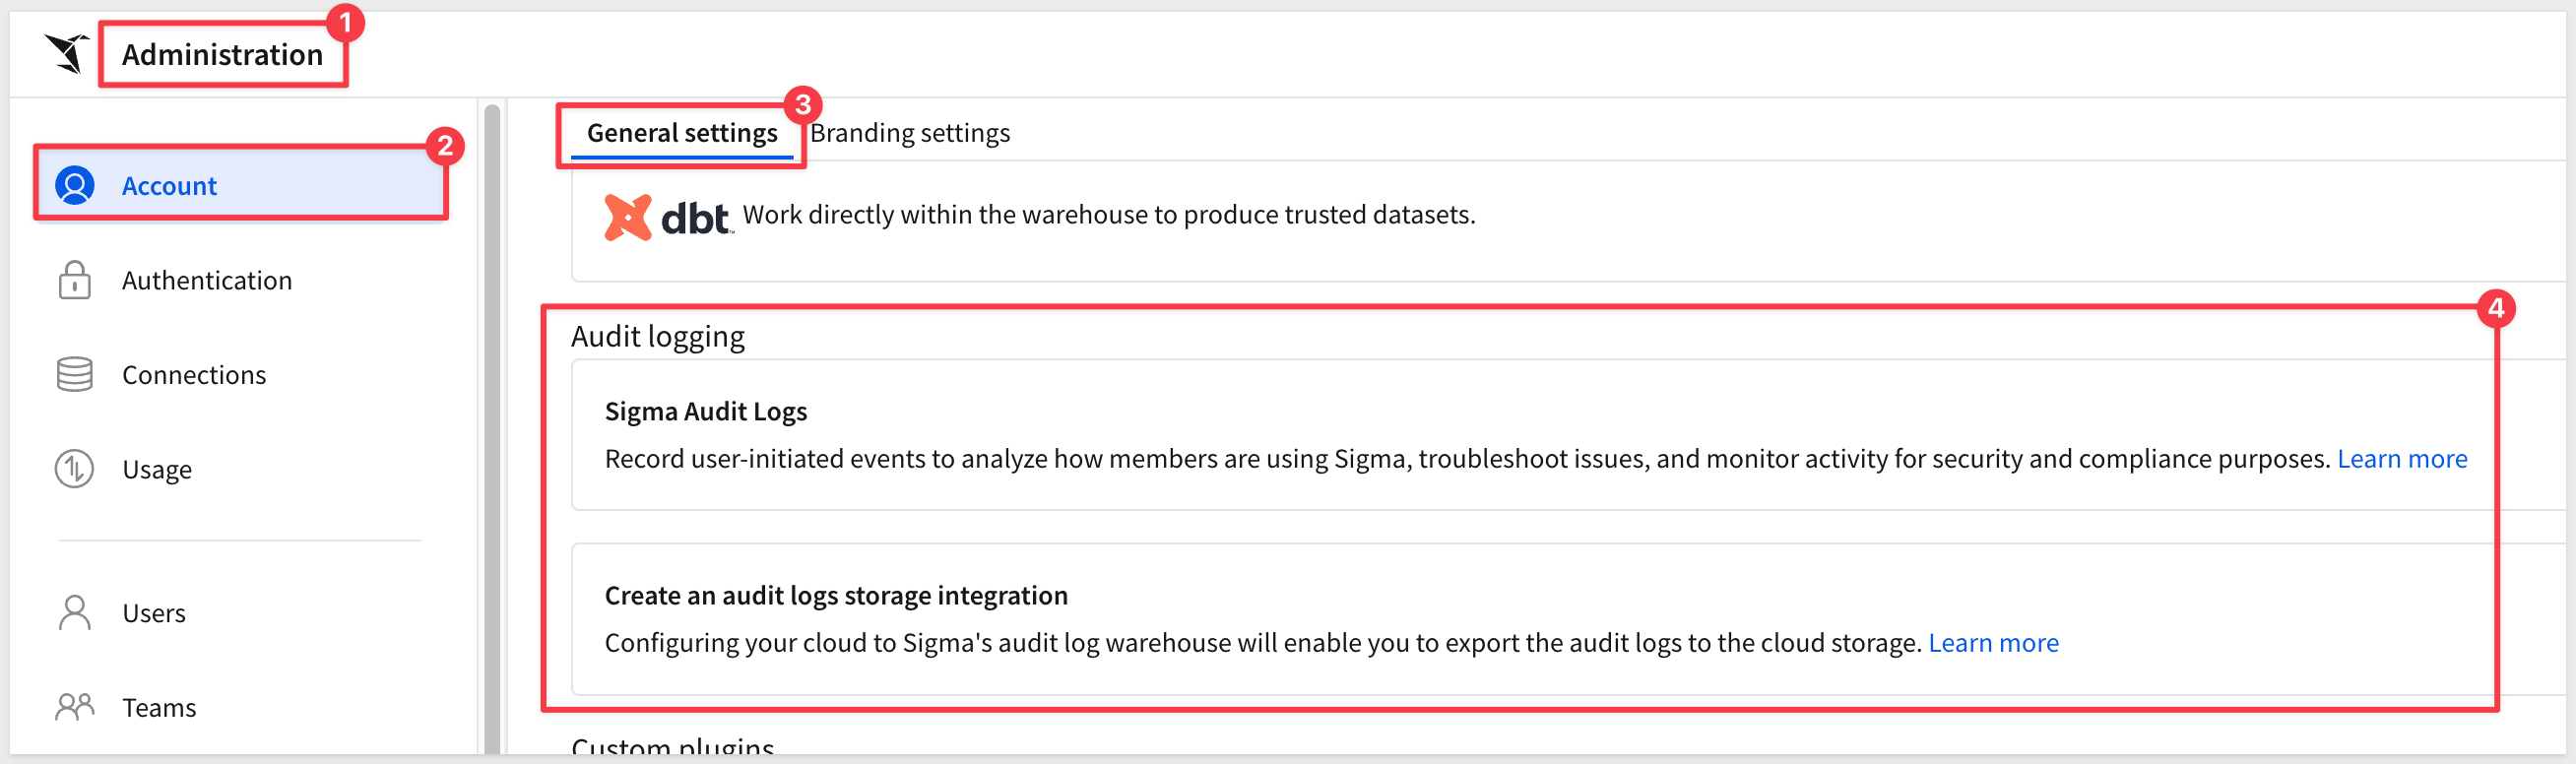
For setup steps, see Enable audit logging and Access and explore audit logs. For longer retention, see Export audit log data to cloud storage
For a hands-on walkthrough, see Audit Logging
Monitor Usage and Warehouse Costs
Sigma's usage overview shows which features and users are most active — useful for spotting power users worth turning into champions, and for catching licenses that are going unused.
For warehouse spend specifically, Sigma publishes a Snowflake Cost per Query template: two setup steps, and you get a live dashboard showing exactly what each workbook, user, role, and warehouse is costing you:
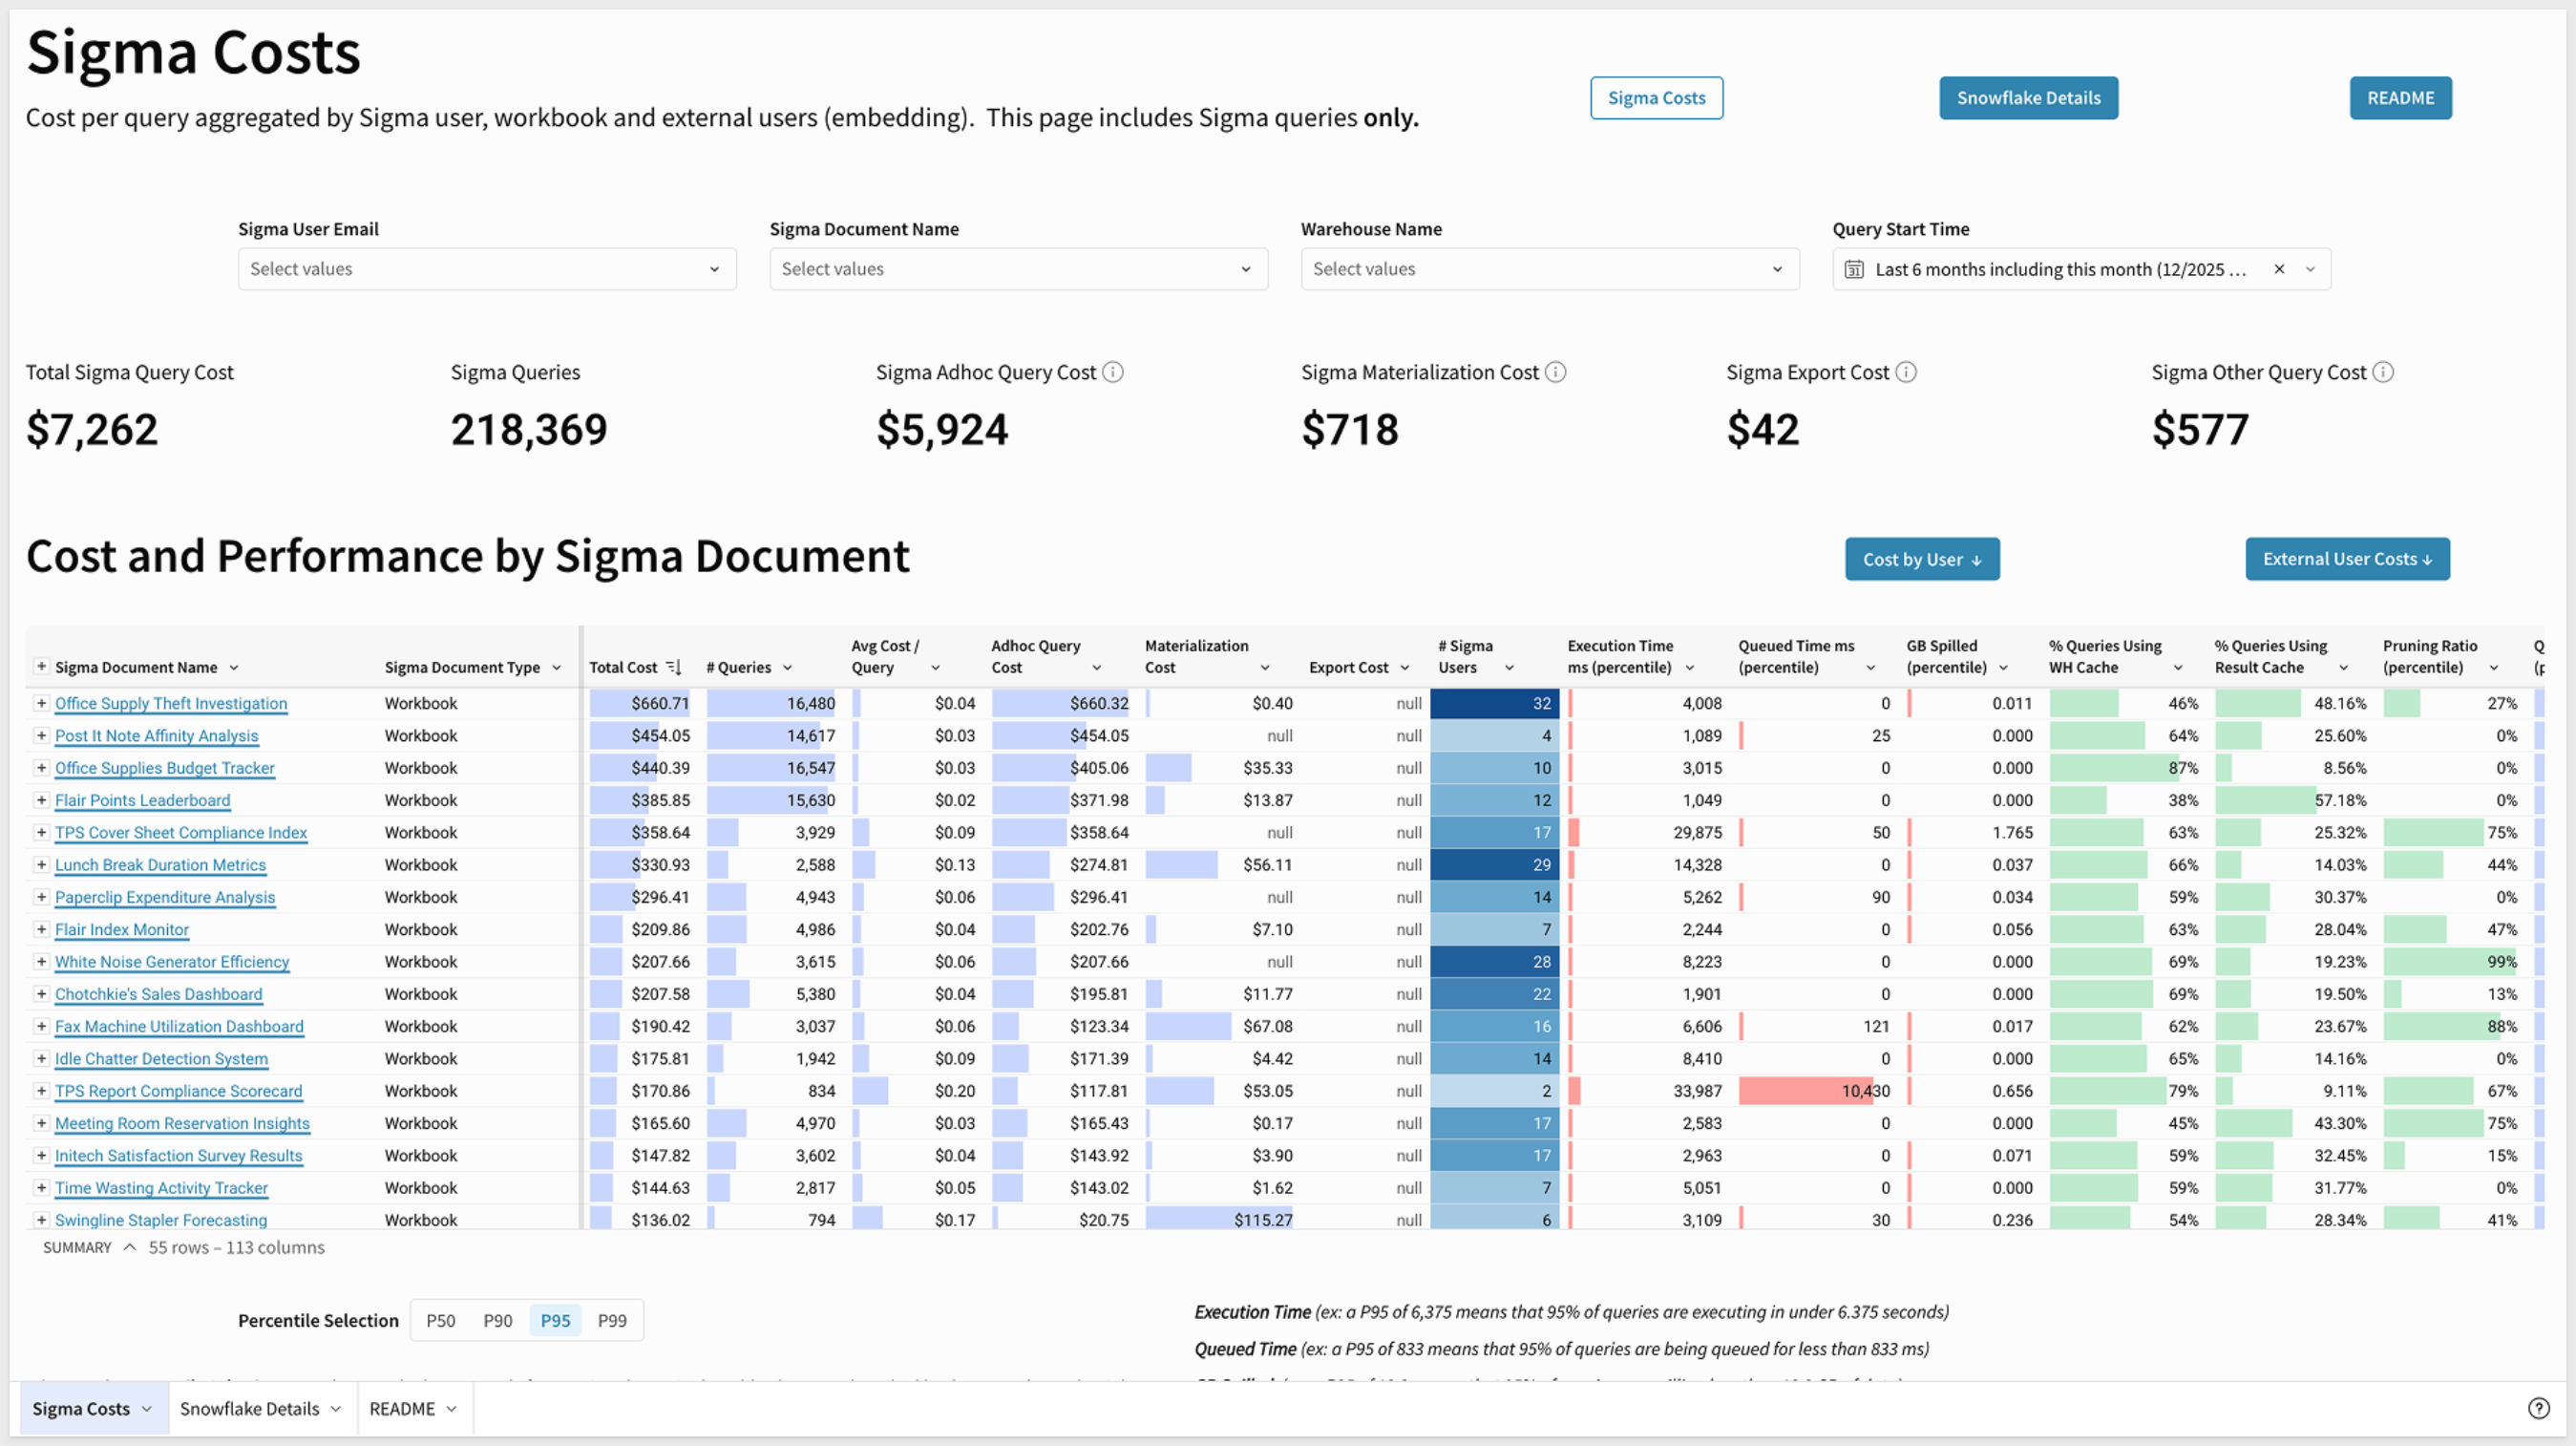
If queries are running slower or more expensively than they should, materializing the underlying datasets is usually the fastest fix, but talk to your Sigma CSM if the issue is persistent.
For setup steps, see Usage overview
For a hands-on walkthrough of each, see Snowflake Cost per Query Template Setup and Materialization with Sigma
Deprecate Unused Content
Use audit logs and usage data together to spot workbooks nobody's opened in months, and decide on a regular cadence for archiving or removing them. An environment that keeps growing without ever being pruned gets harder to navigate and costs more to run than it needs to.
AI in Sigma isn't a separate, bolted-on tool — it's built into the same governed environment your team already works in, so turning it on doesn't mean opening an ungoverned side door to your data. Before any AI feature works, an administrator has to configure a provider from Administration > AI settings.
This page is organized into three tabs — General AI, Assistant, and AI columns — each controlling a different layer of your AI strategy.
Configure an AI Provider
On the General AI tab, choose your provider hosting:
- Data warehouse hosted model — AI runs entirely inside your data platform (for example, Snowflake Cortex), tied to a specific connection
- External AI provider — OpenAI, Azure OpenAI, Google Gemini, Amazon Bedrock, and others
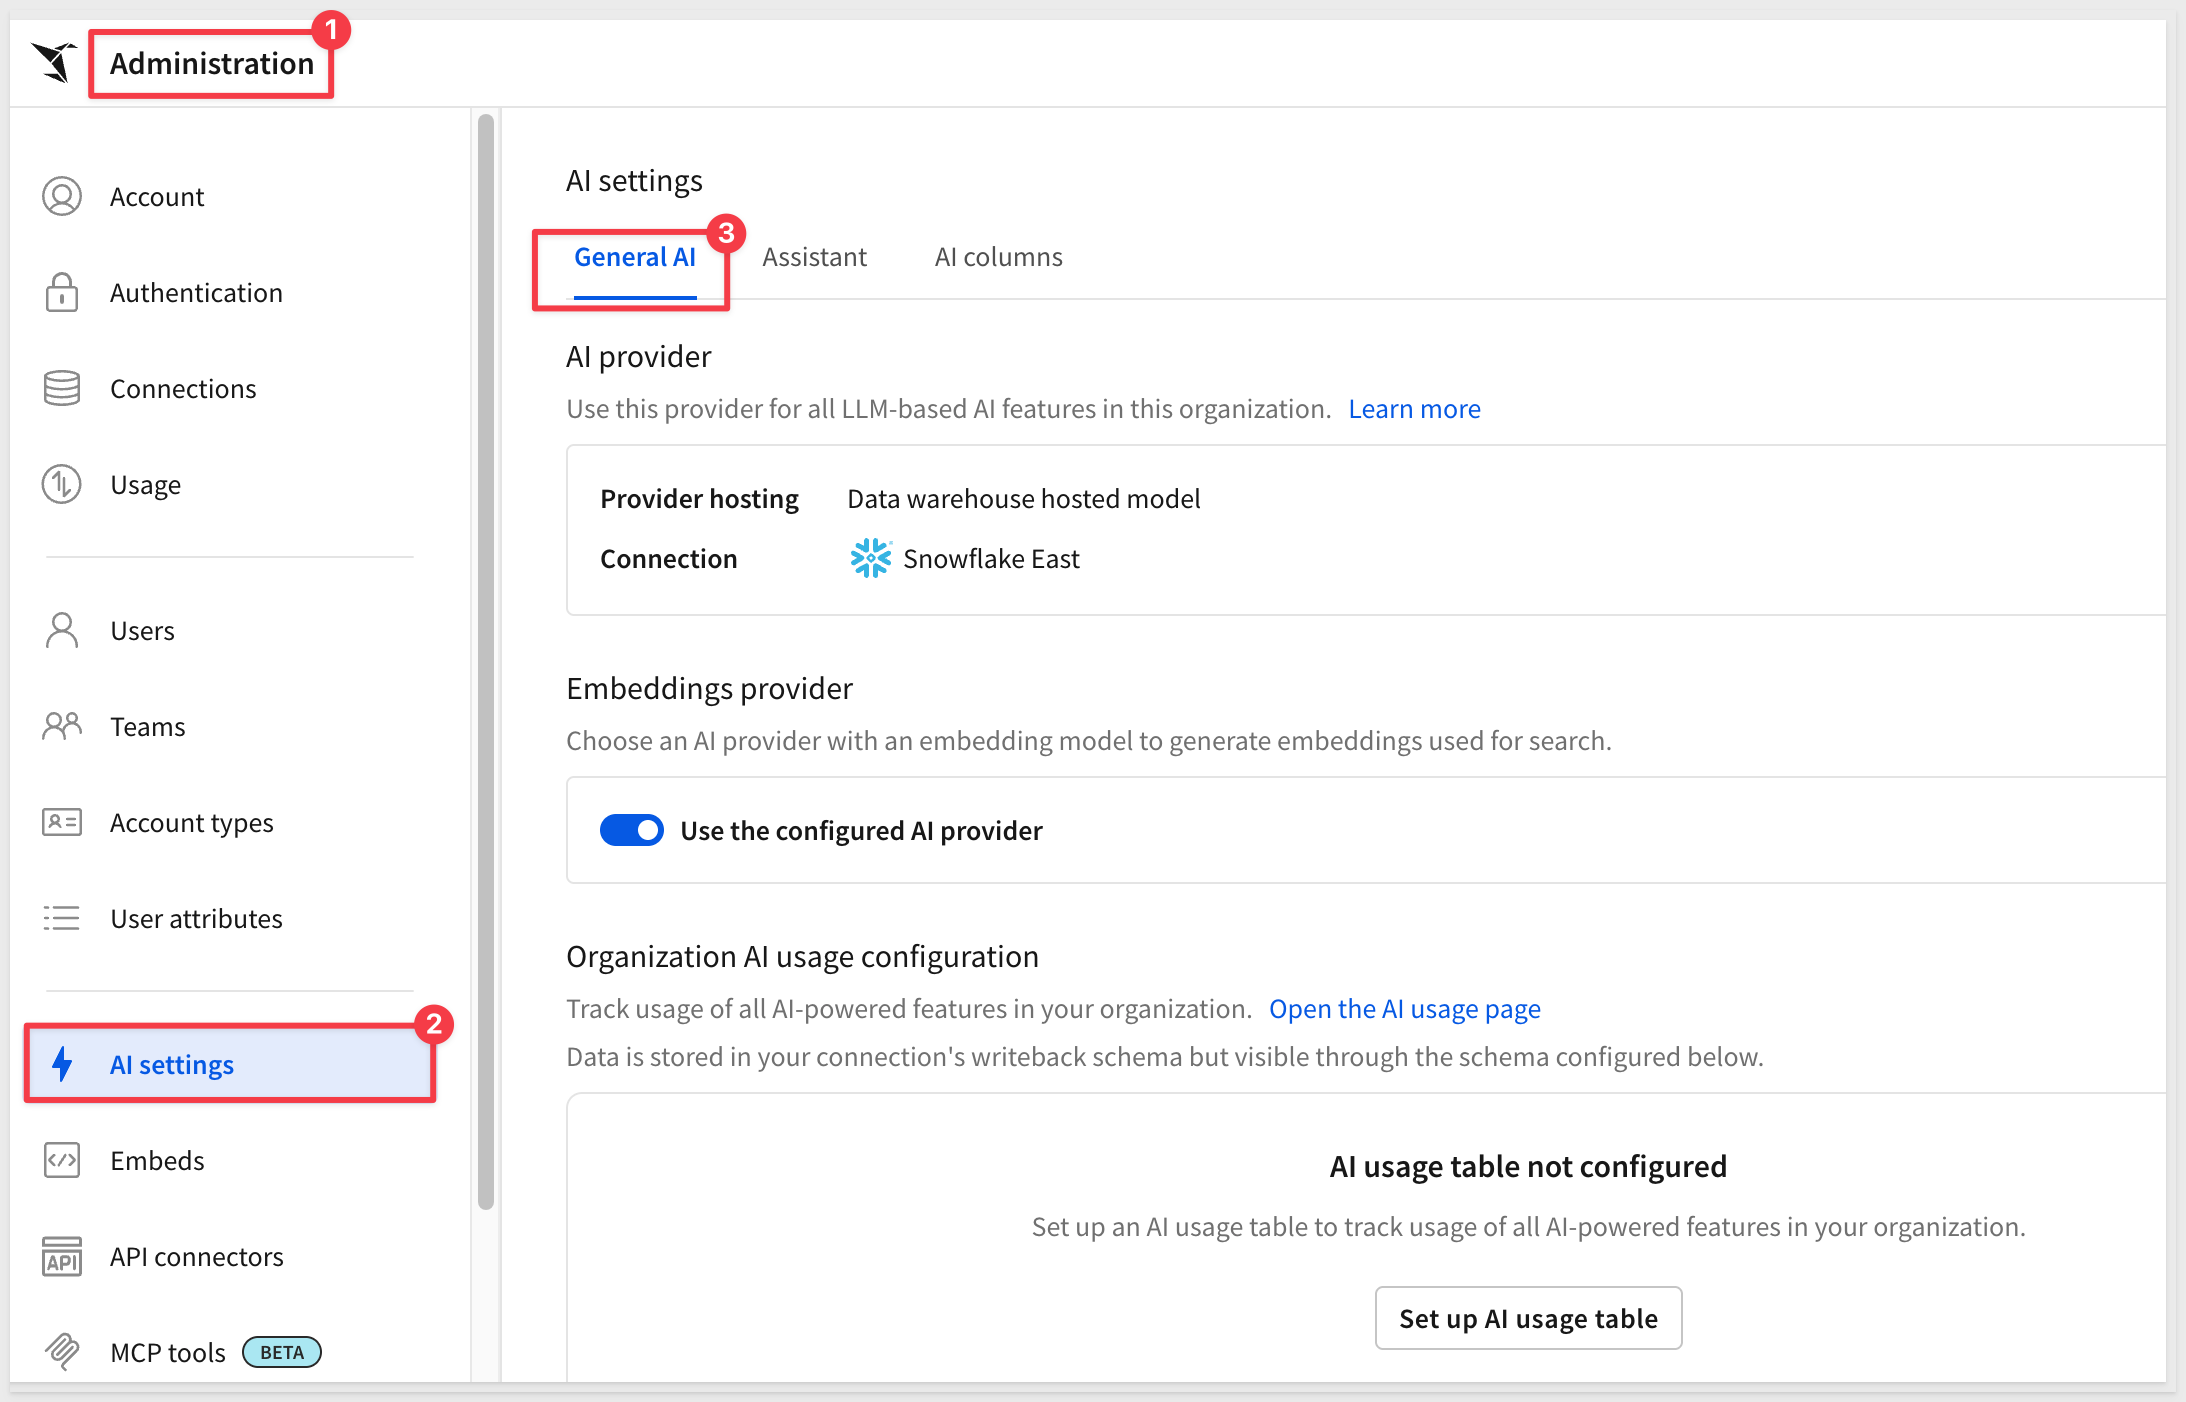
You can also choose a separate embeddings provider for search, or just reuse the AI provider you already configured.
For setup steps, see Configure an AI provider
Choose Which Agents Users Can Access
On the Assistant tab, decide which agents show up in Sigma Assistant:
- Sigma Assistant — the standard conversational agent, accessed from the homepage
- Warehouse agents — agents that run natively in your warehouse (for example, a Snowflake Cortex agent), accessed from both the homepage and Sigma Agents
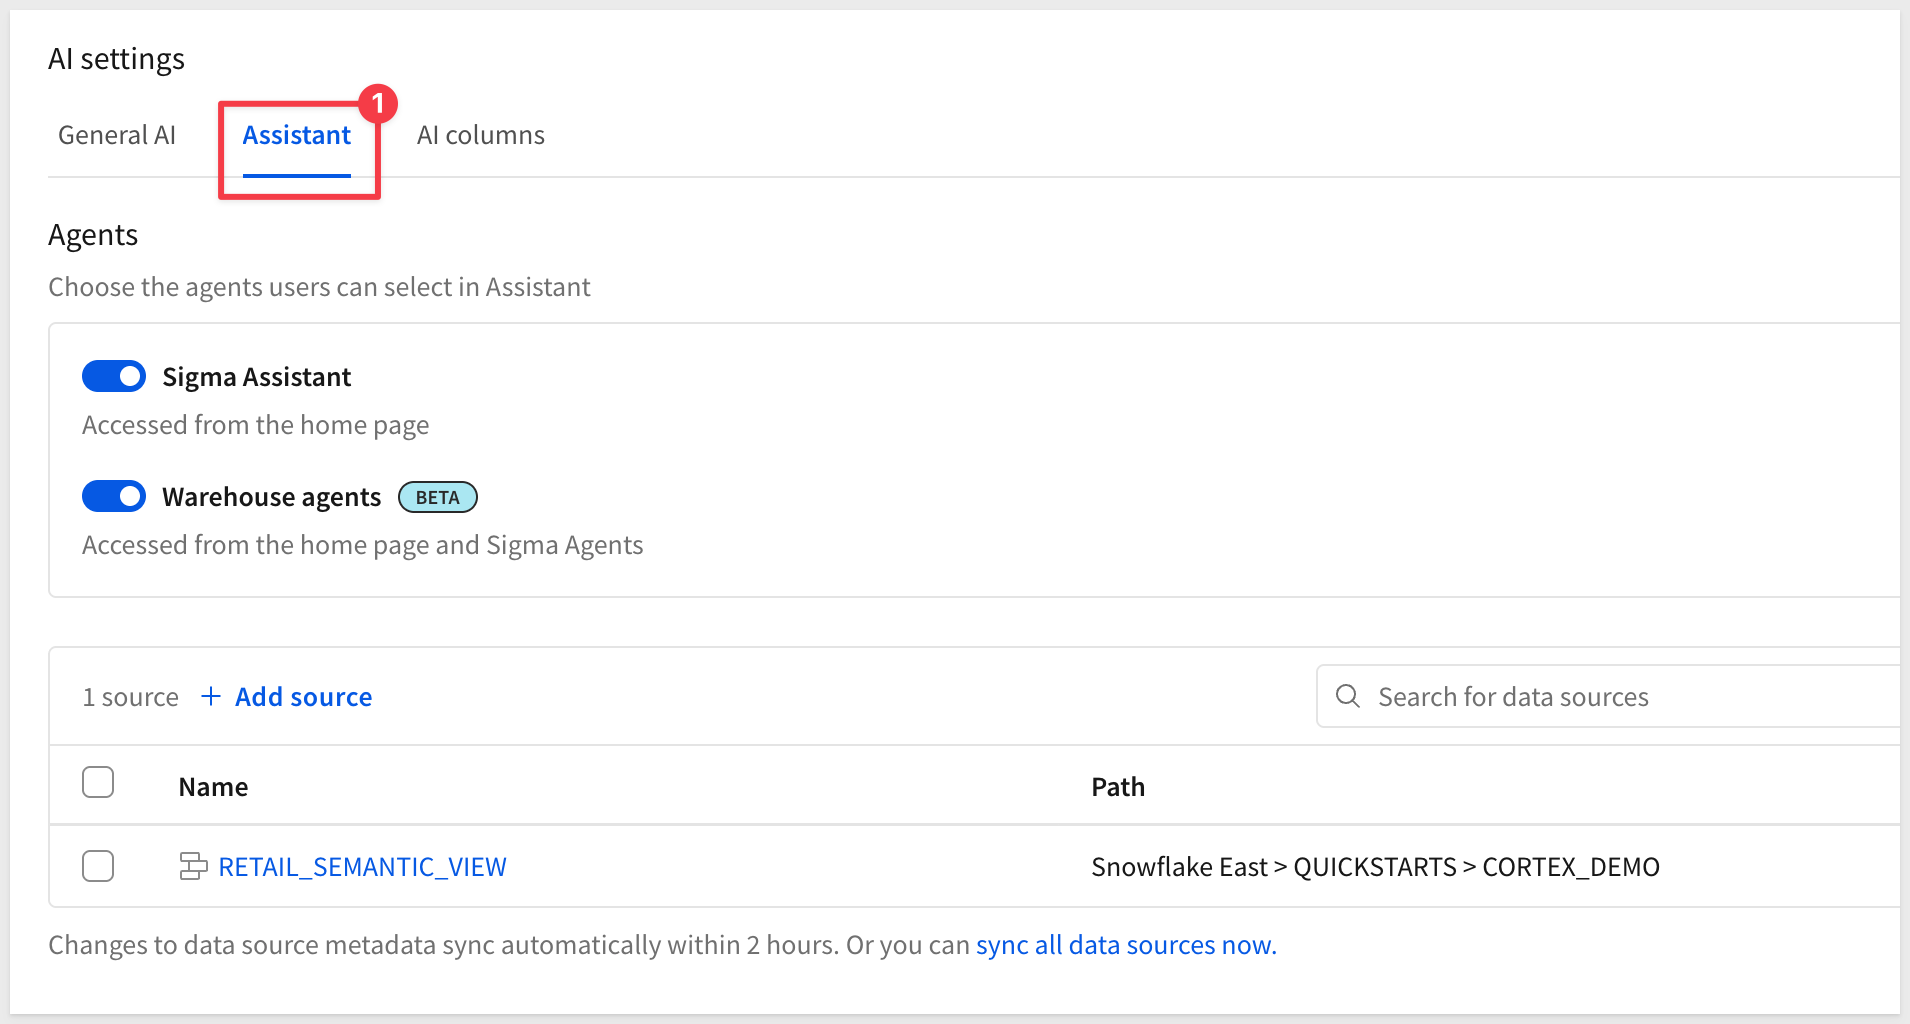
This is also where you choose which data sources Assistant can query. Assistant inherits the same warehouse permissions already provisioned on those sources — it can't surface a table or column that the querying user couldn't already access themselves.
For the full feature spectrum beyond Assistant — Formula Assistant, Building with Assistant, and Sigma agents and chat elements — see Get started with AI in Sigma
For QuickStarts, see Fundamentals 01: Overview - AI in Sigma and AI Apps Fundamentals
Configure Chat History
Also on the Assistant tab, below Sigma Assistant data sources, decide whether conversations with Sigma agents are saved and resumable. Toggle Chat history on and choose Store on Sigma for — 30, 60, or 90 days:
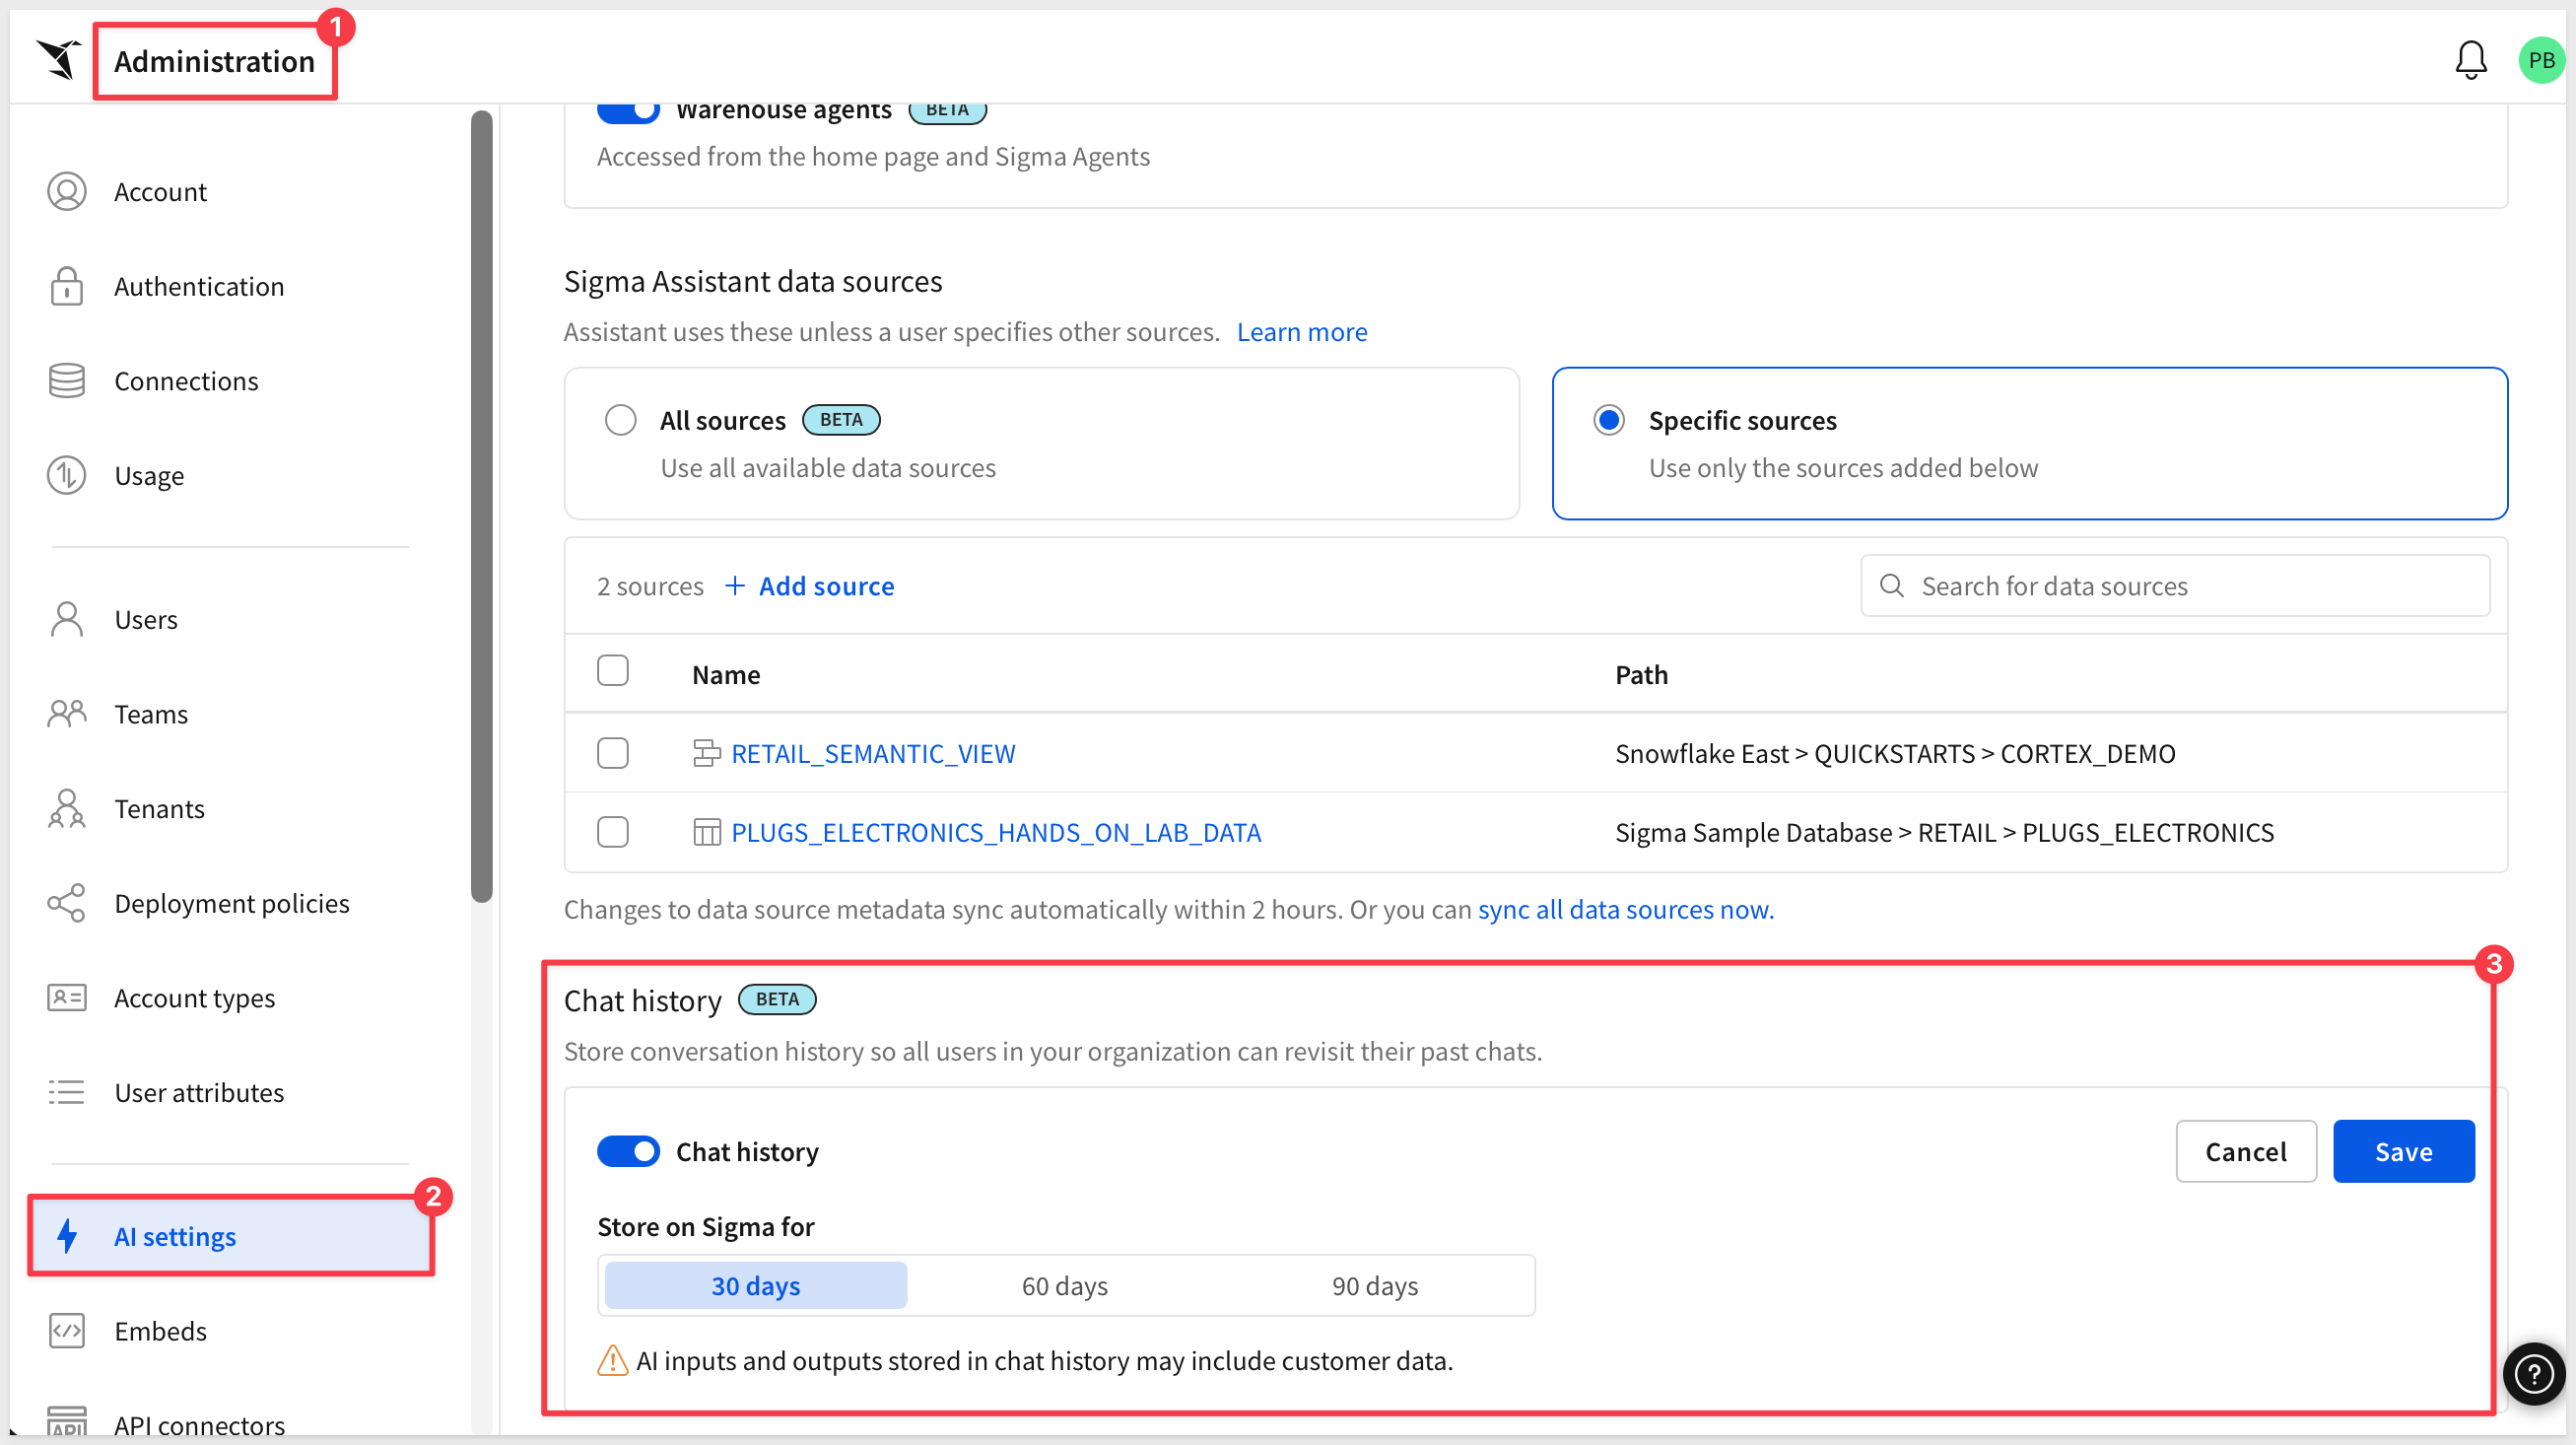
This control is gated by your organization's agreement with Sigma — only organizations with AI terms in their MSA, or a signed AI addendum, can turn it on. If you don't see the Chat history panel on your Assistant tab, check with your Sigma account team on getting that in place.
Chat history is scoped narrowly: it's per-user — each person only sees their own past conversations — and applies only to agent conversations inside workbook chat elements, not the homepage Assistant or warehouse agents. Turning it off stops new conversations from being stored and deletes previously stored ones once their retention period expires.
For setup steps, see Configure chat history for agents
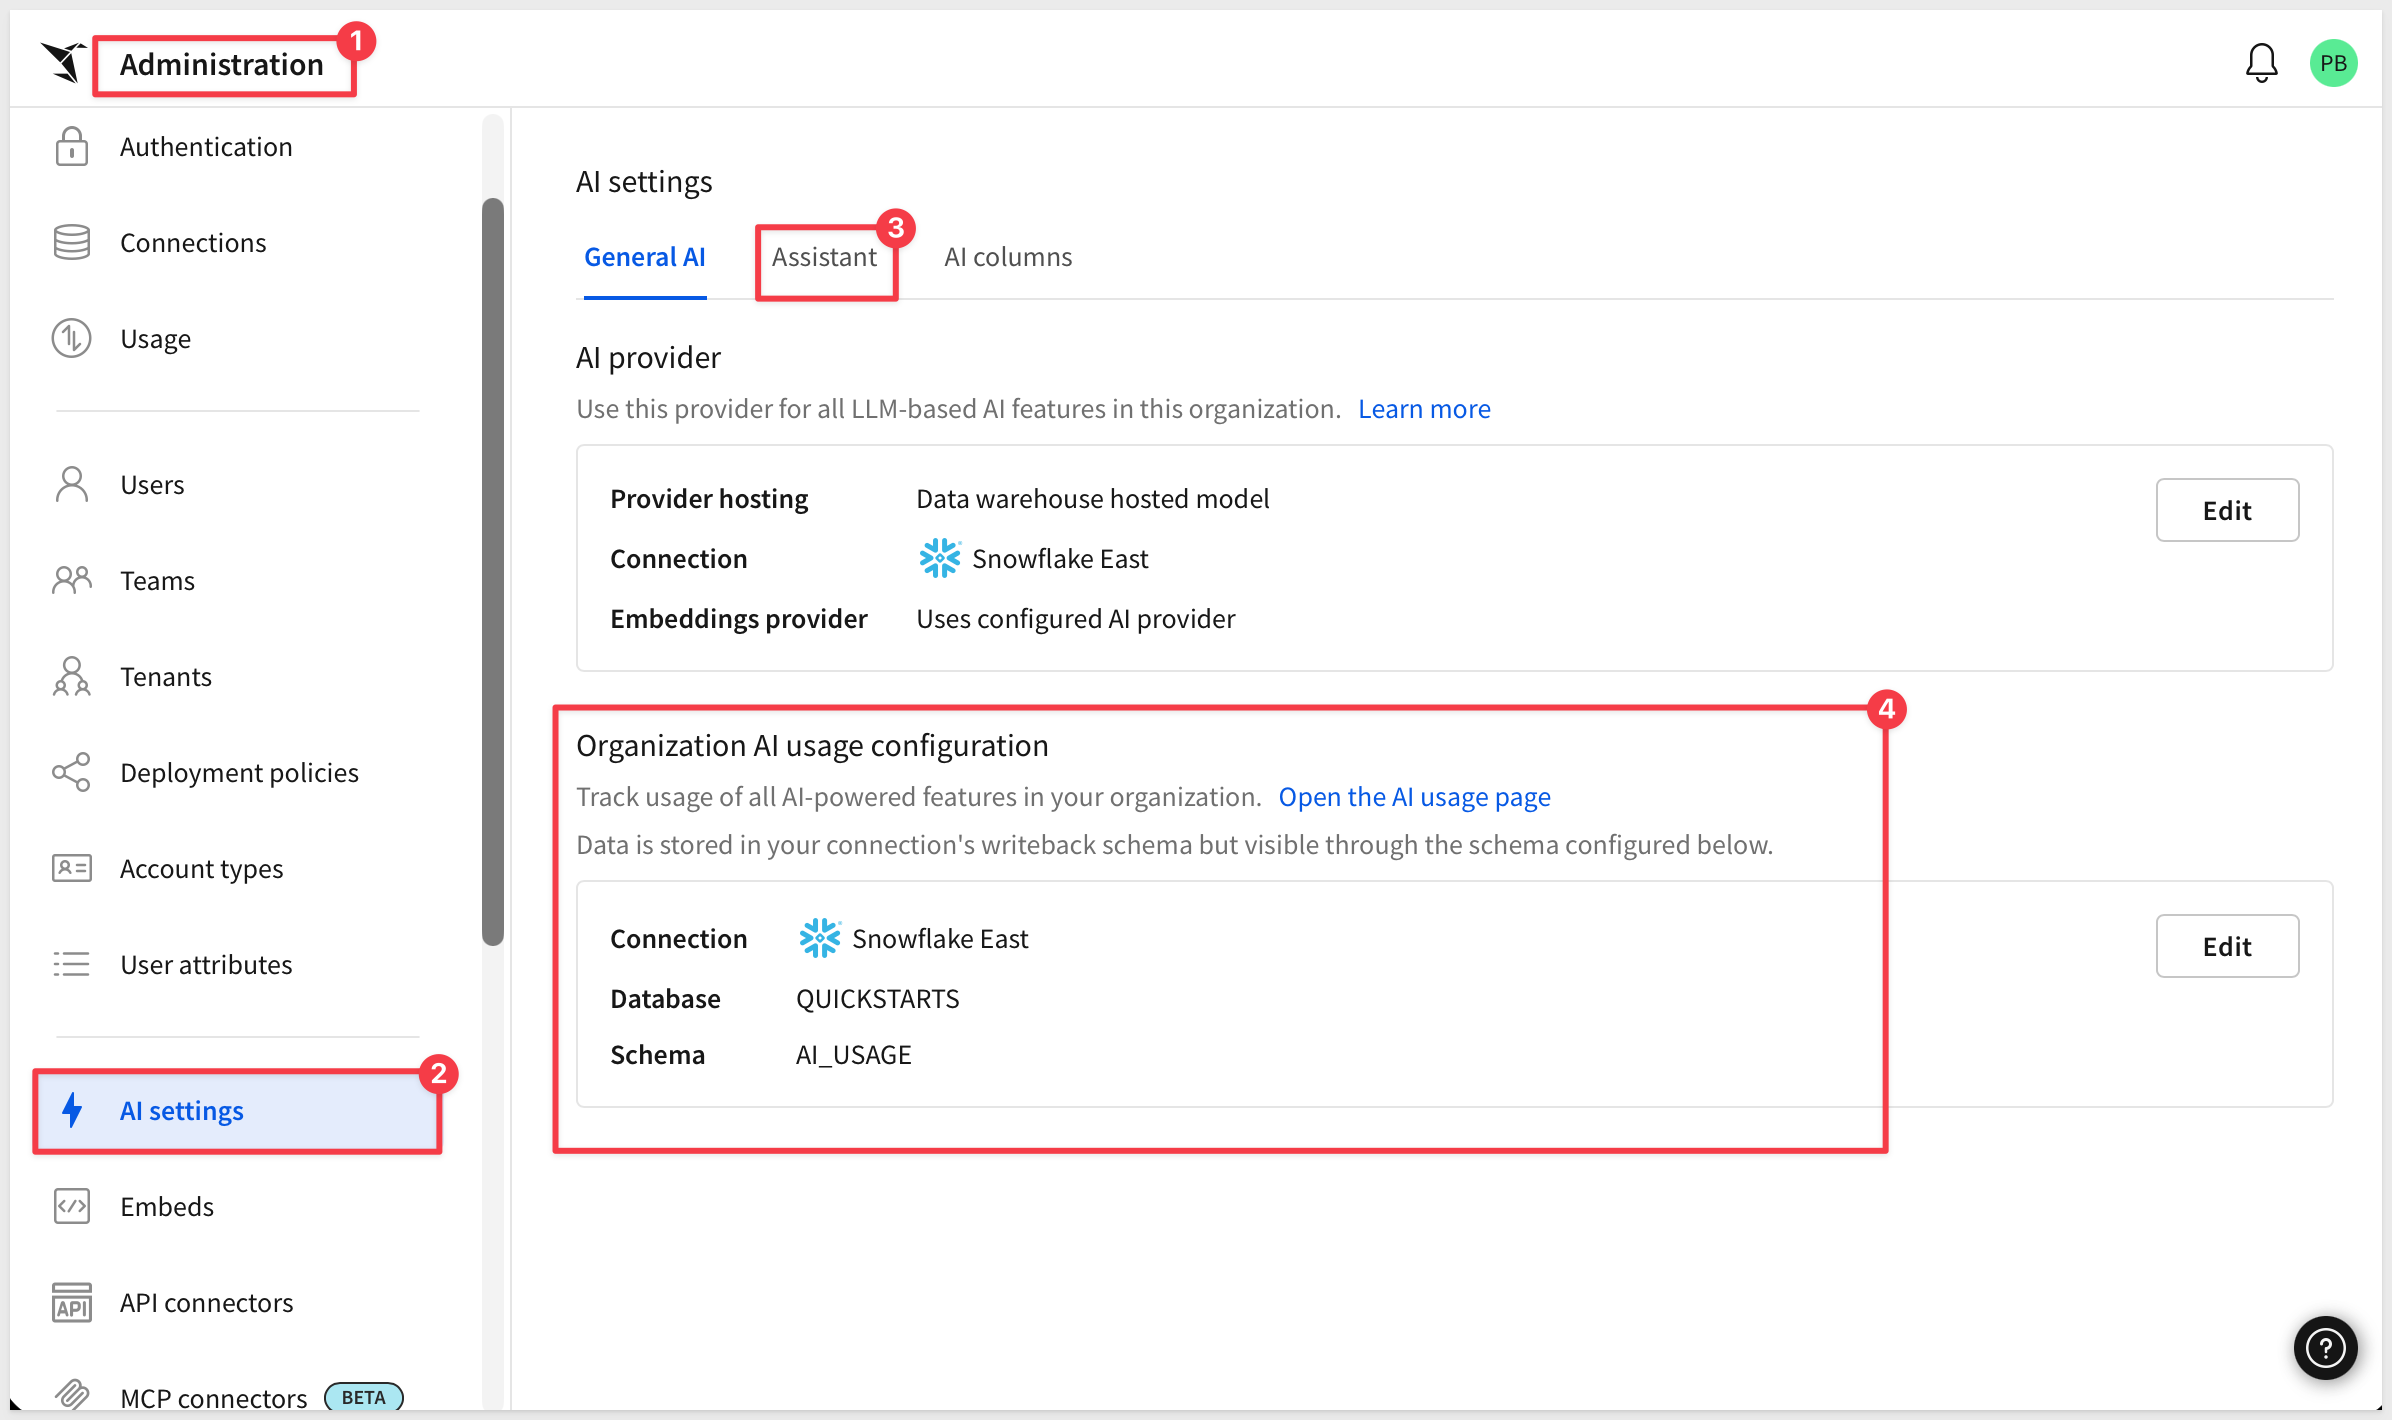
While you're on the AI settings page, the General AI tab's Organization AI usage configuration panel is a related setting worth pointing at now — it's a separate feature from chat history (it powers the AI usage table covered in Set Cost Controls below), but it's configured from the same page. Click Edit to set the connection, database, and schema where Sigma should write AI usage data:
MCP Integrations
Model Context Protocol (MCP) is the standard that lets AI tools and agents connect to outside systems and data in a consistent way, instead of every integration needing its own custom-built connection. Sigma's MCP support works in both directions, and either one reuses your existing account types and permissions — neither creates a new governance surface to manage.
Inbound, external AI tools — Claude, ChatGPT, Codex, Cortex Code, Cursor — can connect to Sigma as an MCP server, letting a user search, explore, and query Sigma data from wherever they're already working, without writing SQL. Each user needs their normal view/use access (Can view on the documents, Can use on the connections) plus a Use Sigma MCP with OAuth permission on their account type, and connects from Profile > Integrations.
Outbound, from Administration > MCP tools, you connect external MCP-compliant tools and services — a ticketing system, a CRM, a custom internal API — for Sigma agents to call as part of their own reasoning, instead of Sigma building a custom connector for each one:
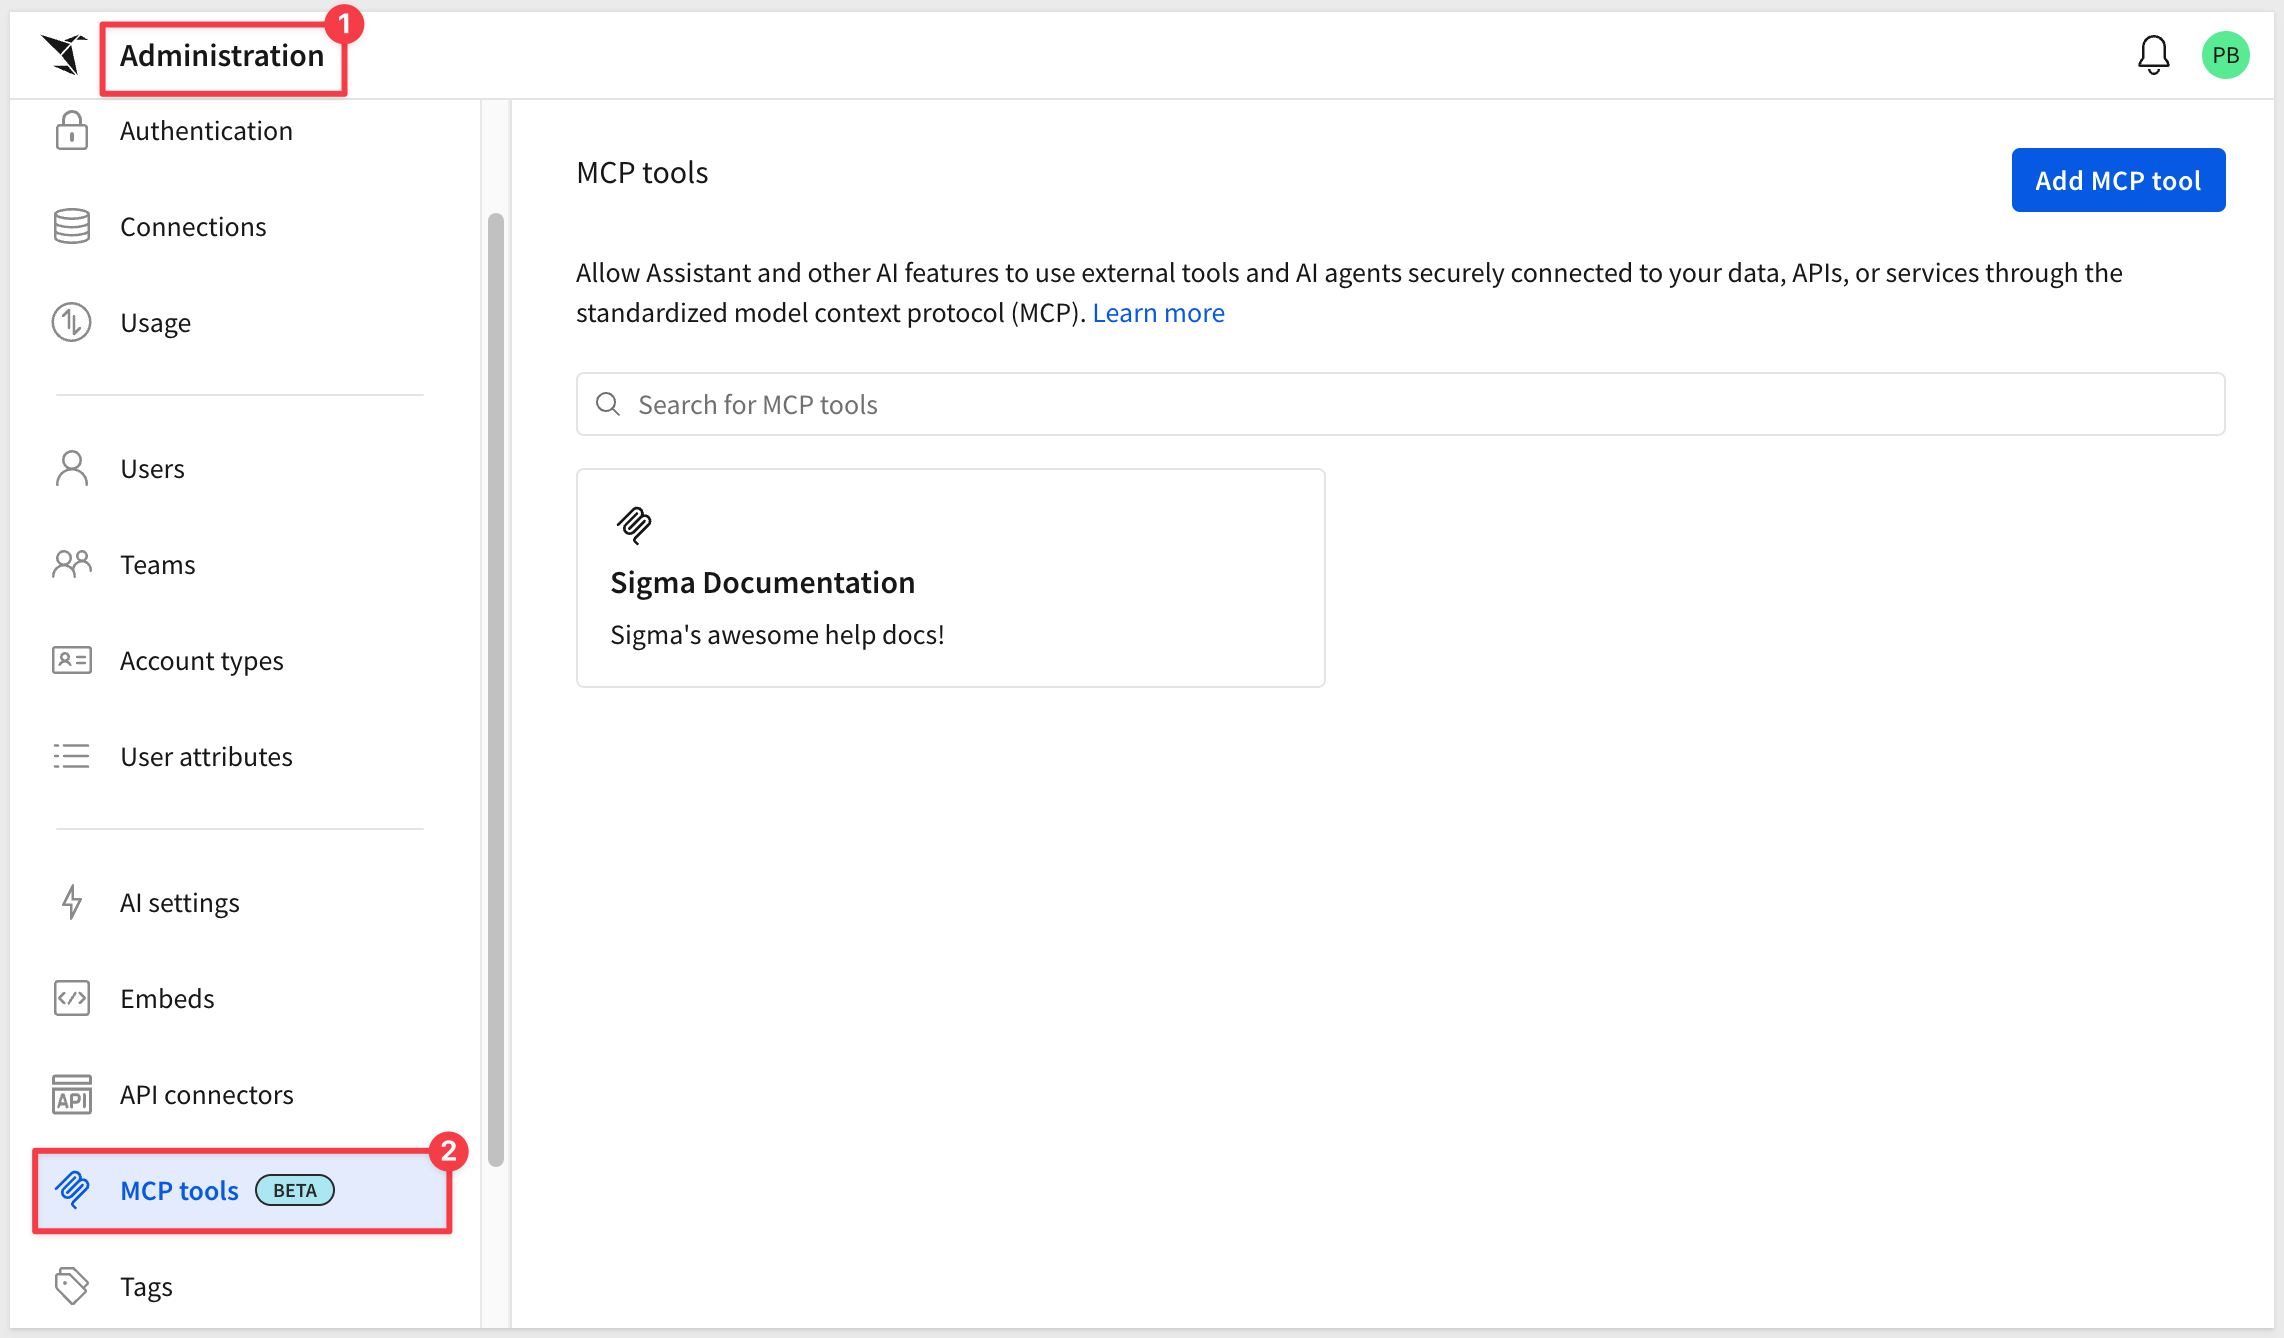
For setup steps, see Use Sigma MCP Server and Configure MCP tools
Agent Skill Configuration
Sigma also publishes open-source agent skills — reference files that give AI coding assistants (Claude Code, OpenAI Codex, Snowflake Cortex Code, Cursor) direct knowledge of Sigma's REST API and data modeling workflows. With a skill installed, a developer can ask their coding assistant to authenticate, list workbooks, or build a data model in natural language, instead of writing the API calls by hand.
This is typically a builder's activity rather than an end-user AI feature, but it's worth planning for as an admin: it requires a Sigma API client ID and secret, plus Can Edit or Admin permission on the resources being touched — the same API connectors you set up earlier in this section.
For a hands-on walkthrough, see Sigma Skills for AI Assistants
Set Cost Controls
The AI columns tab is where you set monthly token limits per connection, shared across everyone in your organization:
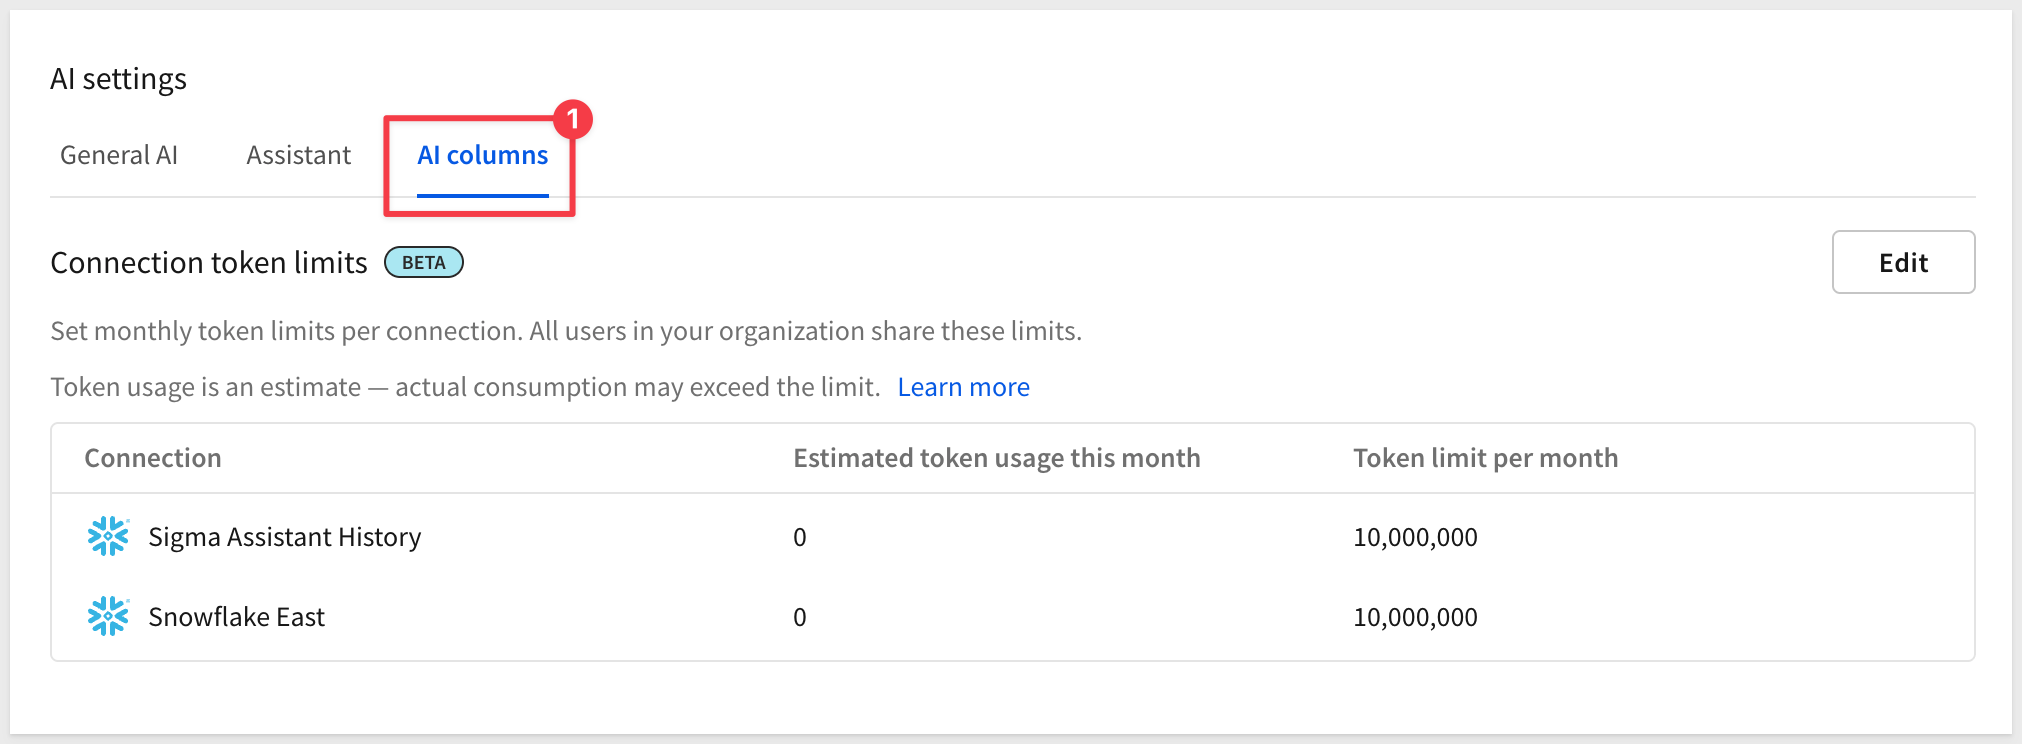
Back on the General AI tab, you can also set up an AI usage table, so token consumption is tracked and queryable like any other data in Sigma.
This is a write-back destination like any other, so write access needs to be enabled on the connection first; from there, point the usage table at its own dedicated write schema rather than one shared with other write-back activity, so AI cost data stays easy to isolate and query.
For a walkthrough of building a dashboard on top of that data, see Create a Sigma Assistant Usage Dashboard — or start from one of Sigma's ready-made AI Cost Monitoring templates (Claude, Snowflake, Snowflake Cortex AI, and OpenAI are all available in the Templates gallery) if you'd rather not build a dashboard from scratch:
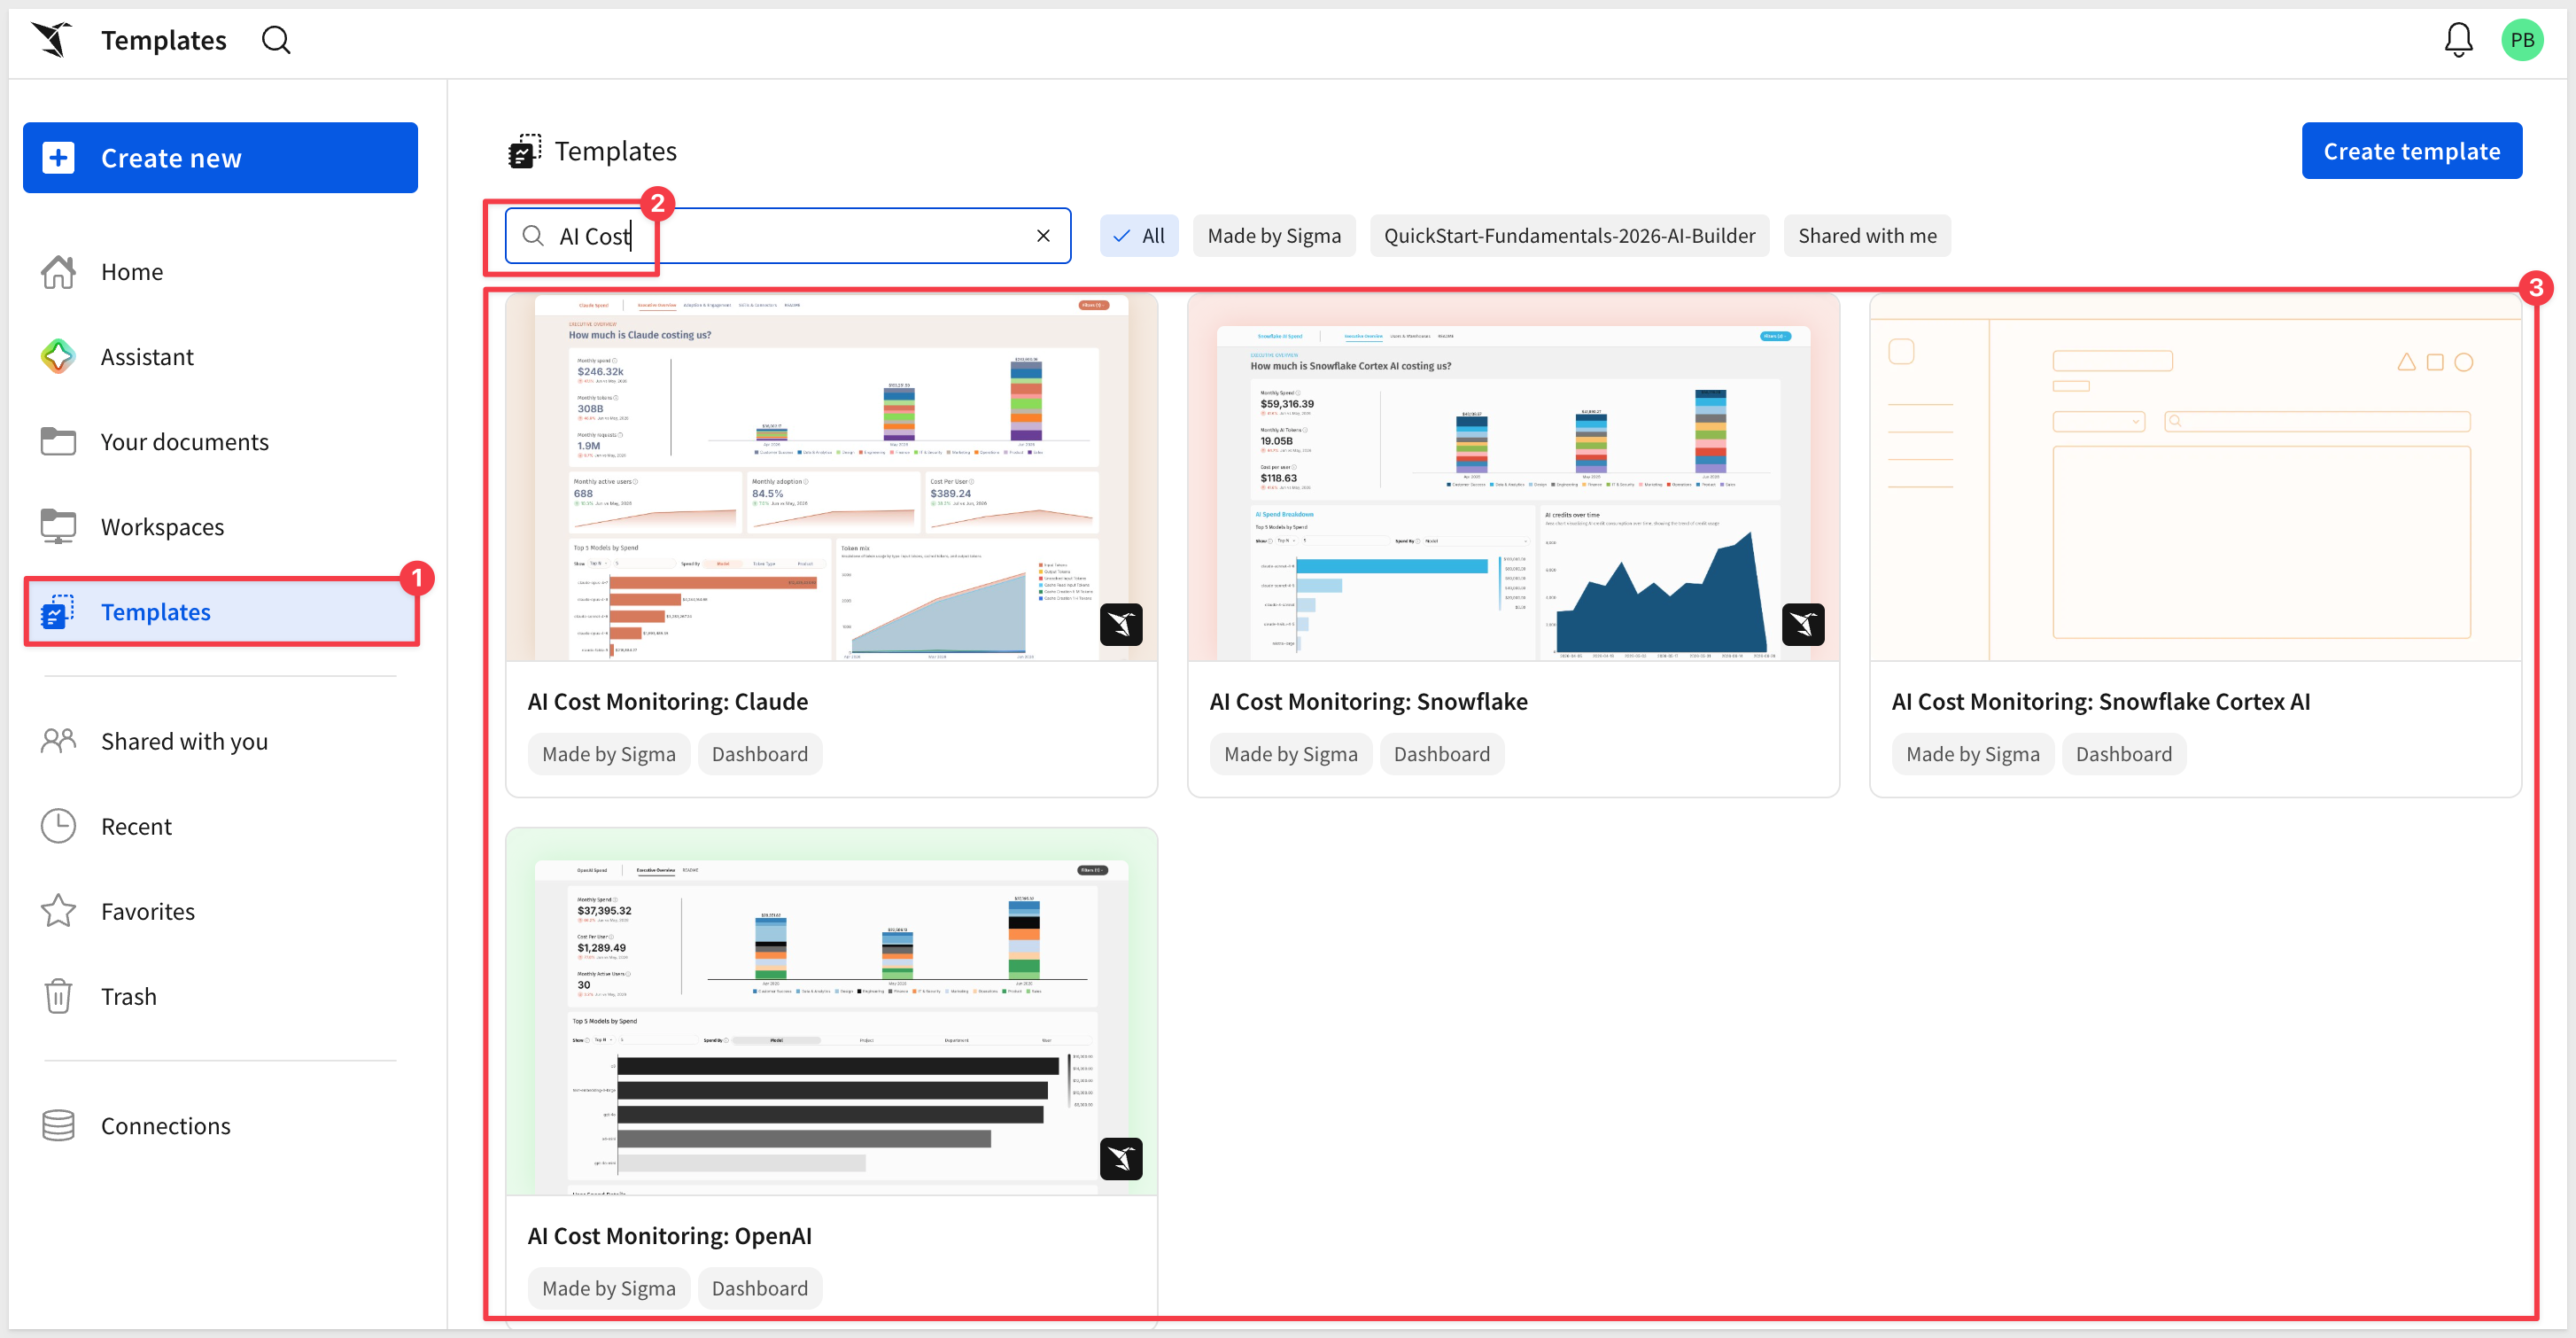
If your use case involves building AI apps that call external systems, set up your API connectors ahead of time — see API Connectors in Cloud Warehouse Connection Strategy above.
A Sigma environment that looks and feels like your organization's own tools gets adopted faster than one that looks like a generic vendor product. Custom themes, home pages, and localization take little time to configure, and they're often the first thing a new user notices — long before they open their first workbook.
Custom Theme
Set your organization's default look and feel from Administration > Account > Branding Settings. A custom theme controls:
- Color — text, highlight, and surface colors, plus categorical, sequential, and diverging chart palettes
- Font — choose from Sigma's pre-installed fonts
- Layout style — spacing and padding defaults
- Table style — header, subheader, and cell formatting
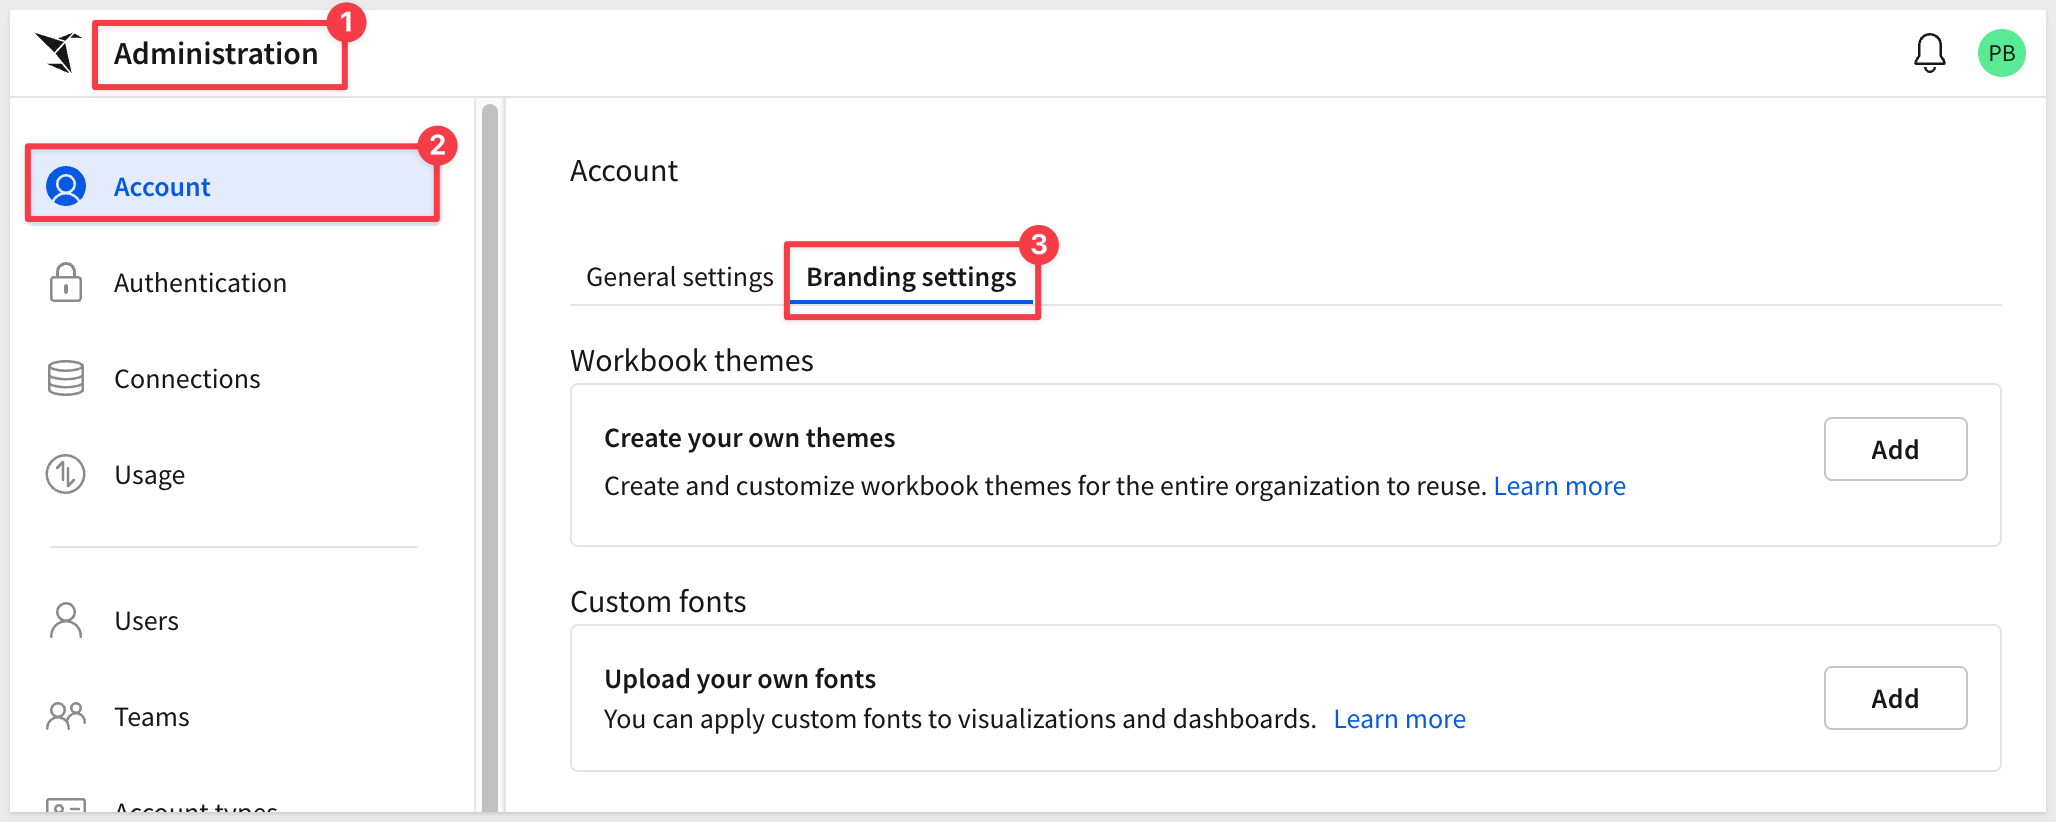
Once built, a theme can be applied to any workbook from its Workbook settings, and updating the theme later cascades everywhere it's used — you don't have to restyle each dashboard by hand.
For a full walkthrough, see Fundamentals 07: Design Elements (UI & Layout)
Custom Home Pages
Sigma admins can designate a workbook to serve as a custom homepage — the first page of that workbook becomes the landing page a user or team sees the moment they sign in. It's a natural place to surface curated visualizations, onboarding links, or announcements instead of leaving everyone to find their own way to a starting point.
You'll need admin access, and the target workbook shared with at least Can view access to everyone it's assigned to. If the workbook queries an OAuth-authenticated connection, configure it to run under a service account so sessions don't expire mid-use.
To set it up: go to Administration > Account > General Settings, enable custom home pages, assign it to specific users, Teams, or everyone, and pick the workbook (optionally a tagged version):
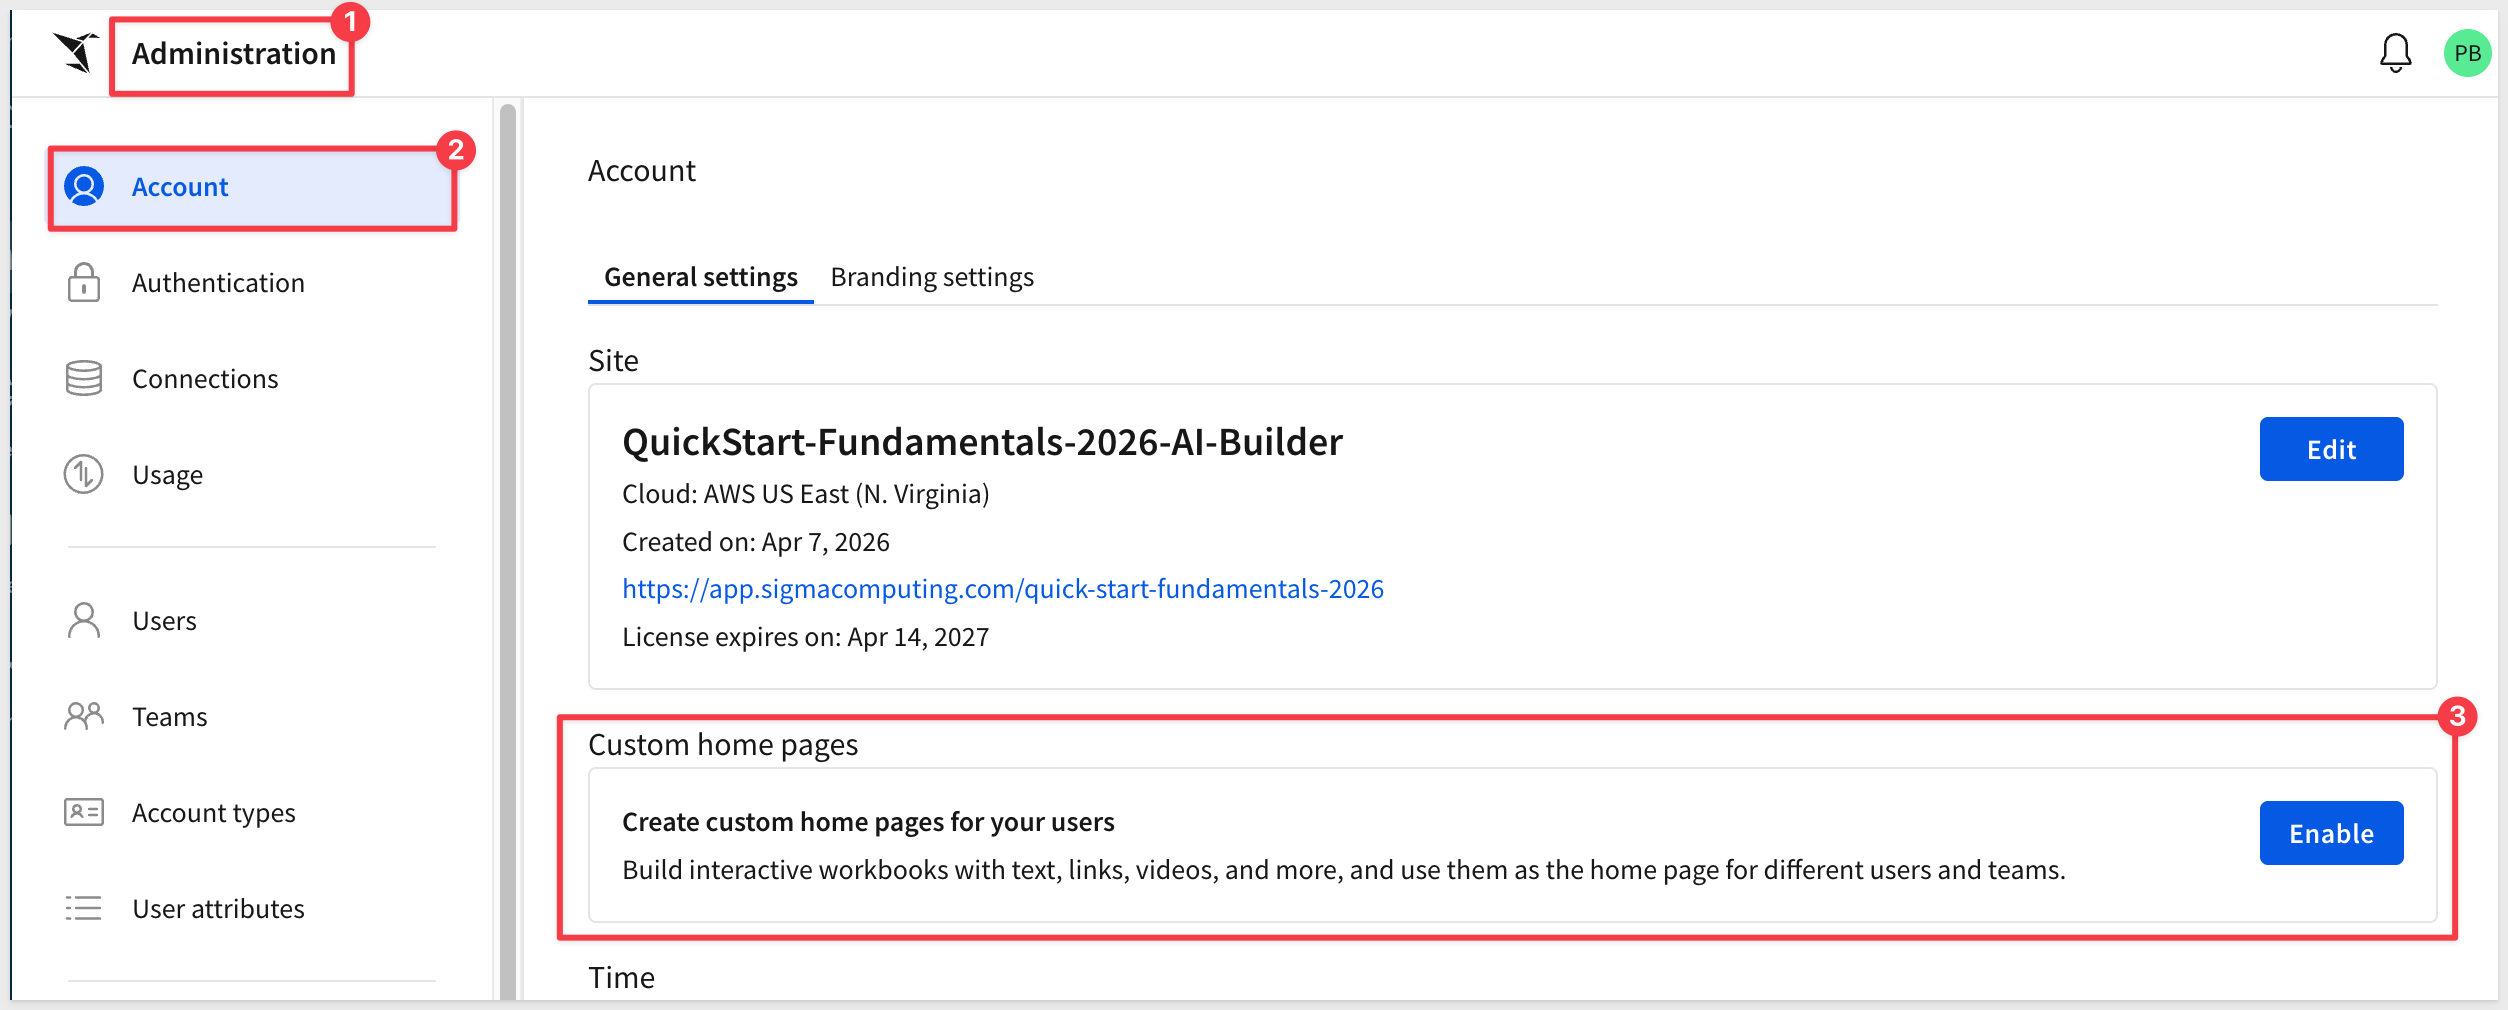
For setup steps, see Set up custom home pages
Localization
Decide your organization's defaults for time and language before you roll out broadly:
- Account timezone — the portal-wide default timezone (UTC unless you change it)
- Organization locale — the portal-wide default locale applied to documents
- Organization translation files — centrally managed translations for commonly used terms, so individual workbook owners aren't each re-translating the same words
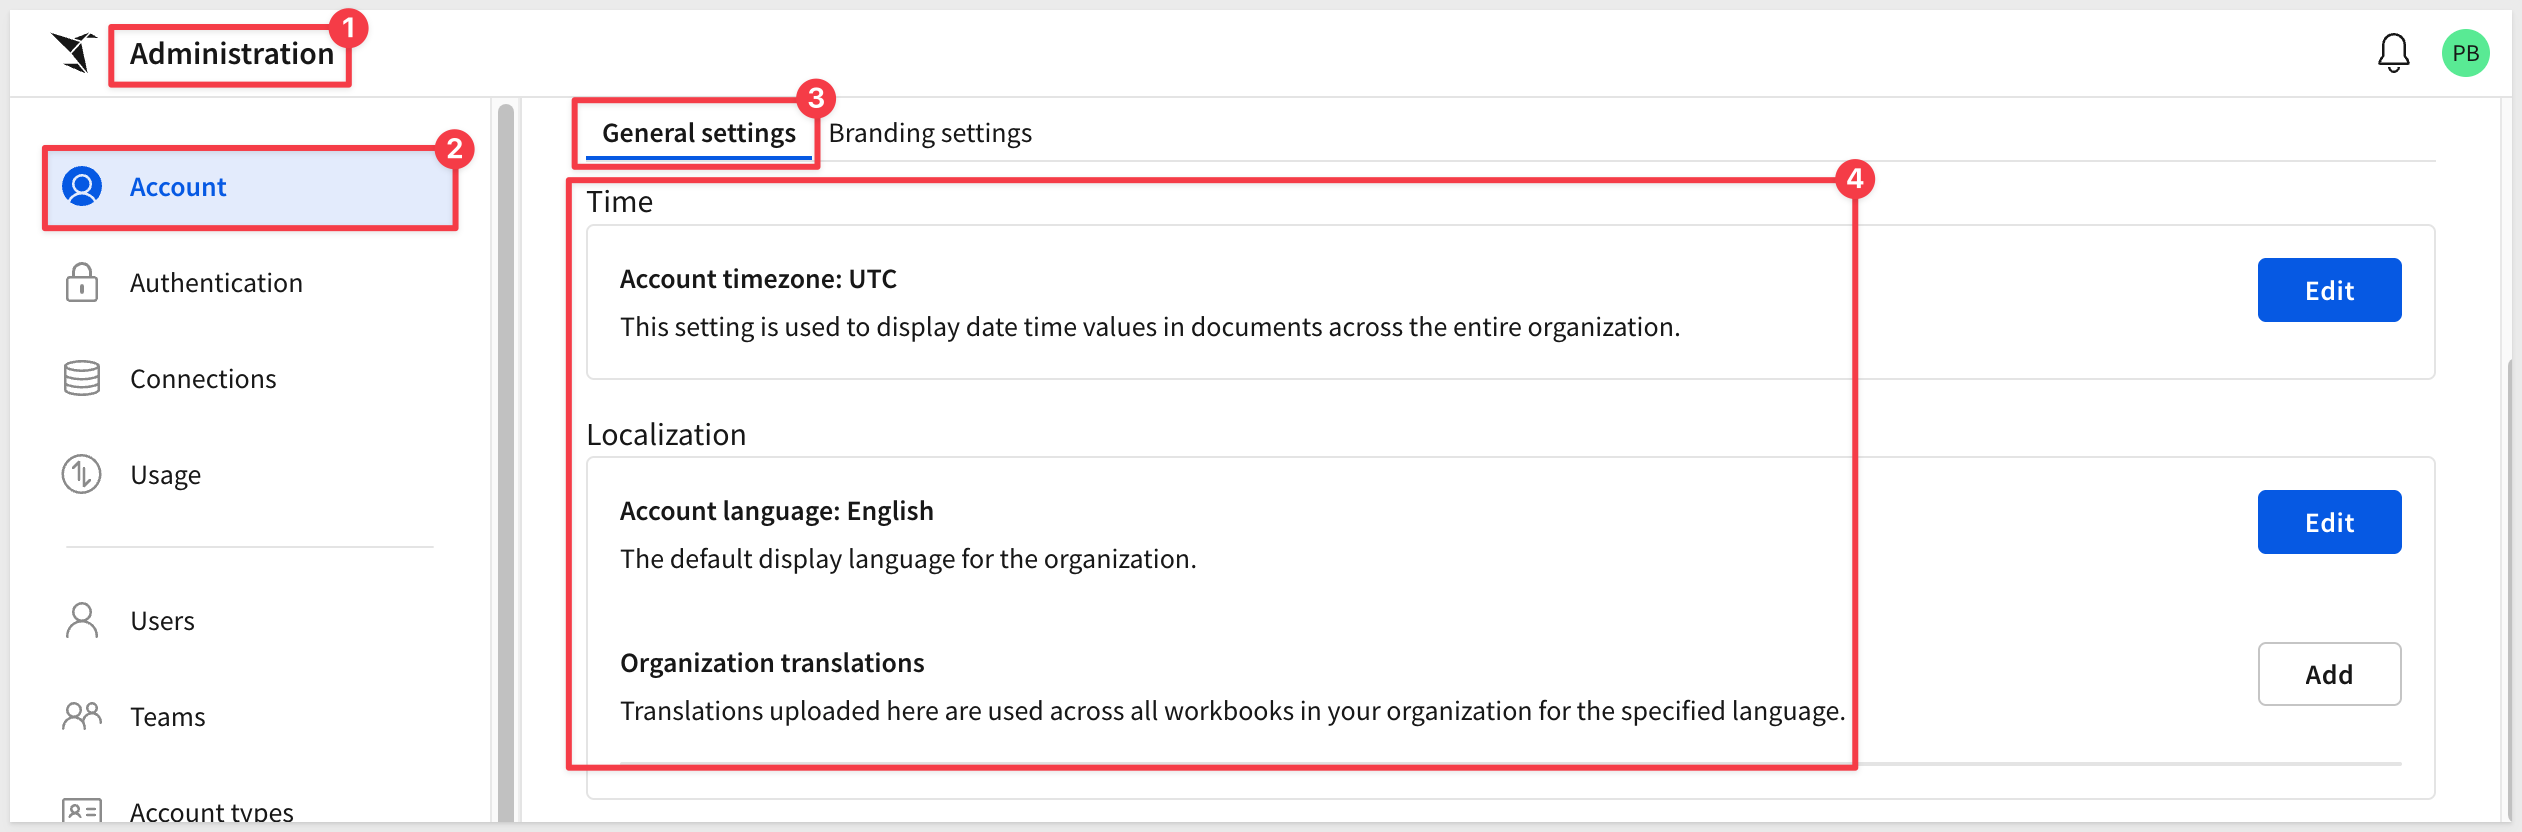
Sigma recommends setting your Account timezone to match your cloud data warehouse's timezone. Sigma passes it to the warehouse as the session's local timezone (LTZ) when a connection is established, so keeping the two aligned avoids timestamp discrepancies between what Sigma shows and what the warehouse computes.
For setup steps, see Change the account time zone, Set organization language, and Manage organization translation files
If a specific workbook needs its own language settings on top of your organization defaults, see Manage workbook localization
Sigma doesn't impose a specific change or version control process — you decide how formal to make it. Every workbook and data model still moves through some version of Dev → QA → Production, whether or not you've set up a deliberate process for it, and Sigma gives you the building blocks — version tags, workspaces, and version history — to make that movement explicit and reviewable, instead of an informal habit of renaming workbooks or asking people not to touch one while it's being tested.
Version Tagging
A tag freezes a workbook's state at a specific point in time, creating a version you can point users at — for example, a Production tag for the version everyone consumes, while a Development tag holds the version still under review. Tagging doesn't duplicate your data or fork the workbook; it's a pointer to a specific version, so promoting content is just a matter of moving the tag.
Two tags — Development and Production — are better than three: build against QA-scoped tables under the Development tag, swap the workbook's connection to your Dev warehouse resources while it's under review, then swap to Production and move the tag once it's approved. A third tag for a separate review stage isn't standard practice — it adds an extra hop to your promotion procedure without much practical benefit.
For example:
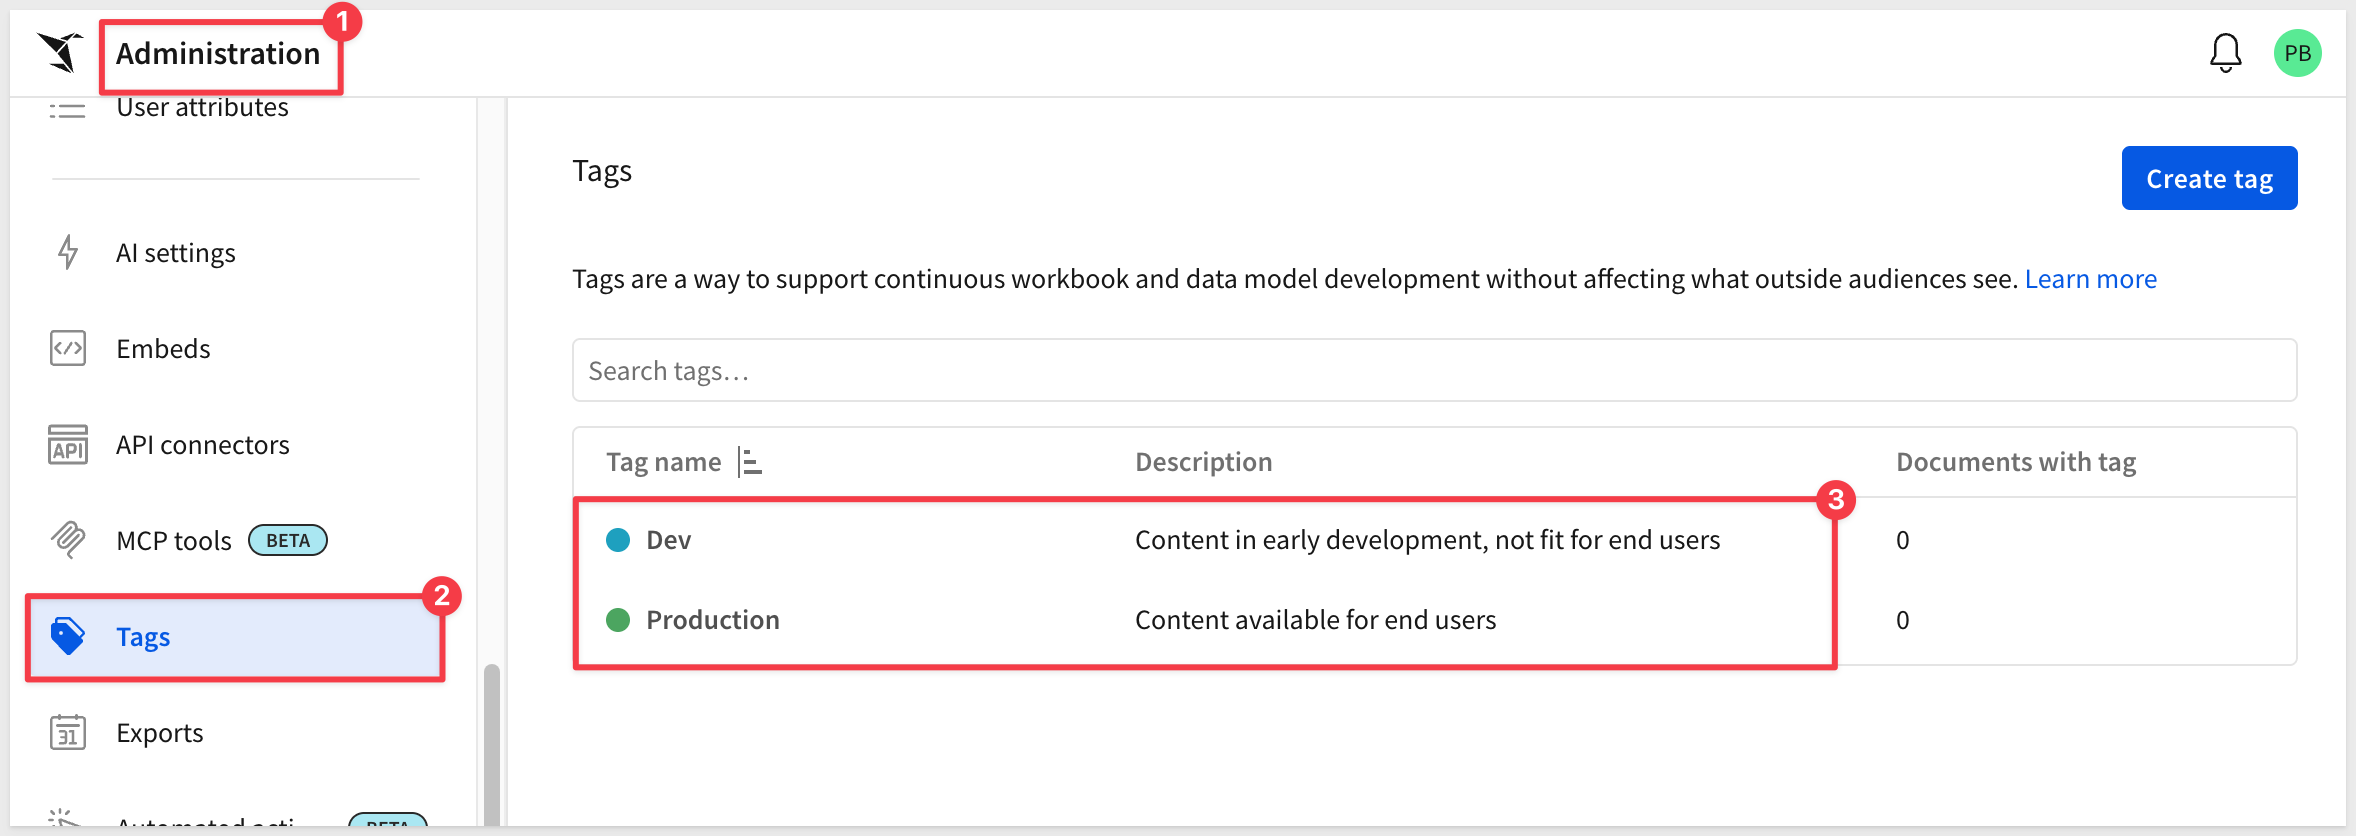
Set a tag to Protected if you want to control who's allowed to move it — that way, promoting a workbook to Production takes someone with the right permission doing it deliberately, not whoever happens to be editing.
At minimum, create and use one tag — typically Production — so there's a deliberate step between "someone edited this" and "everyone sees this."
Tag both workbooks and their underlying data models, keeping them in sync: a Production-tagged workbook should point to a Production-tagged data model, a Development-tagged workbook to a Development-tagged model, and so on. Mixing tags across the two — a Production workbook built on a Development model, for example — undermines the whole point of tagging.
For setup steps, see Create and manage version tags, and for a QuickStart, see Version Tagging with Sigma
Workspaces for Version Control
Tagging alone doesn't restrict who sees what — it only marks which version is which. Without separately securing access to the tagged versions, a user with general access to a document sees its published, untagged state regardless of any tags you've set, which quietly bypasses your whole promotion process.
Workspaces (and the sharing permissions within them) are how you close that gap: scope broad access to the Workspace holding your Production-tagged content, and keep Development-tagged work restricted to the team actively building and reviewing it.
Version History
Independent of tagging, Version History preserves every change made to a workbook, data model, or report, so you can revert to any past version, or save a past version as a new document.
Every time you select Publish, Sigma creates a new version snapshot with its own permalink URL — giving you a complete, browsable history of a document's changes with no setup required.
For more information, see Workbook versions and version history
Data Models as Code
If your data models need the same rigor — code review, CI/CD, a Git history of every change — Sigma's REST API lets you create and update data models programmatically from a JSON specification, instead of only through the UI. That means a data model change can go through a pull request and an automated deployment pipeline, the same as any other code change.
For the documentation, see Manage data models as code
For a QuickStart, see Data Models as Code
A great configuration doesn't help anyone if your users don't know it's there. Sigma is intuitive enough that most people find their way around on their own, but a deliberate onboarding plan is what turns "available" into "actually used" — both for your initial rollout and for every person who joins after it.
Plan to be involved yourself, even if training isn't formally your job — whether that means coordinating the schedule, presenting the admin-specific pieces, or just sitting in on a session or two so you know firsthand what your users are being told.
Training Plan
Decide how new users get trained, both at launch and on an ongoing basis:
Self-paced learning:
- E-learning course — send builders through the Sigma Fundamentals learning track on DataCamp, which combines video, interactive exercises in real Sigma workbooks, and quizzes to check understanding. You can track learner progress, and learners earn a badge of completion at the end. Sigma partners with DataCamp to offer 30 days of free access to the full platform if your organization doesn't already have an account.
- Tutorials — follow Sigma's tutorials to skill up on key Sigma workflows for builders and developers.
- QuickStarts — the full QuickStart library offers dozens of self-paced guides like this one. QuickStarts can also be private-labeled to fit naturally into your own onboarding materials.
Instructor-led training:
- JumpStart webinars — Sigma offers free live JumpStart training for builders, administrators, and end users, on a recurring basis. Register for an upcoming session, or browse the on-demand catalog for course descriptions and recordings.
- Special events — hear directly from the product team about how to get the most out of new features at livestreamed webinars and launch events, also available on demand after they air.
Community resources:
- Sigma Public — explore apps and use cases on Sigma Public, and contribute your own.
- Sigma Community — join the Sigma Community to trade ideas and tips and read helpful how-to articles.
If you set up a custom homepage in the Branding section above, it's a natural place to surface links to whichever of these your organization relies on.
Foster a User Community
Training gets people started; a community keeps them growing. Consider:
- A champions program — power users in each team who help others and surface feedback
- Recurring events — internal meetups or "Data Days" where people share what they've built
- Content-sharing — a shared space for tips, templates, and reusable patterns
- Message boards or forums — a place for peer-to-peer support outside of live sessions
Sigma runs its own version of this at the Sigma Community — worth a look as a model for what to build internally.
Use this checklist to confirm you've addressed each planning area in this guide. Not every item will apply to your organization — check off only what's relevant to your use case.
Use Case Plan
☐ Identified who this use case is for
☐ Defined the workflow or decision it needs to support
☐ Confirmed data source ownership and access
☐ Set a target go-live date
Security
☐ Selected an authentication method (SAML, OAuth, or username/password)
☐ Selected a provisioning method (SCIM, JIT, or manual invite)
☐ Defined account types for each group of users
☐ Organized users into Teams
☐ Structured a single Workspace with Team-aligned folders (or additional Workspaces if a group needs exclusive access)
☐ Established a license upgrade request process
☐ Requested Security Portal and Support Portal access
Cloud Warehouse Connection Strategy
☐ Decided on a connection strategy (one connection vs. multiple, sizing, PrivateLink, Python queries)
☐ Implemented data security (RLS/CLS, OAuth vs. Service Account vs. Service Account with dynamic roles)
☐ Decided how builders access CDW tables (direct vs. data-model-only, and at what granularity)
☐ Configured write-back access
☐ Set up external storage integration, if needed
☐ Set up API connectors for external systems, if needed
Auditing and Cost Monitoring
☐ Enabled audit logging
☐ Set up an audit logs storage integration for retention beyond 30 days
☐ Gave power users access to usage and cost data
☐ Set up warehouse cost monitoring
☐ Defined a process for deprecating unused content
AI Features and Strategy
☐ Configured an AI provider
☐ Decided which agents users can access
☐ Decided whether to enable chat history and set a retention period
☐ Decided whether to enable MCP integrations (inbound and/or outbound)
☐ Considered agent skill configuration for builders
☐ Set cost controls (token limits, AI usage table)
☐ Aligned on an AI strategy across your tech stack
Branding
☐ Built a custom theme (colors, fonts, layout, table style)
☐ Set up a custom homepage
☐ Set organization timezone and locale
☐ Configured organization translation files, if needed
Versioning and Promotion (WDLC)
☐ Set up version tagging for Dev/Prod promotion (two tags — avoid a third)
☐ Tagged workbooks and their underlying data models in sync
☐ Applied Protected tags where promotion needs controlled approval
☐ Used Workspaces to control access to Dev/Prod content
☐ Noted Version History as an automatic fallback, no setup required
☐ Considered managing data models as code via the API
Onboarding Training Plan
☐ Decided on a training plan (self-paced, instructor-led, or both)
☐ Linked training resources from your custom homepage
☐ Considered how to foster a user community
We worked through the full set of decisions that turn a fresh Sigma environment into one that's ready for real users — security and access, connections and data governance, the consumption-driving features that get the most value out of Sigma (write-back, API connectors, external storage integration), audit and cost monitoring, AI strategy, branding, promotion process, and onboarding.
Not every decision needed an answer today; the point is to know what exists, what to decide now versus later, and where to find the details when you're ready.
The Summary Checklist is meant to help you through that process, not just sit here as a record of today's setup — some of these decisions are one-time (branding, initial connection setup), while others are worth revisiting as adoption spreads beyond your first use case, especially licensing, Team structure, and AI strategy.
Bring your Sigma Customer Success Manager (CSM) into the harder tradeoffs — connection strategy, security model, AI provider selection — before you commit to a path. A CSM has seen how these decisions play out across other Sigma deployments, and their input up front is far cheaper than restructuring after rollout. They're a resource throughout your Sigma journey, not just at kickoff, so loop them back in whenever a new use case raises a question this guide didn't answer.
Additional Resource Links
Blog
Community
Help Center
QuickStarts
Be sure to check out all the latest developments at Sigma's First Friday Feature page!