This QuickStart introduces essential administrative features and considerations within Sigma. Whether you're managing your instance, setting up connections, configuring data governance rules, or customizing user interactions, this guide provides a foundational overview.
For more information on Sigma's product release strategy, see Sigma product releases
If something is not working as you expect, here is how to contact Sigma support
Target Audience
Administrators (admin) who are new to Sigma and want a quick overview of the available features common to their role.
Prerequisites
- A computer with a current browser. It does not matter which browser you want to use.
- Access to your Sigma environment.
- Some familiarity with Sigma is assumed. Not all steps will be shown as the basics are assumed to be understood.
What You'll Learn
How to leverage the available administrative functions in Sigma to get things done efficiently and effectively.

We will first cover how to access the administrative ("admin") areas of Sigma, and then list and describe each of the available options.
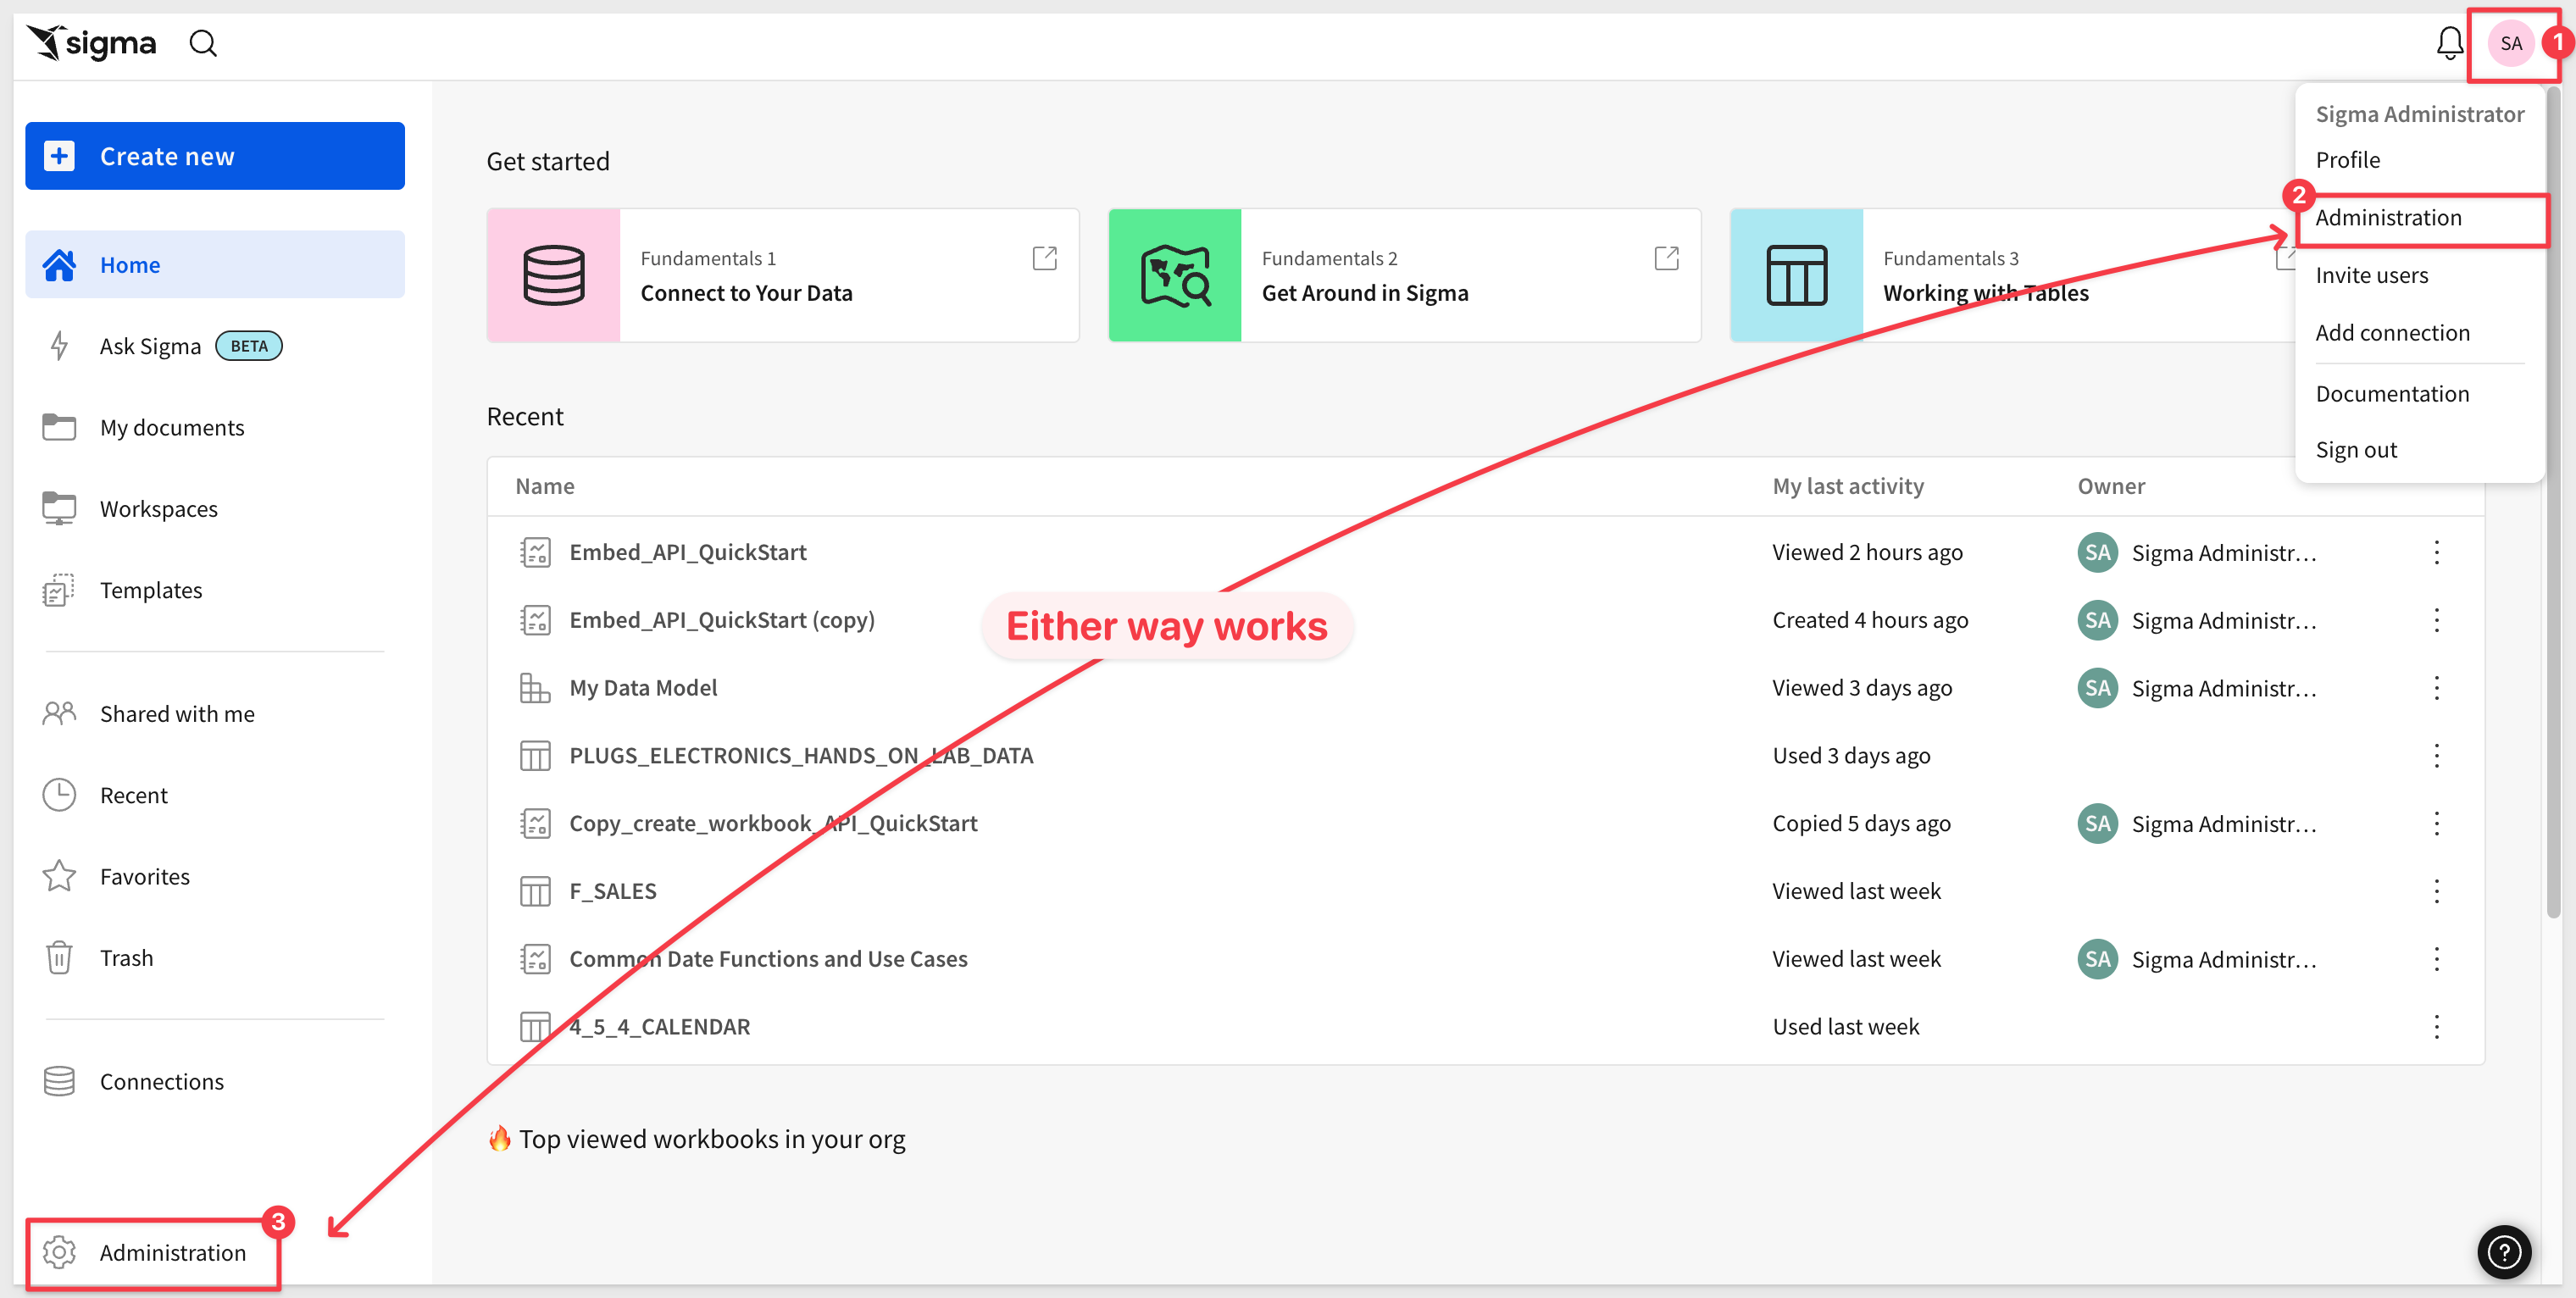
Admin users can access the admin page one of two ways as shown:
We have centralized all the admin options on this one page as shown:
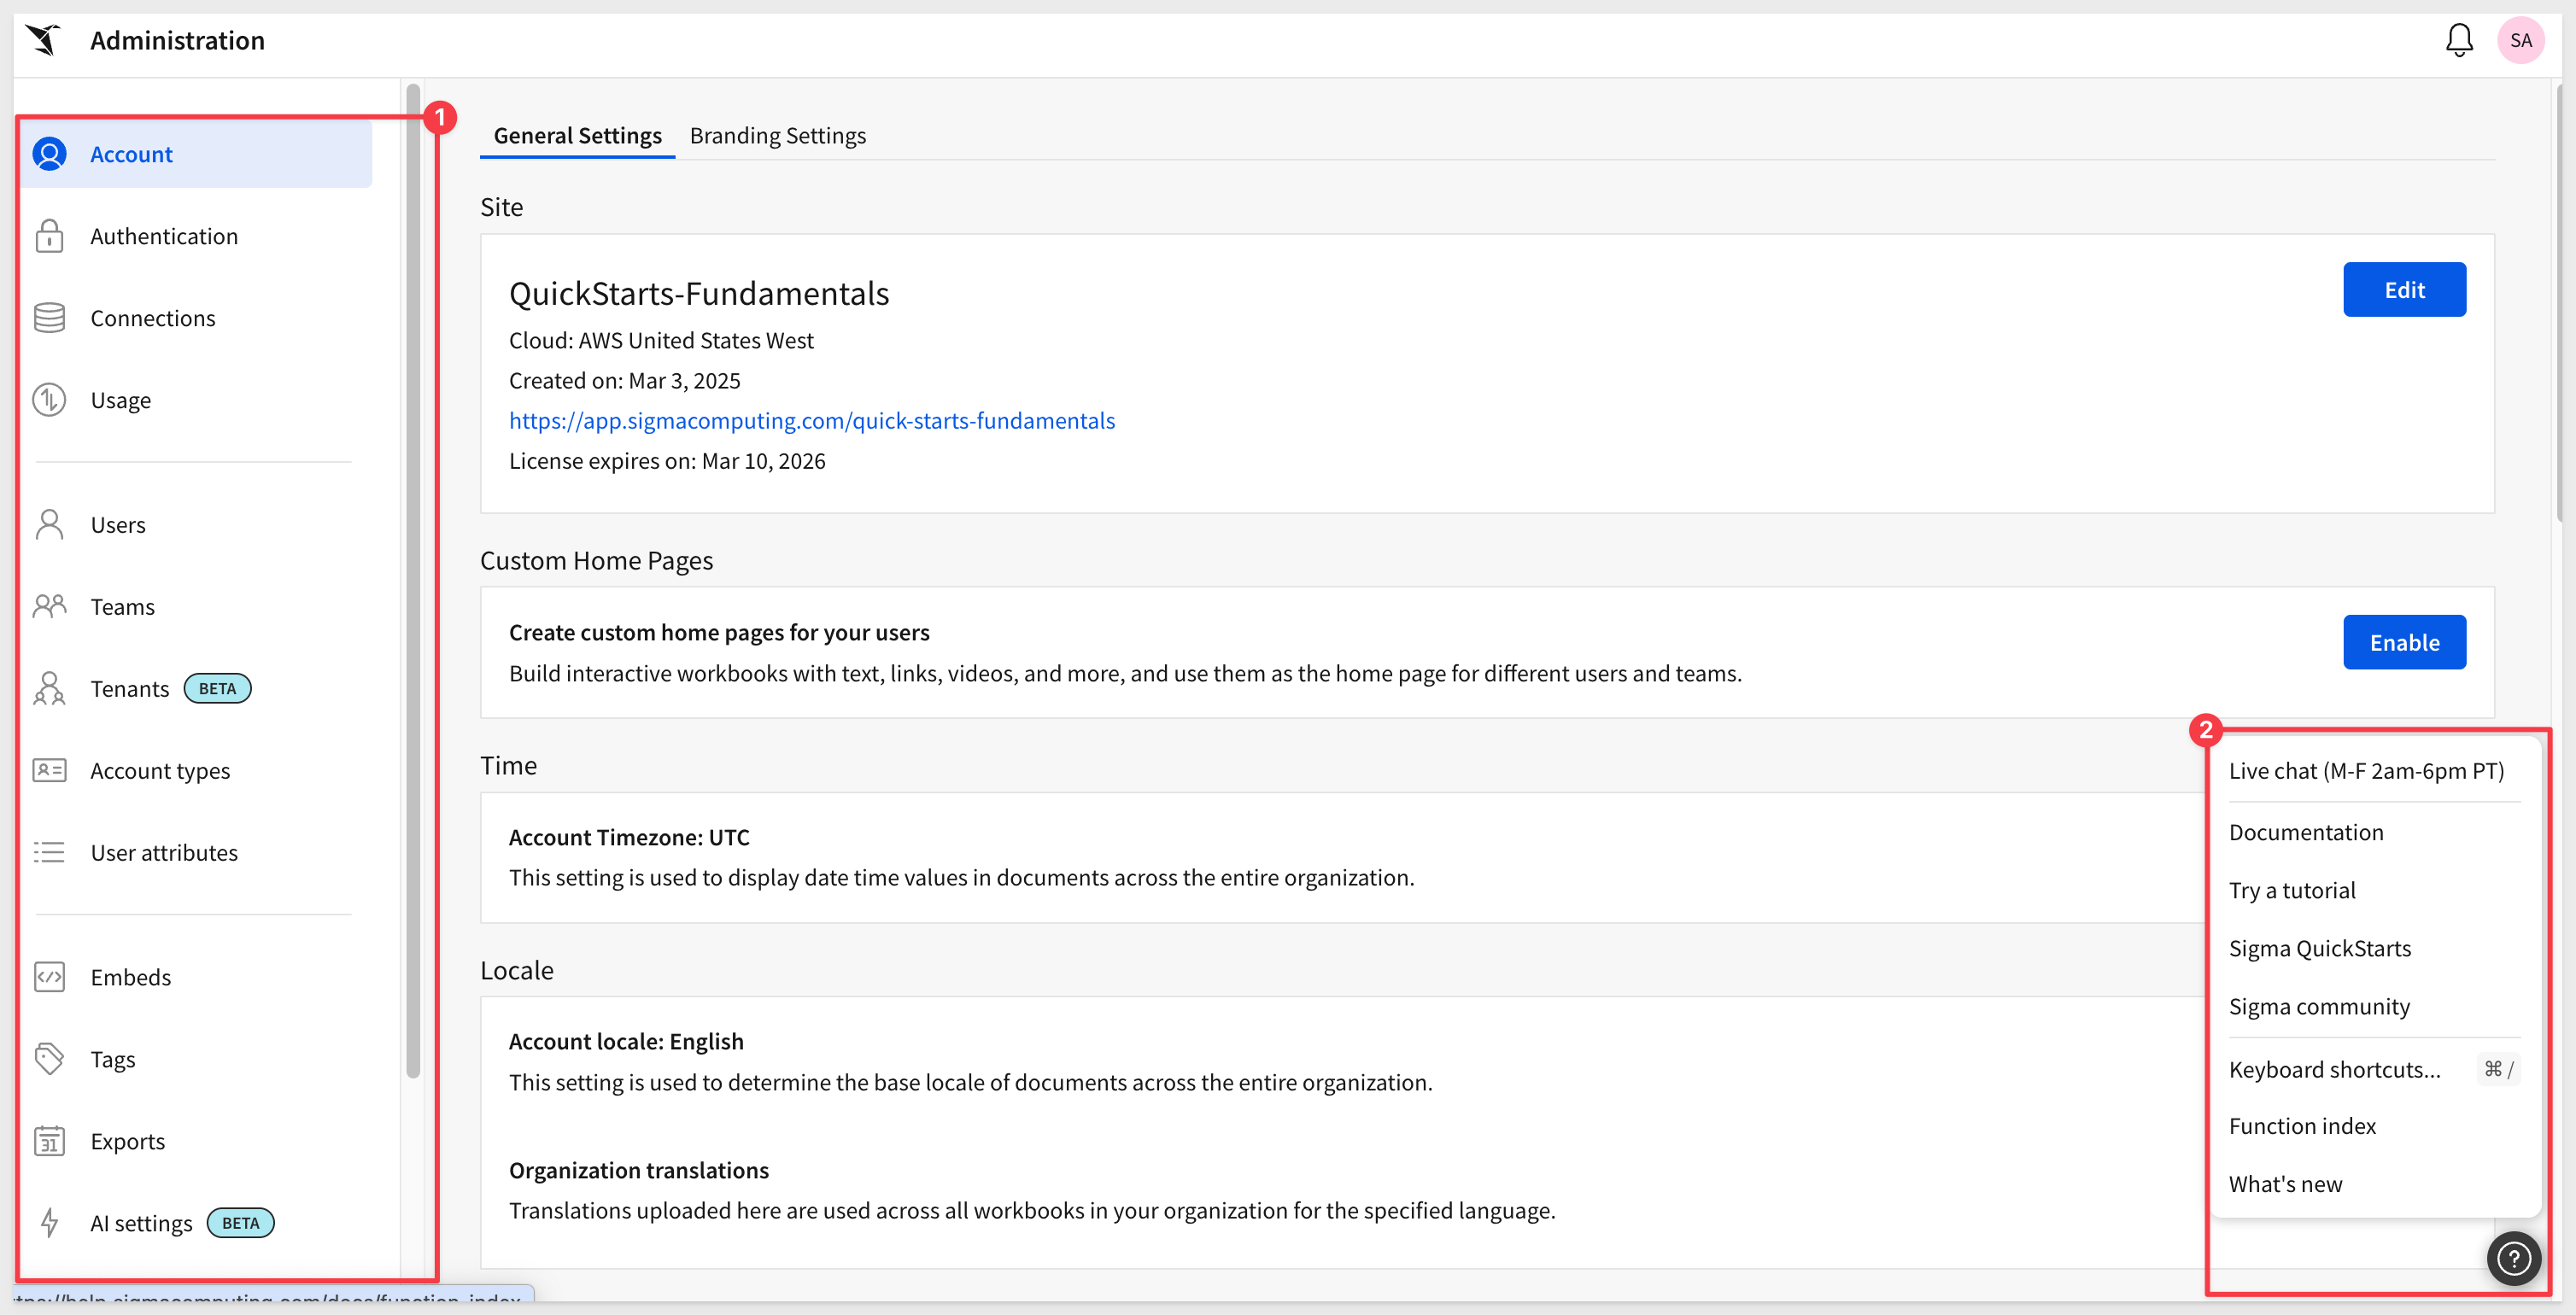
In addition to Live chat, there are many other options exposed by clicking on the  icon:
icon:
- Documentation: Explore Sigma's self-service resource library for documentation.
- Try a tutorial: Access commonly used features via in-product tutorials.
- Sigma QuickStarts: Step-by-step tutorials for learning Sigma's features and fundamentals.
- Sigma community: Interact with other Sigma users, share knowledge, and get answers.
- Keyboard shortcuts: Learn shortcuts for efficient navigation and actions.
- Function index: Browse all Sigma functions with explanations and examples.
- What's new: Stay updated on new feature releases in weekly release notes.
Click here to see What's new in Sigma
In addition, Sigma publishes new feature announcements in QuickStart format, once per month.
Next, we will cover each area inside administration, at a high-level.
Navigate to Administration > Account > General Settings:
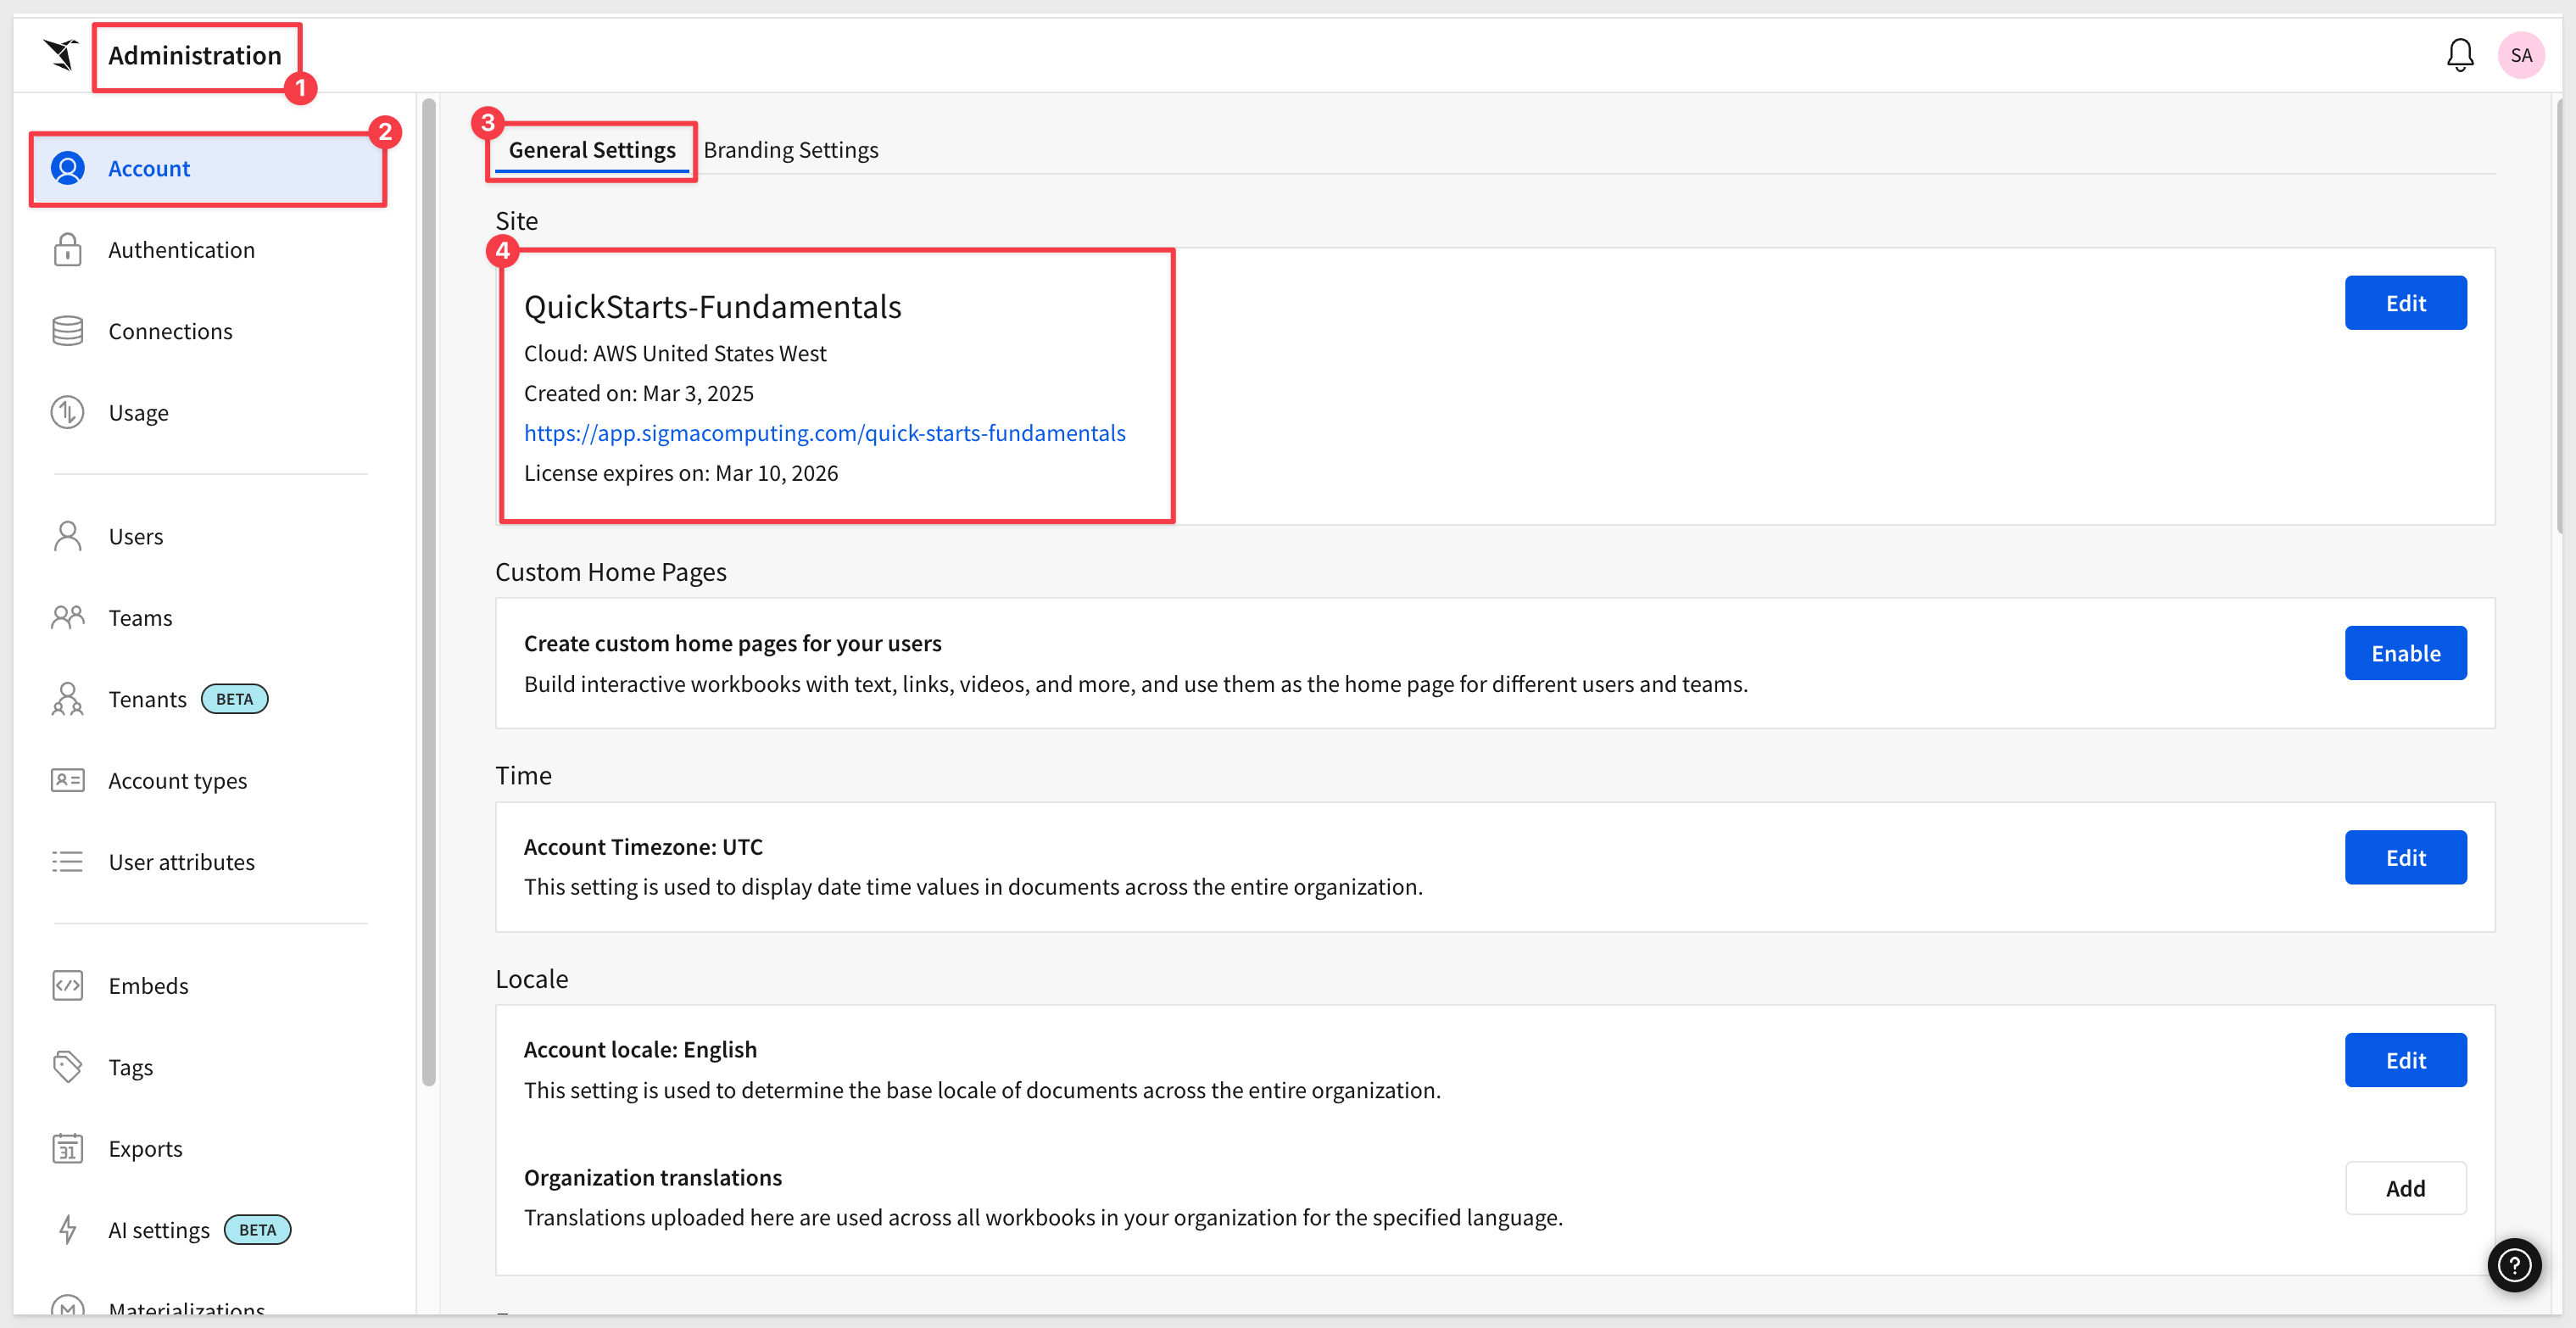
General Setting provides additional control of:

Site
Site identifies your user account name, cloud provider, date of creation, URL and when the product license will expire.
Admin users are able to edit Organization Name and Company Login URL values by clicking the Edit button.
Custom Home Pages
Sigma Admins can Enable this feature, and designate a workbook to use as a custom homepage for an organization or team. The first page of the workbook becomes the custom homepage.
A custom homepage functions as a landing page for its viewers.
For example, embedding specific visualizations along with buttons linking to the fundamental QuickStarts:
For more information, see Set up custom homepages
Time
Allows portal-wide timezone preference setting. The default is UTC.
For more information, see Change the account time zone
Locale
Account Locale
Allows portal-wide timezone preference for base local for all documents. This may be changed.
For more information, see Set the organization locale
Organization Translations
Organization translations are centrally managed translation files that translate commonly-used terms across all workbooks. As a result, workbook owners do not need to translate those common terms in each individual workbook.
For more information, see Manage organization translation files
Features
This is a grouping of features that do not necessitate their own group. Each feature can be enabled/disabled using the slide control.
CSV upload:
Enable CSV upload for connections with write access configured.
For more information, see Enable or disable CSV upload
Sample connection:
Include Sigma's sample connection in list of connections to select from.
For more information, see Sigma's sample connection
Public embeds:
Allow public embedding of Sigma documents.
For more information, see Create and manage a public embed
License upgrade request:
Allow users to request a license with more permission from admin (e.g. from Lite to Essentials).
For more information, see Enable or disable upgrade requests
Comments:
Allow commenting on Sigma documents.
For more information, see Enable or disable comments
Annotations:
Capture elements as images to annotate as comments in Sigma documents. Captured images will be stored in a Sigma managed cloud for a period of your choosing. The default is for 3 months.
For more information, see Manage annotated image ability and storage period
Integrations
Sigma supports integrations with Slack and dbt.
For more information, see Manage Slack integration 
For more information, see Manage dbt Integration 
Audit Logging
When Audit Logs are enabled for your organization, an additional Snowflake connection will appear to administrative users. This connection provides read access to data related to user-initiated events that occur within your Sigma organization.
Sigma also provides a pre-built dashboard (Usage Dashboard) that customers can access for free. It provides comprehensive information on how Sigma is being used. Information on that is here.
There is a QuickStart on audit logging basics
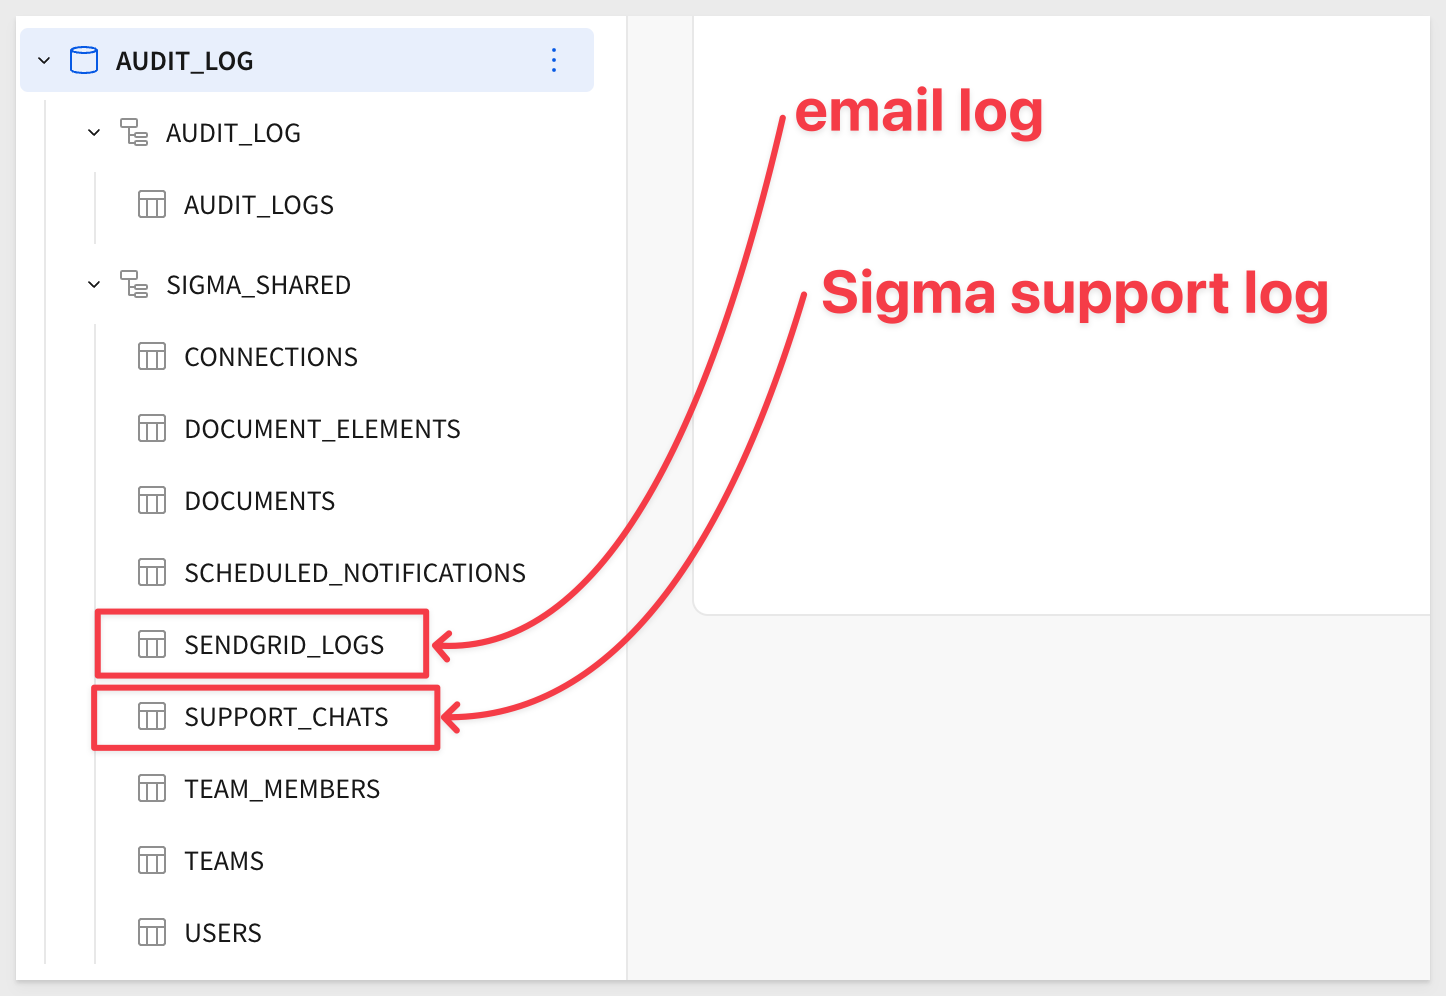
Sigma Audit Logs
Sigma provides an extensive log of user activity in the audit database. In addition, we also log all emails sent and support chats with Sigma, for your convenience:
For more information, see Enable audit logging
Create an Audit Logs Storage Integration
Some customers prefer to save export logs in their own cloud. Sigma supports these providers:

For more information, see Export audit log data to cloud storage
Custom Plugins
Sigma supports plugin elements in workbooks. Plugins are third-party applications built to add additional functionality into Sigma.
For more information, see Get started with custom plugins
There is a QuickStart that covers this topic here
Custom Functions
Admins can define custom functions to represent frequently used complex calculations that combine logic, aggregates, and other types of operations. There are many advantages to adding custom functions to your Sigma practice:
For more information, see Create reusable custom functions
Brand settings are the next tab over, in Account Settings, and provides a way to customize Sigma towards your organization's fonts, color themes and email content.
Custom Fonts
Sigma supports custom fonts for workbooks, worksheet visualizations, and dashboards.
Custom fonts can be uploaded at the organization level and used on any workbooks, worksheet visualizations, and dashboards in that organization.
Organizations are not limited to one custom font.
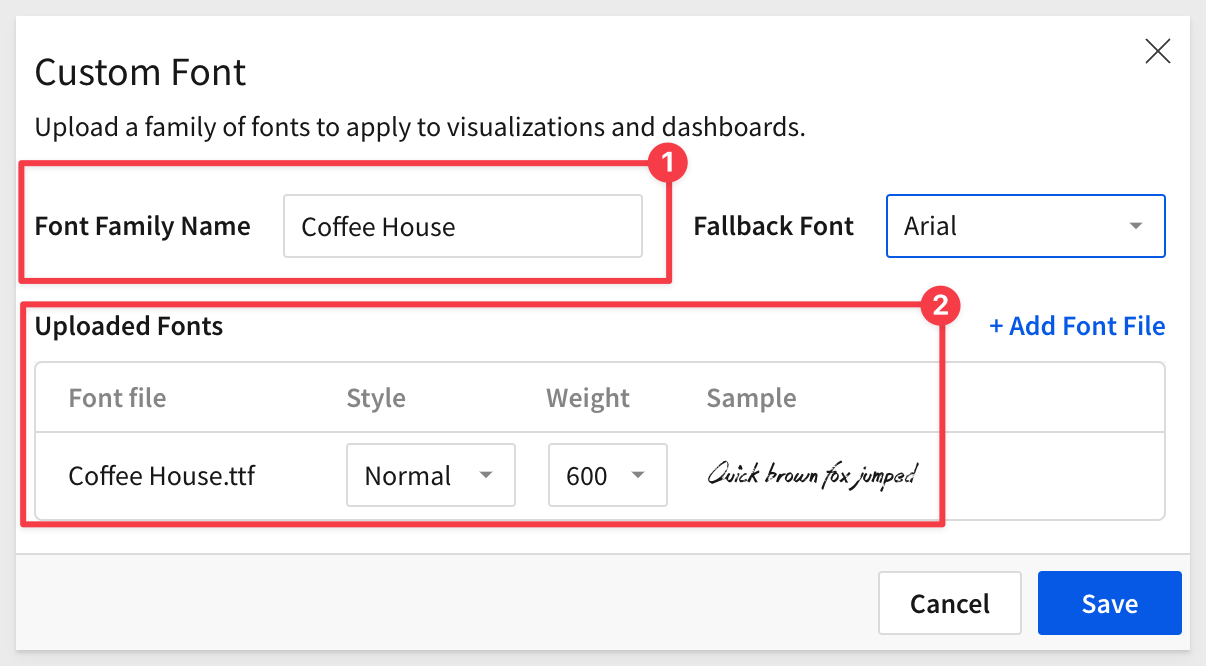
Accepted formats: .ttf, .otf, .woff, .woff2
For example, we can easily add a new font, "Coffee House" in this case:
Workbook Themes
Sigma supports creation of workbook themes. Admins can customize sets of colors, fonts, spacing, and more.
For example, we can easily add a new theme and set it as the Organizations Default so that it is the first choice for all content:
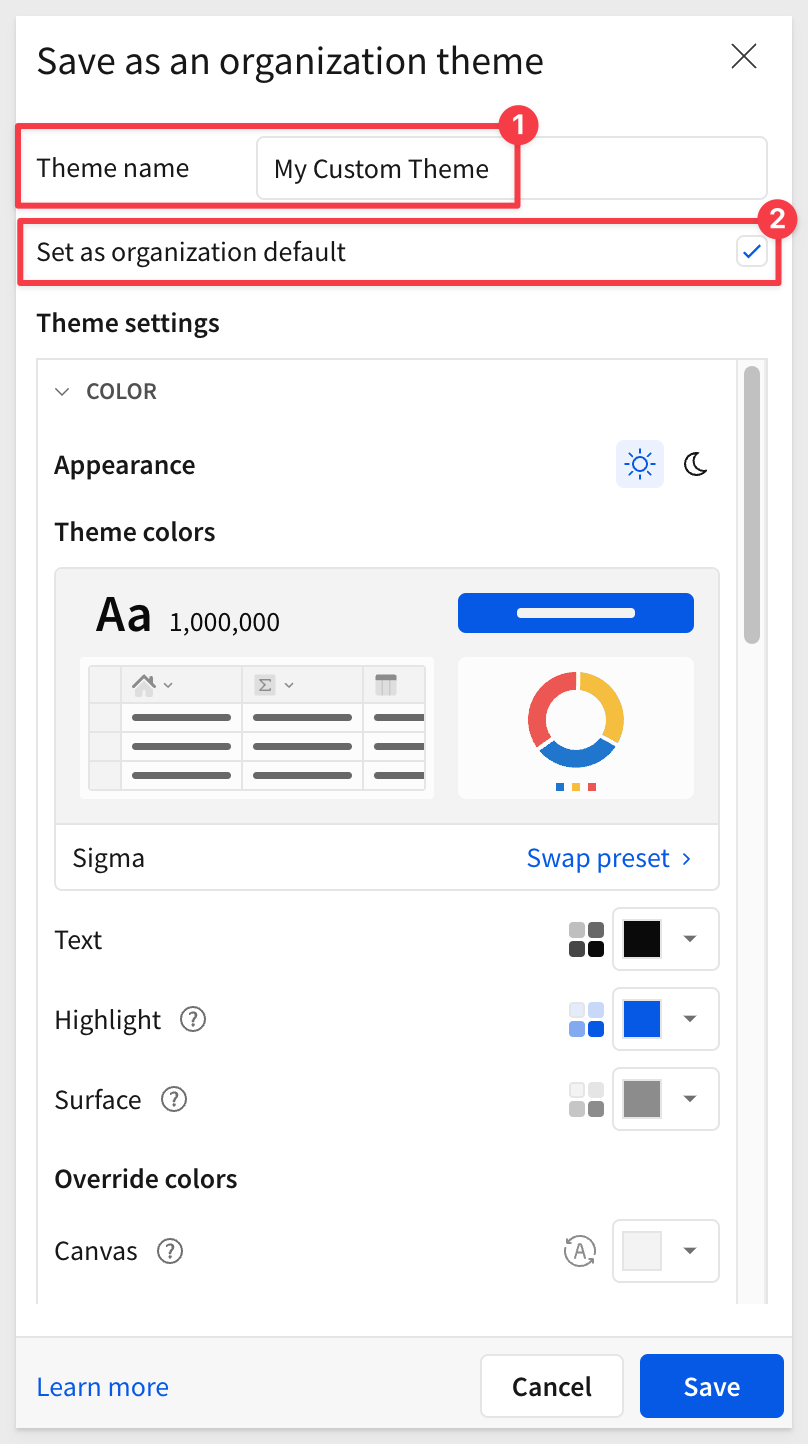
There are many options available when you scroll the list, to help you achieve the look required.
For more information, see Create and manage workbook themes
2-Factor Authentication
All Sigma instances require 2-factor authentication.
For more information, see Mandatory two-factor authentication for accounts
Learn more about 2-Factor authentication with Sigma
Sigma supports multiple authentication methods including:
Sigma supports Snowflake Key-pair Authorization and there is a QuickStart on how to use that.
For more information, see Manage Authentication
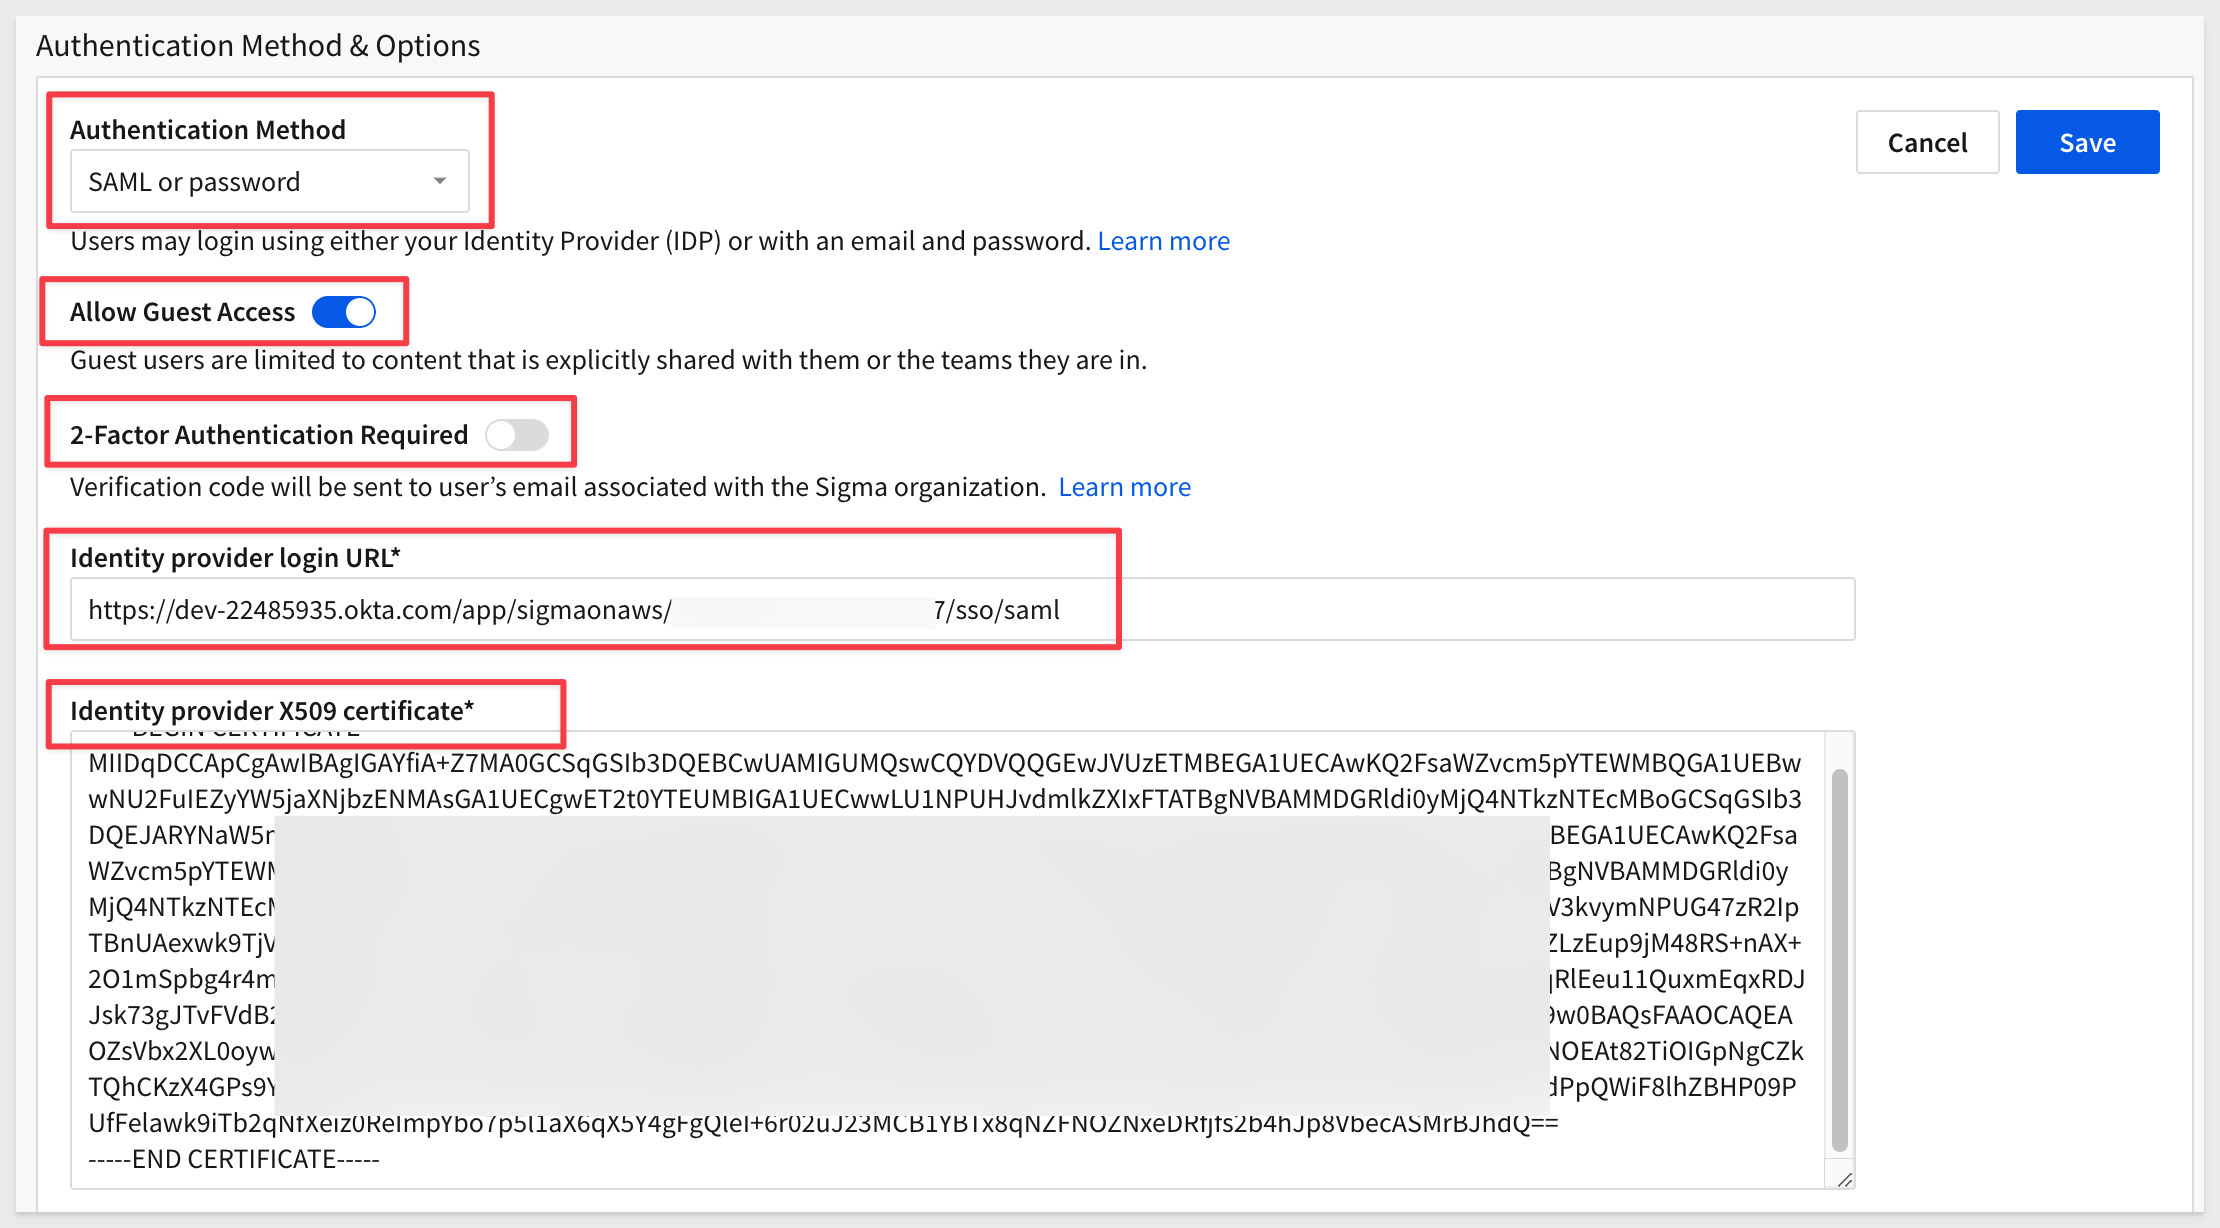
Authentication Methods & Options:
All configuration is accessed by clicking the Edit button.
The current values for Guest Account and 2-Factor Authentication are shown on the main page for your convenience.
In the example below, we are allowing SAML or a Sigma password to be used to log in.
Guest Access
Guest Access is enabled (off by default). Guest user accounts are recommended when working with external vendors.
Guest users cannot view or request access to content outside of their Admin-assigned team(s).
This feature is opt-in and must be enabled by an organization admin before guest users can be invited to your organization.
For more information, see Guest User Accounts
Session Length
The maximum number of hours that a user can be logged in before having to login again.
Inactivity Timeout
Sigma allows you to configure inactivity timeouts. These timeouts ensure users are automatically logged out after a certain length of inactivity in the product.
Identity provider login URL
Sigma can be configured to use Single Sign-On (SSO) Authentication with any platform that supports SAML (e.g., Okta, OneLogin and Google SSO).
For more information, see Use custom account types with your IdP
Okta also provides the X509 certificate as well.
There is a QuickStart covering Single Sign-On with Sigma and Okta
Company Domain Sign-up
When you use the Password authentication method, you can also select if you would like to add any domains to the allowlist. By default, new users can only sign up through an invite.
Adding your company's email domain allows anyone with a company email to create a Sigma account without a personalized invite.
Sigma prompts new users to enter their email from a domain on the allowlist. After confirming the email, the user can register as a Sigma user.
Export Authentication
Authorized Domains
Sigma Admins may choose to control which domains can receive emails, Google Sheets or Google Drive exports from Sigma.
If no domains are declared authorized, users can export reports to any email address.
For more information, see Restrict export recipients and frequency
Restrict API access by IP address
Restrict access to the Sigma API for your organization by adding IP addresses to an allowlist. When you enable the allowlist and add IP addresses or IP address ranges using CIDR notation, only users making requests from allowed IP addresses can make successful API requests.
The Connections page provides configuration information so that Sigma is able to connect to your cloud data warehouse.
For new Sigma customers (and trial accounts), only the Sigma Sample Database will be available initially.
Administrators can click Create Connection to configure additional connections:
At the time of this QuickStart, eight vendors are supported.
Clicking on the desired icon will bring up the configuration dialogue specific to that vendor:
For more information, see Connect to data sources
Whitelisting Sigma
Depending on the security parameters of your organization, it may be necessary to add Sigma's IP addresses to your allowed list of IPs (whitelist).
Sigma's egress IP addresses are listed on all individual connection pages in your Sigma Admin Portal:
For example, selecting Snowflake displays the egress IP addresses:
Write-Back
Another important configuration is warehouse write-back access. This is only required for specific Sigma features. If you are not using these features, it is not required.
Granting write-back to a database enables the use of several Sigma features:
CSV upload
Materialization
Dataset warehouse views
Input Tables
By the way; Sigma input tables are a game-changer, and if you have not seen why, check out this QuickStart.
Sigma provides all customers with extensive reporting on various aspects of user activity. All the reports are built using Sigma and are provided at no-cost to customers. Admins can use this area to quickly view important KPIs and leverage Sigma's ‘drill anywhere' capability for detailed insights.
The standard reports can also be customized to suit unique requirements.
To learn more about external logging, please review this QuickStart
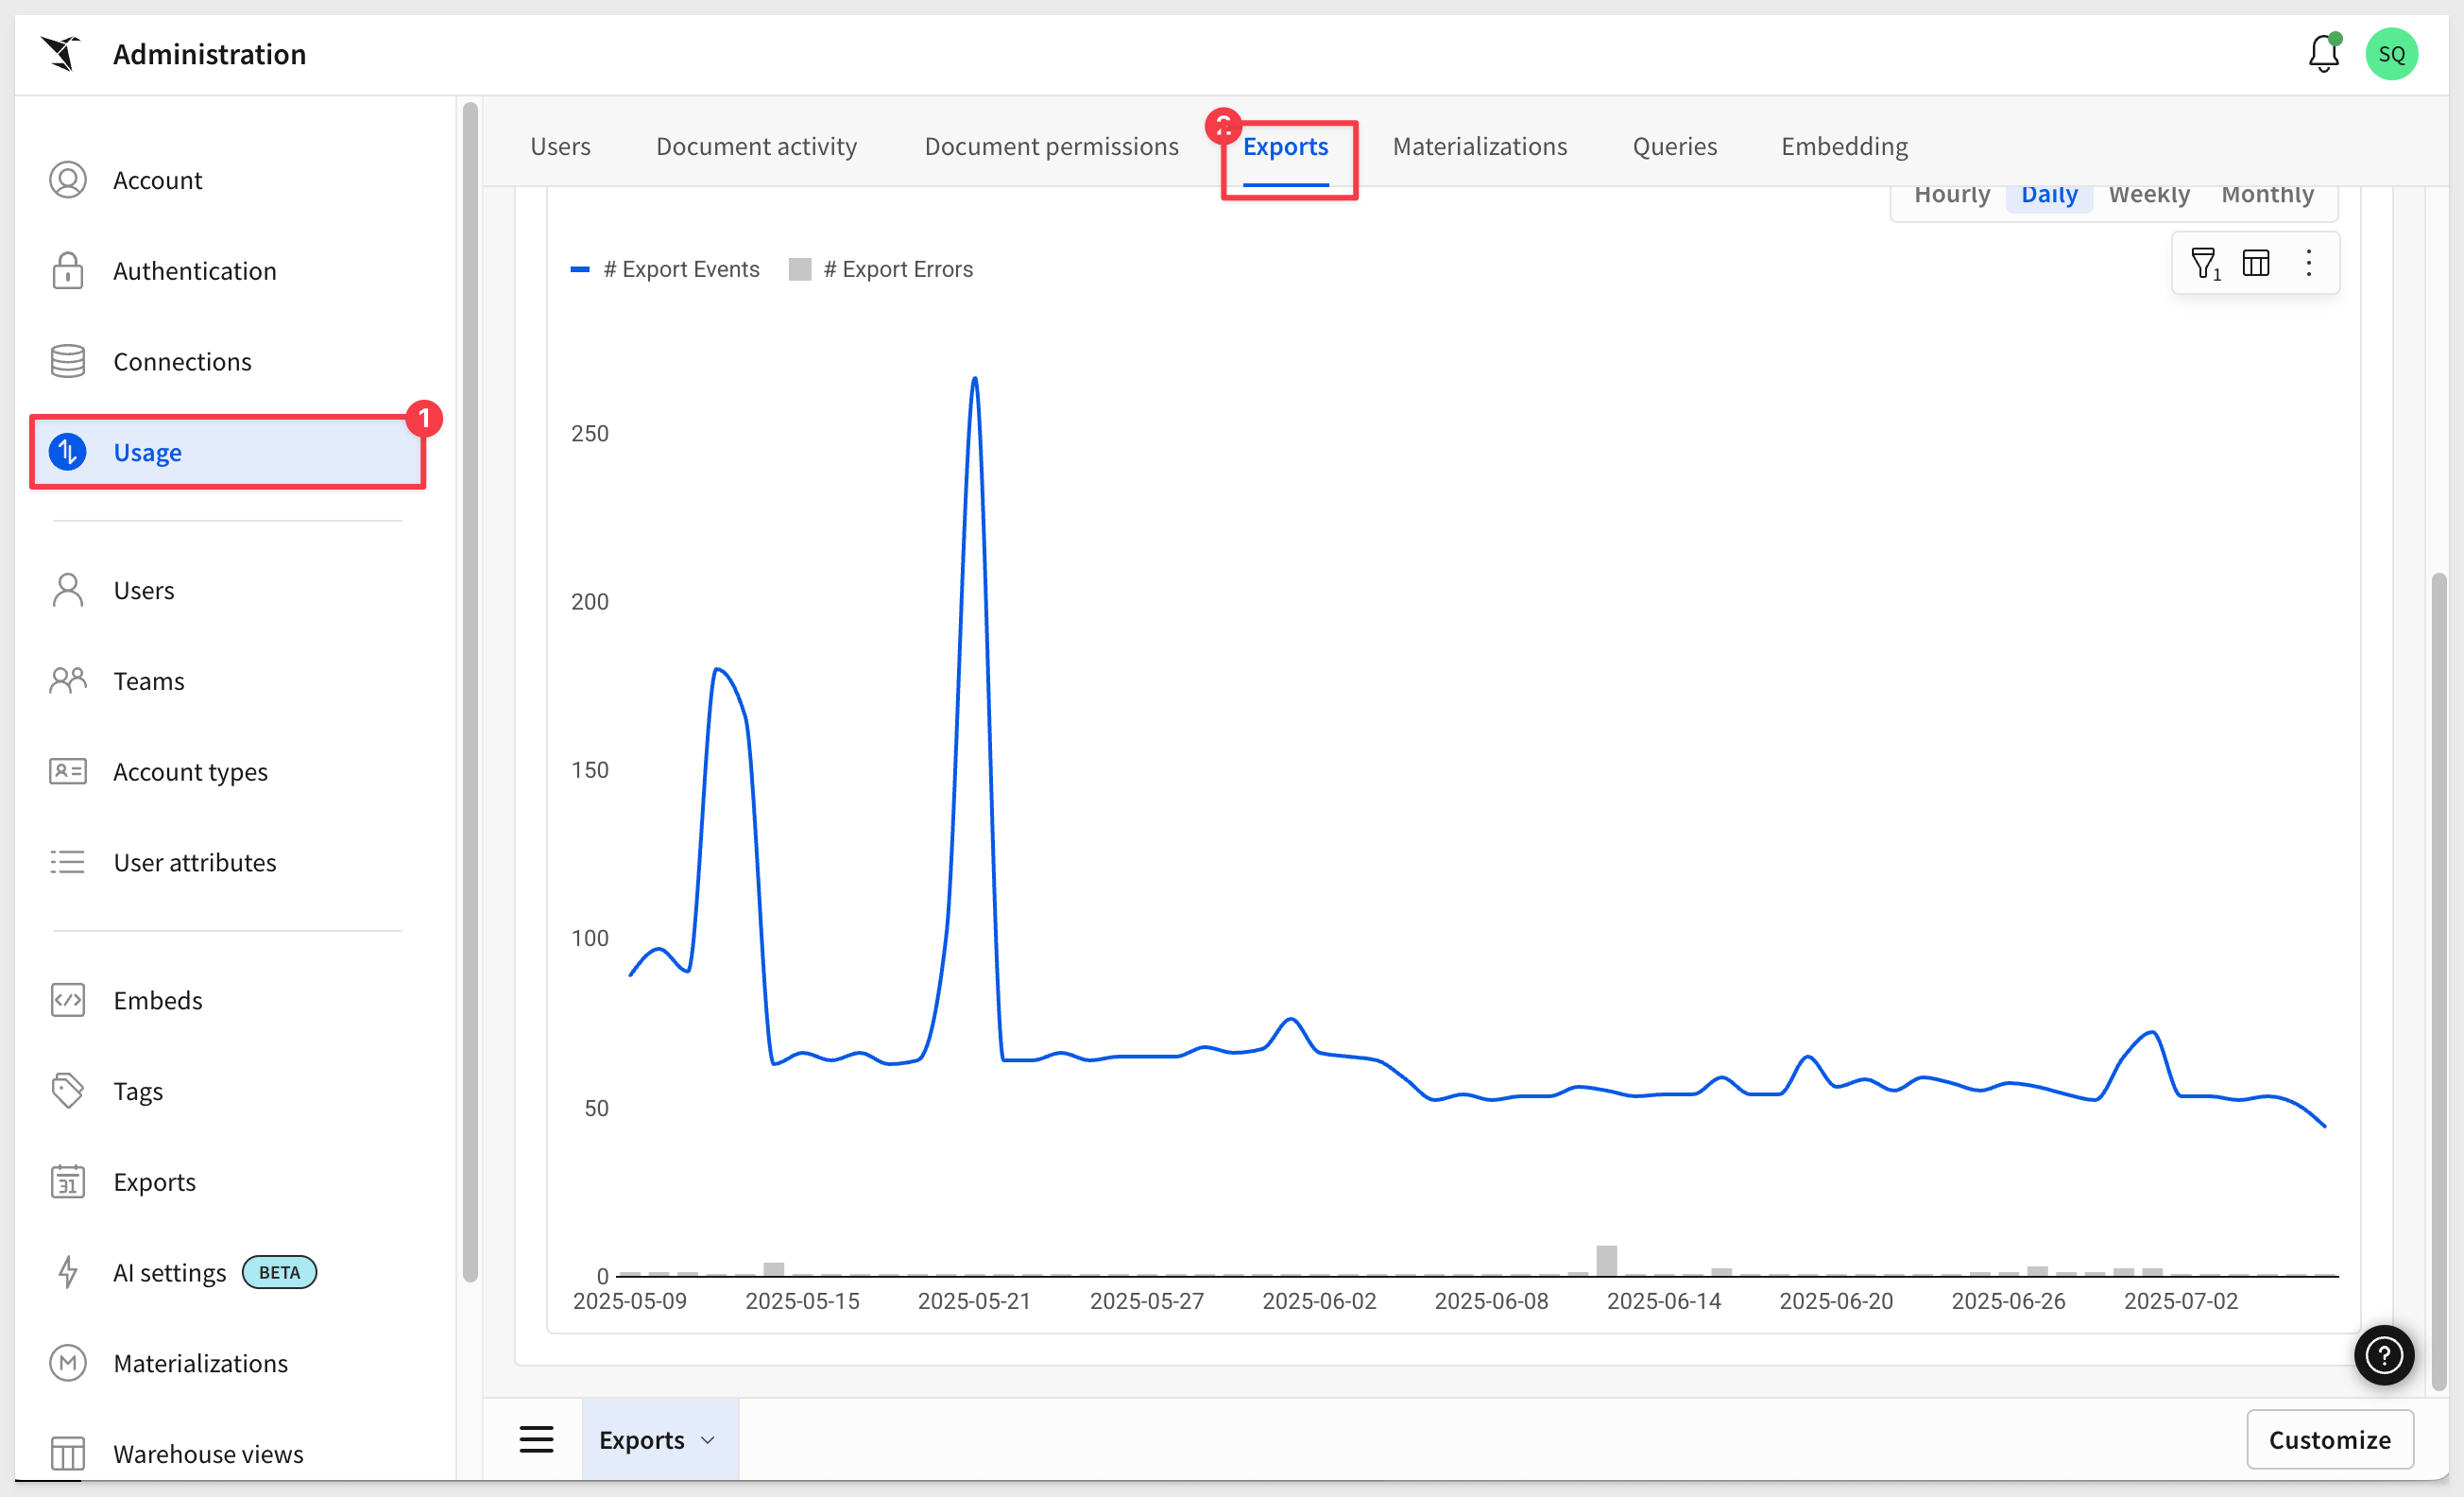
At the time of this QuickStart, the following usage categories are provided. Each category has many KPI, charts, tables and filters, formatted based on the available data.
Users:
Explore user status, activity and licensing. Filter by date range and/or query text.

Document Activity:
Discover your organization's most commonly used documents and your top document users. Filter by date range, Top N, and the number of days since the dashboards were last opened. These insights can assist organizations to audit unused documents and identify documents that drive the most user engagement.
Document Permissions:
Discover who has permissions for a document, the origin of the permissions, access type, and who granted permission. These insights can help organizations to improve security.
Scheduled Exports:
View data on your organization's export tasks and Sendgrid email events.
Materializations:
Metrics and status of materialization runs with run-times.
Query Summary:
View a summary of your queries. Available data includes total queries run, queries over 10s, median query time, average query duration, queries by user type, query status, and timeouts. Filter by date range and/or query text.

Embedding:
View application embedding usage for your organization. Private and Public embeds are not tracked. Each embed URL must include an external_user_id for tracking purposes.
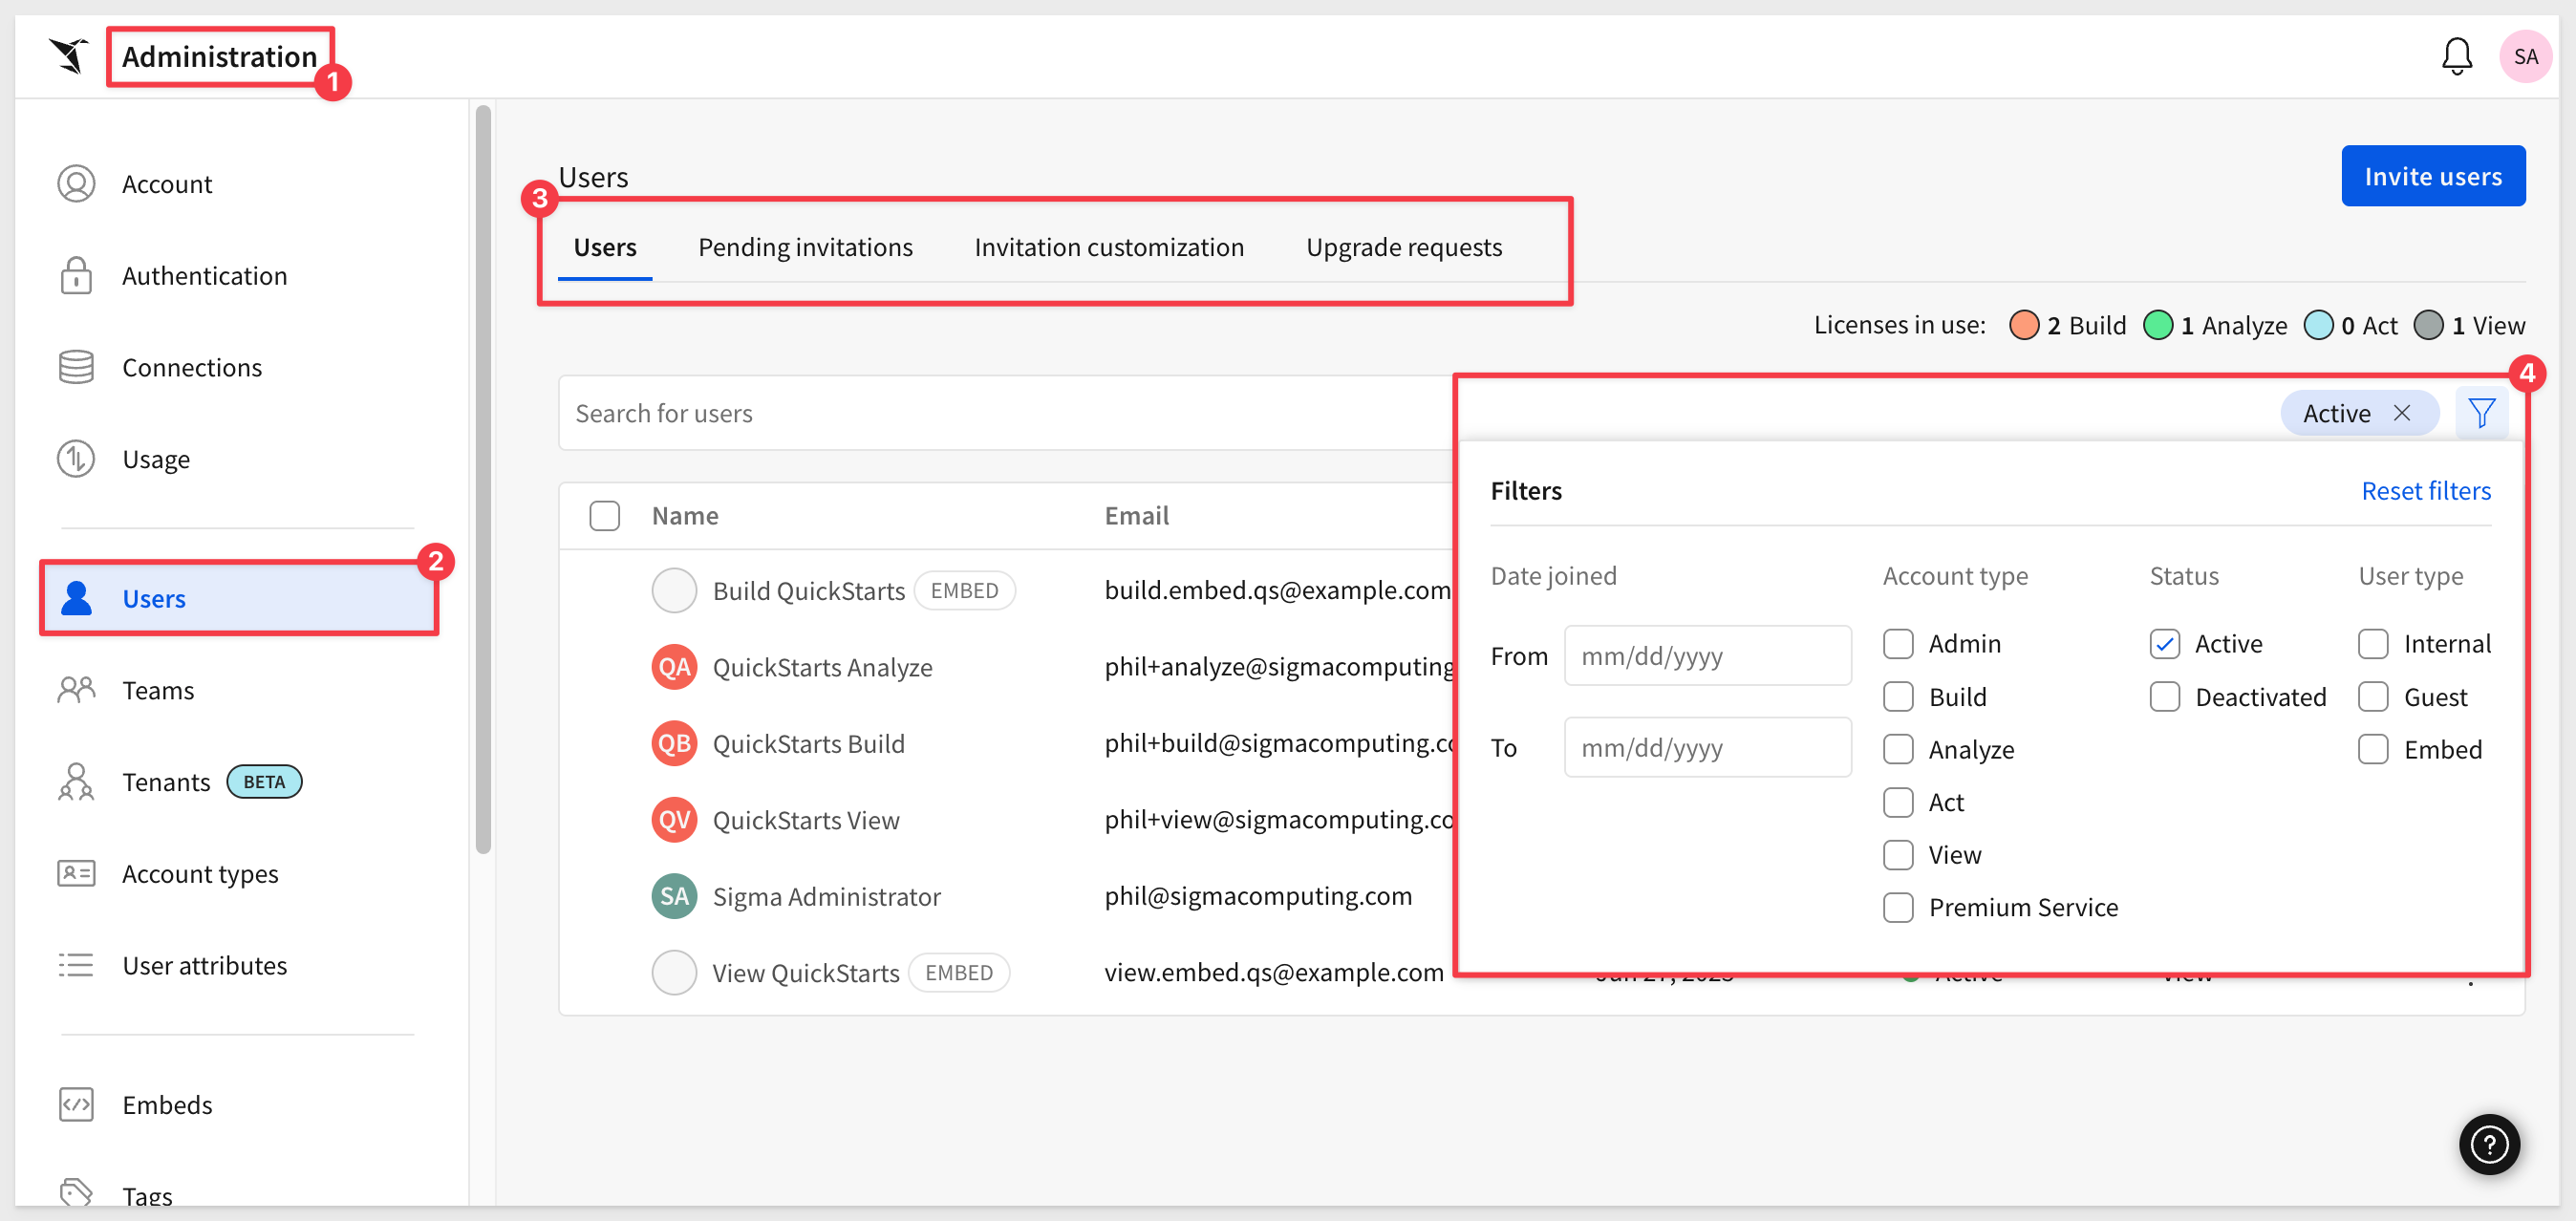
Users can be added manually to Sigma using the Administration > User interface. This interface also supports adding multiple users at a time (bulk loading).
When added manually, users receive an email invitation. Once invited, their Sigma account is listed on the Pending Invitations section of the Users page.
Email invitations and welcome emails can be customized if desired.
Users can be added automatically the first time they login to Sigma using an IDP, or when using Sigma embedded into another application.
Sigma's REST API also supports adding new users ("members in the API). For more information, see API Reference
There are also API code samples ("recipes"), demonstrating common API operations.
There is a QuickStart that covers API Recipes
For more information, see Invite new organization members
The Users page has a filter that is a convenient way to see only the categories of users you are interested in:
Users in Sigma can be deactivated, but never fully deleted. Deactivated users cannot access Sigma.
After you click Deactivate, the user's documents are automatically migrated to the selected person's My Documents folder. The deactivated user's documents will be located in My Documents > Archived Users > Folder (folder title is the deactivated user's name).
There is no need to manually transfer all the worksheets/dashboards created by the user; Sigma does this for you.
For more information, see Deactivate users
Sigma uses teams to organize and manage users in groups.
You can use Sigma to manage user group membership or leverage your organizations Identity Provider (IdP).
Manage Users and Teams with SCIM
Teams can be Public or Private.
Public teams are visible and searchable by all members of your Sigma organization. Anyone can share documents with public teams.
Private teams will only be visible to members of the team.
When creating a new team, you are prompted to also create a new workspace (optional). You can use workspaces to help organize content, to categorize and share folders and documents. Workspaces can be shared with other users and teams using permission grants.
Account Types allow different users different rights and are part of Sigma's RBAC (role-based access control) system.
A user's account type determines their highest level of interaction with data and content in Sigma.
Each user is assigned a single account type; they can only be assigned one account type at any time.
Sigma provides five default account types, which are directly mapped to the four Sigma license types.
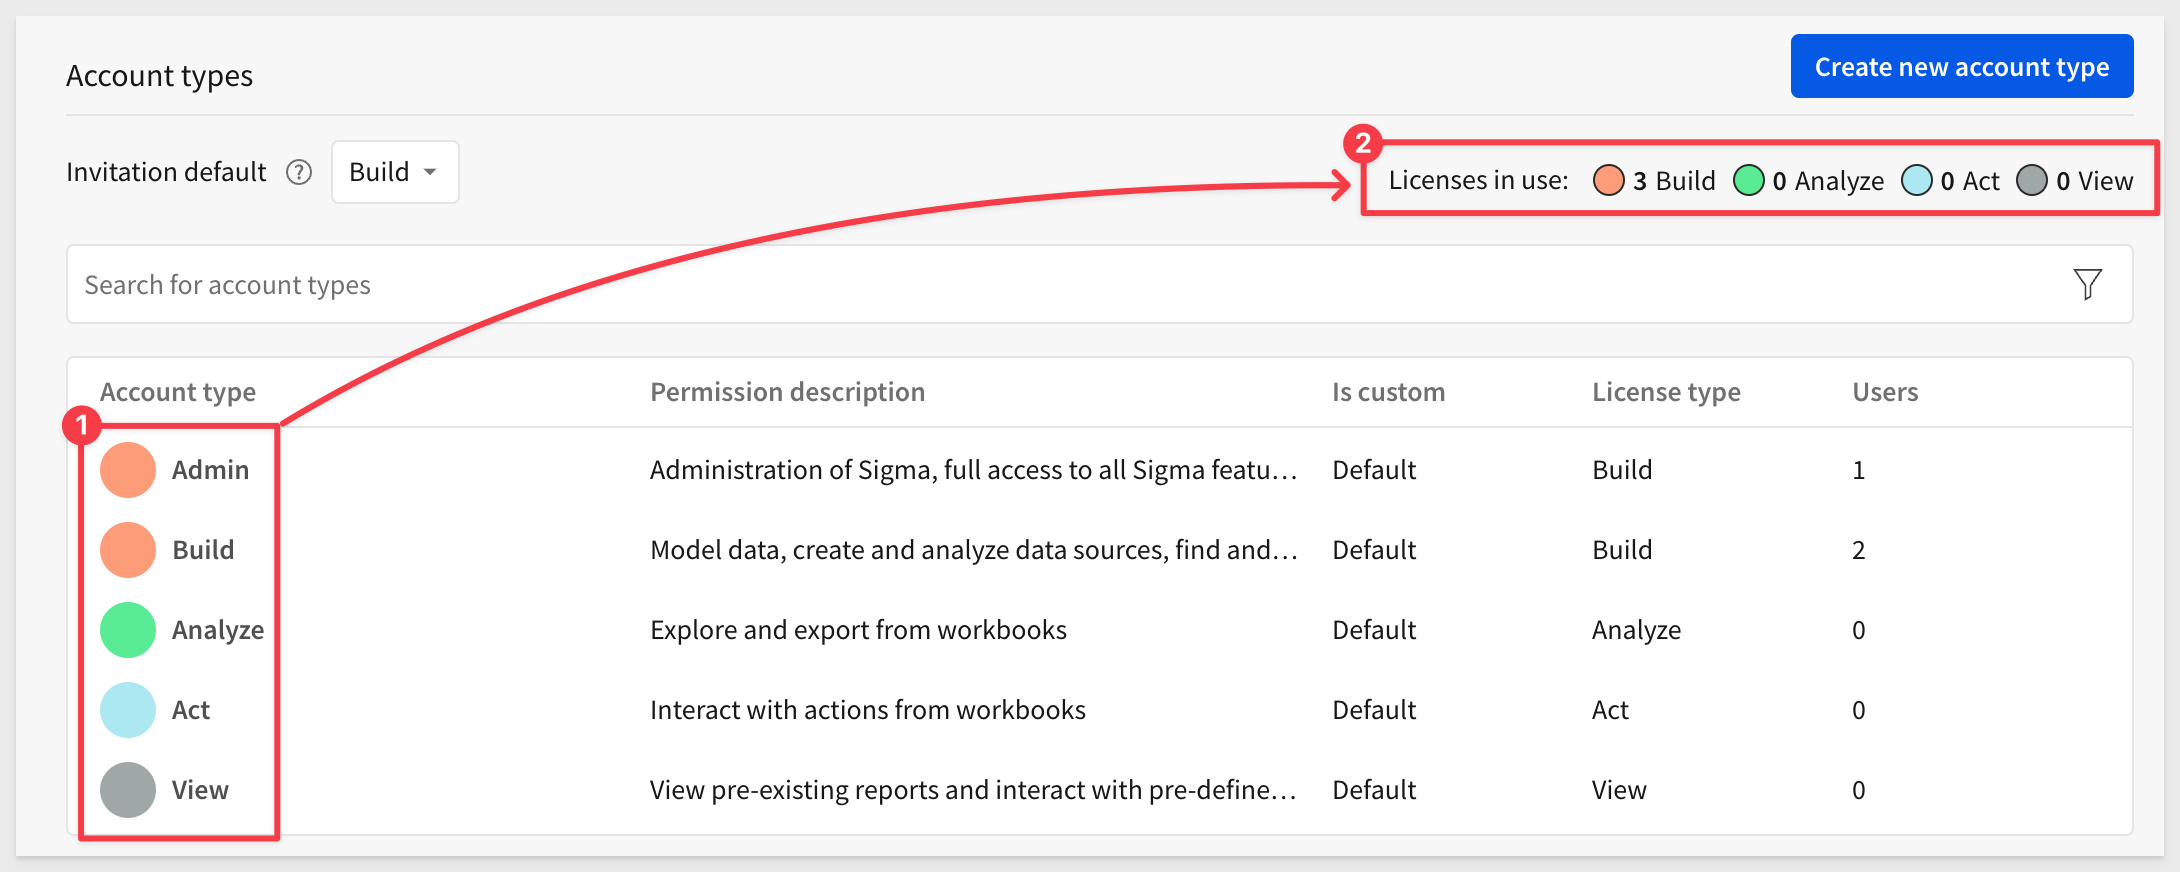
- View: Suitable for report consumers who need access to prepared data and insights with baseline interactions.
- Act: Ideal for collaborative data contributors who actively input and update data.
- Analyze: Optimized for decision-making data consumers who require more deep-dive capabilities without building workbooks themselves.
- Build: Designed for data architects, BI analysts, and report builders who model, transform, and analyze data.
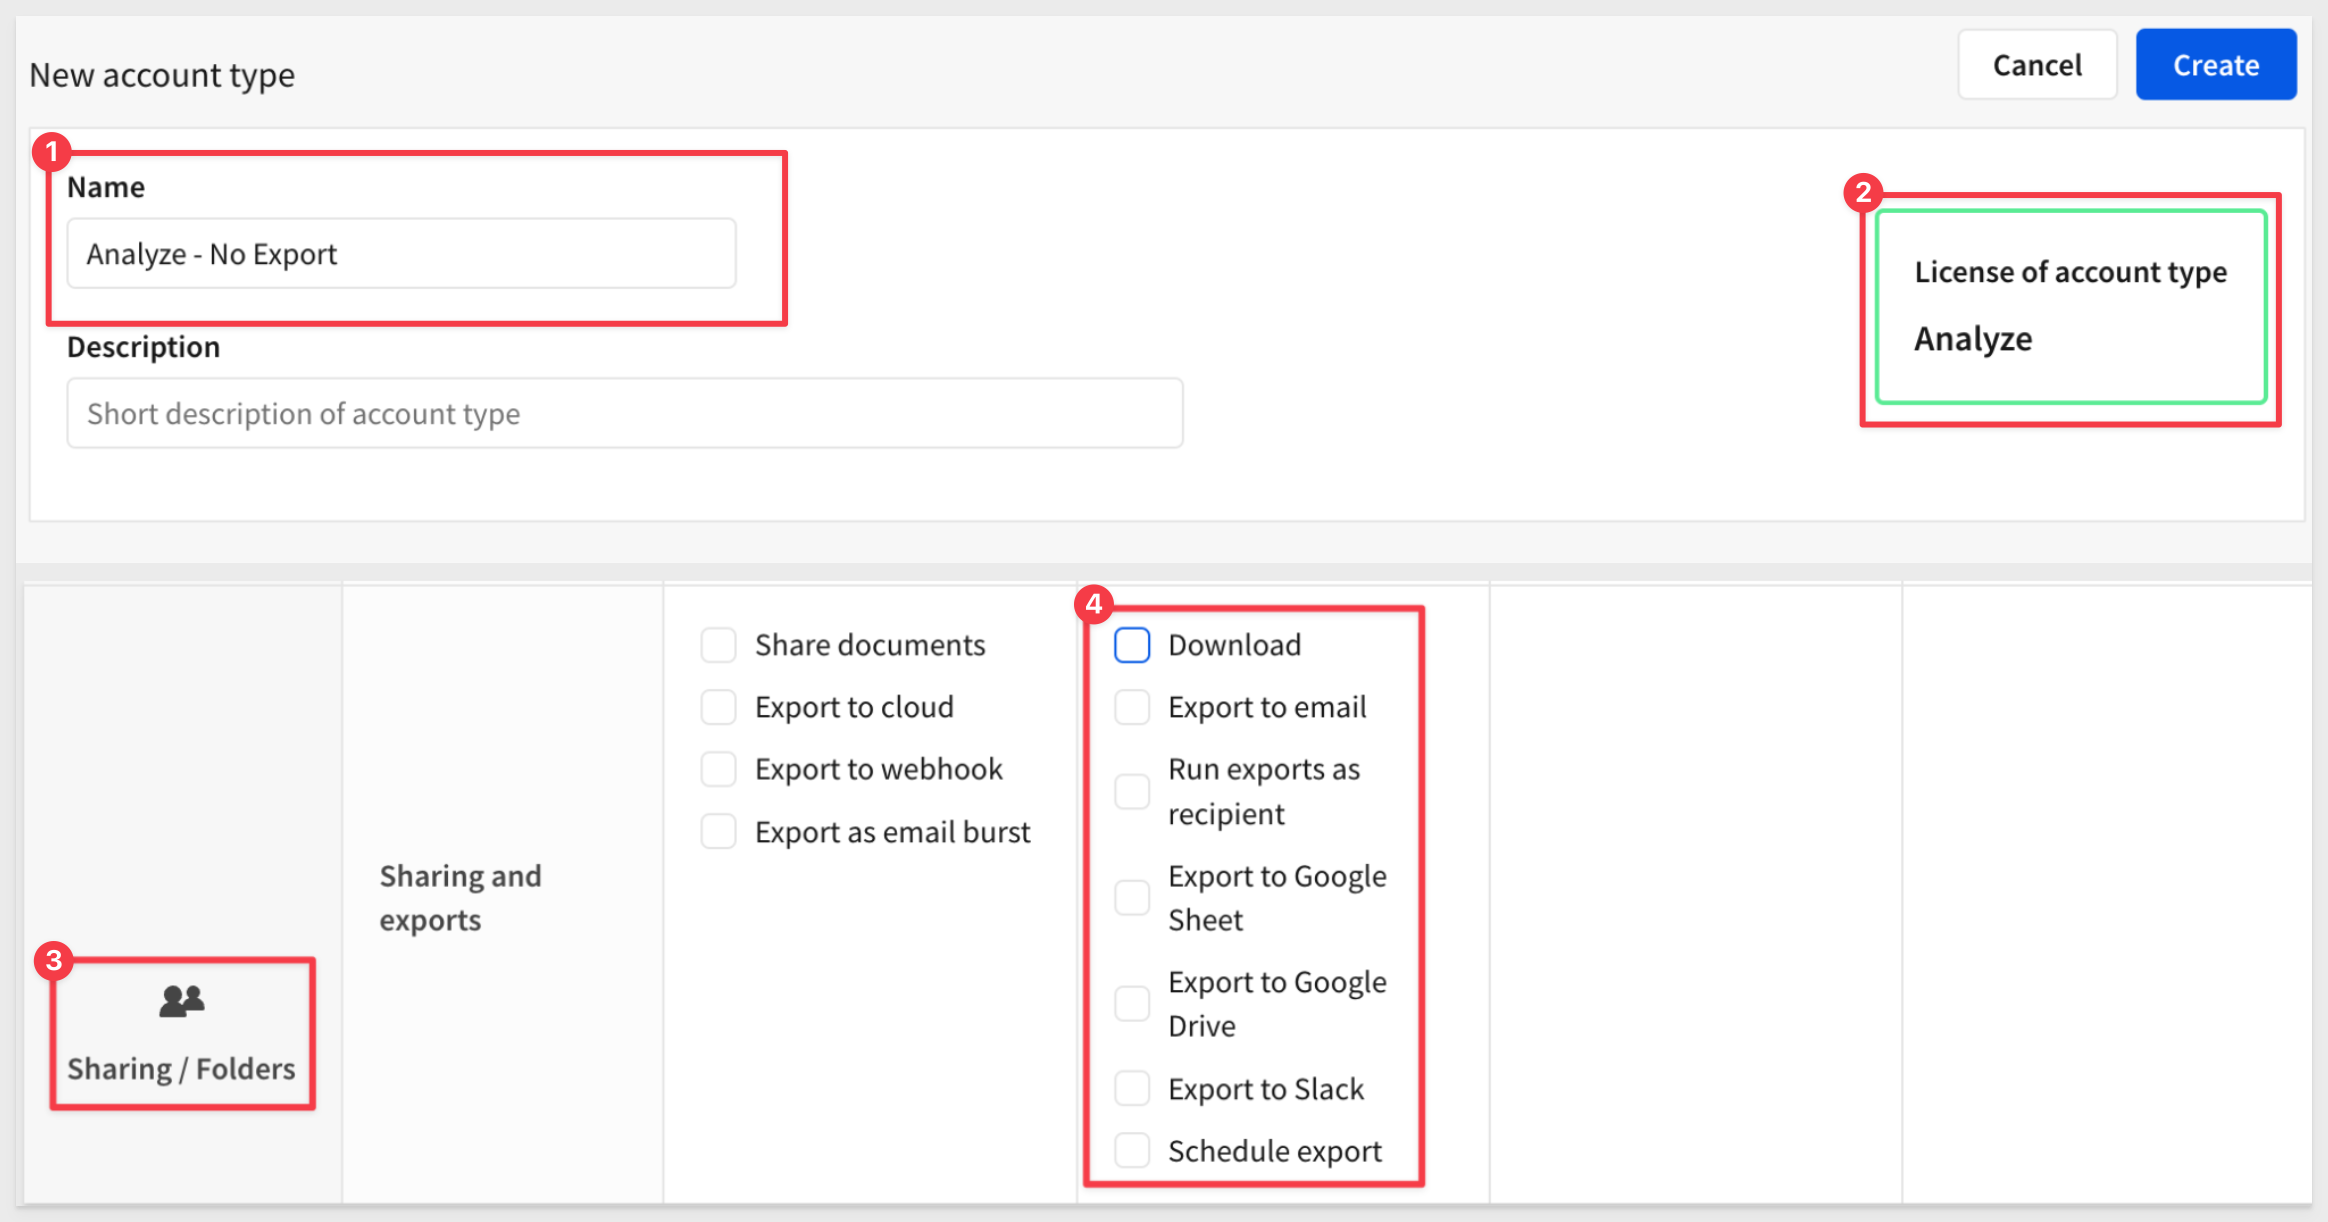
Sigma also supports custom account types. These provide a way to restrict users to specific Sigma functionality, and can be named anything, but must be assigned a license type.
For example, a No-Export role that does not allow exporting data would look like this, based on the Analyze license:
For more information, see Create and manage account types
User Attributes can be used to provide a customized experience for your Sigma teams, users, or embedded users.
For example, they can be assigned as a function in a dataset/data-model to provide row-level security.
There are QuickStarts that cover row level security:
Implementing Row Level Security
Once you create and assign a user attribute to teams, you can use this functionality in a dataset to enforce row-level security using the function CurrentUserAttributeText in a formula.
For example, if we want to restrict a user QuickStarts View to only the rows that are in the East region, we create a user attribute like this:
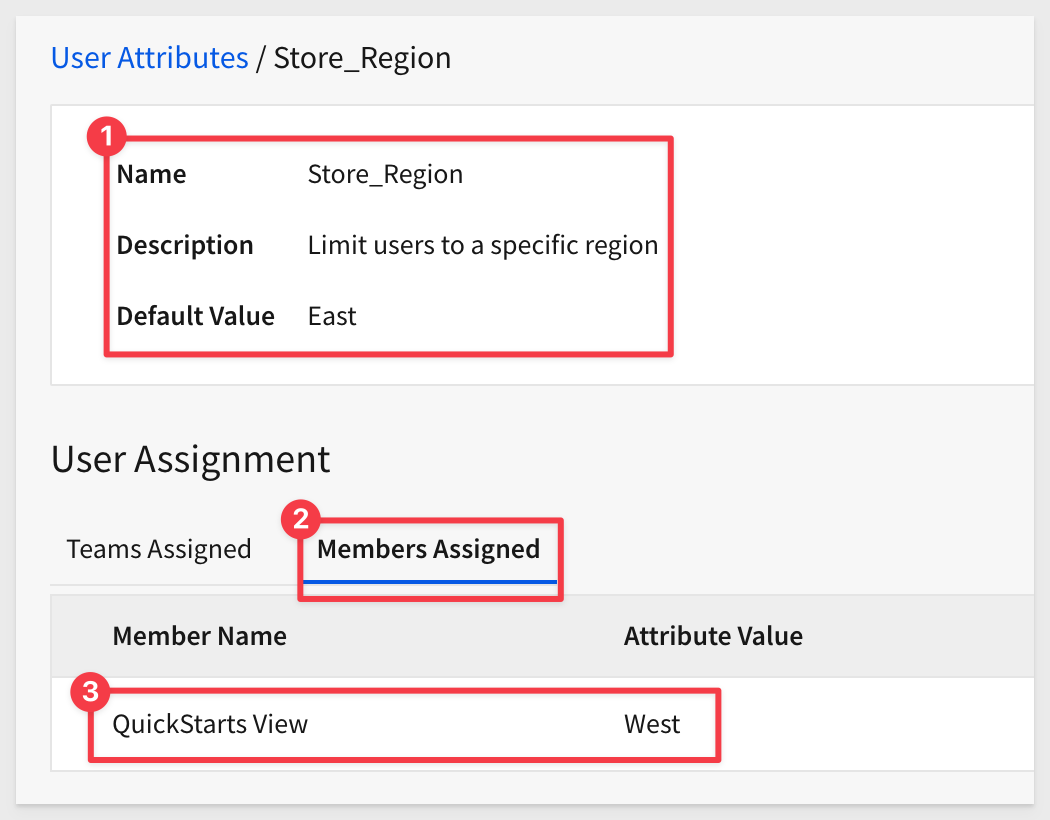
Then we use a formula on a dataset (that has a column called "Store Region") like this:
Contains(CurrentUserAttributeText("Store_Region"), [Store Region])
The user would not be aware of the restriction and the data would be limited to the East region rows automatically.
For more information, see User Attributes
For more information on User Attributes in Embedded Scenarios
The AI settings page is where administrators configure Sigma's AI capabilities for the organization.
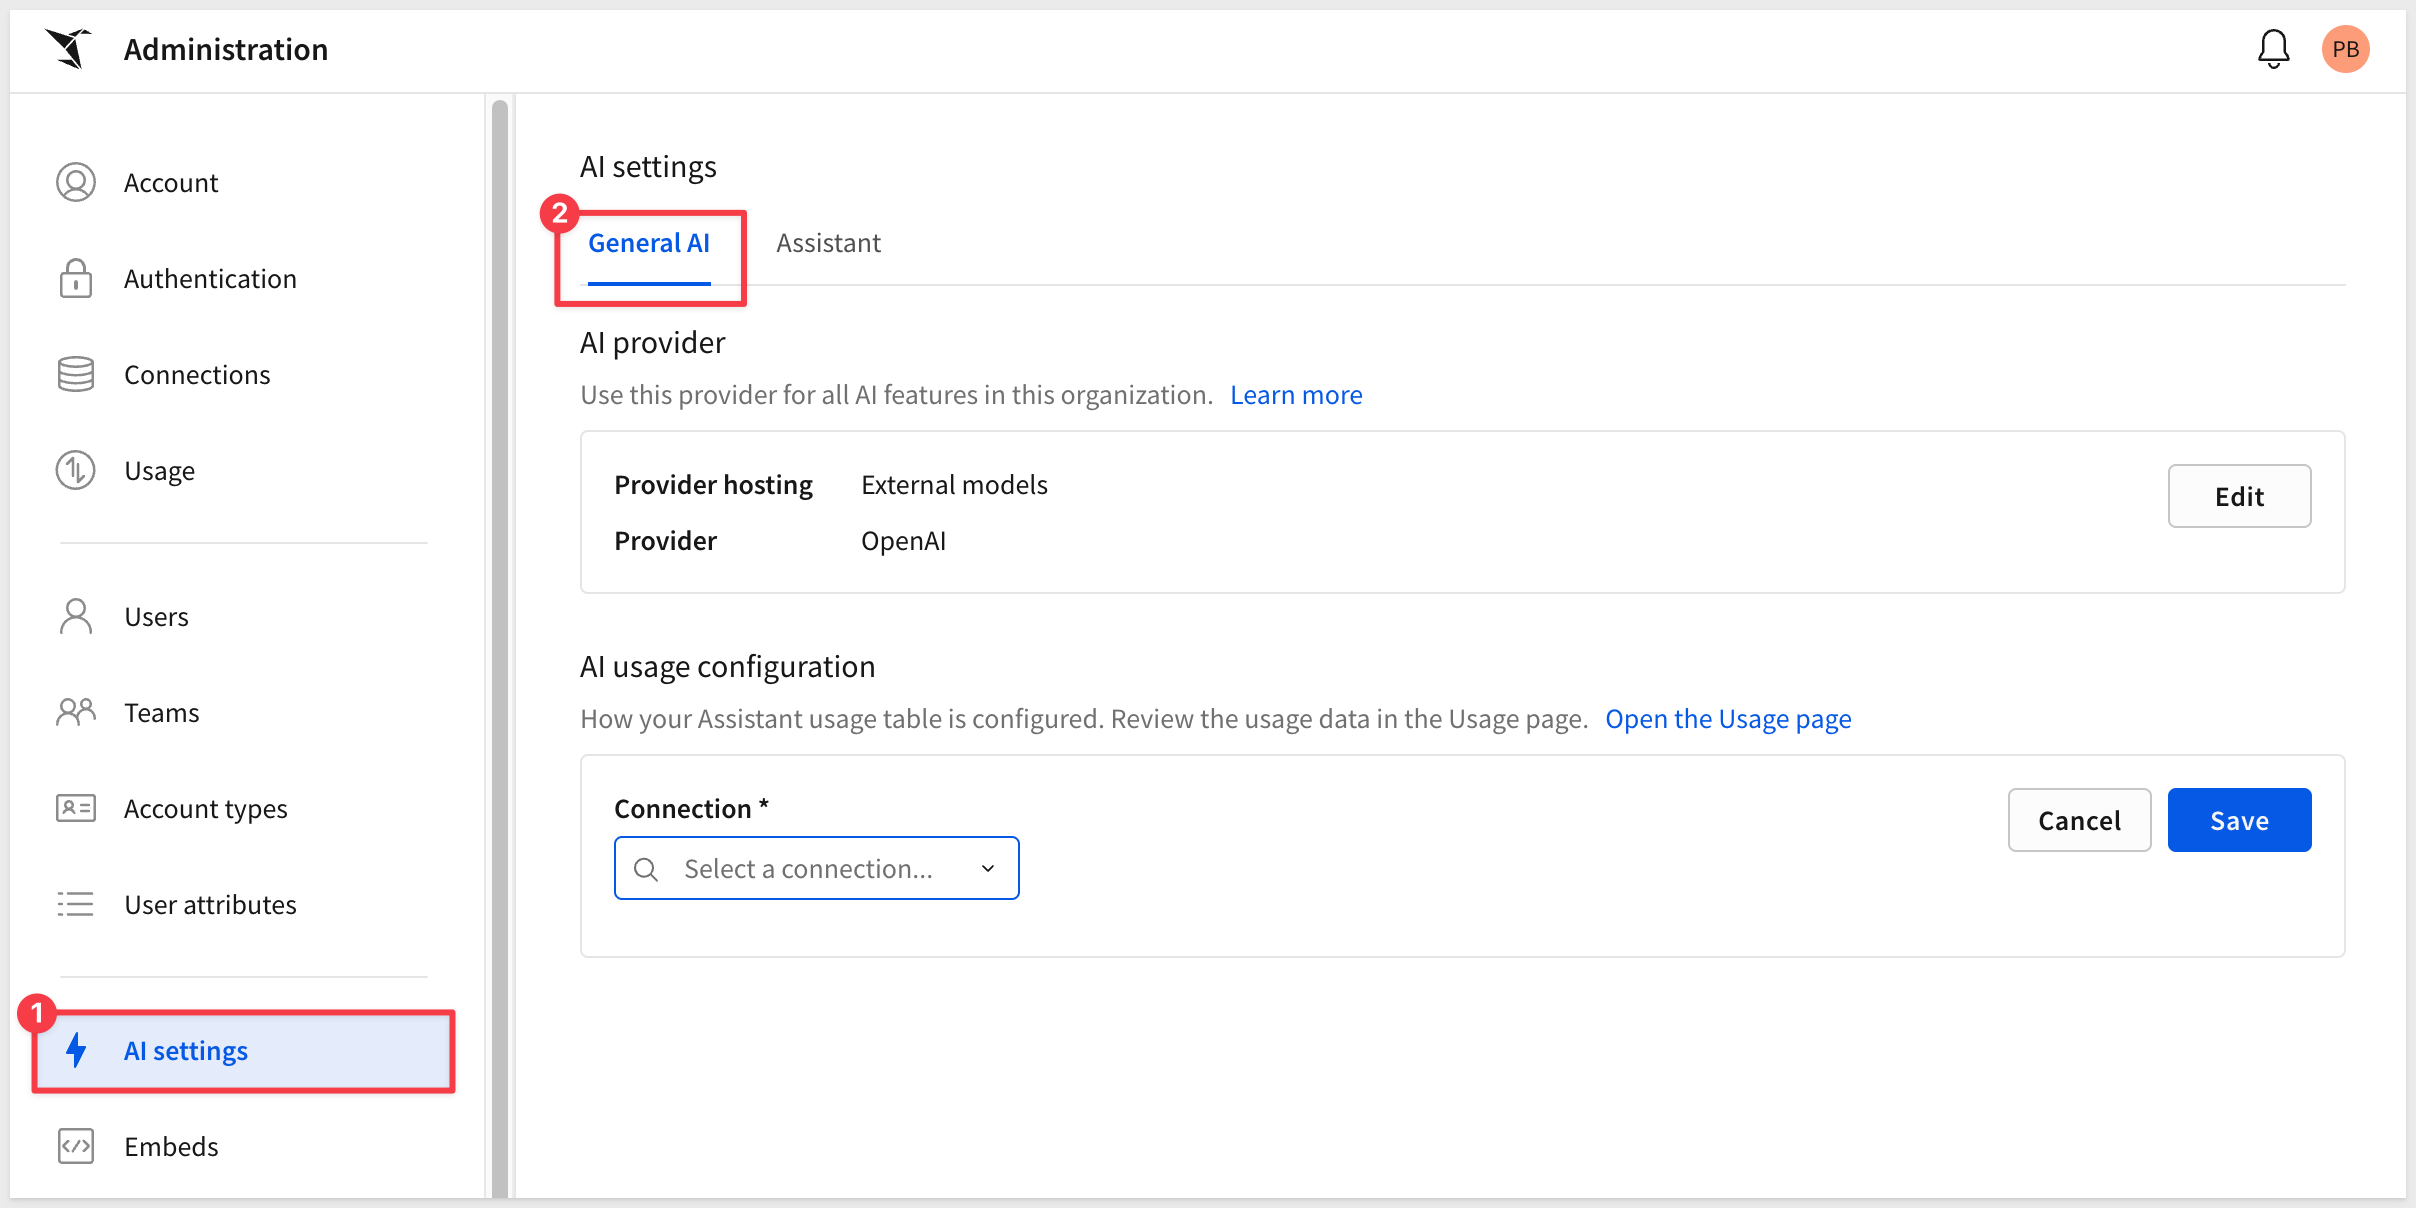
Configuration is organized into several areas:
AI Provider
Select the AI provider Sigma will use to power features like Sigma Assistant. Options include third-party providers such as OpenAI, as well as warehouse-hosted AI models for organizations that need to keep data within their own environment.
For more information, see Configure warehouse AI model integration
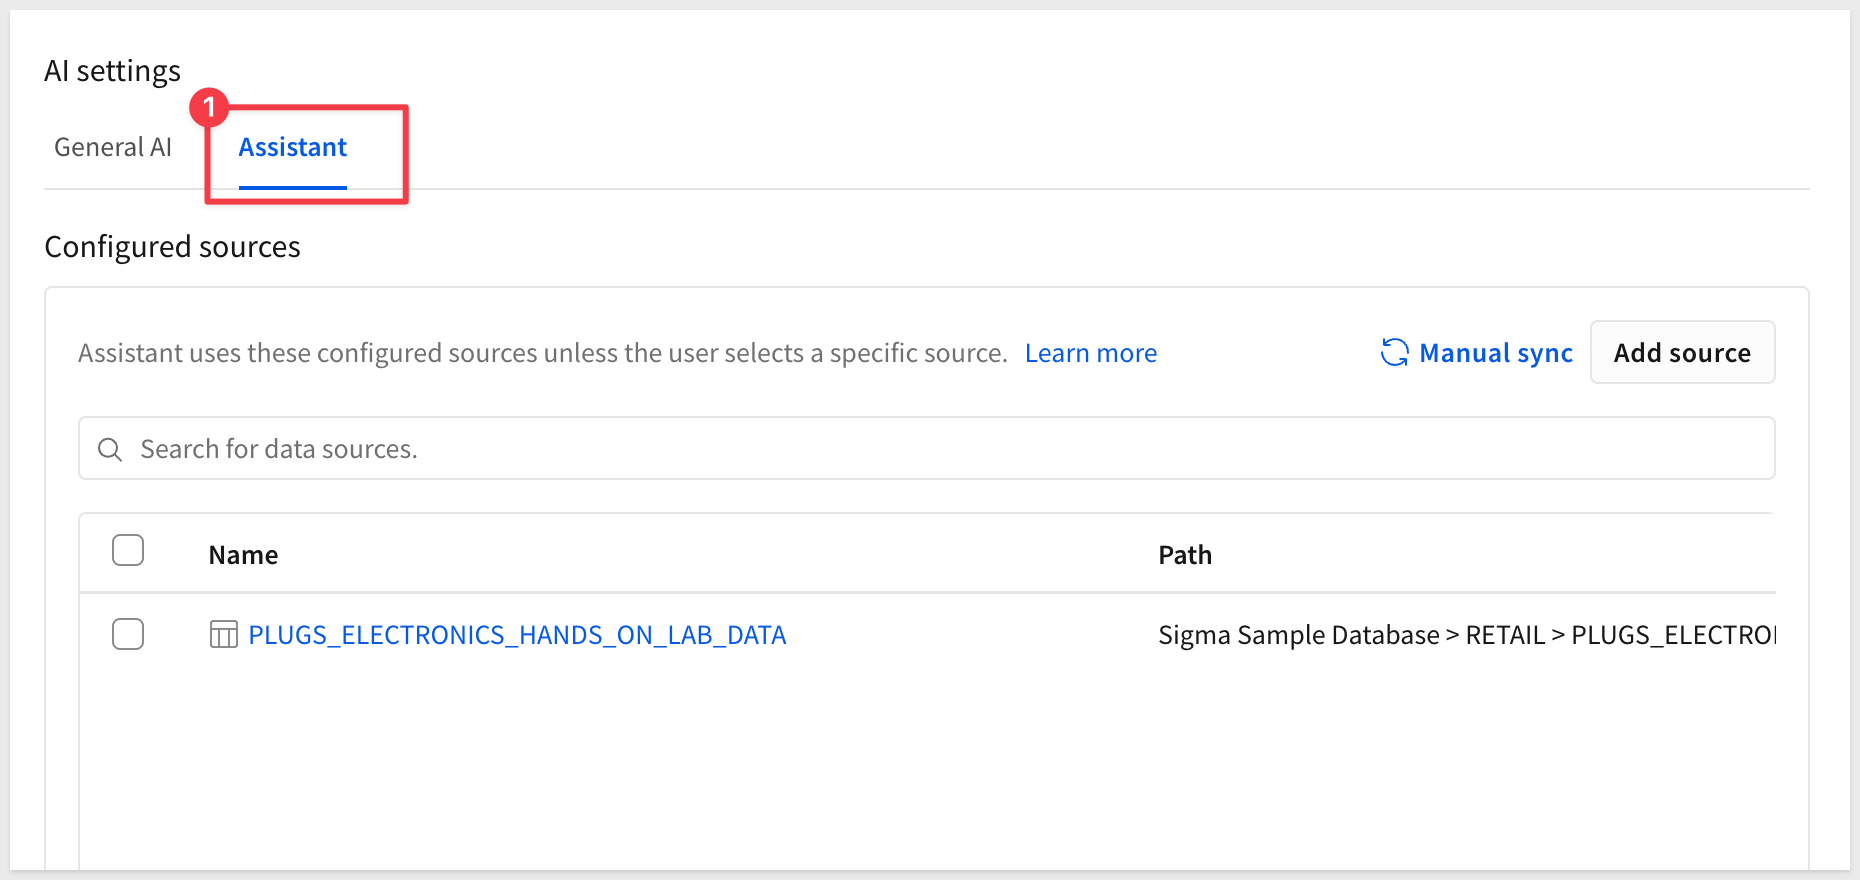
Sigma Assistant
Controls whether Sigma Assistant is enabled for the organization and which data sources users can query through it. Administrators can also enable usage logging, which records the questions users ask along with metadata useful for governance and optimization.
For more information, see Configure AI features for your organization
There is also a QuickStart: Create a Sigma Assistant Usage Dashboard
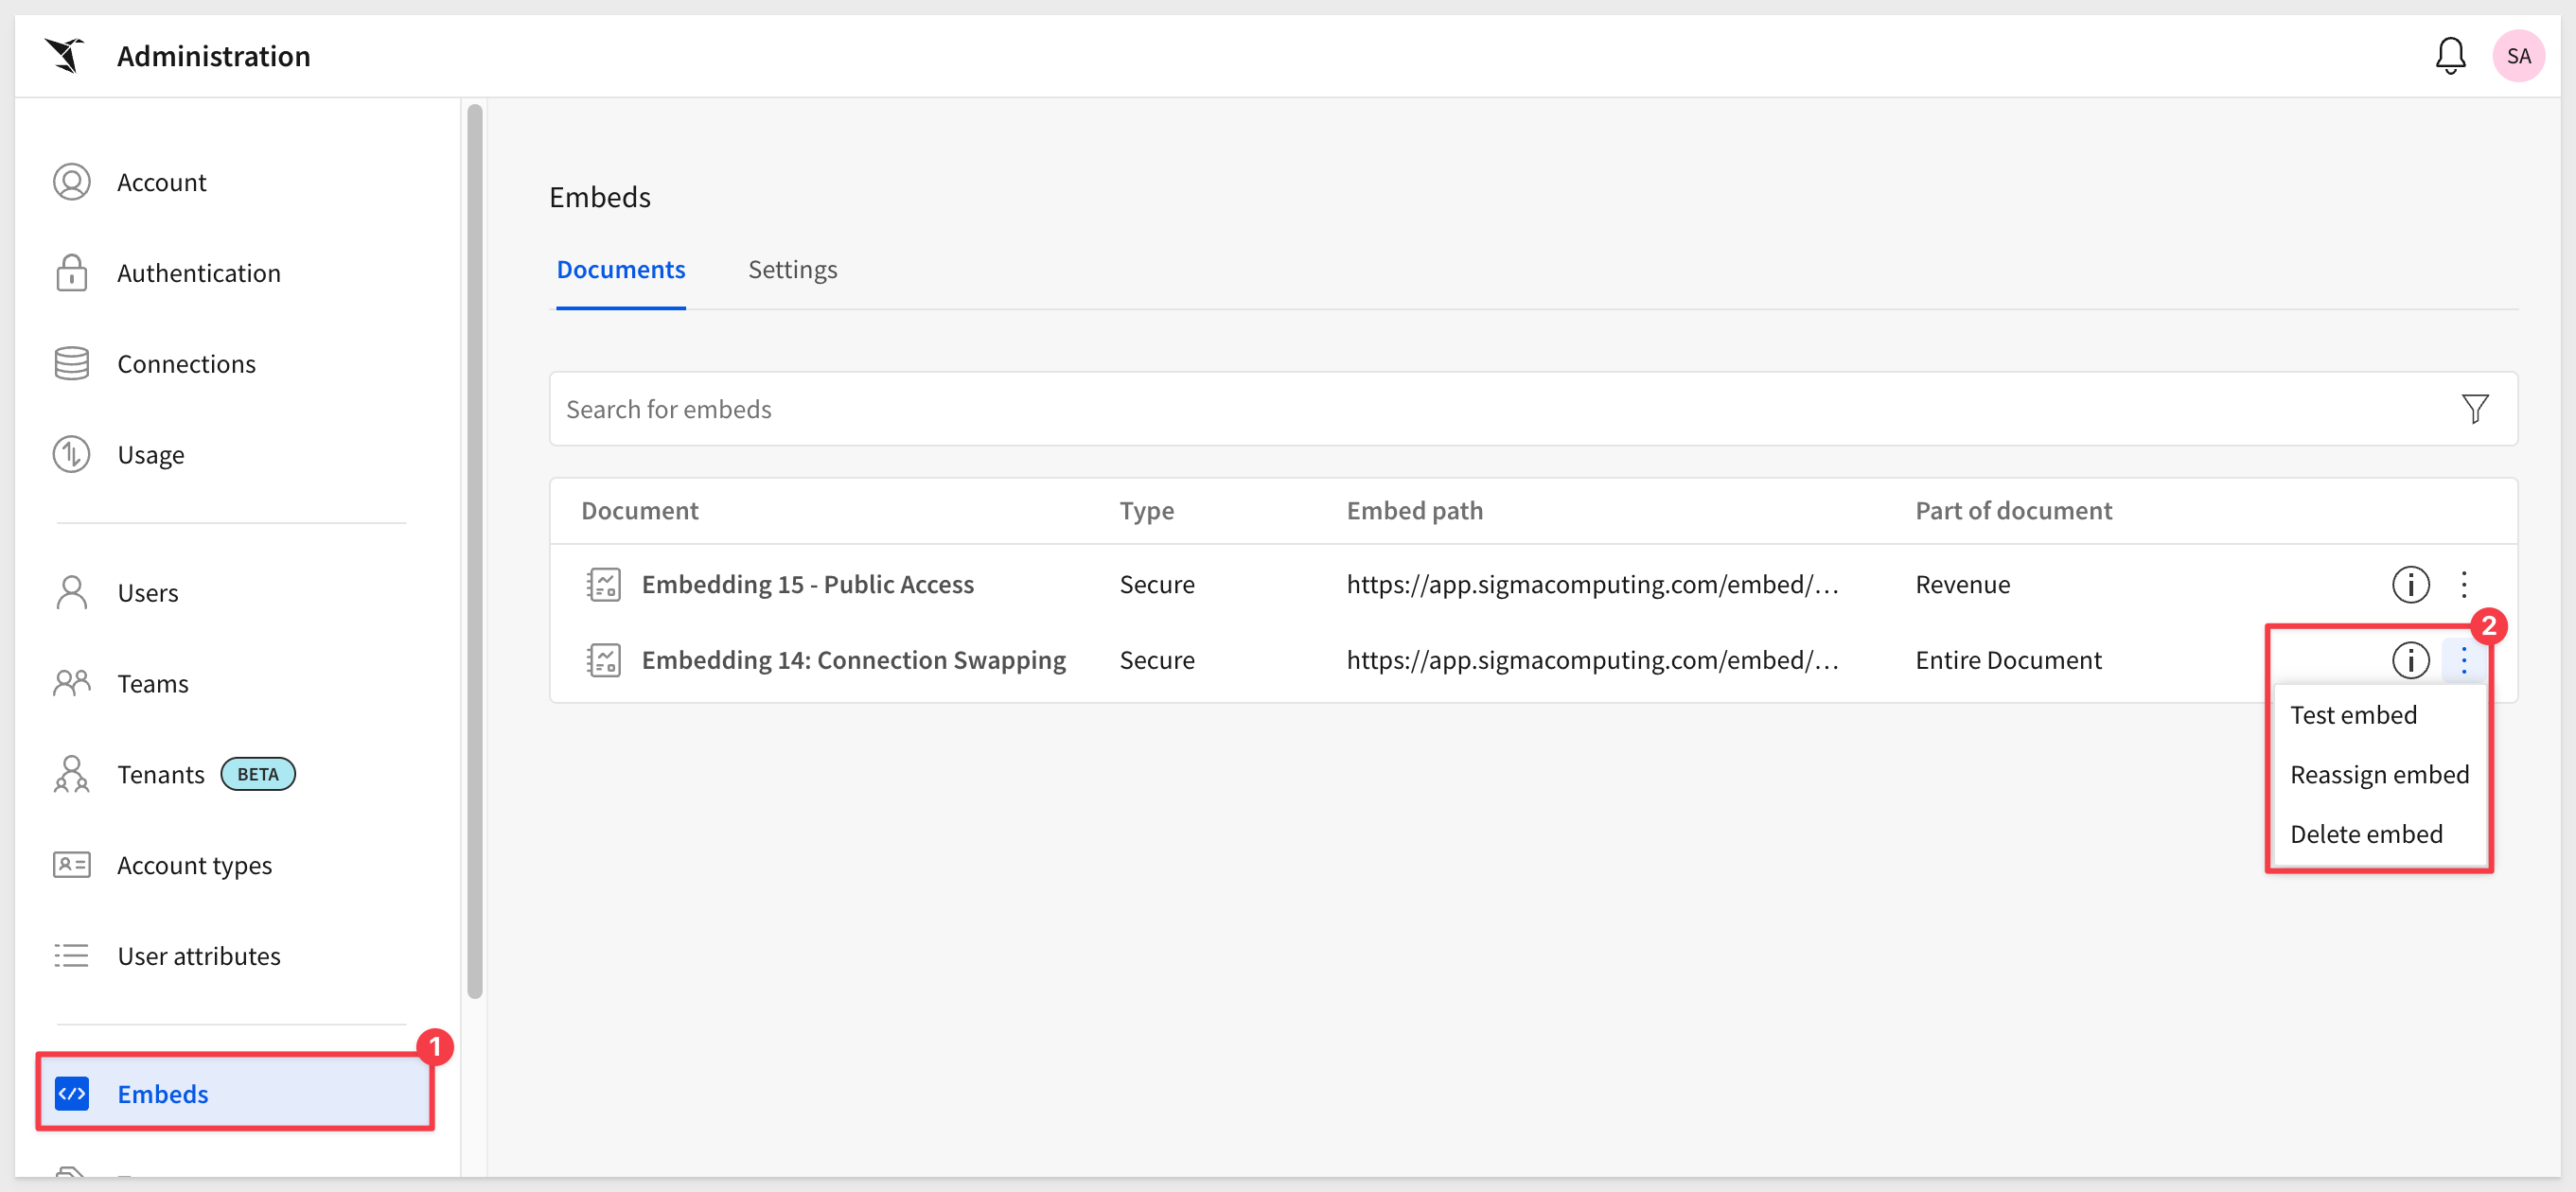
The Embeds page lists all of the workbooks or dashboards that are active.
It is common when using Sigma to embed content into another application, that many "embeds" are created.
This page provides a centralized way to manage them and alerts you to basic configuration issues with an embed.
We are able to either Reassign embed or simply delete any embed (non-JWT only):
For those interested in embedding, there is an entire series of QuickStarts dedicated to getting you going.
API Connectors allow Sigma to call external REST APIs directly from a workbook, enabling real-time integration with third-party systems without requiring a data pipeline or custom backend.
Once configured, an API connector can be used to send or retrieve data from external systems — for example, creating a Jira ticket, looking up a Salesforce record, or triggering a ServiceNow workflow — all from within a Sigma workbook.
For more information, see API connectors overview
There are QuickStarts that demonstrate API connectors with common platforms:
API Actions: Getting Started
API Actions: Integrate Jira
API Actions: Integrate Salesforce
API Actions: Integrate ServiceNow
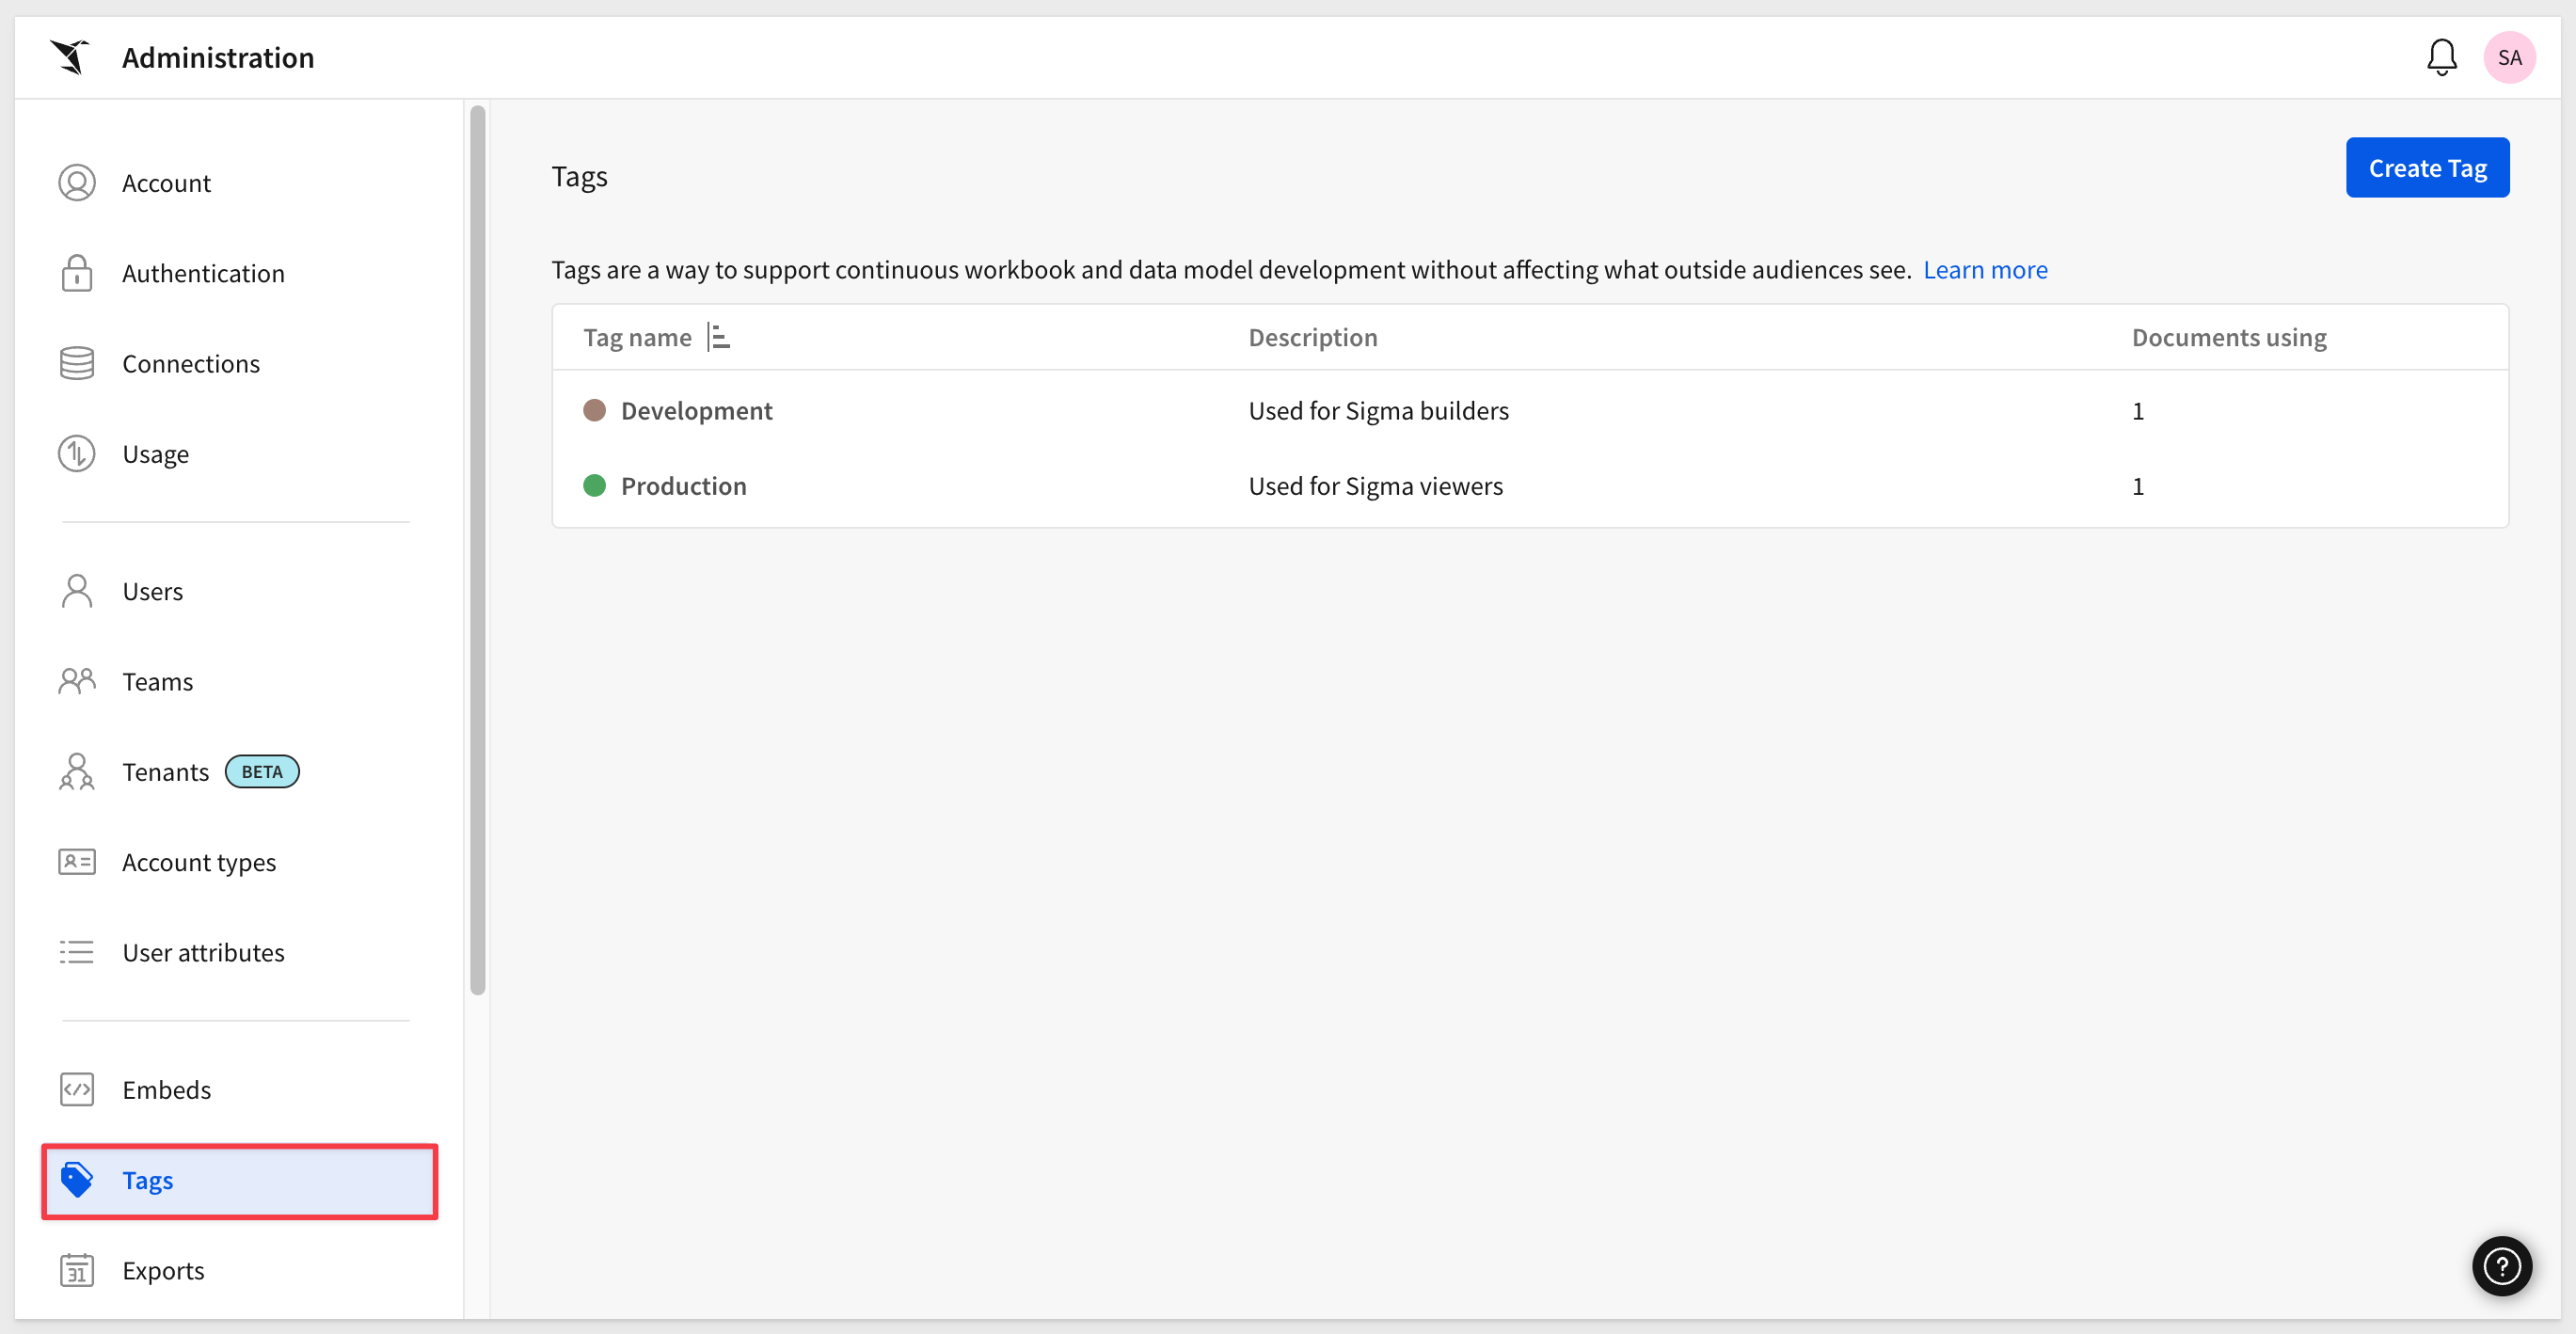
Version tagging allows you to employ a software development lifecycle (SDLC) to control workbook versions, using tags.
For example, Sigma can have Development, Staging, and Production versions of a workbook, and migrate changes as needed.
This allows you to control which workbook versions are available to specific users, during the development lifecycle.
For example, when a workbook is assigned the Quality_Assurance tag (in the image below), only the Quality_Assurance has access to it for testing:

Once testing is complete, a member of that team might tag the workbook as Production, so that end-users can access it.
A summary of all workbooks that are tagged will appear in the corresponding tag page. Drilling into any tag will also show the workbooks assigned that tag:
For more information, see Create and manage version tags
There are QuickStarts that cover tagging:
The scheduled exports page provides a summary of all exports scheduled to run across all users.
Admins are able to filter this list and delete scheduled jobs.
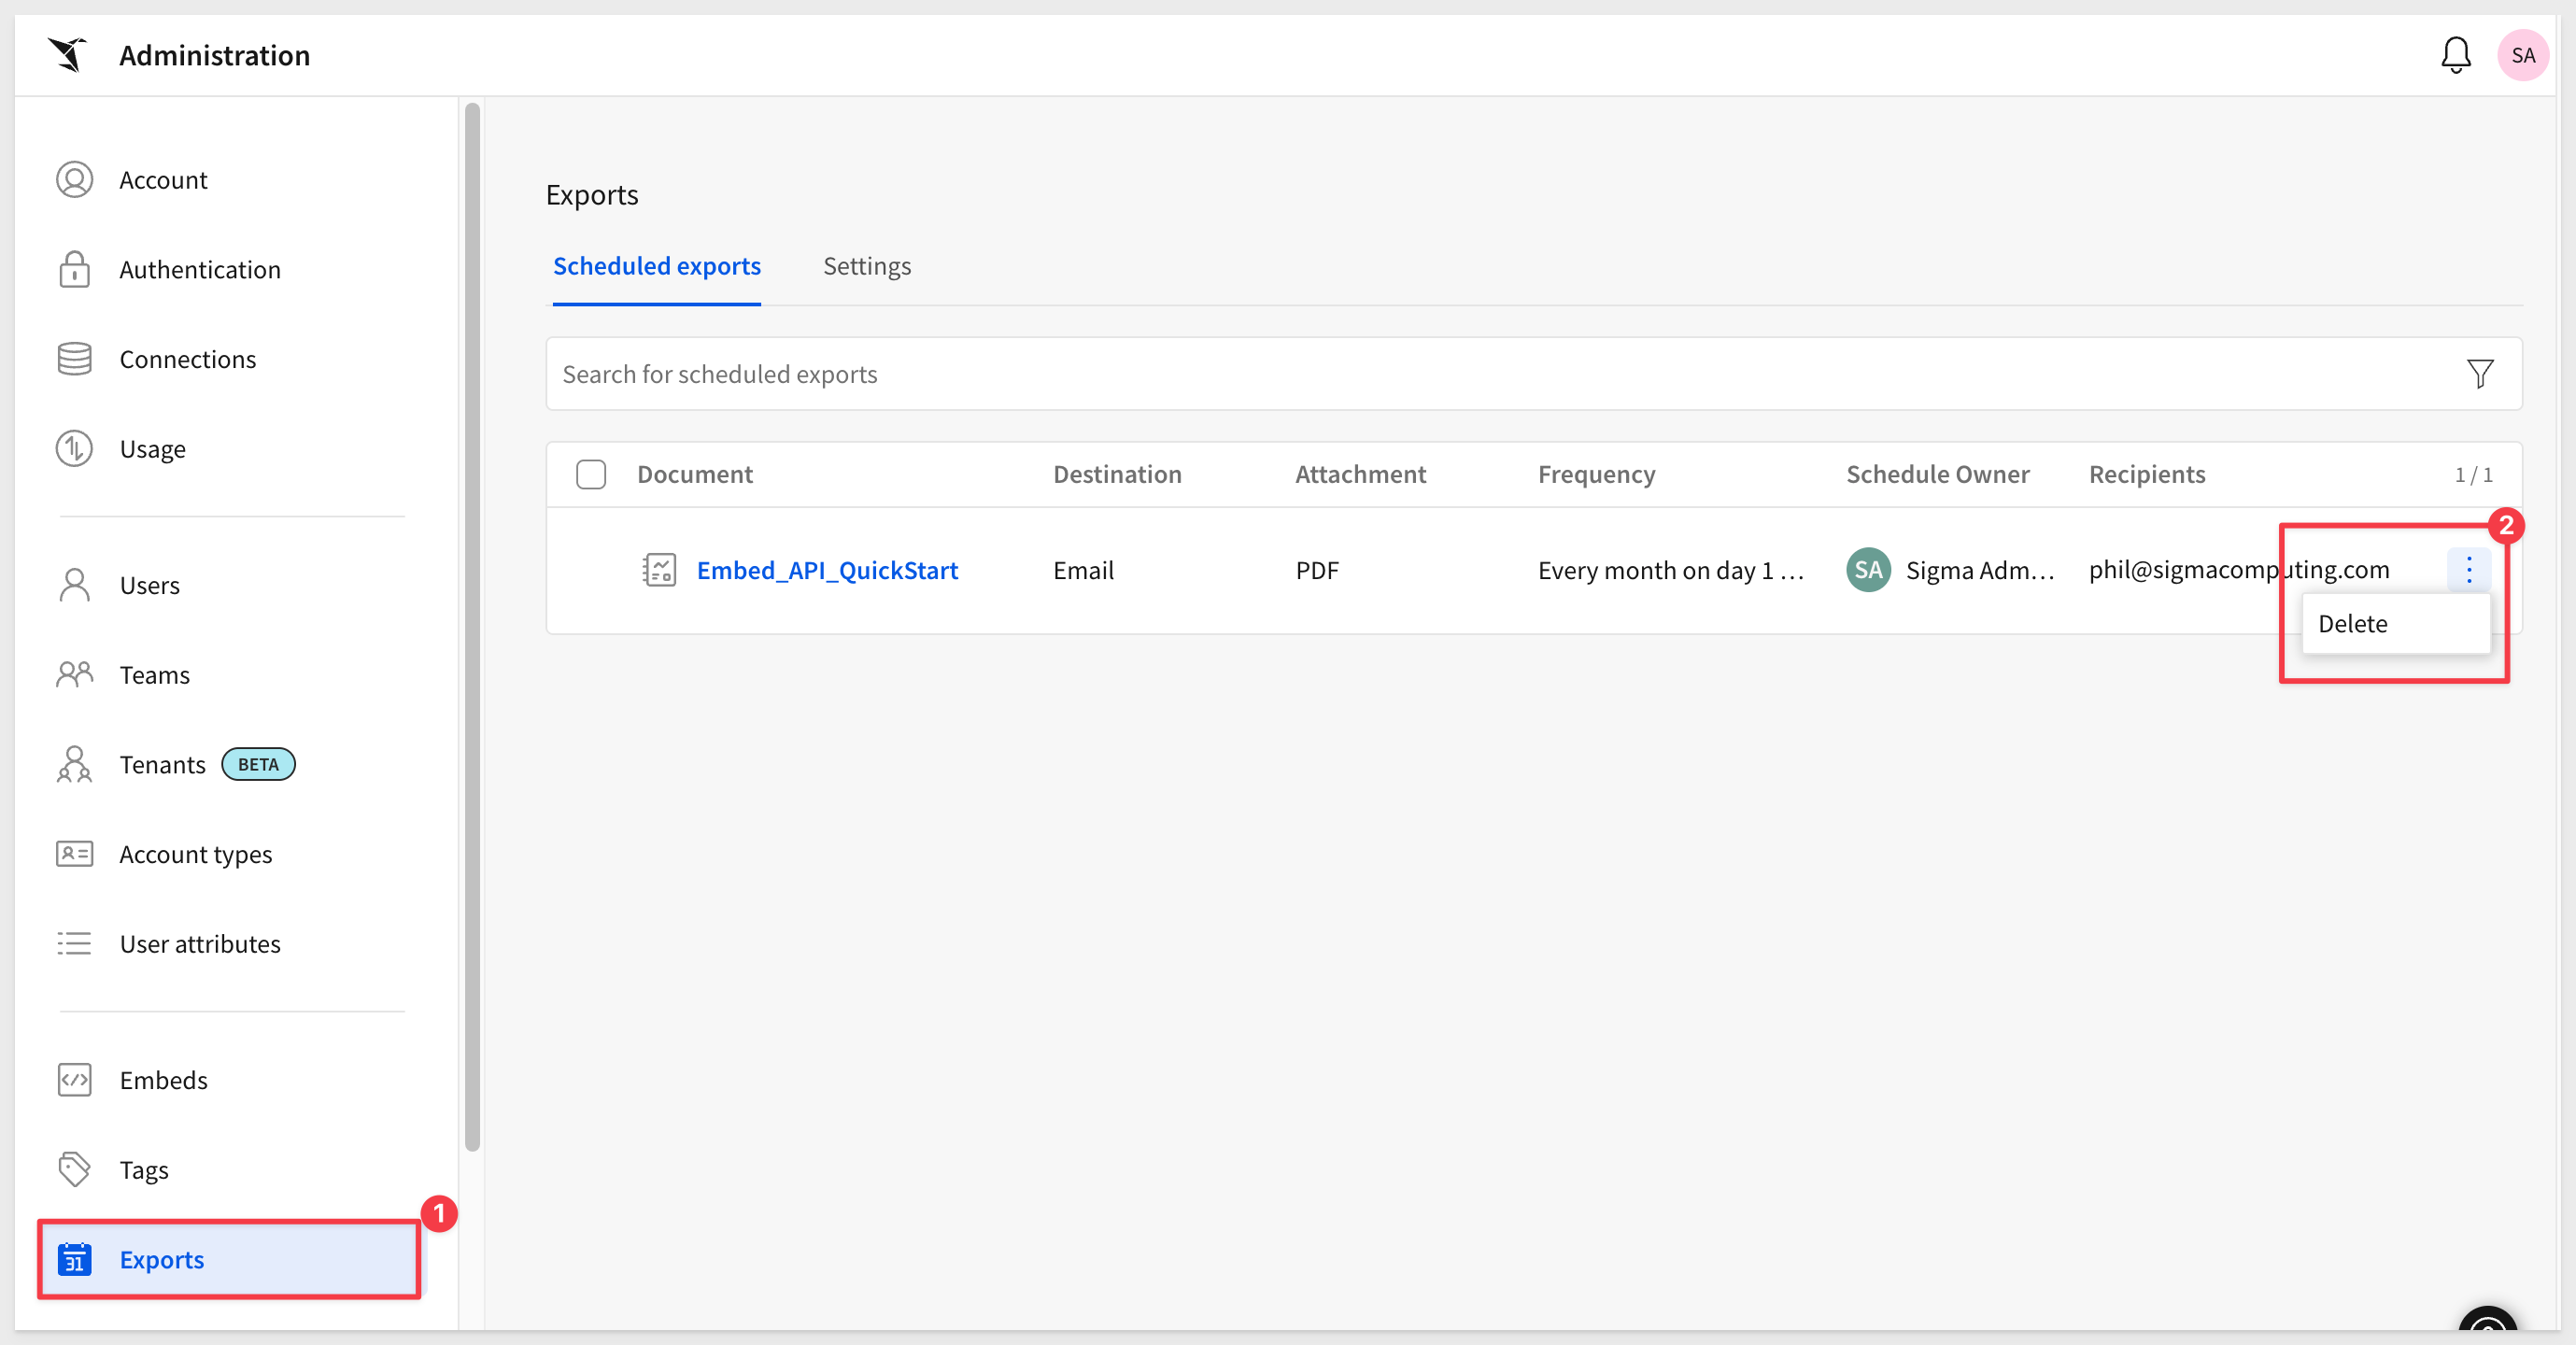
Sigma also provides extensive reporting on scheduled report usage:
For more information, see Manage organization schedules
The Materializations page summarizes all schedule materialization jobs, last run date, next run date, status, running time and when the data was last used.
This can be very useful to admin wanting to ensure that jobs are not only running properly, but also that the result sets are being used. There is no value (but there is some cost!) in materializing data that is not being used by the business.
Sigma also provides an option to pause jobs that are not being used as shown (number three):

Admins are able to jump directly to the object being materialized, simply by clicking the desired item in the Element / Document column.
For more information, see About materialization
The Warehouse Views page summarizes all views, their status, when they were created, last updated and the owner.
Warehouse views are virtual tables in Snowflake that can be queried using Sigma or any other application in your data ecosystem. Instead of storing data in a Snowflake database table, a view saves a SQL statement that expresses specific query logic defined by the data element or input table in Sigma.
When a warehouse view is created, a live link is established between Snowflake and Sigma. The view references the data element (or input table) as the source of truth and automatically updates to reflect the most recent version of the element's underlying data. Warehouse views can be especially useful to present the data in a way that's optimized for analysis, without altering the base tables.
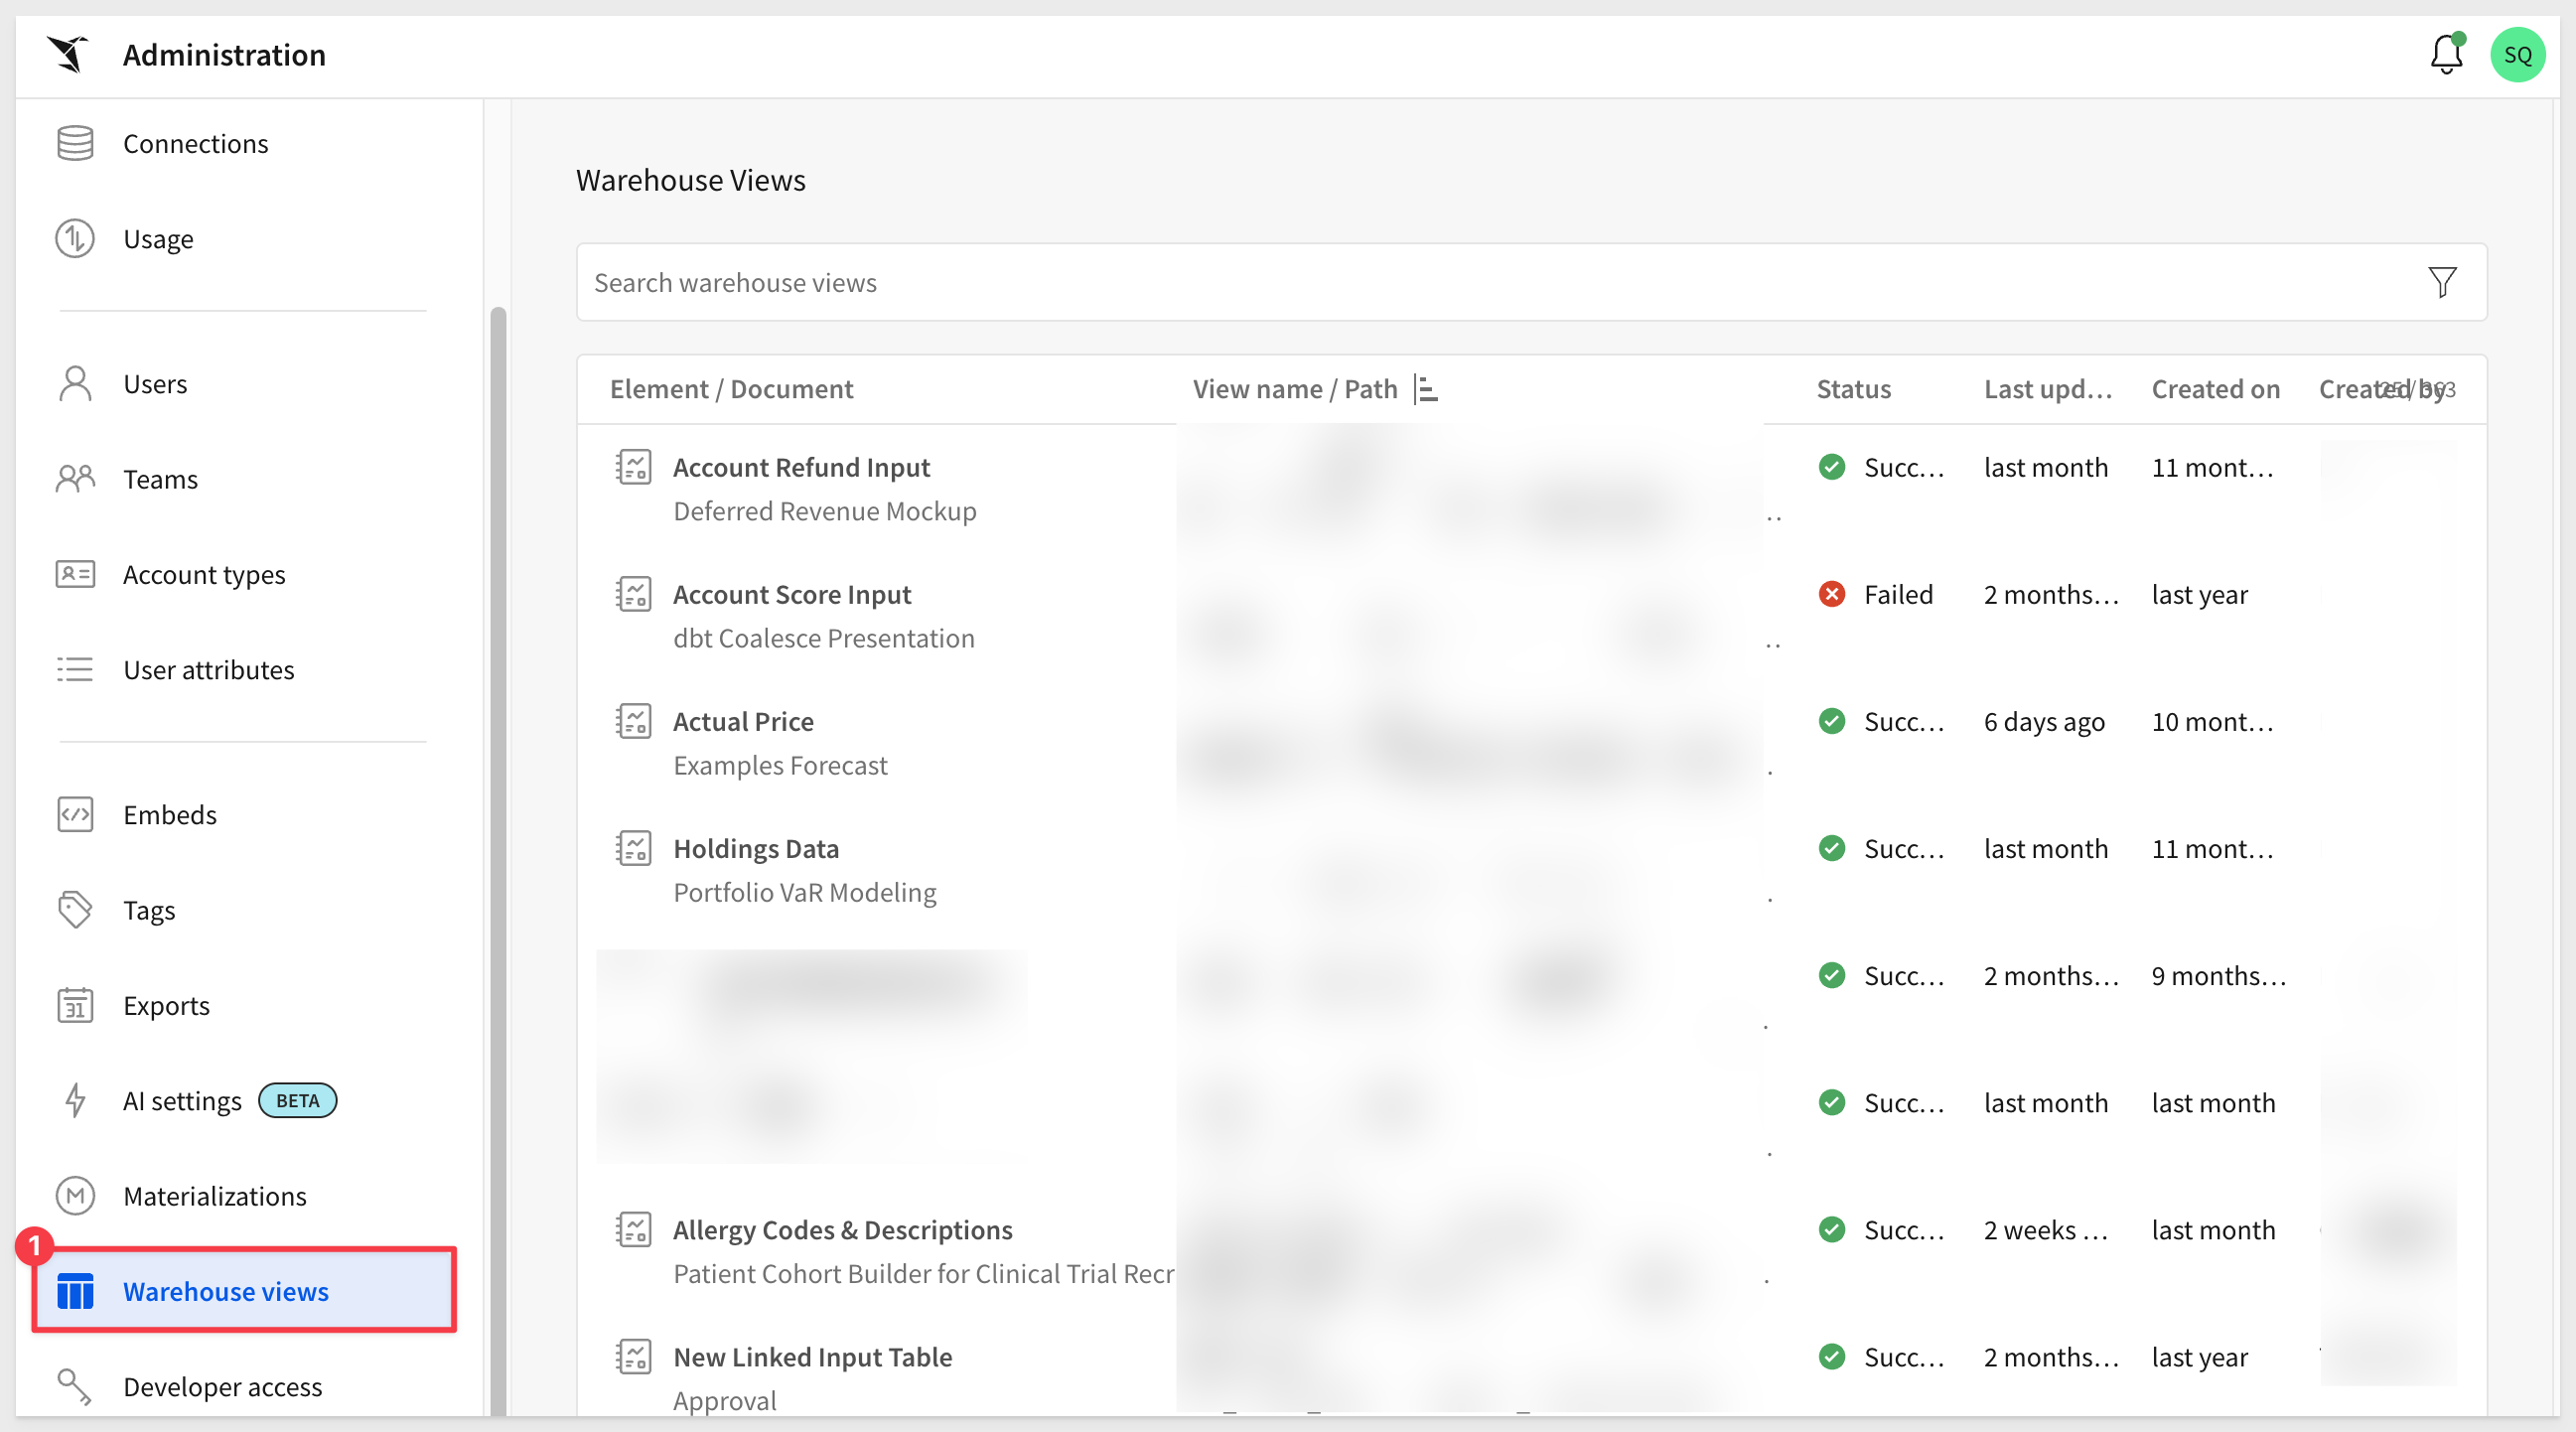
For more information, see Review warehouse view details
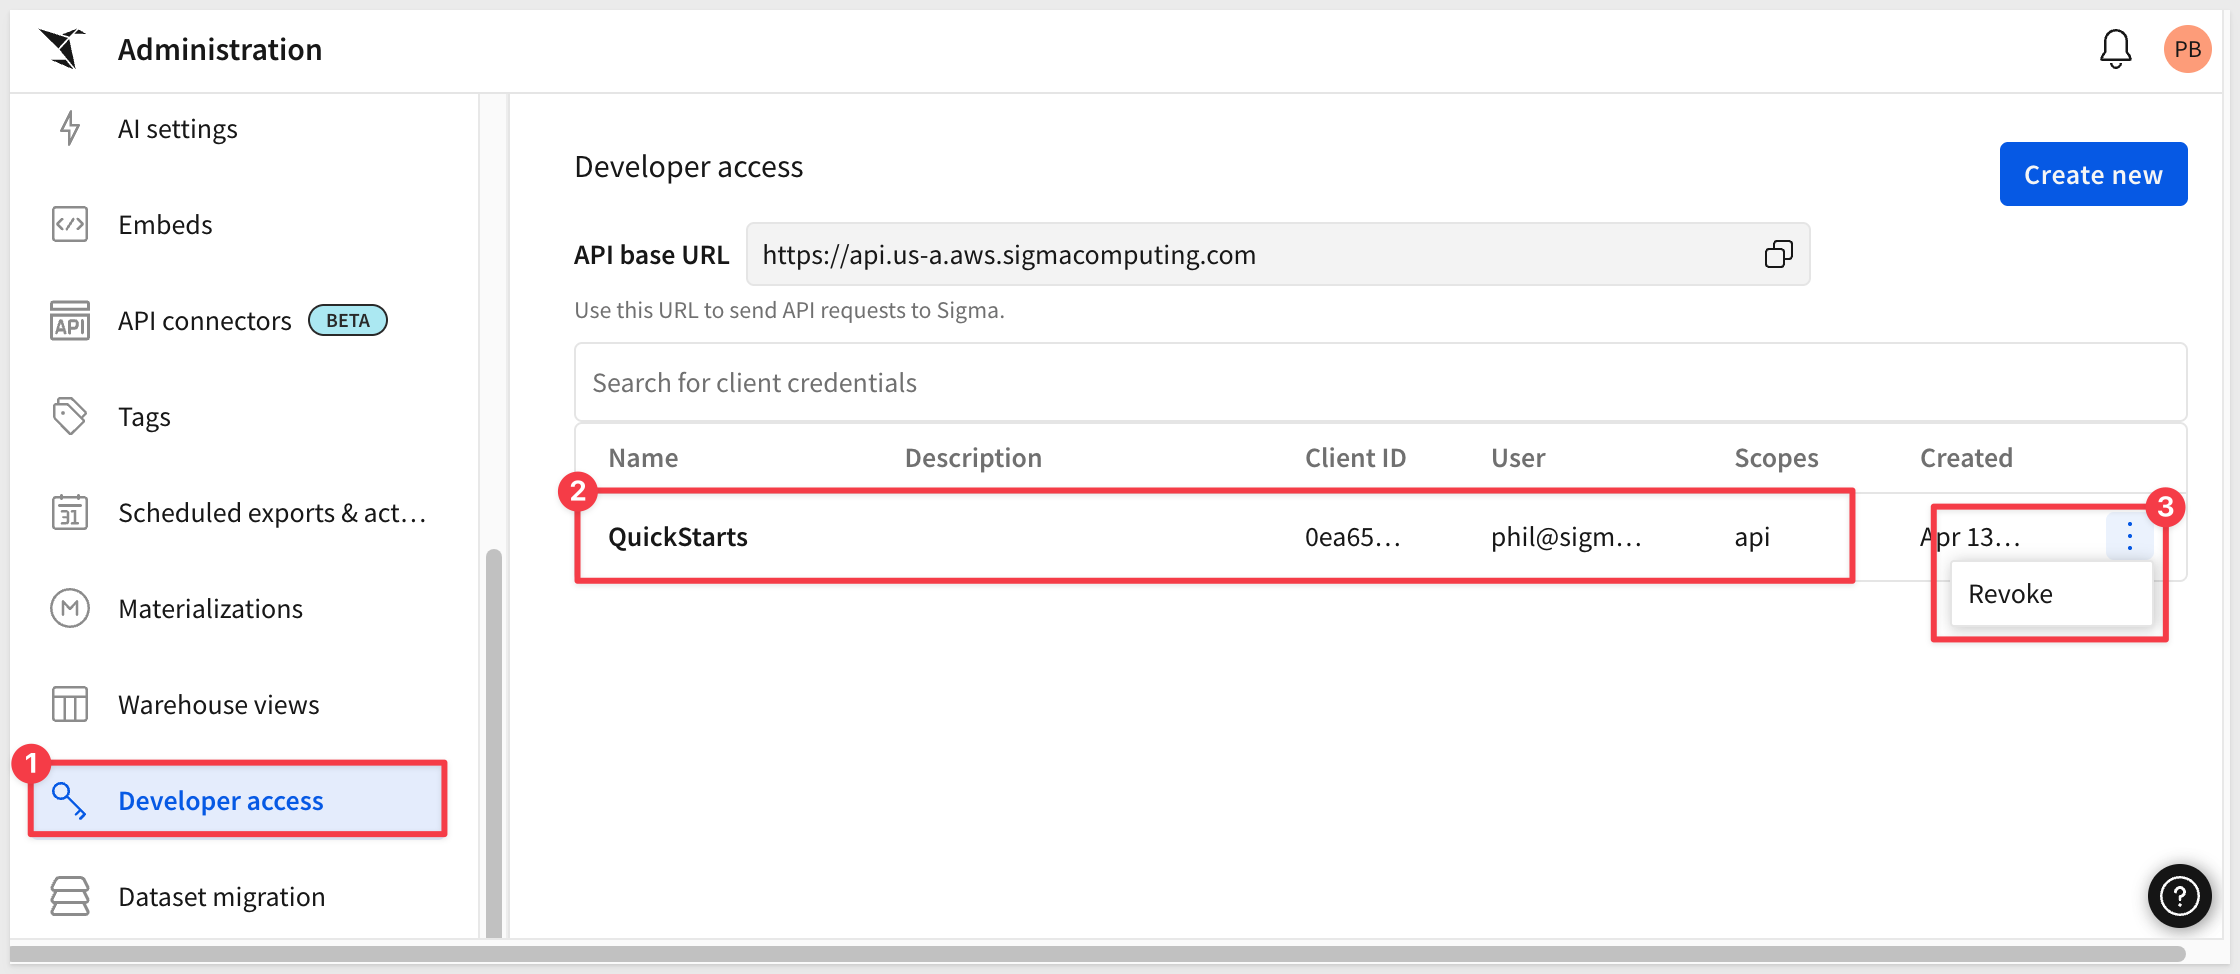
Developer Access provides a way to create client credentials for programmatic access to Sigma.
It supports the generation of client credentials for Sigma's REST API and/or embedded applications.
The page lists all client credentials and provides a way to revoke them:
To learn how to access Sigma via Postman, there is Sigma API with Postman
There is also an API Reference
There are API code samples with a corresponding QuickStart
To learn how to access Sigma via embedding, there is a QuickStart series
In this QuickStart, we provided a very high-level overview of all the administrative features of the Sigma platform. Please be sure to check out the additional resources list below.
The next QuickStart in this series covers things that are a little beyond the basics, but are common across customers.
Additional Resource Links
Help Center Home
Sigma Community
Sigma Blog
Be sure to check out all the latest developments at Sigma's First Friday Feature page!